metasys export utility help guide - product documentation
TRANSCRIPT

Metasys Export Utility Help Guide
LIT-1201952
Software Release 10.0
MS-EXPRT-0
Johnson Controlswww.johnsoncontrols.com2018-12-17


ContentsContentsMetasys Export Utility Help..............................................................................................................3
Summary of Changes............................................................................................................................3
Metasys Export Utility Overview......................................................................................................3
Metasys Export Utility Related Documentation.............................................................................3
Metasys Export Utility System Requirements................................................................................4
Metasys Export Utility Technical Specifications.............................................................................4
Metasys Export Utility User Interface............................................................................................. 5
Metasys Export Utility Supported File Formats............................................................................. 5
Metasys Export Utility Authentication............................................................................................ 6
Metasys Export Utility Definition File..............................................................................................6
Scheduler...........................................................................................................................................6
Performance Considerations.......................................................................................................... 7
Recommendations.................................................................................................................................7
Custom Report Capabilities............................................................................................................ 7
Billing Example File............................................................................................................................... 8
DLLR Example Files................................................................................................................................8
Sheets in the DLLR Example Files............................................................................................. 8
Example DLLR Energy Report Output...................................................................................... 9
DLLR Energy Report Features................................................................................................. 10
System Tray Icon............................................................................................................................ 11
Detailed Procedures.......................................................................................................................11
Logging in to the Metasys System through Metasys Export Utility................................................11
Creating a New Metasys Export Utility Definition............................................................................ 13
Selecting Trend Data................................................................................................................ 15
Selecting Alarm or Audit Data.................................................................................................19
Example Expressions................................................................................................................33
Selecting File Formats for Output...........................................................................................33

Creating a New Schedule................................................................................................................... 37
Export Scheduling Options......................................................................................................37
Scheduler................................................................................................................................... 38
Modifying an Existing Metasys Export Utility Definition................................................................. 40
Modifying an Existing Schedule........................................................................................................ 41
Creating Custom Reports Using the Component Interface...........................................................41
Referencing the DLL File from a VBA Project........................................................................ 41
Using the Billing Report Example File.................................................................................... 46
Using the DLLR Example Files................................................................................................. 46
Using the Scheduler Service from the System Tray........................................................................ 71
Displaying the Help File, About Window, or Exiting Export Utility................................................ 72
Troubleshooting............................................................................................................................. 72
Error Messages, Problems, and the Error Log................................................................................ 72
Index................................................................................................................................................ 77
Metasys Export Utility Help Guideii

Metasys® Export Utility Help
Welcome to the Metasys® Export Utility Help.The Metasys Export Utility extracts historical data for export to several software file formats. ThisHelp does not contain any information on configuring or working with the Network AutomationEngine (NAE), Network Intergration Engine (NIE), Network Control Engine (NCE), Application andData Server/Extended Application and Data Server (ADS/ADX), or Open Data Server (ODS).
Note: Unless otherwise noted, the term engine refers to all NAE, NIE, and NCE models. Serverrefers to all ADS, ADX, and ODS models.
Summary of Changes
The following information is new or revised:• Updated Table 2 for Required Memory and for Supported Operating Systems.
• Removed references to Windows 7 Professional, Enterprise, and Ultimate Editions with SP1 (32-bit). This operating system is no longer supported at this release.
• Metasys Export Utility is now licensed from the Software Activation Manager (SAM). For moreinformation, refer to Software Activation Manager Help (LIT-120121389).
Metasys Export Utility Overview
Metasys Export Utility is a Microsoft Windows based application that uses Web Services to extractthe data from the Metasys system. The application runs from an ADS/ADX, ADS-Lite, ODS, or from astand-alone computer on the same network.Metasys Export Utility extracts historical trend, alarm, and audit data from the NAE/NIE/NCE, ADS/ADX, or ODS. This data is provided in several file formats, such as Microsoft Excel® spreadsheet(.xls) and Access database (.mdb). You can instantly extract the selected data or schedule anextraction at a convenient time or interval.
Metasys Export Utility Related Documentation
Table 1 lists documentation related to the Metasys Export Utility.Table 1: Metasys Export Utility Documentation
For Information On See DocumentMetasys System Requirements Metasys® System Configuration Guide (LIT-12011832)Demand Limiting Load Rolling (DLLR) DLLR Technical Bulletin (LIT-12011288)ADS/ADX Installation Metasys® Server Installation and Upgrade Instructions
Wizard (LIT-12012162)SCT Installation SCT Installation and Upgrade Instructions
(LIT-12012067)ADS-Lite Installation Metasys® Server Lite Installation and Upgrade
Instructions Wizard (LIT-12012258)
3Metasys Export Utility Help Guide

Table 1: Metasys Export Utility Documentation
For Information On See DocumentOpen Data Server System (ODS)Installation
ODS Installation and Upgrade Instructions Wizard(LIT-12011945)
Trends Trend Extensions section of the Metasys® SMP Help(LIT-1201793)
Alarms Alarm and Event Management section of the Metasys®SMP Help (LIT-1201793)
Audits Audit Trail section of the Metasys® SMP Help(LIT-1201793)
Metasys Export Utility License Activation Software Activation Manager Help (LIT-120121389)Metasys Advanced Reporting System andEnergy Essentials
Metasys® Advanced Reporting System and EnergyEssentials Help (LIT-12011312)
Metasys Export Utility System Requirements
All Metasys system devices from which you are extracting data must be at Release 2.0 or later. SeeMetasys Export Utility Technical Specifications for details.
Metasys Export Utility Technical Specifications
Table 2: Metasys Export Utility System Requirements
Product Code MS-EXPORT-0
Required Computer/Server Platform1
When Metasys Export Utility is installed on an ADS/ADX, follow therequirements for an ADS/ADX. Refer to the Application and Data Server(ADS/ADX) Product Bulletin (LIT-1201525), the Application and DataServer (ADS) Lite for Europe (E) Product Bulletin (LIT-12011690), or theApplication and Data Server (ADS) Lite for Asia (A) System Product Bulletin(LIT-12011694).
When Metasys Export Utility is installed on an Open Data Server (ODS),follow the requirements for an ODS. Refer to the Open Data Server(ODS) Product Bulletin (LIT-12011943).
Required Memory2 Computer Platforms: 8 GB RAM
Server Platforms: 16 GB RAM
Metasys Export Utility Help Guide4

Table 2: Metasys Export Utility System Requirements
Supported OperatingSystems
Windows® 10 Pro and Enterprise Editions with Creators Update(version 1709 or later) (64-bit)
Windows® 8.1 Pro and Enterprise Editions with Update 1 (64-bit)
Windows® 7 Professional, Enterprise, and Ultimate Editions with SP1(64-bit)
Windows® Server® 2016 (64-bit)
Windows® Server® 2012 R2 with Update 1 (64-bit)
Windows® Server® 2012 (64-bit)Additional Requirements(Order Separately)
Microsoft Office 2016, Microsoft Office Professional 2013, MicrosoftOffice Enterprise 365, Microsoft Office Professional 2007, or MicrosoftOffice Professional 2010 software to generate reports.
Note:• To extract data to Microsoft Excel or Microsoft Access software,
you must have the Microsoft software installed on the computerthat is running Metasys Export Utility.
• Metasys Export Utility can extract data to 32-bit and 64-bitversions of Microsoft Office. However, the DLL file and examplefiles used to create custom reports are compatible only with the32-bit version of Microsoft Office.
1 Our computer platform and memory recommendations are not meant to imply that older or slower machines arenot usable. Refer to the Network and IT Guidance for the BAS Professional Technical Bulletin (LIT-12011279) for moreinformation regarding computer or server recommendations.
Metasys Export Utility User Interface
The Metasys Export Utility UI has a wizard-type format that allows the user to enter definitionparameters, schedule information, and provide a means for saving and exporting the definition.Filters allow you to quickly select the data you wish to extract. The user interface allows you toselect one or many output file formats.Many windows contain two tabs: Basic and Advanced. In most cases, the Basic tab contains optionsto quickly select basic data for extraction, and the Advanced tab provides additional, but notrequired, filtering options from which you can narrow the data to export.User view trees only display objects relevant to the type of data you choose to extract.
Metasys Export Utility Supported File Formats
Metasys Export Utility extracts user-defined data to any of the following file formats:• Microsoft Excel (.xls)
• Tab-delimited text (.txt)
5Metasys Export Utility Help Guide
• Comma-separated value (.csv)
• Microsoft Access (.mdb)
• HTML (.htm)
• XML version 1.0 (.xml)Note:• If you change the extension on the Advanced tab of the Export Output Selection dialog box,
Metasys Export Utility only creates output reports using the supported extension types. Forexample, if you rename a .htm file extension with a .html extension on the Advanced tab,Metasys Export Utility creates the file with a .htm extension.
• Scheduled Export using the Excel format (.xls) is not supported on server-class operatingsystems. Scheduled Export using Excel format is also not supported on Windows 8.1 whenrunning on a VM. All other export formats are supported. We recommend using .csv formatfor the Scheduled Export and then manually importing the .csv file into Excel and saving it inExcel format.
• Windows 10, Windows 8.1, Windows Server 2016, Windows Server 2012 R2, Windows Server2012 support On Demand Export using Excel format.
Metasys Export Utility Authentication
You must have login credentials with the Site Director as well as permissions to view the data to beextracted with Metasys Export Utility. You must know the IP address or the host name of the SiteDirector. Metasys Export Utility follows Metasys system authentication, using the same user nameand password. If login fails, contact your Metasys system administrator.
Metasys Export Utility Definition File
All of the export selections, such as points, date/time range, and filters, are stored in an MetasysExport Utility Definition (EUD) file. You can export data directly using this EUD file at any time or ata predefined schedule interval through the Scheduler service. The Scheduler runs continuously tocheck for any executable schedules.Definition files are also required when using the custom programming capabilities of MetasysExport Utility.
Note: When creating an EUD file, the user login credentials used to create the EUD file mustpersist. If the user login credentials are deleted, the EUD file no longer works.
Scheduler
You may schedule data collection at a predefined time (for example, every day at 1:00 A.M.). TheScheduler component maintains a schedule file with the following information: encrypted WebServices authentication details, Metasys Export Utility definition file name, date, time, and interval.The Scheduler reads the Metasys Export Utility definition file whenever a schedule is defined or anexisting schedule is modified.
Metasys Export Utility Help Guide6

For scheduling, the computer must remain connected to the network while data is being extractedfrom the engine or server.
Note: Metasys Export Utility does not support writing reports to network drives on Novell clientcomputers.
Performance Considerations
When extracting audit data from a Metasys system that has over 10,000 audits, Metasys ExportUtility requires more time to parse and extract the data. Also, when you select the Annotationsexport attribute, additional time is necessary. When Metasys Export Utility extracts this data, thecentral processing unit (CPU) use of the server is high, which affects the performance of a server;however, the Metasys system continues to run.
Note: These considerations are not an issue for engines because engines typically hold only500 audit records.
In a lab environment with the following platform, we observed these audit extraction times (Table3):• Operating System: Windows® 7 Professional, Enterprise, and Ultimate Editions with SP1 (32-bit)
• CPU Type: Pentium 4 processor, 2 GHz
• Memory: 1 GB RAMTable 3: Audit Extraction Times
Audit Extraction Type Total Time of Extraction10,000 audit entries without annotations 22 minutes10,000 audit entries with annotations 31 minutes
Recommendations
When you extract audit data:• Use the scheduling service to extract the data at a time when the Metasys system is not busy (for
example, during off-peak hours when users are not logged in to the system).
• Do not schedule the extraction of data near the engine’s ADS Delivery Time because this time iswhen the engine transfers its information to the server. By default, each engine’s ADS DeliveryTime is 12:15 A.M.
• Choose the Annotations export attribute only when necessary, as this attribute requiresadditional time to retrieve data.
Custom Report Capabilities
A programming interface to Metasys Export Utility is provided so that you can develop programsto create custom reports. To help you get started, easily customized example files are included forbilling reports and DLLR energy reports.
7Metasys Export Utility Help Guide

Metasys Export Utility can import data into third-party applications that support the Microsoft .NETFramework. This compatibility allows you to write applications for Microsoft Visual Basic, Excel, orAccess to extract Metasys system historical data.
Note: Metasys Export Utility can extract data to Microsoft Office 32-bit and 64-bit versions.However, the DLL file and example files used to create custom reports are compatible withMicrosoft Office 32-bit version only.
See Creating Custom Reports Using the Component Interface.
Billing Example File
The Billing Report Example.xls file is located in:C:\ProgramData\Johnson Controls\MetasysIII\MEU\DLL ExamplesThe billing example file provides an example of how the Metasys Export Utility DLL component canbe used with VBA in Microsoft Excel software to create a billing report.This report is not intended to be used as is, but rather serves as a template or starting point for lessexperienced developers and to show them how to use the Metasys Export Utility DLL. Use or modifyBilling Report Example.xls and its VBA code to meet your specific needs.MetasysSee Creating Custom Reports Using the Component Interface.
DLLR Example Files
Note: Microsoft Excel 2010 and Excel 2013 do not support the use of DLLR example files.
The DLLR example files are working examples of how the Metasys Export Utility DLL componentcan be used with Excel software to provide an automated DLLR energy report. The report is basedon historical information from the Metasys DLLR object using a Demand Limiting Sliding Windowalgorithm.The DLLR example files retrieve and display one month of data only. The files can be used easilywithout modification but still allow you to adjust or modify the file to meet your needs.The DLLR example files are located in:C:\ProgramData\Johnson Controls\MetasysIII\MEU\DLL ExamplesThe sample files are:• DLLR_Excel 97-2003.xls: for use with Excel 97 through Excel 2003 software
• DLLR_Excel 2007.xlsm: for use with Excel 2007 softwareFor more information on DLLR, refer to the DLLR Technical Bulletin (LIT-12011288).See Creating Custom Reports Using the Component Interface for information on using the examplefiles.
Sheets in the DLLR Example Files
Important: Do not rename these sheets. Changing the names of the sheets breaks thereferences within the VBA code. The example files do not work properly if these references arebroken.
Each DLLR example files contain the following Excel sheets:
Energy Report
This sheet displays the DLLR energy report output in chart form after you run the report.
Metasys Export Utility Help Guide8

Daily Data
This sheet contains a numerical representation of the data displayed on the Energy Report sheet in1-day increments.
Data by Minute
This sheet contains a numerical representation of the data displayed on the Energy Report sheet in1-minute increments.
Configuration
This sheet allows you to configure the DLLR energy report parameters. See Configuring the DLLRExample Files.
Example DLLR Energy Report Output
Note: Microsoft Excel 2010 and Excel 2013 do not support the use of DLLR example files.
The DLLR example files output a DLLR energy report similar to the one shown in Figure 1.
Figure 1: Example DLLR Energy Report Chart
9Metasys Export Utility Help Guide
DLLR Energy Report Features
The DLLR energy report offers the following features:Status Bar IndicationWhile running the DLLR energy report, the status bar of the Excel file indicates the current actions.For example, the following status messages may appear:• Logging into Metasys
• Login to Metasys successful
• Retrieving data
• Export of Data successful
Daily Data Conditional FormattingThe Daily Data sheet provides two types of conditional formatting. In each column, with theexception of the Date column, the cells with the highest value are red.In each row, if no entry in the Date column exists, the rest of the row is black.
Note: In Excel 97-2003, only the Date column is black, because these Excel software versionsdo not support multiple conditional formatting.
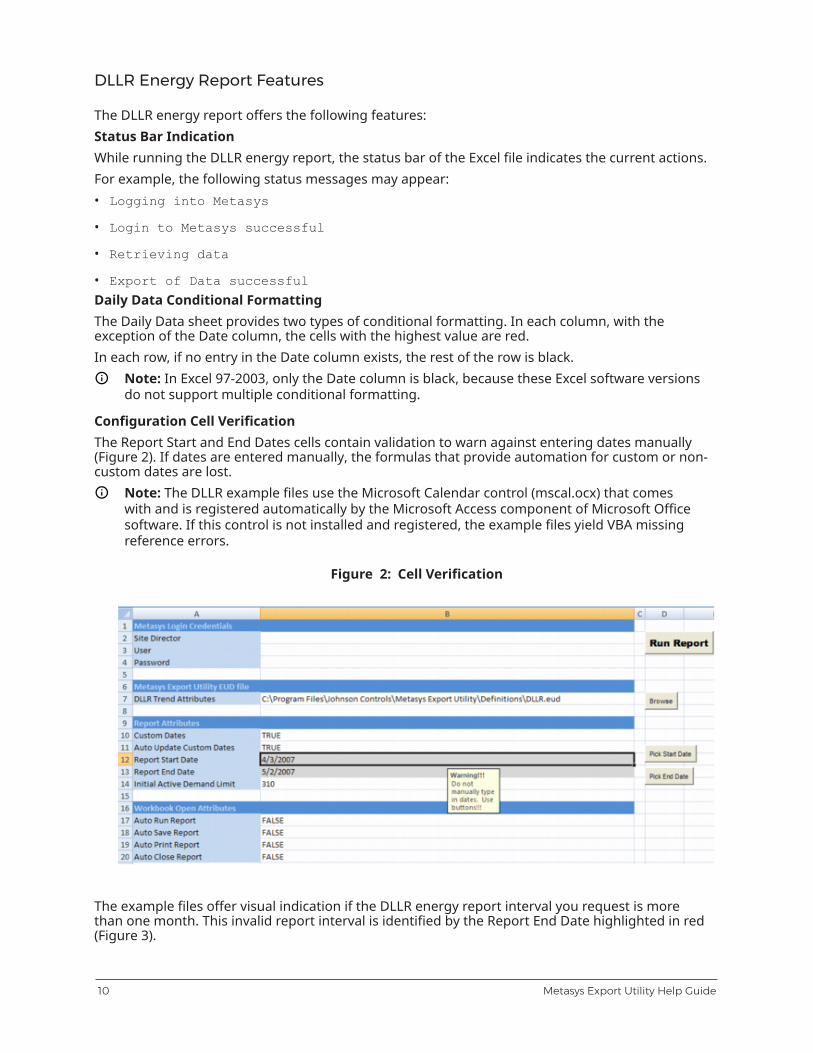
Configuration Cell VerificationThe Report Start and End Dates cells contain validation to warn against entering dates manually(Figure 2). If dates are entered manually, the formulas that provide automation for custom or non-custom dates are lost.
Note: The DLLR example files use the Microsoft Calendar control (mscal.ocx) that comeswith and is registered automatically by the Microsoft Access component of Microsoft Officesoftware. If this control is not installed and registered, the example files yield VBA missingreference errors.
Figure 2: Cell Verification
The example files offer visual indication if the DLLR energy report interval you request is morethan one month. This invalid report interval is identified by the Report End Date highlighted in red(Figure 3).
Metasys Export Utility Help Guide10

Figure 3: Invalid Report Interval
System Tray Icon
By using the system tray icon, you can view a schedule and start, stop, and exit the Schedulerservice, but you cannot modify or create new schedules or access any Metasys Export Utilitydefinition files. The Metasys Export Utility system tray icon border is green when the Schedulerservice is running; otherwise, it appears red. See the Using the Scheduler Service from the SystemTray section for more information.
Detailed Procedures
Logging in to the Metasys System through Metasys ExportUtility
This procedure allows you to open Metasys Export Utility and log in to the Metasys system to accessdata.The Log In window displays two pieces of important information in the bottom bar: the result of thelogin attempt appears on the left side, and the privileges assigned to the user currently logged inappears on the right side. If a login attempt fails, contact your Metasys system administrator. SeeTable 4 for details.To log in to the Metasys system through Metasys Export Utility:1. On the Windows Start Menu, browse to Programs > Johnson Controls > Metasys > Metasys
Export Utility The Log In window appears (Figure 4).
11Metasys Export Utility Help Guide

Figure 4: Log In Window
2. Enter the name or IP address of the Site Director and the Metasys system user name andpassword. (Passwords are case sensitive.)
Note: If your IT department uses a port other than Port 80 (default), enter a colon followed bythe port number after the Site Director IP address (for example, 172.17.13.233:8080). If youdo not enter a port number, the default port is used (Port 80). If the time on your computer isout of sync with the server by more than 5 minutes, you cannot log in to Metasys Export Utility.Adjust the time to match the server and try again. For information on time synchronization,refer to the Time Management section of the Metasys® SMP Help (LIT-1201793).
3. Click Log In. When the connection is successful, Continue becomes active. For information onthe status bar at the bottom of the Log In window, see Table 4.
Table 4: Access - User Privileges
User Privilege MeaningAccess You need to enter the Site Director and login information,
then click Log In.Access Denied Your login attempt fails for a reason other than those listed
in this table and the error message Log in to Metasysfailed appears.
View Audit Only You can view audit data only.Metasys Account Expired Your Metasys system account is expired and the error
message Log in to Metasys failed appears.Metasys Account Disabled Your Metasys system account is disabled and the error
message Log in to Metasys failed appears.Metasys Account Locked Your Metasys system account is locked and the error
message Log in to Metasys failed appears.View All You can view all Metasys system information and export all
trend, alarm, and audit data.
4. Click Continue. The Export Definition Selection window appears.
Metasys Export Utility Help Guide12

Figure 5: Export Definition Selection Window
5. Proceed to one of the following sections:
Creating a New Metasys Export Utility Definition
Modifying an Existing Metasys Export Utility Definition
Creating the Metasys Export Utility Definition (EUD) File (Step 2)
Creating a New Metasys Export Utility Definition
To extract the desired data from the Metasys system for export to a file, the first step is to create aMetasys Export Utility definition file. This definition file specifies all of the information required toextract the data.1. On the Export Definition Selection window, click New Definition (Figure 5).
2. Click Next. The Export Time Duration - Basic tab appears (Figure 6).
Figure 6: Export Time Duration - Basic Tab
13Metasys Export Utility Help Guide

3. Select one of the frequently used intervals from the drop-down menu using information inTable 5.
Table 5: Frequently Used Intervals
Interval ResultToday Extracts data for the day Metasys Export Utility is run.Yesterday Extracts data for the calendar day before Metasys Export Utility is run.Last Week Extracts data for the week before Metasys Export Utility is run.Last Two Weeks Extracts data for the two weeks before Metasys Export Utility is run.Last Month Extracts data for the calendar month before Metasys Export Utility is
run.Last Quarter Extracts data for the last quarter before Metasys Export Utility is run.
Quarters are defined as follows:
• 1 = January 1 - March 31• 2 = April 1 - June 30• 3 = July 1 - September 30• 4 = October 1 - December 31
Last Year Extracts data for the last calendar year before Metasys Export Utility isrun.
Choose Date Extracts data for the dates you choose from the pop-up calendar. Clickthe calendar icon to the right of the Start Date and End Date fields.
Note: This interval is the only interval that allows the user to inputdata into the Start Date and End Date fields.
All Available Extracts data for the entire history of the device to the current day.
Note: Frequently Used Intervals are relative. For instance, if you choose Last Month, the userinterface shows the last month relative to the current month. If scheduled, however, theScheduler determines Last Month at runtime.
4. Click the Advanced tab (Figure 7) if you wish to narrow the date/time range chosen on theBasic tab. Select or clear days of the week check boxes for which you wish to extract the data.Narrow the time for which Metasys Export Utility extracts data using the drop-down menus forthe Start and End Time fields (from 12:00 A.M. to the present time), as defined by the systemclock of the computer running Metasys Export Utility. For example, if the computer uses the24-hour clock (military time), make sure you click the 24 Hrs field in the Time section of theAdvanced tab.
Example: To extract data only for the operating hours of a building, change the Start Time to8:00 A.M. and the End Time to 5:00 P.M.
Metasys Export Utility Help Guide14
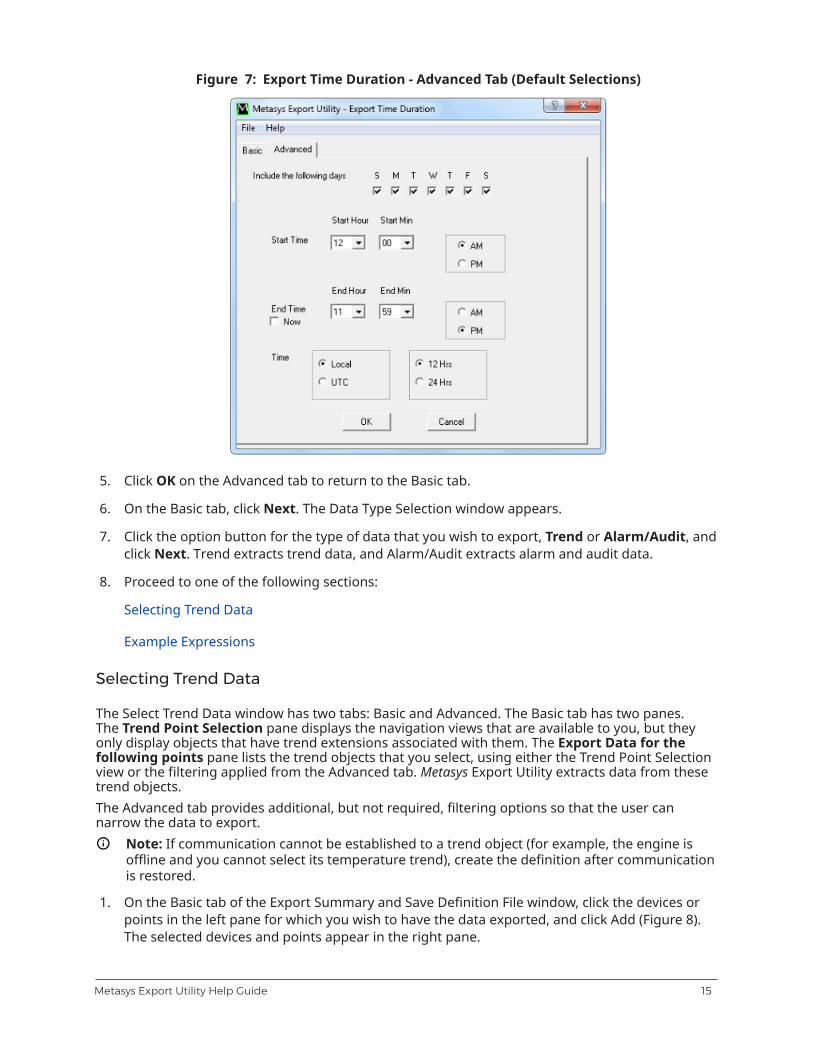
Figure 7: Export Time Duration - Advanced Tab (Default Selections)
5. Click OK on the Advanced tab to return to the Basic tab.
6. On the Basic tab, click Next. The Data Type Selection window appears.
7. Click the option button for the type of data that you wish to export, Trend or Alarm/Audit, andclick Next. Trend extracts trend data, and Alarm/Audit extracts alarm and audit data.
8. Proceed to one of the following sections:
Selecting Trend Data
Example Expressions
Selecting Trend Data
The Select Trend Data window has two tabs: Basic and Advanced. The Basic tab has two panes.The Trend Point Selection pane displays the navigation views that are available to you, but theyonly display objects that have trend extensions associated with them. The Export Data for thefollowing points pane lists the trend objects that you select, using either the Trend Point Selectionview or the filtering applied from the Advanced tab. Metasys Export Utility extracts data from thesetrend objects.The Advanced tab provides additional, but not required, filtering options so that the user cannarrow the data to export.
Note: If communication cannot be established to a trend object (for example, the engine isoffline and you cannot select its temperature trend), create the definition after communicationis restored.
1. On the Basic tab of the Export Summary and Save Definition File window, click the devices orpoints in the left pane for which you wish to have the data exported, and click Add (Figure 8).The selected devices and points appear in the right pane.
15Metasys Export Utility Help Guide

Figure 8: Export Summary and Save Definition File Window
2. On the Advanced tab, select a desired attribute filtering option from the drop-down menu. Theattributes are based on the Metasys system Object Name.
3. Specify the filtering criteria for each reference point for the corresponding Value field.
Note: The value field supports wildcards (*). For example, set up a filter of Field Point = *-T toextract all trends on temperature (-T) points.
4. Add a new filter row by entering a value for the last filter. (Click Remove Filter to remove thecurrent row of filtering.)
5. Add the following relational operators to narrow the filtering criteria in the expression: AND,OR, NOT.
Figure 9 shows filtering to return trend data for all objects on any NIE engine, on the N1Migration1 trunk, and on the UNT-004 controller that are trended on the Present Valueattribute.
Metasys Export Utility Help Guide16

Figure 9: Trend Example
17Metasys Export Utility Help Guide

Figure 10: Trend Output File in Excel
Figure 11: Trend Chart Output File in Excel
Metasys Export Utility Help Guide18

Note: The Excel output file for trends is unique. The Date/Time columns are combined, andthere is a column for each trend object. The column heading is the Name Path Referencewith units in parentheses. Cells with data with a status other than Reliable appear with a redfill. Cells with Reliable status have no fill. Use the Excel Chart wizard to develop trend charts:highlight the appropriate cells, click Chart Wizard, and follow the instructions.
6. To retrieve less data than what may be stored in the system, select the Export Interval checkbox to change the sampling interval, and select the desired interval in hours and minutes fromthe drop-down menus.
For example, if a trend is sampled once a minute in Metasys system, but you only need data forevery half hour, select the Export Interval check box, and choose 30 minutes from the drop-down menu.
7. After you complete filters on the Advanced tab, click OK. The Basic tab appears with the filterresults in the Export Date for the following points pane.
8. Check the desired General and Trend attributes using Table 6.
Table 6: General and Trend Attributes
Attribute MeaningDateTime*
Display together in the first column of the output file.
Allows you to select the date format. For example, August 18, 2010,appears as:MM/DD/YYYY 08/18/2010MM/DD/YY 08/18/10DD/MM/YY 18/08/10
MM/DD/YYYY Drop-DownMenu
YY/MM/DD 10/08/1812 Hrs, 24 Hrs Selection Displays the time in 12-hour or 24-hour format. Select the same time
format that is used on the Site Director computer.Name Path Reference Displays the unique reference name for the trend object as a full
path of the object based on the Metasys system All Items View. Forexample: WeCare4U:AC1/N2 Trunk 1.UNT-1.0A-%.Present Value
Note: Name Path Reference should not be confused with theMetasys system Fully Qualified Reference.
Object Name Displays trend object names (for example, OA-T.Present Value[Trend1])
Value* Displays the numeric values of the trend objects.Status Displays the status of the trend object at the time the sample is taken
(for example, Reliable or ???).
Note: The options marked with * are always selected by default.
9. Click Next. The Export Output Selection window appears. Proceed to Selecting File Formats forOutput.
Selecting Alarm or Audit Data
See Performance Considerations for extracting audit data before you begin.
19Metasys Export Utility Help Guide

The Alarm/Audit Data Selection window has three main options for extracting data: Alarm, Audit,and Both.• Alarm extracts alarm data only. Audit parameters are hidden. The Basic tab has two subtabs:
Point Selection and Alarm Selection.
• Audit extracts audit data only. Alarm parameters are hidden. The Basic tab has two subtabs:Audit Selection and User Selection. The point selection device is disabled because audits aredevice-specific, not point-specific.
• Both extracts alarm and audit data. When you choose the Both option, the Basic tab displaysall four tabs relating to alarms and audits, Point Selection, Alarm Selection, Audit Selection, andUser Selection. All parameters are available, and extracted data appears in a single output fileformat. For example, if you choose HTML as the output file type, the result is an Alarm reportwith an Audit report that follows.
Depending on which you select, some tabs disable (including the Advanced tab) because additionalfiltering is not necessary. The Advanced tab provides additional, but not required, filtering optionsso that the user can narrow the data to export.
Selecting Both Alarm and Audit Data
When you choose the Both option, the Basic tab displays all four tabs relating to alarms and audits:Point Selection, Alarm Selection, Audit Selection, and User Selection. To select both alarm and auditdata, follow these steps:1. Click Both.
2. On the Basic tab, select options on the four tabs using the instructions in the followingsections: Selecting Alarm Data and Selecting Audit Data.
3. Click Next. The Output Selection window appears. Proceed to Selecting File Formats forOutput.
Metasys Export Utility Help Guide20

Selecting Alarm Data
Figure 12: Alarm/Audit Data Selection - Basic and Point Selection Tabs
1. Click Alarm.
2. If desired, select the Get All Alarms check box to extract data for all available alarms. (Thisdisables all filtering options.)
3. On the Basic tab, click the Point Selection tab. Click the individual devices or points in the AlarmPoint Selection pane for which you wish to have the data exported, and click Add. The devicesor points that you select appear in the Export Data for the following points pane.
Note: Choose at least one object on the Point Selection tab to ensure that output files containsome data.
4. On the Basic tab, click the Alarm Selection tab. Using Table 7, select one or more types ofalarms whose data you wish to export for the devices/points chosen on the Point Selection tab.
Note: Select at least one alarm data type on the Alarm Selection tab to ensure that output filescontain some data.
21Metasys Export Utility Help Guide
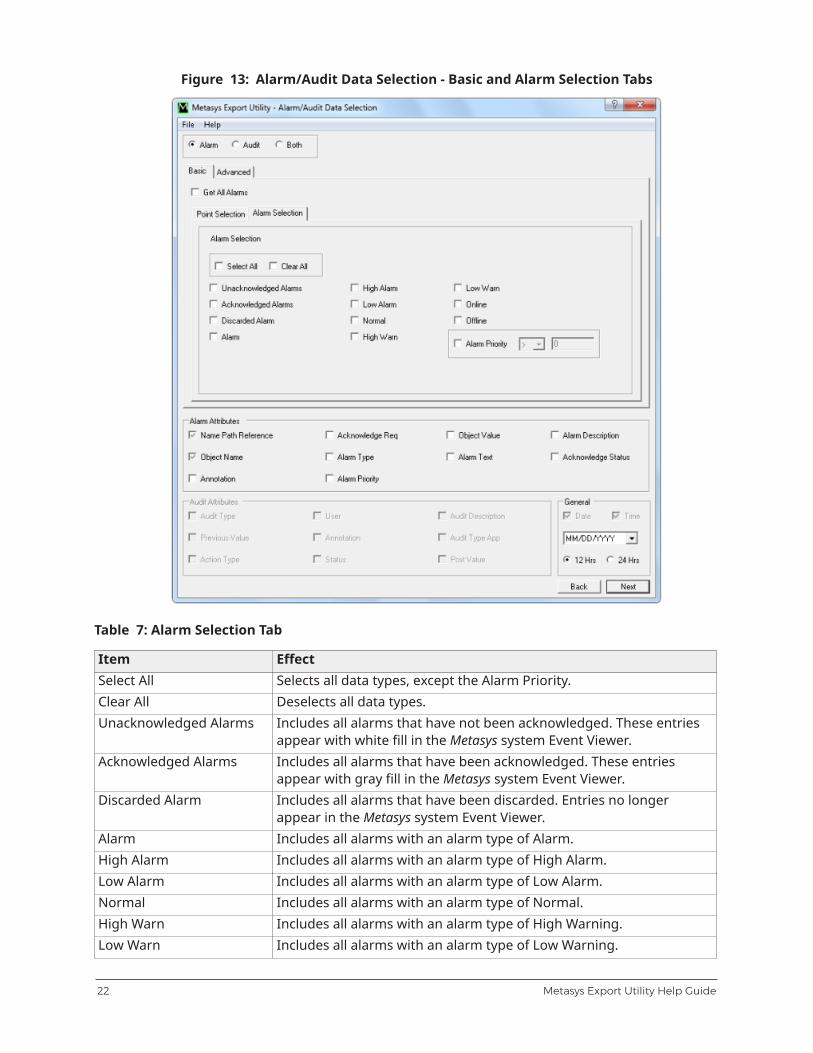
Figure 13: Alarm/Audit Data Selection - Basic and Alarm Selection Tabs
Table 7: Alarm Selection Tab
Item EffectSelect All Selects all data types, except the Alarm Priority.Clear All Deselects all data types.Unacknowledged Alarms Includes all alarms that have not been acknowledged. These entries
appear with white fill in the Metasys system Event Viewer.Acknowledged Alarms Includes all alarms that have been acknowledged. These entries
appear with gray fill in the Metasys system Event Viewer.Discarded Alarm Includes all alarms that have been discarded. Entries no longer
appear in the Metasys system Event Viewer.Alarm Includes all alarms with an alarm type of Alarm.High Alarm Includes all alarms with an alarm type of High Alarm.Low Alarm Includes all alarms with an alarm type of Low Alarm.Normal Includes all alarms with an alarm type of Normal.High Warn Includes all alarms with an alarm type of High Warning.Low Warn Includes all alarms with an alarm type of Low Warning.
Metasys Export Utility Help Guide22

Table 7: Alarm Selection Tab
Item EffectOnline Includes all alarms with an alarm type of Online.Offline Includes all alarms with an alarm type of Offline.Alarm Priority Includes all alarms in the set priority range.
Example: To extract alarm data for entries with an alarm prioritygreater than or equal to 100, choose the >= operator and enter 100 inthe value field.
5. Click the Advanced tab, and select a desired reference point filtering option from the drop-down menu using Table 8.
Table 8: Alarm Attributes for Filtering
Attribute DescriptionAlarm Object Select this option to filter on the alarm object’s name path reference.
For example, select Alarm Object and type *ZN-T in the Value fieldto extract all data on alarm objects that end with ZN-T, or zonetemperatures.
Alarm Value Select this option to filter on the alarm value using the relationaloperand that becomes enabled.
For example, select Alarm Value >= and place 80 in the Value field toextract data on only those alarms greater than or equal to 80.
Alarm Text Select this option to filter on alarm text as defined in the Metasyssystem alarm messages.
For example, in the Metasys system, place the word critical in thealarm text for your most critical alarms, then select Alarm Text fromthe drop-down menu and type *critical* in the Value field to extractdata with that text in the alarms.
23Metasys Export Utility Help Guide
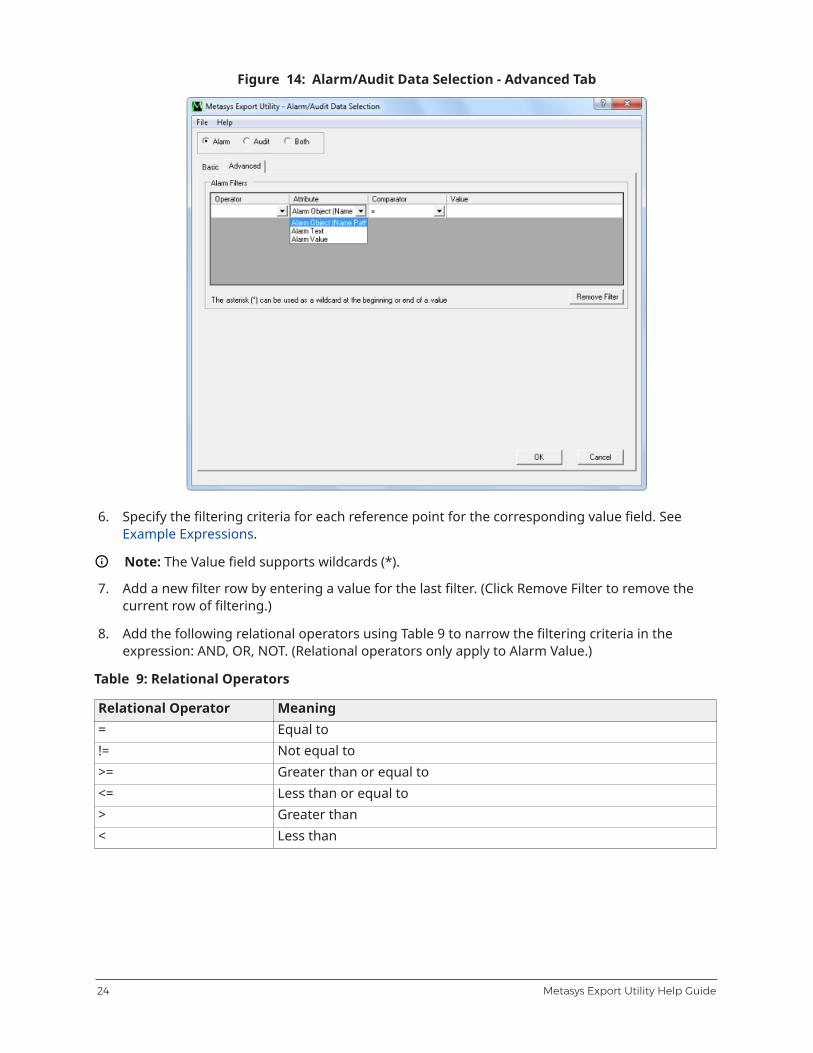
Figure 14: Alarm/Audit Data Selection - Advanced Tab
6. Specify the filtering criteria for each reference point for the corresponding value field. SeeExample Expressions.
Note: The Value field supports wildcards (*).
7. Add a new filter row by entering a value for the last filter. (Click Remove Filter to remove thecurrent row of filtering.)
8. Add the following relational operators using Table 9 to narrow the filtering criteria in theexpression: AND, OR, NOT. (Relational operators only apply to Alarm Value.)
Table 9: Relational Operators
Relational Operator Meaning= Equal to!= Not equal to>= Greater than or equal to<= Less than or equal to> Greater than< Less than
Metasys Export Utility Help Guide24

Figure 15: Alarm Filter Example
Note: This figure represents an advanced alarm filter that would return data for all alarmobjects ending in -T (all temperatures) that were in alarm at a value of 80 degrees or higher,but did not include the word Non-Critical in its Alarm Text.
9. After you complete filters on the Advanced tab, click OK. The Basic tab appears with the filterresults in the right pane.
10. Select the desired Alarm Export attributes according to Table 10. These attributes appear ascolumn headings for the output files. The default column headings are Date, Time, and Value.
Table 10: Alarm Export Attributes
Attribute MeaningName Path Reference Displays the unique reference name for the alarm object that is the
full path name of the Metasys system All Items View.
For example, WeCare4U:AC1/N2 Trunk 1.UNT-1.DA-T.Present Value
Note: This option is always selected by default.Object Name Displays the alarm object names.
For example, DA-T.
Note: This option is always selected by default.Acknowledge Req Displays whether or not the alarms required acknowledgment (True/
False).
25Metasys Export Utility Help Guide

Table 10: Alarm Export Attributes
Attribute MeaningAcknowledge Status Displays the status indicating if an alarm was acknowledged (True/
False).Object Value Displays the alarm object value (for example, 98).Object Units Displays the alarm object value units of measure (for example, deg F).Alarm Description Displays the alarm object description which is the Metasys system
Description for the alarm object.
For example, instead of choosing an object name column whichdisplays ZN-T, you can select this to display Zone Temperature.
Annotation Displays the alarm annotations one after the other in the followingformat: Date/Time: <user>:<annotation>
For example, 8/4/2010 8:37:27 AM : metasyssysagent : Determinedthe freezestat was faulty 8/4/2010 8:37:45 AM : metasyssysagent :Replaced the freezestat
Note: Selecting the Annotation option may take up to five timeslonger to export alarm/event messages with annotations thanwithout annotations.
Note: For Microsoft Access output files, text entries are limitedto 255 characters. If the number of characters is greater than255, an ellipsis appears at the end of the cell.
Alarm Type Displays the alarm types (for example, Online, Offline, Alarm, HighAlarm).
Alarm Priority Displays the alarm priorities which are numbers defined in theMetasys system.
Alarm Text Displays the alarm text messages for each alarm that are defined inthe Metasys system.
11. Click Next. The Output Selection window appears. Proceed to Selecting File Formats forOutput.
Selecting Audit Data
For Audit selection, the Basic tab has two subtabs: Audit Selection and User Selection.Consider the following when selecting users:• Make sure that you are logged in to the Site Director (from the Log In window). If you are logged
in to another supervisory device, you may not be accessing the correct user list.
• The default Metasys system user name is MetasysSysAgent, and this user account cannot bedeleted. This account is typically used by a Johnson Controls representative.
• IntraComputer is the default Metasys system user that supervisory devices use to communicatewith the Site Director. The most common audit entry for IntraComputer is User PasswordChanged when supervisory devices change their internal passwords for Metasys systemsecurity. Check the Metasys system Audit Viewer for other types of entries and select this user asnecessary.
Metasys Export Utility Help Guide26

• The [Blank User Name] option can be selected for retrieving audit entries that were associated tono user. For instance, audit entries related to a supervisory device resetting, such as Startup, areentered without a user assigned. Check the Metasys system Audit Viewer for other types of theseentries, and select this non-user as necessary.
To select audit data:1. Click Audit.
2. Click Get All Audits if you wish to extract data for all available audits. (This option disables allfiltering options.)
3. Click the User Selection tab (Figure 16). All users that appear in the User Selection list box arethe users defined in the Metasys system of the supervisory device that you are logged into.
Figure 16: User Selection Tab
4. Click users in the left pane, and click Add. The selected users appear in the Export Data forthe following users pane.
5. On the Basic tab, click the Audit Selection tab (Figure 17). Using information in Table 11, selectone or more of the check boxes to extract the desired audit data.
27Metasys Export Utility Help Guide

Note: You must choose at least one action type on the Audit Selection tab (Figure 17) foroutput files to contain data.
Figure 17: Audit Selection Tab
Table 11: Audit Selection
Audit Selection Type DescriptionGeneral (Correspond with the Metasys system Audit Viewer, Origin Application, General, and MCEentries.)Uploads Includes all audit entries with an Audit Viewer description of Upload.Downloads Includes all audit entries with an Audit Viewer description of
Download.Archives Includes all audit entries where a supervisory controller has had its
Random Access Memory written to its flash memory.
For example, when a LCT system is saved, an archive audit entry iscreated.
Created Objects Includes all audit entries with an Audit Viewer description of Create.
Metasys Export Utility Help Guide28

Table 11: Audit Selection
Audit Selection Type DescriptionDeleted Objects Includes all audit entries with an Audit Viewer description of Delete.Commands Includes all audit entries with an Audit Viewer description of
Command. Commands normally relate to field points.
For example, select Commands to include all audit entries where auser commanded a fan Off.
Overrides Includes all audit entries with an Audit Viewer description of OperatorOverride.
Release Overrides Includes all audit entries with an Audit Viewer description of ReleaseOperator Override.
Write Includes all audit entries with an Audit Viewer description of Write.Write normally relates to object parameters.
For example, select Write to include all audit entries where the localSite Director has been changed for a supervisory device.
System Security (Correspond with the Metasys system Audit Viewer Origin Application, SystemSecurity entry.)Log Ins Includes all entries when users logged in to the Metasys system where
the Audit Viewer description is User Login Successful.Log Outs Includes all entries when users logged out of the Metasys system
where the Audit Viewer description is User Logout.Failed Login Attempts Includes all entries of failed login attempts where the Audit Viewer
description is User Login Failed.
Note: If the user types in the wrong user name, it is notexported.
Password Changes Includes all entries of changed user passwords where the AuditViewer description is User Password Changed.
Alarm and Audit (Correspond with the Metasys system Audit Viewer, Origin Application, Alarmand Event entry.)Discarded Alarms Includes all audit entries in the Audit Viewer that were discarded from
the Event Repository.Discarded Audits Includes each entry in the Audit Viewer that indicates an audit was
discarded from the Audit Repository.Include Detailed Audits Includes all audit entries in the Audit Viewer that were discarded from
the Audit Repository.Trend (Correspond with the Metasys system Audit Viewer Origin Application, Trend entry.)Unable to write toRepository
Includes all audit entries where supervisory devices cannot transfertrend data to the defined data repository.
Device Manager (Correspond with the Metasys system Audit Viewer Origin Application, DeviceManager entry.)Controller Reset Includes all audit entries of a controller reset, defined as the Audit
Viewer description of Reset.Startup Includes all audit entries of a controller being started, defined as the
Audit Viewer description of Startup.
29Metasys Export Utility Help Guide

Table 11: Audit Selection
Audit Selection Type DescriptionCritical System Events (Correspond with the Metasys system Audit Viewer Origin Application,Critical System Event entry.)Critical Events Includes all audit entries defined as the Critical System Event class
level.
6. On the Advanced tab, select optional audit filtering options from the drop-down menu usingthe information in Table 12.
Table 12: Audit Filtering Options
Attribute PurposeAudit Object Select this option to filter on the audit object’s name path reference.
For example, select Audit Object and type ADS* in the Value field toextract data on all items that begin with ADS.
User Select this option to filter on user names.
For example, in the Metasys system, define users as N<user name>and D<user name> for night and day operators, respectively. Then,select User, and type N* in the Value field to extract data for all nightshift operators.
Audit Description Select this option to filter on audit descriptions.
For example, select Audit Description, and type *acknowledged*in the Value field to extract data for all audit entries that haveacknowledged alarms.
Previous Value Select this option to filter on previous values. The relational operandenables, and you can filter on a numeric previous value.
For example, select Previous Value > and type 80 in the Value field toextract audit entries with a previous value greater than 80.
Post Value Select this option to filter on post values. The relational operandenables, and you can filter on a numeric post value.
For example, select Post Value <= and type 10 in the Value field toextract audit entries with a post value of less than or equal to 10.
Status Select this option to filter on the audit status entry.
For example, select Status and type OK in the Value field to extractsuccessful audits.
7. Specify the filtering criteria for each reference point for the corresponding value field.
Note: The value field supports wildcards (*).
8. Add a new filter row by entering a value for the last filter. (Click Remove Filter to remove thecurrent row of filtering.)
9. Add the following relational operators to narrow the filtering criteria in the expression: AND,OR, NOT. (Relational operators appear only for Previous and Post Values.)
Metasys Export Utility Help Guide30

Note: Audit Filter Example 1 represents an advanced audit filter that extracts data for all auditentries from ADXs. For the Audit Filter Example 1, ADX must be part of the Item Name, for allnighttime operators (assuming each nighttime operator’s user name began with an N), withacknowledged alarms.
Figure 18: Audit Filter Example 1
Note: Audit Filter Example 2 extracts data for all audit entries with an Audit Description ofSample Interval, for trends that previously had values less than or equal to 300 seconds, butwere changed to a value of less than 300 seconds. You could set up the filter to ensure thatemployees changed the trend samples to above 5 minutes. If the output file did not extractany data, the employees followed the instructions.
31Metasys Export Utility Help Guide

Figure 19: Audit Filter Example 2
10. After you complete filters on the Advanced tab, click OK. The Basic tab appears with the filterresults in the Export Data for the following users pane.
11. Select the desired Audit Export attributes using the information in Table 13. These attributesappear as column headings for the output files. The default column headings are Date, Time,and Value.
Table 13: Audit Export Attributes
Attribute MeaningAudit Type Displays the audit types which correspond with the Class Level
column in the Metasys system Audit Viewer. For example, User Actionand Critical System Event.
Audit Type App Displays the audit type application which corresponds with the OriginApplication column in the Metasys system Audit Viewer. For example,Device Manager, MCE, and System Security.
User Displays the Metasys system users.Action Type Displays the action types. For example, Command, Write, and
Subsystem.Audit Description Displays the audit descriptions which are defined by the Metasys
system. For example, User Login Successful, Download, and OperatorOverride.
Status Displays the audit entry status (for example, OK).
Metasys Export Utility Help Guide32

Table 13: Audit Export Attributes
Attribute MeaningPrevious Value Displays the previous values. For example, if a user changes the
name of an engine from NAE to NAE-1, NAE appears in this column.Post Value Displays the post values. For example, if a user changes the name of
an engine from NAE to NAE-1, NAE-1 appears in this column.Annotation Displays the audit annotations one after the other in the following
format: Date/Time: <user>:<annotation>
Note: Selecting the Annotation option may take up to five timeslonger to export audit messages with annotations than withoutannotations.
Note: For Microsoft Access output files, text entries are limitedto 255 characters. If the number of characters is greater than255, an ellipsis (...) appears at the end of the cell.
12. Click Next. The Output Selection window appears. Proceed to Selecting File Formats forOutput.
Example Expressions
Alarm
The following are example expressions for filtering alarms:• First row of criteria: Alarm Object (Name Path Reference) and Floor*
• Relational operator: NOT
• Second row of criteria: Alarm Object (Name Path Reference) and Floor1
• Result: All points under devices with names starting with Floor, with the exception of Floor1.• Alarm Object (Name Path Reference) and Floor*
• AND
• Alarm Value = 200 in the Value field
• Result: All points under devices starting with Floor with an alarm value of 200.• Alarm Object (Name Path Reference) and Floor*
• Alarm Value 200 in the Value field
• OR
• Result: All points under the devices starting with Floor and all points (can be in all devices, notonly those starting with Floor) having an alarm value of 200.
Selecting File Formats for Output
1. In the Export Output Selection - Basic Tab window (Figure 20), enter the following:
a. Enter a file name for the output files in the Define a common filename field. Onlyalphanumeric characters and spaces are allowed. By default, all output files have this name.
b. Click Browse to select a valid path in which to create the output files. Shared network drivesare supported. By default, all output files are created in this directory.
33Metasys Export Utility Help Guide

Figure 20: Export Output Selection - Basic Tab
2. Select all of the desired file format types using the information in Table 14.
Note: If you do not have Microsoft Excel or Microsoft Access software installed, theseselections are unavailable and appear dimmed.
Table 14: File Format Output Types
Type Extension DescriptionTab Delimited Text File .txt Data is presented in a text document separated
by tabs and carriage returns.Microsoft Excel .xls Data is presented in columns and rows.
Note: To avoid errors, make sure thatMicrosoft Excel is not running while youexport data to this file format. Doing so maycause errors. If you do not have MicrosoftExcel installed, this selection is unavailableand appears dimmed.
Hypertext Markup Language .htm Data is presented in columns and rows.Comma Separated Value .csv Data is presented in a text document separated
by commas and carriage returns. The documentcan be viewed in Microsoft Excel.
If you view the data in Excel, the dates may notappear in the format specified in the MetasysExport Utility definition.
Microsoft Access .mdb Data is presented in record sets in a table of adatabase.
Note: In Microsoft Access output files, textentries are limited to 255 characters; if textentries are greater than 255 characters,then an ellipsis (...) appears at the end of thecell. See the Performance Considerationssection. If you do not have Microsoft Accessinstalled, this selection is unavailable andappears dimmed.
Extensible Markup Language .xml Data is presented as separate tags.
Metasys Export Utility Help Guide34

3. If desired, click the Advanced tab to select different destinations or file names for each selectedoutput file format. Click OK to save and return to the Basic tab.
For example, to save all files on the local hard disk, click the corresponding Browse button, andselect the desired network drive with the name Trends.html instead of the common file nameMonthly Trend Report.
Note: You do not need to change anything on the Advanced tab.
Figure 21: Export Output Selection - Advanced Tab
Note: The directory path, including the file name, is limited to a maximum of 260 charactersfor an export to be successful. For Microsoft Excel, this path is limited to 218 characters. If thepath exceeds these limits, the report does not export.
4. Click Next. The Export Summary and Save Definition File window (Figure 22) appears with all ofthe selected information for the Metasys Export Utility Definition file.
35Metasys Export Utility Help Guide

Figure 22: Export Summary and Save Definition File Window
5. Review your selections. (To edit any selections, click Back.)
Note: With the Point Names row selected, next to the heading Point Names, place yourpointer over the Value field to enable a browse (...) button. Click the browse button to displayall point names.
6. If you wish to save the Metasys Export Utility Definition file in a different location from thedefault, click Save As.
7. Click Next. The Data To Export window appears. (If the definition file already exists, a dialogbox appears to ask if you wish to overwrite the existing file.) The Metasys Export UtilityDefinition is defined and saved.
Note: The default name for the definition file is that of the common file name defined in theExport Output Selection window. It also stores the definition in the directory defined duringthe installation process.
The default location is:
C:\ProgramData\Johnson Controls\MetasysIII\MEU\Definitions
8. Click the appropriate option button to export the data now or to schedule the export at a laterdate or time, and click Next.
Note: If you do not want to create an output file at this time, click the X in the upper-rightcorner to close the application. Your definition file has already been saved.
If you wish to schedule the export, proceed to Creating a New Schedule.
Tip: To ensure that your selections are correct before you schedule an export, click ExportNow to view the output of an Metasys Export Utility definition file. Then modify any selectionsand schedule the export.
Metasys Export Utility Help Guide36

Creating a New Schedule
To ensure the best schedule performance, avoid scheduling extractions at times when the Metasyssystem is busy. For instance, do not schedule an extraction at the same time a supervisorydevice has a scheduled ADS Delivery Time or when many users are accessing the Site Directorsimultaneously.The time the schedule runs is based on the system clock of the computer on which Metasys ExportUtility is running. This time may not be synchronized with the Metasys system. The Metasys ExportUtility computer does not have to be synchronized with the Metasys system, but recommend thatyou verify that it is extracting the data appropriately.
Export Scheduling Options
To create a new schedule:1. On the Export Scheduler window, click Browse and select the Metasys Export Utility definition
file to be scheduled. (When you create a definition, this field automatically populates).
Figure 23: Export Scheduler
2. Type a unique Schedule Name to identify this schedule in the Metasys Export Utility Scheduler.The Scheduler does not allow two different schedules with the same name or two identicalschedules with different names.
3. Select the schedule intervals for how often you wish to have the data exported using theinformation in Table 15. Select days and times from the drop-down menus for which theschedule runs. Options change in the window depending on the interval you choose.
Table 15: Schedule Intervals
Interval DescriptionOne Time Runs only once at the defined time.Daily Selections range from every day to every 31st day.Weekly Selections range from every week to every 52nd week. You can select the
day the schedule runs that week.
37Metasys Export Utility Help Guide

Table 15: Schedule Intervals
Interval DescriptionMonthly By Date Selections range from every month to every 12th month. You can select
the day the schedule runs from day 1 to day 31 of the month.Monthly By Day Selections range from every month to every 12th month. You can select
the day the schedule runs from the first day type of the month until the4th day type of the month. For example, the user can select the scheduleto run every month on the 2nd Friday of the month.
Yearly By Date Selections range from every year to every 12th year. You can select themonth and day of the year that the schedule runs.
4. In the File Creation section, click the appropriate option button.
- Append File continually adds the schedule to the same output file. For example, Excel addsnew worksheets, and Access adds new tables.
- Create File creates a new output file each time the schedule is run.5. Click Prefix or Suffix, and select a date format from drop-down menu. The date is appended
before or after the common file.
Note: Choose Prefix or Suffix to organize your files. Prefix puts the date in the chosen dateformat before the common file name (for example, 100818Trend Report.xls). Suffix places thedate after the common file name (for example, Trend Report100818.xls).
6. Click Save Schedule.
7. Click View Schedules. The Scheduler window appears.
Note: If you click View Schedules before you save the schedule, you return to the ExportScheduling Options window, losing the reference to the definition file, and you must browse tothe definition file.
Note: View Schedules appears dimmed and is not accessible when the Scheduler service isnot running. Start the Scheduler service to activate this button.
Scheduler
To manage schedules:1. Verify that the fields display the correct information for the new schedule. See explanations of
the columns in Table 16.
2. Make any changes and manage the schedules using the functionality described in Table 17.
Metasys Export Utility Help Guide38
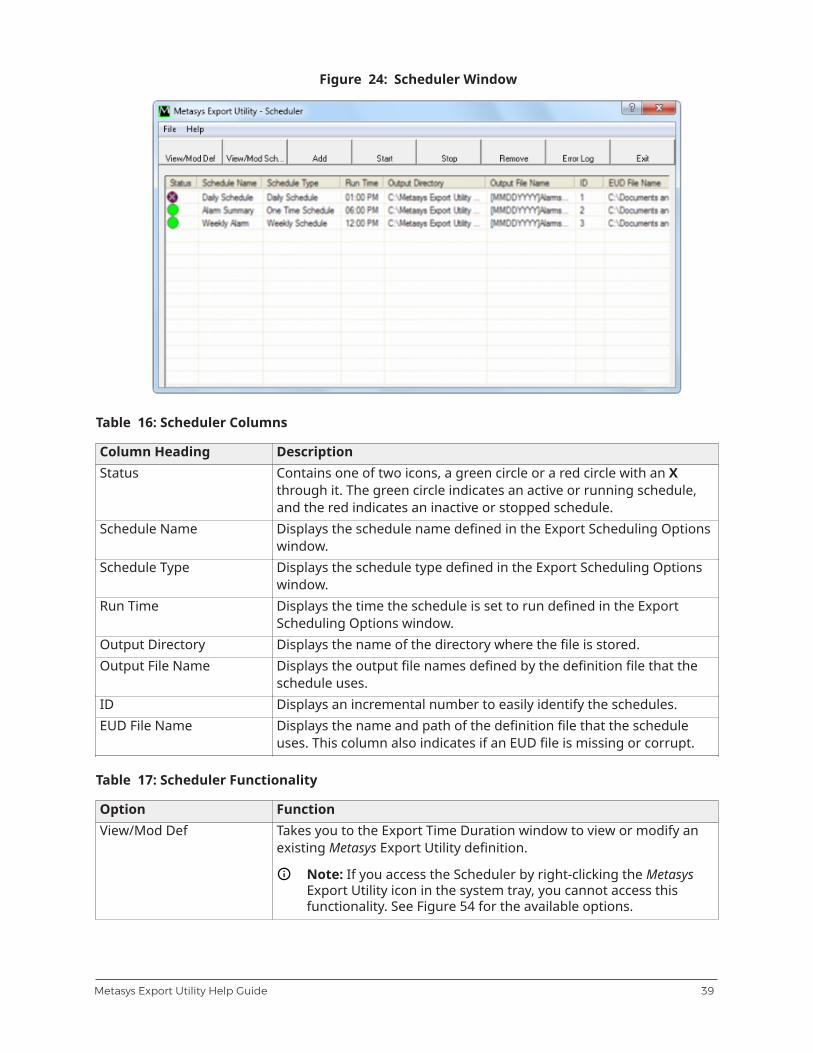
Figure 24: Scheduler Window
Table 16: Scheduler Columns
Column Heading DescriptionStatus Contains one of two icons, a green circle or a red circle with an X
through it. The green circle indicates an active or running schedule,and the red indicates an inactive or stopped schedule.
Schedule Name Displays the schedule name defined in the Export Scheduling Optionswindow.
Schedule Type Displays the schedule type defined in the Export Scheduling Optionswindow.
Run Time Displays the time the schedule is set to run defined in the ExportScheduling Options window.
Output Directory Displays the name of the directory where the file is stored.Output File Name Displays the output file names defined by the definition file that the
schedule uses.ID Displays an incremental number to easily identify the schedules.EUD File Name Displays the name and path of the definition file that the schedule
uses. This column also indicates if an EUD file is missing or corrupt.
Table 17: Scheduler Functionality
Option FunctionView/Mod Def Takes you to the Export Time Duration window to view or modify an
existing Metasys Export Utility definition.
Note: If you access the Scheduler by right-clicking the MetasysExport Utility icon in the system tray, you cannot access thisfunctionality. See Figure 54 for the available options.
39Metasys Export Utility Help Guide

Table 17: Scheduler Functionality
Option FunctionView/Mod Sch... Takes you to the Scheduler to view or modify an existing schedule.
Note: on page
Add Takes you to the Export Scheduling Options window so that you cancreate a new schedule. on page
Start Begins or resumes a schedule.Stop Stops or inactivates a schedule, but keeps the entry in the Scheduler
for future use.Remove Deletes the selected schedule.Error Log Displays all errors that have occurred with all scheduled data exports.Exit If you accessed the Scheduler from taskbar icon, this closes the
Scheduler.
If you accessed the Scheduler by clicking View Schedules, this optionreturns you to Export Scheduling Options.
3. Click Exit.Schedules are saved in the Scheduler queue. See Modifying an Existing Schedule to make changesto an existing schedule.
Modifying an Existing Metasys Export Utility Definition
Use this procedure to modify a Metasys Export Utility Definition file (*.eud) that was createdpreviously.1. Browse to and log in to Metasys Export Utility. See Logging in to the Metasys System through
Metasys Export Utility.
2. In the Export Definition Selection window (Figure 25), click Edit Existing Definition and clickOK. The second Export Existing Definition window appears.
Figure 25: Export Existing Definition Window
3. Click Browse and select the Metasys Export Utility definition file. (By default, the location thatapperas was chosen for definition files during installation.)
4. Click Modify Definition and click Next. The Export Time Duration window appears with theexisting values.
Metasys Export Utility Help Guide40
5. Modify the values according to Creating a New Metasys Export Utility Definition.Note: You cannot change a Trend definition to an Alarm/Audit and vice versa.
Modifying an Existing Schedule
1. Browse to and log in to Metasys Export Utility. See Logging in to the Metasys System throughMetasys Export Utility.
2. On the Export Definition Selection window, click Edit Existing Definition and click OK. TheExport Definition Selection window appears.
3. Click Browse and open the Metasys Export Utility definition file.
4. Click Export Data and click Next. The Data to Export window appears.
5. Click the appropriate option button to export the data immediately or click Schedule Export tochange the existing schedule. Click Next. See Creating a New Schedule.
Creating Custom Reports Using the Component Interface
See:• Referencing the DLL File from a VBA Project for creating reports from scratch
• Using the Billing Report Example File for creating billing reports using the billing example file
• Using the DLLR Example Files for creating custom DLLR energy reports using the DLLR examplefiles
Note: To create custom reports, you must have the 32-bit version of Microsoft Office installedon the computer running Metasys Export Utility. The DLL file and example files used to createcustom reports are compatible with only the 32-bit version of Microsoft Office. Microsoft OfficeExcel 2010 and Office Excel 2013 do not support the DLL example files.
Referencing the DLL File from a VBA Project
See Sample Use of the Export Utility DLL in VBA for how to obtain an example script.1. In Microsoft Visual Basic, select References on the Tools menu. The References dialog box
appears (Figure 26).
41Metasys Export Utility Help Guide

Figure 26: References Dialog Box
2. Select the MSEAExportDLL reference check box, and click OK. The MSEAExportDLL referencenow appears in the Object Browser (Figure 27), and it is available for use. For information onVBA classes, see Table 18.
Note: In the Classes pane, if you click MEUDataExtractor, the items in Table 19 appear in theMembers pane to the right.
Figure 27: Object Browser
Metasys Export Utility Help Guide42

Table 18: VBA Classes Menu Descriptions
Item Description ParametersIDataExtractor The main interface of the Metasys
Export Utility DLL.MEUDataExtractor The object type that implements the
MEUDataExtractor interface.
Examples:
• Dim MyExtractor AsMSEAExportDLL.IDataExtractor
• Set MyExtractor = NewMSEAExportDLL.MEUDataExtractor
TrendDataStruct This structure holds a trendrecord. It contains parameters thatcorrespond to the definition fileexport attributes. See Table 6 forparameter descriptions.
• .DateTime• .NamePathReference• .ObjectName• .ObjectValue• .ObjectUnits• .Status
AlarmDataStruct This structure holds an alarmrecord. It contains parameters thatcorrespond with the definition fileexport attributes. See Table 10 forparameter descriptions.
• .DateTime• .NamePathReference• .ObjectName• .ObjectValue• .ObjectUnits• .AckRequired• .AckStatus• .AlarmType• .AlarmPriority• .AlarmDescription• .AlarmText• .Annotation• .IsDiscarded
AuditDataStruct This structure holds an auditrecord. It contains parameters thatcorrespond with the definition fileexport attributes. See Table 13 forparameter descriptions.
• .DateTime• .NamePathReference• .ObjectName• .AuditType• .ApplicationType• .UserName• .AuditActionType• .AuditDescription• .Status• .PreviousValue• .PostValue• .Annotation
43Metasys Export Utility Help Guide

Table 19: Method Descriptions
Method DescriptionMEULogin This method allows you to log in to the Metasys system. It returns an
encrypted xml namespace as a string.
Function MEULogin(hostName As String, userID As String,password As String) As String
• Hostname: enter either the IP address or the name of the Metasys SiteDirector that you want to log in.
• userID: enter the Metasys system user name that you wish to log in as.• password: enter the Metasys system password for the user.Example:
result = MyExtractor.MEULogin("localhost", "MetasysSysAgent","[default password]")
Note: The MEULogin_2 method is exposed but required for other MetasysExport Utility purposes. It should not be used and is not supported.
MEUGetTrendData
This method returns an array of trend records as defined by the followingparameters.
Function MEUGetTrendData(eudFileName As String) AsTrendDataStruct()
eudFileName: The full path reference of the Metasys Export Utility Definitionthat defines the time duration and trend objects for which you wish to retrievedata. MEUGetTrendData only returns data for the export attributes that areselected in the definition file. For example, if you do not select the ObjectName export attribute when defining the definition file, you do not return anydata for the Object Name parameter of the TrendDataStruct.
Windows 7 Example:
Dim MyTrendData() As TrendDataStruct
MyTrendData = MyExtractor.MEUGetTrendData ("C:\ProgramData\Johnson Controls\MetasysIII\MEU\Definitions\Last MonthsOAT.eud")
Metasys Export Utility Help Guide44

Table 19: Method Descriptions
Method DescriptionMEUGetAlarmData
This method returns an array of alarm records as defined by the followingparameters.
Function MEUGetAlarmData(eudFileName As String) AsAlarmDataStruct()
eudFileName: The full path reference of the Metasys Export Utility Definitionthat defines the time duration and alarm attributes for which you wish toretrieve data. MEUGetAlarmData returns data for the export attributes thatare selected in the definition file. For example, if you do not select the ObjectName export attribute when defining the definition file, you do not return anydata for the Object Name parameter of the AlarmDataStruct.
Windows 7 Example:
Dim MyAlarmData() As AlarmDataStruct
MyAlarmData = MyExtractor.MEUGetAlarmData ("C:\ProgramData\Johnson Controls\MetasysIII\MEU\Definitions\YesterdaysAlarms.eud")
MEUGetAuditData This method returns an array of audit records as defined by the followingparameters:
Function MEUGetAuditData(eudFileName As String) AsAuditDataStruct()
eudFileName: The full path reference of the Metasys Export Utility Definitionthat defines the time duration and audit attributes for which you wish toretrieve data. MEUGetAuditData only returns data for the export attributesthat are selected in the definition file. For example, if you do not select theAudit Description export attribute when defining the definition file, you do notreturn any data for the Audit Description parameter of the AuditDataStruct.
Windows 7 Example:
Dim MyAuditData() As AuditDataStruct
MyAuditData = MyExtractor.MEUGetAuditData ("C:\ProgramData\Johnson Controls\MetasysIII\MEU\Definitions\Last MonthsAudits.eud")
MEULogout This method logs you out of the Metasys system.
Example:
MyExtractor.MEULogout
Sample Use of the Export Utility DLL in VBA
Access the sample script from the following location:C:\Program Files (x86)\Johnson Controls\Metasys Export Utility\Help\Module1.bas (64-bit systems)Copy and paste the sample script text into your program, or import the Module1.bas file into yourprogram.
45Metasys Export Utility Help Guide

Using the Billing Report Example File
1. Browse to C:\ProgramData\Johnson Controls\MetasysIII\MEU\DLL Examples and open BillingReport Example.xls.
2. Customize the report to meet your needs.
Using the DLLR Example Files
Use the DLLR example files in the following order:1. Create DLLR trends in your Metasys system. See Creating DLLR Trends.
2. Create the Export Utility Definition file. See Creating the Metasys Export Utility Definition (EUD)File.
3. Configure the DLLR example file. See Configuring the DLLR Example Files.
4. Run the report. See Running DLLR Reports.
5. View the report. See Viewing DLLR Reports.
6. Schedule the reports, if desired. See Scheduling DLLR Energy Reports in Windows 7 orScheduling DLLR Energy Reports in Windows 8.1.
Creating DLLR Trends
The DLLR example files read and display data from these DLLR object trend extensions.To create DLLR trends, in the Site Management Portal (SMP) UI, add trend extensions to thefollowing attributes of the DLLR object (Figure 28):• Energy Rate: the energy rate that DLLR is currently reading. Use 1-minute intervals for the
extension.
• Active Demand Limit: the current target that DLLR is trying to maintain. Use COV for theextension, and the DLLR example files fill in any gaps in the data.
• Unc Interval Demand: the uncontrolled demand that shows what the demand would have beenhad DLLR not shed any loads. Use 1-minute intervals for the extension.
• Amount Shed: that current amount of energy that DLLR is shedding. Use 1-minute intervals forthe extension.
Metasys Export Utility Help Guide46
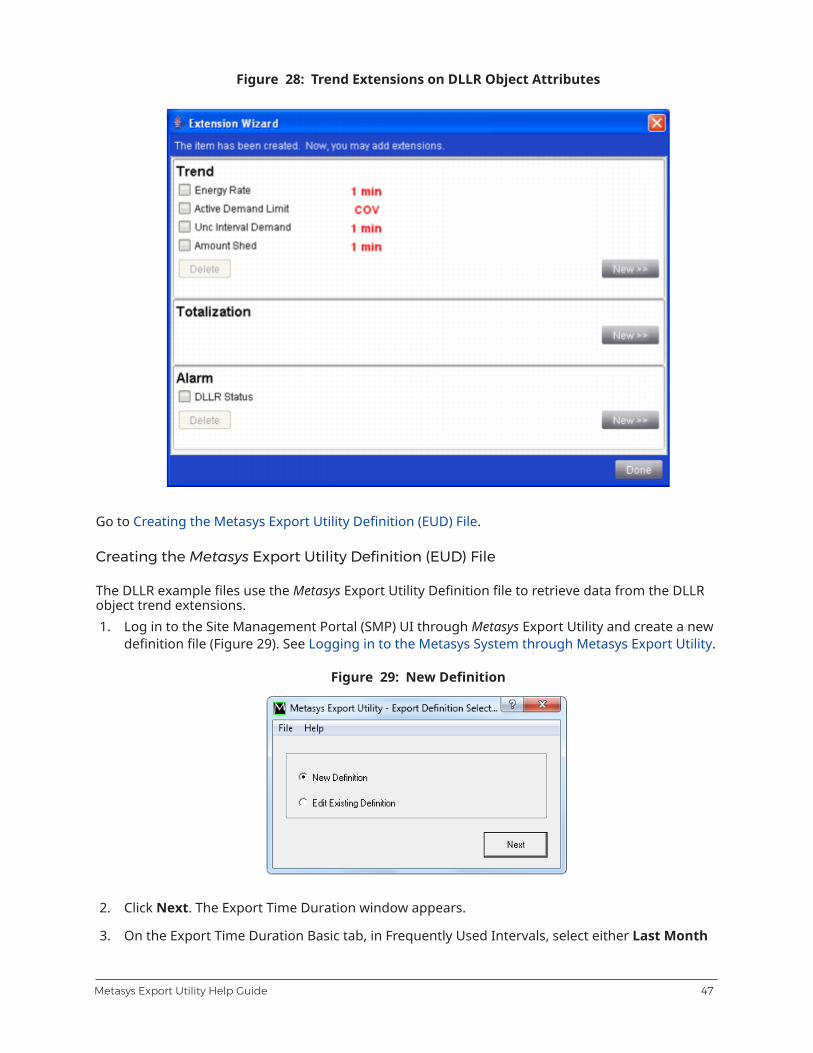
Figure 28: Trend Extensions on DLLR Object Attributes
Go to Creating the Metasys Export Utility Definition (EUD) File.
Creating the Metasys Export Utility Definition (EUD) File
The DLLR example files use the Metasys Export Utility Definition file to retrieve data from the DLLRobject trend extensions.1. Log in to the Site Management Portal (SMP) UI through Metasys Export Utility and create a new
definition file (Figure 29). See Logging in to the Metasys System through Metasys Export Utility.
Figure 29: New Definition
2. Click Next. The Export Time Duration window appears.
3. On the Export Time Duration Basic tab, in Frequently Used Intervals, select either Last Month
47Metasys Export Utility Help Guide

or Choose Date (Table 20).
Note: Other selections under Frequently Used Intervals are not valid. No edits are required forthe Advanced tab.
Table 20: Selections on the Basic Tab - Frequently Used Intervals
Selection DetailsYesterday Not supportedLast Week Not supportedLast Two Weeks Not supportedLast Month For a monthly DLLR energy report based on Day 1 to Day Last of the
previous month, select Last Month (Figure 30).
Figure 30: Last Month
Last Quarter Not supportedLast Year Not supported
Metasys Export Utility Help Guide48

Table 20: Selections on the Basic Tab - Frequently Used Intervals
Selection DetailsChoose Date For a monthly DLLR energy report based on a range such as Month/Day
# to Month+1/Day-1, select Choose Date. For dates, select what wouldhave been the last report date range. For example, Start Date = 10/8/2012and the End Date = 11/1/2012 (Figure 31).
Figure 31: Choose Date
All Available Not supported
4. Click Next.
5. In the Data Type Selection box, select Trend.
Figure 32: Data Type Selection Box
6. Click Next. The Export Summary and Save Definition File window appears.
7. Do the following in the Export Summary and Save Definition File window (Figure 33):
49Metasys Export Utility Help Guide
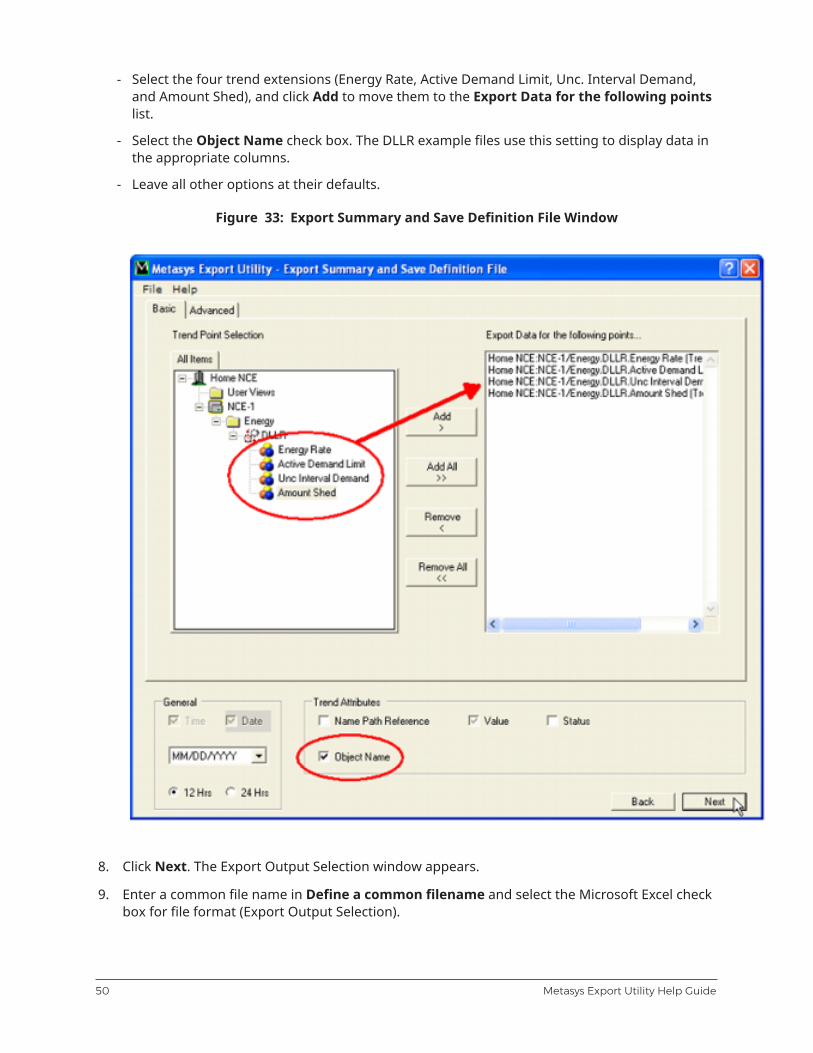
- Select the four trend extensions (Energy Rate, Active Demand Limit, Unc. Interval Demand,and Amount Shed), and click Add to move them to the Export Data for the following pointslist.
- Select the Object Name check box. The DLLR example files use this setting to display data inthe appropriate columns.
- Leave all other options at their defaults.
Figure 33: Export Summary and Save Definition File Window
8. Click Next. The Export Output Selection window appears.
9. Enter a common file name in Define a common filename and select the Microsoft Excel checkbox for file format (Export Output Selection).
Metasys Export Utility Help Guide50

Note: Choosing a common file name, directory, and file format in this step is usually notnecessary. It is necessary only for the DLLR example files with regard to the definition filebeing complete; however, these settings may be useful to make sure you are getting theappropriate data (by using Metasys Export Utility to run its report).
Note: If you do not have Microsoft Excel or Microsoft Access software installed, these choicesare unavailable and appear dimmed.
Figure 34: Export Output Selection
10. Click Next. The Export Summary and Save Definition File window appears.
11. Review your selections (Figure 35).
51Metasys Export Utility Help Guide
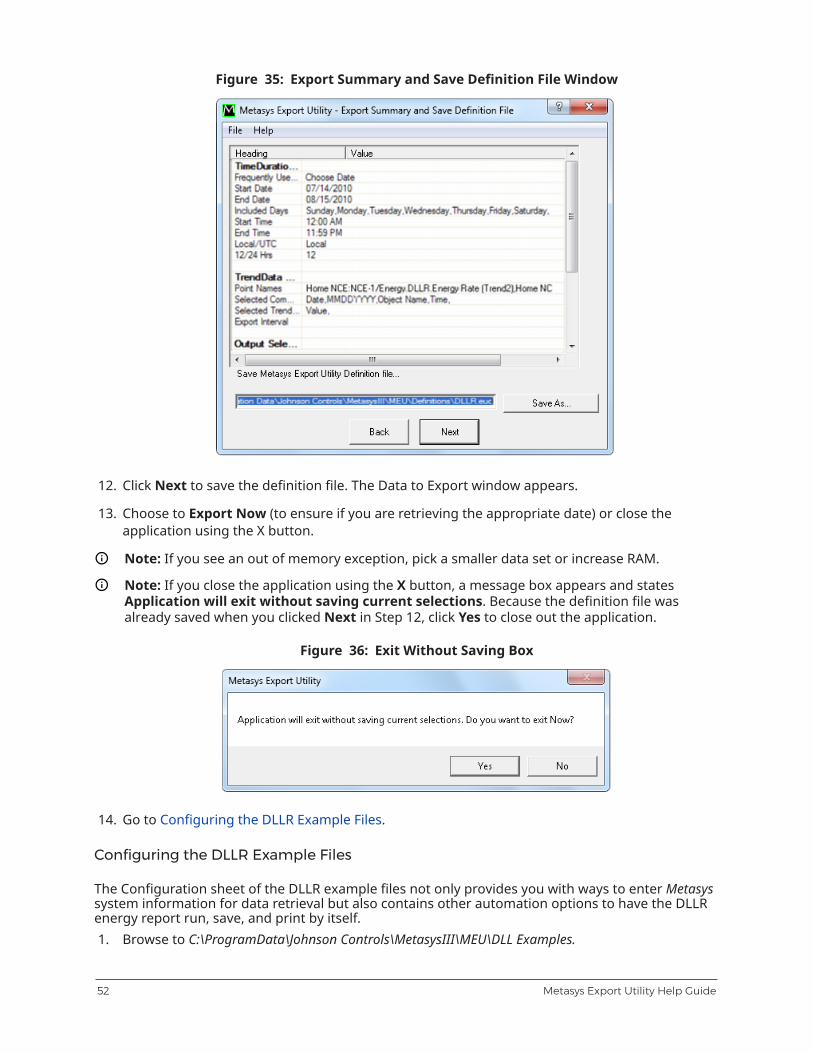
Figure 35: Export Summary and Save Definition File Window
12. Click Next to save the definition file. The Data to Export window appears.
13. Choose to Export Now (to ensure if you are retrieving the appropriate date) or close theapplication using the X button.
Note: If you see an out of memory exception, pick a smaller data set or increase RAM.
Note: If you close the application using the X button, a message box appears and statesApplication will exit without saving current selections. Because the definition file wasalready saved when you clicked Next in Step 12, click Yes to close out the application.
Figure 36: Exit Without Saving Box
14. Go to Configuring the DLLR Example Files.
Configuring the DLLR Example Files
The Configuration sheet of the DLLR example files not only provides you with ways to enter Metasyssystem information for data retrieval but also contains other automation options to have the DLLRenergy report run, save, and print by itself.1. Browse to C:\ProgramData\Johnson Controls\MetasysIII\MEU\DLL Examples.
Metasys Export Utility Help Guide52

2. Open either DLLR_Excel 97-2003.xls (for Microsoft Excel 97 through Microsoft Excel 2003software) or DLLR_Excel 2007.xls (for Microsoft Excel 2007 software).
Note: Microsoft Excel 2010 and Excel 2013 do not support the use of DLLR example files.
3. Click the Configuration sheet. See Figure 37.
Figure 37: DLLR_Excel 97-2003.xls
4. Enter values for each field:Metasys Login CredentialsEnter the appropriate Metasys system Site Director, User (username), and Password. Metasys ExportUtility DLL uses these credentials to log in to the Site Management Portal (SMP) UI.Metasys Export Utility EUD fileUse the Browse button to search for and select the definition file you created in Step 11 of Creatingthe Metasys Export Utility Definition (EUD) File (Figure 35).
Note: The example file does not verify this path. If you edit the cell manually, make sure thepath you enter is correct.
Report AttributesUse Table 21 for the Report Attributes section.
53Metasys Export Utility Help Guide

Table 21: Report Attributes Section
Field DescriptionCustom Dates Select FALSE from the drop-down list if you selected Last Month
as your interval. Select TRUE if you selected Choose Date as yourinterval.
Note: The DLLR example files support only the Last Month orChoose Date for Frequently Used Intervals (see Creating theMetasys Export Utility Definition (EUD) File).
Note: When Custom Dates is set to TRUE and the DLLR energyreport is run (either automatically or via the Run Reportbutton), the Metasys Export Utility Definition file is modified bythe software to reflect the Report Start and End Dates.
Auto Upgrade CustomDates
If Custom Dates is set to TRUE, you can choose to automaticallyupdate the Custom Date ranges (Report Start Date and Report EndDate).
If Auto Upgrade Custom Dates is set to TRUE, each time the DLLRexample files are opened, the Report End Date + 1 month + 1 dayis compared to the current date. If the current date is equal to orgreater than the Report End Date + 1 month + 1 day, the ReportStart and End Dates are increased by the number of month'sdifference between the Report End Date and the current date.
IF (Report End Date + 1 month + 1 day) <= (Today'sDate) THEN
Report Start Date = Report Start Date + (Today'sMonth - Report End Date's Month) month(s)
Report End Date = Report End Date + (Today's Month -Report End Date's Month) month(s)
END IF
Report Start Date 1 When Custom Dates is set to FALSE, the Report Start Dateautomatically displays the first day of the last month. When CustomDates is set to TRUE, choose a date using the Pick Start Date button.
Note: Do not manually edit this field. A formula handles theautomation.
Report End Date When Custom Dates is set to FALSE, the Report End Dateautomatically displays the last day of the last month. When CustomDates is set to TRUE, choose a date using the Pick End Date button.
Note: Do not manually edit this field. A formula handles theautomation.
Metasys Export Utility Help Guide54

Table 21: Report Attributes Section
Field DescriptionInitial Active Demand Limit The value entered here is used to fill any gaps in data resulting
from a COV Trend sample rate. For example, if three targets areused throughout the day, On-Peak, Off-Peak, and Semi-Peak,the Initial Active Demand Limit is used to fill in the target from theprevious day. On the first day, Initial Active Demand Limit appearsfor each minute until the first sample was retrieved. This method isonly necessary when using a COV trend sample rate for the ActiveDemand Limit.
Note: For descriptions that mention drop-down lists, click the cell where you would like tomake a selection. The drop-down arrow then appears to the left of the cell.
Workbook Open AttributesThe DLLR example files allow you to use an application such as Windows Scheduled Tasks to run,save, and print the DLLR energy report automatically. The attributes in Table 22 control how theDLLR energy report is handled each time the DLLR example files open.Table 22: Workbook Open Attributes Section
Field DescriptionAuto Run Report If you set this field to TRUE, each time the DLLR example files open,
they do the following:
• Read the Configuration sheet parameters.• Log in to the Site Management Portal UI via the Metasys Export
Utility DLL.• Modify the Metasys Export Utility Definition file with the Report
Start and End Dates.• Retrieve and write the data into the appropriate sheets.This behavior is the same as when you click Run Report.
Auto Save Report If you set Auto Run Report to TRUE and Auto Save Report to TRUE,then each time the DLLR example files open, a copy of the file issaved after the run report is complete. The copy of the file is namedyymmdd Energy Report.xls(m), where yy = year, mm = month, anddd = day. The file is saved to the same location as the DLLR examplefile.
Auto Print Report If you set Auto Run Report to TRUE and Auto Print Report to TRUE,then each time the DLLR example files open, both the Daily Datasheet and the Energy Report chart print to the default Windowsprinter. Default printer settings should be set to print appropriately.
Auto Close Report If you set this field to TRUE and at least one of the following isalso set to TRUE (Auto Run Report, Auto Save Report, or Auto PrintReport), then each time the DLLR example files open, once any or allthe above are complete, Microsoft Excel closes.
Note: When set to TRUE, if you wish to open the DLLR examplefiles manually, you must press the break key on your keyboardto stop the automation during its progress. Otherwise, it closesthe application.
55Metasys Export Utility Help Guide

Go to Running DLLR Reports.
Running DLLR Reports
Note: To schedule DLLR energy reports, see Scheduling DLLR Energy Reports in Windows 7 orScheduling DLLR Energy Reports in Windows 8.1.
1. Configure the DLLR energy report. See Configuring the DLLR Example Files.
2. On the Configuration sheet, click Run Report.
3. Go to Viewing DLLR Reports.
Viewing DLLR Reports
To view DLLR energy reports, click the Energy Report sheet.Note: To see numerical representations of the data in the DLLR energy report, click the DailyData and Data by Minute sheets.
Scheduling DLLR Energy Reports in Windows 7
Note: The steps in this section apply to Windows 7 only. For steps that apply to Windows10 and Windows 8.1, see Scheduling DLLR Energy Reports in Windows 8.1. If you have adifferent operating system, consult your Microsoft documentation for information on the TaskScheduler.
1. Open the Windows Task Scheduler window from the Start menu at All Programs > Accessories> System Tools > Task Scheduler. The Task Scheduler window appears.
2. Click Create Basic Task to start the Create Basic Task Wizard. The Create Basic Task Wizardappears (Figure 38).
3. Give the task a meaningful name (for example, Monthly DLLR Energy Report). Click Next.
Metasys Export Utility Help Guide56
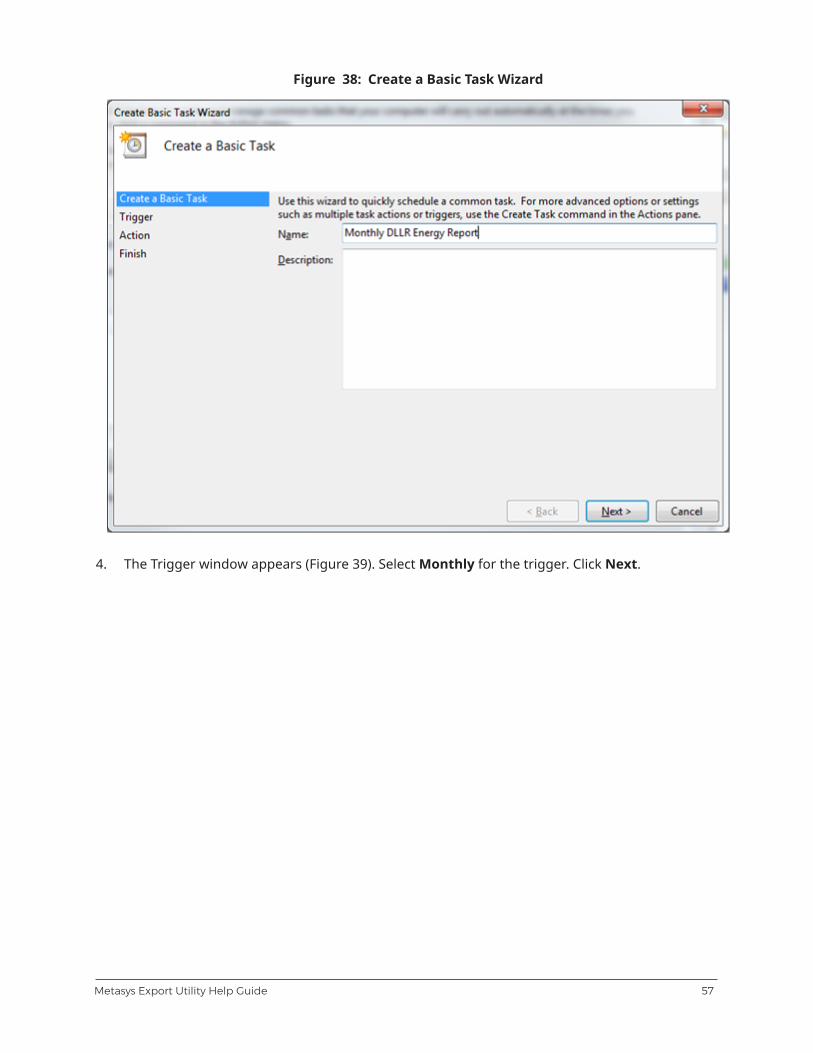
Figure 38: Create a Basic Task Wizard
4. The Trigger window appears (Figure 39). Select Monthly for the trigger. Click Next.
57Metasys Export Utility Help Guide

Figure 39: Create Basic Task Wizard - Task Trigger Window
5. The Monthly window appears (Figure 40). Select the time and day information as appropriate.For example, if your DLLR energy report is based on a Custom Date range of mm/09/yy–mm/08/yy, then choose the task to run on Day 9. Click Next.
Metasys Export Utility Help Guide58

Figure 40: Create Basic Task Wizard - Monthly Window
6. The Start a Program window appears (Figure 41). In the Program/script field, choose thedirectory path of the appropriate Excel software from the file system. In the Add Argumentsfield, add the directory path of the DLLR example in quotations. Click Next.
59Metasys Export Utility Help Guide

Figure 41: Create Basic Task Wizard - Start a Program Window
7. The Summary window appears (Figure 42). Verify the details of the task. Select Open theProperties dialog for this task when I click Finish. Click Finish. The Properties dialog boxappears (Figure 43).
Metasys Export Utility Help Guide60

Figure 42: Create a Basic Task Wizard - Summary Window
8. In the Properties dialog box, click Run whether the user is logged on or not. Click ChangeUser or Group if you would like to run the task as a different user.
61Metasys Export Utility Help Guide

Figure 43: Properties Dialog Box
9. Select the user and click OK.
Figure 44: Select User or Group Window
Metasys Export Utility Help Guide62

10. A credentials window appears and prompts for the user's credentials. Enter your Windowscredentials and click OK.
Figure 45: Task Scheduler User Credentials Dialog Box
Scheduling DLLR Energy Reports in Windows 8.1
Note: The steps in this section apply to Windows 8.1. For steps that apply to Windows 7, seeScheduling DLLR Energy Reports in Windows 7. If you have a different operating system,consult your Microsoft documentation for information on the Task Scheduler.
1. In Control Panel, go toSystem and Security > Administrative Tools > Schedule Tasks.Alternatively, if you have your Start window configured to show Administrative Tools, click TaskScheduler. The Task Scheduler window appears.
2. Click Create Basic Task. The Create Basic Task Wizard appears.
63Metasys Export Utility Help Guide

Figure 46: Create Basic Task Wizard
3. Enter a meaningful name for the task (for example, Monthly DLLR Energy Report). Click Next.The Trigger Window appears.
Metasys Export Utility Help Guide64

Figure 47: Task Trigger Window
4. Select Monthly for the Trigger. The Monthly window appears.
65Metasys Export Utility Help Guide

Figure 48: Monthly Window
5. Select the time and day. For example, if your DLLR energy report is based on a Custom Daterange of mm/09/yy–mm/08/yy, then choose the task to run on Day 9.
6. Click Next. The Action Window appears.
Metasys Export Utility Help Guide66

Figure 49: Action Window
7. Click Start a program.
8. Click Next. The Start a Program window appears.
67Metasys Export Utility Help Guide

Figure 50: Start a Program
9. Click Browse to choose the directory path of the appropriate Excel software from the filesystem.
10. In the Add arguments field, add the directory path of the DLLR example in quotations.Note: Microsoft Office 2013 does not support the use of the DLLR example.
11. Click Next. The Finish window appears.
Metasys Export Utility Help Guide68

Figure 51: Finish Window
12. Select the check box for Open the Properties dialog for this task when I click Finish.
13. Click Finish. The Properties dialog box appears.
69Metasys Export Utility Help Guide

Figure 52: Properties Dialog Box
14. Click Run whether user is logged on or not. If you would like to change the user or group,follow these steps:
a. Click Change User or Group. The Select User or Group window appears.
Figure 53: Select User or Group
Metasys Export Utility Help Guide70

b. Select the user or group and click OK. A credentials window appears.
c. Enter the credentials and click OK. The Properties box reappears.
15. Click OK. The Task Scheduler closes.
Using the Scheduler Service from the System Tray
1. Right-click the Metasys Export Utility icon in the system tray.
2. Select an option using the information in Table 23.
3. Manage schedules using the options in Table 17.Note: Some functionality is not available in the Scheduler service from the system tray. Toaccess all of the functionality, log in to Metasys Export Utility (see Logging in to the MetasysSystem through Metasys Export Utility).
Note: The Start Scheduler and Stop Scheduler options are dimmed (not available). To enablethese options, exit the Scheduler service and restart the Metasys Export Utility ScheduleController by selecting the Run as Administrator option. If the Scheduler service is currentlyrunning, the Stop Scheduler option is available; if the Scheduler service is currently stopped,the Start Scheduler option is available.
Table 23: Scheduler System Tray Menu
Menu Item FunctionalityStart Scheduler Starts the Scheduler service. The system tray icon border is green.
Note: This option appears dimmed when the Scheduler service isalready running.
Stop Scheduler Stops the Scheduler service. The system tray icon border is red.
Note: This option appears dimmed and is not accessible when theScheduler service is not running.
View Schedule Opens the Scheduler service with View Only access. See Figure 54.
Note: This option appears dimmed and is not accessible when theScheduler service is not running. Start the Scheduler service (StartScheduler) to activate this menu item.
Exit Makes the icon disappear from the system tray, and access is no longeravailable. Before exiting, a dialog box appears asking if you want to exitthe Schedule Controller and warns that exiting stops all scheduling.
Note: To manually start and stop the Scheduler service, goto Control Panel > Administrative Tools > Services Right-clickMSEASchedulerService and select Start or Stop as needed. Goto Control Panel > System and Maintenance > AdministrativeTools > Services or go to Control Panel > System and Security >Administrative Tools > Services
71Metasys Export Utility Help Guide

Figure 54: Scheduler - View Only Access from System Tray Icon
Displaying the Help File, About Window, or Exiting ExportUtility
• On the Help menu, select Help. The Help file for Export Utility appears. Click the X in the upper-right corner of the window to close.
• On the Help menu, select About. The About Metasys Export Utility window appears. This windowshows the version of Export Utility. Click the X in the upper-right corner of the window to close.
• On the File menu, select Exit. Metasys Export Utility closes.
Troubleshooting
Error Messages, Problems, and the Error Log
Error messages either appear as a dialog box when running the Export Now! portion of MetasysExport Utility or as entries in the Error Log.
Tip: When using the Scheduler, check the Error Log regularly.
Table 24: Error Messages/Problems
Error Message/Problem Description/SolutionError in exporting data.Out of memory exception.
Appears when trying to export data. You can get around it bypicking a smaller data set or by increasing RAM.
A new schedule hasbeen created. Start theScheduler to run theschedule.
Appears when the Scheduler service is not running and you adda new schedule. Start the Scheduler service to run the schedule.
Metasys Export Utility Help Guide72

Table 24: Error Messages/Problems
Error Message/Problem Description/SolutionCould not establishcommunication with theMetasys Site Director.
Appears when Metasys Export Utility cannot communicatewith the Metasys system. Make sure the Site Director and logincredentials you specified are correct and that the Site Director isreachable over the network.
Could not locate thedefinition file, 'eudfilename and path'.
Appears when the definition file cannot be found. Make sure thefile exists and is in the expected location; if it is not, recreate thedefinition file.
Could not locate theschedule file, 'schedulefilename and path'.
Appears when the schedule file, scheduleinfo.xml, cannot befound. The default location is C:\ProgramData\Johnson Controls\MetasysIII\MEU\xml.
If the schedule file is not found and schedules exist, theScheduler automatically recreates this file. If the file is not copiedautomatically, copy and paste the scheduleinfo.xml file from theinstallation product disk.
Could not read thedefinition file, 'eudfilename and path'.
Appears when the definition file becomes corrupt or is beingused by another person or program. Close the application that isusing the *.eud file or recreate it.
Could not read theschedule file, 'schedulefilename and path'.
Appears when the schedule file defined above becomescorrupted or is being used by another person or program.Close the application that is using the scheduleinfo.xml file, ordelete it so that the Scheduler can recreate it. If it is not copiedautomatically, copy and paste the scheduleinfo.xml file from theinstallation product disk.
Error occurred inretrieving userproperties.
Appears when the time difference between the Metasys ExportUtility computer and the Site Director is more than 5 minutes.Adjust the time accordingly.
Failed to create 'FileType' output file.
Appears whenever Metasys Export Utility has failed to create anoutput file.
Failed to save 'FileType' output file.'Reason'.
Appears when Metasys Export Utility cannot save an output file.
Reasons:
1. The Network drive not accessible. The output file cannotbe written because the shared network drive cannot beaccessed. Check the connection to the shared drive and tryagain.
2. The Windows user does not have sufficient rights. TheWindows user does not have rights to write to the shareddrive. Log in to the Windows operating system with theappropriate rights to write to the shared drive.
Log in to Metasys failed. Appears when your login to the Metasys system has failed. Checkthat the user name and password are correct and that you arelogging in to the correct Metasys system supervisory device.
73Metasys Export Utility Help Guide
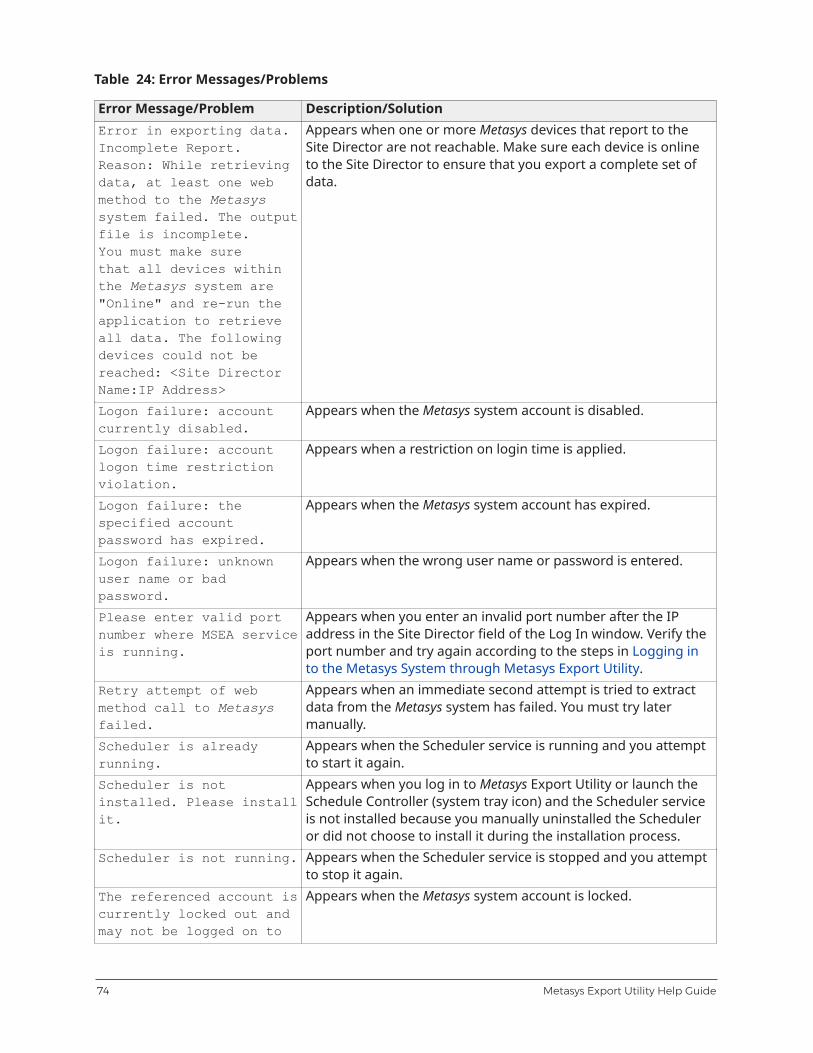
Table 24: Error Messages/Problems
Error Message/Problem Description/SolutionError in exporting data.Incomplete Report.Reason: While retrievingdata, at least one webmethod to the Metasyssystem failed. The outputfile is incomplete.You must make surethat all devices withinthe Metasys system are"Online" and re-run theapplication to retrieveall data. The followingdevices could not bereached: <Site DirectorName:IP Address>
Appears when one or more Metasys devices that report to theSite Director are not reachable. Make sure each device is onlineto the Site Director to ensure that you export a complete set ofdata.
Logon failure: accountcurrently disabled.
Appears when the Metasys system account is disabled.
Logon failure: accountlogon time restrictionviolation.
Appears when a restriction on login time is applied.
Logon failure: thespecified accountpassword has expired.
Appears when the Metasys system account has expired.
Logon failure: unknownuser name or badpassword.
Appears when the wrong user name or password is entered.
Please enter valid portnumber where MSEA serviceis running.
Appears when you enter an invalid port number after the IPaddress in the Site Director field of the Log In window. Verify theport number and try again according to the steps in Logging into the Metasys System through Metasys Export Utility.
Retry attempt of webmethod call to Metasysfailed.
Appears when an immediate second attempt is tried to extractdata from the Metasys system has failed. You must try latermanually.
Scheduler is alreadyrunning.
Appears when the Scheduler service is running and you attemptto start it again.
Scheduler is notinstalled. Please installit.
Appears when you log in to Metasys Export Utility or launch theSchedule Controller (system tray icon) and the Scheduler serviceis not installed because you manually uninstalled the Scheduleror did not choose to install it during the installation process.
Scheduler is not running. Appears when the Scheduler service is stopped and you attemptto stop it again.
The referenced account iscurrently locked out andmay not be logged on to
Appears when the Metasys system account is locked.
Metasys Export Utility Help Guide74

Table 24: Error Messages/Problems
Error Message/Problem Description/SolutionWeb method call toMetasys failed.
Appears when you are already communicating to the Metasyssystem and successfully logged in, but cannot retrieve data fromthe system. The Metasys Export Utility pauses and tries again.
Class does not supportautomation or doesnot support expectedinterface.
Appears when you do any of the following:
• Install Metasys Export Utility on a computer that already hasMetasys Export Utility installed (as in an upgrade).
• Do not take the proper steps as documented in the Metasys®Export Utility Installation Instructions (LIT-12011527).
• Attempt to load an example file and retrieve data.To resolve this problem, use the Metasys® Export UtilityInstallation Instructions (LIT-12011527) to reinstall Metasys ExportUtility.
Error in exporting data.Failed to create ‘Excel’output file, ‘C:\MetasysExport Utility Reports\...’. Reason: Exceptionfrom HRESULT: 0x800A03EC
Appears when the directory path, including the file name,exceeds the defined character limit. The path is limited to amaximum of 260 characters for an export to be successful. ForMicrosoft Excel, this path is limited to 218 characters.
You cannot start orstop the Metasys ExportUtility Scheduler fromthe taskbar icon. Thestart and stop optionsappear dimmed.
Occurs if you are logged in as a Windows user who doesnot have administrative rights. You have two options: (1)exit the Scheduler and restart the Metasys Export UtilitySchedule Controller by selecting the Run as Administratoroption, or (2) use the Windows Services window to start theMSEASchedulerService.
An error message appearsstating that theapplication failed tocreate the Excel outputfile.
In this case, Microsoft Excel cannot open or save any moredocuments because there is not enough available memoryor disk space. This scenario often occurs on a virtual machinesetup. To work around this issue, use On Demand Export insteadof MSEASchedulerService. You can also free up memory and diskspace by doing the following:
• To make more memory available, close workbooks orprograms you no longer need.
• To free disk space, delete files you no longer need from thedisk to which you are saving Excel reports.
75Metasys Export Utility Help Guide

Table 24: Error Messages/Problems
Error Message/Problem Description/SolutionYou cannot find log filesfor troubleshooting.
Log files can be found in C:\ProgramData\Johnson Controls\MetasysIII\MEU\Log. If they are not there, logging may not beturned on.
To configure advanced logging, you must turn on logging byediting the MEUconfig.xml file. Turning on logging gives you theability to see if there are any exceptions, errors, or importantevents (such as Excel file created) during normal operation.
To enable logging for the Metasys Export Utility:
1. In the Metasys Export Utility directory, open theMEUConfig.xmlin an XML editor and find the enableLoggingtag (<enableLogging>).
2. Change the tag value from false to true.(<enableLogging>true</enableLogging>)
Note:The location of the MEUConfig.xml file is in C:\Program-Data\Johnson Controls\MetasysIII\MEU\
When you are finished troubleshooting, turn off loggingagain (by changing the enableLogging tag back fromtrue to false). If you do not turn logging back off, theapplication continues to write and save log files, whichuses memory and disk space.
© 2018 Johnson Controls. All rights reserved. All specifications and other information shown were current as of documentrevision and are subject to change without notice.

IndexA
About Window ..........................................................72
Access ........................................................................11
ADS Delivery Time ................................................... 37
Alarm Data ................................................................21
Alarms
Export Attributes ..........................................21
Filter Example ................................................21
Annotations Attribute ................................................7
Audit Data .................................................................26
Audits
Export Attributes ...........................................26
Filter Example ................................................26
Authentication ............................................................6
B
BAS File ......................................................................45
Batch File ...................................................................45
Billing Example File ....................................................8
Billing Report ..............................................................8
Billing Report Example File ...............................46, 52
C
Common Directory .................................................. 33
Common Filename .................................................. 33
Configuration Sheet ...................................................8
Configuring DLLR Example Files ............................ 52
Creating a New EUD File ......................................... 47
Creating a New Schedule ........................................37
Custom Reports ................................................... 7, 41
D
Daily Data Sheet .........................................................8
Data by Minute Sheet ................................................8
Definition File ............................................................. 6
Demand Limiting Sliding Window ........................... 8
DLL .............................................................................41
Sample File for Use in VBA ...........................45
DLLR Example File
Configuration Cell Verification .................... 10
Daily Data Conditional Formatting ............. 10
Features ......................................................... 10
DLLR Example Files ....................................................8
Configuring ....................................................52
Example Output .............................................. 9
DLLR Object .............................................................. 46
DLLR Trends
Active Demand Limit .................................... 46
Amount Shed .................................................46
Energy Rate ........................................... 46
Unc Interval Demand ................................... 46
E
Energy Report .......................................................... 52
Running ..........................................................56
Viewing ...........................................................56
Energy Report Sheet ..................................................8
Error ...........................................................................72
Error Log ................................................................... 72
EUD
Creating a New EUD File .............................. 47
Creating New .................................................13
Index

Modify Existing ..............................................40
EUD File ....................................................................... 6
Exit Export Utility ..................................................... 72
Export Attributes
Alarm and/or Audit Data ..............................19
Export Output Selection ..........................................33
Export Scheduling Options .....................................37
Export Utility Definition File (EUD) ........................... 6
Export Utility DLL Component ..................................8
F
File Formats ................................................................ 5
File Formats for Output .......................................... 33
Filtering
Alarm Example .............................................. 21
Audits ..............................................................26
Relational Operators .................................... 21
Frequently Used Intervals .......................................13
G
Get All Alarms ...........................................................21
H
Help File .................................................................... 72
L
Literature .................................................................... 3
Logging In .................................................................11
Login ..........................................................................11
M
Metasys Access ...........................................................6
Method Descriptions ...............................................41
Modify Existing Export Utility Definition File ........ 40
Modify Existing Schedule ........................................41
MSEAExportDLL ........................................................41
O
Output Types and Descriptions ............................. 33
Overview ..................................................................... 3
P
Password .............................................................. 6, 11
Performance Considerations ....................................7
Permissions ................................................................ 6
R
Recommendations .....................................................7
Related Documentation ............................................ 3
S
Scheduler .................................................................... 6
Scheduler Queue ..................................................... 38
Scheduler Service .......................................... 6, 37, 71
Scheduling Options ................................................. 37
Sheets in the DLLR Example Files ............................ 8
Site Director ................................................... 6, 11, 37
Software Requirements .............................................4
System Requirements ............................................... 4
System Tray Icon ................................................11, 71
T
Technical Specifications .............................................4
Third-Party Applications ............................................7
Time Synchronization ..............................................37
Trend Data
Example of Output ....................................... 15
Index
Export Attributes ...........................................15
Trend ...................................................... 15
Export Data ....................................................15
Trend Point Selection ................................... 15
Troubleshooting .......................................................72
U
UI ..................................................................................5
User Interface .............................................................5
User Name ................................................................11
V
VBA ............................................................................ 41
Sample Script .................................................45
Visual Basic ................................................................. 7
Index
