metal-1 training presentation
TRANSCRIPT

Tulane MakerSpace
Metal-1Training
Presentation
Metal-1Training
Presentation

Metal-1 TrainingMetal-1 Training
MakerSpace Layout:
This presentation will focus on tools in the “Machine Tool Area”, which are used for working metal and plastic materials.
Training for Machine Tool access involves two parts:
Part One requires completing this presentation and the quiz that follows.
Part Two requires an in-person demonstration where you will use each of the tools to make a small part.

Metal-1 TrainingMetal-1 Training
MakerSpace Safety:
Anyone standing in a yellow zone must be wearing:
*safety glasses
*long pants
*closed-toe shoes
Long hair must be tied back, and no dangling clothes or jewelry are allowed.

Metal-1 TrainingMetal-1 Training
MakerSpace Safety:
The “buddy system” requires that - at all times - there has to be someone in the same room who can both hear and readily see you, and can come to your aid.
For example, someone in the Mezzanine is not a “buddy” for someone working on the Main Floor. Buddies must be able to immediately see and hear if a problem arises.

Metal-1 TrainingMetal-1 Training
MakerSpace Safety:
Be aware of other people in the vicinity, and what they are doing. This rule applies to tool operators, helpers, and bystanders.
Maintaining control of the workpiece is the most important way to operate tools safely and effectively.
Clamp any parts that can remain stationary during a cutting or drilling operation.
Keep parts/workpieces pressed against the table and/or fence.
Consider the motion of cutting surfaces and the forces they apply to your workpiece.

Metal-1 TrainingMetal-1 Training
Tools: Band Saws
There are two vertical band saws in the Machine Tool area.
The larger, gray band saw is geared for cutting softer materials like aluminum and
plastic.
The smaller, black band saw is geared for cutting harder materials like steel.

Metal-1 TrainingMetal-1 Training
Tools: Band Saws
When using a band saw, first adjust the height of the guard so that it covers as much of the blade as possible without interfering with your cut.
Turn the saw on, then slowly but firmly slide your workpiece through the moving blade while keeping it flat on the work surface.
Do Not attempt to hold your workpiece above the work surface, the saw will rip it from your hands and likely injure you.
Turn the knob on the right side to loosen the
guard, then adjust height with your hand and tighten the knob.
Blade
Guard
Guard
Lock
Work
Surface

Metal-1 TrainingMetal-1 Training
Tools: Band Saws
KEEP YOUR HANDS AS FAR FROM THE MOVING BLADE AS POSSIBLE. If you need to use a cutting guide, push stick, clamp, or whatever helps, USE IT.
Depending on the material being cut, you may want to wear ear protection.
Use lubrication as necessary to reduce heat on the blade and on the part.

Metal-1 TrainingMetal-1 Training
Tools: Band Saws
There is also a horizontal band saw in the Machine Tools area.
A horizontal band saw is extremely useful for cutting off accurate, angled cuts, especially from long pieces of stock.
With this machine, you clamp your workpiece into place, and then slowly lower the blade through the piece.
When the blade reaches the bottom of its cut, it will automatically stop moving.
Clamp
Blade
Lower

Metal-1 TrainingMetal-1 Training
Tools: Drill Press
There are three drill presses in the Machine Tools area.This press is
set for cutting soft materials, like aluminum
or plastic.
This press is set for cutting
hard materials, like
steel.
The precision press is used for cutting
precisely measured holes using the movable bed.
Metal-1 TrainingMetal-1 Training
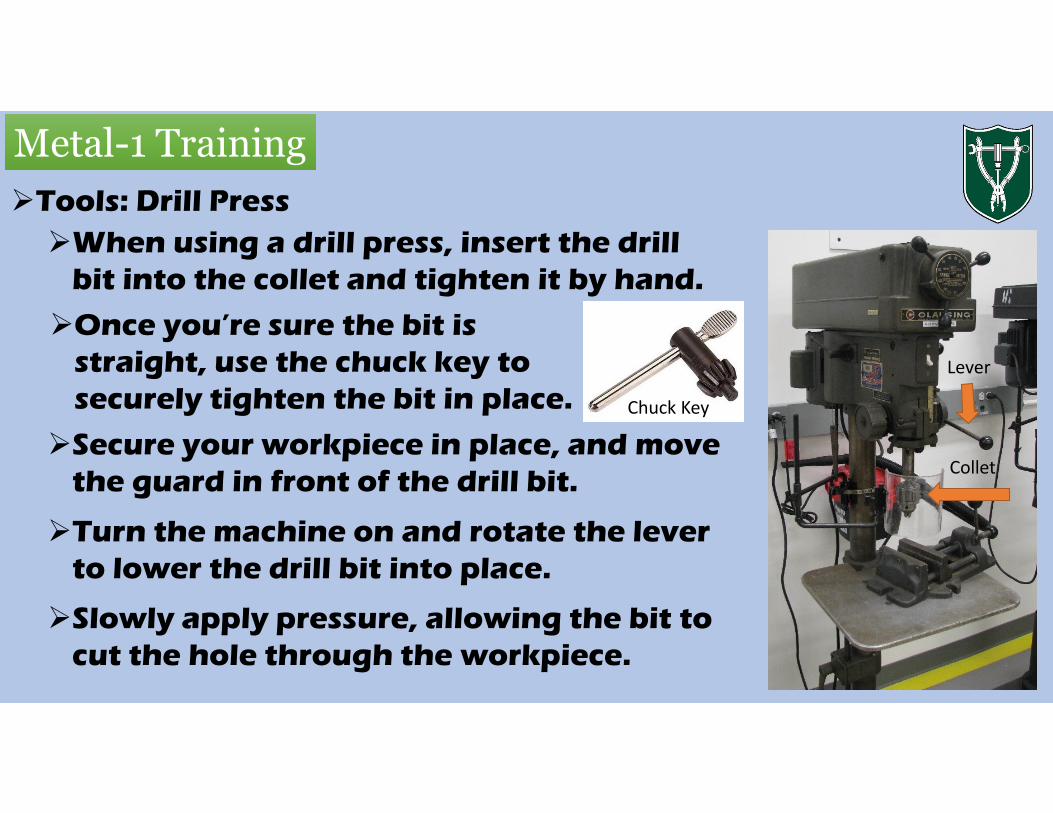
Tools: Drill Press
When using a drill press, insert the drill bit into the collet and tighten it by hand.
Once you’re sure the bit is straight, use the chuck key to securely tighten the bit in place.
Collet
Chuck Key
Secure your workpiece in place, and move the guard in front of the drill bit.
Turn the machine on and rotate the lever to lower the drill bit into place.
Slowly apply pressure, allowing the bit to cut the hole through the workpiece.
Lever

Metal-1 TrainingMetal-1 Training
Tools:
Do not use abrasive cutting or grinding tools on aluminum. The soft aluminum can stick to the wheels and cause them to break apart, which is very dangerous.
For smoothing or finishing aluminum, use sandpaper or a file.

Metal-1 TrainingMetal-1 Training
Tools: Shear
The shear is used for cutting thin pieces of material (mainly aluminum or steel sheets).
Simply align your material with the blade, then press down on the foot-lever to cut the piece.
As you press down, clamps will hold the material in place while being cut.
ALWAYS keep fingers clear of the clamps and blade.
Wear safety gloves when handling sharply cut surfaces.
Foot-
lever
Blade and
Clamp/Guard

Metal-1 TrainingMetal-1 Training
Tools: Bending (Box) Brake
The Bending Brake is used to bend thin metal parts at various angles. It can also be used to shape boxes and other parts.
Align the part to be bent with the Clamp Bar, then pull down to lock the Clamp Handles in place.
Once secured, grab the Bending Handles and pull up to bend the piece to the desired angle.
Keep hands and fingers clear of the clamp bar. Wear safety gloves when working with sharp metal edges.
Clamp
Handles
Clamp
Bar
Bending
Handles

Metal-1 TrainingMetal-1 Training
Tools: Rivets
A rivet can be used to fasten objects together. Rivets are small metal cylinders that are deformed to pinch objects together.
Insert the short end of the rivet through a hole in the parts to be joined (1). Then insert the long end (mandrel) into the tool (2) and squeeze the handles. The mandrel will deform and break, leaving the rivet in place (3).
WEAR SAFETY GLASSES! The broken mandrel will fly dangerously.
Blind
Rivets
Riveting
Tool

Metal-1 TrainingMetal-1 Training
Tools: Taps
Taps are used to cut threads into a hole so that a screw can be used to fasten objects together.
First you must select a screw size, then look up the appropriate sized hole for that screw size.
After drilling the hole, insert the tap into the hole with a tap wrench and turn it counter-clockwise. Reverse direction every few turns to break off the chips.
Be sure to keep the tap straight and perpendicular to the surface! Using lubricant can help the tap move more easily.
Taps
Tap and
Wrench