marine coatings, chemicals, sealants - rsps€¦ · water-based coatings contain latex, vinyl or...
TRANSCRIPT

R A L E I G H S A I L A N D P O W E R S Q U A D R O N
M A Y 7 , 2 0 1 3
Marine Coatings, Chemicals, Sealants

The Basics of Coatings
Solvents (Helps carry coating from can to substrate) Oil-based: mineral spirits, turpentine, castor oil, etc. Water-based, low volatile organic compounds Evaporates leaving behind pigments, binders and additives
Pigments (Add color to coatings) Pigments: carbon black, titanium oxide for white, copper calcium silicate
for blue, cadmium sulfide for red.
Binders (Causes adhesion to substrate and pigments) Water-based coatings contain latex, vinyl or acrylics as a binder Oil-based paints contain alkyd
Derived from alcohol and organic acids (i.e., glycerol and phthalic acid)
Other Additives Silicon added to help waterproof the painted surface Propionic acid to prevent mold growth Copper

Coatings on Your Boat
Keeping Vessel Healthy: Soaps to wash and cleanse your boat Coatings Above the Waterline
Paint: Fiberglass decks, hulls, cockpits, wood trim, metal s and other items Varnishes: Wooden trim, decks, other items
Removing or Stripping what’s already there Physical Removal, compounding or sanding Chemical Removal
Coatings Below the Waterline Anti-Fouling: for fiberglass hulls Anti-Corrosion: For metal hulls Anti-friction: Barrier coats, epoxies
Sealants and Adhesives Hatches, windows and thru-Hulls
Compounds, Polishes, Waxes and Other Protective Coatings Surface Preparation prior to application Surface Application of protective coatings Aesthetic improvement
Anti-corrosion chemicals and treatments for seized metal parts

Why do We Need Coatings?
Marine life Plants & animals find a home on submerged surfaces in saltwater such as boats,
docks, rocks, etc. Their existence depends on sunlight, temperature, salinity, and oxygen content of
the water. A boat kept in the clear, cool, nutrient rich water of a coastal harbor is likely to
attract more marine growth than one kept in a warm, brackish, heavily silted estuary.
Three categories Hard growth: Algae that creates encrustations, very common. Soft growth: Slime, hairy and leafy. Biggest problem and hardest to remove. Animal Growth: Invertebrate organisms, mussels, barnacles, tubeworms &
others.
Attach anywhere on a hull, especially areas not protected by bottom paint (running gear, vents and thru-hulls, bare spots, etc.)
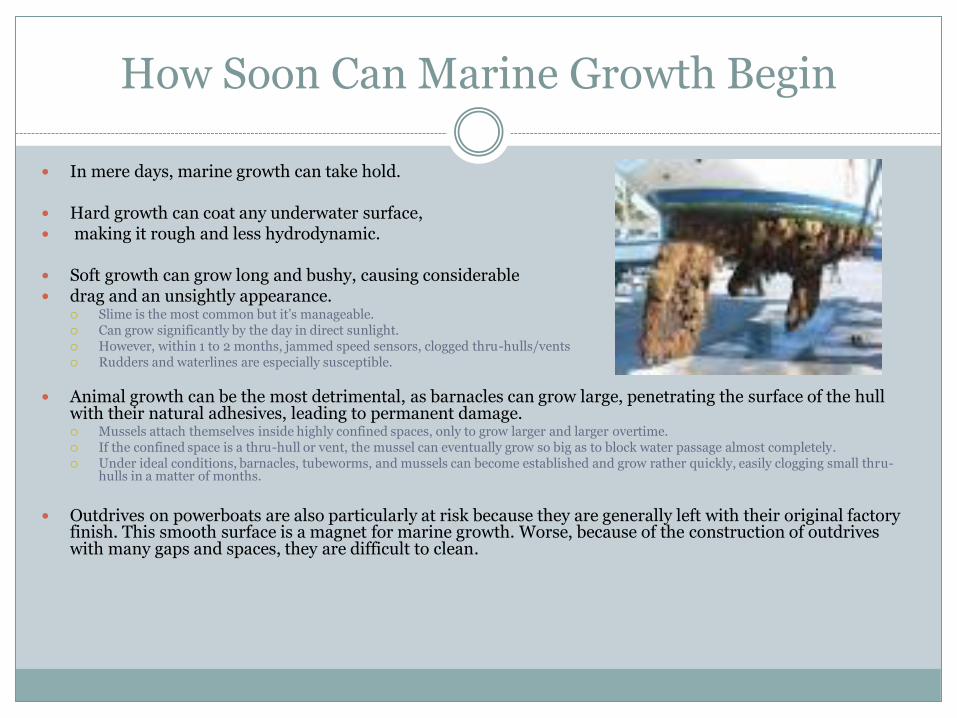
How Soon Can Marine Growth Begin
In mere days, marine growth can take hold.
Hard growth can coat any underwater surface, making it rough and less hydrodynamic.
Soft growth can grow long and bushy, causing considerable drag and an unsightly appearance.
Slime is the most common but it’s manageable. Can grow significantly by the day in direct sunlight. However, within 1 to 2 months, jammed speed sensors, clogged thru-hulls/vents Rudders and waterlines are especially susceptible.
Animal growth can be the most detrimental, as barnacles can grow large, penetrating the surface of the hull with their natural adhesives, leading to permanent damage. Mussels attach themselves inside highly confined spaces, only to grow larger and larger overtime. If the confined space is a thru-hull or vent, the mussel can eventually grow so big as to block water passage almost completely. Under ideal conditions, barnacles, tubeworms, and mussels can become established and grow rather quickly, easily clogging small thru-
hulls in a matter of months.
Outdrives on powerboats are also particularly at risk because they are generally left with their original factory
finish. This smooth surface is a magnet for marine growth. Worse, because of the construction of outdrives with many gaps and spaces, they are difficult to clean.

What Else Are We Facing
Salt Can permanently stain windows if not quickly removed
Corrosive if not cleaned off with fresh water & soap
Hydroscopic: Pulls moisture from humidity
Dry salt on board mixes with dew and becomes salt water again
Ozone and Ultraviolet Rays

Wait, there’s more
Mold and Mildew
Fish blood
Dull finish
Rust stains
Seized metal parts
Water stains
Damage

Surface Preparation
Cleaning Boat soap for deck
Bilge: cleaners
Metal: polishes
Removing stains:
Acidic hull cleaners: EZ On & Off
Removing old coatings Stripping
Physical: Sanding
Chemical: Stripper

Chemicals to Avoid
Chlorinated Chemicals There are some enzyme-active stain removers that can remove
blood stains.
Bleach may work if the stain is "fresh" and has not "set", but contact with household bleach should be minimized because the high pH and chlorine will attack polyester fibers.
The resins in fiberglass boats may also contain some polyester resins so long exposure to bleach should be avoided.
Short contact and thorough rinsing should not cause damage, however.
Be careful of having chlorinated cleaners remain in bilge.

Chemicals to Avoid
Bilge Wastes: What can a conscientious boater do? Bilge wastes often contain oily wastes and we’re tempted to add detergent to the
bilge water and pump it overboard. The detergent/degreasers, breaks the oil into small, floating droplets which cover
a greater area of the water’s surface. Over time, these droplets will sink and gather on the subsurface.
Floating oil impacts larval stages of many marine creatures. The practice of adding detergent and pumping bilge wastes overboard is not only
environmentally damaging, IT IS ILLEGAL. The Coast Guard can impose fines of up to $10,000 for such activity. It seems like the only solution is to remove the oil/water mixture to the oil
recycling container at the local marina. But wait, the signs indicate "Oil only - no bilge wastes." First, fix any leaks that might contribute oil to the bilges. Next, before pumping the bilge water overboard, capture the floating surface oil
with oil absorbent pads, paper towels or old nylon stockings.

Cleaning your Vessel
Cleaning Supplies Bucket, soap and fresh water
Sponges and brushes
Brush: Gentle bristles
Boat Soap containing Wax
A good option to consider
Abrasives
Stain removers
Acids

LET’S START WITH THE BOTTOM
THREE TYPES OF BOTTOM PAINT
Anti-fouling paint or bottom paint is a specialized coating applied to the hull of a ship/boat to slow growth of organisms that attach to the hull and can affect a vessel's performance and durability.
Anti-corrosion coatings: a barrier against corrosion on metal hulls
Barrier coatings: improve the flow of water past the hull of a fishing vessel or high-performance racing yacht.

Considerations
Saltwater or Freshwater? Is slime a problem in your area?
Paint should contain Irgarol or Biolux
Are you coating fiberglass, wood or metal? Are you in an area that restricts copper biocides?
Use Eco-friendly paints
Do you use your boat frequently or infrequently? What activities will your boat be used?
If racing, look for hard paints
Will it be in the water constantly? Do you want bright colors?
There are brands that provide unusual color choices
Are you painting over old paint? Very important because of adherence In general, softer paints can be applied over harder paints but not vice-versa. There are
exceptions however, so it’s always best to consult a compatibility chart.
How do Bottom Paints Prevent Marine Growth
Antifouling paints use the dissipation of metal as a toxic biocide (on the hull’s surface and in the water) to prevent these nasty critters from adhering. Attaching copper below the waterline was one of the first effective
strategies; the hulls of wood sailing ships from centuries ago were sheathed with solid copper.
Today, boaters apply underwater antifouling paint that is up to 70% copper, and cuprous oxide is the most popular active bottom paint biocide.
Tin has also been used. Copper seems the better choice. Look for paints with Irgarol or Biolux
Choosing an antifouling paint is regional. Boaters in the Southeast tend to choose similarly to their
neighbors in the local marina.

Let’s Start with The Bottom
Ablative or Sloughing: Designed to wear off slowly, exposing a fresh layer of biocides. Scrubbing a hull with ablative paint while it is in the water releases its biocides into the environment. To reduce environmental impact, have them hauled out and cleaned at boatyards with a "closed loop" system.
Copolymer/ablative: Release biocide at a controlled rate throughout their lives, wearing away or “ablating” much like a bar of soap.
Paint wears off faster in higher drag areas on the hull and appendages. These paints work well in high-growth areas and continue to be effective after haulout at the end of the season.
Generally, most ablative paints will deteriorate after 60 days out of water In the spring, the paint is reactivated with a scrubbing or light sanding and you’re ready for another season. Good for northern
climates. While the percentage of copper in the paint is important for evaluating its effectiveness, copper content is not the only consideration. Controlled polishing, the technology that controls how quickly the paint wears away, is another way we measure the effectiveness in a
copolymer ablative paint. Interlux MicronCSC and Micron Extra, offer true multi-season protection, lasting as long as there is a reasonable coating thickness. Because they expose new biocide until the coating is worn completely away, additional coats add to their longevity. Pettit Hydrocoat: water-based, an environmental plus, so there are fewer fumes to protect yourself from and easier clean-up using
only water.
Modified Epoxy In the water year round, you a good candidate for a high-copper-content modified epoxy Prevents growth by leaching biocides upon contact with water.
Releases biocide, leaving the hard coating at season’s end. Contact leaching paint releases the biocide at a steadily decreasing rate, leaving the hard paint. Higher copper content, rather than the type of paint binder as with ablative paints, generally means greater effective
performance in this paint type. Modified epoxy paints adhere tenaciously to most surfaces, and can be applied over most types of paints. This type of paint does not wear away. Build up will occur and eventually your hull will need the coating stripped. Modified epoxy paints are the economy single-season choice if you’re in the Northeast or other regions where you dry-store your boat
each winter.

Let’s Start with The Bottom
Hard Bottom Paints Epoxy or vinyl: a more durable surface, smoother textured surface than the ablative paints,
lasts longer and requires more labor when removing, requires more sanding prep. Easily applied with brush and roller. Good good anti-fouling characteristics. Contains teflon or silicon to produce a slick coating. Organisms can’t adhere.
Anti-Friction Coatings or High-Performance Coatings Thin Film Coatings: Epoxycop Epoxy Barrier coats: Interlux VC Offshore
Special Chemical Coatings:
Does not use copper and contain distinctive biocides that produce hydrogen peroxide as a byproduct which inhibits marine growth, algae and plant fungus. Good on aluminum hulls and exhibits excellent anti-fouling characteristics. Some paint contains no biocides and has the smoothest/slickest surface application available. No marine growth adheres, because it has no textured footholds after application.
Inflatable Anti-Fouling Coatings
Adheres to rubber dinghies

PREPARATION: CLEAN
Slime and marine growth are relatively easy to remove while the bottom is still wet, but let the stuff dry and you will have to chisel it off.
Pressure washers work great as soon as the boat is hauled.
Fortunately most boatyards pressure wash the bottom as soon as they haul the boat, scrape off hard growth.
The idea is, remove loose paint as much as possible.

PREPARATION: STRIP?
Remember, adhesion of new paint will only be as good as the paint under it.
Anywhere old paint is flaking or lifting, remove exposed edges with a knife or small chisel. If the paint zips off, the bottom needs to be stripped.
You may also have to strip the bottom if you are changing the type of paint. For example, the aggressive solvents in vinyl paints lift other types of bottom paints, so if you are applying vinyl, any non-vinyl paint has to come off. And soft, sloughing paints are a poor undercoat for anything other than a fresh coat of the same.
Using a 2-inch hook scraper is the stripping method least injurious to both you and the planet, and this is often the easiest method as well.
If you decide to use a chemical stripper, be sure it is one formulated for fiberglass; regular non-marine strippers will attack the gelcoat.

PREPARATION: SAND
When the old paint is in good condition, in general you need only sand it, wash it, tape the waterline, and roll on a fresh coat or two.
When scraping, catch the scrapings with a drop cloth. Use sanders with vacuum attachments and sweep up any scrapings or dust that may escape
your drop cloth and dispose of this hazardous material appropriately. A sander loaded with 80-grit disks on a foam pad can quickly prepare a hull for recoating.
Drawbacks: can also chew through the paint and into the laminate in an instant. If you lack experience, 80-grit paper in a random orbit sander or a finishing sander will do the same job somewhat
less quickly but with much less risk to the hull. Do not use a belt sander; it is designed to make things flat and that is the effect it will have on your hull. Do not use hard-blade grinders. Some boatyards may use this method. BEWARE!
Many boatyards now prohibit normal power sanding because of the dust it generates. Use a shop-vac and a random-orbit sander with a vacuum hose connection. If you don't want to buy a new sander, slip a length of plastic hose over the dust bag mount on your old palm sander
and tape the other end into the shop-vac hose. Either rig will capture most of the toxic dust sanding generates, but not all of it.
Be sure to wear a tight-fitting respirator--not a paper mask--while sanding. Also wear earplugs to dampen the sander and the vac noise. Save your hearing and find the work less tiring.
Even if you aren't stripping the bottom, it is good practice to sand away most of the previous application. This avoids a thick build-up that will eventually turn brittle and cause new paint to flake. A different color first coat provides a flag that signals when you have sanded enough.

Protect Yourself
If you choose to do this job yourself, wear personnel protection
Protect the area around your boat
Most important to protect your lungs and skin Respirators, not just a dust mask.
Tyvek Suit, gloves, hood and tape up the seams

READY, SET, PAINT
Bare Fiberglass A new hull must have mold release wax removed. Use de-waxers and a light sanding.
Stir Put it in a paint shaker for at least 5 minutes or use a drill-powered mixing paddle.
Roll Roll paint onto the hull using a short-nap roller cover. An extension for the handle will make
painting easier Do not add any thinner to bottom paint unless the manufacturer specifies otherwise. Dip your roller and roll it up and down the hull from waterline to keel. Work fast, because bottom paints dry fast. By the time you work all the way around the hull, many bottom paints will be dry enough to
overcoat. A 2nd coat lengthens the life of almost any bottom paint; copolymers benefit from 3 or 4 coats.
No sanding or other prep is needed between coats. Save some paint for the areas under the stand or cradle pads. Let bottom paint dry at least overnight before you put masking tape on it to paint the
bootstripe.

Running Gear
Prop and Shaft Copper-based paint won't stay on a bronze prop (nor bronze
rudders and struts) for long.
Prop paints are available, but demanding prep--up to four prime coats--discourages their use. A heavy coat of wax on the prop will keep it clean for a time.
Some have used lacquer, Teflon grease
Don't paint the shaft,
Leave all anodes unpainted.
Install new anodes.

Above the Waterline: Topcoats
Manufacturers now call paint “protective coating systems.” which include compatible fillers, putties, fairing compounds, thinners, and undercoats.
It is important to get full manufacturer’s directions because, all too often, one kind of paint will not stick to another’s undercoat, even if it’s made by the same manufacturer.
There are at least four major kinds of topside paint used on boats, each with its own characteristics and applications:
Alkyd enamel. Marine formulations of oil-based house paint. Great for interior spaces and makes an inexpensive deck paint. Not the best longest lasting paint for topside.
Single-part polyurethane.
This is a urethane-modified alkyd enamel, a compromise between alkyd enamel and true polyurethane Offers good gloss, three- to five-season longevity, and moderate ease of application.
Two-part linear polyurethane (LPU).
The best choice for high gloss and a long life, but it’s a problem to apply. A professional polyurethane job is sprayed—not recommended for the amateur even if wearing the requisite respirator. Several brands are formulated for application with roller and brush; done correctly, the result is almost indistinguishable from a spray coating. It’s a two-person job: one to roll on the paint with vertical strokes, the other following behind with a paintbrush to tip the paint with horizontal strokes. As
always with marine coatings, preparation is the key to success. The primer will be proprietary to the topcoat.
Epoxy.
Epoxy is sometimes used as a primer over porous or crazed gelcoat. High susceptibility to ultraviolet degradation renders it unsuitable as a topcoat.

Above the Waterline
First, wear the right clothing. Painting can be a messy job, so you'll need overalls; rubber gloves; safety glasses and a hat.
TIP: Don't paint while wearing a woolly sweater or hat - as the fibres will get onto the paintwork.
Surface preparation Preparation is the key. Good surface preparation will result in a beautiful finish. So take your
time. You'll need scrapers, sanding paper and blocks, brushes or rollers and masking tape. Remove loose paint. (Some chemical paint strippers should never be used on glass fibre, as
they will quickly destroy the protective gel coat. Wash and degrease with cleaner. Sanding is required to obtain a smooth surface and key the
surface. Surfaces to be painted must be clean, dry and free of oil or grease. Existing paints need to be sanded to remove small lumps and 'blebs' in the paintwork. Flatten back with P180-P280 abrasive paper. Finally, brush off dust and use lint free tack rags to remove remaining traces of dust. Preparation can vary depending on the surface to be coated.

Above the Waterline: Topcoats
Priming, Filling and Undercoating Bare surfaces must first be primed with manufacturer recommended primer. This can be different for different surfaces. Fill and fair between coats with an epoxy profiling filler to make good any
undulations or damage.
Some topcoats can be applied directly to existing paint or fibre glass. First rubdown to remove any imperfections using 280 then 320 abrasive paper. An undercoat is recommended and also acts to seal the filler and prevents
moisture being absorbed.
TIPS: Two coats of undercoat will give an even better finish. Stir thoroughly before use with a flat blade or stirring stick. Remove sanding dust with a brushand then a lint free tack rag.

Above the Waterline: Topcoats
Applying the Finish Coat For best results, apply using a short haired roller and layoff
with a long haired, high quality, soft bristled brush.
Use a criss-cross pattern and always finish the last stroke in the same direction.
Flatten back between coats using 320-400 abrasive paper.
Two or preferably three coats will give a long lasting finish.
TIPS: Make sure you pick a dry day. Preferably paint in the morning to avoid evening condensation
settling on the surface.
You can dampen the ground underneath the boat to avoid dust rising.

Keeping it Glossy
Preparation New Gel Coat
Wash and Dry
Apply Wax
Oxidized or Chalky Gel Coat
Remove oxidized Gel coat
Rubbing compounds
Polishing compounds
Cleaner Wax
It’s all about PREPARATION Making it shine is about prepping the surface to reflect light

Keeping Up Appearances
Compounds, Rubbing and Polishing Removes oxidized gel coat and prepares surface
Polishes It is not a protective coating or wax. It is a cleaner, a surface smoother Polish or Wax? Lightly run your fingers over the surface, does it feel
smooth? Go straight to waxing. If it feels rough or bumpy, there are defects that polish can address.
Cleaner Waxes A very gentle polisher/cleaner mixed with wax
Waxes Natural: Brazilian Carnuba Wax, very expensive. Synthetic: Polymers, alkyl chains. Insoluble in water
Restorers Silicone based May interfere with future efforts to paint

She’s Got “The Look”
Wood Coatings - Brightwork General appeal:
It’s glossy, looks wet Durable: Luxury of lasting several seasons Multiple coats may be applied in one day
Downside: Not necessarily to apply Not easy to maintain Repeat coats take 24 hours drying time
Varnishes: 1-part, synthetic, stains Traditional
Two-part Varnishes Durable Able to apply coats without previous coats drying

VARNISHES: 1-PART
Varnish is traditionally a combination of a drying oil, a resin, and a thinner or solvent that resulted in a hard coating. Drying oil: In the past, linseed (flax seed) oil, tung oil, poppy seed oil, perilla oil, and walnut oil were used. Today they have been replaced by alkyd resins and other binders. Resin: Resin in the most specific use of the term is a hydrocarbon secretion of many plants, particularly coniferous
trees. The result is amber, kauri gum, dammar, copal, rosin (pine resin), sandarac, balsam, elemi, mastic, and others.
Resins are valued for their chemical properties and associated uses, coatings adhesives and food glazing. Used in making incense and perfume.
Plant resins have a very long history that was documented in ancient Greece, Rome & Egypt known as frankincense and myrrh.
Amber is a hard fossilized resin from ancient trees. Solvents: Toluene, acetone, methyl acetate, ethyl acetate or water.
Varnishes: Laquer (furniture), Polyurethane (flooring), Acrylic (water based and transparent) Marine varnishes must have unique qualities:
Be elastic and flexible, waterproof the spar and adhere to the substrate as it flexes and not crack.
Marine varnish usually made of tung oil/phenolic resins (synthetic, phenol and formaldehyde). Varnish finishes are naturally glossy. Flattening agency yield satin or semi-gloss sheens. Varnish has little or no color, is transparent, and has no added pigment. Varnishes are also applied over wood stains as a film for gloss and protection.

VARNISHES: 1-PART
The film-forming substances in varnishes either harden directly, as soon as the solvent has fully evaporated, or harden after evaporation of the solvent through certain curing processes
A chemical reaction between oils and oxygen from the air (autoxidation) and chemical reactions between components of the varnish.
Resin varnishes "dry" by evaporation of the solvent and harden almost immediately upon drying.
Acrylic and waterborne varnishes "dry" upon evaporation of the water but experience an extended curing period.
Oil, polyurethane, and epoxy varnishes remain liquid even after evaporation of the solvent but quickly begin to cure, undergoing successive stages from liquid or syrupy, to tacky or sticky, to dry gummy, to "dry to the touch", to hard.
Environmental factors such as heat and humidity play a very large role in the drying and curing times of varnishes.

VARNISHES: 2-PART
Various epoxies have been formulated as varnishes or floor finishes whereby two components are mixed directly before application.
The two parts, "part A" and "part B".
True polyurethanes are two-part systems.
Two-part epoxies have a "pot-life" or "working time" during which the epoxy can be used.
A few hours but is also highly temperature dependent.
Both water-borne and solvent based epoxies are used.

Sealants, Caulks and Adhesives
In every Marine Center you will find an array sealants and caulks sufficient to make your head spin.
With so many choices, how do you choose the right one?
Virtually all modern marine sealants fall into one of just three types, each with specific characteristics that make it the best choice for some jobs and unsuitable for others.
Selecting the right sealant is essentially a matter of identifying the materials you are wanting to seal --specifically if any component is plastic
--and of determining the likelihood of ever needing to separate these components.

Sealants
Silicone: versatile, quick and easy to use, elastic and highly resistant to chemicals. Not as strong in adhesive strength as polysulfide or polyurethane. Compatible with plastics.
For bedding plastic components or where insulation is desirable, silicone is the default choice. Silicone is not necessarily a sealant, but more of a gasket material. It is the only one of the marine sealant trio than can be safely used to bed plastic. It is an excellent insulator between dissimilar metals--use it when mounting stainless hardware to an aluminum spar. It is the perfect gasket material between components that must be periodically dismantled--beneath hatch slides, for example. Silicone retains its resilience for decades and is unaffected by most chemicals, but it should not be used below the waterline. A good seal is dependent upon mechanical compression to maintain its seal. Silicone is not a good choice for sealing hardware on a cored deck. Exposed silicone is a magnet for dirt and repels paint, so never fillet with silicone, and don't use it on any surface you plan to paint. Silicone
sealants typically set in a few minutes and reach full cure in less than a day.
For an adhesive seal of plastic components, select a silicone/polyurethane hybrid.
An adhesive sealant maintains its seal even under stress. The sealant stretches like the bellows of an accordion. Good for plastic portlight installations where the portlights are captured between an inner and outer frame. Although silicone has amazing elasticity, its lack of adhesion means any expansion of the space between the frames is likely to cause the
seal to fail. Either polysulfide or polyurethane would provide a more dependable seal, but polysulfide is certain to attack the plastic, and polyurethane
prohibits any future disassembly. The answer to this dilemma is a hybrid sealant--part silicone and part polyurethane.

Sealants
Polysulfides: versatile, one-part sealants are popular, easy to use, durable, slow to cure. Two-part sealants popular caulk for teak deaks. Both bond well to most surfaces but oily woods (such as teak) should be primed.
If neither component is plastic and if you want to preserve your ability to disassemble the joint, use polysulfide. It is a synthetic rubber with excellent adhesive characteristics, and you can use it for almost everything. As a bedding compound it allows for movements associated with stress and temperature change, yet maintains the
integrity of the seal by gripping tenaciously to both surfaces. Excellent caulking compound since it can be sanded after it cures and it takes paint well.
Drawbacks: solvents in polysulfide sealant attack some plastics, causing them to harden & split. DO NOT USE POLYSULFIDE to bed plastic windshields or plastic portlights--either acrylic
(Plexiglas) or polycarbonate (Lexan). Don't use it to bed plastic deck fittings either, including plastic portlight frames. Plastic marine fittings are typically ABS or PVC, and polysulfide will attack both. If you know that the plastic fitting is made of epoxy, nylon, or Delrin, you can safely bed it with polysulfide. Below-
the waterline through-hull fittings are in this group, but when there is any doubt, select an alternative sealant. Polysulfide adheres well to teak (a special primer improves adhesion), and is unaffected by harsh teak cleaners,
making it the best choice for bedding teak rails and trim. The black caulking between the planks of a teak deck is invariably polysulfide. Polysulfide is the slowest curing of the three sealant types, often taking a week or more to reach full cure. Polysulfide sealants will have polysulfide printed on the package, or sometimes Thiokol--the trademark for the
polymer that is the main ingredient of all polysulfide sealants regardless of manufacturer.

Sealants
Polyether (polyurethane): exposure resistant, unaffected by cleaners or teak oils, permanent, flexible and sandable.
Think of polyurethane as an adhesive rather than a sealant. Its grip is so tenacious that its bond should be thought of as
permanent. If there seems to be any likelihood that you will need to separate the
two parts later, do not use polyurethane to seal them. Polyurethane is the best sealant for the hull-to-deck joint. It is also a good choice for through-hull fittings and for rubrails and
toerails, but not if rails are raw teak because some teak cleaners soften it.
Like polysulfide, polyurethane should not be used on most plastics--acrylic, polycarbonate, PVC, or ABS. The cure time for polyurethane is generally shorter than polysulfide, but still may be up to a week.

The World of Waxes
Would you rather do anything that wax your hull?
Waxes are marketed to yield a glossy finish
Waxes protect the surface of substrate Waxes have a melting point in the sun
Nomenclature in the wax world Compounds
Polish
Cleaner Wax
Wax
Synthetic: Polymer sealants, silicone, resins
Carnuba: extracted from palm in NE Brazil
Produces a hard wax coating

Protecting Rubber against UV
Rubber seals: Exposed for extended periods, dry check and eventually crack and split. Annually, "dry-rot" is a problem for boaters. Rubber seal manufacturers blend in certain chemical ingredients which inhibit damage from ozone and ultraviolet light, the main
environmental degradants of synthetic and natural rubbers. Ozone is an odorless gas, but is commonly thought of as the "electric train smell". Ozone is part of the air we breathe everywhere on earth. Hastened by the hazardous effects of UV light, ozone eventually causes rubber to dry and become brittle no matter the locale.
Ultraviolet Light: The need to protect rubber against UV damage is why rubber is black. Rubber has a UV stabilizer called a "competitive absorber" is used. Made from carbon black. Why rubber & tires are in designer colors.l Competitive absorbers capture and absorb harmful UV light wave energy . Competitive absorbers have the added ability to convert harmful UV light wave energy into heat so it can dissipate harmlessly. .
Ozone Waxes can protect against ozone. However, Ozone begins eating away the protective wax. Eventually, the rubber will lose its ability to protect against UV. With UV light and ozone working in concert, degradation starts. The rubber checks, and will eventually crack.
Other Degradants Petrochemicals can remove the protective waxes and increase the rate of degradation. Common automotive rubber/vinyl "protectants" and "dressings" are typically devoid of UV stabilizers of any type and contain
petrochemicals and/or silicone oils which dissolve away the protective waxes and can actually aggress the rubber.
Look for rubber/vinyl protectants that contain UV protectants.

RUST BUSTERS
Rust - Salt water, spray and air reacts with metal surfaces to produce a electro-chemical reaction that deteriorates the material and hampers it intended use. Seized Hardware.
Rust removers or “Rust dissolvers” Most contain acids, messy to apply Not recommended for use on fiberglass boats
Penetrating Oils Penetrates between metal parts by capillary action
Liquid Wrench; PB Blaster (stronger)
Provides a solvent to dissolve or corrosion/rust or loosen parts when a heat method would be unsuitable Freeze-off: drops the temperature to crack fissures in the metal
Displace moisture: WD-40 Provide lubrication: Ease friction Provide a film for long-term protection:

Anti-Seizing Prevention
Use water displacement additives WD-40
Use Anti-Seize lubricants Cyanoacrylates
Use Thread sealants or adhesives on screws/bolts
Loctite
Use waterproofing and rust protection Boeing 303

Consumer Resources
Practical Sailor A consumer focused magazine that tests various products and
provides reports in their magazine.
West Marine Provides many guidelines when choosing coatings
Don Casey
Recognized as a expert on boats and their maintenance.
Raleigh Sail and Power Squadron There are members that have a lot of experience in boat
maintenance to keep your boat in Bristol condition.

Thank You and Happy Boating