map pilot en - mybecker.com€¦ · beckerfi map pilot en_ece_v2.5_a. 2 >>> contents >...
TRANSCRIPT

Operating guide
Becker® MAP PILOT
EN_ECE_V2.5_A

2
>>> CONTENTS
> D
> GB
> F
> I
> E
> P
> NL
> DK
> S
> N
> FIN
> TR
> GR
> PL
> CZ
> H
> RUS
Contents 2Safety instructions 4The Becker® MAP PILOT 5Usage 5Unpacking the Becker® MAP PILOT 5
Checking the delivery 5Delivery contents 5
Complaints 6Dealing with the packaging 6
Description of unit 6Battery 6USB connecting cable 6
Map update/Additional functions 6Registration 7Repairs 7Emissions and disposal 7General operation 8Maintenance and care 8Battery quality declaration 9Commissioning 9Power supply 10Unit holder 10Memory card 11Basic operation 11
Calling up navigation mode 11Selecting/highlighting elements 11Back function 11Delete function 12
Menu basics 12Main menu 12Using the input menu 13
Entering characters 13Selecting from a list 13Selecting a character set/special characters 14Switching between upper and lower case 14
Malfunctions 14Content Manager Becker® MAP PILOT 15
Installing the Content Manager Becker® MAP PILOT 15Starting the Content Manager 15
Navigation mode 16What is navigation? 16Last destinations 17
Using last destinations 17Starting with existing destination 17Displaying or editing a destination 17Home address 18
Destination input 19Structure of the destination input menu 19Entering an address 19
Selecting a country 20Selecting an address and starting route guidance 20Entering an address using speech 24
Points of interest 25POI nearby/POI near destination 26POI near address 26Entering a POI directly 27
Selecting a destination from the map 27Coordinate entry 28Route planning 29
Creating a new route 30Editing a route 30
Traffic announcements using TMC 31
Displaying TMC messages 31Reading a message 32Displaying the relevant road in the map 32
Taking announcements into consideration when calculating routes 32
Automatic recalculation 32Manual recalculation 33
The map display 33Calling up the map display 34Structure of the map display 34
Map display without route guidance 34Map display with route guidance 34Split screen with route guidance 35Route guidance with arrow display 36
Using the map display 36Map zooming 36
Contents
3
CONTENTS >>>
> D
> GB
> F
> I
> E
> P
> NL
> DK
> S
> N
> FIN
> TR
> GR
> PL
> CZ
> H
> RUS
Map Toolbox 37Route 37
Enter/delete stopover. 37TMC on your route 37POI (Points of Interest) on your route 38Set route options. 39Display Entire route. 39Block a route section 40Skip destination 41Display destination list 41
Stop destination navigation. 42Map display 42Displaying position 43Repeat announcement 44Mute announcement 44
Settings 45Route guidance settings 45
Route options 45Realistic intersection displays 46Signposts 46Lane recommendations 46Announcements 47Country information 47
Map settings 47Autozoom 47POIs on the map 48Speed limits 48Driver alerts 49
TMC settings 49
System settings 50Language 50Design variants 50Pin protection 50Map update reminder 51Information 51Factory reset 51
Glossary 52Index 53NOTICE 55CE declaration of conformity 55Disposal 56Disposal of the battery 57
Duty to supply information according to battery legislation (BattV) 57
Removing the battery 57
The information and data contained inthis document is subject to change with-out notice.No part of this document may be repro-duced or transmitted for any purposewithout the prior written permission ofHARMAN/BECKER AutomotiveSystems GmbH. All technical data, draw-ings etc. are protected by copyright law.© Copyright 20121, HARMAN/BECKER Automotive Systems GmbHAll rights reserved.
4
>>> SAFETY INSTRUCTIONS
> D
> GB
> F
> I
> E
> P
> NL
> DK
> S
> N
> FIN
> TR
> GR
> PL
> CZ
> H
> RUS
Safety instructions
!Safety instructions� Operation of the unit is permitted only if traffic conditions are suitable and you are absolutely sure that you, your
passengers or other motorists are not endangered, obstructed or inconvenienced.In all cases, all applicable road traffic regulations must be obeyed. Destinations may only be entered when the vehicle isstationary.
� The navigation system is only an aid. Errors may occur in individual data items/entries. At all times, the driver must decidewhether or not to heed the information provided. We do not accept liability for erroneous data provided by the navigationsystem. Due to continual changes in traffic routing or deviations in the data, it may occur that imprecise or erroneousinformation is given. Therefore, actual road signs and traffic regulations must always be observed. In particular, thenavigation system cannot be used as an orientation aid at times of poor visibility.
� The unit must only be used for its intended purpose. The volume of the navigation unit should be adjusted so that externalnoise is still clearly audible.
� Remove the unit immediately if a fault occurs (e.g. emission of smoke or odours).� In the interest of safety, the unit must only be opened by a specialist. Please refer to your dealer for repair.� Never open the unit (with the exception of the battery compartment) or the rechargeable battery. Any modification to the
unit is also impermissible and renders the type approval invalid.� Use only genuine Harman original accessories. This will ensure that all the relevant regulations are complied with and
damage to health and property is avoided. Dispose of defective units and the rechargeable battery according to theapplicable legal requirements.
� No warranty is granted in the case of improper use. These safety instructions also apply to genuine Harman originalaccessories.

5
THE BECKER® MAP PILOT >>>
> D
> GB
> F
> I
> E
> P
> NL
> DK
> S
> N
> FIN
> TR
> GR
> PL
> CZ
> H
> RUS
The Becker® MAP PILOT
UsageThe Becker® MAP PILOT is a high-per-formance navigation module for use inMercedes-Benz vehicles. The Becker®MAP PILOT can be used with the op-tional equipment "Pre-fitting for Becker®MAP PILOT" and "Becker® MAPPILOT (incl. pre-fitting). The unit and the accessories are to be pro-tected against moisture and dirt.
With GPS = Global Positioning Systemyou no longer have to waste time lookingup road maps.Your Becker® MAP PILOT is equippedwith TMC. TMC gives you the option ofreceiving traffic announcements. You willthen be informed of any traffic problems.The system plans an alternative route au-tomatically or on request to avoid traffic
problems, depending on the setting.
Unpacking the Becker® MAP PILOT
Checking the deliveryBefore starting up the Becker® MAPPILOT, the delivery contents must bechecked to ensure they are complete andin good order.> Carefully unpack the packaging con-
tents and check them.
Delivery contents
Becker® MAP PILOT including bat-teryLeaflet with installation instructionsUSB cable
Note:Your Becker® MAP PILOT is deliveredin stable packaging. If the packaging orits contents exhibit serious damage, theunit must not be unpacked further. Inthis case, please contact your dealer.
2 3
1
1
2
3

6
>>> THE BECKER® MAP PILOT
> D
> GB
> F
> I
> E
> P
> NL
> DK
> S
> N
> FIN
> TR
> GR
> PL
> CZ
> H
> RUS
ComplaintsPlease check first on www.beckermappilot.com (FAQs, soft-ware updates) for possible solutions. Ifthis should not lead to success, please con-tact your dealer.
Dealing with the packagingThe original packaging must be kept in adry place at least for the warranty period.
Description of unitThe Becker® MAP PILOT consists of thebasic Becker® MAP PILOT unit and thesupplied accessories in the delivery con-tents.
BatteryThe integrated rechargeable battery ischarged when the Becker® MAP PILOTis placed in the holder and the vehicle ig-nition is switched on.
USB connecting cableYou can connect the Becker® MAPPILOT to a standard personal computerhaving a USB interface using the USBconnecting cable provided. The 8 GBflash memory of the Becker® MAPPILOT and any SD card can then be ad-dressed via the PC like a removable stor-age medium.
Map update/Additional func-tionsThe road network is constantly changing,but having a fresh map ensures you havethe wealth of information you need tofind your destination with ease.It is also possible that in the course of fur-ther development of your device newfunctions will be available.With the program described under �Con-tent Manager Becker® MAP PILOT� onpage 15 you can easily keep your Becker®MAP PILOT up to date.
Note:It must be disposed of correctly in linewith the national regulations. The pack-aging must not be burnt. The packagingcan be handed over to the dealer, depend-ing on the country where delivered.
Note:The basic unit and the accessories mustnot be opened (except the battery cover)or modified in any way.
Note:When the Becker® MAP PILOT is con-nected to a PC, it is supplied with powervia the PC and does not consume batterypower.

7
THE BECKER® MAP PILOT >>>
> D
> GB
> F
> I
> E
> P
> NL
> DK
> S
> N
> FIN
> TR
> GR
> PL
> CZ
> H
> RUS
RegistrationYou can register your product using oursoftware service. We will then inform youof any new updates and other news.
You can register online on the Beckerhomepage www.beckermappilot.com.
RepairsThe unit must not be opened in the eventof damage. Please contact your dealer.
Emissions and disposalInformation on emissions, electromagnet-ic compatibility and disposal can be foundin �NOTICE� on page 55.
8
>>> GENERAL OPERATION
> D
> GB
> F
> I
> E
> P
> NL
> DK
> S
> N
> FIN
> TR
> GR
> PL
> CZ
> H
> RUS
General operation
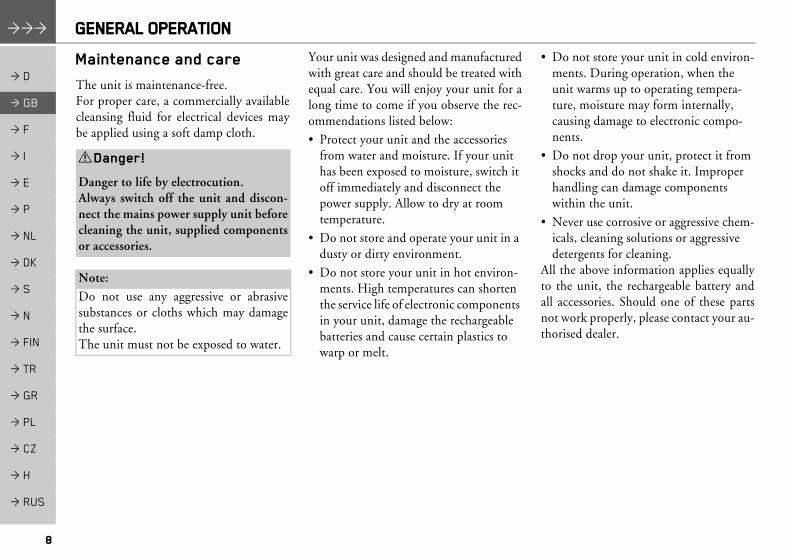
Maintenance and careThe unit is maintenance-free.For proper care, a commercially availablecleansing fluid for electrical devices maybe applied using a soft damp cloth.
Your unit was designed and manufacturedwith great care and should be treated withequal care. You will enjoy your unit for along time to come if you observe the rec-ommendations listed below:� Protect your unit and the accessories
from water and moisture. If your unit has been exposed to moisture, switch it off immediately and disconnect the power supply. Allow to dry at room temperature.
� Do not store and operate your unit in a dusty or dirty environment.
� Do not store your unit in hot environ-ments. High temperatures can shorten the service life of electronic components in your unit, damage the rechargeable batteries and cause certain plastics to warp or melt.
� Do not store your unit in cold environ-ments. During operation, when the unit warms up to operating tempera-ture, moisture may form internally, causing damage to electronic compo-nents.
� Do not drop your unit, protect it from shocks and do not shake it. Improper handling can damage components within the unit.
� Never use corrosive or aggressive chem-icals, cleaning solutions or aggressive detergents for cleaning.
All the above information applies equallyto the unit, the rechargeable battery andall accessories. Should one of these partsnot work properly, please contact your au-thorised dealer.
!Danger!
Danger to life by electrocution. Always switch off the unit and discon-nect the mains power supply unit beforecleaning the unit, supplied componentsor accessories.
Note:Do not use any aggressive or abrasivesubstances or cloths which may damagethe surface.The unit must not be exposed to water.
9
GENERAL OPERATION >>>
> D
> GB
> F
> I
> E
> P
> NL
> DK
> S
> N
> FIN
> TR
> GR
> PL
> CZ
> H
> RUS
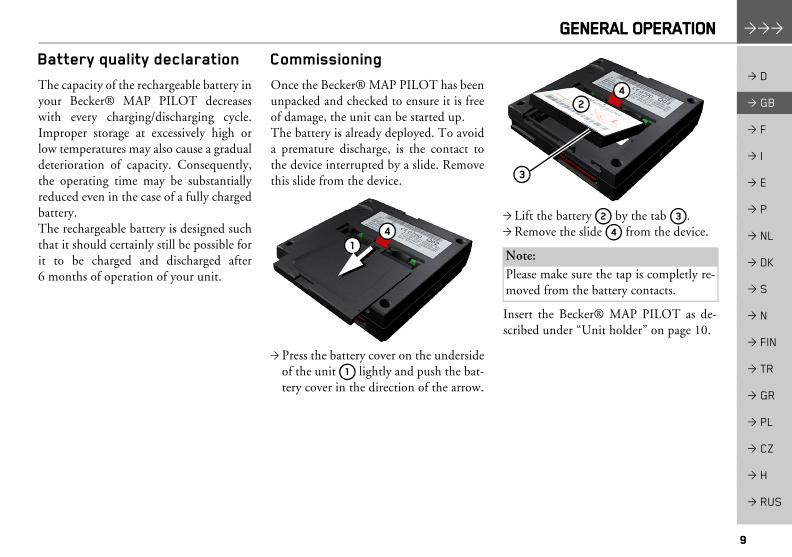
Battery quality declarationThe capacity of the rechargeable battery inyour Becker® MAP PILOT decreaseswith every charging/discharging cycle.Improper storage at excessively high orlow temperatures may also cause a gradualdeterioration of capacity. Consequently,the operating time may be substantiallyreduced even in the case of a fully chargedbattery.The rechargeable battery is designed suchthat it should certainly still be possible forit to be charged and discharged after6 months of operation of your unit.
CommissioningOnce the Becker® MAP PILOT has beenunpacked and checked to ensure it is freeof damage, the unit can be started up.The battery is already deployed. To avoida premature discharge, is the contact tothe device interrupted by a slide. Removethis slide from the device.
> Press the battery cover on the undersideof the unit lightly and push the bat-tery cover in the direction of the arrow.
> Lift the battery by the tab .> Remove the slide from the device.
Insert the Becker® MAP PILOT as de-scribed under �Unit holder� on page 10.
14
1
Note:Please make sure the tap is completly re-moved from the battery contacts.
2
3
4
2 3
4
10
>>> GENERAL OPERATION
> D
> GB
> F
> I
> E
> P
> NL
> DK
> S
> N
> FIN
> TR
> GR
> PL
> CZ
> H
> RUS
Power supplyYour Becker® MAP PILOT has an inte-grated rechargeable battery. The battery ischarged as soon as the Becker® MAPPILOT is placed in the holder and the ve-hicle ignition is switched on.
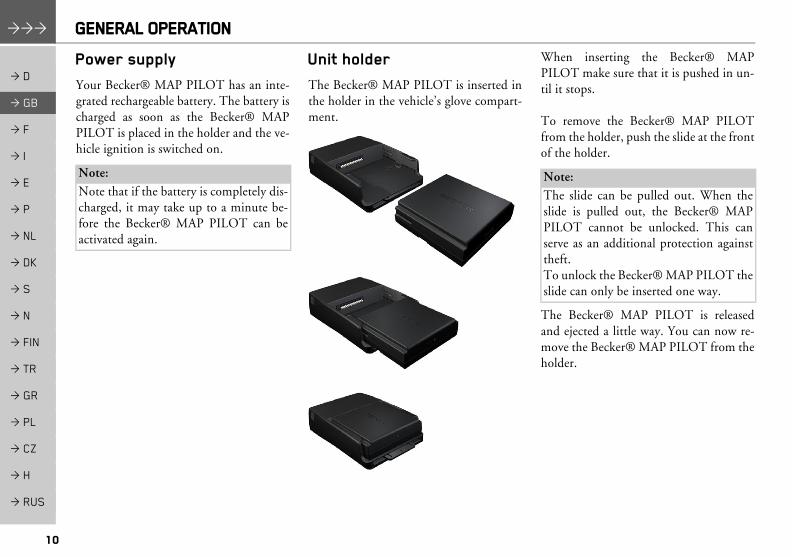
Unit holderThe Becker® MAP PILOT is inserted inthe holder in the vehicle�s glove compart-ment.
When inserting the Becker® MAPPILOT make sure that it is pushed in un-til it stops.
To remove the Becker® MAP PILOTfrom the holder, push the slide at the frontof the holder.
The Becker® MAP PILOT is releasedand ejected a little way. You can now re-move the Becker® MAP PILOT from theholder.
Note:Note that if the battery is completely dis-charged, it may take up to a minute be-fore the Becker® MAP PILOT can beactivated again.
Note:The slide can be pulled out. When theslide is pulled out, the Becker® MAPPILOT cannot be unlocked. This canserve as an additional protection againsttheft. To unlock the Becker® MAP PILOT theslide can only be inserted one way.

11
GENERAL OPERATION >>>
> D
> GB
> F
> I
> E
> P
> NL
> DK
> S
> N
> FIN
> TR
> GR
> PL
> CZ
> H
> RUS
Memory cardYour Becker® MAP PILOT has a slot foran SD memory card. This slot is used foradditional maps that can be purchased viathe Becker Content Manager/Webshop.
The card slot is located on the right side ofthe Becker® MAP PILOT. The card slotis equipped with a spring-actuated lockingand ejector mechanism.
Basic operationThe Becker® MAP PILOT is operatedusing a number of the controls of the in-stalled audio system.Route guidance instructions are also dis-played in the instrument cluster of the ve-hicle.
Calling up navigation mode> Press the button on the
audio system.Navigation mode is called up.
Selecting/highlighting elementsTo operate the Becker® MAP PILOTyou must select or highlight menu items.This is done using the rotary control/pushbutton of the installed audio system. Turnthe rotary control/push button to togglebetween the various menu items. This op-erating manual describes the process ofhighlighting.
To select a menu item, you must first turnthe rotary control/push button to high-light the item and then press the rotarycontrol/push button.
Back functionAt all menu levels you can return to theprevious menu level by pressing theL button.
During route guidance (route guidance isactive), pressing the L button bringsyou back to the main menu.
Note:To exit the Navigation mode, press thecorresponding button on the audio sys-tem.
NAVI
Note:The rotary control/push button can alsobe moved in 8 different directions. Thisis dealt with separately in the guide.
Note:
The L is located to the left of the ro-tary control/push button.

12
>>> GENERAL OPERATION
> D
> GB
> F
> I
> E
> P
> NL
> DK
> S
> N
> FIN
> TR
> GR
> PL
> CZ
> H
> RUS
Delete functionIn input menus you can delete charactersby pressing the button.
Menu basicsDuring operation you are assisted by vari-ous menus and input windows.
Main menuThe top menu level is the main menu.You can start the various functions of yourBecker® MAP PILOT from the mainmenu.
Information on the individual functionscan be found in the following sections.In addition to the individual functions,the main menu also contains further in-formation and operating options.
The navigation satellites currently availa-ble are shown in the bottom right corner.
If route guidance is already active, the cur-rent destination address is displayed in thebottom line.
To cancel route guidance, push the rotarycontrol/push button downwards and thenpress the rotary control/push button.Route guidance can also be interrupted bypressing button in the main menu.
Note:
The button is located to the rightof the rotary control/push button.
C
C
C
13
GENERAL OPERATION >>>
> D
> GB
> F
> I
> E
> P
> NL
> DK
> S
> N
> FIN
> TR
> GR
> PL
> CZ
> H
> RUS
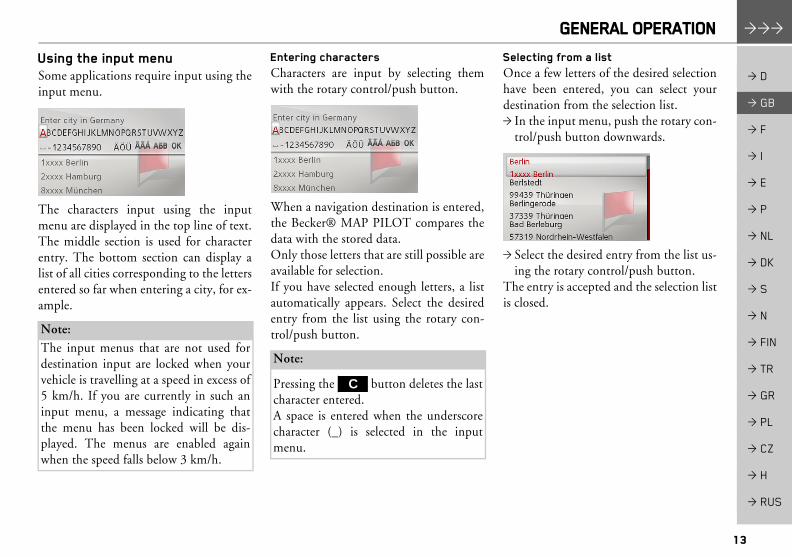
Using the input menuSome applications require input using theinput menu.
The characters input using the inputmenu are displayed in the top line of text.The middle section is used for characterentry. The bottom section can display alist of all cities corresponding to the lettersentered so far when entering a city, for ex-ample.
Entering charactersCharacters are input by selecting themwith the rotary control/push button.
When a navigation destination is entered,the Becker® MAP PILOT compares thedata with the stored data.Only those letters that are still possible areavailable for selection.If you have selected enough letters, a listautomatically appears. Select the desiredentry from the list using the rotary con-trol/push button.
Selecting from a listOnce a few letters of the desired selectionhave been entered, you can select yourdestination from the selection list.> In the input menu, push the rotary con-
trol/push button downwards.
> Select the desired entry from the list us-ing the rotary control/push button.
The entry is accepted and the selection listis closed.
Note:The input menus that are not used fordestination input are locked when yourvehicle is travelling at a speed in excess of5 km/h. If you are currently in such aninput menu, a message indicating thatthe menu has been locked will be dis-played. The menus are enabled againwhen the speed falls below 3 km/h.
Note:
Pressing the button deletes the lastcharacter entered.A space is entered when the underscorecharacter (_) is selected in the inputmenu.
C
14
>>> GENERAL OPERATION
> D
> GB
> F
> I
> E
> P
> NL
> DK
> S
> N
> FIN
> TR
> GR
> PL
> CZ
> H
> RUS
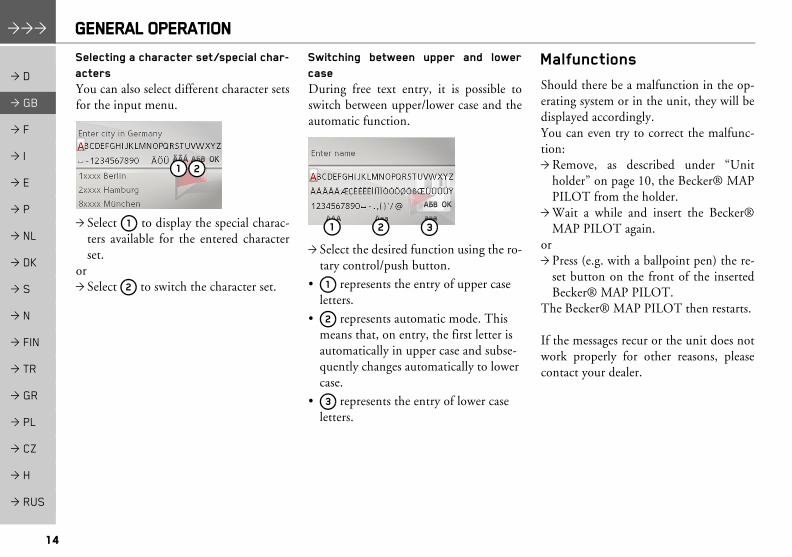
Selecting a character set/special char-actersYou can also select different character setsfor the input menu.
> Select to display the special charac-ters available for the entered characterset.
or> Select to switch the character set.
Switching between upper and lowercase During free text entry, it is possible toswitch between upper/lower case and theautomatic function.
> Select the desired function using the ro-tary control/push button.
� represents the entry of upper case letters.
� represents automatic mode. This means that, on entry, the first letter is automatically in upper case and subse-quently changes automatically to lower case.
� represents the entry of lower case letters.
Malfunctions Should there be a malfunction in the op-erating system or in the unit, they will bedisplayed accordingly. You can even try to correct the malfunc-tion: > Remove, as described under �Unit
holder� on page 10, the Becker® MAPPILOT from the holder.
> Wait a while and insert the Becker®MAP PILOT again.
or > Press (e.g. with a ballpoint pen) the re-
set button on the front of the insertedBecker® MAP PILOT.
The Becker® MAP PILOT then restarts.
If the messages recur or the unit does notwork properly for other reasons, pleasecontact your dealer.
1 2
1
2
1 2 3
1
2
3

15
GENERAL OPERATION >>>
> D
> GB
> F
> I
> E
> P
> NL
> DK
> S
> N
> FIN
> TR
> GR
> PL
> CZ
> H
> RUS
Content Manager Becker® MAP PILOTThe Content Manager Becker® MAPPILOT is a PC based application contain-ing a number of important functions tohelp you manage the content on yourBecker® MAP PILOT. With the Content Manager Becker®MAP PILOT you can:
� back up the content saved on the Becker® MAP PILOT to your PC and restore it later to your Becker® MAP PILOT,
� download current content from the In-ternet and install it on the Becker® MAP PILOT.
To use the Content Manager Becker®MAP PILOT, you will need the USB ca-ble provided as well as a computer thatmeets the following minimum require-ments:
� Microsoft Windows XP (SP2), Vista or Windows 7 operating system
� Microsoft Internet Explorer 7 or higher
� PC with USB 2.0
� Fast Internet connection with more than 2 Mbit/s
� At least 10 GB hard disk space.
Installing the Content Manager Becker® MAP PILOTYou can install the Content ManagerBecker® MAP PILOT on your computerwith the following steps:> Connect the USB interface of the
Becker® MAP PILOT directly to theUSB port of the computer using theUSB cable provided.
After a short time, the Becker® MAPPILOT is displayed as a removable storagemedium on the computer.
Installation should start automatically.
> Follow the instructions of the software.The Content Manager Becker® MAPPILOT can be started immediately afterinstallation. This completes the installation procedure.
Starting the Content Manager> Connect the USB interface of the
Becker® MAP PILOT directly to theUSB port of the computer using theUSB cable provided.
After a short time, the Becker® MAPPILOT is displayed as a removable storagemedium on the computer.> Click on Start > All Programs on the
computer.> Select Content Manager.> Click on Content Manager.
The Content Manager Becker® MAPPILOT is started.
Note:When you connect the Becker® MAPPILOT to the PC for the first time, thePC installs all the necessary drivers andthen displays the message "Your unit isnow ready to use".
Note:If installation does not startautomatically, start the Setup.exe file inthe �Content Manager� directory on theremovable storage medium.
16
>>> NAVIGATION MODE
> D
> GB
> F
> I
> E
> P
> NL
> DK
> S
> N
> FIN
> TR
> GR
> PL
> CZ
> H
> RUS
Navigation mode
What is navigation?The term �navigation� (lat. navigare = totravel by sea) is generally understood tomean the location of a vehicle, the deter-mination of the direction and distancefrom the desired destination and the re-quired route. Stars, prominent landmarks,compass and satellites etc. are used as nav-igation aids.With the Becker® MAP PILOT, the lo-cation is determined by the GPS receiver.The Global Positioning System (GPS)was developed during the 1970s by theUS military as a weapons guiding system.GPS is based on a total of 24 satellites or-biting the Earth and emitting signals. AGPS receiver receives these signals anduses the signal times to calculate the dis-tance to an individual satellite, and thendetermines your current geographical po-sition.
Signals from at least three satellites are re-quired to determine your position; yourheight above sea level can be calculated ifsignals are received from four or more sat-ellites.The Becker® MAP PILOT determinesthe direction and distance from the desti-nation using a navigation computer and adigital street map held in its internalmemory.For safety reasons, route guidance is givenpredominantly in spoken form. This issupported by a direction indicator and amap display.
!Safety instructions� Road traffic regulations always take
priority. The navigation system is only an aid. Errors may occur in individual data items/entries. At all times, the driver must decide whether or not to heed the information provided. We do not accept liability for errone-ous data provided by the navigation system.
� When first put into use it can take up to 30 minutes to fix the position.
� Observation of traffic signs and local traffic regulations must always take pri-ority.
� Traffic guidance is restricted to passen-ger vehicles. Special driving recom-mendations and regulations for other vehicles (e.g. commercial vehicles) are not included.
� Destinations may only be entered when the vehicle is stationary.

17
NAVIGATION MODE >>>
> D
> GB
> F
> I
> E
> P
> NL
> DK
> S
> N
> FIN
> TR
> GR
> PL
> CZ
> H
> RUS
Last destinationsIn the last destinations, the most recentdestinations and stored destinations aredisplayed and can be selected directly.> Select Last destinations from the main
menu.
If you have already entered your home ad-dress, you can start route guidance to yourhome address in the last destinations(Home).The destination list containing the desti-nations most recently travelled to as wellas stored destinations is displayed in thelines below this.
Using last destinations
Starting with existing destinationThe destinations available in the last des-tinations are included in the destinationlist.> Select the desired entry from the list us-
ing the rotary control/push button tostart route calculation.
The calculation begins. When the calculation is complete, themap appears and the route guidance be-gins.
Displaying or editing a destinationAny destination stored in the last destina-tions can be displayed and edited.> Highlight the desired entry using the
rotary control/push button.> Push the rotary control/push button to
the right.
Note:Up to 200 of the most recent destinationsare automatically stored in the destina-tion list. If the storage capacity is reached,the oldest destination is automatically de-leted to make room for a new destina-tion. However, important destinationscan be protected.Protected entries are identified by the symbol.If you select your home address and it hasnot yet been defined, you will be request-ed to enter the address.
18
>>> NAVIGATION MODE
> D
> GB
> F
> I
> E
> P
> NL
> DK
> S
> N
> FIN
> TR
> GR
> PL
> CZ
> H
> RUS
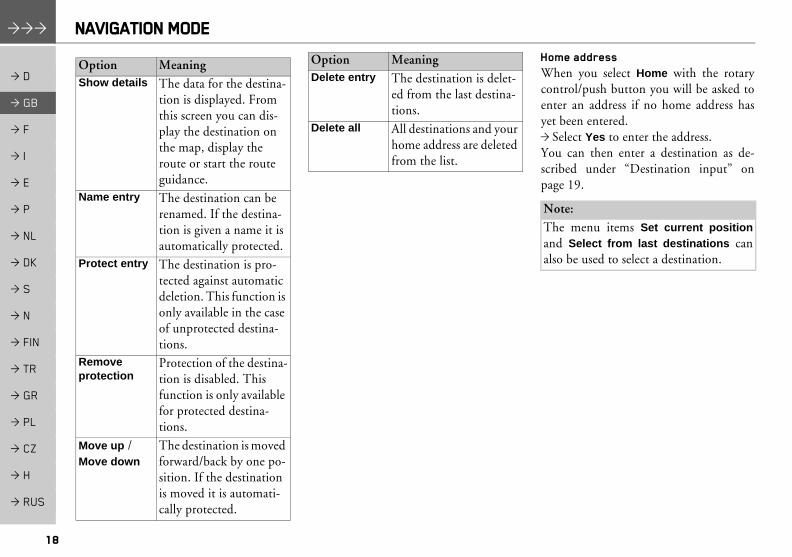
Home addressWhen you select Home with the rotarycontrol/push button you will be asked toenter an address if no home address hasyet been entered.> Select Yes to enter the address.You can then enter a destination as de-scribed under �Destination input� onpage 19.
Option MeaningShow details The data for the destina-
tion is displayed. From this screen you can dis-play the destination on the map, display the route or start the route guidance.
Name entry The destination can be renamed. If the destina-tion is given a name it is automatically protected.
Protect entry The destination is pro-tected against automatic deletion. This function is only available in the case of unprotected destina-tions.
Remove protection
Protection of the destina-tion is disabled. This function is only available for protected destina-tions.
Move up / Move down
The destination is moved forward/back by one po-sition. If the destination is moved it is automati-cally protected.
Delete entry The destination is delet-ed from the last destina-tions.
Delete all All destinations and your home address are deleted from the list.
Option Meaning
Note:The menu items Set current positionand Select from last destinations canalso be used to select a destination.
19
NAVIGATION MODE >>>
> D
> GB
> F
> I
> E
> P
> NL
> DK
> S
> N
> FIN
> TR
> GR
> PL
> CZ
> H
> RUS
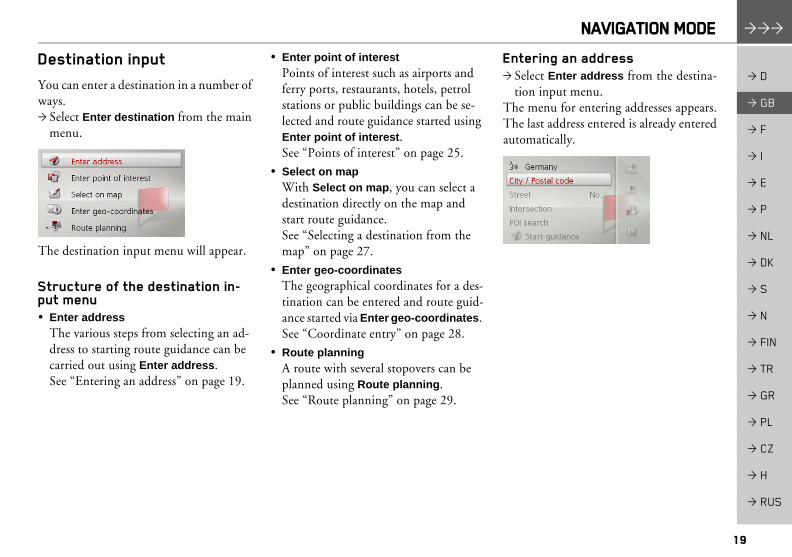
Destination inputYou can enter a destination in a number ofways.> Select Enter destination from the main
menu.
The destination input menu will appear.
Structure of the destination in-put menu� Enter address
The various steps from selecting an ad-dress to starting route guidance can be carried out using Enter address. See �Entering an address� on page 19.
� Enter point of interestPoints of interest such as airports and ferry ports, restaurants, hotels, petrol stations or public buildings can be se-lected and route guidance started using Enter point of interest.See �Points of interest� on page 25.
� Select on mapWith Select on map, you can select a destination directly on the map and start route guidance.See �Selecting a destination from the map� on page 27.
� Enter geo-coordinatesThe geographical coordinates for a des-tination can be entered and route guid-ance started via Enter geo-coordinates. See �Coordinate entry� on page 28.
� Route planningA route with several stopovers can be planned using Route planning.See �Route planning� on page 29.
Entering an address> Select Enter address from the destina-
tion input menu.The menu for entering addresses appears.The last address entered is already enteredautomatically.

20
>>> NAVIGATION MODE
> D
> GB
> F
> I
> E
> P
> NL
> DK
> S
> N
> FIN
> TR
> GR
> PL
> CZ
> H
> RUS
Selecting a country
> Select the entry containing the countryof destination to access the country se-lection list.
The selection list will appear.
> Select the desired country.
Selecting an address and starting routeguidance
The following settings can be made in theaddress input menu:� City
� Postal code
� Street and house number� Intersections as an orientation aid
It is also possible to:
� start the route guidance straight away.� search for a point of interest near to the
address entered (POI search by name). This can be entered as described under �POI near address� on page 26.
� save the destination with name in the last destinations.
� show the route on the map.
Selecting a cityThe destination city can be specified byentering the name or postal code.When you select the letters of a city, theBecker® MAP PILOT displays sugges-tions. If you do not wish to accept the sug-gestion simply select the subsequent let-ters of the desired city.The Becker® MAP PILOT excludes allimpossible letter combinations and postalcodes and activates only those letters andnumbers that could give the name of anexisting city or postal code.
> Select the letters of the destination cityor the numbers of the postal code con-secutively.
Note: If a country of destination has alreadybeen entered it will remain until you se-lect a different country.
Note:If two words need to be entered you mustenter them by selecting the underscorecharacter (_).

21
NAVIGATION MODE >>>
> D
> GB
> F
> I
> E
> P
> NL
> DK
> S
> N
> FIN
> TR
> GR
> PL
> CZ
> H
> RUS
When sufficient letters have been enteredit will automatically switch to a list fromwhich you can select the city. However,you can switch to the list before this bypushing the rotary control/push buttondownwards. You can then select the cityfrom the list.
Selecting the streetIn the Street menu field the street andhouse number can be entered separately.The Becker® MAP PILOT excludes allimpossible letter combinations and acti-vates only those letters that could give anexisting street name.A house number can only be chosen oncethe street has been selected and if housenumbers are included in the data.
> Select the letters of the destinationstreet consecutively.
When sufficient letters have been selectedit will automatically switch to a list fromwhich you can select the street. However,you can switch to the list before this bypushing the rotary control/push buttondownwards. You can then select the streetfrom the list.
Selecting the intersectionAfter entering the destination city andstreet, you can enter an intersection so asto further limit the choice.
> Select Intersection.The input menu for the name of the inter-section will appear.> Select the letters of the intersection con-
secutively.Once a few letters of the desired streethave been entered a list will automaticallybe displayed.However, you can switch to the list beforethis by pushing the rotary control/pushbutton downwards. You can then selectthe intersection from the list.
Note: Instead of entering an intersection, youcan also enter a house number. However,it is not possible to enter both at the sametime.

22
>>> NAVIGATION MODE
> D
> GB
> F
> I
> E
> P
> NL
> DK
> S
> N
> FIN
> TR
> GR
> PL
> CZ
> H
> RUS
Selecting a house numberAfter entering the destination city andstreet, you can enter a house number so asto further limit the choice.
> Select No.The input menu for the house numberwill appear.> Enter the house number.> Select from the automatically displayed
list the desired house number.
Displaying the routeOnce the address has been entered, the ad-dress input menu allows the route to thedestination to be displayed on the map.> Push the rotary control/push button to
the right.> Select Show route to display the route
on the map.The route is calculated.
You can start the route guidance directlyfrom this screen by selecting Start.
The other options on this screen are de-scribed under �Display Entire route.� onpage 39.
In addition to these described functions,you can also display alternative routes.> Select Options und then select
Alternative routes.
After a short time, the alternative routeswill be displayed.
The area on the right-hand side shows thecolour key for the individual routes, themileage for each route and the estimateddriving time.> Select the desired route.The desired route is calculated and theroute guidance will begin.
Note: Instead of entering the house number,you can also enter an intersection. How-ever, it is not possible to enter both at thesame time.
23
NAVIGATION MODE >>>
> D
> GB
> F
> I
> E
> P
> NL
> DK
> S
> N
> FIN
> TR
> GR
> PL
> CZ
> H
> RUS
Showing the destination on the map> In the address input menu, push the ro-
tary control/push button to the right.> Select On map.The map display is opened and the desti-nation is displayed.
Storing a destination> In the address input menu, push the ro-
tary control/push button to the right.> Select Save.> Enter the desired name.The destination is transferred to the lastdestinations and protected.
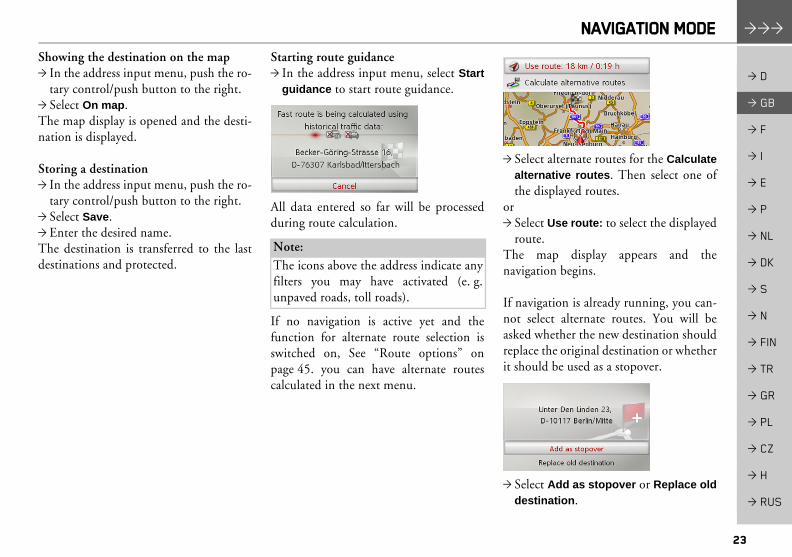
Starting route guidance> In the address input menu, select Start
guidance to start route guidance.
All data entered so far will be processedduring route calculation.
If no navigation is active yet and thefunction for alternate route selection isswitched on, See �Route options� onpage 45. you can have alternate routescalculated in the next menu.
> Select alternate routes for the Calculatealternative routes. Then select one ofthe displayed routes.
or> Select Use route: to select the displayed
route.The map display appears and thenavigation begins.
If navigation is already running, you can-not select alternate routes. You will beasked whether the new destination shouldreplace the original destination or whetherit should be used as a stopover.
> Select Add as stopover or Replace olddestination.
Note: The icons above the address indicate anyfilters you may have activated (e. g.unpaved roads, toll roads).

24
>>> NAVIGATION MODE
> D
> GB
> F
> I
> E
> P
> NL
> DK
> S
> N
> FIN
> TR
> GR
> PL
> CZ
> H
> RUS
If the route guidance is already runningand a stopover has already been enteredyou will be asked whether the new desti-nation should replace the old destinationor the stopover.
> Select Replace stopover or Replaceold destination.
Entering an address using speechYou can start address entry using speechfrom the address input menu by selecting
or from the main menu by selectingPTT.Is your vehicle equipped with a steeringwheel button for voice control, you canalso press this button.
After the function is activated, a displaythat shows you how to say an address willbe shown.
You can say the address as soon as you seethe lines next to the stylised face.
> Say the address.
Notes: � Only one address can be entered using
the voice entry function. Lists for more precise selection cannot be operated using speech.
� The destination country cannot be en-tered using speech.
� The symbol in the list of countries indicates the countries for which ad-dress entry using speech is possible.If entry using speech is not possible,
and PTT cannot be selected.
� An address and the street number must be spoken in the language of the desti-nation country.
Notes:� If a number of languages are spoken in
the destination country (as is the case in Switzerland, for example), you can set another language by selecting Change language.
� You can say the complete address or just a part of it.Possible entries include:- City - street - street number- City - street- City
25
NAVIGATION MODE >>>
> D
> GB
> F
> I
> E
> P
> NL
> DK
> S
> N
> FIN
> TR
> GR
> PL
> CZ
> H
> RUS
If your entry is unique, after a short timethe menu for entering addresses will bedisplayed with your entry filled in.
If the address displayed does not matchthe address you said, you can make appro-priate changes.If the address is correct, you can startroute guidance, display the route or storethe address as described on page 23.
If your entry was not unique or theBecker® MAP PILOT was not able touniquely assign your entry, you will beshown appropriate lists. You can then se-lect the address you want from these lists.Depending on your entry, lists with citynames, lists with street names or com-bined lists with city and street names canbe displayed.
The following example shows a list inwhich a city can be selected.
Entries identified with the symbolopen up a further list when they are select-ed. This can be necessary if, for example,the same city name occurs a number oftimes in the set country.
Once you have selected the city or streetyou want in the lists, the menu for enter-ing addresses is displayed after a short timewith your entry filled in.You can then start route guidance, displaythe route or store the address as describedon page 23.
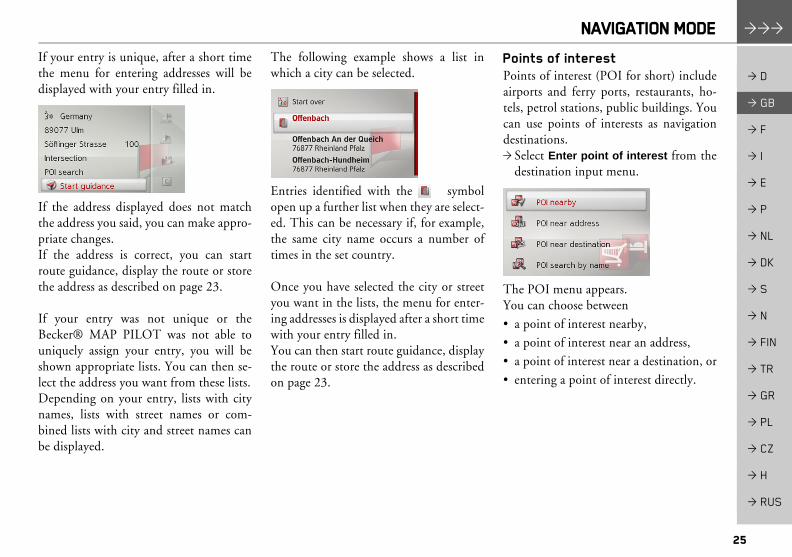
Points of interestPoints of interest (POI for short) includeairports and ferry ports, restaurants, ho-tels, petrol stations, public buildings. Youcan use points of interests as navigationdestinations.> Select Enter point of interest from the
destination input menu.
The POI menu appears.You can choose between
� a point of interest nearby,
� a point of interest near an address,� a point of interest near a destination, or
� entering a point of interest directly.
26
>>> NAVIGATION MODE
> D
> GB
> F
> I
> E
> P
> NL
> DK
> S
> N
> FIN
> TR
> GR
> PL
> CZ
> H
> RUS
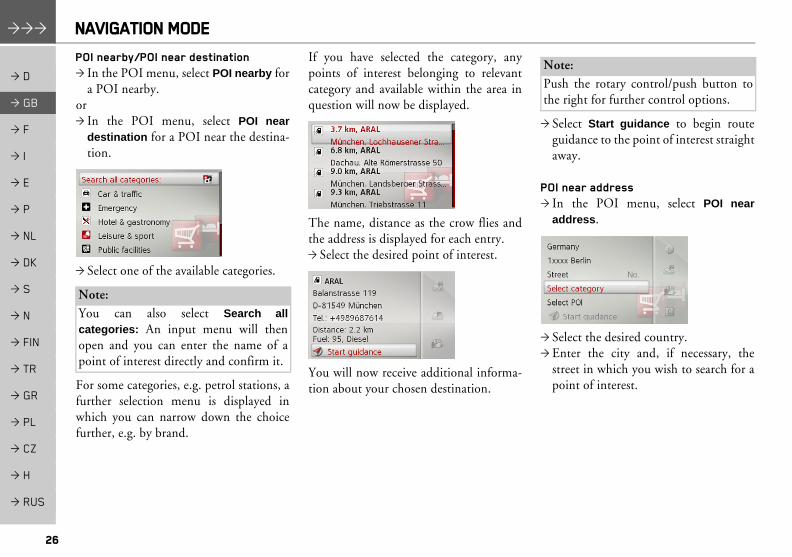
POI nearby/POI near destination> In the POI menu, select POI nearby for
a POI nearby.or> In the POI menu, select POI near
destination for a POI near the destina-tion.
> Select one of the available categories.
For some categories, e.g. petrol stations, afurther selection menu is displayed inwhich you can narrow down the choicefurther, e.g. by brand.
If you have selected the category, anypoints of interest belonging to relevantcategory and available within the area inquestion will now be displayed.
The name, distance as the crow flies andthe address is displayed for each entry.> Select the desired point of interest.
You will now receive additional informa-tion about your chosen destination.
> Select Start guidance to begin routeguidance to the point of interest straightaway.
POI near address> In the POI menu, select POI near
address.
> Select the desired country.> Enter the city and, if necessary, the
street in which you wish to search for apoint of interest.
Note:You can also select Search allcategories: An input menu will thenopen and you can enter the name of apoint of interest directly and confirm it.
Note:Push the rotary control/push button tothe right for further control options.
27
NAVIGATION MODE >>>
> D
> GB
> F
> I
> E
> P
> NL
> DK
> S
> N
> FIN
> TR
> GR
> PL
> CZ
> H
> RUS
> Press the Select category button.
The points of interest categories availablefor the entered city are displayed.> Select the desired point of interest as de-
scribed under �POI nearby/POI neardestination� on page 26.
Entering a POI directly> In the POI menu, select POI search by
name.
> Enter the desired point of interest orpart of the name.
> To confirm the previous input, select or press and hold the rotary con-
trol/push button.
The Becker® MAP PILOT displays in alist all the points of interest correspondingto the name entered.
> Select the desired destination from thelist.
> Select Start guidance to begin routeguidance to the point of interest straightaway.
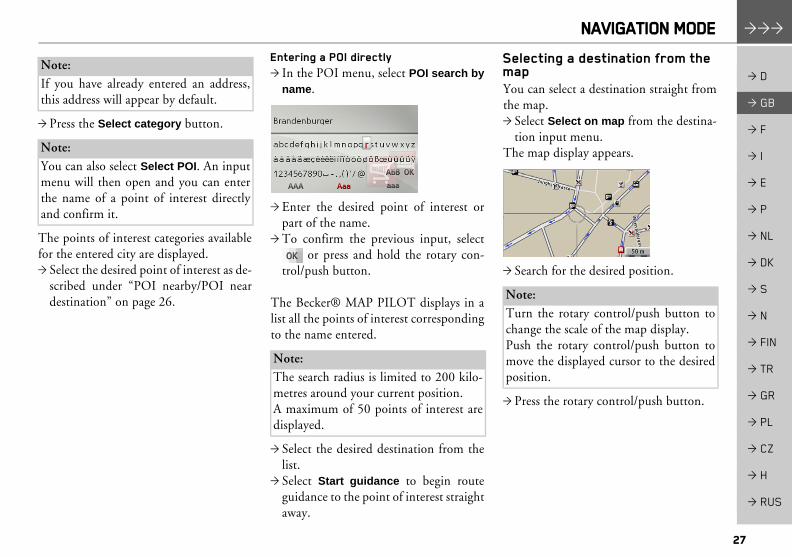
Selecting a destination from the mapYou can select a destination straight fromthe map.> Select Select on map from the destina-
tion input menu.The map display appears.
> Search for the desired position.
> Press the rotary control/push button.
Note:If you have already entered an address,this address will appear by default.
Note:You can also select Select POI. An inputmenu will then open and you can enterthe name of a point of interest directlyand confirm it.
Note:The search radius is limited to 200 kilo-metres around your current position.A maximum of 50 points of interest aredisplayed.
Note:Turn the rotary control/push button tochange the scale of the map display.Push the rotary control/push button tomove the displayed cursor to the desiredposition.

28
>>> NAVIGATION MODE
> D
> GB
> F
> I
> E
> P
> NL
> DK
> S
> N
> FIN
> TR
> GR
> PL
> CZ
> H
> RUS
Depending on the position of the cross-hair pointer, a list of potential destina-tions, an address or geocoordinates is dis-played. When TMC message symbolappears in the cross-hair pointer, it is alsodisplayed in the list. By selecting it in thelist, you can pull up the message details.> Select the desired entry from the list.
> Select Start guidance to begin routeguidance to the destination straightaway.
Coordinate entryYou can also enter your destination usinggeographical coordinates.> Select Enter geo-coordinates from the
destination input menu.
> Select to set the direction requiredfor the geographic latitude.
> From the numbers indicated by se-lect the required numbers.
> Select .> Enter the geographical longitude as de-
scribed earlier.
Where possible, an address matching thecoordinates will be displayed.
> Select Start guidance to begin routeguidance to the destination straightaway.
Note:Push the rotary control/push button tothe right for further control options.
Notes:By selecting you can switch from de-gree to decimal input and vice versa.
1
2
3
1
2
3
Note:Push the rotary control/push button tothe right for further control options.

29
NAVIGATION MODE >>>
> D
> GB
> F
> I
> E
> P
> NL
> DK
> S
> N
> FIN
> TR
> GR
> PL
> CZ
> H
> RUS
Route planningThe route planning menu allows you tocreate and select individual routes. To dothis, enter the individual destinationpoints for the desired route. It is then pos-sible to travel to these points consecutivelywithout having to enter any further infor-mation. You can also optimise the desti-nation points entered and in so doingchange their order.> Select Route planning from the desti-
nation input menu.
The route menu is displayed.In the route menu, you can create a newroute by selecting Create new route. Inthe list displayed below, the stored previ-ous routes are displayed in alphabetical or-der.
Editing stored routesYou can change the name of a stored routeor delete it.> Highlight the route you wish to edit.> Push the rotary control/push button to
the right.By selecting Rename route you can givethe route a new name. By selecting Delete route you can deletethe route from the stored routes.
Selecting and starting a route> Select the required route from the route
menu.The route is loaded and displayed in thestage menu.
> Select Calculate.
> Select the start point or your currentposition as the start point for routeguidance.
The individual stages are calculated.A map of the stages will then be displayed.
The total distance and estimated totaljourney time are displayed on the left-hand side.> Select Start to start route guidance or
select one of the functions described be-low.
Note:If no routes have yet been stored, theroute menu is empty.
Note:You can also select a stage in the routehere. The route is then started from thisstage.
Note:When a start point is selected, this is onlyused for the purposes of displaying aroute.

30
>>> NAVIGATION MODE
> D
> GB
> F
> I
> E
> P
> NL
> DK
> S
> N
> FIN
> TR
> GR
> PL
> CZ
> H
> RUS
� Route listDisplays a list of the individual stages.
� OptionsCalls up further options. You can then simulate the route, optimise the route (order of the destinations to be travelled to) and call up the route options.
� and Scrolls through the individual stages in the route.
Creating a new route> Select Create new route from the route
menu.
You can now enter a stage destination asdescribed under �Destination input� onpage 19. You also have the option of se-lecting a destination in the last destina-tions using Select from last destinations.
> Select Add stage to enter further stagedestinations as described above.
> When you have entered all stage desti-nations, select Save route. Assign theroute a name.
Editing a route> Select the route you wish to edit.> Highlight the stage that you wish to ed-
it.> Push the rotary control/push button to
the right.The edit menu will be displayed. The fol-lowing options are available:
Option MeaningStart guidance
Start route guidance from the selected stage.
Show details The data relating to the stage destination is dis-played.
Move up / Move down
The stage is moved for-wards/backwards by one position.
Replace stage
You can replace the se-lected stage with another stage destination.
Delete stage The stage is deleted from the route.

31
NAVIGATION MODE >>>
> D
> GB
> F
> I
> E
> P
> NL
> DK
> S
> N
> FIN
> TR
> GR
> PL
> CZ
> H
> RUS
Traffic announcements using TMCYour Becker® MAP PILOT can receivetraffic announcements (TMC messages)from radio stations.
Traffic announcements are transmitted byradio stations via the TMC (Traffic Mes-sage Channel) in addition to the radioprogramme and are received and analysedby the navigation system. Receiving trafficannouncements is free of charge.
The Becker® MAP PILOT constantlychecks whether there are any relevant an-nouncements for the route that has beenset.If the continuous checks determine that atraffic announcement is relevant to routeguidance, the unit can automatically re-calculate a new route to the destination(See �TMC settings� on page 49.).
Displaying TMC messagesOnce you have connected the Becker®MAP PILOT to the unit holder, yourBecker® MAP PILOT will receive up-to-date traffic announcements and dynamicroute calculation will be enabled (trafficjam diversion). You can also view trafficannouncements directly.Settings for TMC can be made as de-scribed under �TMC settings� onpage 49.> Select TMC from the main menu.
The message list appears.
Traffic announcements received viaTMCpro are indicated by the sym-bol.
Note:TMC is not available in all countries(currently only Belgium, Germany, Den-mark, France, Italy, Great Britain, TheNetherlands, Austria, Sweden, Switzer-land and Spain).You can receive traffic announcementsvia TMCpro in Germany.
Note:As the traffic announcements are trans-mitted by radio stations, we cannot as-sume responsibility for the completenessor accuracy of the announcements.
32
>>> NAVIGATION MODE
> D
> GB
> F
> I
> E
> P
> NL
> DK
> S
> N
> FIN
> TR
> GR
> PL
> CZ
> H
> RUS
Reading a message> Select the desired message in the mes-
sage list.
The message display appears.
> Select to scroll through the receivedmessages.
By selecting Detour you can specifywhether or not a message is to be takeninto account in the route calculation.
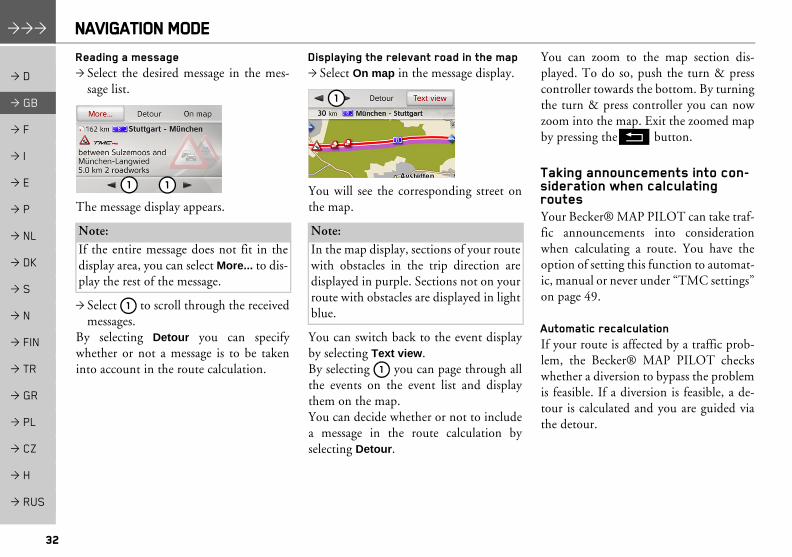
Displaying the relevant road in the map> Select On map in the message display.
You will see the corresponding street onthe map.
You can switch back to the event displayby selecting Text view.By selecting you can page through allthe events on the event list and displaythem on the map. You can decide whether or not to includea message in the route calculation byselecting Detour.
You can zoom to the map section dis-played. To do so, push the turn & presscontroller towards the bottom. By turningthe turn & press controller you can nowzoom into the map. Exit the zoomed mapby pressing theL button.
Taking announcements into con-sideration when calculating routesYour Becker® MAP PILOT can take traf-fic announcements into considerationwhen calculating a route. You have theoption of setting this function to automat-ic, manual or never under �TMC settings�on page 49.
Automatic recalculationIf your route is affected by a traffic prob-lem, the Becker® MAP PILOT checkswhether a diversion to bypass the problemis feasible. If a diversion is feasible, a de-tour is calculated and you are guided viathe detour.
Note:If the entire message does not fit in thedisplay area, you can select More... to dis-play the rest of the message.
1 1
1
Note:In the map display, sections of your routewith obstacles in the trip direction aredisplayed in purple. Sections not on yourroute with obstacles are displayed in lightblue.
1
1
33
NAVIGATION MODE >>>
> D
> GB
> F
> I
> E
> P
> NL
> DK
> S
> N
> FIN
> TR
> GR
> PL
> CZ
> H
> RUS
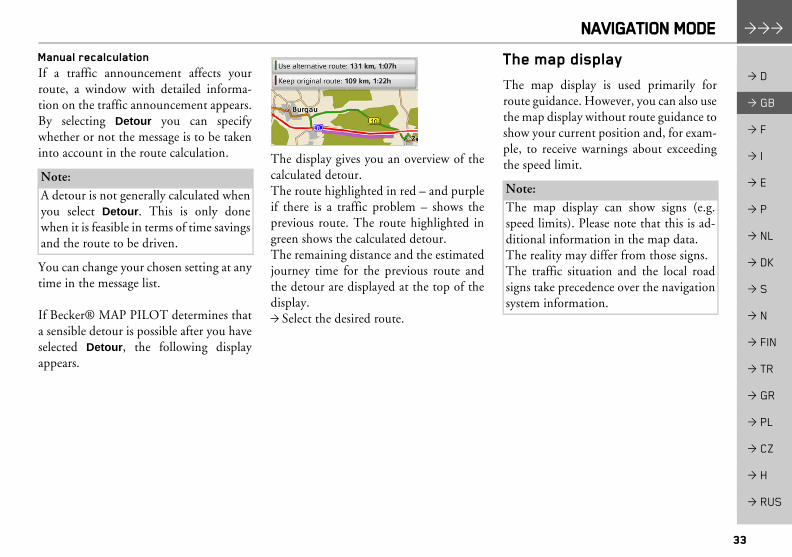
Manual recalculationIf a traffic announcement affects yourroute, a window with detailed informa-tion on the traffic announcement appears.By selecting Detour you can specifywhether or not the message is to be takeninto account in the route calculation.
You can change your chosen setting at anytime in the message list.
If Becker® MAP PILOT determines thata sensible detour is possible after you haveselected Detour, the following displayappears.
The display gives you an overview of thecalculated detour.The route highlighted in red � and purpleif there is a traffic problem � shows theprevious route. The route highlighted ingreen shows the calculated detour. The remaining distance and the estimatedjourney time for the previous route andthe detour are displayed at the top of thedisplay.> Select the desired route.
The map displayThe map display is used primarily forroute guidance. However, you can also usethe map display without route guidance toshow your current position and, for exam-ple, to receive warnings about exceedingthe speed limit.
Note:A detour is not generally calculated whenyou select Detour. This is only donewhen it is feasible in terms of time savingsand the route to be driven.
Note:The map display can show signs (e.g.speed limits). Please note that this is ad-ditional information in the map data. The reality may differ from those signs.The traffic situation and the local roadsigns take precedence over the navigationsystem information.

34
>>> NAVIGATION MODE
> D
> GB
> F
> I
> E
> P
> NL
> DK
> S
> N
> FIN
> TR
> GR
> PL
> CZ
> H
> RUS
Calling up the map displayThe map display is called up automatical-ly when you start route guidance.Without route guidance, you can call upthe map display using the main menu orby pressing and holding down buttonL in the main menus.
> Select Map from the main menu.The map display will then appear and, ifGPS reception is available, will show yourcurrent position.If route guidance is already active, themap will be displayed with route guid-ance.
Structure of the map displayThe structure depends on the settingsmade in �Map display� on page 42 andwhether route guidance is active or not.
Map display without route guidance
If the navigation is not active, almost thewhole area of the display will be taken upby the map.
Speed limit on the road currently be-ing driven on (display not availablefor all roads), signs for the driveralerts will also be displayedNumber of satellites currently beingreceivedVehicle positionCurrent road
Map display with route guidance
Road signs, which you should followSpeed limit on the road currently be-ing driven on (display not availablefor all roads)Driver alertsNumber of satellites currently beingreceivedDisplay of TMC statusVehicle position
1
3
4
2
1
2
3
4
Note:The information in the left area is onlydisplayed when action must be taken.Otherwise the destination arrival time -and stopover arrival time, if applicable - isdisplayed in the lower left area.
1
5
10
9
8
2
3
47
6
1
2
3
4
5
6
35
NAVIGATION MODE >>>
> D
> GB
> F
> I
> E
> P
> NL
> DK
> S
> N
> FIN
> TR
> GR
> PL
> CZ
> H
> RUS
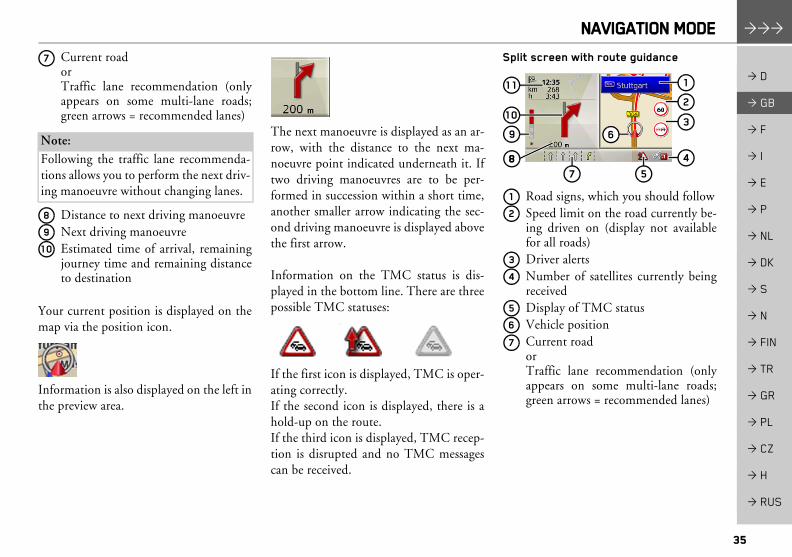
Current roadorTraffic lane recommendation (onlyappears on some multi-lane roads;green arrows = recommended lanes)
Distance to next driving manoeuvreNext driving manoeuvreEstimated time of arrival, remainingjourney time and remaining distanceto destination
Your current position is displayed on themap via the position icon.
Information is also displayed on the left inthe preview area.
The next manoeuvre is displayed as an ar-row, with the distance to the next ma-noeuvre point indicated underneath it. Iftwo driving manoeuvres are to be per-formed in succession within a short time,another smaller arrow indicating the sec-ond driving manoeuvre is displayed abovethe first arrow.
Information on the TMC status is dis-played in the bottom line. There are threepossible TMC statuses:
If the first icon is displayed, TMC is oper-ating correctly. If the second icon is displayed, there is ahold-up on the route.If the third icon is displayed, TMC recep-tion is disrupted and no TMC messagescan be received.
Split screen with route guidance
Road signs, which you should followSpeed limit on the road currently be-ing driven on (display not availablefor all roads)Driver alertsNumber of satellites currently beingreceivedDisplay of TMC statusVehicle positionCurrent roadorTraffic lane recommendation (onlyappears on some multi-lane roads;green arrows = recommended lanes)
Note:Following the traffic lane recommenda-tions allows you to perform the next driv-ing manoeuvre without changing lanes.
7
8
9
10
1
5
11
9
2
3
47
6
10
88
1
2
3
4
5
6
7

36
>>> NAVIGATION MODE
> D
> GB
> F
> I
> E
> P
> NL
> DK
> S
> N
> FIN
> TR
> GR
> PL
> CZ
> H
> RUS
Distance to next driving manoeuvreProgress bar to illustrate the distanceto the next driving manoeuvreNext driving manoeuvreEstimated time of arrival, remainingjourney time and remaining distanceto destination
Route guidance with arrow display
Estimated time of arrival, remainingjourney time and remaining distanceto destinationNumber of satellites currently being
receivedDisplay of TMC statusDriver alertsSpeed limit on the road currently be-ing driven on (display not availablefor all roads)Next driving manoeuvre but oneCurrent roadorTraffic lane recommendation (onlyappears on some multi-lane roads;green arrows = recommended lanes)
Distance to next driving manoeuvreProgress bar to illustrate the distanceto the next driving manoeuvreNext driving manoeuvreRoad signs, which you should follow
Using the map display
Map zoomingIf the Autozoom function is enabled as de-scribed under �Map display� on page 42or �Autozoom� on page 47, the map is en-larged or reduced according to these set-tings.However, you can also enlarge or reducethe map at any time during route guid-ance by turning the rotary control/pushbutton. The Autozoom function is thendisabled until the next maneuver isreached or for the duration of 60 seconds.
The current map scale is shown in thebottom right of the map display.
Note:Following the traffic lane recommenda-tions allows you to perform the next driv-ing manoeuvre without changing lanes.
8
9
10
11
11
8
5
9 6
10 1
2
347
8
1
2
Note:Following the traffic lane recommenda-tions allows you to perform the next driv-ing manoeuvre without changing lanes.
3
4
5
6
7
8
9
10
11

37
NAVIGATION MODE >>>
> D
> GB
> F
> I
> E
> P
> NL
> DK
> S
> N
> FIN
> TR
> GR
> PL
> CZ
> H
> RUS
Map ToolboxYou can set preferences for navigation, themap display style, and the route in theMap Toolbox.> Press the turn & press controller in the
map display.During active navigation, the followingversion of the toolbox is displayed.
If no navigation is active, the followingversion of the toolbox is displayed.
You can advance to enter the destinationby selecting Enter destination. Theentries Route and Repeat cannot beselected if navigation is not active.
Route
> In the Map Toolbox, select Route.
The route menu is displayed.
Enter/delete stopover.With this function, you can enter ordelete a stopover.> In the route menu, select Add
stopover.As described in �Destination input� onpage 19, you can now enter a destinationas a stopover. You can also select fromrecent stopovers by selecting Select fromlast destinations.
Once you've entered the desired stopover,the new route is calculated.The entered stopover is indicated on themap with a red flag.
Delete stopover.> In the route menu, select Delete
stopover.The stopover is deleted. The route isrecalculated
TMC on your routeYou can view and process TMC messagesthat appear on your route.
> In the route menu, select TMC on route.
TMC messages that appear during yourroute are displayed.After selecting a message, you can decide,for example, whether or not you would
Note:The following functions are onlyavailable during active navigation.
Note:The TMC messages that led to routeadjustments are also displayed.
38
>>> NAVIGATION MODE
> D
> GB
> F
> I
> E
> P
> NL
> DK
> S
> N
> FIN
> TR
> GR
> PL
> CZ
> H
> RUS
like to be redirected around the trafficobstacle. View the description in �Trafficannouncements using TMC� on page 31.
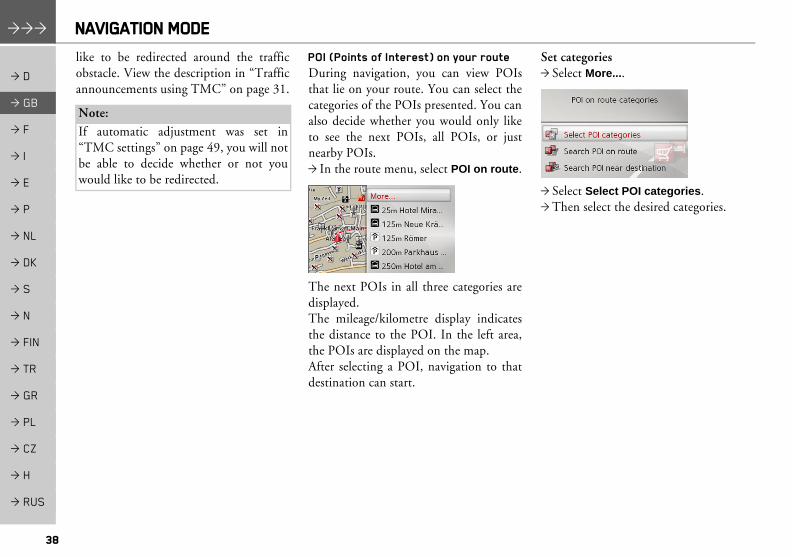
POI (Points of Interest) on your routeDuring navigation, you can view POIsthat lie on your route. You can select thecategories of the POIs presented. You canalso decide whether you would only liketo see the next POIs, all POIs, or justnearby POIs.> In the route menu, select POI on route.
The next POIs in all three categories aredisplayed.The mileage/kilometre display indicatesthe distance to the POI. In the left area,the POIs are displayed on the map.After selecting a POI, navigation to thatdestination can start.
Set categories> Select More....
> Select Select POI categories.> Then select the desired categories.
Note:If automatic adjustment was set in�TMC settings� on page 49, you will notbe able to decide whether or not youwould like to be redirected.
39
NAVIGATION MODE >>>
> D
> GB
> F
> I
> E
> P
> NL
> DK
> S
> N
> FIN
> TR
> GR
> PL
> CZ
> H
> RUS
Nearby/all POIs> Select More....
> Select Search POI on route.or> Select Search POI near destination.> Select the desired category. > Then select the desired POI.> Start navigation to the selected POI.
Set route options.You can adjust route options (routeselection etc.) during the destinationnavigation.> In the route menu, select Route
options.> Configure the route options as
described under �Route options� onpage 45.
After any modification, the route will berecalculated.
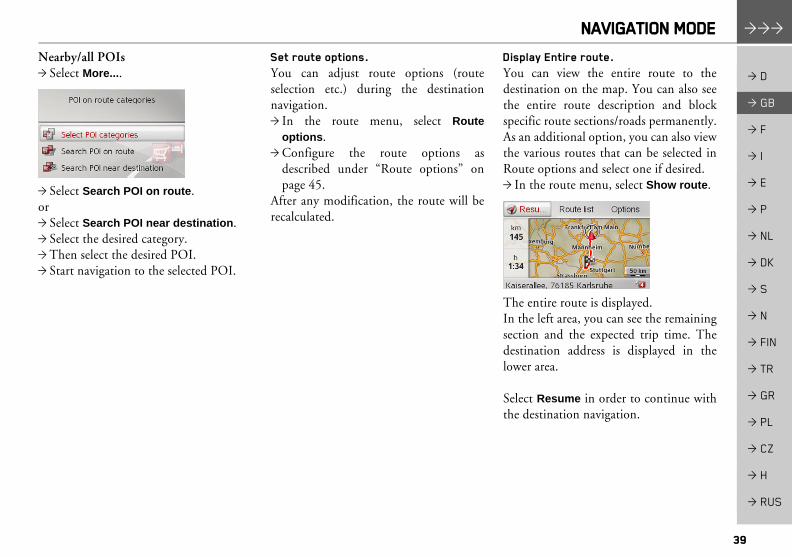
Display Entire route.You can view the entire route to thedestination on the map. You can also seethe entire route description and blockspecific route sections/roads permanently.As an additional option, you can also viewthe various routes that can be selected inRoute options and select one if desired. > In the route menu, select Show route.
The entire route is displayed.In the left area, you can see the remainingsection and the expected trip time. Thedestination address is displayed in thelower area.
Select Resume in order to continue withthe destination navigation.
40
>>> NAVIGATION MODE
> D
> GB
> F
> I
> E
> P
> NL
> DK
> S
> N
> FIN
> TR
> GR
> PL
> CZ
> H
> RUS
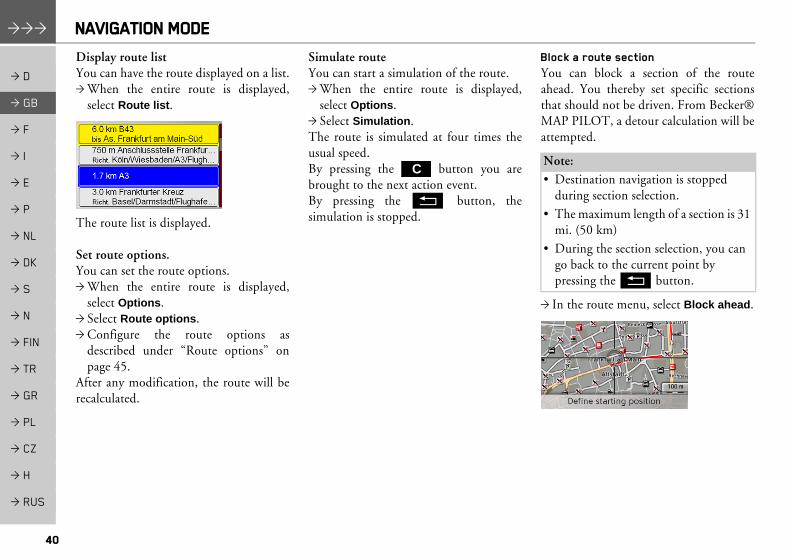
Display route listYou can have the route displayed on a list.> When the entire route is displayed,
select Route list.
The route list is displayed.
Set route options.You can set the route options.> When the entire route is displayed,
select Options.> Select Route options.> Configure the route options as
described under �Route options� onpage 45.
After any modification, the route will berecalculated.
Simulate routeYou can start a simulation of the route.> When the entire route is displayed,
select Options.> Select Simulation.The route is simulated at four times theusual speed.By pressing the button you arebrought to the next action event.By pressing the L button, thesimulation is stopped.
Block a route sectionYou can block a section of the routeahead. You thereby set specific sectionsthat should not be driven. From Becker®MAP PILOT, a detour calculation will beattempted.
> In the route menu, select Block ahead.
CNote:� Destination navigation is stopped
during section selection.
� The maximum length of a section is 31 mi. (50 km)
� During the section selection, you can go back to the current point by pressing the L button.
41
NAVIGATION MODE >>>
> D
> GB
> F
> I
> E
> P
> NL
> DK
> S
> N
> FIN
> TR
> GR
> PL
> CZ
> H
> RUS
> By turning the turn & press controlleryou can select the starting point of theblock.
> Press the turn & press controller toconfirm the starting point.
> By turning the turn & press controlleryou can now select the end point of theblock.
> Press the turn & press controller toconfirm the end point.
> Select Yes to activate the block.The block is activated and the new routeis calculated.
Delete section blockYou can remove a previously enteredblock.> In the route menu, select Clear
blockings.The block is deleted and the new route iscalculated.
Skip destinationIf a planned route with severaldestinations is active, you can delete thecurrent route destination. The destinationnavigation to the next destination starts.This may be necessary when a destinationwas not approached directly. Otherwise,the Becker® MAP PILOT will try todirect you to the current destination.> In the route menu, select Next
destination.The destination navigation to the nextdestination starts.
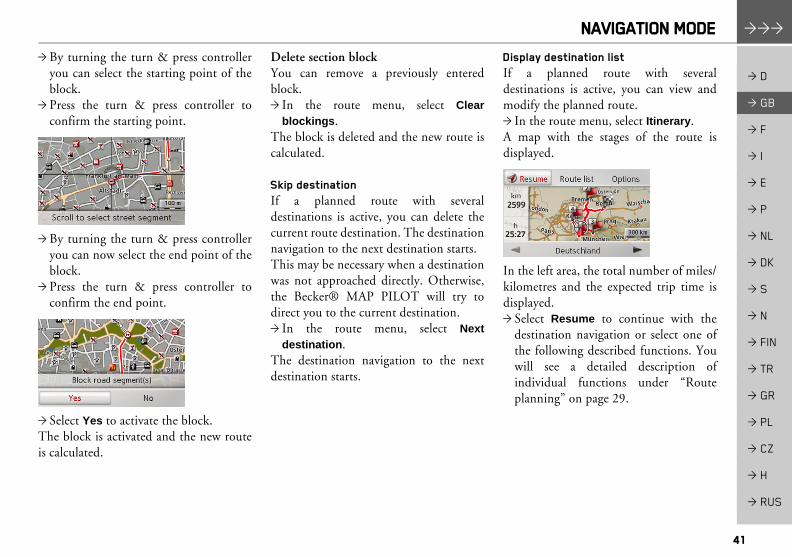
Display destination listIf a planned route with severaldestinations is active, you can view andmodify the planned route.> In the route menu, select Itinerary.A map with the stages of the route isdisplayed.
In the left area, the total number of miles/kilometres and the expected trip time isdisplayed.> Select Resume to continue with the
destination navigation or select one ofthe following described functions. Youwill see a detailed description ofindividual functions under �Routeplanning� on page 29.
42
>>> NAVIGATION MODE
> D
> GB
> F
> I
> E
> P
> NL
> DK
> S
> N
> FIN
> TR
> GR
> PL
> CZ
> H
> RUS
� Route listDisplays a list of the individual stages.
� OptionsDisplays additional options. You can simulate and optimise (order of destinations) the route as well as pull up additional route options.
� and pages through the individual route stages.
Stop destination navigation.You can stop an active destinationnavigation.> In the map toolbox, select Stop
guidance.The destination navigation to alldestinations is stopped.
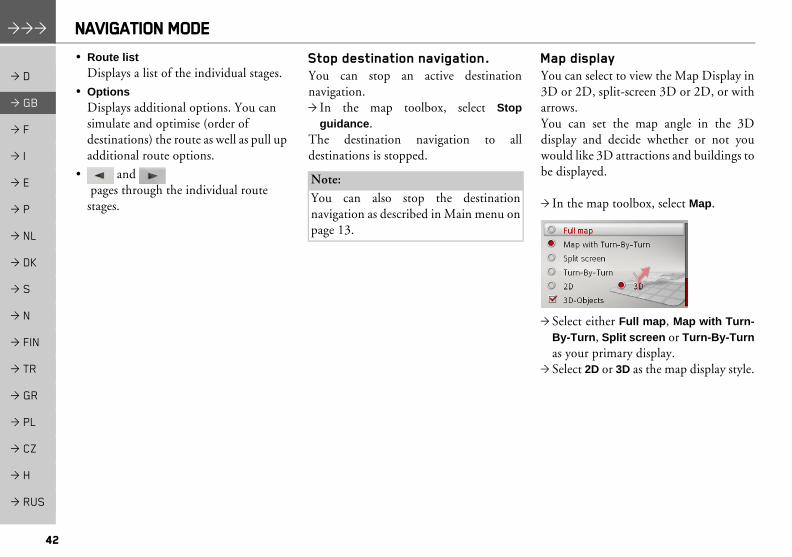
Map displayYou can select to view the Map Display in3D or 2D, split-screen 3D or 2D, or witharrows. You can set the map angle in the 3Ddisplay and decide whether or not youwould like 3D attractions and buildings tobe displayed.
> In the map toolbox, select Map.
> Select either Full map, Map with Turn-By-Turn, Split screen or Turn-By-Turnas your primary display.
> Select 2D or 3D as the map display style.
Note:You can also stop the destinationnavigation as described in Main menu onpage 13.
43
NAVIGATION MODE >>>
> D
> GB
> F
> I
> E
> P
> NL
> DK
> S
> N
> FIN
> TR
> GR
> PL
> CZ
> H
> RUS
> With the 3D display, by selecting 3D-Objects you can select whether youwould like to see 3D attractions ( ) ornot ( ). At the same time, thebuilding display is turned on/off.
> With the 2D display, by selectingHeading up you can select whether youwould like the map displayed facing thetrip direction ( ) or facing North( ).
> With Autozoom, you can turn theautozoom on or off .
> During the 3D display, select Map tiltangle to change the angle of the map.
> Select one of the following angles:Higher, Normal and Lower.
> Save and close your settings by pressingthe L button.
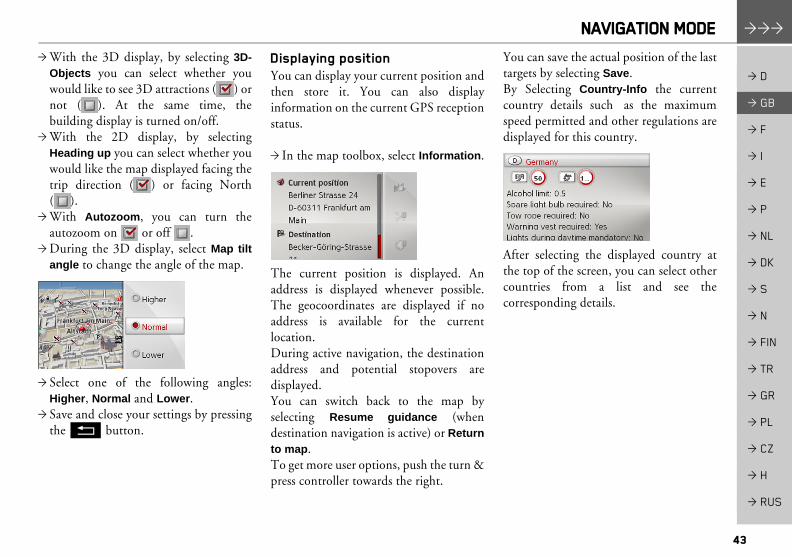
Displaying positionYou can display your current position andthen store it. You can also displayinformation on the current GPS receptionstatus.
> In the map toolbox, select Information.
The current position is displayed. Anaddress is displayed whenever possible.The geocoordinates are displayed if noaddress is available for the currentlocation.During active navigation, the destinationaddress and potential stopovers aredisplayed. You can switch back to the map byselecting Resume guidance (whendestination navigation is active) or Returnto map.To get more user options, push the turn &press controller towards the right.
You can save the actual position of the lasttargets by selecting Save.By Selecting Country-Info the currentcountry details such as the maximumspeed permitted and other regulations aredisplayed for this country.
After selecting the displayed country atthe top of the screen, you can select othercountries from a list and see thecorresponding details.

44
>>> NAVIGATION MODE
> D
> GB
> F
> I
> E
> P
> NL
> DK
> S
> N
> FIN
> TR
> GR
> PL
> CZ
> H
> RUS
GPS reception information is displayedby selecting GPS-Info.
You can see how many satellites can belinked to and if satellite reception issufficient for navigation. The current timeand geolocation is also displayed.
Repeat announcementDuring navigation, you can pull up thecurrent announcement or have theprevious one repeated.> In the map toolbox, select Repeat.
Mute announcementYou can mute the navigation systemannouncements.> In the map toolbox, select the
icon.The navigation system announcementshave now been muted. In the lower area ofthe map display, the corresponding icon isdisplayed, indicating that announcementshave been muted.
> In the map toolbox, select the icon to unmute the announcements.
45
SETTINGS >>>
> D
> GB
> F
> I
> E
> P
> NL
> DK
> S
> N
> FIN
> TR
> GR
> PL
> CZ
> H
> RUS
SettingsTo call up the settings, select Settingsfrom the main menu.
The Settings menu appears.You can now select from the following set-tings:� Guidance settings
Settings relating to the route guidance
� Map settingsSettings relating to the map display
� TMC settingsSettings relating to the receiving of TMC messages
� System settingsBasic settings relating to the Becker® MAP PILOT
Route guidance settingsThe route guidance settings contain thesettings that are relevant to route guid-ance.> In the settings menu, select Guidance
settings.
The route guidance settings are displayed.
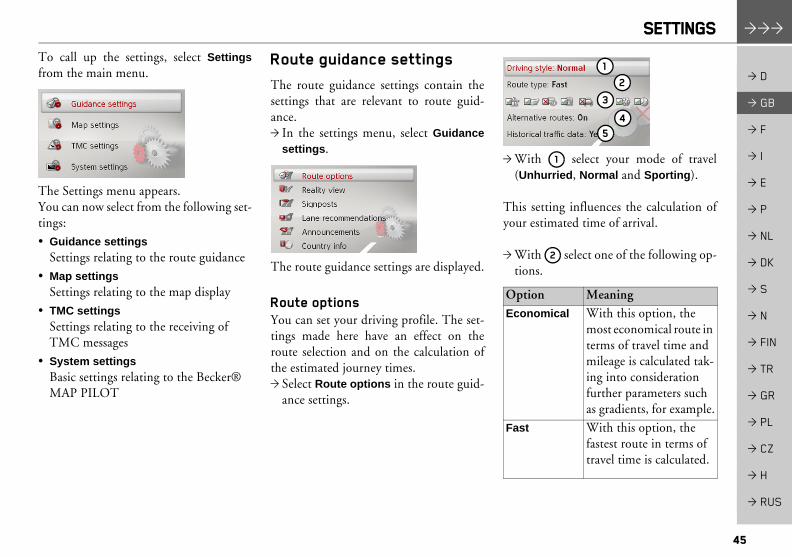
Route optionsYou can set your driving profile. The set-tings made here have an effect on theroute selection and on the calculation ofthe estimated journey times.> Select Route options in the route guid-
ance settings.
> With select your mode of travel(Unhurried, Normal and Sporting).
This setting influences the calculation ofyour estimated time of arrival.
> With select one of the following op-tions.
Option MeaningEconomical With this option, the
most economical route in terms of travel time and mileage is calculated tak-ing into consideration further parameters such as gradients, for example.
Fast With this option, the fastest route in terms of travel time is calculated.
1
2
3
45
1
2
46
>>> SETTINGS
> D
> GB
> F
> I
> E
> P
> NL
> DK
> S
> N
> FIN
> TR
> GR
> PL
> CZ
> H
> RUS
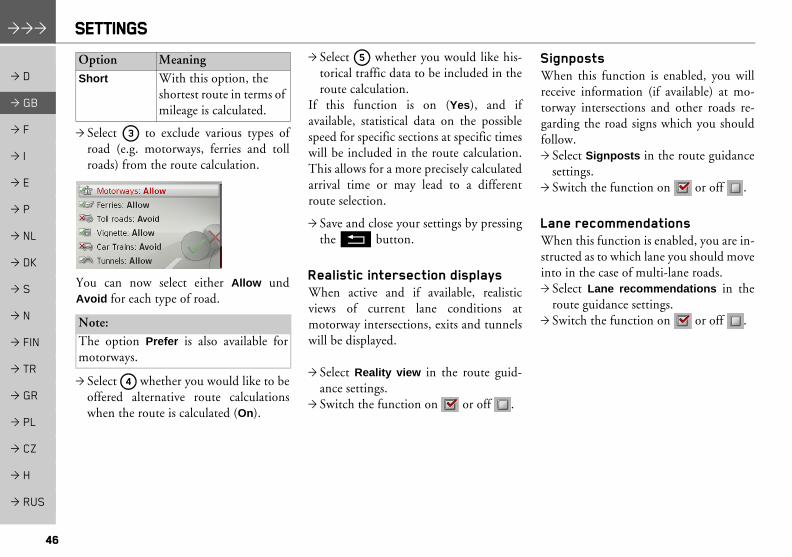
> Select to exclude various types ofroad (e.g. motorways, ferries and tollroads) from the route calculation.
You can now select either Allow undAvoid for each type of road.
> Select whether you would like to beoffered alternative route calculationswhen the route is calculated (On).
> Select whether you would like his-torical traffic data to be included in theroute calculation.
If this function is on (Yes), and ifavailable, statistical data on the possiblespeed for specific sections at specific timeswill be included in the route calculation.This allows for a more precisely calculatedarrival time or may lead to a differentroute selection.
> Save and close your settings by pressingthe L button.
Realistic intersection displaysWhen active and if available, realisticviews of current lane conditions atmotorway intersections, exits and tunnelswill be displayed.
> Select Reality view in the route guid-ance settings.
> Switch the function on or off .
SignpostsWhen this function is enabled, you willreceive information (if available) at mo-torway intersections and other roads re-garding the road signs which you shouldfollow.> Select Signposts in the route guidance
settings.> Switch the function on or off .
Lane recommendationsWhen this function is enabled, you are in-structed as to which lane you should moveinto in the case of multi-lane roads.> Select Lane recommendations in the
route guidance settings.> Switch the function on or off .
Short With this option, the shortest route in terms of mileage is calculated.
Note: The option Prefer is also available formotorways.
Option Meaning
3
4
5
47
SETTINGS >>>
> D
> GB
> F
> I
> E
> P
> NL
> DK
> S
> N
> FIN
> TR
> GR
> PL
> CZ
> H
> RUS
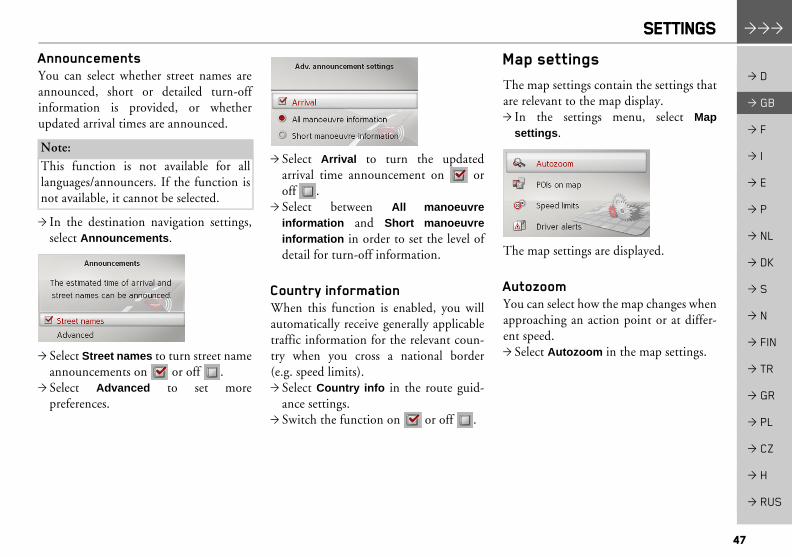
AnnouncementsYou can select whether street names areannounced, short or detailed turn-offinformation is provided, or whetherupdated arrival times are announced.
> In the destination navigation settings,select Announcements.
> Select Street names to turn street nameannouncements on or off .
> Select Advanced to set morepreferences.
> Select Arrival to turn the updatedarrival time announcement on oroff .
> Select between All manoeuvreinformation and Short manoeuvreinformation in order to set the level ofdetail for turn-off information.
Country informationWhen this function is enabled, you willautomatically receive generally applicabletraffic information for the relevant coun-try when you cross a national border(e.g. speed limits).> Select Country info in the route guid-
ance settings.> Switch the function on or off .
Map settingsThe map settings contain the settings thatare relevant to the map display.> In the settings menu, select Map
settings.
The map settings are displayed.
AutozoomYou can select how the map changes whenapproaching an action point or at differ-ent speed.> Select Autozoom in the map settings.
Note: This function is not available for alllanguages/announcers. If the function isnot available, it cannot be selected.

48
>>> SETTINGS
> D
> GB
> F
> I
> E
> P
> NL
> DK
> S
> N
> FIN
> TR
> GR
> PL
> CZ
> H
> RUS
> Switch Autozoom on or off with Autozoom.
After selecting Advanced you can specifyhow strong the Autozoom action is to be.
POIs on the mapYou can select which POI symbols are tobe displayed on the map.> Select POIs on map in the map settings.
> Switch display of the POIs on or off with Show POIs.
After selecting Advanced you can specifywhether all POI symbols or only a set ofPOI symbols selected by you are to be dis-played on the map.
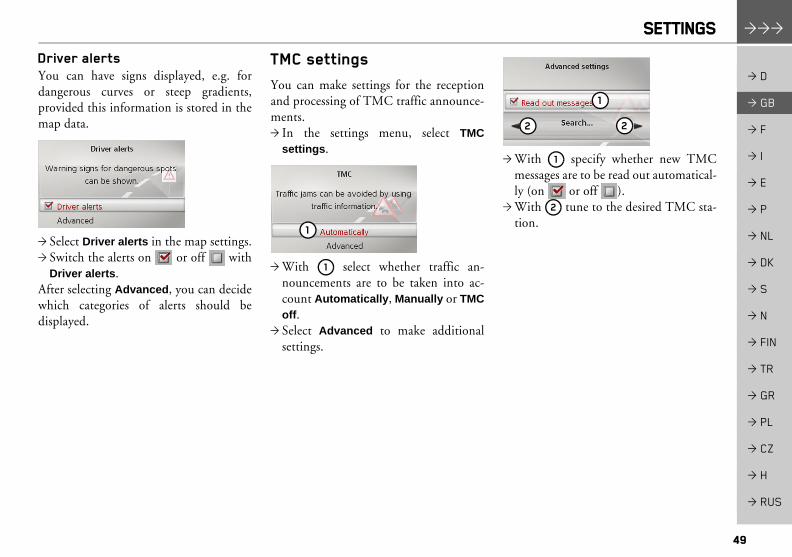
Speed limitsYou can select whether speed limits aredisplayed in parallel to the navigation. You can also receive an audible warningabout exceeding the speed limit.> Select Speed limits in the map settings.
> Switch the speed limits on or off with Speed limits.
After selecting Advanced you can specifywhether speed limits are only to be dis-played if the limit is exceeded or alwaysdisplayed. You can also set the minimumspeed at which you would like to receive awarning if the limit is exceeded.
!Danger!
Accident hazard. The information in the map data maybe incorrect as a result of short-termchanges (e.g. speed limits at roadworks).The traffic situation and the local roadsigns always take precedence over thenavigation system information.
49
SETTINGS >>>
> D
> GB
> F
> I
> E
> P
> NL
> DK
> S
> N
> FIN
> TR
> GR
> PL
> CZ
> H
> RUS
Driver alertsYou can have signs displayed, e.g. fordangerous curves or steep gradients,provided this information is stored in themap data.
> Select Driver alerts in the map settings.> Switch the alerts on or off with
Driver alerts.After selecting Advanced, you can decidewhich categories of alerts should bedisplayed.
TMC settingsYou can make settings for the receptionand processing of TMC traffic announce-ments.> In the settings menu, select TMC
settings.
> With select whether traffic an-nouncements are to be taken into ac-count Automatically, Manually or TMCoff.
> Select Advanced to make additionalsettings.
> With specify whether new TMCmessages are to be read out automatical-ly (on or off ).
> With tune to the desired TMC sta-tion.
1
1
1
22
1
2

50
>>> SETTINGS
> D
> GB
> F
> I
> E
> P
> NL
> DK
> S
> N
> FIN
> TR
> GR
> PL
> CZ
> H
> RUS
System settingsYou can change various basic settings forthe Becker® MAP PILOT.> In the settings menu, select System
settings.
The system settings are displayed.
LanguageYou can set the menu language and thelanguage for the navigation announce-ments.> Select Language in the system settings.> Select the desired language.You can now choose the type of voice (e.g.male or female voice) for some languages.> Select the desired voice.
Design variantsYou can choose between two differentdesign variants for displaying the daydesign.> Select Design variants in the system
settings. > Select the desired variant.
Pin protectionYou can create a freely definable securitycode of between 4 and 10 digits in lengthand enable/disable this security code.
> Select PIN protection in the system set-tings.
> Select Enable PIN to enable a securitycode.
> Enter the desired security code and con-firm your entry with .
> Enter the security code again and con-firm your entry with .
The security code is now enabled.
Select Disable PIN to disable a securitycode.> Enter the correct security code and con-
firm your entry with .The security code is now disabled.
Note:When a security code is entered, yourBecker® MAP PILOT is linked withyour vehicle by means of this securitycode. If your Becker® MAP PILOT is tobe used in a different vehicle, the securitycode must be entered.For the entry or change of the securitycode, the ignition of the vehicle must beturned on.

51
SETTINGS >>>
> D
> GB
> F
> I
> E
> P
> NL
> DK
> S
> N
> FIN
> TR
> GR
> PL
> CZ
> H
> RUS
Map update reminderYou can turn off the automatic reminderfor a map update.> Select Map update reminder in the sys-
tem settings.> Switch the automatic reminder on
or off .
InformationThe following selection displays informa-tion regarding the Becker® MAP PILOT.> Select Information in the system set-
tings.The information display appears.Always quote these details in enquiries tothe service.Map data versions displays informationrelating to the installed map data.
Factory resetYou can reset your Becker® MAP PILOTto the factory settings.All settings apart from the language are re-set to their factory settings. The last desti-nations and your home address are alsodeleted.> Select Factory reset in the system set-
tings.> Select Yes.The Becker® MAP PILOT is reset to thefactory settings.
52
>>> GLOSSARY
> D
> GB
> F
> I
> E
> P
> NL
> DK
> S
> N
> FIN
> TR
> GR
> PL
> CZ
> H
> RUS
GlossaryGMT(Greenwich Mean Time)Central European timeStandard time at degree of longitude 0(the degree of longitude through Green-wich, Great Britain). This time is used allover the world as the standard time forsynchronising data acquisition.
GPS(Global Positioning System)GPS uses satellites to calculate your cur-rent geographical position. It is based on atotal of 24 satellites orbiting the Earth andemitting signals. A GPS receiver receivesthese signals and uses the signal time dif-ferences to calculate the distance to an in-dividual satellite and thus the current geo-graphical position (longitude andlatitude). Signals from at least three satel-lites are required for positioning. The cur-rent height can also be calculated if signalsare received from four or more satellites.
PTT(Push To Talk)For this unit it means that after a selectionof PTT a address can be spoken. Theaddress is then processed by the navigati-on system.
SD card(Secure Digital)The SD card was developed in 2001 bySanDisk and is based on the older MMCstandard. An SD card is a rewriteable re-movable memory card.
TMC(Traffic Message Channel)Traffic announcements transmitted bymost FM stations via RDS. Basis for dy-namic navigation.
TMCpro(Traffic Message Channel Professional)A free TMC traffic alert service which isbroadcast in Germany on various privatechannels. The messages of this service aremore precise than standard traffic messag-es. The service is offered since April 2004.The license fees are already paid with theprice of the TMCpro-enabled navigationsystem.
USB(Universal Serial Bus)The Universal Serial Bus (USB) is a bussystem for connecting a computer to ex-ternal USB peripherals for exchanging da-ta.There are two different standards withvarious transmission speeds. USB 1.1transfers at a speed of 12 Mbit/s and USB2.0 transfers at 480 Mbit/s. For a transfer of large amounts of data de-vices that use the USB 2.0 standardshould be used.
53
INDEX >>>
> D
> GB
> F
> I
> E
> P
> NL
> DK
> S
> N
> FIN
> TR
> GR
> PL
> CZ
> H
> RUS
Numerics3D Display . . . . . . . . . . . . . . . . . . . .42
AAlternative routes . . . . . . . . . . . . . . . .22
BBlock . . . . . . . . . . . . . . . . . . . . . . . . .40Block a route section . . . . . . . . . . . . .40
CContent Manager Becker® MAP PILOT . . . . . . . . . . . . . . . . . . .15
Installing . . . . . . . . . . . . . . . . . .15Starting . . . . . . . . . . . . . . . . . . .15
Coordinate entry . . . . . . . . . . . . . . . .28Country information . . . . . . . . . . . . .47Current Position . . . . . . . . . . . . . . . .43
DDelete
stopover . . . . . . . . . . . . . . . . . . .37Destination from map . . . . . . . . . . . .27Destination input . . . . . . . . . . . . . . .19Destination input menu . . . . . . . . . .19Destination list . . . . . . . . . . . . . . . . .17
DestinationsEntering . . . . . . . . . . . . . . . . . . .19Storing . . . . . . . . . . . . . . . . . . . .23
Display route . . . . . . . . . . . . . . . . . . .39Displaying the route . . . . . . . . . . . . .22
EEconomical route . . . . . . . . . . . . . . . .45Entering a city . . . . . . . . . . . . . . . . . .20Entering an address . . . . . . . . . . . . . .20Entering an address using speech . . . .24
FFast access mode . . . . . . . . . . . . . . . .17Fast route . . . . . . . . . . . . . . . . . . . . . .45Ferries . . . . . . . . . . . . . . . . . . . . . . . .46
GGeographical coordinates . . . . . . . . . .28GMT . . . . . . . . . . . . . . . . . . . . . . . . .52GPS . . . . . . . . . . . . . . . . . . . . . . . . . .52GPS Reception . . . . . . . . . . . . . . . . .44
HHome address . . . . . . . . . . . . . . . . . .18House number . . . . . . . . . . . . . . . . . .22
IInput lock . . . . . . . . . . . . . . . . . . . . .13Intended purpose . . . . . . . . . . . . . . . . .4Intersection . . . . . . . . . . . . . . . . . . . .21
LLast destinations . . . . . . . . . . . . . . . .17
MMain menu . . . . . . . . . . . . . . . . . . . .12Map
Displaying . . . . . . . . . . . . . . . . .33Zooming in . . . . . . . . . . . . . . . .36Zooming out . . . . . . . . . . . . . . .36
Map display . . . . . . . . . . . . . . . . . . . .33Map settings . . . . . . . . . . . . . . . . . . .47Memory card . . . . . . . . . . . . . . . . . . .11Motorways . . . . . . . . . . . . . . . . . . . . .46
NNavigation . . . . . . . . . . . . . . . . . . . . .16
Starting . . . . . . . . . . . . . . . . . . . .23New destination . . . . . . . . . . . . . . . .19
Index

54
>>> INDEX
> D
> GB
> F
> I
> E
> P
> NL
> DK
> S
> N
> FIN
> TR
> GR
> PL
> CZ
> H
> RUS
PPoints of interest
Entered directly . . . . . . . . . . . . . 27Near address . . . . . . . . . . . . . . . 26Near destination . . . . . . . . . . . . 26Nearby . . . . . . . . . . . . . . . . . . . 26
POIson your route . . . . . . . . . . . . . . 38
RRestrictions
Ferries . . . . . . . . . . . . . . . . . . . . 46Motorways . . . . . . . . . . . . . . . . 46Toll roads . . . . . . . . . . . . . . . . . 46
Route guidanceStarting . . . . . . . . . . . . . . . . . . . 23
Route guidance settings . . . . . . . . . . 45Route options . . . . . . . . . . . . . . . 39, 45Route planning . . . . . . . . . . . . . 19, 29
SSafety instructions . . . . . . . . . . . . 4, 16Satellites . . . . . . . . . . . . . . . . . . . . . . 44SD card . . . . . . . . . . . . . . . . . . . . . . 11Selecting a city . . . . . . . . . . . . . . . . . 20Selecting a country . . . . . . . . . . . . . . 20Selecting a destination
Entering an address . . . . . . . . . . 20
Selecting the street . . . . . . . . . . . . . . 21Set map display . . . . . . . . . . . . . . . . 42Settings
Map . . . . . . . . . . . . . . . . . . . . . 47Route guidance . . . . . . . . . . . . . 45System . . . . . . . . . . . . . . . . . . . 50TMC . . . . . . . . . . . . . . . . . . . . 49
Short route . . . . . . . . . . . . . . . . . . . . 46Stop
Navigation . . . . . . . . . . . . . . . . 42System settings . . . . . . . . . . . . . . . . . 50
TTMC . . . . . . . . . . . . . . . . . . . . . . . . 31
on your route . . . . . . . . . . . . . . 37Recalculating routes . . . . . . . . . 32
TMC settings . . . . . . . . . . . . . . . . . . 49Toll roads . . . . . . . . . . . . . . . . . . . . . 46Traffic information . . . . . . . . . . . . . 47
UUSB . . . . . . . . . . . . . . . . . . . . . . . . . 52
VVoice entry . . . . . . . . . . . . . . . . . . . . 24
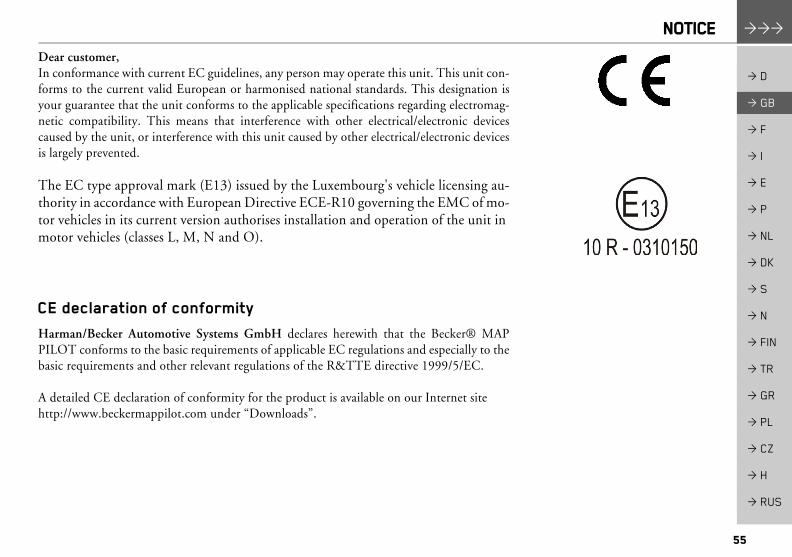
55
NOTICE >>>
> D
> GB
> F
> I
> E
> P
> NL
> DK
> S
> N
> FIN
> TR
> GR
> PL
> CZ
> H
> RUS
NOTICEDear customer,In conformance with current EC guidelines, any person may operate this unit. This unit con-forms to the current valid European or harmonised national standards. This designation isyour guarantee that the unit conforms to the applicable specifications regarding electromag-netic compatibility. This means that interference with other electrical/electronic devicescaused by the unit, or interference with this unit caused by other electrical/electronic devicesis largely prevented.
The EC type approval mark (E13) issued by the Luxembourg's vehicle licensing au-thority in accordance with European Directive ECE-R10 governing the EMC of mo-tor vehicles in its current version authorises installation and operation of the unit in motor vehicles (classes L, M, N and O).
CE declaration of conformityHarman/Becker Automotive Systems GmbH declares herewith that the Becker® MAPPILOT conforms to the basic requirements of applicable EC regulations and especially to thebasic requirements and other relevant regulations of the R&TTE directive 1999/5/EC.
A detailed CE declaration of conformity for the product is available on our Internet site http://www.beckermappilot.com under �Downloads�.

56
>>> NOTICE
> D
> GB
> F
> I
> E
> P
> NL
> DK
> S
> N
> FIN
> TR
> GR
> PL
> CZ
> H
> RUS
DisposalCustomer information on the disposal of electrical and electronic devices(private households)In accordance with the self-imposed principles of Harman/Becker Automotive Systems Gm-bH, its product was developed and made from high-quality, recyclable materials and compo-nents.This symbol on the product and/or accompanying documents means that at the end of theirlife electrical and electronic products must be disposed of separately from domestic waste.Please take these products to communal collecting points or recycling centres for processingand salvage of materials. The units will be accepted there free of charge.The proper disposal of this product helps protect the environment and prevents harmful ef-fects on humans and the environment, which could result from improper handling.More detailed information on the nearest collecting point or the nearest recycling centre canbe obtained from your local council.
For commercial customers in the European UnionPlease contact your dealer or supplier if you would like to dispose of this electrical/electronicequipment.
Information on disposal in countries outside of the European UnionThis symbol is only valid within the European Union.
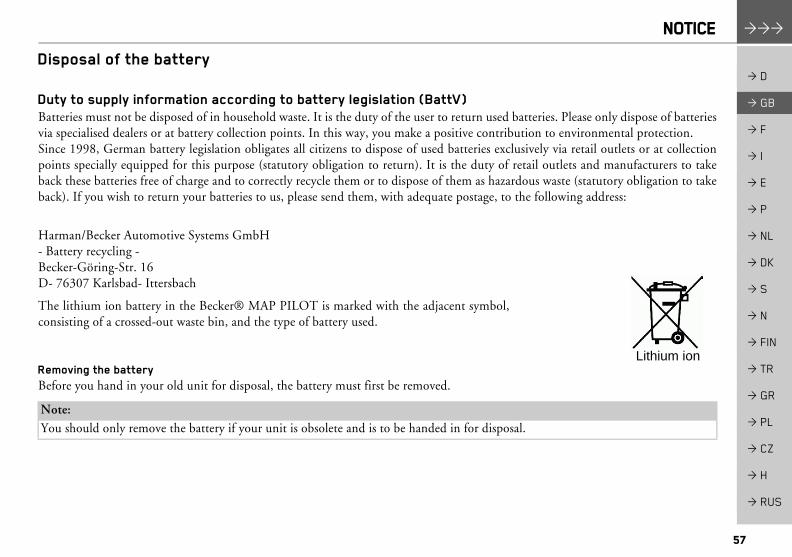
57
NOTICE >>>
> D
> GB
> F
> I
> E
> P
> NL
> DK
> S
> N
> FIN
> TR
> GR
> PL
> CZ
> H
> RUS
Disposal of the battery
Duty to supply information according to battery legislation (BattV)Batteries must not be disposed of in household waste. It is the duty of the user to return used batteries. Please only dispose of batteriesvia specialised dealers or at battery collection points. In this way, you make a positive contribution to environmental protection.Since 1998, German battery legislation obligates all citizens to dispose of used batteries exclusively via retail outlets or at collectionpoints specially equipped for this purpose (statutory obligation to return). It is the duty of retail outlets and manufacturers to takeback these batteries free of charge and to correctly recycle them or to dispose of them as hazardous waste (statutory obligation to takeback). If you wish to return your batteries to us, please send them, with adequate postage, to the following address:
Harman/Becker Automotive Systems GmbH- Battery recycling - Becker-Göring-Str. 16D- 76307 Karlsbad- Ittersbach
The lithium ion battery in the Becker® MAP PILOT is marked with the adjacent symbol,consisting of a crossed-out waste bin, and the type of battery used.
Removing the batteryBefore you hand in your old unit for disposal, the battery must first be removed.
Note:You should only remove the battery if your unit is obsolete and is to be handed in for disposal.
Lithium ion
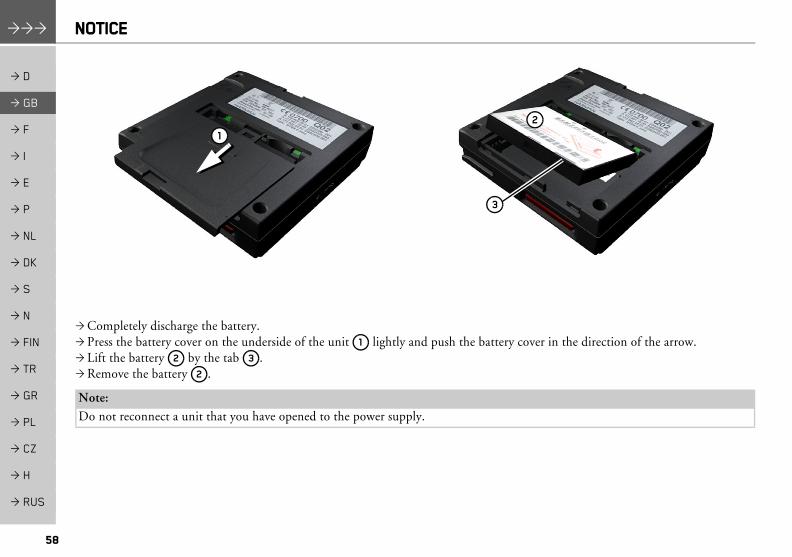
58
>>> NOTICE
> D
> GB
> F
> I
> E
> P
> NL
> DK
> S
> N
> FIN
> TR
> GR
> PL
> CZ
> H
> RUS
> Completely discharge the battery.> Press the battery cover on the underside of the unit lightly and push the battery cover in the direction of the arrow.> Lift the battery by the tab .> Remove the battery .
Note:Do not reconnect a unit that you have opened to the power supply.
12
3
1
2 3
2