manual for vendor dashboard
TRANSCRIPT

MANUAL FOR VENDOR
DASHBOARD JMC Vendor Portal
Abstract The document covers step by step instructions to be followed by a Vendor to conduct various
activities in JMC Vendor Portal. This Document aims at those who are going to carry out Vendor activities in the portal.

1 | P a g e
Contents Manual for prospective vendor to raise expression of interest and registration:.................................. 2
How to Express interest for Business units? ....................................................................................... 2
How to do Registration for prospective vendor? ............................................................................... 4
Registered Vendor: ............................................................................................................................... 12
First Time Login: ................................................................................................................................ 12
Dashboard: ........................................................................................................................................ 15
New Enrolment: ................................................................................................................................ 16
Vendor User: ..................................................................................................................................... 17

2 | P a g e
Manual for prospective vendor to raise expression of interest and
registration:
How to Express interest for Business units? Step 1: The user to click on Expression of interest as shown below.
Step 2: Following fields marked with ‘ * ‘ are mandatorily to be filled by the user.
User to enter the OTP send to the Contact mobile number entered by the user.
User to click on proceed.
3 | P a g e
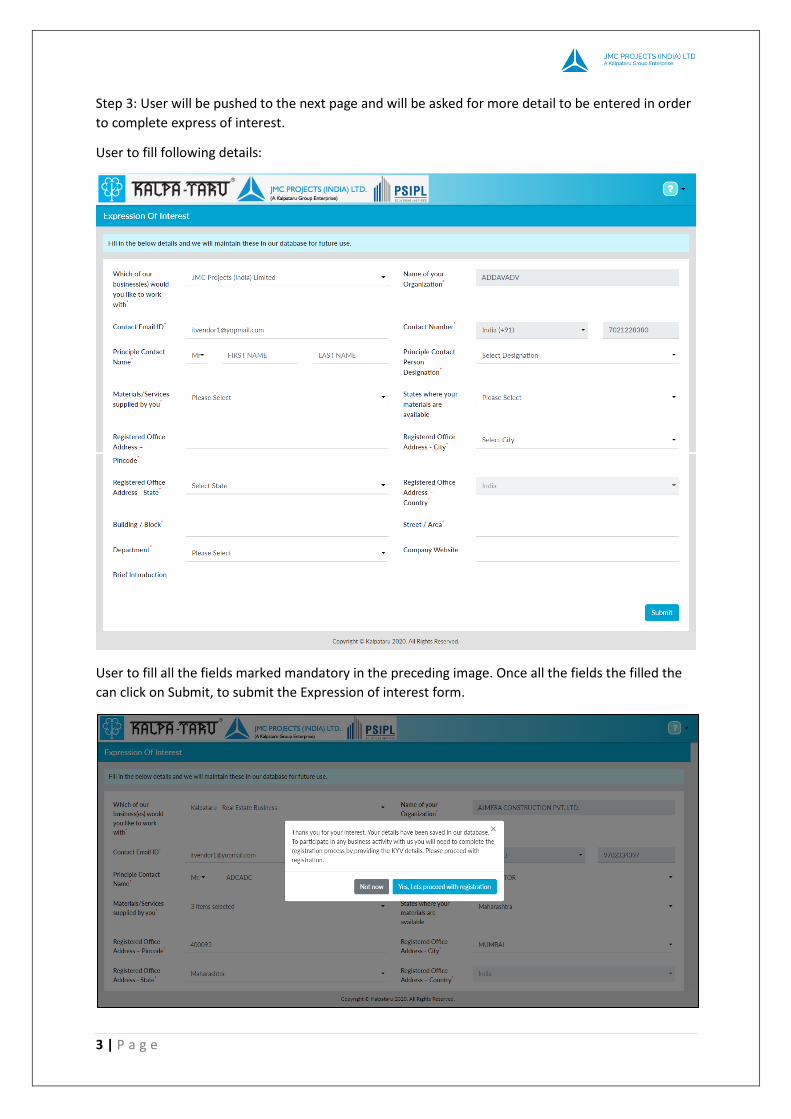
Step 3: User will be pushed to the next page and will be asked for more detail to be entered in order
to complete express of interest.
User to fill following details:
User to fill all the fields marked mandatory in the preceding image. Once all the fields the filled the
can click on Submit, to submit the Expression of interest form.

4 | P a g e
The user is direct to the Registration page on clicking “Yes, lets proceed with registration”.
Alternatively
The user can continue with registration from login page.
How to do Registration for prospective vendor? The user can continue with registration from login page by the clicking on registration as shown
below:
Step 4: If the user wishes to register himself, on clicking register the user is shown the following
page:

5 | P a g e
User to fill all the fields that are marked with ‘*’ which signifies mandatory fields.
User to enter the OTP send to the Contact mobile number and Contact Email ID entered by the
user.
User to click on proceed on entering the OTP.
Step 5: On clicking proceed the user will be directed to the Introduction form of the registration
process.

6 | P a g e
The user should fill all mandatory data (Marked ‘*’) asked by the form.
The top ribbon shows the location of the user on the registration form. As the user moves on the
form, this ribbon shows the current page on which the user is, along with the previous and next
pages of the form.
On filling all the details, the user can click on next to move the KYV detail page.
Step 6: On KYV details page user can fill in his details as follows:
The user has to select the Country of residency. The above page shows KYV details page for an Indian
user. For a foreign user, the KYV details have to Tax residency number.
Before enter the user enters pan details, the user has to Select the date of Incorporation/birth.
The user has to enter Captcha against every detail entered on the KYV page.
If the user doesn’t have any of the mandatory details as asked, he can either choose to tick Not
Registered to mark that the vendor doesn’t have the registered document, or can tick Not
Applicable to mark that the user is not applicable to these documents.
When user adds TAN number, a OTP will be sent to the mobile number entered to be verified.

7 | P a g e
PAN-PIN-Region-GST validation:
At the time of registration, in the KYV tab the system will validate if the combination of PAN, PIN,
Region & GST already exist in the system.
If the combination exist, then the system will throw an error notification pop up to the user and will
not allow him/her to proceed.
If user has not entered the GST No or marked it as NA/NR, the system will check PAN, PIN & Region
combination. If combination already exist then the system will not allow the user to proceed and
give error notification pop up. This will occur even if the vendor type is different.
The user to click next once all the details are entered.
Step 7: On clicking next on KYV details page the user is moved to KYV verification page, where
resultant fields are displayed, depending upon details filled in the KYV details page.

8 | P a g e
Here the portal displays the details depending on the details filled on the KYV details page.
The user verifies the details fetched from the government sites displayed on the portal. User can edit
these details to correct them.
The page displays the attributes, information of the attributes, and the source of information of the
attributes.
If the information entered by the user conflicts with the information fetched from the gov. site, the
portal marks it as incorrect and the User will have to enter the correct value in the corrected value
box and will also have to state the reason for discrepancy.
On clicking next, the portal saves the data and moves the user to the next page.

9 | P a g e
Step 8: On clicking next on KYV verification page, the portal moves the user to bank details page.
The page displays information about the bank details of the prospective vendor.
User has to enter only his/her Bank IFSC code, while the portal auto fills the bank name, bank
branch, and branch address.
On clicking ‘Add’ the bank details are saved in the portal.
If the user is eligible for Low TDS, the user can tick the Lower TDS box to claim eligibility.
On clicking next, the user is moved to the next page.

10 | P a g e
Step 9: On clicking next, the user is moved to the next page i.e, other details page.
The customer to enter Additional details required by the company.
Accounts Email ID , Email 2, Email 3 are available on the form. Accounts Email ID will be mandatory
for domestic service, domestic material, domestic specialized service. On clicking next, the portal
saves the entered details and moves the user to Upload document page.
Step 10: On upload document page, the user has upload document which is has claimed to have in
the KYV details page and various other document, depending on the vendor type selected.

11 | P a g e
If the user has marked Not applicable or Not registered in any of the field in the KVY detail page,
then those fields have declaration sample document link beside it. The user has to download this
document by clicking on the link, fill in the details, and upload it under the respective field.
The user can save the information declared by him/her by clicking save button.
The user can submit the information by clicking submit. On clicking submit the document is saved
and the user is provided with a request identification code.
On clicking ‘OK’ the user is logged out of the form and redirected to the login/registration page.

12 | P a g e
Registered Vendor:
First Time Login: Once the vendor request sent by the user is approved, an Email is sent to the user confirming that
the request is accepted and the details that has been sent is now registered.
The User name is the Email ID provided and a default password is set.
A hyperlink to the portal is provided.
Step 1: clicking the hyperlink in the mail, the user is directed to the login page of the portal.
Step 2: The user can enter his ‘user name’ and ‘password’ as mentioned in the mail.
Step 3: On entering the credentials, click Login.
Step 4: The portal identifies the credentials and sends an OTP to the registered Email address.

13 | P a g e
Step 5: On verifying the OTP a password reset link is sent to the registered Email ID. On clicking
‘Resend OTP’ a OTP is resent to the user email ID.
Step 6: On clicking the link in mail,
the user is directed to the portal where he is asked to enter ‘New Password’.
Step 7: The user has to enter the New Password and enter the password again to confirm the
password.

14 | P a g e
Step 8: On confirming the password a ‘Password Reset Successful’ message is prompt to the user
and the user is asked to re-enter using his credentials.
Step 9: The user has to enter his registered Email ID and the newly created password on the login
portal and click login.
Step 10: The user has to enter 6 digit OTP received on the Email and then Click verify.
Step 11: On verification the vendor is logged on his vendor dashboard.

15 | P a g e
Dashboard: Below is the dashboard of the vendor.
• The Vendor can sort its searches according to vendor category and vendor type.
• The first request registered with the portal is viewed in the Registered vendor section. Here
the user can view the Vendor Code, Vendor Name, PAN, GST, vendor type, State, Pin code,
and status.
• The user can also view and edit the request as required. When user clicks the view option
the request form is opened. User can view the details entered in the request.
• To edit the form, the user can click the edit option. On doing so, the request form is shown
to the user and the user can edit the form.
• In the Request section, the user can view all the request that were raised for new enrolment
or for changes. This section shows the ongoing request that are awaiting approval.
• User can search for the desired request by filtering the Request type, Request Status, and its
Vendor Type.
• The Request is classified according to Vendor Code, Vendor Name, PAN, GST, vendor type,
State, Pin code, and status.

16 | P a g e
New Enrolment: To create a new enrolment, the user has to be present on the Vendor dashboard.
Step 1: In vendor details section, click on new enrolment.
Step 2: The user is moved to vendor registration request page where it is asking to select Business
Unit, vendor type, Country name. the fields like Contact email ID and contact mobile number
remains the same.
Step 3: On clicking ‘Submit’ the user is prompt to select the vendor code whose data would like to
copied to the current request in case the data is repetitive.
The user can Click ‘Don’t Apply’ to skip copying data to the new request. On doing so, the user will
receive black form for registration.
Step 4: On filling all the necessary details for the registration page the user can submit the form
which is forwarded for approval.

17 | P a g e
Vendor User: In the LHS column masters tab is seen:
Here the vendor can extend the registered vendor request of the current entry to another email and
contact number.
Step 1: Move the cursor to the LHS of the age where a column appears.
Step 2: Under the masters’ dropdown, select vendor user.
Step 3: On clicking the vendor user, user will be directed to Vendor Initiator dashboard
Step 4: Click on Add New
Step 6: The user has to fill out details and then click Submit.
Step 7: The newly added email ID will receive the credentials access and will be able to Add, view
and modify request.

18 | P a g e
The user will be able edit the vendor account by clicking the Edit button in the action column.
Step 8: Click the Edit button in the action column.
Step 9: The user can edit the name and contact number in the request. The user will not be able to
edit Organisation name and contact email ID.
Step 10: On doing the necessary changes the user can click submit to save the changes.