m3 user guide - fastpay payroll · payroll ... millennium 3 quick reference user guide 6 mpay...
TRANSCRIPT

Quick Reference User Guide
Millennium 3 Quick Reference User Guide 2 MPAY Software 2006
Table of Contents
GETTING STARTED ..........................................................................................................................................4 LOGGING IN.............................................................................................................................................................4 NAVIGATION ...........................................................................................................................................................4 COMPANY SELECTION OPTIONS ..............................................................................................................................5 OTHER NAVIGATION OPTIONS.................................................................................................................................5
EMPLOYEE MAINTENANCE .........................................................................................................................6
NEW EMPLOYEE WIZARD .............................................................................................................................6
EMPLOYEE INFORMATION...........................................................................................................................9 ACCRUALS...............................................................................................................................................................9 AUTO PAYS ...........................................................................................................................................................10 DEDUCTIONS .........................................................................................................................................................10 DEMOGRAPHICS ....................................................................................................................................................12 DIRECT DEPOSIT....................................................................................................................................................12 FRINGE ..................................................................................................................................................................14 INFORMATION........................................................................................................................................................15 CHECK CALCULATOR ............................................................................................................................................15 LABOR ALLOCATION .............................................................................................................................................16 MISCELLANEOUS ...................................................................................................................................................16 PAY HISTORY ........................................................................................................................................................16 RATES/REVIEWS....................................................................................................................................................17 STATUS/POSITION..................................................................................................................................................18 TAXES ...................................................................................................................................................................18
EMPLOYEE HR INFORMATION .................................................................................................................20 401K......................................................................................................................................................................20 RATES/REVIEWS....................................................................................................................................................20 DEPENDENTS .........................................................................................................................................................20 DOCUMENTS..........................................................................................................................................................20 EDUCATION ...........................................................................................................................................................20 EMERGENCY CONTACTS........................................................................................................................................20 EVENTS .................................................................................................................................................................20 PREVIOUS EMPLOYERS ..........................................................................................................................................20 SKILLS ...................................................................................................................................................................21
PAYROLL .............................................................................................................................................................22 START PAYROLL....................................................................................................................................................22
PAY ENTRY BATCHES ..................................................................................................................................23 PAYROLL ENTRY ...................................................................................................................................................24 NAVIGATION IN PAYROLL ENTRY..........................................................................................................................24 PAY ENTRY ...........................................................................................................................................................25 KEYING YOUR PAYROLL .......................................................................................................................................26 PREPROCESS REGISTER..........................................................................................................................................26 CLOSING AND SUBMITTING PAYROLL ...................................................................................................................27 RETRIEVING YOUR PAYROLL DATA ......................................................................................................................27
PAYROLL PROCESS CHECKLIST ............................................................................................................28
Millennium 3 Quick Reference User Guide 3 MPAY Software 2006
REPORTS .............................................................................................................................................................29 TO ADD A REPORT.................................................................................................................................................29 TO RUN A REPORT.................................................................................................................................................29 CHANGING REPORT PARAMETERS .........................................................................................................................30
REPORT WRITER .............................................................................................................................................33 CREATING A REPORT WRITER REPORT..................................................................................................................33
Step 1 – Create a blank report ..........................................................................................................................33 Step 2 – Enter a Report Title.............................................................................................................................33 Step 3 – Select the report type...........................................................................................................................34 Step 4 – Enter the needed fields........................................................................................................................34 Step 5 – Create Groups/Sorts (optional)...........................................................................................................35 Step 6 – Set up Filters (optional) ......................................................................................................................36 Step 7 – Preview/Print Report ..........................................................................................................................36

Millennium 3 Quick Reference User Guide 4 MPAY Software 2006
GETTING STARTED Logging In
Your payroll provider will furnish you with a user name and password to log in to Millennium. You should not share this information with anyone else. If you need additional users set up notify your payroll provider.
Navigation From the Main Menu, you may access all the areas allowed by your payroll provider. Click the icons or the links to navigate to the desired area.
TOOL BAR FUNCTIONS
SAVE or Fll is also a SAVE key.
Tree Control – use this to open and close the tree display section on the left.
Employee Lookups - Allows you to view the employees in a variety of ways to assist with navigation through the software. These functions are only available in the Payroll and Employee modules.
Module Contents Lookup - Additional lookup feature. The section of the software you are using controls the available selection list.
Navigation Arrows - Assist in moving through the list of items displayed in the Module Contents Lookup.
Printer icon – click to print a report.
Preview – click here to preview a report.
Module Bar – click any module to go directly to that area. The drop down arrows list the sections within each module.
TreeView - Clicking on any “+” in the Tree Display Area will open that section to display the contents of that section. Any item with a “+” indicates there are additional options to display. There are no additional options to view for any item with a “-“.
Refresh

Millennium 3 Quick Reference User Guide 5 MPAY Software 2006
Company Selection Options You may access your company(s) one of three ways:
1. Use the dropdown and select GO in the middle of the screen 2. Click “+” in the Tree View to maximize 3. Use the Module Bar to select a specific module within a company.
Other Navigation Options SORT – by ID, Name, or Other. You must be in the employee area to change the sort method. ID will sort by EE ID, Name will sort by EE Name, and Other will sort by what is chosen in the Filter dropdown. TOOLS/Preferences – another method to change what you can view and change your color preferences. The Automatic Logout of M3 can be changed on the Other tab.
Yellow Star – this is the add new function. Clicking this will create a new entry.
The “x” is the delete function.
Start Date / End Date fields control when the item will be used. If the check date is within the start and end dates, the related item will be used. This allows the entry of future dated items (rates, deductions) at any time.
Click this to access system HELP. Some areas may not be populated with information.
For field specific help – right click on a field to get this message and then choose it.
Millennium 3 Quick Reference User Guide 6 MPAY Software 2006
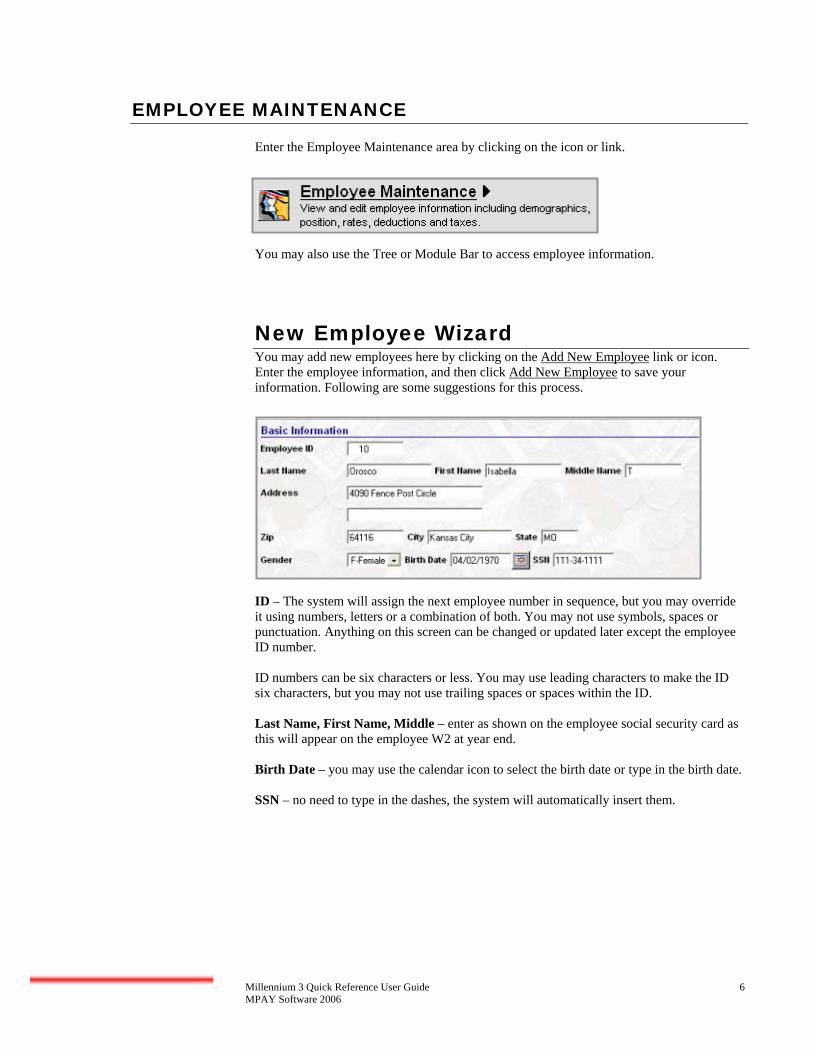
EMPLOYEE MAINTENANCE Enter the Employee Maintenance area by clicking on the icon or link. You may also use the Tree or Module Bar to access employee information.
New Employee Wizard You may add new employees here by clicking on the Add New Employee link or icon. Enter the employee information, and then click Add New Employee to save your information. Following are some suggestions for this process.
ID – The system will assign the next employee number in sequence, but you may override it using numbers, letters or a combination of both. You may not use symbols, spaces or punctuation. Anything on this screen can be changed or updated later except the employee ID number. ID numbers can be six characters or less. You may use leading characters to make the ID six characters, but you may not use trailing spaces or spaces within the ID. Last Name, First Name, Middle – enter as shown on the employee social security card as this will appear on the employee W2 at year end. Birth Date – you may use the calendar icon to select the birth date or type in the birth date. SSN – no need to type in the dashes, the system will automatically insert them.

Millennium 3 Quick Reference User Guide 7 MPAY Software 2006
Hire Date – the default value is today’s date. If the hire date is not today, you should change this field to the correct date. Worker Comp Code – use the drop down if applicable. If the code you need is not listed in the drop down, it must be added on the company level. Call your payroll provider if you do not have access to this tab, and they will add it for you.
Base Rate – the hourly rate is keyed here. For salary employees, you may skip this field and it will automatically populate when you type in the salary amount. If it field does not, automatically populate, then manually calculate it. Call your payroll provider to set up this automation feature; so in the future you do not have to manually calculate the hourly rate for salary employees. Avg Hours – this field is optional. Using this field for hourly employees will create an “Auto Pay” box on the payroll entry screen which can be “checked” to pay the employee. The other option is leave this field blank since worked hours tend to fluctuate. This allows you to key actual hours in the pay entry grid. Populate this field for salary employees so the system will automatically populate the hours in the pay period (as seen in the example above.) This is especially helpful if you have a retirement plan so the census reports will reflect hours worked. Salary – use this for salary employees and type in the amount they will receive per pay period. You may want to record hours for the salary employee as well as dollars. If so, then use the default hours field as applicable (40, 80, 86.67 or 173.33) in the Avg Hours field. Pay Frequency – will default to your company default, but it may be changed. Auto Pay – the choices in the drop down are to leave blank, Salary, or Hourly. We recommend choosing “Salary” for all Salary employees. This utilizes the automation of the system and means less work for you. All salary employees will be paid during a payroll process unless you manually override it. You can mark hourly employees as “Hourly”, but it is recommended this be left blank as the hourly staff hours change frequently. This option depends on the setup of your company.

Millennium 3 Quick Reference User Guide 8 MPAY Software 2006
Tax Information – the federal and default state will populate automatically. If you operate in multiple states, remember to change the employee information accordingly. Federal/State/Local Tax Details – use this area to input filing and exemption status. The system knows the status levels for each state so the dropdown will populate with the appropriate choices. Remember to attach the appropriate local tax if applicable.
Note: call your payroll provider if there is a tax code you need but it is not in the dropdown menu.
Click Add New Employee. If all the mandatory fields have been populated, the employee should now be in your list of employees. A field highlighted with a red box indicates an error has been made or a field left blank. Correct the error and click Add New Employee again.

Millennium 3 Quick Reference User Guide 9 MPAY Software 2006
Employee Information An explanation of each tab follows. Tabs are in alphabetical order with the exception of HR tabs. Those are reviewed at the end of this section. Accruals Use this tab to establish an employee’s participation in a time off accrual type. The Accrual types are setup on the company level by your payroll provider. An employee can participate in an unlimited number of time off types. To add a new accrual, click the yellow star and select the appropriate accrual.
To remove a policy type from the employee file, press the delete button (x). It may be better, however, to change the end date and leave the policy in the employee record to provide you with a better audit trail. Options are available to override certain aspects of the company level policy accrual at the employee level, such as:
Adj LOS - If the employee falls outside of the standard policy with regard to length of service, populate the Adj LOS Date with the override length of service date. This date will be subtracted from the current check date to determine the accrual amount.
If the employee falls outside of the standard policy with regard to rate, hours, or amount, check the applicable box and populate the override value. If a box is “checked”, but no amount is associated with the check box, the item will be overridden to zero.
Accrual Balance You may adjust an employee’s accrual balance in the bottom right corner of the screen. This may have to be done periodically based on the way your policy is set up or if the balance is incorrect. DO NOT adjust an employee balance if that employee is in a probationary period. This could cause an error when the probationary period is over.

Millennium 3 Quick Reference User Guide 10 MPAY Software 2006
Auto Pays You may enter pay types here that are added to the employee’s paycheck every payroll (i.e. car allowance or phone allowance.) These entries will appear in pay detail when the employee is paid. You can temporarily cancel the payment of a scheduled item in Employee Pay Entry by deleting the pay item or the paycheck in payroll entry. One-time additions to an employee’s paycheck can be done in Payroll Entry and should not be entered here. Employee Auto Pays Choose the appropriate earning/deduction code you would like to automatically pay the employee. Attach hours if necessary and fill in the amount and proper date fields. Note: The employee will be paid this amount even if you do not input data for a paycheck. Remember to delete the item from pay entry if you do not want them to be paid this amount.
Deductions Amounts to be deducted from an employee’s paycheck as a scheduled activity are stored here. One-time deductions can be entered in Payroll Entry as needed and should not be entered here. DEDUCTION FIELDS Calc Code A calc code can be assigned to a deduction. Calc Codes are VB
Scripts containing the deduction calculation logic. The Drop List displays all available Calc Codes setup on the company level.
Rate/Amount The calc code will determine if the number entered is a rate or amount. If the calc code field is left blank, the number entered here will be treated as an amount.
Frequency Leave blank the deduction will occur every pay period, and on any additional checks you might create. You may block an unwanted deduction in the paycheck attributes by using the override function in payroll entry. Your payroll provider can set up special frequencies for deductions that should occur only once per month, or those that should be blocked on the fifth payroll of the month, etc.
Last Taken The system updates this field automatically with the date this deduction was last taken on a paycheck. When adding a new frequency based deduction, you must enter the check date that reflects when the deduction would have last occurred
Start/End Dates These will populate automatically with the start date = the next check date and end date = 12/31/2100 (forever.) These dates can be changed.
Agency Select the appropriate agency. New agencies are added on the company level.
Misc Information If the deduction has been assigned to an agency check, then information entered in this field will appear on the check stub. Enter the Case Number or other identifier for a Child Support Garnishment in this field
Goal The Goal amount indicates the full amount owed by the employee and is commonly used with Tax Levies, FSA’s, and Employee Loans. If an amount is entered, the deduction will be taken until

Millennium 3 Quick Reference User Guide 11 MPAY Software 2006
the Paid field equals the Goal amount. Paid The life to date amount taken since the goal amount was entered.
If a deduction has taken place and the goal amount is entered later you must also update the Paid amount with the amount previously deducted. Millennium will only look at the amount in the paid field and will NOT look back at the history of the deduction.
Min/Max/YTD Max
Minimum- The amount of the deduction withheld cannot be lower than this amount. If the calculated deduction amount is less than the value of this field, the amount entered in this field will be withheld. Maximum- The amount of the deduction withheld cannot exceed this amount. If the calculated deduction amount is greater than the value of this field, the amount entered in this field will be withheld. YTD Max -If an amount is entered, this deduction will not be withheld once the YTD withholding for the deduction equals this amount.
Use Co. Defined Rate/Calc
No longer used. Default values (if any) are determined in the Company level definition for this deduction code.
Example – Setting up a Deduction: 1. Click the yellow star and choose the deduction from the list. 2. Choose a special calculation code if necessary (i.e. child support, 401k). Leave blank
to take a flat amount. 3. Populate the rate/amount. The rate will be a percentage if you choose a percentage
calculation code. 4. Let the frequency default to Every Pay Period unless this deduction should have a
special frequency, such as the first payroll of the month, then choose as needed. 5. The start date will default to your next payroll and the end date to 12/31/2100
(forever). You may override this if necessary.

Millennium 3 Quick Reference User Guide 12 MPAY Software 2006
Demographics This tab contains the employee name and address along with a few other pieces of demographic data.
You may change an employee address, add additional contact information, and insert data into custom fields. User Defined Fields –You can create field labels to track information for which there is not a field already available in M3. There are four custom fields available on this tab as seen in the screenshot above.
Direct Deposit The definitions for employee’s direct deposits are setup here. An employee can have an unlimited amount of direct deposits. Direct Deposits can be coded as a Flat Amount, a percentage of the Net Pay or Net Pay minus a flat amount. DIRECT DEPOSIT FIELDS Priority This is the order Millennium will perform the Direct Deposit
instructions. Priorities are defined numerically. Millennium will create the direct deposits for the employee in priority order, starting with the lowest number first. If multiple direct deposits are setup and have the same priority order there is no way to know which one will happen first. By default, direct deposit has a priority of zero.
Start/End Dates The Direct deposit will be created if the check date is within the Start and End Date range. If the check date is before the Start Date or after the End Date, the Direct Deposit will not be created.
ABA Routing This is the routing or transit number. This number should always be obtained from a Voided check when possible. Valid routing numbers DO NOT begin with “5” and if used will be rejected.
Account The bank account number. Checking If selected, the bank account is a checking account. If not
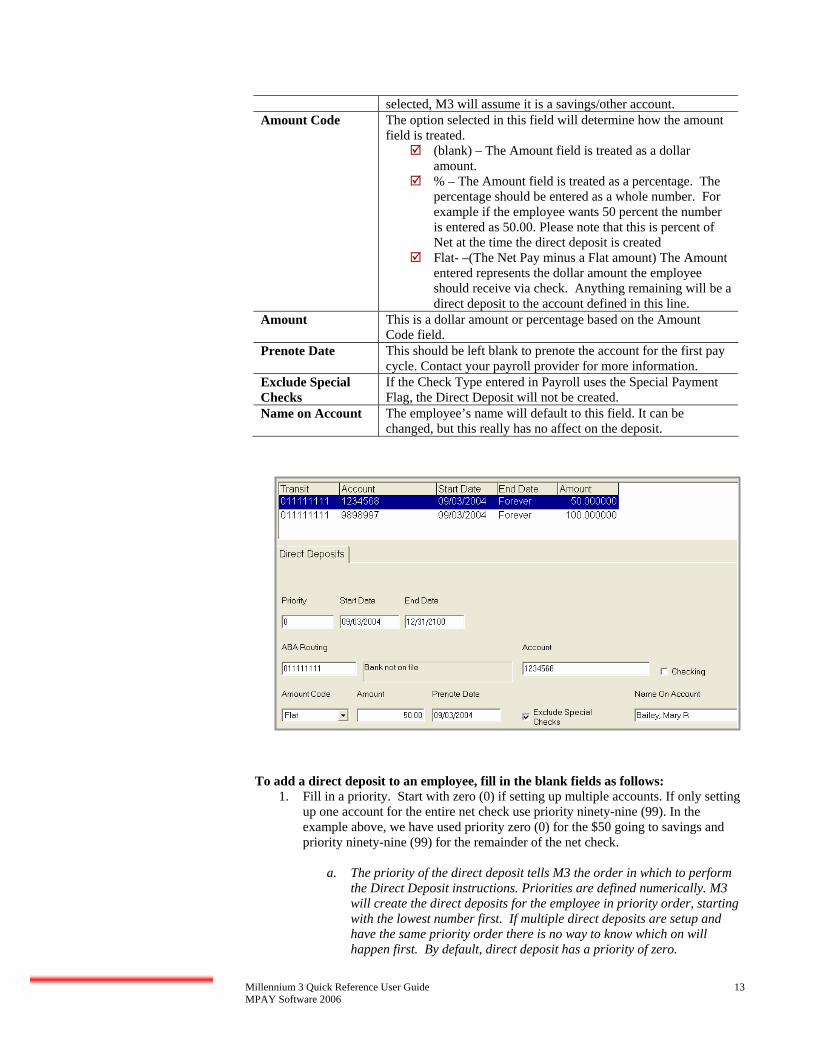
Millennium 3 Quick Reference User Guide 13 MPAY Software 2006
selected, M3 will assume it is a savings/other account. Amount Code The option selected in this field will determine how the amount
field is treated. (blank) – The Amount field is treated as a dollar
amount. % – The Amount field is treated as a percentage. The
percentage should be entered as a whole number. For example if the employee wants 50 percent the number is entered as 50.00. Please note that this is percent of Net at the time the direct deposit is created
Flat- –(The Net Pay minus a Flat amount) The Amount entered represents the dollar amount the employee should receive via check. Anything remaining will be a direct deposit to the account defined in this line.
Amount This is a dollar amount or percentage based on the Amount Code field.
Prenote Date This should be left blank to prenote the account for the first pay cycle. Contact your payroll provider for more information.
Exclude Special Checks
If the Check Type entered in Payroll uses the Special Payment Flag, the Direct Deposit will not be created.
Name on Account The employee’s name will default to this field. It can be changed, but this really has no affect on the deposit.
To add a direct deposit to an employee, fill in the blank fields as follows:
1. Fill in a priority. Start with zero (0) if setting up multiple accounts. If only setting up one account for the entire net check use priority ninety-nine (99). In the example above, we have used priority zero (0) for the $50 going to savings and priority ninety-nine (99) for the remainder of the net check.
a. The priority of the direct deposit tells M3 the order in which to perform
the Direct Deposit instructions. Priorities are defined numerically. M3 will create the direct deposits for the employee in priority order, starting with the lowest number first. If multiple direct deposits are setup and have the same priority order there is no way to know which on will happen first. By default, direct deposit has a priority of zero.
Millennium 3 Quick Reference User Guide 14 MPAY Software 2006
2. Input the ABA Transit or Routing number. We recommend getting this
information from a voided check, not deposit slips. Note: Do not input a Transit number beginning with five (5.) Transit numbers never begin with five (5). Transit numbers beginning with five (5) are internal banking numbers and will be rejected when your ACH file is sent.
3. Input the Account Number. Again, we recommend getting this information from a
voided check. 4. Check the box if the account is a checking account. Do not check it if it is a
savings or other type of account. 5. Amount Code:
a. Flat Amount i. Choose if the amount to be deposited is a flat amount.
b. Percentage i. Choose if the amount to be deposited is a percentage or if this is
the net check amount. Make sure you input 100.00 in the Amount field for net checks.
c. Net minus flat i. The amount entered represents the dollar amount the employee
should receive via check. Anything remaining will be a direct deposit to the account defined on this line. For example, if the amount is $50.00, then the employee will receive a check for $50.00 and the remaining amount will go direct deposit.
6. The Prenote Date field will automatically populate with the next payroll. We
recommend letting the system automatically prenote this file. You may override the prenote function by inputting a prior date in this field. Please consult your payroll provider as they may not recommend this practice.
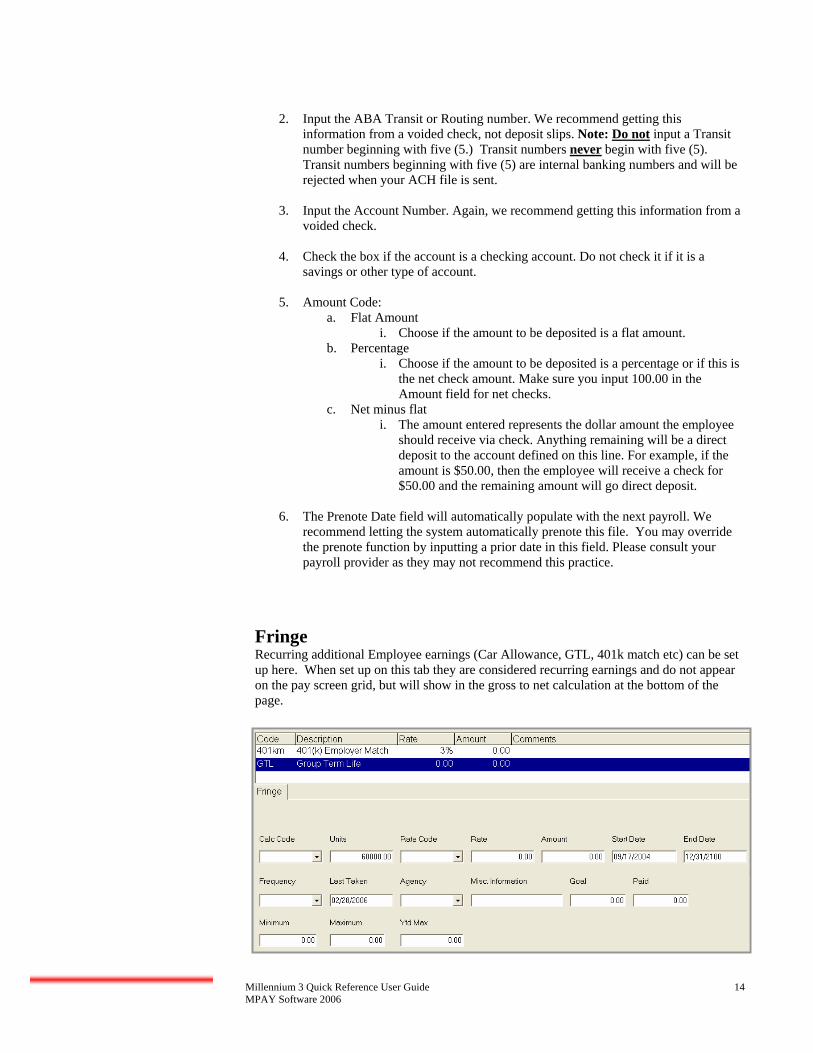
Fringe Recurring additional Employee earnings (Car Allowance, GTL, 401k match etc) can be set up here. When set up on this tab they are considered recurring earnings and do not appear on the pay screen grid, but will show in the gross to net calculation at the bottom of the page.
Millennium 3 Quick Reference User Guide 15 MPAY Software 2006
Note: you must have your payroll provider set up the proper group term life codes if you wish to use the automatic GTL calculator. This feature will look at the full amount of the employee’s GTL (units field) and based on the age of the employee (DOB must be in system), the system will input a GTL earning, tax it appropriately, then deduct it. These entries will appear in pay detail when the employee is paid. You can temporarily cancel the payment of a scheduled item in Employee Pay Entry by going to Edit in Employee Pay Entry and blocking the earning.
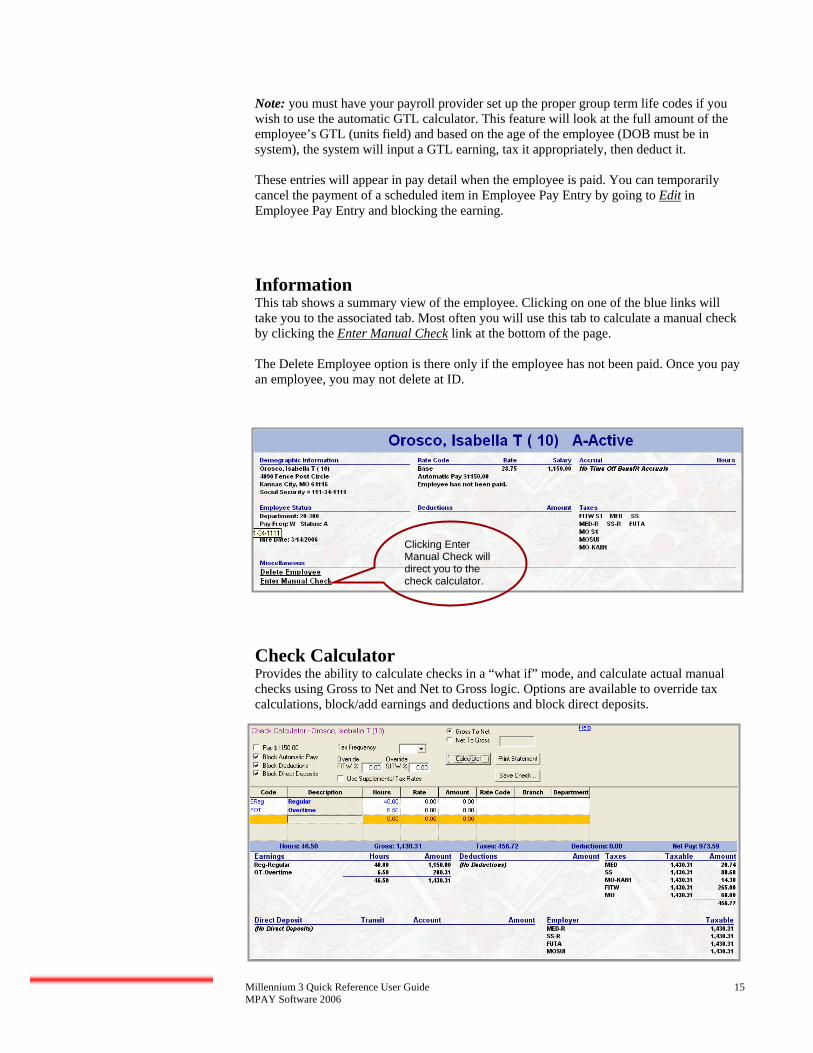
Information This tab shows a summary view of the employee. Clicking on one of the blue links will take you to the associated tab. Most often you will use this tab to calculate a manual check by clicking the Enter Manual Check link at the bottom of the page. The Delete Employee option is there only if the employee has not been paid. Once you pay an employee, you may not delete at ID.
Check Calculator Provides the ability to calculate checks in a “what if” mode, and calculate actual manual checks using Gross to Net and Net to Gross logic. Options are available to override tax calculations, block/add earnings and deductions and block direct deposits.
Clicking Enter Manual Check will direct you to the check calculator.

Millennium 3 Quick Reference User Guide 16 MPAY Software 2006
Gross to Net: 1) Enter earnings using the dropdown 2) Click Calculate 3) Review Net Pay information 4) Change blocks or overrides if needed. 5) To cancel, simply leave the screen. To SAVE, Click Save Check. Depending on your specific company, you may SAVE this check to a VM (Void/Manual) batch or SAVE & PRINT, if you have the capability. Net to Gross: Simply choose the Net to Gross option. The inactive field to the right then becomes available for data entry. Enter the net amount of the check in this field and click the Calculate button. Millennium will develop a Gross amount, deductions and taxes for the check.
Labor Allocation Labor Allocation is used to automatically distribute percentages of employee’s earnings, deductions and taxes to multiple cost centers within the company. Employees set up for Labor Allocation will only receive one paycheck. Labor Allocation will take place on all paychecks, unless overrides are submitted. For infrequent allocation of labor it is best to use the input in the pay entry area. Click the new (*) button to create a new labor allocation entry NOTE: If the total of the Labor Allocation percentages are not 100 %, the difference will be allocated to the employee’s home location. If the percentage is more than 100%, a negative amount will be posted to the employee’s home department.
Miscellaneous This tab contains a variety of employee information fields used for a number of purposes. Many of the fields are populated at the company level allowing you to choose from the drop-downs. Memo - Use the Memo area to input reminder notes that can be viewed during the payroll process for a specific employee. Simply type in your note and check the box to “show in pay entry.” It will appear in bold, red letters on the pay screen. This note will remain the same until you change it.
Pay History Any check processed in M3 for an employee is viewable through this tab. The paycheck history is displayed with the most recent entries displayed at the top of the list. The top section of the screen shows a recap of each check, displaying check type, check date, hours, gross, taxes, deductions, net and check/voucher number.

Millennium 3 Quick Reference User Guide 17 MPAY Software 2006
You may view information for the current year, previous year, or quarterly by selecting a filter button on the right. To view the information for a single check, simply click on that check. You may view checks for a date range by dragging you mouse from the first check t the last check you wish to view. Additionally, you may Control/Click to view multiple checks. The Gross-to-Net section at the bottom of the page will change depending on what is selected in the window. View Check – creates a check stub report you may run from this screen for whatever you have selected in the window. Void - This will void the check and place the void in the next payroll process in the VM batch which allows you to process the void with your normal payroll. Void/Reissue - This will void the check and place the void in the next payroll process in the VM batch which allows you to process the void with your normal payroll and it will reissue a check for the same amount, but assign a new check number.
Rates/Reviews This is where the employee pay rate and review information is stored. Employees may have multiple pay rates active at one time as long as the rate code is different, as in the example below. This tab is also your historical lookup tool, so it is recommended, as a rate change is necessary, that a new version of that rate be added. Do not change or delete existing rates. EXAMPLE: Make a change to the active base rate in the above picture: 1. Click Add New Review and Pay Rate 2. Choose New Pay Rate Only option 3. Enter New Pay Rate, click okay. 4. The old rate will be updated with a new end date and the new rate will populate with
the next check dates as the start date. This can be changed.
EXAMPLE: Make a change to a Salary employee: 1. Click Add New Review and Pay Rate 2. Choose New Pay Rate Only option 3. Fill in the new salary (manually calculate the hourly rate if it does not automatically
calculate – this feature can be turned on at the company level, please call your payroll provider) – click okay
4. The old rate will be updated with a new end date and the new rate will populate with the next check date as the start date. This can be changed.

Millennium 3 Quick Reference User Guide 18 MPAY Software 2006
Status/Position The employee status with the company, position information and company location information are assigned here. Status – these fields are used to define the employee’s status within the company.
Status, Type, and Pay Group – are populated by the drop-downs. Term Date – input the employee’s termination date here along with changing
the status type to ‘Terminated.’ o You may pay an employee before or after termination. The termination
date determines if the employee will show in the current batch or not. If the employee is not in your batch, you can change your filter so that terminated employee’s are visible and then pay the employee.
Position – this area contains optional fields including the Worker Comp Code. This drop- down is populated on the company level. Cost Center/Department – change an employees department by using the drop down list.
Taxes Information regarding the employee taxes are input here. Tax and taxable wage data is stored at the paycheck level. As a result, all employee and employer taxes that the employee is considered for will be displayed in this tab. Only taxes setup on the company level can be assigned to the employee. Contact your payroll provider to add new or modify current tax set up. The function of adding a new employee will automatically add the employee’s tax codes. Normally, you will only have to make tax adjustments (status changes, additional taxes, etc.) here.

Millennium 3 Quick Reference User Guide 19 MPAY Software 2006
Tax Details Filing Status - To make status changes such as Single to Married, use the appropriate drop downs and fill in the exemptions box. Only status codes available for each particular tax are seen in the drop-down. Start/End Dates – Typically you do not want to alter these date fields. When you add a new employee the start date will populate with the next check date. The end date will populate with 12/31/2100 or forever (until it is changed.) Any check dates entered between the start and end dates will calculate taxes. If the check date is not within the range, taxes will not calculate which is why you should be very careful when modifying dates. Override Tax Calc – this is used to calculate additional tax amounts or override the system calculation. Check this box and input an amount or percentage to override the system calculation. Uncheck the box and input an amount or percentage to take the system calculated taxes, plus the additional tax you input here. Change State – Click this button if an employee moves from one state to another. The wizard will walk through ending the old tax and starting the new tax. NOTE: Always verify the start/end dates when adding a new tax code.
Millennium 3 Quick Reference User Guide 20 MPAY Software 2006
Employee HR Information 401k Entries made on this screen affect 401k census reports only. This has no affect on the 401k deduction (set up on the Deductions tab) or the 401k match (set up on the Fringe tab.) Rates/Reviews The Reviews area allows you to track employee review information such as Reviewer, Rating, and Next Review Date. Additionally, you can add pay increase information as well as reviewer and employee notes. Dependents The employee’s dependents can be entered here. This tab is for informational purpose only and includes such items as; name, relationship to employee, telephone number and DOB. Documents This tab can be used to locate scanned images or documents such as applications, resumes, certifications, etc. To add a file or image to be displayed by this tab, click the drop list and choose Add New. Assign the New Image a code. Choose the appropriate file type for the file or image. Choose Create from File. Use the Browse button to map the file to the Picture tab then click OK. You may map an unlimited number of files to the Picture tab in this fashion.
Education This tab is used to store the employee’s education information such as; school, years attended, degree and grade point average. Emergency Contacts This tab is used to store emergency contact information for the employee and includes items such as; name, relationship, address and phone number. Events This tab is used to store information regarding various significant events like “Employee of the Month” or “Sales Person of the Year.” Events can also be used to track disciplinary history of an employee by defining event categories relating to disciplinary issues (Verbal Warning, Written Warning, etc). Event Codes are created in the Company > Misc tab. If you do not have access to this tab, contact your payroll provider to set up event codes. Information in the tab is available for reporting purposes and has no affect on the calculation of payroll, taxes, etc. Previous Employers This tab is used to store information regarding previous employment. It includes items such as; name of employer, start and end dates, job title, supervisor, termination reason, notes, etc.

Millennium 3 Quick Reference User Guide 21 MPAY Software 2006
Skills The Skills tab is used to hold an inventory of employee skills. This information may be used to search for in house candidates having the skill set required to fill various open positions in the organization. All information in this tab is informational only.

Millennium 3 Quick Reference User Guide 22 MPAY Software 2006
PAYROLL This is the entry point to the various areas used for the input, balancing and submission of the payroll to your payroll provider. At the end of the section is a Payroll Process Checklist you may use. First, we will discuss each of those steps in detail. Start Payroll Click the green arrow to start the payroll process. Starting Payroll will move you to the Start Payroll Cycle screen. From there, review your pay period begin and end dates as well as the batch(s). Once you have confirmed the information, click Start Payroll Now.
At this point you have the change to Jump Back to Company Auto Post to review your pay screen set up. Once the payroll is started and the pay screen codes need to be modified, you must restart the payroll for the change to take affect. A blue check mark indicates that job is complete, a green arrow indicates your next step. Clicking Payroll Entry will direct you to the Pay Entry Batches Screen.
Click here to view the calendar and change your check date if necessary.

Millennium 3 Quick Reference User Guide 23 MPAY Software 2006
Pay Entry Batches This section briefly explains the options on this page. Time Clock Import If you use a time clock and your payroll provider has configured your file output to download into M3 then you will see the Time Clock Import link at the bottom of the page. You will not see this option if you do not use this feature. Click Time Clock Import to import your data.
Batches Your payroll may or may not be separated into a series of batches. In our example below, there is only one batch (B=Bi-Weekly Payroll.)
Commands Control You may input control totals prior to keying any data and use
this as an audit on the Batch Totals screen when keying is complete. This is optional.
Batch Totals Clicking batch totals at this point gives you Auto Pay information only as no data has been keyed yet. You have the option to go into batch totals anytime.
Delete This will delete the batch. Call your payroll provider before deleting any batch.
Restart You may restart at any time. Keep in mind any data you keyed will be lost and must be input again.

Millennium 3 Quick Reference User Guide 24 MPAY Software 2006
Payroll Entry The screenshot below is a full view of the payroll entry screen without the tree view. This area contains some employee demographic information on the top, the middle gray area is where you input or view payroll data, and the bottom area is the gross-to-net section where you can view changes real time. We will review each area after a quick review of navigation.
Navigation in Payroll Entry
Shortcut keys to change EE order – alpha, id, or other if you choose to use an EE Filter to the right
Select an EE using the dropdown, or
advance to the next EE by using the + key
on your keyboard.
Quickest way to go back to previous screen
Use this EE dropdown to quickly access EE tabs for last minute changes.

Millennium 3 Quick Reference User Guide 25 MPAY Software 2006
Pay Entry The top of the page contains employee notes (if applicable) and demographics. The bottom area allows you to enter hours/dollars, etc.
A You may click on a blue link within the EE demographic tab to direct you to a
particular tab or use the EE’s tab drop down. B Choose New Paycheck if you want to pay the employee hours/dollars on a separate
check. You may create as many paychecks as you like. Remember to user the Edit feature to override deductions, etc., if applicable.
C Set your code column to include your most commonly paid earning/deduction codes. Go to Company Setup/Auto Post to customize. Call your payroll provider if you do not have access to this tab and it will be changed for you. Also, you can add new line items by choosing them from the drop down.
D Gross-net-area allows you to see changes as you make them. E The hours, rate and amount columns are the default. You may customize this if
needed (branch, dept., job coded, etc.), by right clicking on a column header, then choose Pay Entry Field Selection… Your customization will be saved until you wish to change it again.
F Choose Override to change information for this paycheck only. You may change tax percentages or frequency, block earnings, deductions, labor allocation, or direct deposit. Additionally, you may create a memo for this specific employee that will show on the check stub. Remember when applying overrides:
Save Changes-This Paycheck Only – will apply these overrides to this paycheck only.
Save Changes-This Employee Only – will apply these overrides to all paychecks for this employee in the batch.
G These are delete functions. Click the Delete Check button to delete the entire check
or the x to delete a specific line item.
A
D
B
C
E G F

Millennium 3 Quick Reference User Guide 26 MPAY Software 2006
Keying Your Payroll Once you’ve configured the screen to your liking, you may start the input of payroll data. Hourly EE’s – input the hours as needed, using your tab, up/down, back/forward arrows, or the plus key on your keyboard. Remember the plus key advances you to the next EE. Salary EE’s – input or record hours as needed (vacation, sick, etc.) and advance to the next EE. If no changes are needed for an auto paid salary EE, it is not necessary to even visit their pay screen. Once data is keyed for the final employee, the plus key will advance you to the Batch Totals screen. You may verify totals from this screen or use the Preprocess Register to verify your payroll totals. Preprocess Register The Preprocess Register report can be viewed by clicking Preprocess Register on the Payroll Batches screen. This report allows you to view and verify your payroll data prior to submitting the information to your payroll provider. You may save this report to your desktop or print it. You may run it for all batches or a specific batch by changing the report properties. Note: Once the payroll has processed, you will not be able to preview this report again. After the payroll processes, you may view the Payroll Register report. Running the Preprocess Register: Simply click on one of the Preprocess Register link. Again you may run the register for one batch or all batches. You may also run the Preprocess Register from your Reporting area by adding the report to the queue.

Millennium 3 Quick Reference User Guide 27 MPAY Software 2006
Closing and Submitting Payroll After payroll totals have been verified for accuracy, you may close and submit the payroll. Close/Submit Payroll 1. Click Close Batch on the Payroll Batches screen. 2. Or you go straight to the Submit Payroll link located in your Tree or Toolbar. You will
be prompted to close your batch before you submit. 3. Click Submit Payroll. 4. Go to System/Operations/Job Queue to ensure your sync job was successful. If so you
are free to log out of Millennium. 5. It is recommended that you do NOT log out of Millennium until your sync job is
finished or your data transfer may not be complete.
Retrieving Your Payroll Data Processing times vary once your data is submitted. As a general rule, you may access your current payroll data the next business day after processing. Follow your payroll provider’s instructions on when to complete your Backup/Synchronize. The Backup/Synchronize creates a sync between you and your payroll provider. If your payroll provider has made any changes for you or processed a payroll, you will update your database by completing a Backup/Synch. The action of clicking “Submit Payroll Now” also creates a sync job.

Millennium 3 Quick Reference User Guide 28 MPAY Software 2006
Payroll Process Checklist
1. Go to: Employee Information
Conduct employee maintenance (new hires, terminations, deduction changes, etc.)
This does not have to be done prior to Starting Payroll. Employee Maint. can be done after a payroll batch is opened.
2. Go to: Payroll Entry Start the Payroll cycle by clicking Start Payroll
The new payroll cycle can be started anytime during the pay period; always verify the last payroll submitted did process before starting a new one
3. Click on the appropriate Batch or Import Time
4. Input payroll data (Note, M3 has customizable input sheets that may help make this process faster.)
You may leave the payroll process anytime and continue later. Just don’t close the batch until you are completely done.
5. Go to: Payroll Batches/Preprocess Register and verify payroll totals with the Preprocess Register
Save the Preprocess Register to your desktop or print a copy so you can verify what you sent to your payroll provider later, if needed.
6. Close the batch(s) after verification is complete.
7. Submit the payroll to process.
8. Call your payroll provider if you encounter any problems with submission.
Accessing your payroll data after submission: Check with your payroll provider to determine the timeframe for completion and when you may access your data. Processing times vary. NOTES:
Millennium 3 Quick Reference User Guide 29 MPAY Software 2006
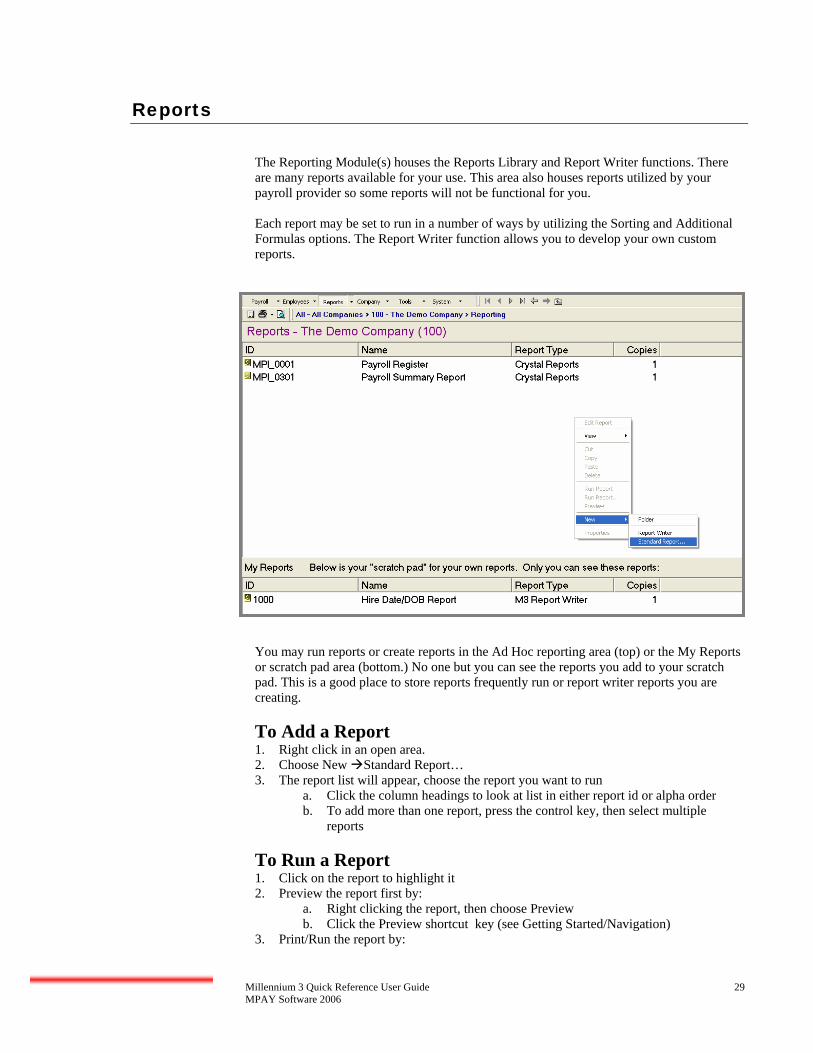
Reports The Reporting Module(s) houses the Reports Library and Report Writer functions. There are many reports available for your use. This area also houses reports utilized by your payroll provider so some reports will not be functional for you. Each report may be set to run in a number of ways by utilizing the Sorting and Additional Formulas options. The Report Writer function allows you to develop your own custom reports.
You may run reports or create reports in the Ad Hoc reporting area (top) or the My Reports or scratch pad area (bottom.) No one but you can see the reports you add to your scratch pad. This is a good place to store reports frequently run or report writer reports you are creating. To Add a Report 1. Right click in an open area. 2. Choose New Standard Report… 3. The report list will appear, choose the report you want to run
a. Click the column headings to look at list in either report id or alpha order b. To add more than one report, press the control key, then select multiple
reports
To Run a Report 1. Click on the report to highlight it 2. Preview the report first by:
a. Right clicking the report, then choose Preview b. Click the Preview shortcut key (see Getting Started/Navigation)
3. Print/Run the report by:
Millennium 3 Quick Reference User Guide 30 MPAY Software 2006
a. Right click the report, then choose Run Report b. Click the Print shortcut key (see Getting Started/Navigation)
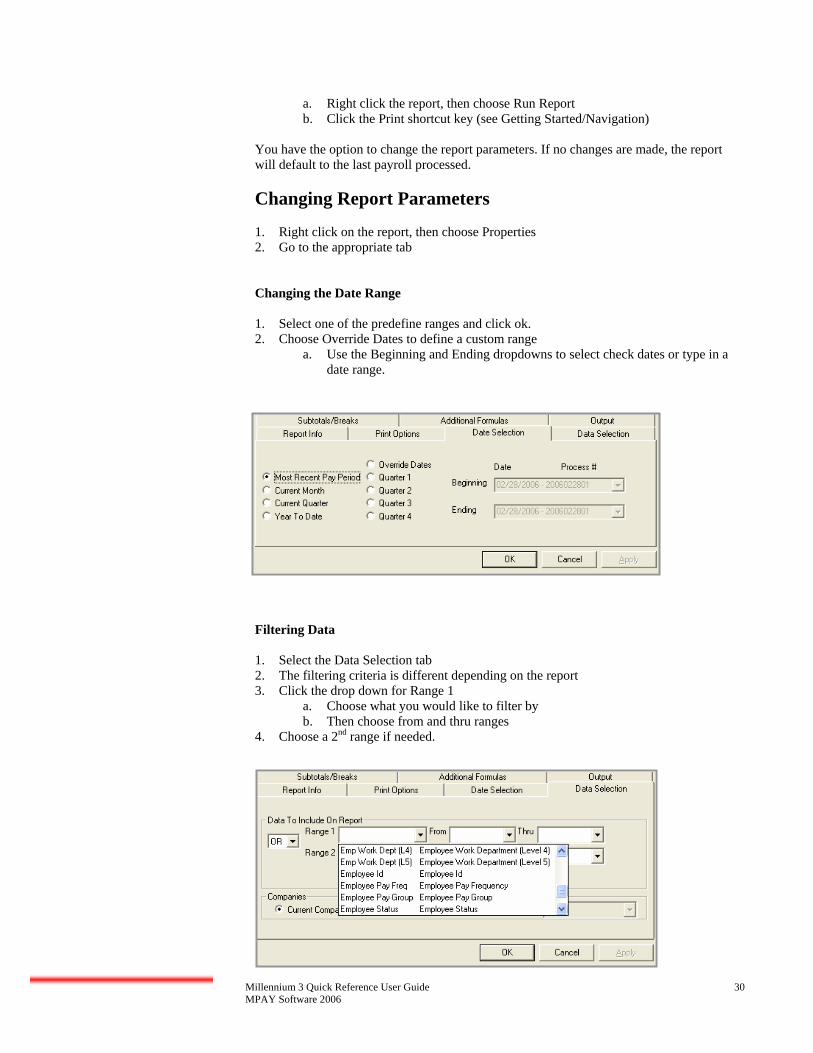
You have the option to change the report parameters. If no changes are made, the report will default to the last payroll processed. Changing Report Parameters 1. Right click on the report, then choose Properties 2. Go to the appropriate tab
Changing the Date Range 1. Select one of the predefine ranges and click ok. 2. Choose Override Dates to define a custom range
a. Use the Beginning and Ending dropdowns to select check dates or type in a date range.
Filtering Data 1. Select the Data Selection tab 2. The filtering criteria is different depending on the report 3. Click the drop down for Range 1
a. Choose what you would like to filter by b. Then choose from and thru ranges
4. Choose a 2nd range if needed.

Millennium 3 Quick Reference User Guide 31 MPAY Software 2006
Subtotals/Breaks You may choose different subtotal options on most reports and view the report in detail or summary view. Each report will have a default that can be changed. The screenshot below is an example of a report changed to “Custom” and two new sorts added to sort by EE ID, then state.
Additional Formulas Whenever there is a question about whether an item can be added or deleted on a report, the first place to look is in the Additional Options. Additional options are different for every report. Changes are made in the Formula Value column. See the table below for helpful hints.

Millennium 3 Quick Reference User Guide 32 MPAY Software 2006
Formula Value Column If The value is a blank field Then Type in a value based on the description If The value is a populated drop-down Then Change it based on the description you want If The value is a blank drop-down Then This field does not currently show on the
report, but you may choose from the drop-down
If The value is a checkbox Then Check or uncheck based on the description

Millennium 3 Quick Reference User Guide 33 MPAY Software 2006
Report Writer The report writer can be used for most of your reporting needs, including employee and personnel listings. You also can access current, MTD, QTD, and YTD values for any earning, deduction or tax code. Various formatting options are provided to facilitate the creation of a variety of output files.
Creating a Report Writer Report Following are the steps to create a new report writer report. Each step is reviewed in detail below.
Step 1: Create a blank report. Step 2: Enter Report title. Step 3: Select the report type. Step 4: Enter the needed fields Step 5: Create Groups/Sorts (optional) Step 6: Setup Filters (optional) Step 7: Print Report
Step 1 – Create a blank report 1. Right click in an open area. 2. Choose New Report Writer
Step 2 – Enter a Report Title 1. A “New Report” will appear in the list 2. Right click on it and select Edit Report 3. On the Setup tab enter a Title and Sub Title (optional) for your new report

Millennium 3 Quick Reference User Guide 34 MPAY Software 2006
Step 3 – Select the report type 1. The report type is used to tell the system what to display as the detail items on your
report. For example, if you choose a report type of “Employee List” Millennium will display one line per employee. If you choose a report type of “Employee Paychecks”, one line per check will be displayed
2. Click the Reset Field Selection Tree button if you change the report type. This updates the list of available fields as determined by the Report Type
Step 4 – Enter the needed fields 1. Go to the Fields tab 2. Maximize you available fields by clicking the plus (+) in the tree on the left 3. To add fields to your report, select the field, then press the ADD button or double-click
on the field to add it You have just created a report. At this point you may press the Preview button to view it. Making cosmetic changes, adding filters and sorting is optional.

Millennium 3 Quick Reference User Guide 35 MPAY Software 2006
Step 5 – Create Groups/Sorts (optional) The Sorts are used to create groups with subtotals as well as control the sort order of data within a group. 1. Go to the Sorts tab 2. To add sort field, select the field, then press the ADD button or double-click on the
field to add it 3. The example below indicates the report will sort and subtotal by Branch and sort by EE
ID within each Branch.
Millennium 3 Quick Reference User Guide 36 MPAY Software 2006
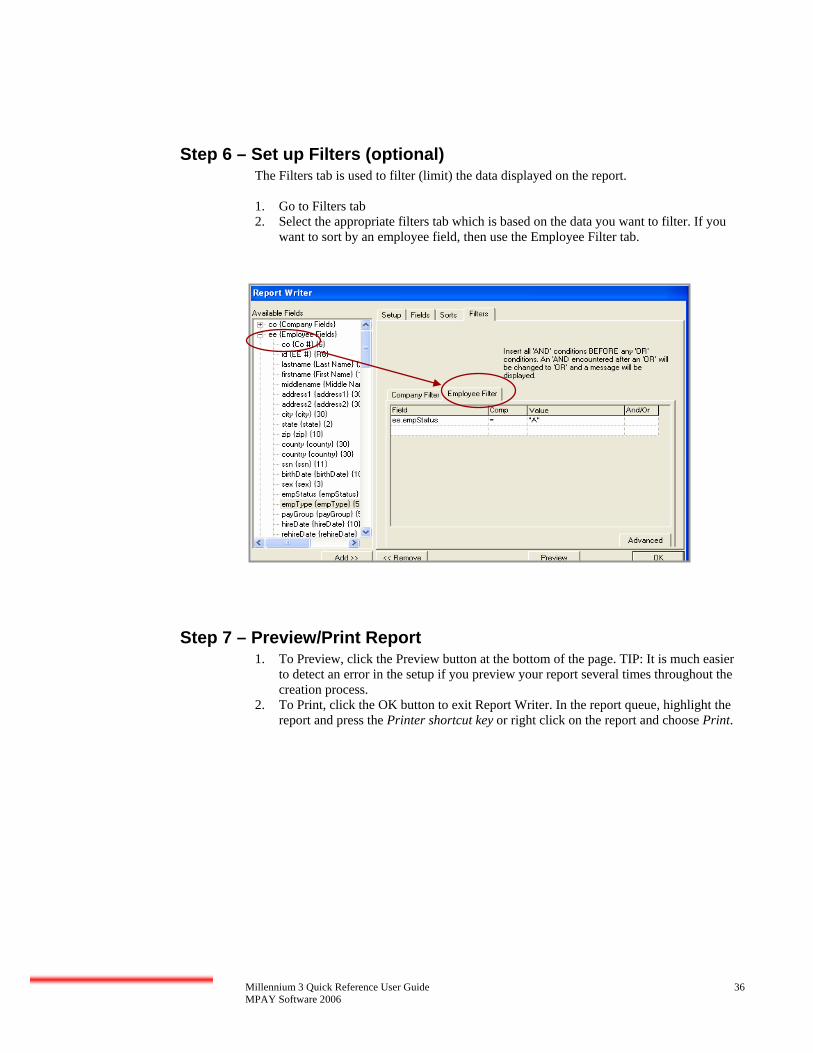
Step 6 – Set up Filters (optional) The Filters tab is used to filter (limit) the data displayed on the report. 1. Go to Filters tab 2. Select the appropriate filters tab which is based on the data you want to filter. If you
want to sort by an employee field, then use the Employee Filter tab.
Step 7 – Preview/Print Report 1. To Preview, click the Preview button at the bottom of the page. TIP: It is much easier
to detect an error in the setup if you preview your report several times throughout the creation process.
2. To Print, click the OK button to exit Report Writer. In the report queue, highlight the report and press the Printer shortcut key or right click on the report and choose Print.

Millennium 3 Quick Reference User Guide 37 MPAY Software 2006
Formatting Options Description Len Specify the number of spaces in each column. The default is most often
changed to make the report look nicer or make more room on the report Dec Specify the number of decimal places to display for number fields L/R Specify the Left of Right column justification Fill Enter a character that will be used to ‘fill’ in any extra space in a field.
Especially useful when creating fixed length export file Show 0 If the box is checked, zeros are displayed, if unchecked a blank is
displayed in place of a zero Total Specify which number fields are included in subtotals and report totals.
If checked, the field will be displayed on the total lines No Punct Used to delete all punctuation from the field before it is displayed.
Helpful when output files require no punct (i.e. SSN, phone number) No Periods Used to delete decimals points from fields No Commas Used to delete commas from fields Overpunch Used to convert number fields to an overpunch format. The overpunch
format replaces the last digit in a field with a character that is based on the last digit and on the sign (positive or negative) of the number
Uppercase Used to convert the field to all uppercase letters