low speed virtual wind tunnel simulation for educational studies
TRANSCRIPT

Low Speed Virtual Wind Tunnel Simulation For Educational Studies In
Introducing Computational Fluid Dynamics And Flow Visualization
BY
Cher-Chiang Yang BS, Aerospace Engineering, University of Kansas, Lawrence 1995
Submitted to the Department of Aerospace Engineering and the Faculty of the Graduate
School of the University of Kansas in partial fulfillment of the requirements for the degree of Master of Science.
_______________________________ Committee Chairperson, Dr. Ray Taghavi
_______________________________ Committee Member, Dr. David Downing
_______________________________ Committee Member, Dr. Saeed Farokhi
_______________________________ Date thesis accepted

Acknowledgements
I would like to extend my most sincere gratitude to my advisor Dr. Ray Taghavi
(John E. & Winifred E. Sharp Professor of Aerospace Engineering). I would like thank
him for his constant guidance and motivation. Not only did he provide me with his
mental support, Dr. Taghavi has been a very good friend to me during my difficult times
when I went through a family crisis.
I would also like to thank Dr. Saeed Farokhi, Dr. Chuan-Tau Edward Lan, Dr.
David R. Downing. Their patience and aid have helped me tremendously in completing
this writing. The continuous encouragements from them made this completion possible.
Last but not least, I wish to thank my parents, Ee Chuang Yong and Hwee Huan
Tan. Their constant love and care for me are deeply appreciated. With the passing of my
father, I would like to dedicate this thesis to him and to all the individuals that believe in
me.

i
Abstract
Computational Fluid Dynamics tools have been around for a couple of decades
now. With the growing computing power, the speed and accuracy of these tools have
improved tremendously. The ability to visualize flow is now a common feat on the
powerful and speedy computers. Students of aerodynamics studies would benefit greatly
not only with the abilities to simulate flows, but also to visualize them. Unfortunately, to
use such tools, one has to be quite well-versed in the language of complex computational
programming.
The challenge for most aerospace or aeronautical undergraduate student is to
understand the complicated world of aerodynamics through series of mathematical
equations. Without the ability to see how flows behave in motion, the student can only
imagine how the stall occurs over an airfoil or how the turbulent air looks like after
separation happens. In this case, a (flow separation) picture will definitely speak more
than a thousand words (or equations). Computational Fluid Dynamics offers the above
capabilities, but with a catch – the user must know aerodynamics well enough so as not to
blindly believe all the computer data being spewed out is correct. The phrase “garbage in,
garbage out” will describe the situation most adequately if the user has little knowledge
about setting the boundary conditions or fluid properties. Also, the more complex the
simulation is, the longer it requires to compute the solution. Nowadays, as in all
processes, flow simulation is expected to work fast, if not instantaneous. However, in the
world of Computational Fluid Dynamics, typically the accuracy of the simulation is
sacrificed for the speed in obtaining the solution or vice versa.

ii
To simplify the complex mathematics involved in Computational Fluid
Dynamics, the Low Speed Virtual Wind Tunnel simulation is created. This program cuts
down on the require information from the user in order to perform a simulation. The
program is capable of taking an airfoil coordinates that is generated according to the
user’s specifications and provide a “quick and dirty” estimation of aerodynamic
characteristics like lift, drag and pitching moment. In addition to that, a pressure flow
field across the airfoil is created to show the pressure distribution of the airfoil. With
further modification to the input coordinates data, an animation of the flow is produced.
Thus this “picture speaks more than a thousand words” (or equations).
By utilizing the speed of the computation, there are restrictions to the results
obtained. The visualizations of the flows are extremely telling but the aerodynamics
characteristics are skewed when flow separation occurs. Unsteady flow in flow separation
requires longer computing time and information to give a more complete analysis.
Therefore, results from high angles of attack in stall condition should be taken with some
skepticism.
Thus, the Low Speed Virtual Wind Tunnel simulation program remains an
acceptable tool for students who are beginners to the field of aerodynamics and
Computational Fluid Dynamics. The ability to visualize the flow field enhances the
understanding of the mathematical flow equations is undeniable. This also gives the
students an early taste of the power of Computational Fluid Dynamics in the years to
come that would play a crucial role in the ever developing aerospace industry.

iii
Table of Contents 1. INTRODUCTION .................................................................................................................................... 1
2. THEORETICAL BACKGROUND AND LITERATURE REVIEW.................................................. 5
3. LOW SPEED WIND TUNNEL DESIGN ............................................................................................ 10
3.1. LOW SPEED VIRTUAL WIND TUNNEL OVERVIEW.............................................................................. 12
3.1.1. 2-D Analysis with Low Speed Virtual Wind Tunnel .................................................................. 14
3.1.2. System Requirements for LSVWT.............................................................................................. 14
3.2. QUICK START GUIDE TO LSVWT...................................................................................................... 15
3.2.1. Airfoil coordinates generations................................................................................................. 18
3.2.2. Panel Method Analysis.............................................................................................................. 21
3.2.3. FlowLab in 2-D usage............................................................................................................... 25
3.2.4. Starting FlowLab ...................................................................................................................... 26
3.2.5. Geometry Settings ..................................................................................................................... 27
3.2.6. Flow Conditions (Physics) Settings .......................................................................................... 27
3.2.7. Mesh Settings ............................................................................................................................ 30
3.2.8. Solve for Solution Settings ........................................................................................................ 31
3.2.9. Graphic Reports Settings .......................................................................................................... 32
3.2.10. Post-processing Analysis Settings........................................................................................... 34
3.3. ADDITIONAL FEATURE IN ANIMATION............................................................................................... 34
4. RESULTS AND DISCUSSIONS........................................................................................................... 36
4.1 2-D FLOW RESULTS OF NACA 2415 .................................................................................................. 36
4.2 2-D VISUAL FLOW RESULTS OF NACA 2415 ..................................................................................... 39
5. CONCLUSION AND RECOMMENDATIONS.................................................................................. 45
5.1. LSVWT 2-D FLOW ANALYSIS ........................................................................................................... 45
5.2. RECOMMENDATIONS FOR FUTURE WORK........................................................................................... 46
5.2.1. 2-D Analysis in LabVIEW and FlowLab................................................................................... 46

iv
5.2.2. FLUENT and GAMBIT in grid generation ............................................................................... 46
5.2.3. FlowLab in 3-D usage............................................................................................................... 47
5.2.4. OpenFlower and Gmsh ............................................................................................................. 48
6. REFERENCES ....................................................................................................................................... 50
APPENDIX A: PROGRAM FLOWCHART OF LABVIEW FOR LSVWT PROGRAM LABVIEW
DETAILS OF THE PROGRAMMING....................................................................... 52

v
List of Figures FIGURE 2.1 – COST AND TIME RELATIONSHIP WITH RESPECT TO CFD AND WIND TUNNELS............................. 5
FIGURE 2.2 - BOEING 777 DESIGN COMPONENTS AFFECTED BY CFD............................................................... 7
FIGURE 2.3 – NASA VIRTUAL WIND TUNNEL APPLICATION........................................................................... 7
FIGURE 2.4 – UNSTEADY FLOW OF STREAKLINES AND TIME LINES OVER AN AIRFOIL. ..................................... 8
FIGURE 3.1 – LAYOUT OF KU LARGE WIND TUNNEL. .................................................................................... 10
FIGURE 3.2 – CURRENT KU LARGE WIND TUNNEL USER INTERFACE. ............................................................ 11
FIGURE 3.3 – FEATURES OF THE LOW SPEED VIRTUAL WIND TUNNEL. ........................................................ 13
FIGURE 3.4 – STARTUP SCREEN OF LSVWT PROGRAM. ................................................................................ 15
FIGURE 3.5 – JAVAFOIL AIRFOIL COORDINATE GENERATION SCREEN............................................................ 16
FIGURE 3.6 – FLOW FIELD PLOTTING BY JAVAFOIL. ...................................................................................... 17
FIGURE 3.7 – FOILSIM PROGRAM IN MOTION. ................................................................................................ 18
FIGURE 3.8 – PANEL METHOD AIRFOIL COORDINATES GENERATION OF NACA 0012. .................................. 19
FIGURE 3.9 – COORDINATE GENERATION OF NACA 2415 AIRFOIL. .............................................................. 20
FIGURE 3.10 – AERODYNAMICS RESULTS WITH PRESSURE DISTRIBUTION ACROSS AIRFOIL........................... 21
FIGURE 3.11 – PANEL METHOD RESULTS OF A NACA 2415 AIRFOIL. ........................................................... 24
FIGURE 3.12 – FLOWLAB 2-D ANALYSIS OF CLARK Y AIRFOIL. .................................................................... 25
FIGURE 3.13 – FLOWLAB ANALYSIS MODEL SELECTION................................................................................ 26
FIGURE 3.14 – GEOMETRY MODULE CREATION. ............................................................................................ 27
FIGURE 3.15 – PHYSICS OR FLOW CONDITIONS MODULE SETTINGS................................................................ 28
FIGURE 3.16 – BOUNDARY CONDITION SETTINGS IN THE PHYSICS MODULE. ................................................. 29
FIGURE 3.17 – MATERIALS PROPERTIES IN THE PHYSICS MODULE. ............................................................... 29
FIGURE 3.18 – MESH SETTINGS FOR THE AIRFOIL. ......................................................................................... 30
FIGURE 3.19 – SOLUTION SETTINGS MODULE. ............................................................................................... 31
FIGURE 3.20 – GRAPHIC REPORTS MODULE. ................................................................................................. 32
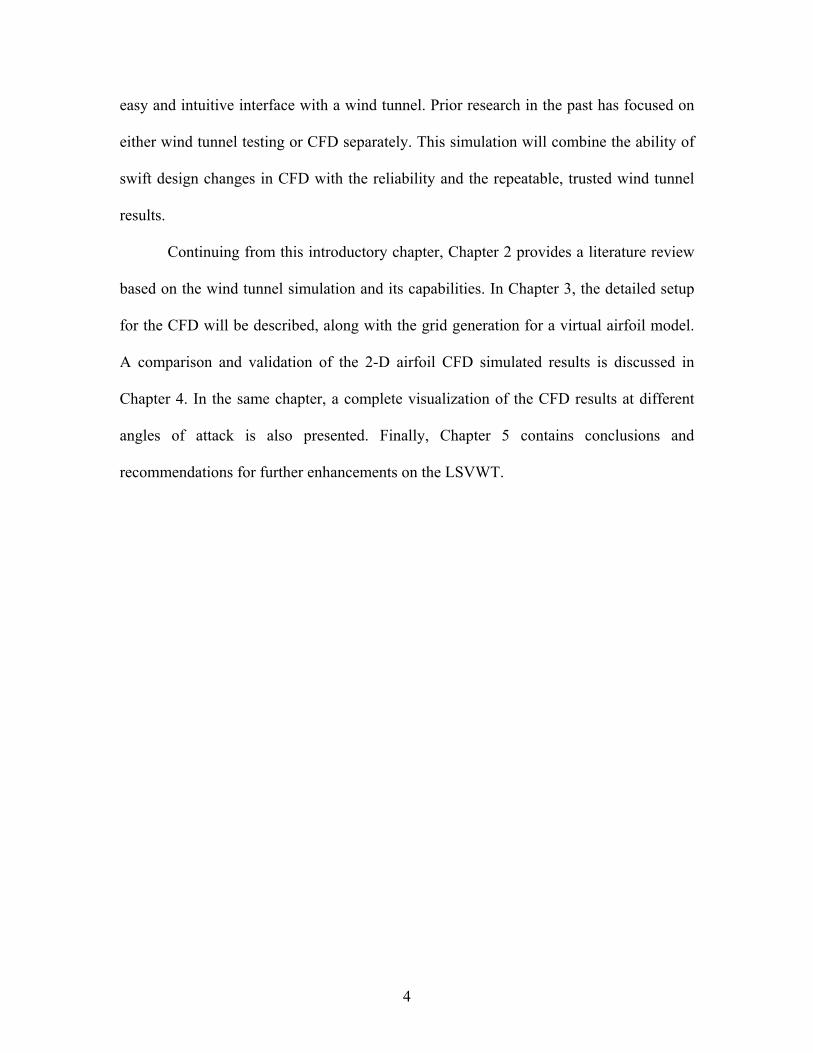
FIGURE 3.21 – EXAMPLE OF A RESIDUALS PROGRESS WITH RESPECT TO ITERATIONS. ................................... 33
FIGURE 3.22 – POST MODULE TO SHOW THE RESULTS OF COMPUTATION....................................................... 34
FIGURE 3.23 – VON KÁRMÁN VORTEX STREET ILLUSTRATED IN FLOWLAB. ................................................. 35

vi
FIGURE 4.1 – GENERATION OF NACA 2415 AIRFOIL COORDINATES. ............................................................ 36
FIGURE 4.2 – 2-D RESULTS OF NACA 2415 AT ZERO ANGLE OF ATTACK. ..................................................... 37
FIGURE 4.3 – PRESSURE FLOW FIELD NACA 2415 AT ANGLE OF ATTACK AT 10 DEGREES (TOP LEFT), 12
DEGREES (TOP RIGHT) AND 14 DEGREES (ABOVE). ................................................................... 39
FIGURE 4.4 – PRESSURE DISTRIBUTION ON NACA 2415 AT -6 TO 4 DEGREE ANGLES OF ATTACK. ................ 40
FIGURE 4.5 – PRESSURE DISTRIBUTION ON NACA 2415 AT 6 TO 15 DEGREE ANGLES OF ATTACK................. 41
FIGURE 4.6 – PRESSURE DISTRIBUTION ON NACA 2415 AT HIGH ANGLES OF ATTACK OF 16 AND 17 DEGREES.
............................................................................................................................................................ 42
FIGURE 4.7 – PRESSURE DISTRIBUTION ON NACA 2415 AT HIGH ANGLES OF ATTACK OF 18 AND 20 DEGREES.
............................................................................................................................................................ 43

1
1. Introduction
Computational fluid dynamics (CFD), a fast growing component in computer-
aided engineering, plays a very vital role in reducing costs and turn-around times in the
design and development of aircraft. The CFD simulations and wind tunnel testing
represent an important phase to any aircraft design, particularly for brand new design
concepts. These complex simulations or wind tunnel results show whether the aircraft
aerodynamics behaviors are acceptable for the purpose of its design. One such example is
the Boeing 777 that utilized intricate CFD simulations extensively in its design
development of components like the wing, wing-body fairing and engine/airframe
integration. Physical testing of aircraft models in wind tunnels has remained useful in
design validation and analysis even though CFD simulations are becoming more popular
and reliable than before. To fine-tune CFD simulations and authenticate the aerodynamic
characteristics of aircraft designs, prior wind tunnel studies are compared to the simulated
CFD results of the same wind tunnel models.
Since its inception in the 1950s, CFD has matured progressively and advanced
greatly especially in the past two decades. In the early days of CFD, supercomputers were
needed to process the long and tedious CFD calculations. Later, researchers moved away
from the expensive and limited availability of supercomputers by running workstations in
parallel processing to accomplish the CFD tasks. With the emergence of powerful
personal computers in the last two decades, most of the CFD simulations can now be
achieved relatively quickly compared to the workstations.
Two features of the CFD outshine wind tunnel testing and the element of cost is
one of such advantages. During the preliminary aircraft design phase, wind tunnel models

2
undergo multiple modifications. These modifications, which can lead to higher costs, are
necessary in order to optimize design configuration or allow iteration changes.
Fortunately, CFD simulations do not require these costly and time-consuming model
modifications. There is no expensive model alteration to carry out or down time in the
wind tunnel while the model is being fixed. These CFD simulations can apply changes to
the virtual models as quickly as they can be modified in the computers to obtain new
results. This time saving benefit is another edge that CFD simulation has over the
traditional wind tunnel testing. In the same amount of time needed to conduct a wind
tunnel testing, many simulations could be completed to produce far more extensive
results and detailed flow field information that wind tunnel results are incapable of
showing. For full configuration aircraft models, these extensive results can show the
detail flow field interaction of the wing-fuselage interface whereas the wind tunnel results
can only present the overall aerodynamics behaviors. In the design phase, especially in
the preliminary stage, it would be impractical to study several major configuration
changes without the use of CFD. The ability to obtain results with CFD in a short amount
of time stands out against wind tunnel testing that requires time to create or modify a
model.
Although CFD offers quicker solutions, this does not mean that wind tunnel
testing is obsolete. Wind tunnel data still play a key role in the design validation of
configurations, but CFD simulations can take a step further with complex configurations
analysis and enhance rapid prototyping capability. There is still a considerably strong
need for basic wind tunnel experiments to validate CFD data in areas such as flow
stability, 3-D boundary layers and flow separation characteristics. Through data

3
validation, CFD simulations accuracy will steadily improve and then will be capable of
simulating results even for a conceptual design before going into a wind tunnel. When
used in conjunction with wind tunnel testing, CFD can help to determine and refine wind
tunnel experimental data due to interferences from the tunnel walls and model mounting
system. Thus, this creates a synergistic use of CFD and wind tunnels that will aid the
development of more effective and reliable simulations.
As powerful as CFD simulation can be, it also have weaknesses and pitfalls if the
user applies it inappropriately. The simulation’s sophistication is the strength and the
weakness that presents to researchers or aerodynamics students with little or no CFD
experience will face. Most current CFD tools are too difficult for new users with limited
aerodynamics knowledge to perform simulations by themselves. These non-CFD users
will also be looking at a rather challenging task in grid generation. With knowledge in
fluid dynamics but not in computational mechanics, they do not know which grid to use
or how to specify minimum spacing.
To address such difficulties and make CFD a relatively user-friendly tool, the
current project attempts to combine the advantages of CFD and wind tunnel testing to
provide a unique educational and experimental platform for aerodynamics study. The
Low-speed Virtual Wind Tunnel (LSVWT) computer program will simulate the KU large
wind tunnel that is capable of running at a maximum velocity of 185 miles per hour and
allow users to have a hands-on experience of a typical wind tunnel operation to obtain
aerodynamics results for preliminary design analysis.
The goal of this Low-speed Virtual Wind Tunnel (LSVWT) program is to apply
the simplified Computational Fluid Dynamics (CFD) calculations while providing an
4
easy and intuitive interface with a wind tunnel. Prior research in the past has focused on
either wind tunnel testing or CFD separately. This simulation will combine the ability of
swift design changes in CFD with the reliability and the repeatable, trusted wind tunnel
results.
Continuing from this introductory chapter, Chapter 2 provides a literature review
based on the wind tunnel simulation and its capabilities. In Chapter 3, the detailed setup
for the CFD will be described, along with the grid generation for a virtual airfoil model.
A comparison and validation of the 2-D airfoil CFD simulated results is discussed in
Chapter 4. In the same chapter, a complete visualization of the CFD results at different
angles of attack is also presented. Finally, Chapter 5 contains conclusions and
recommendations for further enhancements on the LSVWT.

5
2. Theoretical Background and Literature Review
Throughout the design phase of a vehicle, improvements and modifications
usually occur that lead to design changes. Although design iteration is not completely
new to CFD, its use in conjunction with wind tunnel data is not often adequately explored
enough. Previous studies of CFD did not include wind tunnel data, and focused on
reducing the time needed to solve for accurate solution convergence. The numerical wind
tunnel researched by Bell1 demonstrated the computational mechanics knowledge that is
required to carry out a CFD simulation of a wind tunnel and the focus was to speed up the
time to obtain the solution. It is important to solve for the solution convergence in a
relatively short time so that the vehicle design is examined and improved in the same
amount of time it takes to conduct a single wind tunnel experiment. This is illustrated in
Figure 2.1.
Figure 2.1 – Cost and time relationship with respect to CFD and wind tunnels.2

6
Saving time is one of the key features in using CFD. However, no matter how fast
a CFD solution is presented, the results do not bear much technical value if the CFD
modeling is not supported by any wind-tunnel-based experimental data. This type of
numerical simulation would only provide the insight for better mathematical code
optimization, and not improving the vehicle design significantly.
To create synergism between CFD and wind tunnel testing, several accurate tests
are used to form the building blocks of the validation of the computational results. The
validation of data starts with a 2-D aerodynamics analysis on an airfoil, with the focus on
the aerodynamics characteristics and the stall behavior. Once validated, an airfoil model
design can be inserted into the CFD simulation to be tested for aerodynamic behavior and
flight characteristics. Design corrections can be made so that the desirable behavior and
characteristics are obtained in the simulation. This process of design optimization creates
a refined wind tunnel model vehicle that should perform very well in aerodynamic terms
and demonstrate desirable flight characteristics in the testing. Tinoco2 showed evidences
of the conjunction usage of CFD and wind tunnel testing in influencing and optimizing
Boeing 737, 757, 767 and 777 component designs. The components that were influenced
by CFD are shown in Figure 2.2. This synergistic use, however, needed experienced CFD
users.

7
Figure 2.2 - Boeing 777 design components affected by CFD.2
For non-CFD users, Fujii and Miyaji3 of Japan created a web-based CFD tool to
process grid generation, flow simulation and visualization with limited body
configurations. But their application was narrowed to rocket and rocket nozzle
configurations. There is a handful of commercial CFD software available but are too
complicated for inexperienced users.
Figure 2.3 – NASA Virtual Wind Tunnel application.6

8
NASA’s Glenn Research Center has been developing the application of virtual
tunnels for many years and even more so recently with the improvement of computing
power. One of these virtual tunnels named “Immersive Connection to RemoteWind
Tunnel” is shown in Figure 2.3. However, due to the complexity of the programs, other
than the CFD specialists, most of the communities do not have easy access to these CFD
tools. For instance, the state-of-the-art Unsteady Flow Analysis Toolkit (UFAT)
developed at NASA Ames Research Center is a pioneering tool in visualizing unsteady
flow simulations.
The UFAT program can plot streaklines and time lines that are time-dependent
particle tracing techniques. Those techniques are very effective for visualizing unsteady
flows like an unsteady flow data surrounding an oscillating airfoil shown in Figure 2.4.
However, to obtain those results, users are required to understand and setup the complex
conditions in CFD. As powerful as UFAT is, it is not a program that is easily understood
by any user.
Figure 2.4 – Unsteady flow of streaklines and time lines over an airfoil.7

9
A simple aircraft-related CFD simulation is needed and thus the Low-speed
Virtual Wind Tunnel (LSVWT) concept is born.
This project will show how the LSVWT handles the two main pieces of the
program in grid generation and flow simulation. The panel method approximation is
applied in the 2-D airfoil analysis with the capabilities of generating coordinates for 4 and
5-digit NACA airfoils. FlowLab, a commercial software, enhances the flow field analysis
and a second source to verify the panel method result. FlowLab is the simplified version
of its more complex parent FLUENT. The 2-D analysis in FlowLab uses the same
FLUENT commercial code that utilizes the Navier-Stokes equations to solve for various
types of flow and turbulence models. GAMBIT, a grid generation program, works with
FLUENT to discretize the domain to form structured and/or unstructured grid in order to
solve the Navier-Stokes equations for inviscid or viscid flow.
The goal in creating LSVWT is to provide non-CFD researchers or students a user
interface that quickly set-up to CFD analysis. With the LSVWT controls modeled after
the KU large wind tunnel user interface, students can familiarize themselves with the
actual large wind tunnel through the usage of LSVWT.

10
3. Low Speed Wind Tunnel Design
The Low-speed Virtual Wind Tunnel (LSVWT) program consists of a 2-D
analysis portion. LabVIEW is the primary software used in designing the user interface to
perform simulated wind tunnel testing and 2-D flow analysis. LabVIEW is chosen to
build the program because the KU large wind tunnel uses the very same software for its
wind tunnel data acquisition. The commonality in the wind tunnel controls is reflected in
LSVWT’s control panel layout. Figure 3.1 shows the schematics of the large wind tunnel
diagram.
Figure 3.1 – Layout of KU large wind tunnel.8
The subsonic large wind tunnel is closed circuit and has a 36" by 51" test section
and a maximum speed of 185 mph. It is equipped with a six-component strain-gage
balance and a PC-based LabVIEW data acquisition system. The user can set the test
section velocity with a remote throttle control. The LabVIEW user interface provides the
real time monitor that shows the aerodynamics characteristics and coefficients as shown
in Figure 3.2.

11
Figure 3.2 – Current KU large wind tunnel user interface.
The interface also displays the tunnel velocity (in feet per second) and
temperature (in Fahrenheit). The inputs required by the user are:
Atmospheric pressure in inches of mercury.
Mean aerodynamic chord of model in inches.
Wing span of model in inches.
Reference area of model in inches squared.
Each desired angle of attack in degree.

12
The following are its characteristics:
Table I – Characteristics of the KU low-speed large wind tunnel.
Characteristics Data
Tunnel type Closed circuit, single return
Test section type Closed, rectangular shape
Test section size W = 51”, H = 36”, L = 70”
Power source 300 hp constant rpm electric motor
Fan type Four-bladed, variable pitch fan
Maximum test section velocity 185 mph
Turbulence factor 1.1
Contraction ratio 0
Test section sidewash* Maximum +1.8°, average +1.3°
Test section downwash* Maximum 1.3°, average 0.4°
Test section pressure Atmospheric
* The average values calculated in side wash and downwash are for the cross section
3.1. Low Speed Virtual Wind Tunnel Overview
The LSVWT can be used as an educational tool to introduce aerodynamics study
to students who are new to aerodynamics and CFD. With the control panel layout of the
LSVWT being almost identical to that of the KU large wind tunnel, the students will be
familiar with the large wind tunnel controls before they get to use it aerodynamics
characteristics analysis. The 2-dimensional analysis provides lift, drag and pitching
moment characteristics in relation to change in angle of attack and airspeed. The students
can correlate the lift, drag and pitching moment equations to varying angle of attack and

13
airspeed when they can see the immediate changes in those values as they change the
testing conditions. On top of the aerodynamics parameter values, a pressure distribution
across the 2-dimensional airfoil will be shown in real time. The students will have a
better understanding of pressure changes on the airfoil surface with the different angle of
attack settings.
For a more advanced study on 2-dimensional aerodynamics, FlowLab is called up
to provide a contour plot of the flow field around the tested airfoil. Velocity vectors and
entire flow field pressures are shown in full color to represent the wide range of values
from freestream to surface of the airfoil locations.
Figure 3.3 – Features of the Low Speed Virtual Wind Tunnel.
Figure 3.3 shows a general roadmap of the LSVWT features where 4 different
modules work together to provide an uncomplicated and general CFD tool.
Low Speed Virtual Wind Tunnel
LabVIEW Panel Method
FlowLab
JavaFoil NACA type airfoil results for Cl, Cd, Cm in static flow field
FoilSim
Cylinder results for Cl, Cd, Cm plus flow field analysis
Non-standard type airfoil results for Cl, Cd, Cm in dynamic flow field
Any type airfoil results for Cl, Cd, Cm in dynamic flow field
Airfoil results for Cl, Cd, Cm plus flow field analysis

14
3.1.1. 2-D Analysis with Low Speed Virtual Wind Tunnel
The LSVWT program has the following main features:
The control panel layout resembles the actual layout of the KU large wind tunnel
data acquisition system.
In 2-D airfoil analysis, the lift, drag, and pitching moment along with surface
pressure distribution are presented.
In the flow analysis, the contour, vector velocity and streamline can be shown.
All the CFD work, including grid generation and simulation, can be done with
limited knowledge of CFD.
The flow regime is restricted to subsonic range and templates of several model
setups are prepared in FLUENT so that they can be studied in FlowLab.
The templates are modular in design and more can be created (using FLUENT
and GAMBIT by experienced users) to expand the library of CFD analysis.
3.1.2. System Requirements for LSVWT
The computer system requirements for LSVWT are dictated by the sum of
programs involved in CFD analysis. The main requirements are summarized as follows:
A Pentium 4 or equivalent processor is recommended. A minimum hard disk
space of 800 MB running on Windows 2000/XP or later is needed. The computer
must be able to use Internet Explorer 5.5 with Service Pack 2 or later.
A computer with LabVIEW version 7.1 installed.
A computer with MATLAB version 5 installed

15
A computer that is able to launch internet browsers like Internet Explorer or
Mozilla Firefox to use Java applets.
Networked computer that has FLUENT, FlowLab and GAMBIT installed and the
license to execute all three programs in Exceed X-Server environment.
3.2. Quick Start Guide to LSVWT
With the system requirements mentioned earlier satisfied, the LSVWT program
can be started. Click on the LSVWT icon will launch the program and the user will see
the menu screen as shown in the following figure.
Figure 3.4 – Startup screen of LSVWT program.

16
The user has a choice of 2 simple web-based flow analysis modules and 2 more
advanced simulations. An airfoil grid generation program is included to aid the more
advanced 2-D flow analysis programs. The JavaFoil8 module is developed by Martin
Hepperle that utilizes potential flow and boundary layer analysis without taking flow
separation into account. FoilSim9, developed by a team led by NASA scientist Tom
Benson, provides simple flow visualization of airflow over an object – like an airfoil –
without the complexity of flow separation. The Airfoil Generation and 2-D Flow modules
capabilities will be discussed with further details in the chapters to come.
Clicking on the JavaFoil button will launch the module in a separate window.
Javafoil is equipped with its own airfoil generation so that it can proceed with the flow
over airfoil analysis. In Figure 3.5, a NACA 2415 is generated with the coordinates
shown.
Figure 3.5 – JavaFoil airfoil coordinate generation screen.

17
This interactive web-based program is capable of calculating the velocity and
pressure distribution across the chosen airfoil. As soon as an airfoil shape is generated
from its airfoil library, the program can generate velocity and pressure distribution with
the default setting for angles of attack. A table of results that includes the lift, drag and
pressure coefficients is calculated and can be printed. One of the useful features of
JavaFoil is the plotting of the flow field as shown below in Figure 3.6. JavaFoil is simple
to use but it does not handle flow separation issues.
Figure 3.6 – Flow field plotting by JavaFoil.
To view a “moving” flow field, another web-based program FoilSim will fill the
need. FoilSim utilizes animation to further enhance the flow visualization. Clicking on
the FoilSim button from the LSVWT main menu will launch a separate window to the
web-based program as seen in Figure 3.7. This program functions very much like

18
JavaFoil but it runs in constant simulation. FoilSim runs more like a demonstration
because the airfoil shape model does not follow any NACA specification in details.
Figure 3.7 – FoilSim program in motion.
However, with the ability to change the angle of attack, camber and thickness of
airfoil on the fly, the results are shown instantaneously with the lift curve slope, pressure
and/or velocity distribution. The flow visualization is quick but not extremely accurate
without taking flow separation into account.
3.2.1. Airfoil coordinates generations
To initiate the 2-dimensional analysis, the coordinates of an airfoil must be
defined. The airfoil coordinates for NACA 4, 5 and 6-digit airfoils are generated within a
LabVIEW’s subprogram using the NACA equations involving polynomials that relate to
airfoil camber line and thickness distribution. The NACA 2415 and 0012 airfoils are
chosen as the subject of case study because these shapes are used in the Cessna 210 wing

19
and horizontal stabilizer. The published 2-D aerodynamics results of these airfoils are
also readily available in Pope4.
Figure 3.8 – Panel Method airfoil coordinates generation of NACA 0012.
The coordinates generated come in two columns – namely in the Cartesian X and
Y arrangement. To simplify the program setup, the number of panels to represent an
airfoil is set to 50 for this analysis. There will be 25 upper surface X-Y pair coordinates
and another 25 for the lower surface as shown in Figure 3.8. When the user clicks on the
Generate Airfoil button that is highlighted in Figure 3.8, a new window will pop up with
the interface to generate a NACA airfoil shape. If the airfoil is symmetrical, there is a
button (next to the Generate Airfoil) for that option. This helps to cut down on the points
generated by simply mirroring the upper half of the airfoil shape.

20
Figure 3.9 – Coordinate generation of NACA 2415 airfoil.
The user can select the type of NACA airfoil from the pull-down menu from the
top left corner. Once selected, the corresponding section number for the desired airfoil
shape should be entered. The number of points required for this setup is picked to be 50.
More points will provide more details to the airfoil shape but at the same time, the
computation time will increase as well. 50 points are chosen so as to strike the balance
between airfoil shape details and speed of computation in the aerodynamics calculations.
Once the airfoil coordinates are ready, the user can click on Get data button to get the 2-D
results as shown in Figure 3.10.
Type of Airfoil
Section Number
Number of Points

21
Figure 3.10 – Aerodynamics results with pressure distribution across airfoil.
The coordinates are fed into the Panel Method solver to obtain aerodynamics
results. The values of lift, drag and pitching moment coefficients are calculated and
presented in numeric and a pressure distribution graph. The pressure distribution
locations on the airfoil are the same locations of the coordinates generated earlier in
Figure 3.8. By changing the Angle of Attack knob and clicking on the Get data button,
real-time results of the coefficients and the pressure distribution will be updated.
3.2.2. Panel Method Analysis
The Panel Method calculates the velocity distribution along the surface of a
defined panel from an airfoil. The Kutta condition is applied here for linear and steady
Angle of Attack knob

22
flow for the boundary condition setup. The governing equation (Laplace’s equation or the
linearized form in compressible flow) is recast into an integral equation. This integral
equation involves quantities such as velocity, only on the surface, whereas the original
equation involved the velocity potential all over the flow field. The surface is divided into
panels or “boundary elements”, and the integral is approximated by an algebraic
expression on each of these panels. A system of linear algebraic equations result for the
unknowns at the solid surface, which may be solved using techniques such as Gaussian
elimination to determine the unknowns at the body surface.
The equations governing 2-D, incompressible, irrotational flow are:
Continuity: 0=+yv
xu
∂∂
∂∂ (1)
and, irrotationality: ∂∂
∂∂
uy
vx
− = 0 (2)
One can define a velocity potentialφ such that
∂ φ∂
∂ φ∂x
uy
v= =; (3)
This equation satisfies the irrotationality. Continuity equation becomes:
∂ φ∂
∂ φ∂
2
2
2
2 0x y
+ = (4)
One can also define a stream function ψ such that
vx
uy
==∂∂ψ
∂∂ψ - ; (5)
which yields the following relation:
∂ ψ∂
∂ ψ∂
2
2
2
2 0x y
+ = (6)

23
Equations (3) and (6) are each called Laplace’s equation.
In subsonic compressible flow, the potential flow equation is modified to give the
following, approximate equation:
( )1 022
2
2
2− + =∞Mx y
∂ φ∂
∂ φ∂
Assuming one can solve for either the velocity potential or the stream function
and its derivatives (which yield the flow velocities u and v), the pressure can be
computed for incompressible flows, from Bernoulli’s equation as:
( )p u v p V+ + = +∞ ∞ ∞
12
12
2 2 2ρ ρ
From pressure, a non-dimensional quantity called the pressure coefficient may be
computed:
Cp p
V
u vV
VVp =
−= −
+= −∞
∞ ∞∞ ∞
12
1 12
2 2
2
2
2
ρ
where u and v are Cartesian components of velocity V.
With angle of attack chosen by the user, the lift, drag and pitching moment
coefficient are calculated. The surface pressure distribution is also computed and then
presented visually by LabVIEW. The result of such typical calculation is shown in Figure
3.11.

24
Figure 3.11 – Panel Method results of a NACA 2415 airfoil.
Through the change of angle of attack, a 2-D airfoil lift curve slope and drag polar
can be plotted. The pressure distribution can also be shown in the corresponding locations
of the coordinates generated for the airfoil. However, the results do not take into account
of flow separation at high angle of attack (more than 12 degrees) settings. Even though
the stall characteristics do not match up favorably with Pope’s findings at the high angles
of attack, the results do show that the aerodynamics coefficients are similar at the lower
range of angles of attack.

25
3.2.3. FlowLab in 2-D usage
Figure 3.12 – FlowLab 2-D analysis of Clark Y airfoil.
In the same way the Panel Method is activated, FlowLab can be launched from
the LSVWT program. Depending solely on the template used, FlowLab performs quick
and limited CFD analysis of the 2-D subject. The subject can range from an airfoil like
the NACA 4- or 5-digit series to a simple cylinder. Figure 3.12 shows an example with
Clark Y airfoil. The user may adjust the characteristic length of the test subject, Reynolds
Number, types of mesh and grid. These choice selections are completely fixed during the
creation of the template. Once the solution converges, pressure and velocity profile of the
entire flow field can be plotted and saved for further analysis or comparison.

26
3.2.4. Starting FlowLab
Click on the Start FlowLab button will launch the program and a screen following
that, shown below, provide models to be analyzed. The models used in the LabVIEW
module are readily converted from LSVWT when needed.
Figure 3.13 – FlowLab analysis model selection.
Once that is chosen, FlowLab will load the model and proceed to the main
program (shown in Figure 3.14) that will consists of the flow field/ grid screen, controls
for analysis and overview notes on the operation of the case study.

27
3.2.5. Geometry Settings
Figure 3.14 – Geometry module creation.
From the Geometry module, the chord length can be determined. The length
limitation is set accordingly to the grid that is generated around it. The user can choose to
enter the length in metric or British units. Once the chord length is set, the user can click
on Next to proceed to the next module that sets the physics of the flow.
3.2.6. Flow Conditions (Physics) Settings
Flow conditions are chosen in this module as shown in the Figure 3.15. The
condition can be set to either inviscid or viscous. For the simplicity of calculations,

28
inviscid condition is usually selected. Boundary condition and materials can be selected
to reflect the fluid of the flow.
Figure 3.15 – Physics or flow conditions module settings.
For the boundary conditions as seen in the Figure 3.16, the far field pressure and
temperature can be set for the flow. This is also where the user can set the velocity (in
terms of Mach number) of the flow and the angle of attack for the airfoil. The wall
roughness is typically ignored for the quick calculations.

29
Figure 3.16 – Boundary condition settings in the Physics module.
After the boundary condition is set, the density and viscosity of the flow can be
chosen by activating the Materials option. In that option, the user can also determine the
thermal conductivity, specific heat and molecular weight of the fluid.
Figure 3.17 – Materials properties in the Physics module.
Once the Physics setup is complete, the Reynolds Number can be calculated when
the Compute button is pressed. Then, the user can move on to the next module by
clicking on the Next button.

30
3.2.7. Mesh Settings
The intensity of meshes is chosen here will affect the solving time directly. The
user has the straightforward options under Mesh Density to use Fine, Medium or Coarse
setting. The Cell Count is for the user to gauge the complexity of the proposed mesh. The
higher the cell count is, the longer it will take for the program to complete the
calculations. The wall function is typically set to standard unless specified otherwise.
Figure 3.18 – Mesh settings for the airfoil.
Once the mesh is selected, the user must click on Create to generate the newly
selected type of mesh to be used. A progress bar will appear at the top and once that
disappears, the user can proceed to the next module by clicking on the Next button.

31
3.2.8. Solve for Solution Settings
The number of iterations is set here that will determine the time to take to solve
the computations. From the screenshot below, the user will enter the number of iterations
desired and also the convergence limit of the solution. The driving factor of time required
will be the convergence limit set because the program will only stop computing once the
limit is set unless it has reached the iterations count. If the iterations are set too low, the
solution may not converge and thus yielding no results from the calculations. For a
decent convergence, the limit is set to 0.0001.
Figure 3.19 – Solution settings module.

32
The user will need to click on Iterate to start the program to solve for the flow
field solution. After the iterations are completed, the graphic reports will be available in
the next module.
3.2.9. Graphic Reports Settings
Once iterations are completed, the graphic reports are available. In this module,
the aerodynamics coefficients are shown as seen in the figure below. The user will also
have the options to plot graphs of the residuals calculation progress (see Figure 3.21) and
the pressure distribution of the airfoil for that particular velocity and angle of attack.
Figure 3.20 – Graphic Reports module.
33
Figure 3.21 – Example of a residuals progress with respect to iterations.

34
3.2.10. Post-processing Analysis Settings
Figure 3.22 – Post module to show the results of computation.
This is where the flow field can be plotted and shown depending on the user’s
choices. As shown in the Figure 3.22, the flow field can be plotted using (pressure or
velocity) contour, vector or streamlines.
3.3. Additional Feature in Animation
When the CFD model in FlowLab is configured in another grid format, time steps
of the flow can actually be seen. The pictures of the flow are captured in the time steps
specified by the user. An example of such application is shown in Figure 3.23 where a

35
sphere is subjected to a relatively low Reynolds Number flow to induce the Von Kármán
vortex street.
Figure 3.23 – Von Kármán vortex street illustrated in FlowLab.
This advantage of such feature is that user no longer has to imagine the flow
behavior of unsteady flow. The unsteady flow is captured vividly in FlowLab where it
can be exported as a series of pictures or as an animation.

36
4. Results and Discussions
4.1 2-D Flow Results of NACA 2415
With the known mathematical equation to create the NACA 2415 airfoil, the
coordinates are generated as shown in Figure 4.1.
Figure 4.1 – Generation of NACA 2415 airfoil coordinates.
The results of lift, drag and pitching moment coefficients are shown as seen in
Figure 3.9. Each of the run here gives the results for one angle of attack setting. To
produce a lift curve slope and the variation of drag and pitching moment due to different
angle of attacks, multiple runs are needed.

37
Figure 4.2 – 2-D results of NACA 2415 at zero angle of attack.
With each run of different angle of attack, a set of values for lift, drag and
pitching moment coefficients are calculated, along with a pressure distribution chart. An
angle of attack range from -6 to 18 is selected, with an interval of 2 degrees between each
angle. The computed results and the NACA findings are compiled as follows:
-0.6-0.5-0.4-0.3-0.2-0.10.00.10.20.30.40.50.60.70.80.91.01.11.21.31.4
-8 -6 -4 -2 0 2 4 6 8 10 12 14 16 18 20 22
Angle of Attack, α (deg.)
Lift
Coef
ficie
nt, C
L (~
)
CFDNACA data
Figure 4.3 – Lift curve slope of NACA 2415.

38
From Figure 4.3, the lift curve slope obtained from the computation is fairly close
to the NACA results. At the lower angle of attacks from -6 to 2 degrees, both sets of data
are almost on top of each other. They show about the same values for lift coefficient for
those angles of attack. However, the discrepancy starts right after 2 degrees. From 2 to 10
degrees, the difference between the computed and NACA values begins to grow. The
computed values show a steeper linear increase compared to the NACA’s. At this point,
the computed result also show that the airfoil has reached its’ stall around 10 degrees for
a lift coefficient of 1.22. As for the NACA data, the airfoil stalls at a later angle of attack
of 12 degrees and it has a slightly lower lift coefficient of 1.2.
The lift curve slopes also show that the stall characteristics are different between
the computed and experimental data from NACA. The computed lift curve slope has a
more gentle stall behavior as the lift coefficient tapers out from 1.22 to 1.15 at around 16
degree angle of attack. In contrast, the NACA data that stalls later at 12 degrees angle of
attack drops its lift coefficient from 1.2 to 0.85 when it reaches 16 degrees. This show the
computational results will be fairly accurate up to the point where flow separation may
have occurred.
A closer observation to this stall difference can be made using FlowLab. By
calling up FlowLab, the flow field at angles of attack from 10, 12 and 14 are shown in
Figures 4.3. Note that the airfoil is referenced always horizontally, which is the default
orientation of FlowLab.

39
Figure 4.3 – Pressure flow field NACA 2415 at angle of attack at 10 degrees (top left), 12 degrees (top right) and 14 degrees (above).
From Figure 4.3, the unsteady flow (blue color region) is seen growing from each
angle of attack progression. The flow separation at the trailing edge of the airfoil is barely
noticeable at 10 degrees although this is the stall angle of attack for the computational
result. Looking at the 12 degrees angle of attack, the separation has crept forward to more
than half of the airfoil’s chord length. Thus, this corresponds to the drop in lift coefficient
value from 1.22 to 1.19. As the angle of attack increases further to 14 degrees, the
unsteady flow has almost reached the leading edge of the airfoil and therefore produces a
lower lift coefficient value of 1.10.
4.2 2-D Visual Flow Results of NACA 2415
Closer observations of the results of the NACA 2415 can be seen here. The visual
results will be shown in the progressing order of the angle of attack changes starting from
-6 to 14 degrees with a 2-degree step. From 15 to 20 degrees angle of attack, the

40
increment will be 1 degree to demonstrate drastic changes in pressure at high angle of
attack.
– 6 degree angle of attack 4 degree angle of attack
– 2 degree angle of attack –0 degree angle of attack
2 degree angle of attack 4 degree angle of attack
Figure 4.4 – Pressure distribution on NACA 2415 at -6 to 4 degree angles of attack.

41
6 degree angle of attack 8 degree angle of attack
10 degree angle of attack 12 degree angle of attack
14 degree angle of attack 15 degree angle of attack
Figure 4.5 – Pressure distribution on NACA 2415 at 6 to 15 degree angles of attack.

42
16 degree angle of attack
17 degree angle of attack
Figure 4.6 – Pressure distribution on NACA 2415 at high angles of attack of 16 and 17 degrees.

43
18 degree angle of attack
20 degree angle of attack
Figure 4.7 – Pressure distribution on NACA 2415 at high angles of attack of 18 and 20 degrees.

44
The visual results of the NACA 2415 shows a steady low pressure (indicated with
blue color) buildup on top of the airfoil as the angle of attack increases. At the 16 degree
angle of attack, flow separation occurs and thus creating unsteady airflow. Once the
airfoil experiences unsteady flow, the computation on the aerodynamics characteristics
like lift, drag and pitching moment will start to increase at a higher rate. At this point,
only the visual results are considered trustworthy. From Figure 4.6 and 4.7, the flow
separation begins to propagate downstream and create larger wake as the airfoil increase
in angle of attack. The turbulence due to the wake generates higher aerodynamics
characteristics, in particular – lift coefficient. Thus, the stall characteristics of the airfoil
would be inaccurate but the visual results do provide an insight to when and how the
turbulent flow occurs and behaves.

45
5. Conclusion and Recommendations
5.1. LSVWT 2-D flow analysis
Both web-based modules of JavaFoil and FoilSim offer quick visualization of
airfoil and flow analysis. However, each has its shortcomings; JavaFoil can only perform
analysis with each time a button is pushed and FoilSim is not able to generate specific
any airfoil shapes including NACA’s. Also, both JavaFoil and FoilSim are not suitable
for flow that has separated.
Fortunately, the other 2-D modules are able to compensate on those flaws. The 2-
D Flow Over Airfoil module can provide aerodynamic characteristics continuously once
it has started. The 2-D Flow Visualization module through FlowLab is able to show the
flow separation. However, the values of the lift, drag and pitching moment coefficients
are slightly different as seen in the case study of NACA 2415 airfoil. At the 10 degree
angle of attack, flow separation may have occur which indicates the decrease in lift
coefficient as shown in Figure 4.3. The CFD stall behavior is more gentle compared to
the NACA data. This shows that FlowLab may have predicted the stall angle correctly,
but the post-stall behavior does not match up with NACA’s results.
Overall, the results are satisfactory for non-CFD researchers or students learning
the basics of aerodynamics and CFD. The flow visualization will help users to understand
the flow behaviors, especially when the flow is unsteady.
46
5.2. Recommendations for future work
To further enhance the capabilities of LSVWT, an extensive 3-D model module
should be developed. There are very few CFD tools that are user friendly for CFD
beginners and the time required to solve the CFD calculations are long (as in many hours,
if not days). The following are the possible future development to consider.
5.2.1. 2-D Analysis in LabVIEW and FlowLab
Although there is an Airfoil Generation option, the generated airfoil can only be
used in LabVIEW’s Panel Method module currently. To use the same airfoil for FlowLab
analysis, the user need to edit the airfoil coordinates data text file manually so that
FlowLab can use it. A simple computer programming in LabVIEW could automate this
process so that the user can have the airfoil coordinates data converted for FlowLab use
with a click of a button.
With a better understanding of the condition settings and tweaking in FlowLab,
the post-stall behavior could be modeled more closely to the experimental NACA results.
With these tweaks, the CFD simulation will be more reliable and able to provide even
more convincing aerodynamic characteristics values.
5.2.2. FLUENT and GAMBIT in grid generation
GAMBIT is the primary software in creating geometry and mesh generation for
FLUENT. Virtual models can either be built in GAMBIT or imported from other
computer-aided design (CAD) programs such as CATIA or Pro/E. Other than the
common Cartesian type mesh, GAMBIT is also capable of producing triangular surface
meshes and tetrahedral volume meshes.

47
Once the geometric shape and mesh is completed, FLUENT performs the CFD
analysis. Conditions of the test environment and model are tested and this is where the
template is created with the choice selections that are later available to FlowLab. The
template creation should be left to the experienced CFD users and the non-CFD users can
benefit from the simplified case studies of the CFD templates to be used in FlowLab.
To get a 3-dimensional analysis, FLUENT can be used to provide the detail flow
field representation. However, FLUENT does require more than minimal proficiency in
CFD knowledge in setting up for the computation. A library of models will be provided
so that users do not need to know much in model grid generation using GAMBIT.
The Cessna 210 that has been tested annually in the KU large wind tunnel would
be a good candidate as the test subject in the 3-dimensional CFD analysis. The results can
then be combined with the wind tunnel experimental data to provide a more complete
picture of the model’s flow behavior in the wind tunnel. The CFD results in the flow
analysis, coupled with velocity and pressure will compliment the experimental data in
order to provide details on the relationship between aerodynamics and flow
characteristics. This should verify whether the CFD setting is correct.
5.2.3. FlowLab in 3-D usage
FlowLab, once again, can play the pre- and post-processing role of CFD analysis
as in the 3-D scenario. The results obtained in the 3-D setup will be similar to the 2-D
situation with the calculated velocity contour, vectors and streamline except for that
difference in which the flow field is in 3-D. The user can take a zoom-in close look at the

48
flow interference with the virtual test model. FlowLab can provide a simply user interface
to analysis the flow compared to FLUENT that is much harder to use.
5.2.4. OpenFlower and Gmsh
OpenFlower (Open Source Flow solver) was a joint effort and product of some
CFD research engineers launched in 2004. The open-source nature of the software
provides a public platform in which all levels of CFD users can contribute to improve it
so that the increasing CFD industrial need can be met. This publicly free software is
mainly devoted to the resolution of the turbulent unsteady incompressible Navier-Stokes
equations. The grid generation portion is managed by another open-source software
called Gmsh that creates 3-D finite element mesh and works with OpenFlower in pre- and
post-processing of solutions.
“OpenFlower is a free open-source finite volume CFD software, mainly devoted
to the resolution of the turbulent incompressible Navier-Stokes equations, with scalar
transport.”5 It is a command line solver that would handle geometry and mesh generated
by Gmsh, a mesh and grid generator. The current stage of development in 3-D flow
analysis is not yet proven to be stable in the aircraft application. Thus, the results from
OpenFlower are strictly for evaluation purposes, not for close comparison.
Gmsh, the pre- and post- processor, is consisted of four modules: geometry, mesh,
solver and post-processing. It is an automatic 3-D finite element grid generator (primarily
Delaunay) with a build-in CAD engine. Since OpenFlower is a command line program
(meaning there is not any user interface), the results are shown using Gmsh. One

49
significant limitation of Gmsh is that it can only post-process 3-D results from
OpenFlower.
If the more expensive FLUENT software is unavailable, the alternate choice
would be OpenFlower and Gmsh. Although these two programs are free to download,
they are not thoroughly tested like FLUENT. The up side to the free programs is that
there are more users online that would be able to offer assistance to help any user.

50
6. References
1. Bell, Theo “The Numerical Wind Tunnel: A Three-dimensional Computational
Fluid Dynamics Tool,” M.S. Thesis, Dalhousie University, Halifax, Nova Scotia,
August 2003.
2. Tinoco, Edward N. “The Changing Role of Computational Fluid Dynamics in
Aircraft Development,” AIAA Paper 98-2512, pp. 161-174, Boeing Commercial
Airplane Group, Seattle, Washington, 1998.
3. Fujii, Kozo and Miyaji, Koji “WEB-CFD and Beyond –CFD for non-CFD
Researchers–,” AIAA Paper 02-14233, 2002.
4. Pope, Alan “Basic wing and airfoil theory,” New York, McGraw-Hill, 1951.
5. OpenFlower CFD Software Reference Manual, OpenFlower Team, July, 2004.
6. NASA Glenn Research Center, http://www.sgevolution.com/htm/nasa.htm
7. NASA Advanced Supercomputing Division: Unsteady Flow Analysis Toolkit,
http://www.nas.nasa.gov/Software/UFAT
8. JavaFoil – Analysis of Airfoils, http://www.mh-aerotools.de/airfoils/javafoil.htm
9. NASA Glenn Research Center – FoilSim, http://www.grc.nasa.gov/WWW/K-
12/airplane/foil2.html
10. KU Large Wind Tunnel Operating Handbook.
11. Deasi, S. S. “Relative roles of computational fluid dynamics and wind tunnel
testing in the development of aircraft.” Current Science, Vol. 84, No. 1, 10
January 2003.

51
12. W.H. Mason, D. L. Knill, A.A. Giunta, B. Grossman and L.T. Watson “Getting
the Full Benefits of CFD in Conceptual Design” AIAA Paper 98-2513, 16th
AIAA Applied Aerodynamics Conference June 15-18, 1998.
13. van Leer, Bram “CFD Education: Past, Present, Future” AIAA Paper 99-0910,
37th AIAA Aerospace Sciences Meeting and Exhibit, January 11-I 4, 1999.
14. Lamar, John E., Obara, Clifford J., Fisher, Bruce D., Fisher, David F. “Flight,
Wind-Tunnel, and Computational Fluid Dynamics Comparison for Cranked
Arrow Wing (F-16XL-1) at Subsonic and Transonic Speeds” NASA/TP-2001-
210629.
15. FLUENT FlowLab 1.2 Documentation, User’s Guide, Fluent, Inc, Jan 2005.
16. FLUENT 6.2 Documentation, User’s Guide, Fluent, Inc, 2005.
17. FLUENT GAMBIT 2.2 Documentation, User’s Guide, Fluent, Inc, 2005.

52
Appendix A: Program Flowchart of LabVIEW for LSVWT Program LabVIEW details of the programming Program Hierarchy

53
Main menu

54
Launch JavaFoil

55
Launch JavaFoil (continue)
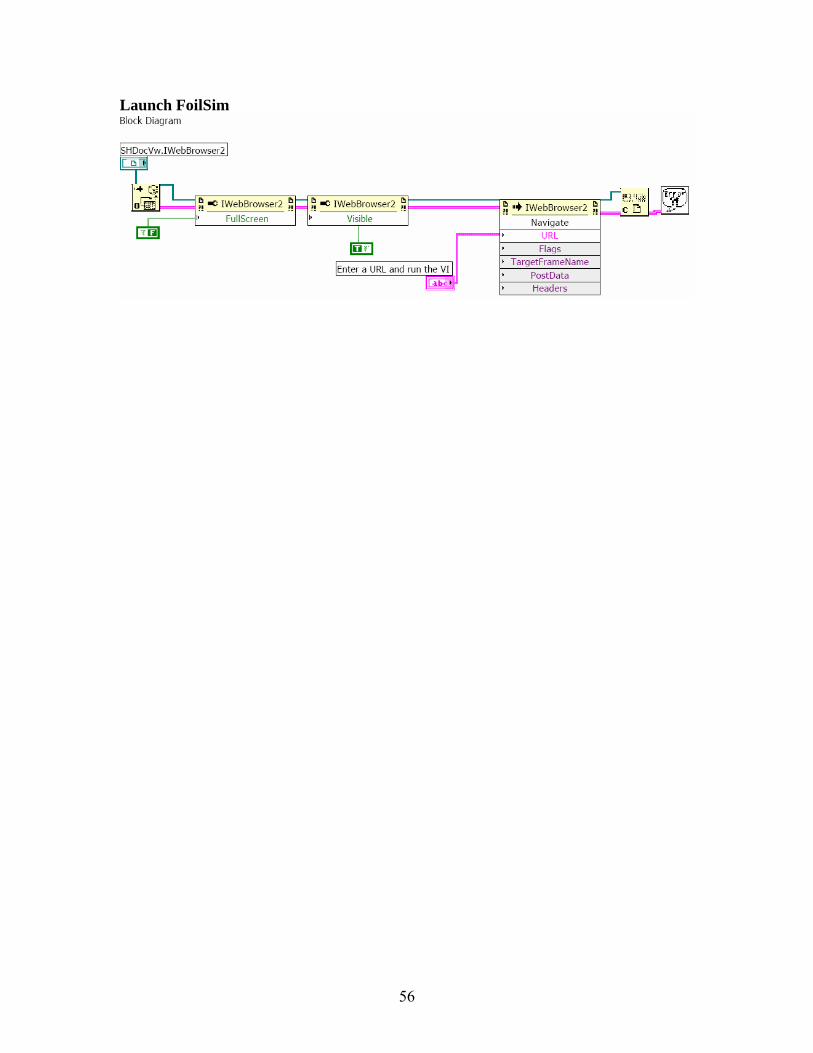
56
Launch FoilSim

57
Launch FlowLab

58
2-D Panel Method

59
Airfoil pressure distribution chart

60
Airfoil coordinates conversion from generated to LabVIEW use

61
MATLAB source code for Panel Method used in LabVIEW % Panel Code in MATLAB % % Open a File and read airfoil coordinates % fid = fopen('panel.data.txt','r') % % Read Angle of Attack % alpha = fscanf(fid,'%f',1); % % read number of points on the upper side of airfoil % nu = fscanf(fid,'%d',1); % % read number of points on the lower side of airfoil % nl = fscanf(fid, '%d',1); % % read Flag that states if this airfoil is symmetric % if isym > 0 then airfoil is assumed symmetric % isym = fscanf(fid,'%d',1); % % Read a scaling factor % The airfoil y- ordinates will be multiplied by this factor % factor=fscanf(fid,'%f',1); if(isym>0) nl = nu; end % % Allocate storage for x and y % x = zeros(1,100); y = zeros(1,100); % % Read the points on the upper surface % for i = nl:nl+nu-1 a=fscanf(fid,'%f',1); b = fscanf(fid,'%f',1); x(i) = a; y(i) = b * factor;

62
end if isym == 0 % % If the airfoil is not symmetric, read lower side ordinates too.. % for i = 1:nl a=fscanf(fid, '%f',1); b = fscanf(fid, '%f', 1); x(nl+1-i) = a; y(nl+1-i) = b * factor; end else for i =1:nl x(nl+1-i) = x(nl-1+i); y(nl+1-i) = - y(nl-1+i); end end fclose(fid); % % Plot the airfoil on window #1 % % plot(x,y); n=nu+nl-2; A=zeros(n+1,n+1); ds=zeros(1,n); pi=4. * atan(1.0); % % Assemble the Influence Coefficient Matrix A % for i = 1:n t1= x(i+1)-x(i); t2 = y(i+1)-y(i); ds(i) = sqrt(t1*t1+t2*t2); end for j = 1:n a(j,n+1) = 1.0; for i = 1:n if i == j a(i,i) = ds(i)/(2.*pi) *(log(0.5*ds(i)) - 1.0); else xm1 = 0.5 * (x(j)+x(j+1)); ym1 = 0.5 * (y(j)+y(j+1)); dx = (x(i+1)-x(i))/ds(i); dy = (y(i+1)-y(i))/ds(i); t1 = x(i) - xm1;

63
t2 = y(i) - ym1; t3 = x(i+1) - xm1; t7 = y(i+1) - ym1; t4 = t1 * dx + t2 * dy; t5 = t3 * dx + t7 * dy; t6 = t2 * dx - t1 * dy; t1 = t5 * log(t5*t5+t6*t6) - t4 * log(t4*t4+t6*t6); t2 = atan2(t6,t4)-atan2(t6,t5); a(j,i) = (0.5 * t1-t5+t4+t6*t2)/(2.*pi); end end a(n+1,1) = 1.0; a(n+1,n) = 1.0; end % % Assemble the Right hand Side of the Matrix system % rhs=zeros(n+1,1); alpha = alpha * pi /180; xmid=zeros(n,1); for i = 1:n xmid(i,1) = 0.5 * (x(i) + x(i+1)); ymid = 0.5 * (y(i) + y(i+1)); rhs(i,1) = ymid * cos(alpha) - xmid(i) * sin(alpha); end gamma = zeros(n+1,1); % % Solve the syetm of equations % In MATLAB this is easy! % gamma = a\rhs; cp=zeros(n,1); cp1=zeros(n,1); % % Open a file to write x vs. Cp and the Loads % % Change the file name below, to open a new file every time % fid=fopen('cp.data.txt','w'); fprintf(fid,' X CP\n\n'); for i = 1:n cp(i,1) = 1. - gamma(i) * gamma(i); cp1(i,1) = - cp(i,1); xa = xmid(i,1); cpa = cp(i,1); %

64
% Write x and Cp to the file % % The xa- coordinate is the center points of panel 'i' % Cpa is the Cp value at that point % fprintf(fid,'%10.4f %10.4f\n',xa,cpa); end % % Open a new figure and plot x vs. Cp % %figure(2); %plot(xmid,cp1); % % Compute Lift and Drag Coefficients % cy = 0.0; cx = 0.0; cm = 0.0; % We assume that the airfoil has unit chord % we assume that the leading edge is at i = nl; for i=1:n dx = x(i+1) - x(i); dy = y(i+1) - y(i); % xarm is the moment arem , equals distance from % the center of the panel to quarter-chord. xarm = 0.5 * (x(i+1)+x(i))-x(nl)-0.25; cy = cy - cp(i,1) * dx; cx = cx + cp(i,1) * dy; cm = cm - cp(i,1) * dx * xarm; end % % Print Lift and Drag coefficients on the screen % cl = cy * cos(alpha) - cx * sin(alpha) cd = cy * sin(alpha) + cx * cos(alpha) cm cp x=x' y=y' % % Write lift and Drag coefficients to a file % %fprintf(fid,' CL CD CM\n'); %fprintf(fid,'%10.4f %10.4f %10.4f\n', cl,cd,cm); fclose(fid);