litter evacuation section i. types of litters · litter evacuation section i. types of litters 9-1....
TRANSCRIPT

FM 8-10-6
CHAPTER 9
LITTER EVACUATION
Section I. TYPES OF LITTERS
9-1. General
After patients are picked up in a forward area bylitter bearers, they may be moved by surface or airassets to points as far to the rear as required bytheir medical condition. The patient who must betransported on a litter is referred to as a litterpatient.
This paragraph implements STANAG 2040and QSTAG 519.
9-2. Types of Litters
A litter may be prefabricated or may be improvisedfrom available materials. The Armed Forces useseveral types of standard litters. This standardi-zation allows a patient to travel in various vehicleson the same litter; thereby, minimizing the possi-bility of further injury and saving valuable time.
a. Standard Litters. Standard litters areprefabricated and may have accessories to be usedwith them.
(1) The standard collapsible litter is themost widely used (Figure 9-1). It folds along the longaxis only.
(a) Thelitter and their functions are provided below:
weight aluminum poles.
duck.
tached to the poles.
basic components of the
Two straight, rigid, light-
A cover (bed) of cotton
Four wooden handles at-
Four stirrups (one boltednear the end of each pole). The stirrups support thelitter when it is placed on the ground.
Two spreader bars (onenear each end of the litter). These bars are extendedcrosswise at the stirrups to hold the cover taut whenthe litter is open.
Two litter securing straps(one attached to each pole at the stirrup bolts).These straps are used to secure the litter when it isclosed.
Accessories such as pa-tient securing straps.
(b) Dimensions of the standardcollapsible litters are as follows:
inches.
Overall length is 90 inches.
Overall width is 22 7/8
Bed length is 72 inches.
Bed width is 22 7/8 inches.
Weight is 15 pounds.
9-1

FM 8-10-6
(2) The patient securing strap (Figure can also be used with an improvised litter and as a9-2) is used to hold the patient in position on the patient restraint, if required. It is made from alitter. It is designed to fit the straight and folding 6-foot length of 2-inch webbing and a buckle with aaluminum litters as well as other standard litters. It locking device and spring.is available in quantities of four per litter. This strap
(3) Another standard litter, with thesame general dimensions when open, is the foldingaluminum litter. It has folding lightweight alu-
minum poles (Figure 9-3). The poles can be folded toone-half their length when the litter is not in use.
(4) The poleless semirigid litter (Figure tient in a vertical position. The dimensions of this9-4) is useful in evacuating patients from ships and litter are overall length, 83¾ inches; overall width,in mountainous areas. It holds the patient securely 22¾ inches; and its weight is 18¾ pounds. Thein position and facilitates the movement of the pa- basic components and their functions are—
9-2

FM 8-10-6
Semirigid cotton duck withwooden supports.
Four webbing handles (two ateach end). These straps can be used when the litter iscarried by four bearers.
Four loops. These loops are
used to insert the poles for carrying.
Headpiece. This is used tosupport the patient’s head.
Seven patient securing straps.These straps are used to secure the patient to thelitter.
(5) The poleless nonrigid litter (Figure has slings for hoisting, lowering, and carrying, and9-5) can be folded and carried by the combat medic. patient securing straps to secure the patient to theIt has folds into which improvised poles can be in- litter.serted for evacuation over long distances. It also
9-3

FM 8-10-6
(6) The Stokes litter (Figure 9-6) affordsmaximum security for the patient when the litter istilted. (For additional information, refer to para-graph 11-32.) The basic components of the litter andtheir functions, and its dimensions are providedbelow.
It is composed of a steel oraluminum tubular frame supporting a bed of wiremesh netting. It also has wooden support slats tosupport the patient’s back.
The lower half is divided intotwo compartments to accommodate the patient’slegs.
It has four webbing patientsecuring straps for use in securing the patients.
It has ropes, cables, or steelrings which can be attached to the litter as requiredfor vertical recoveries.
Its dimensions are length, 84inches; width, 23 inches; and weight, 31½ pounds.
(7) The SKED litter (Figure 9-7) is a rescue a patient in the water. Detailed informationcompact and lightweight transport system used to on this system is contained in paragraphs 11-27evacuate a patient over land. It may also be used to through 11-30.
9-4

FM 8-10-6
b. Improvised Litters. Improvised littersare those made from various materials normallyavailable in the forward area.
(1) There are times when a patient mayhave to be moved and a standard litter is not avail-able. The distance may be too great for manualcarries, or the patient may have an injury (such as afractured neck, back, hip, or thigh) that would beaggravated by manual transportation. In these sit-uations, litters can be improvised from materials athand. Improvised litters must be as well construc-ted as possible to avoid the risk of dropping orfurther injuring the patient. Improvised litters areemergency measures and must be replaced by stan-dard litters at the first opportunity.
(2) Many different types of litters canbe improvised, depending upon the materials avail-able. A satisfactory litter can be made by securingpoles inside such items as a blanket (Figure 9-8),poncho, shelter half, tarpaulin, mattress cover,jacket, shirts (Figure 9-9), or bed ticks, bags, andsacks (Figure 9-10). Poles can be improvised fromstrong branches, tent poles, skis, lengths of pipe,
and other objects. If objects for improvising polesare not available, a blanket, poncho, or similar itemcan be rolled from both sides toward the center sothe rolls can be gripped for carrying a patient (Fig-ure 9-11). Most flat-surface objects of suitable sizecan be used as litters. Such objects include doors,boards, window shutters, benches, ladders, cots, andchairs. If possible, these objects should be paddedfor patient comfort.
(a) To improvise a litter using ablanket and poles, the following steps should beused:
Open the blanket and layone pole lengthwise across the center; then fold theblanket over the pole.
across the center of the folded blanket.
blanket over the second pole and across to the firstpole.
Place the second pole
Fold the free edges of the
9-5

FM 8-10-6
(b) To improvise a litter using (d) If no poles are available, roll ashirts or jackets, button the shirt or jacket and turn blanket, shelter half, tarpaulin, or similar item fromit inside out, leaving sleeves inside, then pass pole both sides toward the center. Grip the rolls to carrythrough the sleeves. the patient.
(c) To improvise a litter from bedsacks and poles, rip open the corners of bed ticks,bags, or sacks; then pass the poles through them.
9-3. Dressed Litter
A litter is dressed with one, two, or three blankets(Figures 9-12 through 9-14) to reduce the danger ofshock and to afford warmth and comfort duringtransport. In an NBC environment, the litter shouldbe dressed with an impermeable cover (rubber pon-cho or similar material). This cover is folded over thepatient to prevent additional exposure to contami-nants. If an impermeable cover is not available, ablanket can be used.
a. To dress a litter with one blanket (Figure9-12), place the blanket diagonally over the litter.After the patient is placed on the litter, bring thesides of the blanket over the patient and tuck in theedges at his head and feet.
9-6

FM 8-10-6
b. To dress a litter with two blankets(Figure 9-13), place the first blanket lengthwiseacross the litter with the blanket edge just beyondthe head end of the litter. The second blanket isfolded in thirds, lengthwise, and placed over thefirst blanket. Let the upper edge of the secondblanket drop about 10 inches below the upper edgeof the first one. Open the folds on the secondblanket about 2 feet from the foot end. After thepatient is placed on the litter, bring the bottom ofthe blanket up and over the patient’s feet. Leave a
small fold between his feet. Tuck the two foldsclosely over and around his feet and ankles. Finally,wrap the patient with one side and then the oppositeside of the first blanket.
NOTE
If the patient to be placed on thelitter is tall, the blanket should beplaced lower on the litter.
9-7
FM 8-10-6
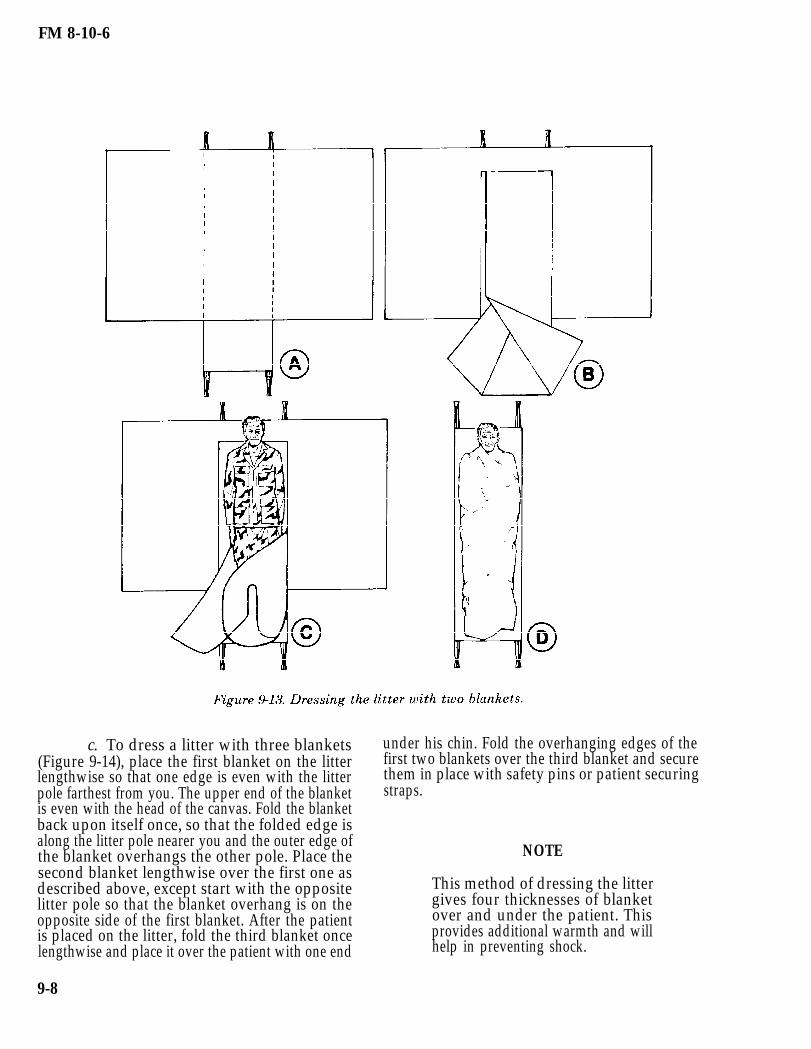
c. To dress a litter with three blankets under his chin. Fold the overhanging edges of the(Figure 9-14), place the first blanket on the litter first two blankets over the third blanket and securelengthwise so that one edge is even with the litter them in place with safety pins or patient securingpole farthest from you. The upper end of the blanket straps.is even with the head of the canvas. Fold the blanketback upon itself once, so that the folded edge isalong the litter pole nearer you and the outer edge ofthe blanket overhangs the other pole. Place thesecond blanket lengthwise over the first one asdescribed above, except start with the oppositelitter pole so that the blanket overhang is on theopposite side of the first blanket. After the patientis placed on the litter, fold the third blanket oncelengthwise and place it over the patient with one end
NOTE
This method of dressing the littergives four thicknesses of blanketover and under the patient. Thisprovides additional warmth and willhelp in preventing shock.
9-8
FM 8-10-6
9-4. Using Patient Securing Straps
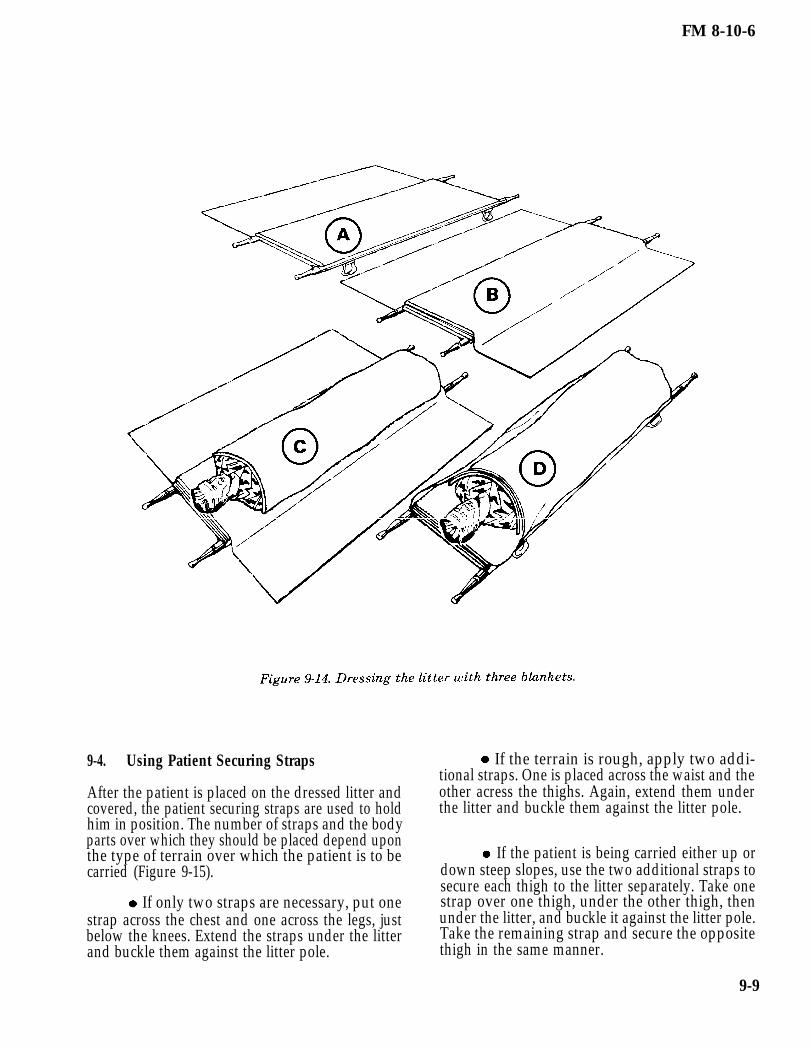
After the patient is placed on the dressed litter andcovered, the patient securing straps are used to holdhim in position. The number of straps and the bodyparts over which they should be placed depend uponthe type of terrain over which the patient is to becarried (Figure 9-15).
If only two straps are necessary, put onestrap across the chest and one across the legs, justbelow the knees. Extend the straps under the litterand buckle them against the litter pole.
If the terrain is rough, apply two addi-tional straps. One is placed across the waist and theother acress the thighs. Again, extend them underthe litter and buckle them against the litter pole.
If the patient is being carried either up ordown steep slopes, use the two additional straps tosecure each thigh to the litter separately. Take onestrap over one thigh, under the other thigh, thenunder the litter, and buckle it against the litter pole.Take the remaining strap and secure the oppositethigh in the same manner.
9-9

FM 8-10-5
9-5. General Rules for Litter Bearers
In addition to the bearer rules addressed inparagraph 8-4, the following rules also apply:
a. In moving a patient, the litter bearersmust make every movement deliberately and asgently as possible. The command STEADY shouldbe used to prevent undue haste.
b. The rear bearers should watch themovements of the front bearers and time theirmovements accordingly to ensure a smooth andsteady action.
c. The litter must be kept as level aspossible at all times, particularly when crossingobstacles, such as ditches.
d. Normally, the patient should be carriedon the litter feet first, except when going uphill or
9-10
upstairs; his head should then be forward. If thepatient has a fracture of a lower extremity, heshould be carried uphill or upstairs feet first anddownhill or downstairs head first to prevent theweight of the body from pressing upon the injuredpart.
e. When the patient is loaded on a litter, hisindividual equipment is carried by two of thebearers or placed on the litter.
9-6. Use of Spine Boards and the KendricksExtrication Device
Spine boards and the KED aid in rescuing andimmobilizing patients with known or suspectedspinal fractures. Spine boards can be prefabricatedfrom plywood or any suitable material {Figure 9-16).

FM 8-10-6
a. Short Spine Board. When a patient has afracture or suspected fracture of the neck, the shortspine board is applied from the waist up to immo-bilize the upper spine before moving him (Figure9-17). The patient is then lifted onto a long spineboard (c below). To apply the short spine board, thebearers assemble the required items: a short spineboard, a cervical collar, two 6-foot patient securingstraps, and a cravat. If an item is not available, thebearers should improvise it from any availablematerial.
(1) Bearer number 1 places his hands oneach side of the patient’s head and jaws. He thenapplies slight upward traction to the neck whilebearer number 2 inserts a cervical collar around thepatient’s neck.
(2) Bearer number 1 maintains a slightupward traction while bearer number 2 inserts theshort spine board behind the patient’s back, He thenapplies the cravat and the two patient securingstraps (Figure 9-17) in the following order:
(a) Cravat. The center of thecravat is placed across the patient’s forehead withthe middle of the cravat covering the hairline. Theends are inserted into the bottom notches of theboard and are tied in the back.
(b) First strap. The buckle of thefirst patient securing strap is placed in the patient’slap and the other end is passed through the lowerhole in the board. It is brought up the back of theboard, through the top hole, under the armpit, overthe shoulder, and across the back of the board at theneck. The end is then attached to the second strap.
(c) Second strap. The secondpatient securing strap is buckled to the first one,letting the buckle rest on the side of the board at theneck. The other end of the second strap is passedover the shoulder, under the armpit, through the tophole in the board, down the back of the board, andthrough the lower hole. It is then taken across thepatient’s lap, where it is secured in place bybuckling it to the first strap.
9-11

FM 8-10-6
NOTE
If available, bearer number 2 willapply a rigid cervical collar.
b. Kendricks Extrication Device. The KED(Figure 9-18) is a prefabricated flexible type of shortspine board. It is useful in extricating a patientsuspected of having spinal injuries, especially if thepatient is in the sitting position.
(1) Bearer number 1 maintains cervicaltraction until the KED has been completely applied.
(2) Bearer number 2 applies a rigidcervical collar, places the KED behind the patient,puts a cushion behind the patient’s head to align theKED, fastens the trunk straps, then the leg/hipstraps, and then the forehead strap and chin strap.
(3) Bearer number 3 ties the hands ofthe patient together and places the patient on thelong board.
9-12

FM 8-10-6
c. Long Spine Board. When a patient has a then place padding on the board at the points wherefracture or suspected fracture of the back as well asthe neck ( a above), he is placed on a long spine board(Figures 9-19 and 9-21). To apply the long spineboard, the bearers assemble the required items: along spine board, four 6-foot patient securing straps,a cravat, and four pieces of padding. If an item is notavailable, the bearers should improvise it from anyavailable material.
(1) The bearers place the spine boardbeside the patient. They align it with his body. They
the patient’s neck, small of the back, knees, andankles will rest.
(2) Bearer number 1 kneels at thepatient’s head. He places his hands on each side ofthe patient’s head and jaws, immobilizing the headand neck and applying slight traction (Figure 9-19).Bearers numbers 2, 3, and 4 kneel on one side of thepatient and place their hands on the opposite side atthe patient’s shoulder and waist, hip and thigh, kneeand ankle (Figure 9-20).
9-13

FM 8-10-6
(3) Bearers numbers 2, 3, and 4 roll thepatient’s body slightly toward them as bearernumber 1 turns the patient’s head, keeping it in astraight line with the spine.
(4) Bearer number 3 reaches across thepatient’s body with one hand, grasps the board atthe nearer edge and slides it against the patient.Bearer number 3, with the same hand, reachesacross the board to the farther edge and holds theboard in place. All the bearers then slowly roll the
9-14
patient backward onto the board, keeping the headand spine in a straight line.
(5) While bearer number 1 continues toapply slight traction to the neck, bearers numbers 2,3, and 4 immobilize the patient by applying thecravat and four patient securing straps (Figure 9-21)in the following order:
(a) Cravat. The center of the cra-vat is placed over the patient’s forehead with the

FM 8-10-6
middle of the cravat covering the hairline. The endsare then extended straight across and insertedthrough the nearest holes on each side of the board.
(b) First strap. One end of the firstpatient securing strap is inserted through the boardhole near the chest, across the chest, and throughthe hole on the opposite side. It is then brought backacross the arms and buckled to the other end of the
strap. The buckle rests on the top of the board, notagainst the patient.
(c) Remaining straps. The threeremaining straps are applied: one across the hips,one above the knees (not over the knee caps), andone above the ankles. One end of each strap isinserted through the board hole near the body partand buckled to the other end of the strap. The bucklerests on the top of the board, not against the patient.
9-7. Travois
A travois is a crude sled lashed to a horse or similaranimal and dragged along the ground. It can also belashed between two animals in single file and carriedlevel. The sled is made from two long poles fastenedtogether by two crossbars and a litter bed fastenedto the poles and crossbars. The patient is secured onthe litter bed. If the sled is pulled by only oneanimal, the bearers lift the dragging end from theground when going uphill, fording streams, or cross-ing obstacles. To make a travois—
a. Cut two poles about 16-feet long (one poleshould be 8- to 10-inches longer than the other).Ensure that the small ends are at least 2 inches indiameter. Then cut two crossbars which are about3-feet long.
b. Lay the poles parallel to each other. Theyshould be placed about 2 ½ feet apart with thelarger ends to the front. If only one animal is used,let the smaller ends spread apart about 3 feet andhave one of the small ends project 8 to 10 inchesbeyond the other one. This results in a rockingmotion, rather than a jolting motion to the patient.
c. Notch the poles and the crossbars so thatthe poles can be connected with one crossbar about6 feet from the front end and the other crossbarabout 6 feet to the rear of the first one. Fit thenotches in the crossbars and poles together and lacethem securely in place.
d. Make a litter bed 6-feet long between thecrossbars. This is done by fastening a blanket, can-vas, or similar material securely to the poles andcrossbars.
9-15

FM 8-10-6
NOTE
A rope or strap may be stretcheddiagonally from pole-to-pole, lettingit cross many times to form a basefor an improvised bed. A litter or cot
may also be fastened between thepoles for the same purpose.
e. If only one animal is used, securely fastenthe front ends of the poles to the saddle of the ani-mal. Leave the other ends of the poles on the ground(Figure 9-22).
f. If two animals are used, securely fastenthe front ends of the poles to the saddle of the lead
animal and the other end of the poles to the saddle ofthe animal which follows (Figure 9-23).
9-8. Packsaddle Litter animal (Figure 9-24). This technique is particularityuseful in jungle and mountain areas where it may be
A packsaddle litter can be improvised by fitting a necessary to carry a litter patient for a longsuitable litter onto the packsaddle of a mule or other distance.
9-16

FM 8-10-6
9-9. Litter Evacuation in Extreme Cold WeatherOperations
Patient treatment and handling under conditions ofextreme cold and deep snow equates to—
Prompt collection of patients.
Emergency medical treatment.
Prevention of shock.
Rapid evacuation to locations where they
9-10.
can be kept warm.
a. Emergency Medical Treatment. Treat-ment is limited to controlling hemorrhage, clearingthe airway, preventing and treating infection, andsplinting fractures. This treatment is modified de-pending on the weather, the type of clothing wornby the patient, and the judgment of the persongiving the treatment.
b. Preventing Shock. Cold hastens theprogress of shock and lessens the chances ofrecovery if a patient is exposed to a coldenvironment for any length of time. It is partic-ularly important to guard against shock by con-serving body heat. Therefore, at the earliest possible
moment, patients must be placed in specially con-structed evacuation bags. When evacuation bagsare not available, arctic sleeping bags or othersimilar articles may be used.
Aids to Litter Evacuation in Extreme ColdWeather Operations
Litter evacuation is difficult under conditions ofextreme cold and deep snow. Litter bearers are sub-ject to excessive fatigue and possible cold injury.For this reason, litter aids which are either hand-drawn by litter bearers, animal-drawn, or vehicle-towed should be used whenever possible.
a. Litter Kit, Ski Sled. The litter kit, skisled is used for converting a pair of skis and skipoles to a sled for transporting patients. It consistsof one canvas platform, four brackets, two crossbraces, two 2.13-meter and two 8.23-meter lengthsof rope, and two patient securing straps.
b. Ski Adapters (Figure 9-25). Two skiadapters are attached to each of two skis; then theadapters are clamped onto the litter stirrups of astandard litter. With ropes attached to the con-verted litter, a litter patient can be easily pulledover the surface of the snow.
9-17

FM 8-10-6
9-12.
c. Ahkio (Figures 9-26). The Ahkio (Alaskansled) is particularly useful where patients must beevacuated through deep snow.
d. Evacuation Bag, Casualty. The casualtyevacuation bag is issued in cold climates to keep thepatient warm. It zips up to protect the entirepatient. Blankets may also be used inside theevacuation bag for added protection.
9-11. Litter Evacuation in Mountain Operations
a. Personnel assigned to litter squads formountain service must be trained in—
Rock climbing.
Use of ropes.
Individual and unit movements athigh altitudes.
9-18
b. Because of the conditions in mountainoperations, a litter squad is normally increased fromfour to six men.
c. For additional information on medicalevacuation over mountainous terrain, refer toparagraphs 5-2, 9-12 through 9-14, and 11-15.
Techniques for Litter Evacuation inMountain Operations
The evacuation techniques used in mountain opera-tions are well proven. They are, however, subject toimprovement and should be modified as bettermethods of patient handling are developed. Whenevacuating a patient from mountainous areas—
a. Select the smoothest available route.
b. Keep the patient as warm as possible andavoid unnecessary handling.
c. Place the patient’s helmet on his head forprotection from falling rocks.
d. If the evacuation route is long and diffi-cult to travel, a series of litter relay points orwarming stations should be established. Warmingstations, if established, should be staffed withmedical personnel to permit proper treatment ofshock, hemorrhage, or other emergency conditions.
e. If a patient develops new or increasedsigns of shock while being evacuated, he should betreated and retained at one of the warming stationsuntil his condition permits further evacuation.
9-13. Types of Litters for Mountain Operations
There are four types of litters available forevacuation of casualties over rough mountainterrain. They are the standard collapsible litter(Figure 9-1); the poleless semirigid litter (Figure 9-4);the Stokes litter (Figure 9-6); and the SKED litter(Figure 9-7). When using the standard collapsiblelitter and patient securing straps are not available,it is necessary to secure a patient to the litter with arope.

FM 8-10-6
9-14. Methods of Litter Evacuation in MountainOperations
Several litter evacuation methods that areadaptable to mountain terrain and climatic condi-tions are discussed.
a. Modified Travois (Descending) (Figure9-27). This method is used when descending rela-tively smooth slopes. Considerable speed can bemade on slopes and cliff faces which are 4- to 6-feethigh. These areas can be passed without much diffi-culty.
(1) Two poles about 18-feet long andabout 3 inches in diameter at the large end are cut.These poles are fastened to the litter stirrups. About5 to 10 feet of these poles should extend beyond thelitter to serve as runners.
(2) One bearer supports the foot of thelitter by a rope sling and guides the litter downhill.Another bearer uses a rope to lower the patient andthe litter. A third bearer assists the soldier holdingthe rope and relieves him at frequent intervals.
b. Modified Travois (Ascending Steep Slope (2) Two bearers take their places at the(Figure 9-28). The litter is prepared as a modified head of the litter. A third bearer, using an impro-travois. vised rope sling, takes his place at the foot of the
litter.(1) A thin sapling is passed through the
litter stirrups at the head of the litter. The poles (3) The fourth and fifth bearers takeshould extend about 18 inches on each side of the their positions along the rope extending from thelitter. The use of poles affords a more secure grip for head of the litter. The sixth bearer handles the endthe bearers at the head of the litter. of the rope.
9-19

FM 8-10-6
(4) At the command UP ROPE, the selves to be pulled up the slope as they hold thefourth, fifth, and sixth bearers pull on the rope while litter off the ground and climb. The position of thethe first, second, and third bearers lift the litter and bearers should be rotated at each halt to lessenclimb slowly. The bearers carrying the litter should fatigue.not try to do all the work. They should allow them-
c. Modified Travois (Descending Steep (3) The sixth bearer may assist with theSlope) (Figure 9-29). In making a descent, the mostdirect passage should be taken. The litter is pre-pared as a modified travois.
(1) Two bearers hold the rope to assistin lowering the litter.
foot of the litter, or he may precede the team to—
(2) Three bearers take positions at thelitter: two at the head and one at the foot.
Pick out a trail, thus prevent-ing the squad from having to retrace its stepsshould there be a cliff ahead.
Make the passage more negoti-able by clearing away shrubs and vines.
9-20

FM 8-10-6
d. Modified Travois (Lowered from Cliff)(Figure 9-30). If a cliff is too extensive to bypass, theportion with the smoothest face is selected for de-scending. The litter is prepared as a modified tra-vois. (If using a SKED litter, follow manufacturer’sinstructions for lacing the litter.)
(1) Notches are cut in the poles toprovide an indentation for tying the ropes, thuspreventing them from becoming frayed by the stonecliff.
(2) Ropes are lashed to the stirrups atthe foot of the litter to serve as guys in keeping thelitter from revolving.
160-923 O-94-6
(3) After one bearer secures the ropearound a tree or large boulder, two bearers lower thelitter over the cliff’s edge.
(4) One bearer descends the cliff’s faceon a rope, moving parallel to the litter and assistingthe litter over any projections.
(5) The two remaining bearers hold theguy ropes and guide the litter from the foot of thecliff. When the litter has almost reached the base ofthe cliff, they ease it to the ground.
9-21

FM 8-10-6
9-15. Horizontal Hauling Line
The horizontal hauling line (Figure 9-31) is also amethod of evacuation. It is addressed in a separateparagraph because of its complexity. The horizontalhauling line is used in those cases where a steepslope or cliff must be scaled and where, at the sametime, there is an intervening obstacle such as aswiftly running mountain stream. It can also beused to span a chasm when a bridge has been demol-ished. This method should be used only where therewill be a considerable number of patients (a warmingstation or collecting point) and should not beinstalled for the evacuation of only one or twopatients. It can also be used to lower or to raisepatients over obstacles. The installation and opera-tion of the hauling line is addressed below.
This apparatus is a continuous ropecableway secured by a system of snaplinks spanning
9-22
a maximum of 1,000 feet between terminals. A slopeof at least 10 degrees is required for properoperation.
A Stokes litter containing the patient issuspended from the top of the cable at the upperterminal, and an empty litter is suspended from thebottom of the cable at the lower terminal.
The litter patient at the upper terminal islowered by gravity to the lower terminal. A relayline attached to the litter prevents it from rapidlyand uncontrollably descending. At the same time,the empty litter at the lower terminal is raised to theupper terminal ready to receive the next patient.
One bearer stands at the upper terminalto control the relay line and another bearer stands atthe lower terminal ready to receive the patient.

FM 8-10-6
a. Installation. The horizontal hauling lineis installed in four steps:
(1) By means of a bowline, secure a 10-centimeter manila rope to a tree far enough from theedge of the cliff (2 to 3 meters) to permit freedom ofmovement by the medical personnel.
(2) On the opposite side, pass the otherend of the rope around another fixed point (tree,boulder, or vehicle), and make a transport knot topull the rope as taut as necessary. All traverse ropesshould have a certain amount of slack. When manilaor sisal rope is used, a 5-percent sag should beallowed to avoid undue fatigue in the rope.
(3) To suspend the litter, place twosnaplinks on the traverse rope and attach one longlitter carrying strap to each. Attach an upper andlower retrieving rope to either the litter stirrup or tothe respective snaplinks. In the latter case, the looseends of each rope are tied together above the centerof the litter so that, when drawn up or down, bothsnaplinks move simultaneously.
(4) After the patient has been securedto the litter, the litter is raised, and the littercarrying straps or suspension ropes are passedthrough the stirrups and fastened together or elsesecured to the opposite stirrup.
b. Operation. The horizontal hauling line isoperated as follows:
(1) For the ascent, three men can easilyraise the litter along the traverse by pulling on theupper retrieving rope. The pull should be steady andsmooth in order to prevent jolting and swaying.
(2) For the descent, a gentle pull on thelower retrieving rope is enough to break the inertiaand let gravity do the rest. During the descent, themen on the upper side should control the speed ofthe descent through their retrieving rope. It may benecessary to pull the patient the last few meterswhen the litter nears the low point of the slack in thetraverse rope.
c. Refer to TC 90-6-1 for additionalinformation on the construction of a horizontalhauling system.
9-23

FM 8-10-6
Section II. PROCEDURES FOR LITTER EVACUATION TRAINING
9-16. General
To safely transport a patient by litter and to ensurelitter bearers are not injured by using incorrect lift-ing procedures, training is required for litterbearers. This section provides the techniques andprocedures necessary to accomplish litter evacua-tion.
9-17. Basic Guides for Training Litter Bearers
Litter bearers are normally grouped into squads offour to carry patients. For this reason, litterprocedures for squads of four are effective intraining individuals to be litter bearers. Thefollowing guides promote uniformity and accuracyin training methods:
Several squads may be trained at thesame time by one individual, or each squad may beinstructed separately by an instructor or trainedsquad leader.
For the initial training procedures, a litterwithout a patient on it can be used to simulate aloaded litter.
For later training, some personnel can bedesignated as ’’patients.” These individuals should
instruction.
be frequently rotated with the ones carrying thelitters so that all may participate in each phase of
For more realistic training in thehandling of the different types of injuries,“patients” may wear moulages, bandages, andsplints to simulate actual wounds or injuries.
The persons designated as “patients”may be positioned on the ground at suitable inter-vals near a line of litters, first with the head andlater with the feet toward the litters. As the instruc-tion progresses, their positions may be varied.Lastly, they may be dispersed or concealed to simu-late positions that the wounded might occupy on abattlefield.
9-18. Litter Commands
Litter procedures are not to be considered precisiondrills; however, certain preparatory commands andcommands of execution are used to facilitateinstruction. A preparatory command states themovement or formation to be carried out andmentally prepares the individual for its execution. Acommand of execution tells when the command is tobe carried out. The use of these commands in actualoperations is not contemplated. For purposes ofidentification in the discussion of the different typesof procedures, preparatory commands will be inlower case with initial capital letters and commandsof execution will be in capital letters.
9-19. Formation for Instruction
First, align the trainees into four ranks; then givethe commands to form litter squads. This is accom-plished as follows:
a. The trainees count off from front to rear,one through four, thus forming the litter squads anddesignating each trainees’s position in the littersquad by number. Each number carries with itspecific responsibilities in the litter squad. Thetrainee designated number 1 is the squad leader.
b. The squad leaders count off from right toleft, designating a number for each litter squad.
c. The formation is then opened to provideeach squad adequate space for performance.
d. Since exceptional circumstances maymake it necessary to use two-bearer litter squads,the instruction should include procedures for thesereduced squads, using bearers 2 and 3 of the four-bearer squad.
9-20. Procedures to Procure, Ground, Open, Close,and Return the Litter
a. To Procure Litter. Upon the command ofProcure, LITTER, the squad leader (bearer number1) steps forward, goes to the source of supply, picks
9-24

FM 8-10-6
up the litter, and returns to his original positioncovered by bearers numbers 2, 3, and 4.
(1) The closed litter is carried at highport except near helicopters where it is kept levelwith the ground to avoid contacting the rotorblades. At high port, the litter is carried diagonallyacross the body with the left wrist in front of the leftshoulder and the right wrist near the right hip(Figure 9-32).
b. To Ground Litter. Upon command ofGround, LITTER, bearer number 1 lowers the litterto the ground. With the litter squad in formation,bearer number 1 places his left foot beside the litterhandles, steps forward with his right foot, andlowers the litter to the ground so that it rests on thestirrups (Figure 9-34). Then upon command ofLitter, POSTS, the other three bearers move intotheir positions at the sides of the litter. Bearernumber 2 moves to the right front, bearer number 3moves to the left rear, and bearer number 4 moves tothe left front (Figure 9-35).
(2) After bearer number 1 reurns to hisoriginal position in the squad, he holds the litter inan uprght position on his left side with the metalstirrups away from his body (Figure 9-33).
9-25

FM 8-10-6
9-26
FM 8-10-6
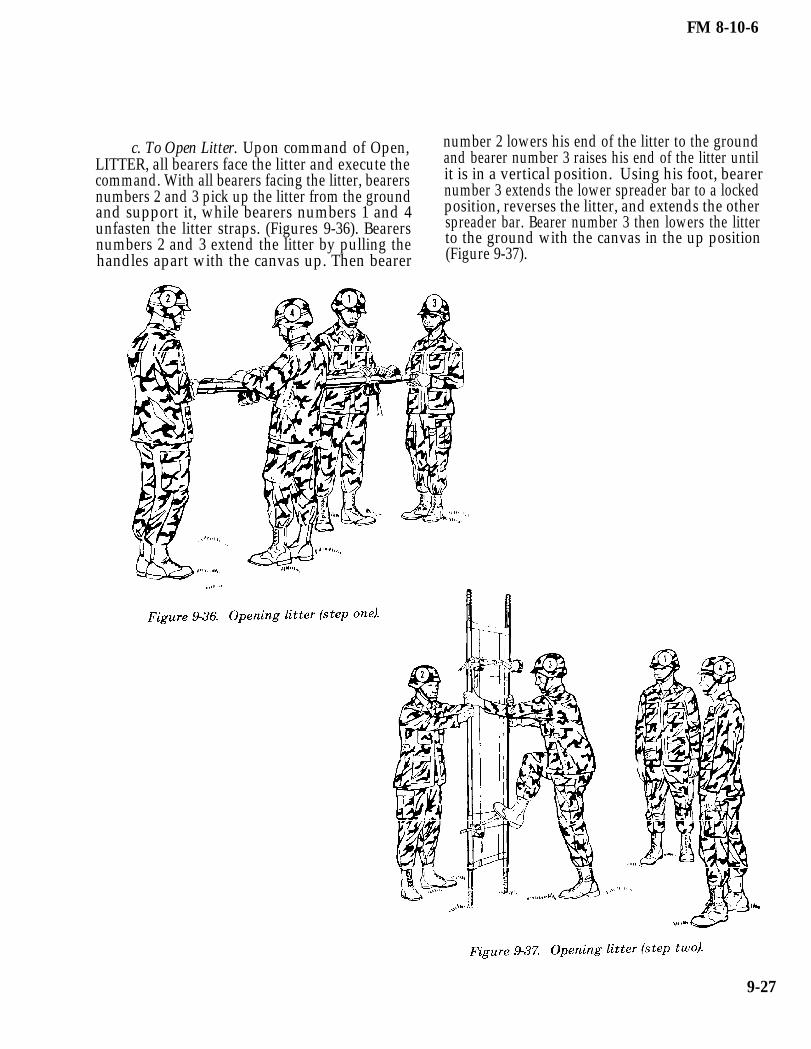
c. To Open Litter. Upon command of Open,LITTER, all bearers face the litter and execute thecommand. With all bearers facing the litter, bearersnumbers 2 and 3 pick up the litter from the groundand support it, while bearers numbers 1 and 4unfasten the litter straps. (Figures 9-36). Bearersnumbers 2 and 3 extend the litter by pulling thehandles apart with the canvas up. Then bearer
number 2 lowers his end of the litter to the groundand bearer number 3 raises his end of the litter untilit is in a vertical position. Using his foot, bearernumber 3 extends the lower spreader bar to a lockedposition, reverses the litter, and extends the otherspreader bar. Bearer number 3 then lowers the litterto the ground with the canvas in the up position(Figure 9-37).
9-27

FM 8-10-6
d. To Close Litter. Upon command of Close,LITTER, bearer number 2 supports the litter whilebearer number 3 releases the spreader bars andturns the bars against the litter poles. Bearersnumbers 2 and 3 then lift the litter, move the polestogether, and support the litter. Bearers numbers 1and 4 fold the canvas smoothly on top of the polesand secure the canvas and the poles in place with thelitter straps.
e. To Return Litter. At the completion ofthe instruction and upon command of Return,
supply.LITTER, bearer number 1 returns the litter to
Procedures for Loading a Patient onto a9-21.Litter
After the patient has been located, the generalnature of his wounds determined, emergency treat-
ment given, and the litter opened and positioned,the bearers load the patient onto the litter.
a. To Load a Litter (Four Bearers). Upon thefollowing commands, the bearers position them-selves, lift the patient, position the litter, and lowerthe patient onto the litter:
(1) At the command, Right (Left) Side,POSTS, the bearers take the following positionsfacing the patient: bearer number 2 at the right (left)ankle; bearer number 3 at the right (left) shoulder;bearers numbers 4 and 1 at the right and left hips,respectively (Figure 9-38).
(2) At the command, Lift, PATIENT,each bearer kneels on his knee that is nearest thepatient’s feet. Bearer number 2 passes his forearmsunder the patient’s legs, carefully supporting any
9-28

FM 8-10-6
fracture, if required. Bearers numbers 1 and 4 place armpit and uses the other hand to support the nearertheir arms under the small of the patient’s back and shoulder. All bearers lift the patient slowly andthighs without locking hands. Bearer number 3 passes carefully and place him upon the knees of the threeone hand under the patient‘s neck to the farther bearers who are on the same side (Figure 9-39).
(3) At the preparatory command litter (Figure 9-40). He places the litter under theLower, bearer number 1 resumes his former kneeling patient and against the ankles of the other bearers.position opposite the other three bearers and At the command of execution, PATIENT, theprepares to assist in lowering the patient. As soon patient is lowered gently onto the litter (Figureas the patient is firmly supported on the knees of the 9-41). Without further orders, all bearers rise andthree bearers, the bearer on the opposite side (bearer resume their positions at Litter, POSTS.number 1) relinquishes his hold and reaches for the
9-29

FM 8-10-6
b. To Load Litter (Three Bearers). In theabsence of one man from the litter squad, bearersnumbers 2 and 3 with the assistance of bearernumber 1, lift the patient and lower him onto thelitter. To lift the patient with three bearers, bearernumber 2 places his arms under the legs and thighsof the patient. Bearer number 3 places his armsunder the small of the back and shoulders of the
patient. Bearer number 1, on the opposite side of thelitter, places his arms under the patient’s knees andback. The patient is supported on the knees ofbearers numbers 2 and 3, while bearer number 1places the litter in position (Figure 9-42). All threebearers lower the patient unto the litter (Figure9-43). The procedures are performed upon thecommands cited in paragraph a above.
9-30

FM 8-10-6
c. To Load Litter (Two Bearers). Theprocedures for loading litters with the two bearerson the same side are illustrated in Figures 9-44through 9-47.
(1) At the command to Right Side,POSTS, bearers numbers 1 and 2 take positions atthe patient’s right thigh and shoulder, respectively(Figure 9-44).
9-31

FM 8-10-6
(2) At the preparatory command, Lift,each bearer kneels on his knee nearer the patient’sfeet. Bearer number 1 passes his arms beneath the
patient’s hips and knees. Bearer number 2 passeshis arms beneath the small of the patient's back(Figure 9-45).
(3) At the command of execution,PATIENT, the bearers lift together, raising thepatient upon their knees. Readjusting their hold,
they rise to their feet and move as close as possibleto the side of the litter (Figure 9-46).
(4) At the preparatory command, Lower, gently place the patient onto the litter (Fgure 9-47).the bearers kneel and place the patient on their knees. They then rise and resume the position of Litter,At the command of execution, PATIENT, the bearers POSTS, without command.
9-32

FM 8-10-6
d. To Load Litter with Conscious Patient(Two Bearers). If the patient is conscious and able tohold onto the bearers, the following procedure is used:
(1) At the command, On Each Side,POSTS, bearers numbers 1 and 2 face the patient andtake positions at the patient’s right and left hips,respectively (Figure 9-48).
9-33
FM 8-10-6
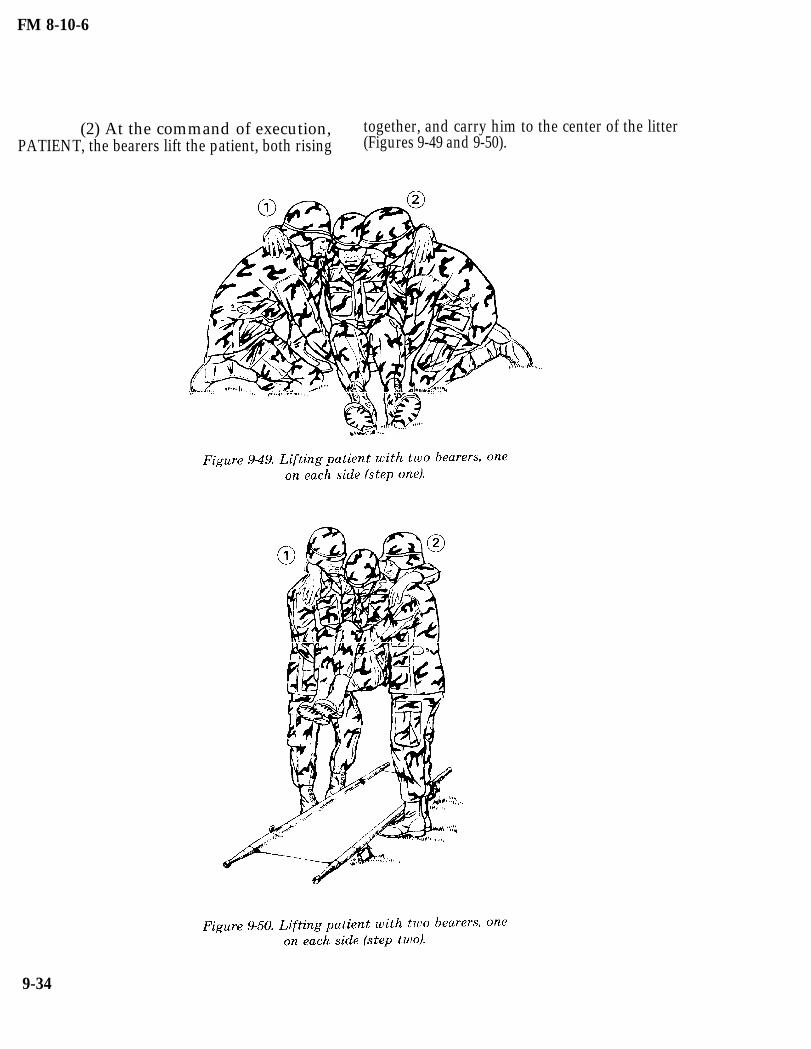
(2) At the command of execution, together, and carry him to the center of the litterPATIENT, the bearers lift the patient, both rising (Figures 9-49 and 9-50).
9-34

FM 8-10-6
(3) At the command, Lower, PATIENT, his hold on the bearers’ necks. Both bearers assistthe bearers stoop and lower the patient onto the the patient to lie down. They then resume the positionlitter in a sitting position. The patient then releases of Litter, POSTS, without commands (Figure 9-51).
e. To Load Patient with Back Injury. Toavoid aggravating the condition of a patient with anactual or suspected back injury, the bearers proceedas follows (Figure 9-52):
(1) Each bearer kneels on his kneenearer the patient’s feet. (If the patient is unable tohold his arms in front of him, his wrists should betied loosely before placing him on the litter. This willprevent injury to his arms.)
(2) Bearer number 1 places a blanket,coat, or jacket in a firm roll or in a position tosupport the arch of the patient’s back. Bearernumber 3 places one hand under the patient’s headarid the other hand under his shoulders. Bearernumber 4 places his hands under the small of the
back and buttocks. Bearer number 2 places hishands under the thighs and calves. Bearer number 1assists bearer number 4 in supporting the small ofthe patient’s back.
(3) At the command, Lift, PATIENT,all bearers gently lift the patient off the groundabout 8 inches. Bearers ensure that proper align-ment is maintained. Bearer number 1 places thelitter under the patient and adjusts the roll underthe patient’s back.
(4) At the command, Lower,PATIENT, the three bearers lean forward and withthe aid of bearer number 1, lower the patient ontothe litter.
9-35

FM 8-10-6
9-22. Procedures for Carrying a Loaded Litter
After the patient has been loaded onto the litter, thelitter is lifted and carried as described below.
a. To Lift Loaded Litter. Resuming theposition of Litter, POSTS, and facing in thedirection of travel, the bearers lift the loaded litterupon the command Prepare to Lift, LIFT (Figure9-53).
(1) At the preparatory command,Prepare to Lift, each bearer kneels on his kneeclosest to the litter. He grasps the litter handle withthe hand nearest the litter and places his other handon his raised knee.
(2) At the command of execution,LIFT, all bearers rise together keeping the litterlevel. When lifting, bearers should use leg muscles,not their back muscles.
9-36

FM 8-10-6
b. To Carry a Loaded Litter. The type ofcarry used in transporting a litter patient dependsupon the type of terrain as well as the obstaclesinvolved. It may be necessary to use several types ofcarries.
(1) After the bearers lift the loadedlitter, they are in position for the four-man carry(Figure 9-54) which is used when the terrain issmooth and level. The command to proceed is Four-Man Carry, MOVE. With modifications, this carryis also used to pass under low obstacles.
9-37

FM 8-10-6
(2) The command Two-Man Carry,MOVE, is given to enable the litter squad in a four-man carry to pass through or over narrow passagessuch as trails, bridges, gangplanks, and catwalks(Figure 9-55). After the litter bearers reach the endof such passages, they change back to the four-mancarry. With modification, this carry can also be usedto pass through such obstacles as culverts ortunnels. Both bearers carrying the litter face thepatient and crawl on their knees through theseobstacles. This requires one bearer to crawlbackwards.
(a) With the litter squad in theposition of the four-man carry, the preparatory
command, Two-Man Carry, is given. Bearersnumbers 2 and 3 change their holds on the litterhandles to the other hand, step between the handles,and take the full support of the litter as bearersnumbers 1 and 4 release their holds.
(b) Bearer number 1 steps onepace in front of the squad to lead, and bearernumber 4 falls one pace to the rear to follow.
(c) At the command of execution,MOVE, the four bearers proceed through thepassage.
(3) The command Litter Post Carry, litter and take hold of the handles. Bearers numbersMOVE, is given to enable the litter squad in a four- 1 and 4 then release their holds.man carry to move over rough terrain (Figure 9-56). (b) Bearers numbers 1 and 4 move
(a) With the litter squad in posi- to the sides of the litter and grasp the litter poles.tion of the four-man carry, the preparatory (c) At the command of execution,command, Litter Post Carry, is given. Bearers MOVE, the four bearers proceed carefully over thenumbers 2 and 3 step between the handles of the rough terrain.
9-38

FM 8-10-6
(4) Except when the patient has a frac-ture of a lower extremity, the litter is carried up hiilor upstairs with the patient’s head forward. There-fore, before proceeding with the uphill carry, thelitter must first be turned correctly. From theposition of four-man carry (Figure 9-54), the littersquad first moves into the position of litter postcarry (Figure 9-56); then the command Prepare toRotate, ROTATE (Figure 9-57) is given andfollowed by command, Uphill (Upstairs) Carry,MOVE (Figure 9-58).
(a) With the litter squad in theposition of litter post carry, the preparatorycommand, Prepare to Rotate, is given. Bearers
numbers 2 and 3 release the litter handles and stepone pace away, allowing bearers numbers 1 and 4 tosupport the litter at its sides.
(b) At the command of execution,ROTATE, bearers numbers 1 and 4 move 180degrees counterclockwise, thus placing the patient’shead in the direction of travel with bearer number 1still on the patient’s right side.
(c) As soon as bearers numbers 2and 3 observe that the rotation has been completed,they resume their positions at the litter handles.The rotation of the litter places bearer number 2 atthe patient’s head.
9-39

FM 8-10-6
(d) After the litter is rotated so handle released by bearer number 3. Bearer numberthat the patient’s head is in the direction of travel, 1 moves in front of the squad.the squad halts.
(f) At the command of execution,(e) At the preparatory command, MOVE, the squad proceeds uphill (upstairs) with
Uphill (Upstairs) Carry, bearer number 4 moves to bearer number 1 preceding the squad. Bearersthe foot of the litter and takes hold of the litter numbers 3 and 4 keep the litter level.
(5) Except when the patient has a frac-ture of a lower extremity, the litter should be carrieddownhill or downstairs with the patient’s feet for-ward. The command Downhill (Downstairs) Carry,MOVE (Figure 9-59) is given when the litter squadis in the position of four-man carry (Figure 9-54) orin the position of litter post carry (Figure 9-56)provided it has been used to rotate the loaded litteror to move it over rough terrain just prior to carry-ing it downhill (downstairs).
(a) With the litter squad in theposition of the four-man carry, the preparatorycommand, Downhill (Downstairs) Carry, is given.Bearer number 3 takes the full support of the litterat the patient’s head, and bearers numbers 2 and 4remain in their positions at the patient’s feet.
(b) Bearer number 1 moves to thefront, facing the squad. He supports bearers
9-40

FM 8-10-6
numbers 2 and 4 and ensures that they keep thelitter level as they move downhill (downstairs).
c. To Lower Loaded Litter. Before loweringthe litter to the ground, the bearers resume theposition of four-man carry. At the preparatorycommand Lower, LITTER, each bearer slowlykneels on the knee closer to the litter and gentlyplaces the litter on the ground. The squad thenstands without command. For balance and supportwhen lowering the litter, each bearer places his freehand on his other knee which remains in an uprightposition.
9-23. Procedures for Surmounting Obstacles
In litter transportation, bearers must be able tosurmount various artificial and natural obstaclessuch as fences, high walls, deep trenches, widestreams, and stairwells with small landings. Specificcommands for surmounting these obstacles areneither necessary nor feasible, as they must be givenin conjunction with the commands for the appro-priate litter carry. Common sense must also be used
in adapting specific procedures to individual situa-tions.
a. Litter Obstacle Course. A litter obstaclecourse is a useful training tool for surmountingobstacles and for the physical conditioning ofbearers. An obstacle course can be constructed tosimulate most types of natural and artificialobstructions that litter bearers are likely to meet.Where construction of such a course is imprac-ticable, many obstacles can be simulated fromexisting facilities.
b. Methods for Surmounting Obstacles. Anumber of methods, as well as modifications in littercarries, which enable the litter squad to surmountvarious obstacles, are discussed below.
(1) Surmounting a fence or low wall.
(a) With the litter squad in theposition of Litter Post, CARRY, bearer number 2releases his grasp of the front handles at thepatient’s feet and crosses the obstacle, maintaininga low silhouette. Bearers numbers 1, 3, and 4 thenadvance the litter until bearer number 2 can resumehis grip of the front handles (Figure 9-60).
9-41

FM 8-10-6
(b) The litter is rested on the number 3 resumes his grasp on the rear handles andobstacle with the stirrups placed on the side of the bearers numbers 1 and 4 adjust the position of theirobstacles in the direction of travel. Bearers holds (Figure 9-61).numbers 2 and 3 support the litter by the front andrear handles, respectively, while bearers numbers 1and 4 cross the obstacle maintaining a low silhou-ette. Having passed the obstacle, bearers number 1and 4 grasp the litter poles near the rear handlesheld by bearer number 3. Bearer number 3 thenreleases his hold of the rear handles and crosses theobstacle, maintaining a low silhouette. Bearer
NOTE
The litter should be lifted and notdragged across the top of theobstacle.
9-42

FM 8-10-6
(2) Surmounting a high wall. With the side. All four bearers move the litter forward untillitter squad in the position of the four-man carry, the rear stirrups are against the wall, taking care tothe bearers turn and face each other. Together they avoid scraping the patients back. The rear bearersraise the litter approximately chest high, step close then scale the wall and drop to the other side and liftto the litter, letting their bent elbows touch their their end of the litter off the wall (Figure 9-62). Thechests. The front bearers place the front stirrups bearers then resume the four-man carry.beyond the wall, scale the wall and drop to the other
(3) Fording streams and crossing deep face each other, determining who is the taller of thetrenches. two at each end of the litter. Together they raise the
litter over their heads, keeping it level. If they are in(a) With the litter squad in posi- trench, they lift the litter above the top of the trench
tion for the four-man carry, the bearers turn and (Figure 9-63).
9-43

FM 8-10-6
(b) The taller bearer at each end ofthe litter moves between the handles, facing in thedirection of travel and grasps the handles as close tothe canvas as possible. The shorter bearer at eachend moves under the litter, facing in the direction oftravel and grasps the stirrups, which compensatefor the differences in height. If all bearers are ofequal height, the bearers under the litter grasp the
litter poles to the side of the stirrups nearer the ends(Figure 9-64).
NOTEShould the front bearer step into ahole as they proceed across thestream and release his hold, theother three bearers could keep thelitter in position.
(4) Carrying a litter patient up astairwell with small landings. The steps for thisprocedure (Figure 9-65) are—
(a) The litter squad proceeds up-stairs to the landing with bearers numbers 1 and 3supporting the head of the litter and bearersnumbers 2 and 4 supporting the foot of the litter.
(b) Upon arrival at the landing,bearer number 3 turns facing the head of the litterand supports it while bearer number 1 proceedsseveral steps up the next flight of stairs. Bearersnumbers 2 and 4 raise the foot of the litter untilbearer number 1 can grasp the handle released by
bearer number 2. Bearer number 2 then moves tothe side of the litter.
(c) With bearer number 2 helpingbearer number 1 to support the litter, bearer number1 grasps the handle released by bearer number 4.
(d) Bearer number 4 continues tohelp support the litter on the side as he moves upthe stairs.
(e) Bearer number 4 assists bearernumber 3 in carrying the head of the litter whilebearer number 2 advances and assists bearernumber 1 in carrying the foot of the litter to the nextlanding.
9-44

FM 8-10-6
9-45

FM 8-10-6
(5) Carrying a litter patient down astairwell with a small landing. The steps for thisprocedure (Figure 9-66) are—
(a) The litter squad proceeds downthe steps to the first landing with bearers numbers 1and 3 supporting the head of the litter and bearersnumbers 2 and 4 supporting the foot of the litter.
(b) Upon arrival at the first land-ing, bearer number 4 turns and faces toward the
litter and supports the foot of the litter while bearernumber 3 supports the head of the litter. Bearersnumbers 1 and 2 descend a few steps to the lowerflight of stairs and receives the head of the litterfrom bearer number 3.
(c) Bearer number 3 moves to thefoot of the litter to assist bearer number 4 whilebearers numbers 1 and 2 support the head of thelitter. They then move down the stairs to the nextlanding.
9-46