literature - edvotek.com · the polymerase chain reaction . in 1984, dr. kary mullis revolutionized...
TRANSCRIPT
372.190123
372Edvo-Kit #372
Quick PCRExperiment Objective:
In this experiment, students will gain an understanding of the traditional three-step Polymerase Chain Reaction (PCR). Using PCR and Agarose Gel Electrophoresis, they will analyze a small section of Lambda DNA in a time-saving two-step process.
See page 3 for storage instructions.
NOTE:PCR Cycling Conditions have changed. Please review your PCR program before performing the experiment.
&REVISED
UPDATED
SAMPLE LITERATURE
Please
refer
to in
cluded
weblin
k for c
orrect
versi
on.

PageExperiment Components 3Experiment Requirements 4Background Information 5
Experiment Procedures Experiment Overview 8 Module I: Amplification of Lambda DNA 9 Overview of Agarose Gel Electrophoresis & Staining 10 Module II-A: Separation of PCR Products by Electrophoresis (SYBR® Safe Stain) 11 Module II-B: Separation of PCR Products by Electrophoresis (Improved FlashBlue™ Staining) 14 Study Questions 17 Instructor's Guidelines 18 Pre-Lab Preparations 19 Experiment Results and Analysis 22 Study Questions and Answers 23
Appendices 24 A EDVOTEK® Troubleshooting Guide 25 B Performing the PCR Experiment Using Two Waterbaths 26 C Bulk Preparation of Electrophoresis Buffer and Agarose Gels 27
Safety Data Sheets can be found on our website: www.edvotek.com/safety-data-sheets
Table of Contents
Quick PCR EDVO-Kit #372
1.800.EDVOTEK • Fax 202.370.1501 • [email protected] • www.edvotek.com
2
Duplication of any part of this document is permitted for non-profit educational purposes only. Copyright © 1989-2019 EDVOTEK, Inc., all rights reserved. 372.190123
EDVO-Kit #372Quick PCR

Experiment Components
This experiment is designed for
10 lab groups.
All experiment components are intended for educational research only. They are not to be used for diagnostic or drug purposes, nor administered to or consumed by humans or animals.
Components Storage Check (√)A LyphoPrimer™ Mix -20° C qB EdvoQuick™ DNA ladder -20° C qC LyphoTemplate™ Lambda DNA -20° C qD TE Buffer -20° C q• PCR EdvoBeads™ Room Temp. q(Each PCR EdvoBead™ contains: dNTP Mixture, Taq DNA Polymerase Buffer, Taq DNA
Polymerase, MgCl2, and Reaction Buffer)
NOTE: Components A and C are supplied in our LyphoPrimer™ and LyphoTemplate™ format. They will require reconstitution before use. Be sure to review page 19 in the Instructor's Guide for more details.
REAGENTS & SUPPLIESStore all components below at room temperature.
Component Check (√)• UltraSpec-Agarose™ q• Electrophoresis Buffer (50X) q• SYBR® Safe Stain q• FlashBlue™ Stain q• Microcentrifuge Tubes q • PCR Tubes q
EDVOTEK and The Biotechnology Education Company are registered trademarks of EDVOTEK, Inc. SYBR is a registered trademark of Thermo Fisher Scientific. EdvoBead, UltraSpec-Agarose, LyphoPrimer, LyphoTemplate, EdvoQuick, and FlashBlue are trademarks of EDVOTEK, Inc.
NOTE:PCR Cycling Conditions have changed. Please review your PCR program before performing the experiment.
Quick PCREDVO-Kit #372
3
1.800.EDVOTEK • Fax 202.370.1501 • [email protected] • www.edvotek.com
Duplication of any part of this document is permitted for non-profit educational purposes only. Copyright © 1989-2019 EDVOTEK, Inc., all rights reserved. 372.190123
EDVO-Kit #372 Quick PCR

• Thermal cycler (EDVOTEK Cat. # 541 highly recommended) or two waterbaths*• Horizontal gel electrophoresis apparatus• D.C. power supply• Microcentrifuge• UV Transilluminator or Blue light visualization (use if staining with SYBR® Safe)• UV safety goggles (use if staining with SYBR® Safe)• White light visualization system (use if staining with FlashBlue™)• Automatic micropipettes (5-50 µL) with tips• Microwave• Pipet pump• 250 mL flasks or beakers• Hot gloves • Disposable laboratory gloves• Ice buckets and ice• Distilled or deionized water
*If you do not have a thermal cycler, this experiment can be conducted using three water baths with proper care (EDVOTEK® Cat. #544 highly recommended). However, a thermal cycler assures a significantly higher rate of suc-cess. See Appendix B for detailed instructions.
Requirements
Quick PCR EDVO-Kit #372
1.800.EDVOTEK • Fax 202.370.1501 • [email protected] • www.edvotek.com
4
Duplication of any part of this document is permitted for non-profit educational purposes only. Copyright © 1989-2019 EDVOTEK, Inc., all rights reserved. 372.190123
EDVO-Kit #372Quick PCR

THE POLYMERASE CHAIN REACTION
In 1984, Dr. Kary Mullis revolutionized the field of molecular biology when he devised a simple and elegant method to copy specific pieces of DNA. Mullis recognized that he could replicate DNA in vitro using short, synthetic DNA oligonucleotides (known as primers) and DNA polymerase I in a process similar to DNA replica-tion in a cell’s nucleus. Because researchers can customize the primers to target a specific gene, this method allows for the rapid amplification of a selected DNA sequence. For the development of this technique, known today as the Polymerase Chain Reaction (or PCR), Mullis was awarded the Nobel Prize in Chemistry in 1993.
Before performing PCR, template DNA is extracted from a biological sample. Two primers are designed to correspond to the 5’ and 3’ ends of the target sequence. The template DNA and primers are mixed with buf-fer, the four “free” deoxynucleotides (dATP, dCTP, dGTP, and dTTP), and a thermostable DNA polymerase (Taq). Next, the PCR mixture is subjected to sequential heating/cooling cycles at three different temperatures to amplify DNA.
• In the first step, known as “denaturation”, the mixture is heated to 94° C to disrupt the hydrogen bonds between the complementarity strands. This causes the target DNA to unzip into single strands (or melt). It is important to use a thermostable DNA polymerase for PCR because this enzyme remains stable at high temperatures.
• In the second step, known as “annealing”, the reaction mixture is cooled to 45° C - 65° C. This allows the primers to base pair with the target DNA sequence.
• In the third step, known as “extension”, the temperature is raised to 72° C. This temperature is optimal for Taq polymerase to add nucleotides to the 3’ end of the primer, synthesizing a new strand of DNA.
Together, these three steps - denaturation, annealing, and extension – make up one PCR “cycle” (Figure 1). To simplify this process, a specialized machine, called a “thermal cycler” or a “PCR machine”, was created to heat and cool the samples rapidly.
Each PCR cycle doubles the amount of the target DNA in less than five minutes. This makes PCR a very sensi-tive technique, as only a few copies of the template DNA are required to produce a large amount of signal. Mathematically, PCR is described as an exponential relationship – if we begin with a starting copy number of m, then after n cycles, we will have m x 2n copies of our DNA target. For example, if we start with one copy of our target, we will have two copies after the first PCR cycle, four after the second PCR cycle, eight after the third PCR cycle, and so on. In numbers, cycle 1 equals 1x21, cycle 2 equals 1x22, cycle 3 equals 1x23. After n cycles, we will have 1x2n copies of our DNA target. In order to produce enough DNA for analysis, twenty to forty cycles may be required. After many cycles (regardless of the quantity of DNA present in the starting material) the amount of DNA produced reaches a maximum amount of product known as the plateau. This is due to depletion of reaction components like primers and nucleotides and the loss of Taq polymerase activity.
Because of its ease of use and its ability to amplify DNA rapidly, PCR has become indispensable in medical and life sciences labs, replacing the time-intensive Southern blot as the method of choice. For example, to-day’s research laboratories can quickly create copies of a specific region of DNA for cloning applications. Medi-cal diagnostics use PCR to identify genetic mutations and infectious agents. In addition, because amplification by PCR requires a small amount of starting material, it is ideal for forensic analysis of biological samples or determination of paternity.
Background Information
Quick PCREDVO-Kit #372
5
1.800.EDVOTEK • Fax 202.370.1501 • [email protected] • www.edvotek.com
Duplication of any part of this document is permitted for non-profit educational purposes only. Copyright © 1989-2019 EDVOTEK, Inc., all rights reserved. 372.190123
EDVO-Kit #372 Quick PCR

3'5'
3'5'
5'3'
5'3'
5'
5'3'3'5'
5'3'
5'5'
Denature 94°C
5'
Extension72°C
3'5'
Separation of two DNA strands
=
Primer 1=
Primer 2=
5'3'5'
Anneal 2 primers 40°C - 65°C
3'5'5'
5'5'
3'5'5'
5'
5'3'
5'
5'5'
5'3'
5' 3'
5' 3'
5'3'
5'3'
5'3'
5'
5' 3'
Cyc
le 1
Cyc
le 2
Cyc
le 3
Target Sequence
5'3'
5' 3'
5' 3'
Figure 1:Polymerase Chain Reaction
1.800.EDVOTEK • Fax 202.370.1501 • [email protected] • www.edvotek.com
6
Duplication of any part of this document is permitted for non-profit educational purposes only. Copyright © 1989-2019 EDVOTEK, Inc., all rights reserved. 372.190123
Quick PCR EDVO-Kit #372

REINVENTING PCR
While PCR is relatively fast and easy compared to techniques like the Southern blot, it still takes several hours to complete the experiment. In response, researchers have devised several strategies to reduce the time necessary to amplify a specific sequence. One timesaving strategy involves designing the primers so that the annealing temperature and the extension temperature are very close. This allows researchers to combine the annealing and extension steps of the traditional PCR cycle. Another timesaving strategy involves reducing the time spent at each temperature. By modifying the PCR program, researchers could reduce the length of each cycle from 90-150 sec-onds to 60 seconds or less (Table 1). These changes reduce the time required for this experiment by over 50%.
Figure 2:Lambda Phage Map
Head Recombination
Immunity
Replication
Regulation
Lysis
0 20 40 48
Kilobases
Tail
Regulation
Quick PCR30s
0s
30s
~30 minutes
Traditional PCR45s
45s
45s
~70 minutes
Denaturation (95° C)
Annealing (40° C - 60° C)
Extension (72° C)
TOTAL TIME (30 cycles)
Table 1:Comparison of Traditional and Quick PCR
In this exploration, we will use quick PCR to analyze genomic DNA isolated from a virus that infects E. coli, known as bacteriophage lambda. Historically, lambda is an important virus for molecular biology. Early studies of the lambda genome contributed to our understanding of DNA replication, transcription, and translation. The 48,500 base pair genome contains information necessary for the virus’s entry into the cell, production of new virions, and lysis of the host cell (Figure 2). The primers used in this experiment have been designed to amplify a 500 base pair region of a viral capsid protein. They are engineered to have an annealing temperature of 71° C, which is close to the optimum temperature for Taq’s DNA polymerase activity. This allows us to combine the annealing and exten-sion steps of PCR. As a result, the entire amplification can be performed in about thirty minutes, allowing your students to perform PCR in a single lab period.
7
1.800.EDVOTEK • Fax 202.370.1501 • [email protected] • www.edvotek.com
Duplication of any part of this document is permitted for non-profit educational purposes only. Copyright © 1989-2019 EDVOTEK, Inc., all rights reserved. 372.190123
Quick PCREDVO-Kit #372

EXPERIMENT OBJECTIVE:
In this experiment, students will gain an understanding of the traditional three-step Polymerase Chain Reaction (PCR). Using PCR and Agarose Gel Electrophoresis, they will analyze a small section of Lambda DNA in a time-saving two-step process.
LABORATORY SAFETY:
Be sure to READ and UNDERSTAND the instructions completely BEFORE starting the experiment. If you are unsure of something, ASK YOUR INSTRUCTOR!
• Wear gloves and goggles while working in the laboratory.• Exercise caution when working in the laboratory – you will be using equip-
ment that can be dangerous if used incorrectly.• Wear protective gloves when working with hot reagents like boiling water
and melted agarose.• DO NOT MOUTH PIPET REAGENTS - USE PIPET PUMPS.• Always wash hands thoroughly with soap and water after working in the
laboratory.
LABORATORY NOTEBOOKS:
Scientists document everything that happens during an experiment, includ-ing experimental conditions, thoughts and observations while conducting the experiment, and, of course, any data collected. Today, you'll be documenting your experiment in a laboratory notebook or on a separate worksheet.
Before starting the Experiment:
• Carefully read the introduction and the protocol. Use this information to form a hypothesis for this experiment.
• Predict the results of your experiment.
During the Experiment:
• Record your observations.
After the Experiment:
• Interpret the results – does your data support or contradict your hypothesis? • If you repeated this experiment, what would you change? Revise your
hypothesis to reflect this change.
Experiment Overview
Wear gloves and safety goggles
Amplification of Lambda DNA - 45 min.
Module I
Analysis of PCR Products by Electrophoresis - 15 to 20 min.Staining Agarose Gels - 5 to 30 min. (OPTIONAL)
Module II
NOTE: Experimental times are approximate.
Quick PCR EDVO-Kit #372
1.800.EDVOTEK • Fax 202.370.1501 • [email protected] • www.edvotek.com
8
Duplication of any part of this document is permitted for non-profit educational purposes only. Copyright © 1989-2019 EDVOTEK, Inc., all rights reserved. 372.190123
EDVO-Kit #372Quick PCR

Module I: Amplification of Lambda DNA
1.
4. 6.5.SPIN
TC2. 3.
• 20 µL Primer Mix• 5 µL DNA Sample• PCR EdvoBead™
Gently mix NOTES AND REMINDERS:
At least one negative control should be performed per class. To prepare the control sample, add 20 µL Primer Mix and 5 µL Lambda DNA template to a labeled PCR tube. NO PCR EdvoBead™ IS ADDED.
If your thermal cycler does not have a heated lid, it is necessary to overlay the PCR reaction with wax to prevent evaporation. See our website for more information.
1. LABEL a PCR tube with the sample and your initials2. ADD 20 µL primer mix (yellow), 5 µL DNA sample (red) and one PCR Edvo-
Bead™ to the appropriately labeled 0.2 mL PCR tube. 3. MIX each PCR sample. Make sure the PCR EdvoBeads™ are completely dis-
solved. NOTE: Double-check that both the primer and DNA have been added by looking at the color of the mixture in the PCR tube. The mixture should be orange with the primer and DNA mixed together.
4. CENTRIFUGE the samples for a few seconds to collect the sample at the bottom of the tubes.
5. AMPLIFY DNA using PCR. PCR cycling conditions: • Initial denaturation 94° C for 3 minutes • 94° C for 30 seconds • 71° C for 30 seconds6. After PCR, PLACE tubes on ice. PROCEED to Module II: Separation of PCR Prod-
ucts by Electrophoresis.
OPTIONAL STOPPING POINT: The PCR samples may be stored at -20° C for electrophoresis at a later time.
20 cycles}
NOTE:PCR Cycling Conditions have changed. Please review your PCR program before performing the experiment.
Quick PCREDVO-Kit #372
9
1.800.EDVOTEK • Fax 202.370.1501 • [email protected] • www.edvotek.com
Duplication of any part of this document is permitted for non-profit educational purposes only. Copyright © 1989-2019 EDVOTEK, Inc., all rights reserved. 372.190123
EDVO-Kit #372 Quick PCR

Prepare agarose gel & casting tray. If using SYBR® Safe DNA Stain (PREFERRED METHOD), gel preparation begins on page 11. If using FlashBlue™, gel preparation procedures begin on page 14.
Remove end caps & comb. Place tray into the electrophoresis chamber. Add 1x buffer into the chamber to submerge the gel.
Using a variable micropipette,load each sample into consecutive wells.
Attach safety cover, connect leads to power source and conduct electrophoresis.
1X DilutedBuffer
After electrophoresis, if SYBR® Safewas used, proceed directly to visualizingthe gel. If using FlashBlue™, transfer the gel for staining.
Visualize results on a U.V. Trans-illuminator or Blue Light Visualizationsystem (SYBR® Safe) or a white light system (FlashBlue™ Stain).
FlashBlue™ StainPreferred MethodSYBR® Safe
1
2
3
4
5
6
Gel pattern will vary depending upon experiment.
or
Samples
Overview of Agarose Gel Electrophoresis & Staining
1.800.EDVOTEK • Fax 202.370.1501 • [email protected] • www.edvotek.com
10
Duplication of any part of this document is permitted for non-profit educational purposes only. Copyright © 1989-2019 EDVOTEK, Inc., all rights reserved. 372.190123
Quick PCR EDVO-Kit #372

Module II-A: Separation of PCR Products by Electrophoresis (SYBR® Safe DNA Stain)
PREPARING THE AGAROSE GEL WITH SYBR® SAFE STAIN
1. DILUTE concentrated (50X) buffer with distilled water to create 1X buffer (see Table A.1).2. MIX agarose powder with 1X buffer in a 250 mL flask (see Table A.1).3. DISSOLVE agarose powder by boiling the solution. MICROWAVE the solution on high for 1
minute. Carefully REMOVE the flask from the microwave and MIX by swirling the flask. Continue to HEAT the solution in 15-second bursts until the agarose is com-pletely dissolved (the solution should be clear like water).
4. COOL the agarose to 60° C by carefully swirling the flask to promote even dissipa-tion of heat.
5. While the agarose is cooling, SEAL the ends of the gel-casting tray with the rubber end caps. PLACE the comb in the appropriate notch.
6. Before casting the gel, ADD diluted SYBR® Safe stain to the cooled molten agarose and swirl to mix (see Table A.1).
7. POUR the cooled agarose solution into the prepared gel-casting tray. The gel should thoroughly solidify within 20 minutes. The gel will stiffen and become less transparent as it solidifies.
8. REMOVE the end caps and comb. Take particular care when removing the comb to prevent damage to the wells.
ConcentratedBuffer (50x)
Size of GelCasting tray
7 x 7 cm
7 x 14 cm
0.5 mL
1.0 mL
+DistilledWater
24.5 mL
49.0 mL
+TOTALVolume
25 mL
50 mL
Diluted SYBR®(Step 6)
25 µL
50 µL
=
Individual 0.8% UltraSpec-Agarose™ Gel with SYBR® Safe Stain
Amt ofAgarose
0.23g
0.46 g
Table
A.1
IMPORTANT:
7 x 7 cm gels are recommended. Place
the comb in the first set of notches.
If you are unfamiliar with agarose gel prep and electrophoresis, detailed instructions and helpful resources
are available at www.edvotek.com
OPTIONAL STOPPING POINT:Gels can be stored overnight sub-merged in electrophoresis buffer, in the fridge, and protected from light.
Quick PCREDVO-Kit #372
11
1.800.EDVOTEK • Fax 202.370.1501 • [email protected] • www.edvotek.com
Duplication of any part of this document is permitted for non-profit educational purposes only. Copyright © 1989-2019 EDVOTEK, Inc., all rights reserved. 372.190123
EDVO-Kit #372 Quick PCR

Lane Recommended Sample Name
1
2
3
4
5
6
EdvoQuick™ DNA ladder
Negative Control*
Student Group #1
Student Group #2
Student Group #3
Student Group #4
* Optional, or additional student group sample.
Table 2
Module II-A: Separation of PCR Products by Electrophoresis(SYBR® Safe DNA Stain), continued
RUNNING THE GEL
9. PLACE the gel (on the tray) into the electrophoresis chamber. COVER the gel with 1X electrophoresis buffer (See Table B.1 for recommended volumes). The gel should be completely submerged.
10. Using Table 2 as a guide, LOAD the entire sample (25 µL) into the wells in consecutive order.11. PLACE safety cover. CHECK that the gel is properly oriented. Remember, the DNA samples will mi-
grate toward the positive (red) electrode.12. CONNECT leads to the power source and PERFORM
electrophoresis (See Table C for time and voltage guidelines).
13. After electrophoresis is complete, REMOVE the gel and casting tray from the electrophoresis chamber.
9. 10.
11. 12.
POUR1X DilutedBuffer.
OPTIONAL STOPPING POINT: Gels can be stored for several days. Place gel in a watertight plastic bag with 2 mL of electrophoresis buffer and store in the refrigerator.
Time and Voltage Guidelines(0.8% - 7 x 7 cm Agarose Gel)
Volts
150
125
70
10 min.
20 min.
35 min.
Table
CRecommended Time
Minimum Maximum
20 min.
35 min.
1 hour
Reminder:Before loading the samples, make sure the gel is properly oriented in the ap-paratus chamber.
Wear gloves and safety goggles
50x Conc.Buffer
DistilledWater+
EDVOTEKModel #
Total Volume Required
1x Electrophoresis Buffer (Chamber Buffer)
M6+ & M12 (new)
M12 (classic)
M36
300 mL
400 mL
1000 mL
Dilution
Table
B.1
6 mL
8 mL
20 mL
294 mL
392 mL
980 mL
1.800.EDVOTEK • Fax 202.370.1501 • [email protected] • www.edvotek.com
12
Duplication of any part of this document is permitted for non-profit educational purposes only. Copyright © 1989-2019 EDVOTEK, Inc., all rights reserved. 372.190123
Quick PCR EDVO-Kit #372

VISUALIZING THE SYBR® GEL
14. SLIDE the gel off the casting tray onto the viewing surface of the transilluminator and turn the unit on. ADJUST the brightness to the desired level to maximize band visualization. DNA should appear as bright green bands on a dark background.
15. PHOTOGRAPH the results. 16. REMOVE and DISPOSE of the gel and CLEAN the transilluminator surfaces with
distilled water.
14. 15. 16.
dH2O
Be sure to wear UV goggles if using a
UV transilluminator.
Module II-A: Separation of PCR Products by Electrophoresis(SYBR® Safe DNA Stain), continued
13
1.800.EDVOTEK • Fax 202.370.1501 • [email protected] • www.edvotek.com
Duplication of any part of this document is permitted for non-profit educational purposes only. Copyright © 1989-2019 EDVOTEK, Inc., all rights reserved. 372.190123
Quick PCREDVO-Kit #372

1:001. 3.
4. 5.
7.
Caution! Flask will be HOT!
50XConcentrated
bufferDistilledwater
Agarose
10XFlashBlue™
2.
60°C
6.
50x
60°C
DILUTE
POUR
20min.
WAIT
SEAL gel tray.PLACE comb.
60°C
COOLby swirling
REMOVE end caps & comb.
PREPARING THE AGAROSE GEL WITH FLASHBLUE™
1. DILUTE concentrated (50X) buffer with distilled water to create 1X buffer (see Table A.2).
2. MIX agarose powder with 1X buffer in a 250 mL flask (see Table A.2).
3. DISSOLVE agarose powder by boiling the solution. MICROWAVE the solution on high for 1 minute. Carefully REMOVE the flask from the microwave and MIX by swirling the flask. Continue to HEAT the solution in 15-second bursts until the agarose is completely dissolved (the solution should be clear like water).
4. COOL agarose to 60° C with careful swirling to promote even dissipation of heat.5. While agarose is cooling, SEAL the ends of the gel casting tray with the rubber
end caps. PLACE the comb in the appropriate notch.6. ADD 10X FlashBlue™ Solution to the cooled agarose (see Table A.3 for correct
amount). POUR the cooled agarose solution into the prepared gel casting tray. The gel should thoroughly solidify within 20 minutes. The gel will stiffen and become less transparent as it solidifies.
7. Carefully REMOVE end caps and comb. Take particular care when removing the comb to prevent damage to the wells.
IMPORTANT:
7 x 7 cm gels are recom-mended. Place well-for-mer template (comb) in the first set of notches.
If you are unfamiliar with agarose gel prep and electrophoresis, detailed instructions and helpful resources are available at www.edvotek.com
Wear gloves and safety goggles
Module II-B: Separation of PCR Products by Electrophoresis (Improved FlashBlue™ Staining)
ConcentratedBuffer (50x)
Size of GelCasting tray
7 x 7 cm
7 x 14 cm
0.6 mL
1.2 mL
+DistilledWater
29.4 mL
58.8 mL
+TOTALVolume
30 mL
60 mL
=
Individual 0.8% UltraSpec-Agarose™ Gel
Amt ofAgarose
0.23g
0.46 g
Table
A.2
Amt ofFlashBlue™
Size ofGel
7 x 7 cm
7 x 14 cm
10 µL
20 µL
FlashBlue™ Enhanced Gel
Table
A.3
Quick PCR EDVO-Kit #372
1.800.EDVOTEK • Fax 202.370.1501 • [email protected] • www.edvotek.com
14
Duplication of any part of this document is permitted for non-profit educational purposes only. Copyright © 1989-2019 EDVOTEK, Inc., all rights reserved. 372.190123
EDVO-Kit #372Quick PCR

Module II-B: Separation of PCR Products by Electrophoresis (Improved FlashBlue™ Staining), continued
RUNNING THE GEL
8. PLACE gel (on the casting tray) into electrophoresis chamber. POUR the FlashBlue™ Enhanced 1X Diluted Chamber Buffer into the electrophoresis chamber (See Table B.2 for recommended volumes). Completely SUBMERGE the gel.
9. LOAD the entire sample volumes (25 µL) into the wells in consecutive order as indicated by Table 2.10. PLACE safety cover. CHECK that the gel is properly oriented. Remember, the samples will migrate toward
the positive (red) electrode.11. CONNECT leads to the power source and PERFORM electrophoresis (See Table C for time and voltage guide-
lines). For best results, the orange tracking dye should migrate at least 4 cm from the wells.
12. After electrophoresis is complete, REMOVE the gel and casting tray from the electrophoresis chamber and proceed to STAINING the agarose gel with FlashBlue™ Stain (page 16).
POUR1X Diluted
Buffer(FlashBlue™Enhanced)
8. 9.
10. 11.
LOAD samples.
PLACE safety cover. CONNECT to power source.
PLACE gel and tray.
50x Conc.Buffer
DistilledWater+
EDVOTEKModel #
Total Volume Required
FlashBlue™ Enhanced 1x Diluted Chamber Buffer
M6+ & M12 (new)
M12 (classic)
M36
300 mL
400 mL
1000 mL
DILUTION
Table
B.2
6 mL
8 mL
20 mL
294 mL
392 mL
980 mL
10xFlashBlueSolution+
100 µL
130 µL
330 µL
Reminder:Before loading the samples, make sure the gel is properly oriented in the ap-paratus chamber.
Wear gloves and safety goggles
Lane Recommended Sample Name
1
2
3
4
5
6
EdvoQuick™ DNA ladder
Negative Control*
Student Group #1
Student Group #2
Student Group #3
Student Group #4
* Optional, or additional student group sample.
Table 2
Time and Voltage Guidelines(0.8% - 7 x 7 cm Agarose Gel)
Volts
150
125
70
10 min.
20 min.
35 min.
Table
CRecommended Time
Minimum Maximum
20 min.
35 min.
1 hour
15
1.800.EDVOTEK • Fax 202.370.1501 • [email protected] • www.edvotek.com
Duplication of any part of this document is permitted for non-profit educational purposes only. Copyright © 1989-2019 EDVOTEK, Inc., all rights reserved. 372.190123
Quick PCREDVO-Kit #372

Module II-B: Separation of PCR Products by Electrophoresis (Improved FlashBlue™ Staining), continued
Wear gloves and safety goggles
STAINING AND VISUALIZING WITH FLASHBLUE™ STAIN
1. DILUTE 10 mL of 10X concentrated FlashBlue™ with 90 mL of distilled water in a flask. MIX well.
2. REMOVE the agarose gel and casting tray from the electrophoresis chamber. SLIDE the gel off of the casting tray into a small, clean gel staining tray.
3. COVER the gel with the 1X FlashBlue™ stain solution. STAIN the gel for 5 minutes. For best results, use an orbital shaker to gently agitate the gel while staining. STAINING THE GEL FOR LONGER THAN 3 MINUTES WILL REQUIRE EXTRA DESTAINING TIME.
4. POUR the 1X FlashBlue™ back into the flask (the stain can be reused). COVER the gel with warm water (40-45° C). Gently RINSE the gel for 20-30 seconds. POUR off the water.
5. COVER the gel with 100 mL clean, warm water (40-45° C). DESTAIN for 5-15 minutes with gentle shak-ing (longer periods will yield better results). DNA bands will start to appear after 5 minutes of destaining. Frequent changes of the water will accelerate destaining.
6. Carefully REMOVE the gel from the destaining liquid. VISUALIZE results using a white light visualization system. DNA will appear as dark blue bands on a light blue background.
ALTERNATIVE FLASHBLUE™ STAINING PROTOCOL:
1. DILUTE 1 mL of 10X FlashBlue™ stain with 499 mL distilled water. 2. COVER the gel with diluted FlashBlue™ stain. 3. SOAK the gel in the staining liquid for at least three hours. For best results, stain gels overnight.4. Carefully REMOVE the gel from the staining liquid. VISUALIZE results using a white light visualization sys-
tem. DNA will appear as dark blue bands on a light blue background.
1.800.EDVOTEK • Fax 202.370.1501 • [email protected] • www.edvotek.com
16
Duplication of any part of this document is permitted for non-profit educational purposes only. Copyright © 1989-2019 EDVOTEK, Inc., all rights reserved. 372.190123
Quick PCR EDVO-Kit #372

Study Questions
1. Why is a thermostable DNA polymerase required for PCR-based DNA amplification?
2. Why are two different primers required for the PCR reaction?
3. How do traditional PCR and quick PCR differ? How do these changes affect the time spent performing PCR?
Quick PCREDVO-Kit #372
17
1.800.EDVOTEK • Fax 202.370.1501 • [email protected] • www.edvotek.com
Duplication of any part of this document is permitted for non-profit educational purposes only. Copyright © 1989-2019 EDVOTEK, Inc., all rights reserved. 372.190123
EDVO-Kit #372 Quick PCR
Instructor's Guide
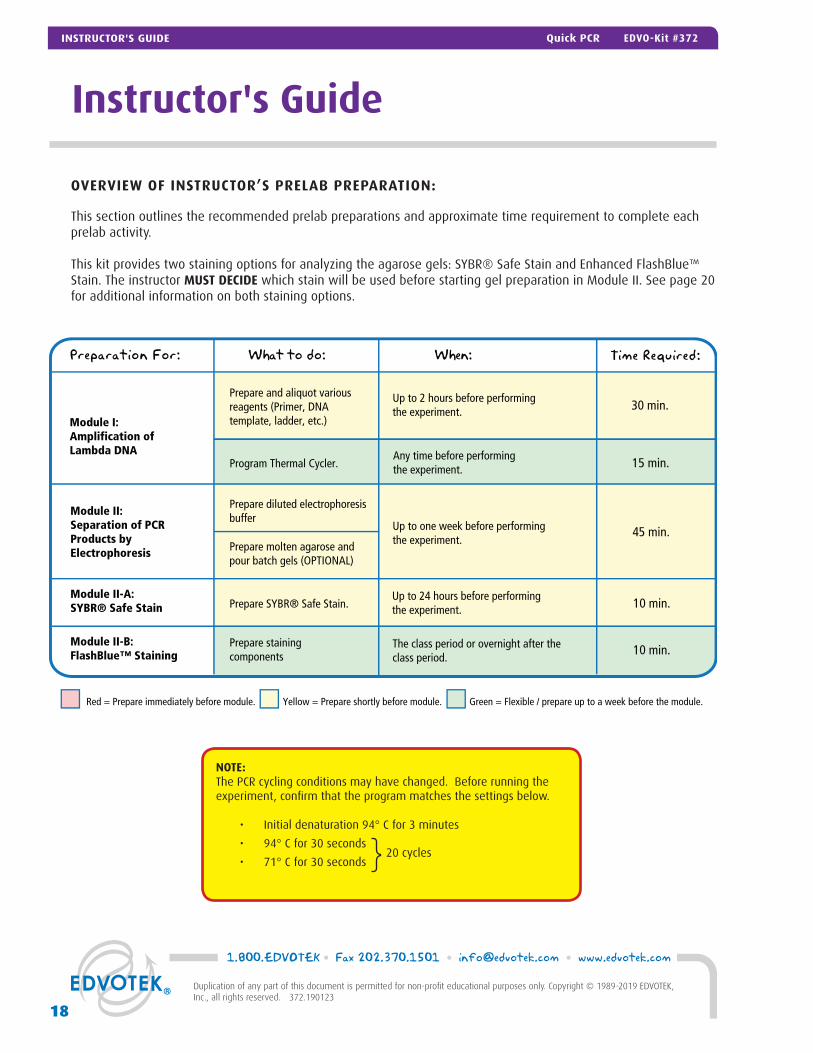
NOTE:The PCR cycling conditions may have changed. Before running the experiment, confirm that the program matches the settings below. • Initial denaturation 94° C for 3 minutes
• 94° C for 30 seconds
• 71° C for 30 seconds 20 cycles
1.800.EDVOTEK • Fax 202.370.1501 • [email protected] • www.edvotek.com
18
Duplication of any part of this document is permitted for non-profit educational purposes only. Copyright © 1989-2019 EDVOTEK, Inc., all rights reserved. 372.190123
INSTRUCTOR'S GUIDE Quick PCR EDVO-Kit #372
OVERVIEW OF INSTRUCTOR’S PRELAB PREPARATION:
This section outlines the recommended prelab preparations and approximate time requirement to complete each prelab activity.
This kit provides two staining options for analyzing the agarose gels: SYBR® Safe Stain and Enhanced FlashBlue™ Stain. The instructor MUST DECIDE which stain will be used before starting gel preparation in Module II. See page 20 for additional information on both staining options.
Preparation For: What to do: When: Time Required:
Module II: Separation of PCR Products by Electrophoresis
Prepare diluted electrophoresisbuffer
Prepare molten agarose and pour batch gels (OPTIONAL)
45 min.
Module I: Amplification of Lambda DNA
Prepare and aliquot various reagents (Primer, DNA template, ladder, etc.)
Up to 2 hours before performingthe experiment.
Up to one week before performingthe experiment.
The class period or overnight after the class period.
30 min.
15 min.
Module II-B: FlashBlue™ Staining
Prepare staining components 10 min.
10 min.Module II-A: SYBR® Safe Stain Prepare SYBR® Safe Stain.
Up to 24 hours before performing the experiment.
Any time before performing the experiment.Program Thermal Cycler.
Red = Prepare immediately before module. Yellow = Prepare shortly before module. Green = Flexible / prepare up to a week before the module.

AMPLIFICATION OF LAMBDA DNA
This kit features the NEW EDVOTEK® LyphoTemplate™ and LyphoPrimer™. The reagents are color coded so that a correctly assembled PCR reaction should appear orange in color. This innovation will help ensure experimental success.
Preparation of the Primer Mix
1. Thaw the TE buffer (D). Mix well before using.2. Before preparing the primer mix, make sure the solid material is at the bottom
of the LyphoPrimer™ Tube (A). If not, centrifuge the tube at full speed for 20 seconds or tap the tube on the lab bench.
3. Dilute the LyphoPrimer™ by adding 1 mL of TE Buffer to the tube. Cap and mix well and place on ice. The solution should be clear and light yellow in color, and no solid pieces should remain.
4. Dispense 25 µL of the diluted primer per tube. Label these 10 tubes “Primer Mix". Distribute one tube per student group.
Preparation of the DNA Template
1. Thaw the TE buffer (D). Mix well before using.2. Before preparing the DNA template, make sure the solid material is at the bot-
tom of the LyphoTemplate™ Tube (C). If not, centrifuge the tube at full speed for 20 seconds or tap the tube on the lab bench.
3. Dilute the LyphoTemplate™ Lambda DNA by adding 75 µL of TE Buffer to the tube. Cap and mix well and place on ice. The solution should be clear and red in color, and no solid pieces should remain.
4. Dispense 6 µL of the diluted DNA template per tube. Label these 10 tubes “Lambda DNA". Distribute one tube per student group.
5. This kit provides enough template DNA for two negative control reactions. Dis-tribute one additional tube containing 6 µL diluted Lambda DNA to the groups preparing the control samples.
Additional Materials
• Each student group receives one 0.2 mL PCR tube and one PCR EdvoBead™.
PCR Amplification
The Thermal cycler should be programmed as outlined in Module I in the Student’s Experimental Procedure.
• Accurate temperatures and cycle times are critical. A pre-run for one cycle (takes approximately 3 to 5 min.) is recommended to check that the thermal cycler is properly programmed.
• For thermal cyclers that do not have a heated lid, it is necessary to place a layer of wax or mineral oil above the PCR reactions in the microcentrifuge tubes to prevent evaporation. Visit www.edvotek.com for more infor-mation.
Pre-Lab Preparations - Module I
FOR MODULE IEach Group should receive:• One PCR tube and PCR EdvoBead™• 25 µL Diluted Primer Mix• 6 µL Diluted Lambda DNA Template • Additional 6 µL Diluted Lambda DNA Template for designated group performing the Optional Control Reaction
NOTE:Sample volumes are very small. It is important to quick spin the tube con-tents in a microcentrifuge to obtain sufficient vol-ume for pipetting. Spin samples for 10-20 seconds at maximum speed.
NOTE:PCR Cycling Conditions have changed. Please re-view your PCR program before performing the experiment.
19
1.800.EDVOTEK • Fax 202.370.1501 • [email protected] • www.edvotek.com
Duplication of any part of this document is permitted for non-profit educational purposes only. Copyright © 1989-2019 EDVOTEK, Inc., all rights reserved. 372.190123
INSTRUCTOR'S GUIDEEDVO-Kit #372 Quick PCR

Pre-Lab Preparations - Module II
FOR MODULE IIEach Group should receive:• 50X concentrated buffer• Distilled Water • UltraSpec-Agarose™ Powder• EdvoQuick DNA ladder (35 µL)• Diluted SYBR® Safe or 10X
FlashBlue™ Stain
NOTE:Accurate pipetting is critical for maximizing successful ex-periment results. This experi-ment is designed for students who have had previous experience with micropipet-ting techniques and agarose gel electrophoresis.
If students are unfamiliar with using micropipettes, we rec-ommended performing Cat. #S-44, Micropipetting Basics or Cat. #S-43, DNA DuraGel™ prior to conducting this ad-vanced level experiment.
NOTE:QuickGuide instructions and guidelines for casting various agarose gels can be found our website. www.edvotek.com/quick-guides
1.800.EDVOTEK • Fax 202.370.1501 • [email protected] • www.edvotek.com
20
Duplication of any part of this document is permitted for non-profit educational purposes only. Copyright © 1989-2019 EDVOTEK, Inc., all rights reserved. 372.190123
INSTRUCTOR'S GUIDE Quick PCR EDVO-Kit #372
SEPARATION OF PCR PRODUCTS BY ELECTROPHORESIS
NOTE: The instructor MUST DECIDE whether to use SYBR® Safe or FlashBlue™ to visualize the gel BEFORE starting the gel preparation in Module II.
Prepare SYBR® Safe Stain (if using in Module II):
1. Following the instructions in Appendix C, prepare 1x Electrophoresis Buffer by combining 10 µL of 50X Concentrated Buffer with 490 µL of distilled water.
2. Add 250 µL of the 1X buffer from step 1 to the tube of SYBR® Safe and mix by tapping the tube several times. The SYBR® Safe Stain is now ready to be used during agarose gel preparation.
Individual Gel Preparation:This experiment requires a total of three 0.8% agarose gels shared by the entire class. 7 x 7 cm gels are recommended. Each student group can be responsible for casting their own individual gel prior to conducting the experiment. See Module II in the Stu-dent’s Experimental Procedure. Students will need 50X electrophoresis buffer, distilled water, agarose powder, and either diluted SYBR® Safe Stain or 10X FlashBlue™ solu-tion.
Batch Gel Preparation:To save time, a larger quantity of agarose solution can be prepared for sharing by the class. Electrophoresis buffer can also be prepared in bulk. See Appendix C.
Preparing Gels in Advance:Gels may be prepared ahead and stored for later use. Solidified gels can be stored under buffer in the refrigerator (4° C) for up to two days.
If using the Improved FlashBlue™ staining protocol, the buffer should contain Flash-Blue™. See Table B.2 on page 15 for preparation guidelines.
Do not freeze gels at -20º C as freezing will destroy the gels.
Gels that have been removed from their trays for storage should be “anchored" back to the tray with a few drops of molten agarose before being placed into the tray. This will prevent the gels from sliding around in the trays and the chambers.
Additional Materials:• Dispense 35 µL of the EdvoQuick™ DNA ladder (B) into 3 microcentrifuge tubes labeled "Ladder".
Distribute one tube of EdvoQuick™ DNA ladder per gel.

Pre-Lab Preparations - Module II
STAINING & VISUALIZING AGAROSE GELS
Module II-A: SYBR® Safe stain (PREFERRED METHOD)
SYBR® Safe is a fluorescent DNA stain that binds specifically to DNA. Students can obtain safe and rapid results from their electrophoresis experiment by adding a diluted solution of SYBR® Safe to molten agarose before cast-ing a gel. When excited with UV or blue light, any SYBR® Safe that is bound to DNA fluoresces with a bright green color. Fluorescent DNA stains like SYBR® Safe are perfect for technically challenging experiments like PCR because they are extremely sensitive, making it easy to quantify small amounts of DNA.
Use a mid-range ultraviolet transilluminator (Cat #558) or TruBlu™ Blue Light Transilluminator (Cat #557) to visual-ize gels stained with SYBR® Safe. Gels are ready to visualize immediately after electrophoresis is completed.
Module II-B: FlashBlue™ Stain
FlashBlue™ stain is optimized to shorten the time required for both staining and de-staining steps. The gels are prestained with FlashBlue™ by adding the concentrate to the gel and running buffer. Agarose gels can be stained with diluted FlashBlue™ for 5 minutes and destained for only 20 minutes. For the best results, leave the gel in liquid overnight. This will allow the stained gel to “equilibrate" in the destaining solution, resulting in dark blue DNA bands contrasting against a uniformly light blue background. A white light box (Cat. #552) is recommended for visualizing gels stained with Flash-Blue™.
• Stained gels may be stored in destaining liquid for several weeks with refrigeration, although the bands may fade with time. If this happens, re-stain the gel.
• Destained gels can be discarded in solid waste disposal. Destaining solutions can be disposed of down the drain.
PHOTODOCUMENTATION OF DNA (OPTIONAL)
Once gels are stained, you may wish to photograph your results. There are many different photodocumentation systems available, including digital systems that are interfaced directly with computers. Specific instructions will vary depending upon the type of photodocumentation system you are using.
FOR MODULE II-BEach Group should receive:• 10 mL 10X concentrated FlashBlue OR 100 mL 1X diluted FlashBlue• Small plastic tray or weight
boat• Distilled or deionized water
21
1.800.EDVOTEK • Fax 202.370.1501 • [email protected] • www.edvotek.com
Duplication of any part of this document is permitted for non-profit educational purposes only. Copyright © 1989-2019 EDVOTEK, Inc., all rights reserved. 372.190123
INSTRUCTOR'S GUIDEEDVO-Kit #372 Quick PCR
Experiment Results and Analysis
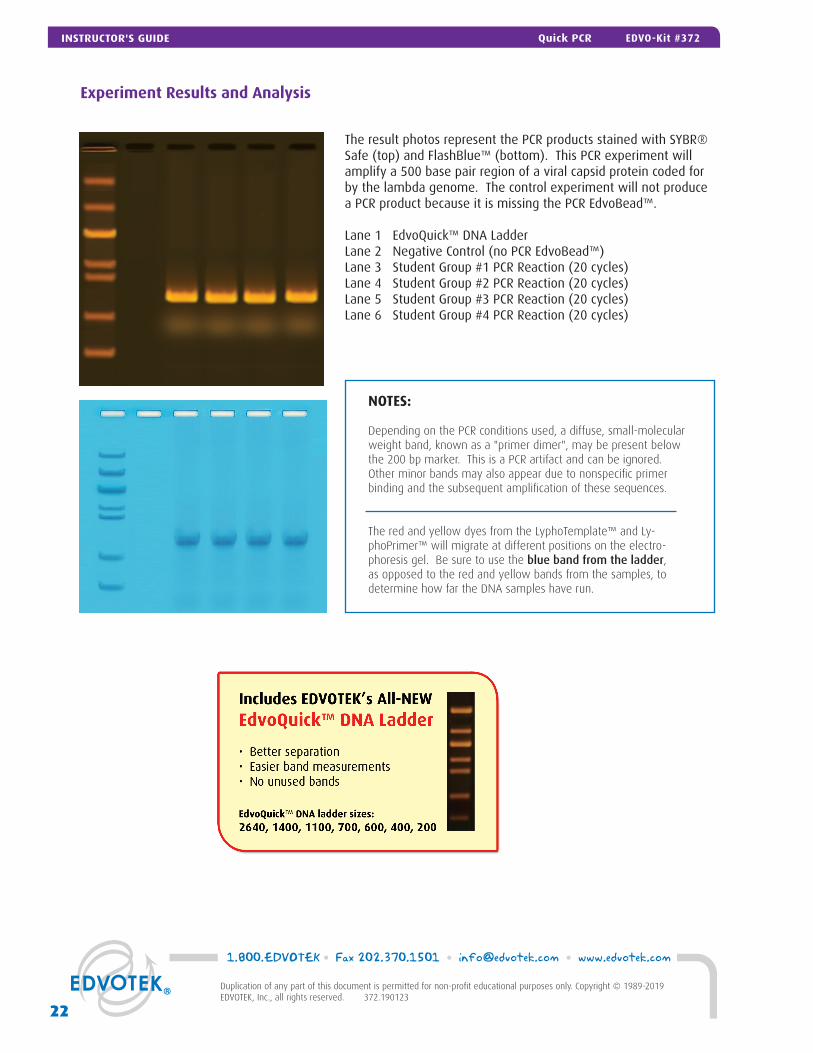
The result photos represent the PCR products stained with SYBR® Safe (top) and FlashBlue™ (bottom). This PCR experiment will amplify a 500 base pair region of a viral capsid protein coded for by the lambda genome. The control experiment will not produce a PCR product because it is missing the PCR EdvoBead™.
Lane 1 EdvoQuick™ DNA Ladder Lane 2 Negative Control (no PCR EdvoBead™)Lane 3 Student Group #1 PCR Reaction (20 cycles)Lane 4 Student Group #2 PCR Reaction (20 cycles)Lane 5 Student Group #3 PCR Reaction (20 cycles)Lane 6 Student Group #4 PCR Reaction (20 cycles)
NOTES:
Depending on the PCR conditions used, a diffuse, small-molecular weight band, known as a "primer dimer", may be present below the 200 bp marker. This is a PCR artifact and can be ignored. Other minor bands may also appear due to nonspecific primer binding and the subsequent amplification of these sequences.
The red and yellow dyes from the LyphoTemplate™ and Ly-phoPrimer™ will migrate at different positions on the electro-phoresis gel. Be sure to use the blue band from the ladder, as opposed to the red and yellow bands from the samples, to determine how far the DNA samples have run.
1.800.EDVOTEK • Fax 202.370.1501 • [email protected] • www.edvotek.com
22
Duplication of any part of this document is permitted for non-profit educational purposes only. Copyright © 1989-2019 EDVOTEK, Inc., all rights reserved. 372.190123
INSTRUCTOR'S GUIDE Quick PCR EDVO-Kit #372

Please refer to the kit insert for the Answers to
Study Questions

A EDVOTEK® Troubleshooting Guide
B Performing the PCR Experiment Using Two Waterbaths
C Bulk Preparation of Electrophoresis Buffer and Agarose Gels
Safety Data Sheets can be found on our website: www.edvotek.com/Safety-Data-Sheets
Appendices
1.800.EDVOTEK • Fax 202.370.1501 • [email protected] • www.edvotek.com
24
Duplication of any part of this document is permitted for non-profit educational purposes only. Copyright © 1989-2019 EDVOTEK, Inc., all rights reserved. 372.190123
APPENDICES Quick PCR EDVO-Kit #372
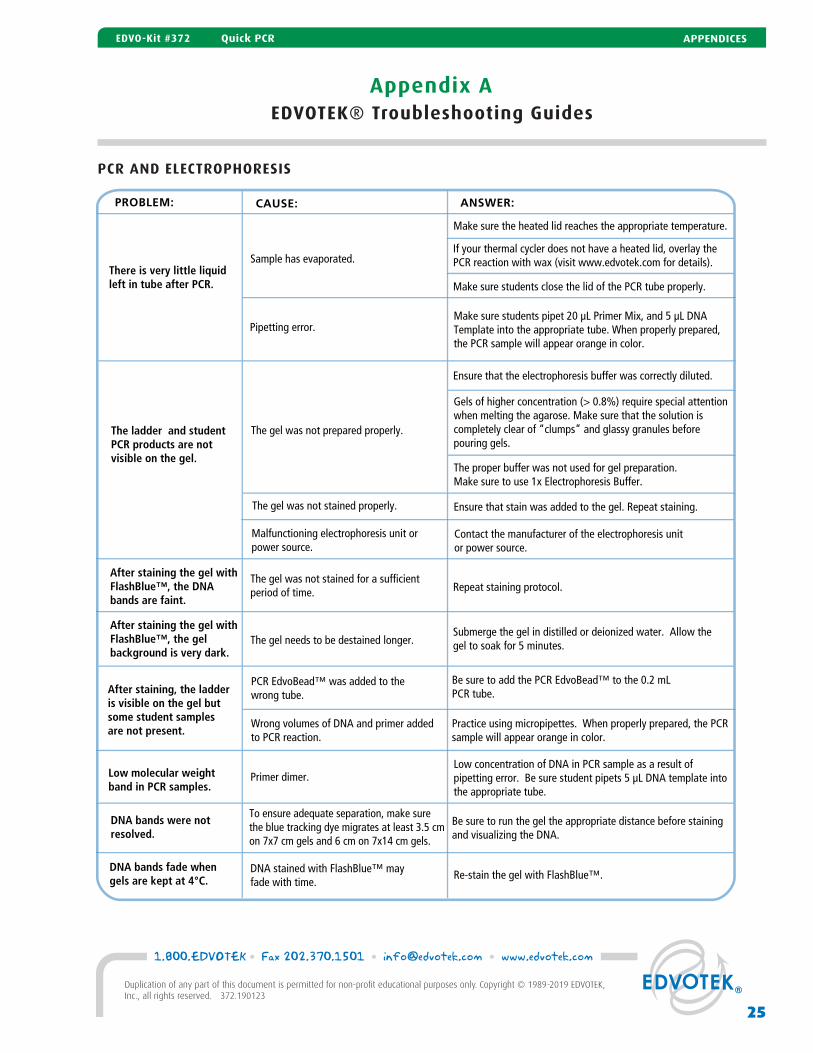
Appendix AEDVOTEK® Troubleshooting Guides
PCR AND ELECTROPHORESISPCR AND ELECTROPHORESIS
PROBLEM: CAUSE: ANSWER:
There is very little liquid left in tube after PCR.
Sample has evaporated.
Make sure the heated lid reaches the appropriate temperature.
If your thermal cycler does not have a heated lid, overlay the PCR reaction with wax (visit www.edvotek.com for details).
Make sure students close the lid of the PCR tube properly.
After staining the gel withFlashBlue™, the DNA bands are faint.
The gel was not stained for a sufficient period of time. Repeat staining protocol.
After staining, the ladderis visible on the gel but some student samplesare not present.
Pipetting error.Make sure students pipet 20 µL Primer Mix, and 5 µL DNA Template into the appropriate tube. When properly prepared, the PCR sample will appear orange in color.
The ladder and student PCR products are not visible on the gel.
The gel was not prepared properly.
The gel was not stained properly.
Ensure that the electrophoresis buffer was correctly diluted.
Gels of higher concentration (> 0.8%) require special attention when melting the agarose. Make sure that the solution is completely clear of “clumps” and glassy granules before pouring gels.
The proper buffer was not used for gel preparation. Make sure to use 1x Electrophoresis Buffer.
Ensure that stain was added to the gel. Repeat staining.
Wrong volumes of DNA and primer added to PCR reaction.
Practice using micropipettes. When properly prepared, the PCR sample will appear orange in color.
PCR EdvoBead™ was added to the wrong tube.
Be sure to add the PCR EdvoBead™ to the 0.2 mL PCR tube.
Contact the manufacturer of the electrophoresis unit or power source.
After staining the gel withFlashBlue™, the gel background is very dark.
The gel needs to be destained longer.Submerge the gel in distilled or deionized water. Allow thegel to soak for 5 minutes.
Low molecular weight band in PCR samples.
Primer dimer.Low concentration of DNA in PCR sample as a result of pipetting error. Be sure student pipets 5 µL DNA template into the appropriate tube.
DNA bands were not resolved.
To ensure adequate separation, make sure the blue tracking dye migrates at least 3.5 cm on 7x7 cm gels and 6 cm on 7x14 cm gels.
Be sure to run the gel the appropriate distance before stainingand visualizing the DNA.
DNA bands fade when gels are kept at 4°C.
DNA stained with FlashBlue™ may fade with time.
Re-stain the gel with FlashBlue™.
Malfunctioning electrophoresis unit orpower source.
25
1.800.EDVOTEK • Fax 202.370.1501 • [email protected] • www.edvotek.com
Duplication of any part of this document is permitted for non-profit educational purposes only. Copyright © 1989-2019 EDVOTEK, Inc., all rights reserved. 372.190123
APPENDICESEDVO-Kit #372 Quick PCR
Appendix BPerforming the PCR Experiment Using Two Waterbaths
This experiment can be modified to use two waterbaths in place of a thermal cycler. In this method, the PCR samples are cycled between two waterbaths, each maintained at a different temperature, for a specified period. The sequential placement of the reaction sample between the two waterbaths constitutes one PCR cycle. Please note that results ob-tained when using two waterbaths are often variable. A thermal cycler assures a significantly higher rate of success.
We recommend EDVOTEK’s Digital PCR Waterbath (Cat. #544) if you do not have access to a thermal cycler.
Set up the samples as outlined in Module I steps 1-4. Before cycling the samples, be sure to:
• Allow at least 15 minutes for the waterbaths to reach the temperatures specified in Module I (94° C and 71° C). • Cover the waterbaths when not in use to maintain the proper temperature and to prevent water evaporation.• The volume of the PCR sample is small and can evaporate easily. To prevent this, transfer one wax bead to each
PCR sample. The melted wax bead forms a barrier over the PCR sample to prevent its evaporation during heating.• Make sure that the sample remains undisturbed at the bottom of the tube. If necessary, centrifuge or shake the
tube to get the sample to the bottom of the tube. • Place the PCR samples in a waterbath float before placing them in the waterbath.
Continue with step 5 (thermal cycling), following the protocol below:
• Initial denaturation at 94° C for 3 minutes • 94° C for 30 seconds • 71° C for 30 seconds
Handle the samples carefully when shifting between waterbaths. Use forceps to carefully raise/lower the float into the waterbaths.
Remove samples at specified time points. Take care to avoid the liquid wax layer when removing the sample. We rec-ommend placing the tube on ice for a few seconds to solidify the wax. Use a clean pipette tip to gently break through the wax layer, making enough room to fit a clean pipette tip. Using a fresh, clean pipette tip, remove the PCR product and transfer to the appropriate tube.
PLACE tubes on ice. PROCEED to Module II: Separation of PCR Products by Electrophoresis.
20 cycles}
1.800.EDVOTEK • Fax 202.370.1501 • [email protected] • www.edvotek.com
26
Duplication of any part of this document is permitted for non-profit educational purposes only. Copyright © 1989-2019 EDVOTEK, Inc., all rights reserved. 372.190123
APPENDICES Quick PCR EDVO-Kit #372

Appendix CBulk Preparation of Electrophoresis Buffer and Agarose Gels
To save time, the electrophoresis buffer and agarose gel solution can be prepared in larger quantities for sharing by the class. Unused diluted buffer can be used at a later time and solidified agarose gel solution can be remelted.
BULK ELECTROPHORESIS BUFFER
Quantity (bulk) preparation for 3 liters of 1x electro-phoresis buffer is outlined in Table D.
NOTE: If staining gels with FlashBlue, add 1 mL 10X FlashBlue concentrate to the diluted buffer and mix thoroughly.
BATCH AGAROSE GELS (0.8%)
Bulk preparation of 0.8% agarose gel is out-lined in Table E.
1. Use a 500 mL flask to prepare the diluted gel buffer
2. Pour the appropriate amount of UltraSpec-Agarose™ into the prepared buffer. Swirl to disperse clumps.
3. With a marking pen, indicate the level of solution volume on the outside of the flask.
4. Heat the agarose solution as outlined previously for individual gel preparation. The heating time will require adjustment due to the larger total volume of gel buf-fer solution.
5. Cool the agarose solution to 60° C with swirling to promote even dissipa-tion of heat. If evaporation has occurred, add distilled water to bring the solution up to the original volume as marked on the flask in step 3.
6. a. If staining gels with SYBR® Safe stain, add the entire volume of di-luted SYBR® Safe (from page 20) to the cooled agarose and mix thoroughly.
b. If staining gels with FlashBlue™, add 130 µL of 10X FlashBlue™ concentrate to the cooled agarose and mix thoroughly.
7. Dispense the required volume of cooled agarose solution for casting each gel. Mea-sure 30 mL for a 7 x 7 cm tray, 50 mL for a 7 x 10 cm tray, and 60 mL for a 7 x 14 cm tray. For this experiment, 7 x 7 cm gels are recommended.
8. Allow the gel to completely solidify. It will become firm and cool to the touch after approximately 20 minutes. Gels can be used immediately or stored in a small amount of buffer in the refrigerator for several days.
60˚C
50x Conc.Buffer +
DistilledWater
Total Volume Required
60 mL 2,940 mL 3000 mL (3 L)
Bulk Preparation of Electrophoresis BufferTable
D
NOTE: The UltraSpec-Agarose™ kit component is usually labeled with the amount it contains. Please read the label care-fully. If the amount of aga-rose is not specified or if the bottle's plastic seal has been broken, weigh the agarose to ensure you are using the correct amount.
NOTE: QuickGuide instruc-tions and guidelines for casting various agarose gels can be found our website. www.edvotek.com/quick-guides
27
1.800.EDVOTEK • Fax 202.370.1501 • [email protected] • www.edvotek.com
Duplication of any part of this document is permitted for non-profit educational purposes only. Copyright © 1989-2019 EDVOTEK, Inc., all rights reserved. 372.190123
APPENDICESEDVO-Kit #372 Quick PCR