let’s talk it outguide+6.pdf · your app. it’s ultimatly up to you as the app creator to decide...
TRANSCRIPT

LIGHTWELL | LESSONS
Guide #6Dialogue
LET’S TALK IT OUT 🗣

Dialogue is a super powerful part of Lightwell and features three major components. We’ll talk about that quickly before we jump into the tutorial 👍
LIGHTWELL 1
SHOULD I HAVE DIALOGUE IN MY APP?
DIALOGUE
Dialogue, whether through voice over or character animation, can give a much deeper level of immersion to your app.
It’s ultimatly up to you as the app creator to decide where and how to implement it!
The Dialogue feature in Lightwell is made up of three components:
Script - The simplest component is the script which is
basically a the text version of the dialogue you’ve
recorded.
Audio File - This is the sound recording of your
Dialogue. Instead of one long audio file containing all of
your dialogue, we recommend splitting it up into
individual lines to make it easier to work with in
Lightwell.
Mouth Sprites (optional) - If you’re trying to illustrate
a character speaking, you’re going to need some
alternate mouth shapes to help your character speak!
At the very least, we recommend having an Open and
Closed state, but for a more natural look, check out
these examples.
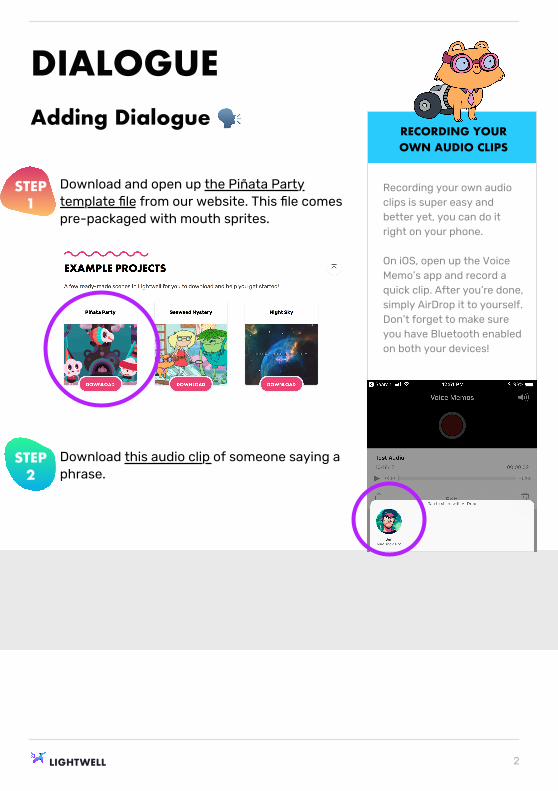
Download and open up the Piñata Party template file from our website. This file comes pre-packaged with mouth sprites.
Download this audio clip of someone saying a phrase.
STEP 2
STEP 1
Adding Dialogue 🗣
DIALOGUE
LIGHTWELL 2
RECORDING YOUR OWN AUDIO CLIPS
Recording your own audio clips is super easy and better yet, you can do it right on your phone.
On iOS, open up the Voice Memo’s app and record a quick clip. After you’re done, simply AirDrop it to yourself. Don’t forget to make sure you have Bluetooth enabled on both your devices!

STEP 4
Now that you have all your necessary files, Open up the Piñata Party.lwp Scene 1 and open up the Dialogue Panel.
STEP 3
LIGHTWELL 3
WHAT IS A TOPIC?
A Topic is a way to categorize and keep track of dialogue within Lightwell.
To create a new Topic, just tap the Create a New Topic button in the Dialogue panel.
Adding Dialogue 🗣
DIALOGUE
Click on the small + button to add a new line of Dialogue.

STEP 5
LIGHTWELL 4
WHAT DOES @2X MEAN?
Adding Dialogue 🗣
DIALOGUE
When exporting assets, it’s common to refer to “Retina” images as 2x - because they are twice as large to accomodate for larger screens.
Lightwell takes care of this automatically so you barely have to worry about it. You can download our templates here, which are sized for Retina.
If you’d like to start from scratch, be sure to set up your document to measure 2554px by 1808px at 72dpi to account for padding.
First we need to define the Trigger. The Trigger is basically the Layer that starts the Dialogue. In this case, let’s pick Left Cloud for both Trigger and Speaker. By tapping on Left Cloud, the Left Cloud character will speak.
Ignore the Topic for now and select the Audio File you downloaded in Step 2.
Almost done! Lastly we need to type up the script. The audio file contains a clip of someone saying “Hi there, how are you?” so go ahead and type that in and click Create Line.
STEP 7
STEP 6

LIGHTWELL 5
WHAT DOES @2X MEAN?
Adding Dialogue 🗣
DIALOGUE
When exporting assets, it’s common to refer to “Retina” images as 2x - because they are twice as large to accomodate for larger screens.
Lightwell takes care of this automatically so you barely have to worry about it. You can download our templates here, which are sized for Retina.
If you’d like to start from scratch, be sure to set up your document to measure 2554px by 1808px at 72dpi to account for padding.
Your Dialogue Control Panel and Lip Sync Timeline should now look the same as the below screenshots:
STEP 8
Now, Click on the “Calculate” button in the Lip Sync Manager....
STEP 9

LIGHTWELL 6
WHAT DOES @2X MEAN?
Adding Dialogue 🗣
DIALOGUE
When exporting assets, it’s common to refer to “Retina” images as 2x - because they are twice as large to accomodate for larger screens.
Lightwell takes care of this automatically so you barely have to worry about it. You can download our templates here, which are sized for Retina.
If you’d like to start from scratch, be sure to set up your document to measure 2554px by 1808px at 72dpi to account for padding.
Your Lip Sync Manager should now look like this! When you clicked “Calculate”, Lightwell analyzed your audio, script and the projects mouth sprites to create a seamless talking animation. Try hitting the play button to see it in action!
STEP 10
Say you want to upload your own mouth sprites. Lightwell makes it easy to do that too! Find the “Mouth” Layer on the Left Cloud in the Layers Panel.
STEP 11

LIGHTWELL 7z
WHAT DOES @2X MEAN?
Adding Dialogue 🗣
Here you can see all the sprites associated with the mouth as well as their corresponding sounds. The bottom panel allows you to upload and delete current sprites.
When you’re happy with your new sprites, drag and drop them into the top panel to rearrange them according to their phonetic shape.
STEP 13
STEP 12
DIALOGUE
When exporting assets, it’s common to refer to “Retina” images as 2x - because they are twice as large to accomodate for larger screens.
Lightwell takes care of this automatically so you barely have to worry about it. You can download our templates here, which are sized for Retina.
If you’d like to start from scratch, be sure to set up your document to measure 2554px by 1808px at 72dpi to account for padding.