kymco agility 50 sr '11 - shad · a c b 4 3 5 2 1 consejo para un correcto montaje del kit: no...
TRANSCRIPT
A
C
BA B
C
43
5
2
13
4 1
Consejo para un correcto montaje del kit: No apretar los tornillos del todo hasta asegurarse que el KIT esté correctamentecolocado y alineado. Advice for correct fitting of the kit: Do not fully tighten the screws until it is ensured that the KIT is correctly attachedand aligned.Conseil pour un montage correct du kit: Ne pas serrer les vis avant d’être sûr que le Kit est correctement monté et ajusté.Hinweis für einen korrekten Einbau des Bausatzes: Ziehen Sie die Schrauben nicht ganz fest, bevor Sie sich nicht vergewissert haben,daß der Bausatz korrekt eingestellt und ausgerichtet ist. Consiglio per un montaggio corretto del kit: Non stringere del tutto le viti finché non si è controllato che il Kit è situato eallineato correttamente.
KYM
CO A
GIL
ITY
50 S
R ‘1
1 K
IT T
OPM
ASTE
R
K0G
L51S
T
REF. 500479Edición 1ª
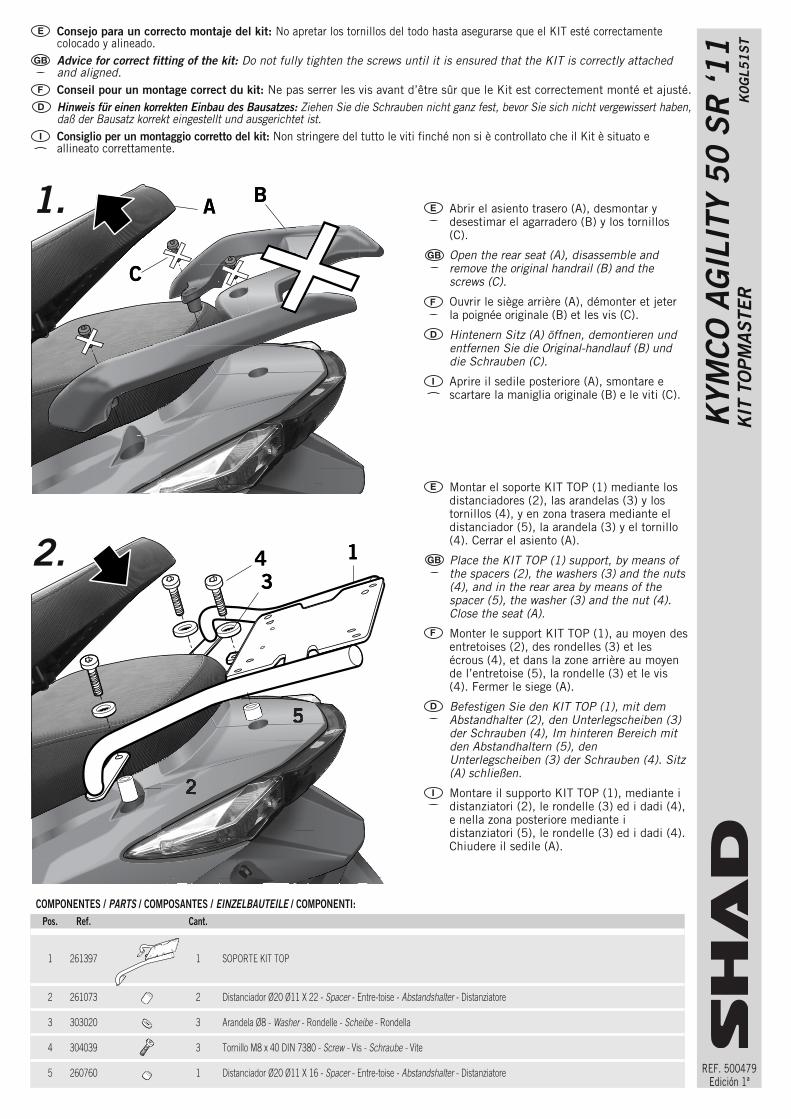
Abrir el asiento trasero (A), desmontar ydesestimar el agarradero (B) y los tornillos(C).
Open the rear seat (A), disassemble andremove the original handrail (B) and thescrews (C).
Ouvrir le siège arrière (A), démonter et jeterla poignée originale (B) et les vis (C).
Hintenern Sitz (A) öffnen, demontieren undentfernen Sie die Original-handlauf (B) unddie Schrauben (C).
Aprire il sedile posteriore (A), smontare escartare la maniglia originale (B) e le viti (C).
Pos. Ref. Cant.
1 261397 1 SOPORTE KIT TOP
2 261073 2 Distanciador Ø20 Ø11 X 22 - Spacer - Entre-toise - Abstandshalter - Distanziatore
3 303020 3 Arandela Ø8 - Washer - Rondelle - Scheibe - Rondella
4 304039 3 Tornillo M8 x 40 DIN 7380 - Screw - Vis - Schraube - Vite
5 260760 1 Distanciador Ø20 Ø11 X 16 - Spacer - Entre-toise - Abstandshalter - Distanziatore
COMPONENTES / PARTS / COMPOSANTES / EINZELBAUTEILE / COMPONENTI:
1.
2.
Montar el soporte KIT TOP (1) mediante losdistanciadores (2), las arandelas (3) y lostornillos (4), y en zona trasera mediante eldistanciador (5), la arandela (3) y el tornillo(4). Cerrar el asiento (A).
Place the KIT TOP (1) support, by means ofthe spacers (2), the washers (3) and the nuts(4), and in the rear area by means of thespacer (5), the washer (3) and the nut (4).Close the seat (A).
Monter le support KIT TOP (1), au moyen desentretoises (2), des rondelles (3) et lesécrous (4), et dans la zone arrière au moyende l’entretoise (5), la rondelle (3) et le vis(4). Fermer le siege (A).
Befestigen Sie den KIT TOP (1), mit demAbstandhalter (2), den Unterlegscheiben (3)der Schrauben (4), Im hinteren Bereich mitden Abstandhaltern (5), denUnterlegscheiben (3) der Schrauben (4). Sitz(A) schließen.
Montare il supporto KIT TOP (1), mediante idistanziatori (2), le rondelle (3) ed i dadi (4),e nella zona posteriore mediante idistanziatori (5), le rondelle (3) ed i dadi (4).Chiudere il sedile (A).