kgp-920_ome_0904.pdf
TRANSCRIPT


Amendment History
KGP-920 Operation Manual
Doc No: 0093121662
No. Document No & Rev No.
Date
Y/M/D
Amendments
0 93121662-00 2005/05/31 First issue
1 93121662-01 2005/08/10 Chapter 2:Add optional item
2 93121662-02 2005/10/17 2005/10/18
Chapter 2:Correct standard equipment and optional items Chapter 4:Correct cable connections
3 0093121662-03 2006/06/16 Chapter 4;Cover
4 0093121662-04 2007/01/25 Cover Certificate
5 0093121662-05 2007/10/19 DECLARATION
6 0093121662-06 2008/04/15 Add Chapter 12
7 0093121662-07 2008/08/06 Cover
8 0093121662-08 2009/03/25 Chapter 2,Chapter 4,Chapter 10,Inserted DECLARATION
9
10
11
12
13
14
15
16
17
18
19
20
Amendment policy
When any change is applied in the document, only the document number of the relevant sheet(s) and cover sheet are modified and the rest of the sheets are not changed. The document number is shown in the footer area, right or left bottom of each sheet.
○c 2005,2006,2007,2008,2009 Koden Electronics Co.,Ltd. All rights reserved.
No part of this publication may be reproduced, transmitted, translated in any form by any means without the written permission of Koden Electronics Co., Ltd. The technical descriptions contained in this publication are subject to change without notice. Koden assumes no responsibility for any errors, incidentals or consequential damages caused by misinterpretation of the descriptions contained in this publication.

KGP-920 Preface
0093121662-06 (1)
Safety Precautions
Disconnect Main Power It is still possible to receive an electric shock caused by unintentionally switching on the power during repair work. To prevent this from happening, make sure to completely disconnect the unit from the ship’s main supply before attempting any inspection and repair.
Dust Dust can accumulate inside the unit after long periods of use. Allergies can result from the inhalation of this dust, therefore during inspection and cleaning it is advisable to use a mask.
Static Electricity Static sensitive semiconductor devices are used in this unit. Before changing the printed boards be careful not to damage any of these devices due to electrostatic build up from carpet, clothes, seats, etc
Liquid Crystal Display A Liquid Crystal Display contains mercury, which is harmful to the human body when touched. When you attempt to discard this device, follow the proper disposal procedures.
Preface KGP-920
(2) 0093121662-06
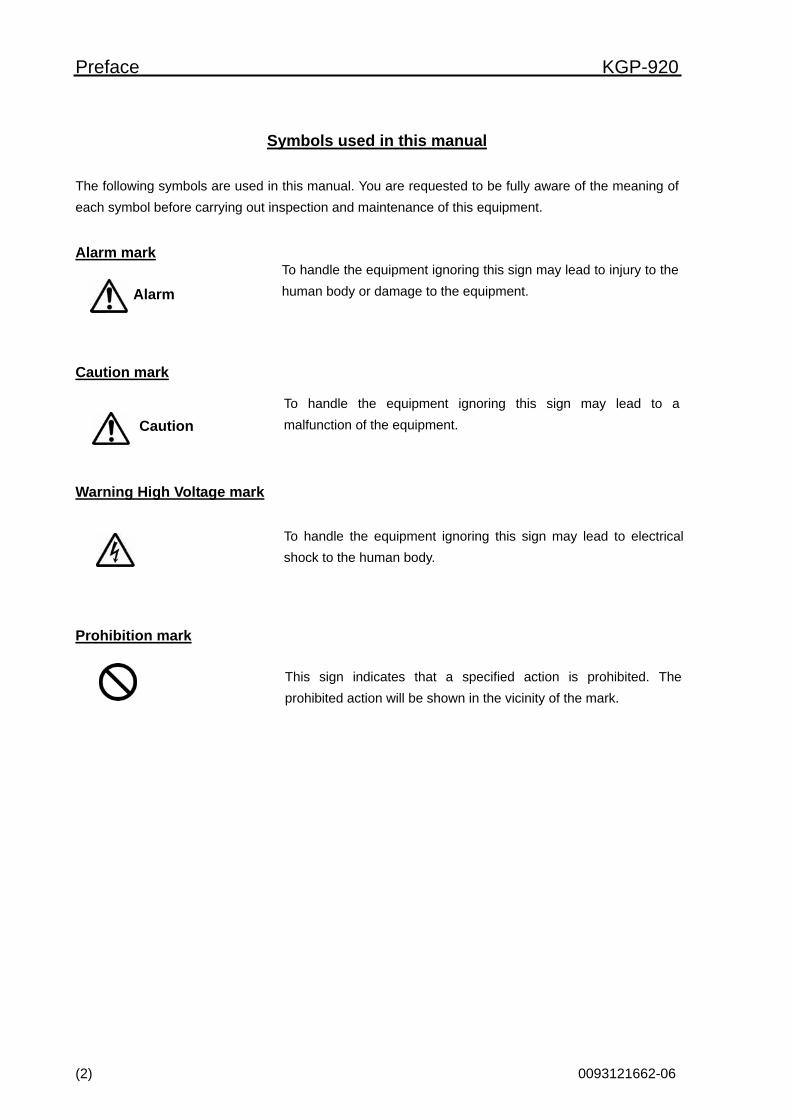
Symbols used in this manual
The following symbols are used in this manual. You are requested to be fully aware of the meaning of each symbol before carrying out inspection and maintenance of this equipment.
Alarm mark
Caution mark
Warning High Voltage mark
Prohibition mark
To handle the equipment ignoring this sign may lead to injury to the human body or damage to the equipment. Alarm
To handle the equipment ignoring this sign may lead to electrical shock to the human body.
This sign indicates that a specified action is prohibited. The prohibited action will be shown in the vicinity of the mark.
To handle the equipment ignoring this sign may lead to a malfunction of the equipment. Caution

KGP-920 Preface
0093121662-06 (3)
How to use this manual Scope of this manual This manual contains information about installation, operation and maintenance of the KGP-920 GPS navigator. Structure of this manual This manual is divided into sections according to the contents as described below. This arrangement will help you overview the whole contents as well as refer to detailed information for your specific requirement.
Chapter 1: General Information - About GPS - Outline of the equipment - Equipment composition - Software type name
Chapter 2: Equipment Composition - Standard equipment list - Optional items list
Chapter 3: Specification - GPS receiver - Display section - Data Input/Output - Power requirements - Compass safe distance - Environmental conditions - External dimensions and weight Chapter 4: Installation - Installation consideration - Unpacking of the goods - Inspection of the goods - Siting the units - Display unit installation - Antenna unit installation - Cable connections to the KGP-920 - Connector pin outs - Inspection after installation

Preface KGP-920
(4) 0093121662-06
Chapter 5 : Basic Operations - The name and function of each part - Power On/Off - Adjusting display contrast and brightness - Selecting the screen - String present position (EVENT) - Using MOB (Man over-board) - Recalling event or MOB position - Displaying average speed, average bearing and elapsed time Chapter 6: Various Navigation - Storing waypoint (LAT/LONG) data - Setup of waypoint navigation - Cross track error and course deviation angle - Storing and erasing route - Route setup - Setting an anchor position - Track display Chapter 7: Alarms - Kinds of alarms - Alarm explanation - Setting and canceling
Chapter 8: Setup Procedure - Menu options - Menu 3: GPS - Menu 4: Differential GPS (DGPS) - Menu 5: Compensation - Menu 8: Initial setting - Menu 9: Interface - Initialization
Chapter 9: How to use LOPs - Initial setup for LOPs display - Storing waypoints (LOPs data) - Correcting your position (LOPs) - Calculating LOPs based on LAT/LONG data
Chapter 10: Maintenance and Trouble shooting - Periodic inspection and cleaning

KGP-920 Preface
0093121662-06 (5)
- Trouble shooting Chapter 11: Technical Reference - Digital interface (IEC 61162-1 second edition) Chapter 12: Communication with external navigation system - Changing to the EXTERNAL mode - Route data transfer
Annex - Local Geodetic Systems - Decca zone

KGP-920 Chapter 1 General information
93121662-00 Contents
Chapter 1 General Information
Page No.
1.1 About GPS................................................................................................1-1 1.1.1 General .............................................................................................................1-1 1.1.2 Positioning by GPS .........................................................................................1-1
1.1.3 Time required for position fix.........................................................................1-1 1.2 Outline of the equipment.........................................................................1-2 1.3 Equipment composition ..........................................................................1-2 1.4 Software type name .................................................................................1-2
KGP-920 Chapter 1 General Information
93121662-02 1-1
Chapter 1 General Information
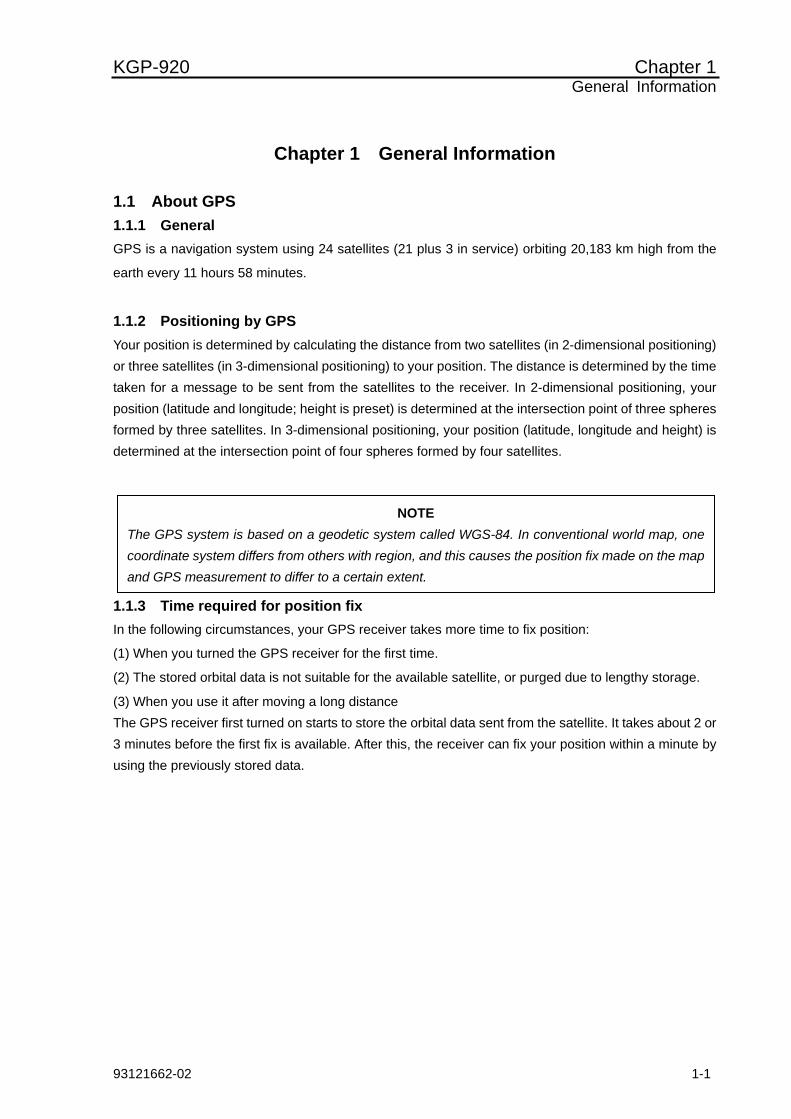
1.1 About GPS 1.1.1 General GPS is a navigation system using 24 satellites (21 plus 3 in service) orbiting 20,183 km high from the
earth every 11 hours 58 minutes.
1.1.2 Positioning by GPS Your position is determined by calculating the distance from two satellites (in 2-dimensional positioning) or three satellites (in 3-dimensional positioning) to your position. The distance is determined by the time taken for a message to be sent from the satellites to the receiver. In 2-dimensional positioning, your position (latitude and longitude; height is preset) is determined at the intersection point of three spheres formed by three satellites. In 3-dimensional positioning, your position (latitude, longitude and height) is determined at the intersection point of four spheres formed by four satellites.
1.1.3 Time required for position fix In the following circumstances, your GPS receiver takes more time to fix position:
(1) When you turned the GPS receiver for the first time.
(2) The stored orbital data is not suitable for the available satellite, or purged due to lengthy storage.
(3) When you use it after moving a long distance The GPS receiver first turned on starts to store the orbital data sent from the satellite. It takes about 2 or 3 minutes before the first fix is available. After this, the receiver can fix your position within a minute by using the previously stored data.
NOTE The GPS system is based on a geodetic system called WGS-84. In conventional world map, one coordinate system differs from others with region, and this causes the position fix made on the map and GPS measurement to differ to a certain extent.

Chapter 1 KGP-920 General Information
1-2 93121662-02
1.2 Outline of the equipment The KGP-920 of GPS navigator is designed and manufactured to meet the carriage requirement of the latest IMO/SOLAS regulation and its harmonized IMO resolution MSC.112(73) and IEC technical standards, shown below.
IEC 60945 4th Edition 2002-08, General
IEC 61108-1 Ed.2.0 2003-07: Ship borne GPS-Receiver
IEC 61162-1 2nd Edition: Digital Interface
1.3 Equipment composition The equipment composition of KGP-920 is shown in Figure 1.1.
1.4 Software type name The following software type is used in KGP-920 GPS navigator.
Software type Application
KM-D94 Main logic board
KM-D89 GPS receiver module

KGP-920 Chapter 1 General Information
93121662-02 1-3
Figure 1.1 equipment composition of KGP-920
NOTE: Connecting cable is option
Antenna extension cable
30m/60m (Option)
10.8 - 31.2VDC
100/115VAC 200/230VAC
DC Power cable
(Option)
Power rectifier
PS-003A
AC Power cable VV-2D8-3M
(Option)
Junction BoxJB-10 or 12
(Option)
DGPS beacon receiver
Chart plotter Marine radar Echo sounder Auto pilot AIS (Other brand)
Chart plotter GTD-110/150
Radar Plotter MDP-600series MDP-1200series
Echo sounder CVS-841series CVS-842/852series
Plotter sounder CVG-80/200
Marine radar MD-3420/3441series MD-3641/3642series MD-3840series MDC-3560/3510series
Marine radar MDC-1800series
Marine radar MDC-700series MDC-1000series MDC-1500series MDL-1100series
Chart plotter Marine radar Echo sounder Auto pilot AIS (Other brand)
Echo sounder CVS-833series
Antenna unit GA-08-KODEN(10m)
GA-08L-KODEN(15m)
Antenna unit GA-08S-KODEN
(0.5m)
Beacon antenna coupler / unit
(Option)
Whip antenna RA-14
(Option)
*If connected more than two units, JB-10 or 12 is required

KGP-920 Chapter 2 Equipment Composition
93121662-00 Contents
Chapter 2 Equipment Composition
Page No.
2.1 Standard equipment list ..........................................................................2-1 2.2 Option items list.......................................................................................2-1

KGP-920 Chapter 2 Equipment composition
0093121662-08 2-1
Chapter 2 Equipment composition
2.1 Standard equipment list No Item Type name Remarks Weight/Length Q’ty
01 Display unit KGP-920.MU With vinyl cover 0.86 kg 1
02 GA-08-KODEN 0.62kg 10m
03 GA-08L-KODEN
Connected to GA-08, other end BNC connector 0.81kg
15m
04
Antenna unit
GA-08S-KODEN Connected to GA-08, other end N-P connector
0.26kg 0.5m
1
05 DC power cable CW-267-1.8M With 3-pin connector, other end plain 1.8m 1
06 Fuse F-7161,2A For spare 1
07 Truss tapping screw TPT5X20U For mounting bracket 2
08 Operation manual KGP-920.OM.E English 1
2.2 Optional items list No Item Type name Remarks Weight/
Length
01 CW-373-1-5M 5m
02 CW-373-1-10M 6 pin water resistant connectors both ends w / EMI core 10m
03 CW-374-1-5M 5m
04 CW-374-1-10M A 6 pin water resistant connector and a 6 pin connector w / EMI core 10m
05 CW-376-1-5M 5m
06 CW-376-1-10M A 6 pin water resistant connector and other end plain w / EMI core 10m
07 CW-391-1-5M 5 m
08 CW-391-1-10M A 8 pin water resistant connector and other end plain w / EMI core 10 m
09
Connecting cable
CW-154A-5M A 6 pin connector and other end plain 5 m
10 Junction box JB-10 1 input,3 outputs X 2 circuits 0.4kg
11 Junction box JB-12 3 inputs1 output, 1 input 3 outputs 0.42kg
12 Hose band 738-1015 2pcs for antenna fixture --
13 Power rectifier PS-003A With 5A fuses 2pcs 2.8kg
14 AC power cable VV-2D8-3M For PS-003A, both ends plain 3 m
15 Flush mount kit FMK-1 Flush mount frame with bolts, washers and screws --
16 Connector FM14-6P 6 pin for TD, CVS, MD --
17 Connector LTWBD-06BFFA-L180 6 pin water resistant connector for TD, CVS --
18 Antenna cable extension kit CW-839-30M KIT 5DFB cable with N-J connector and other end plain, N-J connector, and CW-826-0.5M
30m

Chapter 2 KGP-920 Equipment composition
2-2 0093121662-08
19 Antenna cable extension kit CW-394-60M KIT 8DSFA cable with N-J connector and other end plain, N-J connector, N-BNC connector* and CW-826-0.5M
60m
20 Conversion cable CW-826-0.5M A BNC connector / N-P connector 0.5m
21 Internal beacon receiver kit INT-DGPS KIT Receiver PCB, connector, harness (install at the factory) --
22 BA-02-K 0.85kg 10m
23 BA-02L-K 0.81kg 15m
24
Beacon antenna coupler (Electric field type)
BA-02S-K
With antenna cable with a connector
0.47kg 0.5m
25 Whip antenna RA-14 2.45m, for BA-02 0.3kg
26 BA-03 1.4kg 10m
27 BA-03L 1.6kg 15m
28
Beacon antenna unit (Magnetic field type)
BA-03S
With antenna cable with a connector
0.99kg 0.5m
29 Operation manual KGP-920.OM.E English
30 Service manual KGP-920.SM.E English
*19. N-BNC connector in the kit will not be used.

KGP-920 Chapter 3 Specifications
93121662-00 Contents
Chapter 3 Specifications
Page No.
3.1 GPS receiver ............................................................................................3-1 3.2 Display section ........................................................................................3-1 3.3 Data Input/Output.....................................................................................3-1 3.4 Power requirements ................................................................................3-2 3.5 Compass safe distance ...........................................................................3-2 3.6 Environmental conditions.......................................................................3-2 3.7 External dimensions and weight ............................................................3-2

KGP-920 Chapter 3 Specifications
93121662-02 3-1
Chapter 3 Specifications 3.1 GPS receiver Receiving frequency 1575.42 MHz
Receiving channel 18 channel parallel
Receiving code C/A code
Sensitivity Better than –130 dBm (elevation angle: 5o or over)
Position 10 m 2drms(GPS), 5 m 2drms(DGPS), 8 m 2drms(SBAS)
SOG 0.1 kt rms
Accuracy
HDOP≦4 COG ± 3 o (SOG 1-17 kt), ±1 o (SOG >17 kt)
Note: Accuracy is subject to change in accordance with DoD civil GPS user policy.
3.2 Display section Display LCD with backlight (128 x 64 dot’s, effective picture area: 85.71 x 54.35 mm)
Display mode NAV1, NAV2, NAV3, PLOT, MOB (Man Over Board)
Display range 0.025, 0.05, 0.1, 0.2, 0.5, 1, 2, 5, 10, 20 nm (sm, km)
Usable ground Within 80° in latitude
Plotting interval 10, 20, 30 seconds, 1, 3, 5 minutes, 0.1, 0.5, 1 nm (sm, km)
Track display
Plotting capacity 2,000 points
Position data display Latitude/longitude in increments of 0.0001 minute, converted Loran C LOPs, converted Loran A LOPs, converted Decca LOPs,
Navigational display Speed, course, velocity made good/course made good/elapsed time, altitude, distance/bearing/cross track error/course deviation/time to go to waypoint, total time to go and distance on route, DOP value, present time(UTC or LTC), satellite status, beacon receiving status, distance/bearing between two points, MOB display
Instant (event) memory 200 points
Waypoint memory 200 points
Route memory 20 routes (Max. 400 waypoints) reverse trail possible
Alarm Proximity, cross track error, CDI, anchor watch
Position compensation Latitude/longitude, LOPs, Datum
Magnetic compensation Auto or manual
Parameters
Loran C LOPs conversion, Loran A LOPs conversion, Decca LOPs conversion, memory of waypoints and name (up to 10 letters), selection of measuring unit (nm, sm, km), antenna height unit (ft, m), antenna height, averaging (smooth) factor, position mode (2D or 3D automatic selection), beacon stations selection
3.3 Data Input/Output Output data format (DATA connector)
IEC 61162-1/ NMEA 0183 Ver.1.5 (NMEA1, 2)/ CIF/ SHIPMATE (AAM, APB, BOD, BWC, DCN, DTM, GBS, GGA, GLC, GLL, GNS, GSA, GSV, MSS, RMB, RMC, Rnn, RTE, SGR, VTG, WDC, WPL, XTE, ZDA)
Output data format (DATA2 connector)
IEC 61162-1 (AAM, APB, BOD, BWC, DCN, DTM, GBS, GGA, GLC, GLL, GNS, GSA, GSV, MSS, RMB, RMC, Rnn, RTE, SGR, VTG, WDC, WPL, XTE, ZDA)
Input data format RTCM SC104 Ver.2.0 (DGPS)

Chapter 3 KGP-920 Specifications
3-2 93121662-02
3.4 Power requirements Input voltage: 10.8 - 31.2 VDC
Power consumption: Less than 4.5 W (at 24VDC)
AC Operation: AC/DC rectifier PS-003A is required.
Input voltage range: 115 VAC or 230 VAC
3.5 Compass safe distance Standard: 0.8m
Steering: 0.4m
3.6 Environmental conditions (1) Temperature and humidity
Display unit: - 15° to + 55°C Operating temperature
Antenna unit: - 25° to + 70°C
Humidity 93% (+40°C)
(2) Vibration
The equipment operates normally under the following vibrating conditions. 2 - 5 Hz - 13.2 Hz: Amplitude ±1mm ±10 % (Maximum acceleration of 7 m/s2 at 13.2 Hz) 13.2 Hz - 100 Hz: Maximum acceleration of 7 m/s2 being applied
(3) Water proof
Display unit: IPX4
Antenna unit: IPX6
3.7 External dimensions and weight External dimensions: Width x Height x Depth
Dimensions (WxHxD): 220 x 131 x 90 (mm)
Weight: 0.86 kg
Refer to Figure 3.1 for the exterior with dimensions.
Refer to Figure 3.2 for service space required.
Refer to Figure 3.3 for exterior of antenna unit with dimensions.
Refer to Figure 3.4 for exterior of DGPS antenna unit(option) with dimensions.

KGP-920 Chapter 3 Specifications
93121662-02 3-3
Figure 3.1 The Exterior of KGP-920 with dimensions
Figure 3.2 Service space required for KGP-920
Unit: mm (inch)
Unit: mm (inch)

Chapter 3 KGP-920 Specifications
3-4 93121662-02
Unit: mm
Figure 3.3 The Exterior of antenna unit with dimensions
Weight Without cable : 0.19kg
GA-08: 0.62kg GA-08L: 0.81kg GA-08S: 0.26kg
GA-08: with cable (10m) GA-08L: with cable (15m) GA-08S: with cable (0.5m, for extension )
Figure 3.4 The Exterior of DGPS antenna unit (option) with dimensions
Weight Without cable : 0.92kg
BA-03: 1.4kg BA-03L: 1.6kg BA-03S: 0.99kg
Weight Without cable : 0.4kg
BA-02-K: 0.85kg BA-02L-K: 1.2kg BA-02S-K: 0.33kg
BA-02-K / -03: with cable (10m) BA-02L-K / -03L: with cable (15m) BA-02S-K / 03S: with cable (0.5m, for extension )
Unit: mm

KGP-920 Chapter 4 Installation
93121662-00 Contents
Chapter 4 Installation
Page No.
4.1 Installation consideration .......................................................................4-1 4.2 Unpacking of the goods ..........................................................................4-1 4.3 Inspection of the goods ..........................................................................4-1 4.4 Siting the units .........................................................................................4-1 4.5 Display unit installation...........................................................................4-1
4.5.1 Table mounting ................................................................................................4-1 4.5.2 Flush mounting................................................................................................4-3
4.6 Antenna unit installation .........................................................................4-4
4.6.1 Selecting the best site of GPS / Beacon antenna.........................................4-4 4.6.2 Fixing the antenna unit ...................................................................................4-5 4.6.3 Extension of an antenna cable.......................................................................4-5 4.6.4 Waterproofing on the connector jointing section ........................................4-6
4.7 Cable connections to the KGP-920 ........................................................4-7 4.8 Connector pin outs ..................................................................................4-9 4.9 Inspection after installation ..................................................................4-10

KGP-920 Chapter 4 Installation
0093121662-08 4-1
Chapter 4 Installation
4.1 Installation consideration General Qualified service technicians should perform the installation of the KGP-920 series that comprises the following operations. (1) Unpacking each component of the system. (2) Inspection of the exterior of each component unit and accessory. (3) Checking the ship’s mains voltage and current capacity. (4) Determining the installation site (5) Installing the Display unit (6) Planning the cable routing and connections (7) Adjustment and setups
4.2 Unpacking of the goods Unpack your package and check if all of the items stated in the packing list are contained in the package. If not, report this to an insurance agent for tracing missing goods or refund.
4.3 Inspection of the goods Carefully check the exterior of each component unit for dents, damage, etc. Also check the inside of component units for electrical and mechanical damages.
4.4 Siting the units To achieve best operational performance, the following factors must be considered. (1) The display unit should be positioned in the location where the external situation can be viewed.
(2) Locate the display so that it provides easy viewing from all likely operator’s positions.
(3) Select a position safe and free from dampness, water spray, rain and direct sunlight.
(4) Provide enough space for servicing. Consider access to the rear panel for connecting cables.
(5) Position the display unit as possible away from other radio equipment.
4.5 Display unit installation The display unit is designed for table mount and flush mount. Refer to Figure 4.1or 4.3 for installation.
4.5.1 Table mounting (1) Remove the two knurled fixing knobs that fix the display unit to the mounting bracket. (2) Remove the display unit from the bracket and place it on a flat and safe area. (3) Place the mounting bracket to the place where the display unit is to be installed, and fix the bracket
with two (2) tapping screws. (4) Reset the display unit on to the bracket and fix it using the two knurled fixing knobs that were
removed in step (1). Refer to Figure 4.2 for detail.

Chapter 4 KGP-920 Installation
4-2 0093121662-08
Figure 4.1 Fitting detail of KGP-920 in table mounting mode
Figure 4.2 Service space required for KGP-920
KGP-920 Chapter 4 Installation
0093121662-08 4-3
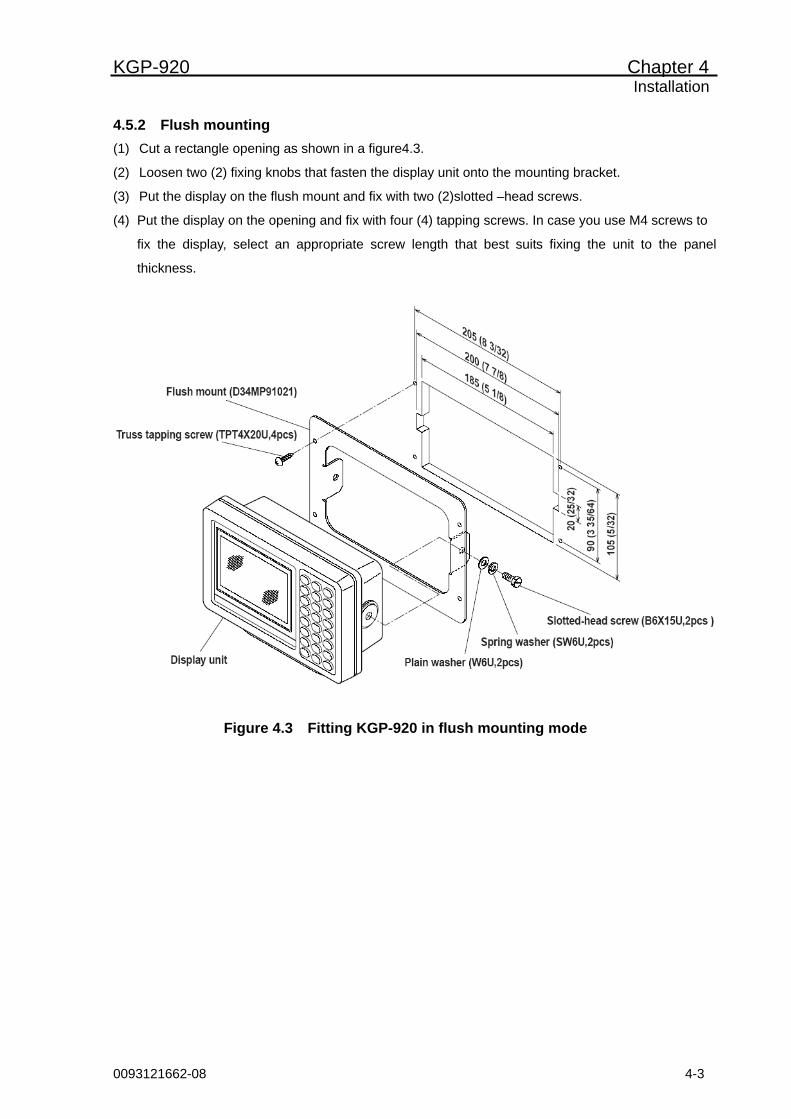
4.5.2 Flush mounting (1) Cut a rectangle opening as shown in a figure4.3.
(2) Loosen two (2) fixing knobs that fasten the display unit onto the mounting bracket.
(3) Put the display on the flush mount and fix with two (2)slotted –head screws.
(4) Put the display on the opening and fix with four (4) tapping screws. In case you use M4 screws to
fix the display, select an appropriate screw length that best suits fixing the unit to the panel
thickness.
Figure 4.3 Fitting KGP-920 in flush mounting mode

Chapter 4 KGP-920 Installation
4-4 0093121662-08
4.6 Antenna unit installation 4.6.1 Selecting the best site of GPS / Beacon antenna Make sure to install the antenna unit at a location where nothing shades the antenna of a view above the horizon. Objects placed above the antenna unit or too close to the antenna unit may cause signal to noise ratio to degrade and shorten measuring time.
(1) As far away from any metallic objects as possible.
(2) At least 4 meters (13.2 feet) away from the MF/HF reversed L-type TX antenna, VHF or HF whip antenna.
(3) At least 1.5 meter (4.9 feet) above the MF/HF reversed L-type TX antenna.
(4) At least 1 meter (3.3 feet) away from the receiving antenna.
(5) Outside radar transmitting beam (30° to 40°).
(6) At least 1 meter (3.3 feet) away from the radar antenna.
(7) At least 5 meters (16.5 feet) away from the Inmarsat antenna.
(8) At least 3 meters (9.8 feet) away from the loop antenna.
(9) At least 0.5 meters (1.6 feet) above the large metal surface.
4 m (13.2 ft) or more 4 m (13.2 ft) or more
VHF whip antenna
LOOP antenna
1 m (3.3 ft)
3 m (9.8 ft) or more Or more Inmarsat antenna
Receiving antenna
HF whip antenna
4 m (13.2 ft) or
more MF/HF reversed L-type TX antenna
Main beam
Outside the radar beam30o to 40o 1.5 m (4.9 ft) or more
GPS / Beacon antenna5 m (16.5 ft) or more
* AT least 0.5 m (1.6 ft) above the large metal surface
Figure. 4.4 Recommended GPS / Beacon Antenna installation

KGP-920 Chapter 4 Installation
0093121662-08 4-5
4.6.2 Fixing the GPS antenna unit 4.6.3 Extension of an antenna cable Although the standard length of an antenna cable is 10m or 15m, extension of 30m or 60m is possible by the antenna and extension cable of an option.
(Case1) (Case2)
Antenna unitGA-08 GA-08L GA-08S
Antenna unitGA-08 GA-08L GA-08S
Hose clamp (Option)
Screw (1”-14UNS-2B)
Mast (pole) (not supplied)
Antenna extension pole (not supplied)
GA-08S
0.5m Antenna cable
30m: CW-839-30M 60m: CW-394-60M
Conversion Cable Assy
To display unit
CW-826-0.5M
Waterproofing required See next page

Chapter 4 KGP-920 Installation
4-6 0093121662-08
4.6.4 Waterproofing on the connector jointing section (1) Wind the self-fusible tape around the jointing section. Pull the tape end to stretch its length to be doubled and wind it overlaid by half to 3 plies. When winding is completed, apply gentle pressure over the surface with fingers to expedite the fusion. (2) Apply windings of PVC tape to reinforce the protection. PVC tape should not be strained. Wind it overlaid by half to 3 plies. When finished, press the surface
evenly without strain for complete adhesion of the tape.
Figure. 4.5 Processing on the coax cable jointing section
Self-fusible tape PVC tape for protection
Connectors

KGP-920 Chapter 4 Installation
0093121662-08 4-7
4.7 Cable connections to KGP-920 4.7.1 Single connection
DGPS beacon receiver
Chart plotter Marine radar Echo sounder Auto pilot AIS (Other brand)
Chart plotter GTD-110/150
Radar Plotter MDP-600series MDP-1200series
Echo sounder CVS-841series CVS-842/852series
Plotter sounder CVG-80/200
Marine radar MD-3420/3441series MD-3641/3642series MD-3840series MDC-3560/3510series
Marine radar MDC-1800series
Marine radar MDC-700series MDC-1000series MDC-1500series MDL-1100series
Chart plotter Marine radar Echo sounder Auto pilot AIS (Other brand)
Echo sounder CVS-833series
100/115VAC 200/230VAC
Grounding Wire (not supplied)
10.8 - 31.2VDC
DC Power cable CW-267-1.8M
(Option)
Power rectifier
PS-003A
AC Power cable VV-2D8-3M
(Option)
+ (Red)
- (Black)
Conversion cablefor extension CW-826-0.5M
(Option)
Antenna extension cable
CW-839-30M CW-394-60M
(Option)
CW-391-1-5M/10M
(Option)
(Option) CW-391-1-5M/10M
(Option) CW-373-1-5M/10M
(Option) CW-373-1-5M/10M
(Option) CW-373-1-5M/10M
(Option) CW-373-1-5M/10M
(Option) CW-374-1-5M/10M
(Option)
CW-373-1-5M/10M
CW-376-1-5M/10M
(Option)
(Option) CW-376-1-5M/10M
(Option) CW-374-1-5M/10M
Antenna unit GA-08-KODEN(10m)
GA-08L-KODEN(15m)
Antenna unit GA-08S-KODEN
(0.5m)
Beacon antenna coupler / unit
(Option)
Whip antennaRA-14
(Option)

Chapter 4 KGP-920 Installation
4-8 0093121662-08
4.7.2 Multi connections
100/115VAC 200/230VAC
CW-376-1-5M/10M (Option)
Grounding Wire (not supplied)
10.8 - 31.2VDC
DC Power cable CW-267-1.8M
(Option)
Power rectifier
PS-003A
AC Power cable VV-2D8-3M
(Option)
+ (Red)
- (Black)
CW-391-1-5M/10M
(Option) DGPS beacon receiver
Chart plotter Marine radar Echo sounder Auto pilot AIS (Other brand)
Chart plotter GTD-110/150
Radar plotter MDP-600series MDP-1200series
Echo sounder CVS-841series CVS-842/852series
(Option) CW-391-1-5M/10M
(Option) CW-376-1-5M/10M
Plotter sounder CVG-80/200
(Option) CW-376-1-5M/10M
(Option) CW-376-1-5M/10M
(Option) CW-376-1-5M/10M
Marine radar MD-3420/3441series MD-3641/3642series MD-3840series MDC-3560/3510series
(Option) CW-154A-5M
Marine radar MDC-1800series (Option)
CW-376-1-5M/10M
Marine radar MDC-700series MDC-1000series MDC-1500series MDL-1100series
Customer’s supply
Chart plotter Marine radar Echo sounder Auto pilot AIS (Other brand)
Customer’s supply
Junction BoxJB-10 or 12
(Option)
*If connected more than two units, JB-10 or 12 is required
Antenna unit GA-08-KODEN(10m)
GA-08L-KODEN(15m)
Antenna unit GA-08S-KODEN
(0.5m)
Antenna extension cable
CW-839-30M CW-394-60M
(Option)
Conversion cable for extension CW-826-0.5M
(Option)
Beacon antenna coupler / unit
(Option)
Whip antenna RA-14
(Option)
Echo sounder CVS-833series
(Option) CW-154A-5M

KGP-920 Chapter 4 Installation
0093121662-08 4-9
4.8 Connector pin outs
(CW-376-1-5M/10M, CW-391-1-5M/10M Pin number form cable side )
These cables are used as a general/extension data port and external DGPS beacon receiver.
(External buzzer connection)
1: GND/SHILD 2: TXD (+) 3: TXD (-) 4: RXD (+) 5: RXD (-) 6: +15V
DATA
1 5
6 2
3 4
DATA 2 1: GND/SHILD 2: TXD (+) 3: TXD (-) 4: RXD (+) 5: RXD (-) 6: BUZZER STP(+) 7: BUZZER STP(-) 8: EXT BUZZER
1
5
6 2
3 4
7
8
POWER 1: DC + 2: F.GND 3: DC -
1 3
2
(General data output)
* RXD is used only maintenance
(DGPS beacon receiver) (Extension data output) (External buzzer) 2:ACK/ALR OUT(+) 3:ACK/ALR OUT(-) *When ACK/ALR Mode is ON See page 8-19
To display unit
Blue
White
Red
Orange
Black
Green
GND
TXD (+)
TXD (-)
RXD (+)
RXD (-)
+15V
Buzzer DATA No.6pin: +15V
DATA 2 No.8pin: EXT BUZZER
or Relay
Buzzer (+)
(-)

Chapter 4 KGP-920 Installation
4-10 0093121662-08
(DATA port)
This port is general data output port. Output data is selected by the menu among the output of IEC 61162-1,NMEA Ver.1.5, CIF, and SHIPMATE. Output signal level is RS-422.
(DATA 2 port)
When CW-376/391 are used.
This port is data input/output port for DGPS beacon receiver. If a DGPS receiver is not connected, it can be used as a data output port for extension, but unlike the DATA port, output is possible only for IEC 61162-1. Output signal level is RS-422.
When CW-398 are used. This port is an only for external alarm system. ACK/ALR output signal level is RS-422,and EXT
BUZZER out put can drive a relay(24V/10mA). BUZZER STP is an input port for stopping a buzzer, and impresses 24V.
4.9 Inspection after installation Before you turn the unit on, check the following points to make sure the system operates properly.
(1) Is the ship’s supply voltage and current within the rated range?
(2) Is the connection between the display and antenna unit correct?
(3) Are the cables routed and connected properly?
NOTE: ACK/ALR of menu 9-3 needs to be turned off. See chapter 8.6.5 (page 8-19)
NOTE: ACK/ALR of menu 9-3 needs to be turned on. See chapter 8.6.5 (page 8-19)

KGP-920 Chapter 5 Basic Operation
93121662-00 Contents
Chapter 5 Basic Operation
Page No.
5.1 The name and function of each part ......................................................5-1 5.1.1 Control panel ...................................................................................................5-1
5.2 Power On/Off............................................................................................5-2 5.3 Adjusting display contrast and brightness ...........................................5-2 5.4 Selecting the screen................................................................................5-3
5.4.1 A (NAV1) screen...............................................................................................5-3 5.4.2 B (NAV2) screen...............................................................................................5-4 5.4.3 C (NAV3) screen...............................................................................................5-5 5.4.4 D (PLOT) screen ..............................................................................................5-5
5.5 String present position (EVENT) ............................................................5-7
5.5.1 AUTO ................................................................................................................5-7 5.5.2 MANUAL...........................................................................................................5-7 5.5.3 Changing the event symbols..........................................................................5-7
5.6 Using MOB (Man over-board) key ..........................................................5-8 5.7 Recalling event or MOB position............................................................5-9 5.8 Displaying average speed, average bearing and elapsed time..........5-10

KGP-920 Chapter 5 Basic Operation
93121662-00 5-1
Chapter 5 Basic Operation
5.1 The name and function of each part
5.1.1 Control panel
Selects NAV1 , NAV2, NAV3 or PLOT screen.
Cursor shift (Right)
Cursor shift (Up)
Selects parameters
Cursor shift (Down)
Stores event positions
Recalls memory position, entry of numerical values, and selection North or South latitude or East or West longitude.
Turns the power on and changes the brightness of control panel (5 levels).
Enters a numeric/optional parameter.
Turns the power off
Recalls the menu
Cursor shift (Left)
Changes display contrast in 8 levels.
Clears numeric/optional parameter or stops alarm sound temporarily.
Activates MOB (Man Over Board) function.

Chapter 5 KGP-920 Basic Operation
5-2 93121662-00
5.2 Power On/Off
5.3 Adjusting display contrast and brightness
PWR DIM
Press to power on.
Initial message during power-on. The receiver is performing the self-check.
Message to indicate checking of GPS receiver and display has been completed.
OFF Press for 2 seconds to turn NAVIGATOR off. All data before power-off is kept in memory for later use.
PWR DIM Press to change the LCD brightness in 5 levels.
CTRS Press to change the LCD contrast in 8 levels.
Blinks when NAVIGATOR is searching GPS satellites.
Blinking
When NAVIGATOR receives signals from 3 or more satellites, it displays present latitude and longitude position with solid N (or S) and W (or E).
No blinking
NOTE: These setup is memorized and turns into the same setup next time at the time of a power supply ON.
KGP-920 Chapter 5 Basic Operation
93121662-00 5-3
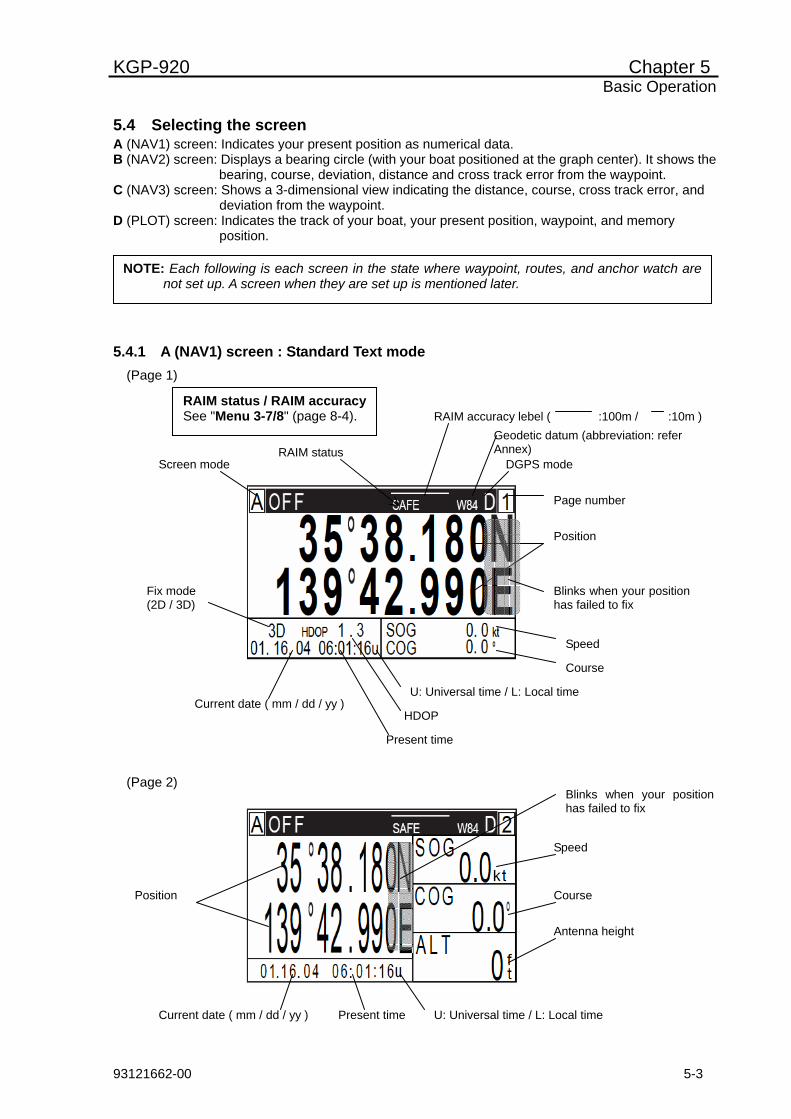
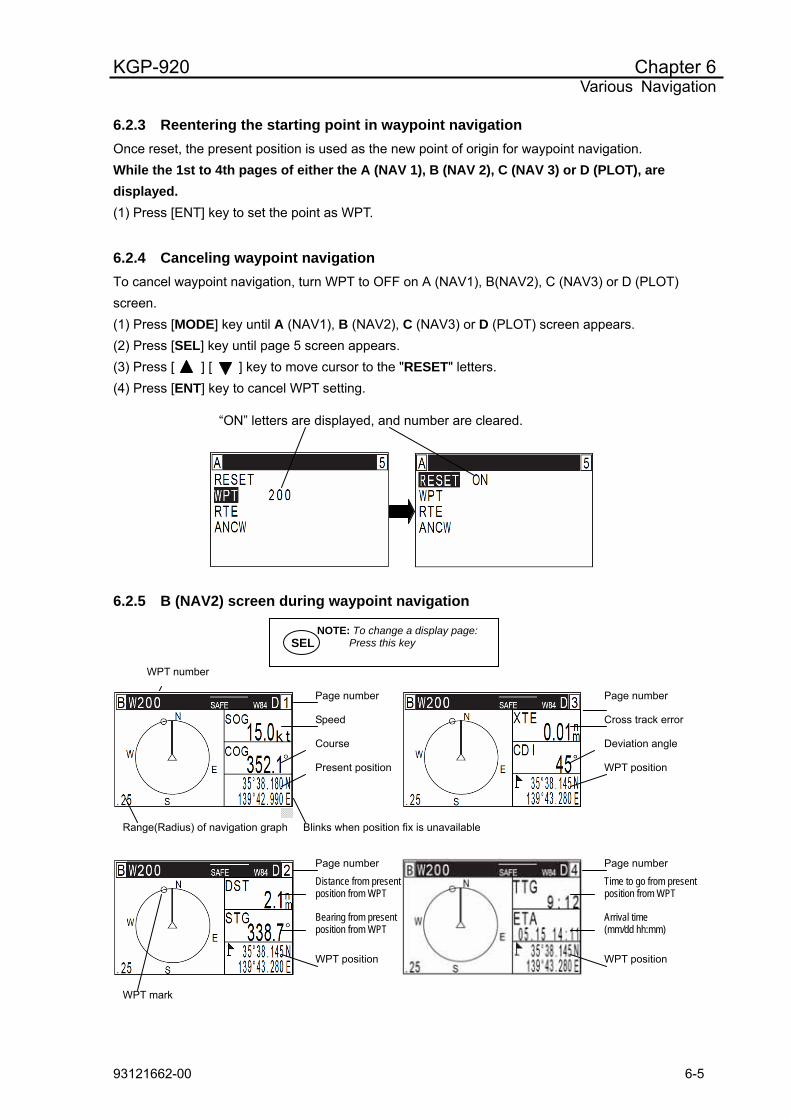
5.4 Selecting the screen A (NAV1) screen: Indicates your present position as numerical data. B (NAV2) screen: Displays a bearing circle (with your boat positioned at the graph center). It shows the
bearing, course, deviation, distance and cross track error from the waypoint. C (NAV3) screen: Shows a 3-dimensional view indicating the distance, course, cross track error, and
deviation from the waypoint. D (PLOT) screen: Indicates the track of your boat, your present position, waypoint, and memory
position.
5.4.1 A (NAV1) screen : Standard Text mode (Page 1)
(Page 2)
NOTE: Each following is each screen in the state where waypoint, routes, and anchor watch are not set up. A screen when they are set up is mentioned later.
Current date ( mm / dd / yy ) Present time U: Universal time / L: Local time
Position
Speed
Course
Antenna height
Blinks when your position has failed to fix
RAIM status Screen mode
Geodetic datum (abbreviation: refer Annex)
DGPS mode
RAIM accuracy lebel ( :100m / :10m )
Current date ( mm / dd / yy )
Blinks when your position has failed to fix
Position
Page number
Present time
U: Universal time / L: Local time
Course
Speed
HDOP
Fix mode (2D / 3D)
RAIM status / RAIM accuracySee "Menu 3-7/8" (page 8-4).
Chapter 5 KGP-920 Basic Operation
5-4 93121662-00
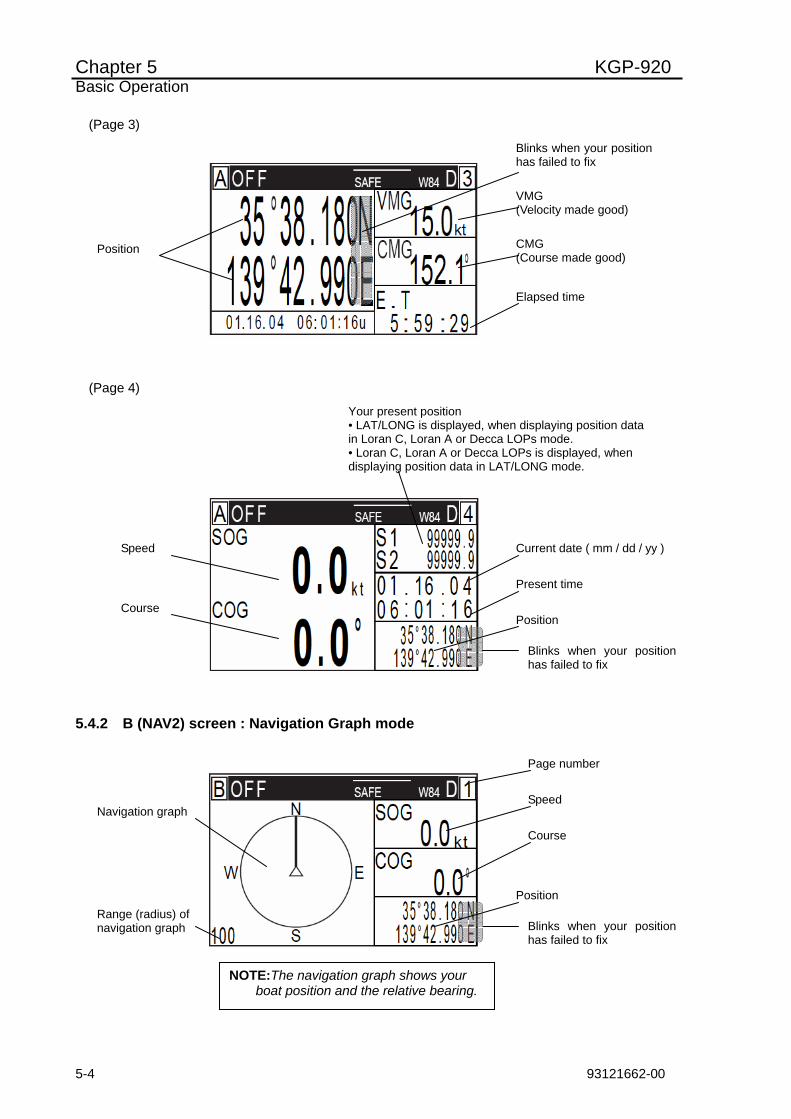
(Page 3)
(Page 4)
5.4.2 B (NAV2) screen : Navigation Graph mode
Position
Blinks when your position has failed to fix
VMG (Velocity made good)
CMG (Course made good)
Elapsed time
Position
Current date ( mm / dd / yy )
Your present position • LAT/LONG is displayed, when displaying position data in Loran C, Loran A or Decca LOPs mode. • Loran C, Loran A or Decca LOPs is displayed, when displaying position data in LAT/LONG mode.
Present time
Speed
Course
Blinks when your position has failed to fix
NOTE:The navigation graph shows your boat position and the relative bearing.
Page number
Course
Speed
Position
Blinks when your position has failed to fix
Range (radius) of navigation graph
Navigation graph

KGP-920 Chapter 5 Basic Operation
93121662-00 5-5
5.4.3 C (NAV3) screen : 3-D Highway mode 5.4.4 D (PLOT) screen : Simple Plotter mode
(Page 1)
(Page 3)
Page number
Course
Speed
Position
Blinks when your position has failed to fix
Your boat
NAV3 screen shows a 3-dimensional view indicating the distance, course, cross track error, and deviation from the waypoint. The boat icon does not move in OFF mode.
Distance and bearing from your present position to cross cursor position
Cross-cursor position
Cross-cursor
Page number
Course
Speed
Position
Blinks when your position has failed to fix
Scale
Your boat position
Track

Chapter 5 KGP-920 Basic Operation
5-6 93121662-00
(Page 4)
Close-up of PLOT screen

KGP-920 Chapter 5 Basic Operation
93121662-00 5-7
5.5 Storing present position (EVENT) You can store up to 199 present positions with numbers 001 to 199. When you store additional positions, the oldest position is deleted and the newest position is stored in its place. • The storage date, hours and minutes, position data, and symbols (selectable on the PLOT screen)
can be stored. • It is convenient to store the present position for use later in route navigation. • These positions can be used as targets or waypoints. • Event numbering is available both in the automatic or manual mode. Auto or Manual selection is made
at the "5. EVENT" in the INITIAL MENU.
5.5.1 AUTO
5.5.2 MANUAL
5.5.3 Changing the event symbols (1) Press [MODE] key until D(PLOT) screen appears. (2) Press [SEL] key until page 6 screen appears. (3) Press [ ] or [ ] key and move cursor onto the SYMBOL. (4) Press [ENT] key to display symbol list. (5) Press [ ] [ ] or [ ] [ ] key and move cursor onto the new symbol. (6) Press [ENT] key to select new symbol.
CAUTION EVT key does not function when positioning is invalid
EVT=001 + 15 04 : 59 35°38 . 180N
139°42 . 990E
The latest event number
Storage date (Day, Hour, Minute)
Blinks for 10 seconds
Storage position (Lat, Long)
EVT (1) Press [EVT] key to store your present position. (2) You can store up to 199 present positions by pressing this key. They have
storage numbers 001 to 199.
(1) Press [EVT] key to show the registration number display window. (2) Specify a desired registration number from the numerical keypad. (3) Press [ENT] key. The event will be registered to the number specified.
EVT
NOTE: Auto or Manual selection is made at the "5. EVENT" in the INITIAL MENU.

Chapter 5 KGP-920 Basic Operation
5-8 93121662-00
5.6 Using MOB (Man over-board) key MOB function is provided for an emergency situation (if a person falls into the water) to make it easier
to return to MOB point.
Symbol list New symbol
CAUTION MOB key does not function when positioning is invalid
MOB Press MOB key, and your position is stored immediately and MOB screen appears. You can see the distance and bearing from your present position to the point you pressed MOB key.
Proximity alarm (blinking) Alarm sounds when you approached 0.1 nm from the point you pressed MOB key.
Distance (in nm) from your present position to the point you pressed MOB key
Bearing to the point where you pressed MOB key
Point where you pressed MOB key
Point where you pressed MOB key
MOB appears
Range (radius) of navigation graph fixed to 0.25 nm Present position

KGP-920 Chapter 5 Basic Operation
93121662-00 5-9
(Page 2) Press [SEL] key when changing a page.
(Page 3)
5.7 Recalling event or MOB position (1) Press [MENU] key until menu options 1 to 9 appears. (2) Press [1] key to select “1:WAYPOINT”. (3) Enter a storage number (000 or 199) of position data you wish to check. (4) Press [ENT] key to recall data of the selected storage number.
Antenna height
Present Date (Month, Day, Year)
Present time (Greenwich or local time)
The elapsed time (mm:ss) after you pressed MOB key
NOTE: The time display that is shown when the elapsed time has exceeded 99 minutes 59 seconds after the MOB key was pressed.
Speed (in knots)
Course
Present position
NOTE: You can use only the following five keys in MOB mode: [EVT] [CLR] [CTRS] [PWR] [OFF]
CLR Clears the MOB mode, and returns to the previous screen when you pressed MOB key. When alarm is sounding, press CLR key to stop it. Press it again to return to the screen you were at before you pressed MOB key.
NOTE:000: Position data where you pressed MOB key 001 to 199: Position data that contains events
Use [CLR] key if you have entered an incorrect number. You can reenter an event number.

Chapter 5 KGP-920 Basic Operation
5-10 93121662-00
5.8 Displaying average speed, average bearing and elapsed time (1) Press [MODE] key until A (NAV1) screen appears. (2) Press [SEL] key until page 3 screen appears.
What are velocity made good, course made good,
and elapsed time? Velocity made good: Speed that is calculated by dividing the distance between the origin (the point
where you set the elapsed time) and the present position by the elapsed time. Course made good: A true bearing from origin to present position. Elapsed time: The time elapsed after your power-on or after you have pressed the CLR (Reset)
key.
LAT/LONG mode (Example)
Data displayed when you press MOB key
Symbol (O:Fixed), storage date, storage time Storage position
Storage number
Data displayed when you press EVT key
Symbol, storage date, storage time Storage position
NOTE: This function is also available even when the waypoint navigation, root navigation or anchor position is in operation.
Velocity made good (Example: 15.0 knots)
Course made good (Example: 125.1')
Elapsed time (Example: 05 hours 59 min 29 sec)

KGP-920 Chapter 6 Various Navigation
93121662-00 Contents
Chapter 6 Various Navigation
Page No.
6.1 Storing waypoint (LAT/LONG) data ........................................................6-1 6.1.1 Storing a new position or updating an existing one ....................................6-1 6.1.2 Writing comment .............................................................................................6-1 6.1.3 Copying a position ..........................................................................................6-2 6.1.4 Changing comment I.D. ..................................................................................6-3 6.1.5 Erasing a single waypoint ..............................................................................6-3
6.2 Setup of waypoint navigation .................................................................6-4
6.2.1 Setting waypoint navigation...........................................................................6-4 6.2.2 Quick waypoint setup .....................................................................................6-4 6.2.3 Reentering the starting point in waypoint navigation..................................6-5 6.2.4 Canceling waypoint navigation......................................................................6-5 6.2.5 B (NAV2) screen during waypoint navigation...............................................6-5 6.2.6 C (NAV3) screen during waypoint navigation...............................................6-6 6.2.7 D (PLOT) screen during waypoint navigation...............................................6-6
6.3 Cross track error and course deviation angle.......................................6-7
6.3.1 Navigation graph of (NAV2) screen ...............................................................6-7 6.3.2 Electronic fairway (NAV3) screen ..................................................................6-8
6.4 Storing and erasing routes ...................................................................6-10
6.4.1 Storing your route .........................................................................................6-10 6.4.2 Automatic switching of waypoints .............................................................. 6-11 6.4.3 Erasing point data ......................................................................................... 6-11 6.4.4 Erasing a single route ...................................................................................6-12
6.5 Route setup ............................................................................................6-13
6.5.1 Selecting route navigation............................................................................6-13 6.5.2 Reentering the origin of route navigation ...................................................6-13 6.5.3 Checking a route point position...................................................................6-14 6.5.4 Skipping a route point in route navigation .................................................6-14 6.5.5 Canceling route navigation ..........................................................................6-14 6.5.6 Switching between distance and time to go ...............................................6-15 6.5.7 B (NAV2) screen during route navigation ...................................................6-16 6.5.8 C (NAV3) screen during route navigation ...................................................6-16

Chapter 6 KGP-920 Various Navigation
Contents 93151542-00
6.5.9 D (PLOT) screen during route navigation................................................... 6-17
6.6 Setting an anchor position ................................................................... 6-18 6.6.1 String an anchor position............................................................................. 6-18 6.6.2 Recalling anchor position ............................................................................ 6-18 6.6.3 Removing the anchor position symbol on PLOT screen .......................... 6-19 6.6.4 Reentering an anchor position .................................................................... 6-19 6.6.5 Canceling anchor position ........................................................................... 6-19 6.6.6 B (NAV2) screen during anchor position setup ......................................... 6-20 6.6.7 C (NAV3) screen during anchor position setup ......................................... 6-20 6.6.8 D (PLOT) screen during anchor position setup ......................................... 6-20
6.7 Track display.......................................................................................... 6-21
6.7.1 Display a cross cursor on PLOT screen ..................................................... 6-21 6.7.2 Screen scrolling ............................................................................................ 6-21 6.7.3 Scaling the PLOT screen.............................................................................. 6-22 6.7.4 Changing the setup contents....................................................................... 6-22

KGP-920 Chapter 6 Various Navigation
93121662-00 6-1
Chapter 6 Various Navigation
6.1 Storing waypoints (LAT/LONG) data 6.1.1 Storing a new position or updating an existing one
Up to 200 waypoints can be stored in memory. As 200 points (numbers 000 and 199) are reserved for MOB and event registration, you can use 200 to 399 (total of 200 points) to store waypoints. (1) Press [MENU] key until Menu options 1 to 9 appears. (2) Press [1] key to select “1:WAYPOINT”. (3) Enter storage number (200 to 399) using numeric keys. (4) Press to [ENT] key to display data of the specified storage number. (5) Press [ ] key to move cursor to letter “ = ”. (6) Press [ ] key to move cursor to the numeric input field. (7) Enter latitude and longitude. Example: The position “N35°38.180 / E139°42.990” is entered by pressing the following keys in
exact order given below. [3],[5],[3],[8],[1],[8],[0],[N],[1],[3],[9],[4],[2],[9],[9],[0],[E].
6.1.2 Writing comment Try to use comments for often used positions. Nine symbols are available. If you set a symbol at the beginning of your comment, the symbol is shown at waypoint. If not, an asterisk (*) and waypoint number are shown on PLOT screen. (1) Press [MENU] key until Menu options 1 to 9 appears. (2) Press [1] key to select “1:WAYPOINT”. (3) Enter storage number (200 to 399) using numeric keys. (4) Press [ENT] key to display data of the specified memory. (5) Press [ ] key twice to move cursor to the comment field. (6) Press [ ] [ ] [ ] [ ] key to select a comment letter or symbol from the comment letter
table by locating cursor on it, or enter a value using numeric keys. (7) Press [SEL] key . And one letter or symbol are made to decide. (8) You can enter up to 10 letters by repeating (6) and (7) steps.
NOTE: Press to backspace the cursor to correct an input error.
NOTE: Press to clear incorrect Input. You can reenter Numeric data.
CLR
Storage position
Latitude Longitude
Storage number LAT/LONG mode (Example)

Chapter 6 KGP-920 Various Navigation
6-2 93121662-00
(9) Press [ENT] key and decide of a comment.
6.1.3 Copying a position You can copy the position data (stored with numbers 000 to 399) to the waypoint data (having numbers 200 to 399). (1) Press [MENU] key until Menu options 1 to 9 appears. (2) Press [1] key to select “1:WAYPOINT”. (3) Press [ ] key to move cursor to “COPY” reverse its display. (4) Enter a source point number (000 to 399) using numeric keys. The coordinates will appears. (5) Press [ENT] key to enter the source point number. (6) Enter a destination point number (200 to 399) using numeric keys. The coordinates will appears.
Use another number if you do not wish to erase the existing number data. (7) Press [ENT] key to copy the storage data. A comment if any is also copied.
Example of symbols: : Reference point : Fishing spot : Shallow : Sunken ships : Buoy : Anchoring point or other ships : Prohibited area : Fish gathering place
Comment field Point number LAT/LONG mode (Example)
Table of comment letters and symbols
Destination point number
Source point number

KGP-920 Chapter 6 Various Navigation
93121662-00 6-3
6.1.4 Changing comment I.D. You can change a comment stored in memory.
(1) Press [MENU] key until Menu options 1 to 9 appears. (2) Press [1] key to select “1:WAYPOINT”. (3) Enter storage number (001 to 399) using numeric keys. (4) Press [ENT] key. The storaged number data will appears. (5) Press [ ] key twice to move cursor to the comment field. (6) Press [ ] [ ] [ ] [ ] key to select a comment letter or symbol from the comment letter
table by locating cursor on it, or enter a value using numeric keys. (7) Press [SEL] key . And one letter or symbol are made to decide. (8) You can enter up to 10 letters by repeating (6) and (7) steps. (9) Press [ENT] key and decide of a comment.
6.1.5 Erasing a single waypoint (1) Press [MENU] key until Menu options 1 to 9 appears. (2) Press [1] key to select “1:WAYPOINT”. (3) Enter storage number (001 to 399) using numeric keys. (4) Press [ENT] key. The storaged number data will appears. (5) Press [CLR] key. A confirmation message will apprars. (6) If OK, press [ENT] key to erase the data from storage. If cancel erasing, press [CLR] key.
Comment field
Storage number
LAT/LONG mode (Example)
Table of comment letters and symbols Changed comment
Data to erase
Storage number A confirmation message Display after data erasure
LAT/LONG mode (Example)
NOTE: To erase an entire data from memory simultaneously, see “Erasing entire data from memory” (page 63).

Chapter 6 KGP-920 Various Navigation
6-4 93121662-00
6.2 Setup of waypoint navigation 6.2.1 Setting waypoint navigation The position data for each waypoint must be set prior to navigating to waypoints. You can use the data
already stored from Menu, or you can set the waypoints on A (NAV1), B (NAV2), C (NAV3) or D
(PLOT) screen (called the quick waypoint navigation).
(1) Press [MODE] key until A (NAV1), B (NAV2), C (NAV3) or D (PLOT) screen appears. (2) Press [SEL] key until page 5 screen appears. (3) Press [ ] [ ] key to move cursor to the "WPT" letters. (4) Press [ENT] key. (5) Enter a waypoint number (001 to 399) using numeric keys. (6) Press [ENT] key to set the point as WPT.
6.2.2 Quick waypoint setup Quick WPT (first priority waypoint) can be set by specifying it directly either from the A (NAV 1), B (NAV 2), C (NAV 3) or D (PLOT) screen. When the new waypoint is selected, the waypoint navigation to it will commence and the specified position, along with the comment ( QUICK), will be assigned to the position number 398. Old data is replaced with a new during quick WPT setup. While the 1st to 4th pages of either the A (NAV 1), B (NAV 2), C (NAV 3) or D (PLOT), are displayed. (1) Press [0] key to display “QUICK” pop-up menu. (2) Enter latitude and longitude. For example, if “N35°38.180 / E139°42.990” is inputted, a key will be pressed in order of
[3],[5],[3],[8],[1],[8],[0],[N],[ENT],[1],[3],[9],[4],[2],[9],[9],[0],[E] (3) Press [ENT] key. The waypoint is set and the point data is stored in number 398.
NOTE: Press to backspace the cursor to correct an input error.
NOTE: Press to clear incorrect Input. You can reenter Numeric data.
CLR
LAT/LONG display (example)
Position data used as the waypoint Cursor Waypoint number
The registration number recalled will be shown as the waypoint number.
QUICK pop-up menu
Storage position Latitude Longitude
All the entry should be in lat/long except
Loran C LOPs.
KGP-920 Chapter 6 Various Navigation
93121662-00 6-5
6.2.3 Reentering the starting point in waypoint navigation
Once reset, the present position is used as the new point of origin for waypoint navigation. While the 1st to 4th pages of either the A (NAV 1), B (NAV 2), C (NAV 3) or D (PLOT), are displayed. (1) Press [ENT] key to set the point as WPT.
6.2.4 Canceling waypoint navigation To cancel waypoint navigation, turn WPT to OFF on A (NAV1), B(NAV2), C (NAV3) or D (PLOT) screen. (1) Press [MODE] key until A (NAV1), B (NAV2), C (NAV3) or D (PLOT) screen appears. (2) Press [SEL] key until page 5 screen appears. (3) Press [ ] [ ] key to move cursor to the "RESET" letters. (4) Press [ENT] key to cancel WPT setting.
6.2.5 B (NAV2) screen during waypoint navigation
“ON” letters are displayed, and number are cleared.
Time to go from present position from WPT
WPT position
Page number
Arrival time (mm/dd hh:mm)
Distance from present position from WPT
WPT position
Page number
Bearing from present position from WPT
WPT mark
Cross track error
WPT position
Deviation angle
Page number
Speed
Present position
Course
Page number
WPT number
Range(Radius) of navigation graph Blinks when position fix is unavailable
NOTE: To change a display page: Press this key SEL

Chapter 6 KGP-920 Various Navigation
6-6 93121662-00
6.2.6 C (NAV3) screen during waypoint navigation 6.2.7 D (PLOT) screen during waypoint navigation
SEL
Distance from present position from WPT
WPT position
Page number
Bearing from present position from WPT
Your ship’s position Track Scale
NOTE: To change a display page: Press this key SEL
For description of the parameters shown in the 1st, 3rd and 4th pages of the D (PLOT) screen, refer to "D (PLOT) screen in OFF mode" in page 8. They are used in the same manner.
Distance from present position from WPT
WPT position
Page number
Bearing from present position from WPT
Time to go from present position from WPT
WPT position
Page number
Arrival time (mm/dd hh:mm)
Cross track error
WPT position
Deviation angle
Page number
NOTE: To change a display page: Press this key
Speed
Present position
Course
Page number
WPT number
Blinks when position fix is unavailable XTE alarm range

KGP-920 Chapter 6 Various Navigation
93121662-00 6-7
6.3 Cross track error and course deviation angle 6.3.1 Navigation graph of (NAV2) screen Use the navigation graph to check the distance and bearing to the waypoint. When the distance to WPT is further than the range (radius) of navigation graph, the WPT locates on the circle of navigation graph. When the distance is closer than the graph range, the WPT marking shows in the circle. The XTE bar graph and course deviation angle bar graphs appear only when the WPT is on the circle (these graphs are cleared in the short distance).
Course deviation angle
Waypoint
Course deviation angle
Cross track error
Steer to the left to get back to the original course. Bearing to WPT
Distance from present Position to WPT
True north
Origin
Course
Steering direction
Steer to the right to get back to the original course.
NOTES: 1. The cross track error (XTE) indication is 9.99
(nm, sm,km) maximum, and doesn't change beyond that limit.
2. The XTE bar graph responds up to 1.00 (nm, sm, km) deviation, and doesn't change beyond that limit.
3. To set an XTE alarm, see the "Alarm" (page 29).
4. The course deviation angle indication is 180 degrees maximum.
NOTE: Changing the range(radius) of Navigation graph 1. Press [MODE] key until B(NAV2) screen appears. 2. Press to [ ] or [ ] key to select a desired range. The range that can be changed is as follows. ( 0.25, 0.5, 1, 2, 5, 10, 20, 50, 100, 200 )

Chapter 6 KGP-920 Various Navigation
6-8 93121662-00
6.3.2 Electronic fairway (NAV3) screen Use the three-dimensional chart for navigation on the course line. You can set a course width from Menu (6: Alarm). Symbol “ ” shows the waypoint, and your ship and track are shown along the course line. ( When waypoint is distance ) When the distance is greater than 4 (nm,sm, km), the 4-(nm,sm, km) course line is shown on the screen. When you have sailed 2 (nm,sm, km), the present position indication moves toward you and the next 4 (nm,sm, km) are shown.
At point E You are sailing outside of course width.
Present position This marking moves at the course edge.
Course line length on the screen
At point B At point A
Present position Present position
At point D At point C
Present position Present position
Waypoint Distance to WPT Distance on
course line
XTE alarm range You can change the XTE alarm range by “Setting and canceling an XTE alarm” (page 29 to 31).
Course line
Examples: The screen changes as follows when you sail along points A, B, C and D.

KGP-920 Chapter 6 Various Navigation
93121662-00 6-9
( Nearing to the WPT ) When you close to the waypoint, the course line length decreases to 4 (nm, sm, km), 2 (nm, sm, km) and 1 (nm, sm, km). Then, the WPT marking closes to your ship.
NOTES: WPT marking changes: When distance on course line is greater than 4 (nm, sm, km) When distance on course line is less than 4 (nm, sm, km)
At point K: Distance to WPT is greater than 1 (nm, sm, km). Present position
Waypoint The WPT indication remains close to you, but the course length increases to 1 (nm, sm, km), 2 (nm, sm, km), and 4 (nm, sm, km). The WPT indication changes when the length exceeds 4 (nm, sm, km).
At point J: You have reached The waypoint.
At point I: You are 0.5 (nm, sm, km) away from waypoint.
Waypoint
Present position
At point H: You are 1 (nm, sm, km) away from waypoint.
Waypoint
Present position
The WPT marking moves toward you.
The WPT marking moves to The center of course line
Waypoint
Present position
The course length closing up to 1-(nm, sm, km) scale from 2- scale
Present position
At point F: You are 4 (nm, sm, km) away from waypoint.
The present position indication moves toward you and the WPT indication changes when you have reached 4 (nm, sm, km) on the course line away from the waypoint.
Waypoint
Waypoint

Chapter 6 KGP-920 Various Navigation
6-10 93121662-00
6.4 Storing and erasing routes 6.4.1 Storing your route
• Up to 20routes and 230 waypoints can be registered for one route. NOTE: 230 waypoints are the maximum number of waypoints the system can handle.
In case you have registered 230 waypoints for one route only, you cannot register any waypoint to other routes. To store the route, you first need to register the waypoint on route in the menu, "1. WAYPOINT".
(1) Press [MENU] key until Menu options 1 to 9 appears. (2) Press [2] key to select “2:ROUTE”. (3) Press [1] key to select “1: RTE EDIT”. Route Input screen is displayed. (4) Enter a route number (01 to 20) using numeric keys. (5) Press [ENT] key to store the route number. (6) Press [ ] key to move cursor to the forward( →)or backward(← ) route setup column. (7) Press [SEL] key to select the forward or backward route navigation. (8) Press [ ] key to move cursor to the waypoint number column. (9) Enter a waypoint number (200 to 399) of the route using numeric keys. (You can check its memory
data on the screen.) (10) Press [ENT] key to store the waypoint number. (11) Repeat (9) and (10) steps to set another waypoint of the route.
NOTE: Press to backspace the cursor to correct an input error.
NOTE: Press to clear incorrect Input. You can reenter Numeric data.
CLR
Total number of points on the route Sequence of route (Cursor)
Data registered to the specified number will be displayed.
Route number
Cursor Waypoint number

KGP-920 Chapter 6 Various Navigation
93121662-00 6-11
6.4.2 Automatic switching of waypoints Route navigation can switch the current waypoint in two ways: switching in CIRCLE mode and switching in BI-SECTOR mode. In CIRCLE mode, the next waypoint is shown when you reach the proximity alarm circle. In BI-SECTOR mode, the next waypoint is shown when you cross a half-angle line.
(1) Press [MENU] key until Menu options 1 to 9 appears. (2) Press [2] key to select “2:ROUTE”. (3) Press [2] key to select “2: CHANGE”. (4) Press [ ] or [ ] key to locate cursor to select a mode. (5) Press [ENT] key. The selected mode will be shown.
6.4.3 Erasing point data (1) Press [MENU] key until Menu options 1 to 9 appears. (2) Press [2] key to select “2:ROUTE”. (3) Press [1] key to select “1: RTE EDIT”. Route Input screen is displayed. (4) Enter a route number (01 to 20) using numeric keys. (5) Press [ ] [ ] [ ] [ ]key to move cursor to the waypoint number you wish to erase.
Its data and comment (if any) are displayed. (6) Press [CLR] key. A confirmation message appears. (7) If OK, press [ENT] key to erase all points of this route. If cancel erasing, press [CLR] key.
CIRCLE mode Proximity
Alarm circle
Waypoint Course line B Course line A
BI-SECTOR mode
Waypoint
Course line A Course line B
When you reach the proximity alarm circle, the course line is switched from A to B. To change the proximity alarm range, see “Setting and canceling a proximity alarm” (page 37).
When you cross a half-angle line, the course line is switched from A to B.
Cursor
Data of point 201 has been erased, and 3 points of data remain in Confirmation message before.
Erasing point 201 data
Sequence of route Total number of points in a route (3 points) Route number
Cursor

Chapter 6 KGP-920 Various Navigation
6-12 93121662-00
6.4.4 Erasing a single route (1) Press [MENU] key until Menu options 1 to 9 appears. (2) Press [2] key to select “2:ROUTE”. (3) Press [1] key to select “1: RTE EDIT”. Route Input screen is displayed. (4) Enter a route number (01 to 20) using numeric keys. (5) Press [ENT] key to recall the route number. (6) Press [CLR] key. A confirmation message appears. (7) If OK, press [ENT] key to erase all points of this route. If cancel erasing, press [CLR] key.
Route 01 data has been erased Confirmation message before. Erasing route 01
Route 01 Cursor
NOTE: To erase all stored data from memory, see “Erasing entire data from memory” (page 63).

KGP-920 Chapter 6 Various Navigation
93121662-00 6-13
6.5 Route setup
You can use up to 400 points (maximum) to go to a final destination using route navigation. You can also reverse the navigation route to return to the start point. To do so, you must first store the waypoints and route from Menu (using option 2). See “Storing waypoints (LAT/LONG)” (page 6-1 to 6-3) and “Storing and Erasing Routes” (page 7-1 to 7-3). You can set the route by entering a route number, forward/backward navigation, and route start point number of the route from the A (NAV1), B (NAV2), C (NAV3) or D (PLOT) screen.
6.5.1 Selecting route navigation You navigate on a route, following the course line, which is automatically updated as you reach each waypoint. Use the following steps to start route navigation. Select the reverse navigation only after you have reached the final destination, or the route navigation may not work properly. (1) Press [MODE] key until A (NAV1), B (NAV2), C (NAV3) or D (PLOT) screen appears. (2) Press [SEL] key until page 5 screen appears. (3) Press [ ] or [ ] key to move cursor to “RTE” letters. (4) Press [ENT] key. (5) Enter a route number (01 to 20) using numeric keys. (6) Press [ ] key (7) Enter the route start point number using numeric keys. (8) Press [ENT] key.
6.5.2 Reentering the origin of route navigation You can reset the present position as a new point of origin and start navigation.
(1) Press [ENT] key while the 1st to 4th pages of either the A (NAV 1), B (NAV 2), C (NAV 3) or D (PLOT), are displayed.
Cursor Route number
Forward(→) or backward(← )
Position data of the first waypoint
Route point number for the first waypoint
Route number
Route point number for the first waypoint

Chapter 6 KGP-920 Various Navigation
6-14 93121662-00
6.5.3 Checking a route point position You can check the waypoints on a route from the Menu.
(1) Press [MENU] key until Menu options 1 to 9 appears. (2) Press [2] key to select “2:ROUTE”. (3) Press [1] key to select “1: RTE EDIT”. Route Input screen is displayed. (4) Press [ ] [ ] [ ] [ ] key to move cursor onto the desired point number. Its data and
comment, if any, are displayed.
6.5.4 Skipping a route point in route navigation You can skip the next route point and go to a new route point.
(1) Press [MODE] key until A (NAV1), B (NAV2), C (NAV3) or D (PLOT) screen appears. (2) Press [SEL] key until page 5 screen appears. (3) Press [ ] or [ ] key to move cursor to “RTE” letters. (4) Press [ENT] key. (5) Enter a route number (01 to 20) using numeric keys. (6) Press [ ] key (7) Enter the new route start point number using numeric keys. (8) Press [ENT] key.
6.5.5 Canceling route navigation To cancel waypoint navigation, turn RTE to OFF on A (NAV1), B (NAV2), C (NAV3) or D (PLOT) screen. (1) Press [MODE] key until A (NAV1), B (NAV2), C (NAV3) or D (PLOT) screen appears. (2) Press [SEL] key until page 5 screen appears. (3) Press [ ] or [ ] key to move cursor to “RESET” letters. (4) Press [ENT] key.
Data of specified Point number
Specified point number
“ON” letters are displayed, and numbers are cleared.

KGP-920 Chapter 6 Various Navigation
93121662-00 6-15
6.5.6 Switching between distance and time to go
When you select the “DIST” (Distance to WPT) or “TDIST” (Total distance) on NAV1, NAV2 or NAV3 screen in route navigation, the respective “TTG” (Time to go to WPT) or “T.TTG” (Total time to go) is shown.
(1) Press [MODE] key until B (NAV2), C (NAV3) or D (PLOT) screen appears. (2) Press [SEL] key until page 2 screen appears. (3) Press [ ] key to display “DST” .
(4) Press [ ] key to display “TDST”.
(1) Press [MODE] key until B (NAV2), C (NAV3) or D (PLOT) screen appears. (2) Press [SEL] key until page 4 screen appears. (3) Press [ ] key to display “TTG” .
(4) Press [ ] key to display “T.TTG”.
NOTE: “DIST” shows the distance to the next waypoint. “TDIST” shows the total distance to the final destination.
“TTG” shows the time to the next waypoint. “T.TTGT” shows the total time to the final destination.
Time to go to WPT Page 4.
Total time to go to WPT
Distance to WPT Page 2.
Total distance to WPT

Chapter 6 KGP-920 Various Navigation
6-16 93121662-00
6.5.7 B (NAV2) screen during route navigation
6.5.8 C (NAV3) screen during route navigation
NOTE: To change a display page: Press this key SEL
NOTE: Positioning has failed or the distance has exceeded 9999 nm, sm or km.
DST: 9999
NOTE: To change a display page: Press this key SEL
NOTE: Positioning has failed or the time to go has exceeded 999 hours 59 minutes.
DST: 9999 ETA: 12.31 23:59
Distance to the next Route point
WPT position
Page number
Bearing to the next Point (Total distance Can also be shown)
WPT mark
Time to go to the next Route point (Total time to go can also be shown)
WPT position
Page number
Arrival time (mm/dd hh:mm)
Blinks when position fix is unavailable
Speed
Present position
Course
Page number
Range(Radius) of navigation graph
Cross track error
WPT position
Deviation angle
Page number
Route number (01)
Forward (→) or backward (←) navigation
Next route point number (001)
Blinks when position fix is unavailable
Speed
Present position
Course
Page number
XTE alarm range
Distance to the next Route point
WPT position
Page number
Bearing to the next Point (Total distance Can also be shown)
Cross track error
WPT position
Deviation angle
Page number
Time to go to the next Route point (Total time to go can also be shown)
WPT position
Page number
Arrival time (mm/dd hh:mm)

KGP-920 Chapter 6 Various Navigation
93121662-00 6-17
6.5.9 D (PLOT) screen during route navigation
Distance to the next Route point
WPT position
Page number
Bearing to the next Point (Total distance Can also be shown)
NOTE: To change a display page: Press this key SEL
For description of the parameters shown in the 1st, 3rd and 4th pages of the D (PLOT) screen, refer to "D (PLOT) screen in OFF mode" in page 8. They are used in the same manner.

Chapter 6 KGP-920 Various Navigation
6-18 93121662-00
6.6 Setting an anchor position After arriving at your destination, it is possible to drift from the anchor position due to a tide or wind.
Once the anchor position is stored in memory, it is easy to check the distance and bearing moved from
the anchor position.
6.6.1 String an anchor position You can set the anchor position from the A (NAV1), B (NAV2), C (NAV3) or D (PLOT) screen. The following operations allow you to store and specify the current position as the anchor position. The anchor position is registered to memory number 397 along with the comment ( ANCW). (1) Press [MODE] key until B (NAV2), C (NAV3) or D (PLOT) screen appears. (2) Press [SEL] key until page 5 screen appears. (3) Press [ ] or [ ] key to move cursor to the letters “ANCW”. (4) Press [ENT] key. Current position is registered and selected as the anchor position.
6.6.2 Recalling anchor position You can check the anchor position on any of A (NAV1), B (NAV2), C (NAV3) and D (PLOT) screens
during anchoring.
(1) Press [MODE] key until B (NAV2), C (NAV3) or D (PLOT) screen appears. (2) Press [SEL] key to display anchor position data. The anchor position and comment " ANCW" are
displayed.
Cursor ANCW
B (NAV2) screen C(NAV3) screen D (PLOT) screen
Anchor position
Anchor positions will be displayed in the 2nd, 3rd and 4th pages.
Anchor positions will be displayed in the 2nd, 3rd and 4th pages.
Anchor position will be displayed in the 2nd page.

KGP-920 Chapter 6 Various Navigation
93121662-00 6-19
6.6.3 Removing the anchor position symbol on PLOT screen You can remove the anchor position as a symbol on the PLOT screen.
(1) Press [MODE] key until D (PLOT) screen appears. (2) Press [SEL] key until page 6 screen appears. (3) Press [ ] or [ ] key to move cursor to “WAYPOINT” letters. (4) Press [ENT] key. (5) Press [ ] or [ ] key to move cursor onto “OFF” letters. (6) Press [ENT] key. 6.6.4 Reentering an anchor position You can reenter a new anchor position and start to calculate navigation. While the 1st to 4th pages of either the A (NAV 1), B (NAV 2), C (NAV 3) or D (PLOT), are displayed. (1) Press [ENT] key to set the point as WPT. 6.6.5 Canceling anchor position (1) Press [MODE] key until A (NAV1), B (NAV2), C (NAV3) or D (PLOT) screen appears. (2) Press [SEL] key until page 5 screen appears. (3) Press [ ] [ ] key to move cursor to the "RESET" letters. (4) Press [ENT] key to cancel the anchor watch.
Cursor “ON” letters are displayed, and number are cleared.
Position of “ON” is moved.

Chapter 6 KGP-920 Various Navigation
6-20 93121662-00
6.6.6 B (NAV2) screen during anchor position setup
6.6.7 C (NAV3) screen during anchor position setup
6.6.8 D (PLOT) screen during anchor position setup
NOTE: To change a display page: Press this key SEL
Distance from present position to anchor position
WPT position
Page number
Bearing from present position to anchor position
Cross track error
Anchor position
Deviation angle
Page number
Time to go from present position to anchor position
WPT position
Page number
Arrival time (mm/dd hh:mm)
NOTE: To change a display page: Press this key SEL
Time to go from Present position to anchor position
WPT position
Page number
Arrival time (mm/dd hh:mm)
Distance from present position to anchor position
WPT position
Page number
Bearing from present position to anchor position
Cross track error
Anchor position
Deviation angle
Page number
Distance from present position to anchor position
WPT position
Page number
Bearing from present position to anchor position
Anchor position
NOTE: To change a display page: Press this key SEL
NOTE: The 3D PLOT screen shows the distance, bearing, cross track error (XTE), and course deviation angle to the waypoint. Your boat icon does not move in the ANCW mode.

KGP-920 Chapter 6 Various Navigation
93121662-00 6-21
6.7 Track display You can display track, the waypoint, course line, and cross cursor on the PLOT screen.
6.7.1 Display a cross cursor on PLOT screen You can display a cross cursor and position it on the screen.
(How to use cross cursor)
(1) Press [MODE] key until D (PLOT) screen appears. (2) Press [SEL] key until page 3 screen appears. (3) Press [ ] [ ] [ ][ ] key to shift the cross cursor.
(How to store cross cursor position)
(1) With the cross cursor activated, press the EVT key to store the cross cursor position. (Note: not the present shipís position).
6.7.2 Screen scrolling You can scroll the PLOT screen (pages: 1, 2, 3 or 4) in any direction so that your ship is always shown on the screen. If your ship moves off the screen, it will automatically return to the center of the display.
D:PLOT screen
Cross cursor Page number
Position (LAT/LONG) ofCross cursor
Present position
Distance and bearing toThe cross cursor
Cross cursor position (stored in number 002)
The stored cross cursor position is shown as X CURSOR
EVT=002 X CURSOR 35°38 . 248N
139°43 . 066E
New LAT/LONG of cross cursor Blinks about 10 seconds when you press the EVT key.
2/N
8/S
6/E 4/W

Chapter 6 KGP-920 Various Navigation
6-22 93121662-00
6.7.3 Scaling the PLOT screen You can select a display scale of PLOT (pages: 1, 2, 4) screen. (1) Press to [ ] or [ ] key to select a desired range. The range that can be changed is as follows. ( 0.25, 0.5, 1, 2, 5, 10, 20, 50, 100, 200 ) 6.7.4 Changing the setup contents (1) Press [MODE] key until D (PLOT) screen appears. (2) Press [SEL] key until page 6 screen appears. (3) Press [ ] or [ ] key to locate cursor and select an item. (4) Press to [ENT] key to display the option. (5) Press [ ] or [ ] key to locate cursor and select an option. (6) Press [ENT] key. Selected option is setup.
(Changing the event symbol)
To change the event symbol, place cursor on SYMBOL option and press ENT key.
(Activating event numbers (000 to 199))
Turn ON the EVENT option and you can save events (the present position marking) into memory numbers (000 to 199).
(Activating event numbers (200 to 399))
Turn ON the WAYPOINT option and save events (the present position marking) into memory numbers (200 to 399). (On/off of course line (dotted lines))
During waypoint or route navigation, you can display or clear the course line from your present position to the waypoint.
Initial scale: 0.025
Scale indication fields
NOTE: You can change the scale unit from Menu 2: UNIT (nm) of 8: INITIAL options.
Cursor Page number
Initial setup: +
Initial setup: ON
Initial setup: ON
Initial setup: ON

KGP-920 Chapter 6 Various Navigation
93121662-00 6-23
(Adjusting the track recording interval)
To adjust the track recording interval (time or distance interval), locate cursor on PLOT option, and press ENT key. You can set the unit of track distance interval from the Menu 2: UNIT (DST) of 8 INITIAL. (Turning tracking off)
Set the "TRACK" option to OFF to stop recording the track on PLOT screen. Your present position marking moves on the screen. Set the "TRACK" option to ON to record the track on PLOT screen. (Erasing the track)
If you press the CLR key when the cursor is positioned at TRACK CLR, a confirming message (DELETE?) will appear. Press the ENT key to delete every track line currently displayed on the plotter screen.
Initial setup: 10sec.
Initial setup: ON

KGP-920 Chapter 7 Alarms
93121662-00 Contents
Chapter 7 Alarms
Page No.
7.1 Kinds of alarms........................................................................................7-1 7.1.1 Anchor watch alarm (ANCW)..........................................................................7-1 7.1.2 Proximity alarm (PROX) ..................................................................................7-1 7.1.3 Cross track error alarm (XTE) ........................................................................7-2 7.1.4 Course deviation angle alarm (CDI)...............................................................7-2
7.2 Alarm explanation....................................................................................7-2 7.3 Setting and canceling..............................................................................7-3

KGP-920 Chapter 7 Alarms
93121662-00 7-1
Chapter 7 Alarms
7.1 Kinds of alarms There are four kinds of alarms, anchor watch (ANCW), proximity (PROX), cross track error (XTE) and course deviation angle.
7.1.1 Anchor watch alarm (ANCW) An anchor watch alarm can alert you if your boat drifts a set distance from where it is activated. This alarm function will not work if the alarm range is set to "0.00". ACW letters blink and buzzer (short beep) sounds when outside of alarm range.
7.1.2 Proximity alarm (PROX) A proximity alarm alerts you when you arrive to within a preset distance to a waypoint. The proximity alarm will not work if the alarm range is set to "0.00". Note: you will automatically advance to the next waypoint at the alarm range if you have selected the CIRCLE mode of route navigation by "Automatic switching of waypoints" (page 6-15). PRX letters blink and buzzer (short beep) sounds when I arrive.
Anchor position
Preset anchor watch alarm range
Initial setup: OFF, 1.00 Enter an alarm range: 0.00 to 9.99
Waypoint or route point
Preset alarm range Initial setup: ON, 1.00 Enter an alarm range: 0.00 to 9.99
Blink
Blink

Chapter 7 KGP-920 Alarms
7-2 93121662-00
7.1.3 Cross track error alarm (XTE) The cross track error (XTE) alarm alerts you when you have deviated from your course line by a predetermined distance. The alarm function does not work if the alarm range is set to '0.00'. The course width shown on NAV3 screen is the same as the XTE alarm value you have set. XTE letters blink and buzzer (long beep) sounds when I’m away from XTE range.
7.1.4 Course deviation angle alarm (CDI) The CDI alarm alerts you when you deviate from your course to steer by a predetermined margin. The alarm function does not work if the alarm range is set to “00”. CDI letters blink and buzzer (long beep) sounds when I’m away from CDI range.
7.2 Alarm explanation The reason of an alarm can be seen in the following ways.
(1) Press [MENU] key until Menu options 1 to 9 appears. (2) Press [6] key to select “6:ALARM”. (3) Press [5] key to select “5:MESSAGE”. Reason for alarm notification is displayed
Waypoint or route point
Present alarm range
Course line
Origin
Cross track error (XTE)
Initial setup: ON, 1.00 Enter an alarm range: 0.00 to 9.99
Waypoint or route point
Course
Course deviation angle (CDI)
Bearing to waypoint
Initial setup: ON, 45 degrees Enter an alarm range: 00 to 99 degrees
Blink
Blink

KGP-920 Chapter 7 Alarms
93121662-00 7-3
7.3 Setting and canceling (Setting alarm) (1) Press [MENU] key until Menu options 1 to 9 appears. (2) Press [6] key to select “6:ALARM”. (3) Select item number of the alarm to be set from the numerical keypad. (4) Press [ ] or [ ] key to move cursor to ON. (5) Press [ENT] key. (Changing alarm range) (1) Press [MENU] key until Menu options 1 to 9 appears. (2) Press [6] key to select “6:ALARM”. (3) Select item number of the alarm to be set from the numerical keypad. (4) Press [ ] key to move cursor to alarm range field. (5) Enter an alarm range by numeric key. CDI alarm range is 2-digit. (6) Press [ENT] key. (Canceling alarm) (1) Press [MENU] key until Menu options 1 to 9 appears. (2) Press [6] key to select “6:ALARM”. (3) Select desired alarm number by numeric key. (4) Press [ ] or [ ] key to move cursor to OFF. (5) Press [ENT] key. Example
Cursor
Setting PROX alarm
Changing alarm range
Select “ON”
Setting PROX alarm range
Canceling PROX alarm
Select “OFF”
Select “ON”

KGP-920 Chapter 8 Setup Procedure
93121662-00 Contents
Chapter 8 Setup Procedure
Page No.
8.1 Menu options ...........................................................................................8-1 8.2 Menu 3: GPS.............................................................................................8-2
8.2.1 Monitoring GPS satellite signal reception ....................................................8-2 8.2.2 Selecting a measuring system mode ............................................................8-2 8.2.3 Selecting a geodetic datum............................................................................8-2 8.2.4 Setting antenna height (above sea level) ......................................................8-3 8.2.5 Masking DOP ...................................................................................................8-3 8.2.6 Masking satellite elevation angle...................................................................8-3 8.2.7 Setting RAIM function .....................................................................................8-4 8.2.8 Selecting RAIM accuracy................................................................................8-4
8.3 Menu 4: Differential GPS (DGPS) ...........................................................8-5
8.3.1 Displaying DGPS .............................................................................................8-5 8.3.2 Selecting a style of DGPS...............................................................................8-5 8.3.3 DGPS measurement ........................................................................................8-5 8.3.4 Setting a DGPS timeout ..................................................................................8-6 8.3.5 Selecting a beacon station (Beacon DGPS only).............................................8-6 8.3.6 String a beacon station (internal beacon receiver system only) ......................8-8 8.3.7 Selecting the DGPS input signal baud rate
(External beacon receiver system only).............................................................8-9 8.3.8 DGPS monitor (Beacon DGPS only) .................................................................8-9 8.3.9 Message monitor (Beacon DGPS only) ..........................................................8-10
8.4 Menu 5: Compensation .........................................................................8-11
8.4.1 Correcting your position............................................................................... 8-11 8.4.2 Checking the correction offset.....................................................................8-12 8.4.3 Disable position crrection ............................................................................8-12 8.4.4 Compensating the compass.........................................................................8-12 8.4.5 Displaying local time.....................................................................................8-13
8.5 Menu 8: Initial setting ............................................................................8-15
8.5.1 Setting average constants ..........................................................................8-15 8.5.2 Changing the distance or speed unit ..........................................................8-15 8.5.3 Changing the antenna height unit ...............................................................8-15

Chapter 8 KGP-920 Setup Procedure
Contents 93151542-00
8.5.4 Changing sail mode...................................................................................... 8-16 8.5.5 Displaying position data in LAT/LONG mode............................................. 8-16 8.5.6 Changing the latitude and longitudinal display digits............................... 8-16 8.5.7 Specifying the chain and secondary stations for Loran C, Loran A or Decca
......................................................................................................................... 8-16 8.6 Menu 9: Interface................................................................................... 8-17
8.6.1 Selecting an output data format of DATA port............................................ 8-17 8.6.2 Editing the IEC 61162-1 output data format of DATA port ......................... 8-17 8.6.3 Explanation of output data (sentence)........................................................ 8-18 8.6.4 Selecting an output format of waypoint data ............................................. 8-18 8.6.5 Selecting an output data format of DATA2 port ......................................... 8-19
8.7 Initialization............................................................................................ 8-20
8.7.1 Initialization ................................................................................................... 8-20 8.7.2 Erasing entire data from memory................................................................ 8-20 8.7.3 Switching between Loran C Lops, Loran A LOPs, and Decca LOPs........ 8-20 8.7.4 Changing a storing method for present position (EVENT) ....................... 8-20 8.7.5 Selecting an initial value (North, South, East, West) of latitude/longitude
......................................................................................................................... 8-21

KGP-920 Chapter 8 Setup Procedure
93121662-00 8-1
Chapter 8 Setup Procedure
8.1 Menu options
1. Waypoints Store, edit, copy and erase waypoints (see pages 6-1 to 6-6)
2. Route (See pages 6-13 to 6-17). Store and erase a route. Forward/backward navigation Selection. Automatic route switching. Waypoint data switching.
3. GPS Display GPS satellite status. Switch (2- and 3-dimensional) positioning modes. Select datum. Set antenna height (above sea level). See DOP value to limit fix data Set satellite elevation angle limit. Select RAIM function. Select RAIM accuracy.
4. Differential GPS (DGPS) Select DGPS style. Select DGPS mode. Set DGPS timeout. Select beacon station. Set beacon frequency. Select beacon bit rate. Set DGPS input baud rate. m Monitor DGPS data. Monitor beacon message.
NOTE: You can select an option from Menu in two ways: by direct numeric key entry and by cursor shifting. This manual explains how to enter numeric values for easy understanding, but you can also use the cursor for option selection.
5. Compensation Position correction (LAT/LONG,LOPs) Compass correction Time difference
6. Alarm (See pages 7-1 to 7-3) Anchor watch alarm. Proximity alarm. XTE alarm. CDI alarm. Alarm message.
8. Initial value setup Set average constants. Select distance/speed units. Select antenna height (above sea level) units. Select navigation mode. Select position display mode (LAT/ LONG, LOPs) Select LAT/LONG display digitsSet chain.
9. Interfacing Select output format. Edit the output format (IEC 61162-1). Select ACK/ALR output
7. Calculation Distance and bearing between two points LAT/LONG into LOPs data conversion Calculation of estimated time length from the current position to the destination, or required speed.

Chapter 8 KGP-920 Setup Procedure
8-2 93121662-00
8.2 Menu 3: GPS 8.2.1 Monitoring GPS satellite signal reception You can monitor the signal status from GPS (SBAS) satellites. The signals from 3 satellites are used for two-dimensional positioning, but signals from 4 or more satellites are required for three-dimensional positioning. (1) Press [MENU] key until Menu options 1 to 9 appears. (2) Press [3] key to select “3:GPS”. (3) Press [1] key to select “1:GPS MONITOR”. Reason for alarm notification is displayed
8.2.2 Selecting a measuring system mode initial setup: 3D There are the two modes, 2D and 3D, in a measuring mode. Usually, it is used in 3D mode. Usually, in 3D mode, in case use it in 2D mode, they need to set up an antenna height manually. (see 7.2.4) If you cannot receive signals from four satellites or if the PDOP value exceeds the limit, the 3D(three-dimensional measurement) mode is automatically switched to the 2D mode. (1) Press [MENU] key until Menu options 1 to 9 appears. (2) Press [3] key to select “3:GPS”. (3) Press [2] key to select “2:FIX MODE”. (4) Press [ ] or [ ] key to select desired measuring system mode. (5) Press [ENT] key.
8.2.3 Selecting a geodetic datum Initial setup: WGS-84
The latitude and longitude are calculated based on the WGS-84 with GPS system. However, the charts used in many countries are based on different geodetic datums. You can compensate this difference from your chart by converting GPS position data into your actual chart system. To select a geodetic datum, see "Local Geodetic System" (Annex). (1) Press [MENU] key until Menu options 1 to 9 appears. (2) Press [3] key to select “3:GPS”. (3) Press [3] key to select “3:DATUM”. (4) Press [ ] or [ ] key to move cursor onto the desired geodetic datum. (5) Press [ENT] key.
Satellite PRN (Pseudo Random Noise) number .
Azimuth angle of satellite The angle of satellite from true north (0 degree)
Elevation angle of satellite The angle of satellite from horizon
Satellite signal S/N The S/N usually shows 10 to 20 when elevation angle is above 10 degrees.
SBAS satellite information
DOP(PDOP or HDOP) value

KGP-920 Chapter 8 Setup Procedure
93121662-00 8-3
8.2.4 Setting antenna height (above sea level) Initial height: 0
In case of 2D mode, the antenna height from sea level must be entered within 5 meters or 16 3/8 feet in accuracy. If failed, the positioning accuracy may be worsened. The data can be set in either metric or imperial system. For detail, refer to the setting procedure “Menu 8, Changing the antenna height unit”, on page 8-13 in this manual. (1) Press [MENU] key until Menu options 1 to 9 appears. (2) Press [3] key to select “3:GPS”. (3) Press [4] key to select “4:ANT.H”. (4) Enter a (4-digit) antenna height above sea level using numeric keys. (5) Press [ENT] key.
8.2.5 Masking DOP Initial setup: 07
You can set a DOP mask value in two-dimensional positioning to minimize the position fluctuation. When the HDOP value exceeds this limit, positioning is stopped. During three-dimensional positioning, you can set a PDOP mask value. When a satellite combination exceeds this limit, two-dimensional positioning is selected automatically. (1) Press [MENU] key until Menu options 1 to 9 appears. (2) Press [3] key to select “3:GPS”. (3) Press [5] key to select “5:DOP MASK”. (4) Enter a DOP mask value (00 to 99) using numeric keys. (5) Press [ENT] key.
8.2.6 Masking satellite elevation angle Initial setup: 10degrees
When the satellite is below 5 degrees above the horizon, signal reflection and interference can cause erroneous positioning. You can improve the positioning accuracy by masking the elevation angle. However, a large mask value shortens the signal receive time and most satellite combinations are rejected. (1) Press [MENU] key until Menu options 1 to 9 appears. (2) Press [3] key to select “3:GPS”. (3) Press [6] key to select “6:ELV MASK”. (4) Press [ ] or [ ] key to move cursor onto
elevation angle masking. (5) Press [ENT] key.
Cursor

Chapter 8 KGP-920 Setup Procedure
8-4 93121662-00
8.2.7 Setting RAIM function Initial setup: ON RAIM (Receiver Autonomous Integrity Monitoring) is the function, which supervises whether GPS holds the accuracy, which the user chose (100m or 10m). If this function is turned ON, the bar of RAIM accuracy will be displayed. And the status is displayed after position fix is available. (1) Press [MENU] key until Menu options 1 to 9 appears. (2) Press [3] key to select “3:GPS”. (3) Press [ ] or [ ] key to move cursor onto “7:RAIM FUNCTION” (4) Press [ENT] key. (5) Press [ ] or [ ] key to select desired RAIM function. (6) Press [ENT] key.
8.2.8 Selecting RAIM accuracy Initial setup: 100m
RAIM accuracy can be chosen from 100m and 10m.
(1) Press [MENU] key until Menu options 1 to 9 appears. (2) Press [3] key to select “3:GPS”. (3) Press [ ] or [ ] key to move cursor onto “8:RAIM ACCURACY” (4) Press [ENT] key. (5) Press [ ] or [ ] key to select desired RAIM accuracy (100m or 10m). (6) Press [ENT] key.
Status 1.SAFE: GPS signal is safe to use 2.CAUTION Using a GPS signal, necessity or
a RAIM function does not have enough cautions.
3.GPS signal is unsafe to use.
RAIM accuracy ( ) or ( )
RAIM accuracy When 100m is chosen, it is a long
bar ( ) display. When 10m is chosen, it is a short
bar ( ) display. This bar is displayed when a RAIM
function is ON. It is not displayed at the time of OFF.

KGP-920 Chapter 8 Setup Procedure
93121662-00 8-5
8.3 Menu 4: Differential GPS (DGPS) This DGPS system can improve the GPS positioning accuracy. There are two styles, BEACON and SBAS, in DGPS, and BEACON is further divided into the system of internal receiver and external receiver. The internal receiver system requires internal beacon receiver kit of option. The external receiver system requires an external differential beacon receiver, which outputs the compensation data of RTCM SC-104, connected to a GPS navigator.
8.3.1 Displaying DGPS When the DGPS is set, the DGPS positioning status is displayed with letters D on A (NAV1), B (NAV2), C (NAV3), D (PLOT) screen.
8.3.2 Selecting a style of DGPS Initial setup: BEACON BEACON: DGPS for RTCM SC-104 . SBAS: WAAS / EGNOS / MSAS (1) Press [MENU] key until Menu options 1 to 9 appears. (2) Press [4] key to select “4:DGPS”. (3) Press [1] key to select “1:DGPS STYLE”. (4) Press [ ] or [ ] key to move cursor onto ”BEACON” or “SBAS”. (5) Press [ENT] key.
8.3.3 DGPS measurement Initial setup: AUTO
OFF: Normal GPS positioning takes place. D letter is not shown. ON: DGPS correction takes place only. D letter continues during DGPS correction. AUTO: DGPS correction takes place when DGPS correction data is received.
When no data is received, the normal GPS positioning is automatically changing from DGPS positioning.
(1) Press [MENU] key until Menu options 1 to 9 appears. (2) Press [4] key to select “4:DGPS”.
A (NAV1) screen B (NAV2) screen C (NAV3) screen D (PLOT) screen
DGPS mode On: DGPS positioning in progress Indication Blinks: Unsuccessful DGPS positioning Off: Canceled DGPS positioning
Cursor

Chapter 8 KGP-920 Setup Procedure
8-6 93121662-00
(3) Press [2] key to select “2:DGPS MODE”. (4) Press [ ] or [ ] key to move cursor onto ”AUTO”, “ON” or “OFF”. (5) Press [ENT] key.
8.3.4 Setting a DGPS timeout Initial setup: 40 sec
If the correction data from beacon receiver is interrupted or has errors, NAVIGATOR holds the last differential correction for the duration of timeout. You can set TIMEOUT to 010 to 180 seconds. However, the position accuracy degrades as TIMEOUT lengthens. (1) Press [MENU] key until Menu options 1 to 9 appears. (2) Press [4] key to select “4:DGPS”. (3) Press [3] key to select “3:TIME OUT”. (4) Enter a timeout (010 to 180 seconds) using numeric keys. (5) Press [ENT] key.
8.3.5 Selecting a beacon station (Beacon DGPS only) Initial setup: AUTO
A beacon station is selectable in both the manual or auto mode. The manual mode differs by the internal system and an external system. (Selecting a station in the auto mode)
If the beacon receiver to connect supports automatic tuning, in the auto mode, the nearest station will be selected based on actual longitude and latitude among all the stored beacon stations. (1) Press [MENU] key until Menu options 1 to 9 appears. (2) Press [4] key to select “4:DGPS”. (3) Press [ ] or [ ] key to move cursor onto “NEXT” and 2/2 page is displayed. (4) Press [1] key to select “1:STN SEL”. (5) Press [ ] or [ ] key to move cursor onto ”AUTO”. (6) Press [ENT] key.
Cursor
Cursor
Cursor Cursor

KGP-920 Chapter 8 Setup Procedure
93121662-00 8-7
(Selecting a station in the manual mode)
Internal beacon receiver system
In the manual mode of internal beacon receiver system, specify the station number between 001 and 480. (Refer “Table of DGPS reference stations” of supplement.) (1) Press [MENU] key until Menu options 1 to 9 appears. (2) Press [4] key to select “4:DGPS”. (3) Press [ ] or [ ] key to move cursor onto “NEXT” and 2/2 page is displayed. (4) Press [1] key to select “1:STN SEL”. (5) Press [ ] or [ ] key to move cursor onto ”AUTO”. (6) Press [ENT] key. (7) Press [ ] or [ ] key to move cursor onto ”MANUAL”.
(8) Press [ENT] key.
(9) Press [ ] key to move cursor to the station number field. (10) Enter station number (001 to 480) by numerical keys. (11) Press [ENT] key.
External beacon receiver system
In the manual mode of external beacon receiver system, frequency and bit rate of the receiving beacon station must be entered. (1) Press [MENU] key until Menu options 1 to 9 appears. (2) Press [4] key to select “4:DGPS”. (3) Press [ ] or [ ] key to move cursor onto “NEXT” and 2/2 page is displayed. (4) Press [1] key to select “1:STN SEL”. (5) Press [ ] or [ ] key to move cursor onto ”AUTO”. (6) Press [ENT] key. (7) Press [ ] or [ ] key to move cursor onto ”MANUAL”. (8) Press [ENT] key.
Frequency Initial setup: 283.5kHz Selectable range: 283.5 to 325.0kHz Bit rate Initial setup: 200bps
Cursor Cursor
Description of the station number 001 - 020: Numbers which can be registered by the user. 021 - 030: Numbers which are stored as the beacon almanac data. 031 - 480: Numbers stored in the ROM (worldwide beacon stations are stored).

Chapter 8 KGP-920 Setup Procedure
8-8 93121662-00
(9) Press [2] key to select “2:FREQUENCY”. (10) Specify receiving frequency (4-digit) of beacon station using numeric keys (0 to 9). (11) Press [ENT] key to set receiving frequency. (12) Press [ ] key to move cursor onto bit rate. (13) Press [ENT] key. (14) Press [ ] or [ ] key to set bit rate. (15) Press [ENT] key . 8.3.6 String a beacon station (internal beacon receiver system only) When a beacon station is not stored or when change takes place in the data of a beacon station, reception from that station is done by registering the station data. The user can register up to 20 station numbers in the range of 001 to 020. 1) Press [MENU] key until Menu options 1 to 9 appears. (2) Press [4] key to select “4:DGPS”. (3) Press [ ] or [ ] key to move cursor onto “NEXT” and 2/2 page is displayed. (4) Press [1] key to select “1:STN SEL”. (5) Press [ ] or [ ] key to move cursor onto ”AUTO”. (6) Press [ENT] key. (7) Press [ ] or [ ] key to move cursor onto ”MANUAL”. (8) Press [ENT] key (9) Press [ ] key to move cursor to the station number field. (10) Enter station number (001 to 020) by numerical keys. (11) Press [ENT] key. (12) Press [ ] key to move cursor to the frequency input field. (13) Specify receiving frequency (4-digit) of beacon station using numeric keys (0 to 9). (14) Press [ENT] key to set receiving frequency. (15) Press [ ] key to move cursor onto bit rate. (16) Press [ENT] key.
Cursor Cursor
Frequency Bit rate
Cursor Cursor

KGP-920 Chapter 8 Setup Procedure
93121662-00 8-9
(17) Press [ ] or [ ] key to set bit rate. (18) Press [ENT] key . (19) Press [ ] key to move cursor to the station name (STN NAME) field. (20) Press [ ] [ ] [ ] [ ] key to select a comment letter or symbol from the comment letter
table by locating cursor on it, or enter a value using numeric keys. (21) Press [SEL] key . And one letter or symbol are made to decide. (22) You can enter up to 10 letters by repeating (20) and (21) steps. (23) Press [ENT] key and decide of a station name. 8.3.7 Selecting the DGPS input signal baud rate (External beacon receiver system only)
Initial setup: 4800 bps Adjust the baud rate of RTCM SC-104 format signal reception to the output signal baud rate of beacon receiver. (1) Press [MENU] key until Menu options 1 to 9 appears. (2) Press [4] key to select “4:DGPS”. (3) Press [ ] or [ ] key to move cursor onto “NEXT” and 2/2 page is displayed. (4) Press [4] key to select “4:BAUD RATE”. (5) Press [ ] or [ ] key to move cursor onto the correct baud rate. (6) Press [ENT] key. 8.3.8 DGPS monitor (Beacon DGPS only) DGPS monitor provides information on the DGPS beacon receiver interface and receiving status.
(1) Press [MENU] key until Menu options 1 to 9 appears. (2) Press [4] key to select “4:DGPS”. (3) Press [ ] or [ ] key to move cursor onto “NEXT” and 2/2 page is displayed.
Cursor Baud rate
Bit rate
Table of comment Letters and symbols
Station name field
Station name
Frequency
Bit rate

Chapter 8 KGP-920 Setup Procedure
8-10 93121662-00
(4) Press [5] key to select “5:DGPS MONITOR”. (5) Press [ ] or [ ] key to change pages of DGPS monitor. 8.3.9 Message monitor (Beacon DGPS only) Message monitor provides DGPS text message. (1) Press [MENU] key until Menu options 1 to 9 appears. (2) Press [4] key to select “4:DGPS”. (3) Press [ ] or [ ] key to move cursor onto “NEXT” and 2/2 page is displayed. (4) Press [6] key to select “6:MESSAGE MONITOR”.
Cursor
Displays Frequency being received, bit rate, S/N ratio and ID No (beacon station number)
Display age of DGPS data
HEALTH indicates health status of reference station. 0 is best. Reliability degrades as the number increases up to 5. 6 indicates reference station not monitored. 7 means reference station not working.
Data from beacon receiver is displayed
Cursor

KGP-920 Chapter 8 Setup Procedure
93121662-00 8-11
8.4 Menu 5: Compensation 8.4.1 Correcting your position You can compensate your GPS present position given by GPS in the following two ways: • Enter the latitude and longitude of your actual position using numeric keys. • Enter the correction offset to use. (Direct entry of actual position data) When your present position is displayed in LAT/LONG mode, you can correct it by entering the known LAT/LONG data. (1) Press [MENU] key until Menu options 1 to 9 appears. (2) Press [5] key to select “5:COMP.”. (3) Press [1] key to select “1:LAT/LON”. (4) Enter the correct latitude and longitude value. Example: The position “N35°37.700 / E139°43.200” is entered by pressing the following keys in
exact order given below. [3],[5],[3],[7],[7],[0],[0],[N],[ENT],[ ],[1],[3],[9],[4],[3],[2],[0],[0],[E],[ENT]
Present position Actual position (to be entered) Correction offset
Latitude 35 o37.893 N Latitude 35 o37.700 N Latitude 0o00.193 N
Longitude 139 o43.348 E Longitude 139 o43.200 E Longitude 0o00.148 W
(Entry of correction offset) When your present position is shown in LAT/LONG mode, you can correct it by entering the LAT/LONG correction data. (1) Press [MENU] key until Menu options 1 to 9 appears. (2) Press [5] key to select “5:COMP.”. (3) Press [1] key to select “1:LAT/LON”. (4) Press [ ] key to move cursor to correction offset field of latitude.
NOTE: Press to clear incorrect Input. You can reenter Numeric data.
CLR
Present positionActual position (to be entered)
Correction position
NOTE: The latitude and longitude correction is also available in LOPs mode.

Chapter 8 KGP-920 Setup Procedure
8-12 93121662-00
(5) Enter the latitude/longitude correction offset. Example: The correction offset “S0°0.193 / W0°0.148” is entered by pressing the following keys
in exact order given below. [0],[0],[0],[0],[1],[9],[3],[S],[ENT],[ ],[0],[0],[0],[0],[0],[1],[4],[8],[W],[ENT]
Correction offset (to be entered) Present position Correction position
Latitude 0o00.193 S Latitude 35 o37.893 N Latitude 35 o37.700 N
Longitude 0o00.148 W Longitude 139 o43.348 E Longitude 139 o43.200 E
8.4.2 Checking the correction offset You can check the correction offset as follows:
(1) Press [MENU] key until Menu options 1 to 9 appears. (2) Press [5] key to select “5:COMP.”. (3) Press [1] key to select “1:LAT/LON”. 8.4.3 Disable position correction To delete and disable the correction offset follow these steps:
(1) Press [MENU] key until Menu options 1 to 9 appears. (2) Press [5] key to select “5:COMP.”. (3) Press [1] key to select “1:LAT/LON”. (4) Press [CLR] key to set correction offset to 0 correction is disabled.
8.4.4 Compensating the compass Initial setup: Auto mode The course and bearing to waypoint is shown in true bearing. You can adjust the GPS true bearing to the magnetic compass bearing. (Automatic compensation) In the Auto mode, the magnetic compass is compensated based on the built-in global magnetic variation maps. However, avoid using this mode if you are higher than 75 degrees North or South latitude. As the compass may have a small error because the system contains world maps. Manual correction is recommended. For areas that do not allow exact translation of a true bearing to a magnetic bearing, despite the map covering the whole world, the resulting value may differ from the actual deviation.
NOTE: Press to clear incorrect Input. You can reenter Numeric data.
CLR
Present position Corrected position
Correction amount Cursor
Correction data (to be entered)
The correction offset
Correction data (to be entered)
Position correction Has been cleared

KGP-920 Chapter 8 Setup Procedure
93121662-00 8-13
(1) Press [MENU] key until Menu options 1 to 9 appears. (2) Press [5] key to select “5:COMP.”. (3) Press [3] key to select “3:MAG.V”. (4) Press [ ] or [ ] key to move cursor onto “AUTO” . (5) Press [ENT] key.
(Manual compensation)
(1) Press [MENU] key until Menu options 1 to 9 appears. (2) Press [5] key to select “5:COMP.”. (3) Press [3] key to select “3:MAG.V”. (4) Press [ ] or [ ] key to move cursor onto “MANUAL” . (5) Press [ENT] key. (6) Press [ ] key . (7) Press [SEL] key to change the positive (+) or negative (-) sign of correction offset. or (8) Press [0] key to use the current positive (+) or negative (-) sign as it is. (9) Enter a (4-digit) compensation offset using numeric keys. (10) Press [ENT] key.
8.4.5 Displaying local time Initial setup: 00:00 hour You can display your local time by entering a time difference from the Greenwich Mean Time (GMT). See the following figure 8.1 to determine zone time difference. (1) Press [MENU] key until Menu options 1 to 9 appears. (2) Press [5] key to select “5:COMP.”. (3) Press [4] key to select “4:TIME”. (7) Press [SEL] key to change the positive (+) or negative (-) sign of correction offset. or (8) Press [0] key to use the current positive (+) or negative (-) sign as it is. (9) Enter a time difference from GMT using numeric keys. (10) Press [ENT] key.
initial setup: 0.0 o
Setup range: -180.0° to +180.0°
NOTE: Press to clear incorrect Input. You can reenter Numeric data.
CLR An error (compensation amount) From true bearing is shown
An error (compensation amount) From true bearing is shown

Chapter 8 KGP-920 Setup Procedure
8-14 93121662-00
-11 -10 -9 -8 -7 -6 -5 -4 -3 -2 -1 0 +1 +2 +3 +4 +5 +6 +7 +8 +9 +10 +11
-11 -10 -9 -8 -7 -6 -5 -4 -3 -2 -1 0 +1 +2 +3 +4 +5 +6 +7 +8 +9 +10 +11
Figure 8.1 Time difference chart
+12 -12
+12 -12
+12 -12
+12 -12
Greenwich Mean Time (GMT)
International date line International date line
NOTE: Press to clear incorrect input. You can reenter a “+” or “-“ sign and numeric data.
CLR

KGP-920 Chapter 8 Setup Procedure
93121662-00 8-15
8.5 Menu 8: Initial setting 8.5.1 Setting average constants(measuring position, speed and course) Initial setup: HIGH Use the averaging function to compare GPS sensor signals several times and get their average. This stabilizes the GPS position (latitude and longitude), speed and course data. The maximum averaging rate is “LOW” and the minimum averaging rate is “HIGH”. When you select “LOW” value, data is averaged more often and the display data has smaller variations. However, delays for updating occur. When you select a “HIGH” value, data is averaged less but the display data responds quicker. Selecting a constant (averaging constant) suitable for your boat speed will provide you with smoother data of the boat position, course and speed. (1) Press [MENU] key until Menu options 1 to 9 appears. (2) Press [8] key to select “8:INIT.SET”. (3) Press [1] key to select “1:AVERAGE”. (4) Press [ ] or [ ] key to move cursor onto the average constants to choose”. (5) Press [ENT] key. 8.5.2 Changing the distance or speed unit Initial setup: nm You can change the measuring unit of distance (to WPT or final destination) and speed.
(1) Press [MENU] key until Menu options 1 to 9 appears. (2) Press [8] key to select “8:INIT.SET”. (3) Press [2] key to select “2:UNIT(DST)”. (4) Press [ ] or [ ] key to move cursor onto the distance
or speed unit to choose. (5) Press [ENT] key. 8.5.3 Changing the antenna height unit Initial setup: ft You can change the measuring unit of antenna height (above sea level).
(1) Press [MENU] key until Menu options 1 to 9 appears. (2) Press [8] key to select “8:INIT.SET”. (3) Press [3] key to select “3:UNIT(ALT)”. (4) Press [ ] or [ ] key to move cursor onto the antenna
height unit to choose. (5) Press [ENT] key.
Cursor

Chapter 8 KGP-920 Setup Procedure
8-16 93121662-00
8.5.4 Changing sail mode Initial setup: GREAT CIRCLE You can change the navigation mode. There are two navigation modes. Great Circle course: ....... The shortest course on a sphere. Rhumb Line course: ....... Straight course on a Mercator chart. (1) Press [MENU] key until Menu options 1 to 9 appears. (2) Press [8] key to select “8:INIT.SET”. (3) Press [4] key to select “4:SAIL MODE”. (4) Press [ ] or [ ] key to move cursor onto the sail mode
to choose. (5) Press [ENT] key. 8.5.5 Displaying position data in LAT/LONG mode Initial setup: L/L mode For the switching procedure, refer to the "Registering a Position in LOP".
(1) Press [MENU] key until Menu options 1 to 9 appears. (2) Press [8] key to select “8:INIT.SET”. (3) Press [5] key to select “5:POSITION”. (4) Press [ ] or [ ] key to move cursor onto the LAT/LON
mode to choose. (5) Press [ENT] key. 8.5.6 Changing the latitude and longitudinal display digits Initial setup: .001’ The following operations enable to display the latitude and longitude of present position up to 0.0001 minute. (1) Press [MENU] key until Menu options 1 to 9 appears. (2) Press [8] key to select “8:INIT.SET”. (3) Press [6] key to select “6:L/L UNIT”. (4) Press [ ] or [ ] key to move cursor onto the display
digits to choose. (5) Press [ENT] key. 8.5.7 Specifying the chain and secondary stations for Loran C, Loran A or Decca For the operating procedure, refer to the "Initial setup for LOP display".
NOTE: If you select .0001', the latitude and longitude data of GGA sentence will also be output in 0.0001' only when Format
IEC is selected.

KGP-920 Chapter 8 Setup Procedure
93121662-00 8-17
8.6 Menu 9: Interface 8.6.1 Selecting an output data format of DATA port . Initial setup: IEC
You can select the format of output data. (1) Press [MENU] key until Menu options 1 to 9 appears. (2) Press [9] key to select “9:INTERFACE”. (3) Press [1] key to select “1:FORMAT”. (4) Press [ ] or [ ] key to move cursor onto the output data format to choose. (5) Press [ENT] key. 8.6.2 Editing the IEC 61162-1 output data format of DATA port initial setup: Sentence: GGA, GLL, GBS, VTG, ZDA Cycle: 1 second You can select the output sentence and set the output cycle (in seconds) of the IEC 61162-1 output data format. (1) Press [MENU] key until Menu options 1 to 9 appears. (2) Press [9] key to select “9:INTERFACE”. (3) Press [2] key to select “2:IEC EDIT”. (4) Press [ ] [ ] [ ] [ ] key to move cursor onto the sentence to change its cycle. (5) Enter an output cycle of selected sentence using numeric keys. (6) Press [ENT] key.
DATA port
Sentence Output meter Output cycle (sec)
NOTE: Set the output cycle for the required sentence only and set the unused data to "00". The output meter indicates the ratio of total data amount (of selected sentence) to the data transmission capacity (about 10% per scale). Do not maximize at 100% or poor performance may result.
Cursor
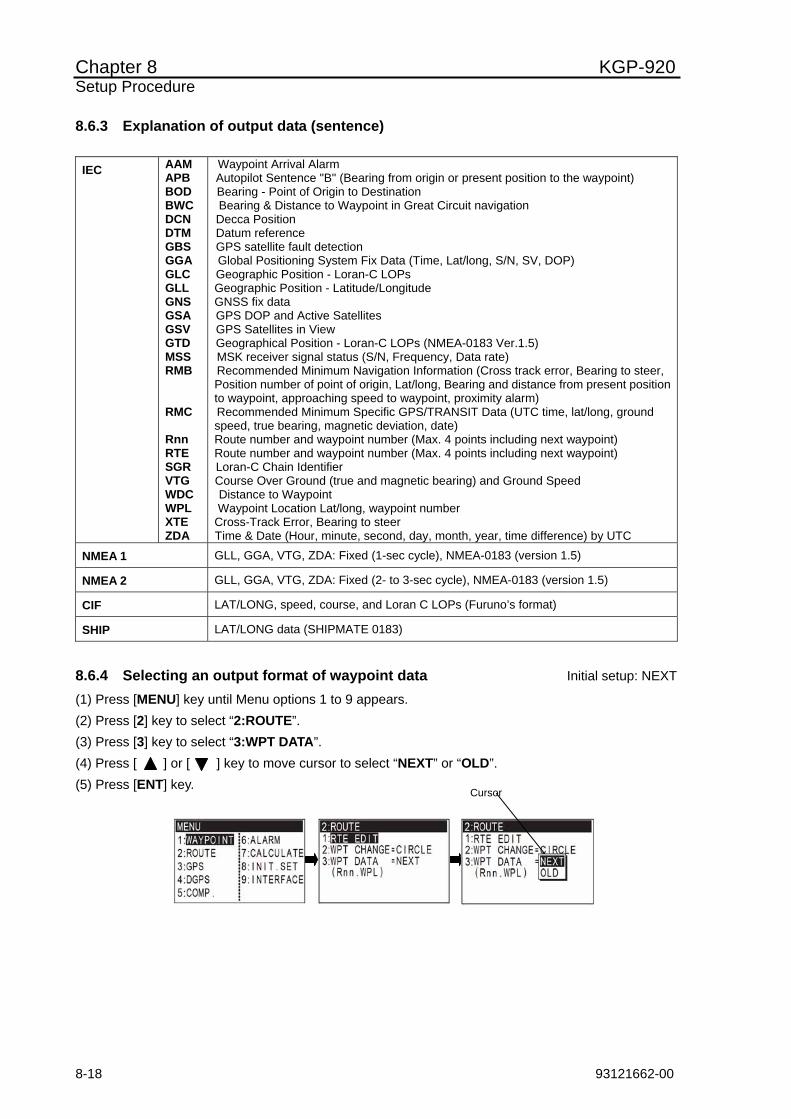
Chapter 8 KGP-920 Setup Procedure
8-18 93121662-00
8.6.3 Explanation of output data (sentence) IEC AAM
APB BOD BWC DCN DTM GBS GGA GLC GLL GNS GSA GSV GTD MSS RMB
RMC Rnn RTE SGR VTG WDC WPL XTE ZDA
Waypoint Arrival Alarm Autopilot Sentence "B" (Bearing from origin or present position to the waypoint) Bearing - Point of Origin to Destination Bearing & Distance to Waypoint in Great Circuit navigation Decca Position Datum reference GPS satellite fault detection Global Positioning System Fix Data (Time, Lat/long, S/N, SV, DOP) Geographic Position - Loran-C LOPs Geographic Position - Latitude/Longitude GNSS fix data GPS DOP and Active Satellites GPS Satellites in View Geographical Position - Loran-C LOPs (NMEA-0183 Ver.1.5) MSK receiver signal status (S/N, Frequency, Data rate) Recommended Minimum Navigation Information (Cross track error, Bearing to steer, Position number of point of origin, Lat/long, Bearing and distance from present position to waypoint, approaching speed to waypoint, proximity alarm) Recommended Minimum Specific GPS/TRANSIT Data (UTC time, lat/long, ground speed, true bearing, magnetic deviation, date) Route number and waypoint number (Max. 4 points including next waypoint) Route number and waypoint number (Max. 4 points including next waypoint) Loran-C Chain Identifier Course Over Ground (true and magnetic bearing) and Ground Speed Distance to Waypoint Waypoint Location Lat/long, waypoint number
Cross-Track Error, Bearing to steer Time & Date (Hour, minute, second, day, month, year, time difference) by UTC
NMEA 1 GLL, GGA, VTG, ZDA: Fixed (1-sec cycle), NMEA-0183 (version 1.5)
NMEA 2 GLL, GGA, VTG, ZDA: Fixed (2- to 3-sec cycle), NMEA-0183 (version 1.5)
CIF LAT/LONG, speed, course, and Loran C LOPs (Furuno’s format)
SHIP LAT/LONG data (SHIPMATE 0183)
8.6.4 Selecting an output format of waypoint data Initial setup: NEXT
(1) Press [MENU] key until Menu options 1 to 9 appears. (2) Press [2] key to select “2:ROUTE”. (3) Press [3] key to select “3:WPT DATA”. (4) Press [ ] or [ ] key to move cursor to select “NEXT” or “OLD”. (5) Press [ENT] key.
Cursor

KGP-920 Chapter 8 Setup Procedure
93121662-00 8-19
8.6.5 Selecting an output data format of DATA 2 port . Initial setup: Extension data port You can select either the extension data port or exclusive port of ACK/ALR for DATA 2 port. It can select ACK/ALR of a menu3 in turning on or turning off. If ACK/ALR is turned ON, it will be set to exclusive port of ACK/ALR, and it will be set to extension data port if it turns OFF. (1) Press [MENU] key until Menu options 1 to 9 appears. (2) Press [9] key to select “9:INTERFACE”. (3) Press [3] key to select “3:ACK/ALR”. (4) Press [ ] or [ ] key to move cursor onto the mode to choose. (5) Press [ENT] key. (ACK/ALR) ACK and ALR is a sentence of IEC 61162-1. ACK: Acknowledge alarm. ALR: Set alarm state. (Extension data port) When IEC format is selected, both DATA and DATA 2 ports output IEC format. But when output format other than IEC is selected, DATA 2 port only outputs the position data for external beacon receiver.
DATA 2 port
$ GP ACK, xxx *hh <CR><LF>
Start of sentence
Talker device Sentence type
Local alarm number (identifier) 001: Anchor watch 002:Proximity 003: Cross track error 004: Course deviation angle 005: GPS no fix 006: GPS error 007: HDOP error 008: DGPS error 009: RAIM caution 010: RAIM unsafe
$ GP ALR, hhmmss.ss, xxx, A, A, c—c*hh<CR><LF>
Alarm’s description text
Alarm’s acknowledge state: A = acknowledged V = unacknowledged
Alarm condition: A = threshold exceeded V = not exceeded
Local alarm number (identifier): Same as the above
Time of alarm condition change, UTC
Sentence type
Talker device
Cursor

Chapter 8 KGP-920 Setup Procedure
8-20 93121662-00
8.7 Initialization (Displaying the menu) Turn power on, then press the ENT key while the screen message "CHECK OK" is displayed. (How to use menus) Initialization 1) Press [1] key to select “1:INITIALIZE”. 2) Press [ENT] key. Menu is initialized and the screen for powering
off will appear. or Press [CLR] key. Initialization will be canceled. Other menu (1) Press [2] to [6] key to select a desired item. (2) Press [ ] or [ ] key to select a desired content. (3) Press [ENT] key. (Exit from the menu) Press the [MODE] key to display the screen for powering off.
8.7.1 Initialization If your GPS position has failed due to satellite maintenance or other reason, initialize your GPS navigator. Then, set all system parameters again. 8.7.2 Erasing entire data from memory You can erase the entire data such as waypoints, events, MOB, and route from memory. 8.7.3 Switching between Loran C LOPs, Loran A LOPs and Decca LOPs
initial setup: LORAN C
This menu option allows you to select a desired display among the loran C LOP, Loran A LOP and Decca LOP. 8.7.4 Changing a storing method for present position (EVENT) initial setup: AUTO
You can use either of the following two procedures for registering your current position (event).
AUTO: Pressing the EVT key automatically registers the points starting from No. 001 through 199. When the 200th point is reached, the number is returned to 001 again and the older data is sequentially replaced by the newer one.
NOTE: Already registered data on the waypoints, events, MOBs and routes remain unchanged.
NOTE: Already registered data on the waypoints, events, MOBs and routes remain unchanged.

KGP-920 Chapter 8 Setup Procedure
93121662-00 8-21
MANUAL: Press the EVT key, then specify desired registration numbers (in the range of 001 to 199) from the numerical keypad.
8.7.5 Selecting an initial value (North, South, East, West) of latitude/longitude Initial setup: N/W N/W (N. Lat./W. Long.): When power is turned on, GPS or DGPS position measurement is
started using the north latitude/west longitude region as the initial value.
N/E (N. Lat./E. Long.): When power is turned on, GPS or DGPS position measurement is started using the north latitude/east longitude region as the initial value.
S/W (S. Lat./W. Long.): When power is turned on, GPS or DGPS position measurement is started using the south latitude/west longitude region as the initial value.
S/E (S. Lat./E. Long.): When power is turned on, GPS or DGPS position measurement is started using the south latitude/west longitude region as the initial value.
In the MANUAL mode, you can specify desired registration numbers.
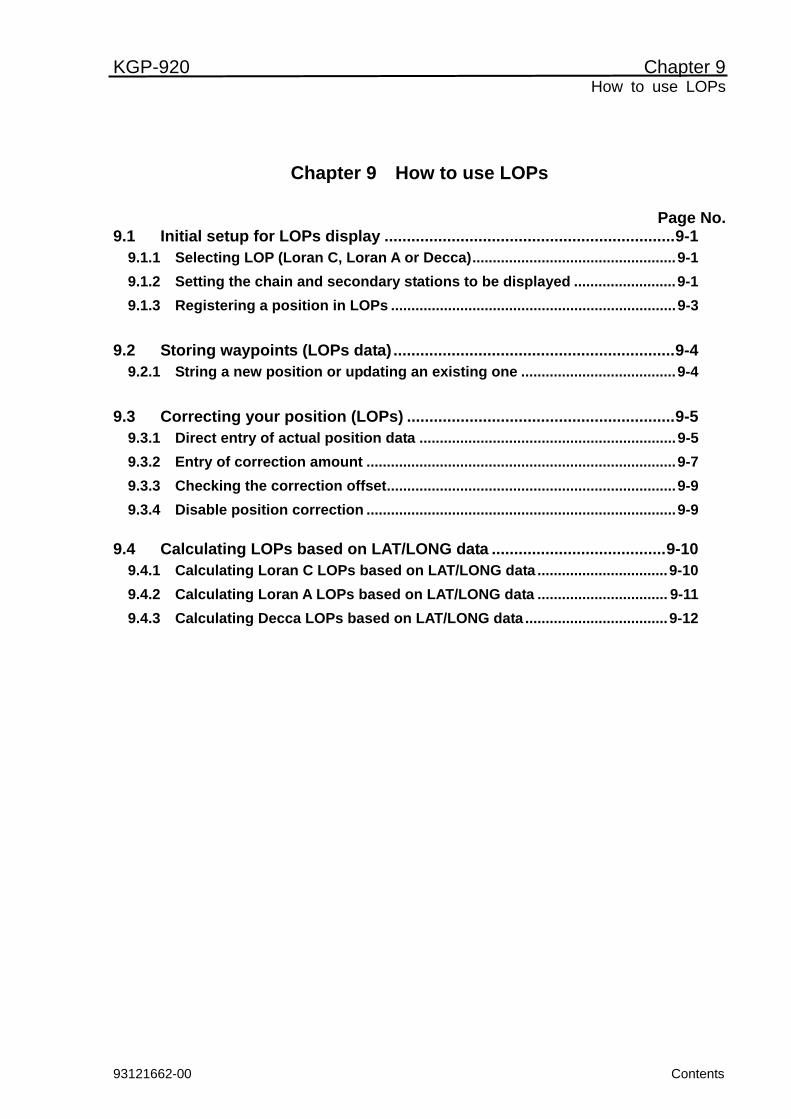
KGP-920 Chapter 9 How to use LOPs
Chapter 9 How to use LOPs
Page No.
9.1 Initial setup for LOPs display .................................................................9-1 9.1.1 Selecting LOP (Loran C, Loran A or Decca)..................................................9-1 9.1.2 Setting the chain and secondary stations to be displayed .........................9-1 9.1.3 Registering a position in LOPs ......................................................................9-3
9.2 Storing waypoints (LOPs data) ...............................................................9-4
9.2.1 String a new position or updating an existing one ......................................9-4 9.3 Correcting your position (LOPs) ............................................................9-5
9.3.1 Direct entry of actual position data ...............................................................9-5 9.3.2 Entry of correction amount ............................................................................9-7 9.3.3 Checking the correction offset.......................................................................9-9 9.3.4 Disable position correction ............................................................................9-9
9.4 Calculating LOPs based on LAT/LONG data .......................................9-10
9.4.1 Calculating Loran C LOPs based on LAT/LONG data ................................9-10 9.4.2 Calculating Loran A LOPs based on LAT/LONG data ................................ 9-11 9.4.3 Calculating Decca LOPs based on LAT/LONG data ...................................9-12
93121662-00 Contents

KGP-920 Chapter 9 How to use LOPs
Chapter 9 How to use LOPs
9.1 Initial setup for LOPs display Measured longitude and latitude can be translated into loran C, loran A or decca LOPs mode. To turn on the LOPs mode, the following initial setup is required.
NOTE: Press to clear incorrect
Input. You can reenter Numeric data.
CLR NOTE: Press to backspace the
cursor to correct an input error.
9.1.1 Selecting LOP (Loran C, Loran A or Decca) See Page 8-19 “8.7.3 Switching between Lran C LOPs, Loran A LOPs, and Decca LOPs”. 9.1.2 Setting the chain and secondary stations to be displayed Select the chain and secondary stations to be displayed. Settings depend on the LOPs mode to be used as described below. (Setting chain and secondary stations in Loran C LOPs mode)
You can convert your GPS present position and stored memory data (waypoints and events) from LAT/LONG into Loran C LOPs. (1) Press [MENU] key until Menu options 1 to 9 appears. (2) Press [8] key to select “8:INIT.SET”. (3) Press [ ] key to move cursor to the letters “7:CHAIN”. (4) Enter a (4-digit) Loran C chain number. (5) Enter the highest digit (10 thousand microseconds) of two Loran C secondary stations. (6) Press [ENT] key.
Chain number
First digit of two secondary sCursor tations
(Specifying combinations of secondary stations in Loran A LOPs mode)
You can convert your present position given by GPS and stored position data (waypoints and event data) from LAT/LONG into Loran A LOPs. (1) Press [MENU] key until Menu options 1 to 9 appears. (2) Press [8] key to select “8:INIT.SET”. (3) Press [ ] key to move cursor to the letters “7:CHAIN”. (4) Press [ENT] key. (5) Press [ ] or [ ] key to select the secondary station 1. (6) Press [ENT] key.
93121662-00 9-1

Chapter 9 KGP-920 How to use LOPs
(7) Press [ ] key. (8) Press [ENT] key.
(9) Press [ ] or [ ] key to select the secondary station 2. (10) Press [ENT] key.
Secondary station 1
Cursor
Secondary station 1
(Automatic chain selecting in Decca LOPs mode) You can convert your GPS present position and stored position memory (waypoints and event data) from LAT/LONG into Decca LOPs by automatic selection of Decca chain. (1) Press [MENU] key until Menu options 1 to 9 appears. (2) Press [8] key to select “8:INIT.SET”. (3) Press [ ] key to move cursor to the letters “7:CHAIN”.
Cursor (4) Press [ENT] key. (5) Press [ ] or [ ] key to move cursor onto “AUTO”. (6) Press [ENT] key.
(Manual chain selecting in Decca LOPs mode) You can convert both your present position given by GPS and stored position data (waypoints and event data) from LAT/LONG into Decca LOPs. (1) Press [MENU] key until Menu options 1 to 9 appears. (2) Press [8] key to select “8:INIT.SET”. (3) Press [ ] key to move cursor to the letters “7:CHAIN”. (4) Press [ENT] key. (5) Press [ ] or [ ] key to move cursor onto “MANUAL”. (6) Press [ENT] key. (7) Enter a (2-digit) Decca chain number (8) Press [ENT] key. (9) Press [ ] key . (10) Press [ ] or [ ] key to select a combination of secondary stations. (11) Press [ENT] key.
Cursor Chain number
Combination of two secondary station
9-2 93121662-00

KGP-920 Chapter 9 How to use LOPs
9.1.3 Registering a position in LOPs Following describes the procedure for replacing LAT/LONG display with LOP and registering a position in LOP (1) Press [MENU] key until Menu options 1 to 9 appears. (2) Press [8] key to select “8:INIT.SET”. (3) Press [5] key to select “5:POSITION”. (4) Press [ ] or [ ] key to select “LOP” letters. (5) Press [ENT] key. Cursor
93121662-00 9-3

Chapter 9 KGP-920 How to use LOPs
9.2 Storing waypoints (LOPs data)
NOTE: Press to clear incorrect Input. You can reenter Numeric data.
CLR NOTE: Press to backspace the
cursor to correct an input error.
9.2.1 String a new position or updating an existing one Up to 200 waypoints can be stored in memory. As 200 points (numbers 000 and 199) are reserved for MOB and event registration, you can use 200 to 399 (total of 200 points) to store waypoints. (1) Press [MENU] key until Menu options 1 to 9 appears. (2) Press [1] key to select “1:WAYPOINT”. (3) Enter storage number (200 to 399) using numeric keys. (4) Press to [ENT] key to display data of the specified storage number. (5) Press [ ] key to move cursor to letter “ = ”. (6) Press [ ] key to move cursor to the numeric input field. (Loran C LOPs mode) (7) Enter a 6-digit data (LOPs of secondary station 1) using numeric keys. (8) Press [ENT] key. (9) Enter a 6-digit data (LOPs of secondary station 2) using numeric keys. (10) Press [ENT] key. (Loran A LOPs mode) (7) Enter a 5-digit data (LOPs of secondary station 1) using numeric keys. (8) Press [ENT] key. (9) Enter a 5-digit data (LOPs of secondary station 2) using numeric keys. (10) Press [ENT] key. (Decca LOPs mode) (7) Enter 2-digit numbers (zone, lane, centilane) of secondary station 1 using numeric keys. (8) Press [ENT] key. (9) Enter 2-digit numbers (zone, lane, centilane) of secondary station 2 using numeric keys. (10) Press [ENT] key.
Zone Lane Centilane
Zone letter table
NOTES:.Refer to "Decca zone" of annex about a zone.
See “Zone letter table”, when you input the alphabet
For the following operations, refer to the "Storing waypoints (LAT/LONG) data" • "Registering additional comments" (see page 6-1). • "Copying a position" (see page 6-2) • "Changing the comment I.D." (see page 6-3) • "Erasing a single waypoint" (see page 6-3)
9-4 93121662-00

KGP-920 Chapter 9 How to use LOPs
9.3 Correcting your position (LOPs) You can compensate your GPS present position given by GPS in the following two ways: • Enter the LOPs of your actual position using numeric keys. • Enter the correction offset to use. NOTE: The LOP correction is ineffective in latitude and longitude mode
NOTE: Press to clear incorrect Input. You can reenter Numeric data.
CLR NOTE: Press to backspace the
cursor to correct an input error.
9.3.1 Direct entry of actual position data (Correction by Loran C LOPs data entry) When your position is displayed in Loran C LOPs mode, you can correct it by entering the Loran C LOPs correction offset. (1) Press [MENU] key until Menu options 1 to 9 appears. (2) Press [5] key to select “5:COMP.”. (3) Press [2] key to select “2:LOP”. (4) Enter correct (6-digit) LOPs of secondary station 1 using numeric keys. (5) Press [ENT] key. (6) Press [ ] key to move cursor to Loran C LOPs field of secondary station 2. (7) Enter correct (6-digit) LOPs of secondary station 2 using numeric keys. (8) Press [ENT] key.
Present positionActual position (to be entered)
Correction position
Present position (GPS fix) Actual position (to be entered) Correction offset
Secondary st.1 35518.9 usec Secondary st.1 35520.9 usec Secondary st.1 +0001.1 usec
Secondary st.2 60387.5 usec Secondary st.2 60386.0 usec Secondary st.2 –0001.5 usec
(Correction by Loran A LOPs data entry) When your position is displayed in Loran A LOPs mode, you can correct it by entering the Loran A LOPs correction offset. (1) Press [MENU] key until Menu options 1 to 9 appears. (2) Press [5] key to select “5:COMP.”. (3) Press [2] key to select “2:LOP”. (4) Enter correct (5-digit) LOPs of secondary station 1 using numeric keys.
93121662-00 9-5

Chapter 9 KGP-920 How to use LOPs
(5) Press [ENT] key. (6) Press [ ] key to move cursor to Loran A LOPs field of secondary station 2. (7) Enter correct (5-digit) LOPs of secondary station 2 using numeric keys. (8) Press [ENT] key.
Present position (GPS fix) Actual position (to be entered) Correction offset
Secondary st.1 3821.8 msec Secondary st.1 3820.0 msec Secondary st.1 –001.8 msec
Secondary st.2 1009.0 msec Secondary st.2 1010.0 msec Secondary st.2 +001.1 msec
(Correction by Decca LOPs data entry) When your position is displayed in Decca LOPs mode, you can correct it by entering the Decca LOPs correction offset. (1) Press [MENU] key until Menu options 1 to 9 appears. (2) Press [5] key to select “5:COMP.”. (3) Press [2] key to select “2:LOP”. (4) Enter correct Decca LOPs (lane and centilane) of secondary station 1 using numeric keys. (5) Press [ENT] key. (6) Press [ ] key to move cursor to Loran A LOPs field of secondary station 2. (7) Enter correct Decca LOPs (lane and centilane) of secondary station 2 using numeric keys. (8) Press [ENT] key.
Present positionActual position (to be entered)
Correction position
Present positionActual position (to be entered)
Correction position
Present position (GPS fix) Actual position (to be entered) Correction offset
Green st. 0G:30:62 usec Secondary st.1 30:42 Secondary st.1 –00:20 usec
Purple st. 0C:76:16 usec Secondary st.2 76:35 Secondary st.2 +00:19 usec
9-6 93121662-00

KGP-920 Chapter 9 How to use LOPs
9.3.2 Entry of correction offset (Correction by Loran C LOPs data entry) When your position is displayed in Loran C LOPs mode, you can correct it by entering the Loran C LOPs correction offset. (1) Press [MENU] key until Menu options 1 to 9 appears. (2) Press [5] key to select “5:COMP.”. (3) Press [2] key to select “2:LOP”. (4) Press [ ] key to move cursor to correction offset field of secondary station 1. (5) Press [SEL] key to change the positive (+) or negative (-) sign of correction offset. or Press [0] key to use the current positive (+) or negative (-) sign as it is. (6) Enter correction offset (6-digit) of secondary station 1 using numeric keys. (7) Press [ENT] key. (8) Press [ ] key to move cursor to correction offset field of secondary station 2. (9) Press [SEL] key to change the positive (+) or negative (-) sign of correction offset. or Press [0] key to use the current positive (+) or negative (-) sign as it is. (10) Enter correction offset (6-digit) of secondary station 2 using numeric keys. (11) Press [ENT] key.
Present position (GPS fix) Actual position (to be entered) Correction offset
Secondary st.1 +0001.1 usec Secondary st.1 35518.9 usec Secondary st.1 35520.0 usec
Secondary st.2 –0001.5 usec Secondary st.2 60387.5 usec Secondary st.2 60386.0 usec
(Correction by Loran A LOPs data entry) When your position is displayed in Loran A LOPs mode, you can correct it by entering the Loran A LOPs correction offset. (1) Press [MENU] key until Menu options 1 to 9 appears. (2) Press [5] key to select “5:COMP.”. (3) Press [2] key to select “2:LOP”. (4) Press [ ] key to move cursor to correction offset field of secondary station 1.
Present positionActual position (to be entered)
Correction position
(5) Press [SEL] key to change the positive (+) or negative (-) sign of correction offset. or Press [0] key to use the current positive (+) or negative (-) sign as it is. (6) Enter correction offset (5-digit) of secondary station 1 using numeric keys.
93121662-00 9-7

Chapter 9 KGP-920 How to use LOPs
(7) Press [ENT] key. (8) Press [ ] key to move cursor to correction offset field of secondary station 2. (9) Press [SEL] key to change the positive (+) or negative (-) sign of correction offset. or Press [0] key to use the current positive (+) or negative (-) sign as it is. (10) Enter correction offset (5-digit) of secondary station 2 using numeric keys. (11) Press [ENT] key.
Present position (GPS fix) Actual position (to be entered) Correction offset
Secondary st.1 -001.8 usec Secondary st.1 3821.8 usec Secondary st.1 3820.0 usec
Secondary st.2 +001.1 usec Secondary st.2 1009.0 usec Secondary st.2 1010.1 usec
(Correction by Decca LOPs data entry) When your position is displayed in Decca LOPs mode, you can correct it by entering the Decca LOPs correction offset. (1) Press [MENU] key until Menu options 1 to 9 appears. (2) Press [5] key to select “5:COMP.”. (3) Press [2] key to select “2:LOP”. (4) Press [ ] key to move cursor to correction offset field of secondary station 1. (5) Press [SEL] key to change the positive (+) or negative (-) sign of correction offset. or Press [0] key to use the current positive (+) or negative (-) sign as it is. (6) Enter correct Decca LOPs (lane and centilane) of secondary station 1 using numeric keys. (7) Press [ENT] key. (8) Press [ ] key to move cursor to correction offset field of secondary station 1.
Present positionActual position (to be entered)
Correction position
(9) Press [SEL] key to change the positive (+) or negative (-) sign of correction offset. or Press [0] key to use the current positive (+) or negative (-) sign as it is. (10) Enter correct Decca LOPs (lane and centilane) of secondary station 2 using numeric keys. (11) Press [ENT] key.
9-8 93121662-00

KGP-920 Chapter 9 How to use LOPs
Present positionActual position (to be entered)
Correction position
Present position (GPS fix) Actual position (to be entered) Correction offset
Secondary st. –00:20 usec Green st.1 0G:30:42 usec Secondary st.1 0G:30:42
Secondary st. +00:19 usec Purple st.2 0C:76:35 usec Secondary st.2 0C:76:35
9.3.3 Checking the correction offset Example: Loran C
You can check the correction offset as follows: Correction data (to be entered)
The correction offset
(1) Press [MENU] key until Menu options 1 to 9 appears. (2) Press [5] key to select “5:COMP.”. (3) Press [2] key to select “2:LOP”. 9.3.4 Disable position correction To delete and disable the correction offset follow these steps:
(1) Press [MENU] key until Menu options 1 to 9 appears. Example: Decca (2) Press [5] key to select “5:COMP.”.
Correction data (to be entered)
Position correction Has been cleared
(3) Press [1] key to select “1:LAT/LON”. (4) Press [CLR] key to set correction offset to 0 correction is disabled.
93121662-00 9-9

Chapter 9 KGP-920 How to use LOPs
9.4 Calculating LOPs based on LAT/LONG data 9.4.1 Calculating Loran C LOPs based on LAT/LONG data You can enter a Loran C chain number and the first digit of two secondary stations, NAVIGATOR calculates the Loran C LOPs based on the specified LAT/LONG data and displays the LOP values. (1) Press [MENU] key until Menu options 1 to 9 appears. (2) Press [7] key to select “7:CALCULATE”. (3) Press [2] key to select “2: L/L→LOP”. (4) Enter a (4-digit) Loran C chain number. (5) Enter the first digit of two Loran C secondary stations. (6) Press [ENT] key. (7) Enter a (7-digit) latitude using numeric keys. (8) Enter “N” for north or “S” for south latitude. (9) Press [ENT] key. (10) Enter a (8-digit) longitude using numeric keys. (11) Enter “E” for east or “W” for west latitude. (12) Press [ENT] key.
If you store the calculation result.
(1) Press [ ] key to display page 2/2. (2) Enter a data number (200 to 399) using numeric keys. The existing data, if any, is displayed for your
checkout. (3) Press [ENT] key.
LAT/LONG data used For LOPs conversion
Chain number and the first digit of two secondary stations used for LOPs conversion
Converted Loran C LOPs
Specified data number Data currently stored ( “X L/L-LOP” : fixed)
CAUTION Do not use the converted LOPs position data for waypoint or route
navigation because of likely conversion errors. Accuracy of converted positions can be off 1/4 mile or more.
9-10 93121662-00

KGP-920 Chapter 9 How to use LOPs
9.4.2 Calculating Loran A LOPs based on LAT/LONG data When You enter a combination of two secondary stations of Loran A, NAVIGATOR calculates the Loran A LOPs based on the specified LAT/LONG data and displays the LOP values. (1) Press [MENU] key until Menu options 1 to 9 appears. (2) Press [7] key to select “7:CALCULATE”. (3) Press [2] key to select “2: L/L→LOP”. (4) Press [ENT] key. (5) Press [ ] or [ ] key to select the secondary station 1. (6) Press [ENT] key. (7) Press [ ] key to move the cursor to secondary station 2 field. (8) Press [ENT] key. (9) Press [ ] or [ ] key to select the secondary station 2. (10) Press [ENT] key. (11) Press [ ] key to move the cursor to latitude field. (12) Enter a (7-digit) latitude using numeric keys. (13) Enter “N” for north or “S” for south latitude. (14) Press [ENT] key. (15) Enter a (8-digit) longitude using numeric keys. (16) Enter “E” for east or “W” for west latitude. (17) Press [ENT] key.
LAT/LONG data used For LOPs conversion
Combination of two secondary stations used for LOPs conversion
Converted Loran A LOPs
If you store the calculation result.
(1) Press [ ] key to display page 2/2. (2) Enter a data number (200 to 399) using numeric keys. The existing data, if any, is displayed for your
checkout. (3) Press [ENT] key.
Specified data number Data currently stored ( “X L/L-LOP” : fixed)
93121662-00 9-11

Chapter 9 KGP-920 How to use LOPs
CAUTION Do not use the converted LOPs position data for waypoint or route
navigation because of likely conversion errors. Accuracy of converted positions can be off 1/4 mile or more.
9.4.3 Calculating Decca LOPs based on LAT/LONG data When you enter a Decca chain number and a combination of two secondary stations, NAVIGATOR calculates the Decca LOPs based on the specified LAT/LONG data and displays the LOP values. (1) Press [MENU] key until Menu options 1 to 9 appears. (2) Press [7] key to select “7:CALCULATE”. (3) Press [2] key to select “2: L/L→LOP”. (4) Enter a (2-digit) Decca chain number. (5) Press [ENT] key. (6) Press [ ] key to move the cursor to combination field of secondary stations. (7) Press [ENT] key. (8) Press [ ] or [ ] key to select a combination of secondary stations. (9) Press [ENT] key. (10) Press [ ] key to move the cursor to latitude field. (11) Enter a (7-digit) latitude using numeric keys. (12) Enter “N” for north or “S” for south latitude. (13) Press [ENT] key. (14) Enter a (8-digit) longitude using numeric keys. (15) Enter “E” for east or “W” for west latitude. (16) Press [ENT] key.
LAT/LONG data used For LOPs conversion
Chain number and a combination of two secondary stations used for LOPs conversion
Converted Decca LOPs
If you store the calculation result.
(1) Press [ ] key to display page 2/2. (2) Enter a data number (200 to 399) using numeric keys. The existing data, if any, is displayed for your
checkout. (3) Press [ENT] key.
9-12 93121662-00

KGP-920 Chapter 9 How to use LOPs
Specified data number Data currently stored ( “X L/L-LOP” : fixed)
CAUTION Do not use the converted LOPs position data for waypoint or route
navigation because of likely conversion errors. Accuracy of converted positions can be off 1/4 mile or more.
93121662-00 9-13

KGP-920 Chapter 10 Maintenance and Trouble shooting
Chapter 10 Maintenance and Trouble shooting
Page No.
10.1 Periodic inspection and cleaning.........................................................10-1 10.1.1 Monthly check..............................................................................................10-1 10.1.2 maintenance.................................................................................................10-1
10.2 Trouble shooting....................................................................................10-1
10.2.1 Information required service ......................................................................10-1 10.2.2 Trouble shooting .........................................................................................10-1 10.2.3 Error message .............................................................................................10-2
93121662-00 Contents

KGP-920 Chapter 10 Maintenance and Trouble shooting
0093121662-08 10-1
Chapter 10 Maintenance and troubleshooting 10.1 Periodic inspection and cleaning 10.1.1 Monthly check Check if there is any loose connection on the Processor unit for GPS Antenna, radar or navigational unit.
10.1.2 Maintenance If the Processor unit is smeared or stained with dirt, wipe the surface of the unit with soft dry cloth.
10.2 Trouble shooting This chapter covers simplified fault locating procedures to assist the ship’s crew to locate a faulty module as well as simple fuse replacement. If the problem continues, call for service. 10.2.1 Information required for service Please advise the following details:
(1) Name of vessel, Satcom number if available. (2) Equipment type name (3) Equipment serial number (4) Next port of call, ship’s agent name, fax number, email address, etc. (5) Faulty conditions (precisely as possible) and the result of on board check 10.2.2 Trouble shooting The following table provides information about first line check schedules to locate a faulty area and gives remedial measure(s), where applicable.
Faults detected Possible cause of the failure Remedial action Equipment does not turn on
1. Is the fuse attached to the power cable blown?
2. Dose the power supply voltage line within the rated range (10.8 to 31.2VDC)? 3. Is the connection between the display unit and power supply cable firmly connected? 4. Is the power cable firmly connected to ship’s battery?
1. Replace the blown fuse with a new one. (Refer to figure 10.1 for the replace method of fuse.)
2. Use a proper rated main supply. 3. Reconnect the cable firmly to the display unit. 4. Reconnect the cable firmly to the battery.
SOLVENT CAUTION
Never use solvent like thinner, alcohol, turpentine, etc.

Chapter 10 KGP-920 Maintenance and Trouble shooting
10-2 0093121662-08
Faults detected Possible cause of the failure Remedial action Unstable signal reception
1. Are the connections between the GPS antenna and the display unit is correct and firm?
2. Is there any obstacle preventing the GPS unit from receiving the GPS signal?
1. Check the connection and reconnect, if necessary.
2. If an obstacle exists viewed
from the GPS antenna site, the GPS signal cannot be received properly. Remove the obstacle or, if this is not possible, change the antenna position for better viewing range available.
Differential GPS (DGPS) Positioning fails
1. Are the baud rate you have set and the output signal baudrate of DGPS beacon receiver match? (See page 8-7)
2. Are the elevation angle set greater than 10 degrees? (See
page 8-3)
1. Match the baud rate. 2. Set the elevation angle
greater than 10 degrees.
Data cannot be Transmitted to external equipment.
1. Is the connection between the display unit and interface cable firmly connected? 2. Are the output data format and input data format of external equipment match? (See page
8-15)
1. Reconnect the cable firmly to the display unit. 2. Match the data format.
Figure 10.1 Replacing the fuse
CAUTION Always turn off power supply before replacing the fuse
Fuse: F7161 2A
Fuse case
Fuse case

KGP-920 Chapter 10 Maintenance and Trouble shooting
0093121662-08 10-3
10.2.3 Error message (An error message may appear when you power on)
BACKUP ERROR The backup data saved at RAM is faulty.
ROM CHANGED A checksum differs from the backed-up value.
ROM ERROR Communication between CPU and ROM is faulty.
RAM ERROR Communication between CPU and RAM is faulty.
BATTERY LOW A voltage of back-up battery is low.
BEACON ERROR Communication between CPU and internal beacon receiver is faulty.
(An error message under operation)
There are some, which are described below in the error message under operation. The latitude / longitude, and time in this message are a thing when an error occurs.
Error message display area
• Call for service. • The ROM CHANGED message appears when ROM has
been replaced. In this case, turn the power off, and then restart again.
GPS NO FIX 35 o37.893N
141 o05.719E 01.16.04 06:01:16
1. GPS NO FIX This message is that it became impossible to receive a GPS signal, and when the positioning of it becomes impossible, it appears. Please check whether the connector of an antenna cable has separated, or the cable is not disconnected. A buzzer will become quiet if a key is pressed
GPS ERROR 35 o37.893N
141 o05.719E 01.16.04 06:01:16
2. GPS ERROR This message appears, when the data output from an internal GPS sensor becomes poor. Please check an internal connecting cable. A buzzer will become quiet if a key is pressed
HDOP ERROR 35 o37.893N
141 o05.719E 01.16.04 06:01:16
3. HDOP ERROR This message appears, when a HDOP value exceeds 4. A buzzer will become quiet if a key is pressed.
DGPS ERROR CHECK MENU 4-5 STATION HEALTH
4. DGPS ERROR When the transmitting station is not working or the monitor of this message is not carried out, it appears.Check the station health of menu 4-5.

KGP-920 Chapter 11 Technical Reference
Chapter 11 Technical Reference
Page No.
11.1 Digital interface (IEC 61162-1 second edition).....................................11-1 11.1.1 input data format (DATA 2 port).................................................................. 11-1 11.1.2 Output data format (DATA / DATA 2 port) .................................................. 11-1 11.1.3 Output data specification............................................................................ 11-1 11.1.4 Output sentence .......................................................................................... 11-1 11.1.5 Input / Output circuit ................................................................................... 11-8
93121662-00 Contents

KGP-920 Chapter 11 Technical Reference
11.1 Digital Interface (IEC 61162-1 second edition) 11.1.1 Input data format (DATA 2 port) RTCM SC104 Ver.2.0 (DGPS)
11.1.2 Output data format (DATA / DATA 2 port) Data per one byte is as follows:
Parity bit: none
1 bit Logic 0 1 bit
Start bit D0 D1 D2 D3 D4 D5 D6 D7 Stop bit
Data bit (ASCII code)
Logic 0
Logic 1
11.1.3 Output data specification Baud rate
Output level
Output current
Sentence Update rate
4800 RS422 20mA max AAM, APB, BOD, BWC, DCN, DTM, GBS, GGA, GLC, GLL, GNS, GSA, GSV, MSS, RMB, RMC, RTE, VTG, WPL, XTE, ZDA NOTE: The sentences of bold character are set in 1 second cycle during initial setup.
Any of 1 to 99sec
11.1.4 Output sentence Description Contents of data field
Waypoint arrival alarm GPAAM
$ GP AAM, A, A, x.x, N, c--c*hh <CR><LF>
Sentence type
Waypoint ID Units of radius, nautical miles
Arrival circle radius A = Perpendicular passed at waypoint V = Not passed
A = Arrival circle entered V = Not entered
Talker device Start of sentence
93121662-00 11-1

Chapter 11 KGP-920 Technical Reference
Description Contents of data field
Heading / Track controller (auto pilot) sentence B GPAPB
Bearing origin to destination
$ GP APB, A, A, x.x, a, N, A, A, x.x, a, c--c, x.x, a, x.x, a, a*hh<CR><LF> Mode indicator A: Autonomous D: Differential M: Manual input S: Simulator N: Data not valid
Bearing, present position to destination, magnetic or true
Heading to steer to destination waypoint, magnetic true
Bearing origin to destination, M/T Destination waypoint ID
A = perpendicular passed at waypoint V = perpendicular not passed
A = arrival circle entered V = arrival circle not passed
Direction to steer, L/R XTE units, nautical miles
Magnitude of XTE (cross-track-error) A = O.K. or not used V = LORAN-C cycle lock warning flag A = Data valid
V = LORAN-C blink or SNR warning V = general warning flag for other navigation systems when a reliable fix is not available
Sentence type
Talker device
Start of sentence
GPBOD
$ GP BOD, x.x, T, x.x, M, c--c, c--c*hh <CR><LF>
Destination waypoint ID
Start
TaSentence type
Origin waypoint ID
Bearing, degrees magnetic Bearing, degrees true
11-2
of sentence
lker device
93121662-00

KGP-920 Chapter 11 Technical Reference
Description Contents of data field
Bearing and distance to waypoint GPBWC
DECCA position
Mode indicator A: Autonomous D: Differential M: Manual input S: Simulator N: Data not valid
$ GP BWC, hhmmss.ss, llll.lll, a, yyyyy.yyy, a, x.x, T, x.x, M, xx, N, c--c, a*hh<CR><LF>
Start of sentence Talker device
Sentence type
Distance, nautical milesWaypoint ID
Bearing, degrees magnetic Bearing, degrees true
Waypoint longitude, E/W Waypoint latitude, N/S
UTC of observation
GPDCN
Datum reference GPDTM
$ GP DCN, xx, cc, x.x, A, cc, x.x, A, cc, x.x, A, A, A, A, x.x, N, x*hh<CR><LF>
Start of sentence
Talker device Sentence type
Fix data basisPosition uncertainly, n. miles
Purple-line navigation use A = valid V = Data not valid
Green-line navigation use A = valid V = Data not valid
Red-line navigation use A = valid V = Data not valid
PurpleGreen
Red-master line, A = valid V = data not valid
Red line of position (LOP)
Red zone identifier, number-letter
DECCA chain identifier
$ GP DTM, ccc, a, x.x, a, x.x, a, x.x, ccc*hh<CR><LF>
Start of sentence
Talker device Sentence type
Local datum
Reference datum
WGS84 = W84WGS72 = W72SGS85 = S85PE90 = P90
Altitude offset, mLon offset, min, E/W
Lat offset, min, N/S Local datum subdivision code
WGS84 = W84 WGS72 = W72 SGS85 = S85 PE90 = P90 User defined = 999 IHO datum code
93121662-00 11-3

Chapter 11 KGP-920 Technical Reference
Description Contents of data field
GPS satellite fault detection GPGBS
GPS fix data GPGGA
Geographic position (LORAN-C)
Start of sentence
$ GP GBS, hhmmss.ss, x.x, x.x, x.x, x.x, x.x, x.x, x.x *hh<CR><LF>
Talker device Sentence type
UTC time of the GGA or GNS fix associated with this sentence Expected error in latitude
Expected error in longitude Expected error in altitude
ID number of most likely failed satellite Probability missed detection for most likely failed satellite
Estimate of bias on most likely failed satellite Standard deviation of bias estimate
$ GP GGA, hhmmss.ss, lllll.lll, a, yyyyy.yyy, a, x, xx, x.x, x.x, M, x.x, M,
Sentence type Talker device
Latitude, N/S
Start of sentence
UTC of position fix (hr/min/sec) Longitude,
E/W
GPS quality indicator 0: Fix not available or invalid 1: GPS fix valid 2: DGPS fix valid
Antenna altitude, m HDOP value
Number of satellites in use, 00-12,
Age of differential data (sec) Differential reference station ID
Geoidal separation, m
xxx, xxxx*hh<CR><LF>
GPGLC
$ GP GLC, xxxx, x.x, a, x.x, a, x.x, a, x.x, a, x.x, a, x.x, a*hh<CR><LF>
Talker device Sentence type
GRI, in tens of microseconds
TD1
Master TOA microseconds
Signal status in order of priority B = blink warning C = cycle warning S = SNR warning A = valid
TD2 TD3 TD4 TD5
Start of sentence
11-4 93121662-00

KGP-920 Chapter 11 Technical Reference
Description Contents of data field
Geographic position (latitude/longitude) GPGLL
GNSS fix data GPGNS
GPS DOP and active satellites
Start of sentence
Talker device
Sentence type
Longitude E/W
Latitude, N/S
Mode indicator NN: Fix not available or invalid AN: GPS fix valid DN: DGPS fix valid MN: Manual input SN: Simulator
$ GP GNS, hhmmss.ss, lllll.lll, a, yyyyy.yyy, a, c--c, xx, x.x, x.x, x.x,
Sentence type Talker device
Latitude, N/S
Start of sentence
UTC of position fix (hr/min/sec)
Longitude, E/W Antenna altitude, m
HDOP value Number of satellites in use, 00-12,
Age of differential data (sec) Differential reference station ID
Geoidal separation, m
x.x, x.x*hh<CR><LF>
$ GP GLL, lllll.lll, a, yyyyy.yyy, a, hhmmss.ss, A, a*hh <CR><LF>
UTC of position fix(hr/min/sec)
A: Data valid V: Data invalid
Mode indicator A: Autonomous D: Differential M: Manual input S: Simulator N: Data not valid
GPGSA
VDOP
$ GP GSA, A, x, xx, xx, xx, xx, xx, xx, xx, xx, xx, xx, xx, xx, xx.x, xx.x, xx.x*hh <CR><LF>
Mode: M = Manual, forced to operate in 2D or 3D mode A = automatic, allowed to automatically switch 2dD3D
1: Fix not available 2: 2D fix (2D) 3: 3D fix (3D)
ID numbers of satellites used in solution
Start of sentence
Sentence type
Talker device
HDOP
PDOP
93121662-00 11-5

Chapter 11 KGP-920 Technical Reference
Description Contents of data field
GPS Satellite in view GPGSV
MSK receiver signal status GPMSS
Recommended minimum navigation information GPRMB
$ GP RMB, A, x.x, a, c--c, c--c, llll.lll, a, yyyyy.yyy, a, x.x, x.x, x.x, A, a*hh<CR><LF>
Start of sentence Talker device
Sentence type
Destination waypoint ID
Destination closing velocity, knots
Destination waypoint latitude, N/S Destination waypoint longitude, E/W
Bearing to destination, degrees true
Mode indicator A: Autonomous D: Differential M: Manual input S: Simulator N: Data not valid
A=arrival circle, entered or perpendicular passed V = not entered or passed
Origin waypoint ID Direction to steer L/R
Cross track error, nautical miles A = data valid V = navigation receiver warning
Range to destination, nautical miles
$ GP MSS, x.x, x.x, x.x, x.x, x*hh<CR><LF>
Talker device Sentence type
Channel number
Beacon frequency, 285.5 – 325.5kHz Beacon bit rate (25,50,100,200) bits/s
Signal-to-noise ratio (SNR), dBSignal strength (SS), dB/1 uV/m
Start of sentence
Talker device
Start of sentence
Message number (1 to 9)
Azimuth, degrees true, (000 to 359)
SNR (C/No) 00-99 dB Hz, null when not tracking “2nd and 3rd sv 4th sv
$ GP GSV, x, x, xx, xx, xx, xxx, xx, …………., xx, xx, xxx, xx*hh <CR><LF>
Elevation, degrees, 90°maximum
Sentence type
Satellite ID number Total number of satellites in view
Total number of messages (1 to 9)
11-6 93121662-00
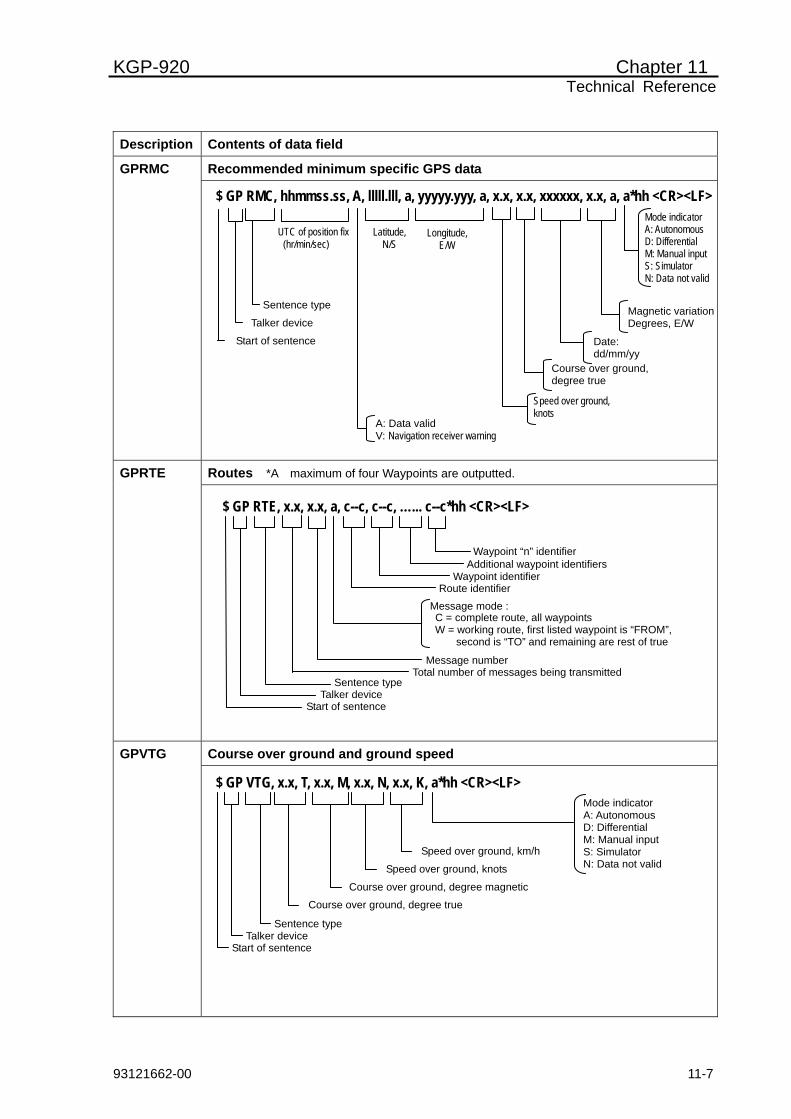
KGP-920 Chapter 11 Technical Reference
Description Contents of data field
Recommended minimum specific GPS data GPRMC
Routes *A maximum of four Waypoints are outputted.
$ GP RMC, hhmmss.ss, A, lllll.lll, a, yyyyy.yyy, a, x.x, x.x, xxxxxx, x.x, a, a*hh <CR><LF>
UTC of position fix (hr/min/sec)
Latitude, N/S
Longitude, E/W
Course over ground, degree true
Date: dd/mm/yy
Start of sentence
Talker device
Sentence type
A: Data valid V: Navigation receiver warning
Speed over ground, knots
Magnetic variation Degrees, E/W
Mode indicator A: Autonomous D: Differential M: Manual input S: Simulator N: Data not valid
GPRTE
Course over ground and ground speed
$ GP RTE, x.x, x.x, a, c--c, c--c, …... c--c*hh <CR><LF>
Waypoint “n” identifier
Sentence typeTalker device
Start of sentence
C = complete route, all waypoints Message mode :
W = working route, first listed waypoint is “FROM”, second is “TO” and remaining are rest of true
Additional waypoint identifiers Waypoint identifier
Route identifier
Message number Total number of messages being transmitted
GPVTG
$ GP VTG, x.x, T, x.x, M, x.x, N, x.x, K, a*hh <CR><LF>
Speed over ground, knots
Sentence typeTalker device
Start of sentence
Course over ground, degree true
Speed over ground, km/h
Mode indicator A: Autonomous D: Differential M: Manual input S: Simulator N: Data not valid
Course over ground, degree magnetic
93121662-00 11-7

Chapter 11 KGP-920 Technical Reference
Description Contents of data field
Waypoint location *A maximum of four Waypoints are outputted. GPWPL
Cross-track error, measured GPXTE
$ GP WPL, llll.lll, a, yyyyy.yyy, a, c--c*hh <CR><LF>
Waypoint identifier
Sentence typeTalker device
Start of sentence
Waypoint latitude, E/WWaypoint latitude, N/S
$ GP XTE, A, A, x.x, a, N, a*hh <CR><LF>
Sentence type Talker device
Start of sentence
V = general warning flag for other navigation systems When a reliable fix is not available
V = LORAN-C blink or SNR warning, A = data valid
A = data valid V = LORAN-C cycle lock warning flag
Magnitude of cross-track error Direction to steer, L/R
Units, nautical miles
Mode indicator A: Autonomous D: Differential M: Manual input S: Simulator N: Data not valid
11.1.5 Input / Output circuit Port (connector) name: DATA, DATA2 The connector used: LTWBD-06BFFA-L180 (DATA) / LTWBD-08BFFA-L180 (DATA 2) (DATA port Input circuit) Input load: 470 ohm Device: Photo-coupler TLP151A (Toshiba)
RXD (+)
TLP-115A
+Vcc
470
RXD (-)
11-8 93121662-00

KGP-920 Chapter 11 Technical Reference
(DATA port output circuit)
Device: Driver IC AM26C311 (T.I)
TXD (+)
TXD (- )
AM26C31I
+Vcc
(DATA 2 port input circuit)
Input load: 470 / 2.4k ohm
Device: Photo-coupler TLP181(Toshiba)
RXD (+) TLP-181
+Vcc
470
RXD (-)
+Vcc
BUZZER STP (+)
TLP-181 2.4k
BUZZER STP (-)
93121662-00 11-9

Chapter 11 KGP-920 Technical Reference
DATA 2 port output circuit
Device: Transistor 2SC2712
2SC2712
EXT BUZZER
11-10 93121662-00

KGP-920 Chapter 12 Communication with external navigation system
Chapter 12 Communication with external navigation system
Page No.
12.1 Changing to the EXTERNAL mode.......................................................12-1 12.2 Route data transfer ................................................................................12-2
12.2.1 Complete route transfer..............................................................................12-2 12.2.2 Selecting route navigation..........................................................................12-3 12.2.3 Working(active) route transfer ...................................................................12-3 12.2.4 Error message .............................................................................................12-4
0093121662-06 Contents

KGP-920 Chapter 12 Communication with external navigation system
Communication with external navigation system
KGP-920 is provided with a mode having capability to communicate with external system such as ECDIS and can take in route data from the interfaced external system. Then KGP-920 can work on the same route as the external system does. If a route is transferred to KGP-920 from the external system before voyage, KGP-920 can play a role as back up system in case of failed external system by any reason. While the external system is in working navigation mode, the working route information is automatically transferred to KGP-920 and KGP-920 navigates on the same route as the external system does. In order to utilize this function, connection between KGP-920 and an external system should be established by a connecting cable according to the operation manual (Page 69 and 70 interconnecting Diagram).
12.1 Changing to the EXTERNAL mode
Communication with an external system such as ECDIS is established by switching KGP-920 from NORMAL mode to EXTERNAL mode. However switching to EXTERNAL mode is not acceptable when KGP-920 is in Route/Waypoint navigation or Anchor watch operation in NORMAL mode. Reset those functions before switching to EXTERNAL mode. Switching steps are as follows. (1) Press [MENU] key until Menu options 1 to 9 appear. (2) Press [8] key to select “8:INIT.SET”. (3) Press [ ] key to move cursor to “8:WPT.RTE” . (4) Press [ENT] key . (5) Press [ ] key to select “EXT.”. (6) Press [ENT] key .
Cursor
A small E is displayed at the end of the way point identifier to show KGP-920 is in external mode. Route identifier shows maximum leading 5 characters of the original route name while waypoint identifier shows maximum leading 6 characters of the original waypoint name. A small E
0093121662-06 12-1

Chapter 12 KGP-920 Communication with external navigation system
12.2 Route data transfer Only a single route date can be transferred to KGP-920. Route data should consist of a combination of $--RTE (Route) and $--WPT (Waypoint) sentences specified by IEC61162. Maximum number of characters including checksum in a RTE sentence line is limited to 124 bytes. Route data can be two kinds of data, a Complete route or a Working route. A Complete route can contain 100 waypoints ( waypoints excess of 100 are ignored) while a Working route can contain 9 waypoints and the last passed over waypoint (waypoints excess of 9 are ignored). In EXT. mode, working route has priority over other functions including route navigation. When KGP-920 receives a Working route data, it automatically goes into Working route navigation. Maximum waypoint storage capacity is for 400 points combined with both NORMAL and EXT. modes.
12.2.1 Complete route transfer When KGP-920 receives a Complete route data, “OVERWRITING last sent route” is indicated and then it indicates “LOADED ext. route” to notify the route was successfully transferred. When consecutive more than single routes are received. It indicates “INVALID ext. route” and voids received data but the previously loaded route data remains and valid. KGP-920 judges data transfer is ended when more than 10 second interruption of data transfer occurs. The Complete route is stored as number 19th route.
ORVERWRITING last sent route Receiving indication of a Complete route
LOADED ext. route A Complete route became valid
INVALID ext. route Received route was voided
Following is an example of Complete rote data. Refer to IEC61126 for detail.
$ECRTE,3,1,c,Dover,WP_001,West-Port,WP_003,WP_004,WP_005,E:Cape,WP_007,WP_008*0B
Maxi. number of characters in a line should be within 124bytes including checksum.
route identifier(Max. 5 charactors are displayed with the rest dropped) waypoint identifier(Max. 6 characters are displayed with the rest dropped)
c: Complete route
$ECRTE,3,2,c,Dover,WP_009,WP_010,WP_011,East.Port,WP_013,WP_014,WP_015,WP_016*3D $ECRTE,3,3,c,Dover,WP_017,WP_018,WP_019,WP_020,WP_021,W/Cape*4D
12-2 0093121662-06

KGP-920 Chapter 12 Communication with external navigation system
$ECWPL,5331.87,N,00953.37,E,WP_001*33 $ECWPL,5332.66,N,00948.71,E,West-Port*7F $ECWPL,5054.04,N,00127.00,E,WP_021*35 $ECWPL,5106.17,N,00126.25,E,W/Cape*13 12.2.2 Selecting route navigation Procedure to navigate by the received Complete route by following steps. (1) Press [MODE] key until A (NAV1), B (NAV2), C (NAV3) or D (PLOT) screen appears. (2) Press [SEL] key until page 5 screen appears. (3) Press [ ] or [ ] key to move cursor to “RTE” letters. (4) Press [ENT] key. (5) Press [ ] or [ ] key to select the required Complete route identifier (name or number). (6) Press [ ] key (7) Press [ ] or [ ] key to select the start waypoint identifier (name or number). (8) Press [ENT] key.
12.2.3 Working (active) route transfer When KGP-920 receives Working route data for the first time, it shows “LOADED ext. active route” and goes into Working route mode regardless of previous navigation mode due to the first priority. As far as KGP-920 receives Working route data within 10 seconds consecutively, it continues to work for the received working route. When waypoint is changed by reaching to the next waypoint or other reasons, “LOADED waypoint change “ is indicated. If interruption of Working route data transfer exceeds 10 seconds, KGP-920 judges working route navigation has ended and quits working in route navigation by indicating “DEACTIVATED ext. active route” and goes back to the previous mode. When an external route is received during working route navigation, it is rejected by showing “REJECTED ext. route Route is active”. The working (active) route is stored as number 20th route.
Cursor Route identifier Position data of the first waypoint
The first waypoint identifier
Route identifier
The first waypoint identifier
Max. 100 different waypoints (The over 100 are dropped)
Max. 400 as combined total number including duplication waypoints composing routes can be contained. (Waypoints over 400 are dropped.)
LOADED ext. active route
LOADED waypoint change
0093121662-06
New Working route became valid
Waypoint was changed12-3

Chapter 12 KGP-920 Communication with external navigation system
Following is an example of W
$ECRTE,1,1,w,northsea,WP_
w: Working rou
Max. character nu
The las
DEACTIVATED ext. active route
$ECWPL,5355.91,N,00840.2
$ECWPL,5357.98,N,00833.3
$ECWPL,5402.22,N,00805.2
$ECWPL,5411.81,N,00721.9
$ECWPL,5414.39,N,00616.2
$ECWPL,5417.69,N,00450.7
Working route has priority anworking route data. It is upda
12.2.4 Error message Following indications are dispreference. Press (CLR)key to erase the
ERROR overflow
ERROR
checksum
ERROR format
12-4
orking route data. Refer to IEC61162-1 for detail.
001,APORTS,BIRAND,WP_004,myName,WP_006*76
*Max. number of character is same as Complete route te
mber in a line is 124 bytes including
t passed waypointCurrent waypoint
Working route is finished
2,E,WP_001*20
7,E,APORTS*28
9,E,BIRAND*25
4,E,WP_004*26
2,E,myName*77
0,E,WP_006*2B
Max. 10 waypoints (Over10 is ignored)
d route navigation by Working route automatically begins by reception of ted every time Working route data is received.
Indicating route navigation by Working route data from external system.
layed during transfer of data from an external navigation system for user’s
indication and try transfer again.
Number of characters in a line is exceeding 124 bytes.
Checksum error.
Sentence format error.
0093121662-06

KGP-920 Annex
Annex
Page No.
Local Geodetic Systems................................................................................... A-1 Decca zone......................................................................................................... A-3
93121662-00 Contents

Local Geodetic Systems
A-1
The number assigned to each place name is the set values used in the “Selecting a geodetic datum” (Page 8-3) In alphabetical order
Name Abbreviation No. Name Abbreviation No.
ALASKA / CANADA A/C 04 IWO JIMA IWO 32
ARC 50 ARF 29 JAPAN JAP 24
ARC 60 ARS 30 JOHNSTON JOH 53
ARGENTIN ARG 39 KELGUELEN KEL 55
ASCENSION ASC 31 LIBERIA 64 LIB 57
AUSTRALIAN 84 AUS 06 MAHA 71 MAH 58
BAHRAIN BAH 27 MALAYSIA MAL 23
BERMUDA BER 37 MALDIVE MLD 48
BRAZIL BRZ 45 MARCUS MCS 35
CANARY CAN 68 MARSHALL MSL 82
CAYMAN BRAC CYB 56 MASCARENE MAS 73
CHATHAM CAT 43 MIDWAY 61 MID 62
COCOS CCS 28 MOROCCO MOR 61
COLOMBIA CLB 38 NAD-27 N27 03
CORVO/FLORES C/F 65 NAD-83 N83 10
DIEGO GARCIA DEG 52 NEW GEORGIA NEG 46
DJAKARTE DJK 22 NEW ZELAND NEZ 13
EAST FALKLAND EAF 76 NIGERIA NIG 63
EAST MALAYSIA EAM 79 OMAN OMA 67
EASTER EST 47 PARAGUAY PAR 44
EFATE EFA 36 PHILLIPPINES PHI 19
EGYPT EGY 66 PHOENIX PNX 40
ENGLAND ENG 20 PITCAIRN PIT 69
ERITREA ERI 60 PORTO SANTO POS 77
ETHIOPIA ETH 25 PUERTO RICO PUR 71
EUROPEAN 50 E50 05 QATAR QAT 72
EUROPEAN 79 EUS 14 ROME 40 ROM 15
FAIAL FAI 78 SALVAGE SAV 59
FIJI FIJ 81 SANTA MARIA SAM 75
FINLAND FIN 84 SANTO SAE 74
FLORIDA FLO 41 SAUDIARABIA SAR 17
GREENLAND GRE 09 SOMALIA SOM 26
GUADALCANAL GUD 50 SOUTH AFRICA SAF 16
GUAM 63 GUA 49 SOUTH AMERICA SAN 08
HAWAII HAW 21 SOUTH ASIA SOA 07
HONG KONG 63 HKD 51 SOUTH CHILE SCH 70
ICELAND 55 ICE 11 SRILANKA SRI 54
INDIAN / NEPAL I/N 18 ST.HELENA STH 34
IRELAND 65 IRL 12 SURINAM SUR 83

Local Geodetic Systems
A-2
Name Abbreviation No. Name Abbreviation No.
SWEDEN SWE 85
TERN TER 33
TOKYO TOY 02
TRINIDAD TRD 64
TRISTAN TRI 80
TUNISIA TUN 42
WGS-72 W72 01
WGS-84 W84 00
HU-TZU-SHAN HTN 86

Decca zone
A-3
Chain No. Code Chain No. Code
EUROPE NORTH WEST AUSTRALIA
South Baltic 00 0A Dampier 36 8E
Vestlandet 01 0E Port Hedland 37 4A
Southwest British 02 1B CANADA Northumbrian 03 2A Anticosti 38 9C
Holland 04 2E Newfoundland 39 2C
North British 05 3B Cabot Straits 40 6B
Lofoten 06 3E Nova Scotia 41 7C
German 07 3F INDIAN OCEAN North Baltic 08 4B Salaya 42 2F
Northwest Spanish 09 4C SOUTH AFRICA
Trondelag 10 4E Southwest Africa 44 9C
English 11 5B Natal 45 10C
North Bothnian 12 5F
South Spanish 13 6A
North Scottish 14 6C
Gulf of Finland 15 6E
Danish 16 7B
Irish 17 7D
Finnmark 18 7E
French 19 8B
South Bothnian 20 8C
Hebridean 21 8E
Frisian Islands 22 9B
Helgeland 23 9E
Skagerrak 24 10B
PERSIAN GULF North Persian 25 5C
South Persian 26 1C
INDIAN OCEAN
Bombay 27 7B
Calcutta 28 8B
Bangladesh 29 6C
JAPAN Hokkaido 30 9C
North Kyushu 32 7C
SOUTH AFRICA Namaqua 33 4A
Cape 34 6A
Eastern province 35 8A
