instructions: prr / pc shops g43 series gondola kit ... · model as a reference for your building,...
TRANSCRIPT

Instructions for Tangent Scale Models PRR/PC Shops G43 Series Gondola Kit Page 1
Instructions: PRR / PC Shops G43 Series Gondola Kit
Tangent Part Numbers: 17000-01 through 17002-02 8/2016
Thank you for purchasing the Tangent Scale Models PRR / PC Shops G43 Series
Gondola Kit! A few quick notes before starting:
Instructions have many large images: Because some model builders are visually
oriented, while others prefer written instructions, we have included both text and
photos within these instructions. As you can see, many of the images are rather
large, to aid in your model building.
There are more images at the end: If you want to see more views of a completed
model as a reference for your building, scroll to the end of this document. This is
another advantage of a “digital download” over a printed instruction sheet.
Modeling from computer screen is ideal: If possible we recommend modeling from
your monitor. You can then enlarge the images as you see fit, and you save ink
and paper at the same time.
There are several ways to complete your kit: While there are multiple sequence
steps possible to build this car, we believe the sequence included here yields the
best results.
Prototype photos: While you likely have your own sources of prototype photos,
please recall that for each RTR scheme that Tangent releases, we include a
prototype photo on our website. You can use these as references in addition to
your own sources. Look for those photos with the model photos for each paint
scheme.
We want feedback: If you find something missing from our text instructions, or an
error within these instructions, please let us know by submitting a comment to us on
our website or sending an email to [email protected] Thank you!
This kit is meant for adults: While we applaud bringing younger modelers into our
hobby, this model includes many small parts, some of which are sharp and/or
delicate. Therefore, this kit is recommended for those 14 years of age and older.

Instructions for Tangent Scale Models PRR/PC Shops G43 Series Gondola Kit Page 2
We offer semi-scale wheels separately: We offer semi-scale wheels separately in 12
or 100 axle packs – in either 33” or 36” diameters - to fit all of our trucks – and those
from other brands!

Instructions for Tangent Scale Models PRR/PC Shops G43 Series Gondola Kit Page 3
Overview of this kit’s contents:
Below you will find a photo with corresponding descriptions for each part in our kit.
Please note that this kit may include EXTRA parts that will not be needed for your
assembly.
Standalone parts included:
Part 1 – Body car sides – 2 parts (3 possible paired versions depending on which kit you
purchased)
Part 2 – Body car ends – 2 parts (2 possible paired versions depending on which kit you
purchased)
Part 3 – Car Weight (Bottom)
Part 4 – Car Weight (Top)
Part 5 – Floor (2 possible versions depending on which kit you purchased)
Part 6 - Underframe
Part sprues included:
#7 Sprue contains floor stringer assembly
#8 Sprue contains air reservoir, AB valve, air hoses, stirrup steps
#9 Sprue contains the brake cylinder and brake rigging
#10 Sprue contains the bolster plates
#11 Sprue contains the coupler boxes / draft gear
#12 Sprue contains the brakewheels, L-shaped connector, brake fulcrum, and air release
valve
4
1
2
3
5
6
7
8
9
10
0
11
12
13
14
15
16
17
18
19
20
Instructions for Tangent Scale Models PRR/PC Shops G43 Series Gondola Kit Page 4
#13 Sprue contains the coupler cut lever brackets (4 total, 2 of each type) and brake
housing
#14 Sprue contains the side and end ladders
#15 Sprue contains the side and end ladders
#16 Sprue contains the various placard parts to house the railroad logos and reporting
marks and road numbers
#17 Sprue contains the interior wood load shift protectors that protect the end of the car
(only applicable to builds with coil parts)
Parts bags included:
#18 Bag contains all of the etched and wire parts
#19 Bag contains all of the screws
Standalone parts included:
#20 Tangent’s 100-ton Roller Bearing trucks with 36” CNC-machined wheelsets
Parts needed/recommended:
Couplers. The coupler boxes for this car are designed for Kadee “whisker” shank couplers -
#158.
Tools needed/recommended:
Liquid styrene cement for plastic to plastic bonds (Tamiya green bottle, Testors Liquid
Styrene Cement are two example products)
CA-type cement or cyanpoxy – for wire to plastic joins (sold in hobby shops, or in hardware
store as “super glue” under various brands in the small squeeze tubes) – best applied with a
piece of scrap wire
Canopy cement – for etched brake step to plastic roof joins (made by Pacer and other
brands)(Also Pliobond is a good substitute)
Hobby knives - #11 and #17 are ideal
Small Phillips head screwdrivers
Tweezers
THINGS YOU SHOULD KNOW
This kit is NOT recommended for children aged 14 and under.
Small parts: there are many very small parts included in this kit. The assembly sequence
requires you to have access to multiple parts at a time, so we recommend a clean and
open work surface so that you can keep all of the parts in the open and accessible.
Let’s get started!
Kit variations: When you ordered this kit, there were 3 different prototype-based
configurations to choose from. If you want to change the configuration of your kit, you
can order all of our parts here: http://www.tangentscalemodels.com/parts/ or simply
go to www.tangentscalemodels.com and click on “View & Buy Models” and then
“Parts.”
Build the body:

Instructions for Tangent Scale Models PRR/PC Shops G43 Series Gondola Kit Page 5
1. Overview. To assemble the G43 Series body, you will begin by building the two gondola
side and end parts around the underframe. The cross members of the underframe fit into
notches that are cast into the side panels. The ends will then attach to the sides. There are
two different end castings, one for the A end and one for the B end. The B end
(brakewheel) has a few more holes and pins that let you know which one it is. The
underframe also has an A and B end, with the small rectangular mounting pad for the
cylinder facing toward the B end. Clean all flash and remove all mold release pins from
the side, end, and underframe castings, including the small tabs on the very end of the
coupler pads.
2. Glue sides to underframe. Begin body assembly by taking one side panel and the
underframe. Lay the side panel flat on your bench and insert the cross members of the
underframe into the notches that are cast into the side panel and glue in place. After
letting the glue set up for a few minutes (to make sure the underframe does not come out
of the side panel), glue the other side to the underframe and again, let it sit for a few
minutes.
3. Glue B-end to side/underframe assembly. Locate the B end casting and position it
between the sides making sure the top of the end panel is flush with the top of the sides,
and that the coupler platform fits flush with the bottom of the casting. Also make sure that
you put it on the end that has the cylinder pad closest to it. Glue in place.
Instructions for Tangent Scale Models PRR/PC Shops G43 Series Gondola Kit Page 6
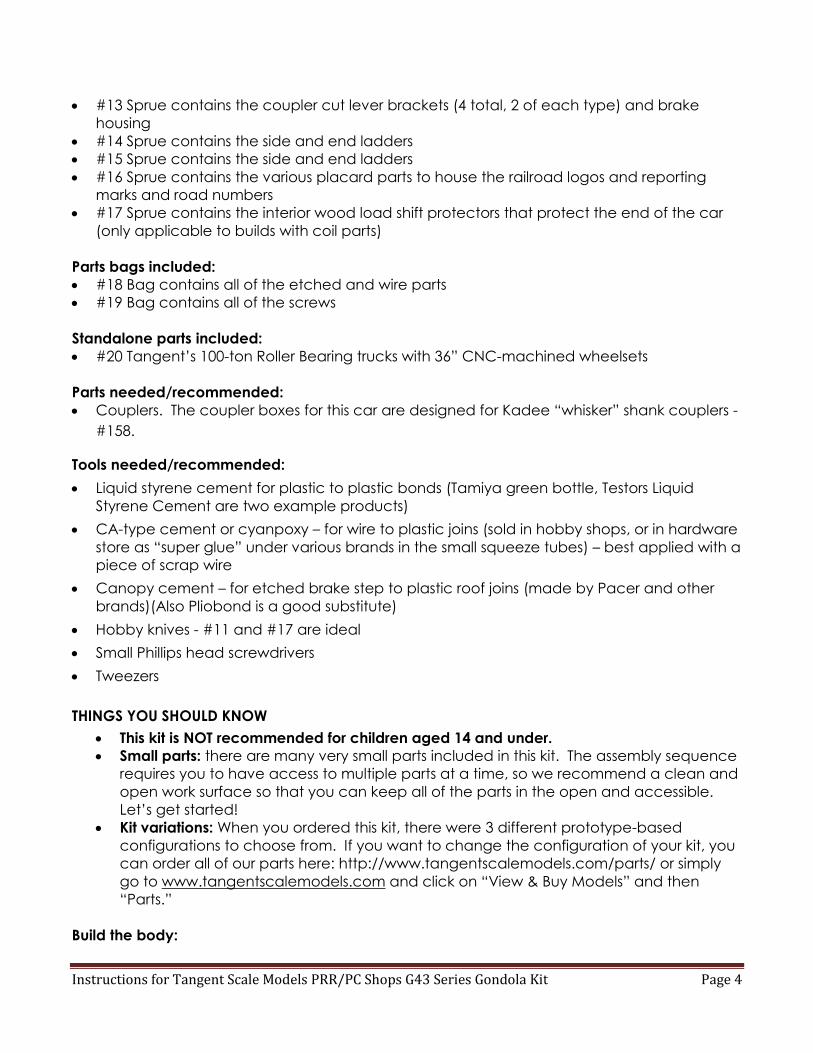
4. Glue A-end to side/underframe assembly. Repeat the process with the A end and glue in
place as well. Make any adjustments to the whole assembly to ensure it is square, and let
the glue dry completely before proceeding.
Complete the underframe assembly:
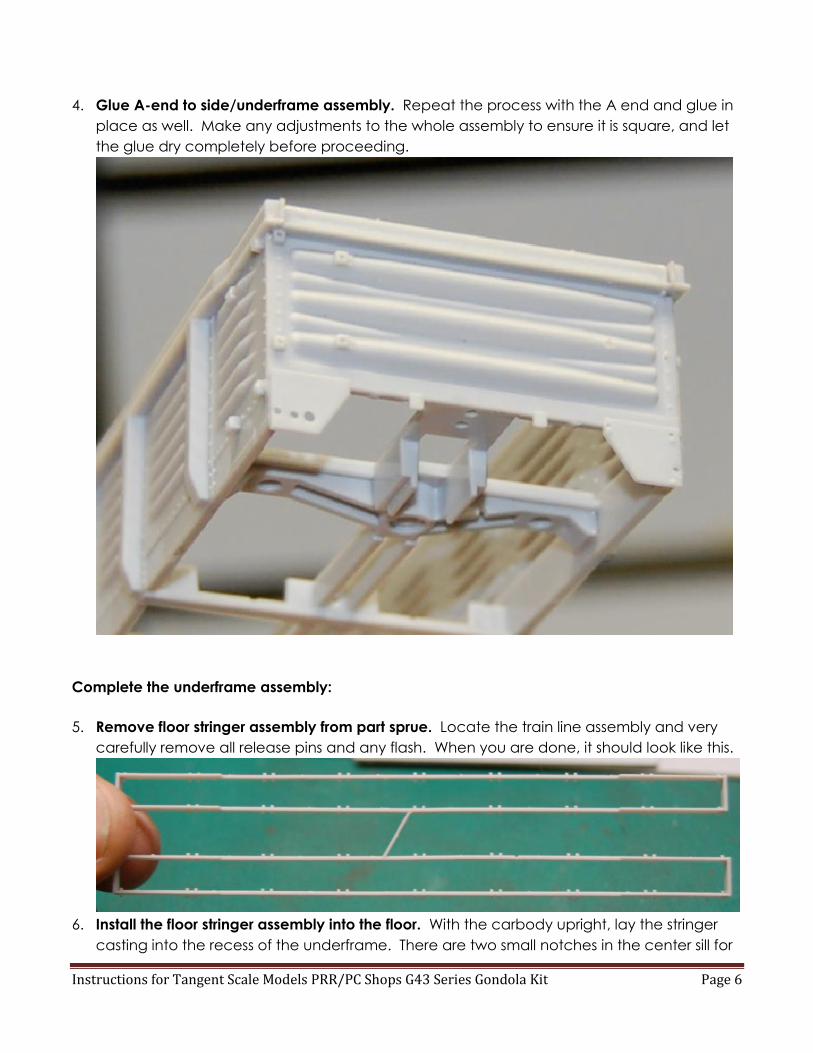
5. Remove floor stringer assembly from part sprue. Locate the train line assembly and very
carefully remove all release pins and any flash. When you are done, it should look like this.
6. Install the floor stringer assembly into the floor. With the carbody upright, lay the stringer
casting into the recess of the underframe. There are two small notches in the center sill for
Instructions for Tangent Scale Models PRR/PC Shops G43 Series Gondola Kit Page 7
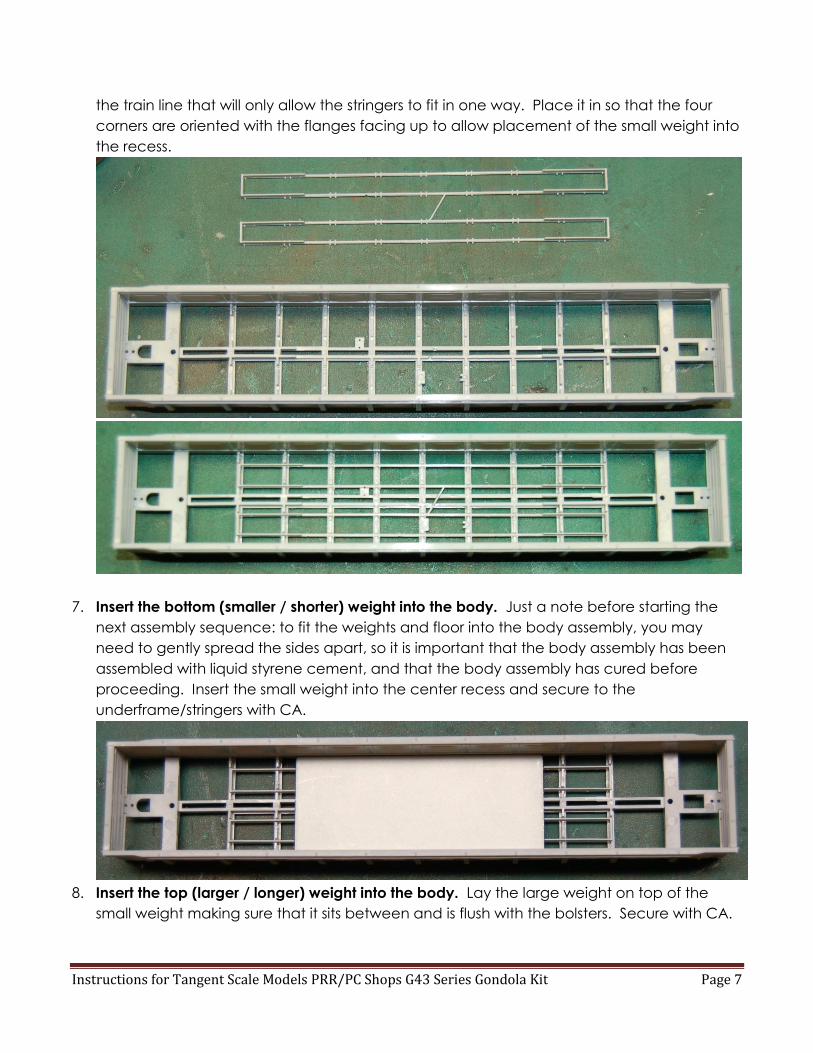
the train line that will only allow the stringers to fit in one way. Place it in so that the four
corners are oriented with the flanges facing up to allow placement of the small weight into
the recess.
7. Insert the bottom (smaller / shorter) weight into the body. Just a note before starting the
next assembly sequence: to fit the weights and floor into the body assembly, you may
need to gently spread the sides apart, so it is important that the body assembly has been
assembled with liquid styrene cement, and that the body assembly has cured before
proceeding. Insert the small weight into the center recess and secure to the
underframe/stringers with CA.
8. Insert the top (larger / longer) weight into the body. Lay the large weight on top of the
small weight making sure that it sits between and is flush with the bolsters. Secure with CA.
Instructions for Tangent Scale Models PRR/PC Shops G43 Series Gondola Kit Page 8
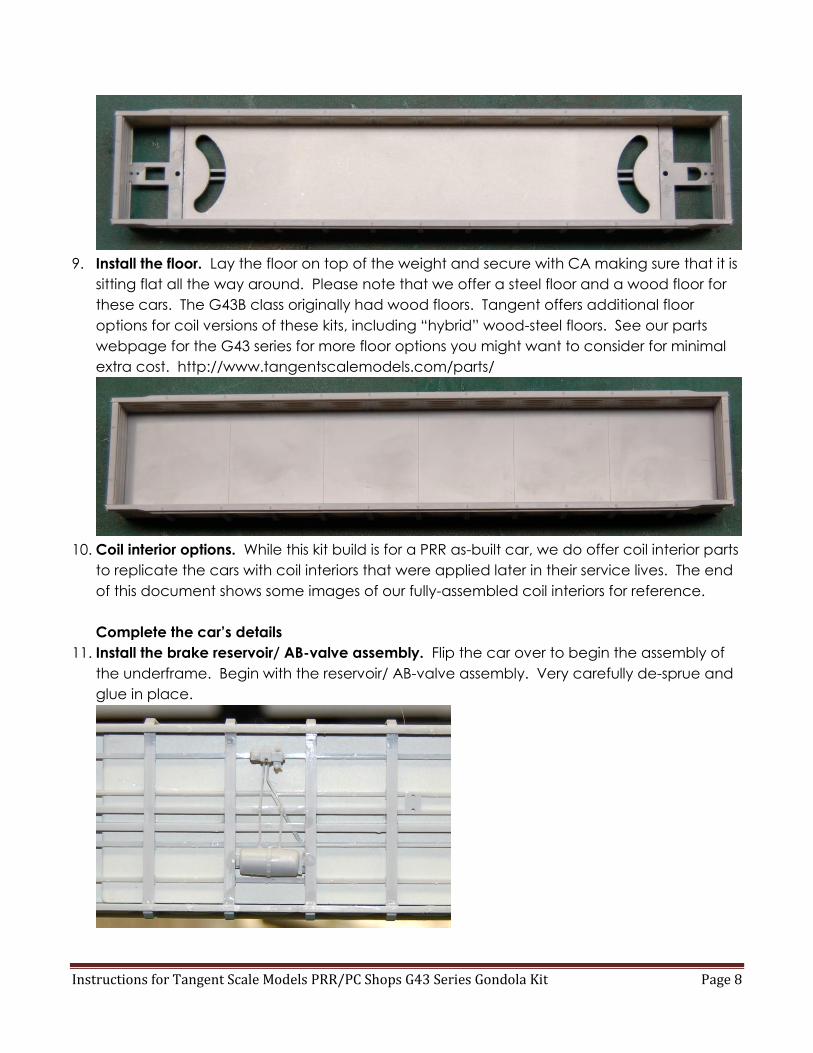
9. Install the floor. Lay the floor on top of the weight and secure with CA making sure that it is
sitting flat all the way around. Please note that we offer a steel floor and a wood floor for
these cars. The G43B class originally had wood floors. Tangent offers additional floor
options for coil versions of these kits, including “hybrid” wood-steel floors. See our parts
webpage for the G43 series for more floor options you might want to consider for minimal
extra cost. http://www.tangentscalemodels.com/parts/
10. Coil interior options. While this kit build is for a PRR as-built car, we do offer coil interior parts
to replicate the cars with coil interiors that were applied later in their service lives. The end
of this document shows some images of our fully-assembled coil interiors for reference.
Complete the car’s details
11. Install the brake reservoir/ AB-valve assembly. Flip the car over to begin the assembly of
the underframe. Begin with the reservoir/ AB-valve assembly. Very carefully de-sprue and
glue in place.
Instructions for Tangent Scale Models PRR/PC Shops G43 Series Gondola Kit Page 9
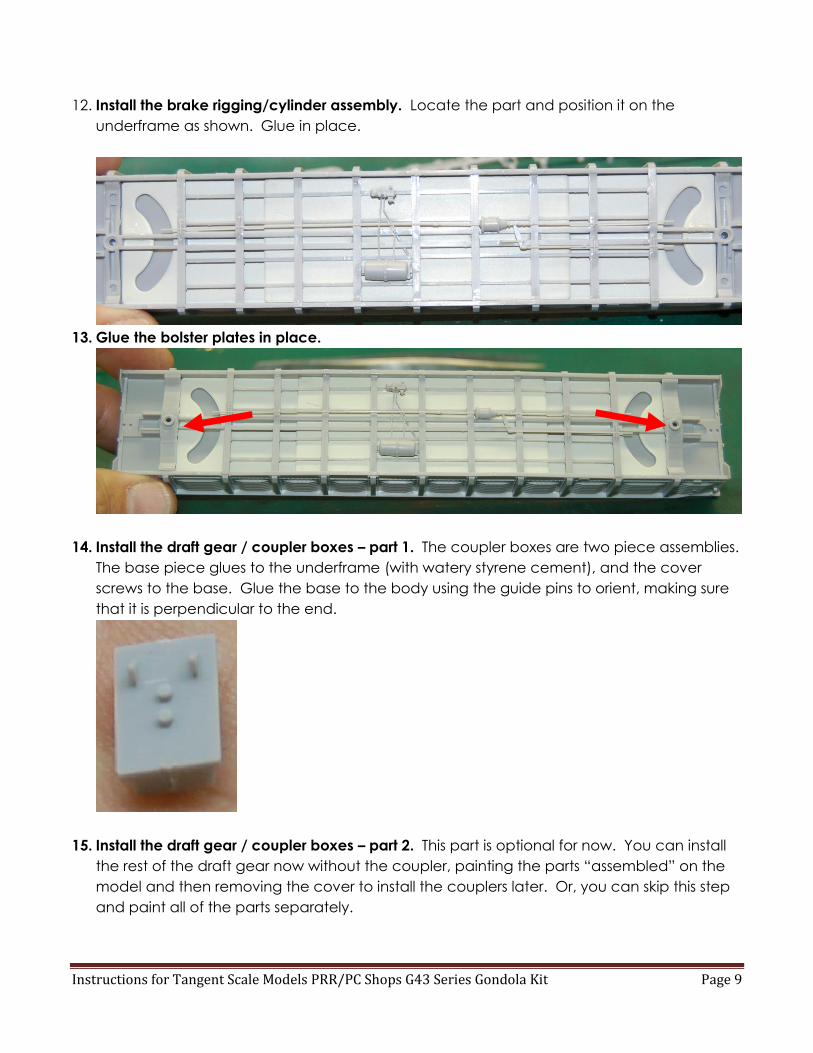
12. Install the brake rigging/cylinder assembly. Locate the part and position it on the
underframe as shown. Glue in place.
13. Glue the bolster plates in place.
14. Install the draft gear / coupler boxes – part 1. The coupler boxes are two piece assemblies.
The base piece glues to the underframe (with watery styrene cement), and the cover
screws to the base. Glue the base to the body using the guide pins to orient, making sure
that it is perpendicular to the end.
15. Install the draft gear / coupler boxes – part 2. This part is optional for now. You can install
the rest of the draft gear now without the coupler, painting the parts “assembled” on the
model and then removing the cover to install the couplers later. Or, you can skip this step
and paint all of the parts separately.
Instructions for Tangent Scale Models PRR/PC Shops G43 Series Gondola Kit Page 10
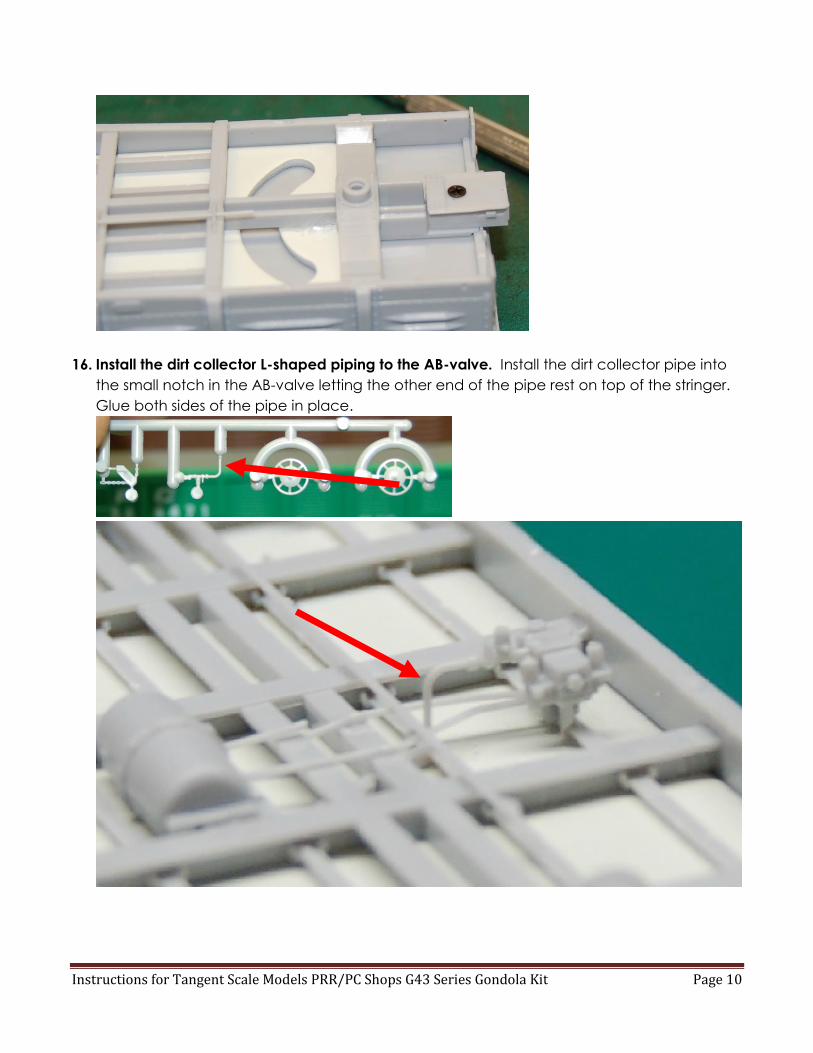
16. Install the dirt collector L-shaped piping to the AB-valve. Install the dirt collector pipe into
the small notch in the AB-valve letting the other end of the pipe rest on top of the stringer.
Glue both sides of the pipe in place.

Instructions for Tangent Scale Models PRR/PC Shops G43 Series Gondola Kit Page 11
17. Install the air release valve. From the same part sprue as the part above, install the
(plastic) air release valve on the underframe next to the AB-valve. This is a U-shaped
plastic part and the small notch in the stringer will aid in proper positioning.
18. Install the air line from the air release valve to the AB-valve. After the glue is dry, locate the
small “C” shaped wire and orient it so that the longer leg goes into the hole in the back of
the bracket, and the shorter leg goes into the back of the AB-valve. It may need to be
bent slightly to get it to fit. Do not glue yet.

Instructions for Tangent Scale Models PRR/PC Shops G43 Series Gondola Kit Page 12
19. Install the release rod lever assembly. There are three wire parts to the release rod lever
assembly; the wire lever, a wire eyebolt, and a wire bracket. You will need to feed the
eyebolt and the bracket onto the lever. In order to do this you will need to slightly open
one of the loops at the end of the lever. When you have done this, feed the eyebolt and
the bracket onto the wire with the eyebolt going on the longer side of the offset in the
lever. Close the loop at the end of the lever. When you’ve fed both parts onto the wire,
insert the end of the eyebolt into the hole on the top of the triple valve and the end of the
bracket into the small hole in the stringer next to the reservoir. Secure both with CA, and
position the lever so that the loops are facing down (toward the ground) and it is centered
between the sides. Secure with CA.

Instructions for Tangent Scale Models PRR/PC Shops G43 Series Gondola Kit Page 13
20. Install the coupler cut lever brackets. There are two different types of plastic coupler cut
lever brackets, one for a standard underframe (in image below, on the left), and one for a
cushion underframe (in image below, on the right). The standard part fits flush on the end
sill, and the cushioned underframe part has an extension bracket. Choose the one
appropriate for your car and glue in place in the two holes in the corner of the end sill (it’s
keyed, so it will only fit in one way). We will install the wire coupler cut levers later.
21. Install the right side ladders. Remove all mold release pins and de-sprue the right side
ladders (the wider, four rung ladders). They are keyed to ensure correct positioning. Glue
in place on both sides.

Instructions for Tangent Scale Models PRR/PC Shops G43 Series Gondola Kit Page 14
22. Install the left side ladders. Do the same for the two rung left side ladders. Again, these
are keyed for positioning. Glue in place.
23. Install the end ladders. These have a “kick out” at the bottom of them – please do not try
to bend these back since that is how they are supposed to look!
24. Clean off any flash from the brakewheel housing and glue in place.

Instructions for Tangent Scale Models PRR/PC Shops G43 Series Gondola Kit Page 15
25. Install the brake fulcrum part. De-sprue the fulcrum part being very careful not to break
the chains as they are very fragile. Using the notch in the bottom of the end sill to locate,
glue the fulcrum in place. Also glue the chain from the fulcrum to the chain that comes
out to the brakewheel housing.
26. Glue the brake platform in place using CA or canopy cement.
Instructions for Tangent Scale Models PRR/PC Shops G43 Series Gondola Kit Page 16
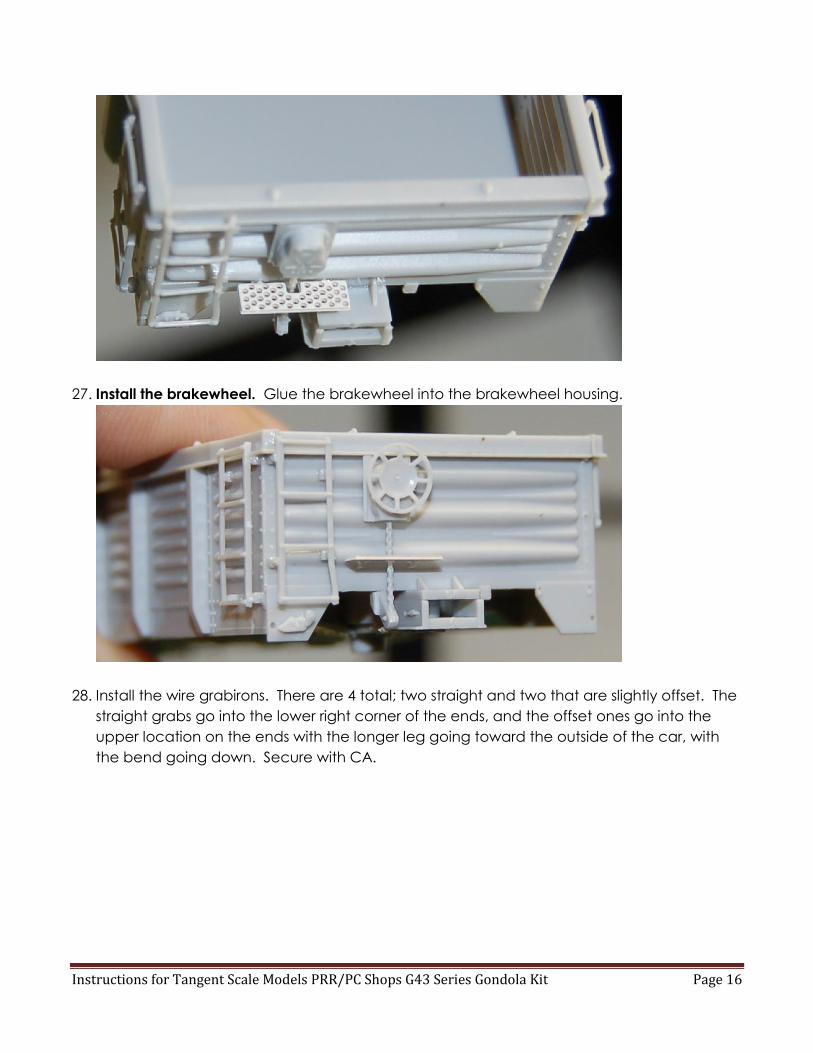
27. Install the brakewheel. Glue the brakewheel into the brakewheel housing.
28. Install the wire grabirons. There are 4 total; two straight and two that are slightly offset. The
straight grabs go into the lower right corner of the ends, and the offset ones go into the
upper location on the ends with the longer leg going toward the outside of the car, with
the bend going down. Secure with CA.
Instructions for Tangent Scale Models PRR/PC Shops G43 Series Gondola Kit Page 17
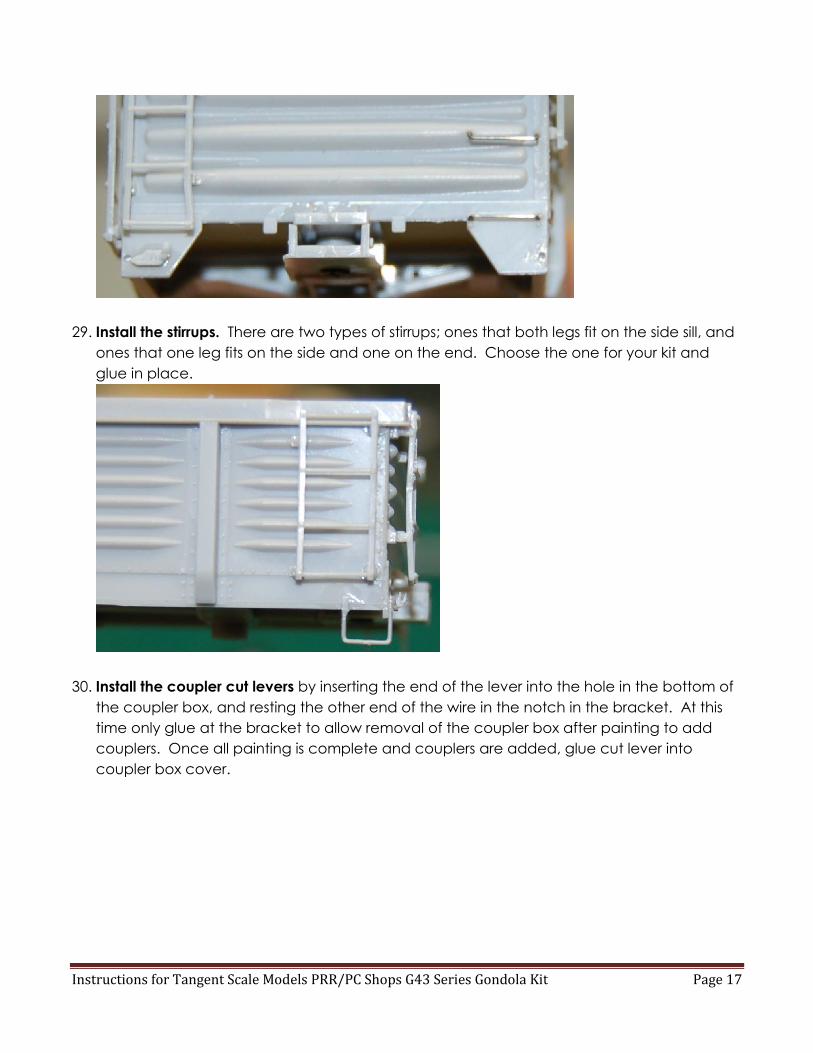
29. Install the stirrups. There are two types of stirrups; ones that both legs fit on the side sill, and
ones that one leg fits on the side and one on the end. Choose the one for your kit and
glue in place.
30. Install the coupler cut levers by inserting the end of the lever into the hole in the bottom of
the coupler box, and resting the other end of the wire in the notch in the bracket. At this
time only glue at the bracket to allow removal of the coupler box after painting to add
couplers. Once all painting is complete and couplers are added, glue cut lever into
coupler box cover.

Instructions for Tangent Scale Models PRR/PC Shops G43 Series Gondola Kit Page 18
31. Install the air hoses in the locating holes of the coupler box being careful not to glue the
coupler box together. Note there are two air hose options. The longer ones are for the
cushioned draft gear (G43B only).
32. Add placards if your paint job requires them. Consult photos for this step because we offer
several placard part options. For example, if you are building a PRR (or former PRR) version,
locate side panels with the numbers 35, 36, and 37 on the back side. You will need one of
each per side. Mount on the car side so that they cover the corrugations completely, and
also ensure that they are straight using the top chord for reference. Panel 37 (the smallest
of the three) is for the PRR Keystone will be mounted vertically and centered in the panel.
Refer to the photos for placement.
Instructions for Tangent Scale Models PRR/PC Shops G43 Series Gondola Kit Page 19
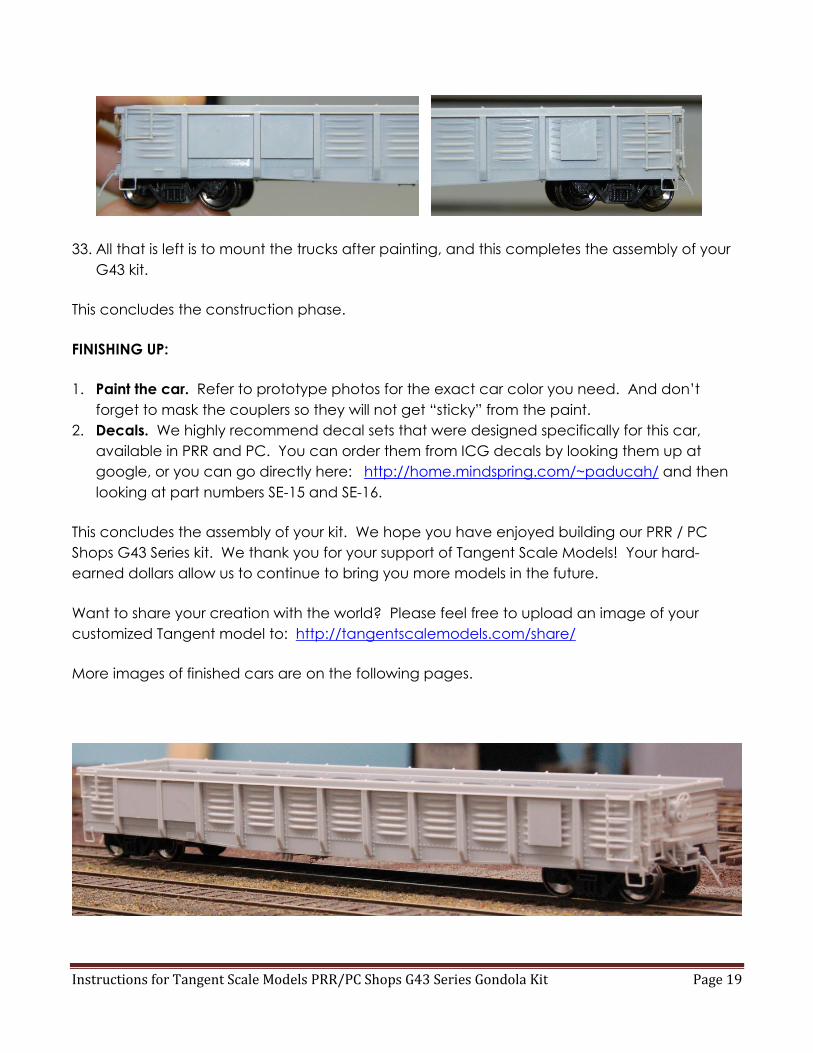
33. All that is left is to mount the trucks after painting, and this completes the assembly of your
G43 kit.
This concludes the construction phase.
FINISHING UP:
1. Paint the car. Refer to prototype photos for the exact car color you need. And don’t
forget to mask the couplers so they will not get “sticky” from the paint.
2. Decals. We highly recommend decal sets that were designed specifically for this car,
available in PRR and PC. You can order them from ICG decals by looking them up at
google, or you can go directly here: http://home.mindspring.com/~paducah/ and then
looking at part numbers SE-15 and SE-16.
This concludes the assembly of your kit. We hope you have enjoyed building our PRR / PC
Shops G43 Series kit. We thank you for your support of Tangent Scale Models! Your hard-
earned dollars allow us to continue to bring you more models in the future.
Want to share your creation with the world? Please feel free to upload an image of your
customized Tangent model to: http://tangentscalemodels.com/share/
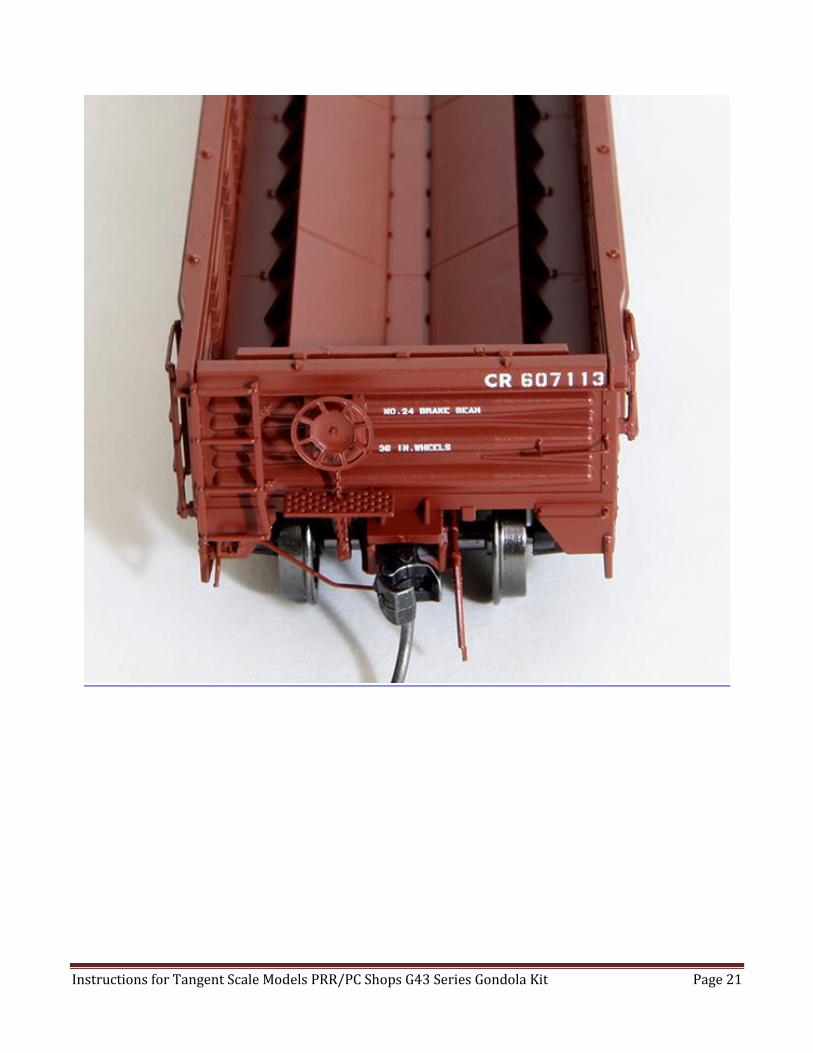
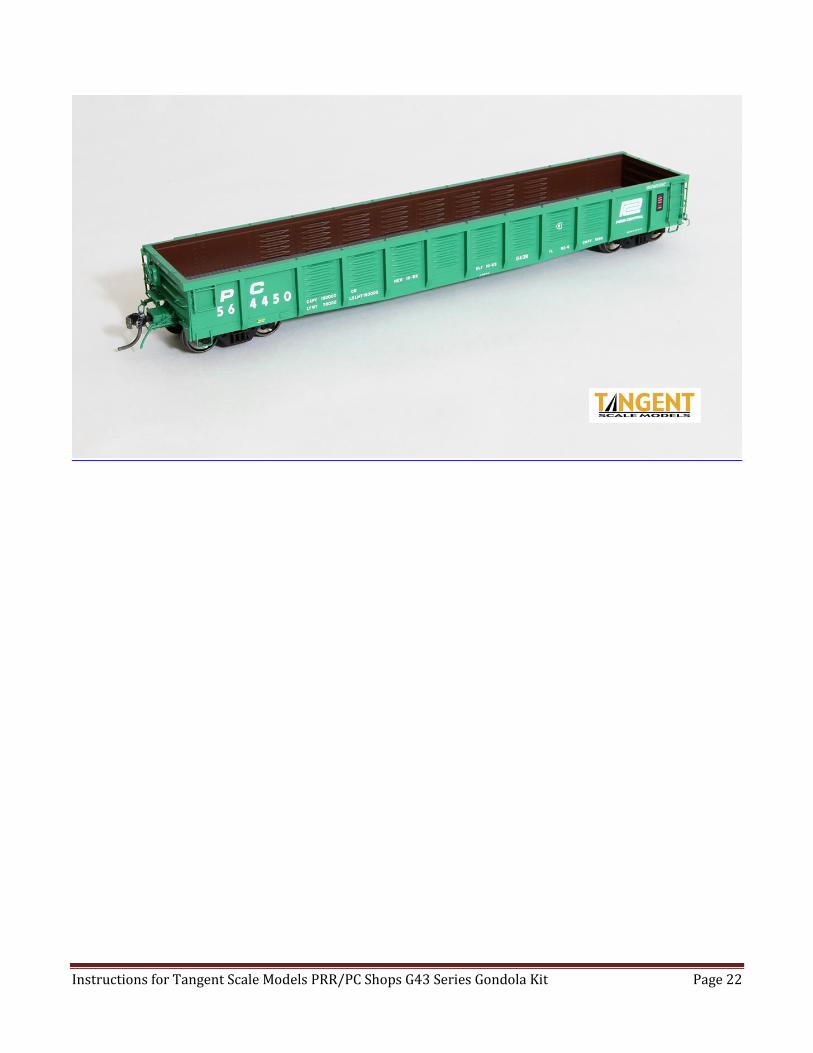
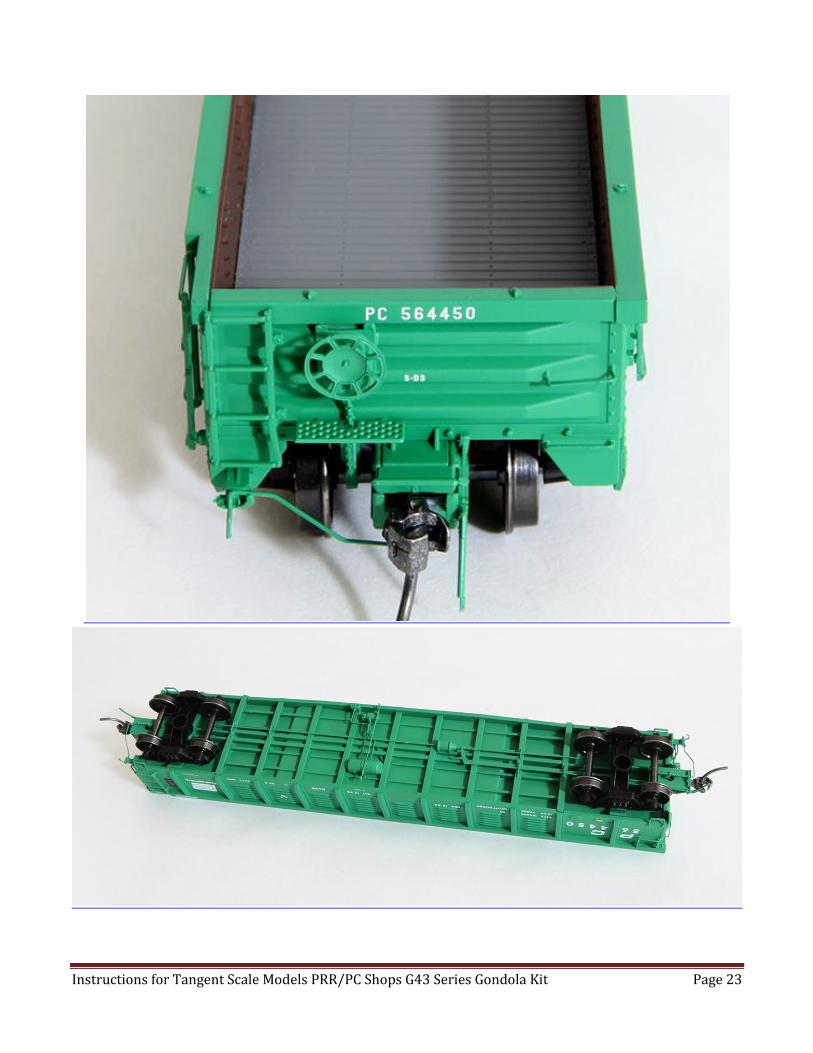
More images of finished cars are on the following pages.

Instructions for Tangent Scale Models PRR/PC Shops G43 Series Gondola Kit Page 20
Instructions for Tangent Scale Models PRR/PC Shops G43 Series Gondola Kit Page 21
Instructions for Tangent Scale Models PRR/PC Shops G43 Series Gondola Kit Page 22
Instructions for Tangent Scale Models PRR/PC Shops G43 Series Gondola Kit Page 23

Instructions for Tangent Scale Models PRR/PC Shops G43 Series Gondola Kit Page 24

Instructions for Tangent Scale Models PRR/PC Shops G43 Series Gondola Kit Page 25

Instructions for Tangent Scale Models PRR/PC Shops G43 Series Gondola Kit Page 26

Instructions for Tangent Scale Models PRR/PC Shops G43 Series Gondola Kit Page 27

Instructions for Tangent Scale Models PRR/PC Shops G43 Series Gondola Kit Page 28