instruction manual machine p/n: 1000870#, 1000871# & 1000880#
TRANSCRIPT
1
Instruction ManualMachine P/N: 1000870#, 1000871# & 1000880#
2
Contents1. Information.......................................................................................................................3
1 Introduction.........................................................................................................3
2 Safety.................................................................................................................3
3 Electrical Installation Procedure...........................................................................4
4 Plumbing Installation Procedure..........................................................................4
5 Backflow Prevention............................................................................................4
6 Maintenance.......................................................................................................4
7 Descale Procedure.............................. ................................................................4
8 Limescale............................................................................................................5
9 Operating the Boiler for the First Time.................................................................5
10 Contact Details..................................................................................................5
2. Installation........................................................................................................................6
3. Push Button Boiler.............................................................................................................7
4.1 Operation: Multi Temp.......................................................................................7
4.2 Programming: Multi Temp................................................................................8
4.3 Operation: Single Temp....................................................................................9
4.4 Programming: Single Temp.............................................................................10
4. Tap Boiler.........................................................................................................................11
5.1 Operation: Tap..................................................................................................11
5.2 Programming: Tap..........................................................................................12
5. Under Counter Boiler........................................................................................................12
6.1 Operation: Under Counter................................................................................13
6.2 Programming: Under Counter..........................................................................14
6.3 Set Up Single Button Font................................................................................14
6. Service Set Up.................................................................................................................15
7. Changing Filter................................................................................................................16
8. Cleaning & Maintenance...................................................................................................17
9. Descale Proceedure..........................................................................................................18
10. Troubleshooting.............................................................................................................20
3
IntroductionThe information provided in this manual is intended to assist in the installation and mainte-nance of the MIX range of hot water boilers. Please read the instructions carefully to prevent accidents and ensure an efficient installation. This manual is not a substitute for any safety instructions or technical data affixed to the machine or its packaging. All information in this manual is current at the time of publication and is subject to change without notice. The company accepts no responsibility for any damage or injury caused by incorrect or unrea-sonable installation and operation.
SafetyWhen using electrical appliances, basic safety precautions should always be followed to pre-vent the risk of fire, electric shock, burns, or other injuries or damages.• Read all operating and safety instructions carefully.• This appliance must be placed/installed on a horizontal flat stable surface.• The ambient temperatures this appliance should operate within are 5 °C - 35 °C.• This appliance may be placed in self-service areas if attended to by trained personnel.• The hose supplied with the boiler is non-toxic food quality tested to 190psi. However, a hose is not a permanent connection. It is, therefore, advisable to switch off boiler and close the stopcock valve when boiler is not in use, e.g. overnight etc.• The utmost care has been taken in the manufacture and testing of this machine. Failure to install, maintain and / or operate this machine according to the manufacturer’s instructions may result in conditions that can cause injury or damage to property. If in any doubt about the serviceability of the machine always contact the manufacturer or your own supplier for advice.• This machine is not intended for use by persons (including children) with reduced physical, sensory, or mental capabilities, or lack of experience and knowledge, unless they have been given supervision or instruction concerning use of the machine by a person responsible for their safety.• Children should be supervised to ensure that they do not play with the machine.• In the event where any wires are damaged, such wires can only be replaced by qualified service technicians.• CAUTION - Risk of fire and electric shock. Only to be used with manufacturer’s specified power cord set. Marco p/n 1501487 (USA), 1501488 (EU), 1501489 (UK/Ire).• This appliance should not be installed in an area where a water jet could be used to clean it.• Access to the service area of the appliance is restricted to persons having knowledge and practical experience of the appliance and the relevant safety and hygiene requirements.
Information
4
Information
Electrical Installation ProcedureWhen installing the machine, always observe the local regulations and standards. The ap-pliance is supplied with a moulded power cord. A suitable mains power supply socket should be available within easy access of the appliance so that it can be disconnected easily after install.
Plumbing Installation Procedure• Ensure that the equipment is installed according to local plumbing & water regulations.Mains water pressure required (limits): 14.5 -145psi (100 -1000kPa, 0.1 - 1MPa).• Fit a stop valve on a cold water line and attach a 3/4” BSP male fitting,(E.g. 3/4” x 1/2” 311 or washing machine type stop valve).• Turn on the water to flush any impurities, dust etc from the inlet hose and water pipe. Allow several litres through. Especially for new installations.• Connect the hose to the inlet valve of the boiler. Make sure a sealing washer is fitted.• Turn on water and check for leaks.
Backflow PreventionThis equipment must be installed with adequate backflow protection to comply with all ap-plicable federal, state and local codes.
MaintenanceThis machine has been designed to give many years of trouble free service. The only regular maintenance required is occasional de-scaling.
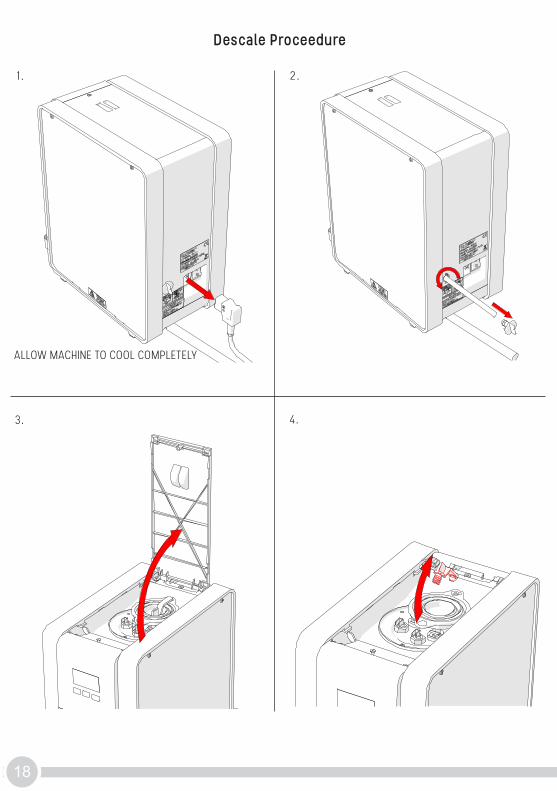
Descale Procedure• Isolate machine from power supply.• Isolate machine from water supply.• ALLOW TO COOL COMPLETELY!• Drain water from machine.• Remove lid.• Clean the water level probes with scotch brite.• Use ScaleKleen, Marco part No. 8000270 or similar. Follow instructions carefully.• Thoroughly clean and flush the machine before re-use.• Follow installation and first time operation instructions.• See page 18 of this manual for further details.

5
LimescaleIn common with all water boiler manufacturers, service calls resulting from limescale are not covered by warranty. Fitting a scale reducer is recommended, especially in hard water areas. This can reduce the build-up of scale but may not stop it altogether. The frequency that descaling is required depends on the local water supply; hard water areas need more attention. Descaling of the machine should ideally be carried out by qualified service per-sonnel.
Operating Boiler For The First Time• Check that all installation procedures have been carried out.• Ensure water valve is on.• Plug boiler into suitable socket.• Turn on the power switch.The “Wait” progress circle will be visible on the screen and the machine will fill to a safe level, above the elements, before heating. The “Ready” tick will come up on screen when the machine is full and up to normal operat-ing temperature.The boiler is now ready for use – the display will show the button settings and the “Ready” status tick.• The Boiler may now be used to dispense Hot Water to the preset factory settings.
NOTE: Because the boiler is electronically controlled no priming is necessary.The element cannot switch on until a safe level of water is reached.
Contact DetailsMarco Beverage Systems Limited.63d Heather Road,Sandyford Industrial Estate,Dublin 18Tel: +353 (0)1 295 2674Fax: +353 (0)1 295 3715email: [email protected]
Information

6
Installation
1. 2.
3. 4.

7
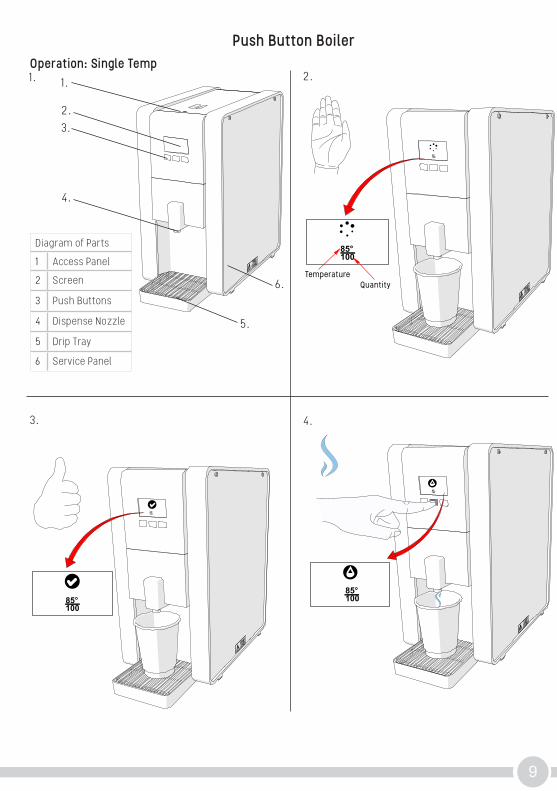
85°100
75°100 95°
85°100
75°100 95°
TemperatureQuantity
85°100
75°100 95°
85°100
75°100 95°
1. 2.
Push Button Boiler
3. 4.
85°100
85°100
Operation: Multi Temp
Diagram of Parts
1 Access Panel
2 Screen
3 Push Buttons
4 Dispense Nozzle
5 Drip Tray
6 Service Panel
2.3.
5.
4.
1.
6.
8
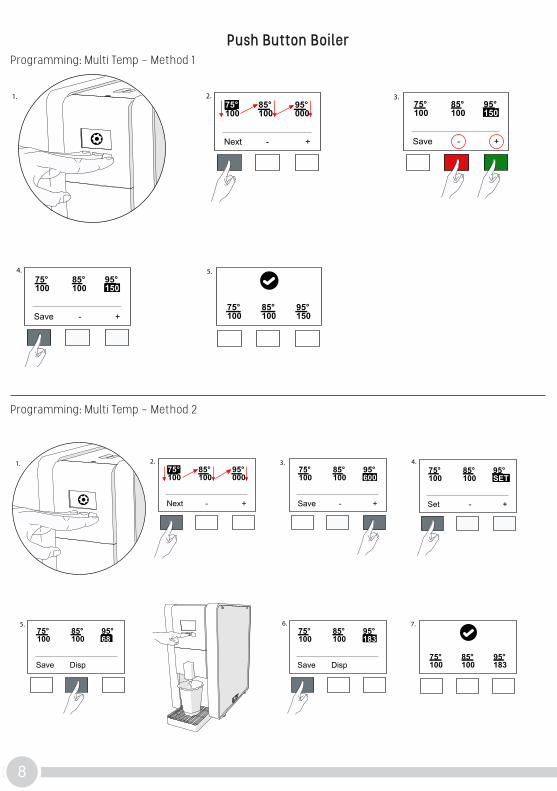
Next - +
85°100
75°100
95°000
2.75°100
Save - +
85°100
95°150
3.
85°100
75°100
95°150
5.4.75°100
Save - +
85°100
95°150
1.
Push Button Boiler
75°100
Save - +
85°100
95°600
3.
7.
85°100
75°100
95°183
4.75°100
Set - +
85°100
95°SET
Save Disp
85°100
75°100
95°68
5.
Save Disp
85°100
75°100
95°183
6.
1.
Next - +
85°100
75°100
95°000
2.
Programming: Multi Temp - Method 1
Programming: Multi Temp - Method 2
9
85°100
85°100
1. 2.
Push Button Boiler
3. 4.
85°100
85°100
Operation: Single Temp
85°100
85°100
TemperatureQuantity
Diagram of Parts
1 Access Panel
2 Screen
3 Push Buttons
4 Dispense Nozzle
5 Drip Tray
6 Service Panel
2.3.
5.
4.
1.
6.
10
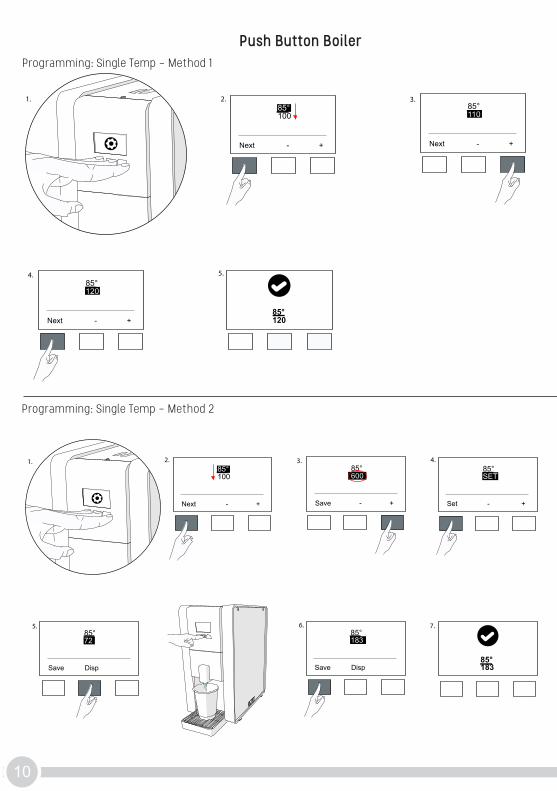
2.
Next - +
85°100
3.
Next - +
85°110
5.
85°120
1.
4.
Next - +
85°120
Push Button Boiler
2.
Next - +
85°100
3.
Save - +
85°600
85°183
7.
4.
Set - +
85°SET
5.
Save Disp
85°72
6.
Save Disp
85°183
1.
Programming: Single Temp - Method 1
Programming: Single Temp - Method 2

11
94°
94°
Temperature
94°
94°
1. 2.
Tap Boiler
3.4.
94°
94°
Operation: Tap
94°
Diagram of Parts
1 Access Panel
2 Screen
3 Push Buttons
4 Tap
5 Drip Tray
6 Service Panel
2.3.
4.
1.
5.
6.

12
Tap Boiler Programming: Tap
Under Counter Boiler
2.
Next - +
90°3.
Save - +
94°
4.
94°
1.
Diagram of Parts
1 Hot Connection
2 Cold Connection
3 Vent
4 Wiring Connection
5 Access Panel
6 Screen
7 Push Buttons
8 Service Panel
3. 4.
1.2.
8.
7.
6.
5.

13
85°100
75°100 95°
85°100
75°100 95°
85°100
75°100 95°
85°100
2.
Under Counter BoilerOperation: Under Counter
85°100
75°100 95°
85°100
75°100 95°
Temperature
Weight
1.
3. 4.
14
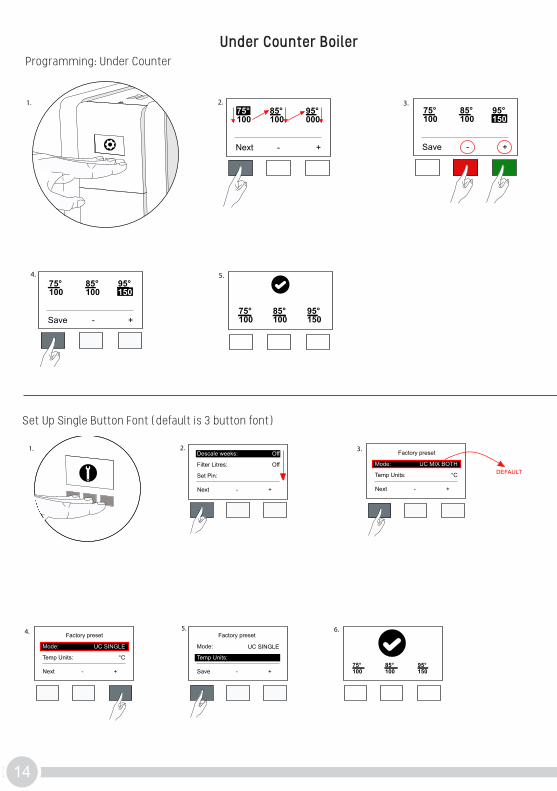
Under Counter Boiler Programming: Under Counter
Set Up Single Button Font (default is 3 button font)
Next - +
85°100
75°100
95°000
2.75°100
Save - +
85°100
95°150
3.
85°100
75°100
95°150
5.4.75°100
Save - +
85°100
95°150
1.
Off
Off
Descale weeks:
Filter Litres:
Set Pin:
Next - +
2. 3.
UC MIX BOTH
°C
Factory preset
Mode:
Temp Units:
Next - +
85°100
75°100
95°150
6.5.
C
Factory preset
UC SINGLE°Mode:
Temp Units:
Save - +
1.
DEFAULT
4.
UC SINGLE
°C
Factory preset
Mode:
Temp Units:
Next - +

15
Service Set Up
3 sec
1.
Next - +
Enter Pin0000
Off
Off
Descale weeks:
Filter Litres:
Set Pin:
Next - +
2a. 2b.
OR
IF PIN IS SET
1.
2.
Off
Off
Descale weeks:
Filter Litres:
Set Pin:
Next - +
2. 3.
MIX BOTH
°C
Factory preset
Mode:
Temp Units:
Next - GO!
85°100
75°100
95°150
5.4.
°C
Factory preset
Mode:
Temp Units:
Save - +
1.
Factory preset
Pick machine type:
PB3
Save - +
Factory preset
Pick machine type:
TAP
Save - + Next - +
Enter Pin0000
OffOff
Descale weeks:Filter Litres:Set Pin:
Next - +
Only required for factory reset, not for install
Set appropriate time for descale & filter flags
MACHINE TYPE OPTIONS
TAP
PB3
PB8
UC3 (3 button)
UC3 (1 button)
MIX BOTH
MODE OPTIONS
UC HOT COLD
UC COLD HOT
UC MIX BOTH
UC SINGLE
HOT COLD
COLD HOT
MIX BOTH
SINGLE
TAP
COLD 60S
HOT 5S

16
Changing Filter
1. 2.
3. 4.

17
Cleaning & Maintenance
1. 2.
3. 4.
18
Descale Proceedure
1. 2.
3. 4.
ALLOW MACHINE TO COOL COMPLETELY

19
Descale Proceedure
4. 5.
7. 8.
Repeat descale proceedure as required

TroubleshootingThe screen of the boiler indicates various errors or problems with the machine. See diag-nostic table below for futher details.
www.marcobeveragesystems.com
NSF/ANSI 4E337347
Code / Icon Type Description Action
Status Boiler Ready
Status Boiler not ready Wait until the boiler ready symbol appears
Button Description
Turn machine ON/ OFF (only in Tap mode)
Press Button
Status Dispensing (not in Tap mode)
Warning Low water pressure Check mains pressure
Warning Descale flag Check level probe for scale build up. Des-cale the tank. Reset the Descale flag
F
Warning Change filter flag Change the filter. Reset the Filter flag
Check low level probe!
Error Probes connection mixed up / low level probe failure
Call a qualified service technician
Check thermistor! Error Temperature sensor is out of range Call a qualified service technician
Heater failure! Error Heating element not heating Call a qualified service technician
Tank overfill! Error Too much water in the tank Call a qualified service technician