installation manual v2.2: twin cp3 fuel injection kit 2003 ... ats twin cp3 kit 701-900-2272-inst...
TRANSCRIPT

12/13/11 ATS Twin CP3 Kit 701-900-2272-INST
ATS Diesel Performance
1-866-209-3695
1
Installation Manual v2.2: Twin CP3 Fuel Injection Kit
2003-2004 Dodge 5.9L
Figure 1 - Full Kit Photo
Figure 2 - Hardware Kit
26

12/13/11 ATS Twin CP3 Kit 701-900-2272-INST
ATS Diesel Performance
1-866-209-3695
2
Please read all instructions before installation.
This kit is not emissions legal in California. Kit is legal only on race vehicles that will not be used on public highways.
Note: DO NOT remove any high pressure fittings from the pump. Doing so can result in damage to the internal components. CAUTION: Cleanliness cannot be overemphasized when handling or replacing diesel fuel system components. This especially includes the fuel injectors, high-pressure fuel lines and fuel injection pump. Very tight tolerances are used with these parts. Dirt contamination could cause rapid part wear and possible plugging/sticking of the injector nozzles. This in turn could lead to possible engine misfire. Always wash/clean any fuel system component thoroughly before disassembly and then air dry. Cap or cover any open part after disassembly. Before assembly, examine each part for dirt, grease or other contaminants and clean if necessary. When installing new parts, lubricate them with clean engine oil or clean diesel fuel only (unless otherwise specified).
1. Before starting the installation, please check to make sure all of the parts
pictured above are inside the Dodge Twin CP3 kit. A complete corresponding list of components can be found on pages 11 and 12.
2. Disconnect the (-) negative battery terminals and secure them away from the terminals.
3. Drain the coolant from the radiator and remove the upper radiator hose.
4. Remove the factory serpentine belt and discard it.
Note: Once the serpentine belt is loose, it is helpful to loosen the tensioner bolt to remove the belt.
5. Thoroughly clean the area around the intake manifold and the front of the fuel rail. Place shop towels around any fuel fitting that will be removed to absorb any fuel leakage. Also, cover the intake inlet if removing the intake manifold.
6. Remove the engine oil dipstick tube mounting bolts located on the intake manifold. This will allow the dipstick tube to move and provide better access to fuel lines, however, take care not to bend the dipstick tube.
7. The TPS Sensor and bracket will have to be removed to make room for the new CP3 pump and bracket. The sensor will have to be relocated using the bracket (#10, Figure 1) and hardware supplied.
a. The TPS assembly is located on the driver side of the engine at the front of the intake manifold. Remove the TPS assembly from the bracket and remove the bracket from the intake manifold. Discard the bracket.
b. Install the new TPS bracket supplied in the kit. Use the supplied hardware to first attach the TPS assembly to the bracket, and then attach the backside of the block where shown.

12/13/11 ATS Twin CP3 Kit 701-900-2272-INST
ATS Diesel Performance
1-866-209-3695
3
Figure 3 - Timing Cover Bolt Holes
Figure 4 - Bracket Orientation and Assembly
8. Loosely install the pump support bracket (#5, Figure 1) into the front side of the timing bracket (Figure 3) using the 3/8” hardware included. This will be used later when installing the pump and bracket.
9. Loosen the banjo bolt holding the fuel return line to the fuel filter housing.
Install TPS Assembly Here

12/13/11 ATS Twin CP3 Kit 701-900-2272-INST
ATS Diesel Performance
1-866-209-3695
4
Figure 5 - Fitting and Connector Locations
10. Remove the electrical connector from the fuel pressure sensor located on the top of the fuel rail, behind the intake as shown.
11. Remove the rail pressure sensor and set it aside.
12. Before installing the pump and bracket, install the factory rail pressure sensor into the high pressure fitting located on the backside of the pump. Place a small amount of grease (Polylube, Transjel or equivalent) on the sealing surface of the pressure sensor. Torque the sensor to 52 ft-lbs (use a backing wrench on the fitting in the pump to not over-torque the fitting in the pump).
Figure 6 - Installed Rail Pressure Sensor
DO NOT remove pressure sensor
adapter
Pressure sensor installed in fitting
Fuel return banjo bolt
Factory rail pressure sensor connector
Replace pressure sensor with ATS
high pressure fitting

12/13/11 ATS Twin CP3 Kit 701-900-2272-INST
ATS Diesel Performance
1-866-209-3695
5
13. Using the supplied 8mm hardware, install the new CP3 pump and radiator hose support bracket in the CP3 bracket with the fittings oriented as shown.
Figure 7 - Pump Bracket Assembly
14. Remove the mount holding the wiring loom to the front of the head. Install the CP3 bracket/pump on the head with the three supplied M10 x 1.5 bolts and 10mm flat washers as shown. Use a small amount of thread locking compound on the three 10mm bolts. Torque each bolt to 35 ft-lbs.
Note: Prior to installing the pump and bracket, it can be useful to start installing the new fittings and lines in the factory fuel pump. Please refer to step 19 to determine the correct installation procedure for your application.
15. Install the 8mm bolt and flange nut through the slotted hole in the bottom of the pump bracket and the top of the pump support bracket. Tighten all pump bracket fan shroud support bracket hardware.
Figure 8 - Pump Mounting Assembly

12/13/11 ATS Twin CP3 Kit 701-900-2272-INST
ATS Diesel Performance
1-866-209-3695
6
16. Locate the high pressure fitting (#19, Figure 1), lubricate the threads with clean diesel fuel and thread it into the fuel rail. Apply a small amount of grease (Polylube, Transjel or equivalent) on the sealing surface. To prevent leaks, torque the fitting to 52 ft-lbs.
17. Loosely install the high pressure line (#9, Figure 1) in the fitting in the back of the pump and the high pressure fitting. When both are threaded hand tight, torque each fitting to 30 ft-lbs.
18. Locate the rail pressure sensor extension harness (#24, Figure 1). Plug the factory rail pressure sensor connector from the factory harness into the extension harness. Plug the harness into the rail pressure sensor.
NOTE: Be sure to orient the rail pressure sensor connectors as show below. There is a ramp and clip that must be connected properly. The block on the opposite side will then slide into the slot of the opposing connector. If reversed, the truck will not idle properly and the engine will likely shut off.
Figure 9 - Rail Pressure Sensor Connector Orientation
19. There are two common ways to supply fuel to the new pump:
a. Use the factory lift pump and share the supply between the two injection pumps (adequate, but limits performance gains).
b. Supply the injection pumps with an aftermarket lift pump and filter (performance applications).
Supplies are included with the ATS Dodge Twin CP3 Kit to help connect the fuel lines for both options. Some aftermarket lift pump kits use different sized lines and fittings. The fittings included in the kit will help but may work with all aftermarket lift pump kits.
Option A – Factory Lift Pump:
A1. If the factory lift pump will supply both pumps, remove the factory plastic supply line.
A2. Remove the fuel supply banjo bolt from the factory CP3 injection pump feed line at the pump and replace it with the JIC-6 banjo fitting and 2 copper washers (#22 and #23, Figure 1).
Ramp Clip
Block Slot

12/13/11 ATS Twin CP3 Kit 701-900-2272-INST
ATS Diesel Performance
1-866-209-3695
7
Figure 10 – Remove Factory Banjo and Install New Fitting
A3. Using the supplied braided stainless steel supply line (#11, Figure 1), connect the JIC-6 fitting in the factory CP3 to the JIC-6 fitting in the new CP3 pump.
A4. Remove the banjo bolt from the return line on the factory fuel filter housing (Figure 5). Replace this fitting with a 12mm banjo to JIC-6 fitting using the copper washers provided.
A5. Using the supplied -6 braided stainless steel fuel return line (#12, Figure 1), connect the new JIC-6 banjo fitting to the return fitting on the new injection pump.
Option B – Aftermarket Lift Pump:
B1. Remove the factory fuel supply line between the fuel filter housing and factory injection pump.
B2. Remove the supply line from the injection pump.
B3. Install a 12mm banjo to JIC-6 fitting (#22, Figure 1), a barbed 12mm banjo fitting (#15, Figure 1) and sealing washers (#23, Figure 1) in its place. Orient the barbed fitting up and away from the motor. Use the supplied barbed to JIC-6 brass fitting (#16, Figure 1) to connect the lift pump to the injection pump.

12/13/11 ATS Twin CP3 Kit 701-900-2272-INST
ATS Diesel Performance
1-866-209-3695
8
Figure 11 - Supply Line Plumbing
B4. Connect the braided stainless return line as described in Option A.
B5. If an aftermarket lift pump was installed prior to the Twin CP3 installation, it may be necessary to extend the 3/8 fuel line supplying the pumps. In this case, use the supplied 3/8 union (#17, Figure 1).
20. Install the pulley (#2, Figure 1) and nut (#20, Figure 1). Torque the pulley nut to 52 ft-lbs.
21. Install the new ATS radiator hose (#3, Figure 1) in place of the factory hose reusing the factory clamps. Snap the radiator hose into the clamp on the support bracket.
22. Unplug the factory CP3 regulator harness from the factory pump.
23. Connect the factory harness to the ATS Twin CP3 controller harness and connect the two male connectors into the existing and new CP3 pump fuel pressure regulators.
24. Using the Velcro provided, attach the controller to the top of the fuse box or in another convenient location away from any excessive heat.
25. Connect the black ground lead to the negative (-) terminal on the battery.
26. Connect the red power wire to the positive (+) terminal on the battery. The CP3 electronics must have full time power to avoid extremely high rail pressure during vehicle startup. The electronics do not pull enough current to drain the battery. Make sure a 7.5 Amp or 10 Amp fuse is in the fuse holder.
Remove this fitting
Move to this position
M12 to -6 Banjo
Barbed Banjo Fitting

12/13/11 ATS Twin CP3 Kit 701-900-2272-INST
ATS Diesel Performance
1-866-209-3695
9
27. Install the new serpentine belt as shown in Figure 11. Be sure to tighten the tensioner bolt if it was removed.
Figure 12 - Belt Routing (front view)
28. Refill engine coolant using approved coolant.
29. Remove any towels or rags used to absorb fuel leakage during installation.
30. Reinstall engine oil dipstick tube bolts.
31. Reconnect the (-) negative battery terminals.
32. Turn the ignition to the ON position without starting the vehicle. Check for fuel leaks. If no leaks are present, start the vehicle. It may take a few tries to because the fuel lines start empty. If no leaks are present at idle, drive the vehicle being sure to use the entire throttle range. Park the vehicle and check for signs of leaking fuel. Pay special attention to high pressure fittings in the rail and on the pump. High pressure fuel leaks will usually set a check engine light.
33. If no leaks are found, installation is complete.
ATS Pulley
New Idler Pulley

12/13/11 ATS Twin CP3 Kit 701-900-2272-INST
ATS Diesel Performance
1-866-209-3695
10
Have Any Questions?
Thank you for purchasing the ATS Twin CP3 Kit. Please check our website at http://www.atsdiesel.com for technical support and other performance products such as the 5-Star™ torque converter, ATS High Performance Valve Body and ATS High Performance Transmission along with our full line of power enhancers. Please call or e-mail our Technical Service Department, 8:00am to 5:30pm Mountain Standard Time, Monday through Friday.
Contact Information
Toll Free: 800-949-6002
Local: 303-431-7973 Fax: 303-431-0135
Website: www.ATSDiesel.com Email: [email protected]
We strive to make our instructions as clear and complete as possible. To achieve this, our instructions are under constant construction. We encourage you to visit our website to check for the most up-to-date manuals and diagrams as well as other information. If you have any suggestions as to how we can improve this installation manual, let us know at mailto:[email protected].
12/13/11 ATS Twin CP3 Kit 701-900-2272-INST
ATS Diesel Performance
1-866-209-3695
11
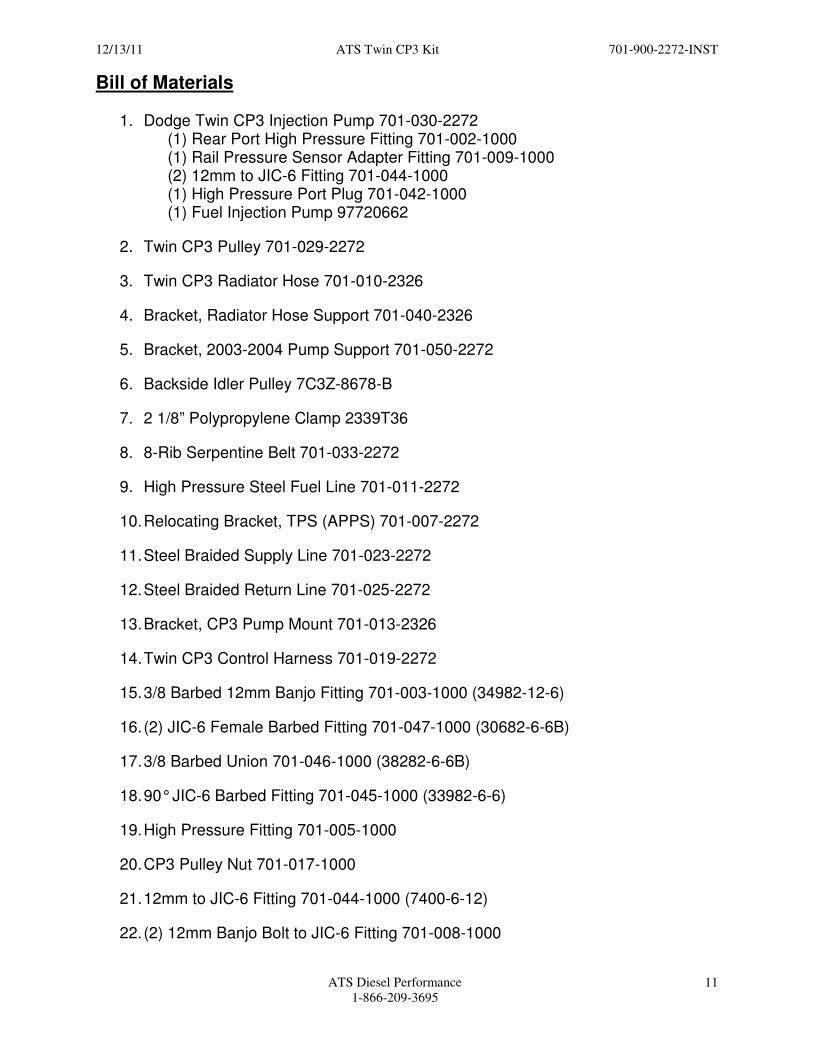
Bill of Materials
1. Dodge Twin CP3 Injection Pump 701-030-2272 (1) Rear Port High Pressure Fitting 701-002-1000 (1) Rail Pressure Sensor Adapter Fitting 701-009-1000 (2) 12mm to JIC-6 Fitting 701-044-1000 (1) High Pressure Port Plug 701-042-1000 (1) Fuel Injection Pump 97720662
2. Twin CP3 Pulley 701-029-2272
3. Twin CP3 Radiator Hose 701-010-2326
4. Bracket, Radiator Hose Support 701-040-2326
5. Bracket, 2003-2004 Pump Support 701-050-2272
6. Backside Idler Pulley 7C3Z-8678-B
7. 2 1/8” Polypropylene Clamp 2339T36
8. 8-Rib Serpentine Belt 701-033-2272
9. High Pressure Steel Fuel Line 701-011-2272
10. Relocating Bracket, TPS (APPS) 701-007-2272
11. Steel Braided Supply Line 701-023-2272
12. Steel Braided Return Line 701-025-2272
13. Bracket, CP3 Pump Mount 701-013-2326
14. Twin CP3 Control Harness 701-019-2272
15. 3/8 Barbed 12mm Banjo Fitting 701-003-1000 (34982-12-6)
16. (2) JIC-6 Female Barbed Fitting 701-047-1000 (30682-6-6B)
17. 3/8 Barbed Union 701-046-1000 (38282-6-6B)
18. 90° JIC-6 Barbed Fitting 701-045-1000 (33982-6-6)
19. High Pressure Fitting 701-005-1000
20. CP3 Pulley Nut 701-017-1000
21. 12mm to JIC-6 Fitting 701-044-1000 (7400-6-12)
22. (2) 12mm Banjo Bolt to JIC-6 Fitting 701-008-1000

12/13/11 ATS Twin CP3 Kit 701-900-2272-INST
ATS Diesel Performance
1-866-209-3695
12
23. (4) 12mm Copper Sealing Washers 701-048-1000 (8530009-12)
24. Rail Pressure Harness Extension Kit 701-032-2272
25. Thread Locking Compound .02oz Tube 91458A56
26. Hardware Kit 701-001-2272 (3) M10 X 1.5 X 30 Flange Bolt (3) M8-1.25 X 50 Socket Head Cap Screw (4) M8-1.25 Flange Nuts (4) 8mm Flat Washer (3) 10mm Flat Washer (3) 3/8-16 X 2 Flange Bolt (3) 3/8-16 Nut (3) 3/8 Lock Washer (3) 3/8 Washer (1) M8-1.25 X 25 Cap Screw (1) 10-24 X ¾ Button Head Screw (1) 10-24 Nylon Insert Nut (3) 5/16-18 X 1” Flange Bolts (3) 5/16-18 Flange Nuts
Not Pictured:
27. ATS Instructions Folder (1) ATS Instructions 701-900-2272-INST (2) ATS Stickers
28. ATS Warranty www.atsdiesel.com/warranty