condair cp3 d - arktika.ru5.6.1 wiring diagram condair cp3 d 31 5.6.2 notes on electric installation...
TRANSCRIPT
Technical DocumenTaTion
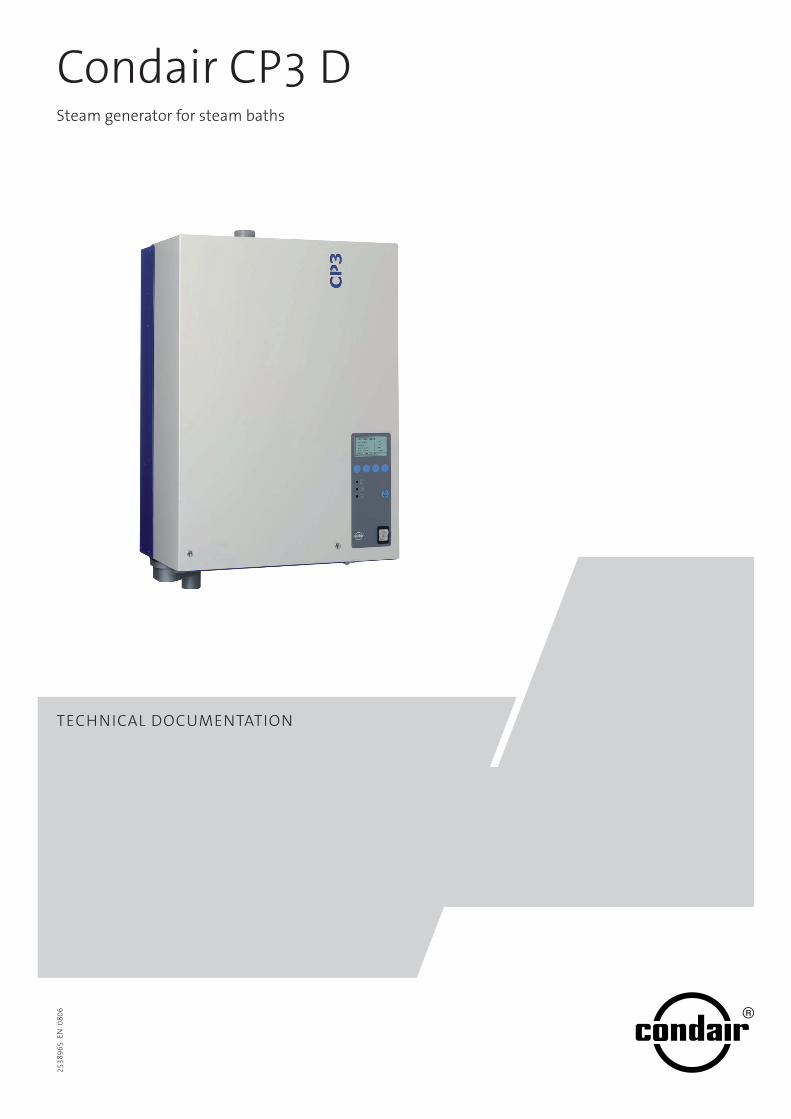
Steam generator for steam baths
2538
965
en
080
6
condair cP3 D

1 Introduction 41.1 Totheverybeginning 41.2 Notesonthetechnicaldocumentation 4
2 Foryoursafety 6
3 ProductOverview 83.1 Modelsoverview 83.2 Identificationoftheunit 93.3 Steamgeneratorconstruction 103.4 Functionaldescription 113.5 Systemoverview 123.6 Options 133.6.1 Optionsoverview 133.6.2 Optiondetails 143.7 Accessories 153.8 Standarddelivery 163.9 Storing/Transportation/Packaging 16
4 Notesfortheplanningengineer 174.1 Selectingtheunitversion 174.1.1 Determinationoftherequiredsteamcapacity 174.1.2 Selectingtheunit 184.2 Selectingtheoptionsanaccessories 18
5 Mountingandinstallationwork 195.1 Importantnotesformountingandinstallationwork 195.2 Installationoverview 205.3 Mountingtheunit 215.3.1 Notesonlocatingtheunit 215.3.2 Mountingtheunit 235.3.3 Inspectingtheinstalledunit 245.4 Steaminstallation 255.4.1 Overviewsteaminstallation 255.4.2 Positioning/mountingthesteamdistributor 255.4.3 Installingthesteamhose 265.4.4 Inspectingthesteaminstallation 275.5 Waterinstallation 285.5.1 Overviewwaterinstallation 285.5.2 Notesonwaterinstallation 295.5.3 Inspectingthewaterinstallation 305.6 Electricinstallation 315.6.1 WiringdiagramCondairCP3D 315.6.2 Notesonelectricinstallation 325.6.3 InsertingtheCP3Card 345.6.4 Inspectingtheelectricalinstallation 34
6 Operation 356.1 Commissioning 356.2 Notesonoperation 366.2.1 Functionofthedisplayandoperatingelements 366.2.2 Remoteoperatingandfaultindication 366.2.3 Inspectionsduringoperation 376.2.4 Carryingoutmanualdraining 376.3 Takingtheunitoutofoperation 376.4 Overviewandoperatingofthemenu 38
6.5 Interrogationfunctions 396.5.1 Informationintheoperatingdisplay 396.5.2 Interrogationofunitinformation 396.5.3 Interrogationofthemalfunctionlist 406.6 Unitsettings 406.6.1 Settingthesetpointtemperature 406.6.2 Settingthecontrolmode 406.6.3 Settingthefragrancepumpsettings 416.6.4 Unitsettingsinthesettingsmenu 426.6.4.1 Launchingthesettingsmenu 426.6.4.2 Selectingthedialoguelanguage 426.6.4.3 Steambathcontrolsettings 426.6.4.4 Settingthedate 456.6.4.5 Settingthetime 456.6.4.6 Cylindersettings 456.6.4.7 Settingthecapacitylimitation 466.6.4.8 Activating/Deactivatingfaultcurrentrelayoperation 466.6.4.9 Watermanagementsettings 466.6.4.10 Performingremoterelaytests 476.6.4.11 Performingsteambathtests 486.6.4.12 Settingthedisplaycontrast 486.7 Modbussettings 48
7 Maintenance 497.1 Importantnotesonmaintenance 497.2 Maintenancelist 507.3 Removingandinstallingpartsformaintenance 517.3.1 Removalandinstallationofthesteamcylinder 517.3.2 Disassemblyandassemblyof
thecleanablesteamcylindertypeD... 537.3.3 Removalandinstallationofthewatercup
andthewaterhoses 547.3.4 Removalandinstallationofthedrainpump 557.3.5 Removalandinstallationoftheinletvalve 557.4 Notesoncleaningtheunitcomponents 567.5 Notesoncleaningagents 577.6 Resettingthemaintenanceindication 58
8 Malfunctions 598.1 Malfunctionlist 598.1.1 Systemfaults 598.1.2 Unitfaults 608.2 Notesonfaultelimination 628.3 Resettingtheerrorindication(redLEDlights) 62
9 Takingoutofservice/Disposal 639.1 Takingoutofservice 639.2 Disposal/Recycling 63
10 Productspecifications 6410.1 Technicaldata 6410.2 Unitdimensions 65
Contents
�
Limitation
The subject of this technical documentation is the steam generator Condair CP3 D. The various accessories are only described insofar as this is necessary for proper operation of the equipment. Further information on accessories can be obtained in the respective instructions.
This technical documentation is restricted to the installation, commissioning, operation, servic-ing and trouble shooting of the steam generator Condair CP3 D and is meant for well trained personnel being sufficiently qualified for their respective work.
The technical documentation is supplemented by various separate items of documentation (spare parts list, manuals for accessories, etc.). Where necessary, appropriate cross-references are made to these publications in the technical documentation.
1 Introduction
We thank you for having purchased the steam generator Condair CP3 D.
The steam generator Condair CP3 D incorporates the latest technical advances and meets all rec-ognized safety standards. Nevertheless, improper use of the Condair CP3 D may result in danger to the user or third parties and/or impairment of material assets.
To ensure a safe, proper, and economical operation of the steam generator Condair CP3 D, please observe and comply with all information and safety instructions contained in the present technical documentation as well as the instructions given in the manuals for the components used in the humidification system.
If you have questions, which are not or insufficiently answered in this documentation, please contact your Condair supplier. They will be glad to assist you.
1.2 Notes on the technical documentation
1.1 To the very beginning
�
Symbols used in this manual
CAUTION!The catchword “CAUTION” designates notes in this technical documentation that, if neglected, may cause damage and/or malfunction of the unit or other material assets and/or may lead to injury to persons.
WARNING!
The catchword “WARNING” used in conjunction with the general caution symbol designates safety and danger notes in this technical documentation that, if neglected, may lead to severe injury or even lethal violation of persons.
Safekeeping
Please safeguard this technical documentation in a safe place, where it can be immediately accessed. If the equipment changes hands, the documentation should be passed on to the new operator.
If the documentation gets mislaid, please contact your Condair supplier.
Language versions
This technical documentation is available in various languages. Please contact your Condair supplier for information.
Copyright protection
The present technical documentation is protected under the Copyright Act. Passing-on and reproduc-tion of the manual (or part thereof) as well as exploitation and communication of the contents are prohibited without written permission by the manufacturer. Violation of copyright terms is subject to legal prosecution and arises liability for indemnification.
The manufacturer reserves the right to fully exploit commercial patent rights.
�
2 For your safety
General
Every person working with the Condair CP3 D must have read and understood the Technical Docu-mentation before carrying out any work.Knowing and understanding the contents of the Technical Documentation is a basic requirement for protecting the personnel against any kind of danger, to prevent faulty operation, and to operate the unit safely and correctly.
All ideograms, signs and markings applied to the unit must be observed and kept in readable state.
Qualification of personnel
All actions described in the present Technical Documentation (installation, operation, maintenance, etc.) must be carried out only by well trained and sufficiently qualified personnel authorised by the owner.For safety and warranty reasons any action beyond the scope of this manuals must be carried out only by qualified personnel authorised by the manufacturer.
It is assumed that all persons working with the Condair CP3 D are familiar and comply with the ap-propriate regulations on work safety and the prevention of accidents.
Intended use
The steam generator Condair CP3 D is intended exclusively for generation of steam for a steam bath within the specified operating conditions (see chapter 10 “Product specifications”). Any other type of application without the express written consent of the manufacturer is considered as not conforming with the intended purpose and may lead to the Condair CP3 D becoming dangerous.Operation of the equipment in the intended manner requires that all the information in these instructions is observed (in particular the safety instructions).

�
Danger that may arise from the unit
– The Condair CP3 D is mains powered.
WARNING!
One may get in touch with live parts when the unit is open. Touching live parts may cause severe injury or danger to life.
Prevention: Before carrying out any work set the Condair CP3 D out of operation as de-scribed in chapter 6.3 (switch off the unit, disconnect it from the mains and stop the water supply) and secure the unit against inadvertent power-up.
– The Condair CP3 D produces steam. When producing steam, the steam cylinder inside the steam generator gets very hot (up to 100 °C).
WARNING!
If the unit is opened immediately after having produced steam there is danger of burning when touching the steam cylinder.
Prevention: Before carrying out any work set the Condair CP3 D out of operation as de-scribed in chapter 6.3, then wait until the evaporation unit has cooled down sufficiently thus preventing danger of burning.
Behaviour in case of danger
If it is suspected that safe operation is no longer possible, then the Condair CP3 D should imme-diately be shut down and secured against accidental power-up according to chapter 6.3. This can be the case under the following circumstances:– if the Condair CP3 D or its mains cable is damaged– if the Condair CP3 D is no longer operating correctly– if connections and/or piping are not sealed
All persons working with the Condair CP3 D must report any alterations to the unit that may affect safety to the owner without delay.
Prohibited modifications to the unit
No modifications must be undertaken on the Condair CP3 D without the express written consent of the manufacturer.
For the replacement of defective components use exclusively original accessories and spare parts available from your Condair supplier.
�
3 Product Overview
3.1 Models overview
The steam generators Condair CP3 D are available with different heating voltages and steam capacities ranging from 5 kg/h up to a max. of 45 kg/h.
Heatingvoltage* Max.steamcapacityinkg/h
Graduationinkg/h
ModelCondairCP3D
Unitsize
small large
400V3(400V/3~/50...60Hz)
5...15 1 5...15 1
16...45 1 16...45 1
230V3(230V/3~/50...60Hz)
5...15 1 5...15 1
16...30 1 16...30 1
230V1(230V/1~/50...60Hz) 5...8 1 5...8 1
* Otherheatingvoltagesonrequest
The steam generators Condair CP3 D are equipped, as standard, with an exchangeable steam cylinder, a control with an integrated continuous controller, as well as a complete steam bath control (connec-tion and control of: fan, lighting, fragrance pump and remote maintenance and fault indicator).
All models are controlled steplessly via the KTY temperature sensor supplied and the built-in trans-mitter and the continuous controller.
Note: a special version of the Condair CP3 D without steam bath control is available on demand.
Key model designation
Example:Condair CP3 D 45 400V3
Unit version
Maximum steam capacity in kg/h:
Heating voltage:�00V/3~/�0...�0Hz: 400V3230V/3~/�0...�0Hz: 230V3230V/1~/�0...�0Hz: 230V1
�
Walter Meier (Climate International) Ltd. 8808 Pfäffikon
Made in Switzerland
Condair CP3 D 45
Dampf/Steam/Vapeur = 45.0 kg/hWasser/Water/Eau = 1...10 bar
Wechselstrom ACMain Unit / Modul A
400V 3~ / 50...60Hz 33.8 kWXXXXXXX 11.06
3.2 Identificationoftheunit
The identification of the unit is found on the type plate (for the location of the type plate see unit overview):
Type designation Serial number (7 digits) Month/Year
Unit voltage (heating voltage)
Maximum steam capacity per unit
Admissible water supply pressure
Operation note
Unit designation
Total steam capacity in kg/h
10
3.3 Steam generator construction
1 Housing (small, large) 2 Cable openings, top side 3 Main contactor � Power board � Control board with CP3 Card � Display and control unit � Remote operating and fault indication board � Operation status indicators � Cable openings, bottom side 10 Drain key 11 Unit switch 12 Steam hose connector (option) 13 Water cup
1� Filling hose 1� Water supply hose 1� Inlet valve 1� Overflow hose 1� Drain connection (not visible) 1� Water supply pipe 20 Drain pump 21 Type plate 22 Data plate CP3 Card 23 Steam cylinder 2� Level sensor 2� Auxiliary drain hose 2� Electrode plug
The illustration above shows the large unit
1
12
13
15
14
17
16
1918
20
23
25
26
24
2
3
7
4
56
8
11109
2122

11
3.4 Functional description
The Condair CP3 D is a pressureless steam generator that utilizes an electrode heating. The Condair CP3 D is designed for steam generation in a steam bath.
Steam generation
Any time steam is requested, the electrodes are supplied with voltage via main contactor. Simulta-neously, the inlet valve opens and water enters the steam cylinder from the bottom via water cup and supply line. As soon as the electrodes come in contact with the water, current begins to flow between the electrodes, eventually heating and evaporating the water. The more the electrode surface is exposed to water, the higher is the current consumption and thus the steam capacity.Upon reaching the requested steam capacity, the inlet valve closes. If the steam generation de-creases below a certain percentage of the required capacity, due to lowering of the water level (e.g. because of the evaporation process or drainage), the inlet valve opens until the required capacity is available again.If the required steam capacity is lower than the actual output, the inlet valve is closed until the de-sired capacity is achieved by lowering of the water level (evaporation process).
Level monitoringA sensor provided in the steam cylinder cover detects when the water level gets too high. The mo-ment the sensor comes in contact with water, the inlet valve closes.
DrainageAs a result of the evaporation process, the conductivity of the water increases due to an escalating mineral concentration. Eventually, an inadmissibly high current consumption would take place if this concentration process were permitted to continue. To prevent this concentration from reaching a value, unsuitably high for the operation, a certain amount of water is periodically drained from the cylinder and replaced by fresh water.
Control
The steam production is controlled steplessly (continuous control) by the KTY temperature sensor supplied (or an 0-10V temperature sensor) and the integrated continuous controller.
Below a minimum controllable steam output a two-point control (On/Off) is used.

12
3.5 System overview
1 Steam generator 2 Steam connection 3 Water drain connection � Water supply connection � Filter valve (accessory “Z2�1”) � Manometer (installation recommended) � Funnel with siphon (building side)
� Water drain hose (accessory “DS�0”) � Control voltage supply 10 Heating voltage supply 11 Cable openings 12 Steam hose (accessory “DS..”) 13 Steam distributor (accessory “W..”)
DS808
7
9
10
125...1250 µS/cm1...10 bar1...40 °C
1
2
3
4
5
6
Z261
11
DS60
DS22
DS80
W30
W22
W45
12
13

13
3.6 Options
3.6.1 Options overview
CondairCP3D
230V1 5...8
400V3 5...8 9...15 16...45
230V3 5...8 9...15 16...30
D... CleanablesteamcylinderCleanable steam cylinder as an alternative to thedisposable steam cylinder built in as standard (seealsochapter3.6.2).
1xD3.. 1xD4.. 1xD6..
RFI RemoteoperatingandfaultindicationPCBwithrelaycontactsfortheconnectionofremotedisplaysfor“Operation”,“Steam”,“Fault”and“Service”aswellasananalogueoutputforremotetemperatureindicationandananalogueoutputforthetemperature-dependentcontrolofanoptionalflapcontrolsystem.
1xRFI 1xRFI 1xRFI
THV TerminalsheatingvoltageSeparateterminalsforsystemswheredirectconnectionofheatingvoltagetomaincontactor(standardversion)isnotpermittedbylocalregulations.
1xM-THV 1xM-THV 1xL-THV
PG Cablegland 1xPG 1xPG 1xPG
SC.. Steamhoseconnector 1xSC22 1xSC60 1xSC80
MP Mountingprofile 1xMP 1xMP 1xMP
CVI Internalcontrolvoltage 1xM-CVI 1xM-CVI 1xL-CVI
TRAFO Transformer(400V/230V) 1xM-Trafo 1xM-Trafo 1xL-Trafo

1�
3.6.2 Option details
Steam cylinder
The steam generator is available with two different types of steam cylinders:
– Exchangeable steam cylinder type A... (standard version)
– Cleanable steam cylinder type D... (option)
The following tables present an overview of the steam cylinders used in the different models.
CondairCP3D...400V3 5...8 9...15 16...25 26...45
Forwaterconductivityfrom125to1250µS/cm
Exchangeablesteamcylinder 1xA363 1xA464 1xA674 1xA664
Cleanablesteamcylinder 1xD363 1xD464 1xD674 1xD664
Forlowwaterconductivity
Exchangeablesteamcylinder 1xA343 1xA444 1xA654 1xA654
Cleanablesteamcylinder 1xD343 1xD444 1xD654 1xD654
CondairCP3D...230V3 5...8 9...15 16...21 22...30
Forwaterconductivityfrom125to1250µS/cm
Exchangeablesteamcylinder 1xA343 1xA444 1xA654 1xA644
Cleanablesteamcylinder 1xD343 1xD444 1xD654 1xD674
CondairCP3D...230V1 5...8
Forwaterconductivityfrom125to1250µS/cm
Exchangeablesteamcylinder 1xA342
Cleanablesteamcylinder 1xD342
If you have questions regarding the steam cylinders please contact your Condair representative.
1�
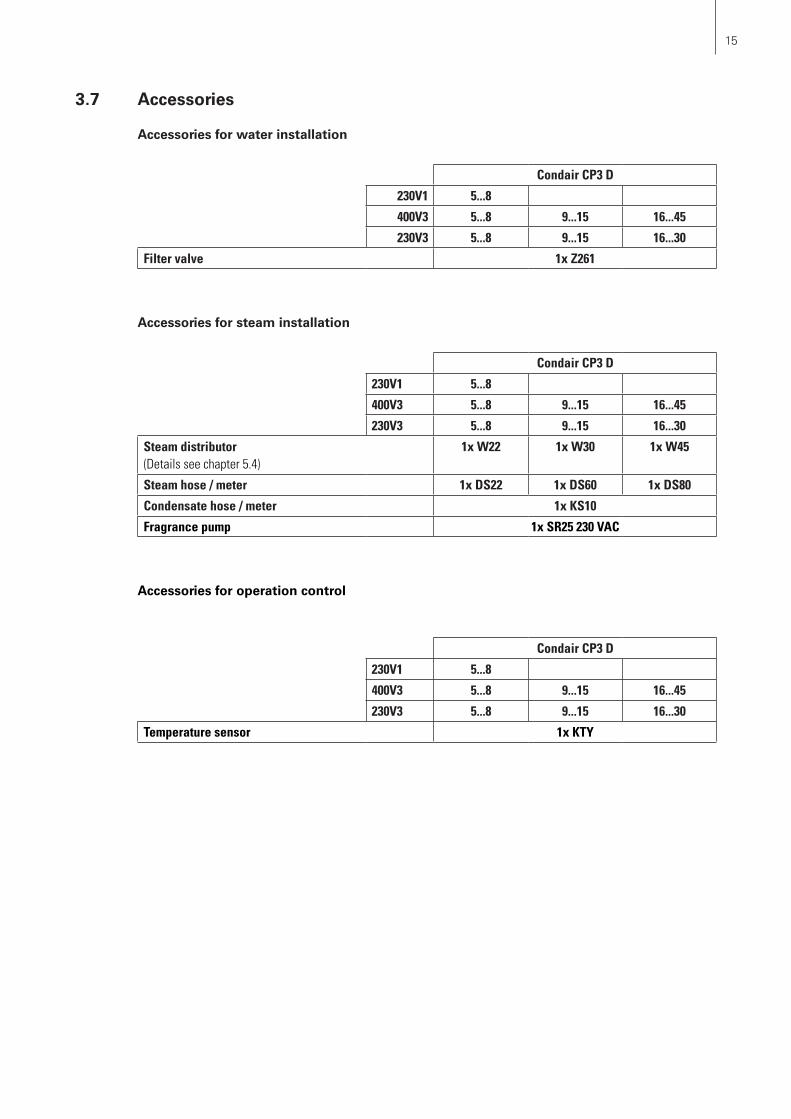
3.7 Accessories
Accessories for water installation
CondairCP3D
230V1 5...8
400V3 5...8 9...15 16...45
230V3 5...8 9...15 16...30
Filtervalve 1xZ261
Accessories for steam installation
CondairCP3D
230V1 5...8
400V3 5...8 9...15 16...45
230V3 5...8 9...15 16...30
Steamdistributor(Detailsseechapter5.4)
1xW22 1xW30 1xW45
Steamhose/meter 1xDS22 1xDS60 1xDS80
Condensatehose/meter 1xKS10
Fragrancepump 1xSR25230VAC
Accessories for operation control
CondairCP3D
230V1 5...8
400V3 5...8 9...15 16...45
230V3 5...8 9...15 16...30
Temperaturesensor 1xKTY

1�
3.9 Storing/Transportation/Packaging
Storing
Store the unit in a protected area meeting the following requirements:
– Room temperature: 1 ... �0 °C– Room humidity: 10 ... �� %rh
Transportation
For optimum protection always transport the unit in the original packaging.
The weight of the small and the large unit is more than 20 kg (weight without packaging: small unit 23 kg, large unit 2� kg). Therefore, always transport the unit with the help of another person or use a forklift or a crane. Always place the unit on its back side.
Packaging
Keep the original packaging of the Condair CP3 D for later use.
In case you wish to dispose of the packaging, observe the local regulations on waste disposal. Never dispose of the packaging to the environment.
The standard delivery includes:
– Steam generator Condair CP3 D cpl. equipped with the options ordered according to chapter 3.� with KTY temperature sensor, water connection pipe G3/�" - 1/2", fixing set, Technical Documen-tation (this document) and spare parts list, packaged in cardboard box:– Unit small (WxHxD): ��0 mm x �20 mm x 2�0 mm, shipping weight: 2� kg– Unit large (WxHxD): ��� mm x ��� mm x 3�0 mm, shipping weight: 31 kg
– Ordered accessories with operating instructions according chapter 3.�, packed separately
– Spare parts list
3.8 Standard delivery

1�
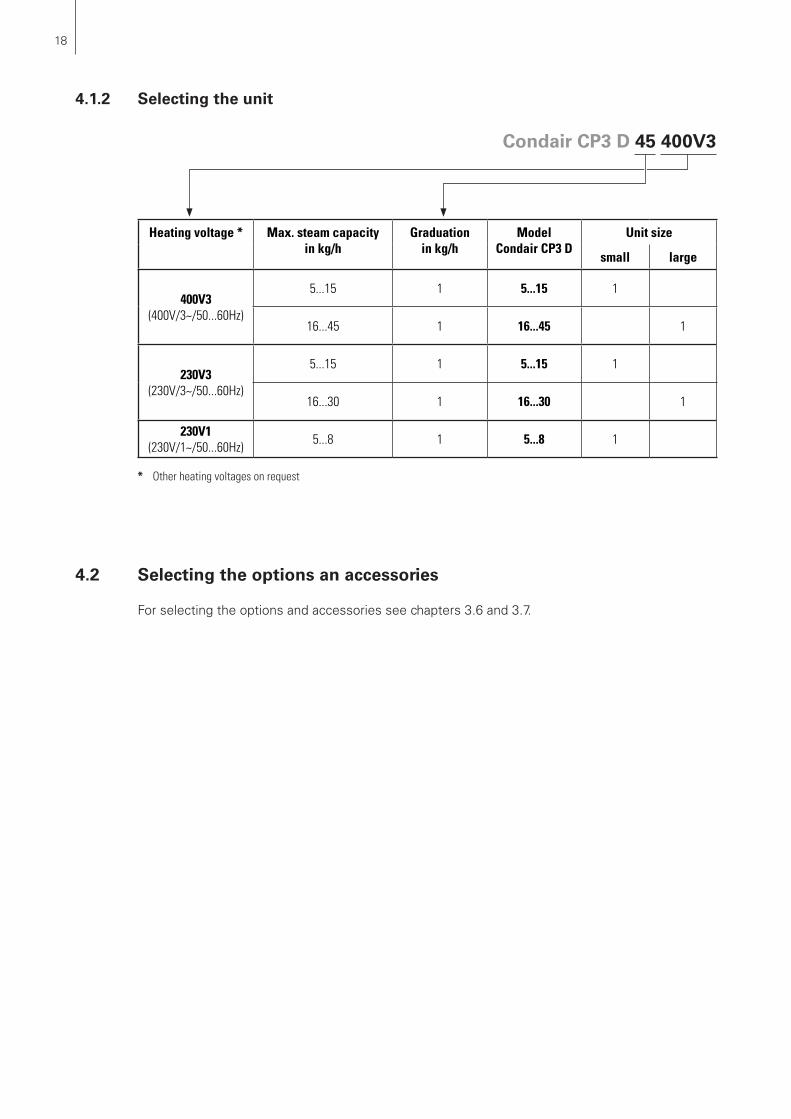
4.1 Selecting the unit version
The steam capacity required for a particular steam bath can be determined with the following table:
Cabin size Required steam capacity
in m3 Plastic cabin brick lined cabin
� � kg/h � kg/h
� � kg/h 12 kg/h
12 10 kg/h 1� kg/h
1� 12 kg/h 1� kg/h
20 13 kg/h 21 kg/h
2� 1� kg/h 2� kg/h
2� 1� kg/h 2� kg/h
32 1� kg/h 2� kg/h
3� 20 kg/h 31 kg/h
�0 21 kg/h 3� kg/h
�� 23 kg/h 3� kg/h
�� 2� kg/h 3� kg/h
�2 2� kg/h �1 kg/h
�� 2� kg/h �3 kg/h
�0 2� kg/h �� kg/h
4 Notes for the planning engineer
To select the unit version the following planning steps are required:
1. Calculating the required maximum steam capacity according chapter �.1.1
2. Selecting the unit version from the table in chapter �.1.2
4.1.1 Determination of the required steam capacity
1�
4.1.2 Selecting the unit
Heatingvoltage* Max.steamcapacityinkg/h
Graduationinkg/h
ModelCondairCP3D
Unitsize
small large
400V3(400V/3~/50...60Hz)
5...15 1 5...15 1
16...45 1 16...45 1
230V3(230V/3~/50...60Hz)
5...15 1 5...15 1
16...30 1 16...30 1
230V1(230V/1~/50...60Hz) 5...8 1 5...8 1
* Otherheatingvoltagesonrequest
4.2 Selecting the options an accessories
For selecting the options and accessories see chapters 3.� and 3.�.
Condair CP3 D 45 400V3

1�
5 Mounting and installation work
Qualification of personnel
All mounting and installation work must be carried out only by well qualified personnel authorised by the owner. It is the owner’s responsibility to verify proper qualification of the personnel.
General note
Strictly observe and comply with all information given in the present Technical Documentation regard-ing the location of the unit and the installation of water, steam and electricity.
Observe and comply with all local regulations dealing with water, steam and electrical installa-tions.
Safety
Some installation work requires removal of the unit cover. Please note the following:
WARNING!
Danger of electrical shock! You may get in touch with live parts when the unit is open. The steam generator must be connected to the mains only after all mounting and installation work has been completed and the cover has been relocated properly.
CAUTION!
The electronic components inside the steam generator are very sensitive to electrostatic discharge. When the unit is open for installation work, appropriate measures must be taken to protect these components against damage caused by electrostatic discharge (ESD protection).
5.1 Important notes for mounting and installation work

20
125...1250 µS/cm1...10 bar1...40 °C
≥ 40 mm
min. 10 %–
60...70 °C
ø40 mm
ø10/8 mm 230V/1~/50...60Hz
400V/3~/50...60Hz230V/3~/50...60Hz230V/1~/50...60HzG 1/2"
G 1/2"
1 ... 40 °Cmax. 75 %rhIP20
min
. 300
mm
DS80
Z261
DS60
DS22
DS80
W30
W22
W45
Rmin. 300 mm
min. 5 %–
min. 20 %+
Rmin
. 300
mm
max
. 4 m
5.2 Installation overview
Water installation, see chapter �.�
Electric installation, see chapter �.�
Steam installation, see chapter �.�
Mounting the unit, see chapter �.3
21
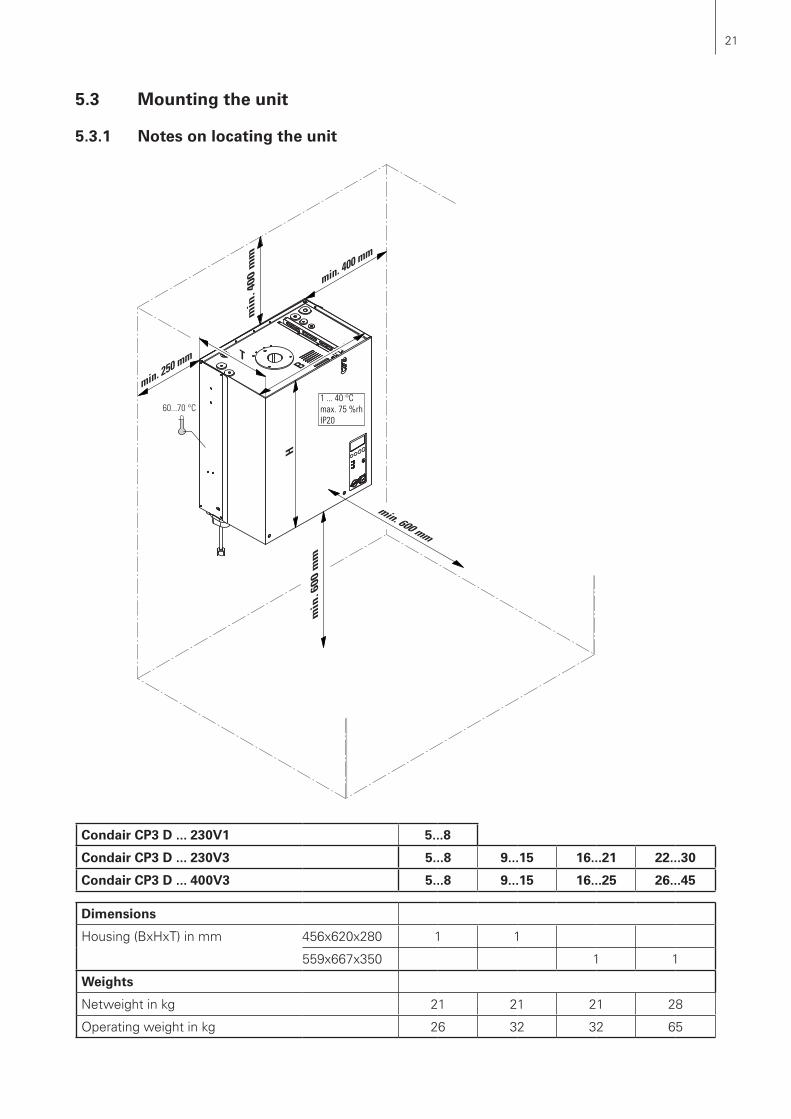
5.3 Mountingtheunit
5.3.1 Notesonlocatingtheunit
CondairCP3D...230V1 5...8
CondairCP3D...230V3 5...8 9...15 16...21 22...30
CondairCP3D...400V3 5...8 9...15 16...25 26...45
Dimensions
Housing (BxHxT) in mm 456x620x280 1 1
55�x667x350 1 1
Weights
Netweight in kg 21 21 21 28
Operating weight in kg 26 32 32 65
min
. 400
mm
B
min. 600 mm
H
min. 250 mm
min. 400 mm
min
. 600
mm
60...70 °C1 ... 40 °Cmax. 75 %rhIP20
T

22
The installation site of the steam generator depends largely on the location of the steam distributor (see chapter �.�). To ensure proper functioning of the steam generator and to obtain an optimal efficiency, the following points must be considered and observed when choosing the location for the steam generator:
– Install the steam generator so that the length of the steam hose is kept as short as possible (max. 4 m) and that the minimum bend radius (R= 300 mm) and up-slope (20 %) or down-slope (5 %) of the steam hose is observed (see chapter �.�.�).
– The steam generators Condair CP3 D are designed for wall-mounting. Make sure that the construc-tion (wall, pillar, floor-mounted console, etc.) to which the steam generators are to be mounted, offers a sufficiently high load-bearing capacity (take notice of the weight information found in the dimension sand weights table above), and is suitable for the installation.
– The back panel of the Condair CP3 D is retaining heat during operation (max. surface temperature of the metal housing approx. �0 - �0 °C). Make sure, therefore, that the construction (wall, pillar, etc.) to which the units are to be mounted, does not consist of heat-sensitive material.
– Install the steam generator in such a manner that it is freely accessible with sufficient space available for maintenance purposes (refer to the above illustration for minimum distances).
– The Condair CP3 D is protected according to IP20. Make sure the units are installed in a drip-proof location and the admissible ambient conditions are complied with.
– The steam generator Condair CP3 D may only be installed in rooms with a floor drain.
CAUTION!If for some reason the Condair CP3 D must be installed in a location without floor drain, it is mandatory to provide a leakage monitoring device to safely interrupt the water supply in case of leakage.
– When fixing the Condair CP3 D use only the fixing materials supplied with the unit. If fixing with the materials supplied is not possible in your particular case, select a method of fixing that is of similar stability.

23
d
e
bc
a
A
B
B
5.3.2 Mounting the unit
Procedure
1. Mark the attachment point “A” on the wall.
2. Drill hole for attachment point “A” (diameter: � mm, depth: �0 mm).
3. Insert the supplied plastic plug, and tighten the screw until the distance between the wall and the screw head is � mm.
�. Unlock the two screws fixing the front panel to the unit, then remove the front panel.
�. Hang up the unit onto the screw and adjust it horizontally and vertically using a spirit level. Then, mark the fixing points “B”.
�. Drill the holes for the fixing points “B” (diameter: � mm, depth: �0 mm).
�. Insert the supplied plastic plugs, and tighten the screws until the distance between the wall and the screw head is � mm.
�. Hang the unit up onto the screws. Before tightening the screws, readjust the unit with the spirit level.
�. Reattach the front panel and secure it with the two screws.
Dimension Housingsizesmall large
a 228mm 284mmb 51mm 51mmc 500mm 545mmd 90mm 144mme 180mm 216mm

2�
5.3.3 Inspecting the installed unit
Check the following points:
Is the unit installed in the correct place (see chapter �.3.1)?
Is the supporting surface stable enough?
Is the unit correctly aligned, vertically and horizontally?
Is the unit properly secured (see chapter �.3.2)?
Has the front panel of the unit been relocated and correctly fixed with the two screws?
2�
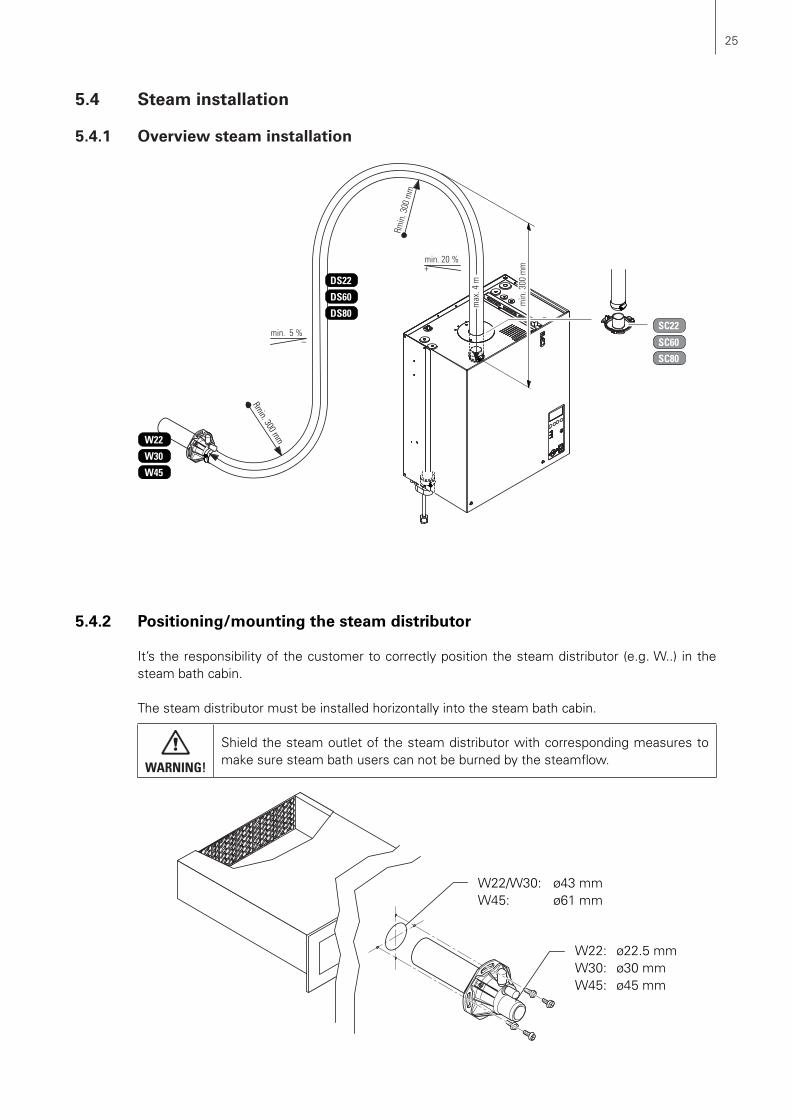
5.4 Steam installation
5.4.1 Overview steam installation
DS60
DS22
DS80
W30
W22
W45
Rmin. 300 mm
min. 5 %–
min. 20 %+
Rmin
. 300
mm
max
. 4 m
SC22
SC60
SC80
min
. 300
mm
5.4.2 Positioning/mounting the steam distributor
It’s the responsibility of the customer to correctly position the steam distributor (e.g. W..) in the steam bath cabin.
The steam distributor must be installed horizontally into the steam bath cabin.
WARNING!
Shield the steam outlet of the steam distributor with corresponding measures to make sure steam bath users can not be burned by the steamflow.
W22/W30: ø�3 mmW��: ø�1 mm
W22: ø22.� mmW30: ø30 mmW��: ø�� mm

2�
5.4.3 Installing the steam hose
Important! Use original Condair steam hose exclusively. Other types of steam hoses can cause undesired operational malfunctions.
Instructions for the hose layout
– Initially, the steam hose is led with an upslope of at least 20 % over a minimum height of 300 mm above the top edge of the steam generator and then down to the steam distribution pipe with a minimum slope of 5 %.
– The steam hose should be kept as short as possible (max. 4 m) while observing the minimum bend radius of 300 mm. Important! Allowance must be made for a pressure loss of 10 mm water column (approx. 100 Pa) per meter steam hose.Note: If your particular installation exceeds the maximum steam hose length of � m contact your Condair representative. In any case, steam hoses longer than � m must be insulated in their entire length.
– Reductions in the cross section such as kinks should be avoided throughout the entire length of the hose. The installation of a stop cock in the steam hose is not permissible.
– Steam hoses must be prevented from sagging (condensate pockets); if necessary, support with pipe clamps, trough, or wall brackets, or install a condensate drain in the steam hose.
– Important! When deciding on the length and layout of the hose, it should be noted that the steam hose may become somewhat shorter with progressive ageing.
Securing the hose
The steam hose must be secured to the steam distribution pipe and the steam outlet of the steam generator by means of hose clamps. Caution! Do not overtighten the hose clamp on the steam connector of the steam generator.
min
.300
mm
Rmin. 300m
m
min.5%
min.20%max
.4m
2�
Steam line with fixed piping
For steam lines with fixed piping, the same instructions apply to the laying of the piping as already described. The following additional notes should be observed:
– The minimum internal diameter of 22 mm, 30 mm or 45 mm respectively should be applied over the whole length of the piping.
– Use exclusively Cu pipe or stainless steel (min. DIN 1.�301).
– To minimize the condensate formation (=loss), the steam pipes must be insulated.
– The minimum bend radius for solid pipes is 4-5 x internal diameter.
– Connection of the steam pipes to the steam distribution pipe and steam generator is effected by means of short lengths of steam hose secured with hose clamps.
– Important! Allowance must be made for a pressure loss of 10 mm water column (approx. 100 Pa) per meter length or per �0° bend.
5.4.4 Inspecting the steam installation
Use the following check list to ascertain that the steam installation was performed correctly:
– Steam distribution pipe
Steam distributor correctly positioned and secured (screws tightened)?
Steam outlet of the steam distributor with corresponding measures shielded to make sure steam bath users can not be burned by the steamflow.
– Steam hose
Maximum length of � m?
Minimum bend radius of 300 mm (�-� x internal diameter with fixed piping)?
Have the instructions for hose positioning been followed?
Steam hose: no sagging (condensate pocket) or condensate drain with siphon (hose bend with a minimum diameter of 200 mm) installed at the lowest point?
Rigid steam lines: properly insulated? Correct installation material used? Minimum internal diameter maintained?
Steam hose(s) securely attached with clamps?
Heat expansion during operation and shortening of the hose with ageing taken into considera-tion?
2�
5.5 Water installation
5.5.1 Overview water installation
DS80
125...1250 µS/cm1...10 bar1...40 °C
ø40 mm
ø10/8 mm
G 1/2"
Z261
≥ 40 mm
G 1/2"
min
. 50
cm
min. 10 %–
min. 10 %–
2�
Water supply
The water supply is to be carried out according to the figure found in chapter �.�.1 and the applicable local regulations for water installations. The indicated connection specifications must be observed.
– The installation of the filter valve (accessory “Z2�1”, alternatively a shut-off valve and a � µm water filter can be used) should be made as close as possible to the steam generator.
– Admissible mains pressure 1.0 to 10.0 bar (hammer-free system)For mains pressures >10 bar, the connection must be made via a pressure reducing valve (adjusted to 1.0 bar). For mains pressures <1.0 bar please contact your Condair supplier.
– Notes on water quality:
– For the water supply of the Condair CP3 D, use exclusively untreated drinking water.
– The use of additives such as corrosion inhibitors, disinfectants, etc. is not allowed, since these additives may endanger health and affect proper operation.
– If the Condair CP3 D shall be operated with softened or partly softened water, please contact your Condair supplier.
– The connection material must be pressure-proof and certified for use in drinking water systems.
– Important! Before connecting the water line, the line should be well flushed out.
CAUTION!The thread at the unit connection is made of plastic. To avoid overtightening, the union nut of the water pipe must be tightened by hand only.
Water drain
The water drain is to be carried out according to the figure found in chapter �.�.1 and the applicable local regulations for water installations. The indicated connection specifications must be observed.
– Make sure that the drain pipe is correctly fixed and easily accessible for inspections and cleaning purposes.
– The draining temperature is: 80…90 °C (approx. �0...�0 °C with activated drain water cooling). Use temperature-resistant installation materials only!
5.5.2 Notes on water installation

30
5.5.3 Inspecting the water installation
Check the following topics:
– Water supply
Has filter valve (accessory “Z2�1”) or shut-off valve and � µm water filter respectively been installed in supply line?
Have admissible water pressure (1 – 10 bar) and admissible temperature (1 – �0 °C) been observed?
Does the supply capacity match the steam generator and is the minimum inside diameter of the supply pipe maintained throughout the entire length?
Are all components and pipes properly secured and are all threaded connections securely tightened?
Is the water system properly sealed?
Does the water supply installation meet the requirements of the local regulations for water installations?
– Water drain
Is the minimum inside diameter of the drain pipe of �0 mm maintained throughout the entire length?
Has drain pipe been installed with a downslope of at least 10 %?
Has the heat resistance of the material used been verified to be at least 100 °C?
Is the drain hose properly secured (hose clamps at unit connection tightened)?
Does the water drain installation meet the requirements of the local regulations for water installations?

31
5.6 Electric installation
5.6.1 Wiring diagram Condair CP3 D
A1
Tem
pera
ture
sen
sor(
0-10
V)F1
In
tern
alfu
se“
Driv
erb
oard
”(6
.3A
,slo
wa
ctin
g)F2
In
tern
alfu
se“
Driv
erb
oard
”co
ntro
lsig
nal(
200
mA,
fast
act
ing)
F1
Fuse
fan
“Ste
amb
ath
boar
d”(4
A,s
low
act
ing)
F2
Fuse
ligh
tnin
g“S
team
bat
hbo
ard”
(4A
,slo
wa
ctin
g)F3
Ex
tern
alfu
seh
eatin
gvo
ltage
sup
ply
F4
Exte
rnal
fuse
con
trolv
olta
ges
uppl
yH
Rem
ote
oper
atin
gan
dfa
ulti
ndic
atio
nH1
Co
ntro
llam
pst
eam
bat
hOn
/Off
H2
Cont
roll
amp
light
ning
ste
amb
ath
On/O
ffH3
Li
ghtn
ing
stea
mb
ath
(24V
AC,m
ax.2
x25
W)
JSh
ortc
ircui
ted,
ifn
odo
ors
witc
his
con
nect
edK1
M
ain
cont
acto
r(fo
rcon
nect
ing
the
heat
ing
volta
ges
uppl
yto
the
unit)
M1
Frag
ranc
epu
mp
(1x2
30VA
C)M
2Fa
nst
eam
bat
hca
bin
(24V
AC,m
ax.5
0W)
M3
Flap
act
uato
r(al
tern
ativ
ely
toth
efa
n)Q3
Ex
tern
als
ervi
ces
witc
hhe
atin
gvo
ltage
sup
ply
Q4
Exte
rnal
ser
vice
sw
itch
cont
rolv
olta
ges
uppl
y
S1
Tem
pera
ture
sen
sor(
KTY)
S2
Max
.tem
pera
ture
sw
itch
72°
CSW
1On
/Off
switc
hst
eam
bat
hSW
2On
/Off
switc
hlig
htni
ngs
team
bat
hSW
3Do
ors
witc
hst
eam
bat
h(o
ptio
n)U1
An
alog
ueo
utpu
ttem
pera
ture
0-1
0V(=
0-10
0°C)
U2
Anal
ogue
out
putt
empe
ratu
res
igna
lfor
the
cont
rolo
fthe
flap
act
uato
rM3
X0
Conn
ectio
nte
rmin
alh
eatin
gvo
ltage
X1
Conn
ectio
nte
rmin
alc
ontro
lvol
tage
CPU
BOAR
D
J3 DRIV
ER B
J2 FAUL
T RE
MOT
E
J1 D
RIVE
R A
J4
CP3
Card
Mai
n un
it 4 3 2 1 2 1
Analog Out
F110
0mA
Sensor Supply Max. 60mA
Unit
ONSt
eam
Serv
ice
Erro
r
Faul
t Rem
ote
Boar
d
12
34
56
78
910
H
Q4
J
F4
L1N
230
V/1N
~/50
..60
Hz
+–
A1
L1
Q3K1 X0 F3
L1L2
L3
L1L2
L3PE
L1L2
L3
Heat
ing
400
V/3~
/50.
.60
Hz23
0 V/
3~/5
0..6
0 Hz
Q3 F3
L1N
PE
230
V/1~
/50.
.60
Hz
F220
0mAF
X2X7X4X3INLET V.DRAIN V.CONTACTOR
X5
PN
P1M
odul
BV+
INGN
DCO
NT.S
IGN
DRIV
ER B
OARD
J1 CPU
BOAR
D
J4 EXTE
RNAL
CON
.
J2 LIN
K UP
INGN
DLI
M. S
IGN
V+IN
BLOW
ERX6
PEL1
NSC
1M
AIN
SUP
PLY
X1
SC2
LEV.
SEN
SOR
F16.
3 AT
VTX SUPPLY SWITCH
OUT
24V
OUT
5VJP
3
Link
UpTe
rmin
atio
nJP1
PE
0V
15V
18V
24V L1
N
rtbl
rsgu
F1 4AT FAN
F2 4AT LAMP
12
3
24V
18V
15V
0V
54
32
14
32
13
42
1
X2X3
X4
H1
H2
SW2
SW1
M2
STEA
M B
ATH
BOAR
D
SW3
AC 24V
LAM
PFA
NLIG
HTGN
DTE
MP
SWITC
HTE
MP
SENS
ORON
24V
S2S1
M1
1234567
L1
X1X5
NL1 NPE SC1SC2
J3J1
24V
GND
REL2
REL1
LAM
PPU
MP
TEM
PSW
ITCH
J21234
U1 U
2
40 °
C
AIN
H3
M3
24V
0VAIN
123
N PEPUMP

32
5.6.2 Notes on electric installation
– The electric installation must be carried out according to the wiring diagram in chapter �.�.1 and the applicable local regulations. All information given in the wiring diagram must be followed and observed.
– All cables must be lead into the unit via the cable openings equipped with cable glands (e.g. option “PG-cable gland”). The cable for the heating voltage supply must be lead into the unit from the bottom via the cable opening equipped with the clamp strap. Fix the cable with the clamp strap.
– Make sure the cables do not scrub on any components.
– Maximum cable length and required cross section per wire must be observed.
– The supply voltages for heating and control must match the respective voltages stated in the wiring diagram.
Heating voltage supply “Up”
Caution! Before connecting, ensure that the mains voltage corresponds with the heating voltage for the unit (see mains code on the type label).
The heating voltage supply is connected to the corresponding terminals of the main contactor ac-cording to the wiring diagram. In the supply line a service switch “Q1” (an all-pole disconnecting device with a minimum contact opening of 3 mm is an essential requirement) and a fuse group “F1” (essential requirement: fuses are to be as detailed in the following table) must be installed (by the client).
Heatingvoltage Max.steamcapacity
[kg/h]
ModelCondairCP3D
Nominalpower[kW]
Nominalcurrent
[A]
MainfusesF3
[A]
400V3(400V/3~/50...60Hz)
5...8 5...8 6.0 8.7 3x10⁹...12 9...12 9.0 13.0 3x1613...15 13...15 11.3 16.3 3x2016...20 16...20 15.0 21.7 3x2521...25 21...25 18.8 27.1 3x3526...30 26...30 22.5 32.5 3x4031...42 31...42 31.5 45.5 3x5043...45 43...45 33.8 48.8 3x63
230V3(230V/3~/50...60Hz)
5...8 5...8 6.0 15.8 3x209...15 9...15 11.3 29.6 3x4016...21 16...21 15.8 41.4 3x5022...30 22...30 22.5 59.1 3x63
230V1(230V/1~/50...60Hz)
5 5 3.8 16.3 206...8 6...8 6.0 26.1 35
Note: The minimum cross section of the supply cable must comply with the local regulations.
Control voltage supply “Uc”
Caution! Before connecting, make sure that the mains voltage corresponds with the control voltage of the unit (220…240 V, 50…60 Hz).
The control voltage supply is connected to the terminals L1 and N according to the wiring dia-gram. In the supply line a service switch “Q2” (an all-pole disconnecting device with a minimum contact opening of 3 mm is an essential requirement) and a fuse “F2” (max. 10 A, slow acting, essential requirement) must be installed (by the client).
Note: The minimum cross section of the supply cable must comply with the local regulations.

33
Remote indicator board H
The remote operating and fault indicators must be connected to the respective potential-free relay contacts of the remote indicator board according to the wiring diagram:
– “Error”: This relay is activated if a fatal error occurs.
– “Maintenance”: This relay is activated after the maintenance interval time has ex-pired.
– “Steam”: This relay is activated as soon as the CP3 D produces steam.
– “Unit on”: This relay is activated as soon as the CP3 D is switched on.
Caution! The maximum contact load is: 2�0V/1A.
Caution! Appropriate suppressor modules are to be used for the switching of relays and miniature contactors.
Remote temp. indication U1: Temperature signal 0...10V (0...100%) for remote temp. indication
Temperature signal U2: Temperature signal for the control of the flap actuator
Fragrance pump M1 (230VAC)
The fragrance pump is connected to terminals X5-1, X5-2 and X5-3 on the steam bath board ac-cording to the wiring diagram.
Note: The cross-section of the cable must comply with the applicable local regulations.
Steam bath lighting H3 (24VAC, max. 2x 25 W)
The steam bath lighting is connected to terminals X2-3 and X2-4 on the steam bath board accord-ing to the wiring diagram
Note: The cross-section of the cable must comply with the applicable local regulations.
Steam bath fan M2 (24VAC, max. 50 W)
The steam bath fan is connected to terminals X2-1 and X2-2 on the steam bath board according to the wiring diagram.
Note: The cross-section of the cable must comply with the applicable local regulations.
Flap actuator M3 (24 VAC, max. 50 W), alternatively to the steam bath fan M2
The flap actuator is connected to terminals X2-1 and X2-5 on the steam bath board according to the wiring diagram. The control signal to control the flap motor is always active.
Note: The cross-section of the cable must comply with the applicable local regulations.
Temperature sensor KTY S1
The supplied temperature sensor KTY is connected to terminals X4-1 and X4-2 according to the wiring diagram. The steam bath board is ready for the connection of the supplied temperature sen-sor, hence not further adjustments are required.
The temperature sensor must be installed in a appropriate location inside the steam bath (away from the steam exit).Please refer the separate installation instructions for proper location and connection of the tempera-ture sensor.
3�
5.6.3 Inserting the CP3 Card
All important operating parameters such as the maximum steam capacity, the heating voltage, the number of base units as well as the differentiation between main and extension unit are permanently stored on the CP3 Card.Before you start the electrical installation, check whether the CP3 Card is installed. If it is not, check whether the type designation on the CP3 Card supplied corresponds with the type designa-tion on the data plate of the unit (the data plate is located inside the unit). If the designations match, place the CP3 Card in the card holder on control print . Then cover the data plate inside the unit beside the type plate with the data plate supplied (self-adhesive).If the type designation on the CP3 Card and the data plate do not match, the CP3 Card must not be installed. If this is the case, contact your Condair supplier.
5.6.4 Inspecting the electrical installation
Check the following points:
Do the supply voltages for heating and control comply with the relevant voltages given in the wiring diagram?
Is the correct CP3 Card inserted?
Are the voltage supplies (heating and control voltage) correctly fused?
Is the service switch “Q..” installed in the supply line for to the heating and control voltage?
Are all components correctly connected according to the wiring diagram?
Are all connecting cables fastened?
Are the connecting cables free of tension (passed through cable glands?)
Does the electric installation meet the applicable local regulations for electric installations?
Is the front panel mounted and correctly fixed with the two screws?

3�
6 Operation
Proceed as follows when putting the unit into operation:
1. Examine the steam generator and installation for possible damage.
WARNING!
Damaged devices or devices with damaged installation may present danger to human life or cause severe damage to material assets. Damaged units and/or units with damaged or faulty installation must not be operated.
2. Check whether the front panel is mounted and fixed with the two screws.
3. Open the filter valve (or the shut-off valve, respectively) in the water supply line.
�. Switch on the service switches for mains supplies (heating and control voltage).
�. Actuate the unit switch of the steam generator. Switch lights up.
6.1 Commissioning
STARTUP: CP3 STEAMBATH
INIT MODULEXXXXXXXXXXXXXXXXXXXX
Menu Set
The steam generator carries out a system test, during which all the LEDs light up and the opposite display is shown.
If a failure occurs on the system test, a corresponding error message is shown in the display.
After the system test the operating display is shown. Note: The contents of the operating display and the setting of the keys depend on the actual operating status and on the configuration of the Condair CP3 D and can differ from the opposite display.
Depending on the selected operating mode of the Condair CP3 D, the steam generator must manually be started via the Start/Stop button of the display and control unit or via an external Start/Stop button or the operation runs time-controlled via the day timer or the week timer. As soon as the steam generator is started, the heating current is switched on. The inlet valve opens (slight delay) and the steam cylinder fills with water. As soon as the submerged electrodes heat the water up the green LED lights up and after a few minutes (approx. �–10 minutes, depending on the conductivity of the water) steam is produced and the steam bath cabin is heated up. As soon as the set temperature in the steam bath cabin is achieved, the light is switched on and the bath phase starts. During the bath phase the fragrance pump (if available) is controlled in accordance with the se-lected operating mode and the fan (or the flap actuator) is controlled in accordance with the set temperature and the actual temperature in the steam bath cabin.
Note: If the Condair CP3 D is operated with water of low conductivity it may happen that the maximum steam capacity is not reached in the first few hours of operation. This is normal. As soon as the conductivity has reached a sufficient level (due to the vaporisation process) the steam generator will reach the maximum steam capacity.
Steam Bath :StandbyCP3 D45 400V3
Temperature :34°CSetpoint :48°C05.05.2008 12.00.00Start MenuLight
Steam Bath :HeatingCP3 D45 400V3
Temperature :34°CSetpoint :48°C05.05.2008 12.00.00Stop MenuLight
3�
6.2 Notes on operation
6.2.1 Function of the display and operating elements
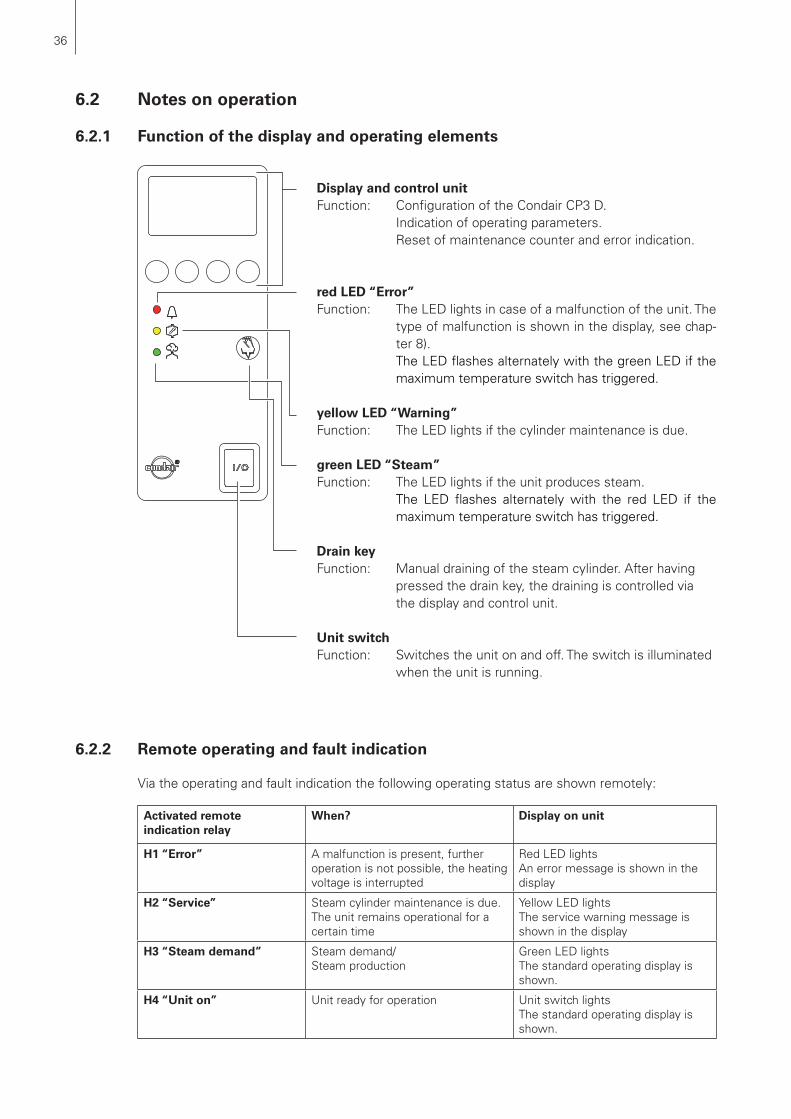
Display and control unitFunction: Configuration of the Condair CP3 D. Indication of operating parameters. Reset of maintenance counter and error indication.
red LED “Error”Function: The LED lights in case of a malfunction of the unit. The
type of malfunction is shown in the display, see chap-ter �).
The LED flashes alternately with the green LED if the maximum temperature switch has triggered.
yellow LED “Warning”Function: The LED lights if the cylinder maintenance is due.
green LED “Steam”Function: The LED lights if the unit produces steam. The LED flashes alternately with the red LED if the
maximum temperature switch has triggered.
Drain keyFunction: Manual draining of the steam cylinder. After having
pressed the drain key, the draining is controlled via the display and control unit.
Unit switchFunction: Switches the unit on and off. The switch is illuminated
when the unit is running.
6.2.2 Remote operating and fault indication
Via the operating and fault indication the following operating status are shown remotely:
Activated remote indication relay
When? Display on unit
H1 “Error” A malfunction is present, further operation is not possible, the heating voltage is interrupted
Red LED lightsAn error message is shown in the display
H2 “Service” Steam cylinder maintenance is due. The unit remains operational for a certain time
Yellow LED lightsThe service warning message is shown in the display
H3 “Steam demand” Steam demand/Steam production
Green LED lightsThe standard operating display is shown.
H4 “Unit on” Unit ready for operation Unit switch lightsThe standard operating display is shown.
3�
6.2.3 Inspections during operation
During operation the Condair CP3 D and the humidification system have to be inspected weekly. On this occasion check the following:
• the water and steam installation for any leakage.
• the steam generator and the other system components for correct fixing and any damage.
• the electric installation for any damage.
If the inspection reveals any irregularities (e.g. leakage, error indication) or any damaged components take the Condair CP3 D out of operation as described in chapter �.3. Then, contact your Condair representative.
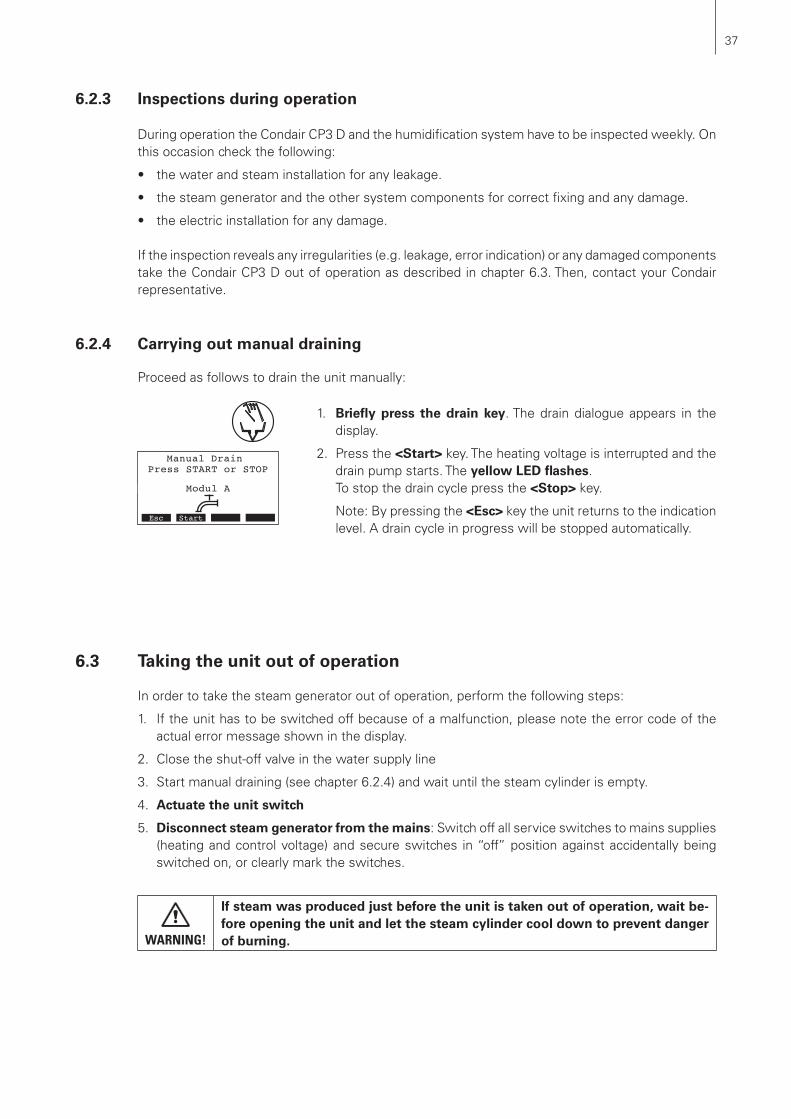
6.2.4 Carrying out manual draining
Proceed as follows to drain the unit manually:
Manual Drain
Modul A
Press START or STOP
Esc SetStart
6.3 Taking the unit out of operation
In order to take the steam generator out of operation, perform the following steps:
1. If the unit has to be switched off because of a malfunction, please note the error code of the actual error message shown in the display.
2. Close the shut-off valve in the water supply line
3. Start manual draining (see chapter �.2.�) and wait until the steam cylinder is empty.
�. Actuate the unit switch
�. Disconnect steam generator from the mains: Switch off all service switches to mains supplies (heating and control voltage) and secure switches in “off” position against accidentally being switched on, or clearly mark the switches.
WARNING!
If steam was produced just before the unit is taken out of operation, wait be-fore opening the unit and let the steam cylinder cool down to prevent danger of burning.
1. Briefly press the drain key. The drain dialogue appears in the display.
2. Press the <Start> key. The heating voltage is interrupted and the drain pump starts. The yellow LED flashes. To stop the drain cycle press the <Stop> key.
Note: By pressing the <Esc> key the unit returns to the indication level. A drain cycle in progress will be stopped automatically.

3�
Main Menu
Mode :ManualAroma :SetInfo :Set
Setpoint :48°C
User :SetEsc Set
Steam Bath :StandbyCP3 D45 400V3
Temperature :34°CSetpoint :48°C05.05.2008 12.00.00Start Light Menu
Main Menu
Mode :ManualAroma :SetInfo :Set
Setpoint :48°C
User :SetEsc Set
Main Menu
Mode :ManualAroma :SetInfo :Set
Setpoint :48°C
User :SetEsc Set
Main Menu
Mode :ManualAroma :SetInfo :Set
Setpoint :48°C
User :SetEsc Set
Info
ErrorHistory:SetUnit Status :Set
Esc Set
User CodeUser Code
88088808
Enter Number Enter Number Confirm with Set Confirm with SetEsc Set
UserUser
Settings :SetSettings :SetModbus :SetModbus :Set
Maintenance :SetMaintenance :Set
EscEsc Set
Main Menu
Mode :ManualAroma :SetInfo :Set
Setpoint :48°C
User :SetEsc Set
6.4 Overview and operating of the menu
The operating and display unit is operated via the four keys located just below the display. The � status fields at the bottom of the display show the active keys the functions assigned to them.
Menu overview
actual key setting
keys
Operating display
Menu level
Operating
Menu Info– Interrogation of unit information– Interrogation of the malfunction list
Menu User– Resetting the maintenance counter– Unit settings– Modbus settings
Steam Bath :StandbyCP3 D45 400V3
Temperature :34°CSetpoint :48°C05.05.2008 12.00.00Start MenuLight
Setting the setpoint temperature
Setting the control mode
Fragrance pump settings

3�
Steam Bath :StandbyCP3 D45 400V3
Temperature :34°CSetpoint :48°C05.05.2008 12.00.00Start MenuLight
6.5 Interrogation functions
6.5.1 Information in the operating display
The following information are shown in the operating display:
Operating status of the steam generator (Standby, Heating or Drying)
Actual temperature in the steam bath cabin
Set nominal steam bath temperature
Date (dd.mm.yyyy) and time (hh.mm.ss)
6.5.2 Interrogation of unit information
Select the list with the unit information:Path: Main menu > Info > Unit Status
Press < > and < > keys, in order to select the unit information available in the list:
1 Type designation of the steam cylinder type
2 Total operating hours of the steam cylinder
3 Software version (1.00)/language version (LA00)
� Operating mode of the steam generator
� Actual steam capacity of the unit in kg/h
� Actual request in %
� Actual temperature in the steam bath in °C
� Calculated mean drain time of the unit in seconds
� Actual status of the maximum level sensor in the steam cylinder
10 Counter showing the number of times the maximum level in the steam cylinder has been exceeded
11 Actual status of the maximum temperature switch
12 Actual status of the door switch of the steam bath cabin
13 Total operating hours since the initial commissioning
Press the <Esc> key several times to quit the unit information list and to return to the standard operating display.
Unit Status
A664Cylinder Operat.HourdA 0h
Cylinder type
11.11.2006 12.00.00Esc Set
Software Version1.01LA00 12.00.00OperationIntern∑ Steam0kg/h12.00.00Actual RequestA 0%Actual Temperature42°CAverage Drain TimeA 0.0 s
Max. Level CounterA 0Max. Temp.FuseOffDoor SwitchOpenSystem Operation Hour0h
Max. Level SensorA Off
1
2
3
4
5
6
7
8
9
10
111213
�0
6.5.3 Interrogation of the malfunction list
Select the error history list:Path: Main menu > Info > ErrorHistory
The last error that occurred is shown with:– running number of the error– date and time of occurrence (version Pro only)– error code (Warning: W..., Error: E...– error message– additional info text regarding the error
Press < > and < > keys, in order to select further error messages in the list.
Press the <Esc> key several times to quit the error history list and to return to the standard operating display.
The error messages generated by the last 20 malfunctions that occurred are saved in the malfunc-tion list of the Condair CP3 D and can be interrogated.
ErrorHistory
E32A Temp.Sensor voidNo sensor signalTemp.Sensor damaged
01/05 11.11.06 12.34
11.11.2006 12.00.00Esc Set
6.6 Unit settings
6.6.1 Setting the setpoint temperature
Select “Setpoint” in the main menu, then press the <Set> key.In the upcoming modification dialogue set the desired nominal tempera-ture for the steam bath.
Factory setting: 48 °CSetting range: 25 °C ... 55 °C
6.6.2 Setting the control mode
Note: This setting is available only if the setting “Operation” in the steam bath settings (see chapter �.�.�.3) is set to “Intern”.
Select “Mode” in the main menu, then press the <Set> key. In the upcoming modification dialogue set the desired control mode.
Factory setting: ManualOptions: Manual, Timer
Main Menu
Mode :ManualAroma :SetInfo :Set
Setpoint :48°C
User :SetEsc Set
Main Menu
Mode :ManualAroma :SetInfo :Set
Setpoint :48°C
User :SetEsc Set
�1
6.6.3 Setting the fragrance pump settings
Select “Aroma” in the main menu, then press the <Set> key. The fragrance pump settings appear. Press the < > and < > keys in order to select the individual settings and press the <Set> key to call up the modification dialogue for the selected setting.
Description of the fragrance pump settings
– Pump: Activating and deactivating the fragrance pump.
Factory setting: OnOptions: On (Pump activated) Off (Pump deactivated)
– Interval: Setting the interval time in minutes for the pump impulses.
Factory setting: 5 minSetting range: 2 ... 20 min
– Impulse: Setting the duration for a pump impulse in seconds.
Factory setting: 3 sSetting range: 2 ... 10 s
Aroma
Interval :5minImpulse :3s
Pump :On
Esc Set
Steam Bath :StandbyCP3 D45 400V3
Temperature :34°CSetpoint :48°C05.05.2008 12.00.00Start MenuLight
Steam Bath :HeatingCP3 D45 400V3
Temperature :37°CSetpoint :48°C05.05.2008 12.05.00Stop MenuLight
Description of the control mode settings
– Manual: The steam generator must be switched on and off via the Start/Stop key in the operating display.
– Timer: The steam generator is switched on and off time controlled via the day timer. The timer settings can be accessed by pressing the <Timer> key in the operating display.
– Status: activate (On) or deactivate (Off) timer function
– Start time: set starting time (format: hh:mm)
– Duration: Set heating time in minutes
Steam Bath :StandbyCP3 D45 400V3
Temperature :34°CSetpoint :48°C05.05.2008 12.00.00Timer MenuLight
Timer
Start time :18:00Duration :15min
Status :Off
Esc Set

�2
6.6.4 Unit settings in the settings menu
6.6.4.1 Launching the settings menu
Select the settings menu:Path: Main menu > User > Password entry: 8808 > Settings
Press the < > and < > keys in order to select the individual settings in the settings menu. Detailed information on the different settings are found in the following chapters.
6.6.4.2 Selecting the dialogue language
Select “Language” in the settings menu, then press the <Set> key.In the upcoming modification dialogue select the desired dialogue lan-guage. After confirmation, the unit automatically switches to the selected dialogue language.
Factory setting: country specificOptions: divers languages
6.6.4.3 Steam bath control settings
Select “BathSetting” in the settings menu, then press the <Set> key.
The steam bath control settings appear. Press the < > and < > keys in order to select the individual settings and press the <Set> key to call up the modification dialogue for the selected setting.
Note: The settings available depend on the current settings of the indi-vidual parameters. The opposite display shows the maximum number of settings available.
Description of the steam bath control settings
– Operation: Setting the operating mode.
Factory setting: InternOptions: Intern (switching the unit on and off the Start/
Stop key of the display and control unit or via the day timer, see chapter �.�.2 “ Setting the control mode”)
Extern (switching the unit on and off via an exter-nal On/Off switch)
WeekTime (the operation of the unit is time con-trolled via the week timer, see following settings “WeekTimer”)
Settings
BathSetting :SetDate :05.05.08Time :12:00
Language :English
Cylinder :SetEsc Set
Settings
BathSetting :SetDate :05.05.08Time :12:00
Language :English
Cylinder :SetEsc Set
Integr.-Time:2minMax.Heating :2hMax.DoorOpen:2min
P-Band :4°C
BathSetting
Week Timer :SetFan :SetTemp.Sensor :Set
Operation :WeekTime
Temp.Control:Int(PI)Esc Set
Water Manag.:SetRemote Test :SetBath Test :Set
GFCI-Mode :Aus
Contrast :15
Settings
BathSetting :SetDate :05.05.08Time :12:00
Language :English
Cylinder :SetEsc Set
Power Limit :Set
�3
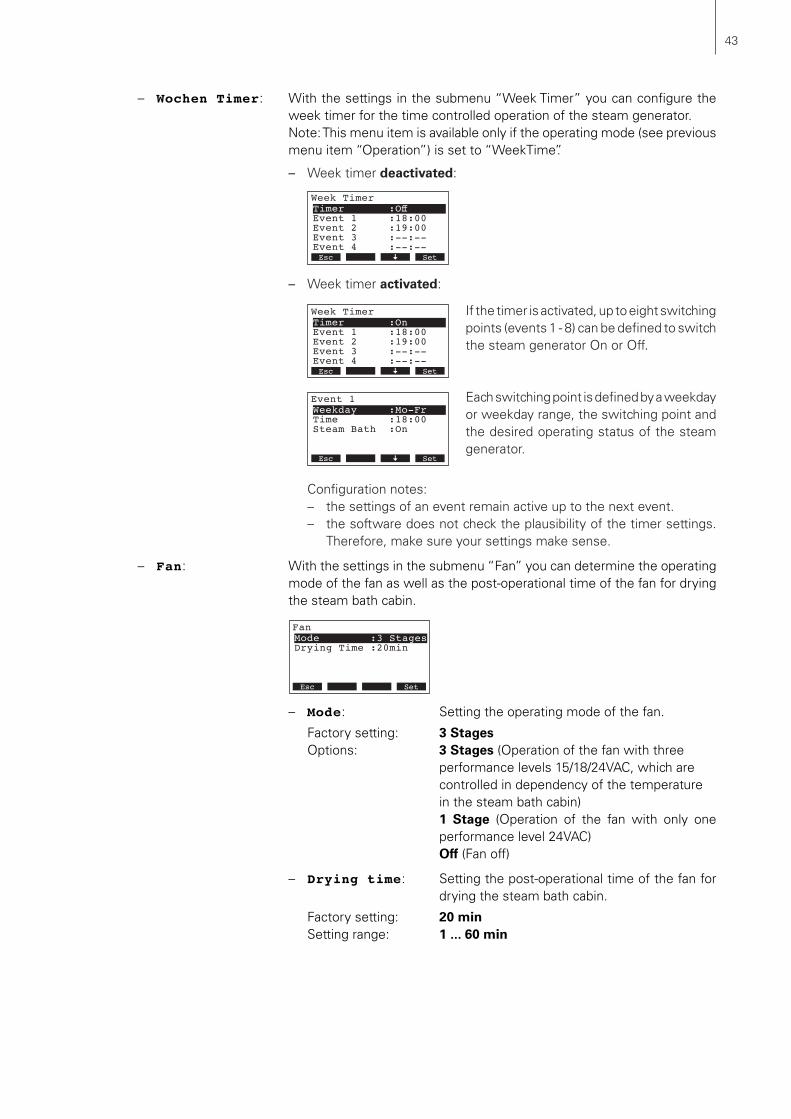
– Wochen Timer: With the settings in the submenu “Week Timer” you can configure the week timer for the time controlled operation of the steam generator.
Note: This menu item is available only if the operating mode (see previous menu item “Operation”) is set to “WeekTime”.
– Week timer deactivated:
– Week timer activated:
If the timer is activated, up to eight switching points (events 1 - �) can be defined to switch the steam generator On or Off.
Each switching point is defined by a weekday or weekday range, the switching point and the desired operating status of the steam generator.
Configuration notes: – the settings of an event remain active up to the next event.– the software does not check the plausibility of the timer settings.
Therefore, make sure your settings make sense.
– Fan: With the settings in the submenu “Fan” you can determine the operating mode of the fan as well as the post-operational time of the fan for drying the steam bath cabin.
– Mode: Setting the operating mode of the fan.
Factory setting: 3 StagesOptions: 3 Stages (Operation of the fan with three
performance levels 1�/1�/2�VAC, which are controlled in dependency of the temperature in the steam bath cabin)
1 Stage (Operation of the fan with only one performance level 2�VAC)
Off (Fan off)
– Drying time: Setting the post-operational time of the fan for drying the steam bath cabin.
Factory setting: 20 minSetting range: 1 ... 60 min
Week Timer
Event 1 :18:00Event 2 :19:00Event 3 :--:--
Timer :On
Event 4 :--:--Esc Set
Event 1
Time :18:00Steam Bath :On
Weekday :Mo-Fr
Esc Set
Week Timer
Event 1 :18:00Event 2 :19:00Event 3 :--:--
Timer :Off
Event 4 :--:--Esc Set
Fan
Drying Time :20min
Mode :3 Stages
Esc Set
��
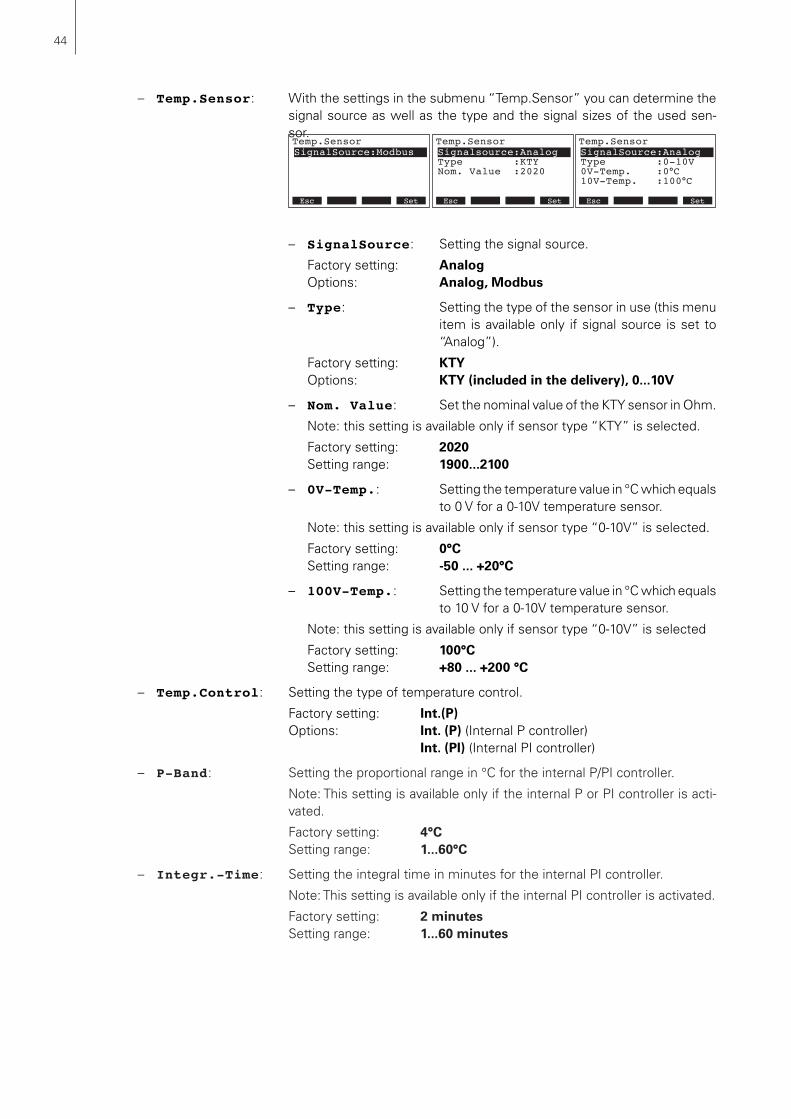
– Temp.Sensor: With the settings in the submenu “Temp.Sensor” you can determine the signal source as well as the type and the signal sizes of the used sen-sor.
– SignalSource: Setting the signal source.
Factory setting: AnalogOptions: Analog, Modbus
– Type: Setting the type of the sensor in use (this menu item is available only if signal source is set to “Analog”).
Factory setting: KTYOptions: KTY (included in the delivery), 0...10V
– Nom. Value: Set the nominal value of the KTY sensor in Ohm.
Note: this setting is available only if sensor type “KTY” is selected.
Factory setting: 2020Setting range: 1900...2100
– 0V-Temp.: Setting the temperature value in °C which equals to 0 V for a 0-10V temperature sensor.
Note: this setting is available only if sensor type “0-10V” is selected.
Factory setting: 0°CSetting range: -50 ... +20°C
– 100V-Temp.: Setting the temperature value in °C which equals to 10 V for a 0-10V temperature sensor.
Note: this setting is available only if sensor type “0-10V” is selected
Factory setting: 100°CSetting range: +80 ... +200 °C
– Temp.Control: Setting the type of temperature control.
Factory setting: Int.(P)Options: Int. (P) (Internal P controller) Int. (PI) (Internal PI controller)
– P-Band: Setting the proportional range in °C for the internal P/PI controller.
Note: This setting is available only if the internal P or PI controller is acti-vated.
Factory setting: 4°CSetting range: 1...60°C
– Integr.-Time: Setting the integral time in minutes for the internal PI controller.
Note: This setting is available only if the internal PI controller is activated.
Factory setting: 2 minutesSetting range: 1...60 minutes
Temp.Sensor
SignalSource:Modbus
Esc Set
Temp.Sensor
Type :KTYNom. Value :2020
Signalsource:Analog
Esc Set
Temp.Sensor
Type :0-10V0V-Temp. :0°C10V-Temp. :100°C
SignalSource:Analog
Esc Set

��
6.6.4.6 Cylinder settings
Cylinder
Cyl. Number :644Cyl. Line :Dispos
Esc Set
Select “Cylinder” in the settings menu, then press the <Set> key.
The cylinder settings appear. Press the < > and < > keys in order to select the individual settings and press the <Set> key to call up the modification dialogue for the selected setting.
Description of the cylinder settings
– Cyl. Line: Selecting the cylinder type.
Factory setting: DisposOptions: Dispos (Disposable cylinder A..) Clean (Cleanable cylinder D..)
– Cyl. Number: Selecting the cylinder number
Factory setting: according the installed cylinderOptions: 342, 343, 363, 444, 464, 654, 644, 664, 674
– Max.Heating: Setting the maximum heating time for the steam generator. As soon as the maximum heating time is reached, the steam production is interrupted and the drying phase begins (if the fan is activated). After the drying phase the light is switched off automatically.
Factory setting: 2 hSetting range: 1 ... 24 h
– Max.Door Open: Setting the maximum time the door of the steam bath cabin can be open, before the steam production is interrupted.
Factory setting: 2 minSetting range: 1 ... 30 min
6.6.4.4 Setting the date
Select “Date” in the settings menu, then press the <Set> key. In the upcom-ing modification dialogue set the actual date (format: “dd.mm.yy”).
6.6.4.5 Setting the time
Select “Time” in the settings menu, then press the <Set> key. In the upcoming modification dialogue set the actual time (format: “hh.mm”).
Settings
Time :12:00Cylinder :SetPower Limit :100%
Date :05.05.08
GFCI-Mode :AusEsc Set
Settings
Date :05.05.08Time :12:00Cylinder :Set
BathSetting :Set
Power Limit :100%Esc Set
Settings
BathSetting :SetDate :05.05.08Time :12:00
Language :English
Cylinder :SetEsc Set

��
6.6.4.7 Setting the capacity limitation
Select “Power Limit” in the settings menu, then press the <Set> key. In the upcoming modification dialogue set the desired power limit in % of the maximum capacity.
6.6.4.8 Activating/Deactivating fault current relay operation
Select “GFCI-Mode” in the settings menu, then press the <Set> key.In the upcoming modification dialogue select whether or not the Condair CP3 D is connected to a fault current relay protected mains supply.
Factory setting: OffOptions: On (mains supply with fault current relay protec-
tion) Off (mains supply without fault current relay
protection)
6.6.4.9 Water management settings
Select “Water Manag.” in the settings menu, then press the <Set> key.
The water management settings menu appears. Press the < > and < > keys in order to select the individual settings and press the <Set> key to call up the modification dialogue for the selected setting.
Description of the water management settings
– Conductivity: Selecting the conductivity range of the supply water.
Factory setting: >125 μS/cmOptions: >125 μS/cm, <125 μS/cm
– Drain Factor: Setting the drain factor
Factory setting: 1.0Setting range: 0.5...2.0
– StandbyDrain: Selecting the type of draining which takes place after a certain time (see following setting) of standby operation.
Factory setting: FullOptions: Full (complete draining) Partial (partial draining) ** Off (draining deactivated)
** The cylinder is drained so far that the water does not touch the elec-trodes any longer.
Settings
Cylinder :SetPower Limit :100%GFCI-Mode :Aus
Teit :12:00
Water Manag.:SetEsc Set
Settings
Power Limit :100%GFCI-Mode :AusWater Manag.:Set
Cylinder :Set
Remote Test :SetEsc Set
Settings
GFCI-Mode :AusWater Manag.:SetRemote Test :Set
Power Limit :100%
Bath Test :SetEsc Set
Force Delay :72h
Water Manag.
Drain Factor:1.0StandbyDrain:FullStandbyDelay:72h
Conductivity:>125µS
Force Drain :OnEsc Set

��
6.6.4.10 Performing remote relay tests
Select “Remote Test” in the settings menu, then press the <Set> key.
The list with the remote relay tests appears, the first relay test is shown. Press the < > and < > keys in order to select the further relay tests available and press the <Set> key to activate/deactivate the correspond-ing relay for testing.
– StandbyDelay: Setting the period of time in standby operation after which an automatic cylinder draining takes place.
Factory setting: 72 hoursSetting range: 1...720 hours
– Force Drain: Activating/Deactivating the forced draining which takes place after a cer-tain time of operation. The forced draining takes place also during steam production.
Factory setting: OffOptions: On (Forced draining activated) Off (Forced draining deactivated)
– Force Delay: Setting the time of operation after which a forced draining takes place.
Factory setting: 72 hoursSetting range: 1...720 hours
Settings
Water Manag.:SetRemote Test :SetBath Test :Set
GFCI-Mode :Aus
Contrast :15Esc Set
Remote Test
Remote Steam:Off
Esc Set
Remote Service:Off 12.00.00Remote Error:OffRemote Unit On:On.11.2006 12.00.00

��
6.6.4.12 Setting the display contrast
Select “Contrast” in the settings menu, then press the <Set> key.In the upcoming modification dialogue set the desired value for the display contrast.
Factory setting: 15Setting range: 0 (no display) ...100 (display turns black)
6.7 Modbus settings
Select the Modbus menu:Path: Main menu > User > Password entry: 8808 > Modbus
The settings for the Modbus appear.
Modbus
Parity :noneTimeout :5sXXXXXXXXXXXXXXXXXXXX
Modbus Addr.:1
11.11.2006 12.00.00Esc Set
Description of the Modbus settings
– Modbus Addr.: Setting the modbus address of the Condair CP3 D.
Factory setting: 1
Setting range: 1...247
– Parity: Selecting the parity bit for the data transmission
Factory setting: None
Options: None, Odd, Even
– Timeout: Setting the time out time for the data transmission.
Factory setting: 5 Seconds
Setting range: 1...600 Seconds
Settings
Water Manag.:SetRemote Test :SetBath Test :Set
GFCI-Mode :Aus
Contrast :15Esc Set
Settings
Remote Test :SetDate :19.10.07Time :12:00
Water Manag.:Set
Contrast :15Esc Set
Bad Test
Licht:Aus
Esc Set
Ventilator Leistung:Aus 12.00.00Duftstoffpumpe:AusKlappe Analogausgang:0.0V.11.2006 12.00.00Temp. Analogausgang:0.0V.11.2006 12.00.00
6.6.4.11 Performing steam bath tests
Select “Bath Test” in the settings menu, then press the <Set> key.
The list with the bath tests appears, the first bath test is shown. Press the < > and < > keys in order to select the further bath tests available and press the <Set> key to activate/deactivate the function or to increase the corresponding parameter value for testing.
��
7 Maintenance
Qualification of personnel
All maintenance work must be carried out only by well qualified and trained personnel authorised by the owner. It is the owner’s responsibility to verify proper qualification of the personnel.
General note
The instructions and details for maintenance work must be followed and upheld.
Only the maintenance work described in this documentation may be carried out.
Only use original Condair spare parts to replace faulty parts.
Safety
Some maintenance work requires removal of the unit cover. Please note the following:
WARNING!
Danger of electrical shock! You may get in touch with live parts when the unit is open. Touching live parts may cause severe injury or even lethal viola-tion.
Prevention: Before carrying out any maintenance work set the Condair CP3 D out of opera-tion as described in chapter 6.3 (switch off the unit, disconnect it from the mains and stop the water supply) and secure the unit against inadvertent power-up.
CAUTION!The electronic components inside the unit are very sensitive to electrostatic discharge.
Prevention: Before carrying out any maintenance work to the electrical or electronic equipment of the steam generator, appropriate measures must be taken to protect the respective components against damage caused by electrostatic discharge (ESD protec-tion).
7.1 Important notes on maintenance

�0
7.2 Maintenance list
To maintain operational safety the Condair CP3 D steam generator must be maintained at regular in-tervals. This is differentiated between the first maintenance after approx. 500 operating hours (I), steam cylinder maintenance after the yellow LED lights (II) and annual maintenance (III).
Below you will find a summary of the work to be carried out for each of the three maintenance stages.
Components Interval Work to be done
I II III
Cleanable steam cylinder Type D.. X X X Clean steam cylinder and electrodes and check for damage, replace if necessary. Note: The steam cyl-inder must be replaced after a maximum operating time of �,000 h.
Electrode plug X X X Check to see firmly positioned (remove cover and tighten fixing screw with hexagonal head socket wrench). Warning! This work should only be carried out by an electrician.
Replacement steam cyl. type A.. X Remove and replace.
Drain pump X Remove, disassemble and clean, replace if neces-sary.
Steam cylinder receptacle X Inspect, clean if necessary.
Inlet valve X Remove and clean filter insert, replace if neces-sary.
Drain pipe and siphon X Inspect, clean if necessary (decalcify and rinse out).
Steam installation X X Inspect steam and condensate hoses for cracks and to see that they are correctly attached, replace faulty hoses.
Water installation X X Inspect water hoses in the unit for cracks and to see that they are correctly attached, replace faulty hosesCheck supply pipe is tight, make tight if necessary. Clean water filter, if available.
Electrical installation X X Check all cables in the unit are firmly positioned and examine status of insulation.

�1
7.3 Removing and installing parts for maintenance
7.3.1 Removal and installation of the steam cylinder
1. Use a screwdriver to undo the two screws fixing the front panel to the unit, then remove the front panel.
2. Units with steam hose connector in housing top: release the two hose clamps on the rubber sleeve using a screwdriver, then detach the rubber sleeve from the connection in the unit cover and from the steam outlet connection of the steam cylinder.
Units without steam hose connector in housing top (not shown): release the hose clamp on the steam hose using a screwdriver, then detach the steam hose from the steam outlet con-nection of the steam cylinder.
1 2
3 4
3. Remove all plugs from the electrodes and from the level sensor.
�. Loosen the two screws of the steam cylinder fixing device by a few turns, then push the fixing device upwards until it comes loose and remove it.

�2
�. Carefully lift steam cylinder away from the cylinder receptacle, then remove it to the front.
CAUTION!Put steam cylinder down carefully to avoid damage to the lower connection piece!
Installation of the steam cylinder follows the reverse sequence. Observe the following:
– Before installing the steam cylinder in the unit, check the O-ring of the cylinder receptacle for damage and replace if necessary.
– Moisten the O-ring of the cylinder receptacle with water (do not use grease or oil), then insert steam cylinder into the receptacle and push it down to the stop.
– Attach the electrode plugs and the level sensor plug to the respective electrode and sensor con-nections according to the following table.
Steam cylinder type
A363 / D363A464 / D464
A664 / D664A674 / D674
Cable configuration
5
Sensor white
brown
red
blackSensor white
brown
red
black brown
red
black
– Fasten steam hose on the connector in the unit cover and on steam connector of the cylinder with hose clamps.
CAUTION! A leaky steam hose can cause damage due to moisture inside the unit.
CAUTION!The outlet connector of the steam cylinder is made of plastic. Do not overtighten the hose clamp on the steam connector of the steam cylinder.

�3
7.3.2 Disassembly and assembly of the cleanable steam cylinder type D...
1. Fasten electrode snap fastenings and push electrodes approx. 2 cm downwards into the steam cylinder.
2. Release clamp clips of the cylinder cover and raise cover.
3. Remove carefully electrodes by lifting upwards.
�. Remove O-rings from the electrodes.Note: Intact O-rings can be reused.
The assembly of the cleanable steam cylinder follows the reverse sequence. Observe the following:
– Before assembling the steam cylinder, check the O-ring in the steam cylinder cover and the O-rings on the electrodes for damage, and replace if necessary. Make sure to relocate O-rings correctly.
– Insert electrodes into steam cylinder cover and push them upwards until the snap fasteners engage.
– Place the cylinder cover (with mounted O-ring) in the correct position (align the two cams on the steam cylinder body with the corresponding grooves in the cylinder cover) on the cylinder body and secure cover with the fastening clips.
1 3
2
4

��
7.3.3 Removal and installation of the water cup and the water hoses
To improve accessibility for removing the water cup and the water hoses we recommend to remove the steam cylinder first (see chapter �.3.1).
1. Release hose clamps using pliers, then disconnect all hoses from the corresponding connectors and remove the hoses.Note: The hoses connected to the water cup may also be removed together with the water cup (see illustration) and then disconnected from the connectors of the water cup outside the unit.
2. Carefully pull fixing clip of the water cup to the front, then push water cup down from the hold-ing device and remove it to the front.
The installation of the water cup and the water hoses follows the reverse sequence. Before fixing the water hoses to the connector using the hose clamps, align the hoses in a way that they are not twisted.
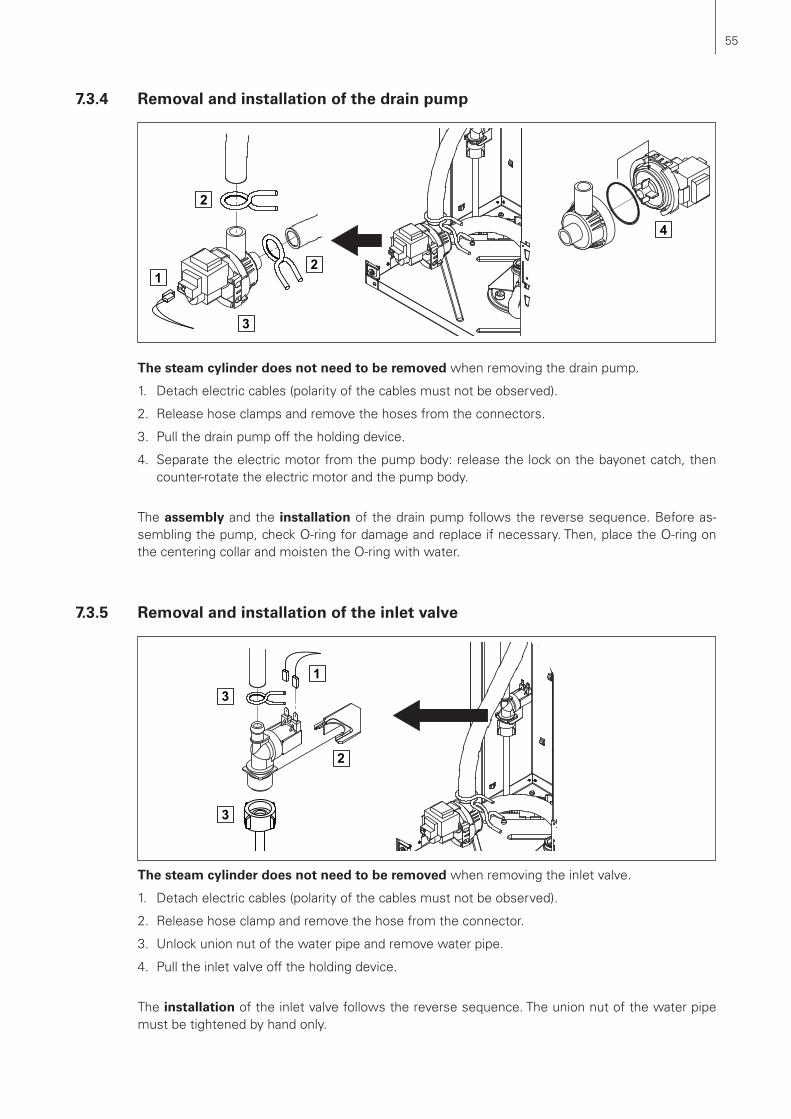
��
7.3.4 Removal and installation of the drain pump
The steam cylinder does not need to be removed when removing the drain pump.
1. Detach electric cables (polarity of the cables must not be observed).
2. Release hose clamps and remove the hoses from the connectors.
3. Pull the drain pump off the holding device.
�. Separate the electric motor from the pump body: release the lock on the bayonet catch, then counter-rotate the electric motor and the pump body.
The assembly and the installation of the drain pump follows the reverse sequence. Before as-sembling the pump, check O-ring for damage and replace if necessary. Then, place the O-ring on the centering collar and moisten the O-ring with water.
7.3.5 Removal and installation of the inlet valve
The steam cylinder does not need to be removed when removing the inlet valve.
1. Detach electric cables (polarity of the cables must not be observed).
2. Release hose clamp and remove the hose from the connector.
3. Unlock union nut of the water pipe and remove water pipe.
�. Pull the inlet valve off the holding device.
The installation of the inlet valve follows the reverse sequence. The union nut of the water pipe must be tightened by hand only.
1
2
2
3
4
2
3
3
1

��
7.4 Notes on cleaning the unit components
Unit component What to clean and how to clean
Steam cylinder cover Steam cylinder bodyCylinder strainer
• Knock off or brush away any limescale as much as pos-sible (do not use a wire brush). If the parts are heavily calcified, place them in an �% formic acid solution (observe safety notes in chap-ter 7.5), until the limescale comes off.
• Finally wash parts in a lukewarm soap solution and rinse well with tap water.
Heating electrodes • Immerse the heating electrodes (up to 2 cm below the snap fastening) in a container with �-percent formic acid (observe safety notes in chapter 7.5). Allow the acid to take effect until the limescale has dissolved.Note: The heating elements do not have to be entirely free from scale.
• Finally rinse the heating electrodes well with tap water and let them dry.
CAUTION!
On no account remove limescale from the heating electrodes using tools (screw-driver, scraper, etc.) or by striking. This could damage the heating elements.
Water hoses • Remove any limescale by slightly knocking on the tubes using a rubber hammer. Then, rinse the tubes well with hot tap water.
Inlet valve
Strainer insert
• Remove strainer insert with pointed pliers. Use a brush (do not use a wire brush) to remove any limescale.
• Wash strainer insert with a lukewarm soap solution, then rinse well with tap water.
Let the inlet valve dry before reinstallation!

��
Unit component What to clean and how to clean
Drain pump
O-ring
pump wheel
• Use a brush to remove any limscale from the pump hous-ing and the pump wheel (do not use a wire brush).
• Then, wipe pump wheel with a damp cloth. Wash the pump housing with a lukewarm soap solution and rinse well with tap water.
Cylinder receptacle in the unit • Remove any limscale from the cylinder receptacle and its connectors using a brush (do not use a wire brush).
• Wash the cylinder receptacle with a lukewarm soap solution and rinse well with tap water.
Water cup • Remove any limscale from the water cup and its con-nectors using a brush (do not use a wire brush).
• Wash the water cup with a lukewarm soap solution and rinse well with tap water.
Interior of the unit (water side only)
Wipe the interior of the unit with a damp cloth without using any cleaning agent.
CAUTION!Take care that the electrical connections and the electronic components remain dry.
7.5 Notes on cleaning agents
Only use cleaning agents stated in the table above. The use of disinfectants is only permitted if they do not leave any toxic residues. In any case the parts must be thoroughly rinsed with water after cleaning.
WARNING!
Formic acid is indeed harmless to the skin, but it attacks the mucous membranes. Therefore prevent your eyes and respiratory tracts from getting in touch with the acid and its vapours (wear goggles and work in a well ventilated room or outside).
CAUTION!Do not use any solvents, aromatized or halogenized hydrocarbons or other ag-gressive substances as they may cause damage to the components of the unit.
It is mandatory to observe and comply with the information and instructions regarding cleaning agents. Observe in particular: all information relating to the protection of personnel, environmental protection and restrictions regarding usage.

��
7.6 Resetting the maintenance indication
After completing maintenance work, the maintenance indication (yellow LED lights) must be reset as follows:
Select the maintenance menu:Path: Main menu > User > Password entry: 8808 >
Select “Cyl. A Reset” in the maintenance menu, then press the <Set> key.
The reset dialogue shows up in the display. Press the <Yes> key to reset the maintenance counter.Note: Press the <No> key if you wish to abort the reset procedure.
To return to the standard operating display press the <Esc> key several times.
Maintenance
Cyl. A Reset:Set
XXXXXXXXXXXXXXXXXXXX
HistoryReset:Set
11.11.2006 12.00.00Esc Set
Cyl. A Reset
Attention ! Resetwithout cyl. Mainten.
Are you sure?
is very dangerous!Esc SetNo Yes
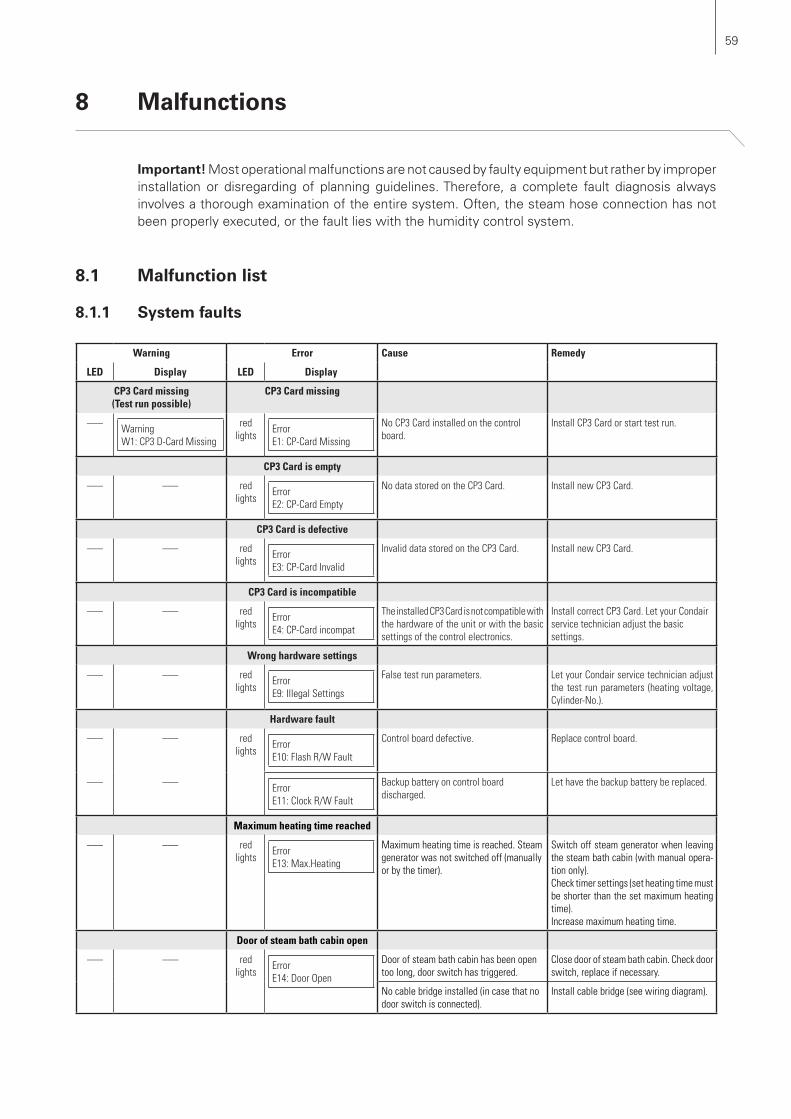
��
8 Malfunctions
Important! Most operational malfunctions are not caused by faulty equipment but rather by improper installation or disregarding of planning guidelines. Therefore, a complete fault diagnosis always involves a thorough examination of the entire system. Often, the steam hose connection has not been properly executed, or the fault lies with the humidity control system.
8.1 Malfunction list
8.1.1 System faults
Warning Error Cause Remedy
LED Display LED Display
CP3Cardmissing(Testrunpossible)
CP3Cardmissing
––– WarningW1:CP3D-CardMissing
redlights
ErrorE1:CP-CardMissing
NoCP3Cardinstalledonthecontrolboard.
InstallCP3Cardorstarttestrun.
CP3Cardisempty
––– ––– redlights
ErrorE2:CP-CardEmpty
NodatastoredontheCP3Card. InstallnewCP3Card.
CP3Cardisdefective
––– ––– redlights
ErrorE3:CP-CardInvalid
InvaliddatastoredontheCP3Card. InstallnewCP3Card.
CP3Cardisincompatible
––– ––– redlights
ErrorE4:CP-Cardincompat
TheinstalledCP3Cardisnotcompatiblewiththehardwareoftheunitorwiththebasicsettingsofthecontrolelectronics.
InstallcorrectCP3Card.LetyourCondairservicetechnicianadjustthebasicsettings.
Wronghardwaresettings
––– ––– redlights
ErrorE9:IllegalSettings
Falsetestrunparameters. LetyourCondairservicetechnicianadjustthe test runparameters (heatingvoltage,Cylinder-No.).
Hardwarefault
––– ––– redlights
ErrorE10:FlashR/WFault
Controlboarddefective. Replacecontrolboard.
––– ––– ErrorE11:ClockR/WFault
Backupbatteryoncontrolboarddischarged.
Lethavethebackupbatterybereplaced.
Maximumheatingtimereached
––– ––– redlights
ErrorE13:Max.Heating
Maximumheatingtimeisreached.Steamgeneratorwasnotswitchedoff(manuallyorbythetimer).
Switchoffsteamgeneratorwhenleavingthesteambathcabin(withmanualopera-tiononly).Checktimersettings(setheatingtimemustbeshorterthanthesetmaximumheatingtime).Increasemaximumheatingtime.
Doorofsteambathcabinopen
––– ––– redlights
ErrorE14:DoorOpen
Doorofsteambathcabinhasbeenopentoolong,doorswitchhastriggered.
Closedoorofsteambathcabin.Checkdoorswitch,replaceifnecessary.
Nocablebridgeinstalled(incasethatnodoorswitchisconnected).
Installcablebridge(seewiringdiagram).

�0
8.1.2 Unit faults
Warning Error Cause Remedy
LED Display LED Display
Maximumtemperatureswitchhastriggered
Maximumtemperatureswitchhastriggered
redandgreenflash
WarningW20A:Temp.Fuse
redlights
ErrorE20A:Temp.Fuse
Maximumtemperatureswitchhastrig-gered
Check temperature in the steam bathcabin.
Maximumtemperatureswitchdefectiveornotconnected.
Check maximum temperature switch, re-place if necessary or correctly connectmaximumtemperatureswitch.
Max.fillinglevelofsteamcylinderreached
Max.fillinglevelofsteamcylinderreachedbut
noheatingcurrent
––– WarningW21A:Cyl.Max.Level
redlights
ErrorE21A:Cyl.Max.&NoCurr
Water conductivity too low (after initialoperation).
Waituntilthemineralcontentofthecylinderhasincreased
Water conductivity too low for type ofsteamcylinder.
Selectcorrectsteamcylindertype.
Phasefailureheatingvoltage. Checkserviceswitchinthemainssupplylineandswitchonifapplicable.Checkmainsfuse(s)andreplaceifapplicable.
Permissiblefillingtimeex-ceeded(20minutes)
Permissiblefillingtimeex-ceeded(morethan4hours)
––– WarningW22A:Max.Filltime
redlights
ErrorE22A:Max.Filltime
Water supply obstructed/shut-off valveclosed/waterpressuretoolow.
Inspectwatersupply (filter,waterpiping,etc.),check/openshut-offvalve,checkwaterpressure.
Inletvalveblockedordefective. Inspectstrainerinsertintheinletvalve,ifapplicablecleanstrainerinsertorreplaceinletvalve.
Excessivebackpressureinthesteamline(steam line too long or kinked), causingwaterlossviafillingcup.
Inspectsteaminstallation.
Leakageinthewatersystem. Inspectwatersystemandsealifnecessary.
Noelectrodecurrentformorethan20minutes
Noelectrodecurrentformorethan4hours
––– WarningW23A:NoCurrent
redlights
ErrorE23A:NoCurrent
Phasefailureheatingvoltage. Inspect/turnonserviceswitchofthemainssupplyline.Inspectthefusesofthemainssupply,replaceifnecessary.
Water supply obstructed/shut-off valveclosed/waterpressuretoolow.
Inspectwatersupply (filter,waterpiping,etc.),check/openshut-offvalve,checkwaterpressure.
Inletvalveblockedordefective. Inspectstrainerinsertoftheinletvalve,ifapplicablecleanstrainerinsertorreplaceinletvalve.
Excessivebackpressureinthesteamline(steam line too long or kinked), causingwaterlossviafillingcup.
Inspectsteaminstallation.
Leakageinthewatersystem. Inspectwatersystemandsealifnecessary.
Electrodecurrentinrelationtothesteamdemandtoohigh
Electrodecurrentinrelationtothesteamdemandtoohigh
––– WarningW24A:OverCurrent
redlights
ErrorE24A:OverCurrent
Humiditydemandhasdecreasedtoofast. Automaticadaptationoftheoperatingpoint.
Drainpumpdefective. Inspectdrainpump,replaceifnecessary.
Draininsteamcylinderblocked. Clean/replacesteamcylinder.
Waterconductivitytoohighforthistypeofsteamcylinder.
Selectcorrectsteamcylindertype.

61
Warning Error Cause Remedy
LED Display LED Display
Max. admissible electrode current exceeded
Max. admissible electrode current exceeded
––– WarningW25A: Excess Current
redlights
ErrorE25A: Excess Current
Drain pump defective. Inspect drain pump, replace if necessary.
Drain in steam cylinder blocked. Clean/replace steam cylinder.
Water conductivity too high for this type of steam cylinder.
Select correct steam cylinder type.
Main contactor jammed
––– ––– redlights
ErrorE26A: Req.Off Current
Main contactor jammed in activated posi-tion.
Inspect main contactor, replace if necessary.
Foam detection Foam detection (4 automatic drainings within 24 hours)
––– WarningW27A: Foam
redlights
ErrorE27A: Foam
Foaming in steam cylinder. Drain steam cylinder via drain key (sev-eral times, if necessary). Check quality of the supply water.
Steam cylinder needs service Service interval for steam cylinder exceeded
yellowlights
WarningW28A: Cyl. Maintenance
red and yellowflash
ErrorE28A: Cyl. Maintenance
Mineral deposits and/or electrodes spent. Steam cylinder Type A: replaceSteam cylinder Type D: clean
Important: After replacement or cleaning of the steam cylinder, reset the maintenance counter (see chapter 7.6).
Steam cylinder needs service Max. operating hours of the steam cylinder reached
yellowlights
WarningW29A: Cyl. Maintenance
red and yellowflash
ErrorE29A: Cyl. Maintenance
Maximum operating hours of the steam cylinder reached.
Steam cylinder Type A: replaceSteam cylinder Type D: clean
Important: After replacement or cleaning of the steam cylinder, reset the maintenance counter (see chapter 7.6).
Temperature sensor signal missing
Temperature sensor signal missing for more than 1 minute
––– WarningW32A: Temp.Sensor def.
redlights
FehlerE32A: Temp.Sensor def.
No temperature signal present at signal input.
Check temperature sensor, replace if neces-sary. Inspect wiring.
Unit locked via Modbus
––– WarningW34A: Modbus disable
––– Module A (B) locked because the corre-sponding Modbus register is deactivated.
Activate the corresponding Modbus register.
Modbus Timeout (5 s)
––– ––– redlights
ErrorE35A: Modbus Timeout
No actual demand or humidity signal received via Modbus.
Send actual demand or humidity signal.
Standby draining of steam cylinder active
––– WarningW36A: Standby Drain
––– ––– Automatic standby draining of steam cylinder active.
No measures must be taken.
Forced draining of steam cylinder active
––– WarningE37A: Forced Drain
––– ––– Forced draining of steam cylinder active. No measures must be taken.

�2
8.2 Notes on fault elimination
WARNING!
For the elimination of faults set the steam generator out of operation as described in chapter �.3, separate the unit from the mains and secure it against inadvert-ent power-up.
The elimination of faults must be carried out by qualified and well trained professionals only.Malfunctions relating to the electrical installation (e.g. replacement of fuses) must be repaired by authorized personnel or by your Condair representative’s service technician only.
Repair work and the replacement of faulty components must be carried out by your Condair repre-sentative’s service technician only!
8.3 Resetting the error indication (red LED lights)
To reset the error indication:
Disconnect the steam generator from the mains. Wait approx. 5 seconds, then reconnect the unit to the mains.
Note: If the fault has not been eliminated, the error indication reappears after a short while.
�3
9 Taking out of service/Disposal
9.1 Taking out of service
If the Condair CP3 D must be replaced or if the humidification system is not needed any more, proceed as follows:
1. Take the unit out of operation as described in chapter �.3.
2. Have the unit (and all other system components, if necessary) unmounted by a qualified service technician.
9.2 Disposal/Recycling
Dismantled components must be disposed of and/or recycled according to the local regulations. In case of doubt please contact your Condair supplier.
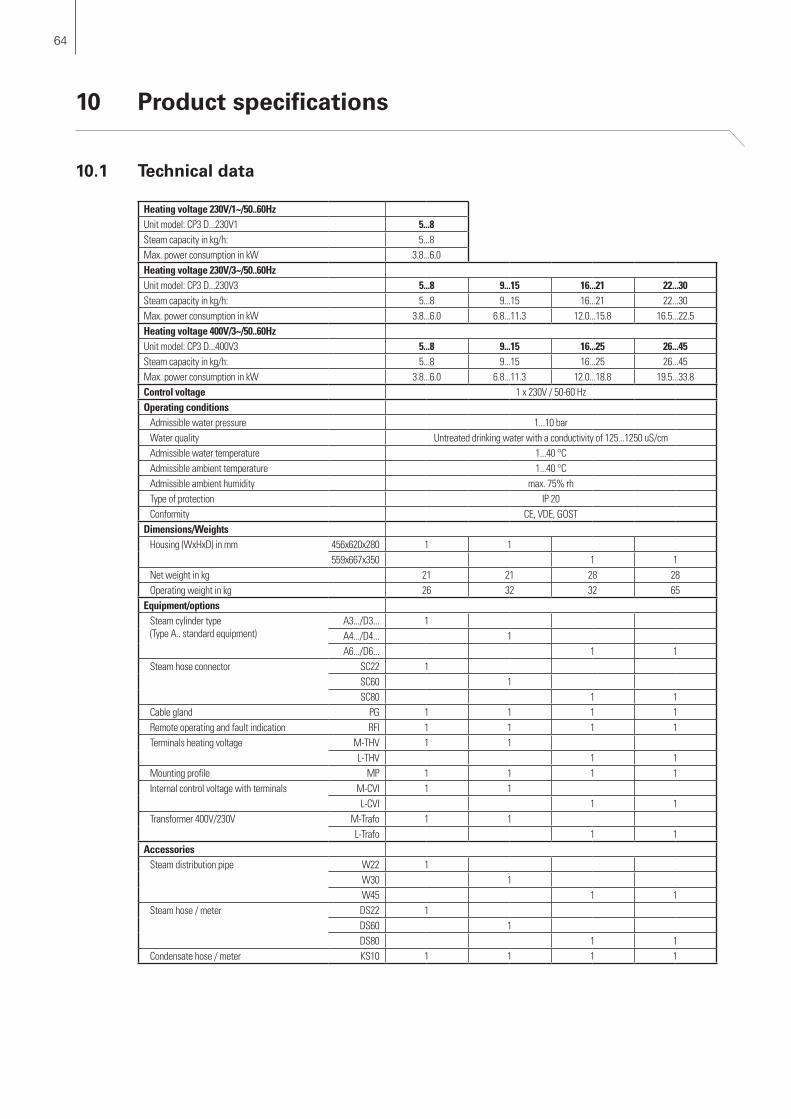
��
10 Product specifications
10.1 Technical data
Heatingvoltage230V/1~/50..60HzUnitmodel:CP3D...230V1 5...8Steamcapacityinkg/h: 5...8Max.powerconsumptioninkW 3.8...6.0Heatingvoltage230V/3~/50..60HzUnitmodel:CP3D...230V3 5...8 9...15 16...21 22...30Steamcapacityinkg/h: 5...8 9...15 16...21 22...30Max.powerconsumptioninkW 3.8...6.0 6.8...11.3 12.0...15.8 16.5...22.5Heatingvoltage400V/3~/50..60HzUnitmodel:CP3D...400V3 5...8 9...15 16...25 26...45Steamcapacityinkg/h: 5...8 9...15 16...25 26...45Max.powerconsumptioninkW 3.8...6.0 6.8...11.3 12.0...18.8 19.5...33.8Controlvoltage 1x230V/50-60HzOperatingconditionsAdmissiblewaterpressure 1...10barWaterquality Untreateddrinkingwaterwithaconductivityof125...1250uS/cmAdmissiblewatertemperature 1...40°CAdmissibleambienttemperature 1...40°CAdmissibleambienthumidity max.75%rhTypeofprotection IP20Conformity CE,VDE,GOSTDimensions/WeightsHousing(WxHxD)inmm 456x620x280 1 1
559x667x350 1 1Netweightinkg 21 21 28 28Operatingweightinkg 26 32 32 65Equipment/optionsSteamcylindertype(TypeA..standardequipment)
A3.../D3... 1A4.../D4... 1A6.../D6... 1 1
Steamhoseconnector SC22 1 SC60 1 SC80 1 1Cablegland PG 1 1 1 1Remoteoperatingandfaultindication RFI 1 1 1 1Terminalsheatingvoltage M-THV 1 1
L-THV 1 1Mountingprofile MP 1 1 1 1Internalcontrolvoltagewithterminals M-CVI 1 1
L-CVI 1 1Transformer400V/230V M-Trafo 1 1
L-Trafo 1 1AccessoriesSteamdistributionpipe W22 1
W30 1W45 1 1
Steamhose/meter DS22 1DS60 1DS80 1 1
Condensatehose/meter KS10 1 1 1 1

��
10.2 Unit dimensions
Condair CP3 D 5...15 (dimensions in mm)
456
ø42.5178
177 73
28
105
71
28
93
34 40
280
150 228
51
180 90
500620
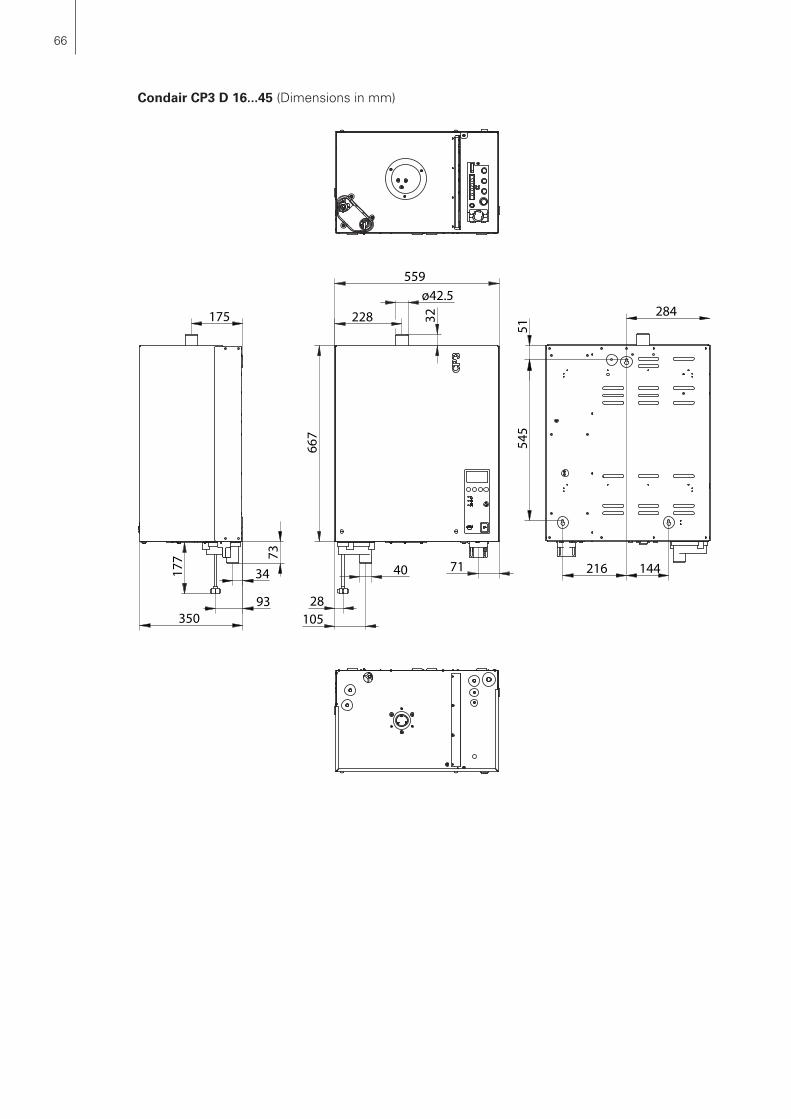
��
Condair CP3 D 16...45 (Dimensions in mm)
559
228
ø42.566
7
40
28105
71
175
34
93350
73
177
284
51
216 144
545
32

© Walter meier (climate international) ltd. 2008, Printed in SwitzerlandTechnical modifications reserved
manufacturer:Walter meier (climate international) ltd.Talstr. 35-37, P.o. Box, ch-8808 Pfäffikon (Switzerland)Phone +41 55 416 61 11, Fax +41 55 416 62 62www.waltermeier.com, [email protected]
conSulTinG, SaleS anD Service:
reg.no. 40002-2
Solutions for indoor climate