installation manual - digi-star international series scale link installation manual tm ft. atkinson,...
TRANSCRIPT

SL200 Series Scale Link
Installation Manual
TM
Ft. Atkinson, Wisconsin USA
Panningen, The Netherlandswww.digi-star.com
D3934-US Rev A March 29, 2012

Introduction
2 SL200 Series Scale Link D3934
INTRODUCTION Thank you for purchasing a Scale LinkTM product. This installation manual describes the steps necessary to install the Scale LinkTM and available cabling and connector configurations. Scale LinkTM works with several types of user displays such as Scale Link ControlTM, Virtual Terminal (ISO models ONLY) and Scale Link TouchTM (SLT 7600). Separate manuals describe the use and installation of the displays.

Safety During Use
D3934-US Rev A SL200 Series Scale Link 3
SAFETY DURING USE CAUTION Failure to install this system properly could result in equipment damage. Please read this document thoroughly before starting up the system. CAUTION Cap all unused connectors when not in use or corrosion and intermittent connections may occur. CAUTION Disconnect all Scale Link Connections before charging battery or welding. Damage may occur to Scale LinkTM and Load Cells.

SL200 Series Scale Link Features
4 SL200 Series Scale Link D3934
SL200 SERIES SCALE LINK FEATURES Figure 1. SL200 Series Main Board
1. TB2: Communications (ISOBUS, CAN, Serial, Touch Screen) 2. TB1: SLC / Remote 3. Program Memory Jumpers 4. Power LED 5. Program Memory 6. Ground Terminal 7. Power (12V) Terminal 8. Main Board Load Cell Connections 9. Expansion Header 10. Data LED

Standard Connectors
D3934-US Rev A SL200 Series Scale Link 5
STANDARD CONNECTORS Table 1: Standard Connectors NAME FUNCTION IMAGE M12-5 Pin Load Cell connector for all Digi-Star Load Cells Un-Capped Capped M12-6 Pin Serial Data Communication M12-8 Pin Scale Link ControlTM (SLC 2400V, SLC 2500V) Deutsch DT6 ISOBUS/CAN Weatherpack 3 Scale LinkTM Power

Alternate Connectors
6 SL200 Series Scale Link D3934
ALTERNATE CONNECTORS Table 2: Alternate Connectors NAME FUNCTION IMAGE Weatherpack 6 Power and Communication

Installation
D3934-US Rev A SL200 Series Scale Link 7
INSTALLATION Mounting 1. Mount Scale LinkTM as shown in Figure 2. Figure 2. Scale LinkTM Mounting

8
CAUTION If connecting Scale Link TM to a different brand of Load Cells, color schemes and functions may not match. Load Cell Setup If you have: M12-5 Pin connectors on the Scale Link• Plug in Load Cells directly to bottom of Scale LinkNo Load Cell connectors on• Install cables through strain reliefs block as shown in Figure
Display • Determine which connector connector options. • Connect display connector • Refer to Wiring Reference• Connect Scale LinkTM to
Figure 3. Wiring Load Cells Directly to Scale Link
SL200 Series Scale Link
to a different brand of Load Cells, color schemes and 5 Pin connectors on the Scale LinkTM and Load Cells: ells directly to bottom of Scale LinkTM. ell connectors on Scale LinkTM and bare leads on Load CellsInstall cables through strain reliefs and wire Load Cells to Scale LinkFigure 3.
Determine which connector is used with your display. See Table 1 or Table 2connector to mating connector on Scale LinkTM. eference Information for more detail on connecting to a display.to 12VDC power source.
. Wiring Load Cells Directly to Scale Link
WIRE TERMINAL BLOCK WHITE WHT GREEN GRN RED RED BLACK BLK SHIELD SHD
Installation
D3934
to a different brand of Load Cells, color schemes and and bare leads on Load Cells: Scale LinkTM terminal
Table 1 or Table 2 for on connecting to a display.
. Wiring Load Cells Directly to Scale Link TERMINAL FUNCTION +SIGNAL -SIGNAL +EXCITATION -EXCITATION SHIELD

Wiring Reference Information
D3934-US Rev A SL200 Series Scale Link 9
WIRING REFERENCE INFORMATION (Refer to Figure 4) POWER TERMINALS Table 3: Power Terminal Wiring WIRE COLOR FUNCTION (See Figure 1) BLACK GROUND RED POWER (12V) SERIAL (PRINTER, TOUCH SCREEN, OTHER SERIAL ENABLED DEVICES) Table 4: Printer and other Serial Device Wiring (Including SLT 7600 / Touch Screen) FUNCTION MAIN PCB DESIGNATOR TERMINAL BLOCK GND GND TB1-1 OR TB2-1 Data In (Rx) IN TB2-4 Data Out (Tx) PRN TB2-5 +12V 12V TB1-6 SCALE LINK CONTROLTM (SLC 2400V, SLC 2500V) Table 5: Scale Link ControlTM Wiring PIN WIRE COLOR MAIN PCB DESIGNATOR TERMINAL BLOCK 1 WHITE 12V TB1-6 2 BROWN 12V TB1-6 3 GREEN RMZ TB1-5 4 YELLOW OUT TB1-2 5 GRAY CLK TB1-3 6 PINK IN TB1-4 7 BLUE GND TB1-1 OR TB2-1 8 RED GND TB1-1 OR TB2-1
Wiring Reference Information
10 SL200 Series Scale Link D3934
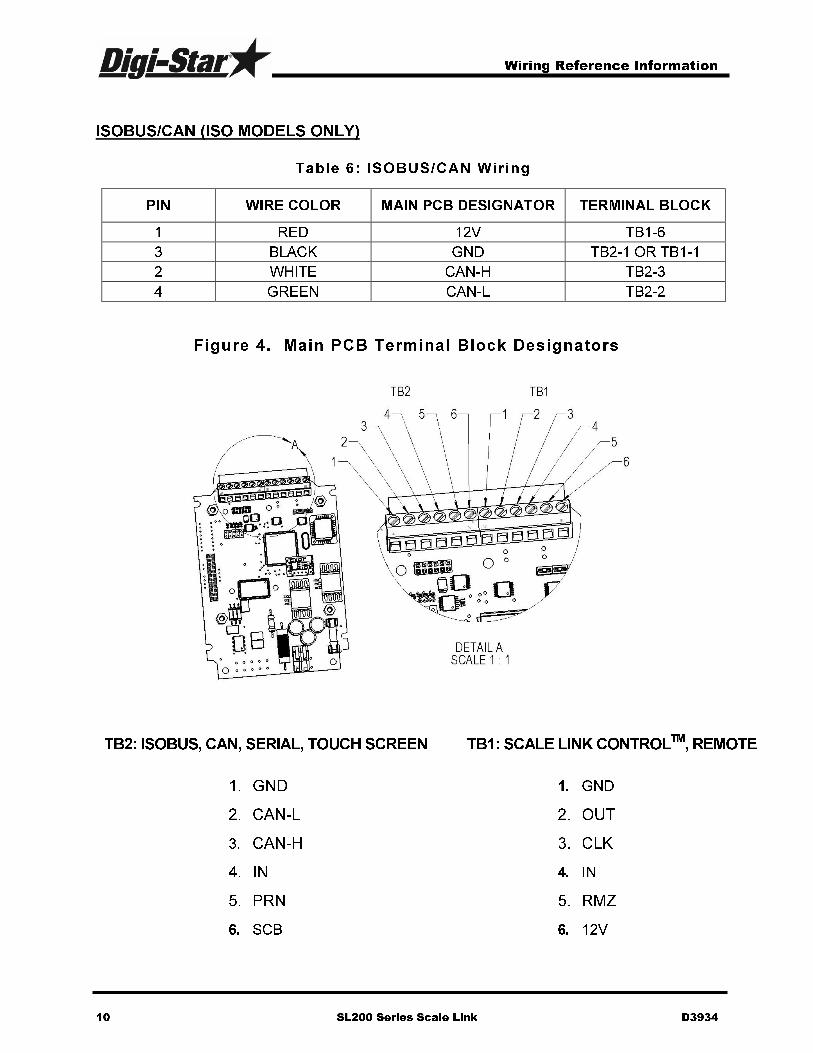
ISOBUS/CAN (ISO MODELS ONLY) Table 6: ISOBUS/CAN Wiring PIN WIRE COLOR MAIN PCB DESIGNATOR TERMINAL BLOCK 1 RED 12V TB1-6 3 BLACK GND TB2-1 OR TB1-1 2 WHITE CAN-H TB2-3 4 GREEN CAN-L TB2-2 Figure 4. Main PCB Terminal Block Designators
TB2: ISOBUS, CAN, SERIAL, TOUCH SCREEN TB1: SCALE LINK CONTROLTM, REMOTE 1. GND 1. GND 2. CAN-L 2. OUT 3. CAN-H 3. CLK 4. IN 4. IN 5. PRN 5. RMZ 6. SCB 6. 12V