installation instructions for part 99-5812 · installation instructions for part 99-5812 cutting...
TRANSCRIPT

INSTALLATION INSTRUCTIONS FOR PART 99-5812
Cutting Tool • Phillips Screwdriver • Socket Wrench
1-800-221-0932 www.metraonline.com
KIT FEATURES
© COPYRIGHT 2004-2007 METRA ELECTRONICS CORPORATION
APPLICATIONS
FORD Edge 2007 / Expedition 2007
F-150 2004-07 / FreeStar 2004-07Mustang 2005-07 / Five-Hundred 2005-07
Freestyle 2005-07 / Focus 2005-07 / Super Duty 2008F Series 2005-07 / Fusion 2006-07 / Explorer 2006-07
Ford Explorer Sport Trac 2006-07 Ford Taurus 2008, Ford Taurus X 2008
MERCURYMonterey 2004-07 / Milan 2006-07
Montego 2005-07 / Mountaineer 2006-07 Sable 2008
LINCOLN Mark LT 2005-07
Factory Navigation Only: MKX 2007 / MKZ 2007 / Navigator 2007 Zephyr 2006
• DIN Head Unit Provision with Pocket• ISO DIN Head Unit Provision with Pocket
A) Radio Housing • B) ISO Brackets • C) Trim Plate • D) Side brackets • E) Spacers • F) (4) Screws
KIT COMPONENTS
TOOLS REQUIRED:
99-5812
A B C
D
EF

Dash DisassemblyFord Edge 2007 .................................................................................................................................1Ford F-150 2004-2007 / Expedition 2007 .........................................................................................1Lincoln Mark LT 2005-2007 ............................................................................................................. 1Ford Mustang 2005-2007.................................................................................................................. 2Ford Five Hundred 2005-2007 .......................................................................................................... 3Mercury Sable-2008.......................................................................................................................... 3Ford Taurus-2008 .............................................................................................................................. 3Mercury Montego 2005-2007............................................................................................................ 3Ford Fusion 2006-2007..................................................................................................................... 4Mercury Milan 2006-2007................................................................................................................. 4Ford Freestyle 2005-2007................................................................................................................. 5Ford Taurus X 2008 ...........................................................................................................................5Ford Freestar 2004-2007 .................................................................................................................. 6Mercury Monterey 2004-2007 .......................................................................................................... 6Ford Focus 2005-2007 ...................................................................................................................... 7Ford Explorer 2006-2007 .................................................................................................................. 8Ford Explorer Sport Trac 2006-2007................................................................................................. 8Mercury Montaineer 2006-2007 ....................................................................................................... 8Ford F Series Super Duty 2005-2007................................................................................................ 9Ford Super Duty 2008 ..................................................................................................................... 10Lincoln MKX 2007 ...........................................................................................................................11Lincoln MKZ 2007........................................................................................................................12,13Lincoln Zephyr 2006....................................................................................................................12.13Lincoln Navigator 2007....................................................................................................................14
Kit AssemblyDIN Head Unit Provision .................................................................................................................. 15ISO DIN Head Unit Provision ............................................................................................................ 16
Final Assembly ................................................................................................................................17
TABLE OF CONTENTS
99-5812
*Note: Refer also to the instructions included with the aftermarket radio.

1
Disconnect the negative battery terminalto prevent an accidental short circuit.
Unsnap and remove entire panel surrounding the radio and climate controls. (Figure A)
1
2
Remove (4) 9/32" screws to remove thefactory radio. (Figure B)
3
A
FORD F-150 2004-2007LINCOLN MARK LT 2005-07
FORD EXPEDITION 2007FORD EDGE 2007
B
99-5812 DASH DISASSEMBLY
Continue to kit assembly

2
FORD MUSTANG 2005-2007
Disconnect the negative battery terminalto prevent an accidental short circuit.
Remove (2) Phillips screws from underthe center armrest at the back of theshifter trim panel (including cup holders). (Figure B)
1
3
Unclip and remove panel. (Figure B)4
A
B
Unclip and remove the (2) center stacktrim panels from the left and right sideof the radio and climate controls.(Figure C)
5
Remove (6) 9/32” screws from centertrim panel surrounding the radio andclimate controls then unclip and removepanel. (Figure D)
6
Remove (4) 9/32” screws from the radioto remove. (Figure E)
7
C
DE
Remove the small rectangular shifterlever trim panel if equipped. (Figure A)
2
99-5812 DASH DISASSEMBLY
Continue to kit assembly

Disconnect the negative battery terminalto prevent an accidental short circuit.
Unclip and remove the small rectan-gular trim around shift lever. (Figure A)
1
2
Unclip and remove the entire panel(including cup holders) surrounding theshift lever. (Figure B)
3
A
FORD FIVE-HUNDRED 2005-2007, FORD TAURUS 2008MERCURY MONTEGO 2005-2007, MERCURY SABLE 2008
B
Remove (2) 9/32” screws at the bottomof the center radio/ climate controlpanel. (Figure C)
4
Unclip and remove the center panel.(Figure D)
5
Remove (4) 9/32” screws from the radioto remove. (Figure E)
6
C
DE
3
99-5812 DASH DISASSEMBLY
Continue to kit assembly

4
FORD FUSION 2006-2007MERCURY MILAN 2006-2007
Disconnect the negative battery terminalto prevent an accidental short circuit.
1
3
A
B
Remove (4) 9/32” screws to remove thefactory radio. (Figure B)
Unsnap and remove entire panel sur-rounding the radio and climate controls.(Figure A)
2
99-5812 DASH DISASSEMBLY
Continue to kit assembly

5
FORD FREESTYLE 2005-2007FORD TAURUS X 2008
99-5812
Disconnect the negative battery terminalto prevent an accidental short circuit.
1
3
A
B
Remove (4) 9/32” screws from radio toremove. (Figure B)
Unclip and remove entire panel sur-rounding the radio and a/c controls.(Figure A)
2
DASH DISASSEMBLY
Continue to kit assembly

6
FORD FREESTAR 2004-2007MERCURY MONTEREY 2004-2007
Disconnect the negative battery terminalto prevent an accidental short circuit.
Remove (4) 9/32” screws to remove thefactory radio. (Figure B)
1
3
A
B
Unsnap and remove entire panel sur-rounding the radio and climate controls.(Figure A)
2
99-5812 DASH DISASSEMBLY
Continue to kit assembly

7
Disconnect the negative battery terminalto prevent an accidental short circuit.
Unsnap and remove entire panel surrounding the radio and climate controls. (Figure A)
1
2
Remove (4) 9/32” screws to remove thefactory radio. (Figure B)
3
A
FORD FOCUS 2005-2007
B
99-5812 DASH DISASSEMBLY
Continue to kit assembly

8
Disconnect the negative battery terminalto prevent an accidental short circuit.
Open center console and remove (2)Phillips screws then unclip and removeentire panel surrounding shifter.(Figure A)
1
2
Remove dash panel surrounding radio toaccess the factory radio screws.(Figure B)
3
Remove (4) 9/32” screws to remove thefactory radio. (Figure C)
4
A
C
FORD EXPLORER 2006-2007FORD SPORT TRAC 2006-2007
MERCURY MOUNTAINEER 2006-2007
B
99-5812 DASH DISASSEMBLY
Continue to kit assembly

9
Disconnect the negative battery terminalto prevent an accidental short circuit.
Unsnap and remove entire panel surrounding the radio and climate controls. (Figure A)
1
2
Remove (4) 9/32” screws to remove thefactory radio. (Figure B)
3
A
FORD F SERIES SUPER DUTY 2005-2007
B
99-5812 DASH DISASSEMBLY
Continue to kit assembly
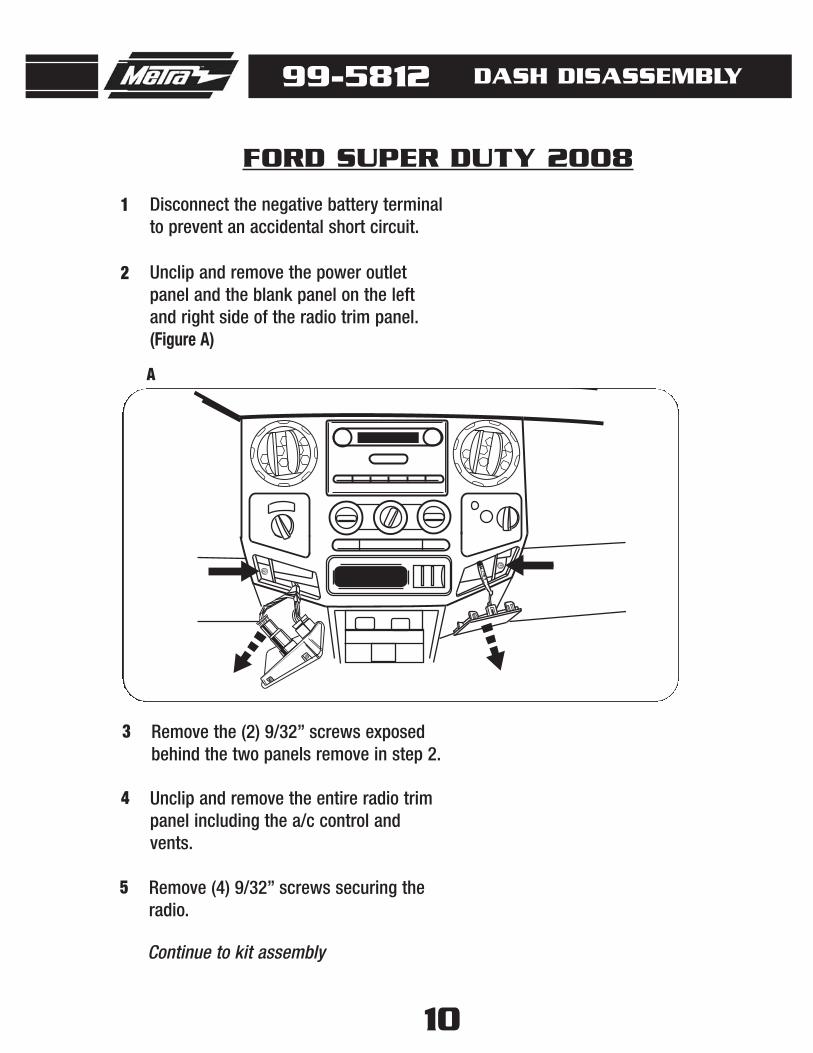
10
Disconnect the negative battery terminalto prevent an accidental short circuit.
Unclip and remove the power outletpanel and the blank panel on the leftand right side of the radio trim panel.(Figure A)
1
2
Remove the (2) 9/32” screws exposedbehind the two panels remove in step 2.
3
Remove (4) 9/32” screws securing theradio.
5
Unclip and remove the entire radio trimpanel including the a/c control andvents.
4
FORD SUPER DUTY 2008
99-5812 DASH DISASSEMBLY
Continue to kit assembly
A

11
Disconnect the negative battery terminalto prevent an accidental short circuit.
Open center console lid and unclip andremove the center console trim panelsurrounding the shifter. (Figure A)
1
2
Remove (2) Phillips screws from thestorage bin then unclip and remove thebin. (Figure B)
3
Remove (4) 9/32” screws securing theradio. Unplug and remove the Radio.
5
Unclip and remove the upper and lowercenter trim panel as one assembly.(Figure C)
4
LINCOLN MKX 2007
99-5812 DASH DISASSEMBLY
Continue to kit assembly
A
B
C

12
Disconnect the negative battery terminalto prevent an accidental short circuit.
Open and remove the top of the centerconsole. (Figure A)
1
2
Open ashtray door and remove ashtraythen remove (1) Phillips screw frominside ashtray cavity. Close ashtray door.
3
Open the climate control vents and pullstraight outward to remove. (Figure C)
5
Unclip and remove the climate controland trim panel assembly starting at thebottom edge. (Figure B)
4
LINCOLN MKZ 2007 / LINCOLN ZEPHYR 2006
99-5812 DASH DISASSEMBLY
Continue on next page
A
B
C

13
Remove (2) 9/32” from the bottom ofthe radio trim panel assembly and (2)9/32” screws from inside the vents.(Figure D)
Unclip the radio trim panel/radio assem-bly. Unplug and remove assembly.(Figure D)
6
7
Remove (4) 9/32” screws securing theradio to the trim panel and remove theradio. (Figure E)
8
LINCOLN MKZ 2007 / LINCOLN ZEPHYR 2006
99-5812 DASH DISASSEMBLY
Continue to kit assembly
D
E

14
Disconnect the negative battery terminalto prevent an accidental short circuit.
Unclip and remove the panel surround-ing the shifter. (Figure A)
1
2
Remove (2) 9/32” screws from the bot-tom of the radio/climate control trimpanel. (Figure B)
3
Unclip and remove the entire panel sur-rounding the radio and including the cli-mate controls. (Figure B)
4
Remove (4) 9/32” screws securing theradio. Unplug and remove the Radio.
5
LINCOLN NAVIGATOR 2007
99-5812 DASH DISASSEMBLY
Continue to kit assembly
A
B

15
DIN HEAD UNIT PROVISION
99-5812 KIT ASSEMBLY
NOTE: Refer also to the instructions included with the aftermarket radio.
2 Slide the DIN cage into the RadioHousing and secure by bending themetal locking tabs outward. (Figure A)
1 (a) For the Ford Edge/Expedition2007, Explorer 2006-07, Fusion2006-07, Mustang 2007 and theSuper Duty 2008 attach the includedspacers to the back of the radio hous-ing mounting tabs. (Figure 1A)NOTE: Use the screws supplied with this kitto mount the radio housing in the vehiclesthat require the spacers.
(b) For the Ford Freestar 2004-07,Monterey 2004-07, Focus 2005-07,and the F Series Super Duty 2005-07,slide the included brackets onto thesides of the radio housings pocket fromthe back of the housing forward. (Figure 1B)
If your vehicle is not listed abovemove to step 2.
3 Slide the aftermarket radio into thecage until it snaps in place. (Figure B)
A
B
1A
1B
Continue to final assembly

16
ISO DIN HEAD UNIT PROVISION
99-5812 KIT ASSEMBLY
2 Mount the ISO Brackets to the headunit with the screws supplied with theunit. (Figure A)
3 Slide the head unit into the radio open-ing until the side clips engage(Figure B)
4 Snap the Trim plate into the RadioHousing. (Figure B)
1B
A
B
1 (a) For the Ford/Edge Expedition2007, Explorer 2006-07, Fusion2006-07, Mustang 2007 and theSuper Duty 2008 attach the includedspacers to the back of the radio hous-ing mounting tabs. (Figure 1A)NOTE: Use the screws supplied with this kitto mount the radio housing in the vehiclesthat require the spacers.
(b) For the Ford Freestar 2004-07,Monterey 2004-07, Focus 2005-07,and the F Series Super Duty 2005-07, slide the included brackets ontothe sides of the radio housings pocketfrom the back of the housing forward.(Figure 1B)
If your vehicle is not listed abovemove to step 2.
NOTE: Refer also to the instructions included with the aftermarket radio.
1A

17
FINAL ASSEMBLY1 Locate the factory wiring harness in the dash and make the connection as shown.
Metra recomends using the proper mating adapter and making the connections asshown. (Isolate and individually tape off the ends of any unused wires to preventelectrical short circuit.)
2 Re-connect the negative battery terminal and test the unit for proper operation.3 Reassemble radio and dash assemblies in reverse order of disassembly.
A
A) Strip wire ends back 1/2"
B) Twist ends together
C) Solder
D) Tape
B
C
D
Make wiring connections using the EIA color code chart shown below and the instructions included with the headunit. Metra recommends making connections as shown below; Strip, Splice, Solder, Tape. Isolate and individuallytape off ends of any unused wires to prevent electrical short circuit.
12V Ignition / Acc . . . Red
12V Batt / Memory . . Yellow
Ground . . . . . . . . . . . Black*
Power Antenna . . . . . Blue
Amp Turn-On . . . . . . Blue / White
Amp Ground . . . . . . . Black / White
Illumination. . . . . . . . Orange
Dimmer . . . . . . . . . . Orange / White
Right Front (+) . . . . . Gray
Right Front (-) . . . . . . Gray / Black
Left Front (+) . . . . . . White
Left Front (-) . . . . . . . White / Black
Right Rear (+). . . . . . Violet
Right Rear (-) . . . . . . Violet / Black
Left Rear (+). . . . . . . Green
Left Rear (-) . . . . . . . Green / Black
*NOTE: When Black a wire is not present, ground radio to vehicle chassis.All colors may not be present on all leads due to manufacturer’s specifications.
METRA / EIA WIRING CODE
FINAL WIRING CONNECTIONS
99-5812 KIT ASSEMBLY
NOTE: Use the screws supplied with this kit to mount the radio housing in the vehicles that require thespacers.

99-5812 INSTRUCTIONS
1-800-221-0932 www.metraonline.com© COPYRIGHT 2004-2007 METRA ELECTRONICS CORPORATION INST99-5812REV. 08/17/07