instalacion de cabezales con pantalla en ingles
TRANSCRIPT
7/28/2019 Instalacion de Cabezales Con Pantalla en Ingles
http://slidepdf.com/reader/full/instalacion-de-cabezales-con-pantalla-en-ingles 1/7
Page 1
Rear Seat Video Installation Guide
Car Electronics Resource Center
In This Guide: The diculty level o
Rear Seat Entertainment (RSE) Instal-
lations varies widely. Some systems
involve signicant vehicle disassembly
and wiring, while others are simply a
matter o replacing a actory-installed
headrest. This guide covers what youneed to know to install a video screen
or the enjoyment o rear seat pas-
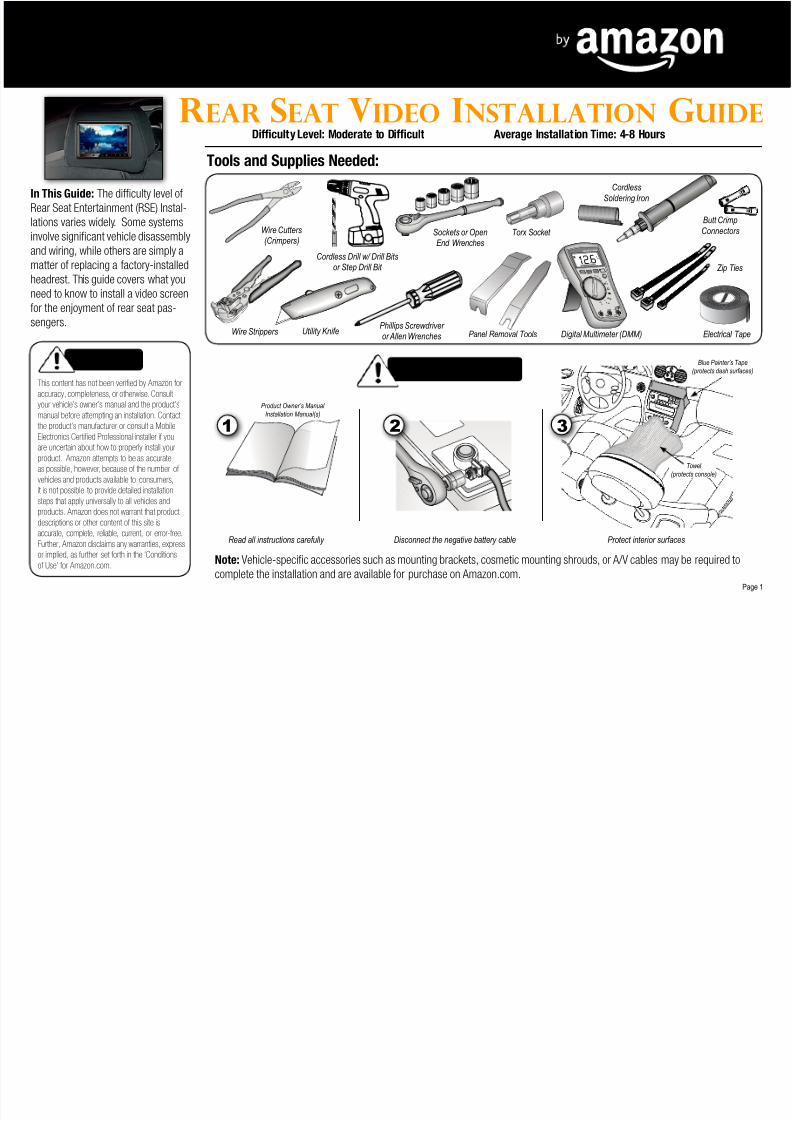
sengers. Phillips Screwdriver or Allen Wrenches
Wire Cutters(Crimpers)
Cordless Drill w/ Drill Bitsor Step Drill Bit
Digital Multimeter (DMM)
Tools and Supplies Needed:
Difculty Level: Moderate to Difcult Average Installation Time: 4-8 Hours
Wire Strippers
Beore You BeginImportant
This content has not been verifed by Amazon or
accuracy, completeness, or otherwise. Consult
your vehicle’s owner’s manual and the product’s
manual beore attempting an installation. Contact the product’s manuacturer or consult a Mobile
Electronics Certifed Proessional installer i you
are uncertain about how to properly install your
product. Amazon attempts to be as accurate
as possible, however, because o the number o
vehicles and products available to consumers,
it is not possible to provide detailed installation
steps that apply universally to all vehicles and
products. Amazon does not warrant that product
descriptions or other content o this site is
accurate, complete, reliable, current, or error-ree.
Further, Amazon disclaims any warranties, express
or implied, as urther set orth in the ‘Conditionso Use’ or Amazon.com.
Read all instructions carefully Disconnect the negative battery cable Protect interior surfaces
Note: Vehicle-specic accessories such as mounting brackets, cosmetic mounting shrouds, or A/V cables may be required to
complete the installation and are available or purchase on Amazon.com.
1 2
AC O M
A A
V O F F
V
V
H z
H z
V
V
1 0 A CA TII
FU S ED 10 0 V
1 2 . 6
Electrical Tape
3
Blue Painter’s Tape
(protects dash surfaces)
Towel
(protects console)
Product Owner’s Manual
Installation Manual(s)
Zip Ties
Utility Knife
Sockets or OpenEnd Wrenches
Panel Removal Tools
Torx Socket
Cordless
Soldering Iron
Butt Crimp
Connectors
7/28/2019 Instalacion de Cabezales Con Pantalla en Ingles
http://slidepdf.com/reader/full/instalacion-de-cabezales-con-pantalla-en-ingles 2/7
Car Electronics Resource CenterPage 2
Rear Seat Video Installation Guide
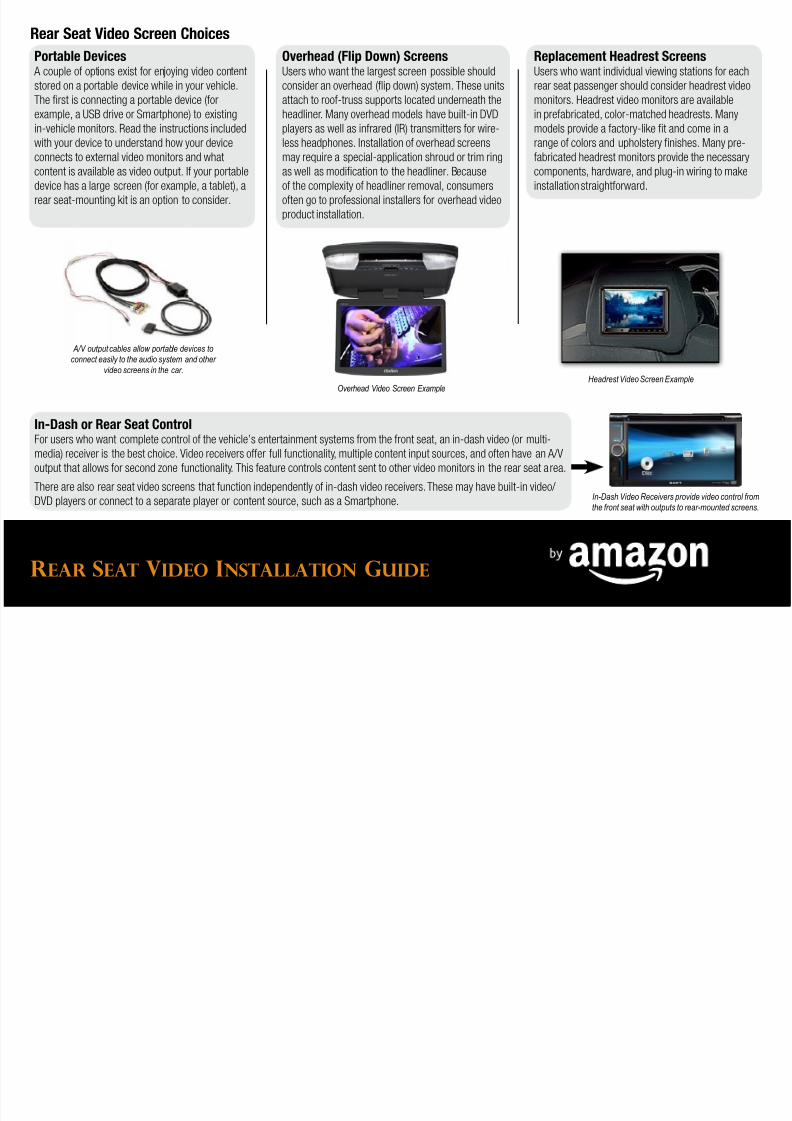
Portable Devices A couple o options exist or enjoying video content
stored on a portable device while in your vehicle.
The rst is connecting a portable device (or
example, a USB drive or Smartphone) to existing
in-vehicle monitors. Read the instructions included
with your device to understand how your device
connects to external video monitors and what
content is available as video output. I your portable
device has a large screen (or example, a tablet), a
rear seat-mounting kit is an option to consider.
Overhead (Flip Down) ScreensUsers who want the largest screen possible should
consider an overhead (fip down) system. These units
attach to roo-truss supports located underneath the
headliner. Many overhead models have built-in DVD
players as well as inrared (IR) transmitters or wire-
less headphones. Installation o overhead screens
may require a special-application shroud or trim ring
as well as modication to the headliner. Because
o the complexity o headliner removal, consumers
oten go to proessional installers or overhead video
product installation.
Replacement Headrest ScreensUsers who want individual viewing stations or each
rear seat passenger should consider headrest video
monitors. Headrest video monitors are available
in preabricated, color-matched headrests. Many
models provide a actory-like t and come in a
range o colors and upholstery nishes. Many pre-
abricated headrest monitors provide the necessary
components, hardware, and plug-in wiring to make
installation straightorward.
Rear Seat Video Screen Choices
Overhead Video Screen ExampleHeadrest Video Screen Example
A/V output cables allow portable devices toconnect easily to the audio system and other
video screens in the car.
In-Dash or Rear Seat ControlFor users who want complete control o the vehicle’s entertainment systems rom the ront seat, an in-dash video (or multi-
media) receiver is the best choice. Video receivers oer ull unctionality, multiple content input sources, and oten have an A/V
output that allows or second zone unctionality. This eature controls content sent to other video monitors in the rear seat area.
There are also rear seat video screens that unction independently o in-dash video receivers. These may have built-in video/
DVD players or connect to a separate player or content source, such as a Smartphone. In-Dash Video Receivers provide video control fromthe front seat with outputs to rear-mounted screens.

7/28/2019 Instalacion de Cabezales Con Pantalla en Ingles
http://slidepdf.com/reader/full/instalacion-de-cabezales-con-pantalla-en-ingles 3/7
Car Electronics Resource CenterPage 3
Rear Seat Video Installation Guide
Overhead Video Screens
Proper mounting and sae wiring o overhead video screens require disassembly o the headliner to access the roo
support trusses. The overhead video screen comes with mounting hardware and a ‘plate’ that installs to the roo truss.
This plate is the mount or the overhead screen assembly. Once the mounting plate is securely installed to the roo
trusses, the overhead screen assembly attaches to pre-threaded holes in the mounting plate or a secure installation.
The disassembly process is dierent or each vehicle, but most vehicles require removal o the pillar trim panels toallow the headliner to drop down. Pillar trim includes the windshield side trim (A pillar) behind the ront door (B pillar)
and rear door/windows (C and, i present, D pillar). The position o the screen in the headliner area depends on what
options are present in the vehicle. Here are a ew guidelines:
If there is an existing overhead console: The location o the existing overhead console may be a suitable mounting
area. Some video screen manuacturers oer custom overhead consoles or mounting shrouds that replace or blend
with the actory overhead console. I the console-mounting accessory is not available, the overhead video screen
must mount behind the console where the headliner is fat.
If there are rear roof A/C vents: The screen must be located in a fat area behind the rear A/Cvent ‘hump’. Some disassembly o the headliner to inspect the routing o A/C vents is neces-
sary to ensure an unobstructed location or direct roo truss mounting o the overhead video
screen hardware.
If there is a sliding sunroof: The screen must be located behind the sunroo in a position that
does not interere with the sunroo mechanisms or the roo ‘pocket’ into which the sunroo
slides. Some disassembly o the headliner is necessary to inspect the sunroo mechanisms
and movement to ensure an unobstructed location or direct roo truss mounting.
Follow the exact installation instructions included with the overhead video screen or the best results.
General Pre-Installation Inormation
When to Consider Professional Installation: Beore attempting any DIY video screen installation, assess your comort level disassembling vehicle interior
panels and ensure you have the r ecommended tools or the job. Many independent retail installation shops
welcome jobs with products purchased on Amazon.com. Always look or a Mobile Electronics Certifed
Proessional (MECP) installation technician to handle your most challenging installation needs.
View Into Roof (Under Headliner)
Roof Support Trusses Mounting Plate
Bracket Attached to Roof Trusses
Once an opening in the headliner is made, the
overhead screen mounting plate attaches to theroof support trusses.
After the mounting plate is secured, theoverhead screen assembly attaches to the
mounting plate with the headliner in between.
Some applications require an applicationspecic shroud (housing) to mate the
overhead screen with the vehicle bothfunctionally and cosmetically. These are
avaliable on Amazon.com
7/28/2019 Instalacion de Cabezales Con Pantalla en Ingles
http://slidepdf.com/reader/full/instalacion-de-cabezales-con-pantalla-en-ingles 4/7
Car Electronics Resource CenterPage 4
Rear Seat Video Installation Guide
Caution:Beore attempting any DIY video screen installation, assess your comort level disassembling vehicle interior panels
and ensure you have the recommended tools or the job. Many independent retail installation shops welcome
jobs with products purchased on Amazon.com. Always look or a Mobile Electronics Certifed Proessional (MECP)
installation technician to handle your most challenging installation needs.
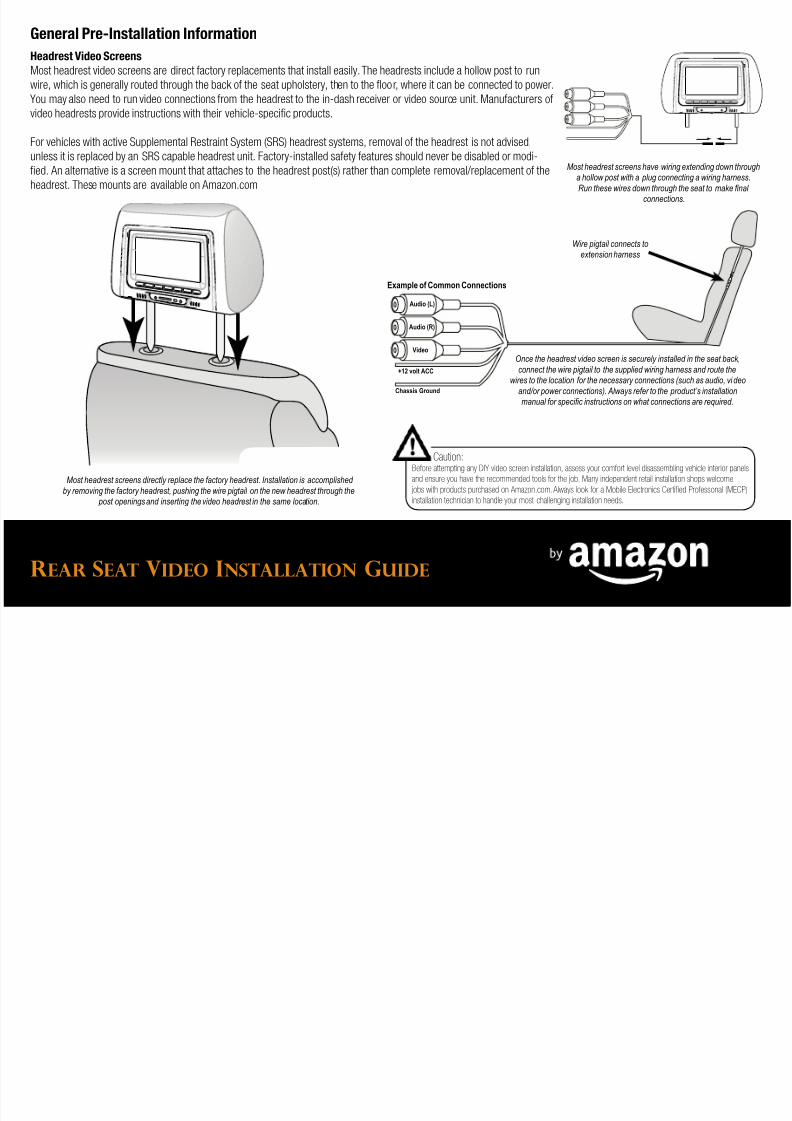
Most headrest screens have wiring extending down througha hollow post with a plug connecting a wiring harness.
Run these wires down through the seat to make nal connections.
General Pre-Installation Inormation
Headrest Video Screens
Most headrest video screens are direct actory replacements that install easily. The headrests include a hollow post to run
wire, which is generally routed through the back o the seat upholstery, then to the foor, where it can be connected to power.
You may also need to run video connections rom the headrest to the in-dash receiver or video source unit. Manuacturers o
video headrests provide instructions with their vehicle-specic products.
For vehicles with active Supplemental Restraint System (SRS) headrest systems, removal o the headrest is not advised,unless it is replaced by an SRS capable headrest unit. Factory-installed saety eatures should never be disabled or modi-
ed. An alternative is a screen mount that attaches to the headrest post(s) rather than complete removal/replacement o the
headrest. These mounts are available on Amazon.com
Most headrest screens directly replace the factory headrest. Installation is accomplished
by removing the factory headrest, pushing the wire pigtail on the new headrest through the post openings and inserting the video headrest in the same location.
Once the headrest video screen is securely installed in the seat back,
connect the wire pigtail to the supplied wiring harness and route thewires to the location for the necessary connections (such as audio, video
and/or power connections). Always refer to the product’s installationmanual for specic instructions on what connections are required.
Wire pigtail connects toextension harness
Audio (L)
Audio (R)
Video
+12 volt ACC
Chassis Ground
Example of Common Connections

7/28/2019 Instalacion de Cabezales Con Pantalla en Ingles
http://slidepdf.com/reader/full/instalacion-de-cabezales-con-pantalla-en-ingles 5/7
Car Electronics Resource CenterPage 5
Rear Seat Video Installation Guide
Wiring and Connections
Power Wiring
Video screens require a connection to the vehicle’s accessory power circuit. This positive (+) 12 volt accessory power
is usually located at either the vehicle’s use panel using a use box tap (shown at right), the ignition switch, or (in
some vehicles) at the actory stereo wiring using soldered or crimped wire connections. Choose the route or the video
screen power wiring based on other connections you will need to make in the same area(s). The connection should
support 5 amps o current or screen-only systems or 10 amps o current i there is a built-in DVD player. Check the
actory circuit’s use size to veriy the capacity.
Once an accessory power wire is located, complete the wiretap connection:
1) Strip 1/2” to 3/4” o insulation rom the video screen’s power wire end.
2) Strip a 1/2” section o insulation rom the middle o the accessory power wire. Do not cut the wire.
3) Separate the copper strands on two sides o the accessory power wire, creating an opening
through which the video screen’s power wire can be inserted.
4) Insert the video screen power wire into the accessory power wire.
5) Wrap the end o the video screen power wire around the exposed accessory power wire.
6) Solder this connection.
7) Use electrical tape to cover the connection when complete.
I soldering the wiretap connection is not possible, cut the actory wires and crimp them back together with the video
screen’s power wire using a butt connector. Crimping involves twisting the copper and inserting the bare wires into
the butt connector, positing the butt connector in the appropriate gauge setting in the crimper jaws and squeezing the
crimper on the butt connector on both sides (midway between the middle and the end) to secure the wire.
Ground Wiring
Connect the ground wire’s ring terminal to a solid metal point on the vehicle body or chassis using the hardware
supplied with the video screen(s). Avoid using a actory ground point to eliminate voltage spike-induced noises that
appear as lines on the video screen.
1) Locate a suitable ground point with no obstructions on, around, or behind it, such as uel tanks and wiring
harnesses. The kick panel or ‘B-pillar’ panel area (as shown) are good examples or rear seat video systems.
2) Drill a 1/8” hole. Clean the painted surace around the hole and remove the paint by sanding down to bare
metal. This step helps ensure good electrical conductivity.
3) Attach the ground wire’s ring terminal to the location using a #8 sheet metal screw (or supplied hardware).
Soldered wiretap
connection
Ground point
shown in ‘B-pillar’ area behind plastic
trim panel
Crimped wiretapconnection
Vehicle Wires
Vehicle Wires
Video ScreenPower Wire
Video Screen
Power Wire
Use a fuse box tap to provide
a safe and easy method of adding a circuit to which the
video system can connect for power in the fuse panel.
7/28/2019 Instalacion de Cabezales Con Pantalla en Ingles
http://slidepdf.com/reader/full/instalacion-de-cabezales-con-pantalla-en-ingles 6/7
Car Electronics Resource CenterPage 6
Rear Seat Video Installation Guide
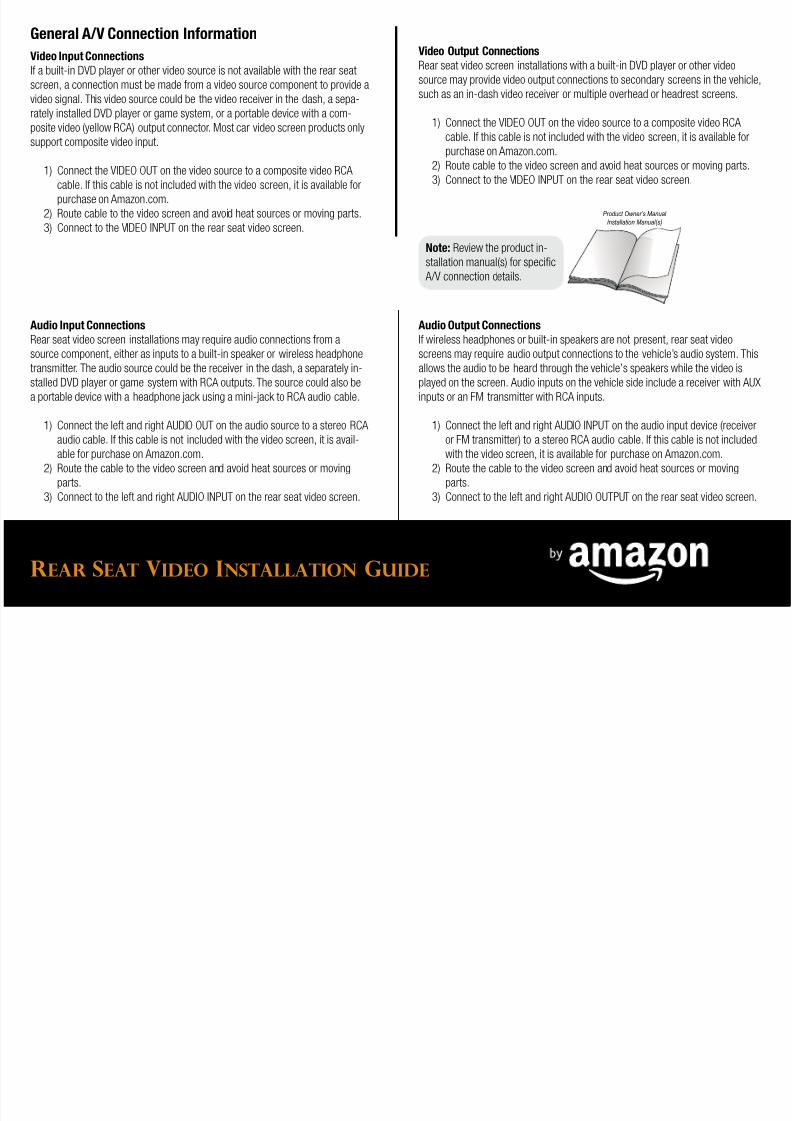
General A/V Connection Inormation
Video Input Connections
I a built-in DVD player or other video source is not available with the rear seat
screen, a connection must be made rom a video source component to provide a
video signal. This video source could be the video receiver in the dash, a sepa-
rately installed DVD player or game system, or a portable device with a com-
posite video (yellow RCA) output connector. Most car video screen products only
support composite video input.
1) Connect the VIDEO OUT on the video source to a composite video RCA
cable. I this cable is not included with the video screen, it is available or
purchase on Amazon.com.
2) Route cable to the video screen and avoid heat sources or moving parts.
3) Connect to the VIDEO INPUT on the rear seat video screen.
Note: Review the product in-
stallation manual(s) or specic
A/V connection details.
Product Owner’s Manual
Installation Manual(s)
Video Output Connections
Rear seat video screen installations with a built-in DVD player or other video
source may provide video output connections to secondary screens in the vehicle,
such as an in-dash video receiver or multiple overhead or headrest screens.
1) Connect the VIDEO OUT on the video source to a composite video RCA
cable. I this cable is not included with the video screen, it is available orpurchase on Amazon.com.
2) Route cable to the video screen and avoid heat sources or moving parts.
3) Connect to the VIDEO INPUT on the rear seat video screen.
Audio Input Connections
Rear seat video screen installations may require audio connections rom a
source component, either as inputs to a built-in speaker or wireless headphone
transmitter. The audio source could be the receiver in the dash, a separately in-
stalled DVD player or game system with RCA outputs. The source could also be
a portable device with a headphone jack using a mini-jack to RCA audio cable.
1) Connect the let and right AUDIO OUT on the audio source to a stereo RCA
audio cable. I this cable is not included with the video screen, it is avail-
able or purchase on Amazon.com.
2) Route the cable to the video screen and avoid heat sources or moving
parts.
3) Connect to the let and right AUDIO INPUT on the rear seat video screen.
Audio Output Connections
I wireless headphones or built-in speakers are not present, rear seat video
screens may require audio output connections to the vehicle’s audio system. This
allows the audio to be heard through the vehicle’s speakers while the video is
played on the screen. Audio inputs on the vehicle side include a receiver with AUX
inputs or an FM transmitter with RCA inputs.
1) Connect the let and right AUDIO INPUT on the audio input device (receiver
or FM transmitter) to a stereo RCA audio cable. I this cable is not included
with the video screen, it is available or purchase on Amazon.com.
2) Route the cable to the video screen and avoid heat sources or moving
parts.
3) Connect to the let and right AUDIO OUTPUT on the rear seat video screen.

7/28/2019 Instalacion de Cabezales Con Pantalla en Ingles
http://slidepdf.com/reader/full/instalacion-de-cabezales-con-pantalla-en-ingles 7/7
Car Electronics Resource CenterPage 7
Rear Seat Video Installation Guide
Veriy Operation and Finish InstallationVeriy Operation
Beore reassembly, veriy correct operation o the video system.
1) Turn the key to the ACC position and turn on the screen(s) as well as any other video system components.
2) Play a video source such as a DVD or game system.
3) I there are multiple video inputs such as “MAIN” or “AUX 1”, ensure the screen input is congured to display the video source. Veriy the screen displays the video
source image.4) Veriy audio unctions properly through the audio playback method such as wireless headphones, AUX input o the in-dash receiver, or FM transmitter.
Reassembly
Reassemble any parts o the vehicle removed during the video system installation. Veriy all wiring is securely tied down with zip ties and routed away rom moving parts or
heat sources.