incharge service assurance manager user's guide for ... · incharge service assurance manager...
TRANSCRIPT

Service Assurance Manager User’s Guide for InfoVista Adapter
Version 1.0
Copyright ©1996-2003 by System Management ARTS Incorporated. All rights reserved.The Software and all intellectual property rights related thereto constitute trade secrets and proprietary data of SMARTS and any third party from whom SMARTS has received marketing rights, and nothing herein shall be construed to convey any title or ownership rights to you. Your right to copy the software and this documentation is limited by law. Making unauthorized copies, adaptations, or compilation works is prohibited and constitutes a punishable violation of the law. Use of the software is governed by its accompanying license agreement. The documentation is provided “as is” without warranty of any kind. In no event shall System Management ARTS Incorporated (“SMARTS”) be liable for any loss of profits, loss of business, loss of use of data, interruption of business, or for indirect, special, incidental, or consequential damages of any kind, arising from any error in this documentation.The InCharge products mentioned in this document are covered by one or more of the following U.S. patents or pending patent applications: 5,528,516, 5,661,668, 6,249,755, 10,124,881 and 60,284,860.“InCharge,” the InCharge logo, “SMARTS,” the SMARTS logo, “Graphical Visualization,” “Authentic Problem,” “Codebook Correlation Technology,” and “Instant Results Technology” are trademarks or registered trademarks of System Management ARTS Incorporated. All other brand or product names are trademarks or registered trademarks of their respective companies or organizations.
Third-Party Software. The Software may include software of third parties from whom SMARTS has received marketing rights and is subject to some or all of the following additional terms and conditions:
Bundled SoftwareSun Microsystems, Inc., Java(TM) Interface Classes, Java API for XML Parsing, Version 1.1. "Java" and all Java-based marks are trademarks or registered trademarks of Sun Microsystems, Inc. in the U.S. and other countries. SMARTS is independent of Sun Microsystems, Inc.
W3C IPR SoftwareCopyright © 2001-2003 World Wide Web Consortium (http://www.w3.org), (Massachusetts Institute of Technology (http://www.lcs.mit.edu), Institut National de Recherche en Informatique et en Automatique (http://www.inria.fr), Keio University (http://www.keio.ac.jp)). All rights reserved (http://www.w3.org/Consortium/Legal/). Note: The original version of the W3C Software Copyright Notice and License can be found at http://www.w3.org/Consortium/Legal/copyright-software-19980720.
The Apache Software License, Version 1.1Copyright ©1999-2003 The Apache Software Foundation. All rights reserved. Redistribution and use of Apache source and binary forms, with or without modification, are permitted provided that the following conditions are met:1. Redistributions of Apache source code must retain the above copyright notice, this list of conditions and the Apache disclaimer as
written below. 2. Redistributions in binary form must reproduce the above copyright notice, this list of conditions and the Apache disclaimer as written
below in the documentation and/or other materials provided with the distribution.3. The end-user documentation included with the redistribution, if any, must include the following acknowledgment:
"This product includes software developed by the Apache Software Foundation (http://www.apache.org/)."Alternately, this acknowledgment may appear in the software itself, if and wherever such third-party acknowledgments normally appear.
4. The names “The Jakarta Project”, “Tomcat”, "Xalan", "Xerces", and "Apache Software Foundation" must not be used to endorse or promote products derived from Apache software without prior written permission. For written permission, please contact [email protected].
5. Products derived from this Apache software may not be called "Apache," nor may "Apache" appear in their name, without prior written permission of the Apache Software Foundation.
APACHE DISCLAIMER: THIS APACHE SOFTWARE FOUNDATION SOFTWARE IS PROVIDED "AS IS'' AND ANY EXPRESSED OR IMPLIED WARRANTIES, INCLUDING, BUT NOT LIMITED TO, THE IMPLIED WARRANTIES OF MERCHANTABILITY AND FITNESS FOR A PARTICULAR PURPOSE ARE DISCLAIMED. IN NO EVENT SHALL THE APACHE SOFTWARE FOUNDATION OR ITS CONTRIBUTORS BE LIABLE FOR ANY DIRECT, INDIRECT, INCIDENTAL, SPECIAL, EXEMPLARY, OR CONSEQUENTIAL DAMAGES (INCLUDING, BUT NOT LIMITED TO, PROCUREMENT OF SUBSTITUTE GOODS OR SERVICES; LOSS OF USE, DATA, OR PROFITS; OR BUSINESS INTERRUPTION) HOWEVER CAUSED AND ON ANY THEORY OF LIABILITY, WHETHER IN CONTRACT, STRICT LIABILITY, OR TORT (INCLUDING NEGLIGENCE OR OTHERWISE) ARISING IN ANY WAY OUT OF THE USE OF THIS SOFTWARE, EVEN IF ADVISED OF THE POSSIBILITY OF SUCH DAMAGE.This Apache software consists of voluntary contributions made by many individuals on behalf of the Apache Software Foundation and was originally based on software copyright © 1999, Lotus Development Corporation., http://www.lotus.com. For information on the Apache Software Foundation, please see http://www.apache.org.
FLEXlm Software© 1994 - 2003, Macrovision Corporation. All rights reserved. "FLEXlm" is a registered trademark of Macrovision Corporation. For product and legal information, see http://www.macrovision.com/solutions/esd/flexlm/flexlm.shtml.
JfreeChart – Java library for GIF generationThe Software is a “work that uses the library” as defined in GNU Lesser General Public License Version 2.1, February 1999 Copyright © 1991, 1999 Free Software Foundation, Inc., and is provided “AS IS” WITHOUT WARRANTY OF ANY KIND EXPRESSED OR IMPLIED, INCLUDING, BUT NOT LIMITED TO, THE IMPLIED WARRANTIES OF MERCHANTABILITY AND FITNESS FOR A PARTICULAR PURPOSE. THE ENTIRE RISK AS TO THE QUALITY AND PERFORMANCE OF THE LIBRARY IS WITH YOU. SHOULD THE LIBRARY PROVE DEFECTIVE, YOU ASSUME THE COST OF ALL NECESSARY SERVICING, REPAIR OR CORRECTION. IN NO EVENT UNLESS REQUIRED BY APPLICABLE LAW OR AGREED TO IN WRITING WILL ANY COPYRIGHT HOLDER, OR ANY OTHER PARTY WHO MAY MODIFY AND/OR REDISTRIBUTE THE LIBRARY AS PERMITTED IN THE ABOVE-REFERENCED LICENSE BE LIABLE TO YOU FOR DAMAGES, INCLUDING ANY GENERAL, SPECIAL,
INCIDENTAL OR CONSEQUENTIAL DAMAGES ARISING OUT OF THE USE OR INABILITY TO USE THE LIBRARY (INCLUDING BUT NOT LIMITED TO LOSS OF DATA OR DATA BEING RENDERED INACCURATE OR LOSSES SUSTAINED BY YOU OR THIRD PARITES OR A FAILURE OF THE LIBRARY TO OPERATE WITH ANY OTHER SOFTWARE), EVEN IF SUCH HOLDER OR OTHER PARTY HAS BEEN ADVISED OF THE POSSIBILITY OF SUCH DAMAGES. JfreeChart library (included herein as .jar files) is provided in accordance with, and its use is covered by the GNU Lesser General Public License Version 2.1, which is set forth at http://www.object-refinery.com/lgpl.html/.
BMC – product libraryThe Software contains technology (product library or libraries) owned by BMC Software, Inc. (“BMC Technology”). BMC Software, Inc., its affiliates and licensors (including SMARTS) hereby disclaim all representations, warranties and liability for the BMC Technology.
Crystal Decisions ProductsThe Software may contain certain software and related user documentation (e.g., Crystal Enterprise Professional, Crystal Reports Professional and/or Crystal Analysis Professional) that are owned by Crystal Decisions, Inc., 895 Emerson Street, Palo Alto, CA 94301 (“Crystal Decisions”). All such software products are the technology of Crystal Decisions. The use of all Crystal Decisions software products is subject to a separate license agreement included with the Software electronically, in written materials, or both. YOU MAY NOT USE THE CRYSTAL DECISIONS SOFTWARE UNLESS AND UNTIL YOU READ, ACKNOWLEDGE AND ACCEPT THE TERMS AND CONDITIONS OF THE CRYSTAL DECISIONS’ SOFTWARE LICENSE AGREEMENT. IF YOU DO NOT ACCEPT THE TERMS AND CONDITIONS OF THE CRYSTAL DECISIONS’ SOFTWARE LICENSE, YOU MAY RETURN, WITHIN THIRTY (30) DAYS OF PURCHASE, THE MEDIA PACKAGE AND ALL ACCOMPANYING ITEMS (INCLUDING WRITTEN MATERIALS AND BINDERS OR OTHER CONTAINERS) RELATED TO THE CRYSTAL DECISIONS’ TECHNOLOGY, TO SMARTS FOR A FULL REFUND; OR YOU MAY WRITE, CRYSTAL WARRANTIES, P.O. BOX 67427, SCOTTS VALLEY, CA 95067, U.S.A.
GNU eTeks PJA Toolkit Copyright © 2000-2001 Emmanuel PUYBARET/eTeks [email protected]. All Rights Reserved.The eTeks PJA Toolkit is resident on the CD on which the Software was delivered to you. Additional information is available at eTEks’ web site: http://www.eteks.com. The eTeks PJA Toolkit program is free software; you can redistribute it and/or modify it under the terms of the GNU General Public License (GPL) as published by the Free Software Foundation; version 2 of the License. The full text of the applicable GNU GPL is available for viewing at http://www.gnu.org/copyleft/gpl.txt. You may also request a copy of the GPL from the Free Software Foundation, Inc., 59 Temple Place - Suite 330, Boston, MA 02111-1307, USA. The eTeks PJA Toolkit program is distributed in the hope that it will be useful, but WITHOUT ANY WARRANTY; without even the implied warranty of MERCHANTABILITY or FITNESS FOR A PARTICULAR PURPOSE. See the GNU General Public License for more details. For a period of three years from the date of your license for the Software, you are entitled to receive under the terms of Sections 1 and 2 of the GPL, for a charge no more than SMARTS’ cost of physically performing source distribution, a complete machine-readable copy of the corresponding source code for the GNU eTeks PJA Toolkit provided to you hereunder by requesting such code from SMARTS in writing: Attn: Customer Support, SMARTS, 44 South Broadway, White Plains, New York 10601.
IBM Runtime for AIX The Software contains the IBM Runtime Environment for AIX(R), Java™ 2 Technology Edition Runtime Modules © Copyright IBM Corporation 1999, 2000 All Rights Reserved.
HP-UX Runtime Environment for the Java™ 2 PlatformThe Software contains the HP-UX Runtime for the Java™ 2 Platform, distributed pursuant to and governed by Hewlett-Packard Co. ("HP") software license terms set forth in detail at: http://www.hp.com. Please check the Software to determine the version of Java runtime distributed to you.
DataDirect TechnologiesPortions of this software are copyrighted by DataDirect Technologies, 1991-2002.
NetBSD Copyright (c) 2001 Christopher G. Demetriou. All rights reserved. Redistribution and use in source and binary forms, with or without modification, are permitted provided that the following conditions are met:1. Redistributions of source code must retain the above copyright notice, this list of conditions and the following disclaimer.2. Redistributions in binary form must reproduce the above copyright notice, this list of conditions and the following disclaimer in the
documentation and/or other materials provided with the distribution.3. All advertising materials mentioning features or use of this software must display the following acknowledgement:
This product includes software developed for the NetBSD Project. See http://www.netbsd.org/ for information about NetBSD.4. The name of the author may not be used to endorse or promote products derived from this software without specific prior written
permission.THIS SOFTWARE IS PROVIDED BY THE AUTHOR “AS IS” AND ANY EXPRESS OR IMPLIED WARRANTIES, INCLUDING, BUT NOT LIMITED TO, THE IMPLIED WARRANTIES OF MERCHANTABILITY AND FITNESS FOR A PARTICULAR PURPOSE ARE DISCLAIMED. IN NO EVENT SHALL THE AUTHOR BE LIABLE FOR ANY DIRECT, INDIRECT, INCIDENTAL, SPECIAL, EXEMPLARY, OR CONSEQUENTIAL DAMAGES (INCLUDING, BUT NOT LIMITED TO, PROCUREMENT OF SUBSTITUTE GOODS OR SERVICES; LOSS OF USE, DATA, OR PROFITS; OR BUSINESS INTERRUPTION) HOWEVER CAUSED AND ON ANY THEORY OF LIABILITY, WHETHER IN CONTRACT, STRICT LIABILITY, OR TORT (INCLUDING NEGLIGENCE OR OTHERWISE) ARISING IN ANY WAY OUT OF THE USE OF THIS SOFTWARE, EVEN IF ADVISED OF THE POSSIBILITY OF SUCH DAMAGE. <<Id: LICENSE, v 1.2 2000/06/14 15:57:33 cgd Exp>>

Last Update: 7/16/03
InCharge Service Assurance Manager User’s Guide for InfoVista Adapter v
Contents
Preface vii
Intended Audience viiPrerequisites viiDocument Organization viiiDocumentation Conventions viiiInCharge Installation Directory ixAdditional Resources xi
InCharge Commands xiDocumentation xi
Common Abbreviations and Acronyms xiiTechnical Support xiii
1 The InCharge Adapter for InfoVista 1
Requirements for InCharge Adapter for InfoVista 1Exporting Topology from InCharge to InfoVista 2Displaying InfoVista Reports from the InCharge Global Console 3
How InfoVista Client Tools Retrieve Reports 4Converting InfoVista Traps to InCharge Notifications 5Configuring the InCharge Adapter for InfoVista 5
Editing Adapter Configuration Files 5Integrating the InfoVista Adapter 6Editing the infovista.conf Configuration File 8Editing the InfoVista Client Tool Files 9About sm_infovista 11Customize VistaProvisioner to Import InCharge Topology 11Automating the Transfer of Topology from InCharge 12
Using the InfoVista Adapter from the Global Console 15Viewing an InfoVista Report 15
Contents
vi InCharge Service Assurance Manager User’s Guide for InfoVista Adapter
Viewing and Responding to InfoVista Notifications at the InCharge Global Console 16
Index 17
InCharge Service Assurance Manager User’s Guide for InfoVista Adapter vii
Preface
This document describes the configuration and operation of the InCharge Service Assurance Manager Adapter for InfoVista.
Intended AudienceThis document is intended for personnel who need to configure and use the InCharge Adapter for InfoVista.
PrerequisitesBefore you configure and use the InCharge Adapter for InfoVista, the following software must be installed on appropriate servers in your network:
• InfoVista software version 2.2 or 2.3. For complete requirements, see Requirements for InCharge Adapter for InfoVista on page 1.
• The InCharge Adapter for InfoVista. For information about installing InCharge adapters, see the InCharge Installation Guide.
• Other required InCharge applications: InCharge Global Console, InCharge Service Assurance Manager (Service Assurance), and InCharge Service Assurance Manager (SAM) Adapter Platform. For information about installing these InCharge applications, see the InCharge Installation Guide.
Preface
viii InCharge Service Assurance Manager User’s Guide for InfoVista Adapter
Document OrganizationThis guide consists of the following chapter.
Table 1: Document Organization
Documentation ConventionsSeveral conventions may be used in this document as shown in Table 2.
Table 2: Documentation Conventions
Directory path names are shown with forward slashes (/). Users of the Windows operating systems should substitute back slashes (\) for forward slashes.
Also, if there are figures illustrating consoles in this document, they represent the consoles as they appear in Windows. Under UNIX, the consoles appear with slight differences. For example, in views that display items in a tree hierarchy such as the Topology Browser, a plus sign displays for Windows and an open circle displays for UNIX.
1. THE INCHARGE ADAPTER FOR
INFOVISTA
Provides an overview and explains how to configure and use the InCharge Adapter for InfoVista.
CONVENTION EXPLANATION
sample code Indicates code fragments and examples in Courier font
keyword Indicates commands, keywords, literals, and operators in bold
% Indicates C shell prompt
# Indicates C shell superuser prompt
<parameter> Indicates a user-supplied value or a list of non-terminal items in angle brackets
[option] Indicates optional terms in brackets
/InCharge Indicates directory path names in italics
yourDomain Indicates a user-specific or user-supplied value in bold, italics
File > Open Indicates a menu path in italics
▲ ▼ Indicates a command that is formatted so that it wraps over one or more lines. The command must be typed as one line.
InCharge Service Assurance Manager User’s Guide for InfoVista Adapter ix
I n C h a r g e I n s t a l l a t i o n D i r e c t o r y
Finally, unless otherwise specified, the term InCharge Manager is used to refer to InCharge programs such as Domain Managers, Global Managers, and adapters.
InCharge Installation DirectoryIn this document, the term BASEDIR represents the location where InCharge software is installed.
• For UNIX, this location is: /opt/InCharge<n>/<productsuite>.
• For Windows, this location is: C:\InCharge<n>\<productsuite>.
The <n> represents the InCharge software version number. The <productsuite> represents the InCharge product suite that the product is part of.
Table 3 defines the <productsuite> directory for each InCharge product.
Preface
x InCharge Service Assurance Manager User’s Guide for InfoVista Adapter
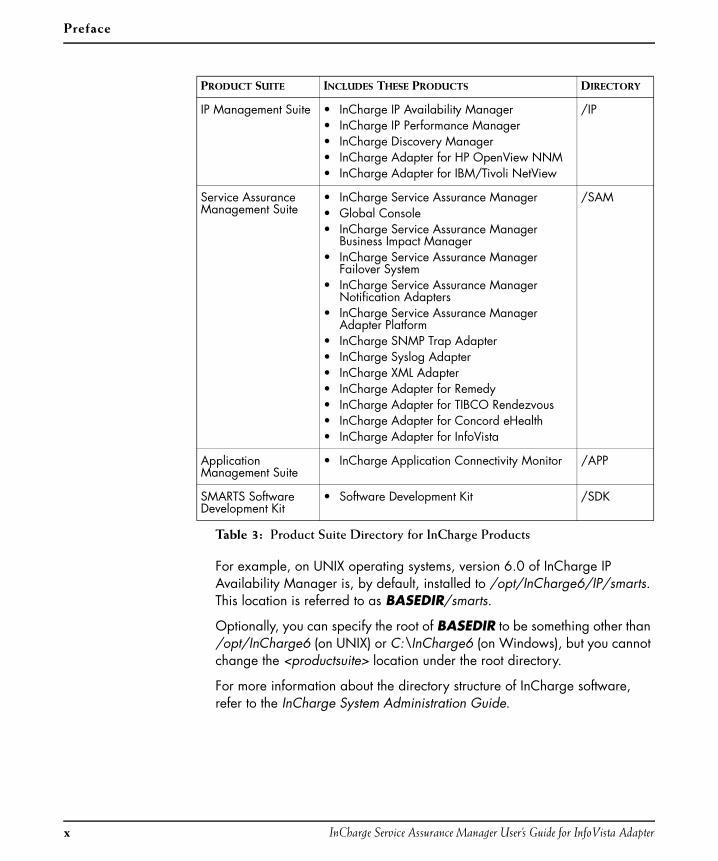
Table 3: Product Suite Directory for InCharge Products
For example, on UNIX operating systems, version 6.0 of InCharge IP Availability Manager is, by default, installed to /opt/InCharge6/IP/smarts. This location is referred to as BASEDIR/smarts.
Optionally, you can specify the root of BASEDIR to be something other than /opt/InCharge6 (on UNIX) or C:\InCharge6 (on Windows), but you cannot change the <productsuite> location under the root directory.
For more information about the directory structure of InCharge software, refer to the InCharge System Administration Guide.
PRODUCT SUITE INCLUDES THESE PRODUCTS DIRECTORY
IP Management Suite • InCharge IP Availability Manager• InCharge IP Performance Manager• InCharge Discovery Manager• InCharge Adapter for HP OpenView NNM• InCharge Adapter for IBM/Tivoli NetView
/IP
Service Assurance Management Suite
• InCharge Service Assurance Manager• Global Console• InCharge Service Assurance Manager
Business Impact Manager• InCharge Service Assurance Manager
Failover System• InCharge Service Assurance Manager
Notification Adapters• InCharge Service Assurance Manager
Adapter Platform• InCharge SNMP Trap Adapter• InCharge Syslog Adapter• InCharge XML Adapter• InCharge Adapter for Remedy• InCharge Adapter for TIBCO Rendezvous• InCharge Adapter for Concord eHealth• InCharge Adapter for InfoVista
/SAM
Application Management Suite
• InCharge Application Connectivity Monitor /APP
SMARTS Software Development Kit
• Software Development Kit /SDK
InCharge Service Assurance Manager User’s Guide for InfoVista Adapter xi
A d d i t i o n a l R e s o u r c e s
Additional ResourcesIn addition to this manual, SMARTS provides the following resources.
InCharge CommandsDescriptions of InCharge commands are available as HTML pages. The index.html file, which provides an index to the various commands, is located in the BASEDIR/smarts/doc/html/usage directory.
Documentat ionReaders of this manual may find other SMARTS documentation (also available in the BASEDIR/smarts/doc/pdf directory) helpful.
I n C h a r g e Do c u me n t a t i o n
The following SMARTS documents are product independent and thus relevant to users of all InCharge products:
• InCharge Release Notes
• InCharge Documentation Roadmap
• InCharge Installation Guide
• InCharge System Administration Guide
• InCharge Operator’s Guide
I n C h a r g e S e r v i c e A s s u r a n c e M a n a g e r D o c u m en t a t i o n
The following SMARTS documents are relevant to users of the InCharge Service Assurance Management product suite.
• An Introduction to InCharge Service Assurance Manager
• InCharge Service Assurance Manager Configuration Guide
• InCharge Service Assurance Manager Failover System User’s Guide
• InCharge Service Assurance Manager User’s Guide for Business Impact Manager
The following SMARTS documents are relevant to InCharge Service Assurance Manager adapters.
• InCharge Service Assurance Manager Notification Adapters User’s Guide
• InCharge Service Assurance Manager Adapter Platform User’s Guide
Preface
xii InCharge Service Assurance Manager User’s Guide for InfoVista Adapter
• InCharge XML Adapter User’s Guide
• InCharge Service Assurance Manager User’s Guide for Remedy Adapter
• InCharge Service Assurance Manager User’s Guide for Concord eHealth Adapter
• InCharge Service Assurance Manager User’s Guide for InfoVista Adapter
Common Abbreviations and AcronymsThe following lists common abbreviations and acronyms that are used in the InCharge guides.
ASL Adapter Scripting Language
CDP Cisco Discovery Protocol
ICIM InCharge Common Information Model
ICMP Internet Control Message Protocol
IDS Incremental Device Support
IP Internet Protocol
MSFC Multilayer Switch Feature Card
MIB Management Information Base
MODEL Managed Object Definition Language
RSFC Router Switch Feature Card
RSM Router Switch Module
SNMP Simple Network Management Protocol
TCP Transmission Control Protocol
VLAN Virtual Local Area Network
InCharge Service Assurance Manager User’s Guide for InfoVista Adapter xiii
Te c h n i c a l S u p p o r t
Technical SupportSMARTS provides technical support by e-mail or phone during normal business hours (9:00 A.M.—6:00 P.M. U.S. Eastern Time).
You may also contact us at:
SMARTS44 South BroadwayWhite Plains, New York 10601 U.S.A.
TECHNICAL SUPPORT: [email protected]
SALES: [email protected]
WORLD WIDE WEB: http://www.smarts.com
TELEPHONE: +1.914.948.6200
FAX: +1.914.948.6270
Preface
xiv InCharge Service Assurance Manager User’s Guide for InfoVista Adapter
InCharge Service Assurance Manager User’s Guide for InfoVista Adapter 1
1
The InCharge Adapter for
InfoVista
The InCharge Adapter for InfoVista integrates with the InfoVista suite of applications and enables you to do the following:
• Export topology from InCharge Service Assurance Managers and Availability Managers to the InfoVista VistaProvisioner product.
• Display InfoVista performance-related reports from an InCharge Global Console.
• View and respond to performance-related notifications at the InCharge Global Console that originate from the InfoVista Server.
This chapter describes these capabilities and how to configure and use this adapter.
Requirements for InCharge Adapter for InfoVistaThe InCharge Adapter for InfoVista is supported on these platforms:
• Solaris 8 or Solaris 9
• Windows 2000 Server or Windows 2000 Advanced Server.
Note: The InCharge Adapter for InfoVista is not supported on the HP-UX, AIX, and Linux operating systems.
The InCharge Adapter for InfoVista
2 InCharge Service Assurance Manager User’s Guide for InfoVista Adapter
To ensure all necessary files are available, the InCharge Adapter for InfoVista must be installed on the same hosts as:
• InfoVista VistaProvisioner application 1.1 and InCharge Service Assurance Manager (6.0 or later), which are also coresident.
• InCharge Global Consoles (6.0 or later) and the InfoVista native client, which are also coresident. The InCharge Adapter for InfoVista cannot be used with pre-6.0 Global Managers.
• InCharge SAM Adapter Platforms
To install the InCharge Adapter for InfoVista, you must either:
• Be superuser (User ID 0) on UNIX platforms.
• Have administrative privileges on Windows platforms.
For InCharge Service Assurance Management suite hardware and additional software requirements including required X Server Settings (UNIX) and Java Applet requirements, see the InCharge Installation Guide.
Exporting Topology from InCharge to InfoVistaThe InCharge Adapter for InfoVista permits InfoVista servers to leverage the power of InCharge autodiscovery to obtain an accurate topology of the managed network environment in real time. InCharge provides a powerful tool to accurately discover dynamically changing infrastructure components automatically. InCharge can provide InfoVista with information about all the physical and logical elements in layer 2 and 3 from InCharge IP Availability Manager(s) and with groups defined in the InCharge Global Manager(s).
The InCharge Adapter for InfoVista processes elements from InCharge IP Availability Manager(s) and groups from the InCharge Service Assurance Manager(s). The InfoVista Adapter then writes an export file for each InfoVista server that will import the topology. The InfoVista Adapter also writes the Dictionary file used by the InfoVista Performance Report tool.
Once the export and Dictionary files are written, the InfoVista Adapter exits. The export files must be imported by InfoVista to complete the transfer of the topology. InfoVista uses the VistaProvisioner component to import the files. The VistaProvisioner then initiates data collection for reports on the imported topology elements.
InCharge Service Assurance Manager User’s Guide for InfoVista Adapter 3
D i s p l a y i n g I n f o Vi s t a R ep o r t s f r o m t h e I n C h a r g e G lo b a l C o n s o l e
The exported topology can be imported into VistaProvisioner manually using the VistaProvisioner user interface. In addition, the complete topology transfer can be automated using sm_sched and the runExportImport script. For more information on automating the process, see Automating the Transfer of Topology from InCharge on page 12.
Displaying InfoVista Reports from the InCharge Global Console
The InCharge Adapter for InfoVista allows you to retrieve performance-related InfoVista reports directly from an InCharge Global Console. Predefined and ad hoc reports are available.
Predefined reports are displayed using the InfoVista native client and are accessed at the Global Console using these client tools:
• InfoVista Trap Report
• InfoVista Performance Report
Ad hoc reports are displayed by InfoVista’s web-based VistaNext interface to produce reports for trend analysis, performance statistics, and troubleshooting. These reports are accessed at the Global Console using the following client tools:
• Create VistaNext Report
• View VistaNext Report
• View Related VistaNext Report
The InfoVista-related client tools are available for topology elements that have been exported from InCharge to InfoVista and for any notifications that relate to these elements. The classes of InCharge elements that can be exported include:
• Firewall
• Host
• Interface
• Router
• Service Offering
• Switch
• Unitary Computer System
The InCharge Adapter for InfoVista
4 InCharge Service Assurance Manager User’s Guide for InfoVista Adapter
Note: As with any tool, Global Manager administrator can permit or deny access to these tools by any user.
How InfoVista Cl ient Tools Retr ieve ReportsThe InfoVista client tools retrieve reports from InfoVista in different ways, but all the tools display the reports on the host where the Global Console is running. The reports are displayed using either a browser or the InfoVista native client.
The VistaNext client tools, Create VistaNext Report, View VistaNext Report, and View Related VistaNext Report, all use a web-based interface to create and view ad hoc reports via the VistaPortal.
When you select a VistaNext client tool from the Global Console, it launches a browser. The tool also passes a URL to the browser that includes the InfoVista server name, user name (and password, optionally), and the identifier of the topology element that the report will document.
The InfoVista Trap Report tool starts the InfoVista native client rather than a browser to display the report. When you use the tool on a notification that originated as a trap from InfoVista, the tool passes information from the trap to the native client, including the InfoVista Server name, user name (and password, optionally), and the report name. The InfoVista native client then accesses the InfoVista Server and displays the InfoVista Trap report.
The InfoVista Performance Report tool uses a more complex approach to display a report using the InfoVista native client. When you select the InfoVista Performance Report tool at the Global Console, the corresponding client tool script is invoked. The client tool launches an server-based script on the Global Manager to obtain an export keyword. The server script consults a Dictionary file that was created by the InfoVista Adapter and is stored on the Global Manager. The server script returns the report keyword and InfoVisa server name from the Dictionary file to the client tool.
The InfoVista Performance Report tool then starts the InfoVista native client. The tool passes the InfoVista Server name, user name (and password, optionally), element name, and, based on the keyword, the report name to the native client. The InfoVista native client then accesses the InfoVista Server and displays the appropriate report.
InCharge Service Assurance Manager User’s Guide for InfoVista Adapter 5
C o n v e r t i n g I n f o Vi s t a Tr a p s t o I n C ha r g e N o t i f i c a t i o n s
Converting InfoVista Traps to InCharge Notifications
InfoVista generates traps using performance-related reports running on an InfoVista server. The InfoVista traps include the related topological element, the InfoVista report, and the InfoVista server that is the source of the trap.
The InCharge SNMP Trap Adapter (Receiver) on the host with the InCharge SAM Adapter Platform receives the trap. If the Trap Adapter identifies the trap as originating from an InfoVista server, it invokes an asl hook script. The infovistaTrap.asl script identifies the topology element associated with the InfoVista trap and provides the element’s identity to the Trap Adapter.
The InCharge SNMP Trap Adapter (Receiver) then creates a new notification that is sent to the Global Manager and displayed in the Global Console.
Configuring the InCharge Adapter for InfoVistaThis section explains how to configure the InCharge Adapter for InfoVista and its related client tools.
Edit ing Adapter Conf igurat ion Fi lesAs part of the InCharge deployment and configuration process, you will need to modify certain files. User modifiable files include InCharge tool scripts, configuration files, rule set files, and templates. Original versions of these files are installed into appropriate subdirectories under the BASEDIR/smarts/ hierarchy. For example, original versions of Global Manager configuration files are installed to BASEDIR/smarts/conf/ics.
To edit a user modifiable file, create a local copy of the file in BASEDIR/smarts/local or one of its subdirectories. For example, a modified ics.conf file should be saved to BASEDIR/smarts/local/conf/ics. InCharge software is designed to first search for user modifiable files in BASEDIR/smarts/local or one of its subdirectories. If a modified version of a file is not found in the local area, InCharge software then searches appropriate nonlocal directories.
Note: Original versions of files may be changed or updated as part of an InCharge software upgrade. However, files located in BASEDIR/smarts/local are always retained during an upgrade.
The InCharge Adapter for InfoVista
6 InCharge Service Assurance Manager User’s Guide for InfoVista Adapter
To facilitate proper file editing, SMARTS provides the sm_edit utility. When used to modify an original version of a file, this utility automatically creates a local copy of the file and places it in the appropriate location under BASEDIR/smarts/local. This ensures that the original version of the file remains unchanged. In both UNIX and Windows environments, you can invoke sm_edit from the command line. Optionally, you can configure Windows so that sm_edit is automatically invoked when user-modifiable files are double-clicked in Windows Explorer.
To invoke the sm_edit utility from the command line, specify the path and the name of the file you want to edit under BASEDIR/smarts. For example, to edit the configuration file for the Global Manager, you invoke the sm_edit utility as follows:
% BASEDIR/smarts/bin/sm_edit conf/ics/ics.conf
The sm_edit utility automatically creates a local copy of the ics.conf file in the BASEDIR/smarts/local/conf/ics directory, if necessary, and opens the file in a text editor. If a local version of the file already exists, the sm_edit utility opens the local version in a text editor. In addition, sm_edit creates any necessary directories.
For more information about how to properly edit user modifiable InCharge files and how to use the sm_edit utility, refer to the InCharge System Administration Guide.
Integrat ing the InfoVista AdapterConfigure the InCharge Adapter for InfoVista using the files in Table 4. Edit only the InCharge configuration file installed on the same host as the application listed in the first column.
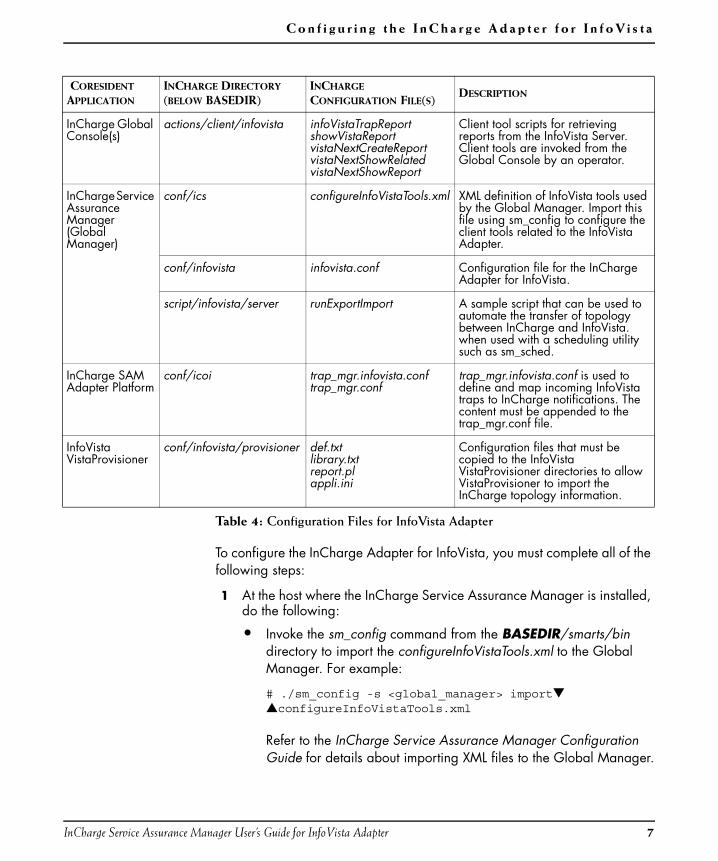
InCharge Service Assurance Manager User’s Guide for InfoVista Adapter 7
C o n f i g u r i n g t h e I n C ha r g e A d a p t e r f o r I n f o Vi s t a
Table 4: Configuration Files for InfoVista Adapter
To configure the InCharge Adapter for InfoVista, you must complete all of the following steps:
1 At the host where the InCharge Service Assurance Manager is installed, do the following:
• Invoke the sm_config command from the BASEDIR/smarts/bin directory to import the configureInfoVistaTools.xml to the Global Manager. For example:
# ./sm_config -s <global_manager> import▼ ▲configureInfoVistaTools.xml
Refer to the InCharge Service Assurance Manager Configuration Guide for details about importing XML files to the Global Manager.
CORESIDENT
APPLICATION
INCHARGE DIRECTORY
(BELOW BASEDIR)
INCHARGE
CONFIGURATION FILE(S)DESCRIPTION
InCharge Global Console(s)
actions/client/infovista infoVistaTrapReportshowVistaReportvistaNextCreateReportvistaNextShowRelatedvistaNextShowReport
Client tool scripts for retrieving reports from the InfoVista Server. Client tools are invoked from the Global Console by an operator.
InCharge Service Assurance Manager (Global Manager)
conf/ics configureInfoVistaTools.xml XML definition of InfoVista tools used by the Global Manager. Import this file using sm_config to configure the client tools related to the InfoVista Adapter.
conf/infovista infovista.conf Configuration file for the InCharge Adapter for InfoVista.
script/infovista/server runExportImport A sample script that can be used to automate the transfer of topology between InCharge and InfoVista. when used with a scheduling utility such as sm_sched.
InCharge SAM Adapter Platform
conf/icoi trap_mgr.infovista.conftrap_mgr.conf
trap_mgr.infovista.conf is used to define and map incoming InfoVista traps to InCharge notifications. The content must be appended to the trap_mgr.conf file.
InfoVista VistaProvisioner
conf/infovista/provisioner def.txtlibrary.txtreport.plappli.ini
Configuration files that must be copied to the InfoVista VistaProvisioner directories to allow VistaProvisioner to import the InCharge topology information.
The InCharge Adapter for InfoVista
8 InCharge Service Assurance Manager User’s Guide for InfoVista Adapter
▼▲ Indicates the command must be typed as one line.
• Change the configuration parameters in the infovista.conf file to match your InCharge and InfoVista configurations. For details, refer to Editing the infovista.conf Configuration File on page 8.
• Automate the process of exporting the topology information from InCharge and then importing it into InfoVista. For more information on automating the process, see Automating the Transfer of Topology from InCharge on page 12.
2 Edit the client tool files related to the InfoVista reports at each Global Console to match your browser and InfoVista configurations. For details, refer to Editing the InfoVista Client Tool Files on page 9.
3 At the host where VistaProvisioner is coresident with the InCharge Adapter for InfoVista, customize VistaProvisioner to import InCharge topology information. For detailed information, see Customize VistaProvisioner to Import InCharge Topology on page 11.
4 At the host where InCharge SAM Adapter Platform is installed, append the content of trap_mgr.infovista.conf to the trap_mgr.conf file. Both files are in the BASEDIR/smarts/conf/icoi. This will map incoming InfoVista traps to InCharge notifications.
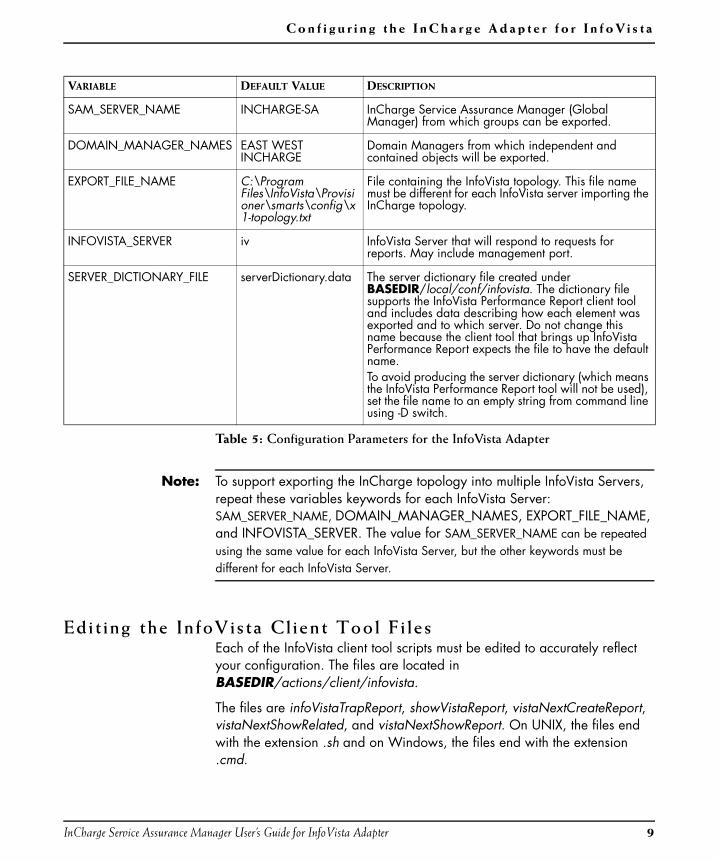
Edit ing the in fovista .conf Conf igurat ion F i leThe configuration parameters for the InfoVista Adapter are specified in the local copy of infovista.conf file, located in the BASEDIR/smarts/local/conf/infovista directory.
To open and modify the default invovista.conf file, use sm_edit to ensure that the file is copied to BASEDIR/smarts/local/script/server/infovista and that it retains the proper permissions. For example, to open and modify the default infovista.conf file on UNIX, use the following command from BASEDIR/smarts/bin:
# ./sm_edit BASEDIR/smarts/conf/infovista/infovista.conf
Table 5 lists the configuration parameters of infovista.conf file.
InCharge Service Assurance Manager User’s Guide for InfoVista Adapter 9
C o n f i g u r i n g t h e I n C ha r g e A d a p t e r f o r I n f o Vi s t a
Table 5: Configuration Parameters for the InfoVista Adapter
Note: To support exporting the InCharge topology into multiple InfoVista Servers, repeat these variables keywords for each InfoVista Server: SAM_SERVER_NAME, DOMAIN_MANAGER_NAMES, EXPORT_FILE_NAME, and INFOVISTA_SERVER. The value for SAM_SERVER_NAME can be repeated using the same value for each InfoVista Server, but the other keywords must be different for each InfoVista Server.
Edit ing the InfoVista Cl ient Tool Fi lesEach of the InfoVista client tool scripts must be edited to accurately reflect your configuration. The files are located in BASEDIR/actions/client/infovista.
The files are infoVistaTrapReport, showVistaReport, vistaNextCreateReport, vistaNextShowRelated, and vistaNextShowReport. On UNIX, the files end with the extension .sh and on Windows, the files end with the extension .cmd.
VARIABLE DEFAULT VALUE DESCRIPTION
SAM_SERVER_NAME INCHARGE-SA InCharge Service Assurance Manager (Global Manager) from which groups can be exported.
DOMAIN_MANAGER_NAMES EAST WEST INCHARGE
Domain Managers from which independent and contained objects will be exported.
EXPORT_FILE_NAME C:\Program Files\InfoVista\Provisioner\smarts\config\x1-topology.txt
File containing the InfoVista topology. This file name must be different for each InfoVista server importing the InCharge topology.
INFOVISTA_SERVER iv InfoVista Server that will respond to requests for reports. May include management port.
SERVER_DICTIONARY_FILE serverDictionary.data The server dictionary file created under BASEDIR/local/conf/infovista. The dictionary file supports the InfoVista Performance Report client tool and includes data describing how each element was exported and to which server. Do not change this name because the client tool that brings up InfoVista Performance Report expects the file to have the default name.To avoid producing the server dictionary (which means the InfoVista Performance Report tool will not be used), set the file name to an empty string from command line using -D switch.
The InCharge Adapter for InfoVista
10 InCharge Service Assurance Manager User’s Guide for InfoVista Adapter
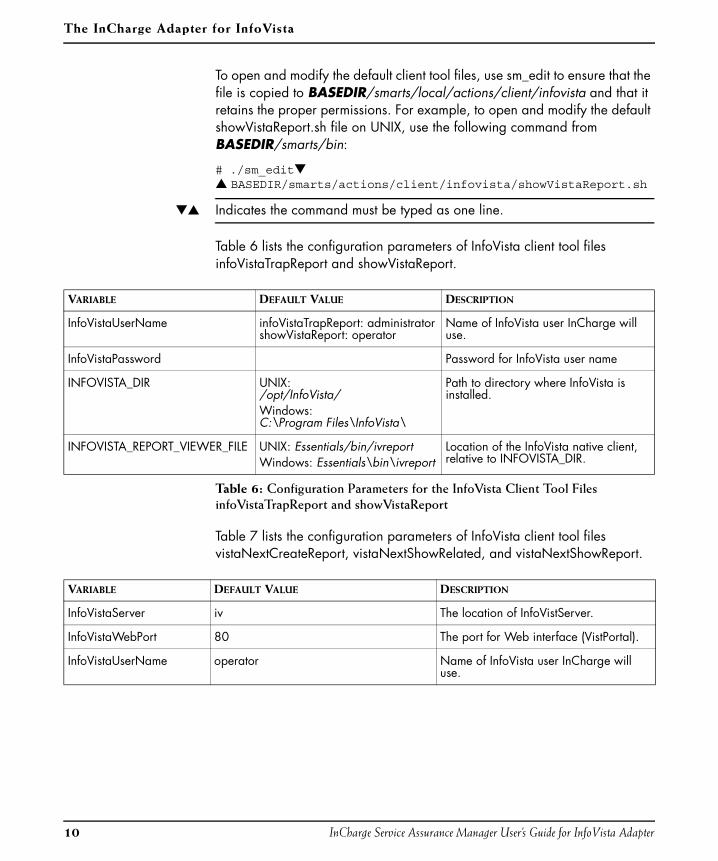
To open and modify the default client tool files, use sm_edit to ensure that the file is copied to BASEDIR/smarts/local/actions/client/infovista and that it retains the proper permissions. For example, to open and modify the default showVistaReport.sh file on UNIX, use the following command from BASEDIR/smarts/bin:
# ./sm_edit▼▲ BASEDIR/smarts/actions/client/infovista/showVistaReport.sh
▼▲ Indicates the command must be typed as one line.
Table 6 lists the configuration parameters of InfoVista client tool files infoVistaTrapReport and showVistaReport.
Table 6: Configuration Parameters for the InfoVista Client Tool Files infoVistaTrapReport and showVistaReport
Table 7 lists the configuration parameters of InfoVista client tool files vistaNextCreateReport, vistaNextShowRelated, and vistaNextShowReport.
VARIABLE DEFAULT VALUE DESCRIPTION
InfoVistaUserName infoVistaTrapReport: administratorshowVistaReport: operator
Name of InfoVista user InCharge will use.
InfoVistaPassword Password for InfoVista user name
INFOVISTA_DIR UNIX: /opt/InfoVista/Windows: C:\Program Files\InfoVista\
Path to directory where InfoVista is installed.
INFOVISTA_REPORT_VIEWER_FILE UNIX: Essentials/bin/ivreportWindows: Essentials\bin\ivreport
Location of the InfoVista native client, relative to INFOVISTA_DIR.
VARIABLE DEFAULT VALUE DESCRIPTION
InfoVistaServer iv The location of InfoVistServer.
InfoVistaWebPort 80 The port for Web interface (VistPortal).
InfoVistaUserName operator Name of InfoVista user InCharge will use.
InCharge Service Assurance Manager User’s Guide for InfoVista Adapter 11
C o n f i g u r i n g t h e I n C ha r g e A d a p t e r f o r I n f o Vi s t a
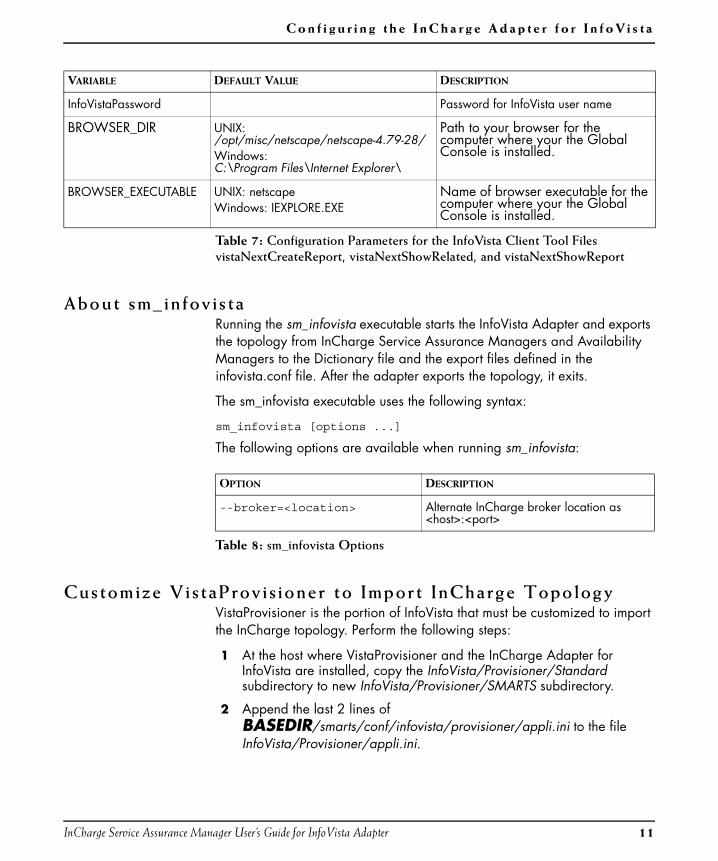
Table 7: Configuration Parameters for the InfoVista Client Tool Files vistaNextCreateReport, vistaNextShowRelated, and vistaNextShowReport
About sm_infovistaRunning the sm_infovista executable starts the InfoVista Adapter and exports the topology from InCharge Service Assurance Managers and Availability Managers to the Dictionary file and the export files defined in the infovista.conf file. After the adapter exports the topology, it exits.
The sm_infovista executable uses the following syntax:
sm_infovista [options ...]
The following options are available when running sm_infovista:
Table 8: sm_infovista Options
Customize VistaProvis ioner to Import InCharge TopologyVistaProvisioner is the portion of InfoVista that must be customized to import the InCharge topology. Perform the following steps:
1 At the host where VistaProvisioner and the InCharge Adapter for InfoVista are installed, copy the InfoVista/Provisioner/Standard subdirectory to new InfoVista/Provisioner/SMARTS subdirectory.
2 Append the last 2 lines of BASEDIR/smarts/conf/infovista/provisioner/appli.ini to the file InfoVista/Provisioner/appli.ini.
InfoVistaPassword Password for InfoVista user name
BROWSER_DIR UNIX: /opt/misc/netscape/netscape-4.79-28/Windows: C:\Program Files\Internet Explorer\
Path to your browser for the computer where your the Global Console is installed.
BROWSER_EXECUTABLE UNIX: netscapeWindows: IEXPLORE.EXE
Name of browser executable for the computer where your the Global Console is installed.
OPTION DESCRIPTION
--broker=<location> Alternate InCharge broker location as <host>:<port>
VARIABLE DEFAULT VALUE DESCRIPTION
The InCharge Adapter for InfoVista
12 InCharge Service Assurance Manager User’s Guide for InfoVista Adapter
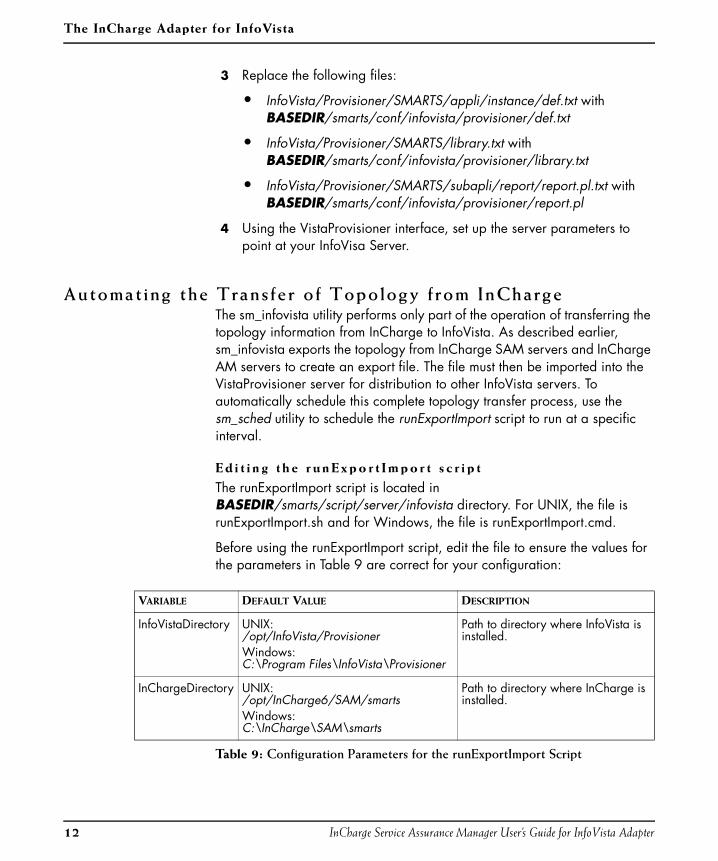
3 Replace the following files:
• InfoVista/Provisioner/SMARTS/appli/instance/def.txt with BASEDIR/smarts/conf/infovista/provisioner/def.txt
• InfoVista/Provisioner/SMARTS/library.txt with BASEDIR/smarts/conf/infovista/provisioner/library.txt
• InfoVista/Provisioner/SMARTS/subapli/report/report.pl.txt with BASEDIR/smarts/conf/infovista/provisioner/report.pl
4 Using the VistaProvisioner interface, set up the server parameters to point at your InfoVisa Server.
Automating the Transfer of Topology from InChargeThe sm_infovista utility performs only part of the operation of transferring the topology information from InCharge to InfoVista. As described earlier, sm_infovista exports the topology from InCharge SAM servers and InCharge AM servers to create an export file. The file must then be imported into the VistaProvisioner server for distribution to other InfoVista servers. To automatically schedule this complete topology transfer process, use the sm_sched utility to schedule the runExportImport script to run at a specific interval.
E d i t i n g t h e r un E xp o r t Im p o r t s c r i p t
The runExportImport script is located in BASEDIR/smarts/script/server/infovista directory. For UNIX, the file is runExportImport.sh and for Windows, the file is runExportImport.cmd.
Before using the runExportImport script, edit the file to ensure the values for the parameters in Table 9 are correct for your configuration:
Table 9: Configuration Parameters for the runExportImport Script
VARIABLE DEFAULT VALUE DESCRIPTION
InfoVistaDirectory UNIX: /opt/InfoVista/ProvisionerWindows: C:\Program Files\InfoVista\Provisioner
Path to directory where InfoVista is installed.
InChargeDirectory UNIX: /opt/InCharge6/SAM/smartsWindows: C:\InCharge\SAM\smarts
Path to directory where InCharge is installed.
InCharge Service Assurance Manager User’s Guide for InfoVista Adapter 13
C o n f i g u r i n g t h e I n C ha r g e A d a p t e r f o r I n f o Vi s t a
Use sm_edit to ensure that the file is copied to BASEDIR/smarts/local/script/server/infovista and that it retains the proper permissions. For example, to open and modify the default runExportImport.sh file on UNIX, use the following command from BASEDIR/smarts/bin:
# ./sm_edit▼ ▲BASEDIR/smarts/script/server/infovista/runExportImport.sh
▼▲ Indicates the command must be typed as one line.
A b o u t s m_ s c h ed
The sm_sched utility uses a control file to store configuration options and settings for the scheduled events. By default, sm_sched reads the control file called sched.conf, located in BASEDIR/smarts/local/conf. The sm_sched utility runs all of the jobs listed in the control file beginning two minutes from the time it is issued and repeats the jobs at the interval times specified. Up to 20 jobs may be performed simultaneously; if you have more than 20 jobs, the additional jobs are queued until the others are completed.
To modify the sched.conf file, use sm_edit to ensure that the file is copied to BASEDIR/smarts/local/conf and that it retains the proper permissions. For example, to open and modify the default sched.conf file, use the following command from BASEDIR/smarts/bin:
# ./sm_edit BASEDIR/smarts/conf/sched.conf
The sched.conf lists a number of jobs, or tasks, to be performed when the control file is called by sm_sched. A job is a line that consists of two items: a time interval and a command. Each job is on an individual line within the control file using the following syntax:
<time interval> <command>
A line beginning with whitespace or the # character is treated as a comment line and ignored by the utility.
The time interval has the syntax of hh:mm:ss and represents the interval of time that needs to elapse (the hours, minutes, and seconds) before the job is run. For example, "24:00:00", represents an interval of twenty-four hours. An empty field has a value of zero so “24::” also represents 24 hours.
The InCharge Adapter for InfoVista
14 InCharge Service Assurance Manager User’s Guide for InfoVista Adapter
After the time interval, type the sm_infovista command to be issued at a UNIX or Windows command prompt. For example, to run sm_infovista at the recommended interval of every 24 hours using the options values specified in the infovista.conf file, add the following to the control file:
• UNIX: 24:00:00 runExportImport.sh
• Windows: 24:00:00 runExportImport.cmd
Note: On UNIX systems, cron is usually used to schedule commands. If you desire, use cron to schedule runExportImport following the guidelines in this section.
R u n n i n g t h e s m _ s c h ed U t i l i t y
The syntax for running sm_sched is as follows:
sm_sched [options...] [control-file]
Where control-file is the path and file name of the file listing the jobs you want executed. If you leave the value empty, it is assumed you want to use the default control file, sched.conf located in BASEDIR/smarts/local/conf.
Run sm_sched from the BASEDIR/smarts/bin directory and issue the following command:
% ./sm_sched
The sm_infovista records important information to its log file. The log file is located in the BASEDIR/smarts/local/logs directory and is named infovista.log.
O p t io n s f o r s m _ s c h e d
The following options are available when running sm_sched:
Table 10: Command-Line Options for the sm_sched Utility
OPTION DESCRIPTIONDEFAULT
VALUE
--maxjobs=<n> Maximum number of jobs to be run simultaneously. Additional jobs listed in the control file are queued until one of the currently running jobs finishes.
20
--retries=<n> Number of retries to attempt for each job. The job is canceled after <n> consecutive failures and no further attempt is made. If <n> is 0, then there is no limit to the number of retries.
3
--maxfails=<n> Failure limit. The job is canceled after <n> failures. If <n> is 0, then there is no limit on the number of failures allowed.
100
InCharge Service Assurance Manager User’s Guide for InfoVista Adapter 15
U s i n g t h e I n f o Vi s t a A d ap t e r f r o m t h e G lo b a l C o n so l e
R e s u l t s F r o m s m _ s c h e d
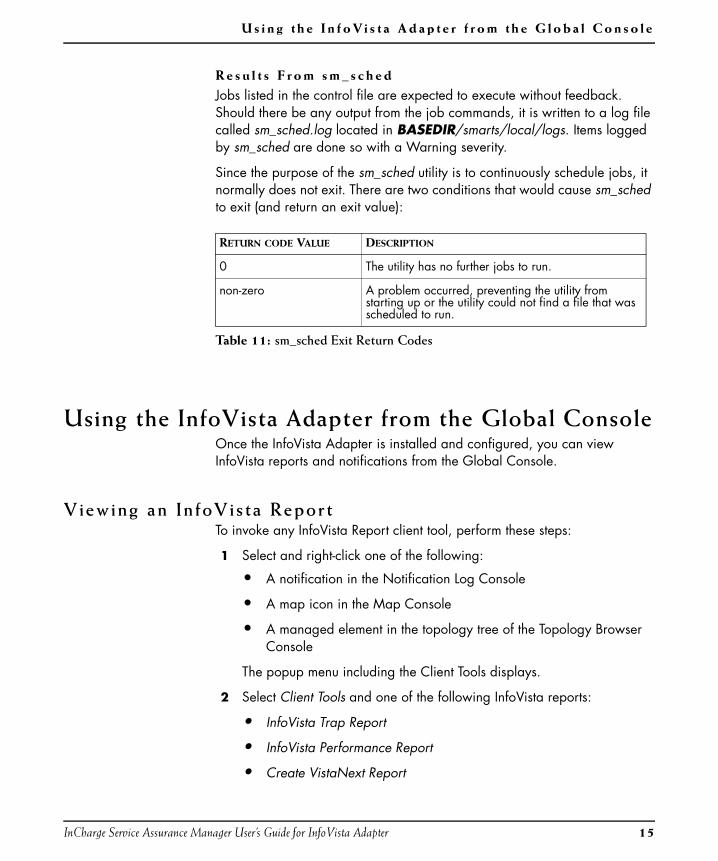
Jobs listed in the control file are expected to execute without feedback. Should there be any output from the job commands, it is written to a log file called sm_sched.log located in BASEDIR/smarts/local/logs. Items logged by sm_sched are done so with a Warning severity.
Since the purpose of the sm_sched utility is to continuously schedule jobs, it normally does not exit. There are two conditions that would cause sm_sched to exit (and return an exit value):
Table 11: sm_sched Exit Return Codes
Using the InfoVista Adapter from the Global ConsoleOnce the InfoVista Adapter is installed and configured, you can view InfoVista reports and notifications from the Global Console.
Viewing an InfoVista ReportTo invoke any InfoVista Report client tool, perform these steps:
1 Select and right-click one of the following:
• A notification in the Notification Log Console
• A map icon in the Map Console
• A managed element in the topology tree of the Topology Browser Console
The popup menu including the Client Tools displays.
2 Select Client Tools and one of the following InfoVista reports:
• InfoVista Trap Report
• InfoVista Performance Report
• Create VistaNext Report
RETURN CODE VALUE DESCRIPTION
0 The utility has no further jobs to run.
non-zero A problem occurred, preventing the utility from starting up or the utility could not find a file that was scheduled to run.
The InCharge Adapter for InfoVista
16 InCharge Service Assurance Manager User’s Guide for InfoVista Adapter
• View VistaNext Report
• View Related VistaNext Reports
A browser window or InfoVista native client opens and displays the report that you selected. If a report is not available, a message displays that indicates the report is not available.
Viewing and Responding to InfoVista Not i f icat ions at the InCharge Global Console
Notifications that originate from InfoVista and arrive at the Global Console can be viewed and processed as any other InCharge notification. These notifications can be acknowledged, owned, and escalated. In addition, InfoVista-related client tools can be invoked on the notifications.
The InfoVista classes (called “Vistas”) are mapped to InCharge classes as show in Table 12.
Table 12: InfoVista Classes and Corresponding InCharge Classes
VISTA NAME INCHARGE CLASS
Router Router
LAN Switch Switch
ATM Switch Switch
Server Host
SNMP Node Unitary Computer System
WAN Interface Interface
LAN Interface Interface
Resource Group Service Offering
InCharge Service Assurance Manager User’s Guide for InfoVista Adapter 17
Index
AAIX 1appli.ini 7Autodiscovery 2
BBASEDIR ixBROWSER_DIR 11BROWSER_EXECUTABLE 11
CClient tools 8Configuration 5
Parameters 8Configuration files 6, 7
infovista.conf 8, 10configureInfoVistaTools.xml 7Converting InfoVista traps to InCharge notifications 5
Ddef.txt 7Dictionary file 2DOMAIN_MANAGER_NAMES 9
EEXPORT_FILE_NAME 9Exporting topology 1, 2
HHP-UX 1
IImport topology to InfoVista 2InfoVista Native Client 2InfoVista notifications 16InfoVista Performance Report 2infovista.conf 7, 8, 10INFOVISTA_DIR 10INFOVISTA_REPORT_VIEWER_FILE 10INFOVISTA_SERVER 9
InfoVistaPassword 10, 11InfoVistaServer 10infoVistaTrapReport 7, 10InfoVistaUserName 10InfoVistaWebPort 10Installation Requirements 1
Llibrary.txt 7Linux 1Log files 14
MMap Console
Invoking tools 15Mapping InfoVista to InCharge 4
NNotification Log Console
Invoking tools 15
PPrerequisites 1
Rreport.pl 7Requirements 1runExportImport 3, 7
SSAM Adapter Platform
trap_mgr.conf 7trap_mgr.infovista.conf 7
SAM_SERVER_NAME 9Scheduling sm_infovista 11, 12SERVER_DICTIONARY_FILE 9showVistaReport 7, 10sm_config 7sm_infovista
Scheduling 11, 12sm_infovista utility 11
Index
18 InCharge Service Assurance Manager User’s Guide for InfoVista Adapter
sm_sched 12Syntax 14
sm_shed 3Solaris 1
TTechnical Support xiiiTopology Browser Console
Invoking tools 15trap_mgr.conf 7, 8trap_mgr.infovista.conf 7, 8Traps
Converting InfoVista to InCharge 5
VView InfoVista notifications 16vistaNextCreateReport 7, 10vistaNextShowRelated 7, 10vistaNextShowReport 7, 10VistaProvisioner 2, 7
WWindows 2000 1
XXML files 7