in situ hybridization protocol for eden - edenrcn.com protocols/zhang_protocol.pdf · clone pcr...
TRANSCRIPT
1
In Situ Hybridization in Plants
Home lab Host lab Million Tadege lab Elena M. Kramer lab Institute of Agricultural Biology Department of Organismic and Evolutionary Biology Plant and Soil Sciences Oklahoma State University Harvard University USA USA

2
Contents Introduction…………………………………………………………………………….3
Fixation and Embedding……………………………………………………………….4
Probes………………………………………………………………………………7
Preparation for In situs…………………………………………………………….......12
Sectioning……………………………………………………………………………...13
Pre-hybridization and hybridization……………………………………………………15
Post-hybridization………………………………………………………………………19
Troubleshooting………………………………………………………………………...23
Receipts…………………………………………………………………………………24
Chemicals and Equipments……………………………………………………………..26

3
Name: Fei Zhang Name of host lab: Elena M. Kramer lab in Harvard University Dates of visit: Oct. 8th, 2013 to Nov. 8th, 2013 Title of protocol RNA In situ hybridization (ISH) in Aquilegia Rationale and Background: RNA in situ hybridization is the best available method to localize RNAs (mRNAs, IncRNAs and miRNAs) within tissue sections and whole mounts (1). RNA ISH is a type of hybridization that uses labeled complementary RNA strand (Probe) to localize a specific RNA sequence in a portion or section of tissue (in situ) or in the entire tissue (plant seeds, whole mount ISH).The probe can be labeled by radioactive or nonradioactive method. The radioactive probe is very sensitive and doesn’t require the immunological enzyme reaction after hybridization. However, it requires restricted protection, has limited time to observe the signals and also may be not available for some labs. In contrast, the non-radioactive ISH is generally preferable because of the great improvement of sensitivity, easy to handle, and the results can be visualized for much longer time. This protocol will ONLY describe the nonradioactive ISH in plant materials. For those who are interested in radioactive ISH can refer to ref. 2 and ref.3. The non radioactive RNA ISH is can be mainly divided into two parts: First, it’s like Northern blot, the antisense probe gets into the tissues and pairs with the mRNA transcripts which stay in the fixed cells. Secondly, a Western blot procedure to detect the digoxigenin which associated only to the probes. Thus, for the first step, it’s crucial that the materials are Rnase free, especially the hybridization buffer, which will be used for overnight incubation with probes and sections of tissues. For the second step, because the RNA-RNA double strand is very stable, the Rnase A can not destroy it, but the reaction is mostly immunohistochemistry, it’s important to keep the materials CLEAN (autoclaved water and buffer). References:
1. Kramer, E.M. (2005). Methods for studying the evolution of plant reproductive structures: Comparative gene expression techniques. In Molecular Evolution: Producing the Biochemical Data, E.A. Zimmer and E.H. Roalson, eds (San Diego, CA: Elsevier Academic Press), pp. 617–635.
2. Jackson, D. (1991). In situ hybridisation in plants. In ‘‘Molecular Plant Pathology: A Practical Approach’’ (D. J. Bowles, S. J. Gurr, and P. McPherson, eds.). Oxford University Press,Oxford.
3. Weigel, D., and Glazebrook, J. (2002). ‘‘Arabidopsis: A Laboratory Manual.’’ Cold Spring Harbor Press, Cold Spring Harbor, NY.
4. Some useful links:
Meyerowitz lab: http://www.its.caltech.edu/~plantlab/protocols/insitu.pdf
Langdale lab: http://www.plants.ox.ac.uk/langdalelab/protocols/histology/in_site_hyb_general.pdf
4
In the following parts, I will describe the protocols I learned from the Kramer lab step by step. Some figures about critical steps will be shown.
1. FIXATION AND EMBEDDING OF TISSUE (total 6-7 days) FAA (50 mL) =25 ml 100% EtOH + 5 mL Formalin (<a year old) + 2.5 mL AcOH +17.5 mL
1. Make appropriate volume of FAA under hood in falcon tubes (can use the volume markers on the falcon tube to measure. Keep on ice for entire procedure.
2. Pour off some the FAA into a spare falcon tube and keep it on ice. 3. Put plant material in FAA in falcon tubes. The smaller the plant material, the better, try
the best to remove excess plant tissues. Try to get the plant material into the FAA as soon as possible. Record tube number and contents on worksheet.
4. Take off lid of falcon tube, cover lid of tube with parafilm and poke some holes into it. Place falcon tubes into ice and put both tubes and ice into a desiccator.
5. Vacuum infiltrate the tissue. Watch plant material for “boiling” of FAA. If plant material starts to boil and get out of the fixative: turn off the pump and the bell jar will stay under vacuum (if necessary knock plant material back into FAA). Depending on plant material, vacuum for approximately 15-30 minutes. Record total amount of time on worksheet.
6. After vacuum infiltration, cover plant material completely using spare FAA. 7. Place Falcon tubes on the shaker in the 4 oC cold room (O/N, typically 4-12 h of
incubation, never more than 16 h total). 8. Dehydration Dehydrate the samples through the following ethanol series at 4 °C with
agitation for 90-120 min (time depending on size of plant material) each: 50% ethanol- 70% ethanol-85% ethanol-95% ethanol-100%ethanol. Renew 100% EtOH and leave O/N at cold room. Note: Don’t let any plant material be exposed to air if at all possible. For each change, decant off as much EtOH as possible and then add new concentration of EtOH. Or, the EtOH can be pipetted off to reduce the exposure of plant material to air. Repeat this change of EtOH for 2-5 times until you feel confident that there has been a complete change over.
9. After overnight incubation in 100% EtOH (note all EtOH concentrations are 100%) 1 hour 100% EtOH at RT 2 hours 50% EtOH:50% Citrisolv (Fisher Scientific 22-143-975) 2 hours 100% Citrisolv Note: Keep these in the same falcon tube, typically 50 mL and use the volume indicators for rough measurements. It is very important for all the dehydrating material to be removed from the tissue of the tissue will not be infiltrated.
10. Infiltration After 2 hours in Citrisolve, change to fresh Citrosolv and move plant material to a a small glass beaker (there are spare extra beakers in the oven (60 °C ) , just be sure to rinse out with fresh Citrosolv). Add enough to cover plant material and try to keep at roughly the same volume that was used in falcon tubes.
11. Add “ Tissue-Prep” paraplast chips so that the ratio of Citrisolv to Chips is 50:50. 12. Place in Oven (60 °C) 13. Make sure that there is enough melted paraplast in the metal pitchers in the oven (Keep
four pitchers with melted paraplast) 14. For the next two-four days, make 2-3 changes of paraplast. With dense tissue or organs
that tend to retain air bubbles (such as spurs), vacuum infiltration of the molten Paraplast

5
may be necessary. This can be accomplished using a vacuum oven set to 60 �, applying moderate vacuum for 30–60 min.
15. Embedding A couple of hours before starting, check: a) Start heating the forceps that
are in the warmer. b) Make sure there is sufficient melted paraffin in metal pitchers (4 pichers in 60 °C oven)
16. One hour before a) Turn on a hot plate at the lowest setting b) get out flat plastic
containers and put in 1 L water c) Cut out molds, label them and place on a slide warmer. d) Turn on the warmer.
17. Start embedding (It’s very important to keep the melted paraffin hot, as soon as you
start to see small bubbles you need to rotate pitchers).
18. Place a pitcher and a beaker on the hot plate
19. Fill mold with molten paraffin-keeping it on a warmer.
20. Put in plant material in correct orientation. Can use the warmed forceps for orientation and also can place the mold in the water, which will start to solidify the paraplast and helped to keep plant material in the proper orientation.
21. Place mold in water to cool.
22. Record on spread sheet any notes.
23. Let blocks cool overnight and then put in Ziploc bag and place in the 4°C cold room.
Shaker in the cold room Oven (60℃ with beakers and pitchers)

6
Warmer and hot plate for Embedding. See forceps are inserted into the place which will be heated when turn on.

7
2. MAKING PROBES (AROUND ONE WEEK): A. Pick clones and prep plasmids:
1. Pick clone from gene/region of interest: Make sure that it is not a ‘funny clone’ with odd sequences, has long 3’UTR, and preferably does not have Not I or Spe I internal digest sites.
2. EcoR I digest the clone, make sure it’s the right size insert, then gel extract insert using min-elute (Qiagen)
3. PCR using insert fragment diluted 1:20 as a template 4. Clone PCR product using TOPO 5. Screen colonies to determining orientation of inserts –
a. Goal two colonies such that transcription from T7 promoter off one clone will generate sense and transcription off another generate antisense (alternatively, can use one clone and do transcription with T7 and T3).
b. Screen with m13f-m13r to see if have right insert c. Screen with m13f and original forward primer to determine orientation of clone
6. Pick one/two clones and grow 3 mL cultures for 8 hours 7. Inoculate the 3 mL cultures into 25-50 mL of LB + carb; grow O/N (ca. 16 hours) 8. [SORVAL should be set to 4°C] 9. Use QIAFILTER MIDIPREP kit to isolate plasmids 10. Final step resuspend pres in 250 μL of dH2O; I USED ELUTION BUFFER – CHECK
NOTEBOOK 11. EcoR I digest maxiprep & Spec to get concentration for linearizing below 12. Confirm orientation of inserts with PCR and/or sequencing
B. Linearize Plasmid:
1. Choose an enzyme that: a. Cuts at the opposite end of your insert from the T7 promoter b. Does not cut into your insert c. Leaves 5’ overhang or blunt ends d. Has 100% (or close) efficiency in optimal digestion buffer e. For TOPO-TA for sequencing vectors – SPE I (or NotI if cannot get both
orientation of inserts into clones) 2. Set up digestion:
15 μg plasmid 10 μL 10x buffer 3 μL restriction enzyme (Check if BSA is necessary) Bring to 100 μL with ddH20 (If need to set up larger digest, keep 3 μL of enzyme, but scale up buffer accordingly) Incubate in 37 °C O/N.(Spe I can add 2 μL and then O/N, or 4h+2h)
3. Run out: 1 μL digested plasmid to confirm the size; 5 μL digested plasmid to make sure there’s no evidence of undigested plasmid in the lane.
Heat shock in 80 °C for more than 0.5 hour to inactivate the enzymes. C. Phenol/Chloroform extract linearized plasmid (Volumes for 100 μL reaction, scale as needed) Add ddH2O to 600 μL.
1. Add equal volume Phenol:Chloroform:IAA to linearized plasmid (600 μL)
8
2. Vortex & Spin 1 minute @13K rpm 3. Remove aqueous phase (ca. 550 μL) to a new tube. 4. Extract aqueous with equal volume Chloroform (550 μL) 5. Vortex & Spin 1 minute @13K rpm 6. Remove aqueous phase to RNASE FREE TUBE (500 μL)
****FROM THIS POINT ON, EVERYTHING IS RNASE FREE!!!!****
7. Add 0.1 volume (ca. 50 μL) 3M Sodium Acetate (NaAC) RNASE FREE 8. Add 2 volumes (ca. 1 mL) 100% EtOH RNASE FREE 9. Precipitate more than 4h (better O/N) at -20 °C 10. Spin 10 min. 13K rpm @4°C 11. Wash pellet with 75% EtOH (ca. 200 μL) RNASE FREE 12. Let pellet dry (Usually centrifuge and use the smallest tips to remove all residues and put
in the hood for 10 min) 13. Resuspend in DEPC H2O, vortex, to approximate 1μg/μL (start with 10μL H2O and then
adjust, use 0.5μL in 99.5 H2O, 1:200, to spec by NANODrop.) D. Transcription REACTION 1. 2 transcription reactions per probe (1 to be hydrolyzed, 1 un-hydrolyzed, use PCR reaction
tubes) 2. Reaction (20 μl)
1 μg linearized plasmid 2 μL NTP mix (35% DIG or other) 2 μL 10X transcription buffer 2 μL T7 RNA polymerase 1 μL RNAse inhibitor Add DEPC H2O up to 20 μL
3. Let transcription run at least 2 h @ 37 °C in incubator (or thermocycler) [prepare TBE gel and RNAse free gel-rig towards end of time]
4. Set aside 1 μL in 9 μL DEPC H2O; labeled pre-DNase 5. Add 2 μL DNAse (Amplification grade) to transcription reaction 6. Let DNAse treatment go for 15 minutes @ 37 °C in incubator (or thermocycler) 7. Set aside 1 μL in 9 μL DEPC H2O (or 0.5 μL in 9.5 μL DEPC); label post-DNase 8. Put reaction at -20 °C while run out pre- versus post-DNAse in TBE gel
Should see in gel: Pre-DNase – high band and 1-2 low bands Post-DNase- NO high band and same 1-2 low bands (if high band still there, but back in incubator more time and run out again until no high band).
9. After confirm there is no DNA, transfer the reaction into 1.5 ml RNase free PE tubes and stop reaction with 4 μL 200mM EDTA.
E. Probe precipitation and hydrolysis 1. Add 5 μL 5M LiCl RNASE FREE 2. Add 150 μL 100% EtOH RNASE FREE 3. Precipitate 2 hours @-20 °C ,then 10 min @-80 °C. 4. Set up water bath for 60 °C.
9
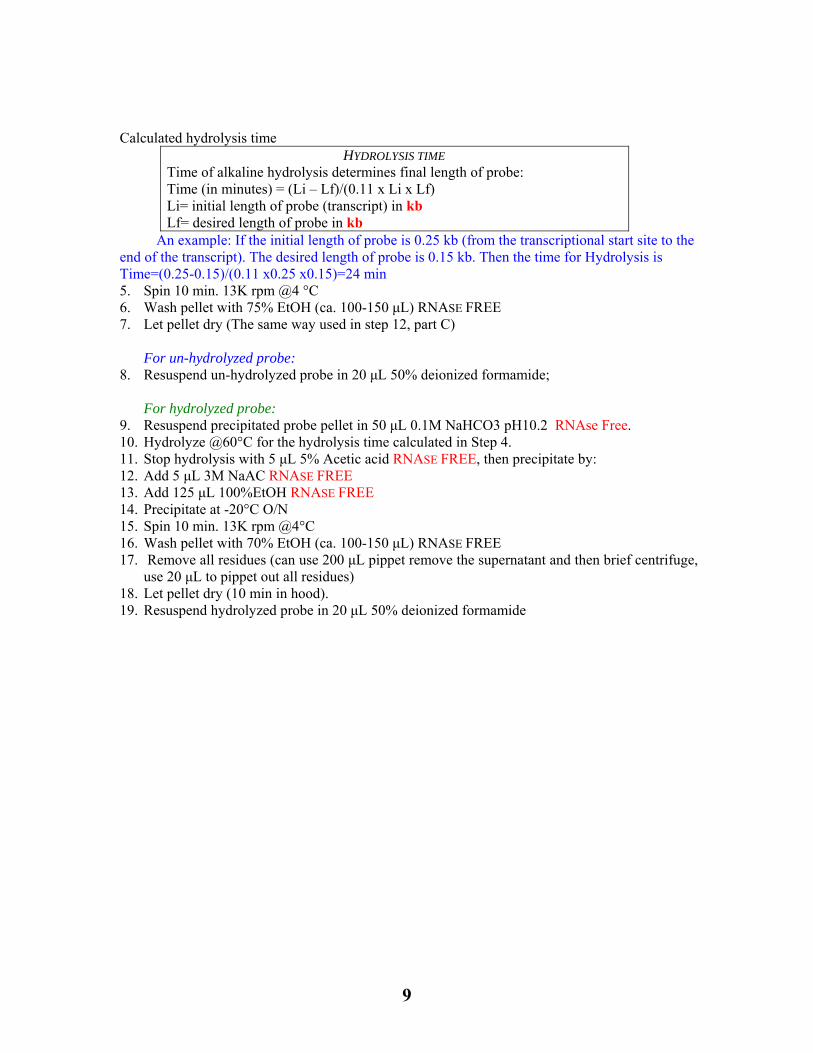
Calculated hydrolysis time
HYDROLYSIS TIME Time of alkaline hydrolysis determines final length of probe: Time (in minutes) = (Li – Lf)/(0.11 x Li x Lf) Li= initial length of probe (transcript) in kb Lf= desired length of probe in kb
An example: If the initial length of probe is 0.25 kb (from the transcriptional start site to the end of the transcript). The desired length of probe is 0.15 kb. Then the time for Hydrolysis is Time=(0.25-0.15)/(0.11 x0.25 x0.15)=24 min 5. Spin 10 min. 13K rpm @4 °C 6. Wash pellet with 75% EtOH (ca. 100-150 μL) RNASE FREE 7. Let pellet dry (The same way used in step 12, part C)
For un-hydrolyzed probe:
8. Resuspend un-hydrolyzed probe in 20 μL 50% deionized formamide; For hydrolyzed probe:
9. Resuspend precipitated probe pellet in 50 μL 0.1M NaHCO3 pH10.2 RNAse Free. 10. Hydrolyze @60°C for the hydrolysis time calculated in Step 4. 11. Stop hydrolysis with 5 μL 5% Acetic acid RNASE FREE, then precipitate by: 12. Add 5 μL 3M NaAC RNASE FREE 13. Add 125 μL 100%EtOH RNASE FREE 14. Precipitate at -20°C O/N 15. Spin 10 min. 13K rpm @4°C 16. Wash pellet with 70% EtOH (ca. 100-150 μL) RNASE FREE 17. Remove all residues (can use 200 μL pippet remove the supernatant and then brief centrifuge,
use 20 μL to pippet out all residues) 18. Let pellet dry (10 min in hood). 19. Resuspend hydrolyzed probe in 20 μL 50% deionized formamide

10
PROBE QUALIFICATION: Solutions
① 100 mM Tris (pH=7.5) +150 mM NaCl ② Block solution ③ Block+ αDig ④ G3 solution ⑤ G3 + NBT/BCIP
1. Make series of five tubes with 1:10 serial dilution of each probe, as well as five 1:10 serial dilution of the Labeled Control RNA (DIG-RNA Labeling Control)
2. Spot 1 μL of each dilution on Nylon membrane. Fix the RNAs to the membrane by cross-linking with UV light twice (or by baking for 30 minutes at 80°C)
3. Wet the membrane with solution ①, add 10 ml solution ②. Incubate @ RT with shaking for 5 min.
4. Pour off the solution, add 10 ml solution ③. Incubate @ RT with shaking for 5 min 5. Pour off the solution, wash twice for 5 min with solution ①. 6. Incubate @ RT with solution ④ with shaking for 2 min 7. Incubate @ RT with solution ⑤ in dark for about 30 min 8. Compare spot intensities of the control and experimental dilutions to estimate the
concentration of the experimental probe. Preparation of the solutions: ① 100 mM Tris (pH=7.5) +150 mM NaCl: 1 L
100 ml of 1 M Tris pH 7.5 --- ⑥ 30 ml of 5 M NaCl Add DEPC H2O up to 1L
② Block solution: 20 ml 20 ml 100 mM Tris pH7.5 Microwave the solution until it’s warm (ATTENTION! Very easy to boil!) Add 0.04 g blocking Reagent Vortex until it goes into solution Put on ice
③ Block+ αDig 10 ml blocking solution (②) 2 μL of αDig Put into 4°C fridge
④ G3 solution: 250 ml 100 mM Tris pH 9.5 (25 ml) 100 mM NaCl (5 ml) 50 mM MgCl2 (12.5 ml) Add DEPC H2O up to 250 ml
⑤ G3 + NBT/BCIP
10 ml of G3 solution (④) 235 μL NBT/BCIP (light sensitive! Wrap the tube with foil paper) Put into 4°C fridge
⑥1 M Tris: 500 ml Add about 78.8 g Tris in 400 ml DEPC
H2O Adjust pH value with HCl: (Add the HCl in the hood) pH=7.5, about 35 ml HCl pH=8, about 20 ml HCl pH=9, about 1 ml HCl Add H2O up to 500 ml
11
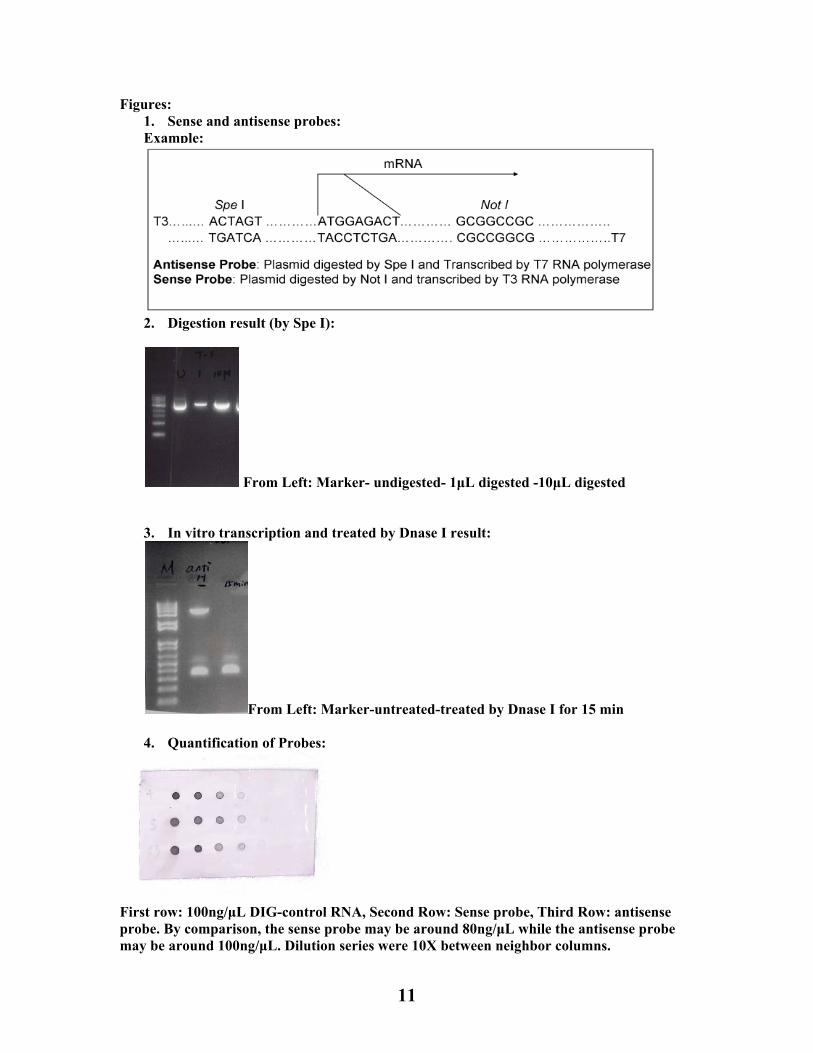
Figures: 1. Sense and antisense probes: Example:
2. Digestion result (by Spe I):
From Left: Marker- undigested- 1μL digested -10μL digested
3. In vitro transcription and treated by Dnase I result:
From Left: Marker-untreated-treated by Dnase I for 15 min
4. Quantification of Probes:
First row: 100ng/μL DIG-control RNA, Second Row: Sense probe, Third Row: antisense probe. By comparison, the sense probe may be around 80ng/μL while the antisense probe may be around 100ng/μL. Dilution series were 10X between neighbor columns.

12
PREPARATIONS FOR IN SITUS: (Need 3 days for all of this; amounts for processing: 15 slides)
1. Wash plastic ware (1x with soap(Program 1), 102x without (Program 5), dry upside down on paper towels):
a. At least 20 300 mL small Tupperware boxes w/lids b. 2-3 large flat boxes
2. Bake glassware O/N at 180°C (oven in herbaria) a. Erlenmayer flask (500 mL) or large beaker (ca. 500 mL) b. 5-10 stir bars c. bottles, various sizes (100 mL, 500mL) d. 2-3 100mL cylinders, 1 50mL cylinder, 1 25 mL cylinder e. metal slide holder f. upright glass slide holder g. spatulas
3. Soak plastics (bottle lids) O/N in 0.1M NaOH/1mM EDTA 4. Make DEPC water
a. Add 1ml DEPC-active to 1L miliQ H2O in hood – best to make 5L and distribute between 250mL, 500mL, and 1L screw-cap jars
b. Mix well and let incubate in hood at room temp O/N c. Autoclave 20min to kill DEPC
5. Make 4 “2L” bottles of ‘clean water’ – MiliQ water direct from purifier, then autoclave (121 °C, 30 min)
6. Check that there are enough stock solutions 7. Walk through protocol and make sure that you have everything including working
buffers Day before first day of in situs:
1. Small bottle of clean water, tighten lid right after autoclaved, then put in cold room 2. Blocks to be sectioned in cassettes 3. Make up 2L 1X PBS (200mL per 2L – mark on bottle) 4. Set up EtOH series, 2 citri-solve boxes in hood; 1x PBS, 1X PBS w/Glycine, 150mM
NaCl 5. Set one of the incubators to 50°C. 6. 300ml box of Pronase buffer in walk-in 37°C room.
Check buffer as follows: 5x NTE 600ml 0.5M EDTA 500 ml (~14ml NaOH) 20x SSC 500ml 1M Na2HPO4 250 ml Tris pH 7.5 500ml 1M NaH2PO4 250ml 10XPBS 500ml 1M MgCl2 50.8g/250ml Tris pH 8 500ml DEPC-H2O 3L Tris pH9.5 500ml clean H2O 8L 5M NaCl 500ml 10x Pronase 250ml
10x Glycine 250ml
13
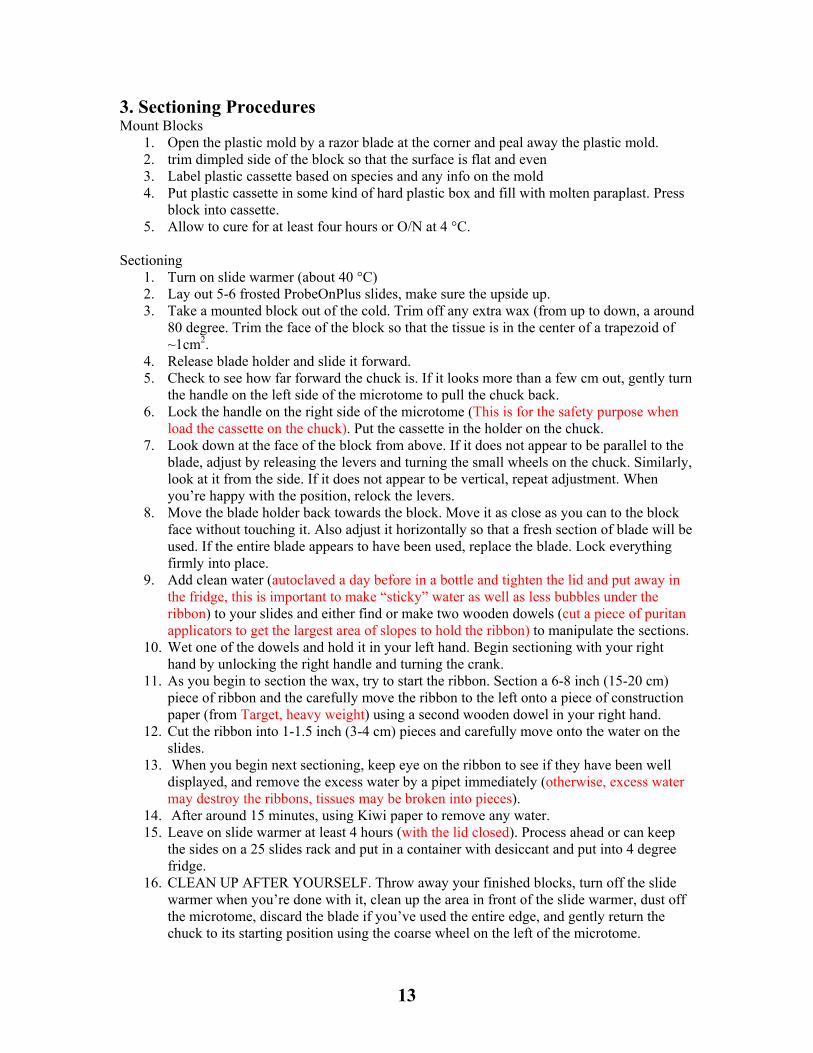
3. Sectioning Procedures Mount Blocks
1. Open the plastic mold by a razor blade at the corner and peal away the plastic mold. 2. trim dimpled side of the block so that the surface is flat and even 3. Label plastic cassette based on species and any info on the mold 4. Put plastic cassette in some kind of hard plastic box and fill with molten paraplast. Press
block into cassette. 5. Allow to cure for at least four hours or O/N at 4 °C.
Sectioning
1. Turn on slide warmer (about 40 °C) 2. Lay out 5-6 frosted ProbeOnPlus slides, make sure the upside up. 3. Take a mounted block out of the cold. Trim off any extra wax (from up to down, a around
80 degree. Trim the face of the block so that the tissue is in the center of a trapezoid of ~1cm2.
4. Release blade holder and slide it forward. 5. Check to see how far forward the chuck is. If it looks more than a few cm out, gently turn
the handle on the left side of the microtome to pull the chuck back. 6. Lock the handle on the right side of the microtome (This is for the safety purpose when
load the cassette on the chuck). Put the cassette in the holder on the chuck. 7. Look down at the face of the block from above. If it does not appear to be parallel to the
blade, adjust by releasing the levers and turning the small wheels on the chuck. Similarly, look at it from the side. If it does not appear to be vertical, repeat adjustment. When you’re happy with the position, relock the levers.
8. Move the blade holder back towards the block. Move it as close as you can to the block face without touching it. Also adjust it horizontally so that a fresh section of blade will be used. If the entire blade appears to have been used, replace the blade. Lock everything firmly into place.
9. Add clean water (autoclaved a day before in a bottle and tighten the lid and put away in the fridge, this is important to make “sticky” water as well as less bubbles under the ribbon) to your slides and either find or make two wooden dowels (cut a piece of puritan applicators to get the largest area of slopes to hold the ribbon) to manipulate the sections.
10. Wet one of the dowels and hold it in your left hand. Begin sectioning with your right hand by unlocking the right handle and turning the crank.
11. As you begin to section the wax, try to start the ribbon. Section a 6-8 inch (15-20 cm) piece of ribbon and the carefully move the ribbon to the left onto a piece of construction paper (from Target, heavy weight) using a second wooden dowel in your right hand.
12. Cut the ribbon into 1-1.5 inch (3-4 cm) pieces and carefully move onto the water on the slides.
13. When you begin next sectioning, keep eye on the ribbon to see if they have been well displayed, and remove the excess water by a pipet immediately (otherwise, excess water may destroy the ribbons, tissues may be broken into pieces).
14. After around 15 minutes, using Kiwi paper to remove any water. 15. Leave on slide warmer at least 4 hours (with the lid closed). Process ahead or can keep
the sides on a 25 slides rack and put in a container with desiccant and put into 4 degree fridge.
16. CLEAN UP AFTER YOURSELF. Throw away your finished blocks, turn off the slide warmer when you’re done with it, clean up the area in front of the slide warmer, dust off the microtome, discard the blade if you’ve used the entire edge, and gently return the chuck to its starting position using the coarse wheel on the left of the microtome.
14
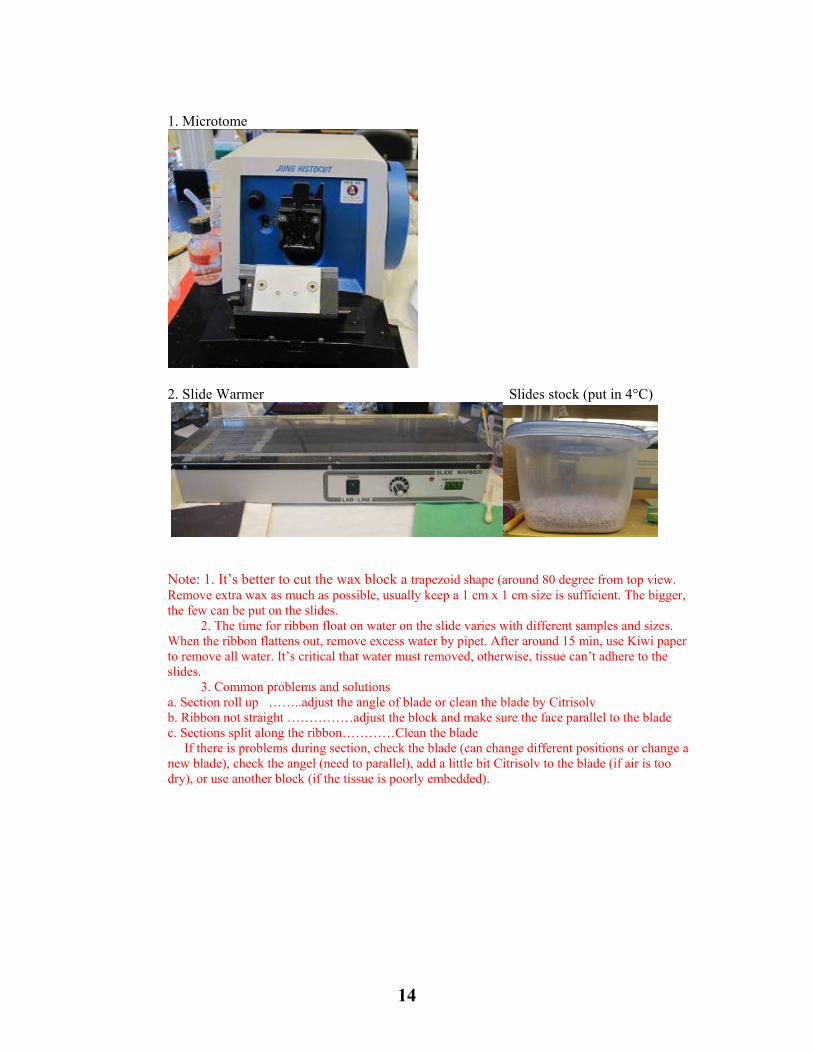
1. Microtome
2. Slide Warmer Slides stock (put in 4°C)
Note: 1. It’s better to cut the wax block a trapezoid shape (around 80 degree from top view. Remove extra wax as much as possible, usually keep a 1 cm x 1 cm size is sufficient. The bigger, the few can be put on the slides. 2. The time for ribbon float on water on the slide varies with different samples and sizes. When the ribbon flattens out, remove excess water by pipet. After around 15 min, use Kiwi paper to remove all water. It’s critical that water must removed, otherwise, tissue can’t adhere to the slides. 3. Common problems and solutions a. Section roll up ……..adjust the angle of blade or clean the blade by Citrisolv b. Ribbon not straight ……………adjust the block and make sure the face parallel to the blade c. Sections split along the ribbon…………Clean the blade If there is problems during section, check the blade (can change different positions or change a new blade), check the angel (need to parallel), add a little bit Citrisolv to the blade (if air is too dry), or use another block (if the tissue is poorly embedded).

15
4. Prehybridization and hybridization When Slides are fixing, preparations before:
1. Turn on Hybridization oven to HYB temperature: 38°C-44°C (put an Thermo meter in the oven to make sure the temperature is correct and stable before usage)
2. Set water bath heat block to 80°C, can add DEPC-H2O to the wells before usage. 3. Move Pronase (12.5 mg/mL) in from -20 °C fridge to 4°C fridge to thaw; 4. 590 mL clean water in anhydride container in hood 5. 1.5L 1X NTE (300 ml 5X NTE stock + 1200 ml clear water) and put in 37°C shaker 6. 1X Pronase buffer in 37°C shaker 7. 1.2L 0.2X SSC (120 mL 20X SSC stock + 1080 mL clean water) and put in incubator
at 50°C 8. Make 4% Paraformaldehyde (in hood):
a. Wear 2 set gloves, lab coat and mask when measuring out paraformaldehyde (use three large weigh boats: 2 to be used as cover when moving between hood and scale)----Weigh the paraformaldehyde and aliquot in the 50 mL tubes with 12g/tube.
b. Boil 300 ml 1X PBS in erlenmeyer flask WITH one Stir (put a rolled paper towel to the top of the flask) in microwave – it needs to be HOT (at least 4 minutes, nearly can not hold by hands with gloves)
c. Add one tube of paraformaldehyde (12 g) to PBS already in beaker with stir bar until dissolved (need to be quick). The paraformaldehyde will be dissolved quickly.
d. Let cool to RT (can be cooled down on ice) and pour into the 300ml plastic container.
e. Wash the flask with rinse water twice (in hood, waste goes into liquid hazardous container for paraformaldehyde). Leave the flask in hood O/N to dry.
9. Determine probe concentrations for 40μL total & dilute
a. 1X=0.5 ng/μL/kb; 2.5X=1.25 ng/μL/kb; 5X=2.5 ng/μL/kb; etc. b. add appropriate volume of H2O up to a total volume of 40μL per probe c. keep in freezer before use
An example for calculation of probe concentration eg. If your probe A concentration is estimated to be 30 ng/ μL. Probe size is 150 bp. Then for 1 slide, 1X probe need probe: 0.15 kb X 100μL X 0.5 ng/μL/kb=7.5 ng. If a slide pair, 1X probe need 15 ng (0.5 μL of probe A+39.5 μL 50% formamide). If a slide pair, 10X probe need 150 ng (5μL of probe A+35 μL 50% formamide).
16
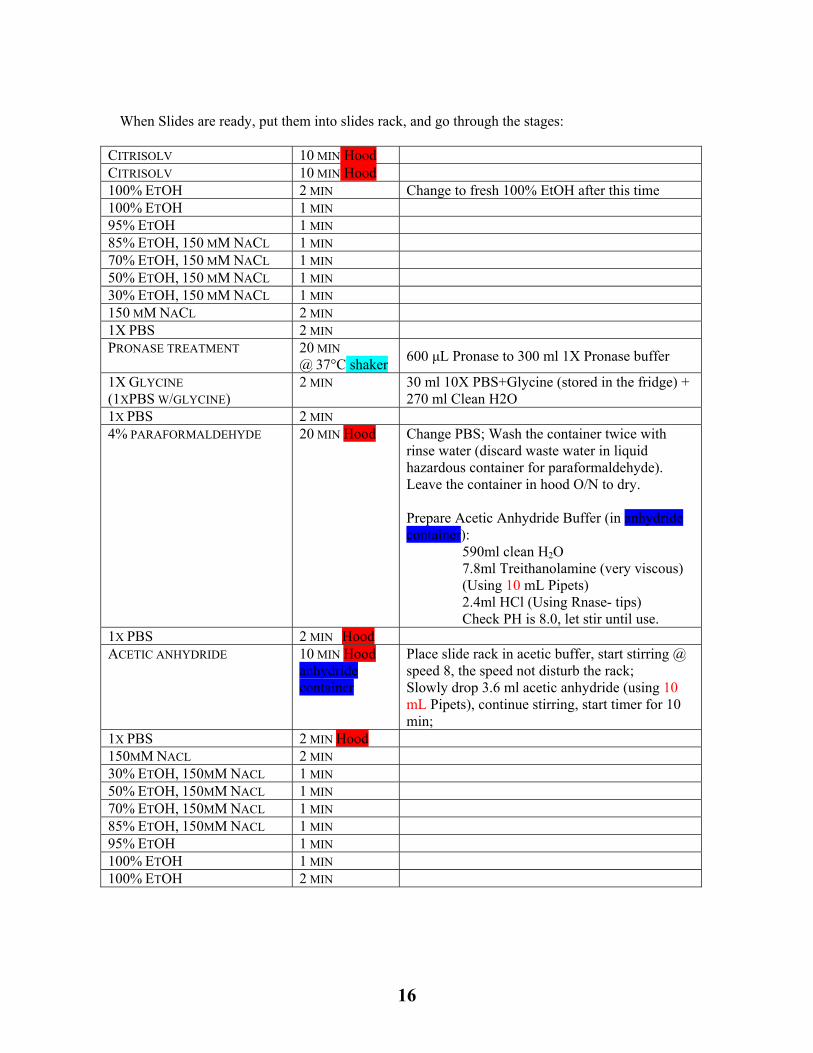
When Slides are ready, put them into slides rack, and go through the stages:
CITRISOLV 10 MIN Hood CITRISOLV 10 MIN Hood 100% ETOH 2 MIN Change to fresh 100% EtOH after this time 100% ETOH 1 MIN 95% ETOH 1 MIN 85% ETOH, 150 MM NACL 1 MIN 70% ETOH, 150 MM NACL 1 MIN 50% ETOH, 150 MM NACL 1 MIN 30% ETOH, 150 MM NACL 1 MIN 150 MM NACL 2 MIN 1X PBS 2 MIN PRONASE TREATMENT 20 MIN
@ 37°C shaker 600 μL Pronase to 300 ml 1X Pronase buffer
1X GLYCINE (1XPBS W/GLYCINE)
2 MIN 30 ml 10X PBS+Glycine (stored in the fridge) + 270 ml Clean H2O
1X PBS 2 MIN 4% PARAFORMALDEHYDE 20 MIN Hood Change PBS; Wash the container twice with
rinse water (discard waste water in liquid hazardous container for paraformaldehyde). Leave the container in hood O/N to dry. Prepare Acetic Anhydride Buffer (in anhydride container):
590ml clean H2O 7.8ml Treithanolamine (very viscous) (Using 10 mL Pipets) 2.4ml HCl (Using Rnase- tips) Check PH is 8.0, let stir until use.
1X PBS 2 MIN Hood ACETIC ANHYDRIDE 10 MIN Hood
anhydride container
Place slide rack in acetic buffer, start stirring @ speed 8, the speed not disturb the rack; Slowly drop 3.6 ml acetic anhydride (using 10 mL Pipets), continue stirring, start timer for 10 min;
1X PBS 2 MIN Hood 150MM NACL 2 MIN 30% ETOH, 150MM NACL 1 MIN 50% ETOH, 150MM NACL 1 MIN 70% ETOH, 150MM NACL 1 MIN 85% ETOH, 150MM NACL 1 MIN 95% ETOH 1 MIN 100% ETOH 1 MIN 100% ETOH 2 MIN

17
Allow sections to dry (lean vertically for about 10 min on a piece of clean paper in the hood) 1. Put HYB in 80 °C heat block water bath (add DPEC water in the heat block) 2. Look at slides (under microscope) and choose which slides to use for sense and anti-
sense and for which concentrations 3. Add 40 μL probe solution to 80 °C heat block for two minutes (may want to stagger
depending how fast at sandwiching) 4. Add 200 μL HYB solution to 40 μL probe solution; mix gently by pipetting without
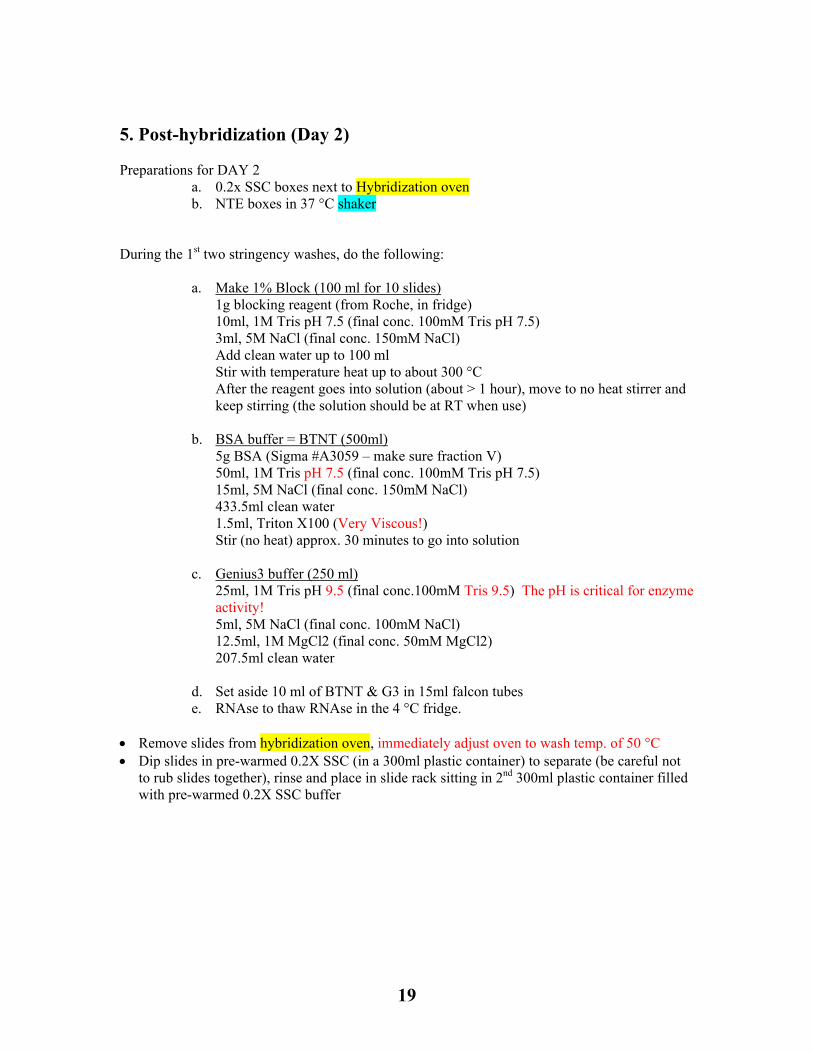
generating bubbles 5. Make slide sandwiches
a. Take ca. ½ probe+HYB and put in line down middle of 1st slide, smooth out w/tip
b. Make T with ½ probe+HYB on 2nd slide c. Flip (fast!) T slide over and slowly (with gentle bouncing!) lower it onto the
1st slide trying not to have any bubbles 6. Place slides sandwiches elevated in humid chamber (flat container with wet paper
towels; wet the paper towels with normal water). Seal the container with plastic wrap before put on the lid. Put in hybridization oven overnight (without shaking)
Some figures: a. the 4% paraformaldehyde and anhydride container in the hood
Cool on ice in the hood, clear anhydride container with 590 mL H20+ stir+broken pipets b. Ethanol gradient on the bench
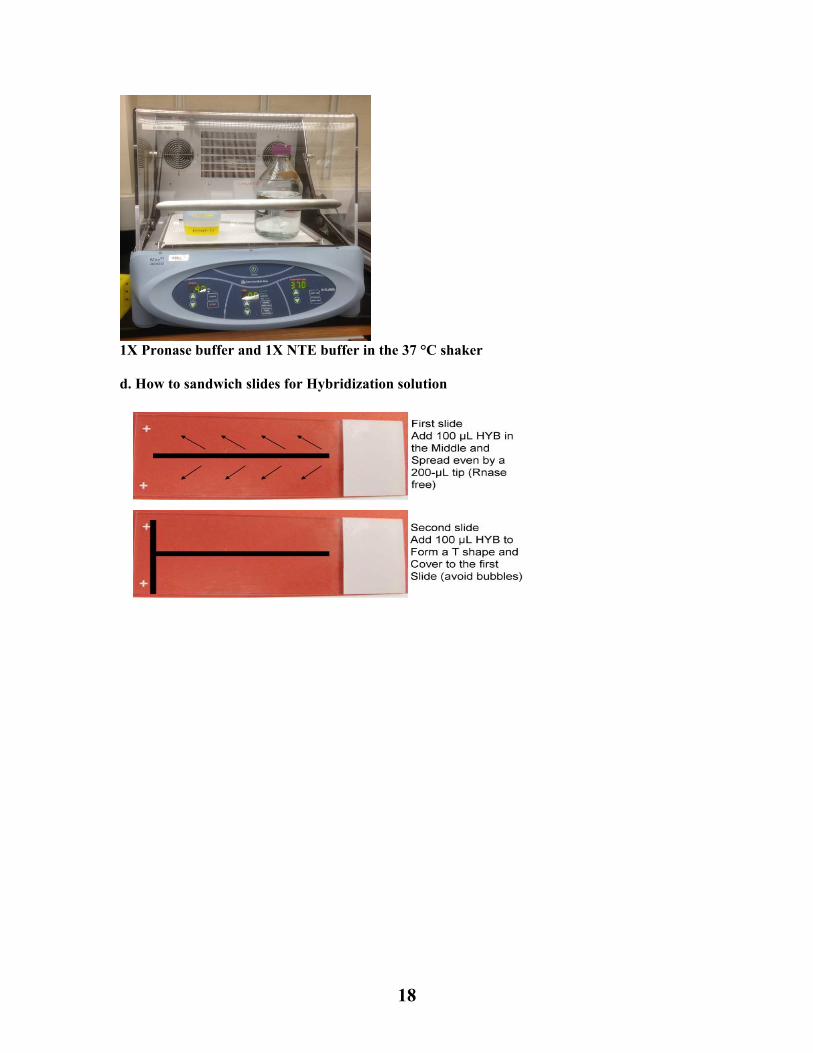
c. Preheated buffers in the 37 °C shaker
18
1X Pronase buffer and 1X NTE buffer in the 37 °C shaker d. How to sandwich slides for Hybridization solution
19
5. Post-hybridization (Day 2)
Preparations for DAY 2
a. 0.2x SSC boxes next to Hybridization oven b. NTE boxes in 37 °C shaker
During the 1st two stringency washes, do the following:
a. Make 1% Block (100 ml for 10 slides) 1g blocking reagent (from Roche, in fridge) 10ml, 1M Tris pH 7.5 (final conc. 100mM Tris pH 7.5) 3ml, 5M NaCl (final conc. 150mM NaCl) Add clean water up to 100 ml Stir with temperature heat up to about 300 °C After the reagent goes into solution (about > 1 hour), move to no heat stirrer and keep stirring (the solution should be at RT when use)
b. BSA buffer = BTNT (500ml) 5g BSA (Sigma #A3059 – make sure fraction V) 50ml, 1M Tris pH 7.5 (final conc. 100mM Tris pH 7.5) 15ml, 5M NaCl (final conc. 150mM NaCl) 433.5ml clean water 1.5ml, Triton X100 (Very Viscous!) Stir (no heat) approx. 30 minutes to go into solution
c. Genius3 buffer (250 ml) 25ml, 1M Tris pH 9.5 (final conc.100mM Tris 9.5) The pH is critical for enzyme activity! 5ml, 5M NaCl (final conc. 100mM NaCl) 12.5ml, 1M MgCl2 (final conc. 50mM MgCl2) 207.5ml clean water
d. Set aside 10 ml of BTNT & G3 in 15ml falcon tubes e. RNAse to thaw RNAse in the 4 °C fridge.
Remove slides from hybridization oven, immediately adjust oven to wash temp. of 50 °C Dip slides in pre-warmed 0.2X SSC (in a 300ml plastic container) to separate (be careful not
to rub slides together), rinse and place in slide rack sitting in 2nd 300ml plastic container filled with pre-warmed 0.2X SSC buffer
20
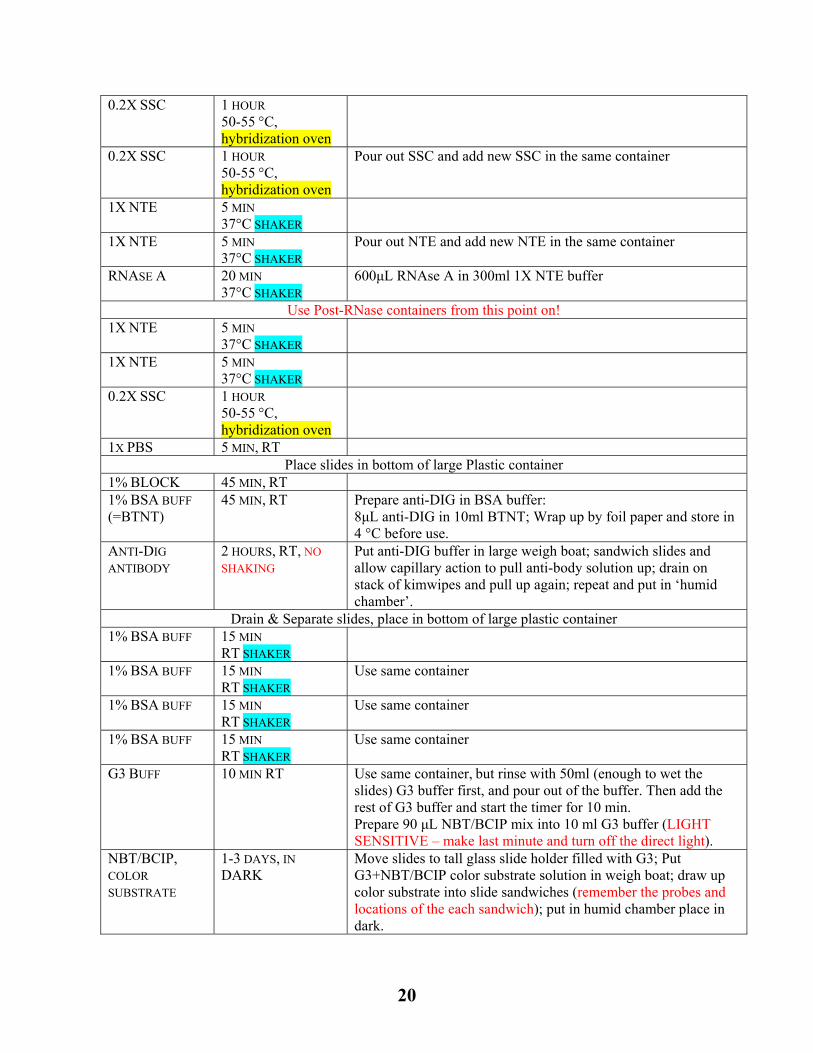
0.2X SSC 1 HOUR 50-55 °C, hybridization oven
0.2X SSC 1 HOUR 50-55 °C, hybridization oven
Pour out SSC and add new SSC in the same container
1X NTE 5 MIN 37°C SHAKER
1X NTE 5 MIN 37°C SHAKER
Pour out NTE and add new NTE in the same container
RNASE A 20 MIN 37°C SHAKER
600μL RNAse A in 300ml 1X NTE buffer
Use Post-RNase containers from this point on! 1X NTE 5 MIN
37°C SHAKER
1X NTE 5 MIN 37°C SHAKER
0.2X SSC 1 HOUR 50-55 °C, hybridization oven
1X PBS 5 MIN, RT Place slides in bottom of large Plastic container
1% BLOCK 45 MIN, RT 1% BSA BUFF (=BTNT)
45 MIN, RT Prepare anti-DIG in BSA buffer: 8μL anti-DIG in 10ml BTNT; Wrap up by foil paper and store in 4 °C before use.
ANTI-DIG
ANTIBODY 2 HOURS, RT, NO
SHAKING Put anti-DIG buffer in large weigh boat; sandwich slides and allow capillary action to pull anti-body solution up; drain on stack of kimwipes and pull up again; repeat and put in ‘humid chamber’.
Drain & Separate slides, place in bottom of large plastic container 1% BSA BUFF 15 MIN
RT SHAKER
1% BSA BUFF 15 MIN RT SHAKER
Use same container
1% BSA BUFF 15 MIN RT SHAKER
Use same container
1% BSA BUFF 15 MIN RT SHAKER
Use same container
G3 BUFF 10 MIN RT Use same container, but rinse with 50ml (enough to wet the slides) G3 buffer first, and pour out of the buffer. Then add the rest of G3 buffer and start the timer for 10 min. Prepare 90 μL NBT/BCIP mix into 10 ml G3 buffer (LIGHT SENSITIVE – make last minute and turn off the direct light).
NBT/BCIP, COLOR
SUBSTRATE
1-3 DAYS, IN
DARK Move slides to tall glass slide holder filled with G3; Put G3+NBT/BCIP color substrate solution in weigh boat; draw up color substrate into slide sandwiches (remember the probes and locations of the each sandwich); put in humid chamber place in dark.

21
After color reaction is complete (1-3 days, can check under microscope without separate the slide pair):
1. Separate slide sandwiches and stop reaction in TE buffer for 5-10 mins. 2. Wash in 1X PBS for 5min; do not let slides dry out. 3. Put a drop of mounting medium of the slide, a coverslip, and observe under the
microscope using bright field and fluorescence a. Mounting medium is 0.5% of n-propyl gallate (Sigma P3130) in PBS/Glycerol
(30% 1x PBS, 70% Glycerol) you can stores the slides in this way for up to 2 weeks at 4C
b. Can Also Mount with water 4. Take pictures 5. After photographing, you can permanently mount slides in Permount, but you will not be
able to see the fluorescence of the calcofluor any longer. Remove the aqueous mounting media by dipping the slides in 1x PBS. Dehydrate though an EtOH series followed by 2 citrisolv washes and mount with Permount
Pictures: 1. Prepare 1% Block and 1% BSA buffer
300 °C RT 2. SSC in the Hybridization oven
Wash temperature usually 10 °C higher than Hyb temperature 3. How to sandwich slides for DIG-antibody or NBT/BCIP substrate
Pour off buffer into the big dish, put slides one side (long) into buffer, close two slides and the buffer will draw up. Open the slides And then close again (Be careful not to make bubbles), and also when using the NBT/BCIP substrate, it’s better to turn off the direct Lights and open the far ones.
22
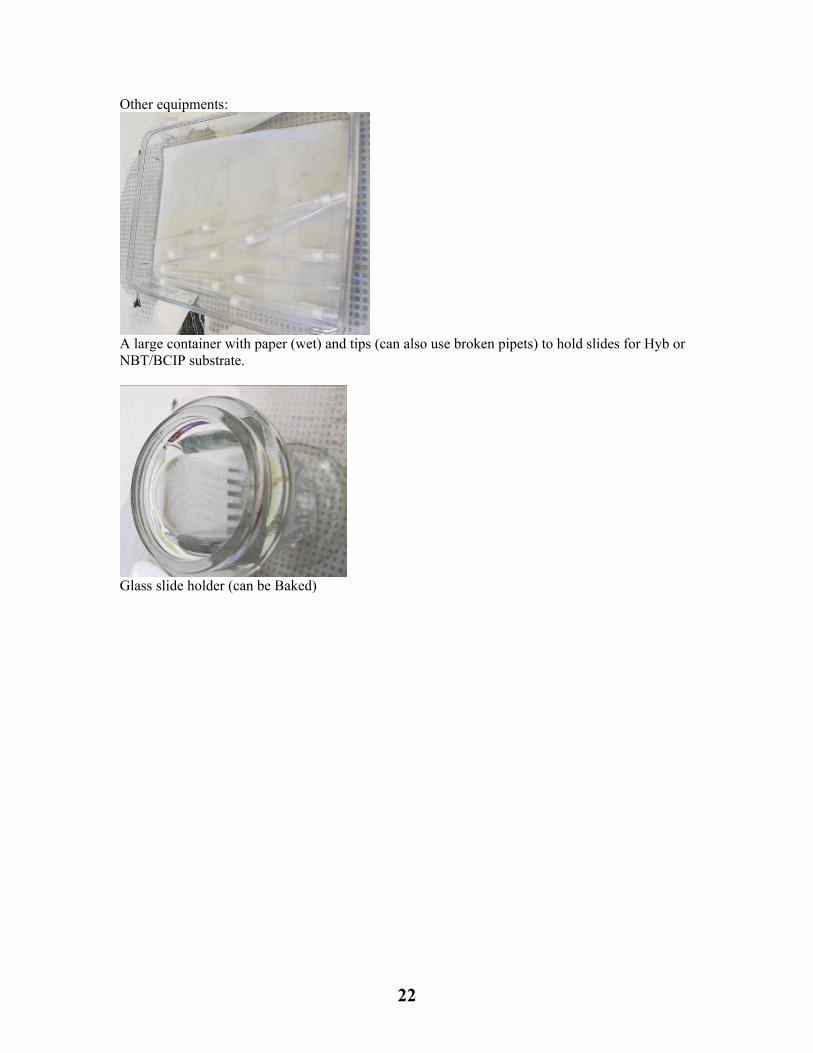
Other equipments:
A large container with paper (wet) and tips (can also use broken pipets) to hold slides for Hyb or NBT/BCIP substrate.
Glass slide holder (can be Baked)
23
6. Troubleshooting
1. No signal a. Include a positive control to check if the experimental process is all right. b. Increase the concentration of the probes if the background is still low, some
probes need 20X or even higher concentrations c. Hydrolysis probes to smaller size (eg. 75bp). The smaller, the better to enter the
cells. However, this may lower the specificity. d. If all trials not successful, can try Locked Nucleic Acid probes. e. It’s always better have signals with background than no signal at all.
2. High background a. Include a sense control b. Increase Hybridization temperature and Wash temperature
3. What is true signal? a. Real signal should be light brown or lilac to dark brown b. Dark blue staining is usually not real (such as vascular tissues, easily stained) c. Nonspecific signal often associated with cell walls (very dark blue) while true
signals should be in the cytoplasm, not the nucleus or cell walls.

24
7 Receipts for all buffers: 1. FAA (50 mL) =25 ml 100% EtOH + 5 mL Formalin (<a year old) + 2.5 mL AcOH +17.5 mL 2. 10x PBS pH7.0 (1L/600ml)
1.3M NaCL (76g NaCl/45.6g) 70mM Na2HPO4 (70ml 1M/42ml) 30mM NaH2PO4 (30ml 1M/18ml)
(900ml/540ml DEPC) 3. 5M NaCl (500ml)
146.1g/500ml 4. 10x proteinase K buffer (500ml)
100mM Tris pH8 50mM EDTA
5. 10X Pronase buffer (200ml) 500mM Tris pH7.5 (100ml 1M Tris) 50mM EDTA (20ml 0.5M EDTA)
6. 1M Tris (500ml) make 3: pH7.5, 8, 9 78.78g Tris [NOTE - check MW of your Tris, this may vary] pH 7.5, ca. 35ml HCl pH 8, ca. 20ml HCl pH 9, ca. 1ml HCl pH9.5 0.6 mL HCl
7. 0.5M EDTA (500ml) 93g EDTA
8. 1M MgCl2 (500ml) 101.6g MgCl2
9. 5X NTE buffer (600ml) 2.5M NaCl (87. 6g NaCl) 50mM Tris pH 8 (30ml 1M) 5mM EDTA (6ml 0.5M) (564ml DEPC)
10. 20X SSC (1L) 3M NaCl (175.32g NaCl) 300mM Na citrate (88.23g Na Citrate)
11. G3 buffer (250ml) 100mM Tris pH 9.5 (25ml) 100mM NaCl (5ml) 50mM MgCl2 (12.5ml)
12. 100mM Tris, 150mM NaCl (stock for various buffers) (1L) 100ml of 1 M Tris pH 7.5 30ml of 5 M NaCl
13. EtOH series for 300ml containers (note: 5M NaCl crashes out of solution at greater than 85% EtOH):
Clean H2O 100% EtOH 5M NaCl95% EtOH 15ml 285ml N/A 85% EtOH 36ml 255ml 9ml 70% EtOH 81ml 210ml 9ml 50% EtOH 141ml 150ml 9ml 30% EtOH 201ml 90ml 9ml 150mM NaCL 291ml N/A 9ml
25
14. 10X in situ salts (50 mL) 30 mL 5M NaCl 5 mL 1M Tris pH 8 5 mL 1M NaH2PO4 pH 6.8 5 mL 0.5 M EDTA 5 mL DEPC treated water 15. Hybridization solution (8 mL): 1mL 10X in situ salts 4mL deionized formamide 2mL 50% dextran sulfate (this will require heating to dissolve) 200μL 50X Denhardt’s solution 100μL tRNA(100 mg/ml in DEPC water) 700 μL DEPC water
26
8. Chemicals and equipments: 1. T7 RNA Polymerase Cat #10881775001 http://www.roche-applied-science.com/shop/en/us/products/t7-rna-polymerase#tab-0 2. Rnase Inhibitor NxGen Cat#30281-1 http://lucigen.com/store/NxGen-RNAse-Inhibitor 3. DIG RNA labeling mix Cat#11277073910 http://www.roche-applied-science.com/shop/en/us/products/dig-rna-labeling-mix#tab-0 4. Dnase I Cat#04716728001 http://www.roche-applied-science.com/shop/en/us/products/dnase-i-recombinant-rnase-
free#tab-0 5. Formamide Cat#EM-4650 https://us.vwr.com/store/catalog/product.jsp?catalog_number=EM-4650 6. DIG antibody Cat#11093274910 http://www.roche-applied-science.com/shop/products/anti-digoxigenin-ap-fab-
fragments#tab-0 7. NBT/BCIP Cat#11681451001 http://www.roche-applied-science.com/shop/products/nbt-bcip-stock-solution#tab-0 8. Blocking Reagent Cat#10057177103 http://www.roche-applied-science.com/shop/custom-biotech/products/blocking-reagent#tab-
0 DIG-labeled Control RNA Cat#11585746910 http://www.roche-applied-science.com/shop/en/us/products/dig-labeled-control-rna#tab-0 9. Fisherbrand Probe On Plus micrioscope slides Cat#: 22-230-900 http://www.fishersci.com/ecomm/servlet/fsproductdetail?position=content&tab=Items&productId
=620808&catlogId=29102&storeId=10652&langId=-1 10. Pasteur pipet Cat#:14672-200 https://us.vwr.com/store/catalog/product.jsp?product_id=4758170 11. construction paper pad super heavy weight http://www.target.com/p/pacon-40-sheets-multicolored-heavyweight-construction-paper-
pad-9-x12/-/A-13649498#prodSlot=medium_1_1&term=construction+paper+pad 12. Puritan Applicators http://www.amazon.com/Puritan-Non-Sterile-Applicators-Stick-Dust-Free/dp/B003IT74D6 13 .Ethanol Cat#:89125-170 https://us.vwr.com/store/catalog/product.jsp?product_id=7756054
27
14. Formaldehyde Cat# BDH0500-1LP https://us.vwr.com/store/catalog/product.jsp?product_id=4544556 13. Citrisolv http://www.fishersci.com/ecomm/servlet/fsproductdetail_10652_670209__-1_0 14. Peel-A-Way embedding molds,Square S-22 Cat#E6032-1CS http://www.sigmaaldrich.com/catalog/product/sigma/e6032?lang=en®ion=US 15. SAKURA processing/Embedding Cassette white, 4187 Cat#:62520-W http://www.emsdiasum.com/microscopy/products/histology/tissue-tek.aspx#62520
16. 12 Oz Stainless Steel Frothing Pitcher
http://www.foodservicewarehouse.com/update-international/ep-12/p8208.aspx?utm_medium=cpc&utm_term=Update-International-EP-12&utm_campaign=Frothing-Pitchers&utm_source=googleproductfeed&source=googleps&gclid=CM638OqW27oCFSdp7AodrwUAHg
19. VWR® Disposable Serological Pipets, Polystyrene, Sterile, Plugged 10 mL Cat#: 89130-898 https://us.vwr.com/store/catalog/product.jsp?catalog_number=89130-898 20.VWR® Disposable Serological Pipets, Polystyrene Sterile, Plugged 25 mL Cat#:89130-900 https://us.vwr.com/store/catalog/product.jsp?catalog_number=89130-900 21. Acetic Anhydride Cat#320102-500ML http://www.sigmaaldrich.com/catalog/product/sial/320102?lang=en®ion=US 22. Triethanolamine Cat#: T58300-1KG http://www.sigmaaldrich.com/catalog/product/sial/t58300?lang=en®ion=US 23. Paraformaldehyde Cat#:P6148-500G http://www.sigmaaldrich.com/catalog/product/sial/p6148?lang=en®ion=US 24. Staining Racks Cat#: 235314-0001 http://www.thomassci.com/39F022CD-DE1C-41DD-AF89-8D0862A324DB/_/D70AA097-C20C-49CC-AF85-56046E674470 25. Dish with cover Cat#: 8542L20

28
http://www.thomassci.com/Equipment/Histology/_/THOMAS-STAINING-OUTFIT?q=Stainless%20Steel%20Rack%20slide
26. Staining Dishes
Cat#:71424-DL http://www.emsdiasum.com/microscopy/products/histology/staining.aspx#70321-20 27. Tupperware boxes (Square polyethylene, 500 mL size)
28. Nalgene® Plastic Utility Boxes, Styrene-A, Thermo Scientific
Cat#: 36212-204
https://us.vwr.com/store/catalog/product.jsp?product_id=4537640
29. Fisherbrand™ Glass Staining Dishes for 10 Slides, with Ground Glass Cover
http://www.fishersci.com/ecomm/servlet/fsproductdetail?position=content&tab=Items&productId=813882&fromSearch=1&highlightProductsItemsFlag=Y&catlogId=29104&storeId=10652&langId=-1&searchType=PROD 30. Albumin from bovine serum
Cat#: A3059-100G
http://www.sigmaaldrich.com/catalog/product/sigma/a3059?lang=en®ion=US 31. Pronase Cat#:10165921001 http://www.roche-applied-science.com/shop/products/pronase#tab-3 32. Denhardt’s Solution 50x Cat#:D2532-5ML http://www.sigmaaldrich.com/catalog/product/sigma/d2532?lang=en®ion=US 33. Dextran sulfate Cat#:D8906-50G http://www.sigmaaldrich.com/catalog/product/sigma/d8906?lang=en®ion=US 34. tRNA R6750-100MG http://www.sigmaaldrich.com/catalog/product/sigma/r6750?lang=en®ion=US 35.Rnase A Cat#:10109169001 http://www.roche-applied-science.com/shop/products/rnase-a#tab-1
36. VWR® Standard Hot Plate Stirrers
Cat#: 97042-634

29
Link:https://us.vwr.com/store/catalog/product.jsp?catalog_number=97042-634