idz/adfz enablement
TRANSCRIPT

®
IBM Software Group
© IBM Corporation
®
IBM Software Group
®
IBM Software Group
®
IBM Software Group
®
IBM Software Group
© 2021 IBM Corporation
IDz/ADFz Enablement –
TSO/ISPF Integration through Menu Manager
Jon Sayles, IBM z Products - [email protected]
@Copyright May 2021
DevOps

2
IBM Trademarks and Copyrights © Copyright IBM Corporation 2008 through 2021.
All rights reserved – including the right to use these materials for IDz instruction.
The information contained in these materials is provided for informational purposes only, and is provided AS IS without warranty of any kind, express or implied. IBM shall not be responsible for any damages arising out of the use of, or otherwise related to, these materials. Nothing contained in these materials is intended to, nor shall have the effect of, creating any warranties or representations from IBM or its suppliers or licensors, or altering the terms and conditions of the applicable license agreement governing the use of IBM software. References in these materials to IBM products, programs, or services do not imply that they will be available in all countries in which IBM operates.
This information is based on current IBM product plans and strategy, which are subject to change by IBM without notice. Product release dates and/or capabilities referenced in these materials may change at any time at IBM’s sole discretion based on market opportunities or other factors, and are not intended to be a commitment to future product or feature availability in any way.
IBM, the IBM logo, the on-demand business logo, Rational, the Rational logo, and other IBM Rational products and services are trademarks or registered trademarks of the International Business Machines Corporation, in the United States, other countries or both. Other company, product, or service names may be trademarks or service marks of others.

3
Course Contributing Authors
▪ Thanks to the following individuals, for assisting with this course: Onno Van Den Troost
Reginaldo Barosa/IBM
Joel Duquene/IBM
Zvi Weiss/IBM

4
Course Overview
▪ AudienceThis course is designed for application developers, tools administrators
and technical personnel who are responsible to create Menu Manager Actions that integrate IDz client with z/OS.
▪ PrerequisitesThis course assumes that the student has a basic understanding and
knowledge of software computing technologies, and general data processing terms, concepts and vocabulary, as well as a working knowledge of COBOL and z/OS.
Knowledge of and some experience coding and running JCL, TSO commands, CLISTs and REXX execs
Six+ months of IDz experience developing z/OS applications using including:
▪ Eclipse navigation, techniques, terms and concepts
▪ Remote Systems Explorer
▪ Editing code
▪ Creating and using MVS SubProjects

5
Tech-Enablement:▪ Onno Van Den Troost: z Specialist for IDz
Configuring your host system for Menu Manager
▪ Legacy versus Interactive Gateway configuration ***
▪ Jon Sayles: IDz Enablement
Setting up Menu Manager client and interactive enablement – for anyone ready to:▪ Write and test simple run actions
▪ Create custom Context menus & menu actions
▪ Import existing Menu Manager functions
Menu Manager – Technical materials (manuals, videos, etc.) available from:▪ https://community.ibm.com/community/user/ibmz-and-linuxone/search?executeSearch=true&SearchTerm=menu%20manager&l=1
*** Interactive Gateway provides the means for you to enable conversational REXX execs and CLISTS

6
Software Pre-requisites – Testing (1 of 2)
▪ IDz client and z/OS software installed @ v14.1.2 or later
▪ Access to z/OS with IDz host components and installed and configured (tested)
Note – to check that your Menu Manager workshops will run in your environment, issue a TSO command from the IDz Remote TSO Shell
1. Launch a TSO Command Shell
2. Type a TSO command and Press Enter

7
Software Pre-requisites – Testing (2 of 2)▪ Select a PDS or sequential (QSAM) dataset in Remote Systems Explorer,
and look at the Properties view. You should see the correct Dataset attributes
If you don’t get file attribute statistics contact your Systems Programmer before continuing with the course

8
Course objectivesAfter completing this course on using Menu Manager to integrate with z/OS
technology, you should be able to:
Define the various elements of Menu Manager
Create Menu Manager actions, menus and sub-menus that interact with z/OS resources and:
▪ Issue TSO commands
▪ Invoke Command Lists (CLISTS) and REXX execs
▪ Submit batch jobs that include dynamic variable substitution
Describe the Best Practices approach to doing Menu Manager work, in terms of
development and testing
This course describes how to use Menu Manager to create functional
integration with z/OS TSO commands, REXX execs, CLISTs and Batch Jobs.
▪ It does not cover the use Menu Manager for integrating with:
Local Windows applications
USS and Linux on System z menus
▪ It also does not cover the REXX or CLIST languages
Use Google searches to find books and/or white papers on REXX
9
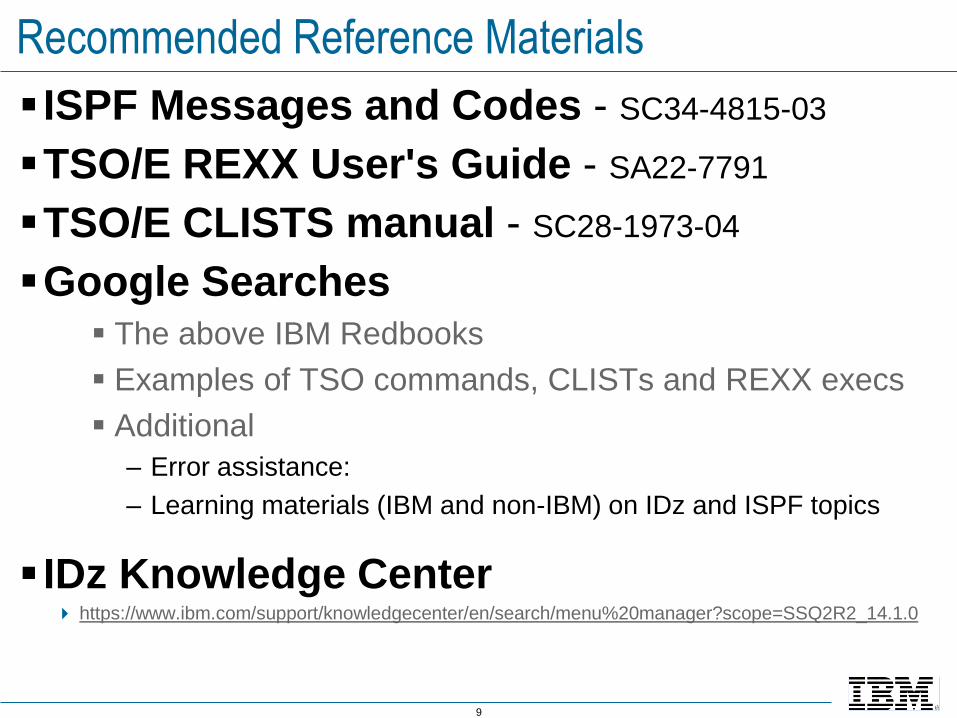
Recommended Reference Materials
▪ ISPF Messages and Codes - SC34-4815-03
▪TSO/E REXX User's Guide - SA22-7791
▪TSO/E CLISTS manual - SC28-1973-04
▪Google Searches▪ The above IBM Redbooks
▪ Examples of TSO commands, CLISTs and REXX execs
▪ Additional
– Error assistance:
– Learning materials (IBM and non-IBM) on IDz and ISPF topics
▪ IDz Knowledge Center https://www.ibm.com/support/knowledgecenter/en/search/menu%20manager?scope=SSQ2R2_14.1.0

10
UNIT
Topics:
Menu Manager
▪ Menu Manager - Introduction, Terms and Concepts, Workflow
▪ Invoking CLISTS and REXX execs
▪ Submitting Batch Jobs with JCL variable substitution
▪ Organizing Menu Manager Actions Through Sub-menus
▪ Enabling ISPF Edit Macros
▪ Appendix – Sample Menu Run Actions to access CA-Panvalet
11
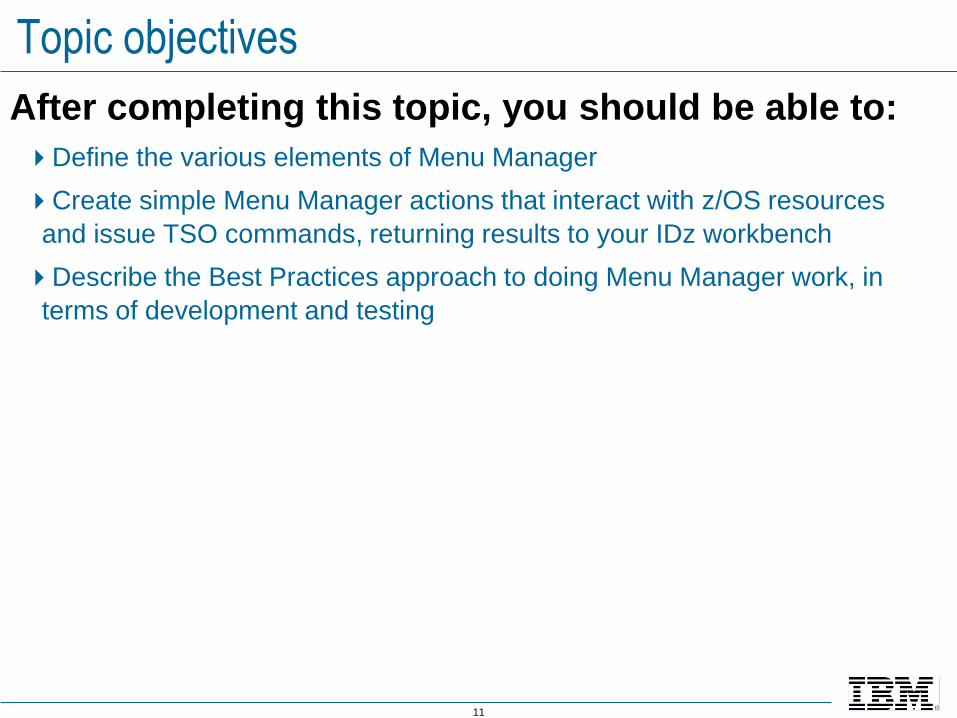
Topic objectives
After completing this topic, you should be able to:
Define the various elements of Menu Manager
Create simple Menu Manager actions that interact with z/OS resources
and issue TSO commands, returning results to your IDz workbench
Describe the Best Practices approach to doing Menu Manager work, in
terms of development and testing

12
The DevOps JourneyThe problem space defined… As your shop moves from
3270-Data-Stream ➔ Eclipse
Waterfall Lifecycle ➔ Agile
Monolithic/Centralized/Customized Library Management system ➔ Distributed SCM
…you cannot afford to throw away years – sometimes decades of critical ISPF-based
infrastructure, tooling and process – that service your application delivery through:
Automation and raising:
▪ Productivity
▪ Quality
▪ Lowering defect rates
Accounting/Audit/Security
Lifecycle Integration – sign off, etc.
This tooling typically exists as:
CLIST/REXX Execs
ISPF Dialog-based Applications
Edit Macros
You cannot afford to begin DevOps development without accessing the ISPF-based infrastructure or
your projects will fall into the same problem space that the CLIST/REXX Execs & custom ISPF Dialogs
have been protecting you from when using TSO/ISPF.
If you don’t integrate these tools & processes, developers will be forced to use emulators to complete
their daily projects & tasks.

13
Customizing IDz/Eclipse with external tools and products
Custom CLISTs and REXX Execs
ISPF Edit Macros
Native ISPF functionality necessary
for z/OS AppDev
3rd Party Products
SCM Tooling
MS-Windows integration
Eclipse IDE customization
© Copyright 2019 - IBM
ISPF Dialog Manager Apps
IDz provides tooling that allows you to integrate Eclipse with the mainframe world
you’re leaving behind en route to DevOps

14
z/OS Green-Screen Tools Integration
Four ways to integrate IDz/Eclipse with your mainframe apps:
1.Menu Manager:
– Both simple round-trip & complex/conversational MVS CLISTS &
REXX execs integrate into Eclipse/IDz through Menu Manager
which generates Java/Eclipse code for your Workspace
2. HATS/RCP:
– For ISPF Dialog Manager and 3rd party applications and tools
you can use HATS/RCP – a screen-scraping product from IBM
that is free for developing integration points, with IDz.
3. CARMA:
– CARMA provides a generic interface to z/OS software which can be used to
access REXX and CLIST applications
4. Java/Eclipse plug-ins:
– Java eclipse plug-ins can be used to integrate TSO resources using remote
Resource Java APIs developed and exposed by IBM
© Copyright 2021 - IBM

15
A framework that extends the IDz Context Menu system, providing access to TSO/ISPF mainframe resources through custom menu
actions that invoke TSO commands –including CLISTS and REXX Execs.
What is "Menu Manager"?
Which IDz Context Menus?1. Remote Systems Explorer - Sequential datasets and PDS members in RSE
2. z/OS Projects - Individual dataset members in an MVS Subproject
3. LPEX & COBOL Editors - From within edit on a file
4. Remote Search results – Files in the Remote Search Results view
5. JES – Batch Jobs and Job Spool files
Which z/OS resources?
1. TSO commands – Which include CLISTs and REXX execs
2. JCL – Submitting jobs, using dynamic variable substitution
3. ISPF Edit Macros
Within a default
Context Menu
Custom
Menu
Options
16
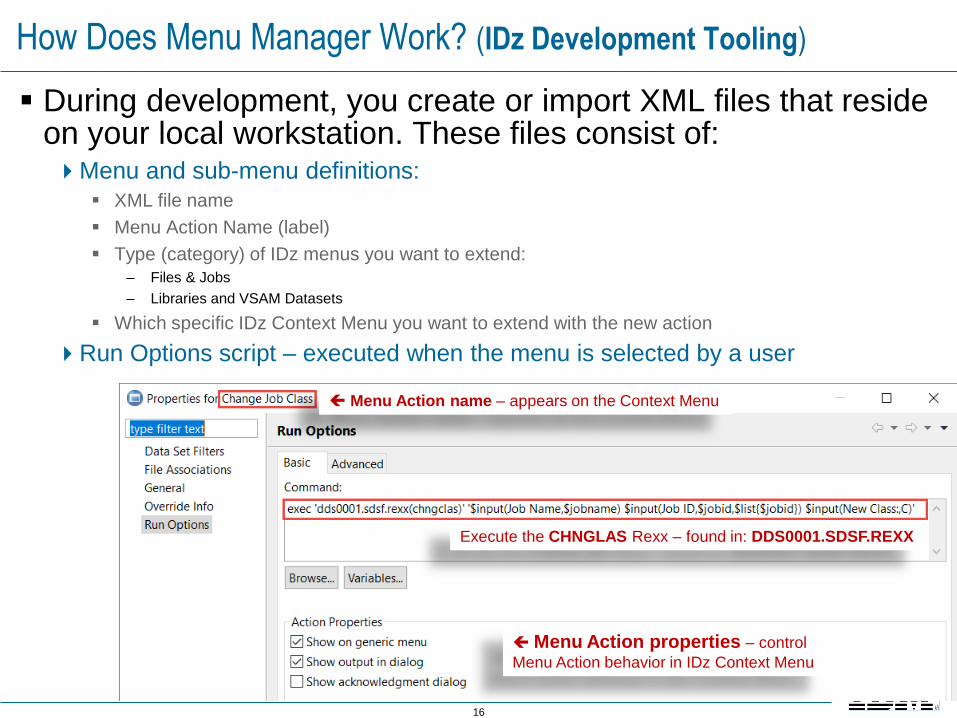
How Does Menu Manager Work? (IDz Development Tooling)
▪ During development, you create or import XML files that reside on your local workstation. These files consist of:Menu and sub-menu definitions:
▪ XML file name
▪ Menu Action Name (label)
▪ Type (category) of IDz menus you want to extend:
– Files & Jobs
– Libraries and VSAM Datasets
▪ Which specific IDz Context Menu you want to extend with the new action
Run Options script – executed when the menu is selected by a user
Execute the CHNGLAS Rexx – found in: DDS0001.SDSF.REXX
Menu Action name – appears on the Context Menu
Menu Action properties – control
Menu Action behavior in IDz Context Menu

17
▪ The Menu Manager Action pipes the TSO command from your workstation to the ISPF Gateway on z/OS – which then:
Executes the Menu Manager-initiated TSO command/CLIST or REXX Exec
(Optionally) Streams result messages to an output window
z/OS
Action Output from the
Command/CLIST/REXX
ISPF
Gateway
Your
Workstation
How Does Menu Manager Work? (Run-Time Architecture)

18
Options and Notes
▪Depending on the requirements of your TSO commands, CLISTS, and REXX execs your Menu Manager actions pass parameters to the ISPF Gateway:User-selected or user-entered identifiers passed as arguments to your command
▪ Example: you can pass the user's TSO ID, a selected PDS member name, the fully-
qualified PDS name, etc.
▪You can substitute variables within JCL files (much like ISPF Dialog Manager's "file tailoring“ capabilities)
▪Results (output/displays from the TSO commands, CLISTS and REXX
scripts) can be returned to a GUI output windowOutput from submitted jobs goes to the JES queue
▪ The same Menu Manager action will work across different LPAR connections provided the above pre-requisites are met

19
Prerequisites for Calling CLISTS and REXX Execs
▪Pre-requisites:The TSO command must be available and APF-authorized
▪ The "action" must also be authorized – i.e. some shops do not permit submitting
JCL from within a CLIST
The REXX exec, JCL or CLIST named in the Menu Manager action must be found in the dataset specified by the command
▪ This has ramifications for sharing CLISTs or REXX Execs
▪ Limitations of Menu Manager:In order to invoke a conversational or multi-step REXX or CLIST
command you will need to be on: IDz v14.1.2 or later
Your REXX/CLIST may not utilize ISPF Dialog Manager/ISPF screens
or several screen functions
As of v15, conversational/multi-step REXX/CLISTs are “one-trip” only. They collect user values which are passed into the REXX/CLIST –which can respond iteratively – but only using WRITE/READ syntax –piping text back & forth

20
Menu Manager Preferences: Changing Default Output Colors and Fonts
Starting with IDz v14 you can change the default output display:
- Color
- Font
This is done from:
Preferences ➔
General ➔
Appearance ➔
Colors and Fonts
Expand Menu Manager –
Select and customize the elements you want changed.
Press Apply then OK

21
Example: Changed Output Colors and Fonts – Save Message…Green on Black | Courier 12pt Font
Save the output to a Windows Filespec

22
The Menu Manager Vocabulary – 1 of 2Actions and Menus – contains Action commands and menu definitions
Menu Manager XML file
▪ The file that contains your menu and action scripts and specifications
A wizard - that prompts you for coding elements in defining a Menu Action
Menus and sub-menus
▪ Used to define context menus, as they appear in your views
Actions
▪ The commands that are transmitted and executed on z/OS
XML file consisting of Actions and Menus ➔M
enu
Actio
ns
Button that invokes a
Menu Action development
wizard
Tab used to define the menu U.I.

23
The Menu Manager Vocabulary – 2 of 2▪ Menu Selection Context – a design construct
used to apply your Menu Manager actions to specific IDz Context menus: Remote Systems Explorer, z/OS Projects, Source File Editors, JES, Search Results, etc.
▪ Base File Menus:
▪ An XML file that is associated with one of the
above view contexts
▪ What’s the advantage of this?
▪ You can assign Actions and Menus stored in
the XML file to a specific view Context Menu
– i.e. You get more control over what Menu
Manager actions are presented and where
they’re presented
Provide access to the Menu Manager Actions in

24
Menu Manager Keywords – For Creating Menu Actions
▪ Interacting with ISPF – Run Options: CommandNative TSO commands:
LISTDS, LISTC, LISTALC, LISTBC, NETSTAT, HELP, REPRO
Executing CLISTs and REXX execs:
▪ EX 'LIB.REXX(MEMBER)' 'PARMS’
Submitting jobs
▪ SUBMIT LIB.JCL(MEMBER)
▪Defining and passing arguments – done with a combination of CLISTS/REXX Execs and Menu Manager features:
$input
$list{…}
Custom substitution variables and parameters in the Run Options Commands
25
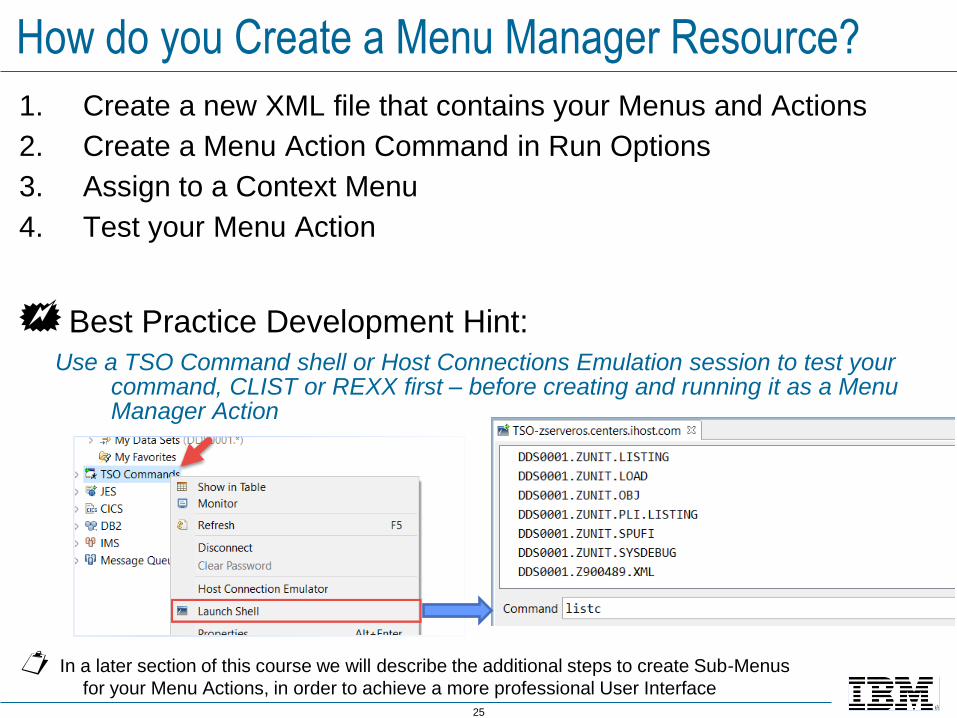
How do you Create a Menu Manager Resource?
1. Create a new XML file that contains your Menus and Actions
2. Create a Menu Action Command in Run Options
3. Assign to a Context Menu
4. Test your Menu Action
Best Practice Development Hint:
Use a TSO Command shell or Host Connections Emulation session to test your command, CLIST or REXX first – before creating and running it as a Menu Manager Action
In a later section of this course we will describe the additional steps to create Sub-Menus
for your Menu Actions, in order to achieve a more professional User Interface
26
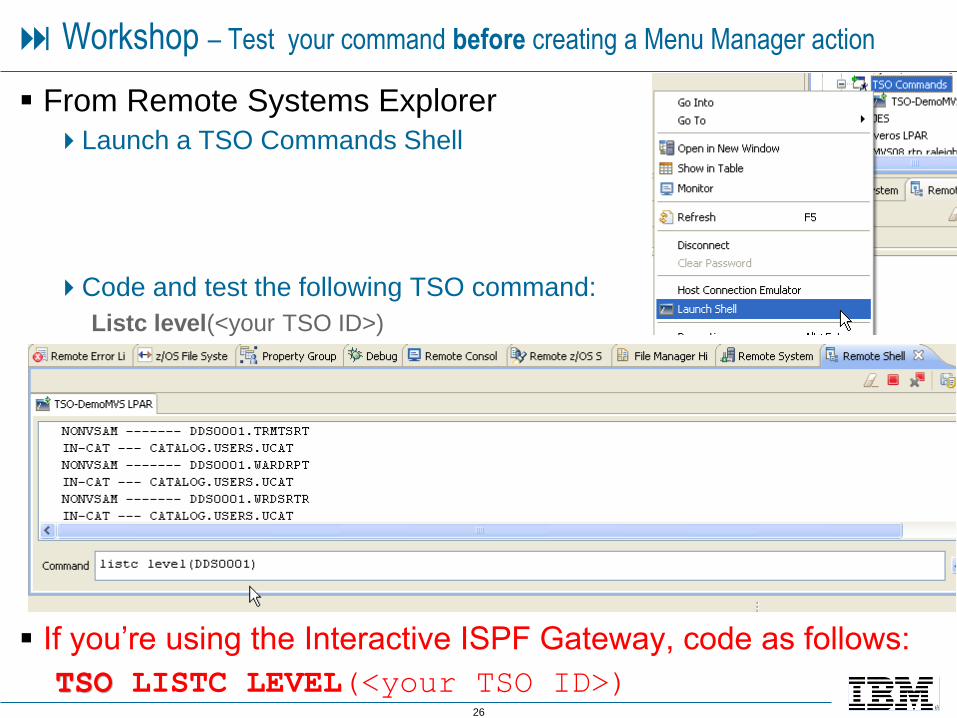
Workshop – Test your command before creating a Menu Manager action
▪ From Remote Systems Explorer
Launch a TSO Commands Shell
Code and test the following TSO command:
Listc level(<your TSO ID>)
▪ If you’re using the Interactive ISPF Gateway, code as follows:
TSO LISTC LEVEL(<your TSO ID>)

27
Workshop – Create a new XML File
From Window > Preferences
Expand Menu Manager and select Actions and Menus
From File Select click: New
- If prompted select: Create content later
▪ Click File
▪ Enter a filespec➔You will need write-authorization to the directory
▪ Click Finish
C:\test2.xml
Notes on Resource type: File – For Sequential dataset, PDS member &JES file actions
Data set – For library (PDS) and VSAM file actions
28
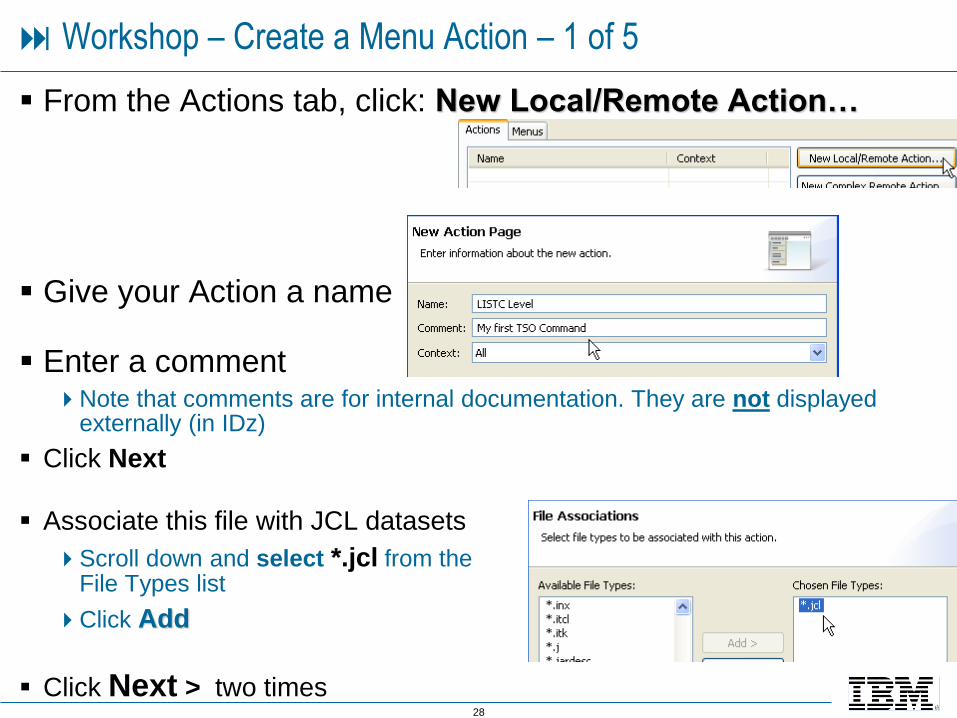
Workshop – Create a Menu Action – 1 of 5
▪ From the Actions tab, click: New Local/Remote Action…
▪ Give your Action a name
▪ Enter a commentNote that comments are for internal documentation. They are not displayed
externally (in IDz)
▪ Click Next
▪ Associate this file with JCL datasets
Scroll down and select *.jcl from the File Types list
Click Add
▪ Click Next > two times

29
Workshop – Create a Menu Action – 2 of 5
▪ From Run Options, enter your TSO LISTC command – as shown including the variable: $userid
listc level($userid)
Note that TSO commands are case in-sensitive
Important Note: End the commands without additional Carriage Returns
(which are caused by hitting Enter) – and without additional Spaces
▪ Check:
Show on generic menu
Use existing action
▪ Click Select…
▪ Expand com.ibm.ftt.ui.menumanager
and select com.ibm.ftt.ui.menumanager.tsoaction
▪ Click OK

30
Workshop – Create a Menu Action – 3 of 5
From Action Properties
Check Show output in dialog
Click Finish
This will return you to Actions and Menus
By selecting Show on generic menuthe Action will appear on all Context Menus
If you select Show acknowledgement dialog, a Progress bar appears…

31
Workshop – Create a Menu Action – 4 of 5
▪ This is the final Actions and Menus dialog your LISTC action
▪ Click Apply
▪ Click OK

32
Workshop – 5 of 5 Test your Menu Action
From Remote Systems Explorer
Expand a library that is z/OS File Mapped to a workstation type of .jcl
Right-click over a member in the dataset
▪ Note that this Menu Manager File action
is only enabled for library members –
It is not enabled at the Dataset level
Select your new Action▪ This sends your Menu Action (in this case the LISTC
TSO command) to be run on z/OS – with results
returned to Action Output window
View the Action output
Click OK to close the output window
▪ Let's do another…

33
Workshop – Test your command in TSO
▪ From Remote Systems Explorer
Open a TSO Remote Shell
Or use the one that's already opened
Code and test the following TSO command:
Listds (<your.library_dsn>) members
▪ Notes:Just as you would in ISPF, you can either provide the fully-qualified dataset name in single
quotes or the unqualified DSN as shown. If you don’t add quotes your TSO is added as the DSN prefix (high-level qualifier)
If you’re using the Interactive ISPF Gateway code:
▪ LISTDS (<your.library_dsn>) MEMBERS

34
Workshop – Create a new Menu Action – 1 of 4
▪ From Window > Preferences > Menu Manager > Menu Actions click New Local/Remote Action…
▪ Give your Action a name
▪ Enter a comment
▪ Click Next >
▪ Associate this file with all dataset types:
Click Add All >>
Click Next > twice

35
Workshop – Create a Menu Action – 2 of 4
▪ From Run Options/Command: enter the LISTDS command – as shown below, including single quotes and the variable: '$datasetname'
listds ('$datasetname') members
$datasetname is an IDz/Menu Manager variable that resolves to the fully-qualified DSN of a file you’ve selected in a Context Menu
Note that the 'single quotes' enclose/fully-qualify the DSN in the LISTDS command when it is run on z/OS
Reminder: End the commands without additional Carriage Returns caused by hitting Enter and without additional spaces
▪ Check:
Show on generic menu
Use existing action
▪ Click Select…

36
Workshop – Create a Menu Action – 3 of 4
After you’ve clicked Select…
▪ Expand com.ibm.ftt.ui.menumanager
and select com.ibm.ftt.ui.menumanager.tsoaction
▪ Click OK
▪ From Run Options
Check: Show output in dialog
Click: Finish This returns you to Actions and Menus
▪ Click Apply then OK

37
▪ From Remote Systems Explorer
Expand a PDS (library)
Right-click over a PDS member in the dataset list ➔
▪ Note that Menu Manager actions in this
exercise are only enabled for library
members – not at the dataset level
Select your new Action
▪ View the Action Output
It should look something like this ➔
▪ Click OK to close the output window
Workshop – 4 of 4 Test your Menu Action

38
What if my Menu Manager Function Doesn't Work?
The Top 5 reasons Menu Manager functions don’t execute:
1. A typo in the Run Action command – like adding a trailing Enter, mis-spelling a TSO function or CLIST name, forgetting to enclose parameters with apostrophes, etc.
2. Forgetting to select the tsoaction:
3. The CLIST or REXX Exec contains statements or references that require:
Additional library allocations that TSO users get through their ISPF
logon proc library allocation
User interaction - a multi-step "conversational" CLIST or REXX
Exec, that requires IBM'S HATS/RCP to integrate with IDz
4. You are not authorized to run a CLIST or REXX Exec
5. You’re using the Interactive ISPF Gateway, and forgot to prefix the command with: TSO – and use UPPER CASE

39
Testing your Menu Manager FunctionThere is no line-by-line debugger in Menu Manager
So following a systematic approach to coding and testing these functions is recommended:
▪ Run the same command from the IDz TSO Remote Shell
▪ Run the TSO command, REXX Exec or CLIST from TSO - Ready mode or =6(if there's a problem running in the IDz TSO Remote Shell)
▪ Write and test the Menu Manager Action
▪ If the test fails with a return code higher than > 8
Uncheck: Show output in dialog
Open the Remote Console view to see the exact syntax that was executed in z/OS when the Menu Manager Action was launched
Add debug statements to your REXX or CLISTs: Trace i or Trace r - for REXX Execs
CONTROL SYMLIST LIST CONLIST - for CLISTs

40
Open Ended Workshops
▪ Using the development steps documented in the previous slides, create a separate Menu Manager Action for each of the following TSO commands:
1. LISTALC STATUS HISTORY SYSNAMES
2. NETSTAT ALLC
3. LISTC ENTRY ('$datasetname') ALL
Steps:
1. Test each TSO command out using the Remote Shell
2. Create a new Menu Action for each TSO command
Name your Menu Manager Action anything you'd like
Make the action generic
Follow the steps in the previous slides carefully
3. Test the command out from an IDz context menu
If you get stuck, un-check: Show on generic menu
and debug from the Remote Console view

41
Unit objectives - Summary
Having completed this unit on using Menu
Manager to integrate with z/OS technology, you
should now be able to:
Define the various elements of Menu Manager
Create Menu Manager actions, menus and sub-menus that
interact with z/OS resources and:
▪ Issue TSO commands
Describe a Best Practices approach to doing Menu Manager
development and testing

42
UNIT
Topics:
Menu Manager
▪ Menu Manager - Introduction, Terms and Concepts
▪ Invoking CLISTS and REXX execs
▪ Submitting Batch Jobs with JCL variable substitution
▪ Organizing Menu Manager Actions Through Sub-Menus
▪ Enabling ISPF Edit Macros
▪ Appendix – Sample Run Actions to access CA-Panvalet

43
Unit objectivesAfter completing this unit on using Menu Manager to integrate with z/OS technology,
you should be able to:
Describe the elements of the Menu Manager specific to CLIST/REXX execution
Create Menu Manager actions, menus and sub-menus that interact with z/OS resources and:
▪ Invoke Command Lists (CLISTS) and REXX procedures
– In TSO
– Using Menu Manager Actions
▪ Prompt for user (dynamic) input variables – passing the variables to z/OS as input
parameters
▪ Interface correctly with CLIST/REXX input parameters
44
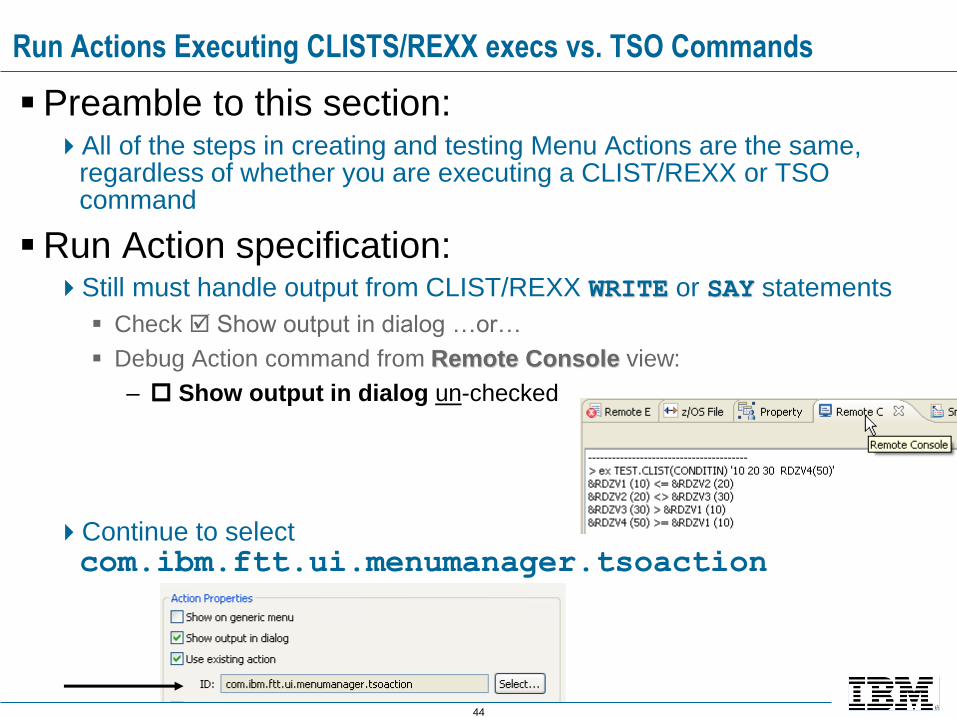
Run Actions Executing CLISTS/REXX execs vs. TSO Commands
▪Preamble to this section:All of the steps in creating and testing Menu Actions are the same,
regardless of whether you are executing a CLIST/REXX or TSO command
▪Run Action specification: Still must handle output from CLIST/REXX WRITE or SAY statements
▪ Check Show output in dialog …or…
▪ Debug Action command from Remote Console view:
– Show output in dialog un-checked
Continue to select com.ibm.ftt.ui.menumanager.tsoaction

45
Executing CLISTS/REXX Execs – Parameter Input
▪ In addition, the Run Options Command must account for the syntactical requirements of invoking CLISTS and REXX execs:
Parameter lists and parameter types:
▪ Values
▪ Over-riding parameters with default values
Accessing and running the CLISTs/REXX execs on z/OS
▪ Dataset naming qualification
▪ Access the libraries

46
Invoking REXX Execs/CLISTS (Review)
z/OS
ISPF Gateway
------------------------------------
Locate REXX/CLIST
Execute REXX/CLIST
Pipe Say output back to IDz
Cust
om
Menu
Actions ➔
“Say” output – back from REXX/CLIST ➔
Remote Systems
Explorer view
Eclipse
Values

47
Passing Eclipse Values to REXX Arguments
There is a 1 ➔ 1 relationship between Menu Manager $input parameters and arg (argument values) received by your REXX/CLIST
EX 'DDS0001.TEST.REXX(IEBCOMP2)’
'$input(Dataset 1,$datasetname)
$input(Dataset 2,$userid.) $input(Sysprint
DSN,$userid.) $input(HLQ,$userid)'
EX 'DDS0001.TEST.REXX(IEBCOMP2)'
‘DDS0001.TEST.JCL DDS0001.TEST.REXX
DDS0001.LIST133 DDS0001'
Running the same REXX from ISPF =6
Creates this Custom Menu/Dialog…
Four $input definitions…
Each value is passed into the REXX as an argument

48
Run Options Command - Passing Arguments
DDS0001.TEST.REXX
(SORT)
1. IDz Menu Action
2. Menu Manager Run Options Command
3. EclipseMenu
EX ‘DDS0001.TEST.REXX(SORT)’ ‘DDS0001.EQUIP DDS0001 DDS0001 78CHD’
a. b.
c.
d.
a.b.
c.
d.
-----------------Four Parameters-----------------
InvokesDisplays
Clicking OK launches REXX
4. Menu parameter values get
passed to the REXX as arguments ➔
49
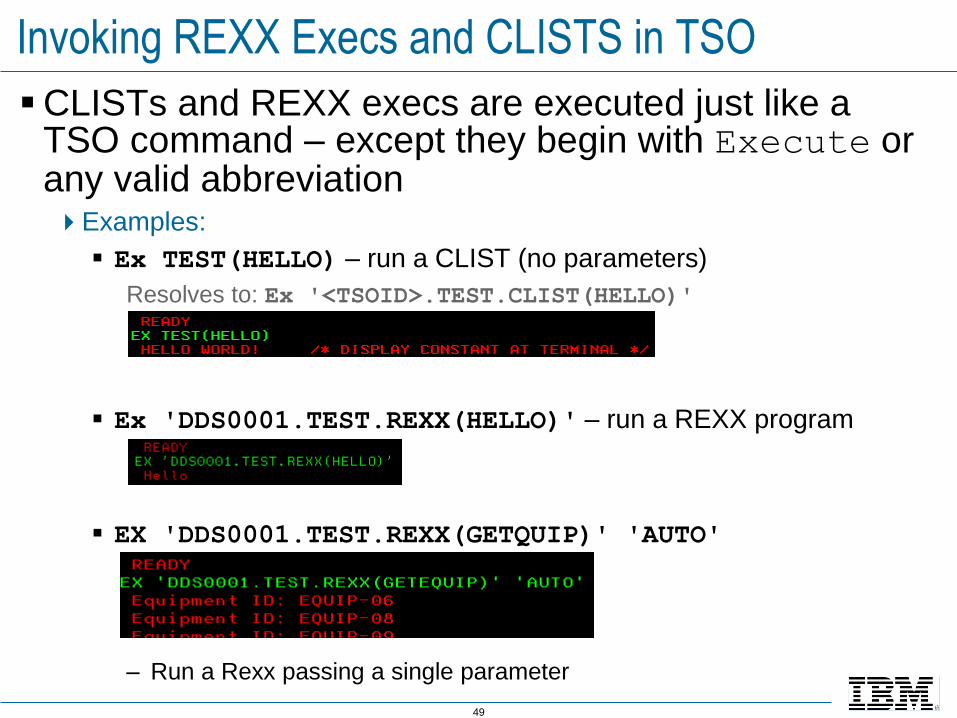
Invoking REXX Execs and CLISTS in TSO
▪CLISTs and REXX execs are executed just like a TSO command – except they begin with Execute or any valid abbreviationExamples:
▪ Ex TEST(HELLO) – run a CLIST (no parameters)
Resolves to: Ex '<TSOID>.TEST.CLIST(HELLO)'
▪ Ex 'DDS0001.TEST.REXX(HELLO)' – run a REXX program
▪ EX 'DDS0001.TEST.REXX(GETQUIP)' 'AUTO'
– Run a Rexx passing a single parameter

50
Invoking REXX execs and CLISTS in TSO - Notes
▪ Statements are case-insensitive. Example: EXEC == exec
▪ Valid abbreviations are supported. Example: EXEC == EX
▪ Fully-qualify the CLIST and REXX PDS names in the EXEC statement (see previous slide) unless your TSO ID "owns" the libraries
I.E. - the high-level dataset qualification follows standard TSO protocol
With the exception that, following the "Exec" command, TSO assumes a CLIST library:
▪ This allows you to abbreviate CLIST command invocation
– No need to add .CLIST library name qualifier, if .CLIST is the final dataset qualifier
– Ex TEST(Hello)
Resolves to: Ex <MyTSOID>.TEST.CLIST(Hello)
– Ex (Hello)
Resolves to: Ex <MyTSOID>.CLIST(Hello)
Note: More than likely you will invoke CLISTs and REXX through
fully-qualified dataset names for your Menu Manager Actions

51
Invoke a CLIST With No Parameters
▪ CLIST statements
▪ Running the CLIST in TSO
▪ Menu Manager and Run Action ➔
Ex 'DDS0001.TEST.CLIST(HELLO)'
PROC 0 in line 1 (same as without PROC statement)
REXX uses ARG keyword for parameters
Without ARG, a REXX exec takes no parameters

52
CLISTs, REXX Execs and Parameters
Almost all z/OS CLISTs and REXX Execs are designed to expect user input as arguments:
In CLISTs the PROC statement names the number of expected parameters
In REXX Execs ARG is the equivalent statement
You have already seen parameter passing:listc level($userid) – example where your TSO ID was passed in to the TSO LISTC command as a parameter
You also saw how to access variables using IDz:
▪ The selected member name - $name
▪ The dataset name (library name) of the selected member - $datasetname

53
Design consideration for using Menu Manager $variables
Design considerations:
While $userid is a variable that is useful globally (as it resolves to the user's TSO ID) care must be taken with other IDz $variables such as:
$name, $fullname, $datasetname
▪ They resolve to the user’s selection context
▪ They will return different (potential error) results if users
select a sequential dataset (as opposed to a member in a PDS)
You will still want to use $variables – but may have to provide user (developer) training, or clear directions for their use in the Label or input Form text

54
Menu Manager Run Action Parameter Types
Three types of Menu Manager parameter passing options:
1. Pre-filled parameter input (no prompting for variable value)
▪ Typically using '$<variable>'
2. Variable parameter input:
▪ Coded with $input
▪ Rendered as a GUI input form
▪ Can have as many inputs
as required
3. Lists:
▪ Coded with $list keyword in Run Actions (as part of $input)
▪ Rendered as a combo-box
$input parameters can be user-entered custom values or IDz variables ($name, $datasetname, etc.)

55
Run Action Syntax - Single $input Syntax
▪ CLIST PROC (input parameter) statement
▪ Running the CLIST in TSO:
▪ Run Action command:
Ex 'DDS0001.TEST.CLIST(BUILTINS)' '$input(Enter Numeric Value,40)'
'Single quotes around'
- CLIST or REXX Exec name
- Input parameter specification
Input Form
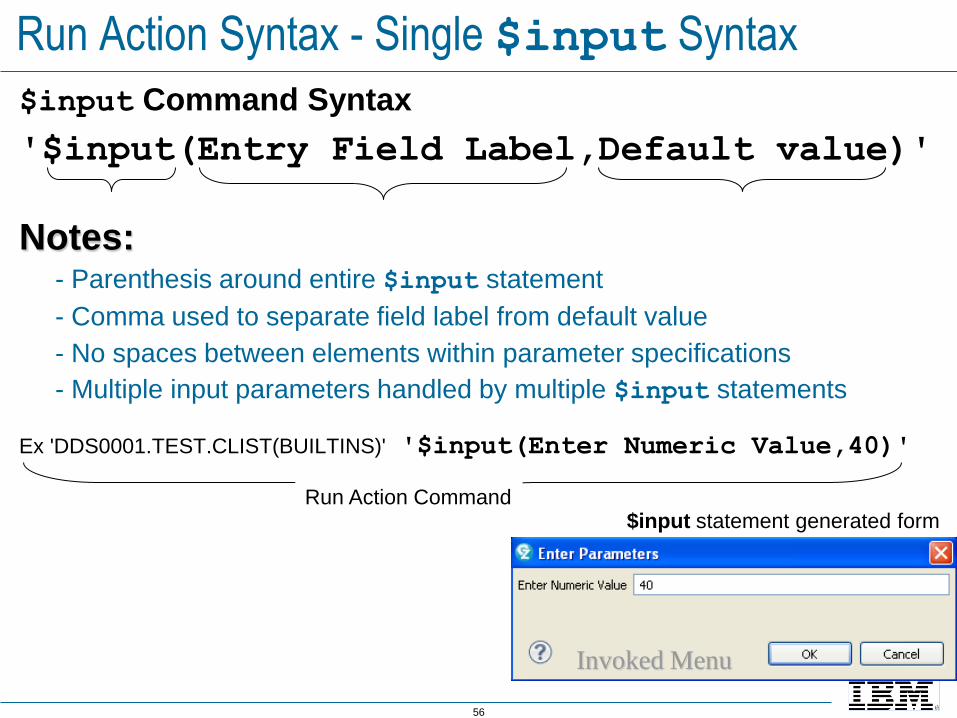
56
Run Action Syntax - Single $input Syntax
$input Command Syntax
'$input(Entry Field Label,Default value)'
Notes:- Parenthesis around entire $input statement
- Comma used to separate field label from default value
- No spaces between elements within parameter specifications
- Multiple input parameters handled by multiple $input statements
Ex 'DDS0001.TEST.CLIST(BUILTINS)' '$input(Enter Numeric Value,40)'
Invoked Menu
Run Action Command$input statement generated form

57
CLIST/REXX Parameter Types and Input Variables – 1 of 2
There are two types of CLIST/REXX parameters:1. Positional parameter(s)
▪ REXX accepts one or more parameters
– Accept the name of a file from the process that invokes the REXX
▪ Pass the parameter value in the menu's Run Action
– Pass the selected filename ($name) in RSE to the REXX exec (and
invoke the exec on the mainframe)
Note: The first line of a REXX Exec must be a REXX comment
/* comment text */

58
CLIST/REXX Parameter Types and Input Variables – 2 of 2
2. Parameters with default values - overridden by user-entered values
▪ Requires passing the variable name in the Run Action – and
passing the value to over-ride the default within parentheses
– Accept three positional variable values. And accept a fourth (keyword) parameter/value
▪ Here, the Run Action passes the keyword parameter/value in the command using a nested $input…,…($list{…})
▪ The user must type the parameter value including the parentheses
surrounding the value: (50)
This format will be described in greater detailthrough examples in an upcoming section

59
Run Action - Multiple $input Syntax – 1 of 2
▪ REXX arguments
Two parameters: dsn you
▪ Running the REXX exec in TSO
Notes:
You must fully qualify the REXX dataset name – because the EXEC command assumes you are running a CLIST and will add .clistas a suffix to the dataset name
Parameters:
▪ All input parameters enclosed by apostrophes: ' XXXXX XXXX '
▪ Separated by one or more spaces

60
Run Action - Multiple $input Syntax – 2 of 2
▪ Ex 'DDS0001.TEST.REXX(SAYHELLO)' '$input(dsn,$datasetname) $input(you,$userid)'
Notes:Fully-qualified dataset name
Single quotes surround:
▪ Dataset name
▪ Both parameters
Single space between parameters
The names of the parameters in the CLIST do not have to match the menu labels
Over-type variable values
in the Menu Manager form
REXX source code

61
$list – For Combo-Box U.I. – 1 of 2
▪ Input $list renders as a selection list-box:
▪ Examples:
Ex TEST.CLIST(PHONE) '$input(Select Name,,$list{Jones,Smith})'
Notes:$list substitutes for the value - after the menu label in $input
Two commas between: $input(menu label,,$list
Values inside of curly braces:
▪ Separated by commas
▪ Displayed in a drop down
$input specification
$list specification
Two Commas

62
$list – For Combo-Box U.I. – 2 of 2
▪ Example – embedded select list box, used to over-ride keyword parameter
Ex TEST.CLIST(CONDITIN) '$input(Var1,10) $input(Var2,20) $input(Var3,30)$input(Select Keyword Variable,RDZV4,$list{30,50})'
Notes:
Within $input, add the Keyword variable name (in the above: RDZV4) before the ,$list specification
▪ IDz will pass the variable name to TSO – plain text
▪ The user will have to enter (manually type in) the positional parameter – including the surrounding parentheses: RDZV4(50)
63
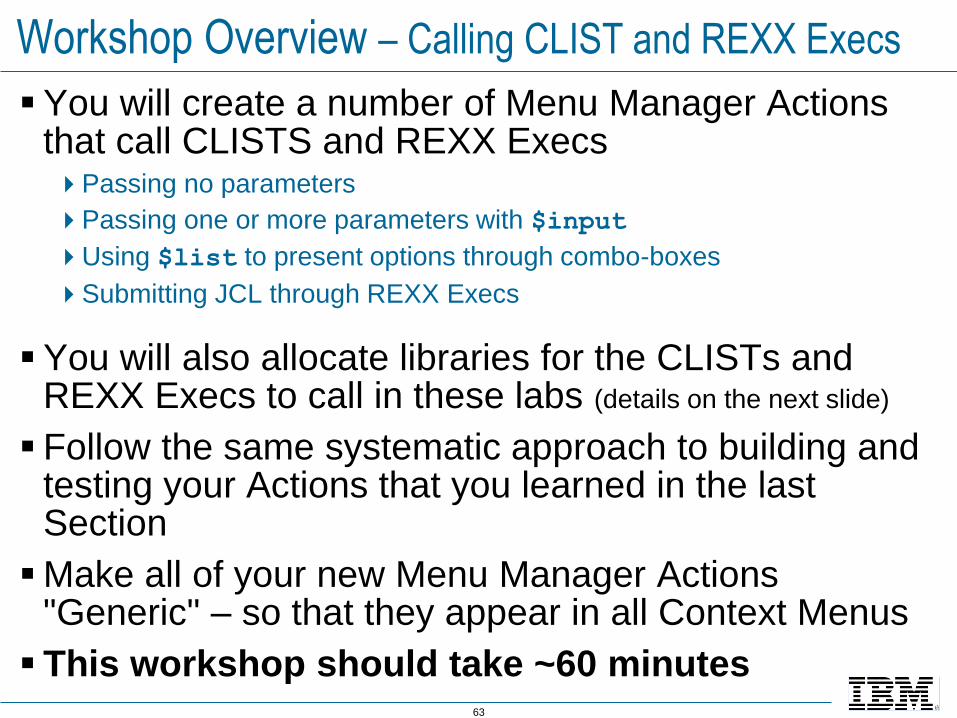
Workshop Overview – Calling CLIST and REXX Execs
▪You will create a number of Menu Manager Actions that call CLISTS and REXX ExecsPassing no parameters
Passing one or more parameters with $input
Using $list to present options through combo-boxes
Submitting JCL through REXX Execs
▪You will also allocate libraries for the CLISTs and REXX Execs to call in these labs (details on the next slide)
▪ Follow the same systematic approach to building and testing your Actions that you learned in the last Section
▪Make all of your new Menu Manager Actions "Generic" – so that they appear in all Context Menus
▪ This workshop should take ~60 minutes

64
Workshop – Setup
Allocate two 80-byte LRECL libraries on z/OS
1.<TSOID>.IDz.CLIST
2.<TSOID>.IDz.REXX You won't need much space: TRK(2,1) with room for 12 directory
entries each will be sufficient
You can use Allocate Like –
against an existing PDS ➔
to save time
65
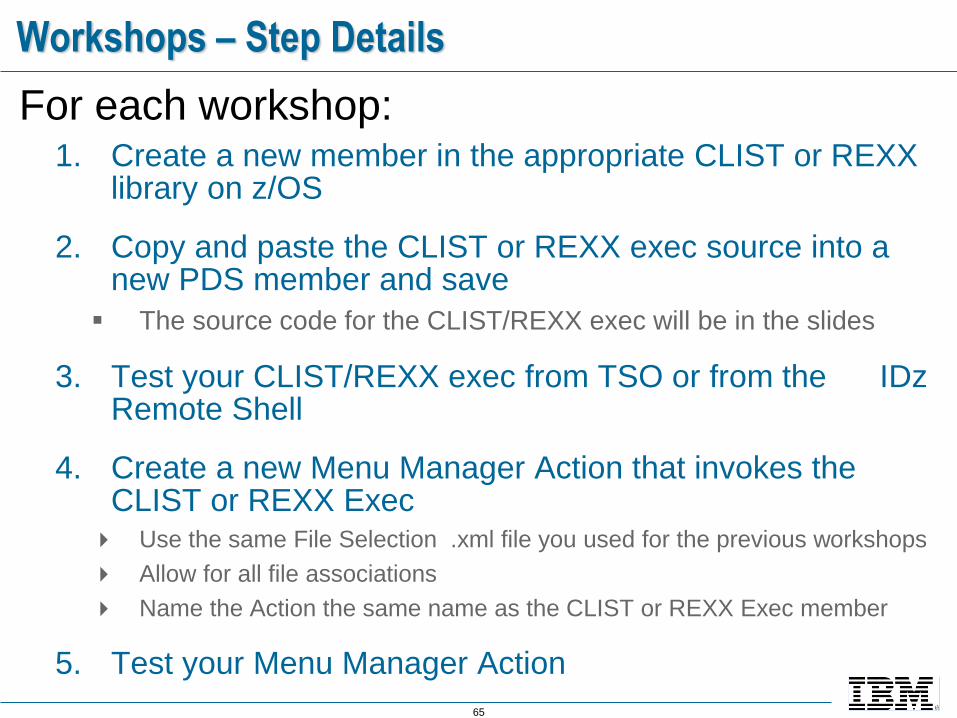
Workshops – Step Details
For each workshop:1. Create a new member in the appropriate CLIST or REXX
library on z/OS
2. Copy and paste the CLIST or REXX exec source into a new PDS member and save
▪ The source code for the CLIST/REXX exec will be in the slides
3. Test your CLIST/REXX exec from TSO or from the IDz Remote Shell
4. Create a new Menu Manager Action that invokes the CLIST or REXX Exec
Use the same File Selection .xml file you used for the previous workshops
Allow for all file associations
Name the Action the same name as the CLIST or REXX Exec member
5. Test your Menu Manager Action

66
Workshop – Call a CLIST Passing No Parameters
▪ CLIST code – copy and paste into a member named: HELLO in your CLIST library
PROC 0 /* No input parameters needed */
WRITE HELLO WORLD! /* Display HELLO WORLD! */
EXIT /* Return to TSO */
▪ Run the CLIST in TSO
Or from the TSO Remote Shell ➔
▪ From the Menu Manager options in Preferences create a new Local/Remote Action that calls your CLIST
▪ From RSE, test your work by running your new Menu Manager Action
Recall that TSO commands are not case sensitive

67
Workshop – Call a CLIST Passing No Parameters
▪ CLIST code – copy and paste into a member named: SYSVARS in your CLIST library
PROC 0
WRITE THE CURRENT DATE (&&SYSDATE) IS &SYSDATE
WRITE THE CURRENT TIME (&&SYSTIME) IS &SYSTIME
WRITE THE CURRENT USER (&&SYSUID) IS &SYSUID
WRITE THE VALUE OF &&SYSNEST IS &SYSNEST
WRITE THE VALUE OF &&SYSPROC IS &SYSPROC
EXIT
▪ Run the CLIST in TSO - or from the TSO Remote Shell
▪ Create and test a new Local/Remote Action that calls SYSVARS
68
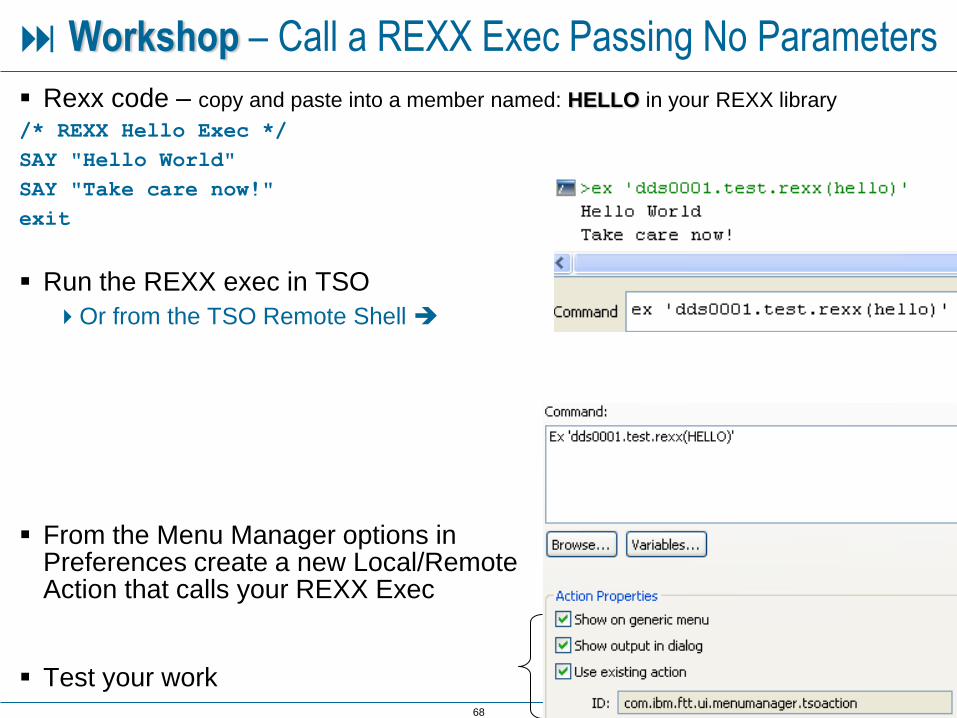
Workshop – Call a REXX Exec Passing No Parameters
▪ Rexx code – copy and paste into a member named: HELLO in your REXX library
/* REXX Hello Exec */
SAY "Hello World"
SAY "Take care now!"
exit
▪ Run the REXX exec in TSO
Or from the TSO Remote Shell ➔
▪ From the Menu Manager options in Preferences create a new Local/Remote Action that calls your REXX Exec
▪ Test your work

69
Workshop – Call a REXX Passing No Parameters
▪ REXX code – copy and paste into a member named: DATETIME in your REXX library
/* REXX Exec Tell Date and Time*/
/* Turn REXX statement tracing on */
Trace ?R
address TSO
Say "Today's date is: " Date();
Say ".... and it is " Time();
Say "See you later."
▪ Run the REXX exec in TSO - or from the TSO Remote Shell
▪ Create and test a new Local/Remote Action that calls DATETIME

70
Workshop – Call a CLIST Passing One Parameter
▪ CLIST code – copy and paste into a member named: BUILTINS in your CLIST library
PROC 1 IDzVAR1
SET IDzVAR2 = KUMQUAT
SET IDzVAR3 = &STR(10/01/1952)
WRITE CONTENTS OF &&IDzVAR1 ==> &IDzVAR1, its Datatype ==> &DATATYPE(&IDzVAR1)
WRITE CONTENTS OF &&IDzVAR2 ==> &IDzVAR2, ITS DATATYPE IS: &DATATYPE(&IDzVAR2)
WRITE CONTENTS OF &&IDzVAR1 * 20 ==> &EVAL(&IDzVAR1 * 20)
WRITE CONTENTS OF &&IDzVAR1 ==> &LENGTH(&IDzVAR1)
WRITE LENGTH OF &&IDzVAR2 ==> &LENGTH(&IDzVAR2)
WRITE ARITHMETIC RESULT OF &STR(3 * &&IDzVAR1) ==> &EVAL(3 * &IDzVAR1)
WRITE THE VALUE OF YEAR VALUE OF &IDzVAR3 ==> &SUBSTR(7:10,&IDzVAR3)
EXIT
▪ Run the CLIST in TSO
Or from the TSO Remote Shell ➔
▪ Crate a new Local/Remote Action that calls your CLIST
▪ Test your work

71
Workshop – Call a CLIST Passing One Parameter
▪ CLIST code – copy and paste into a member named: ONEPARM in your CLIST library
PROC 1 VAR1 UNIT(DISK) VAR2(BANANA) VAR3(CONTROL)
SET VARNULL = /* Assign a null */
SET NUMVAR = 10 /* Assign an ordinal number */
SET DSN1 = DDS001.TEST.JCL /* Assign a character value */
SET CHARVAR = &UNIT /* Assign a variable = to another variable */
SET CONCATVAR = &VAR2..&VAR3 /* Concatenate variable values */
SET LC = &SYSLC(&VAR2) /* Demonstrate a CLIST function */
SET RESULT = &NUMVAR + 1 / 3 /* Numeric computation */
WRITE THE VALUE OF CONCATVAR IS: &CONCATVAR
WRITE THE VALUE OF VARNULL IS: &VARNULL
WRITE THE VALUE OF NUMVAR IS: &NUMVAR
WRITE THE VALUE OF CHARVAR IS: &CHARVAR
WRITE THE VALUE OF &&VAR3 IS: &VAR3
WRITE THE VALUE OF PARM: &&VAR1 IS: &VAR1
WRITE THE VALUE OF LOWER CASE: LC IS: &LC
WRITE THE VALUE OF ARITHMETIC RESULT IS: &RESULT
WRITE **** NOTE THE DECIMAL TRUNCATION FOR RESULT ****
EXIT
▪ Run the CLIST in TSO - or from the TSO Remote Shell
▪ Create a new Local/Remote Action that calls ONEPARM
▪ Test your work

72
Workshop – Call a REXX Exec Passing One Parameter
▪ Rexx code – copy and paste into a member named: SAYFILE in your REXX library
/* REXX - allocate, read and write a sequential dataset */
/* Note that the FILENAME passed in is expected to be fully-qualified */
ARG FILENAME
ADDRESS TSO "ALLOC FI(T) DA('"FILENAME"') SHR REU"
ADDRESS TSO "EXECIO * DISKR T (STEM IN. FINIS"
ADDRESS TSO "FREE FI(T)"
DO I = 1 TO IN.0
SAY 'RECORD:' I IN.I
END I
EXIT
▪ Run the REXX exec
▪ From the Menu Manager options in Preferences create a new Local/Remote Action that calls your REXX Exec
▪ Test your work – by running this Menu Manager Action over a Sequential (QSAM) file
If you do not have a QSAM file that is a good candidate
change $name to $fullname and run this Action against a PDS member
73
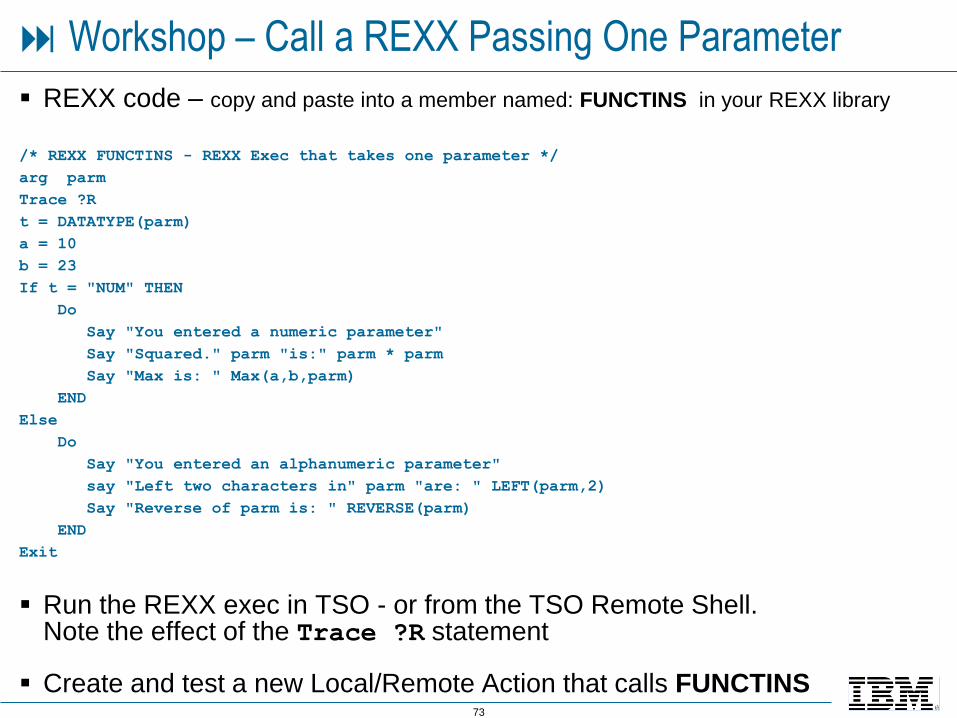
Workshop – Call a REXX Passing One Parameter
▪ REXX code – copy and paste into a member named: FUNCTINS in your REXX library
/* REXX FUNCTINS - REXX Exec that takes one parameter */
arg parm
Trace ?R
t = DATATYPE(parm)
a = 10
b = 23
If t = "NUM" THEN
Do
Say "You entered a numeric parameter"
Say "Squared." parm "is:" parm * parm
Say "Max is: " Max(a,b,parm)
END
Else
Do
Say "You entered an alphanumeric parameter"
say "Left two characters in" parm "are: " LEFT(parm,2)
Say "Reverse of parm is: " REVERSE(parm)
END
Exit
▪ Run the REXX exec in TSO - or from the TSO Remote Shell. Note the effect of the Trace ?R statement
▪ Create and test a new Local/Remote Action that calls FUNCTINS

74
Workshop – Call a REXX Passing One Parameter
▪ REXX code – copy and paste into a member named: LOOPING in your REXX library
/* REXX - a sample program written by Larry England */
/* Trace ?A */
Say "This LOOPING.rexx.";
Say "Today' date blah is: " Date() " and it is " Time();
/* Parse the arguments */
parse arg max
say "max is '"max"'"
if (max = "") then
max = 10
say "max is big :" max
/* Loop */
do c=1 to max
if ((c // 2) = 0 )then
say c "is an even number and your userid is " userid()
else
say c "is an odd number"
end
▪ Run the REXX exec in TSO - or from the TSO Remote Shell
▪ Create and test a new Local/Remote Action that calls LOOPING

75
Workshop – Call a CLIST Passing Multiple Parameters
▪ CLIST code – copy and paste into a member named: THREPARM in your CLIST library
PROC 3 VAR1 UNIT VAR2 VAR3(CONTROL) /* CLIST STATEMENTS MUST BE UPPERCASE */
SET VARNULL = /* Assign a null */
SET NUMVAR = 10 /* Assign an ordinal number */
SET DSN1 = DDS001.TEST.JCL /* Assign a character value */
SET CHARVAR = &UNIT /* Assign a variable = to another variable */
SET CONCATVAR = &VAR2..&VAR3 /* Concatenate variable values */
SET LC = &SYSLC(&VAR2) /* Demonstrate a CLIST function */
SET RESULT = &NUMVAR + &VAR1 /* Numeric computation */
WRITE THE VALUE OF CONCATVAR IS: &CONCATVAR
WRITE THE VALUE OF VARNULL IS: &VARNULL
WRITE THE VALUE OF NUMVAR IS: &NUMVAR
WRITE THE VALUE OF CHARVAR IS: &CHARVAR
WRITE THE VALUE OF PARM: &&VAR1 IS: &VAR1
WRITE THE VALUE OF ARITHMETIC RESULT IS: &RESULT
WRITE **** NOTE THE DECIMAL TRUNCATION FOR RESULT ****
EXIT
▪ Run the CLIST in TSO
Or from the TSO Remote Shell
▪ Create a new Local/Remote Action that calls THREPARM
▪ Test your work

76
Workshop – Call a REXX Passing Multiple Parameters
▪ Rexx code – copy and paste into a member named: SAYHELLO in your REXX library
/* REXX SAYHELLO - REXX Exec that takes two parameters */
Arg dsn you
SAY "Hello " you
/* Display names of all your datasets */
SAY "** All datasets with names beginning with your <HLQ> include **"
"listc"
/* Display stats on the dataset */
SAY "** Members of your selected PDS include **"
"LISTDS '"dsn"' STATUS"
exit
▪ Run the REXX exec in TSO
Or from the TSO Remote Shell ➔
▪ From the Menu Manager options in Preferences create a new Local/Remote Action that calls your REXX Exec
▪ Test your work

77
Workshop – Call a REXX Passing Multiple Parameters
▪ REXX code – copy and paste into a member named: THREPARM in your REXX library
/* REXX THREPARM - Rexx looping constructs */
arg LoopControl LoopCtr1 LoopCtr2
DO WHILE LoopControl \= LoopCtr1
SAY "LoopCtr1=" LoopCtr1
LoopCtr1 = LoopCtr1 + 1 ;
END
Say "=================="
DO UNTIL LoopControl = LoopCtr2
SAY "......LoopCtr2=" LoopCtr2
LoopCtr2 = LoopCtr2 + 1 ;
END
Exit
▪ Run the REXX exec in TSO - or from the TSO Remote Shell
▪ Create and test a new Local/Remote Action that calls THREPARM
▪ Test with argument values such as: '8 1 1'

78
Workshop – Call a CLIST Passing $list Parameters – 1 of 3
▪ In this workshop you will have to create a sequential file in TSO – then access the file using a CLIST – and call the CLIST from Menu Manager
▪ File Specification:
DSN: <HLQ>.PHONE
DCB:
▪ LRECL: 80
▪ BLKSIZE: 800
▪ SPACE: 1 Track is sufficient
▪ Edit: <HLQ>.PHONE
▪ Add a few records
Last Name starting in byte 1
Followed by a space
9 ordinal numbers
▪ Save your changes

79
Workshop – Call a CLIST Passing $list Parameters – 2 of 3
▪ CLIST code – copy and paste into a member named: PHONE in your CLIST library
PROC 1 NAME
Alloc f(sysdval) da('DDS0001.PHONE.DATA') shr reu
CONTROL NOMSG NOFLUSH
ERROR +
DO
IF &LASTCC = 400 THEN +
DO
WRITENR The name requested, &NAME, was not found in the staff
WRITE directory.
SET DONE=YES
END
RETURN
END /* END OF END-OF-FILE ROUTINE */
SET DONE=NO
OPENFILE SYSDVAL
DO WHILE &DONE=NO
GETFILE SYSDVAL
READDVAL LNAME PHONUMBR
IF &STR(&NAME) = &STR(&LNAME) THEN +
DO
WRITE &PHONUMBR
SET DONE=YES
END
END
CLOSFILE SYSDVAL
Free file(sysdval)

80
Workshop – Call a CLIST Passing $list Parameters – 3 of 3
▪ Run the CLIST in TSO -or run from the TSO Remote Shell
▪ Create a new Local/Remote Action that calls PHONE and test your work

81
Workshop – Call a REXX Passing List Parameters – 1 of 3
▪ In this workshop you will have to create a simple sequential file in TSO – then access the file using a REXX – and call the REXX Exec from Menu Manager
▪ File Specification:
DSN: <HLQ>.EQUIP
DCB:
▪ LRECL: 80
▪ BLKSIZE: 800
▪ SPACE: 1 Track is sufficient
▪ Edit your <HLQ>.EQUIP
▪ Add several records
8 Bytes of repeated letters AAAA → LLLL (see picture)
One of the following: AUTO SCOP MON TTES
Anything at all (any characters) to the end of the record
Save your changes
82
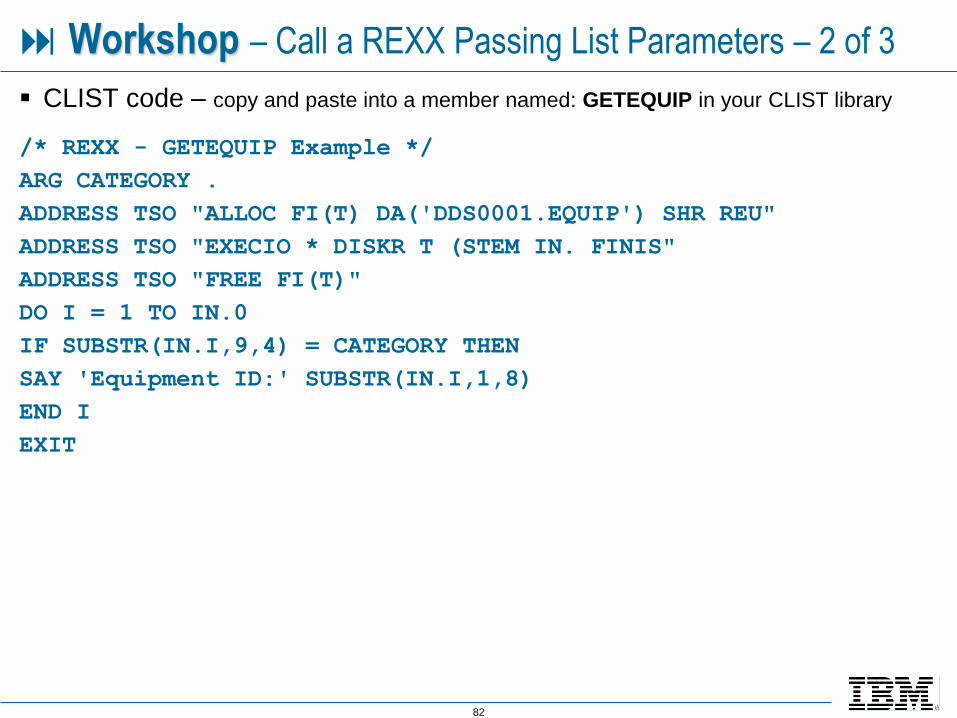
Workshop – Call a REXX Passing List Parameters – 2 of 3
▪ CLIST code – copy and paste into a member named: GETEQUIP in your CLIST library
/* REXX - GETEQUIP Example */
ARG CATEGORY .
ADDRESS TSO "ALLOC FI(T) DA('DDS0001.EQUIP') SHR REU"
ADDRESS TSO "EXECIO * DISKR T (STEM IN. FINIS"
ADDRESS TSO "FREE FI(T)"
DO I = 1 TO IN.0
IF SUBSTR(IN.I,9,4) = CATEGORY THEN
SAY 'Equipment ID:' SUBSTR(IN.I,1,8)
END I
EXIT

83
Workshop – Call a REXX Passing List Parameters – 3 of 3
▪ Run the REXX in TSO -or run from the TSO Remote Shell
▪ Create a new Local/Remote Action that calls GETEQUIP and test your work

84
Workshop – Invoke a TSO Command Passing List Parameters – 1 of 2
▪Menu Manager example that uses $list to present different TSO commands to the ISPF Help system.
Create a new Menu Manager Run Action that uses the following
HELP $input(TSO Keyword,,$list{allocate,alter,convert,copy,delete,edit,format,free,list,listalc,listbc,listcat,listds,merge,rename,exec,logof,logon,profile,send,terminal,time,when,cancel,output,status,submit,cnvtcat,define,export,import,print,repro,verify})
Note - Please copy/paste the
above (do not type all of this) ➔

85
Workshop – Invoke a TSO Command Passing List Parameters – 2 of 2
▪Test your new Menu Manager Run ActionNote that there may be some Help topics that are not found
in your z/OS installation
86
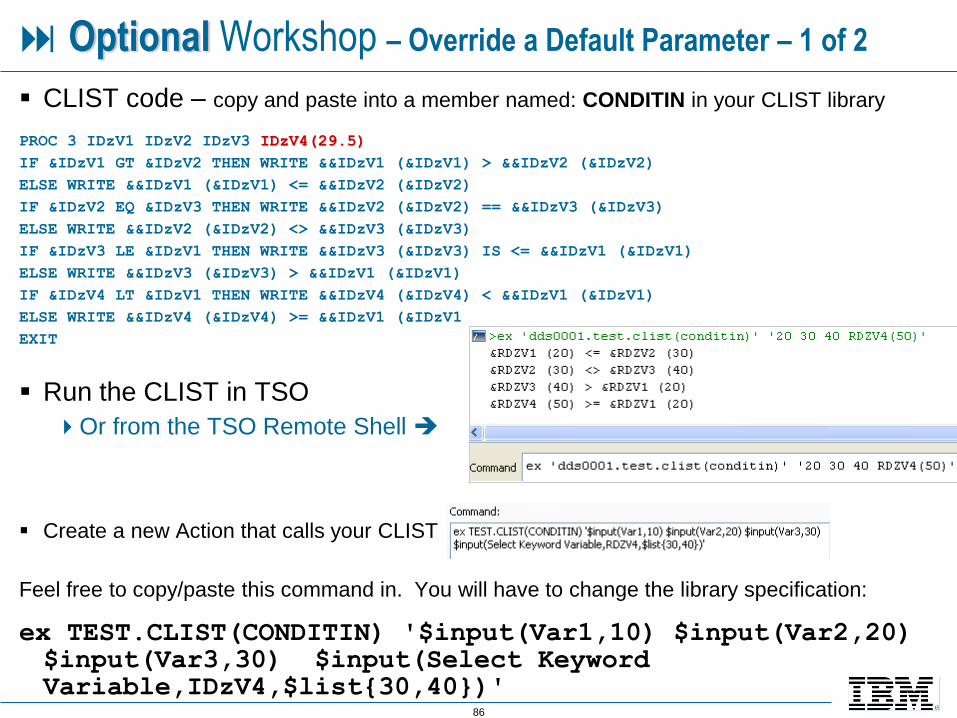
Optional Workshop – Override a Default Parameter – 1 of 2
▪ CLIST code – copy and paste into a member named: CONDITIN in your CLIST library
PROC 3 IDzV1 IDzV2 IDzV3 IDzV4(29.5)
IF &IDzV1 GT &IDzV2 THEN WRITE &&IDzV1 (&IDzV1) > &&IDzV2 (&IDzV2)
ELSE WRITE &&IDzV1 (&IDzV1) <= &&IDzV2 (&IDzV2)
IF &IDzV2 EQ &IDzV3 THEN WRITE &&IDzV2 (&IDzV2) == &&IDzV3 (&IDzV3)
ELSE WRITE &&IDzV2 (&IDzV2) <> &&IDzV3 (&IDzV3)
IF &IDzV3 LE &IDzV1 THEN WRITE &&IDzV3 (&IDzV3) IS <= &&IDzV1 (&IDzV1)
ELSE WRITE &&IDzV3 (&IDzV3) > &&IDzV1 (&IDzV1)
IF &IDzV4 LT &IDzV1 THEN WRITE &&IDzV4 (&IDzV4) < &&IDzV1 (&IDzV1)
ELSE WRITE &&IDzV4 (&IDzV4) >= &&IDzV1 (&IDzV1
EXIT
▪ Run the CLIST in TSO
Or from the TSO Remote Shell ➔
▪ Create a new Action that calls your CLIST
Feel free to copy/paste this command in. You will have to change the library specification:
ex TEST.CLIST(CONDITIN) '$input(Var1,10) $input(Var2,20) $input(Var3,30) $input(Select Keyword Variable,IDzV4,$list{30,40})'

87
Optional Workshop – Override a Default Parameter – 2 of 2
▪ Test your work
If you checked: Show output in dialog
If you un-checked: Show output in dialog
Recall from the slides that you must explicitly
type (Parentheses) around a keyword variable
to over-ride its default value

88
Workshop - Invoke a REXX Exec From Within Edit – 1 of 3
It can be useful to invoke CLISTs and REXX Execs from within the LPEX editor on a program:
Ensure that the code conforms to standards
Check JCL syntax
▪ This is done the same way as other Menu Manager work we've seen so far:
In the last section of this course you will learn how to provide Run Actions within different IDz context menus
▪ In this workshop you will create and execute a REXX Exec using Menu Manager that passes the name of the program you're editing to the REXX Exec.
▪ You'll follow the same process
Create the REXX Exec
Test the Exec using TSO
Create the Menu Manager Run Action and test it
Important note for invoking CLISTS/REXX Execs from within LPEX –
The only resource that is transmitted to z/OS through Menu Manager is the name of
the source file – not the source itself. So – if you use this technique in your shop,
developers will (given your use case) most likely want to: 1. Save their work – then
2. Launch the Menu Manager Action

89
Workshop - Invoke a REXX Exec From Within Edit – 2 of 3
▪ REXX code – copy and paste into a member named: FINDGOTO in your REXX library
/* REXX - FINDGOTO Example */
ARG FULLNAME
ADDRESS TSO "ALLOC FI(T) DA('"FULLNAME"') SHR REU"
ADDRESS TSO "EXECIO * DISKR T (STEM IN. FINIS"
ADDRESS TSO "FREE FI(T)"
COUNT = 0
DO I = 1 TO IN.0
DO X = 12 TO 72
IF SUBSTR(IN.I,X,5) = "GO TO" THEN
DO
SAY 'GO TO FOUND AT LINE ' I ' CODE IS ' SUBSTR(IN.I,7,72)
COUNT = COUNT +1
END
END X
END I
SAY 'NUMBER OF GO TO STATEMENTS FOUND ' COUNT
SAY 'NUMBER OF LINES IN PROGRAM ' I
EXIT 0
▪ Run the REXX exec in TSO - or from the TSO Remote Shell –tested with a fully qualifiedCOBOL PDS – with a program that contains GO TO statements

90
Workshop – Invoke a REXX Exec From Within Edit – 3 of 3
▪ Create and test a new Menu Manager Run Action ➔
▪ Use the variable: '$fullname' - to pass up the fully qualified DSN+source member name to the REXX Exec
▪ Open a program in the LPEX editor and run the Menu Manager entry

91
Workshop – Call a REXX That Submits JCL – 1 of 2
Sometimes the functionality you require can only be invoked from JCL. The REXX "queue" keyword allows you to pipe JCL statements internally, and then submit the JCL directly out of the REXX exec
1. Create a new REXX PDS member named: IEBCOPY
/* REXX to queue JCL for doing an IEBCOPY - of all PDS members into a new DSN */
parse arg indsn outdsn userid
indsn = strip(translate(indsn,"","'"))
say indsn
queue "//"userid||C||" JOB , "
queue "// MSGLEVEL=(1,1),MSGCLASS=H,USER=&SYSUID, "
queue "// NOTIFY=&SYSUID,TIME=1,REGION=70M "
queue "//STEP1 EXEC PGM=IEBCOPY "
queue "//SYSPRINT DD SYSOUT=* "
queue "//INDD1 DD DISP=SHR,DSN="||indsn
queue "//OUTDD1 DD DSN="||outdsn||",DISP=(NEW,CATLG,DELETE), "
queue "// STORCLAS=USRBASE,SPACE=(TRK,(10,10,10),RLSE), "
queue "// DCB=(LRECL=80,RECFM=FB,DSORG=PO) "
queue "//SYSUT3 DD UNIT=SYSDA,SPACE=(TRK,(1,2)) "
queue "//SYSUT4 DD UNIT=SYSDA,SPACE=(TRK,(1,2)) "
queue "//SYSIN DD * "
queue " COPY INDD=INDD1,OUTDD=OUTDD1 "
queue "/* "
queue "@#"
Address TSO "SUB * END(@#)"
2. Run the REXX exec in TSO –or from the TSO Remote Shell ➔
92
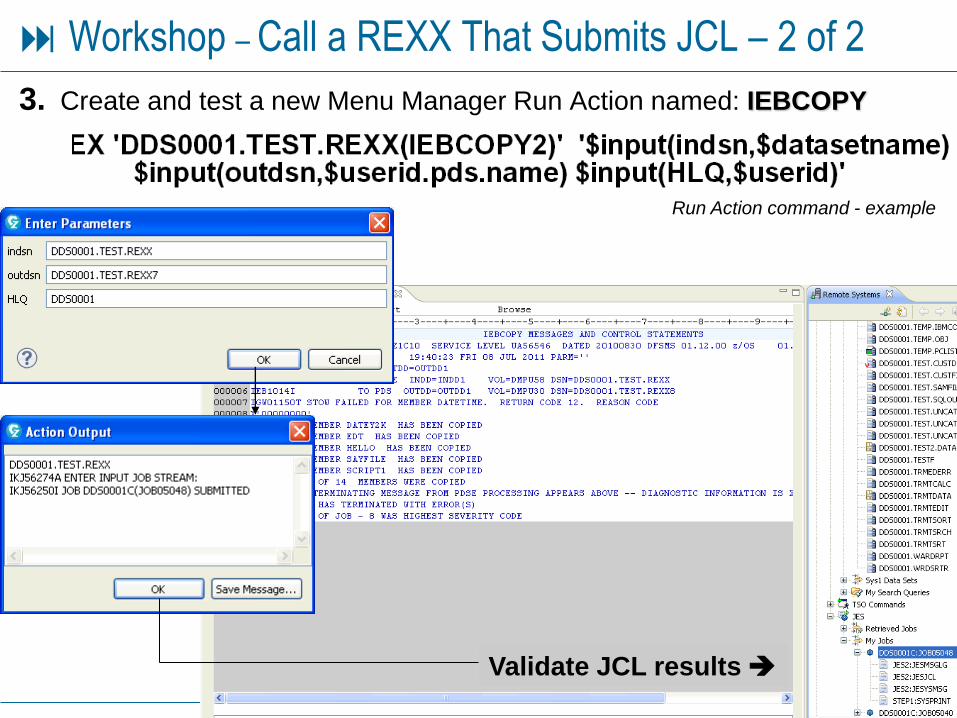
Workshop – Call a REXX That Submits JCL – 2 of 2
3. Create and test a new Menu Manager Run Action named: IEBCOPY
Run Action command - example
Validate JCL results ➔

93
Unit ReviewHaving completed this unit on using Menu Manager to execute CLISTS and REXX
execs on z/OS, you should now be able to:
Describe the elements of the Menu Manager specific to CLIST/REXX execution
Create Menu Manager actions, menus and sub-menus that interact with z/OS resources and:
▪ Invoke Command Lists (CLISTS) and REXX procedures
▪ Prompt for user (dynamic) input variables – passing the variables to z/OS as input
parameters
Describe the Best Practices approach to doing Menu Manager work, in terms of
development and testing

94
UNIT
Topics:
Menu Manager
▪ Menu Manager - Introduction, Terms and Concepts
▪ Invoking CLISTS and REXX execs
▪ Submitting Batch JOBs with JCL Variable Substitution
▪ Organizing Menu Manager Actions Through Sub-menus
▪ Enabling ISPF Edit Macros
▪ Appendix – Sample Menu Run Actions to access CA-Panvalet

95
Unit objectivesAfter completing this topic on using Menu Manager to submit jobs to z/OS, you should
be able to:
Create JCL that employs variables correctly
Create Action scripts with the correct syntax for dynamic variable JCL submission
Identify the context for dynamic variable / JCL menu action definitions
Describe the Best Practices approach to developing and testing Menu Manager dynamic
variable JCL menu actions
96
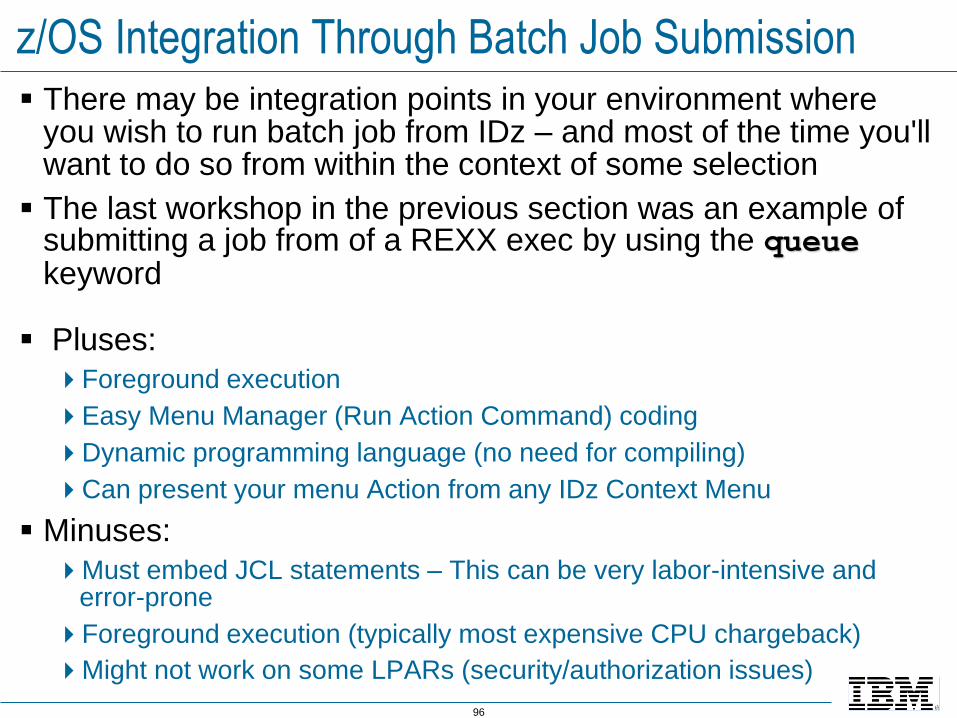
z/OS Integration Through Batch Job Submission
▪ There may be integration points in your environment where you wish to run batch job from IDz – and most of the time you'll want to do so from within the context of some selection
▪ The last workshop in the previous section was an example of submitting a job from of a REXX exec by using the queuekeyword
▪ Pluses:
Foreground execution
Easy Menu Manager (Run Action Command) coding
Dynamic programming language (no need for compiling)
Can present your menu Action from any IDz Context Menu
▪ Minuses:
Must embed JCL statements – This can be very labor-intensive and error-prone
Foreground execution (typically most expensive CPU chargeback)
Might not work on some LPARs (security/authorization issues)

97
Using Menu Manager for JCL Submission
Another option: submit a JCL job using the Menu Manager keyword: SUBMIT
▪ Pluses:
Easy menu manager work
Easy JCL coding and no need to compile JCL
More flexible coding from Run Action – more transparency into the process
▪ Minuses:
Do not have procedural logic capabilities of CLIST/REXX language – no:
▪ Conditional logic
▪ Calls to other CLIST or REXX Execs
– Unless your JCL itself calls a CLIST or REXX Exec
JCL Submission Menu options are available from all IDz Context Menus
To learn how to use Menu Manager with dynamic JCL submission we'll start from a JCL file (next slide)

98
Example – Run SUPERCE to Compare Two Libraries▪ Here is a simple JCL file to execute the IBM utilities SUPERCE
– which compares two libraries and all members with matching names
▪ In this example, we will allow the IDz user to dynamically specify:
!USERID! – Pass the USERID dynamically – with an "S" suffix
DSN=!NEWDD! – Provide the fully-qualified name of a PDS
DSN=!OLDD! – Provide another fully-qualified PDS name
Here is the JCL – including dynamic substitution variables –which are enclosed in exclamation marks (!)

99
Example: Submit Command Syntax
Note the following:
▪ SUBMIT → Keyword
▪ DDS0001.TEST.JCL(SUPERCE) → JCL member in library
▪ Prompt,2,VariableValue → boilerplate (always include this – if you want to prompt for user input – alternatively, you may code: NOPROMPT)
▪ Submit – Type of Menu Manager action
▪ Compare PDS – Label on Menu Manager input form
▪ Named pairs of input data: Must match with JCL dynamic substitution variables –there are three in this example:
USERID,$userid→ Label, IDz substitution Variable
NEWDD,$datasetname → Label, IDz substitution Variable
OLDDD,$userid.YYY.ZZZ → Label, IDz substitution Variable
Run Action

100
Example: IDz Run Action Selection
▪ Most of the Run Action coding for Menu Manager dynamic JCL substitution is the same as calling TSO commands and calling CLIST/REXX Execs
▪ However, the Use existing action ID: changes to:
▪ From:
Select…
Open com.ibm.etools.varsusbtitution
▪ Select: com.ibm.ftt.ui.menumanager.mfivarsubsaction
com.ibm.ftt.ui.menumanager.mfivarsubsaction

101
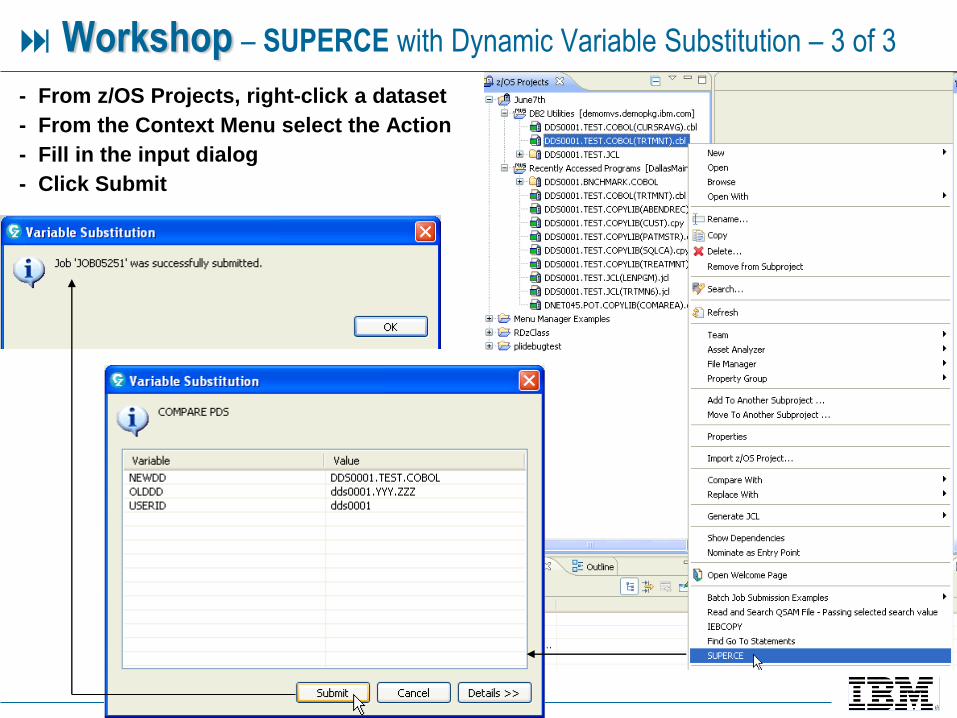
Using a Menu Manager SUBMIT Action1. From z/OS Projects, right-click a dataset
2. From the Context Menu select the Action
3. Fill in the input dialog
4. Click Submit
4.
1.
2.
3.
102
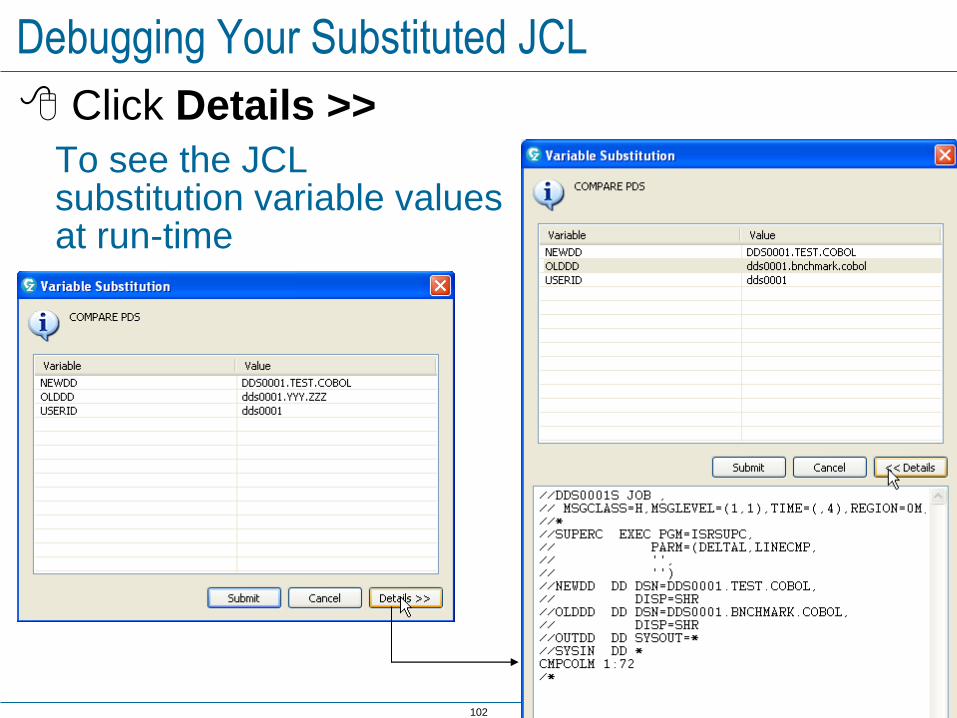
Debugging Your Substituted JCL
Click Details >>
To see the JCL substitution variable values at run-time

103
JCL Submission Notes
▪ The results of the batch job submitted will be found in JES
▪ JCL Variables presented in the user Menu include:
1. All Run Action command variables
▪ First value of named-pair:
2. Any !variable! found in the JCL:
▪ All JCL statements must be:
Syntactically correct - at run-time
▪ DSN=, DISP=, etc.
– I.E. In our example, you must have a listing library that receives
the output of a SUPERCE utility: 133 LRECL, etc.

104
SUBMIT – Copy/Paste Example
Custom JCL//!USERID!A JOB ,// MSGCLASS=H,MSGLEVEL=(1,1),TIME=(,4),REGION=0M,COND=(16,LT)//SORTSTEP EXEC PGM=SORT//SYSPRINT DD SYSOUT=*//SYSOUT DD SYSOUT=*//SORTIN DD DSN=!SORTIN!,DISP=SHR//SORTOUT DD DSN=!SORTOUT!,DISP=SHR//SYSIN DD *SORT FIELDS=(1,20,CH,D)
Copy/Paste Menu Manager Command
SUBMIT,DDS0001.ADLAB.JCL1(SORTMENU),Prompt,2,Variable,Value,Submit,Sort
File,USERID,$userid,SORTIN,$userid.TXT,SORTOUT,$userid.TXT

105
Workshops – Dynamic JCL Substitution
▪ You will create several Menu Manager Actions that call JCL passing variables to be substituted dynamically in the JCL
▪ You might wish to create a JCL library for this set of workshops – in order not to affect your shop's source code
▪ You will not be able to test these dynamic JCL substitution use cases from TSO or from the Remote Shell
However, you should run (submit) the native JCL statements (before adding substitution variables and writing the Menu Manager Action commands) and validate your results
And you should make frequent use of the Details >> button, on the input form – to visualize the JCL prior to a SUBMIT
▪ Make all of your new Menu Manager Actions "Generic" – so that they appear in all Context Menus
▪ This workshop should take ~60 minutes

106
Workshops – Setup
Allocate an 80-byte LRECL libraries on z/OS
<TSOID>.IDz.JCL
You won't need much space: TRK(1,1) with room for 4 directory entries each will be sufficient
You can use Allocate Like –
against an existing PDS ➔

107
Workshop – Step Details
1. Create a z/OS Project/MVS SubProject for the z/OS connection you are using in this course (this is a one time task … why is it necessary?)
2. Create a new member in your JCL library
3. Copy and paste the JCL source into a new PDS member and save
The source code for the JCL will be in the slides
You will need to modify the JOB card (and possibly other statements)
4. Submit the JCL from IDz as is – and verify that it works
5. Modify the JCL statements to add IDz substitution variables as per the workshop specifications
6. Create a new Menu Manager Action that invokes the JCL Use the same File Selection .xml file you used for the previous workshops
Allow for all file associations
Name the Action the same name as the JCL member
7. Test your Menu Manager Action from your z/OS Project

108
Step 0. Ensure that your Property Groups files are correctly specified and associated with your connection.
Steps:1. From Remote Systems, expand: My Data Sets – under MVS Files
2. From z/OS Projects - Create a new z/OS Project… and MVS Subproject
Create an MVS Subproject – Workshop

109
▪From Remote Systems - Expand some of the PDS files and select some copy members, COBOL programs and JCL datasets
▪Right-click and add any number of selected:
– Individual dataset members
– Libraries (an entire PDS)
Add Resources to an MVS Subproject – Workshop
A z/OS Project + MVS SubProject

110
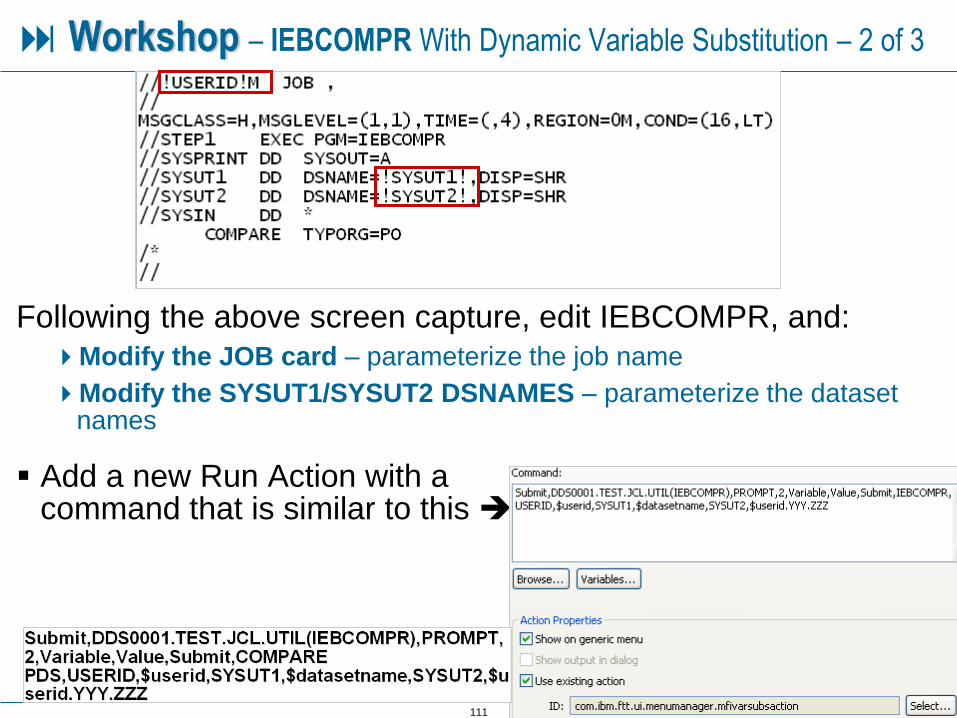
Workshop – IEBCOMPR With Dynamic Variable Substitution – 1 of 3
JCL statements - copy and paste into a new member named: IEBCOMPR in your JCL library
//DDS0001M JOB ,
// MSGCLASS=H,MSGLEVEL=(1,1),TIME=(,4),REGION=0M,COND=(16,LT)
//STEP1 EXEC PGM=IEBCOMPR
//SYSPRINT DD SYSOUT=A
//SYSUT1 DD DSNAME=DDS0001.TEST.REXX8,DISP=SHR
//SYSUT2 DD DSNAME=DDS0001.TEST.REXX5,DISP=SHR
//SYSIN DD *
COMPARE TYPORG=PO
/*
//
▪ From the above
Modify the JOB card
Modify the SYSUT1/SYSUT2 DSNAMES – to point at any of your (small) libraries
▪ From RSE: Submit the JCL – and verify that it runs successfully in JES
▪ Create and test a new Local/Remote Action that calls IEBCOMPR
Steps on the next slide…
111
Workshop – IEBCOMPR With Dynamic Variable Substitution – 2 of 3
Following the above screen capture, edit IEBCOMPR, and:
Modify the JOB card – parameterize the job name
Modify the SYSUT1/SYSUT2 DSNAMES – parameterize the dataset names
▪ Add a new Run Action with a command that is similar to this ➔
112
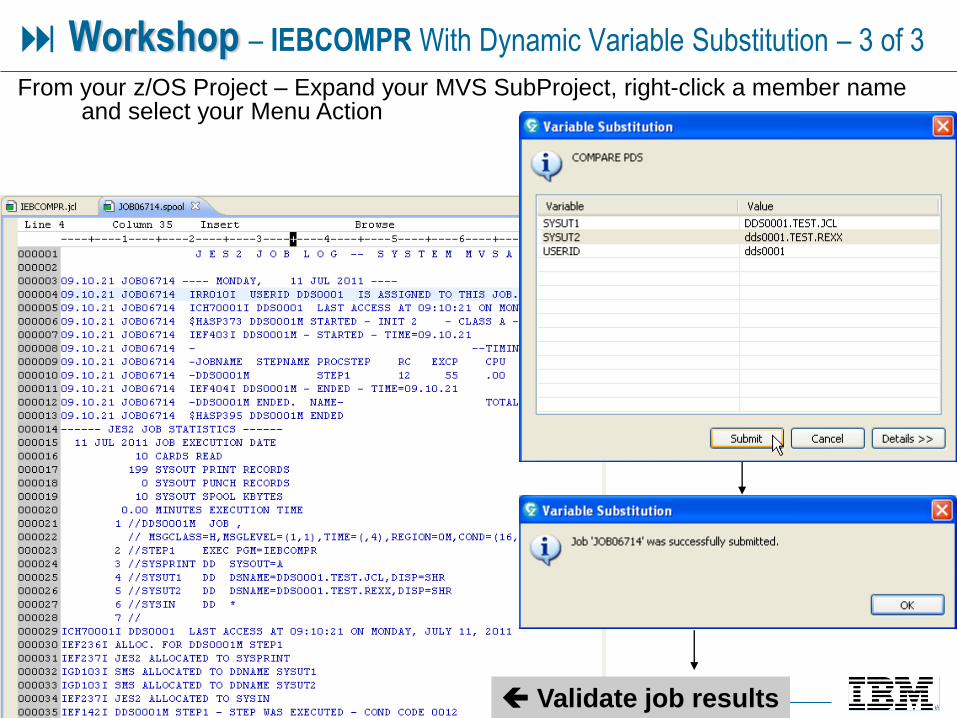
Workshop – IEBCOMPR With Dynamic Variable Substitution – 3 of 3
Validate job results
From your z/OS Project – Expand your MVS SubProject, right-click a member name and select your Menu Action

113
Workshop – SUPERCE with Dynamic Variable Substitution – 1 of 3
1. Copy and paste the following JCL into a new member named: SUPERCE in your JCL library
//DDS0001S JOB ,
// MSGCLASS=H,MSGLEVEL=(1,1),TIME=(,4),REGION=0M,COND=(16,LT)
//*
//SUPERC EXEC PGM=ISRSUPC,
// PARM=(DELTAL,LINECMP,'','')
//NEWDD DD DSN=DDS0001.TEST.REXX,
// DISP=SHR
//OLDDD DD DSN=DDS0001.TEST.REXX4,
// DISP=SHR
//OUTDD DD SYSOUT=*
//SYSIN DD *
CMPCOLM 1:72
/*
//
2. In the SUPERCE member:
Modify the JOB card
Modify the SYSUT1/SYSUT2 DSNAMES – to point at any of your (small) libraries
3. From RSE: Submit the JCL – and verify that it runs successfully in JES

114
Workshop – SUPERCE with Dynamic Variable Substitution – 2 of 3
Following the above screen capture, edit SUPERCE, and:
Modify the JOB card – parameterize the job name
Modify the NEWDD and OLDDD DSNAMES – parameterize the dataset names – save your changes
▪ Add a new Menu Manager Run Action with a Command similar to the following ➔
115
Workshop – SUPERCE with Dynamic Variable Substitution – 3 of 3
- From z/OS Projects, right-click a dataset
- From the Context Menu select the Action
- Fill in the input dialog
- Click Submit

116
Workshop – IEBDG with Dynamic Variable Substitution – 1 of 2
1. Create (allocate) a new sequential dataset named: <HLQ>.DATA.TEST. Use the IDz allocate new wizard – and from the Advanced screen make the LRECL=100
2. Copy and paste the following JCL into a new member named: IEDBG in your JCL library
//DDS0001S JOB ,
// MSGCLASS=H,MSGLEVEL=(1,1),TIME=(,4),REGION=0M,COND=(16,LT)
//IEBDG EXEC PGM=IEBDG
//SYSPRINT DD SYSOUT=*
//OUTFILE DD DSN=DDS0001.DATA.TEST,DISP=SHR
//SYSIN DD *
DSD OUTPUT=(OUTFILE)
FD NAME=LNAME,LENGTH=20,FORMAT=AL,ACTION=RP
FD NAME=FNAME,LENGTH=20,PICTURE=20,'ALEXANDRIA '
FD NAME=CITY,LENGTH=20,PICTURE=20,'RIDGEWOOD '
FD NAME=ST,LENGTH=2,PICTURE=2,'NJ'
FD NAME=ZIP,LENGTH=5,PICTURE=5,'07450'
CREATE QUANTITY=100,NAME=(LNAME,FNAME,CITY,ST,ZIP),FILL=X'40'
END
/*
//
3. In the SUPERCE member:
Modify the JOB card
Modify the OUTFILE DSN – to point to your new sequential dataset
4. From RSE: Submit the JCL – and verify that it runs successfully in JES
5. From RSE: Open <HLQ>.DATA.TEST and verify that the sample data was generated. Using the editor, delete all of the records in the file
6. Close and save your record deletions.

117
Following the above screen capture, edit IEBDG and:Modify the JOB card – parameterize the job name
Modify the OUTFILE DSNAME – parameterize the dataset name – save your changes
Modify QTY – parameterize the numbers passed in to the utility
▪ Add a new Menu Manager Run Action and Command to submit the JCL
▪ Run your Menu Manager Action, launching it by right-clicking over a PDS member
▪ Overtype DSN and optionally, QTY. Submit the job and verify the results in JES
Menu Manager only allows menu selection from a PDS member – for JCL substitution
▪ Add another variable (both in the Run Action Command and in the JCL), to make the number of output records created dynamic
Workshop – IEBDG with Dynamic Variable Substitution – 2 of 2

118
Workshop – SORT with Dynamic Variable Substitution – 1 of 2
1. Create (allocate) a new dataset named <HLQ>.DATA.TEST.SORTOUT : with the same DCB as <HLQ>.DATA.TEST. Use the IDz Allocate Like function in RSE
2. Copy and paste the following JCL into a new member named: SORT in your JCL library
//DDS0001S JOB ,
// MSGCLASS=H,MSGLEVEL=(1,1),TIME=(,4),REGION=0M,COND=(16,LT)
//SORTSTEP EXEC PGM=SORT
//SYSPRINT DD SYSOUT=*
//SYSOUT DD SYSOUT=*
//SORTIN DD DSN=DDS0001.DATA.TEST,DISP=SHR
//SORTOUT DD DSN=DDS0001.DATA.TEST.SORTOUT,DISP=SHR
//SYSIN DD *
SORT FIELDS=(1,20,CH,D)
3. In the SORT member:
Modify the JOB card
Modify the SORTIN AND SORTOUT DSNAMES – to point to your files
4. From RSE: Submit the JCL – and verify that it runs successfully in JES
5. From RSE: Open <HLQ>.DATA.TEST.SORTOUT and verify that the records were sorted by LNAME (the first 20 bytes) descending.
6. Using the editor: Delete all of the records in the file. Close and save your record deletions.

119
Following the above screen capture, edit SORT and:Modify the JOB card – parameterize the job name
Modify the SORTIN and SORTOUT DSNAMES – parameterize the dataset names – save your changes
▪ Add a new Menu Manager Run Action and Command to submit the JCL
▪ Run your Menu Manager Action, launching it by right-clicking over a PDS member
▪ Verify your results by opening <HLQ>.DATA.TEST.SORTOUT in the editor
▪ Add another variable (both in the Run Action Command and in the JCL), to make the SORT FIELDS specification dynamic.
Note that you may make the order specification dynamic, beginning/ending position or all three dynamic
Workshop – SORT with Dynamic Variable Substitution – 2 of 2

120
Unit objectivesHaving completed this topic on using Menu Manager to submit jobs to z/OS, you
should be able to:
▪Create JCL that employs variables correctly
Create Action scripts with the correct syntax for dynamic variable JCL submission
Identify the context for Dynamic Variable / JCL Menu Action definitions
Describe the Best Practices approach to developing and testing Menu Manager dynamic
variable JCL menu actions

121
UNIT
Topics:
Menu Manager
▪ Menu Manager - Introduction, Terms and Concepts
▪ Invoking CLISTS and REXX execs
▪ Submitting Batch Jobs with JCL variable substitution
▪ Organizing Menu Manager Actions Through Sub-menus
▪ Enabling ISPF Edit Macros
▪ Appendix – Sample Menu Run Actions to access CA-Panvalet

122
Unit objectivesSub-Menus are used to avoid having dozens of GENERIC menu Actions overrunning
your Context Menus
After completing this topic on organizing Menu Manager actions through sub-menus,
you should be able to:
Create additional File selection XML files
Describe the concept of context menu selection
Describe the menu/sub-menu principles of Menu Manager's U.I.
Create two and three-level submenus
Assign different File Selection XML files to different IDz Context Menus
Describe how to import and share Menu Manager work
Describe the Best Practices approach to doing Menu Manager work, in terms of
development and testing
123
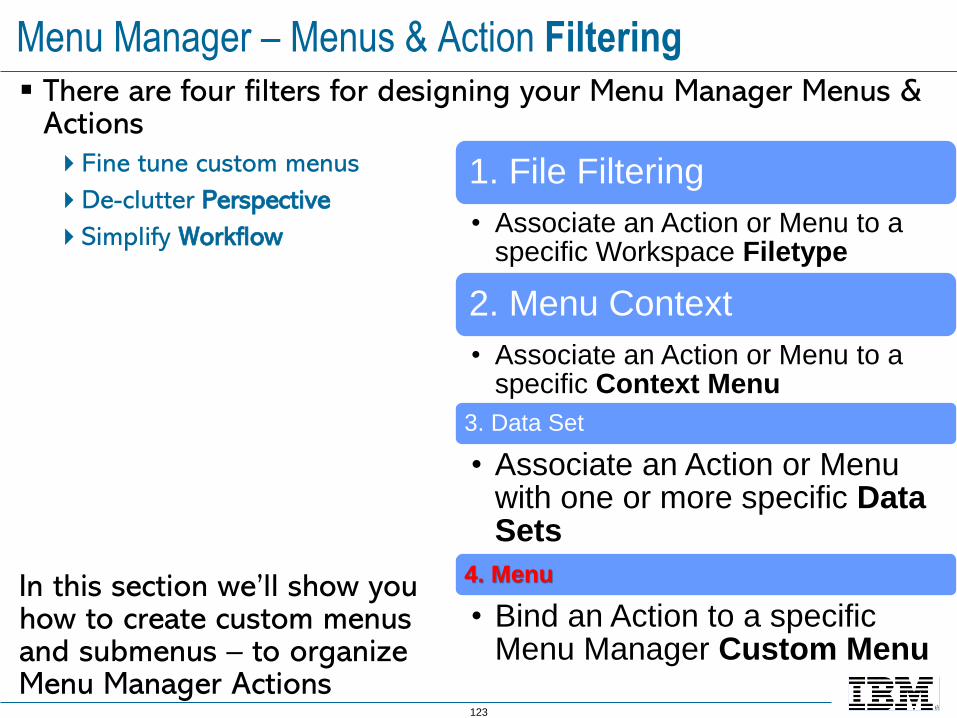
▪ There are four filters for designing your Menu Manager Menus & Actions
Fine tune custom menus
De-clutter Perspective
Simplify Workflow
In this section we’ll show you how to create custom menus and submenus – to organize Menu Manager Actions
Menu Manager – Menus & Action Filtering
1. File Filtering
• Associate an Action or Menu to a specific Workspace Filetype
2. Menu Context
• Associate an Action or Menu to a specific Context Menu
3. Data Set
• Associate an Action or Menu with one or more specific Data Sets
4. Menu
• Bind an Action to a specific Menu Manager Custom Menu

124
Review – Menu Manager Design Solutions
In designing the U.I. for your Menu Manager Actions, you have three options – or techniques:
1. Associate Menu Actions with file-types – allowing you to control what options are allowed per file type:
▪ Example, you can specify what actions are available to a COBOL program
versus what actions are allowed for a JCL file
2. Associate Menu Actions with specific views –This allows you to make:
▪ Certain menus available under Remote Systems Explorer
▪ Other menus available within z/OS Projects/MVS SubProjects
▪ And still other menus only displayed in the LPEX editor
3. Display Menu Actions in Sub-Menus – allowing you to hierarchically categorize and present your menu Action system
The above (3) options are NOT mutually exclusive
In this section we'll walk you through all three of the above
125
File Type Associations
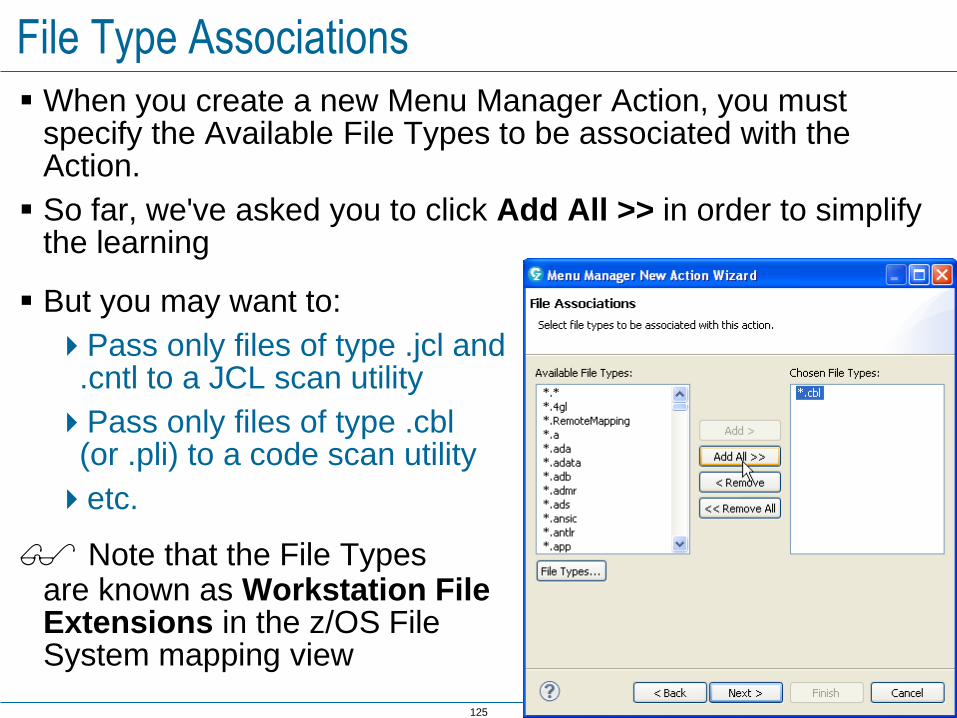
▪ When you create a new Menu Manager Action, you must specify the Available File Types to be associated with the Action.
▪ So far, we've asked you to click Add All >> in order to simplify the learning
▪ But you may want to:
Pass only files of type .jcl and .cntl to a JCL scan utility
Pass only files of type .cbl (or .pli) to a code scan utility
etc.
Note that the File Types are known as Workstation File Extensions in the z/OS File System mapping view
126
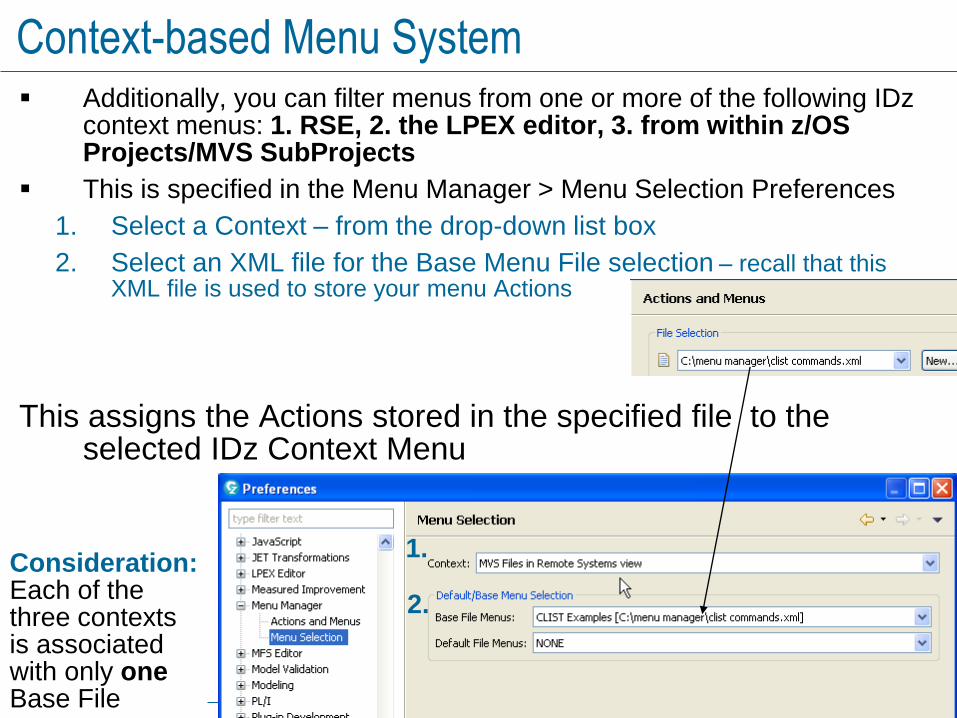
Context-based Menu System▪ Additionally, you can filter menus from one or more of the following IDz
context menus: 1. RSE, 2. the LPEX editor, 3. from within z/OS Projects/MVS SubProjects
▪ This is specified in the Menu Manager > Menu Selection Preferences
1. Select a Context – from the drop-down list box
2. Select an XML file for the Base Menu File selection – recall that this XML file is used to store your menu Actions
This assigns the Actions stored in the specified file to the selected IDz Context Menu
Consideration:Each of the three contexts is associated with only oneBase File
1.
2.

127
Creating Sub-Menus and Assigning Actions▪ Finally, you can create Sub-Menus, used to organize/categorize your
menu Actions
Consideration: A menu Action that is not generic must be assigned to a Sub-Menu (not a menu, a Sub-Menu) in order to be displayed

128
Menus and Sub-Menus
▪ Terms and concepts:
Menus are internal names - for a collection of Sub-Menus and Actions
Sub-Menus are the unit-of-display - from a Context Menu
▪ Example:
Consider the Menu definition below:
▪ Name: Class Examples
▪ Four Sub-Menus
▪ Each Sub-Menu contains one-to-many Actions
▪ Class Examples is not shown – only the Sub-Menus – and Actions
that are assigned to a Sub-Menu
From the Context Menu
Sub-Menus
Actions
Menu ➔
Sub-Menu ➔
Sub-Menu ➔Sub-Menu ➔
Sub-Menu ➔
Actions
129
Workshops – Creating Sub-Menus Overview
▪ You will create several Sub-Menus and assign Actions to them
▪ This workshop should take ~45 minutes

130
Workshop Setup – Remove GENERIC Specification
▪ In order to properly work with Sub-Menus remove (un-check) the "Show on generic menu" check-box on the Run Options –for all of your existing menu Actions
Double-click each Action
Select Run Options
Un-check: Show on generic menu
Click OK

131
Workshop – Setup
From Actions and Menus, create four new files:
1. <filespec>\TSO
2. <filespec>\CLIST-REXX
3. <filespec>\JCL
4. <filespec>\LPEX
For each New File:
- Select File
- Click Finish
In the next steps, you will assign the menu Actions you've created to a menu in one of these files. Don't worry about which Actions you assign to which menus.
Except for: 1. Find Go TO Statements – which will be assigned to the \LPEXfile, 2. and the four Dynamic JCL Substitution examples (IEBCMPRE,
SUPERCE, SORT and IEBDG) which you will assign to \JCL

132
Workshop – Add Menus and Sub-Menus to the new Files
▪ From Actions: From File Selection, open one of the four new files
▪ From the Menus tab: Right-click and select New Menu…
Name the menu and click Next >
▪ From Add Actions:
Check each of the Actions you want associated with that file and click Finish

133
Workshop – Add Actions to the Three Other Files
▪ From Actions: From File Selection, open one of the other files ➔
▪ From the Menus tab: Right-click and select New Menu…
Name the menu and click Next >
▪ From Add Actions:
Check each of the Actions you want associated with that file and click Finish
Note.
The Find Go To
Statements Action
should be assigned
to your \LPEX file
Repeat this step for the other two files

134
Workshop – Assign File to Context Menu - LPEX▪ You will now filter the menu Actions by assigning each of your files to one of
the three Contexts
▪ From Menu Selection:
Open Context and select: MVS Files in System z LPEX Editor
Open Base File Menus: and select your \LPEX file

135
Workshop – Assign File to Context Menu – z/OS Projects
▪ From Menu Selection:
Open Context and select: MVS Files in z/OS Projects view
Open Base File Menus: and select your \JCL file

136
Workshop – Assign File to Context Menu - RSE▪ From Menu Selection:
Open Context and select: MVS Files in Remote Systems view
Open Base File Menus: and select your \CLIST-REXX file
▪ Click OK to close Preferences

137
Workshop – Test Your Context Menu Filters
▪ Test your LPEX filterFrom RSE – open a COBOL program
Right-click and run Find Go To Statements
Note that this was the only Menu Manager Action
▪ Test z/OS Projects
Expand a PDS
Right-click over a member (note that you have many individual Actions)
▪ Test RSE
Expand a PDS
Right-click a member (again … you have many individual menu Actions)
▪ If you found Actions in places you hadn't anticipated (where your
Context filters did not seem to work) – return to the Run Action wizard, and ensure that Show on generic menu is unchecked
▪ Even if everything was perfect (with your Context filters) - we're not quite there yet, are we – terms of an optimal U.I.

138
Workshop – Create Sub-Menus for CLISTS and REXX Execs – 1 of 4
▪ To create Sub-Menus:Return to Actions and Menus
(select the Menus tab)
Select the \CLIST-REXX file
Right-click over your Menu and select Add Submenu…
Name the Sub-menu: CLISTS
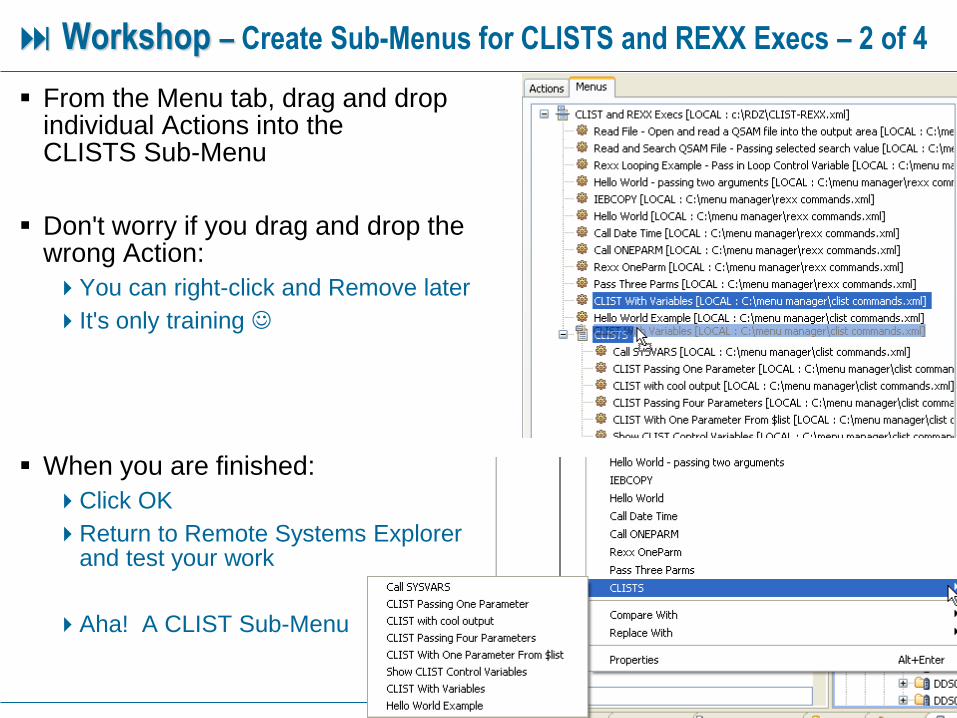
139
Workshop – Create Sub-Menus for CLISTS and REXX Execs – 2 of 4
▪ From the Menu tab, drag and drop individual Actions into the CLISTS Sub-Menu
▪ Don't worry if you drag and drop the wrong Action:
You can right-click and Remove later
It's only training ☺
▪ When you are finished:
Click OK
Return to Remote Systems Explorer and test your work
Aha! A CLIST Sub-Menu

140
Workshop – Create Sub-Menus for CLISTS and REXX Execs – 3 of 4
▪Create another Sub-Menu:Return to Actions and Menus
(from the Menus tab)
Select the \CLIST-REXX file
Right-click over your Menu and select Add Submenu…
Name the Sub-menu: REXX Execs
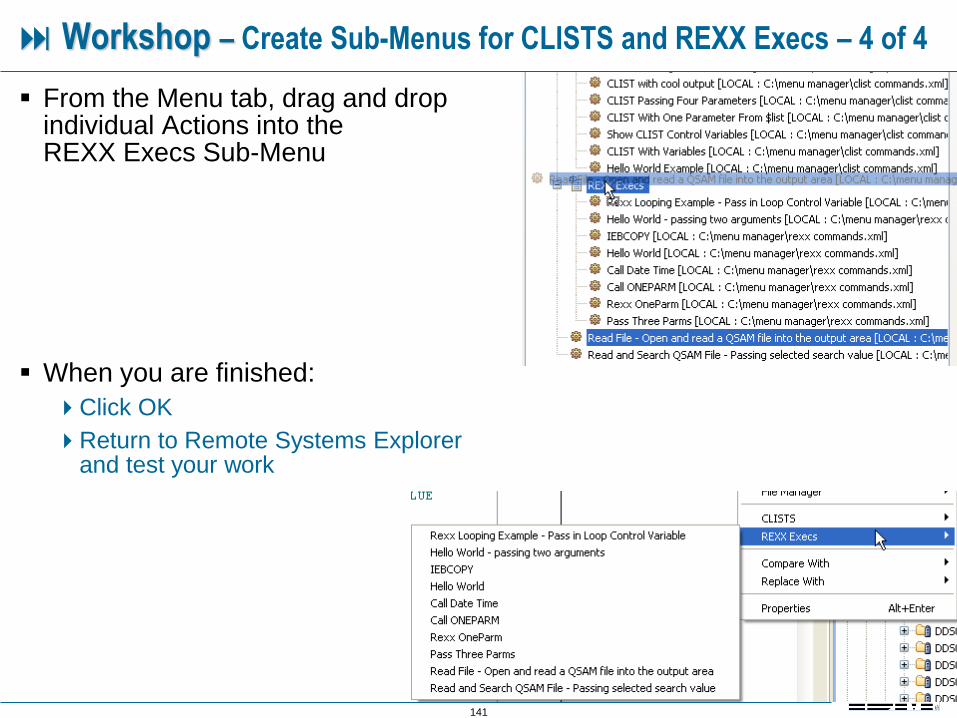
141
Workshop – Create Sub-Menus for CLISTS and REXX Execs – 4 of 4
▪ From the Menu tab, drag and drop individual Actions into the REXX Execs Sub-Menu
▪ When you are finished:
Click OK
Return to Remote Systems Explorer and test your work
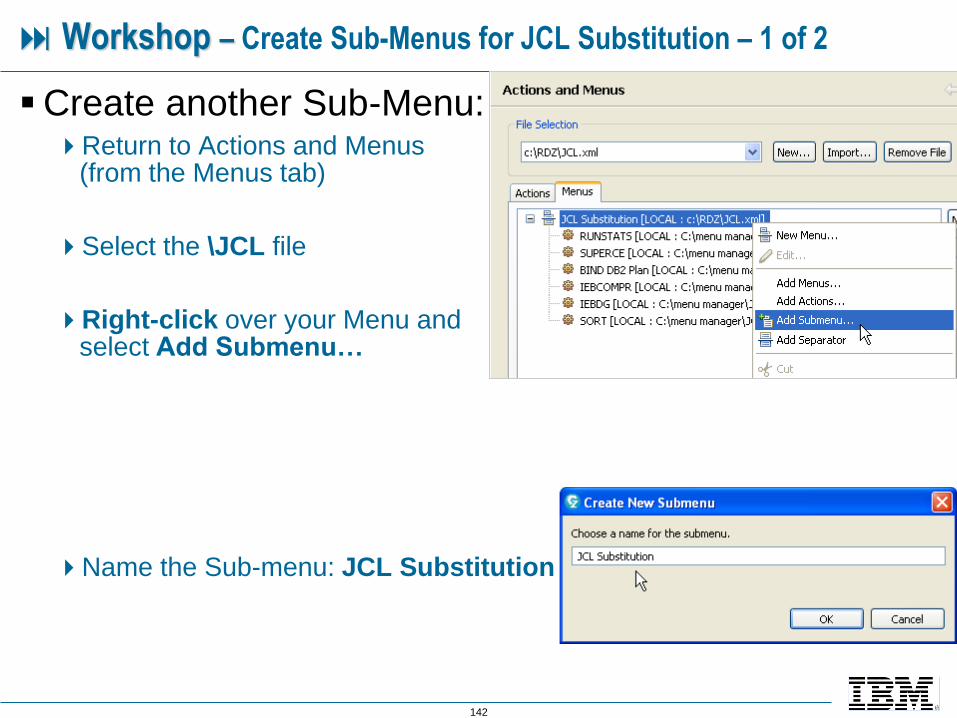
142
Workshop – Create Sub-Menus for JCL Substitution – 1 of 2
▪Create another Sub-Menu:Return to Actions and Menus
(from the Menus tab)
Select the \JCL file
Right-click over your Menu and select Add Submenu…
Name the Sub-menu: JCL Substitution
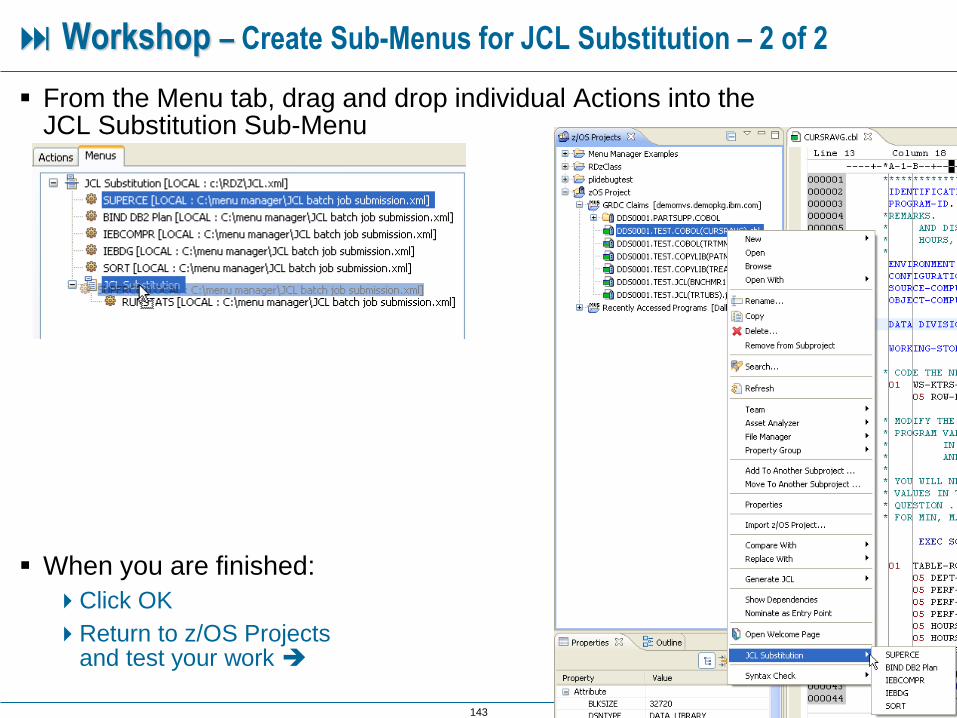
143
Workshop – Create Sub-Menus for JCL Substitution – 2 of 2
▪ From the Menu tab, drag and drop individual Actions into the JCL Substitution Sub-Menu
▪ When you are finished:
Click OK
Return to z/OS Projects and test your work ➔

144
Workshop – Add the TSO Commands Menu
▪ Now we will add the TSO Commands Menuinto the RSE Context
▪ From Actions and Menus (Menus tab)
Select CLISTS and REXX Execs
Right-click and select: Add Menus…
▪ From Menu Selection
Select your TSO Commands menu
Click OK

145
Workshop – Create Sub-Menus for TSO Commands – 1 of 2
▪Now we'll create a Sub-Menufrom a menuRight-click over your Menu and
select Make Submenu
Expand your TSO Commands Sub-Menu
Click OK
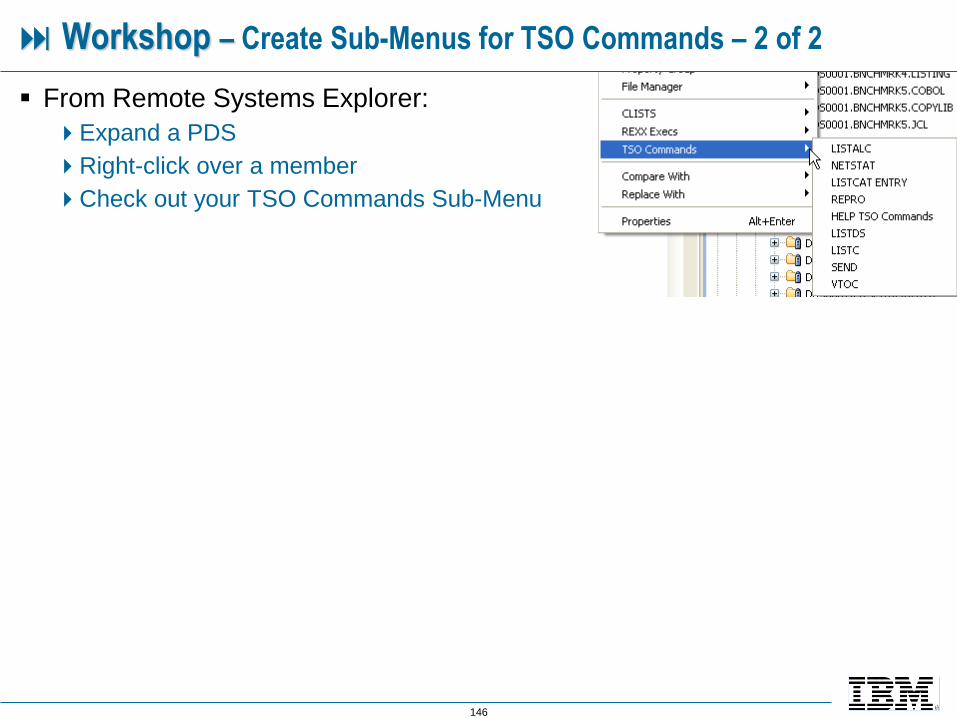
146
Workshop – Create Sub-Menus for TSO Commands – 2 of 2
▪ From Remote Systems Explorer:
Expand a PDS
Right-click over a member
Check out your TSO Commands Sub-Menu

147
Sharing Menu Manager Work
▪ Menu Manager resources are plain XML files
▪ You can share them by:1. Saving files to a network drive
2. Importing the files from Actions and Menus to each users local PC
Share Drive

148
Menu Manager - Administration
Three ways to rollout Menu Manager resources:1. Individuals copy from shared-drive and import in Preferences
2. Push-to-client
Import Menu Manager resources when users first connect to an LPAR
3. Saving a "default workspace"
The XML files that contain your Menu Manager resources must be defined in the
same filespec (Drive:\directory_location) as the new definitions in the Actions and
Menus
In other words, if IDz is to find your menus you must initially create the XML file(s) within the
default workspace filespec
This is because IDz will look for the XML files as based
Net: Which method you use is based on your approach to administering IDz non-product (ancillary) tools and features (plugins, etc.)
149
Unit objectives
Having completed this topic on organizing Menu
Manager actions through sub-menus, you should be
now able to:Create additional File selection XML files
Describe the concept of context menu selection
Describe the menu/sub-menu principles of Menu Manager's U.I.
Create two and three-level submenus
Assign different File Selection XML files to different IDz Context Menus
Describe how to import and share Menu Manager work
Describe the Best Practices approach to doing Menu Manager work, in terms of
development and testing
150
UNIT
Topics:
Menu Manager
▪ Menu Manager - Introduction, Terms and Concepts
▪ Invoking CLISTS and REXX execs
▪ Submitting Batch Jobs with JCL variable substitution
▪ Enabling ISPF Edit Macros▪ Appendix 1 – Import REXX and Menu Manager samples
▪ Appendix 2 – Sample Menu Run Actions to access CA-Panvalet
Note: This short section assumes that you’ve completed
the previous parts of this course on Menu Manager

151
Joel’s (detailed) Technical Blog on Enabling Edit Macroshttps://developer.ibm.com/mainframe/2017/10/16/using-ispf-edit-macros-within-idz-v14-1/

152
Introduction and ConstraintsThe IBM Developer for z Systems (IDz) V14.1 release introduces support for ISPF Edit Macros as follows:
▪The Edit Macro action can be invoked for a Partitioned Data Set (PDS) member as well as for a Sequential Data Set.
▪When invoking the Edit Macro action from the Remote Systems or z/OS Projects view, it is possible to request that the contents be first loaded into an editor window before invoking the Edit Macro action.
▪When invoked from within an IDz editor session, saving the editor contents is not required before invoking the Edit Macro action. This means that it is possible to invoke the Edit Macro for editor contents that have not been saved.
▪When opened in an edit session, after invocation of the Edit Macro action, the contents of the editor are updated with the results of the Edit Macro invocation.
The updated editor contents are not automatically saved. This allows the IDz user to analyze the results of the Edit Macro action before saving the editor contents.
You can also decide to undo the results of the Edit Macro action.
▪In the IDz V14.1 release, support for ISPF Edit Macros is limited to Edit Macros that alter and save the contents of the file being processed.
Visual updates (i.e. Exclude lines, etc.) that do not alter the file contents, or unsaved macro updates, are not reflected in the IDz editor when the ISPF Edit Macros are executed from within IDz.
For a Partitioned Data Set, the invocation of the ISPF Edit Macro is also limited to a single member, you cannot select the Partitioned Data Set itself to execute the macro against every member contained within.
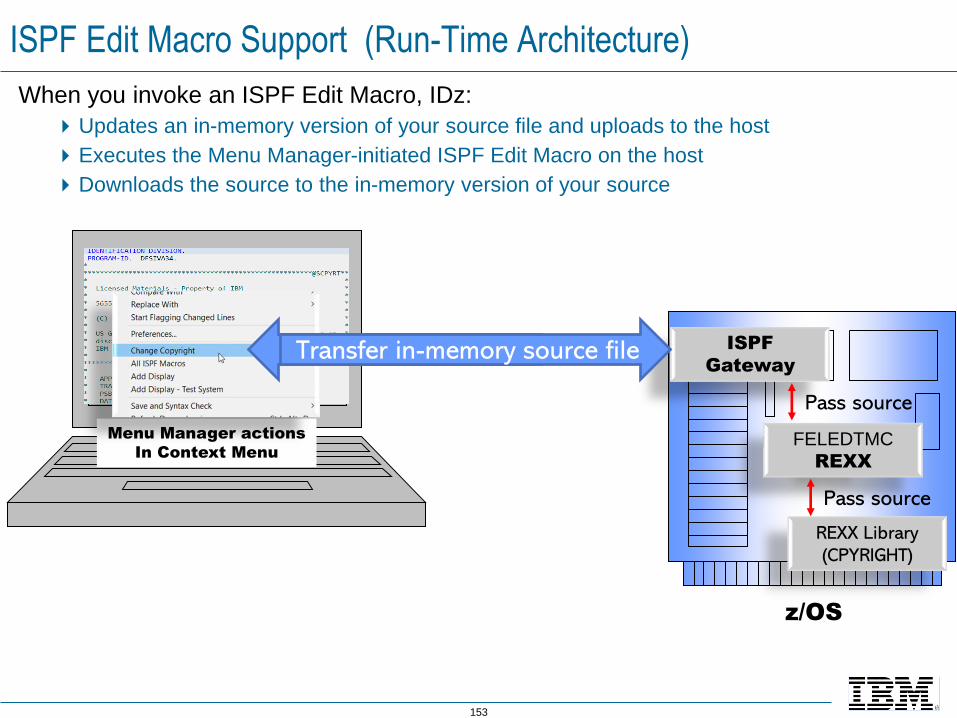
153
Editing a source file
When you invoke an ISPF Edit Macro, IDz:
Updates an in-memory version of your source file and uploads to the host
Executes the Menu Manager-initiated ISPF Edit Macro on the host
Downloads the source to the in-memory version of your source
z/OS
Pass source
Menu Manager actions
In Context Menu
ISPF
Gateway
ISPF Edit Macro Support (Run-Time Architecture)
Transfer in-memory source file
FELEDTMC
REXX
REXX Library
(CPYRIGHT)
Pass source

154
Example IDz Menu Manager Edit Macro commands
▪ The exclamation character (!) is used to separate the different parts of the command, explained here. It can be surrounded by blanks to improve readability.
▪ <Edit Option>, when set to EDIT, indicates that the user wants the IDz Menu Manager action to open the data set member
▪ <Work Data Set> is the name of a data set with the same characteristics as the data set holding the file being processed by the ISPF Edit Macro action..
▪ <Allocation Parameters> are optional allocation parameters to override the defaults used during the allocation of the work data set.
▪ <Additional Allocation Parameters> are for additional, non-standard, parameters to pass to the REXX program during the allocation step. In IDz V14.1, the only supported parameter is “STATS”, to force the creation of ISPF statistics for work data set members.
▪ <IDz REXX Data Set> is the name of the data set that contains this REXX program. IDz provides the sample FELEDTMC REXX for this purpose.
▪ <Edit Macro Data Set> is the name of the data set that contains the ISPF Edit Macro that is to be invoked.
▪ <Edit Macro Name> is the name of the ISPF Edit Macro that is to be invoked.
▪ <Edit Macro Parameters> are the parameters that are to be passed to the ISPF Edit Macro. Up to 26 single-word arguments can be provided to the macro.

155
Working Example of Run Command
1. EDIT - IDz Menu Manager action open the source file
2. $userid.STAGING.DATASET($name) – Source file name in Staging Dataset
3. STATS - forces the creation of ISPF statistics for work data set members.
4. <IDz REXX Data Set> is the name of the data set that contains this REXX program. IDz provides the sample FELEDTMC REXX for this purpose.
5. <Fully-Qualified Edit Macro Name> is the name of the ISPF Edit Macro that is to be invoked: REXX.LIBRARY(EDITMACRO)
6. <Edit Macro Parameters> are the parameters that are to be passed to the ISPF Edit Macro. Up to 26 single-word arguments can be provided to the macro.
1. 3.2. 4.
6.5.

156
Menu Manager Edit Macro Run Command (copy/paste)
▪ You must select the
EDIT ! $userid.STAGING.DATASET($name) ! + STATS ! DEV0.V41.PROD-
HOP.SFELSAMP(FELEDTMC) ! DDS0001.TEST.REXX(CPYRIGHT) ! +SYSNAME +FELDATE
+FELTIME IDz
Copy/Paste
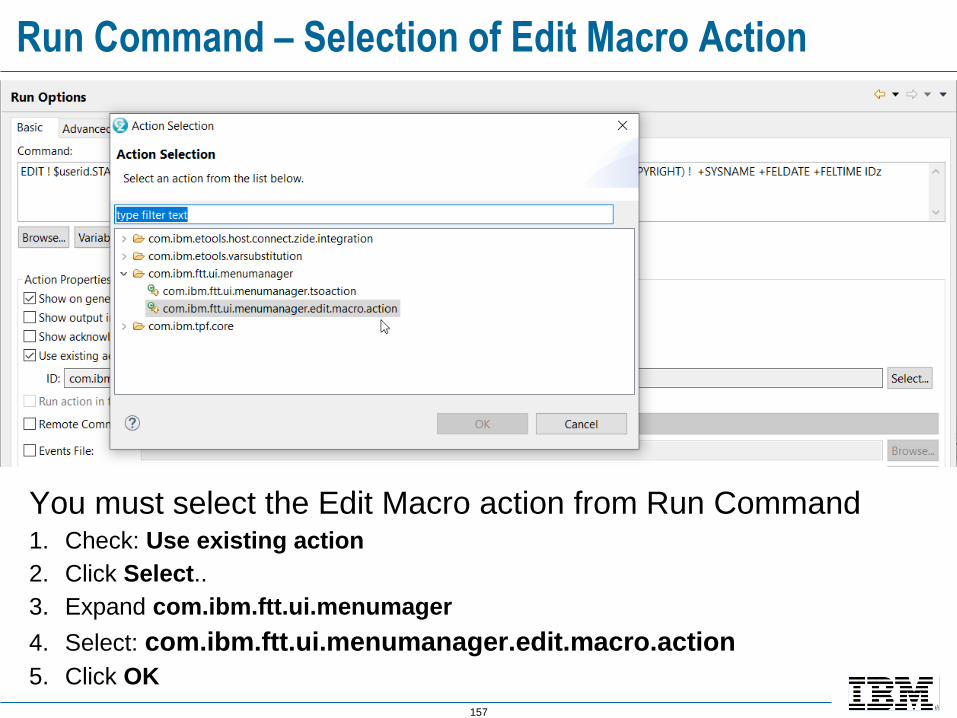
157
Run Command – Selection of Edit Macro Action
You must select the Edit Macro action from Run Command1. Check: Use existing action
2. Click Select..
3. Expand com.ibm.ftt.ui.menumager
4. Select: com.ibm.ftt.ui.menumanager.edit.macro.action
5. Click OK

158
Edit Macros – As Context Menu Actions
You must select the Edit Macro action from Run Command

159
Three Sample Edit Macro/REXX Execs (Source Code)▪ /* REXX */
▪ /* */
▪ /* Displays the paragraph names in a COBOL program */
▪ /* It works if the edit mode is NUM ON STD or NUM OFF */
▪ /* */
▪ /*TRACE ?I*/
▪ ISREDIT MACRO
▪ ADDRESS ISREDIT "F 'PROCEDURE DIVISION' 8 FIRST"
▪ ADDRESS ISREDIT "F P'¬' 8"
▪ DO UNTIL RC > 0
▪ ADDRESS ISREDIT "(THELINE) = LINE .ZCSR"
▪ IF POS("EXIT",THELINE) = 0 ,
▪ & POS("*",THELINE) = 0 ,
▪ & POS("-INC",THELINE) = 0 ,
▪ & POS("COPY",THELINE) = 0
▪ THEN
▪ DO
▪ PARSE VAR THELINE NUM " " LINE1 "." LINE2
▪ LINE3 = STRIP(LINE1,'L'," ")
▪ /* LINE3 = LINE3||"''"||"." */
▪ /* ADDRESS ISREDIT "LINE_AFTER .ZCSR = ' DISPLAY '"LINE3"''"*/
▪ ADDRESS ISREDIT "LINE_AFTER .ZCSR = ' DISPLAY '"LINE3"''"
▪ END
▪ ADDRESS ISREDIT "F P'¬' 8"
▪ END
▪ ISREDIT END
▪ /* rexx */
▪ "isredit macro"
▪ "isredit change '(c)' 'Copyright.' all"
▪ "isredit end"
▪ /* REXX */
▪ /* */
▪ /* Deletes the DISPLAYS for paragraph names in a COBOL program */
▪ /* Companion of ADDDISP macro */
▪ /*TRACE ?I*/
▪ ISREDIT MACRO
▪ ADDRESS ISREDIT "F 'PROCEDURE DIVISION' 8 FIRST"
▪ ADDRESS ISREDIT "F P'¬' 8"
▪ DO UNTIL RC > 0
▪ ADDRESS ISREDIT "(THELINE) = LINE .ZCSR"
▪ IF POS("EXIT",THELINE) = 0 ,
▪ & POS("*",THELINE) = 0 ,
▪ & POS("-INC",THELINE) = 0 ,
▪ & POS("COPY",THELINE) = 0
▪ THEN
▪ DO
▪ CURLINE = 0
▪ ADDRESS ISREDIT "(CURLINE,CURCOLM) = CURSOR"
▪ CURLINE = CURLINE +1
▪ ADDRESS ISREDIT "CURSOR = " CURLINE CURCOLM
▪ ADDRESS ISREDIT "(DISLINE) = LINE .ZCSR"
▪ IF POS("DISPLAY",DISLINE) <> 0 ,
▪ THEN
▪ DO
▪ ADDRESS ISREDIT "(HERE) = CURSOR"
▪ ADDRESS ISREDIT "LABEL " HERE " = .CURRENT"
▪ ADDRESS ISREDIT "DELETE .CURRENT"
▪ END
▪ END
▪ ADDRESS ISREDIT "F P'¬' 8"
▪ END
▪ ISREDIT END
ADDDISP DELDISP
CPYRIGHT

160
UNIT
Topics:
Menu Manager
▪ Menu Manager - Introduction, Terms and Concepts
▪ Invoking CLISTS and REXX execs
▪ Submitting Batch Jobs with JCL variable substitution
▪ Enabling ISPF Edit Macros
▪ Appendix 1 – Import REXX and Menu Manager samples
▪ Appendix 2 – Sample Menu Run Actions to access CA-Panvalet
Learn by ExampleAppendix 1 steps you through the process of downloading, importing and working with REXX Execs and the Menu Manager scripts that launch them.
Note that these are “use-as-is-examples”. As such they are not supported as part of your IBM product license.

161
Import “File” Menu Manager Actions
Workshop steps...
1. Download this zip file: https://community.ibm.com/community/user/ibmz-and-linuxone/viewdocument/menu-manager-actions-
1?CommunityKey=b0dae4a8-74eb-44ac-86c7-90f3cd32909a&tab=librarydocuments
2. Unzip this file into a folder on your PC
3. Launch IDz
4. From Windows ➔ Preferences ➔ Menu Manager select: Actions and Menus
▪ Click File then
▪ Browse… your PC to where you unzipped the file and select: File Menu Manager Actions.xml
▪ Click Finish
Note that some of the URLs in the Actions will need to be updated

162
Import “Data set” Menu Manager Actions(Again) From Menu Manager Actions and Menus
5. Click Import
6. Click Data set
7. Browse your PC… and select: Data Set Menu Manager Actions.xml
8. Click Finish
Note that this and the previous step import
the downloaded Menu Manager samples
into your Workspace and associate them
with a given file type

163
Assign Menu Manager Actions to Context Menus
From the Menu Manager side-bar, click Menu Selections ➔
From Menu Selection:
▪ From Context: select MVS Files in Remote Systems view
– From Default Data Set Menus: select Dataset Menu Manager Actions
– From Default File Menus: select File Menu Manager Actions
▪ Click Apply
Again from Context: select JES Job Datasets in Remote Systems View
– From Default File Menus: select File Menu Manager Actions
– Click Apply
Again from Context: select JES Job in Remote Systems View
– From Default File Menus: select File Menu Manager Actions
– Click Apply – then Click OK
Click Save when prompted
These steps associate
scripts in the downloaded
files to specific IDz Context
Menus

164
Copy the REXX Execs to a TSO Library Select an 80-byte/LRECL library and
use Allocate Like to create a new
library that will hold REXX Execs ➔
From Local:
▪ Scroll and browse to the folder that
contains the .rex files you unzipped in
step 2 (four slides back)
▪ Select and copy all of the .rex files
▪ Paste the .rex files into your new
REXX library
Expand the library to ensure that all
of the REXX files copied ➔
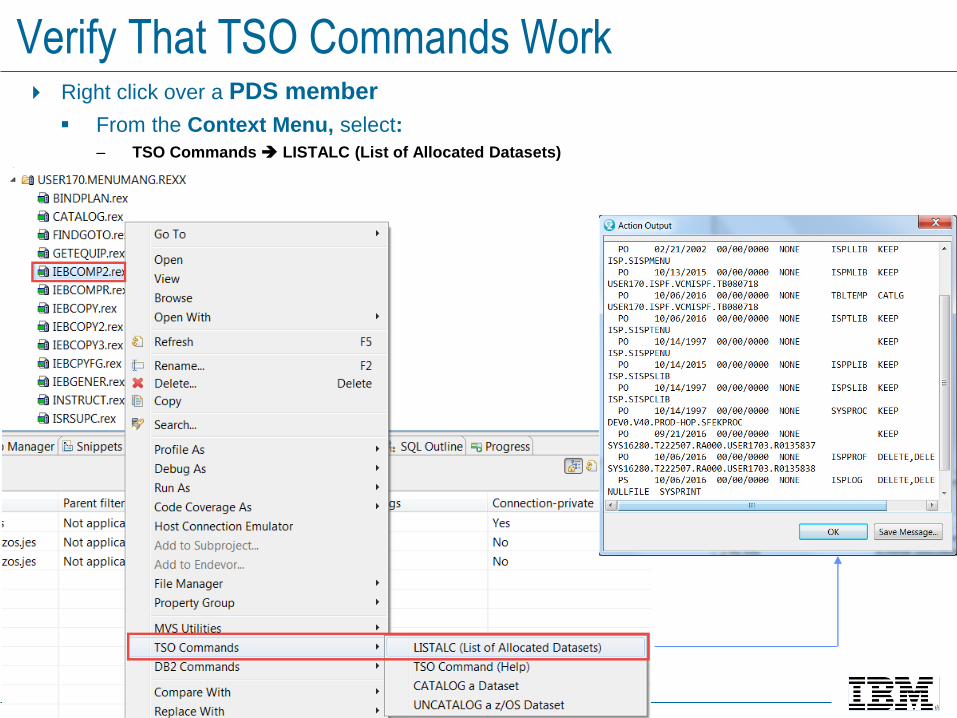
165
Verify That TSO Commands Work Right click over a PDS member
▪ From the Context Menu, select:
– TSO Commands ➔ LISTALC (List of Allocated Datasets)
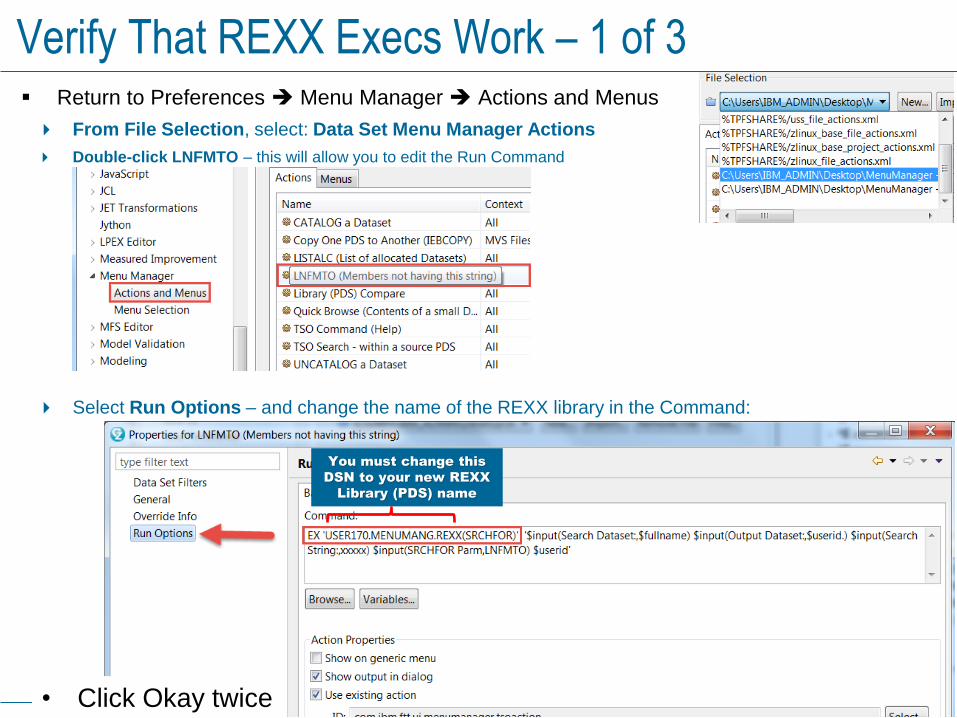
166
Verify That REXX Execs Work – 1 of 3▪ Return to Preferences ➔ Menu Manager ➔ Actions and Menus
From File Selection, select: Data Set Menu Manager Actions
Double-click LNFMTO – this will allow you to edit the Run Command
Select Run Options – and change the name of the REXX library in the Command:
• Click Okay twice
You must change this
DSN to your new REXX
Library (PDS) name

167
Verify That REXX Execs Work – 2 of 3 Right click over a PDS (library) and from the Context Menu, select:
– MVS Utilities ➔ LNFMTO (Members not having this string)
Output Dataset must be a sequential file
• 133 byte/LRECL
Enter a Search String
Click OK

168
Verify That REXX Execs Work – 3 of 3
SuperC’s LNFMTO parameter
lists names of library members
that do NOT contain a specified
search string.
This utility is useful for
• Finding code that does not
meet standards
• Listing certain types of
members (DB2, CICS, etc.)

169
SDSF REXX/Menu Manager Options▪ SDSF allows developers to do a number of operations that native IDz/JES
does not: XDC (copy Job Output), Change a Job Class, Search, etc.
▪ What follows are a few examples of this functionality:
XDC Job Output to a PDS

170
Menu Manager/REXXThere are eight REXX Execs in the examples file specific to XDC
functionality:
1. XDC Job
2. Search Job
3. XDC Spool file
4. Search Spool file
5. Cancel Job
6. Change Class
7. Change Priority
8. Change
What follows are a few specific examples of this functionality – and how
to implement the REXX/Menu Manager functionality

171
XDC
Saving Job output in an MVS file is a common requirement – especially if
jobs are purged frequently.
Use the REXX/XDC functionality as follows:
▪ Ensure that the XDC REXX is copied to your REXX library – on the LPAR
in which you wish to use this function
▪ Create a new Menu Manager action – for Files
▪ Context: JES Jobs in Remote Systems View
▪ Files: *.*
▪ Command:
▪ Action properties:
Show on Generic Menu
Show output in dialog
▪ Save your command – and test your work
exec 'dds0001.test.rexx(parsexdc)' '$input(Job ID,$jobid,$list{$jobid}) $input(Host Name,$systemhostname)
$input(User ID,$userid) $input(Job Owner,$jobowner) $input(Job Name,$jobname) $input(Output dataset,$userid.)'

172
UNIT
Topics:
Menu Manager
▪ Menu Manager - Introduction, Terms and Concepts
▪ Invoking CLISTS and REXX execs
▪ Submitting Batch Jobs with JCL variable substitution
▪ Appendix 1 – Import REXX and Menu Manager samples
▪ Appendix 2 – Sample Menu Run Actions to access CA-Panvalet
▪ Configuring the Legacy or Interactive ISPF Gateway
173
Topics
This section was written by Frank P Jones/IBM. It is
presented an effective example of Menu Manager for use CA-Panvalet or other SCM products: CA-Librarian, etc.
▪ The following Panvalet commands are covered:▪ Pan Retrieve
▪ Pan Store
▪ Pan Add
▪ Pan ListDS
▪ For each Panvalet request – we have documented:▪ Panvalet Action Description
▪ Panvalet Menu (User Picture)
▪ IDz Menu Entry (Picture)
▪ TSO resulting action

174
Panvalet Retrieve Command (Pan R) – 1 of 2Pan Retrieve extracts the application developer’s specified program – in this
example LAB3POT.cbl from a Panvalet library – and places it into a default PDS (source.cobol). If “Output Program Name” below is left blank then the Panvalet member name is used as the PDS member name. The user has the option of specifying a different member name while working on the COBOL Program.
Menu Manager Run Action Command and Properties
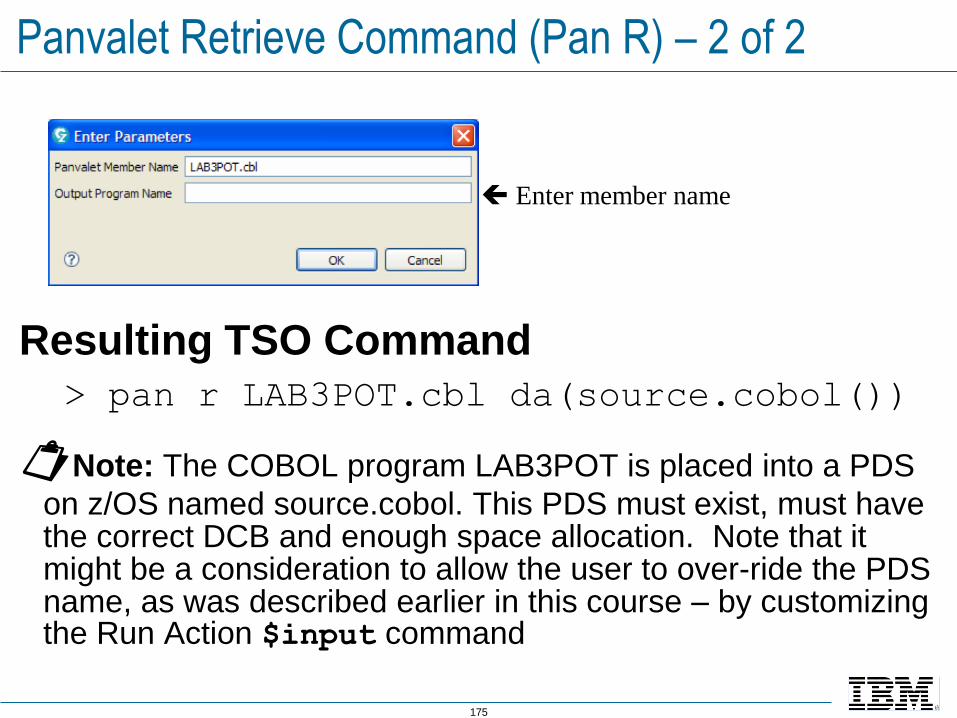
175
Panvalet Retrieve Command (Pan R) – 2 of 2
Resulting TSO Command
> pan r LAB3POT.cbl da(source.cobol())
Note: The COBOL program LAB3POT is placed into a PDS
on z/OS named source.cobol. This PDS must exist, must have the correct DCB and enough space allocation. Note that it might be a consideration to allow the user to over-ride the PDS name, as was described earlier in this course – by customizing the Run Action $input command
Enter member name

176
Panvalet Store Command (Pan S) – 1 of 2Pan Store takes the default program that you are working on or the member
specified as “Input Program Name” and updates the Panvalet Library member specified in “Panvalet Member Name.” If you highlight the program you wish to store and select the Pan Store Menu, the program name will be placed in the appropriate boxes. These names can be overwritten. Optionally, a Panvalet program level can be entered.
Menu Manager Run Action Command and Properties
This Menu Manager Action can
(and ideally should?) be
launched from the LPEX Editor

177
Panvalet Store Command (Pan S) – 2 of 2
Resulting TSO Command> pan s LAB3POT level() da(source.cobol(LAB3POT))
Enter (optional) Level number

178
Panvalet Add Command (Pan ADD) – 1 of 2Pan Add adds a new program to the Panvalet library. The “New Panvalet
Program Name” is the name of the new Panvalet Member. Highlight the program you wish to store and select the Pan Add Menu, the program name will be placed in the appropriate boxes. These names can be overwritten.
Menu Manager Run Action Command and Properties
This Menu Manager Action can
- and also should be launched
from the LPEX Editor

179
Panvalet Add Command (Pan A) – 2 of 2
Resulting TSO Command> pan add CUSVSAM format(cobol) da(source.cobol(CUSVSAM))
COBOL format has been added to this command. Also,
note that CUSVSAM has been entered by the user in the above screen capture
Your program name Panvalet name

180
Panvalet LISTDS Command (Pan LISTDS) – 1 of 2
Pan LISTDS will list the attributes of the member name supplied in the Panvalet Library. In the example, below, the attributes of INVMENU.cbl will be returned.
Menu Manager Run Action Command and Properties

181
Panvalet LISTDS Command (Pan LISTDS) – 2 of 2
Resulting TSO Command
> pan listds INVMENU.cbl
The attributes will be returned in the IDz TSO Remote
Console – or, if you check Show output in dialog (previous slide), will be displayed in the output form
Panvalet member name
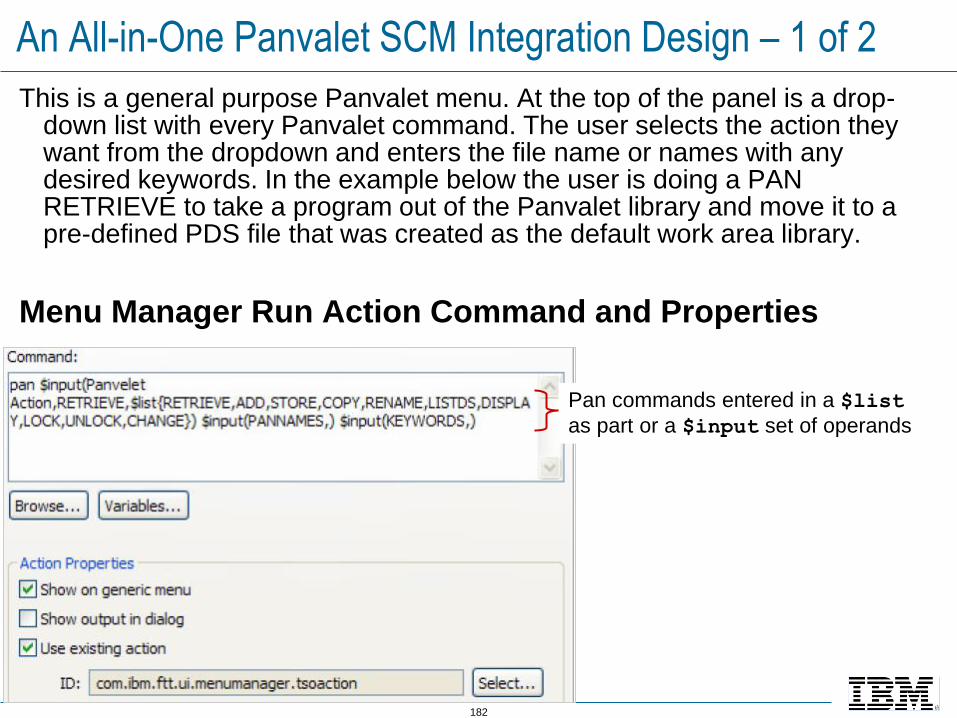
182
An All-in-One Panvalet SCM Integration Design – 1 of 2
This is a general purpose Panvalet menu. At the top of the panel is a drop-down list with every Panvalet command. The user selects the action they want from the dropdown and enters the file name or names with any desired keywords. In the example below the user is doing a PAN RETRIEVE to take a program out of the Panvalet library and move it to a pre-defined PDS file that was created as the default work area library.
Menu Manager Run Action Command and Properties
Pan commands entered in a $list
as part or a $input set of operands
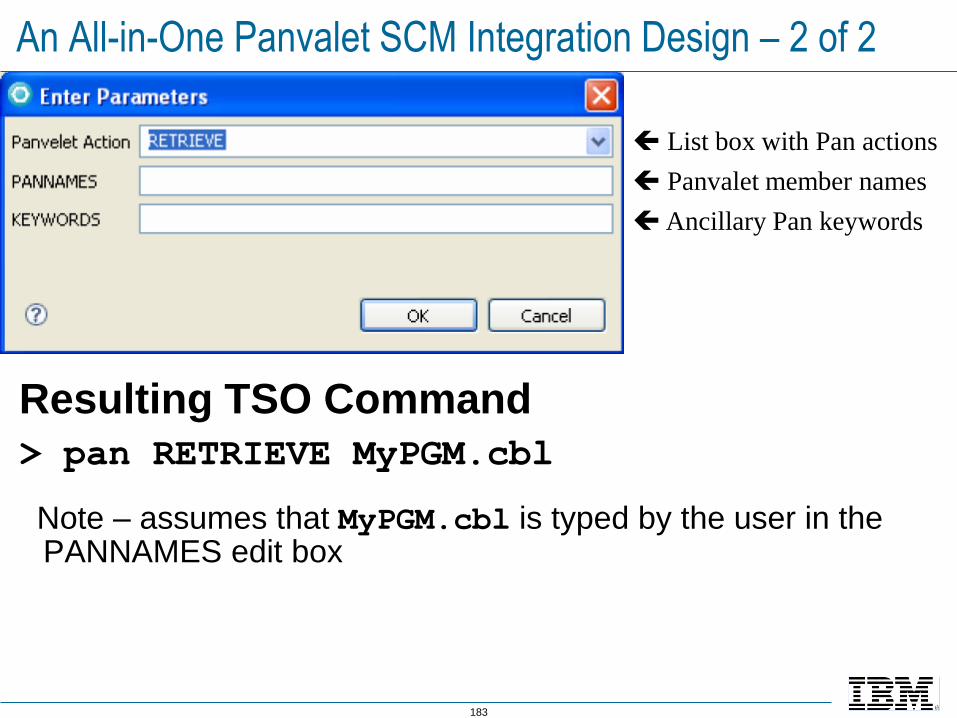
183
An All-in-One Panvalet SCM Integration Design – 2 of 2
Resulting TSO Command
> pan RETRIEVE MyPGM.cbl
Note – assumes that MyPGM.cbl is typed by the user in the PANNAMES edit box
List box with Pan actions
Panvalet member names
Ancillary Pan keywords

184
UNIT
Topics:
Menu Manager
▪ Menu Manager - Introduction, Terms and Concepts
▪ Invoking CLISTS and REXX execs
▪ Submitting Batch Jobs with JCL variable substitution
▪ Appendix 1 – Import REXX and Menu Manager samples
▪ Appendix 2 – Sample Menu Run Actions to access CA-Panvalet
▪ Appendix 3 – Configuring the Legacy or Interactive ISPF Gateway
The material in Appendix 3 is specific to the work done by Systems Programmers with access to IDz setup jobs and protected UNIX environment files and variables. This material is not intended for applications personnel.

185
Turn off the Checkbox allowing
users to save their passwordThe following directive which is set in the rse.envconfiguration file.. This directive (setting) is documented in the IBM Explorer for z/OS Host Configuration Guide (SC27-8437-01).
#_RSE_JAVAOPTS="$_RSE_JAVAOPTS -DDENY_PASSWORD_SAVE=true"
Big "ups" to Roger Newton for the find
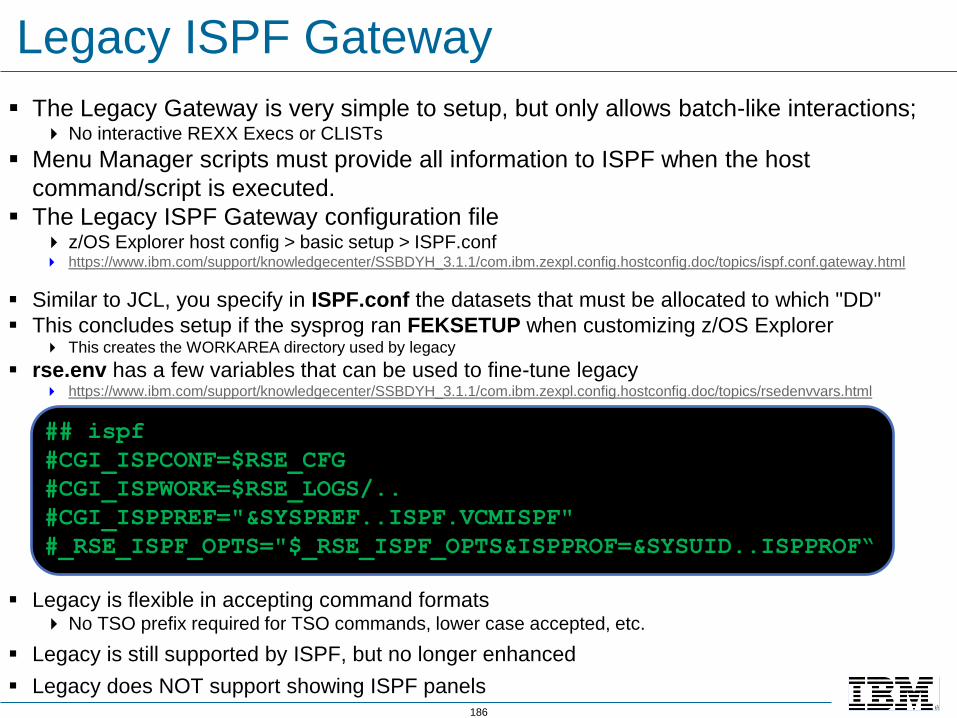
186
Legacy ISPF Gateway
▪ The Legacy Gateway is very simple to setup, but only allows batch-like interactions; No interactive REXX Execs or CLISTs
▪ Menu Manager scripts must provide all information to ISPF when the host
command/script is executed.
▪ The Legacy ISPF Gateway configuration file z/OS Explorer host config > basic setup > ISPF.conf https://www.ibm.com/support/knowledgecenter/SSBDYH_3.1.1/com.ibm.zexpl.config.hostconfig.doc/topics/ispf.conf.gateway.html
▪ Similar to JCL, you specify in ISPF.conf the datasets that must be allocated to which "DD"
▪ This concludes setup if the sysprog ran FEKSETUP when customizing z/OS Explorer This creates the WORKAREA directory used by legacy
▪ rse.env has a few variables that can be used to fine-tune legacy https://www.ibm.com/support/knowledgecenter/SSBDYH_3.1.1/com.ibm.zexpl.config.hostconfig.doc/topics/rsedenvvars.html
## ispf
#CGI_ISPCONF=$RSE_CFG
#CGI_ISPWORK=$RSE_LOGS/..
#CGI_ISPPREF="&SYSPREF..ISPF.VCMISPF"
#_RSE_ISPF_OPTS="$_RSE_ISPF_OPTS&ISPPROF=&SYSUID..ISPPROF“
▪ Legacy is flexible in accepting command formats No TSO prefix required for TSO commands, lower case accepted, etc.
▪ Legacy is still supported by ISPF, but no longer enhanced
▪ Legacy does NOT support showing ISPF panels
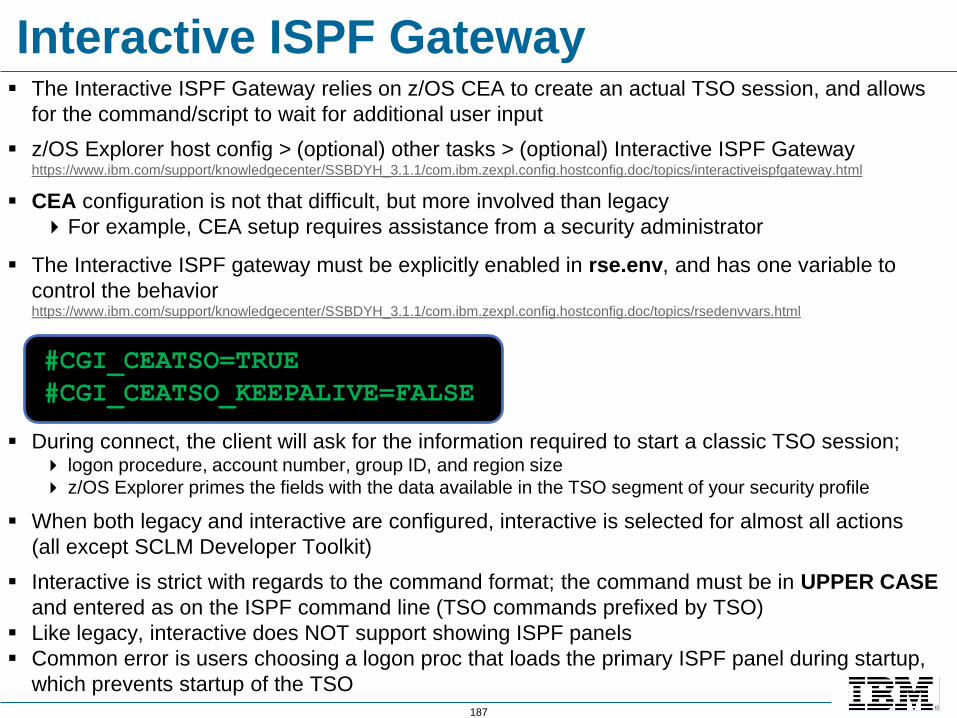
187
Interactive ISPF Gateway▪ The Interactive ISPF Gateway relies on z/OS CEA to create an actual TSO session, and allows
for the command/script to wait for additional user input
▪ z/OS Explorer host config > (optional) other tasks > (optional) Interactive ISPF Gatewayhttps://www.ibm.com/support/knowledgecenter/SSBDYH_3.1.1/com.ibm.zexpl.config.hostconfig.doc/topics/interactiveispfgateway.html
▪ CEA configuration is not that difficult, but more involved than legacy
For example, CEA setup requires assistance from a security administrator
▪ The Interactive ISPF gateway must be explicitly enabled in rse.env, and has one variable to
control the behaviorhttps://www.ibm.com/support/knowledgecenter/SSBDYH_3.1.1/com.ibm.zexpl.config.hostconfig.doc/topics/rsedenvvars.html
#CGI_CEATSO=TRUE
#CGI_CEATSO_KEEPALIVE=FALSE
▪ During connect, the client will ask for the information required to start a classic TSO session; logon procedure, account number, group ID, and region size
z/OS Explorer primes the fields with the data available in the TSO segment of your security profile
▪ When both legacy and interactive are configured, interactive is selected for almost all actions
(all except SCLM Developer Toolkit)
▪ Interactive is strict with regards to the command format; the command must be in UPPER CASE
and entered as on the ISPF command line (TSO commands prefixed by TSO)
▪ Like legacy, interactive does NOT support showing ISPF panels
▪ Common error is users choosing a logon proc that loads the primary ISPF panel during startup,
which prevents startup of the TSO