ibmconnections4...
TRANSCRIPT
© 2009 IBM Corporation
IBM Collaboration Solutions
IBM Connections 4.5 & CR2 Installation”From Zero to Social Hero”
Frank Altenburg | SME for IBM Social Collaboration Software IBM Collaboration Solutionsmailto:[email protected]
Version 2.03, released Oct 11. 2013
For Domino LDAP
2 © 2013 IBM CorporationSocial Business
About the Author
Frank Altenburg is a Certified Senior Field Support Engineer and Subject Matter Expert for IBM Social Collaboration Software in the Accelerated Value Program (AVP) organization in Germany, which delivers a proactive, cost-reducing, and productivity enhancing advisory service. Frank has more then 15 years experience supporting Lotus products predominately on customer sites. For over 10 years Frank has specialized his skills in the IBM Sametime Product family. As a leader of the European IBM Sametime and IBM Connections Communities, Frank is an evangelist for the IBM Social Collaboration business and is a regular presenter at Lotusphere since 2008. He has presented at many events all around the world. Frank is the author of the "From Zero To Hero" document series for IBM Sametime and IBM Connections. Frank can be found on Facebook, Twitter or his blog.

3 © 2013 IBM CorporationSocial Business
Agenda
● Introduction
● Requirements for a IBM Connections 4.5 installation
● Architecture of a IBM Connections 4.5 Server deployment
● The 33 steps to a IBM Connections 4.5 Server deployment

4 © 2013 IBM CorporationSocial Business
IntroductionThis document
● Describes how to implement, in a very fast way, the infrastructure for a small deployment of a IBM Connections 4.5 Server.
● It is designed for a Proof of Concept, Proof of Technology or a small test pilot deployment only.
● It does not contain information how to implement a high available infrastructure.● You can start with this document just to "make your bosses happy". But to make the
system available for a larger number of users, it is recommended to invite IBM Services to plan and implement a clustered IBM Connections infrastructure in your organization that is fully supported.
● The Author has tested this scenario with the hardware specification and software components described in this document.
● You can use the official IBM support channels for any issue you raise when you use just this document to install your IBM Connections server. All instructions in this document are based on the official documentation wiki.
● You need IBM Connections licenses to download the code from Passport Advantage and to install and use this software.

5 © 2013 IBM CorporationSocial Business
What is IBM Connections?
IBM® Connections is social networking software that consists of these applications: Activities, Blogs, Bookmarks, Communities, Files, Forums, Home page, Metrics, Profiles, and Wikis.
Use the IBM Connections applications to accomplish the following goals:
● ActivitiesCollaboration tool for collecting, organizing, sharing, and reusing work that is related to a project goal.
● BlogsOnline journals that you can use to deliver timely information with a personal touch. You can use a blog to present your ideas and get feedback from others or learn from the expertise of others who blog.
● BookmarksSocial bookmarking tool for saving, organizing, and sharing Internet and intranet bookmarks. Discover bookmarks that have been created by others with similar interests and expertise.
Note: The application was previously named Dogear.

6 © 2013 IBM CorporationSocial Business
What is IBM Connections? (cont)
● CommunitiesA website where people who share a common interest can interact with one another, share information, and exchange ideas. Community members can participate in community-specific activities and forums, and can share blogs, bookmarks, feeds, and files.
● FilesA common repository in which you can upload files and share them with others. Store versions of a file, view who has downloaded a file or commented on it, and see highly recommended files.
● ForumsA place to brainstorm and collect feedback on topics that are relevant to you and your colleagues. Statements and comments are collected in a format that captures the exchange of ideas and presents them as an ongoing conversation.

7 © 2013 IBM CorporationSocial Business
What is IBM Connections? (cont)
● Home pageA central location that provides a snapshot of the latest updates collected from IBM Connections. Perform in-context actions on entries in your activity stream, check the latest updates from the content and people that you are following, stay up to date with the latest notifications and updates that require a response from you, or post your own status updates.
● ProfilesDirectory of the people in your organization, including the information you need to form and encourage effective networks across your organization.
● MetricsStatistics tool that collects and displays information about how people use Connections applications. Community metrics show details on a particular community while global metrics show information across all of Connections.
8 © 2013 IBM CorporationSocial Business
What is IBM Connections? (cont)
● WikisA tool for creating wikis that individuals, groups, and communities can use to capture, share, and coauthor information. View page changes, recommendations, and comments.
Together, these tools will help you and your colleagues interact with one another more effectively.

9 © 2013 IBM CorporationSocial Business
What's new in IBM Connections 4.5
What's new for administrators in Version 4.5?
Installation
● The installation of IBM Connections Content Manager for the Libraries application on AIX®, Linux, and Windows.
● The installation now supports IBM i platform 6.1/7.1 for all applications other than Libraries.
● The installation wizard is based on IBM Installation Manager 1.5.3.
Administration IBM Connections:
● You can lock the default frequency with which email digests from IBM Connections applications are sent to your users by configuring the frequencyLocked property in the notification-config.xml file. For more information, see Setting the default frequency of email digests.

10 © 2013 IBM CorporationSocial Business
What's new in IBM Connections 4.5 (cont.)
Activities:
● The EventLogPurgeJob task deletes old entries from the Activities events log. This task helps maintain performance and keeps the log from becoming too large. By default, it runs daily at 2 AM. You can specify the time that the log is purged and set the properties that define which entries can be deleted.
Communities:
● You can increase the maximum number of communities that can be displayed in the Communities user views by adding a configuration setting to the LotusConnections-config.xml file.
● If the Communities catalog index becomes corrupted or is not being refreshed properly, you can restore the index by deleting the existing index data and waiting for the next scheduled crawl. For more information, see the Restoring the Communities catalog index topic.
● By adding search to the list of modes in the Linked Library widget definition, you can enable search for content in linked libraries. For more information, see Enabling search for linked libraries.

11 © 2013 IBM CorporationSocial Business
What's new in IBM Connections 4.5 (cont.)
Libraries:
Libraries provide community members document management capabilities to upload, manage, organize, and collaborate on community files. A community can contain multiple libraries.Attention: When the IBM® Connections Content Manager add-on is deployed, community owners can create libraries directly from a community using the Library widget. Community owners can also link to existing libraries using the Linked Library widget available in IBM Connections 3.0.1 and later. In this documentation, the libraries created directly from a community using the Library widget are referred to as community libraries. The libraries connected to a community using the Linked Library widget are referred to as linked libraries. Community libraries are currently only supported in IBM FileNet® Content Manager deployments. Linked libraries are supported by IBM FileNet Content Manager and IBM Content Manager.

12 © 2013 IBM CorporationSocial Business
What's new in IBM Connections 4.5 (cont.)Community libraries provide owners and members with the following content management capabilities and enhanced social features:
● Checkin and checkout. Members can check out files and edit them using private drafts. Checked out files are locked to prevent other users from making updates at the same time.
● Version control. Members can see who has updated content at a glance and roll back to previous file versions if there is a need to recover older content.
● File organization. Members can copy, move, and delete files, and use Trash view functionality to manage deleted content.
● Draft review. Members can collaborate on shared files and send them through an established review cycle to obtain the approval of selected members of the community.
● Sharing. Community owners can set file-level access to the library, giving them tighter control over who can edit content.
● Social content management. Members can interact with content in the community library in a social and dynamic way. For example, they can use tags to categorize content and improve file retrieval, and like files to recommend them to fellow members. Members can also track file updates in the community activity stream, follow files, comment on files, and see who has downloaded files.
● Document types and properties. Community owners can set the default document type for a library, allowing them to specify a defined set of information and properties for library files.
13 © 2013 IBM CorporationSocial Business
What's new in IBM Connections 4.5 (cont.)Existing linked libraries from earlier versions of IBM Connections can also leverage many of the content management capabilities and enhanced social features provided by community libraries, depending on the deployment specification. Where there are limitations for specific linked library deployments, these are noted in this help.Notes:
● Access to linked libraries is managed on the Enterprise Content Management (ECM) server unlike community libraries, where the access is managed from the community. Access to a linked library does not include the community owners and members groups, so having access to a community does not necessarily mean that you have access to its linked libraries. You can see the Linked Library widget but unless you have access to the linked library, you cannot see any content in the library.
● If you remove the Linked Library widget from your community, the linked library content is not deleted from the ECM server. You can access the content by adding the Linked Library widget to your community again and recreating the connection with the ECM server. If you remove the Library widget from your community, the associated library content is permanently removed from your community and cannot be retrieved.
● You can search for files in community libraries, however, searching in linked libraries is disabled by default. If search is enabled for linked libraries, a Linked Libraries tab is available in your Communities search results. Linked library search results display all matching files in the library. The search results do not include any social features, such as tagging, or document type information. When you click a search result, you are taken to a generic landing page that is outside the scope of a community. When a linked library is connected to a subfolder of a library, the search results are scoped to the library rather than to the folder.
14 © 2013 IBM CorporationSocial Business
What's new in IBM Connections 4.5 (cont.)
Wikis:
● The Wikis administrator can delete draft wiki pages that were created by other users. This capability is useful after a user leaves the organization.
● Create your own message for users by customizing the Wikis welcome page.
Files:
● You can now use a Files administrative command to obtain the ID of a community library using its community uuid value. The format of the command is:
FilesLibraryService.getByExternalContainerId(string community_id)

15 © 2013 IBM CorporationSocial Business
What's new in IBM Connections 4.5 (cont.)
Profiles:
● You can now exclude nicknames when adding or updating user profiles by specifying a new name.expansion property in the tdi-profiles-config.xml file.
● You can use the new mapToNameTable property in the profiles-types.xml file to specify an additional givenname or surname value for use with Profiles directory search.
● You can integrate the Profiles business card with your web application by mapping an LDAP distinguished name, using the DN parameter; in addition to the previously available user ID and email mapping options.
● The hashEmail extended attribute can be added to the map_dbrepos_from_source.properties file or profileExtension table in the tdi-profiles-config.xml file to support Profiles users in conjunction with the Microsoft Outlook Social Connector. For related information topics in the Using the IBM Connections Desktop Plug-ins for Microsoft Windows section of the IBM Connections wiki.

16 © 2013 IBM CorporationSocial Business
What's new in IBM Connections 4.5 (cont.)
News:
● Use the NewsActivityStreamService.updateApplicationRegistrationForEmailDigest command to update a registered third-party application to enable it for email digest functionality. For more information about this command, see Registering third-party applications.
● Use the NewsEmailDigestService.refreshDefaultEmailPrefsFromConfig()command to refresh updates to the default email preferences specified in the notification-config.xml file without the need for a server restart.
17 © 2013 IBM CorporationSocial Business
What's new in IBM Connections 4.5 (cont.)
Search:
● Use the new, optional parameter for the SearchService.startBackgroundIndex command to run social analytics indexing jobs at the end of the background indexing operation.
● You can configure post-filtering for the ECM service by enabling or disabling a property in the Search configuration file. Post-filtering is enabled by default.
● Use the SearchService.startBackgroundSandIndex command to create a background index for the social analytics service. Use this command to run background indexing for social analytics without having to run a full index crawl.
● By adding search to the list of modes in the Linked Library widget definition, you can enable search for content in linked libraries using FileNet P8 5.2. For more information, see Enabling search for linked libraries.
18 © 2013 IBM CorporationSocial Business
Administrators: Deploying the preview guide to your users
The IBM® Connections 4.5 preview guide is available for you to distribute to your users for new installations and upgrades to IBM Connections 4.5. This guide is designed to help your users become productive on the new software quickly, and to provide them with links to documentation resources for further help. http://www-10.lotus.com/ldd/lcwiki.nsf
This guide provides the following information for this release:
● Overview of several new applications● Important changes from the previous release● Familiar applications that remain the same● Links to product tours, reference cards, and product documentation● A few key productivity tips

19 © 2013 IBM CorporationSocial Business
Administrators: Deploying the preview guide to your users
You can download the preview guide from the IBM Connections wiki at http://www-10.lotus.com/ldd/lcwiki.nsf
There are two files available to you:
● An Adobe® PDF file, ready for emailing, printing, or distributing to your organization.● An IBM Symphony™ ODT file that can be customized for your organization; for example,
you can add contact information for your Help Desk.
Note: This file includes instructions in blue text for customizing information. Remember to remove these instructions before rolling out the file to your organization.
It is recommended that you distribute the guide to your users before their new IBM Connections software is installed or updated.

20 © 2013 IBM CorporationSocial Business
Audience
This Installation Guide assumes that you have prior experience with products that support enterprise web applications.
IBM® Connections has dependencies on a number of other products. This guide assumes that you have a basic knowledge of those products, including how to:
● Install, configure, secure, and administer IBM WebSphere® Application Server.● Install IBM Tivoli® Directory Server, Microsoft® Active Directory, Sun Java™ System
Directory Server, or IBM Lotus® Domino® LDAP directory, and then configure WebSphere Application Server to use that LDAP directory with federated repositories.
● Create, manage, and drop IBM DB2®, Oracle, or Microsoft SQL Server databases.● Install IBM HTTP Server, and then configure it to interact with IBM WebSphere
Application Server over HTTP and HTTPS.● Install and configure Cognos Business Intelligence and Cognos Transformer

21 © 2013 IBM CorporationSocial Business
Agenda
● Introduction
● Requirements for a IBM Connections 4.5 installation
● Architecture of a IBM Connections 4.5 Server deployment
● The 33 steps to a IBM Connections 4.5 Server deployment
22 © 2013 IBM CorporationSocial Business
Detailed system requirements for IBM Connections
You can find the official IBM Connections 4.5 System Requirements here:
Detailed system requirements for IBM Connections (#7012786)

23 © 2013 IBM CorporationSocial Business
IBM Connections 4.5 Server PrerequisitesFor this pilot deployment you need
● a supported LDAP directory server (see system requirements) In this example we use Domino LDAP
● two Windows Server 2008 64Bit boxes for the installation
● Network and DNS configuration
● to download the required installation files from Passport Advantage and Fix Central
● several administrative user accounts
● a trusted certificate (optional)
● A IBM Lotus Domino 8.5.3 FP3 Server for Domino Mail integration (optional)
● A IBM Sametime Proxy Server 8.5.2 IFR1 for the Sametime awareness and BIZ-Card integration (optional)
24 © 2013 IBM CorporationSocial Business
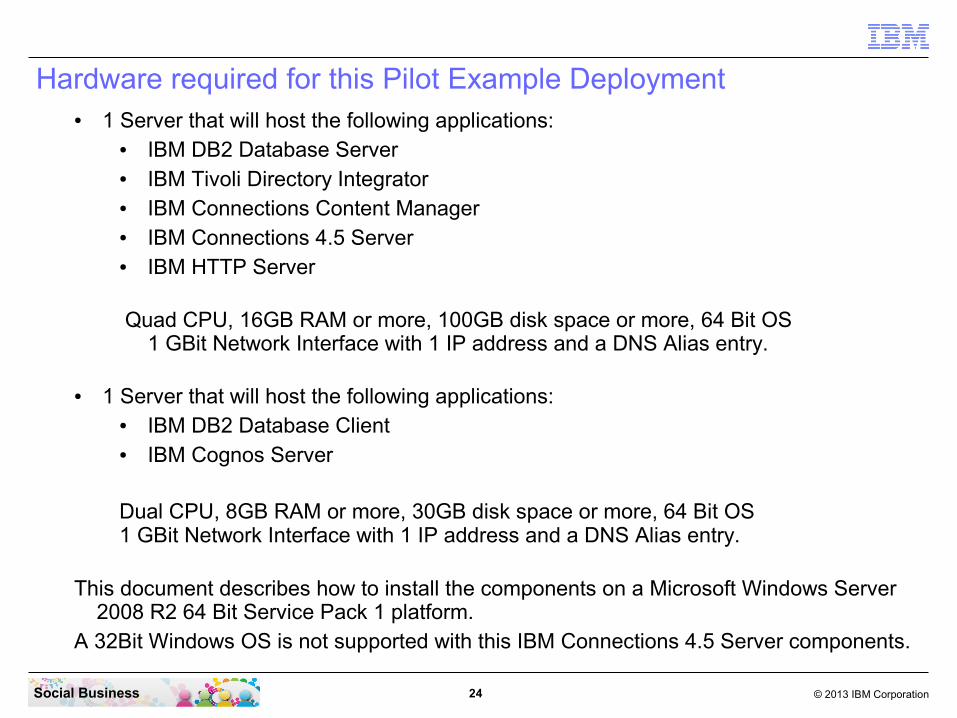
● 1 Server that will host the following applications:● IBM DB2 Database Server● IBM Tivoli Directory Integrator● IBM Connections Content Manager● IBM Connections 4.5 Server● IBM HTTP Server
Quad CPU, 16GB RAM or more, 100GB disk space or more, 64 Bit OS1 GBit Network Interface with 1 IP address and a DNS Alias entry.
● 1 Server that will host the following applications:● IBM DB2 Database Client● IBM Cognos Server
Dual CPU, 8GB RAM or more, 30GB disk space or more, 64 Bit OS1 GBit Network Interface with 1 IP address and a DNS Alias entry.
This document describes how to install the components on a Microsoft Windows Server 2008 R2 64 Bit Service Pack 1 platform.
A 32Bit Windows OS is not supported with this IBM Connections 4.5 Server components.
Hardware required for this Pilot Example Deployment

25 © 2013 IBM CorporationSocial Business
OS and Network requirements
● Make sure that all servers you want to use can be resolved in DNS.
● If DNS is not available then list all full qualified server names and IP addresses from all servers in the hosts file and publish this file to all servers.
● If your machines have multiple NIC and / or multiple IP addresses and / or multiple hostnames and / or multiple aliases in DNS then this can cause issues that we have not tested. We recommend to have machines with only one NIC and one IP address, a full qualified host name in the OS network preferences and if required one DNS Alias for example “connections.renovations.com” if the machine name is cryptic and you don't want to use it as access point for your users.
● If you use Windows 2008 as Operating System, then you need to start all installations and configurations in „Administrative mode“.

26 © 2013 IBM CorporationSocial Business
For a Windows installation you need to download these files from Passport Advantage:
CIG8XML IBM FileNet Content Platform Engine V5.2 Windows MultilingualCIG9FEN IBM FileNet Content Platform Engine Client V5.2 Windows EnglishCIG7ZML IBM FileNet Collaboration Services V2.0 Windows Multilingual
CI5VMML IBM Cognos Business Intelligence Server 64-bit 10.1.1 Windows MultilingualCI2Q1ML IBM Cognos Business Intelligence Transformer 10.1.1 Windows Multilingual
CI6NDML IBM DB2 10.1 Enterprise Server Edition - Authorized User Single Install Option Quick Start and Activation Multiplatform Multilingual
CZ9MKML IBM Tivoli Directory Integrator Identity Edition V7.1 for Windows x86-64
CZM9KML IBM WebSphere Application Server Network Deployment V8.0 (1 of 4)CZM9LML IBM WebSphere Application Server Network Deployment V8.0 (2 of 4)CZM9MML IBM WebSphere Application Server Network Deployment V8.0 (3 of 4)CZVG4ML IBM WebSphere Application Server Network Deployment V8.0 (4 of 4)CZM91ML IBM WebSphere Application Server V8.0 Supplements (1 of 4)CZM94ML IBM WebSphere Application Server V8.0 Supplements (2 of 4)CZM95ML IBM WebSphere Application Server V8.0 Supplements (3 of 4)CZXR9ML IBM WebSphere Application Server V8.0 Supplements (4 of 4)
CIHC5ML IBM Connections V4.5 for Windows MultilingualCIHC8ML IBM Connections V4.5 Wizard for Windows Multilingual
Required files for a deployment on Windows
27 © 2013 IBM CorporationSocial Business
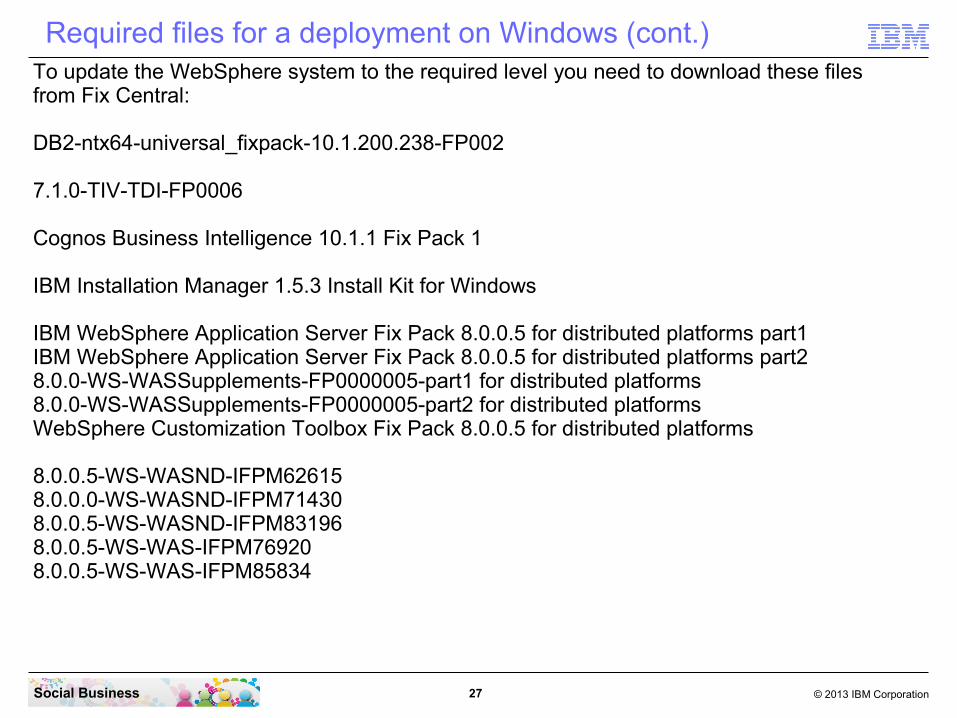
To update the WebSphere system to the required level you need to download these files from Fix Central:
DB2-ntx64-universal_fixpack-10.1.200.238-FP002
7.1.0-TIV-TDI-FP0006
Cognos Business Intelligence 10.1.1 Fix Pack 1
IBM Installation Manager 1.5.3 Install Kit for Windows
IBM WebSphere Application Server Fix Pack 8.0.0.5 for distributed platforms part1IBM WebSphere Application Server Fix Pack 8.0.0.5 for distributed platforms part28.0.0-WS-WASSupplements-FP0000005-part1 for distributed platforms8.0.0-WS-WASSupplements-FP0000005-part2 for distributed platformsWebSphere Customization Toolbox Fix Pack 8.0.0.5 for distributed platforms
8.0.0.5-WS-WASND-IFPM626158.0.0.0-WS-WASND-IFPM714308.0.0.5-WS-WASND-IFPM831968.0.0.5-WS-WAS-IFPM769208.0.0.5-WS-WAS-IFPM85834
Required files for a deployment on Windows (cont.)

28 © 2013 IBM CorporationSocial Business
For the Domino Social Mail integration you need to download this file from Greenhouse:
ICM1.3_iFix1_allplattform_install.zipThis download can be found here. Log in with your Greenhouse ID and password. If you dont have a Greenhouse ID you can join Greenhouse for free.https://greenhouse.lotus.com/plugins/plugincatalog.nsf/assetDetails.xsp?action=editDocument&documentId=2118E657CE35A81F85257B2C0083B92D
Required files for a deployment on Windows (cont.)

29 © 2013 IBM CorporationSocial Business
Required files for a deployment on Windows (cont.)If you have downloaded all files into a single directory then this directory should look like this screen shot:

30 © 2013 IBM CorporationSocial Business
Create a directory, for example “C:\Install”, on the servers where you want to install. Then unpack the downloaded files into this directory. Just unpack the files required for your deployment architecture on the particular server.
Required files for a deployment on Windows (cont.)

31 © 2013 IBM CorporationSocial Business
The Directory “C:\Install\CCM” contains the 3 executable files from the 3 CCM packages:
Required files for a deployment on Windows (cont.)

32 © 2013 IBM CorporationSocial Business
The Directory “C:\Install\DB2” contains the subdirectories “UNIVERSAL” for the DB2 10.1 FP2 installer and “License” for the license files.
Required files for a deployment on Windows (cont.)
33 © 2013 IBM CorporationSocial Business
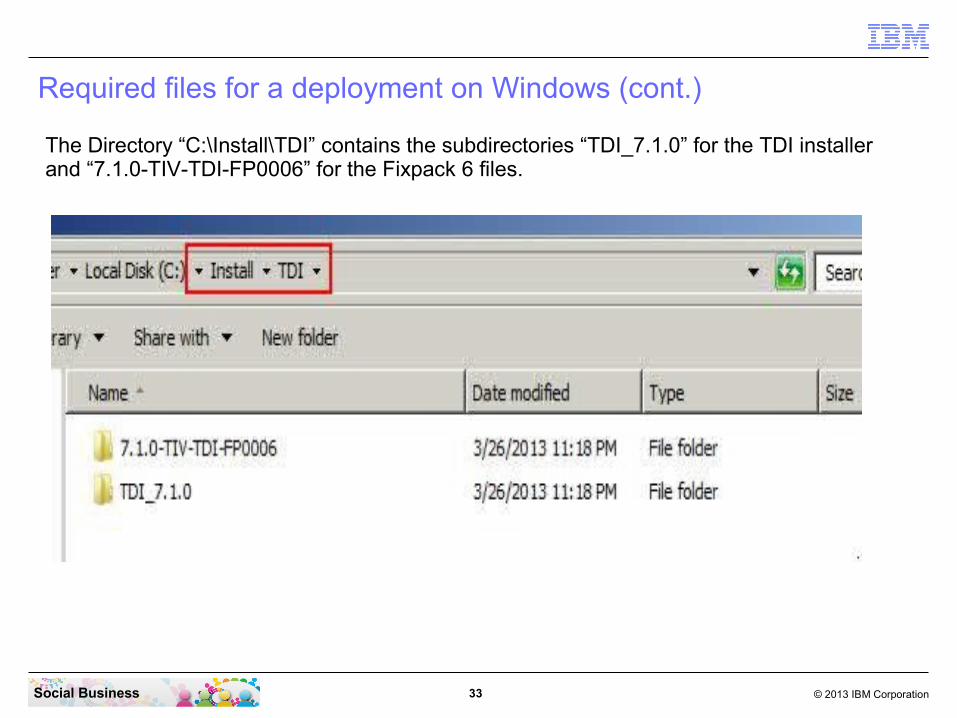
The Directory “C:\Install\TDI” contains the subdirectories “TDI_7.1.0” for the TDI installer and “7.1.0-TIV-TDI-FP0006” for the Fixpack 6 files.
Required files for a deployment on Windows (cont.)

34 © 2013 IBM CorporationSocial Business
The Directory “C:\Install\WAS_ND_8.0” contains the subdirectories “IM” for the IBM Installation Manager, “WAS” for the WebSphere 8.0 Installation Files, “WAS_FP5” for the WAS 8.0 FP5 files, “..SUP..” for the WAS Supplements and Supplements FP5 files and the “..WCT..” for the WebSphere Configuration Tools FP5 files and the 5 additional fixes.
Required files for a deployment on Windows (cont.)

35 © 2013 IBM CorporationSocial Business
On the Cognos Box, the Directory “C:\Install” contains the subdirectories “Cognos” for the Cognos files, “UNIVERSAL” for the DB2 client installer and “WAS_ND_8.0” for the WebSphere installation files.
Required files for a deployment on Windows (cont.)

36 © 2013 IBM CorporationSocial Business
The Directory “C:\Install\Cognos” contains the subdirectories “bisrvr” for the Cognos Business Intelligence Server install files, “bitrsfrm” for the Cognos Transformer installation files and “CBI_10.1.1_Win64_FP001” for the FP1 installation files.
Required files for a deployment on Windows (cont.)

37 © 2013 IBM CorporationSocial Business
The Directory “C:\Install\WAS_ND_8.0” contains the subdirectories “IM” for the IBM Installation Manager, “WAS” for the WebSphere 8.0 Installation Files, “WAS_FP5” for the WAS 8.0 FP5 files and the 5 additional fixes.
Required files for a deployment on Windows (cont.)

38 © 2013 IBM CorporationSocial Business
Required technical users for IBM Connections 4.5
IBM Connections requires some technical users for components to communicate in an authenticated mode. All of this users should be configured so that the password never expires and never needs to be changed.
db2admin This user is created during installation of the DB2 server in the Operating System. Do not create this user in advance. It is the user for all IBM Connections related components using DB2 to access their databases. Be sure to match the password policy requirements of the OS.
LCUSER This user is created manually after installation of the DB2 server in the Operating System. Do not create this user in advance. It is the user for all IBM Connections related components using DB2 to access their databases. Be sure to match the password policy requirements of the OS.
39 © 2013 IBM CorporationSocial Business
Required technical users for IBM Connections 4.5
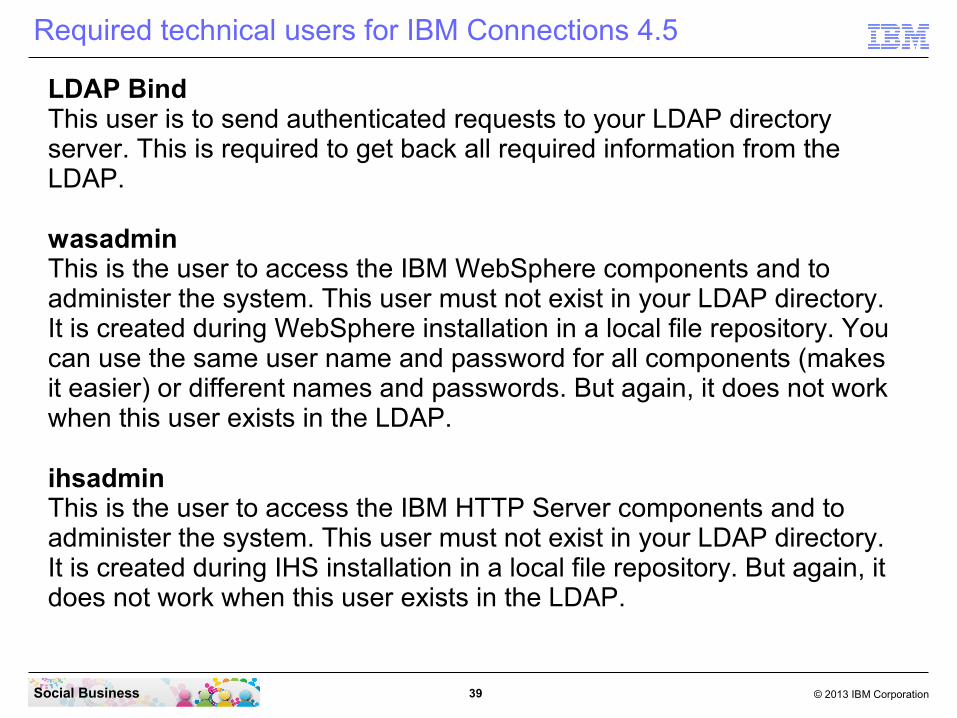
LDAP Bind This user is to send authenticated requests to your LDAP directory server. This is required to get back all required information from the LDAP.
wasadminThis is the user to access the IBM WebSphere components and to administer the system. This user must not exist in your LDAP directory. It is created during WebSphere installation in a local file repository. You can use the same user name and password for all components (makes it easier) or different names and passwords. But again, it does not work when this user exists in the LDAP.
ihsadminThis is the user to access the IBM HTTP Server components and to administer the system. This user must not exist in your LDAP directory. It is created during IHS installation in a local file repository. But again, it does not work when this user exists in the LDAP.

40 © 2013 IBM CorporationSocial Business
Required technical users for IBM Connections 4.5
Cognos Admin This user is required to administer the Cognos Business Intelligence and Transformer components in your Connections installation. This user must be created in your LDAP directory and the password should never expire as all technical user accounts. Take note of the shortname of this user. This shortname is required later in the post install tasks for Cognos.
Connections Content Manager (CCM) AdministratorThis user is required for CCM to communicate with the WebSphere Application Server part. If you use an existing FileNet deployment then this user should be an LDAP user that has admin rights to your WebSphere deployment. If you install a new FileNet deployment – this is what we are doing here with this document – it is easiest to use the existing “wasadmin” user.

41 © 2013 IBM CorporationSocial Business
Required technical users for IBM Connections 4.5
Anonymous User for Filenet
IBM FileNet Collaboration Services implements anonymous access with a designated user that is used only for this purpose. The user should be a system-type user that is not used by a real person. The user ID does not need, and should not have, any particular privileges on the object store beyond what is given by the installation guide. This user's access control records will determine what level of access is given to anonymous users. Consequently, choose a functional ID that is reserved for this purpose and that does not have special access.
Configuring an anonymous user is required if users will be accessing Connections communities anonymously. In some cases, such as when desktop single-sign is enabled, or when roles in the communities application have been restricted to limit access to authenticated users, setting up anonymous access for FileNet is optional. Refer to Roles for information on restricting access to anonymous users in communities.
Create a user with the name “Anonymous User” in your Domino LDAP.

42 © 2013 IBM CorporationSocial Business
Agenda
● Introduction
● Requirements for a IBM Connections 4.5 installation
● Architecture of a IBM Connections 4.5 Server deployment
● The 33 steps to a IBM Connections 4.5 Server deployment

43 © 2013 IBM CorporationSocial Business
Deployment options
Install IBM® Connections in one of three deployment topologies to achieve optimum scaling, load balancing, and failover.
A network deployment can consist of a single server that hosts all IBM Connections applications or two or more sets of clustered servers that share the workload. You must configure an additional system with WebSphere® Application Server Network Deployment Manager.
IBM Cognos® Business Intelligence is an optional component in the deployment. If used, Cognos must be federated to the same Deployment Manager as the IBM Connections servers. However, Cognos servers cannot be configured within an IBM Connections cluster.
A network deployment provides the administrator with a central management facility and it ensures that users have constant access to data. It balances the workload between servers, improves server performance, and facilitates the maintenance of performance when the number of users increases. The added reliability also requires a larger number of systems and experienced administrative personnel who can manage them.

44 © 2013 IBM CorporationSocial Business
When you are installing IBM Connections, you have three deployment options:
● Small deployment Install all IBM Connections applications on a single node in a single cluster. This option is the simplest deployment but has limited flexibility and does not allow individual applications to be scaled up. All the applications run within a single Java™ Virtual Machine (JVM). Note: The diagram depicts a topology with up to 8 servers. If you install the servers on shared systems, you do not need to deploy 8 separate systems.

45 © 2013 IBM CorporationSocial Business
● Medium deployment Install a subset of applications in separate clusters. IBM Connections provides three predefined cluster names shared among all of its applications. Use this option to distribute applications according to your usage expectations. For instance, you might anticipate higher loads for the Profiles application and install it in its own cluster, while other applications could be installed in a different cluster. This option allows you to maximize the use of available hardware and system resources to suit your needs.

46 © 2013 IBM CorporationSocial Business
● Large deployment Install each application in its own cluster. IBM Connections provides a predefined cluster name for each application. This option provides the best performance in terms of scalability and availability options but also requires more system resources. In most cases, you should install the News and Home page applications in the same cluster.

47 © 2013 IBM CorporationSocial Business
Different ways to a IBM Connections 4.5 Server deployment
As you could see in the previous slides, you can install IBM Connections on one box and have up to nearly unlimited number of boxes for a really large high available deployment.
The largest customer environment that I know is of more then 50 boxes where all 10 IBM Connections components run on a cluster of 3 servers and a high available dedicated IBM HTTP Server in front.
Everything between one box and many boxes is possible. For your production environment a detailed architecture design and sizing is urgently recommended.
In this pilot we use one box for the IBM Connections Server and an other box for the Cognos Business Intelligence and Transformer services. We assume you have a already existing Domino LDAP with user data.
We now will install one large box that will contain the DB2 Databases for all the IBM Connections Applications, the TDI to move personal data from the LDAP server to the People database, the IBM Connections server by itself and the IBM HTTP server for caching and SSL security in front. On the second box we will install the DB2 client, the WebSphere Server platform and the Cognos Server components.

48 © 2013 IBM CorporationSocial Business
IBM Connections 4.5 architecture for this documentExisting components New components to be installed
IBM DB2 Database
Server
IBM Connections
Server
Cognos BI Server
IBM HTTP Server
IBM Lotus Domino LDAP
Server
IBM DB2 Database
Client
IBM Tivoli Directory Integrator
IBM Connections
Content Manager

49 © 2013 IBM CorporationSocial Business
Agenda
● Introduction
● Requirements for a IBM Connections 4.5 installation
● Architecture of a IBM Connections 4.5 Server deployment
● The 33 steps to a IBM Connections 4.5 Server deployment

50 © 2013 IBM CorporationSocial Business
The 33 steps to a IBM Connections 4.5 Pilot deployment
Pre Installation tasks1.Prepare your machines and the network 542.Prepare your LDAP 573.Install the IBM DB2 Server, add the license and create users 614.Run the Database Creation Wizard 1025.Install IBM Tivoli Directory Integrator and update to FP6 1176.Run the Population Wizard 1417.Install IBM WebSphere Application Server 8.0 and the FP5 1598.Create the required Manager and AppServer profiles 1879.Update WebSphere with 5 required fixes 19610.Install IBM IHS, Plugin and FP5 21311.Setup LDAP with Federated Repositories in WAS 23912.Create the Cognos administrator account 281

51 © 2013 IBM CorporationSocial Business
The 33 steps to a IBM Connections 4.5 Pilot deployment
13.Install the DB2 Database Client for Cognos 28214.Install IBM WebSphere Application Server for Cognos 29915.Create the required AppServer profile 32716.Update the WebSphere Server with 5 required fixes 33617.Install the Cognos Business Intelligence and Transformer Server 35418.Federate Cognos 37319.Validate Cognos 388
Installation20.Install the IBM Connections Server 393
Post Installation tasks21.Reviewing the JVM heap size 450

52 © 2013 IBM CorporationSocial Business
The 33 steps to a IBM Connections 4.5 Pilot deployment
22.Configure the IBM HTTP Server IHS 46023.Configuring the Home page administrator 56624.Configure File Downloads through the HTTP server 57925.Install the Cognos FP1 Fixpack 60326.Granting access to Global Metrics and Community Metrics 63127.Configuring the IBMConnectionsMetricsAdmin role on Cognos 64928.Configure Cognos to use the HTTP Server and SSL 68529.Configure the Job Scheduler 70730.Configure IBM Connections Content Manager for Libraries 73131.Configure services to start and stop the server automatic 78832.Update IBM Connections to the Cumulative Refresh 1 level 80533.Update IBM Connections to the Cumulative Refresh 2 level 943
Attachment:● Worksheet for Connections 1088
53 © 2013 IBM CorporationSocial Business
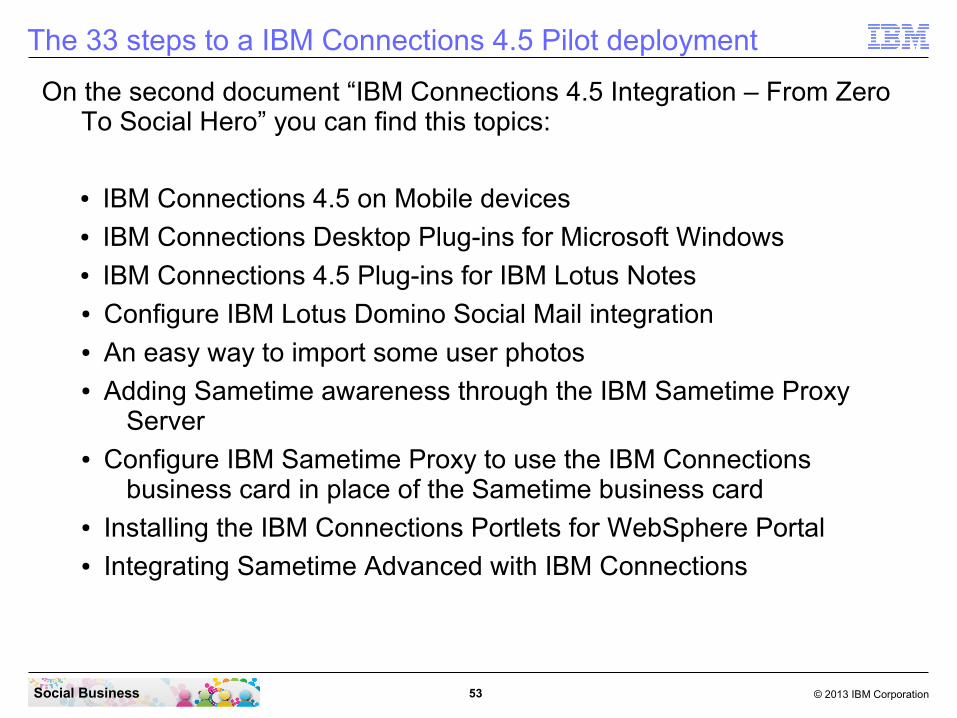
The 33 steps to a IBM Connections 4.5 Pilot deployment
On the second document “IBM Connections 4.5 Integration – From Zero To Social Hero” you can find this topics:
● IBM Connections 4.5 on Mobile devices● IBM Connections Desktop Plug-ins for Microsoft Windows● IBM Connections 4.5 Plug-ins for IBM Lotus Notes● Configure IBM Lotus Domino Social Mail integration● An easy way to import some user photos● Adding Sametime awareness through the IBM Sametime Proxy
Server● Configure IBM Sametime Proxy to use the IBM Connections
business card in place of the Sametime business card● Installing the IBM Connections Portlets for WebSphere Portal● Integrating Sametime Advanced with IBM Connections

54 © 2013 IBM CorporationSocial Business
STEP ONE: Prepare your machines and the network
Summary
Before you can install your IBM Connections Server environment, some things needs to be checked and prepared.
55 © 2013 IBM CorporationSocial Business
The machines that you run the IBM Connections 4.5 Server, the Cognos Server and the DB2 Database Server can be virtual machines or a hardware boxes. Both work.
It is possible to use Linux as OS, but this document describes how to install on Windows.
If you use Linux you can use most parts of this document and most installation instructions and screen shots are identical. Mostly the paths are different.In Linux it is recommended to have the graphical system installed for this installation and then use a x-server on our client.
These instructions work with Windows Server 2008 in 64Bit only. You can use the R2 Version of the supported OS.
Be sure that your Firewall Admin has opened all ports in the firewalls. Test all connections using the telnet command in a CMD line window.
Be sure the used host names or DNS alias is listed in the DNS and can be used and resolved in the internet and in your intranet.

56 © 2013 IBM CorporationSocial Business
More information can be found in the official IBM Connections Documentation at this URL:
http://www-10.lotus.com/ldd/lcwiki.nsf/xpDocViewer.xsp?lookupName=IBM+Connections+4.5+documentation#action=openDocument&content=catcontent&ct=prodDoc
The IBM Connections Installation and the IBM Sametime Installation – “From Zero To Hero” documents can be found here:
https://www-304.ibm.com/connections/blogs/sametimeguru/?lang=en_us

57 © 2013 IBM CorporationSocial Business
STEP TWO: Prepare your LDAP
Before you beginEnsure that you have installed a supported LDAP directory. For more information about supported LDAP directories, see the IBM Connections detailed system requirements topic.
To ensure that the Profiles population wizard can return the maximum number of records from your LDAP directory, set the Size Limit parameter in your LDAP configuration to match the number of users in the directory. For example, if your directory has 100,000 users, set this parameter to 100000. For more information, see the documentation for your LDAP directory. If you cannot set the Size Limit parameter, you could run the wizard multiple times. Alternatively, you could write a JavaScript™ function to split the original LDAP search filter, then run the collect_dns_iterate.bat file, and finally run the populate_from_dns_files.bat file.
Note: For information about a limitation in environments with a Turkish locale, see the Base entry comparison for Turkish locale external link technote.

58 © 2013 IBM CorporationSocial Business
The LDAP Server
In most environments a LDAP server is already present. If you use Domino it is simple to just enable LDAP on one of the Domino Directory Servers. If you use an existing LDAP Server other then Domino, it is important to use a V3 compliant LDAP.
Make sure you have all relevant data from the LDAP system. (use ldapsearch, Apache LDAP studio or another LDAP browser to get the relevant LDAP information - an LDIF extract of a user and a group)
A security related recommendation is to have a Bind DN. This means a user record in the LDAP that can be used for authenticated access to the data in the LDAP server. We use the „LDAP Bind“ user in this example.This is a technical user. His password should never expire. Otherwise the systems can not connect to the LDAP server anymore when this password is expired.
The LDAP connection can be configured with SSL encryption. To configure your Connections Servers connecting to LDAP with SSL (LDAPS), additional steps are required. Make sure that you have access to the required certificate. But we recommend to start without SSL and when all components work, start implementing LDAPS.
59 © 2013 IBM CorporationSocial Business
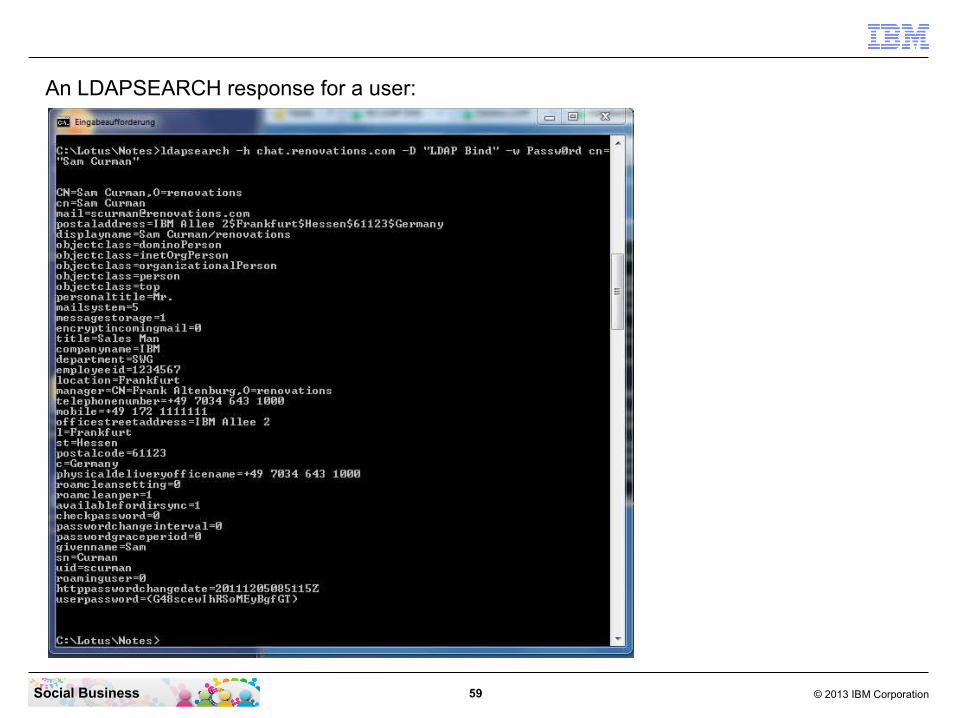
An LDAPSEARCH response for a user:
60 © 2013 IBM CorporationSocial Business
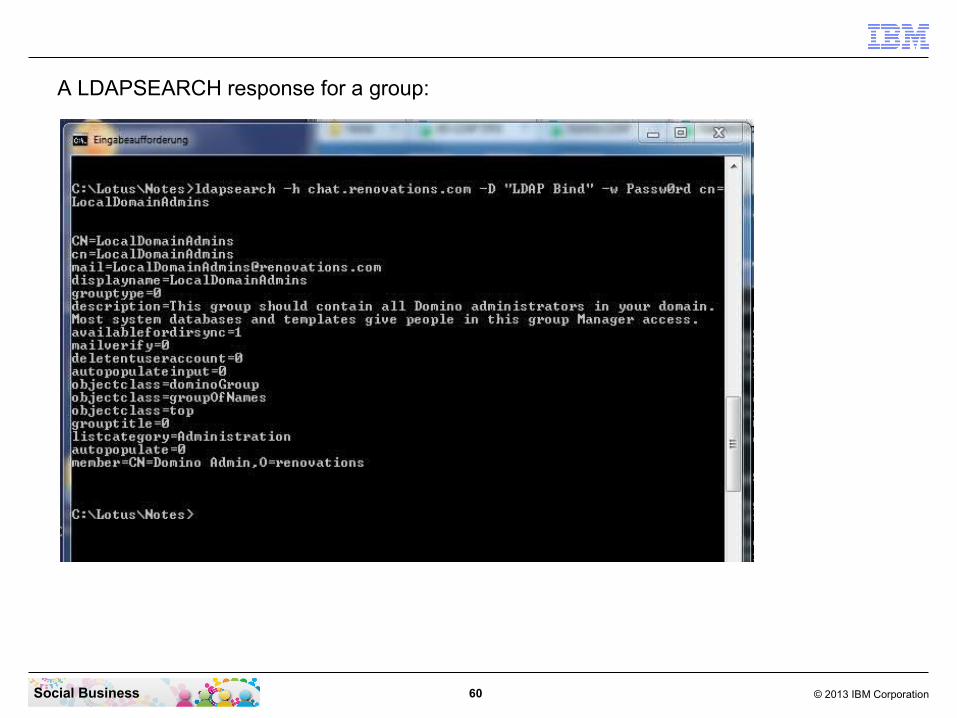
A LDAPSEARCH response for a group:

61 © 2013 IBM CorporationSocial Business
STEP THREE: Install the IBM DB2 Server, add the license and create users
Summary
This step installs the IBM DB2 Database Server release 10.1 with the FP2 update, installs the license key into the server and then creates a user for IBM Connections to connect to the databases.

62 © 2013 IBM CorporationSocial Business
You need to check your local password security policy that the users can be created and the passwords you want to use can be used. In your Windows 2008 server click on “Start” - “Administrative Tools” - “Local Security Policy”.

63 © 2013 IBM CorporationSocial Business
If the Password complexity setting is enabled then the password must contain characters in upper and lower case and a number. If you want easier passwords then set this flag to “Disabled”.

64 © 2013 IBM CorporationSocial Business
To disable just select the “Disabled” check box and click the “OK” button. Then close the Local Security editor.

65 © 2013 IBM CorporationSocial Business
You can start now with the DB2 installation. Open your Windows Explorer or just the “Computer” and navigate to the unpacked installation files for IBM DB2. In this example this can be found in “C:\Install\DB2\UNIVERSAL”. Right click the “setup.exe” file and then “Run as Administrator”.

66 © 2013 IBM CorporationSocial Business
Click “Install a Product” on the left side.
67 © 2013 IBM CorporationSocial Business
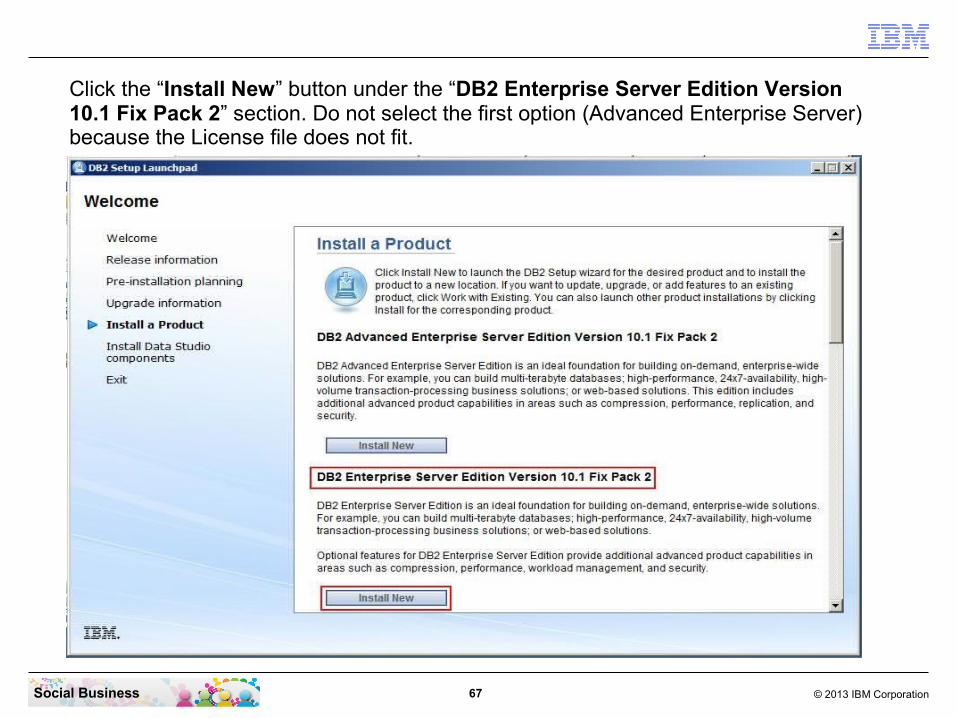
Click the “Install New” button under the “DB2 Enterprise Server Edition Version 10.1 Fix Pack 2” section. Do not select the first option (Advanced Enterprise Server) because the License file does not fit.
68 © 2013 IBM CorporationSocial Business
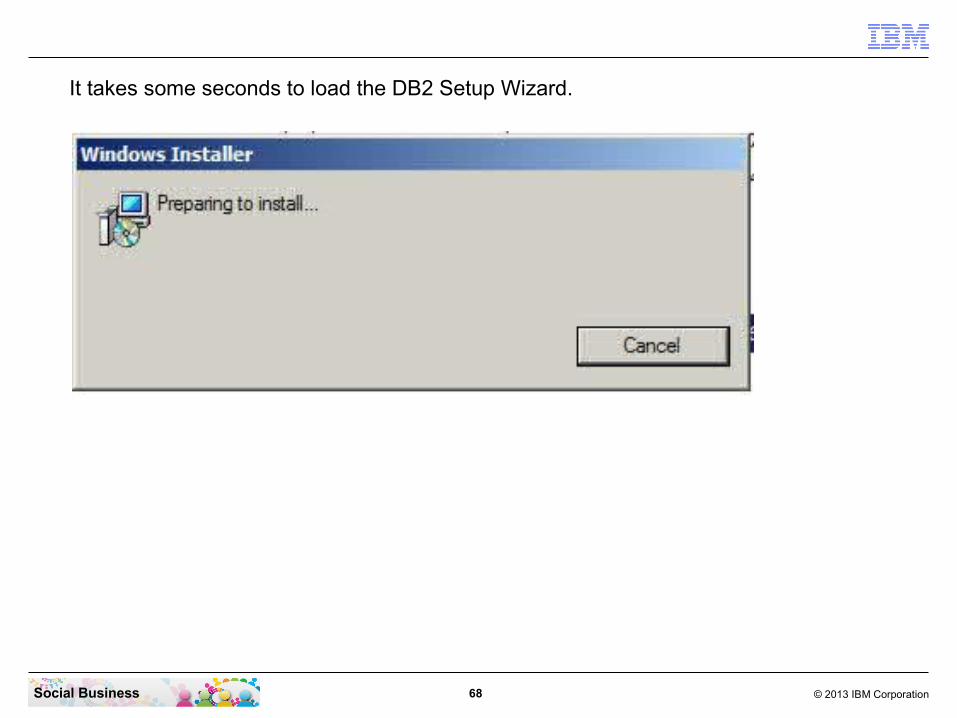
It takes some seconds to load the DB2 Setup Wizard.
69 © 2013 IBM CorporationSocial Business
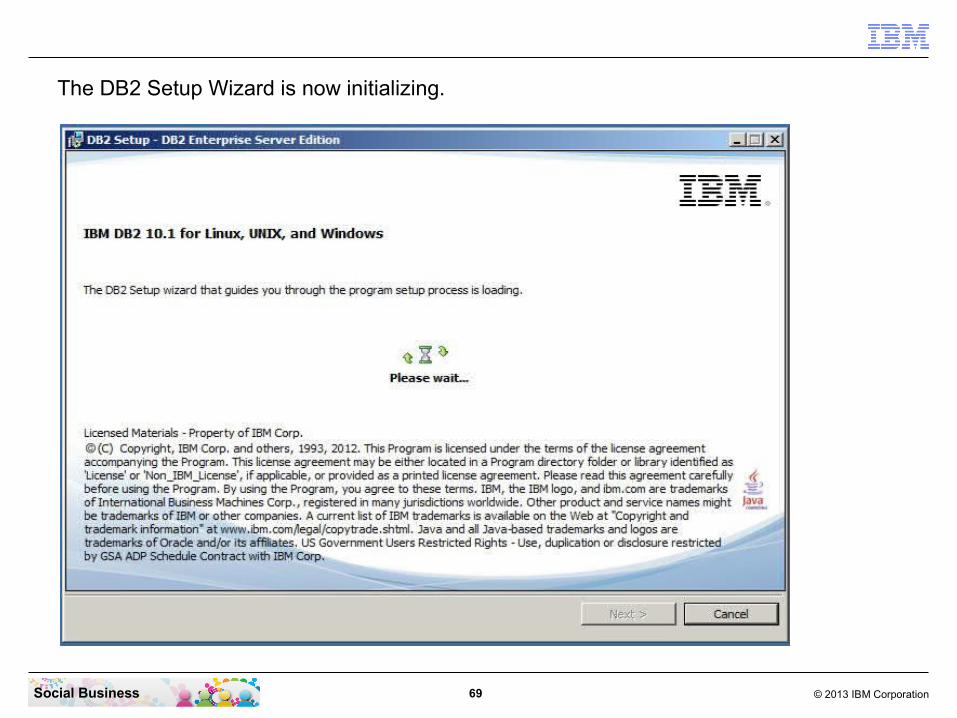
The DB2 Setup Wizard is now initializing.
70 © 2013 IBM CorporationSocial Business
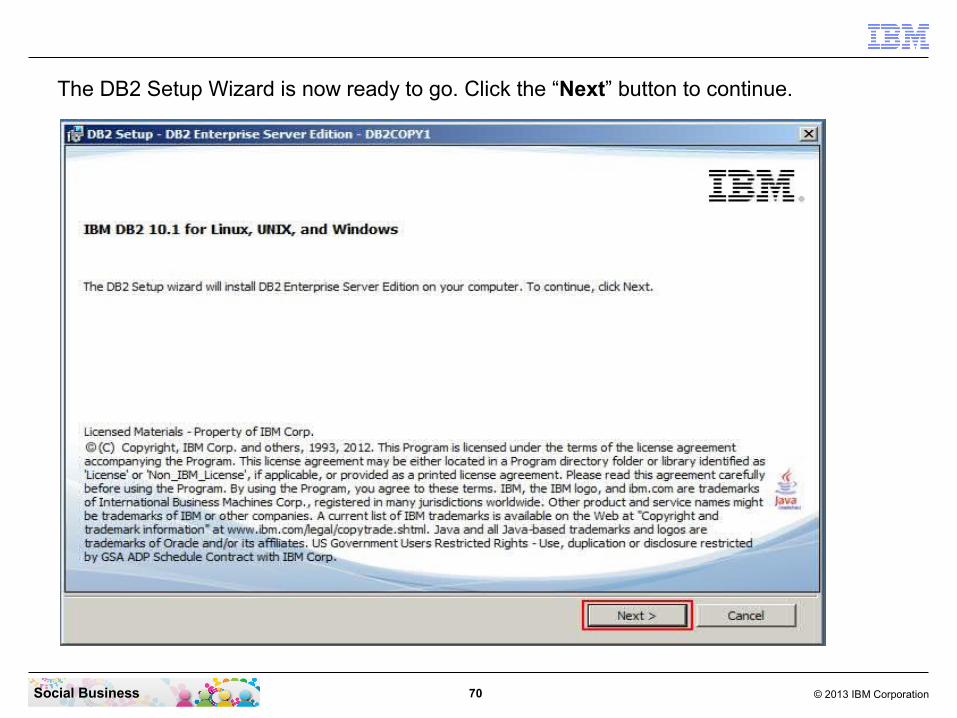
The DB2 Setup Wizard is now ready to go. Click the “Next” button to continue.

71 © 2013 IBM CorporationSocial Business
Select the check box to accept the terms in the license agreement. Then click the “Next” button to continue.

72 © 2013 IBM CorporationSocial Business
Leave the “Typical” installation defaults and just click the “Next” button to continue.

73 © 2013 IBM CorporationSocial Business
Select the first option “Install DB2 Enterprise Server Edition on this computer” and click the “Next” button to continue.

74 © 2013 IBM CorporationSocial Business
We recommend to remove the “Program Files” part in the path. It works with the default path as well. Click the “Next” button to continue.
We recommend to use path names without spaces (as some scripts may require this) and also shorten the path name so that the typical limits of some operating systems and applications for path + file name length are avoided.

75 © 2013 IBM CorporationSocial Business
Remove the “Program Files” part again in the path and select “Do not autostart the IBM SSH server” option. Then click the “Next” button to continue.
76 © 2013 IBM CorporationSocial Business
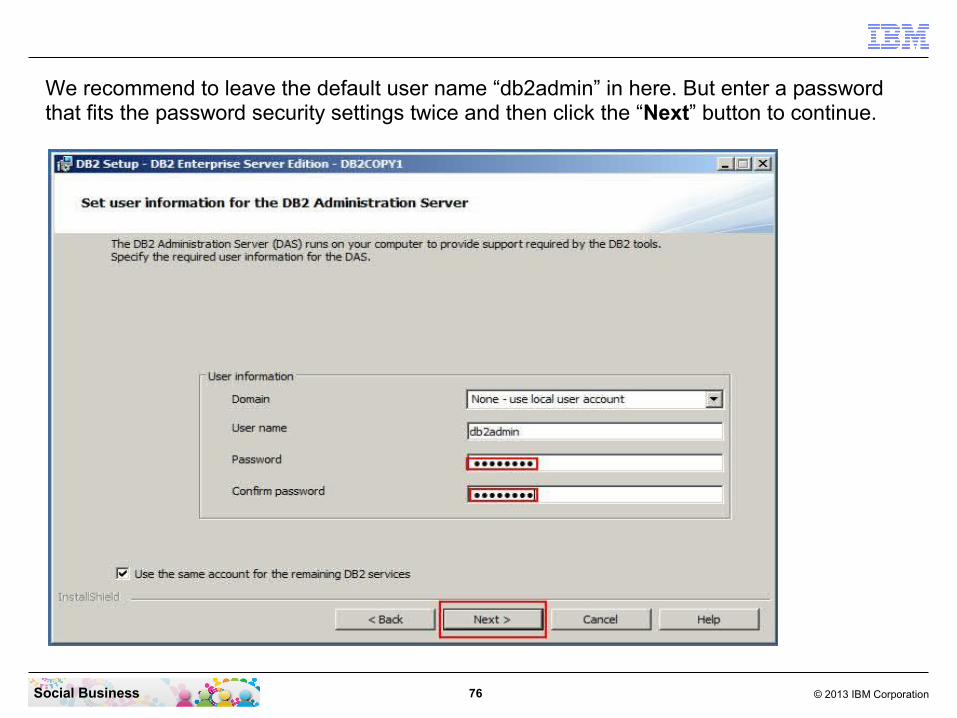
We recommend to leave the default user name “db2admin” in here. But enter a password that fits the password security settings twice and then click the “Next” button to continue.

77 © 2013 IBM CorporationSocial Business
Just click the “Next” button to continue.

78 © 2013 IBM CorporationSocial Business
Un-check the box “Set up your DB2 Server to send notifications”. Then click the “Next” button to continue.
79 © 2013 IBM CorporationSocial Business
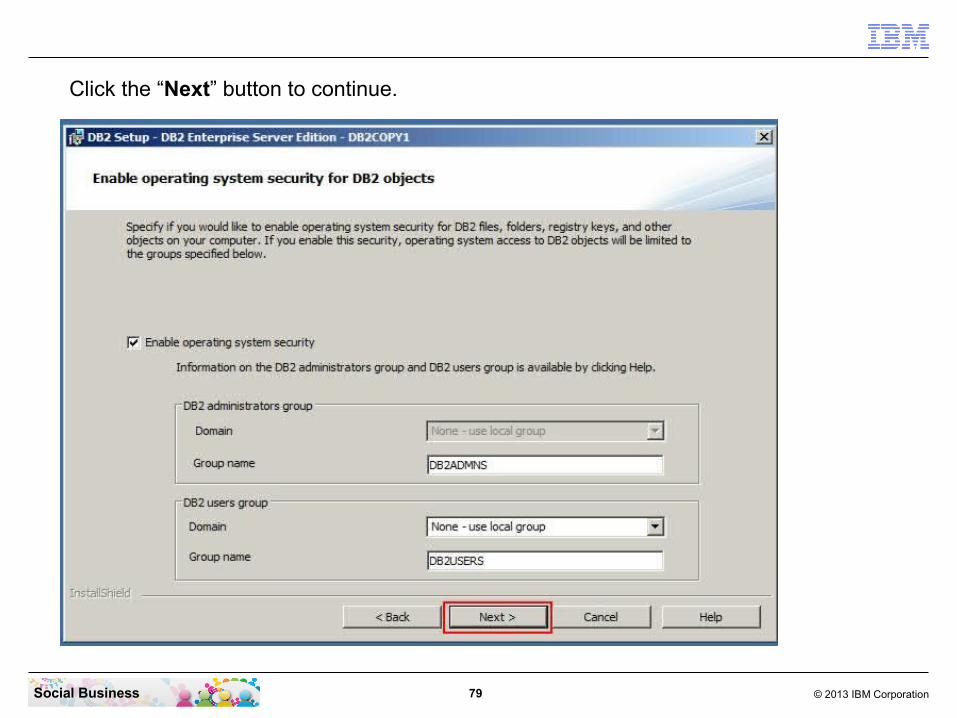
Click the “Next” button to continue.
80 © 2013 IBM CorporationSocial Business
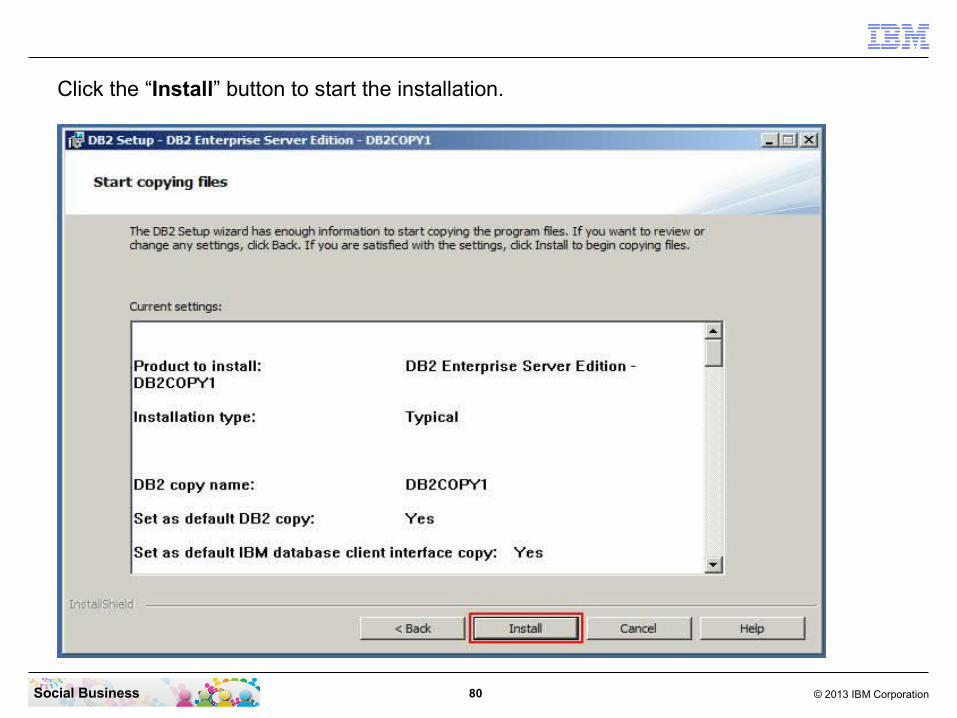
Click the “Install” button to start the installation.

81 © 2013 IBM CorporationSocial Business
The installation of the DB2 Server will take approximately 5 to 10 Minutes.

82 © 2013 IBM CorporationSocial Business
Click the “Finish” button to end the Installation Wizard.

83 © 2013 IBM CorporationSocial Business
Click the “Finish” button to end the DB2 Setup.

84 © 2013 IBM CorporationSocial Business
After some seconds this “DB2 First Steps” window appears. You can close it.

85 © 2013 IBM CorporationSocial Business
Now we need to add the DB2 License. We need a DB2 command line window with Administrator privileges. Click on “Start” - “All Programs” - “IBM DB2” - “DB2COPY1” - “Command Window - Administrator”.

86 © 2013 IBM CorporationSocial Business
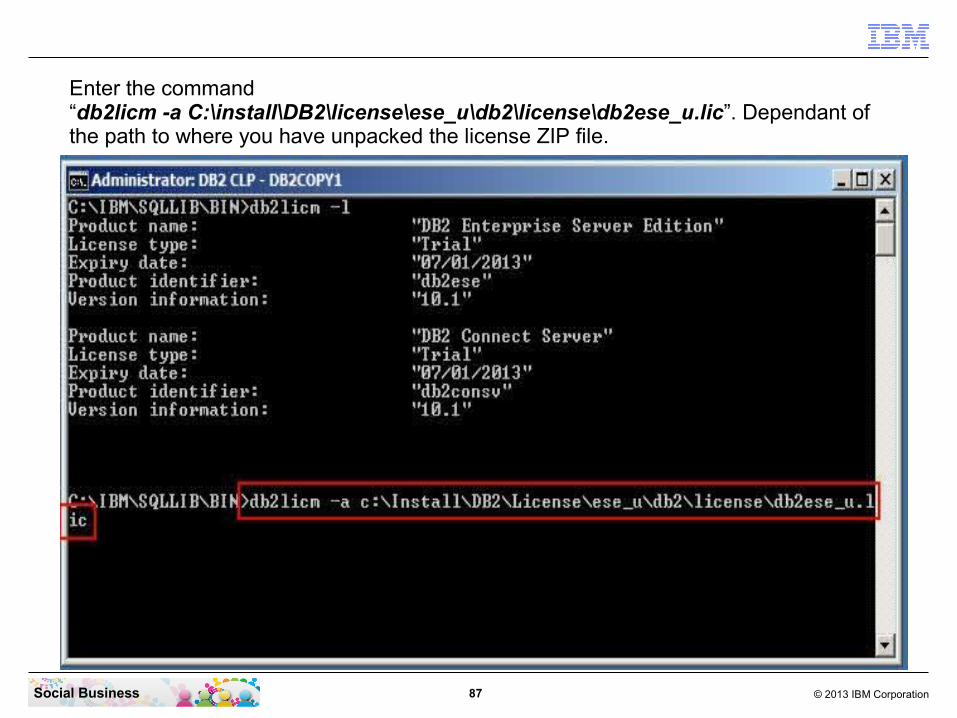
Enter the command “db2licm -l”. you will see that the license is not registered.
Do not copy and paste any commands from this document into your CMD line. This does not work because this would copy some special characters.
87 © 2013 IBM CorporationSocial Business
Enter the command “db2licm -a C:\install\DB2\license\ese_u\db2\license\db2ese_u.lic”. Dependant of the path to where you have unpacked the license ZIP file.
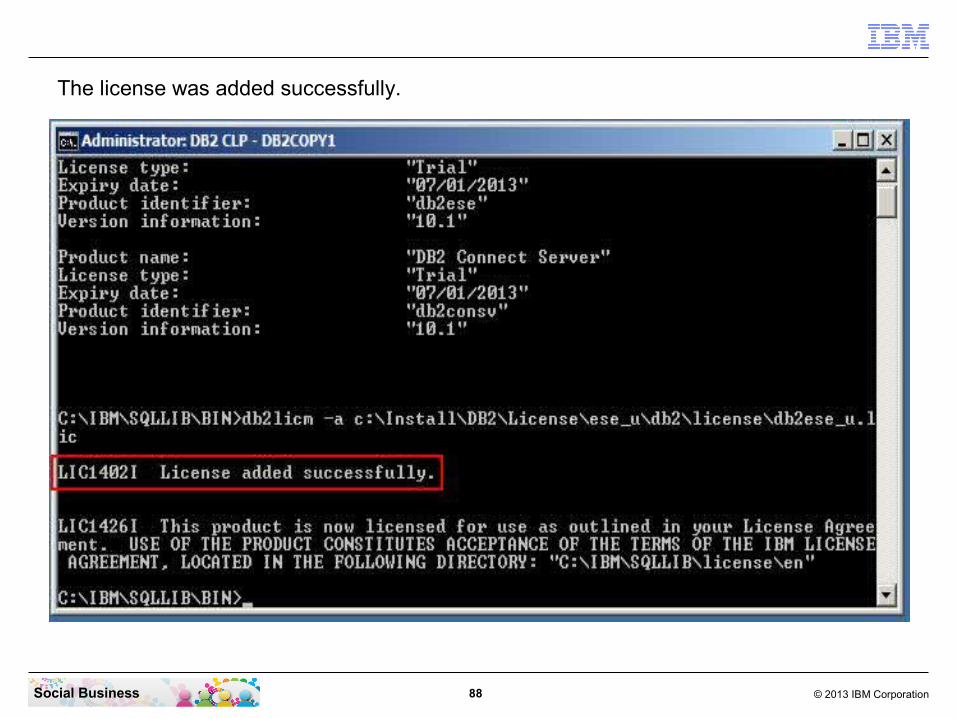
88 © 2013 IBM CorporationSocial Business
The license was added successfully.

89 © 2013 IBM CorporationSocial Business
Confirm that the license was added by entering again the command “db2licm -l”.

90 © 2013 IBM CorporationSocial Business
Configuring the DB2 databases for unicode ensures that DB2 tools like export and import do not corrupt unicode data.In the existing actual DB2 command window run the following commands: “db2set DB2CODEPAGE=1208” “db2start”Run the following commands to check the new configuration: “db2set”This should return DB2CODEPAGE=1208. If not, it is not configured correctly and you should try this step again.

91 © 2013 IBM CorporationSocial Business
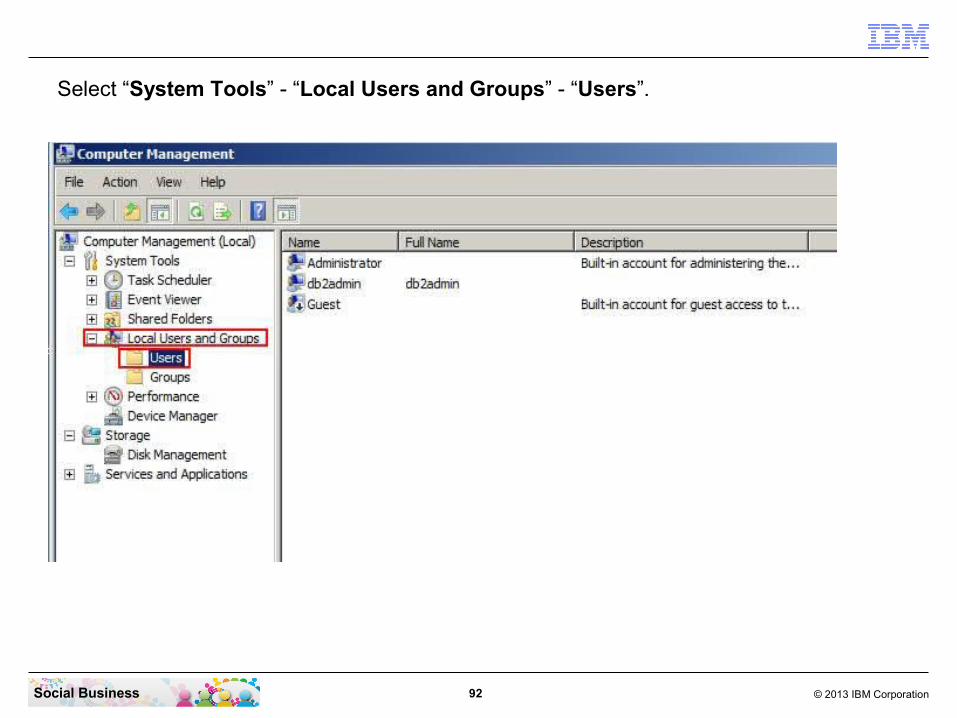
Next step is to create a specific user for the IBM Connections Server to access the databases on the IBM DB2 Server. Click “Start” - “Administrative Tools” - “Computer Management”.
92 © 2013 IBM CorporationSocial Business
Select “System Tools” - “Local Users and Groups” - “Users”.

93 © 2013 IBM CorporationSocial Business
In the Menu click “Action” and then “New User...”.

94 © 2013 IBM CorporationSocial Business
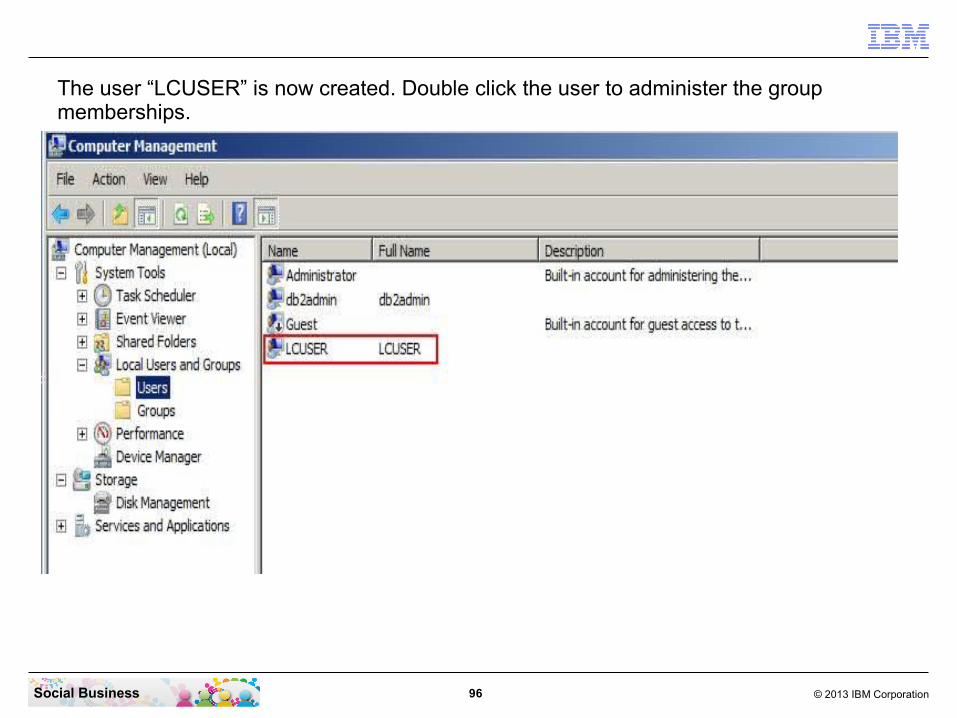
For this pilot we recommend to use the name “LCUSER” because this is the default name used in the database creation wizard. Enter a valid password (take note on the Password security policy). Deselect the box “User must change password at next logon” and select the box “Password never expires”. Then click the “Create” button.

95 © 2013 IBM CorporationSocial Business
We don't need an other user. So just click the “Close” button.
96 © 2013 IBM CorporationSocial Business
The user “LCUSER” is now created. Double click the user to administer the group memberships.

97 © 2013 IBM CorporationSocial Business
Click the “Member Of” tab.

98 © 2013 IBM CorporationSocial Business
Click the “Add...” button.

99 © 2013 IBM CorporationSocial Business
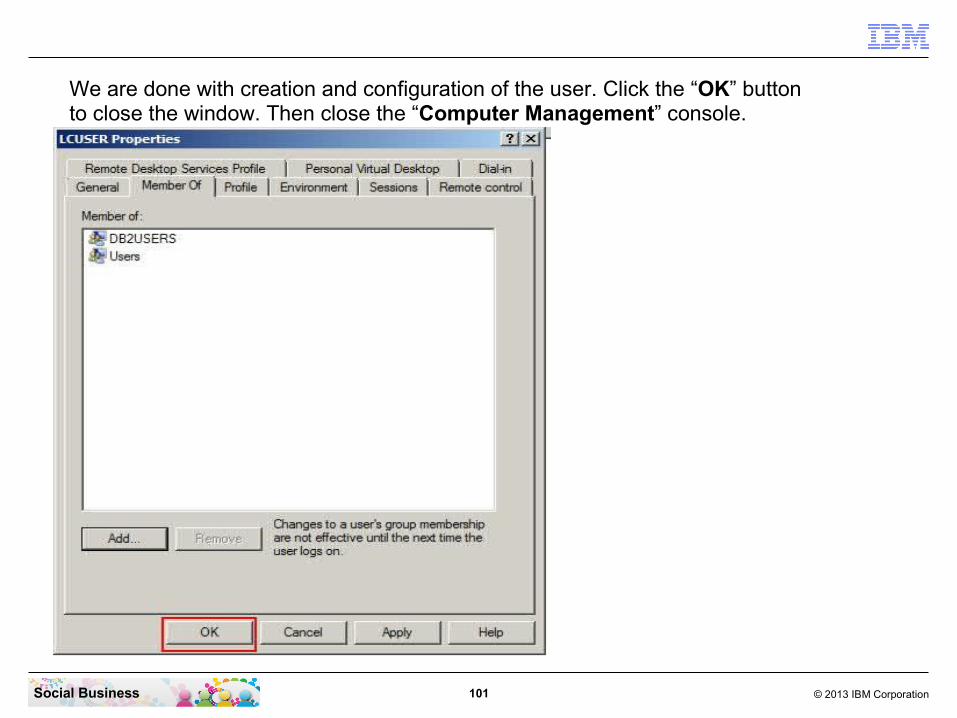
Enter the goup name “DB2USERS” and click the “Check Names” button.

100 © 2013 IBM CorporationSocial Business
The group was found in the system so you can click the “OK” button.
101 © 2013 IBM CorporationSocial Business
We are done with creation and configuration of the user. Click the “OK” button to close the window. Then close the “Computer Management” console.

102 © 2013 IBM CorporationSocial Business
STEP FOUR: Run the Database Creation Wizard
Summary
When you are creating a database either with the database wizard or SQL scripts, you must log into the system where the database is hosted with the database administrator account. The default values for DB2® are db2admin on Microsoft™ Windows™.
If you use only one database instance and if that instance includes other databases besides IBM Connections, configure the numdb parameter to match the total number of databases on the instance.

103 © 2013 IBM CorporationSocial Business
Now open a file explorer and navigate to the directory “C:\Install\Wizards”. Right Click the “dbWizard” and select “Run as Administrator”.
104 © 2013 IBM CorporationSocial Business
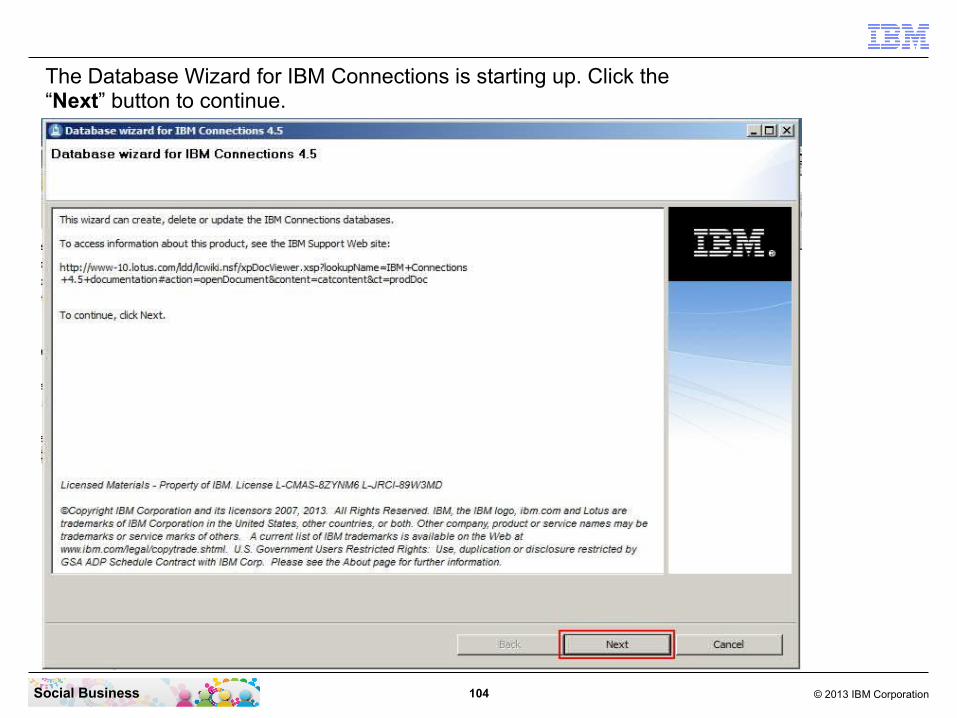
The Database Wizard for IBM Connections is starting up. Click the “Next” button to continue.
105 © 2013 IBM CorporationSocial Business
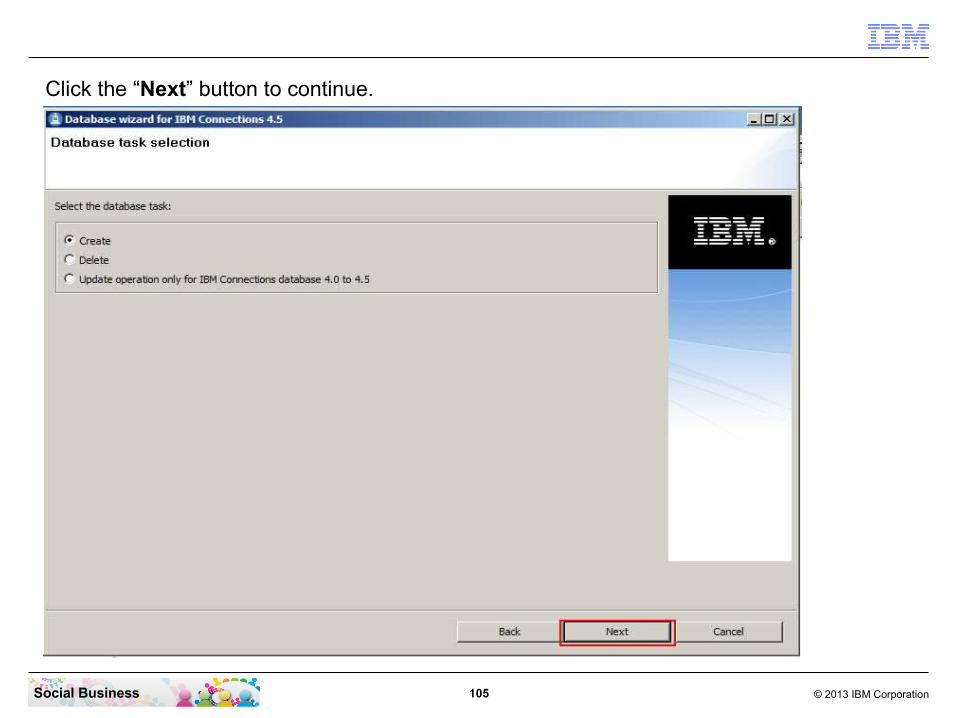
Click the “Next” button to continue.

106 © 2013 IBM CorporationSocial Business
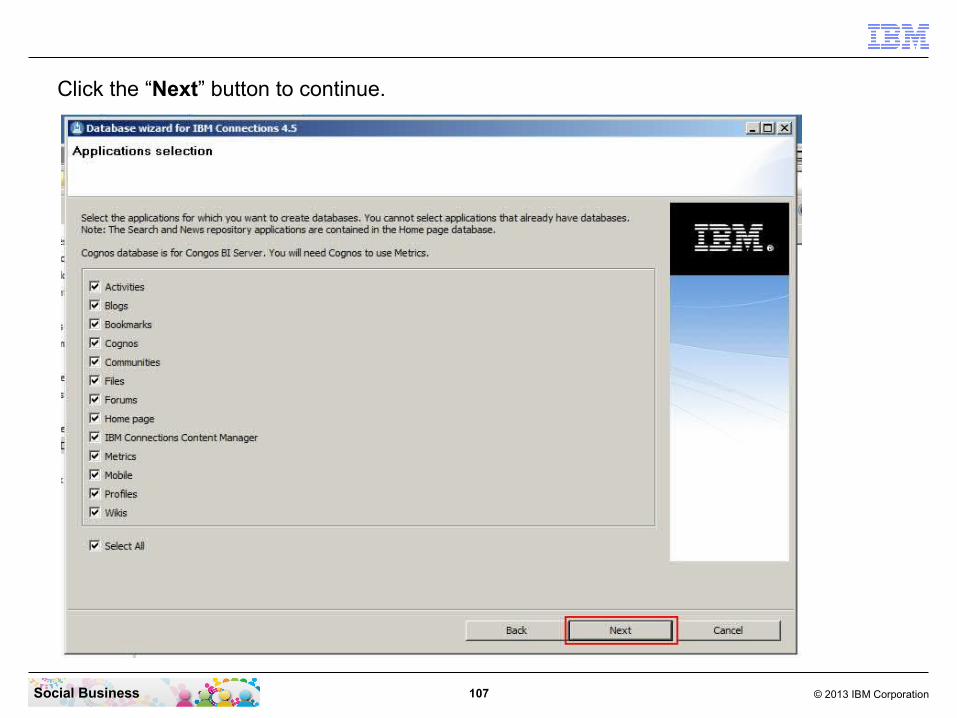
Click the “Next” button to continue.
107 © 2013 IBM CorporationSocial Business
Click the “Next” button to continue.

108 © 2013 IBM CorporationSocial Business
Click the “Create” button to continue.
109 © 2013 IBM CorporationSocial Business
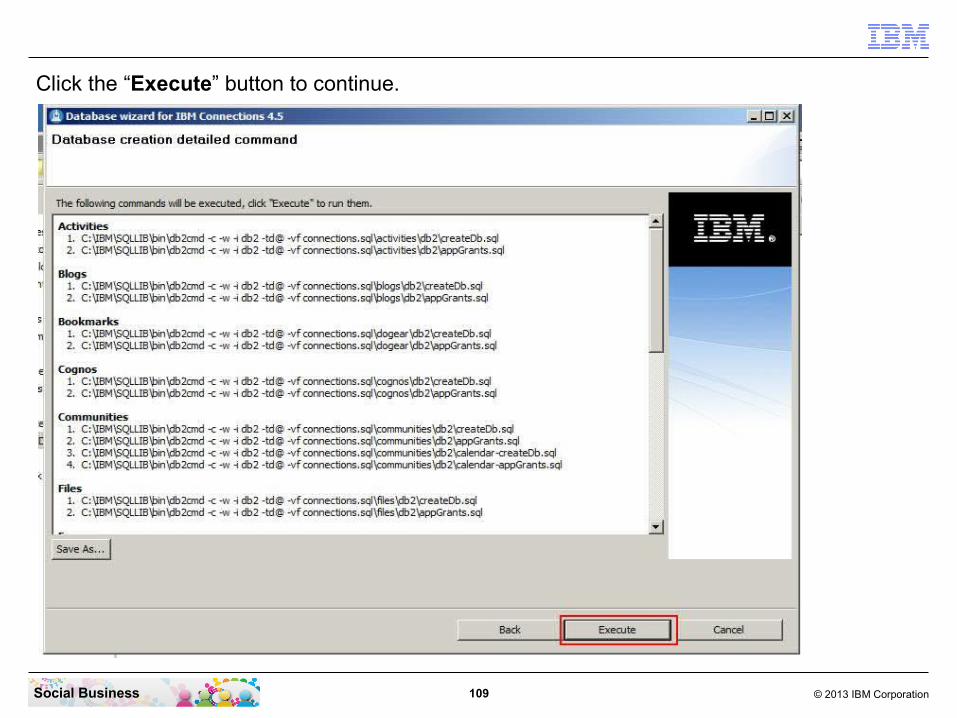
Click the “Execute” button to continue.

110 © 2013 IBM CorporationSocial Business
The Database creation wizard is now creating the required databases. This step takes approximately 10 to 15 minutes.
111 © 2013 IBM CorporationSocial Business
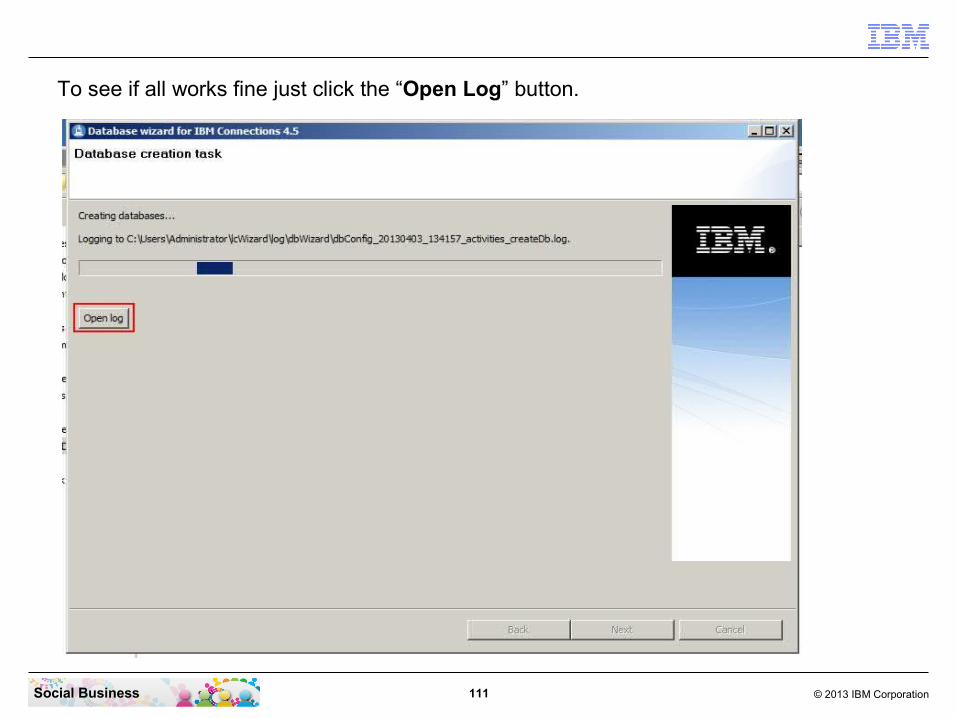
To see if all works fine just click the “Open Log” button.
112 © 2013 IBM CorporationSocial Business
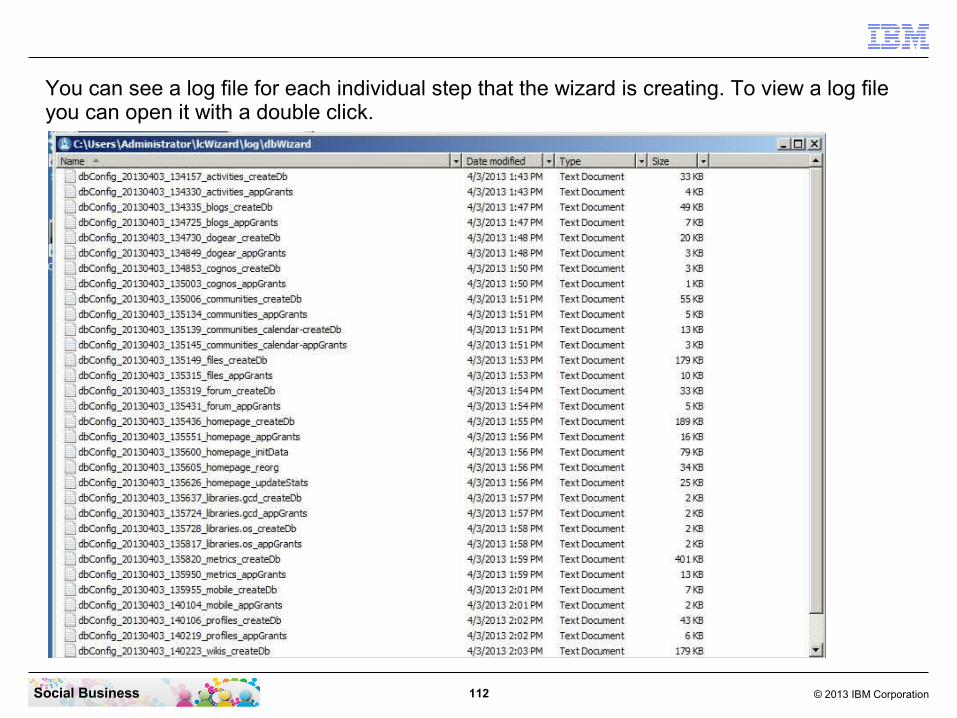
You can see a log file for each individual step that the wizard is creating. To view a log file you can open it with a double click.
113 © 2013 IBM CorporationSocial Business
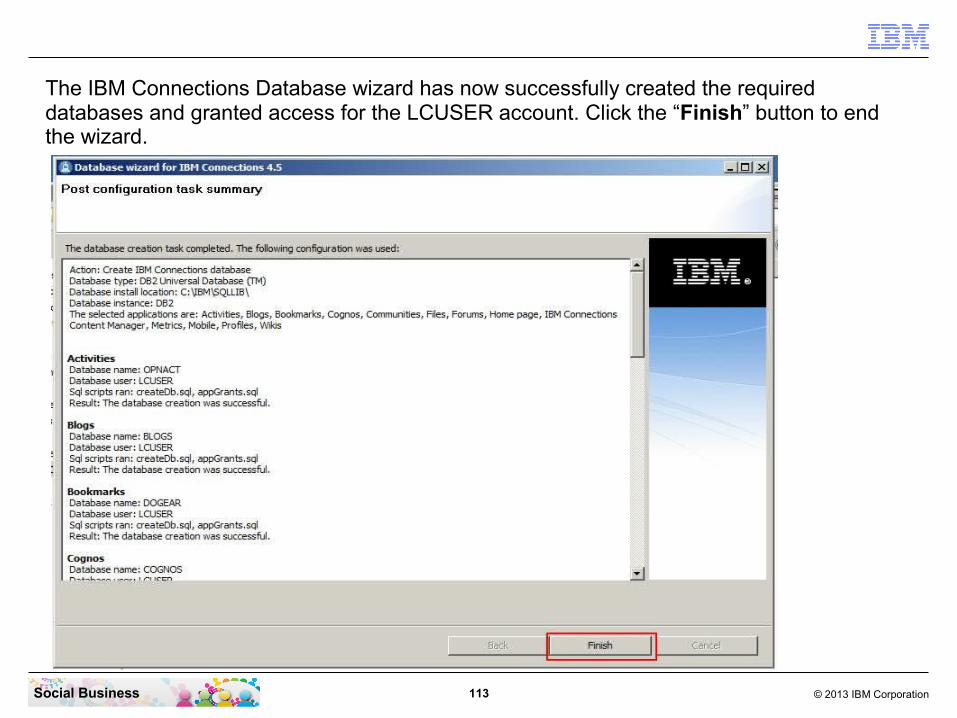
The IBM Connections Database wizard has now successfully created the required databases and granted access for the LCUSER account. Click the “Finish” button to end the wizard.
114 © 2013 IBM CorporationSocial Business
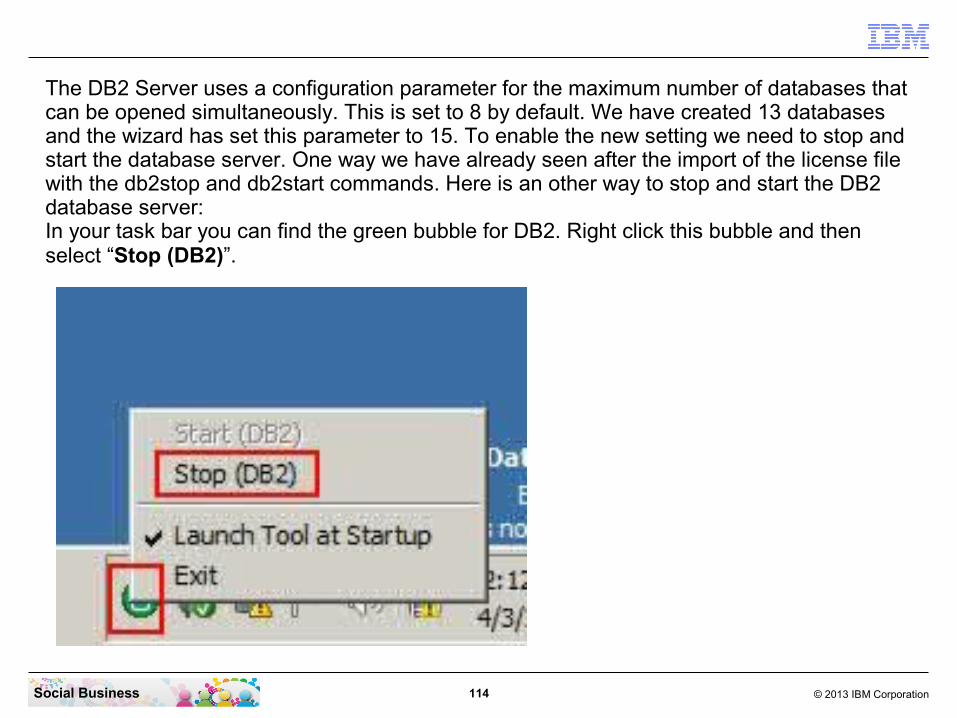
The DB2 Server uses a configuration parameter for the maximum number of databases that can be opened simultaneously. This is set to 8 by default. We have created 13 databases and the wizard has set this parameter to 15. To enable the new setting we need to stop and start the database server. One way we have already seen after the import of the license file with the db2stop and db2start commands. Here is an other way to stop and start the DB2 database server:In your task bar you can find the green bubble for DB2. Right click this bubble and then select “Stop (DB2)”.

115 © 2013 IBM CorporationSocial Business
Click the “OK” button to continue.

116 © 2013 IBM CorporationSocial Business
You can now see the red square on the bubble. This means the DB2 Database server is stopped. To start it again right click on the bubble and select “Start (DB2)”.

117 © 2013 IBM CorporationSocial Business
STEP FIVE: Install the IBM Tivoli Directory Integrator and update to FP6
Summary
This step installs the Tivoli Directory Integrator component on your IBM Connections Server machine to fill your Profiles Database with predefined information from your LDAP and other sources.

118 © 2013 IBM CorporationSocial Business
In your File Explorer navigate to the directory “C:\Install\TDI\TDI_7.1.0” and right click the “launchpad”. Then click the “Run as Administrator” option.

119 © 2013 IBM CorporationSocial Business
Click the “Install IBM Tivoli Directory Integrator” link.

120 © 2013 IBM CorporationSocial Business
Click the “Tivoli Directory Integrator 7.1 Installer” link
121 © 2013 IBM CorporationSocial Business
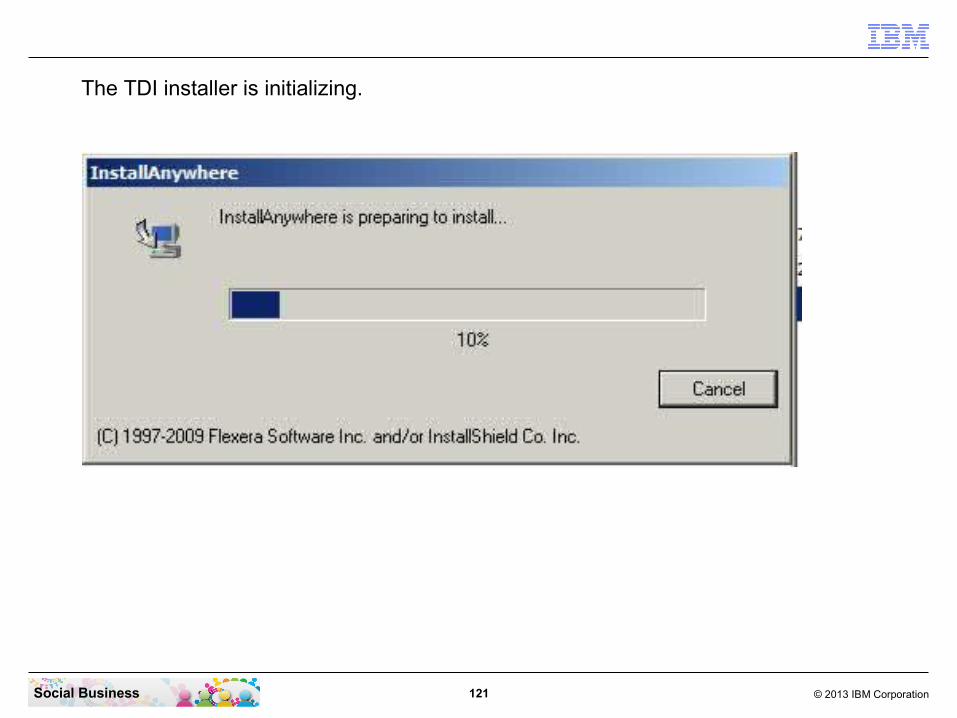
The TDI installer is initializing.
122 © 2013 IBM CorporationSocial Business
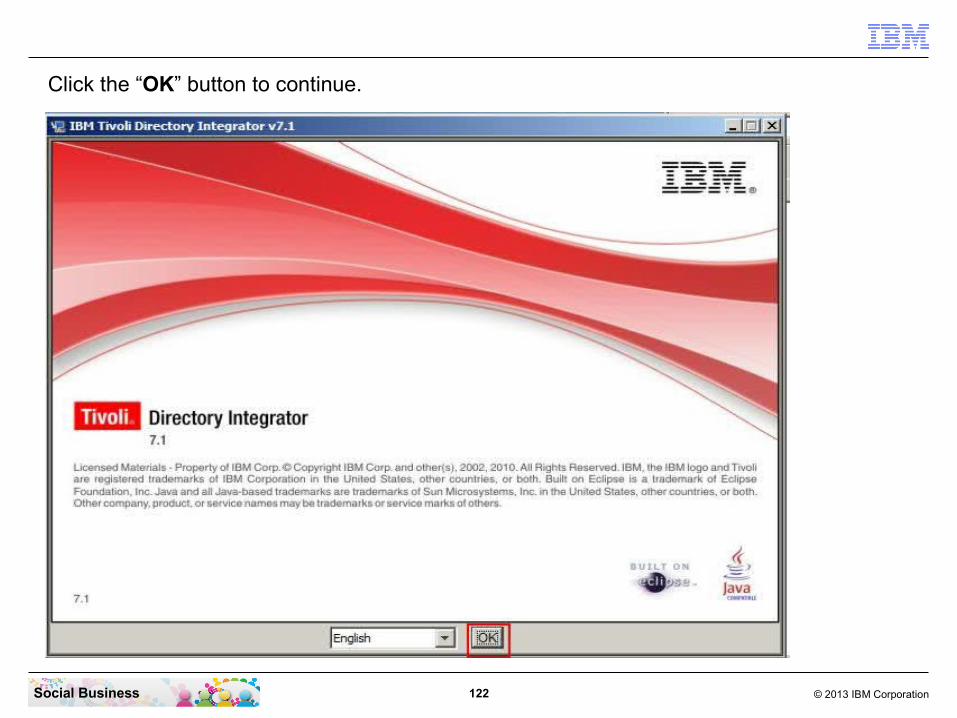
Click the “OK” button to continue.

123 © 2013 IBM CorporationSocial Business
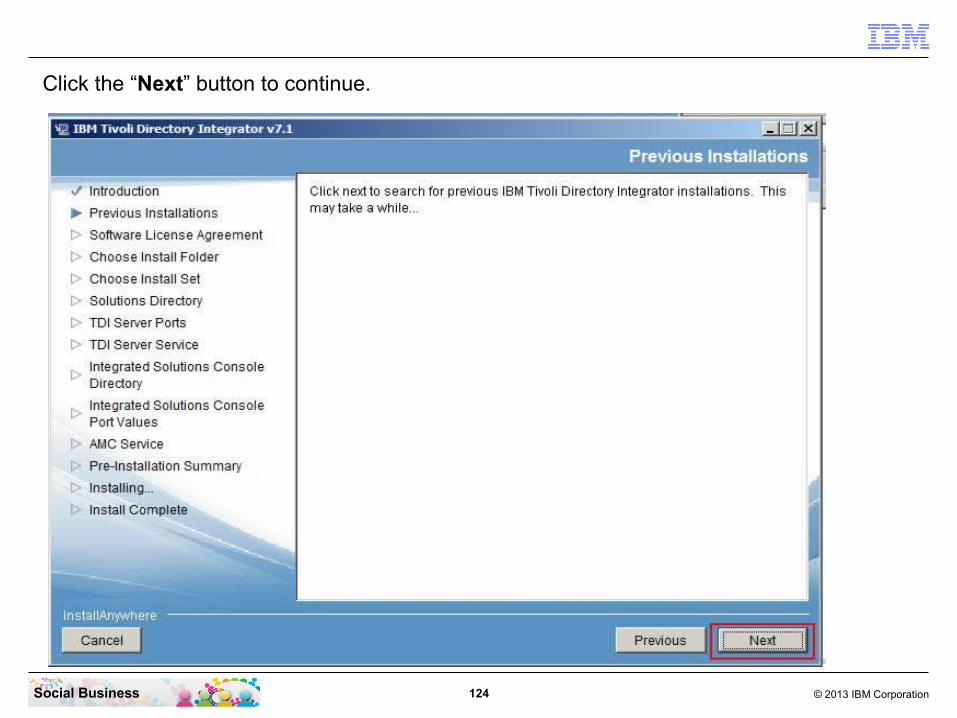
Click the “Next” button to continue.
124 © 2013 IBM CorporationSocial Business
Click the “Next” button to continue.

125 © 2013 IBM CorporationSocial Business
Accept he terms in the license agreement and click the “Next” button to continue.
126 © 2013 IBM CorporationSocial Business
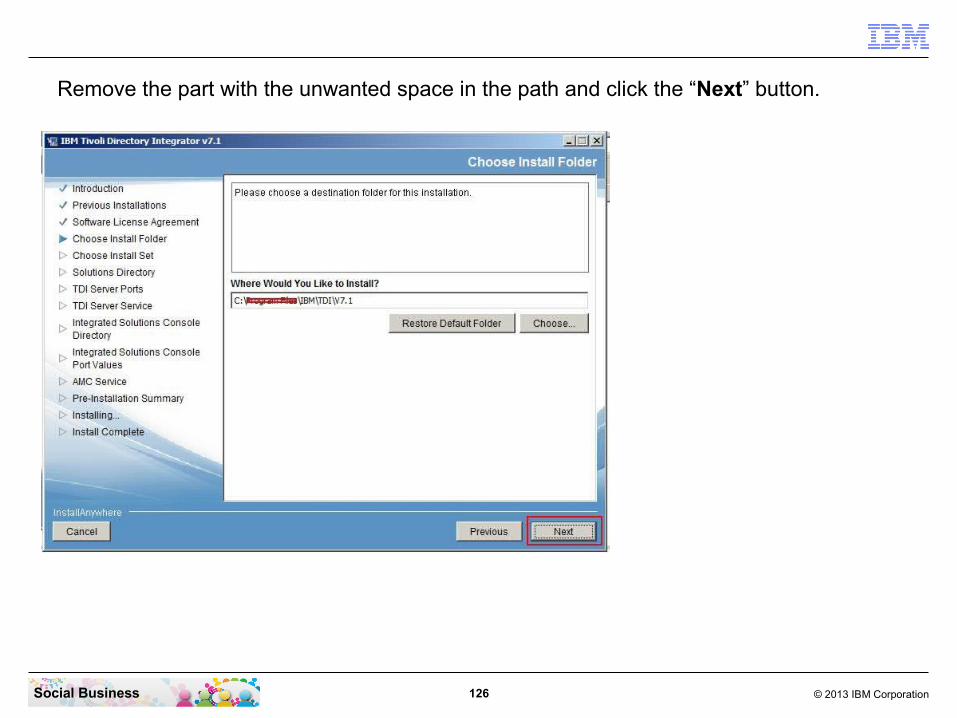
Remove the part with the unwanted space in the path and click the “Next” button.

127 © 2013 IBM CorporationSocial Business
Click the “Next” button to continue.
128 © 2013 IBM CorporationSocial Business
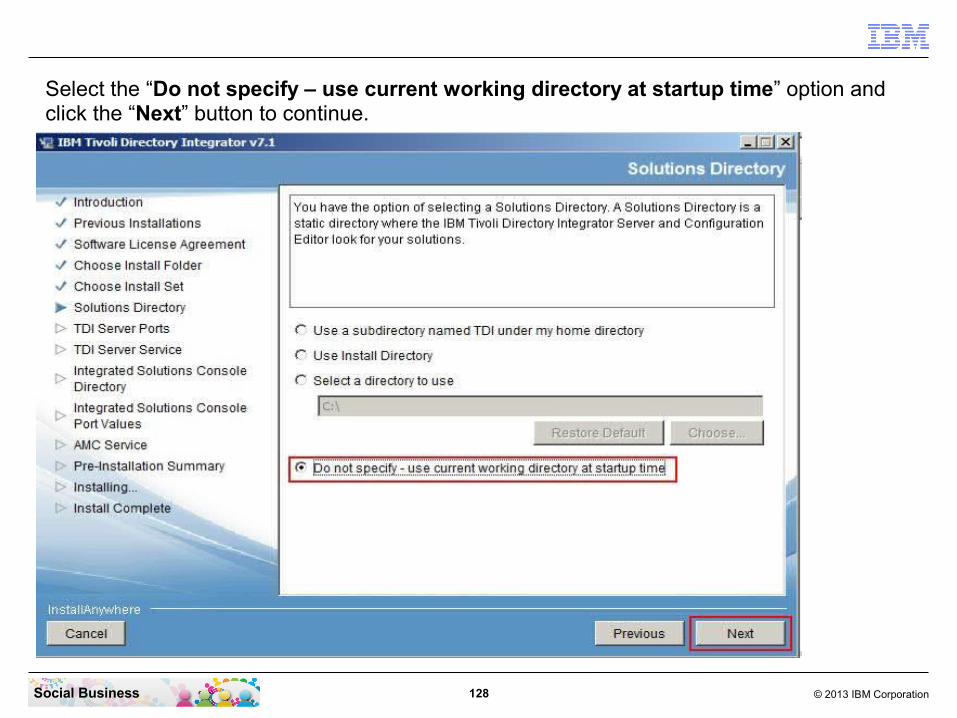
Select the “Do not specify – use current working directory at startup time” option and click the “Next” button to continue.

129 © 2013 IBM CorporationSocial Business
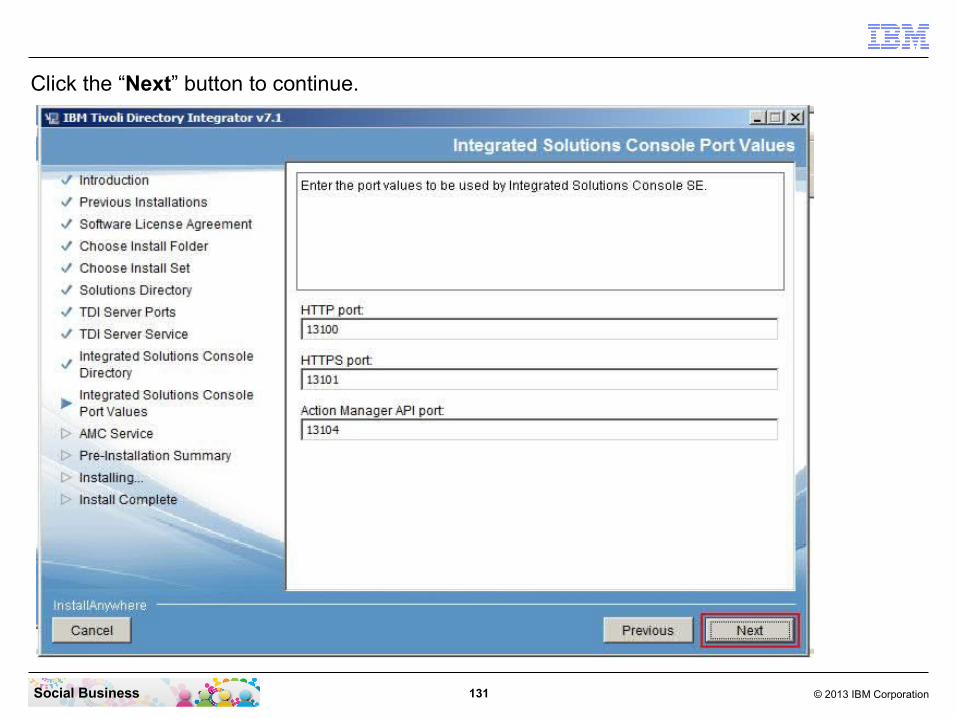
Click the “Next” button to continue.

130 © 2013 IBM CorporationSocial Business
Click the “Next” button to continue.
131 © 2013 IBM CorporationSocial Business
Click the “Next” button to continue.

132 © 2013 IBM CorporationSocial Business
Click the “Next” button to continue.

133 © 2013 IBM CorporationSocial Business
Click the “Install” button to continue.
134 © 2013 IBM CorporationSocial Business
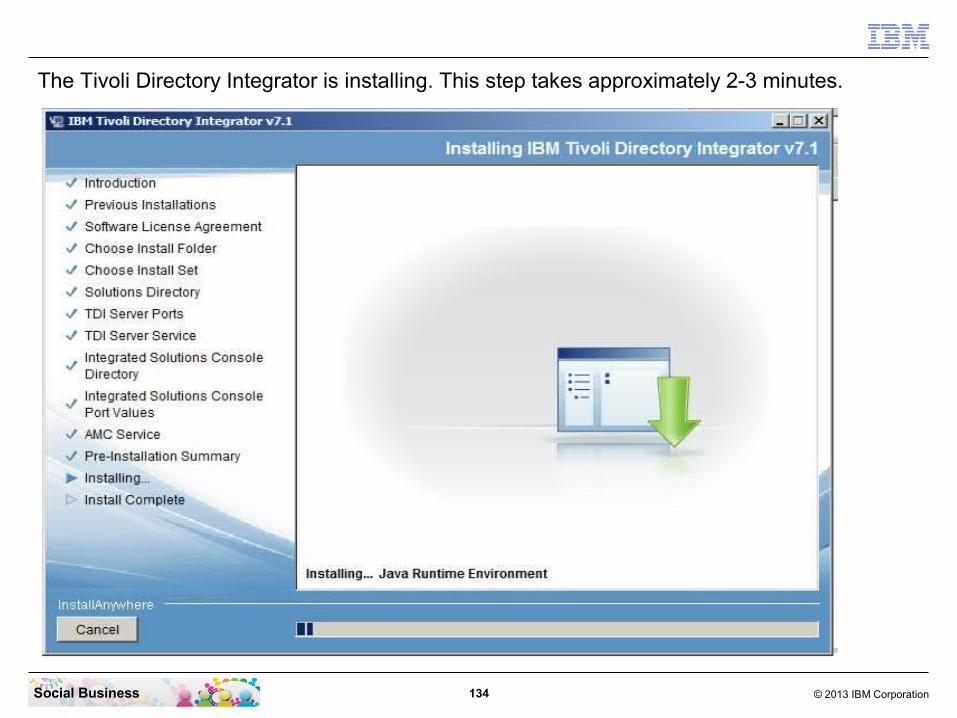
The Tivoli Directory Integrator is installing. This step takes approximately 2-3 minutes.

135 © 2013 IBM CorporationSocial Business
When the installation has finished, deselect the “Start configuration Editor” check box and click the “Done” button to exit the installer.
136 © 2013 IBM CorporationSocial Business
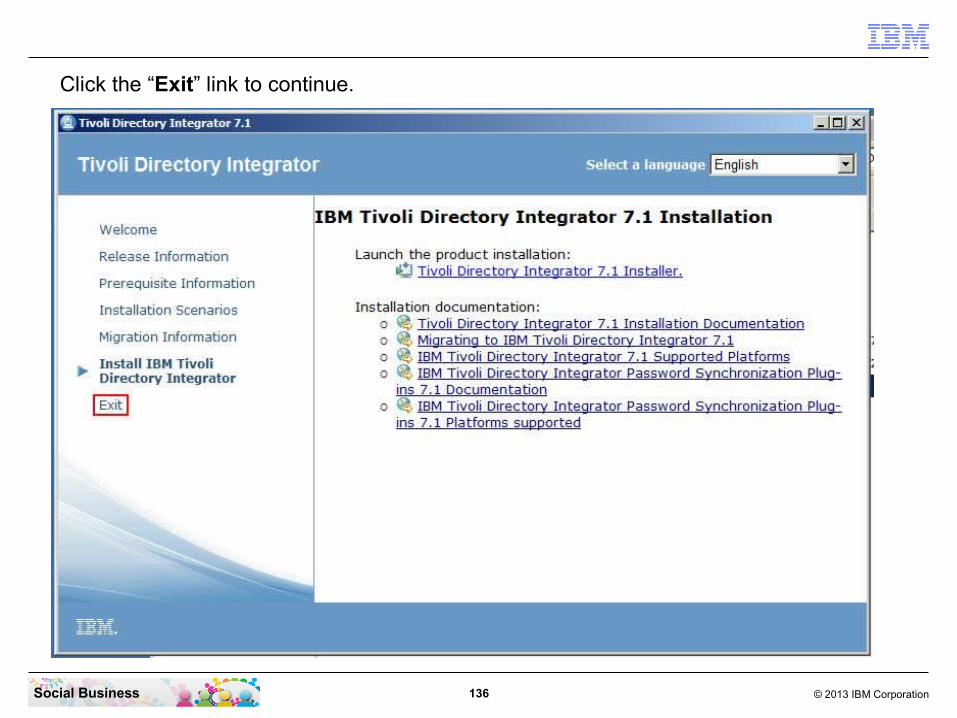
Click the “Exit” link to continue.

137 © 2013 IBM CorporationSocial Business
Click the “OK” button to end this installation step.

138 © 2013 IBM CorporationSocial Business
Open a CMD-Line window in Administrative mode and enter the command “cd \Install\TDI\7.1.0-TIV-TDI-FP0006” to change to the TDI FP6 directory. Then enter the command “\IBM\TDI\V7.1\bin\applyUpdate.bat -update TDI-7.1-FP0006.zip”.

139 © 2013 IBM CorporationSocial Business
The FP6 installation takes approximately 2 minutes. Then you should see this messages.
140 © 2013 IBM CorporationSocial Business
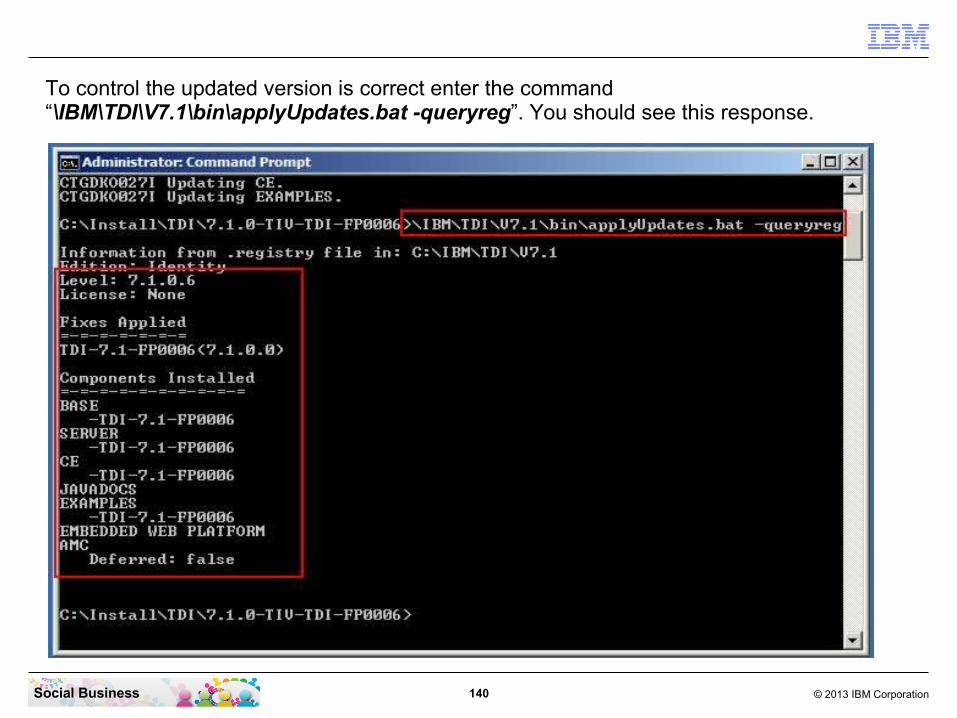
To control the updated version is correct enter the command “\IBM\TDI\V7.1\bin\applyUpdates.bat -queryreg”. You should see this response.

141 © 2013 IBM CorporationSocial Business
Before you begin
● Spend time planning your Profiles population, integration, and customization.● Involve all the relevant stakeholders at an early stage of the planning process.● If possible, phase the Profiles rollout and get feedback from pilot users.● Prepopulate Profiles photos.● Plan for business card use and for Sametime® presence awareness.● Ensure that Tivoli® Directory Integrator is correctly configured.● Consider using Tivoli Directory Integrator to populate the LDAP and then to populate the Profiles database.
In this example we make it simple by just running the population wizard and copy the data from the LDAP to the profiles (PEOPLEDB) database.
STEP SIX: Run the Population Wizard
142 © 2013 IBM CorporationSocial Business
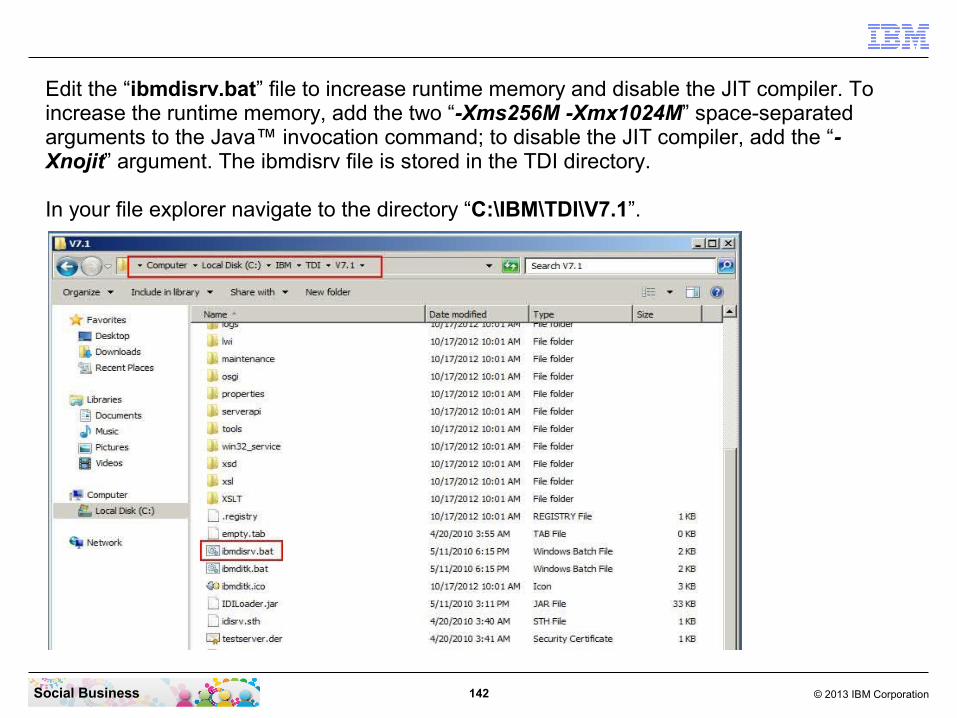
Edit the “ibmdisrv.bat” file to increase runtime memory and disable the JIT compiler. To increase the runtime memory, add the two “-Xms256M -Xmx1024M” space-separated arguments to the Java™ invocation command; to disable the JIT compiler, add the “-Xnojit” argument. The ibmdisrv file is stored in the TDI directory.
In your file explorer navigate to the directory “C:\IBM\TDI\V7.1”.
143 © 2013 IBM CorporationSocial Business
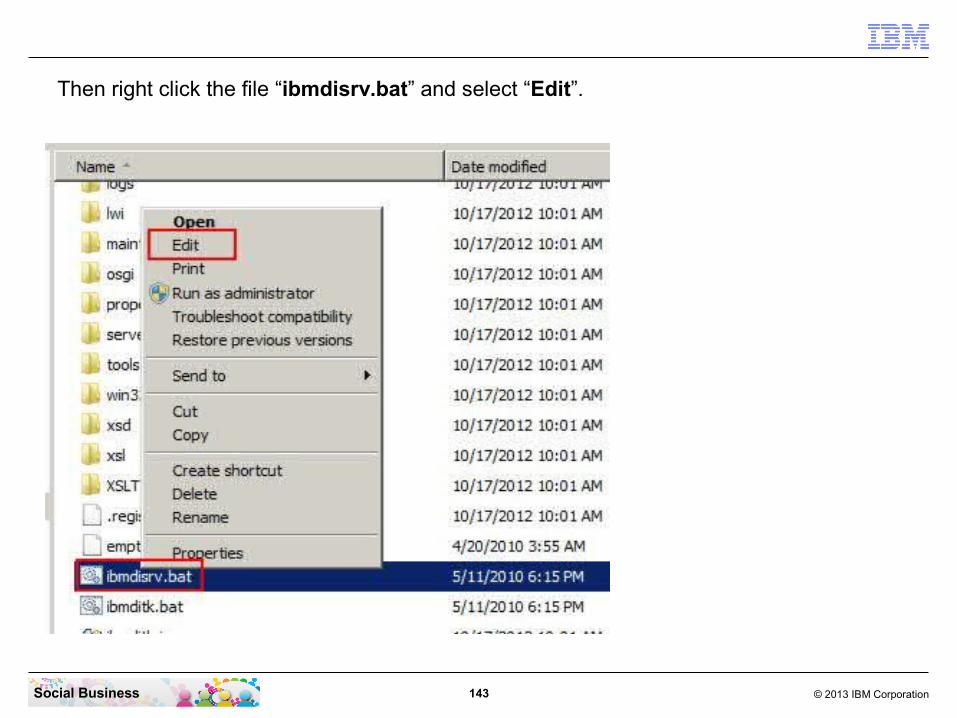
Then right click the file “ibmdisrv.bat” and select “Edit”.

144 © 2013 IBM CorporationSocial Business
In the line starting with “%TDI_JAVA_PROGRAM%” add the parameters “-Xms256M -Xmx1024M -Xnojit”. See below in the screen shot, how this should look like. Then save and close the file.
145 © 2013 IBM CorporationSocial Business
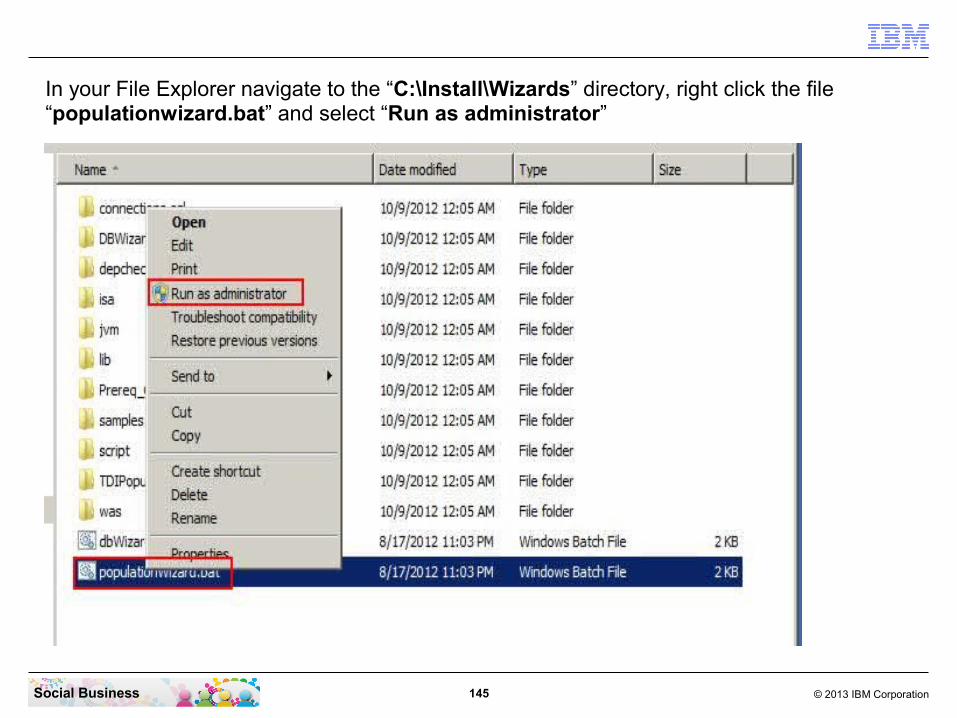
In your File Explorer navigate to the “C:\Install\Wizards” directory, right click the file “populationwizard.bat” and select “Run as administrator”
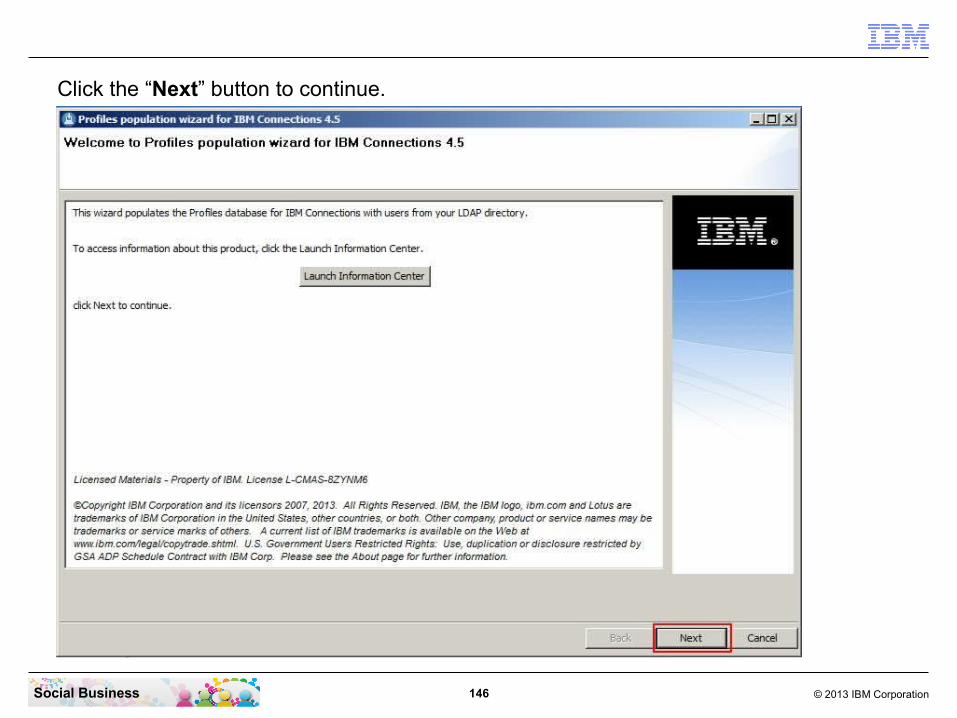
146 © 2013 IBM CorporationSocial Business
Click the “Next” button to continue.

147 © 2013 IBM CorporationSocial Business
Select the path “C:\IBM\TDI\V7.1” to where you have installed your TDI components, and click the “Next” button to continue.

148 © 2013 IBM CorporationSocial Business
Click the “Next” button to continue.

149 © 2013 IBM CorporationSocial Business
In the “Host name” field enter the host name of your IBM DB2 server. In this case it is our machine where you install connections. In the “JDBC Driver library path” line enter the path where the 2 files db2jcc.jar and db2jcc_license_cu.jar can be found. In this installation you can use “C:\IBM\SQLLIB\JAVA”. In the Password field enter the password for the “LCUSER” that you have created after the DB2 Server installation. Then click the “Next” button to continue.

150 © 2013 IBM CorporationSocial Business
In the “LDAP server name” field enter the host name of your ldap server. Then click the “Next” button to continue.

151 © 2013 IBM CorporationSocial Business
Enter the LDAP Bind User name and password. Then click the “Next” button to continue.

152 © 2013 IBM CorporationSocial Business
If you are using Domino LDAP, leave the “LDAP user search base” field empty. If you use another LDAP then this field has to be filled. Mostly it detects the base DN's and you can just choose the right one. Then click the “Next” button to continue.

153 © 2013 IBM CorporationSocial Business
In most LDAP servers you have not filled the country code field. Then you should select “null” in the “countryCode” attribute. Then click the “Next” button to continue.

154 © 2013 IBM CorporationSocial Business
In this simple pilot we dont use any more csv files for additional data. Just click the “Next” button to continue.

155 © 2013 IBM CorporationSocial Business
Click the “Configure” button to start the data population.

156 © 2013 IBM CorporationSocial Business
The population wizard is now working. If you want to see the logs click the “Open Log” button.

157 © 2013 IBM CorporationSocial Business
The Log shows the progress of the population work.

158 © 2013 IBM CorporationSocial Business
The population wizard has successfully populated the data from LDAP to the IBM DB2 PEOPLEDB database. Click the “Finish” button to continue.
159 © 2013 IBM CorporationSocial Business
Before you beginWebSphere Application Server Network Deployment is provided with IBM Connections.
To establish an environment with one Deployment Manager and one or more managed nodes, use the following table to determine the installation option that you should choose. The IBM Connections installation wizard creates server instances that require each node to have an application server. Choose one of these options when installing WebSphere Application Server to ensure that each node has an application server.
IBM Connections deployment● Deployment Manager and one node on the same system (use this now)● Deployment Manager and nodes on separate systems
STEP SEVEN: Install IBM WebSphere Application Server 8.0 and the FP5 update

160 © 2013 IBM CorporationSocial Business
Starting with WebSphere 8.0 the System is installed using the IBM Installation Manager.For IBM Connections 4.5 we use the IBM Installation Manager release 1.5.3. Navigate to the directory “C:\Install\WAS_ND_8.0\IM”. Then right click the file “install.exe” and select “Run as Administrator”.
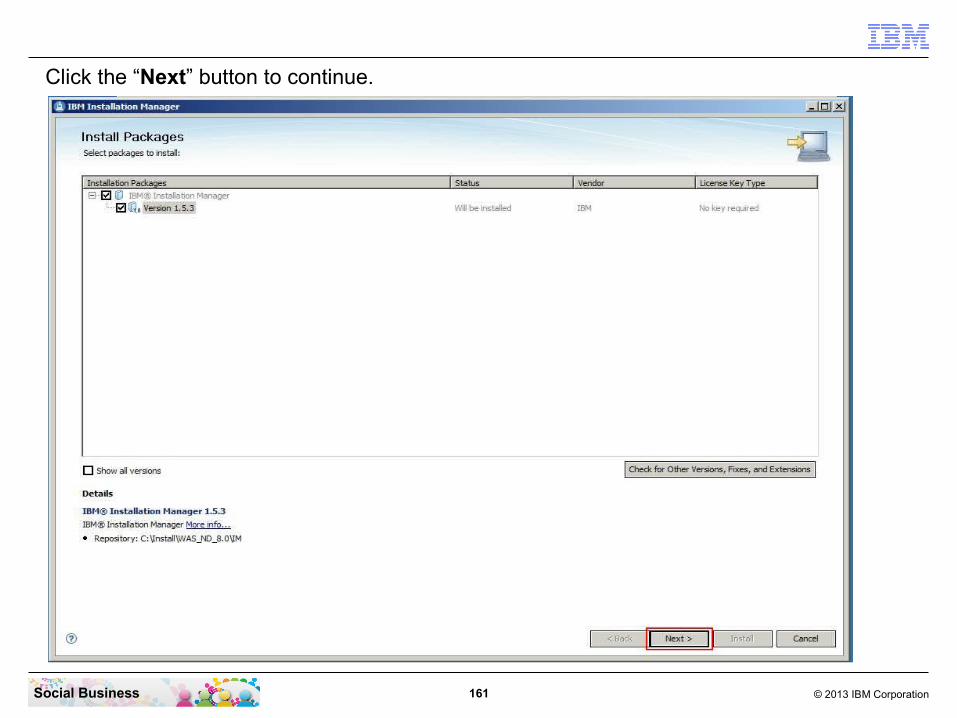
161 © 2013 IBM CorporationSocial Business
Click the “Next” button to continue.

162 © 2013 IBM CorporationSocial Business
Select “I accept the terms in the license agreement”. Then click the “Next” button to continue.
163 © 2013 IBM CorporationSocial Business
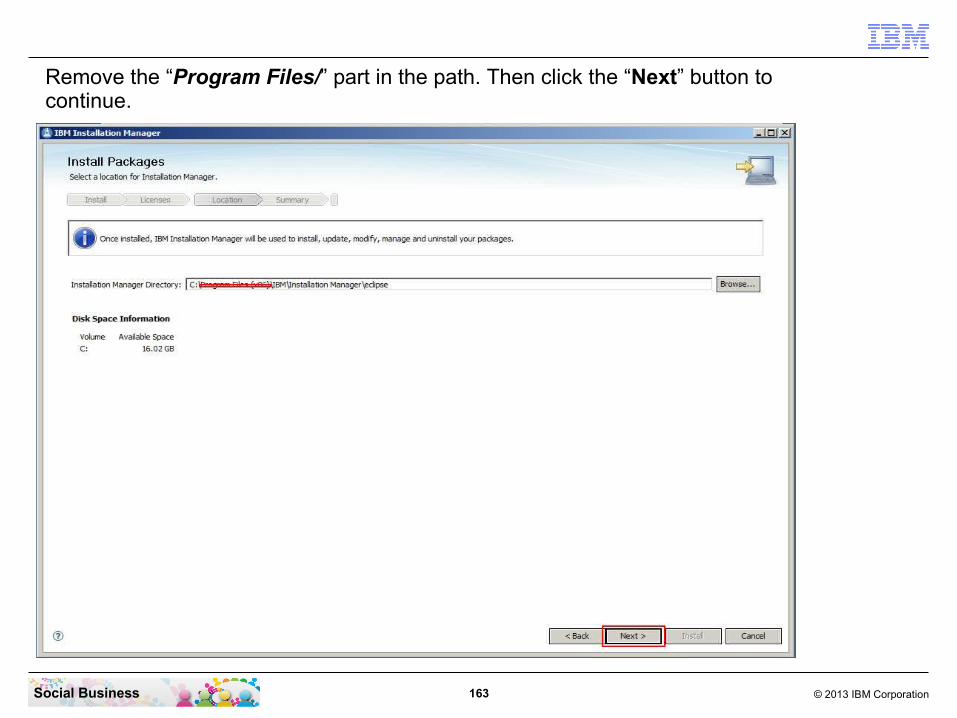
Remove the “Program Files/” part in the path. Then click the “Next” button to continue.

164 © 2013 IBM CorporationSocial Business
Click the “Install” button to start the installation.

165 © 2013 IBM CorporationSocial Business
The IBM Installation Manager is installing. This step takes approximately 60 to 90 seconds.

166 © 2013 IBM CorporationSocial Business
The IBM Installation Manager is installed. Click the “Restart Installation Manager” button.
167 © 2013 IBM CorporationSocial Business
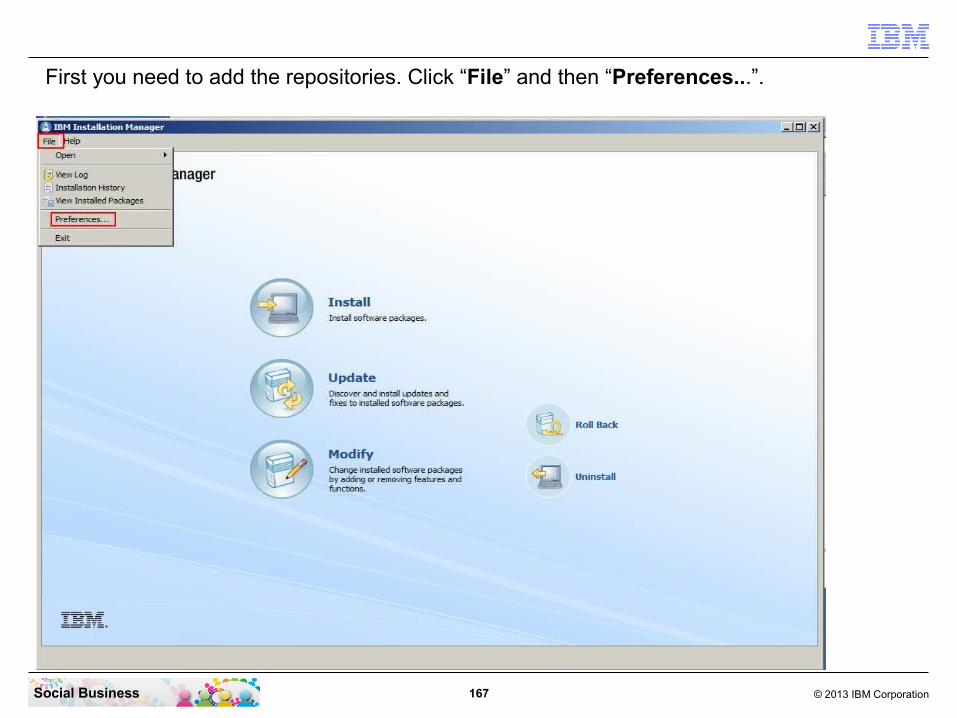
First you need to add the repositories. Click “File” and then “Preferences...”.

168 © 2013 IBM CorporationSocial Business
First uncheck the “Search service repositories during installation and updates” checkbox. If this is checked and you have access to the internet, the installer searches for updates and newer fixpacks. This can cause the connections system to fail after the installation. Click the “Add Repository...” button.

169 © 2013 IBM CorporationSocial Business
Click the “Browse...” button.
170 © 2013 IBM CorporationSocial Business
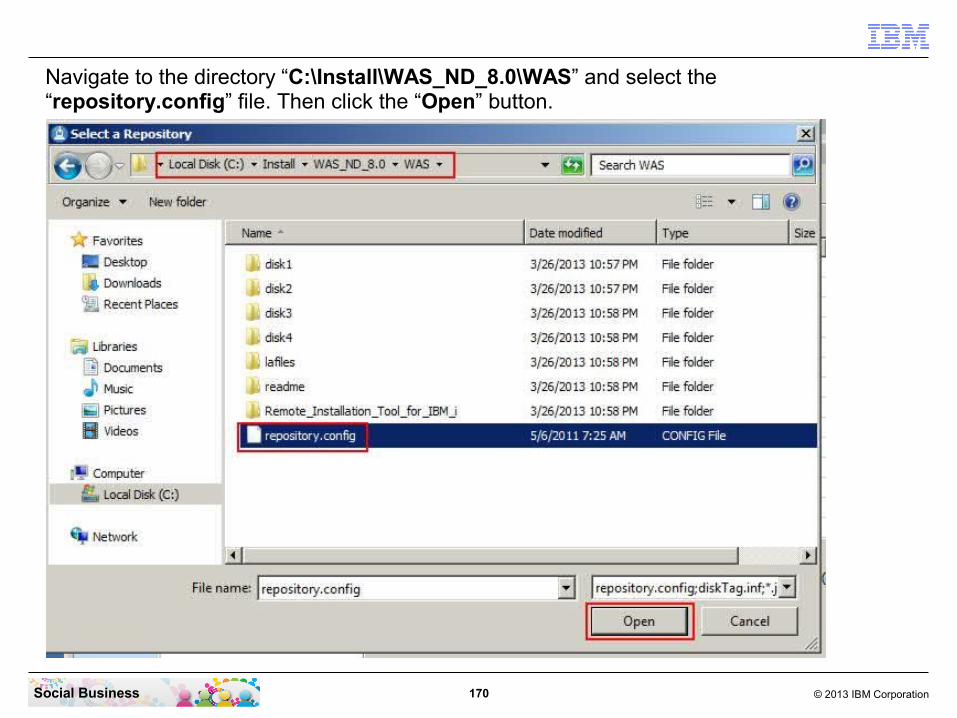
Navigate to the directory “C:\Install\WAS_ND_8.0\WAS” and select the “repository.config” file. Then click the “Open” button.

171 © 2013 IBM CorporationSocial Business
Click the “OK” button to continue.

172 © 2013 IBM CorporationSocial Business
Click again the “Add Repository...” button.

173 © 2013 IBM CorporationSocial Business
Click the “Browse...” button.
174 © 2013 IBM CorporationSocial Business
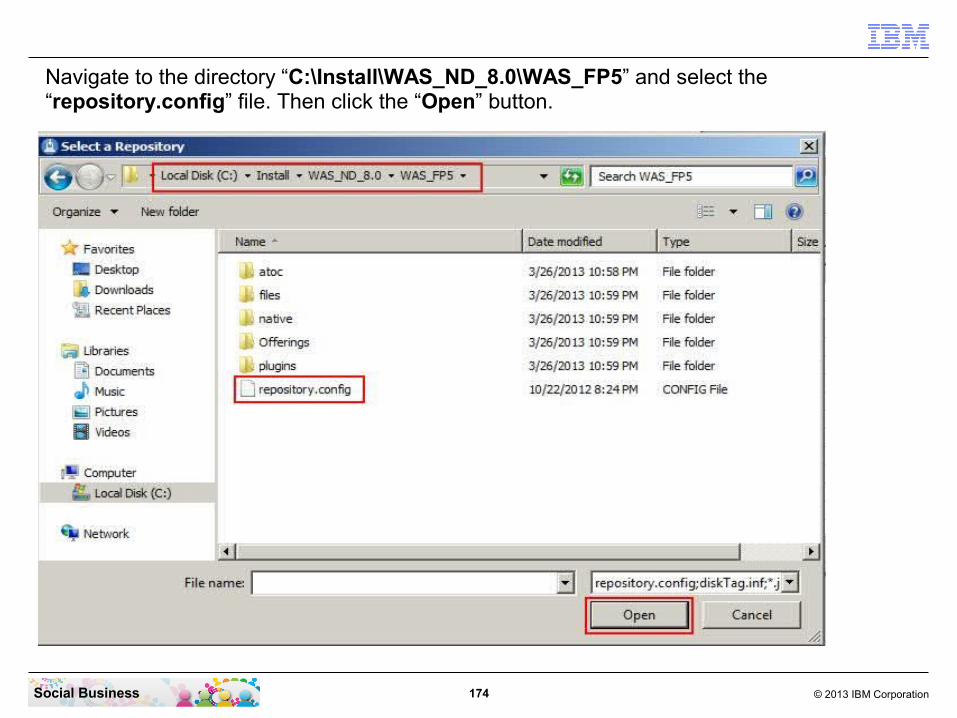
Navigate to the directory “C:\Install\WAS_ND_8.0\WAS_FP5” and select the “repository.config” file. Then click the “Open” button.

175 © 2013 IBM CorporationSocial Business
Click the “OK” button to continue.
176 © 2013 IBM CorporationSocial Business
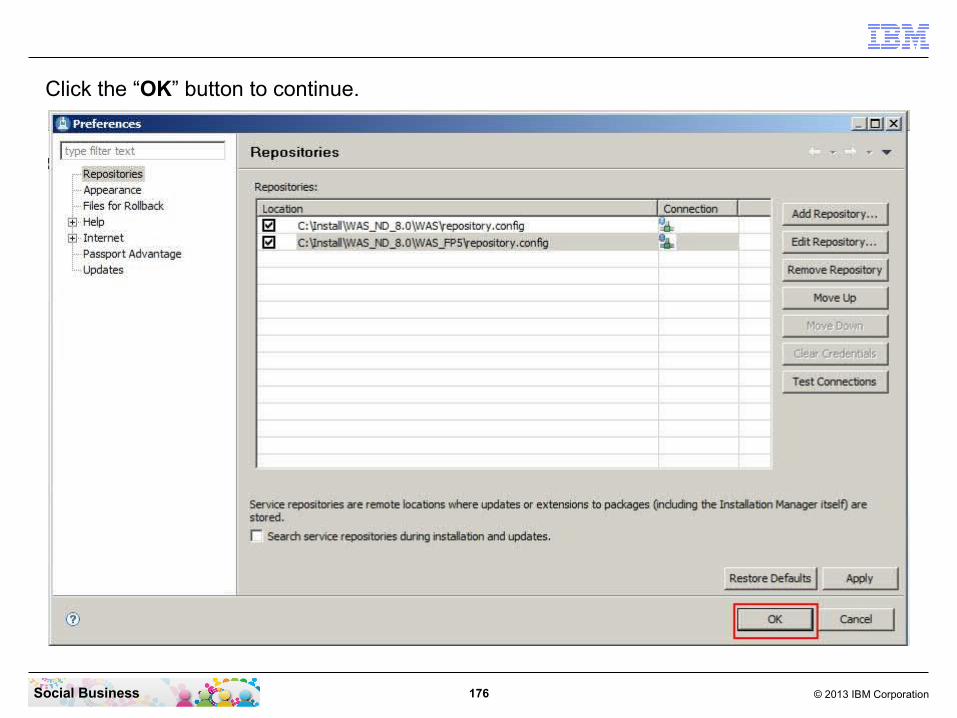
Click the “OK” button to continue.

177 © 2013 IBM CorporationSocial Business
Now click on “Install”.

178 © 2013 IBM CorporationSocial Business
Check both check boxes. Then click the “Next” button to continue.
179 © 2013 IBM CorporationSocial Business
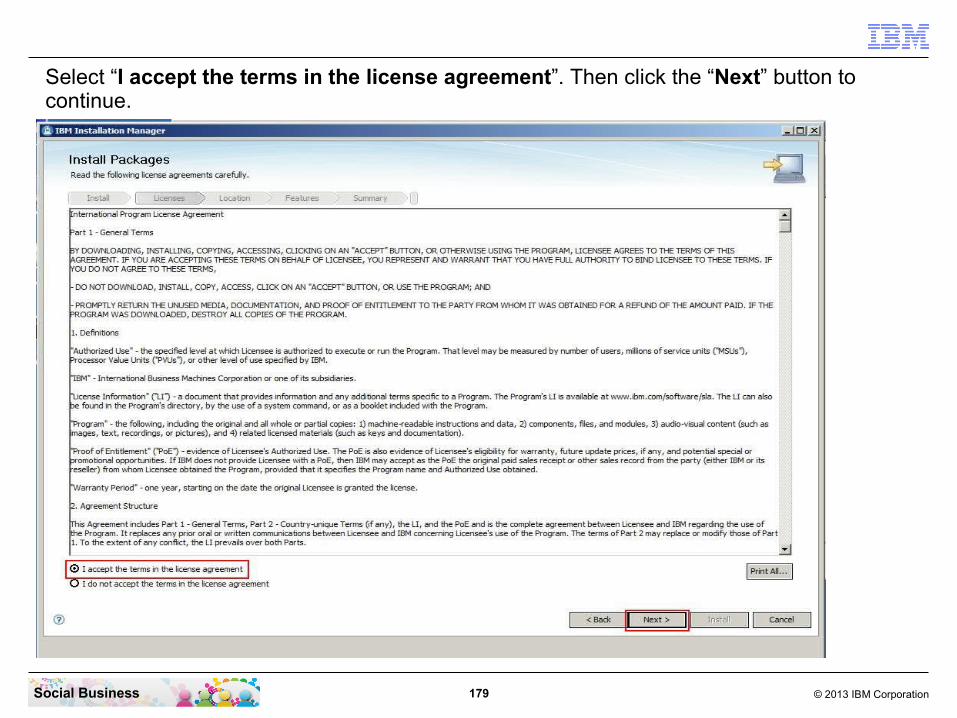
Select “I accept the terms in the license agreement”. Then click the “Next” button to continue.
180 © 2013 IBM CorporationSocial Business
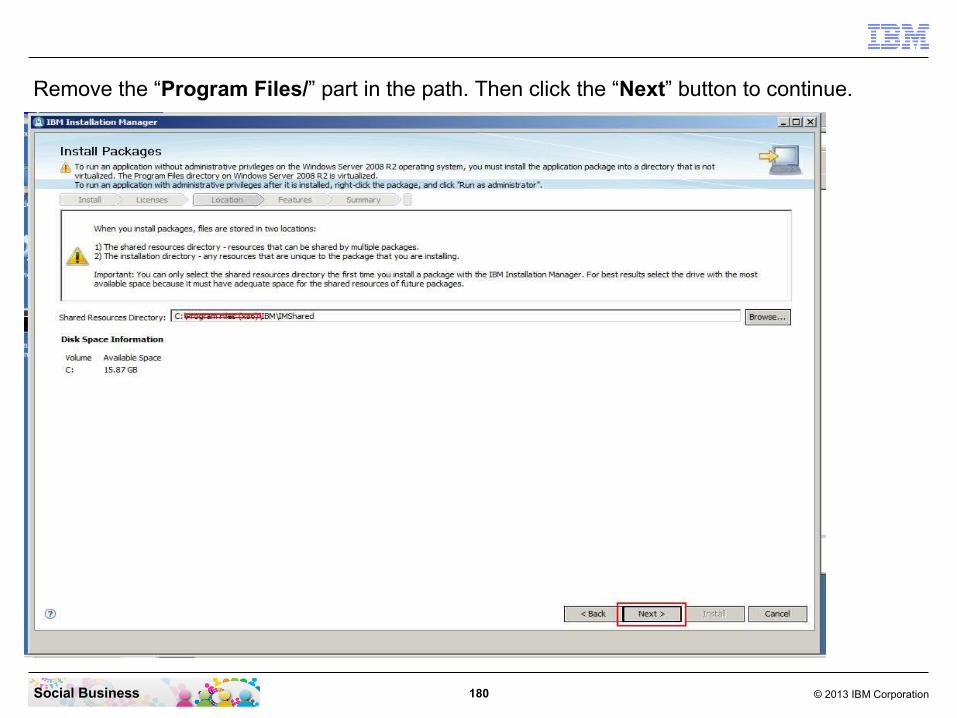
Remove the “Program Files/” part in the path. Then click the “Next” button to continue.

181 © 2013 IBM CorporationSocial Business
Again remove the “Program Files\” part in the path. Then click the “Next” button to continue.

182 © 2013 IBM CorporationSocial Business
Then click the “Next” button to continue.
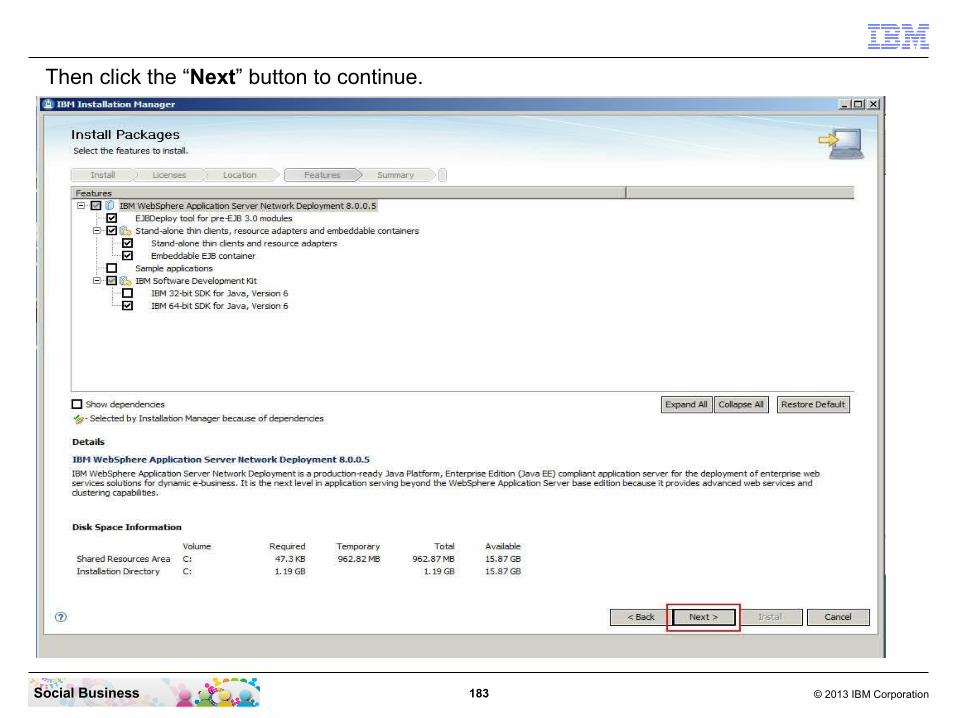
183 © 2013 IBM CorporationSocial Business
Then click the “Next” button to continue.
184 © 2013 IBM CorporationSocial Business
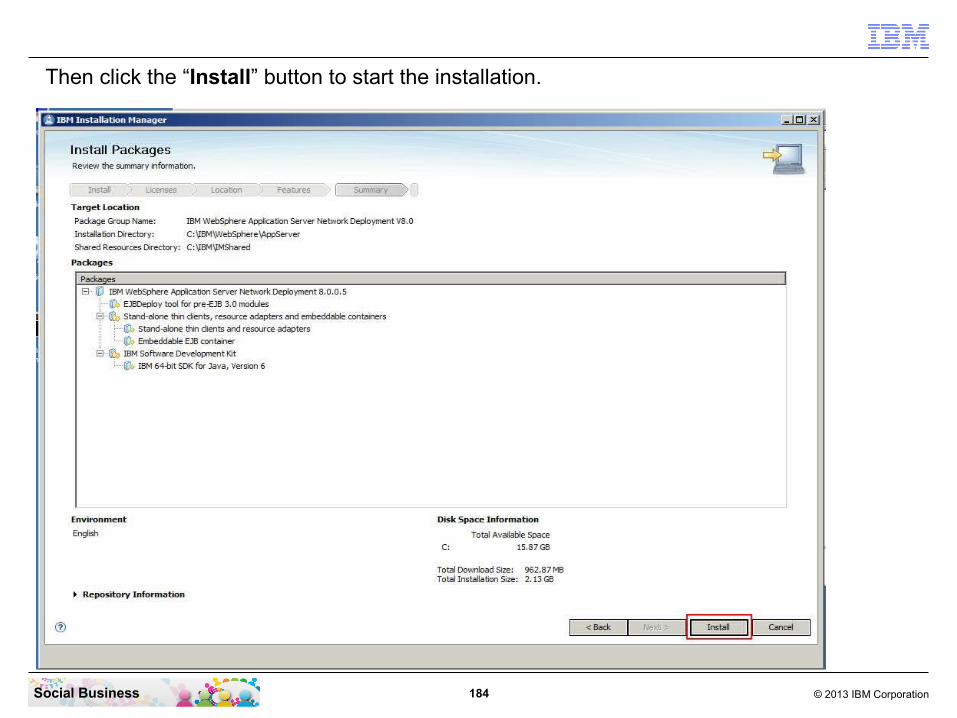
Then click the “Install” button to start the installation.

185 © 2013 IBM CorporationSocial Business
The installation takes approximately 5 to 8 minutes.

186 © 2013 IBM CorporationSocial Business
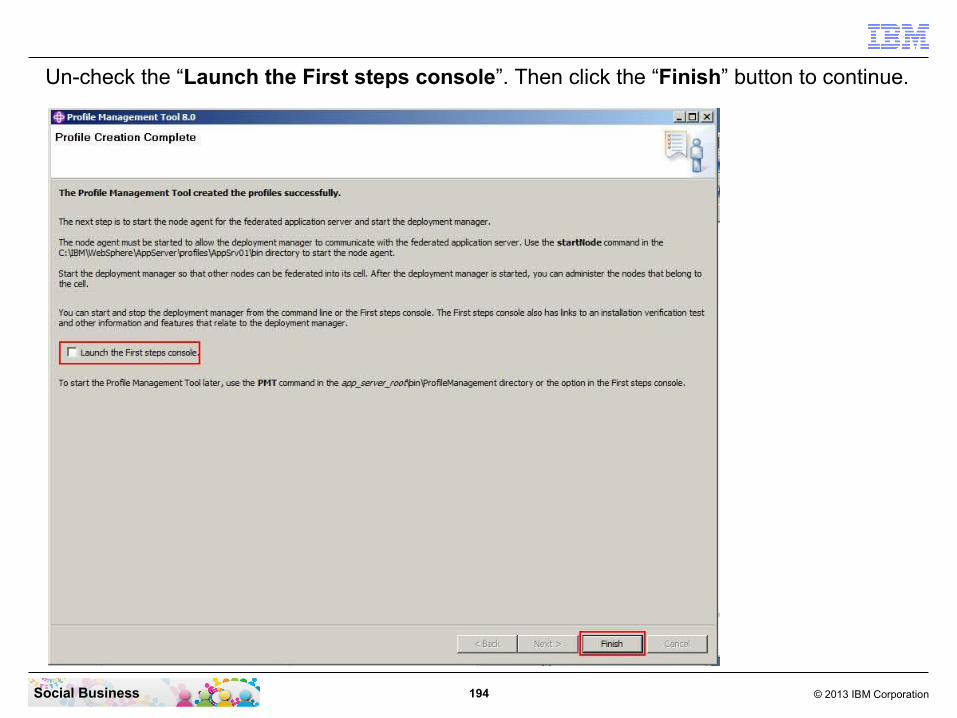
Click the “Finish” button now. The “Profile Management Tool” will start automatically.
187 © 2013 IBM CorporationSocial Business
This step creates the required profiles for the Deployment Manager and the Application Server. It automatically creates the dmgr server and a default server in the Application Profile. This server will be deleted later because it is not required.
STEP EIGHT: Create the required Deployment Manager and Application Server profiles

188 © 2013 IBM CorporationSocial Business
Click the “Create...” button to start the profiles creation wizzard.

189 © 2013 IBM CorporationSocial Business
Select “Cell (deployment manager and a federated application server)”. Then click the “Next” button to continue.

190 © 2013 IBM CorporationSocial Business
Then click the “Next” button to continue.

191 © 2013 IBM CorporationSocial Business
Enter the WebSphere Administrators user name and password. Be sure this user does not exist in your LDAP directory. Do not use special characters like $ or % or others in the password. Then click the “Next” button to continue.

192 © 2013 IBM CorporationSocial Business
Then click the “Create” button to continue.

193 © 2013 IBM CorporationSocial Business
This step takes approximately 4 to 5 minutes.
194 © 2013 IBM CorporationSocial Business
Un-check the “Launch the First steps console”. Then click the “Finish” button to continue.

195 © 2013 IBM CorporationSocial Business
Close the WebSphere Customization Toolbox now.
196 © 2013 IBM CorporationSocial Business
This step updates your WebSphere Application Server and installs 5 fixes required for IBM Connections 4.5.
STEP NINE: Update the WebSphere Server with 5 required Fixes.

197 © 2013 IBM CorporationSocial Business
Click “File” and then “Preferences...”.

198 © 2013 IBM CorporationSocial Business
Un-check the WAS and WAS_FP5 repositories. Then click the “Add Repository...” button.
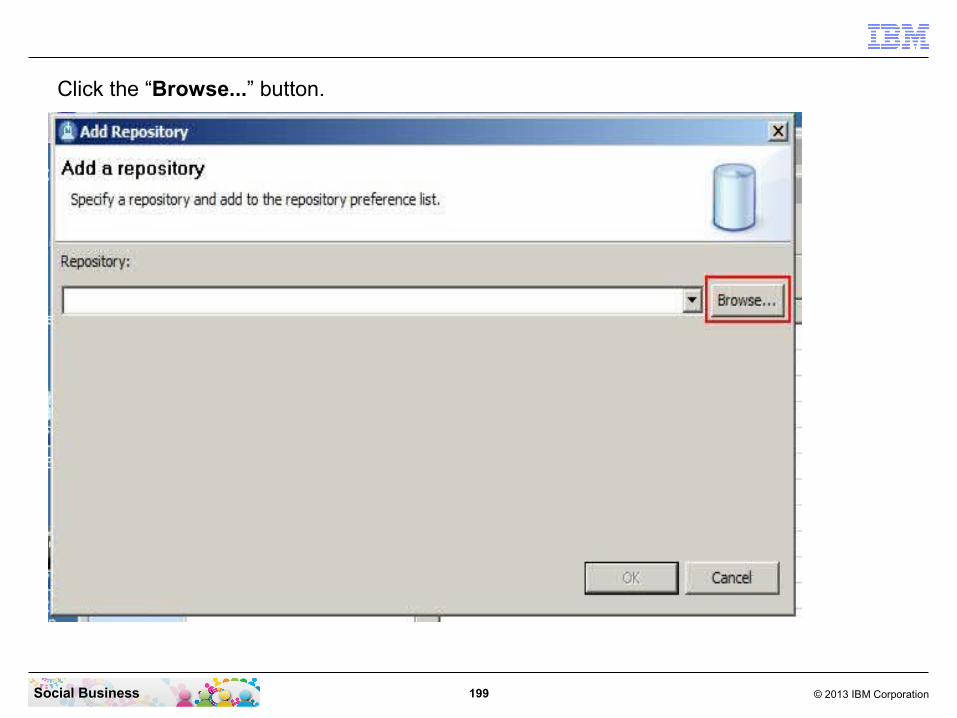
199 © 2013 IBM CorporationSocial Business
Click the “Browse...” button.
200 © 2013 IBM CorporationSocial Business
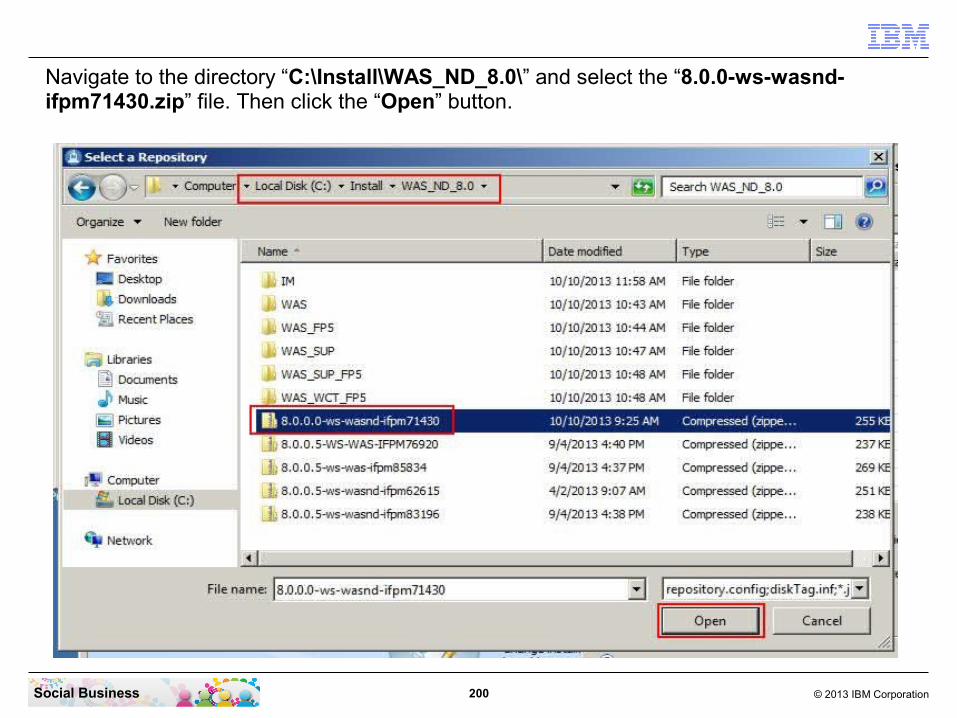
Navigate to the directory “C:\Install\WAS_ND_8.0\” and select the “8.0.0-ws-wasnd-ifpm71430.zip” file. Then click the “Open” button.

201 © 2013 IBM CorporationSocial Business
Click the “OK” button to continue.

202 © 2013 IBM CorporationSocial Business
Click again the “Add Repositories...” button.

203 © 2013 IBM CorporationSocial Business
Click the “Browse...” button.

204 © 2013 IBM CorporationSocial Business
Navigate to the directory “C:\Install\WAS_ND_8.0\” and select the “8.0.0.5-ws-was-ifpm76920.zip” file. Then click the “Open” button. Repeat this steps (page 202 to 206) for the files “8.0.0.5-ws-was-ifpm85834.zip”, “8.0.0.5-ws-wasnd-ifpm62615.zip” nd “8.0.0.5-ws-wasnd-ifpm83196.zip”

205 © 2013 IBM CorporationSocial Business
Click the “OK” button to continue.

206 © 2013 IBM CorporationSocial Business
Click the “OK” button to continue.
207 © 2013 IBM CorporationSocial Business
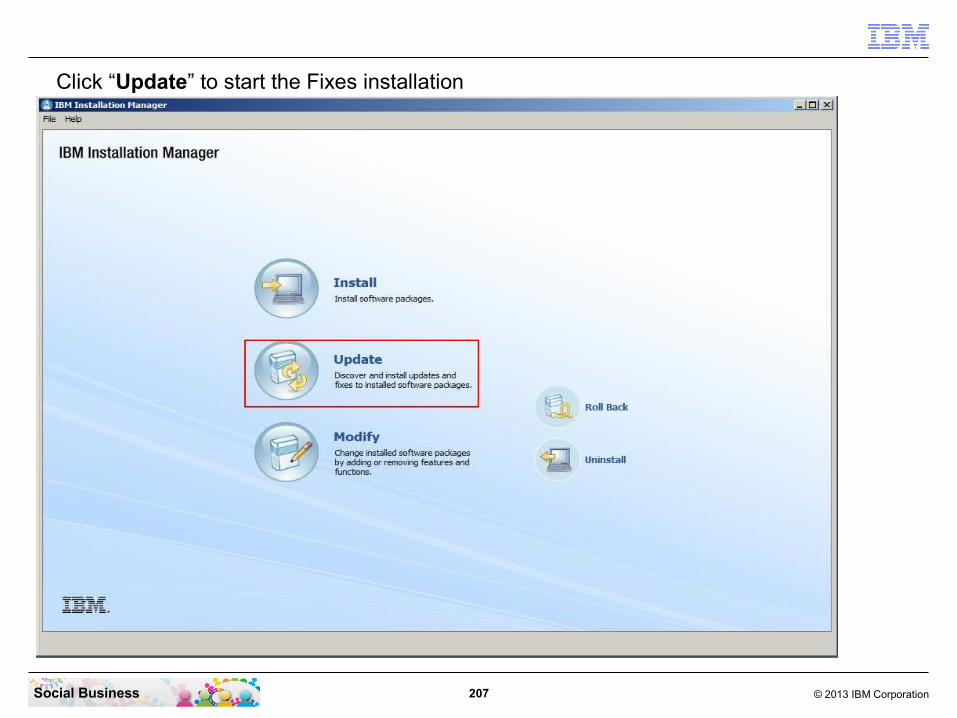
Click “Update” to start the Fixes installation

208 © 2013 IBM CorporationSocial Business
Click the “Next” button to continue.

209 © 2013 IBM CorporationSocial Business
Select all 5 fixes. Then click the “Next” button to continue.

210 © 2013 IBM CorporationSocial Business
Then click the “Update” button to continue.
211 © 2013 IBM CorporationSocial Business
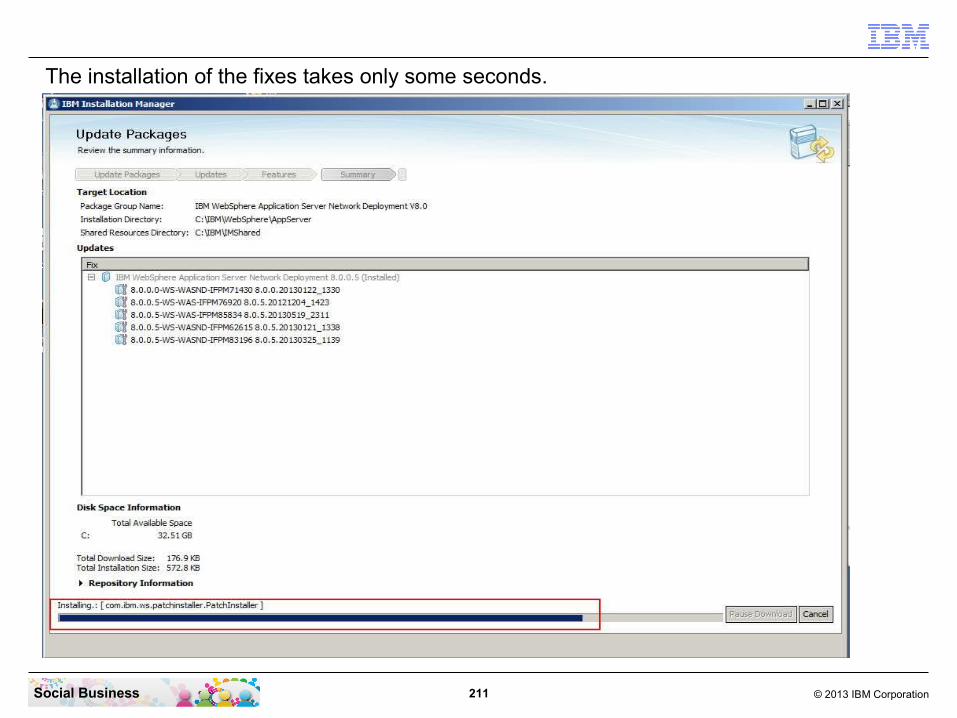
The installation of the fixes takes only some seconds.

212 © 2013 IBM CorporationSocial Business
Click the “Finish” button to close the installer.

213 © 2013 IBM CorporationSocial Business
Summary
In this step you install the IBM HTTP Server and IBM HTTP Server Plugin. Then you will update them to the required fix and patch level for IBM Connections 4.5.
STEP TEN: Install IBM HTTP Server and the IHS Plugin. Then update both to the required level
214 © 2013 IBM CorporationSocial Business
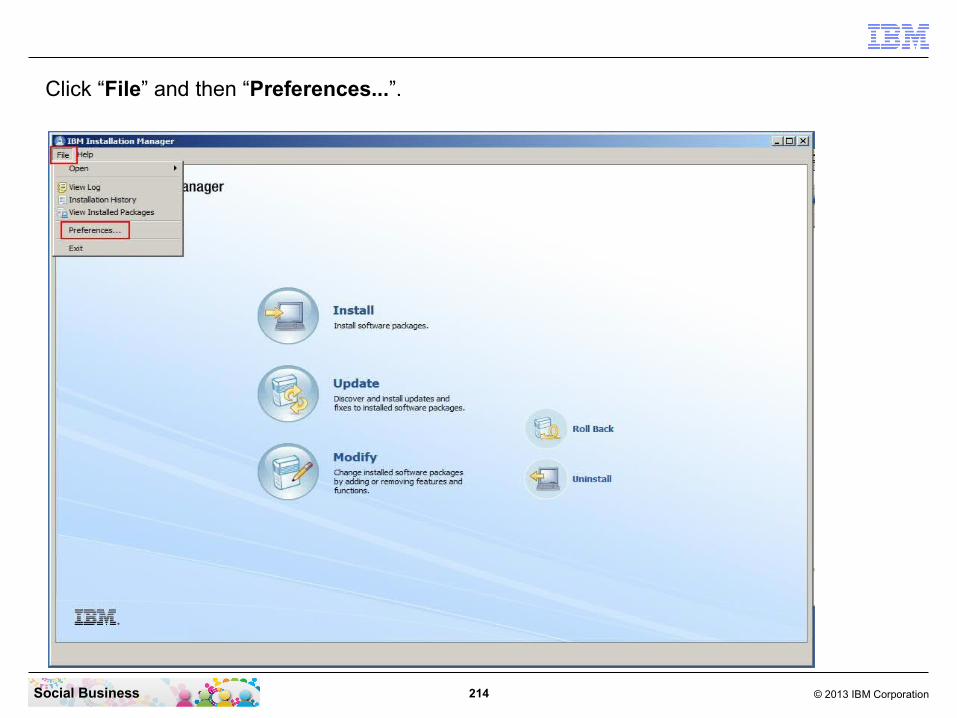
Click “File” and then “Preferences...”.

215 © 2013 IBM CorporationSocial Business
Un-check the 5 fixes repositories. Then click the “Add Repository...” button.

216 © 2013 IBM CorporationSocial Business
Click the “Browse...” button.
217 © 2013 IBM CorporationSocial Business
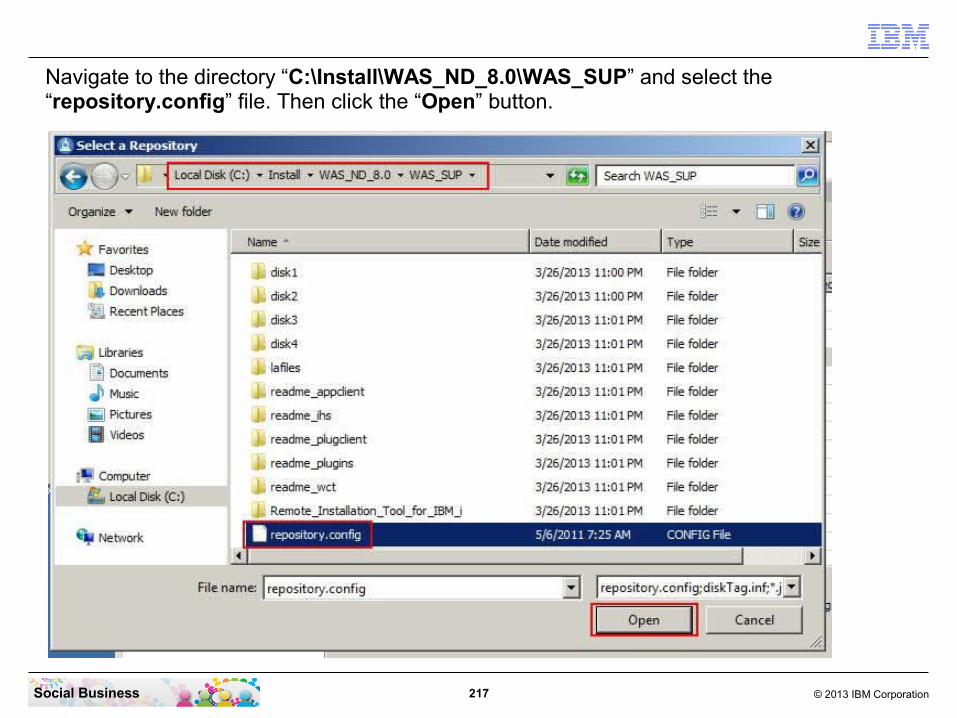
Navigate to the directory “C:\Install\WAS_ND_8.0\WAS_SUP” and select the “repository.config” file. Then click the “Open” button.

218 © 2013 IBM CorporationSocial Business
Click the “OK” button to continue.

219 © 2013 IBM CorporationSocial Business
Click again the “Add Repositories...” button.

220 © 2013 IBM CorporationSocial Business
Click the “Browse...” button.

221 © 2013 IBM CorporationSocial Business
Navigate to the directory “C:\Install\WAS_ND_8.0\WAS_SUP_FP5” and select the “repository.config” file. Then click the “Open” button.

222 © 2013 IBM CorporationSocial Business
Click the “OK” button to continue.
223 © 2013 IBM CorporationSocial Business
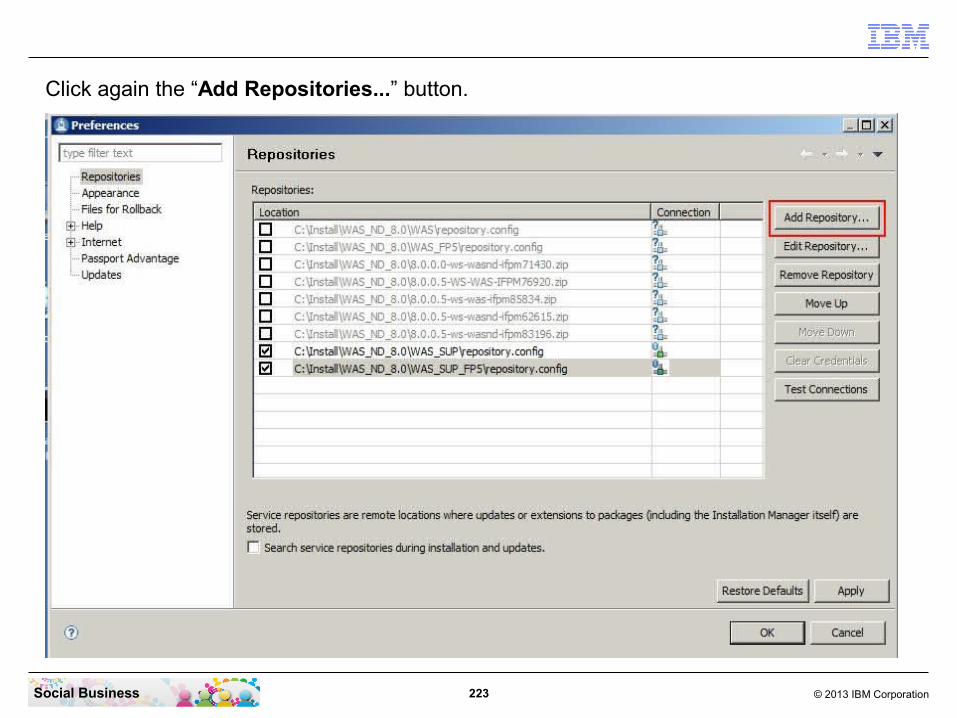
Click again the “Add Repositories...” button.

224 © 2013 IBM CorporationSocial Business
Click the “Browse...” button.

225 © 2013 IBM CorporationSocial Business
Navigate to the directory “C:\Install\WAS_ND_8.0\WAS_WCT_FP5” and select the “repository.config” file. Then click the “Open” button.

226 © 2013 IBM CorporationSocial Business
Click the “OK” button to continue.
227 © 2013 IBM CorporationSocial Business
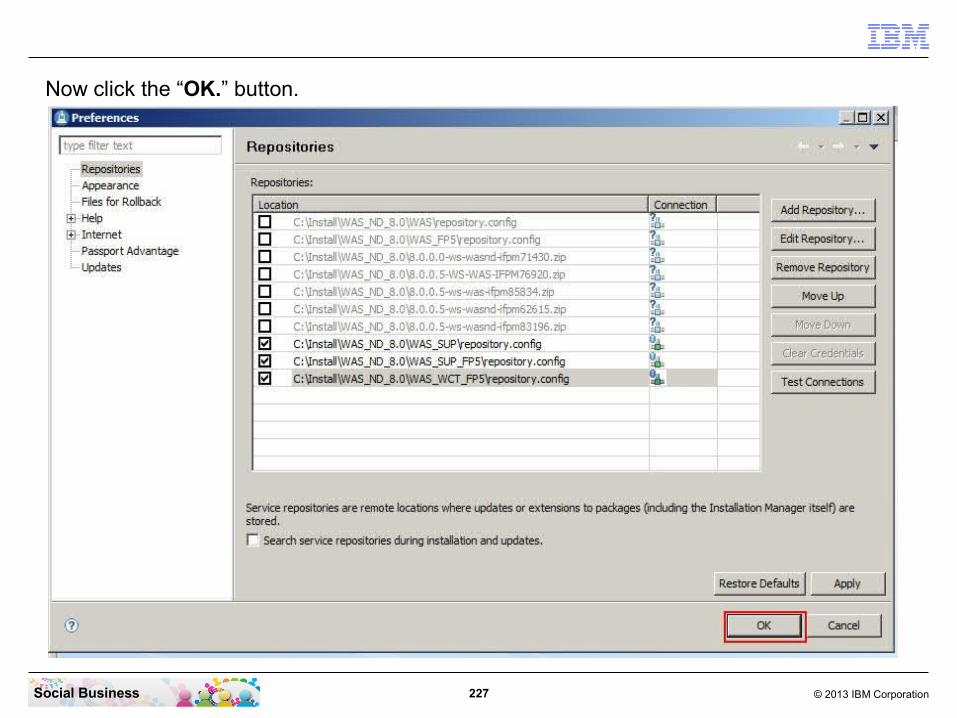
Now click the “OK.” button.

228 © 2013 IBM CorporationSocial Business
Click “Install” to start the installation.

229 © 2013 IBM CorporationSocial Business
Select the “IBM HTTP Server for WebSphere Application Server” and the “FP 8.0.0.5”, the “Web Server Plug-ins for IBM WebSphere Application Server” and the “FP 8.0.0.5”, and the “WebSphere Customization Toolbox” and the “FP 8.0.0.5”. Then click the “Next” button to continue.

230 © 2013 IBM CorporationSocial Business
Select “I accept the terms in the license agreement”. Then click the “Next” button to continue.

231 © 2013 IBM CorporationSocial Business
Select the “IBM HTTP Server” and remove the “Program Files\” part in the path.

232 © 2013 IBM CorporationSocial Business
Select the “Web Server Plugins for IBM HTTP Server” and remove the “Program Files\” part in the path.
233 © 2013 IBM CorporationSocial Business
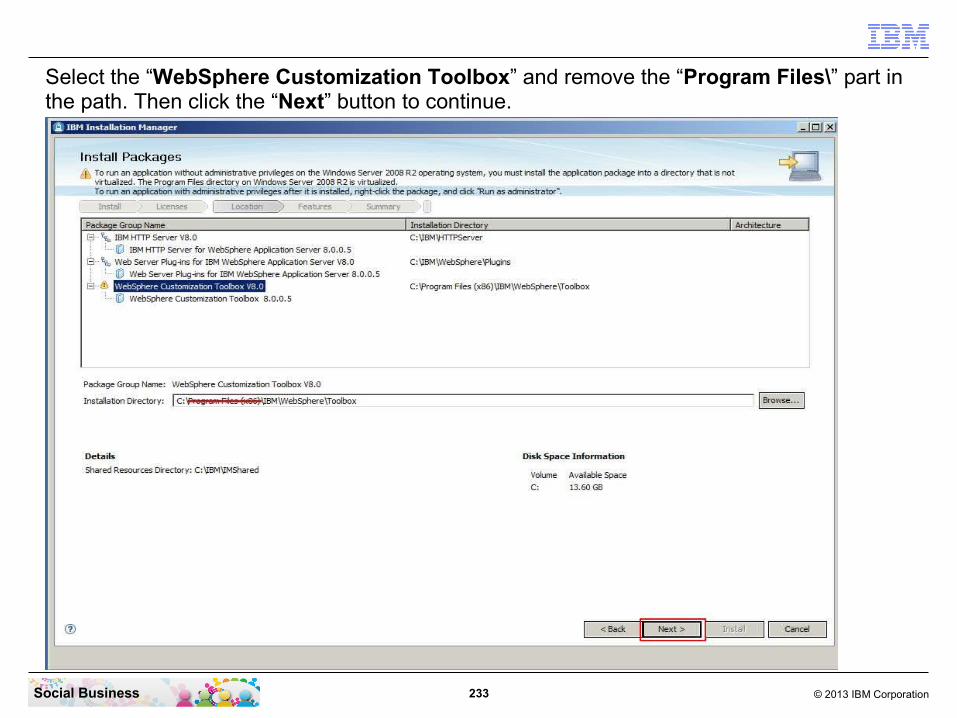
Select the “WebSphere Customization Toolbox” and remove the “Program Files\” part in the path. Then click the “Next” button to continue.

234 © 2013 IBM CorporationSocial Business
Click the “Next” button to continue.
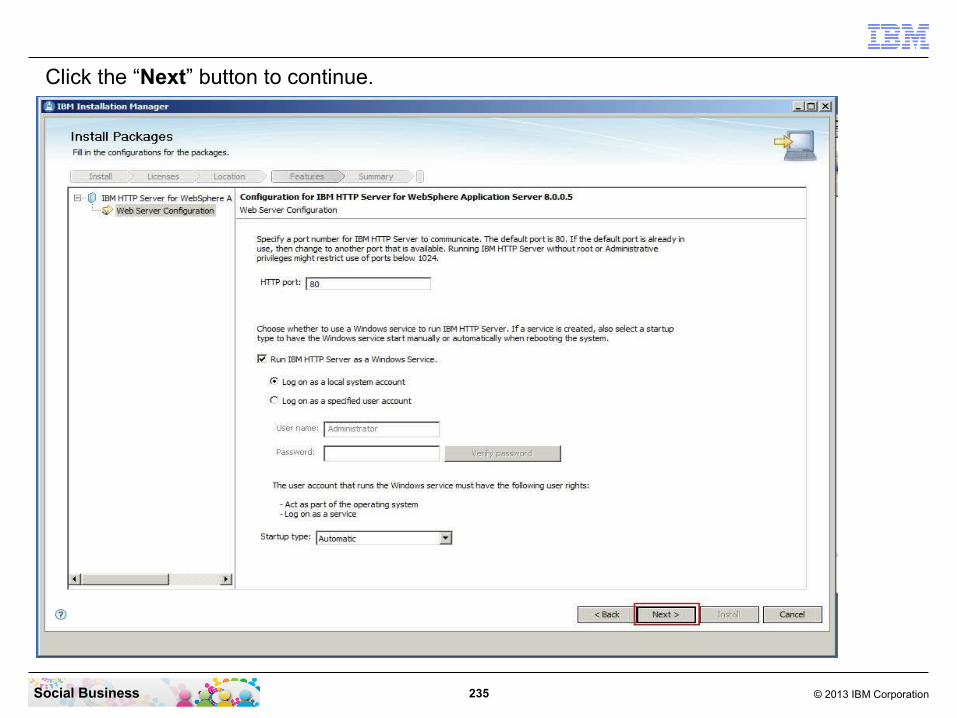
235 © 2013 IBM CorporationSocial Business
Click the “Next” button to continue.

236 © 2013 IBM CorporationSocial Business
Click the “Install” button to continue.
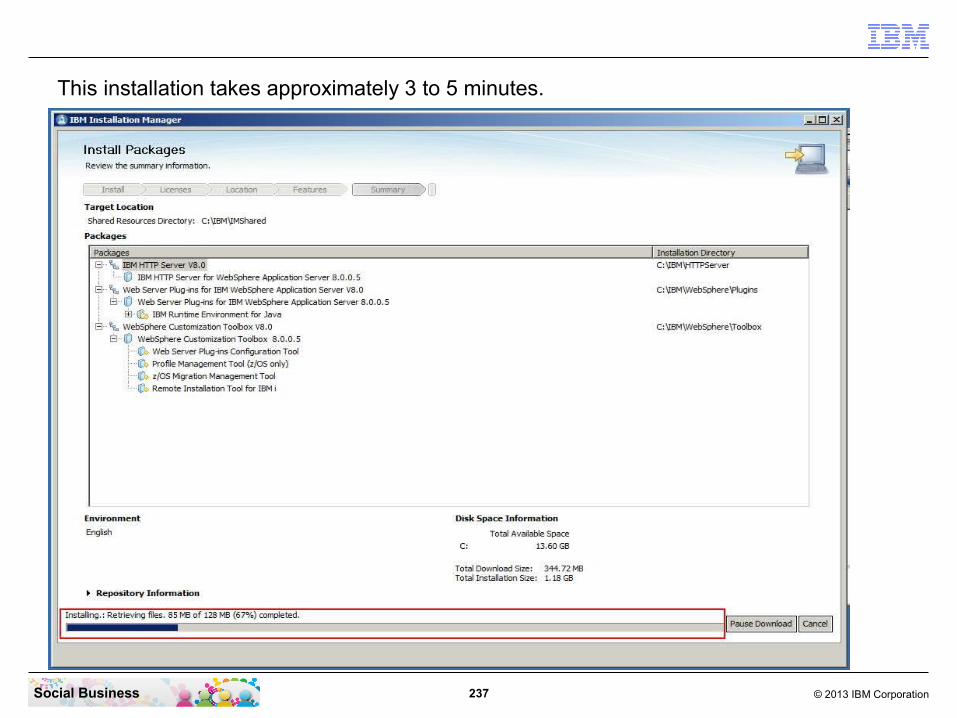
237 © 2013 IBM CorporationSocial Business
This installation takes approximately 3 to 5 minutes.
238 © 2013 IBM CorporationSocial Business
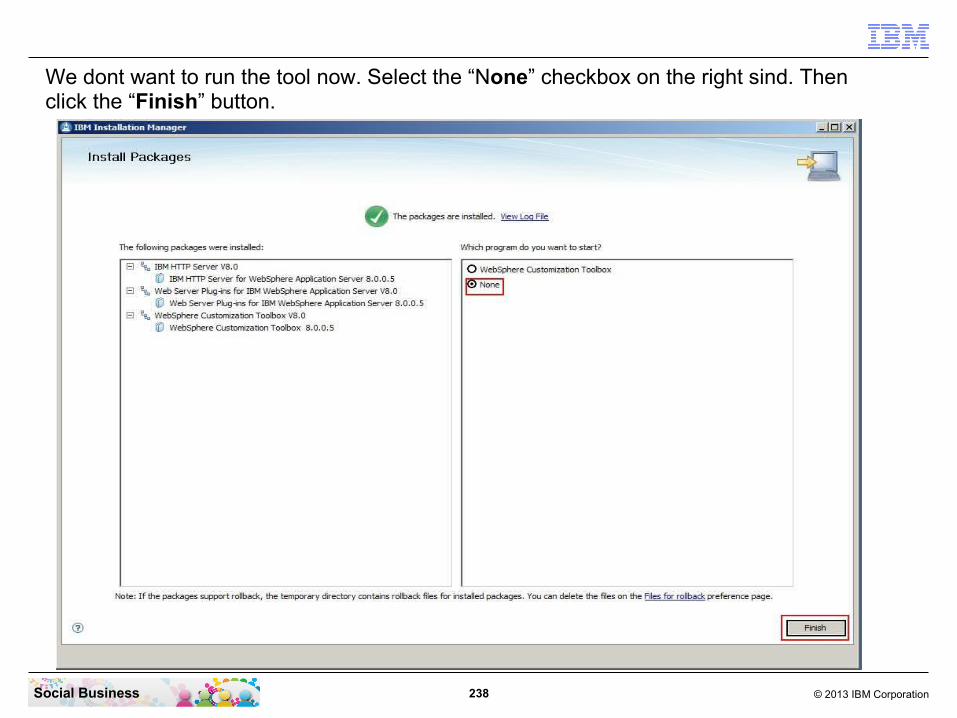
We dont want to run the tool now. Select the “None” checkbox on the right sind. Then click the “Finish” button.

239 © 2013 IBM CorporationSocial Business
Summary
Use this procedure to configure your installed WebSphere Server to connect to your LDAP server for user and group look-ups and for user authentication.
In this document we use a Domino LDAP. If you plan to use Microsoft Active Directory LDAP then consult the AD LDAP version of this document.
STEP ELEVEN: Setup LDAP with Federated Repositories in IBM WebSphere Application Server

240 © 2013 IBM CorporationSocial Business
The IBM WebSphere Application Server Deployment Manager “dmgr” needs to be started first. In the “Start” menue click on “All Programs” - “IBM WebSphere” - “IBM WebSphere Application Server Network Deployment” - “Profiles” - “Dmgr01” - “Start the deployment manager”.

241 © 2013 IBM CorporationSocial Business
The dmgr server process is starting up. Wait until this has finished and the cmd line window disappears.
242 © 2013 IBM CorporationSocial Business
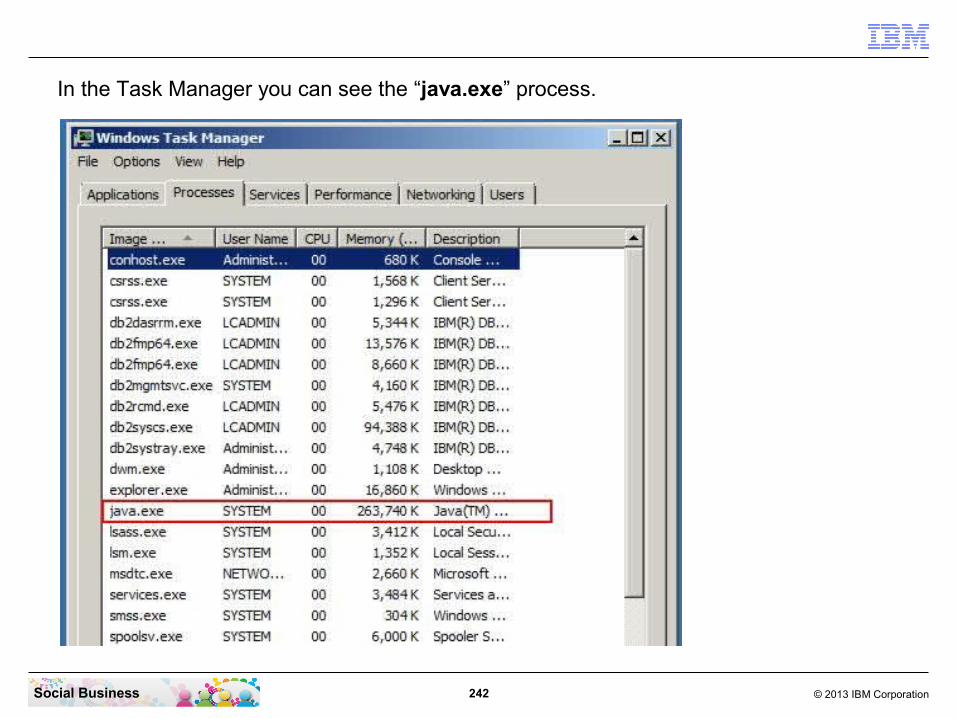
In the Task Manager you can see the “java.exe” process.

243 © 2013 IBM CorporationSocial Business
Open your favorite browser and enter the URL to your dmgr admin interface. In this example we use: “http://connections.renovations.com:9060/admin”

244 © 2013 IBM CorporationSocial Business
In Microsoft Internet Explorer just select “Continue loading the Web Site”. In Mozilla Firefox select “I Understand the Risks”.

245 © 2013 IBM CorporationSocial Business
Then click the “Add Exception...” button.

246 © 2013 IBM CorporationSocial Business
Then click the “Get Certificate” button and the “Confirm Security Exception” button.

247 © 2013 IBM CorporationSocial Business
Enter the user name and password of your IBM WebSphere Application Server Administrator user. Then click the “Log in” button.

248 © 2013 IBM CorporationSocial Business
You have now entered the IBM WebSphere Integrated Solutions Console. The Admin Console for most of the WebSphere administration tasks. Here click the “Security” link on the left side.

249 © 2013 IBM CorporationSocial Business
Click the “Global security” link.

250 © 2013 IBM CorporationSocial Business
At the bottom of the screen click the “Configure...” button.

251 © 2013 IBM CorporationSocial Business
Click the “Add Base entry to Realm...” button.
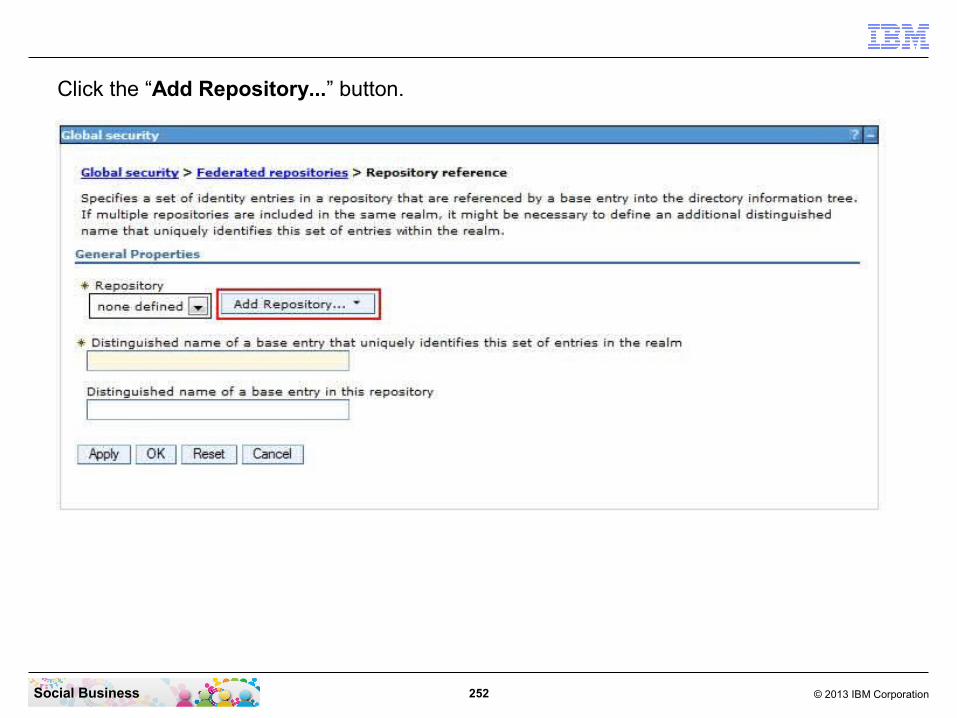
252 © 2013 IBM CorporationSocial Business
Click the “Add Repository...” button.
253 © 2013 IBM CorporationSocial Business
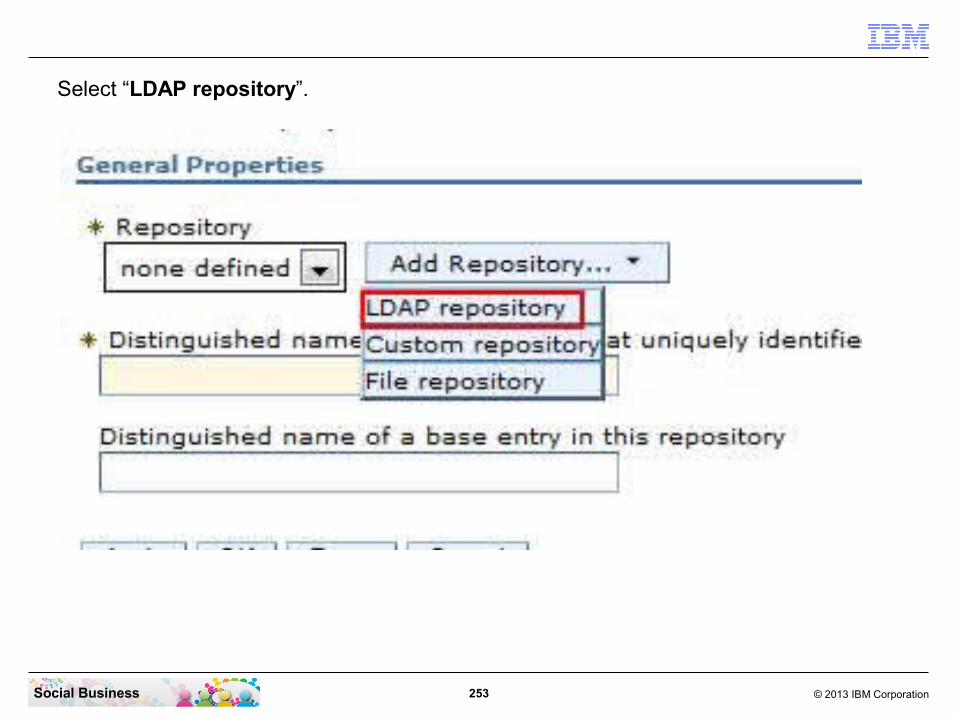
Select “LDAP repository”.
254 © 2013 IBM CorporationSocial Business
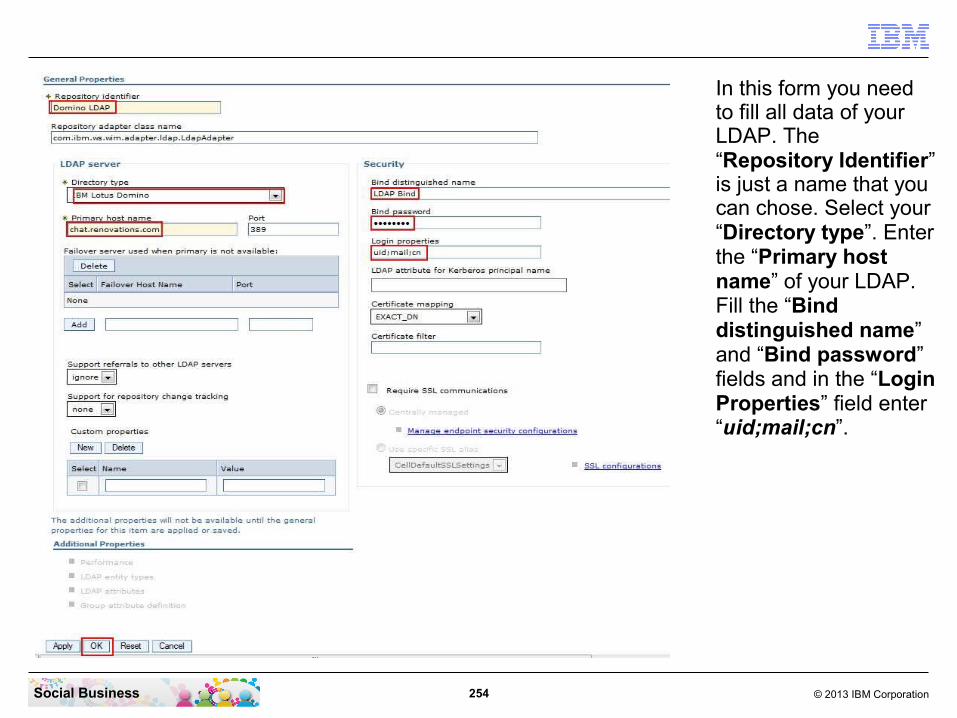
In this form you need to fill all data of your LDAP. The “Repository Identifier” is just a name that you can chose. Select your “Directory type”. Enter the “Primary host name” of your LDAP. Fill the “Bind distinguished name” and “Bind password” fields and in the “Login Properties” field enter “uid;mail;cn”.

255 © 2013 IBM CorporationSocial Business
At the bottom of the form click the “Apply” button.

256 © 2013 IBM CorporationSocial Business
Click the “Save” link to save the configuration changes.

257 © 2013 IBM CorporationSocial Business
Your new created Repository configuration should appear in the “Repository” field now. Enter a value in the “Distinguished name of a base entry that uniquely identifies this ...”. Enter here just “root” if you use Domino LDAP and have flat group names in the directory. Leave the second field blank if you use Domino LDAP. Then click the “Apply” button.

258 © 2013 IBM CorporationSocial Business
Click the “Save” link to save the last configuration changes.

259 © 2013 IBM CorporationSocial Business
Click the “OK” button to continue.
260 © 2013 IBM CorporationSocial Business
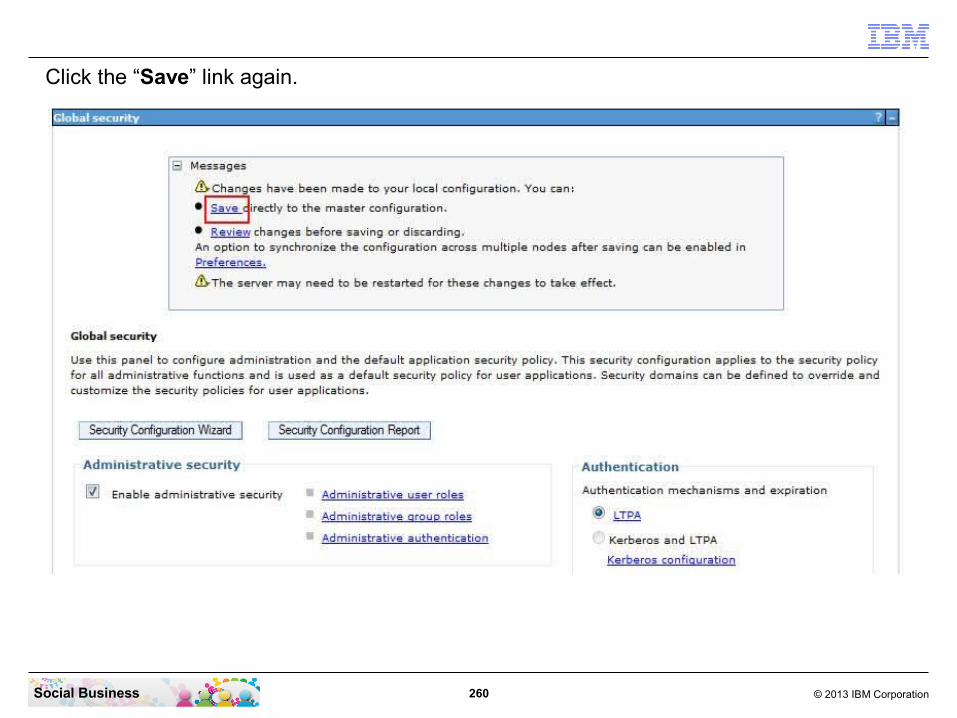
Click the “Save” link again.

261 © 2013 IBM CorporationSocial Business
Click the “Global security” link on the top of the screen.

262 © 2013 IBM CorporationSocial Business
Click the “Set as current” button.

263 © 2013 IBM CorporationSocial Business
Check the “Enable application security” check box.

264 © 2013 IBM CorporationSocial Business
Now click the “Apply” button.

265 © 2013 IBM CorporationSocial Business
Click the “Save” link to save the last changes.

266 © 2013 IBM CorporationSocial Business
Now click “Web and SIP security” and then on “Single sign-on (SSO)”.
267 © 2013 IBM CorporationSocial Business
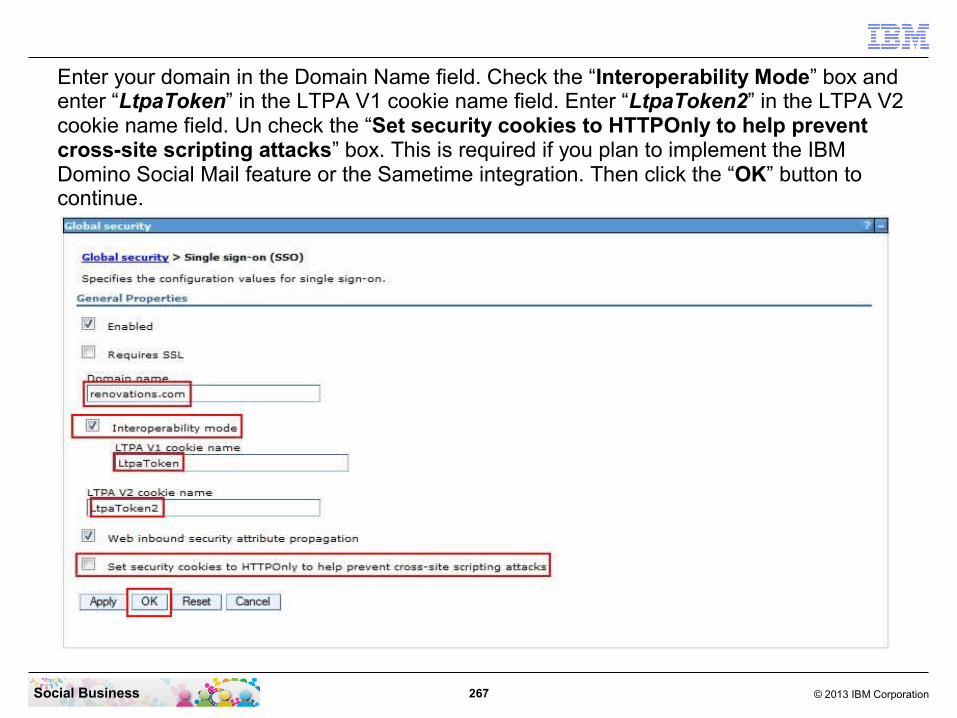
Enter your domain in the Domain Name field. Check the “Interoperability Mode” box and enter “LtpaToken” in the LTPA V1 cookie name field. Enter “LtpaToken2” in the LTPA V2 cookie name field. Un check the “Set security cookies to HTTPOnly to help prevent cross-site scripting attacks” box. This is required if you plan to implement the IBM Domino Social Mail feature or the Sametime integration. Then click the “OK” button to continue.

268 © 2013 IBM CorporationSocial Business
Click the “Save” link to save the last changes.

269 © 2013 IBM CorporationSocial Business
Click the “Apply” button.

270 © 2013 IBM CorporationSocial Business
Click the “Save” link to save the last changes.

271 © 2013 IBM CorporationSocial Business
Log out from the Integrated Solutions Console by clicking the “Logout” link.

272 © 2013 IBM CorporationSocial Business
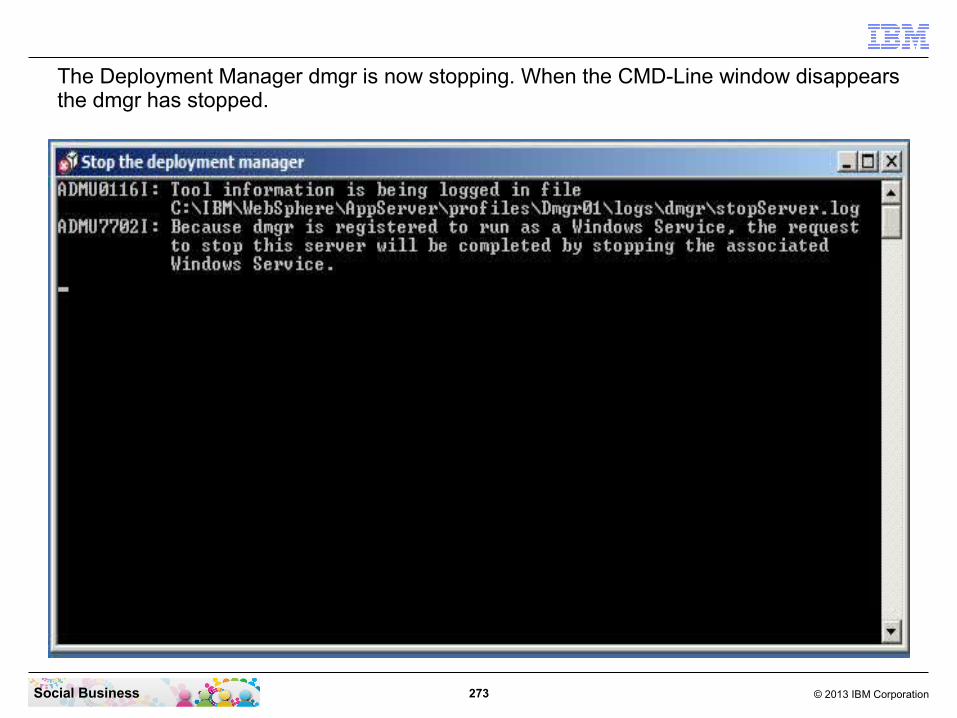
Changes in the Security configuration always require to restart the deployment manager and all configured nodes and servers. To stop the dmgr process click the “Start” menu and then “All Programs” - “IBM WebSphere” - “Application Server Network Deployment” - “Profiles” - “Dmgr01” - “Stop the deployment manager”.
273 © 2013 IBM CorporationSocial Business
The Deployment Manager dmgr is now stopping. When the CMD-Line window disappears the dmgr has stopped.

274 © 2013 IBM CorporationSocial Business
Now start again the dmgr process click the “Start” menu and then “All Programs” - “IBM WebSphere” - “Application Server Network Deployment” - “Profiles” - “Dmgr01” - “Start the deployment manager”.

275 © 2013 IBM CorporationSocial Business
You want to be sure that the LDAP connection is working. Open your browser and navigate to the Integrated Solutions Console. Did you bookmark it before?

276 © 2013 IBM CorporationSocial Business
Log in with your IBM WebSphere Application Server Administrator user name and password.

277 © 2013 IBM CorporationSocial Business
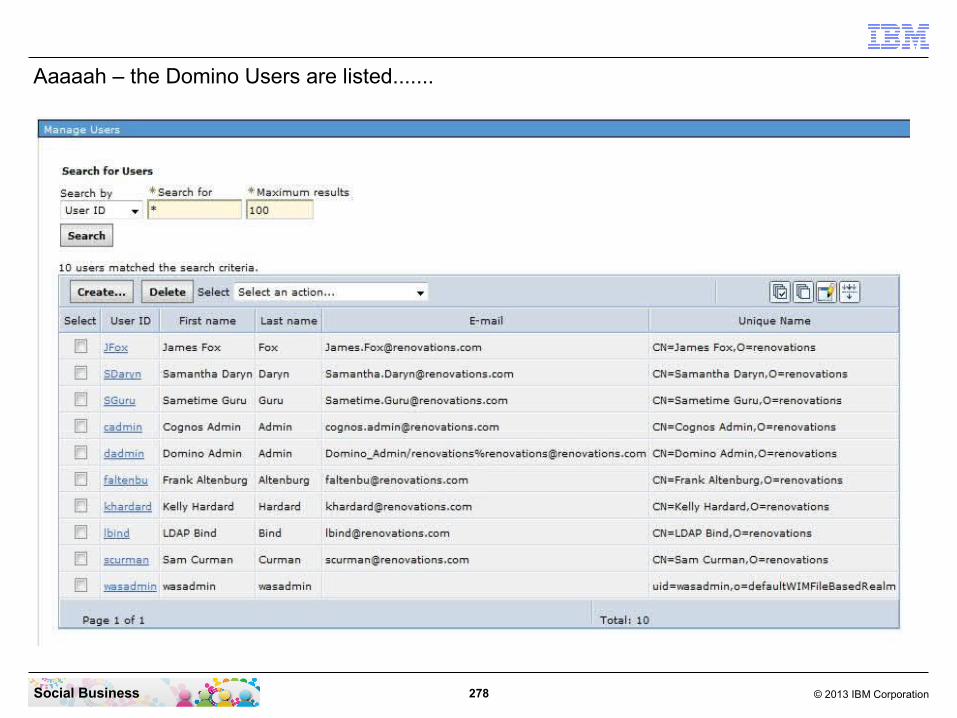
Click on “Users and Groups” and then on “Manage Users”.
278 © 2013 IBM CorporationSocial Business
Aaaaah – the Domino Users are listed.......

279 © 2013 IBM CorporationSocial Business
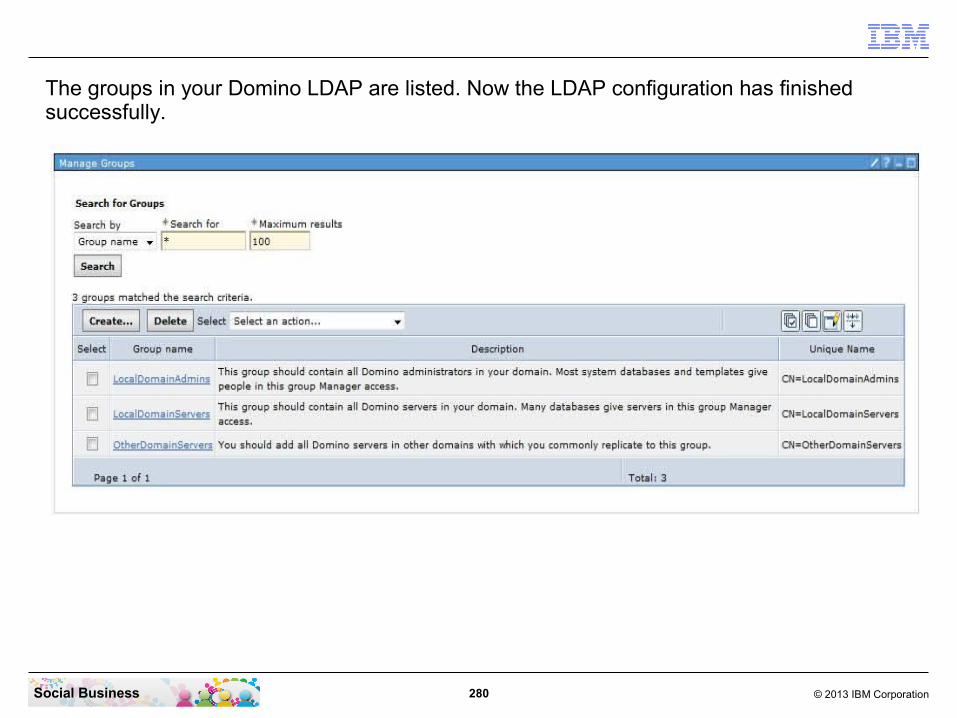
To check the groups click on “Manage Groups”.
280 © 2013 IBM CorporationSocial Business
The groups in your Domino LDAP are listed. Now the LDAP configuration has finished successfully.

281 © 2013 IBM CorporationSocial Business
Attention: The Cognos administrator account must reside in the same LDAP directory used by IBM Connections.
If you will use an existing LDAP account, take note of the user name and password. For example, if your organization already has a Cognos deployment, you might choose to use the same administrator account with Connections.
If an acceptable account does not exist already, create it now; again, note the credentials for use later. The short name of this user needs to be used during the Cognos installation.
STEP TWELFE: Create the Cognos Administrator Account

282 © 2013 IBM CorporationSocial Business
B e fo re yo u be g inThis step installs the DB2 Database client to the Cognos Server box. This client is required for the Cognos Transformer component to connect to the Cognos and Metrics Databases on your DB2 Server.
STEP THIRTEEN: Install the DB2 Database Client on the Cognos Server box

283 © 2013 IBM CorporationSocial Business
Switch to the Cognos Box and navigate to the directory “C:\Install\UNIVERSAL”. Then right click the “setup.exe”. Then select “Run as Administrator”

284 © 2013 IBM CorporationSocial Business
In the navigator click “Install a Product”.

285 © 2013 IBM CorporationSocial Business
Scroll down until you can see the “IBM Data Server Client Version 10.1 Fix Pack 2”. here click the “Install New” button.

286 © 2013 IBM CorporationSocial Business
Click the “Next” button to continue.

287 © 2013 IBM CorporationSocial Business
Select “I accept both the IBM and the non-IBM terms”. Then click the “Next” button to continue.

288 © 2013 IBM CorporationSocial Business
Click the “Next” button to continue.

289 © 2013 IBM CorporationSocial Business
Select “Install IBM Data Server Client on this computer”. Then click the “Next” button to continue.

290 © 2013 IBM CorporationSocial Business
Remove the “Program Files\” part in the path. Then click the “Next” button to continue.

291 © 2013 IBM CorporationSocial Business
Click the “Next” button to continue.
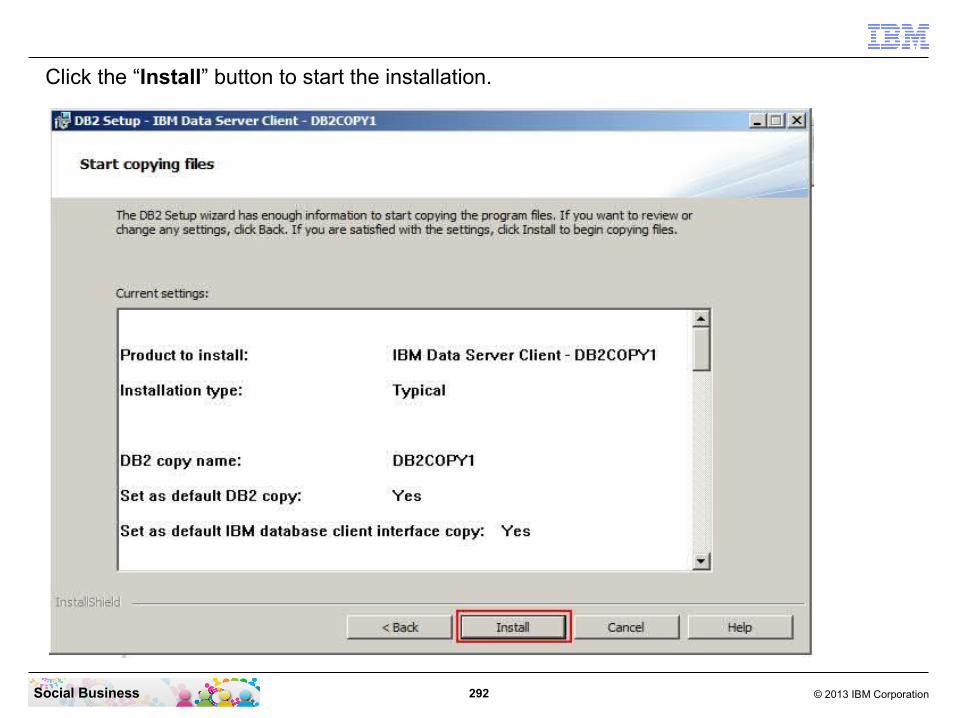
292 © 2013 IBM CorporationSocial Business
Click the “Install” button to start the installation.

293 © 2013 IBM CorporationSocial Business
The DB2 client is now installing. This installation takes approximately 3 to 5 minutes.
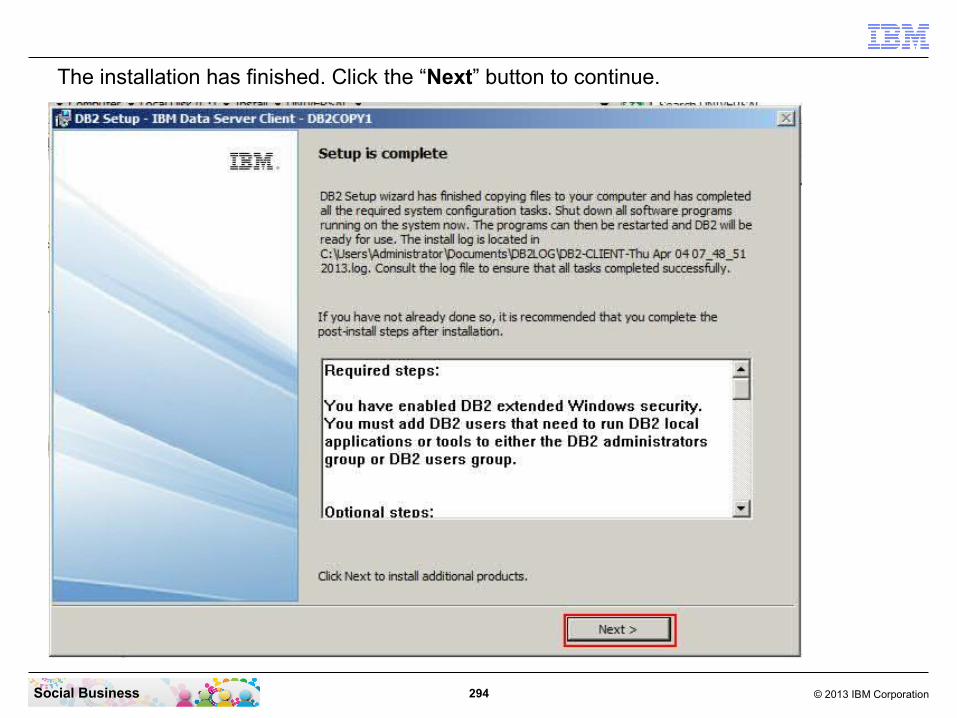
294 © 2013 IBM CorporationSocial Business
The installation has finished. Click the “Next” button to continue.
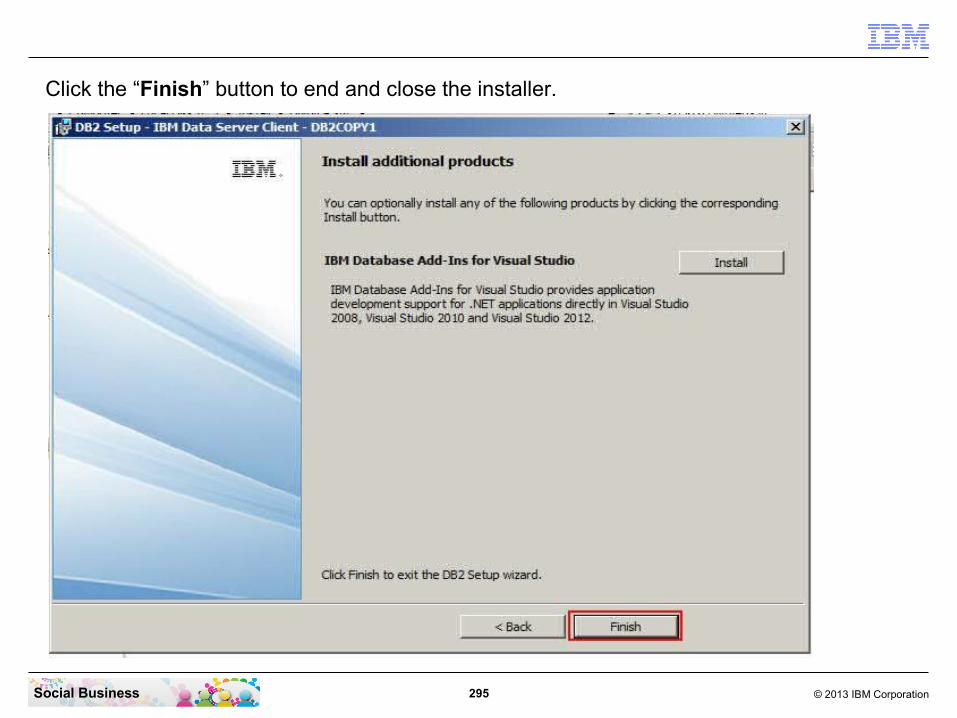
295 © 2013 IBM CorporationSocial Business
Click the “Finish” button to end and close the installer.
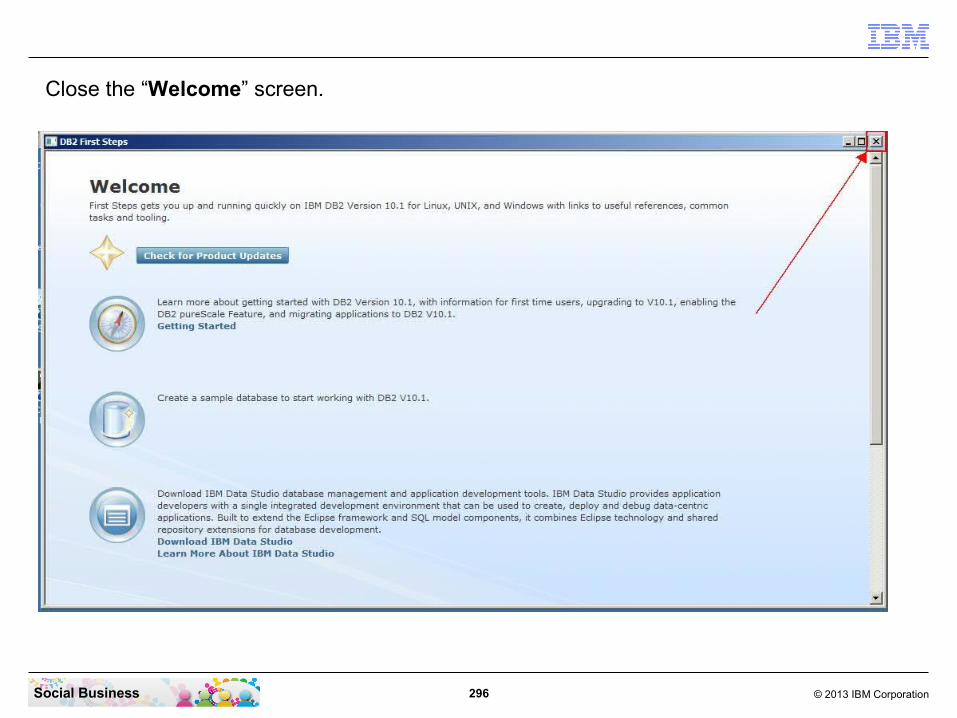
296 © 2013 IBM CorporationSocial Business
Close the “Welcome” screen.

297 © 2013 IBM CorporationSocial Business
Next step is to configure the connectivity to the DB2 Server. For this configuration we need a DB2 command window. Click “Run” - “All Programs” - “IBM DB2” - “DB2COPY1” - “Command Window - Administrator”.

298 © 2013 IBM CorporationSocial Business
In the Command Window enter the 3 commands:“db2 catalog tcpip node db2node remote connections.renovations.com server 50000”“db2 catalog database COGNOS as COGNOS at node db2node”“db2 catalog database METRICS as METRICS at node db2node”Be sure all 3 commands completing successfully.

299 © 2013 IBM CorporationSocial Business
Before you beginWebSphere Application Server Network Deployment is provided with IBM Connections.
To establish an environment with one Deployment Manager and one or more managed nodes, use the following table to determine the installation option that you should choose. The IBM Connections installation wizard creates server instances that require each node to have an application server. Choose one of these options when installing WebSphere Application Server to ensure that each node has an application server.
IBM Connections deployment● Deployment Manager and one node on the same system (use this now)● Deployment Manager and nodes on separate systems
STEP FOURTEEN: Install IBM WebSphere Application Server 8.0 and the FP5 update

300 © 2013 IBM CorporationSocial Business
Starting with WebSphere 8.0 the System is installed using the IBM Installation Manager.For IBM Connections 4.5 we use the IBM Installation Manager release 1.5.3. Navigate to the directory “C:\Install\WAS_ND_8.0\IM”. Then right click the file “install.exe” and select “Run as Administrator”.

301 © 2013 IBM CorporationSocial Business
Click the “Next” button to continue.

302 © 2013 IBM CorporationSocial Business
Select “I accept the terms in the license agreement”. Then click the “Next” button to continue.

303 © 2013 IBM CorporationSocial Business
Remove the “Program Files/” part in the path. Then click the “Next” button to continue.

304 © 2013 IBM CorporationSocial Business
Click the “Install” button to start the installation.

305 © 2013 IBM CorporationSocial Business
The IBM Installation Manager is installing. This step takes approximately 60 to 90 seconds.

306 © 2013 IBM CorporationSocial Business
The IBM Installation Manager is installed. Click the “Restart Installation Manager” button.

307 © 2013 IBM CorporationSocial Business
First you need to add the repositories. Click “File” and then “Preferences...”.

308 © 2013 IBM CorporationSocial Business
Uncheck the “Search service repositories during installation and updates” check box. Then click the “Add Repository...” button.

309 © 2013 IBM CorporationSocial Business
Click the “Browse...” button.

310 © 2013 IBM CorporationSocial Business
Navigate to the directory “C:\Install\WAS_ND_8.0\WAS” and select the “repository.config” file. Then click the “Open” button.
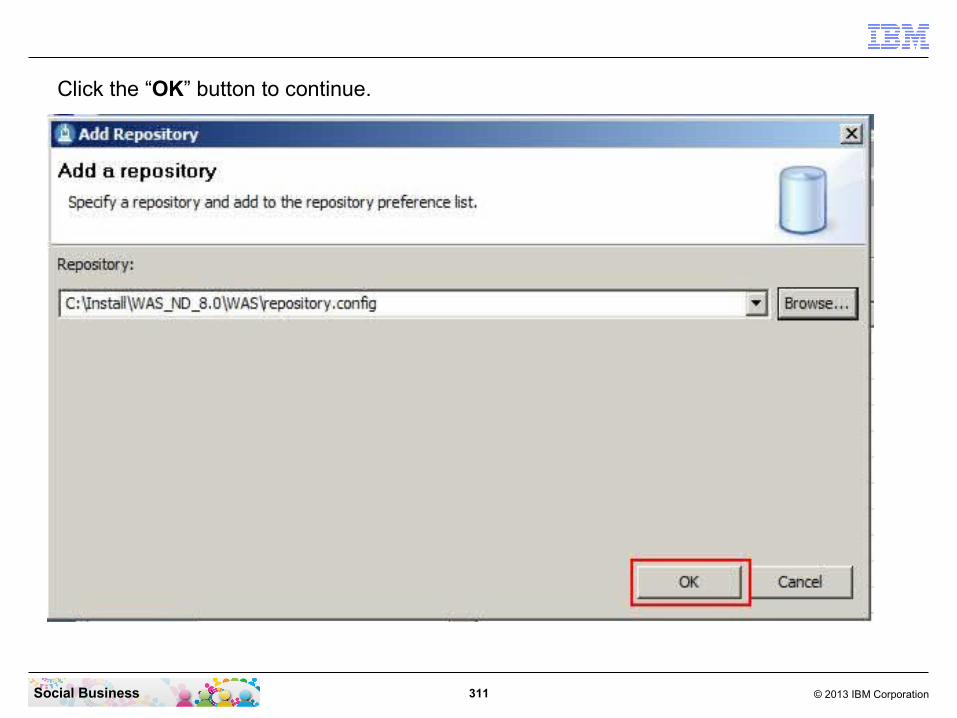
311 © 2013 IBM CorporationSocial Business
Click the “OK” button to continue.
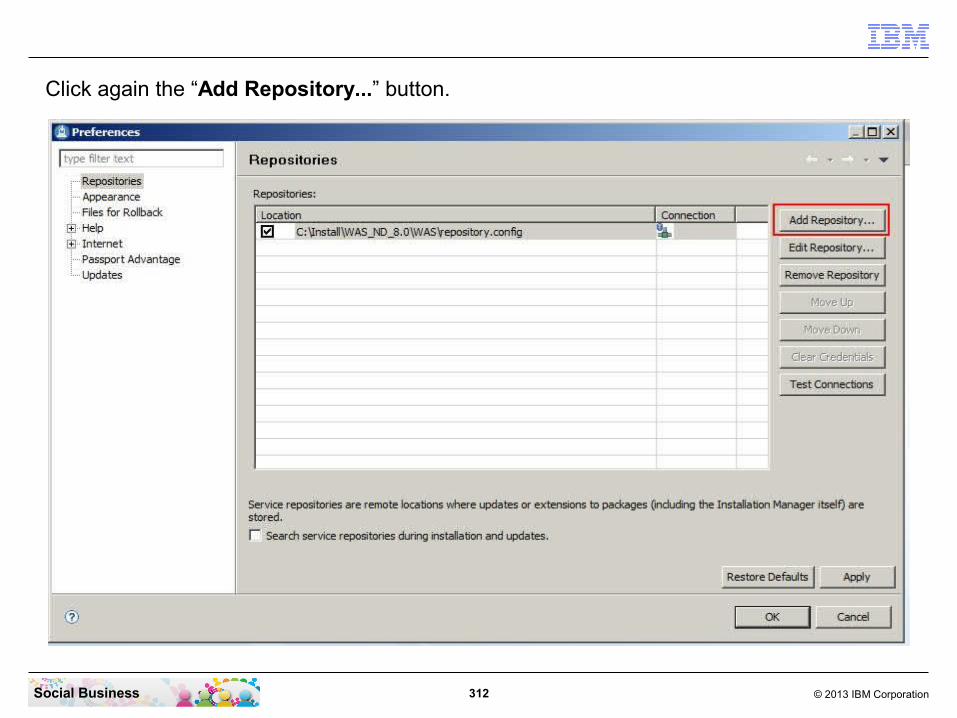
312 © 2013 IBM CorporationSocial Business
Click again the “Add Repository...” button.

313 © 2013 IBM CorporationSocial Business
Click the “Browse...” button.

314 © 2013 IBM CorporationSocial Business
Navigate to the directory “C:\Install\WAS_ND_8.0\WAS_FP5” and select the “repository.config” file. Then click the “Open” button.

315 © 2013 IBM CorporationSocial Business
Click the “OK” button to continue.

316 © 2013 IBM CorporationSocial Business
Click the “OK” button to continue.
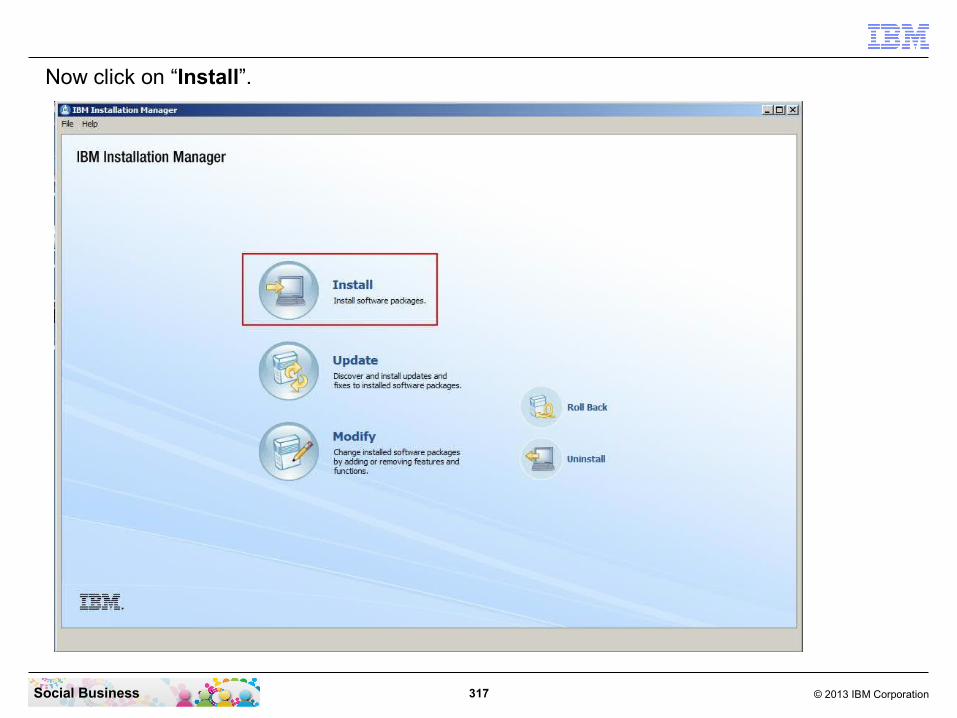
317 © 2013 IBM CorporationSocial Business
Now click on “Install”.

318 © 2013 IBM CorporationSocial Business
Check both check boxes. Then click the “Next” button to continue.

319 © 2013 IBM CorporationSocial Business
Select “I accept the terms in the license agreement”. Then click the “Next” button to continue.

320 © 2013 IBM CorporationSocial Business
Remove the “Program Files/” part in the path. Then click the “Next” button to continue.

321 © 2013 IBM CorporationSocial Business
Again remove the “Program Files\” part in the path. Then click the “Next” button to continue.

322 © 2013 IBM CorporationSocial Business
Then click the “Next” button to continue.

323 © 2013 IBM CorporationSocial Business
Then click the “Next” button to continue.

324 © 2013 IBM CorporationSocial Business
Then click the “Install” button to start the installation.
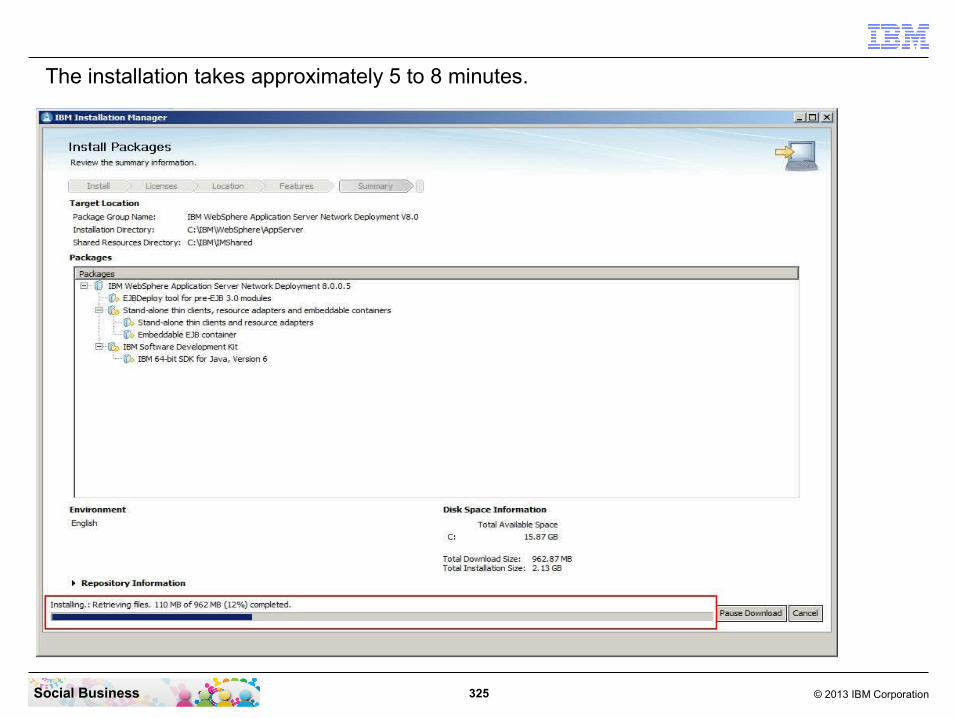
325 © 2013 IBM CorporationSocial Business
The installation takes approximately 5 to 8 minutes.
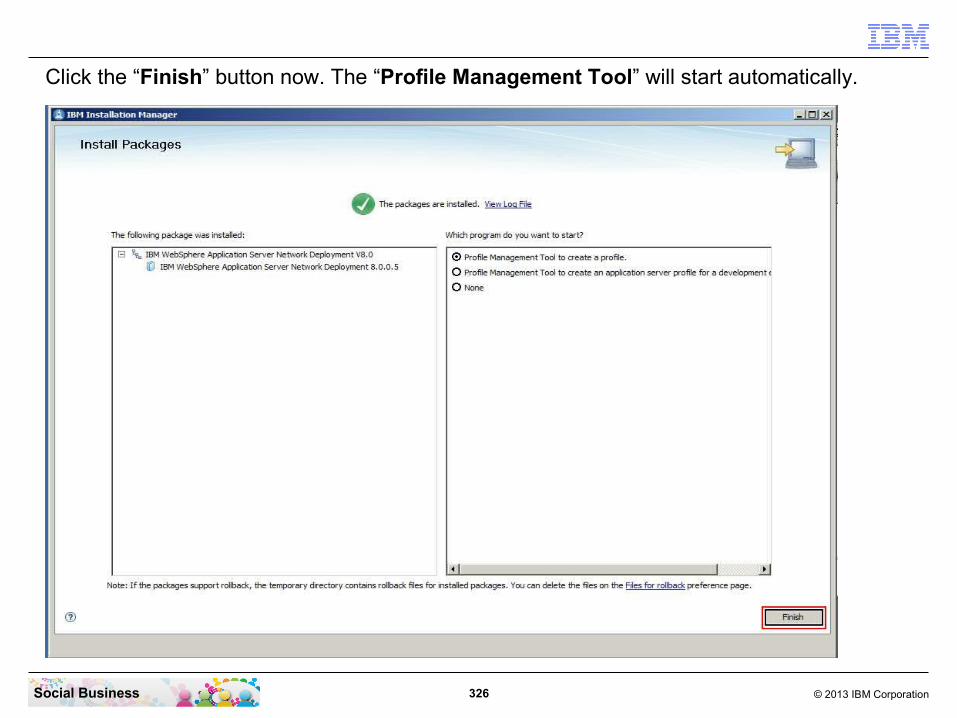
326 © 2013 IBM CorporationSocial Business
Click the “Finish” button now. The “Profile Management Tool” will start automatically.
327 © 2013 IBM CorporationSocial Business
This step creates the required profiles for the Application Server. It automatically creates a default server in the Application Profile. This server will be deleted later because it is not required.
STEP FIFTEEN: Create the required AppServer profile for Cognos

328 © 2013 IBM CorporationSocial Business
Click the “Create...” button to start the profiles creation wizzard.

329 © 2013 IBM CorporationSocial Business
Select “Application Server”. Then click the “Next” button to continue.

330 © 2013 IBM CorporationSocial Business
Then click the “Next” button to continue.
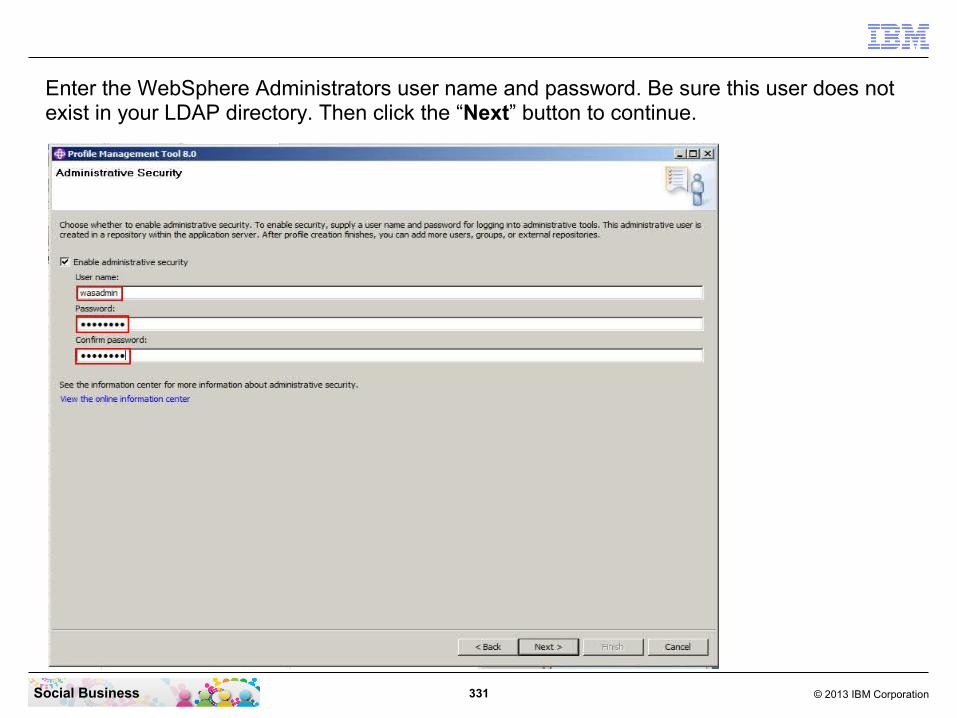
331 © 2013 IBM CorporationSocial Business
Enter the WebSphere Administrators user name and password. Be sure this user does not exist in your LDAP directory. Then click the “Next” button to continue.

332 © 2013 IBM CorporationSocial Business
Then click the “Create” button to continue.
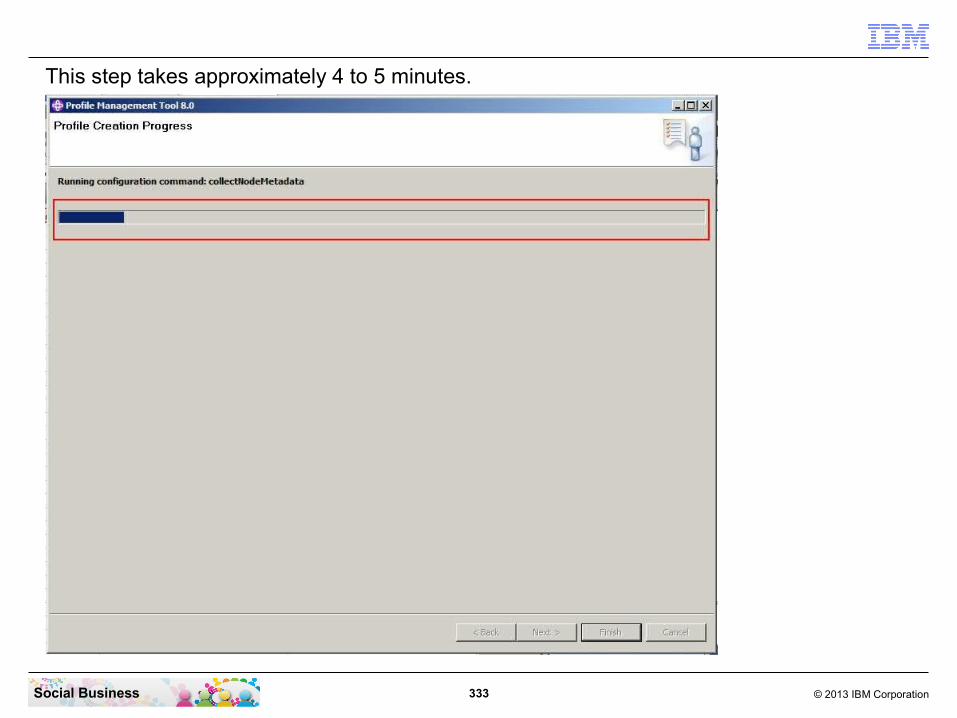
333 © 2013 IBM CorporationSocial Business
This step takes approximately 4 to 5 minutes.

334 © 2013 IBM CorporationSocial Business
Un-check the “Launch the First steps console”. Then click the “Finish” button to continue.

335 © 2013 IBM CorporationSocial Business
Close the WebSphere Customization Toolbox now.

336 © 2013 IBM CorporationSocial Business
This step updates your WebSphere Application Server and installs 5 fixes required for IBM Connections 4.5.
STEP SIXTEEN: Update the WebSphere Server with 5 required Fixes.

337 © 2013 IBM CorporationSocial Business
Click “File” and then “Preferences...”.
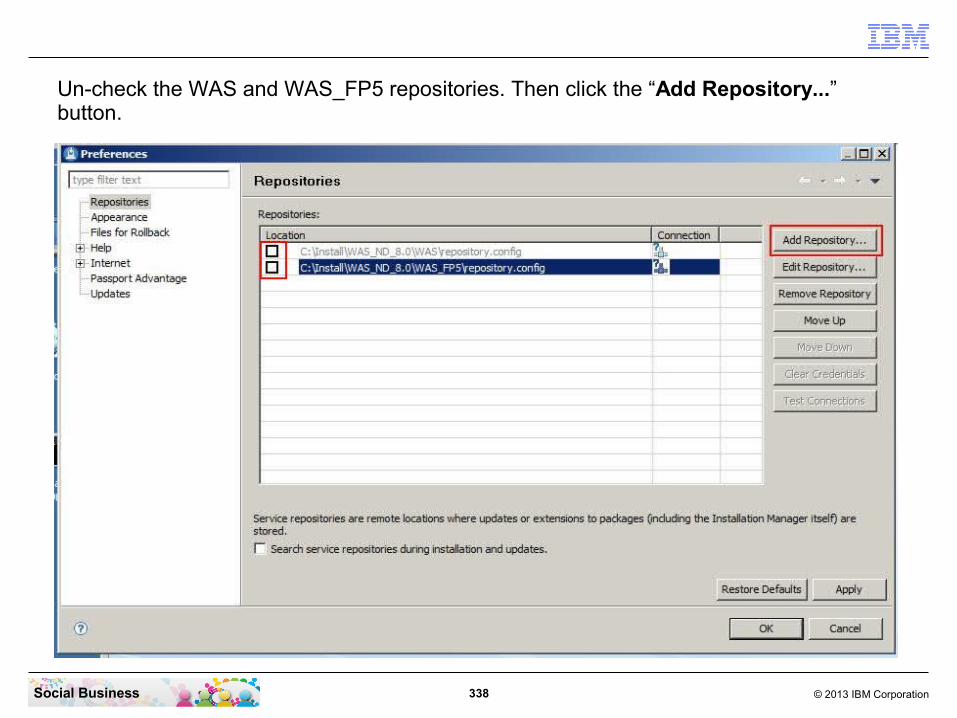
338 © 2013 IBM CorporationSocial Business
Un-check the WAS and WAS_FP5 repositories. Then click the “Add Repository...” button.

339 © 2013 IBM CorporationSocial Business
Click the “Browse...” button.

340 © 2013 IBM CorporationSocial Business
Navigate to the directory “C:\Install\WAS_ND_8.0\” and select the “8.0.0-ws-wasnd-ifpm71430.zip” file. Then click the “Open” button.

341 © 2013 IBM CorporationSocial Business
Click the “OK” button to continue.
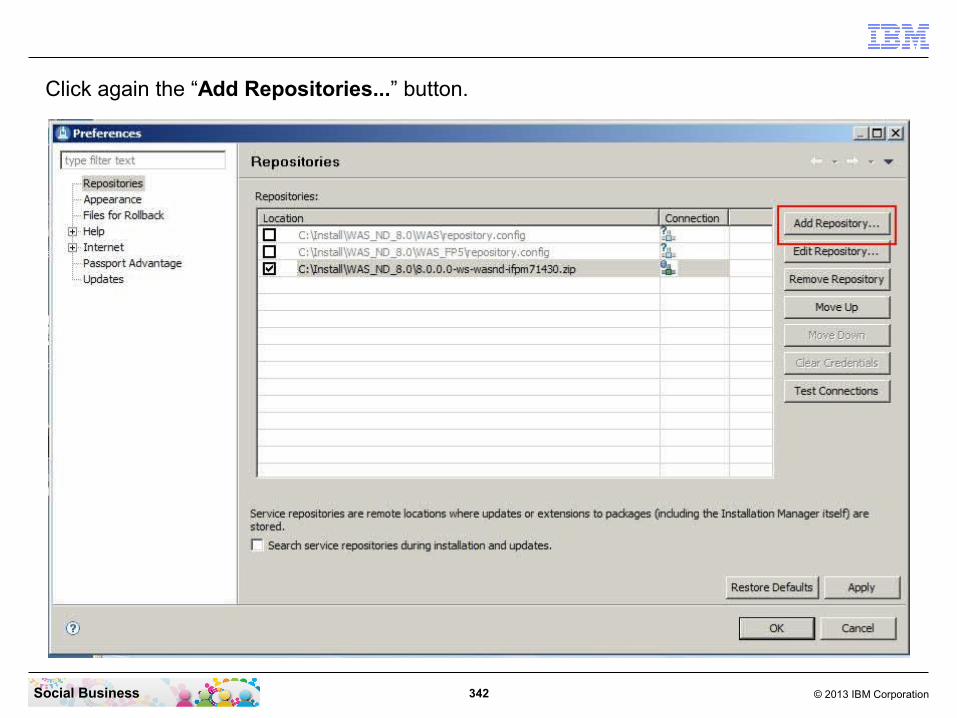
342 © 2013 IBM CorporationSocial Business
Click again the “Add Repositories...” button.

343 © 2013 IBM CorporationSocial Business
Click the “Browse...” button.

344 © 2013 IBM CorporationSocial Business
Navigate to the directory “C:\Install\WAS_ND_8.0\” and select the “8.0.0.5-ws-was-ifpm76920.zip” file. Then click the “Open” button. Repeat this steps (page 342 to 346) for the files “8.0.0.5-ws-was-ifpm85834.zip”, “8.0.0.5-ws-wasnd-ifpm62615.zip” nd “8.0.0.5-ws-wasnd-ifpm83196.zip”

345 © 2013 IBM CorporationSocial Business
Click the “OK” button to continue.

346 © 2013 IBM CorporationSocial Business
Click the “OK” button to continue.

347 © 2013 IBM CorporationSocial Business
Click “Update” to start the Fixes installation

348 © 2013 IBM CorporationSocial Business
Click the “Next” button to continue.
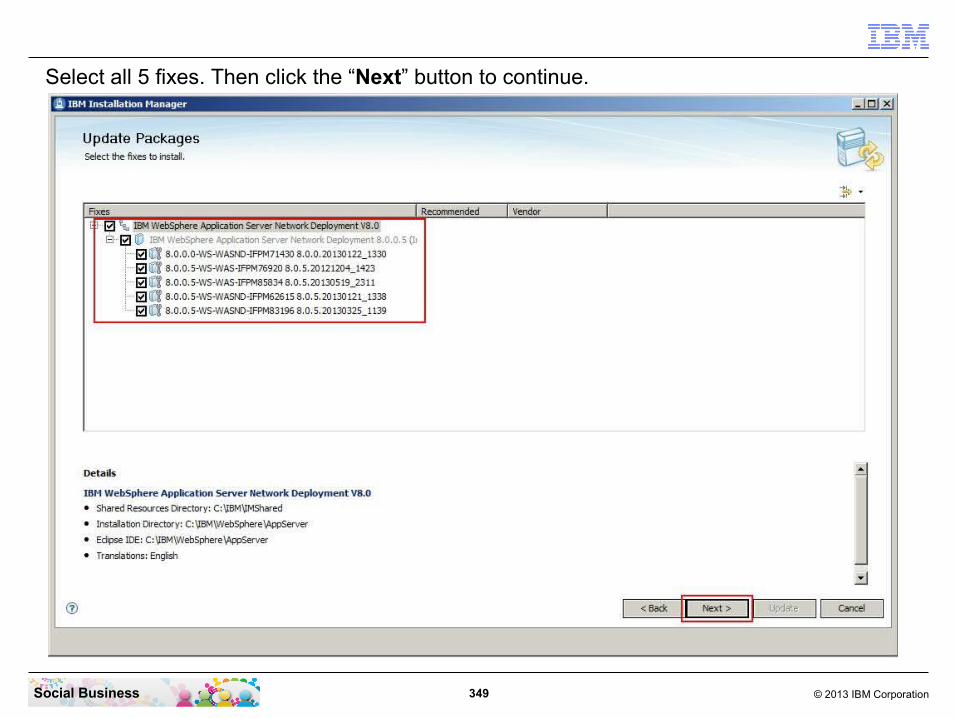
349 © 2013 IBM CorporationSocial Business
Select all 5 fixes. Then click the “Next” button to continue.

350 © 2013 IBM CorporationSocial Business
Then click the “Update” button to continue.
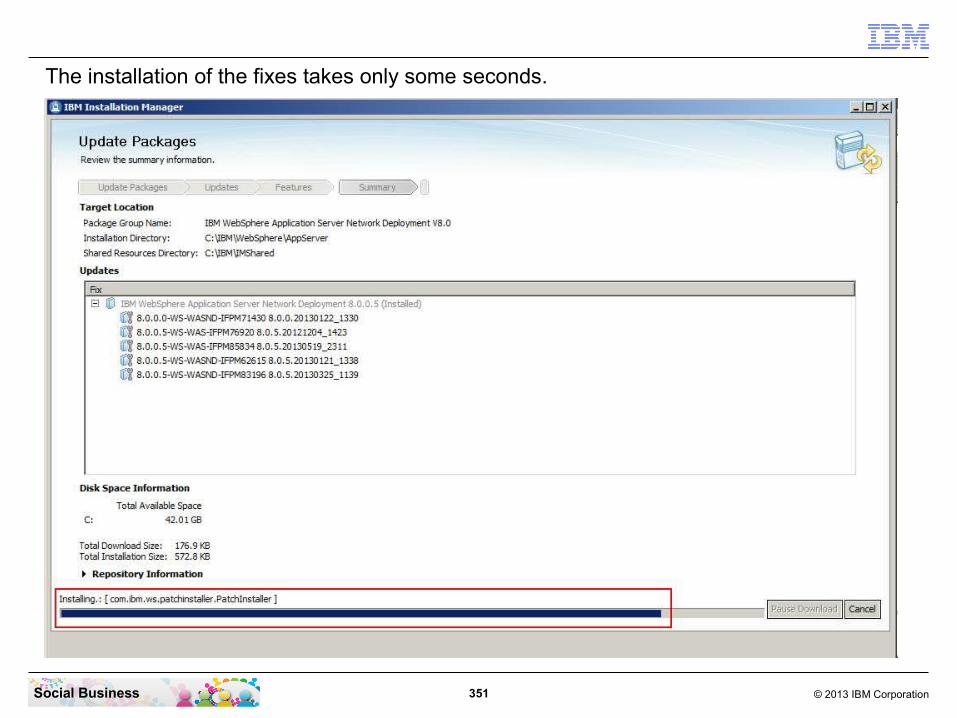
351 © 2013 IBM CorporationSocial Business
The installation of the fixes takes only some seconds.

352 © 2013 IBM CorporationSocial Business
Click the “Finish” button to close the installer.

353 © 2013 IBM CorporationSocial Business
Close the IBM Installation Manager.

354 © 2013 IBM CorporationSocial Business
B e fo re yo u be g inThe following conditions must be satisfied to ensure that the Cognos Business Intelligence components installs correctly:
● The Cognos Content Store database must have been created on the database server, and that database server must be running (see Creating databases)
● The current server must reside within the same domain as the IBM Connections servers so you can enable SSO (Single Sign-On) as required for generating reports.
● The user running the Cognos installation script must have permissions to use the database client.
STEP SEVENTEEN: Install the Cognos Business Intelligence and Transformer Server

355 © 2013 IBM CorporationSocial Business
Open your file explorer and navigate to the directory “C:\Install\IBM_Connections_Install\Cognos”. There you can find the file “CognosConfig.zip”. Copy this file to your Cognos Server to the directory “C:\Install”.

356 © 2013 IBM CorporationSocial Business
On the Cognos Server navigate to the “C:\Install” directory and then right click the file “CognosConfig.zip” and select “Extract All...” in the menu.

357 © 2013 IBM CorporationSocial Business
Edit the path to “C:\Install\CognosConfig”.

358 © 2013 IBM CorporationSocial Business
Then click the “Extract” button.
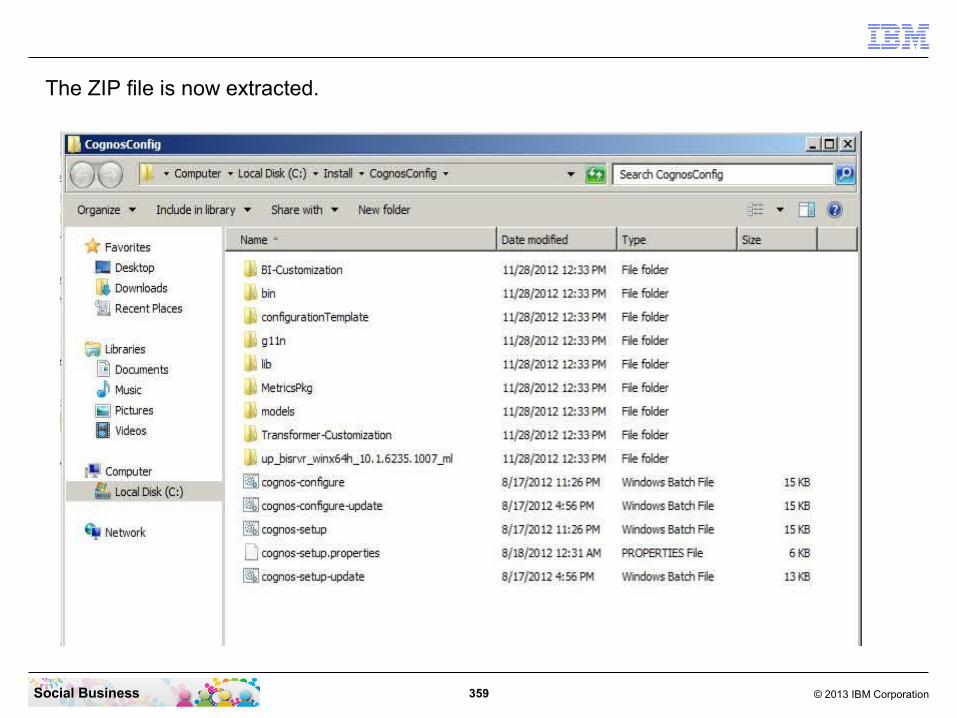
359 © 2013 IBM CorporationSocial Business
The ZIP file is now extracted.

360 © 2013 IBM CorporationSocial Business
Now change to the directory “C:\IBM\SQLLIB\JAVA” and mark the two files “db2jcc.jar” and “db2jcc_license_cu.jar”. Click “Ctrl-C” to copy the files into your dashboard.

361 © 2013 IBM CorporationSocial Business
Open a second file explorer window and navigate to the directory “C:\Install\CognosConfig\BI-Customization\JDBC”. Then click “Ctrl-V” to copy the 2 files into the directory.
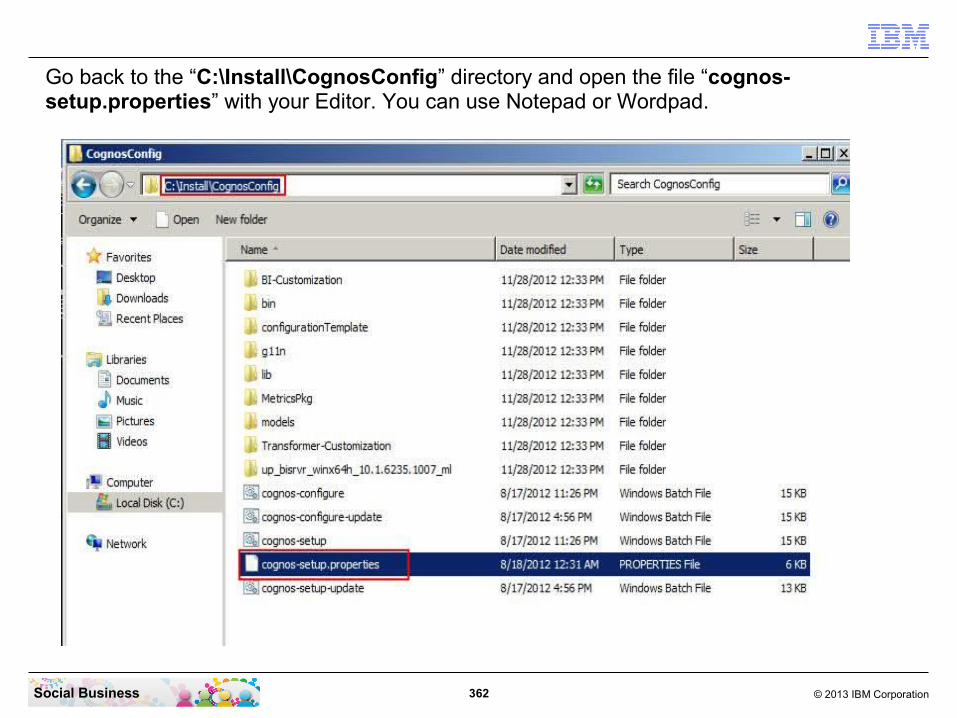
362 © 2013 IBM CorporationSocial Business
Go back to the “C:\Install\CognosConfig” directory and open the file “cognos-setup.properties” with your Editor. You can use Notepad or Wordpad.

363 © 2013 IBM CorporationSocial Business
You need to fill this lines with relevant data:was.install.path “C:\IBM\WebSphere\AppServer”was.profile.name “AppSrv01”was.local.admin.username “wasadmin”was.local.admin.password “passw0rd”was.fqdn.hostname “cognos.renovations.com”cognos.was.node.name “cognosNode01”
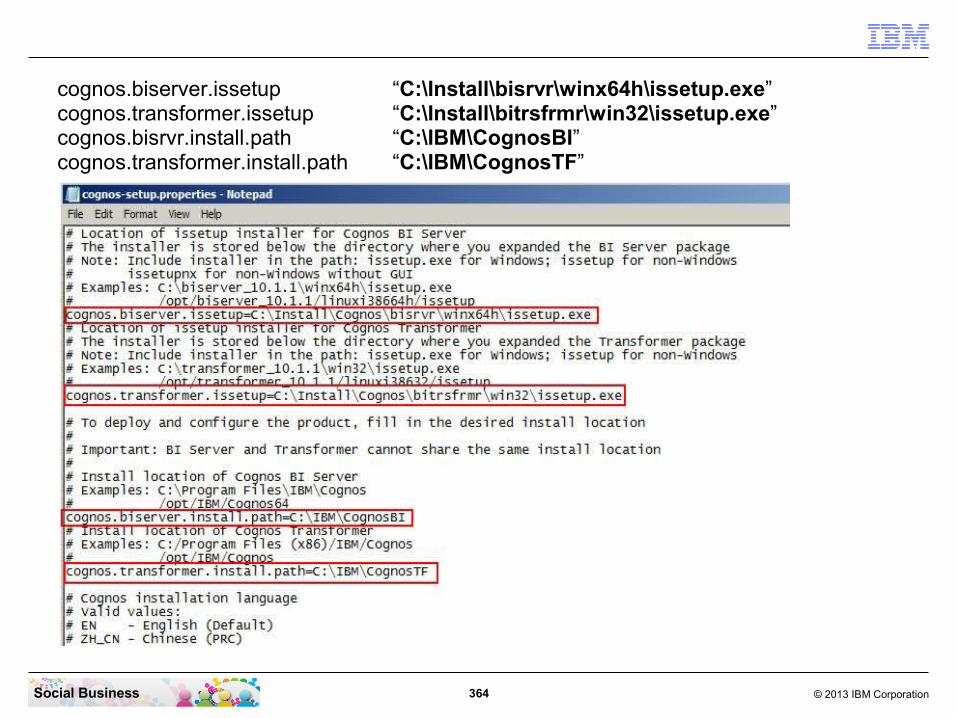
364 © 2013 IBM CorporationSocial Business
cognos.biserver.issetup “C:\Install\bisrvr\winx64h\issetup.exe”cognos.transformer.issetup “C:\Install\bitrsfrmr\win32\issetup.exe”cognos.bisrvr.install.path “C:\IBM\CognosBI”cognos.transformer.install.path “C:\IBM\CognosTF”

365 © 2013 IBM CorporationSocial Business
cognos.admin.username “cadmin” (!!! important – use the short name !!!)cognos.admin.password “Passw0rd”cognos.cube.path “C:\IBM\CognosTF\PowerCubes”cognos.db.host “connections.renovations.com:50000”cognos.db.password “passw0rd”
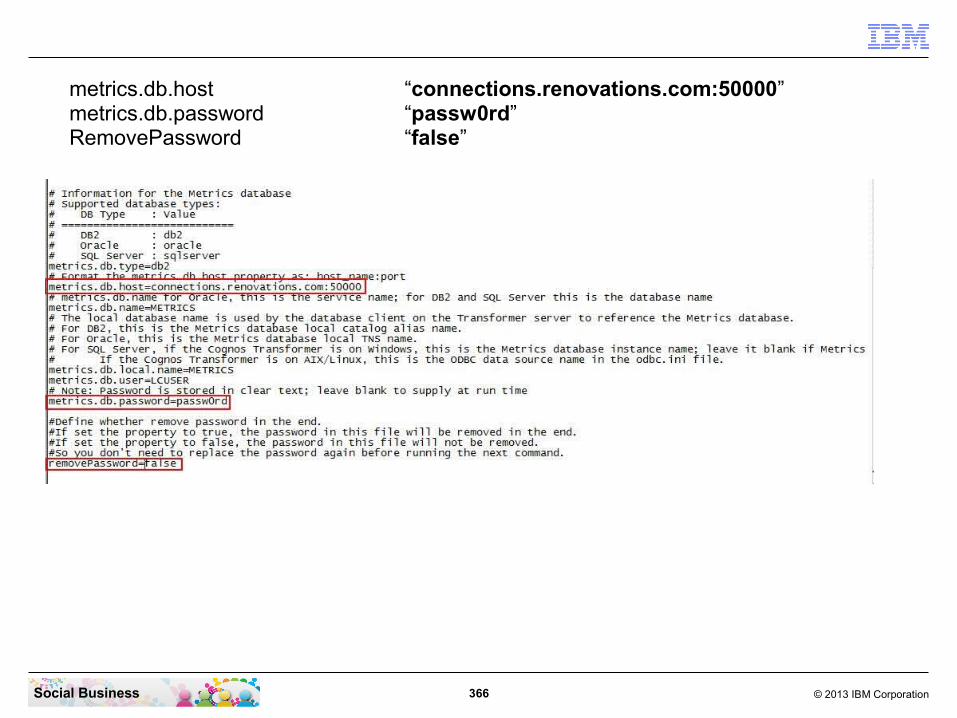
366 © 2013 IBM CorporationSocial Business
metrics.db.host “connections.renovations.com:50000”metrics.db.password “passw0rd”RemovePassword “false”

367 © 2013 IBM CorporationSocial Business
Switch back to your CMD-Line window and navigate to the Cognos install directory with the command “cd \Install\CognosConfig”. Then enter the command “cognos-setup.bat”.

368 © 2013 IBM CorporationSocial Business
Cognos is now installing. This step can take up to 10 minutes.

369 © 2013 IBM CorporationSocial Business
The installation of Cognos was successful.

370 © 2013 IBM CorporationSocial Business
In your CMD line window enter the command “cognos-configure.bat”.

371 © 2013 IBM CorporationSocial Business
The Cognos installer is now configuring Cognos. This step takes approximately 5 minutes.

372 © 2013 IBM CorporationSocial Business
Cognos BI and Transformer are now configured successfully.
373 © 2013 IBM CorporationSocial Business
STEP EIGHTEEN: Federate the Cognos WebSphere Application Server to the Connections Cell
Before you beginBefore attempting to federate the Cognos node to the Deployment Manager, make sure that:
● The Deployment Manager is running.● The Cognos server is stopped (if you started it after installation, stop it now by
stopping the IBM WebSphere Application Server hosting it).● The system clock on the Cognos server is set to within 1 minute of the time (and
time zone) of the system clock on the Deployment Manager.● The Deployment Manager and the Cognos server are either both registered in the
DNS or are referenced in each other’s etc/hosts file.
About this taskThis task involves working on the newly installed Cognos Business Intelligence server to add the node to the Deployment Manager, and then working on the Deployment Manager to create virtual ports for the new node.

374 © 2013 IBM CorporationSocial Business
To check if the Cognos server is started, start the task manager. Here you can see the Cognos Services are running.

375 © 2013 IBM CorporationSocial Business
In the CMD line window change to the Cognos server directory with the command “cd \IBM\WebSphere\AppServer\profiles\AppSrv01\bin”.Stop the Cognos server with the command: “stopserver cognos_server -username wasadmin -password passw0rd”. Wait until the server stop is completed.
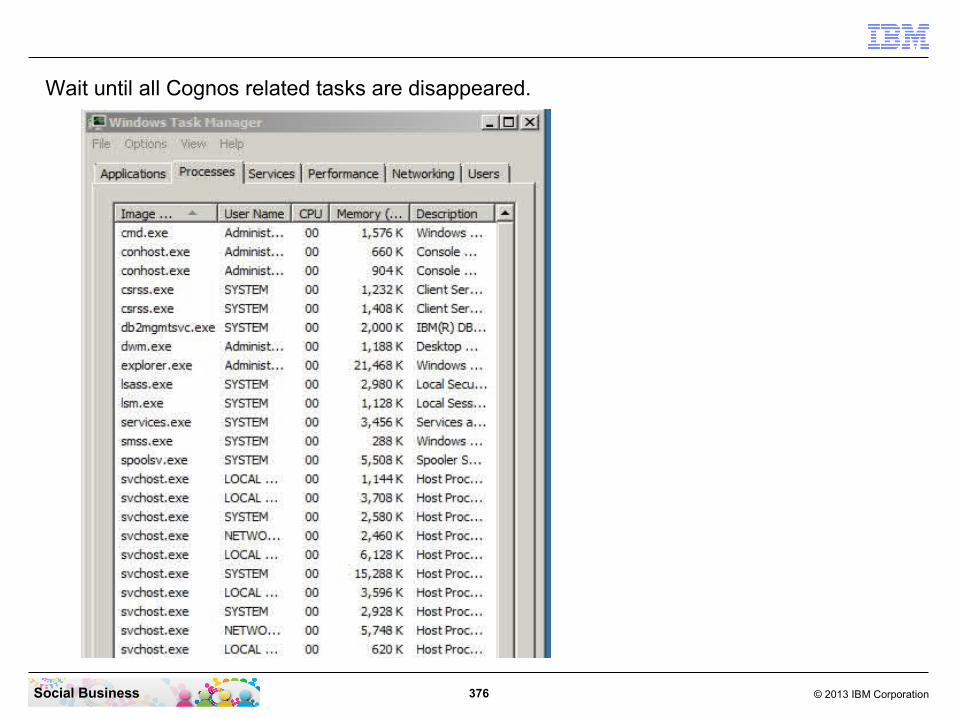
376 © 2013 IBM CorporationSocial Business
Wait until all Cognos related tasks are disappeared.
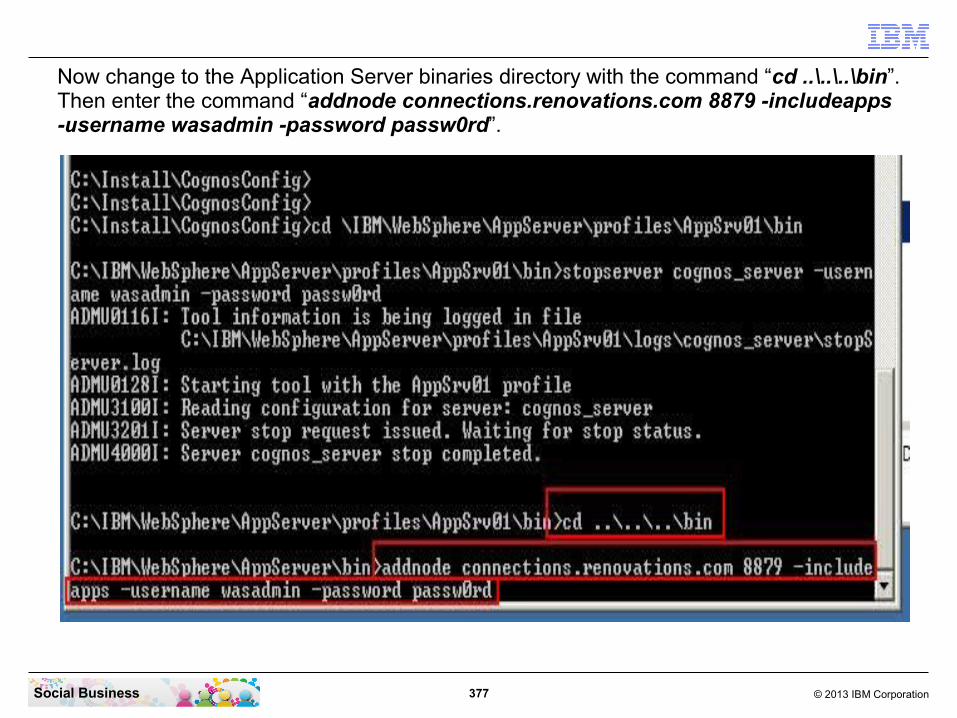
377 © 2013 IBM CorporationSocial Business
Now change to the Application Server binaries directory with the command “cd ..\..\..\bin”.Then enter the command “addnode connections.renovations.com 8879 -includeapps -username wasadmin -password passw0rd”.

378 © 2013 IBM CorporationSocial Business
The server is now federating to the cell of the IBM Connections server. This step takes 2-3 minutes.

379 © 2013 IBM CorporationSocial Business
The node has been successfully federated.

380 © 2013 IBM CorporationSocial Business
Log in to your WebSphere Integrated Solutions Console with your WAS Admin account and password.

381 © 2013 IBM CorporationSocial Business
Click “System administration” and then “Nodes”.

382 © 2013 IBM CorporationSocial Business
Select the “cognosNode01” node and click the “Full Resynchronize” button.
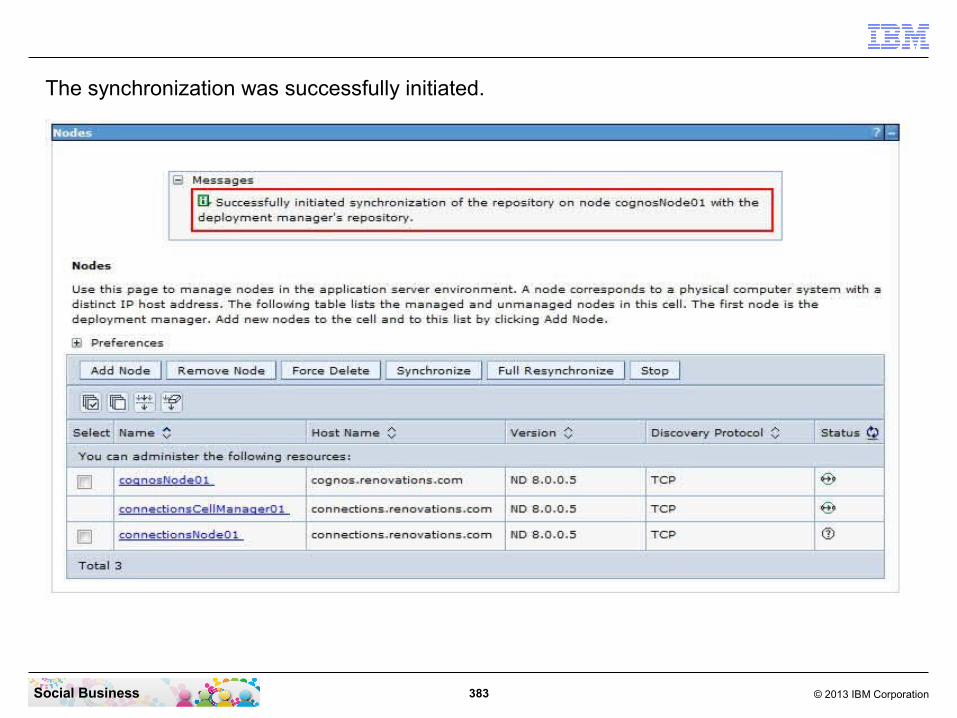
383 © 2013 IBM CorporationSocial Business
The synchronization was successfully initiated.

384 © 2013 IBM CorporationSocial Business
Now click “Servers” - “Server Types” - “WebSphere application servers”.
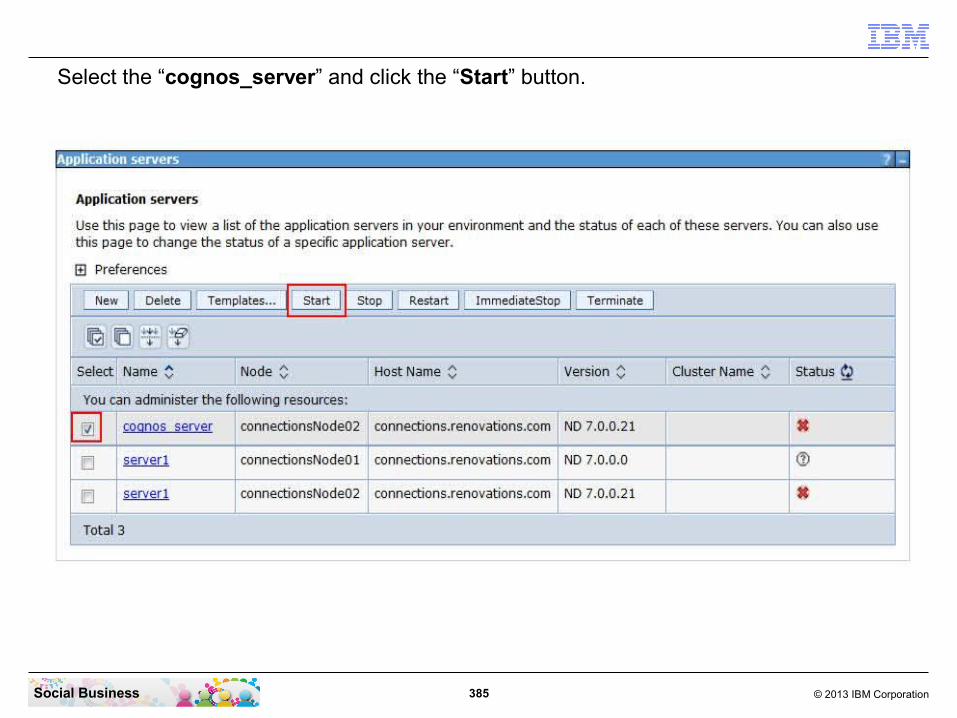
385 © 2013 IBM CorporationSocial Business
Select the “cognos_server” and click the “Start” button.
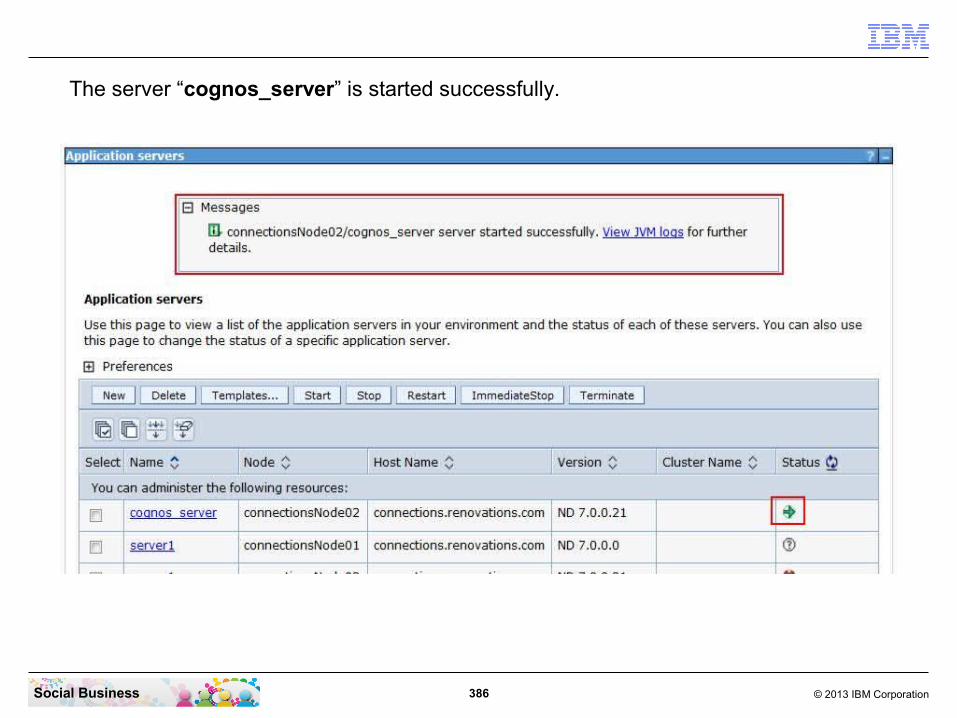
386 © 2013 IBM CorporationSocial Business
The server “cognos_server” is started successfully.

387 © 2013 IBM CorporationSocial Business
Wait until all required Cognos related processes are started.

388 © 2013 IBM CorporationSocial Business
STEP NINETEEN: Validate the Cognos Server
Before you beginMake sure the Cognos® server is running.
About this taskFor configuration tips and information on troubleshooting the Cognos Business Intelligence installation, see Troubleshooting Cognos Business Intelligence.

389 © 2013 IBM CorporationSocial Business
Switch back to your Browser, logout from the ISC and then enter the URL “http://cognos.renovations.com:9081/cognos/servlet”. You should get a screen like the one here in this screenshot.

390 © 2013 IBM CorporationSocial Business
Next test is to check the dispatcher. Enter the url “http://cognos.renovations.com:9081/cognos/servlet/dispatch”.
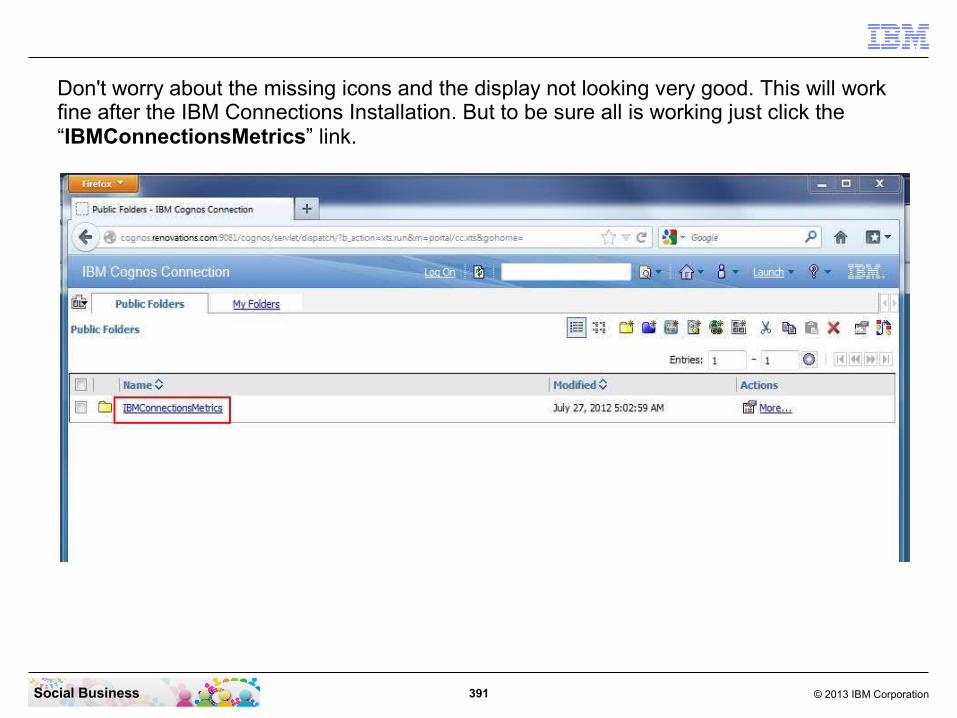
391 © 2013 IBM CorporationSocial Business
Don't worry about the missing icons and the display not looking very good. This will work fine after the IBM Connections Installation. But to be sure all is working just click the “IBMConnectionsMetrics” link.

392 © 2013 IBM CorporationSocial Business
If you see a page similar to this screen shot, then the installation was successful and you can continue with the next step.

393 © 2013 IBM CorporationSocial Business
B e fo re yo u be g in
Ensure that you complete all the prerequisite tasks that are relevant for your environment. For more information, see the Before installing topic.
A bo ut this ta s kTo install IBM Connections, run the IBM Installation Manager wizard on the system where the Deployment Manager is installed.
STEP TWENTY: Install the IBM Connections Server

394 © 2013 IBM CorporationSocial Business
If an error occurs during installation, IBM Installation Manager cancels the installation and rolls back the installation files. Installation errors are usually caused by environment problems such as insufficient disk space, privilege issues, or corruption of a WebSphere® profile. If your installation is canceled, complete the following steps:
● Identify and resolve the error that caused the cancellation. After canceling the installation, IBM Installation Manager displays an error message with an error code. You can look up the error code in the Installation error messages topic or check the log files.
● Restore the Deployment Manager profile from your backup.
● Delete the connections_root directory.
● Start this task again.
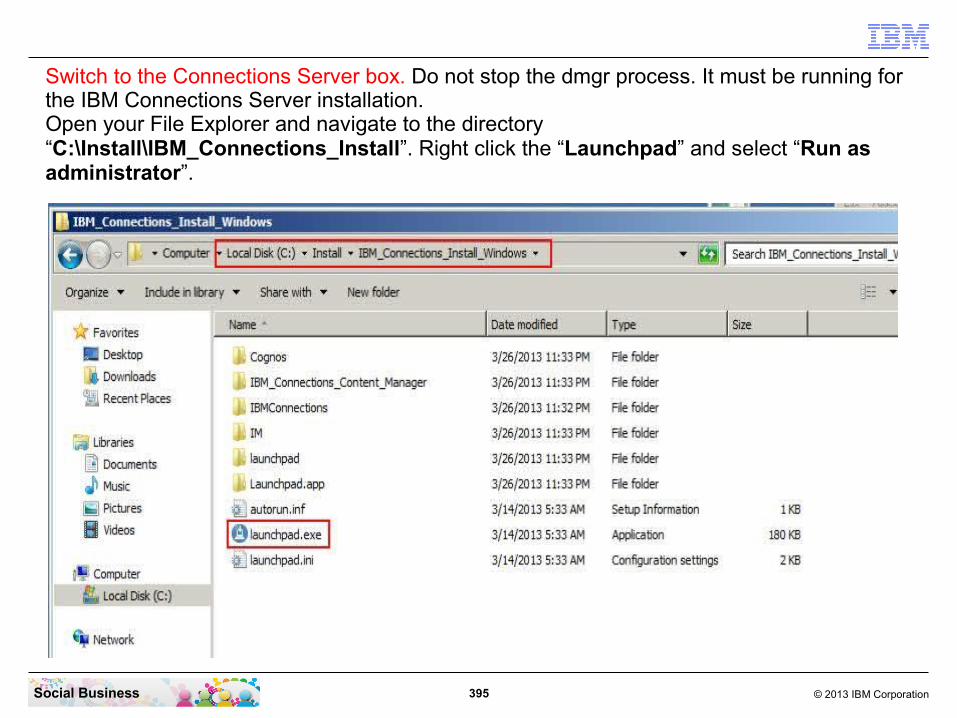
395 © 2013 IBM CorporationSocial Business
Switch to the Connections Server box. Do not stop the dmgr process. It must be running for the IBM Connections Server installation.Open your File Explorer and navigate to the directory “C:\Install\IBM_Connections_Install”. Right click the “Launchpad” and select “Run as administrator”.
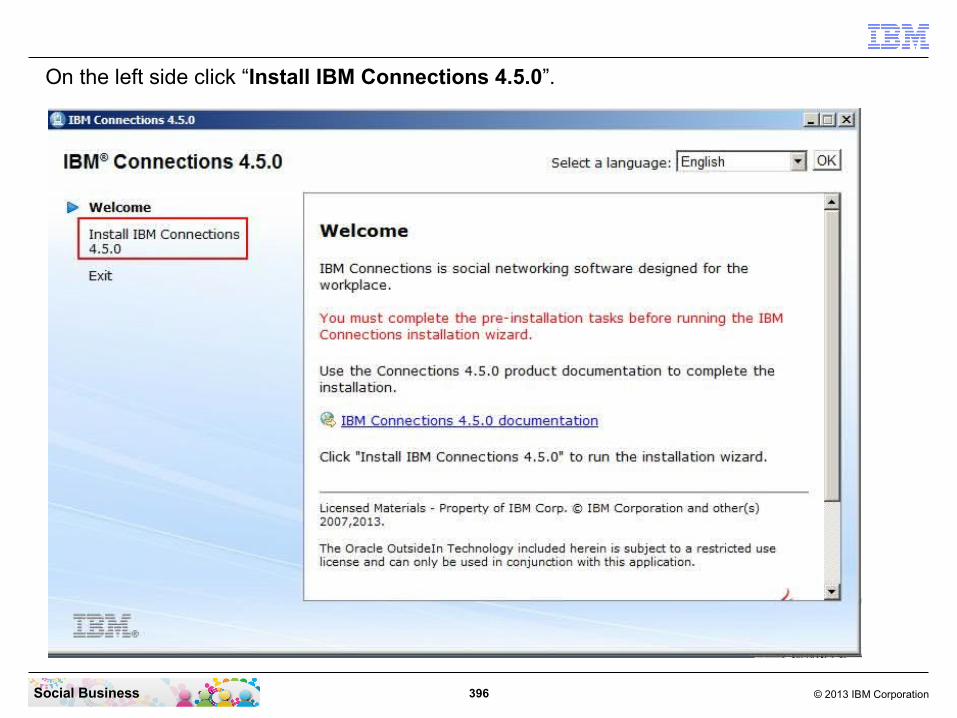
396 © 2013 IBM CorporationSocial Business
On the left side click “Install IBM Connections 4.5.0”.
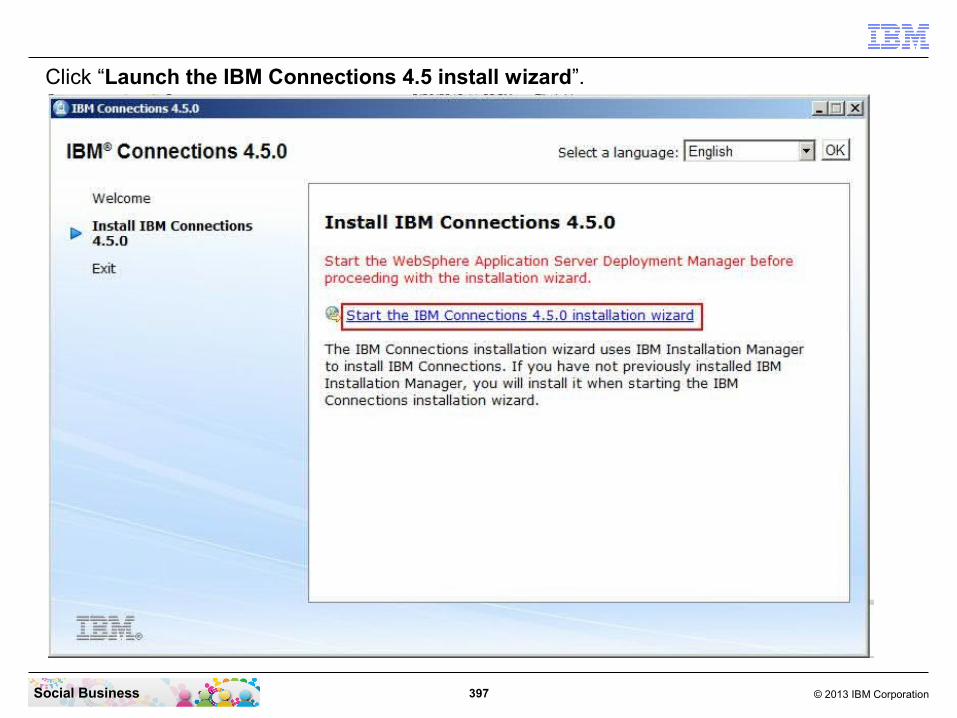
397 © 2013 IBM CorporationSocial Business
Click “Launch the IBM Connections 4.5 install wizard”.

398 © 2013 IBM CorporationSocial Business
Click the “Next” button to continue.
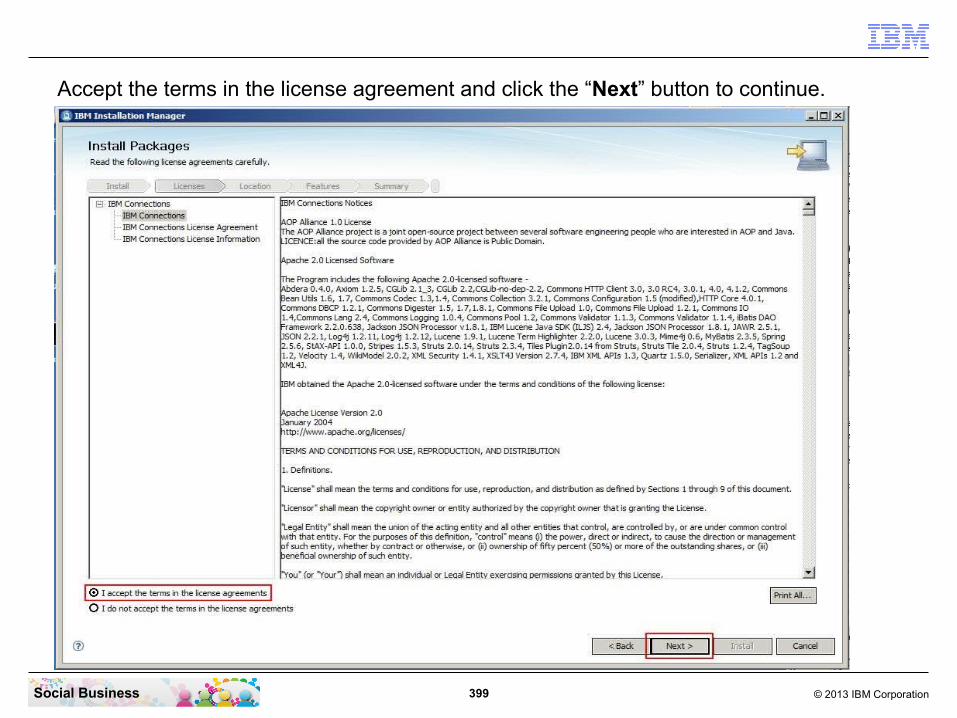
399 © 2013 IBM CorporationSocial Business
Accept the terms in the license agreement and click the “Next” button to continue.

400 © 2013 IBM CorporationSocial Business
Remove the part with the blank character in the path field and click the “Next” button to continue.
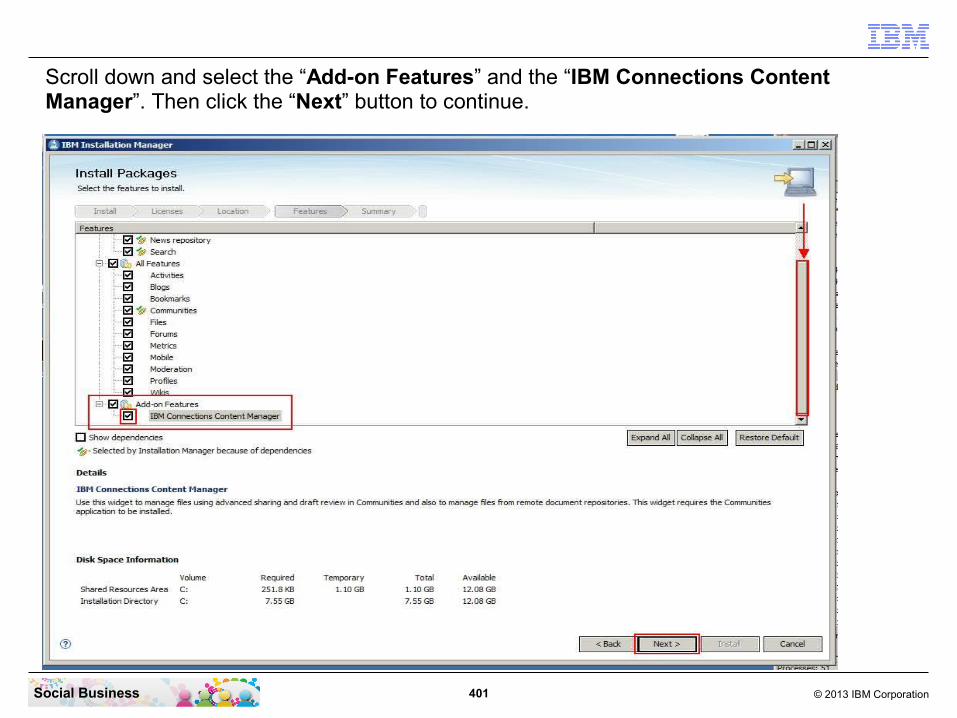
401 © 2013 IBM CorporationSocial Business
Scroll down and select the “Add-on Features” and the “IBM Connections Content Manager”. Then click the “Next” button to continue.

402 © 2013 IBM CorporationSocial Business
Click the “Browse” button and select the IBM WebSphere Application Server directory “C:\IBM\WebSphere\AppServer”. Then click the “OK” button.Enter the host name of your Connections Server and the password of the IBM WebSphere Application Server Administrator. Then click the “Validate” button.

403 © 2013 IBM CorporationSocial Business
The install wizard checks the connectivity to the dmgr process of your WebSphere Application Server.
When the validation was successful click the “OK” button to continue.
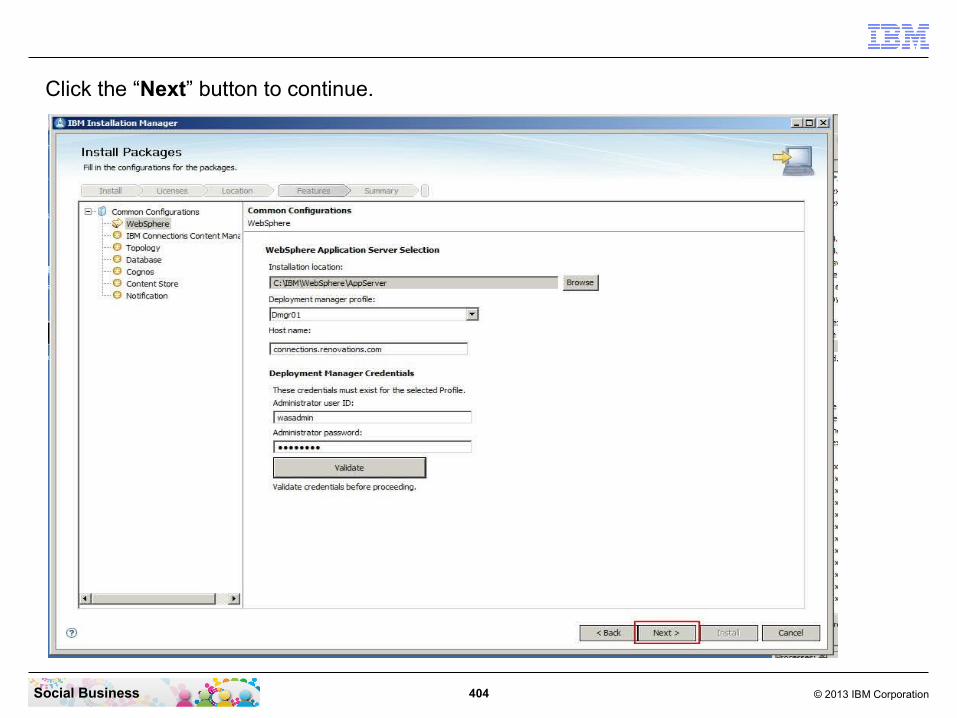
404 © 2013 IBM CorporationSocial Business
Click the “Next” button to continue.

405 © 2013 IBM CorporationSocial Business
Select “New deployment”. Then enter the path to the IBM Connections Content Manager installation files “C:\Install\CCM”. Then click the “Validate” button.
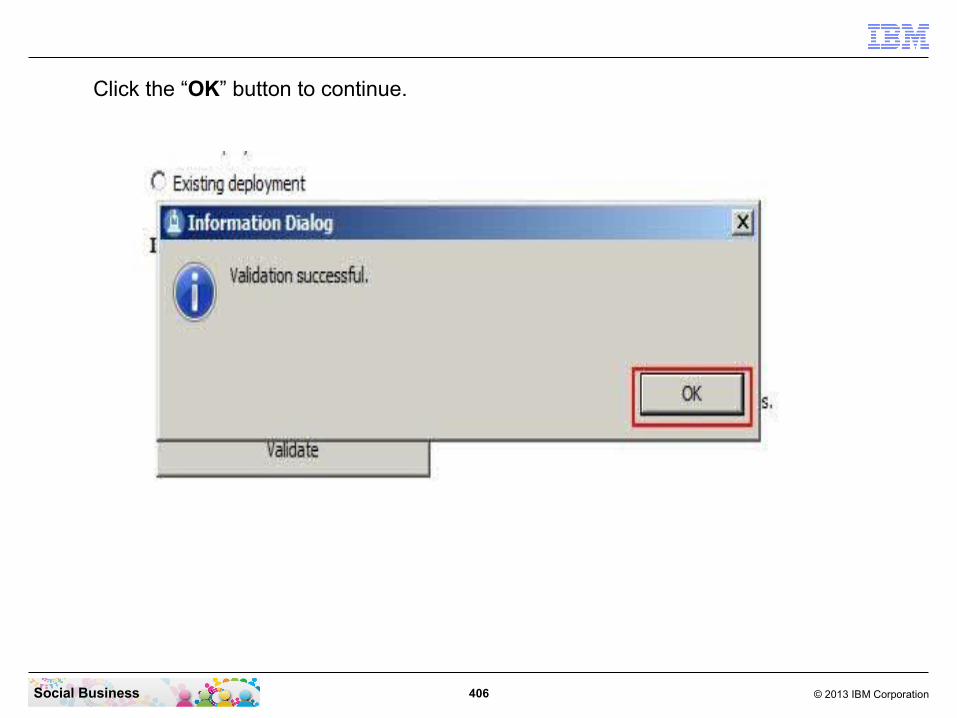
406 © 2013 IBM CorporationSocial Business
Click the “OK” button to continue.

407 © 2013 IBM CorporationSocial Business
Click the “Next” button to continue.

408 © 2013 IBM CorporationSocial Business
Select the first Deployment type “Small – all applications are grouped on the same cluster”.

409 © 2013 IBM CorporationSocial Business
Enter a name for the cluster. We just use “CL” in this example. Select the “connectionsNode01” node and enter a name for the server. In this example we use “connections_server”. Then click the “Next” button to continue.
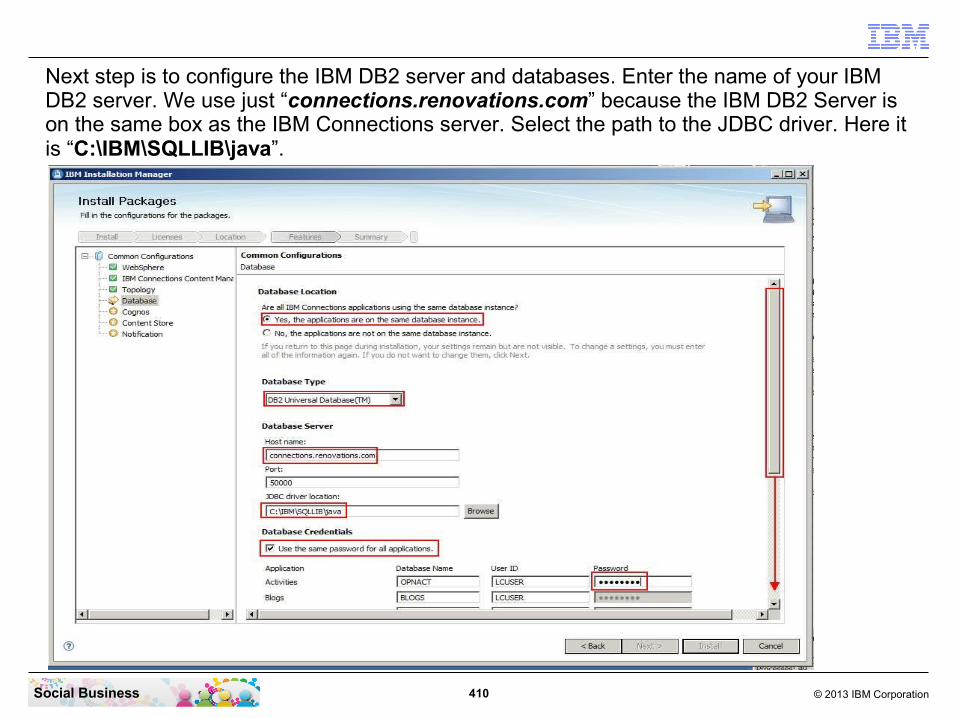
410 © 2013 IBM CorporationSocial Business
Next step is to configure the IBM DB2 server and databases. Enter the name of your IBM DB2 server. We use just “connections.renovations.com” because the IBM DB2 Server is on the same box as the IBM Connections server. Select the path to the JDBC driver. Here it is “C:\IBM\SQLLIB\java”.
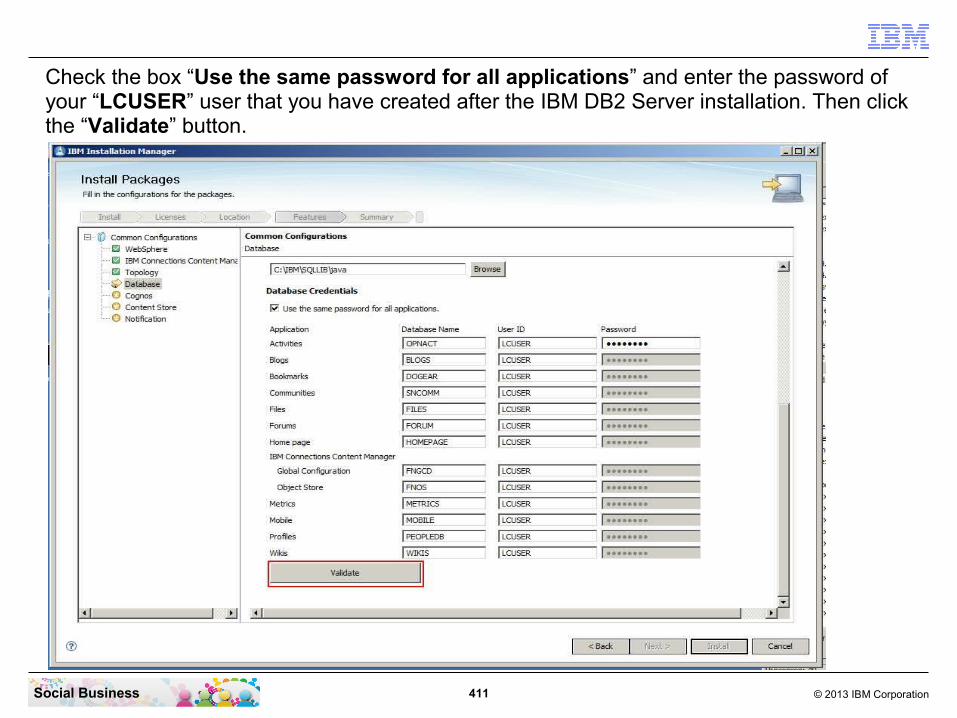
411 © 2013 IBM CorporationSocial Business
Check the box “Use the same password for all applications” and enter the password of your “LCUSER” user that you have created after the IBM DB2 Server installation. Then click the “Validate” button.

412 © 2013 IBM CorporationSocial Business
The install wizard is testing the connection to all required databases on the IBM DB2 Server.
When the validation was successful click the “OK” button.
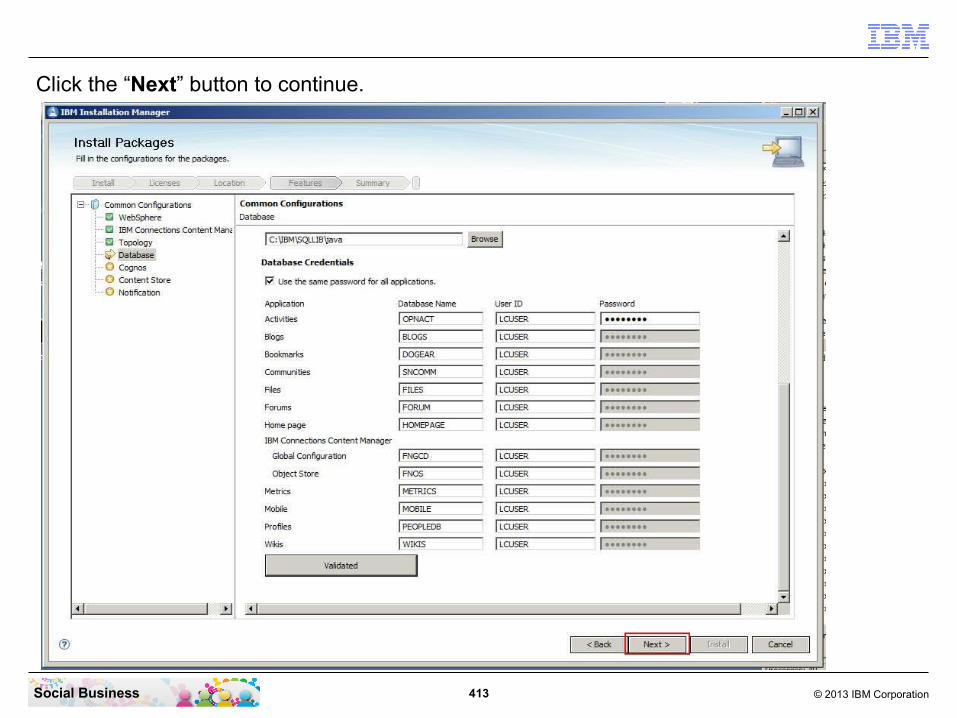
413 © 2013 IBM CorporationSocial Business
Click the “Next” button to continue.

414 © 2013 IBM CorporationSocial Business
Enter the Cognos Administrator user name and password. Then click the “Load node info” button.
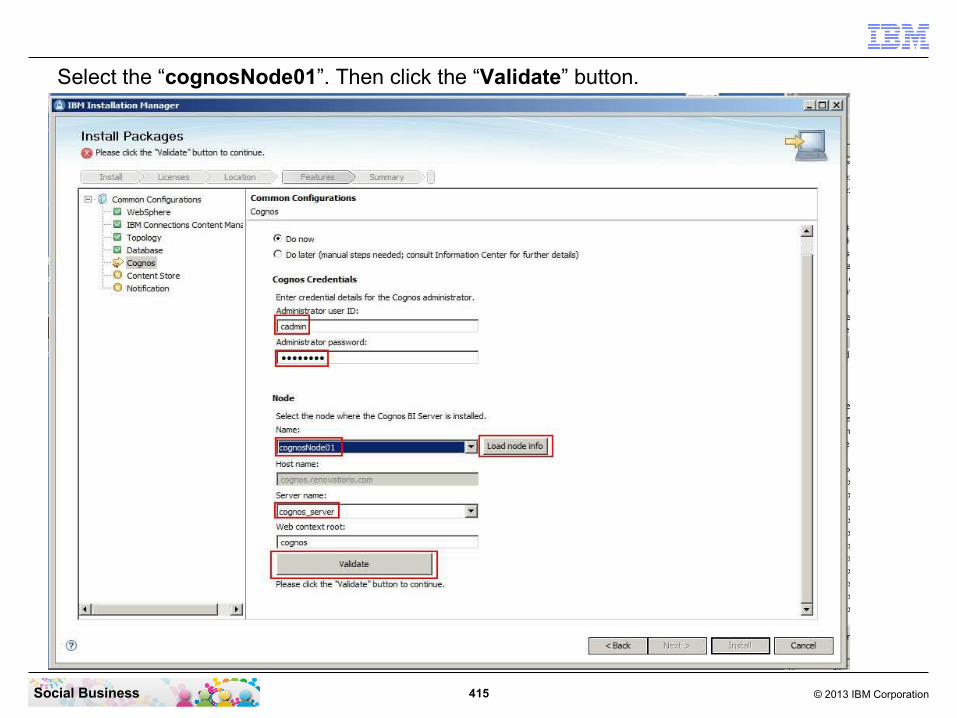
415 © 2013 IBM CorporationSocial Business
Select the “cognosNode01”. Then click the “Validate” button.
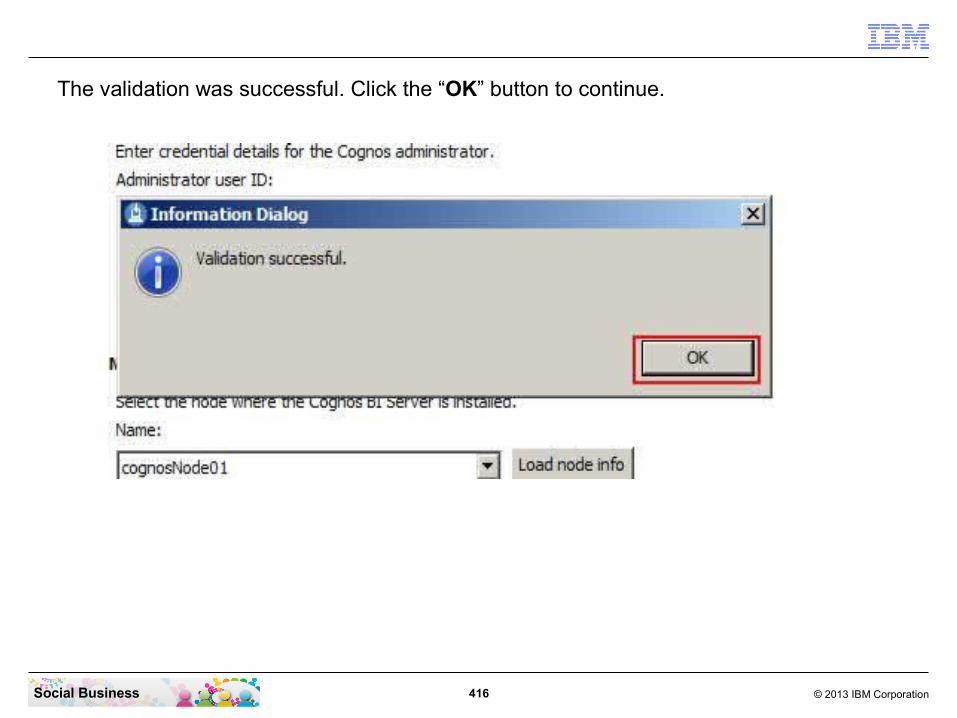
416 © 2013 IBM CorporationSocial Business
The validation was successful. Click the “OK” button to continue.
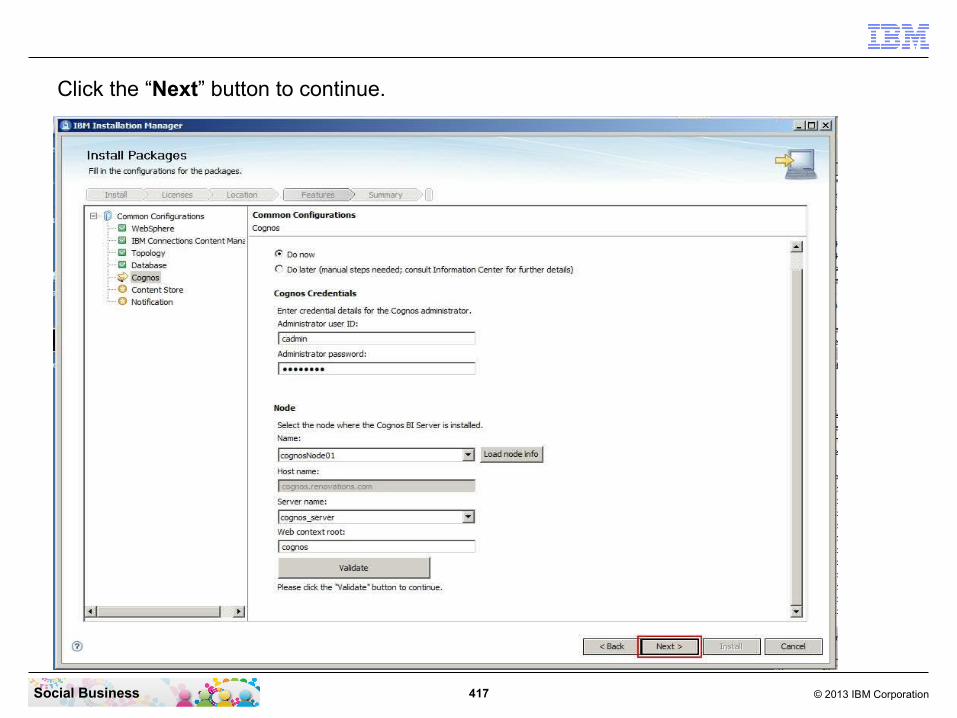
417 © 2013 IBM CorporationSocial Business
Click the “Next” button to continue.
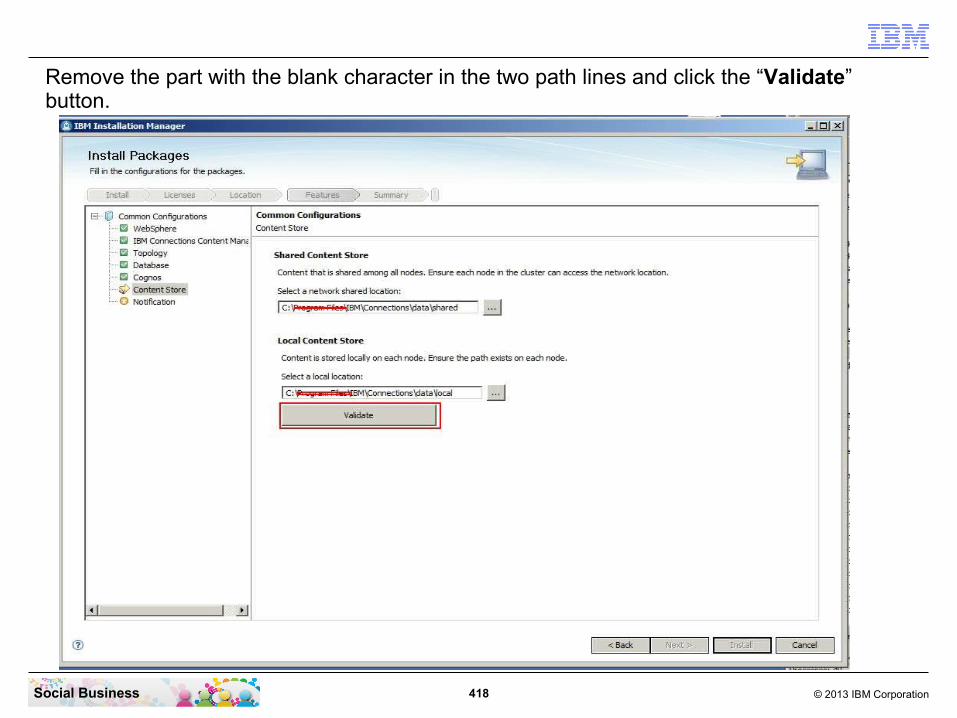
418 © 2013 IBM CorporationSocial Business
Remove the part with the blank character in the two path lines and click the “Validate” button.
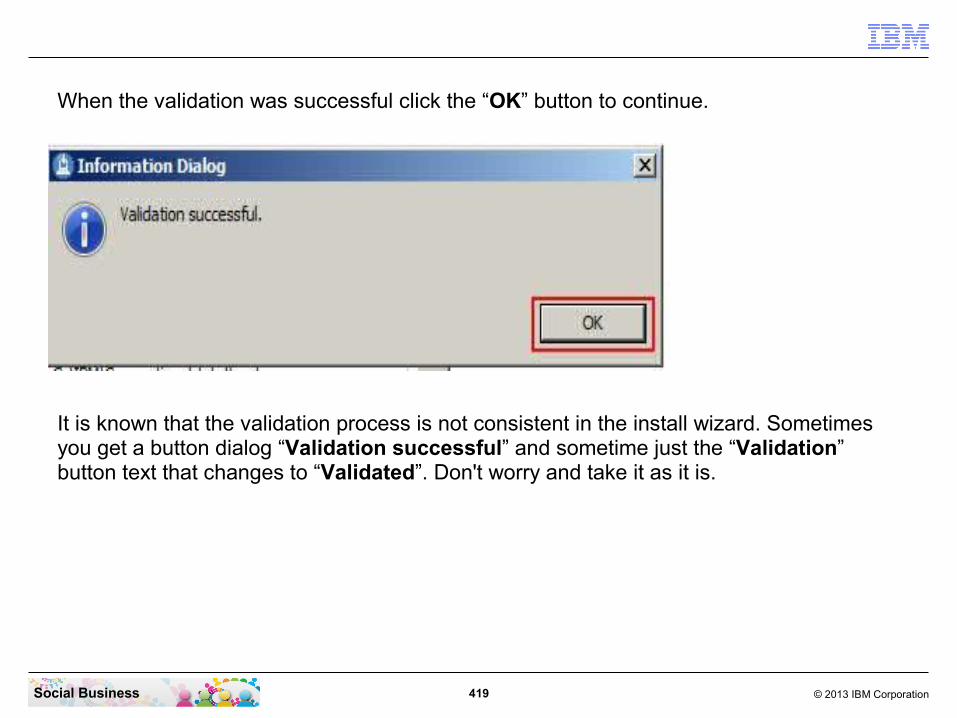
419 © 2013 IBM CorporationSocial Business
When the validation was successful click the “OK” button to continue.
It is known that the validation process is not consistent in the install wizard. Sometimes you get a button dialog “Validation successful” and sometime just the “Validation” button text that changes to “Validated”. Don't worry and take it as it is.
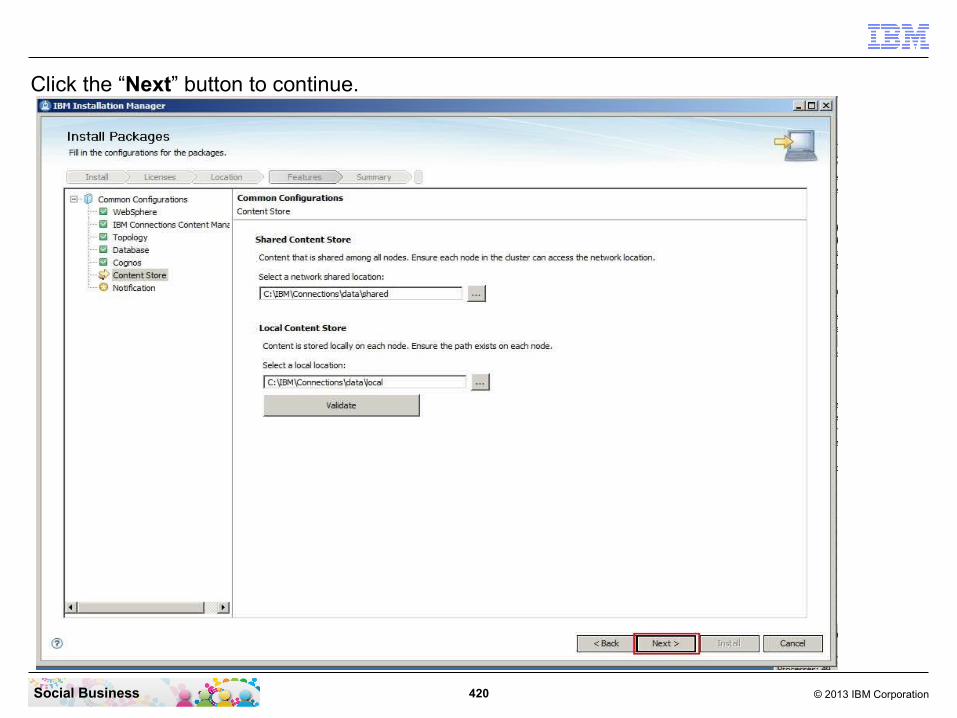
420 © 2013 IBM CorporationSocial Business
Click the “Next” button to continue.
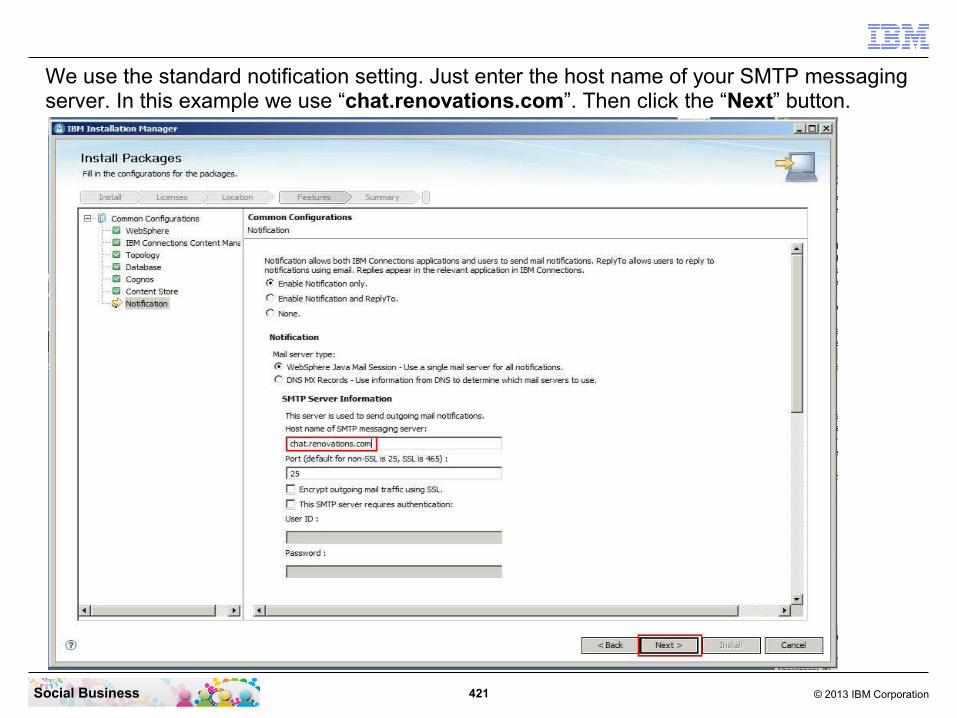
421 © 2013 IBM CorporationSocial Business
We use the standard notification setting. Just enter the host name of your SMTP messaging server. In this example we use “chat.renovations.com”. Then click the “Next” button.

422 © 2013 IBM CorporationSocial Business
Click the “Install” button to continue.
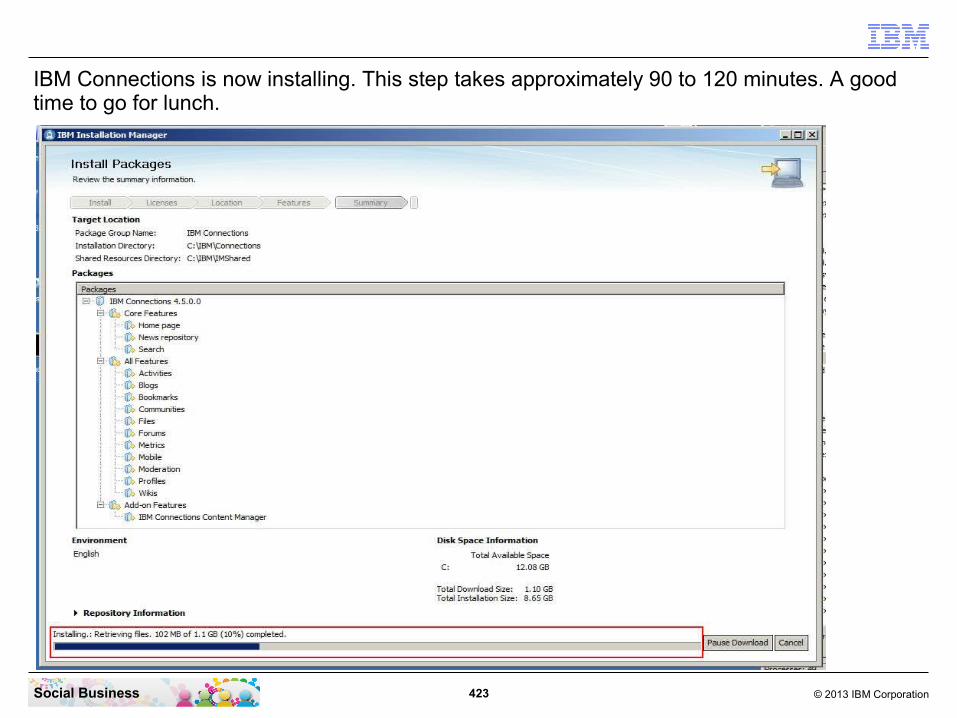
423 © 2013 IBM CorporationSocial Business
IBM Connections is now installing. This step takes approximately 90 to 120 minutes. A good time to go for lunch.

424 © 2013 IBM CorporationSocial Business
You have finished your lunch and can see this screen now? Fine, you are nearly done. Just the Post Install Tasks need to be done. Click the “Finish” button to close the Install Manager.
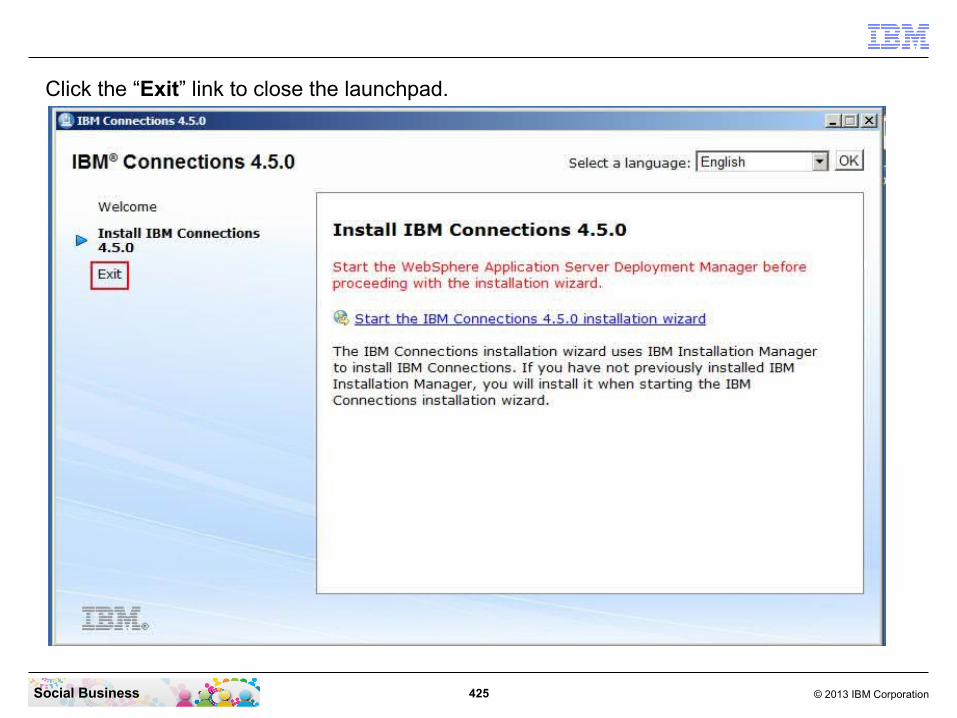
425 © 2013 IBM CorporationSocial Business
Click the “Exit” link to close the launchpad.
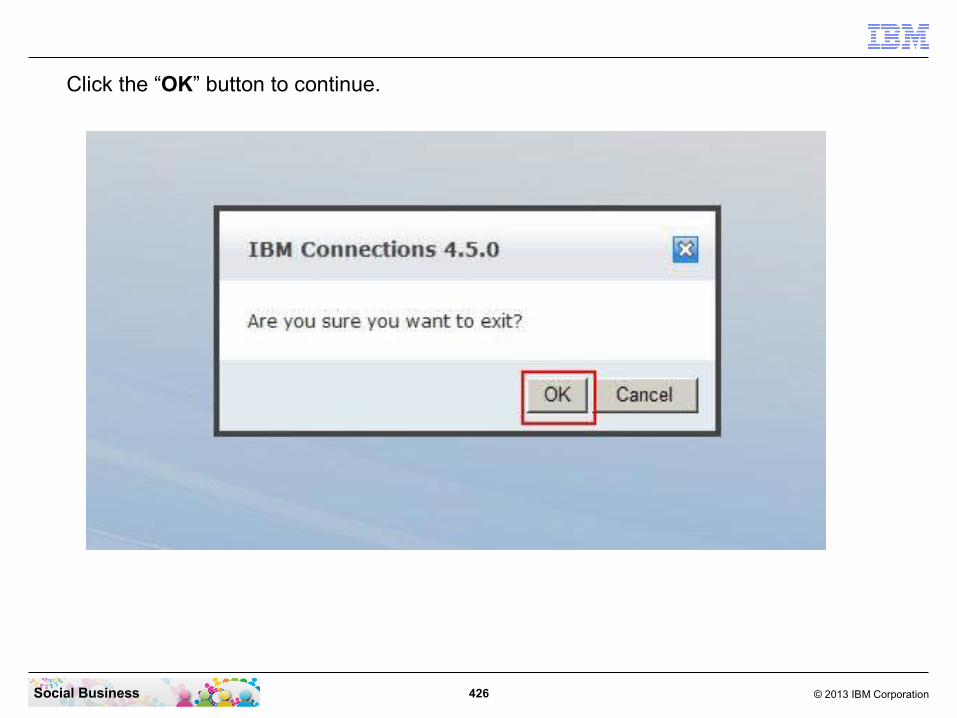
426 © 2013 IBM CorporationSocial Business
Click the “OK” button to continue.
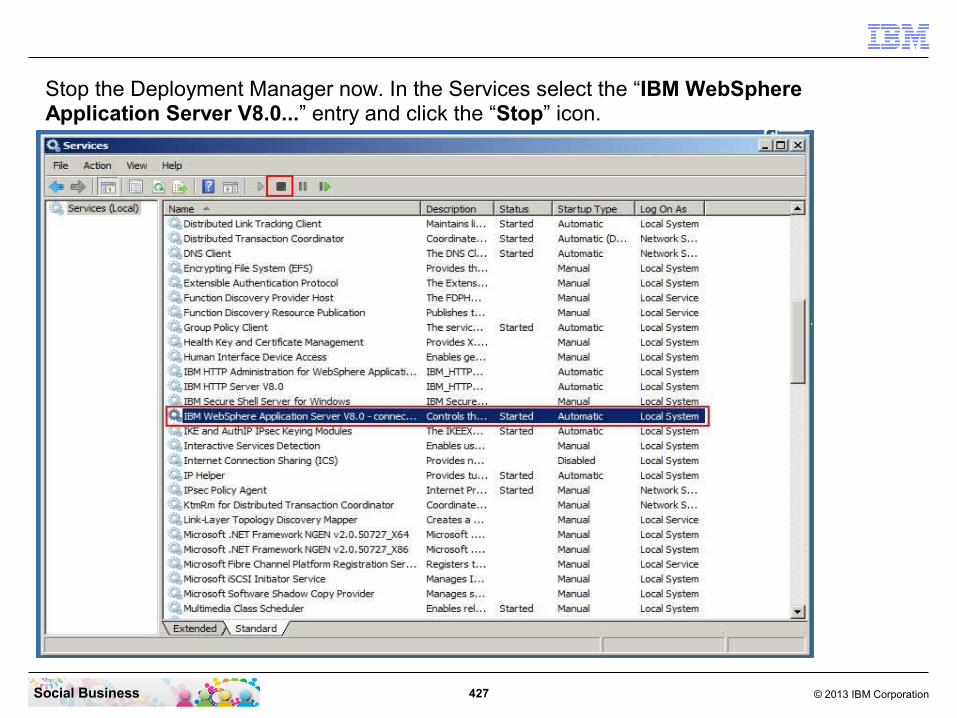
427 © 2013 IBM CorporationSocial Business
Stop the Deployment Manager now. In the Services select the “IBM WebSphere Application Server V8.0...” entry and click the “Stop” icon.

428 © 2013 IBM CorporationSocial Business
When the server has stopped you can click the “Start” button to start it up again.

429 © 2013 IBM CorporationSocial Business
Check the “java.exe” processes in the task manager.
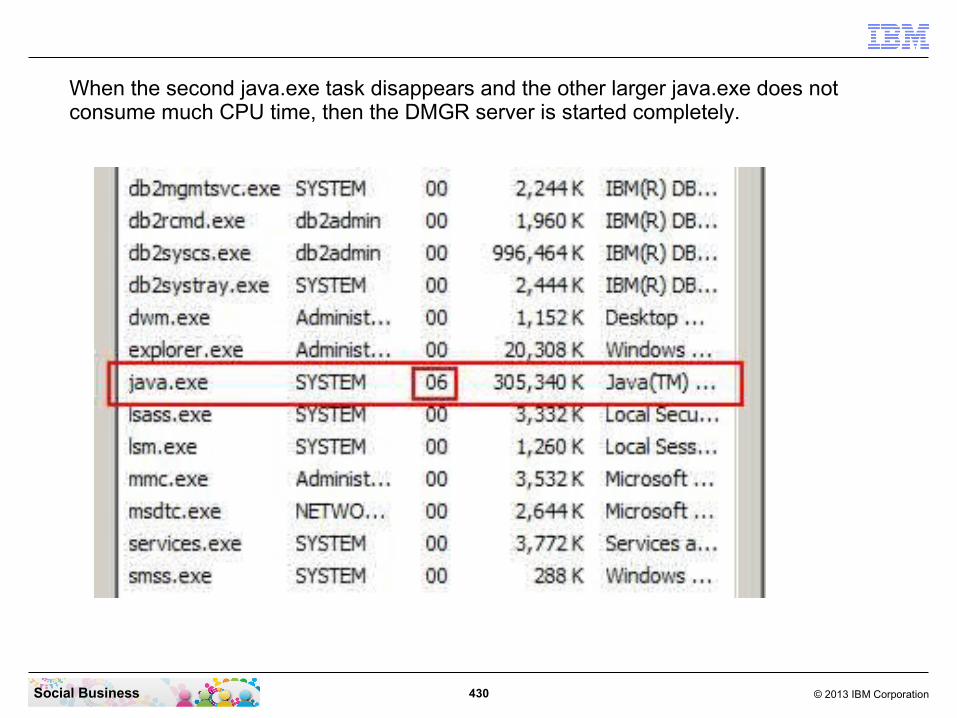
430 © 2013 IBM CorporationSocial Business
When the second java.exe task disappears and the other larger java.exe does not consume much CPU time, then the DMGR server is started completely.

431 © 2013 IBM CorporationSocial Business
The installer has installed the IBM Connections Server into the existing node. You need to start the node. First you need to start the nodeagent and synchronize the configuration.Open a CMD line window and navigate to the profile directory with the command “cd ..\..\AppSrv01\bin”. Then enter the command “startnode” or “startserver nodeagent”. Bith commands work in the same way.

432 © 2013 IBM CorporationSocial Business
The nodeagent has started successful.

433 © 2013 IBM CorporationSocial Business
In the task manager you can see that the process db2syscs.exe now uses much more memory and 2 java.exe processes are running. One is the dmgr and the other is the nodeagent. They are consuming a lot of CPU time in the next minutes because they are synchronizing the configuration and the IBM Connections applications from the dmgr to the node.

434 © 2013 IBM CorporationSocial Business
The synchronization process is starting automatically. You don't need to initiate it manually. To check that it works, open a File Explorer and navigate to the directory “C:\IBM\WebSphere\AppServer\profiles\AppSrv01\installedApps\connectionsCell01”. You should see that the synchronization creates this 23 directories. Wait until all of them are created and the 2 java.exe processes in the task manager don't consume CPU time anymore.
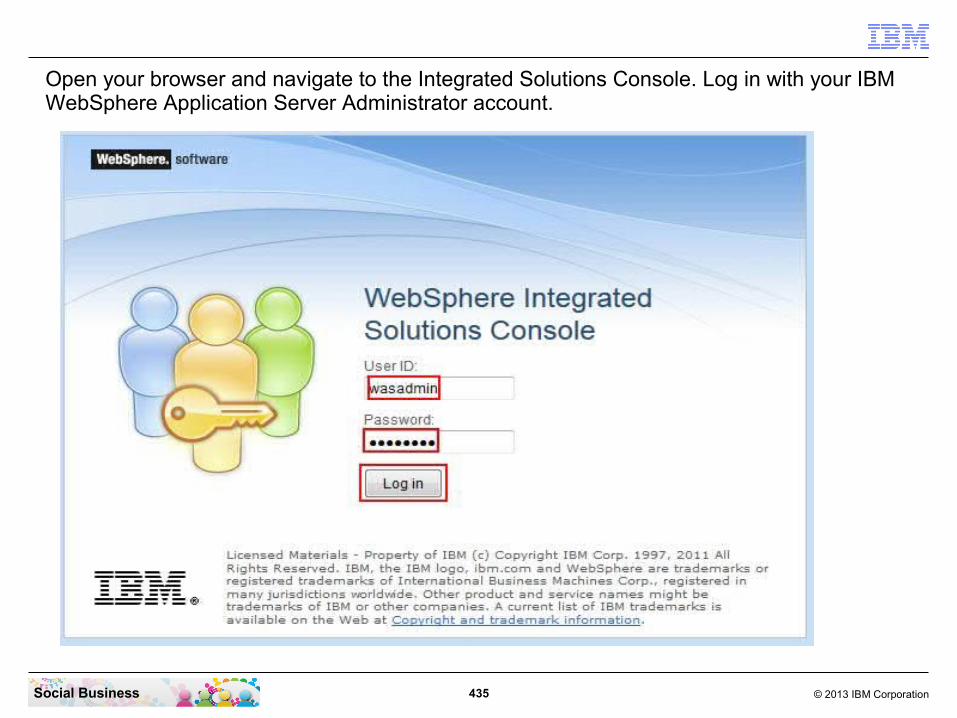
435 © 2013 IBM CorporationSocial Business
Open your browser and navigate to the Integrated Solutions Console. Log in with your IBM WebSphere Application Server Administrator account.

436 © 2013 IBM CorporationSocial Business
The official IBM Connections documentation says to do a full resynchronize. Lets do it to be sure all works properly. In the ISC navigate to “System administration” - “Nodes”.
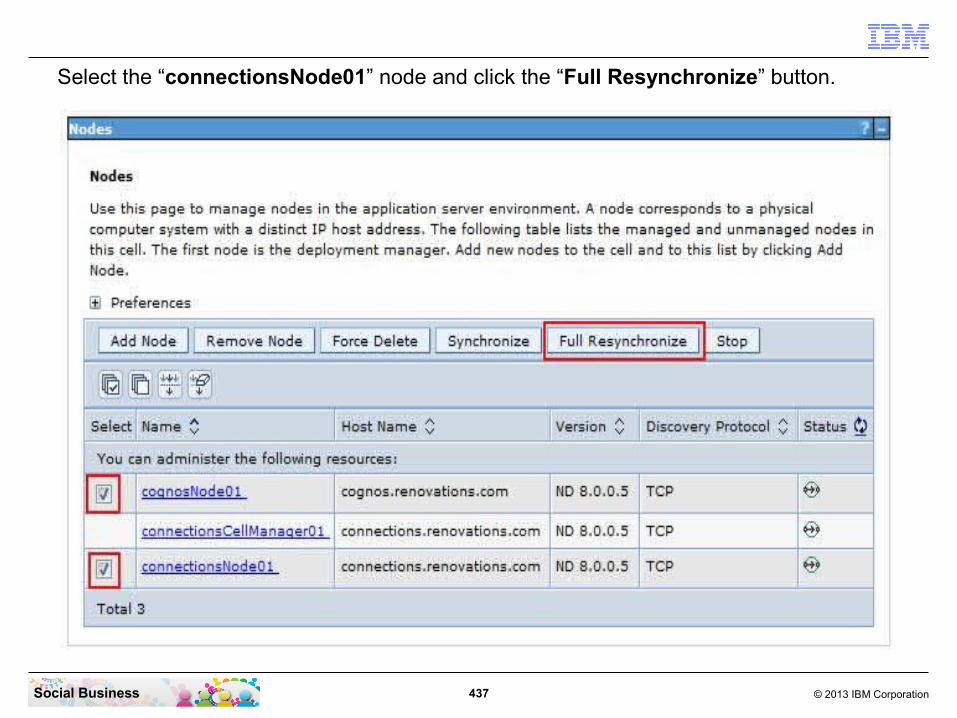
437 © 2013 IBM CorporationSocial Business
Select the “connectionsNode01” node and click the “Full Resynchronize” button.

438 © 2013 IBM CorporationSocial Business
The synchronization was initiated. This takes normally only some seconds. But wait a minute to be sure all works well.

439 © 2013 IBM CorporationSocial Business
Now we need to restart all components. First switch to the Cognos machine. Here in the CMD line window enter the commands “stopserver cognos_server -username wasadmin -password passw0rd” and then “stopserver nodeagent -username wasadmin -password passw0rd”.

440 © 2013 IBM CorporationSocial Business
Now switch back to the Connections box and enter this commands in the CMD line window: “stopserver nodeagent -username wasadmin -password passw0rd”. Where “wasadmin” is your IBM WebSphere Application Server Administrator name and “passw0rd” is the password for this user.Then change to the dmgr directory with the command “cd ..\..\Dmgr01\bin”.Now stop the dmgr with the command “stopserver dmgr -username wasadmin -password passw0rd”.

441 © 2013 IBM CorporationSocial Business
The dmgr process has stopped successfully. Now restart it with the command “startserver dmgr”. You can use the command “startmanager” as well.
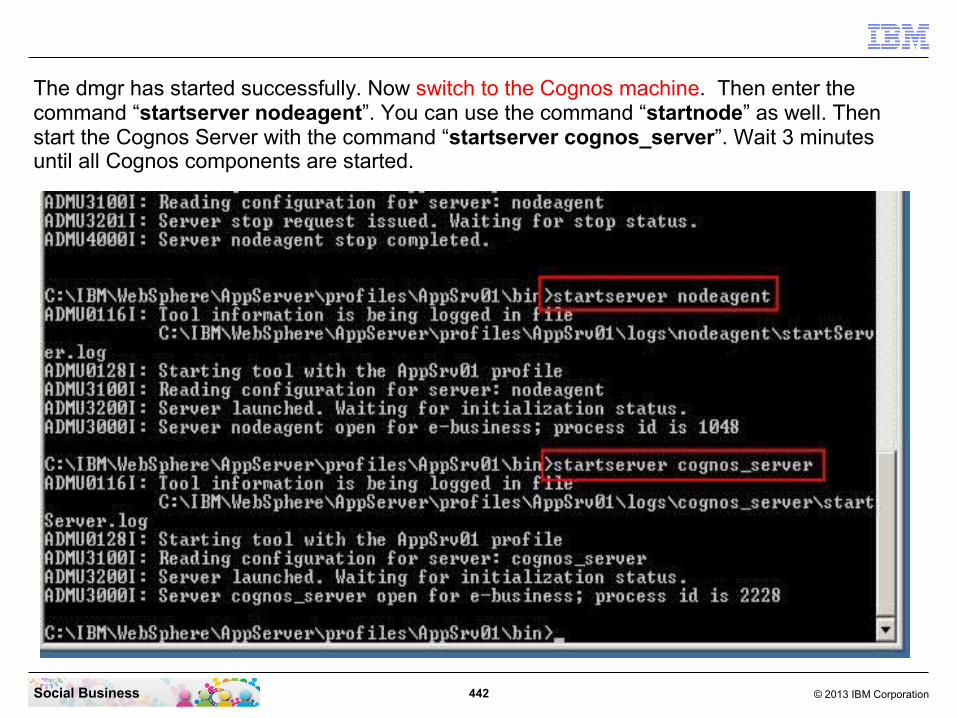
442 © 2013 IBM CorporationSocial Business
The dmgr has started successfully. Now switch to the Cognos machine. Then enter the command “startserver nodeagent”. You can use the command “startnode” as well. Then start the Cognos Server with the command “startserver cognos_server”. Wait 3 minutes until all Cognos components are started.

443 © 2013 IBM CorporationSocial Business
Switch back to the Connections box. Here you need to change to the IBM Connections Server profile with the command “cd ..\..\AppSrv01\bin”. Then start the nodeagent with the command “startserver nodeagent”.When the nodeagent has started successfully, start the IBM Connections Server with the command “startserver connections_server”.
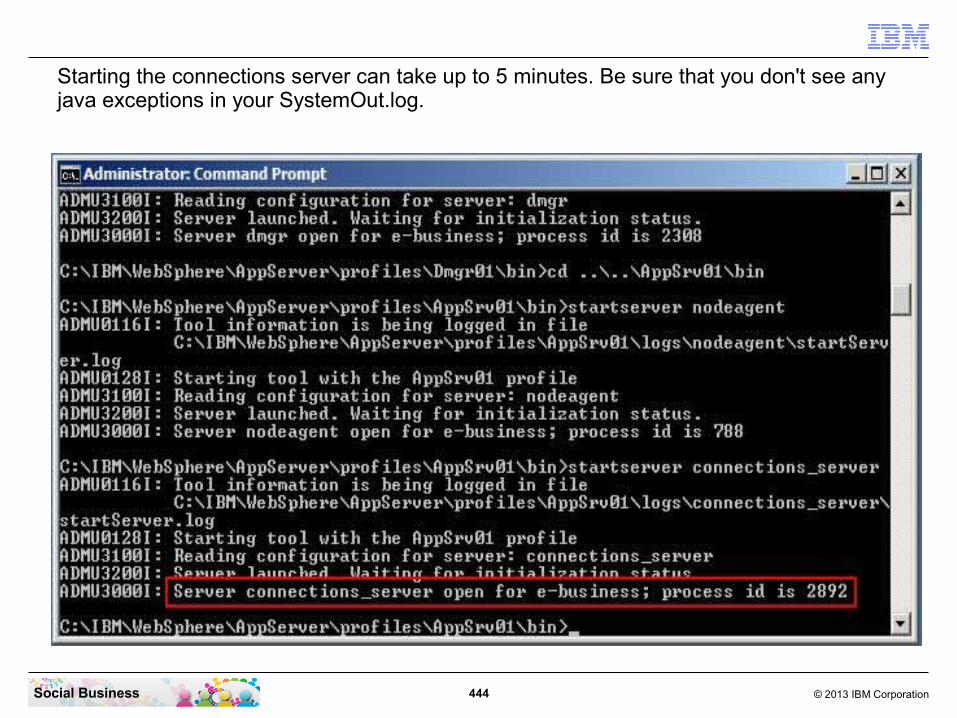
444 © 2013 IBM CorporationSocial Business
Starting the connections server can take up to 5 minutes. Be sure that you don't see any java exceptions in your SystemOut.log.

445 © 2013 IBM CorporationSocial Business
It can take up to 10 Minutes until all Connections applications are started. Wait until the related java and DB2 tasks do not consume any CPU time.
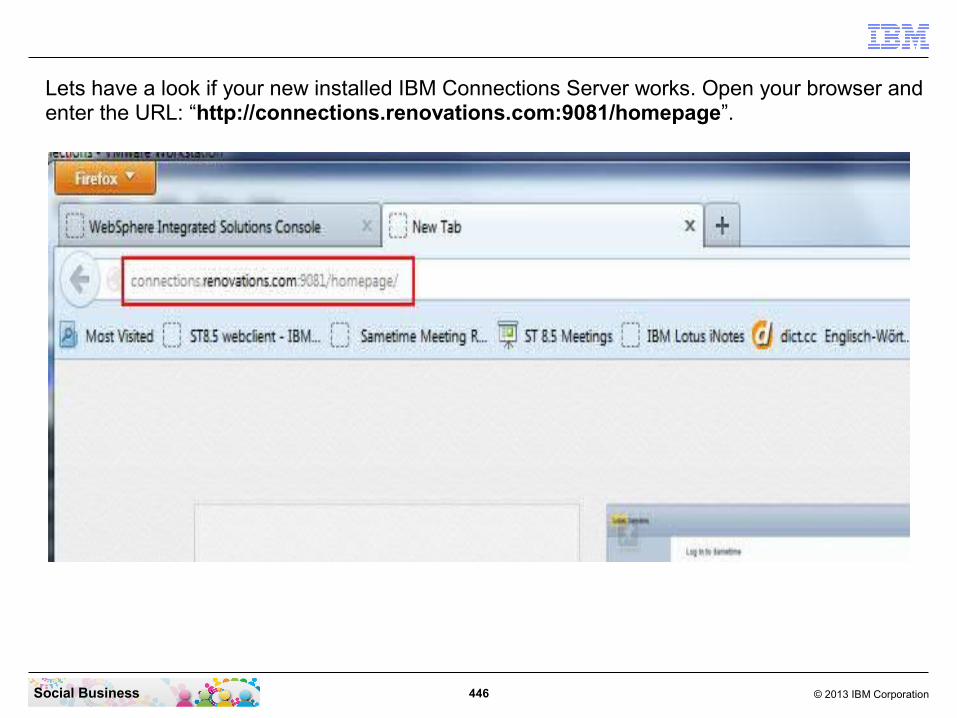
446 © 2013 IBM CorporationSocial Business
Lets have a look if your new installed IBM Connections Server works. Open your browser and enter the URL: “http://connections.renovations.com:9081/homepage”.

447 © 2013 IBM CorporationSocial Business
Enter the user name and password of a LDAP user and click the “Log In” button.
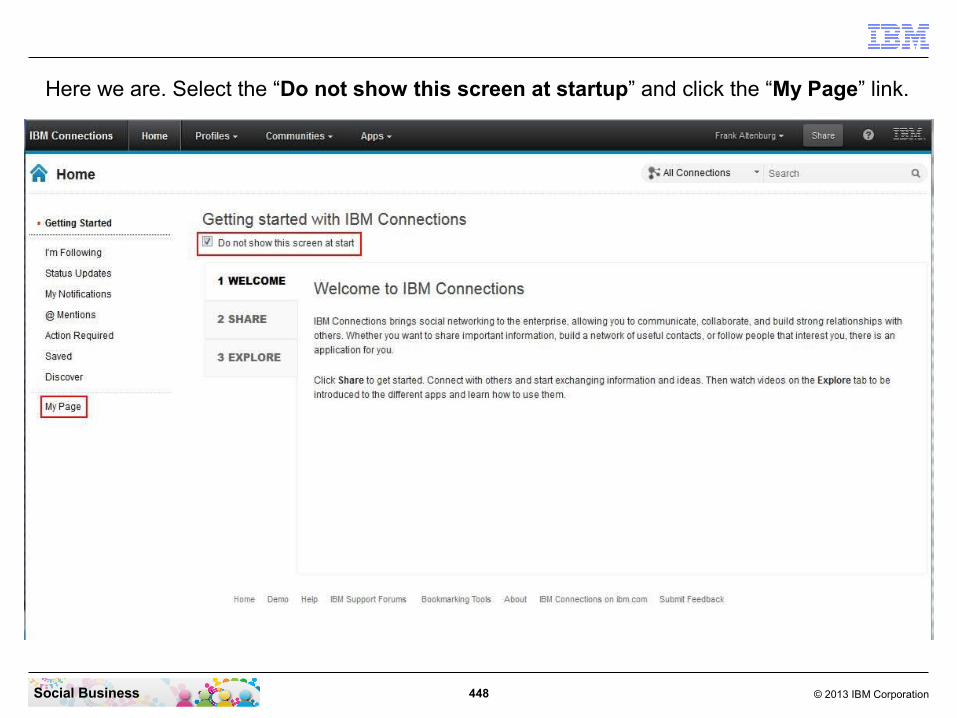
448 © 2013 IBM CorporationSocial Business
Here we are. Select the “Do not show this screen at startup” and click the “My Page” link.
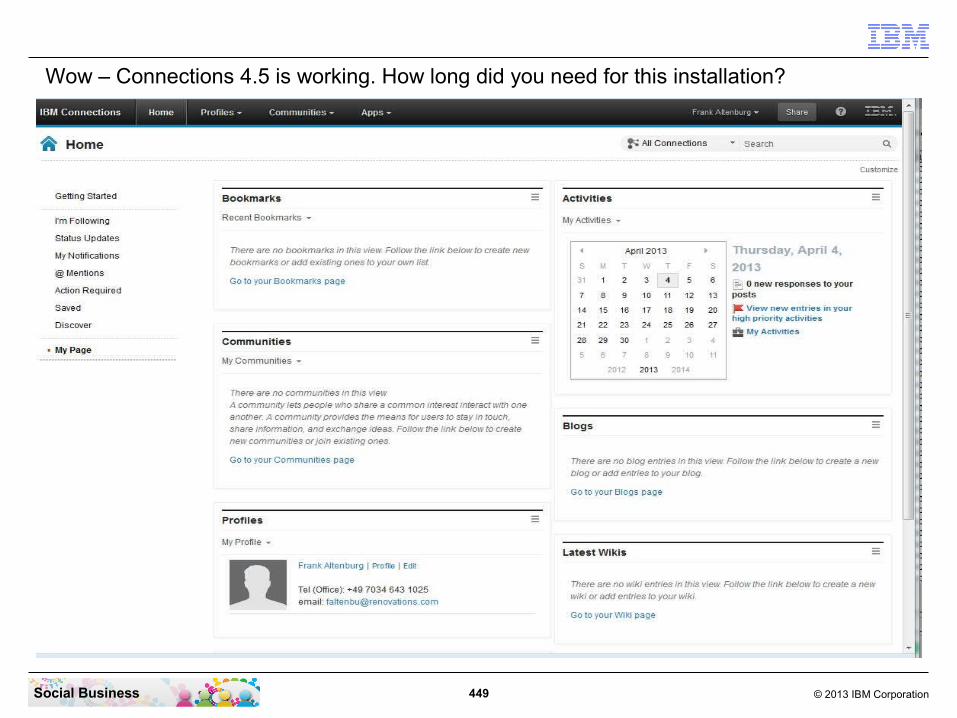
449 © 2013 IBM CorporationSocial Business
Wow – Connections 4.5 is working. How long did you need for this installation?
450 © 2013 IBM CorporationSocial Business
A bo ut this ta s k
If you selected the Small or Medium deployment option when you installed IBM® Connections, IBM Installation Manager set the Maximum Heap Size of the Java Virtual Machine (JVM) on each application server. This setting is designed to avoid out-of-memory errors.
Review the heap size on each server to ensure that you are allocating enough memory for IBM Connections but also to ensure that you are not allocating more memory than the physical capabilities of the systems where the JVMs are deployed.
Whether you installed a Small, Medium, or Large deployment of IBM Connections, you should review the JVM heap sizes in your deployment and make adjustments, if necessary.
To review the JVM heap size, complete the following steps:
STEP TWENTY-ONE: Reviewing the JVM heap size
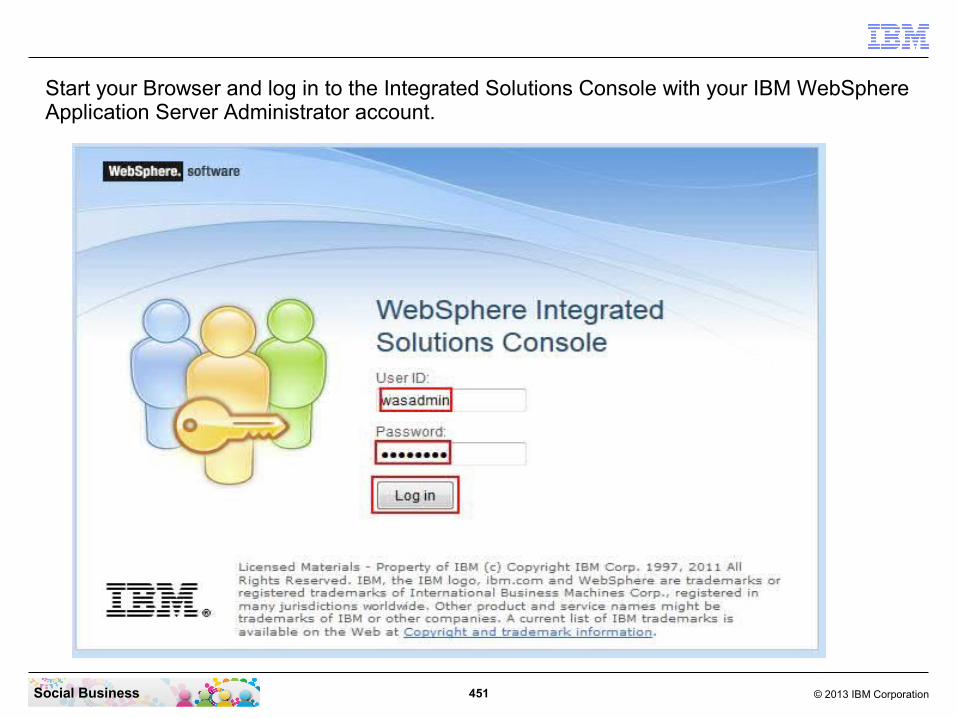
451 © 2013 IBM CorporationSocial Business
Start your Browser and log in to the Integrated Solutions Console with your IBM WebSphere Application Server Administrator account.
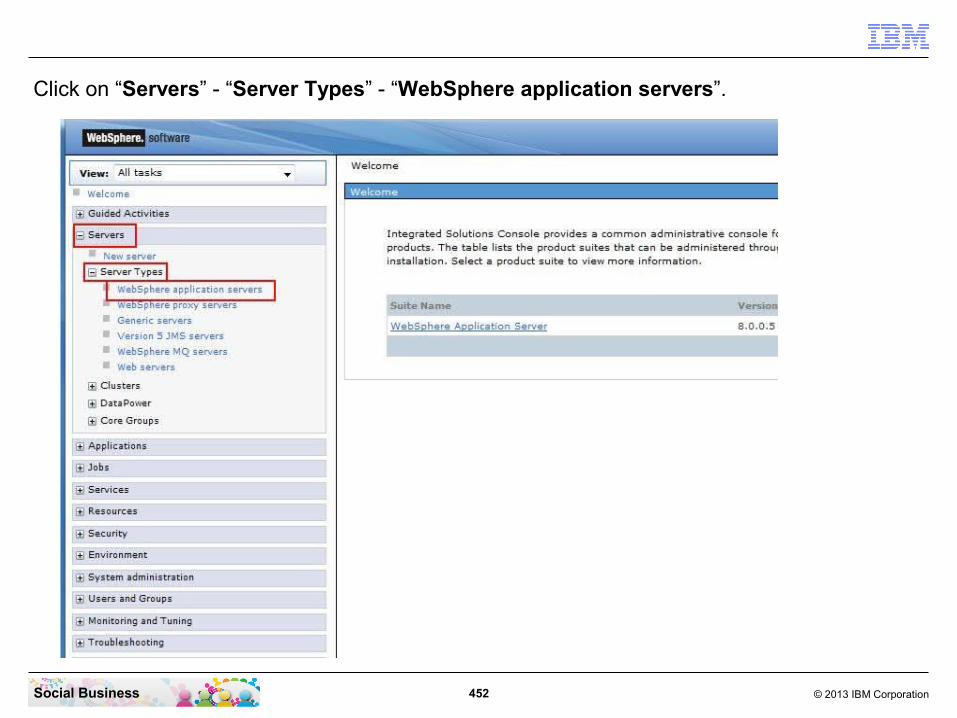
452 © 2013 IBM CorporationSocial Business
Click on “Servers” - “Server Types” - “WebSphere application servers”.

453 © 2013 IBM CorporationSocial Business
The test and demonstration server that was created during installation of the IBM WebSphere Application Server is not required anymore. Check both check boxes near the “server1” servers and click the “Delete” button.

454 © 2013 IBM CorporationSocial Business
Click the “OK” button to continue.

455 © 2013 IBM CorporationSocial Business
Click the “Save” link to save the last configuration changes.

456 © 2013 IBM CorporationSocial Business
Click the “connections_server” link.

457 © 2013 IBM CorporationSocial Business
On the right side click “Java and Process Management” and then “Process definition”.

458 © 2013 IBM CorporationSocial Business
Click “Java Virtual Machine”.

459 © 2013 IBM CorporationSocial Business
Check that the field “Maximum Heap Size” contains “2506” MB.
460 © 2013 IBM CorporationSocial Business
When you have successfully installed IBM Connections to run on WebSphere® Application Server, you can configure IBM HTTP Server to handle web traffic by completing the following tasks:
1.Defining IBM HTTP ServerDefine IBM HTTP Server to manage web connections.
2.Configuring IBM HTTP Server for SSLConfigure IBM HTTP Server to use the SSL protocol.
3.Adding certificates to the WebSphere trust storeImport a self-signed IBM HTTP Server certificate into the default trust store of IBM WebSphere Application Server.
4.Determining which files to compressIf you are not compressing content with the IBM® WebSphere® Application Server Edge components or a similar device, configure the IBM HTTP Server to compress certain types of content to improve browser performance.
5.Updating web addresses in IBM HTTP ServerUpdate the web addresses that IBM HTTP Server uses to access IBM Connections applications.
STEP TWENTY-TWO: Configure the IBM HTTP Server
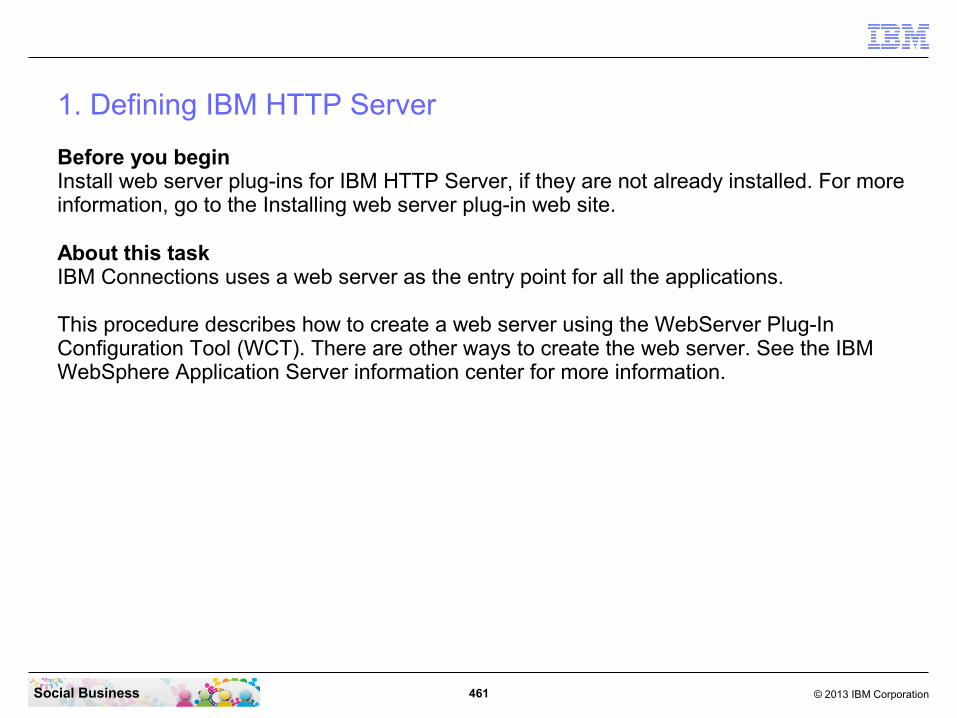
461 © 2013 IBM CorporationSocial Business
1. Defining IBM HTTP Server
Before you beginInstall web server plug-ins for IBM HTTP Server, if they are not already installed. For more information, go to the Installing web server plug-in web site.
About this taskIBM Connections uses a web server as the entry point for all the applications.
This procedure describes how to create a web server using the WebServer Plug-In Configuration Tool (WCT). There are other ways to create the web server. See the IBM WebSphere Application Server information center for more information.

462 © 2013 IBM CorporationSocial Business
Start the WCT tool by clicking “Start” - “All Programs” - “IBM WebSphere” - “WebSphere Customization Toolbox V8.0” - “Tools” - “Web Server Plug-in Configuration Tool”

463 © 2013 IBM CorporationSocial Business
Select the “Web Server Plug-ins Configuration Tool” and then click the “Launch Selected Tool” button.

464 © 2013 IBM CorporationSocial Business
Click the “Add...” button

465 © 2013 IBM CorporationSocial Business
Enter “IHS_Location” in the “Name” field. Then click the “Browse...” button.
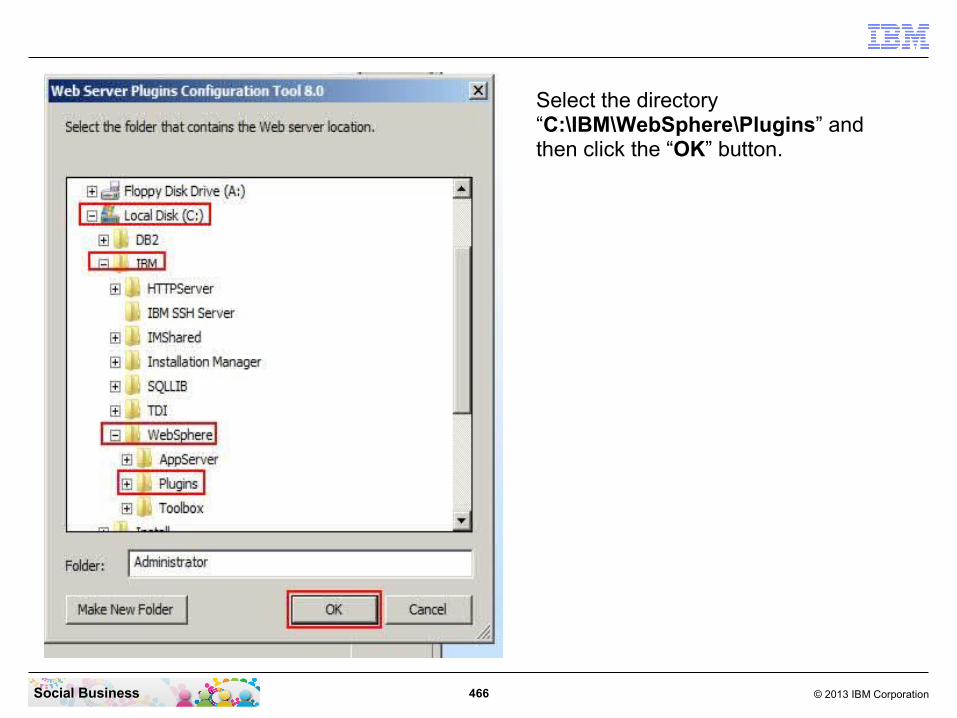
466 © 2013 IBM CorporationSocial Business
Select the directory “C:\IBM\WebSphere\Plugins” and then click the “OK” button.
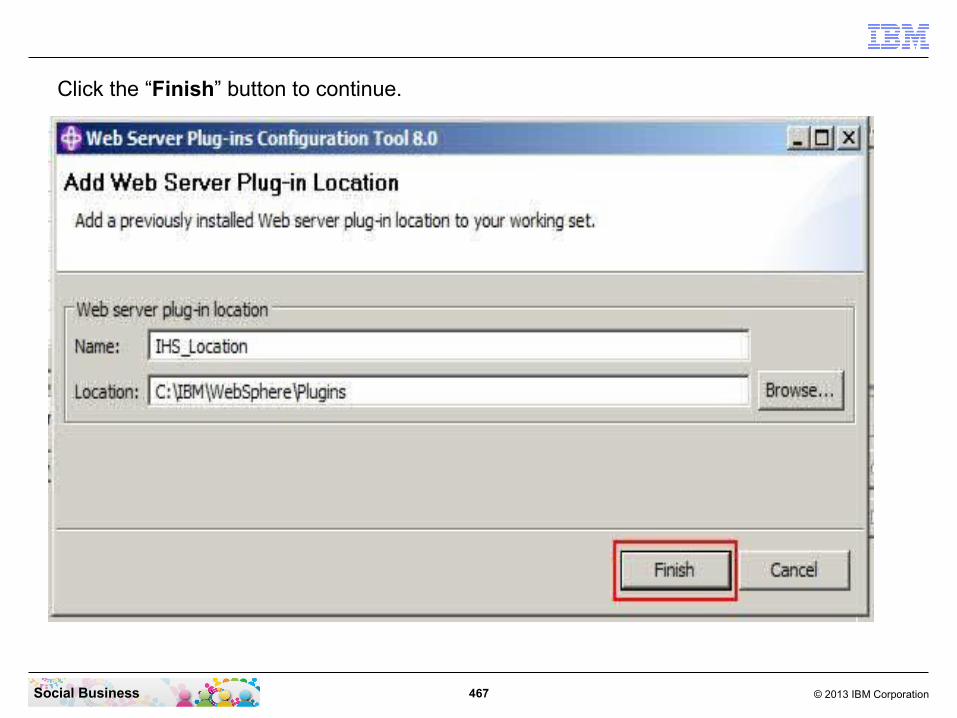
467 © 2013 IBM CorporationSocial Business
Click the “Finish” button to continue.

468 © 2013 IBM CorporationSocial Business
The IHS Location is configured. Now click the “Create...” button to continue.

469 © 2013 IBM CorporationSocial Business
Click the “Next” button to continue.

470 © 2013 IBM CorporationSocial Business
Select the path to your HTTP Servers configuration file “httpd.conf”. Normally you can just remove the “Program Files\” part in the path. Then click the “Next” button to continue.

471 © 2013 IBM CorporationSocial Business
Enter a user ID name for your IBM HTTP Server Administrator and the password twice. Then Click the “Next” button to continue. Be aware this user should not exist in the LDAP.

472 © 2013 IBM CorporationSocial Business
Click the “Next” button to continue.

473 © 2013 IBM CorporationSocial Business
Use the standard “webserver1”. Then click the “Next” button to continue.

474 © 2013 IBM CorporationSocial Business
Select “Remote” and enter the URL to your IHS Server. In this installation it is “connections.renovations.com”. But it can be an other name Alias name like “ihs.renvations.com”. Then click the “Next” button to continue.
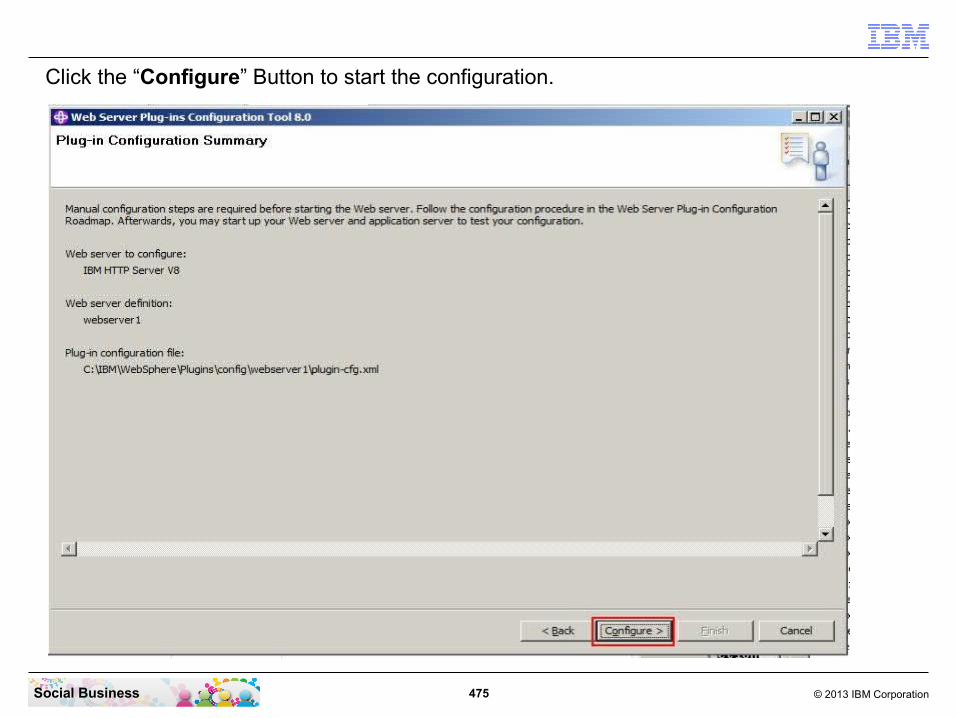
475 © 2013 IBM CorporationSocial Business
Click the “Configure” Button to start the configuration.
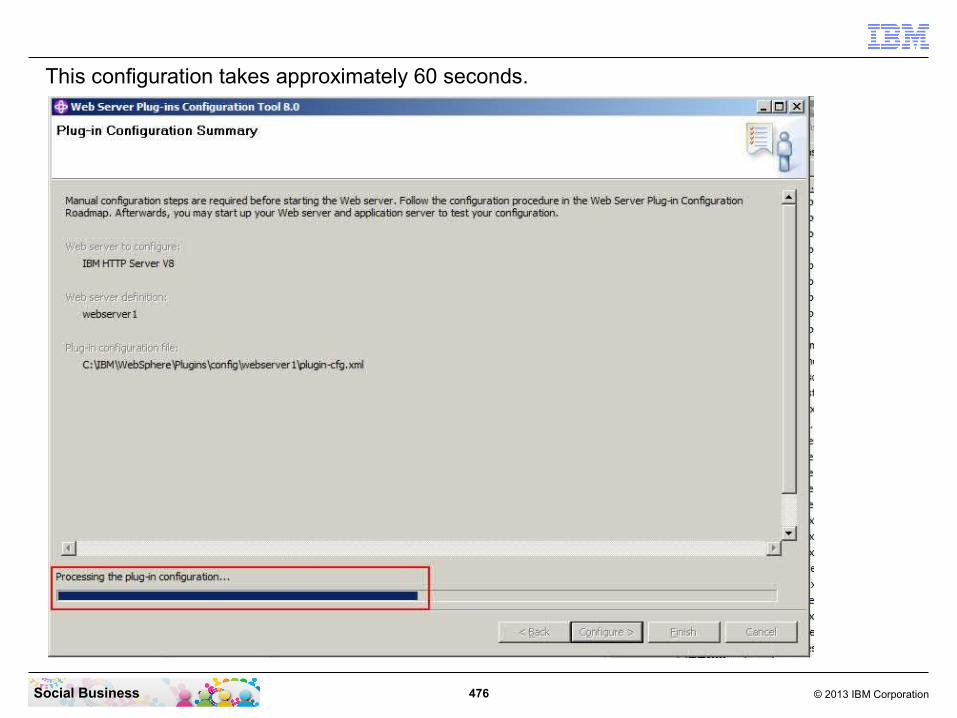
476 © 2013 IBM CorporationSocial Business
This configuration takes approximately 60 seconds.
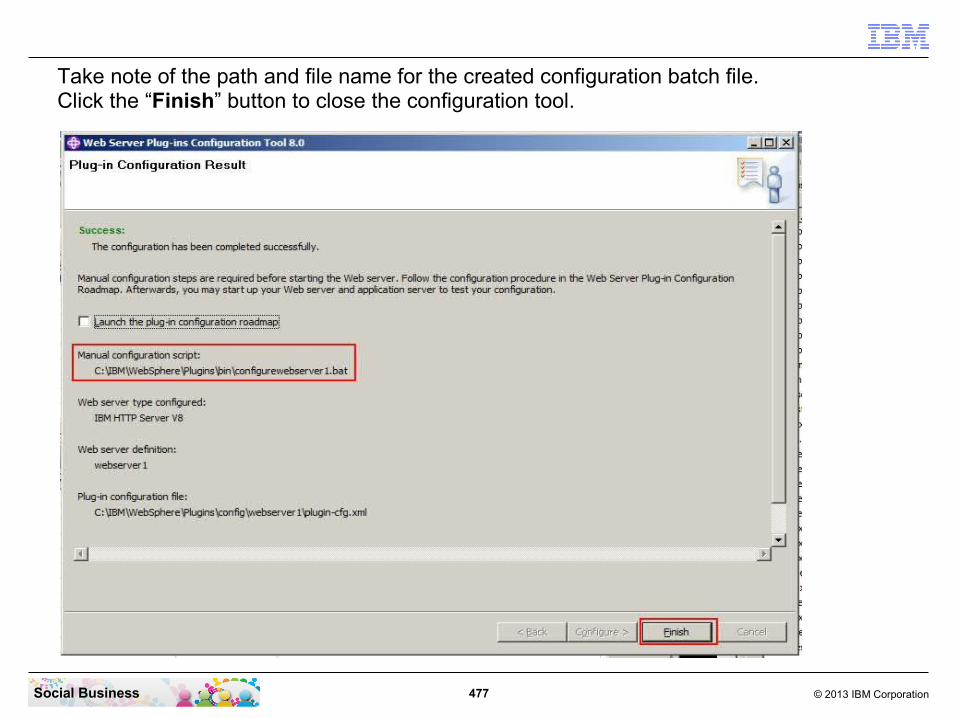
477 © 2013 IBM CorporationSocial Business
Take note of the path and file name for the created configuration batch file.Click the “Finish” button to close the configuration tool.

478 © 2013 IBM CorporationSocial Business
Close the WebSphere Customization Toolbox.
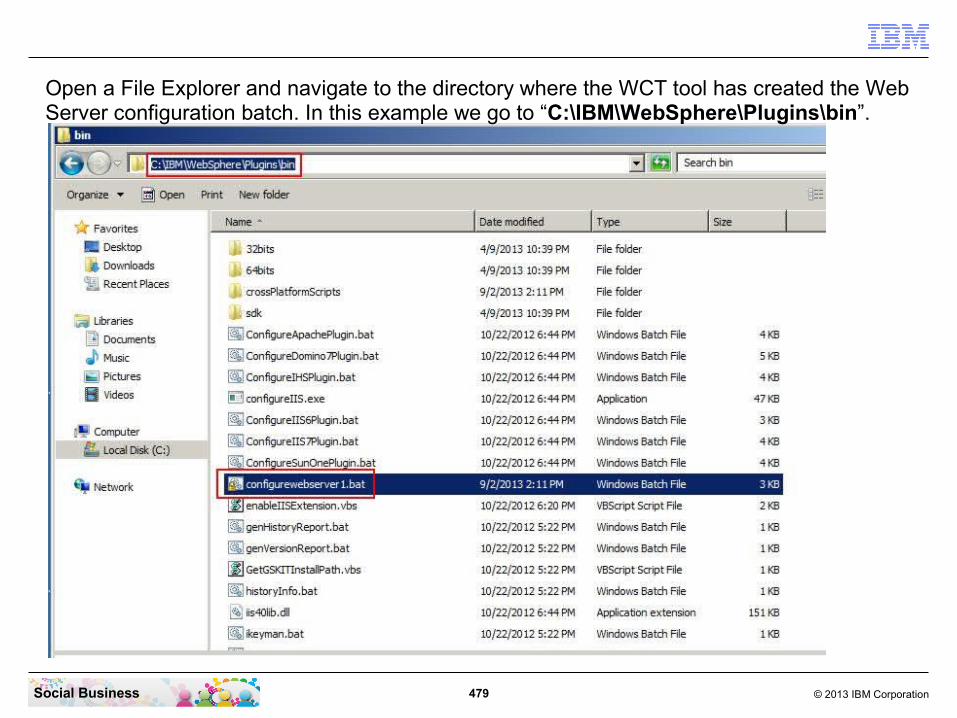
479 © 2013 IBM CorporationSocial Business
Open a File Explorer and navigate to the directory where the WCT tool has created the Web Server configuration batch. In this example we go to “C:\IBM\WebSphere\Plugins\bin”.
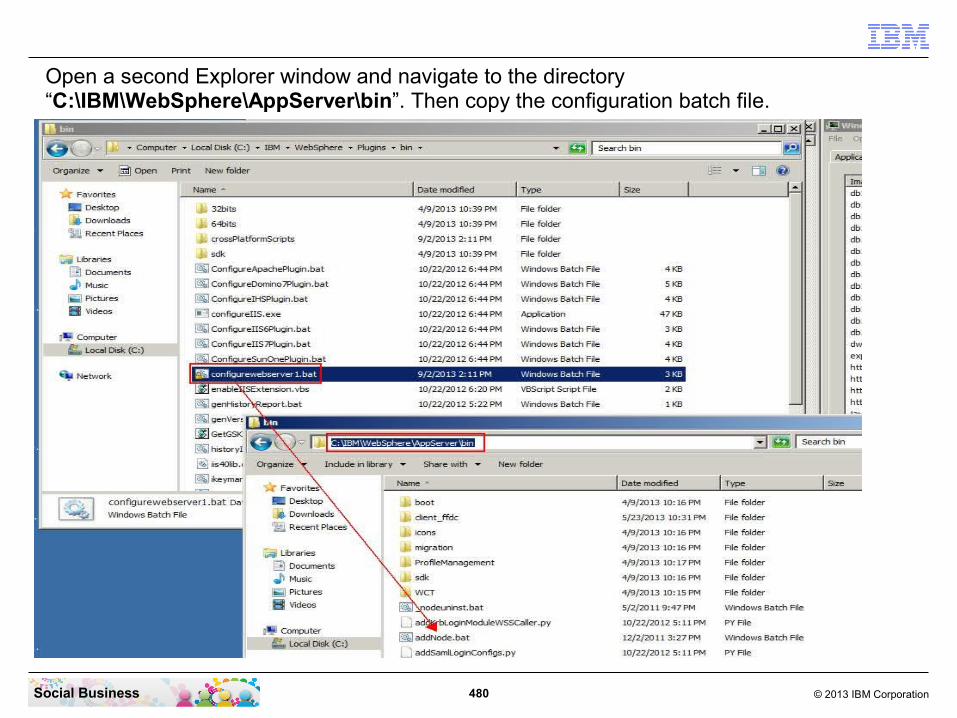
480 © 2013 IBM CorporationSocial Business
Open a second Explorer window and navigate to the directory “C:\IBM\WebSphere\AppServer\bin”. Then copy the configuration batch file.
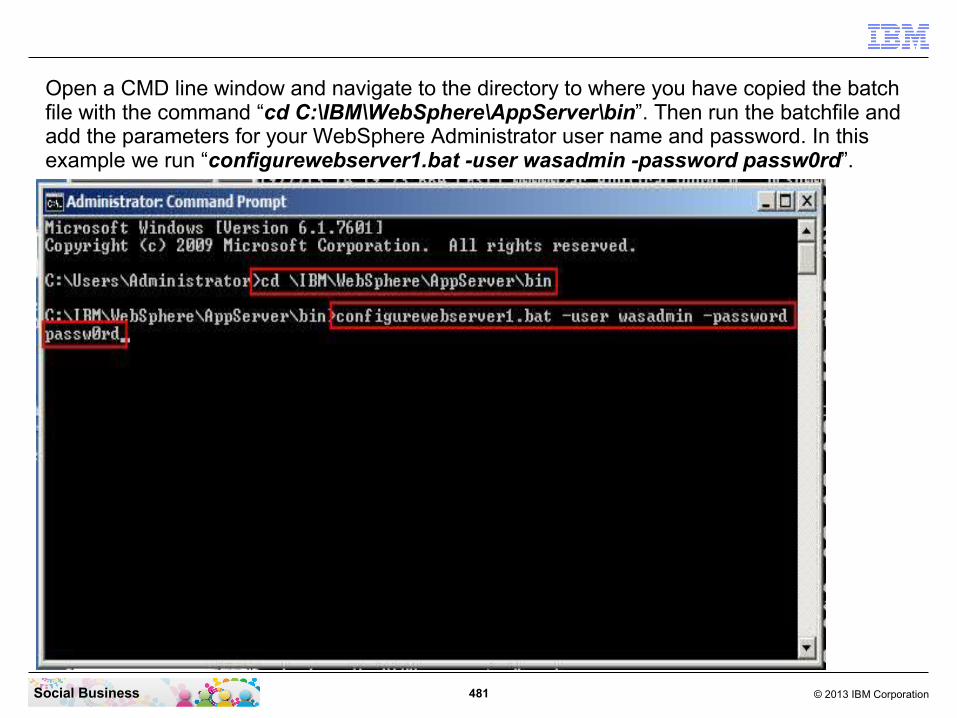
481 © 2013 IBM CorporationSocial Business
Open a CMD line window and navigate to the directory to where you have copied the batch file with the command “cd C:\IBM\WebSphere\AppServer\bin”. Then run the batchfile and add the parameters for your WebSphere Administrator user name and password. In this example we run “configurewebserver1.bat -user wasadmin -password passw0rd”.
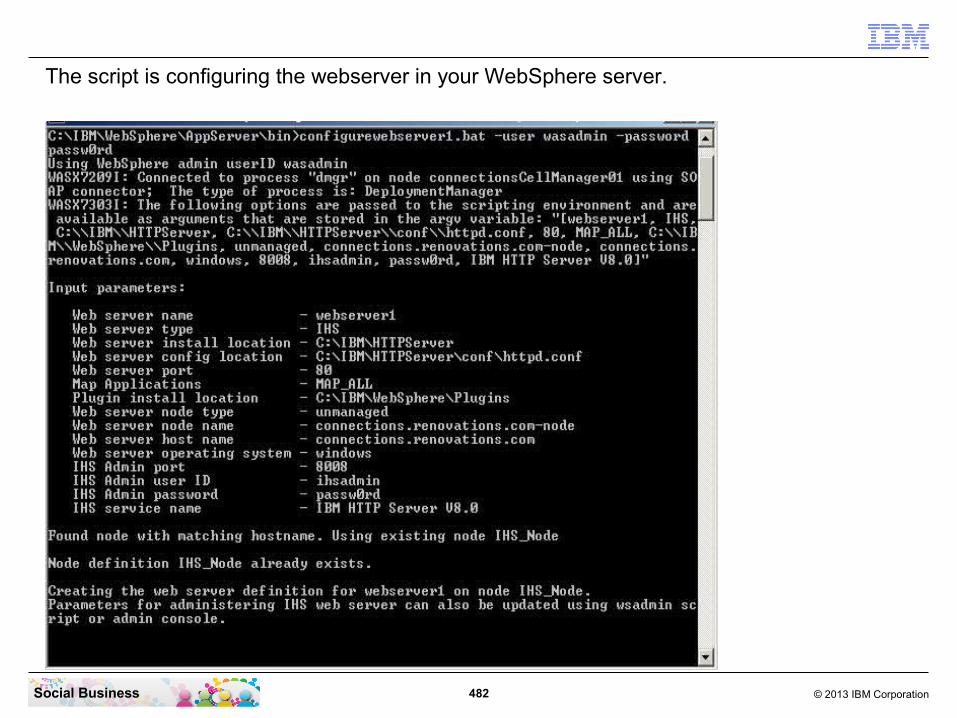
482 © 2013 IBM CorporationSocial Business
The script is configuring the webserver in your WebSphere server.

483 © 2013 IBM CorporationSocial Business
Confirm that you see the messages below.

484 © 2013 IBM CorporationSocial Business
Go to your Services view and start the “IBM HTTP Administrator 7.0” service.

485 © 2013 IBM CorporationSocial Business
The service has now started successfully.

486 © 2013 IBM CorporationSocial Business
Click “System administration” - “Nodes”.
487 © 2013 IBM CorporationSocial Business
Select all nodes and click the “Full Resynchronize” button.

488 © 2013 IBM CorporationSocial Business
Next click “Servers” - “Server Types” - “Web servers”.
489 © 2013 IBM CorporationSocial Business
Select the “webserver1” and click the “Generate Plug-in” button.
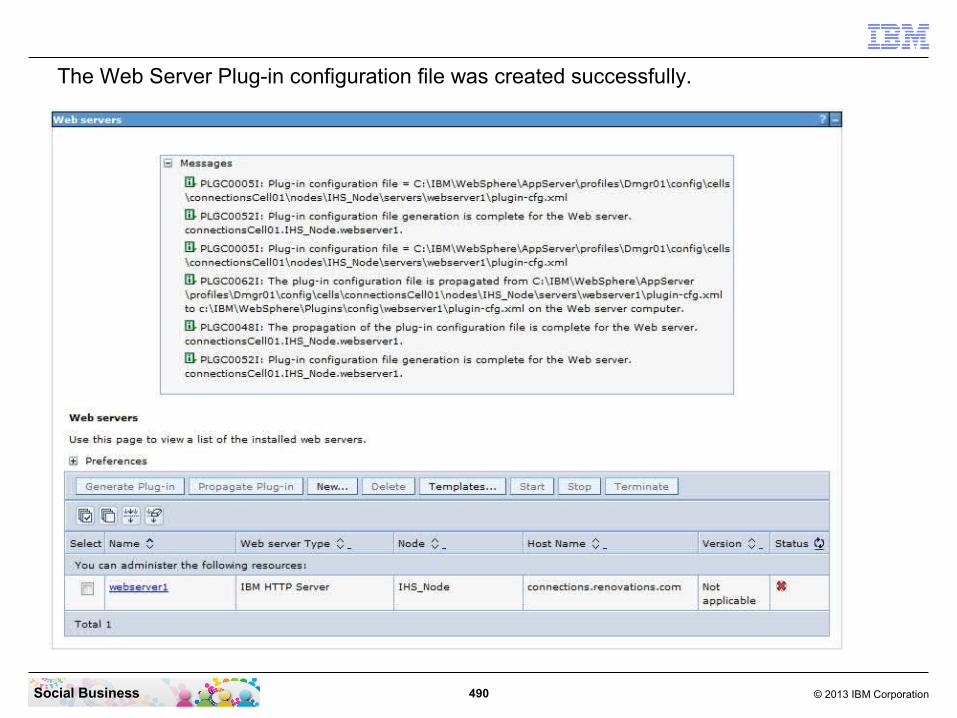
490 © 2013 IBM CorporationSocial Business
The Web Server Plug-in configuration file was created successfully.

491 © 2013 IBM CorporationSocial Business
Select the “webserver1” again and click the “Propagate Plug-in” button.

492 © 2013 IBM CorporationSocial Business
The Web Server Plug-in configuration file was propagated successfully.

493 © 2013 IBM CorporationSocial Business
Open the web server configuration by clicking the “webserver1” link.

494 © 2013 IBM CorporationSocial Business
Click the “Plug-in properties” link on the right side.

495 © 2013 IBM CorporationSocial Business
Click the “Copy to Web server key store directory” button.
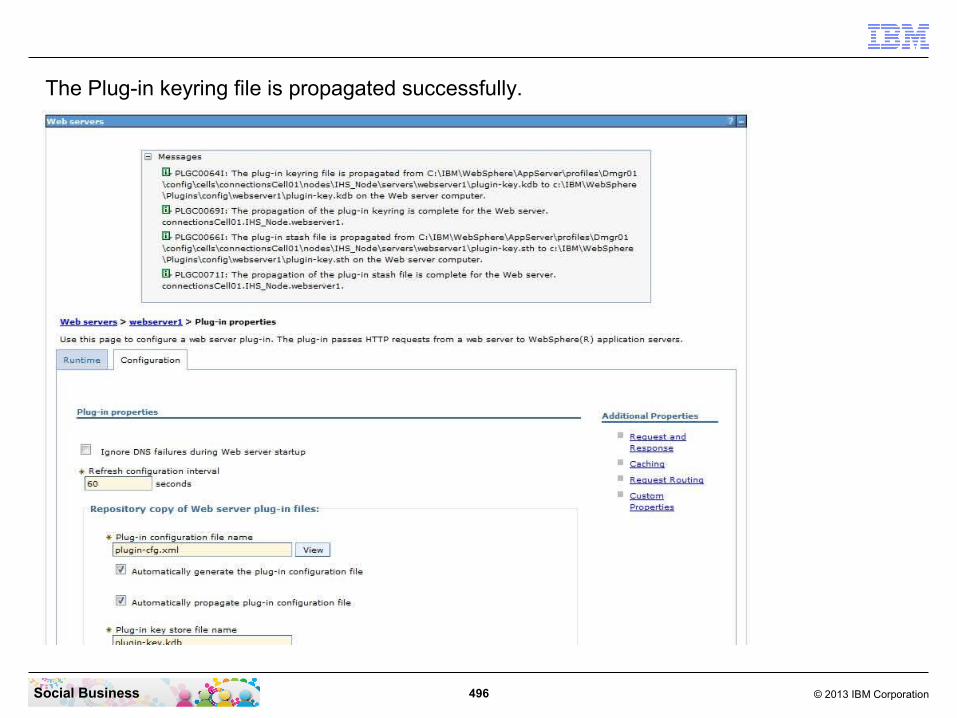
496 © 2013 IBM CorporationSocial Business
The Plug-in keyring file is propagated successfully.

497 © 2013 IBM CorporationSocial Business
Go back to “Servers” - “Server Types” - “Web servers”.

498 © 2013 IBM CorporationSocial Business
Select the “webserver1” and click the “Start” button.
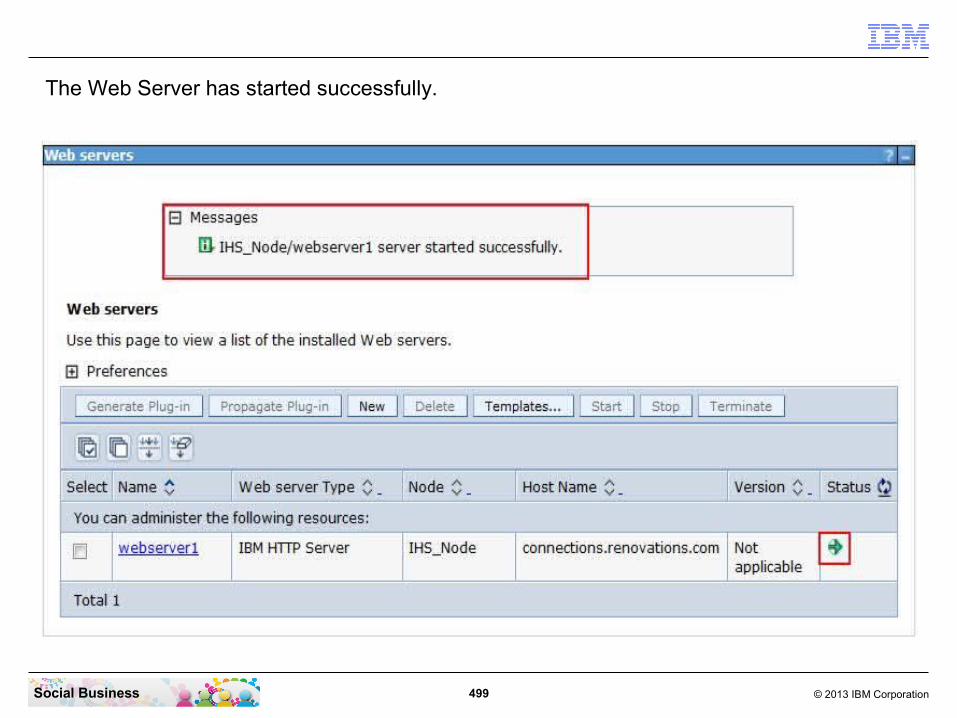
499 © 2013 IBM CorporationSocial Business
The Web Server has started successfully.

500 © 2013 IBM CorporationSocial Business
Check the Application Module Mapping configuration and if required add the IHS server in the applications. Click “Applications” - “Application Types” - “WebSphere enterprise applications”. The following 5 slides must be repeated for all 23 applications.
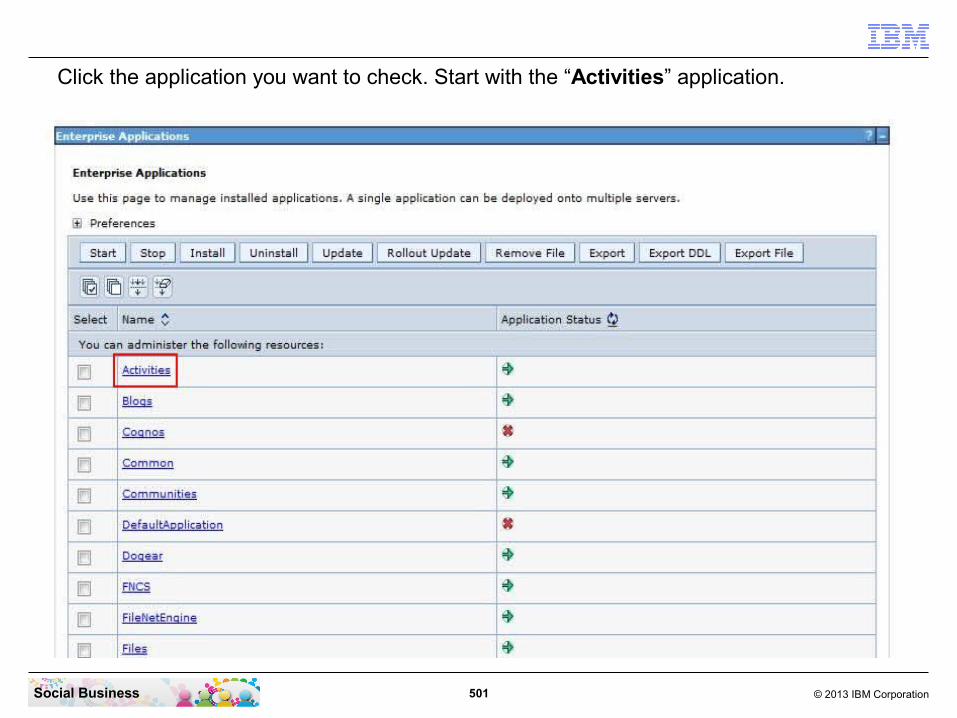
501 © 2013 IBM CorporationSocial Business
Click the application you want to check. Start with the “Activities” application.

502 © 2013 IBM CorporationSocial Business
Click “Manage Modules”.
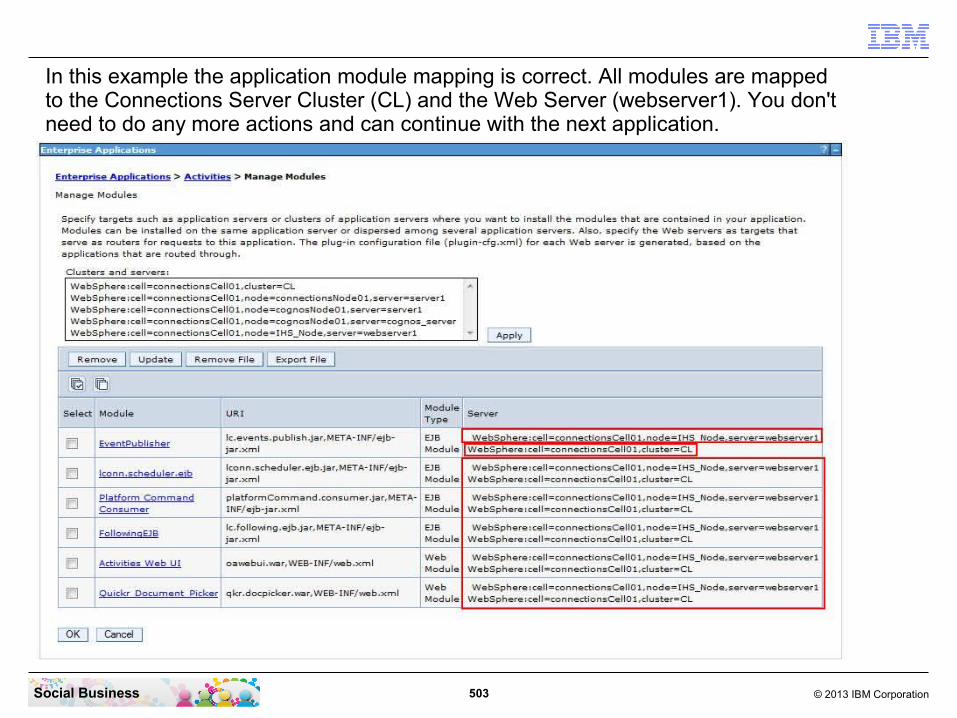
503 © 2013 IBM CorporationSocial Business
In this example the application module mapping is correct. All modules are mapped to the Connections Server Cluster (CL) and the Web Server (webserver1). You don't need to do any more actions and can continue with the next application.
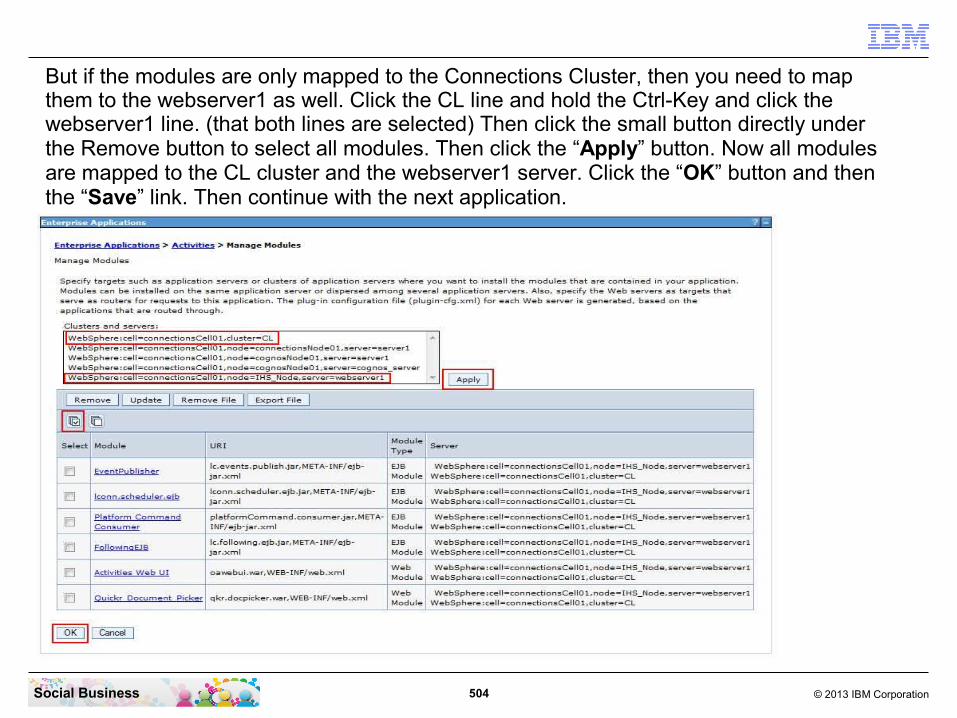
504 © 2013 IBM CorporationSocial Business
But if the modules are only mapped to the Connections Cluster, then you need to map them to the webserver1 as well. Click the CL line and hold the Ctrl-Key and click the webserver1 line. (that both lines are selected) Then click the small button directly under the Remove button to select all modules. Then click the “Apply” button. Now all modules are mapped to the CL cluster and the webserver1 server. Click the “OK” button and then the “Save” link. Then continue with the next application.
505 © 2013 IBM CorporationSocial Business
2. Configuring IBM HTTP Server for SSL
About this taskTo support SSL, create a self-signed certificate and then configure IBM HTTP Server for SSL traffic. If you use this certificate in production, users might receiver warning messages from their browsers. In a typical production deployment, you would use a certificate from a trusted certificate authority.
To configure IBM HTTP Server for SSL, complete the following steps:

506 © 2013 IBM CorporationSocial Business
In your Start menue click on “Start” - “All Programs” - “IBM HTTP Server V8.0” - “Start Key Management Utility”.

507 © 2013 IBM CorporationSocial Business
Click the button to create a new keyring file.

508 © 2013 IBM CorporationSocial Business
Enter a file name for the keyring file. In this example we use “key.kdb”. Select the location to save the keyring file. We use just “C:\IBM\HTTPServer\” in this example. Then click the “OK” button to continue.
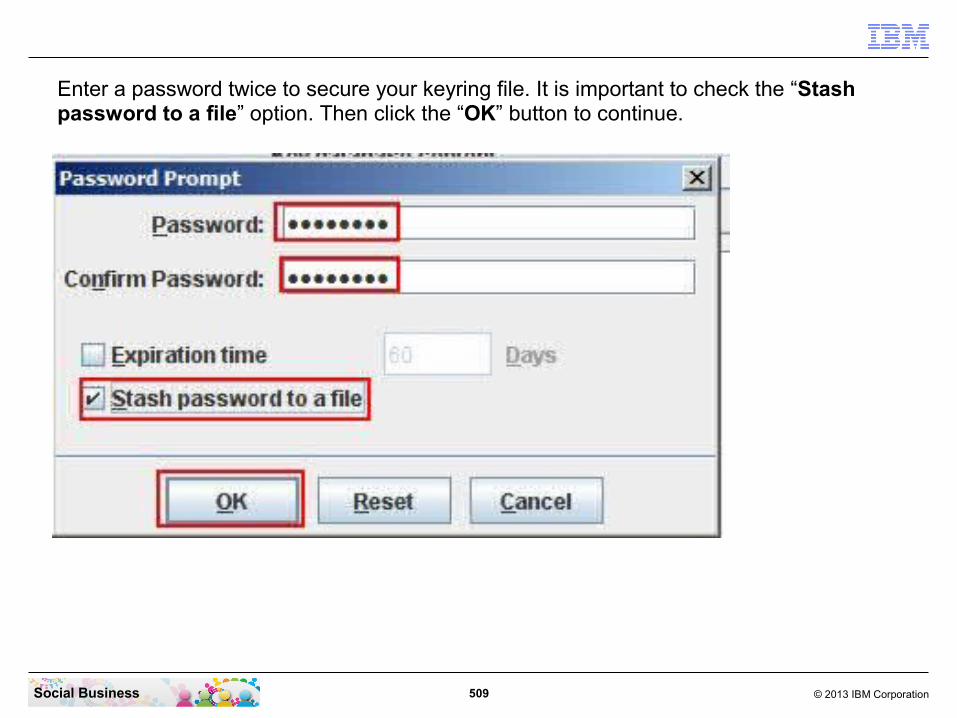
509 © 2013 IBM CorporationSocial Business
Enter a password twice to secure your keyring file. It is important to check the “Stash password to a file” option. Then click the “OK” button to continue.
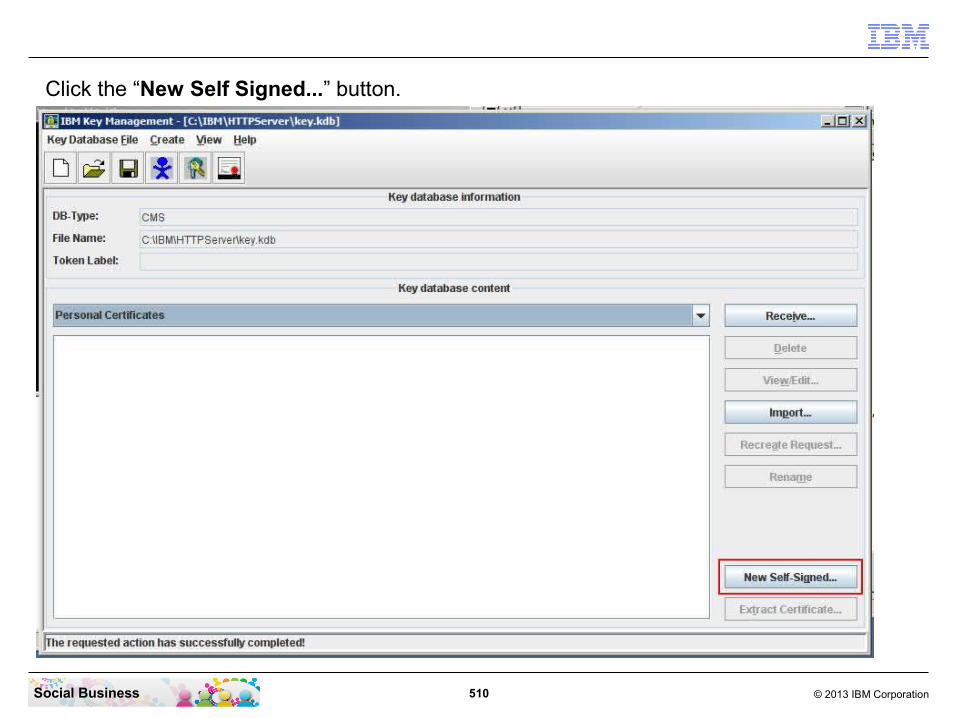
510 © 2013 IBM CorporationSocial Business
Click the “New Self Signed...” button.

511 © 2013 IBM CorporationSocial Business
Give the certificate a name. In this example we use the host name “connections.renovations.com”. Then click the “OK” button to continue.

512 © 2013 IBM CorporationSocial Business
The new self signed certificate is created and stored in the keyring file. Close the ikeyman application.

513 © 2013 IBM CorporationSocial Business
In the File Explorer navigate to the directory “C:\IBM\HTTPServer”. There you can see the 3 files that where created with the ikeyman application.

514 © 2013 IBM CorporationSocial Business
In the Integrated Solutions Console navigate to “Servers” - “Server Types” - “Web servers”.
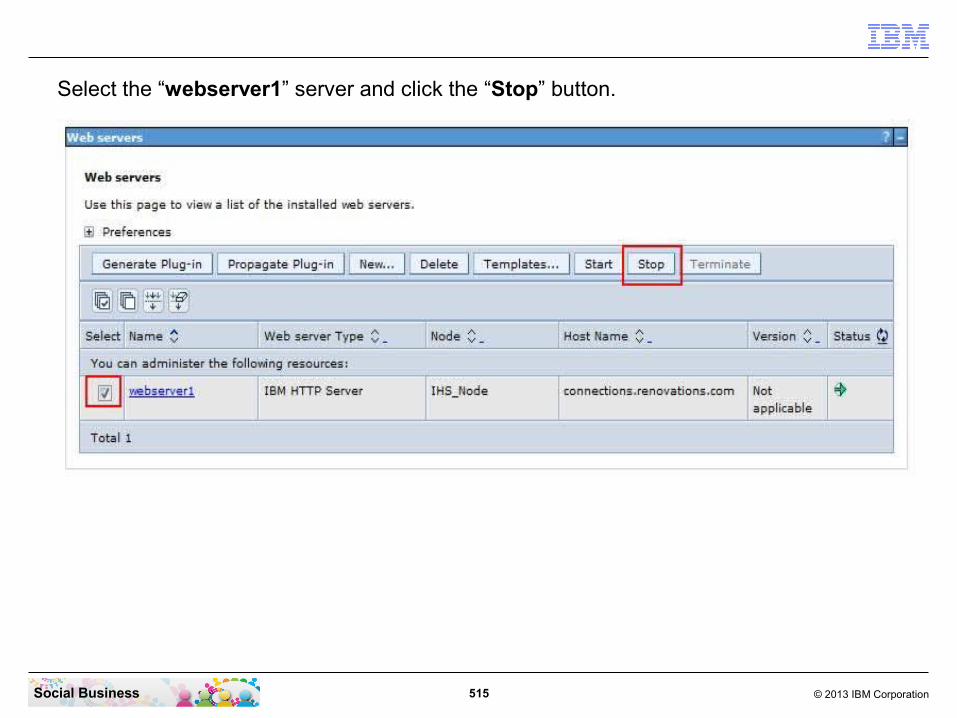
515 © 2013 IBM CorporationSocial Business
Select the “webserver1” server and click the “Stop” button.

516 © 2013 IBM CorporationSocial Business
The webserver1 has stopped successfully. Now click the “webserver1” link to open the configuration page.

517 © 2013 IBM CorporationSocial Business
On the right side click the “Configuration File” link. Or just the “Edit” button.
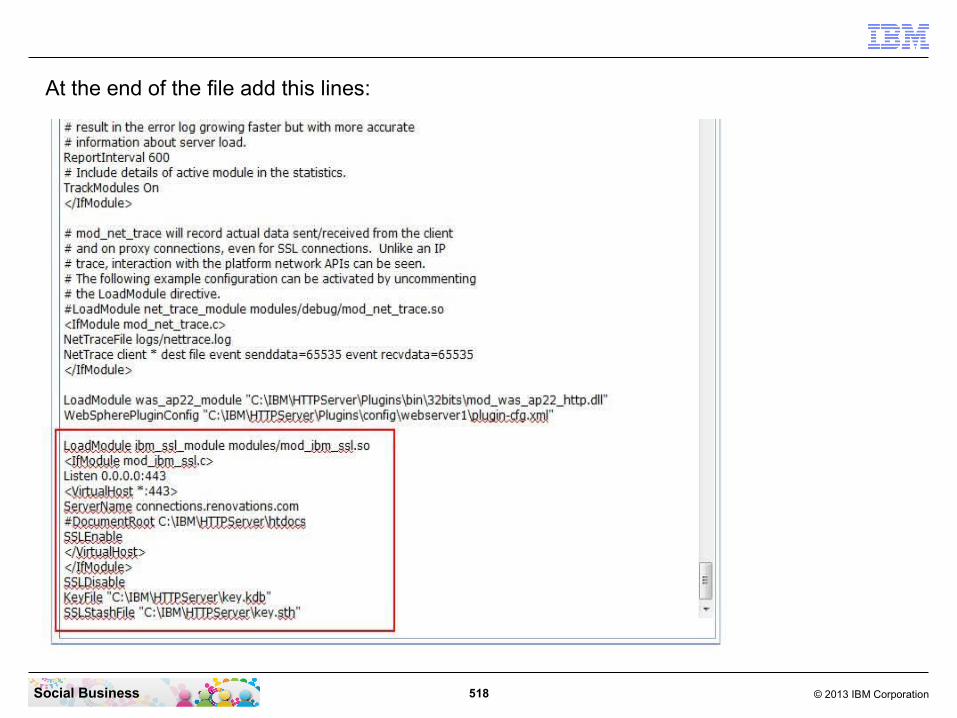
518 © 2013 IBM CorporationSocial Business
At the end of the file add this lines:

519 © 2013 IBM CorporationSocial Business
LoadModule ibm_ssl_module modules/mod_ibm_ssl.so
<IfModule mod_ibm_ssl.c>
Listen 0.0.0.0:443
<VirtualHost *:443>
ServerName connections.renovations.com
#DocumentRoot C:\IBM\HTTPServer\htdocs
SSLEnable
</VirtualHost>
</IfModule>
SSLDisable
Keyfile "C:\IBM\HTTPServer\key.kdb"
SSLStashFile "C:\IBM\HTTPServer\key.sth"

520 © 2013 IBM CorporationSocial Business
Click the “Apply” button to continue.
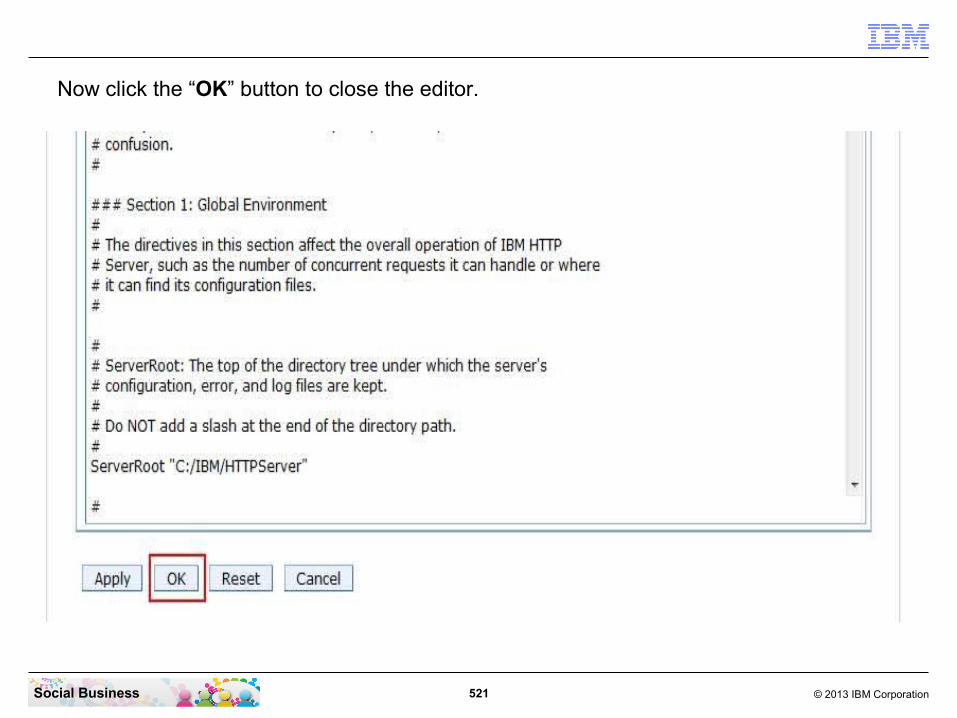
521 © 2013 IBM CorporationSocial Business
Now click the “OK” button to close the editor.
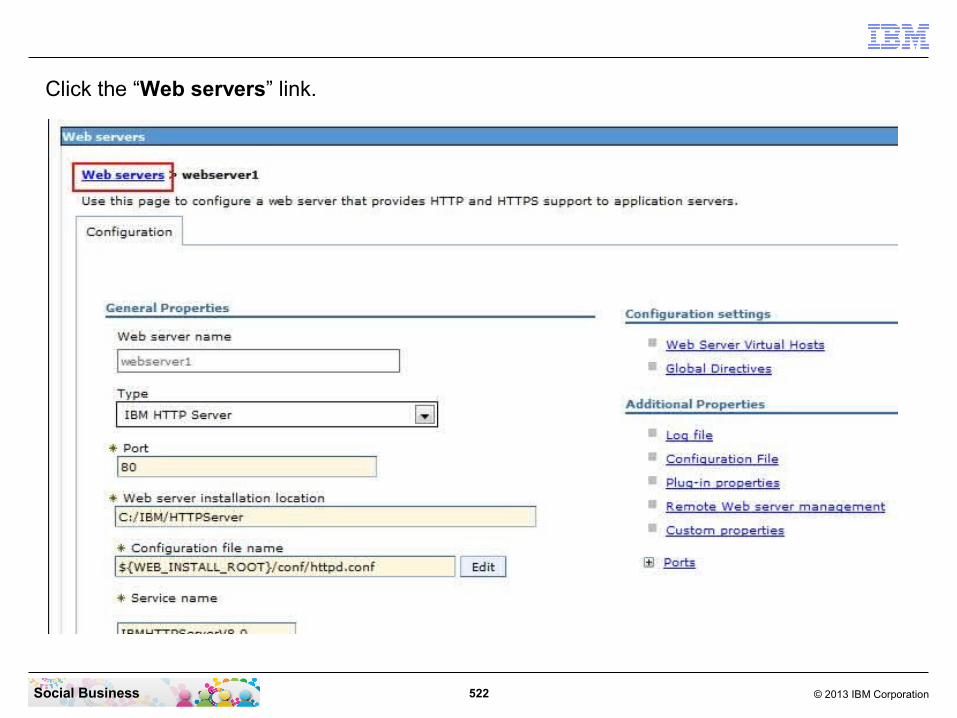
522 © 2013 IBM CorporationSocial Business
Click the “Web servers” link.
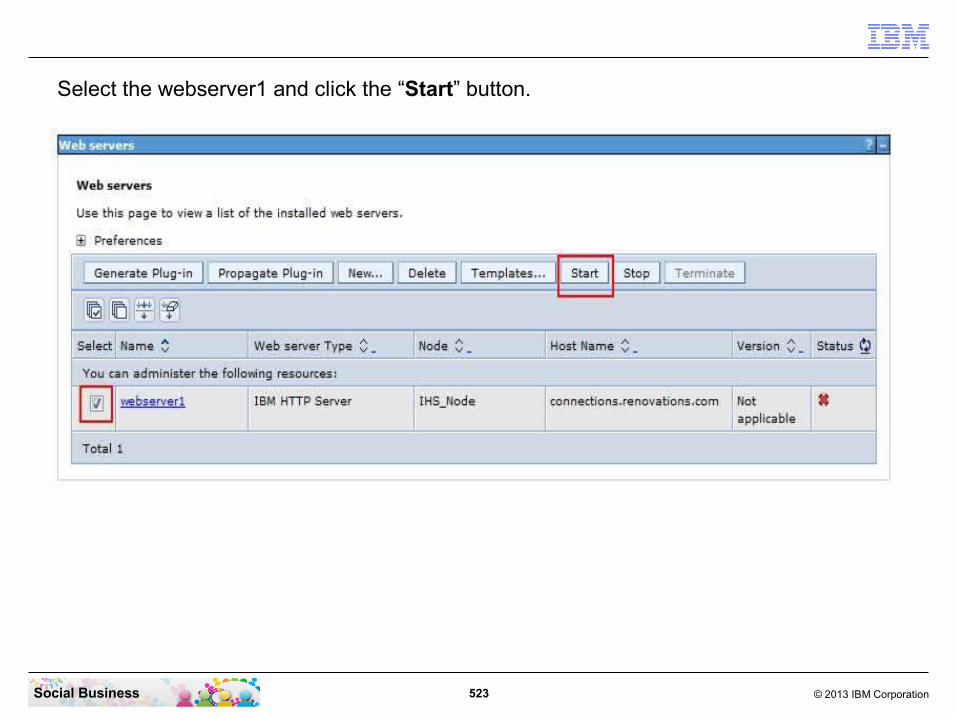
523 © 2013 IBM CorporationSocial Business
Select the webserver1 and click the “Start” button.

524 © 2013 IBM CorporationSocial Business
The Web server has started successfully.

525 © 2013 IBM CorporationSocial Business
3. Adding certificates to the WebSphere trust store
About this taskTo establish trusted server to server communication for IBM Connections, import signer certificates from IBM HTTP Server into the WebSphere Application Server default trust store.
There are different types of certificates that you can use. This procedure describes how to import a self-signed certificate. You can also import a certificate that you purchased from a third-party Certificate Authority. To help decide a key file strategy for your environment, go the IBM HTTP Server information center.
To import a public certificate from IBM HTTP Server to the default trust store in IBM WebSphere Application Server, complete the following steps:

526 © 2013 IBM CorporationSocial Business
Click on “Security” - “SSL certificate and key management”.

527 © 2013 IBM CorporationSocial Business
Click on “Key stores and certificates”.
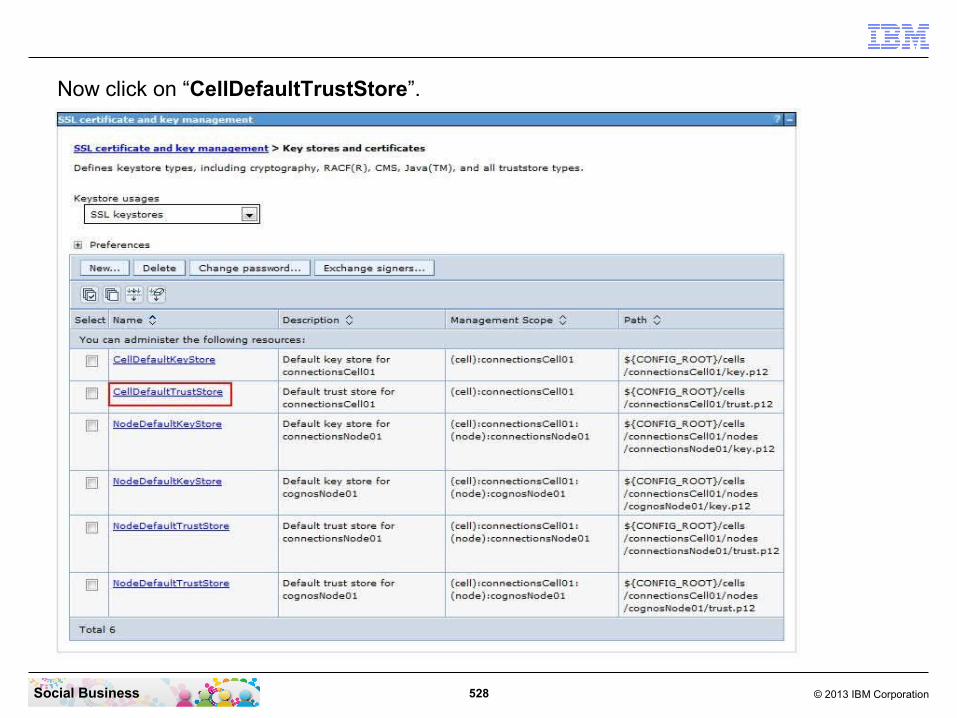
528 © 2013 IBM CorporationSocial Business
Now click on “CellDefaultTrustStore”.

529 © 2013 IBM CorporationSocial Business
Click on “Signer certificates”.
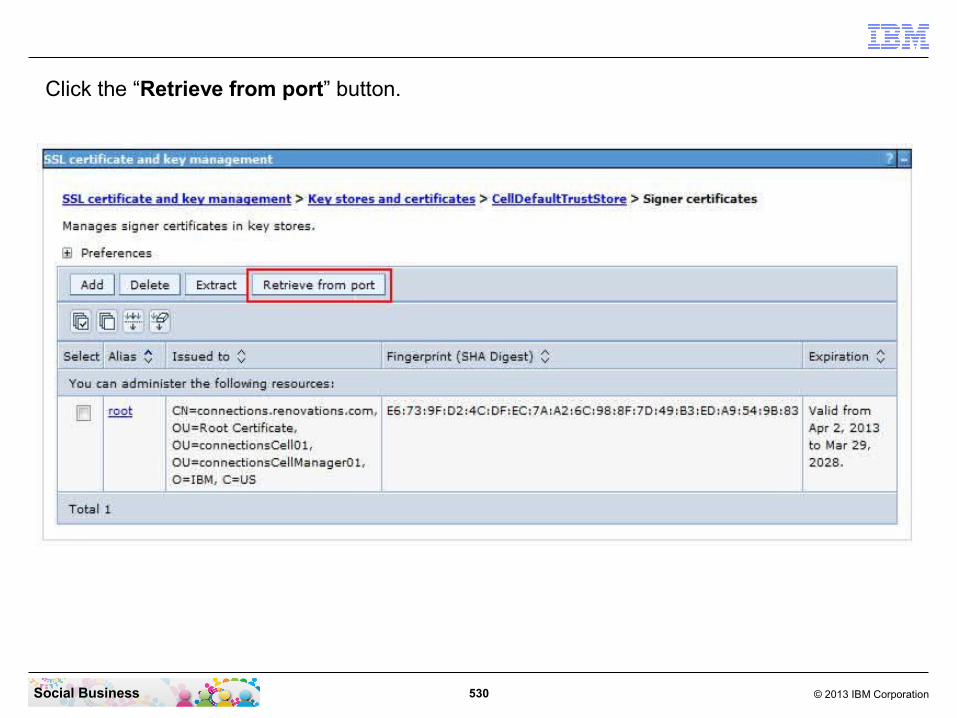
530 © 2013 IBM CorporationSocial Business
Click the “Retrieve from port” button.
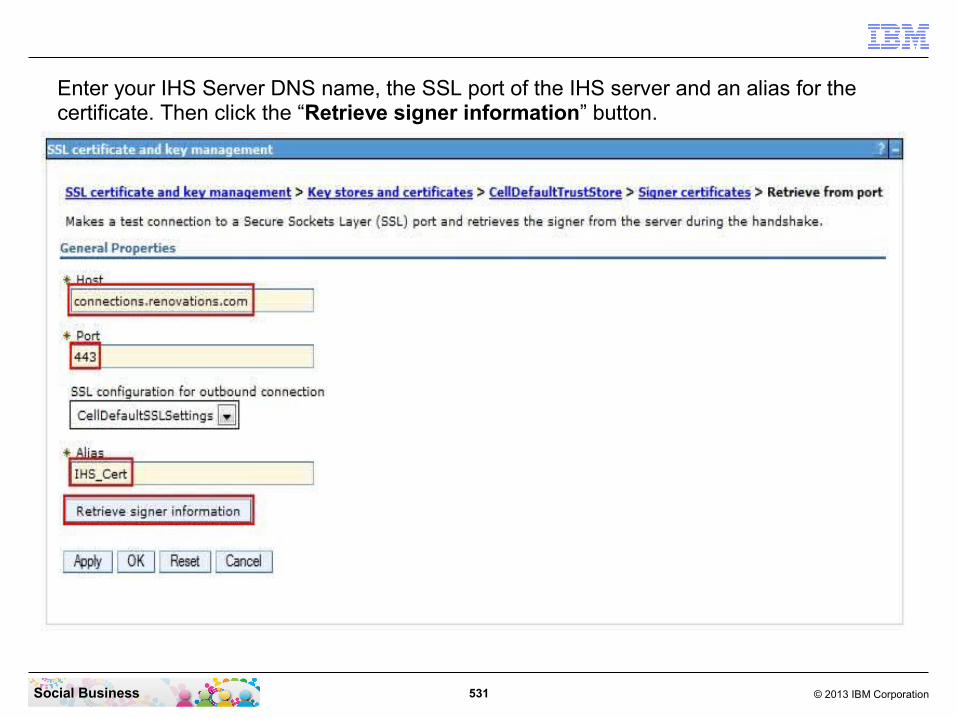
531 © 2013 IBM CorporationSocial Business
Enter your IHS Server DNS name, the SSL port of the IHS server and an alias for the certificate. Then click the “Retrieve signer information” button.

532 © 2013 IBM CorporationSocial Business
The IHS certificate (the self signed certificate that we have created with the IHS key management utility) is retrieved. Click the “OK” button to continue.
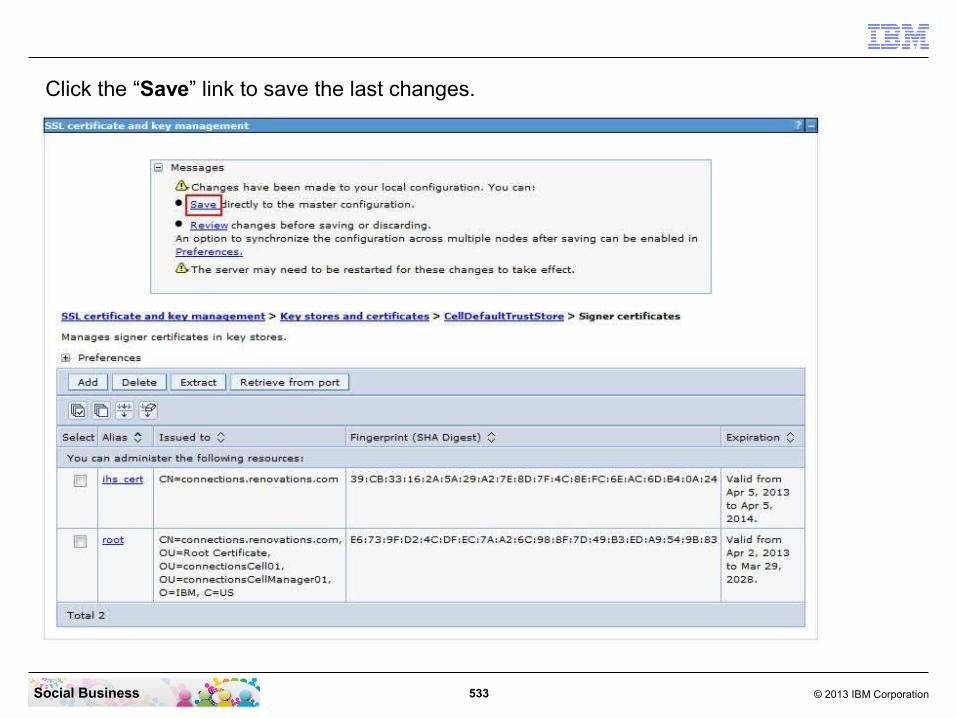
533 © 2013 IBM CorporationSocial Business
Click the “Save” link to save the last changes.
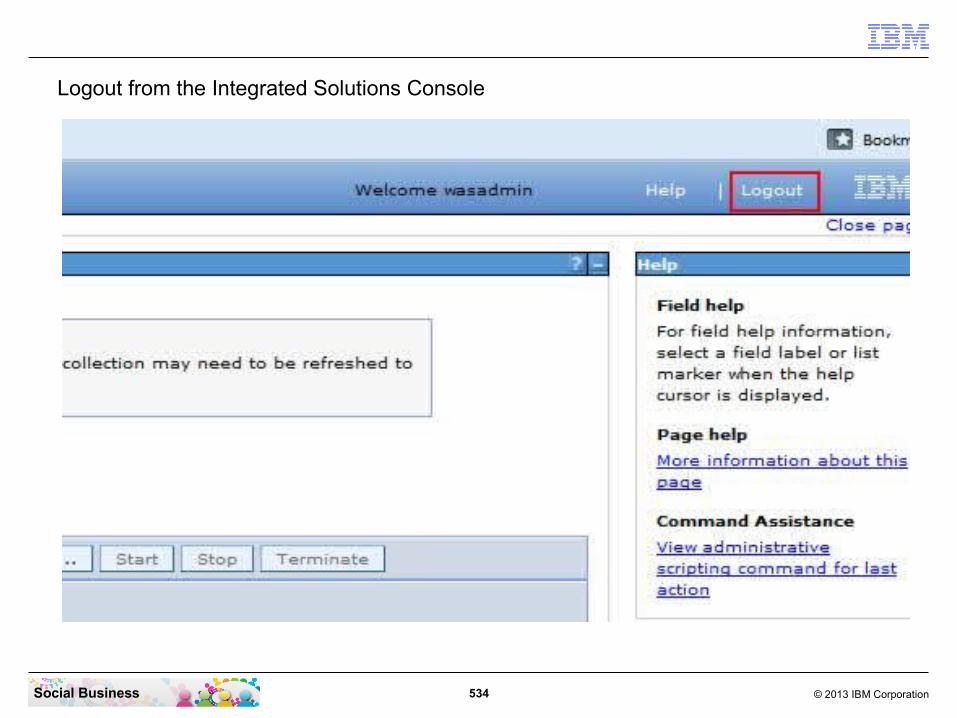
534 © 2013 IBM CorporationSocial Business
Logout from the Integrated Solutions Console
535 © 2013 IBM CorporationSocial Business
4. Determining which files to compress
Before you beginThis is an optional configuration. You do not need to perform this procedure if you are compressing content elsewhere in your network. Compression requires a significant amount of CPU; you must monitor resource availability if you choose to use this option.
About this taskThe directives discussed here do not compress images, but do compress JavaScript™.
To specify which types of files to compress, complete the following steps:

536 © 2013 IBM CorporationSocial Business
Open your File Explorer and navigate to the directory “C:\IBM\HTTPServer\conf”. Then open the file “httpd.conf” with your Editor or Notepad.

537 © 2013 IBM CorporationSocial Business
Search for the string “mod_deflat.so”.

538 © 2013 IBM CorporationSocial Business
If the line containing the string is commented (starting with the # letter) then uncomment it by removing this “#” letter.

539 © 2013 IBM CorporationSocial Business
Add the following lines after the uncommented “LoadModule...” line:

540 © 2013 IBM CorporationSocial Business
#Only the specified MIME types will be compressed.
AddOutputFilterByType DEFLATE application/atom+xmlAddOutputFilterByType DEFLATE application/atomcat+xmlAddOutputFilterByType DEFLATE application/javascriptAddOutputFilterByType DEFLATE application/jsonAddOutputFilterByType DEFLATE application/octet-streamAddOutputFilterByType DEFLATE application/x-javascriptAddOutputFilterByType DEFLATE application/xhtml+xmlAddOutputFilterByType DEFLATE application/xmlAddOutputFilterByType DEFLATE text/cssAddOutputFilterByType DEFLATE text/htmlAddOutputFilterByType DEFLATE text/javascriptAddOutputFilterByType DEFLATE text/plainAddOutputFilterByType DEFLATE text/xmlAddOutputFilterByType DEFLATE text/xsl
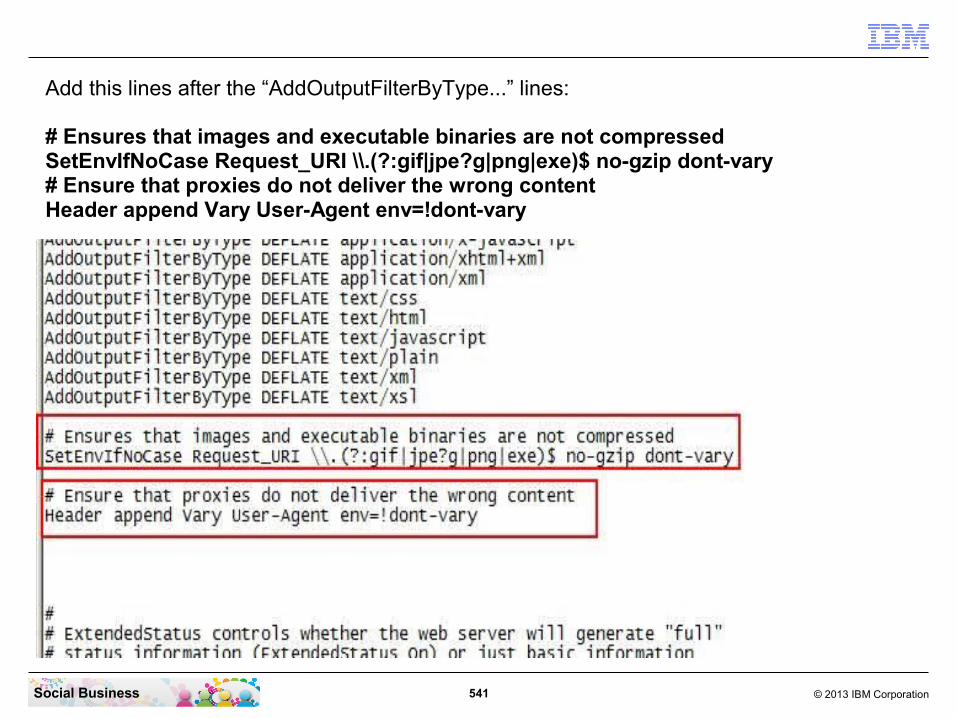
541 © 2013 IBM CorporationSocial Business
Add this lines after the “AddOutputFilterByType...” lines:
# Ensures that images and executable binaries are not compressedSetEnvIfNoCase Request_URI \\.(?:gif|jpe?g|png|exe)$ no-gzip dont-vary# Ensure that proxies do not deliver the wrong contentHeader append Vary User-Agent env=!dont-vary

542 © 2013 IBM CorporationSocial Business
Search for the string “mod_headers.so”.

543 © 2013 IBM CorporationSocial Business
If found, check that the line is un-commented (without a trailing # letter)
Then save and close the httpd.conf file.

544 © 2013 IBM CorporationSocial Business
Restart the “IBM HTTP Server V8.0” service.
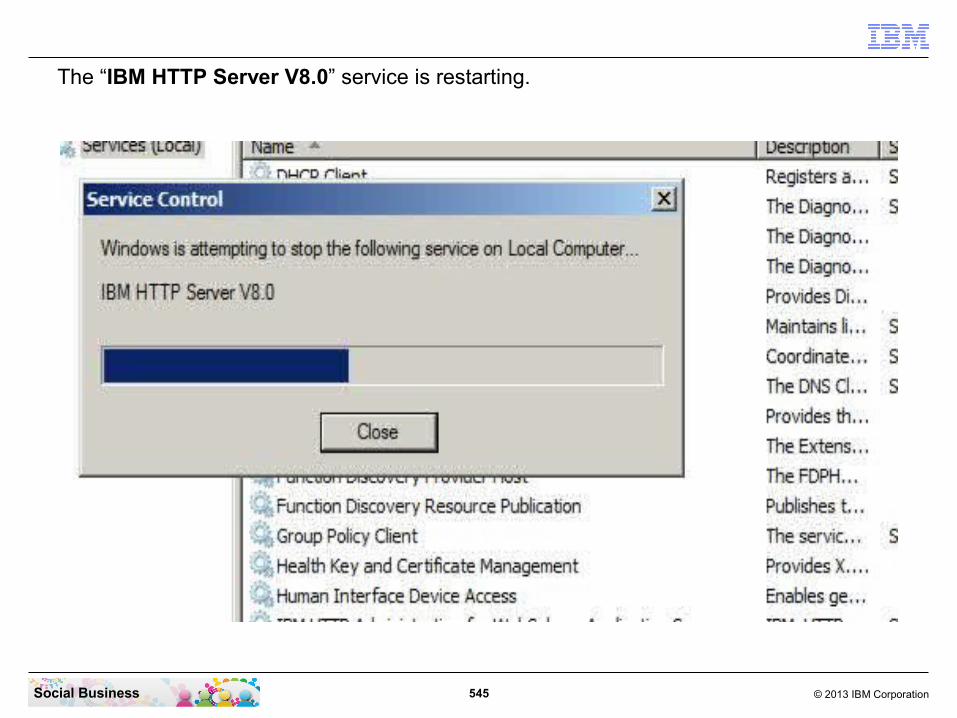
545 © 2013 IBM CorporationSocial Business
The “IBM HTTP Server V8.0” service is restarting.
546 © 2013 IBM CorporationSocial Business
5. Updating web addresses in IBM HTTP Server
By default, the web address that you enter to access IBM Connections applications includes the port number for each application. To avoid using port numbers, update the web addresses by editing the LotusConnections-config.xml file. IBM HTTP Server can then redirect requests to the appropriate port for each application.
To update the web addresses to your IBM Connections applications, complete the following steps:

547 © 2013 IBM CorporationSocial Business
First you need to stop your IBM Connections Application Server.Open a CMD Line window and navigate to the directory “cd C:\IBM\WebSphere\AppServer\profiles\Dmgr01\bin”. Then enter the command “stopserver connections_server -username wasadmin -password passw0rd”.Wait until the server has stopped.
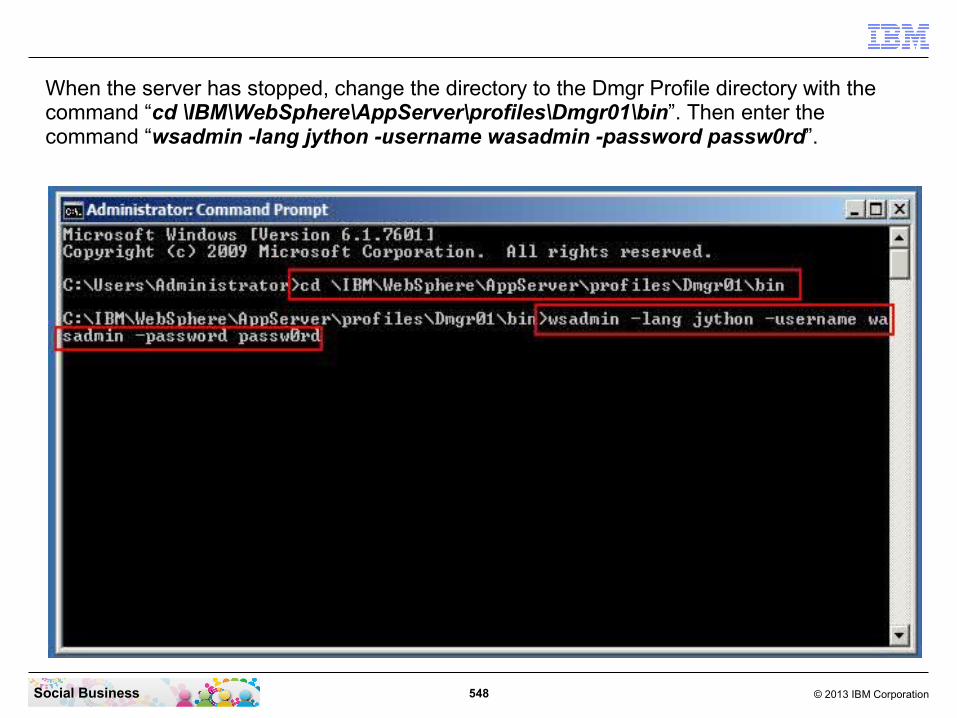
548 © 2013 IBM CorporationSocial Business
When the server has stopped, change the directory to the Dmgr Profile directory with the command “cd \IBM\WebSphere\AppServer\profiles\Dmgr01\bin”. Then enter the command “wsadmin -lang jython -username wasadmin -password passw0rd”.

549 © 2013 IBM CorporationSocial Business
The wsadmin command has started successfully. Now you can see the “wsadmin>” command prompt.

550 © 2013 IBM CorporationSocial Business
To initialize the Connections Administration enter the command “execfile(“..\config\bin_lc_admin\connectionsConfig.py”)”.
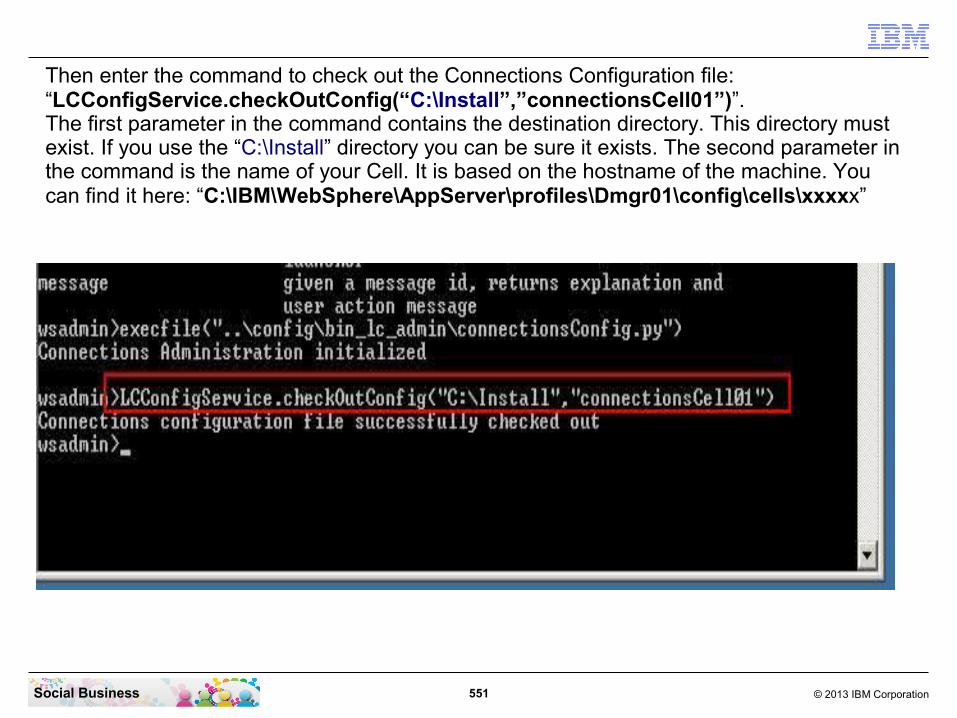
551 © 2013 IBM CorporationSocial Business
Then enter the command to check out the Connections Configuration file:“LCConfigService.checkOutConfig(“C:\Install”,”connectionsCell01”)”.The first parameter in the command contains the destination directory. This directory must exist. If you use the “C:\Install” directory you can be sure it exists. The second parameter in the command is the name of your Cell. It is based on the hostname of the machine. You can find it here: “C:\IBM\WebSphere\AppServer\profiles\Dmgr01\config\cells\xxxxx”

552 © 2013 IBM CorporationSocial Business
Open your File Explorer and navigate to the directory “C:\Install”. Then open the file “LotusConnections-config.xml” for editing.

553 © 2013 IBM CorporationSocial Business
In this file you can find many lines containing the port number in the path. This needs to be changed.

554 © 2013 IBM CorporationSocial Business
Find the string”http://connections.renovations.com:9081”Replace with”http://connections.renovations.com”Click the “Replace All” button.
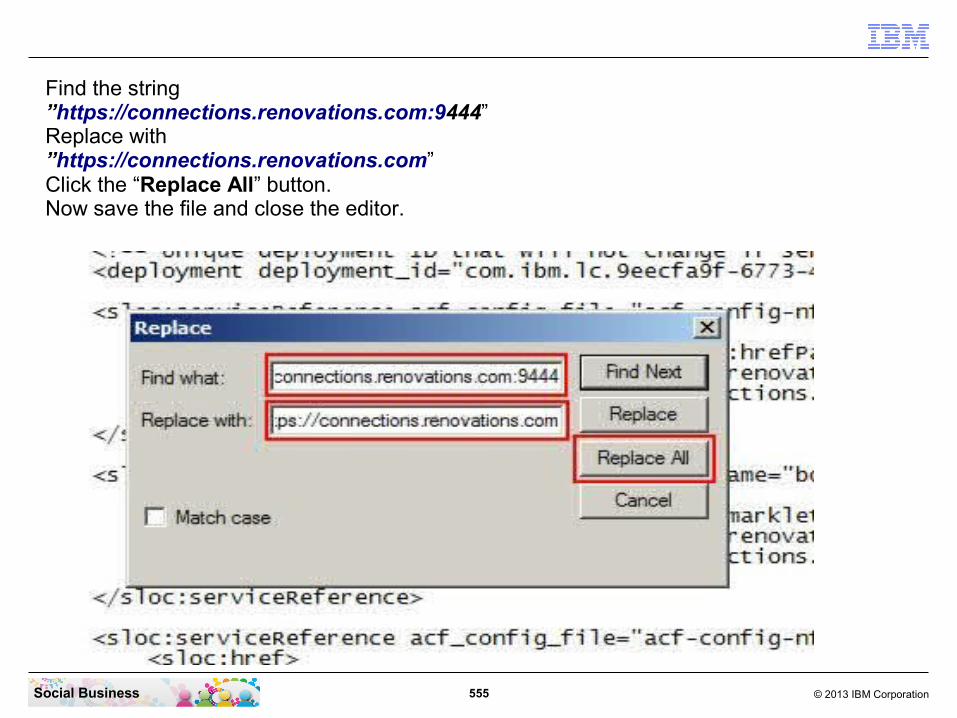
555 © 2013 IBM CorporationSocial Business
Find the string”https://connections.renovations.com:9444”Replace with”https://connections.renovations.com”Click the “Replace All” button.Now save the file and close the editor.
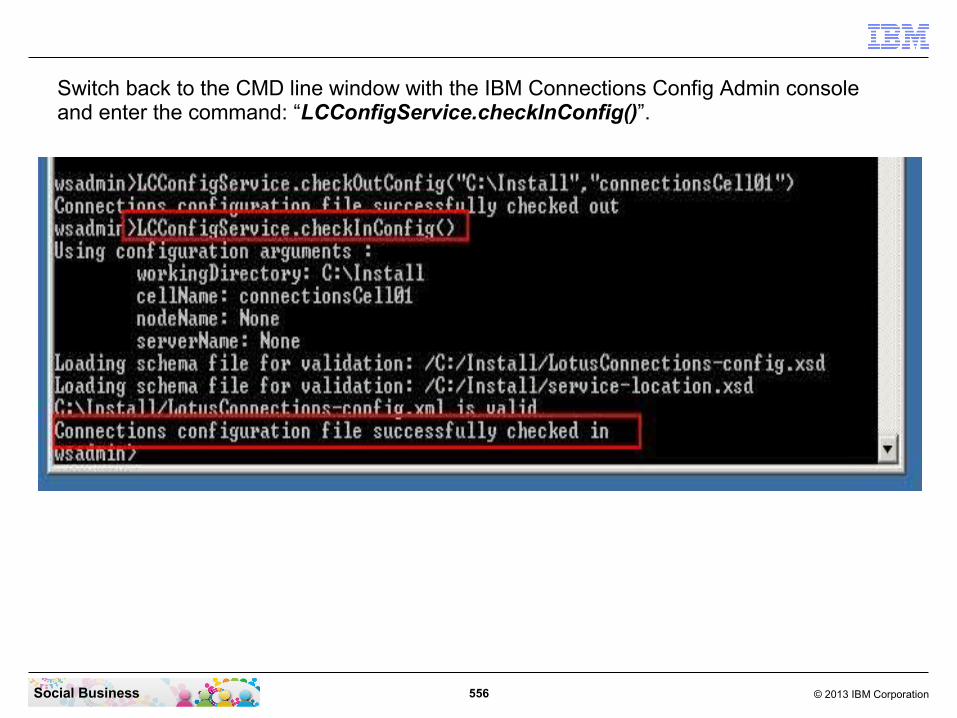
556 © 2013 IBM CorporationSocial Business
Switch back to the CMD line window with the IBM Connections Config Admin console and enter the command: “LCConfigService.checkInConfig()”.

557 © 2013 IBM CorporationSocial Business
Enter the command “synchAllNodes()”.
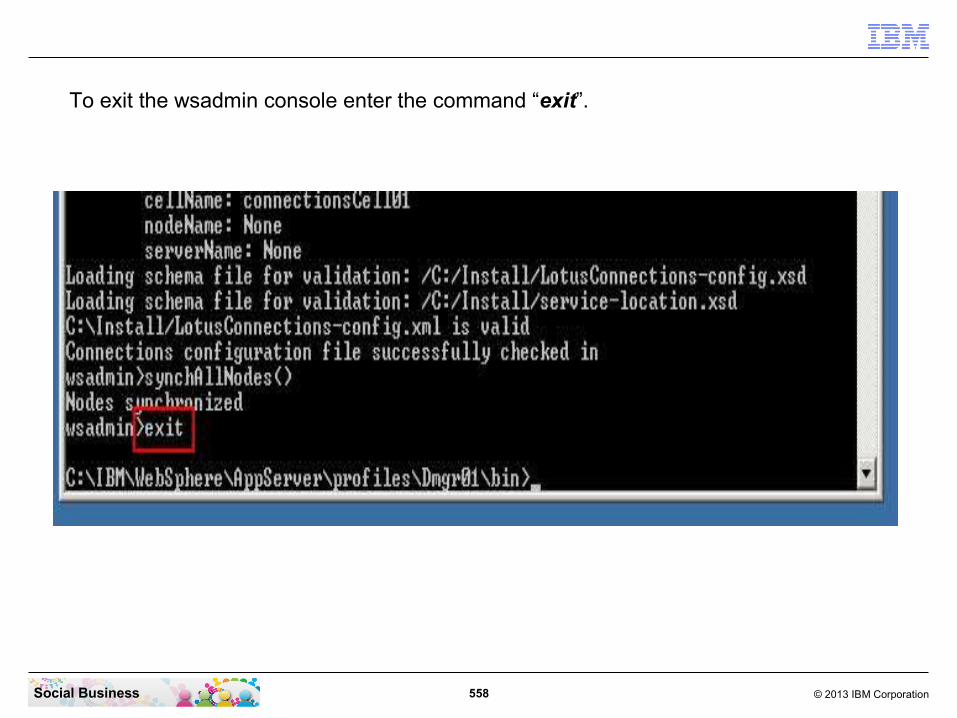
558 © 2013 IBM CorporationSocial Business
To exit the wsadmin console enter the command “exit”.
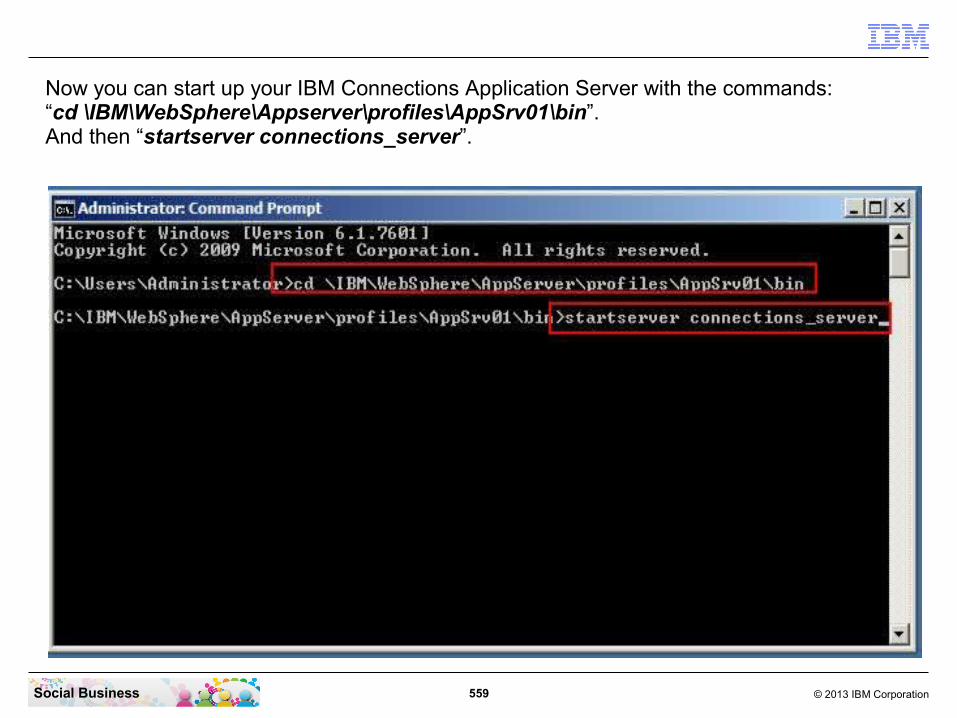
559 © 2013 IBM CorporationSocial Business
Now you can start up your IBM Connections Application Server with the commands:“cd \IBM\WebSphere\Appserver\profiles\AppSrv01\bin”.And then “startserver connections_server”.

560 © 2013 IBM CorporationSocial Business
Wait 15 minutes until the server is started completely. Then enter the URL “https://connections.renovations.com/homepage” in your Browser.

561 © 2013 IBM CorporationSocial Business
Understand the Risks

562 © 2013 IBM CorporationSocial Business
Add the exception
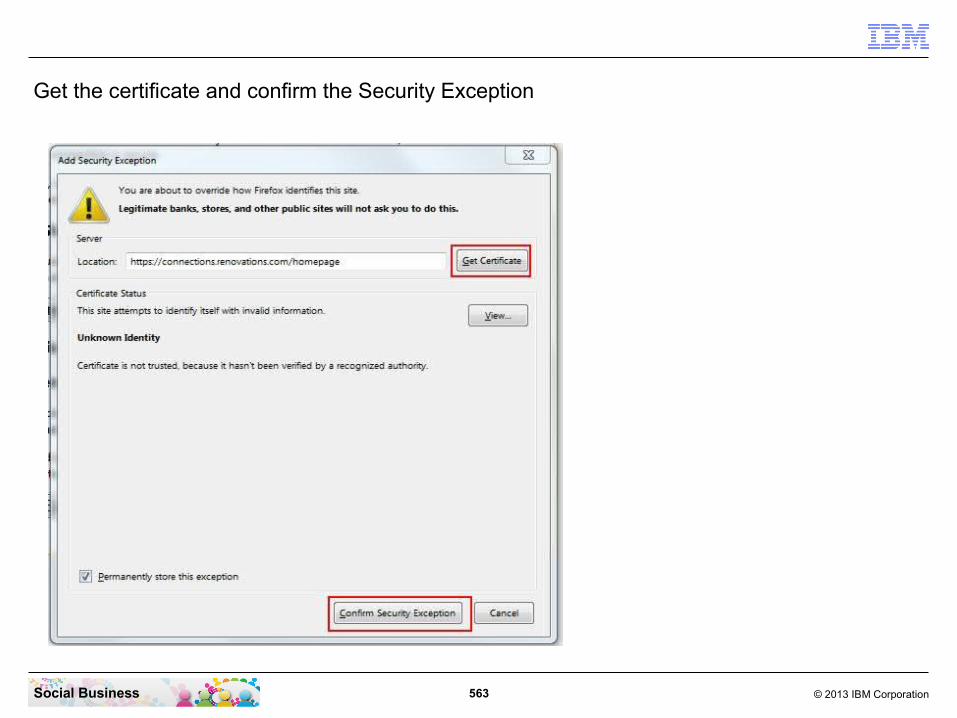
563 © 2013 IBM CorporationSocial Business
Get the certificate and confirm the Security Exception
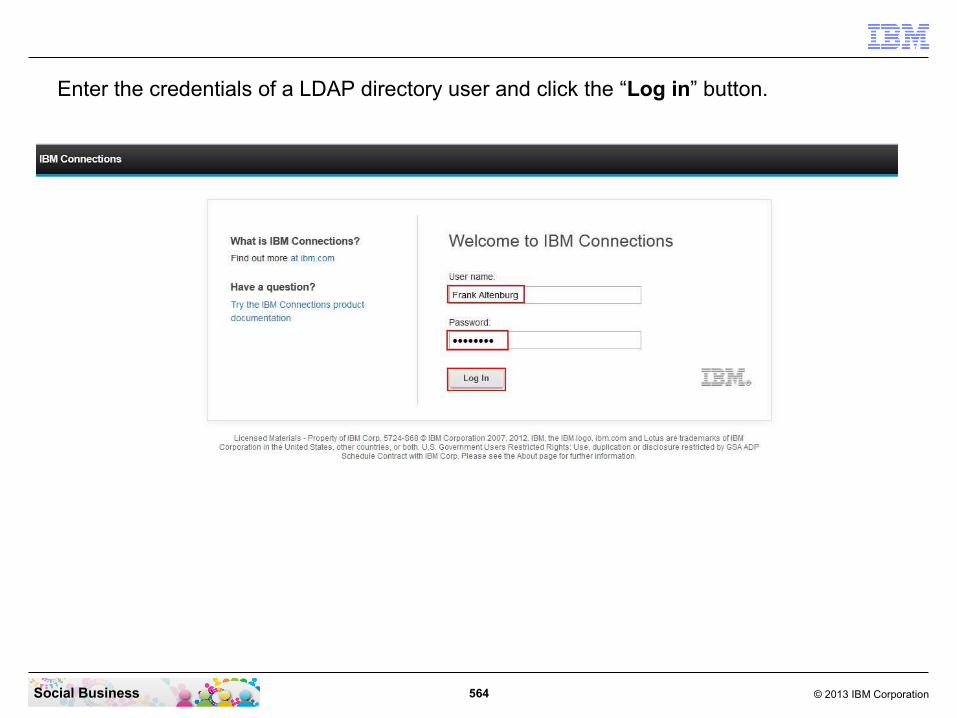
564 © 2013 IBM CorporationSocial Business
Enter the credentials of a LDAP directory user and click the “Log in” button.

565 © 2013 IBM CorporationSocial Business
IBM Connections and the IBM HTTP Server are now configured successfully to use secure SSL connection.

566 © 2013 IBM CorporationSocial Business
B e fo re y o u be g inIBM® Connections administrators must be dedicated users. Their only purpose should be application administration.
About this taskOnly a Home page administrator can add, remove, enable, or disable widgets on the Home page. For more information, see the Administering the Home page from the user interface topic.
Note: You can also create global administrators for any of the applications, for the purpose of managing content. For more information, see the Administering application content topic.
To configure administrative access to the Home page application, complete the following steps:
STEP TWENTY-THREE: Configuring the Home page administrator
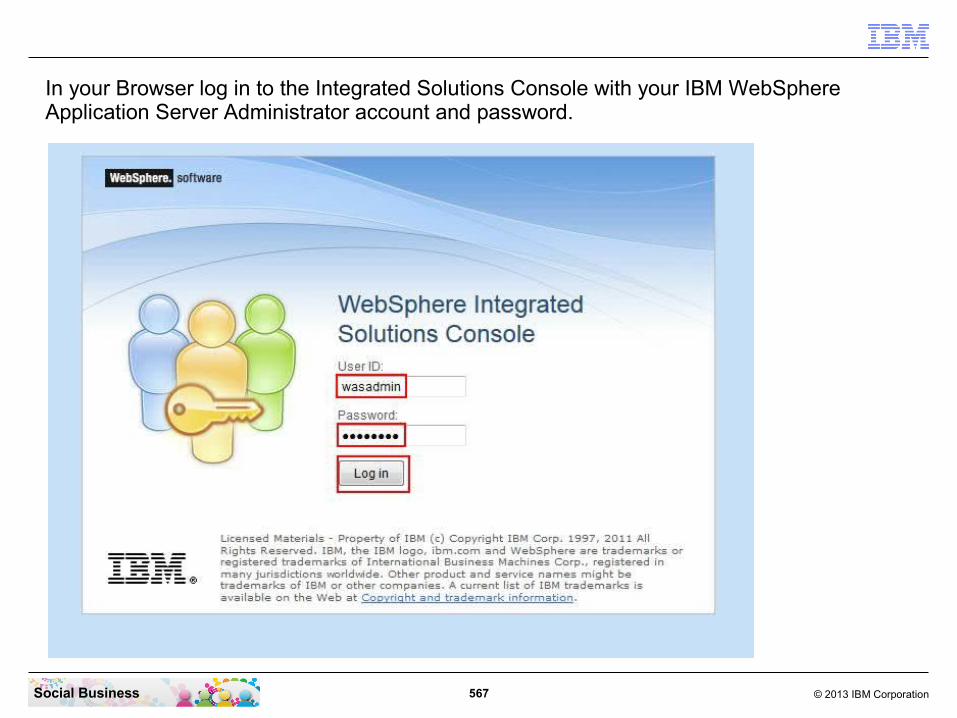
567 © 2013 IBM CorporationSocial Business
In your Browser log in to the Integrated Solutions Console with your IBM WebSphere Application Server Administrator account and password.
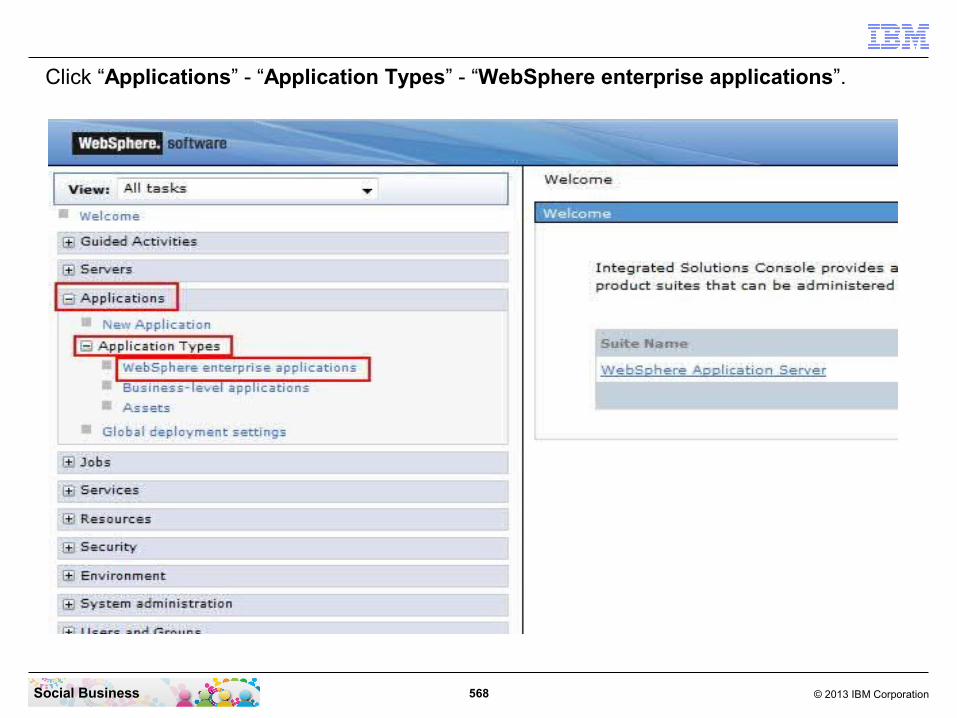
568 © 2013 IBM CorporationSocial Business
Click “Applications” - “Application Types” - “WebSphere enterprise applications”.

569 © 2013 IBM CorporationSocial Business
Click the “Homepage” application.

570 © 2013 IBM CorporationSocial Business
In the “Detail Properties” section click the “Security roles to user/group mapping” link.

571 © 2013 IBM CorporationSocial Business
Select the “admin” role and click the “Map Users...” button.

572 © 2013 IBM CorporationSocial Business
Enter a name or part of a name in the “Search String” field and click the “Search” button.

573 © 2013 IBM CorporationSocial Business
Select one of the names in the “Available” view and click the button to add it to the “Selected” view.

574 © 2013 IBM CorporationSocial Business
The user name is now in the “Selected” view. Click the “OK” button to continue.
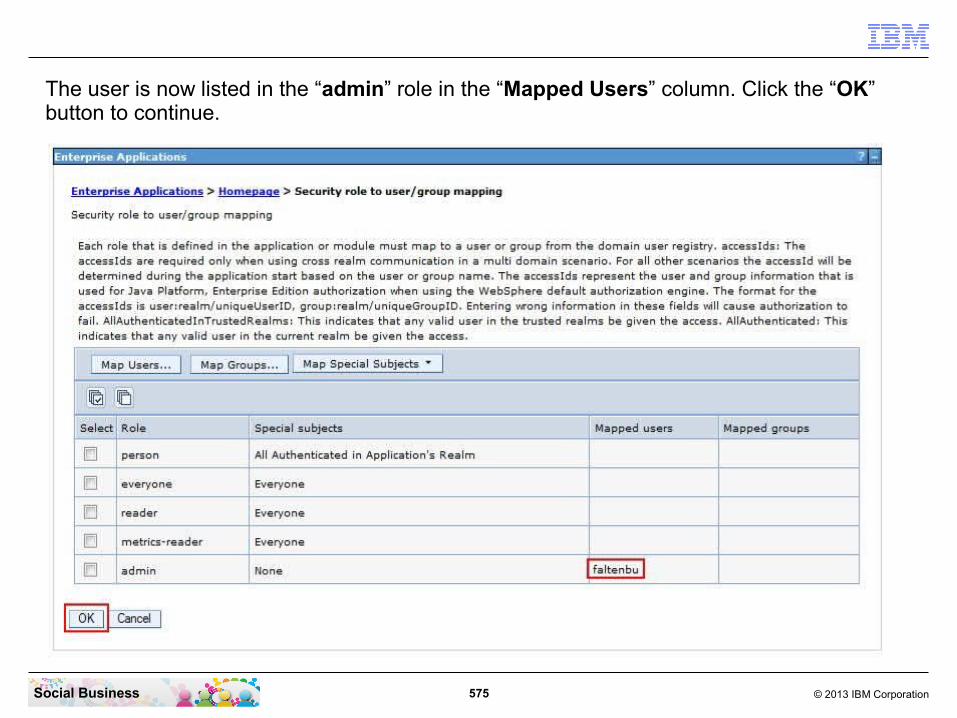
575 © 2013 IBM CorporationSocial Business
The user is now listed in the “admin” role in the “Mapped Users” column. Click the “OK” button to continue.

576 © 2013 IBM CorporationSocial Business
Click the “Save” link to save the last configuration changes.

577 © 2013 IBM CorporationSocial Business
If you now login with this administrative user id to your connections server, you can see the “Administration” link on the left side.

578 © 2013 IBM CorporationSocial Business
Here you can do some administrative configuration of the Homepage application.
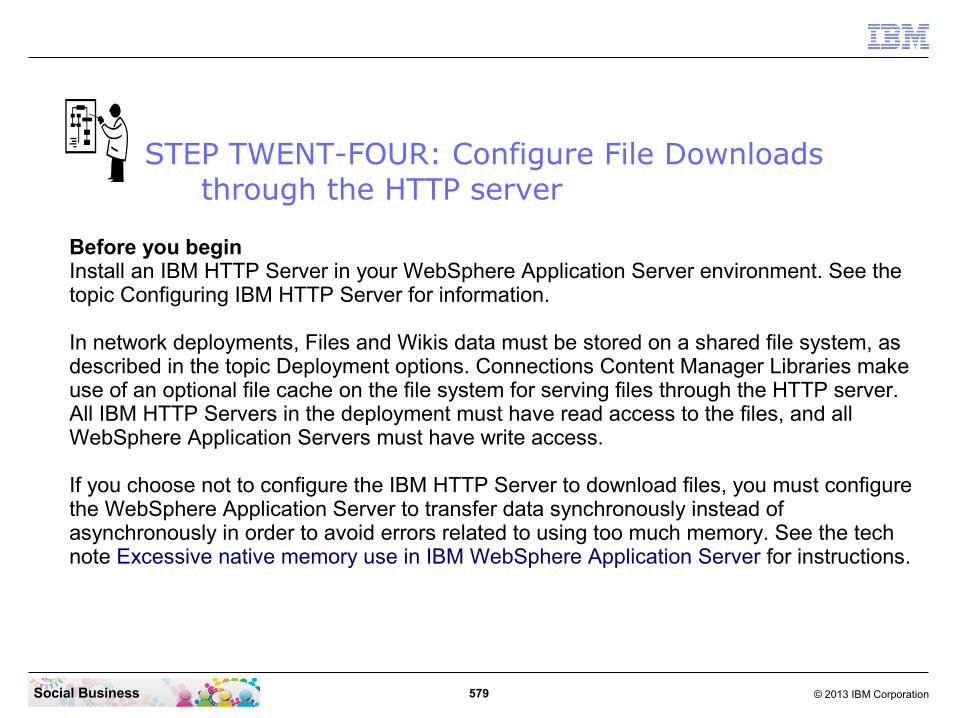
579 © 2013 IBM CorporationSocial Business
STEP TWENT-FOUR: Configure File Downloads through the HTTP server
Before you beginInstall an IBM HTTP Server in your WebSphere Application Server environment. See the topic Configuring IBM HTTP Server for information.
In network deployments, Files and Wikis data must be stored on a shared file system, as described in the topic Deployment options. Connections Content Manager Libraries make use of an optional file cache on the file system for serving files through the HTTP server. All IBM HTTP Servers in the deployment must have read access to the files, and all WebSphere Application Servers must have write access.
If you choose not to configure the IBM HTTP Server to download files, you must configure the WebSphere Application Server to transfer data synchronously instead of asynchronously in order to avoid errors related to using too much memory. See the tech note Excessive native memory use in IBM WebSphere Application Server for instructions.

580 © 2013 IBM CorporationSocial Business
About this taskIn the default deployment with an IBM HTTP Server, file download requests are passed from the IBM HTTP Server to the WebSphere Application Server. The WebSphere Application Server accesses the binary files in a data directory on the file system and returns them to the IBM HTTP Server, which passes them to the browser.
This is inefficient in deployments where large numbers of users are downloading files, partly because WebSphere Application Server has a limited thread pool that is tuned for short-lived transactions, and optimized for J2EE applications and not file downloads. In this environment it is possible that you would need to create a cluster to handle downloads, especially if you have slow transfer rates, for example caused by people in different geographies downloading 2 MB at 2 KB per second. This would cause problems, such as making it impractical to properly tune the thread pool.
Configuring the IBM HTTP Server to download the binary files instead makes downloading far more efficient, since IBM HTTP Server is designed specifically for serving files. This leaves WebSphere Application Server to perform tasks such as security checking and cache validation while leaving downloading to the IBM HTTP Server.
581 © 2013 IBM CorporationSocial Business
To configure this environment, you install an add-on module to the IBM HTTP Server. As in typical deployments, download requests are passed from the IBM HTTP Server to the WebSphere Application Server. But instead of responding with the binary data, the WebSphere Application Server only adds a special header to its response. The add-on module recognizes the header and directs the IBM HTTP Server to download the binary data.
This configuration requires making the Files and Wikis data directories, and optionally a content cache directory from Connections Content Manager, available to the IBM HTTP Server using an alias. This creates a security concern, so you must configure the access control at the IBM HTTP Server level. After you configure security, access to the data through the HTTP Server is denied unless a specific variable is set. Requests to the applications on WebSphere Application Server are then configured to set the variable. In other words, only requests passing through WebSphere Application Server are able to access the data directory, with WebSphere Application Server acting as the authorizer.
If you use the add-on module you must use an IBM HTTP Server address for the IBM Connections "inter-service" URL. See the topic Troubleshooting inter-server communicationfor information on setting an inter-service URL.
Do the following tasks to configure IBM HTTP Server downloading:

582 © 2013 IBM CorporationSocial Business
Open your File Explorer and navigate to the directory “C:\IBM\Connections\plugins\ihs\mod_ibm_local_reirection\win_ia32_ap22”. Ths is the directory for the used Windows OS version in this example. Here you can find the file “mod_ibm_local_redirect.so”.
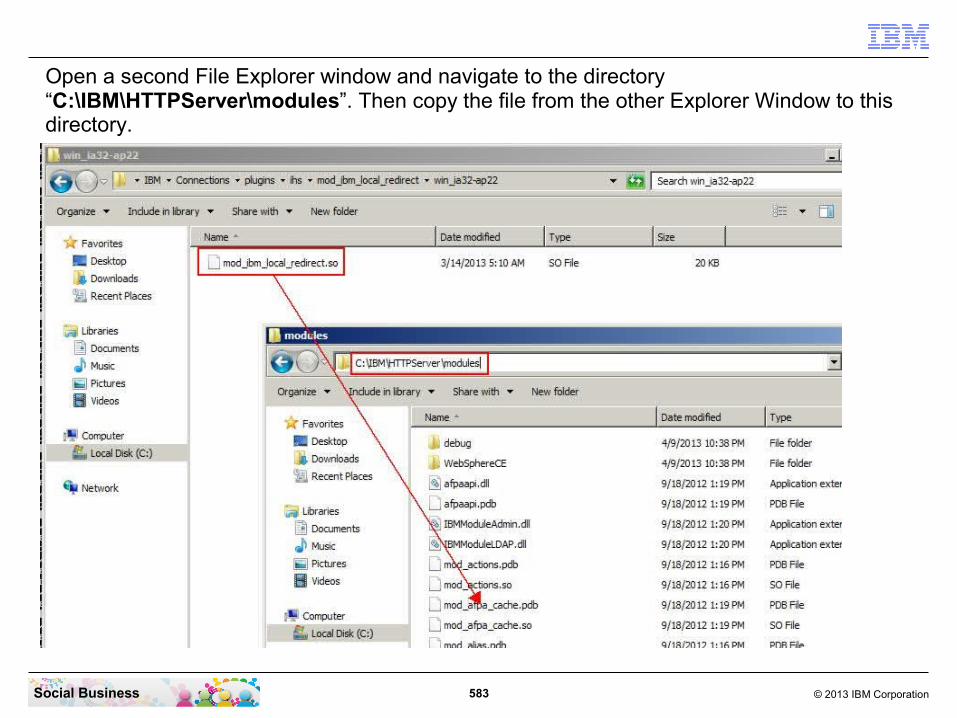
583 © 2013 IBM CorporationSocial Business
Open a second File Explorer window and navigate to the directory “C:\IBM\HTTPServer\modules”. Then copy the file from the other Explorer Window to this directory.
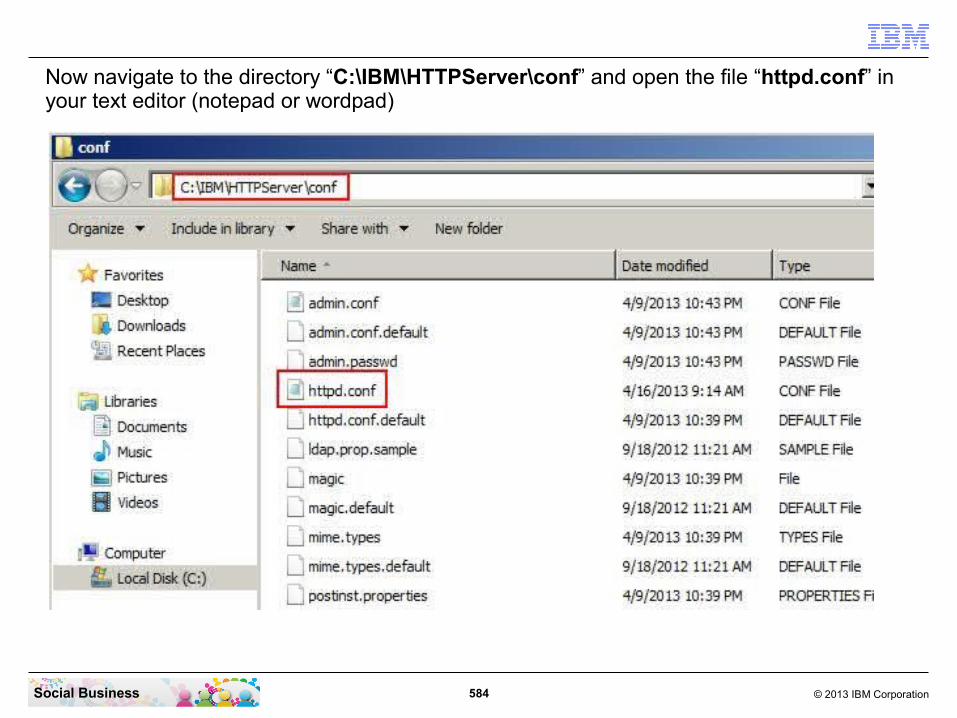
584 © 2013 IBM CorporationSocial Business
Now navigate to the directory “C:\IBM\HTTPServer\conf” and open the file “httpd.conf” in your text editor (notepad or wordpad)

585 © 2013 IBM CorporationSocial Business
At the end of the file add the line “LoadModule ibm_local_redirect_module modules/mod_ibm_local_redirect.so”.

586 © 2013 IBM CorporationSocial Business
If you have installed the IBM Connections Content Manager application, then navigate in your File Explorer to the directory “C:\IBM\Connections\data\shared”. Here create a subdirectory “ccmcache” that will be used to cache downloaded files.
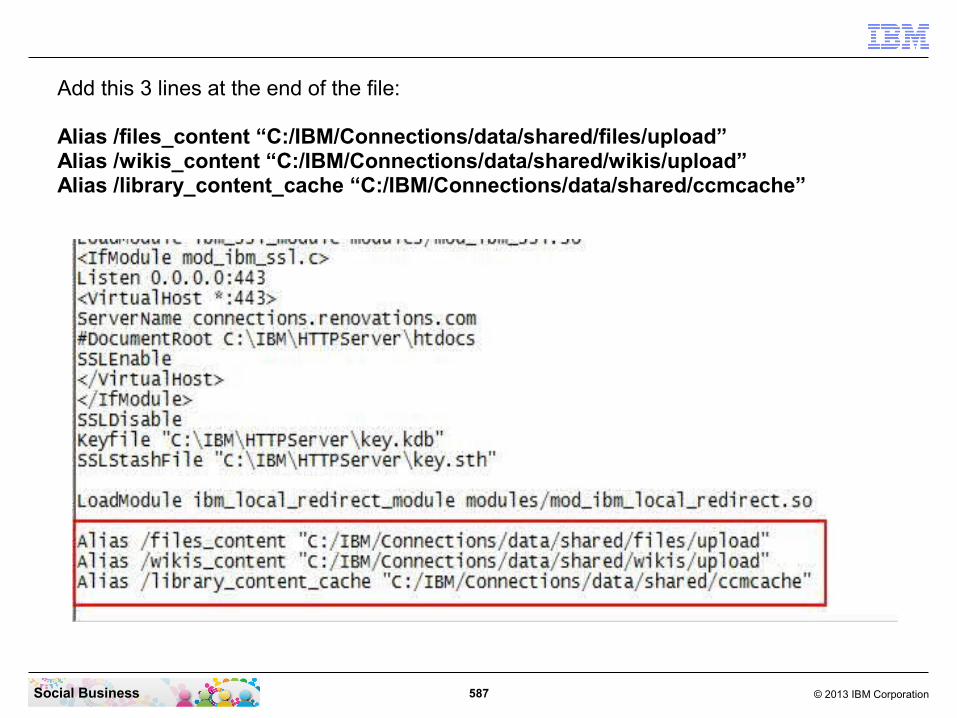
587 © 2013 IBM CorporationSocial Business
Add this 3 lines at the end of the file:
Alias /files_content “C:/IBM/Connections/data/shared/files/upload”Alias /wikis_content “C:/IBM/Connections/data/shared/wikis/upload”Alias /library_content_cache “C:/IBM/Connections/data/shared/ccmcache”
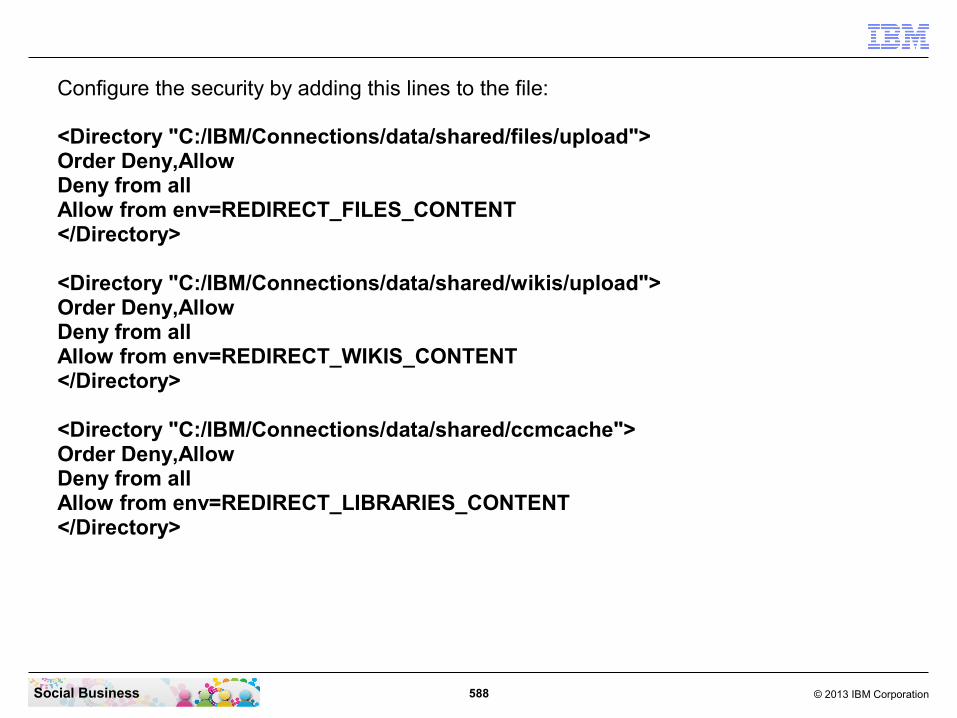
588 © 2013 IBM CorporationSocial Business
Configure the security by adding this lines to the file:
<Directory "C:/IBM/Connections/data/shared/files/upload">Order Deny,AllowDeny from allAllow from env=REDIRECT_FILES_CONTENT</Directory>
<Directory "C:/IBM/Connections/data/shared/wikis/upload">Order Deny,AllowDeny from allAllow from env=REDIRECT_WIKIS_CONTENT</Directory>
<Directory "C:/IBM/Connections/data/shared/ccmcache">Order Deny,AllowDeny from allAllow from env=REDIRECT_LIBRARIES_CONTENT</Directory>
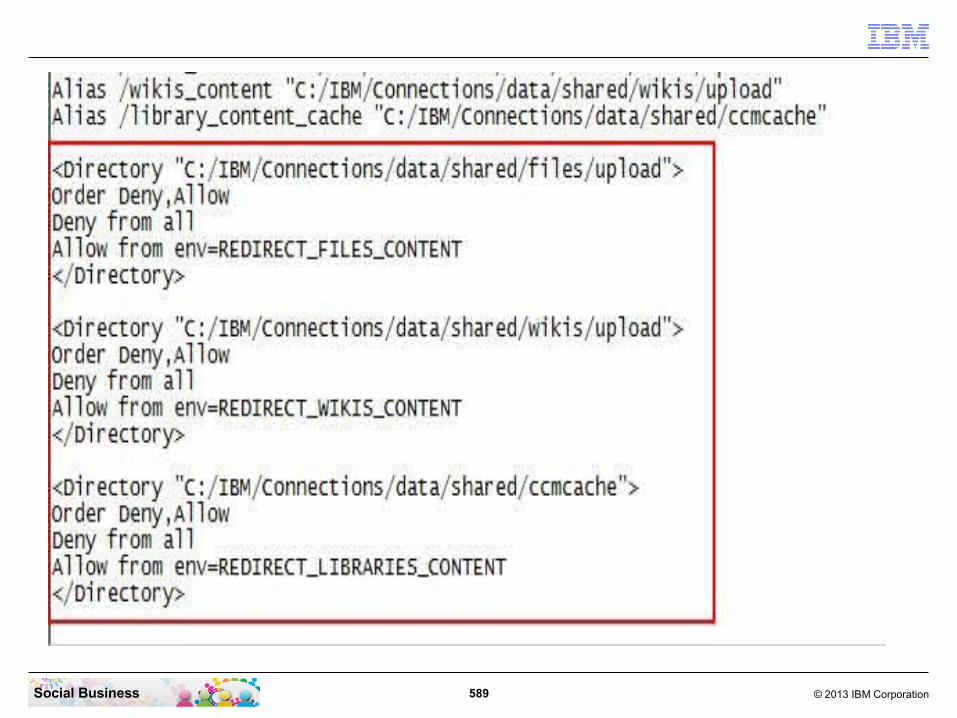
589 © 2013 IBM CorporationSocial Business
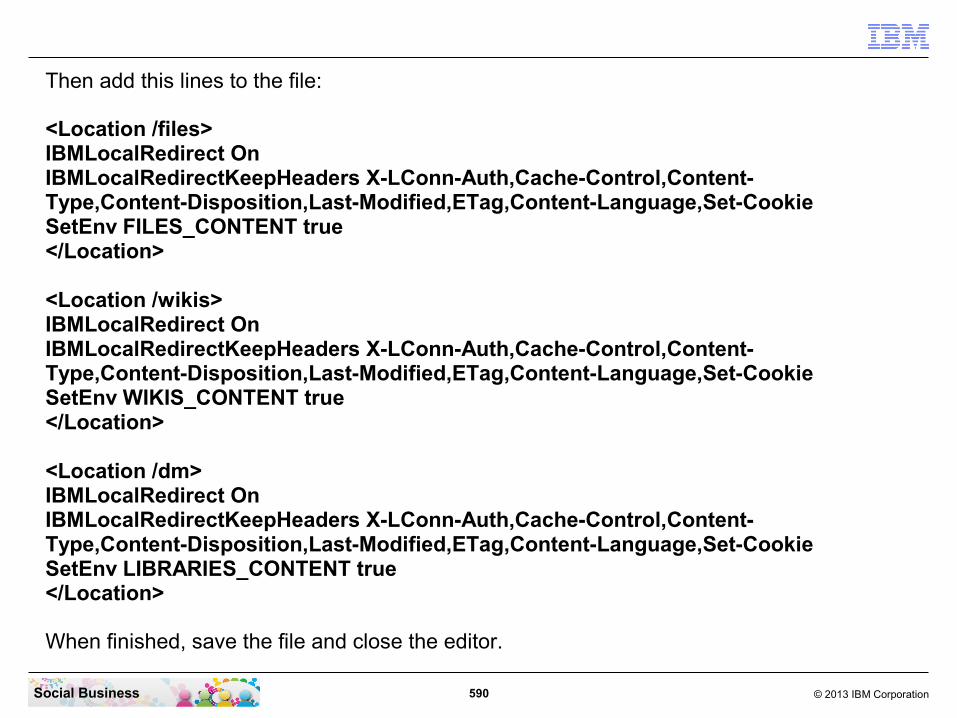
590 © 2013 IBM CorporationSocial Business
Then add this lines to the file:
<Location /files>IBMLocalRedirect OnIBMLocalRedirectKeepHeaders X-LConn-Auth,Cache-Control,Content-Type,Content-Disposition,Last-Modified,ETag,Content-Language,Set-CookieSetEnv FILES_CONTENT true</Location>
<Location /wikis>IBMLocalRedirect OnIBMLocalRedirectKeepHeaders X-LConn-Auth,Cache-Control,Content-Type,Content-Disposition,Last-Modified,ETag,Content-Language,Set-CookieSetEnv WIKIS_CONTENT true</Location>
<Location /dm>IBMLocalRedirect OnIBMLocalRedirectKeepHeaders X-LConn-Auth,Cache-Control,Content-Type,Content-Disposition,Last-Modified,ETag,Content-Language,Set-CookieSetEnv LIBRARIES_CONTENT true</Location>
When finished, save the file and close the editor.

591 © 2013 IBM CorporationSocial Business

592 © 2013 IBM CorporationSocial Business
Restart the “IBM HTTP Server V8.0” service.

593 © 2013 IBM CorporationSocial Business
To check that it works, start your browser and navigate to the URL “https://connections.renovations.com/files_content”. You should get a “Forbidden” message.

594 © 2013 IBM CorporationSocial Business
To check that it works, start your browser and navigate to the URL “https://connections.renovations.com/wikis_content”. You should get a “Forbidden” message.

595 © 2013 IBM CorporationSocial Business
To check that it works, start your browser and navigate to the URL “https://connections.renovations.com/library_content_cache”. You should get a “Forbidden” message.
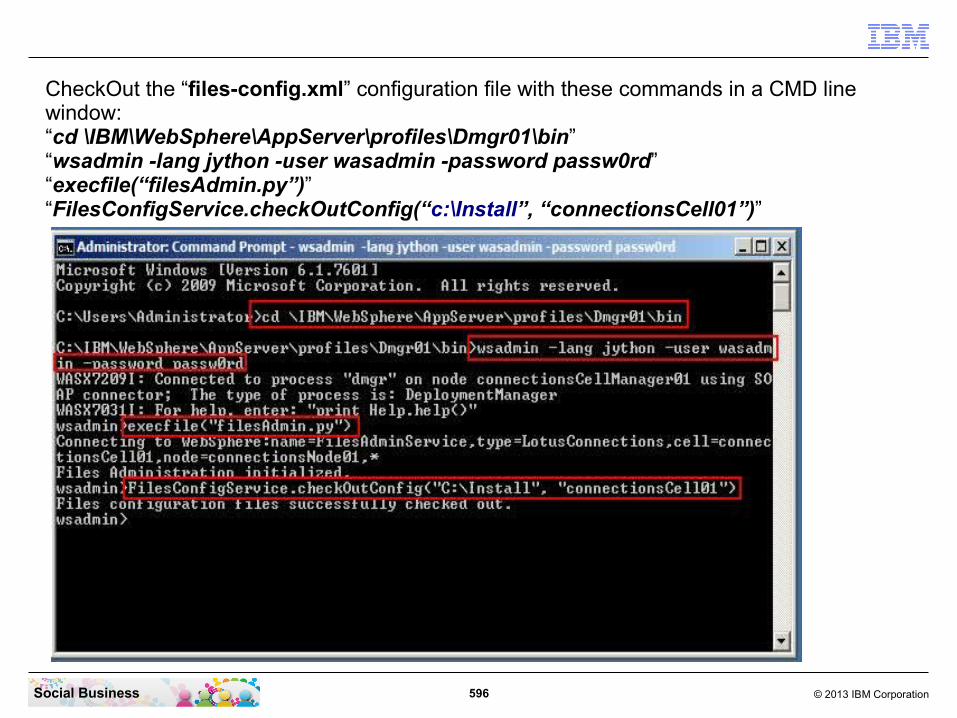
596 © 2013 IBM CorporationSocial Business
CheckOut the “files-config.xml” configuration file with these commands in a CMD line window:“cd \IBM\WebSphere\AppServer\profiles\Dmgr01\bin”“wsadmin -lang jython -user wasadmin -password passw0rd”“execfile(“filesAdmin.py”)”“FilesConfigService.checkOutConfig(“c:\Install”, “connectionsCell01”)”
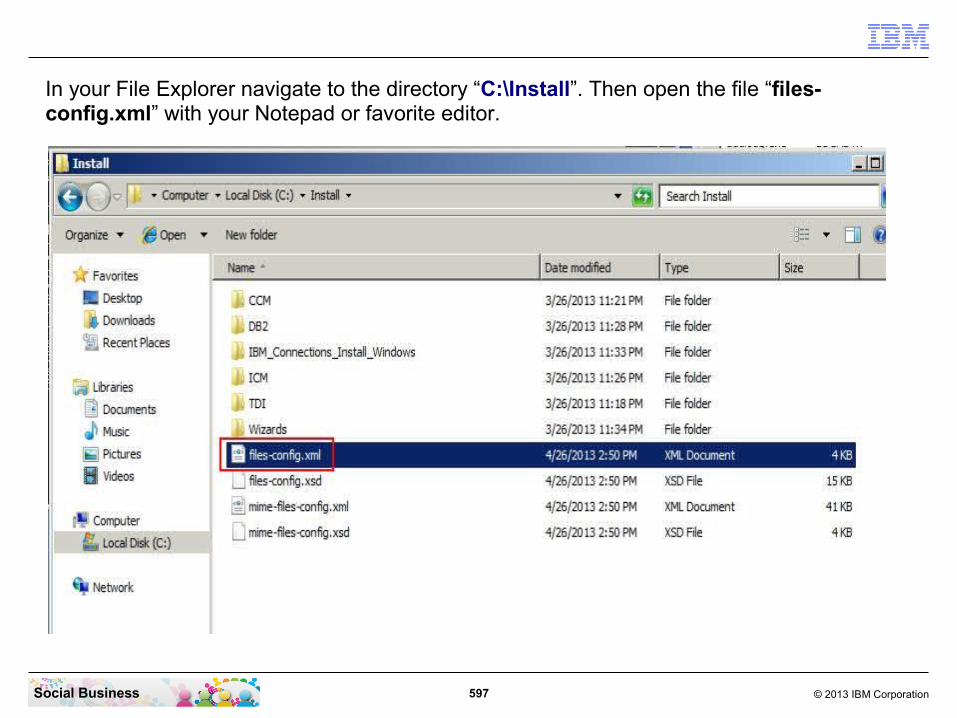
597 © 2013 IBM CorporationSocial Business
In your File Explorer navigate to the directory “C:\Install”. Then open the file “files-config.xml” with your Notepad or favorite editor.
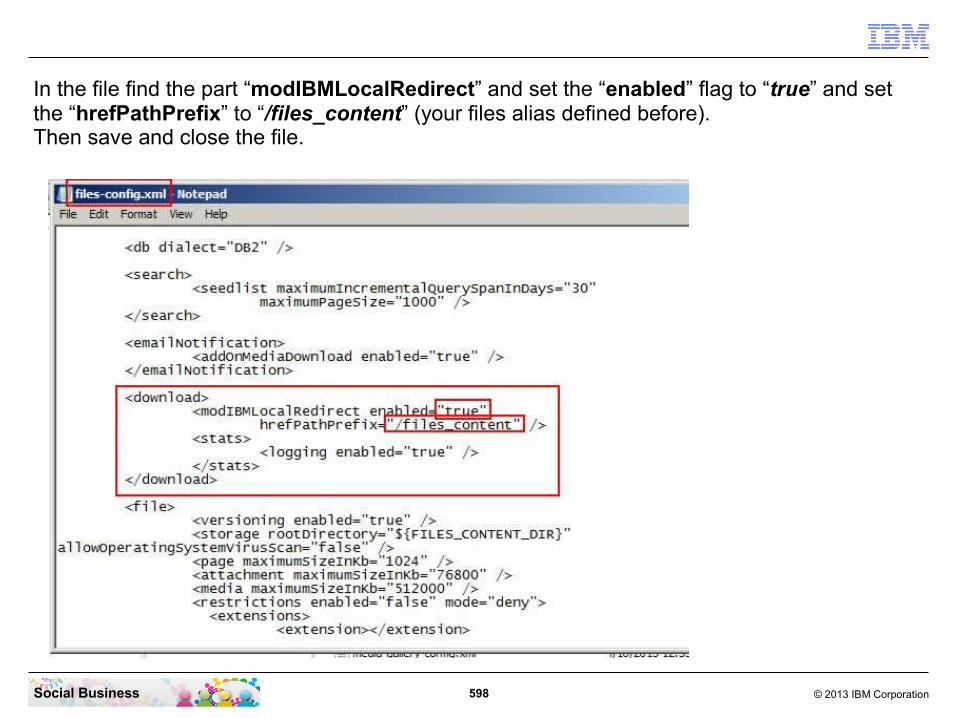
598 © 2013 IBM CorporationSocial Business
In the file find the part “modIBMLocalRedirect” and set the “enabled” flag to “true” and set the “hrefPathPrefix” to “/files_content” (your files alias defined before).Then save and close the file.

599 © 2013 IBM CorporationSocial Business
Check In the file with the command:“FilesConfigService.checkInConfig(“C:\Install”, “connectionsCell01”)”

600 © 2013 IBM CorporationSocial Business
To check out the Wikis Configuration file enter these commands:“execfile(“wikisAdmin.py”)”“WikisConfigService.checkOutCOnfig(“C:\Install”, “connectionsCell01”)”(in the screenshot here you can see what happens if you do a typo – capitalization of one letter was wrong)

601 © 2013 IBM CorporationSocial Business
In the file find the part “modIBMLocalRedirect” and set the “enabled” flag to “true” and set the “hrefPathPrefix” to “/wikis_content” (your files alias defined before).Then save and close the file.
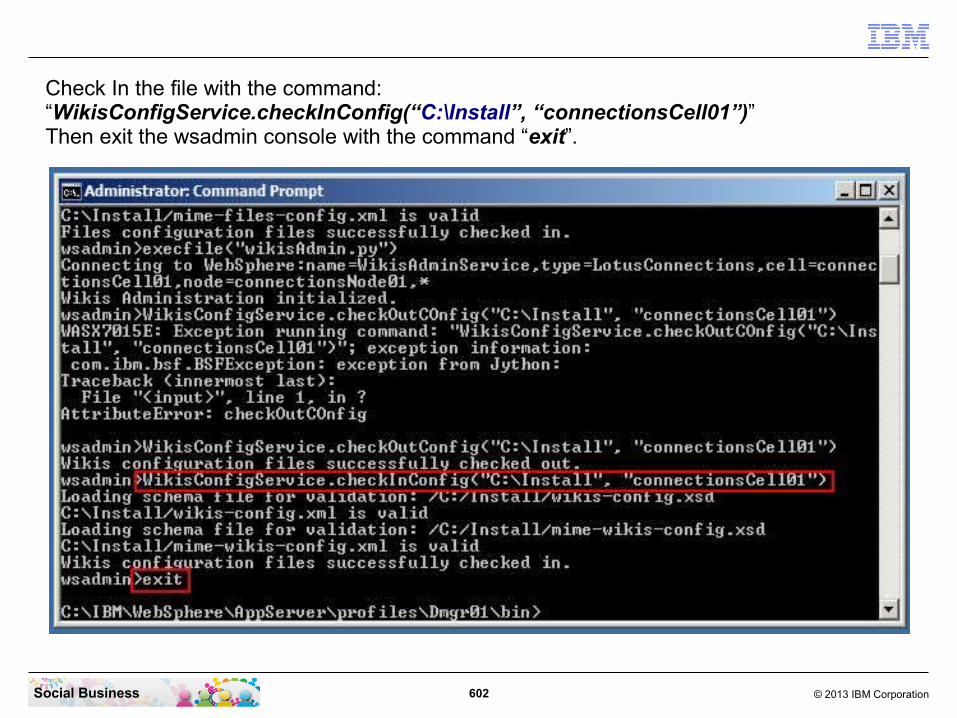
602 © 2013 IBM CorporationSocial Business
Check In the file with the command:“WikisConfigService.checkInConfig(“C:\Install”, “connectionsCell01”)”Then exit the wsadmin console with the command “exit”.
603 © 2013 IBM CorporationSocial Business
STEP TWENTY-FIVE: Install the Cognos FP1 Fixpack
Before you beginInstall Cognos Business Intelligence and federate the server to the IBM Connections Deployment Manager as explained in Installing Cognos Business Intelligence in the Pre-installation section of this documentation.
For additional information on updating Cognos Business Intelligence with fix packs, see Installing Fix Packs in the Cognos information center.
About this taskDownload the latest fix pack and apply it to the Cognos server. At a minimum, you will need to apply the fix pack listed below, but you should check with IBM Fix Central in case additional fix packs were made available after this documentation was published. Fix packs are cumulative; when you install the latest fix pack, it includes updates from all previous fix packs.

604 © 2013 IBM CorporationSocial Business
Switch to the Cognos Box. There open a CMD line window and navigate to the Cognos Server profile with the command “cd \IBM\WebSphere\AppServer\profiles\AppSrv01\bin”. Then stop the Cognos server with the command “stopserver cognos_server -username wasadmin -password passw0rd”.

605 © 2013 IBM CorporationSocial Business
Change to the FP1 directory with the command “cd \Install\Cognos\CBI_10.1.1_Win64_FP001\winx64h”. Then start the FP installer with the command “issetup.exe”.

606 © 2013 IBM CorporationSocial Business
The FP1 installer has started. Click the “Next” button to continue.

607 © 2013 IBM CorporationSocial Business
Agree to the license agreement. Then click the “Next” button to continue.

608 © 2013 IBM CorporationSocial Business
Change the Installation directory to “C:\IBM\CognosBI”. Then click the “Next” button to continue.
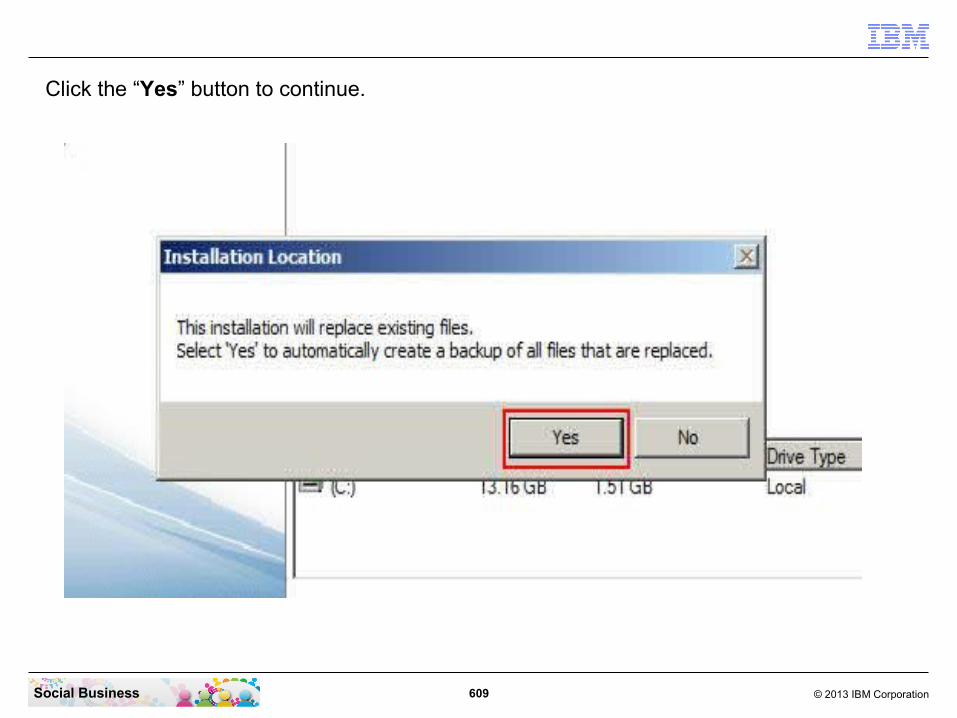
609 © 2013 IBM CorporationSocial Business
Click the “Yes” button to continue.
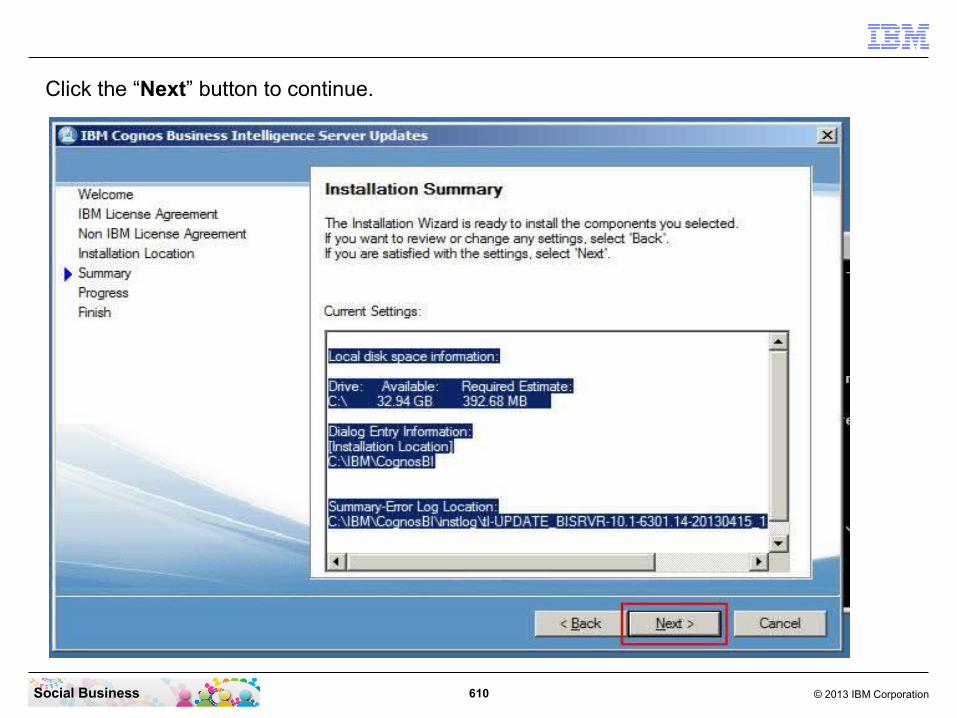
610 © 2013 IBM CorporationSocial Business
Click the “Next” button to continue.

611 © 2013 IBM CorporationSocial Business
The Cognos FP1 is now installing. This step takes 3 to 5 minutes.

612 © 2013 IBM CorporationSocial Business
The installation has finished. Click the “Finish” button to exit the wizard.

613 © 2013 IBM CorporationSocial Business
Switch back to the CMD line window. Navigate to the Cognos Setup directory with the command “cd ..\..\..\CognosConfig”. Then run the command “cognos-setup-update.bat”.

614 © 2013 IBM CorporationSocial Business
The Cognos Setup Update tool has successfully rebuild the Cognos application EAR file.

615 © 2013 IBM CorporationSocial Business
Start the nodeagent. Enter the command “cd \IBM\WebSphere\AppServer\profiles\AppSrv01\bin”. Then start the nodeagent with the command “startserver nodeagent”.
616 © 2013 IBM CorporationSocial Business
Open your browser and connect to your ISC with the URL “http://connections.renovations.com:9060/admin”. Login with your WAS Admin account and password.

617 © 2013 IBM CorporationSocial Business
Click “Applications” - “Application Types” - “WebSphere enterprise applications”.
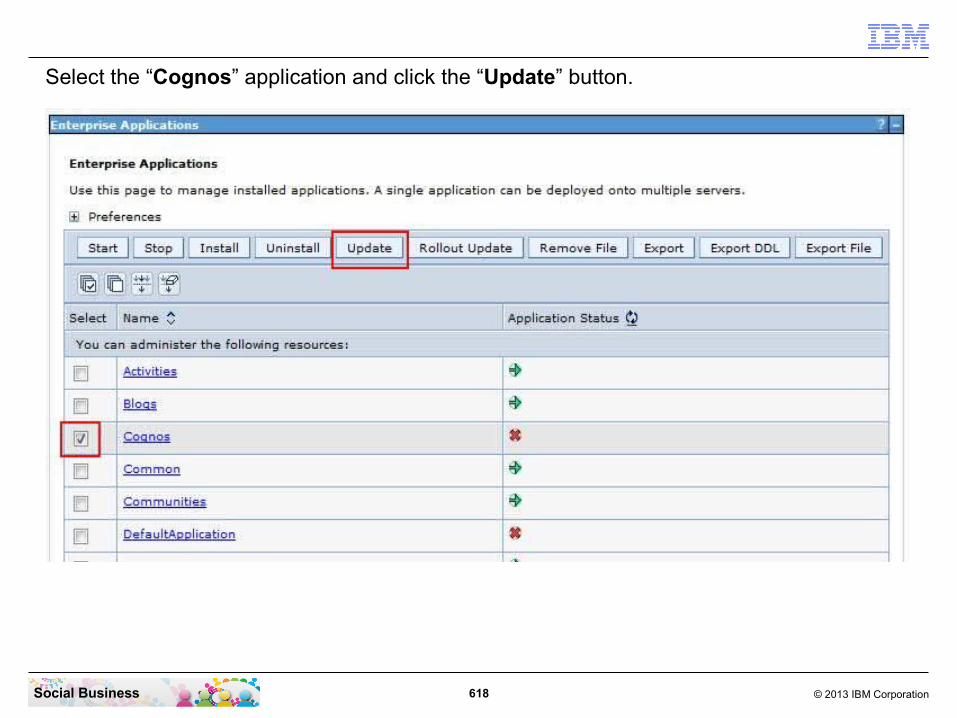
618 © 2013 IBM CorporationSocial Business
Select the “Cognos” application and click the “Update” button.

619 © 2013 IBM CorporationSocial Business
Select the option “Remote file system” and click the “Browse” button.

620 © 2013 IBM CorporationSocial Business
Select the “cognosNoder01”

621 © 2013 IBM CorporationSocial Business
Change to the directory “C:\IBM\CognosBI”. Then select the file “cognos.ear”.

622 © 2013 IBM CorporationSocial Business
Click the “OK” button to continue.
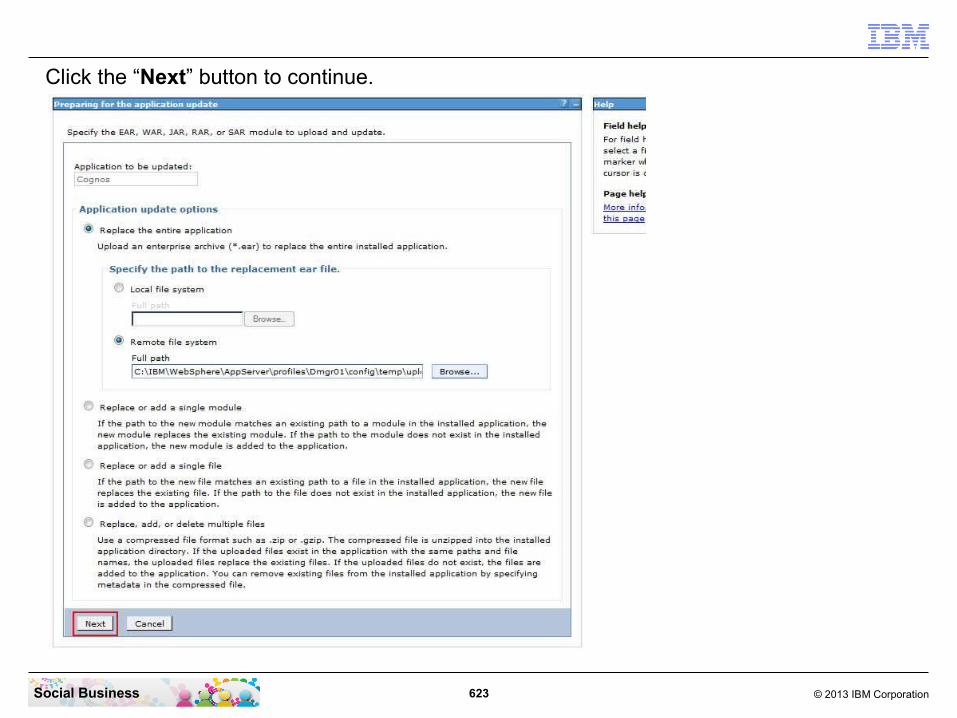
623 © 2013 IBM CorporationSocial Business
Click the “Next” button to continue.

624 © 2013 IBM CorporationSocial Business
Click the “Next” button to continue.

625 © 2013 IBM CorporationSocial Business
Click the “Next” button to continue.

626 © 2013 IBM CorporationSocial Business
Click the “Next” button to continue.

627 © 2013 IBM CorporationSocial Business
Click the “Finish” button to continue.
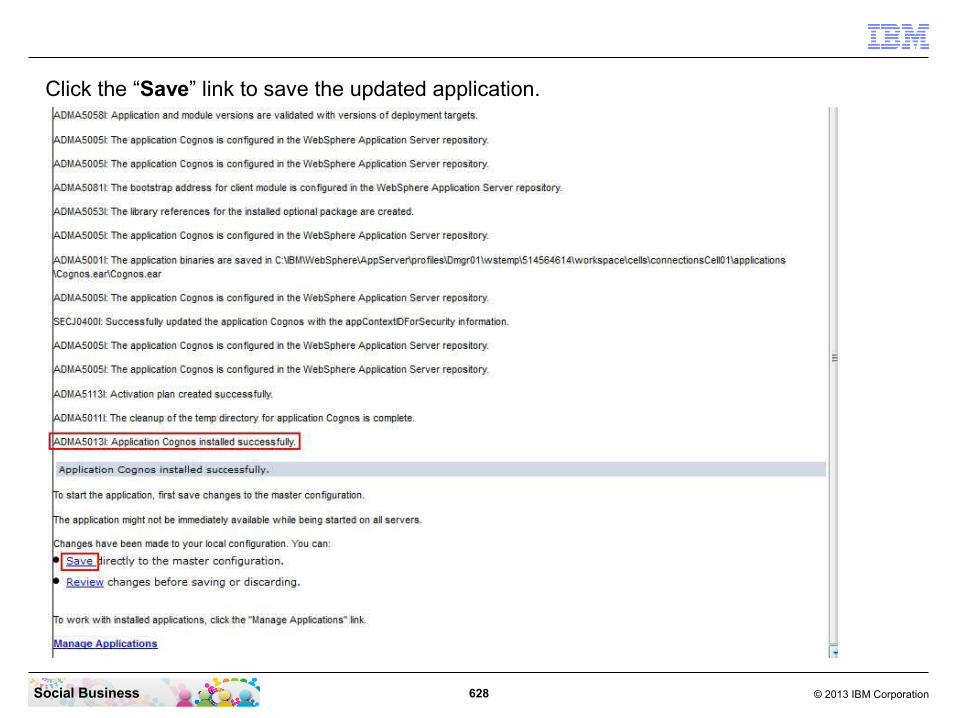
628 © 2013 IBM CorporationSocial Business
Click the “Save” link to save the updated application.

629 © 2013 IBM CorporationSocial Business
Switch to the CMD line window and navigate to the Cognos Application Server directory with the command “cd \IBM\WebSphere\AppServer\profiles\AppSrv01\bin”. Then start the Cognos server with the command “startserver cognos_server”. Wait approximately 3 minutes until Cognos is started completely. Then change to the Cognos Install directory with the command “cd \Install\CognosConfig”. Now run the command “cognos-configure-update.bat”.

630 © 2013 IBM CorporationSocial Business
The Cognos Configuration Update has finished successfully.

631 © 2013 IBM CorporationSocial Business
STEP TWENTY-SIX: Granting access to Global Metrics and Community Metrics
About this taskOther than administrators, only the users assigned to the metrics-report-run role can access global metrics. Whenever a user with this authorization level views the global metrics, the report information is updated automatically.
Note: The configuration in the “Common” application can be done to have the “Metrics” menu entry in the Navigation bar on the IBM Connections page frame. This task is not documented in the IBM Connections documentation wiki.
Note: The next step in the IBM Connections documentation wiki “Granting access to community metrics” is not required because it is already configured for all users in the LDAP. If you want to limit this community Metrics to some users only, then you need to do this step. It is equal to the step described below, but with the “Community” application.
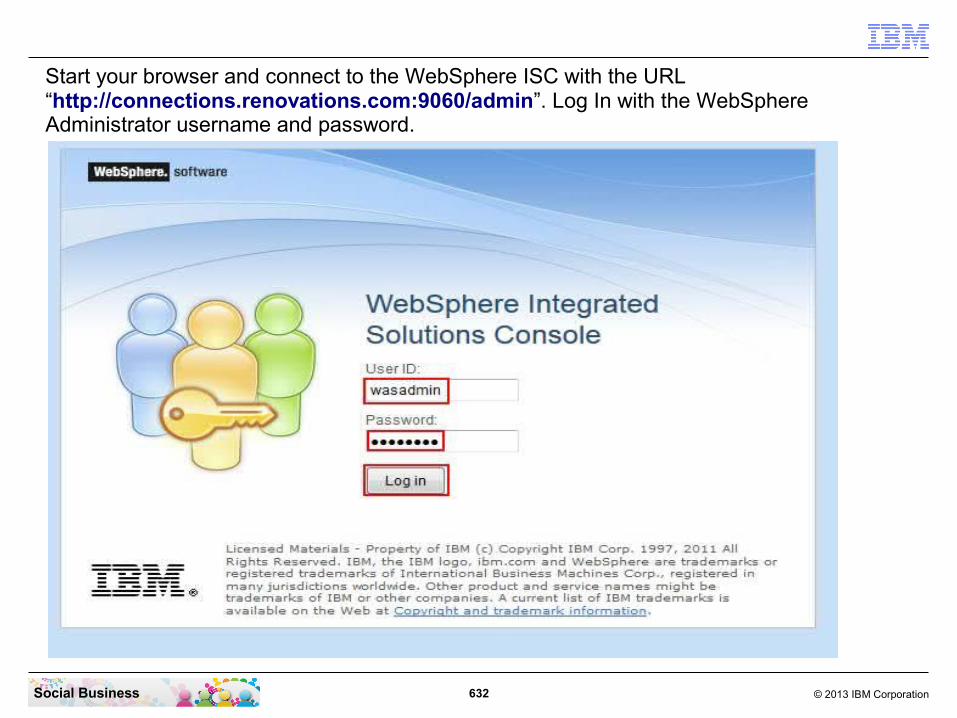
632 © 2013 IBM CorporationSocial Business
Start your browser and connect to the WebSphere ISC with the URL “http://connections.renovations.com:9060/admin”. Log In with the WebSphere Administrator username and password.
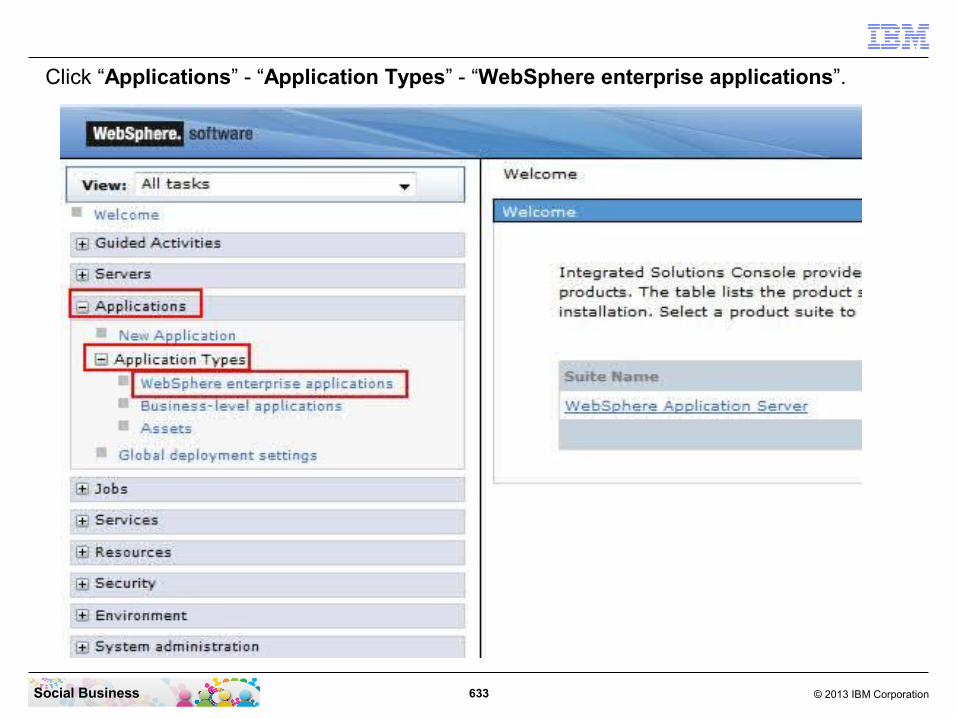
633 © 2013 IBM CorporationSocial Business
Click “Applications” - “Application Types” - “WebSphere enterprise applications”.

634 © 2013 IBM CorporationSocial Business
Click the “Metrics” application.
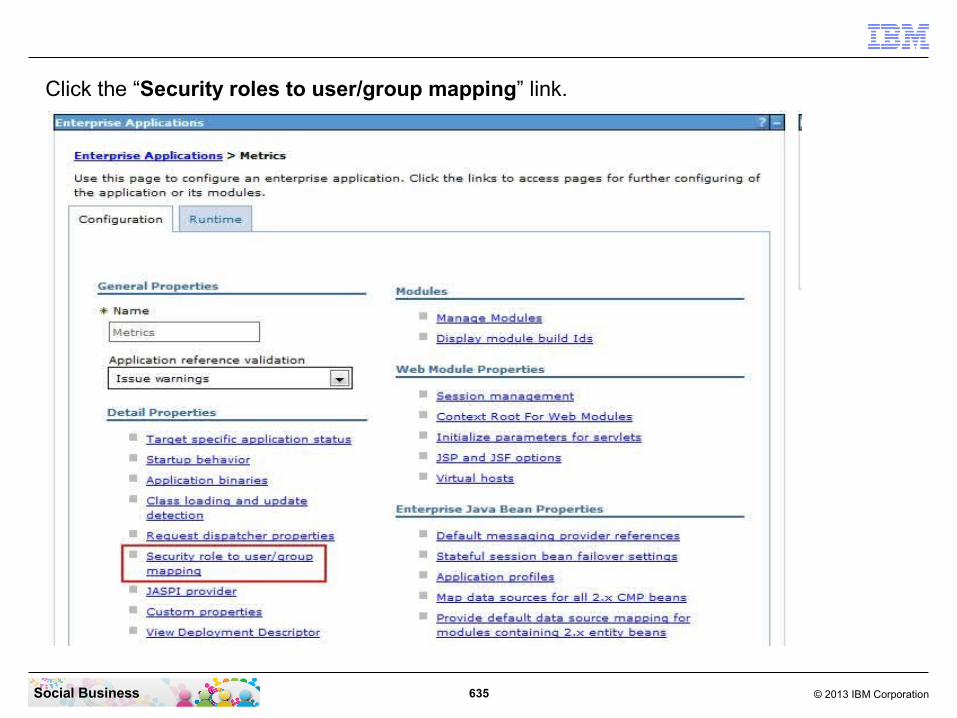
635 © 2013 IBM CorporationSocial Business
Click the “Security roles to user/group mapping” link.

636 © 2013 IBM CorporationSocial Business
Select the “metrics-report-run” role and click the “Map Special Subjects” button.
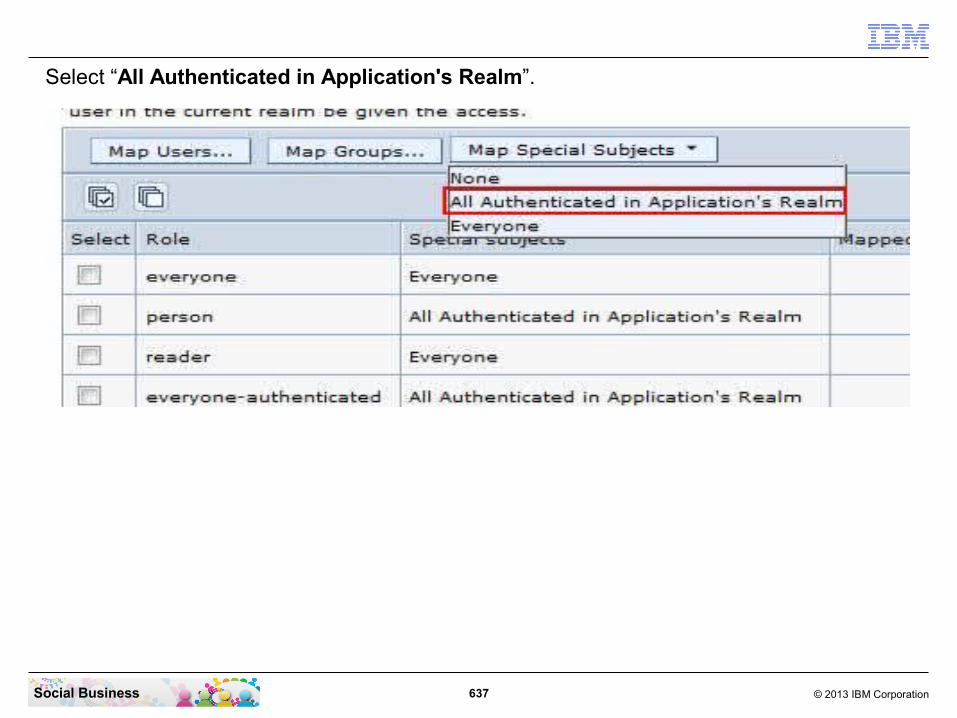
637 © 2013 IBM CorporationSocial Business
Select “All Authenticated in Application's Realm”.
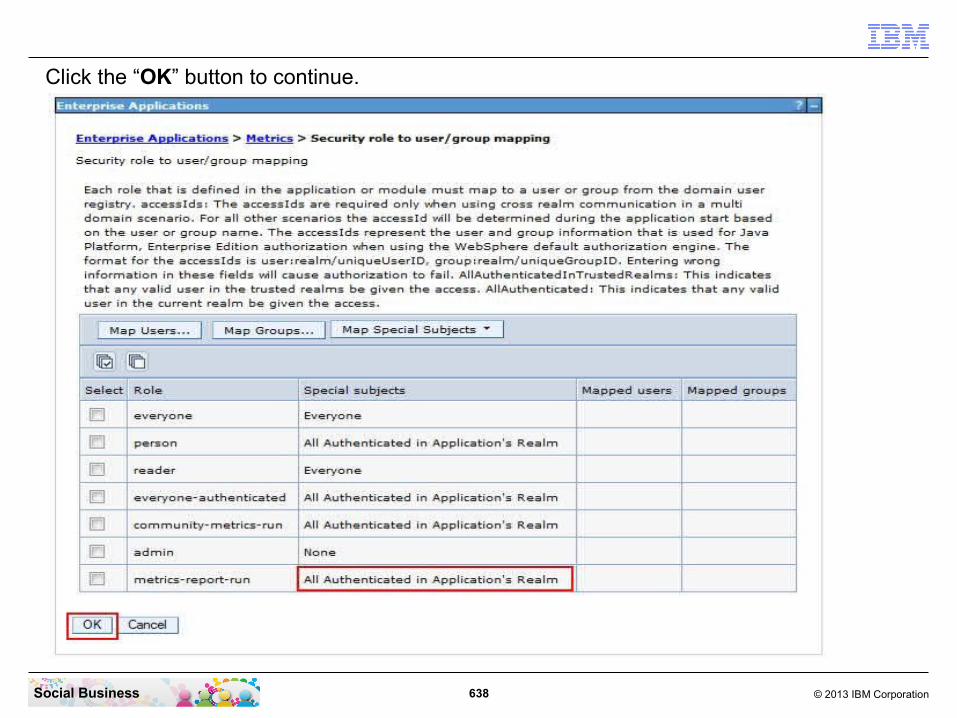
638 © 2013 IBM CorporationSocial Business
Click the “OK” button to continue.
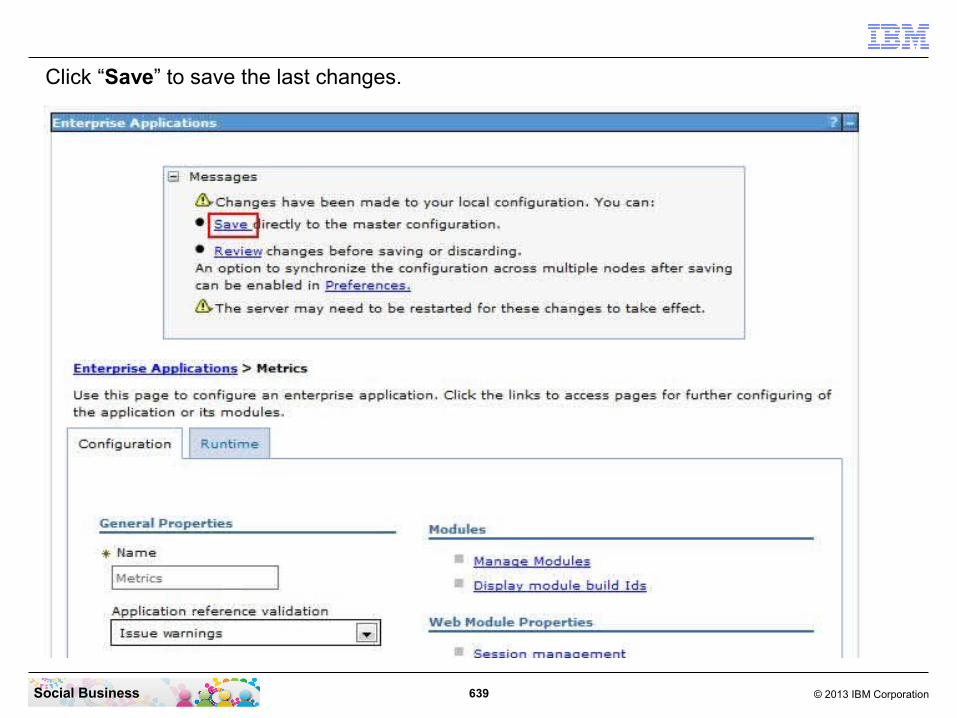
639 © 2013 IBM CorporationSocial Business
Click “Save” to save the last changes.

640 © 2013 IBM CorporationSocial Business
Click the “Common” application”

641 © 2013 IBM CorporationSocial Business
Click the “Security roles to user/group mapping” link.

642 © 2013 IBM CorporationSocial Business
Select the “metrics-report-run” role and click the “Map Special Subjects” button.

643 © 2013 IBM CorporationSocial Business
Select “All Authenticated in Application's Realm”.

644 © 2013 IBM CorporationSocial Business
Click the “OK” button to continue.
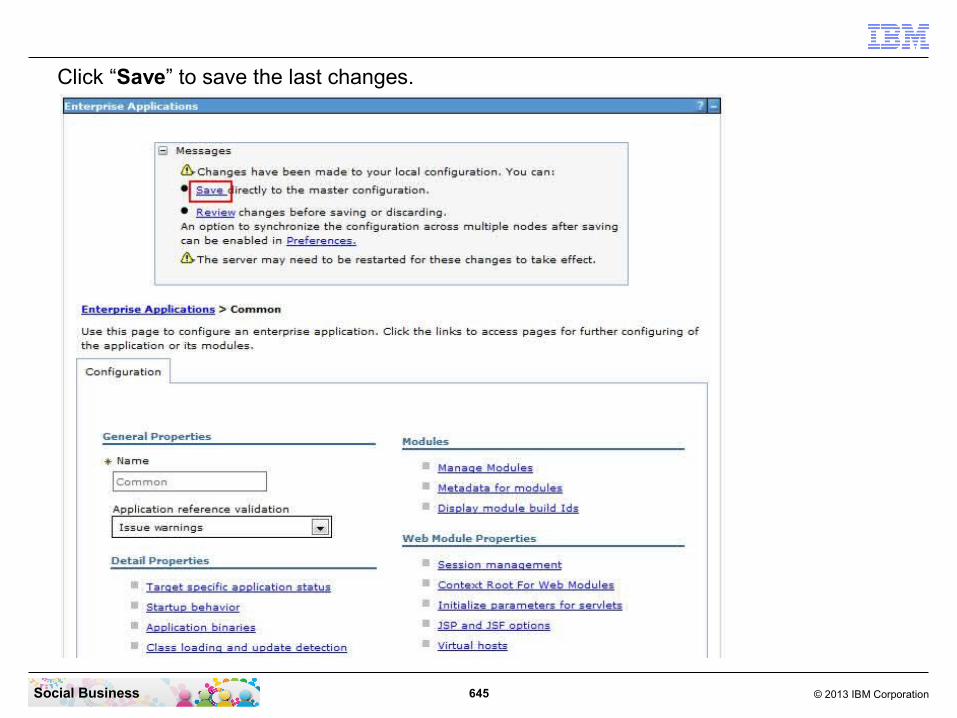
645 © 2013 IBM CorporationSocial Business
Click “Save” to save the last changes.

646 © 2013 IBM CorporationSocial Business
Click “System administration” - “Nodes”.

647 © 2013 IBM CorporationSocial Business
Select both nodes and click the “Full Resynchronize” button.
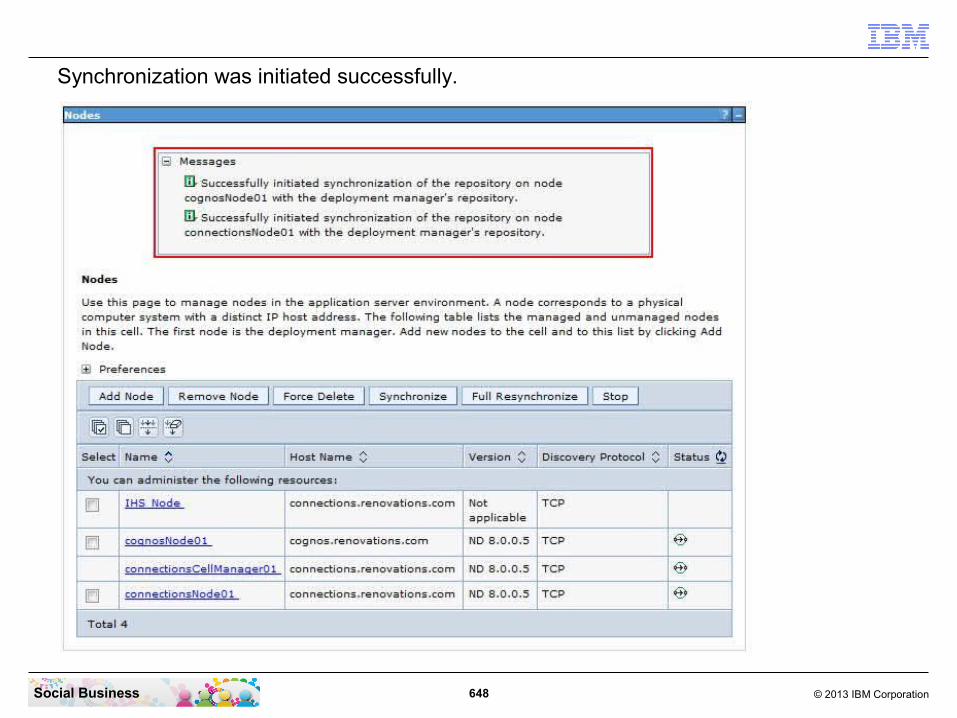
648 © 2013 IBM CorporationSocial Business
Synchronization was initiated successfully.

649 © 2013 IBM CorporationSocial Business
STEP TWENTY-SEVEN: Configuring the IBMConnectionsMetricsAdmin role on Cognos
Before you beginEnsure that the LDAP directory that will be used with Cognos Business Intelligence has been set up. When configuring the IBMConnectionsMetricsAdmin role, you must be logged in using the Cognos administrator account specified in the cognos.admin.username setting of the cognos_setup.properties file. If the Cognos administrator cannot view and add other users, consult your LDAP administrator.
About this taskAfter you have configured LDAP authentication for Cognos Business Intelligence, you must configure the IBMConnectionsMetricsAdmin role so that specified LDAP users can access Cognos features.
650 © 2013 IBM CorporationSocial Business
In particular, you will want to add the following users to this role:
● The user assigned to the Cognos administrator account
The Cognos administrator is the primary person responsible for configuring Cognos features and reports.
● All users who have been assigned to the admin role for Connections
Anyone tasked with administering the Connections deployment should have access to Cognos features to ensure they can manage the full deployment as needed.
● All users who have been assigned to the metrics-report-run role
Users who have been authorized to run global metrics reports require access to Cognos before they can work with the reports.
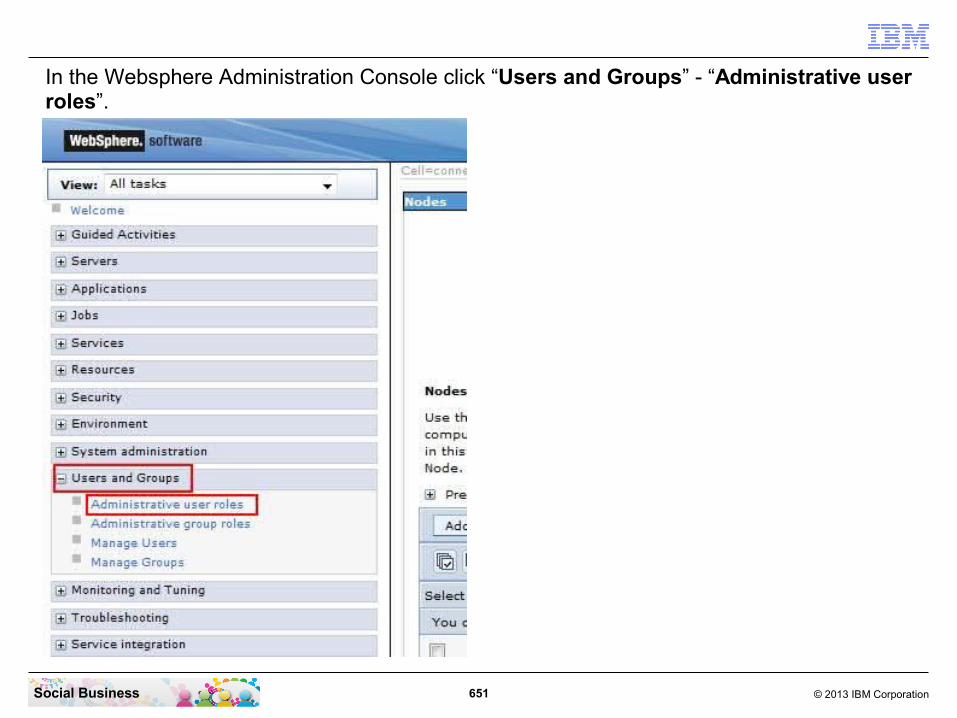
651 © 2013 IBM CorporationSocial Business
In the Websphere Administration Console click “Users and Groups” - “Administrative user roles”.

652 © 2013 IBM CorporationSocial Business
Click the “Add...” button.

653 © 2013 IBM CorporationSocial Business
Select the “Administrator” role and enter the Cognos Administrators short name in the Search String Field. Then click the “Search” button.

654 © 2013 IBM CorporationSocial Business
Select the Cognos Admin username in the “Available” table and click the “move” button.

655 © 2013 IBM CorporationSocial Business
Now click the “OK” button to continue.
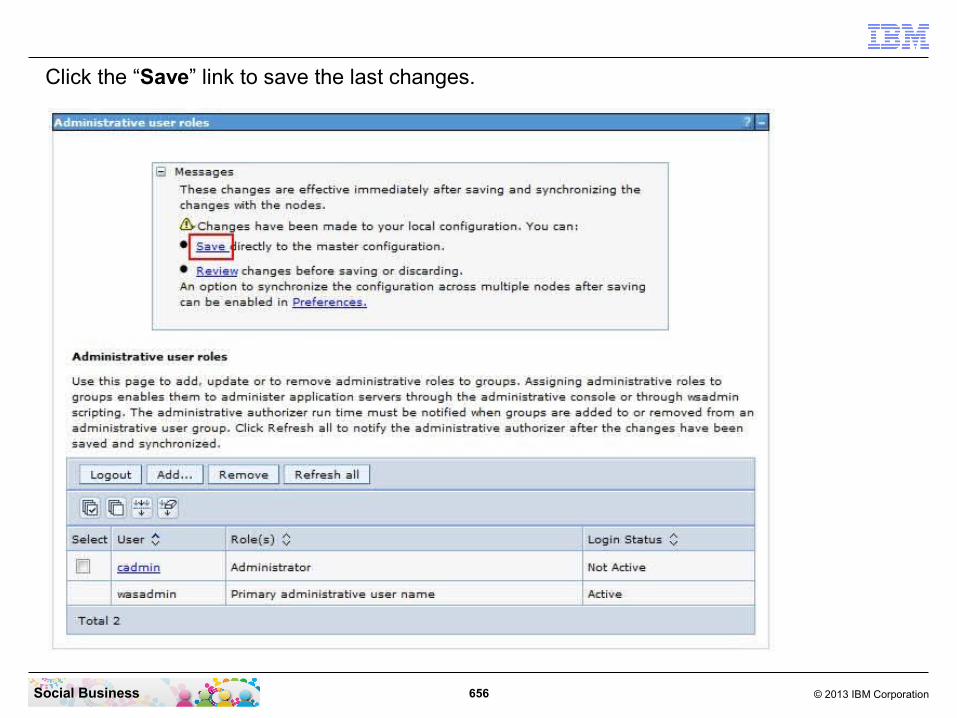
656 © 2013 IBM CorporationSocial Business
Click the “Save” link to save the last changes.

657 © 2013 IBM CorporationSocial Business
Logout from the WebSphere Administration Console.
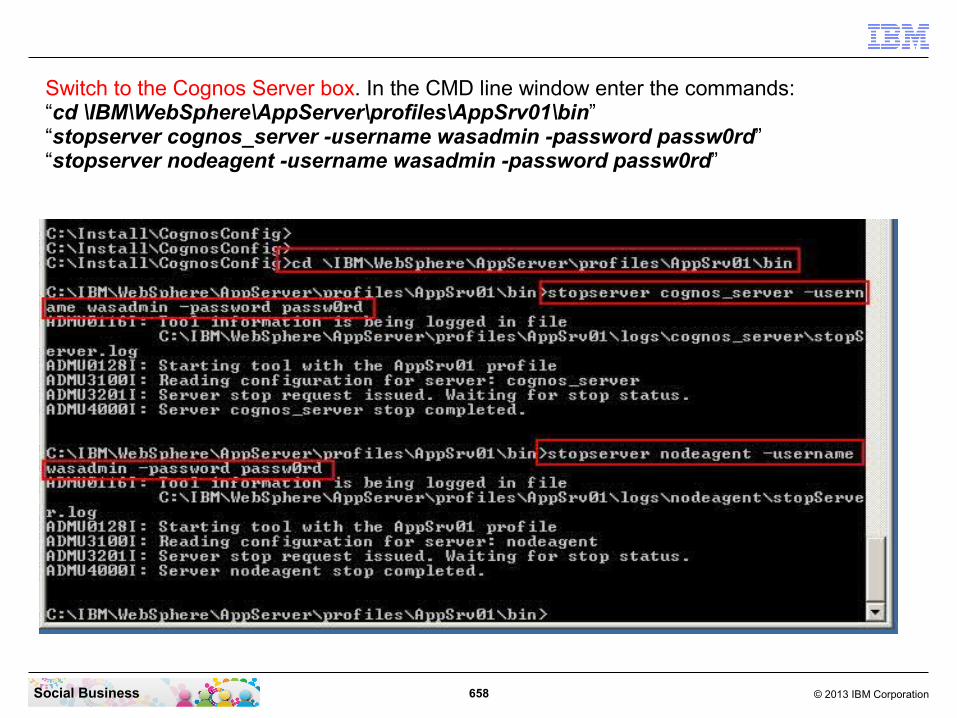
658 © 2013 IBM CorporationSocial Business
Switch to the Cognos Server box. In the CMD line window enter the commands:“cd \IBM\WebSphere\AppServer\profiles\AppSrv01\bin”“stopserver cognos_server -username wasadmin -password passw0rd”“stopserver nodeagent -username wasadmin -password passw0rd”

659 © 2013 IBM CorporationSocial Business
Switch back to the Connections Box. In the CMD Line window enter this commands:“cd \IBM\WebSphere\AppServer\profiles\AppSrv01\bin”“stopserver connections_server -username wasadmin -password passw0rd”“stopserver nodeagent -username wasadmin -password passw0rd”“cd ..\..\Dmgr01\bin”“stopmanager”

660 © 2013 IBM CorporationSocial Business
Start the servers now with this commands:“startmanager”“cd ..\..\AppSrv01\bin”“startserver nodeagent”“startserver connections_server”

661 © 2013 IBM CorporationSocial Business
Switch to the Cognos box. Then enter this commands to start the Cognos Server:
“startnode”“startserver cognos_server”

662 © 2013 IBM CorporationSocial Business
In your browser navigate to the WebSphere Administration Console and login with your Cognos Administrator user and password.

663 © 2013 IBM CorporationSocial Business
Click “Users and Groups” - “Manage Users”
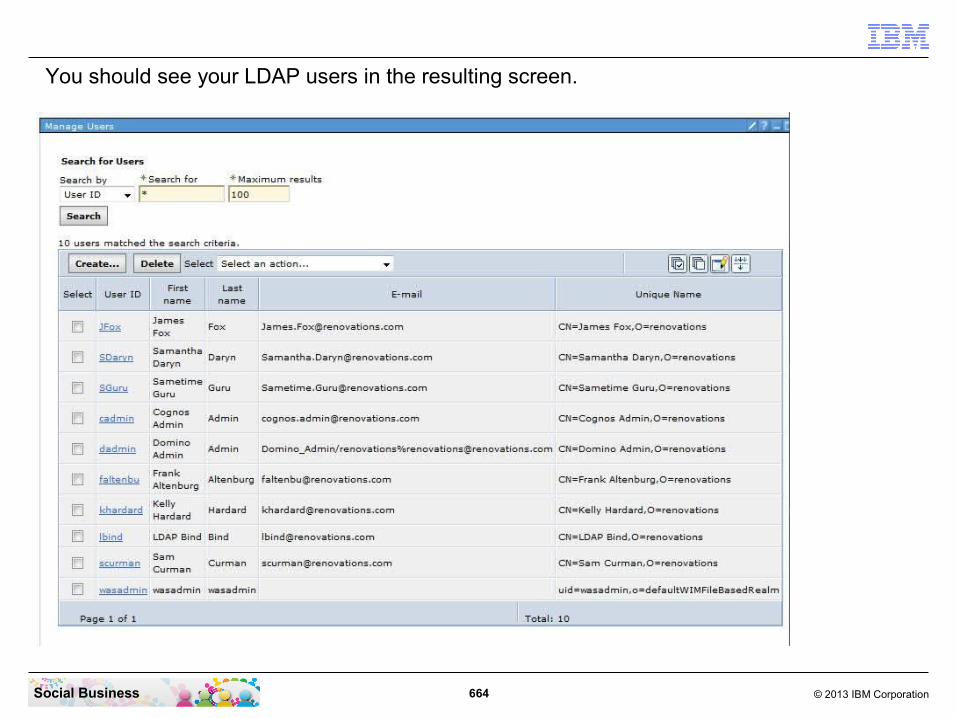
664 © 2013 IBM CorporationSocial Business
You should see your LDAP users in the resulting screen.

665 © 2013 IBM CorporationSocial Business
In the URL line just enter the URL “http://connections.renovations.com:9081/cognos/servlet/dispatch/ext”.

666 © 2013 IBM CorporationSocial Business
Because you where logged in with the Cognos Administrator user, just click the “Log On” link in the top center of the screen..

667 © 2013 IBM CorporationSocial Business
You are now logged in with the Cognos Administrator user.Click “Launch” and then “IBM Cognos Administration”.
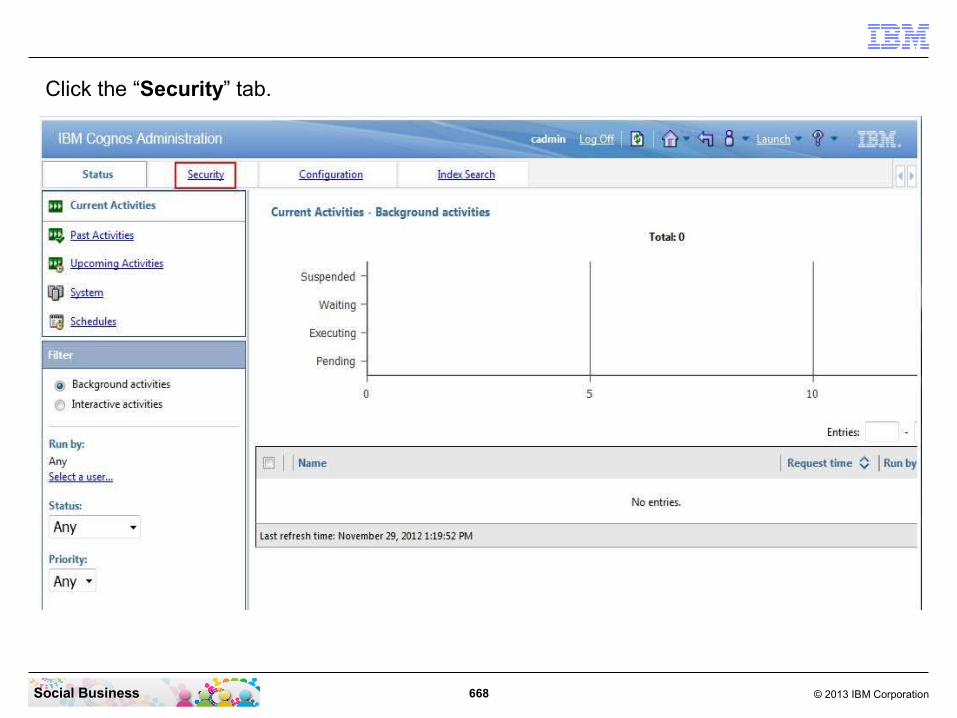
668 © 2013 IBM CorporationSocial Business
Click the “Security” tab.

669 © 2013 IBM CorporationSocial Business
Click the “Cognos” name.

670 © 2013 IBM CorporationSocial Business
Find the “IBMConnectionsMetricsAdmin” line and click the “More...” link.
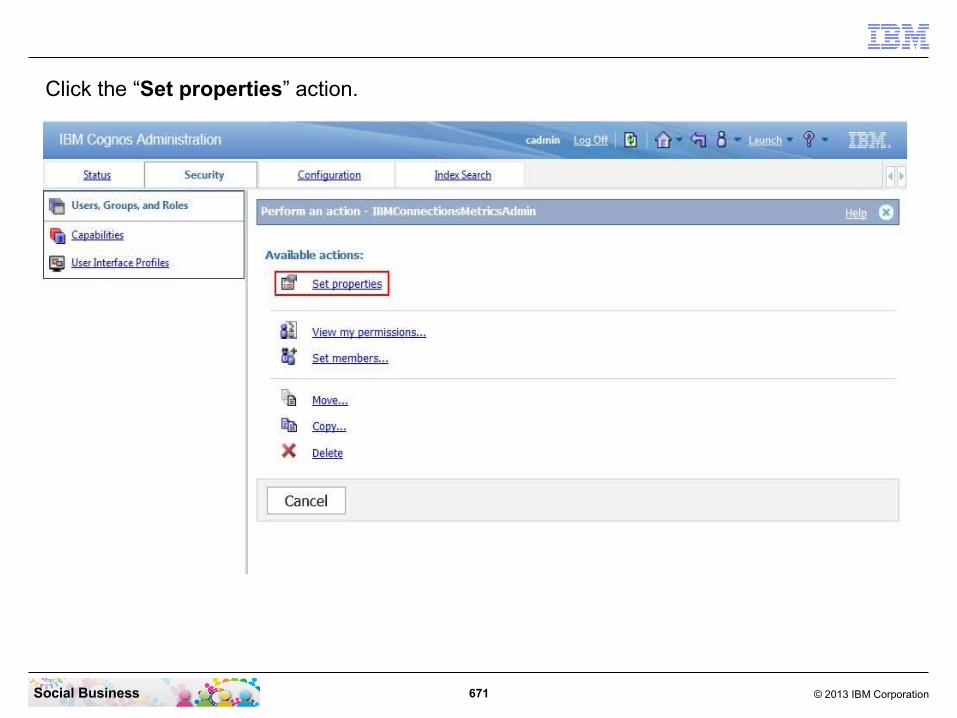
671 © 2013 IBM CorporationSocial Business
Click the “Set properties” action.

672 © 2013 IBM CorporationSocial Business
Click the “Members” tab.
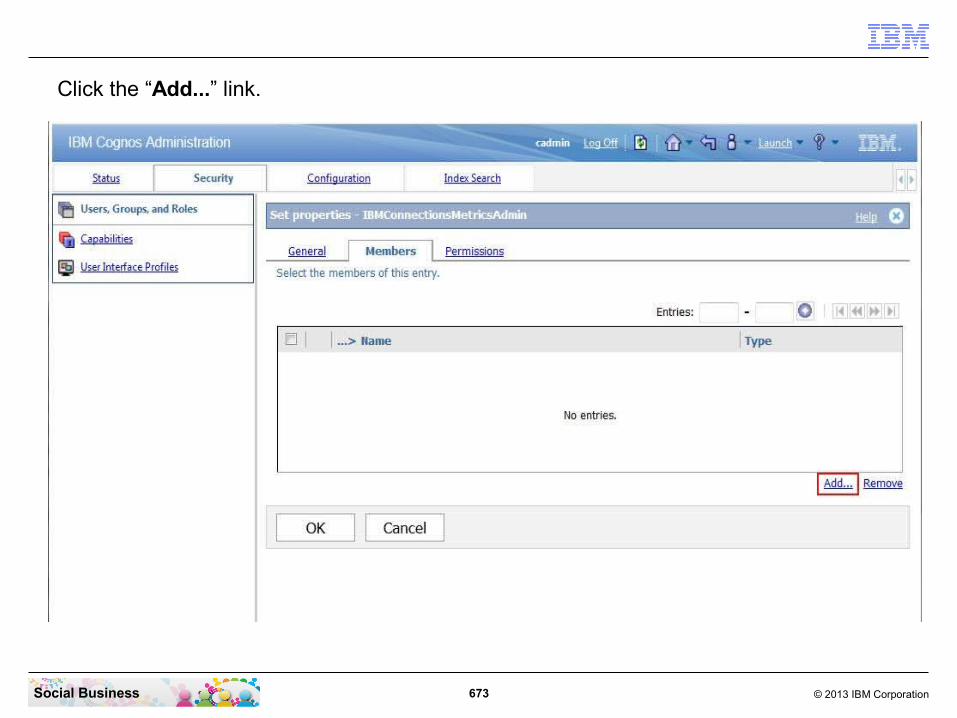
673 © 2013 IBM CorporationSocial Business
Click the “Add...” link.
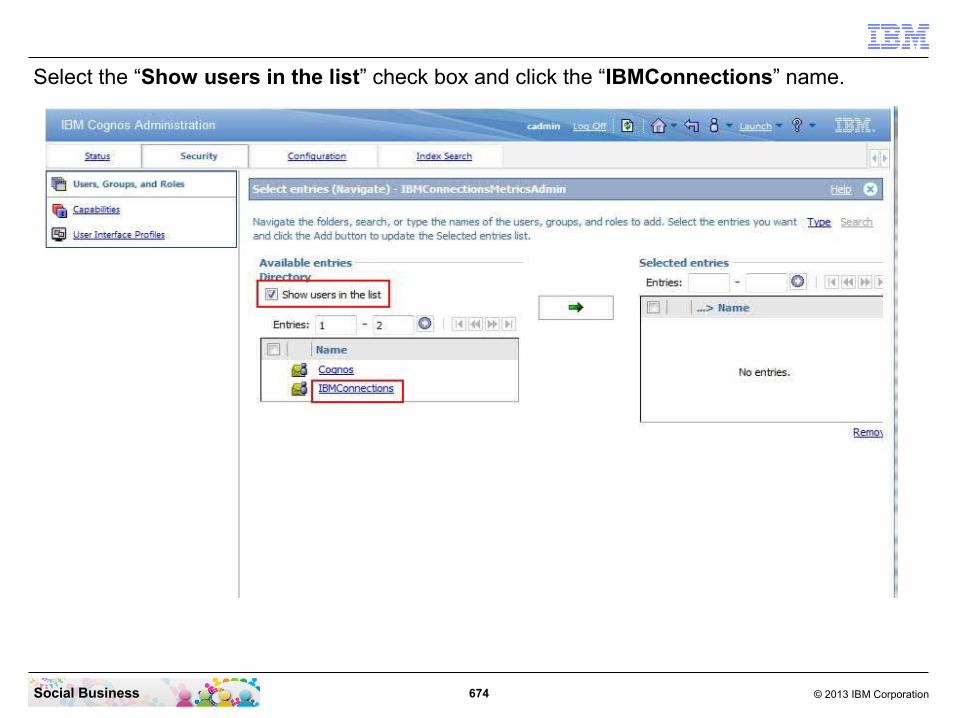
674 © 2013 IBM CorporationSocial Business
Select the “Show users in the list” check box and click the “IBMConnections” name.

675 © 2013 IBM CorporationSocial Business
Select all users you want to be able to run Metrics and click the “move” button in the middle.
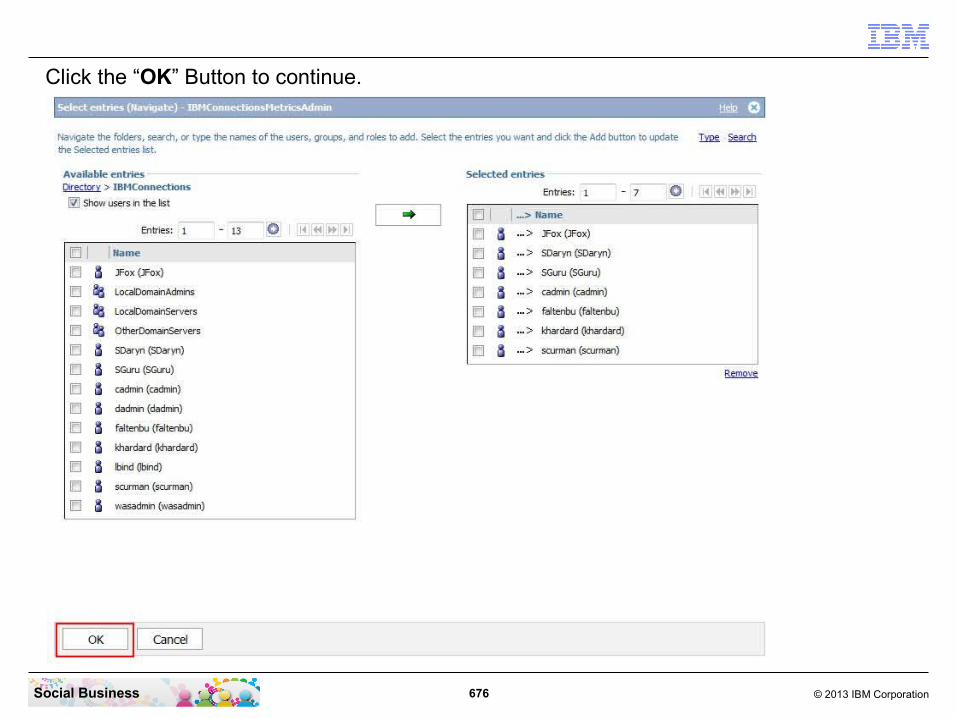
676 © 2013 IBM CorporationSocial Business
Click the “OK” Button to continue.

677 © 2013 IBM CorporationSocial Business
Click the “OK” Button to continue.

678 © 2013 IBM CorporationSocial Business
Click the “more” button to go to the next page.
Limit access to the System Administrators role by removing Everyone from the members list:
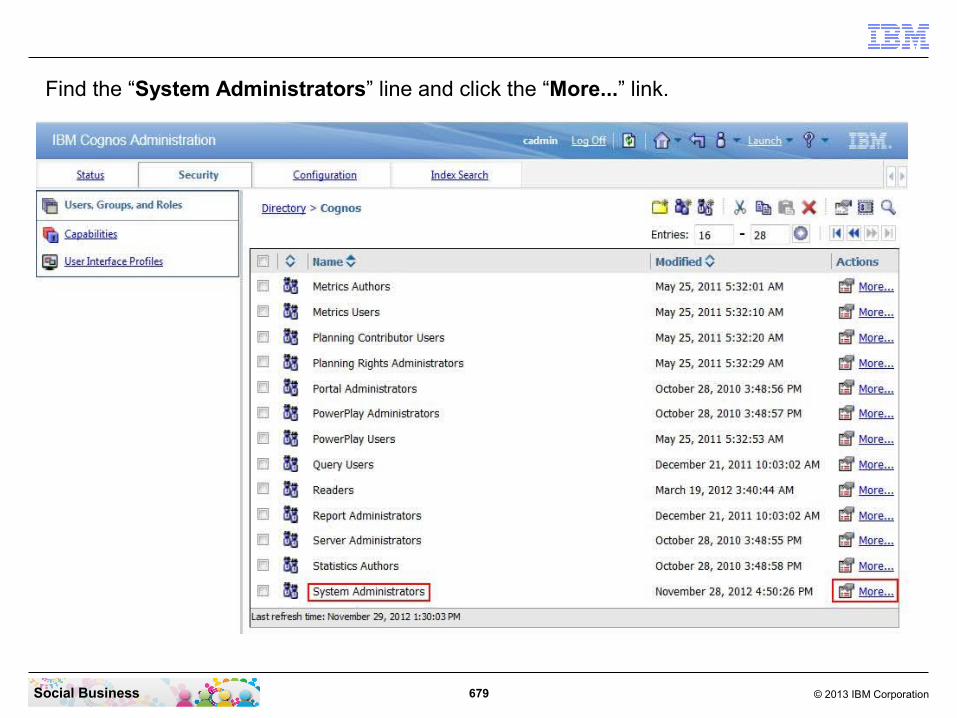
679 © 2013 IBM CorporationSocial Business
Find the “System Administrators” line and click the “More...” link.
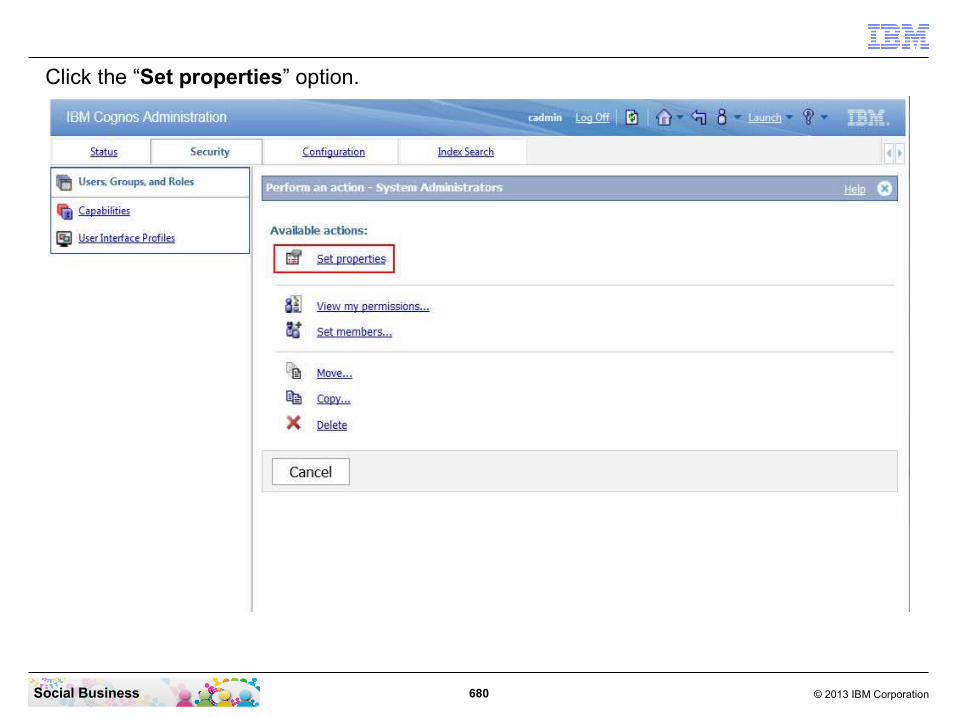
680 © 2013 IBM CorporationSocial Business
Click the “Set properties” option.

681 © 2013 IBM CorporationSocial Business
Click the “Members” tab.

682 © 2013 IBM CorporationSocial Business
Select the “Everyone” name and click the “Remove” link.
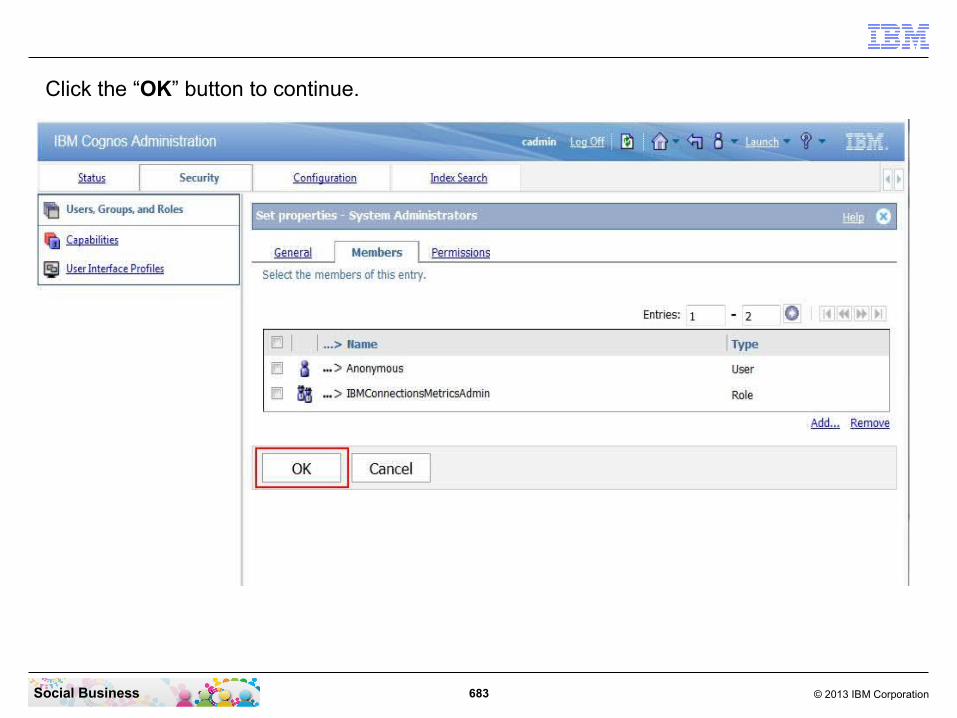
683 © 2013 IBM CorporationSocial Business
Click the “OK” button to continue.

684 © 2013 IBM CorporationSocial Business
Log Out from the Cognos Console and then close the Browser window.
685 © 2013 IBM CorporationSocial Business
STEP TWENTY-EIGHT: Configure Cognos to use HTTP Server and SSL
About this taskUse the Cognos Configuration tool to specify settings that enable Cognos BI Server to operate with IBM HTTP Server.
Note: The Cognos Configuration tool provides a graphical user interface. If your IBM AIX® or Linux™ server does not support a graphical user interface, see the topic Configuring HTTP manually for Cognos BI Server for instructions on configuring these settings manually.

686 © 2013 IBM CorporationSocial Business
Switch to your CMD line window and navigate to the Cognos BI server directory with the command “cd \IBM\CognosBI\bin64”. Then start the configuration tool with the command “cogconfigw.exe”.
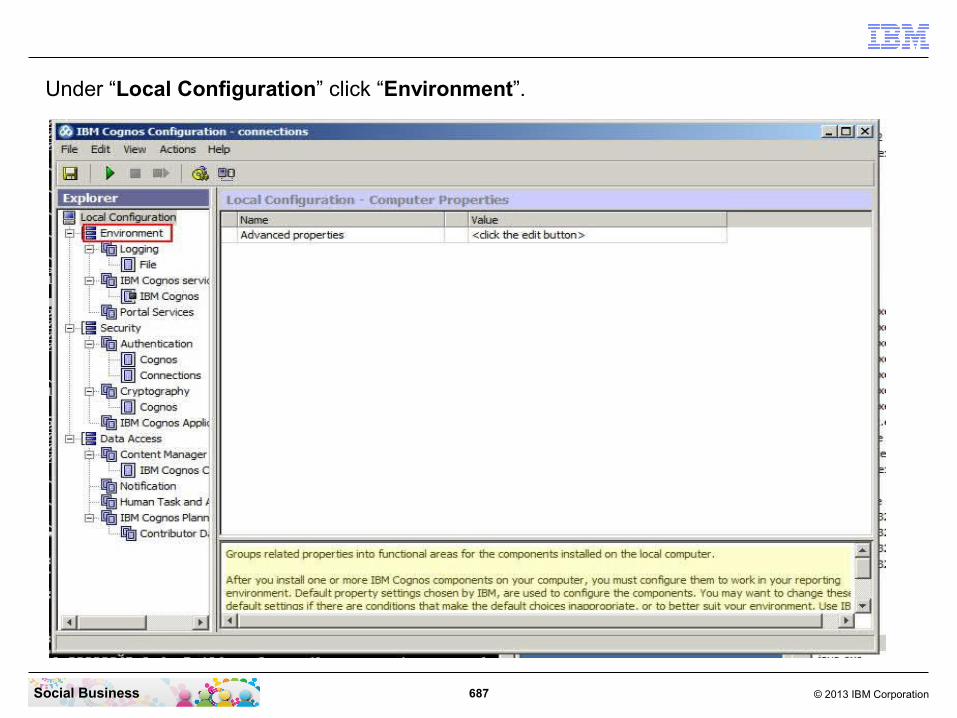
687 © 2013 IBM CorporationSocial Business
Under “Local Configuration” click “Environment”.
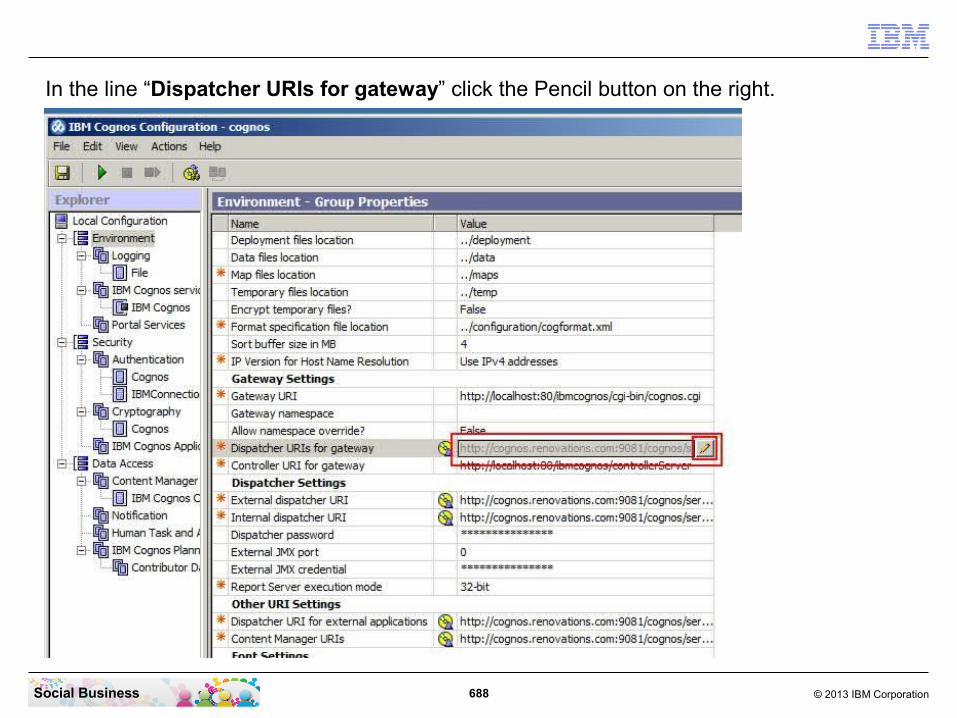
688 © 2013 IBM CorporationSocial Business
In the line “Dispatcher URIs for gateway” click the Pencil button on the right.
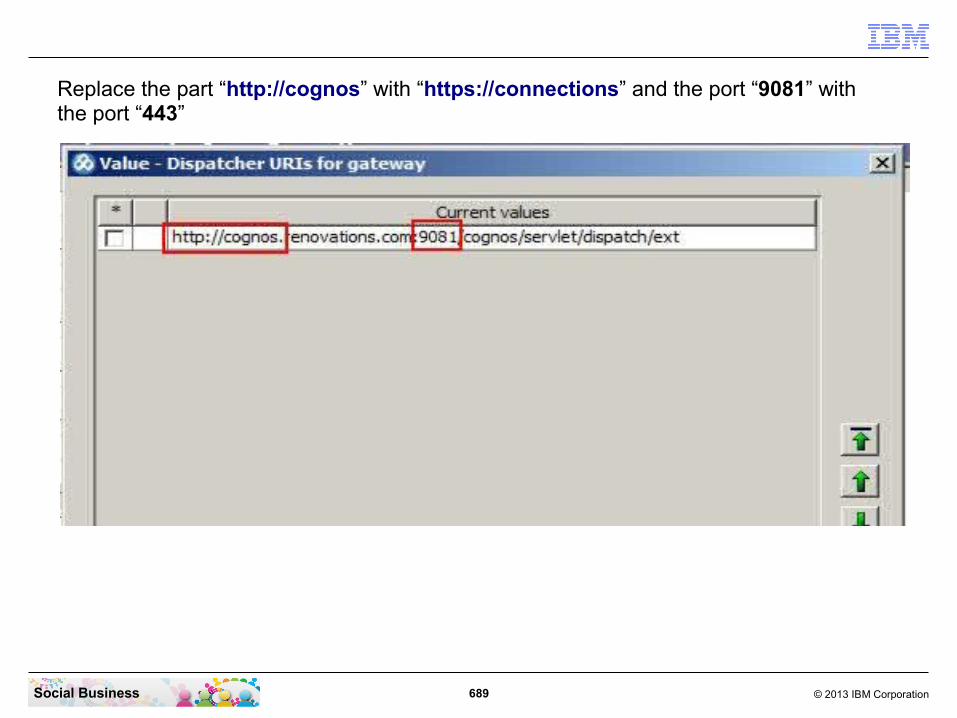
689 © 2013 IBM CorporationSocial Business
Replace the part “http://cognos” with “https://connections” and the port “9081” with the port “443”
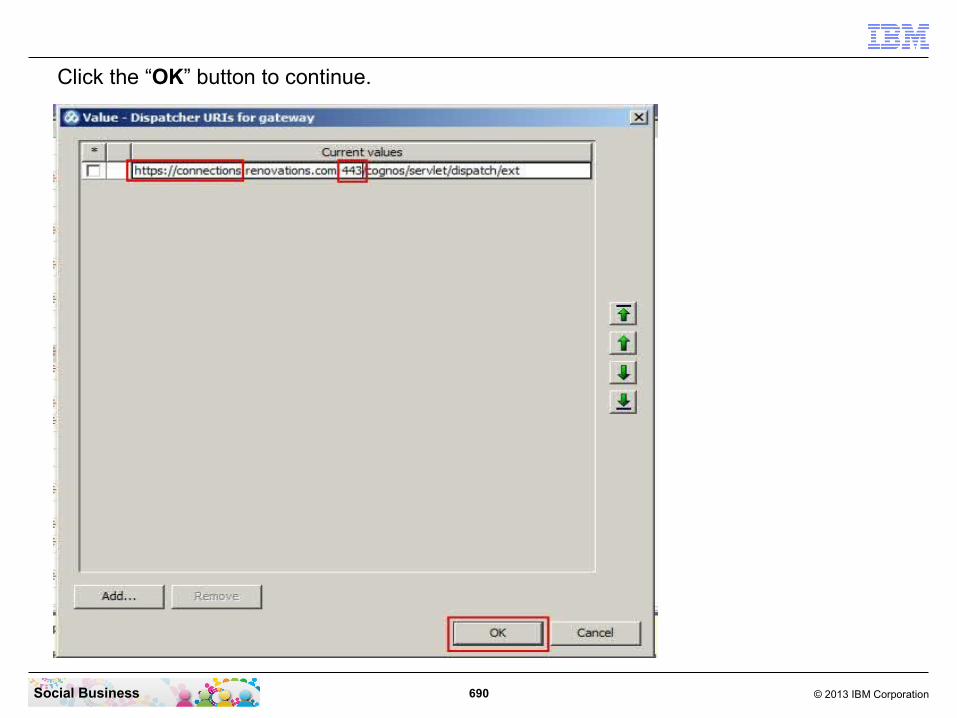
690 © 2013 IBM CorporationSocial Business
Click the “OK” button to continue.
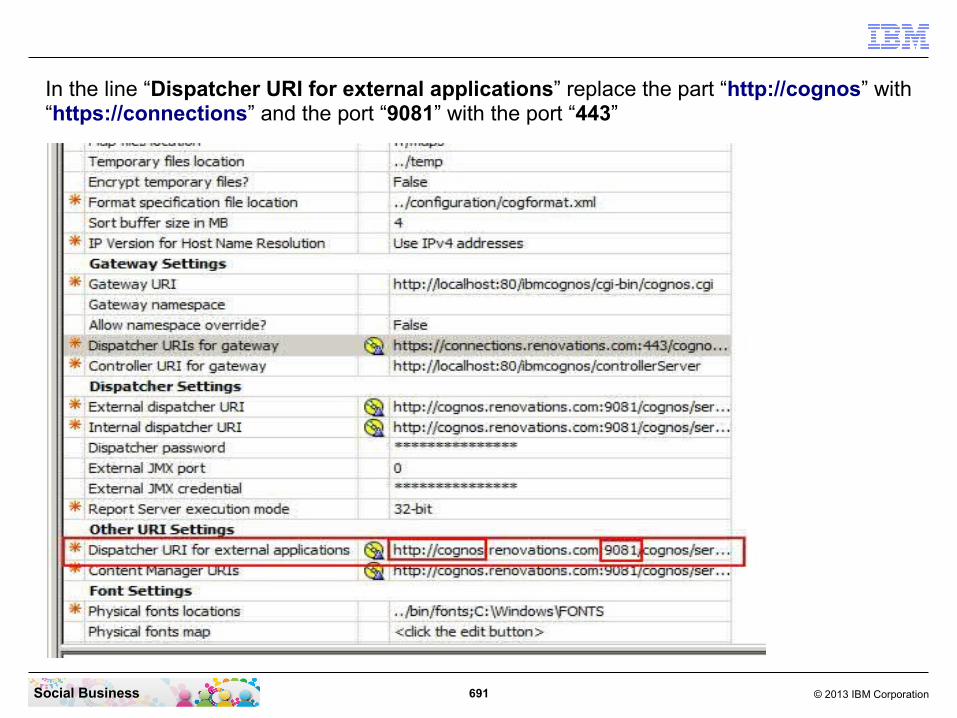
691 © 2013 IBM CorporationSocial Business
In the line “Dispatcher URI for external applications” replace the part “http://cognos” with “https://connections” and the port “9081” with the port “443”

692 © 2013 IBM CorporationSocial Business
The port is now changed to “443”.
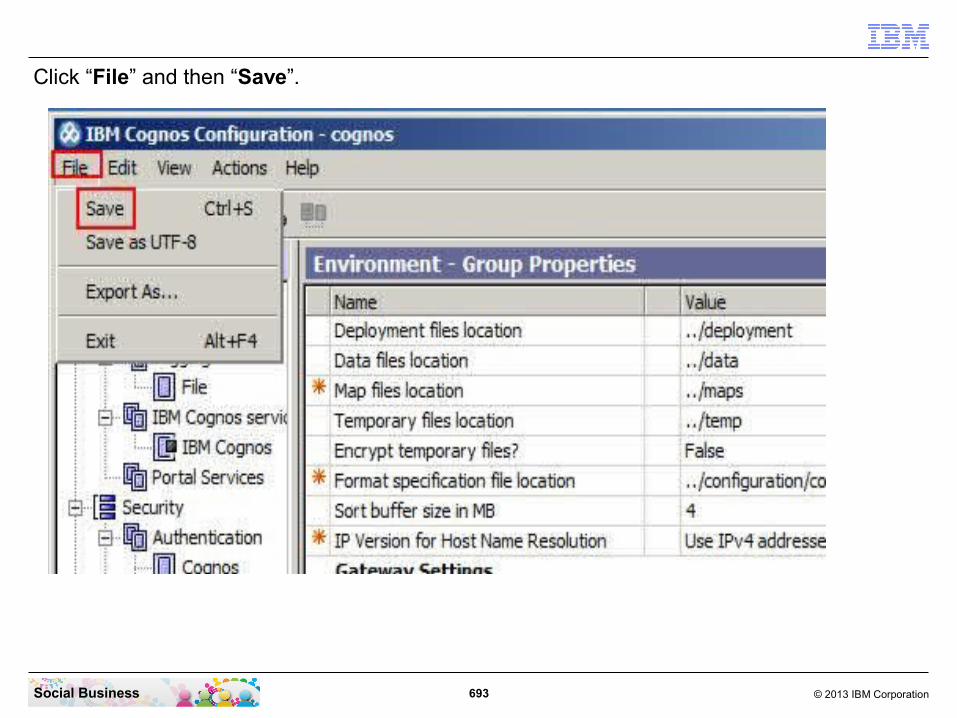
693 © 2013 IBM CorporationSocial Business
Click “File” and then “Save”.

694 © 2013 IBM CorporationSocial Business
The configuration change was saved successfully. Click the “Close” button to continue.

695 © 2013 IBM CorporationSocial Business
To close the Cognos Configuration tool click “File” and then “Exit”.

696 © 2013 IBM CorporationSocial Business
It is important to click the “No” button to continue.

697 © 2013 IBM CorporationSocial Business
Change to the Cognos Transformer directory with the command “cd ..\..\cognosTF\bin”. Then start the Cognos Transformer configuration tool with the command “cogconfigw.exe”.

698 © 2013 IBM CorporationSocial Business
The Cognos Transformer configuration tool is starting up.

699 © 2013 IBM CorporationSocial Business
Under “Local Configuration” click “Environment”.
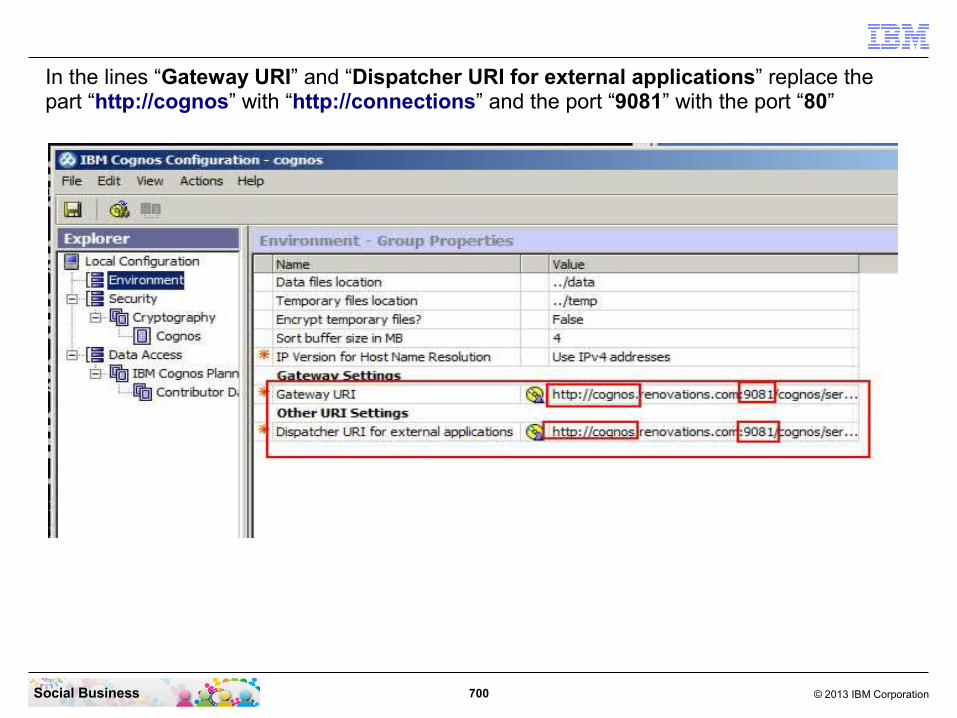
700 © 2013 IBM CorporationSocial Business
In the lines “Gateway URI” and “Dispatcher URI for external applications” replace the part “http://cognos” with “http://connections” and the port “9081” with the port “80”

701 © 2013 IBM CorporationSocial Business
The two lines are now changed.
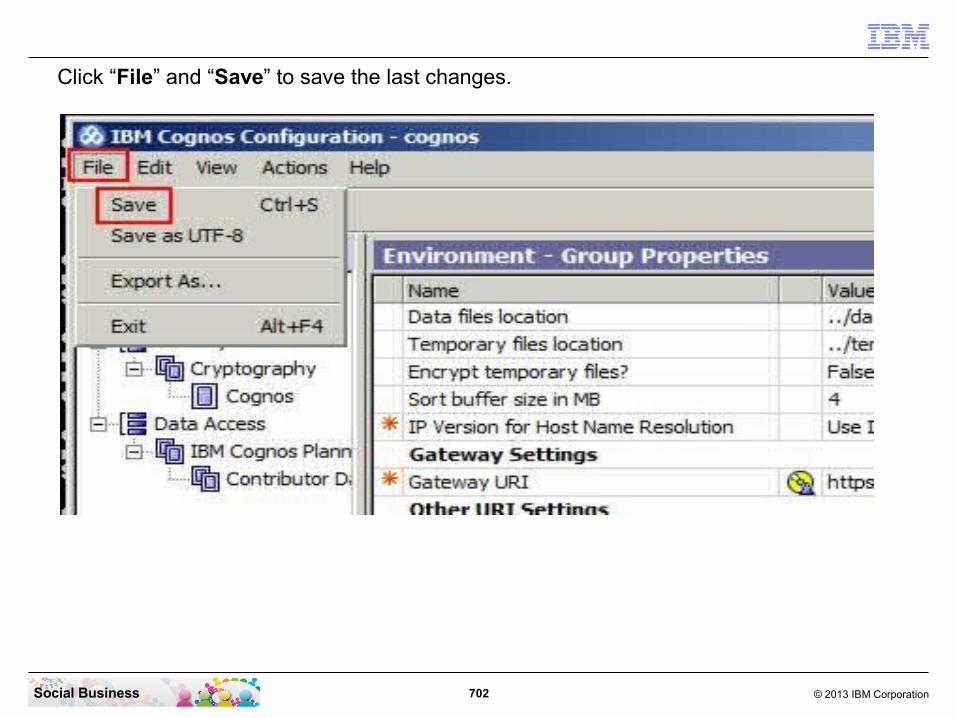
702 © 2013 IBM CorporationSocial Business
Click “File” and “Save” to save the last changes.

703 © 2013 IBM CorporationSocial Business
Accept the certificate by clicking the “Yes” button.

704 © 2013 IBM CorporationSocial Business
The changes are saved successfully. Click the “Close” button to continue.

705 © 2013 IBM CorporationSocial Business
Click “File” and “Exit” to close the Cognos Transformer configuration tool.

706 © 2013 IBM CorporationSocial Business
To restart the Cognos server, switch back to your CMD line window. Change to the Cognos Application Server directory with the command “cd \IBM\WebSphere\AppServer\profiles\AppSrv01\bin”. Then stop the server with the command “stopserver cognos_server -username wasadmin -password passw0rd”. To start the server enter the command “startserver cognos_server”.
707 © 2013 IBM CorporationSocial Business
STEP TWENTY-NINE: Configure the Job Scheduler
About this taskFinish configuring the job scheduler to run the Transformer periodically by adding the Windows Administrator credentials to the MetricsCubeDailyRefresh scheduler job.
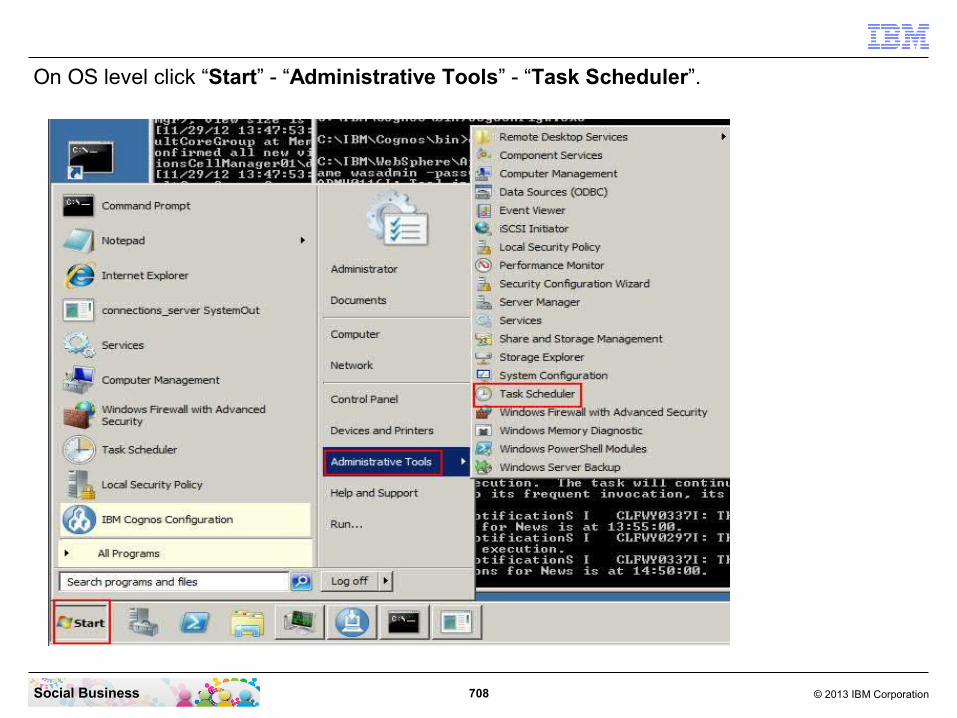
708 © 2013 IBM CorporationSocial Business
On OS level click “Start” - “Administrative Tools” - “Task Scheduler”.
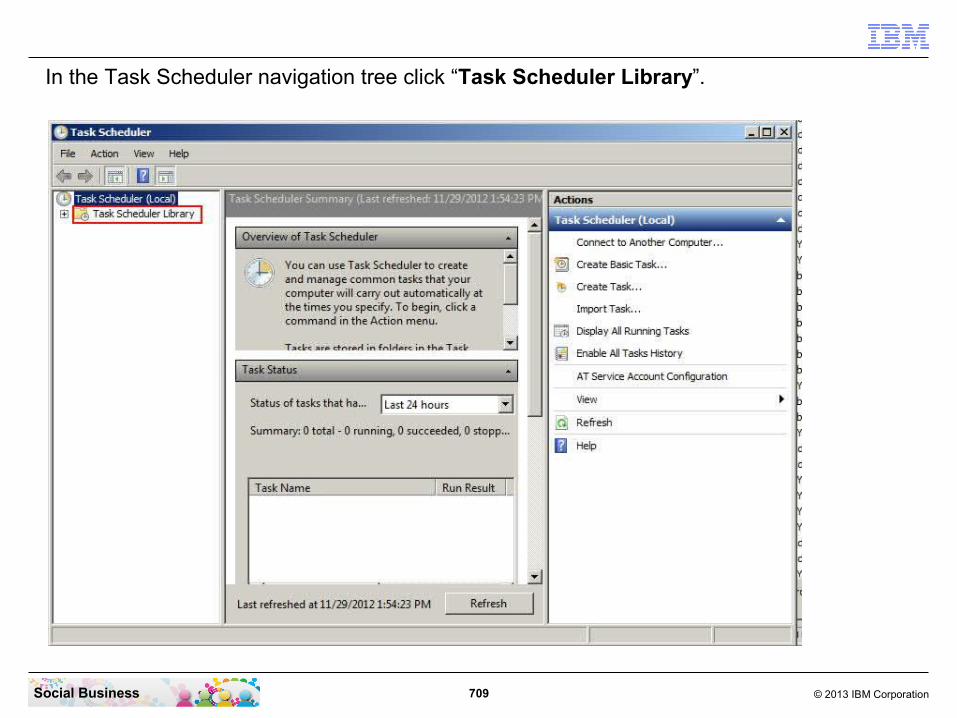
709 © 2013 IBM CorporationSocial Business
In the Task Scheduler navigation tree click “Task Scheduler Library”.
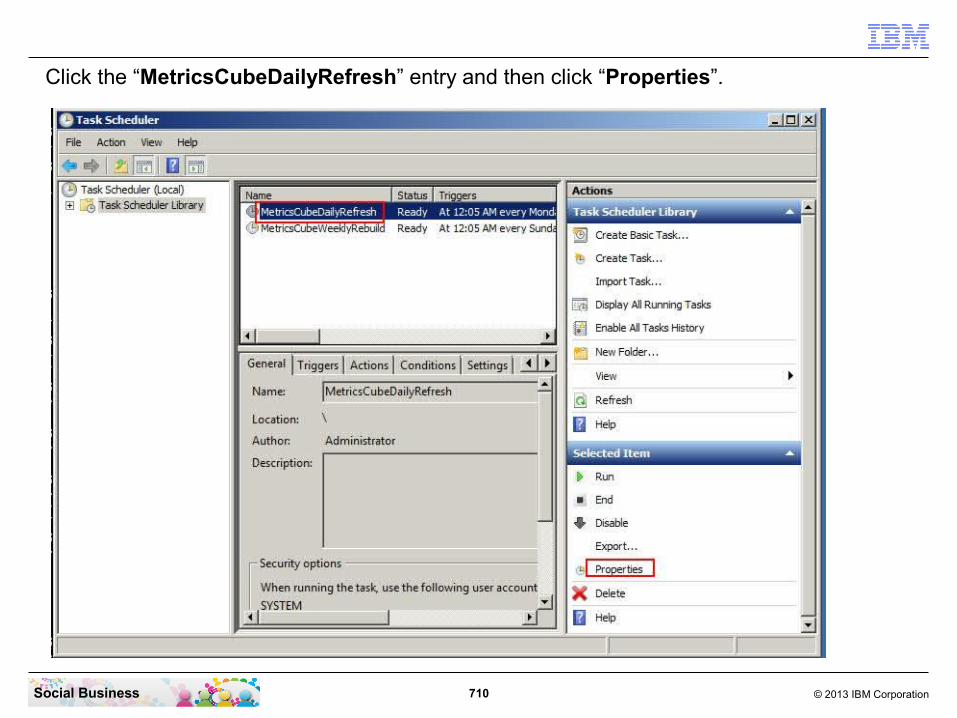
710 © 2013 IBM CorporationSocial Business
Click the “MetricsCubeDailyRefresh” entry and then click “Properties”.

711 © 2013 IBM CorporationSocial Business
Click the “Change User or Group...” button.

712 © 2013 IBM CorporationSocial Business
In the “Enter the object name to select” window enter the “Administrator” user and click the “Check Names” button.

713 © 2013 IBM CorporationSocial Business
Click the “OK” button to continue.
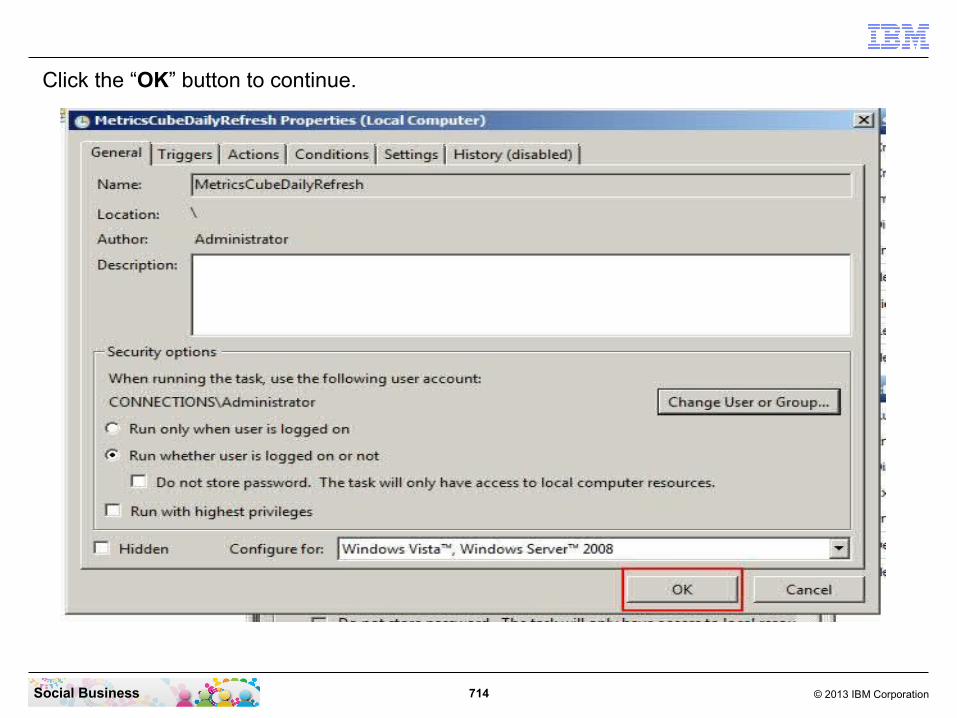
714 © 2013 IBM CorporationSocial Business
Click the “OK” button to continue.
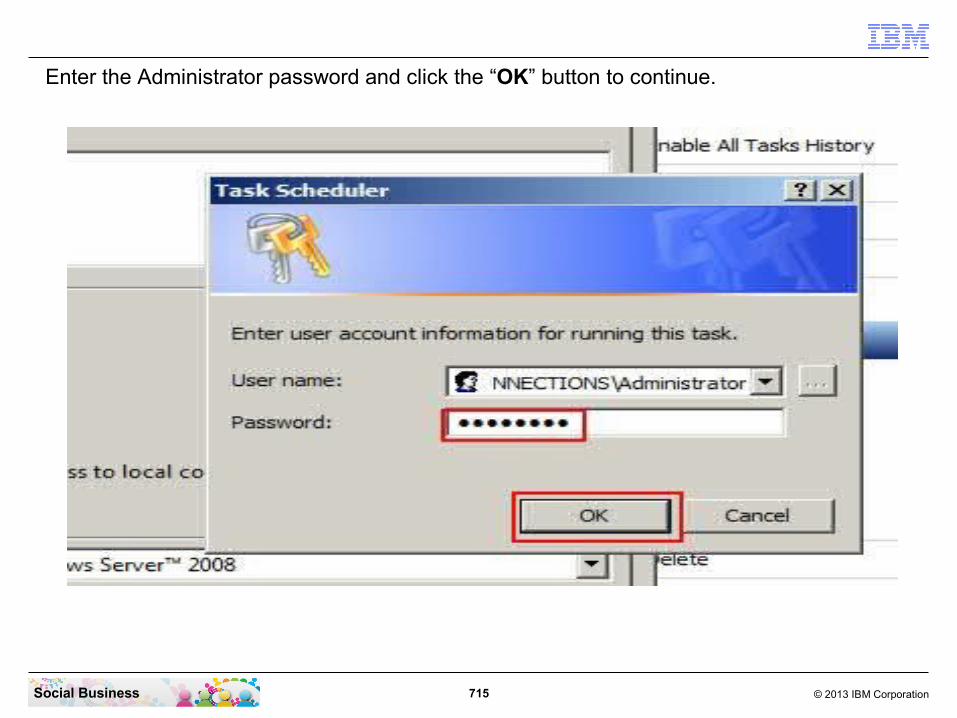
715 © 2013 IBM CorporationSocial Business
Enter the Administrator password and click the “OK” button to continue.

716 © 2013 IBM CorporationSocial Business
Click the “MetricsCubeWeeklyRebuild” entry and then click “Properties”.
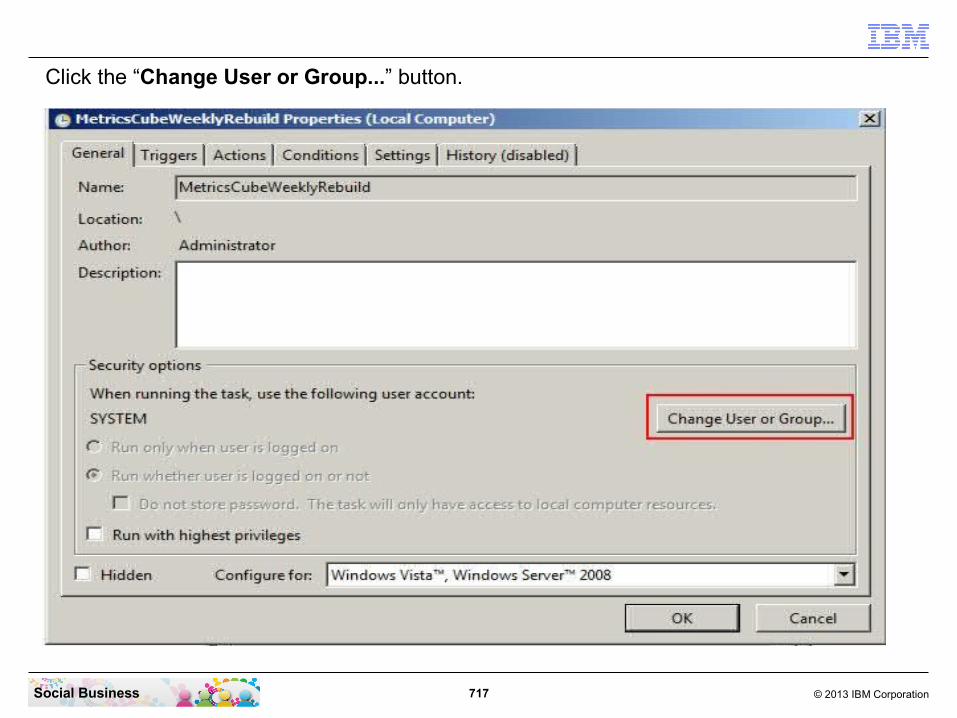
717 © 2013 IBM CorporationSocial Business
Click the “Change User or Group...” button.

718 © 2013 IBM CorporationSocial Business
In the “Enter the object name to select” window enter the “Administrator” user and click the “Check Names” button.

719 © 2013 IBM CorporationSocial Business
Click the “OK” button to continue.
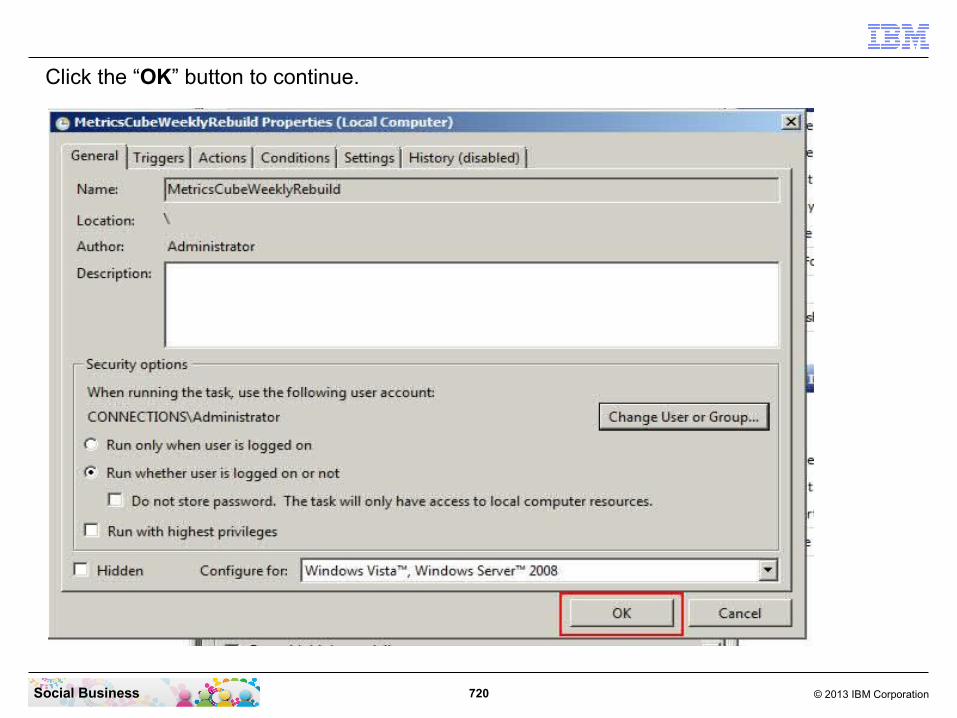
720 © 2013 IBM CorporationSocial Business
Click the “OK” button to continue.
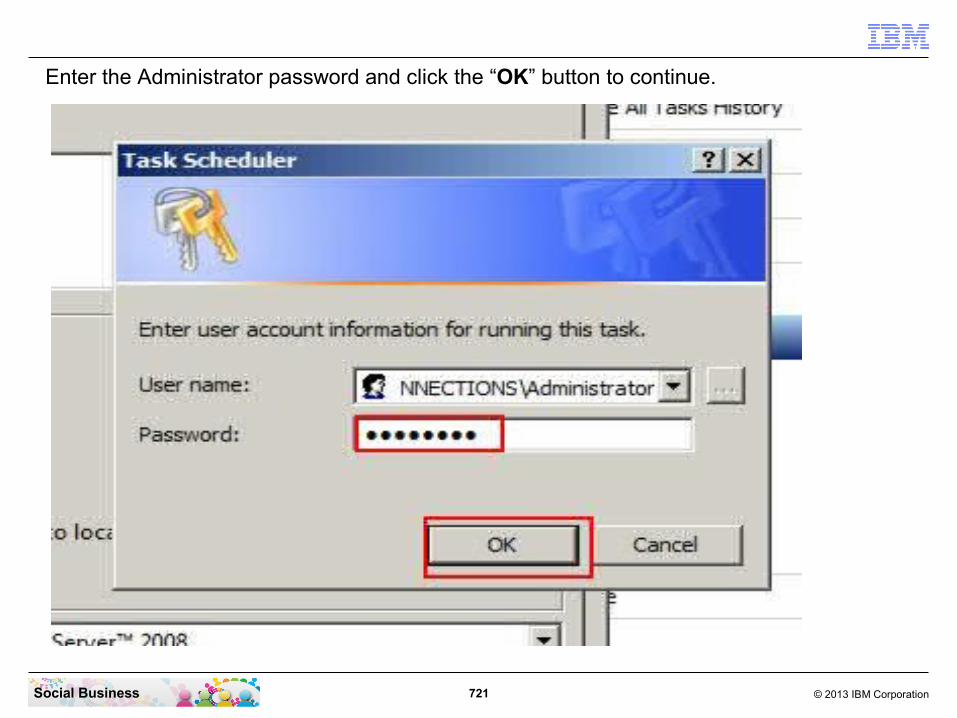
721 © 2013 IBM CorporationSocial Business
Enter the Administrator password and click the “OK” button to continue.
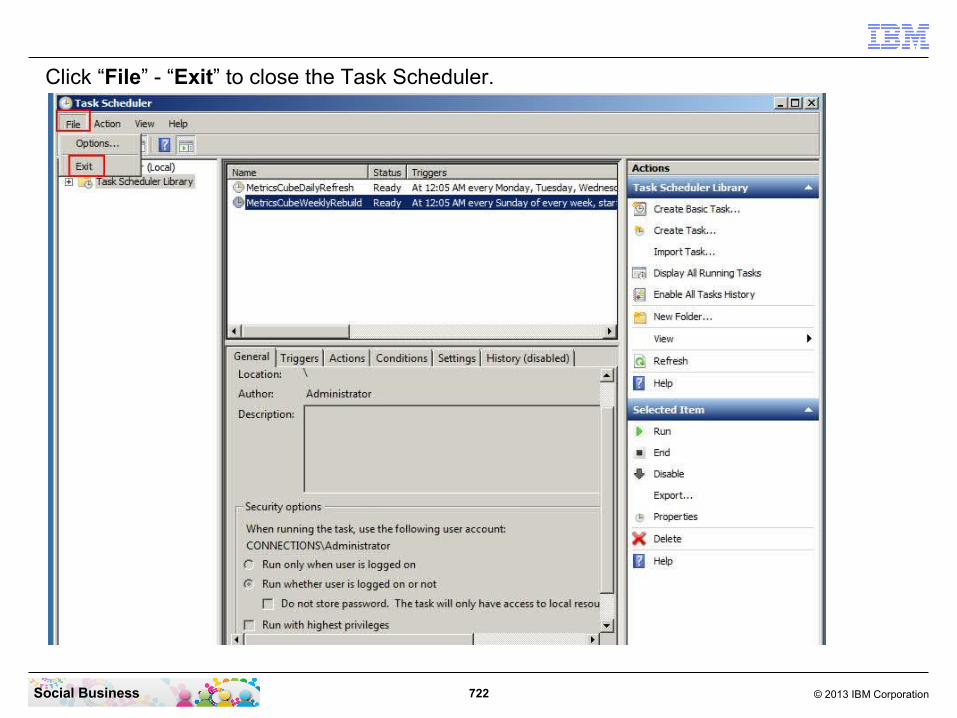
722 © 2013 IBM CorporationSocial Business
Click “File” - “Exit” to close the Task Scheduler.
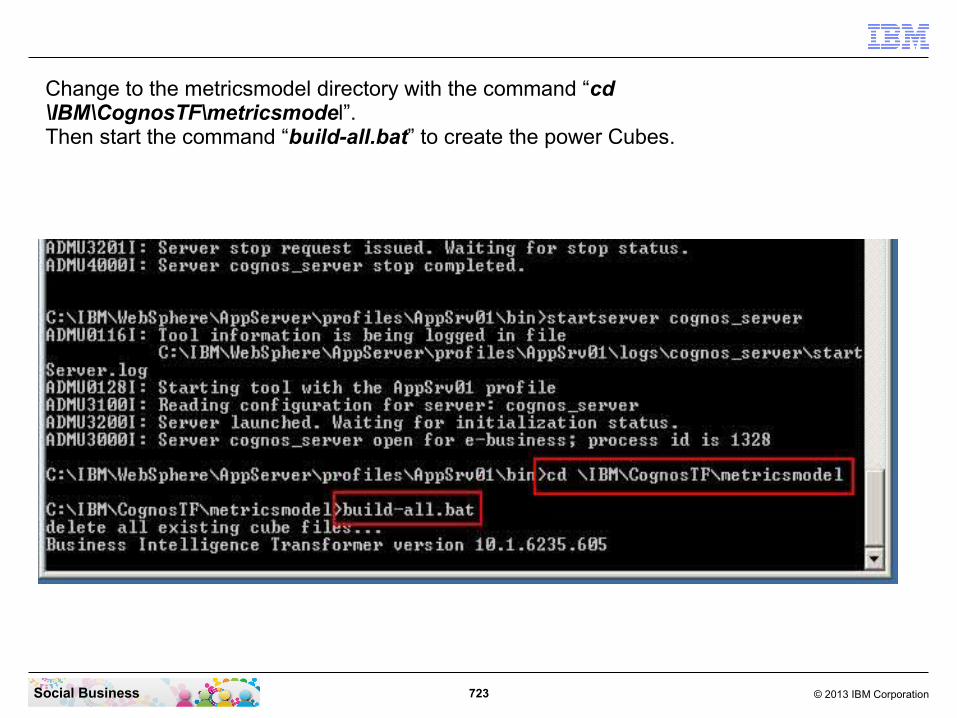
723 © 2013 IBM CorporationSocial Business
Change to the metricsmodel directory with the command “cd \IBM\CognosTF\metricsmodel”.Then start the command “build-all.bat” to create the power Cubes.
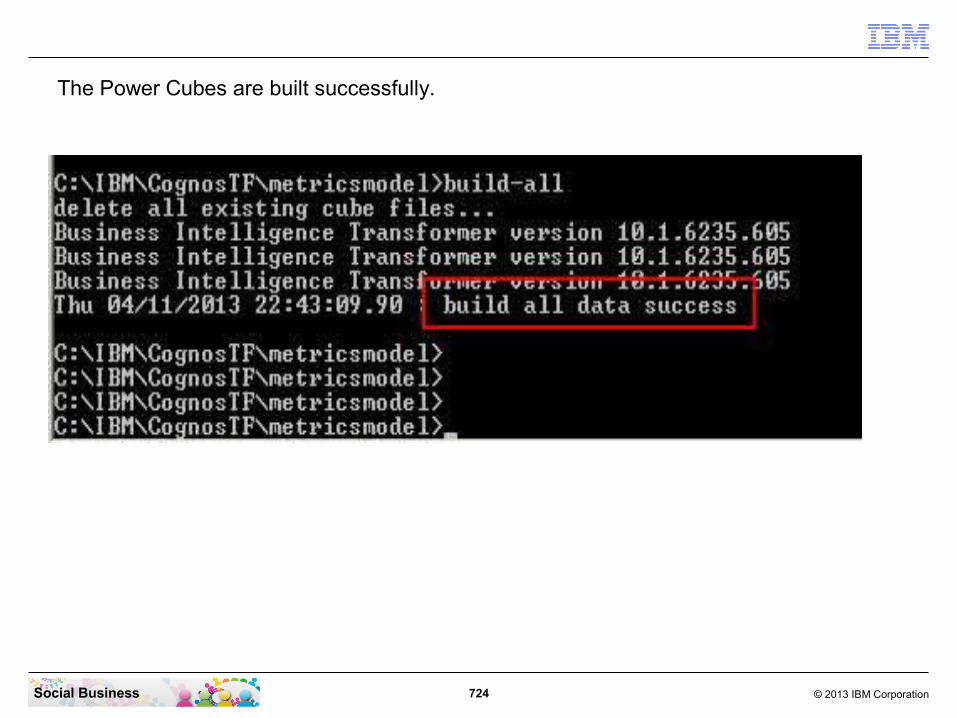
724 © 2013 IBM CorporationSocial Business
The Power Cubes are built successfully.

725 © 2013 IBM CorporationSocial Business
In your File Explorer window navigate to the directory “C:\IBM\CognosTF\PowerCubes”. In this directory you can see the newly built cubes.

726 © 2013 IBM CorporationSocial Business
Change to the Connections Box.The Connections Server needs to be restarted now. Switch to the CMD line window and change to the Connections Application server directory with the command “cd ..\..\AppSrv01\bin”. Stop the Connections Server with the command “stopserver connections_server -username wasadmin -password passw0rd”. Now start the Connections server with the command “startserver connections_server”.
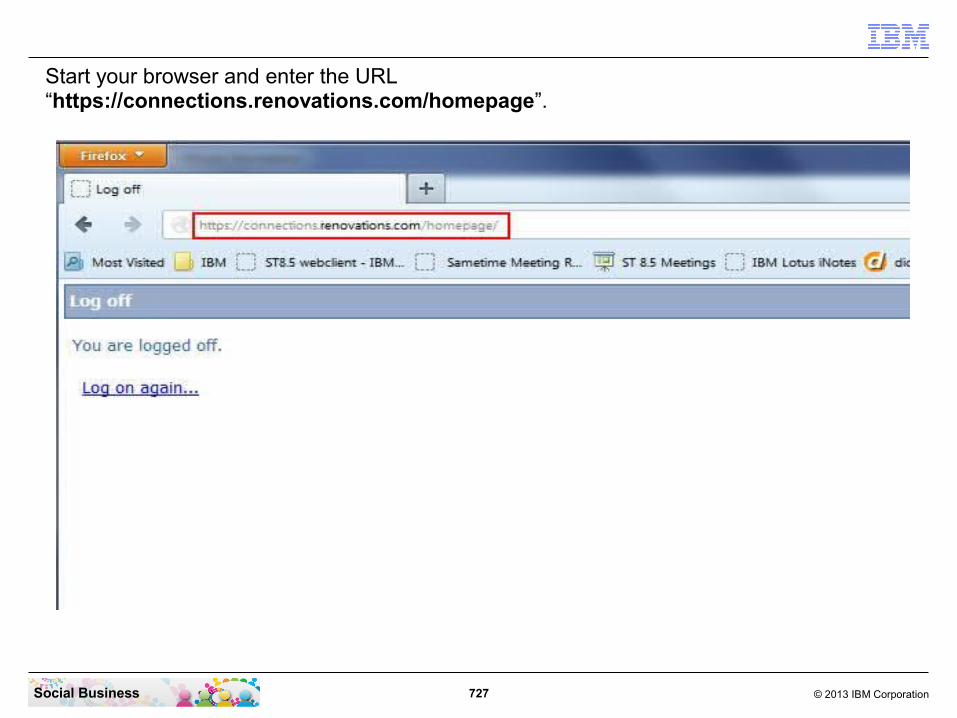
727 © 2013 IBM CorporationSocial Business
Start your browser and enter the URL “https://connections.renovations.com/homepage”.

728 © 2013 IBM CorporationSocial Business
Log in with a directory user and his password.
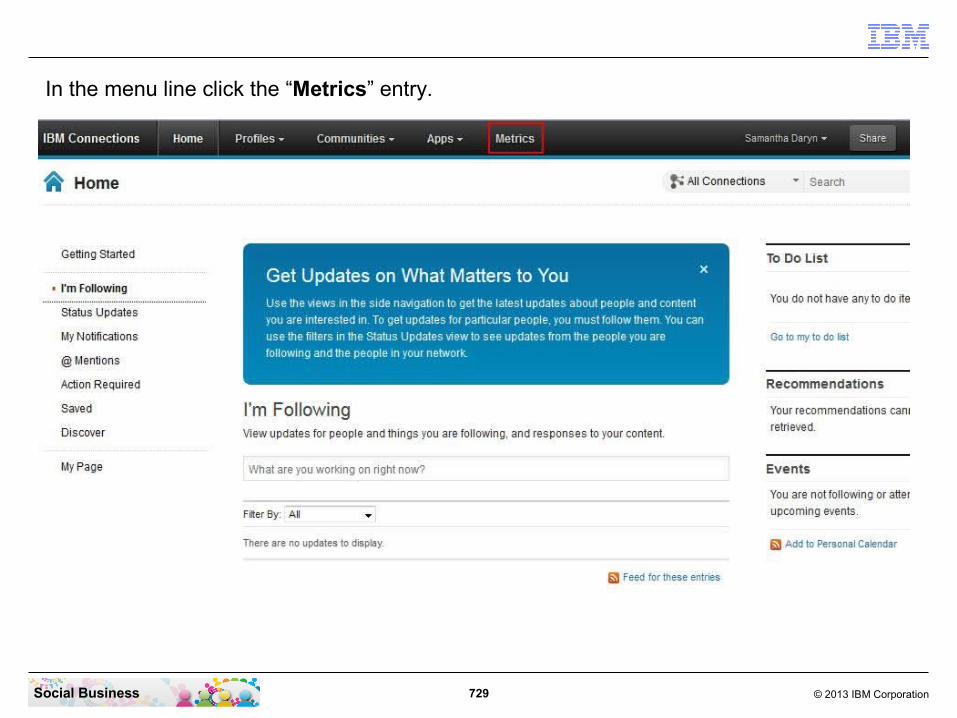
729 © 2013 IBM CorporationSocial Business
In the menu line click the “Metrics” entry.

730 © 2013 IBM CorporationSocial Business
You can see the first data when the server was running for 24 hours.

731 © 2013 IBM CorporationSocial Business
STEP THIRTY: Configure IBM Connections Content Manager for Libraries
Use these tasks to set up your new installation of FileNet® to work with IBM® Connections Content Manager.
Configuring Libraries automaticallyYou can configure Libraries automatically using the ccmDomain tool to create a P8 domain, GCD, Object Store, and AddOns.
Generating Security identifiers to be used in configurationYou need to generate Security Identifiers (SID) values for installing IBM Connections Content Manager with a new FileNet deployment or an existing FileNet deployment.
Configuring Filenet to be an Activity Stream producer with a new deploymentYou can set up FileNet to send Addons to the IBM Connections Activity Stream.
Setting up anonymous access for a new FileNet deploymentIf anonymous access has not been enabled for IBM FileNet Collaboration Services 2.0, enable it now. IBM Connections requires anonymous access to be set in FileNet for public communities.

732 © 2013 IBM CorporationSocial Business
Configuring Libraries automatically
Before you begin
If you have set the value of login properties in your LDAP configuration to be other than uid or if uid is not the first value in the list of values, then the first <login> attribute in the section of <loginAttributes> in profiles-config.xml needs to match with the value that FileNet uses to look up a user. Since by default, the uid value is used and if the security principal for FileNet is not uid, then you must modify the profiles-config.xml to move the attribute that matches up with the principal to be the first attribute in the <loginAttributes> section. For example, if email is used as the principal, then the <loginAttributes> section should look like this:
<loginAttributes> <loginAttribute>email</loginAttribute> <loginAttribute>uid</loginAttribute> <loginAttribute>loginId</loginAttribute></loginAttributes>
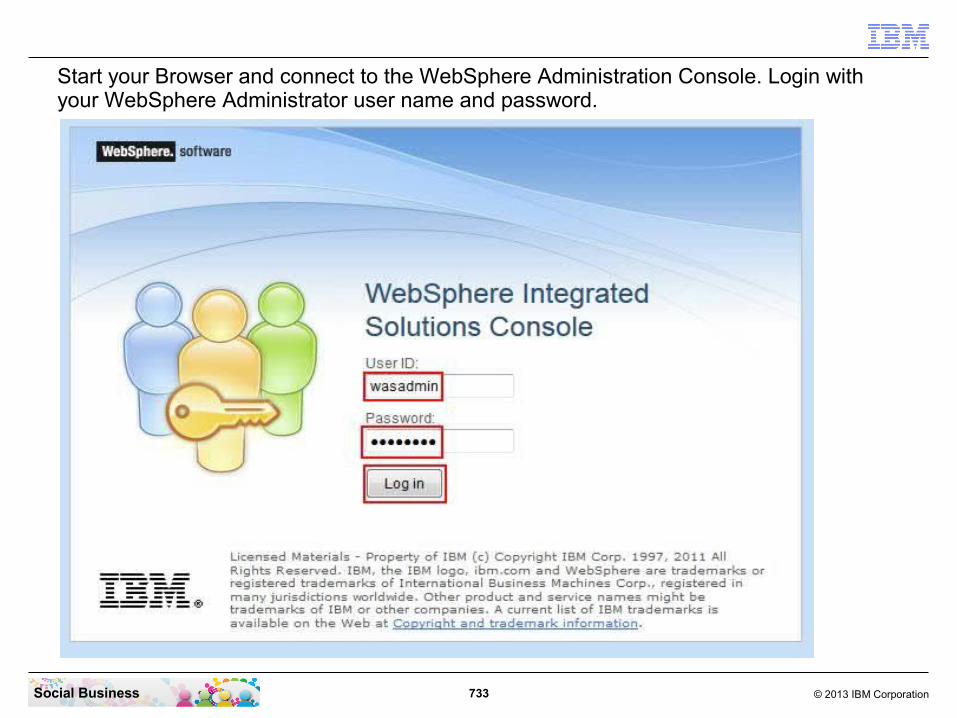
733 © 2013 IBM CorporationSocial Business
Start your Browser and connect to the WebSphere Administration Console. Login with your WebSphere Administrator user name and password.

734 © 2013 IBM CorporationSocial Business
Click “Servers” - “Server Types” - “WebSphere application servers”.
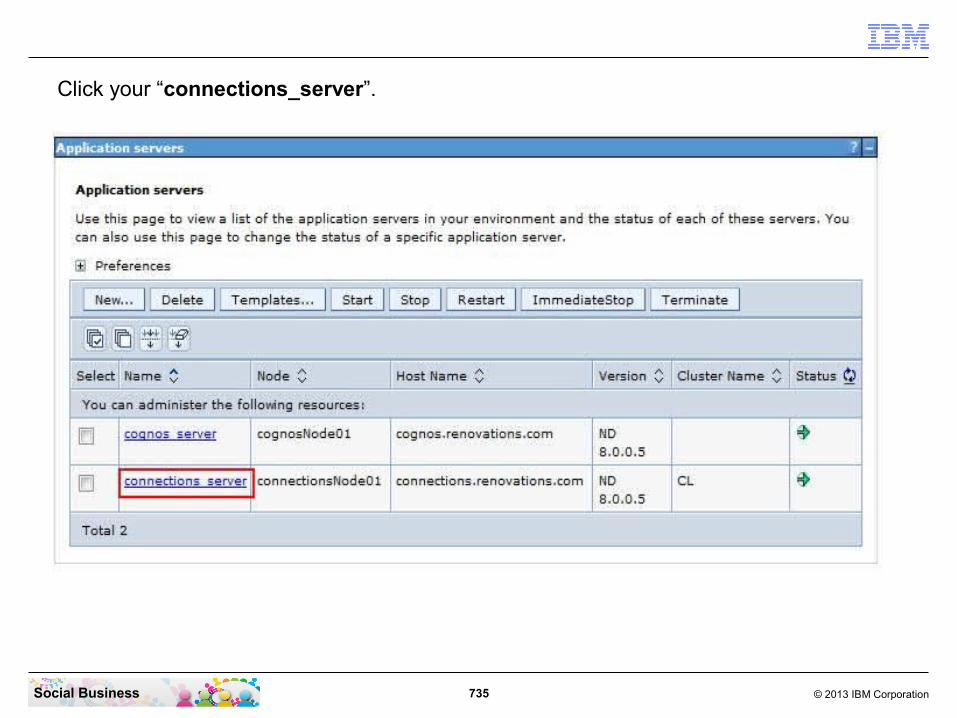
735 © 2013 IBM CorporationSocial Business
Click your “connections_server”.
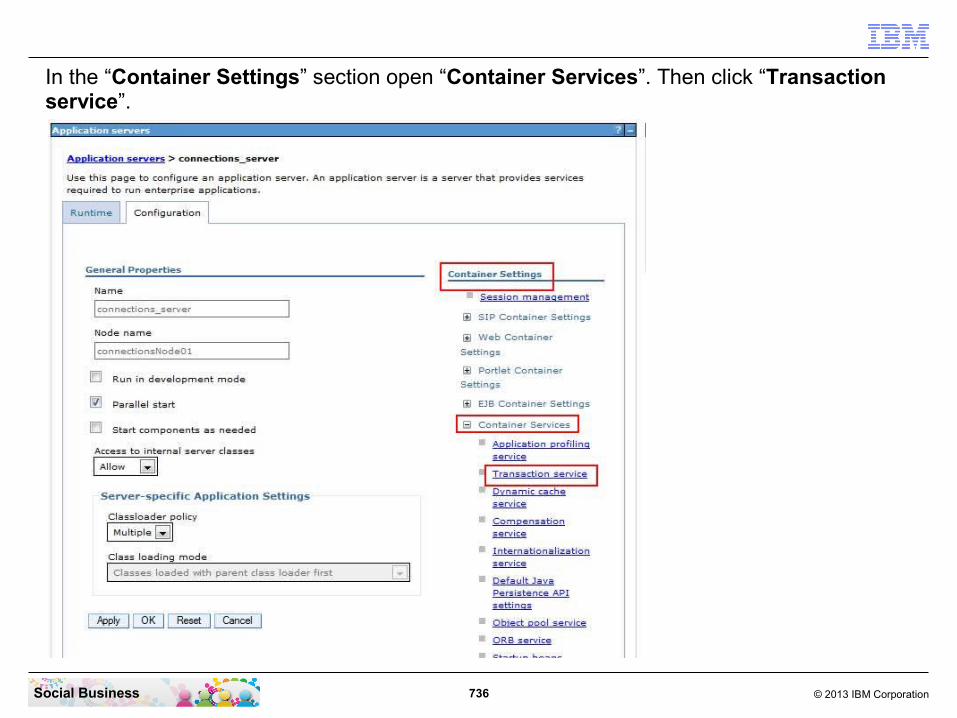
736 © 2013 IBM CorporationSocial Business
In the “Container Settings” section open “Container Services”. Then click “Transaction service”.

737 © 2013 IBM CorporationSocial Business
In the “Maximum transaction timeout” field change the value to “600”. Then click the “OK” button to continue.

738 © 2013 IBM CorporationSocial Business
Click the “Save” link to save the last changes.

739 © 2013 IBM CorporationSocial Business
In your CMD line window change the directory with the command “cd \IBM\Connections\addons\ccm\ccmDomainTool”. Then run the command “createGCD.bat”.
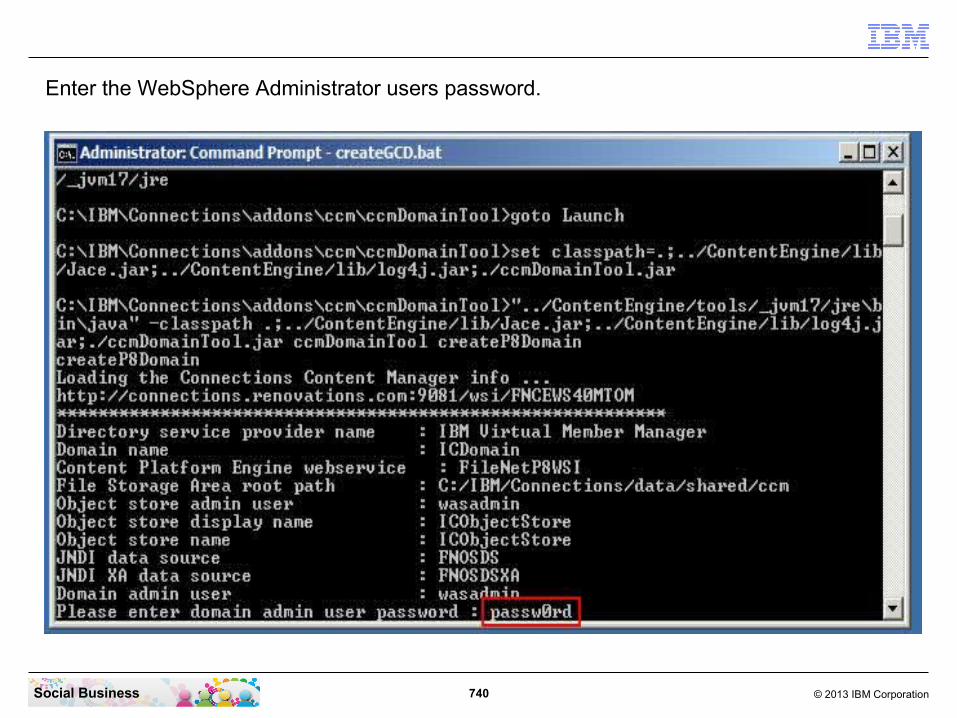
740 © 2013 IBM CorporationSocial Business
Enter the WebSphere Administrator users password.

741 © 2013 IBM CorporationSocial Business
Enter the WebSphere Administrators user name and its password.

742 © 2013 IBM CorporationSocial Business
The Filenet P8 Domain “ICDomain” is created successfully.
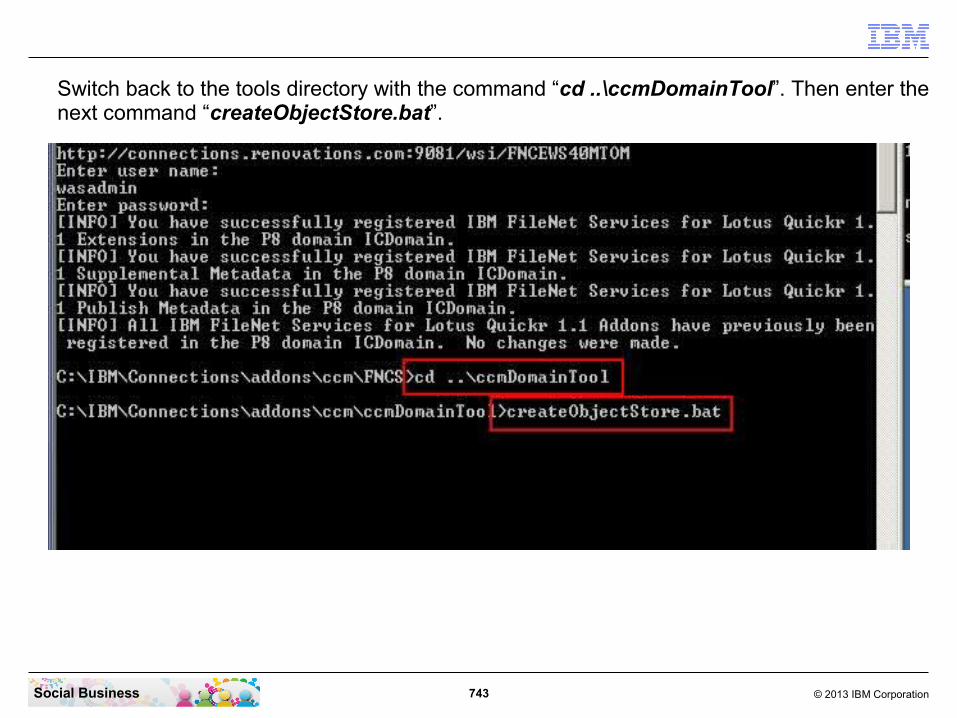
743 © 2013 IBM CorporationSocial Business
Switch back to the tools directory with the command “cd ..\ccmDomainTool”. Then enter the next command “createObjectStore.bat”.

744 © 2013 IBM CorporationSocial Business
Enter the password of your WebSphere Administrator user.
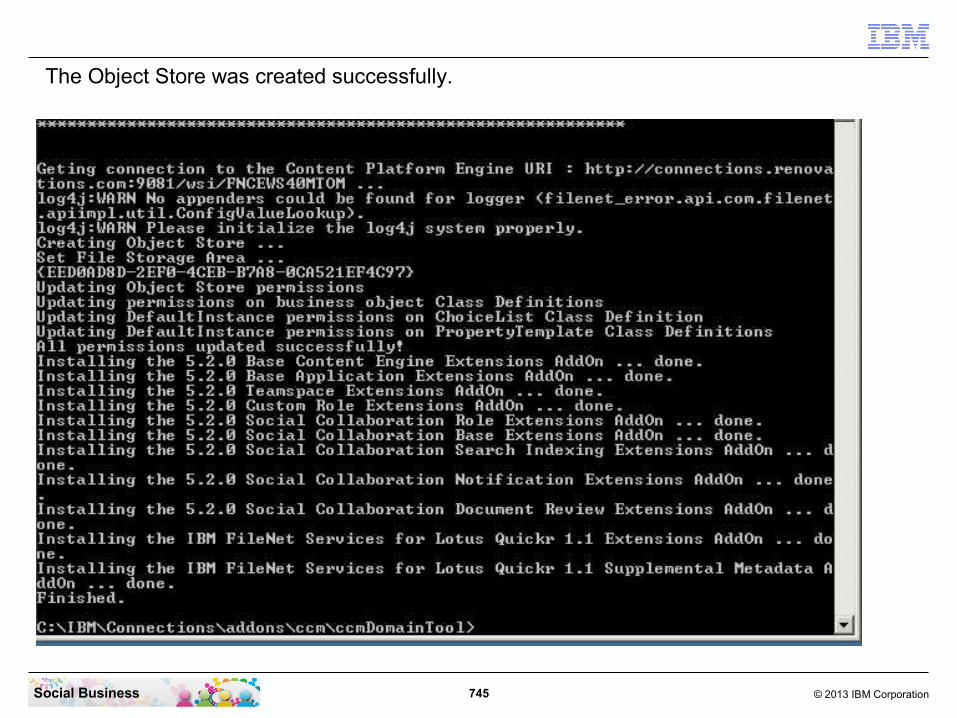
745 © 2013 IBM CorporationSocial Business
The Object Store was created successfully.

746 © 2013 IBM CorporationSocial Business
Attention: The Anonymous User account must reside in the same LDAP directory used by IBM Connections.
If you will use an existing LDAP account, take note of the user name and password. For example, if your organization already has a Filenet deployment, you might choose to use this anonymous account with Connections Content Manager.
If an acceptable account does not exist already, create it now; again, note the credentials for use later. The short name of this user needs to be used for the SID generation and later to setup Anonymous access for the FileNet deployment.During this installation we use the user name “Anonymous User” with the short name “auser”.
Create the Anonymous user for the IBM Connections Content Manager in the LDAP

747 © 2013 IBM CorporationSocial Business
Generating Security identifiers to be used in configuration
About this taskA Security Identifier (SID) is an internal ID used within Connections Content Manager and FileNet. This internal ID is used to reference a user in some areas of configuration. Specifically, you will need SIDs when setting up anonymous access and configuring indexing. Follow these instructions if you chose to install Connections Content Manager with a new FileNet deployment.

748 © 2013 IBM CorporationSocial Business
To create a SID enter the command “generateSID.bat”. Enter your WebSphere Administrator users password.

749 © 2013 IBM CorporationSocial Business
The first required ISD is for your WebSphere Administrator user. Enter the its user ID.Mark and copy the SID. Copy only the part after “SID : “ starting with “S-1-....”. Be sure to not have any return or other characters in the string. Save it somewhere into a Text file. You need it in a later step.
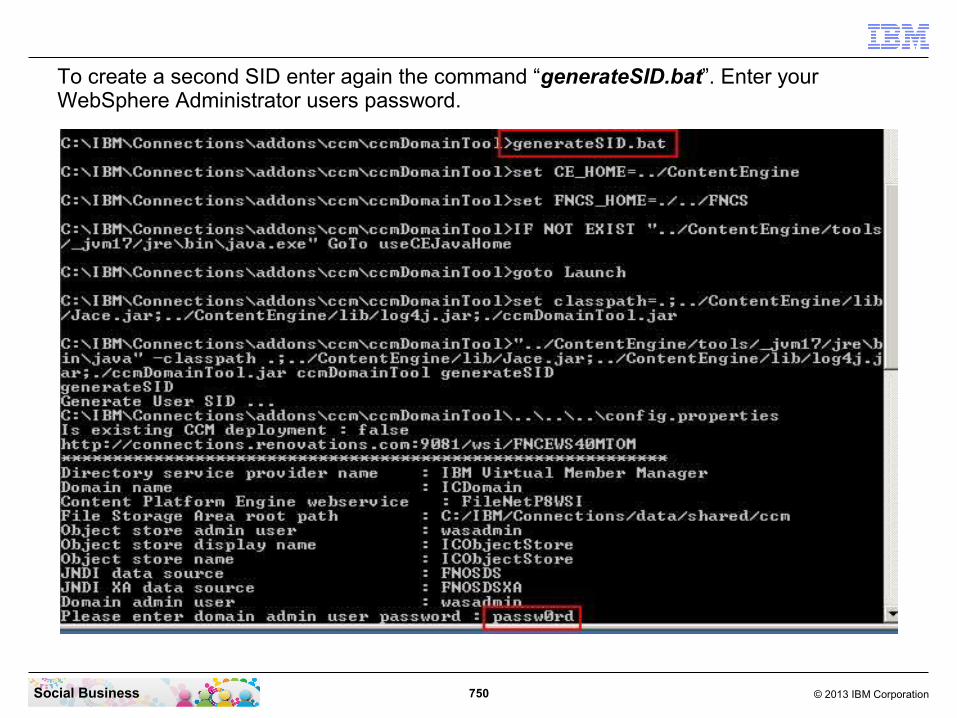
750 © 2013 IBM CorporationSocial Business
To create a second SID enter again the command “generateSID.bat”. Enter your WebSphere Administrator users password.

751 © 2013 IBM CorporationSocial Business
The second required SID is for a LDAP directory user, used for Anonymous Access in CCM. Enter the user ID. Here we take the Anonymous User shortname “auser” from the Domino LDAP server.Mark and copy the SID. Copy only the part after “SID : “ starting with “S-1-....”. Be sure to not have any return or other characters in the string. Save it somewhere into a Text file. You need it in a later step.

752 © 2013 IBM CorporationSocial Business
Configuring Filenet to be an Activity Stream producer with a new deployment
You can set up FileNet® to send Addons to the IBM® Connections Activity Stream.
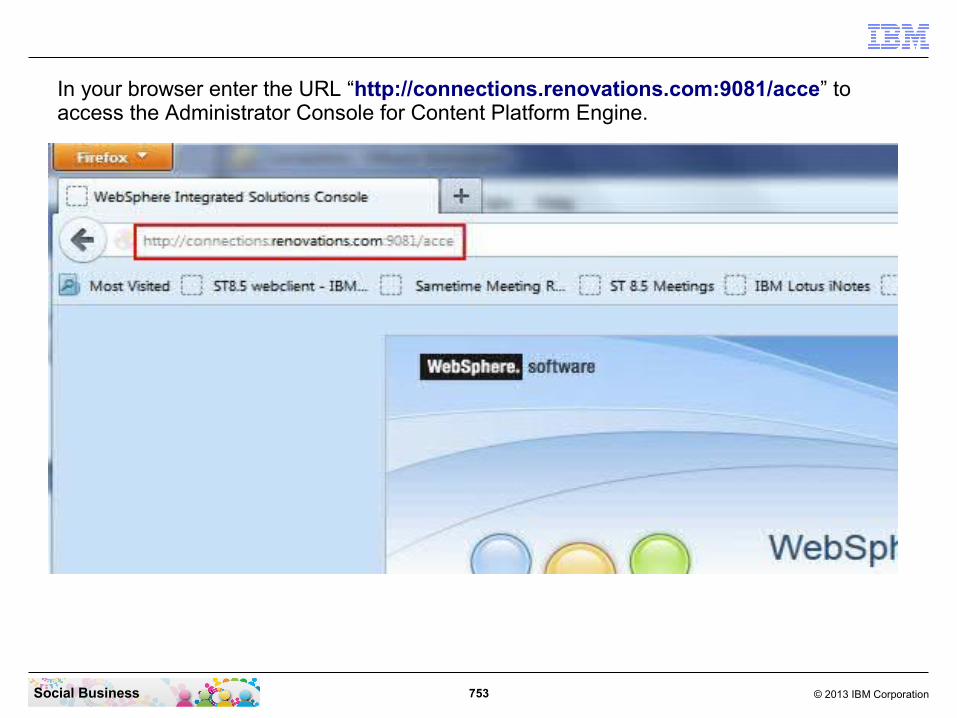
753 © 2013 IBM CorporationSocial Business
In your browser enter the URL “http://connections.renovations.com:9081/acce” to access the Administrator Console for Content Platform Engine.

754 © 2013 IBM CorporationSocial Business
Log in with your WebSphere Administrator user name and password.
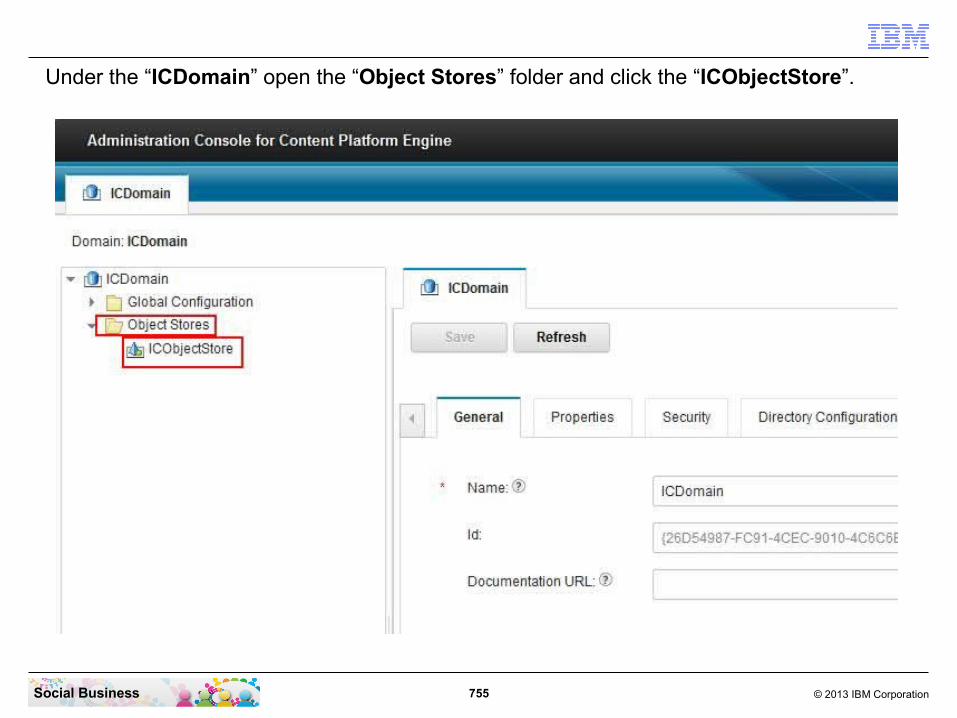
755 © 2013 IBM CorporationSocial Business
Under the “ICDomain” open the “Object Stores” folder and click the “ICObjectStore”.
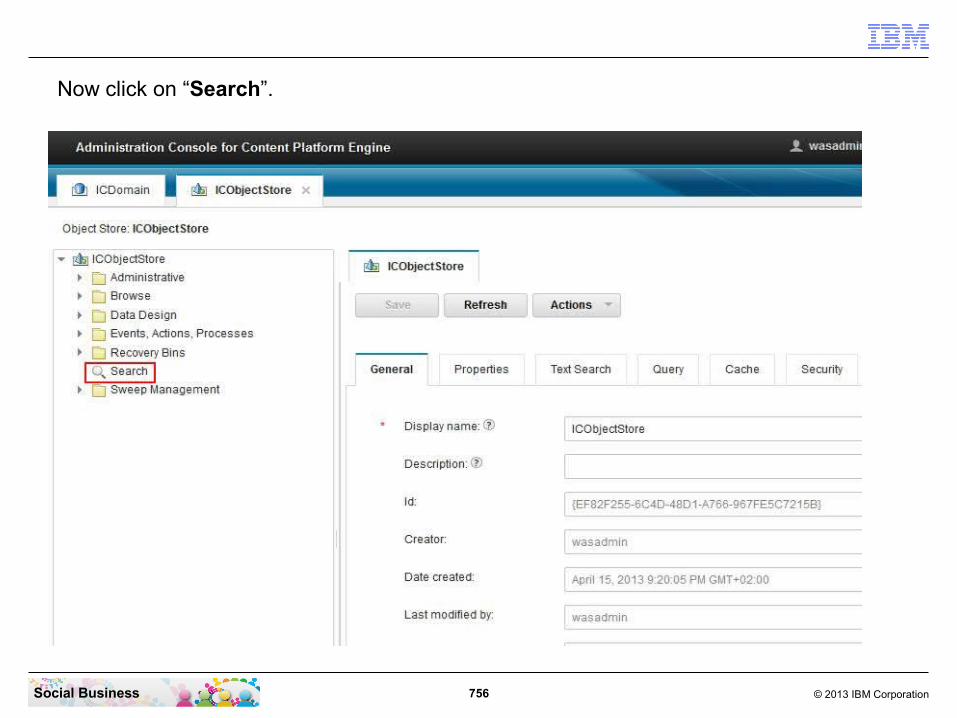
756 © 2013 IBM CorporationSocial Business
Now click on “Search”.
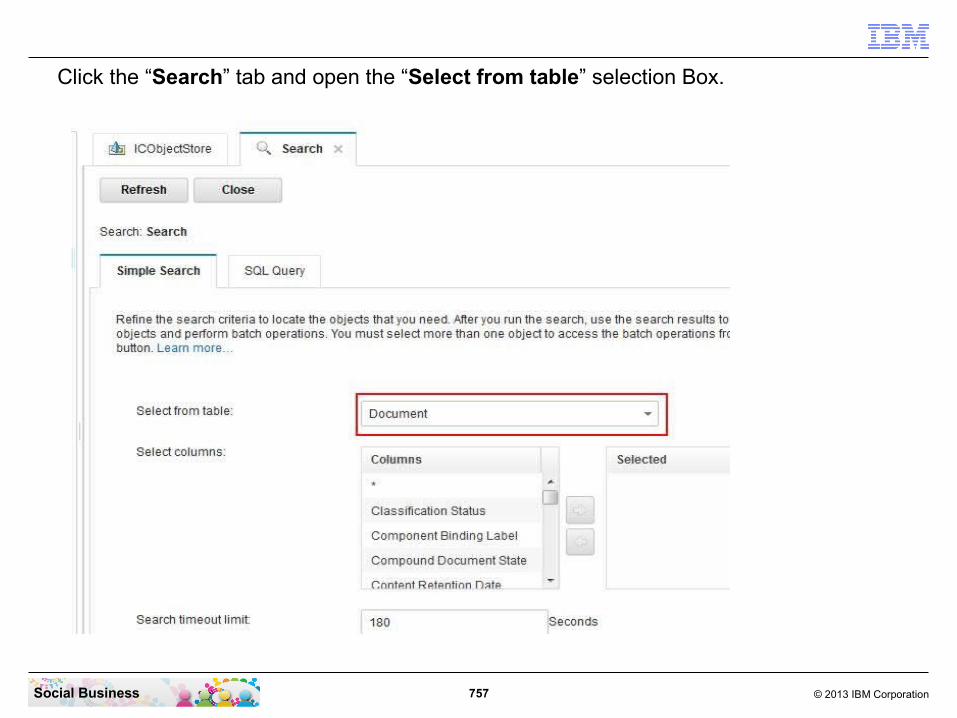
757 © 2013 IBM CorporationSocial Business
Click the “Search” tab and open the “Select from table” selection Box.

758 © 2013 IBM CorporationSocial Business
In the Selection box select “Collaboration Configuration” (on the second page). In the “Columns” selection box select the “*” element and click the “Move” button.

759 © 2013 IBM CorporationSocial Business
Click the “Search” button.

760 © 2013 IBM CorporationSocial Business
Click the “OK” button in the message box.

761 © 2013 IBM CorporationSocial Business
Click the single appearing ID.

762 © 2013 IBM CorporationSocial Business
Click the “Properties” tab.
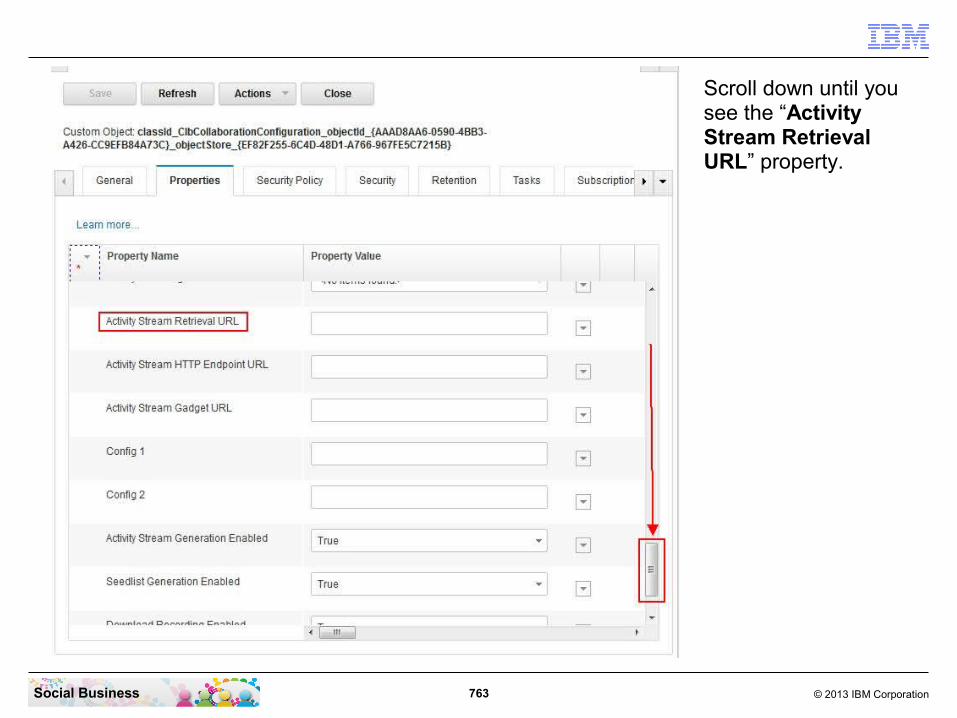
763 © 2013 IBM CorporationSocial Business
Scroll down until you see the “Activity Stream Retrieval URL” property.

764 © 2013 IBM CorporationSocial Business
In the property “ActivityStreamRetrievalURL” enter the string “{ecm_files}” in the Property Value field.In the property “ActivityStreamHTTPEndpointURL” enter the URL to your Connections Server “https://connections.renovations.com” in the Property Value field.In the property “ActivityStreamGadgetlURL” enter the string “{connections}/resources/web/com.ibm.social.ee/ConnectionsEE.xml” in the Property Value field.In the property “Config 1” enter the WebSphere Administrator User password in the Property Value field.In the property “Config 2” enter the WebSphere Administrator User name in the Property Value field.
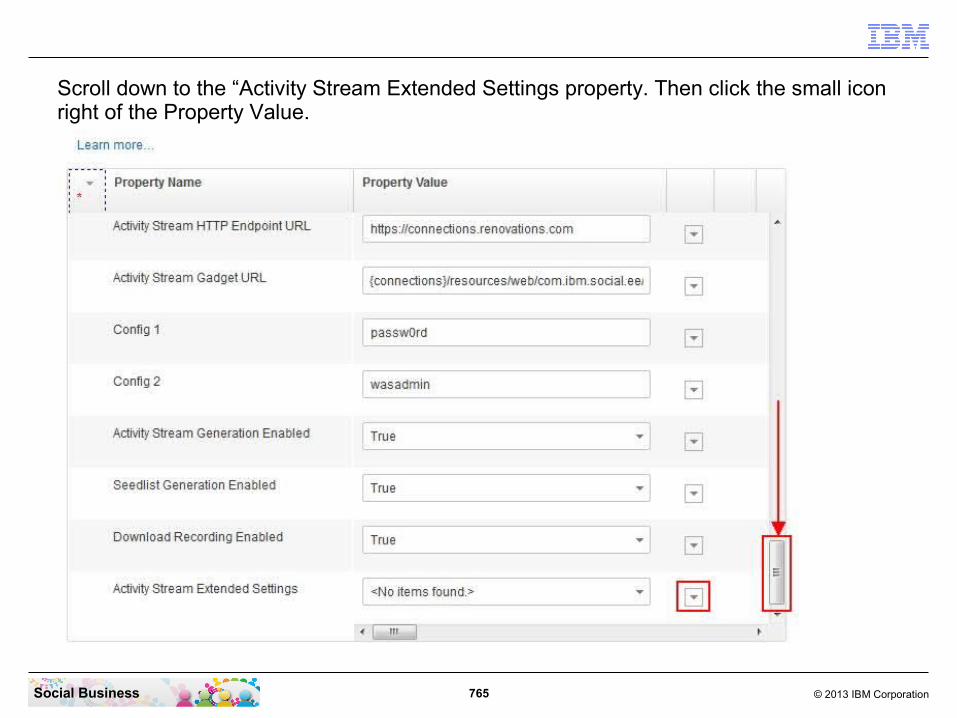
765 © 2013 IBM CorporationSocial Business
Scroll down to the “Activity Stream Extended Settings property. Then click the small icon right of the Property Value.

766 © 2013 IBM CorporationSocial Business
Click “Display or Edit Value”.

767 © 2013 IBM CorporationSocial Business
Now you need to enter 5 strings. The first is:“activityStreamRetrievalURL={0}/atom/library/{1}%3B{2}/{3}/{4}/entry”Click the “Add” button.

768 © 2013 IBM CorporationSocial Business
The second is:“activityStreamAnonymousRetrievalURL={0}/atom/anonymous/library/{1}%3B{2}/{3}/{4}/entry”Click the “Add” button.
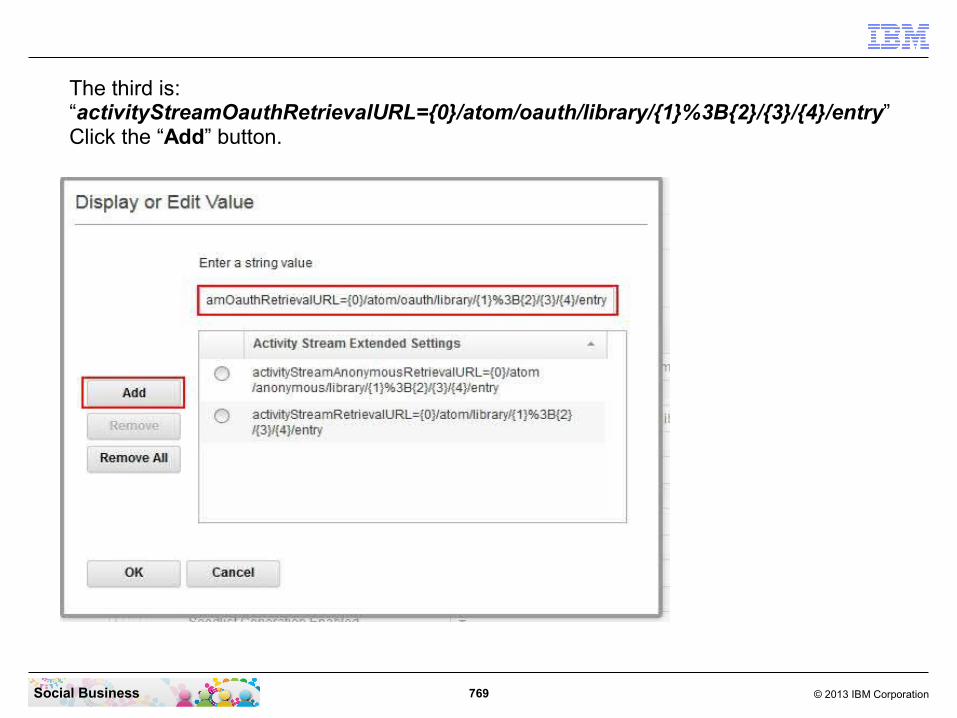
769 © 2013 IBM CorporationSocial Business
The third is:“activityStreamOauthRetrievalURL={0}/atom/oauth/library/{1}%3B{2}/{3}/{4}/entry”Click the “Add” button.

770 © 2013 IBM CorporationSocial Business
The fourth is:“activityStreamFileLinkURL={0}/atom/library/{1}/document/{2}/media/{3}”Click the “Add” button.
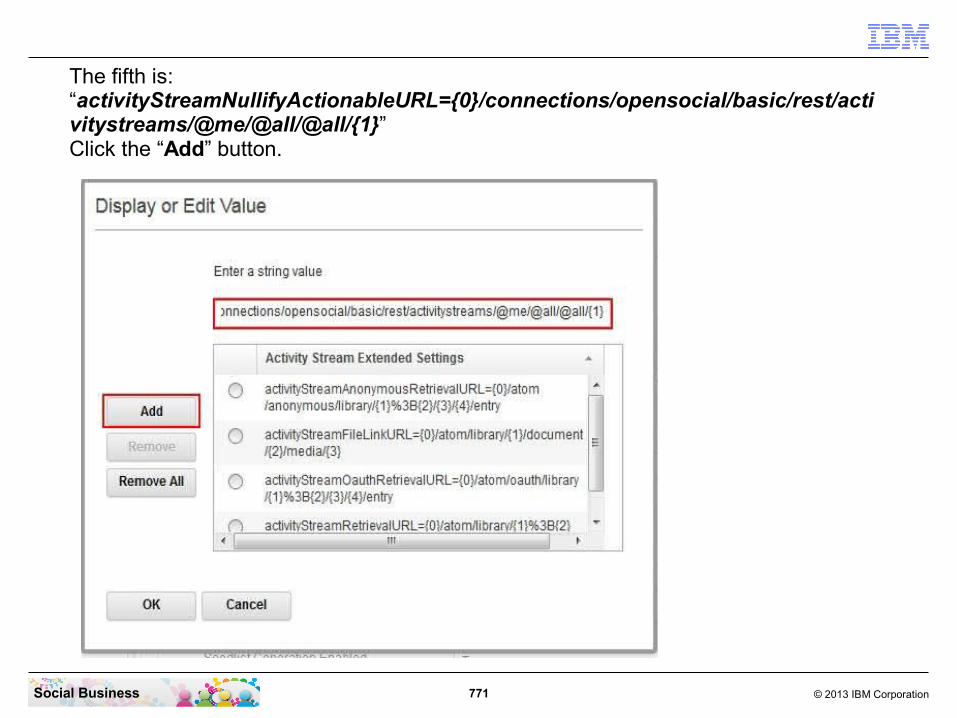
771 © 2013 IBM CorporationSocial Business
The fifth is:“activityStreamNullifyActionableURL={0}/connections/opensocial/basic/rest/activitystreams/@me/@all/@all/{1}”Click the “Add” button.

772 © 2013 IBM CorporationSocial Business
Click the “OK” button to continue

773 © 2013 IBM CorporationSocial Business
Scroll up to the “Download Count Ignored User Ids” property and click the small icon to the right.

774 © 2013 IBM CorporationSocial Business
Click “Display or Edit Value”. Then add the first SID from the WebSphere Administrator User and click the “Add” button.
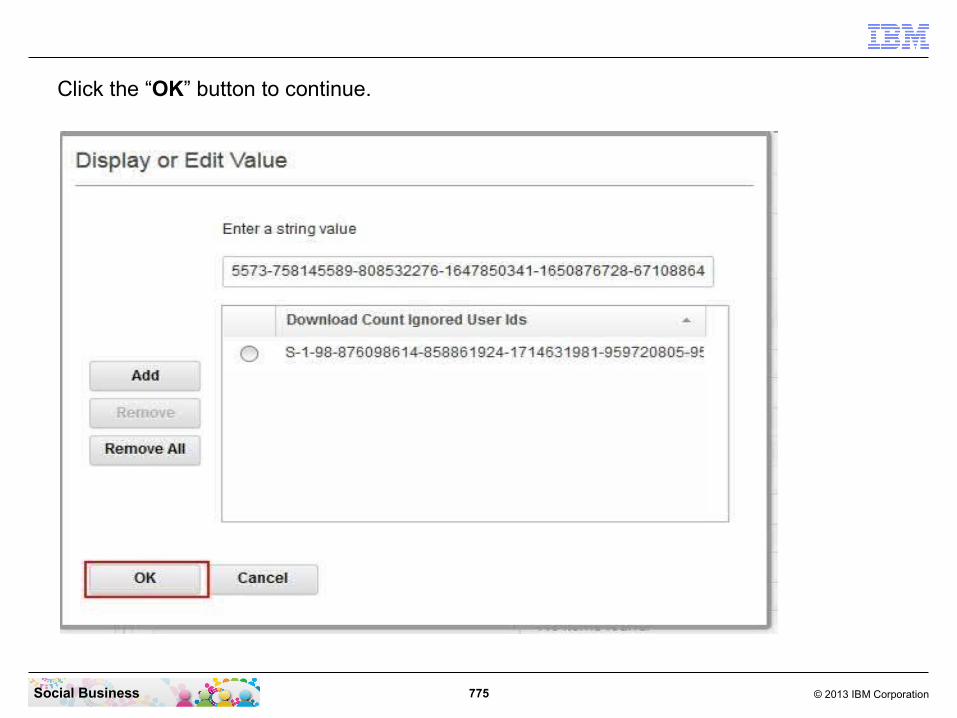
775 © 2013 IBM CorporationSocial Business
Click the “OK” button to continue.

776 © 2013 IBM CorporationSocial Business
Setting up anonymous access for a new FileNet deployment
About this taskIBM FileNet Collaboration Services implements anonymous access with a designated user that is used only for this purpose. The user should be a system-type user that is not used by a real person. The user ID does not need, and should not have, any particular privileges on the object store beyond what is given by the installation guide. This user's access control records will determine what level of access is given to anonymous users. Consequently, choose a functional ID that is reserved for this purpose and that does not have special access.
Configuring an anonymous user is required if users will be accessing Connections communities anonymously. In some cases, such as when desktop single-sign is enabled, or when roles in the communities application have been restricted to limit access to authenticated users, setting up anonymous access for FileNet is optional. Refer to Roles for information on restricting access to anonymous users in communities.
The display name of the user used in this role might appear in some supplemental user interfaces, so a user account or functional ID should be chosen with a suitable display name matching the purpose of this account, for instance, Anonymous User. Do not choose the administrative account ID. Follow these steps to configure anonymous access

777 © 2013 IBM CorporationSocial Business
Scroll up to the “Download Count Anonymous User Ids” property and click the small icon to the right.

778 © 2013 IBM CorporationSocial Business
Click “Display or Edit Value”. Then add the second SID that you have created from the “Anonymous User” User and click the “Add” button.

779 © 2013 IBM CorporationSocial Business
Click the “OK” button to continue.
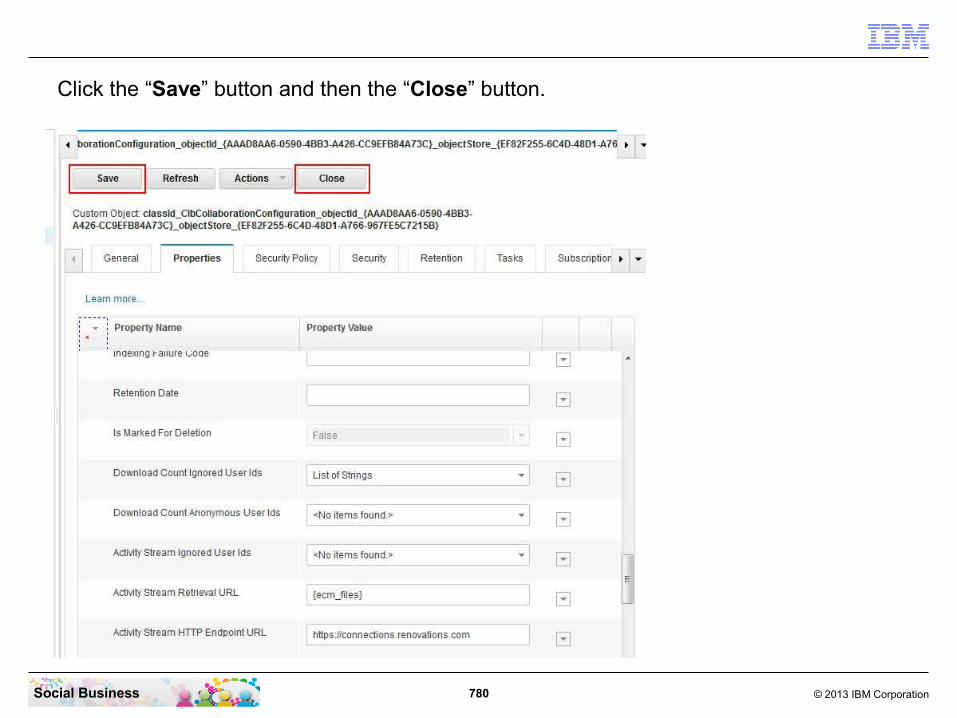
780 © 2013 IBM CorporationSocial Business
Click the “Save” button and then the “Close” button.

781 © 2013 IBM CorporationSocial Business
Start the WebSphere Administration console and login with your WebSphere Administrator user name and password.

782 © 2013 IBM CorporationSocial Business
Click “Applications” - “Application Types” - “WebSphere enterprise application”.

783 © 2013 IBM CorporationSocial Business
Click the “FNCS” application.

784 © 2013 IBM CorporationSocial Business
Click the “User RunAs roles” link.

785 © 2013 IBM CorporationSocial Business
Enter the user ID (Short-Name) of your “Anonymous User” user and its password. Select the “Anonymous” user role. Then click the “Apply” button.

786 © 2013 IBM CorporationSocial Business
Click the “OK” button to continue.

787 © 2013 IBM CorporationSocial Business
Click the “Save” link to save the last changes.

788 © 2013 IBM CorporationSocial Business
Summary
By default, the IBM WebSphere server installer configures a service in the Windows OS only for the Deployment Manager. The Application Server services nodeagents, the Cognos Server and the IBM Connections Application Server are not configured as service. This step describes how to configure this additional services and how to configure the dependencies.
This instructions are not part of the official IBM Connections Documentation Wiki and added by the author of this document as a best practice.
STEP THIRTY-ONE: Configure services to start and stop the Cognos and Connections servers automatic
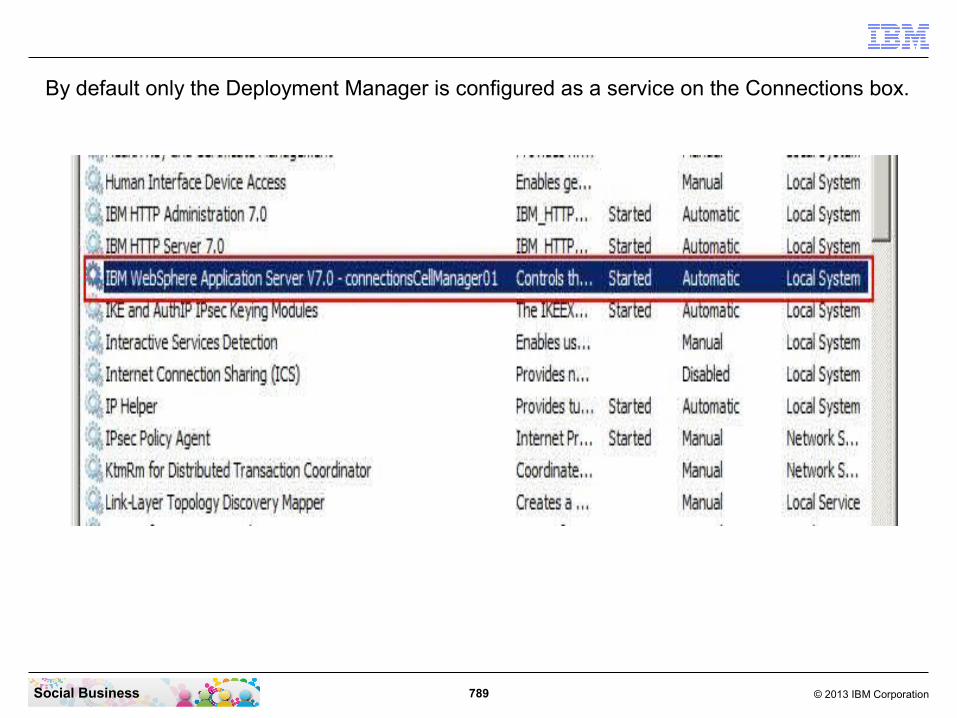
789 © 2013 IBM CorporationSocial Business
By default only the Deployment Manager is configured as a service on the Connections box.
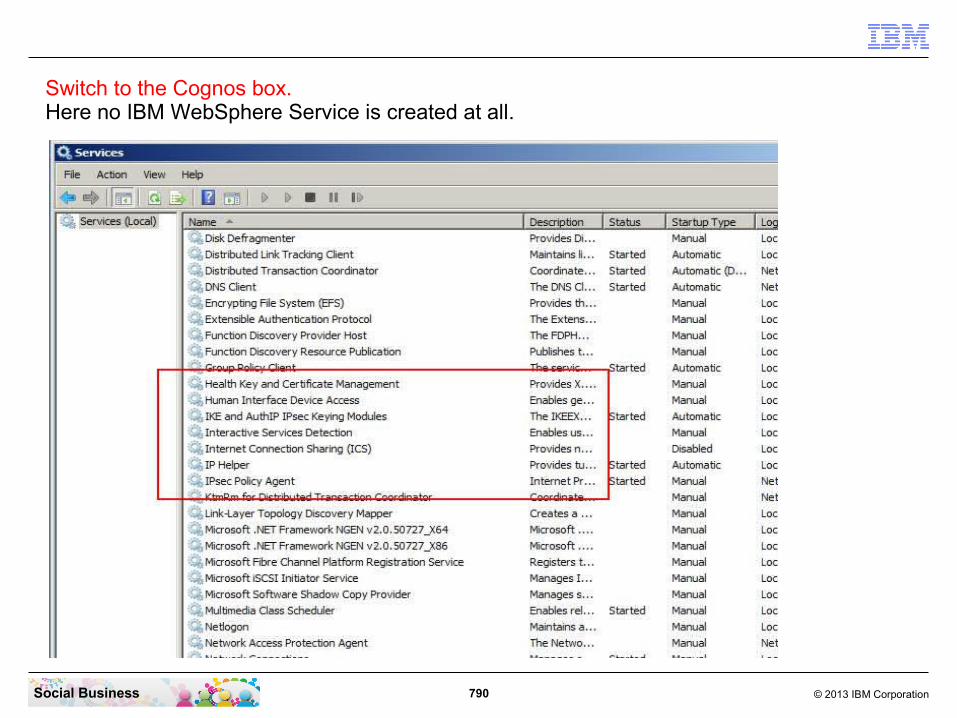
790 © 2013 IBM CorporationSocial Business
Switch to the Cognos box.Here no IBM WebSphere Service is created at all.

791 © 2013 IBM CorporationSocial Business
But before you can start the servers as Services, you must shut down all servers manually. In your CMD line window enter this commands:
”stopserver cognos_server -username wasadmin -password passw0rd””stopserver nodeagent -username wasadmin -password passw0rd”

792 © 2013 IBM CorporationSocial Business
Switch to the Connections box.Switch to the CMD-Line window and enter this commands to stop all servers:”stopserver connections_server -username wasadmin -password passw0rd””stopserver nodeagent -username wasadmin -password passw0rd””cd ..\..\Dmgr01\bin””stopserver dmgr -username wasadmin -password passw0rd” or just “stopmanager”.
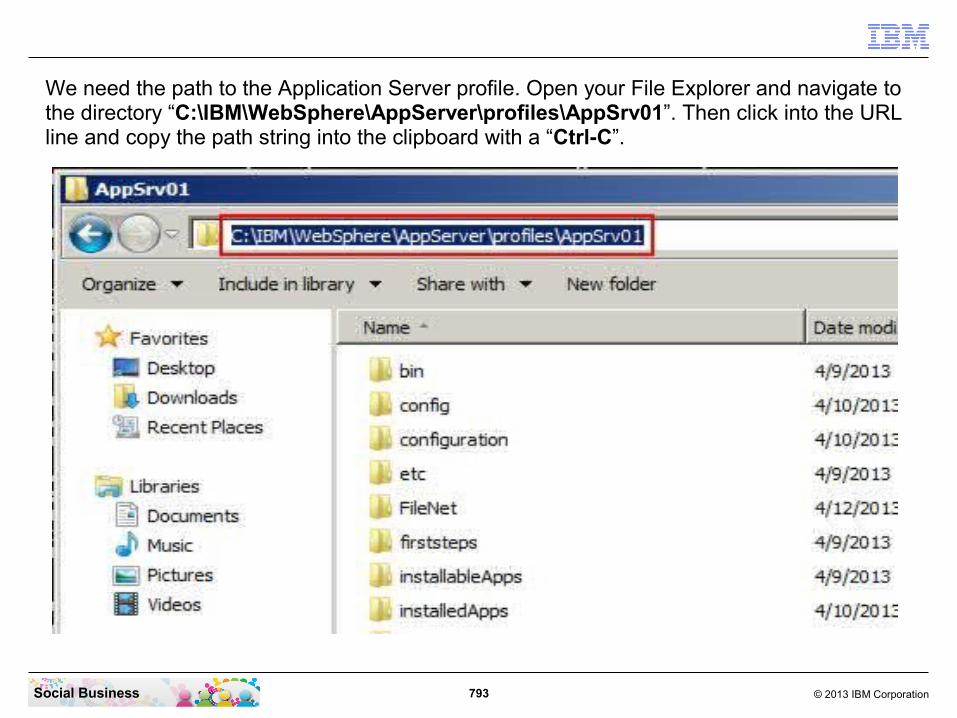
793 © 2013 IBM CorporationSocial Business
We need the path to the Application Server profile. Open your File Explorer and navigate to the directory “C:\IBM\WebSphere\AppServer\profiles\AppSrv01”. Then click into the URL line and copy the path string into the clipboard with a “Ctrl-C”.
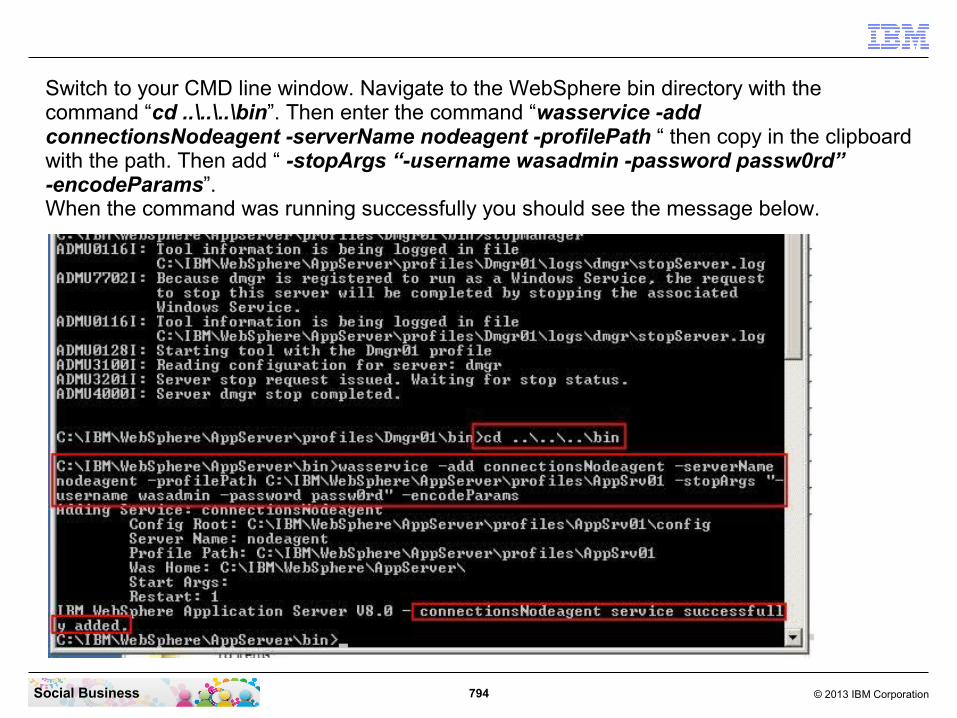
794 © 2013 IBM CorporationSocial Business
Switch to your CMD line window. Navigate to the WebSphere bin directory with the command “cd ..\..\..\bin”. Then enter the command “wasservice -add connectionsNodeagent -serverName nodeagent -profilePath “ then copy in the clipboard with the path. Then add “ -stopArgs “-username wasadmin -password passw0rd” -encodeParams”.When the command was running successfully you should see the message below.
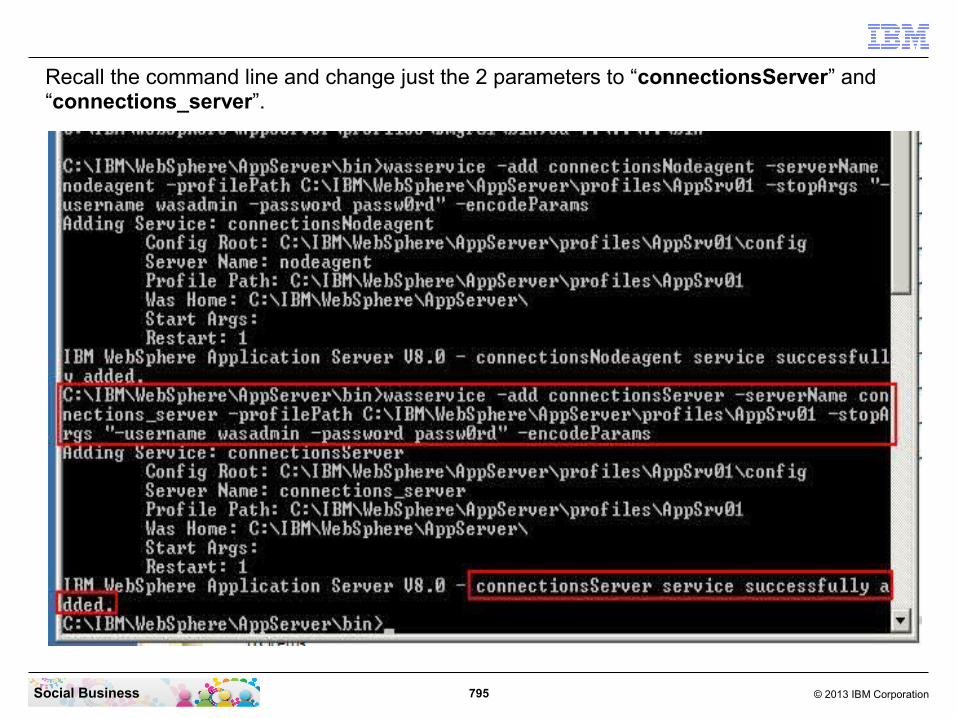
795 © 2013 IBM CorporationSocial Business
Recall the command line and change just the 2 parameters to “connectionsServer” and “connections_server”.

796 © 2013 IBM CorporationSocial Business
Switch to the Cognos box.We need the path to the Application Server profile. Open your File Explorer and navigate to the directory “C:\IBM\WebSphere\AppServer\profiles\AppSrv01”. Then click into the URL line and copy the path string into the clipboard with a “Ctrl-C”.

797 © 2013 IBM CorporationSocial Business
Now enter the command “cd ..\..\..\bin” to switch to the right directory. Now enter the command “wasservice -add cognosNodeagent -serverName nodeagent -profilePath C:\IBM\WebSphere\AppServer\profiles\AppSrv01 -stopArgs “-username wasadmin -password passw0rd” -encodeParams”.When the command was running successfully you should see the message below.

798 © 2013 IBM CorporationSocial Business
Recall the command line and change just the 2 parameters to “cognosServer” and “cognos_server”.

799 © 2013 IBM CorporationSocial Business
Two new services are now created on the Cognos Box and two additional Services are created on the Connections box. Next step is to configure the dependencies.

800 © 2013 IBM CorporationSocial Business
We still stay on the Cognos Box.Switch back to the CMD line window and enter the command lines:
“sc config “IBMWAS80Service – cognosServer” depend= “IBMWAS80Service – cognosNodeagent”
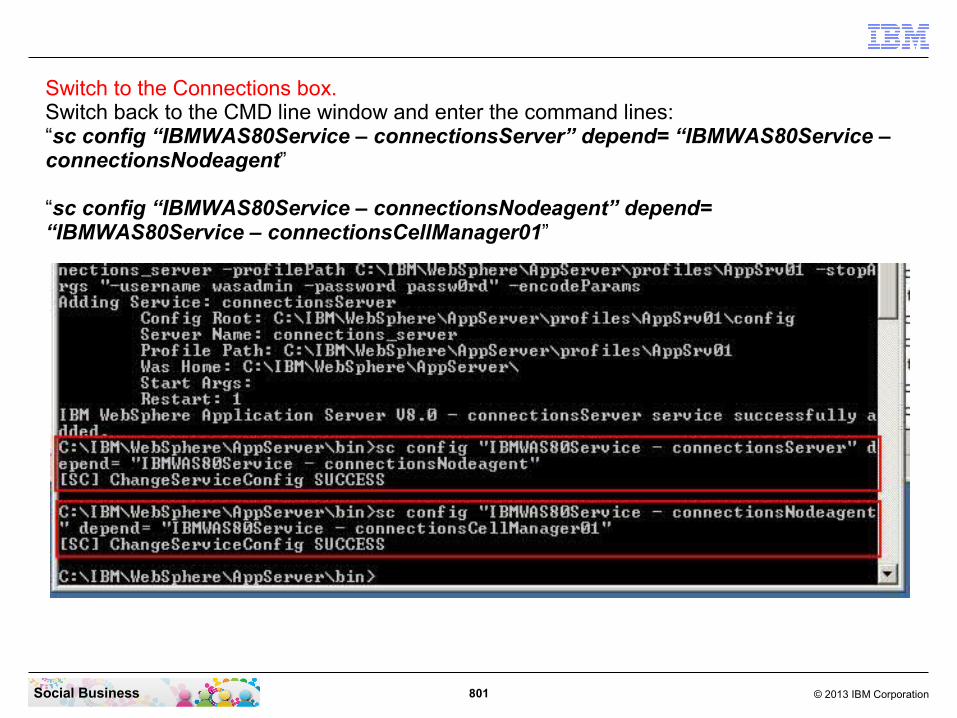
801 © 2013 IBM CorporationSocial Business
Switch to the Connections box.Switch back to the CMD line window and enter the command lines:“sc config “IBMWAS80Service – connectionsServer” depend= “IBMWAS80Service – connectionsNodeagent”
“sc config “IBMWAS80Service – connectionsNodeagent” depend= “IBMWAS80Service – connectionsCellManager01”
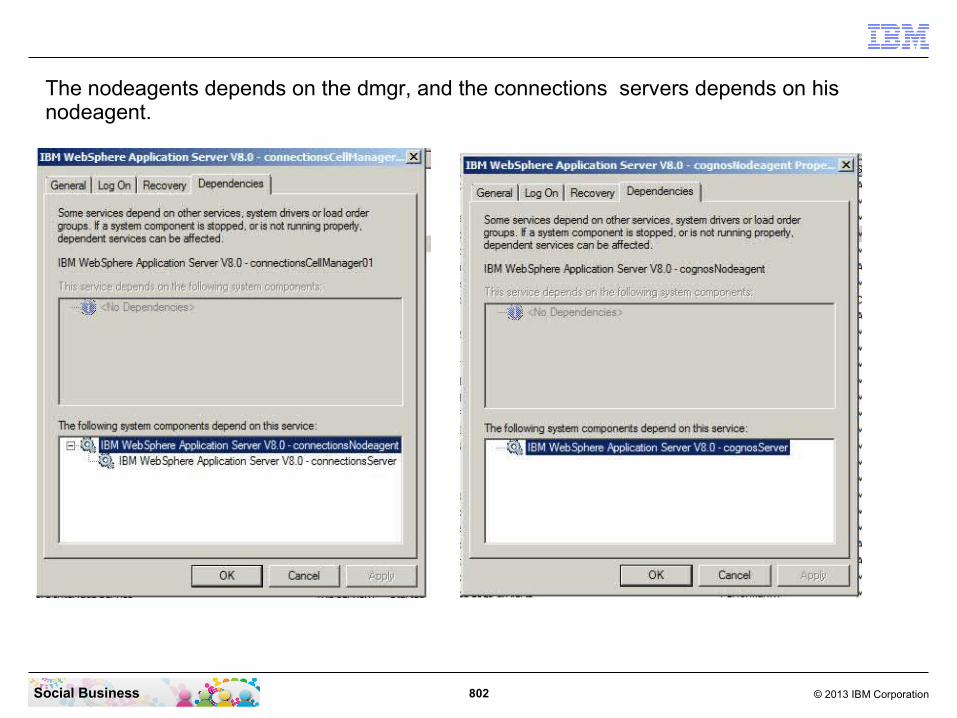
802 © 2013 IBM CorporationSocial Business
The nodeagents depends on the dmgr, and the connections servers depends on his nodeagent.

803 © 2013 IBM CorporationSocial Business
The last step is to set all services to “Automatic”. Then the system should start up completely and automatic after a OS restart. Restart your OS now on both boxes – the Connections and the Cognos box. Bo be sure the automatic start of all WebSphere Application Servers works in both boxes.

804 © 2013 IBM CorporationSocial Business
After the system has completely restarted you should see all WebSphere services running.Be aware that starting all application servers can take up to 10 minutes.

805 © 2013 IBM CorporationSocial Business
Summary
The next pages explain how to update the IBM Connections 4.5 environment with the embedded IBM Connections Content Manager 5.2.0 to IBM Connections 4.5 CR1.
STEP THIRTY-TWO: Update IBM Connections to the Cumulative Refresh 1 level

806 © 2013 IBM CorporationSocial Business
Cumulative Refreshes (CRs) consists of a set of cumulative fixes for each of IBM Connections applications. For additional information on CRs, including instructions on how to download and install, please review the Update strategy for IBM Connections 4.5 document.
CR1 is a set of 20 cumulative fixes; each will update the entire application. The CCM (Connections Content Management) fix should only be installed on Connections environments which have Content Management configured.
CR1 requires the use of a new version of the Update Installer, which is published in Fix Central: 4.5.0.0-IC-Multi-UPDI-20130604.
Fix Central download link for 4.5 CR1 package (4.5.0.0-IC-Multi-CR01-LO75060).
CR1 includes fixes LO74499 and LO74629, listed in this document. It also includes LO74571 for Connections Mail support. It is not necessary to apply these previous fixes if you are installing CR1. CR1 can also be applied on environments that have those fixes already applied.
The detailed list of the Fixes in the CR1 release can be found Here.

807 © 2013 IBM CorporationSocial Business
The update of IBM Connections 4.5 to the CR1 release requires to update the CCM package first. (If you have installed it)See the Update strategy for IBM Connections 4.5 documentation.This CCM update to FP1 is the largest part in this procedure.
But first you need to download the required files from FixCentral:● 5.2.0.1-P8CE-WIN-FP001.zip: IBM FileNet Content Plattform Engine Server update
Version 5.2.0.1● 5.2.0.1-P8CE-CLIENT-WIN-FP001.zip: IBM FileNet Content Platform Engine Client
update version 5.2.0.1● 2.0.0.1-FNCS-FP001-WIN.zip: IBM FileNet Collaboration Services update Version
2.0.0.1● 4.5.0.0-IC-Multi-UPDI-20130604.zip: IBM UpdateInstaller for IBM Connections ● 4.5.0.0-IC-Multi-CR01-LO75060.zip: IBM Connections 4.5 CR1 package
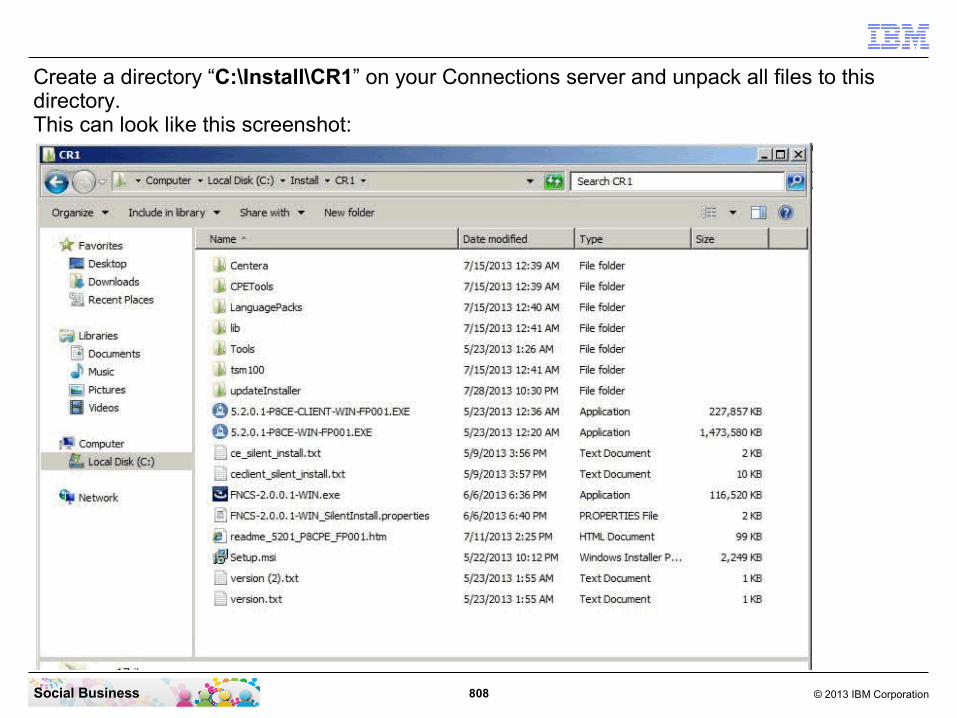
808 © 2013 IBM CorporationSocial Business
Create a directory “C:\Install\CR1” on your Connections server and unpack all files to this directory.This can look like this screenshot:
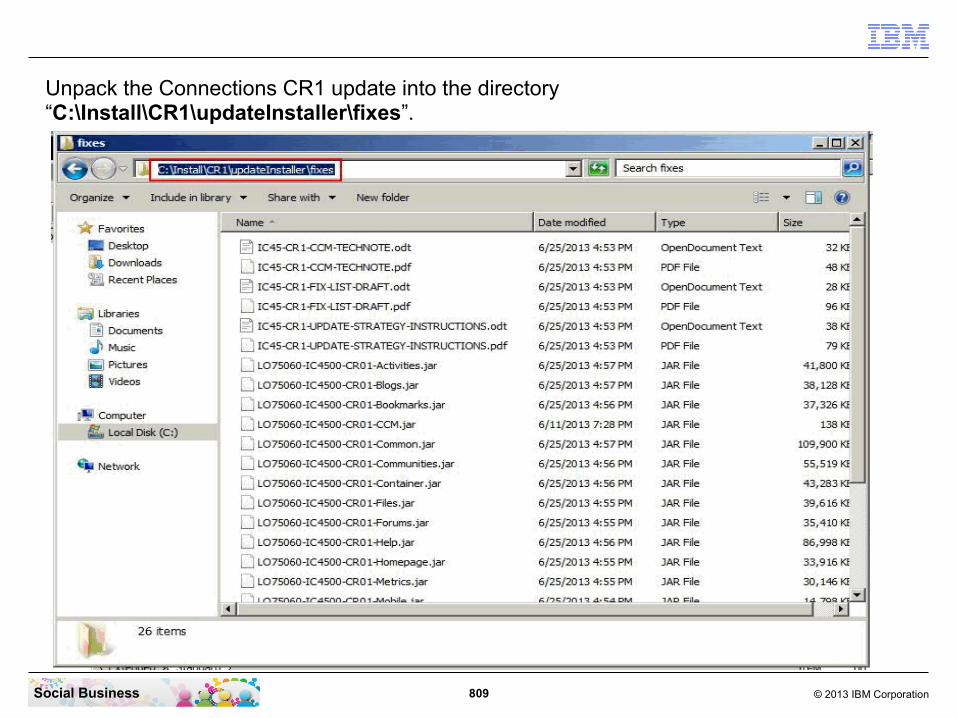
809 © 2013 IBM CorporationSocial Business
Unpack the Connections CR1 update into the directory “C:\Install\CR1\updateInstaller\fixes”.

810 © 2013 IBM CorporationSocial Business
There is one zipped file 45-CR1-CCM-OPTIONAL-UPDATE-UNZIP-AND-PLACE-JAR-IN-FIXES-DIRECTORY.zip. unzip this file into this fixes directory as well.
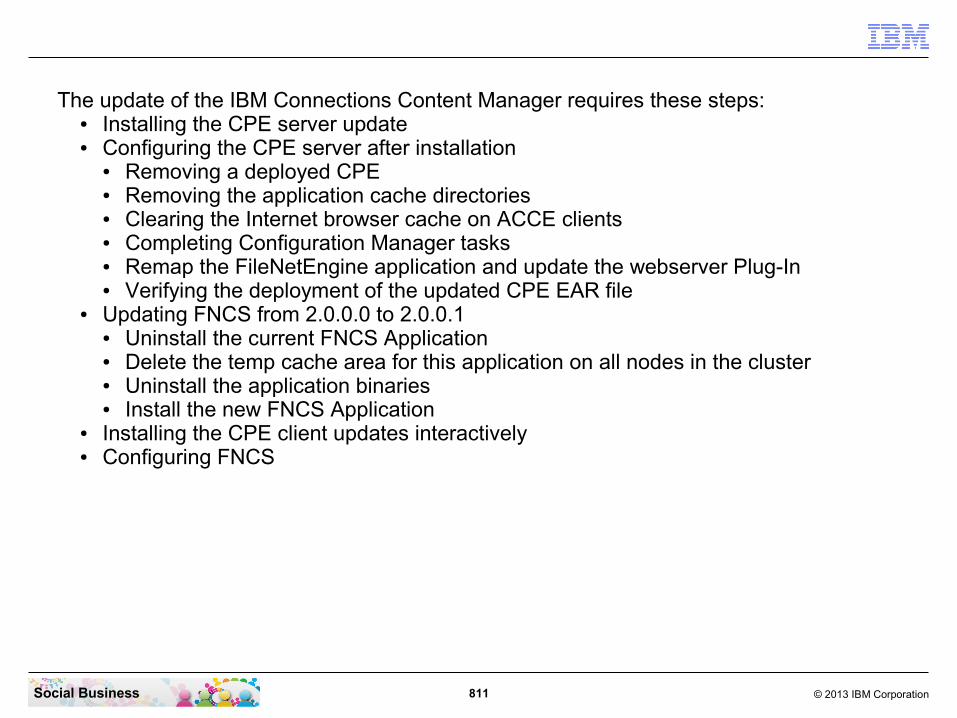
811 © 2013 IBM CorporationSocial Business
The update of the IBM Connections Content Manager requires these steps:● Installing the CPE server update● Configuring the CPE server after installation
● Removing a deployed CPE● Removing the application cache directories● Clearing the Internet browser cache on ACCE clients● Completing Configuration Manager tasks● Remap the FileNetEngine application and update the webserver Plug-In● Verifying the deployment of the updated CPE EAR file
● Updating FNCS from 2.0.0.0 to 2.0.0.1● Uninstall the current FNCS Application● Delete the temp cache area for this application on all nodes in the cluster● Uninstall the application binaries● Install the new FNCS Application
● Installing the CPE client updates interactively● Configuring FNCS

812 © 2013 IBM CorporationSocial Business
Install the CPE Server updateTo install the CPE Server update, the IBM Connections server must be running.Be sure the dmgr, the nodeagent and the connections server are running.

813 © 2013 IBM CorporationSocial Business
Open a CMD line window and navigate to the “C:\Install\CR1 directory”. Then start the Update installation with the “5.2.0.1-P8CE-WIN-FP001.EXE” command.
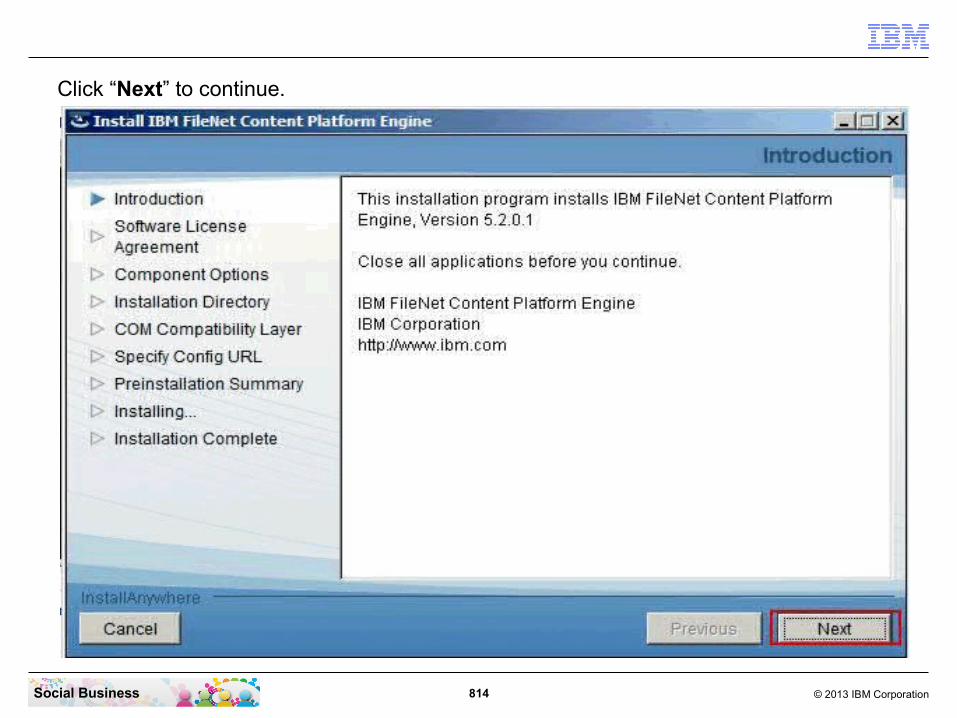
814 © 2013 IBM CorporationSocial Business
Click “Next” to continue.

815 © 2013 IBM CorporationSocial Business
On Windows Platform the update requires the Microsoft Web Services Enhancement to be installed.If it is not already installed the update installer can install it for you.Just click “OK” to accept the installation and continue.

816 © 2013 IBM CorporationSocial Business
Select “.NET” Clients and “FileNet Enterprise Manager”. Then click “Next” to continue.
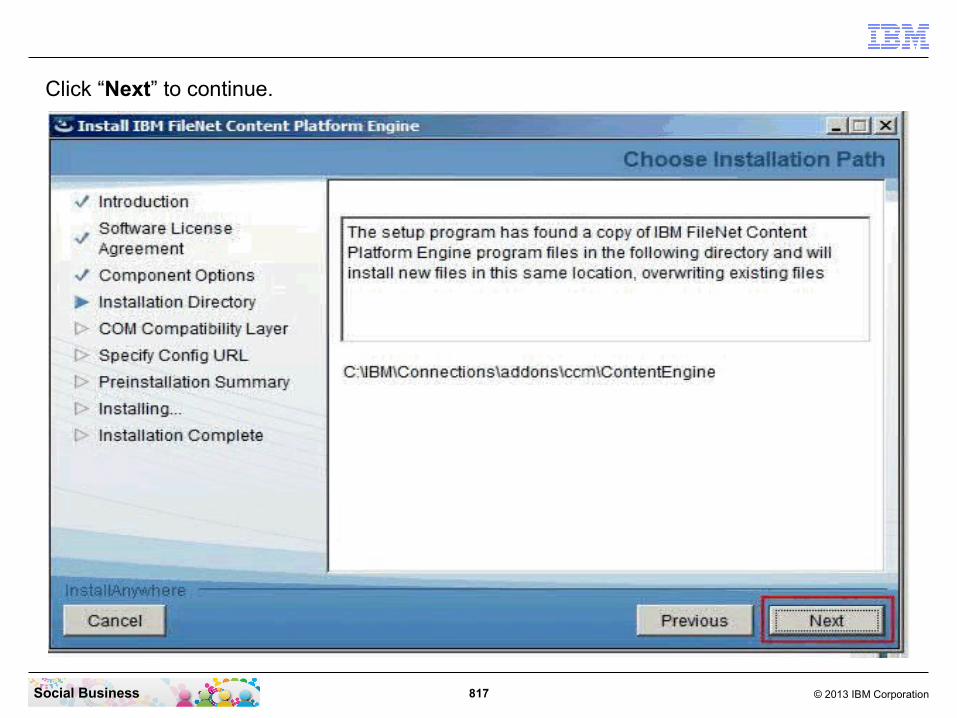
817 © 2013 IBM CorporationSocial Business
Click “Next” to continue.

818 © 2013 IBM CorporationSocial Business
In the next screen you normally have to change the port only. Check for the default port of your connections server and enter this port here. Then click “Next” to continue.
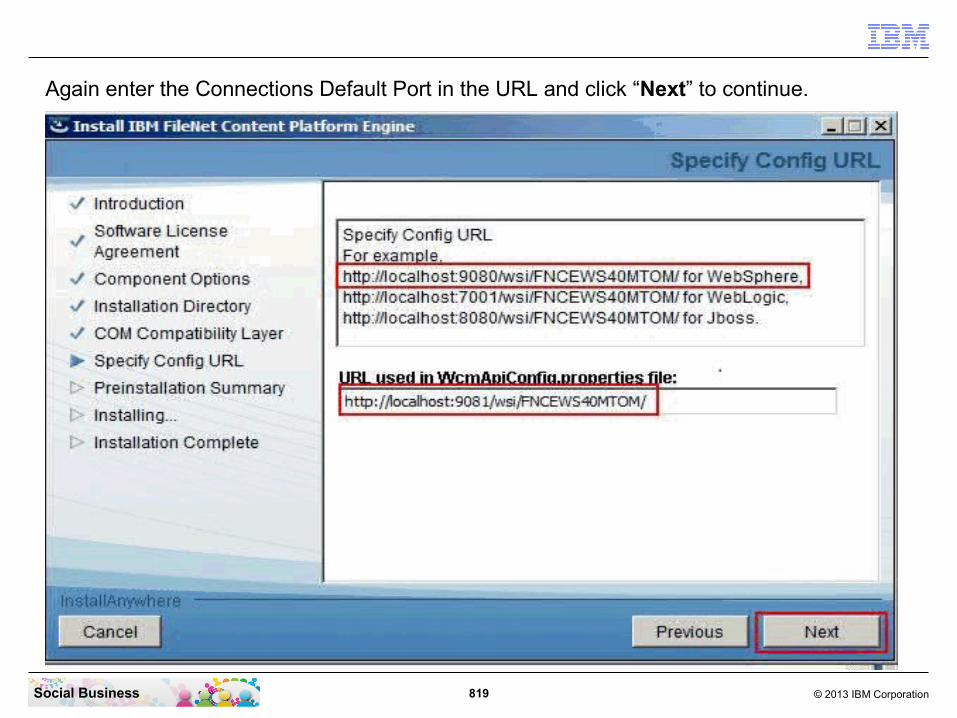
819 © 2013 IBM CorporationSocial Business
Again enter the Connections Default Port in the URL and click “Next” to continue.

820 © 2013 IBM CorporationSocial Business
Click “Install” to start the installation.

821 © 2013 IBM CorporationSocial Business
The CPE Server is now installing.
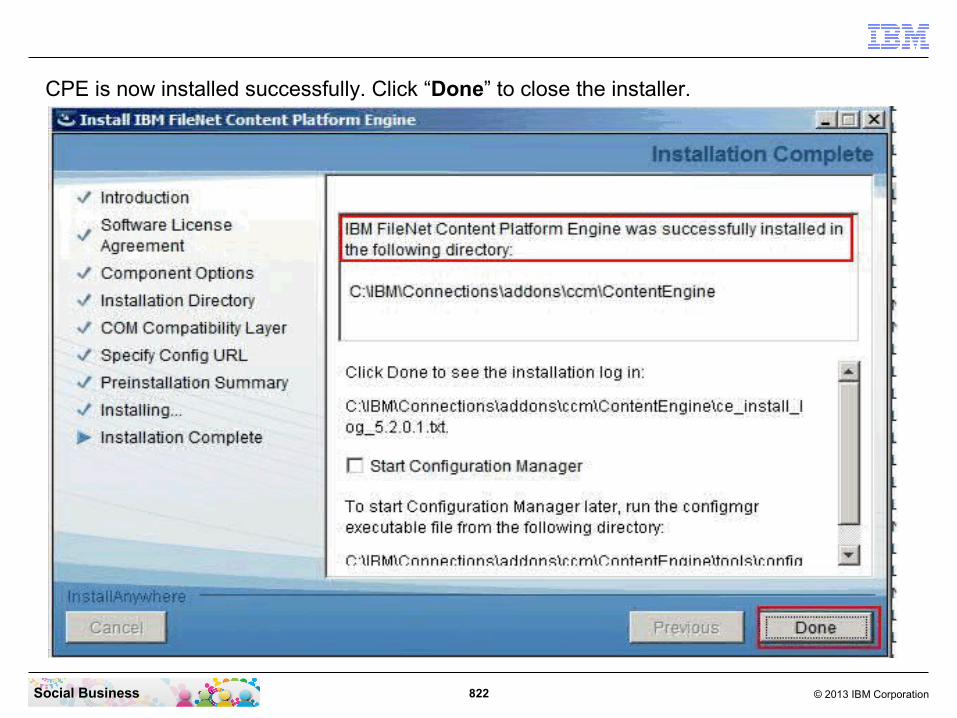
822 © 2013 IBM CorporationSocial Business
CPE is now installed successfully. Click “Done” to close the installer.

823 © 2013 IBM CorporationSocial Business
Configuring the CPE Server after update installation
The CPE Server configuration requires this steps:● Removing a deployed CPE● Removing the application cache directories● Clearing the Internet browser cache on ACCE clients● Completing Configuration Manager tasks● Remap the FileNetEngine application and update the webserver Plug-In● Verifying the deployment of the updated CPE EAR file

824 © 2013 IBM CorporationSocial Business
Removing a deployed CPEStart your browser and navigate to your WebSphere Integrated Solutions Console.Log in with your WebSphere Administrator user name and password.Click “Applications” - “Application Types” - “WebSphere enterprise applications”.
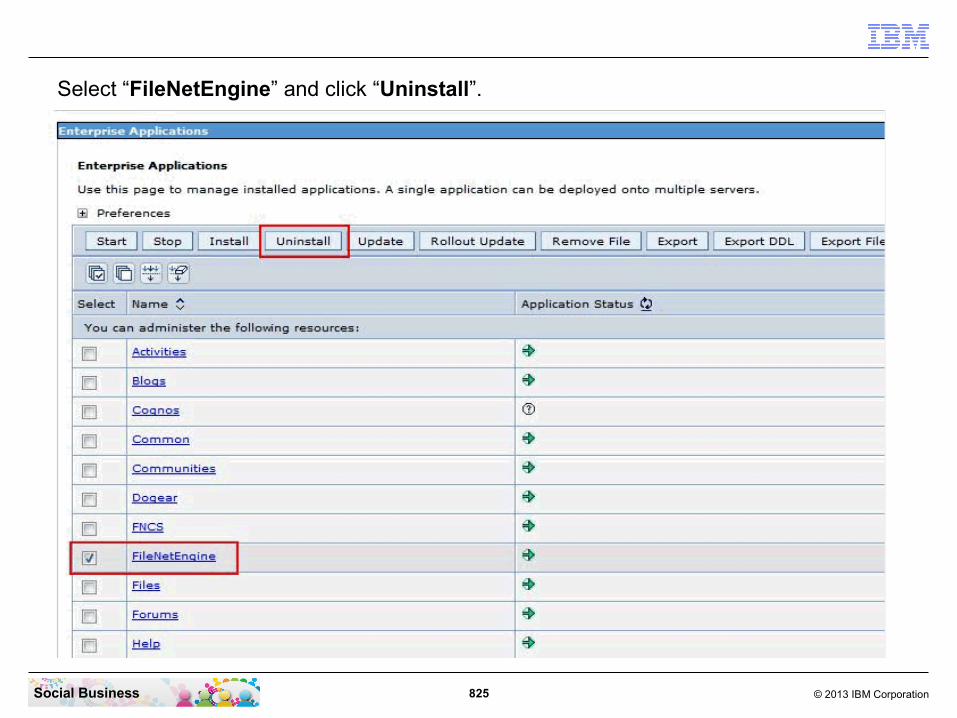
825 © 2013 IBM CorporationSocial Business
Select “FileNetEngine” and click “Uninstall”.

826 © 2013 IBM CorporationSocial Business
Click “OK” to confirm that you want to uninstall the application.

827 © 2013 IBM CorporationSocial Business
Click “Save” to save your last changes.
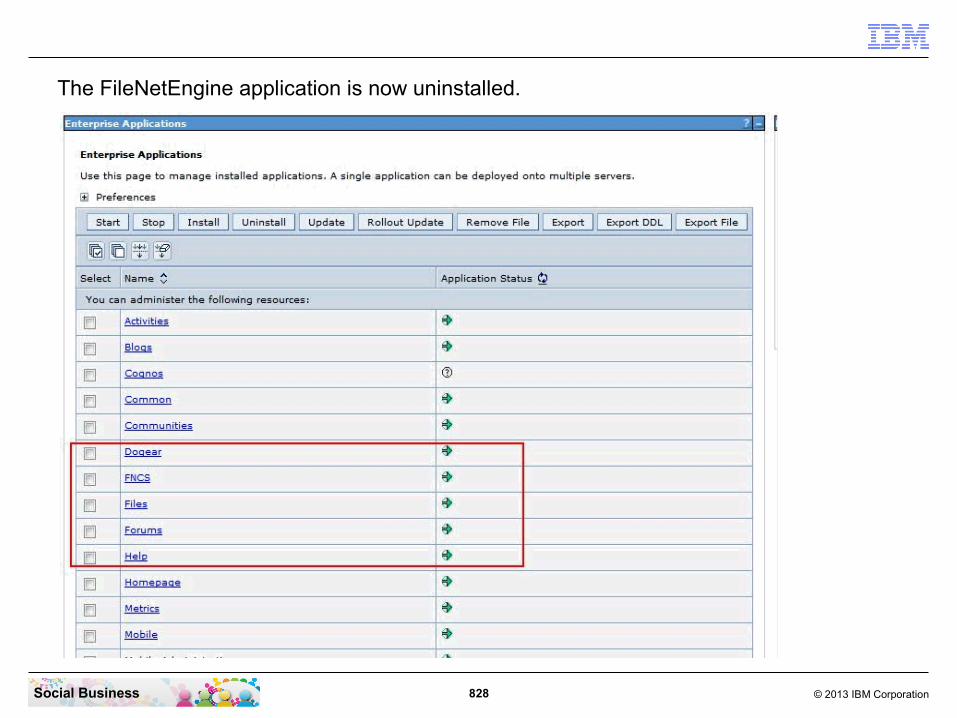
828 © 2013 IBM CorporationSocial Business
The FileNetEngine application is now uninstalled.

829 © 2013 IBM CorporationSocial Business
Removing the application cache directoriesTo remove the application cache directory you have to stop the connections server.

830 © 2013 IBM CorporationSocial Business
Open a File Explorer window and navigate to the “C:\IBM\WebSphere\AppServer\profiles\AppSrv01\temp\connectionsNode01\connections_server” directory.Delete the subdirectory of the “FileNetEngine” application.

831 © 2013 IBM CorporationSocial Business
Confirm with “Yes”.

832 © 2013 IBM CorporationSocial Business
Clearing the Internet browser cache on ACCE clients
In your browser with that you have accessed the acce application during the installation, it is recommended to clear the cache before continuing with the next step.
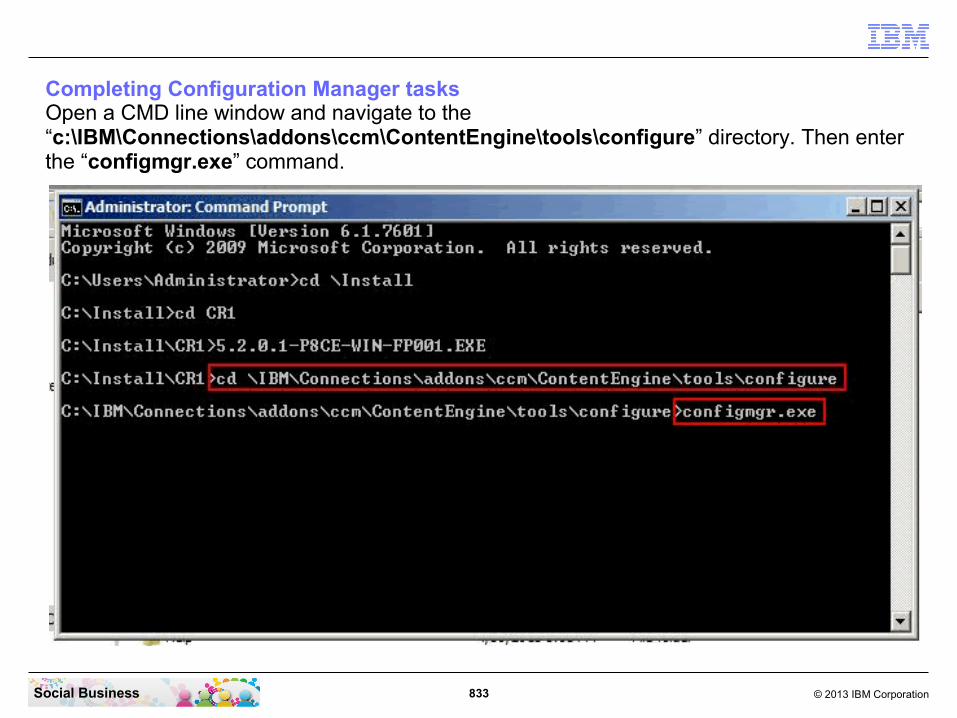
833 © 2013 IBM CorporationSocial Business
Completing Configuration Manager tasksOpen a CMD line window and navigate to the “c:\IBM\Connections\addons\ccm\ContentEngine\tools\configure” directory. Then enter the “configmgr.exe” command.

834 © 2013 IBM CorporationSocial Business
The Configuration Manager is starting up.
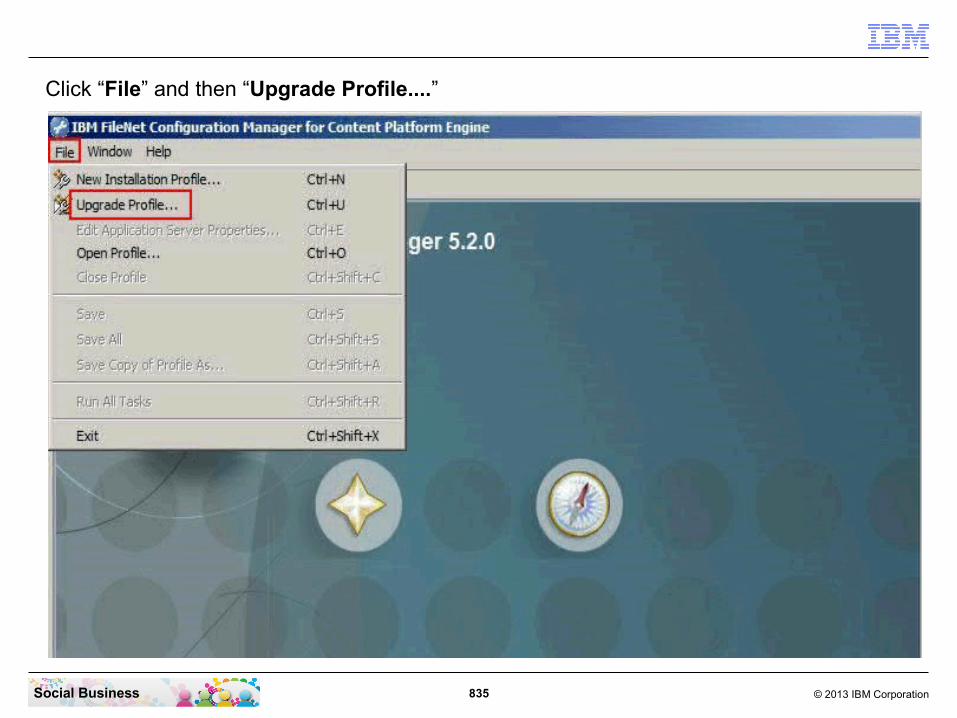
835 © 2013 IBM CorporationSocial Business
Click “File” and then “Upgrade Profile....”
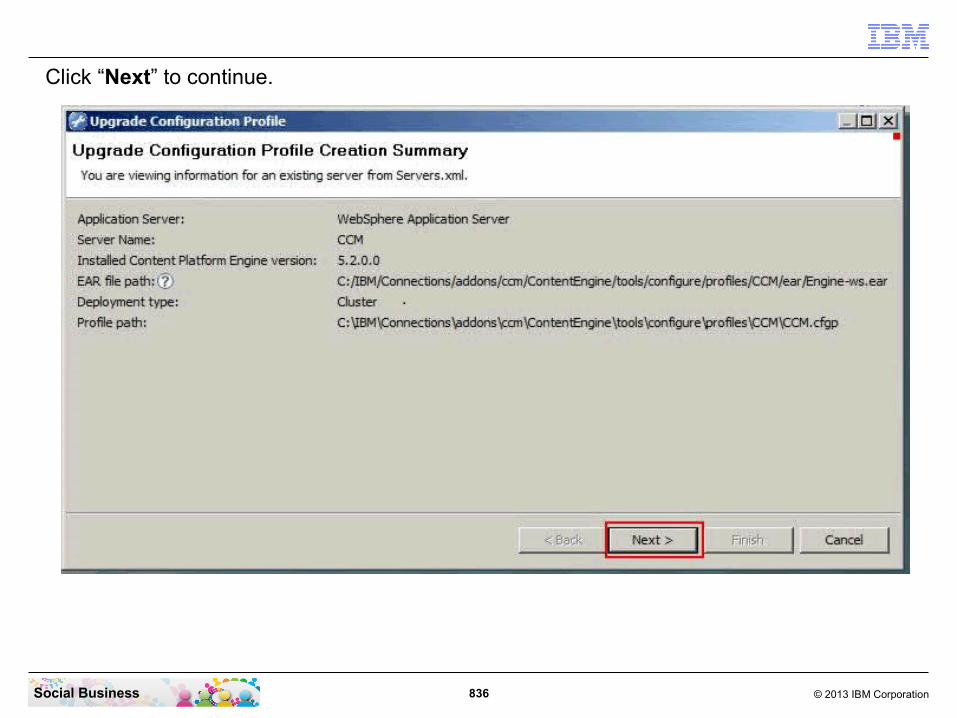
836 © 2013 IBM CorporationSocial Business
Click “Next” to continue.

837 © 2013 IBM CorporationSocial Business
In the “Application server administrative user name” field enter your WebSphere Administrator user name. In the “Application Server administrator password” fields enter the WebSphere Administrator user password twice. Then click “Test Connection”.
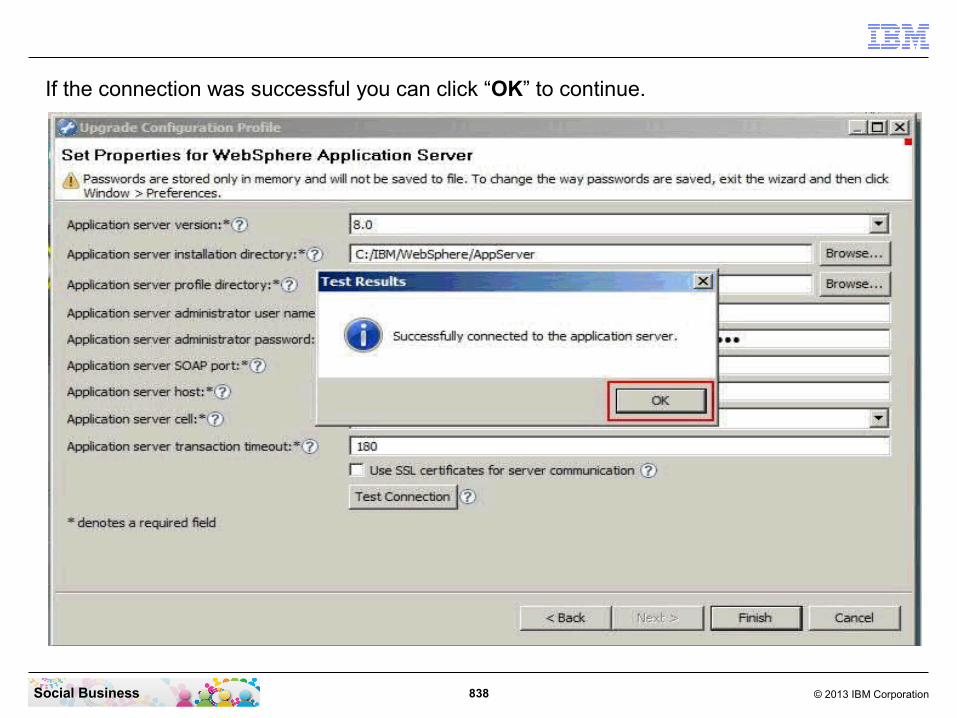
838 © 2013 IBM CorporationSocial Business
If the connection was successful you can click “OK” to continue.

839 © 2013 IBM CorporationSocial Business
Click “Finish” to continue.

840 © 2013 IBM CorporationSocial Business
Verify the properties and if all is correct, click “OK” to continue.
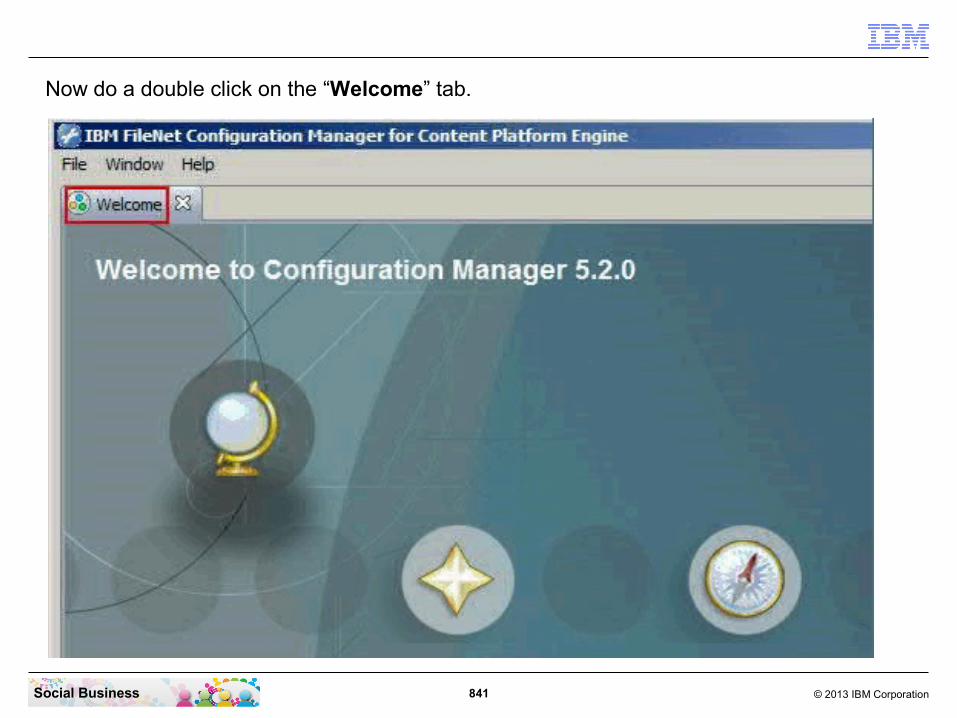
841 © 2013 IBM CorporationSocial Business
Now do a double click on the “Welcome” tab.
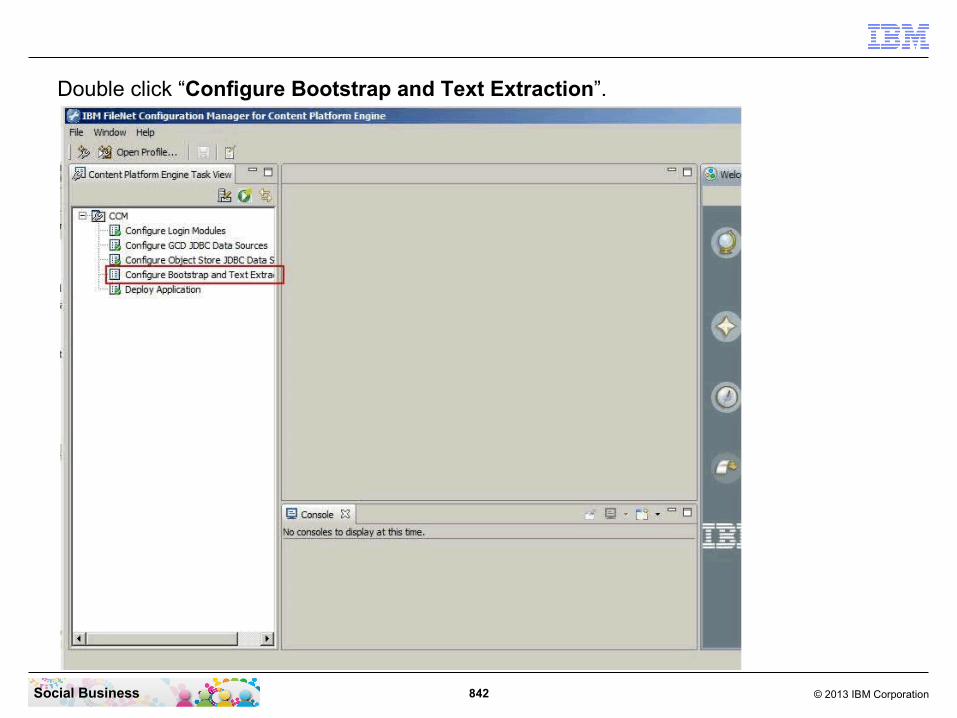
842 © 2013 IBM CorporationSocial Business
Double click “Configure Bootstrap and Text Extraction”.

843 © 2013 IBM CorporationSocial Business
Select “Upgrade” in “Bootstrap Operation”. Confirm that the content of the 2 other fields is correct. Then click “Save”.

844 © 2013 IBM CorporationSocial Business
Click “Run Task”.

845 © 2013 IBM CorporationSocial Business
Confirm that the operation was successful.
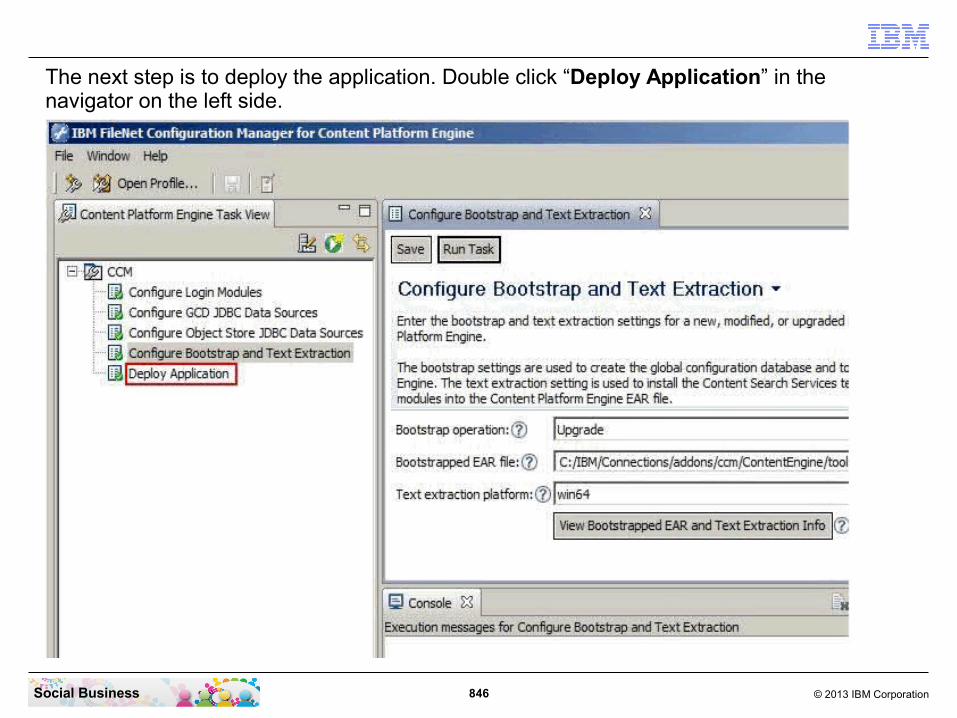
846 © 2013 IBM CorporationSocial Business
The next step is to deploy the application. Double click “Deploy Application” in the navigator on the left side.
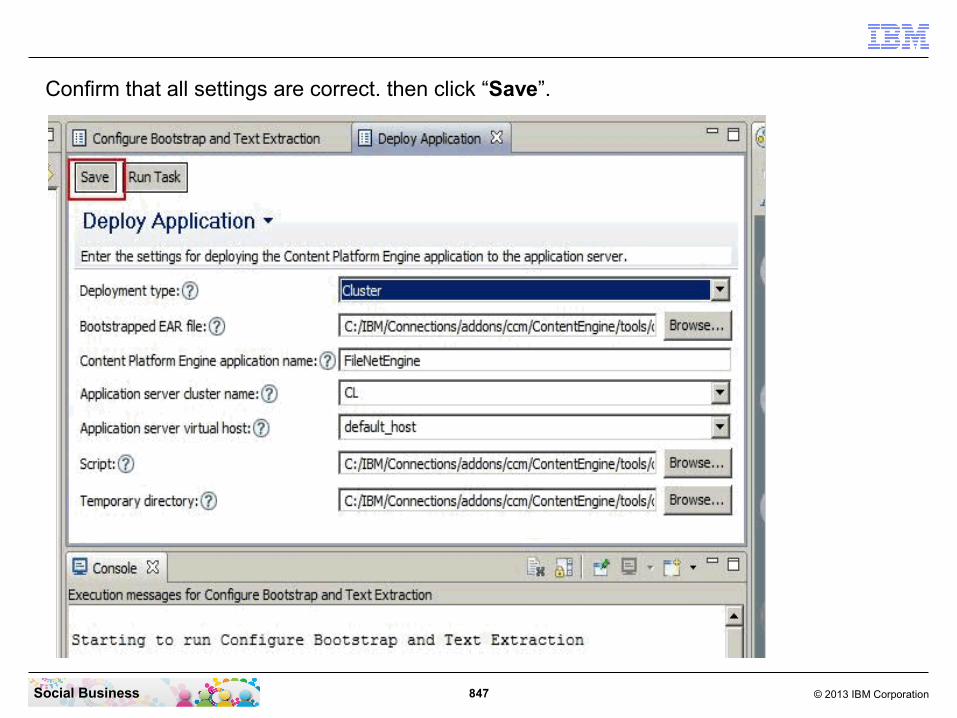
847 © 2013 IBM CorporationSocial Business
Confirm that all settings are correct. then click “Save”.

848 © 2013 IBM CorporationSocial Business
To deploy the application click “Run Task”.
Confirm that the application was deployed successfully.

849 © 2013 IBM CorporationSocial Business
Close the FileNet Configuration Manager.
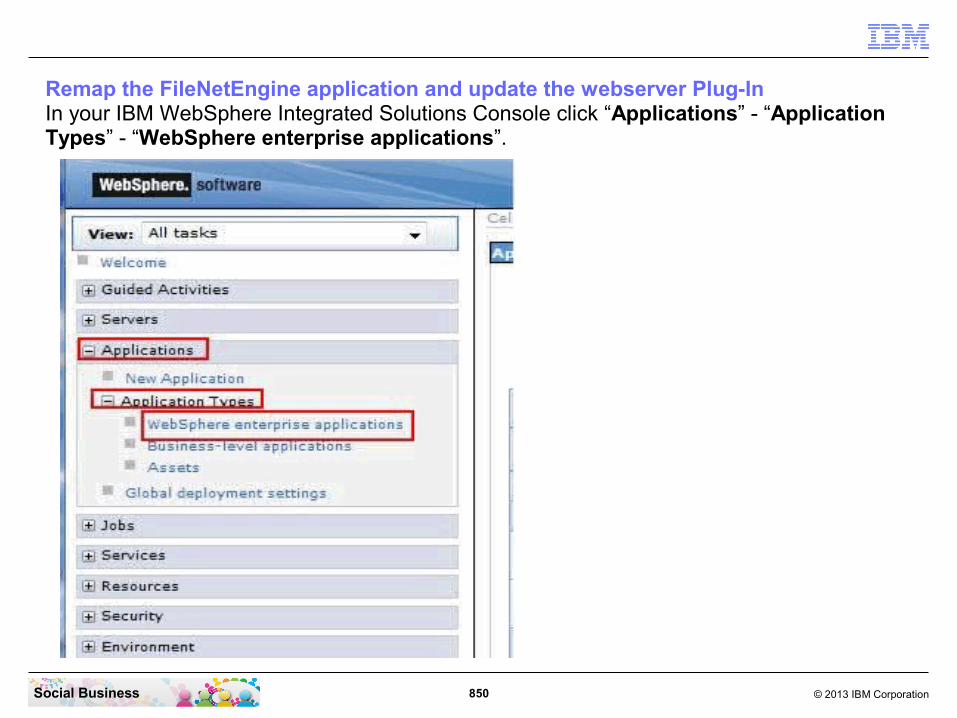
850 © 2013 IBM CorporationSocial Business
Remap the FileNetEngine application and update the webserver Plug-InIn your IBM WebSphere Integrated Solutions Console click “Applications” - “Application Types” - “WebSphere enterprise applications”.
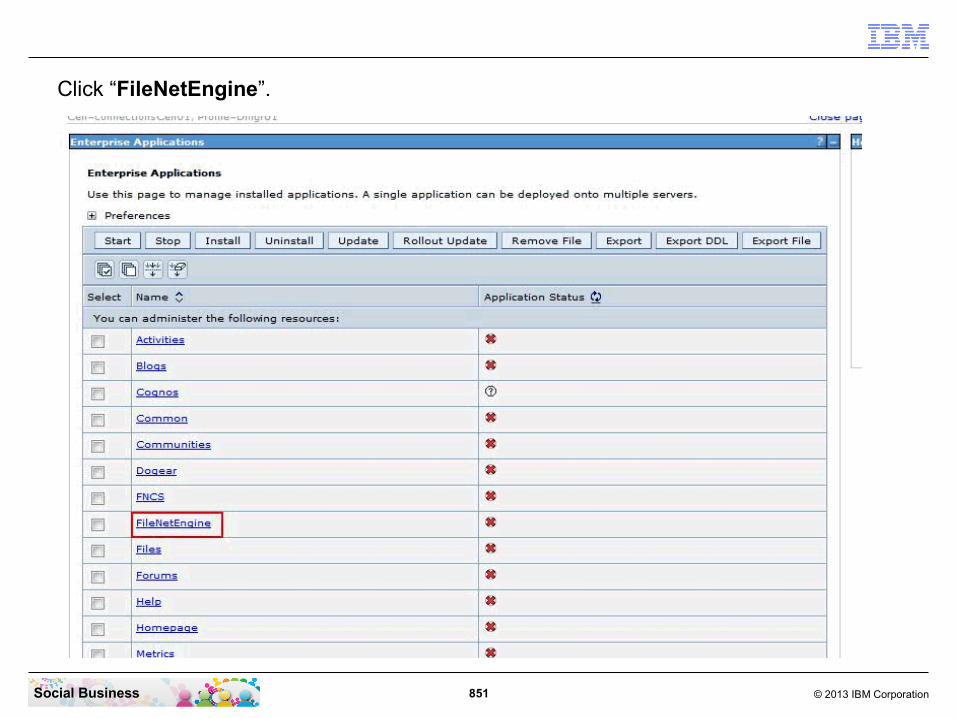
851 © 2013 IBM CorporationSocial Business
Click “FileNetEngine”.
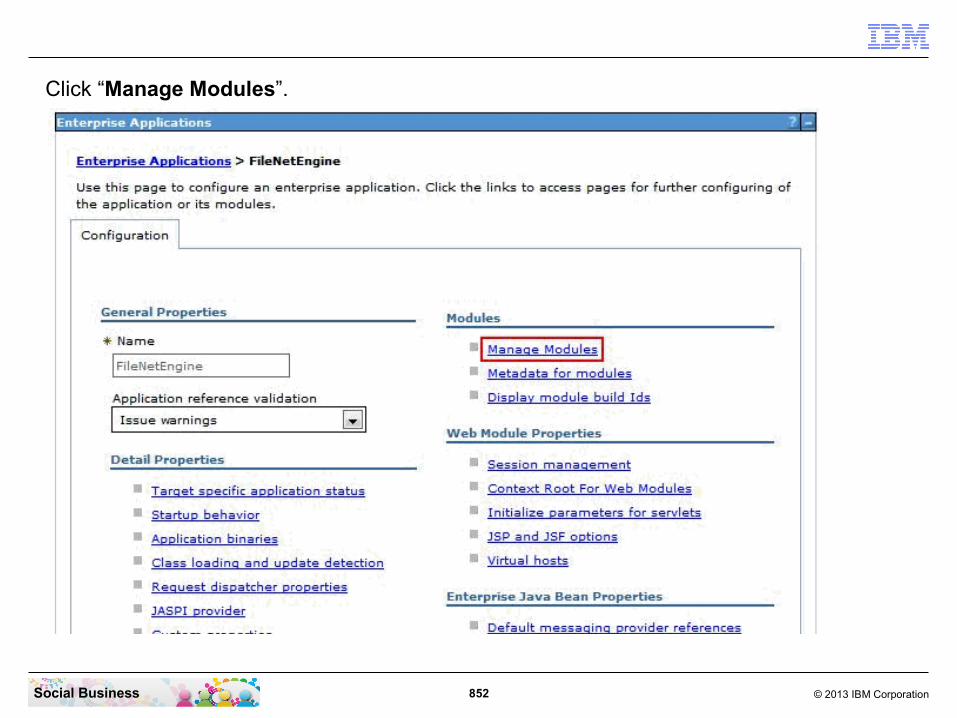
852 © 2013 IBM CorporationSocial Business
Click “Manage Modules”.

853 © 2013 IBM CorporationSocial Business
In the selection box “Clusters and servers” select your Connections server cluster and your webserver. (this can be done by holding the Ctrl key) Then click the selection button to select all modules.

854 © 2013 IBM CorporationSocial Business
Click “Apply”.
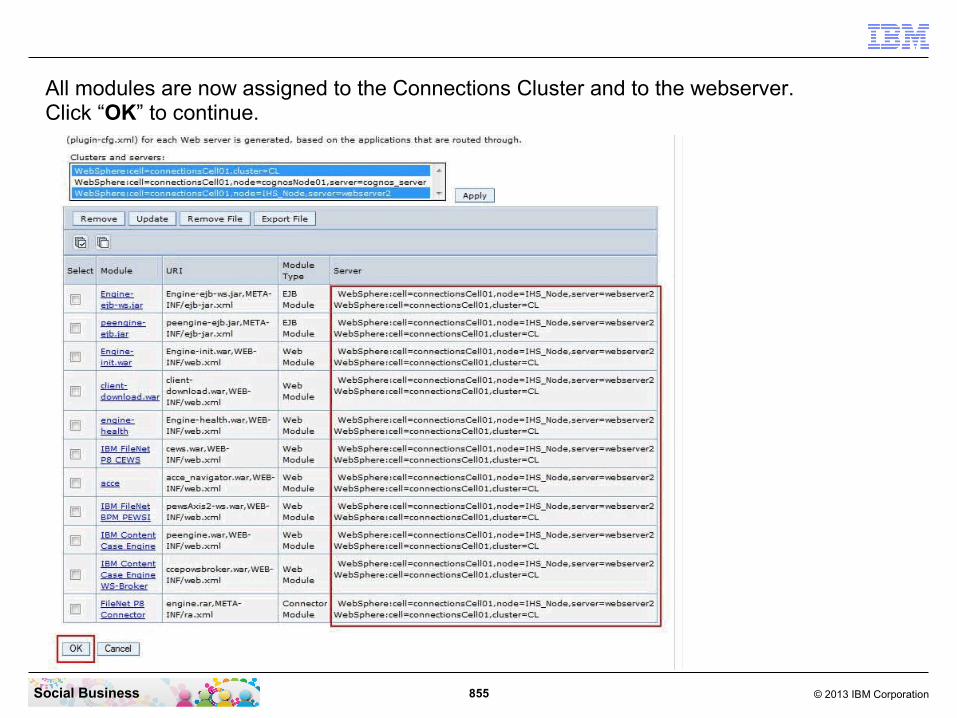
855 © 2013 IBM CorporationSocial Business
All modules are now assigned to the Connections Cluster and to the webserver.Click “OK” to continue.
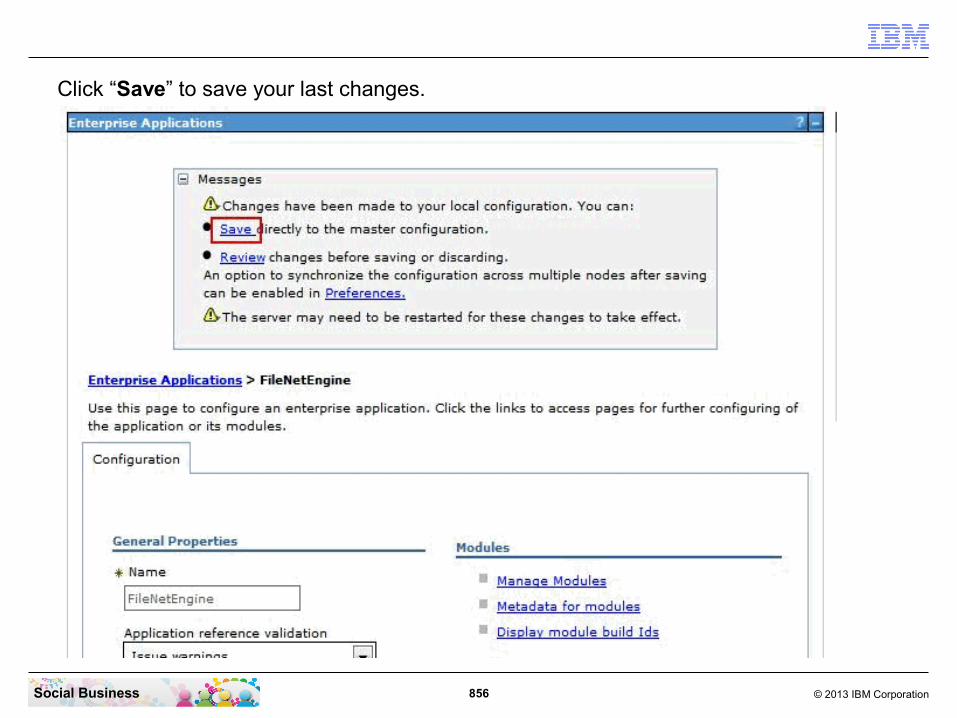
856 © 2013 IBM CorporationSocial Business
Click “Save” to save your last changes.
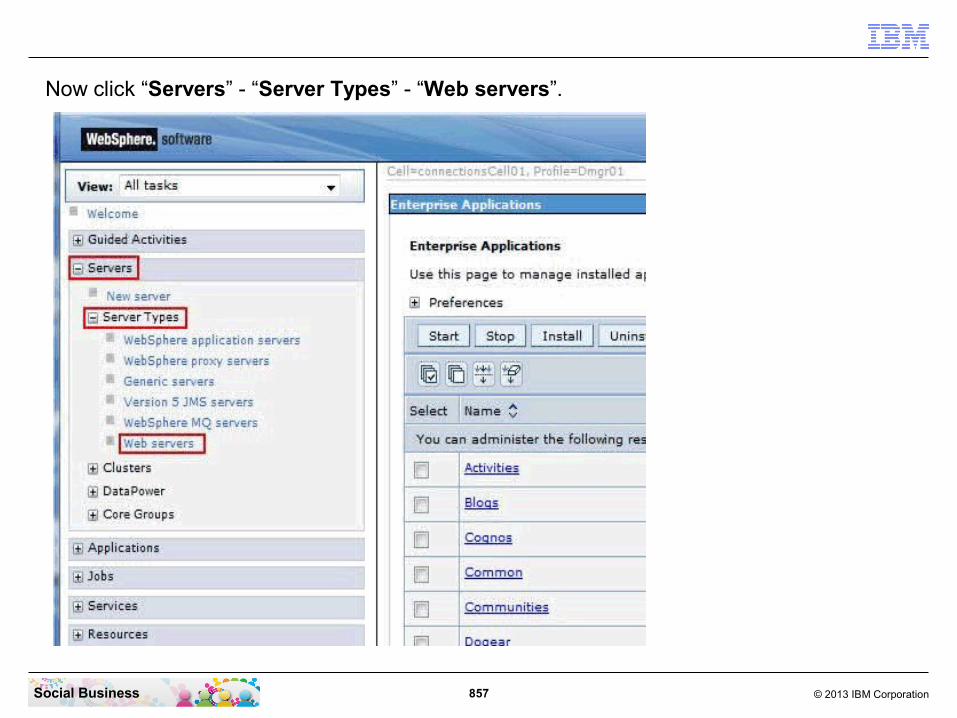
857 © 2013 IBM CorporationSocial Business
Now click “Servers” - “Server Types” - “Web servers”.

858 © 2013 IBM CorporationSocial Business
Select your web server and click “Generate Plug-in”.

859 © 2013 IBM CorporationSocial Business
Plug-in was created. To propagate the plugin select again your webserver and click “Propagate Plug-in”.

860 © 2013 IBM CorporationSocial Business
The plug-in was propagated successfully now.

861 © 2013 IBM CorporationSocial Business
Restart the web server now. Select your web server and click “Stop”.

862 © 2013 IBM CorporationSocial Business
Select your web server again and click “Start”.

863 © 2013 IBM CorporationSocial Business
Now you can start your Connections Server.

864 © 2013 IBM CorporationSocial Business
Verifying the deployment of the updated CPE EAR fileWhen your Connections Server has started completely, open a new Browser window and enter the “https://connections.renovations.com/FileNet/Engine” URL.

865 © 2013 IBM CorporationSocial Business
Confirm that the Startup Message Key for CPE has been updated.

866 © 2013 IBM CorporationSocial Business
Change the URL to “https://connections.renovations.com/FileNet/AutomaticUpgradeStatus”.

867 © 2013 IBM CorporationSocial Business
Confirm that the update has been Completed.

868 © 2013 IBM CorporationSocial Business
When you don't see the Completed message in the Upgrade Status, refresh the browser until you see the Completed message.
869 © 2013 IBM CorporationSocial Business
Updating FNCS from 2.0.0.0 to 2.0.0.1
The update of the FileNet Collaboration Services application requires this 4 steps:● Uninstall the current FNCS Application● Delete the temp cache area for this application on all nodes in the cluster● Uninstall the application binaries● Install the new FNCS Application

870 © 2013 IBM CorporationSocial Business
Uninstall the current FNCS Application
Open your WebSphere Integrated Solutions Console and navigate to “Applications” - “Application Types” - “WebSphere enterprise applications”.

871 © 2013 IBM CorporationSocial Business
Select “FNCS” and click “Uninstall”.
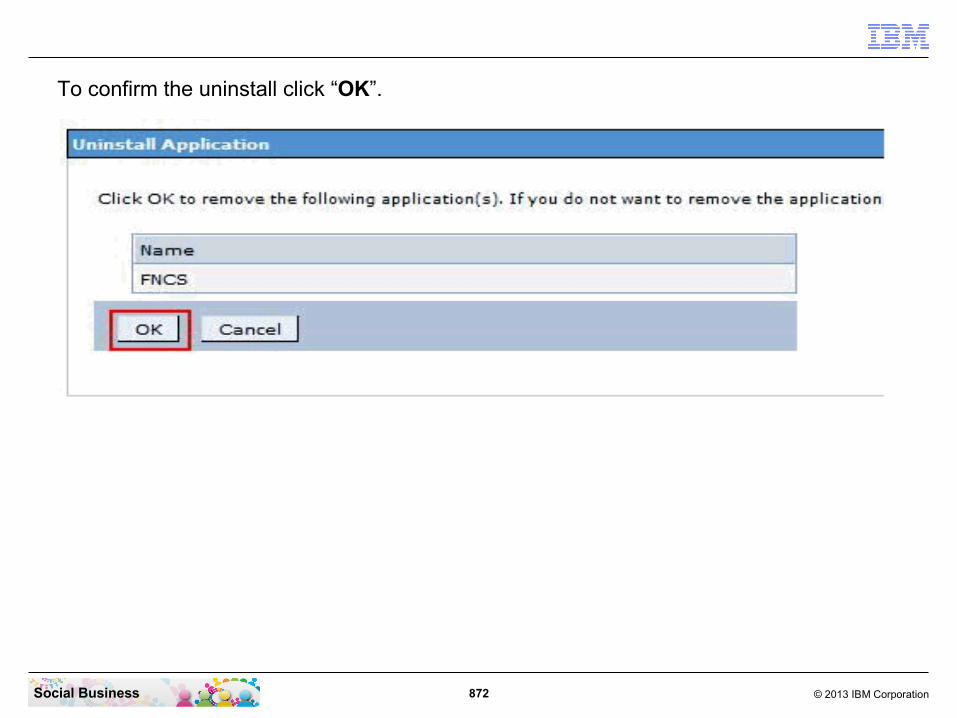
872 © 2013 IBM CorporationSocial Business
To confirm the uninstall click “OK”.

873 © 2013 IBM CorporationSocial Business
Click “Save” to save the last changes.

874 © 2013 IBM CorporationSocial Business
Delete the temp cache area for this application on all nodes in the cluster
To delete the temp cache directory you need to stop the Connections Server.

875 © 2013 IBM CorporationSocial Business
Open your File Explorer and navigate to the “C:\IBM\WebSphere\AppServer\profiles\AppSrv01\temp\connectionsNode01\connections_server” directory. Then delete the “FNCS” directory.
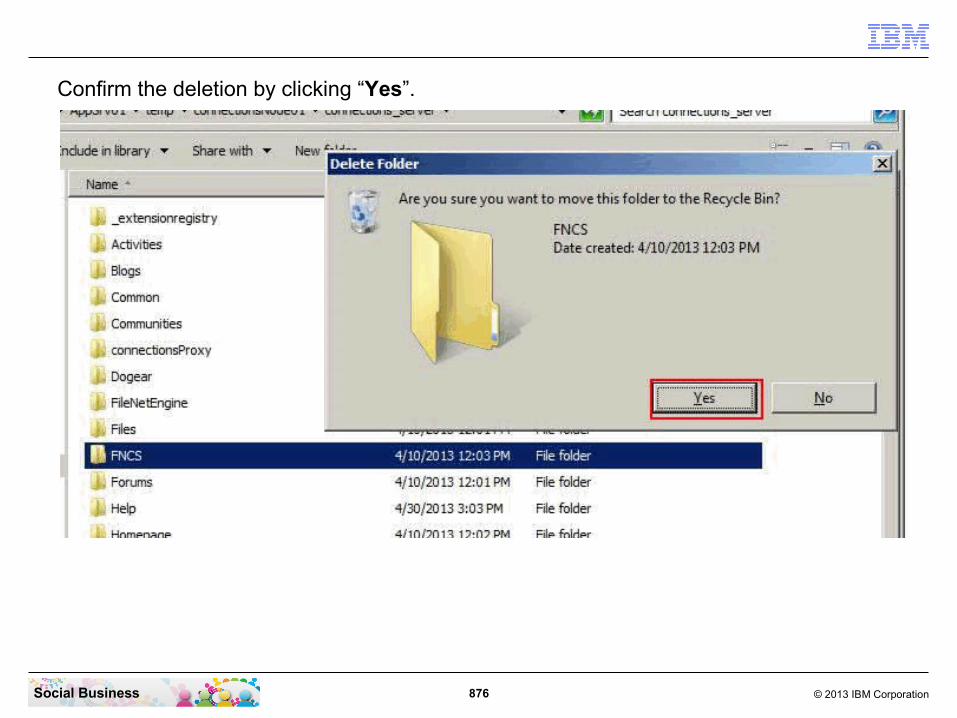
876 © 2013 IBM CorporationSocial Business
Confirm the deletion by clicking “Yes”.

877 © 2013 IBM CorporationSocial Business
Uninstall the application binaries
To uninstall the application binaries open a CMD line window. Navigate to the “C:\IBM\Connections\addons\ccm\FNCS\uninstall” directory. Then run the “fncs-uninstall.exe” command.
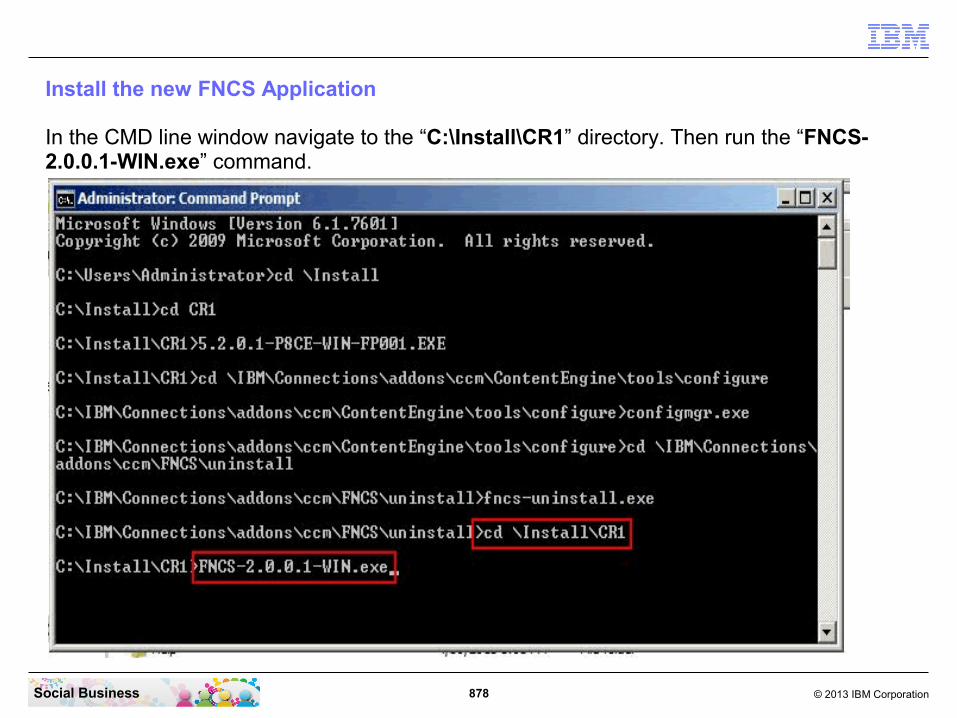
878 © 2013 IBM CorporationSocial Business
Install the new FNCS Application
In the CMD line window navigate to the “C:\Install\CR1” directory. Then run the “FNCS-2.0.0.1-WIN.exe” command.
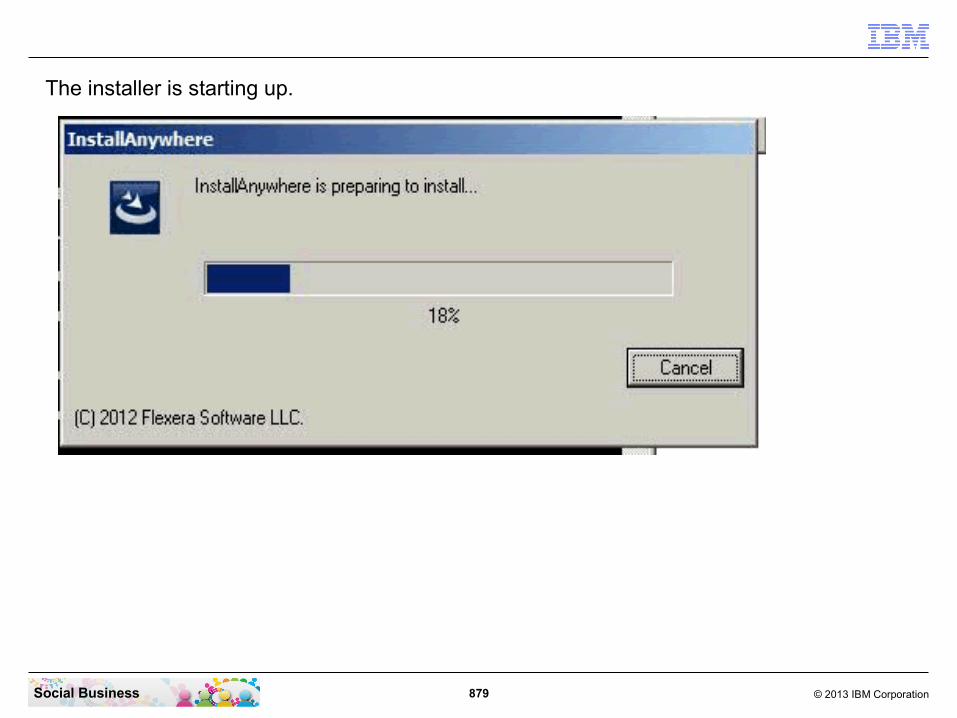
879 © 2013 IBM CorporationSocial Business
The installer is starting up.

880 © 2013 IBM CorporationSocial Business
The FNCS installer has started. Select your preferred language and click “OK” to continue.

881 © 2013 IBM CorporationSocial Business
Click “Next” to continue.

882 © 2013 IBM CorporationSocial Business
Accept the terms in the license agreement and click “Next” to continue.

883 © 2013 IBM CorporationSocial Business
Change the path to your FNCS “C:\IBM\Connections\addons\ccm\FNCS” directory and click “Next”.
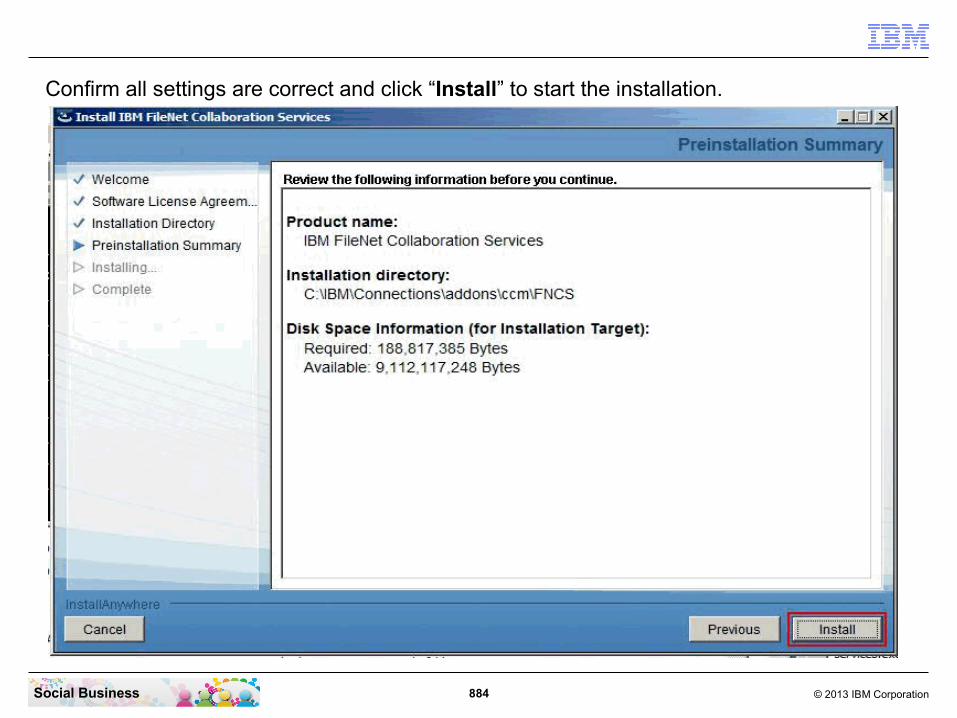
884 © 2013 IBM CorporationSocial Business
Confirm all settings are correct and click “Install” to start the installation.

885 © 2013 IBM CorporationSocial Business
The installation is running.

886 © 2013 IBM CorporationSocial Business
Confirm that the FileNet Collaboration Services are installed successfully. Then click “Done” to close the installer.

887 © 2013 IBM CorporationSocial Business
Install the CPE Client updates
To install the IBM Content Platform Engine Client, you have to start the IBM Connections Server first.
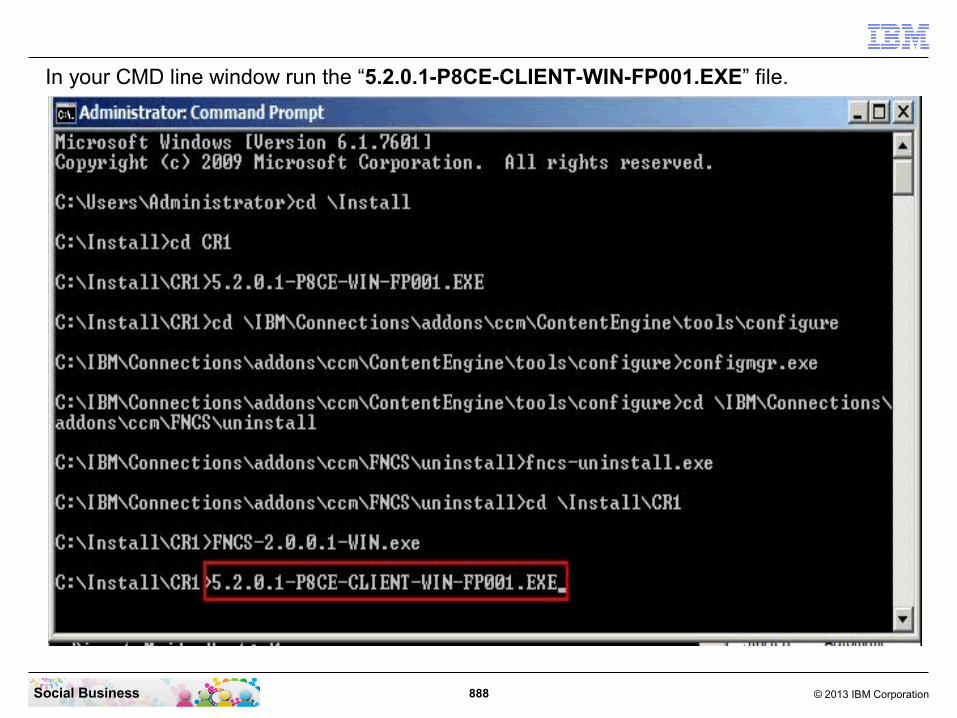
888 © 2013 IBM CorporationSocial Business
In your CMD line window run the “5.2.0.1-P8CE-CLIENT-WIN-FP001.EXE” file.

889 © 2013 IBM CorporationSocial Business
The CPE installer is starting up.
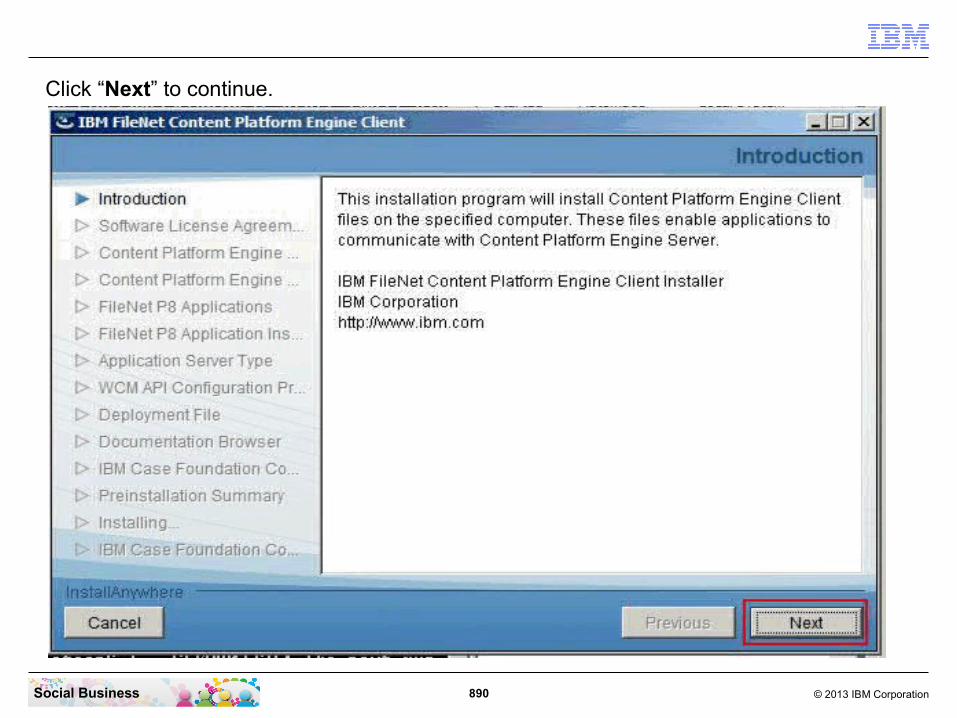
890 © 2013 IBM CorporationSocial Business
Click “Next” to continue.

891 © 2013 IBM CorporationSocial Business
Click “Next” to continue.

892 © 2013 IBM CorporationSocial Business
Enter the host name of your server and the default port. Then click “Next” to continue.
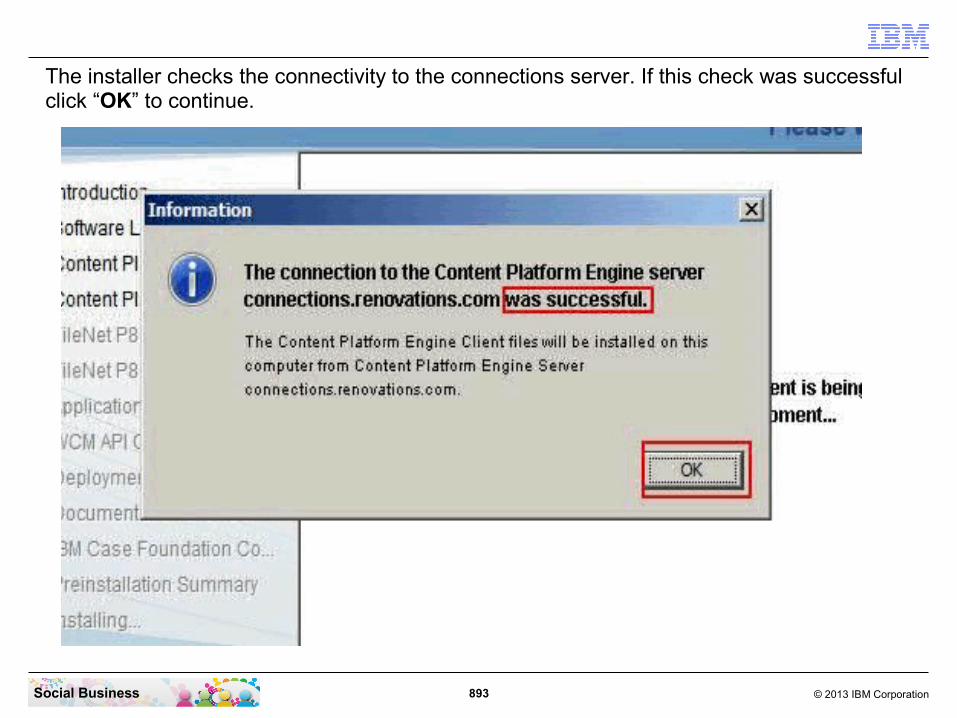
893 © 2013 IBM CorporationSocial Business
The installer checks the connectivity to the connections server. If this check was successful click “OK” to continue.
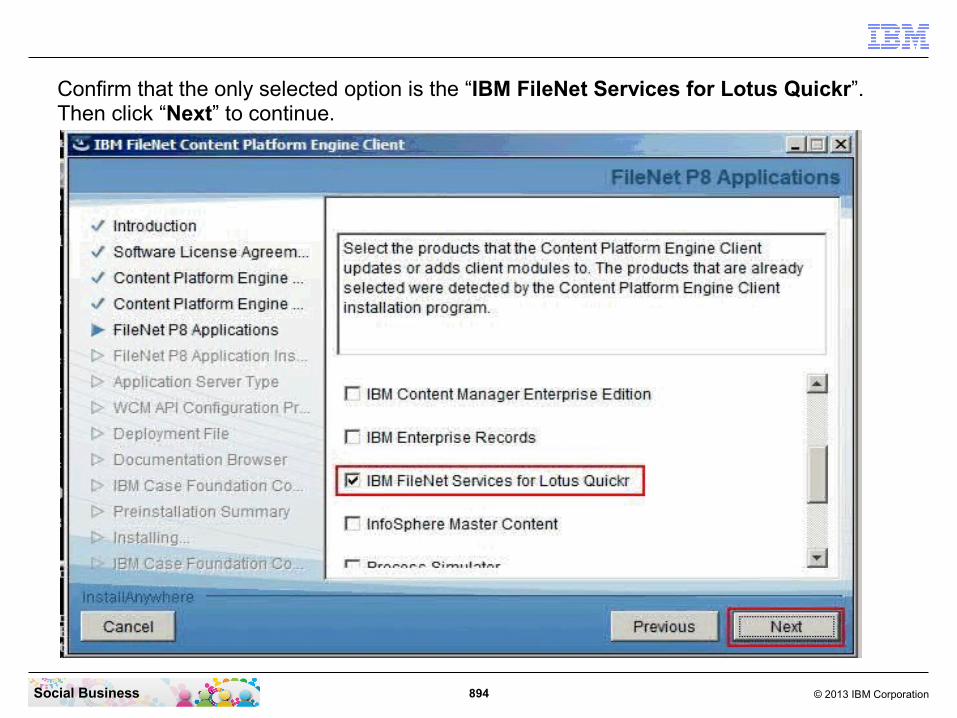
894 © 2013 IBM CorporationSocial Business
Confirm that the only selected option is the “IBM FileNet Services for Lotus Quickr”.Then click “Next” to continue.

895 © 2013 IBM CorporationSocial Business
Click “Next” to continue.

896 © 2013 IBM CorporationSocial Business
Enter a path to a directory where the FileNet system can share configuration information with other components. Click “Next” to continue.

897 © 2013 IBM CorporationSocial Business
Confirm that all settings are correct. Then click “Install” to start the installation.
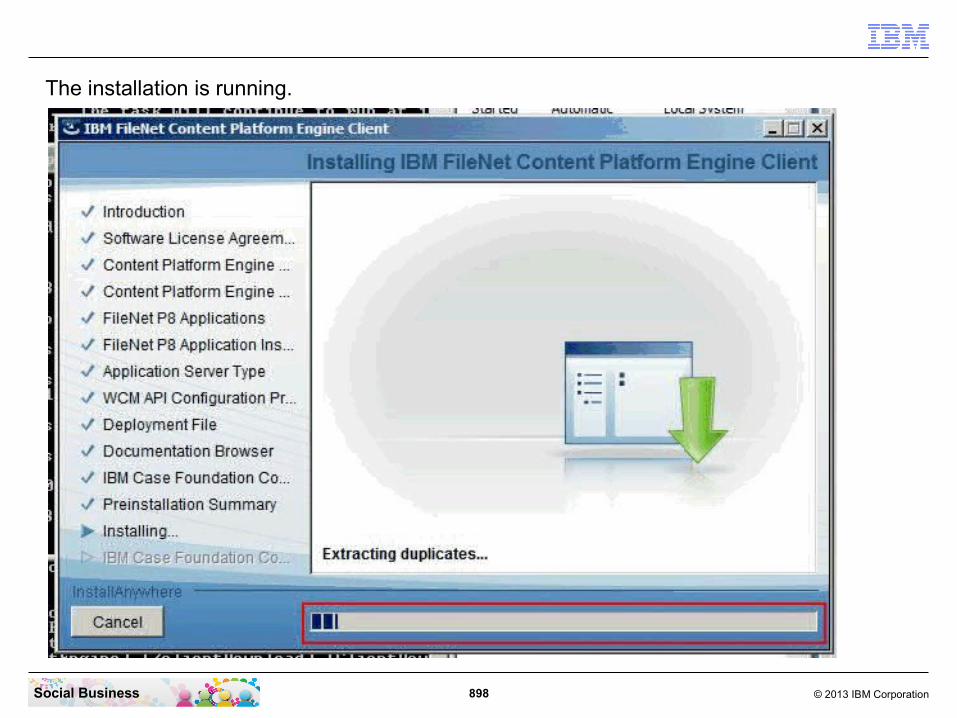
898 © 2013 IBM CorporationSocial Business
The installation is running.

899 © 2013 IBM CorporationSocial Business
Confirm that the installation was successful. Click “Done” to close the installer.
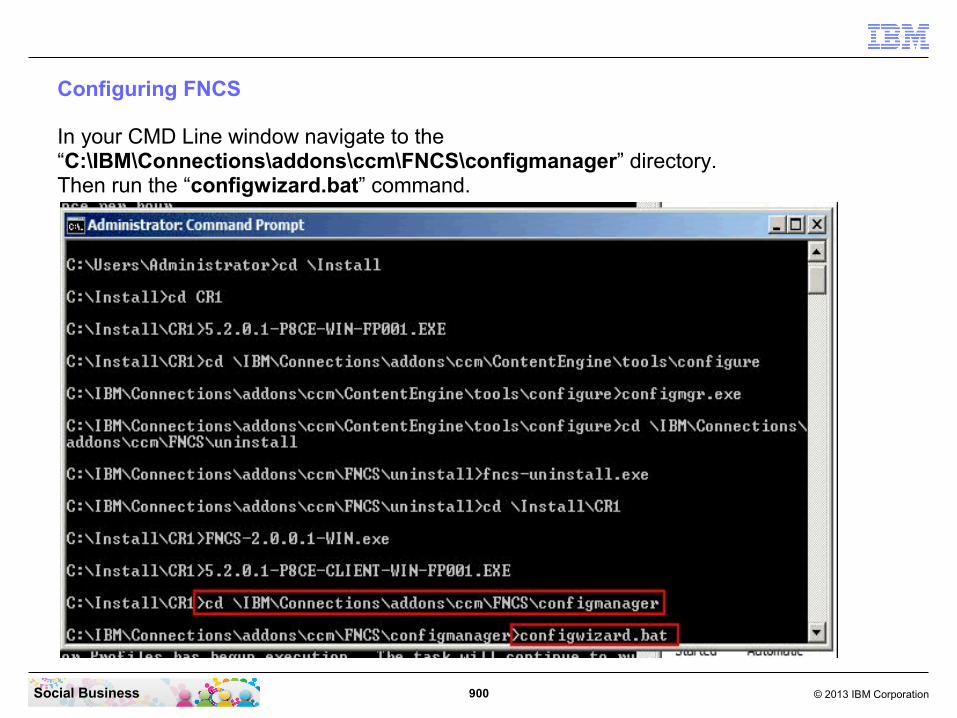
900 © 2013 IBM CorporationSocial Business
Configuring FNCS
In your CMD Line window navigate to the “C:\IBM\Connections\addons\ccm\FNCS\configmanager” directory.Then run the “configwizard.bat” command.
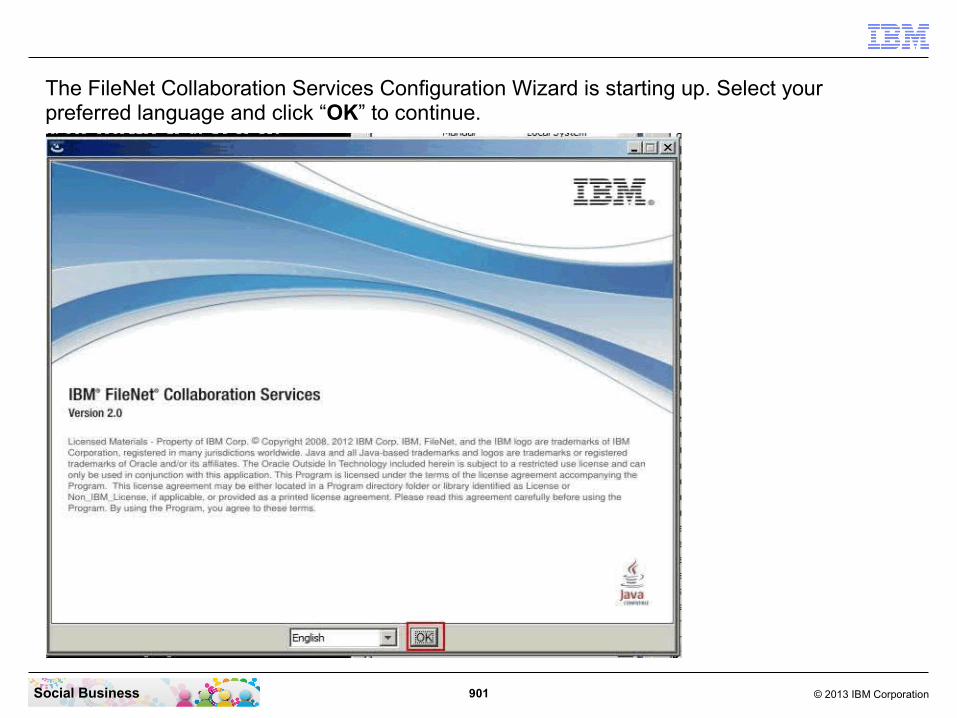
901 © 2013 IBM CorporationSocial Business
The FileNet Collaboration Services Configuration Wizard is starting up. Select your preferred language and click “OK” to continue.

902 © 2013 IBM CorporationSocial Business
Click “Next” to continue.

903 © 2013 IBM CorporationSocial Business
Enter the Content Platform Engine “iiop://connections.renovations.com:2811/FileNet/Engine” URL.The port is the BOOTSTRAP_ADDRESS port of your Connections Server.The Object store symbolic name is “ICObjectStore” by default.Then click “Next” to continue.

904 © 2013 IBM CorporationSocial Business
Select the version of your WebSphere Application Server. With IBM Connections 4.5 we use the WAS version 8.0. Enter the path to your WebSphere installation. Then click “Next” to continue.

905 © 2013 IBM CorporationSocial Business
Enter the WebSphere Administrator user name and password. Then click “Next” to continue.

906 © 2013 IBM CorporationSocial Business
The wizard checks if he can connect to the Content Engine Platform Server. If this was successful click “Next” to continue.

907 © 2013 IBM CorporationSocial Business
In Web client application select None. Then click “Next” to continue.

908 © 2013 IBM CorporationSocial Business
Enter the full URL to your Connections Server "https://connections.renovations.com". Then click “Next” to continue.

909 © 2013 IBM CorporationSocial Business
Select the “Dmgr01” profile and enter the WebSphere administrator user name and password. Click “Next” to continue.
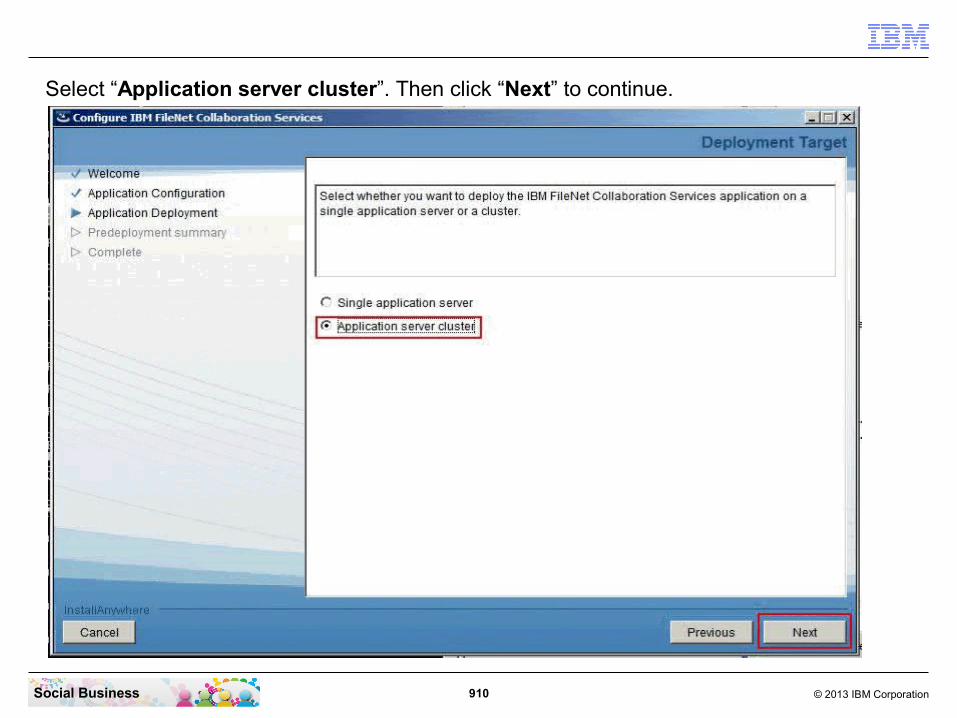
910 © 2013 IBM CorporationSocial Business
Select “Application server cluster”. Then click “Next” to continue.
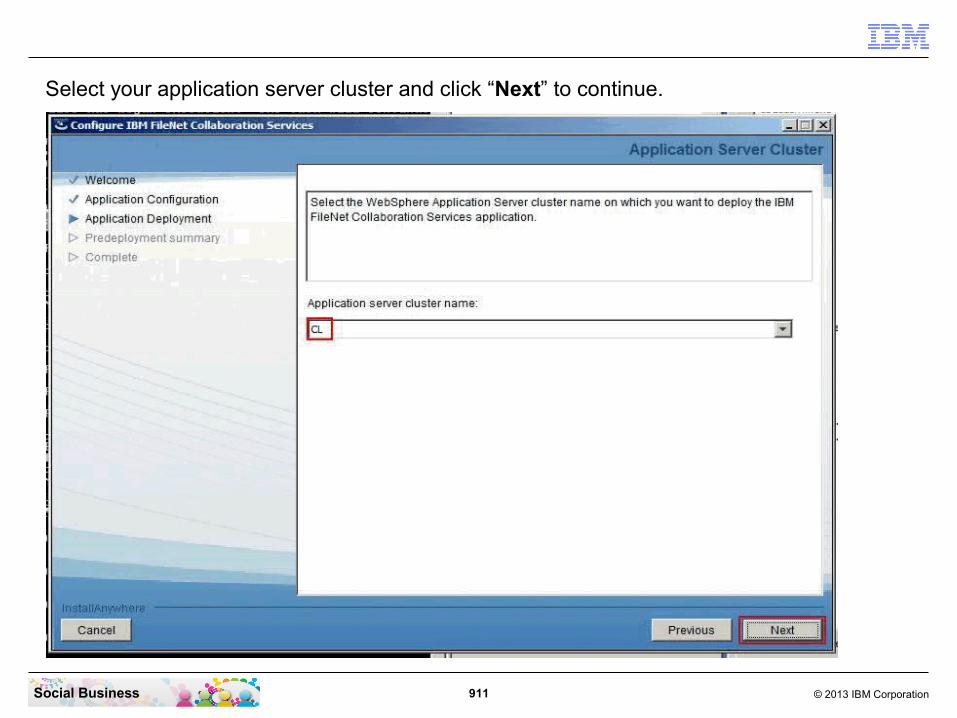
911 © 2013 IBM CorporationSocial Business
Select your application server cluster and click “Next” to continue.

912 © 2013 IBM CorporationSocial Business
For the application enter “FNCS” in capital letters. It is important to enter this name in capital letters. Then click “Next” to continue.

913 © 2013 IBM CorporationSocial Business
Confirm that all your settings are correct. Then click “Next” to continue.

914 © 2013 IBM CorporationSocial Business
The wizard is now deploying the FNCS application.

915 © 2013 IBM CorporationSocial Business
Confirm that the application was deployed successfully. Then click “Done” to close the configuration wizard.

916 © 2013 IBM CorporationSocial Business
Now it is time to restart the server.
When all is started successfully then open your browser and enter the “http://connections.renovations.com/dm” URL.

917 © 2013 IBM CorporationSocial Business
Log in with your WebSphere administrator user name and password.

918 © 2013 IBM CorporationSocial Business
Confirm that the FNCS application is updated to the release 2.0.0.1.

919 © 2013 IBM CorporationSocial Business
Applying the CR1 Update to yout IBM Connections Server
To apply the CR1 update you need to stop the Connections Server and the nodeagent. Leave the dmgr running.Fastest way is to stop the nodeagent in the services.

920 © 2013 IBM CorporationSocial Business
Because of the dependencies configuration in the services it asks you if you want to stop the connections server as well. Just click “Yes”.

921 © 2013 IBM CorporationSocial Business
The connections server and the nodeagent are now stopped.

922 © 2013 IBM CorporationSocial Business
Now you need to remove the old updateInstaller in your connections installation. In your File Explorer navigate to the “C:\IBM\Connections” directory and rename or delete the “updateInstaller” directory.

923 © 2013 IBM CorporationSocial Business
Open a second File Explorer window and naviate to the “C:\Install\CR1” directory. Then copy the “updateInstaller” directory to the other File Explorer window.
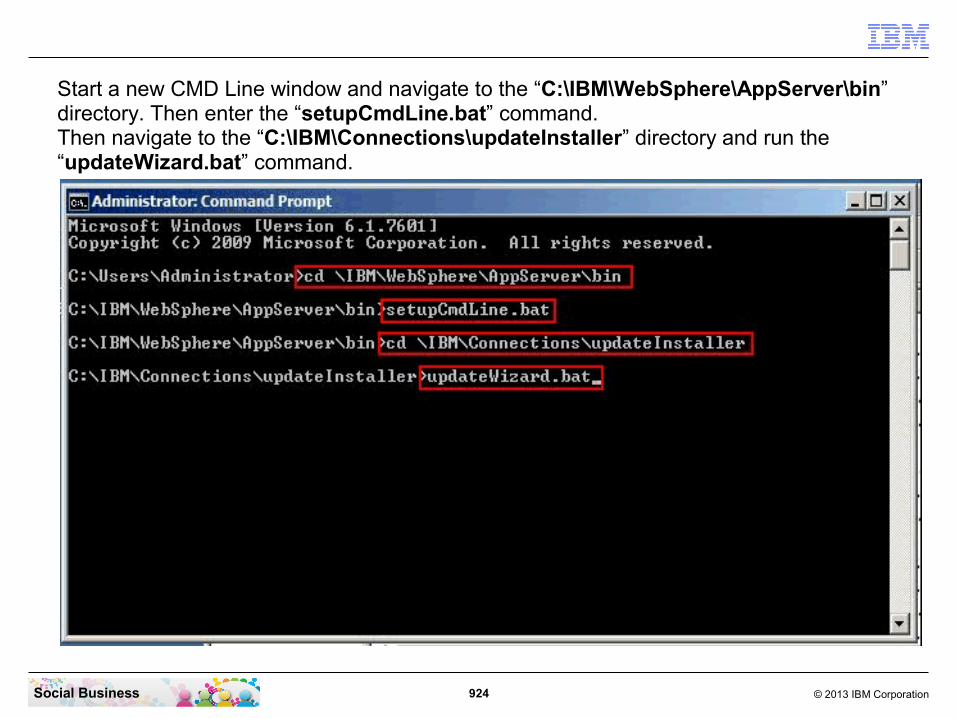
924 © 2013 IBM CorporationSocial Business
Start a new CMD Line window and navigate to the “C:\IBM\WebSphere\AppServer\bin” directory. Then enter the “setupCmdLine.bat” command.Then navigate to the “C:\IBM\Connections\updateInstaller” directory and run the “updateWizard.bat” command.

925 © 2013 IBM CorporationSocial Business
The Update Wizard has started. Click “Next” to continue.

926 © 2013 IBM CorporationSocial Business
Leave the detected default settings and click “Next” to continue.
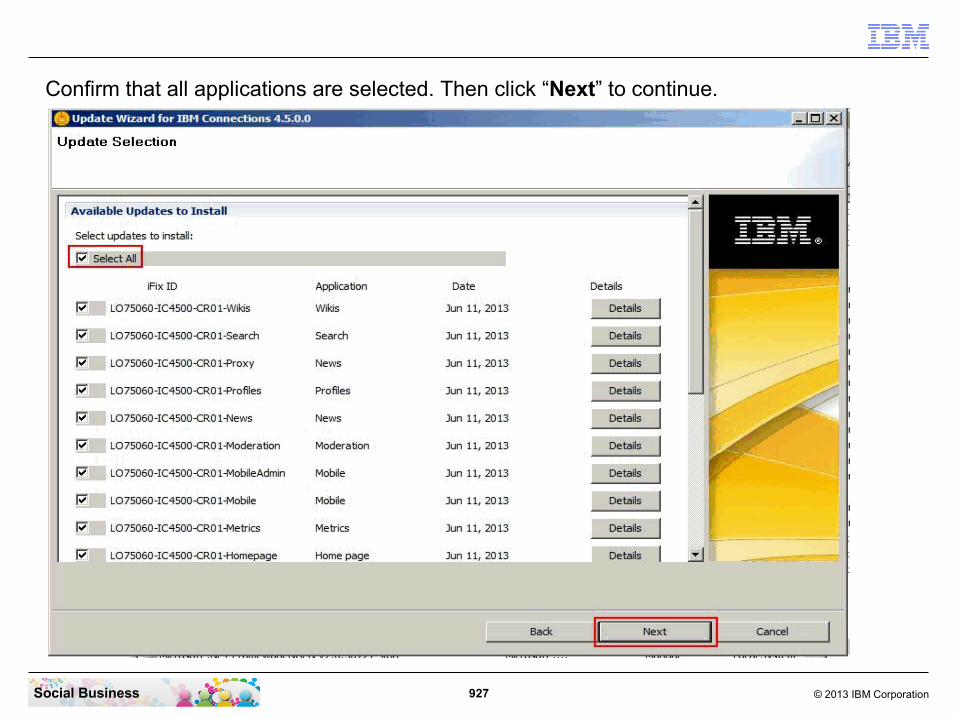
927 © 2013 IBM CorporationSocial Business
Confirm that all applications are selected. Then click “Next” to continue.

928 © 2013 IBM CorporationSocial Business
During the migration, you have first backed up all your customization and will revert that back later. So we have now a standard IBM Connections installation and can easily just click “OK” here.

929 © 2013 IBM CorporationSocial Business
Enter the WebSphere administrator user name and password. Then click “Next” to continue.
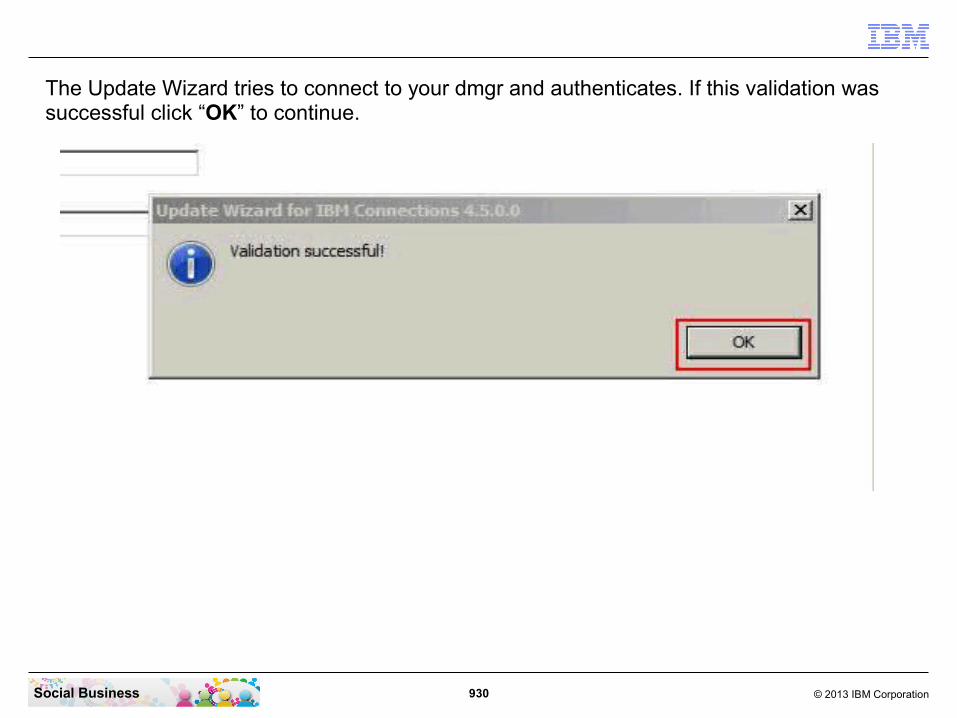
930 © 2013 IBM CorporationSocial Business
The Update Wizard tries to connect to your dmgr and authenticates. If this validation was successful click “OK” to continue.

931 © 2013 IBM CorporationSocial Business
You are now ready to install the CR1 update. Click “Install” to start the installation.
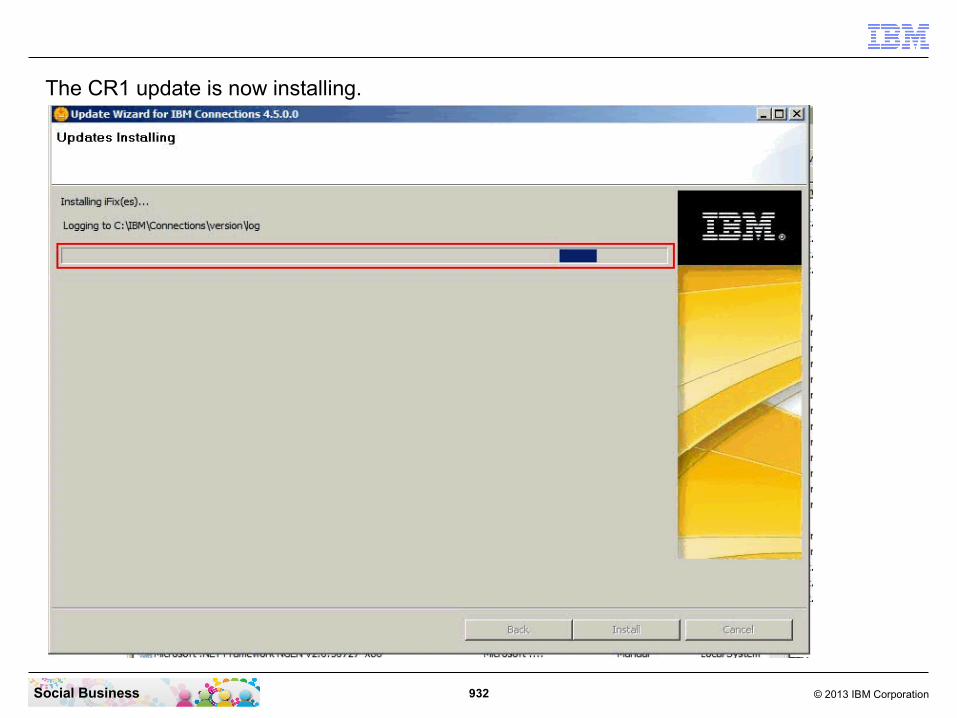
932 © 2013 IBM CorporationSocial Business
The CR1 update is now installing.

933 © 2013 IBM CorporationSocial Business
Confirm that the installation was successful for all applications. Then click “Finish” to close the update wizard.

934 © 2013 IBM CorporationSocial Business
The CR1 update has updated your Connections applications in the dmgr. To synchronize this changes to the server start the nodeagent first.
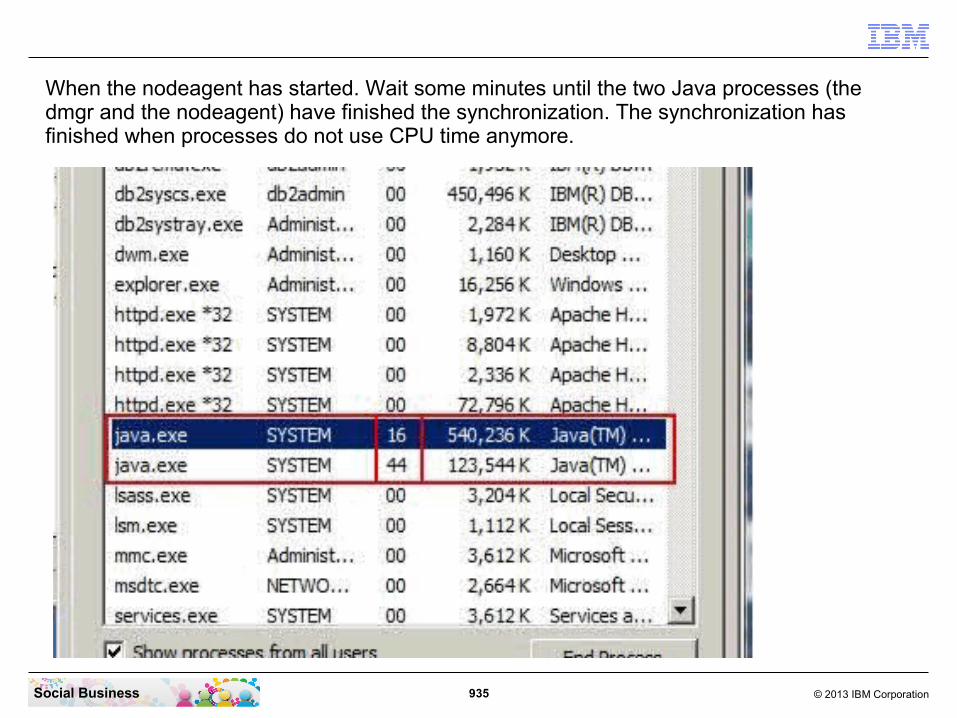
935 © 2013 IBM CorporationSocial Business
When the nodeagent has started. Wait some minutes until the two Java processes (the dmgr and the nodeagent) have finished the synchronization. The synchronization has finished when processes do not use CPU time anymore.
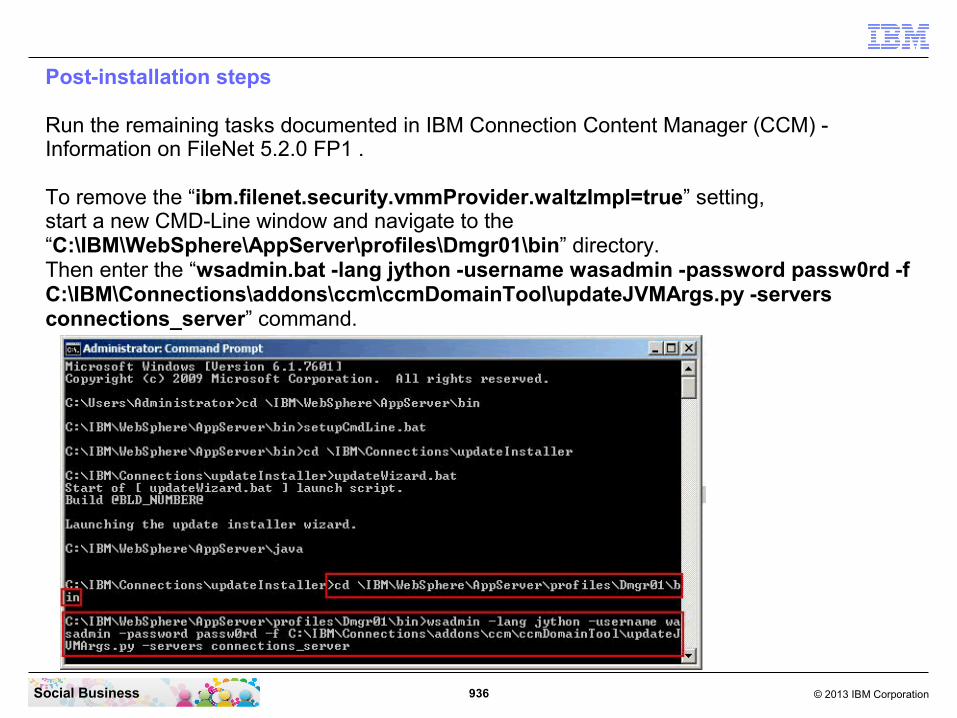
936 © 2013 IBM CorporationSocial Business
Post-installation steps
Run the remaining tasks documented in IBM Connection Content Manager (CCM) - Information on FileNet 5.2.0 FP1 .
To remove the “ibm.filenet.security.vmmProvider.waltzImpl=true” setting,start a new CMD-Line window and navigate to the “C:\IBM\WebSphere\AppServer\profiles\Dmgr01\bin” directory.Then enter the “wsadmin.bat -lang jython -username wasadmin -password passw0rd -f C:\IBM\Connections\addons\ccm\ccmDomainTool\updateJVMArgs.py -servers connections_server” command.
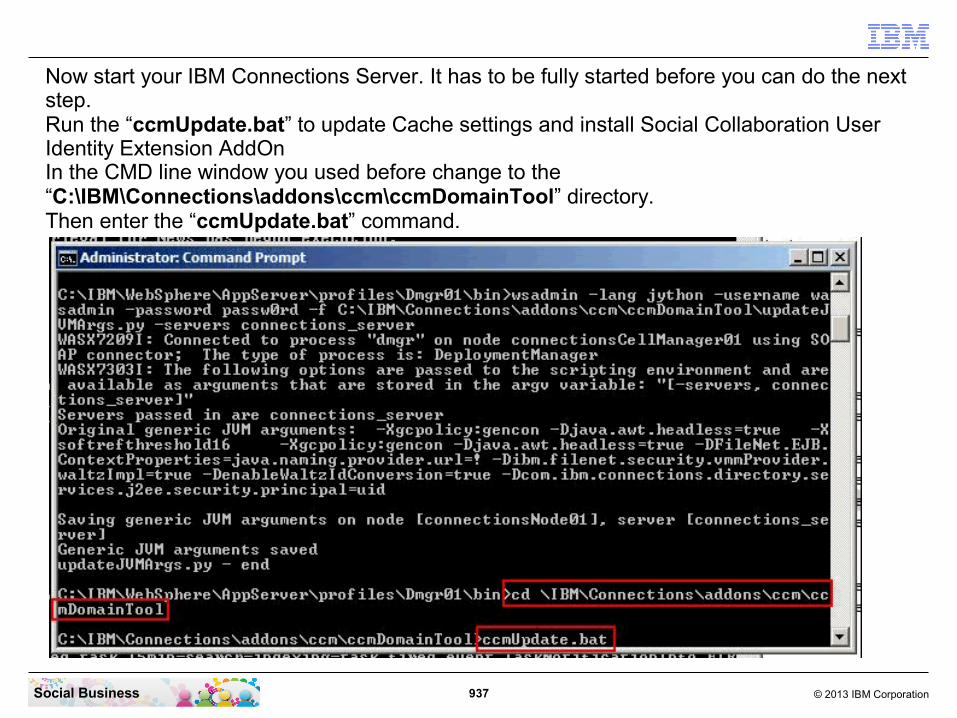
937 © 2013 IBM CorporationSocial Business
Now start your IBM Connections Server. It has to be fully started before you can do the next step.Run the “ccmUpdate.bat” to update Cache settings and install Social Collaboration User Identity Extension AddOnIn the CMD line window you used before change to the “C:\IBM\Connections\addons\ccm\ccmDomainTool” directory.Then enter the “ccmUpdate.bat” command.
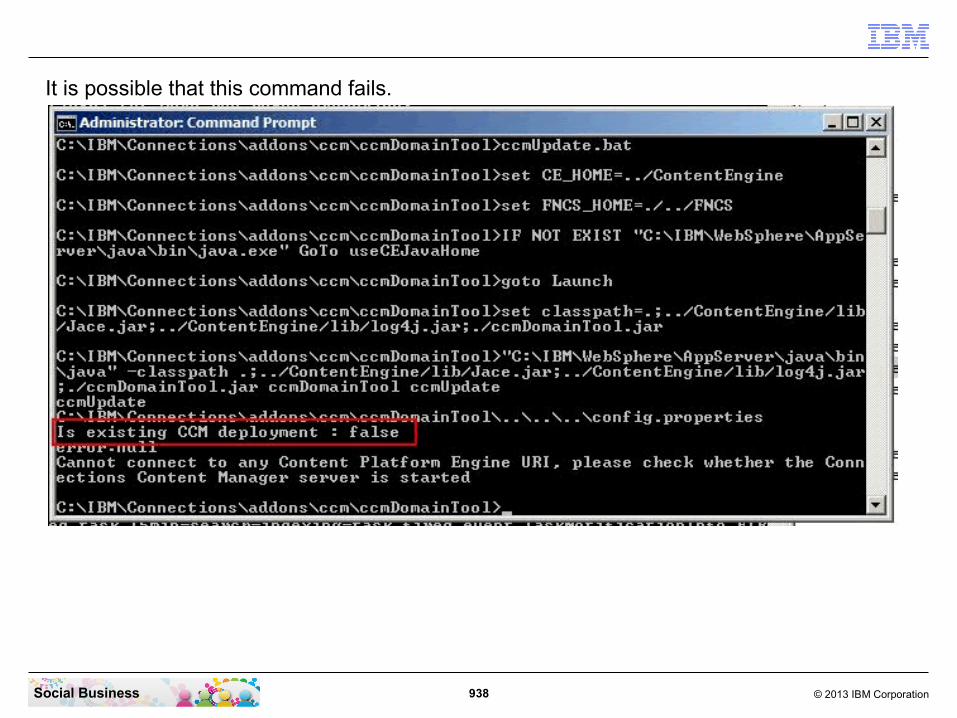
938 © 2013 IBM CorporationSocial Business
It is possible that this command fails.

939 © 2013 IBM CorporationSocial Business
In this case open your File Explorer and navigate to the “C:\IBM\WebSphere\AppServer\profiles\Dmgr01\bin” directory. Then remove or rename the file “dminfo.properties”.

940 © 2013 IBM CorporationSocial Business
Switch back to the command window and run the “ccmUpdate.bat” command again.

941 © 2013 IBM CorporationSocial Business
Enter the password of your WebSphere Administrator user.
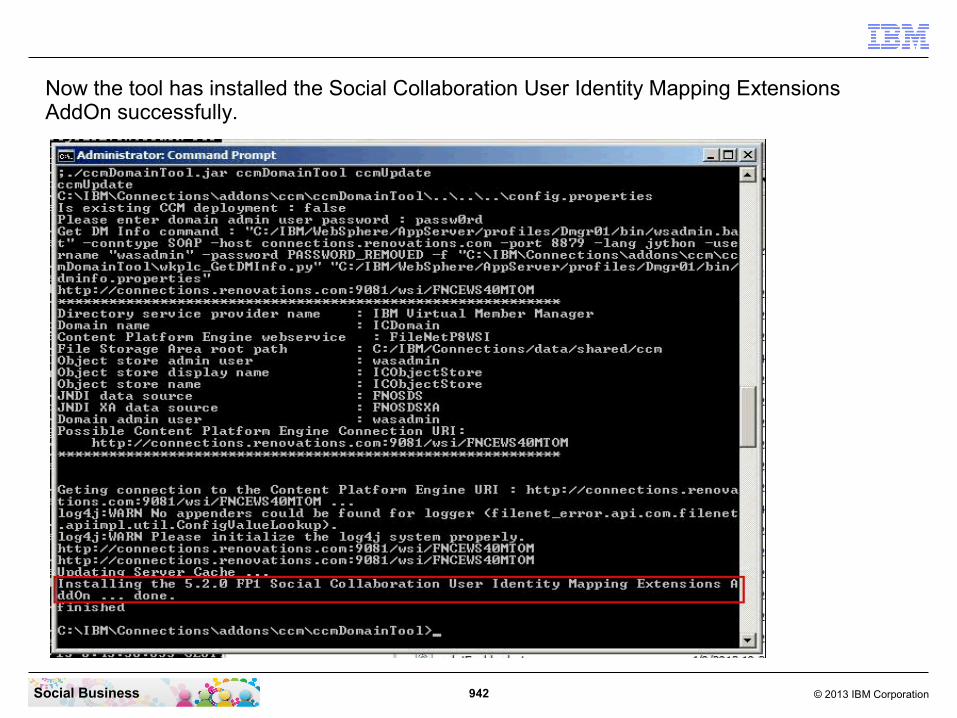
942 © 2013 IBM CorporationSocial Business
Now the tool has installed the Social Collaboration User Identity Mapping Extensions AddOn successfully.

943 © 2013 IBM CorporationSocial Business
Summary
The next pages explain how to update the IBM Connections 4.5 CR1 environment with the embedded IBM Connections Content Manager 5.2.0.1 to FNCS IF001 and IBM Connections 4.5 CR2.
STEP THIRTY-THREE: Update IBM Connections to the Cumulative Refresh 2 level

944 © 2013 IBM CorporationSocial Business
Before you can install the CR2 package you should read some important information and download the required packages and files to your servers.The most important document to read is the “Update strategy for IBM Connections 4.5”.In this document you can find the download links to the required files.
To update the Metrics Database and application you need to download and apply additional files from here.
If you have already installed IBM Connections 4.5 Cumulative Release 1 and the IBM Connections Content Manager update to release 5.2 FP1, then you only need to update the FNCS Update to IF001.
If you have not installed the CR1 update, then you have to install the CCM Update to 5.2 FP1 first as described in the section above first. With one difference, the FNCS update to FP1 can be replaced directly by the FNCS IF001 update. Then continue to install the CR2 package instead of the CR1 package and configure the Metrics update as the last step.
This section of the document describes the required steps to update an already installed CR1 to the CR2 level.

945 © 2013 IBM CorporationSocial Business
To download the required files go to the Fix Central Download page (see link in the previous slide) and download the files “4.5.0.0-IC-Multi-CR02-LO76350.zip” and “4.5.0.0-IC-Multi-UPDI-20130909.zip”.
946 © 2013 IBM CorporationSocial Business
To update the Metrics System go to this page and download the files“METRICS-db-upgrade-45-45CR2_DB2.sql”, “METRICS-db-reorg-45-45CR2_DB2.sql”, “METRICS-db-updateStats-45-45CR2_DB2.sql”. These files needs to be copied to your DB2 server where the Metrics database is located.
“configBI.bat”, “lc.metrics.cognos.install.jar”, “MetricsPkg.zip”, “lc.metrics.cognos.api.jar”, “MetricsTrxCube.mdl”, “cognos-installation-verify.bat”. These files needs to be copied to your Cognos Server and there placed exactly into the directories pointed in the documentation replacing the existing files.
To update the IBM Connections Content Manager FNCS to the IF001 release download from this page the file “2.0.0.1-FNCS-IF001-WIN.exe”.
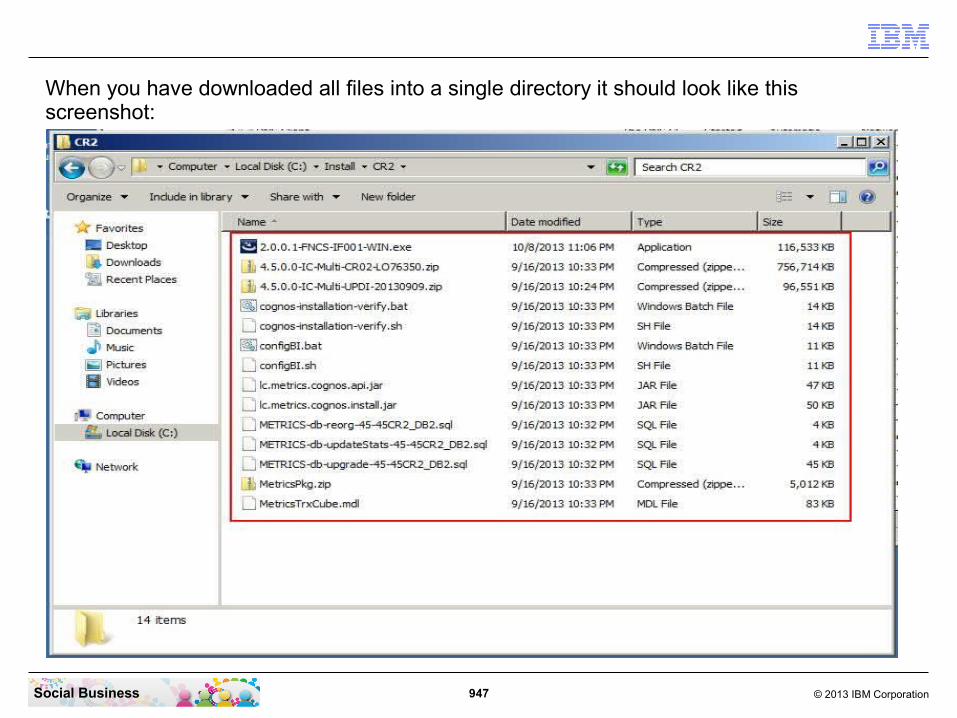
947 © 2013 IBM CorporationSocial Business
When you have downloaded all files into a single directory it should look like this screenshot:
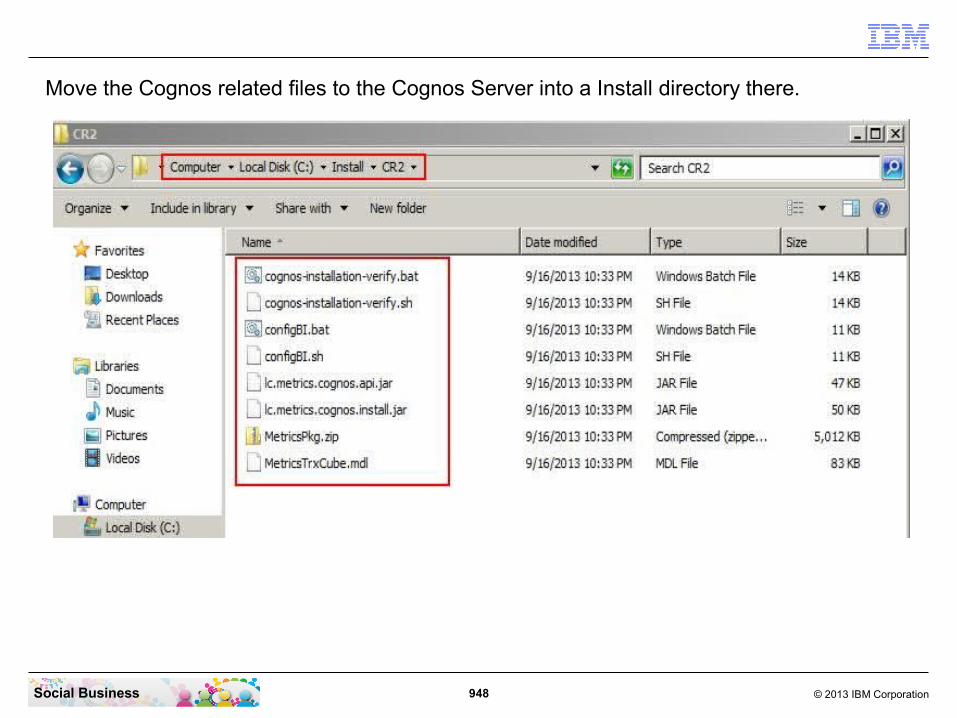
948 © 2013 IBM CorporationSocial Business
Move the Cognos related files to the Cognos Server into a Install directory there.

949 © 2013 IBM CorporationSocial Business
Unpack the file “4.5.0.0-IC-Multi-UPDI-20130909.zip” first.

950 © 2013 IBM CorporationSocial Business
Then unpack the file “4.5.0.0-IC-Multi-CR02-LO76350.zip” to the directory “C:\Install\CR2\updateInstaller\fixes”.
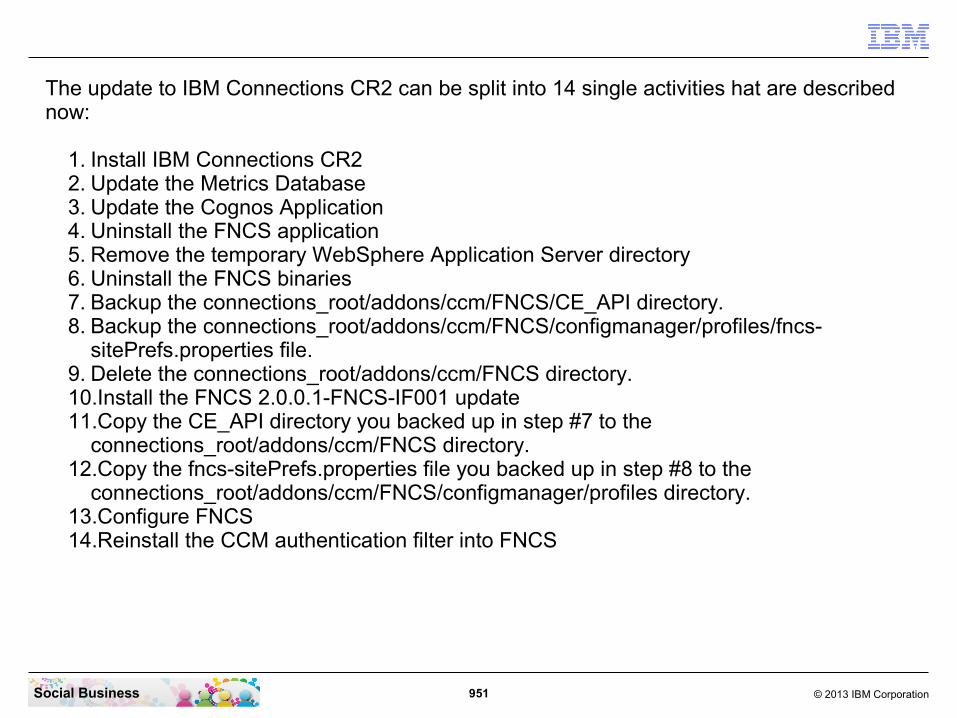
951 © 2013 IBM CorporationSocial Business
The update to IBM Connections CR2 can be split into 14 single activities hat are described now:
1. Install IBM Connections CR22. Update the Metrics Database3. Update the Cognos Application4. Uninstall the FNCS application5. Remove the temporary WebSphere Application Server directory 6. Uninstall the FNCS binaries7. Backup the connections_root/addons/ccm/FNCS/CE_API directory.8. Backup the connections_root/addons/ccm/FNCS/configmanager/profiles/fncs-
sitePrefs.properties file.9. Delete the connections_root/addons/ccm/FNCS directory.10.Install the FNCS 2.0.0.1-FNCS-IF001 update11.Copy the CE_API directory you backed up in step #7 to the
connections_root/addons/ccm/FNCS directory.12.Copy the fncs-sitePrefs.properties file you backed up in step #8 to the
connections_root/addons/ccm/FNCS/configmanager/profiles directory.13.Configure FNCS14.Reinstall the CCM authentication filter into FNCS
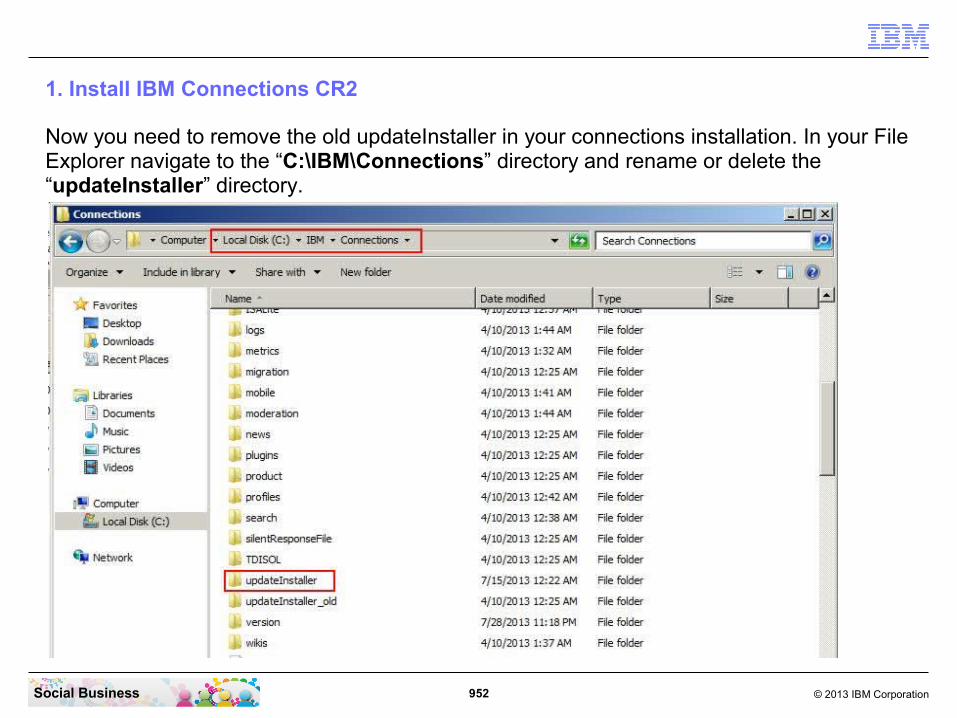
952 © 2013 IBM CorporationSocial Business
1. Install IBM Connections CR2
Now you need to remove the old updateInstaller in your connections installation. In your File Explorer navigate to the “C:\IBM\Connections” directory and rename or delete the “updateInstaller” directory.
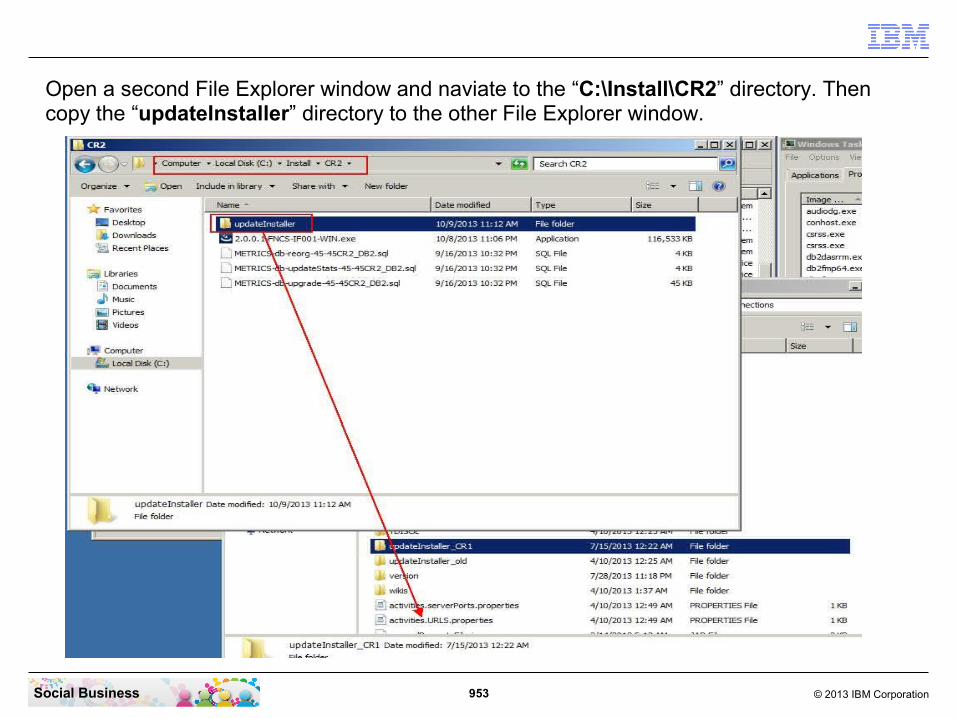
953 © 2013 IBM CorporationSocial Business
Open a second File Explorer window and naviate to the “C:\Install\CR2” directory. Then copy the “updateInstaller” directory to the other File Explorer window.

954 © 2013 IBM CorporationSocial Business
Stop the Connections Server by stopping the connectionsServer service.

955 © 2013 IBM CorporationSocial Business
The Connections Server has now been stopped.

956 © 2013 IBM CorporationSocial Business
Start a new CMD Line window and navigate to the “C:\IBM\WebSphere\AppServer\bin” directory. Then enter the “setupCmdLine.bat” command.Then navigate to the “C:\IBM\Connections\updateInstaller” directory and run the “updateWizard.bat” command.
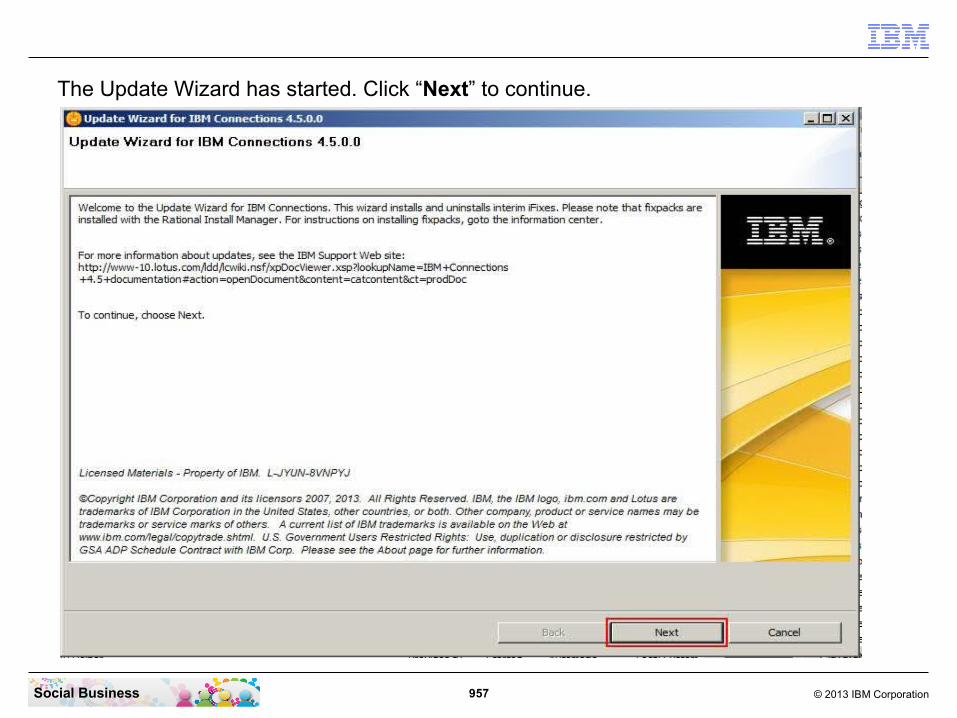
957 © 2013 IBM CorporationSocial Business
The Update Wizard has started. Click “Next” to continue.

958 © 2013 IBM CorporationSocial Business
Leave the detected default settings and click “Next” to continue.

959 © 2013 IBM CorporationSocial Business
Confirm that all applications are selected. Then click “Next” to continue.

960 © 2013 IBM CorporationSocial Business
During the migration, you have first backed up all your customization and will revert that back later. So we have now a standard IBM Connections installation and can easily just click “OK” here.

961 © 2013 IBM CorporationSocial Business
Enter the WebSphere administrator user name and password. Then click “Next” to continue.
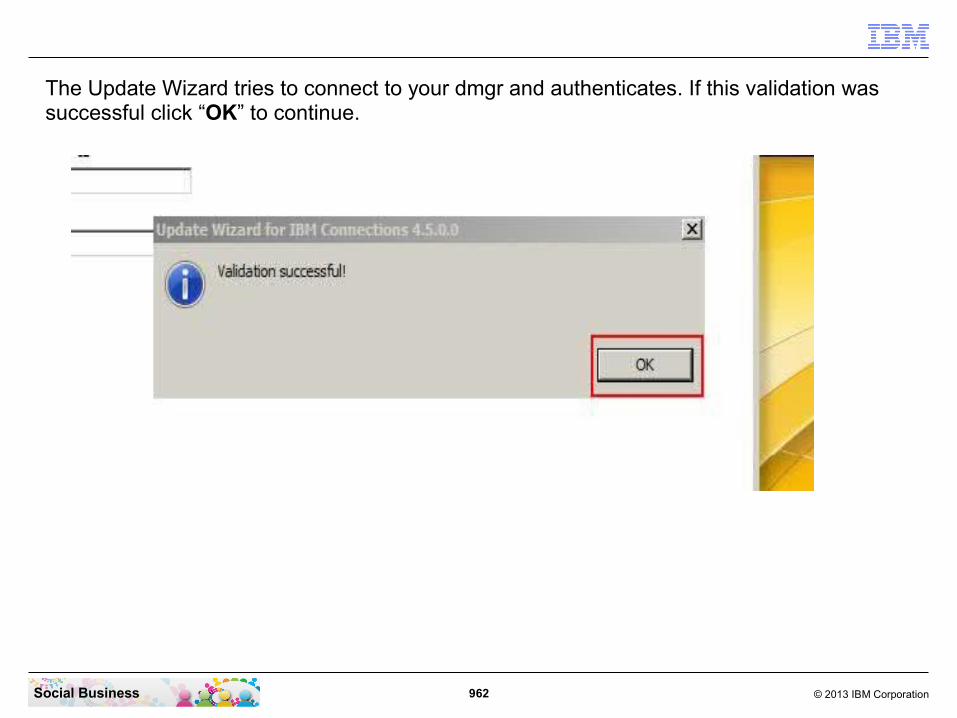
962 © 2013 IBM CorporationSocial Business
The Update Wizard tries to connect to your dmgr and authenticates. If this validation was successful click “OK” to continue.
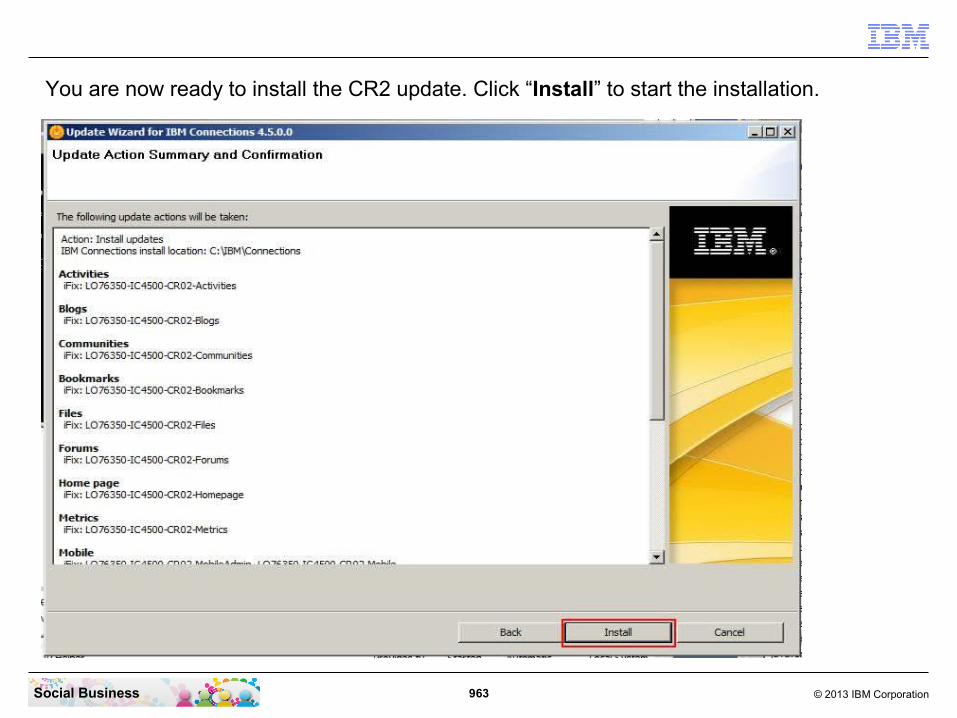
963 © 2013 IBM CorporationSocial Business
You are now ready to install the CR2 update. Click “Install” to start the installation.
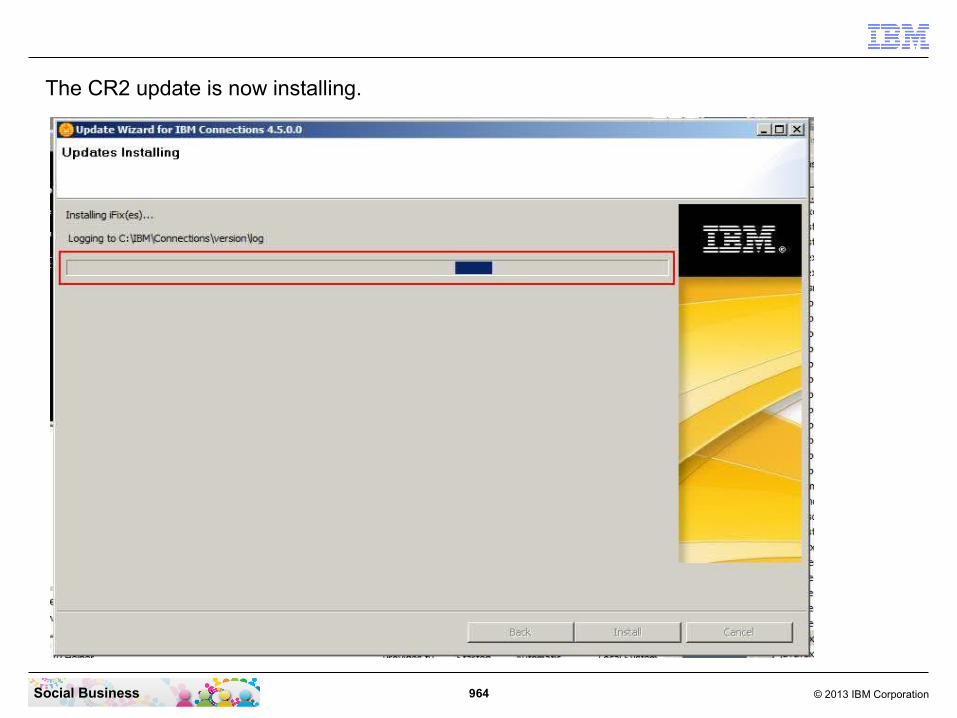
964 © 2013 IBM CorporationSocial Business
The CR2 update is now installing.

965 © 2013 IBM CorporationSocial Business
Confirm that the installation was successful for all applications. Then click “Finish” to close the update wizard.

966 © 2013 IBM CorporationSocial Business
The synchronization starts every minute. Wait some minutes until the two Java processes (the dmgr and the nodeagent) have finished the synchronization. The synchronization has finished when processes do not use CPU time anymore.

967 © 2013 IBM CorporationSocial Business
2. Update the Metrics Database
To update the Metrics Database you need to stop the Cognos Server first. Switch to the Cognos machine and stop the cognosServer service. Then switch back to your Connections Machine where your DB2 system resides.

968 © 2013 IBM CorporationSocial Business
Start a DB2 Command Window by clicking “Start” - “All Programs” - “IBM DB2” - “DB2COPY1 (Default)” - “Command Window - Administrator”.

969 © 2013 IBM CorporationSocial Business
Change to the CR2 directory with the command “cd \Install\CR2”.

970 © 2013 IBM CorporationSocial Business
Enter the command “db2 -td@ -vf METRICS-db-upgrade-45-45CR2_DB2.sql”.

971 © 2013 IBM CorporationSocial Business
Enter the command “db2 -td@ -vf METRICS-db-reorg-45-45CR2_DB2.sql”.

972 © 2013 IBM CorporationSocial Business
Enter the command “db2 -td@ -vf METRICS-db-updateStats-45-45CR2_DB2.sql”.

973 © 2013 IBM CorporationSocial Business
Confirm that all commands where completed successfully.
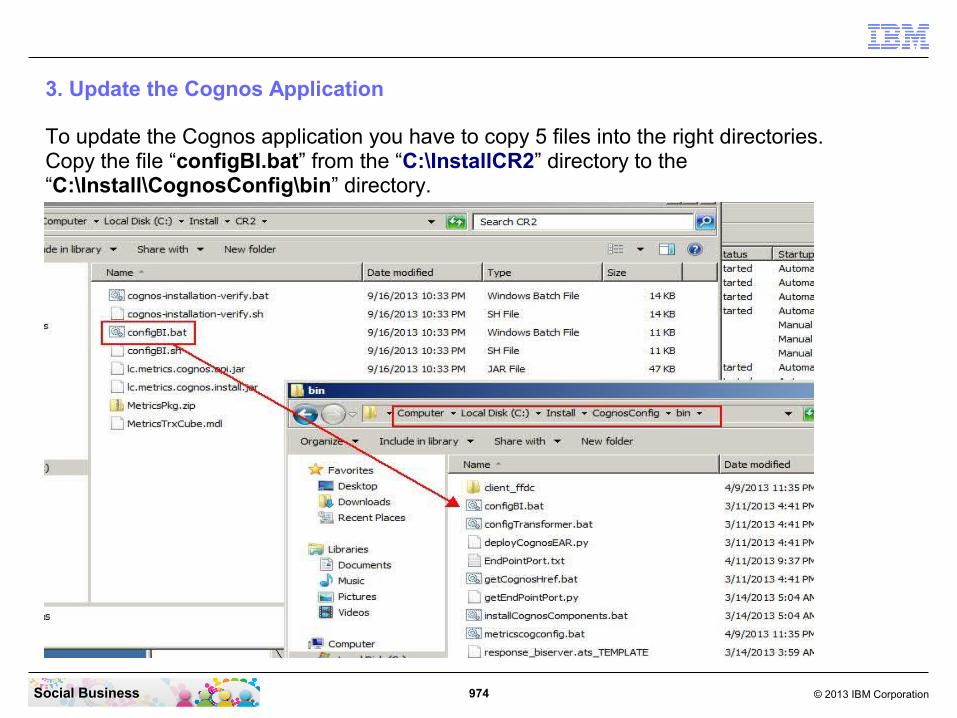
974 © 2013 IBM CorporationSocial Business
3. Update the Cognos Application
To update the Cognos application you have to copy 5 files into the right directories.Copy the file “configBI.bat” from the “C:\InstallCR2” directory to the “C:\Install\CognosConfig\bin” directory.
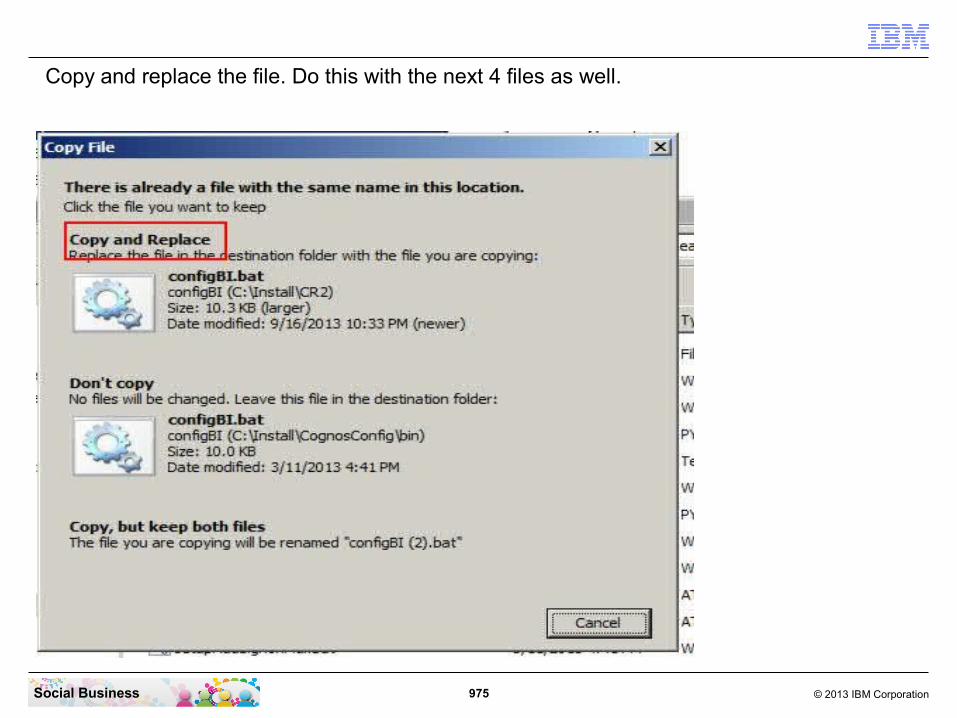
975 © 2013 IBM CorporationSocial Business
Copy and replace the file. Do this with the next 4 files as well.

976 © 2013 IBM CorporationSocial Business
Copy the file “lc.metrics.cognos.install.jar” from the “C:\InstallCR2” directory to the “C:\Install\CognosConfig\lib” directory.

977 © 2013 IBM CorporationSocial Business
Copy the file “MetricsPkg.zip” from the “C:\InstallCR2” directory to the “C:\Install\CognosConfig\MetricsPkg” directory.
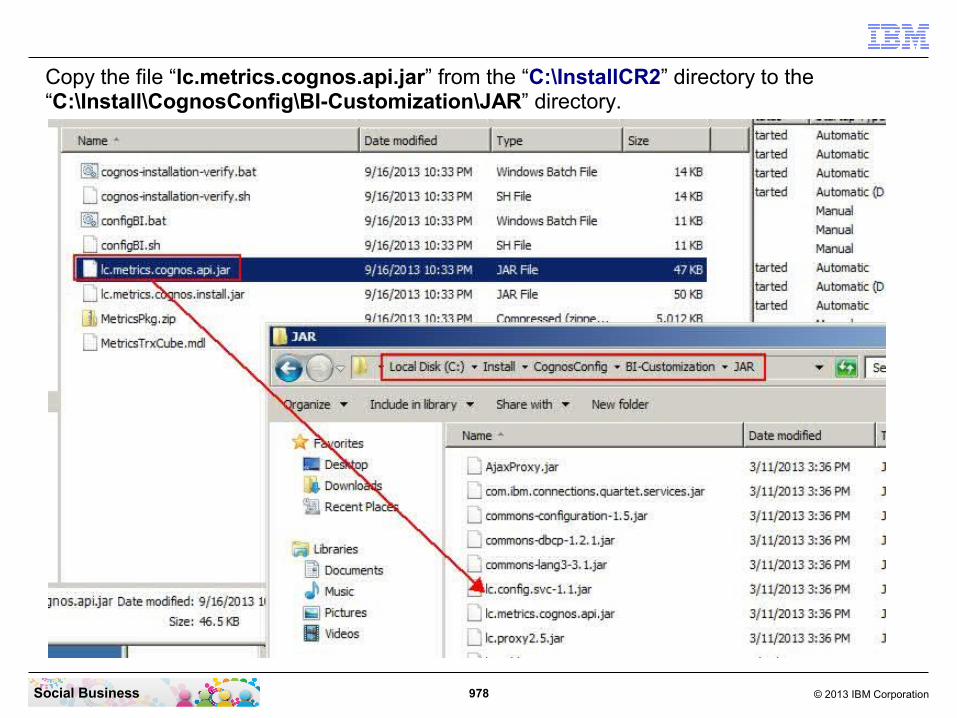
978 © 2013 IBM CorporationSocial Business
Copy the file “lc.metrics.cognos.api.jar” from the “C:\InstallCR2” directory to the “C:\Install\CognosConfig\BI-Customization\JAR” directory.

979 © 2013 IBM CorporationSocial Business
Copy the file “cognos-installation-verify.bat” from the “C:\InstallCR2” directory to the “C:\Install\CognosConfig” directory.

980 © 2013 IBM CorporationSocial Business
Open a new CMD Line window and navigate to the “C:\Install\CognosConfig” directory with the command “cd \Install\CognosConfig”. Then run the command “cognos-setup-update.bat”.

981 © 2013 IBM CorporationSocial Business
Confirm that the command was running successfully.

982 © 2013 IBM CorporationSocial Business
Open your browser and connect to your ISC with the URL “http://connections.renovations.com:9060/admin”. Login with your WAS Admin account and password.

983 © 2013 IBM CorporationSocial Business
Click “Applications” - “Application Types” - “WebSphere enterprise applications”.

984 © 2013 IBM CorporationSocial Business
Select the “Cognos” application and click the “Update” button.

985 © 2013 IBM CorporationSocial Business
Select the option “Remote file system” and click the “Browse” button.

986 © 2013 IBM CorporationSocial Business
Select the “cognosNoder01”

987 © 2013 IBM CorporationSocial Business
Change to the directory “C:\IBM\CognosBI”. Then select the file “cognos.ear”.
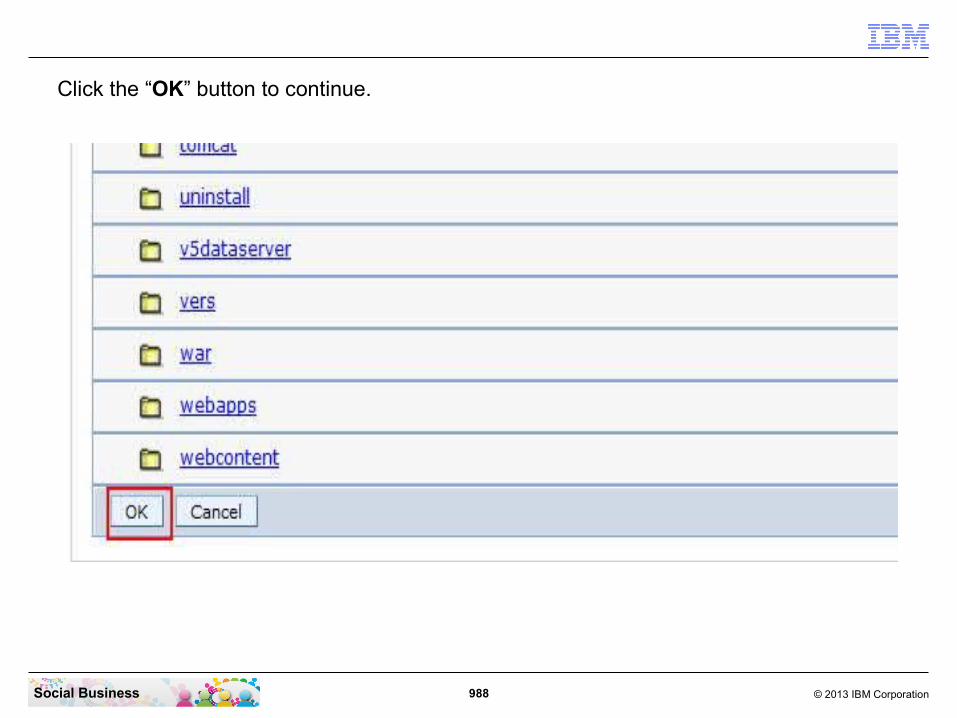
988 © 2013 IBM CorporationSocial Business
Click the “OK” button to continue.

989 © 2013 IBM CorporationSocial Business
Click the “Next” button to continue.

990 © 2013 IBM CorporationSocial Business
Click the “Next” button to continue.

991 © 2013 IBM CorporationSocial Business
Click the “Next” button to continue.
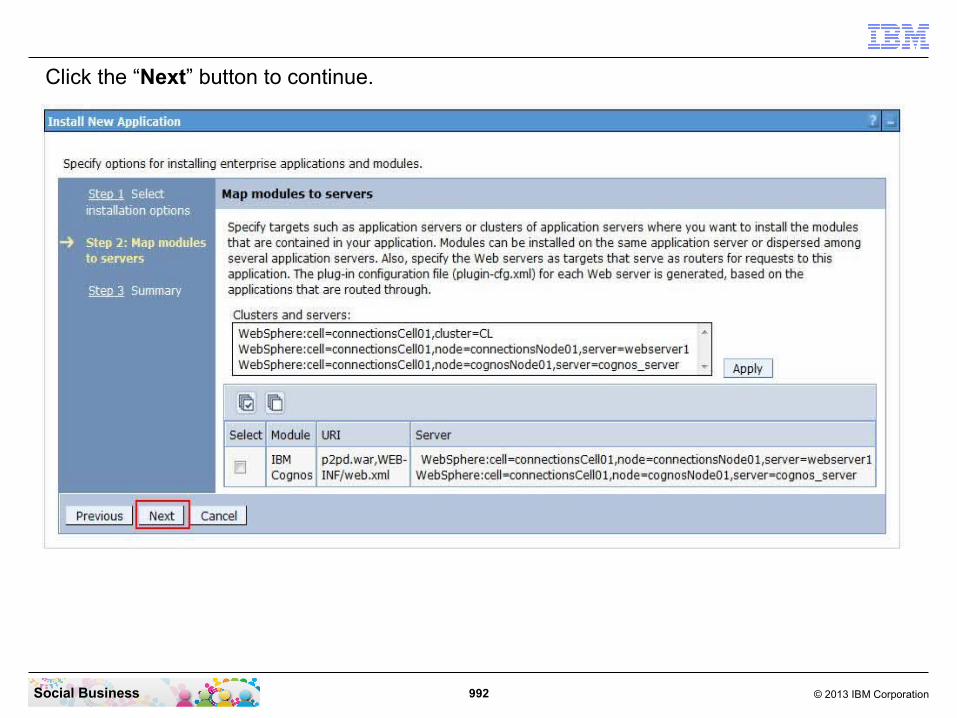
992 © 2013 IBM CorporationSocial Business
Click the “Next” button to continue.
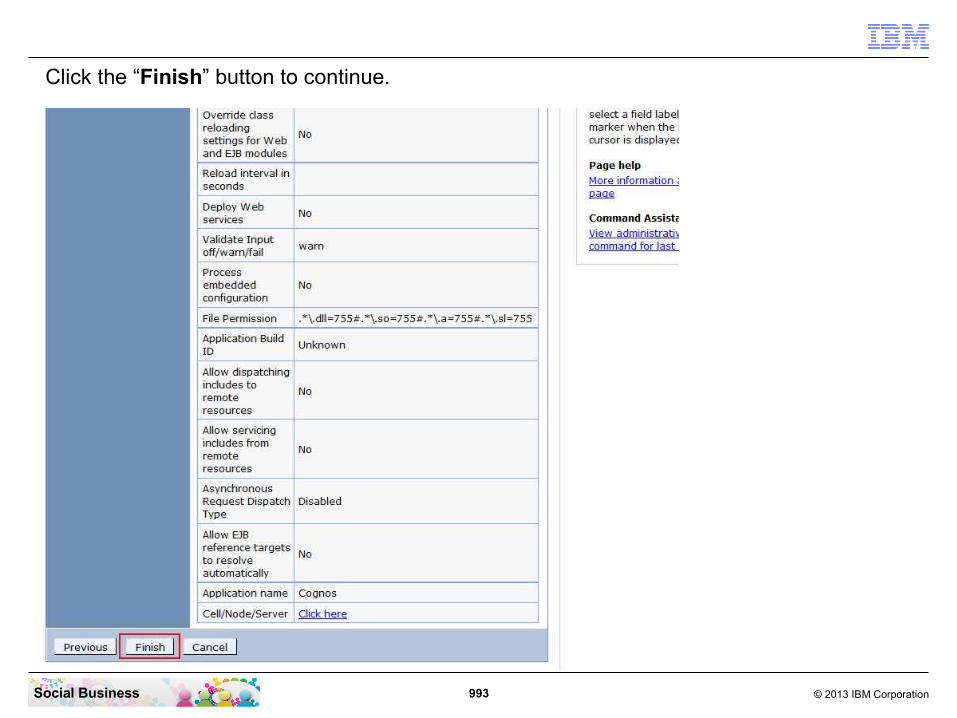
993 © 2013 IBM CorporationSocial Business
Click the “Finish” button to continue.
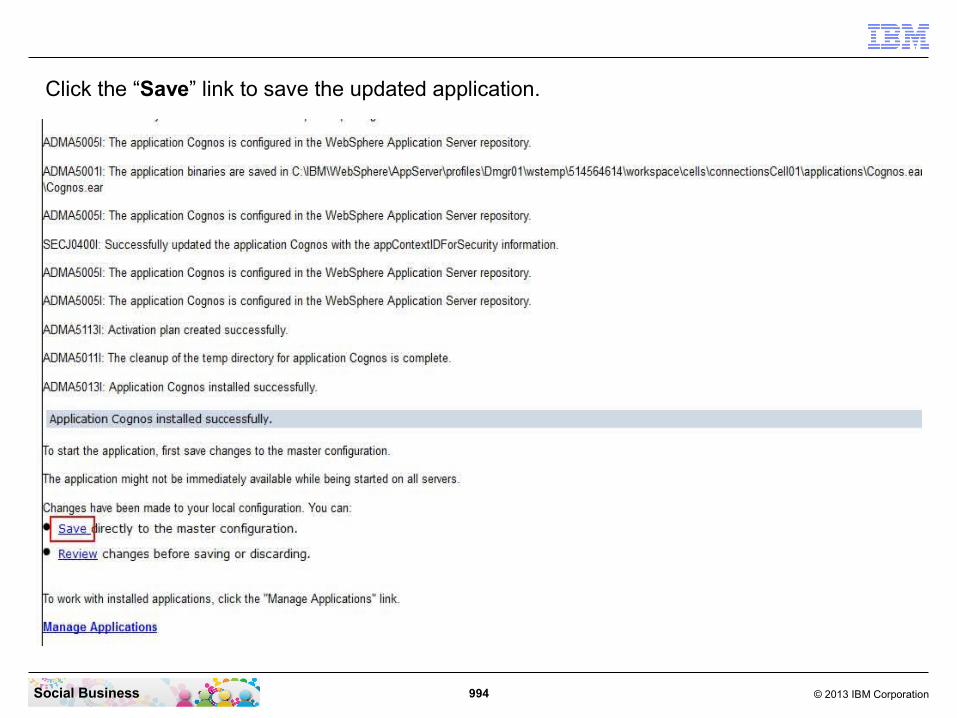
994 © 2013 IBM CorporationSocial Business
Click the “Save” link to save the updated application.

995 © 2013 IBM CorporationSocial Business
Switch to the CMD line window and navigate to the Cognos Application Server directory with the command “cd \IBM\WebSphere\AppServer\profiles\AppSrv01\bin”. Then start the Cognos server with the command “startserver cognos_server”. Wait approximately 5 minutes until Cognos is started completely. Then change to the Cognos Install directory with the command “cd \Install\CognosConfig”. Now run the command “cognos-configure-update.bat”.
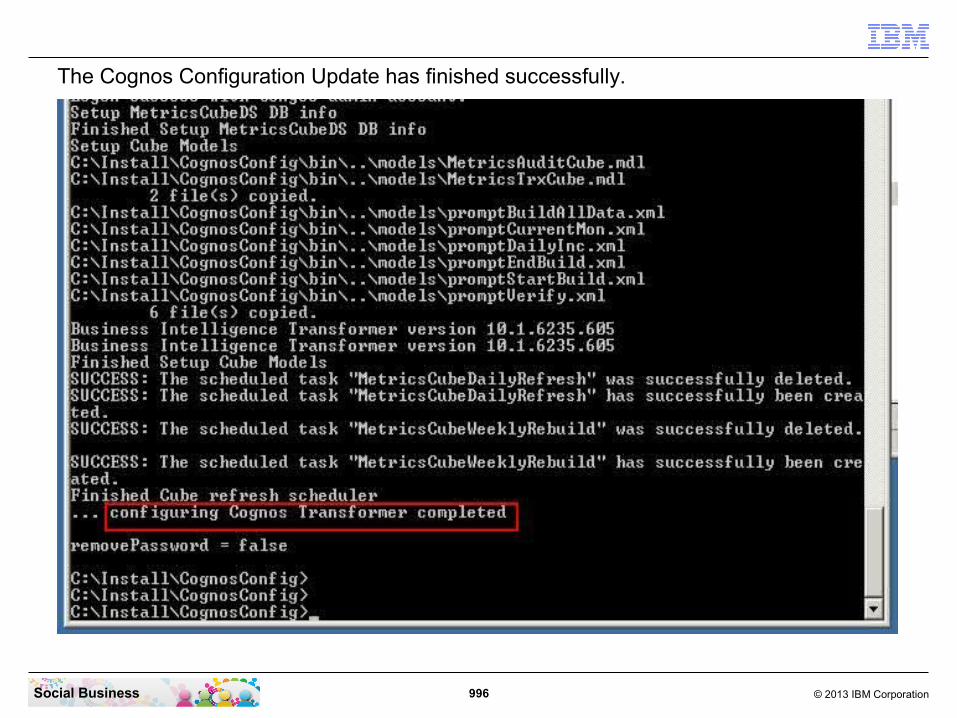
996 © 2013 IBM CorporationSocial Business
The Cognos Configuration Update has finished successfully.

997 © 2013 IBM CorporationSocial Business
Change to the PowerCube Creation dir with the command “cd \IBM\CognosTF\metricsmodel”. Then recreate the Power Cubes with the command “build-all.bat”

998 © 2013 IBM CorporationSocial Business
Confirm that the build process was running successfully.

999 © 2013 IBM CorporationSocial Business
In your browser navigate to the WebSphere Administration Console and login with your Cognos Administrator user and password.
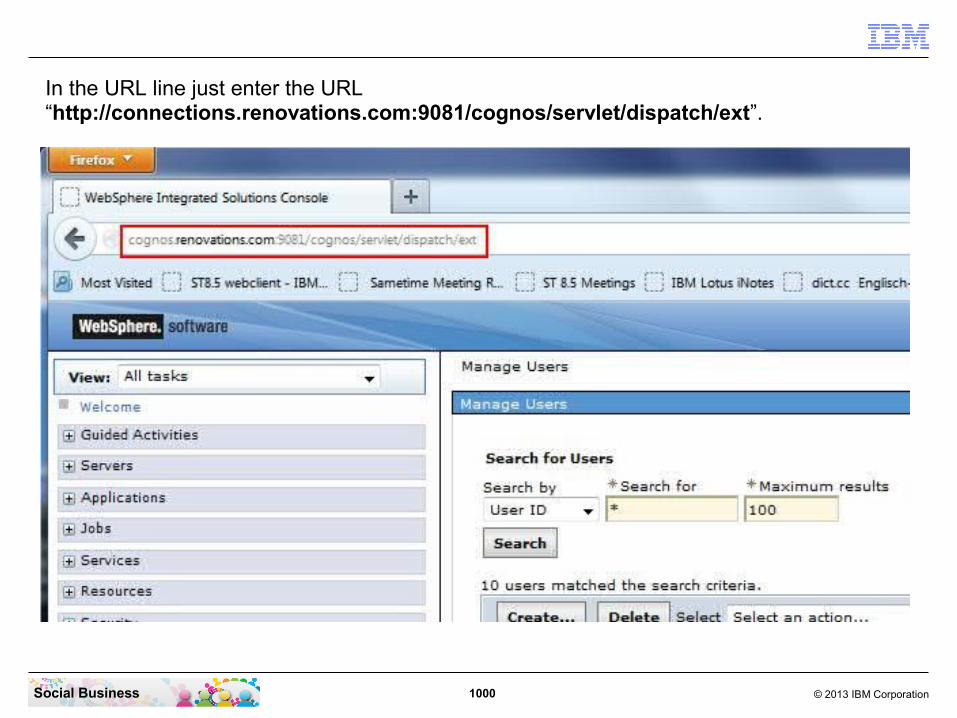
1000 © 2013 IBM CorporationSocial Business
In the URL line just enter the URL “http://connections.renovations.com:9081/cognos/servlet/dispatch/ext”.
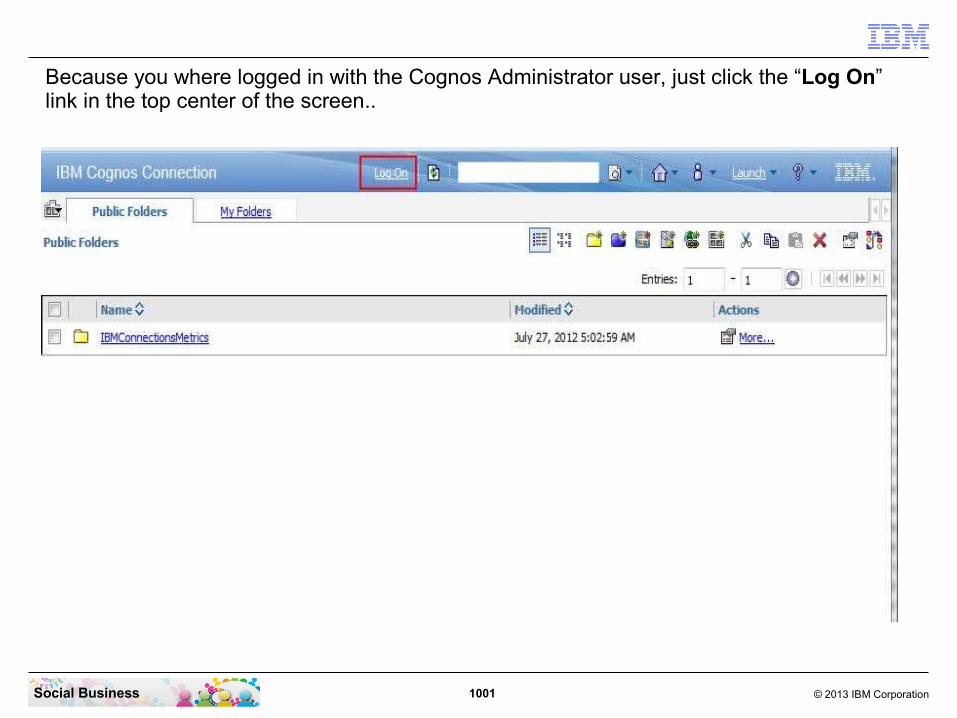
1001 © 2013 IBM CorporationSocial Business
Because you where logged in with the Cognos Administrator user, just click the “Log On” link in the top center of the screen..
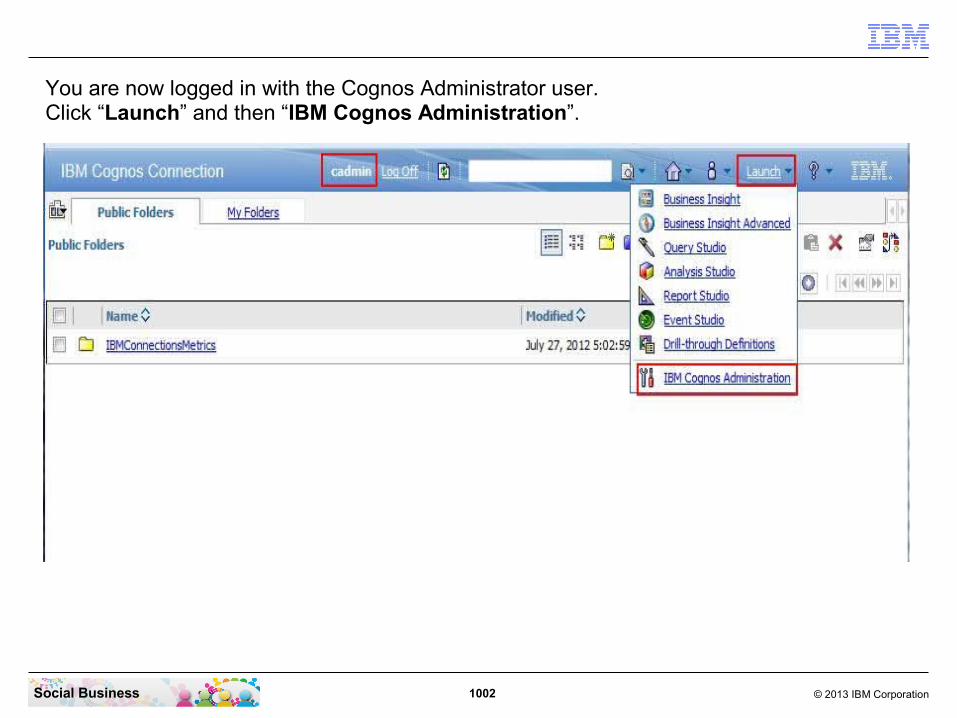
1002 © 2013 IBM CorporationSocial Business
You are now logged in with the Cognos Administrator user.Click “Launch” and then “IBM Cognos Administration”.

1003 © 2013 IBM CorporationSocial Business
Click the “Security” tab.

1004 © 2013 IBM CorporationSocial Business
Click the “Cognos” name.

1005 © 2013 IBM CorporationSocial Business
Find the “IBMConnectionsMetricsAdmin” line and click the “More...” link.

1006 © 2013 IBM CorporationSocial Business
Click the “Set properties” action.

1007 © 2013 IBM CorporationSocial Business
Click the “Members” tab.
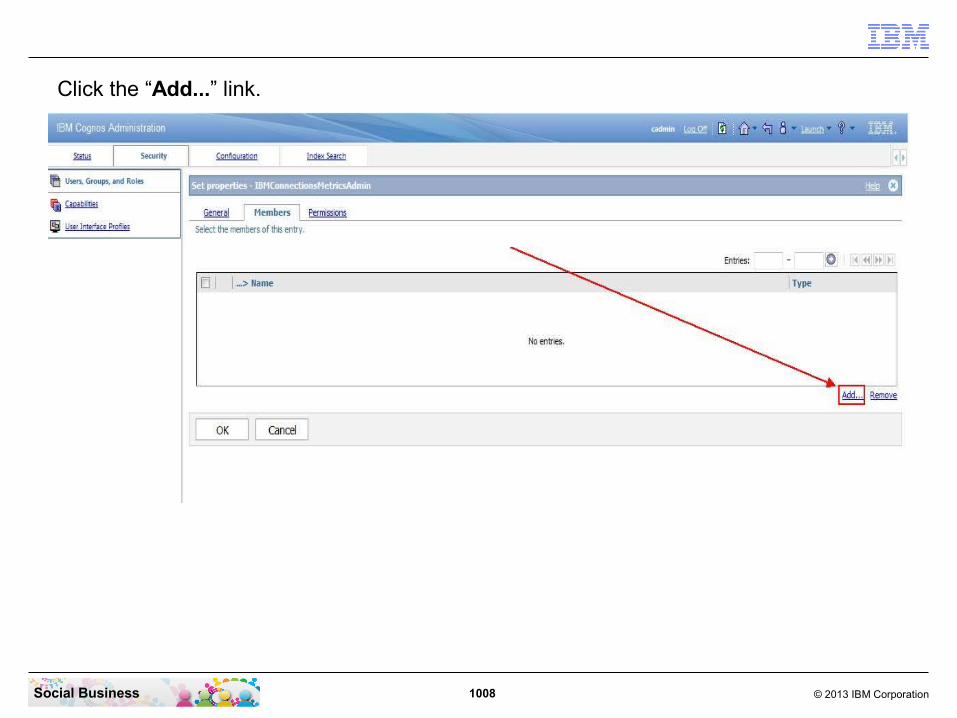
1008 © 2013 IBM CorporationSocial Business
Click the “Add...” link.

1009 © 2013 IBM CorporationSocial Business
Select the “Show users in the list” check box and click the “IBMConnections” name.
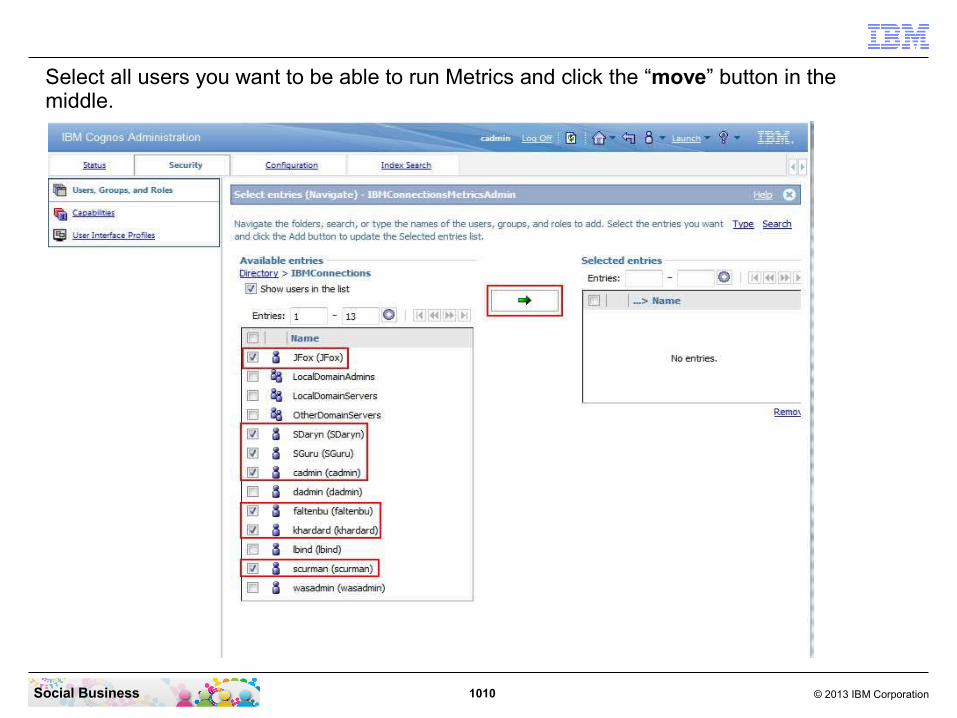
1010 © 2013 IBM CorporationSocial Business
Select all users you want to be able to run Metrics and click the “move” button in the middle.

1011 © 2013 IBM CorporationSocial Business
Click the “OK” Button to continue.
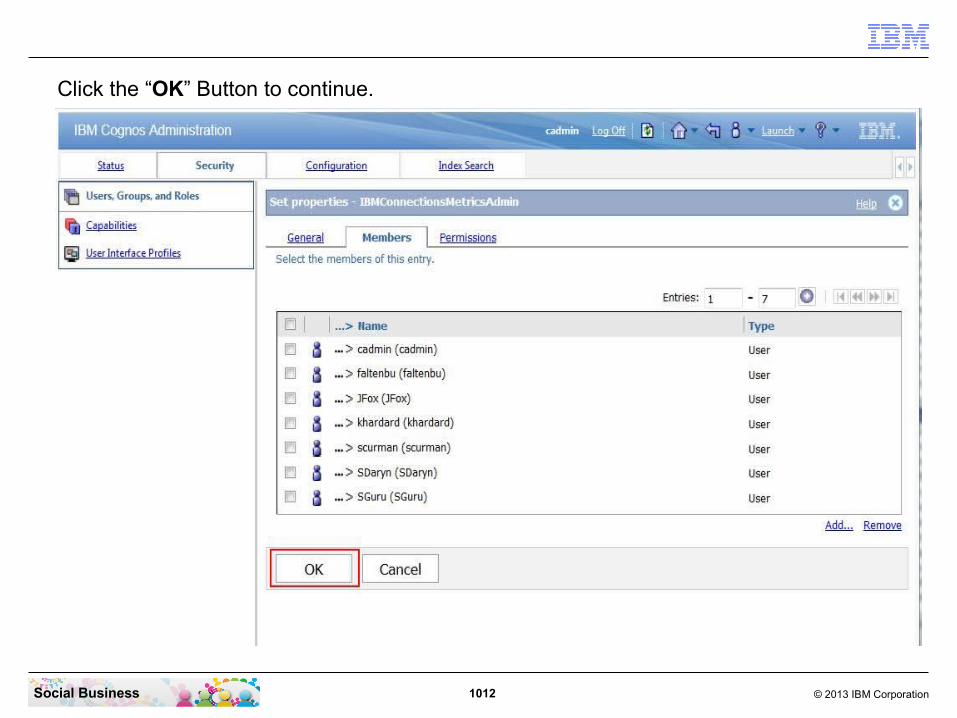
1012 © 2013 IBM CorporationSocial Business
Click the “OK” Button to continue.
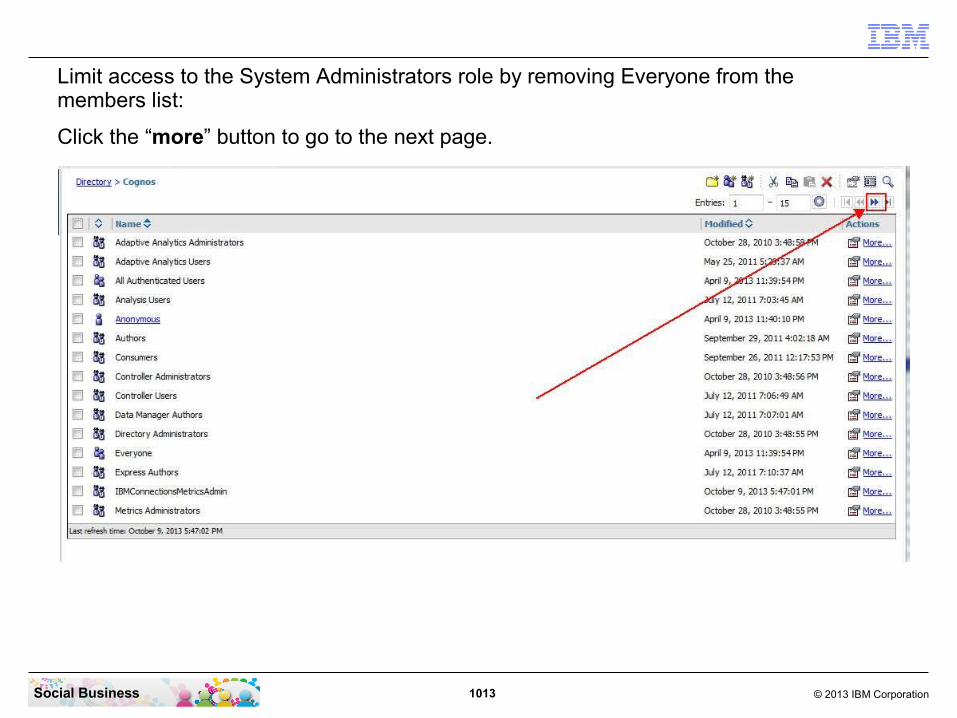
1013 © 2013 IBM CorporationSocial Business
Click the “more” button to go to the next page.
Limit access to the System Administrators role by removing Everyone from the members list:

1014 © 2013 IBM CorporationSocial Business
Find the “System Administrators” line and click the “More...” link.

1015 © 2013 IBM CorporationSocial Business
Click the “Set properties” option.
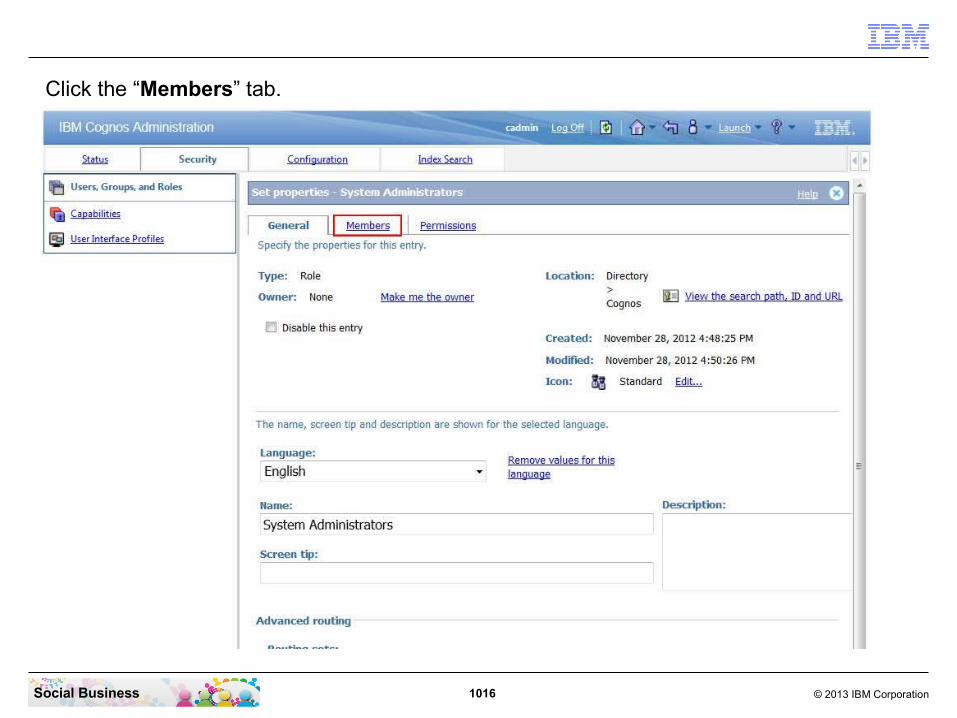
1016 © 2013 IBM CorporationSocial Business
Click the “Members” tab.

1017 © 2013 IBM CorporationSocial Business
Select the “Everyone” name and click the “Remove” link.

1018 © 2013 IBM CorporationSocial Business
Click the “OK” button to continue.

1019 © 2013 IBM CorporationSocial Business
Log Out from the Cognos Console and then close the Browser window.
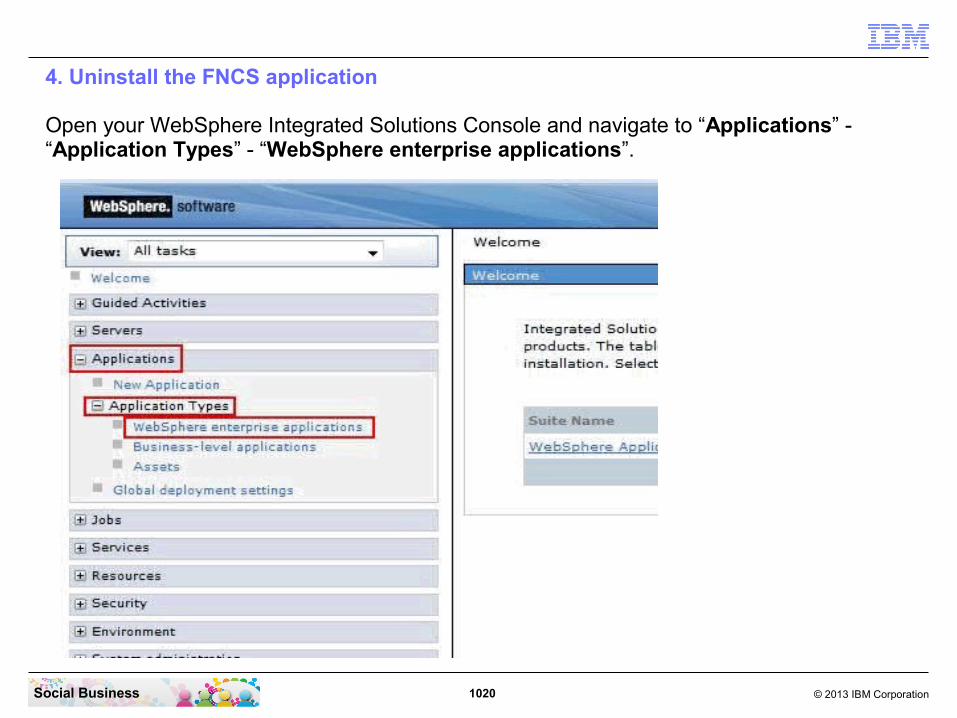
1020 © 2013 IBM CorporationSocial Business
4. Uninstall the FNCS application
Open your WebSphere Integrated Solutions Console and navigate to “Applications” - “Application Types” - “WebSphere enterprise applications”.
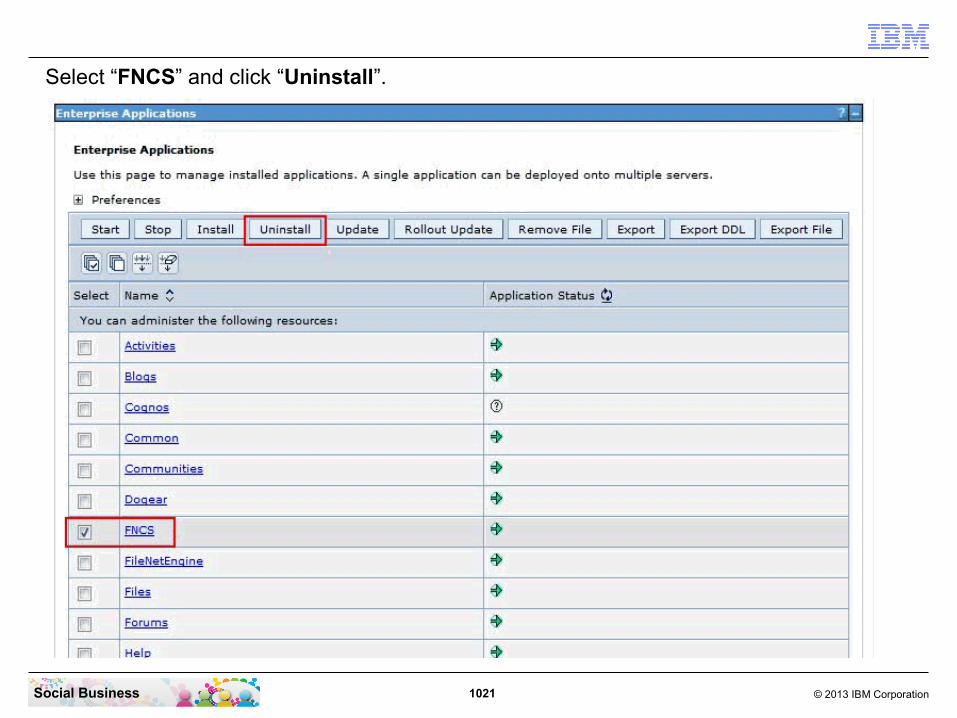
1021 © 2013 IBM CorporationSocial Business
Select “FNCS” and click “Uninstall”.

1022 © 2013 IBM CorporationSocial Business
To confirm the uninstall click “OK”.

1023 © 2013 IBM CorporationSocial Business
Click “Save” to save the last changes.

1024 © 2013 IBM CorporationSocial Business
5. Remove the temporary WebSphere Application Server directory
To delete the temp cache directory you need to stop the Connections Server.

1025 © 2013 IBM CorporationSocial Business
Open your File Explorer and navigate to the “C:\IBM\WebSphere\AppServer\profiles\AppSrv01\temp\connectionsNode01\connections_server” directory. Then delete the “FNCS” directory.

1026 © 2013 IBM CorporationSocial Business
Confirm the deletion by clicking “Yes”.

1027 © 2013 IBM CorporationSocial Business
6. Uninstall the FNCS binaries
To uninstall the application binaries open a CMD line window. Navigate to the “C:\IBM\Connections\addons\ccm\FNCS\uninstall” directory. Then run the “fncs-uninstall.exe” command.

1028 © 2013 IBM CorporationSocial Business
Click the “Uninstall” button to start uninstalling.

1029 © 2013 IBM CorporationSocial Business
Click the “Done” button to continue.
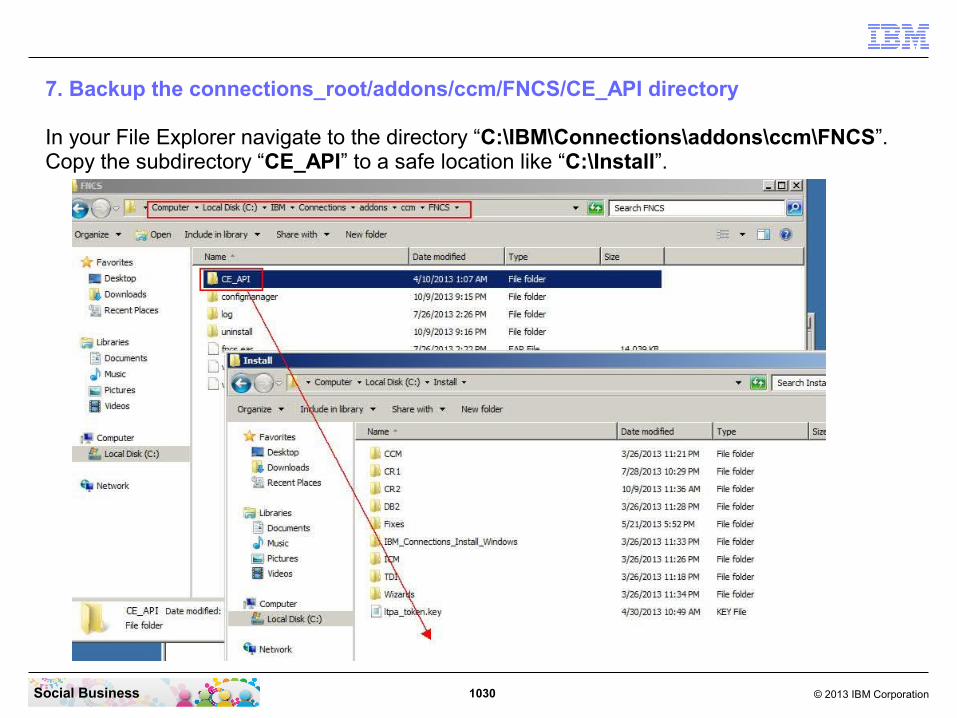
1030 © 2013 IBM CorporationSocial Business
7. Backup the connections_root/addons/ccm/FNCS/CE_API directory
In your File Explorer navigate to the directory “C:\IBM\Connections\addons\ccm\FNCS”. Copy the subdirectory “CE_API” to a safe location like “C:\Install”.

1031 © 2013 IBM CorporationSocial Business
8. Backup the connections_root/addons/ccm/FNCS/configmanager/profiles/fncs-sitePrefs.properties file
In your File Explorer navigate to the directory “C:\IBM\Connections\addons\ccm\FNCS\configmanager\profiles”. Copy the file “fncs-sitePrefs.properties” to a safe location like “C:\Install”.

1032 © 2013 IBM CorporationSocial Business
9. Delete the connections_root/addons/ccm/FNCS directory
Go to the “C:\IBM\Connections\addons\ccm” directory. Delete the “FNCS” subdirectory.

1033 © 2013 IBM CorporationSocial Business
Confirm the deletion with the “Yes” button.

1034 © 2013 IBM CorporationSocial Business
10. Install the FNCS 2.0.0.1-FNCS-IF001 update
In the File Explorer navigate to the “C:\Install\CR2” directory. Then run the “2.0.0.1-FNCS.IF001-WIN.exe” command.
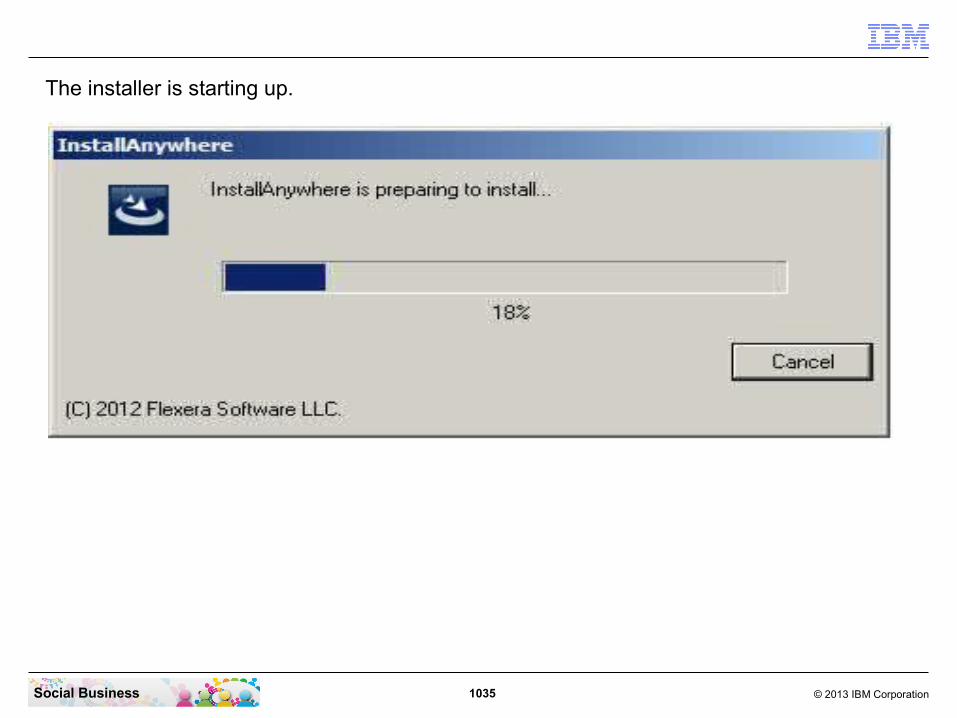
1035 © 2013 IBM CorporationSocial Business
The installer is starting up.

1036 © 2013 IBM CorporationSocial Business
The FNCS installer has started. Select your preferred language and click “OK” to continue.
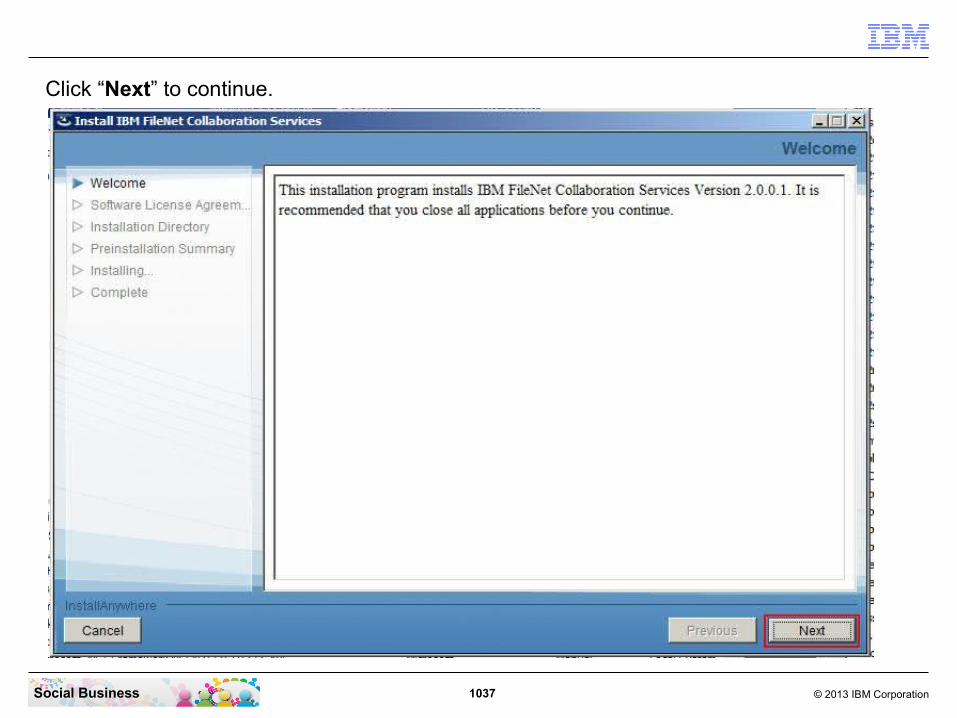
1037 © 2013 IBM CorporationSocial Business
Click “Next” to continue.

1038 © 2013 IBM CorporationSocial Business
Accept the terms in the license agreement and click “Next” to continue.

1039 © 2013 IBM CorporationSocial Business
Change the path to your FNCS “C:\IBM\Connections\addons\ccm\FNCS” directory and click “Next”.
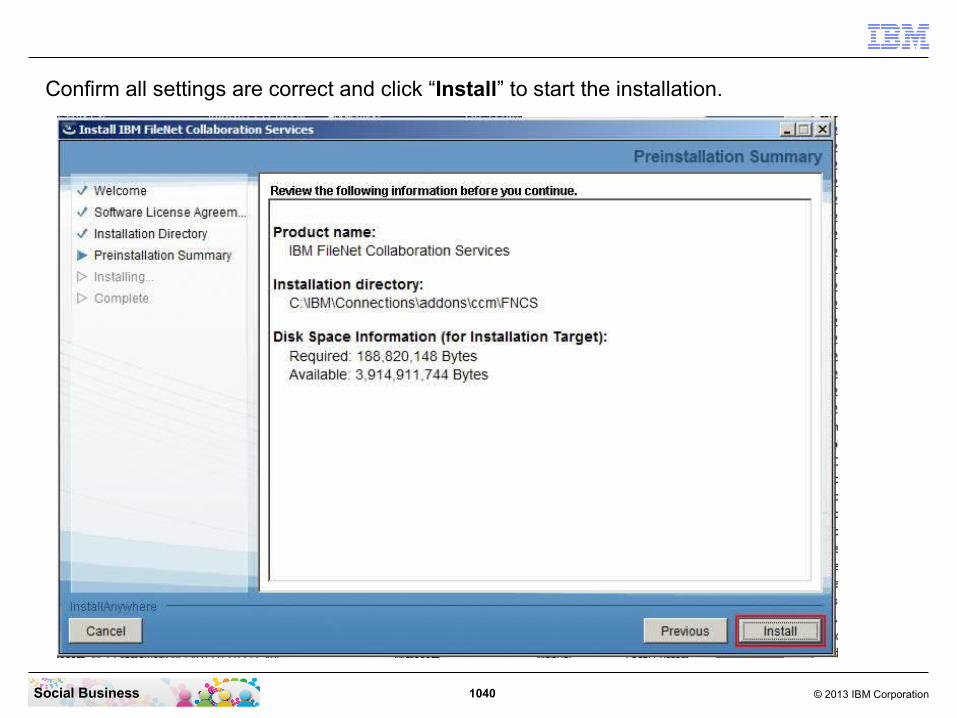
1040 © 2013 IBM CorporationSocial Business
Confirm all settings are correct and click “Install” to start the installation.

1041 © 2013 IBM CorporationSocial Business
The installation is running.

1042 © 2013 IBM CorporationSocial Business
Confirm that the FileNet Collaboration Services are installed successfully. Then click “Done” to close the installer.

1043 © 2013 IBM CorporationSocial Business
11. Copy the CE_API directory you backed up in step #7 to the connections_root/addons/ccm/FNCS directory
Copy back from your “C:\Install” Directory the “CE_API” directory to “C:\IBM\Connections\addons\ccm\FNCS”.

1044 © 2013 IBM CorporationSocial Business
12. Copy the fncs-sitePrefs.properties file you backed up in step #8 to the connections_root/addons/ccm/FNCS/configmanager/profiles directory.
Copy back from your “C:\Install” Directory the “fncs-sitePrefs.properties” file to “C:\IBM\Connections\addons\ccm\FNCS\configmanager\profiles” directory.

1045 © 2013 IBM CorporationSocial Business
Yes, copy and replace the file.

1046 © 2013 IBM CorporationSocial Business
Configuring FNCS
In your CMD Line window navigate to the “C:\IBM\Connections\addons\ccm\FNCS\configmanager” directory.Then run the “configwizard.bat” command.

1047 © 2013 IBM CorporationSocial Business
The FileNet Collaboration Services Configuration Wizard is starting up. Select your preferred language and click “OK” to continue.

1048 © 2013 IBM CorporationSocial Business
Click “Next” to continue.

1049 © 2013 IBM CorporationSocial Business
Enter the Content Platform Engine “iiop://connections.renovations.com:2811/FileNet/Engine” URL.The port is the BOOTSTRAP_ADDRESS port of your Connections Server.The Object store symbolic name is “ICObjectStore” by default.Deselect the “Test the connection to the Content Platform Engine” check box.Then click “Next” to continue.

1050 © 2013 IBM CorporationSocial Business
In Web client application select None. Then click “Next” to continue.

1051 © 2013 IBM CorporationSocial Business
Enter the full URL to your Connections Server "https://connections.renovations.com". Then click “Next” to continue.
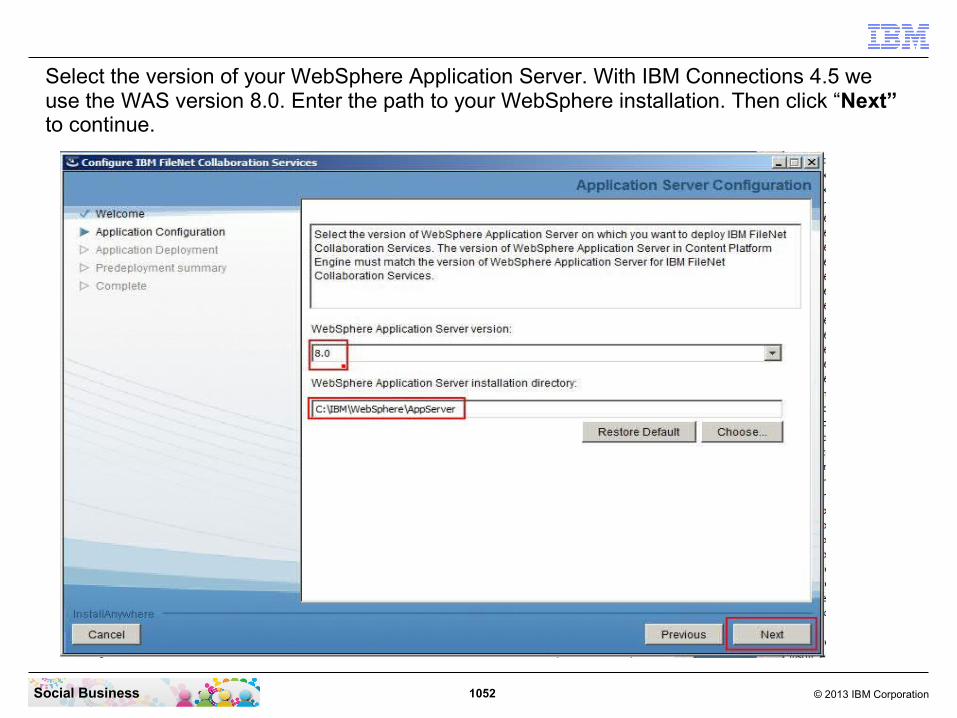
1052 © 2013 IBM CorporationSocial Business
Select the version of your WebSphere Application Server. With IBM Connections 4.5 we use the WAS version 8.0. Enter the path to your WebSphere installation. Then click “Next” to continue.

1053 © 2013 IBM CorporationSocial Business
Select the “Dmgr01” profile and enter the WebSphere administrator user name and password. Click “Next” to continue.

1054 © 2013 IBM CorporationSocial Business
Select “Application server cluster”. Then click “Next” to continue.

1055 © 2013 IBM CorporationSocial Business
Select your application server cluster and click “Next” to continue.
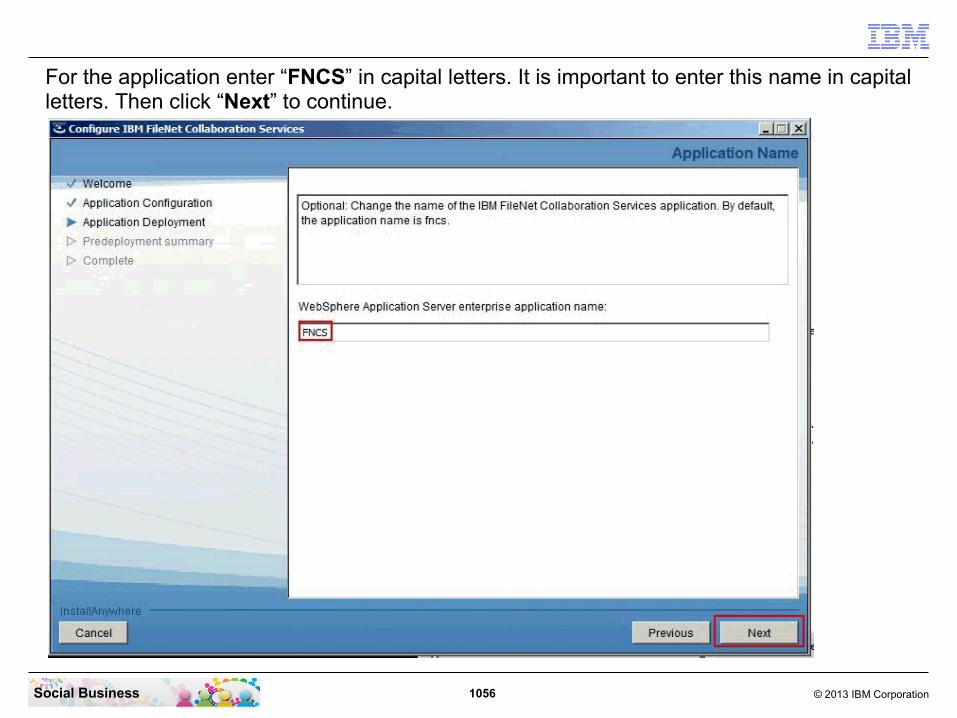
1056 © 2013 IBM CorporationSocial Business
For the application enter “FNCS” in capital letters. It is important to enter this name in capital letters. Then click “Next” to continue.

1057 © 2013 IBM CorporationSocial Business
Confirm that all your settings are correct. Then click “Next” to continue.

1058 © 2013 IBM CorporationSocial Business
The wizard is now deploying the FNCS application.
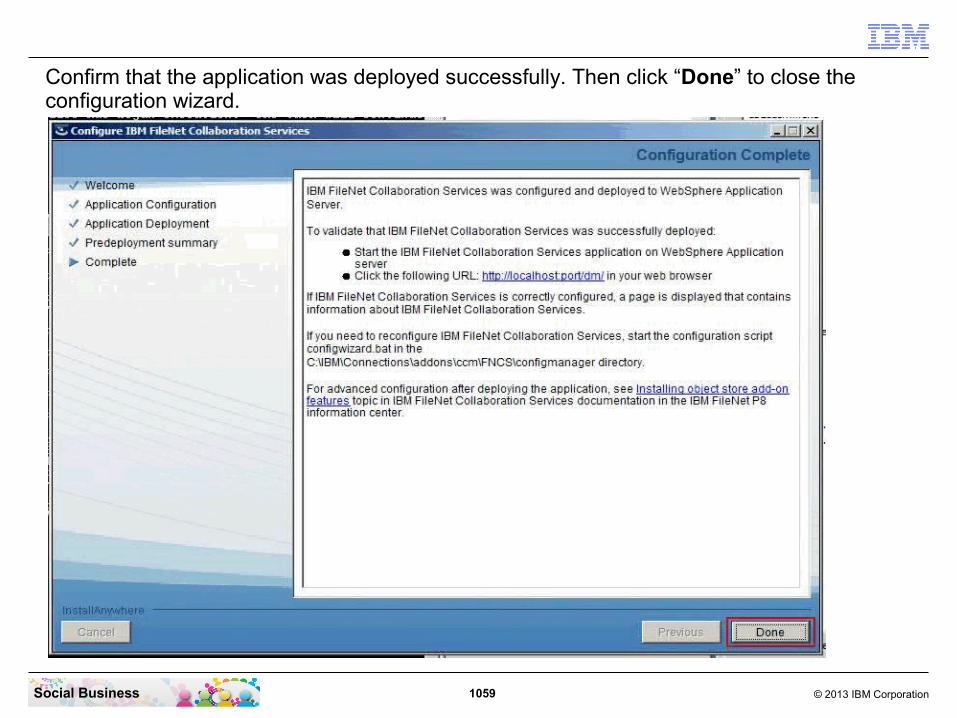
1059 © 2013 IBM CorporationSocial Business
Confirm that the application was deployed successfully. Then click “Done” to close the configuration wizard.

1060 © 2013 IBM CorporationSocial Business
Start your Connections Server now.

1061 © 2013 IBM CorporationSocial Business
When all is started successfully then open your browser and enter the “http://connections.renovations.com/dm” URL.
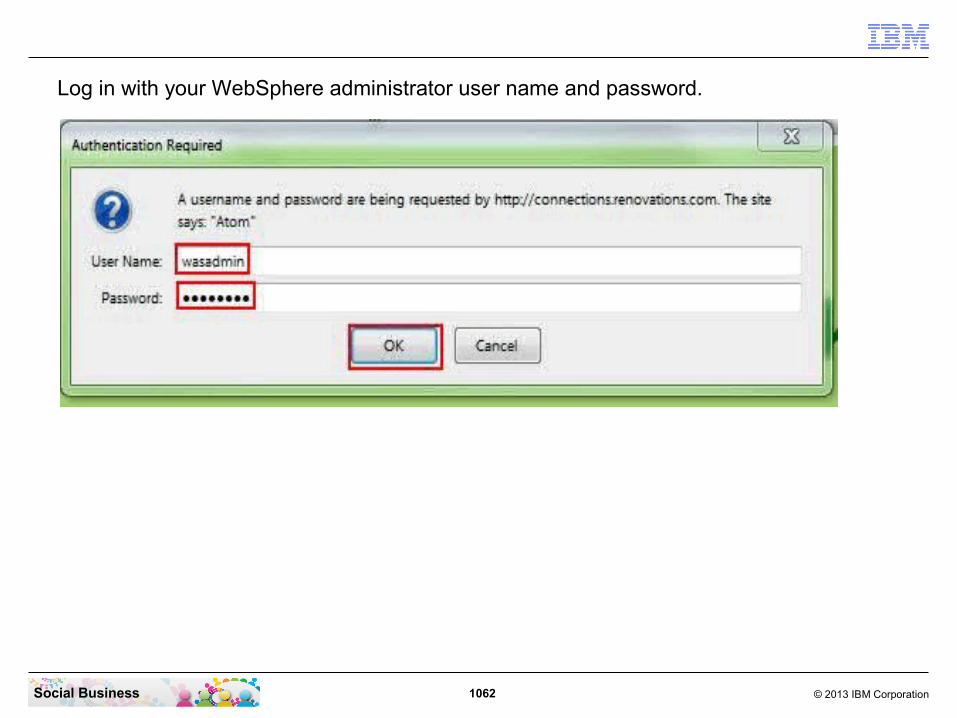
1062 © 2013 IBM CorporationSocial Business
Log in with your WebSphere administrator user name and password.
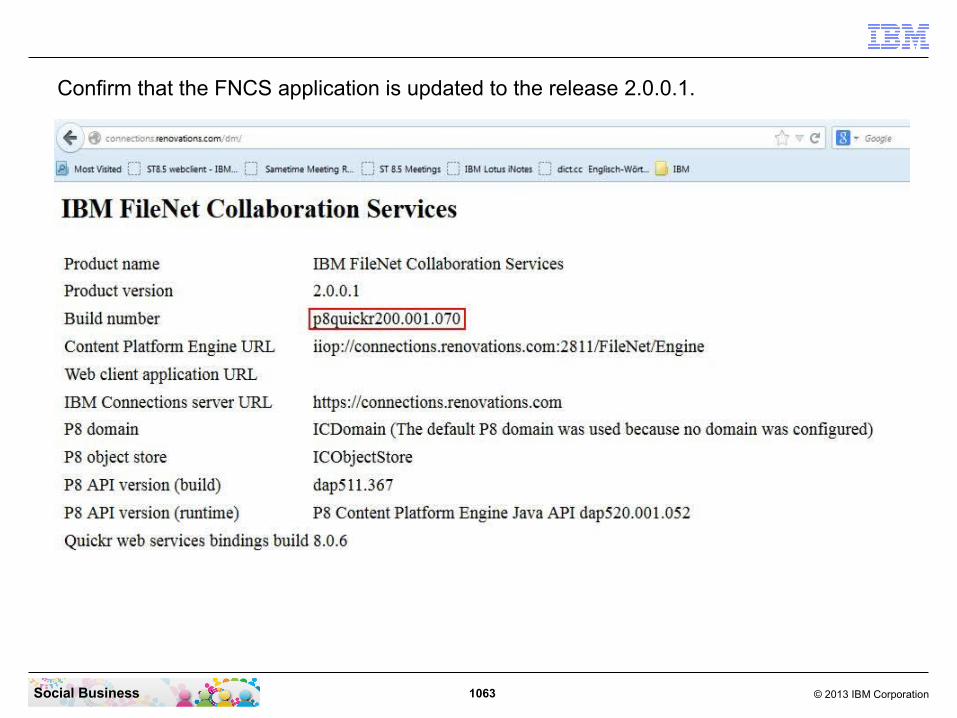
1063 © 2013 IBM CorporationSocial Business
Confirm that the FNCS application is updated to the release 2.0.0.1.

1064 © 2013 IBM CorporationSocial Business
13. Configure FNCS
Log in to your Integrated solutions console with your WebSphere Administrator user name and password.

1065 © 2013 IBM CorporationSocial Business
Click on “Applications” - “Application Types” - “WebSphere enterprise applications”.
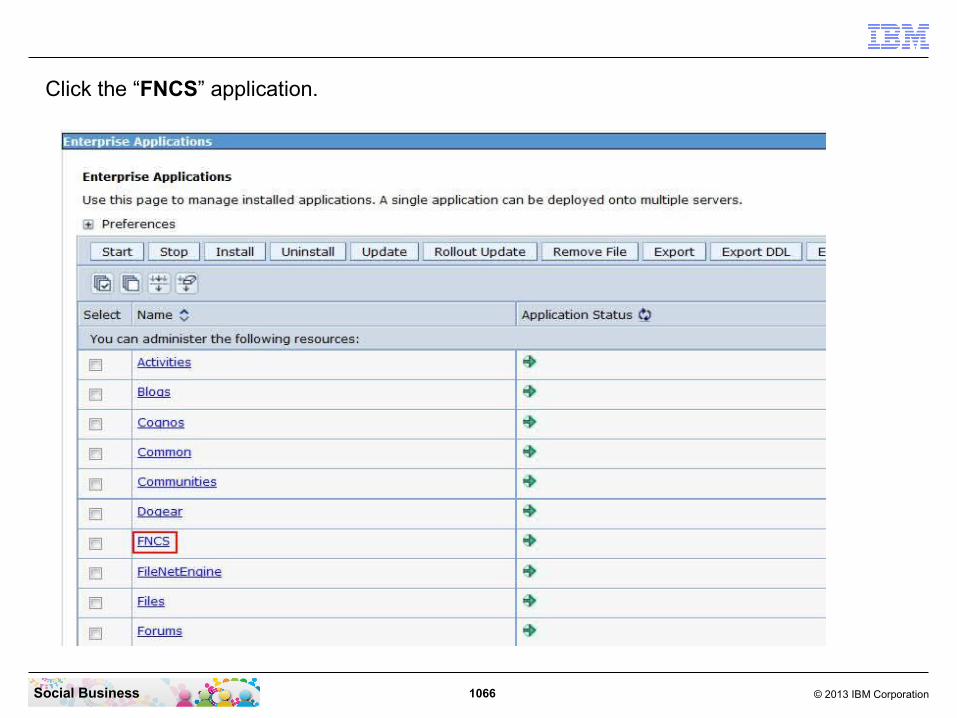
1066 © 2013 IBM CorporationSocial Business
Click the “FNCS” application.

1067 © 2013 IBM CorporationSocial Business
Under “Detail Properties” click the “Security role to user/group mapping” link.

1068 © 2013 IBM CorporationSocial Business
Select the check box near the Anonymous role and click the “Map Users...” button.
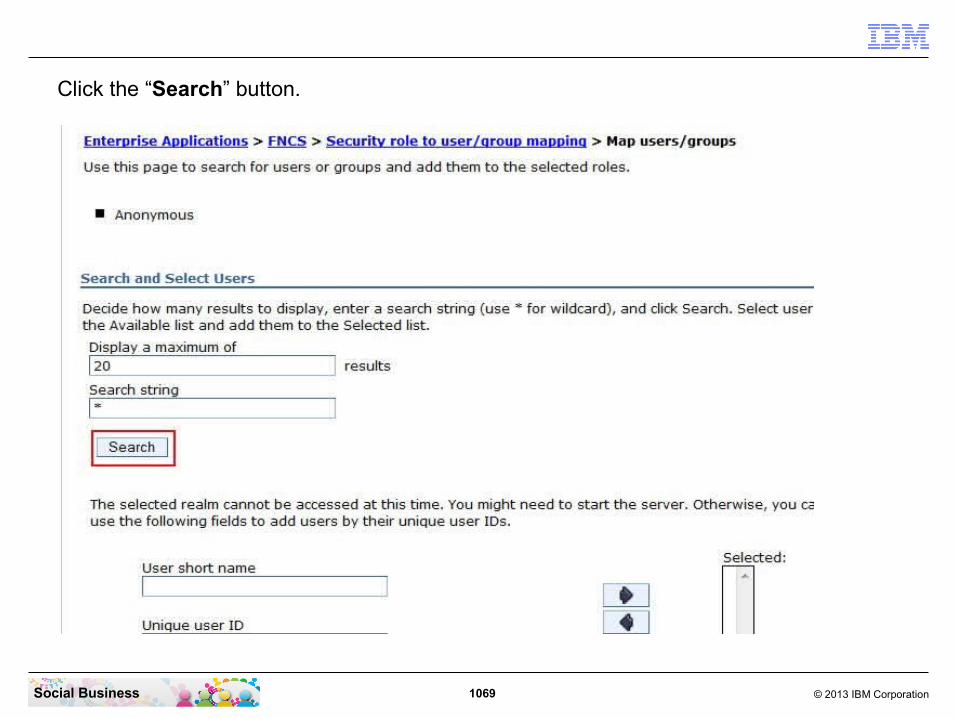
1069 © 2013 IBM CorporationSocial Business
Click the “Search” button.

1070 © 2013 IBM CorporationSocial Business
Select the Anonymous User (auser) and click the “Move” button.

1071 © 2013 IBM CorporationSocial Business
Click the “OK” button to continue.

1072 © 2013 IBM CorporationSocial Business
Click the “OK” button to continue.
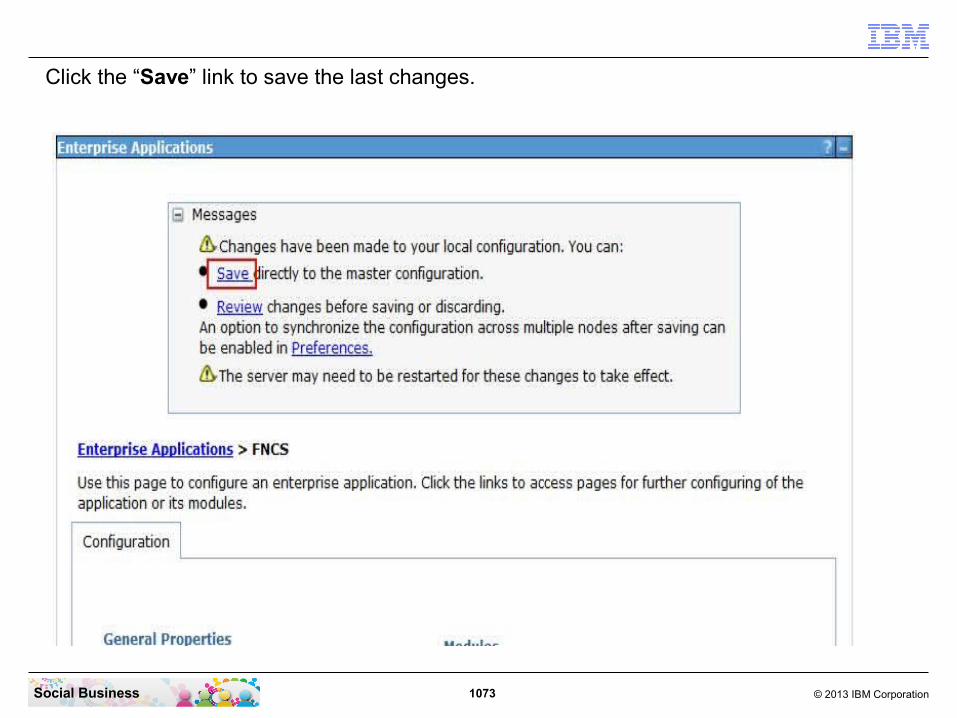
1073 © 2013 IBM CorporationSocial Business
Click the “Save” link to save the last changes.

1074 © 2013 IBM CorporationSocial Business
14. Reinstall the CCM authentication filter into FNCS
Click on “Applications” - “Application Types” - “WebSphere enterprise applications”.

1075 © 2013 IBM CorporationSocial Business
Select the check box near the “FNCS” application and click the “Update” button.

1076 © 2013 IBM CorporationSocial Business
Select the “Replace, add, or delete multiple files” option.

1077 © 2013 IBM CorporationSocial Business
Select the “Remote file system” option and click the “Browse...” button.

1078 © 2013 IBM CorporationSocial Business
Select the “connectionsNode01” and then navigate to the directory “C:\IBM\Connections\ccm\ccm\ccm\auth_filter_patch”. Select the “auth_filter_patch.zip” file and click the “OK” button.

1079 © 2013 IBM CorporationSocial Business
Click the “Next” button to continue.

1080 © 2013 IBM CorporationSocial Business
Click the “OK” button to continue.
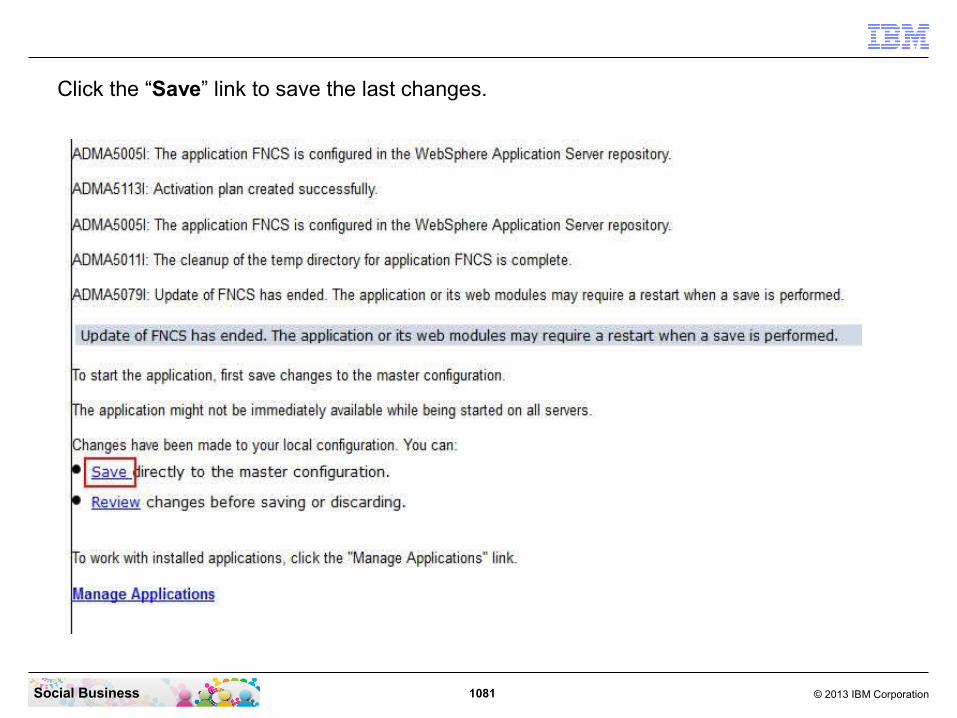
1081 © 2013 IBM CorporationSocial Business
Click the “Save” link to save the last changes.
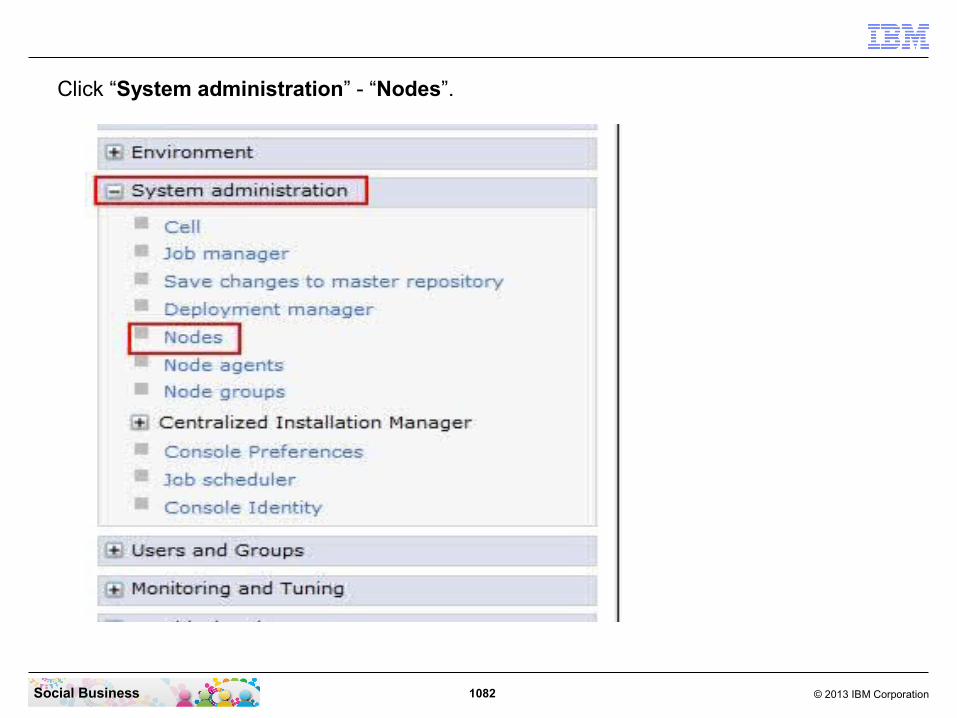
1082 © 2013 IBM CorporationSocial Business
Click “System administration” - “Nodes”.

1083 © 2013 IBM CorporationSocial Business
Select the “connectionsNode01” and click the “Synchronize” button.

1084 © 2013 IBM CorporationSocial Business
Stop the Connections Server.
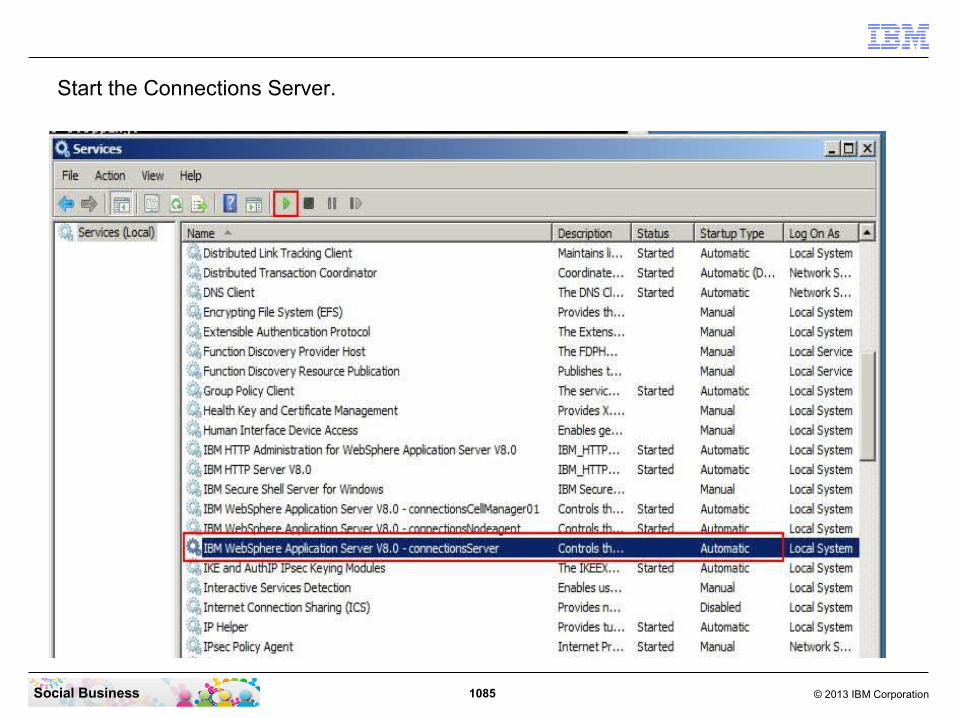
1085 © 2013 IBM CorporationSocial Business
Start the Connections Server.
1086 © 2013 IBM CorporationSocial Business
Congratulations, you have finished the required installation and configuration steps for your first IBM Connections 4.5 installation and updated to the CR1 level.
You can publish the url of your server to the test or pilot users and see how the content in your IBM Connections Server grows as it becomes alive.
As more people use the system and over time as users add content it will become clearer how valuable and successful this system is. A social software system grows with usage.
The main messages are:● Use the system with as MANY people as possible● Use all Applications (services) ● Add Content ● Monitor usage● Collect feedback from Users
1087 © 2013 IBM CorporationSocial Business
Additional Steps after the installation:Some additional Post Install Tasks can be done after all components are installed. You should consult the IBM Connections Product Documentation about these tasks:
http://www-10.lotus.com/ldd/lcwiki.nsf/xpDocViewer.xsp?lookupName=IBM+Connections+4.5+documentation#action=openDocument&res_title=Optional_postinstallation_tasks_ic45&content=pdcontent

1088 © 2013 IBM CorporationSocial Business
Worksheet for IBM Connections
Recording installation data
While installing and configuring IBM® Connections, it can be difficult to remember all the user IDs, passwords, server names, and other information that you need during and after installation. Print out and use this worksheet to record that data.
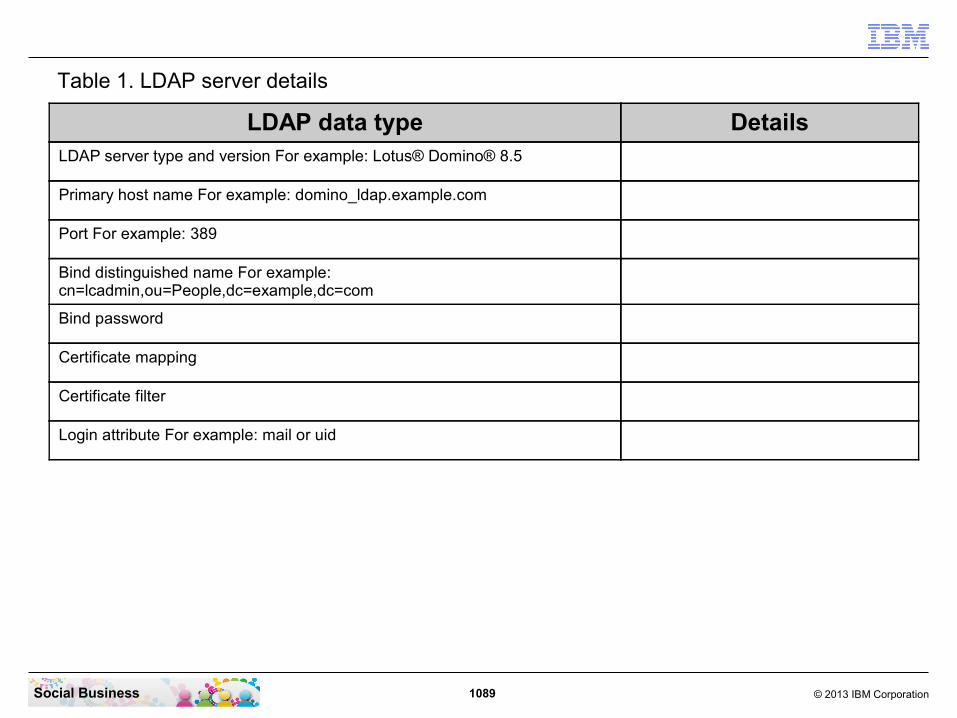
1089 © 2013 IBM CorporationSocial Business
Table 1. LDAP server details
LDAP data type DetailsLDAP server type and version For example: Lotus® Domino® 8.5
Primary host name For example: domino_ldap.example.com
Port For example: 389
Bind distinguished name For example: cn=lcadmin,ou=People,dc=example,dc=com
Bind password
Certificate mapping
Certificate filter
Login attribute For example: mail or uid
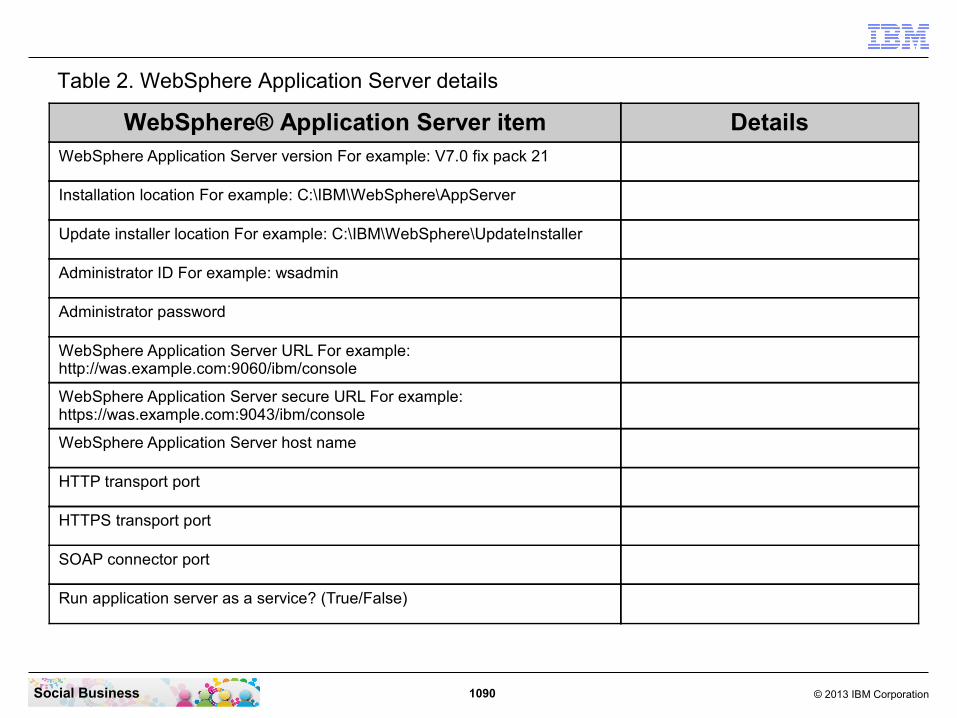
1090 © 2013 IBM CorporationSocial Business
Table 2. WebSphere Application Server details
WebSphere® Application Server item DetailsWebSphere Application Server version For example: V7.0 fix pack 21
Installation location For example: C:\IBM\WebSphere\AppServer
Update installer location For example: C:\IBM\WebSphere\UpdateInstaller
Administrator ID For example: wsadmin
Administrator password
WebSphere Application Server URL For example: http://was.example.com:9060/ibm/console
WebSphere Application Server secure URL For example: https://was.example.com:9043/ibm/console
WebSphere Application Server host name
HTTP transport port
HTTPS transport port
SOAP connector port
Run application server as a service? (True/False)
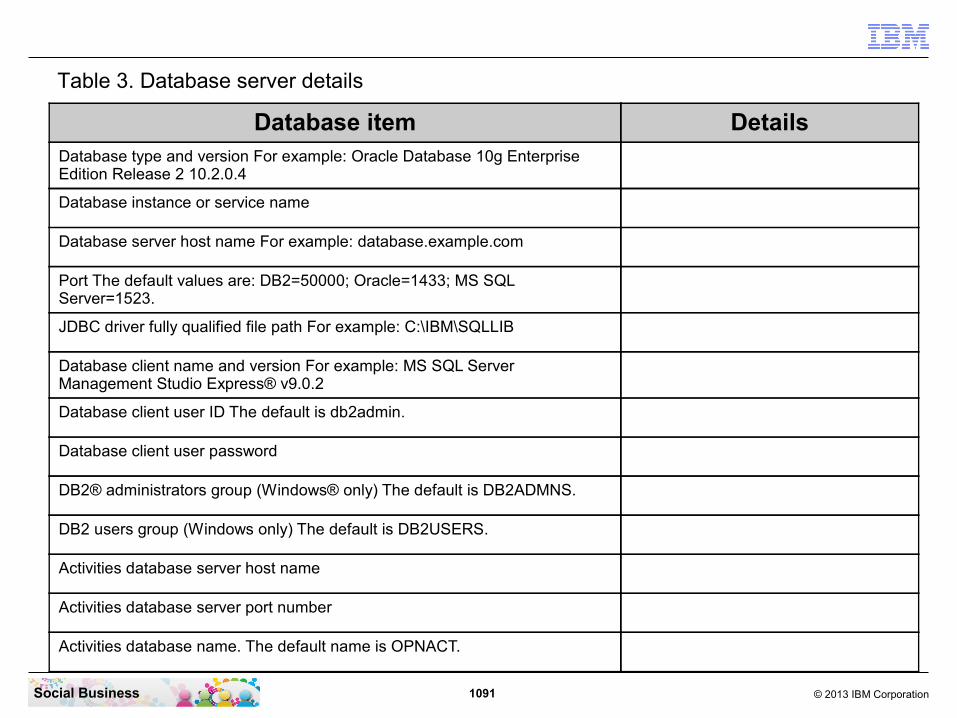
1091 © 2013 IBM CorporationSocial Business
Table 3. Database server details
Database item DetailsDatabase type and version For example: Oracle Database 10g Enterprise Edition Release 2 10.2.0.4
Database instance or service name
Database server host name For example: database.example.com
Port The default values are: DB2=50000; Oracle=1433; MS SQL Server=1523.
JDBC driver fully qualified file path For example: C:\IBM\SQLLIB
Database client name and version For example: MS SQL Server Management Studio Express® v9.0.2
Database client user ID The default is db2admin.
Database client user password
DB2® administrators group (Windows® only) The default is DB2ADMNS.
DB2 users group (Windows only) The default is DB2USERS.
Activities database server host name
Activities database server port number
Activities database name. The default name is OPNACT.

1092 © 2013 IBM CorporationSocial Business
Table 3. Database server details
Database item DetailsActivities database application user ID
Activities database application user password
Blogs database server host name
Blogs database server port number
Blogs database name. The default name is BLOGS.
Blogs database application user ID
Blogs database application user password
Cognos database server host name
Cognos database server port number
Cognos database name. The default name is COGNOS.
Cognos database application user ID
Cognos database application user password
Communities database server host name
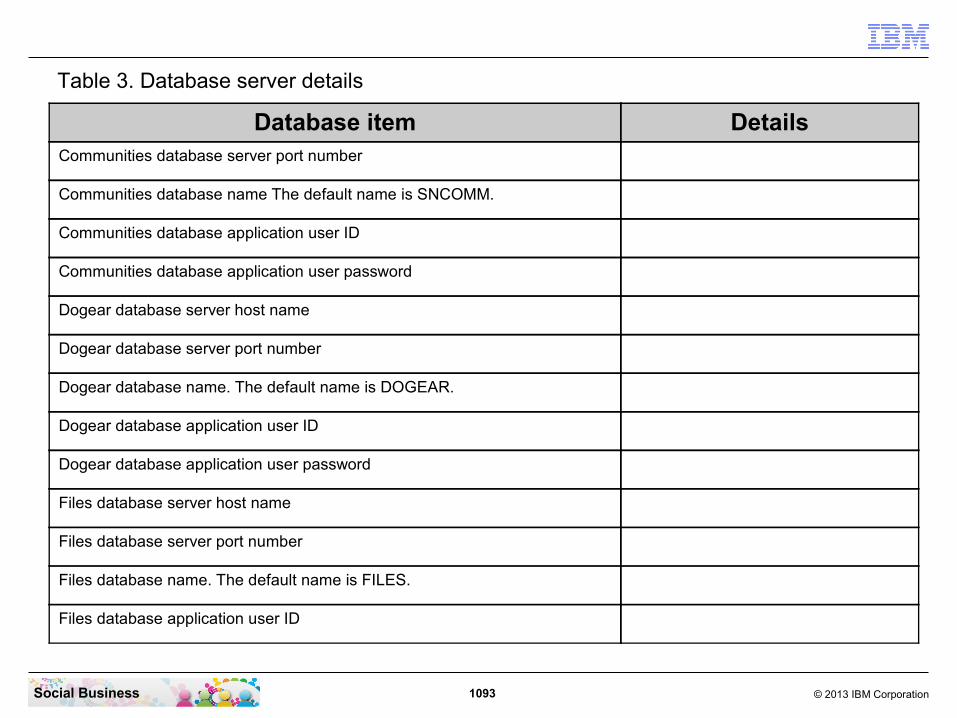
1093 © 2013 IBM CorporationSocial Business
Table 3. Database server details
Database item DetailsCommunities database server port number
Communities database name The default name is SNCOMM.
Communities database application user ID
Communities database application user password
Dogear database server host name
Dogear database server port number
Dogear database name. The default name is DOGEAR.
Dogear database application user ID
Dogear database application user password
Files database server host name
Files database server port number
Files database name. The default name is FILES.
Files database application user ID

1094 © 2013 IBM CorporationSocial Business
Table 3. Database server details
Database item DetailsFiles database application user password
Forums database server host name
Forums database server port number
Forums database name. The default name is FORUM.
Forums database application user ID
Forums database application user password
Home page database server host name
Home page database server port number
Home page database name. The default name is HOMEPAGE.
Home page database application user ID
Home page database application user password
Metrics database server host name
Metrics database server port number
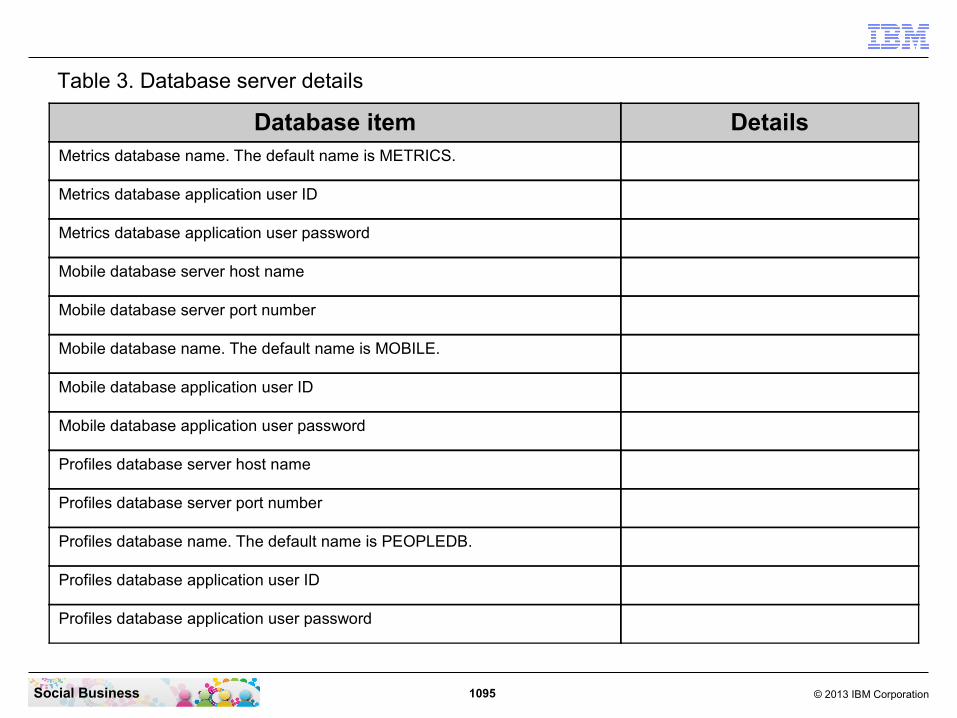
1095 © 2013 IBM CorporationSocial Business
Table 3. Database server details
Database item DetailsMetrics database name. The default name is METRICS.
Metrics database application user ID
Metrics database application user password
Mobile database server host name
Mobile database server port number
Mobile database name. The default name is MOBILE.
Mobile database application user ID
Mobile database application user password
Profiles database server host name
Profiles database server port number
Profiles database name. The default name is PEOPLEDB.
Profiles database application user ID
Profiles database application user password

1096 © 2013 IBM CorporationSocial Business
Table 3. Database server details
Database item DetailsWikis database server host name
Wikis database server port number
Wikis database name. The default name is WIKIS.
Wikis database application user ID
Wikis database application user password

1097 © 2013 IBM CorporationSocial Business
Table 4. Tivoli Directory Integrator details
Tivoli® Directory Integrator item DetailsTivoli Directory Integrator installation location For example: C:\IBM\TDI\
Tivoli Directory Integrator version. For example: 7.1 fix pack 2.
Solutions Directory path For example: C:\IBM\TDISOL\TDI

1098 © 2013 IBM CorporationSocial Business
Table 5. LDAP-Profiles mapping details
Profiles database attribute LDAP attribute (example)
Profiles database column
alternateLastname null PROF_ALTERNATE_LAST_NAME
bldgId null PROF_BUILDING_IDENTIFIER
blogUrl null PROF_BLOG_URL
calendarUrl null PROF_CALENDAR_URL
countryCode c PROF_ISO_COUNTRY_CODE
courtesyTitle null PROF_COURTESY_TITLE
deptNumber null PROF_DEPARTMENT_NUMBER
description description PROF_DESCRIPTION
displayName cn PROF_DISPLAY_NAME
distinguishedName $dn PROF_SOURCE_UID
email mail PROF_MAIL
employeeNumber employeenumber PROF_EMPLOYEE_NUMBER
employeeTypeCode employeetype PROF_EMPLOYEE_TYPE

1099 © 2013 IBM CorporationSocial Business
Table 5. LDAP-Profiles mapping details
Profiles database attribute LDAP attribute (example)
Profiles database column
experience null PROF_EXPERIENCE
faxNumber facsimiletelephonenumber PROF_FAX_TELEPHONE_NUMBER
floor null PROF_FLOOR
freeBusyUrl null PROF_FREEBUSY_URL
givenName givenName PROF_GIVEN_NAME
givenNames givenName
groupwareEmail null PROF_GROUPWARE_EMAIL
guid (Javascript function: {func_map_from_GUID})
PROF_GUID
ipTelephoneNumber null PROF_IP_TELEPHONE_NUMBER
isManager null PROF_IS_MANAGER
jobResp null PROF_JOBRESPONSIBILITIES
loginId employeenumber PROF_LOGIN and PROF_LOGIN_LOWER
logins null PROF_LOGIN

1100 © 2013 IBM CorporationSocial Business
Table 5. LDAP-Profiles mapping details
Profiles database attribute LDAP attribute (example)
Profiles database column
managerUid $manager_uid
Note: This attribute represents a lookup of the UID of a manager using DN in the manager field.
PROF_MANAGER_UID
mobileNumber mobile PROF_MOBILE
nativeFirstName null PROF_NATIVE_FIRST_NAME
nativeLastName null PROF_NATIVE_LAST_NAME
officeName physicaldeliveryofficename PROF_PHYSICAL_DELIVERY_OFFICE
orgId ou PROF_ORGANIZATION_IDENTIFIER
pagerId null PROF_PAGER_ID
pagerNumber null PROF_PAGER
pagerServiceProvider null PROF_PAGER_SERVICE_PROVIDER
pagerType null PROF_PAGER_TYPE

1101 © 2013 IBM CorporationSocial Business
Table 5. LDAP-Profiles mapping details
Profiles database attribute LDAP attribute (example)
Profiles database column
preferredFirstName null PROF_PREFERRED_FIRST_NAME
preferredLanguage preferredlanguage PROF_PREFERRED_LANGUAGE
preferredLastName null PROF_PROF_PREFERRED_LAST_NAM
profileType null PROF_TYPE
secretaryUid $secretaryUid
Note: This attribute represents a lookup of the UID of a secretary using DN in the secretary field.
PROF_SECRETARY_UID
shift null PROF_SHIFT
surname sn PROF_SURNAME
surnames sn PROF_SURNAME
telephoneNumber telephonenumber PROF_TELEPHONE_NUMBER
timezone null PROF_TIMEZONE
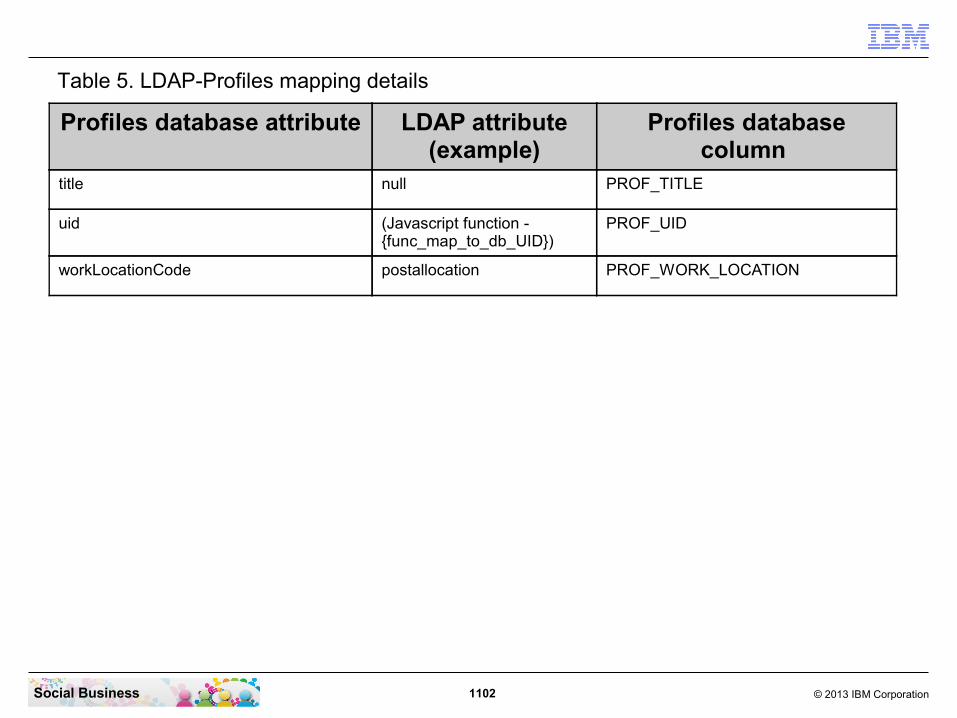
1102 © 2013 IBM CorporationSocial Business
Table 5. LDAP-Profiles mapping details
Profiles database attribute LDAP attribute (example)
Profiles database column
title null PROF_TITLE
uid (Javascript function - {func_map_to_db_UID})
PROF_UID
workLocationCode postallocation PROF_WORK_LOCATION
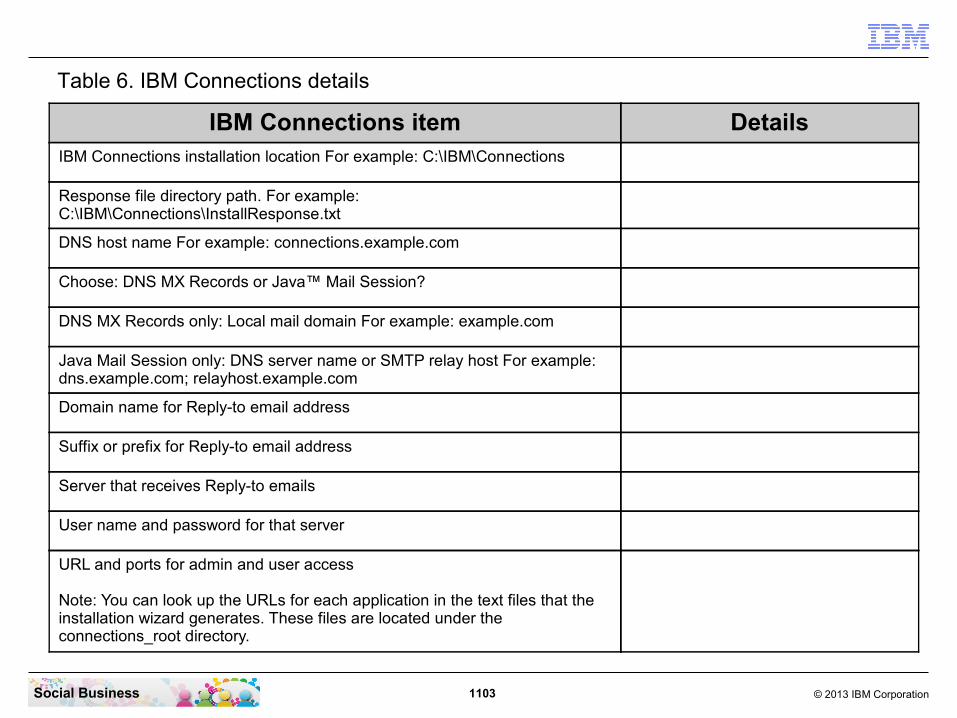
1103 © 2013 IBM CorporationSocial Business
Table 6. IBM Connections details
IBM Connections item DetailsIBM Connections installation location For example: C:\IBM\Connections
Response file directory path. For example: C:\IBM\Connections\InstallResponse.txt
DNS host name For example: connections.example.com
Choose: DNS MX Records or Java™ Mail Session?
DNS MX Records only: Local mail domain For example: example.com
Java Mail Session only: DNS server name or SMTP relay host For example: dns.example.com; relayhost.example.com
Domain name for Reply-to email address
Suffix or prefix for Reply-to email address
Server that receives Reply-to emails
User name and password for that server
URL and ports for admin and user access
Note: You can look up the URLs for each application in the text files that the installation wizard generates. These files are located under the connections_root directory.
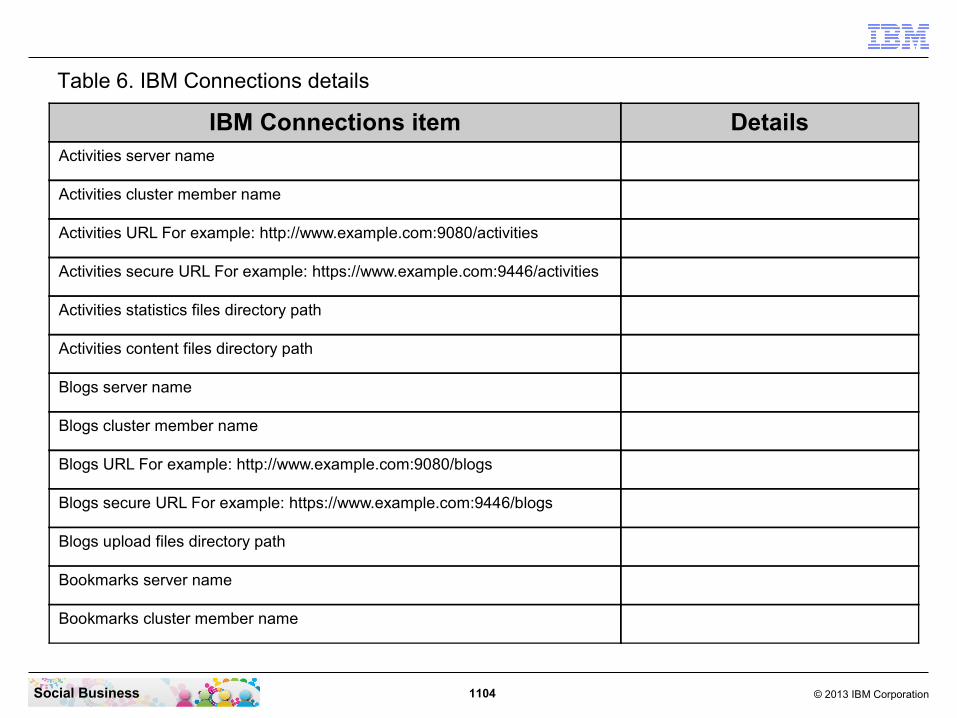
1104 © 2013 IBM CorporationSocial Business
Table 6. IBM Connections details
IBM Connections item DetailsActivities server name
Activities cluster member name
Activities URL For example: http://www.example.com:9080/activities
Activities secure URL For example: https://www.example.com:9446/activities
Activities statistics files directory path
Activities content files directory path
Blogs server name
Blogs cluster member name
Blogs URL For example: http://www.example.com:9080/blogs
Blogs secure URL For example: https://www.example.com:9446/blogs
Blogs upload files directory path
Bookmarks server name
Bookmarks cluster member name
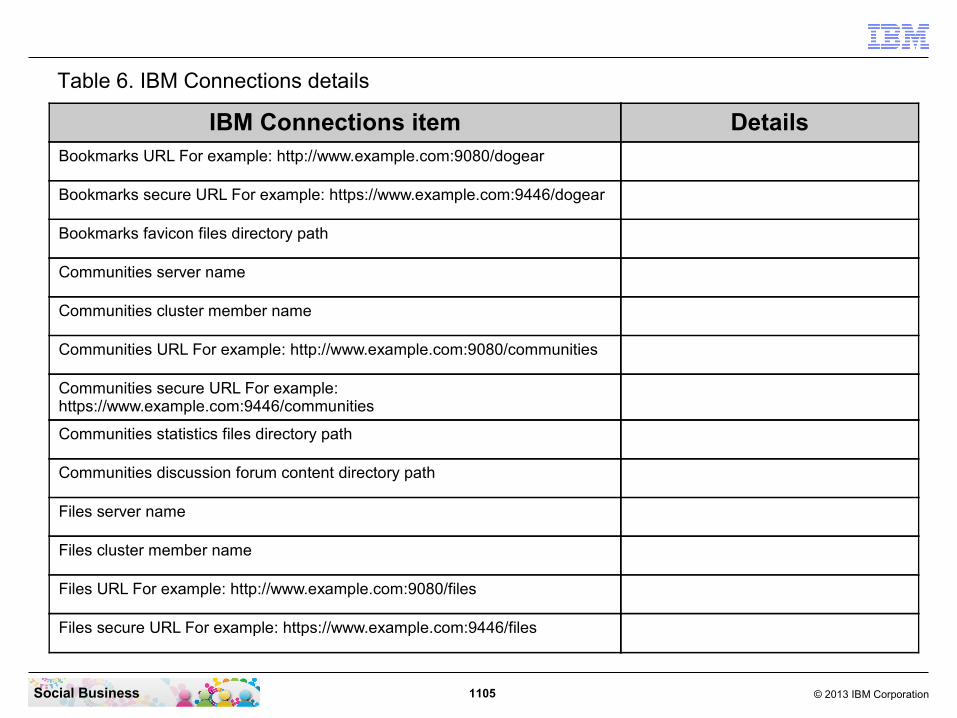
1105 © 2013 IBM CorporationSocial Business
Table 6. IBM Connections details
IBM Connections item DetailsBookmarks URL For example: http://www.example.com:9080/dogear
Bookmarks secure URL For example: https://www.example.com:9446/dogear
Bookmarks favicon files directory path
Communities server name
Communities cluster member name
Communities URL For example: http://www.example.com:9080/communities
Communities secure URL For example: https://www.example.com:9446/communities
Communities statistics files directory path
Communities discussion forum content directory path
Files server name
Files cluster member name
Files URL For example: http://www.example.com:9080/files
Files secure URL For example: https://www.example.com:9446/files

1106 © 2013 IBM CorporationSocial Business
Table 6. IBM Connections details
IBM Connections item DetailsFiles content store directory path
Forums server name
Forums cluster member name
Forums URL For example: http://www.example.com:9080/forums
Forums secure URL For example: https://www.example.com:9446/forums
Forums content store directory path
Home page server name
Home page cluster member name
Home page URL For example: http://www.example.com:9080/homepage
Home page secure URL For example: https://www.example.com:9446/homepage
Home page content store directory path
Metrics server name
Metrics cluster member name

1107 © 2013 IBM CorporationSocial Business
Table 6. IBM Connections details
IBM Connections item DetailsModeration server name
Moderation cluster member name
Moderation URL For example: http://www.example.com:9080/moderation
Moderation secure URL For example: https://www.example.com:9446/moderation
Profiles server name
Profiles cluster member name
Profiles URL For example: http://www.example.com:9080/profiles
Profiles secure URL For example: https://www.example.com:9446/profiles
Profiles statistics files directory path
Profiles cache directory path
Search server name
Search cluster member name
Search dictionary directory path

1108 © 2013 IBM CorporationSocial Business
Table 6. IBM Connections details
IBM Connections item DetailsSearch index directory path
Wikis server name
Wikis cluster member name
Wikis URL For example: http://www.example.com:9080/wikis
Wikis secure URL For example: https://www.example.com:9446/wikis
Wikis content directory path

1109 © 2013 IBM CorporationSocial Business
Table 7. IBM HTTP Server details
IBM HTTP Server item DetailsIBM HTTP Server installation location For example: C:\IBM\HTTPServer\
IBM HTTP Server version For example: V7.0 fix pack 21.
IBM HTTP Server httpd.conf file directory path For example: C:\IBM\HTTPServer\conf\
web server definition name For example: webserver1
web server plugin-cfg.xml file directory path For example: C:\IBM\HTTPServer\Plugins\config\webserver1\
IBM HTTP Server host name
IBM HTTP Server fully qualified host name
IBM HTTP Server IP address
IBM HTTP Server communication port For example: 80
IBM HTTP Server administration port For example: 8008
Run IBM HTTP Server as a service? (Y/N)
Run IBM HTTP administration as a service? (Y/N)

1110 © 2013 IBM CorporationSocial Business
Table 7. IBM HTTP Server details
IBM HTTP Server item DetailsIBM HTTP Server administrator ID
IBM HTTP Server administrator password

1111 © 2013 IBM CorporationSocial Business
Table 8. Cognos BI Server and Transformer details
Cognos BI Server and Transformer item DetailsCognos BI Server and Transformer Refer to the cognos-
setup.properties file. Installation location for BI server, such as:
Windows: C:\IBM\CognosBI
Installation location for Transformer server, such as:
Windows: C:\IBM\CognosTF
Administrator ID
Administrative password
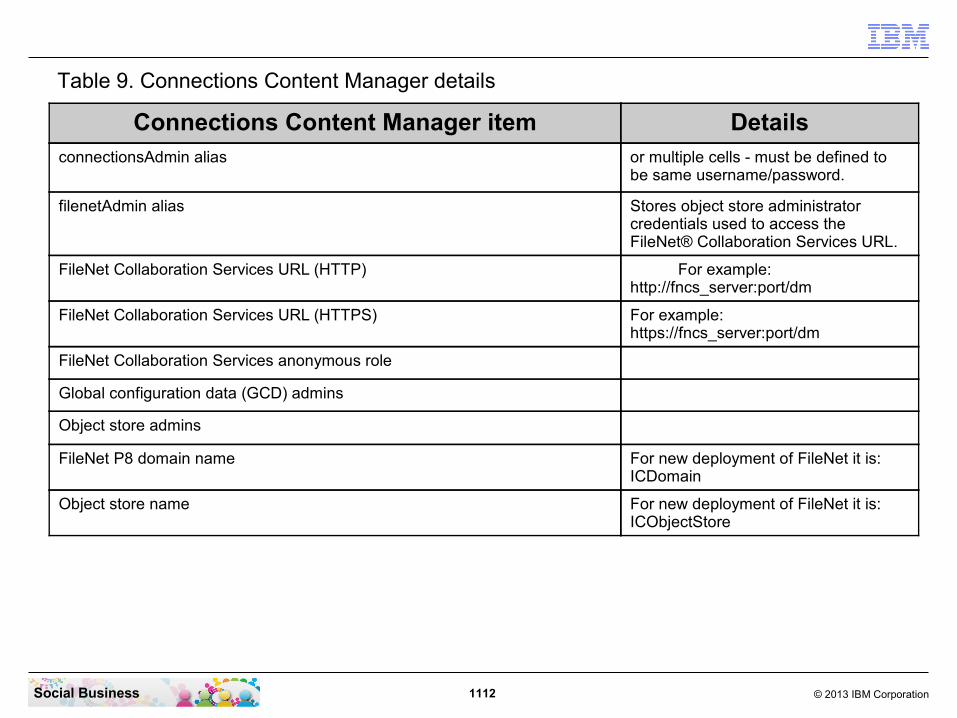
1112 © 2013 IBM CorporationSocial Business
Table 9. Connections Content Manager details
Connections Content Manager item DetailsconnectionsAdmin alias or multiple cells - must be defined to
be same username/password.
filenetAdmin alias Stores object store administrator credentials used to access the FileNet® Collaboration Services URL.
FileNet Collaboration Services URL (HTTP) For example: http://fncs_server:port/dm
FileNet Collaboration Services URL (HTTPS) For example: https://fncs_server:port/dm
FileNet Collaboration Services anonymous role
Global configuration data (GCD) admins
Object store admins
FileNet P8 domain name For new deployment of FileNet it is: ICDomain
Object store name For new deployment of FileNet it is: ICObjectStore
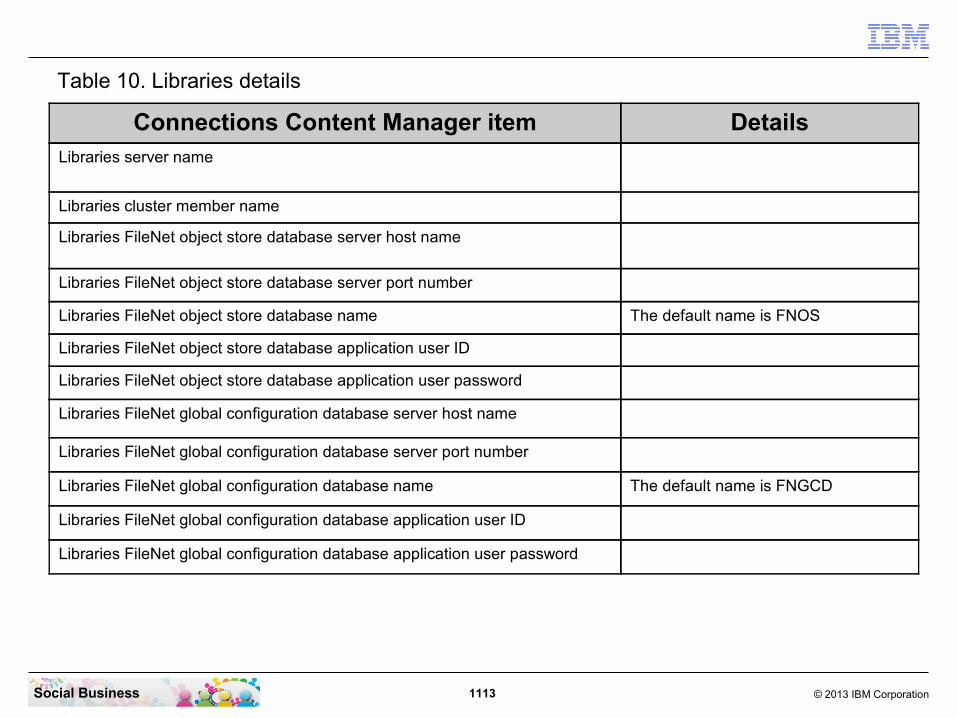
1113 © 2013 IBM CorporationSocial Business
Table 10. Libraries details
Connections Content Manager item DetailsLibraries server name
Libraries cluster member name
Libraries FileNet object store database server host name
Libraries FileNet object store database server port number
Libraries FileNet object store database name The default name is FNOS
Libraries FileNet object store database application user ID
Libraries FileNet object store database application user password
Libraries FileNet global configuration database server host name
Libraries FileNet global configuration database server port number
Libraries FileNet global configuration database name The default name is FNGCD
Libraries FileNet global configuration database application user ID
Libraries FileNet global configuration database application user password

1114 © 2013 IBM CorporationSocial Business
And a special thank you to all those who contributed in various ways to the production of this presentation.
Danke schoen!Thank you!
Merci beaucoup!Grazie!
Muchas gracias!Toa chie!
Domo arigato!Spasibo!
Shukran gazilan!
1115 © 2013 IBM CorporationSocial Business
Legal Disclaimer
© IBM Corporation 2013. All Rights Reserved.
The information contained in this publication is provided for informational purposes only. While efforts were made to verify the completeness and accuracy of the information contained in this publication, it is provided AS IS without warranty of any kind, express or implied. In addition, this information is based on IBM’s current product plans and strategy, which are subject to change by IBM without notice. IBM shall not be responsible for any damages arising out of the use of, or otherwise related to, this publication or any other materials. Nothing contained in this publication is intended to, nor shall have the effect of, creating any warranties or representations from IBM or its suppliers or licensors, or altering the terms and conditions of the applicable license agreement governing the use of IBM software.
References in this presentation to IBM products, programs, or services do not imply that they will be available in all countries in which IBM operates. Product release dates and/or capabilities referenced in this presentation may change at any time at IBM’s sole discretion based on market opportunities or other factors, and are not intended to be a commitment to future product or feature availability in any way. Nothing contained in these materials is intended to, nor shall have the effect of, stating or implying that any activities undertaken by you will result in any specific sales, revenue growth or other results.
Performance is based on measurements and projections using standard IBM benchmarks in a controlled environment. The actual throughput or performance that any user will experience will vary depending upon many factors, including considerations such as the amount of multiprogramming in the user's job stream, the I/O configuration, the storage configuration, and the workload processed. Therefore, no assurance can be given that an individual user will achieve results similar to those stated here.
All customer examples described are presented as illustrations of how those customers have used IBM products and the results they may have achieved. Actual environmental costs and performance characteristics may vary by customer.
IBM, the IBM logo, Lotus, Lotus Notes, Notes, Domino, Quickr, Sametime, WebSphere, UC2, PartnerWorld and Lotusphere are trademarks of International Business Machines Corporation in the United States, other countries, or both. Unyte is a trademark of WebDialogs, Inc., in the United States, other countries, or both.
Adobe, the Adobe logo, PostScript, and the PostScript logo are either registered trademarks or trademarks of Adobe Systems Incorporated in the United States, and/or other countries.
Java and all Java-based trademarks are trademarks of Sun Microsystems, Inc. in the United States, other countries, or both.
Microsoft and Windows are trademarks of Microsoft Corporation in the United States, other countries, or both.
Intel, Intel Centrino, Celeron, Intel Xeon, Intel SpeedStep, Itanium, and Pentium are trademarks or registered trademarks of Intel Corporation or its subsidiaries in the United States and other countries.
UNIX is a registered trademark of The Open Group in the United States and other countries.
Linux is a registered trademark of Linus Torvalds in the United States, other countries, or both.Other company, product, or service names may be trademarks or service marks of others.