ibm dynamic server - oninit.comdynamic server as your database server. check the release notes for...
TRANSCRIPT

DB2® IBM Informix
IBM Informix Dynamic Server Enterprise Replication Guide
Version 10.0
G251-2279-01
���

DB2® IBM Informix
IBM Informix Dynamic Server Enterprise Replication Guide
Version 10.0
G251-2279-01
���

Note:
Before using this information and the product it supports, read the information in “Notices” on page I-1.
Second Edition (December 2005)
This document contains proprietary information of IBM. It is provided under a license agreement and is protected
by copyright law. The information contained in this publication does not include any product warranties, and any
statements provided in this manual should not be interpreted as such.
When you send information to IBM, you grant IBM a nonexclusive right to use or distribute the information in any
way it believes appropriate without incurring any obligation to you.
© Copyright International Business Machines Corporation 1996, 2005. All rights reserved.
US Government Users Restricted Rights – Use, duplication or disclosure restricted by GSA ADP Schedule Contract
with IBM Corp.
Contents
Introduction . . . . . . . . . . . . . . . . . . . . . . . . . . . . . . . . . . ix
In This Introduction . . . . . . . . . . . . . . . . . . . . . . . . . . . . . . . . . ix
About This Manual . . . . . . . . . . . . . . . . . . . . . . . . . . . . . . . . . ix
Types of Users . . . . . . . . . . . . . . . . . . . . . . . . . . . . . . . . . ix
Software Dependencies . . . . . . . . . . . . . . . . . . . . . . . . . . . . . . . x
Assumptions About Your Locale . . . . . . . . . . . . . . . . . . . . . . . . . . . . x
Demonstration Databases . . . . . . . . . . . . . . . . . . . . . . . . . . . . . . x
New Features in Dynamic Server, Version 10.0 . . . . . . . . . . . . . . . . . . . . . . . . xi
Functionality Enhancements . . . . . . . . . . . . . . . . . . . . . . . . . . . . . xi
Command-Line Changes . . . . . . . . . . . . . . . . . . . . . . . . . . . . . . xii
Configuration Parameter Changes . . . . . . . . . . . . . . . . . . . . . . . . . . . xii
Documentation Conventions . . . . . . . . . . . . . . . . . . . . . . . . . . . . . xiii
Typographical Conventions . . . . . . . . . . . . . . . . . . . . . . . . . . . . . xiii
Feature, Product, and Platform Markup . . . . . . . . . . . . . . . . . . . . . . . . . xiii
Syntax Diagrams . . . . . . . . . . . . . . . . . . . . . . . . . . . . . . . . xiv
Example Code Conventions . . . . . . . . . . . . . . . . . . . . . . . . . . . . xvii
Additional Documentation . . . . . . . . . . . . . . . . . . . . . . . . . . . . . xviii
IBM Informix Information Center . . . . . . . . . . . . . . . . . . . . . . . . . . xviii
Installation Guides . . . . . . . . . . . . . . . . . . . . . . . . . . . . . . . xviii
Online Notes . . . . . . . . . . . . . . . . . . . . . . . . . . . . . . . . . xviii
Informix Error Messages . . . . . . . . . . . . . . . . . . . . . . . . . . . . . . xx
Manuals . . . . . . . . . . . . . . . . . . . . . . . . . . . . . . . . . . . xx
Online Help . . . . . . . . . . . . . . . . . . . . . . . . . . . . . . . . . . xxi
Accessibility . . . . . . . . . . . . . . . . . . . . . . . . . . . . . . . . . . . xxi
IBM Informix Dynamic Server Version 10.0 and CSDK Version 2.90 Documentation Set . . . . . . . . . . xxi
Compliance with Industry Standards . . . . . . . . . . . . . . . . . . . . . . . . . . xxiii
IBM Welcomes Your Comments . . . . . . . . . . . . . . . . . . . . . . . . . . . . xxiii
Part 1. Introducing Enterprise Replication
Chapter 1. About IBM Informix Enterprise Replication . . . . . . . . . . . . . . . 1-1
In This Chapter . . . . . . . . . . . . . . . . . . . . . . . . . . . . . . . . . . 1-1
IBM Informix Enterprise Replication . . . . . . . . . . . . . . . . . . . . . . . . . . . 1-1
Asynchronous Data Replication . . . . . . . . . . . . . . . . . . . . . . . . . . . 1-2
Log-Based Data Capture . . . . . . . . . . . . . . . . . . . . . . . . . . . . . . 1-2
High Performance . . . . . . . . . . . . . . . . . . . . . . . . . . . . . . . . 1-3
High Availability . . . . . . . . . . . . . . . . . . . . . . . . . . . . . . . . 1-3
Consistent Information Delivery . . . . . . . . . . . . . . . . . . . . . . . . . . . 1-3
Repair and Initial Data Synchronization . . . . . . . . . . . . . . . . . . . . . . . . . 1-4
Flexible Architecture . . . . . . . . . . . . . . . . . . . . . . . . . . . . . . . 1-4
Centralized Administration . . . . . . . . . . . . . . . . . . . . . . . . . . . . . 1-5
Ease of Implementation . . . . . . . . . . . . . . . . . . . . . . . . . . . . . . 1-5
Network Encryption . . . . . . . . . . . . . . . . . . . . . . . . . . . . . . . 1-6
How Enterprise Replication Replicates Data . . . . . . . . . . . . . . . . . . . . . . . . 1-6
Capturing Transactions . . . . . . . . . . . . . . . . . . . . . . . . . . . . . . 1-6
Evaluating Data for Replication . . . . . . . . . . . . . . . . . . . . . . . . . . . 1-7
Distributing Data . . . . . . . . . . . . . . . . . . . . . . . . . . . . . . . . 1-12
Applying Replicated Data . . . . . . . . . . . . . . . . . . . . . . . . . . . . . 1-12
Chapter 2. Overview of Enterprise Replication Administration . . . . . . . . . . . . 2-1
In This Chapter . . . . . . . . . . . . . . . . . . . . . . . . . . . . . . . . . . 2-1
Overview of Enterprise Replication Administration . . . . . . . . . . . . . . . . . . . . . . 2-1
Enterprise Replication Server Administrator . . . . . . . . . . . . . . . . . . . . . . . . 2-2
Enterprise Replication Terminology . . . . . . . . . . . . . . . . . . . . . . . . . . . 2-2
© Copyright IBM Corp. 1996, 2005 iii
Enterprise Replication Server . . . . . . . . . . . . . . . . . . . . . . . . . . . . 2-3
Replicate . . . . . . . . . . . . . . . . . . . . . . . . . . . . . . . . . . . 2-3
Master Replicate . . . . . . . . . . . . . . . . . . . . . . . . . . . . . . . . 2-3
Shadow Replicate . . . . . . . . . . . . . . . . . . . . . . . . . . . . . . . . 2-3
Participant . . . . . . . . . . . . . . . . . . . . . . . . . . . . . . . . . . 2-3
Replicate Set . . . . . . . . . . . . . . . . . . . . . . . . . . . . . . . . . . 2-4
Template . . . . . . . . . . . . . . . . . . . . . . . . . . . . . . . . . . . 2-4
Global Catalog . . . . . . . . . . . . . . . . . . . . . . . . . . . . . . . . . 2-4
Enterprise Replication Considerations . . . . . . . . . . . . . . . . . . . . . . . . . . 2-5
Operational Considerations . . . . . . . . . . . . . . . . . . . . . . . . . . . . . 2-5
Backup and Restore Considerations . . . . . . . . . . . . . . . . . . . . . . . . . . 2-6
Database and Table Design Considerations . . . . . . . . . . . . . . . . . . . . . . . . 2-6
Transaction Processing Considerations . . . . . . . . . . . . . . . . . . . . . . . . . 2-9
Replication Environment Considerations . . . . . . . . . . . . . . . . . . . . . . . . 2-11
Enterprise Replication Data Types . . . . . . . . . . . . . . . . . . . . . . . . . . 2-12
Part 2. Setting Up and Managing Enterprise Replication
Chapter 3. Selecting the Enterprise Replication System and Network Topology . . . . 3-1
In This Chapter . . . . . . . . . . . . . . . . . . . . . . . . . . . . . . . . . . 3-1
Selecting the Enterprise Replication System . . . . . . . . . . . . . . . . . . . . . . . . 3-1
Primary-Target Replication System . . . . . . . . . . . . . . . . . . . . . . . . . . 3-1
Update-Anywhere Replication System . . . . . . . . . . . . . . . . . . . . . . . . . 3-5
Conflict Resolution . . . . . . . . . . . . . . . . . . . . . . . . . . . . . . . 3-6
Choosing a Replication Network Topology . . . . . . . . . . . . . . . . . . . . . . . . 3-11
Fully Connected Topology . . . . . . . . . . . . . . . . . . . . . . . . . . . . . 3-12
Hierarchical Replication Topologies . . . . . . . . . . . . . . . . . . . . . . . . . . 3-12
Chapter 4. Preparing the Replication Environment . . . . . . . . . . . . . . . . . 4-1
In This Chapter . . . . . . . . . . . . . . . . . . . . . . . . . . . . . . . . . . 4-1
Preparing the Network Environment . . . . . . . . . . . . . . . . . . . . . . . . . . . 4-2
Setting Up the Hosts File . . . . . . . . . . . . . . . . . . . . . . . . . . . . . 4-2
Setting Up the Services File . . . . . . . . . . . . . . . . . . . . . . . . . . . . . 4-2
Setting Up the Trusted Environment . . . . . . . . . . . . . . . . . . . . . . . . . . 4-3
Verifying SQLHOSTS . . . . . . . . . . . . . . . . . . . . . . . . . . . . . . . 4-3
Testing the Network Environment . . . . . . . . . . . . . . . . . . . . . . . . . . 4-6
Preparing the Disk . . . . . . . . . . . . . . . . . . . . . . . . . . . . . . . . . 4-6
Planning for Disk Space Requirements . . . . . . . . . . . . . . . . . . . . . . . . . 4-6
Setting Up Send and Receive Queue Spool Areas . . . . . . . . . . . . . . . . . . . . . 4-8
Setting Up the Grouper Paging File . . . . . . . . . . . . . . . . . . . . . . . . . . 4-12
Creating ATS and RIS Directories . . . . . . . . . . . . . . . . . . . . . . . . . . 4-12
Preparing the Database Server Environment . . . . . . . . . . . . . . . . . . . . . . . . 4-13
Setting Environment Variables . . . . . . . . . . . . . . . . . . . . . . . . . . . 4-13
Setting Configuration Parameters . . . . . . . . . . . . . . . . . . . . . . . . . . 4-13
Preparing Data for Replication . . . . . . . . . . . . . . . . . . . . . . . . . . . . 4-14
Preparing Consistent Data . . . . . . . . . . . . . . . . . . . . . . . . . . . . . 4-14
Blocking Replication . . . . . . . . . . . . . . . . . . . . . . . . . . . . . . . 4-14
Preparing to Replicate User-Defined Types . . . . . . . . . . . . . . . . . . . . . . . 4-16
Preparing to Replicate User-Defined Routines . . . . . . . . . . . . . . . . . . . . . . 4-16
Preparing Tables for Conflict Resolution . . . . . . . . . . . . . . . . . . . . . . . . 4-16
Preparing Logging Databases . . . . . . . . . . . . . . . . . . . . . . . . . . . . 4-17
Loading and Unloading Data . . . . . . . . . . . . . . . . . . . . . . . . . . . . . 4-17
High-Performance Loader . . . . . . . . . . . . . . . . . . . . . . . . . . . . . 4-18
onunload and onload Utilities . . . . . . . . . . . . . . . . . . . . . . . . . . . 4-18
dbexport and dbimport Utilities . . . . . . . . . . . . . . . . . . . . . . . . . . . 4-18
UNLOAD and LOAD Statements . . . . . . . . . . . . . . . . . . . . . . . . . . 4-18
Data Preparation Example . . . . . . . . . . . . . . . . . . . . . . . . . . . . . . 4-19
Using the cdr start replicate Command . . . . . . . . . . . . . . . . . . . . . . . . 4-19
Using LOAD, UNLOAD, and BEGIN WORK WITHOUT REPLICATION . . . . . . . . . . . . . 4-20
iv IBM Informix Dynamic Server Enterprise Replication Guide

Chapter 5. Using High-Availability Data Replication with Enterprise Replication . . . . 5-1
In This Chapter . . . . . . . . . . . . . . . . . . . . . . . . . . . . . . . . . . 5-1
High-Availability Replication System . . . . . . . . . . . . . . . . . . . . . . . . . . 5-1
Using HDR in a Hierarchical Tree Topology . . . . . . . . . . . . . . . . . . . . . . . 5-3
Using HDR in a Forest of Trees Topology . . . . . . . . . . . . . . . . . . . . . . . . 5-3
Preparing HDR Database Servers . . . . . . . . . . . . . . . . . . . . . . . . . . . . 5-4
HDR Requirements . . . . . . . . . . . . . . . . . . . . . . . . . . . . . . . 5-4
Setting Up Database Server Groups . . . . . . . . . . . . . . . . . . . . . . . . . . 5-5
Preparing to Replicate UDTs, UDRs, and DataBlade Modules . . . . . . . . . . . . . . . . . 5-6
Loading and Unloading Data . . . . . . . . . . . . . . . . . . . . . . . . . . . . 5-6
Managing Enterprise Replication with High-Availability Data Replication . . . . . . . . . . . . . . 5-6
Row Data Sbspace Logging . . . . . . . . . . . . . . . . . . . . . . . . . . . . . 5-7
HDR Failure . . . . . . . . . . . . . . . . . . . . . . . . . . . . . . . . . . 5-7
Performance Considerations . . . . . . . . . . . . . . . . . . . . . . . . . . . . 5-8
Chapter 6. Defining Replication Servers, Replicates, Participants, and Replicate Sets 6-1
In This Chapter . . . . . . . . . . . . . . . . . . . . . . . . . . . . . . . . . . 6-1
Initializing Database Servers . . . . . . . . . . . . . . . . . . . . . . . . . . . . . 6-2
Defining Replication Servers . . . . . . . . . . . . . . . . . . . . . . . . . . . . . 6-2
Customizing the Replication Server Definition . . . . . . . . . . . . . . . . . . . . . . 6-3
Defining Replicates . . . . . . . . . . . . . . . . . . . . . . . . . . . . . . . . 6-3
Defining Participants . . . . . . . . . . . . . . . . . . . . . . . . . . . . . . . 6-4
Defining Master Replicates . . . . . . . . . . . . . . . . . . . . . . . . . . . . . 6-5
Defining Shadow Replicates . . . . . . . . . . . . . . . . . . . . . . . . . . . . 6-6
Specifying Conflict Resolution Rules and Scope . . . . . . . . . . . . . . . . . . . . . . 6-7
Specifying Replication Frequency . . . . . . . . . . . . . . . . . . . . . . . . . . . 6-7
Setting Up Error Logging . . . . . . . . . . . . . . . . . . . . . . . . . . . . . 6-8
Replicating Only Changed Columns . . . . . . . . . . . . . . . . . . . . . . . . . . 6-8
Using the IEEE Floating Point or Canonical Format . . . . . . . . . . . . . . . . . . . . . 6-9
Enabling Triggers . . . . . . . . . . . . . . . . . . . . . . . . . . . . . . . . 6-9
Defining Replicate Sets . . . . . . . . . . . . . . . . . . . . . . . . . . . . . . . 6-10
Exclusive Replicate Sets . . . . . . . . . . . . . . . . . . . . . . . . . . . . . . 6-10
Non-Exclusive Replicate Sets . . . . . . . . . . . . . . . . . . . . . . . . . . . . 6-10
Customizing the Replicate Set Definition . . . . . . . . . . . . . . . . . . . . . . . . 6-11
Initially Synchronizing Data Among Database Servers . . . . . . . . . . . . . . . . . . . . 6-11
Using Templates to Set Up Replication . . . . . . . . . . . . . . . . . . . . . . . . . . 6-12
Defining Templates . . . . . . . . . . . . . . . . . . . . . . . . . . . . . . . 6-13
Realizing Templates . . . . . . . . . . . . . . . . . . . . . . . . . . . . . . . 6-13
Chapter 7. Managing Replication Servers and Replicates . . . . . . . . . . . . . . 7-1
In This Chapter . . . . . . . . . . . . . . . . . . . . . . . . . . . . . . . . . . 7-2
Managing Replication Servers . . . . . . . . . . . . . . . . . . . . . . . . . . . . . 7-2
Modifying Replication Servers . . . . . . . . . . . . . . . . . . . . . . . . . . . . 7-2
Viewing Replication Server Attributes . . . . . . . . . . . . . . . . . . . . . . . . . 7-2
Connecting to Another Replication Server . . . . . . . . . . . . . . . . . . . . . . . . 7-2
Stopping Replication on a Server . . . . . . . . . . . . . . . . . . . . . . . . . . . 7-2
Restarting Replication on a Stopped Server . . . . . . . . . . . . . . . . . . . . . . . 7-3
Suspending Replication for a Server . . . . . . . . . . . . . . . . . . . . . . . . . . 7-3
Resuming a Suspended Replication Server . . . . . . . . . . . . . . . . . . . . . . . . 7-4
Deleting a Replication Server . . . . . . . . . . . . . . . . . . . . . . . . . . . . 7-4
Managing Replicates . . . . . . . . . . . . . . . . . . . . . . . . . . . . . . . . 7-4
Modifying Replicates . . . . . . . . . . . . . . . . . . . . . . . . . . . . . . . 7-5
Viewing Replicate Properties . . . . . . . . . . . . . . . . . . . . . . . . . . . . 7-5
Starting a Replicate . . . . . . . . . . . . . . . . . . . . . . . . . . . . . . . 7-6
Stopping a Replicate . . . . . . . . . . . . . . . . . . . . . . . . . . . . . . . 7-6
Suspending a Replicate . . . . . . . . . . . . . . . . . . . . . . . . . . . . . . 7-7
Resuming a Suspended Replicate . . . . . . . . . . . . . . . . . . . . . . . . . . . 7-7
Deleting a Replicate . . . . . . . . . . . . . . . . . . . . . . . . . . . . . . . 7-7
Managing Replicate Sets . . . . . . . . . . . . . . . . . . . . . . . . . . . . . . . 7-8
Modifying Replicate Sets . . . . . . . . . . . . . . . . . . . . . . . . . . . . . . 7-8
Contents v

Viewing Replicate Sets . . . . . . . . . . . . . . . . . . . . . . . . . . . . . . 7-9
Starting a Replicate Set . . . . . . . . . . . . . . . . . . . . . . . . . . . . . . 7-9
Stopping a Replicate Set . . . . . . . . . . . . . . . . . . . . . . . . . . . . . . 7-9
Suspending a Replicate Set . . . . . . . . . . . . . . . . . . . . . . . . . . . . 7-10
Resuming a Replicate Set . . . . . . . . . . . . . . . . . . . . . . . . . . . . . 7-10
Deleting a Replicate Set . . . . . . . . . . . . . . . . . . . . . . . . . . . . . . 7-10
Managing Templates . . . . . . . . . . . . . . . . . . . . . . . . . . . . . . . . 7-10
Viewing Template Definitions . . . . . . . . . . . . . . . . . . . . . . . . . . . . 7-11
Deleting Templates . . . . . . . . . . . . . . . . . . . . . . . . . . . . . . . 7-11
Managing Replication Server Network Connections . . . . . . . . . . . . . . . . . . . . . 7-11
Viewing Network Connection Status . . . . . . . . . . . . . . . . . . . . . . . . . 7-11
Dropping the Network Connection . . . . . . . . . . . . . . . . . . . . . . . . . . 7-11
Reestablishing the Network Connection . . . . . . . . . . . . . . . . . . . . . . . . 7-11
Resynchronizing Data Among Replication Servers . . . . . . . . . . . . . . . . . . . . . . 7-11
Performing Direct Synchronization . . . . . . . . . . . . . . . . . . . . . . . . . . 7-12
Checking Consistency and Repairing Inconsistent Rows . . . . . . . . . . . . . . . . . . . 7-13
Performing a Repair Job . . . . . . . . . . . . . . . . . . . . . . . . . . . . . 7-14
Repairing Failed Transactions with ATS and RIS Files . . . . . . . . . . . . . . . . . . . . 7-15
Resynchronizing Data Manually . . . . . . . . . . . . . . . . . . . . . . . . . . . 7-16
Performing Alter Operations on Replicated Tables . . . . . . . . . . . . . . . . . . . . . . 7-16
Adding a Replicated Column . . . . . . . . . . . . . . . . . . . . . . . . . . . . 7-17
Dropping a Replicated Column . . . . . . . . . . . . . . . . . . . . . . . . . . . 7-18
Modifying a Replicated Column . . . . . . . . . . . . . . . . . . . . . . . . . . . 7-18
Attaching a New Fragment to a Replicated Table . . . . . . . . . . . . . . . . . . . . . 7-19
Remastering a Replicate . . . . . . . . . . . . . . . . . . . . . . . . . . . . . 7-20
Chapter 8. Monitoring and Troubleshooting Enterprise Replication . . . . . . . . . 8-1
In This Chapter . . . . . . . . . . . . . . . . . . . . . . . . . . . . . . . . . . 8-1
Aborted Transaction Spooling Files . . . . . . . . . . . . . . . . . . . . . . . . . . . 8-2
Preparing to Use ATS . . . . . . . . . . . . . . . . . . . . . . . . . . . . . . . 8-2
About ATS Filenames . . . . . . . . . . . . . . . . . . . . . . . . . . . . . . . 8-2
About ATS File Information . . . . . . . . . . . . . . . . . . . . . . . . . . . . . 8-3
BYTE and TEXT Information in ATS Files . . . . . . . . . . . . . . . . . . . . . . . . 8-3
Changed Column Information in ATS Files . . . . . . . . . . . . . . . . . . . . . . . 8-4
BLOB and CLOB Information in ATS Files . . . . . . . . . . . . . . . . . . . . . . . . 8-4
UDT Information in ATS Files . . . . . . . . . . . . . . . . . . . . . . . . . . . . 8-4
Suppressing Datasync Errors and Warnings in ATS Files . . . . . . . . . . . . . . . . . . . 8-4
Row Information Spooling Files . . . . . . . . . . . . . . . . . . . . . . . . . . . . 8-5
Preparing to Use RIS . . . . . . . . . . . . . . . . . . . . . . . . . . . . . . . 8-5
About RIS Filenames . . . . . . . . . . . . . . . . . . . . . . . . . . . . . . . 8-5
BYTE and TEXT Information in RIS Files . . . . . . . . . . . . . . . . . . . . . . . . 8-6
Changed Column Information in RIS Files . . . . . . . . . . . . . . . . . . . . . . . . 8-6
BLOB and CLOB Information in RIS Files . . . . . . . . . . . . . . . . . . . . . . . . 8-6
UDT Information in RIS Files . . . . . . . . . . . . . . . . . . . . . . . . . . . . 8-6
Suppressing Datasync Errors and Warnings in RIS Files . . . . . . . . . . . . . . . . . . . 8-7
Preventing Memory Queues from Overflowing . . . . . . . . . . . . . . . . . . . . . . . 8-7
Preventing DDRBLOCK Mode . . . . . . . . . . . . . . . . . . . . . . . . . . . . 8-8
Monitoring Disk Usage for Send and Receive Queue Spool . . . . . . . . . . . . . . . . . . 8-9
Increasing the Sizes of Storage Spaces . . . . . . . . . . . . . . . . . . . . . . . . . 8-9
Recovering when Storage Spaces Fill . . . . . . . . . . . . . . . . . . . . . . . . . 8-10
Solving Common Configuration Problems . . . . . . . . . . . . . . . . . . . . . . . . 8-10
Troubleshooting Tips for Alter Operations . . . . . . . . . . . . . . . . . . . . . . . . 8-11
Enterprise Replication Event Alarms . . . . . . . . . . . . . . . . . . . . . . . . . . 8-14
Part 3. Appendixes
Appendix A. Command-Line Utility Reference . . . . . . . . . . . . . . . . . . A-1
Appendix B. Configuration Parameter and Environment Variable Reference . . . . . B-1
vi IBM Informix Dynamic Server Enterprise Replication Guide
444444444444
Appendix C. onstat Command Reference . . . . . . . . . . . . . . . . . . . . C-1
Appendix D. SMI Table Reference . . . . . . . . . . . . . . . . . . . . . . . . D-1
Appendix E. Replication Examples . . . . . . . . . . . . . . . . . . . . . . . E-1
Appendix F. SQLHOSTS Registry Key (Windows) . . . . . . . . . . . . . . . . . F-1
Appendix G. Datasync Warning and Error Messages . . . . . . . . . . . . . . . G-1
Appendix H. Accessibility . . . . . . . . . . . . . . . . . . . . . . . . . . . H-1
Notices . . . . . . . . . . . . . . . . . . . . . . . . . . . . . . . . . . . I-1
Index . . . . . . . . . . . . . . . . . . . . . . . . . . . . . . . . . . . . X-1
Contents vii

viii IBM Informix Dynamic Server Enterprise Replication Guide

Introduction
In This Introduction . . . . . . . . . . . . . . . . . . . . . . . . . . . . . . . . . ix
About This Manual . . . . . . . . . . . . . . . . . . . . . . . . . . . . . . . . . ix
Types of Users . . . . . . . . . . . . . . . . . . . . . . . . . . . . . . . . . ix
Software Dependencies . . . . . . . . . . . . . . . . . . . . . . . . . . . . . . . x
Assumptions About Your Locale . . . . . . . . . . . . . . . . . . . . . . . . . . . . x
Demonstration Databases . . . . . . . . . . . . . . . . . . . . . . . . . . . . . . x
New Features in Dynamic Server, Version 10.0 . . . . . . . . . . . . . . . . . . . . . . . . xi
Functionality Enhancements . . . . . . . . . . . . . . . . . . . . . . . . . . . . . xi
Command-Line Changes . . . . . . . . . . . . . . . . . . . . . . . . . . . . . . xii
Configuration Parameter Changes . . . . . . . . . . . . . . . . . . . . . . . . . . . xii
Documentation Conventions . . . . . . . . . . . . . . . . . . . . . . . . . . . . . xiii
Typographical Conventions . . . . . . . . . . . . . . . . . . . . . . . . . . . . . xiii
Feature, Product, and Platform Markup . . . . . . . . . . . . . . . . . . . . . . . . . xiii
Syntax Diagrams . . . . . . . . . . . . . . . . . . . . . . . . . . . . . . . . xiv
How to Read a Command-Line Syntax Diagram . . . . . . . . . . . . . . . . . . . . . xv
Keywords and Punctuation . . . . . . . . . . . . . . . . . . . . . . . . . . . . xvi
Identifiers and Names . . . . . . . . . . . . . . . . . . . . . . . . . . . . . xvii
Example Code Conventions . . . . . . . . . . . . . . . . . . . . . . . . . . . . xvii
Additional Documentation . . . . . . . . . . . . . . . . . . . . . . . . . . . . . xviii
IBM Informix Information Center . . . . . . . . . . . . . . . . . . . . . . . . . . xviii
Installation Guides . . . . . . . . . . . . . . . . . . . . . . . . . . . . . . . xviii
Online Notes . . . . . . . . . . . . . . . . . . . . . . . . . . . . . . . . . xviii
Locating Online Notes . . . . . . . . . . . . . . . . . . . . . . . . . . . . . xix
Online Notes Filenames . . . . . . . . . . . . . . . . . . . . . . . . . . . . . xx
Informix Error Messages . . . . . . . . . . . . . . . . . . . . . . . . . . . . . . xx
Manuals . . . . . . . . . . . . . . . . . . . . . . . . . . . . . . . . . . . xx
Online Manuals . . . . . . . . . . . . . . . . . . . . . . . . . . . . . . . . xx
Printed Manuals . . . . . . . . . . . . . . . . . . . . . . . . . . . . . . . xxi
Online Help . . . . . . . . . . . . . . . . . . . . . . . . . . . . . . . . . . xxi
Accessibility . . . . . . . . . . . . . . . . . . . . . . . . . . . . . . . . . . . xxi
IBM Informix Dynamic Server Version 10.0 and CSDK Version 2.90 Documentation Set . . . . . . . . . . xxi
Compliance with Industry Standards . . . . . . . . . . . . . . . . . . . . . . . . . . xxiii
IBM Welcomes Your Comments . . . . . . . . . . . . . . . . . . . . . . . . . . . . xxiii
In This Introduction
This introduction provides an overview of the information in this manual and
describes the conventions it uses.
About This Manual
This manual describes IBM Informix Enterprise Replication and the concepts of
data replication. This manual explains how to design your replication system, as
well as administer and manage data replication throughout your enterprise.
This section discusses the intended audience and the associated software products
that you must have to use Enterprise Replication.
Types of Users
This manual is for database server administrators and assumes that you have the
following background:
v A working knowledge of your computer, your operating system, and the utilities
that your operating system provides
© Copyright IBM Corp. 1996, 2005 ix

v Some experience working with relational databases or exposure to database
concepts
v Some experience with database server administration, operating- system
administration, and network administration
If you have limited experience with relational databases, SQL, or your operating
system, refer to your IBM Informix Getting Started Guide for a list of supplementary
titles.
Software Dependencies
To use Enterprise Replication, you must use IBM Informix Dynamic Server as your
database server. Check the release notes for specific version compatibility.
This manual assumes that you are using Dynamic Server, Version 10.0, as your
database server.
Assumptions About Your Locale
IBM Informix products can support many languages, cultures, and code sets. All
the information related to character set, collation and representation of numeric
data, currency, date, and time is brought together in a single environment, called a
GLS (Global Language Support) locale.
The examples in this manual are written with the assumption that you are using
the default locale, en_us.8859-1. This locale supports U.S. English format
conventions for date, time, and currency. In addition, this locale supports the ISO
8859-1 code set, which includes the ASCII code set plus many 8-bit characters such
as é, è, and ñ.
If you plan to use nondefault characters in your data or your SQL identifiers, or if
you want to conform to the nondefault collation rules of character data, you need
to specify the appropriate nondefault locale.
For instructions on how to specify a nondefault locale, additional syntax, and other
considerations related to GLS locales, see the IBM Informix GLS User's Guide.
Demonstration Databases
The DB–Access utility, which is provided with your IBM Informix database server
products, includes one or more of the following demonstration databases:
v The stores_demo database illustrates a relational schema with information about
a fictitious wholesale sporting-goods distributor. Many examples in IBM
Informix manuals are based on the stores_demo database.
v The superstores_demo database illustrates an object-relational schema. The
superstores_demo database contains examples of extended data types, type and
table inheritance, and user-defined routines.
For information about how to create and populate the demonstration databases,
see the IBM Informix DB–Access User's Guide. For descriptions of the databases and
their contents, see the IBM Informix Guide to SQL: Reference.
The scripts that you use to install the demonstration databases reside in the
$INFORMIXDIR/bin directory on UNIX platforms and in the
%INFORMIXDIR%\bin directory in Windows environments.
x IBM Informix Dynamic Server Enterprise Replication Guide

New Features in Dynamic Server, Version 10.0
This section describes new Enterprise Replication features. These features fall into
the following areas:
v Functionality Enhancements
v Command-Line Changes
v Configuration Parameter Changes
For a description of all new features, see the IBM Informix Getting Started Guide.
Functionality Enhancements
Enterprise Replication for Dynamic Server, Version 10.0, includes the following
functionality enhancements:
v Event Alarms
You can use event alarms that are specific to Enterprise Replication to automate
many administrative tasks. See “Enterprise Replication Event Alarms” on page
8-14 for more information.
v Master Replicates
To guarantee consistency between the nodes in your Enterprise Replication
environment, you can create master replicates. See “Defining Master Replicates”
on page 6-5 for more information.
v Templates
Enterprise Replication provides templates to allow easy set up and deployment
of replication for clients with large numbers of tables to replicate. See “Using
Templates to Set Up Replication” on page 6-12 for more information.
v Alter Support
You can alter a replicated table’s schema or its fragmentation strategy without
stopping replication. See “Performing Alter Operations on Replicated Tables” on
page 7-16 for more information.
v Repair and Consistency Checking
If replication has failed for some reason and data is inconsistent, you can
synchronize your tables while replication is still active. You can also check the
consistency of the replicate and optionally repair any inconsistent rows.
See “Resynchronizing Data Among Replication Servers” on page 7-11 for more
information.
v Initial Data Synchronization
You can perform an initial synchronization when you start a replicate or
replicate set to synchronize a new replicate, or add a new participant to an
existing replicate.
See “Initially Synchronizing Data Among Database Servers” on page 6-11 for
more information.
v Repair using ATS and RIS files
You can also repair data after replication has failed by using ATS and RIS files.
Enterprise Replication examines the specified ATS or RIS file and attempts to
reconcile the rows that failed to be applied. This method is fast, but does not
allow you as much flexibility in defining how the repair should be done. See
“Repairing Failed Transactions with ATS and RIS Files” on page 7-15 for more
information.
v Shadow Replicates
Introduction xi
4
444
44
Enterprise Replication uses shadow replicates to manage alter and repair
operations on replicated tables. If you perform manual remastering of a replicate
that was defined with the -n option, you must create a shadow replicate. See
“Defining Shadow Replicates” on page 6-6 for more information.
Command-Line Changes
This release includes the following new commands for the command-line interface:
v The cdr define template and cdr realize template commands to define and
implement replication using a template. The cdr list template and cdr delete
template commands to view and clean up templates.
v The cdr define repair and cdr start repair commands to create and run a repair
job to resynchronize your replicated data. The cdr stop repair command to halt
a running repair job. The cdr list repair and cdr delete repair commands to
view and clean up repair jobs.
v The cdr repair command to make repairs using ATS or RIS files.
v The cdr remaster command to redefine a master replicate, and the cdr swap
shadow command to switch a replicate with its shadow replicate during manual
remastering.
v The cdr alter command to place tables in alter mode.
v The cdr cleanstart command to start an Enterprise Replication server with
empty queues.
v The cdr stats rqm and cdr stats recv commands to view statistics about
replication.
v The cdr check replicate and cdr check replicateset commands to check
consistency within replicates and optionally repair inconsistent rows.
v The cdr sync replicate and cdr sync replicateset command to perform direct
synchronization between a reference server and one or more target servers.
This release includes the following new options for commands in the
command-line interface:
v The options --syncdatasource and --extratargetrows for the command. These
options allow you to perform an initial synchronization of data when you start a
new replicate, or when you add a new participant to an existing replicate.
v The master replicate options --master, --empty, --name, --verify, and --autocreate
for the cdr define replicate command.
v The shadow replicate option --mirrors for the cdr define replicate command.
v A brief option for the cdr list replicate command to display a summary of
participants for all replicates.
For more information on these commands and their options, see Appendix A,
“Command-Line Utility Reference,” on page A-1.
Configuration Parameter Changes
This release includes the following new configuration parameters:
v ENCRYPT_SWITCH to define the frequency at which ciphers and secret keys are
renegotiated (The cipher is the encryption methodology. The secret key is the
key used to build the encrypted data using the cipher.)
v CDR_SUPPRESS_ATSRISWARN to prevent certain Datasync errors and
warnings from appearing in ATS files.
xii IBM Informix Dynamic Server Enterprise Replication Guide
33
44
44

For more information, see Appendix B, “Configuration Parameter and Environment
Variable Reference,” on page B-1.
Documentation Conventions
This section describes the conventions that this manual uses. These conventions
make it easier to gather information from this and other volumes in the
documentation set.
The following conventions are discussed:
v Typographical conventions
v Other conventions
v Syntax diagrams
v Command-line conventions
v Example code conventions
Typographical Conventions
This manual uses the following conventions to introduce new terms, illustrate
screen displays, describe command syntax, and so forth.
Convention Meaning
KEYWORD Keywords of SQL, SPL, and some other programming languages appear
in uppercase letters in a serif font.
italics Within text, new terms and emphasized words appear in italics. Within
syntax and code examples, variable values that you are to specify
appear in italics.
boldface Names of program entities (such as classes, events, and tables),
environment variables, file and pathnames, and interface elements (such
as icons, menu items, and buttons) appear in boldface.
monospace Information that the product displays and information that you enter
appear in a monospace typeface.
KEYSTROKE Keys that you are to press appear in uppercase letters in a sans serif
font.
> This symbol indicates a menu item. For example, “Choose Tools >
Options” means choose the Options item from the Tools menu.
Tip: When you are instructed to “enter” characters or to “execute” a command,
immediately press RETURN after the entry. When you are instructed to “type”
the text or to “press” other keys, no RETURN is required.
Feature, Product, and Platform Markup
Feature, product, and platform markup identifies paragraphs that contain
feature-specific, product-specific, or platform-specific information. Some examples
Introduction xiii
of this markup follow:
Dynamic Server
Identifies information that is specific to IBM Informix Dynamic Server
End of Dynamic Server
Windows Only
Identifies information that is specific to the Windows environment
End of Windows Only
This markup can apply to one or more paragraphs within a section. When an
entire section applies to a particular product or platform, this is noted as part of
the heading text, for example:
Table Sorting (Linux)
Syntax Diagrams
This guide uses syntax diagrams built with the following components to describe
the syntax for statements and all commands other than system-level commands.
Syntax diagrams depicting SQL and command-line statements have changed in the
following ways:
v The symbols at the beginning and end of statements are double arrows.
v The symbols at the beginning and end of syntax segment diagrams are vertical
lines.
v How many times a loop can be repeated is explained in a diagram footnote,
whose marker appears above the path that is describes.
v Syntax statements that are longer than one line continue on the next line.
v Product or condition-specific paths are explained in diagram footnotes, whose
markers appear above the path that they describe.
v Cross-references to the descriptions of other syntax segments appear as diagram
footnotes, whose markers immediately follow the name of the segment that they
reference.
The following table describes syntax diagram components.
Component represented in PDF Component represented in HTML Meaning
>>---------------------- Statement begins.
-----------------------> Statement continues on next
line.
>----------------------- Statement continues from
previous line.
----------------------->< Statement ends.
--------SELECT---------- Required item.
xiv IBM Informix Dynamic Server Enterprise Replication Guide

Component represented in PDF Component represented in HTML Meaning
--+-----------------+---
’------LOCAL------’
Optional item.
---+-----ALL-------+---
+--DISTINCT-----+
’---UNIQUE------’
Required item with choice.
One and only one item must
be present.
---+------------------+---
+--FOR UPDATE-----+
’--FOR READ ONLY--’
Optional items with choice
are shown below the main
line, one of which you might
specify.
.---NEXT---------.
----+----------------+---
+---PRIOR--------+
’---PREVIOUS-----’
The values below the main
line are optional, one of
which you might specify. If
you do not specify an item,
the value above the line will
be used as the default.
.-------,-----------.
V |
---+-----------------+---
+---index_name---+
’---table_name---’
Optional items. Several items
are allowed; a comma must
precede each repetition.
>>-| Table Reference |->< Reference to a syntax
segment.
Table Reference
|--+-----view--------+--|
+------table------+
’----synonym------’
Syntax segment.
How to Read a Command-Line Syntax Diagram
The following command-line syntax diagram uses some of the elements listed in
the table in the previous section.
Creating a No-Conversion Job
�� onpladm create job job
-p
project -n -d device -D database �
� -t table �
Introduction xv

�
�
(1)
Setting the Run Mode
-S
server
-T
target
��
Notes:
1 See page Z-1
The second line in this diagram has a segment named “Setting the Run Mode,”
which according to the diagram footnote, is on page Z-1. If this was an actual
cross-reference, you would find this segment in on the first page of Appendix Z.
Instead, this segment is shown in the following segment diagram. Notice that the
diagram uses segment start and end components.
Setting the Run Mode:
-f
d
p
a
l
c
u
n
N
To see how to construct a command correctly, start at the top left of the main
diagram. Follow the diagram to the right, including the elements that you want.
The elements in this diagram are case sensitive because the illustrates utility
syntax. Other types of syntax, such as SQL, are not case sensitive.
The Creating a No-Conversion Job diagram illustrates the following steps:
1. Type onpladm create job and then the name of the job.
2. Optionally, type -p and then the name of the project.
3. Type the following required elements:
v -n
v -d and the name of the device
v -D and the name of the database
v -t and the name of the table4. Optionally, you can choose one or more of the following elements and repeat
them an arbitrary number of times:
v -S and the server name
v -T and the target server name
v The run mode. To set the run mode, follow the Setting the Run Mode
segment diagram to type -f, optionally type d, p, or a, and then optionally
type l or u.5. Follow the diagram to the terminator.
Your diagram is complete.
Keywords and Punctuation
Keywords are words reserved for statements and all commands except
system-level commands. When a keyword appears in a syntax diagram, it is
xvi IBM Informix Dynamic Server Enterprise Replication Guide

shown in uppercase letters. When you use a keyword in a command, you can
write it in uppercase or lowercase letters, but you must spell the keyword exactly
as it appears in the syntax diagram.
You must also use any punctuation in your statements and commands exactly as
shown in the syntax diagrams.
Identifiers and Names
Variables serve as placeholders for identifiers and names in the syntax diagrams
and examples. You can replace a variable with an arbitrary name, identifier, or
literal, depending on the context. Variables are also used to represent complex
syntax elements that are expanded in additional syntax diagrams. When a variable
appears in a syntax diagram, an example, or text, it is shown in lowercase italic.
The following syntax diagram uses variables to illustrate the general form of a
simple SELECT statement.
�� SELECT column_name FROM table_name ��
When you write a SELECT statement of this form, you replace the variables
column_name and table_name with the name of a specific column and table.
Example Code Conventions
Examples of SQL code occur throughout this manual. Except as noted, the code is
not specific to any single IBM Informix application development tool.
If only SQL statements are listed in the example, they are not delimited by
semicolons. For instance, you might see the code in the following example:
CONNECT TO stores_demo
...
DELETE FROM customer
WHERE customer_num = 121
...
COMMIT WORK
DISCONNECT CURRENT
To use this SQL code for a specific product, you must apply the syntax rules for
that product. For example, if you are using DB–Access, you must delimit multiple
statements with semicolons. If you are using an SQL API, you must use EXEC SQL
at the start of each statement and a semicolon (or other appropriate delimiter) at
the end of the statement.
Tip: Ellipsis points in a code example indicate that more code would be added in
a full application, but it is not necessary to show it to describe the concept
being discussed.
For detailed directions on using SQL statements for a particular application
development tool or SQL API, see the manual for your product.
Introduction xvii

Additional Documentation
For additional information, refer to the following types of documentation:
v Installation guides
v Online notes
v Informix error messages
v Manuals
v Online help
IBM Informix Information Center
The Informix Dynamic Server Information Center integrates the entire IBM
Informix Dynamic Server 10.0 and IBM Informix Client SDK (CSDK) 2.90
documentation sets in both HTML and PDF formats. The Information Center
provides full text search, a master index, logical categories, easy navigation, and
links to troubleshooting and support files.
The IBM Informix Information Center site is located at
http://publib.boulder.ibm.com/infocenter/ids9help/index.jsp.
Installation Guides
Installation guides are located in the /doc directory of the product CD or in the
/doc directory of the product‘s compressed file if you downloaded it from the IBM
Web site. Alternatively, you can obtain installation guides from the IBM Informix
Online Documentation site at
http://www.ibm.com/software/data/informix/pubs/library/ or the IBM Informix
Information Center at
http://publib.boulder.ibm.com/infocenter/ids9help/index.jsp.
Online Notes
The following sections describe the online files that supplement the information in
this manual. Please examine these files before you begin using your IBM Informix
product. They contain vital information about application and performance issues.
xviii IBM Informix Dynamic Server Enterprise Replication Guide

Online File Description Format
TOC Notes The TOC (Table of Contents) notes file provides
a comprehensive directory of hyperlinks to the
release notes, the fixed and known defects file,
and all the documentation notes files for
individual manual titles.
HTML
Documentation Notes The documentation notes file for each manual
contains important information and corrections
that supplement the information in the manual
or information that was modified since
publication.
HTML, text
Release Notes The release notes file describes feature
differences from earlier versions of IBM
Informix products and how these differences
might affect current products. For some
products, this file also contains information
about any known problems and their
workarounds.
HTML, text
Machine Notes (Non-Windows platforms only) The machine
notes file describes any platform-specific actions
that you must take to configure and use IBM
Informix products on your computer.
text
Fixed and Known
Defects File
This text file lists issues that have been
identified with the current version. It also lists
customer-reported defects that have been fixed
in both the current version and in previous
versions.
text
Locating Online Notes
Online notes are available from the IBM Informix Online Documentation site at
http://www.ibm.com/software/data/informix/pubs/library/ and in the IBM
Informix Information Center at
http://publib.boulder.ibm.com/infocenter/ids9help/index.jsp. Additionally you
can locate these files before or after installation as described below.
Before Installation
All online notes are located in the /doc directory of the product CD. The easiest
way to access the documentation notes, the release notes, and the fixed and known
defects file is through the hyperlinks from the TOC notes file.
The machine notes file and the fixed and known defects file are only provided in
text format.
After Installation
On UNIX platforms in the default locale, the documentation notes, release notes,
and machine notes files appear under the $INFORMIXDIR/release/en_us/0333
directory.
Dynamic Server
On Windows the documentation and release notes files appear in the Informix
folder. To display this folder, choose Start > Programs > IBM product name
version > Documentation Notes or Release Notes from the taskbar.
Introduction xix

Machine notes do not apply to Windows platforms.
End of Dynamic Server
Online Notes Filenames
Online notes have the following file formats:
Online File File Format Examples
TOC Notes prod_os_toc_version.html ids_win_toc_10.0.html
Documentation Notes prod_bookname_docnotes_version.html/txt ids_hpl_docnotes_10.0.html
Release Notes prod_os_relnotes_version.html/txt ids_unix_relnotes_10.0.txt
Machine Notes prod_machine_notes_version.txt ids_machine_notes_10.0.txt
Fixed and Known
Defects File
prod_defects_version.txt
ids_win_fixed_and_known
_defects_version.txt
ids_defects_10.0.txt
client_defects_2.90.txt
ids_win_fixed_and_known
_defects_10.0.txt
Informix Error Messages
This file is a comprehensive index of error messages and their corrective actions for
the Informix products and version numbers.
On UNIX platforms, use the finderr command to read the error messages and their
corrective actions.
Dynamic Server
On Windows, use the Informix Error Messages utility to read error messages and
their corrective actions. To display this utility, choose Start > Programs > IBM
product name version > Informix Error Messages from the taskbar.
End of Dynamic Server
You can also access these files from the IBM Informix Online Documentation site at
http://www.ibm.com/software/data/informix/pubs/library/ or in the IBM
Informix Information Center at
http://publib.boulder.ibm.com/infocenter/ids9help/index.jsp.
Manuals
Online Manuals
A CD that contains your manuals in electronic format is provided with your IBM
Informix products. You can install the documentation or access it directly from the
CD. For information about how to install, read, and print online manuals, see the
installation insert that accompanies your CD. You can also obtain the same online
manuals from the IBM Informix Online Documentation site at
http://www.ibm.com/software/data/informix/pubs/library/ or in the IBM
Informix Information Center at
http://publib.boulder.ibm.com/infocenter/ids9help/index.jsp.
xx IBM Informix Dynamic Server Enterprise Replication Guide
Printed Manuals
To order hardcopy manuals, contact your sales representative or visit the IBM
Publications Center Web site at
http://www.ibm.com/software/howtobuy/data.html.
Online Help
IBM Informix online help, provided with each graphical user interface (GUI),
displays information about those interfaces and the functions that they perform.
Use the help facilities that each GUI provides to display the online help.
Accessibility
IBM is committed to making our documentation accessible to persons with
disabilities. Our books are available in HTML format so that they can be accessed
with assistive technology such as screen reader software. The syntax diagrams in
our manuals are available in dotted decimal format, which is an accessible format
that is available only if you are using a screen reader. For more information about
the dotted decimal format, see the Accessibility appendix.
IBM Informix Dynamic Server Version 10.0 and CSDK Version 2.90
Documentation Set
The following tables list the manuals that are part of the IBM Informix Dynamic
Server, Version 10.0 and the CSDK Version 2.90, documentation set. PDF and
HTML versions of these manuals are available at
http://www.ibm.com/software/data/informix/pubs/library/ or in the IBM
Informix Information Center at
http://publib.boulder.ibm.com/infocenter/ids9help/index.jsp. You can order
hardcopy versions of these manuals from the IBM Publications Center at
http://www.ibm.com/software/howtobuy/data.html.
Table 1. Database Server Manuals
Manual Subject
Administrator’s Guide Understanding, configuring, and administering your database server.
Administrator’s Reference Reference material for Informix Dynamic Server, such as the syntax of database
server utilities onmode and onstat, and descriptions of configuration parameters,
the sysmaster tables, and logical-log records.
Backup and Restore Guide The concepts and methods you need to understand when you use the ON-Bar
and ontape utilities to back up and restore data.
Built-In DataBlade Modules
User’s Guide
Using the following DataBlade modules that are included with Dynamic Server:
v MQ DataBlade module, to allow IBM Informix database applications to
communicate with other MQSeries applications.
v Large Object Locator, a foundation DataBlade module that can be used by other
modules that create or store large-object data.
DB-Access User’s Guide Using the DB-Access utility to access, modify, and retrieve data from Informix
databases.
DataBlade API
Function Reference
The DataBlade API functions and the subset of ESQL/C functions that the
DataBlade API supports. You can use the DataBlade API to develop client LIBMI
applications and C user-defined routines that access data in Informix databases.
DataBlade API
Programmer’s Guide
The DataBlade API, which is the C-language application-programming interface
provided with Dynamic Server. You use the DataBlade API to develop client and
server applications that access data stored in Informix databases.
Introduction xxi
Table 1. Database Server Manuals (continued)
Manual Subject
Database Design and
Implementation Guide
Designing, implementing, and managing your Informix databases.
Enterprise Replication Guide How to design, implement, and manage an Enterprise Replication system to
replicate data between multiple database servers.
Error Messages file Causes and solutions for numbered error messages you might receive when you
work with IBM Informix products.
Getting Started Guide Describes the products bundled with IBM Informix Dynamic Server and
interoperability with other IBM products. Summarizes important features of
Dynamic Server and the new features for each version.
Guide to SQL: Reference Information about Informix databases, data types, system catalog tables,
environment variables, and the stores_demo demonstration database.
Guide to SQL: Syntax Detailed descriptions of the syntax for all Informix SQL and SPL statements.
Guide to SQL: Tutorial A tutorial on SQL, as implemented by Informix products, that describes the basic
ideas and terms that are used when you work with a relational database.
High-Performance Loader
User’s Guide
Accessing and using the High-Performance Loader (HPL), to load and unload
large quantities of data to and from Informix databases.
Installation Guide for
Microsoft Windows
Instructions for installing IBM Informix Dynamic Server on Windows.
Installation Guide for
UNIX and Linux
Instructions for installing IBM Informix Dynamic Server on UNIX and Linux.
J/Foundation Developer’s
Guide
Writing user-defined routines (UDRs) in the Java programming language for
Informix Dynamic Server with J/Foundation.
Migration Guide Conversion to and reversion from the latest versions of Informix database servers.
Migration between different Informix database servers.
Optical Subsystem Guide The Optical Subsystem, a utility that supports the storage of BYTE and TEXT data
on optical disk.
Performance Guide Configuring and operating IBM Informix Dynamic Server to achieve optimum
performance.
R-Tree Index User’s Guide Creating R-tree indexes on appropriate data types, creating new operator classes
that use the R-tree access method, and managing databases that use the R-tree
secondary access method.
SNMP Subagent Guide The IBM Informix subagent that allows a Simple Network Management Protocol
(SNMP) network manager to monitor the status of Informix servers.
Storage Manager
Administrator’s Guide
Informix Storage Manager (ISM), which manages storage devices and media for
your Informix database server.
Trusted Facility Guide The secure-auditing capabilities of Dynamic Server, including the creation and
maintenance of audit logs.
User-Defined Routines and
Data Types Developer’s Guide
How to define new data types and enable user-defined routines (UDRs) to extend
IBM Informix Dynamic Server.
Virtual-Index Interface
Programmer’s Guide
Creating a secondary access method (index) with the Virtual-Index Interface (VII)
to extend the built-in indexing schemes of IBM Informix Dynamic Server.
Typically used with a DataBlade module.
Virtual-Table Interface
Programmer’s Guide
Creating a primary access method with the Virtual-Table Interface (VTI) so that
users have a single SQL interface to Informix tables and to data that does not
conform to the storage scheme of Informix Dynamic Server.
xxii IBM Informix Dynamic Server Enterprise Replication Guide
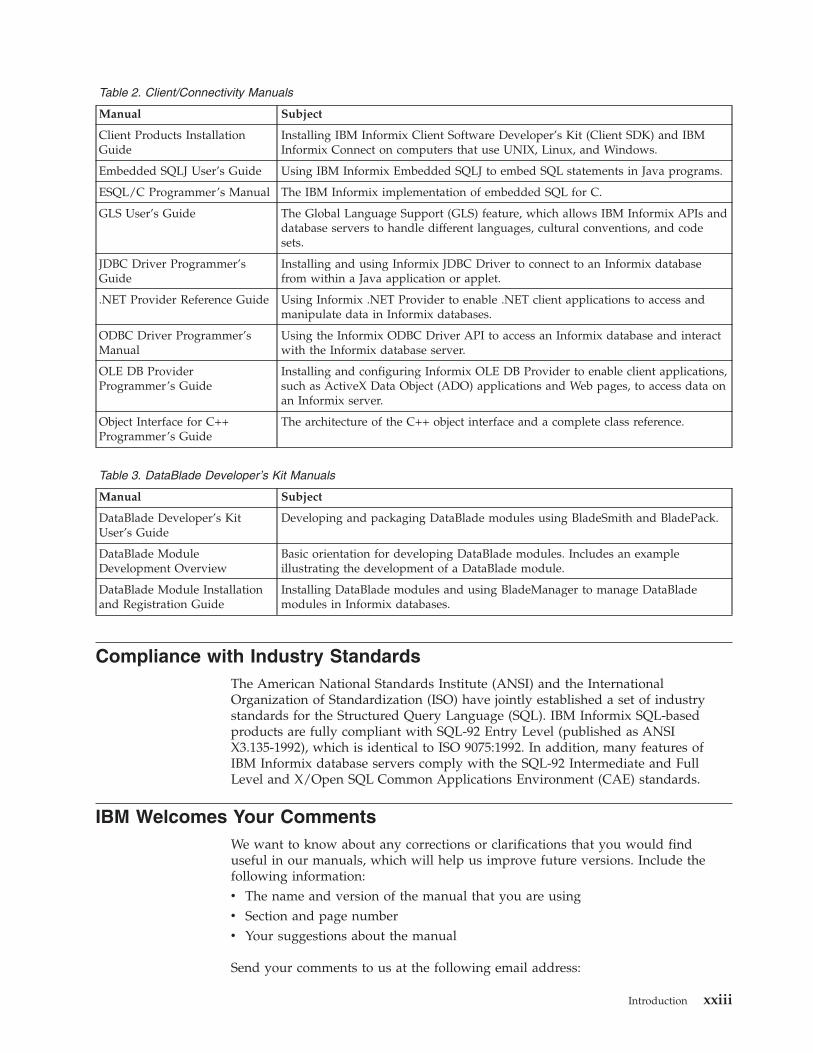
Table 2. Client/Connectivity Manuals
Manual Subject
Client Products Installation
Guide
Installing IBM Informix Client Software Developer’s Kit (Client SDK) and IBM
Informix Connect on computers that use UNIX, Linux, and Windows.
Embedded SQLJ User’s Guide Using IBM Informix Embedded SQLJ to embed SQL statements in Java programs.
ESQL/C Programmer’s Manual The IBM Informix implementation of embedded SQL for C.
GLS User’s Guide The Global Language Support (GLS) feature, which allows IBM Informix APIs and
database servers to handle different languages, cultural conventions, and code
sets.
JDBC Driver Programmer’s
Guide
Installing and using Informix JDBC Driver to connect to an Informix database
from within a Java application or applet.
.NET Provider Reference Guide Using Informix .NET Provider to enable .NET client applications to access and
manipulate data in Informix databases.
ODBC Driver Programmer’s
Manual
Using the Informix ODBC Driver API to access an Informix database and interact
with the Informix database server.
OLE DB Provider
Programmer’s Guide
Installing and configuring Informix OLE DB Provider to enable client applications,
such as ActiveX Data Object (ADO) applications and Web pages, to access data on
an Informix server.
Object Interface for C++
Programmer’s Guide
The architecture of the C++ object interface and a complete class reference.
Table 3. DataBlade Developer’s Kit Manuals
Manual Subject
DataBlade Developer’s Kit
User’s Guide
Developing and packaging DataBlade modules using BladeSmith and BladePack.
DataBlade Module
Development Overview
Basic orientation for developing DataBlade modules. Includes an example
illustrating the development of a DataBlade module.
DataBlade Module Installation
and Registration Guide
Installing DataBlade modules and using BladeManager to manage DataBlade
modules in Informix databases.
Compliance with Industry Standards
The American National Standards Institute (ANSI) and the International
Organization of Standardization (ISO) have jointly established a set of industry
standards for the Structured Query Language (SQL). IBM Informix SQL-based
products are fully compliant with SQL-92 Entry Level (published as ANSI
X3.135-1992), which is identical to ISO 9075:1992. In addition, many features of
IBM Informix database servers comply with the SQL-92 Intermediate and Full
Level and X/Open SQL Common Applications Environment (CAE) standards.
IBM Welcomes Your Comments
We want to know about any corrections or clarifications that you would find
useful in our manuals, which will help us improve future versions. Include the
following information:
v The name and version of the manual that you are using
v Section and page number
v Your suggestions about the manual
Send your comments to us at the following email address:
Introduction xxiii

This email address is reserved for reporting errors and omissions in our
documentation. For immediate help with a technical problem, contact IBM
Technical Support. For instructions, see the IBM Informix Technical Support
website at http://www-306.ibm.com/software/data/informix/support/contact.html.
We appreciate your suggestions.
xxiv IBM Informix Dynamic Server Enterprise Replication Guide

Part 1. Introducing Enterprise Replication
© Copyright IBM Corp. 1996, 2005

IBM Informix Dynamic Server Enterprise Replication Guide
Chapter 1. About IBM Informix Enterprise Replication
In This Chapter . . . . . . . . . . . . . . . . . . . . . . . . . . . . . . . . . . 1-1
IBM Informix Enterprise Replication . . . . . . . . . . . . . . . . . . . . . . . . . . . 1-1
Asynchronous Data Replication . . . . . . . . . . . . . . . . . . . . . . . . . . . 1-2
Log-Based Data Capture . . . . . . . . . . . . . . . . . . . . . . . . . . . . . . 1-2
High Performance . . . . . . . . . . . . . . . . . . . . . . . . . . . . . . . . 1-3
High Availability . . . . . . . . . . . . . . . . . . . . . . . . . . . . . . . . 1-3
Consistent Information Delivery . . . . . . . . . . . . . . . . . . . . . . . . . . . 1-3
Repair and Initial Data Synchronization . . . . . . . . . . . . . . . . . . . . . . . . . 1-4
Flexible Architecture . . . . . . . . . . . . . . . . . . . . . . . . . . . . . . . 1-4
Centralized Administration . . . . . . . . . . . . . . . . . . . . . . . . . . . . . 1-5
Ease of Implementation . . . . . . . . . . . . . . . . . . . . . . . . . . . . . . 1-5
Network Encryption . . . . . . . . . . . . . . . . . . . . . . . . . . . . . . . 1-6
How Enterprise Replication Replicates Data . . . . . . . . . . . . . . . . . . . . . . . . 1-6
Capturing Transactions . . . . . . . . . . . . . . . . . . . . . . . . . . . . . . 1-6
Evaluating Data for Replication . . . . . . . . . . . . . . . . . . . . . . . . . . . 1-7
Row Images . . . . . . . . . . . . . . . . . . . . . . . . . . . . . . . . . 1-7
Evaluating Rows for Updates . . . . . . . . . . . . . . . . . . . . . . . . . . . 1-8
Send Data Queues and Receive Data Queues . . . . . . . . . . . . . . . . . . . . . . 1-9
Data Evaluation Examples . . . . . . . . . . . . . . . . . . . . . . . . . . . . 1-9
Distributing Data . . . . . . . . . . . . . . . . . . . . . . . . . . . . . . . . 1-12
Applying Replicated Data . . . . . . . . . . . . . . . . . . . . . . . . . . . . . 1-12
In This Chapter
Data replication generates and manages multiple copies of data at one or more
sites, which allows an enterprise to share corporate data throughout its
organization.
This chapter introduces IBM Informix Enterprise Replication and explains how this
product replicates data.
IBM Informix Enterprise Replication
IBM Informix Enterprise Replication is an asynchronous, log-based tool for
replicating data between IBM Informix Dynamic Server database servers.
Enterprise Replication on the source server captures transactions to be replicated
by reading the logical log, storing the transactions, and reliably transmitting each
transaction as replication data to the target servers.
At each target server, Enterprise Replication receives and applies each transaction
contained in the replication data to the appropriate databases and tables as a
normal, logged transaction.
IBM Informix Enterprise Replication provides the following features:
v Asynchronous Data Replication
v Log-Based Data Capture
v High Performance
v High Availability
v Consistent Information Delivery
v Repair and Initial Data Synchronization
v Flexible Architecture
© Copyright IBM Corp. 1996, 2005 1-1

v Centralized Administration
v Ease of Implementation
v Network Encryption
Enterprise Replication is supported by IBM Informix Dynamic Server Enterprise
and Workgroup Editions only. Enterprise Replication is not supported by IBM
Informix Dynamic Server Express Edition.
Asynchronous Data Replication
Enterprise Replication uses asynchronous data replication to update the databases
that reside at a replicated site after the primary database has committed a change.
With asynchronous replication, the delay to update the replicated-site databases
can vary depending on the business application and user requirements. However,
the data eventually synchronizes to the same value at all sites. The major benefit of
this type of data replication is that if a particular database server fails, the
replication process can continue and all transactions in the replication system will
be committed.
In contrast to this, synchronous data replication replicates data immediately when
the source data is updated. Synchronous data replication uses the two-phase commit
technology to protect data integrity. In a two-phase commit, a transaction is
applied only if all interconnected distributed sites agree to accept the transaction.
Synchronous data replication is appropriate for applications that require immediate
data synchronization. However, synchronous data replication requires that all
hardware components and networks in the replication system be available at all
times. For more information about synchronous replication, refer to the discussion
of two-phase commit in your IBM Informix Dynamic Server Administrator's Guide.
Asynchronous replication is often preferred because it allows for system and
network failures.
Asynchronous replication allows the following replication models:
v Primary-target (“Primary-Target Replication System” on page 3-1)
All database changes originate at the primary database and are replicated to the
target databases. Changes at the target databases are not replicated to the
primary.
v Update-anywhere (“Update-Anywhere Replication System” on page 3-5)
All databases have read and write capabilities. Updates are applied at all
databases.
The update-anywhere model provides the greater challenge in asynchronous
replication. For example, if a replication system contains three replication sites that
all have read and write capabilities, conflicts occur when the sites try to update the
same data at the same time. Conflicts must be detected and resolved so that the
data elements eventually have the same value at every site. For more information,
see “Conflict Resolution” on page 3-6.
Log-Based Data Capture
Enterprise Replication uses log-based data capture to gather data for replication.
Enterprise Replication reads the logical log to obtain the row images for tables that
participate in replication and then evaluates the row images.
1-2 IBM Informix Dynamic Server Enterprise Replication Guide

Log-based data capture takes changes from the logical log and does not compete
with transactions for access to production tables. Log-based data-capture systems
operate as part of the normal database-logging process and thus add minimal
overhead to the system.
Two other methods of data capture, which Enterprise Replication does not support,
include:
v Trigger-based data capture
A trigger is code in the database that is associated with a piece of data. When
the data changes, the trigger activates the replication process.
v Trigger-based transaction capture
A trigger is associated with a table. Data changes are grouped into transactions
and a single transaction might trigger several replications if it modifies several
tables. The trigger receives the whole transaction, but the procedure that
captures the data runs as a part of the original transaction, thus slowing down
the original transaction.
High Performance
Enterprise Replication provides high performance by not overly burdening the
data source and by using networks and all other resources efficiently.
Because Enterprise Replication captures changes from the logical log instead of
competing with transactions that access production tables, Enterprise Replication
minimizes the effect on transaction performance. Because the capture mechanism is
internal to the database, the database server implements this capture mechanism
efficiently. For more information, see “Log-Based Data Capture” on page 1-2.
All Enterprise Replication operations are performed in parallel, which further
extends the performance of Enterprise Replication.
High Availability
Because Enterprise Replication implements asynchronous data replication, network
and target database server outages are tolerated. In the event of a database server
or network failure, the local database server continues to service local users. The
local database server stores replicated transactions in persistent storage until the
remote server becomes available.
If high availability is critical, you can use High-Availability Data Replication (HDR)
in conjunction with Enterprise Replication. HDR supports synchronous data
replication between two database servers: a primary server, which can participate
in Enterprise Replication, and a secondary server, which is read-only and does not
participate in Enterprise Replication. If a primary server in an HDR pair fails, you
switch the secondary server to the standard server, allowing it to participate in
Enterprise Replication. Client connections to the original primary server can be
automatically switched to the new standard server.
For more information on using HDR with Enterprise Replication, see Chapter 5,
“Using High-Availability Data Replication with Enterprise Replication.”
Consistent Information Delivery
Enterprise Replication protects data integrity. All Enterprise Replication
transactions are stored in a reliable queue to maintain the consistency of
transactions.
Chapter 1. About IBM Informix Enterprise Replication 1-3
Enterprise Replication uses a data-synchronization process to ensure that
transactions are applied at the target database servers in any order equivalent to
the order that they were committed on the source database server. If Enterprise
Replication can preserve the consistency of the database, Enterprise Replication
might commit transactions in a slightly different order on the target database.
If update conflicts occur, Enterprise Replication provides built-in automatic conflict
detection and resolution. You can configure the way conflict resolution behaves to
meet the needs of your enterprise. For more information, see “Conflict Resolution”
on page 3-6.
Repair and Initial Data Synchronization
Enterprise Replication provides an initial synchronization feature that allows you
to easily bring a new table up-to-date with replication when you start a new
replicate, or when you add a new participant to an existing replicate. Initial
synchronization can be run online while replication is active. For more information
about initial synchronization, see “Initially Synchronizing Data Among Database
Servers” on page 6-11.
If replication has failed for some reason, Enterprise Replication allows you to run a
repair job to resynchronize data and correct data mismatches between replicated
tables. Repair jobs can be run online while replication is active. For more
information, see “Resynchronizing Data Among Replication Servers” on page 7-11.
You can also repair data after replication has failed by using ATS and RIS files.
Enterprise Replication examines the specified ATS or RIS file and attempts to
reconcile the rows that failed to be applied. This method is fast, but does not allow
as much flexibility as a repair job allows in defining how the repair should be
done. See “Repairing Failed Transactions with ATS and RIS Files” on page 7-15 for
more information.
Flexible Architecture
Enterprise Replication allows replications based on specific business and
application requirements and does not impose model or methodology restrictions
on the enterprise.
Enterprise Replication supports both primary-target and update-anywhere
replication models. For more information, see “Selecting the Enterprise Replication
System” on page 3-1.
Enterprise Replication supports the following network topologies:
v Fully connected
Continuous connectivity between all participating database servers.
v Hierarchical tree
A parent-child configuration that supports continuous and intermittent
connectivity.
v Forest of trees
Multiple hierarchical trees that connect at the root database servers.
You can add High-Availability Data Replication to any of these topologies. For
more information on topologies, see “Choosing a Replication Network Topology”
on page 3-11.
1-4 IBM Informix Dynamic Server Enterprise Replication Guide

Enterprise Replication supports all built-in Informix data types, as well as
extended and user-defined data types. For more information, see “Enterprise
Replication Data Types” on page 2-12.
Enterprise Replication operates in LAN, WAN, and combined LAN/WAN
configurations across a range of network transport protocols.
Enterprise Replication supports the Global Language Support (GLS) feature, which
allows IBM Informix products to handle different languages, regional conventions,
and code sets. For more information, see “Using GLS with Enterprise Replication”
on page 2-11.
Centralized Administration
Enterprise Replication allows administrators to easily manage all the distributed
components of the replication system from a single point of control.
You can use the command-line utility (CLU) to administer the replication system
from your system command prompt and connect to other servers involved in
replication, as necessary. For information, see Appendix A, “Command-Line Utility
Reference,” on page A-1.
In addition, you can use IBM Informix Server Administrator (ISA) to administer
your replication system from a web browser.
Ease of Implementation
Enterprise Replication provides templates to allow easy set up and deployment of
replication for clients with large numbers of tables to replicate. Administrators of
Enterprise Replication can use templates to develop scripts and with only a few
commands can set up replication over a large number of server nodes. Without
using templates, many individual commands must be run. Using templates, you
can also easily add a new server into your replication environment and optionally
create and populate new database tables.
First, you create a template using the cdr define template command. This defines
the database, tables, and columns and the characteristics of the replicates that will
be created. You can view information about a template by using the cdr list
template command from a non-leaf node.
Second, you instantiate the template on the servers where you want to replicate
this data by running the cdr realize template command. If the table already exists
on a node, Enterprise Replication verifies it matches the template definition. If the
table does not exist on a node, Enterprise Replication can optionally create the
table. Enterprise Replication can also optionally perform an initial data
synchronization on all servers where you realize the template.
You can delete templates that you no longer need using the cdr delete template
command.
See “Using Templates to Set Up Replication” on page 6-12 for more information.
All replication commands mentioned in this section are described in detail in
Appendix A, “Command-Line Utility Reference,” on page A-1.
Chapter 1. About IBM Informix Enterprise Replication 1-5
Network Encryption
Enterprise Replication supports the same network encryption that you can use
with client/server communications to provide complete data encryption with the
OpenSSL library. A message authentication code (MAC) is transmitted as part of
the encrypted data transmission to ensure data integrity. A MAC is an encrypted
message digest. The encryption algorithms use OpenSSL 0.9.6 as the code base.
However, encryption is implemented differently for Enterprise Replication than for
client/server communications:
v Client/server network encryption uses the ENCCSM communications support
module (CSM) that is specified in the SQLHOSTS file.
v Enterprise Replication encryption requires setting encryption configuration
parameters.
Enterprise Replication cannot accept a connection that is configured with a CSM.
To combine client/server network encryption with Enterprise Replication
encryption, configure two network connections for each database server, one with
CSM and one without. For more information, see “Network Encryption and
SQLHOSTS” on page 4-5.
Important: HDR does not support encryption. If you combine Enterprise
Replication with HDR, communication between Enterprise Replication
servers and the HDR primary server can be encrypted, but the
communication between the HDR primary server and the HDR
secondary server cannot be encrypted.
Enterprise Replication encryption configuration parameters are documented in
Appendix B, “Configuration Parameter and Environment Variable Reference,” on
page B-1.
How Enterprise Replication Replicates Data
Before you can replicate data, you must declare a database server for replication
and define the replicates (the data to replicate and the database servers that
participate in replication). To declare a database server for replication, see
“Defining Replication Servers” on page 6-2. To define replicates, see “Defining
Replicates” on page 6-3. Appendix E, “Replication Examples,” on page E-1, has
simple examples of declaring replication servers and defining replicates.
After the servers and replicates are defined, Enterprise Replication uses the
following steps to replicate data:
1. Capturing Transactions
2. Evaluating Data for Replication
3. Distributing Data
4. Applying Replicated Data
Capturing Transactions
As the database server writes rows to the logical log, it marks rows that should be
replicated. Later, Enterprise Replication reads the logical log to obtain the row
images for tables that participate in replication.
Informix database servers manage the logical log in a circular fashion; the most
recent logical-log entries write over the oldest entries. Enterprise Replication must
1-6 IBM Informix Dynamic Server Enterprise Replication Guide

read the logical log quickly enough to prevent new logical-log entries from
overwriting the logs Enterprise Replication has not yet processed. If the database
server comes close to overwriting a logical log that Enterprise Replication has not
yet processed, user transactions are blocked until Enterprise Replication can
advance. (This situation is called DDRBLOCK mode and occurs only if the system is
severely misconfigured.)
The row images that participate in replication are passed to Enterprise Replication
for further evaluation.
Evaluating Data for Replication
Enterprise Replication evaluates transactions based on a change to a final image of
a row.
Row Images
Enterprise Replication evaluates the initial and final images of a row and any
changes that occur between the two row images to determine which rows to
replicate. Each row image contains the data in the row as well as the action
performed on that row.
A row might change more than once in a particular transaction. For example, a
transaction might insert and then update a row prior to committing. Enterprise
Replication evaluates the net effect (final state) of a transaction based on the row
buffers in the log. Enterprise Replication then determines what should replicate,
based on the net effect, the initial state of the row, and whether the replicate
definition (in particular, the WHERE clause) applies to the initial and final state.
Table 1-1 shows the logic that determines which rows are candidates for
replication.
Table 1-1. Enterprise Replication Evaluation Logic
Initial
Image
Replicate
Evaluates Final Image
Replicate
Evaluates
Primary-Key
Changed?
Send to
Destination
Database Server Comments
INSERT T or F DELETE T or F Yes or no Nothing Net change of
transaction results in no
replication
INSERT T or F UPDATE T Yes or no INSERT with final
row image
Inserts final data of
transaction
INSERT T or F UPDATE F Yes or no Nothing Final evaluation
determines no
replication
UPDATE T DELETE T or F Yes or no DELETE with
initial row image
Net result of transaction
is delete
UPDATE F DELETE T or F Yes or no Nothing Net change of
transaction results in no
replication
UPDATE T UPDATE T Yes DELETE with
initial row image
and INSERT with
final row image
Ensures old primary
key does not replicate
UPDATE T UPDATE T No UPDATE with
final row image
Simple update
Chapter 1. About IBM Informix Enterprise Replication 1-7

Table 1-1. Enterprise Replication Evaluation Logic (continued)
Initial
Image
Replicate
Evaluates Final Image
Replicate
Evaluates
Primary-Key
Changed?
Send to
Destination
Database Server Comments
UPDATE T UPDATE F Yes or no DELETE with
initial row image
Row no longer matches
replicate definition
UPDATE F UPDATE T Yes or no INSERT with final
row image
Row now matches
replicate definition
UPDATE F UPDATE F Yes or no Nothing No match exists, and
therefore, no replication
Where:
v Initial image is the before image of the transaction in the logical log.
v The replicate evaluates to T (true) or F (false).
v Final image is the image of the transaction that is replicated.
Table 1-1 on page 1-7 illustrates how Enterprise Replication evaluates the
row-image type (INSERT, UPDATE, DELETE), the results of evaluating the
replicate WHERE clause for both the initial and final image, and whether the
primary key changes as a result of the transaction.
Tip: The evaluation logic in Table 1-1 on page 1-7 assumes that the source and the
destination tables are initially synchronized (identical before replication
begins). If the tables were not synchronized, anomalous behavior could result.
After Enterprise Replication identifies transactions that qualify for replication,
Enterprise Replication transfers the transaction data to a queue.
Evaluating Rows for Updates
Enterprise Replication evaluates rows for primary-key updates, for WHERE-clause
column updates, and for multiple updates to the same row. The following list
describes an occurrence in a transaction and the Enterprise Replication action:
v Primary-key updates
Enterprise Replication translates an update of a primary key into a delete of the
original row and an insert of the row image with the new primary key. If
triggers are enabled on the target system, insert triggers are executed.
v WHERE-clause column updates
If a replicate includes a WHERE clause in its data selection, the WHERE clause
imposes selection criteria for rows in the replicated table.
– If an update changes a row so that it no longer passes the selection criteria on
the source, it is deleted from the target table. Enterprise Replication translates
the update into a delete and sends it to the target.
– If an update changes a row so that it passes the selection criteria on the
source, it is inserted into the target table. Enterprise Replication translates the
update into an insert and sends it to the target.v Multiple-row images in a transaction
Enterprise Replication compresses multiple-row images and only sends the net
change to the target. Because of this, triggers might not execute on the target
database. For more information, see “Triggers” on page 2-8.
1-8 IBM Informix Dynamic Server Enterprise Replication Guide

Enterprise Replication supports the replication of BYTE and TEXT data types
(simple large objects) and BLOB and CLOB data types (smart large objects), and
opaque user-defined data types, as well as all built-in Informix data types.
However, Enterprise Replication implements the replication of these types of data
somewhat differently from the replication of other data types. For more
information, see “Replicating Simple and Smart Large Objects” on page 2-13, and
“Replicating Opaque User-Defined Data Types” on page 2-15.
Send Data Queues and Receive Data Queues
Enterprise Replication uses send and receive queues to receive and deliver
replication data to and from database servers that participate in a replicate:
v Send queue
Enterprise Replication stores replication data in memory to be delivered to target
database servers that participate in a replicate. If the send queue fills, Enterprise
Replication spools the send-queue transaction records to a dbspace and the
send-queue row data to an sbspace.
v Receive queue
Enterprise Replication stores replication data in memory at the target database
server until the target database server acknowledges receipt of the data. If the
receive queue fills as a result of a large transaction, Enterprise Replication spools
the receive queue transaction header and replicate records to a dbspace and the
receive queue row data to an sbspace. For more information, see “Large
Transactions” on page 2-10.
For more information, see “Setting Up Send and Receive Queue Spool Areas” on
page 4-8 and “Preventing Memory Queues from Overflowing” on page 8-7.
The data contains the filtered log records for a single transaction. Enterprise
Replication stores the replication data in a stable (recoverable) send queue on the
source database server. Target sites acknowledge receipt of data when it is applied
to or rejected from the target database.
If a target database server is unreachable, the replication data remains in a stable
queue at the source database server. Temporary failures are common, and no
immediate action is taken by the source database server; it continues to queue
transactions. When the target database server becomes available again, queued
transactions are transmitted and applied (see “Applying Replicated Data” on page
1-12).
If the target database server is unavailable for an extended period, the send queue
on the source database server might consume excessive resources. In this situation,
you might not want to save all transactions for the target database server. To
prevent unlimited transaction accumulation, you can remove the unavailable target
database server from the replicate (see “Managing Replication Servers” on page
7-2). Before the database server that is removed rejoins any replicate, however, you
must synchronize (bring tables to consistency) with the other database servers (see
“Resynchronizing Data Among Replication Servers” on page 7-11).
Data Evaluation Examples
Figure 1-1, Figure 1-2 on page 1-11, and Figure 1-3 on page 1-11 show three
examples of how Enterprise Replication uses logic to evaluate transactions for
potential replication.
Chapter 1. About IBM Informix Enterprise Replication 1-9

Figure 1-1 shows a transaction that takes place at the Dallas office. Enterprise
Replication uses the logic in Table 1-2 to evaluate whether any information is sent
to the destination database server at the Phoenix office.
Table 1-2. Insert Followed by a Delete Evaluation Logic
Initial Image
Replicate
Evaluates
Final
Image
Replicate
Evaluates
Primary-Key
Changed?
Send to
Destination
Database Server
INSERT T or F DELETE T or F Yes or no Nothing
Enterprise Replication determines that the insert followed by a delete results in no
replication operation; therefore, no replication data is sent.
In Figure 1-2, Enterprise Replication uses the logic in Table 1-3 to evaluate whether
any information is sent to the destination database server.
Figure 1-1. Insert Followed by a Delete
1-10 IBM Informix Dynamic Server Enterprise Replication Guide
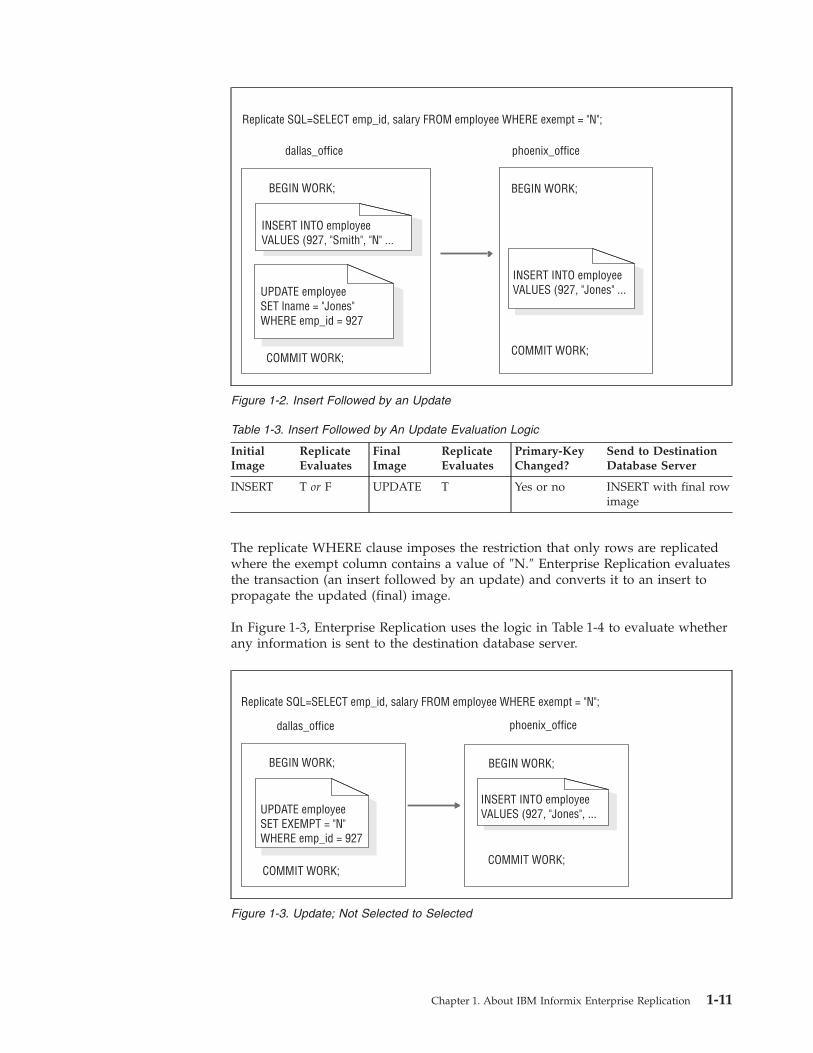
Table 1-3. Insert Followed by An Update Evaluation Logic
Initial
Image
Replicate
Evaluates
Final
Image
Replicate
Evaluates
Primary-Key
Changed?
Send to Destination
Database Server
INSERT T or F UPDATE T Yes or no INSERT with final row
image
The replicate WHERE clause imposes the restriction that only rows are replicated
where the exempt column contains a value of ″N.″ Enterprise Replication evaluates
the transaction (an insert followed by an update) and converts it to an insert to
propagate the updated (final) image.
In Figure 1-3, Enterprise Replication uses the logic in Table 1-4 to evaluate whether
any information is sent to the destination database server.
Figure 1-2. Insert Followed by an Update
Figure 1-3. Update; Not Selected to Selected
Chapter 1. About IBM Informix Enterprise Replication 1-11

Table 1-4. Update; Not Selected to Selected Evaluation Logic
Initial Image
Replicate
Evaluates Final Image
Replicate
Evaluates
Primary-Key
Changed?
Send to Destination Database
Server
UPDATE F UPDATE T Yes or no INSERT with final row image
The example shows a replicate WHERE clause column update. A row that does not
meet the WHERE clause selection criteria is updated to meet the criteria.
Enterprise Replication replicates the updated row image and converts the update
to an insert.
Distributing Data
Enterprise Replication ensures that all data reaches the appropriate server,
regardless of a network or system failure. In the event of a failure, Enterprise
Replication stores data until the network or system is operational. Enterprise
Replication replicates data efficiently with a minimum of data copying and
sending.
Applying Replicated Data
Enterprise Replication uses a data-synchronization process to apply the replicated
data to target database servers. The target database servers acknowledge receipt of
data when the data is applied to the target database. The data-synchronization
process ensures that transactions are applied at the target database servers in an
order equivalent to the order that they were committed on the source database
server. If consistency can be preserved, Enterprise Replication might commit
transactions out of order on the target database.
When Enterprise Replication applies replication data, it checks to make sure that
no collisions exist. A collision occurs when two database servers update the same
data simultaneously. Enterprise Replication reviews the data one row at a time to
detect a collision.
If Enterprise Replication finds a collision, it must resolve the conflict before
applying the replication data to the target database server.
Figure 1-4 shows a situation that yields a conflict. Pakistan updates the row two
seconds before Bangkok updates the same row. The Bangkok update arrives at the
Figure 1-4. Collision Example
1-12 IBM Informix Dynamic Server Enterprise Replication Guide
India site first, and the Pakistan update follows. The Pakistan time is earlier than
the Bangkok time. Because both updates involve the same data and a time
discrepancy exists, Enterprise Replication detects a collision.
For more information, see “Conflict Resolution” on page 3-6.
Enterprise Replication scans to see if the same primary key already exists in the
target table or in the associated delete table, or if a replication order error is detected.
A delete table stores the row images of deleted rows. A replication order error is
the result of replication data that arrives from different database servers with one
of the following illogical results:
v A replicated DELETE that finds no row to DELETE on the target
v An UPDATE that finds no row to UPDATE on the target
v An INSERT that finds a row that already exists on the target
Chapter 1. About IBM Informix Enterprise Replication 1-13

1-14 IBM Informix Dynamic Server Enterprise Replication Guide

Chapter 2. Overview of Enterprise Replication Administration
In This Chapter . . . . . . . . . . . . . . . . . . . . . . . . . . . . . . . . . . 2-1
Overview of Enterprise Replication Administration . . . . . . . . . . . . . . . . . . . . . . 2-1
Enterprise Replication Server Administrator . . . . . . . . . . . . . . . . . . . . . . . . 2-2
Enterprise Replication Terminology . . . . . . . . . . . . . . . . . . . . . . . . . . . 2-2
Enterprise Replication Server . . . . . . . . . . . . . . . . . . . . . . . . . . . . 2-3
Replicate . . . . . . . . . . . . . . . . . . . . . . . . . . . . . . . . . . . 2-3
Master Replicate . . . . . . . . . . . . . . . . . . . . . . . . . . . . . . . . 2-3
Shadow Replicate . . . . . . . . . . . . . . . . . . . . . . . . . . . . . . . . 2-3
Participant . . . . . . . . . . . . . . . . . . . . . . . . . . . . . . . . . . 2-3
Replicate Set . . . . . . . . . . . . . . . . . . . . . . . . . . . . . . . . . . 2-4
Template . . . . . . . . . . . . . . . . . . . . . . . . . . . . . . . . . . . 2-4
Global Catalog . . . . . . . . . . . . . . . . . . . . . . . . . . . . . . . . . 2-4
Enterprise Replication Considerations . . . . . . . . . . . . . . . . . . . . . . . . . . 2-5
Operational Considerations . . . . . . . . . . . . . . . . . . . . . . . . . . . . . 2-5
Backup and Restore Considerations . . . . . . . . . . . . . . . . . . . . . . . . . . 2-6
Database and Table Design Considerations . . . . . . . . . . . . . . . . . . . . . . . . 2-6
Unbuffered Logging . . . . . . . . . . . . . . . . . . . . . . . . . . . . . . 2-6
Table Types . . . . . . . . . . . . . . . . . . . . . . . . . . . . . . . . . 2-6
Out-of-Row Data . . . . . . . . . . . . . . . . . . . . . . . . . . . . . . . 2-7
Shadow Columns . . . . . . . . . . . . . . . . . . . . . . . . . . . . . . . 2-7
Primary Key Constraint . . . . . . . . . . . . . . . . . . . . . . . . . . . . . 2-7
SERIAL Data Types and Primary Keys . . . . . . . . . . . . . . . . . . . . . . . . 2-7
Cascading Deletes . . . . . . . . . . . . . . . . . . . . . . . . . . . . . . . 2-8
Triggers . . . . . . . . . . . . . . . . . . . . . . . . . . . . . . . . . . 2-8
Using Constraints . . . . . . . . . . . . . . . . . . . . . . . . . . . . . . . 2-8
Sequence Objects . . . . . . . . . . . . . . . . . . . . . . . . . . . . . . . 2-9
Transaction Processing Considerations . . . . . . . . . . . . . . . . . . . . . . . . . 2-9
Replication Volume . . . . . . . . . . . . . . . . . . . . . . . . . . . . . . 2-9
Distributed Transactions . . . . . . . . . . . . . . . . . . . . . . . . . . . . . 2-9
Large Transactions . . . . . . . . . . . . . . . . . . . . . . . . . . . . . . 2-10
Supported SQL Statements . . . . . . . . . . . . . . . . . . . . . . . . . . . . 2-10
Replication Environment Considerations . . . . . . . . . . . . . . . . . . . . . . . . 2-11
Time Synchronization . . . . . . . . . . . . . . . . . . . . . . . . . . . . . 2-11
Using GLS with Enterprise Replication . . . . . . . . . . . . . . . . . . . . . . . 2-11
Enterprise Replication Data Types . . . . . . . . . . . . . . . . . . . . . . . . . . 2-12
Replicating on Heterogeneous Hardware . . . . . . . . . . . . . . . . . . . . . . . 2-12
Replicating Simple and Smart Large Objects . . . . . . . . . . . . . . . . . . . . . . 2-13
Replicating Opaque User-Defined Data Types . . . . . . . . . . . . . . . . . . . . . 2-15
Verifying the Data Type of Replicated Columns . . . . . . . . . . . . . . . . . . . . . 2-17
In This Chapter
This chapter introduces you to Enterprise Replication administration and describes
the Enterprise Replication server administrator, Enterprise Replication terminology,
and considerations for using Enterprise Replication.
Overview of Enterprise Replication Administration
To set up Enterprise Replication:
1. Select the Enterprise Replication system and network topology to use for your
replication environment.
For information, see Chapter 3, “Selecting the Enterprise Replication System
and Network Topology,” on page 3-1
© Copyright IBM Corp. 1996, 2005 2-1

2. Prepare the replication environment.
For information, see Chapter 4, “Preparing the Replication Environment,” on
page 4-1.
3. Initialize the database server.
For information, see Chapter 6, “Defining Replication Servers, Replicates,
Participants, and Replicate Sets,” on page 6-1.
4. Define database servers for replication.
For information, see Chapter 6.
5. Define replicates and participants.
For information, see Chapter 7, “Managing Replication Servers and Replicates,”
on page 7-1.
6. Create replicate sets (optional).
For information, see “Defining Replicate Sets” on page 6-10.
7. Start the replicate.
For information, see Chapter 7.
Once you configure Enterprise Replication, use this information to manage your
replication environment:
v “Managing Replication Servers” on page 7-2
v “Managing Replicates” on page 7-4
v “Managing Replicate Sets” on page 7-8
v Chapter 8, “Monitoring and Troubleshooting Enterprise Replication,” on page 8-1
Enterprise Replication Server Administrator
The Enterprise Replication server administrator must have Informix Database
Server Administrator (DBSA) privileges to configure and manage Enterprise
Replication.
Operating System Privileges
UNIX user informix
Windows Member of the Informix-Admin group
Enterprise Replication Terminology
The following terms define the data in an Enterprise Replication system and how it
is treated:
v Enterprise Replication server
v Replicate
v Master Replicate
v Shadow Replicate
v Participant
v Replicate Set
v Template
v Global Catalog
2-2 IBM Informix Dynamic Server Enterprise Replication Guide

Enterprise Replication Server
An Enterprise Replication server, or replication server, is an Informix database server
that participates in data replication. The replication server maintains information
about the replication environment, which columns should be replicated, and the
conditions under which the data should be replicated. This information is stored in
a database, syscdr, that the database server creates when it is initialized. Multiple
database servers can be on the same physical computer, and each database server
can participate in Enterprise Replication.
Important: For each server participating in replication, you must set up a database
server group in the SQLHOSTS file (UNIX) or registry (Windows). For
more information, see “Setting up Database Server Groups” on page
4-3 and Appendix F, “SQLHOSTS Registry Key (Windows),” on page
F-1.
Tip: This manual uses the convention that the name of a database server group is
g_ followed by the name of a database server that is in the group; for
example, g_italy.
For more information, see “Defining Replication Servers” on page 6-2 and “cdr
define server” on page A-30.
Replicate
A replicate defines the replication participants and various attributes of how to
replicate the data, such as frequency and how to handle any conflicts during
replication.
For more information, see “Defining Replicates” on page 6-3 and “cdr define
replicate” on page A-21.
Master Replicate
A master replicate is a replicate that guarantees data integrity by verifying that
replicated tables on different servers have consistent column attributes. Master
replicates also allow you to perform alter operations on replicated tables.
For more information, “Defining Master Replicates” on page 6-5 and “cdr define
replicate” on page A-21.
Shadow Replicate
A shadow replicate is a copy of an existing (primary) replicate. Shadow replicates
allow Enterprise Replication to manage alter and repair operations on replicated
tables.
For more information, see “Defining Shadow Replicates” on page 6-6 and “cdr
define replicate” on page A-21.
Participant
A participant specifies the data (database, table, and columns) to replicate and the
database servers to which the data replicates.
Important: You cannot start and stop replicates that have no participants.
Chapter 2. Overview of Enterprise Replication Administration 2-3

For more information, see “Defining Participants” on page 6-4 and “Participant” on
page A-108.
Replicate Set
A replicate set combines several replicates to form a set that can be administered
together as a unit.
If your replication system contains many replicates that you define as part of a
replicate set, you can use a single command to start, stop, suspend, or resume all
the replicates in the set.
For more information, see “Managing Replicate Sets” on page 7-8 and “cdr change
replicateset” on page A-6.
Template
A template provides a mechanism to set up and deploy replication for a group of
tables on one or more servers. This is especially useful if you have a large number
of tables to replicate between many servers. Internally, a template defines a group
of master replicates and a replicate set for a specified group of tables using
attributes such as database, tables, columns and primary keys from the master
node.
You create a template using the cdr define template command and then
instantiate, or realize, it on servers with the cdr realize template command. See
“Using Templates to Set Up Replication” on page 6-12 for more information.
Global Catalog
Each database server that participates in Enterprise Replication maintains tables in
the syscdr database to keep track of Enterprise Replication configuration
information and state. For all root and nonroot replication servers, this catalog is a
global catalog that maintains a global inventory of Enterprise Replication
configuration information. The global catalog is created when you define the server
for replication. For more information, see Table 3-5 on page 3-13.
The global catalog includes the following:
v Enterprise Replication server definitions and state
v Routing and connectivity information
v Replicate definitions and state
v Participant definitions and state
v Replicate set definitions and state
v Conflict detection and resolution rules and any associated SPL routines
The tables in one global catalog instance are automatically replicated to the global
catalogs of all other replication servers (except leaf servers). Thus you can manage
the entire replication environment from one non-leaf replication server. For
information about managing replication servers (and their global catalogs), refer to
“Managing Replication Servers” on page 7-2.
Leaf replication servers (Table 3-5 on page 3-13) have limited catalogs. Because the
parent database server always manages operations that involve a leaf database
server, the catalog of the leaf database server contains only enough data to allow it
2-4 IBM Informix Dynamic Server Enterprise Replication Guide

to interact with its parent server. Limiting the catalog of leaf database servers
makes the replication system more efficient because the global catalogs do not
need to be replicated to the leaf servers.
For information on defining root, nonroot, and leaf servers, see “Customizing the
Replication Server Definition” on page 6-3.
Enterprise Replication Considerations
This section discusses items to consider when planning to use Enterprise
Replication:
v Operational Considerations
v Backup and Restore Considerations
v Database and Table Design Considerations
v Transaction Processing Considerations
v Replication Environment Considerations
v Enterprise Replication Data Types
Operational Considerations
Enterprise Replication imposes the following operational limitations:
v Enterprise Replication supports replication on IBM Informix Dynamic Server
only.
v Replication is restricted to base tables. That is, you cannot define a replicate on a
view or synonym. A view is a synthetic table, a synthesis of data that exists in
real tables and other views. A synonym is an alternative name for a table or a
view. For more information on views and synonyms, see the IBM Informix
Database Design and Implementation Guide.
v Replication is not inherited by any child tables in a typed hierarchy.
Enterprise Replication asynchronously propagates many control operations through
the Enterprise Replication network. When you perform administrative functions
using Enterprise Replication, the status that returns from those operations is
indicative only of the success or failure of the operation at the database server to
which you are directly connected. The operation might still be propagating
through the other Enterprise Replication database servers in the network at that
time.
Due to this asynchronous propagation, avoid performing control operations in
quick succession that might directly conflict with one another without verifying
that the first operation has successfully propagated through the entire enterprise
network. Specifically, avoid deleting Enterprise Replication objects such as
replicates, replicate sets, and Enterprise Replication servers, and immediately
re-creating those objects with the same name. Doing so can cause failures in the
Enterprise Replication system at the time of the operation or later. These failures
might manifest themselves in ways that do not directly indicate the source of the
problem.
If you must delete and re-create a definition, use a different name for the new
object (for example, delete replicate a.001 and recreate it as a.002) or wait until the
delete action has successfully propagated through the entire Enterprise Replication
system before you re-create the object. The former strategy is especially appropriate
if you have database servers that are not connected to the Enterprise Replication
Chapter 2. Overview of Enterprise Replication Administration 2-5

network at all times. It might take a significant amount of time before the
operation is propagated to those disconnected servers.
Backup and Restore Considerations
When backing up and restoring database servers that participate in replication, do
not stop Enterprise Replication before performing a backup on an Enterprise
Replication system.
Warm restores are not permitted. You must perform a cold restore for Enterprise
Replication servers before resuming replication.
Database and Table Design Considerations
Consider the following when designing databases and tables for replication:
v Unbuffered Logging
v Table Types
v Shadow Columns
v SERIAL Data Types and Primary Keys
v Cascading Deletes
v Triggers
v Sequence Objects
Unbuffered Logging
Databases on all server instances involved in replication must be created with
logging.
It is recommended that you replicate tables only from databases created with
unbuffered logging. Enterprise Replication evaluates the logical log for transactions
that modify tables defined for replication. If a table defined for replication resides
in a database that uses buffered logging, the transactions are not immediately
written to the logical log, but are instead buffered and then written to the logical
log in a block of logical records. When this occurs, Enterprise Replication evaluates
the buffer of logical-log records all at once, which consumes excess CPU time and
memory. When you define a table for replication in a database created with
unbuffered logging, Enterprise Replication can evaluate the transactions as they are
produced.
To create a database with unbuffered logging, use:
CREATE DATABASE db_name WITH LOG
To minimize impact on the system, Enterprise Replication uses buffered logging
whenever possible, even if the database is defined as unbuffered. For more
information, see the section on CREATE DATABASE in the IBM Informix Database
Design and Implementation Guide.
Table Types
The following table types are not supported by Enterprise Replication:
v RAW tables
Because RAW tables are not logged, they cannot be replicated using Enterprise
Replication.
v Temporary tables
2-6 IBM Informix Dynamic Server Enterprise Replication Guide

Because the database server deletes temporary tables when an application
terminates or closes the database, you should not include these tables in your
replication environment.
For more information on table types, see IBM Informix Database Design and
Implementation Guide.
Out-of-Row Data
Enterprise Replication collects out-of-row data for transmission after the user
transaction has committed. Due to activity on the replicated row, the data might
not exist at the time Enterprise Replication collects it for replication. In such cases,
Enterprise Replication normally applies a NULL on the target system. Therefore,
you should avoid placing a NOT NULL constraint on any replicated column that
includes out-of-row data.
Shadow Columns
In an update-anywhere replication environment, you must provide for conflict
resolution using a conflict-resolution rule (see “Conflict Resolution” on page 3-6).
When you create a table that uses the time stamp or time stamp plus SPL
conflict-resolution rule, you must define the shadow columns, cdrserver and
cdrtime on both the source and target replication servers.
Tip: If you plan to use only the ignore conflict-resolution rule, you do not need to
define the cdrserver and cdrtime shadow columns.
For more information, see “Preparing Tables for Conflict Resolution” on page 4-16.
Primary Key Constraint
All tables involved in replication must have a PRIMARY KEY constraint defined
on at least one column, which forces the column to be unique. (For more
information about primary keys, see the IBM Informix Database Design and
Implementation Guide and the IBM Informix Guide to SQL: Syntax.)
Important: Because primary key updates are sent as DELETE/INSERT statement
pairs, avoid changing the primary key and updating data in the same
transaction.
SERIAL Data Types and Primary Keys
If you plan to use SERIAL data types (SERIAL and SERIAL8) as the primary key
for a table, the same serial value might be generated on two servers at the same
time.
To avoid this problem, use the CDR_SERIAL configuration parameter to generate
non-overlapping (unique) values for SERIAL columns across all database servers in
your replication environment. Set CDR_SERIAL in the ONCONFIG file for each
primary (source) database server. For more information and examples, see
“CDR_SERIAL Configuration Parameter” on page B-6.
If you do not set CDR_SERIAL, you must specify that the serial column is part of a
composite primary key, to avoid generating non-unique SERIAL primary keys. The
non-serial column part of the primary key identifies the server on which the row
was initially created.
Chapter 2. Overview of Enterprise Replication Administration 2-7

Cascading Deletes
If a table includes a cascading delete, when a parent row is deleted, the children are
also deleted. If both the parent and child tables participate in replication, the
deletes for both the parent and child are replicated to the target servers.
If the same table definition exists on the target database, Enterprise Replication
attempts to delete the child rows twice. Enterprise Replication usually processes
deletes on the parent tables first and then the children tables. When Enterprise
Replication processes deletes on the children, an error might result, because the
rows were already deleted when the parent was deleted. The table in Table 2-1
indicates how Enterprise Replication resolves cascading deletes with
conflict-resolution scopes and rules.
For more information on cascading deletes, see the ON DELETE CASCADE section
in the IBM Informix Guide to SQL: Syntax.
Table 2-1. Resolving Cascade Deletes
Conflict-Resolution Rule Conflict-Resolution Scope Actions on Delete Errors
Time stamp Row-by-row or transaction Continue processing rest of
the transaction
Ignore Transaction Abort entire transaction
Ignore Row-by-row Continue processing rest of
the transaction
Triggers
A trigger is a database object that automatically sets off a specified set of SQL
statements when a specified event occurs.
If the --firetrigger option is enabled on a replicate, any triggers defined on a table
that participates in replication are invoked when transactions are processed on the
target server. However, because Enterprise Replication only replicates the final
result of a transaction, triggers execute only once on the target regardless of how
many triggers execute on the source. In cases where the final evaluation of the
transaction results in no replication (for example, an INSERT where the final row
image is a DELETE, as shown in Table 1-2 on page 1-10), no triggers execute on the
target database.
If the same triggers are defined on both the source and target tables, any insert,
update, or delete operation that the triggers generate are also sent to the target
database server. For example, the target table might receive replicate data caused
by a trigger that also executes locally. Depending on the conflict-resolution rule
and scope, these operations can result in errors. To avoid this problem, define the
replicate to not fire triggers on the target table.
For more information on triggers, see “Enabling Triggers” on page 6-9 and the
CREATE TRIGGER section in IBM Informix Guide to SQL: Syntax.
Using Constraints
When using constraints, ensure that the constraints you add at the target server are
not more restrictive than those at the source server. Discrepancies between
constraints at the source and target servers can cause some rows to fail to be
replicated.
2-8 IBM Informix Dynamic Server Enterprise Replication Guide

For tables that have referential integrity constraints set up between them, if you
need to resynchronize the data in the tables, you can perform synchronization on
the replicate set. For replicate sets, Enterprise Replication synchronizes tables in an
order that preserves referential integrity constraints (for example, child tables are
synchronized after parent tables).
When you perform synchronization, rows that fail to be repaired due to
discrepancies between constraints are recorded in the ATS and RIS files. For more
information about ATS and RIS files, see Chapter 8, “Monitoring and
Troubleshooting Enterprise Replication,” on page 8-1.
Sequence Objects
In bi-directional Enterprise Replication, if you replicate tables using sequence
objects for update, insert, or delete operations, the same sequence values might be
generated on different servers at the same time, leading to conflicts.
To avoid this problem, define sequence objects on each server so that the ranges of
generated sequence values are disjunct. For more information about the CREATE
SEQUENCE and ALTER SEQUENCE statements of SQL, see the IBM Informix
Guide to SQL: Syntax.
Transaction Processing Considerations
Many variables affect what impact replicating data has on your transaction
processing. This section discusses some of these variables:
v Replication Volume
v Distributed Transactions
v Large Transactions
v Supported SQL Statements
Replication Volume
To determine replication volume, you must estimate how many data rows change
per day. For example, an application issues a simple INSERT statement that inserts
100 rows. If this table is replicated, Enterprise Replication must propagate and
analyze these 100 rows before applying them to the targets.
Distributed Transactions
A distributed transaction is a transaction that commits data in a single transaction
over two or more database servers.
Outside of the replication environment, Dynamic Server uses a two-phase commit
protocol to ensure that the transaction is either committed completely across all
servers involved or is not committed on any server. For more information about
the two-phase commit protocol, see the IBM Informix Dynamic Server Administrator's
Guide.
In a replication environment, when a distributed transaction is committed across
the source servers, each part of the transaction that applies to the local server is
written to the local logical logs. When Enterprise Replication retrieves the
transaction from the logical logs and forms its transaction data, it is unable to
identify the separate transaction data as the original single transaction.
This situation could result in Enterprise Replication applying one transaction
successfully while aborting another. Another result might be a time lapse between
the application of one transaction and another (depending on how much
transaction data is in each server’s send queue and the state of the server).
Chapter 2. Overview of Enterprise Replication Administration 2-9
44444
4444

Large Transactions
While Enterprise Replication is able to handle large transactions, it is optimized for
small transactions. For best performance, avoid replicating large transactions.
Large transactions are handled with a grouper paging file located in temporary
smart large objects. Enterprise Replication can process transactions up to 4 TB in
size. For more information, see “Setting Up the Grouper Paging File” on page 4-12.
You can view Enterprise Replication grouper paging statistics with the onstat -g
grp pager command (see “onstat -g grp” on page C-6).
Instead of using Enterprise Replication to perform a batch job, use BEGIN WORK
WITHOUT REPLICATION to run the batch job locally on each database server. For
more information, see “Blocking Replication” on page 4-14.
Supported SQL Statements
After you define Enterprise Replication on a table by including that table as a
participant in a replicate you cannot exclusively lock a database that is involved in
replication (or perform operations that require an exclusive lock). However, you
can exclusively lock a table in a database.
To use the forbidden and limited SQL statements described in this section against a
table defined for replication, you must first stop (not suspend) the replicate that
contains the table, before running the SQL statement. After modifying the table at
all required nodes, restart the replicate. For more information, see “Managing
Replicates” on page 7-4.
Forbidden SQL Statements: You cannot use the following SQL statements against
a table that is included in a replicate:
v DROP TABLE
v RENAME TABLE
v TRUNCATE (or TRUNCATE TABLE)
Limited SQL Statements: The following additional limitations also apply to tables
defined for replication:
v Do not add or drop rowids.
v Do not add or drop CRCOLS (shadow columns):
– ALTER TABLE ... ADD CRCOLS
– ALTER TABLE ... DROP CRCOLS
For more information about CRCOLS, see “Preparing Tables for Conflict
Resolution” on page 4-16.v Do not remove or disable the primary key constraint.
v Do not modify the primary key columns.
For example, do not alter the column to add default values or other integrity
constraints.
v Do not change the primary key from one column to another.
For example, if a primary key is defined on col1, do not change the primary key
to col2.
Permitted SQL Statements: Enterprise Replication permits the following SQL
statements with no limitations:
v SET object mode (no disabling of primary key constraint)
v START VIOLATIONS TABLE
2-10 IBM Informix Dynamic Server Enterprise Replication Guide

v STOP VIOLATIONS TABLE
v CREATE TRIGGER
v DROP TRIGGER
v CREATE VIEW
v DROP VIEW
v CREATE SYNONYM
v DROP SYNONYM
v ADD INDEX
v DROP INDEX
v ALTER INDEX
v ALTER TABLE (except for the primary key)
v ALTER FRAGMENT
v Creating a clustered index
v Reclustering an existing index
Tip: You can rename both dbspaces and sbspaces while Enterprise Replication is
active.
Replication Environment Considerations
Each replication system that you create affects your environment. Consider the
following when setting up your replication environment:
v Time Synchronization
v Using GLS with Enterprise Replication
Time Synchronization
Whenever you use replication that requires time stamp conflict resolution (see
“Conflict Resolution” on page 3-6), the operating system times of the database
servers that participate in the replicate must be synchronized. All time stamps and
internal computations are performed in Greenwich Mean Time (GMT) and have an
accuracy of plus or minus one second.
Important: Enterprise Replication does not manage clock synchronization between
database servers that participate in a replicate.
To synchronize the time on one database server with the time on another database
server, use one of the following commands.
Operating System Command
UNIX rdate hostname
Windows net time \\servername /set
net time /domain:servername /set
Important: These commands do not guarantee the times will remain synchronized.
You should use a product that supplies a network time protocol to
ensure that times remain synchronized. For information on tools for
synchronizing the times, refer to your operating system documentation.
Using GLS with Enterprise Replication
An Enterprise Replication system can include databases in different locales, with
the following restrictions:
Chapter 2. Overview of Enterprise Replication Administration 2-11

v When you define a database server for Enterprise Replication, that server must
be running in the U. S. English locale.
In other words, the syscdr database on every Enterprise Replication server must
be in the English locale.
v You can replicate only between databases that are in the same locale.
v Replicate names can be in the locale of the database.
Code-set conversion with the GLS library requires only those code-set conversion
files found in the $INFORMIXDIR/gls/cv9 directory.
v For U.S. English, locales are handled automatically by the Client SDK/Informix
Connect installation and setup.
v For non-U.S. English locales, you might need to explicitly provide the locale and
conversion files.
For information about how to specify a nondefault locale and other considerations
related to GLS locales, see the IBM Informix GLS User's Guide.
Enterprise Replication Data Types
Enterprise Replication supports built-in data types and user-defined data types,
including row types and collection types. This section describes how Enterprise
Replication handles special data types:
v Replicating on Heterogeneous Hardware
v Replicating Simple and Smart Large Objects
v Replicating Opaque User-Defined Data Types
For general information on data types, refer to the IBM Informix Guide to SQL:
Reference.
Important: Enterprise Replication does not support replication of simple large
objects stored on optical devices.
Important: For non-master replicates, Enterprise Replication does not verify the
data types of columns in tables that participate in replication. The
replicated column in a table on the source database server must have
the same data type as the corresponding column on the target server.
The exception to this rule is cross-replication between simple large
objects and smart large objects.
If you use SERIAL or SERIAL8 data types, you must be careful when defining
serial columns. For more information, see “SERIAL Data Types and Primary Keys”
on page 2-7.
Replicating on Heterogeneous Hardware
Enterprise Replication supports all primitive data types across heterogeneous
hardware. If you define a replicate that includes non-primitive data types (for
example, BYTE and TEXT data), the application must resolve data-representation
issues that are architecture dependent.
If you use floating-point data types with heterogeneous hardware, you might need
to use IEEE floating point or canonical format for the data transfers. For more
information, see “Using the IEEE Floating Point or Canonical Format” on page 6-9.
2-12 IBM Informix Dynamic Server Enterprise Replication Guide

Replicating Simple and Smart Large Objects
Enterprise Replication replicates:
v Simple large object data types (TEXT and BYTE)
You can store simple large objects either in the tblspace with the rest of the table
columns (in a dbspace) or in a blobspace.
v Smart large object data types (BLOB and CLOB)
You must store smart large objects in sbspaces.
For more information about database storage, see the IBM Informix Dynamic Server
Administrator's Guide.
Replicating Simple Large Objects from Tblspaces: Simple large object data that
is stored in tblspaces (rather than in blobspaces) is placed in the logical log.
Enterprise Replication reads the logical log to capture and evaluate the data for
potential replication.
Replicating Large Objects from Blobspaces or Sbspaces: Enterprise Replication
does not retrieve simple large object data that is stored in blobspaces and smart
large object data that is stored in sbspaces from the logical log. Instead, Enterprise
Replication retrieves the large object data directly from the blobspace or sbspace
before sending the data to the target database server.
It is possible that a transaction subsequent to the transaction being replicated can
modify or delete a simple or smart large object that Enterprise Replication is trying
to retrieve. If Enterprise Replication encounters a row whose large object (simple or
smart) has been modified or deleted by a subsequent transaction, Enterprise
Replication does not send the data in the large object.
In most cases, the subsequent transaction that modified or deleted the large object
will also be replicated, so the data again becomes consistent once that transaction
is replicated. The data in the large object is inconsistent for only a short time.
Keep in mind that if you specify sending only the columns that changed, the data
might not get updated during the next update of the row. For more information,
see “Replicating Only Changed Columns” on page 6-8.
Tip: Enterprise Replication allows cross-replication between simple large objects
and smart large objects. For example, you can replicate a simple large object
on the source database server to a smart large object on the target server or
vice versa.
Conflict Resolution for Simple and Smart Large Objects: By default, Enterprise
Replication performs all conflict detection and resolution at the row level.
However, in some cases, simple large object data that is stored in a tblspace (rather
than in a blobspace) is accepted by the target server even if the row is rejected.
This does not apply to simple large object data that is stored in blobspaces or
smart large object data that is stored in sbspaces.
Time-Stamp Conflict Resolution for Simple Large Objects: When a replicated BYTE or
TEXT column is modified on the source database server, Enterprise Replication
records the value of cdrserver and cdrtime for that column. (For more information
on cdrserver and cdrtime, see “Preparing Tables for Conflict Resolution” on page
4-16.) If the column on the target database server is also stored in a tablespace
Chapter 2. Overview of Enterprise Replication Administration 2-13
(rather than in a blobspace), Enterprise Replication evaluates the cdrserver and
cdrtime values in the source and target columns and uses the following logic to
determine if the data is to be applied:
v If the column of the replicated data has a time stamp that is greater than the
time stamp of the column on the local row, the data for the column is accepted
for replication.
v If the server ID and time stamp of the replicated column are equal to the server
ID and time stamp on the column on the local row, the data for the column is
accepted for replication.
v If there is no SPL conflict-resolution rule and the time stamps are equal, then
Enterprise Replication applies the data to the row with the lowest CDR server
ID.
SPL Conflict Resolution for Simple Large Objects: If the replicate is defined with an
SPL conflict-resolution rule, the SPL routine must return the desired action for each
BYTE or TEXT column. When the routine is invoked, information about each BYTE
or TEXT column is passed to the routine as five separate fields. The following table
describes the fields.
Argument Description
Column size (INTEGER) The size of the column (if data exists for this column).
NULL if the column is NULL.
BLOB flag [CHAR(1)] For the local row, the field is always NULL.
For the replicated row:
v D indicates BYTE or TEXT data is sent from the
source database server.
v U indicates BYTE or TEXT data is unchanged on the
source database server.
Column type [CHAR(1)] v P indicates tablespace data.
v B indicates blobspace data.
ID of last update server
[CHAR(18)]
The ID of the database server that last updated this
column for tablespace data.
For blobspace data: NULL
Last update time (DATETIME
YEAR TO SECOND)
For tablespace data: The date and time when the data
was last updated. For blobspace data: NULL
For information on creating stored procedures, see the IBM Informix Guide to SQL:
Tutorial.
If the routine returns an action code of A, D, I, or U, the routine parses the return
values of the replicated columns. Each BYTE or TEXT column can return a
two-character field. For information about the action codes, refer to “SPL
Conflict-Resolution Rule” on page 3-8.
The first character defines the desired option for the BYTE or TEXT column, as the
following table shows.
2-14 IBM Informix Dynamic Server Enterprise Replication Guide

Value Function
C Performs a time-stamp check for this column as used by the time-stamp rule
N Sets the replicate column to NULL
R Accepts the replicated data as it is received
L Retains the local data
The second character defines the desired option for blobspace data if the data is
found to be undeliverable, as the following table shows.
Value Function
N Sets the replicated column to NULL
L Retains the local data (default)
O Aborts the row
X Aborts the transaction
SPL Conflict Resolution for Smart Large Objects: Enterprise Replication handles
conflict resolution for smart large objects using the SPL conflict-resolution rule in
the same way as for simple large objects. See “Conflict Resolution for Simple and
Smart Large Objects” on page 2-13.
Distributing BYTE and TEXT Data: If Enterprise Replication processes a row and
discovers undeliverable BYTE or TEXT columns, the following actions can occur:
v Any undeliverable columns are set to NULL if the replication operation is an
INSERT and the row does not already exist at the target.
v The old value of the local row is retained if the replication operation is an
UPDATE or if the row already exists on the target.
Considerations for Replicating Smart Large Objects: The following conditions
apply to replicating smart large objects:
v Enterprise Replication does not support replication of smart large object updates
performed outside of a row update.
v After you update a smart large object that is referenced explicitly in the table
schema, you must update the referencing row before Enterprise Replication can
replicate the updated smart large object. For example:
UPDATE table_name SET smart_large_object_column = x
For more information, see the IBM Informix Guide to SQL: Syntax.
v Enterprise Replication replicates updates to in-place smart large objects by
sending a new copy of the entire smart large object. Enterprise Replication does
not send only the logged changes to update smart large objects.
v Enterprise Replication does not support sharing out-of-row data (multiple
references to a smart large object) during replication. If you try to replicate
multiple references to the same smart large object on the source database server,
Enterprise Replication does not re-create those references on the target database
server. Instead, Enterprise Replication creates multiple smart large objects on the
target database server.
Replicating Opaque User-Defined Data Types
Enterprise Replication supports built-in data types and extended data types,
including opaque data types and user-defined types (UDTs).
Chapter 2. Overview of Enterprise Replication Administration 2-15
Installing and Registering UDTs: You must install and register UDTs and their
associated support routines on all database servers participating in Enterprise
Replication prior to starting replication.
If you combine Enterprise Replication with High-Availability Data Replication
(HDR), you must install UDTs on both HDR database servers, but only register
them on the primary HDR database server (see IBM Informix Dynamic Server
Administrator's Guide).
UDT Support Functions: If you plan to replicate opaque user-defined types
(UDTs), the UDT designer must provide two support functions, streamwrite() and
streamread(). This also applies to UDTs embedded in complex types.
The purpose of these functions is similar to the existing send() and receive()
functions provided for client/server transmissions.
For information on writing these support functions, see the section on Enterprise
Replication stream support functions in the IBM Informix DataBlade API
Programmer's Guide.
When preparing a row that includes any UDT columns to queue to the target
system, Enterprise Replication calls the streamwrite() function on each UDT
column. The function converts the UDT column data from the in-server
representation to a representation that can be shipped over the network. This
allows Enterprise Replication to replicate the column without understanding the
internal representation of the UDT.
On the target server, Enterprise Replication calls the streamread() function for each
UDT column that it transmitted using the streamwrite() function.
Considerations for Replicating Opaque Data Types: The following conditions
apply to replicating opaque data types:
v The WHERE clause of the SELECT statement of the participant modifier can
reference an opaque UDT as long as the UDT is always stored in row.
v Any UDRs in a WHERE clause can use only parameters whose values can be
extracted fully from the logged row images, plus any optional constants.
v All of the columns in the SELECT statement of each participant definition must
be actual columns in that table. Enterprise Replication does not support virtual
columns (results of UDRs on table columns).
See “Participant Modifier” on page A-109 for information on the WHERE clause
in participant definitions.
v You cannot use SPL routines for conflict resolution if the replicate includes any
UDTs in the SELECT statement or if the replicate is defined to replicate only
changed columns.
See “Conflict Resolution” on page 3-6 and “Replicating Only Changed Columns”
on page 6-8.
v Enterprise Replication allows you to define replicates on tables that contain one
or more UDT columns as the primary key.
For more information, see the section on primary key constraints in the IBM
Informix Guide to SQL: Syntax.
2-16 IBM Informix Dynamic Server Enterprise Replication Guide
Replicating Table Hierarchies: To replicate tables that form a hierarchy, you must
define a separate replicate for each table. If you define a replicate on a super table,
Enterprise Replication does not automatically create implicit replicate definitions
on the subordinate tables.
Tip: Enterprise Replication does not require that the table hierarchies be identical
on the source and target servers.
You must use conflict resolution uniformly for all tables in the hierarchy. In other
words, either no conflict resolution for all tables or conflict resolution for all tables.
Verifying the Data Type of Replicated Columns
By using master replicates you can verify that all participants in a replicate have
columns with matching data types. Master replicates also allow verification that
each participant contains all replicated columns, and optionally that column names
are the same on each participant. See “Defining Master Replicates” on page 6-5 for
more information.
Chapter 2. Overview of Enterprise Replication Administration 2-17

2-18 IBM Informix Dynamic Server Enterprise Replication Guide

Part 2. Setting Up and Managing Enterprise Replication
© Copyright IBM Corp. 1996, 2005

IBM Informix Dynamic Server Enterprise Replication Guide

Chapter 3. Selecting the Enterprise Replication System and
Network Topology
In This Chapter . . . . . . . . . . . . . . . . . . . . . . . . . . . . . . . . . . 3-1
Selecting the Enterprise Replication System . . . . . . . . . . . . . . . . . . . . . . . . 3-1
Primary-Target Replication System . . . . . . . . . . . . . . . . . . . . . . . . . . 3-1
Primary-Target Business Models . . . . . . . . . . . . . . . . . . . . . . . . . . 3-2
Primary-Target Considerations . . . . . . . . . . . . . . . . . . . . . . . . . . . 3-4
Update-Anywhere Replication System . . . . . . . . . . . . . . . . . . . . . . . . . 3-5
Conflict Resolution . . . . . . . . . . . . . . . . . . . . . . . . . . . . . . . 3-6
Conflict-Resolution Rule . . . . . . . . . . . . . . . . . . . . . . . . . . . . . 3-6
Scope . . . . . . . . . . . . . . . . . . . . . . . . . . . . . . . . . . . 3-11
Choosing a Replication Network Topology . . . . . . . . . . . . . . . . . . . . . . . . 3-11
Fully Connected Topology . . . . . . . . . . . . . . . . . . . . . . . . . . . . . 3-12
Hierarchical Replication Topologies . . . . . . . . . . . . . . . . . . . . . . . . . . 3-12
HR Topology Terminology . . . . . . . . . . . . . . . . . . . . . . . . . . . . 3-12
Hierarchical Tree . . . . . . . . . . . . . . . . . . . . . . . . . . . . . . . 3-13
Forest of Trees . . . . . . . . . . . . . . . . . . . . . . . . . . . . . . . . 3-14
In This Chapter
This chapter describes types of replication systems provided by Enterprise
Replication and discusses the trade-offs associated with performance and data
availability.
Selecting the Enterprise Replication System
Enterprise Replication supports the following types of replication systems:
v Primary-Target Replication System
v Update-Anywhere Replication System
Primary-Target Replication System
In the primary-target replication system, the flow of information is in one
direction.
In primary-target replication, all database changes originate at the primary
database and are replicated to the target databases. Changes at the target databases
are not replicated to the primary.
A primary-target replication system can provide one-to-many or many-to-one
replication:
v One-to-many replication
In one-to-many (distribution) replication, all changes to a primary database server
are replicated to many target database servers. Use this replication model when
information gathered at a central site must be disseminated to many scattered
sites.
v Many-to-one replication
In many-to-one (consolidation) replication, many primary servers send
information to a single target server. Use this replication model when many sites
are gathering information (for example, local field studies for an environmental
study) that needs to be centralized for final processing.
© Copyright IBM Corp. 1996, 2005 3-1

Primary-Target Business Models
Primary-target Enterprise Replication systems support the following business
models:
v Data Dissemination
v Data Consolidation
v Workload Partitioning
v Workflow Replication
Data Dissemination: Data dissemination supports business needs where data is
updated in a central location and then replicated to read-only sites. This method of
distribution can be particularly useful for online transaction processing (OLTP)
systems where data is required at several sites, but because of the large amounts of
data, read-write capabilities at all sites would cripple the performance of the
application. Figure 3-1 on page 3-2 illustrates data dissemination.
Data Consolidation: As businesses reorganize to become more competitive, many
choose to consolidate data into one central database server. Data consolidation
allows the migration of data from several database servers to one central database
server. In Figure 3-2, the remote locations have read-write capabilities while the
central database server is read-only.
Primary(Read-only)
(Read-only) (Read-only)
(Read-only)
(Read-write)
Databaseserver
Databaseserver
Databaseserver
Databaseserver
Databaseserver
Target
TargetTarget
Target
Figure 3-1. Data Dissemination in a Primary-Target Replication System
3-2 IBM Informix Dynamic Server Enterprise Replication Guide

Businesses can also use data consolidation to off-load OLTP data for decision
support (DSS) analysis. For example, data from several OLTP systems can be
replicated to a DSS system for read-only analysis. Pay close attention to the
configuration of the tables from which data is replicated to ensure that each
primary key is unique among the multiple primary database servers.
Workload Partitioning: Workload partitioning gives businesses the flexibility of
assigning data ownership at the table-partition level, rather than within an
application. Figure 3-3 illustrates workload partitioning.
In Figure 3-3, the replication model matches the partition model for the employee
tables. The Asia-Pacific database server owns the partition and can therefore
update, insert, and delete employee records for personnel in its region. The
(Read-write)
(Read-write)
(Read-only)
(Read-write)
(Read-write)
Databaseserver
Databaseserver
Databaseserver
Databaseserver
Databaseserver
Primary Primary
PrimaryPrimary
Target
Figure 3-2. Data Consolidation in a Primary-Target Replication System
U.S.A. Europe
A-P Partition
U.S.A. Partition
Europe Partition
A-P Partition
U.S.A. Partition
Europe Partition
A-P Partition
U.S.A. Partition
Europe Partition
Owner of partition (Read-write) Read-only privileges
Databaseserver
Databaseserver
Databaseserver
Asia-Pacific
emp# empname
2994 N. Night
4402 R. River
emp# empname
6398 D. Davis
9456 E. Eldridge
emp# empname
9631 J. Jones
4951 H. Height
emp# empname
6520 P.
3798 G.
Peters
Gladys
emp# empname
8002 F. Fire
9966 S. Smith
emp# empname
5783 A. Alder
1235 M. Markar
emp# empname
3711 L. Lane
5540 T. Thomas
emp# empname
3622 C.
7333 K.
Cowpar
Kristen
emp# empname
5761 B. Barry
6642 Z. Zachary
Figure 3-3. Workload Partitioning in a Primary-Target Replication System
Chapter 3. Selecting the Enterprise Replication System and Network Topology 3-3

changes are then propagated to the U.S. and European regions. The Asia-Pacific
database server can query or read the other partitions locally, but cannot update
those partitions locally. This strategy applies to other regions as well.
Workflow Replication: Unlike the data dissemination model, in a
workflow-replication system, the data moves from site to site. Each site processes
or approves the data before sending it on to the next site.
Figure 3-4 illustrates an order-processing system. Order processing typically
follows a well-ordered series of steps: orders are entered, approved by accounting,
inventory is reconciled, and the order is finally shipped.
In a workflow-replication system, application modules can be distributed across
multiple sites and databases. Data can also be replicated to sites that need
read-only access to the data (for example, if order-entry sites want to monitor the
progress of an order).
A workflow-replication system, like the primary-target replication system, allows
only unidirectional updates. Many facts that you need to consider for a
primary-target replication system should also be considered for the
workflow-replication system.
However, unlike the primary-target replication system, availability can become an
issue if a database server goes down. The database servers in the
workflow-replication system rely on the data updated at a previous site. Consider
this fact when you select a workflow-replication system.
Primary-Target Considerations
The following sections describe some of the factors to consider when you select a
primary-target replication system:
v Administration
Primary-target replication systems are the easiest to administer because all
updates are unidirectional and therefore, no data update conflicts occur.
Primary-target replication systems use the ignore conflict-resolution rule. See
“Conflict-Resolution Rule” on page 3-6.
v Capacity planning
All replication systems require you to plan for capacity changes. For more
information, see “Preparing Data for Replication” on page 4-14.
v High-availability planning
In the primary-target replication system, if a target database server or network
connection goes down, Enterprise Replication continues to log information for
the database server until it becomes available again. If a database server is
unavailable for some time, you might want to remove the database server from
Order entry ShipAccountingInventorymanagement
Orderprocessing
Orderprocessing
Orderprocessing
Orderprocessing
custno custname1234 XYZLTD1235 XSPORTS
custno custname1234 XYZLTD1235 XSPORTS
custno custname1234 XYZLTD1235 XSPORTS
custno custname1234 XYZLTD1235 XSPORTS
Figure 3-4. A Workflow-Replication System Where Update Authority Moves From Site to Site
3-4 IBM Informix Dynamic Server Enterprise Replication Guide

the replication system. If the unavailable database server is the read-write
database server, you must plan a course of action to change read-write
capabilities on another database server.
If you require a fail-safe replication system, you should select a high-availability
replication system. For more information, see “High-Availability Replication
System” on page 5-1.
Update-Anywhere Replication System
In update-anywhere replication, changes made on any participating database
server are replicated to all other participating database servers. This capability
allows users to function autonomously even when other systems or networks in
the replication system are not available.
Figure 3-5 illustrates an update-anywhere replication system.
Because each service center can update a copy of the data, conflicts can occur
when the data is replicated to the other sites. To resolve update conflicts,
Enterprise Replication uses conflict resolution. For more information, see “Conflict
Resolution” on page 3-6.
Review the following information before you select your update-anywhere
replication system:
v Administration
Update-anywhere replication systems allow peer-to-peer updates, and therefore
require conflict-resolution (see “Conflict Resolution” on page 3-6).
Update-anywhere replication systems require more administration than
primary-target replication systems.
v Information consistency
Some risk is associated with delivering consistent information in an
update-anywhere replication system. You determine the amount of risk based on
the type of conflict-resolution rules and routines you choose for resolving
conflicts. You can configure an update-anywhere replication system where no
data is ever lost; however, you might find that other factors (for example,
performance) outweigh your need for a fail-safe mechanism to deliver consistent
information.
v Capacity Planning
All replication systems require you to plan for capacity changes. For more
information, see “Preparing Data for Replication” on page 4-14. In particular, if
Update
UpdateUpdate
Washingtonservice center
Los Angelesservice center
New Yorkservice center
Databaseserver
Databaseserver
Databaseserver
Figure 3-5. Update-Anywhere Replication System
Chapter 3. Selecting the Enterprise Replication System and Network Topology 3-5

you choose the time stamp or time stamp plus SPL routine conflict-resolution
rule, see “Delete Table Disk Space” on page 4-7 and “Shadow Column Disk
Space” on page 4-8.
v High Availability
If any of your database servers are critical, consider using HDR to provide
backup servers. For more information, see “High-Availability Replication
System” on page 5-1.
Conflict Resolution
When multiple database servers try to update the same row simultaneously (the
time stamp for both updates is the same GMT time), a collision occurs. For more
information, see “Applying Replicated Data” on page 1-12. Enterprise Replication
must determine which new data to replicate. To solve conflict resolution, you must
specify the following for each replicate:
v A conflict-resolution rule
v The scope of the rule
Conflict-Resolution Rule
Enterprise Replication supports the following conflict-resolution rules.
Conflict Resolution Rule Effect Reference
Ignore Enterprise Replication does not attempt to
resolve conflicts.
page 3-7
Time stamp The row or transaction with the most
recent time stamp is applied.
page 3-7
SPL routine Enterprise Replication uses a routine
written in SPL (Stored Procedure
Language) that you provide to determine
which data should be applied.
page 3-8
Time stamp with SPL routine If the time stamps are identical,
Enterprise Replication invokes an SPL
routine that you provide to resolve the
conflict.
page 3-7,
page 3-8
Always-apply Enterprise Replication does not attempt to
resolve conflicts.
page 3-10
For all conflict-resolution rules except ignore and always-apply, you must create
shadow columns in the tables on both the source and target servers involved in
replication. For more information, see “Shadow Columns” on page 2-7.
Enterprise Replication supports up to two conflict-resolution rules for each
replicate: a primary rule and a secondary rule (if desired). Table 3-1 shows the
valid combinations of Enterprise Replication conflict-resolution rules.
Table 3-1. Valid Conflict-Resolution Rule Combinations
Primary Rule Secondary Rule
Ignore None
Time stamp None
Time stamp SPL routine
SPL routine None
Always-apply None
3-6 IBM Informix Dynamic Server Enterprise Replication Guide
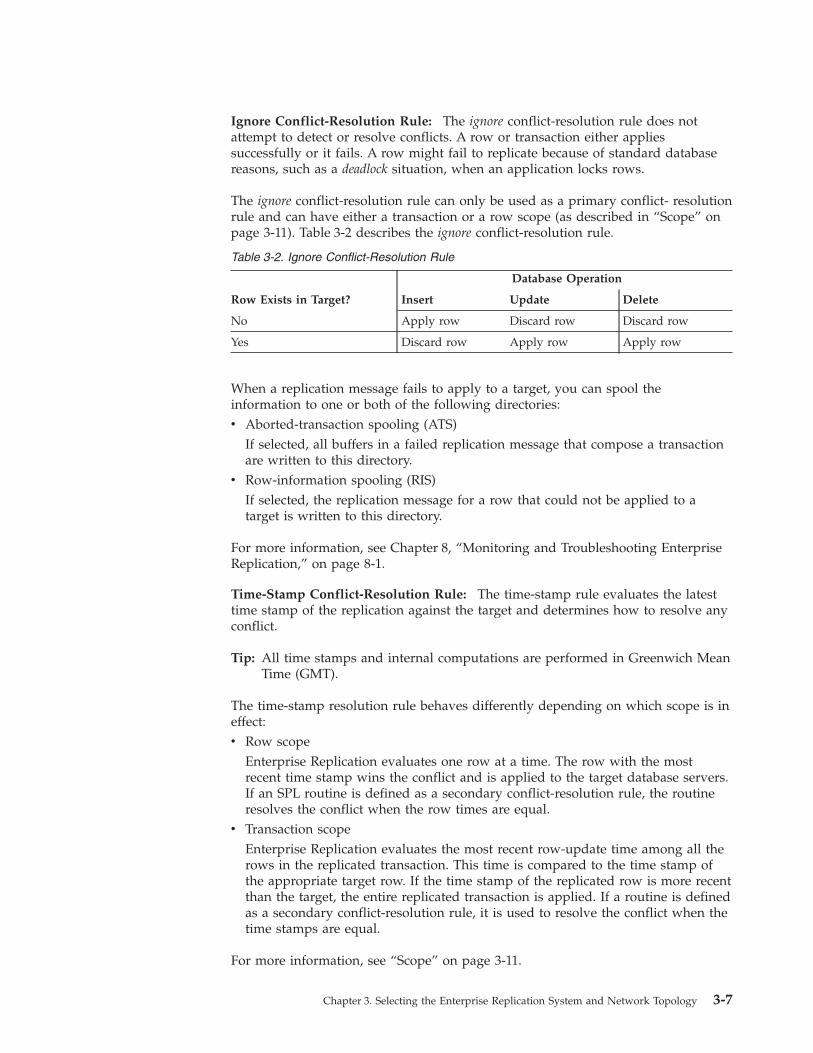
Ignore Conflict-Resolution Rule: The ignore conflict-resolution rule does not
attempt to detect or resolve conflicts. A row or transaction either applies
successfully or it fails. A row might fail to replicate because of standard database
reasons, such as a deadlock situation, when an application locks rows.
The ignore conflict-resolution rule can only be used as a primary conflict- resolution
rule and can have either a transaction or a row scope (as described in “Scope” on
page 3-11). Table 3-2 describes the ignore conflict-resolution rule.
Table 3-2. Ignore Conflict-Resolution Rule
Row Exists in Target?
Database Operation
Insert Update Delete
No Apply row Discard row Discard row
Yes Discard row Apply row Apply row
When a replication message fails to apply to a target, you can spool the
information to one or both of the following directories:
v Aborted-transaction spooling (ATS)
If selected, all buffers in a failed replication message that compose a transaction
are written to this directory.
v Row-information spooling (RIS)
If selected, the replication message for a row that could not be applied to a
target is written to this directory.
For more information, see Chapter 8, “Monitoring and Troubleshooting Enterprise
Replication,” on page 8-1.
Time-Stamp Conflict-Resolution Rule: The time-stamp rule evaluates the latest
time stamp of the replication against the target and determines how to resolve any
conflict.
Tip: All time stamps and internal computations are performed in Greenwich Mean
Time (GMT).
The time-stamp resolution rule behaves differently depending on which scope is in
effect:
v Row scope
Enterprise Replication evaluates one row at a time. The row with the most
recent time stamp wins the conflict and is applied to the target database servers.
If an SPL routine is defined as a secondary conflict-resolution rule, the routine
resolves the conflict when the row times are equal.
v Transaction scope
Enterprise Replication evaluates the most recent row-update time among all the
rows in the replicated transaction. This time is compared to the time stamp of
the appropriate target row. If the time stamp of the replicated row is more recent
than the target, the entire replicated transaction is applied. If a routine is defined
as a secondary conflict-resolution rule, it is used to resolve the conflict when the
time stamps are equal.
For more information, see “Scope” on page 3-11.
Chapter 3. Selecting the Enterprise Replication System and Network Topology 3-7
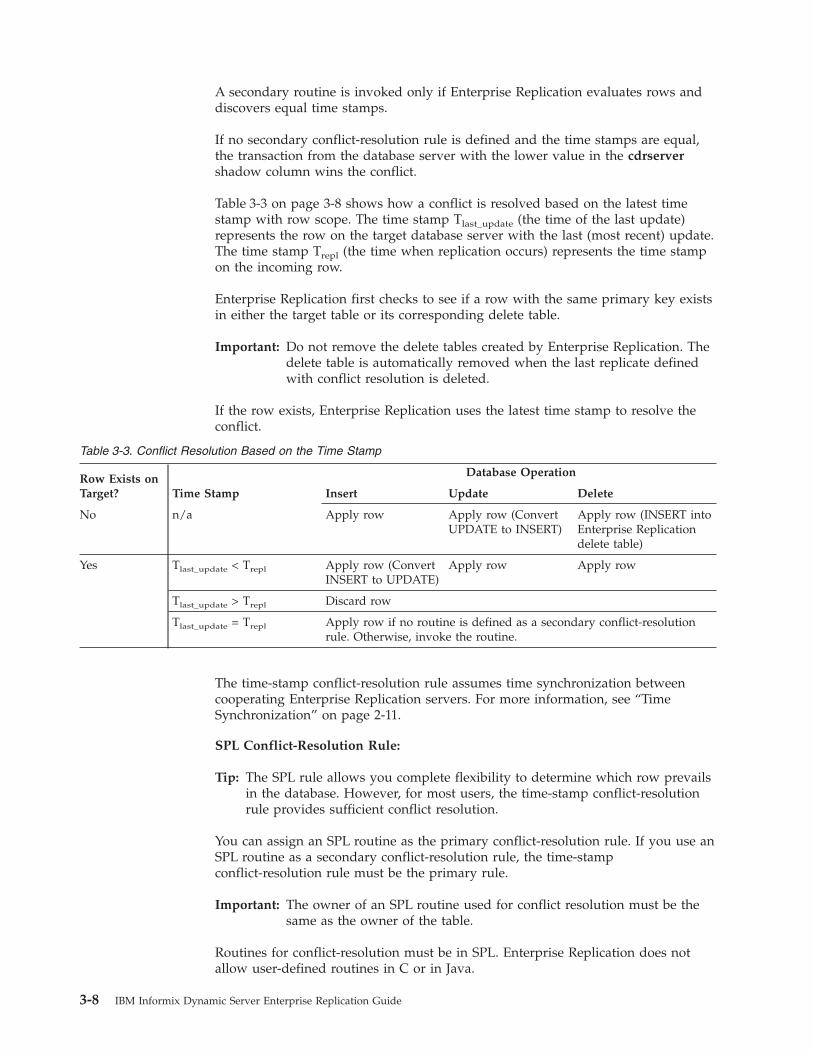
A secondary routine is invoked only if Enterprise Replication evaluates rows and
discovers equal time stamps.
If no secondary conflict-resolution rule is defined and the time stamps are equal,
the transaction from the database server with the lower value in the cdrserver
shadow column wins the conflict.
Table 3-3 on page 3-8 shows how a conflict is resolved based on the latest time
stamp with row scope. The time stamp Tlast_update
(the time of the last update)
represents the row on the target database server with the last (most recent) update.
The time stamp Trepl
(the time when replication occurs) represents the time stamp
on the incoming row.
Enterprise Replication first checks to see if a row with the same primary key exists
in either the target table or its corresponding delete table.
Important: Do not remove the delete tables created by Enterprise Replication. The
delete table is automatically removed when the last replicate defined
with conflict resolution is deleted.
If the row exists, Enterprise Replication uses the latest time stamp to resolve the
conflict.
Table 3-3. Conflict Resolution Based on the Time Stamp
Row Exists on
Target? Time Stamp
Database Operation
Insert Update Delete
No n/a Apply row Apply row (Convert
UPDATE to INSERT)
Apply row (INSERT into
Enterprise Replication
delete table)
Yes Tlast_update
< Trepl
Apply row (Convert
INSERT to UPDATE)
Apply row Apply row
Tlast_update
> Trepl
Discard row
Tlast_update
= Trepl
Apply row if no routine is defined as a secondary conflict-resolution
rule. Otherwise, invoke the routine.
The time-stamp conflict-resolution rule assumes time synchronization between
cooperating Enterprise Replication servers. For more information, see “Time
Synchronization” on page 2-11.
SPL Conflict-Resolution Rule:
Tip: The SPL rule allows you complete flexibility to determine which row prevails
in the database. However, for most users, the time-stamp conflict-resolution
rule provides sufficient conflict resolution.
You can assign an SPL routine as the primary conflict-resolution rule. If you use an
SPL routine as a secondary conflict-resolution rule, the time-stamp
conflict-resolution rule must be the primary rule.
Important: The owner of an SPL routine used for conflict resolution must be the
same as the owner of the table.
Routines for conflict-resolution must be in SPL. Enterprise Replication does not
allow user-defined routines in C or in Java.
3-8 IBM Informix Dynamic Server Enterprise Replication Guide

Important: You cannot use an SPL routine or a time stamp with an SPL routine if
the replicate is defined to replicate only changed columns or the
replicated table contains any extensible data types. See “Replicating
Only Changed Columns” on page 6-8.
Enterprise Replication passes the following information to an SPL routine as
arguments.
Argument Description
Server name [CHAR(18)] From the local target row
NULL if local target row does not exist
Time stamp (DATETIME YEAR TO
SECOND)
From the local target row
NULL if local target row does not exist
Local delete-table indicator [CHAR(1)]
or Local key delete-row indicator
[CHAR(1)]
Y indicates the origin of the row is the delete
table.
K indicates the origin of the row is the
replicate-key delete row.
If a conflict occurs while deleting a primary key
row, because the local row with the old key no
longer exists, the received key delete row is
passed as the local row (using the seventh
argument, local row data, described below).
The received key insert row is passed to the
stored procedure as the replicated row using the
eighth argument, described below.
Server name [CHAR(18)] Of the replicate source
Time stamp (DATETIME YEAR TO
SECOND)
From the replicated row
Replicate action type [CHAR(1)] I - insert
D - delete
U - update
Local row data returned in regular SQL
format
Where the regular SQL format is taken from the
SELECT clause of the participant list
Replicate row data after-image returned
in regular SQL format
Where the regular SQL format is taken from the
SELECT clause of the participant list
The routine must set the following arguments before the routine can be applied to
the replication message.
Chapter 3. Selecting the Enterprise Replication System and Network Topology 3-9

Argument Description
An indicator of the desired database
operation to be performed [CHAR(1)]
Same as the replicate action codes with the
following additional codes
v A - Accept the replicated row and apply the
column values returned by the SPL routine.
For example, if Enterprise Replication receives an
insert and the row already exists locally, the insert
is converted to an update
v S - Accept the replicated row and apply the
column values as received from the other site.
For example, if Enterprise Replication receives an
insert and the row already exists locally, the insert
fails at the time Enterprise Replication tries to
apply the transaction to the database, and the
transaction aborts with an SQL error.
v O - Discard the replicated row.
v X - Abort the transaction.
A non-zero integer value to request
logging of the conflict resolution and the
integer value in the spooling files
(INTEGER)
Logging value takes effect only if logging is
configured for this replicate.
The columns of the row to be applied to
the target table replicate action type in
regular SQL format
This list of column values is not parsed if the
replicate action type that the routine returns is S,
O, or X.
You can use the arguments to develop application-specific routines. For example,
you can create a routine in which a database server always wins a conflict
regardless of the time stamp.
The following list includes some items to consider when you use an SPL routine
for conflict resolution:
v Any action that a routine takes as a result of replication does not replicate.
v You cannot use an SPL routine to start another transaction.
v Frequent use of routines might affect performance.
In addition, you must determine when the SPL routine executes:
v An optimized SPL routine is called only when a collision is detected and the row
to be replicated fails to meet one of the following two conditions:
– It is from the same database server that last updated the local row on the
target table.
– It has a time stamp greater than or equal to that of the local row.v A nonoptimized SPL routine executes every time Enterprise Replication detects a
collision. By default, SPL routines are nonoptimized.
For information on specifying that the SPL routine is optimized, see “Conflict
Options” on page A-23.
Tip: Do not assign a routine that is not optimized as a primary conflict-resolution
rule for applications that usually insert rows successfully.
Always-Apply Conflict-Resolution Rule: The always-apply conflict-resolution rule
does not attempt to detect or resolve conflicts. Unlike with the ignore
3-10 IBM Informix Dynamic Server Enterprise Replication Guide

conflict-resolution rule, replicated changes are applied even if the operations are
not the same on the source and target servers. In the case of a conflict, the current
row on the target is deleted and replaced with the replicated row from the source.
Table 3-4 describes the always-apply conflict-resolution rule.
Table 3-4. Always-Apply Conflict-Resolution Rule
Row Exists in Target?
Database Operation
Insert Update Delete
No Apply row Apply row
(convert UPDATE
to INSERT)
Apply row (INSERT
into Enterprise
Replication delete
table, no error
returned)
Yes Apply as an
UPDATE
(overwrite the
existing row)
Apply row Deletes the row
Scope
Each conflict-resolution rule behaves differently depending on the scope. Enterprise
Replication uses the following scopes:
v Row scope
When you choose a row scope, Enterprise Replication evaluates one row at a
time. It only applies replicated rows that win the conflict resolution with the
target row. If an entire replicated transaction receives row-by-row evaluation,
some replicated rows are applied while other replicated rows might not be
applied.
v Transaction scope
When you choose a transaction scope, Enterprise Replication applies the entire
transaction if the replicated transaction wins the conflict resolution. If the target
wins the conflict (or other database errors are present), the entire replicated
transaction is not applied.
A transaction scope for conflict resolution guarantees transactional integrity.
Important: Enterprise Replication defers some constraint checking on the target
tables until the transaction commits. If a unique constraint or
foreign-key constraint violation is found on any row of the transaction
at commit time, the entire transaction is rejected (regardless of the
scope) and, if you have ATS set up, written to the ATS directory. For
more information, see “Aborted Transaction Spooling Files” on page
8-2.
Choosing a Replication Network Topology
Enterprise Replication topology describes connections that replication servers make
to interact with each other. You must define the replication topology within the
topology of the physical network, but the replication topology is not synonymous
with the physical network topology. The order in which you define the database
servers for replication and the options that you use when you define the database
server determine the replication topology.
Enterprise Replication supports two types of network topology:
Chapter 3. Selecting the Enterprise Replication System and Network Topology 3-11
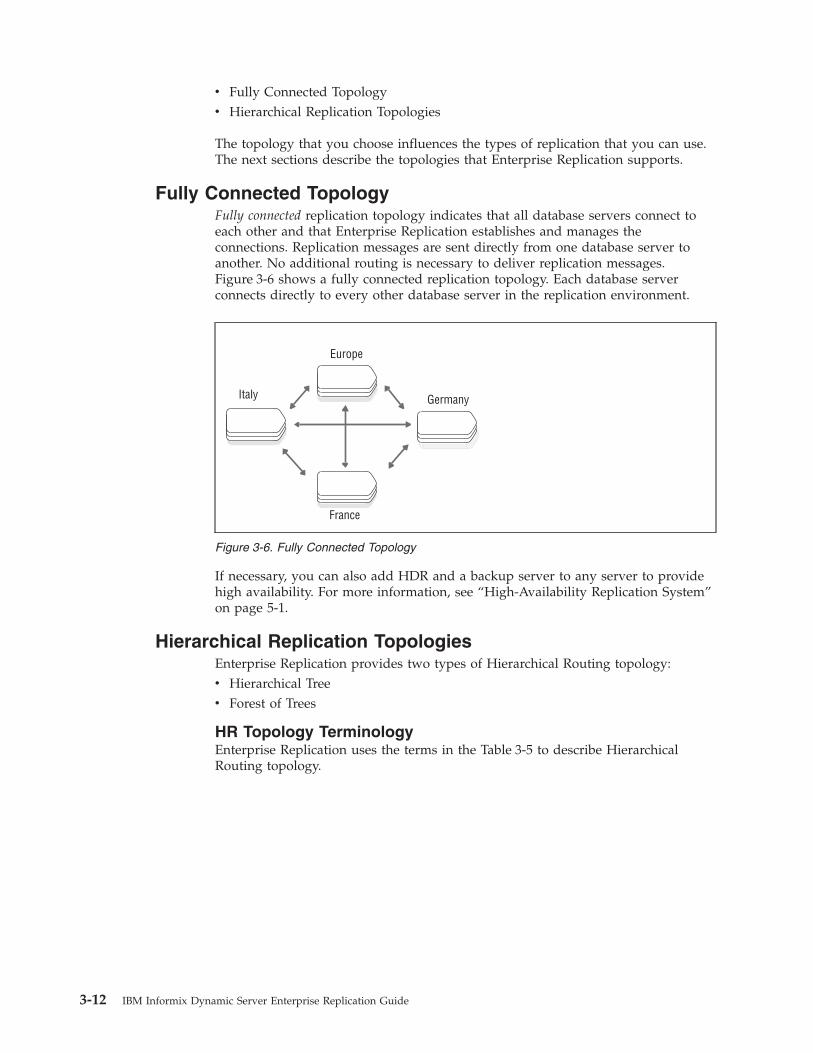
v Fully Connected Topology
v Hierarchical Replication Topologies
The topology that you choose influences the types of replication that you can use.
The next sections describe the topologies that Enterprise Replication supports.
Fully Connected Topology
Fully connected replication topology indicates that all database servers connect to
each other and that Enterprise Replication establishes and manages the
connections. Replication messages are sent directly from one database server to
another. No additional routing is necessary to deliver replication messages.
Figure 3-6 shows a fully connected replication topology. Each database server
connects directly to every other database server in the replication environment.
If necessary, you can also add HDR and a backup server to any server to provide
high availability. For more information, see “High-Availability Replication System”
on page 5-1.
Hierarchical Replication Topologies
Enterprise Replication provides two types of Hierarchical Routing topology:
v Hierarchical Tree
v Forest of Trees
HR Topology Terminology
Enterprise Replication uses the terms in the Table 3-5 to describe Hierarchical
Routing topology.
GermanyItaly
France
Europe
Figure 3-6. Fully Connected Topology
3-12 IBM Informix Dynamic Server Enterprise Replication Guide

Table 3-5. Replication Topology Terms
Term Definition
Root server An Enterprise Replication server that is the uppermost level in
a hierarchically organized set of information
The root is the point from which database servers branch into a
logical sequence. All root database servers within Enterprise
Replication must be fully interconnected.
Nonroot server An Enterprise Replication server that is not a root database
server but has a complete global catalog and is connected to its
parent and to its children
Tree A data structure that contains database servers that are linked
in a hierarchical manner
The topmost node is called the root. The root can have zero or
more child database servers; the root is the parent database
server to its children.
Parent-child A relationship between database servers in a tree data structure
in which the parent is one step closer to the root than the child.
Leaf server A database server that has a limited catalog and no children.
A root server is fully connected to all other root servers. It has information about
all other replication servers in its replication environment. Figure 3-6 on page 3-12
shows an environment with four root servers.
A nonroot server is similar to a root server except that it forwards all replicated
messages for other root servers (and their children) through its parent. All nonroot
servers are known to all root and other nonroot servers. A nonroot server might or
might not have children. All root and nonroot servers are aware of all other servers
in the replication environment.
Important: In Hierarchical Routing topologies, Enterprise Replication specifies the
synchronization server as the new server’s parent in the current
topology. For more information, see “Customizing the Replication
Server Definition” on page 6-3 and “cdr define server” on page A-30.
Hierarchical Tree
A hierarchical tree consists of a root database server and one or more database
servers organized into a tree topology. The tree contains only one root, which has
no parent. Each database server within the tree references its parent. A database
server that is not a parent is a leaf. Figure 3-7 illustrates a replication tree.
Chapter 3. Selecting the Enterprise Replication System and Network Topology 3-13
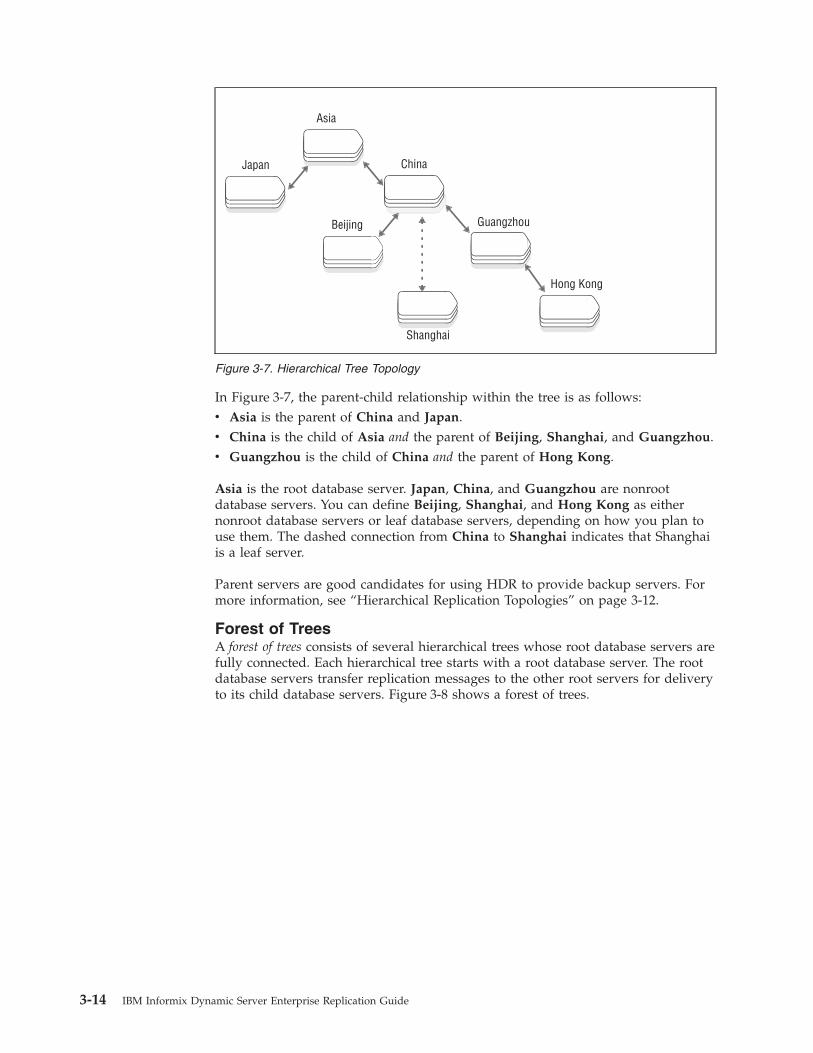
In Figure 3-7, the parent-child relationship within the tree is as follows:
v Asia is the parent of China and Japan.
v China is the child of Asia and the parent of Beijing, Shanghai, and Guangzhou.
v Guangzhou is the child of China and the parent of Hong Kong.
Asia is the root database server. Japan, China, and Guangzhou are nonroot
database servers. You can define Beijing, Shanghai, and Hong Kong as either
nonroot database servers or leaf database servers, depending on how you plan to
use them. The dashed connection from China to Shanghai indicates that Shanghai
is a leaf server.
Parent servers are good candidates for using HDR to provide backup servers. For
more information, see “Hierarchical Replication Topologies” on page 3-12.
Forest of Trees
A forest of trees consists of several hierarchical trees whose root database servers are
fully connected. Each hierarchical tree starts with a root database server. The root
database servers transfer replication messages to the other root servers for delivery
to its child database servers. Figure 3-8 shows a forest of trees.
China
Guangzhou
Hong Kong
Japan
Beijing
Shanghai
Asia
Figure 3-7. Hierarchical Tree Topology
3-14 IBM Informix Dynamic Server Enterprise Replication Guide
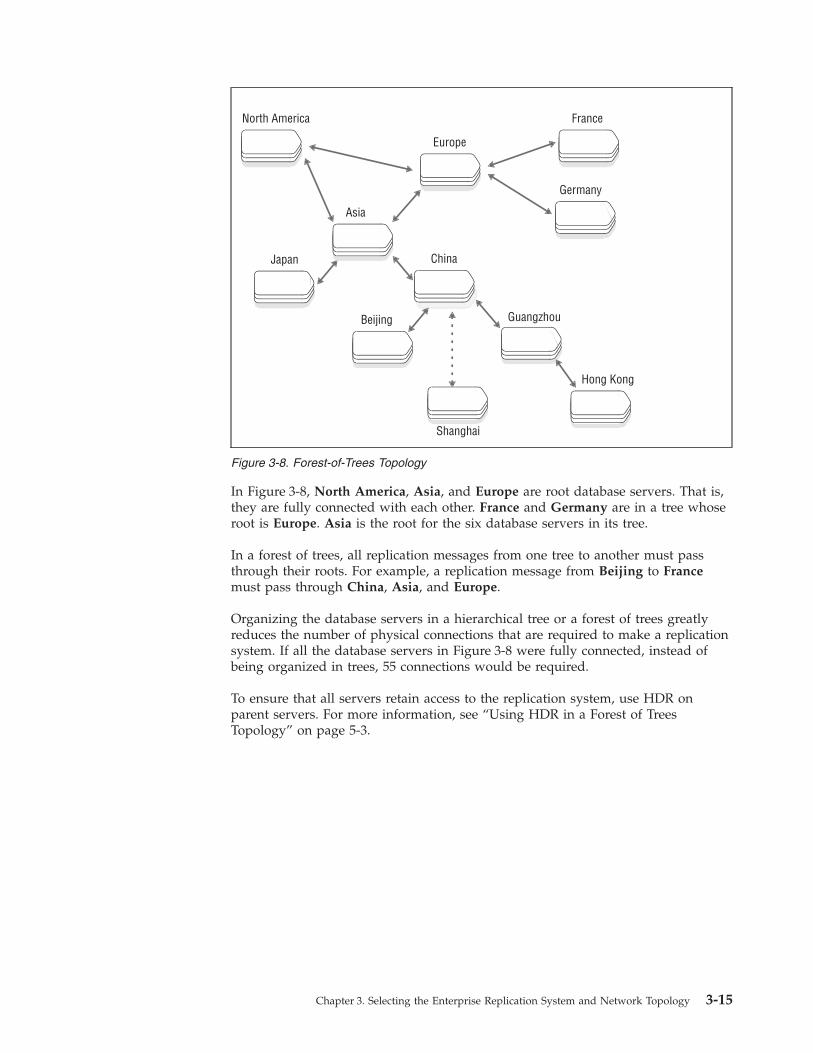
In Figure 3-8, North America, Asia, and Europe are root database servers. That is,
they are fully connected with each other. France and Germany are in a tree whose
root is Europe. Asia is the root for the six database servers in its tree.
In a forest of trees, all replication messages from one tree to another must pass
through their roots. For example, a replication message from Beijing to France
must pass through China, Asia, and Europe.
Organizing the database servers in a hierarchical tree or a forest of trees greatly
reduces the number of physical connections that are required to make a replication
system. If all the database servers in Figure 3-8 were fully connected, instead of
being organized in trees, 55 connections would be required.
To ensure that all servers retain access to the replication system, use HDR on
parent servers. For more information, see “Using HDR in a Forest of Trees
Topology” on page 5-3.
China
Guangzhou
Hong Kong
Japan
Beijing
Shanghai
Asia
Germany
France
Europe
North America
Figure 3-8. Forest-of-Trees Topology
Chapter 3. Selecting the Enterprise Replication System and Network Topology 3-15

3-16 IBM Informix Dynamic Server Enterprise Replication Guide

Chapter 4. Preparing the Replication Environment
In This Chapter . . . . . . . . . . . . . . . . . . . . . . . . . . . . . . . . . . 4-1
Preparing the Network Environment . . . . . . . . . . . . . . . . . . . . . . . . . . . 4-2
Setting Up the Hosts File . . . . . . . . . . . . . . . . . . . . . . . . . . . . . 4-2
Setting Up the Services File . . . . . . . . . . . . . . . . . . . . . . . . . . . . . 4-2
Setting Up the Trusted Environment . . . . . . . . . . . . . . . . . . . . . . . . . . 4-3
Verifying SQLHOSTS . . . . . . . . . . . . . . . . . . . . . . . . . . . . . . . 4-3
Setting up Database Server Groups . . . . . . . . . . . . . . . . . . . . . . . . . 4-3
Hierarchical Routing Topologies and SQLHOSTS . . . . . . . . . . . . . . . . . . . . 4-5
Network Encryption and SQLHOSTS . . . . . . . . . . . . . . . . . . . . . . . . 4-5
Using the Connection Security Option (s=6) . . . . . . . . . . . . . . . . . . . . . . 4-5
Testing the Network Environment . . . . . . . . . . . . . . . . . . . . . . . . . . 4-6
Preparing the Disk . . . . . . . . . . . . . . . . . . . . . . . . . . . . . . . . . 4-6
Planning for Disk Space Requirements . . . . . . . . . . . . . . . . . . . . . . . . . 4-6
Logical Log Configuration Disk Space . . . . . . . . . . . . . . . . . . . . . . . . 4-6
Logical Log Configuration Guidelines . . . . . . . . . . . . . . . . . . . . . . . . 4-7
Delete Table Disk Space . . . . . . . . . . . . . . . . . . . . . . . . . . . . . 4-7
Shadow Column Disk Space . . . . . . . . . . . . . . . . . . . . . . . . . . . 4-8
Setting Up Send and Receive Queue Spool Areas . . . . . . . . . . . . . . . . . . . . . 4-8
Transaction Record dbspace . . . . . . . . . . . . . . . . . . . . . . . . . . . . 4-8
Row Data sbspaces . . . . . . . . . . . . . . . . . . . . . . . . . . . . . . 4-9
Setting Up the Grouper Paging File . . . . . . . . . . . . . . . . . . . . . . . . . . 4-12
Creating ATS and RIS Directories . . . . . . . . . . . . . . . . . . . . . . . . . . 4-12
Preparing the Database Server Environment . . . . . . . . . . . . . . . . . . . . . . . . 4-13
Setting Environment Variables . . . . . . . . . . . . . . . . . . . . . . . . . . . 4-13
Setting Configuration Parameters . . . . . . . . . . . . . . . . . . . . . . . . . . 4-13
Preparing Data for Replication . . . . . . . . . . . . . . . . . . . . . . . . . . . . 4-14
Preparing Consistent Data . . . . . . . . . . . . . . . . . . . . . . . . . . . . . 4-14
Blocking Replication . . . . . . . . . . . . . . . . . . . . . . . . . . . . . . . 4-14
Using DB-Access to Begin Work Without Replication . . . . . . . . . . . . . . . . . . . 4-15
Using ESQL/C to Begin Work Without Replication . . . . . . . . . . . . . . . . . . . 4-15
Preparing to Replicate User-Defined Types . . . . . . . . . . . . . . . . . . . . . . . 4-16
Preparing to Replicate User-Defined Routines . . . . . . . . . . . . . . . . . . . . . . 4-16
Preparing Tables for Conflict Resolution . . . . . . . . . . . . . . . . . . . . . . . . 4-16
Preparing Logging Databases . . . . . . . . . . . . . . . . . . . . . . . . . . . . 4-17
Loading and Unloading Data . . . . . . . . . . . . . . . . . . . . . . . . . . . . . 4-17
High-Performance Loader . . . . . . . . . . . . . . . . . . . . . . . . . . . . . 4-18
onunload and onload Utilities . . . . . . . . . . . . . . . . . . . . . . . . . . . 4-18
dbexport and dbimport Utilities . . . . . . . . . . . . . . . . . . . . . . . . . . . 4-18
UNLOAD and LOAD Statements . . . . . . . . . . . . . . . . . . . . . . . . . . 4-18
Data Preparation Example . . . . . . . . . . . . . . . . . . . . . . . . . . . . . . 4-19
Using the cdr start replicate Command . . . . . . . . . . . . . . . . . . . . . . . . 4-19
Using LOAD, UNLOAD, and BEGIN WORK WITHOUT REPLICATION . . . . . . . . . . . . . 4-20
In This Chapter
This chapter covers the steps to take to prepare your environment for replicating
data with Enterprise Replication: preparing the network environment, the disk, the
server environment, and the data.
© Copyright IBM Corp. 1996, 2005 4-1

Preparing the Network Environment
For more information on preparing the network environment, see the chapter on
client/server connectivity in the IBM Informix Dynamic Server Administrator's Guide.
See Appendix E, “Replication Examples,” on page E-1, for a sample setup.
To prepare your network environment:
1. Set up the hosts file.
For information, see “Setting Up the Hosts File” on page 4-2.
2. Set up the services file.
For information, see “Setting Up the Services File” on page 4-2.
3. Set up the trusted environment.
For information, see “Setting Up the Trusted Environment” on page 4-3.
4. Verify the SQLHOSTS information.
For information, see “Verifying SQLHOSTS” on page 4-3.
5. Test the network environment.
For information, see “Testing the Network Environment” on page 4-6.
Setting Up the Hosts File
First, make sure the hosts file includes the IP addresses and system names for all
database servers involved in Enterprise Replication.
Important: If you are using Domain Name Service (DNS) to identify IP addresses
and system names, you do not need to configure the hosts file.
The hosts file is in the following location.
Operating System File
UNIX /etc/hosts
Windows %WINDIR%\system32\drivers\etc\hosts
Important: Leave a blank line at the end of the hosts file on Windows.
For example, your hosts file might look like the following:
123.456.789.1 sydney
123.456.789.2 melbourne
Setting Up the Services File
Next, make sure that the services file includes the port numbers and service names
for all the database servers involved in Enterprise Replication. The services file is
in the following location.
Operating System File
UNIX /etc/services
Windows %WINDIR%\system32\drivers\etc\services
Important: Leave a blank line at the end of the services file on Windows.
For example, your services file might look like the following:
4-2 IBM Informix Dynamic Server Enterprise Replication Guide

sydney 5327/tcp
melbourne 5327/tcp
If the database servers reside on the same system, you must provide unique port
numbers for each.
Setting Up the Trusted Environment
To establish the trust relationship for all users, set up the hosts.equiv file. The
hosts.equiv file is in the following location.
Operating System File
UNIX /etc/hosts.equiv
Windows %WINDIR%\system32\drivers\etc\hosts.equiv
For example, your hosts.equiv file might look like the following:
sydney
melbourne
Tip: Instead of allowing access to all users, you can set up .rhosts files in the
home directory of specific users. See your operating system documentation
for more information.
Verifying SQLHOSTS
Make sure that the SQLHOSTS file is set up properly on each server participating
in replication.
Setting up Database Server Groups
Enterprise Replication requires that all database servers participating in replication
be members of database server groups. Each server in the enterprise must have a
unique identifier; the database server group uniquely identifies a server.
If you are combining Enterprise Replication with HDR, both the primary and
secondary HDR servers must be members of the same database server group. For
more information, see “Managing Enterprise Replication with High-Availability
Data Replication” on page 5-6.
Typically, a server group includes only one database server. However, if the
computer has multiple network protocols or network interface cards, the server
group includes all aliases for the database server. Enterprise Replication treats the
server group as one object, whether it includes one or several database server
names.
All Enterprise Replication commands and options use the name of the database
server group of the more familiar database server name (that is, the name specified by
the INFORMIXSERVER environment variable) for all references to database
servers. The exception is the --connect option, which can use both server name or
group name. This manual also refers to a database server group as a server group.
This manual uses the convention that the name of a database server group is g_
followed by the name of a database server that is in the group. This use of g_ is
only a convention; g_ is not required syntax.
Database Server Groups on UNIX: On UNIX, a database server group is defined
in the sqlhosts file. The following example shows a very simple sqlhosts file for
Chapter 4. Preparing the Replication Environment 4-3

four Enterprise Replication servers, john, paul, george, and ringo and their
database server groups. The first line describes the database server group g_john,
which includes the database server john, and so on.
dbservername nettype hostname servicename options
g_john
john
g_paul
paul
g_george
george
g_ringo
ringo
group
ontlitcp
group
ontlitcp
group
ontlitcp
group
ontlitcp
-
sydney.australia.com
-
melbourne.australia.com
-
perth.australia.com
-
brisbane.australia.com
-
10110
-
2939
-
5329
-
10101
i=143
g=g_john
i=144
g=g_paul
i=145
g=g_george
i=146
g=g_ringo
The following table describes the fields in the sqlhosts example above.
dbservername Database server group name or database server name
nettype Type of connection (composed of the database server product, interface
type, and network protocol)
hostname The name of the computer where the database server resides
servicename The service name or port number entry in the services file
options v The g option specifies the name of the group to which the database
server belongs.
v The i option specifies a unique identifier for the database server.
Make sure that this identifier is consistent for the database server
across all nodes in the enterprise.
Important: The network connection entry should appear immediately after the
database server group definition.
Important: It is not necessary for the DBSERVERNAME to be set to a network
connection; however, at least one of server names listed by the
DBSERVERNAME or the DBSERVERALIASES configuration
parameters should be set to a network protocol. For information about
database server aliases, refer to the IBM Informix Dynamic Server
Administrator's Guide.
Important: Enterprise Replication cannot use shared memory connections even if
the replicating servers are on same machine.
For an example of an SQLHOSTS file when combining Enterprise Replication and
High-Availability Data Replication, see “Managing Enterprise Replication with
High-Availability Data Replication” on page 5-6.
For more information about database server groups and setting up SQLHOSTS, see
the chapter on client/server communications in the IBM Informix Dynamic Server
Administrator's Guide.
Database Server Groups on Windows: For information about preparing the
SQLHOSTS connectivity information on Windows, see Appendix F, “SQLHOSTS
Registry Key (Windows),” on page F-1.
Important: It is strongly recommended that you use IBM Informix Server
Administrator (ISA), rather than regedt32, to set up the SQLHOSTS
4-4 IBM Informix Dynamic Server Enterprise Replication Guide

registry key and database server group registry key on your Windows
system. In addition, ISA allows you to administer your replication
system from a web browser.
Hierarchical Routing Topologies and SQLHOSTS
For hierarchical routing (HR) topologies:
v Root and nonroot servers must each have complete SQLHOSTS server group
information for the entire enterprise.
v Each leaf server must have SQLHOSTS connectivity information only for itself
and its parent (hub).
Root and nonroot servers contain the complete global catalog; leaf servers do not.
For more information, see “HR Topology Terminology” on page 3-12 and “Global
Catalog” on page 2-4.
Network Encryption and SQLHOSTS
Client/server network communication is encrypted by specifying the ENCCSM
module with the communications support module (CSM) option in the SQLHOSTS
file. However, Enterprise Replication can only be encrypted by setting encryption
configuration parameters. The ENCRYPT_CDR configuration parameter must be
set to 1 or 2 to allow encryption.
Important: Enterprise Replication cannot use a connection configured with a CSM.
To combine client/server network encryption with Enterprise Replication
encryption, configure two network connections for each database server. The
configuration in the SQLHOSTS file would look like the following example.
dbservername nettype hostname servicename options
g_group1
cdr1
serv1
group
ontlitcp
ontlitcp
-
texpdx
texpdx
-
mp.cdr1
mp.serv1
i=1
g=g_group1
csm=(ENCCSM)
In this example, cdr1 and serv1 are two connection ports on the same database
server. Encrypted client/server communications uses the serv1 port, while
encrypted Enterprise Replication uses the cdr1 port.
For more information on encrypting client/server network communications, see
the IBM Informix Dynamic Server Administrator's Guide.
For more information on encrypting Enterprise Replication, see “Setting
Configuration Parameters” on page 4-13 and Appendix B, “Configuration
Parameter and Environment Variable Reference,” on page B-1.
Using the Connection Security Option (s=6)
If you are using the connection security option, s=6, your SQLHOSTS file must
contain a regular connection (without s=6) within the same group. To do this, you
can add an alias server definition that includes the server group name. For
example:
g_serv1 group - - i=10
serv1 ontlitcp lxsun02 ertest1 g=g_serv1, s=6
a_serv1 ontlitcp lxsun02 ertest10 g=g_serv1
Chapter 4. Preparing the Replication Environment 4-5

For more information about the connection security option, see the IBM Informix
Administrator's Guide.
Testing the Network Environment
Once you have verified the network setup information, test the network
environment.
To test the network environment:
1. Verify the network connection.
Use the ping command to test the connection between two systems. For
example, from sydney, test the connection to melbourne:
ping melbourne
2. Test the trusted environment.
a. Run dbaccess.
b. Select the Connection menu option.
c. Select the Connect menu option.
d. Connect to the server group name and the server name of the other hosts.
For example, if you are running dbaccess on sydney, and you are testing
the connection to a database server on melbourne, select paul and g_paul.
e. When prompted for the USER NAME, press Enter.If you can connect to the host database server, the host server is trusted for
user informix.
For more information, see the IBM Informix DB–Access User's Guide.
Preparing the Disk
Preparing your disk for Enterprise Replication includes the following:
v Planning for Disk Space Requirements
v Setting Up Send and Receive Queue Spool Areas
v Creating ATS and RIS Directories
Planning for Disk Space Requirements
Enterprise Replication requires additional disk space for storing the logical logs
and, depending on your conflict-resolution configuration, delete tables and shadow
columns.
Logical Log Configuration Disk Space
The database server uses the logical log to store a record of changes to the data
since the last archive. Enterprise Replication requires the logical log to contain
entire row images for updated rows, including deleted rows.
The database server normally logs only columns that have changed. This behavior
is called the logical-log record reduction option. Enterprise Replication deactivates
this option for tables that participate in replication. (The logical-log record
reduction option remains enabled for tables that do not participate in Enterprise
Replication.) Enterprise Replication logs all columns, not only the columns that
have changed, which increases the size of your logical log.
To determine the size of your logical log, examine your data activity for normal
operations and for the replication system you defined. Keep in mind that defining
4-6 IBM Informix Dynamic Server Enterprise Replication Guide
replication on a table causes Enterprise Replication to deactivate log reduction for
that table, and that your transactions might log more data.
Important: Enterprise Replication performs internal cleanup tasks based on how
often the log files switch. If the log files switch too frequently,
Enterprise Replication might perform excessive cleanup work.
Logical Log Configuration Guidelines
Use the following guidelines when configuring your logical log files:
v Make sure that all logical log files are approximately the same size.
v Make the size of the logical log files large enough so that the database server
switches log files no more than once every 15 minutes during normal
processing.
v Plan to have sufficient logical-log space to hold at least four times the maximum
transaction size.
v Set LTXEHWM (long-transaction, exclusive-access, high-watermark) 30 percent
larger than LTXHWM (long-transaction high-watermark).
Important: If you specify that the database server allocate logical log files
dynamically (DYNAMIC_LOGS), it is recommended that you set
LTXEHWM to no higher than 70 when using Enterprise Replication.
For more information about logical logs and these configuration parameters, see
IBM Informix Administrator's Reference and IBM Informix Dynamic Server
Administrator's Guide.
The database server can add logs dynamically when Enterprise Replication enters
blockout mode if the CDR_MAX_DYNAMIC_LOGS configuration parameter is set
to a non-zero integer. For more information, see “Preventing DDRBLOCK Mode”
on page 8-8.
Delete Table Disk Space
If you use the time stamp or time stamp and SPL routine conflict-resolution rules,
Enterprise Replication creates delete tables to keep track of modified rows for conflict
resolution. (Enterprise Replication creates delete tables only for tables that have
replicates defined with a conflict-resolution rule other than ignore.) Delete tables
handle conflicts such as when a DELETE or UPDATE finds no corresponding row
on the target. The DTCleaner thread removes a row from the delete tables after all
the servers have progressed beyond that row. For more information, see
“Conflict-Resolution Rule” on page 3-6.
Delete tables are created on the database server where the data originates and on
all the database servers to which data gets replicated. Delete tables are stored in
the same dbspaces, using the same fragmentation strategy, as their base tables.
To determine the disk space requirements to accommodate delete tables, estimate
how many rows will be deleted or modified. For example, if the base table has 100
megabytes of data, but only half the rows might be deleted or modified, then 50
megabytes is a reasonable estimate for the size of the delete table.
Important: Do not remove the delete tables created by Enterprise Replication. The
delete table is automatically removed when the last replicate defined
with conflict resolution is deleted.
Chapter 4. Preparing the Replication Environment 4-7

Shadow Column Disk Space
When you define a replicate that uses any conflict-resolution rule except ignore,
you must define shadow columns (CRCOLS) with the WITH CRCOLS clause. The
shadow columns, cdrserver and cdrtime, store server and time-stamp information
that Enterprise Replication uses for conflict resolution. The two shadow columns
are integers, which adds a total of 8 bytes to each row in the table involved in a
replicate that uses conflict resolution.
Tip: If you plan to use only the ignore conflict-resolution rule, you do not need to
define the cdrserver and cdrtime shadow columns.
For more information, see “Conflict-Resolution Rule” on page 3-6 and “Preparing
Tables for Conflict Resolution” on page 4-16.
Setting Up Send and Receive Queue Spool Areas
The term data queue refers to both the send queue and the receive queue. Enterprise
Replication collects information from the logical logs and places the data to be
transferred in the send queue. Then Enterprise Replication transfers the contents of
the send queue to the receive queue on the target server. Enterprise Replication on
the target reads the data from the receive queue and applies the changes to the
tables on the target server.
The send and receive queues reside in memory and are managed by the Reliable
Queue Manager (RQM). The CDR_QUEUEMEM configuration parameter
(“CDR_QUEUEMEM Configuration Parameter” on page B-6) specifies the amount
of memory space that is available for the data queues.
When a queue in memory fills (for the receive queue, this only occurs with large
transactions), the transaction buffers are written (spooled) to disk. Spooled
transactions consist of transaction records (headers that contain internal information
for Enterprise Replication), replicate information (summaries of the replication
information for each transaction), and row data (the actual replicated data). Spooled
transaction records and replication records are stored in transaction tables and
replication tables in a single dbspace. Spooled row data is stored in one or more
sbspaces.
Important: To prevent the send and receive queues from spooling to disk, see
“Preventing Memory Queues from Overflowing” on page 8-7.
Transaction Record dbspace
By default, the transaction records and replication records are stored in the root
dbspace. Because Enterprise Replication and other database servers become
unavailable if the root dbspace fills, you should define a single, separate dbspace
for the send and receive queue transaction records and replication records before
you define the replication server.
To determine the size of your transaction record dbspace, you must determine the
estimated number of transactions in a given period. You should allocate 110 bytes
per transaction to the dbspace and allocate enough disk space to store 24 hours of
transaction records. For example, if your network is down for 24 hours, and you
estimate that you will log 1000 transactions each day, the size of the transaction
record dbspace should be at least 108 kilobytes (110 bytes * 1000 transactions /
1024).
4-8 IBM Informix Dynamic Server Enterprise Replication Guide

To create the transaction record dbspace, use onspaces -c. For example, to create a
110 kilobyte dbspace called er_dbspace using raw disk space on UNIX with an
offset of 0, enter:
onspaces -c -d er_dbspace -p /dev/raw_dev1 -o 0 -s 110
The pathname for the dbspace cannot be longer than 256 bytes.
Set the CDR_QHDR_DBSPACE configuration parameter (“CDR_QHDR_DBSPACE
Configuration Parameter” on page B-5) in the ONCONFIG file to the location of
the transaction record dbspace (er_dbspace, in this example).
Warning: Do not change the value of CDR_QHDR_DBSPACE after you initialize
Enterprise Replication on a server.
For information on creating dbspaces, see the chapter on managing disk space in
the IBM Informix Dynamic Server Administrator's Guide and the utilities chapter in
the IBM Informix Administrator's Reference.
Row Data sbspaces
Replicated data might include UDT and CLOB or BLOB data types. Therefore, the
spooled row data is stored as smart large objects in one or more sbspaces.
Important: Before starting Enterprise Replication, you must create at least one
sbspace for spooled row data and set the CDR_QDATA_SBSPACE
configuration parameter to its location.
The CDR_QDATA_SBSPACE configuration parameter accepts multiple sbspaces,
up to a maximum of 32 sbspaces. Enterprise Replication can support a combination
of logging and non-logging sbspaces for storing spooled row data. If
CDR_QDATA_SBSPACE is configured for multiple sbspaces, then Enterprise
Replication uses all appropriate sbspaces in round-robin order. For more
information, see “CDR_QDATA_SBSPACE Configuration Parameter” on page B-5.
Creating sbspaces for Spooled Row Data: Follow these guidelines when creating
sbspaces for spooled row data:
v Create all the sbspaces of same default log mode type with the same size.
v Do not use Enterprise Replication row data sbspaces for non-Enterprise
Replication activity.
v Ensure that the sbspaces are sufficiently large.
To determine the size of your spooled row data sbspaces, determine your log
usage and then consider how much data you can collect if your network goes
down. For example, assume that you usually log 40 megabytes of data each day,
but only 10 percent of that is replicated data. If your network is down for 24
hours and you estimate that you will log 4 megabytes of replicated data each
day, the size of the sbspaces you identify for the spooled row data must be a
total of at least 4 megabytes.
Windows Only
On Windows, increase the resulting size of the sbspace by approximately a
factor of two. (The default page size, the way that data maps onto a page, and
the number of pages written to disk differs on Windows.)
End of Windows Only
Chapter 4. Preparing the Replication Environment 4-9
Warning: When the row data sbspaces fill, Enterprise Replication hangs until you
either resolve the problem that is causing Enterprise Replication to spool
or allocate additional disk space to the sbspaces. For more information,
see “Preventing Memory Queues from Overflowing” on page 8-7.
To create row data sbspaces, use the onspaces -c utility. For example, to create a
4-megabyte sbspace, called er_sbspace, using raw disk space on UNIX with an
offset of 0, enter:
onspaces -c -S er_sbspace -p /dev/rdsk/c0t1d0s4 -o 0 -s 4000\
-m /dev/rdsk2/c0t1d0s4 0 \
-Df "AVG_LO_SIZE=2,LOGGING=OFF"
The pathname for an sbspace cannot be longer than 256 bytes.
The -m option specifies the location and offset of the sbspace mirror. The -Df
option specifies default behavior of the smart large objects stored in the sbspace:
v AVG_LO_SIZE (average large object size)
Set this parameter to the expected average transaction size (in kilobytes). The
database server uses this value to calculate the metadata size. The minimum
value for AVG_LO_SIZE is 2 kilobytes, which is appropriate for Enterprise
Replication in most cases. (The default value of AVG_LO_SIZE is 32 kilobytes.) If
you set AVG_LO_SIZE to larger than the expected transaction size, you might
run out of metadata space. If you set AVG_LO_SIZE too small, you might waste
space on metadata.
v LOGGING
Set this parameter to OFF to create an sbspace without logging. Set this
parameter to ON to create an sbspace with logging. It is recommended that you
use a combination of logging and non-logging sbspaces for Enterprise
Replication. For more information, see “Logging Mode for sbspaces” on page
4-10.
Set the CDR_QDATA_SBSPACE configuration parameter in the ONCONFIG file to
the location of the row data sbspace (er_sbspace, in this example). For more
information, see “CDR_QDATA_SBSPACE Configuration Parameter” on page B-5.
Warning: Do not change the value of CDR_QDATA_SBSPACE after you initialize
Enterprise Replication.
Logging Mode for sbspaces: Enterprise Replication uses the default log mode
that the sbspace was created with for spooling row data.
Create sbspaces with a default logging mode of ON or OFF according to the types
of transactions Enterprise Replication replicates:
v LOGGING=ON
Create sbspaces with LOGGING set to ON to support these situations:
– Replicated systems with HDR
Enterprise Replication must use logging sbspaces for transactions involved in
HDR.
– Small transactions
Enterprise Replication uses logging sbspaces for transactions that are less than
a page size (2K or 4K) of replicated data.For logging sbspaces, performance might be enhanced because logging mode
enables asynchronous IO. However, a logging sbspace consumes additional
logical-log space.
4-10 IBM Informix Dynamic Server Enterprise Replication Guide

v LOGGING=OFF
Create sbspaces with LOGGING set to OFF to support replication of large
transactions (greater than a page size of replicated data).
It is recommended that you mirror non-logging sbspaces. For more information,
see the chapter on managing disk space in the IBM Informix Dynamic Server
Administrator's Guide and the utilities chapter in the IBM Informix Administrator's
Reference.
For non-logging sbspaces, performance is enhanced on the database server when
Enterprise Replication spools to disk because Enterprise Replication writes less
data to disk.
Warning: Do not change the Enterprise Replication sbspace default log mode
while Enterprise Replication is running. To change the default log mode,
follow the procedure below.
You can change the default logging mode of the row data sbspace if you have
more than one sbspace specified by the CDR_QDATA_SBSPACE configuration
parameter.
To change the default logging mode of a row data sbspace:
1. Shut down the database server.
2. Remove the sbspace from the CDR_QDATA_SBSPACE configuration parameter
value list.
3. Start the database server in recovery mode.
4. Wait for all the smart large objects to get deleted from the sbspace. Use the
onstat -g smb lod command to check for smart large objects stored in an
sbspace.
5. Change the default logging mode for the sbspace.
6. Add the sbspace name to the CDR_QDATA_SBSPACE configuration parameter
value list.
7. Shut down and restart the database server using the onmode -ky and oninit
commands.
Dropping a Spooled Row Data sbspace: You can drop a row data sbspace if you
have more than one sbspace specified by the CDR_QDATA_SBSPACE
configuration parameter.
Dropping a row data sbspace:
1. Shutdown the database server.
2. Remove the sbspace from the CDR_QDATA_SBSPACE configuration parameter
value list.
3. Start the database server in recovery mode.
4. Wait for all the smart large objects to get deleted from the sbspace. Use the
onstat -g smb lod command to check for smart large objects stored in a
sbspace.
5. Drop the sbspace.
Warning: Do not drop an Enterprise Replication row data sbspace using the
onspaces -d -f (force) command.
Chapter 4. Preparing the Replication Environment 4-11

Setting Up the Grouper Paging File
Enterprise Replication uses a grouper paging mechanism for evaluating large
transactions. A transaction is large if the portion to be replicated meets at least one
of the following conditions:
v It has greater than 5,000 log records.
v It exceeds one fifth the size of the value of the CDR_QUEUEMEM onconfig
variable.
v It exceeds one tenth the size of the value of the SHMVIRTSIZE configuration
variable.
The location of the sbspace used for the paging file is determined by the first of
the following ONCONFIG configuration parameters that is set:
v SBSPACETEMP
v SBSPACENAME
v CDR_QDATA_SBSPACE
The best solution is to set up an unlogged sbspace, as specified by the
SBSPACETEMP configuration parameter. All updates to the paging files are
unlogged.
The size of the paging sbspace should be at least three time the size of the largest
transaction to be processed. This sbspace is also used by the database server for
other tasks; consider its overall usage when determining size requirements.
Warning: If the paging sbspace fills, Enterprise Replication hangs until you
allocate additional disk space to the sbspace. If additional space is
unavailable, use the cdr stop command to stop replication.
Creating ATS and RIS Directories
The Aborted Transactions Spooling (ATS) and Row Information Spooling (RIS) files
contain information about failed transactions and aborted rows. You can repair
data after replication has failed by using ATS and RIS files. Enterprise Replication
examines the specified ATS or RIS file and attempts to reconcile the rows that
failed to be applied. This method is fast, but does not allow as much flexibility as a
repair job allows in defining how the repair should be done. See “Repairing Failed
Transactions with ATS and RIS Files” on page 7-15 for more information. For
information about repair jobs, see “Resynchronizing Data Among Replication
Servers” on page 7-11.
If you set up ATS and RIS, Enterprise Replication writes ATS and RIS files to
directories on the system:
v ATS files
If you are using primary-target replication, create the ATS directory on the target
system. If you are using update-anywhere replication (“Update-Anywhere
Replication System” on page 3-5) and have conflict resolution (“Conflict
Resolution” on page 3-6) enabled, create the ATS directory on all participating
replication systems.
v RIS files
If you have conflict resolution enabled, create the RIS directory on all
participating replication systems.
4-12 IBM Informix Dynamic Server Enterprise Replication Guide

The default location for these directories is /tmp (UNIX) or \tmp (Windows).
Specify a location other than /tmp or \tmp for the spooling directories.
Create the new location for these directories before you define the server for
replication. The pathnames for the ATS and RIS directories cannot be longer than
256 characters.
For information about ATS and RIS, refer to Chapter 8, “Monitoring and
Troubleshooting Enterprise Replication,” on page 8-1.
Preparing the Database Server Environment
To prepare the database server environment, complete the following tasks:
v Setting Environment Variables
v Setting Configuration Parameters
If you are using High-Availability Data (HDR) replication with Enterprise
Replication, set up your HDR servers according to the instructions in the section
“HDR Requirements” on page 5-4.
Setting Environment Variables
To configure the database server environment, verify that the following
environment variables are set correctly:
v INFORMIXDIR is set to the full path of the Informix directory.
v INFORMIXSERVER is set to the name of the default database server.
For more information, see also “Connect Option” on page A-107.
v INFORMIXSQLHOSTS is set to the full path to the SQLHOSTS file (UNIX) or
the SQLHOSTS registry host machine (Windows).
For more information, see the IBM Informix Administrator's Reference.
Setting Configuration Parameters
In the ONCONFIG file for each database server, make sure that the following
configuration parameters are set:
v DBSERVERNAME is set to the correct database server.
If you use both DBSERVERNAME and DBSERVERALIASES, DBSERVERNAME
should refer to the TCP connection and not to a shared-memory connection. For
information about database server aliases, refer to the IBM Informix Dynamic
Server Administrator's Guide.
v CDR_DBSPACE is set to the dbspace for the syscdr database. If not set, the root
dbspace is used.
v CDR_QUEUEMEM is set to the maximum amount of memory to be used for the
send and receive queues.
v CDR_QHDR_DBSPACE is set to the location of the transaction record dbspace.
For more information, see “Transaction Record dbspace” on page 4-8.
v CDR_QDATA_SBSPACE is set to the location of the row data sbspace.
If the CDR_QDATA_SBSPACE configuration parameter is not set in ONCONFIG
or the sbspace name specified by CDR_QDATA_SBSPACE is invalid, Enterprise
Replication fails to define the server.
For more information, see “Row Data sbspaces” on page 4-9.
Chapter 4. Preparing the Replication Environment 4-13

v CDR_SERIAL is set to generate non-overlapping (unique) values for SERIAL
columns across all database servers in the replication environment.
For more information, see “SERIAL Data Types and Primary Keys” on page 2-7.
If you want to suppress certain Datasync error and warning codes from appearing
in ATS and RIS files, you can set the CDR_SUPPRESS_ATSRISWARN configuration
parameter. See “CDR_SUPPRESS_ATSRISWARN Configuration Parameter” on
page B-7 for more information.
If you want to encrypt network communications, make sure that the following
configuration parameters are set in the ONCONFIG file for each database server:
v ENCRYPT_CDR is set to 1 or 2 to enable encryption. The default value is 0,
which prevents encryption.
v ENCRYPT_CIPHERS specifies which ciphers and cipher modes are used for
encryption.
v ENCRYPT_MAC controls the level of Message Authentication Code (MAC) used
to ensure message integrity.
v ENCRYPT_MACFILE is set to the full path and filenames of the MAC files.
v ENCRYPT_SWITCH is set to the number of minutes between automatic
renegotiations of ciphers and keys. (The cipher is the encryption methodology.
The secret key is the key used to build the encrypted data using the cipher.)
These configuration parameters are documented in Appendix B, “Configuration
Parameter and Environment Variable Reference,” on page B-1.
Preparing Data for Replication
The goal of data replication is to provide identical, or at least consistent, data on
multiple database servers. This section describes how to prepare the information in
your databases for replication.
When you define a new replicate on tables with existing data on different database
servers, the data might not be consistent. Similarly, if you add a participant to an
existing replicate, you must ensure that all the databases in the replicate have
consistent values.
For more information, see “Data Preparation Example” on page 4-19.
Preparing Consistent Data
In most cases, preparing consistent data simply requires that you decide which of
your databases has the most accurate data and then that you copy that data onto
the target database. If the target database already has data, for data consistency,
you must remove that data before adding the copied data. For information on
loading the data, see “Loading and Unloading Data” on page 4-17.
Blocking Replication
You might need to put data into a database that you do not want replicated,
perhaps for a new server or because you had to drop and re-create a table.
To block replication while you prepare a table, use the BEGIN WORK WITHOUT
REPLICATION statement. This starts a transaction that does not replicate to other
database servers.
4-14 IBM Informix Dynamic Server Enterprise Replication Guide

The following code fragment shows how you might use this statement:
BEGIN WORK WITHOUT REPLICATION
LOCK TABLE office
DELETE FROM office WHERE description = ’portlandR_D’
COMMIT WORK
The following list indicates actions that occur when a transaction starts with
BEGIN WORK WITHOUT REPLICATION:
v SQL does not generate any values for the shadow columns (cdrserver and
cdrtime) for the rows that are inserted or updated within the transaction. You
must supply values for these columns with the explicit column list. You must
supply these values even if you want the column values to be NULL.
v To modify a table with shadow columns that is already defined in Enterprise
Replication, you must explicitly list the columns to be modified. The following
two examples show an SQL statement and the correct changes to the statement
to modify columns:
– If table_name1 is a table defined for replication, you must change the
following statement:LOAD FROM filename INSERT INTO table_name1;
to:
LOAD FROM filename INSERT INTO table_name1 \
(list of columns);
The list of columns must match the order and the number of fields in the load file.
v If table_name3 and table_name4 are tables defined for replication with the same
schema, you must change the following statement:INSERT INTO table_name3 SELECT * FROM table_name4;
to an explicit statement, where col1, col2,..., colN are the columns of the table:
INSERT INTO table_name3 VALUES
(cdrserver, cdrtime, col1, ..., colN)
cdrserver, cdrtime *
FROM table_name4;
The shadow columns (cdrserver and cdrtime) are not included in an * list.
For more information about these statements, refer to the IBM Informix Guide to
SQL: Syntax.
Using DB-Access to Begin Work Without Replication
The following example shows how to use DB–Access to begin work without
replication as well as update the Enterprise Replication shadow columns cdrserver
and cdrtime:
DATABASE adatabase;
BEGIN WORK WITHOUT REPLICATION
INSERT into mytable (cdrserver, cdrtime, col1, col2, ....)
VALUES (10, 845484154, value1, value2, ....);
UPDATE mytable
SET cdrserver = 10, cdrtime = 945484154
WHERE col1 > col2;
COMMIT WORK
Using ESQL/C to Begin Work Without Replication
The following example shows how to use ESQL/C to begin work without
replication as well as update the Enterprise Replication shadow columns cdrserver
and cdrtime:
Chapter 4. Preparing the Replication Environment 4-15

MAIN (argc, argv)
INT argc;
CHAR *argv[];
{
EXEC SQL CHAR stmt[256];
EXEC SQL database mydatabase;
sprintf(stmt, “BEGIN WORK WITHOUT REPLICATION”);
EXEC SQL execute immediate :stmt;
EXEC SQL insert into mytable (cdrserver, cdrtime,
col1, col2, ...)
values (10, 845494154, value1, value2, ...);
EXEC SQL update mytable
set cdrserver = 10, cdrtime = 845494154
where col1 > col2;
EXEC SQL commit work;
}
Important: You must use the following syntax when you issue the BEGIN WORK
WITHOUT REPLICATION statement from ESQL/C programs. Do not
use the ‘$’ syntax.sprintf(stmt, “BEGIN WORK WITHOUT REPLICATION”);
EXEC SQL execute immediate :stmt;
Preparing to Replicate User-Defined Types
You must install and register user-defined types on all database servers prior to
starting replication.
If you are using HDR with Enterprise Replication, follow the instructions in the
section “Preparing to Replicate UDTs, UDRs, and DataBlade Modules” on page 5-6.
For Enterprise Replication to be able to replicate opaque user-defined types
(UDTs), the UDT designer must provide two support functions, streamwrite() and
streamread(). For more information, see “Replicating Opaque User-Defined Data
Types” on page 2-15.
Preparing to Replicate User-Defined Routines
You must install and register user-defined routines on all database servers prior to
starting replication.
If you are using HDR with Enterprise Replication, follow the instructions in the
section “Preparing to Replicate UDTs, UDRs, and DataBlade Modules” on page 5-6.
Preparing Tables for Conflict Resolution
To use any conflict-resolution rule other than ignore, you must define the shadow
columns, cdrserver and cdrtime.
Tip: If you plan to use only the ignore conflict-resolution rule, you do not need to
define the cdrserver and cdrtime shadow columns.
For more information about update-anywhere and conflict resolution, see
“Update-Anywhere Replication System” on page 3-5.
To define the shadow columns in your table, use the following statements:
v For new tables, use:
4-16 IBM Informix Dynamic Server Enterprise Replication Guide
CREATE TABLE table_name WITH CRCOLS;
v For existing tables, use:
ALTER TABLE table_name ADD CRCOLS;
Important: If a table already participates in Enterprise Replication, you must stop
replication before altering it with the ADD CRCOLS clause. For more
information, see “Stopping a Replicate” on page 7-6.
To drop the cdrserver and cdrtime shadow columns, use:
ALTER TABLE table_name DROP CRCOLS;
Tip: The ADD CRCOLS and DROP CRCOLS clauses to the ALTER TABLE
statement are now processed as in-place alters in most cases. For more
information, see the section on in-place alters in the IBM Informix Performance
Guide. For more information on CREATE TABLE and ALTER TABLE, see the
sections in the IBM Informix Guide to SQL: Syntax.
Preparing Logging Databases
Databases on all server instances involved in replication must be created with
logging. For best results, use unbuffered logging. For more information, see
“Unbuffered Logging” on page 2-6.
Loading and Unloading Data
If you are adding a table to your already existing replication environment,
Enterprise Replication provides an initial synchronization feature that allows you
to easily bring a new table up-to-date with replication. You can synchronize the
new table with data on the source server you specify when you start the new
replicate, or when you add a new participant to an existing replicate. You do not
need to suspend any servers that are replicating data while you add the new
replicate and synchronize it. See “Initially Synchronizing Data Among Database
Servers” on page 6-11 for more information.
Otherwise, if you have not yet set up your replication environment, for loading
data, you can use the following tools:
v High-Performance Loader
v onunload and onload Utilities
v dbexport and dbimport Utilities
v UNLOAD and LOAD Statements
When you unload and load data, you must use the same type of utility for both
the unload and load operations. For example, you cannot unload data with the
onunload utility and then load the data with a LOAD statement.
If you are using HDR with Enterprise Replication, follow the instructions in the
section “Loading and Unloading Data” on page 5-6.
If the table that you are preparing for replication is in a database that already uses
replication, you might need to block replication while you prepare the table. For
information on how to do this, see “Blocking Replication” on page 4-14.
If a table that you plan to replicate includes the shadow columns, cdrserver and
cdrtime, the statements that you use for unloading the data must explicitly name
the shadow columns. If you use the SELECT statement with * FROM table_name to
Chapter 4. Preparing the Replication Environment 4-17

the data to unload, the data from the shadow columns will not be unloaded. To
include the shadow columns in the unloaded data, use a statement like the
following:
SELECT cdrserver, cdrtime, * FROM table_name
For more information, see “Shadow Columns” on page 2-7.
High-Performance Loader
The High-Performance Loader (HPL) provides a high-speed tool for moving data
between databases.
How you use the HPL depends on how you defined the tables to replicate. If the
table definition included the WITH CRCOLS clause, you must take special steps
when you unload the data.
If the table contains shadow columns, you must:
v Include the cdrserver and cdrtime columns in your map when you load the
data.
v Use express mode to load data that contains the cdrserver and cdrtime columns.
You must perform a level-0 archive after completion.
You can also use deluxe mode without replication to load data. After a deluxe
mode load, you do not need to perform a level-0 archive. Deluxe mode also allows
you to load TEXT and BYTE data and opaque user-defined types.
For information about HPL, refer to the IBM Informix High-Performance Loader
User's Guide.
onunload and onload Utilities
You can use the onunload and onload utilities only to unload and load an entire
table. If you want to unload selected columns of a table, you must use either the
UNLOAD statement or the HPL.
Important: You can only use onunload and onload in identical (homogeneous)
environments.
For more information about onunload and onload, see the IBM Informix Migration
Guide.
dbexport and dbimport Utilities
If you need to copy an entire database for replication, you can use the dbexport
and dbimport utilities. These utilities unload an entire database, including its
schema, and then re-create the database. If you want to move selected tables or
selected columns of a table, you must use some other utility.
For more information about dbexport and dbimport, see the IBM Informix
Migration Guide.
UNLOAD and LOAD Statements
The UNLOAD and LOAD statements allow you to move data within the context of
an SQL program.
If the table contains shadow columns, you must:
4-18 IBM Informix Dynamic Server Enterprise Replication Guide

v Include the cdrserver and cdrtime columns explicitly in your statement when
you unload your data.
v List the columns that you want to load in the INSERT statement and explicitly
include the cdrserver and cdrtime columns in the list when you load your data.
For more information about the UNLOAD and LOAD statements, see the IBM
Informix Guide to SQL: Syntax.
Data Preparation Example
The following examples show how to add a new participant (delta) to an existing
replicate by two different methods:
v Using the cdr start replicate command
This method is simple and can be done while replication is online.
v Using the LOAD, UNLOAD, and BEGIN WORK WITHOUT REPLICATION
statements.
If you use HPL, this method can be faster for a large table.
Replicate zebra replicates data from table table1 for the following database servers:
alpha, beta, and gamma.
The servers alpha, beta, and gamma belong to the server groups g_alpha, g_beta,
and g_gamma, respectively. Assume that alpha is the database server from which
you want to get the initial copy of the data.
Using the cdr start replicate Command
To add a new participant to an existing replicate:
1. Declare server delta to Enterprise Replication. For example:
cdr def ser -c delta -I -S g_alpha g_delta
At the end of this step, all servers in the replication environment include
information in the syscdr database about delta, and delta has information
about all other servers.
2. Add delta as a participant to replicate zebra. For example:
cdr cha rep -a zebra "dbname@g_delta:owner.table1"
This step updates the replication catalog. The servers alpha, beta, and gamma
do not queue any qualifying replication data for delta because the replicate on
delta, although defined, has not been started.
3. Start replication for replicate zebra on delta.
cdr sta rep zebra g_delta -S g_alpha -e delete
The -S g_alpha option specifies that the server alpha be used as the source for
data synchronization.
The -e delete option indicates that if there are rows on the target server, delta,
that are not present on the synchronization data server (alpha) then those rows
are deleted
Do not run any transactions on delta that affect table table1 until you finish the
synchronization process.
Chapter 4. Preparing the Replication Environment 4-19

Using LOAD, UNLOAD, and BEGIN WORK WITHOUT
REPLICATION
To add a new participant to an existing replicate:
1. Declare server delta to Enterprise Replication. For example:
cdr def ser -c delta -I -S g_alpha g_delta
At the end of this step, all servers in the replication environment include
information in the syscdr database about delta, and delta has information
about all other servers.
2. Add delta as a participant to replicate zebra. For example:
cdr cha rep -a zebra "dbname@g_delta:owner.table1"
This step updates the replication catalog. The servers alpha, beta, and gamma
do not queue any qualifying replication data for delta because the replicate on
delta, although defined, has not been started.
3. Suspend server to delta on alpha, beta, and gamma.
cdr sus ser g_alpha g_beta g_gamma
As a result of this step, replication data is queued for delta, but no data is
delivered.
4. Start replication for replicate zebra on delta.
cdr sta rep zebra g_delta
This step causes servers alpha, beta, and gamma to start queueing data for
delta. No data is delivered to delta because delta is suspended. Then, delta
queues and delivers qualifying data (if any) to the other servers.
Do not run any transactions on delta that affect table table1 until you finish the
synchronization process.
5. Unload data from table table1 using the UNLOAD statement or the unload
utility on HPL.
6. Copy the unloaded data to delta.
7. Start transactions with BEGIN WORK WITHOUT REPLICATION, load the data
using the LOAD statement, and commit the transactions.
If you used the HPL to unload the data in step 5, then use the HPL Deluxe
load without replication to load the data into table1 on delta.
8. Resume server delta on alpha, beta, and gamma.
This step starts the flow of data from alpha, beta, and gamma to delta.
At this point, you might see some transactions aborted because of conflict.
Transactions can abort because alpha, beta, and gamma started queueing data
from delta in step 4. However, those same transactions might have been moved
in steps 5 and 7.
You must declare replication on server delta and then immediately suspend
replication because, while you are preparing the replicates and unloading and
loading files, the other servers in the replicate (alpha, beta, and gamma) might be
collecting information that needs to be replicated. After you finish loading the
initial data to delta and resume replication, the information that was generated
during the loading process can be replicated.
4-20 IBM Informix Dynamic Server Enterprise Replication Guide
Chapter 5. Using High-Availability Data Replication with
Enterprise Replication
In This Chapter . . . . . . . . . . . . . . . . . . . . . . . . . . . . . . . . . . 5-1
High-Availability Replication System . . . . . . . . . . . . . . . . . . . . . . . . . . 5-1
Using HDR in a Hierarchical Tree Topology . . . . . . . . . . . . . . . . . . . . . . . 5-3
Using HDR in a Forest of Trees Topology . . . . . . . . . . . . . . . . . . . . . . . . 5-3
Preparing HDR Database Servers . . . . . . . . . . . . . . . . . . . . . . . . . . . . 5-4
HDR Requirements . . . . . . . . . . . . . . . . . . . . . . . . . . . . . . . 5-4
Setting Up Database Server Groups . . . . . . . . . . . . . . . . . . . . . . . . . . 5-5
Preparing to Replicate UDTs, UDRs, and DataBlade Modules . . . . . . . . . . . . . . . . . 5-6
Loading and Unloading Data . . . . . . . . . . . . . . . . . . . . . . . . . . . . 5-6
Managing Enterprise Replication with High-Availability Data Replication . . . . . . . . . . . . . . 5-6
Row Data Sbspace Logging . . . . . . . . . . . . . . . . . . . . . . . . . . . . . 5-7
HDR Failure . . . . . . . . . . . . . . . . . . . . . . . . . . . . . . . . . . 5-7
Performance Considerations . . . . . . . . . . . . . . . . . . . . . . . . . . . . 5-8
In This Chapter
This chapter covers how to include High-Availability Data Replication (HDR) in
your Enterprise Replication system. The following topics are covered:
v The design of a high-availability replication system using HDR
v Preparing HDR database server
v Managing Enterprise Replication with HDR
For a complete description of HDR, see the IBM Informix Dynamic Server
Administrator's Guide.
High-Availability Replication System
You can combine Enterprise Replication and HDR to create a high-availability
replication system in which a critical read-write database server in an Enterprise
Replication system maintains a backup server with HDR.
An HDR system consists of two database servers: the primary database server,
which receives updates, and the secondary, read-only copy of the primary database
server. The secondary server is a mirror image of the primary system and is in
perpetual recovery mode, applying logical-log records from the primary server to
its dbspaces and sbspaces.
The HDR secondary server does not participate in Enterprise Replication; it
receives updates through HDR. When the HDR primary server receives an update
through Enterprise Replication, the transaction is not committed until the log
records containing that transaction are sent to the secondary server. If the primary
server becomes unavailable, you replace it with the secondary server by switching
the secondary server into standard mode and redirecting connections to it.
High-availability replication systems are most useful for replication systems in
which the failure of a critical server prevents other servers from participating in
replication. Figure 5-1 illustrates the combination of a primary-target replication
system with a high-availability replication system.
© Copyright IBM Corp. 1996, 2005 5-1

If the primary server fails, the secondary server is set to standard mode, the target
database connections are redirected to it, and Enterprise Replication continues, as
illustrated in Figure 5-2.
In an update-anywhere replication system, you can use HDR with any server for
which you need high availability, as illustrated in Figure 5-3.
HDR Primary
(Read-only) (Read-only)
(Read-only)(Read-only)
(Read-write)
Target Target
TargetTarget
HDR Secondary
(Read-only)
EnterpriseReplication
High-Availability Data Replication
Figure 5-1. Using High-Availability with a Primary-Target Replication System
HDR y(offline)
Primar
(Read-write)
(Read-only)
Target
(Read-only)
Target
(Read-only)
Target
(Read-only)
Target
HDR Secondary (switched to standard mode)
(Read-write)
Figure 5-2. Redirection to the Secondary Database Server
5-2 IBM Informix Dynamic Server Enterprise Replication Guide
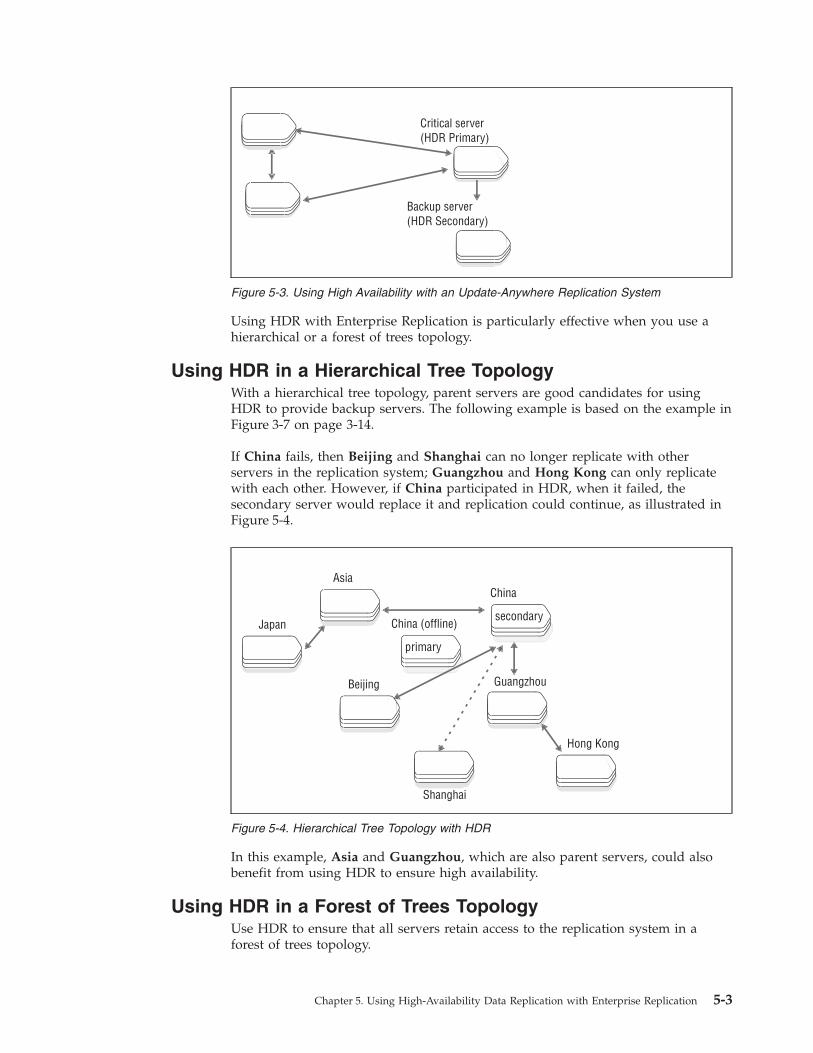
Using HDR with Enterprise Replication is particularly effective when you use a
hierarchical or a forest of trees topology.
Using HDR in a Hierarchical Tree Topology
With a hierarchical tree topology, parent servers are good candidates for using
HDR to provide backup servers. The following example is based on the example in
Figure 3-7 on page 3-14.
If China fails, then Beijing and Shanghai can no longer replicate with other
servers in the replication system; Guangzhou and Hong Kong can only replicate
with each other. However, if China participated in HDR, when it failed, the
secondary server would replace it and replication could continue, as illustrated in
Figure 5-4.
In this example, Asia and Guangzhou, which are also parent servers, could also
benefit from using HDR to ensure high availability.
Using HDR in a Forest of Trees Topology
Use HDR to ensure that all servers retain access to the replication system in a
forest of trees topology.
Critical server(HDR Primary)
Backup server(HDR Secondary)
Figure 5-3. Using High Availability with an Update-Anywhere Replication System
primary
China (offline)
Guangzhou
Hong Kong
Japan
Beijing
Shanghai
Asia
secondary
China
Figure 5-4. Hierarchical Tree Topology with HDR
Chapter 5. Using High-Availability Data Replication with Enterprise Replication 5-3

For example, in Figure 3-8 on page 3-15, Asia, Europe, China, and Guangzhou
should use HDR to provide backup servers, as illustrated in Figure 5-5.
Preparing HDR Database Servers
To prepare HDR database server for Enterprise Replication, perform the following
tasks:
v Configure HDR database servers according to HDR requirements.
v Set up the SQLHOSTS file with both the primary and secondary HDR servers as
members of the same database server group.
v Install and register user-defined data types, user-defined routines, and DataBlade
modules.
v Load data using backup and restore procedures.
Important: HDR does not support encryption. If you combine Enterprise
Replication with HDR, communication between Enterprise Replication
servers and the HDR primary server can be encrypted, but the
communication between the HDR primary server and the HDR
secondary server cannot be encrypted. For more information, see
“ENCRYPT_CDR Configuration Parameter” on page B-7.
HDR Requirements
Make sure the HDR database servers meet HDR requirements in the following
categories:
v Hardware and operating-system requirements
primary
primary
primary
primary
China
Guangzhou
Hong Kong
JapanBeijing
Shanghai
Asia
Germany
France
Europe
North America
Asia
Europe
China
GuangzhouHDR
HDR
HDR
HDR
secondary
secondary
secondary
secondary
Figure 5-5. HDR in a Forest-of-Trees Topology
5-4 IBM Informix Dynamic Server Enterprise Replication Guide
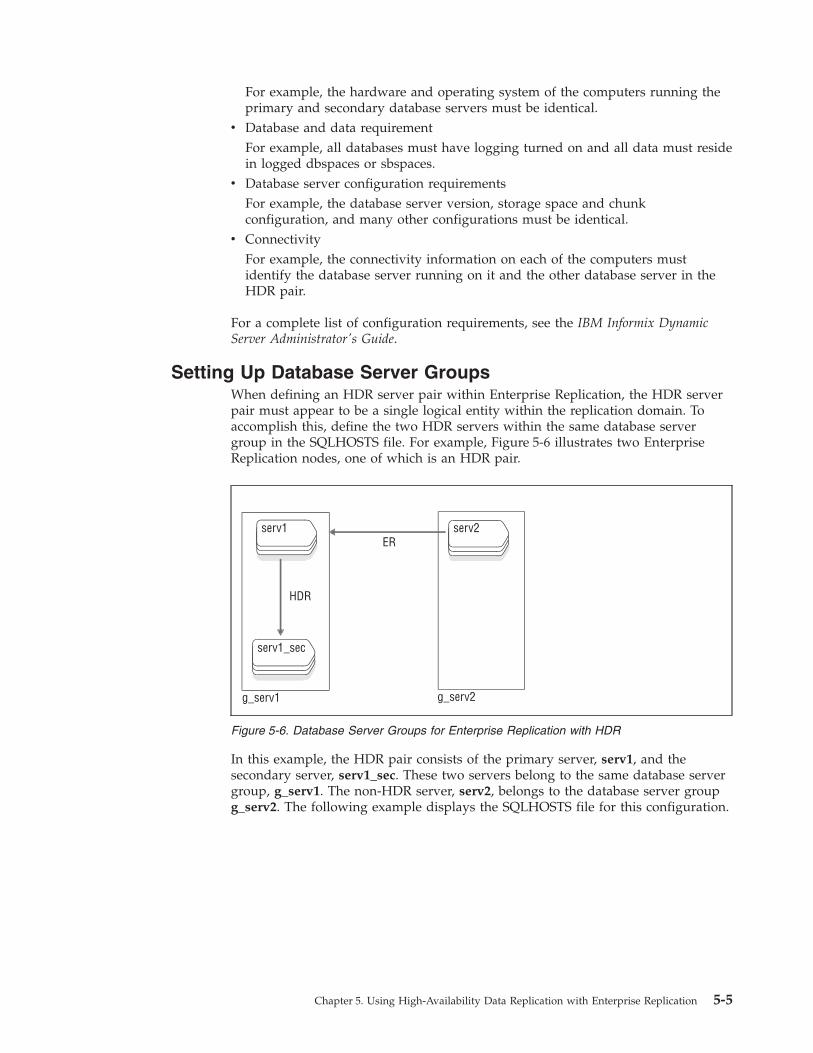
For example, the hardware and operating system of the computers running the
primary and secondary database servers must be identical.
v Database and data requirement
For example, all databases must have logging turned on and all data must reside
in logged dbspaces or sbspaces.
v Database server configuration requirements
For example, the database server version, storage space and chunk
configuration, and many other configurations must be identical.
v Connectivity
For example, the connectivity information on each of the computers must
identify the database server running on it and the other database server in the
HDR pair.
For a complete list of configuration requirements, see the IBM Informix Dynamic
Server Administrator's Guide.
Setting Up Database Server Groups
When defining an HDR server pair within Enterprise Replication, the HDR server
pair must appear to be a single logical entity within the replication domain. To
accomplish this, define the two HDR servers within the same database server
group in the SQLHOSTS file. For example, Figure 5-6 illustrates two Enterprise
Replication nodes, one of which is an HDR pair.
In this example, the HDR pair consists of the primary server, serv1, and the
secondary server, serv1_sec. These two servers belong to the same database server
group, g_serv1. The non-HDR server, serv2, belongs to the database server group
g_serv2. The following example displays the SQLHOSTS file for this configuration.
serv1 serv2
serv1_sec
HDR
ER
g_serv1 g_serv2
Figure 5-6. Database Server Groups for Enterprise Replication with HDR
Chapter 5. Using High-Availability Data Replication with Enterprise Replication 5-5

dbservername nettype hostname servicename options
g_serv1
serv1
serv1_sec
g_serv2
serv2
group
ontlitcp
ontlitcp
group
ontlitcp
-
machine1pri
machine1sec
-
machine2
-
port1
port1
-
port1
i=1
g=g_serv1
g=g_serv1
i=2
g=g_serv2
For more information on setting up the SQLHOSTS file, see “Verifying
SQLHOSTS” on page 4-3.
Either HDR or Enterprise Replication can be set up first on the HDR pair serv1
and serv1_sec, but Enterprise Replication cdr commands must be executed only on
the primary server. If any cdr commands are attempted on the secondary server, a
–117 error is returned: Attempting to process a cdr command on an HDR secondary
server.
Preparing to Replicate UDTs, UDRs, and DataBlade Modules
If you are using HDR with Enterprise Replication with user-defined types,
user-defined routines, or DataBlade modules, perform the tasks shown in Table 5-1
on the primary and secondary database servers.
Table 5-1. Preparing to Replicate UDTs, UDRs, and DataBlade Modules
Step On the Primary On the Secondary
1. Install the user-defined types, user-defined
routines, or DataBlade modules.
Install the user-defined types,
user-defined routines, or DataBlade
modules.
2. Register the user-defined types,
user-defined routines, or DataBlade
modules.
When you start HDR, the user-defined types, user-defined routines, or DataBlade
modules are registered on the secondary database server. For instructions on
starting HDR, see the IBM Informix Dynamic Server Administrator's Guide.
Loading and Unloading Data
After you load data onto the HDR primary database server, use backup and restore
procedures to load the data onto the HDR secondary database server. For
instructions, see the IBM Informix Dynamic Server Administrator's Guide.
Managing Enterprise Replication with High-Availability Data
Replication
This section describes how to manage Enterprise Replication with HDR in the
following areas:
v Row data sbspace logging
v HDR failure
v Performance
5-6 IBM Informix Dynamic Server Enterprise Replication Guide

Row Data Sbspace Logging
All sbspaces used by Enterprise Replication with HDR for spooled transaction row
data must be created with logging enabled. For more information, see “Row Data
sbspaces” on page 4-9.
HDR Failure
If the primary server within an HDR pair fails, the secondary server can be
switched to standard mode by executing the onmode –d standard command.
However, you must manually start Enterprise Replication by executing the cdr
start command on that server. This is necessary to prevent Enterprise Replication
from starting on both servers in an HDR pair. Table 5-2 shows how to switch the
secondary server to standard mode.
Table 5-2. Switching the Secondary Server to Standard Mode
Step On the Primary On the Secondary
1. The server becomes unavailable.
2. onmode command
onmode -d standard
3. cdr command
cdr start
If you need to start the primary server while Enterprise Replication is running on
the secondary server, use the oninit –D command to prevent Enterprise
Replication and HDR from starting on the primary server.
If the problem has been resolved on the primary server and you wish to
reestablish it as the primary server, then first stop Enterprise Replication on the
secondary server. Otherwise, Enterprise Replication attempts to restart on the
primary server while it is still active on the secondary server. Table 5-3 shows how
to reestablish the primary server.
Table 5-3. Reestablishing the Primary Server
Step On the Primary On the Secondary
1. cdr command
cdr stop
2. onmode command
onmode -s
3. onmode command
onmode -d secondary
4. oninit
5. cdr command
cdr start
If you want to split an active HDR pair into two stand-alone servers, then you
must be careful to avoid Enterprise Replication starting on either server after they
are split. To prevent Enterprise Replication and HDR from running, start the
database servers with the oninit –D command.
If you remove a server from an HDR pair, use the cdr remove command to
eliminate Enterprise Replication from that server. For example, the two HDR
servers are being split and the secondary server is to be used for reporting
Chapter 5. Using High-Availability Data Replication with Enterprise Replication 5-7

purposes. After the report processing is complete, HDR can be reestablished.
Table 5-4 shows how to remove a secondary server from HDR and Enterprise
Replication.
Table 5-4. Removing the Secondary Server from HDR and ER
Step On the Primary On the Secondary
1. onmode command
onmode -d standard
onmode command
onmode -d standard
2. cdr command
cdr remove
If the HDR primary server has problems communicating to its secondary server,
Enterprise Replication is in a suspended state until one of the following actions is
taken:
v Resolve the connection problem between HDR pairs.
v Convert the primary server to standard mode.
For more information on managing HDR servers, see the IBM Informix Dynamic
Server Administrator's Guide.
Performance Considerations
When Enterprise Replication is running on an HDR pair, some operations cannot
be performed until the logs are shipped to the secondary server. This delay
prevents possible inconsistency within the Enterprise Replication domain during
an HDR switch-over to a secondary server. Consequently, there is a slight increase
in replication latency when Enterprise Replication is used with HDR. You can
control this latency increase by setting the DRINTERVAL configuration parameter
to a low value.
5-8 IBM Informix Dynamic Server Enterprise Replication Guide

Chapter 6. Defining Replication Servers, Replicates,
Participants, and Replicate Sets
In This Chapter . . . . . . . . . . . . . . . . . . . . . . . . . . . . . . . . . . 6-1
Initializing Database Servers . . . . . . . . . . . . . . . . . . . . . . . . . . . . . 6-2
Defining Replication Servers . . . . . . . . . . . . . . . . . . . . . . . . . . . . . 6-2
Customizing the Replication Server Definition . . . . . . . . . . . . . . . . . . . . . . 6-3
Defining Replicates . . . . . . . . . . . . . . . . . . . . . . . . . . . . . . . . 6-3
Defining Participants . . . . . . . . . . . . . . . . . . . . . . . . . . . . . . . 6-4
Defining Replicates on Table Hierarchies . . . . . . . . . . . . . . . . . . . . . . . 6-5
Defining Master Replicates . . . . . . . . . . . . . . . . . . . . . . . . . . . . . 6-5
Master Replicate Verification . . . . . . . . . . . . . . . . . . . . . . . . . . . 6-5
Creating Strict Master Replicates . . . . . . . . . . . . . . . . . . . . . . . . . . 6-6
Creating Empty Master Replicates . . . . . . . . . . . . . . . . . . . . . . . . . 6-6
Defining Shadow Replicates . . . . . . . . . . . . . . . . . . . . . . . . . . . . 6-6
Specifying Conflict Resolution Rules and Scope . . . . . . . . . . . . . . . . . . . . . . 6-7
Specifying Replication Frequency . . . . . . . . . . . . . . . . . . . . . . . . . . . 6-7
Setting Up Error Logging . . . . . . . . . . . . . . . . . . . . . . . . . . . . . 6-8
Replicating Only Changed Columns . . . . . . . . . . . . . . . . . . . . . . . . . . 6-8
Using the IEEE Floating Point or Canonical Format . . . . . . . . . . . . . . . . . . . . . 6-9
Enabling Triggers . . . . . . . . . . . . . . . . . . . . . . . . . . . . . . . . 6-9
Defining Replicate Sets . . . . . . . . . . . . . . . . . . . . . . . . . . . . . . . 6-10
Exclusive Replicate Sets . . . . . . . . . . . . . . . . . . . . . . . . . . . . . . 6-10
Non-Exclusive Replicate Sets . . . . . . . . . . . . . . . . . . . . . . . . . . . . 6-10
Customizing the Replicate Set Definition . . . . . . . . . . . . . . . . . . . . . . . . 6-11
Initially Synchronizing Data Among Database Servers . . . . . . . . . . . . . . . . . . . . 6-11
Using Templates to Set Up Replication . . . . . . . . . . . . . . . . . . . . . . . . . . 6-12
Defining Templates . . . . . . . . . . . . . . . . . . . . . . . . . . . . . . . 6-13
Realizing Templates . . . . . . . . . . . . . . . . . . . . . . . . . . . . . . . 6-13
Verifying Participants without Applying the Template . . . . . . . . . . . . . . . . . . 6-13
Synchronizing Data Among Database Servers . . . . . . . . . . . . . . . . . . . . . 6-13
Creating Tables Automatically . . . . . . . . . . . . . . . . . . . . . . . . . . 6-13
Other Options . . . . . . . . . . . . . . . . . . . . . . . . . . . . . . . . 6-14
Changing Templates . . . . . . . . . . . . . . . . . . . . . . . . . . . . . . 6-14
In This Chapter
This chapter describes the steps for declaring a database server for Enterprise
Replication.
To define a replication server:
1. Initialize the database server.
For information, see “Initializing Database Servers” on page 6-2.
2. Declare the database server to Enterprise Replication.
For information, see “Defining Replication Servers” on page 6-2.
After you define the server for replication, the server is known as a replication
server.
3. Define replicates.
The replicate definition includes information about the participants, replication
options, frequency, and conflict-resolution rules and scope.
For information, see “Defining Replicates” on page 6-3.
4. Define participants.
© Copyright IBM Corp. 1996, 2005 6-1

A participant definition specifies the data (database, table, and columns) that
should be replicated. Although you can define a replicate with fewer, a
replicate should contain two or more participants to be useful.
For information, see “Defining Participants” on page 6-4.
This chapter also covers the following topics:
v Defining replicate sets
v Initial data synchronization
For information on managing your replication servers and replicates, see Chapter 7,
“Managing Replication Servers and Replicates,” on page 7-1.
Initializing Database Servers
The database server must be online before you can declare it for replication.
To bring the server from offline to online, issue the following command for your
operating system.
Operating System Command
UNIX oninit
Windows start dbservername
To bring the server from quiescent mode to online on either UNIX or Windows,
enter onmode -m.
For more information on initializing the database server, see the chapter on
database operating modes in the IBM Informix Administrator's Guide.
Defining Replication Servers
After you bring the database server online, the next step is to declare the server to
Enterprise Replication.
Important: You must be the Enterprise Replication server administrator to define
the replication server. For more information about the server
administrator, see “Enterprise Replication Server Administrator” on
page 2-2.
To define the replication server, use the cdr define server command. For example:
cdr define server [--connect=server_name] \
options --init server_group_name
The --init option initializes the server. If the INFORMIXSERVER environment
variable is not set to the server that you are defining, specify the
--connect=server_name option. For more information, see “Connecting to Another
Replication Server” on page 7-2.
Tip: All Enterprise Replication commands and options use the name of the
database server group, also known as a server group, instead of the more
familiar database server name for all references to database servers (except
the --connect option, which can use either). This manual uses the convention
that the name of a server group begins with g_ .
6-2 IBM Informix Dynamic Server Enterprise Replication Guide
Important: If the CDR_SBSPACE configuration parameter is not set in ONCONFIG
or specifies an invalid sbspace, Enterprise Replication fails to define the
server. For more information, see “Row Data sbspaces” on page 4-9.
Customizing the Replication Server Definition
When you define a replication server, you can change the following aspects of the
server in the replication environment:
v Synchronize the new server’s global catalog with another Enterprise Replication
server. For information on the global catalog, see “Global Catalog” on page 2-4.
For all servers except the first server you define in your Enterprise Replication
system, you must use the --sync=sync_server option in your server definition to
synchronize the global catalog with an existing server.
For Hierarchical Routing (HR) topologies, Enterprise Replication also uses the
synchronization server as the parent of the new server in the current topology.
For example, if you add a new server kauai and synchronize its global catalog
with hawaii, kauai is connected to hawaii in the Enterprise Replication
topology. For information on topologies, see “Choosing a Replication Network
Topology” on page 3-11.
v Set the idle timeout.
To specify the time (in minutes) that you want to allow the connection between
two Enterprise Replication servers to remain idle before disconnecting, use the
--idle=timeout option.v Specify the location of the ATS and RIS directories.
To use ATS, specify the directory for the Aborted Transaction Spooling (ATS)
files for the server using --ats=dir or--ris=dir .
For more information, see “Creating ATS and RIS Directories” on page 4-12.
v Specify the type of server if you are using hierarchical replication:
– To specify the server as a nonroot server, use --nonroot.
– To specify the server as a leaf server, use --leaf.If neither --leaf nor --nonroot is specified, the server is defined as a root server.
For more information, see “cdr define server” on page A-30.
Defining Replicates
To define a replicate, use the cdr define replicate command.
You can provide the following information in the replicate definition:
v Participants
v Create as a master replicate
v Conflict resolution rules and scope
v Replication frequency
v Error logging
v Replicate full rows or only changed columns
v IEEE or canonical message formats
v Database triggers
After you define the replicate and participants, you must manually start the
replicate using the command.
Chapter 6. Defining Replication Servers, Replicates, Participants, and Replicate Sets 6-3

Defining Participants
You must define participants for each server involved in the replicate in the
replicate definition using the cdr define replicate command.
Important: You cannot start and stop replicates that have no participants.
Each participant definition includes the following information:
v Database server group name
v Database in which the table to be replicated resides
v Table name
v Table owner
See “Table Owner” on page A-109.
v SELECT statement and optional WHERE clause
See “Participant Modifier” on page A-109.
If you use a SELECT * FROM table_name statement, the tables must be identical
on all database servers defined for the replicate.
Important: Do not create more than one participant definition for each row and
column to replicate. If the participant is the same, Enterprise
Replication attempts to insert or update duplicate values during
replication. For example, if one participant modifier includes WHERE x
< 50 and another includes WHERE x < 100, Enterprise Replication
sends the data for when x is between 50 and 100 twice.
In addition, for a primary-target replication system, you can specify the participant
type as either primary or target (receive-only). If you do not specify the participant
type, Enterprise Replication defines the participant as update-anywhere, by default.
For more information, see “Primary-Target Replication System” on page 3-1 and
“Participant Type” on page A-109.
For example, in the following participant definition, the P indicates that in this
replicate, hawaii is a primary server:
“P db1@g_hawaii:informix.mfct” “select * from mfct” \
If any data in the selected columns changes, that changed data is sent to the
secondary servers.
In the following example, the R indicates that in this replicate, maui is a secondary
server:
“R db2@g_maui:informix.mfct” “select * from mfct”
The specified table and columns receive information sent from the primary server.
Changes to those columns on maui are not replicated.
Important: The R in the participant definition indicates that the table is receive-only
mode, not that the table is in read-only mode.
If you do not specify the participant type, Enterprise Replication defines the
participant as update-anywhere by default. For example:
“db1@g_hawaii:informix.mfct” “select * from mfct” \
“db2@g_maui:informix.mfct” “select * from mfct”
For more information, see “Participant” on page A-108.
6-4 IBM Informix Dynamic Server Enterprise Replication Guide
Defining Replicates on Table Hierarchies
When you define replicates on inherited table hierarchies, use the following
guidelines to replicate operations:
v For both the parent and child tables, define a replicate on each table.
v For only the parent table (not the child table), define a replicate on the parent
table only.
v For only the child table (not the parent table), define a replicate on the child
table only.
Defining Master Replicates
To guarantee consistency between the nodes in your Enterprise Replication
environment, you can define master replicates using the cdr define replicate
command with the --master option. Dictionary information is then stored about
replicated column attributes for the participant you specify. This enables Enterprise
Replication to check for consistency between this master definition and local
participant definitions. Checks are performed when the replicate is defined and
each time a new participant is added to the replicate, thus avoiding runtime errors.
Verification also occurs each time the master replicate is started on a server.
Defining a replicate as a master replicate provides several advantages:
v Ensures data integrity by verifying that all participants in the replicate have
table and replicated column attributes that match the master replicate definition.
v Provides automatic table generation on participants that do not already contain
the table specified in the master replicate. However, Enterprise Replication
cannot create tables with user-defined data types.
v Allows alter operations on the replicated tables. For more information, see
“Performing Alter Operations on Replicated Tables” on page 7-16.
When you define a master replicate, you must specify a participant that is on the
server for which you are running the command. This participant is used to create
the dictionary information for the master replicate. If you specify additional
participants in the cdr define replicate command, they are verified against the
master definition and added to the replicate if they pass validation. If any
participant fails validation, the cdr define replicate command fails and that
participant is disabled.
The master replicate options, described in subsections below, are:
v --name
Use this option to create a strict master replicate that supports alter operations
and remastering.
v --empty
Use this option to create an empty master replicate and add participants later.
Master Replicate Verification
Enterprise Replication verifies the following information about a participant when
the participant is added to the master replicate:
v The participant contains all replicated columns.
v The replicated columns in the participant have the correct data types. For
columns that are user-defined data types, only the names of the data types are
verified.
v Optionally, the replicated columns in the participant have the same column
names as the master replicate.
Chapter 6. Defining Replication Servers, Replicates, Participants, and Replicate Sets 6-5

Creating Strict Master Replicates
You can create a strict master replicate in which all participants have the same
replicated column names by using the --name=y option. This option specifies that
when the master replicate verification is done for a new participant, that the
column names on the participant must be identical to the column names of the
master replicate. Strict master replicates allow you to perform the following tasks:
v Alter operations on replicated tables. For more information, see “Performing
Alter Operations on Replicated Tables” on page 7-16.
v Remastering by using the cdr remaster command. For more information, see
“Remastering a Replicate” on page 7-20.
You can modify an existing master replicate to remove name verification by using
the --name=n option of the cdr modify replicate command.
Creating Empty Master Replicates
You can create an empty master replicate by using the --empty option. This option
allows you to specify a participant as the basis of the master replicate but not
include that participant in the replicate. Creating an empty replicate can be
convenient in large environments in which you later add all participants using
scripts.
When you define an empty master replicate, you must specify only one participant
in the cdr define replicate command. This participant is used to create the master
dictionary information but is not added to the replicate.
The --empty option is only supported for master replicates, you cannot use it
without the --master option.
Defining Shadow Replicates
A shadow replicate is a copy of an existing, or primary, replicate. Enterprise
Replication uses shadow replicates to manage alter and repair operations on
replicated tables. You must create a shadow replicate to perform a manual
remastering of a replicate that was defined with the -n option. See
“Resynchronizing Data Manually” on page 7-16 for information about how you
can repair, or remaster, your replicated data. After creating the shadow replicate,
the next step in manual remastering is to switch the primary replicate and the
shadow replicate using the cdr swap shadow command.
You create a shadow replicate using the cdr define replicate command with the
--mirrors option, as described in “cdr define replicate” on page A-21.
When you define a shadow replicate, its state is always set to the same state as the
primary replicate. If you change the state of the primary replicate, all its shadow
replicates’ states are also changed to the same state.
You cannot delete a primary replicate if it has any shadow replicates defined. You
must first delete the shadow replicates, and then the primary replicate.
You cannot modify a primary replicate (using the cdr modify replicate command)
if it has any shadow replicates defined. Also, you cannot modify shadow replicates
directly.
You cannot suspend or resume a primary replicate (using the cdr suspend
replicate or cdr resume replicate command) if it has any shadow replicates
defined. Also, you cannot suspend or resume shadow replicates directly. If the
6-6 IBM Informix Dynamic Server Enterprise Replication Guide

primary replicate and its shadow replicates are part of an exclusive replicate set,
you can suspend or resume the entire replicate set using the cdr suspend replicate
or cdr resume replicate command.
You cannot add a participant to a shadow replicate:
v If the participant is not part of the primary replicate’s definition
v After remastering the replicate
If the primary replicate is part of an exclusive replicate set, any shadow replicates
you define are automatically added to that replicate set.
If you add a primary replicate to an exclusive replicate set, all its shadow
replicates are also automatically added. If you delete a primary replicate from an
exclusive replicate set, all its shadow replicates are also automatically deleted.
Specifying Conflict Resolution Rules and Scope
For update-anywhere replication systems, you must specify the conflict-resolution
rules in the replicate definition using the --conflict=rule option. The conflict
resolution rules are:
v always-apply
v ignore
v timestamp
v routine_name
If you use an SPL routine for your conflict-resolution rule, you can also use the
--optimize option to specify that the routine is optimized.
For more information, see the following:
v “Update-Anywhere Replication System” on page 3-5
v “Conflict-Resolution Rule” on page 3-6
v “Conflict Options” on page A-23
You can also specify the scope using the --scope=scope option:
v transaction (default)
v row
For more information, see “Scope” on page 3-11, and “Scope Options” on page
A-24.
Specifying Replication Frequency
The replication frequency options allow you to specify the interval between
replications, or the time of day when an action should occur. If you do not specify
the frequency, the default action is that replication always occurs immediately
when data arrives.
The frequency options are:
v --immed
v --every=interval
v --at=time
For more information, see “Frequency Options” on page A-110.
Chapter 6. Defining Replication Servers, Replicates, Participants, and Replicate Sets 6-7

Important: If you use time-based replication and two tables have referential
constraints, the replicates must belong to the same exclusive replicate
set. For more information, see “Exclusive Replicate Sets” on page 6-10.
Setting Up Error Logging
The Aborted Transaction Spooling (ATS) files and Row Information Spooling (RIS)
files contain information about failed transactions and aborted rows. You can use
this information to help you diagnose problems that arise during replication. For
more information about these files, refer to Chapter 8, “Monitoring and
Troubleshooting Enterprise Replication,” on page 8-1.
Recommendation:: Until you become thoroughly familiar with the behavior of the
replication system, you select both ATS and RIS options.
To configure your replicate to use ATS and RIS:
1. Set up the ATS and RIS directories. For instructions, see “Creating ATS and RIS
Directories” on page 4-12.
2. Specify the location of the ATS and RIS directories when you define your
server. For instructions, see “Defining Replication Servers” on page 6-2.
3. Specify that the replicate use ATS and RIS when you define the replicate by
including the --ats and --ris options in the replicate definition.
For more information, see “Special Options” on page A-24.
Replicating Only Changed Columns
By default, Enterprise Replication replicates the entire row, even if only one
column changed. (For more information on how Enterprise Replication evaluates
data for replication, see “Evaluating Data for Replication” on page 1-7.)
You can change the default behavior to replicate only the columns that changed. To
replicate only changed columns, include the --fullrow n option in the replicate
definition.
Tip: Enterprise Replication always sends the primary key column, even if you
specify to replicate only changed columns.
Replicating only the columns that changed has the following advantages:
v Sends less data
This is particularly useful when replicating large objects, such as data stored as
smart large objects and opaque user-defined types (UDTs). For example, when
you replicate a row with a large column that changes infrequently and a small
column that changes frequently, Enterprise Replication sends significantly less
data each time it updates the row if it only replicates the changed columns.
v Uses fewer Enterprise Replication resources, such as memory
If Enterprise Replication replicates an entire row from the source, and the
corresponding row does not exist on the target, Enterprise Replication applies the
update as an insert, also known as an upsert, on the target. By replicating the entire
row, Enterprise Replication corrects any errors during replication. If any errors
occur in an update of the target database server (for example, a large object is
deleted before Enterprise Replication can send the data), the next update from the
source database server (a complete row image) corrects the data on the target
server.
6-8 IBM Informix Dynamic Server Enterprise Replication Guide
Replicating only the columns that changed has the following disadvantages:
v Enterprise Replication does not apply upserts.
If the row to replicate does not exist on the target, Enterprise Replication does
not apply it. If you set up error logging (“Setting Up Error Logging” on page
6-8), Enterprise Replication logs this information as a failed operation.
v You cannot use the SPL routine or time stamp with SPL routine
conflict-resolution rules. For more information, see “Conflict Resolution” on page
3-6.
v You cannot use update-anywhere replication; doing so can result in inconsistent
conflict resolution.
v All database servers in the enterprise must be Version 9.3 or later.
Enterprise Replication does not enforce this restriction. If you attempt to
replicate only changed columns to a pre-Version 9.3 database server, you will
corrupt the data on that database server.
Enterprise Replication logs bitmap information about the updated columns in the
logical-log file. For more information, see the CDR record type in the logical-logs
chapter in the IBM Informix Administrator's Reference.
For more information on the --fullrow option, see “Special Options” on page A-24.
Using the IEEE Floating Point or Canonical Format
The FLOAT and SMALLFLOAT data types are handled inconsistently across
different platforms. You can specify sending this data in either IEEE floating point
format or machine-independent decimal representation:
v Enable IEEE floating point format to send all floating point values in either
32-bit (for SMALLFLOAT) or 64-bit (for FLOAT) IEEE floating point format.
To use IEE floating point format, include the --floatieee option in your replicate
definition.
It is recommended that you define all new replicates with the --floatieee option.
v Enable canonical format to send floating-point values in a machine-independent
decimal representation when you replicate data between dissimilar hardware
platforms.
To use canonical format, include the --floatcanon option in your replicate
definition. The --floatcanon option is provided for backward compatibility only;
it is recommended that you use the --floatieee option when defining new
replicates.
v If you specify neither IEEE or canonical formats, Enterprise Replication sends
FLOAT and SMALLFLOAT data types as a straight copy of machine
representation. If you are replicating across different platforms, replicated
floating-point numbers will be incorrect.
For more information, see “Special Options” on page A-24.
Important: You cannot modify the replicate to change the --floatieee or
--floatcanon options.
Enabling Triggers
By default, when a replicate causes an insert, update, or delete on a target table,
triggers associated with the table are not executed. However, you can specify that
triggers are executed when the replicate data is applied by enabling triggers in the
replicate definition.
Chapter 6. Defining Replication Servers, Replicates, Participants, and Replicate Sets 6-9

To enable triggers, include the --firetrigger option in your replicate definition.
For information, refer to “Triggers” on page 2-8 and “Special Options” on page
A-24.
Defining Replicate Sets
To create a replicate set, use the cdr define replicateset command.
Enterprise Replication supports two types of replicate sets: exclusive and
non-exclusive.
Exclusive Replicate Sets
To maintain referential integrity between replicates that include tables that have
referential constraints placed on columns, you must create an exclusive replicate set
and add the replicate to it.
An exclusive replicate set has the following characteristics:
v All replicates in an exclusive replicate set have the same state and frequency
settings. For more information, see “Displaying Information About Replicates”
on page A-51.
v When you create the replicate set, Enterprise Replication sets the initial state of
the replicate set to active.
v You can manage the replicates in an exclusive replicate set only as part of the
set. Enterprise Replication does not support the following actions for the
individual replicates in an exclusive replicate set:
– Starting a Replicate
– Stopping a Replicate
– Suspending a Replicate
– Resuming a Suspended Replicatev Replicates that belong to an exclusive replicate set cannot belong to any other
replicate sets.
To create an exclusive replicate set, use the --exclusive option with cdr define
replicateset.
Important: You cannot change an exclusive replicate set to non-exclusive.
Non-Exclusive Replicate Sets
By default, the cdr define replicateset command creates non-exclusive replicate sets.
A non-exclusive replicate set has the following characteristics:
v You can manage replicates that belong to a non-exclusive replicate set both
individually and as part of the set.
v Because individual replicates in a non-exclusive replicate set can have different
states, the non-exclusive replicate set itself has no state.
v You should not use non-exclusive replicate sets for replicates that include tables
that have referential constraints placed on columns.
v A replicate can belong to more than one non-exclusive replicate set.
Important: You cannot change a non-exclusive replicate set to exclusive.
6-10 IBM Informix Dynamic Server Enterprise Replication Guide
Use non-exclusive replicate sets if you want to add a replicate to more than one
replicate set. For example, you might want to create replicate sets to manage
replicates on the target server, table, or entire database. To do this, create three
non-exclusive replicate sets:
v A set that contains the replicates that replicate to the target server
v A set that contains the replicates on a particular table
v A set that contains all the replicates
In this scenario, each replicate belongs to three non-exclusive replicate sets.
Customizing the Replicate Set Definition
You can specify the replication frequency (“Specifying Replication Frequency” on
page 6-7) for all the replicates when you define the replicate set. For example, to
define the non-exclusive replicate set sales_set with the replicates sales_fiji and
sales_tahiti and specify that the members of sales_set replicate at 4:00 A.M. every
day, enter:
cdr define replicateset --at 4:00 sales_set sales_fiji \
sales_tahiti
To define the exclusive replicate set dev_set with the replicates dev_pdx and
dev_lenexa and specify that the members of dev_set replicate at 5:00 P.M. every
day, enter:
cdr define replicateset -X --at 17:00 dev_set dev_pdx\
dev_lenexa
Important: For replicates that belong to an exclusive replicate set, you cannot
specify the frequency individually for replicates in the set.
For more information, see “cdr define replicateset” on page A-28.
Initially Synchronizing Data Among Database Servers
Enterprise Replication provides an initial synchronization feature that allows you
to easily bring a new table up-to-date with replication when you start a new
replicate, or when you add a new participant to an existing replicate.
You do not need to suspend any servers that are replicating data while you add
the new replicate and synchronize it.
The cdr define replicate and cdr define replicateset commands provide options to
perform an initial synchronization for the replicates you are starting. All of the
rows that match the replication criteria will be transferred from the source server
to the target servers. If you are starting a replicate set, Enterprise Replication
synchronizes tables in an order that preserves referential integrity constraints (for
example, child tables are synchronized after parent tables).
Use the --syncdatasource (-S) option of the cdr start replicate or cdr start
replicateset command to specify the source server for synchronization. Any
existing rows in the specified replicates are deleted from the remote tables and
replaced by the data from the node you specify using -S.
The --extratargetrows option of the cdr start replicate or cdr start replicateset
commands specifies how to handle rows found on the target servers that are not
Chapter 6. Defining Replication Servers, Replicates, Participants, and Replicate Sets 6-11

present on the source server. You can specify to remove rows from the target, keep
extra rows on the target, or replicate extra rows from the target to other
participants.
If you use the cdr start replicate or cdr start replicateset command to specify a
subset of servers on which to start the replicate (or replicate set), that replicate (or
replicate set) must already be active on the source server. The source server is the
server you specify with the -S option. For example, for the following command,
repl1 must already be active on serv1:
cdr start repl repl1 ... -S serv1 serv2 serv3
When you start a replicate (or replicate set) for participants on all servers, the
replicate does not need to be active on the source server. So, for the following
command, repl1 does not need to be active:
cdr start repl1 ... -S serv1
When Enterprise Replication performs initial data synchronization, it keeps track of
discrepancies between the constraints set up on source and target server tables.
Rows that fail to be repaired due to these discrepancies are recorded in the ATS
and RIS files.
If replication fails for some reason and data becomes inconsistent, there are
different ways to correct data mismatches between replicated tables while
replication is active. The recommended method is direct synchronization. You can
also repair data based on an ATS or RIS file. Both of these methods are described
in “Resynchronizing Data Among Replication Servers” on page 7-11.
Using Templates to Set Up Replication
Enterprise Replication provides templates to allow easy set up and deployment of
replication for clients with large numbers of tables to replicate. A template uses
schema information about a database, a group of tables, columns, and primary
keys to define a group of master replicates and a replicate set.
First, you create a template using the cdr define template command; then, you
instantiate it on the servers where you want to replicate data by running the cdr
realize template command.
Important: If you want to use time-based replication, you must set up replication
manually.
Important: Templates set up replication for full rows of tables (all the columns in
the table), because they are designed to facilitate setting up large scale
replication environments.
If you want a participant to contain a partial row (just some columns
in the table), you can either set up replication manually, or, after you
realize a template you can use the cdr remaster command to restrict
the query.
All options of the cdr define template, cdr list template, cdr realize template, and
cdr delete template commands are described in detail in Appendix A,
“Command-Line Utility Reference,” on page A-1.
6-12 IBM Informix Dynamic Server Enterprise Replication Guide
4444
44444

Defining Templates
You define a template using the cdr define template command, with which you
can specify which tables to use, the database and server they are located in, and
whether to create an exclusive or non-exclusive replicate set. Table names can be
listed on the command line or accessed from a file using the --file option, or all
tables in a database can be selected.
Important: A template cannot define tables from more than one database.
Specify that the replicate set is exclusive if you have referential constraints on the
replicated columns. Also, if you create an exclusive replicate set using a template,
you do not need to stop the replicate set to add replicates. For more information
about exclusive replicate sets, see “Defining Replicate Sets” on page 6-10.
A template defines a group of master replicates and a replicate set.
You can use the cdr list template command from a non-leaf node to view details
about the template, including the internally generated names of the master
replicates. These are unique names based on the template, the server, and table
names.
Realizing Templates
After you define a template using the cdr define template command, use the cdr
realize template command to instantiate the template on your Enterprise
Replication database servers. The cdr realize template command first verifies that
the tables on each node match the master definition used to create the template.
Then, on each node, it adds the tables defined in the template as participants to
master replicates created by the template.
If a table on a server has additional columns to those defined in the template,
those columns are not considered part of the replicate.
If a table does not already exist on a server where you realize the template, you
can choose to create it, and it is also added to the replicate.
Also, at realization time, you can also choose to synchronize data among all
servers.
Verifying Participants without Applying the Template
The --verify option allows you to check that a template’s schema information is
correct on all servers before actually instantiating the template.
Synchronizing Data Among Database Servers
Use the --syncdatasource option to specify a server to act as the source for data
synchronization on all servers where you are realizing the template.
Creating Tables Automatically
The --autocreate option allows you to choose to automatically create tables in the
template definition if they do not already exist on a server. (This cannot be done
for tables that contain user-defined data types.)
Use the --dbspace option to specify a dbspace for table creation.
Chapter 6. Defining Replication Servers, Replicates, Participants, and Replicate Sets 6-13

Other Options
You can use the --applyasowner option to realize a table by its owner rather than
the user informix.
The --extratargetrows option specifies whether to delete, keep, or merge rows
found on target servers that are not present on the source server during the
synchronization operation.
The --target option defines whether target servers are receive-only (when target
servers are defined as receive-only, updates made on those servers are not
propagated).
Changing Templates
You cannot update a template. To adjust a template, you must delete it with the
cdr delete template command and then re-create it with the cdr define template
command.
6-14 IBM Informix Dynamic Server Enterprise Replication Guide
Chapter 7. Managing Replication Servers and Replicates
In This Chapter . . . . . . . . . . . . . . . . . . . . . . . . . . . . . . . . . . 7-2
Managing Replication Servers . . . . . . . . . . . . . . . . . . . . . . . . . . . . . 7-2
Modifying Replication Servers . . . . . . . . . . . . . . . . . . . . . . . . . . . . 7-2
Viewing Replication Server Attributes . . . . . . . . . . . . . . . . . . . . . . . . . 7-2
Connecting to Another Replication Server . . . . . . . . . . . . . . . . . . . . . . . . 7-2
Stopping Replication on a Server . . . . . . . . . . . . . . . . . . . . . . . . . . . 7-2
Restarting Replication on a Stopped Server . . . . . . . . . . . . . . . . . . . . . . . 7-3
Suspending Replication for a Server . . . . . . . . . . . . . . . . . . . . . . . . . . 7-3
Resuming a Suspended Replication Server . . . . . . . . . . . . . . . . . . . . . . . . 7-4
Deleting a Replication Server . . . . . . . . . . . . . . . . . . . . . . . . . . . . 7-4
Managing Replicates . . . . . . . . . . . . . . . . . . . . . . . . . . . . . . . . 7-4
Modifying Replicates . . . . . . . . . . . . . . . . . . . . . . . . . . . . . . . 7-5
Adding or Deleting Participants . . . . . . . . . . . . . . . . . . . . . . . . . . 7-5
Changing Replicate Attributes . . . . . . . . . . . . . . . . . . . . . . . . . . . 7-5
Viewing Replicate Properties . . . . . . . . . . . . . . . . . . . . . . . . . . . . 7-5
Starting a Replicate . . . . . . . . . . . . . . . . . . . . . . . . . . . . . . . 7-6
Stopping a Replicate . . . . . . . . . . . . . . . . . . . . . . . . . . . . . . . 7-6
Suspending a Replicate . . . . . . . . . . . . . . . . . . . . . . . . . . . . . . 7-7
Resuming a Suspended Replicate . . . . . . . . . . . . . . . . . . . . . . . . . . . 7-7
Deleting a Replicate . . . . . . . . . . . . . . . . . . . . . . . . . . . . . . . 7-7
Managing Replicate Sets . . . . . . . . . . . . . . . . . . . . . . . . . . . . . . . 7-8
Modifying Replicate Sets . . . . . . . . . . . . . . . . . . . . . . . . . . . . . . 7-8
Adding or Deleting Replicates From a Replicate Set . . . . . . . . . . . . . . . . . . . . 7-8
Changing Replication Frequency For the Replicate Set . . . . . . . . . . . . . . . . . . . 7-9
Viewing Replicate Sets . . . . . . . . . . . . . . . . . . . . . . . . . . . . . . 7-9
Starting a Replicate Set . . . . . . . . . . . . . . . . . . . . . . . . . . . . . . 7-9
Stopping a Replicate Set . . . . . . . . . . . . . . . . . . . . . . . . . . . . . . 7-9
Suspending a Replicate Set . . . . . . . . . . . . . . . . . . . . . . . . . . . . 7-10
Resuming a Replicate Set . . . . . . . . . . . . . . . . . . . . . . . . . . . . . 7-10
Deleting a Replicate Set . . . . . . . . . . . . . . . . . . . . . . . . . . . . . . 7-10
Managing Templates . . . . . . . . . . . . . . . . . . . . . . . . . . . . . . . . 7-10
Viewing Template Definitions . . . . . . . . . . . . . . . . . . . . . . . . . . . . 7-11
Deleting Templates . . . . . . . . . . . . . . . . . . . . . . . . . . . . . . . 7-11
Managing Replication Server Network Connections . . . . . . . . . . . . . . . . . . . . . 7-11
Viewing Network Connection Status . . . . . . . . . . . . . . . . . . . . . . . . . 7-11
Dropping the Network Connection . . . . . . . . . . . . . . . . . . . . . . . . . . 7-11
Reestablishing the Network Connection . . . . . . . . . . . . . . . . . . . . . . . . 7-11
Resynchronizing Data Among Replication Servers . . . . . . . . . . . . . . . . . . . . . . 7-11
Performing Direct Synchronization . . . . . . . . . . . . . . . . . . . . . . . . . . 7-12
Checking Consistency and Repairing Inconsistent Rows . . . . . . . . . . . . . . . . . . . 7-13
Preparing the checksum Support Functions . . . . . . . . . . . . . . . . . . . . . . 7-13
Interpreting the Consistency Report . . . . . . . . . . . . . . . . . . . . . . . . 7-14
Performing a Repair Job . . . . . . . . . . . . . . . . . . . . . . . . . . . . . 7-14
Filtering a Repair Job . . . . . . . . . . . . . . . . . . . . . . . . . . . . . 7-15
Stopping Repair Jobs . . . . . . . . . . . . . . . . . . . . . . . . . . . . . 7-15
Viewing Information About Repair Jobs . . . . . . . . . . . . . . . . . . . . . . . 7-15
Deleting Repair Jobs . . . . . . . . . . . . . . . . . . . . . . . . . . . . . . 7-15
Repairing Failed Transactions with ATS and RIS Files . . . . . . . . . . . . . . . . . . . . 7-15
Resynchronizing Data Manually . . . . . . . . . . . . . . . . . . . . . . . . . . . 7-16
Performing Alter Operations on Replicated Tables . . . . . . . . . . . . . . . . . . . . . . 7-16
Adding a Replicated Column . . . . . . . . . . . . . . . . . . . . . . . . . . . . 7-17
Dropping a Replicated Column . . . . . . . . . . . . . . . . . . . . . . . . . . . 7-18
Modifying a Replicated Column . . . . . . . . . . . . . . . . . . . . . . . . . . . 7-18
Attaching a New Fragment to a Replicated Table . . . . . . . . . . . . . . . . . . . . . 7-19
Remastering a Replicate . . . . . . . . . . . . . . . . . . . . . . . . . . . . . 7-20
© Copyright IBM Corp. 1996, 2005 7-1
444444444444444444444444

Automatic Remastering . . . . . . . . . . . . . . . . . . . . . . . . . . . . . 7-20
Manual Remastering . . . . . . . . . . . . . . . . . . . . . . . . . . . . . . 7-20
In This Chapter
This chapter covers how to manage your Enterprise Replication system, including
managing replication servers, replicates and participants, replicate sets, templates,
replication server network connections, and resynchronizing data, and performing
alter operations on replicated tables.
Managing Replication Servers
The state of the server refers to the relationship between the source server and the
target server. To determine the current state of the server, use the cdr list server
server_name command. For more information about the possible server states, see
“The STATE Column” on page A-55.
Modifying Replication Servers
To modify a replication server, use the cdr modify server command. With this
command, you can change the following attributes of the server:
v Idle timeout
v Location of the directory for the Aborted Transaction Spooling (ATS) files
v Location of the directory for the Row Information Spooling (RIS) files
For information about each of these attributes, see “Defining Replication Servers”
on page 6-2. For more information about the cdr modify server command, see “cdr
modify server” on page A-64.
Viewing Replication Server Attributes
After you define a server for replication, you can view information about the
server using the cdr list server command. If you do not specify the name of a
defined server on the command line, Enterprise Replication lists all the servers that
are visible to the current server. If you specify a server name, Enterprise
Replication displays information about the current server, including server ID,
server state, and attributes.
For more information, see “cdr list server” on page A-55.
Connecting to Another Replication Server
By default, when you view information about a server, Enterprise Replication
connects to the global catalog of the database server specified by the
INFORMIXSERVER environment variable. You can connect to the global catalog
of another database server using the --connect option.
For example, to connect to the global catalog of the database server idaho, enter:
cdr list server --connect=idaho
For more information, see “Global Catalog” on page 2-4 and “Connect Option” on
page A-107.
Stopping Replication on a Server
Enterprise Replication starts automatically when you use cdr define server to
declare the server for replication. The replication threads continue running until
7-2 IBM Informix Dynamic Server Enterprise Replication Guide

you shut the database server down or you remove the server with cdr delete
server. If you shut down the database server while Enterprise Replication is
running, replication begins again when you restart the database server. For more
information about managing the database server, see the chapter on database
operating modes in the IBM Informix Dynamic Server Administrator's Guide.
Generally, to stop Enterprise Replication on a server, you should shut down the
server. However, you might want to temporarily stop the Enterprise Replication
threads without stopping the server. To stop replication, use the cdr stop
command.
When you use cdr stop, Enterprise Replication stops capturing data to be
replicated. To ensure consistency, verify that no database update activity occurs
while Enterprise Replication is stopped. Replication threads remain stopped (even
if the database server is stopped and restarted) until you issue a cdr start
command.
Warning: When you stop replication on a server, you must ensure that the send
queues on the other Enterprise Replication servers participating in
replication do not fill.
For more information, see “cdr stop” on page A-88.
Restarting Replication on a Stopped Server
To restart replication on a stopped server, use the cdr start command. When you
restart the server, the Enterprise Replication threads start and continue.
Enterprise Replication resumes evaluating the logical logs at the replay position
(where Enterprise Replication stopped evaluating the logical log when the server
was stopped).
Warning: If the logical log corresponding to the replay position no longer exists,
then the restart partially fails and no database updates performed on the
local database server are replicated.
For more information, see “cdr start” on page A-77.
Suspending Replication for a Server
If you do not want to completely shut down the Enterprise Replication threads,
you can suspend replication of data to the server using the cdr suspend server
command. When replication is suspended to the server, the source server queues
replicated data but suspends delivery of replicated data to the target server. Note
that this command does not affect the network connection to the suspended server.
The source server continues to send other messages, such as acknowledgement and
control messages.
For example, to suspend replication of data to the server group g_papeete from the
server group g_raratonga, enter:
cdr suspend server g_papeete g_raratonga
To suspend replication to g_papeete from all servers in the enterprise, enter:
cdr suspend server g_papeete
Chapter 7. Managing Replication Servers and Replicates 7-3

Warning: When you suspend replication on a server, you must ensure that the
send queues on the other Enterprise Replication servers participating in
replication do not fill.
For more information, see “cdr suspend server” on page A-97.
Resuming a Suspended Replication Server
To resume replication to a suspended server, use the cdr resume server command.
When you resume the server, the queued data is delivered.
For example, to resume replication to the g_papeete server group, enter:
cdr resume server g_papeete
If you do not specify the server group (g_papeete in the example), cdr resume
server resumes replication from all servers participating in replication.
For more information, see “cdr resume server” on page A-76.
Deleting a Replication Server
To delete a replication server, use the cdr delete server command. You must run
the cdr delete server command twice.
For example, to remove the server group g_papeete from Enterprise Replication,
set the INFORMIXSERVER environment variable to papeete and run the
following commands:
cdr delete server g_papeete
cdr delete server --connect=raratonga g_papeete
The first command deletes the local server group (g_papeete) from Enterprise
Replication, and the second connects to another server in the replication
environment (raratonga) and deletes g_papeete from that server. The change then
replicates to the other servers in the replication environment.
Warning: Avoid deleting an Enterprise Replication server and immediately
re-creating it with the same name. If you re-create the objects
immediately (before the operation finishes propagating to the other
Enterprise Replication database servers in the network), failures might
occur in the Enterprise Replication system at the time of the operation or
later. For more information, see “Operational Considerations” on page
2-5.
For more information, see “cdr delete server” on page A-40.
Managing Replicates
You can perform the following tasks on existing replicates:
v Modify replicate attributes or participants
v View replicate properties and state
v Change the state of a replicate (whether replication is being performed)
v Delete a replicate
7-4 IBM Informix Dynamic Server Enterprise Replication Guide
Modifying Replicates
You can modify replicates in two ways:
v Adding or Deleting Participants
v Changing Replicate Attributes
Adding or Deleting Participants
To be useful, a replicate must include at least two participants. You can define a
replicate that has fewer than two participants, but before you can use that
replicate, you must add more participants.
To add a participant to an existing replicate, use the cdr change replicate --add
command. For example, to add two participants to the sales_data replicate, enter:
cdr change replicate --add sales_data \
"db1@hawaii:jane.table1" "select * from table1" \
"db2@maui:john.table2" "select * from table2"
To delete a participant from the replicate, use the cdr change replicate --delete
command.
For example, to delete these two participants from the replicate, enter:
cdr change replicate --delete sales_data \
"db1@hawaii:jane.table1" "db2@maui:john.table2"
For more information, see “cdr change replicate” on page A-4.
Changing Replicate Attributes
You can change the following attributes of a replicate using the cdr modify
replicate command:
v Conflict-resolution rules and scope
v Replication frequency
v Error logging
v Replicate full rows or only changed columns
v Database triggers
v Participant type
You cannot change the conflict resolution from ignore to a non-ignore option (time
stamp, SPL routine, or time stamp and SPL routine). You cannot change a
non-ignore conflict resolution option to ignore.
For information on each of these attributes, see “Defining Replicates” on page 6-3.
For example, to change the replication frequency for the sales_data replicate to
every Sunday at noon, enter:
cdr modify replicate sales_data Sunday.12:00
For more information, see “cdr modify replicate” on page A-60.
Viewing Replicate Properties
After you define a replicate, you can view the properties of the replicate using the
cdr list replicate command. If you do not specify the name of a defined replicate
on the command line, Enterprise Replication lists detailed information on all the
replicates defined on the current server. If you use the brief option, Enterprise
Chapter 7. Managing Replication Servers and Replicates 7-5
Replication lists participant information about all the replicates. If you specify a
replicate name, Enterprise Replication displays participant information about the
replicate.
For information about this command, see “cdr list replicate” on page A-50.
Starting a Replicate
When you define a replicate, the replicate does not begin until you explicitly
change its state to active. When a replicate is active, Enterprise Replication captures
data from the logical log and transmits it to the participants.
Important: You cannot start replicates that have no participants.
To change the replicate state to active, use the cdr start replicate command. For
example, to start the replicate sales_data on the servers server1 and server23,
enter:
sales_data server1 server23
This command causes server1 and server23 to start sending data for the sales_data
replicate.
If you omit the server names, this command starts the replicate on all servers that
are included in that replicate.
When you start a replicate, you can choose to perform an initial data
synchronization, as described in “Initially Synchronizing Data Among Database
Servers” on page 6-11.
Warning: Run the cdr start replicatecommand on an idle system (no transactions
are occurring) or use the BEGIN WORK WITHOUT REPLICATION
statement until after you successfully start the replicate.
If a replicate belongs to an exclusive replicate set, you must start the replicate set
to which the replicate belongs. For more information, see “Starting a Replicate.”
For more information, see “cdr start replicate” on page A-80.
Stopping a Replicate
To stop the replicate, use the cdr stop replicate command. This command changes
the replicate state to inactive and deletes any data in the send queue for that
replicate. When a replicate is inactive, Enterprise Replication does not capture,
transmit, or process any database changes.
Tip: You cannot stop replicates that have no participants.
For example, to stop the sales_data replicate on the servers server1 and server23,
enter:
cdr stop replicate sales_data server1 server23
This command causes server1 and server23 to purge any data in the send queue
for the sales_data replicate and stops sending data for that replicate. Any servers
not listed on the command line continue to capture and send data for the
sales_data replicate (even to server1 and server23).
7-6 IBM Informix Dynamic Server Enterprise Replication Guide

If you omit the server names, this command stops the replicate on all servers that
are included in that replicate.
If a replicate belongs to an exclusive replicate set, you must stop the replicate set
to which the replicate belongs. For more information, see “Exclusive Replicate
Sets” on page 6-10 and “Stopping a Replicate Set” on page 7-9.
Stopping a replicate also stops any direct synchronization, consistency checking, or
repair jobs that are in progress. To complete synchronization or consistency
checking, you must rerun the cdr sync replicateset or cdr check replicateset
command. To restart a repair job, use the cdr start repair command.
For more information, see “cdr stop replicate” on page A-90.
Suspending a Replicate
If you do not want to completely halt all processing for a replicate, you can
suspend a replicate using the cdr suspend replicate command. When a replicate is
in a suspended state, the replicate captures and accumulates changes to the source
database, but does not transmit the captured data to the target database.
Warning: Enterprise Replication does not support referential integrity if a replicate
is suspended. Instead, you should suspend a server. For more
information, see “Suspending Replication for a Server” on page 7-3.
For example, to suspend the sales_data replicate, enter:
cdr suspend replicate sales_data
If a replicate belongs to an exclusive replicate set, you must suspend the replicate
set to which the replicate belongs. For more information, see “Exclusive Replicate
Sets” on page 6-10 and “Suspending a Replicate Set” on page 7-10.
For more information, see “cdr suspend replicate” on page A-94.
Resuming a Suspended Replicate
To return the state of a suspended replicate to active, use the cdr resume replicate
command. For example:
cdr resume replicate sales_data
If a replicate belongs to an exclusive replicate set, you must resume the replicate
set to which the replicate belongs. For more information, see “Exclusive Replicate
Sets” on page 6-10 and “Resuming a Replicate Set” on page 7-10.
For more information, see “cdr resume replicate” on page A-74.
Deleting a Replicate
To delete the replicate from the global catalog, use the cdr delete replicate
command. When you delete a replicate, Enterprise Replication purges all
replication data for the replicate from the send queue at all participating database
servers.
For example, to delete sales_data from the global catalog, enter:
cdr delete replicate sales_data
Chapter 7. Managing Replication Servers and Replicates 7-7
4444

Warning: Avoid deleting a replicate and immediately re-creating it with the same
name. If you re-create the objects immediately (before the operation
finishes propagating to the other Enterprise Replication database servers
in the network), failures might occur in the Enterprise Replication
system at the time of the operation or later. For more information, see
“Operational Considerations” on page 2-5.
For more information, see “cdr delete replicate” on page A-37.
Managing Replicate Sets
When you create a replicate set, you can manage the replicates that belong to that
set together or individually. If the replicate set is exclusive, you can only manage
the individual replicates as part of the set.
Performing an operation on a replicate set (except cdr delete replicateset) is
equivalent to performing the operation on each replicate in the replicate set
individually.
For more information, see “Managing Replicates” on page 7-4.
Modifying Replicate Sets
You can modify replicate sets in two ways:
v Add or Delete Replicates
v Change Replication Frequency
Adding or Deleting Replicates From a Replicate Set
To add a replicate to an existing replicate set, use the command cdr change
replicateset --add. For example, to add two replicates to sales_set, enter:
cdr change replicateset --add sales_set sales_kauai \
sales_moorea
The state of the replicate when you add it to a replicate set depends on the type of
replicate set:
v For a non-exclusive replicate set, the state of the new replicate remains as it was
when you added it to the set. To bring all the replicates in the non-exclusive set
to the same state, use one of the commands described in “Managing Replicate
Sets” on page 7-8.
v For an exclusive replicate set, Enterprise Replication changes the existing state
and replication frequency settings of the replicate to the current properties of the
exclusive replicate set.
To delete a replicate from the replicate set, use cdr change replicate --delete.
For example, to delete the two replicates, sales_kauai and sales_moorea, from the
replicate set, enter:
cdr change replicateset --delete sales_set sales_kauai\
sales_moorea
When you add or remove a replicate from an exclusive replicate set that is
suspended or that is defined with a frequency interval, Enterprise Replication
transmits all the data in the queue for the replicates in the replicate set up to the
7-8 IBM Informix Dynamic Server Enterprise Replication Guide

point when you added or removed the replicate. For more information, see
“Suspending a Replicate Set” on page 7-10 and “Frequency Options” on page
A-110.
For more information, see “cdr change replicateset” on page A-6.
Changing Replication Frequency For the Replicate Set
You can change the replication frequency for the replicates in an exclusive or
non-exclusive replicate set using the cdr modify replicateset command. For more
information, see “Specifying Replication Frequency” on page 6-7.
For example, to change the replication frequency for each of the replicates in the
sales_set to every Monday at midnight, enter:
cdr modify replicateset sales_set Monday.24:00
For more information, see “cdr change replicateset” on page A-6.
Viewing Replicate Sets
To view the properties of the replicate set, use the cdr list replicateset command.
The cdr list replicateset command displays the replicate set name and a list of the
replicates that are members of the set. To find out more about each replicate in the
replicate set, see “Viewing Replicate Properties” on page 7-5.
For more information, see “cdr list replicateset” on page A-53.
Starting a Replicate Set
To change the state of all the replicates in the replicate set to active, use the cdr
start replicateset command. For example, to start the replicate set sales_set, enter:
set sales_set
When you start a replicate set, you can choose to perform an initial data
synchronization, as described in “Initially Synchronizing Data Among Database
Servers” on page 6-11.
Warning: Run the cdr start replicateset command on an idle system (when no
transactions are occurring) or use the BEGIN WORK WITHOUT
REPLICATION statement after you successfully start the replicate.
For more information, see “cdr start replicateset” on page A-82 and “cdr start
replicate” on page A-80.
Stopping a Replicate Set
To stop the replicates in the replicate set, use the cdr stop replicateset command.
This command changes the state of all the replicates in the set to inactive.
For example, to stop the sales_set replicate set, enter:
cdr stop replicateset sales_set
Stopping a replicate set also stops any direct synchronization, consistency checking,
or repair jobs that are in progress. To complete synchronization or consistency
checking, you must rerun the cdr sync replicateset or cdr check replicateset
command. To restart a repair job, use the cdr start repair command.
Chapter 7. Managing Replication Servers and Replicates 7-9
4444

For more information, see “cdr stop replicateset” on page A-92 and “cdr stop
replicate” on page A-90.
Suspending a Replicate Set
If you do not want to completely halt all processing for the replicates in a replicate
set, you can suspend the replicates in the set using the cdr suspend replicateset
command.
For example, to suspend the sales_set replicate set, enter:
cdr suspend replicateset sales_set
For more information, see “cdr suspend replicateset” on page A-95 and “cdr
suspend replicate” on page A-94.
Resuming a Replicate Set
To return the suspended replicates in the replicate set to active, use the cdr resume
replicateset command. For example:
cdr resume replicateset sales_set
For more information, see “cdr resume replicateset” on page A-75 and “cdr resume
replicate” on page A-74.
Deleting a Replicate Set
To delete the replicate set, use the cdr delete replicateset command.
Tip: When you delete a replicate set, Enterprise Replication does not delete the
replicates that are members of the replicate set. The replicates remain in the
state they were in when the set was deleted.
For example, to delete sales_set, enter:
cdr delete replicateset sales_set
Warning: Avoid deleting a replicate set and immediately re-creating it with the
same name. If you re-create the objects immediately (before the
operation finishes propagating to the other Enterprise Replication
database servers in the network), failures might occur in the Enterprise
Replication system at the time of the operation or later. For more
information, see “Operational Considerations” on page 2-5.
For more information, see “cdr delete replicateset” on page A-38.
Managing Templates
You can use the cdr list template and cdr delete template commands to view
information about your templates and to clean up obsolete templates. The
commands are described in detail, including examples and sample output, in
Appendix A, “Command-Line Utility Reference.”
You cannot update a template. To modify a template, you must delete it with the
cdr delete template command and then re-create it with the cdr define template
command.
7-10 IBM Informix Dynamic Server Enterprise Replication Guide
Viewing Template Definitions
Use the cdr list template command to view detailed information about the
template and the servers, databases and tables for which the template defines
replication.
Deleting Templates
Use the cdr delete template command to delete any templates that you no longer
want to use to set up replication. The command also deletes any replicate sets
associated with the template which exist if the template has been realized.
Important: Deleting a template does not delete replicates that have been created
by realizing a template.
Managing Replication Server Network Connections
This section explains how you can view network connections status, drop network
connections, and reestablish dropped network connections.
Viewing Network Connection Status
To determine the current status of the network connection to each of the servers
participating in replication, use the cdr list server command and look at the
STATUS column of the output.
For more information, see “cdr list server” on page A-55.
Dropping the Network Connection
To drop the Enterprise Replication network connection for a server, use the cdr
disconnect server command. When you drop the connection, Enterprise
Replication continues to function and queue transactions. For example, to
disconnect the network connection between the current replication server and the
server g_papeete, enter:
cdr disconnect server g_papeete
Warning: When you disconnect a server from Enterprise Replication, you must
ensure that the send queues on all other Enterprise Replication servers
participating in replication do not fill.
For more information, see “cdr disconnect server” on page A-44.
Reestablishing the Network Connection
To reestablish a dropped network connection, use the cdr connect server
command.
For example, to reestablish the network connection between the current replication
server and the server g_papeete, enter:
cdr connect server g_papeete
For more information, see “cdr connect server” on page A-17.
Resynchronizing Data Among Replication Servers
If replication has failed for some reason and data is not synchronized, there are
different ways to correct data mismatches between replicated tables.
Chapter 7. Managing Replication Servers and Replicates 7-11
4
44

The following table compares each of the methods. All methods except manual
table unloading and reloading can be performed while replication is active.
Table 7-1. Resynchronization methods
Method Description
Direct synchronization v Replicates all rows from the specified
reference server to all specified target
servers for a replicate or replicate set
v Runs as a foreground process
Checking consistency and then repairing
inconsistent rows
v Compares all rows from the specified
target servers with the rows on the
reference server, prepares a consistency
report, and optionally repairs inconsistent
rows
v Runs as a foreground process
v Requires preparation of checksum support
functions
Repair job v Replicates all rows from the specified
reference server to one target server for a
replicate or replicate set
v Two-step process: define a job and then
start it
v A job can only be used one time
v Runs as a background process
v Optionally filters a job so that only
specific rows or columns are repaired
ATS or RIS file repairs v Used to repair rows that other
synchronization methods could not repair.
v Repairs a single transaction at a time.
v Replicates or replication server must have
been configured with the ATS or RIS
option.
Manual table unloading and reloading v Manual process of unloading the target
table, copying the reference table, and
then loading the reference table into the
target database
v Requires that replication be suspended
Performing Direct Synchronization
Direct synchronization replicates every row in the specified replicate or replicate
set from the reference server to all the specified target servers.
To perform direct synchronization, use the cdr sync replicate or cdr sync
replicateset command.
You can synchronize a single replicate or a replicate set. When you synchronize a
replicate set, Enterprise Replication synchronizes tables in an order that preserves
referential integrity constraints (for example, child tables are synchronized after
parent tables).
7-12 IBM Informix Dynamic Server Enterprise Replication Guide
44
44
44
4444
4
4444444
4
44
4444
44
4
4
44
444
4
444
44444
44
4
44
44
4444
Important: Running direct synchronization can consume a large amount of space
in your log files. Ensure you have sufficient space before running this
command.
The following restrictions apply to performing direct synchronization:
v The Enterprise Replication network connection must be active between the
Connect server, reference server and the target servers while performing direct
synchronization.
v The replicate must not be in a suspended or stopped state during direct
synchronization.
v The replicate must not be set up for time based replication.
If direct synchronization cannot repair a row, the inconsistent row is recorded in an
ATS or RIS file. For more information, see “Repairing Failed Transactions with ATS
and RIS Files” on page 7-15.
Checking Consistency and Repairing Inconsistent Rows
To perform a consistency check, use the cdr check replicate or cdr check
replicateset command. Use the –repair option to repair the inconsistent rows. A
consistency report is displayed for your review.
You can perform a consistency check and synchronization on a single replicate or a
replicate set. When you synchronize a replicate set, Enterprise Replication
synchronizes tables in an order that preserves referential integrity constraints (for
example, child tables are synchronized after parent tables).
Important: Running a consistency check can consume a large amount of space in
your log files. Ensure you have sufficient space before running this
command.
The following restrictions apply to performing consistency checking:
v The Enterprise Replication network connection must be active between the
Connect server, reference server and the target servers while performing
consistency checking and repair.
v The replicate must not be in a suspended or stopped state during consistency
checking.
v The replicate must not be set up for time based replication.
If synchronization during a consistency check cannot repair a row, the inconsistent
row is recorded in an ATS or RIS file. For more information, see “Repairing Failed
Transactions with ATS and RIS Files” on page 7-15.
Preparing the checksum Support Functions
Before you can use the cdr check replicate command, you must prepare the
Enterprise Replication checksum support functions.
To prepare the checksum support functions::
1. Download the checksum support functions from the IBM developerWorks
Website: http://www.ibm.com/software/data/developer/informix.
2. Compile the function code according to the platform-specific instructions listed
in the accompanying readme file. You can read this file prior to downloading
the function code.
Chapter 7. Managing Replication Servers and Replicates 7-13
444
4
444
44
4
444
4
444
4444
444
4
444
44
4
444
444
4
44
444

3. Register the checksum support functions in each database that you plan to
include in consistency checking. You can register the functions using the
BladeManager utility or CREATE FUNCTION statements.
Interpreting the Consistency Report
Inconsistencies listed in the consistency report do not necessarily indicate a failure
of replication. Data on different database servers is inconsistent while replicated
transactions are in progress. For example, the following consistency report
indicates that two rows are missing on the server g_serv2:
------ Statistics for repl1 ------
Node Rows Extra Missing Mismatch Processed
---------------- --------- --------- --------- --------- ---------
g_serv1 67 0 0 0 0
g_serv2 65 0 2 0 0
WARNING: replicate is not in sync
The missing rows could be in the process of being replicated from g_serv1 to
g_serv2.
If you choose to repair inconsistent rows during a consistency check, the report
shows the condition of the replicate at the time of the check, plus the actions taken
to make the replicate consistent. For example, the following report shows two
missing rows on g_serv2 and that two rows were replicated from g_serv1 to
correct this inconsistency:
------ Statistics for repl1 ------
Node Rows Extra Missing Mismatch Processed
---------------- --------- --------- --------- --------- ---------
g_serv1 67 0 0 0 2
g_serv2 65 0 2 0 0
WARNING: replicate is not in sync
The warning indicates that inconsistencies were discovered. The report does not
indicate whether the replicate became consistent after the repair process.
The verbose form of the consistency report also displays the primary key for each
inconsistent row.
For more information about the contents of the consistency report, see “cdr check
replicate” on page A-8.
Performing a Repair Job
Repair jobs are named background processes that synchronize two database
servers for a specific replicate or replicate set.
Repair jobs can be run online while replication is active. First, you create the repair
job using the cdr define repair command. Then, run the job using the cdr start
repair command.
You can define a repair job for a single replicate or for a replicate set. When you
repair a replicate set, Enterprise Replication synchronizes tables in an order that
preserves referential integrity constraints (for example, child tables are
synchronized after parent tables).
7-14 IBM Informix Dynamic Server Enterprise Replication Guide
444
44444
4444444
44
44444
4444444
44
44
44
4
44
444
4444
During the execution of the repair process, lock contention is possible. The repair
process performs dummy updates on a block of rows at a time, however, the
whole table is not locked.
Transaction log consumption increases during a repair process due to operations
on repair control tables as well as dummy updates on the user table.
Important: Running a repair job can consume a large amount of space in your log
files. Ensure you have sufficient space before starting the repair job.
The following restrictions apply to running repair jobs:
v The Enterprise Replication network connection must be active between the
Connect server, reference server and the target servers while performing a repair
job.
v The replicate must not be in a suspended or stopped state when you start a
repair job or while the job is running.
v The replicate must not be set up for time based replication.
If a repair job cannot repair a row, the inconsistent row is recorded in an ATS or
RIS file. For more information, see “Repairing Failed Transactions with ATS and
RIS Files” on page 7-15.
Filtering a Repair Job
If you have a situation where just part of the table needs to be repaired, for
example when one fragment in a partitioned table has incorrect data, you can use
the --filter (-f) option of the cdr define repair command. With the --filter option
you specify a WHERE clause for the source participant and a WHERE clause for
the target participant that restrict the columns for which the repair job runs.
Important: In the WHERE clauses, only specify columns that are exactly the same
on the source and target nodes and only specify columns that are not
updated.
Stopping Repair Jobs
You can stop a repair job using the cdr stop repair command. You can restart from
where it left off by running the cdr start repair command again. If you have
defined a new repair job of the same name, the new job is started from the
beginning. The old, partially run job is not started again.
Viewing Information About Repair Jobs
You can view information about repair jobs by using the cdr list repair command.
Deleting Repair Jobs
Repair job definitions are not automatically removed from the global catalog;
delete them using the cdr delete repair command.
Warning: If the repair job is active when you issue the cdr delete repair command,
the repair data in the send queue of the source server is purged.
Repairing Failed Transactions with ATS and RIS Files
You can perform a repair using an ATS or RIS file if you defined the replicate or
replication server with the –ats or –ris option.
A repair using an ATS or RIS file repairs the rows associated with the single
transaction that is recorded in the specified ATS or RIS file. To apply repairs based
Chapter 7. Managing Replication Servers and Replicates 7-15
333
33
44
4
444
44
4
444
444444
444
44444
44
444
44
4
44
44

on an ATS or RIS file, use the cdr repair command, as described in Appendix A,
“Command-Line Utility Reference.” The cdr repair command processes one ATS or
RIS file each time you specify the command. The following table shows how failed
operations are handled.
Failed Operation Action Taken on Target Server
Delete Delete
Insert or Update v If the row is found on the source server, does an update
v If the row is not found on the source server, does a delete
Resynchronizing Data Manually
Manual resynchronization involves replacing the inconsistent table in the target
database with a copy of the correct table from the reference database. Manual
resynchronization is the least preferred method to repair your replicated tables
because you must suspend replication to avoid producing further inconsistencies.
The following example shows how to manually resynchronize two replication
database servers.
To synchronize the replication server g_papeete with the server g_raratonga:
1. Suspend replication to the replication server group g_papeete.
See “Suspending Replication for a Server” on page 7-3.
2. Unload the table from the server group g_raratonga.
See “Loading and Unloading Data” on page 4-17.
3. Load the table on g_papeete and specify BEGIN WORK WITHOUT
REPLICATION.
See “Loading and Unloading Data” on page 4-17 and “Blocking Replication” on
page 4-14.
4. Resume replication to g_papeete.
See “Resuming a Suspended Replication Server” on page 7-4.
Important: If tables that you are synchronizing include shadow columns, you must
explicitly unload and load these columns. If these values are not
included, Enterprise Replication inserts NULL values. For more
information, see “Shadow Column Disk Space” on page 4-8 and
“Loading and Unloading Data” on page 4-17.
Performing Alter Operations on Replicated Tables
When Enterprise Replication is active and data replication is in progress, you can
perform many types of alter operations on replicated tables. Most of the supported
alter operations do not require any special steps when performed on replicated
tables; some, however, do require special steps for replicated tables.
You can perform the following alter operations on active, replicated tables without
performing extra steps:
v Add or drop fragments
v Move a non-fragmented table from one dbspace to another dbspace
v Convert a fragmented table to a non-fragmented table
v Convert a non-fragmented table to a fragmented table
7-16 IBM Informix Dynamic Server Enterprise Replication Guide
4444
444
44
44
44
4
4444
44
4
4
4
4
4
44
44
4
4
44444

v Convert from one fragmentation strategy to another
v Change an existing fragment expression on an existing dbspace
v Move a fragment expression from one dbspace to another dbspace
v Create a clustered index
v Recluster an existing index
v Add or drop default values and SQL checks
v Add or drop unique, distinct, and foreign keys
v Alter the locking granularity
v Alter the next extent size
You can perform the following alter operations on active, replicated tables, but you
must perform extra steps, which are described in following sections:
v Add a column to a replicated table
v Drop a column from a replicated table
v Modify a replicated column
v Attach a fragment to a replicated table
Enterprise Replication uses shadow replicates to manage alter operations on
replicated tables without causing any interruption to replication. By using shadow
replicates, the replicate participants SELECT clause can be modified seamlessly
while replication is active. For example, a new column can be brought into the
replicate definition, an existing replicated column can be removed from the
replicate definition and the data type or size of a replicated column can be
changed without interrupting replication. See “Defining Shadow Replicates” on
page 6-6 for more information about shadow replicates.
Before altering a replicated table, ensure that you have sufficient log space
allocated for long transactions, a sufficient number of locks available, and sufficient
space available for the queue sbspace.
When you issue a command to alter a replicated table, Enterprise Replication
places the table in alter mode before performing the alter operation. Alter mode is
a state in which only DDL (data-definition language) and SELECT operations are
allowed but DML (data-manipulation language) operations are not allowed. After
the transaction that initiated the alter operation completes, Enterprise Replication
unsets alter mode.
The following restrictions apply when you use alter operations on replicated tables.
v Enterprise Replication must be in an active state, unless you are only adding or
dropping check constraints and default values.
v Tables must have a master replicate defined.
v The RENAME TABLE and RENAME COLUMN statements are not supported.
v The DROP TABLE statement is not supported.
For a list of common alter operation problems and how to solve them, see
“Troubleshooting Tips for Alter Operations” on page 8-11.
Adding a Replicated Column
You can alter a replicated table to add a new column to be replicated.
To add a new replicated column:
Chapter 7. Managing Replication Servers and Replicates 7-17

1. Use the ALTER TABLE statement to add the column to the replicated table at
all participating nodes.
2. Remaster the replicate to include the newly added column in the replicate
definition, as described in “Remastering a Replicate” on page 7-20.
Dropping a Replicated Column
You can alter a replicated table to drop an existing column that is replicated.
To drop a replicated column:
1. Remaster the replicate and modify the replicate’s SELECT statement to remove
the column being dropped, as described in “Remastering a Replicate” on page
7-20.
2. If the master replicate has shadow replicates defined, remove the column being
dropped from their definitions as well.
3. Wait for the shadow replicate created by the remastering process to be cleaned
up automatically.
To check when the shadow replicate has been deleted, look in the server log
file for a message similar to this:
CDR CDRRTBCleaner: Deleted obsolete replicate
Shadow_4_Repl1_GMT1090373046_GID10_PID28836
The second line shows the name of the shadow replicate. See “cdr remaster” on
page A-70 for information about the format of shadow replicate names.
Alternatively, you can use either the cdr list replicate or onstat -g cat repls
command to view the status of the shadow replicate. After the shadow replicate
has been deleted, these commands will no longer show information about it.
4. Use the ALTER TABLE statement to drop the columns from the replicated table
at all participating nodes.
Modifying a Replicated Column
You can modify the size or type of a column for all basic data types and for the
BOOLEAN and LVARCHAR extended types. Modification of other extended types
is not supported.
When you modify a replicated column, do not insert data into the modified
column that will not fit into the old column definition until all participants have
been altered, because the data might be truncated or data conversion to and from
the master dictionary format to the local dictionary format might fail. Enterprise
Replication handles the data type mismatch by having the source server convert
data that is in the local dictionary format to the master dictionary format, and the
target server convert data from the master dictionary format to the local dictionary
format. If Enterprise Replication detects a mismatch in data type or size between
the master replicate definition and the local table definition, a warning is printed
in the log file.
If Enterprise Replication is not able to convert the replicated row data into the
master dictionary format on the source server while queuing replicated data into
the send queue, the replicate is stopped for the local participant. If this occurs, you
must correct the problem and then restart the replicate from the local participant
with the --syncdatasource option. If the correction is to delete the problematic row
data, delete the row using the BEGIN WORK WITHOUT REPLICATION
statement. Otherwise, the deleted row is moved from the replicated table to the
associated delete table, which might cause problems for the subsequent alter
operation on the replicated table.
7-18 IBM Informix Dynamic Server Enterprise Replication Guide
If Enterprise Replication cannot convert row data from the master dictionary
format to local table dictionary format at the target server after receiving replicated
data, the replicated transaction is spooled to ATS and RIS files. For example, if you
modify a SMALLINT column to an INTEGER column, make sure that you do not
insert data that is too large for the SMALLINT data type until the alter operation is
performed at all replicate participants, and remastering is performed so that the
master dictionary reflects the INTEGER data type.
Warning: While modifying a replicated column, sometimes it is possible that the
alter operation on the base table succeeds, but the delete table
modification might fail when Enterprise Replication unsets alter mode. If
this happens, you will see a message similar to the following in the
server message log file:
CDRGC: cannot populate data into the new delete table
SQL error=-1226, ISAM error=0
This situation can happen while modifying a replicated column from a data type
larger in length or size to a data type smaller in length or size, for example, from
an INTEGER column to a SMALLINT column, and if the delete table has data
which cannot fit in the new type column.
To avoid this situation, do not convert between data types that cause data
truncation or produce cases where data cannot fit into the new type. If the above
situation has already occurred, carefully update or delete the problematic rows
from the delete table and attempt to unset alter mode manually by using the cdr
alter command. If you cannot resolve the problem, contact IBM Informix technical
support.
To modify a replicated column:
1. Issue the alter command to modify the replicated column.
2. Perform the alter operation at all the replicate participants.
3. Optionally remaster the replicate to update the column definition in the
replicate definition, as described in “Remastering a Replicate” on page 7-20.
After an alter operation, the master dictionary no longer matches the replicated
table dictionary. Because data transfer is always done in master dictionary format,
data conversion between the local dictionary format and the master dictionary
format is performed. Data conversion can slow the performance of your replication
system. The remastering process changes the master dictionary to match the
altered replicated table dictionary. Therefore, after remastering, data conversion is
not necessary.
Attaching a New Fragment to a Replicated Table
To attach a new fragment, you must first manually place the replicated table in
alter mode using the cdr alter command (described in Appendix A,
“Command-Line Utility Reference,” on page A-1). Enterprise Replication cannot
automatically set alter mode for this operation due to an SQL restriction that
requires attaching a fragment to be performed in multiple steps.
To attach a new fragment to a replicated table:
1. Set alter mode on the replicate using the cdr alter command.
2. Drop the primary key of the table.
3. Attach the new fragment.
4. Re-create the primary key.
Chapter 7. Managing Replication Servers and Replicates 7-19
33333
33
3333
333333
5. Unset alter mode using the cdr alter command.
Remastering a Replicate
The cdr remaster command redefines an existing master replicate, or turns an
existing non-master replicate into a master replicate. You must run the cdr
remaster command if you add a new replicated column or drop a replicated
column. If you modify a replicated column, you should remaster, however,
remastering is not mandatory.
Automatic Remastering
To use automatic remastering simply run the cdr remaster command for the
replicate for which you want to update the definition.
To use automatic remastering, the master replicate definition must have been
created with name verification turned on (--name option of the cdr define
replicate command set to y). See Appendix A, “Command-Line Utility Reference,”
on page A-1 for details about the cdr remaster command and the cdr define
replicate command.
Manual Remastering
You must use manual remastering if your participants to not have matching
column names and they were created with name verification turned off (--name
option of the cdr define replicate command set to n).
To manually remaster a replicate:
1. Use the cdr define replicate command to create a shadow replicate with the
same attributes as the primary replicate and with the --mirrors option, but with
a SELECT statement that is correct for the table after the alter operation. The
SELECT statement can include newly added columns or omit newly dropped
columns.
2. Use the cdr swap shadow command to exchange the existing primary replicate
and the newly created shadow replicate.
While performing the cdr swap shadow operation, Enterprise Replication stores
the BEGIN WORK position of the last known transaction sent to the grouper as a
swap log position for the current swap operation. Any transaction begun prior to the
swap log position will use the original (old) replicate definition. Any transaction
begun after the swap log position will use the new replicate definition.
The old replicate definition will be cleaned up automatically after the replicate
definition is no longer required by Enterprise Replication.
7-20 IBM Informix Dynamic Server Enterprise Replication Guide

Chapter 8. Monitoring and Troubleshooting Enterprise
Replication
In This Chapter . . . . . . . . . . . . . . . . . . . . . . . . . . . . . . . . . . 8-1
Aborted Transaction Spooling Files . . . . . . . . . . . . . . . . . . . . . . . . . . . 8-2
Preparing to Use ATS . . . . . . . . . . . . . . . . . . . . . . . . . . . . . . . 8-2
About ATS Filenames . . . . . . . . . . . . . . . . . . . . . . . . . . . . . . . 8-2
About ATS File Information . . . . . . . . . . . . . . . . . . . . . . . . . . . . . 8-3
BYTE and TEXT Information in ATS Files . . . . . . . . . . . . . . . . . . . . . . . . 8-3
Example 1 . . . . . . . . . . . . . . . . . . . . . . . . . . . . . . . . . 8-4
Example 2 . . . . . . . . . . . . . . . . . . . . . . . . . . . . . . . . . 8-4
Example 3 . . . . . . . . . . . . . . . . . . . . . . . . . . . . . . . . . 8-4
Changed Column Information in ATS Files . . . . . . . . . . . . . . . . . . . . . . . 8-4
BLOB and CLOB Information in ATS Files . . . . . . . . . . . . . . . . . . . . . . . . 8-4
UDT Information in ATS Files . . . . . . . . . . . . . . . . . . . . . . . . . . . . 8-4
Suppressing Datasync Errors and Warnings in ATS Files . . . . . . . . . . . . . . . . . . . 8-4
Row Information Spooling Files . . . . . . . . . . . . . . . . . . . . . . . . . . . . 8-5
Preparing to Use RIS . . . . . . . . . . . . . . . . . . . . . . . . . . . . . . . 8-5
About RIS Filenames . . . . . . . . . . . . . . . . . . . . . . . . . . . . . . . 8-5
BYTE and TEXT Information in RIS Files . . . . . . . . . . . . . . . . . . . . . . . . 8-6
Example 1 . . . . . . . . . . . . . . . . . . . . . . . . . . . . . . . . . 8-6
Example 2 . . . . . . . . . . . . . . . . . . . . . . . . . . . . . . . . . 8-6
Changed Column Information in RIS Files . . . . . . . . . . . . . . . . . . . . . . . . 8-6
BLOB and CLOB Information in RIS Files . . . . . . . . . . . . . . . . . . . . . . . . 8-6
UDT Information in RIS Files . . . . . . . . . . . . . . . . . . . . . . . . . . . . 8-6
Suppressing Datasync Errors and Warnings in RIS Files . . . . . . . . . . . . . . . . . . . 8-7
Preventing Memory Queues from Overflowing . . . . . . . . . . . . . . . . . . . . . . . 8-7
Preventing DDRBLOCK Mode . . . . . . . . . . . . . . . . . . . . . . . . . . . . 8-8
Monitoring Disk Usage for Send and Receive Queue Spool . . . . . . . . . . . . . . . . . . 8-9
Increasing the Sizes of Storage Spaces . . . . . . . . . . . . . . . . . . . . . . . . . 8-9
Recovering when Storage Spaces Fill . . . . . . . . . . . . . . . . . . . . . . . . . 8-10
Solving Common Configuration Problems . . . . . . . . . . . . . . . . . . . . . . . . 8-10
Troubleshooting Tips for Alter Operations . . . . . . . . . . . . . . . . . . . . . . . . 8-11
Enterprise Replication Event Alarms . . . . . . . . . . . . . . . . . . . . . . . . . . 8-14
In This Chapter
Enterprise Replication provides tools to help diagnose problems that arise during
replications. The Aborted Transaction Spooling (ATS) and Row Information
Spooling (RIS) files contain information about failed transactions.
In addition, you can use tools provided with the server, such as the onstat
command, to display statistics that you can use to diagnose problems. For more
information on the onstat commands that are relevant to Enterprise Replication,
see Appendix C, “onstat Command Reference,” on page C-1.
This chapter covers the following topics:
v Aborted Transaction Spooling Files
v Row Information Spooling Files
v Preventing Memory Queues from Overflowing
v Solving Common Configuration Problems
v Enterprise Replication Event Alarms
© Copyright IBM Corp. 1996, 2005 8-1
Aborted Transaction Spooling Files
When ATS is active, all failed replication transactions are recorded in ATS files.
Each ATS file contains all the information pertinent to a single failed transaction. If
a replicated transaction fails for any reason (constraint violation, duplication, and
so forth), all the buffers in the replication message that compose the transaction are
written to a local operating-system file. You can use the ATS files to identify
problems or as input to custom utilities that extract or reapply the aborted rows.
Aborted-transaction spooling only occurs if the entire transaction is aborted.
Transactions defined with row scope that have aborted rows but are successfully
committed on the target tables are not logged.
All rows that fail conflict resolution for a transaction that has row scope defined
are also written to the RIS file (“Row Information Spooling Files” on page 8-5), if
defined.
In some cases, such as with long transactions, the database server itself aborts
transactions. In these cases, Enterprise Replication does not generate an ATS file.
Preparing to Use ATS
Failed transactions are not automatically recorded in ATS files.
To collect ATS information:
1. Create a directory for Enterprise Replication to store ATS files.
v If you are using primary-target replication, create the directory on the target
system.
v If you are using update-anywhere replication and have conflict resolution
enabled, create the directory on all participating replication systems.For more information, see “Creating ATS and RIS Directories” on page 4-12.
2. When you define a server for Enterprise Replication, specify the location of the
ATS directory you created in step 1.
To do this, include the --ats option with the cdr define server command.
If you do not specify an ATS directory, Enterprise Replication stores the ATS
files in the following directory:
UNIX /tmp
Windows \tmp directory of the drive that contains %INFORMIXDIR%
For more information, see “Creating ATS and RIS Directories” on page 4-12.
3. When you define a replicate, specify that ATS is active.
To do this, include the --ats option with the cdr define replicate command.
For more information, see “Setting Up Error Logging” on page 6-8.
About ATS Filenames
When ATS is active, each aborted transaction is written to a file in the specified
directory.
The following table provides the naming convention for ATS files:
ats.target.source.threadId.timestamp.sequence
8-2 IBM Informix Dynamic Server Enterprise Replication Guide
Name Description
target The name of the database server receiving this replicate transaction
source The name of the database server that originated the transaction
threadId The identifier of the thread that processed this transaction
timestamp The value of the internal time stamp at the time that this ATS instance
was started
sequence A unique integer, incremented by ATS each time a transaction is spooled
The naming convention ensures that all filenames that ATS generates are unique,
and therefore name collision is unlikely. However, when ATS opens a file for
writing, any previous file contents will be overwritten. (ATS does not append to a
spool file; if a name collision does occur with an existing file, the original contents
of the file will be lost.)
The following is an example ATS filename for a transaction sent by server
g_amsterdam to server g_beijing:
ats.g_beijing.g_amsterdam.D_2.000529_23:27:16.6
About ATS File Information
The first three characters in each line of the ATS spool file describe the type of
information for the line, as the following table defines.
Label Name Description
TXH Transaction
heading
This line contains information from the transaction header,
including the sending server ID and the commit time, the
receiving server ID and the received time, and any Enterprise
Replication, SQL, or ISAM error information for the
transaction.
RRH Replicated row
heading
This line contains header information from the replicated
rows, including the row number within the transaction, the
group ID, the replicate ID (same as replicate group ID if
replicate is not part of any replicate group), the database,
owner, table name, and the database operation.
RRS Replicated row
shadow columns
This line contains shadow column information from replicated
rows, including the source server ID and the time when the
row is updated on the source server. This line is printed only
if the replicate is defined with a conflict-resolution rule.
RRD Replicated row
data
This line contains the list of replicated columns in the same
order as in the SELECT statement in the define replicate
command. Each column is separated by a ‘|’ and displayed in
ASCII format. When the spooling program encounters severe
errors (for example, cannot retrieve replicate ID for the
replicated row, unable to determine the replicated column’s
type, size, or length), it displays this row data in hexadecimal
format. The spooling program also displays the row data in
hexadecimal format if a row includes replicated UDT columns.
BYTE and TEXT Information in ATS Files
When the information recorded in the ATS file includes BYTE or TEXT data, the
replicated row data (RRD) information is reported, as the following examples
show.
Chapter 8. Monitoring and Troubleshooting Enterprise Replication 8-3

Example 1
<1200, TEXT, PB 877(necromsv) 840338515(00/08/17 20:21:55)>
In this example:
v 1200 is the size of the data.
v TEXT is the data type (it is either BYTE or TEXT).
v PB is the storage type (PB when the BYTE or TEXT is stored in the tablespace, BB
for blobspace storage).
v The next two fields are the server identifier and the time stamp for the column if
the conflict-resolution rule is defined for this replicate and the column is stored
in a tablespace.
Example 2
<500 (NoChange), TEXT, PB 877(necromsv) 840338478(00/08/17 20:21:18)>
In this example, (NoChange) after the 500 indicates that the TEXT data has a size of
500, but the data has not been changed on the source server. Therefore the data is
not sent from the source server.
Example 3
<(Keep local blob),75400, BYTE, PB 877(necromsv) 840338515(00/08/17 20:21:55)>”)
In this example, (Keep local blob) indicates that the replicated data for this
column was not applied on the target table, but instead the local BYTE data was
kept. This usually happens when time-stamp conflict resolution is defined and the
local column has a time stamp greater than the replicated column.
Changed Column Information in ATS Files
If you define a replicate to only replicate columns that changed, the RRD entry in
the ATS and RIS files show a ? for the value of any columns that are not available.
For example:
RRD 427|amsterdam|?|?|?|?|?|?|?|?|?|?|?
For more information, see “Replicating Only Changed Columns” on page 6-8.
BLOB and CLOB Information in ATS Files
If a replicate includes one or more BLOB or CLOB columns, the RRD entry in the
ATS file displays the smart blob metadata (the in-row descriptor of the data), not
the smart blob itself, in hexadecimal format in the ATS file. See UDT Information
in ATS Files for an example.
UDT Information in ATS Files
If a replicate includes one or more UDT columns, the RRD entry in the ATS file
displays the row data in delimited format as usual, except the string <skipped> is
put in place of UDT column values. For example, for a table with columns of type
INTEGER, UDT, CHAR(10), UDT, the row may look like this:
RRD 334|<skipped>|amsterdam|<skipped>
Suppressing Datasync Errors and Warnings in ATS Files
You prevent certain Datasync errors and warnings from appearing in ATS files by
using the CDR_SUPPRESS_ATSRISWARN configuration parameter.
8-4 IBM Informix Dynamic Server Enterprise Replication Guide

For more information on the CDR_SUPPRESS_ATSRISWARN configuration
parameter, see “CDR_SUPPRESS_ATSRISWARN Configuration Parameter” on page
B-7.
For a list of error and warning messages that you can suppress, see Appendix G,
“Datasync Warning and Error Messages,” on page G-1.
Row Information Spooling Files
Row Information Spooling logs the following types of information in RIS files:
v Individual aborted row errors
v Replication exceptions (such as when a row is converted by Enterprise
Replication from insert to update, or from update to insert, and so forth)
v Special SPL routine return codes, as defined by the application (if an SPL routine
is called to resolve a conflict)
Preparing to Use RIS
Failed transactions are not automatically recorded in RIS files.
To collect RIS information:
1. Create a directory for Enterprise Replication to store RIS files.
If you have conflict resolution enabled, create the directory on all participating
replication systems.
For more information, see “Creating ATS and RIS Directories” on page 4-12.
2. When you define a server for Enterprise Replication, specify the location of the
RIS directory you created in step 1.
To do this, include the --ris option with the cdr define server command.
If you do not specify an RIS directory, Enterprise Replication stores the RIS files
in the following directory:
UNIX /tmp
Windows \tmp directory of the drive that contains %INFORMIXDIR%
If the default directory does not exist, Enterprise Replication returns an error.
For more information, see “Creating ATS and RIS Directories” on page 4-12.
3. When you define a replicate, specify that RIS is active.
To do this, include the --ris option with the cdr define replicate command.
For more information, see “Setting Up Error Logging” on page 6-8.
About RIS Filenames
The RIS row information is written at the time that the data-synchronization
component finishes processing the replicated row and can therefore also provide
the local row information. The RIS filename algorithm is analogous to the one that
ATS uses, with the ats prefix replaced by ris. The RIS file that corresponds to the
ATS file described in the previous section is, for example:
ris.g_beijing.g_amsterdam.D_2.000529_23:27:16.5
For more information, see “About ATS Filenames” on page 8-2.
In addition to the four types of records printed in ATS, the RIS file also includes
the following information.
Chapter 8. Monitoring and Troubleshooting Enterprise Replication 8-5
Label Name Description
LRH Local-row header Indicates if the local row is found in the delete table and
not in the target table
LRS Local-row shadow
columns
Contains the server ID and the time when the row is
updated on the target server
This line is printed only if the replicate is defined with a
conflict-resolution rule.
LRD Local-row data Contains the list of replicated columns extracted from the
local row and displayed in the same order as the
replicated row data
Similar to the replicated row data, each column is
separated by a ‘|’ and written in ASCII format. When
the spooling program encounters severe errors (for
example, cannot retrieve replicate ID for the replicated
row, unable to determine the replicated column’s type,
size, or length) or the table includes UDT columns
(whether defined for replication or not), it displays the
replicated row data in hexadecimal format. In this case,
the local row data is not spooled.
BYTE and TEXT Information in RIS Files
When the information recorded in the RIS file includes BYTE or TEXT data, the
RRD information is reported as the following examples show.
Example 1
<1200, TEXT, PB 877(necromsv) 840338515(00/08/17 20:21:55)>
In this example:
v 1200 is the size of the TEXT data.
v TEXT is the data type (it is either BYTE or TEXT).
v PB is the storage type (PB for storage in the tablespace, BB for blobspace
storage).
v The next two fields are the server identifier and the time stamp for the column if
the conflict-resolution rule is defined for this replicate and the column is stored
in a blobspace.
Example 2
<500 (NoChange), TEXT, PB 877(necromsv) 840338478(0000/08/17 20:21:18)>
In this example, (NoChange) after 500 indicates the TEXT data has size of 500 but
the data has not been changed on the source server. Therefore the data is not sent
from the source server.
Changed Column Information in RIS Files
See “Changed Column Information in ATS Files” on page 8-4.
BLOB and CLOB Information in RIS Files
See “BLOB and CLOB Information in ATS Files” on page 8-4.
UDT Information in RIS Files
See “UDT Information in ATS Files” on page 8-4.
8-6 IBM Informix Dynamic Server Enterprise Replication Guide

Suppressing Datasync Errors and Warnings in RIS Files
You prevent certain Datasync errors and warnings from appearing in RIS files by
using the CDR_SUPPRESS_ATSRISWARN configuration parameter.
For more information on the CDR_SUPPRESS_ATSRISWARN configuration
parameter, see “CDR_SUPPRESS_ATSRISWARN Configuration Parameter” on page
B-7.
For a list of error and warning messages that you can suppress, see Appendix G,
“Datasync Warning and Error Messages,” on page G-1.
Preventing Memory Queues from Overflowing
In a well-tuned Enterprise Replication system, the send queue and receive queue
should not regularly overflow from memory to disk. However, if the queues in
memory fill, the transaction buffers are written (spooled) to disk. Spooled
transactions consist of transaction records, replicate information, and row data. Spooled
transaction records and replicate information are stored in the transaction tables
and the replicate information tables in a single dbspace. Spooled row data is stored
in one or more sbspaces.
For more information, see “Setting Up Send and Receive Queue Spool Areas” on
page 4-8.
The following situations can cause Enterprise Replication to spool to disk:
v Receiving server is down or suspended.
v Network connection is down.
If the receiving server or network connection is down or suspended, Enterprise
Replication might spool transaction buffers to disk.
To check for a down server or network connection, run cdr list server on a root
server. This command shows all servers and their connection status and state.
For more information, see “Viewing Replication Server Attributes” on page 7-2
and “cdr list server” on page A-55.
v Replicate is suspended.
If a replicate is suspended, Enterprise Replication might spool transaction
buffers to disk.
To check for a suspended replicate, run cdr list replicate. This command shows
all replicates and their state.
For more information, see “Viewing Replicate Properties” on page 7-5 and “cdr
list replicate” on page A-50.
v Enterprise Replication is replicating large transactions.
Enterprise Replication is optimized to handle small transactions efficiently. Very
large transactions or batch jobs force Enterprise Replication into an exceptional
processing path that results in spooling. For best results, avoid replicating these
types of transactions.
For more information, see “Large Transactions” on page 2-10.
v Logical log files are too small or too few.
If the logical log files are too small or the number of logical log files is too few,
Enterprise Replication is more likely to spool transaction buffers to disk.
To increase the size of the logical logs, see the chapter on logical logs in the IBM
Informix Dynamic Server Administrator's Guide. For more information on
Chapter 8. Monitoring and Troubleshooting Enterprise Replication 8-7
configuring your logical log files for use with Enterprise Replication, see
“Logical Log Configuration Guidelines” on page 4-7.
v Server is overloaded.
If a server is low on resources, Enterprise Replication might not be able to hold
all transactions replicating from a source server in memory during processing,
and the transactions spool to disk.
If this happens, check the system resources; in particular, check disk speed,
RAM, and CPU resources.
Preventing DDRBLOCK Mode
If the database server comes close to overwriting a logical log that Enterprise
Replication has not yet processed (log wrap), Enterprise Replication enters
DDRBLOCK mode. In DDRBLOCK mode, user transactions are blocked and you see
the following error in the message log:
DDR Log Snooping - DDRBLOCK phase started, userthreads blocked
Although user transactions are blocked while the server is in DDRBLOCK mode,
Enterprise Replication activity is allowed to continue. During this time, Enterprise
Replication attempts process transactions to advance the replay position and
remove the risk of a log overrun. Enterprise Replication can usually resolve the
cause of the DDRBLOCK state. However, in more extreme cases, the replay
position can be overrun. If the replay position is overrun, the following message
appears in the message log file:
WARNING: The replay position was overrun, data may not be replicated.
If this occurs, you must resynchronize the source and target servers. For more
information, see “Resynchronizing Data Among Replication Servers” on page 7-11.
DDRBLOCK mode is usually caused by the logical logs being misconfigured for
the current transaction activity or by the Enterprise Replication system having to
spool more than usual. More-than-usual spooling could be caused by one of the
following situations:
v A one-time job might be larger than normal and thus require more log space.
v If one of the target servers is currently unavailable, more spooling of replicated
transactions can be required.
v The spool file or paging space could be full and needs to be expanded. For more
information, see “Preventing Memory Queues from Overflowing” on page 8-7.
If Enterprise Replication detects that the log files are configured too small for the
current database activity, then the following message might appear in the message
log file:
Warning - The log space appears to be configured too small for use
with Enterprise Replication (ER). ER may require additional logical
logs to avoid a DDRBLOCK state and/or replay position log wrap.
It is recommended that the logical log configuration be expanded.
Enterprise Replication can be configured to dynamically add a logical log file
instead of placing the database server in DDRBLOCK mode. Set the
CDR_MAX_DYNAMIC_LOGS configuration parameter to enable Enterprise
Replication to dynamically add a logical log file when the system is in danger of a
log wrap. This allows the system to better adjust to unusual activity. Set
CDR_MAX_DYNAMIC_LOGS to one of the following values:
8-8 IBM Informix Dynamic Server Enterprise Replication Guide
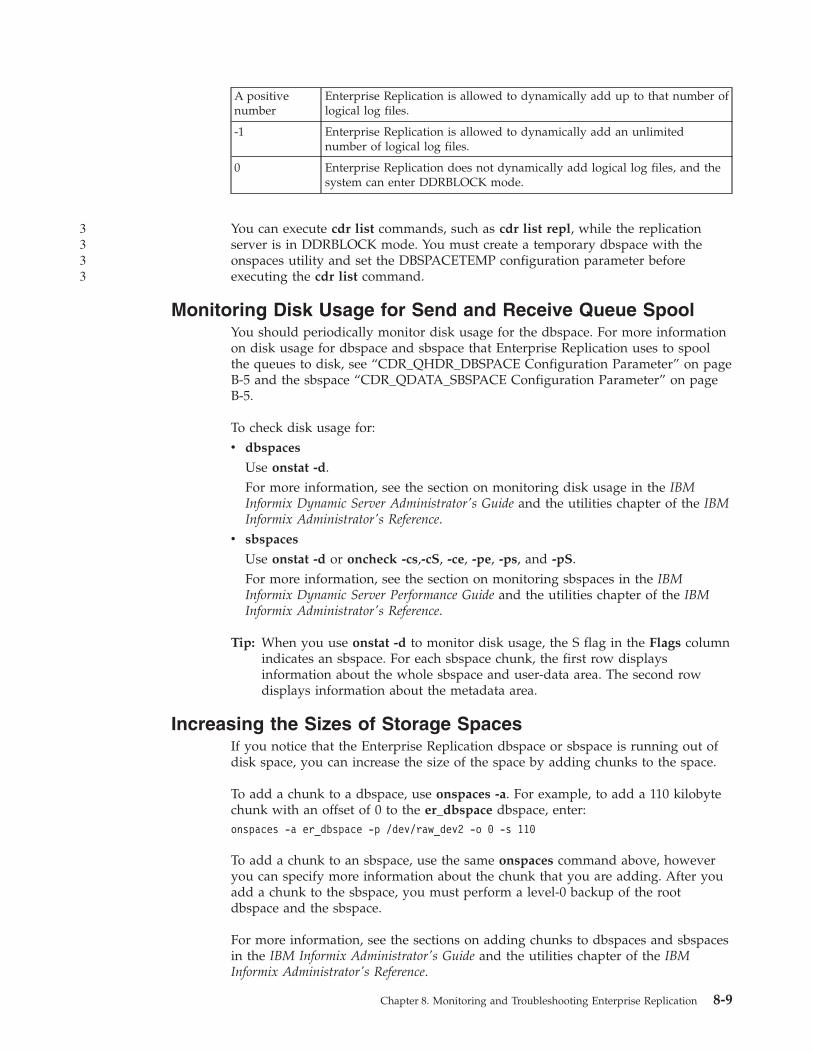
A positive
number
Enterprise Replication is allowed to dynamically add up to that number of
logical log files.
-1 Enterprise Replication is allowed to dynamically add an unlimited
number of logical log files.
0 Enterprise Replication does not dynamically add logical log files, and the
system can enter DDRBLOCK mode.
You can execute cdr list commands, such as cdr list repl, while the replication
server is in DDRBLOCK mode. You must create a temporary dbspace with the
onspaces utility and set the DBSPACETEMP configuration parameter before
executing the cdr list command.
Monitoring Disk Usage for Send and Receive Queue Spool
You should periodically monitor disk usage for the dbspace. For more information
on disk usage for dbspace and sbspace that Enterprise Replication uses to spool
the queues to disk, see “CDR_QHDR_DBSPACE Configuration Parameter” on page
B-5 and the sbspace “CDR_QDATA_SBSPACE Configuration Parameter” on page
B-5.
To check disk usage for:
v dbspaces
Use onstat -d.
For more information, see the section on monitoring disk usage in the IBM
Informix Dynamic Server Administrator's Guide and the utilities chapter of the IBM
Informix Administrator's Reference.
v sbspaces
Use onstat -d or oncheck -cs,-cS, -ce, -pe, -ps, and -pS.
For more information, see the section on monitoring sbspaces in the IBM
Informix Dynamic Server Performance Guide and the utilities chapter of the IBM
Informix Administrator's Reference.
Tip: When you use onstat -d to monitor disk usage, the S flag in the Flags column
indicates an sbspace. For each sbspace chunk, the first row displays
information about the whole sbspace and user-data area. The second row
displays information about the metadata area.
Increasing the Sizes of Storage Spaces
If you notice that the Enterprise Replication dbspace or sbspace is running out of
disk space, you can increase the size of the space by adding chunks to the space.
To add a chunk to a dbspace, use onspaces -a. For example, to add a 110 kilobyte
chunk with an offset of 0 to the er_dbspace dbspace, enter:
onspaces -a er_dbspace -p /dev/raw_dev2 -o 0 -s 110
To add a chunk to an sbspace, use the same onspaces command above, however
you can specify more information about the chunk that you are adding. After you
add a chunk to the sbspace, you must perform a level-0 backup of the root
dbspace and the sbspace.
For more information, see the sections on adding chunks to dbspaces and sbspaces
in the IBM Informix Administrator's Guide and the utilities chapter of the IBM
Informix Administrator's Reference.
Chapter 8. Monitoring and Troubleshooting Enterprise Replication 8-9
3333

Recovering when Storage Spaces Fill
When the Enterprise Replication dbspace runs out of disk space, Enterprise
Replication raises an alarm and writes a message to the log. When the sbspace
runs out of disk space, Enterprise Replication hangs. In either case, you must
resolve the problem that is causing Enterprise Replication to spool (“Preventing
Memory Queues from Overflowing” on page 8-7) or you must allocate additional
disk space (“Increasing the Sizes of Storage Spaces” on page 8-9) before you can
continue replication.
Solving Common Configuration Problems
If you experience problems setting up Enterprise Replication, check the following:
v Make sure that you created an sbspace for the row data and set the
CDR_QDATA_SBSPACE in the ONCONFIG file.
For more information, see “Setting Up Send and Receive Queue Spool Areas” on
page 4-8 and “CDR_QDATA_SBSPACE Configuration Parameter” on page B-5.
v Verify that the trusted environment is set up correctly.
For more information, see “Setting Up the Trusted Environment” on page 4-3.
v Verify that your SQLHOSTS file is set up properly on each server participating
in replication. You must set up database server groups in the SQLHOSTS file.
For more information, see “Verifying SQLHOSTS” on page 4-3.
v Verify the format of the SQLHOSTS file.
The network connection (not the shared memory connection) entry should
appear immediately after the database server group definition. If the network
connection does not appear immediately after the database server group
definition, you might see the following error when you run cdr define server:
command failed -- unable to connect to server specified (5)
You might also see a message like the following in the message log for the target
server:
Reason: ASF connect error (-25592)
v Make sure that the unique identifier for each database server (i= in the options
field of the SQLHOSTS information) is consistent across all nodes in the
enterprise.
For more information, see “Database Server Groups on UNIX” on page 4-3 and
Appendix F, “SQLHOSTS Registry Key (Windows),” on page F-1.
v Verify that the operating system times of the database servers that participate in
the replicate are synchronized.
For more information, see “Time Synchronization” on page 2-11.
v Make sure that the database server has adequate logical log disk space. If the
database server does not have enough logical log space at initialization, you will
see the following error:
command failed -- fatal server error (100)
v Check the $INFORMIXDIR/etc/buildsmi.xxx files to see if a problem occurred
when the databases server built the SMI tables.
v Make sure that the databases on all database server instances involved in
replication are set to logging (unbuffered logging is recommended).
For more information, see “Unbuffered Logging” on page 2-6.
v For replicates that use any conflict-resolution rule except ignore, make sure that
you define shadow columns (CRCOLS) for each table involved in replication.
8-10 IBM Informix Dynamic Server Enterprise Replication Guide

For more information, see “Preparing Tables for Conflict Resolution” on page
4-16.
v If you defined a participant using SELECT * from table_name, make sure that the
tables are identical on all database servers defined for the replicate.
For more information, see “Defining Participants” on page 6-4 and “Participant
Type” on page A-109.
v Verify that each replicated column in a table on the source database server has
the same data type as the corresponding column on the target server.
Enterprise Replication does not support replicating a column with one data type
to a column on another database server with a different data type.
The exception to this rule is cross-replication between simple large objects and
smart large objects.
For more information, see “Enterprise Replication Data Types” on page 2-12.
v Verify that all tables defined in a replicate have one PRIMARY KEY.
For more information, see “Primary Key Constraint” on page 2-7, the IBM
Informix Database Design and Implementation Guide, and IBM Informix Guide to
SQL: Syntax.
v If HDR is enabled in the replication system, then all row data sbspaces must be
created with logging by using the -Df LOGGING=ON option of the onspaces
command.
For more information, see “Row Data sbspaces” on page 4-9 and the IBM
Informix Dynamic Server Administrator's Guide.
Troubleshooting Tips for Alter Operations
The following problems illustrate common issues with performing alter operations
on replicated tables:
v Problem: You receive an error that the replicate is not defined after running the
following command:
cdr alter -o test:tab
Error:Replicate(s) not defined on table test:.tab
The owner name is missing from the table name, test:tab.
Solution: Include the table owner name, for example:
cdr alter -o test:nagaraju.tab
v Problem: You receive an error that the replicated table is in alter mode after
running the following command:
> insert into tab values(1,1);
19992: Cannot perform insert/delete/update operations on a replicated table
while the table is in alter mode
Error in line 1 Near character position 27
>
The table (tab) is in alter mode. DML operations cannot be performed while the
table is in alter mode.
Solution: Wait for the table to be altered and then issue the DML operation. If
no alter statement is in progress against the table, then unset alter mode on the
table using the cdr alter --off command. For example:
cdr alter --off test:nagaraju.tab
You can check the alter mode status using the oncheck -pt command. For
example:
oncheck -pt test:nagaraju.tab
v Problem: How can you tell if a replicate is a mastered replicate?
Chapter 8. Monitoring and Troubleshooting Enterprise Replication 8-11
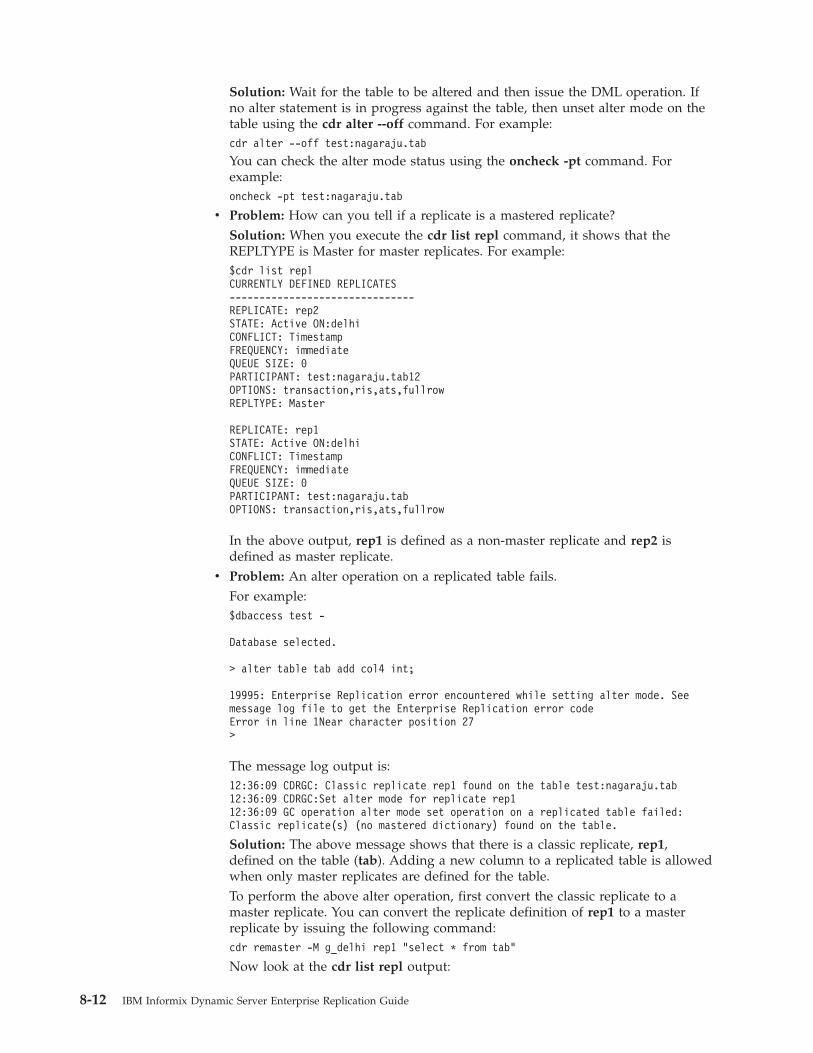
Solution: Wait for the table to be altered and then issue the DML operation. If
no alter statement is in progress against the table, then unset alter mode on the
table using the cdr alter --off command. For example:
cdr alter --off test:nagaraju.tab
You can check the alter mode status using the oncheck -pt command. For
example:
oncheck -pt test:nagaraju.tab
v Problem: How can you tell if a replicate is a mastered replicate?
Solution: When you execute the cdr list repl command, it shows that the
REPLTYPE is Master for master replicates. For example:
$cdr list repl
CURRENTLY DEFINED REPLICATES
-------------------------------
REPLICATE: rep2
STATE: Active ON:delhi
CONFLICT: Timestamp
FREQUENCY: immediate
QUEUE SIZE: 0
PARTICIPANT: test:nagaraju.tab12
OPTIONS: transaction,ris,ats,fullrow
REPLTYPE: Master
REPLICATE: rep1
STATE: Active ON:delhi
CONFLICT: Timestamp
FREQUENCY: immediate
QUEUE SIZE: 0
PARTICIPANT: test:nagaraju.tab
OPTIONS: transaction,ris,ats,fullrow
In the above output, rep1 is defined as a non-master replicate and rep2 is
defined as master replicate.
v Problem: An alter operation on a replicated table fails.
For example:
$dbaccess test -
Database selected.
> alter table tab add col4 int;
19995: Enterprise Replication error encountered while setting alter mode. See
message log file to get the Enterprise Replication error code
Error in line 1Near character position 27
>
The message log output is:
12:36:09 CDRGC: Classic replicate rep1 found on the table test:nagaraju.tab
12:36:09 CDRGC:Set alter mode for replicate rep1
12:36:09 GC operation alter mode set operation on a replicated table failed:
Classic replicate(s) (no mastered dictionary) found on the table.
Solution: The above message shows that there is a classic replicate, rep1,
defined on the table (tab). Adding a new column to a replicated table is allowed
when only master replicates are defined for the table.
To perform the above alter operation, first convert the classic replicate to a
master replicate. You can convert the replicate definition of rep1 to a master
replicate by issuing the following command:
cdr remaster -M g_delhi rep1 "select * from tab"
Now look at the cdr list repl output:
8-12 IBM Informix Dynamic Server Enterprise Replication Guide

$cdr list repl
CURRENTLY DEFINED REPLICATES
-------------------------------
REPLICATE: rep1
STATE: Active ON:delhi
CONFLICT: Timestamp
FREQUENCY: immediate
QUEUE SIZE: 0
PARTICIPANT: test:nagaraju.tab
OPTIONS: transaction,ris,ats,fullrow
REPLTYPE: Master
REPLICATE: rep2
STATE: Active ON:delhi
CONFLICT: Timestamp
FREQUENCY: immediate
QUEUE SIZE: 0
PARTICIPANT: test:nagaraju.tab12
OPTIONS: transaction,ris,ats,fullrow
REPLTYPE: Master
REPLICATE: Shadow_4_rep1_GMT1112381058_GID100_PID29935
STATE: Active ON:delhi
CONFLICT: Timestamp
FREQUENCY: immediate
QUEUE SIZE: 0
PARTICIPANT: test:nagaraju.tab
OPTIONS: transaction,ris,ats,fullrow
REPLTYPE: Shadow
PARENT REPLICATE: rep1
You can see that repl1 has been converted to a master replicate. You can also see
that a new replicate definition,
Shadow_4_rep1_GMT1112381058_GID100_PID29935, was also created against
the table (tab1). Notice the last two fields of the output for
Shadow_4_rep1_GMT1112381058_GID100_PID29935:
REPLTYPE: Shadow
PARENT REPLICATE: rep1
The Shadow attribute indicates that this replicate is a shadow replicate, and
PARENT REPLICATE: rep1 shows that this is a shadow replicate for the primary
replicate rep1. Notice that the Master attribute is not present for this replicate
definition. This shadow replicate is actually the old non-master replicate. The cdr
remaster command created a new master replicate, rep1, for the table tab and
converted the old non-master replicate (rep1) to a shadow replicate for the new
master replicate.
This table is not yet ready to be altered because there is still a non-master
replicate, Shadow_4_rep1_GMT1112381058_GID100_PID29935, defined for the
table, tab. You must wait for
Shadow_4_rep1_GMT1112381058_GID100_PID29935 to be deleted automatically
by Enterprise Replication after all the data queued for this shadow replicate is
applied at all the replicate participants. This process can take some time.
Alternatively, if you are sure that there is no data pending for this old
non-master replicate, then you can issue the cdr delete repl command against
Shadow_4_rep1_GMT1112381058_GID100_PID29935.
After making sure that Shadow_4_rep1_GMT1112381058_GID100_PID29935 no
longer exists, you can attempt the ALTER TABLE tab add col4 int; statement
against the table.
Chapter 8. Monitoring and Troubleshooting Enterprise Replication 8-13
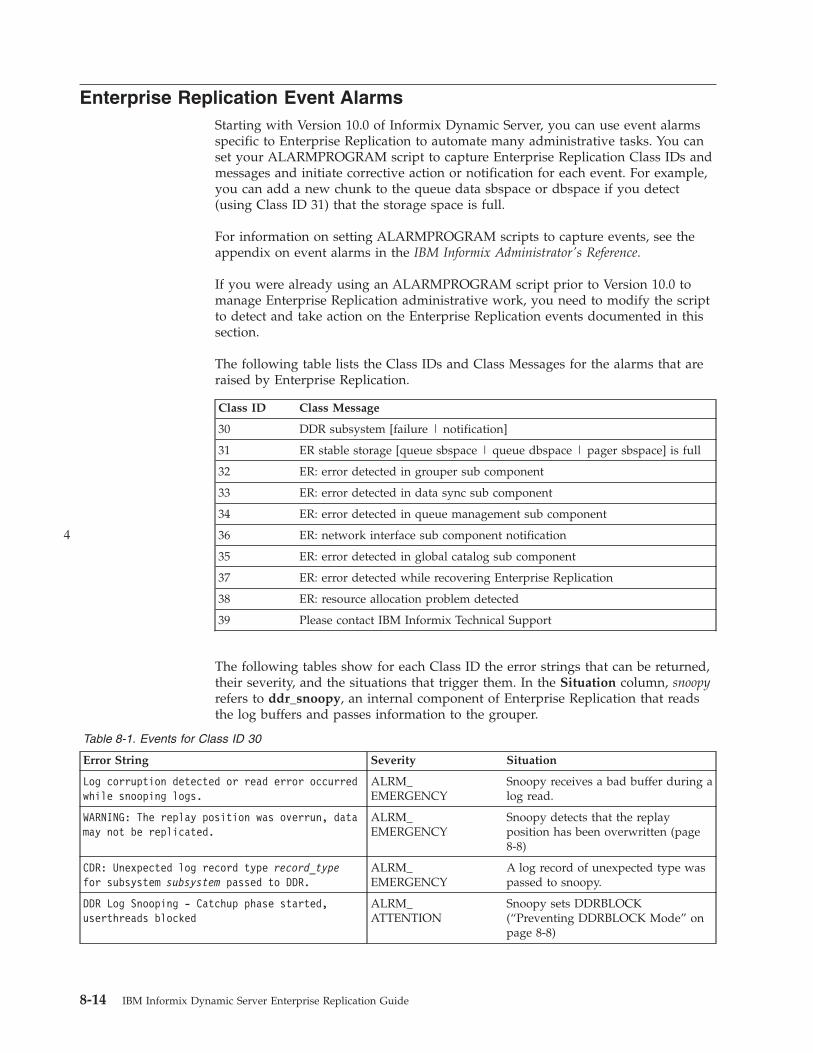
Enterprise Replication Event Alarms
Starting with Version 10.0 of Informix Dynamic Server, you can use event alarms
specific to Enterprise Replication to automate many administrative tasks. You can
set your ALARMPROGRAM script to capture Enterprise Replication Class IDs and
messages and initiate corrective action or notification for each event. For example,
you can add a new chunk to the queue data sbspace or dbspace if you detect
(using Class ID 31) that the storage space is full.
For information on setting ALARMPROGRAM scripts to capture events, see the
appendix on event alarms in the IBM Informix Administrator's Reference.
If you were already using an ALARMPROGRAM script prior to Version 10.0 to
manage Enterprise Replication administrative work, you need to modify the script
to detect and take action on the Enterprise Replication events documented in this
section.
The following table lists the Class IDs and Class Messages for the alarms that are
raised by Enterprise Replication.
Class ID Class Message
30 DDR subsystem [failure | notification]
31 ER stable storage [queue sbspace | queue dbspace | pager sbspace] is full
32 ER: error detected in grouper sub component
33 ER: error detected in data sync sub component
34 ER: error detected in queue management sub component
36 ER: network interface sub component notification
35 ER: error detected in global catalog sub component
37 ER: error detected while recovering Enterprise Replication
38 ER: resource allocation problem detected
39 Please contact IBM Informix Technical Support
The following tables show for each Class ID the error strings that can be returned,
their severity, and the situations that trigger them. In the Situation column, snoopy
refers to ddr_snoopy, an internal component of Enterprise Replication that reads
the log buffers and passes information to the grouper.
Table 8-1. Events for Class ID 30
Error String Severity Situation
Log corruption detected or read error occurred
while snooping logs.
ALRM_
EMERGENCY
Snoopy receives a bad buffer during a
log read.
WARNING: The replay position was overrun, data
may not be replicated.
ALRM_
EMERGENCY
Snoopy detects that the replay
position has been overwritten (page
8-8)
CDR: Unexpected log record type record_type
for subsystem subsystem passed to DDR.
ALRM_
EMERGENCY
A log record of unexpected type was
passed to snoopy.
DDR Log Snooping - Catchup phase started,
userthreads blocked
ALRM_
ATTENTION
Snoopy sets DDRBLOCK
(“Preventing DDRBLOCK Mode” on
page 8-8)
8-14 IBM Informix Dynamic Server Enterprise Replication Guide
4

Table 8-1. Events for Class ID 30 (continued)
Error String Severity Situation
DDR Log Snooping - Catchup phase completed,
userthreads unblocked
ALRM_
ATTENTION
Snoopy unsets DDRBLOCK
(“Preventing DDRBLOCK Mode” on
page 8-8)
Table 8-2. Events for Class ID 31
Error String Severity Situation
CDR QUEUER: Send Queue space is FULL - waiting
for space in sbspace_name.
ALRM_
EMERGENCY
An RQM queue runs out of room to
spool (“Recovering when Storage
Spaces Fill” on page 8-10)
CDR Pager: Paging File full: Waiting for
additional space in sbspace_name
ALRM_
EMERGENCY
Grouper paging sbspace has run out
of space (“Increasing the Sizes of
Storage Spaces” on page 8-9)
Table 8-3. Events for Class ID 32
Error String Severity Situation
CDR Grouper Fanout/Evaluator thread is
aborting.
ALRM_
EMERGENCY
Grouper fanout or evaluator is
aborting.
CDR: Could not copy transaction at log id
log_unique_id position log_position. Skipped.
ALRM_
EMERGENCY
Grouper is unable to copy the
transaction into send queue.
CDR: Paging error detected. ALRM_
EMERGENCY
Grouper detected paging error.
CDR Grouper: Local participant (%s) stopped
for the replicate %s (or exclusive replicate
set), table (%s:%s.%s). Data may be out of
sync. If replicated column definition was
modified then please perform the alter
operation at all the replicate participants,
remaster the replicate definition then restart
the replicate (or exclusive replicate set)
definition for the local participant with the
data sync option (-S).
ALRM_
EMERGENCY
If the grouper sub-component is not
able to convert the replicated row
data from the local dictionary format
to the master dictionary format, the
grouper stops the local participant
from the corresponding replicate (or
exclusive replicate set) definition and
invokes the alarm event handler.
CDR CDR_subcomponent_name: Could not apply
undo properly. SKIPPING TRANSACTION. TX
Begin Time: datetime TX Restart Log Id:
log_id TX Restart Log Position:
log_position TX Commit Time: datetime TX
End Log Id: log_id TX End Log Position:
log_position
ALRM_
ATTENTION
Grouper was unable to apply an
undo (rollback to savepoint) to a
transaction.
Table 8-4. Events for Class ID 33
Error String Severity Situation
CDR DS thread_name thread is aborting. ALRM_
EMERGENCY
Data sync is aborting.
Received aborted transaction, no data to
spool.
ALRM_
INFO
Datasync received transaction that
was aborted in first buffer, so there is
nothing to spool to ATS/RIS.
Chapter 8. Monitoring and Troubleshooting Enterprise Replication 8-15

Table 8-5. Events for Class ID 34
Error String Severity Situation
CDR CDR_subcomponent_name: bad replicate ID
replicate_id
ALRM_
ATTENTION
RQM cannot find the replicate in the
global catalog for which it has a
transaction.
Table 8-6. Events for Class ID 35
Error String Severity Situation
CDR: Could not drop delete table. SQL code
sql_error_code, ISAM code isam_error_code.
Table ’database_name:table_name’. Please drop
the table manually.
ALRM_
ATTENTION
Could not drop delete table while
deleting the replicate from the local
participant.
CDR GC peer request failed: command:
command_string, error error_code, CDR server
CDR_server_ID
ALRM_
ATTENTION
Execution of the control command
requested by the peer server failed at
the local server.
CDR GC peer processing failed: command:
command_string, error error_code, CDR server
CDR_server_ID
ALRM_
ATTENTION
Control command execution at the
peer server failed.
Table 8-7. Events for Class ID 36
Error String Severity Situation
CDR NIF connection terminated to
servergroupname; connection request received
from an unknown server.
ALRM_
ATTENTION
Enterprise Replication received a
re-connect connection request from an
unknown server.
Table 8-8. Events for Class ID 37
Error String Severity Situation
CDR CDR_subcomponent_name: bad replicate ID
replicate_id
ALRM_
ATTENTION
Table 8-9. Events for Class ID 38
Error String Severity Situation
CDR CDR_subcomponent_name memory allocation
failed (reason).
ALRM_INFO The specified Enterprise Replication
component could not allocate
memory.
Table 8-10. Events for Class ID 39
Error String Severity Situation
(blank) ALRM_
EMERGENCY
An internal error has occurred that
requires assistance from Technical
Support.
8-16 IBM Informix Dynamic Server Enterprise Replication Guide
44
444
444
444444

Part 3. Appendixes
© Copyright IBM Corp. 1996, 2005

IBM Informix Dynamic Server Enterprise Replication Guide

Appendix A. Command-Line Utility Reference
The command-line utility (CLU) lets you configure and control Enterprise
Replication from the command line on your UNIX or Windows operating system.
This appendix covers the following topics:
v Command Summary
v Command Syntax
v Interpreting the Command-Line Utility Syntax
Command Summary
The following table shows the commands and the page where the command is
documented.
Command Page
cdr alter A-3
cdr change replicate A-4
cdr change replicateset A-6
cdr check replicate A-8
cdr check replicateset A-13
cdr cleanstart A-16
cdr connect server A-17
cdr define repair A-18
cdr define replicate A-21
cdr define replicateset A-28
cdr define server A-30
cdr define template A-33
cdr delete repair A-36
cdr delete replicate A-37
cdr delete replicateset A-38
cdr delete server A-40
cdr delete template A-43
cdr disconnect server A-44
cdr error A-45
cdr finderr A-47
cdr list repair A-48
cdr list replicate A-50
cdr list replicateset A-53
cdr list server A-55
cdr list template A-58
cdr modify replicate A-60
cdr modify replicateset A-63
© Copyright IBM Corp. 1996, 2005 A-1
4
4
Command Page
cdr modify server A-64
cdr realize template A-66
cdr remaster A-70
cdr remove A-66
cdr repair A-73
cdr resume replicate A-74
cdr resume replicateset A-75
cdr resume server A-76
cdr start A-77
cdr start repair A-78
cdr start replicate A-80
cdr start replicateset A-82
cdr stat recv A-88
cdr stat rqm A-88
cdr stop A-88
cdr stop repair A-89
cdr stop replicate A-90
cdr stop replicateset A-92
cdr suspend replicate A-94
cdr suspend replicateset A-95
cdr suspend server A-97
cdr swap shadow A-99
cdr sync replicate A-101
cdr sync replicateset A-103
Command Syntax
The next sections show the syntax for all the variations of the cdr commands.
A-2 IBM Informix Dynamic Server Enterprise Replication Guide
3
3
4
3

cdr alter
The cdr alter command puts the specified tables in alter mode.
Syntax
�� cdr alter
(1)
Connect Option
--on
--off �
�
�
database:owner.table
��
Notes:
1 See page A-107.
Element Purpose Restrictions Syntax
database The name of the database
that contains the table
The database server must
be registered with
Enterprise Replications.
“Long
Identifiers” on
page A-107
owner User ID of the owner of the
table
“Long
Identifiers” on
page A-107
table Specifies the name of the
table to put in alter mode
The table must be an actual
table. It cannot be a
synonym or a view.
“Long
Identifiers” on
page A-107
The following table describes the options to cdr alter.
Long Form Short Form Meaning
--on -o Sets alter mode on.
--off -f Unsets alter mode.
Usage
Use this command to place a table in or out of alter mode. Use alter mode when
you need to alter an attached fragment to the table or you want to perform other
alter operations manually. For more information, see “Performing Alter Operations
on Replicated Tables” on page 7-16.
Examples
The following example puts table1 and table2 in alter mode:
cdr alter --on db1:owner1.table1 db2:owner2.table2
See Also
v “cdr swap shadow” on page A-99
v “cdr remaster” on page A-70
Appendix A. Command-Line Utility Reference A-3
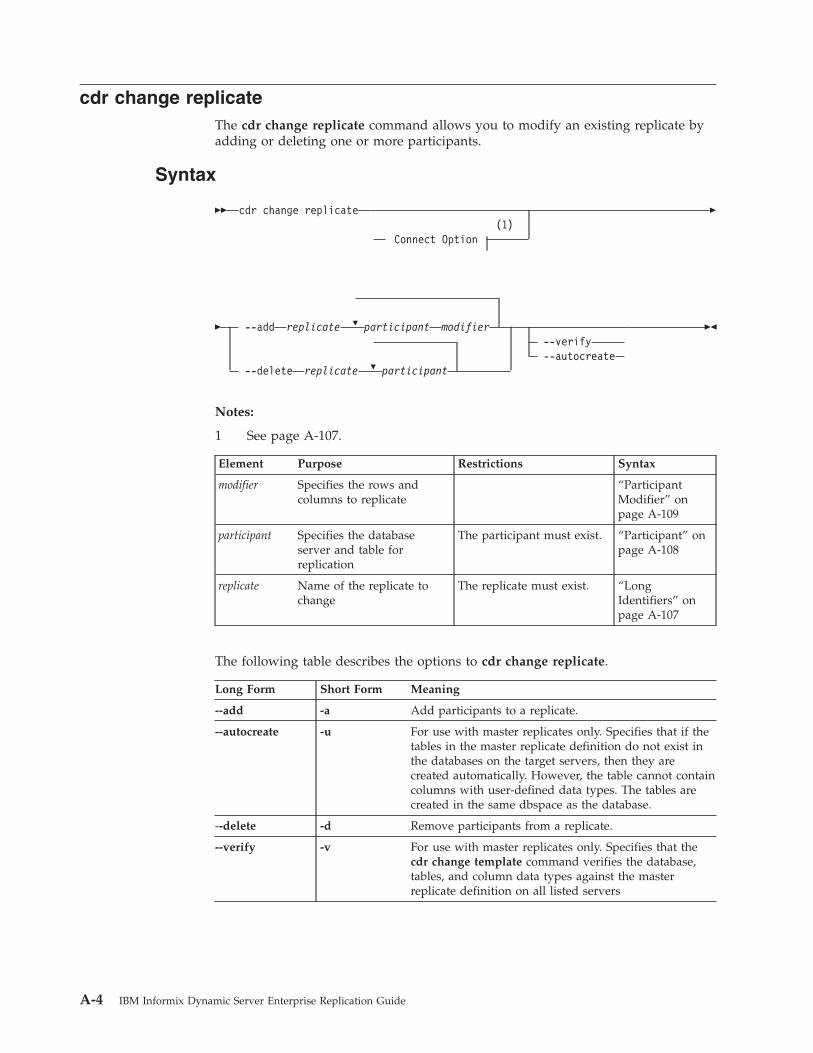
cdr change replicate
The cdr change replicate command allows you to modify an existing replicate by
adding or deleting one or more participants.
Syntax
�� cdr change replicate
(1)
Connect Option
�
�
�
�
--add
replicate
participant
modifier
--delete
replicate
participant
--verify
--autocreate
��
Notes:
1 See page A-107.
Element Purpose Restrictions Syntax
modifier Specifies the rows and
columns to replicate
“Participant
Modifier” on
page A-109
participant Specifies the database
server and table for
replication
The participant must exist. “Participant” on
page A-108
replicate Name of the replicate to
change
The replicate must exist. “Long
Identifiers” on
page A-107
The following table describes the options to cdr change replicate.
Long Form Short Form Meaning
--add -a Add participants to a replicate.
--autocreate -u For use with master replicates only. Specifies that if the
tables in the master replicate definition do not exist in
the databases on the target servers, then they are
created automatically. However, the table cannot contain
columns with user-defined data types. The tables are
created in the same dbspace as the database.
--delete -d Remove participants from a replicate.
--verify -v For use with master replicates only. Specifies that the
cdr change template command verifies the database,
tables, and column data types against the master
replicate definition on all listed servers
A-4 IBM Informix Dynamic Server Enterprise Replication Guide

Usage
Use this command to add or delete a participant from a replicate. You can define a
replicate that has zero or one participants, but to be useful, a replicate must have
at least two participants. You cannot start and stop replicates that have no
participants.
Important: Enterprise Replication adds the participant to the replicate in an
inactive state, regardless of the state of the replicate. To activate the
new participant, run with the name of the server group. See “cdr start
replicate” on page A-80.
Examples
The following example adds two participants to the replicate named repl_1:
db1@server1:antonio.table with the modifier select * from table1, and
db2@server2:carlo.table2 with the modifier select * from table2:
cdr change repl -a repl_1 \
"db1@server1:antonio.table1" "select * from table1" \
"db2@server2:carlo.table2" "select * from table2"
The following example removes the same two participants from replicate repl_1:
cdr change repl -d repl_1 \
"db1@server1:antonio.table1" \
"db2@server2:carlo.table2"
See Also
v “cdr define replicate” on page A-21
v “cdr delete replicate” on page A-37
v “cdr list replicate” on page A-50
v “cdr modify replicate” on page A-60
v “cdr resume replicate” on page A-74
v “cdr start replicate” on page A-80
v “cdr stop replicate” on page A-90
v “cdr suspend replicate” on page A-94
Appendix A. Command-Line Utility Reference A-5

cdr change replicateset
The cdr change replicateset command changes a replicate set by adding or
deleting replicates.
Syntax
�� cdr change replicateset
(1)
Connect Option
--add
--delete �
�
repl_set
�
replicate
��
Notes:
1 See page A-107.
Element Purpose Restrictions Syntax
repl_set Name of the replicate set to
change
The replicate set must exist. “Long
Identifiers” on
page A-107
replicate Name of the replicates to
add to or delete from the
set
The replicates must exist. “Long
Identifiers” on
page A-107
The following table describes the options to cdr change replicateset
Long Form Short Form Meaning
--add -a Add replicates to a replicate set.
--delete -d Remove replicates from a replicate set.
Usage
Use this command to add replicates to a replicate set or to remove replicates from
an exclusive or non-exclusive replicate set:
v If you add a replicate to an exclusive replicate set, Enterprise Replication
changes the existing state and replication frequency settings of the replicate to
the current properties of the exclusive replicate set.
If you remove a replicate from an exclusive replicate set, the replicate retains the
properties of the replicate set at the time of removal (not the state the replicate
was in when it joined the exclusive replicate set).
When you add or remove a replicate from an exclusive replicate set that is
suspended or that is defined with a frequency interval, Enterprise Replication
transmits all the data in the queue for the replicates in the replicate set up to the
point when you added or removed the replicate. For more information, see
“Suspending a Replicate Set” on page 7-10 and “Frequency Options” on page
A-110.
v If you add or remove a replicate to a non-exclusive replicate set, the replicate
retains its individual state and replication frequency settings.
A-6 IBM Informix Dynamic Server Enterprise Replication Guide
Examples
The following example adds the replicates house and barn to replicate set
building_set:
cdr change replicateset --add building_set house barn
The following example removes the replicates teepee and wigwam from replicate
set favorite_set:
cdr change replset --delete favorite_set teepee wigwam
See Also
v “cdr define replicate” on page A-21
v “cdr delete replicateset” on page A-38
v “cdr list replicateset” on page A-53
v “cdr modify replicateset” on page A-63
v “cdr resume replicateset” on page A-75
v “cdr start replicateset” on page A-82
v “cdr stop replicateset” on page A-92
v “cdr suspend replicateset” on page A-95
Appendix A. Command-Line Utility Reference A-7

cdr check replicate
The cdr check replicate command compares the data on replication servers to
create a report listing data inconsistencies and can optionally repair the
inconsistent data within a replicate.
Syntax
�� cdr check replicate
(1)
Connect Option
--master=data_server �
�
--repl=repl_name
�
target_server
--all
--verbose
�
� --repair
--extratargetrows=
delete
keep
merge
��
Notes:
1 See page A-107.
Element Purpose Restrictions Syntax
data_server Name of the database
server to use as the
reference copy of the
data
Must be the name of an
existing database server
group in SQLHOSTS. See
“Setting up Database
Server Groups” on page
4-3.
“Long
Identifiers” on
page A-107
repl_name Name of the replicate to
check
“Long
Identifiers” on
page A-107
target_server Name of a database
server group to check
Must be the name of an
existing database server
group in SQLHOSTS. See
“Setting up Database
Server Groups” on page
4-3.
“Long
Identifiers” on
page A-107
The following table describes the cdr check replicate options.
Long Form Short Form Meaning
--all -a Specifies that all servers defined for the replicate are
checked
A-8 IBM Informix Dynamic Server Enterprise Replication Guide
44
444
4
444444444444444444
444444444444444444444444444
4444444444444444444444444444
4
4
44
44444
44444
444444
444
4444444
444444444
444
4
4
4444
4444
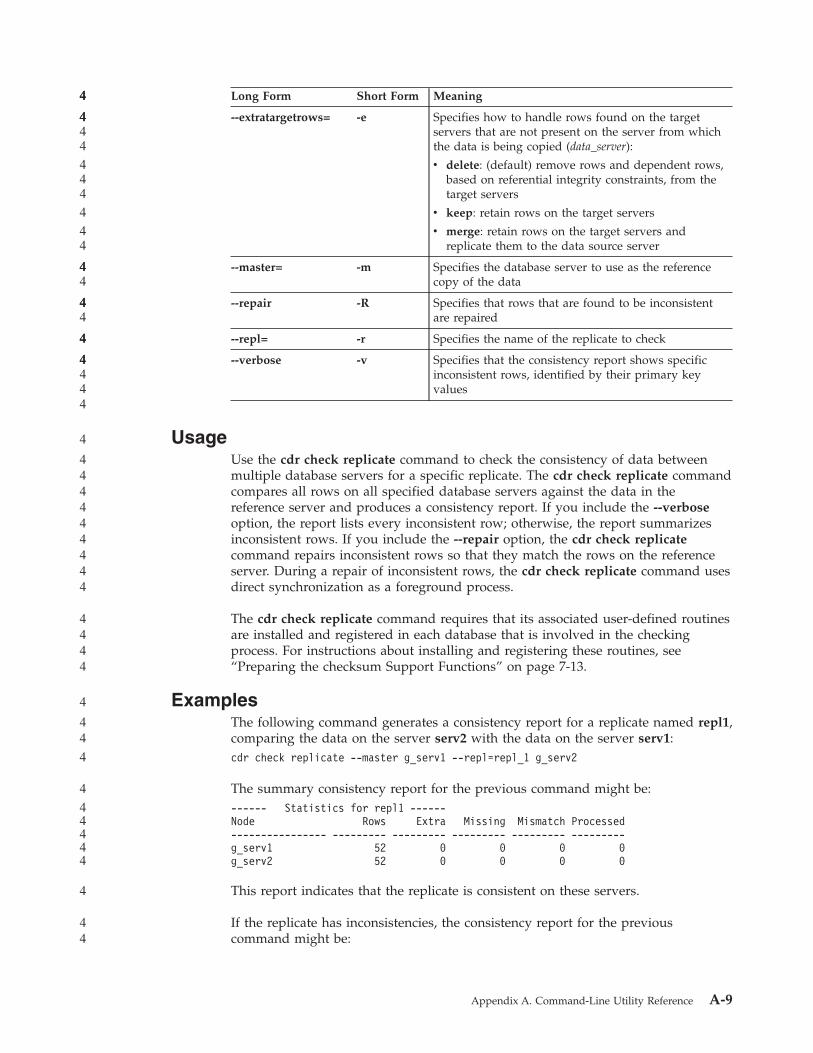
Long Form Short Form Meaning
--extratargetrows= -e Specifies how to handle rows found on the target
servers that are not present on the server from which
the data is being copied (data_server):
v delete: (default) remove rows and dependent rows,
based on referential integrity constraints, from the
target servers
v keep: retain rows on the target servers
v merge: retain rows on the target servers and
replicate them to the data source server
--master= -m Specifies the database server to use as the reference
copy of the data
--repair -R Specifies that rows that are found to be inconsistent
are repaired
--repl= -r Specifies the name of the replicate to check
--verbose -v Specifies that the consistency report shows specific
inconsistent rows, identified by their primary key
values
Usage
Use the cdr check replicate command to check the consistency of data between
multiple database servers for a specific replicate. The cdr check replicate command
compares all rows on all specified database servers against the data in the
reference server and produces a consistency report. If you include the --verbose
option, the report lists every inconsistent row; otherwise, the report summarizes
inconsistent rows. If you include the --repair option, the cdr check replicate
command repairs inconsistent rows so that they match the rows on the reference
server. During a repair of inconsistent rows, the cdr check replicate command uses
direct synchronization as a foreground process.
The cdr check replicate command requires that its associated user-defined routines
are installed and registered in each database that is involved in the checking
process. For instructions about installing and registering these routines, see
“Preparing the checksum Support Functions” on page 7-13.
Examples
The following command generates a consistency report for a replicate named repl1,
comparing the data on the server serv2 with the data on the server serv1:
cdr check replicate --master g_serv1 --repl=repl_1 g_serv2
The summary consistency report for the previous command might be:
------ Statistics for repl1 ------
Node Rows Extra Missing Mismatch Processed
---------------- --------- --------- --------- --------- ---------
g_serv1 52 0 0 0 0
g_serv2 52 0 0 0 0
This report indicates that the replicate is consistent on these servers.
If the replicate has inconsistencies, the consistency report for the previous
command might be:
Appendix A. Command-Line Utility Reference A-9
444
44444
444
4
44
4444
4444
444
444444
4
444444444
4444
4
44
4
4
44444
4
44

------ Statistics for repl1 ------
Node Rows Extra Missing Mismatch Processed
---------------- --------- --------- --------- --------- ---------
g_serv1 67 0 0 0 0
g_serv2 65 0 2 1 0
WARNING: replicate is not in sync
This report indicates that the server g_serv2 is missing two rows and has one
inconsistent row.
The following command generates a consistency report and repairs inconsistent
rows on all servers for a replicate named repl1:
cdr check replicate --master g_serv1 --repl=repl_1 --all --repair
The consistency report for the previous command might be:
------ Statistics for repl1 ------
Node Rows Extra Missing Mismatch Processed
---------------- --------- --------- --------- --------- ---------
g_serv1 67 0 0 0 3
g_serv2 65 0 2 1 0
g_serv3 67 0 0 0 0
WARNING: replicate is not in sync
This report indicates that three rows were replicated from g_serv1 to g_serv2: two
missing rows plus one inconsistent row.
If a target server has extra rows, the consistency report for the previous command
might be:
------ Statistics for repl1 ------
Node Rows Extra Missing Mismatch Processed
---------------- --------- --------- --------- --------- ---------
g_serv1 67 0 0 0 2
g_serv2 67 2 2 0 2
g_serv3 67 0 0 0 0
WARNING: replicate is not in sync
This report indicates that g_serv2 has two extra rows and is missing two rows.
Two rows were processed on g_serv1 to replicate the missing rows to g_serv2.
Also, two rows were processed on g_serv2 to delete the extra rows. Because the
--extratargetrows option is not specified, the default behavior of deleting rows on
the target servers that are not on the reference server occurs.
The following table describes the columns of the consistency report.
Table A-1. Consistency Report Description
Column name Description
Node The name of the replication server
Rows The number of rows in the participant
Extra The number of rows on the target server
that do not exist on the reference server
For the reference server, this number is
always 0.
A-10 IBM Informix Dynamic Server Enterprise Replication Guide
4444444
44
44
4
4
44444444
44
44
44444444
44444
4
44
44
44
44
444
44

Table A-1. Consistency Report Description (continued)
Column name Description
Missing The number of rows on the reference server
that do not exist on the target server
For the reference server, this number is
always 0.
Mismatch The number of rows on the target server
that are not consistent with the
corresponding rows on the reference server
For the reference server, this number is
always 0.
Processed The number of rows processed to correct
inconsistent rows
The number of processed rows on the
reference server is equal to the number of
mismatched rows plus missing rows on the
target servers.
The number of processed rows for a target
server is usually equal to the number of
extra rows it has. If a row has child rows,
then the number of processed rows can be
greater than the number of extra rows
because the child rows must be deleted as
well. If the --extratargetrows option is set to
keep, then extra rows are not deleted from
the target and those rows are not added to
the Processed column. If the
--extratargetrows option is set to merge,
then those rows are replicated to the
reference server and are listed in the
Processed column for the target server.
The following command generates a verbose consistency report for a replicate
named repl1:
cdr check replicate --master g_serv1 --repl=repl_1 g_serv2 --all --verbose
The verbose consistency report for the previous command might be:
------ Statistics for repl1 ------
data mismatch between g_serv1 and g_serv2
item_num:1
order_num:1011
--------------------------------------------------
row missing on g_serv2
item_num:1
order_num:1014
--------------------------------------------------
row missing on g_serv2
item_num:2
order_num:1014
--------------------------------------------------
Node Rows Extra Missing Mismatch Processed
---------------- --------- --------- --------- --------- ---------
Appendix A. Command-Line Utility Reference A-11
4
44
444
44
4444
44
444
4444
444444444444444
44
4
4
444444444444444

g_serv1 67 0 0 0 0
g_serv2 65 0 2 1 0
WARNING: replicate is not in sync
This report indicates that there is one inconsistent row on g_serv2. The primary
key for that row is the combination of the item_num column and the order_num
column. The row that is inconsistent is the one that has the item number 1 and the
order number 1011. There are two rows that are missing on g_serv2, each
identified by its primary key values.
See Also
v “cdr sync replicate” on page A-101
A-12 IBM Informix Dynamic Server Enterprise Replication Guide
4444
44444
4
4
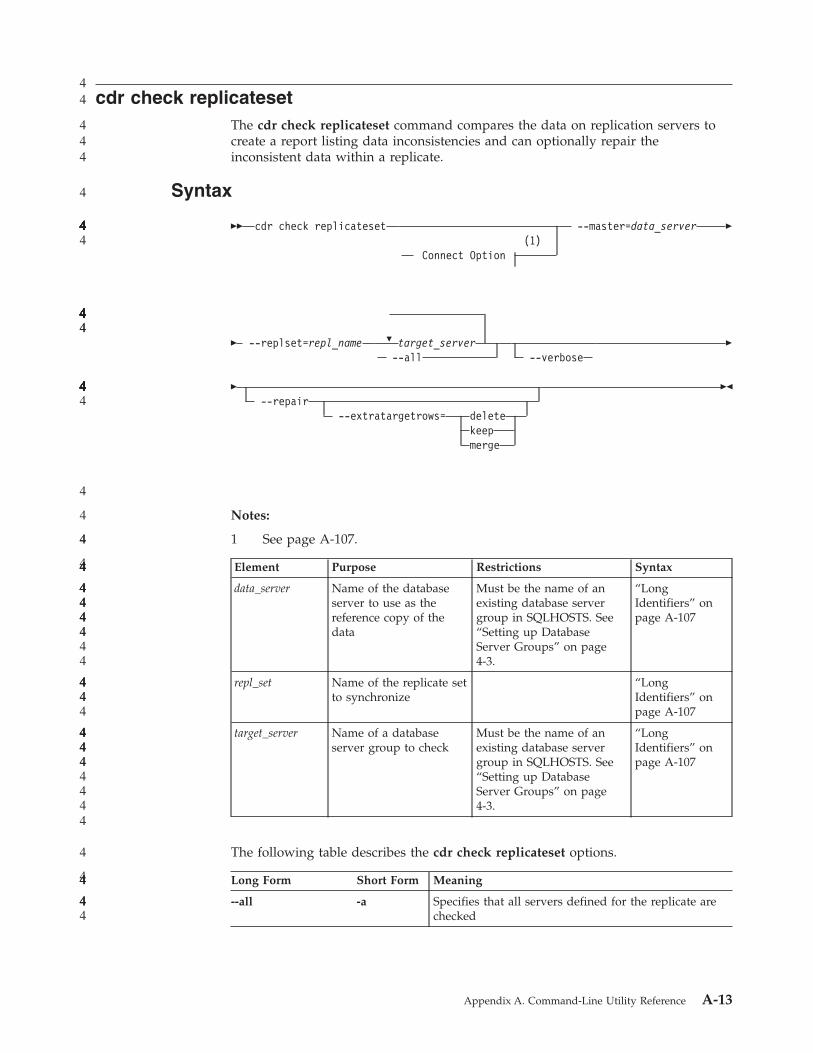
cdr check replicateset
The cdr check replicateset command compares the data on replication servers to
create a report listing data inconsistencies and can optionally repair the
inconsistent data within a replicate.
Syntax
�� cdr check replicateset
(1)
Connect Option
--master=data_server �
�
--replset=repl_name
�
target_server
--all
--verbose
�
� --repair
--extratargetrows=
delete
keep
merge
��
Notes:
1 See page A-107.
Element Purpose Restrictions Syntax
data_server Name of the database
server to use as the
reference copy of the
data
Must be the name of an
existing database server
group in SQLHOSTS. See
“Setting up Database
Server Groups” on page
4-3.
“Long
Identifiers” on
page A-107
repl_set Name of the replicate set
to synchronize
“Long
Identifiers” on
page A-107
target_server Name of a database
server group to check
Must be the name of an
existing database server
group in SQLHOSTS. See
“Setting up Database
Server Groups” on page
4-3.
“Long
Identifiers” on
page A-107
The following table describes the cdr check replicateset options.
Long Form Short Form Meaning
--all -a Specifies that all servers defined for the replicate are
checked
Appendix A. Command-Line Utility Reference A-13
44
444
4
444444444444444444
444444444444444444444444444
4444444444444444444444444444
4
4
44
44444
44444
444444
444
4444444
444444444
444
4
4
4444
4444
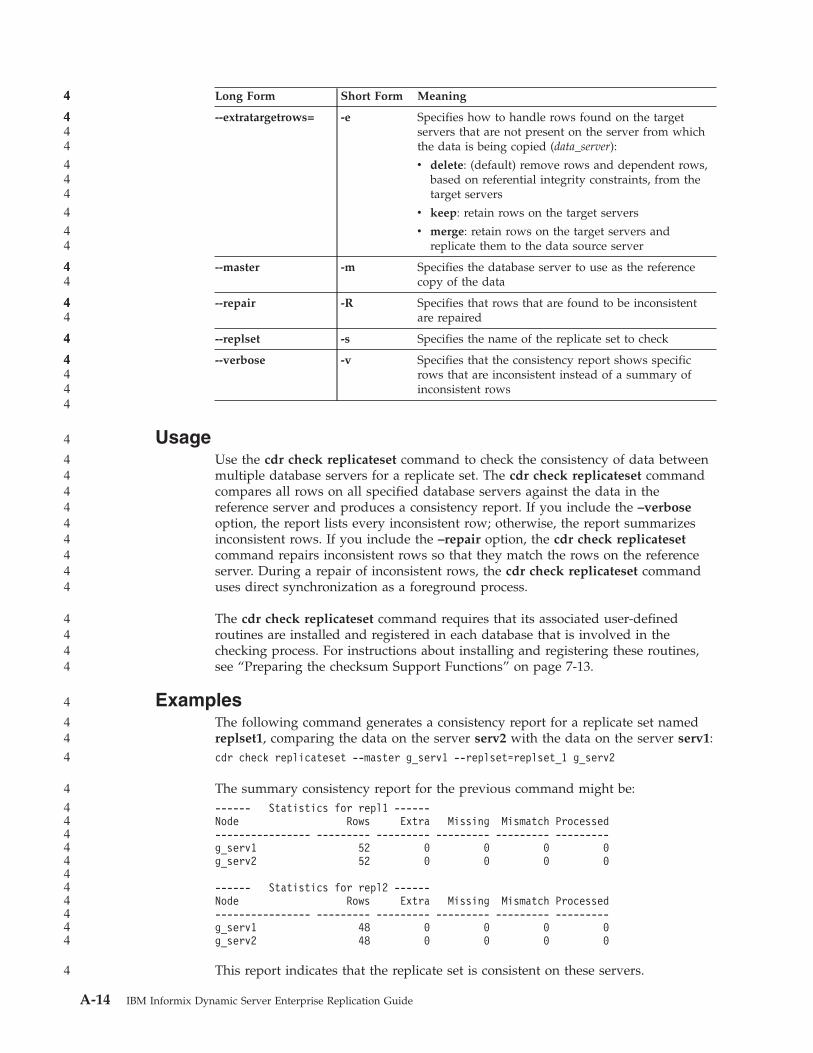
Long Form Short Form Meaning
--extratargetrows= -e Specifies how to handle rows found on the target
servers that are not present on the server from which
the data is being copied (data_server):
v delete: (default) remove rows and dependent rows,
based on referential integrity constraints, from the
target servers
v keep: retain rows on the target servers
v merge: retain rows on the target servers and
replicate them to the data source server
--master -m Specifies the database server to use as the reference
copy of the data
--repair -R Specifies that rows that are found to be inconsistent
are repaired
--replset -s Specifies the name of the replicate set to check
--verbose -v Specifies that the consistency report shows specific
rows that are inconsistent instead of a summary of
inconsistent rows
Usage
Use the cdr check replicateset command to check the consistency of data between
multiple database servers for a replicate set. The cdr check replicateset command
compares all rows on all specified database servers against the data in the
reference server and produces a consistency report. If you include the –verbose
option, the report lists every inconsistent row; otherwise, the report summarizes
inconsistent rows. If you include the –repair option, the cdr check replicateset
command repairs inconsistent rows so that they match the rows on the reference
server. During a repair of inconsistent rows, the cdr check replicateset command
uses direct synchronization as a foreground process.
The cdr check replicateset command requires that its associated user-defined
routines are installed and registered in each database that is involved in the
checking process. For instructions about installing and registering these routines,
see “Preparing the checksum Support Functions” on page 7-13.
Examples
The following command generates a consistency report for a replicate set named
replset1, comparing the data on the server serv2 with the data on the server serv1:
cdr check replicateset --master g_serv1 --replset=replset_1 g_serv2
The summary consistency report for the previous command might be:
------ Statistics for repl1 ------
Node Rows Extra Missing Mismatch Processed
---------------- --------- --------- --------- --------- ---------
g_serv1 52 0 0 0 0
g_serv2 52 0 0 0 0
------ Statistics for repl2 ------
Node Rows Extra Missing Mismatch Processed
---------------- --------- --------- --------- --------- ---------
g_serv1 48 0 0 0 0
g_serv2 48 0 0 0 0
This report indicates that the replicate set is consistent on these servers.
A-14 IBM Informix Dynamic Server Enterprise Replication Guide
444
44444
444
4
44
4444
4444
444
444444
4
444444444
4444
4
44
4
4
44444444444
4

The consistency report for replicate sets shows a series of consistency reports for
individual replicates. For more examples of consistency reports and a description
of the report, see the examples in “cdr check replicate” on page A-8.
See Also
v “cdr sync replicateset” on page A-103
Appendix A. Command-Line Utility Reference A-15
444
4
4

cdr cleanstart
The cdr cleanstart command starts an Enterprise Replication server with empty
queues.
Syntax
�� cdr cleanstart
(1)
Connect Option
��
Notes:
1 See page A-107.
Usage
The cdr cleanstart command starts an Enterprise Replication server, but first
empties replication queues of pending transactions. Use this command if
synchronizing the server using the cdr sync command would be quicker than
letting the queues process normally.
See Also
v “cdr start” on page A-77
A-16 IBM Informix Dynamic Server Enterprise Replication Guide

cdr connect server
The cdr connect server command reestablishes a connection to a database server
that has been disconnected with a cdr disconnect server command.
Syntax
�� cdr connect server
(1)
Connect Option
server_group ��
Notes:
1 See page A-107.
Element Purpose Restrictions Syntax
server_group Name of database server
group to resume
The database server group
must be defined for
replication and be
disconnected.
“Long
Identifiers” on
page A-107
Usage
The cdr connect server command reestablishes a connection to the server
server_group.
See Also
v “cdr define server” on page A-30
v “cdr delete server” on page A-40
v “cdr disconnect server” on page A-44
v “cdr list server” on page A-55
v “cdr modify server” on page A-64
v “cdr resume server” on page A-76
v “cdr suspend server” on page A-97
Appendix A. Command-Line Utility Reference A-17
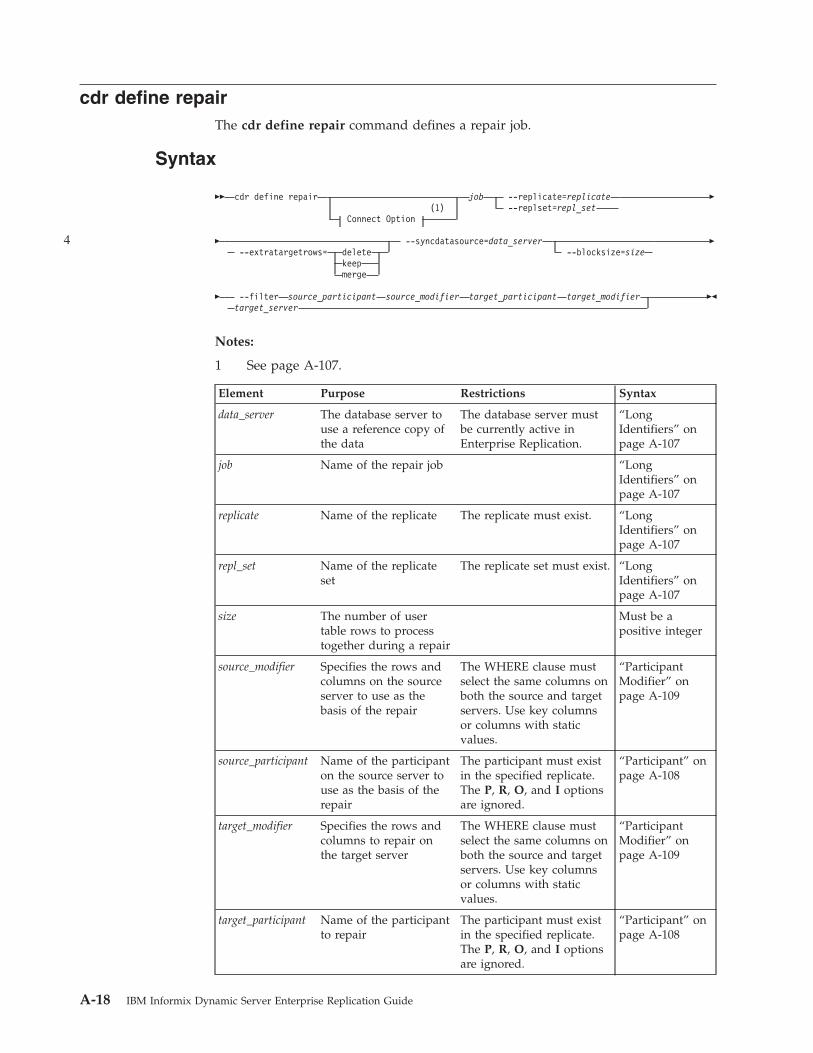
cdr define repair
The cdr define repair command defines a repair job.
Syntax
�� cdr define repair
(1)
Connect Option
job --replicate=replicate
--replset=repl_set �
� --extratargetrows=
delete
keep
merge
--syncdatasource=data_server
--blocksize=size �
� --filter source_participant source_modifier target_participant target_modifier
target_server ��
Notes:
1 See page A-107.
Element Purpose Restrictions Syntax
data_server The database server to
use a reference copy of
the data
The database server must
be currently active in
Enterprise Replication.
“Long
Identifiers” on
page A-107
job Name of the repair job “Long
Identifiers” on
page A-107
replicate Name of the replicate The replicate must exist. “Long
Identifiers” on
page A-107
repl_set Name of the replicate
set
The replicate set must exist. “Long
Identifiers” on
page A-107
size The number of user
table rows to process
together during a repair
Must be a
positive integer
source_modifier Specifies the rows and
columns on the source
server to use as the
basis of the repair
The WHERE clause must
select the same columns on
both the source and target
servers. Use key columns
or columns with static
values.
“Participant
Modifier” on
page A-109
source_participant Name of the participant
on the source server to
use as the basis of the
repair
The participant must exist
in the specified replicate.
The P, R, O, and I options
are ignored.
“Participant” on
page A-108
target_modifier Specifies the rows and
columns to repair on
the target server
The WHERE clause must
select the same columns on
both the source and target
servers. Use key columns
or columns with static
values.
“Participant
Modifier” on
page A-109
target_participant Name of the participant
to repair
The participant must exist
in the specified replicate.
The P, R, O, and I options
are ignored.
“Participant” on
page A-108
A-18 IBM Informix Dynamic Server Enterprise Replication Guide
4

Element Purpose Restrictions Syntax
target_server The database server on
which the data is
updated
The database server must
be currently active in
Enterprise Replication.
“Long
Identifiers” on
page A-107
The following table describes the cdr define repair options.
Long Form
Short
Form Meaning
--blocksize= -b Specifies the number of user table rows to process
together during a repair. Set this option to a lower
number to increase concurrency. If not set, then the
blocksize is calculated internally depending on the
primary key size of the table being repaired.
--extratargetrows= -e Specifies how to handle rows found on the target servers
that are not present on the data source server
(data_server):
v delete: (default) remove rows and dependent rows,
based on referential integrity constraints, from the
target servers
v keep: retain rows on the target server
v merge: retain rows on the target server and replicate
them to the data source server
--filter -f Specifies the job uses a filter to choose which columns to
repair. This option requires a participant and modifier
from both the source and target servers. The WHERE
clauses in the modifiers must select the same set of rows
on both the source and target servers. In the WHERE
clauses, only reference columns that are exactly the same
on the source and target nodes, and only columns that
are not updated.
--replicate= -r Specifies the name of the replicate on which to perform
the repair job.
--replset= -R Specifies the name of the replicate set on which to
perform the repair job.
--syncdatasource= -S Specifies the name of the database server to use as the
reference copy of the data.
Usage
Use the cdr define repair command to define a repair job to repair inconsistent
data between two Enterprise Replication servers. You can choose the level of
granularity for the job by specifying the whole participant, or a specific portion of
it defined by a SELECT statement.
While defining repair job, the Enterprise Replication network connection must be
active between the Connect server, the reference server, and the target servers. The
server specified in the Connect Option must be a non-leaf server.
To start the repair job, use the cdr start repair command.
You can only use a specific repair job one time.
Appendix A. Command-Line Utility Reference A-19

Examples
The following example defines a repair job, repair_1, on the server utah for a
specified portion of the participant:
cdr define repair repair_1\
--replicate=rep1 --syncdatasource=iowa\
--extratargetrows=delete\
--filter "[email protected]" \
"SELECT * FROM table2 WHERE customerid BETWEEN 100 AND 200" \
"SELECT * FROM table2 WHERE customerid BETWEEN 100 AND 200"
Line 2 of this example indicates that the replicate to repair is named rep1 and that
the synchronization data source server containing the correct data is iowa.
Line 3 indicates that if there are rows on the target server, utah, that are not
present on the synchronization data server (iowa) then those rows are deleted
during the repair job.
Lines 4 through 7 show that the specific rows to repair on the utah server are
those that have a customerid between 100 and 200.
The following example starts a repair job, repair_2, on the server utah for the
whole participant:
cdr define repair repair_2\
--replicate=rep1 --syncdatasource=iowa\
--extratargetrows=keep \
utah
Line 3 of this example indicates that if rows are found on the utah server that do
not exist on the iowa server, then those rows should remain.
Line 4 indicates that the target server is utah.
See Also
v “cdr delete repair” on page A-36
v “cdr start repair” on page A-78
v “cdr stop repair” on page A-89
v “cdr list repair” on page A-48
v “cdr repair” on page A-73
A-20 IBM Informix Dynamic Server Enterprise Replication Guide
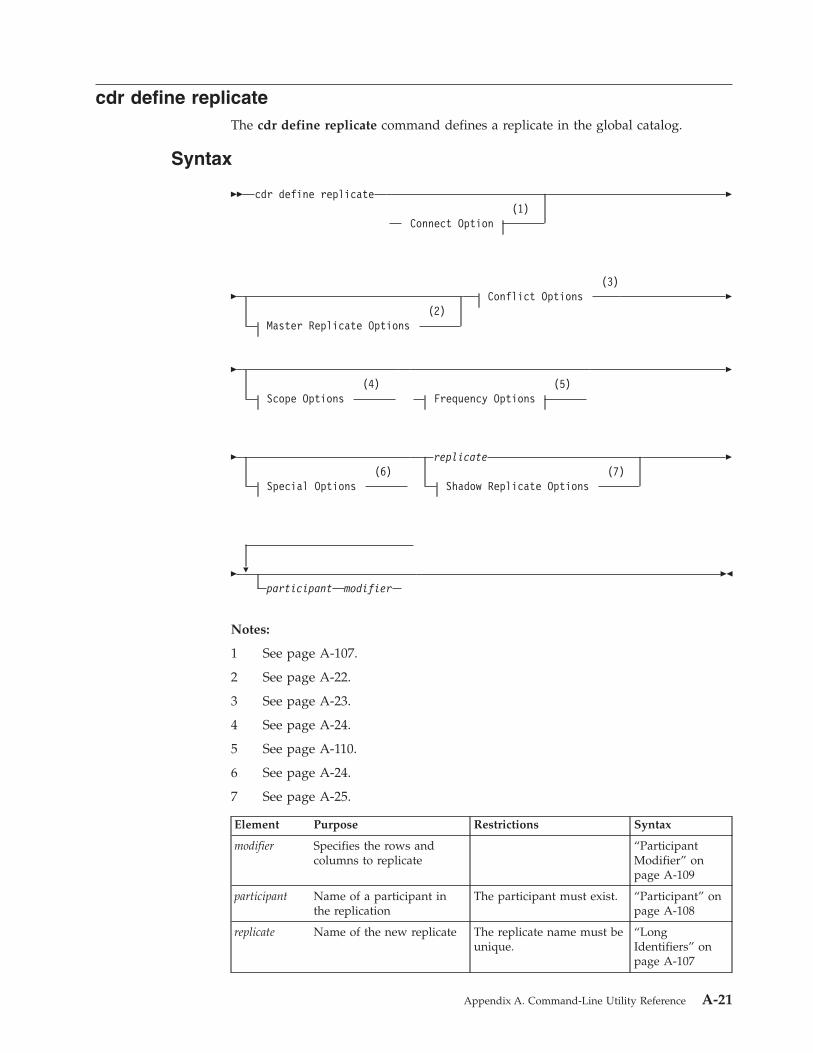
cdr define replicate
The cdr define replicate command defines a replicate in the global catalog.
Syntax
�� cdr define replicate
(1)
Connect Option
�
�
(2)
Master Replicate Options
(3)
Conflict Options
�
� (4)
Scope Options
(5)
Frequency Options
�
� (6)
Special Options
replicate
(7)
Shadow Replicate Options
�
�
�
participant
modifier
��
Notes:
1 See page A-107.
2 See page A-22.
3 See page A-23.
4 See page A-24.
5 See page A-110.
6 See page A-24.
7 See page A-25.
Element Purpose Restrictions Syntax
modifier Specifies the rows and
columns to replicate
“Participant
Modifier” on
page A-109
participant Name of a participant in
the replication
The participant must exist. “Participant” on
page A-108
replicate Name of the new replicate The replicate name must be
unique.
“Long
Identifiers” on
page A-107
Appendix A. Command-Line Utility Reference A-21
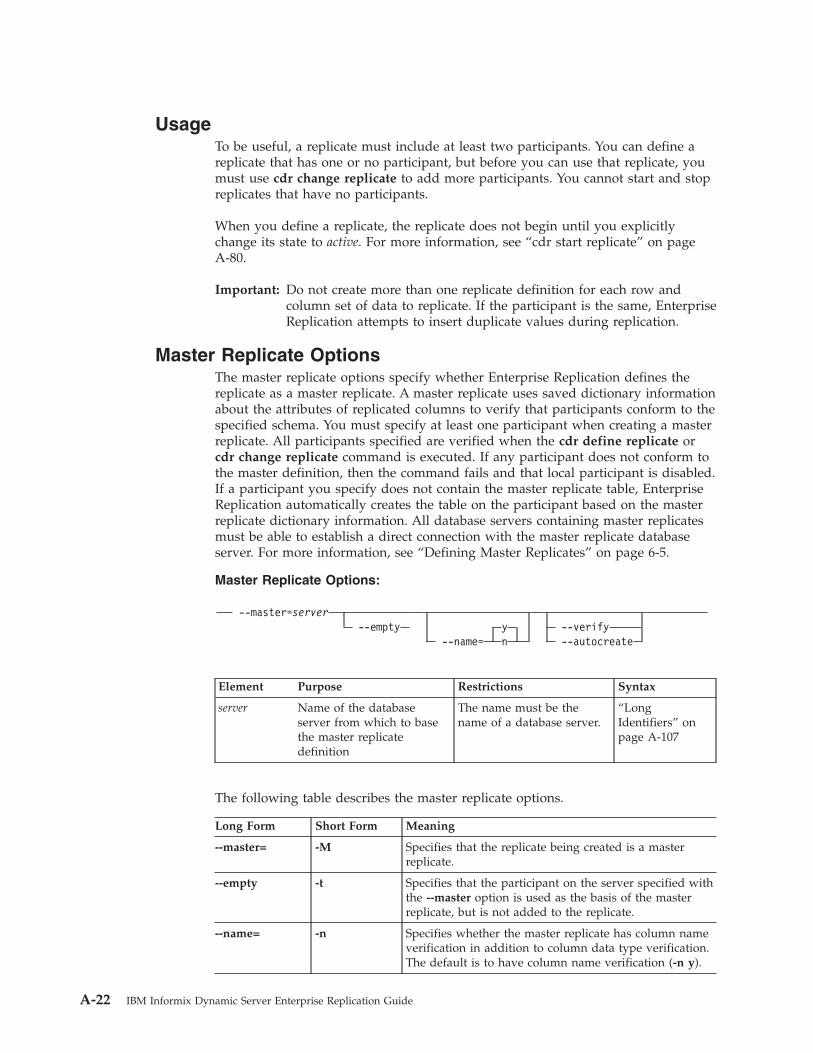
Usage
To be useful, a replicate must include at least two participants. You can define a
replicate that has one or no participant, but before you can use that replicate, you
must use cdr change replicate to add more participants. You cannot start and stop
replicates that have no participants.
When you define a replicate, the replicate does not begin until you explicitly
change its state to active. For more information, see “cdr start replicate” on page
A-80.
Important: Do not create more than one replicate definition for each row and
column set of data to replicate. If the participant is the same, Enterprise
Replication attempts to insert duplicate values during replication.
Master Replicate Options
The master replicate options specify whether Enterprise Replication defines the
replicate as a master replicate. A master replicate uses saved dictionary information
about the attributes of replicated columns to verify that participants conform to the
specified schema. You must specify at least one participant when creating a master
replicate. All participants specified are verified when the cdr define replicate or
cdr change replicate command is executed. If any participant does not conform to
the master definition, then the command fails and that local participant is disabled.
If a participant you specify does not contain the master replicate table, Enterprise
Replication automatically creates the table on the participant based on the master
replicate dictionary information. All database servers containing master replicates
must be able to establish a direct connection with the master replicate database
server. For more information, see “Defining Master Replicates” on page 6-5.
Master Replicate Options:
--master=server
--empty
y
--name=
n
--verify
--autocreate
Element Purpose Restrictions Syntax
server Name of the database
server from which to base
the master replicate
definition
The name must be the
name of a database server.
“Long
Identifiers” on
page A-107
The following table describes the master replicate options.
Long Form Short Form Meaning
--master= -M Specifies that the replicate being created is a master
replicate.
--empty -t Specifies that the participant on the server specified with
the --master option is used as the basis of the master
replicate, but is not added to the replicate.
--name= -n Specifies whether the master replicate has column name
verification in addition to column data type verification.
The default is to have column name verification (-n y).
A-22 IBM Informix Dynamic Server Enterprise Replication Guide

Long Form Short Form Meaning
--verify -v Specifies that the cdr define replicate command verifies
the database, tables, and column data types against the
master replicate definition on all listed servers.
--autocreate -u Specifies that if the tables in the master replicate
definition do not exist in the databases on the target
servers, then they are created automatically. However,
the table cannot contain columns with user-defined data
types. The tables are created in the same dbspace as the
database.
Conflict Options
The --conflict options specify how Enterprise Replication should resolve conflicts
with data arriving at the database server.
For more information, see “Conflict Resolution” on page 3-6.
Conflict Options:
--conflict= always
ignore
SPL_routine
--optimize
timestamp
,
SPL_routine
--optimize
Element Purpose Restrictions Syntax
SPL_routine SPL routine for conflict
resolution
The SPL routine must exist. “Long
Identifiers” on
page A-107
The following table describes the conflict options.
Long Form Short Form Meaning
--conflict= -C Specifies the rule that will be used for conflict resolution.
The action that Enterprise Replication takes depends
upon the scope. If scope is not specified, the default
scope is transaction. Use the always option if you do not
want Enterprise Replication to resolve conflicts, but you
do want replicated changes to be applied even if the
operations are not the same on the source and target
servers. Use the ignore option if you do not want
Enterprise Replication to resolve conflicts. Use the
timestamp option to have the row or transaction with
the most recent timestamp take precedence in a conflict.
Appendix A. Command-Line Utility Reference A-23

Long Form Short Form Meaning
--optimize -O Specifies that the SPL routine is optimized. An optimized
SPL routine is called only when a collision is detected
and the row to be replicated fails to meet one of the
following two conditions:
v It is from the same database server that last updated
the local row on the target table.
v It has a time stamp greater than or equal to that of the
local row.
When this option is not present, Enterprise Replication
always calls the SPL routine defined for the replicate
when a conflict is detected.
Scope Options
The --scope options specify the scope of Enterprise Replication conflict resolution.
Scope Options:
--scope= row
transaction
The following table describes the --scope option.
Long Form Short Form Meaning
--scope= -S Specifies the scope that will be invoked when Enterprise
Replication encounters a problem with data or a conflict
occurs. For more information, see “Scope” on page 3-11.
If scope is not specified, the default scope is transaction.
When specifying the scope, you can abbreviate
transaction to tra.
Special Options
Special Options:
�
--ats
--ris
--floatieee
--floatcanon
--firetrigger
--fullrow
y
n
--ignoredel
y
n
A-24 IBM Informix Dynamic Server Enterprise Replication Guide

The following table describes the special options to cdr define replicate.
Long Form Short Form Meaning
--ats -A Activates aborted transaction spooling for replicate
transactions that fail to be applied to the target
database. For more information, see “Setting Up
Error Logging” on page 6-8 and Chapter 8,
“Monitoring and Troubleshooting Enterprise
Replication,” on page 8-1.
--firetrigger -T Specifies that the rows that this replicate inserts fire
triggers at the destination. For more information,
see “Enabling Triggers” on page 6-9.
--floatieee -I Transfers replicated floating-point numbers in either
32-bit (for SMALLFLOAT) or 64-bit (for FLOAT)
IEEE floating-point format. Use this option for all
new replicate definitions. For more information, see
“Using the IEEE Floating Point or Canonical
Format” on page 6-9.
--floatcanon -F Transfers replicated floating-point numbers in
machine-independent decimal representation. This
format is portable, but can lose accuracy. This
format is provided for backward-compatibility only;
use --floatieee for all new replicate definitions. For
more information, see “Using the IEEE Floating
Point or Canonical Format” on page 6-9.
--fullrow y | n -f y | n Specifies to (y) replicate the full row and enable
upserts or (n) replicate only changed columns and
disable upserts. By default, Enterprise Replication
always replicates the entire row and enables
upserts. For more information, see “Replicating
Only Changed Columns” on page 6-8.
--ignoredel y | n -D y | n Specifies that rows are retained if they are deleted
on other nodes in the Enterprise Replication
system.
--ris -R Activates row-information spooling for replicate
row data that fails conflict resolution or encounters
replication order problems. For more information,
see “Setting Up Error Logging” on page 6-8 and
Chapter 8, “Monitoring and Troubleshooting
Enterprise Replication,” on page 8-1.
Shadow Replicate Options
A shadow replicate is a copy of an existing, or primary, replicate. You must create
a shadow replicate to perform a manual remastering of a replicate that was
defined with the -n option. After creating the shadow replicate, the next step in
manual remastering is to switch the primary replicate and the shadow replicate
using the cdr swap shadow command.
Shadow Replicate Options:
--mirrors
primary_replicate
shadow_replicate
Appendix A. Command-Line Utility Reference A-25

Element Purpose Restrictions Syntax
primary_replicate Name of the replicate on
which to base the
shadow replicate
The replicate must exist.
The replicate name
must be unique.
“Long
Identifiers” on
page A-107
shadow_replicate Name of the shadow
replicate to create
The replicate name
must be unique.
“Long
Identifiers” on
page A-107
The following table describes the shadow replicate option to cdr define replicate.
Long Form Short Form Meaning
--mirrors -m Specifies that the replicate created is a shadow
replicate based on an existing primary replicate.
Examples
The following example illustrates the use of cdr define replicate:
cdr define repl --conflict=timestamp,sp1 \
--scope=tran --ats --fullrow n --floatieee newrepl \
“db1@iowa:antonio.table1” “select * from table1” \
“db2@utah:carlo.table2” “select * from table2”
Line 1 of the example specifies a primary conflict-resolution rule of timestamp. If
the primary rule fails, the SPL routine sp1 will be invoked to resolve the conflict.
Because no database server is specified here (or on any later line), the command
connects to the database server named in the INFORMIXSERVER environment
variable.
Line 2 specifies that the replicate has a transaction scope for conflict-resolution
scope and enables aborted transaction spooling. Enterprise Replication will only
replicate the rows that changed and uses the IEEE floating point format to send
floating-point numbers across dissimilar platforms. The final item specifies the
name of the replicate, newrepl.
Line 3 defines the first participant, "db1@iowa:antonio.table1", with the select
statement "select * from table1".
Line 4 defines a second participant, "db2@utah:carlo.table2", with the select
statement "select * from table2".
The next example is the same as the preceding example with the following
exceptions:
v Line 1 instructs Enterprise Replication to use the global catalog on database
server ohio.
v Line 2 specifies that the data should be replicated every five hours.cdr def repl -c ohio -C timestamp,sp1 \
-S tran -A -e 5:00 -I newrepl \
"db1@iowa:antonio.table1" "select * from table1" \
"db2@utah:carlo.table2" "select * from table2"
The following example illustrates creating a master replicate:
cdr def repl -c iowa -M iowa \
A-26 IBM Informix Dynamic Server Enterprise Replication Guide
-C timestamp -S tran -D y newrepl \
"db1@iowa:antonio.table1" "select * from table1"
Line 1 instructs Enterprise Replication to create a master replicate based on the
replicate information from the database server iowa. Line 2 specifies the conflict
and scope options, that delete operations are ignored, and that the name of the
replicate is newrepl. Line 3 specifies the table and columns included in the master
replicate.
The next example is the same as the previous example except that it specifies a
second participant in Line 4. The second participant (utah) does not have the table
table1 specified in its participant and modifier syntax; the execution of the cdr
define replicate command creates table1 on the utah server.
cdr def repl -c iowa -M iowa \
-C timestamp -S tran -D y newrepl \
"db1@iowa:antonio.table1" "select * from table1 \
"db2@utah:carlo.table1" "select * from table1"
See Also
v “cdr change replicate” on page A-4
v “cdr delete replicate” on page A-37
v “cdr list replicate” on page A-50
v “cdr modify replicate” on page A-60
v “cdr resume replicate” on page A-74
v “cdr start replicate” on page A-80
v “cdr stop replicate” on page A-90
v “cdr suspend replicate” on page A-94
v “cdr swap shadow” on page A-99
Appendix A. Command-Line Utility Reference A-27

cdr define replicateset
The cdr define replicateset command defines a replicate set. A replicate set is a
collection of several replicates to be managed together.
Important: Enterprise Replication supports replicate sets for IBM Informix
Dynamic Server, Version 9.3 and later only. You cannot define or
modify replicate sets to include replicates with participants that are
Version 9.2 and earlier. In addition, replicate sets are different from and
are incompatible with replicate groups (in Version 9.2 and earlier).
Syntax
�� cdr define replicateset
(1)
Connect Option
�
�
(2)
Frequency Options
--exclusive
repl_set
�
replicate
��
Notes:
1 See page A-107.
2 See page A-110.
Element Purpose Restrictions Syntax
repl_set Name of replicate set to
create
The name must be unique
and cannot be the same as
a replicate name.
“Long
Identifiers” on
page A-107
replicate Name of a replicate to be
included in the replicate set
The replicate must exist. “Long
Identifiers” on
page A-107
The following table describes the option to cdr define replicateset.
Long Form Short Form Meaning
--exclusive -X Creates an exclusive replicate set. For more
information, see “Exclusive Replicate Sets”
on page 6-10.
Usage
Use the cdr define replicateset command to define a replicate set.
Any valid replicate can be defined as part of a replicate set. A replicate can belong
to more than one non-exclusive replicate set, but to only one exclusive replicate set.
For details on the differences between exclusive and non-exclusive replicate sets,
see “Defining Replicate Sets” on page 6-10.
A-28 IBM Informix Dynamic Server Enterprise Replication Guide
When you create an exclusive replicate set, the state is initially set to inactive. For
more information, see “Displaying Information About Replicates” on page A-51.
To create an exclusive replicate set and set the state to active:
1. Create an empty replicate set.
2. Stop the replicate set.
3. Add replicates to the replicate set.
4. Set the state of the replicate set to active by running cdr start replicateset.
Because individual replicates in a non-exclusive replicate set can have different
states, the non-exclusive replicate set itself has no state. You cannot change
whether a replicate set is exclusive or not.
Examples
The following example connects to the default server and defines the non-exclusive
replicate set accounts_set with replicates repl1, repl2, and repl3:
cdr def replset accounts_set repl1 repl2 repl3
The following example connects to the server olive and defines the exclusive
replicate set market_set with replicates basil and thyme:
cdr def replset --connect=olive --exclusive market_set basil thyme
See Also
v “cdr change replicateset” on page A-6
v “cdr delete replicateset” on page A-38
v “cdr list replicateset” on page A-53
v “cdr modify replicateset” on page A-63
v “cdr resume replicateset” on page A-75
v “cdr start replicateset” on page A-82
v “cdr stop replicateset” on page A-92
v “cdr suspend replicateset” on page A-95
Appendix A. Command-Line Utility Reference A-29
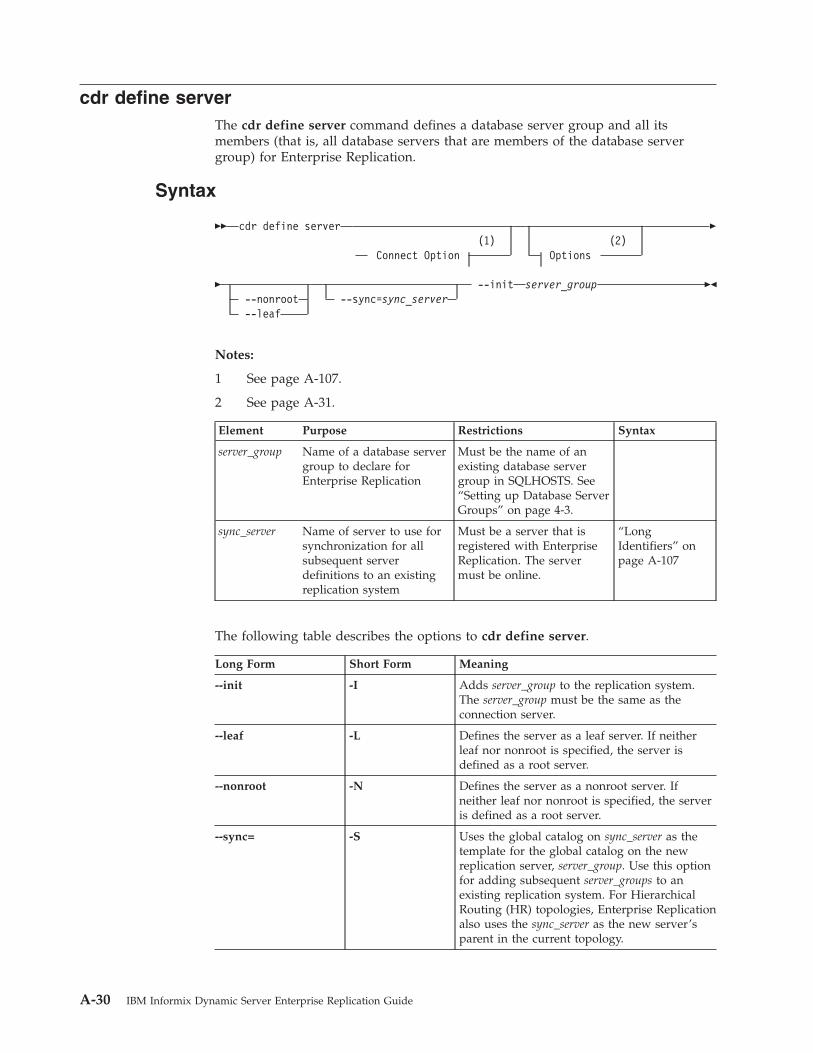
cdr define server
The cdr define server command defines a database server group and all its
members (that is, all database servers that are members of the database server
group) for Enterprise Replication.
Syntax
�� cdr define server
(1)
Connect Option
(2)
Options
�
� --nonroot
--leaf
--sync=sync_server --init server_group ��
Notes:
1 See page A-107.
2 See page A-31.
Element Purpose Restrictions Syntax
server_group Name of a database server
group to declare for
Enterprise Replication
Must be the name of an
existing database server
group in SQLHOSTS. See
“Setting up Database Server
Groups” on page 4-3.
sync_server Name of server to use for
synchronization for all
subsequent server
definitions to an existing
replication system
Must be a server that is
registered with Enterprise
Replication. The server
must be online.
“Long
Identifiers” on
page A-107
The following table describes the options to cdr define server.
Long Form Short Form Meaning
--init -I Adds server_group to the replication system.
The server_group must be the same as the
connection server.
--leaf -L Defines the server as a leaf server. If neither
leaf nor nonroot is specified, the server is
defined as a root server.
--nonroot -N Defines the server as a nonroot server. If
neither leaf nor nonroot is specified, the server
is defined as a root server.
--sync= -S Uses the global catalog on sync_server as the
template for the global catalog on the new
replication server, server_group. Use this option
for adding subsequent server_groups to an
existing replication system. For Hierarchical
Routing (HR) topologies, Enterprise Replication
also uses the sync_server as the new server’s
parent in the current topology.
A-30 IBM Informix Dynamic Server Enterprise Replication Guide

Usage
The cdr define server command creates the Enterprise Replication global catalog
and adds the database server from the server_group.
Options
The options allow you to modify the default behavior of cdr define server.
Options:
�
--ats=ats_dir
--ris=ris_dir
--idle=timeout
Element Purpose Restrictions Syntax
ats_dir Name of the directory for
Aborted Transaction
Spooling
Must be a full pathname.
The path for the directory
can be no longer than 256
bytes.
Follows naming
conventions on
your operating
system
ris_dir Name of the directory for
Row Information Spooling
Must be a full pathname.
The path for the directory
can be no longer than 256
characters.
Follows naming
conventions on
your operating
system
timeout Idle time-out for this
replication server
Must be an integer number
of minutes. 0 indicates no
time-out. The maximum
value is 32,767.
Integer
The following table describes the options to cdr define server.
Long Form Short Form Meaning
--ats= -A Activates aborted transaction spooling for
replicate transactions that fail to be applied
to the target database. For more information,
see Chapter 8, “Monitoring and
Troubleshooting Enterprise Replication,” on
page 8-1.
--ris= -R Activates row information spooling for
replicate row data that fails conflict
resolution or encounters replication-order
problems. For more information, see
Chapter 8, “Monitoring and Troubleshooting
Enterprise Replication,” on page 8-1.
--idle= -i Causes an inactive connection to be
terminated after timeout minutes. If time-out
is 0, the connection does not time out. The
default value is 0.
Examples
The first example defines the first database server in a replication environment.
The command connects to the database server stan, initializes Enterprise
Appendix A. Command-Line Utility Reference A-31
Replication, and sets the idle time-out to 500 minutes. The example also specifies
that any files that ATS generates will go into the /cdr/ats directory.
cdr define server --connect=stan \
--idle=500 --ats=/cdr/ats --init g_stan
The following example adds a database server to the replication environment in
the first example. The command connects to the database server oliver, initializes
Enterprise Replication, synchronizes its catalogs with the catalogs on the existing
database server stan, and defines the database server oliver with an idle time-out
of 600 minutes. This command also specifies that any files that ATS generates will
go into the /cdr/ats directory.
cdr define server -c oliver -i 600 -A /cdr/ats -S g_stan -I g_oliver
See Also
v “cdr connect server” on page A-17
v “cdr delete server” on page A-40
v “cdr disconnect server” on page A-44
v “cdr list server” on page A-55
v “cdr modify server” on page A-64
v “cdr resume server” on page A-76
v “cdr suspend server” on page A-97
A-32 IBM Informix Dynamic Server Enterprise Replication Guide

cdr define template
The cdr define template command creates a template for replicates and a replicate
set. Because templates define replicates, many of the syntax options for the cdr
define template command are the same as for the cdr define replicate command.
Syntax
��
cdr define template
template
(1)
Connect Option
(2)
Conflict Options
�
� (3)
Scope Options
(4)
Frequency Options
(5)
Special Options
�
�
�
--master=server_group
--database=database
table
--exclusive
--all
--file=filename
��
Notes:
1 See page A-107.
2 See page A-23.
3 See page A-24.
4 See page A-110.
5 See page A-24.
Element Purpose Restrictions Syntax
template Name of the template to
create
The template name must be
unique and cannot be the
same as a replicate or
replicate set name.
“Long
Identifiers” on
page A-107
database Name of the database
used to define the
template attributes
The database server must
be registered with
Enterprise Replication.
“Long
Identifiers” on
page A-107
table Name of the table to be
included in the template
The table must be an actual
table. It cannot be a
synonym or a view. For
ANSI databases, you must
specify owner.tablename.
“Long
Identifiers” on
page A-107
filename The directory and filename
of the file containing a list
of tables to be included in
the template
Must be a full pathname
and filename. The path and
filename can be no longer
than 256 bytes. Within the
file, the table names can be
separated by a space or
placed on different lines.
Follows naming
conventions on
your operating
system.
Appendix A. Command-Line Utility Reference A-33
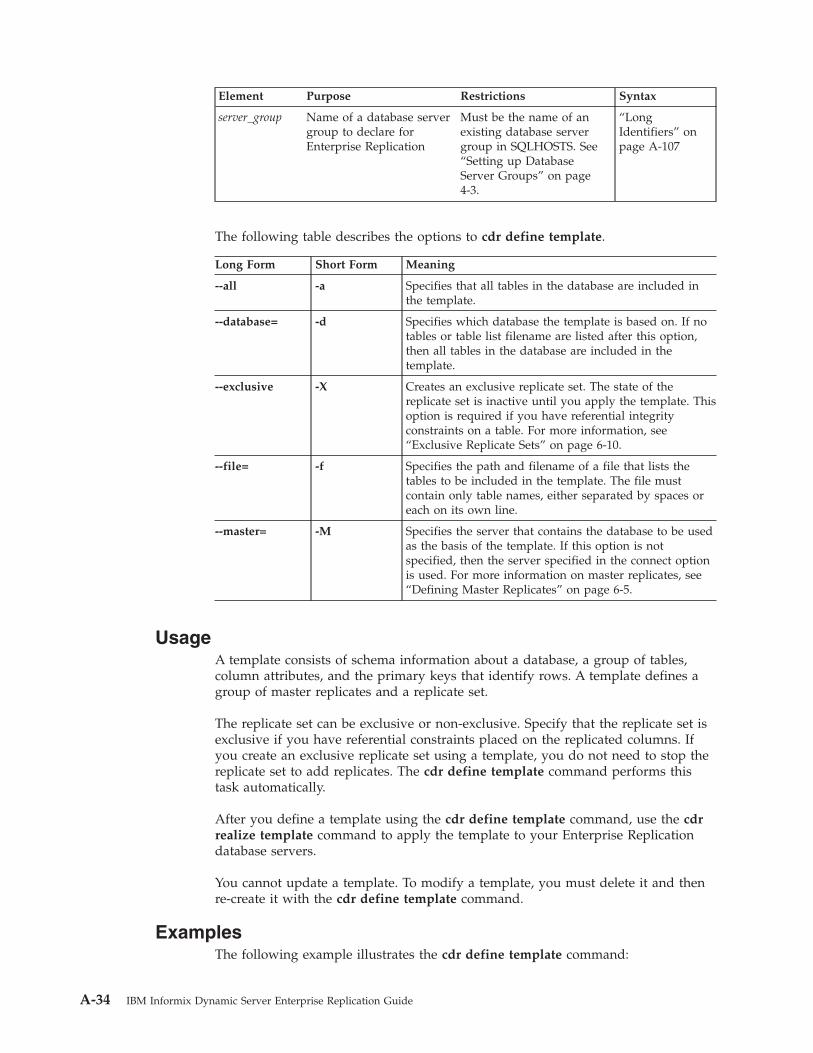
Element Purpose Restrictions Syntax
server_group Name of a database server
group to declare for
Enterprise Replication
Must be the name of an
existing database server
group in SQLHOSTS. See
“Setting up Database
Server Groups” on page
4-3.
“Long
Identifiers” on
page A-107
The following table describes the options to cdr define template.
Long Form Short Form Meaning
--all -a Specifies that all tables in the database are included in
the template.
--database= -d Specifies which database the template is based on. If no
tables or table list filename are listed after this option,
then all tables in the database are included in the
template.
--exclusive -X Creates an exclusive replicate set. The state of the
replicate set is inactive until you apply the template. This
option is required if you have referential integrity
constraints on a table. For more information, see
“Exclusive Replicate Sets” on page 6-10.
--file= -f Specifies the path and filename of a file that lists the
tables to be included in the template. The file must
contain only table names, either separated by spaces or
each on its own line.
--master= -M Specifies the server that contains the database to be used
as the basis of the template. If this option is not
specified, then the server specified in the connect option
is used. For more information on master replicates, see
“Defining Master Replicates” on page 6-5.
Usage
A template consists of schema information about a database, a group of tables,
column attributes, and the primary keys that identify rows. A template defines a
group of master replicates and a replicate set.
The replicate set can be exclusive or non-exclusive. Specify that the replicate set is
exclusive if you have referential constraints placed on the replicated columns. If
you create an exclusive replicate set using a template, you do not need to stop the
replicate set to add replicates. The cdr define template command performs this
task automatically.
After you define a template using the cdr define template command, use the cdr
realize template command to apply the template to your Enterprise Replication
database servers.
You cannot update a template. To modify a template, you must delete it and then
re-create it with the cdr define template command.
Examples
The following example illustrates the cdr define template command:
A-34 IBM Informix Dynamic Server Enterprise Replication Guide

cdr define template tem1 -c detroit\
-C timestamp -S tran \
--master=chicago\
--database=new_cars table1 table2 table3
Line 1 of the example specifies a template name of tem1 and that the connection is
made to the server detroit. Line 2 specifies a conflict-resolution rule of timestamp
and a transaction scope for conflict resolution. Line 3 specifies that the master
replicate information is obtained from the server chicago. Line 4 specifies to use
the new_cars database on the chicago server and to include only the tables table1,
table2, and table3.
The next example is the same as the first except that it has additional options and
uses a file instead of a list of tables:
cdr define template tem1 -c detroit\
-C timestamp -S tran --master=chicago\
--ignoredel y\
--database=new_cars --file=tabfile.txt
Line 3 indicates that delete operations are not replicated. Retaining deleted rows
on target servers is useful for consolidation models.
Line 4 specifies a filename for a file that contains a list of tables to include in the
template. The tabfile.txt file has the following contents:
table1
table2
table3
table4
See Also
v “cdr list template” on page A-58
v “cdr realize template” on page A-66
v “cdr delete template” on page A-43
v “cdr define replicate” on page A-21
Appendix A. Command-Line Utility Reference A-35

cdr delete repair
The cdr delete repair command deletes a repair job.
Syntax
�� cdr delete repair
(1)
Connect Option
job �
� --syncdatasource=source_server ��
Notes:
1 See page A-107.
Element Purpose Restrictions Syntax
job Specifies the name of the
repair job to delete
The repair job must exist
and must not be running
“Long
Identifiers” on
page A-107
The following table describes the option to the cdr delete repair command.
Long Form Short Form Meaning
--syncdatasource= -S Specifies the name of the database server designated
as the reference copy of the data in the cdr define
repair command.
Usage
Use the cdr delete repair command to delete an existing repair job. You cannot
delete a repair job that is running.
The server specified in the Connect Option must be a non-leaf server.
Examples
The following example deletes a repair job named parts_repair:
cdr delete repair parts_repair
See Also
v “cdr define repair” on page A-18
v “cdr start repair” on page A-78
v “cdr stop repair” on page A-89
v “cdr list repair” on page A-48
A-36 IBM Informix Dynamic Server Enterprise Replication Guide
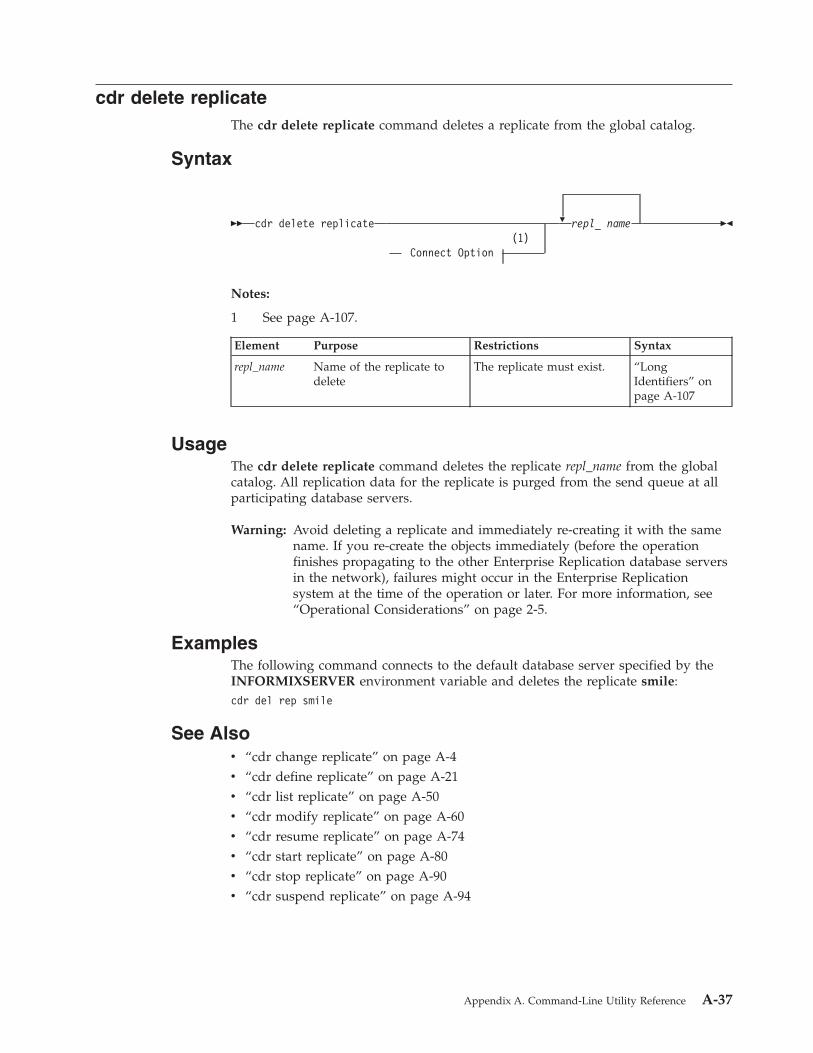
cdr delete replicate
The cdr delete replicate command deletes a replicate from the global catalog.
Syntax
��
cdr delete replicate
(1)
Connect Option
�
repl_ name
��
Notes:
1 See page A-107.
Element Purpose Restrictions Syntax
repl_name Name of the replicate to
delete
The replicate must exist. “Long
Identifiers” on
page A-107
Usage
The cdr delete replicate command deletes the replicate repl_name from the global
catalog. All replication data for the replicate is purged from the send queue at all
participating database servers.
Warning: Avoid deleting a replicate and immediately re-creating it with the same
name. If you re-create the objects immediately (before the operation
finishes propagating to the other Enterprise Replication database servers
in the network), failures might occur in the Enterprise Replication
system at the time of the operation or later. For more information, see
“Operational Considerations” on page 2-5.
Examples
The following command connects to the default database server specified by the
INFORMIXSERVER environment variable and deletes the replicate smile:
cdr del rep smile
See Also
v “cdr change replicate” on page A-4
v “cdr define replicate” on page A-21
v “cdr list replicate” on page A-50
v “cdr modify replicate” on page A-60
v “cdr resume replicate” on page A-74
v “cdr start replicate” on page A-80
v “cdr stop replicate” on page A-90
v “cdr suspend replicate” on page A-94
Appendix A. Command-Line Utility Reference A-37

cdr delete replicateset
The cdr delete replicateset command deletes a replicate set.
Syntax
��
cdr delete replicateset
(1)
Connect Option
�
repl_set
��
Notes:
1 See page A-107.
Element Purpose Restrictions Syntax
repl_set Name of replicate set to
delete
The replicate set must exist. “Long
Identifiers” on
page A-107
Usage
The cdr delete replicateset command deletes the exclusive or non-exclusive
replicate set repl_set from the global catalog.
The cdr delete replicateset command does not affect the replicates or associated
data. When a replicate set is deleted, the individual replicates within the replicate
set are unchanged.
Warning: Do not delete time-based exclusive replicate sets. Doing so might result
in inconsistent data.
Warning: Avoid deleting a replicate set and immediately re-creating it with the
same name. If you re-create the objects immediately (before the
operation finishes propagating to the other Enterprise Replication
database servers in the network), failures might occur in the Enterprise
Replication system at the time of the operation or later. For more
information, see “Operational Considerations” on page 2-5.
Examples
The following example connects to the default database server and deletes the
replicate set accounts_set:
cdr del replset accounts_set
See Also
v “cdr change replicateset” on page A-6
v “cdr define replicate” on page A-21
v “cdr list replicateset” on page A-53
v “cdr modify replicateset” on page A-63
v “cdr resume replicateset” on page A-75
v “cdr start replicateset” on page A-82
v “cdr stop replicateset” on page A-92
A-38 IBM Informix Dynamic Server Enterprise Replication Guide

v “cdr suspend replicateset” on page A-95
Appendix A. Command-Line Utility Reference A-39
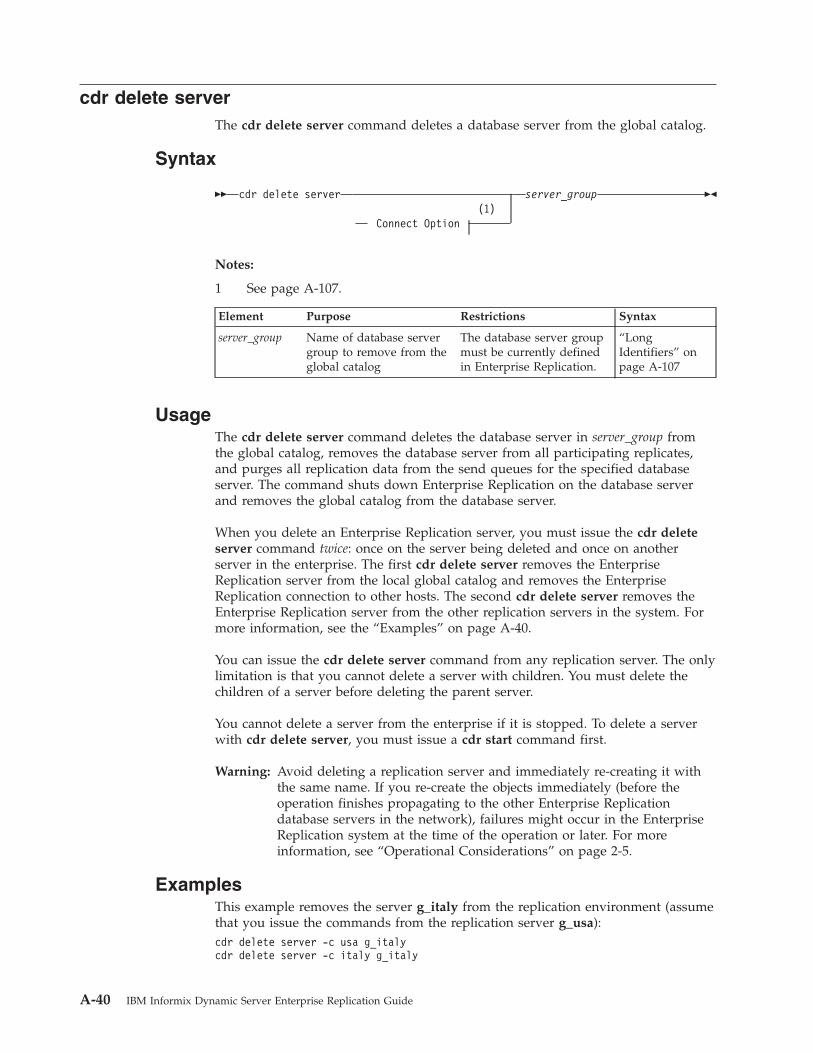
cdr delete server
The cdr delete server command deletes a database server from the global catalog.
Syntax
�� cdr delete server
(1)
Connect Option
server_group ��
Notes:
1 See page A-107.
Element Purpose Restrictions Syntax
server_group Name of database server
group to remove from the
global catalog
The database server group
must be currently defined
in Enterprise Replication.
“Long
Identifiers” on
page A-107
Usage
The cdr delete server command deletes the database server in server_group from
the global catalog, removes the database server from all participating replicates,
and purges all replication data from the send queues for the specified database
server. The command shuts down Enterprise Replication on the database server
and removes the global catalog from the database server.
When you delete an Enterprise Replication server, you must issue the cdr delete
server command twice: once on the server being deleted and once on another
server in the enterprise. The first cdr delete server removes the Enterprise
Replication server from the local global catalog and removes the Enterprise
Replication connection to other hosts. The second cdr delete server removes the
Enterprise Replication server from the other replication servers in the system. For
more information, see the “Examples” on page A-40.
You can issue the cdr delete server command from any replication server. The only
limitation is that you cannot delete a server with children. You must delete the
children of a server before deleting the parent server.
You cannot delete a server from the enterprise if it is stopped. To delete a server
with cdr delete server, you must issue a cdr start command first.
Warning: Avoid deleting a replication server and immediately re-creating it with
the same name. If you re-create the objects immediately (before the
operation finishes propagating to the other Enterprise Replication
database servers in the network), failures might occur in the Enterprise
Replication system at the time of the operation or later. For more
information, see “Operational Considerations” on page 2-5.
Examples
This example removes the server g_italy from the replication environment (assume
that you issue the commands from the replication server g_usa):
cdr delete server -c usa g_italy
cdr delete server -c italy g_italy
A-40 IBM Informix Dynamic Server Enterprise Replication Guide

The first command performs the following actions:
v Removes g_italy from the usa global catalog
v Drops the connection from g_usa to g_italy
v Removes g_italy from all participating replicates
v Purges the replication data destined for g_italy from send queues
v Broadcasts this delete server command to all other servers (other than g_italy)
so that they can perform the same actions
The second command connects to server italy and removes Enterprise Replication
from italy. That is, it removes the syscdr database and removes or stops other
components of Enterprise Replication.
Figure A-1 shows a replication environment with three replication servers, g_usa,
g_italy, and g_japan.
To remove Enterprise Replication from this environment, issue the following
commands from the computer where the usa replication server resides.
To remove Enterprise Replication from this environment:
1. Execute:
cdr delete server g_italy
This command removes connections between the italy replication server and all
other servers in the replication system (usa and japan) and removes any
queued data.
2. Execute:
cdr delete server -c italy g_italy
This command removes all replication information (including the syscdr
database) from the italy database server.
3. Execute:
cdr delete server g_japan
cdr delete server -c japan g_japan
These commands remove the japan replication server.
4. Execute:
cdr delete server g_usa
This command removes the replication information from the usa replication
server itself.
g_italy
g_japan
g_usa
Figure A-1. Three Replication Servers
Appendix A. Command-Line Utility Reference A-41

See Also
v “cdr connect server” on page A-17
v “cdr define server” on page A-30
v “cdr disconnect server” on page A-44
v “cdr list server” on page A-55
v “cdr modify server” on page A-64
v “cdr resume server” on page A-76
v “cdr suspend server” on page A-97
A-42 IBM Informix Dynamic Server Enterprise Replication Guide

cdr delete template
The cdr delete template command deletes a template from the replication domain.
It also deletes any underlying replicate sets associated with the template (these will
exist if the template has been realized). No replicates are deleted.
Syntax
�� cdr delete template template
(1)
Connect Option
��
Notes:
1 See page A-107.
Element Purpose Restrictions Syntax
template Name of the template to
delete
The template must exist. “Long
Identifiers” on
page A-107
Usage
Use the cdr delete template command to delete the template definition and the
replicate set realized from the template. Any replicates created by realizing the
template to a database server are unaffected by this command.
Examples
The following command deletes the template and replicate set tem1:
cdr delete template tem1
See Also
v “cdr define template” on page A-33
v “cdr realize template” on page A-66
Appendix A. Command-Line Utility Reference A-43

cdr disconnect server
The cdr disconnect server command stops a server connection.
Syntax
�� cdr disconnect server
(1)
Connect Option
server_group ��
Notes:
1 See page A-107.
Element Purpose Restrictions Syntax
server_group Name of the database
server group to disconnect
The database server group
must be currently active in
Enterprise Replication.
“Long
Identifiers” on
page A-107
Usage
The cdr disconnect server command drops the connection (for example, for a
dialup line) between server_group and the server specified in the --connect option.
If the --connect option is omitted, the command drops the connection between
server_group and the default database server (the one specified by the
INFORMIXSERVER environment variable).
Examples
The following example drops the connection between the default database server
(the one specified by the INFORMIXSERVER environment variable) and the
server group g_store1:
cdr disconnect server g_store1
See Also
v “cdr connect server” on page A-17
v “cdr define server” on page A-30
v “cdr delete server” on page A-40
v “cdr list server” on page A-55
v “cdr modify server” on page A-64
v “cdr resume server” on page A-76
v “cdr suspend server” on page A-97
A-44 IBM Informix Dynamic Server Enterprise Replication Guide

cdr error
The cdr error command manages the error table and provides convenient displays
of errors.
Syntax
�� cdr error
(1)
Connect Option
�
�
�
--seq=err_server:seqno
--prune
″
last
″
first
,
--zap
--follow
--all
--nomark
��
Notes:
1 See page A-107.
Element Purpose Restrictions Syntax
err_server Name of database server
group that holds the error
table
The server must be
registered for Enterprise
Replication.
“Long Identifiers”
on page A-107
first Start date for a range You must provide a valid
date and time.
“Time of Day” on
page A-111
last Ending date for range You must provide a later
date and time than first.
“Time of Day” on
page A-111
seqno Sequence number of a
specific error
You must provide the
number of an error in the
error table.
Integer
The following table describes the options to cdr error:
Long Form Short Form Meaning
(no options
specified)
Print the current list of errors and then mark them as
reviewed. Enterprise Replication does not display errors
marked as reviewed.
--all -a Print all errors, including those already reviewed.
--follow -f Continuously monitor the error table.
--nomark -n Do not mark errors as reviewed.
--prune -p Prune the error table to those times in the range from
first to last. If first is omitted, then all errors earlier than
last are removed.
--seq -s Remove the (single) error specified by server:seqno from
the error table.
--zap -z Remove all errors from the error table.
Appendix A. Command-Line Utility Reference A-45

Usage
The cdr error command allows you to examine replication errors on any
replication server. Sometimes a command succeeds on the server on which it is
executed but fails on one of the remote servers. For example, if you execute cdr
define replicate on server1, but the table name is misspelled on server2, the
command succeeds on server1 and appears to have completed successfully. You
can use cdr error -c server2 to see why replication is failing.
The cdr error command also allows you to administer the cdr error table remotely.
The reviewed flag lets you watch for new errors while keeping the old errors in
the table. For example, you could run cdr error periodically and append the output
to a file.
Examples
The following command displays the current list of errors on database server hill:
cdr error --connect=hill
After the errors are displayed, Enterprise Replication marks the errors as reviewed.
The following command connects to the database server lake and removes from
the error table all errors that occurred before the time when the command was
issued:
cdr error -c lake --zap
The following command deletes all errors from the error table that occurred at or
before 2:56 in the afternoon on May 1, 2000:
cdr error -p “2000-05-01 14:56:00”
The following command deletes all errors from the error table that occurred at or
after noon on May 1, 2000 and before or at 2:56 in the afternoon on May 1, 2000:
cdr error -p “2000-05-01 14:56:00,2000-05-01 12:00:00”
A-46 IBM Informix Dynamic Server Enterprise Replication Guide

cdr finderr
The cdr finderr command looks up a specific Enterprise Replication error number
and displays the corresponding error text.
Syntax
�� cdr finderr ER_error_number ��
Element Purpose Restrictions
ER_error_number Enterprise Replication error
number to look up.
Must be a positive integer.
You can also view the Enterprise Replication error messages in the file
$INFORMIXDIR/incl/esql/cdrerr.h.
Appendix A. Command-Line Utility Reference A-47
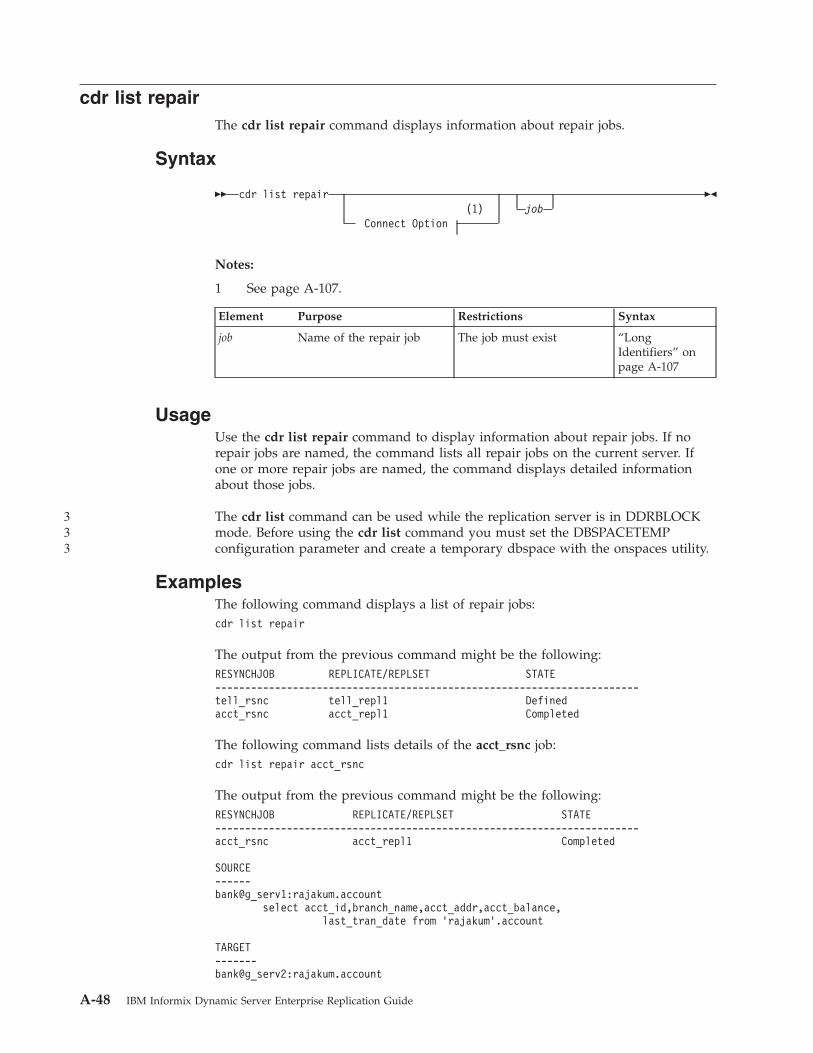
cdr list repair
The cdr list repair command displays information about repair jobs.
Syntax
�� cdr list repair
(1)
job
Connect Option
��
Notes:
1 See page A-107.
Element Purpose Restrictions Syntax
job Name of the repair job The job must exist “Long
Identifiers” on
page A-107
Usage
Use the cdr list repair command to display information about repair jobs. If no
repair jobs are named, the command lists all repair jobs on the current server. If
one or more repair jobs are named, the command displays detailed information
about those jobs.
The cdr list command can be used while the replication server is in DDRBLOCK
mode. Before using the cdr list command you must set the DBSPACETEMP
configuration parameter and create a temporary dbspace with the onspaces utility.
Examples
The following command displays a list of repair jobs:
cdr list repair
The output from the previous command might be the following:
RESYNCHJOB REPLICATE/REPLSET STATE
-----------------------------------------------------------------------
tell_rsnc tell_repl1 Defined
acct_rsnc acct_repl1 Completed
The following command lists details of the acct_rsnc job:
cdr list repair acct_rsnc
The output from the previous command might be the following:
RESYNCHJOB REPLICATE/REPLSET STATE
-----------------------------------------------------------------------
acct_rsnc acct_repl1 Completed
SOURCE
------
bank@g_serv1:rajakum.account
select acct_id,branch_name,acct_addr,acct_balance,
last_tran_date from ’rajakum’.account
TARGET
-------
bank@g_serv2:rajakum.account
A-48 IBM Informix Dynamic Server Enterprise Replication Guide
333
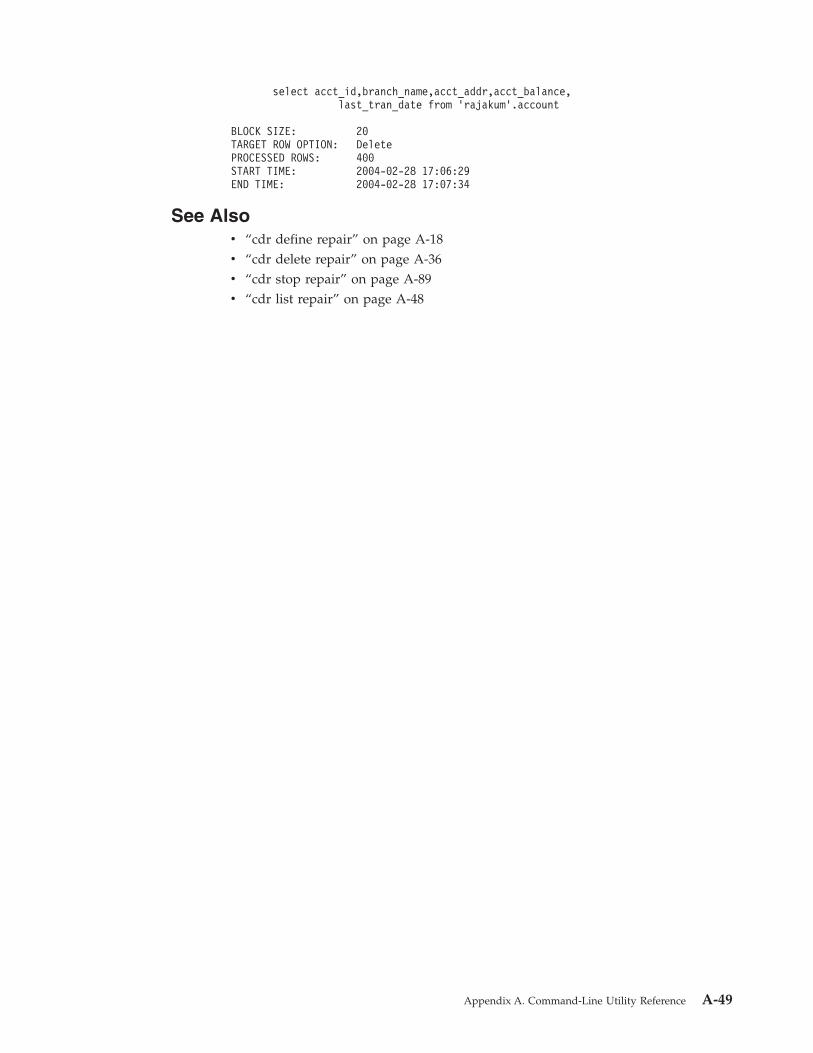
select acct_id,branch_name,acct_addr,acct_balance,
last_tran_date from ’rajakum’.account
BLOCK SIZE: 20
TARGET ROW OPTION: Delete
PROCESSED ROWS: 400
START TIME: 2004-02-28 17:06:29
END TIME: 2004-02-28 17:07:34
See Also
v “cdr define repair” on page A-18
v “cdr delete repair” on page A-36
v “cdr stop repair” on page A-89
v “cdr list repair” on page A-48
Appendix A. Command-Line Utility Reference A-49

cdr list replicate
The cdr list replicate command displays information about the replicates on the
current server.
Syntax
��
cdr list replicate
(1)
Connect Option
full
brief
�
�
�
replicate
��
Notes:
1 See page A-107.
Element Purpose Restrictions Syntax
replicate Name of the replicates The replicates must exist. “Long
Identifiers” on
page A-107
Usage
The cdr list replicate command displays information about replicates (the full
option). If no replicates are named, the command lists all replicates on the current
server. If one or more replicates are named, the command displays detailed
information about those replicates.
To display only replicate names and participant information, use the brief option.
You do not need to be user informix to use this command.
In hierarchical topology, leaf servers have limited information about other database
servers in the Enterprise Replication domain. Therefore, when cdr list replicate is
executed on a leaf server, it displays incomplete information about the other
database servers.
The cdr list replicate command can be used while the replication server is in
DDRBLOCK mode. Before using the cdr list replicate command you must set the
DBSPACETEMP configuration parameter and create a temporary dbspace with the
onspaces utility.
Examples
The following example displays a list of the replicates on the current server with
full details:
cdr list replicate
The output from the previous command might be the following:
A-50 IBM Informix Dynamic Server Enterprise Replication Guide
3333

CURRENTLY DEFINED REPLICATES
---------------------------------------------
REPLICATE: Repl1
STATE: Inactive
CONFLICT: Ignore
FREQUENCY: immediate
QUEUE SIZE: 0
PARTICIPANT: bank:joe.teller
OPTIONS: row,ris,ats
REPLTYPE: Master
REPLICATE: Repl2
STATE: Inactive
CONFLICT: Ignore
FREQUENCY: immediate
QUEUE SIZE: 0
PARTICIPANT: bank:joe.account
OPTIONS: row,ris,ats
REPLTYPE: Master,Shadow
PARENT REPLICATE: Repl1
The PARENT REPLICATE field only appears if the replicate is a shadow replicate.
The following example displays a list of the replicates on the current server with
brief details:
cdr list replicate brief
The output from the previous command might be the following:
REPLICATE TABLE SELECT
----------------------------------------------------------------
Repl1 bank@g_newyork:joe.teller select * from joe.teller
Repl1 bank@g_sanfrancisco:joe.teller select * from joe.teller
Repl2 bank@g_portland:joe.teller select * from joe.teller
Repl2 bank@g_atlanta:joe.teller select * from joe.teller
The following example specifies the names of replicate:
cdr list repl brief Repl1
The following output might result from the previous command:
REPLICATE TABLE SELECT
----------------------------------------------------------------
Repl1 bank@g_newyork:joe.teller select * from joe.teller
Repl1 bank@g_sanfrancisco:joe.teller select * from joe.teller
Displaying Information About Replicates
The STATE field can include the following values.
Value Description
Active Specifies that Enterprise Replication captures data from the logical log
and transmits it to participants
Definition
Failed
Indicates that the replication definition failed on a peer server
Inactive Specifies that no database changes are captured, transmitted, or processed
Pending Indicates that a cdr delete replicate command has been issued and the
replicate is waiting for acknowledgement from the participants
Quiescent Specifies that no database changes are captured for the replicate or
participant
Suspended Specifies that the replicate captures and accumulates database changes
but does not transmit any of the captured data
Appendix A. Command-Line Utility Reference A-51

The CONFLICT field can include the following values.
Value Description
Ignore Specifies that the replicate uses the ignore conflict-resolution rule
Timestamp Specifies that the replicate uses the time stamp conflict-resolution
rule
Procedure Specifies that the replicate uses an SPL routine as the
conflict-resolution rule
The FREQUENCY field can include the following values.
Value Description
immediate Specifies that replication occurs immediately
every hh:mm Specifies that replications occur at intervals (for example, 13:20
specifies every thirteen hours and 20 minutes)
at day.hh:mm Specifies that replications occur at a particular time on a particular
day (for example, 15.18:30 specifies on the 15th day of the month
at 6:30 P.M.)
The REPLTYPE field can include the following values. If the REPLTYPE is not
shown, the replicate is a classic replicate (neither a master or a shadow replicate).
Value Description
Master Indicates that the replicate is defined as a master replicate.
Shadow Indicates that the replicate is a shadow replicate. A shadow
replicate can also be a master replicate.
The PARENT REPLICATE field appears only for shadow replicates. It shows the name
of the replicate on which the shadow replicate is based.
See Also
v “cdr change replicate” on page A-4
v “cdr define replicate” on page A-21
v “cdr delete replicate” on page A-37
v “cdr modify replicate” on page A-60
v “cdr resume replicate” on page A-74
v “cdr start replicate” on page A-80
v “cdr stop replicate” on page A-90
v “cdr suspend replicate” on page A-94
A-52 IBM Informix Dynamic Server Enterprise Replication Guide
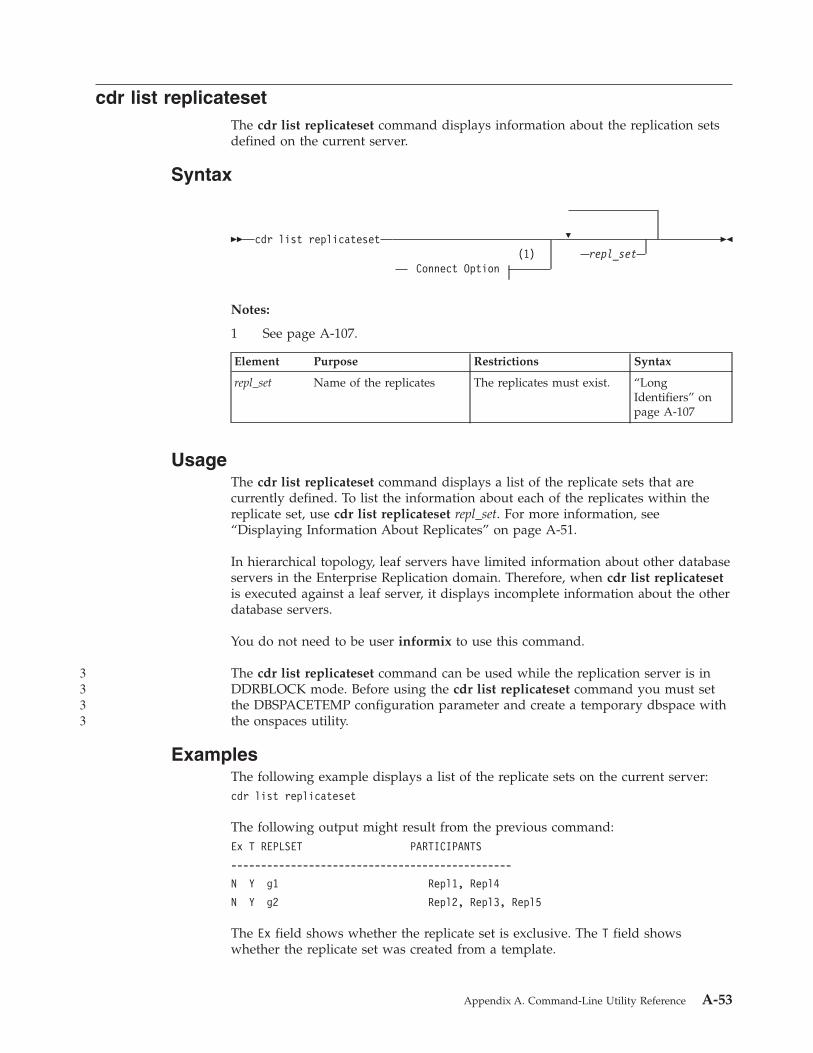
cdr list replicateset
The cdr list replicateset command displays information about the replication sets
defined on the current server.
Syntax
��
cdr list replicateset
(1)
Connect Option
�
repl_set
��
Notes:
1 See page A-107.
Element Purpose Restrictions Syntax
repl_set Name of the replicates The replicates must exist. “Long
Identifiers” on
page A-107
Usage
The cdr list replicateset command displays a list of the replicate sets that are
currently defined. To list the information about each of the replicates within the
replicate set, use cdr list replicateset repl_set. For more information, see
“Displaying Information About Replicates” on page A-51.
In hierarchical topology, leaf servers have limited information about other database
servers in the Enterprise Replication domain. Therefore, when cdr list replicateset
is executed against a leaf server, it displays incomplete information about the other
database servers.
You do not need to be user informix to use this command.
The cdr list replicateset command can be used while the replication server is in
DDRBLOCK mode. Before using the cdr list replicateset command you must set
the DBSPACETEMP configuration parameter and create a temporary dbspace with
the onspaces utility.
Examples
The following example displays a list of the replicate sets on the current server:
cdr list replicateset
The following output might result from the previous command:
Ex T REPLSET PARTICIPANTS
-----------------------------------------------
N Y g1 Repl1, Repl4
N Y g2 Repl2, Repl3, Repl5
The Ex field shows whether the replicate set is exclusive. The T field shows
whether the replicate set was created from a template.
Appendix A. Command-Line Utility Reference A-53
3333

This example displays information for all the replicates in the replicate set g1:
cdr list replset g1
The following output might result from the previous command:
REPLICATE SET:g1 [Exclusive]
CURRENTLY DEFINED REPLICATES
----------------------------------------------------------------------
REPLICATE: Repl1
STATE: Inactive
CONFLICT: Ignore
FREQUENCY: immediate
QUEUE SIZE: 0
PARTICIPANT: bank:arthur.account
OPTIONS: row,ris,ats
REPLTYPE: Master
REPLICATE: Repl4
STATE: Inactive
CONFLICT: Ignore
FREQUENCY: immediate
QUEUE SIZE: 0
PARTICIPANT: bank:arthur.teller
OPTIONS: row,ris,ats
REPLTYPE: Master
See Also
v “cdr change replicateset” on page A-6
v “cdr define replicate” on page A-21
v “cdr delete replicateset” on page A-38
v “cdr modify replicateset” on page A-63
v “cdr resume replicateset” on page A-75
v “cdr start replicateset” on page A-82
v “cdr stop replicateset” on page A-92
v “cdr suspend replicateset” on page A-95
A-54 IBM Informix Dynamic Server Enterprise Replication Guide
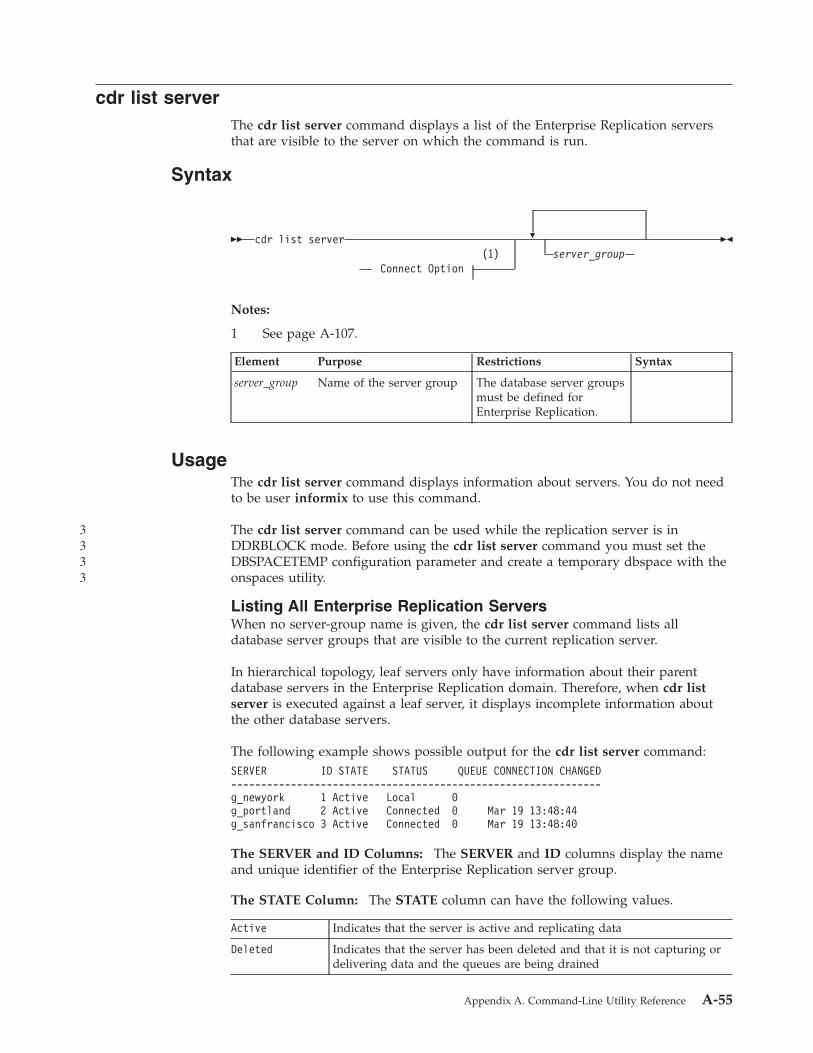
cdr list server
The cdr list server command displays a list of the Enterprise Replication servers
that are visible to the server on which the command is run.
Syntax
��
cdr list server
(1)
Connect Option
�
server_group
��
Notes:
1 See page A-107.
Element Purpose Restrictions Syntax
server_group Name of the server group The database server groups
must be defined for
Enterprise Replication.
Usage
The cdr list server command displays information about servers. You do not need
to be user informix to use this command.
The cdr list server command can be used while the replication server is in
DDRBLOCK mode. Before using the cdr list server command you must set the
DBSPACETEMP configuration parameter and create a temporary dbspace with the
onspaces utility.
Listing All Enterprise Replication Servers
When no server-group name is given, the cdr list server command lists all
database server groups that are visible to the current replication server.
In hierarchical topology, leaf servers only have information about their parent
database servers in the Enterprise Replication domain. Therefore, when cdr list
server is executed against a leaf server, it displays incomplete information about
the other database servers.
The following example shows possible output for the cdr list server command:
SERVER ID STATE STATUS QUEUE CONNECTION CHANGED
--------------------------------------------------------------
g_newyork 1 Active Local 0
g_portland 2 Active Connected 0 Mar 19 13:48:44
g_sanfrancisco 3 Active Connected 0 Mar 19 13:48:40
The SERVER and ID Columns: The SERVER and ID columns display the name
and unique identifier of the Enterprise Replication server group.
The STATE Column: The STATE column can have the following values.
Active Indicates that the server is active and replicating data
Deleted Indicates that the server has been deleted and that it is not capturing or
delivering data and the queues are being drained
Appendix A. Command-Line Utility Reference A-55
3333

Quiescent Indicates that the server is in the process of being defined
Suspended Indicates that delivery of replication data to the server is suspended
The STATUS Column: The STATUS column can have the following values.
Connected Indicates that the server connection is up
Connecting Indicates that the server is attempting to connect
Disconnect Indicates that the server connection is down in response to an explicit
disconnect
Dropped Indicates that the server connection is down due to a network error
because the server is unavailable
Error Indicates that an error has occurred (check the log and contact customer
support, if necessary)
Local Identifies that this server is the local server as opposed to a remote server
Timeout Indicates that the connection is down due to an idle time-out
The QUEUE Column: The QUEUE column displays the size of the queue for the
server group.
The CONNECTION CHANGED Column: The CONNECTION CHANGED
column displays the most recent time that the status of the server connection was
changed.
Displaying Details about a Single Replication Server
When the cdr list server command includes the name of a database server group,
the command displays the attributes of that database server. For example, cdr list
server g_usa might give the following output:
NAME ID ATTRIBUTES
-----------------------------------------------------
g_usa 3 timeout=15,atsdir=/w/ats risdir=/w/ris
Examples
In Figure A-2 and in the following examples, usa, italy, and france are root
servers, denver is a nonroot server, and miami is a leaf server. The usa server is
the parent of denver, and denver is the parent of miami.
francedenver
miami
usa italy
Figure A-2. cdr list server example
A-56 IBM Informix Dynamic Server Enterprise Replication Guide
4
4444

The following commands and example output illustrate how the cdr list server
command displays server information:
cdr list server g_usa
g_usa 1 timeout=15 hub
cdr list server -c denver g_denver
g_denver 27 root=g_usa
cdr list server -c italy g_denver
g_denver 27 root=g_usa forward=g_usa
cdr list server g_miami
g_miami 4 root=g_denver leaf
See Also
v “cdr connect server” on page A-17
v “cdr define server” on page A-30
v “cdr delete server” on page A-40
v “cdr disconnect server” on page A-44
v “cdr modify server” on page A-64
v “cdr resume server” on page A-76
v “cdr start” on page A-77
v “cdr suspend server” on page A-97
Appendix A. Command-Line Utility Reference A-57

cdr list template
The cdr list template command displays information about the templates on the
server on which the command is run.
Syntax
��
cdr list template
(1)
Connect Option
�
template
�
� BRIEF
FULL
��
Notes:
1 See page A-107.
Element Purpose Restrictions Syntax
template Name of the template The template must exist. “Long
Identifiers” on
page A-107
Usage
The cdr list template command displays information about templates. If no
templates are named, the command lists all templates in the Enterprise Replication
domain. If one or more templates are named, the command displays the names,
database names, and table names for those templates.
To display detailed information for your templates, use the FULL option.
You do not need to be user informix to use this command.
In hierarchical topology, leaf servers have limited information about other database
servers in the Enterprise Replication domain. Therefore, when cdr list template is
executed against a leaf server, it displays incomplete information about the other
database servers.
The cdr list template command can be used while the replication server is in
DDRBLOCK mode. Before using the cdr list template command you must set the
DBSPACETEMP configuration parameter and create a temporary dbspace with the
onspaces utility.
Examples
The following example displays detailed information about the templates on the
current server:
cdr list template
The output from the previous command might be the following:
A-58 IBM Informix Dynamic Server Enterprise Replication Guide
3333

TEMPLATE DATABASE TABLES
==============================================
tem1 newcars table1
newcars table2
newcars table3
tem2 carparts table1
carparts table3
The following example displays detailed information about the template tem1:
cdr list template tem1
The output from the previous command might be the following:
CURRENTLY DEFINED TEMPLATES
===========================
TEMPLATE: tem1
TEMPLATE ID: 6553605
SERVER: utah
DATABASE: newcars
REPLICATE: tem1_utah_2_1_table1
OWNER: pravin
TABLE: table1
TEMPLATE: tem1
TEMPLATE ID: 6553605
SERVER: utah
DATABASE: newcars
REPLICATE: tem1_utah_2_2_table2
OWNER: pravin
TABLE: table2
TEMPLATE: tem1
TEMPLATE ID: 6553605
SERVER: utah
DATABASE: newcars
REPLICATE: tem1_utah_2_3_table3
OWNER: pravin
TABLE: table3
Generated Replicate and Replicate Set Names
When you apply a template, Enterprise Replication generates the replicate and
replicate set names. The generated replicate set name is the same as the template
name.
The generated replicate name has the following format:
template_server_cdrserverid_n_table
template The name of the template
server The name of the database
cdrserverid The server ID as set in the SQLHOSTS file
n A unique sequence number
table The name of the table
See Also
v “cdr define template” on page A-33
v “cdr realize template” on page A-66
Appendix A. Command-Line Utility Reference A-59

cdr modify replicate
The cdr modify replicate command modifies replicate attributes.
Syntax
�� cdr modify replicate
(1)
Connect Option
--name=n �
�
�
(2)
Conflict Options
(3)
Scope Options
(4)
Frequency Options
(5)
Special Options
replicate
�
participant
��
Notes:
1 See page A-107.
2 See page A-23.
3 See page A-24.
4 See page A-110.
5 See page A-24.
Element Purpose Restrictions Syntax
participant Name of a participant in
the replication
The participant must be a
member of the replicate.
“Participant” on
page A-108
replicate Name of the replicate to
modify
The replicate name must
exist.
“Long
Identifiers” on
page A-107
The following table describes the option to cdr modify replicate.
Long Form Short Form Meaning
--name=n -n n Removes the name verification attribute from a master
replicate. For more information, see “Creating Strict
Master Replicates” on page 6-6.
Usage
The cdr modify replicate command modifies the attributes of a replicate or of one
or more participants in the replicate. You can also change the mode of a
participant. If the command does not specify participants, the changes apply to all
participants in the replicate.
A-60 IBM Informix Dynamic Server Enterprise Replication Guide
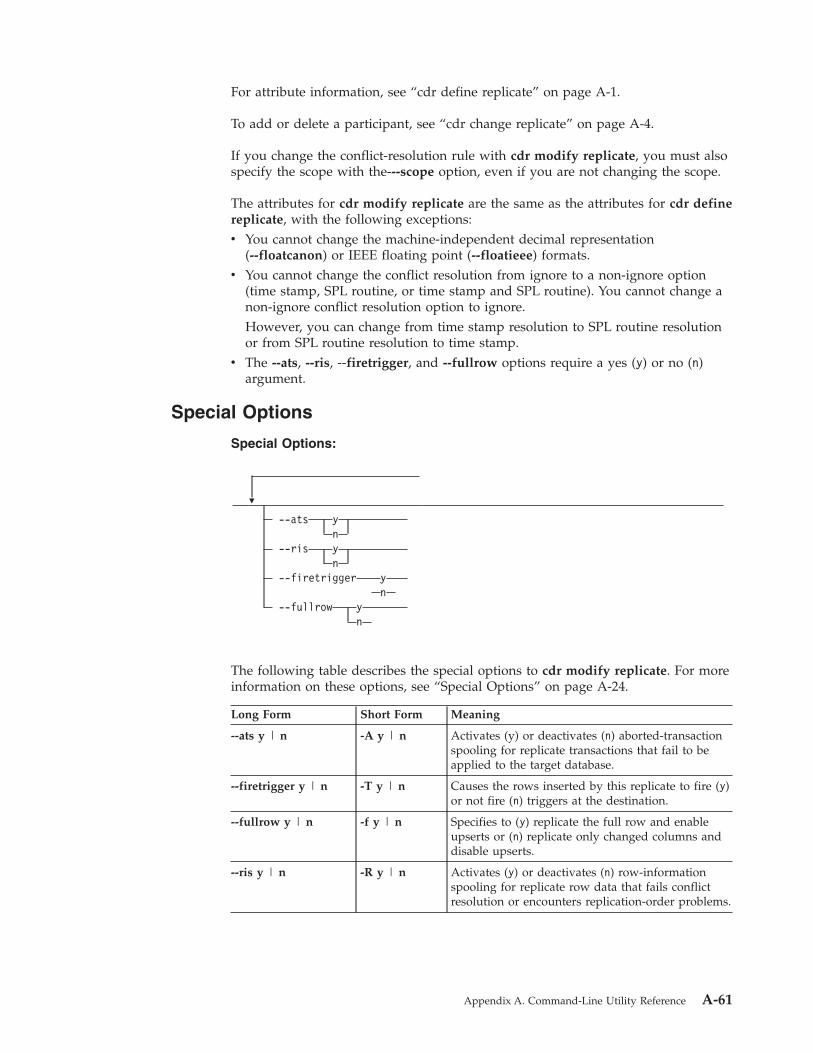
For attribute information, see “cdr define replicate” on page A-1.
To add or delete a participant, see “cdr change replicate” on page A-4.
If you change the conflict-resolution rule with cdr modify replicate, you must also
specify the scope with the---scope option, even if you are not changing the scope.
The attributes for cdr modify replicate are the same as the attributes for cdr define
replicate, with the following exceptions:
v You cannot change the machine-independent decimal representation
(--floatcanon) or IEEE floating point (--floatieee) formats.
v You cannot change the conflict resolution from ignore to a non-ignore option
(time stamp, SPL routine, or time stamp and SPL routine). You cannot change a
non-ignore conflict resolution option to ignore.
However, you can change from time stamp resolution to SPL routine resolution
or from SPL routine resolution to time stamp.
v The --ats, --ris, --firetrigger, and --fullrow options require a yes (y) or no (n)
argument.
Special Options
Special Options:
�
--ats
y
n
--ris
y
n
--firetrigger
y
n
--fullrow
y
n
The following table describes the special options to cdr modify replicate. For more
information on these options, see “Special Options” on page A-24.
Long Form Short Form Meaning
--ats y | n -A y | n Activates (y) or deactivates (n) aborted-transaction
spooling for replicate transactions that fail to be
applied to the target database.
--firetrigger y | n -T y | n Causes the rows inserted by this replicate to fire (y)
or not fire (n) triggers at the destination.
--fullrow y | n -f y | n Specifies to (y) replicate the full row and enable
upserts or (n) replicate only changed columns and
disable upserts.
--ris y | n -R y | n Activates (y) or deactivates (n) row-information
spooling for replicate row data that fails conflict
resolution or encounters replication-order problems.
Appendix A. Command-Line Utility Reference A-61

Examples
The following example modifies the frequency attributes of replicate smile to
replicate every five hours:
cdr modify repl --every=300 smile
The following example modifies the frequency attributes of replicate smile to
replicate daily at 1:00 A.M.:
cdr modify repl -a 01:00 smile
The following example modifies the frequency attributes of replicate smile to
replicate on the last day of every month at 5:00 A.M., to generate ATS files, and
not to fire triggers:
cdr modify repl -a L.5:00 -A y -T n smile
The following example changes the mode of the first participant listed to
receive-only and the mode of the second to primary:
cdr mod repl smile “R db1@server1:antonio.table1” \
“P db2@server2:carlo.table2”
See Also
v “cdr change replicate” on page A-4
v “cdr define replicate” on page A-21
v “cdr delete replicate” on page A-37
v “cdr list replicate” on page A-50
v “cdr resume replicate” on page A-74
v “cdr start replicate” on page A-80
v “cdr stop replicate” on page A-90
v “cdr suspend replicate” on page A-94
A-62 IBM Informix Dynamic Server Enterprise Replication Guide

cdr modify replicateset
The cdr modify replicateset command modifies all the replicates in a replicate set.
Syntax
��
cdr modify replicateset
�
(1)
Connect Option
(2)
Frequency Options
repl_set
��
Notes:
1 See page A-107.
2 See page A-110.
Element Purpose Restrictions Syntax
repl_set Name of replicate set to
modify
The replicate set must exist. “Long
Identifiers” on
page A-107
Usage
The cdr modify replicateset command modifies the attributes of all the replicates
in the replicate set repl_set. To add or delete replicates from a replicate set, use the
cdr change replicateset command (“cdr change replicateset” on page A-6).
You cannot change whether a replicate set is exclusive or not.
Examples
The following example connects to the default server (the server specified by the
INFORMIXSERVER environment variable) and modifies the replicate set sales_set
to process replication data every hour:
cdr mod replset --every 60 sales_set
See Also
v “cdr change replicateset” on page A-6
v “cdr define replicate” on page A-21
v “cdr delete replicateset” on page A-38
v “cdr list replicateset” on page A-53
v “cdr resume replicateset” on page A-75
v “cdr start replicateset” on page A-82
v “cdr stop replicateset” on page A-92
v “cdr suspend replicateset” on page A-95
Appendix A. Command-Line Utility Reference A-63

cdr modify server
The cdr modify server command modifies the Enterprise Replication attributes of a
database server.
Syntax
��
cdr modify server
�
(1)
Connect Option
--idle=timeout
--mode
P
R
--ats=ats_dir
--ris=ris_dir
server_group
��
Notes:
1 See page A-107.
Element Purpose Restrictions Syntax
server_group Name of a database server
group to modify
The database server group
must be defined in
Enterprise Replication.
timeout Idle time-out for this
server
Must be an integer number
of minutes. 0 indicates no
time-out. The maximum
value is 32,767.
Integer.
ats_dir Name of Aborted
Transaction Spooling
directory
Must be a full pathname.
The path for the directory
can be no longer than 256
bytes.
Follows naming
conventions on
your operating
system.
ris_dir Name of the Row
Information Spooling
directory
Must be a full pathname.
The path for the directory
can be no longer than 256
bytes.
Follows naming
conventions on
your operating
system.
Usage
The cdr modify server command modifies the replication server server_group.
The following table describes the options to cdr modify server.
Long Form Short Form Meaning
--ats -A Activates aborted-transaction spooling for replicate
transactions that fail to be applied to the target database.
For more information, see Chapter 8, “Monitoring and
Troubleshooting Enterprise Replication,” on page 8-1.
--idle -i Causes an inactive connection to be terminated after
timeout minutes. If time-out is 0, the connection does not
time out. The default value is 0.
--mode -m Changes the mode of all replicates using this server to
primary (P) or to receive-only (R).
A-64 IBM Informix Dynamic Server Enterprise Replication Guide

Long Form Short Form Meaning
--ris -R Activates row-information spooling for replicate-row
data that fails conflict resolution or encounters
replication-order problems. For more information, see
Chapter 8, “Monitoring and Troubleshooting Enterprise
Replication,” on page 8-1.
Examples
The following example connects to the database server paris and modifies the idle
time-out of server group g_rome to 10 minutes. ATS files go into the directory
/cdr/atsdir.
cdr modify server -c paris -i 10 -A /cdr/atsdir g_rome
The following example connects to the default database server and sets the modes
of all participants on g_geometrix to primary:
cdr mod ser -m P g_geometrix
See Also
v “cdr connect server” on page A-17
v “cdr define server” on page A-30
v “cdr delete server” on page A-40
v “cdr disconnect server” on page A-44
v “cdr list server” on page A-55
v “cdr resume server” on page A-76
v “cdr suspend server” on page A-97
Appendix A. Command-Line Utility Reference A-65

cdr realize template
The cdr realize template command realizes a template on all or a subset of the
database servers within the replication domain.
Syntax
�� cdr realize template
(1)
Connect Option
template �
� --syncdatasource=data_server
--extratargetrows=
delete
keep
merge
�
� --verify
--autocreate
--dbspace=dbspace
--target �
�
�
server_group
database@
:owner.table
--applyasowner
��
Notes:
1 See page A-107.
Element Purpose Restrictions Syntax
database Name of the database that
includes the table to be
replicated
The database server must
be registered with
Enterprise Replication.
“Long
Identifiers” on
page A-107
data_server The database server from
which the data is copied to
all other database servers
listed
The database server must
be defined in Enterprise
Replication.
dbspace The name of the dbspace
for Enterprise Replication to
use when creating tables
The dbspace must exist on
all the database servers
listed. If you do not specify
a dbspace name and new
tables are created, they are
created in the default
dbspace.
owner User ID of the owner of the
table to be replicated
“Long
Identifiers” on
page A-107
A-66 IBM Informix Dynamic Server Enterprise Replication Guide

Element Purpose Restrictions Syntax
server_group Name of the database
server group that includes
the server to connect to
The database server group
name must be the name of
an existing Enterprise
Replication server group in
SQLHOSTS.
“Long
Identifiers” on
page A-107
table Name of the table to be
replicated
The table must be an actual
table. It cannot be a
synonym or a view.
“Long
Identifiers” on
page A-107
template The name of the template The template must exist.
Use the cdr define
template command to
create the template. For
more information, see “cdr
define template” on page
A-33.
“Long
Identifiers” on
page A-107
The following table describes the special options to cdr realize template.
Long Form Short Form Meaning
--applyasowner -o Specifies that the template is realized by the owner
of the table specified when the template was
defined. By default, the template is realized by the
user informix.
--autocreate -u Specifies that if the tables in the template definition
do not exist in the databases on the target servers,
then they are created automatically. However, the
table cannot contain columns with user-defined
data types.
--dbspace= -D Specifies the dbspace in which the automatically
created objects are placed. If not specified, then the
default dbspace is used. (default)
--extratargetrows= -e Specifies how to handle rows found on the target
servers that are not present on the data source
server from which the data is being copied
(data_server):
v delete: (default) remove rows and dependent
rows, based on referential integrity constraints,
from the target servers
v keep: retain rows on the target servers
v merge: retain rows on the target servers and
replicate them to the data source server
This option applies to the initial data
synchronization operation only; it does not affect
the behavior of the replicate.
--syncdatasource= -S Specifies which server is the source of the data that
is used to synchronize all the other servers listed in
the cdr realize template command.
Appendix A. Command-Line Utility Reference A-67
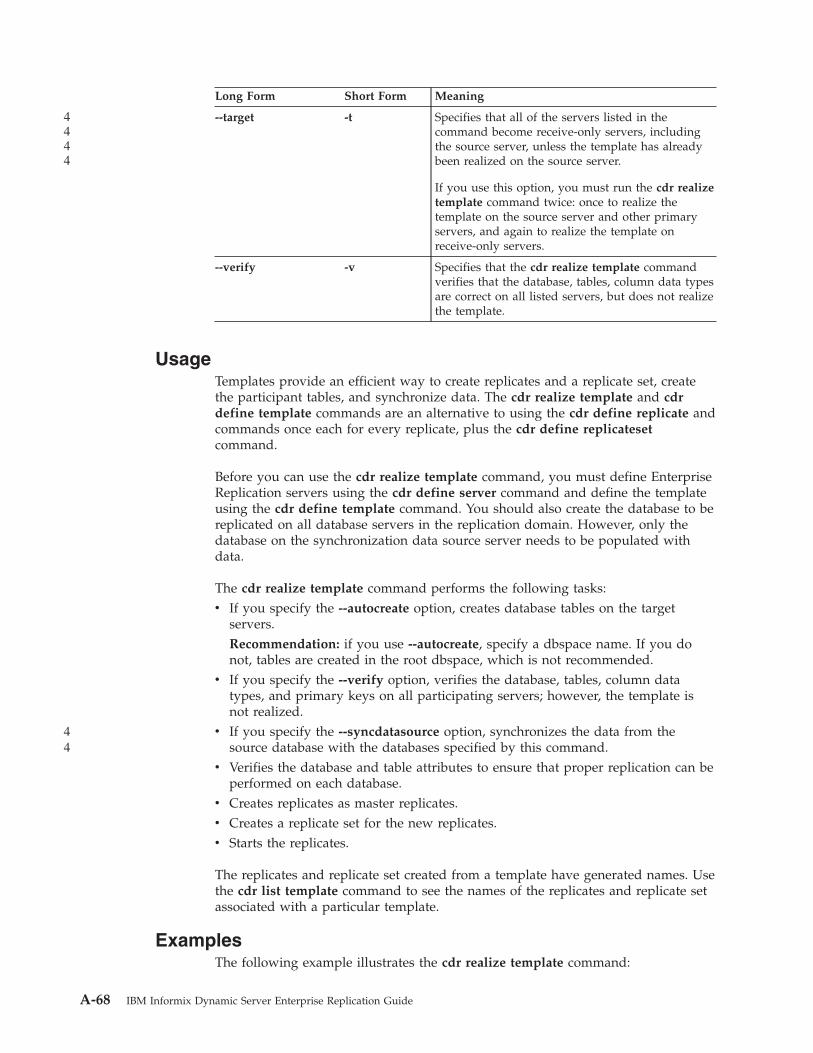
Long Form Short Form Meaning
--target -t Specifies that all of the servers listed in the
command become receive-only servers, including
the source server, unless the template has already
been realized on the source server.
If you use this option, you must run the cdr realize
template command twice: once to realize the
template on the source server and other primary
servers, and again to realize the template on
receive-only servers.
--verify -v Specifies that the cdr realize template command
verifies that the database, tables, column data types
are correct on all listed servers, but does not realize
the template.
Usage
Templates provide an efficient way to create replicates and a replicate set, create
the participant tables, and synchronize data. The cdr realize template and cdr
define template commands are an alternative to using the cdr define replicate and
commands once each for every replicate, plus the cdr define replicateset
command.
Before you can use the cdr realize template command, you must define Enterprise
Replication servers using the cdr define server command and define the template
using the cdr define template command. You should also create the database to be
replicated on all database servers in the replication domain. However, only the
database on the synchronization data source server needs to be populated with
data.
The cdr realize template command performs the following tasks:
v If you specify the --autocreate option, creates database tables on the target
servers.
Recommendation: if you use --autocreate, specify a dbspace name. If you do
not, tables are created in the root dbspace, which is not recommended.
v If you specify the --verify option, verifies the database, tables, column data
types, and primary keys on all participating servers; however, the template is
not realized.
v If you specify the --syncdatasource option, synchronizes the data from the
source database with the databases specified by this command.
v Verifies the database and table attributes to ensure that proper replication can be
performed on each database.
v Creates replicates as master replicates.
v Creates a replicate set for the new replicates.
v Starts the replicates.
The replicates and replicate set created from a template have generated names. Use
the cdr list template command to see the names of the replicates and replicate set
associated with a particular template.
Examples
The following example illustrates the cdr realize template command:
A-68 IBM Informix Dynamic Server Enterprise Replication Guide
4444
44
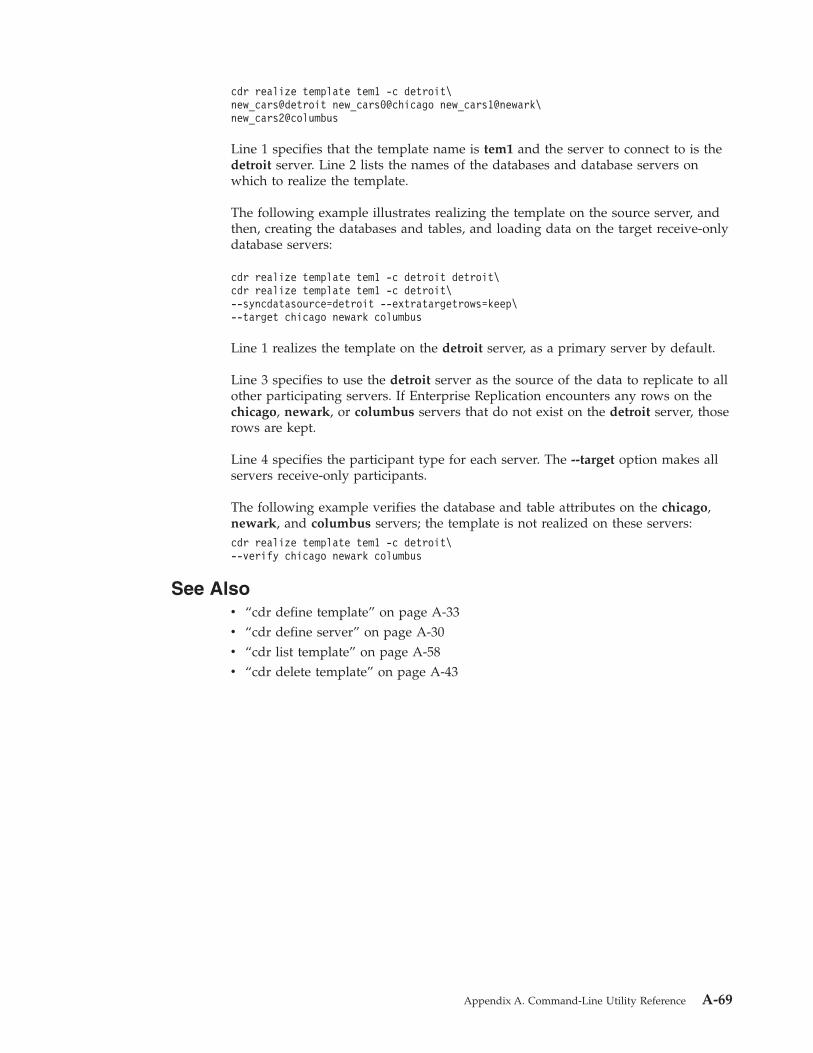
cdr realize template tem1 -c detroit\
new_cars@detroit new_cars0@chicago new_cars1@newark\
new_cars2@columbus
Line 1 specifies that the template name is tem1 and the server to connect to is the
detroit server. Line 2 lists the names of the databases and database servers on
which to realize the template.
The following example illustrates realizing the template on the source server, and
then, creating the databases and tables, and loading data on the target receive-only
database servers:
cdr realize template tem1 -c detroit detroit\
cdr realize template tem1 -c detroit\
--syncdatasource=detroit --extratargetrows=keep\
--target chicago newark columbus
Line 1 realizes the template on the detroit server, as a primary server by default.
Line 3 specifies to use the detroit server as the source of the data to replicate to all
other participating servers. If Enterprise Replication encounters any rows on the
chicago, newark, or columbus servers that do not exist on the detroit server, those
rows are kept.
Line 4 specifies the participant type for each server. The --target option makes all
servers receive-only participants.
The following example verifies the database and table attributes on the chicago,
newark, and columbus servers; the template is not realized on these servers:
cdr realize template tem1 -c detroit\
--verify chicago newark columbus
See Also
v “cdr define template” on page A-33
v “cdr define server” on page A-30
v “cdr list template” on page A-58
v “cdr delete template” on page A-43
Appendix A. Command-Line Utility Reference A-69

cdr remaster
The cdr remaster command changes the SELECT clause or the server from which
to base the master replicate definition of an existing master replicate. You can also
use this command to convert a classic (non-master) replicate to a master replicate.
Syntax
�� cdr remaster
(1)
Connect Option
--master=server replicate �
� modifier
��
Notes:
1 See page A-107.
Element Purpose Restrictions Syntax
modifier Specifies the rows and
columns to replicate
“Participant
Modifier” on
page A-109
replicate Name of the replicate to be
mastered
The replicate must exist. “Long
Identifiers” on
page A-107
server Name of the database
server from which to base
the master replicate
definition
The name must be the
database server group
name.
“Long
Identifiers” on
page A-107
The following table describes the option to cdr remaster.
Long Form Short Form Meaning
--master= -M Specifies that the replicate being created is a master
replicate.
Usage
Use the cdr remaster command to perform one of the following tasks:
v Convert a classic replicate to a master replicate. Master replicates ensure schema
consistency among the participants in the replicates.
v Update the definition of a master replicate whose participant was changed in an
alter operation. You can change the SELECT clause or the server from which to
base the master replicate definition.
v The basereplicatename is the name of the replicate being remastered (up to 64
characters of this name are used).
v The localCDRID is the CDR group ID of the server you specified with the
--connect option. You can obtain this ID using the onstat -g cat servers
command or by looking in the SQLHOSTS file. Alternatively, you can query the
syscdrserver view in the sysmaster database.
v The pid is the process ID of the client computer.
An example of a shadow replicate name is:
A-70 IBM Informix Dynamic Server Enterprise Replication Guide

Shadow_4_Repl1_GMT1090373046_GID10_PID28836
To use the cdr remaster command, the master replicate definition must have been
created with name verification turned on (--name option of the cdr define
replicate command set to y).
As part of its processing, the cdr remaster command creates a shadow replicate.
The shadow replicate is named as follows:
Shadow_4_basereplicatename_GMTtime_GIDlocalCDRID_PIDpid
Examples
The following example shows the original definition of the master replicate before
the alter operation:
cdr define repl --master=delhi -C timestamp\
newrepl "[email protected]" "select col1, col2 from tab"\
This example shows the cdr remaster command adding a new column, col3, in the
newrepl participant:
cdr remaster --master=delhi newrepl\
"select col1, col2, col3 from tab"
Appendix A. Command-Line Utility Reference A-71

cdr remove
The cdr remove command removes Enterprise Replication from an HDR database
server.
Syntax
�� cdr remove ��
Usage
Use this command to remove Enterprise Replication from an HDR primary server
after it has been started using the oninit -D command. For more information, see
“HDR Failure” on page 5-7.
The cdr remove command removes Enterprise Replication from a database server
by deleting its global catalog information. Unlike the cdr delete command, this
command can only be issued when Enterprise Replication is not active. The
database server this command affects is the one specified by the value of the
INFORMIXSERVER environment variable.
Warning: Do not use this command on a database server that does not participate
in HDR.
A-72 IBM Informix Dynamic Server Enterprise Replication Guide

cdr repair
The cdr repair command synchronizes data based on ATS or RIS files.
Syntax
�� cdr repair ats ats_file
ris
ris_file ��
Element Purpose Restrictions Syntax
ats_file Name of the file for
Aborted Transaction
Spooling
Must be a full pathname
and filename. The path for
the directory can be no
longer than 256 bytes.
Follows naming
conventions on
your operating
system
ris_file Name of the file for Row
Information Spooling
Must be a full pathname
and filename. The path for
the directory can be no
longer than 256 characters.
Follows naming
conventions on
your operating
system
Usage
The cdr repair command reconciles rows that failed to be applied based on the
information in the specified ATS or RIS file. If a row does not exist on the source
database server, then it is deleted from the target database server.
Run the cdr repair command on the server where the ATS or RIS file is located.
Enterprise Replication must be able to connect to the source server of the ATS or
RIS file.
Examples
The following example repairs inconsistencies found in the ATS file generated for
an inconsistency found between the g_beijing and g_amsterdam servers:
cdr repair ats\
ats.g_beijing.g_amsterdam.D_2.000529_23:27:16.6
See Also
v “cdr define repair” on page A-18
Appendix A. Command-Line Utility Reference A-73

cdr resume replicate
The cdr resume replicate command resumes delivery of replication data.
Syntax
��
cdr resume replicate
(1)
Connect Option
�
repl_name
��
Notes:
1 See page A-107.
Element Purpose Restrictions Syntax
repl_name Name of the replicate to
change to active state.
The replicate must be
suspended.
“Long
Identifiers” on
page A-107
Usage
The cdr resume replicate command causes all participants in the replicate
repl_name to enter the active state.
For more information on replicate states, refer to “The STATE Column” on page
A-55.
If a replicate belongs to an exclusive replicate set (“Exclusive Replicate Sets” on
page 6-10), you cannot run cdr resume replicate to resume that individual
replicate. You must use cdr resume replicateset to resume all replicates in the
exclusive replicate set. If a replicate belongs to a non-exclusive replicate set, you
can resume the individual replicates in the set.
Examples
The following example connects to the default database server (the one specified
by the INFORMIXSERVER environment variable) and resumes the replicate smile:
cdr res repl smile
See Also
v “cdr change replicate” on page A-4
v “cdr define replicate” on page A-21
v “cdr delete replicate” on page A-37
v “cdr list replicate” on page A-50
v “cdr modify replicate” on page A-60
v “cdr start replicate” on page A-80
v “cdr stop replicate” on page A-90
v “cdr suspend replicate” on page A-94
A-74 IBM Informix Dynamic Server Enterprise Replication Guide

cdr resume replicateset
The cdr resume replicateset command resumes delivery of replication data for all
the replicates in a replicate set.
Syntax
��
cdr resume replicateset
(1)
Connect Option
�
repl_set
��
Notes:
1 See page A-107.
Element Purpose Restrictions Syntax
repl_set Name of replicate set to
resume
None “Long
Identifiers” on
page A-107
Usage
The cdr resume replicateset command causes all replicates contained in the
replicate set repl_set to enter the active state for all participants.
For more information on replicate states, refer to “The STATE Column” on page
A-55.
If not all the replicates in a non-exclusive replicate set are suspended, the cdr
resume replicateset command displays a warning and only resumes the replicates
that are currently suspended.
Examples
The following example connects to the default database server (the one specified
by the INFORMIXSERVER environment variable) and resumes the replicate set
accounts_set:
cdr res replset accounts_set
See Also
v “cdr change replicateset” on page A-6
v “cdr define replicate” on page A-21
v “cdr delete replicateset” on page A-38
v “cdr list replicateset” on page A-53
v “cdr modify replicateset” on page A-63
v “cdr start replicateset” on page A-82
v “cdr stop replicateset” on page A-92
v “cdr suspend replicateset” on page A-95
Appendix A. Command-Line Utility Reference A-75

cdr resume server
The cdr resume server command resumes delivery of replication data to a
suspended database server.
Syntax
�� cdr resume server
(1)
Connect Option
to_server_group �
�
�
from_server_group
��
Notes:
1 See page A-107.
Element Purpose Restrictions
to_server_group Name of the database server group
to which to resume delivery of
replication data
The database server group
must be currently active in
Enterprise Replication.
from_server_group Name of the database server group
from which to resume sending
data to to_server_group
The database server group
must be currently active in
Enterprise Replication.
Usage
The cdr resume server command resumes delivery of replication data to the
to_server_group database server from the database servers included in the
from_server_group list. If the from_server_group list is omitted, the command resumes
replication of data from all database servers participating in the Enterprise
Replication system to the to_server_group. Replication data must have previously
been suspended to the server with the cdr suspend server command.
Examples
The following example connects to the default server (the one specified by the
INFORMIXSERVER environment variable) and resumes replication of data to the
server g_iowa from the servers g_ohio and g_utah:
cdr sus serv g_iowa g_ohio g_utah
See Also
v “cdr connect server” on page A-17
v “cdr define server” on page A-30
v “cdr delete server” on page A-40
v “cdr disconnect server” on page A-44
v “cdr list server” on page A-55
v “cdr modify server” on page A-64
v “cdr suspend server” on page A-97
A-76 IBM Informix Dynamic Server Enterprise Replication Guide
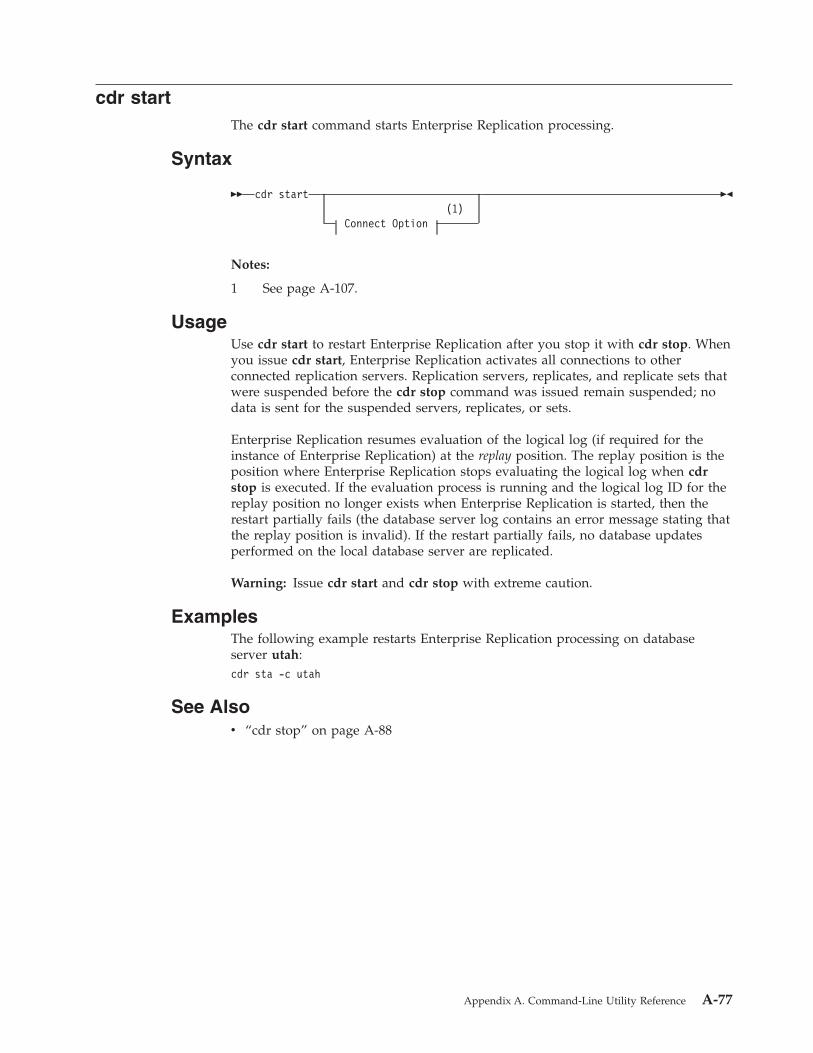
cdr start
The cdr start command starts Enterprise Replication processing.
Syntax
�� cdr start
(1)
Connect Option
��
Notes:
1 See page A-107.
Usage
Use cdr start to restart Enterprise Replication after you stop it with cdr stop. When
you issue cdr start, Enterprise Replication activates all connections to other
connected replication servers. Replication servers, replicates, and replicate sets that
were suspended before the cdr stop command was issued remain suspended; no
data is sent for the suspended servers, replicates, or sets.
Enterprise Replication resumes evaluation of the logical log (if required for the
instance of Enterprise Replication) at the replay position. The replay position is the
position where Enterprise Replication stops evaluating the logical log when cdr
stop is executed. If the evaluation process is running and the logical log ID for the
replay position no longer exists when Enterprise Replication is started, then the
restart partially fails (the database server log contains an error message stating that
the replay position is invalid). If the restart partially fails, no database updates
performed on the local database server are replicated.
Warning: Issue cdr start and cdr stop with extreme caution.
Examples
The following example restarts Enterprise Replication processing on database
server utah:
cdr sta -c utah
See Also
v “cdr stop” on page A-88
Appendix A. Command-Line Utility Reference A-77
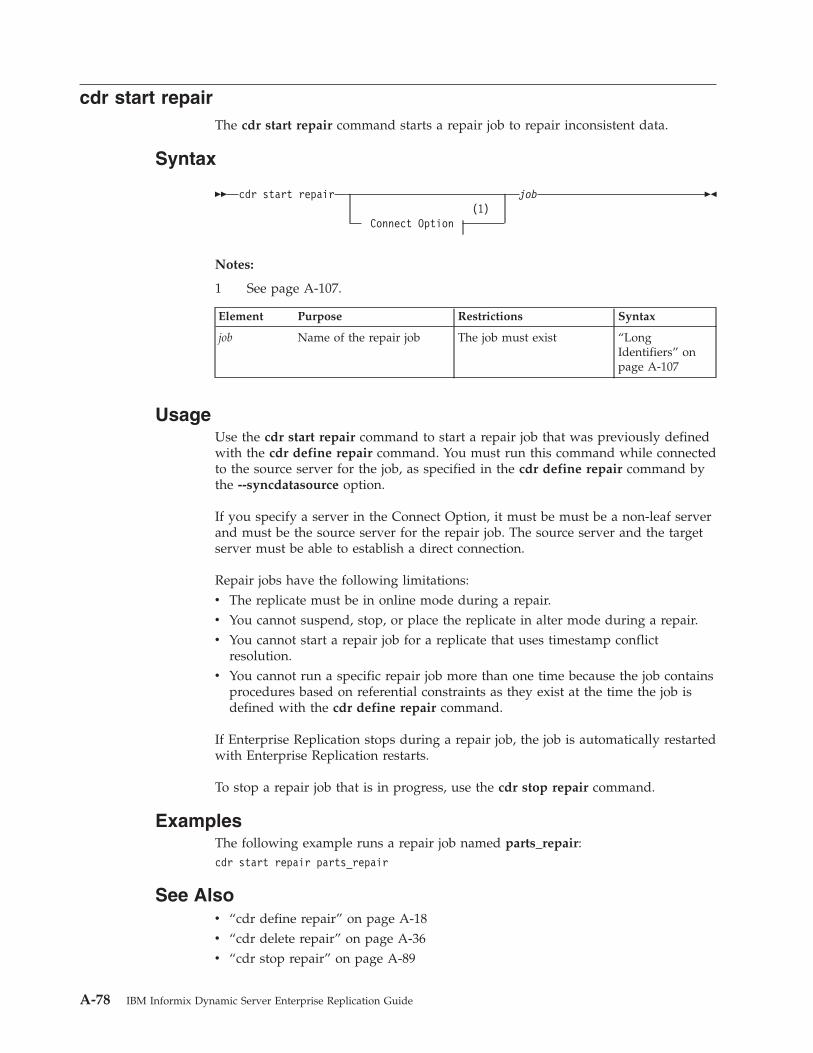
cdr start repair
The cdr start repair command starts a repair job to repair inconsistent data.
Syntax
�� cdr start repair
(1)
Connect Option
job ��
Notes:
1 See page A-107.
Element Purpose Restrictions Syntax
job Name of the repair job The job must exist “Long
Identifiers” on
page A-107
Usage
Use the cdr start repair command to start a repair job that was previously defined
with the cdr define repair command. You must run this command while connected
to the source server for the job, as specified in the cdr define repair command by
the --syncdatasource option.
If you specify a server in the Connect Option, it must be must be a non-leaf server
and must be the source server for the repair job. The source server and the target
server must be able to establish a direct connection.
Repair jobs have the following limitations:
v The replicate must be in online mode during a repair.
v You cannot suspend, stop, or place the replicate in alter mode during a repair.
v You cannot start a repair job for a replicate that uses timestamp conflict
resolution.
v You cannot run a specific repair job more than one time because the job contains
procedures based on referential constraints as they exist at the time the job is
defined with the cdr define repair command.
If Enterprise Replication stops during a repair job, the job is automatically restarted
with Enterprise Replication restarts.
To stop a repair job that is in progress, use the cdr stop repair command.
Examples
The following example runs a repair job named parts_repair:
cdr start repair parts_repair
See Also
v “cdr define repair” on page A-18
v “cdr delete repair” on page A-36
v “cdr stop repair” on page A-89
A-78 IBM Informix Dynamic Server Enterprise Replication Guide

v “cdr list repair” on page A-48
Appendix A. Command-Line Utility Reference A-79
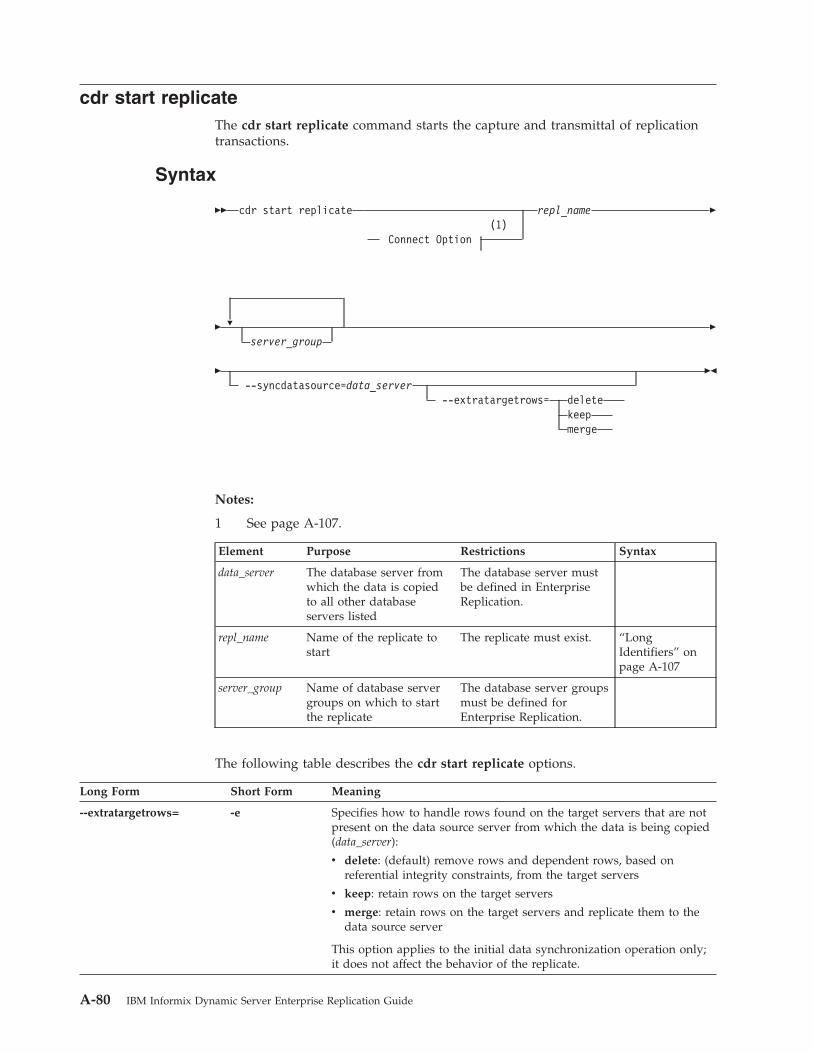
cdr start replicate
The cdr start replicate command starts the capture and transmittal of replication
transactions.
Syntax
�� cdr start replicate
(1)
Connect Option
repl_name �
�
�
server_group
�
� --syncdatasource=data_server
--extratargetrows=
delete
keep
merge
��
Notes:
1 See page A-107.
Element Purpose Restrictions Syntax
data_server The database server from
which the data is copied
to all other database
servers listed
The database server must
be defined in Enterprise
Replication.
repl_name Name of the replicate to
start
The replicate must exist. “Long
Identifiers” on
page A-107
server_group Name of database server
groups on which to start
the replicate
The database server groups
must be defined for
Enterprise Replication.
The following table describes the cdr start replicate options.
Long Form Short Form Meaning
--extratargetrows= -e Specifies how to handle rows found on the target servers that are not
present on the data source server from which the data is being copied
(data_server):
v delete: (default) remove rows and dependent rows, based on
referential integrity constraints, from the target servers
v keep: retain rows on the target servers
v merge: retain rows on the target servers and replicate them to the
data source server
This option applies to the initial data synchronization operation only;
it does not affect the behavior of the replicate.
A-80 IBM Informix Dynamic Server Enterprise Replication Guide

Long Form Short Form Meaning
--syncdatasource= -S Specifies the name of the database server to use as the reference copy
of the data. This server is started even if it is not listed as one of the
servers to start.
Usage
The cdr start replicate command causes the replicate to enter the active state
(capture-send) on the specified database servers and the source database server
specified by the --syncdatasource option. If no server is specified, the repl_name
starts on all servers that are included in the replicate. A replicate can have both
active and inactive participants. When at least one participant is active, the
replicate is active. You cannot start replicates that have no participants.
If a replicate belongs to an exclusive replicate set, you cannot run cdr start
replicate to start that individual replicate. You must use cdr start replicateset to
start all replicates in the exclusive replicate set.
Because Enterprise Replication does not process log records that were produced
before the cdr start replicate command was run, transactions that occur during this
period might be partially replicated. To avoid problems, either issue the cdr start
replicatecommand on an idle system (no transactions are occurring) or use the
BEGIN WORK WITHOUT REPLICATION statement until after you successfully
start the replicate.
Examples
The following command starts the replicate accounts on the server groups g_svr1
and g_svr2:
cdr sta rep accounts g_svr1 g_svr2
See Also
v “cdr change replicate” on page A-4
v “cdr define replicate” on page A-21
v “cdr delete replicate” on page A-37
v “cdr list replicate” on page A-50
v “cdr modify replicate” on page A-60
v “cdr resume replicate” on page A-74
v “cdr stop replicate” on page A-90
v “cdr suspend replicate” on page A-94
Appendix A. Command-Line Utility Reference A-81

cdr start replicateset
The cdr start replicateset command starts the capture and transmittal of replication
transactions for all the replicates in a replicate set.
Syntax
�� cdr start replicateset
(1)
Connect Option
repl_set �
�
�
server_group
�
� --syncdatasource=data_server
--extratargetrows=
delete
keep
merge
��
Notes:
1 See page A-107.
Element Purpose Restrictions Syntax
data_server The database server from
which the data is copied
to all other database
servers listed
The database server must
be defined in Enterprise
Replication.
repl_set Name of replicate set to
start
The replicate set must exist. “Long
Identifiers” on
page A-107
server_group Names of database server
groups on which to start
the replicate set
The database server groups
must be defined for
Enterprise Replication.
The following table describes the cdr start replicateset options.
Long Form Short Form Meaning
--extratargetrows= -e Specifies how to handle rows found on the target servers that are not
present on the data source server from which the data is being copied
(data_server):
v delete: (default) remove rows and dependent rows, based on
referential integrity constraints, from the target servers
v keep: retain rows on the target servers
v merge: retain rows on the target servers and replicate them to the
data source server
This option applies to the initial data synchronization operation only;
it does not affect the behavior of the replicate.
A-82 IBM Informix Dynamic Server Enterprise Replication Guide

Long Form Short Form Meaning
--syncdatasource= -S Specifies the name of the database server to use as the reference copy
of the data. This server is started even if it is not listed as one of the
servers to start.
Usage
The cdr start replicateset command causes the replicates defined in the specified
replicate set to enter the active state (capture-send) on the specified database
servers and the source database server specified by the --syncdatasource option.
If the server_group list is omitted, the replicate set repl_set enters the active state for
all database servers participating in the replicate set.
Because Enterprise Replication does not process log records that were produced
before the cdr start replicateset command took place, transactions that occur
during this period might be partially replicated. To avoid problems, either issue the
cdr start replicateset command on an idle system (no transactions are occurring) or
use the BEGIN WORK WITHOUT REPLICATION statement until after you
successfully start the replicates in the replicate set.
If not all the replicates in a non-exclusive replicate set are inactive, the cdr start
replicateset command displays a warning and only starts the replicates that are
currently inactive.
Examples
The following example connects to the default database server specified by the
INFORMIXSERVER environment variable and starts the replicate set accounts_set
on the server groups g_hill and g_lake:
cdr sta replset accounts_set g_hill g_lake
See Also
v “cdr change replicateset” on page A-6
v “cdr define replicate” on page A-21
v “cdr delete replicateset” on page A-38
v “cdr list replicateset” on page A-53
v “cdr modify replicateset” on page A-63
v “cdr resume replicateset” on page A-75
v “cdr stop replicateset” on page A-92
v “cdr suspend replicateset” on page A-95
Appendix A. Command-Line Utility Reference A-83

cdr stats rqm
The cdr stats rqm command displays information about the reliable queue
manager (RQM) queues used for Enterprise Replication.
Syntax
�� cdr stats rqm
(1)
Connect Option
�
� --ackq
--cntrlq
--recvq
--syncq
--sendq ��
Notes:
1 See page A-107.
The following table describes the cdr stats rqm options.
Long Form Short Form Meaning
--ackq -A Prints the statistics for the ack send queue.
--cntrlq -C Prints the statistics for the control send queue.
--recvq -R Prints the statistics for the receive queue.
--syncq -S Prints the statistics for the sync send queue.
--sendq -T Prints the statistics for the send queue.
Usage
The cdr stats rqm command displays the RQM (reliable queue manager) statistics
for the queues used by Enterprise Replication. These queues are the ack send,
control send, send, sync send, and the receive queue. If no queue is specified, the
cdr stats rqm command displays statistics for all Enterprise Replication queues.
The cdr stats rqm command shows, among other things, how many transactions
are currently queued in memory and spooled, the size of the data in the queue,
how much real memory is being used, pending transaction buffers and data, the
maximum memory used for data and headers (overhead), and totals for the
number of transactions queued, the number of transactions, the number of deleted
transactions, and the number of transaction lookups that have occurred.
If the Connect option is specified, Enterprise Replication connects to the specified
remote server and retrieves the statistics for its Enterprise Replication queues.
Examples
The following example shows the output for cdr stats rqm --ackq:
RQM Statistics for Queue number: 1 name: ack_send
Flags: ACKSEND_Q, SENDQ_MASK
Txns in queue: 0
Txns in memory: 0
Txns in spool only: 0
Txns spooled: 0
Unspooled bytes: 0
Size of Data in queue: 0 Bytes
Real memory in use: 0 Bytes
A-84 IBM Informix Dynamic Server Enterprise Replication Guide
33
33
3
3333333333333333
333333333333333333333
3
3
33
3
3333
333
333
333
333
3333
3
3333
333333
33
3
3
333333333
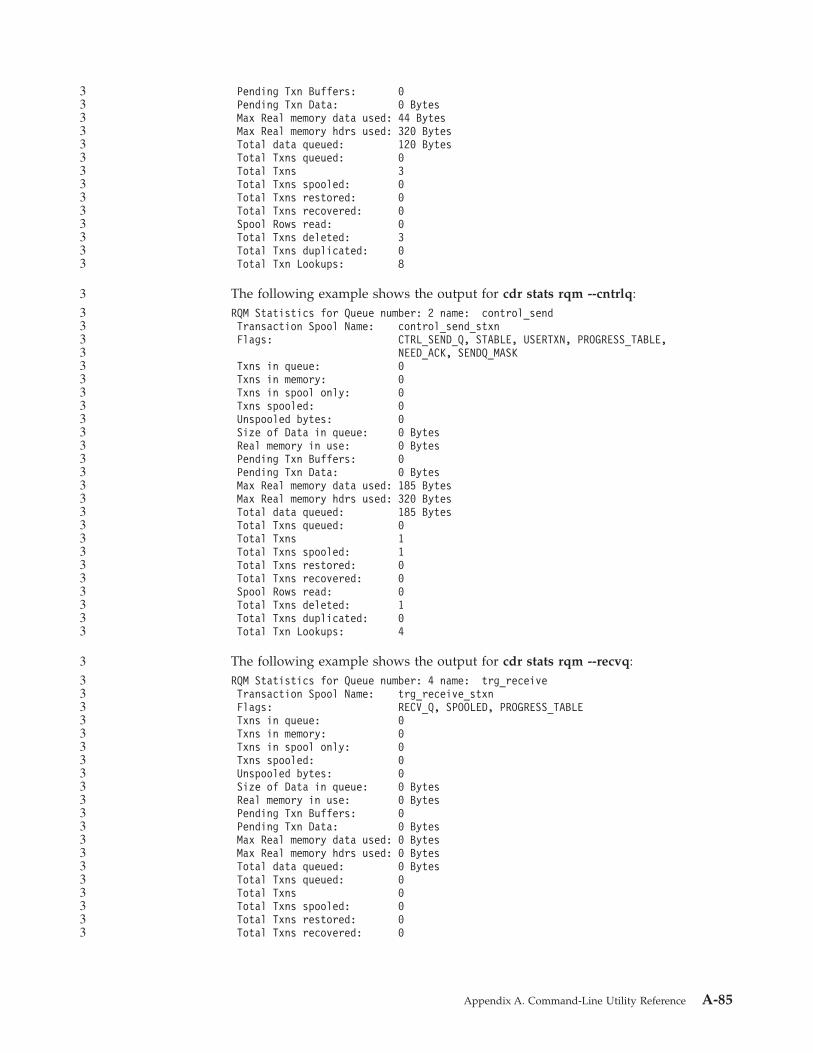
Pending Txn Buffers: 0
Pending Txn Data: 0 Bytes
Max Real memory data used: 44 Bytes
Max Real memory hdrs used: 320 Bytes
Total data queued: 120 Bytes
Total Txns queued: 0
Total Txns 3
Total Txns spooled: 0
Total Txns restored: 0
Total Txns recovered: 0
Spool Rows read: 0
Total Txns deleted: 3
Total Txns duplicated: 0
Total Txn Lookups: 8
The following example shows the output for cdr stats rqm --cntrlq:
RQM Statistics for Queue number: 2 name: control_send
Transaction Spool Name: control_send_stxn
Flags: CTRL_SEND_Q, STABLE, USERTXN, PROGRESS_TABLE,
NEED_ACK, SENDQ_MASK
Txns in queue: 0
Txns in memory: 0
Txns in spool only: 0
Txns spooled: 0
Unspooled bytes: 0
Size of Data in queue: 0 Bytes
Real memory in use: 0 Bytes
Pending Txn Buffers: 0
Pending Txn Data: 0 Bytes
Max Real memory data used: 185 Bytes
Max Real memory hdrs used: 320 Bytes
Total data queued: 185 Bytes
Total Txns queued: 0
Total Txns 1
Total Txns spooled: 1
Total Txns restored: 0
Total Txns recovered: 0
Spool Rows read: 0
Total Txns deleted: 1
Total Txns duplicated: 0
Total Txn Lookups: 4
The following example shows the output for cdr stats rqm --recvq:
RQM Statistics for Queue number: 4 name: trg_receive
Transaction Spool Name: trg_receive_stxn
Flags: RECV_Q, SPOOLED, PROGRESS_TABLE
Txns in queue: 0
Txns in memory: 0
Txns in spool only: 0
Txns spooled: 0
Unspooled bytes: 0
Size of Data in queue: 0 Bytes
Real memory in use: 0 Bytes
Pending Txn Buffers: 0
Pending Txn Data: 0 Bytes
Max Real memory data used: 0 Bytes
Max Real memory hdrs used: 0 Bytes
Total data queued: 0 Bytes
Total Txns queued: 0
Total Txns 0
Total Txns spooled: 0
Total Txns restored: 0
Total Txns recovered: 0
Appendix A. Command-Line Utility Reference A-85
33333333333333
3
3333333333333333333333333
3
33333333333333333333

Spool Rows read: 0
Total Txns deleted: 0
Total Txns duplicated: 0
Total Txn Lookups: 0
The following example shows the output for cdr stats rqm --syncq:
RQM Statistics for Queue number: 3 name: sync_send
Flags: SYNC_Q, NEED_ACK, SENDQ_MASK
Txns in queue: 0
Txns in memory: 0
Txns in spool only: 0
Txns spooled: 0
Unspooled bytes: 0
Size of Data in queue: 0 Bytes
Real memory in use: 0 Bytes
Pending Txn Buffers: 0
Pending Txn Data: 0 Bytes
Max Real memory data used: 0 Bytes
Max Real memory hdrs used: 0 Bytes
Total data queued: 0 Bytes
Total Txns queued: 0
Total Txns 0
Total Txns spooled: 0
Total Txns restored: 0
Total Txns recovered: 0
Spool Rows read: 0
Total Txns deleted: 0
Total Txns duplicated: 0
Total Txn Lookups: 1131
The following example shows the output for cdr stats rqm --sendq:
RQM Statistics for Queue number: 0 name: trg_send
Transaction Spool Name: trg_send_stxn
Flags: SEND_Q, SPOOLED, PROGRESS_TABLE, NEED_ACK,
SENDQ_MASK, SREP_TABLE
Txns in queue: 12
Txns in memory: 12
Txns in spool only: 0
Txns spooled: 0
Unspooled bytes: 24960
Size of Data in queue: 24960 Bytes
Real memory in use: 24960 Bytes
Pending Txn Buffers: 0
Pending Txn Data: 0 Bytes
Max Real memory data used: 24960 Bytes
Max Real memory hdrs used: 22080 Bytes
Total data queued: 27560 Bytes
Total Txns queued: 0
Total Txns 14
Total Txns spooled: 0
Total Txns restored: 0
Total Txns recovered: 0
Spool Rows read: 0
Total Txns deleted: 2
Total Txns duplicated: 0
Total Txn Lookups: 28
A-86 IBM Informix Dynamic Server Enterprise Replication Guide
3333
3
33333333333333333333333
3
3333333333333333333333333
3

cdr stats recv
The cdr stats recv command displays receiver parallelism statistics and latency
statistics by source node.
Syntax
�� cdr stats recv
(1)
Connect Option
��
Notes:
1 See page A-107.
Usage
The cdr stats recv command displays the parallelism statistics for the receiver,
including transaction count, number of pending and active transactions, the
maximum that have been pending and active, the average number of pending and
active transactions, and the commit rate. Totals and averages are calculated for
pending and active transactions for the servers listed.
The Statistics by Source report shows the breakdown of transactions (number of
inserts, updates, and deletes) and the latest source commit time and target apply
time per server. The replication latency is the difference between the time when the
transaction was committed on the source server and the time when the same
transaction is applied on the target.
If the Connect option is specified, Enterprise Replication connects to the specified
remote server and retrieved the statistics from it.
Examples
The following output is an example of the cdr stats recv command:
cdr stats recv
Receive Parallelism Statistics
Server Tot.Txn. Pending Active MaxPnd MaxAct AvgPnd AvgAct CommitRt
144 11 0 0 3 2 1.27 1.36 0.01
Tot Pending:0 Tot Active:0 Avg Pending:0.00 Avg Active:0.00
Avg Commit Rate:0.01
Statistics by Source
Server Repl Txn Ins Del Upd Last Target Apply Last Source Commit
144 9371650 11 0 0 220 2005/03/30 09:36:25 2005/03/30 09:36:25
Appendix A. Command-Line Utility Reference A-87
33
33
3
3333333333333333
3
3
33
3
33333
33333
33
3
3
333333333333333
3

cdr stop
The cdr stop command stops Enterprise Replication processing.
Syntax
�� (1)
cdr stop
Connect Option
��
Notes:
1 See page A-107.
Usage
In most situations, Enterprise Replication starts when cdr define server is first
executed. The replication threads remain running until the database server is shut
down or until the local database server is deleted with the cdr delete server
command. If you shut down the database server while Enterprise Replication is
running, replication begins again when you restart the database server.
Under rare conditions, you might want to temporarily stop the Enterprise
Replication processing without stopping the database server. The cdr stop
command shuts down all Enterprise Replication threads in an orderly manner;
however no data to be replicated is captured. When the shutdown of Enterprise
Replication is complete, the message CDR shutdown complete appears in the
database server log file.
After issuing the cdr stop command, replication threads remain stopped (even if
the database server is stopped and restarted) until you issue a cdr start command.
You cannot delete a server from the enterprise if it is stopped. To delete a server
with cdr delete server, you must issue a cdr start command first.
Warning: If you issue cdr stop and database activity continues, the database server
from which the command is issued and the other database servers
participating in replicates will become inconsistent. To ensure
consistency, verify that no database update activity occurs while
Enterprise Replication is stopped.
Examples
The following example stops Enterprise Replication processing on database server
paris. Processing does not resume until a cdr start command restarts it:
cdr stop -c paris
See Also
v “cdr start” on page A-77
A-88 IBM Informix Dynamic Server Enterprise Replication Guide

cdr stop repair
The cdr stop repair command stops a repair job that is in progress.
Syntax
�� cdr stop repair
(1)
Connect Option
job ��
Notes:
1 See page A-107.
Element Purpose Restrictions Syntax
job Name of the repair job The job must exist “Long
Identifiers” on
page A-107
Usage
Use the cdr stop repair command to stop a repair job that is in progress. To restart
the repair job, use the cdr start repair command. You must run this command
while connected to the source server for the job, as specified in the cdr define
repair command by the --syncdatasource option.
If you specify the Connect Option, it must be the source server.
Examples
The following example stops a repair job named parts_repair:
cdr stop repair parts_repair
See Also
v “cdr define repair” on page A-18
v “cdr delete repair” on page A-36
v “cdr start repair” on page A-78
v “cdr list repair” on page A-48
Appendix A. Command-Line Utility Reference A-89

cdr stop replicate
The cdr stop replicate command stops the capture and transmittal of transactions
for replication.
Syntax
�� cdr stop replicate
(1)
Connect Option
repl_name �
�
�
at_server_group
��
Notes:
1 See page A-107.
Element Purpose Restrictions Syntax
repl_name Name of the new
replicate
The replicate must be
active and not in an
exclusive replicate set.
“Long
Identifiers” on
page A-107
at_server_group List of database server
groups on which to stop
the replicate
The database server
groups must be defined
for Enterprise Replication.
Usage
The cdr stop replicate command changes the state of the replicate repl_name to
inactive (no capture, no send) on the replication servers in the specified
at_server_group list. In addition, this command deletes any data in the send queue
for the stopped replicate. You cannot stop replicates that have no participants.
Warning: If there were any data in the send queue when you issued the cdr stop
replicate command, or if any database activity occurs while the replicate
is stopped, the replication servers become inconsistent. For information
on resynchronizing replication servers, see “Resynchronizing Data
Among Replication Servers” on page 7-11.
If you omit the at_server_group list, the replicate enters the inactive state on all
database servers participating in the replicate and all send queues for the replicate
are deleted.
If a replicate belongs to an exclusive replicate set, you cannot run cdr stop
replicate to stop that individual replicate. You must use cdr stop replicateset to
stop all replicates in the exclusive replicate set.
If you run this command while direct synchronization, a repair job, or consistency
checking with repair is in progress, that repair process will stop. (Consistency
checking continues; only the repair stops.) Direct synchronization and consistency
A-90 IBM Informix Dynamic Server Enterprise Replication Guide
444

checking repair cannot be resumed; you must rerun cdr sync replicate or cdr
check replicate command with the --repair option. Restart the repair job with the
cdr start repair command.
Examples
The following command connects to the database server lake and stops the
replicate aRepl on server groups g_server1 and g_server2:
cdr sto rep -c lake aRepl g_server1 g_server2
See Also
v “cdr change replicate” on page A-4
v “cdr define replicate” on page A-21
v “cdr delete replicate” on page A-37
v “cdr list replicate” on page A-50
v “cdr modify replicate” on page A-60
v “cdr resume replicate” on page A-74
v “cdr start replicate” on page A-80
v “cdr suspend replicate” on page A-94
Appendix A. Command-Line Utility Reference A-91
444

cdr stop replicateset
The cdr stop replicateset command stops capture and transmittal transactions for
all the replicates in a replicate set.
Syntax
�� cdr stop replicateset
(1)
Connect Option
repl_set �
�
�
server_group
��
Notes:
1 See page A-107.
Element Purpose Restrictions Syntax
repl_set Name of replicate set to
stop
The replicate set must exist “Long
Identifiers” on
page A-107
server_group Name of database server
group on which to stop the
replicate group
The database server groups
must be defined for
Enterprise Replication.
Usage
The cdr stop replicateset command causes all replicates in the replicate set repl_set
to enter the inactive state (no capture, no send) on the database servers in the
server_group list.
If the server_group list is omitted, the replicate set repl_set enters the inactive state
for all database servers participating in the replicate set.
If not all the replicates in the non-exclusive replicate set are active, the cdr stop
replicateset command displays a warning and only stops the replicates that are
currently active.
If you run this command while direct synchronization, a repair job, or consistency
checking with repair is in progress, that repair process will stop. (Consistency
checking continues; only the repair stops.) Direct synchronization and consistency
checking repair cannot be resumed; you must rerun cdr sync replicate or cdr
check replicate command. Restart the repair job with the cdr start repair command
with the --repair option.
Examples
The following example connects to the database server paris and stops the
replicate set accounts_set on server groups g_utah and g_iowa:
cdr sto replset --connect=paris accounts_set g_utah g_iowa
A-92 IBM Informix Dynamic Server Enterprise Replication Guide
444444

See Also
v “cdr change replicateset” on page A-6
v “cdr define replicate” on page A-21
v “cdr delete replicateset” on page A-38
v “cdr list replicateset” on page A-53
v “cdr modify replicateset” on page A-63
v “cdr resume replicateset” on page A-75
v “cdr start replicateset” on page A-82
v “cdr suspend replicateset” on page A-95
Appendix A. Command-Line Utility Reference A-93

cdr suspend replicate
The cdr suspend replicate command suspends delivery of replication data.
Syntax
��
cdr suspend replicate
(1)
Connect Option
�
repl_name
��
Notes:
1 See page A-107.
Element Purpose Restrictions Syntax
repl_name Name of the replicate The replicate must be
active.
“Long
Identifiers” on
page A-107
Usage
The cdr suspend replicate command causes the replicate repl_name to enter the
suspend state (capture, no send) for all participants.
Warning: When a replicate is suspended, Enterprise Replication holds the
replication data in the send queue until the replicate is resumed. If a
large amount of data is generated for the replicate while it is suspended,
the send queue space can fill, causing data to be lost. Enterprise
Replication does not synchronize transactions if a replicate is suspended.
For example, a transaction that updates tables X and Y will be split if
replication for table X is suspended.
If a replicate belongs to an exclusive replicate set, you cannot run cdr suspend
replicate to suspend that individual replicate. You must use cdr suspend
replicateset to suspend all replicates in the exclusive replicate set.
Examples
The following example connects to the database server stan and suspends the
replicate house:
cdr sus repl --connect=stan house
See Also
v “cdr change replicate” on page A-4
v “cdr define replicate” on page A-21
v “cdr delete replicate” on page A-37
v “cdr list replicate” on page A-50
v “cdr modify replicate” on page A-60
v “cdr resume replicate” on page A-74
v “cdr start replicate” on page A-80
v “cdr stop replicate” on page A-90
A-94 IBM Informix Dynamic Server Enterprise Replication Guide
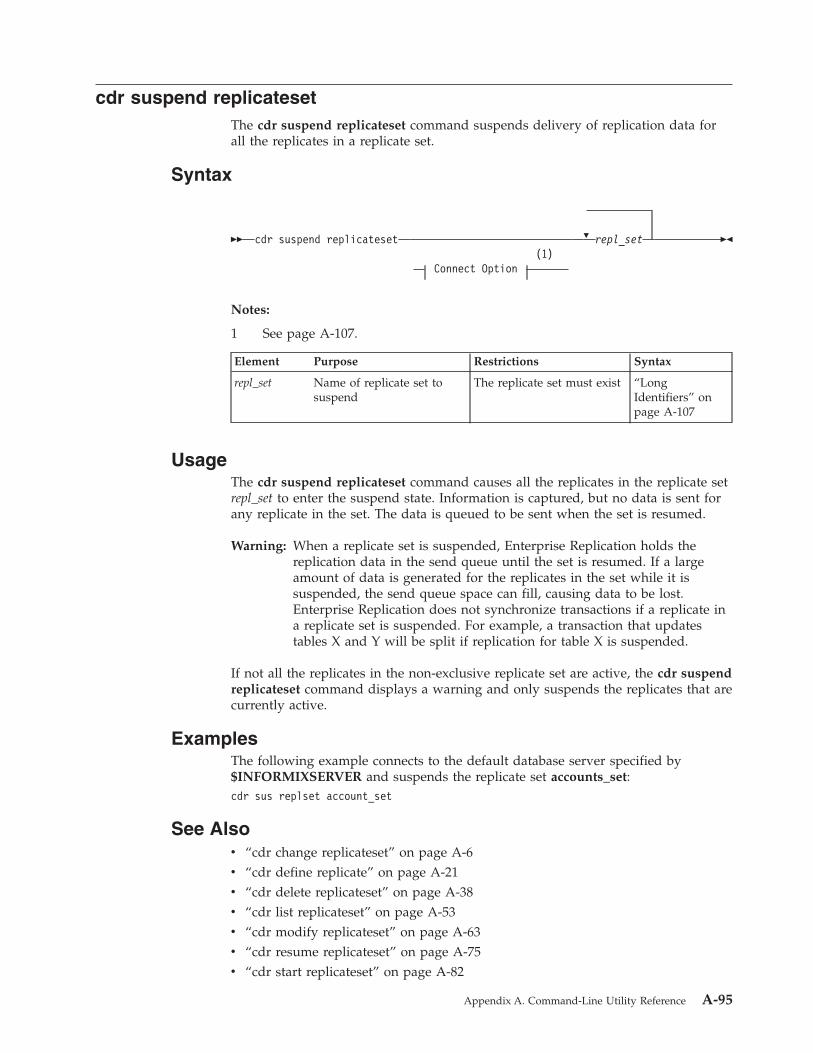
cdr suspend replicateset
The cdr suspend replicateset command suspends delivery of replication data for
all the replicates in a replicate set.
Syntax
��
cdr suspend replicateset
(1)
Connect Option
�
repl_set
��
Notes:
1 See page A-107.
Element Purpose Restrictions Syntax
repl_set Name of replicate set to
suspend
The replicate set must exist “Long
Identifiers” on
page A-107
Usage
The cdr suspend replicateset command causes all the replicates in the replicate set
repl_set to enter the suspend state. Information is captured, but no data is sent for
any replicate in the set. The data is queued to be sent when the set is resumed.
Warning: When a replicate set is suspended, Enterprise Replication holds the
replication data in the send queue until the set is resumed. If a large
amount of data is generated for the replicates in the set while it is
suspended, the send queue space can fill, causing data to be lost.
Enterprise Replication does not synchronize transactions if a replicate in
a replicate set is suspended. For example, a transaction that updates
tables X and Y will be split if replication for table X is suspended.
If not all the replicates in the non-exclusive replicate set are active, the cdr suspend
replicateset command displays a warning and only suspends the replicates that are
currently active.
Examples
The following example connects to the default database server specified by
$INFORMIXSERVER and suspends the replicate set accounts_set:
cdr sus replset account_set
See Also
v “cdr change replicateset” on page A-6
v “cdr define replicate” on page A-21
v “cdr delete replicateset” on page A-38
v “cdr list replicateset” on page A-53
v “cdr modify replicateset” on page A-63
v “cdr resume replicateset” on page A-75
v “cdr start replicateset” on page A-82
Appendix A. Command-Line Utility Reference A-95

v “cdr stop replicateset” on page A-92
A-96 IBM Informix Dynamic Server Enterprise Replication Guide

cdr suspend server
The cdr suspend server command suspends the delivery of replication data to a
database server from either a specified list of database servers or from all database
servers in the enterprise.
Syntax
�� cdr suspend server
(1)
Connect Option
to_server_group �
�
�
from_server_group
��
Notes:
1 See page A-107.
Element Purpose Restrictions Syntax
to_server_group Name of database
server group to which
to suspend delivery of
replication data
The database server group
must be currently active in
Enterprise Replication.
from_server_group Name of the database
server group from
which to stop sending
data to to_server_group
The database server group
must be currently active in
Enterprise Replication.
Usage
The cdr suspend server command suspends delivery of replication data to the
to_server_group database server from the database servers included in the
from_server_group list. If the from_server_group list is omitted, the command
suspends replication of data from all database servers participating in the
Enterprise Replication system to the to_server_group.
The connection to the suspended server is unaffected, and control and
acknowledge messages continue to be sent to that server. Enterprise Replication
continues to replicate data between all database servers unaffected by the cdr
suspend server command.
Examples
The following example connects to the default server (the one specified by the
INFORMIXSERVER environment variable) and suspends replication of data to the
server g_iowa from the servers g_ohio and g_utah:
cdr sus serv g_iowa g_ohio g_utah
Appendix A. Command-Line Utility Reference A-97

See Also
v “cdr connect server” on page A-17
v “cdr define server” on page A-30
v “cdr delete server” on page A-40
v “cdr disconnect server” on page A-44
v “cdr list server” on page A-55
v “cdr modify server” on page A-64
v “cdr resume server” on page A-76
A-98 IBM Informix Dynamic Server Enterprise Replication Guide

cdr swap shadow
The cdr swap shadow command switches a replicate with its shadow replicate
during manual remastering.
Syntax
�� cdr swap shadow
(1)
Connect Option
--primaryname=repl_name �
� --primaryid=repl_ID --shadowname=shadow_name --shadowid=shadow_ID ��
Notes:
1 See page A-107.
Element Purpose Restrictions Syntax
repl_name Name of the primary
replicate
The primary replicate
participant attributes state,
type (P or R), and table
owner (O or I) must match
the shadow replicate
participant attributes. See
“Participant” on page
A-108 for information
about the P, R, O and I
options.
“Long
Identifiers” on
page A-107
repl_ID Internal Enterprise
Replication identification
code for the primary
replicate
shadow_name Name of the shadow
replicate
The shadow replicate state
must match the primary
replicate state.
Shadow replicate
participants must match
the primary replicate
participants.
“Long
Identifiers” on
page A-107
shadow_ID Internal Enterprise
Replication identification
code for the shadow
replicate
The following table describes the cdr swap shadow options.
Long Form Short Form Meaning
--primaryname -p Specifies the name of the primary replicate
--primaryid -P Specifies the ID of the primary replicate
--shadowname -s Specifies the name of the shadow replicate
--shadowid -S Specifies the ID of the shadow replicate
Appendix A. Command-Line Utility Reference A-99

Usage
Use the cdr swap shadow command to switch a replicate with its shadow replicate
as the last step in manually remastering a replicate that was created with the
--name=n option. You create a shadow replicate using the cdr define replicate
command with the --mirrors option. For more information on manual remastering,
see “Remastering a Replicate” on page 7-20.
Use the onstat -g cat repls command to obtain the repl_ID and shadow_ID.
Alternatively, you can query the syscdrrepl view in the sysmaster database.
See Also
v “cdr define replicate” on page A-21
v “cdr list replicate” on page A-50
A-100 IBM Informix Dynamic Server Enterprise Replication Guide

cdr sync replicate
The cdr sync replicate command synchronizes data among replication servers to
repair inconsistent data within a replicate.
Syntax
�� cdr sync replicate
(1)
Connect Option
--master=data_server �
�
--repl=repl_name
�
target_server
--all
�
� --extratargetrows=
delete
keep
merge
��
Notes:
1 See page A-107.
Element Purpose Restrictions Syntax
data_server Name of the database
server to use as the
reference copy of the
data
Must be the name of an
existing database server
group in SQLHOSTS. See
“Setting up Database
Server Groups” on page
4-3.
“Long
Identifiers” on
page A-107
repl_name Name of the replicate to
synchronize
“Long
Identifiers” on
page A-107
target_server Name of a database
server group on which
to perform
synchronization
Must be the name of an
existing database server
group in SQLHOSTS. See
“Setting up Database
Server Groups” on page
4-3.
“Long
Identifiers” on
page A-107
The following table describes the cdr sync replicate options.
Long Form Short Form Meaning
--all -a Specifies that all servers defined for the replicate are
synchronized
Appendix A. Command-Line Utility Reference A-101
44
44
4
444444444444444444
44444444444444444444
44444444444444444444444
4
4
44
44444
44444
444444
444
4444444
44444
444444
444
4
4
4444
4444

Long Form Short Form Meaning
--extratargetrows= -e Specifies how to handle rows found on the target
servers that are not present on the server from which
the data is being copied (data_server):
v delete: (default) remove rows and dependent rows,
based on referential integrity constraints, from the
target servers
v keep: retain rows on the target servers
v merge: retain rows on the target servers and
replicate them to the data source server
--master= -m Specifies the database server to use as the reference
copy of the data
--repl= -r Specifies the name of the replicate to synchronize
Usage
Use the cdr sync replicate command to synchronize data between multiple
database servers for a specific replicate. This command performs direct
synchronization as a foreground process.
Examples
The following example illustrates synchronizing all replication servers for the
replicate named repl_1:
cdr sync replicate --master=g_serv1 --repl=repl_1\
--all --extratargetrows=keep
The data on the server group g_serv1 is used as the reference for correcting the
data on the other servers. Line 2 indicates that all servers associated with the
replicate are synchronized and that if the synchronization process detects rows on
the target servers that do not exist on the reference server (g_serv1), that those
rows should remain on the other servers.
The following example illustrates synchronizing three servers for the replicate
named repl_2:
cdr sync replicate -m g_serv1 -r repl_2\
g_serv2 g_serv3
The reference server is g_serv1 and the target servers are g_serv2 and g_serv3.
Because the --extratargetrows option is not specified, the default behavior occurs:
rows, and any dependent rows that are based on referential integrity constraints,
that are on the target servers but not on the reference server, are deleted.
See Also
v “cdr check replicate” on page A-8
A-102 IBM Informix Dynamic Server Enterprise Replication Guide
444
44444
444
4
44
4444
4444
4
444
4
44
44
44444
44
44
4444
4
4
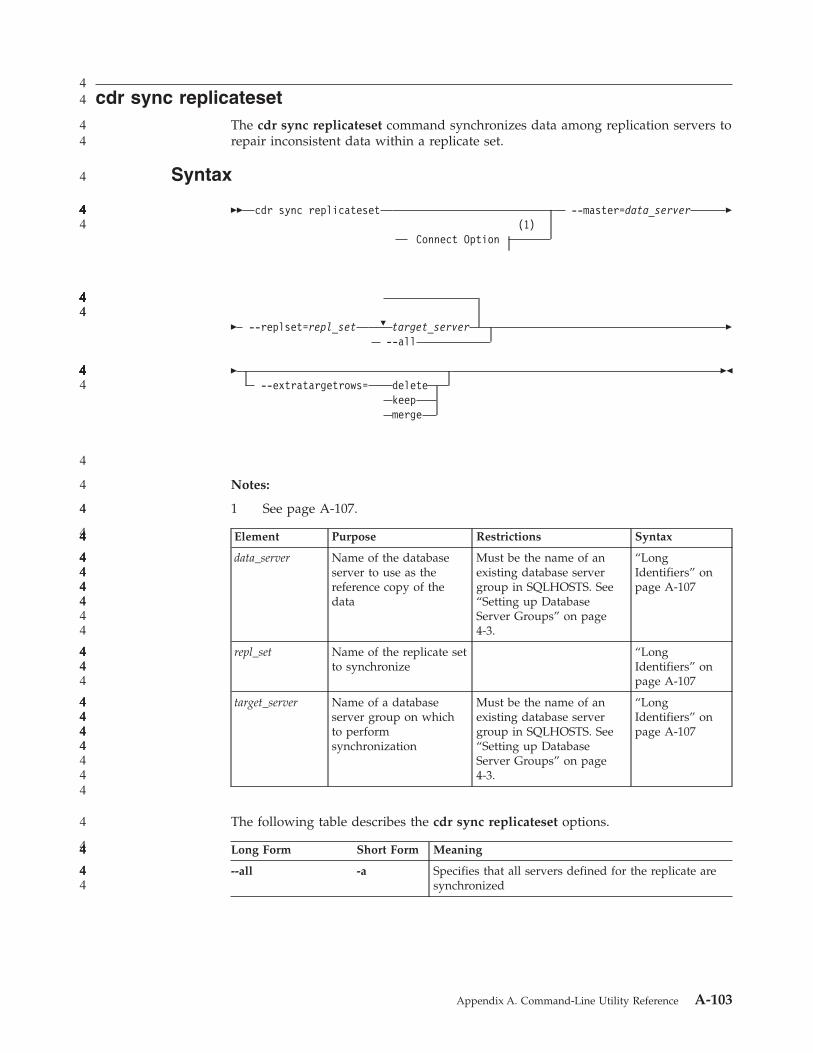
cdr sync replicateset
The cdr sync replicateset command synchronizes data among replication servers to
repair inconsistent data within a replicate set.
Syntax
�� cdr sync replicateset
(1)
Connect Option
--master=data_server �
�
--replset=repl_set
�
target_server
--all
�
� --extratargetrows=
delete
keep
merge
��
Notes:
1 See page A-107.
Element Purpose Restrictions Syntax
data_server Name of the database
server to use as the
reference copy of the
data
Must be the name of an
existing database server
group in SQLHOSTS. See
“Setting up Database
Server Groups” on page
4-3.
“Long
Identifiers” on
page A-107
repl_set Name of the replicate set
to synchronize
“Long
Identifiers” on
page A-107
target_server Name of a database
server group on which
to perform
synchronization
Must be the name of an
existing database server
group in SQLHOSTS. See
“Setting up Database
Server Groups” on page
4-3.
“Long
Identifiers” on
page A-107
The following table describes the cdr sync replicateset options.
Long Form Short Form Meaning
--all -a Specifies that all servers defined for the replicate are
synchronized
Appendix A. Command-Line Utility Reference A-103
44
44
4
444444444444444444
44444444444444444444
44444444444444444444444
4
4
44
44444
44444
444444
444
4444444
44444
444444
444
4
4
4444
4444

Long Form Short Form Meaning
--extratargetrows= -e Specifies how to handle rows found on the target
servers that are not present on the server from which
the data is being copied (data_server):
v delete: (default) remove rows and dependent rows,
based on referential integrity constraints, from the
target servers
v keep: retain rows on the target servers
v merge: retain rows on the target servers and
replicate them to the data source server
--master -m Specifies the database server to use as the reference
copy of the data
--replset -s Specifies the name of the replicate set to synchronize
Usage
Use the cdr sync replicateset command to synchronize data between multiple
database servers for a replicate set. This command performs direct synchronization
as a foreground process.
Examples
The following example illustrates synchronizing all replication servers for the
replicate set replset_1 using g_serv1 as the reference server:
cdr sync replicateset --master=g_serv1 --replset=replset_1\
--all --extratargetrows=keep
Line 2 indicates that all servers associated with the replicate set are synchronized
and that if the synchronization process detects rows on the target servers that do
not exist on the reference server (g_serv1), that those rows should remain on the
other servers.
The following example illustrates synchronizing three servers for the replicate set
named replset_2:
cdr sync replicateset -m g_serv1 -s replset_2\
g_serv2 g_serv3
The reference server is g_serv1 and the target servers are g_serv2 and g_serv3.
Because the --extratargetrows option is not specified, the default behavior occurs:
rows, and any dependent rows that are based on referential integrity constraints,
that are on the target servers but not on the reference server, are deleted.
See Also
v “cdr check replicateset” on page A-13
A-104 IBM Informix Dynamic Server Enterprise Replication Guide
444
44444
444
4
44
4444
4444
4
444
4
44
44
4444
44
44
4444
4
4

Interpreting the Command-Line Utility Syntax
This section defines the terminology and conventions used in the descriptions of
the command-line utility (CLU).
Each command follows the same approximate format, with the following
components:
v Command and its variation
The command specifies the action that should be taken.
v Options
The options modify the action of the command. Each option starts with a minus
(-) or a double-minus (--).
v Target
The target specifies the Enterprise Replication object that should be acted upon.
v Other objects
Other objects specify objects that are affected by the change to the target.
If you enter an incorrect cdr command at the command-line prompt, the database
server returns a usage message that summarizes the cdr commands. For a more
detailed usage message, enter cdr variation -h. For example, cdr list server -h.
Important: You must be the Enterprise Replication server administrator to execute
any of the CLU commands except the cdr list options. For more
information, see “Enterprise Replication Server Administrator” on page
2-2.
Command Abbreviations
For most commands, each of the words that make up a cdr command variation can
be abbreviated to three or more characters. For example, the following commands
are all equivalent:
cdr define replicate
cdr define repl
cdr def rep
The exceptions to this rule are the replicateset commands, which can be
abbreviated to replset. For example, the following commands are equivalent:
cdr define replicateset
cdr def replset
Option Abbreviations
Each option for a command has a long form and a short form. You can use either
form, and you can mix long and short forms within a single command.
On UNIX, a long form example might look like:
cdr define server --connect=ohio --idle=500 \
--ats=/cdr/ats --initial utah
On WINDOWS, the same long form example would look like:
cdr define server --connect=ohio --idle=500 \
--ats=D:\cdr\ats --initial utah
Using short forms, you can write the previous examples as follows:
Appendix A. Command-Line Utility Reference A-105

UNIX:
cdr def ser -c ohio -i 500 -A /cdr/ats -I utah
WINDOWS:
cdr def ser -c ohio -i 500 -A D:\cdr\ats -I utah
The long form is always preceded by a double minus (--). Most (but not all) long
forms require an equal sign (=) between the option and its argument. The short
form is preceded by a single minus (-) and is usually the first letter of the long
form. The short form never requires an equal sign. However, sometimes the short
form is capitalized and sometimes it is not. To find the correct syntax for the short
form, check the table that accompanies each command variation.
Tip: Use the long forms of options to increase readability.
With the exception of the keyword transaction, all keywords (or letter
combinations) that modify the command options must be written as shown in the
syntax diagrams. For example, in the “Conflict Options” on page A-23, the option
(conflict) can be abbreviated, but the keyword ignore cannot be abbreviated. Both
of the following forms are correct:
--conflict=ignore
-C ignore
Option Order
You can specify the options of the CLU commands in any order. Some of the
syntax diagrams in this chapter show the options in a specific order because it
makes the diagram easier to read.
Do not repeat any options. The following fragment is incorrect because -c appears
twice. In most cases, the CLU will catch this inconsistency and flag it as an error.
However, if no error is given, the database server uses the last instance of the
option. In the following example, the database server uses the value -c utah:
-c ohio -i 500 -c utah
Tip: For ease of maintenance, always use the same order for your options.
Long Command-Line Examples
The examples in this guide use the convention of a backslash (\) to indicate that a
long command line continues on the next line. The following two commands are
equivalent. The first command is too long to fit on a single line, so it is continued
on the next line. The second example, which uses short forms for the options, fits
on one line.
On UNIX, the command line might look like:
cdr define server --connect=katmandu --idle=500 \
--ats=/cdrfiles/ats
cdr def ser -c katmandu -i 500 -A /cdrfiles/ats
On Windows, these command lines might look like:
cdr define server --connect=honolulu --idle=500 \
--ats=D:\cdrfiles\ats
cdr def ser -c honolulu -i 500 -A D:\cdr\ats
A-106 IBM Informix Dynamic Server Enterprise Replication Guide
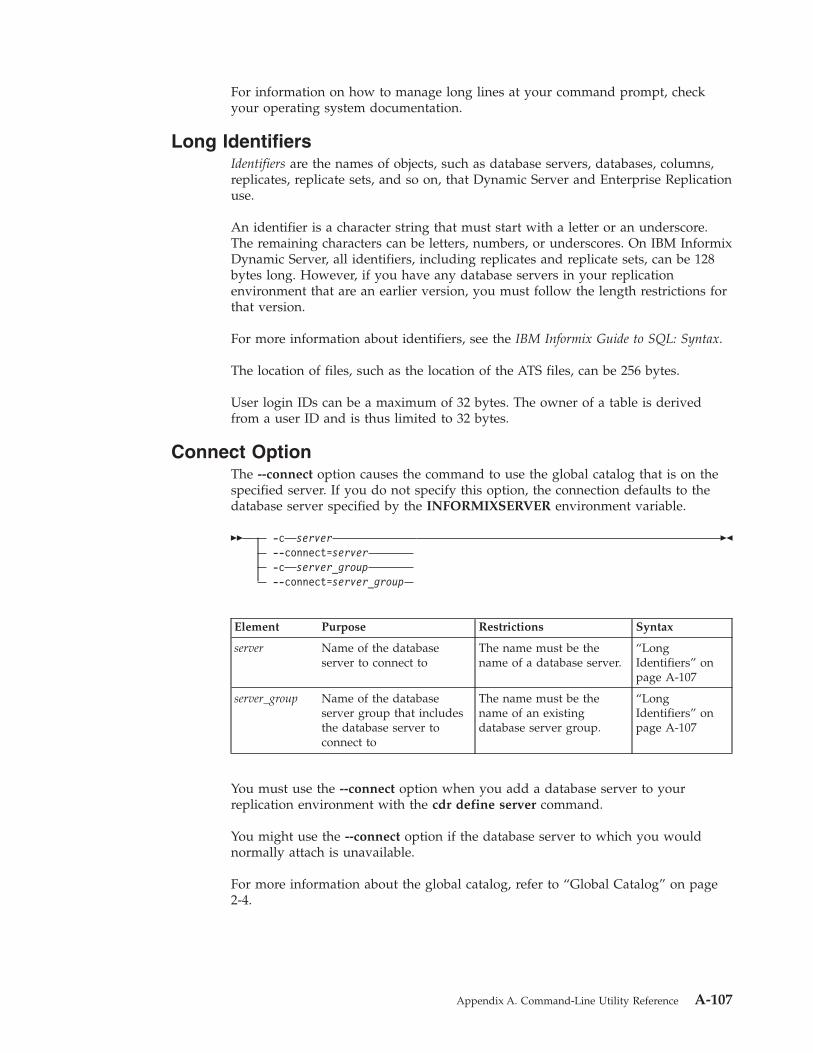
For information on how to manage long lines at your command prompt, check
your operating system documentation.
Long Identifiers
Identifiers are the names of objects, such as database servers, databases, columns,
replicates, replicate sets, and so on, that Dynamic Server and Enterprise Replication
use.
An identifier is a character string that must start with a letter or an underscore.
The remaining characters can be letters, numbers, or underscores. On IBM Informix
Dynamic Server, all identifiers, including replicates and replicate sets, can be 128
bytes long. However, if you have any database servers in your replication
environment that are an earlier version, you must follow the length restrictions for
that version.
For more information about identifiers, see the IBM Informix Guide to SQL: Syntax.
The location of files, such as the location of the ATS files, can be 256 bytes.
User login IDs can be a maximum of 32 bytes. The owner of a table is derived
from a user ID and is thus limited to 32 bytes.
Connect Option
The --connect option causes the command to use the global catalog that is on the
specified server. If you do not specify this option, the connection defaults to the
database server specified by the INFORMIXSERVER environment variable.
�� -c server
--connect=server
-c
server_group
--connect=server_group
��
Element Purpose Restrictions Syntax
server Name of the database
server to connect to
The name must be the
name of a database server.
“Long
Identifiers” on
page A-107
server_group Name of the database
server group that includes
the database server to
connect to
The name must be the
name of an existing
database server group.
“Long
Identifiers” on
page A-107
You must use the --connect option when you add a database server to your
replication environment with the cdr define server command.
You might use the --connect option if the database server to which you would
normally attach is unavailable.
For more information about the global catalog, refer to “Global Catalog” on page
2-4.
Appendix A. Command-Line Utility Reference A-107

Participant
A participant defines the data (database, table, and columns) on a database server
to be replicated. A replicate contains two or more participants. The participant
definition includes the following information:
v Database server group (“Setting up Database Server Groups” on page 4-3)
v Database in which the table resides
v Table name
v Table owner (“Table Owner” on page A-109)
v Participant type (“Participant Type” on page A-109)
v SELECT statement (“Participant Modifier” on page A-109)
You must include the server group, database, table owner, and table name when
defining a participant, and enclose the entire participant definition in quotation
marks.
�� ″ database@server_group:owner.table ″
P
O
R
I
��
Element Purpose Restrictions Syntax
database Name of the database that
includes the table to be
replicated
The database server must
be registered with
Enterprise Replication.
“Long
Identifiers” on
page A-107
owner User ID of the owner of
the table to be replicated
“Long
Identifiers” on
page A-107
server_group Name of the database
server group that includes
the server to connect to
The database server group
name must be the name of
an existing Enterprise
Replication server group in
SQLHOSTS.
“Long
Identifiers” on
page A-107
table Name of the table to be
replicated
The table must be an actual
table. It cannot be a
synonym or a view.
“Long
Identifiers” on
page A-107
Important: Do not create more than one replicate definition for each row and
column set of data to replicate. If the participant overlaps, Enterprise
Replication attempts to insert duplicate values during replication.
You can define participants with the following commands:
v cdr define replicate
v cdr modify replicate
v cdr change replicate
v cdr define template
The P, R, O, and I options are described in the sections below.
A-108 IBM Informix Dynamic Server Enterprise Replication Guide

Table Owner
The O (owner) option causes permission checks for owner to be applied to the
operation (such as insert or update) that is to be replicated and to all actions fired
by any triggers. When the O option is omitted, all operations are performed with
the privileges of user informix.
On UNIX, if a trigger requires any system-level commands (as specified using the
system( ) command in an SPL statement), the system-level commands are executed
as the table owner, if the participant includes the O option.
On Windows, if a trigger requires any system-level commands, the system-level
commands are executed as a less privileged user because you cannot impersonate
another user without having the password, whether or not the participant includes
the O option.
Use the I option to disable the table-owner option.
Participant Type
In a primary-target replicate, specify the participant type using the P (primary) and
R (receive-only or target) options in the participant definition:
v A primary participant both sends and receives replicate data.
v A target participant only receives data from primary participants.
The replicate can contain multiple primary participants.
In an update-anywhere replicate, do not specify either P or R for the participant.
Enterprise Replication defines the participant as primary in an update-anywhere
replication system.
For example, in the following definition, replicate Rone is update-anywhere:
cdr define repl -c serv1 -C timestamp -S tran Rone \
"db@serv1:owner.table" "select * from table" \
"db@serv2:owner.table" "select * from table"
In replicate Rtwo, serv2 is the primary and serv1 is receive-only.
cdr define repl -c serv1 -C ignore -S tran Rtwo \
"R db@serv1:owner.table" "select * from table" \
"P db@serv2:owner.table" "select * from table"
For more information, see “Primary-Target Replication System” on page 3-1.
Participant Modifier
The participant modifier is a restricted SELECT statement. The participant modifier
specifies the rows and columns that will be replicated. The participant modifier
must be enclosed in quotation marks.
��
�
,
″SELECT
column
FROM
table
WHERE_Clause″
*
��
Element Purpose Restrictions Syntax
column Name of a column in
the table specified by
the participant
The column must exist. “Long
Identifiers” on
page A-107
Appendix A. Command-Line Utility Reference A-109
Element Purpose Restrictions Syntax
table The table specified by
the participant
This must be the table
name only. You cannot
specify an owner or a
database server. You
cannot specify a synonym
or a view.
“Long
Identifiers” on
page A-107
WHERE_Clause Clause that specifies a
subset of table rows to
be replicated
WHERE clause
syntax; refer to
IBM Informix
Guide to SQL:
Syntax
The following guidelines apply to a SELECT statement that is used as a participant
modifier:
v The statement cannot include a join or a subquery.
v The FROM clause of the SELECT statement can reference only a single table.
v The table in the FROM clause must be the table specified by the participant.
v The columns selected must include the primary key.
v The columns selected can include any columns in the table, including those that
contain smart large objects and TEXT and BYTE data.
v The statement cannot perform operations on the selected columns.
v The statement can include an optional WHERE clause.
The WHERE clause of the SELECT statement of the participant modifier can
reference an opaque UDT, as long as the UDT is always stored in row. For more
information, see “Considerations for Replicating Opaque Data Types” on page
2-16.
Recommendation: Only replicate between like data types. For example, do not
replicate between the following:
v CHAR(40) to CHAR(20)
v INT to FLOAT
You can replicate between the following types with caution:
v SERIAL and INT
v BYTE and TEXT
v BLOB and CLOB
For detailed information about the SELECT statement and WHERE clause, refer to
the IBM Informix Guide to SQL: Syntax.
Return Codes
If the command encounters an error, the database server returns an error message
and a return-code value. The message briefly describes the error. For information
on interpreting the return code, use the cdr finderr command.
Frequency Options
The following commands allow you to specify the interval between replications or
the time of day when an action should occur. If you do not specify a time, the
action occurs immediately:
A-110 IBM Informix Dynamic Server Enterprise Replication Guide

v cdr define replicate
v cdr define replicateset
v cdr define template
v cdr modify replicate
v cdr modify replicateset
Frequency Options:
--immed
--every=interval
--at=time
Element Purpose Restrictions Syntax
interval Time interval for replication The smallest interval in
minutes.
“Intervals” on
page A-112
time Specific time for replication Time is given with respect
to a 24-hour clock.
“Time of Day”
on page A-111
The following table describes the frequency options.
Long Form Short Form Meaning
--immed -i Action occurs immediately.
--every -e Action occurs immediately and repeats at the
frequency specified by interval.
--at -a Action occurs at the specified day and time.
Time of Day
Enterprise Replication always gives the time of day in 24-hour time. For example,
19:30 is 7:30 P.M. Enterprise Replication always gives times with respect to the
local time, unless the TZ environment variable is set. However, Enterprise
Replication stores times in the global catalog in Greenwich Mean Time (GMT).
The -a time option lets you specify the day on which an action should occur. The
string timecan have the following formats:
v Day of week
To specify a specific day of the week, give either the long or short form of the
day, followed by a period and then the time. For example, --at=Sunday.18:40 or
-a Sun.18:40 specifies that the action should occur every Sunday at 6:40 P.M.
The day of the week is given in the locale of the client. For example, with a
French locale, you might have --at=Lundi.3:30 or -a Lun.3:30. The time and
day are in the time zone of the server.
v Day of month
To specify a specific day in the month, give the date, followed by a period, and
then the time. For example, 1.3:00 specifies that the action should occur at 3:00
A.M. on the first day of every month.
The special character L represents the last day of the month. For example,
L.17:00 is 5:00 P.M. on the last day of the month.
v Daily
Appendix A. Command-Line Utility Reference A-111

To specify that replication should occur each day, give only the time. For
example, 4:40 specifies that the action should occur every day at 4:40 A.M.
Intervals
The -e interval option lets you specify the interval between actions. The interval of
time between replications can be either of the following formats:
v The number of minutes
To specify the number of minutes, specify an integer value. For example, -e 60
indicates 60 minutes between replications.
If you specify the interval of time between replications in minutes, the longest
interval allowed is 1966020.
v The number of hours and minutes
To specify hours and minutes, give the number of hours, followed by a colon,
and then the number of minutes. For example, -e 5:45 indicates 5 hours and 45
minutes between replications.
If you specify the length of time in hours and minutes, the longest interval allowed
is 32767:59.
A-112 IBM Informix Dynamic Server Enterprise Replication Guide

Appendix B. Configuration Parameter and Environment
Variable Reference
The database server configuration file ($ONCONFIG) includes the following
configuration parameters that affect the behavior of Enterprise Replication:
v CDR_DBSPACE
v CDR_DSLOCKWAIT
v CDR_ENV
v CDR_EVALTHREADS
v CDR_MAX_DYNAMIC_LOGS
v CDR_NIFCOMPRESS
v CDR_QDATA_SBSPACE
v CDR_QHDR_DBSPACE
v CDR_QUEUEMEM
v CDR_SERIAL
v CDR_SUPPRESS_ATSRISWARN
v ENCRYPT_CDR
v ENCRYPT_CIPHERS
v ENCRYPT_MAC
v ENCRYPT_MACFILE
v ENCRYPT_SWITCH
Important: If you use both DBSERVERNAME and DBSERVERALIASES,
DBSERVERNAME should refer to the network connection and not to a
shared-memory connection. For information about database server
aliases, refer to the IBM Informix Dynamic Server Administrator's Guide.
Use the CDR_ENV configuration parameter to set the following environment
variables that affect the behavior of Enterprise Replication:
v CDR_LOGDELTA
v CDR_PERFLOG
v CDR_ROUTER
v CDR_RMSCALEFACT
CDR_DBSPACE Configuration Parameter
units any valid dbspace
takes effect when Enterprise Replication is initialized
The CDR_DBSPACE configuration parameter specifies the dbspace where the
syscdr database is created. If it is not set, then syscdr is created in the root
dbspace.
CDR_DSLOCKWAIT Configuration Parameter
default value 5
© Copyright IBM Corp. 1996, 2005 B-1

units seconds
takes effect when shared memory is initialized
The CDR_DSLOCKWAIT configuration parameter specifies the number of seconds
the Datasync (data synchronization) component waits for database locks to be
released. The CDR_DSLOCKWAIT parameter behaves similarly to the SET LOCK
MODE statement. Although the SET LOCK MODE is set by the end user
application, CDR_DSLOCKWAIT is used by Enterprise Replication while applying
data at the target database. This parameter is useful in conditions where different
sources require locks on the replicated table. These sources could be a replicated
transaction from another server or a local application operating on that table.
Transactions that receive updates and deletes from another server in the replicate
can abort because of locking problems. If you experience transaction aborts in the
Datasync due to lock timeouts like this, you might want to increase the value of
this parameter.
CDR_ENV Configuration Parameter
takes effect when Enterprise Replication is initialized
The CDR_ENV configuration parameter sets the Enterprise Replication
environment variables CDR_LOGDELTA, CDR_PERFLOG, CDR_ROUTER, or
CDR_RMSCALEFACT. The ONCONFIG file can contain multiple entries for
CDR_ENV. You can specify only one environment variable per CDR_ENV entry.
For example, to set the CDR_LOGDELTA environment variable to 30 and the
CDR_ROUTER environment variable to 1, include the following lines in the
ONCONFIG file:
CDR_ENV CDR_LOGDELTA=30
CDR_ENV CDR_ROUTER=1
Important: Use the CDR_LOGDELTA, CDR_PERFLOG, CDR_ROUTER, and
CDR_RMSCALEFACT environment variables only if instructed to do
so by Technical Support.
CDR_EVALTHREADS Configuration Parameter
default value 1,2
units evaluator thread instances
range of values 1 to 129 * the number of CPU VPs for each value
takes effect when shared memory is initialized
Enterprise Replication evaluates the images of a row in parallel to assure high
performance. Figure B-1 illustrates how Enterprise Replication uses parallel
processing to evaluate transactions for replication.
B-2 IBM Informix Dynamic Server Enterprise Replication Guide

The CDR_EVALTHREADS configuration parameter specifies the number of
grouper evaluator threads to create when Enterprise Replication starts and enables
parallelism. The format is:
(per-cpu-vp,additional)
The following table provides four examples of CDR_EVALTHREADS.
Number of
Threads
Explanation Example
1,2 1 evaluator thread per CPU VP,
plus 2
For a 3 CPU VP server: (3 * 1) + 2 = 5
2 2 evaluator threads per CPU VP For a 3 CPU VP server: (3 * 2) = 6
2,0 2 evaluator threads per CPU VP For a 3 CPU VP server: (3* 2)+0 = 6
0,4 4 evaluator threads for any
database server
For a 3 CPU VP server: (3 * 0) +4 = 4
Warning: Do not configure the total number of evaluator threads to be smaller
than the number of CPU VPs in the system.
CDR_MAX_DYNAMIC_LOGS Configuration Parameter
default value 0
range of values
v -1 add dynamic log files indefinitely
v 0 disable dynamic log addition
v >0 number of dynamic logs that can be added
takes effect when shared memory is initialized and the DYNAMIC_LOGS
configuration parameter is set to 2. For more information on the
DYNAMIC_LOGS configuration parameter, see the IBM Informix
Dynamic Server Administrator's Reference.
Logical log
Thre
ad
Fan out
EnterpriseReplicationmessage queue
Thre
adTh
read
Thre
ad
Evaluating transactions for replication
Transaction list
INV# Product1234 chandelier1235 candlestick
INV# Product3421 clock3427 china
INV# Product4325 crystal4367 silverware
INV# Product6798 pottery6520 ceramic_tile
Figure B-1. Processing in Parallel for High Performance
Appendix B. Configuration Parameter and Environment Variable Reference B-3

The CDR_MAX_DYNAMIC_LOGS configuration parameter specifies the number
of dynamic log file requests that Enterprise Replication can make in one server
session.
For more information, see “Preventing DDRBLOCK Mode” on page 8-8.
CDR_NIFCOMPRESS Configuration Parameter
default value 0
range of values
v -1 specifies no compression
v 0 specifies to compress only if the target server expects
compression
v 1 - 9 specifies increasing levels of compression
takes effect when Enterprise Replication is initialized
The CDR_NIFCOMPRESS (network interface compression) configuration parameter
specifies the level of compression that the database server uses before sending data
from the source database server to the target database server. Network
compression saves network bandwidth over slow links but uses more CPU to
compress and decompress the data.
The values have the following meanings.
Value Meaning
-1 The source database server never compresses the data, regardless of
whether or not the target site uses compression.
0 The source database server compresses the data only if the target database
server expects compressed data.
1 The database server performs a minimum amount of compression.
9 The database server performs the maximum possible compression.
When Enterprise Replication is defined between two database servers, the
CDR_NIFCOMPRESS values of the two servers are compared and changed to the
higher compression values.
The compression values determine how much memory can be used to store
information while compressing, as follows:
0 = no additional memory
1 = 128k + 1k = 129k
2 = 128k + 2k = 130k
...
6 = 128k + 32k = 160k
...
8 = 128k + 128k = 256k
9 = 128k + 256k = 384k
Higher levels of CDR_NIFCOMPRESS cause greater compression.
Different sites can have different levels. For example, Figure B-2 shows a set of
three root servers connected with LAN and a nonroot server connected over a
modem. The CDR_NIFCOMPRESS configuration parameter is set so that
B-4 IBM Informix Dynamic Server Enterprise Replication Guide
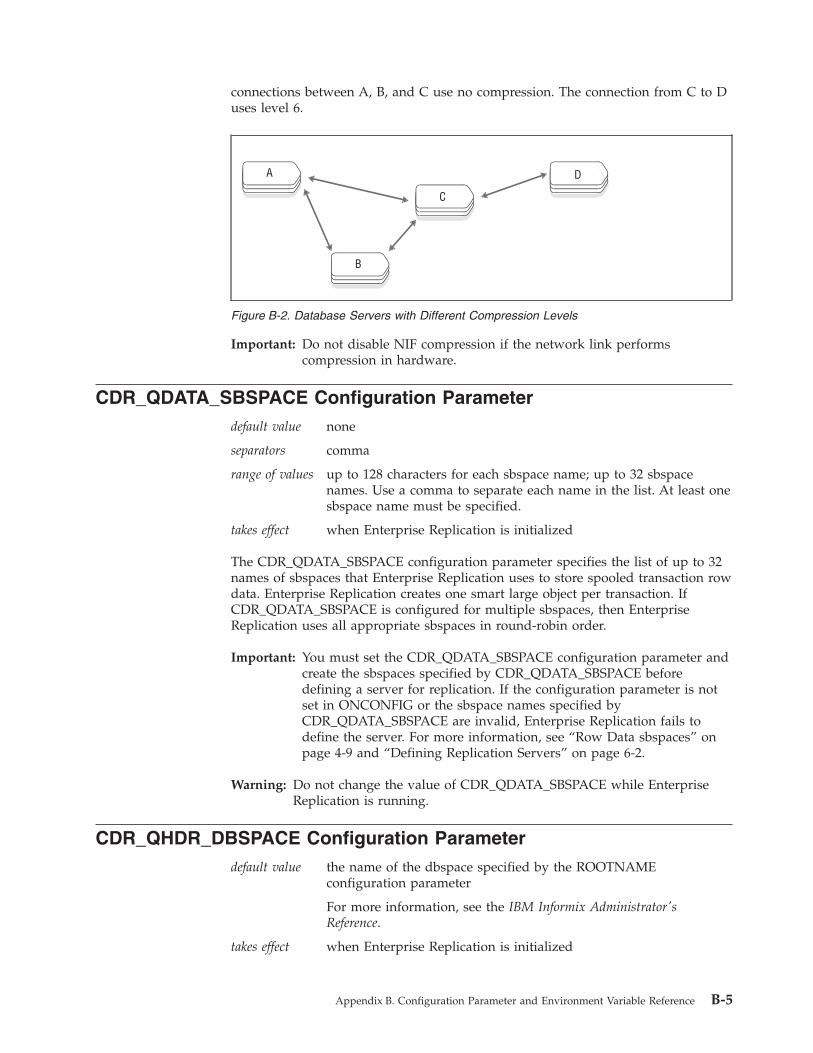
connections between A, B, and C use no compression. The connection from C to D
uses level 6.
Important: Do not disable NIF compression if the network link performs
compression in hardware.
CDR_QDATA_SBSPACE Configuration Parameter
default value none
separators comma
range of values up to 128 characters for each sbspace name; up to 32 sbspace
names. Use a comma to separate each name in the list. At least one
sbspace name must be specified.
takes effect when Enterprise Replication is initialized
The CDR_QDATA_SBSPACE configuration parameter specifies the list of up to 32
names of sbspaces that Enterprise Replication uses to store spooled transaction row
data. Enterprise Replication creates one smart large object per transaction. If
CDR_QDATA_SBSPACE is configured for multiple sbspaces, then Enterprise
Replication uses all appropriate sbspaces in round-robin order.
Important: You must set the CDR_QDATA_SBSPACE configuration parameter and
create the sbspaces specified by CDR_QDATA_SBSPACE before
defining a server for replication. If the configuration parameter is not
set in ONCONFIG or the sbspace names specified by
CDR_QDATA_SBSPACE are invalid, Enterprise Replication fails to
define the server. For more information, see “Row Data sbspaces” on
page 4-9 and “Defining Replication Servers” on page 6-2.
Warning: Do not change the value of CDR_QDATA_SBSPACE while Enterprise
Replication is running.
CDR_QHDR_DBSPACE Configuration Parameter
default value the name of the dbspace specified by the ROOTNAME
configuration parameter
For more information, see the IBM Informix Administrator's
Reference.
takes effect when Enterprise Replication is initialized
B
D
C
A
Figure B-2. Database Servers with Different Compression Levels
Appendix B. Configuration Parameter and Environment Variable Reference B-5

The CDR_QHDR_DBSPACE configuration parameter specifies the location of the
dbspace that Enterprise Replication uses to store the transaction record headers
spooled from the send and receive queues. By default, Enterprise Replication stores
the transaction record headers in the root dbspace. For more information, see
“Transaction Record dbspace” on page 4-8.
Warning: Do not change the value of CDR_QHDR_DBSPACE after you initialize
Enterprise Replication.
CDR_QUEUEMEM Configuration Parameter
default value 4096
units kilobytes
range of values > = 500
takes effect when shared memory is initialized
The CDR_QUEUEMEM configuration parameter specifies the maximum amount of
memory that is used for the send and receive queues. If your logical logs are large,
the Enterprise Replication reads a large amount of data into queues in memory.
You can use CDR_QUEUEMEM to limit the amount of memory devoted to the
queues.
The maximum memory used for queued elements on a replication server is the
total number of database servers involved in replication, multiplied by the value of
CDR_QUEUEMEM.
When you increase the value of CDR_QUEUEMEM, you reduce the number of
elements that must be written to disk, which can eliminate I/O overhead.
Therefore, if elements are frequently stored on disk, increase the value of
CDR_QUEUEMEM. Conversely, if you set the value of CDR_QUEUEMEM too
high, you might adversely impact the performance of your system. High values for
CDR_QUEUEMEM also increase the time necessary for recovery. Tune the value of
CDR_QUEUEMEM for the amount of memory available on your computer.
CDR_SERIAL Configuration Parameter
default value 0,0
units delta, offset
range of values 0,0 disable control of serial column value generation
>0,>0 enable control of serial column value generation
takes effect when Enterprise Replication is initialized
The CDR_SERIAL configuration parameter enables control over generating values
for serial and SERIAL8 columns in tables defined for replication. This is useful for
generating unique serial column primary keys in an Enterprise Replication
environment.
The format is:
CDR_SERIAL delta,offset
where:
B-6 IBM Informix Dynamic Server Enterprise Replication Guide

delta determines the incremental size of the serial column values
offset determines the specific number within the delta that will be
generated.
Example CDR_SERIAL Value Resulting Value for the SERIAL Column
CDR_SERIAL 100,1 1, 101, 201, 301, and so on
CDR_SERIAL 200,2 2, 202, 402, 602, and so on
You should set the delta to greater than the expected number of servers within
your enterprise and make sure the offset is unique on each server.
When you set CDR_SERIAL, only tables that are marked as the source of a
replicate use this method of serial column generation. By default, CDR_SERIAL is
set to 0 to disable control over generating SERIAL and SERIAL8 values.
For more information, see “SERIAL Data Types and Primary Keys” on page 2-7.
CDR_SUPPRESS_ATSRISWARN Configuration Parameter
default value none
separators commas or as range of values specified with a hyphen
takes effect when Enterprise Replication is initialized
The CDR_SUPPRESS_ATSRISWARN configuration parameter specifies the
Datasync error and warning code numbers to be suppressed in ATS and RIS files.
For example, you can set CDR_SUPPRESS_ATSRISWARN to 2-5, 7 to suppress the
generation of error and warning messages 2, 3, 4, 5, and 7. For a list of error and
message numbers see Appendix G, “Datasync Warning and Error Messages,” on
page G-1.
ENCRYPT_CDR Configuration Parameter
default value 0
range of values 0 do not encrypt
1 encrypt when possible
2 always encrypt
takes effect when Enterprise Replication is initialized
The ENCRYPT_CDR configuration parameter sets the level of encryption for
Enterprise Replication.
If the ENCRYPT_CDR configuration parameter is set to 1, then encryption is used
for Enterprise Replication transactions only when the database server being
connected to also supports encryption. This option allows unencrypted
communication with versions of Dynamic Server prior to 9.40.
If the ENCRYPT_CDR configuration parameter is set to 2, then only connections to
encrypted database servers are allowed.
If you use both encryption and compression (by setting the CDR_NIFCOMPRESS
configuration parameter), then compression occurs before encryption.
Appendix B. Configuration Parameter and Environment Variable Reference B-7

ENCRYPT_CIPHERS Configuration Parameter
syntax ENCRYPT_CYPHERS all|allbut:<list of ciphers and
modes>|cipher:mode{,cipher:mode ...}
v all
Specifies to include all available ciphers and modes, except ECB
mode. For example: ENCRYPT_CIPHERS all
v allbut:<list of ciphers and modes>
Specifies to include all ciphers and modes except the ones in the
list. Separate ciphers or modes with a comma. For example:
ENCRYPT_CIPHERS allbut:<cbc,bf>
v cipher:mode
Specifies the ciphers and modes. Separate cipher-mode pairs
with a comma. For example: ENCRYPT_CIPHERS
des3:cbc,des3:ofb
default value allbut:<ecb>
takes effect when Enterprise Replication is initialized
The ENCRYPT_CIPHERS configuration parameter defines all ciphers and modes
that can be used by the current database session.
The cipher list for allbut can include unique, abbreviated entries. For example, bf
can represent bf-1, bf-2, and bf-3. However, if the abbreviation is the name of an
actual cipher, then only that cipher is eliminated. Therefore, des eliminates only the
des cipher, but de eliminates des, des3, and desx.
Important: The encryption cipher and mode used is randomly chosen among the
ciphers common between the two servers. It is strongly recommended
that you do not specify specific ciphers. For security reasons, all
ciphers should be allowed. If a specific cipher is discovered to have a
weakness, then that cipher can be eliminated by using the allbut
option.
The following ciphers are supported. For an updated list, see the Release Notes.
des DES (64-bit key) bf-1 Blow Fish (64-bit key)
des3 Triple DES bf-2 Blow Fish (128-bit key)
desx Extended DES (128-bit key) bf-3 Blow Fish (192-bit key)
aes AES 128bit key aes128 AES 128bit key
aes192 AES 192bit key aes256 aes 256bit key
The following modes are supported.
ecb Electronic Code Book (ECB)
cbc Cipher Block Chaining
cfb Cipher Feedback
ofb Output Feedback
All ciphers support all modes, except the desx cipher, which only supports the cbc
mode.
B-8 IBM Informix Dynamic Server Enterprise Replication Guide
3
3

Because cdb mode is considered weak, it is only included if specifically requested.
It is not included in the all or the allbut list.
ENCRYPT_MAC Configuration Parameter
default value medium
range of values One or more of the following options, separated by commas:
v off does not use MAC generation.
v low uses XOR folding on all messages.
v medium uses SHA1 MAC generation for all messages greater than
20 bytes long and XOR folding on smaller messages.
v high uses SHA1 MAC generation on all messages.
For example: ENCRYPT_MAC medium,high
takes effect when Enterprise Replication is initialized
The ENCRYPT_MAC configuration parameter controls the level of message
authentication code (MAC) generation.
The level is prioritized to the highest value. For example, if one node has a level of
high and medium enabled and the other node has only low enabled, then the
connection attempt fails. Use the off entry between servers only when a secure
network connection is guaranteed.
ENCRYPT_MACFILE Configuration Parameter
default value builtin
units pathnames, up to 1536 bytes in length
range of values One or more full path and filenames separated by commas, and
the optional builtin keyword. For example: ENCRYPT_MACKFILE
/usr/local/bin/mac1.dat, /usr/local/bin/mac2.dat,builtin
takes effect when Enterprise Replication is initialized
The ENCRYPT_MACFILE configuration parameter specifies a list of the full path
names of MAC key files.
To specify the built-in key, use the keyword builtin. Using the builtin option
provides limited message verification (some validation of the received message and
determination that it appears to have come from a Dynamic Server client or
server). The strongest verification is done by a site-generated MAC key file.
To generate a MAC key file:
1. Execute the following command from the command line:
GenMacKey –o filename
The filename is the name of the MAC key file.
2. Update the ENCRYPT_MACFILE configuration parameter on all Enterprise
Replication servers to include the location of the new MAC key file.
3. Distribute the new MAC key file.
Each of the entries for the ENCRYPT_MACFILE configuration parameter is
prioritized and negotiated at connect time. The prioritization for the MAC key files
Appendix B. Configuration Parameter and Environment Variable Reference B-9

is based on their creation time by the GenMacKey utility. The builtin option has
the lowest priority. Because the MAC key files are negotiated, you should
periodically change the keys.
ENCRYPT_SWITCH Configuration Parameter
syntax ENCRYPT_SWITCH cipher_switch_time, key_switch_time
v cipher_switch_time specifies the minutes between cipher
renegotiation
v key_switch_time specifies the minutes between secret key
renegotiation
default value 60,60
units minutes
range of values positive integers
takes effect when Enterprise Replication is initialized
The ENCRYPT_SWITCH configuration parameter defines the frequency at which
ciphers or secret keys are renegotiated. The longer the secret key and encryption
cipher remains in use, the more likely the encryption rules might be broken by an
attacker. To avoid this, cryptologists recommend changing the secret keys on
long-term connections. The default time that this renegotiation occurs is once an
hour.
Environment Variables
The following environment variables affect the behavior of Enterprise Replication.
For a complete list of environment variables, and how to set them, see the IBM
Informix Guide to SQL: Reference.
v CDR_LOGDELTA
v CDR_PERFLOG
v CDR_RMSCALEFACT
v CDR_ROUTER
v CDRSITES_731
v CDRSITES_92X
CDR_LOGDELTA Environment Variable
default value 30
range of values positive numbers
takes effect when Enterprise Replication is initialized
The CDR_LOGDELTA environment variable determines when the send and receive
queues are spooled to disk as a percentage of the logical log size. Use the
CDR_ENV configuration parameter to set this environment variable. For more
information, see “CDR_ENV Configuration Parameter” on page B-2.
Important: Do not use the CDR_LOGDELTA environment variable unless
instructed to do so by Technical Support.
B-10 IBM Informix Dynamic Server Enterprise Replication Guide
CDR_PERFLOG Environment Variable
default value 0
range of values positive number
takes effect when Enterprise Replication is initialized
The CDR_PERFLOG environment variable enables queue tracing, which can be
displayed with the onstat -g que perf command. Use the CDR_ENV configuration
parameter to set this environment variable. For more information, see “CDR_ENV
Configuration Parameter” on page B-2.
Important: Do not use the CDR_PERFLOG environment variable unless instructed
to do so by Technical Support.
CDR_RMSCALEFACT Environment Variable
default value 4
range of values positive number
takes effect when Enterprise Replication is initialized
The CDR_RMSCALEFACT environment variable sets the number of DataSync
threads started for each CPU VP. Specifying a large number of threads can result in
wasted resources. Use the CDR_ENV configuration parameter to set this
environment variable. For more information, see “CDR_ENV Configuration
Parameter” on page B-2.
Important: Do not use the CDR_RMSCALEFACT environment variable unless
instructed to do so by Technical Support.
CDR_ROUTER Environment Variable
default value 0
range of values any number
takes effect when Enterprise Replication is initialized
When set to 1, the CDR_ROUTER environment variable disables intermediate
acknowledgements of transactions in hierarchical topologies. The normal behavior
for intermediate servers is to send acknowledgements if they receive an
acknowledgment from the next server in the replication tree (can be a leaf server)
or if the transaction is stored in the local queue. Use the CDR_ENV configuration
parameter to set this environment variable. For more information, see “CDR_ENV
Configuration Parameter” on page B-2.
If CDR_ROUTER is set at the hub server, an acknowledgement will be sent only if
the hub server receives acknowledgement from all of its leaf servers. Transactions
will not be acknowledged even if they are stored in the local queue of the hub
server.
If CDR_ROUTER is not set at hub server, the hub server will send an
acknowledgement if the transaction is stored in the local queue at the hub server
or if the hub server received acknowledgement from all of its leaf servers.
Appendix B. Configuration Parameter and Environment Variable Reference B-11

Important: Do not use the CDR_ROUTER environment variable unless instructed
to do so by Technical Support.
CDRSITES_731 Environment Variable
units cdrIDs, which are the unique identifiers for the database server in
the Options field of the SQLHOSTS file ( i = unique_ID)
range of values positive numbers
takes effect when Enterprise Replication is initialized
In mixed-version Enterprise Replication environments that involve post
7.3x/7.20x/7.24x servers, the NIF does not properly report its version when it
responds to a new server. When a new server sends an initial protocol message to
a sync server, the sync server, instead of properly giving its version, gives back the
version of the new server. If a 10.0/9.40/9.30 server tries to synchronize with a
7.3x/7.20x/7.24x server, the older server responds to the 10.0/9.40/9.30 server that
it is a 10.0/9.40/9.30 server and will subsequently fail.
To prevent this malfunction:
If you have Version 7.3x/7.20x/7.24x servers in your Enterprise Replication
environment, set the CDRSITES_731 environment variable, as appropriate, for 9.30,
9.40, or 10.0 database servers by setting the CDRSITES_731 cdrID for these
Version 7.x database servers.
The cdrID is the unique identifier for the database server in the Options field of
the SQLHOSTS file ( i = unique_ID).
For example, suppose that you have 5 Informix Dynamic Servers, Version 7x
servers whose cdrID values range from 1 through 7 (cdrIDs = 1, 4, 5, 6, and 7)
If you upgrade database server cdrID 6 to Version 10.0/9.40/9.30, you must set the
CDRSITES_731 environment variable for the other server cdrIDs before bringing
the Version 10.0/9.40/9.30 database server online:
setenv CDRSITES_731 ″1,4,5,7″
CDRSITES_92X Environment Variable
units cdrIDs, which are the unique identifiers for the database server in
the Options field of the SQLHOSTS file ( i = unique_ID)
range of values positive numbers
takes effect when Enterprise Replication is initialized
In mixed-version Enterprise Replication environments that involve 9.21/9.20
servers, the NIF does not properly report its version when it responds to a new
server. When a new server sends an initial protocol message to a sync server, the
sync server, instead of properly giving its version, gives back the version of the
new server. If a 10.0/9.40/9.30 server tries to synchronize with a 9.21/9.20 server,
the older server responds to the 10.0/9.40/9.30 server that it is a 10.0/9.40/9.30
server and will subsequently fail.
To prevent this malfunction:
B-12 IBM Informix Dynamic Server Enterprise Replication Guide

If you have Version 9.21/9.20 servers in your Enterprise Replication environment,
set the CDRSITES_92X environment variable, as appropriate, for 9.30, 9.40, or 10.0
database servers by setting the CDRSITES_92x cdrID for these Version 9.20 and
9.21 servers.
The cdrID is the unique identifier for the database server in the Options field of
the SQLHOSTS file ( i = unique_ID).
For example, suppose that you have 5 Informix Dynamic Servers, Version 9.21/9.20
whose cdrID values range from 2 through 10 (cdrIDs = 2, 3, 8, 9, and 10)
If you upgrade database server cdrID 8 to Version 10.0/9.40/9.30, you must set the
CDRSITES_92X environment variable for the other server cdrIDs before bringing
the Version 10.0/9.40/9.30 database server online:
setenv CDRSITES_92x ″2,3,9,10″
Appendix B. Configuration Parameter and Environment Variable Reference B-13

B-14 IBM Informix Dynamic Server Enterprise Replication Guide

Appendix C. onstat Command Reference
This appendix describes forms of the onstat command that are relevant to
Enterprise Replication. The onstat utility reads shared-memory structures and
provides statistics about the database server that are accurate at the instant that the
command executes. The system-monitoring interface (SMI) also provides information
about the database server. For general information about onstat and SMI, refer to
the IBM Informix Administrator's Reference. For information specific to Enterprise
Replication, see Appendix D, “SMI Table Reference,” on page D-1
onstat -g Command Summary
Command Page
onstat -g ath C-1
onstat -g cat C-2
onstat -g ddr C-3
onstat -g dss C-4
onstat -g dtc C-5
onstat -g grp C-6
onstat -g nif C-11
onstat -g que C-12
onstat -g rcv C-13
onstat -g rep C-15
onstat -g rqm C-16
onstat -g sync C-18
The onstat -g commands are provided for support and debugging only. You can
include only one of these options with each onstat -g command. This appendix
describes the following onstat -g commands:
onstat -g ath
The onstat -g ath command prints information about all threads.
The following table summarizes the threads that Enterprise Replication uses. You
can use this information about threads when you evaluate memory use. For more
information, see the utilities chapter of the IBM Informix Administrator's Reference.
Number of
Threads Thread Name Thread Description
1 ddr_snoopy Performs physical I/O from logical log, verifies potential replication,
and sends applicable log-record entries to Enterprise Replication
1 preDDR Runs during queue recovery to monitor the log and sets blockout mode
if the log position advances too far before replication resumes
1 CDRGfan Receives log entries and passes entries to evaluator thread
© Copyright IBM Corp. 1996, 2005 C-1

Number of
Threads Thread Name Thread Description
n CDRGevaln Evaluates log entry to determine if it should be replicated (n is the
number of evaluator threads specified by CDR_EVALTHREADS)
This thread also performs transaction compression on the receipt of
COMMIT WORK and queues completed replication messages.
1 per large
transaction
CDRPager Performs the physical IO for the temporary smart large object that holds
paged transaction records
Grouper paging is activated for a transaction when its size is 10 percent
of the value of SHMVIRTSIZE or CDR_QUEUEMEM or when it
includes more than 100,000 records.
1 CDRCparse Parses all SQL statements for replicate definitions
1 per
connection
CDRNsTnCDRNsAn Sending thread for site
1 per
connection
CDRNrn Receiving thread for site
2...n CDRACK_n Accepts acknowledgments from site
At least 2, up to a maximum of the number of active connections
# CPUs... CDRD_n Replays transaction on the target system (DataSync thread)
At least one thread is created for each CPU virtual processor (VP). The
maximum number of threads is 4*(number of CPU VPs).
1 CDRSchedMgr Schedules internal Enterprise Replication events
0 or 1 CDRM_Monitor Monitors and adjusts DataSync performance for optimum performance
(on the target)
0 or 1 CDRDTCleaner Deletes (cleans) rows from the deleted rows shadow table when they
are no longer needed
onstat -g cat
The onstat -g cat command prints information from the Enterprise Replication
global catalog. The global catalog contains a summary of information about the
defined servers, replicates, and replicate sets on each of the servers within the
enterprise. If a replicated table is undergoing an alter operation, the onstat -g cat
command shows that it is in alter mode. For example, use this command to
determine:
v How many servers and how many replicates are configured
v Which table matches a given replicate
v Whether a server is a root or leaf server
v The current bitmap mask for a given server. You can use the bitmap mask with
the output from the onstat -g rqm command to determine which server
Enterprise Replication is waiting on for an acknowledgement.
The onstat -g cat command has the following formats:
onstat -g cat
onstat -g cat scope
onstat -g cat replname
C-2 IBM Informix Dynamic Server Enterprise Replication Guide
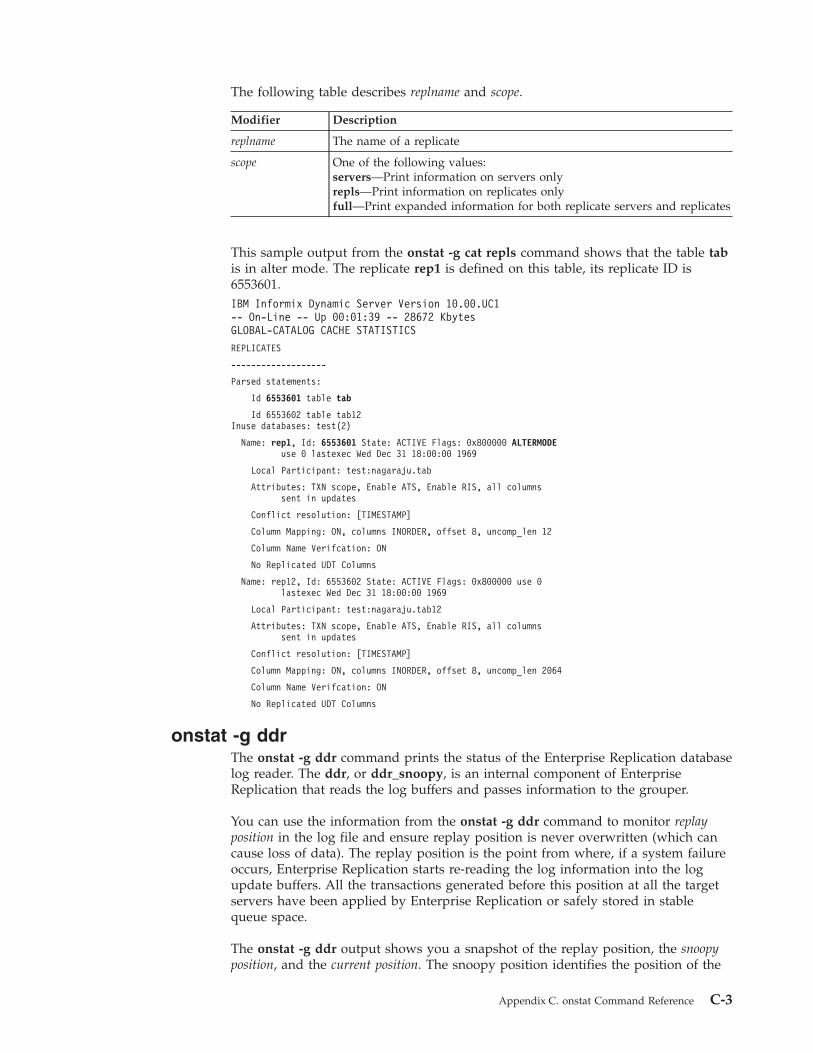
The following table describes replname and scope.
Modifier Description
replname The name of a replicate
scope One of the following values:
servers—Print information on servers only
repls—Print information on replicates only
full—Print expanded information for both replicate servers and replicates
This sample output from the onstat -g cat repls command shows that the table tab
is in alter mode. The replicate rep1 is defined on this table, its replicate ID is
6553601.
IBM Informix Dynamic Server Version 10.00.UC1
-- On-Line -- Up 00:01:39 -- 28672 Kbytes
GLOBAL-CATALOG CACHE STATISTICS
REPLICATES
-------------------
Parsed statements:
Id 6553601 table tab
Id 6553602 table tab12
Inuse databases: test(2)
Name: rep1, Id: 6553601 State: ACTIVE Flags: 0x800000 ALTERMODE
use 0 lastexec Wed Dec 31 18:00:00 1969
Local Participant: test:nagaraju.tab
Attributes: TXN scope, Enable ATS, Enable RIS, all columns
sent in updates
Conflict resolution: [TIMESTAMP]
Column Mapping: ON, columns INORDER, offset 8, uncomp_len 12
Column Name Verifcation: ON
No Replicated UDT Columns
Name: rep12, Id: 6553602 State: ACTIVE Flags: 0x800000 use 0
lastexec Wed Dec 31 18:00:00 1969
Local Participant: test:nagaraju.tab12
Attributes: TXN scope, Enable ATS, Enable RIS, all columns
sent in updates
Conflict resolution: [TIMESTAMP]
Column Mapping: ON, columns INORDER, offset 8, uncomp_len 2064
Column Name Verifcation: ON
No Replicated UDT Columns
onstat -g ddr
The onstat -g ddr command prints the status of the Enterprise Replication database
log reader. The ddr, or ddr_snoopy, is an internal component of Enterprise
Replication that reads the log buffers and passes information to the grouper.
You can use the information from the onstat -g ddr command to monitor replay
position in the log file and ensure replay position is never overwritten (which can
cause loss of data). The replay position is the point from where, if a system failure
occurs, Enterprise Replication starts re-reading the log information into the log
update buffers. All the transactions generated before this position at all the target
servers have been applied by Enterprise Replication or safely stored in stable
queue space.
The onstat -g ddr output shows you a snapshot of the replay position, the snoopy
position, and the current position. The snoopy position identifies the position of the
Appendix C. onstat Command Reference C-3

ddr_snoopy thread in the logical logs. The ddr_snoopy has read the log records up
until this point. The current position is the position where the server has written
its last logical log record.
The log needs position is based on replay position and is set at a certain distance
from replay position, for example, at seventy percent of the log file. The remainder
of the circular log file comprises the DDR BLOCK zone. As messages are
acknowledged or stored in the stable queue, the replay position, and hence also the
log needs position, should advance. If you notice that replay position is not
advancing, this can mean that the stable queue is full or a remote server is down.
If log reading is blocked, data might not be replicated until the problem is
resolved. If the block is not resolved, the database server might overwrite the read
(ddr_snoopy) position, which means that data will not be replicated. If this occurs,
you must manually resynchronize the source and target databases.
If you are running servers prior to Version 9.3, to avoid these problems, IBM
recommends that you:
v Have 24 hours of online log space available
v Keep the log file size consistent. Instead of having a single large log file,
implement several smaller ones.
v Avoid switching logical logs more than once per hour.
v Keep some distance between LTXHWM (long-transaction high-watermark) and
LTXEHWM (long-transaction, exclusive-access, high-watermark).
For servers of Version 9.4, and later, you can enable dynamic log creation by
setting the CDR_MAX_DYNAMIC_LOGS configuration parameter in the
ONCONFIG file. If the current position reaches the log needs position, instead of
going into a blocked state, Enterprise Replication automatically adds another log
file. If this option is set, the onstat -g ddr command prints the number of dynamic
log requests made.
The following sample output from the onstat ddr command shows the replay
position, snoopy position, and current position highlighted.
DDR -- Running
# Event Snoopy Snoopy Replay Replay Current Current
Buffers ID Position ID Position ID Position
528 24 165018 24 6a018 24 166000
Log Pages Snooped: From From Tossed
Cache Disk (LBC full)
247 111 0
Total dynamic log requests: 0
DDR events queue
Type TX id Partnum Row id
onstat -g dss
The onstat -g dss command prints detailed statistical information about the activity
of individual data sync threads. The data sync thread applies the transaction on
the target server. Statistics include the number of applied transactions and failures
and when the last transaction from a source was applied.
The onstat -g dss command has the following formats:
C-4 IBM Informix Dynamic Server Enterprise Replication Guide

onstat -g dss
onstat -g dss modifier
The following table describes the values for modifier.
Modifier Action
UDR Prints summary information about any UDR invocations by the data sync
threads.
UDRx Prints expanded information (including a summary of error information)
about any UDR invocations by the data sync threads. The Procid column
lists the UDR procedure ID.
In the following example, only one data sync thread is currently processing the
replicated data. It has applied a total of one replicated transaction and the
transaction was applied at 2004/09/13 18:13:10. The Processed Time field shows
the time when the last transaction was processed by this data sync thread.
IBM Informix Dynamic Server Version 10.00.UC1 -- On-Line
-- Up 00:00:28 -- 28672 Kbytes
DS thread statistic
cmtTime Tx Tx Tx Last Tx
Name < local Committed Aborted Processed Processed Time
------------ ------- --------- ------- --------- -----------------
CDRD_1 0 1 0 1 (1095117190) 2004/09/13
18:13:10
Tables (0.0%):
Databases: test
CDR_DSLOCKWAIT = 1
CDR_DSCLOSEINTERVAL = 60
onstat -g dtc
The onstat -g dtc command prints statistics about the delete table cleaner. The
delete table cleaner removes rows from the delete table when they are no longer
needed.
The -g dtc option is used primarily as a debugging tool and by Technical Support.
In the following example, the thread name of the delete table cleaner is
CDRDTCleaner. The total number of rows deleted is 1. The last activity on this
thread occurred at 2004/09/13 18:47:19. The delete table for replicate rep1 was last
cleaned at 2004/09/13 18:28:25.
IBM Informix Dynamic Server Version 10.00.UC1 -- On-Line
-- Up 00:59:15 -- 28672 Kbytes
-- Delete Table Cleanup Status as of (1095119368) 2004/09/13 18:49:28
thread = 49 <CDRDTCleaner>
rows deleted = 1
lock timeouts = 0
cleanup interval = 300
list size = 3
last activity = (1095119239) 2004/09/13 18:47:19
Id Database Last Cleanup Time
Replicate Server Last Log Change
=========================================================
Appendix C. onstat Command Reference C-5
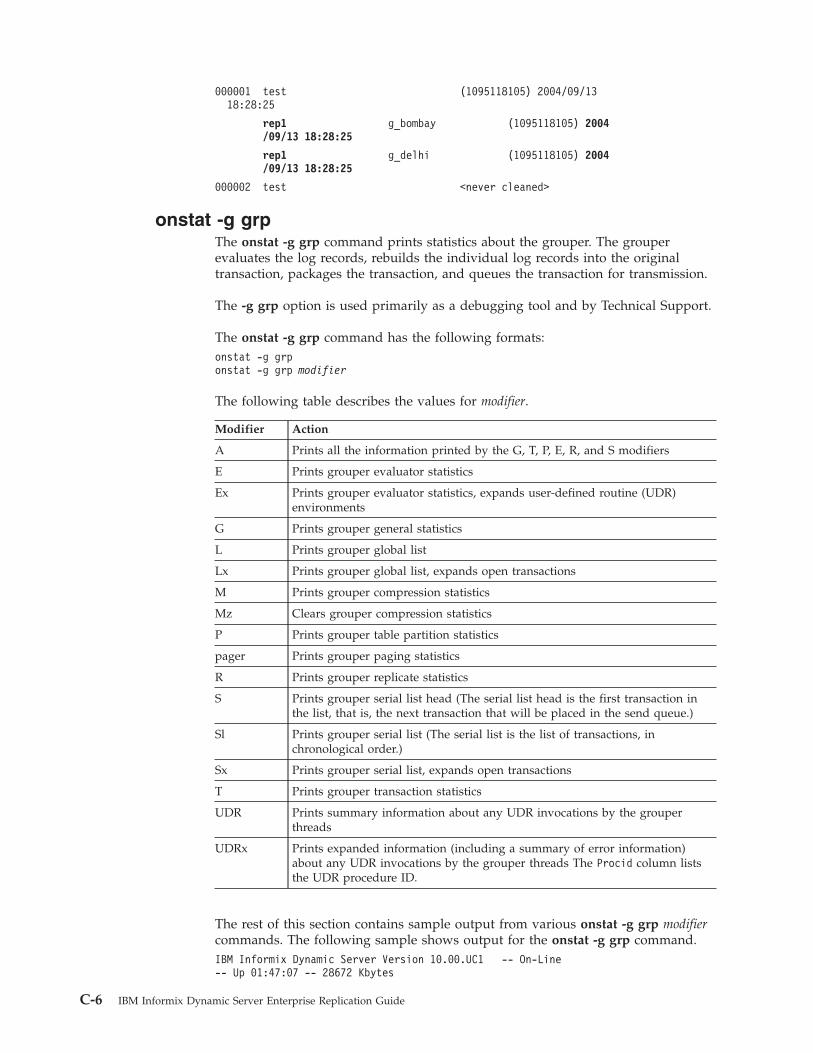
000001 test (1095118105) 2004/09/13
18:28:25
rep1 g_bombay (1095118105) 2004
/09/13 18:28:25
rep1 g_delhi (1095118105) 2004
/09/13 18:28:25
000002 test <never cleaned>
onstat -g grp
The onstat -g grp command prints statistics about the grouper. The grouper
evaluates the log records, rebuilds the individual log records into the original
transaction, packages the transaction, and queues the transaction for transmission.
The -g grp option is used primarily as a debugging tool and by Technical Support.
The onstat -g grp command has the following formats:
onstat -g grp
onstat -g grp modifier
The following table describes the values for modifier.
Modifier Action
A Prints all the information printed by the G, T, P, E, R, and S modifiers
E Prints grouper evaluator statistics
Ex Prints grouper evaluator statistics, expands user-defined routine (UDR)
environments
G Prints grouper general statistics
L Prints grouper global list
Lx Prints grouper global list, expands open transactions
M Prints grouper compression statistics
Mz Clears grouper compression statistics
P Prints grouper table partition statistics
pager Prints grouper paging statistics
R Prints grouper replicate statistics
S Prints grouper serial list head (The serial list head is the first transaction in
the list, that is, the next transaction that will be placed in the send queue.)
Sl Prints grouper serial list (The serial list is the list of transactions, in
chronological order.)
Sx Prints grouper serial list, expands open transactions
T Prints grouper transaction statistics
UDR Prints summary information about any UDR invocations by the grouper
threads
UDRx Prints expanded information (including a summary of error information)
about any UDR invocations by the grouper threads The Procid column lists
the UDR procedure ID.
The rest of this section contains sample output from various onstat -g grp modifier
commands. The following sample shows output for the onstat -g grp command.
IBM Informix Dynamic Server Version 10.00.UC1 -- On-Line
-- Up 01:47:07 -- 28672 Kbytes
C-6 IBM Informix Dynamic Server Enterprise Replication Guide

Grouper at 0xb014018:
Last Idle Time: (1095122236) 2004/09/13 19:37:16
RSAM interface ring buffer size: 528
RSAM interface ring buffer pending entries: 0
Eval thread interface ring buffer size: 48
Eval thread interface ring buffer pending entries: 0
Log update buffers in use: 0
Max log update buffers used at once: 5
Log update buffer memory in use: 0
Max log update buffer memory used at once: 320
Updates from Log: 16
Log update links allocated: 512
Blob links allocated: 0
Conflict Resolution Blocks Allocated: 0
Memory pool cache: Empty
Last Tx to Queuer began : (1095118105) 2004/09/13 18:28:25
Last Tx to Queuer ended : (1095118105) 2004/09/13 18:28:25
Last Tx to Queuer log ID, position: 12,23
Open Tx: 0
Serial Tx: 0
Tx not sent: 0
Tx sent to Queuer: 2
Tx returned from Queuer: 2
Events sent to Queuer: 7
Events returned from Queuer: 7
Total rows sent to Queuer: 2
Open Tx array size: 1024
Table ’tab’ at 0xae8ebb0 [ CDRShadow ]
Table ’tab12’ at 0xae445e0 [ CDRShadow ]
Grouper Table Partitions:
Slot 312...
’tab’ 1048888
Slot 770...
’tab12’ 3145730
Slot 1026...
’tab12’ 4194306
Repl links on global free list: 2
Evaluators: 3
Evaluator at 0xb03d030 ID 0 [Idle:Idle] Protection:unused
Eval iteration: 1264
Updates evaluated: 0
Repl links on local free list: 256
UDR environment table at 0xb03d080
Number of environments: 0
Table memory limit : 25165
Table memory used : 0
SAPI memory limit : 131072
SAPI memory used : 0
Appendix C. onstat Command Reference C-7
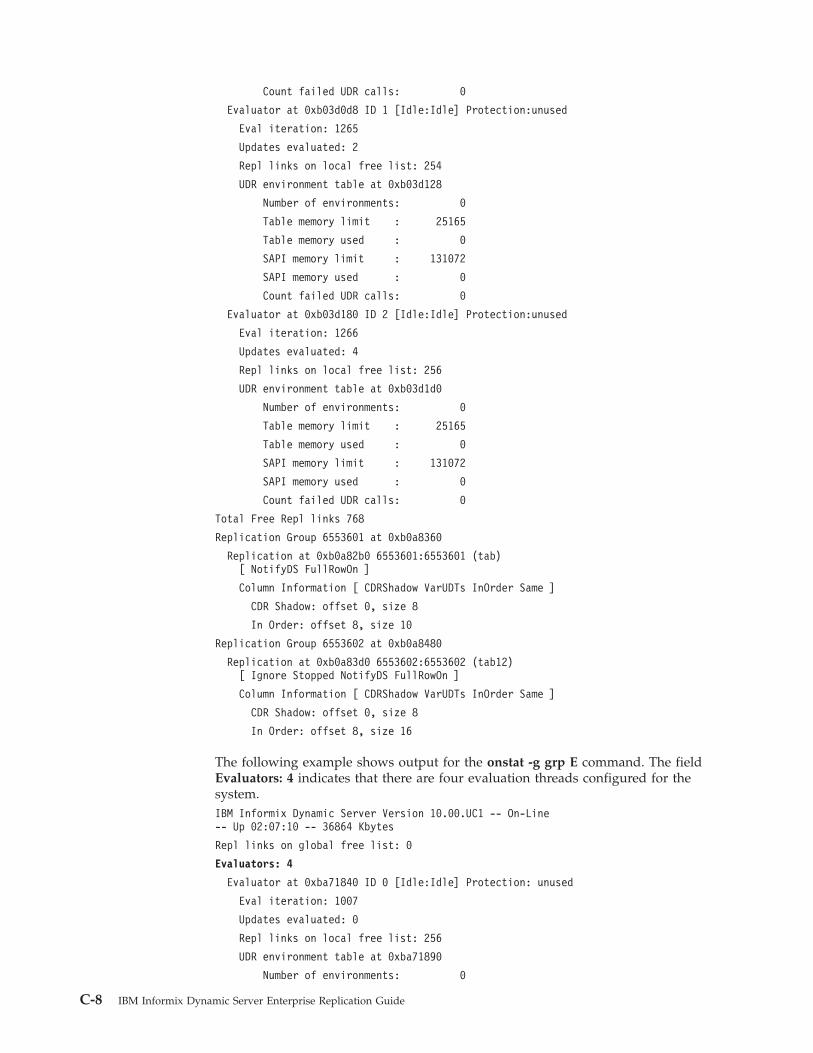
Count failed UDR calls: 0
Evaluator at 0xb03d0d8 ID 1 [Idle:Idle] Protection:unused
Eval iteration: 1265
Updates evaluated: 2
Repl links on local free list: 254
UDR environment table at 0xb03d128
Number of environments: 0
Table memory limit : 25165
Table memory used : 0
SAPI memory limit : 131072
SAPI memory used : 0
Count failed UDR calls: 0
Evaluator at 0xb03d180 ID 2 [Idle:Idle] Protection:unused
Eval iteration: 1266
Updates evaluated: 4
Repl links on local free list: 256
UDR environment table at 0xb03d1d0
Number of environments: 0
Table memory limit : 25165
Table memory used : 0
SAPI memory limit : 131072
SAPI memory used : 0
Count failed UDR calls: 0
Total Free Repl links 768
Replication Group 6553601 at 0xb0a8360
Replication at 0xb0a82b0 6553601:6553601 (tab)
[ NotifyDS FullRowOn ]
Column Information [ CDRShadow VarUDTs InOrder Same ]
CDR Shadow: offset 0, size 8
In Order: offset 8, size 10
Replication Group 6553602 at 0xb0a8480
Replication at 0xb0a83d0 6553602:6553602 (tab12)
[ Ignore Stopped NotifyDS FullRowOn ]
Column Information [ CDRShadow VarUDTs InOrder Same ]
CDR Shadow: offset 0, size 8
In Order: offset 8, size 16
The following example shows output for the onstat -g grp E command. The field
Evaluators: 4 indicates that there are four evaluation threads configured for the
system.
IBM Informix Dynamic Server Version 10.00.UC1 -- On-Line
-- Up 02:07:10 -- 36864 Kbytes
Repl links on global free list: 0
Evaluators: 4
Evaluator at 0xba71840 ID 0 [Idle:Idle] Protection: unused
Eval iteration: 1007
Updates evaluated: 0
Repl links on local free list: 256
UDR environment table at 0xba71890
Number of environments: 0
C-8 IBM Informix Dynamic Server Enterprise Replication Guide

Table memory limit : 16777
Table memory used : 0
SAPI memory limit : 131072
SAPI memory used : 0
Count failed UDR calls: 0
Evaluator at 0xba718f0 ID 1 [Idle:Idle] Protection: unused
Eval iteration: 1007
Updates evaluated: 0
Repl links on local free list: 256
UDR environment table at 0xba71940
Number of environments: 0
Table memory limit : 16777
Table memory used : 0
SAPI memory limit : 131072
SAPI memory used : 0
Count failed UDR calls: 0
Evaluator at 0xba8c260 ID 2 [Idle:Idle] Protection: unused
Eval iteration: 1007
Updates evaluated: 0
Repl links on local free list: 256
UDR environment table at 0xba8c2b0
Number of environments: 0
Table memory limit : 16777
Table memory used : 0
SAPI memory limit : 131072
SAPI memory used : 0
Count failed UDR calls: 0
Evaluator at 0xbaac2a0 ID 3 [Idle:Idle] Protection: unused
Eval iteration: 1007
Updates evaluated: 0
Repl links on local free list: 256
UDR environment table at 0xbaac2f0
Number of environments: 0
Table memory limit : 16777
Table memory used : 0
SAPI memory limit : 131072
SAPI memory used : 0
Count failed UDR calls: 0
Total Free Repl links 1024
The following example shows output for the onstat -g grp G command.
IBM Informix Dynamic Server Version 10.00.UC1 -- On-Line
-- Up 02:08:56 -- 36864 Kbytes
Grouper at 0xb8ab020:
Last Idle Time: (1095115397) 2004/09/13 17:43:17
RSAM interface ring buffer size: 1040
RSAM interface ring buffer pending entries: 0
Eval thread interface ring buffer size: 64
Eval thread interface ring buffer pending entries: 0
Appendix C. onstat Command Reference C-9

Log update buffers in use: 0
Max log update buffers used at once: 1
Log update buffer memory in use: 0
Max log update buffer memory used at once: 64
Updates from Log: 1
Log update links allocated: 512
Blob links allocated: 0
Conflict Resolution Blocks Allocated: 0
Memory pool cache: Empty
The following example shows output for the onstat -g grp P command. In the
following example, the grouper is evaluating rows for the account, teller and
customer tables.
IBM Informix Dynamic Server Version 10.00.UC1 -- On-Line
-- Up 02:11:39 -- 36864 Kbytes
Table ’teller’ at 0xb851480 [ CDRShadow VarChars ]
Table ’account’ at 0xb7faad8 [CDRShadow VarChars VarUDTs Floats
Blobs]
Table ’customer’ at 0xbbe67a8 [CDRShadow VarChars VarUDTs]
Grouper Table Partitions:
Slot 387...
’account’ 1048707
Slot 389...
’teller’ 1048709
Slot 394...
’customer’ 1048714
The following example shows output for the onstat -g grp pager command. The
sample output shows the grouper large transaction evaluation statistics.
IBM Informix Dynamic Server Version 10.00.UC1 -- On-Line
-- Up 00:20:42 -- 28672 Kbytes
Grouper Pager statistics:
Number of active big transactions: 0
Total number of big transactions processed: 0
Spool size of the biggest transaction processed: 0 Bytes
The following example shows output for the onstat -g grp R command. In this
example, the grouper is configured to evaluate rows for replicates with IDs
6553601 and 6553602 (you can use the onstat -g cat repls command to obtain the
replicate names). The Ignore attribute of replicate ID 6553602 shows that the
grouper is currently not evaluating rows for this replicate. This can happen if the
replicate state is not ACTIVE. You can obtain the replicate state using the onstat -g
cat repls command.
IBM Informix Dynamic Server Version 10.00.UC1 -- On-Line
-- Up 00:04:47 -- 28672 Kbytes
Replication Group 6553601 at 0xb0a8360
Replication at 0xb0a82b0 6553601:6553601 (tab) [ NotifyDS
FullRowOn ]
Column Information [ CDRShadow VarUDTs InOrder Same ]
CDR Shadow: offset 0, size 8
In Order: offset 8, size 10
Replication Group 6553602 at 0xb0a8480
C-10 IBM Informix Dynamic Server Enterprise Replication Guide
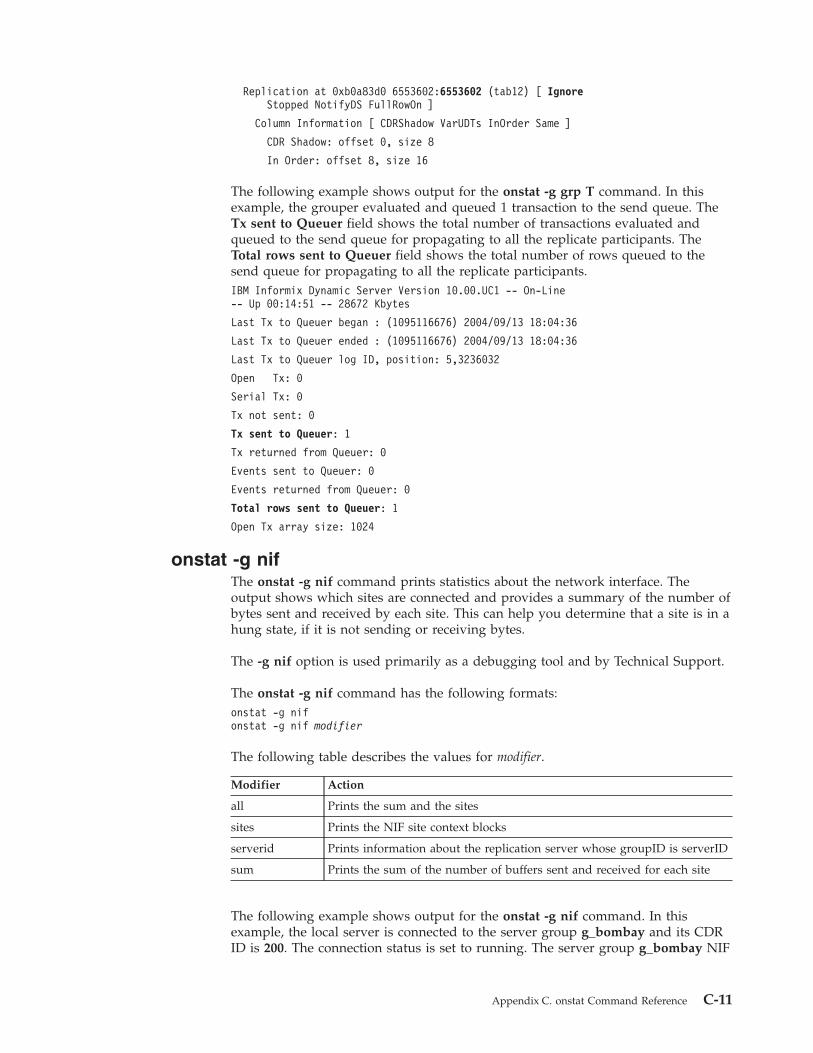
Replication at 0xb0a83d0 6553602:6553602 (tab12) [ Ignore
Stopped NotifyDS FullRowOn ]
Column Information [ CDRShadow VarUDTs InOrder Same ]
CDR Shadow: offset 0, size 8
In Order: offset 8, size 16
The following example shows output for the onstat -g grp T command. In this
example, the grouper evaluated and queued 1 transaction to the send queue. The
Tx sent to Queuer field shows the total number of transactions evaluated and
queued to the send queue for propagating to all the replicate participants. The
Total rows sent to Queuer field shows the total number of rows queued to the
send queue for propagating to all the replicate participants.
IBM Informix Dynamic Server Version 10.00.UC1 -- On-Line
-- Up 00:14:51 -- 28672 Kbytes
Last Tx to Queuer began : (1095116676) 2004/09/13 18:04:36
Last Tx to Queuer ended : (1095116676) 2004/09/13 18:04:36
Last Tx to Queuer log ID, position: 5,3236032
Open Tx: 0
Serial Tx: 0
Tx not sent: 0
Tx sent to Queuer: 1
Tx returned from Queuer: 0
Events sent to Queuer: 0
Events returned from Queuer: 0
Total rows sent to Queuer: 1
Open Tx array size: 1024
onstat -g nif
The onstat -g nif command prints statistics about the network interface. The
output shows which sites are connected and provides a summary of the number of
bytes sent and received by each site. This can help you determine that a site is in a
hung state, if it is not sending or receiving bytes.
The -g nif option is used primarily as a debugging tool and by Technical Support.
The onstat -g nif command has the following formats:
onstat -g nif
onstat -g nif modifier
The following table describes the values for modifier.
Modifier Action
all Prints the sum and the sites
sites Prints the NIF site context blocks
serverid Prints information about the replication server whose groupID is serverID
sum Prints the sum of the number of buffers sent and received for each site
The following example shows output for the onstat -g nif command. In this
example, the local server is connected to the server group g_bombay and its CDR
ID is 200. The connection status is set to running. The server group g_bombay NIF
Appendix C. onstat Command Reference C-11

version is 7. The local server has sent three messages to the server g_bombay and
it has received two messages from g_bombay.
IBM Informix Dynamic Server Version 10.00.UC1 -- On-Line
-- Up 00:02:34 -- 28672 Kbytes
NIF anchor Block: af01610
nifGState RUN
RetryTimeout 300
CDR connections:
Id Name State Version Sent Received
-----------------------------------------------------
200 g_bombay RUN 7 3 2
onstat -g que
The onstat -g que command prints statistics that are common to all queues. The
queuer manages the logical aspects of the queue. The RQM (reliable queue
manager) manages the physical queue.
The -g que option is used primarily as a debugging tool and by Technical Support.
In the following example, Element high water mark shows the maximum size of
the transaction buffer header data (metadata) allowed in memory, shown in
kilobytes. Data high water mark shows the maximum size of transactions for user
data allowed in memory, shown in kilobytes.
IBM Informix Dynamic Server Version 10.00.UC1 -- On-Line
-- Up 00:40:28 -- 28672 Kbytes
CDR Queuer Statistics:
Queuer state : 2
Local server : 100
Element high water mark : 131072
Data high water mark : 131072
# of times txns split : 0
Total # of split txns : 0
allowed log delta : 30
maximum delta detected : 4
Control Key : 0/00000007
Synchronization Key : 0/00000003
Replay Table:
Replay Posn (Disk value): 12/00000018 (12/00000018)
Replay save interval : 10
Replay updates : 10
Replay # saves : 17
Replay last save time : (1095118157) 2004/09/13 18:29:17
Send Handles
Server ID : 200
Send state,count : 0,0
RQM hdl for trg_send: Traverse handle (0xaf8e018) for
thread CDRACK_0 at Head_of_Q, Flags: None
RQM hdl for control_send: Traverse handle (0xaf74018)
for thread CDRACK_0 at Head_of_Q, Flags: None
RQM hdl for sync_send: Traverse handle (0xadc6018) for
thread CDRACK_0 at Head_of_Q, Flags: None
C-12 IBM Informix Dynamic Server Enterprise Replication Guide

Server ID : 200
Send state,count : 0,0
RQM hdl for trg_send: Traverse handle (0xac8b018) for
thread CDRACK_1 at Head_of_Q, Flags: None
RQM hdl for control_send: Traverse handle (0xb1ce018)
for thread CDRACK_1 at Head_of_Q, Flags: None
RQM hdl for sync_send: Traverse handle (0xadc5018) for
thread CDRACK_1 at Head_of_Q, Flags: None
Server ID : 200
Send state,count : 0,0
RQM hdl for trg_send: Traverse handle (0xaea71d8) for
thread CDRNsA200 at Head_of_Q, Flags: None
RQM hdl for ack_send: Traverse handle (0xae8c1d8) for
thread CDRNsA200 at Head_of_Q, Flags: None
RQM hdl for control_send: Traverse handle (0xae9e1d8)
for thread CDRNsA200 at Head_of_Q, Flags: None
onstat -g rcv
The onstat -g rcv command prints statistics about the receive manager. The receive
manager is a set of service routines between the receive queues and data sync.
The onstat -g rcv command has the following formats:
onstat -g rcv
onstat -g rcv serverid
onstat -g rcv full
The serverID modifier causes the command to print only those output messages
received from the replication server whose groupID is serverid. The full modifier
causes the command to print all statistics.
The onstat -g rcv command includes the Receive Manager global section. In this
section, the following fields have the meanings shown:
Field Description
cdrRM_DSParallelPL Shows the current level of Apply Parallelism, 0 (zero) being the highest
cdrRM_DSNumLockTimeout
cdrRM_DSNumLockRB
cdrRM_DSNumDeadLocks
Indicate the number of collisions between various apply threads
cdrRM_acksinList Shows acknowledgements that have been received but not yet
processed
The onstat -g rcv command includes the Receive Parallelism Statistics section, a
summary of the data sync threads by source server.
Appendix C. onstat Command Reference C-13

Field Description
Server Source server ID
Tot.Txn. Total number of transactions applied from this source server
Pending Number of current transactions in the pending list for this source server
Active Number of current transactions currently being applied from this source
server
MaxPnd Maximum number of transactions in the pending list queue
MaxAct Maximum number of transaction in the active list queue
AvgPnd Average depth of the pending list queue
AvgAct Average depth of the active list queue
CommitRt Commit rate of transaction from this source server based on transactions
per second
The Statistics by Source section of the onstat -g rcv command shows the following
information for each source server. For each replicate ID:
v The number of transactions applied from the source servers
v The number of inserts, deletes, and updates within the applied transactions
v The timestamp of the most recently applied transaction on the target server
v The timestamp of the commit on the source server for the most recently applied
transaction
The -g rcv option is used primarily as a debugging tool and by Technical Support.
If you suspect that acknowledgement messages are not being applied, you can use
this option to check.
The following example shows output for the onstat -g rcv full command.
Receive Manager global block 0D452018
cdrRM_inst_ct: 5
cdrRM_State: 00000000
cdrRM_numSleepers: 3
cdrRM_DsCreated: 3
cdrRM_MinDSThreads: 1
cdrRM_MaxDSThreads: 4
cdrRM_DSBlock 0
cdrRM_DSParallelPL 0
cdrRM_DSFailRate 0.000000
cdrRM_DSNumRun: 35
cdrRM_DSNumLockTimeout 0
cdrRM_DSNumLockRB 0
cdrRM_DSNumDeadLocks 0
cdrRM_DSNumPCommits 0
cdrRM_ACKwaiting 0
cdrRM_totSleep: 77
cdrRM_Sleeptime: 153
cdrRM_Workload: 0
cdrRM_optscale: 4
cdrRM_MinFloatThreads: 2
C-14 IBM Informix Dynamic Server Enterprise Replication Guide
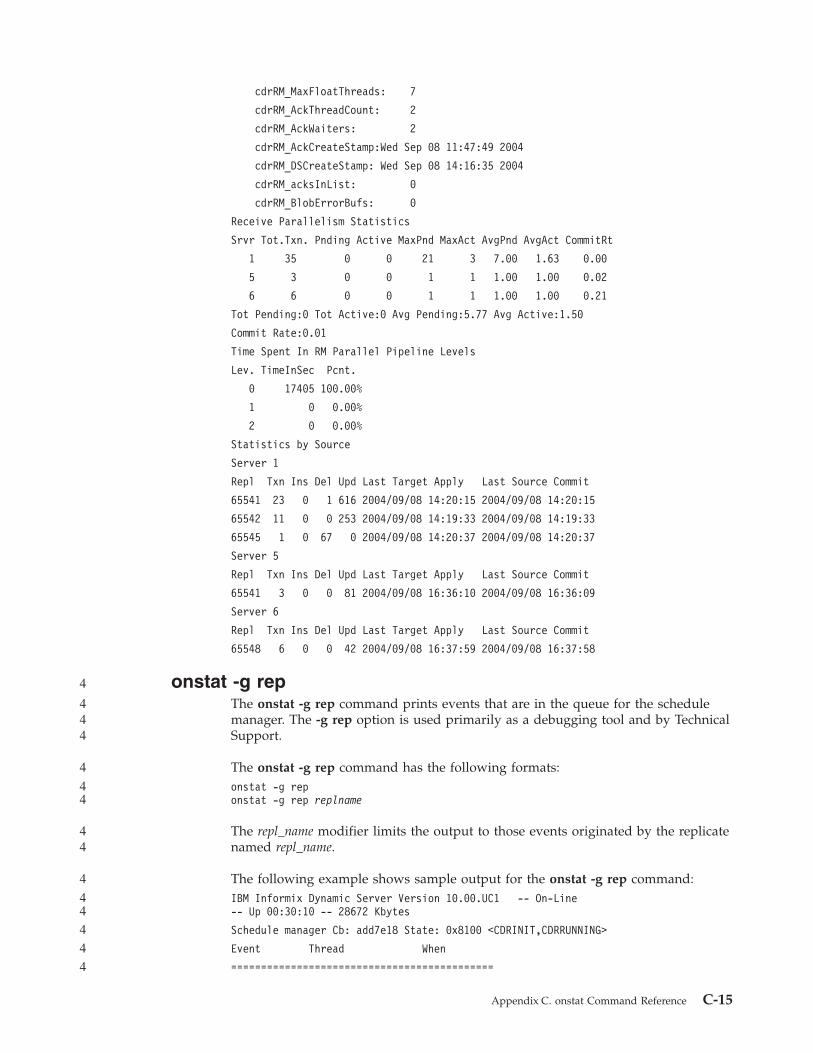
cdrRM_MaxFloatThreads: 7
cdrRM_AckThreadCount: 2
cdrRM_AckWaiters: 2
cdrRM_AckCreateStamp:Wed Sep 08 11:47:49 2004
cdrRM_DSCreateStamp: Wed Sep 08 14:16:35 2004
cdrRM_acksInList: 0
cdrRM_BlobErrorBufs: 0
Receive Parallelism Statistics
Srvr Tot.Txn. Pnding Active MaxPnd MaxAct AvgPnd AvgAct CommitRt
1 35 0 0 21 3 7.00 1.63 0.00
5 3 0 0 1 1 1.00 1.00 0.02
6 6 0 0 1 1 1.00 1.00 0.21
Tot Pending:0 Tot Active:0 Avg Pending:5.77 Avg Active:1.50
Commit Rate:0.01
Time Spent In RM Parallel Pipeline Levels
Lev. TimeInSec Pcnt.
0 17405 100.00%
1 0 0.00%
2 0 0.00%
Statistics by Source
Server 1
Repl Txn Ins Del Upd Last Target Apply Last Source Commit
65541 23 0 1 616 2004/09/08 14:20:15 2004/09/08 14:20:15
65542 11 0 0 253 2004/09/08 14:19:33 2004/09/08 14:19:33
65545 1 0 67 0 2004/09/08 14:20:37 2004/09/08 14:20:37
Server 5
Repl Txn Ins Del Upd Last Target Apply Last Source Commit
65541 3 0 0 81 2004/09/08 16:36:10 2004/09/08 16:36:09
Server 6
Repl Txn Ins Del Upd Last Target Apply Last Source Commit
65548 6 0 0 42 2004/09/08 16:37:59 2004/09/08 16:37:58
onstat -g rep
The onstat -g rep command prints events that are in the queue for the schedule
manager. The -g rep option is used primarily as a debugging tool and by Technical
Support.
The onstat -g rep command has the following formats:
onstat -g rep
onstat -g rep replname
The repl_name modifier limits the output to those events originated by the replicate
named repl_name.
The following example shows sample output for the onstat -g rep command:
IBM Informix Dynamic Server Version 10.00.UC1 -- On-Line
-- Up 00:30:10 -- 28672 Kbytes
Schedule manager Cb: add7e18 State: 0x8100 <CDRINIT,CDRRUNNING>
Event Thread When
============================================
Appendix C. onstat Command Reference C-15
4
444
4
44
44
4
44
4
4
4

CDRDS CDREvent 00:00:20
onstat -g rqm
The onstat -g rqm command prints statistics and contents of the low-level queues
(send queue, receive queue, ack send queue, sync send queue, and control send
queue) managed by the Reliable Queue Manager (RQM). The RQM manages the
insertion and removal of items to and from the various queues. The RQM also
manages spooling of the in-memory portions of the queue to and from disk. The -g
rqm option displays the contents of the queue, size of the transactions in the
queue, how much of the queue is in memory and on disk, the location of various
handles to the queue, and the contents of the various progress tables. You can
choose to print information for all queues or for just one queue by using one of the
modifiers described below.
If a queue is empty, no information is printed for that queue.
The onstat -g rqm command has the following formats:
onstat -g rqm
onstat -g rqm modifier
The following table describes the values for modifier.
Modifier Action
ACKQ Prints the ack send queue
CNTRLQ Prints the control send queue
RECVQ Prints the receive queue
SENDQ Prints the send queue
SYNCQ Prints the sync send queue
FULL Prints full information about every in-memory transaction for every queue
BRIEF Prints a brief summary of the number of transactions in each of the
queues and the replication servers for which the data is queued
Use this modifier to quickly identify sites where a problem exists. If large
amounts of data are queued for a single server, then that server is
probably down or off the network.
VERBOSE Prints all the buffer headers in memory
When you specify a modifier to select a specific queue, the command prints all the
statistics for that queue and information about the first and last in-memory
transactions for that queue.
The other modifiers of the onstat -g rqm command are used primarily as a
debugging tool and by Technical Support.
The output for the SENDQ modifier contains the following sections:
v RQM Statistics for Queue—a summary of current and historical information for
the queue. This includes the number of transactions in the queue, how many are
spooled, how many bytes they are using, some maximum statistics, and the high
water marks that will trigger stably storing transactions in the syscdr tables.
v First Txn—information about the first transaction in the queue. To check if the
queue is draining, you can run onstat -g rqm several times and see if the first
transaction’s RQM key is changing. The RQM key has the following format:
Server_ID/Commit_unique_logID/Commit_log_position/Sequence. If it is not
C-16 IBM Informix Dynamic Server Enterprise Replication Guide
4
4
4444444444
4
4
44
4
444
44
44
44
44
44
44
444444
444
444
44
4
4444
4444

draining, the target server may be offline or some other problem is occurring.
The NeedAck field shows from which server the transaction is waiting for an
acknowledgement. You can use this bitmap mask with the output from the
onstat -g cat command to determine the name of the server which server
Enterprise Replication is waiting on for an acknowledgement.
v Last Txn—information about the last transaction in the queue
v Traverse handle—lists the handles used for threads
v Progress table—provides information about the progress of each replicate under
the headers: Server, Group, Bytes Queued, Acked, and Sent. The Group field
shows the replicate ID. The Acked field shows what has been acknowledged.
The Sent field shows which entries are now in transit. Both the Acked and the
Sent field show the RQM key, which has the following format:
Server_ID/Commit_unique_logID/Commit_log_position/Sequence.
The following example shows output for the onstat -g rqm SENDQ command.
RQM Statistics for Queue (0x0D3DF018) trg_send
Transaction Spool Name: trg_send_stxn
Insert Stamp: 35/0
Flags: SEND_Q, SPOOLED, PROGRESS_TABLE, NEED_ACK
Txns in queue: 35
Log Events in queue: 0
Txns in memory: 35
Txns in spool only: 0
Txns spooled: 0
Unspooled bytes: 176206
Size of Data in queue: 176206 Bytes
Real memory in use: 176206 Bytes
Pending Txn Buffers: 0
Pending Txn Data: 0 Bytes
Max Real memory data used: 176206 (2457600) Bytes
Max Real memory hdrs used 65988 (2457600) Bytes
Total data queued: 176206 Bytes
Total Txns queued: 35
Total Txns spooled: 0
Total Txns restored: 0
Total Txns recovered: 0
Spool Rows read: 0
Total Txns deleted: 0
Total Txns duplicated: 0
Total Txn Lookups: 363
First Txn (0x0D60C018) Key: 1/9/0x000d4bb0/0x00000000
Txn Stamp: 1/0, Reference Count: 0.
Txn Flags: Notify
Txn Commit Time: (1094670993) 2004/09/08 14:16:33
Txn Size in Queue: 5908
First Buf’s (0x0D31C9E8) Queue Flags: Resident
First Buf’s Buffer Flags: TRG, Stream
NeedAck: Waiting for Acks from <[0004]>
No open handles on txn.
Appendix C. onstat Command Reference C-17
44444
4
4
444444
4
4
4
4
4
4
4
4
4
4
4
4
4
4
4
4
4
4
4
4
4
4
4
4
4
4
4
4
4
4
4
4
4
4
4

Last Txn (0x0D93A098) Key: 1/9/0x00138ad8/0x00000000
Txn Stamp: 35/0, Reference Count: 0.
Txn Flags: Notify
Txn Commit Time: (1094671237) 2004/09/08 14:20:37
Txn Size in Queue: 6298
First Buf’s (0x0D92FFA0) Queue Flags: Resident
First Buf’s Buffer Flags: TRG, Stream
NeedAck: Waiting for Acks from <[0004]>
Traverse handle (0x0D045018) for thread CDRNsA3 at txn
(0x0D93A098) End_of_Q,Flags: None
Traverse handle (0x0D08E018) for thread CDRNsA4 at txn
(0x0D93A098) End_of_Q,Flags: None
Traverse handle (0x0D523018) for thread CDRNsA5 at txn
(0x0D93A098) End_of_Q,Flags: None
Traverse handle (0x0D0D9018) for thread CDRNsA6 at txn
(0x0D93A098) End_of_Q,Flags: None
Traverse handle (0x0D4041D8) for thread CDRNsA2 at Head_of_Q,
Flags: None
Traverse handle (0x0D3F01D8) for thread CDRNrA2 at
Head_of_Q, Flags: None
Traverse handle (0x0D045018) for thread CDRNsA3 at
txn (0x0D93A098) End_of_Q,Flags: None
Traverse handle (0x0D31C018) for thread CDRNrA3 at
Head_of_Q, Flags: None
Traverse handle (0x0D08E018) for thread CDRNsA4 at
txn (0x0D93A098) End_of_Q,Flags: None
Traverse handle (0x0D4C8018) for thread CDRNrA4 at
Head_of_Q, Flags: None
Traverse handle (0x0D523018) for thread CDRNsA5 at
txn (0x0D93A098) End_of_Q,Flags: None
Traverse handle (0x0D57F018) for thread CDRNrA5 at
Head_of_Q, Flags: None
Traverse handle (0x0D0D9018) for thread CDRNsA6 at
txn (0x0D93A098) End_of_Q,Flags: None
Server Group Bytes Queued Acked Sent
----------------------------------------------------------
6 0x10009 0 1/9/138ad8/0 - 1/9/138ad8/0
5 0x10009 0 1/9/138ad8/0 - 1/9/138ad8/0
4 0x10009 0 1/9/138ad8/0 - 1/9/138ad8/0
3 0x10009 0 1/9/138ad8/0 - 1/9/138ad8/0
2 0x10009 4154 efffffff/efffffff/efffffff/efffffff
- 1//138ad8/0
6 0x10006 0 1/9/12d8f8/0 - 1//12d8f8/0
5 0x10006 0 1/9/12d8f8/0 - 1//12d8f8/0
4 0x10006 0 1/9/12d8f8/0 - 1/9/12d8f8/0
3 0x10006 0 1/9/12d8f8/0 - 1/9/12d8f8/0
2 0x10006 31625 efffffff/efffffff/efffffff/efffffff
– 1/9/12d8f8/0
onstat -g sync
The onstat -g sync command shows which sync is active.
The following example shows output for the onstat -g sync command.
C-18 IBM Informix Dynamic Server Enterprise Replication Guide
4
4
4
4
4
4
4
4
44
44
44
44
44
44
44
44
44
44
44
44
44
4
4
4
4
4
4
44
4
4
4
4
44
4
4
4

IBM Informix Dynamic Server Version 10.00.U --On-Line-- Up 00:10:16 -- 44084 Kbytes
Prim Sync St. Shadow Flag Stat Block EndBlk
Repl Source Repl Num Num
655361 20 0 1310729 2 0 592 600
Output Description:
Prim Repl
Replicate number of the replicate being synchronized
Sync Source
Source server of the sync
St Sync replicate state
Shadow Repl
The shadow replicate used to perform the sync
Flag Internal flags:
v 0x02 = external sync
v 0x04 = shutdown request has been issued
v 0x08 = abort has occurred
v 0x010 = a replicate stop has been requested
v 0X020 = shadow or primary replicate has been deleted
Stat Resync job state
Block num
Last block applied on targets (on source always 0)
EndBlock Num
Last block in resync process. Marks the end of the sync scan on the target.
A value of’ -2 indicates that the scan is still in progress, and the highest
block number is not yet known.
Additional fields for forwarded rows:
ServID Server where forwarded row originated
fwdLog ID
Originator's log ID of the forwarded row
fwdLog POS
Originator's log position of the forwarded row
endLog ID
Operation switches back to normal at this point
endLog POS
Operation switches back to normal at this log position
complete flag
Set to 1 after normal processing resumes for the originating source
onstat -k
The onstat -k command displays information about active locks.
The following example shows output from the onstat -k command:
Locks
address wtlist owner lklist type tblsnum rowid key#/bsiz
a095f78 0 a4d9e68 0 HDR+S 100002 203 0
Appendix C. onstat Command Reference C-19
44444
4
44
44
44
44
44
4
4
4
4
4
44
44
4444
4
44
44
44
44
44
44
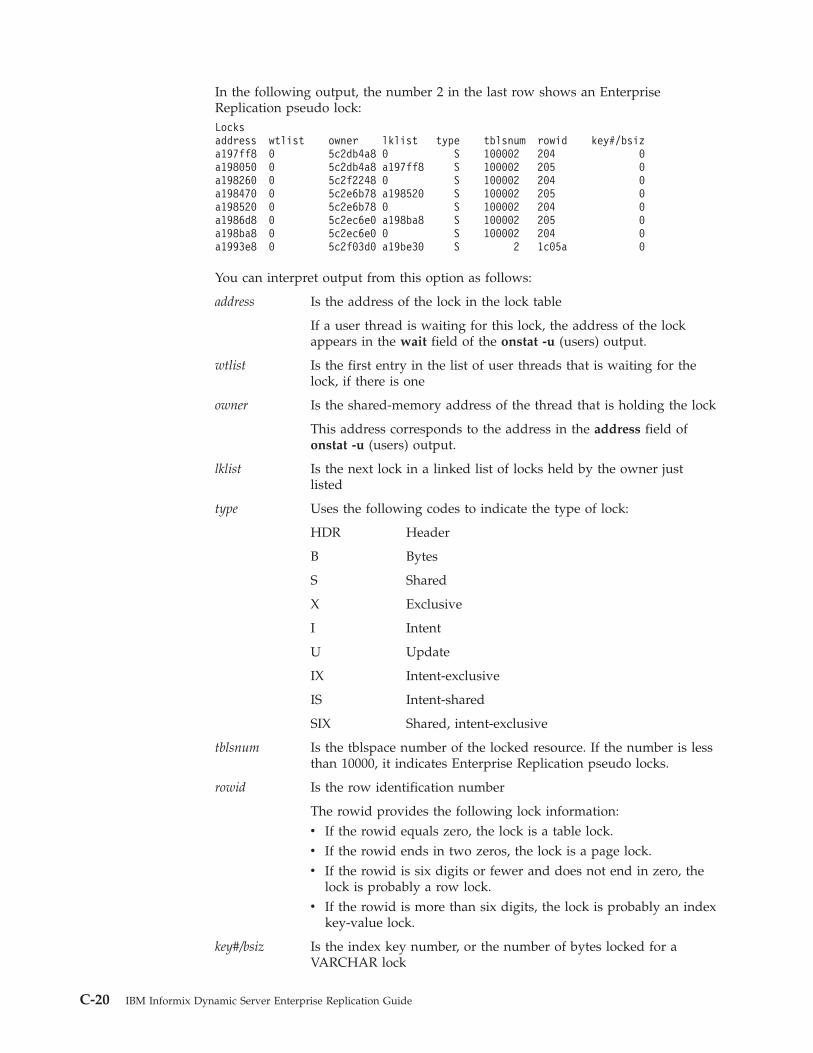
In the following output, the number 2 in the last row shows an Enterprise
Replication pseudo lock:
Locks
address wtlist owner lklist type tblsnum rowid key#/bsiz
a197ff8 0 5c2db4a8 0 S 100002 204 0
a198050 0 5c2db4a8 a197ff8 S 100002 205 0
a198260 0 5c2f2248 0 S 100002 204 0
a198470 0 5c2e6b78 a198520 S 100002 205 0
a198520 0 5c2e6b78 0 S 100002 204 0
a1986d8 0 5c2ec6e0 a198ba8 S 100002 205 0
a198ba8 0 5c2ec6e0 0 S 100002 204 0
a1993e8 0 5c2f03d0 a19be30 S 2 1c05a 0
You can interpret output from this option as follows:
address Is the address of the lock in the lock table
If a user thread is waiting for this lock, the address of the lock
appears in the wait field of the onstat -u (users) output.
wtlist Is the first entry in the list of user threads that is waiting for the
lock, if there is one
owner Is the shared-memory address of the thread that is holding the lock
This address corresponds to the address in the address field of
onstat -u (users) output.
lklist Is the next lock in a linked list of locks held by the owner just
listed
type Uses the following codes to indicate the type of lock:
HDR Header
B Bytes
S Shared
X Exclusive
I Intent
U Update
IX Intent-exclusive
IS Intent-shared
SIX Shared, intent-exclusive
tblsnum Is the tblspace number of the locked resource. If the number is less
than 10000, it indicates Enterprise Replication pseudo locks.
rowid Is the row identification number
The rowid provides the following lock information:
v If the rowid equals zero, the lock is a table lock.
v If the rowid ends in two zeros, the lock is a page lock.
v If the rowid is six digits or fewer and does not end in zero, the
lock is probably a row lock.
v If the rowid is more than six digits, the lock is probably an index
key-value lock.
key#/bsiz Is the index key number, or the number of bytes locked for a
VARCHAR lock
C-20 IBM Informix Dynamic Server Enterprise Replication Guide

If this field contains ’K-’ followed by a value, it is a key lock. The
value identifies which index is being locked. For example, K-1
indicates a lock on the first index defined for the table.
The maximum number of locks available is specified as LOCKS in the
ONCONFIG file.
Appendix C. onstat Command Reference C-21

C-22 IBM Informix Dynamic Server Enterprise Replication Guide
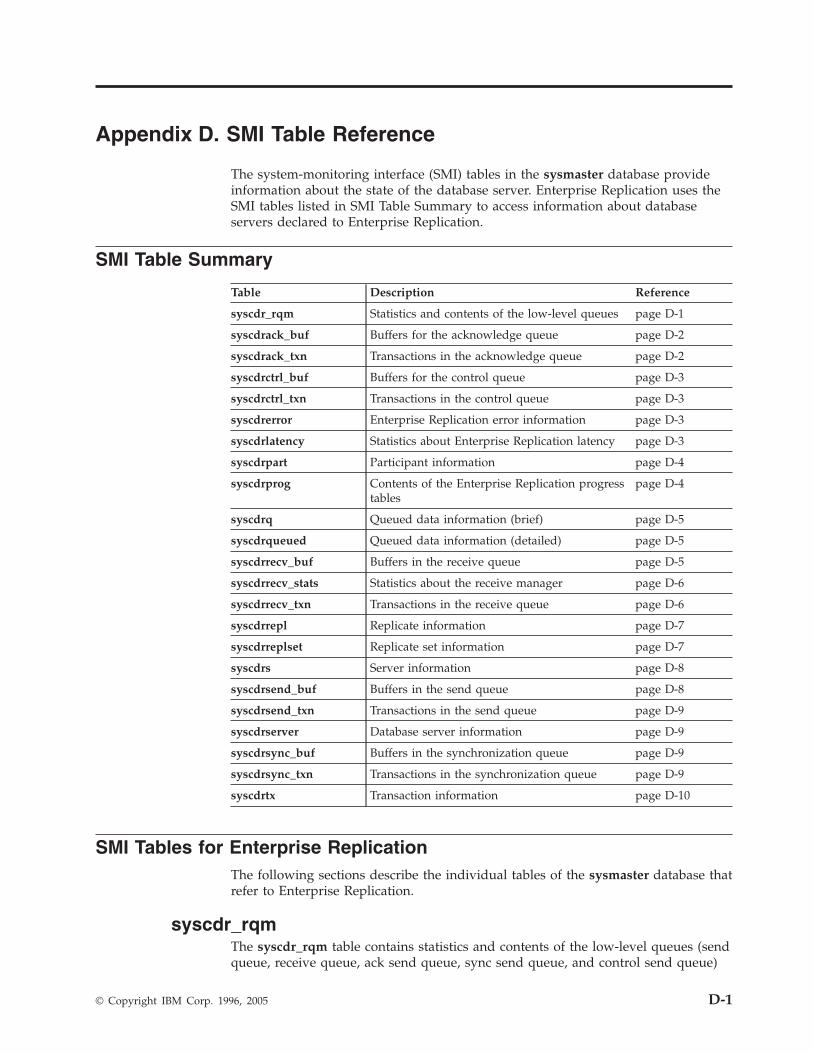
Appendix D. SMI Table Reference
The system-monitoring interface (SMI) tables in the sysmaster database provide
information about the state of the database server. Enterprise Replication uses the
SMI tables listed in SMI Table Summary to access information about database
servers declared to Enterprise Replication.
SMI Table Summary
Table Description Reference
syscdr_rqm Statistics and contents of the low-level queues page D-1
syscdrack_buf Buffers for the acknowledge queue page D-2
syscdrack_txn Transactions in the acknowledge queue page D-2
syscdrctrl_buf Buffers for the control queue page D-3
syscdrctrl_txn Transactions in the control queue page D-3
syscdrerror Enterprise Replication error information page D-3
syscdrlatency Statistics about Enterprise Replication latency page D-3
syscdrpart Participant information page D-4
syscdrprog Contents of the Enterprise Replication progress
tables
page D-4
syscdrq Queued data information (brief) page D-5
syscdrqueued Queued data information (detailed) page D-5
syscdrrecv_buf Buffers in the receive queue page D-5
syscdrrecv_stats Statistics about the receive manager page D-6
syscdrrecv_txn Transactions in the receive queue page D-6
syscdrrepl Replicate information page D-7
syscdrreplset Replicate set information page D-7
syscdrs Server information page D-8
syscdrsend_buf Buffers in the send queue page D-8
syscdrsend_txn Transactions in the send queue page D-9
syscdrserver Database server information page D-9
syscdrsync_buf Buffers in the synchronization queue page D-9
syscdrsync_txn Transactions in the synchronization queue page D-9
syscdrtx Transaction information page D-10
SMI Tables for Enterprise Replication
The following sections describe the individual tables of the sysmaster database that
refer to Enterprise Replication.
syscdr_rqm
The syscdr_rqm table contains statistics and contents of the low-level queues (send
queue, receive queue, ack send queue, sync send queue, and control send queue)
© Copyright IBM Corp. 1996, 2005 D-1
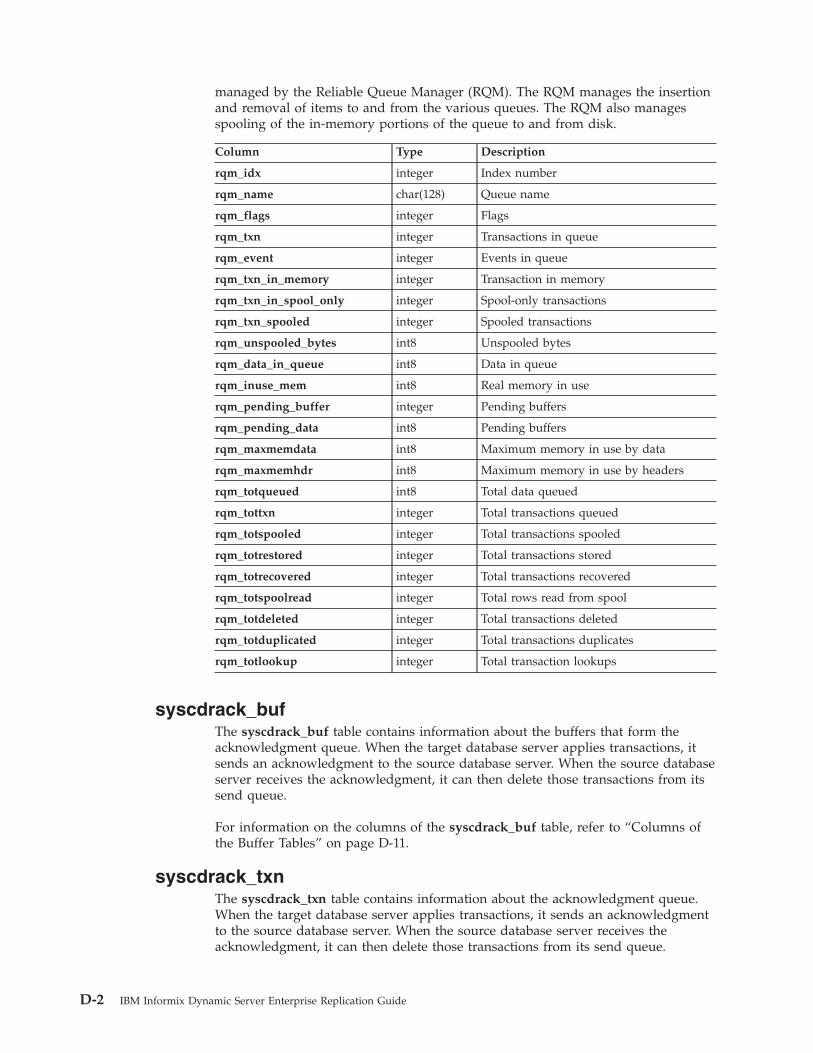
managed by the Reliable Queue Manager (RQM). The RQM manages the insertion
and removal of items to and from the various queues. The RQM also manages
spooling of the in-memory portions of the queue to and from disk.
Column Type Description
rqm_idx integer Index number
rqm_name char(128) Queue name
rqm_flags integer Flags
rqm_txn integer Transactions in queue
rqm_event integer Events in queue
rqm_txn_in_memory integer Transaction in memory
rqm_txn_in_spool_only integer Spool-only transactions
rqm_txn_spooled integer Spooled transactions
rqm_unspooled_bytes int8 Unspooled bytes
rqm_data_in_queue int8 Data in queue
rqm_inuse_mem int8 Real memory in use
rqm_pending_buffer integer Pending buffers
rqm_pending_data int8 Pending buffers
rqm_maxmemdata int8 Maximum memory in use by data
rqm_maxmemhdr int8 Maximum memory in use by headers
rqm_totqueued int8 Total data queued
rqm_tottxn integer Total transactions queued
rqm_totspooled integer Total transactions spooled
rqm_totrestored integer Total transactions stored
rqm_totrecovered integer Total transactions recovered
rqm_totspoolread integer Total rows read from spool
rqm_totdeleted integer Total transactions deleted
rqm_totduplicated integer Total transactions duplicates
rqm_totlookup integer Total transaction lookups
syscdrack_buf
The syscdrack_buf table contains information about the buffers that form the
acknowledgment queue. When the target database server applies transactions, it
sends an acknowledgment to the source database server. When the source database
server receives the acknowledgment, it can then delete those transactions from its
send queue.
For information on the columns of the syscdrack_buf table, refer to “Columns of
the Buffer Tables” on page D-11.
syscdrack_txn
The syscdrack_txn table contains information about the acknowledgment queue.
When the target database server applies transactions, it sends an acknowledgment
to the source database server. When the source database server receives the
acknowledgment, it can then delete those transactions from its send queue.
D-2 IBM Informix Dynamic Server Enterprise Replication Guide
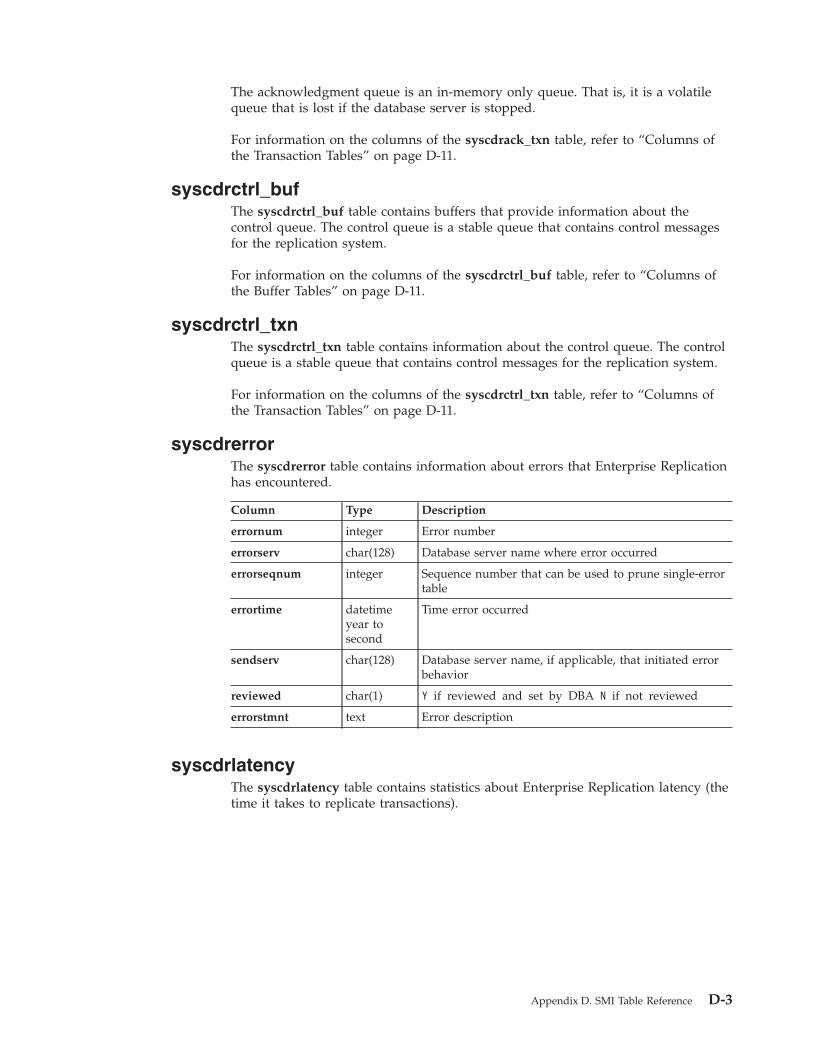
The acknowledgment queue is an in-memory only queue. That is, it is a volatile
queue that is lost if the database server is stopped.
For information on the columns of the syscdrack_txn table, refer to “Columns of
the Transaction Tables” on page D-11.
syscdrctrl_buf
The syscdrctrl_buf table contains buffers that provide information about the
control queue. The control queue is a stable queue that contains control messages
for the replication system.
For information on the columns of the syscdrctrl_buf table, refer to “Columns of
the Buffer Tables” on page D-11.
syscdrctrl_txn
The syscdrctrl_txn table contains information about the control queue. The control
queue is a stable queue that contains control messages for the replication system.
For information on the columns of the syscdrctrl_txn table, refer to “Columns of
the Transaction Tables” on page D-11.
syscdrerror
The syscdrerror table contains information about errors that Enterprise Replication
has encountered.
Column Type Description
errornum integer Error number
errorserv char(128) Database server name where error occurred
errorseqnum integer Sequence number that can be used to prune single-error
table
errortime datetime
year to
second
Time error occurred
sendserv char(128) Database server name, if applicable, that initiated error
behavior
reviewed char(1) Y if reviewed and set by DBA N if not reviewed
errorstmnt text Error description
syscdrlatency
The syscdrlatency table contains statistics about Enterprise Replication latency (the
time it takes to replicate transactions).
Appendix D. SMI Table Reference D-3

Column Type Description
source integer Source of transaction (cdrid)
replid integer Replicate ID
txncnt integer The number of transactions on this source replicate
inserts integer Number of INSERT statements
deletes integer Number of DELETE statements
updates integer Number of UPDATE statements
last_tgt_apply integer The time of the last transaction to be applied to the
target (cdrtime)
last_src_apply integer The time of the last transaction to be applied on the
source (cdrtime)
syscdrpart
The syscdrspart table contains participant information.
Column Type Description
replname lvarchar Replicate name
servername char(128) Database server name
partstate char(50) Participant state: ACTIVE, INACTIVE
partmode char(1) P = primary database server (read-write)
R = target database server (receive only)
dbsname lvarchar Database name
owner lvarchar Owner name
tabname lvarchar Table name
syscdrprog
The syscdrprog table lists the contents of the Enterprise Replication progress
tables. The progress tables keep track of what data has been sent to which servers
and which servers have acknowledged receipt of what data. Enterprise Replication
uses the transaction keys and stamps to keep track of this information.
The progress table is two dimensional. For each server to which Enterprise
Replication sends data, the progress tables keep progress information on a
per-replicate basis.
D-4 IBM Informix Dynamic Server Enterprise Replication Guide

Column Type Description
dest_id integer Server ID of the destination server
repl_id integer The ID that Enterprise Replication uses to identify the
replicate for which this information is valid
source_id integer Server ID of the server from which the data originated
key_acked_srv integer Last key for this replicate that was acknowledged by
this destination
key_acked_lgid integer Logical log ID
key_acked_lgpos integer Logical log position
key_acked_seq integer Logical log sequence
tx_stamp_1 integer Together with tx_stamp2, forms the stamp of the last
transaction acknowledged for this replicate by this
destination
tx_stamp_2 integer Together with tx_stamp1, forms the stamp of the last
transaction acknowledged for this replicate by this
destination
syscdrq
The syscdrq table contains information about Enterprise Replication queues.
Column Type Description
srvid integer The identifier number of the database server
repid integer The identifier number of the replicate
srcid integer The server ID of the source database server
In cases where a particular server is forwarding data to
another server, srvid is the target and srcid is the source
that originated the transaction.
srvname char(128) The name of the database server
replname char(128) Replicate name
srcname char(128) The name of the source database server
bytesqueued integer Number of bytes queued
syscdrqueued
The syscdrqueued table contains data-queued information.
Column Type Description
servername char(128) Sending to database server name
name char(128) Replicate name
bytesqueued decimal(32,0) Number of bytes queued for the server
servername
syscdrrecv_buf
The syscdrrecv_buf table contains buffers that provide information about the
data-receive queue. When a replication server receives replicated data from a
Appendix D. SMI Table Reference D-5

source database server, it puts this data on the receive queue for processing. On
the target side, Enterprise Replication picks up transactions from this queue and
applies them on the target.
For information on the columns of the syscdrrecv_buf table, refer to “Columns of
the Buffer Tables” on page D-11.
syscdrrecv_stats
The syscdrrecv_stats table contains statistics about the receive manager. The
receive manager is a set of service routines between the receive queues and
Datasync.
Column Type Description
source integer The source server (cdrid)
txncnt integer Number of transactions from this source
pending integer The transaction currently pending on this source
active integer The transaction currently active on this source
maxpending integer Maximum pending transactions on this source
maxactive integer Maximum active transactions on this source
avg_pending float Average pending transactions on this source
avg_active float Average active transactions on this source
cmtrate float Average commit rate from this source
syscdrrecv_txn
The syscdrrecv_txn table contains information about the data receive queue. The
receive queue is an in-memory queue.
When a replication server receives replicated data from a source database server, it
puts this data on the receive queue, picks up transactions from this queue, and
applies them on the target.
For information on the columns of the syscdrrecv_txn table, refer to “Columns of
the Transaction Tables” on page D-11.
D-6 IBM Informix Dynamic Server Enterprise Replication Guide
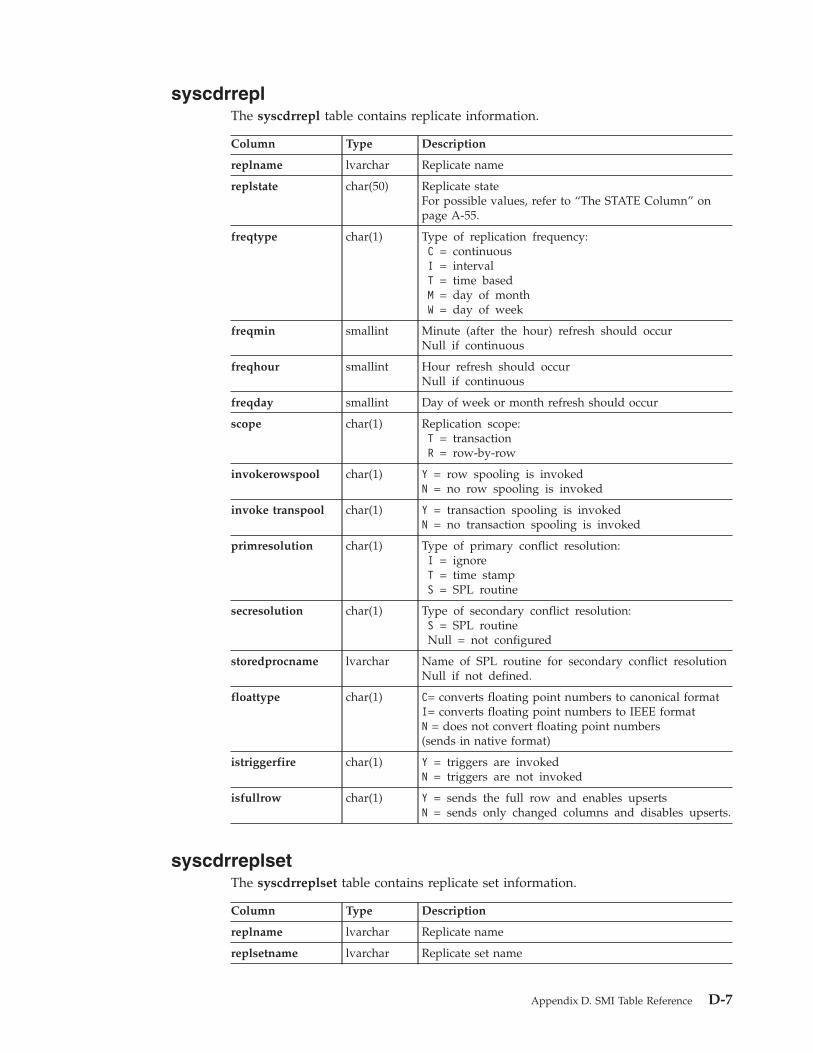
syscdrrepl
The syscdrrepl table contains replicate information.
Column Type Description
replname lvarchar Replicate name
replstate char(50) Replicate state
For possible values, refer to “The STATE Column” on
page A-55.
freqtype char(1) Type of replication frequency:
C = continuous
I = interval
T = time based
M = day of month
W = day of week
freqmin smallint Minute (after the hour) refresh should occur
Null if continuous
freqhour smallint Hour refresh should occur
Null if continuous
freqday smallint Day of week or month refresh should occur
scope char(1) Replication scope:
T = transaction
R = row-by-row
invokerowspool char(1) Y = row spooling is invoked
N = no row spooling is invoked
invoke transpool char(1) Y = transaction spooling is invoked
N = no transaction spooling is invoked
primresolution char(1) Type of primary conflict resolution:
I = ignore
T = time stamp
S = SPL routine
secresolution char(1) Type of secondary conflict resolution:
S = SPL routine
Null = not configured
storedprocname lvarchar Name of SPL routine for secondary conflict resolution
Null if not defined.
floattype char(1) C= converts floating point numbers to canonical format
I= converts floating point numbers to IEEE format
N = does not convert floating point numbers
(sends in native format)
istriggerfire char(1) Y = triggers are invoked
N = triggers are not invoked
isfullrow char(1) Y = sends the full row and enables upserts
N = sends only changed columns and disables upserts.
syscdrreplset
The syscdrreplset table contains replicate set information.
Column Type Description
replname lvarchar Replicate name
replsetname lvarchar Replicate set name
Appendix D. SMI Table Reference D-7

syscdrs
The syscdrs table contains information about database servers that have been
declared to Enterprise Replication.
Column Type Description
servid integer Server identifier
servname char(128) Database server name
cnnstate char(1) Status of connection to this database server:
C = Connected
D = Connection disconnected (will be retried)
T = Idle time-out caused connection to terminate
X = Connection closed by user command
Connection unavailable until reset by user
cnnstatechg integer Time that connection state was last changed
servstate char(1) Status of database server:
A = Active
S = Suspended
Q = Quiescent (initial sync state only)
ishub char(1) Y = Server is a hub
N = Server is not a hub
A hub is any replication server that forwards information
to another replication server.
isleaf char(1) Y = Server is a leaf server
N = Server is not a leaf server
rootserverid integer The identifier of the root server
forwardnodeid integer The identifier of the parent server
timeout integer Idle timeout
Although not directly connected, a nonroot server is similar to a root server except
it forwards all replicated messages through its parent (root) server. All nonroot
servers are known to all root servers and other nonroot servers. A nonroot server
can be a terminal point in a tree or it can be the parent for another nonroot server
or a leaf server. Nonroot and root servers are aware of all replication servers in the
replication environment, including all the leaf servers.
A leaf server is a nonroot server that has a partial catalog. A leaf server has
knowledge only of itself and its parent server. It does not contain information
about replicates of which it is not a participant. The leaf server must be a terminal
point in a replication hierarchy.
syscdrsend_buf
The syscdrsend_buf table contains buffers that give information about the send
queue. When a user performs transactions on the source database server,
Enterprise Replication queues the data on the send queue for delivery to the target
servers.
For information on the columns of the syscdrsend_buf table, refer to “Columns of
the Buffer Tables” on page D-11.
D-8 IBM Informix Dynamic Server Enterprise Replication Guide

syscdrsend_txn
The syscdrsend_txn table contains information about the send queue. When a user
performs transactions on the source database server, Enterprise Replication queues
the data on the send queue for delivery to the target servers.
For information on the columns of the syscdrsync_txn table, refer to “Columns of
the Transaction Tables” on page D-11.
syscdrserver
The syscdrserver table contains information about database servers declared to
Enterprise Replication.
Column Type Description
servid integer Replication server ID
servername char(128) Database server group name
connstate char(1) Status of connection to this database server:
C = Connected
D = Connection disconnected (will be retried)
T = Idle time-out caused connection to terminate
X = Connection closed by user command
Connection unavailable until reset by user
connstatechange integer Time that connection state was last changed
servstate char(50) Status of this database server:
A = Active
S = Suspended
Q = Quiescent (initial sync state only)
ishub char(1) Y = Server is a hub
N = Server is not a hub
isleaf char(1) Y = Server is a leaf server
N = Server connection is not a leaf server
rootserverid integer The identifier of the root server
forwardnodeid integer The identifier of the parent server
idletimeout integer Idle time-out
atsdir lvarchar ATS directory spooling name
risdir lvarchar RIS directory spooling name
syscdrsync_buf
The syscdrsync_buf table contains buffers that give information about the
synchronization queue. Enterprise Replication uses this queue only when defining
a replication server and synchronizing its global catalog with another replication
server.
For information on the columns of the syscdrsync_buf table, refer to “Columns of
the Buffer Tables” on page D-11.
syscdrsync_txn
The syscdrsync_txn table contains information about the synchronization queue.
This queue is currently used only when defining a replication server and
synchronizing its global catalog with another replication server. The
synchronization queue is an in-memory-only queue.
Appendix D. SMI Table Reference D-9

For information on the columns of the syscdrsync_txn table, refer to “Columns of
the Transaction Tables” on page D-11.
syscdrtx
The syscdrtx table contains information about Enterprise Replication transactions.
Column Type Description
srvid integer Server ID
srvname char(128) Name of database server from which data is received
txprocssd integer Transaction processed from database server srvname
txcmmtd integer Transaction committed from database server srvname
txabrtd integer Transaction aborted from database server srvname
rowscmmtd integer Rows committed from database server srvname
rowsabrtd integer Rows aborted from database server srvname
txbadcnt integer Number of transactions with source commit time (on
database server srvname) greater than target commit time
Enterprise Replication Queues
One group of sysmaster tables shows information about Enterprise Replication
queues. The sysmaster database reports the status of these queues in the tables
that have the suffixes _buf and _txn.
The name of each table that describes an Enterprise Replication queue is composed
of the following three pieces:
v syscdr, which indicates that the table describes Enterprise Replication
v An abbreviation that indicates which queue the table describes
v A suffix, either _buf or _txn, which specifies whether the table includes buffers
or transactions
Selecting from these tables provides information about the contents of each queue.
For example, the following SELECT statement returns a list of all transactions
queued on the send queue:
SELECT * FROM syscdrsend_txn
The following example returns a list of all transactions queued on the in-memory
send queue and returns the number of buffers and the size of each buffer for each
transaction on the send queue:
SELECT cbkeyserverid,cbkeyid,cbkeypos,count(*),sum(cbsize)
from syscdrsend_buf
group by cbkeyserverid, cbkeyid, cbkeypos
order by cbkeyserverid, cbkeyid, cbkeypos
All queues are present on all the replication servers, regardless of whether the
replication server is a source or a target for a particular transaction. Some of the
queues are always empty. For instance, the send queue on a target-only server is
always empty.
Each queue is two-dimensional. Every queue has a list of transaction headers. Each
transaction header in turn has a list of buffers that belong to that transaction.
D-10 IBM Informix Dynamic Server Enterprise Replication Guide

Columns of the Transaction Tables
All the tables whose names end with _txn have the same columns and the same
column definitions. The information in the tables represents only transactions in
memory and not those spooled to disk.
The ctstamp1 and ctstamp2 columns combine to form the primary key for these
tables.
Column Type Description
ctkeyserverid integer Server ID of the database server where this data
originated
This server ID is the group ID from the sqlhosts file or
the SQLHOSTS registry key.
ctkeyid integer Logical log ID
ctkeypos integer Position in the logical log on the source server for the
transaction represented by the buffer
ctkeysequence integer Sequence number for the buffer within the transaction
ctstamp1 integer Together with ctstamp2, forms an insertion stamp that
specifies the order of the transaction in the queue
ctstamp2 integer Together with ctstamp1, forms an insertion stamp that
specifies the order of the transaction in the queue
ctcommittime integer Time when the transaction represented by this buffer
was committed
ctuserid integer Login ID of the user who committed this transaction
ctfromid integer Server ID of the server that sent this transaction
Used only in hierarchical replication
Columns of the Buffer Tables
The tables whose names end with _buf give information about the buffers that
form the transactions listed in the _txn table. All the _buf tables have the same
columns and the same column definitions.
Column Type Description
cbflags integer Internal flags for this buffer
cbsize integer Size of this buffer in bytes
cbkeyserverid integer Server ID of the database server where this data
originated
This server ID is group ID from the sqlhosts file or the
SQLHOSTS registry key.
cbkeyid integer Login ID of the user who originated the transaction
represented by this buffer
cbkeypos integer Log position on the source server for the transaction
represented by this buffer
cbkeysequence integer Sequence number for this buffer within the transaction
cbreplid integer Replicate identifier for the data in this buffer
cbcommittime integer Time when the transaction represented by this buffer
was committed
Appendix D. SMI Table Reference D-11

The following columns combine to form the primary key for this table:
cbkeyserverid, cbkeyid, cbkeypos, cbkeysequence.
The columns cbkeyserverid, cbkeyid, and cbkeypos form a foreign key that points
to the transaction in the _txn table that the buffer represents.
D-12 IBM Informix Dynamic Server Enterprise Replication Guide

Appendix E. Replication Examples
This appendix contains simple examples of replication using the command-line
utility (CLU). Appendix A, “Command-Line Utility Reference,” on page A-1
documents the CLU.
Replication Example Environment
To run the replication examples in this chapter, you need three Informix database
servers. Each database server must be in a database server group.
This example uses the following environment:
v Three computers (s1, s2, and s3) are hosts for the database servers usa, italy,
and japan, respectively. Each computer has active network connections to the
other two computers.
v The database servers usa, italy, and japan are members of the database server
groups g_usa, g_italy, and g_japan, respectively.
For information about database server groups, see “Setting up Database Server
Groups” on page 4-3.
UNIX Only
The UNIX sqlhosts file for each database server contains the following
connectivity information.
g_usa group - - i=1
usa ontlitcp s1 techpubs1 g=g_usa
g_italy group - - i=8
italy ontlitcp s2 techpubs2 g=g_italy
g_japan group - - i=6
japan ontlitcp s3 techpub6 g=g_usa
End of UNIX Only
Windows Only
See Appendix F, “SQLHOSTS Registry Key (Windows),” on page F-1 for
information on how to prepare the SQLHOSTS connectivity information using the
information shown in the above UNIX sqlhosts file.
End of Windows Only
The ONCONFIG file contains the following CDR_QDATA_SBSPACE entry:
CDR_QDATA_SBSPACE sbspace #CDR queue smart blob space
You must create an sbspace for the row data and set the CDR_QDATA_SBSPACE
parameter to the location of that sbspace. For more information, see “Setting Up
Send and Receive Queue Spool Areas” on page 4-8 and “CDR_QDATA_SBSPACE
Configuration Parameter” on page B-5.
© Copyright IBM Corp. 1996, 2005 E-1

All commands in this example, except for creation of the sample databases on italy
and japan, are issued from the computer s1.
The databases for the examples in this chapter are identical stores_demo databases
with logging, as follows:
v Create a database named stores on the usa database server:
s1> dbaccessdemo -log stores
v Create a database named stores on the italy database server:
s1> rlogin s2
s2> dbaccessdemo -log stores
v Create a database named stores on the japan database server:
s1> rlogin s3
s2> dbaccessdemo -log stores
For information on preparing data for replication, see “Data Preparation Example”
on page 4-19.
Primary-Target Example
This section contains a simple example of primary-target replication. In
primary-target replication, only changes to the primary table are replicated to the
other tables in the replicate. Changes to the secondary tables are not replicated.
Preparing for a Primary-Target Replication
In this example, define the g_usa and g_italy database server groups as Enterprise
Replication servers and create a replicate, repl1.
To define the database server groups and create the replicate:
1. Create and populate the database that defines the usa database server as a
replication server:
cdr define server --init g_usa
Before replicating data, you must define the database servers as replication
servers. A replication server is a database server that has an extra database that
holds replication information.
The --init option specifies that this server is a new replication server. When you
define a replication server, you must use the name of the database server group
(g_usa) rather than the database server name.
2. Display the replication server that you defined to verify that the definition
succeeded:
cdr list server
The command returns the following information:
SERVER ID STATE STATUS QUEUE CONNECTION CHANGED
----------------------------------------------------------
g_usa 1 Active Local 0
3. Define the second database server, italy, as a replication server:
cdr define server --connect=italy --init \
--sync=g_usa g_italy
The --connect option allows you to define italy (on the s2 computer) while
working at the s1 (usa) computer. The --sync option instructs the command to
use the already-defined replication server (g_usa) as a pattern for the new
definition. The --sync option also links the two replication servers into a
replication environment.
E-2 IBM Informix Dynamic Server Enterprise Replication Guide
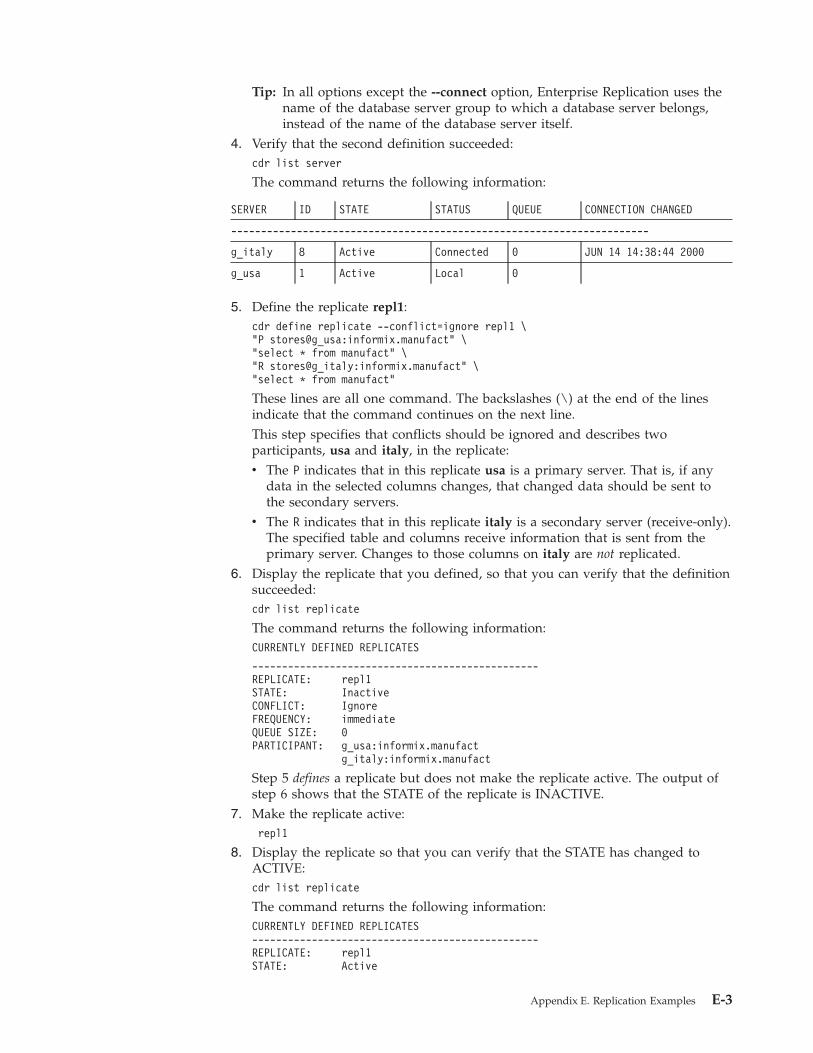
Tip: In all options except the --connect option, Enterprise Replication uses the
name of the database server group to which a database server belongs,
instead of the name of the database server itself.
4. Verify that the second definition succeeded:
cdr list server
The command returns the following information:
SERVER ID STATE STATUS QUEUE CONNECTION CHANGED
----------------------------------------------------------------------
g_italy 8 Active Connected 0 JUN 14 14:38:44 2000
g_usa 1 Active Local 0
5. Define the replicate repl1:
cdr define replicate --conflict=ignore repl1 \
"P stores@g_usa:informix.manufact" \
"select * from manufact" \
"R stores@g_italy:informix.manufact" \
"select * from manufact"
These lines are all one command. The backslashes (\) at the end of the lines
indicate that the command continues on the next line.
This step specifies that conflicts should be ignored and describes two
participants, usa and italy, in the replicate:
v The P indicates that in this replicate usa is a primary server. That is, if any
data in the selected columns changes, that changed data should be sent to
the secondary servers.
v The R indicates that in this replicate italy is a secondary server (receive-only).
The specified table and columns receive information that is sent from the
primary server. Changes to those columns on italy are not replicated.6. Display the replicate that you defined, so that you can verify that the definition
succeeded:
cdr list replicate
The command returns the following information:
CURRENTLY DEFINED REPLICATES
------------------------------------------------
REPLICATE: repl1
STATE: Inactive
CONFLICT: Ignore
FREQUENCY: immediate
QUEUE SIZE: 0
PARTICIPANT: g_usa:informix.manufact
g_italy:informix.manufact
Step 5 defines a replicate but does not make the replicate active. The output of
step 6 shows that the STATE of the replicate is INACTIVE.
7. Make the replicate active:
repl1
8. Display the replicate so that you can verify that the STATE has changed to
ACTIVE:
cdr list replicate
The command returns the following information:
CURRENTLY DEFINED REPLICATES
------------------------------------------------
REPLICATE: repl1
STATE: Active
Appendix E. Replication Examples E-3

CONFLICT: Ignore
FREQUENCY: immediate
QUEUE SIZE: 0
PARTICIPANT: g_usa:informix.manufact
g_italy:informix.manufact
If any changes are made to the manufact table, the changes will be replicated
to the other participants in the replicate.
Cause a Replication
Now you can modify the manufact table on the usa database server and see the
change reflected in the manufact table on the italy database server.
To cause a replication:
1. Use DB–Access to insert a value into the manufact table on usa:
INSERT INTO stores@usa:manufact \
VALUES (’AWN’,’Allwyn’,’8’);
2. Observe the changes on usa and on italy:
SELECT * from stores@usa:manufact
SELECT * from stores@italy:manufact
To Not Cause a Replication
In repl1, usa is the primary database server and italy is the target. Changes made
to the manufact table on italy do not replicate to usa.
To not cause a replication:
1. Use DB–Access to insert a value into the manufact table on italy:
INSERT INTO stores@italy:manufact \
VALUES (’ZZZ’,’Zip’,’9’);
2. Verify that the change occurred on italy but did not replicate to the manufact
table on usa:
SELECT * from stores@usa:manufact
SELECT * from stores@italy:manufact
Update-Anywhere Example
This example builds on the previous example and creates a simple update-anywhere
replication. In update-anywhere replication, changes to any table in the replicate
are replicated to all other tables in the replicate. In this example, any change to the
stock table of the stores database on any database server in the replicate will be
replicated to the stock table on the other database servers.
Preparing for an Update-Anywhere Replication
In this example, define the repl2 replicate.
To prepare for update-anywhere replication:
1. Define the replicate, repl2:
cdr define replicate --conflict=ignore repl2 \
"stores@g_usa:informix.stock" "select * from stock" \
"stores@g_italy:informix.stock" "select * from stock"
These lines are all one command. The backslashes (\) at the end of the lines
indicate that the command continues on the next line.
E-4 IBM Informix Dynamic Server Enterprise Replication Guide

This step specifies that conflicts should be ignored and describes two
participants, usa and italy (including the table and the columns to replicate) in
the replicate.
Because neither P (primary) nor R (receive-only) is specified, the replicate is
defined as update-anywhere. If any data in the selected columns changes, on
either participant, that changed data should be sent to the other participants in
the replicate.
2. Display all the replicates so that you can verify that your definition of repl2
succeeded:
cdr list replicate
The command returns the following information:
CURRENTLY DEFINED REPLICATES
---------------------------------------------------------
REPLICATE: repl1
STATE: Active
CONFLICT: Ignore
FREQUENCY: immediate
QUEUE SIZE: 0
PARTICIPANT: g_usa:informix.manufact
g_italy:informix.manufact
REPLICATE: repl2
STATE: Inactive
CONFLICT: Ignore
FREQUENCY: immediate
QUEUE SIZE: 0
PARTICIPANT: g_usa:informix.stock
g_italy:informix.manufact
Although this output shows that repl2 exists, it does not show the participant
modifiers (the SELECT statements) for repl2.
3. Display the participant modifiers for repl2:
cdr list replicate repl2
This command returns the following information:
REPLICATE TABLE SELECT
----------------------------------------------------------------------
repl2 stores@g_usa:informix.stock select * from stock
repl2 stores@g_italy:informix.stock select * from stock
4. Add the japan database server to the replication system already defined in the
previous example:
cdr define server --connect=japan --init \
--sync=g_usa g_japan
You can use either g_usa or g_italy in the --sync option.
Enterprise Replication maintains identical information on all servers that
participate in the replication system. Therefore, when you add the japan
database server, information about that server is propagated to all
previously-defined replication servers (usa and italy).
5. Display the replication servers so that you can verify that the definition
succeeded:
cdr list server
Appendix E. Replication Examples E-5

The command returns the following information:
SERVER ID STATE STATUS QUEUE CONNECTION CHANGED
----------------------------------------------------------------------
g_italy 8 Active Connected 0 JUN 14 14:38:44 2000
g_japan 6 Active Connected 0 JUN 14 14:38:44 2000
g_usa 1 Active Local
6. Add the participant and participant modifier to repl2:
cdr change replicate --add repl2 \
"stores@g_japan:informix.stock" "select * from stock"
7. Display detailed information about repl2 after adding the participant in step 6:
cdr list replicate repl2
The command returns the following information:
REPLICATE TABLE SELECT
----------------------------------------------------------------------
repl2 stores@g_usa:informix.stock select * from stock
repl2 stores@g_italy:informix.stock select * from stock
repl2 stores@g_japan:informix.stock select * from stock
8. Make the replicate active:
repl2
Changes made to the stock table on usa are reflected in the stock tables on
both italy and japan.
9. Display a list of replicates so that you can verify that the STATE of repl2 has
changed to ACTIVE:
cdr list replicate
The command returns the following information:
CURRENTLY DEFINED REPLICATES
------------------------------------------------------
REPLICATE: repl1
STATE: Active
CONFLICT: Ignore
FREQUENCY: immediate
QUEUE SIZE: 0
PARTICIPANT: g_usa:informix.manufact
g_italy:informix.manufact
REPLICATE: repl2
STATE: Active
CONFLICT: Ignore
FREQUENCY: immediate
QUEUE SIZE: 0
PARTICIPANT: g_usa:informix.stock
g_italy:informix.manufact
g_japan:informix.manufact
Cause a Replication
Now you can modify the stock table on one database server and see the change
reflected on the other database servers.
To cause a replication:
E-6 IBM Informix Dynamic Server Enterprise Replication Guide

1. Use DB–Access to insert a line into the stock table on usa:
INSERT INTO stores@usa:stock VALUES (401, “PRC”, “ski boots”, 200.00, “pair”, “pair”);
2. Observe the change on the italy and japan database servers:
SELECT * from stores@italy:stock;
SELECT * from stores@japan:stock;
To update the stock table on the japan database server:
1. Use DB–Access to change a value in the stock table on japan:
UPDATE stores@japan:stock SET unit_price = 190.00
WHERE stock_num = 401;
2. Verify that the change has replicated to the stock table on usa and on italy:
SELECT * from stores@usa:stock WHERE stock_num = 401;
SELECT * from stores@italy:stock WHERE stock_num = 401;
Hierarchy Example
The example in this section adds a replication tree to the fully-connected
environment of the usa, italy, and japan replication servers. The nonroot servers
boston and denver are children of usa. (The leaf server miami is a child of
boston.) Figure E-1 shows the replication hierarchy.
Preparing for a Hierarchy Example
To try this example, you need to prepare three additional database servers: boston,
denver, and miami. To prepare the database servers, use the techniques described
in “Replication Example Environment” on page E-1.
Defining a Hierarchy
The following example defines a replication hierarchy that includes denver,
boston, and miami and, whose root is usa.
To define a hierarchy:
1. Add boston to the replication hierarchy as a nonroot server attached to the root
server usa:
cdr define server --connect=boston --nonroot --init \
--sync g_usa g_boston
root
usa
boston
leaf
miaminonroot
denver
root
japan
root
italy
nonroot
Figure E-1. Hierarchical Tree Example
Appendix E. Replication Examples E-7
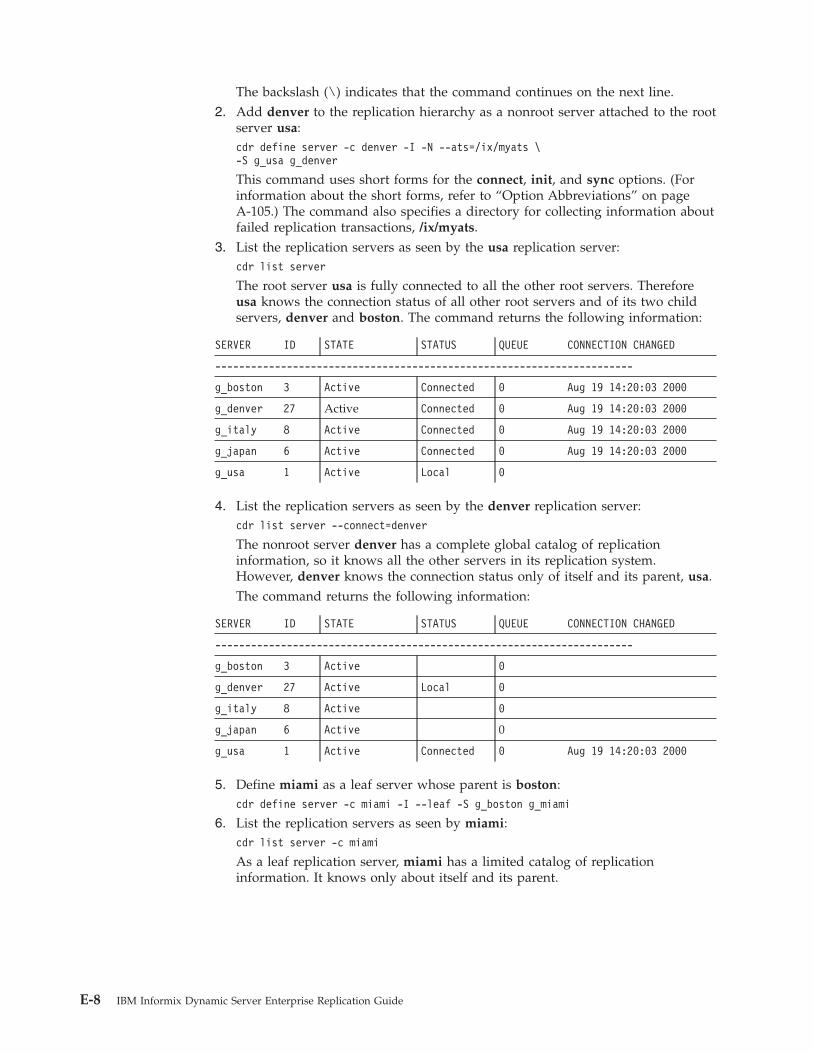
The backslash (\) indicates that the command continues on the next line.
2. Add denver to the replication hierarchy as a nonroot server attached to the root
server usa:
cdr define server -c denver -I -N --ats=/ix/myats \
-S g_usa g_denver
This command uses short forms for the connect, init, and sync options. (For
information about the short forms, refer to “Option Abbreviations” on page
A-105.) The command also specifies a directory for collecting information about
failed replication transactions, /ix/myats.
3. List the replication servers as seen by the usa replication server:
cdr list server
The root server usa is fully connected to all the other root servers. Therefore
usa knows the connection status of all other root servers and of its two child
servers, denver and boston. The command returns the following information:
SERVER ID STATE STATUS QUEUE CONNECTION CHANGED
----------------------------------------------------------------------
g_boston 3 Active Connected 0 Aug 19 14:20:03 2000
g_denver 27 Active Connected 0 Aug 19 14:20:03 2000
g_italy 8 Active Connected 0 Aug 19 14:20:03 2000
g_japan 6 Active Connected 0 Aug 19 14:20:03 2000
g_usa 1 Active Local 0
4. List the replication servers as seen by the denver replication server:
cdr list server --connect=denver
The nonroot server denver has a complete global catalog of replication
information, so it knows all the other servers in its replication system.
However, denver knows the connection status only of itself and its parent, usa.
The command returns the following information:
SERVER ID STATE STATUS QUEUE CONNECTION CHANGED
----------------------------------------------------------------------
g_boston 3 Active 0
g_denver 27 Active Local 0
g_italy 8 Active 0
g_japan 6 Active 0
g_usa 1 Active Connected 0 Aug 19 14:20:03 2000
5. Define miami as a leaf server whose parent is boston:
cdr define server -c miami -I --leaf -S g_boston g_miami
6. List the replication servers as seen by miami:
cdr list server -c miami
As a leaf replication server, miami has a limited catalog of replication
information. It knows only about itself and its parent.
E-8 IBM Informix Dynamic Server Enterprise Replication Guide

The command returns the following information:
SERVER ID STATE STATUS QUEUE CONNECTION CHANGED
----------------------------------------------------------------------
g_boston 3 Active Connected 0 Aug19 14:35:17 2000
g_miami 4 Active Local 0
7. List details about the usa replication server:
cdr list server g_usa
The server is a hub; that is, it forwards replication information to and from
other servers. It uses the default values for idle timeout, send queue, receive
queue, and ATS directory.
The command returns the following information:
NAME ID ATTRIBUTES
----------------------------------------------------------------------
g_usa 1 timeout=15 hub sendq=rootdbs recvq=rootdbs atsdir=/tmp
Appendix E. Replication Examples E-9

E-10 IBM Informix Dynamic Server Enterprise Replication Guide

Appendix F. SQLHOSTS Registry Key (Windows)
When you install the database server, the setup program creates the following key
in the Windows registry:
HKEY_LOCAL_MACHINE\SOFTWARE\INFORMIX\SQLHOSTS
This branch of the HKEY_LOCAL_MACHINE subtree stores the sqlhosts
information. Each key on the SQLHOSTS branch is the name of a database server.
When you click the database server name, the registry displays the values of the
HOST, OPTIONS, PROTOCOL, and SERVICE fields for that particular database
server.
Each computer that hosts a database server or a client must include the
connectivity information either in the sqlhosts registry key or in a central registry.
When the client application runs on the same computer as the database server,
they share a single sqlhosts registry key.
The Location of the SQLHOSTS Registry Key
When you install the database server on Windows, the installation program asks
where you want to store the SQLHOSTS registry key. You can specify one of the
following two options:
v The local computer where you are installing the database server
v Another computer in the network that serves as a central, shared repository of
sqlhosts information for multiple database servers in the network
Local SQLHOSTS Registry Key
If you use the SQLHOSTS registry key on the local computer, for all database
servers, the correct SQLHOSTS registry key must exist on all computers involved
in replication. In addition, the hosts and services files on each computer must
include information about all database servers.
For example, to set up replication between the server instance srv1 on the
computer host1 and the server instance srv2 on host2, you must ensure the
following:
v Both host1 and host2 include SQLHOSTS registry key entries for srv1 and srv2.
v The services file on both computers includes the details of the services used by
both database server instances.
Shared SQLHOSTS Registry Key
If you use a shared SQLHOSTS registry key, you do not need to maintain the same
sqlhosts information on multiple computers. However, the hosts and services files
on each computer must contain information about all computers that have database
servers.
If you specify a shared sqlhosts registry key, you must set the environment
variable INFORMIXSQLHOSTS on your local computer to the name of the
Windows computer that stores the registry. The database server first looks for the
sqlhosts registry key on the INFORMIXSQLHOSTS computer. If the database
server does not find an sqlhosts registry key on the INFORMIXSQLHOSTS
© Copyright IBM Corp. 1996, 2005 F-1

computer, or if INFORMIXSQLHOSTS is not set, the database server looks for an
sqlhosts registry key on the local computer.
You must comply with Windows network-access conventions and file permissions
to ensure that the local computer has access to the shared sqlhosts registry key. For
information about network-access conventions and file permissions, see your
Windows documentation.
Preparing the SQLHOSTS Connectivity Information
Preparing the SQLHOSTS connectivity information consists of setting up registry
keys on each computer that hosts a database server that participates in a replicate.
To prepare the SQLHOSTS connectivity information:
1. Set up the SQLHOSTS registry key on the local computer.
2. Set up the database server group registry key on the local computer.
See “Setting Up the Database Server Group Registry Key” on page F-3.
3. Set up the SQLHOSTS and group registry keys on all computers that are
participants in the replicate.
See “Setting up the Registry Keys on All Computers” on page F-5.
4. Ensure that the services files on each computer include entries for all database
servers that are participants in the replicate.
See “Verifying the services Files on All Computers” on page F-5.
Setting up the SQLHOSTS Registry with ISA
Important: It is strongly recommended that you use IBM Informix Server
Administrator (ISA), rather than regedt32, to set up the SQLHOSTS
registry key and database server group registry key on your Windows
system. In addition, ISA allows you to administer your replication
system from a web browser.
See the online help for ISA for details on setting up the SQLHOSTS registry key
and database server group registry key.
Setting up the SQLHOSTS Registry Key with regedt32
It is recommended that you use ISA to set up the SQLHOSTS registry key.
Important: Use extreme caution with regedt32. If you make mistakes when editing
the registry, you can destroy the configurations, not only of your IBM
Informix products, but of your other applications.
To set up SQLHOSTS with regedt32:
1. Run the Windows program, regedt32.
2. In the Registry Editor window, select the window for the
HKEY_LOCAL_MACHINE subtree.
3. Click the folder icons to select the \SOFTWARE\INFORMIX\ SQLHOSTS
branch.
4. With the SQLHOSTS key selected, choose Edit > Add Key.
5. In the Add Key dialog box, type the name of the database server in the Key
Name dialog box.
Leave the Class dialog box blank. Click OK.
F-2 IBM Informix Dynamic Server Enterprise Replication Guide
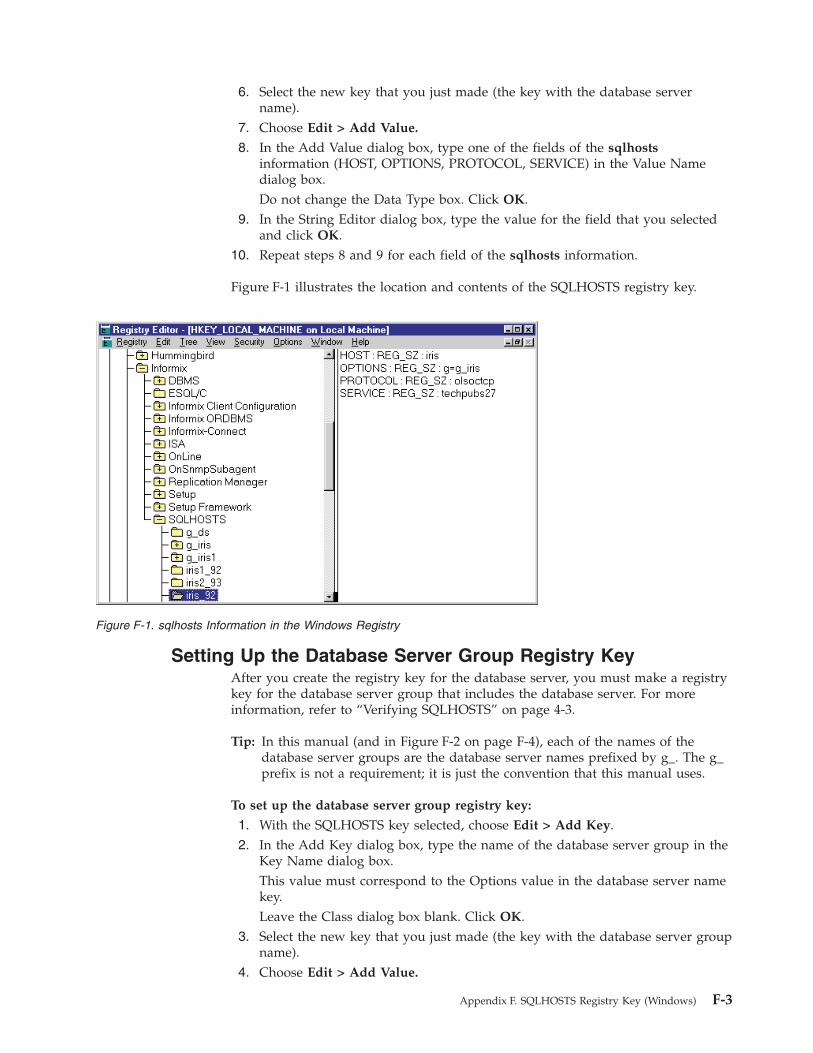
6. Select the new key that you just made (the key with the database server
name).
7. Choose Edit > Add Value.
8. In the Add Value dialog box, type one of the fields of the sqlhosts
information (HOST, OPTIONS, PROTOCOL, SERVICE) in the Value Name
dialog box.
Do not change the Data Type box. Click OK.
9. In the String Editor dialog box, type the value for the field that you selected
and click OK.
10. Repeat steps 8 and 9 for each field of the sqlhosts information.
Figure F-1 illustrates the location and contents of the SQLHOSTS registry key.
Setting Up the Database Server Group Registry Key
After you create the registry key for the database server, you must make a registry
key for the database server group that includes the database server. For more
information, refer to “Verifying SQLHOSTS” on page 4-3.
Tip: In this manual (and in Figure F-2 on page F-4), each of the names of the
database server groups are the database server names prefixed by g_. The g_
prefix is not a requirement; it is just the convention that this manual uses.
To set up the database server group registry key:
1. With the SQLHOSTS key selected, choose Edit > Add Key.
2. In the Add Key dialog box, type the name of the database server group in the
Key Name dialog box.
This value must correspond to the Options value in the database server name
key.
Leave the Class dialog box blank. Click OK.
3. Select the new key that you just made (the key with the database server group
name).
4. Choose Edit > Add Value.
Figure F-1. sqlhosts Information in the Windows Registry
Appendix F. SQLHOSTS Registry Key (Windows) F-3
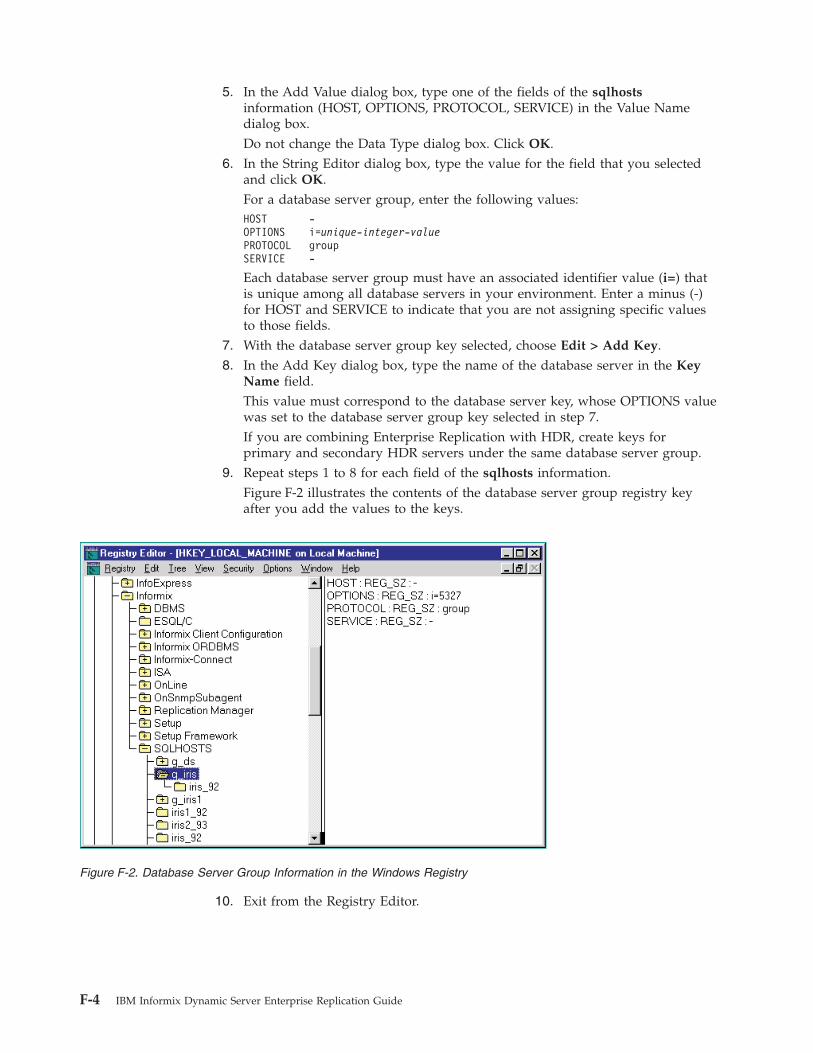
5. In the Add Value dialog box, type one of the fields of the sqlhosts
information (HOST, OPTIONS, PROTOCOL, SERVICE) in the Value Name
dialog box.
Do not change the Data Type dialog box. Click OK.
6. In the String Editor dialog box, type the value for the field that you selected
and click OK.
For a database server group, enter the following values:
HOST -
OPTIONS i=unique-integer-value
PROTOCOL group
SERVICE -
Each database server group must have an associated identifier value (i=) that
is unique among all database servers in your environment. Enter a minus (-)
for HOST and SERVICE to indicate that you are not assigning specific values
to those fields.
7. With the database server group key selected, choose Edit > Add Key.
8. In the Add Key dialog box, type the name of the database server in the Key
Name field.
This value must correspond to the database server key, whose OPTIONS value
was set to the database server group key selected in step 7.
If you are combining Enterprise Replication with HDR, create keys for
primary and secondary HDR servers under the same database server group.
9. Repeat steps 1 to 8 for each field of the sqlhosts information.
Figure F-2 illustrates the contents of the database server group registry key
after you add the values to the keys.
10. Exit from the Registry Editor.
Figure F-2. Database Server Group Information in the Windows Registry
F-4 IBM Informix Dynamic Server Enterprise Replication Guide

Setting up the Registry Keys on All Computers
Now, update the registry keys on all computers that participate in replication.
To update the registry keys on all computers:
1. Set up the SQLHOSTS registry key on all computers that participate in
replication.
See “Setting up the SQLHOSTS Registry Key with regedt32” on page F-2.
2. Set up the database server group registry key on all computers that participate
in replication.
See “Setting Up the Database Server Group Registry Key” on page F-3.
Verifying the services Files on All Computers
Finally, on each computer that participates in replication, make sure that the
services file (located in the C:\Windows/system32/drivers/etc/ directory) contains
entries for all the database servers.
To verify the services files on all computers:
1. Check the services file on the first host (for example, host1).
The file might look like this:
techpubs27 4599/tcp # service for online instance denver
techpubs28 4600/tcp # service for online instance boston
2. Check the services file on the second host (for example, host2).
The file might should look the same as the file on host1:
techpubs27 4599/tcp # service for online instance denver
techpubs28 4600/tcp # service for online instance boston
Appendix F. SQLHOSTS Registry Key (Windows) F-5

F-6 IBM Informix Dynamic Server Enterprise Replication Guide

Appendix G. Datasync Warning and Error Messages
This appendix lists Datasync warning and error messages that you can suppress
from being written to the ATS and RIS files. To specify which warnings and errors
to suppress, use the CDR_SUPPRESS_ATSRISWARN configuration parameter. For
more information, see “CDR_SUPPRESS_ATSRISWARN Configuration Parameter”
on page B-7.
Warning or Error Code Number Description
DSROWCOMMITTED 0
DSEROW 1
DSEReplInsertOrder 2 Warning: Insert exception, row already exists in target table, converted
to update
DSEReplUpdateOrder 3 Warning: Update exception, row does not exist in target table,
converted to insert
DSEReplDeleteOrder 4 Warning: Delete exception, row does not exist in target table, saved in
delete table
DSEReplInsert 5 Error: Insert aborted, row already exists in target table
DSEReplUpdate 6 Error: Update aborted, row does not exist in target table
DSEReplDelete 7 Error: Delete aborted, row does not exist in target table
DSERowLength 8 Error: Length of replicated row is greater than row size in target table
DSEDbopType 9 Error: Unknown db operation
DSENoServerTimeCol 10 Error: Missing cdrserver and/or cdrtime columns in target table
DSEConflictRule 13 Error: Unknown conflict resolution rule defined
DSELostConflictRes 14 Error: Failed conflict resolution rule
DSENoServerName 15 Error: Global catalog cannot translate replicate server id to name
DSEColMap 16 Error: Unable to remap columns selected for replication
DSEColUncomp 17 Error: Invalid char/length in VARCHAR column
DSESPRetTypeOp 18 Error: Invalid data type or unknown operation returned by stored
procedure
DSESPAbortRow 19 Error: Row aborted by stored procedure
DSESPSelCols 20 Error: Number of columns returned by stored procedure not equal to
the number of columns in select statement
DSESPColTypeLen 21 Error: Invalid data type or length for selected columns returned by
stored procedure
DSESPError 22 Error: Error returned by user’s stored procedure
DSESPInternal 23 Error: Internal error (buffer too small for stored procedure arguments
DSENoMatchKeyInsert 24 Error: No matching key delete row for key insert
DSESql 25 Error: SQL error encountered
DSEIsam 26 Error: ISAM error encountered
DSELocalDReExist 27 Warning: Local delete row has been reinserted on local server
DSELocalDOddState 28 Warning: Unable to determine if the local delete row should be
updated to the delete table
© Copyright IBM Corp. 1996, 2005 G-1

Warning or Error Code Number Description
DSELocalDInDelTab 29 Warning: Row already exists in delete table for the given local delete
row
DSEBlobOrder 30 Warning: Row failed conflict resolution rule but one or more blob
columns were accepted
DSEBlobSetToNull 31 Warning: One or more blob columns were set to NULL because data
could not be sent
DSEBlobKeepLocal 32 Warning: One or more blob columns were not changed because data
could not be sent
DSEBlobInvalidFlag 33 Error: Invalid user action defined for blob columns
DSEBlobAbortRow 34 Error: Row aborted by user’s stored procedure due to unsent blobs
DSESPBlobRetOp 35 Error: Invalid action returned by user’s stored procedure on blob
columns
DSEReplDel 36
DSENoUDTHeader 37
DSENoUDTTrailer 38
DSEStreamHandle 39
DSEAttachUDREnv 40
DSECdrreceiveSetup 41
DSECdrreceiveCall 42
DSECdrreceiveRetCode 43 cdrreceive returned error
DSECdrreceiveRetGarbage 44 cdrreceive returned garbage
DSEStream 45 Error reading from stream
DSEStreamAborted 46 Stream aborted by sender
DSEValStore 47
DSECdrreceiveRetType 48 cdrreceive returned wrong type
DSEStreamOptType 49 Unrecognized stream option
DSEStreamOptLen 50 Stream option has bad length
DSEStreamOptBitmap 51 Error in changed col bitmap
DSEUnStreamColl 52 Error while unstreaming collection
DSEUnStreamRowType 53 Error while unstreaming rowtype
DSEStreamFormat 54 Unexpected or invalid data in stream
DSEStack 55 Out of stack space
DSEInternal 56 Generic internal problem
DSESmartBlobCreate 57 Error creating sblob
DSESmartBlobWrite 58 Error writing sblob
DSEStreamColConv 59 Error converting column data from the master dictionary formats to
the local dictionary format
G-2 IBM Informix Dynamic Server Enterprise Replication Guide

Appendix H. Accessibility
The syntax diagrams in the HTML version of this manual are available in dotted
decimal syntax format, which is an accessible format that is available only if you
are using a screen reader.
Dotted Decimal Syntax Diagrams
In dotted decimal format, each syntax element is written on a separate line. If two
or more syntax elements are always present together (or always absent together),
the elements can appear on the same line, because they can be considered as a
single compound syntax element.
Each line starts with a dotted decimal number; for example, 3 or 3.1 or 3.1.1. To
hear these numbers correctly, make sure that your screen reader is set to read
punctuation. All syntax elements that have the same dotted decimal number (for
example, all syntax elements that have the number 3.1) are mutually exclusive
alternatives. If you hear the lines 3.1 USERID and 3.1 SYSTEMID, your syntax can
include either USERID or SYSTEMID, but not both.
The dotted decimal numbering level denotes the level of nesting. For example, if a
syntax element with dotted decimal number 3 is followed by a series of syntax
elements with dotted decimal number 3.1, all the syntax elements numbered 3.1
are subordinate to the syntax element numbered 3.
Certain words and symbols are used next to the dotted decimal numbers to add
information about the syntax elements. Occasionally, these words and symbols
might occur at the beginning of the element itself. For ease of identification, if the
word or symbol is a part of the syntax element, the word or symbol is preceded by
the backslash (\) character. The * symbol can be used next to a dotted decimal
number to indicate that the syntax element repeats. For example, syntax element
*FILE with dotted decimal number 3 is read as 3 \* FILE. Format 3* FILE
indicates that syntax element FILE repeats. Format 3* \* FILE indicates that
syntax element * FILE repeats.
Characters such as commas, which are used to separate a string of syntax
elements, are shown in the syntax just before the items they separate. These
characters can appear on the same line as each item, or on a separate line with the
same dotted decimal number as the relevant items. The line can also show another
symbol that provides information about the syntax elements. For example, the lines
5.1*, 5.1 LASTRUN, and 5.1 DELETE mean that if you use more than one of the
LASTRUN and DELETE syntax elements, the elements must be separated by a comma.
If no separator is given, assume that you use a blank to separate each syntax
element.
If a syntax element is preceded by the % symbol, this identifies a reference that is
defined elsewhere. The string following the % symbol is the name of a syntax
fragment rather than a literal. For example, the line 2.1 %OP1 means that you
should refer to a separate syntax fragment OP1.
The following words and symbols are used next to the dotted decimal numbers:
? Specifies an optional syntax element. A dotted decimal number followed
© Copyright IBM Corp. 1996, 2005 H-1

by the ? symbol indicates that all the syntax elements with a
corresponding dotted decimal number, and any subordinate syntax
elements, are optional. If there is only one syntax element with a dotted
decimal number, the ? symbol is displayed on the same line as the syntax
element (for example, 5? NOTIFY). If there is more than one syntax element
with a dotted decimal number, the ? symbol is displayed on a line by
itself, followed by the syntax elements that are optional. For example, if
you hear the lines 5 ?, 5 NOTIFY, and 5 UPDATE, you know that syntax
elements NOTIFY and UPDATE are optional; that is, you can choose one or
none of them. The ? symbol is equivalent to a bypass line in a railroad
diagram.
! Specifies a default syntax element. A dotted decimal number followed by
the ! symbol and a syntax element indicates that the syntax element is the
default option for all syntax elements that share the same dotted decimal
number. Only one of the syntax elements that share the same dotted
decimal number can specify a ! symbol. For example, if you hear the lines
2? FILE, 2.1! (KEEP), and 2.1 (DELETE), you know that (KEEP) is the
default option for the FILE keyword. In this example, if you include the
FILE keyword but do not specify an option, default option KEEP is applied.
A default option also applies to the next higher dotted decimal number. In
this example, if the FILE keyword is omitted, default FILE(KEEP) is used.
However, if you hear the lines 2? FILE, 2.1, 2.1.1! (KEEP), and 2.1.1
(DELETE), the default option KEEP only applies to the next higher dotted
decimal number, 2.1 (which does not have an associated keyword), and
does not apply to 2? FILE. Nothing is used if the keyword FILE is omitted.
* Specifies a syntax element that can be repeated zero or more times. A
dotted decimal number followed by the * symbol indicates that this syntax
element can be used zero or more times; that is, it is optional and can be
repeated. For example, if you hear the line 5.1* data-area, you know that
you can include more than one data area or you can include none. If you
hear the lines 3*, 3 HOST, and 3 STATE, you know that you can include
HOST, STATE, both together, or nothing.
Notes:
1. If a dotted decimal number has an asterisk (*) next to it and there is
only one item with that dotted decimal number, you can repeat that
same item more than once.
2. If a dotted decimal number has an asterisk next to it and several items
have that dotted decimal number, you can use more than one item
from the list, but you cannot use the items more than once each. In the
previous example, you could write HOST STATE, but you could not write
HOST HOST.
3. The * symbol is equivalent to a loop-back line in a railroad syntax
diagram.
+ Specifies a syntax element that must be included one or more times. A
dotted decimal number followed by the + symbol indicates that this syntax
element must be included one or more times. For example, if you hear the
line 6.1+ data-area, you must include at least one data area. If you hear
the lines 2+, 2 HOST, and 2 STATE, you know that you must include HOST,
STATE, or both. As for the * symbol, you can only repeat a particular item if
it is the only item with that dotted decimal number. The + symbol, like the
* symbol, is equivalent to a loop-back line in a railroad syntax diagram.
H-2 IBM Informix Dynamic Server Enterprise Replication Guide

Notices
IBM may not offer the products, services, or features discussed in this document in
all countries. Consult your local IBM representative for information on the
products and services currently available in your area. Any reference to an IBM
product, program, or service is not intended to state or imply that only that IBM
product, program, or service may be used. Any functionally equivalent product,
program, or service that does not infringe any IBM intellectual property right may
be used instead. However, it is the user’s responsibility to evaluate and verify the
operation of any non-IBM product, program, or service.
IBM may have patents or pending patent applications covering subject matter
described in this document. The furnishing of this document does not give you
any license to these patents. You can send license inquiries, in writing, to:
IBM Director of Licensing
IBM Corporation
North Castle Drive
Armonk, NY 10504-1785
U.S.A.
For license inquiries regarding double-byte (DBCS) information, contact the IBM
Intellectual Property Department in your country or send inquiries, in writing, to:
IBM World Trade Asia Corporation Licensing
2-31 Roppongi 3-chome, Minato-ku
Tokyo 106-0032, Japan
The following paragraph does not apply to the United Kingdom or any other
country where such provisions are inconsistent with local law:
INTERNATIONAL BUSINESS MACHINES CORPORATION PROVIDES THIS
PUBLICATION “AS IS” WITHOUT WARRANTY OF ANY KIND, EITHER
EXPRESS OR IMPLIED, INCLUDING, BUT NOT LIMITED TO, THE IMPLIED
WARRANTIES OF NON-INFRINGEMENT, MERCHANTABILITY OR FITNESS
FOR A PARTICULAR PURPOSE. Some states do not allow disclaimer of express or
implied warranties in certain transactions, therefore, this statement may not apply
to you.
This information could include technical inaccuracies or typographical errors.
Changes are periodically made to the information herein; these changes will be
incorporated in new editions of the publication. IBM may make improvements
and/or changes in the product(s) and/or the program(s) described in this
publication at any time without notice.
Any references in this information to non-IBM Web sites are provided for
convenience only and do not in any manner serve as an endorsement of those Web
sites. The materials at those Web sites are not part of the materials for this IBM
product and use of those Web sites is at your own risk.
IBM may use or distribute any of the information you supply in any way it
believes appropriate without incurring any obligation to you.
Licensees of this program who wish to have information about it for the purpose
of enabling: (i) the exchange of information between independently created
© Copyright IBM Corp. 1996, 2005 I-1
programs and other programs (including this one) and (ii) the mutual use of the
information which has been exchanged, should contact:
IBM Corporation
J46A/G4
555 Bailey Avenue
San Jose, CA 95141-1003
U.S.A.
Such information may be available, subject to appropriate terms and conditions,
including in some cases, payment of a fee.
The licensed program described in this information and all licensed material
available for it are provided by IBM under terms of the IBM Customer Agreement,
IBM International Program License Agreement, or any equivalent agreement
between us.
Any performance data contained herein was determined in a controlled
environment. Therefore, the results obtained in other operating environments may
vary significantly. Some measurements may have been made on development-level
systems and there is no guarantee that these measurements will be the same on
generally available systems. Furthermore, some measurements may have been
estimated through extrapolation. Actual results may vary. Users of this document
should verify the applicable data for their specific environment.
Information concerning non-IBM products was obtained from the suppliers of
those products, their published announcements or other publicly available sources.
IBM has not tested those products and cannot confirm the accuracy of
performance, compatibility or any other claims related to non-IBM products.
Questions on the capabilities of non-IBM products should be addressed to the
suppliers of those products.
All statements regarding IBM’s future direction or intent are subject to change or
withdrawal without notice, and represent goals and objectives only.
All IBM prices shown are IBM’s suggested retail prices, are current and are subject
to change without notice. Dealer prices may vary.
This information contains examples of data and reports used in daily business
operations. To illustrate them as completely as possible, the examples include the
names of individuals, companies, brands, and products. All of these names are
fictitious and any similarity to the names and addresses used by an actual business
enterprise is entirely coincidental.
COPYRIGHT LICENSE:
This information contains sample application programs in source language, which
illustrate programming techniques on various operating platforms. You may copy,
modify, and distribute these sample programs in any form without payment to
IBM, for the purposes of developing, using, marketing or distributing application
programs conforming to the application programming interface for the operating
platform for which the sample programs are written. These examples have not
been thoroughly tested under all conditions. IBM, therefore, cannot guarantee or
imply reliability, serviceability, or function of these programs. You may copy,
modify, and distribute these sample programs in any form without payment to
IBM for the purposes of developing, using, marketing, or distributing application
programs conforming to IBM’s application programming interfaces.
I-2 IBM Informix Dynamic Server Enterprise Replication Guide

Each copy or any portion of these sample programs or any derivative work, must
include a copyright notice as follows:
© (your company name) (year). Portions of this code are derived from IBM
Corp. Sample Programs. © Copyright IBM Corp. (enter the year or years). All
rights reserved.
If you are viewing this information softcopy, the photographs and color
illustrations may not appear.
Trademarks
AIX; DB2; DB2 Universal Database; Distributed Relational Database Architecture;
NUMA-Q; OS/2, OS/390, and OS/400; IBM Informix®; C-ISAM®;
Foundation.2000™; IBM Informix
® 4GL; IBM Informix®DataBlade®Module; Client
SDK™; Cloudscape™; Cloudsync™; IBM Informix®Connect; IBM Informix®Driver
for JDBC; Dynamic Connect™; IBM Informix®Dynamic Scalable
Architecture™(DSA); IBM Informix®Dynamic Server™; IBM Informix®Enterprise
Gateway Manager (Enterprise Gateway Manager); IBM Informix®Extended Parallel
Server™; i.Financial Services™; J/Foundation™; MaxConnect™; Object Translator™;
Red Brick™; IBM Informix® SE; IBM Informix® SQL; InformiXML™; RedBack®;
SystemBuilder™; U2™; UniData®; UniVerse®; wintegrate®are trademarks or
registered trademarks of International Business Machines Corporation.
Java and all Java-based trademarks and logos are trademarks or registered
trademarks of Sun Microsystems, Inc. in the United States and other countries.
Windows, Windows NT, and Excel are either registered trademarks or trademarks
of Microsoft Corporation in the United States and/or other countries.
UNIX is a registered trademark in the United States and other countries licensed
exclusively through X/Open Company Limited.
Other company, product, and service names used in this publication may be
trademarks or service marks of others.
Notices I-3

I-4 IBM Informix Dynamic Server Enterprise Replication Guide

Index
Special characters--ackq option
cdr stats rqm A-84
--add optioncdr change replicate 7-5, A-4
cdr change replicateset 7-8, A-6
--all optioncdr define template A-34
cdr error A-45
--applyasowner option 6-14
cdr realize template A-67
--at option 6-7, A-111
time formats A-111
--ats option 6-3, 6-8, 8-2, A-25
cdr define server A-31
cdr modify replicate A-61
cdr modify server A-64
--autocreate optioncdr change replicate A-4
cdr define replicate A-23
cdr realize template 6-13, A-67
--blocksize optioncdr define repair A-19
--cntrlq optioncdr stats rqm A-84
--conflict option 6-7
cdr define replicate A-23
--connect optionand database server name 6-2
connecting to another replication server 7-2
--database optioncdr define template A-34
--dbspace option 6-13
cdr realize template A-67
--delete option 7-5, 7-8
cdr change replicate A-4
cdr change replicateset A-6
--empty option 6-5
cdr define replicate A-22
--every option 6-7, A-111
--exclusive option 6-10
cdr define replicateset A-28
cdr define template A-34
--extratargetrows option 6-11
cdr check replicate A-9
cdr check replicateset A-14
cdr define repair A-19
cdr realize template A-67
cdr start replicate A-80
cdr start replicateset A-82
cdr sync replicate A-102
cdr sync replicateset A-104
--file option 6-13
cdr define template A-34
--filter option 7-15
cdr define repair A-19
--firetrigger option 6-10, A-25
cdr modify replicate A-61
--floatcanon option 6-9, A-25
--floatieee option A-25
--follow optioncdr error A-45
--fullrow option 6-8, A-25
cdr modify replicate A-61
--idle optioncdr define server 6-3, A-31
cdr modify server A-64
--ignoredel option A-25
--immed option 6-7, A-111
--init option 6-2
cdr define server A-30
--leaf option 6-3
cdr define server A-30
--master option 6-5
cdr define replicate A-22
cdr define template A-34
cdr remaster A-70
--mirrors option 6-6, A-26
--name option 6-5
cdr define replicate A-22
cdr modify replicate A-60
--nonroot option 6-3
cdr define server A-30
--off optioncdr alter A-3
--on optioncdr alter A-3
--optimize option 6-7
cdr define replicate A-24
--primaryid option A-99
cdr swap shadow A-99
--primaryname option A-99
cdr swap shadow A-99
--prune optioncdr error A-45
--recvq optioncdr stats rqm A-84
--replicate optioncdr define repair A-19
--replset optioncdr define repair A-19
--ris option 6-8, 8-5, A-25
cdr define server A-31
cdr modify replicate A-61
cdr modify server A-65
--sendq optioncdr stats rqm A-84
--seq optioncdr error A-45
--shadowid option A-99
cdr swap shadow A-99
--shadowname option A-99
cdr swap shadow A-99
--sync option 6-3
cdr define server A-30
--syncdatasource option 6-11, 6-13
cdr check replicateset A-19
cdr delete repair A-36
cdr realize template A-67
cdr start replicate A-81
cdr start replicateset A-83
© Copyright IBM Corp. 1996, 2005 X-1

--syncq optioncdr stats rqm A-84
--target option 6-14
cdr realize template A-68
--verify optioncdr change replicate A-4
cdr define replicate A-23
cdr realize template 6-13, A-68
--zap optioncdr error A-45
-e option 4-19
-f option 7-15
-S option 4-19
/etc/hosts file 4-2
/etc/hosts.equiv file 4-3
/etc/services file 4-2
.rhosts file 4-3
$INFORMIXDIR/bin directory x
$INFORMIXDIR/gls/cv9 directory 2-12
$INFORMIXDIR/incl/esql/cdrerr.h file A-47
\etc\hosts file 4-2
\etc\hosts.equiv file 4-3
\etc\services file 4-2
—master optioncdr check replicate A-9
cdr check replicateset A-14
cdr sync replicate A-102
cdr sync replicateset A-104
—nomark optioncdr error A-45
—repair optioncdr check replicate A-9
cdr check replicateset A-14
—repl optioncdr check replicate A-9
cdr sync replicate A-102
—replset optioncdr check replicateset A-14
cdr sync replicateset A-104
—scope optioncdr define replicate A-24
—verbose optioncdr check replicate A-9
cdr check replicateset A-14
AAbbreviations
cdr define replicate set A-105
commands A-105
options A-105
Aborted rows, and ATS files 8-2
Aborted Transaction Spooling.See ATS.
Accessibility xxi
dotted decimal format of syntax diagrams H-1
syntax diagrams, reading in a screen reader H-1
ActivatingATS A-25
RIS A-25
Active state A-51
defined 7-6
server A-55
ADD CRCOLSdefining shadow columns 4-17
Addingchunks to storage spaces 8-9
Adding (continued)participants to replicates 4-19
rowids 2-10
Administering Enterprise ReplicationCLU 1-5
ISA 1-5
overview 2-1
Alarmsevent 8-14
Alter mode 7-17
Alter operationsperforming on replicated tables 7-16
troubleshooting 8-11
ALTER TABLE statementSee also IBM Informix Guide to SQL
ADD and DROP CRCOLS 4-17
in-place alters 4-17
Always-apply conflict resolution rule 6-7
Always-apply conflict-resolution rule 3-6, 3-10, 3-11
Applicationspecific routines 3-10
Applying data, process 1-12
ArgumentsSPL routines 3-9
Asynchronousdata replication 1-2
propagation, considerations 2-5
ATSactivating A-25, A-31
capacity planning 4-12
filenames, description 8-2
filesBLOB and CLOB information 8-4
BYTE and TEXT data 8-3
changed column information 8-4
configuring 6-8
defined 8-2
naming conventions 8-2
preparing to use 8-2
smart large objects 8-4
UDT information 8-4
UDTs 8-4
modifying directory 7-2
specifying directory 6-3, A-31, A-64, A-73
ATS filesrepair using 7-15
Attaching fragments 7-19
Attributereplicate, changing 7-5
viewing 7-2
Automatic remastering 7-20
Automatic table creation 6-5, 6-13
Average large object size.See AVG_LO_SIZE configuration parameter.
AVG_LO_SIZE configuration parameter 4-10
BBackups
databases, considerations 2-6
Batch jobs 2-10
BEGIN WORK WITHOUT REPLICATIONbehavior 4-15
DB-Access 4-15
ESQL/C 4-15
example 4-19
running batch jobs 2-10
X-2 IBM Informix Dynamic Server Enterprise Replication Guide

Bitmapinformation in logical log files 6-9
BLOB data typeinformation
ATS files 8-4
RIS files 8-6
spooled row data 4-9
Blobs.See Simple large object.
Blobspacesinconsistent replicated data 2-13
replicating 2-13
storing simple large objects 2-13
Blockingreplication 4-14
Boldface type xiii
Bufferstables, columns D-11
transaction, spooling to disk 4-8, 8-7
Business models, primary-target systems 3-2
BYTE dataATS files 8-3
distributing 2-15
loading with deluxe mode 4-18
RIS files 8-6
SPL conflict resolution 2-14
storing in tblspaces 2-13
CCanonical format 6-9, A-25
Capacity planningfor delete tables 4-7
primary-target 3-4
spooling directories 4-12
update-anywhere 3-5
Capture mechanismslog-based data capture 1-2
trigger-based data capture 1-3
trigger-based transaction capture 1-3
Cascading deletesconsiderations 2-8
cdr alter 7-19, A-3
cdr change replicateadding and deleting participants 7-5
examples A-5
syntax A-4
cdr change replicatesetadding 7-8
adding or deleting replicates A-6
examples A-7
cdr change replicateset.See cdr change replicateset.
cdr check replicate 7-13, A-8
cdr check replicateset 7-13, A-13
cdr cleanstart A-16
cdr connect server 7-11, A-17
cdr define repair 7-14
options A-19
syntax A-18
cdr define replicate 6-5, 7-20
defining participants 6-4
examples A-26
syntax A-21
cdr define replicatesetabbreviation A-105
creating replicate sets 6-10
cdr define replicateset (continued)examples A-29
syntax A-28
cdr define replicateset.See cdr define replicateset.
cdr define serverdefining replication servers 6-2
examples A-31
options A-31
syntax A-30
cdr define template 1-5, 6-12
syntax A-33
cdr delete repair 7-15
syntax A-36
cdr delete replicatedeleting a replicate from the global catalog 7-7
examples A-37
syntax A-37
cdr delete replicatesetdeleting a replicate set 7-10
examples A-38
cdr delete serverdeleting a replication server 7-4
examples A-40, A-41
syntax A-40
cdr delete template 1-5, 6-12, 6-13, 6-14, 7-10
syntax A-43
cdr disconnect serverdropping Enterprise Replication network connection 7-11
examples A-44
syntax A-44
cdr errorexamples A-46
options A-45
syntax A-45
cdr finderr A-47, A-110
cdr list repair 7-15
syntax A-48
cdr list replicatebrief A-51
examples A-50
syntax A-50
viewing properties of replicate 7-5
cdr list replicatesetexamples A-53
syntax A-53
viewing properties of replicate set 7-9
cdr list serverCONNECTION CHANGED column A-56
description of output A-55
determining current state of server 7-2
examples A-55, A-56
ID column A-55
QUEUE column A-56
SERVER column A-55
STATE column A-55
STATUS column A-56
syntax A-55
viewing network connection status 7-11
cdr list template 1-5, 6-12, 7-10
syntax A-58
cdr modify replicatechanging attributes of a replicate 7-5
examples A-62
options A-61
restrictions A-61
syntax A-60
Index X-3

cdr modify replicatesetchanging replication frequency 7-9
examples A-63
syntax A-63
cdr modify server--mode option A-64
changing attributes of server 7-2
examples A-65
options A-64
syntax A-64
cdr realize template 1-5, 6-12, 6-13
options A-67
syntax A-66
CDR record type 6-9
cdr remaster 7-20
option A-70
syntax A-70
cdr removesyntax A-72
cdr repair 7-15, A-73
cdr resume replicateexamples A-74
resuming a suspended replicate to active 7-7
syntax A-74
cdr resume replicateset 7-10, A-75
cdr resume server 7-4, A-76
cdr startexamples A-77
restarting on a stopped server 7-3
syntax A-77
cdr start repair 7-14, A-78
cdr start replicate 4-19, 6-11
changing replicate state to active 7-6
options A-80
syntax A-80
cdr start replicateset 6-11
changing state of all replicates in a replicate set to
active 7-9
options A-82
syntax A-82
cdr stats recvsyntax A-87
cdr stats rqm A-84
options A-84
cdr stopexamples A-88
stopping capture of data 7-3
syntax A-88
cdr stop repair 7-15, A-89
cdr stop replicateexamples A-91
stopping a replicate 7-6
syntax A-90
cdr stop replicatesetexamples A-92
stopping replicates in a replicate set 7-9
syntax A-92
cdr suspend replicateexamples A-94
halting processing for a replicate 7-7
syntax A-94
cdr suspend replicatesetexamples A-95
suspending replicates in a replicate set 7-10
syntax A-95
cdr suspend serverexamples A-76, A-97
cdr suspend server (continued)suspending replication of data to the server 7-3
syntax A-97
cdr swap shadow 6-6, 7-20, A-99
cdr sync replicate 7-12, A-101
cdr sync replicateset 7-12, A-103
CDR_DBSPACE configuration parameter 4-13, B-1
CDR_DSLOCKWAIT configuration parameter B-2
CDR_ENV configuration parameter B-2
CDR_EVALTHREADS configuration parameter B-3
CDR_LOGDELTA environment variable B-10
CDR_MAX_DYNAMIC_LOGS configuration parameter 8-8,
B-4
CDR_NIFCOMPRESS configuration parameter B-4
CDR_PERFLOG environment variable B-11
CDR_QDATA_SBSPACE configuration parameter 4-9, 4-10,
4-13, B-5
CDR_QHDR_DBSPACE configuration parameter 4-9, 4-13,
B-6
CDR_QUEUEMEM configuration parameter 4-8, 4-13, B-6
CDR_RMSCALEFACT environment variable B-11
CDR_ROUTER environment variable B-11
CDR_SBSPACE configuration parameter 6-3
CDR_SERIAL configuration parameter 4-14, B-6
CDR_SUPPRESS_ATSRISWARN configuration parameter B-7
cdrerr.h file A-47
cdrserver shadow columnSee also Shadow columns.
behavior with BEGIN WORK WITHOUT
REPLICATION 4-15
cdrserver 2-7, 2-13
CDRSITES_731 environment variable B-12
CDRSITES_92X environment variable B-12
cdrtime shadow columnSee also Shadow columns.
behavior with BEGIN WORK WITHOUT
REPLICATION 4-15
defined 4-8
defining 2-7
Enterprise Replication recording value of 2-13
Central registrySQLHOSTS F-1
Changingcolumn information
in ATS files 8-4
in RIS files 8-6
columns, replicating 6-8
Checksum functions 7-13
Child database server 3-13
Choosing a replication network topology 3-11
Chunksadding to
storage spaces 8-9
Cipherencryption B-8
CLOB typeATS files 8-4
RIS files 8-6
spooled row data 4-9
Clock synchronization 2-11, 8-10
CLU.See Command-line utility.
Code, sample, conventions for xvii
Codeset conversion files 2-12
Cold restores 2-6
Collisiondefined 1-12
X-4 IBM Informix Dynamic Server Enterprise Replication Guide

Collision (continued)example 1-12
Columnsin transaction tables D-11
primary key 6-8
replicating changed only 6-8
shadowSee Shadow columns.
virtual 2-16
Command-line conventionshow to read xv
sample diagram xv
Command-line utility 1-5
--connect option 6-2
See also Command.
administering Enterprise Replication 1-5
commands 1-5
defined A-1
syntax, interpreting A-105
terminology A-105
Commandsdbaccess 4-6
net time 2-11
onspaces 4-9, 4-10, 8-9
onstat -g ath C-1
onstat -g cat C-2
onstat -g ddr C-3
onstat -g dss C-4
onstat -g dtc C-5
onstat -g grp C-6
onstat -g nif C-11
onstat -g que C-12
onstat -g rcv C-13
onstat -g rep C-15
onstat -g rqm C-16
onstat utility 8-9, C-1, C-16
ping 4-6
rdate 2-11
synchronizing clocks 2-11
Commands for Enterprise Replicationabbreviations A-105
cdr alter A-3
cdr change replicate 7-5, A-4
cdr change replicateset 7-8, A-6
cdr check replicate A-8
cdr check replicateset A-13
cdr cleanstart A-16
cdr connect server 7-11, A-17
cdr define repair A-18
cdr define replicate 6-4, A-21
cdr define replicateset 6-10, A-28
cdr define replicateset.See cdr define replicateset.
cdr define server 6-2, A-30
cdr define template A-33
cdr delete repair A-36
cdr delete replicate 7-7, A-37
cdr delete replicateset 7-10, A-38
cdr delete server 7-4, A-40
cdr delete template A-43
cdr disconnect server 7-11, A-44
cdr error A-45
cdr finderr A-47, A-110
cdr list repair A-48
cdr list replicate 7-5, A-50
cdr list replicateset 7-9, A-53
cdr list server 7-2, 7-11, A-55
Commands for Enterprise Replication (continued)cdr list template A-58
cdr modify replicate 7-5, A-60
cdr modify replicateset 7-9, A-63
cdr modify server 7-2, A-64
cdr realize template A-66
cdr remaster A-70
cdr remove A-72
cdr repair A-73
cdr resume replicate 7-7, A-74
cdr resume replicateset 7-10, A-75
cdr resume server 7-4, A-76
cdr start 7-3, A-77
cdr start repair A-78
cdr start replicate 7-6, A-80
cdr start replicateset 7-9, A-82
cdr stats recv A-87
cdr stats rqm A-84
cdr stop 7-3, A-88
cdr stop repair A-89
cdr stop replicate 7-6, A-90
cdr stop replicateset 7-9, A-92
cdr suspend replicate 7-7, A-94
cdr suspend replicateset 7-10, A-95
cdr suspend server 7-3, A-97
cdr swap shadow A-99
cdr sync replicate A-101
cdr sync replicateset A-103
error return codes A-110
oninit 6-2
onmode 6-2
onstat utility 8-1
starts 6-2
summary A-1
Communications support modulenot allowed with ER 4-5
Compliancewith industry standards xxiii
Configurationproblems, solving 8-10, 8-11
Configuration parametersSee also Parameters, configuration.
CDR_SERIAL 4-14, B-6
DBSERVERALIASES 4-13, B-1
DBSERVERNAME 4-13, B-1
ConfiguringATS and RIS files 6-8
logical logs files, for Enterprise Replication 4-7
trusted environment 4-3
CONFLICT fieldcdr list replicate output A-52
Conflict resolutionand table hierarchies 2-17
BYTE data 2-14
cdrserver 2-13
cdrtime 2-13
considerations for SPL routine 3-10
CRCOLS, adding and dropping 2-10
defined 3-6
delete tables 3-8, 4-7
preparing tables for 4-16
rules 3-6
always apply 3-10
always-apply 6-7
behavior 3-11
changing 7-5
ignore 3-7, 6-7
Index X-5

Conflict resolution (continued)rules (continued)
replicating only changed columns 6-9
shadow columns 3-6
specifying 6-7
SPL routines 3-8, 6-7
time synchronization 3-8
timestamp 3-7, 6-7
valid combinations 3-6
scopechanging 7-5
options A-24
row 3-11, 6-7
specifying 6-7
transaction 3-11, 6-7
shadow columns 2-13
simple large objects 2-13
specifying options A-23
SPL 2-14
support for UDRs 3-8
TEXT data 2-14
timestamp 2-11, 2-13
transactional integrity 3-11
triggers 2-8
update-anywhere 3-5
Conflicts, and asynchronous propagation 2-5
Connecting to a database server A-17
CONNECTION CHANGED column, cdr list server
output A-56
Connection security option 4-5
Connection status, replication servers A-56
Connectionstesting network 4-6
Considerationsdistributed transactions 2-9
large transactions 2-10
memory use C-1
planning to use Enterprise Replication 2-5
primary-target replication systems 3-4
replicatingchanged columns only 6-9
extensible data types 2-16
replicationenvironment 2-11
volume 2-9
SPL routines for conflict resolution 3-10
transaction processing 2-9
Consistencyensuring 4-14
Consistency checking 7-13
Consistency report 7-13
Consolidation replication.See Many-to-one replication.
Constraints 2-7, 2-8, 3-11, 6-8, 6-11, 6-12
Contact information xxiii
ConventionsATS files 8-2
command-line xv
command-line utility A-105
database server groups 4-3
documentation xiii
sample-code xvii
syntax diagrams xiv
syntax notation xiv
typographical xiii
CRCOLS.See Shadow columns.
CREATE TABLE statement 4-17
Creatingdatabases with unbuffered logging 2-6
demonstration databases x
replicate sets 6-10
row data sbspace 4-9, 4-10
Creating templates 1-5, 6-12
Cross-replication, between simple large objects and smart large
objects 2-13
Customizingreplicate sets 6-11
replicates 6-3
replication server definition 6-3
DData
applying 1-12
capture types 1-2
distributing 1-12
inconsistent 2-13
integrity 6-5
loading 4-17
maintaining consistency 1-3
preparing 4-14
repair 7-11
synchronization 7-11
unloading 4-17
Data deliverysuspending
for replicate sets A-95
for replicates A-94
for replication servers A-97
Data dissemination model, defined 3-2
Data propagation, considerations for asynchronous 2-5
Data replicationasynchronous, defined 1-2
capture mechanismslog-based data capture 1-2
trigger-based data capture 1-3
trigger-based transaction capture 1-3
defined 1-1
synchronous, defined 1-2
Data typesbuilt-in 1-5
extensible 2-16
FLOAT 6-9
floating-point 2-12
SERIAL 2-7
SERIAL and SERIAL8 2-12
SERIAL8 2-7
SMALLFLOAT 6-9
support for 2-15
supported 2-12
user-defined 1-5
user-defined.See User-defined data types.
Data-consolidation model, defined 3-2
Database server groupsconventions 4-3
HDR, defining for 5-5
registry key F-3
SQLHOSTS file 2-3, 4-3
UNIX 4-3
usage 4-3, 6-2
Windows 4-4
X-6 IBM Informix Dynamic Server Enterprise Replication Guide

Database serversaliases 4-3, 4-4
connecting to A-17
declaring for Enterprise Replication 6-1
disconnecting from A-44
initializing 6-2
listing A-55
preparing environment 4-13
preparing for HDR 5-4
removing from Enterprise Replication A-40
specifying type 6-3
Databasesconsiderations
backing up 2-6
restoring 2-6
creatingdemonstration x
with unbuffered logging 2-6
designing, considerations 2-6
locking 2-10
logging 4-17
triggers, changing 7-5
unbuffered logging 2-6
DataBlade modulespreparing for HDR 5-6
Datasync row-specific errors G-1
DB-Accessdbaccess command 4-6, 4-15
testing network environment 4-6
utilityBEGIN WORK WITHOUT REPLICATION 4-15
included databases x
dbexport utility 4-18
dbimport utility 4-18
DBSERVERALIASES configuration parameter 4-4, 4-13, B-1
DBSERVERNAME configuration parameter 4-4, 4-13, B-1
dbservername, defined 4-4
dbspacesdelete table storage 4-7
increasing size 8-10
monitoring disk usage 8-9
pathname limitations 4-9
root 4-8
size of transaction record 4-8
spooled transaction records 4-8
transaction record 4-8
DDRBLOCK mode, preventing 8-8
Deadlock situation, defined 3-7
Decision support systemsdata consolidation business model 3-3
Declaring database server for Enterprise Replication 6-1
Defaultsbehavior of Enterprise Replication 6-8
dbspace for transaction records 4-8
locale x
spooling directories 4-12
Definingparticipants 6-4
replicates 6-3, 6-10
replication servers 6-1, 6-2
shadow columns 4-16, 4-17
Definition Failed state A-51
Delete tablescapacity planning 4-7
defined 1-13, 4-7
disk space 4-7
in conflict resolution 3-8, 3-9
Delete tables (continued)storage 4-7
timestamp conflict resolution rule 4-7
Deleted state, server A-55
Deletes, cascading.See Cascading deletes.
DeletingEnterprise Replication objects 2-5
replicates from global catalog 7-7
replication servers 7-4
templates 1-5, 6-12, 6-13
Deluxe modewithout replication 4-18
Demonstration databases x
Dependencies, software x
Deployment 1-5, 6-12
Designing databases and tables 2-6
Determining sizelogical log files 4-6
spooled row data sbspace 4-9
transaction record dbspace 4-8
Dictionary information 6-5
direct 7-12
Direct synchronization 7-12
DirectoriesINFORMIXDIR/bin x
INFORMIXDIR/gls/cv9 2-12
specifyingATS location 6-3
spooling, planning for capacity 4-12
Disabilities, visualreading syntax diagrams H-1
Disconnect status, replication servers A-56
Discrepancies, between constraints 2-8, 6-12
Diskpreparing for Enterprise Replication 4-6
Disk spacedelete table 4-7
message queue spooling 4-8
planning 4-6
shadow columns 4-8
Disk usage, monitoring 8-9
Distributed transactionsdefined 2-9
two-phase commit 2-9
DistributingBYTE and TEXT data 2-15
data, process for 1-12
Distribution replication.See One-to-many replication.
DNS.See Domain Name Service.
Documentation conventions xiii
Documentation Notes xix
Documentation set of all manuals xxi
Documentation, types of xviii
machine notes xix
online manuals xx
printed manuals xxi
Domain Name Service 4-2
Dotted decimal format of syntax diagrams H-1
DRINTERVAL configuration parameter 5-8
DROP CRCOLS statement 4-17
DROP TABLE statement 2-10, 7-17
Dropped status, replication servers A-56
Droppingrowids 2-10
Index X-7

Dropping (continued)shadow columns 4-17
DSS.See Decision support systems.
Dynamic logsetting CDR_MAX_DYNAMIC_LOGS B-4
EEasy set up 1-5, 6-12
Empty master replicate 6-5
en_us.8859-1 locale x
Enabling triggers 6-9
ENCRYPT_CDR configuration parameter 4-5, 4-14, B-7
ENCRYPT_CIPHERS configuration parameter 4-14, B-8
ENCRYPT_MAC configuration parameter 4-14, B-9
ENCRYPT_MACFILE configuration parameter 4-14, B-9
ENCRYPT_SWITCH configuration parameter 4-14, B-10
Encryptioncipher renegotiation B-10
combining with client/server in SQLHOSTS 4-5
configuration parameters for 4-14
enabling with ENCRYPT_CDR B-7
HDR, not supported with 5-4
MAC files, specifying B-9
message authentication code generation B-9
overview 1-6
specifying ciphers and modes B-8
English locale 2-12
Enterprise Replicationadministering 1-5
administration overview 2-1
alter operations 7-16
and cascading deletes 2-8
and triggers 2-8
batch jobs 2-10
consistency 1-3
data types 2-12
database server groups for HDR 5-5
default behavior 6-8
defined 1-1
deleting and recreating objects 2-5
displaying statistics A-84, A-87
encryption, configuring 4-14
event alarms 8-14
flexible architecture 1-4
high availability 1-3
managing 2-2
performance 1-3
process for replicating data 1-6
queues D-10
role of logical log files 2-6
selecting replication systems 3-1
serveradministrator 2-2
defined 2-3
definitions in global catalog 2-4
starting A-77
stopping A-88
supported database servers 2-5
synonyms 2-5
terminology 2-2
threadslist of C-1
restarting 7-3
stopping 7-3
using Global Language Support 2-11
Enterprise Replication (continued)views 2-5
Environmentdatabase server, preparing 4-13
networkpreparing 4-2
testing 4-6
trusted, configuring 4-3
Environment variables xiii
CDR_LOGDELTA B-10
CDR_PERFLOG B-11
CDR_RMSCALEFACT B-11
CDR_ROUTER B-11
CDRSITES_731 B-12
CDRSITES_92X B-12
INFORMIXDIR 4-13
INFORMIXSERVER 4-3, 4-13, 6-2, 7-2
INFORMIXSQLHOSTS 4-13, F-1
setting 4-13
TZ A-111
Error messages xx
Errorsdatasync row-specific G-1
interpreting error numbers A-47
loggingchanging 7-5
setting up 6-8
message filescdrerr.h A-47
replication server status A-56
return codes A-110
tablemanaging A-45
ESQL/C, BEGIN WORK WITHOUT REPLICATION 4-15
Evaluatingdata
for replication 1-7
data, examples of 1-9
rows 1-7, 1-8
Event alarm 8-14
Examplesadding replicates to replicate sets 7-8
ATS filenames 8-3
BEGIN WORK WITHOUT REPLICATION 4-15
BYTE and TEXT datain ATS files 8-4
in RIS files 8-6
cdr delete replicateset A-38
collision 1-12
DB-Access 4-15
defining replicate sets 6-11
deletingreplicates 7-7
replicates from replicate sets 7-8
replication servers 7-4
evaluating data 1-9
hierarchy E-7
hosts.equiv 4-3
non-exclusive replicate sets 6-11
participant definition 6-4
preparing data for replication 4-19
primary-target E-2
replication E-1, E-9
replication environment E-1
resumingreplicates 7-7
replication servers 7-4
X-8 IBM Informix Dynamic Server Enterprise Replication Guide

Examples (continued)RIS filenames 8-5
services file 4-2
set A-83
SQLHOSTS file 4-3
stoppingreplicates 7-6
suspendingreplicates 7-7
replication 7-3
unloading shadow columns 4-17
update-anywhere E-4
updating shadow columns 4-15
using ESQL/C 4-15
Exclusive lock 2-10
Exclusive replicate sets--exclusive option 6-10, A-28, A-34
adding replicates to 7-8
characteristics of 6-10
defined 6-10
referential constraints 6-8
resuming replicates 7-7
starting replicates 7-6
stopping replicates 7-7
suspending replicates 7-7
Extended data typessupport for 2-15
FFail-safe replication system 3-5
Failed rows, repair jobs 2-8, 6-12
Failed transactionsand RIS files 6-8, 8-5
recorded in ATS files 6-8, 8-2
Failure of replication 1-4
Featuresnew xi, xii
Files/etc/hosts 4-2
/etc/hosts.equiv 4-3
/etc/services 4-2
.rhosts 4-3
\etc\hosts 4-2
\etc\hosts.equiv 4-3
\etc\services 4-2
cdrerr.h A-47
hosts 4-2
hosts.equiv 4-3
logical-log 4-7
ONCONFIG 2-7, 4-13
services 4-2
SQLHOSTS 4-3, 4-13
Fixed and Known Defects File xix
FLOAT data type 6-9
Floating-pointdata types 2-12
numberscanonical format A-25
IEEE format A-25
values, and canonical message format 6-9
Forbidden SQL statements 2-10
Forest of treescombining with HDR 5-4
defined 3-14
illustrated 3-14
network topology 1-4
Fragmentsattaching 7-19
Frequencyattributes
description of 6-7
defined A-110
replication, specifying 6-7
FREQUENCY field, cdr list replicate output A-52
Full row replication, changing 7-5
Fully connected topologydefined 3-12
support for 1-4
using HDR with 3-12
Functions, writing for UDT replication 2-16
GGlobal catalog
contents of 2-4
defined 2-4
leaf servers 2-4, 4-5
root and nonroot servers 4-5
synchronizing 6-3
Global Language Support (GLS)defined x
locale of date A-111
support of 1-5
using with Enterprise Replication 2-11
GLS.See Global Language Support.
Grouper 7-20
Grouper paging file, setting up 4-12
Groups.See Database server groups.
Guidelines for configuring logical log files 4-7
HHardware platforms
dissimilar 6-9
heterogeneous 2-12
HDR.See High-Availability Data Replication.
Help xxi
Heterogeneous hardware, replicating on 2-12
Hierarchical routing topologiescombing with HDR 5-3
SQLHOSTS 4-5
supported types 3-12
synchronization server 3-13, 6-3
terminology 3-12
Hierarchical treedefined 3-13
network topology 1-4
using HDR with 3-14
Hierarchiesreplicating table hierarchies 2-17
replication examples E-7
High availabilityplanning
primary-target 3-4
using Enterprise Replication for 1-3
High-Availability Data Replicationdatabase server groups 4-3
database server groups, defining 5-5
DRINTERVAL setting 5-8
Index X-9

High-Availability Data Replication (continued)encryption not supported 5-4
forest of trees topology 5-4
hierarchical routing topologies 5-3
loading data 5-6
logging sbspaces for spooled row data 4-10
managing 5-6, 5-8
oninit -D command 5-7
onmode -d standard command 5-7
performance 5-8
preparing servers 5-4
primary server failure 5-7
primary-target replication systems 5-1
replication system 5-1
secondary server, switching to 5-7
spooled row data sbspace logging 5-7
starting primary without ER or HDR 5-7
UDRs, preparing for 5-6
UDTs, preparing for 5-6
update-anywhere replication 5-2
with fully connected topology 3-12
with hierarchical tree topology 3-14
High-availability replication system 5-1
High-Performance Loader 4-18
HKEY_LOCAL_MACHINE F-1
hostname, in sqlhosts 4-4
Hosts file, preparing 4-2
hosts.equiv file 4-3
HPL.See High-Performance Loader.
IIBM Informix Server Administrator 1-5
setting up SQLHOSTS registry 4-4, F-2
ID column, cdr list server output A-55
Identifier A-107
Idle timeoutmodifying 7-2
setting 6-3
specifying A-31
IEEE floating point format 6-9, A-25
Ignore conflict-resolution rule 3-6, 3-7, 6-7, A-52
database action 3-7
Immediate frequency A-52
In-place altersADD and DROP CRCOLS 4-17
Inactive state A-51
defined 7-6
Inconsistent data with blobspaces or sbspaces 2-13
Increasing storage space size 8-10
Industry standards, compliance with xxiii
Information consistency, update-anywhere 3-5
Informix Dynamic Server documentation set xxi
informix user 2-2
Informix-Admin group, Windows 2-2
INFORMIXDIR environment variable 4-13
INFORMIXSERVER environment variable 4-3, 4-13, 6-2, 7-2
INFORMIXSQLHOSTS environment variable 4-13, F-1
Initial synchronization 1-4, 2-8, 6-11, 6-12
Initializingdatabase server 6-2
Installation Guides xviii
InstallingUDTs 2-16
Instantiating templates 1-5, 6-12, 6-13
Integrity, data 6-5
Interval formats A-112
Invalid sbspace 6-3
IP addressspecifying in hosts file 4-2
ISO 8859-1 code set x
KKeys
primaryand constraints 2-7
and SERIAL data types 2-7
and UDT columns 2-16
removing constraints 2-10
Keywordsin syntax diagrams xvi
LLarge objects
replicating only changed columns 6-8
Large transactionsgrouper paging file 4-12
Large transactions, considerations for Enterprise
Replication 2-10
Leaf serversdefined 3-13
global catalog 2-4, 4-5
limited catalog 2-4
specifying 6-3
SQLHOSTS information 4-5
Limitations, SPL conflict resolution 3-8
Limited SQL statements 2-10
LOAD statement 4-17, 4-18, 4-19
Loading dataER servers 4-17
HDR servers 5-6
Local status, replication servers A-56
Localesdifferent 2-11
Enterprise Replication 2-12
specifying nondefault 2-12
Lockmonitoring with onstat -k C-19
type codes C-20
Locking databases 2-10
Locks, exclusive.See Exclusive lock.
Log-based data capture 1-2
Loggingaborted transactions 8-2
databases, preparing 4-17
errors 6-8
unbuffered 2-6, 4-17
LOGGING configuration parameter 4-10
Logging mode, for spooled row data sbspaces 4-10
Logical logfiles 4-7
and maximum transaction size 4-7
bitmap information about updated columns 6-9
capacity planning 4-6
configuration guidelines 4-7
determining size 4-6
disk space, error 8-10
disk space, requirements 4-6
dynamically adding 8-8
X-10 IBM Informix Dynamic Server Enterprise Replication Guide

Logical log (continued)files (continued)
increasing size 8-7
overwriting 8-8
reading of 1-6
role in Enterprise Replication 2-6
size 4-7
switching 4-7
Logical Log Record reduction option, and Enterprise
Replication 4-6
Long identifiers A-107
LRD label, RIS files 8-6
LRH label, RIS files 8-6
LRS label, RIS files 8-6
LTXEHWM configuration parameter 4-7, C-4
LTXHWM configuration parameter 4-7, C-4
MMachine notes xix
Machine-independent format 6-9, A-25
Maintaining consistency 1-3
ManagingEnterprise Replication, overview 2-2
replicate sets 7-8
replicates 7-4, 7-8
replication servers 7-4
Manual remastering 6-6, 7-20
Manual repair 7-16
Many-to-one replication 3-1
Master replicates 6-5, 7-20
defined 2-3
strict 6-6
Maximum transaction size, and logical log files 4-7
Memory queuespreventing overflows 8-7
Memory use considerations C-1
Message authentication code files B-9
Message formatscanonical 6-9
IEEE 6-9
Message queuesCDR_QUEUEMEM configuration parameter 4-8
defined 4-8
planning disk space 4-8
mode option, cdr modify server A-64
Modesencryption B-8
Modifyingprimary-key constraint 2-10
replicate sets 7-8
templates 6-14
Monitoringdbspaces, onstat command 8-9
disk usage 8-9
sbspaces 8-9
oncheck command 8-9
onstat command 8-9
Multiple references to a smart large object 2-15
Multiple updates to the same row 1-8
Nnet time command, synchronizing clocks 2-11
nettypedefined 4-4
Network connectionsdropping 7-11
encryption, setting up for 4-5
managing 7-11
reestablishing 7-11
troubleshooting 8-7
viewing status 7-11
Network environmentpreparing 4-2
testing 4-6
Network topologieschoosing 3-11
forest of trees 1-4
fully connected 1-4
hierarchical tree 1-4
supported types 3-11
New features xi, xii
New table, bringing up-to-date 1-4
Non-exclusive replicate setsadding replicates 7-8
characteristics 6-10
defined 6-10
example 6-11
Nonoptimized SPL routine 3-10
Nonroot serversdefined 3-13
global catalog 2-4, 4-5
specifying type 6-3
SQLHOSTS information 4-5
OOLTP
data dissemination business model 3-2
oncheck command, monitoring sbspaces 8-9
ONCONFIG configuration fileconfiguration parameters B-1, B-10
configuring encryption 4-14
settingDBSERVERALIASES 4-4
DBSERVERNAME 4-4
parameters 2-7, 4-13
ONCONFIG configuration parameterSee Parameters, configuration.
One-to-many replication 3-1
oninit -D command 5-7
oninit commandinitializing database servers 6-2
Online help xxi
Online manuals xx
Online notes xviii, xix
Online transaction processing.See OLTP.
onload utility 4-18
onmode -d standard command 5-7
onmode command 6-2
onspaces commandadding chunks 8-9
creatingrow data sbspace 4-10
transaction record dbspace 4-9
onstat command C-1, C-16
Enterprise Replication options 8-1
onstat utility-g ath command C-1
-g cat command C-2
-g ddr command C-3
Index X-11

onstat utility (continued)-g dss command C-4
-g dtc command C-5
-g grp command C-6
-g nif command C-11
-g que command C-12
-g rcv command C-13
-g rep command C-15
-g rqm command C-16
-g sync command C-18
-k option C-19
monitoringdbspaces 8-9
sbspaces 8-9
onunload utility 4-17, 4-18
Operating systemsynchronizing time 2-11, 8-10
Optical devices, not supported 2-12
Optimized SPL routine, defined 3-10
Options--add 7-5, 7-8
--ats 8-2
--delete 7-8
--ris 8-5
SQLHOSTSdefined 4-4
Options for Enterprise Replication--ackq A-84
--add A-4, A-6
--all A-34, A-45
--applyasowner 6-14, A-67
--at 6-7, A-111
--ats 6-3, 6-8, A-25, A-31, A-61, A-64
--autocreate 6-13, A-4, A-23, A-67
--blocksize A-19
--cntrlq A-84
--conflict 6-7, A-23
--connect 6-2, A-107
--database A-34
--dbspace 6-13, A-67
--delete A-4, A-6
--empty 6-5, A-22
--every 6-7, A-111
--exclusive 6-10, A-28, A-34
--extratargetrows 6-11, A-9, A-14, A-19, A-67, A-80, A-82,
A-102, A-104
--file 6-13, A-34
--filter A-19
--firetrigger 6-10, A-25, A-61
--floatcanon 6-9, A-25
--floatieee A-25
--follow A-45
--fullrow 6-8, A-25, A-61
--idle 6-3, A-31, A-64
--ignoredel A-25
--immed 6-7, A-111
--init 6-2, A-30
--leaf 6-3, A-30
--master 6-5, A-22, A-34, A-70
--mirrors 6-6, A-26
--mode A-64
--name 6-5, A-22, A-60
--nomark A-45
--nonroot 6-3, A-30
--off A-3
--on A-3
--optimize 6-7, A-24
Options for Enterprise Replication (continued)--primaryid A-99
--primaryname A-99
--prune A-45
--recvq A-84
--replicate A-19
--replset A-19
--ris 6-8, A-25, A-31, A-61, A-65
--scope 6-7, A-24
--sendq A-84
--seq A-45
--shadowid A-99
--shadowname A-99
--sync 6-3, A-30
--syncdatasource 6-11, 6-13, A-19, A-36, A-67, A-81, A-83
--target 6-14, A-68
--verify 6-13, A-4, A-23, A-68
--zap A-45
-–repair A-8, A-13
-–repl A-8
-–replset A-13
-–verbose A-8, A-13
—all A-8, A-13, A-101, A-103
—master A-8, A-13, A-101, A-103
—repl A-101, A-103
abbreviations A-105
conflict resolution A-23
frequency A-110
order A-106
participant owner A-109
primary A-109
receive-only A-109
scope A-24
Out-of-row data, sharing during replication 2-15
Overflowing memory queues, preventing 8-7
Overwriting logical log files 8-8
Owner, table 6-14
PParameters, configuration
AVG_LO_SIZE 4-10
CDR_DBSPACE 4-13, B-1
CDR_DSLOCKWAIT B-2
CDR_ENV B-2
CDR_EVALTHREADS B-3
CDR_MAX_DYNAMIC_LOGS B-4
CDR_NIFCOMPRESS B-4
CDR_QDATA_SBSPACE 4-9, 4-10, 4-13, B-5
CDR_QHDR_DBSPACE 4-9, 4-13, B-6
CDR_QUEUEMEM 4-8, 4-13, B-6
CDR_SBSPACE 6-3
CDR_SUPPRESS_ATSRISWARN B-7
configuration B-1, B-10
ENCRYPT_CDR B-7
ENCRYPT_CIPHERS B-8
ENCRYPT_MAC B-9
ENCRYPT_MACFILE B-9
ENCRYPT_SWITCH B-10
LOGGING 4-10
LTXEHWM 4-7, C-4
LTXHWM 4-7, C-4
Parameters, configurationCDR_SUPPRESS_ATSRISWARN B-7
setting in ONCONFIG file 2-7, 4-13
Parent database server 3-13
X-12 IBM Informix Dynamic Server Enterprise Replication Guide

Parent-childdefined 3-13
Participant definitioncontents 6-4
example 6-4
Participant modifiersdefined A-108
restrictions 2-16, A-110
Participant typechanging 7-5
default 6-4
Primary 6-4
Target 6-4
Participantsadding to replicates 4-19, 7-5, A-4
changing mode A-60
defined 2-3, 6-2, A-108
defining 6-4, A-108
deleting from replicates 7-5
modifier A-109
new 1-4, 6-11
owner option A-109
primary option A-109
receive-only option A-109
removing from replicates A-4
specifying type A-109
update-anywhere 6-4
PathnameATS and RIS directories 4-13
dbspaces 4-9
sbspaces 4-10
Pending state, defined A-51
PerformanceEnterprise Replication 1-3
Permitted SQL statements 2-10
ping command, testing network connection 4-6
Planningconsiderations 2-5
disk space requirements 4-6
Port numbersservices file 4-3
Preparingconsistent data 4-14
data for replicationdefined 4-14
example 4-19
database server environment 4-13
diskEnterprise Replication 4-6
hosts file 4-2
logging databases 4-17
network environment 4-2
services file 4-2
SQLHOSTS connectivity information F-2
tables for conflict resolution 4-16
UDR replication 4-16
UDT replication 4-16
using ATS 8-2
using RIS 8-5
PreventingDDRBLOCK mode 8-8
memory queues from overflowing 8-7
Primaryoption A-109
participant type 6-4
Primary conflict-resolution rule 3-6, 3-7
Primary keyconstraints 2-7
modifying column 2-10
removing constraint 2-10
replicating changed columns 6-8
SERIAL data types 2-7
UDT columns 2-16
updates 1-8
Primary-targetexample E-2
replication systems 3-4
business models 3-2
combining with HDR 5-1
considerations 3-4
defined 3-1
Printed manuals xxi
Problemssolving configuration 8-10, 8-11
Procedure conflict-resolution rule A-52
Propertiesreplicate sets 7-9
QQUEUE column
cdr list server output A-56
Queues.See Memory queues.
Quiescent state A-51, A-56
RRAW table
unsupported 2-6
rdate command, synchronizing clocks 2-11
Realizing templates 1-5, 6-13
Receive queuesSee also Memory queues.
defined 1-9, 4-8
Receive-onlyoption A-109
participant type.See Target participant type.
Receive-only servers 6-14
Recording failed transactions, in ATS files 8-2
RecreatingEnterprise Replication objects 2-5
replicates 7-8
replication servers 7-4
Referential constraint 6-10
time-based replication 6-8
Referential integrity 2-8, 6-11, 6-12
replicate sets 6-10
regedt32 program and sqlhosts registry F-2
RegisteringUDTs 2-16
Release Notes xix
Reliable Queue Manager 4-8
Remastering replicates 7-20
Remastering, manual 6-6
Removingprimary key constraint 2-10
RENAME COLUMN statement 7-17
RENAME TABLE statement 2-10, 7-17
Repair jobs 1-4, 6-12, 7-14, 7-15, A-36, A-48
Repairing data 7-11
Index X-13

Repairing data (continued)and log files 7-14
ATS, RIS files 7-15
manually 7-16
partial row 7-15
using consistency checking 7-13
Replicate definitions 6-5
Replicate informationstorage 4-8
Replicate setsadding and deleting replicates 7-8
changing replication frequency 7-9
changing state A-75
creating 6-10
customizing 6-11
defined 2-4
defining A-28
deleting 7-10, A-38
examples A-83
exclusive 6-10
frequency 6-11
listing A-53
managing 7-8, 7-10
modifying 7-8, 7-9, A-63
non-exclusive 6-10
recreating 7-10
referential constraints 6-8
resuming 7-10, A-75
starting 7-9, A-82
stopping 7-9, A-92
supported versions A-28
suspending 7-10, A-95
viewing properties 7-9
Replicatesactivating
ATS A-25
RIS A-25
active state 7-6
addingparticipants A-4
replicate sets 7-8
adding to replicate sets A-6
CONFLICT field A-52
conflict options A-23
customizing 6-3
defined 2-3, 6-1
defining 6-3, 6-10, A-21
deletingglobal catalog 7-7
participants A-4
replicate sets 7-8
deleting from replicate sets A-6
deleting from the global catalog A-37
displaying information about A-51
FREQUENCY field A-52
inactive state 7-6
listing A-50
managing 7-4, 7-8
modifying 7-5, A-60
recreating 7-8
resuming 7-7, A-74
exclusive replicate sets 7-7
starting 7-6, A-80
exclusive replicate sets 7-6
STATE field A-51
stopping 7-6, A-90
exclusive replicate sets 7-7
Replicates (continued)suspending 7-7, A-94
exclusive replicate sets 7-7
viewing properties 7-5
Replicatingchanged columns only 6-8, 6-9
extensible data typesconsiderations 2-16
floating-point values 6-9
large objects 6-8
multiple references to a smart large object 2-15
simple large objects 2-13, 2-15
smart large objects 2-13, 2-15
table hierarchies 2-17
UDTs 2-15
Replicating datacapturing transactions 1-6
evaluatingdata 1-7
row images 1-7
process 1-6
Replicating only changed columns, advantages 6-8
Replicationblocking 4-14
choosing network topology 3-11
environmentconsiderations 2-11
managing 2-2
examples E-1, E-9
frequencychanging 7-5, 7-9
replicate sets 6-11
specifying 6-7
modelsprimary-target 1-2
update-anywhere 1-2
order error, defined 1-13
restarting 7-3
stopping 7-2
suspending 7-3
tree, illustrated 3-13
volume 2-9
Replication failure 1-4
Replication serversconnecting 7-2
customizing 6-3
defined 2-3, 6-1
defining 6-1, 6-2, A-30
deleting 7-4, A-40
listing A-55
managing 7-2, 7-4
modifying 7-2, 7-5, A-64
recreating 7-4
resuming 7-4
resynchronizing 7-16
state, defined 7-2
suspending A-97
synchronizing 6-3
troubleshooting 8-7
viewing attributes 7-2
Replication systemshigh-availability 5-1
primary-target 3-1, 3-4
supported by Enterprise Replication 3-1
update-anywhere 3-5
Replication topologiesforest of trees 3-14
X-14 IBM Informix Dynamic Server Enterprise Replication Guide
Replication topologies (continued)fully-connected 3-12
hierarchical 3-12
hierarchical tree 3-13
terminology 3-12
Requirementsdisk space
delete tables 4-7
logical log files 4-6
message queue spooling 4-8
planning 4-6
shadow columns 4-8
Restorescold 2-6
warm 2-6
Restoring databases, considerations 2-6
Restrictionsparticipant modifiers A-110
Resumingreplicate sets 7-10
suspendedreplicates 7-7
replication servers 7-4
Resynchronizing replication servers 7-16
Return codesdefined A-110
RIS filesactivating A-25, A-31
BLOB and CLOB information 8-6
BYTE and TEXT data 8-6
capacity planning 4-12
changed column information 8-6
configuring 6-8
defined 8-5
filenames, defined 8-5
modifying directory 7-2
preparing to use 8-5
repair using 7-15
specifying directory A-31, A-64, A-73
UDT information 8-6
root dbspacetransaction records 4-8
Root serversdefined 3-13
global catalog 2-4, 4-5
SQLHOSTS information 4-5
Routinesapplication-specific 3-10
Row conflict resolution scope 3-7, 3-11, 6-7, 8-2
Row datacreating sbspace 4-9
storage 4-8
Row Information Spooling.See RIS.
ROWIDlocking information C-20
ROWIDSadding and dropping 2-10
Rowsreplicating entire 6-8
RQM.See Reliable Queue Manager.
RRD label, ATS files 8-3
RRH label, ATS files 8-3
RRS label, ATS files 8-3
RulesSee also Conflict resolution.
Rules (continued)conflict resolution 3-6
extensible data types 2-16
simple large objects 2-14
smart large objects 2-15
time-stamp 3-8
SSample-code conventions xvii
sbspaces 2-13
grouper paging file 4-12
guidelines for spooled data 4-9
inconsistent replicated data 2-13
increasing sizes 8-10
invalid 6-3
monitoring disk usage 8-9
pathname limitations 4-10
row data 4-9, 4-11
spooled row data 4-8, 4-9
SBSPACETEMP configuration parameter 4-12
Scope--scope option 6-7, A-24
See also Conflict resolution.
defined 3-11
options A-24
row 3-7, 3-11
transaction 3-7
Screen readerreading syntax diagrams H-1
Secondary conflict-resolution rule 3-6
Security, connections 4-5
Security.See Encryption.
SELECT statementslimitations A-110
participant modifier A-109
shadow columns 4-17
Send queuesSee also Memory queues.
defined 1-9, 4-8
Sequence objects 2-9
SERIAL data type 2-7, 2-12
SERIAL8 data type 2-7, 2-12
Server administrator, Enterprise Replication 2-2
SERVER column, cdr list server output A-55
Server connections, stopping A-44
Server definitions, global catalog 2-4
Server groups.See Database server groups.
Server state, global catalog 2-4
Server.See Database server.
servicename, defined 4-4
services fileexample 4-2
preparing 4-2
setexamples A-83
SettingAVG_LO_SIZE configuration parameter 4-10
CDR_QDATA_SBSPACE configuration parameter 4-10
environment variables 4-13
idle timeout 6-3
LOGGING parameter 4-10
Setting upeasy 1-5, 6-12
Index X-15

Setting up (continued)error logging 6-8
SQLHOSTS file 4-3
SQLHOSTS registry F-1
SQLHOSTS registry key F-2
Shadow columnsADD CRCOLS 4-17
adding 2-10
ATS files 8-3
behavior with BEGIN WORK WITHOUT
REPLICATION 4-15
cdrserver 2-7, 2-13
cdrtime 2-7, 2-13
conflict resolution rules 3-6
creating 2-7, 4-8, 8-10
defined 4-16
disk space requirements 4-6, 4-8
dropping 2-10, 4-17
High-Performance Loader 4-18
loading and unloading data 4-17
UNLOAD statement 4-18
updating with DB-Access 4-15
WITH CRCOLS statement 4-17
Shadow replicates 6-6, 7-17, A-25, A-71
defined 2-3
Simple large objectsconflict resolution 2-13
cross-replication 2-13
replicating 2-13, 2-15
from blobspaces 2-13
from tblspaces 2-13
SPL conflict resolution 2-14
storingblobspaces 2-13
tblspaces 2-13
timestamp conflict resolution 2-13
Sizestorage spaces 8-9
transaction record dbspace 4-8
SMALLFLOAT data type 6-9
Smart blobs.See Smart large object.
Smart large objectsATS files 8-4
cross replication 2-13
multiple references 2-15
replicating 2-13, 2-15
replicating only changed columns 6-8
specifying default behavior 4-10
SPL conflict resolution 2-15
spooled row data 4-9
storing in sbspaces 2-13
SMI tablessummary D-1
syscdr_rqm D-1
syscdrack_buf D-2
syscdrack_txn D-2
syscdrctrl_buf D-3
syscdrctrl_txn D-3
syscdrerror D-3, D-9
syscdrpart D-4
syscdrprog D-4
syscdrq D-5
syscdrqueued D-5
syscdrrecv_buf D-5
syscdrrecv_stats D-6
syscdrrecv_txn D-6
SMI tables (continued)syscdrrepl D-7
syscdrreplset D-7
syscdrs D-8
syscdrsend_buf D-8
syscdrsend_txn D-9
syscdrserver D-9
syscdrtx D-10
Software dependencies x
Solving configuration problems 8-10, 8-11
Source server, synchronization 6-11
SpecifyingATS directory A-73
conflict resolutionrules 6-7
scope 6-7
database server type 6-3
default behavior for smart large objects 4-10
locationATS directory 6-3
replication frequency 6-7
RIS directory A-73
SPL conflict resolutionlimitations 3-8
rule 3-6, 3-8, 6-7
simple large object 2-14
smart large object 2-15
SPL routinesarguments 3-9
considerations 3-10
delete table 3-9
information passed by Enterprise Replication 3-9
limitations for conflict resolution 2-16
nonoptimized 3-10
optimized 3-10
Spooled row data sbspacechanging logging mode 4-11
dropping 4-11
guidelines for creating 4-9
logging and HDR 5-7
logging mode 4-10
Spooled transactionsdefined 4-8
storage 4-8
troubleshooting 8-7
Spoolingdirectories
ATS and RIS 3-7
capacity planning 4-12
default 4-12
more than usual, causes of 8-8
planning for disk space 4-8
SQL code xvii
SQL statementsforbidden 2-10
limited 2-10
permitted 2-10
supported 2-10
SQLHOSTShierarchical routine topologies 4-5
INFORMIXSQLHOSTS environment variable F-1
leaf servers 4-5
nonroot servers 4-5
on UNIX E-1
on Windows F-1
preparing connectivity information F-2
registry key F-1, F-5
X-16 IBM Informix Dynamic Server Enterprise Replication Guide

SQLHOSTS (continued)local F-1
setting up F-2
shared F-1
root servers 4-5
setting up with ISA 4-4, F-2
specifying registry host machine 4-13
SQLHOSTS filedatabase server groups for HDR 5-5
encryption, setting up 4-5
example 4-3
format 8-10
server group 2-3
setting up 4-3
specifying location 4-13
UNIX 4-3
Startingreplicates 7-6
starts command 6-2
STATE column, cdr list server output A-55
STATE field, cdr list replicate output A-51
StatementsALTER TABLE 4-17
BEGIN WORK WITHOUT REPLICATION 4-14
CREATE TABLE 4-17
DROP CRCOLS 4-17
LOAD 4-17, 4-18
SELECT 4-17
SQL, supported 2-10
UNLOAD 4-18
WITH CRCOLS 4-17
Statesactive 7-6
inactive 7-6
STATUS column, cdr list server output A-56
Stoppingreplicates 7-6
Storagedelete tables 4-7
increasing size of spaces 8-9
spooled transactions 4-8
Stored Procedure Language.See SPL routine.
stores_demo database x
Storingdata in tblspaces 2-13
streamread support function 2-16, 4-16
streamwrite support function 2-16, 4-16
Strict master replicates 6-6
SummarySMI tables D-1
superstores_demo database x
Support functionsreplicating UDTs 2-16, 4-16
streamread 2-16, 4-16
streamwrite 2-16, 4-16
writing 2-16, 4-16
Supporteddata types 2-12
database servers 2-5
SQL statements 2-10
table types 2-6
Suspended state A-51, A-56
Suspendingreplicate sets 7-10
replicates 7-7
replication 7-3
Swap log position 7-20
Switching logical log files 4-7
Synchronization 1-4, 6-11, 7-12
servers 3-13, 6-3
times 3-8
Synchronizingclocks
net time command 2-11
rdate command 2-11
data 7-11
onload and onunload utilities 4-18
using DB-Access 4-15
using ESQL/C 4-15
global catalog 6-3
operating system times 2-11, 8-10
Synchronous data replicationdefined 1-2
two-phase commit technology 1-2
Synonyms, and Enterprise Replication 2-5
Syntaxcommand-line utility A-105
participant definition A-108
Syntax diagramsconventions for xiv
keywords in xvi
reading in a screen reader H-1
variables in xvii
Syntax segment xvi
syscdr database 2-4
syscdr_rqm table D-1
syscdrack_buf table D-2
syscdrack_txn table D-2
syscdrctrl_buf table D-3
syscdrctrl_txn table D-3
syscdrerror table D-3, D-9
syscdrlatency table D-3
syscdrpart table D-4
syscdrprog table D-4
syscdrq table D-5
syscdrqueued table D-5
syscdrrecv_buf table D-5
syscdrrecv_stats table D-6
syscdrrecv_txn table D-6
syscdrrepl table D-7
syscdrreplset table D-7
syscdrs table D-8
syscdrsend_buf table D-8
syscdrsend_txn table D-9
syscdrserver table D-9
syscdrtx table D-10
sysmaster databaseSMI tables D-1
System Monitoring Interface.See SMI table.
System namehosts file 4-2
System requirementsdatabase x
software x
TTable
buffer D-11
designing, considerations 2-6
locking 2-10
preparing for conflict resolution 4-16
Index X-17
Table (continued)RAW 2-6
SMI D-1, D-12
temporary 2-6
transaction D-11
unsupported 2-6
Table creationautomatic 6-5, 6-13
templates 1-5, 6-12, 6-13
Table hierarchyreplicating 2-17
Table typesunsupported 2-6
Target participant type 6-4
Tblspacestoring BYTE and TEXT data 2-13
Templates 1-5, 6-12, A-34
defined 2-4
deleting A-43
managing 7-10
modifying 6-14, 7-10
realizing A-66
verification option 6-13
viewing A-58
Temporary tables 2-6
Terminologycommand-line utility A-105
Enterprise Replication 2-2
Enterprise Replication servers 2-3
global catalog 2-4
hierarchical topology 3-12
master replicate 2-3
participant 2-3
replicate 2-3
replicate set 2-4
replication servers 2-3
shadow replicate 2-3
templates 2-4
Testingnetwork environment 4-6
trusted environment 4-6
TEXT dataATS files 8-3
distributing 2-15
RIS files 8-6
SPL conflict resolution 2-14
storing in tblspaces 2-13
types, loading 4-18
Threads used by Enterprise Replication C-1
Time formats A-111
Time synchronization 2-11, 3-8, 8-10
Timeoutidle, setting 6-3
status, replication servers A-56
Timestamp conflict resolution rule 3-6, 3-7, 6-7, A-52
database action 3-8
defined 3-7
delete table 4-7
simple large object 2-13
TOC Notes xix
Tools for loading and unloading data 4-17
Topology, choosing network 3-11
Transaction conflict resolution scope 3-7, 3-11, 6-7
Transaction recordsdefault dbspace 4-8
storage 4-8
Transactional integrity 3-11
Transactionsbuffers, spooling to disk 4-8, 8-7
constraint checking 3-11
distributed 2-9
evaluation examples 1-10, 1-12
evaluation logic 1-7
failed, ATS and RIS files 6-8, 8-2
large 2-10
processing 2-9
tables D-11
Treedefined 3-13
topology, illustrated 3-13
Triggersactivating with replication A-25
changing 7-5
data capture 1-3
defined 1-3
enabling 6-9
errors with Enterprise Replication 2-8
firing A-61
permissions A-109
primary key updates 1-8
transaction capture 1-3
Troubleshootingconfiguration problems 8-10, 8-11
spooled transactions 8-7
Troubleshooting Enterprise Replicationalter operations 8-11
TRUNCATE statement 2-10
Trusted environmentconfiguring 4-3
testing 4-6
Two-phase commit protocoldefined 1-2
distributed transactions 2-9
TXH label, ATS files 8-3
Typographical conventions xiii
TZ environment variable A-111
UUDRs
HDR servers, preparing 5-6
installing 4-16
preparing to replicate 4-16
registering 4-16
SPL conflict resolution 3-8
UDTs.See User-defined data types
Unbuffered logging 2-6, 4-17
UNIXdatabase server groups 4-3
onmode command 6-2
SQLHOSTS file 4-3, 4-13
UNLOAD statement 4-18, 4-19
unload utility 4-18
Unloading data 4-17
Unsupported table types 2-6
Up-to-date, with replication 1-4
Update-anywhereexamples E-4
participants 6-4
replication systemcombining with HDR 5-2
defined 3-5
Update-anywhere replication systems 3-5
X-18 IBM Informix Dynamic Server Enterprise Replication Guide

Updatesmultiple-row images 1-8
primary key 1-8
WHERE clause column 1-8
Updating shadow columns 4-15
UPSERTsdefined 6-8
replicating only changed columns 6-9
User-defined data typesATS files 8-4
columns, primary key 2-16
HDR servers, preparing 5-6
information in ATS files 8-4
information in RIS files 8-6
installing 4-16
installing and registering 2-16
loading with deluxe mode 4-18
preparing to replicate 4-16
registering 4-16
replicatingonly changed columns 6-8
preparation 2-15
spooled row data 4-9
support 2-15
support functions 2-16
Users, informix 2-2
Utilitiesdbexport 4-18
dbimport 4-18
onunload 4-17
unload 4-18
VValues, sending floating-point 6-9
Variables, in syntax diagrams xvii
Variables.See Environment variable.
Verification, master replicate 6-5
ViewingEnterprise Replication 2-5
replicate attributes 7-5
replication server attributes 7-2
templates 1-5, 6-12, 6-13
Virtual columnsupport 2-16
Visual disabilitiesreading syntax diagrams H-1
WWarm restores 2-6
WHERE clausecolumn updates 1-8
Windowsdatabase server groups 4-4
Informix-Admin group 2-2
onmode command 6-2
SQLHOSTS registry host 4-13
WITH CRCOLS statementdefining shadow columns 4-17
Workflow replication business model 3-4
Workload partitioning business model 3-3
Writingsupport functions 2-16
transaction buffers to disk 8-7
Index X-19

X-20 IBM Informix Dynamic Server Enterprise Replication Guide


����
Printed in USA
G251-2279-01

Spine information:
IBM
In
form
ix
Vers
ion
10.0
IBM
In
form
ix Dy
nam
ic Se
rver
En
terp
rise
Repl
icat
ion
Guid
e ��
�