dynamic license server 3.0 (dls 3.0) is a client-server
TRANSCRIPT
Installation and Licensing Guide
DLS 3.0
July 31, 2009
2
Table of Contents Introduction ......................................................................................................3
Overview ......................................................................................................3 Supported Server Platforms .........................................................................3 Supported Client...........................................................................................3
DLS v3.0 Installation for Windows XP and Windows 2003 ..............................4 System Requirements ..................................................................................4 How to Install DLS 3.0 on Windows XP........................................................4 How to Install DLS 3.0 on Windows 2003 ....................................................6
Administrative Activities (All Platforms)............................................................8 Licensing DLS ..............................................................................................8 Active License ............................................................................................11 Seat............................................................................................................11 Allocated Seat ............................................................................................11 Expired License..........................................................................................11 Revoked License........................................................................................11 Revoked License Timeout ..........................................................................12 Allowed User ..............................................................................................12 Denied User ...............................................................................................12 The DLS Admin Page Tree ........................................................................12 Users..........................................................................................................14 Licenses .....................................................................................................17 Options.......................................................................................................18
Client Access .................................................................................................22 Troubleshooting .............................................................................................24
Errors from the DLS Server ........................................................................24 Errors from the Client Connection ..............................................................25 Known Problems ........................................................................................26
Contacting Technical Support ........................................................................27 Copyright Information.....................................................................................28
3
Introduction
Overview Dynamic License Server 3.0 (DLS 3.0) is a client-server application that manages concurrent user licenses for Vector NTI Suite and Vector NTI Advance™ client applications. Licenses reside on the DLS Server. The DLS Server dynamically issues available licenses to authorized Vector client applications upon request. Vector client applications operate in Demo mode until they are issued a dynamic license from the DLS Server. The DLS Server software consists of the following two CGI applications:
The administrative tool, vntidlsadmin.cgi, is used for configuration of the licenses and is run through a web browser client.
The license server program, vntidls.cgi, is the program to which client
machines connect to obtain licenses for Vector NTI Suite and Vector NTI Advance™ applications.
The DLS CGI applications run under web HTTP server software. Therefore, you must have web server software that is configured to run CGI scripts installed and running on the DLS Server machine before the DLS software can be installed.
Supported Server Platforms DLS 3.0 is supported on the following server platforms. In each case an HTTP server configured to run CGI applications is required.
Windows 2003 Server Windows XP
Supported Client
Vector NTI Advance™ 9.x, 10.x and 11.0 Vector NTI Suite 6.x, 7.x and 8.0x (Vector NTI Advance) Vector NTI Suite 5.2.5 for Mac and later releases Xpression NTI 1.x Vector Xpression 2.0x
NOTE: Releases of Vector NTI versions for Windows older than Vector NTI Advance™ 9 from the above list have not been tested with the new DLS 3.0.

4
For more details on upgrading visit URL www.invitrogen.com/VectorNTI. When the Vector NTI Suite version is upgraded, the DLS license keys must also be upgraded (see Licensing DLS).
DLS v3.0 Installation for Windows XP and Windows 2003
System Requirements Windows XP, Windows 2003 with web server software capable of running CGI scripts (Microsoft IIS).
Windows XP with Microsoft IIS 5.1 or higher Windows 2003 with Microsoft IIS 6.0 or higher
NOTE: DLS installations under web server software other than IIS, Personal Web Manager or Personal Web Server are not supported and cannot be guaranteed successful.
How to Install DLS 3.0 on Windows XP To install DLS, follow these steps: 1. Log in as Administrator. IMPORTANT: You must have full Administrator rights. If you are merely a user with Admin rights, the DLS installation proceeds improperly and the DLS Admin page cannot be accessed. 2. Download the DLS installer file (VectorNTIDLS.exe) from the Invitrogen web site to a directory on your computer. 3. Execute the DLS installer program by double clicking on the downloaded file. This launches the Install Shield Wizard. Follow the installation instructions on your screen.

5
A) Click ‘Next’ to continue with installation.
B) Click ‘Install’
C) Click ‘Finish’ to complete the installation.

6
4. Assign the DLS working directory: Click ‘OK’. Default path: C:\vnti_dls. If the default location is not appropriate, browse to change the path and/or folder name. The DLS working directory can be changed later with the WinSetup.exe utility, located in the CGI directory (default: C:\program files\Invitrogen\Dynamic License Server 3.0). If you have not chosen the default path, after the installer has finished, you must verify that the appropriate permissions for the DLS working directory are set. The Web Server User should have Read and Write permissions to the DLS working directory (default: C:\vnti_dls).
5. Database folder will be created. Click OK.
6. Launch your browser and go to http://localhost/DLS/vntidlsadmin.cgi for use of DLS.
How to Install DLS 3.0 on Windows 2003 To install DLS, follow these steps: 1. Log in as Administrator. IMPORTANT: You must have full Administrator rights. If you are merely a user with Admin rights, the DLS installation proceeds improperly and the DLS Admin page cannot be accessed. Follow steps 2 to 5 as explained in the installation instructions for Windows XP.

7
6. Go to Control Panel -> Administrative Tools -> Internet Information Services (IIS) Manager.
7. IIS Manager will be opened. Select Web Service Extensions form List. Select All Unknown CGI Extensions and press the “Allow” button.
8. Launch your web browser and go to: http://localhost/DLS/vntidlsadmin.cgi for use of DLS.

8
Administrative Activities (All Platforms)
Licensing DLS To license DLS on the server, follow these steps: 1. Launch your Web browser and type in the URL to connect to the DLS Administrator’s program, vntidlsadmin.cgi. For example, if the CGI scripts folder is named vntidlscgi, the URL for the Admin page is http://your.servers.address/vntidlscgi/vntidlsadmin.cgi. On Windows XP/2003 systems, the CGI scripts are placed in the scripts directory instead of vntidlscgi if the installer defaults are accepted. In this case, the URL is http://your.servers.address/scripts/vntidlsadmin.cgi. 2. The DLS Admin page information form displays in your browser:
9
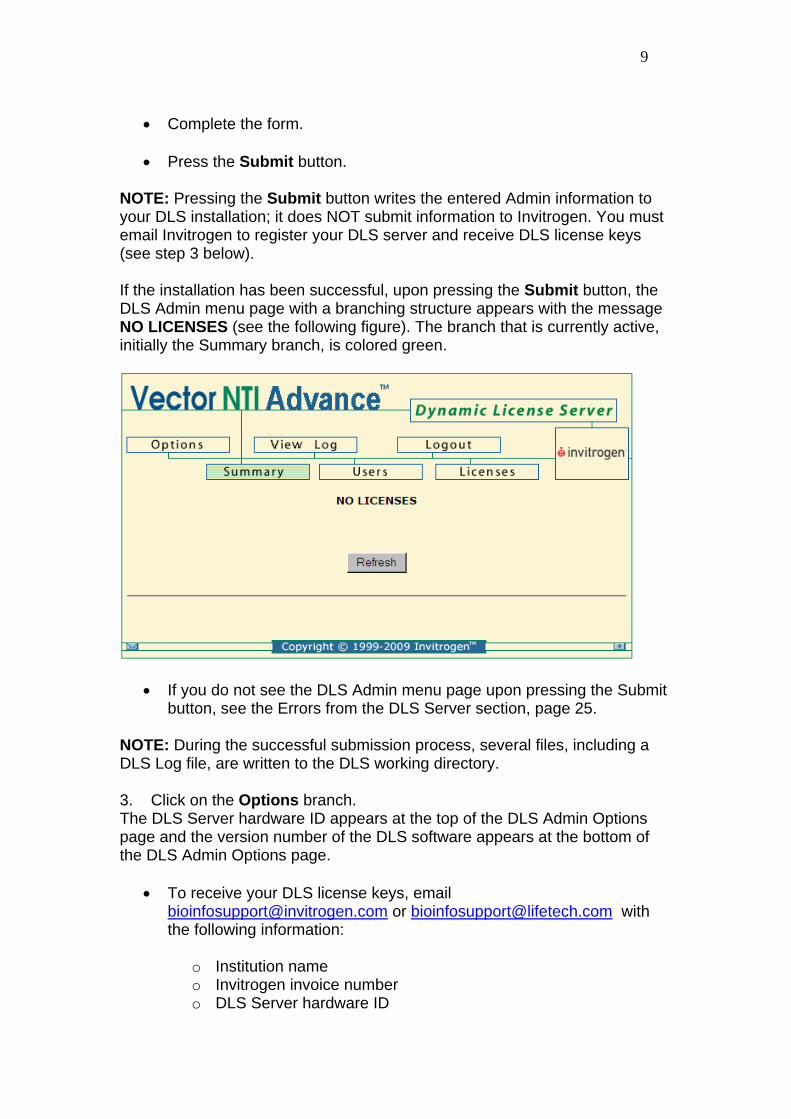
Complete the form. Press the Submit button.
NOTE: Pressing the Submit button writes the entered Admin information to your DLS installation; it does NOT submit information to Invitrogen. You must email Invitrogen to register your DLS server and receive DLS license keys (see step 3 below). If the installation has been successful, upon pressing the Submit button, the DLS Admin menu page with a branching structure appears with the message NO LICENSES (see the following figure). The branch that is currently active, initially the Summary branch, is colored green.
If you do not see the DLS Admin menu page upon pressing the Submit button, see the Errors from the DLS Server section, page 25.
NOTE: During the successful submission process, several files, including a DLS Log file, are written to the DLS working directory. 3. Click on the Options branch. The DLS Server hardware ID appears at the top of the DLS Admin Options page and the version number of the DLS software appears at the bottom of the DLS Admin Options page.
To receive your DLS license keys, email [email protected] or [email protected] with the following information:
o Institution name o Invitrogen invoice number o DLS Server hardware ID

10
o DLS Administrator’s name, email and phone number o Version number of the DLS software
The Licensing Manager at Invitrogen generates your license keys and
emails them back to you. You will receive one license key for each of the client applications you are licensed to run (Vector NTI, BioAnnotator, AlignX, ContigExpress, GenomBench, and/or Vector Xpression).
4. Upon receipt of the license keys, choose the Licenses branch of the
tree on the DLS Admin menu page:
Enter the license keys one at a time. Press the Submit button after typing in each license.
Make sure to include the ENTIRE license string (begins with
application name designation). NOTES:
License strings are case-sensitive. Before license keys are applied, the message NO LICENSES appears on the
Licenses page. After license keys are applied, license key summary information appears in place of the NO LICENSES message (see the Licenses branch description below).
5. After the DLS license keys have been entered, client programs can be configured to access the DLS and obtain dynamic licenses (see

11
Client Access, page 22). NOTE: If the client software version is upgraded (on the client machines), you must request upgraded DLS license keys that are compatible with the new client software version (see step 4 above). Definitions Used in the DLS The following description outlines terms and definitions used on the DLS Administration page:
Active License When a client program connects to the DLS and is granted a license, the license is said to be active. As long as the license is active, the user can use the client program in full functional mode. Once the dynamic license is obtained for an application, it remains active until the application is closed on the client machine or until the license is revoked or denied by the DLS Administrator.
Seat “Position” that is allowed to access the dynamic license. Once a client machine has obtained a dynamic license or has been allocated a seat (see next entry) for an application, it occupies an access position or seat for that application, becoming an Allowed User. Seats for one application are independent of the other applications. The number of seats is always equal to or greater than the total number of dynamic licenses.
Allocated Seat The DLS 3.0 Administrator can allocate available DLS seats to specific client machines. Client computers to which seats are allocated appear immediately on the Allowed Users list even if they have not yet obtained a dynamic license from the DLS Server.
Expired License A license is deemed expired when the client program has lost its connection to the DLS server. This can be caused by instability in the network connection or a non-standard end of the client program.
Revoked License The DLS Administrator can revoke an active license at any time. This forces the active client program to give up the dynamic license. Once the license has been revoked, the user is allowed to obtain a new dynamic license only after the revoked license timeout period elapses.

12
Revoked License Timeout Time period that must elapse before clients with revoked licenses can reapply for a dynamic license. The timeout period is set in the Options branch of the DLS Admin page.
Allowed User A client VNTI computer that is allowed to obtain a dynamic license is called an allowed user. Each allowed user occupies one seat for that product.
Denied User A client VNTI computer whose seat has been withdrawn and is blocked from obtaining a dynamic license. Denied Users remain blocked until the DLS administrator removes their denied status. Denial is on a per client application basis; a client computer can be denied for one VNTI Suite application, but allowed for others.
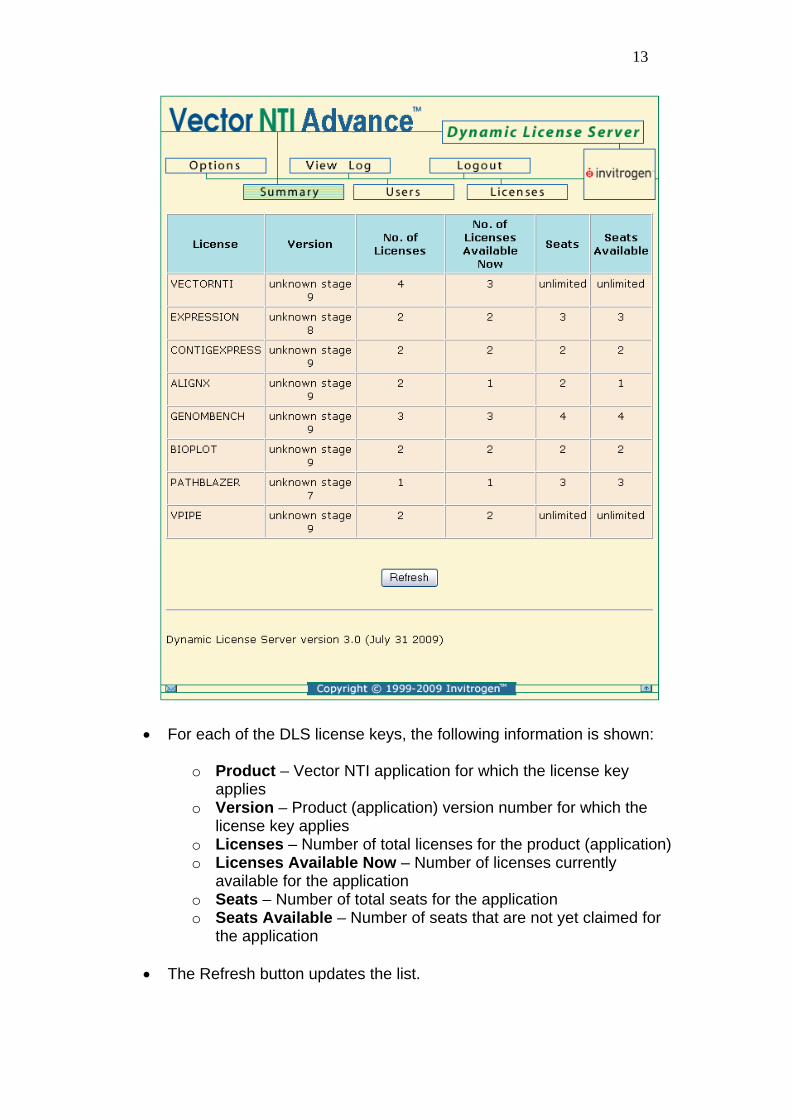
The DLS Admin Page Tree The following details outlines the six branches of the DLS Administration tree, their descriptions and associated sub-branches: Summary The Summary branch shows a summary of the licenses in table format:
13
For each of the DLS license keys, the following information is shown:
o Product – Vector NTI application for which the license key applies
o Version – Product (application) version number for which the license key applies
o Licenses – Number of total licenses for the product (application) o Licenses Available Now – Number of licenses currently
available for the application o Seats – Number of total seats for the application o Seats Available – Number of seats that are not yet claimed for
the application
The Refresh button updates the list.

14
NOTE: Before license keys are applied, the message NO LICENSES appears in place of the license key summary information.
Users In the Users branch, the administrator can view and control users' (client computers’) access to the dynamic licenses. In DLS v. 1.2.4 and higher, both the computer and user names are listed as part of the User information. The Users branch has a sub-tree with the following three branches:
Active The Active branch lists the products and the users for which licenses are currently in use.
o To revoke a user’s active license, check the user’s Select box and press the Revoke Selected Licenses button. This action forces the client program to give up its license, after which it runs in Demo mode. The client application runs in Demo mode for the revoked time out period (set in the Options branch of the Admin Page Tree), after which it automatically requests a new dynamic license. If a dynamic license is available, it is granted to the client; if not, the client continues running in Demo mode.
15
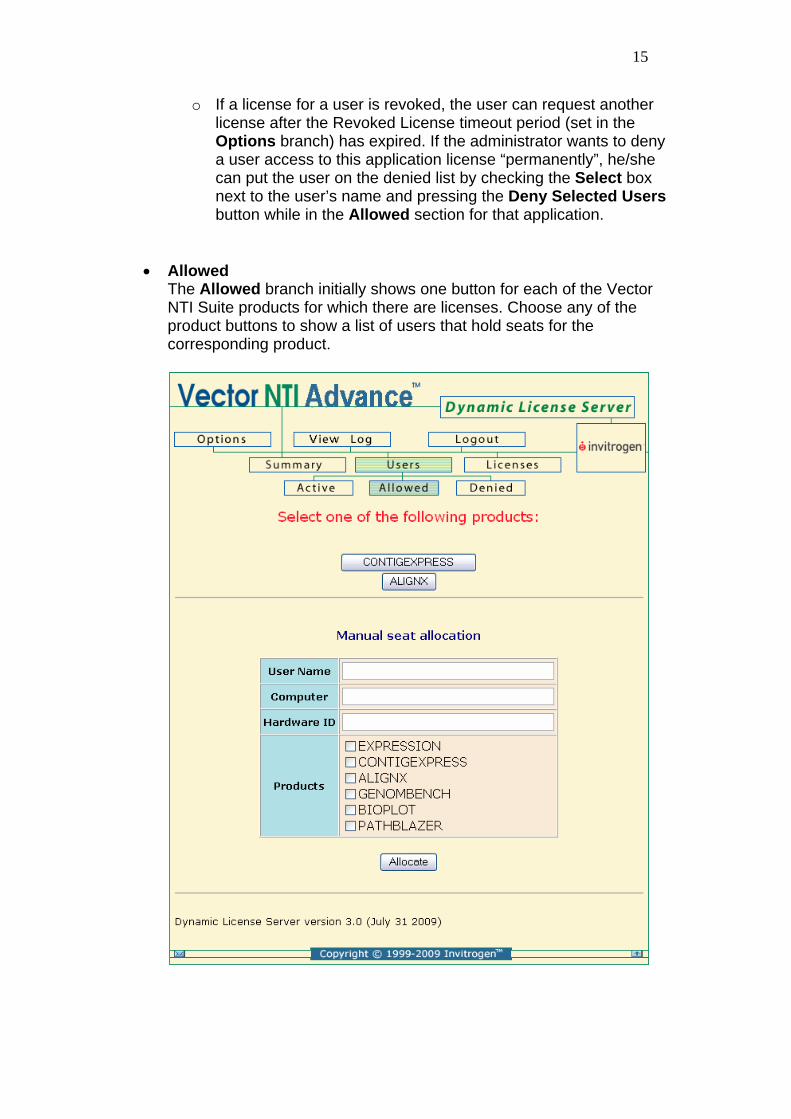
o If a license for a user is revoked, the user can request another license after the Revoked License timeout period (set in the Options branch) has expired. If the administrator wants to deny a user access to this application license “permanently”, he/she can put the user on the denied list by checking the Select box next to the user’s name and pressing the Deny Selected Users button while in the Allowed section for that application.
Allowed The Allowed branch initially shows one button for each of the Vector NTI Suite products for which there are licenses. Choose any of the product buttons to show a list of users that hold seats for the corresponding product.

16
o To deny a user future access, check the user’s Select box and press the Deny Selected Users button. When a denied client program applies for a dynamic license, it is not granted a license even if there are licenses available. Upon denial, the client program’s seat is withdrawn. If the user is running a client program at the time of denial, the application is immediately forced into Demo mode.
o An allowed user’s active license can be revoked in the Active
section of the Users branch of the DLS Admin menu page (see section a, above).
o Manual Seat Allocation -This section allows the DLS
administrator to reserve DLS seats for specific computers based on the computer’s Vector NTI hardware ID. To allocate a seat to a particular computer, type in the VNTI Suite user’s name and their VNTI Suite client computer’s name and hardware ID (found on the Static Licenses tab of VNTI License Manager on the client computer). Check the Vector NTI Suite applications you want to allocate to the client computer and press the Allocate button.
Denied
Similar to the Allowed branch, the Denied branch initially shows one button for each of the Vector NTI Suite products for which there are licenses. Choosing any of the product buttons displays a list of users that are blocked from obtaining a license for that product:
17
o Denied users are listed as permanent in the Expired category, whereas revoked users show a date and time in the Expired category (see Options branch below).
o A user can be removed from the denied list by checking the user’s Select box and pressing the Remove Selected Users button. The user is not automatically reissued a seat or added to the allowed list, but the user can again compete for a license and reclaim a seat, if one is available.
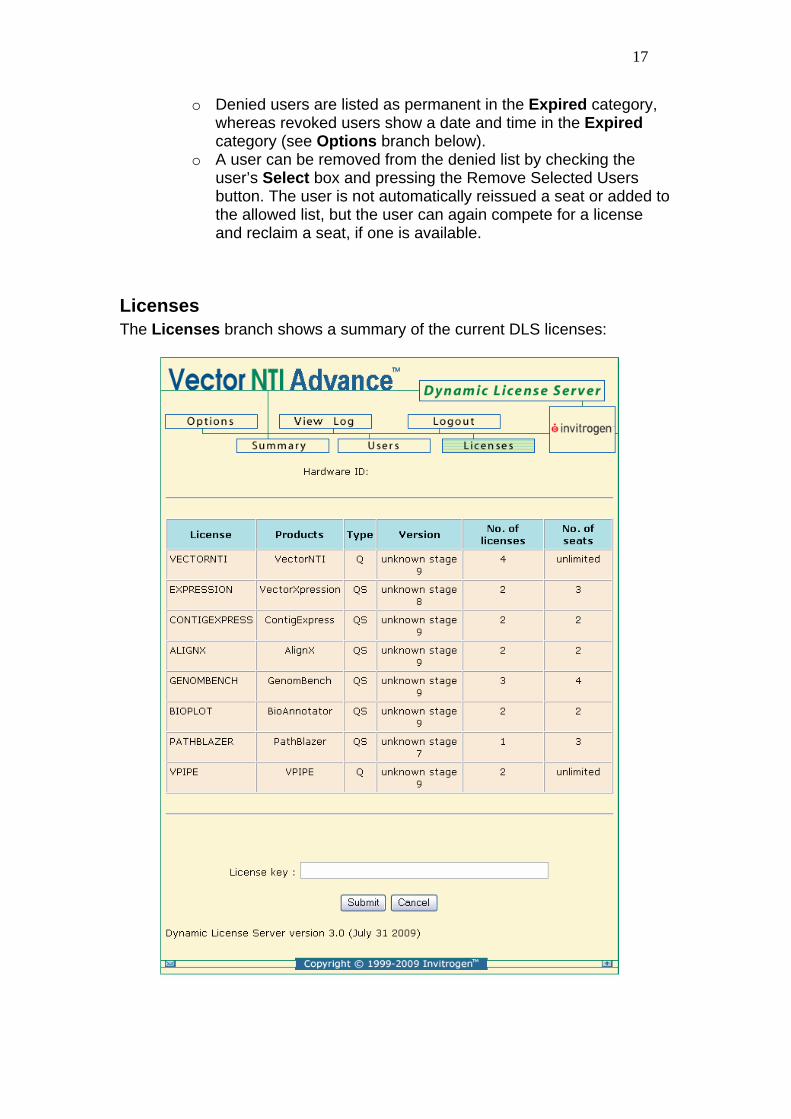
Licenses The Licenses branch shows a summary of the current DLS licenses:
18
If you have not yet entered your DLS license keys, you will see the message NO LICENSES instead of a license summary table.
To enter a new license, type or paste it into the License Key textbox
and press the Submit button. When a new license is entered, the existing license (if any) is replaced by the new license.
Notes:
License keys are case-sensitive. Make sure to include the ENTIRE license string (begins with application name). Make sure that there are no leading or trailing spaces when the license key is
entered.
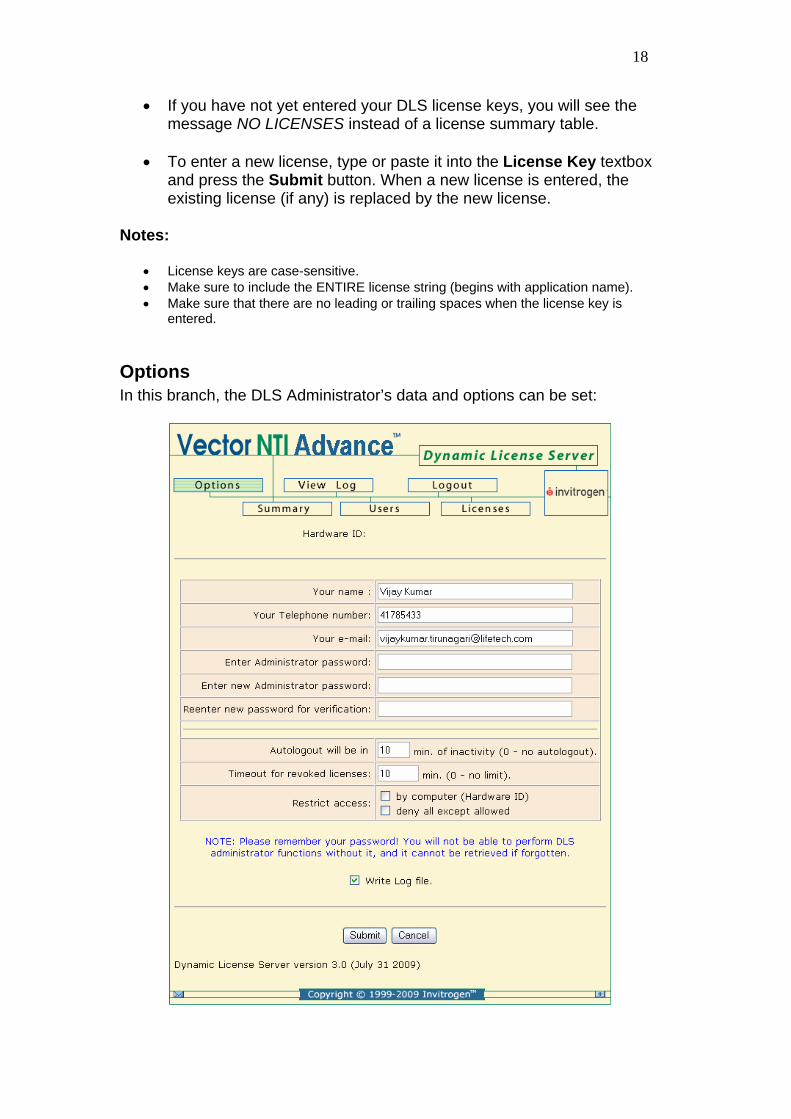
Options In this branch, the DLS Administrator’s data and options can be set:

19
Autologout – Sets the time of Admin page inactivity that initiates
Admin page auto logout.
Restrict Access – Restricts access to the DLS as follows:
o By Computer Hardware ID – If checked, adds users to the Allowed list when they obtain a DLS license from the server.
NOTE: Checking this option only affects Unlimited dynamic license configurations; this is the default condition for limited dynamic license configurations.
o Deny All Except Allowed – If checked, allows only those users
on the Allowed list to obtain licenses from the DLS server.
NOTE: In the case of Unlimited dynamic license configurations, leaving both of these options unchecked results in unrestricted access to dynamic licenses (i.e. any user who knows the URL to the DLS server is able to check out a dynamic license).
Timeout for revoked licenses – Allows the DLS Administrator to
define the timeout period for clients whose licenses have been revoked. Revoked clients continued are blocked from reapplying for a dynamic license until the set time has passed. A value of zero entered in this field indicates no timeout.
NOTE: When a client computer is revoked, it is temporarily added to the Denied list of the Users branch with the label Expired Date Time, where Date and Time indicate the time of revoked status expiration:

20
Once the revoked timeout period has expired, the revoked client is automatically removed from the Denied list and its ability to receive a dynamic license is restored. If the DLS Administrator wants to allow this client to obtain a dynamic license before the revoked timeout period has expired, he/she can remove the revoked client from the denied list at any time during the revocation period by checking the Select box for that client and pressing the Remove Selected Users button.
Write Log file – Allows the option to write all Admin and client activity to the DLS log file. Check the box to enable the option.
NOTE: The log file is found in the DLS working directory and is called vnti_dls_log.txt
Clear Seats If all seats are used and the Administrator wants to remove old computers to add new computers, do the following for each license:
Select the Users branch and then select the Allowed branch. Select the license.
Select the check box for Inactive Users. Select Deny Selected Users. This adds inactive users to the denied
list. Select the Denied branch and select the users again and select
Remove Selected Users. This clears the seats they occupied and the next computer to connect will get the seats. It is important that this step be completed so these users will remain on the denied list.
Repeat for other licenses. View Log The View Log branch shows DLS activity entries in the DLS log file (Write Log file option in the Options branch must be checked to log DLS activity in the DLS log file). It also allows the DLS Administrator to set the page size view in terms of the number of log entries per page (the minimum page size is 10):

21
Filter By – Allows you to filter log file entries by product, user or computer, so that only those log file entries are displayed.
Sort By – Allows you to sort the log file by date or category.
Show Category – Allows you to select the log file information you
would like to display in the log file entries.
The Read button refreshes the view.
The Clear Log File button clears the log file of all entries.
Entries in the DLS log file can show the following information: o Date and time of the log entry o Message describing the activity o Computer name, IP address and Hardware ID o Application version number
The DLS log file resides in the DLS Working Directory (on a PC, the
working directory is called vnti_dls and is located at the root of C:\, if a default DLS installation is performed). The DLS 2.0 log file is tab
22
delimited and, therefore, can easily be imported into Microsoft Excel, if desired.
Logout
This ends the DLS administrator’s session.
NOTE: If the browser is exited without properly logging out of the DLS session, the DLS Admin program continues running and does not allow a new login event, until the DLS Admin program Auto Logout time expires (see Options above). You can immediately regain login ability by deleting the vnti_dls.sf file from the DLS working directory.
IMPORTANT: Vector NTI Suite for PC versions 8.x and earlier have not been tested with DLS version 3.0. Such configurations cannot be guaranteed successful.
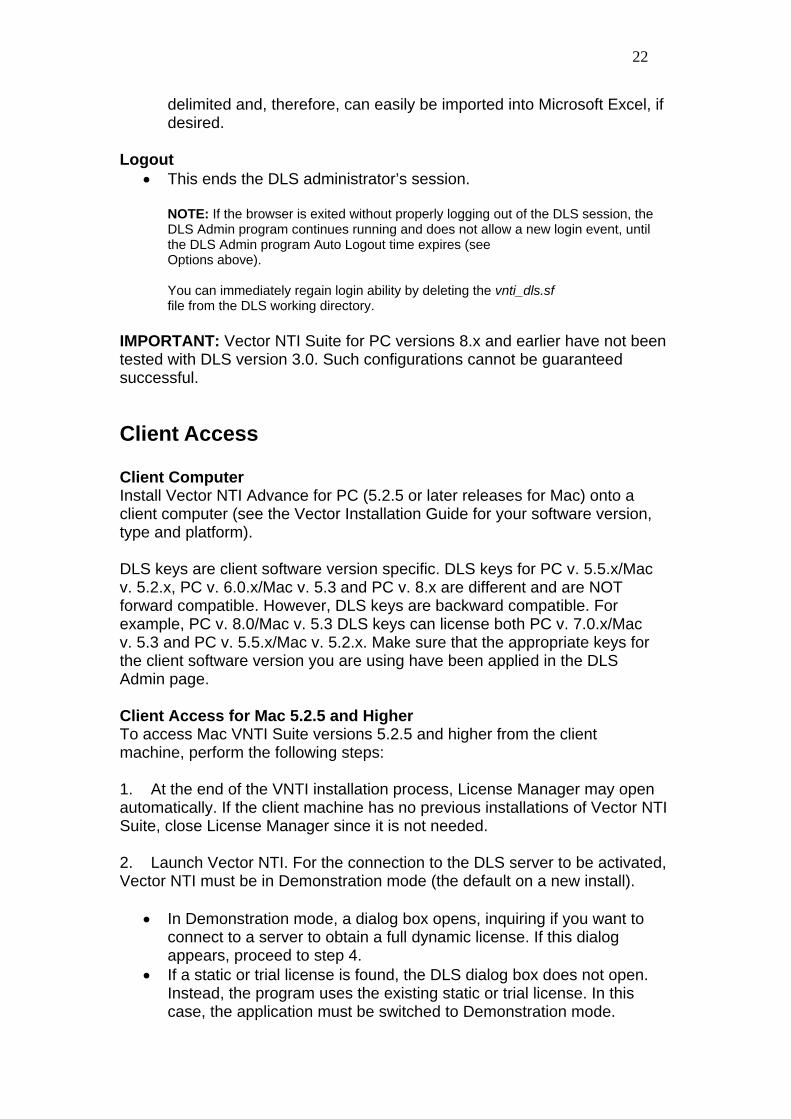
Client Access Client Computer Install Vector NTI Advance for PC (5.2.5 or later releases for Mac) onto a client computer (see the Vector Installation Guide for your software version, type and platform). DLS keys are client software version specific. DLS keys for PC v. 5.5.x/Mac v. 5.2.x, PC v. 6.0.x/Mac v. 5.3 and PC v. 8.x are different and are NOT forward compatible. However, DLS keys are backward compatible. For example, PC v. 8.0/Mac v. 5.3 DLS keys can license both PC v. 7.0.x/Mac v. 5.3 and PC v. 5.5.x/Mac v. 5.2.x. Make sure that the appropriate keys for the client software version you are using have been applied in the DLS Admin page. Client Access for Mac 5.2.5 and Higher To access Mac VNTI Suite versions 5.2.5 and higher from the client machine, perform the following steps: 1. At the end of the VNTI installation process, License Manager may open automatically. If the client machine has no previous installations of Vector NTI Suite, close License Manager since it is not needed. 2. Launch Vector NTI. For the connection to the DLS server to be activated, Vector NTI must be in Demonstration mode (the default on a new install).
In Demonstration mode, a dialog box opens, inquiring if you want to connect to a server to obtain a full dynamic license. If this dialog appears, proceed to step 4.
If a static or trial license is found, the DLS dialog box does not open. Instead, the program uses the existing static or trial license. In this case, the application must be switched to Demonstration mode.

23
3. To switch Vector NTI to Demonstration mode:
Launch the Vector NTI License Manager (found in: Start Menu > Program Files > Vector NTI Suite <version number>, assuming a default installation on a PC has been performed).
Click on the Register button. Enter the word DEMO in the Key field (all caps). Click on the Apply Registration Key button. The program should
switch to Demonstration mode. This is indicated in the upper portion of the License Manager dialog box.
Close License Manager and re-launch Vector NTI. 4. Enter the URL for the vntidls.cgi program in the dialog box (e.g.: http://ServerName or IP Address/scripts/vntidls.cgi).
If a username and password requirement has been set for the server, enter it into the appropriate fields in the dialog box (under “Options…”).
If an HTTP proxy server is being used, enter it into the appropriate field
in the dialog box (under “Options…”). Client Access for VNTI Suite v. 6.x, 7.x, 8.x, 9.x, 10.x, 11.x, Xpression NTI and Vector Xpression To access VNTI Suite version 6.x, 7.x , 8.x, 9.x, 10.x, 11.x (Vector NTI Advance), Xpression NTI, and/or Vector Xpression programs from the client machine, perform the following steps: 1. Open License Manager and select the Summary tab. For each of the applications listed on the Summary tab, perform the following.
Click on the license type listing to activate its down arrow. Click the down arrow and choose Dynamic License from the drop-
down list. 2. Select the Dynamic License Settings tab in License Manager.
Enter your name and the name of your organization in the appropriate fields.
Type the URL to the DLS server in the “URL to the DLS” box. If a server password is required or proxy server is used, make sure that
the relevant information is filled into the appropriate text boxes. Press the Test Connection button. This opens the Dynamic License
server connection tester dialog box. The status of the connection is reported along with a message indicating whether or not there are licenses available.
Close the License server connection tester dialog box.

24
3. Close License Manager. 4. Launch any of the Vector NTI Suite, Xpression NTI or Vector Xpression applications.
If the application obtains the dynamic license, a green, blinking check mark isvisible in the lower right corner of the application window.
If the application fails to obtain the dynamic license, a red, blinking check mark is visible in the lower right corner of the application window.
NOTE: If you see blinking blue dots in the lower right corner, see Errors from the Client Connection in the Troubleshooting section, page 25.
Troubleshooting
Errors from the DLS Server The following table lists error messages associated with the DLS server:
Error Cause/Solution "Program not registered" message upon submission of the vntidlsadmin.cgi page
DLS is unable to write to the DLS working directory. The DLS working directory has not been created or the permissions to the DLS working directory are not set correctly. The account under which the DLS is installed may not have full Admin privileges.
Try manually creating and/or setting the working directory folder permissions.
If this does not work, delete the current DLS installation and reinstall using the default paths. Make sure that you install under the Administrator account (full Admin privileges).
Invalid hardware ID ("KQL-ROYHX") displayed on the DLS Admin page, vntidlsadmin.cgi
DLS installation has not proceeded properly, because the account under which the DLS is installed does not have full Admin privileges.
Delete the current DLS installation and reinstall using the default paths. Make sure that you install under the Administrator account (full Admin privileges).
When the Submit button is pressed, the Admin program cycles back to the Submit page instead of showing the Admin branching page
DLS installation has not proceeded properly, because the account under which the DLS is installed does not have full Admin privileges.
Delete the current DLS installation and reinstall using the default paths. Make sure that you install under the Administrator account (full Admin privileges).
"Administrator Only one Administrator login at a time is allowed. This
25
Already Logged In" message when the vntidlsadmin.cgi page is launched
message also appears when the administrator tries to login after a non-standard end of the previous session (by exiting the web browser without proper log-out, for instance).
An Admin session is already in progress. Check for
an open Admin window. Either wait for the auto-logout period to expire or
delete the vnti_dls.sf file from the DLS working directory to gain immediate login functionality.
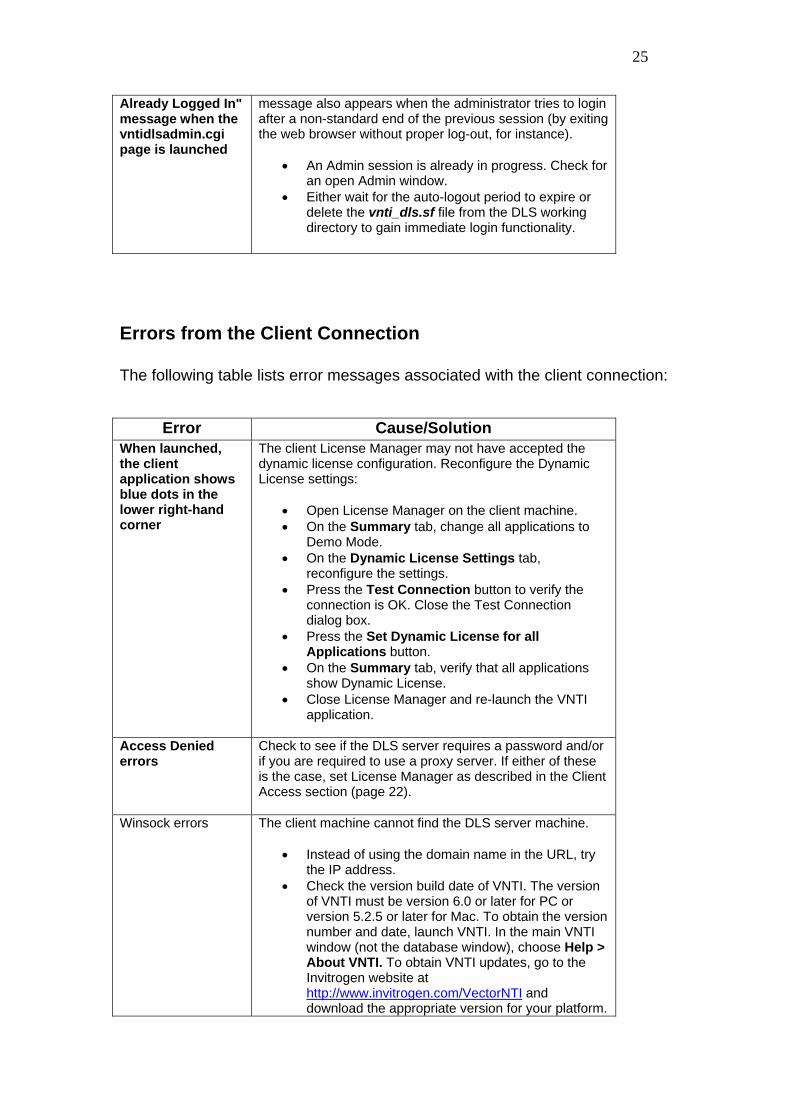
Errors from the Client Connection The following table lists error messages associated with the client connection:
Error Cause/Solution When launched, the client application shows blue dots in the lower right-hand corner
The client License Manager may not have accepted the dynamic license configuration. Reconfigure the Dynamic License settings:
Open License Manager on the client machine. On the Summary tab, change all applications to
Demo Mode. On the Dynamic License Settings tab,
reconfigure the settings. Press the Test Connection button to verify the
connection is OK. Close the Test Connection dialog box.
Press the Set Dynamic License for all Applications button.
On the Summary tab, verify that all applications show Dynamic License.
Close License Manager and re-launch the VNTI application.
Access Denied errors
Check to see if the DLS server requires a password and/or if you are required to use a proxy server. If either of these is the case, set License Manager as described in the Client Access section (page 22).
Winsock errors
The client machine cannot find the DLS server machine.
Instead of using the domain name in the URL, try the IP address.
Check the version build date of VNTI. The version of VNTI must be version 6.0 or later for PC or version 5.2.5 or later for Mac. To obtain the version number and date, launch VNTI. In the main VNTI window (not the database window), choose Help > About VNTI. To obtain VNTI updates, go to the Invitrogen website at http://www.invitrogen.com/VectorNTI and download the appropriate version for your platform.
26
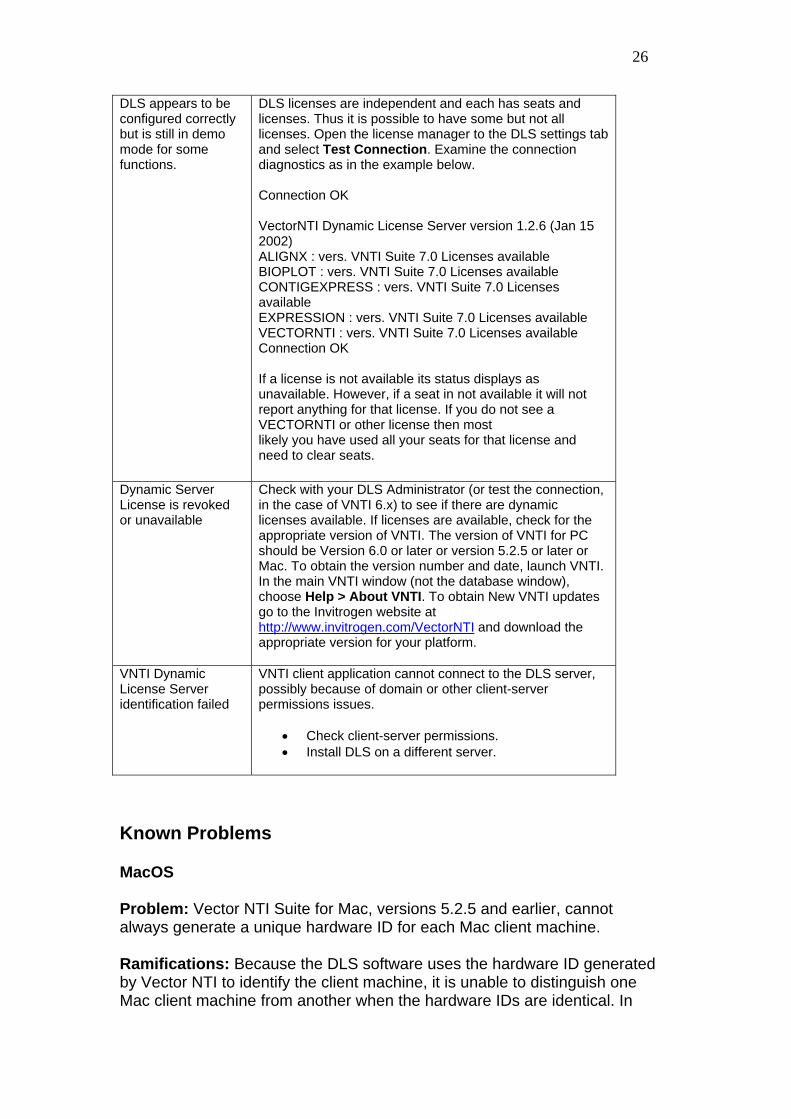
DLS appears to be configured correctly but is still in demo mode for some functions.
DLS licenses are independent and each has seats and licenses. Thus it is possible to have some but not all licenses. Open the license manager to the DLS settings tab and select Test Connection. Examine the connection diagnostics as in the example below. Connection OK VectorNTI Dynamic License Server version 1.2.6 (Jan 15 2002) ALIGNX : vers. VNTI Suite 7.0 Licenses available BIOPLOT : vers. VNTI Suite 7.0 Licenses available CONTIGEXPRESS : vers. VNTI Suite 7.0 Licenses available EXPRESSION : vers. VNTI Suite 7.0 Licenses available VECTORNTI : vers. VNTI Suite 7.0 Licenses available Connection OK If a license is not available its status displays as unavailable. However, if a seat in not available it will not report anything for that license. If you do not see a VECTORNTI or other license then most likely you have used all your seats for that license and need to clear seats.
Dynamic Server License is revoked or unavailable
Check with your DLS Administrator (or test the connection, in the case of VNTI 6.x) to see if there are dynamic licenses available. If licenses are available, check for the appropriate version of VNTI. The version of VNTI for PC should be Version 6.0 or later or version 5.2.5 or later or Mac. To obtain the version number and date, launch VNTI. In the main VNTI window (not the database window), choose Help > About VNTI. To obtain New VNTI updates go to the Invitrogen website at http://www.invitrogen.com/VectorNTI and download the appropriate version for your platform.
VNTI Dynamic License Server identification failed
VNTI client application cannot connect to the DLS server, possibly because of domain or other client-server permissions issues.
Check client-server permissions. Install DLS on a different server.
Known Problems MacOS Problem: Vector NTI Suite for Mac, versions 5.2.5 and earlier, cannot always generate a unique hardware ID for each Mac client machine. Ramifications: Because the DLS software uses the hardware ID generated by Vector NTI to identify the client machine, it is unable to distinguish one Mac client machine from another when the hardware IDs are identical. In

27
such cases, when one of the Mac clients is on the denied list, all of the other Mac clients with the same hardware ID will also be denied a license. Work Around: To circumvent this identification problem, it is advisable to keep the denied list cleared of Mac clients, so that allowed Mac clients are not inadvertently denied a license. Fix: This problem has been rectified in Vector NTI Suite version 5.3 for Mac.
Contacting Technical Support E-mail: [email protected] or [email protected] Phone: 1-800-955-6288, x66790 (Toll-free, U.S.)
+44 (0) 781 696 2707 (Europe, Middle East, Africa and Asia Pacific)
Product Information PLEASE HAVE THE FOLLOWING INFORMATION AVAILABLE WHEN CONTACTING TECH SUPPORT: 1. Version number of DLS, platform and web server software used 2. Any error messages obtained 3. Contact person (name and telephone number) in your company/institution to whom the software was sold. Eligibility To be eligible for technical support, follow these steps:
Step Action 1 Purchase Basic Support (technical support only) or Advanced
Support (technical support with free upgrades) from Invitrogen. Contact your Invitrogen Sales Representative for further details regarding pricing, terms, and support status. If you do not know your Invitrogen Representative, call 1-800-955-6288, x66790 (Toll-free, U.S.) +44 (0) 781 696 2707 (Europe, Middle East, Africa and Asia Pacific).
2 Register as a Vector NTI user with Advanced or Basic Support. To avoid service delays on your initial technical support request, register at the Invitrogen web site (see below) before contacting Technical support. You need only register once. Register at this site: http://www.invitrogen.com/VectorNTI
28
NOTE: Although pre-registering at the Invitrogen web site will save you time, if you have not previously done so, technical support personnel will register you when you call.
Copyright Information Copyright Notice © 2009 Invitrogen, Life Technologies Corporations. All rights reserved. The unauthorized disclosure, copying, or altering of this document, whether in hardcopy, personal computer diskette format, through any electronic medium or otherwise, is strictly prohibited. While every effort has been made to ensure the accuracy of this publication, Invitrogen assumes no liability for error or omission from use of the information contained herein.