hzl-180sz - wuber
TRANSCRIPT

1
HZL-180SZQuick Start Guide

2

3

4

5

6
MenuDetails of the machine...............................................................................................................................7Accessories.................................................................................................................................................8Accessories Box/ Free Arm Sewing/ Fitting in the snap-in sewing table...................................................8Power On the Machine.............................................................................................................................. 9Presser Foot Lever/ Holder......................................................................................................................10Adjust Presser Foot Pressure...................................................................................................................11Winding the Bobbin................................................................................................................................. 12Inserting the Bobbin.................................................................................................................................13Inserting the Needle................................................................................................................................ 14Threading the Upper Thread................................................................................................................... 15Automatic Needle Threader.................................................................................................................... 16Bringing up The Lower Thread.................................................................................................................17Reverse Sewing/ Removing the Work/ Cutting the Thread/ Changing Sewing Directions..................... 18Matching Needle/ Fabric/ Thread............................................................................................................19Stitch Patterns Selection..........................................................................................................................20Regular Maintenance...............................................................................................................................21Troubleshooting Guide............................................................................................................................ 22

7
Details of the machine
1. Tension dial2. Presser foot pressure3. Thread take pp lever4. Thread cutter5. Presser foot6. Needle plate cover7. Sewing table and accessories box8. Needle position button9. Bobbin winder stopper10. Stitch width dial11. Stitch length dial12. Stitch display13. Reverse lever14. Automatic threader15. Spool pin16. Bobbin winder spindle17. Hole for second spool spin18. Handwheel19. Pattern selector dial20. Main switch21. Main plug socket22. Bobbin thread guide23. Upper thread guide24. Handle25. Presser foot lever26. Foot speed controller27. Power cable

8
Accessories
Accessories Box/ Free Arm Sewing/ Fitting in the snap-in sewing table
Pull it in the direction of the arrow(1). Take out accessories from the box (2)You may fit-in the snap-in sewing table after the accessories box is pulled out.
Standard Accessories:A. Standard presser footB. Zipper footC. Buttonhole footD. Button sewing footE. ScrewdriverF. Seam ripper/ brushG. Oil bottleH. Pack of needles (3x)I. Quilt guideJ. Bobbin 3xK. Darning plateL. Spool capM. Auxiliary spool pinN. Spool pin felt
Optional Accessories:O. Decorate stitch footP. Overcasting footQ. Blind stitch footR. Quilt footS. Rolled hem footT. Cording footU. Straight stitch footV. Gathering footW. Walking footX. Twin needle
9
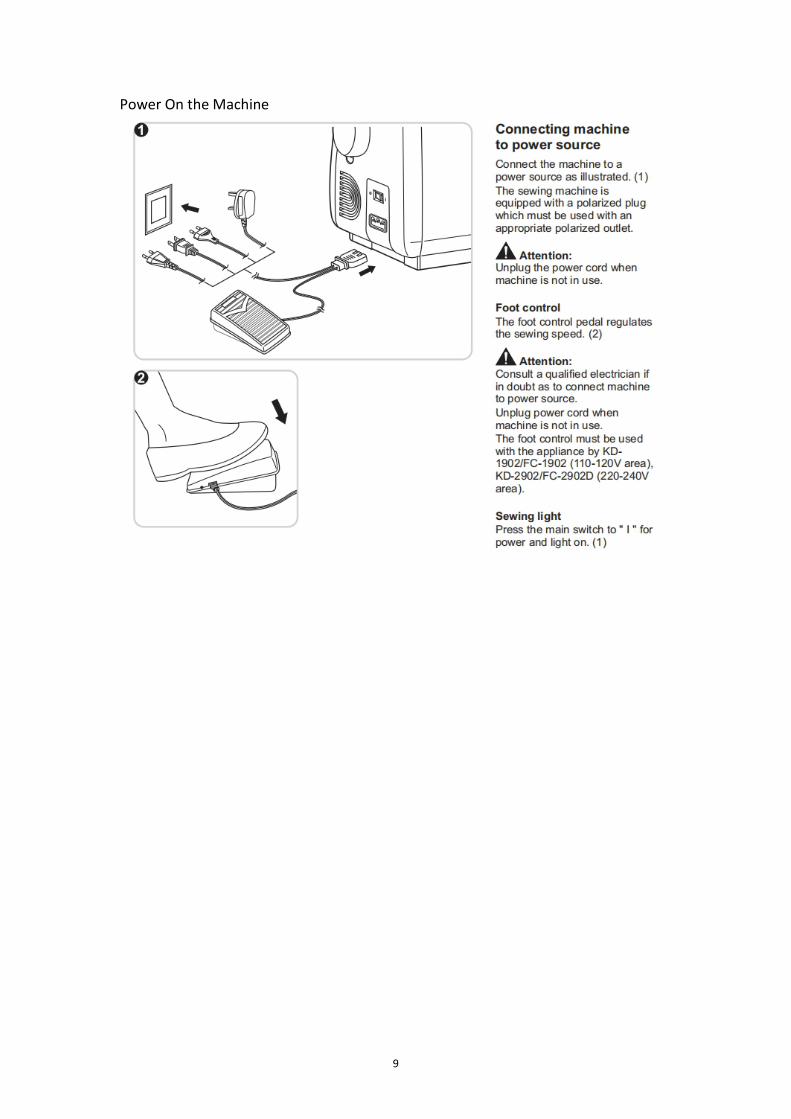
Power On the Machine

10
Presser Foot Lever/ Holder

11
Adjust Presser Foot Pressure

12
Winding the Bobbin

13
Inserting the Bobbin
When inserting or removing the bobbin, theneedle must be fully raised.
1. Open the hinged cover. Pull the bobbincase tab and remove the bobbin case.
2. Hold the bobbin case with one hand.Insert the bobbin so that the thread runs ina clockwise direction (arrow).
3. Pull the thread through the slit andunder the finger. Leave a 10cm tail ofthread.
4. Hold the bobbin case by the hingedlatch.
5. Insert it into the shuttle.When inserting or removing the bobbin, theneedle must be fully raised.

14
Inserting the Needle

15
Threading the Upper Thread
This is a simple operation but it isimportant to carry out correctly asby not doing so several sewingproblems could result.
1. Start by raising the needle to itshighest point, and also raise thepresser foot to release the tensiondiscs.
2. Lift up the spool pin. Place thethread and spool holder onto thespool pin. For small spools of thread,use the spool cap with the small endfacing the spool of thread.
3. Draw thread from spool to theupper thread guide.
4. Guide thread around threadguide pulling thread throughpre-tension spring as illustrated.
5. Continue downwards on the rightside of the large verticle threadguide passing under and up on theleft side allowing the thread toengage in the check spring as itpasses upwards.
6. At the top of this movement passit from right to left through theslotted eye of the take-up lever andthen downwards again.
7. Pass behind the flat. horizontalthread guide.
8. Now take it behind the thin wireneedle clamp guide and then downto the needle which should bethreaded from front to back. Pullabout 10-15cm of thread to the rearbeyond the needle eye.

16
Automatic Needle Threader
- Raise the needle to its highestposition.
- Press lever (A) right down.
- The threader automaticallyswings to the threading position(B).
- Take the thread round the hook(C).
- Take the thread in front of theneedle so that the thread willinsert into the hook (D) frombottom to top
- Release lever (E). Pull thethread through the needle eye.Pull about 10-15cm of thread tothe rear beyond the needle eye.

17
Bringing up The Lower Thread
1. Hold the upper thread withthe left hand. Turn thehandwheel forwards until theneedle is raised.
2. Pull on the upper thread tobring the lower thread upthrough the stitch plate hole.
3. Lay both threads to the backunder the presser foot.

18
Reverse Sewing/ Removing the Work/ Cutting the Thread/ Changing SewingDirections

19
Matching Needle/ Fabric/ Thread

20
Stitch Patterns Selection
How to choose your pattern
To obtain any of the patterns shown in thestitch selection display, turn the stitchselector dial (e). Adjust the stitch length (c)and the stitch width (b) with the controldials according to the result desired.
a. Needle position dialb. Stitch width dialc. Stitch length diald. Stitch selection displaye. Pattern selector dialf. Reverse lever
Straight line/ Zigzag Stitching
Turn the stitch selection dial to straight lineand zigzag stitch.
The maximum zigzag stitch width for zigzagstitching is "5"; however, the width can bereduced on any patterns. The width increasesas you move zigzag dial from "0" - "5". "0" isstraight line setting.
The density of zigzag stitches increase as thesetting of stitch length dial approaches "0".Neat zigzag stitches are usually achieved at"2.5" or below.

21
Regular Maintenance
Disconnect the machine from themains before carrying out anymaintenance or changing the sewinglight bulb.
CleaningIf lint and bits of thread accumulatein the hook, this will interfere withthe smooth operation of themachine.
Check regularly and clean thestitching mechanism whennecessary.
Hook race and feed dog1. Remove the bobbin cover plateand bobbin.2. Clean the feed dog with a brush.3. Open up the hook race clip (a).Remove hook race cover (b) andhook race (c). Lubricating themachine by applying oil to part (d)

22
Troubleshooting Guide

23