hp exstream software download and licensing guide · overview ... it returns the serial number and...
TRANSCRIPT

March 2012 © 2012 Hewlett-Packard Development Company, L.P. The information contained herein is subject to change without notice.
1
HP Exstream Software Download and
Licensing Guide
Contents
Overview ......................................................................................................................................................... 2
Important Information about Licensing .............................................................................................................. 2 Node-locked Licensing ................................................................................................................................. 2 Floating Licensing ......................................................................................................................................... 2
License Adtivation Best Practices and Requirements .......................................................................................... 3
Information You Need to Obtain Your License(s) and Key(s)............................................................................. 4 Obtaining Your Server ID for HP Exstream Products Node-Locked Licensing ................................................. 4 Obtaining your ID for Output Batch Compare Node-Locked Licensing ......................................................... 5 Obtaining Your License Server Name and MAC ID for Floating Licensing .................................................... 6
Accessing Your Order ...................................................................................................................................... 8
Obtaining Your License(s) and Key(s) ............................................................................................................... 9
Downloading HP Exstream Software and Documentation ............................................................................... 11
Temporary Keys and Production Keys ............................................................................................................ 12
Installing Your Keys in an HP Exstream Database ........................................................................................... 13
Installing Your Keys in the Server/Production Environment ............................................................................. 13
Finding Answers to Your Questions ................................................................................................................ 14

March 2012 © 2012 Hewlett-Packard Development Company, L.P. The information contained herein is subject to change without notice.
2
Overview
This document contains the steps that you must perform to complete the license activation process, starting
from when you receive your Software Delivery Receipt and ending with installing your keys.
Important Information about Licensing
To provide the flexibility your organization needs, HP Exstream offers two types of licenses:
Node-locked─This license type allows the software to run on a specific machine.
Floating ─This license type allows the software license to be issued on an on-demand basis.
Node-locked Licensing
Node-locked licenses are dedicated licenses for running the software on a specific workstation or server.
Workstations licenses cannot be used on other machines unless you unlicense the machine to which it is
currently dedicated. The license is locked to the machine's MAC ID (unique network adapter ID). The
license for a server is locked to the Server ID.
For workstations, you must perform a one-time process to download licenses managed by the external
license server. The server licenses the features using the MAC address of your workstation.
Floating Licensing
Floating licensing allows the software license to be issued and returned automatically and only when
needed. A license file that is installed on each workstation points to a license server machine on the local
network. The license server that hosts the licenses is node-locked by the MAC ID and controls all licenses
available for your HP Exstream products. These licenses can be checked out and checked in as needed.
The software license key (.ekf) and a workstation license file (.lic) are installed on the workstation and
reference a specific Windows license server. The Windows license server manages all available design
and engine licenses in the enterprise. Through the association between the workstation license files and
the Windows license server, the workstations can activate a license when needed from the license server.
If you use floating licensing, you can choose from two license server setups: a one-license server setup or
a three-license server setup. If the primary license server fails in the three-license server setup, a backup
server will take over for it. In this arrangement, at least two servers must be functional at the same time in
order to serve licenses.

March 2012 © 2012 Hewlett-Packard Development Company, L.P. The information contained herein is subject to change without notice.
3
License Activation Best Practices and Requirements
Before you begin the license activation process, review the following best practices and requirements:
Make sure that you know the Server IDs or MAC IDs of the servers or workstations where the
licensed modules will be used.
For information about finding the correct Server ID or MAC IDs for your environment, see the
Information You Need to Obtain Your License(s) and Key(s) section.
If you are activating licenses and registering your Server IDs for the first time, do not select the HP
Designer LTU (license to use) SKU product or other Workstation products (such as PDF Designer,
HP Exstream Compare, Converters, LiveEditor, Remote Collaboration, and Live Certificates) before
you have received your server keys and the corresponding Customer ID.
If you are activating floating licenses, you must activate the license server licenses before you can
activate any other product family types (for example, workstation production or design group
development licenses).
For best results, activate all of the modules that must be activated for a specific
environment/Product family at the same time. Keep in mind that you do not have to request
license keys for all the Product families at the same time, but you must process each Product family
of modules separately. For example, if you have both Development and Production modules, you
must select all of desired Development modules and complete the process. Then you must repeat
the activation process for all of the Production modules.
If you are activating the license for the module HP 1-1 Doc Creatr, you must also select at least
one Output/Driver module (for example, PDF, Postscript, or PCL).

March 2012 © 2012 Hewlett-Packard Development Company, L.P. The information contained herein is subject to change without notice.
4
Information You Need to Obtain Your License(s) and Key(s)
To complete the license activation process, you must know your Server ID and/or your license server
name and MAC ID. This section discusses the following topics:
Obtaining Your Server ID for HP Exstream Products
Obtaining Your MAC ID for AFP Studio Products
Obtaining Your License Server Name and MAC ID
Obtaining Your Server ID for HP Exstream Products Node-Locked Licensing
To complete node-locked licensing activation, you will need to obtain your Server ID. Follow the instructions that
apply to your operating system:
Operation System Instructions
Windows 1. Download the utility program at this address:
ftp://ftp.hp.com/pub/softlib/software12/COL24703/co-63650-
1/ExstreamSystemID_Windows.zip
2. Open the ZIP file and extract the .exe file to any location on your hard
drive.
3. Run ExstreamSystemID.exe.
A dialog box opens and displays your Server ID.
4. Click Copy to clipboard.
5. To append the Server ID to an existing file, click Append to file.
Note: If your computer has multiple network cards, select the MAC ID
for a primary network card which is permanently connected to the
computer from the Primary Network Card MAC ID drop-down list.
Linux 1. Download the utility program at this address:
ftp://ftp.hp.com/pub/softlib/software12/COL24703/co-63667-
1/ExstreamSystemID_Linux.zip
2. Open the ZIP file and extract the binary file to any location on your hard
drive.
3. Set the executable bit for the file with the command the following
command:
chmod +x ExSysID
4. Run the executable ExSysID.
5. To write the Server ID to a file, execute the following command:
ExSysID > [filename].txt
6. To append the Server ID to an existing file, execute the following
command:
ExSysID >> [filename].txt
Note: This executable assumes the first network address found is the
primary network port. To choose a MAC ID, specify the port using –
March 2012 © 2012 Hewlett-Packard Development Company, L.P. The information contained herein is subject to change without notice.
5
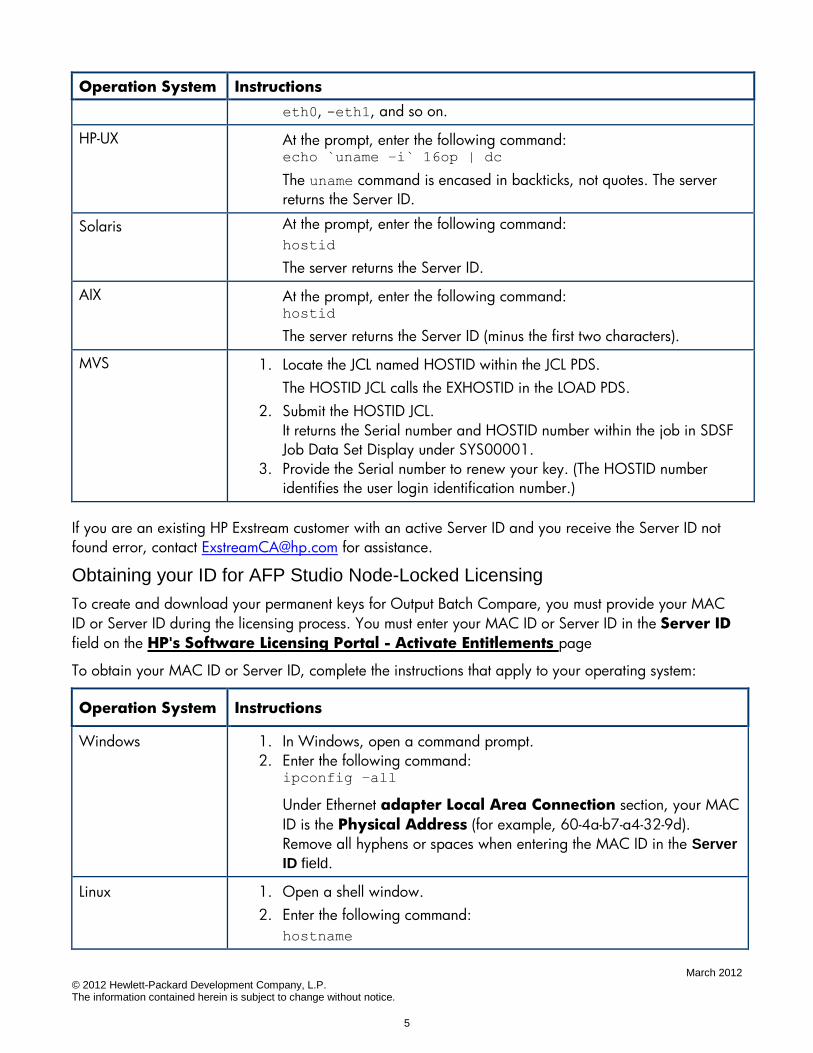
Operation System Instructions
eth0, -eth1, and so on.
HP-UX At the prompt, enter the following command: echo `uname –i` 16op | dc
The uname command is encased in backticks, not quotes. The server
returns the Server ID.
Solaris At the prompt, enter the following command:
hostid
The server returns the Server ID.
AIX At the prompt, enter the following command: hostid
The server returns the Server ID (minus the first two characters).
MVS 1. Locate the JCL named HOSTID within the JCL PDS.
The HOSTID JCL calls the EXHOSTID in the LOAD PDS.
2. Submit the HOSTID JCL.
It returns the Serial number and HOSTID number within the job in SDSF
Job Data Set Display under SYS00001.
3. Provide the Serial number to renew your key. (The HOSTID number
identifies the user login identification number.)
If you are an existing HP Exstream customer with an active Server ID and you receive the Server ID not
found error, contact [email protected] for assistance.
Obtaining your ID for AFP Studio Node-Locked Licensing
To create and download your permanent keys for Output Batch Compare, you must provide your MAC
ID or Server ID during the licensing process. You must enter your MAC ID or Server ID in the Server ID
field on the HP's Software Licensing Portal - Activate Entitlements page
To obtain your MAC ID or Server ID, complete the instructions that apply to your operating system:
Operation System Instructions
Windows 1. In Windows, open a command prompt.
2. Enter the following command: ipconfig –all
Under Ethernet adapter Local Area Connection section, your MAC
ID is the Physical Address (for example, 60-4a-b7-a4-32-9d).
Remove all hyphens or spaces when entering the MAC ID in the Server
ID field.
Linux 1. Open a shell window.
2. Enter the following command:
hostname
March 2012 © 2012 Hewlett-Packard Development Company, L.P. The information contained herein is subject to change without notice.
6
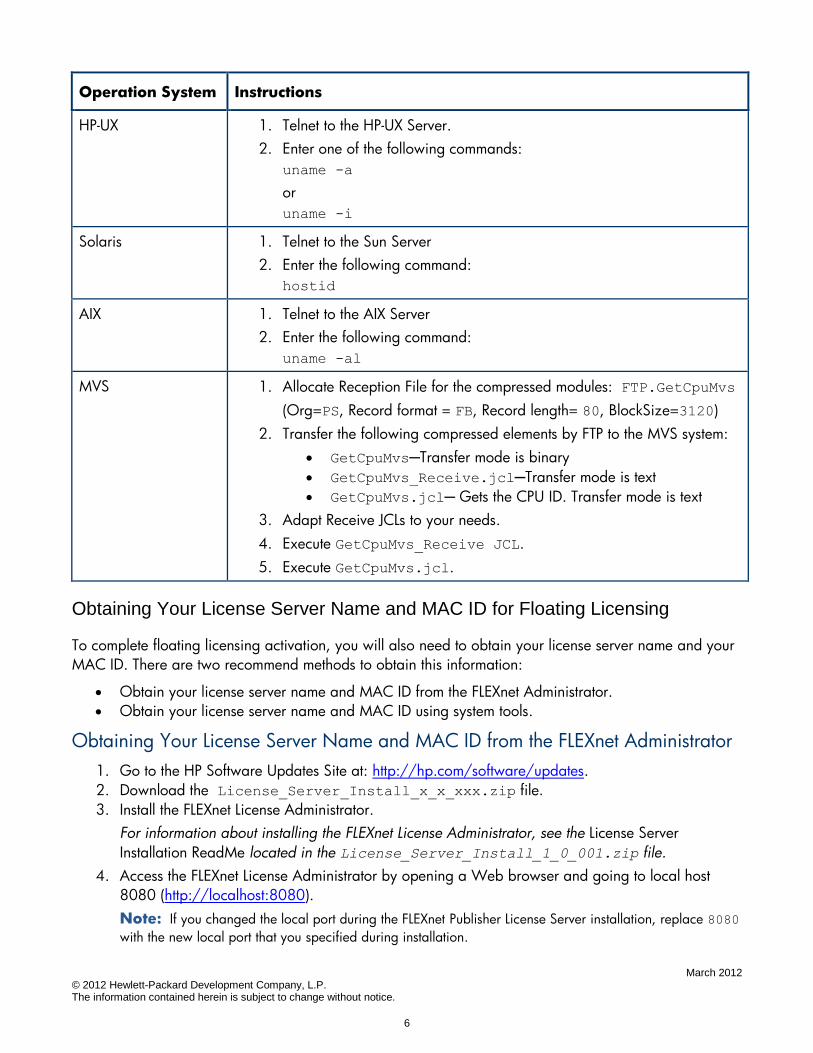
Operation System Instructions
HP-UX 1. Telnet to the HP-UX Server.
2. Enter one of the following commands:
uname -a
or
uname -i
Solaris 1. Telnet to the Sun Server
2. Enter the following command:
hostid
AIX 1. Telnet to the AIX Server
2. Enter the following command:
uname -al
MVS 1. Allocate Reception File for the compressed modules: FTP.GetCpuMvs
(Org=PS, Record format = FB, Record length= 80, BlockSize=3120)
2. Transfer the following compressed elements by FTP to the MVS system:
GetCpuMvs─Transfer mode is binary
GetCpuMvs_Receive.jcl─Transfer mode is text
GetCpuMvs.jcl─ Gets the CPU ID. Transfer mode is text
3. Adapt Receive JCLs to your needs.
4. Execute GetCpuMvs_Receive JCL.
5. Execute GetCpuMvs.jcl.
Obtaining Your License Server Name and MAC ID for Floating Licensing
To complete floating licensing activation, you will also need to obtain your license server name and your
MAC ID. There are two recommend methods to obtain this information:
Obtain your license server name and MAC ID from the FLEXnet Administrator.
Obtain your license server name and MAC ID using system tools.
Obtaining Your License Server Name and MAC ID from the FLEXnet Administrator
1. Go to the HP Software Updates Site at: http://hp.com/software/updates.
2. Download the License_Server_Install_x_x_xxx.zip file.
3. Install the FLEXnet License Administrator.
For information about installing the FLEXnet License Administrator, see the License Server
Installation ReadMe located in the License_Server_Install_1_0_001.zip file.
4. Access the FLEXnet License Administrator by opening a Web browser and going to local host
8080 (http://localhost:8080).
Note: If you changed the local port during the FLEXnet Publisher License Server installation, replace 8080
with the new local port that you specified during installation.

March 2012 © 2012 Hewlett-Packard Development Company, L.P. The information contained herein is subject to change without notice.
7
5. In the upper right corner of the page, click Administration.
6. The Sign In screen appears.
7. If this is the first time you are logging in to the FLEXnet Administrator, enter the default user name
and password.
User Name: admin
Password: admin
The Change Password screen appears and you must change your password.
8. Click the System Information tab.
Your system information appears in the System Information area.
Your license server name is in the Host Domain Name field.
Your MAC ID is in the second Ethernet Address field.
Note: If there is more than one Ethernet address listed, use the Windows system tools to
identify a MAC ID for a permanently attached physical network adapter.
For more information about using the Windows system tools to obtain the correct MAC ID, see
the Obtaining Your License Server Name and MAC ID Using System Tools section.
Obtaining Your License Server Name and MAC ID Using System Tools
1. In Windows, open a command prompt.
2. Enter the following command: ipconfig –all
Your network information is displayed as follows:
In Windows IP Configuration section, your license server name is the Host Name and
the Primary DNS Suffix combined with a period (for example,
Smith2.youroffice.yourcompany.com).
In Ethernet adapter Local Area Connection section, your MAC ID is the Physical
Address (for example, 60-4a-b7-a4-32-9d). Remove all hyphens or spaces when entering the
MAC ID in the License server name & MAC ID field.
Note: If more than one Ethernet adapter is listed, choose one that is for a permanently
attached physical network adapter.

March 2012 © 2012 Hewlett-Packard Development Company, L.P. The information contained herein is subject to change without notice.
8
Accessing Your Order
After your HP Exstream Software Purchase is complete, designated recipient at your Company will
receive an email that contains an Electronic Delivery Receipt. In the Electronic Delivery Receipt is a URL
directing you to your electronic goods (purchased software).
To access your order, complete the following steps:
1. In the Electronic Delivery Receipt, click the provided URL.
The Electronic download page appears.
2. On the Electronic download page, complete one of the following steps:
a. If you have a valid HP Passport, click Login to log in.
The Electronic download page reloads and the Confirmation number and Email
address fields are active.
b. If you do not have a valid HP Passport, click the Register link and follow the prompts to
create your HP Passport. On the HP Passport sign-in page, enter your credentials and
click Sign-in.
Note: Registration is required on your first attempt to download any file. To download
HP Exstream software and documentation, you must have an HP Passport. To register for
an HP Passport, go to the HP Software Updates Site at http://hp.com/software/updates
and click New Users > Register. Follow the instructions on the site to register for an
HP Passport.
3. After you have completed your login on the Electronic download page, make sure the correct
confirmation number is entered in the Confirmation number field. The number in the
Confirmation number field should match the nine-digit number at the end of the URL in your
Electronic Delivery Receipt.
4. In the Email address field, enter your email address.
5. Select the Yes, I accept these terms and conditions check box.
6. Click Submit.
The Download software and license page appears and displays your ship-to address,
transaction information, and a list of the software modules that you purchased.

March 2012 © 2012 Hewlett-Packard Development Company, L.P. The information contained herein is subject to change without notice.
9
Obtaining Your License(s) and Key(s)
After you have reviewed your information on the Software downloads and licenses page, you can
click the Get Licensing tab to view the list of products that you have purchased. You can then go to the
Product selection page to obtain license keys. Products are grouped by Product family (for example,
Development, Production, and so on).
To obtain your license(s) and key(s):
1. From the Software downloads and licenses page, click on the Get Licensing tab.
2. This will take you to the Software Licensing Portal home page.
3. You can either enter your EON here on the home page and click Go or click on Activation
under Activation Mgmt. (The EON, or Entitlement Order Number, is your HP Sales Order
Number that can be found on your Electronic Delivery Receipt. If you cannot locate it, please
contact [email protected].)
4. The entitlements that have not been activated will be listed. If all entitlements have been activated
for this EON, the following message will appear.
5. Check the box for which products you want to activate and click Activate. NOTE: You have
to activate each Product Family section separately since they each require different information for
the activation. All “Certficate” type targets can be activated once your company receives their
unique Customer ID and Password. If you purchased a floating server, it must be activated first
prior to activating the floating modules and workstation products. When activating the floating
modules and workstation products if you have multiple floating servers, specify the number of
seats for each server in order to indicate how the seats will be used on each floating server.
6. If this is your company’s first EON or this is a brand new EON for which no entitlements have
been activated, you will then be prompted with the Search Registered Company dialog box.
If the EON has entitlements that have been activated, continue to step 7.
a. To find the correct company, you can either enter your company name (% is a wildcard)
or use the Advanced Search options.
i. For existing customers that want to use their customer id to search:
1. Open Exstream Design Manager.
2. Expand the Environment node of the tree to display the System
Settings node.
3. Highlight the System Settings and drag it to the upper-right Property
Panel panel.
4. Click the Key tab.
The value in the Licensed to field is your Customer ID.
Contact [email protected] if you need additional assistance finding
your Customer ID.

March 2012 © 2012 Hewlett-Packard Development Company, L.P. The information contained herein is subject to change without notice.
10
5. Enter that into the ID field of Advanced Search. IMPORTANT NOTE:
All Exstream orders need to be activated to a company name that includes
(Exstream) in the name. For instance, for All Seasons Telecom, the
company name would be All Seasons Telecom (Exstream). You do not
need to create a new company.
7. If the User Name is not the correct user for this activation, click Change to select a different
one from the company. If you need to add a new user, click Add a User after clicking
Change.
8. Click Next.
9. Enter only required fields, which are product dependent and noted with an asterick.
a. Target Name – If this is a new server, enter a unique, easy to remember name or click
on Target Options drop down and choose Suggest target name. If this is for an
existing server, click on Target Options drop down and choose Select existing
target and Select the appropriate target.
10. Enter the Qty to activate if this product allows the quantity to be specified.
11. Click Next.
12. Enter or choose any Confirmation Information or Notes you like.
13. Click Finish.
14. A temporary key will be sent to you. This key includes all modules, even those you have not
licensed. Your company-specific key will be emailed within 48 hours.

March 2012 © 2012 Hewlett-Packard Development Company, L.P. The information contained herein is subject to change without notice.
11
Downloading HP Exstream Software and Documentation
After you have registered for an HP Passport, you can download HP Exstream software and
documentation from the HP Software Updates Site.
For more information about registering for an HP Passport, see the Accessing Your Order section.
To download HP Exstream software and documentation, complete the following steps:
1. Go to the HP Software Updates Site at http://hp.com/software/updates.
2. Log in with your HP Passport user ID and password.
3. Select or enter your software support contract ID (SAID).
4. Select the check box to agree to the terms and conditions.
5. Click Submit.
A list of products associated with your SAID opens in the browser window.
Note: If you do not know your SAID, click the Software Support Online link and follow the
instructions.
6. Expand headings as necessary to find the desired software and select one or more check boxes.
Note: After you have selected a product, you might see multiple items to choose from under the
Electronic downloads section. Selecting each option under the Electronic Download section
lists details about that particular download item. You can ignore downloads with a size of 0.01 MB
or less.
7. Click Get software updates.
The software product(s) you selected open in the Download software and license window.
8. Click one of the following tabs based on the type of installation file you want to download:
Get Software
Get Documentation
9. Select the software or documentation set you want to download and click one of the following
methods to download:
To download a single installation file, click Download Directly.
To download multiple installation files, click Use HP Download Manager.
10. Save the ZIP file(s) to a local directory.
11. Extract the installer file from the ZIP file to a local directory.

March 2012 © 2012 Hewlett-Packard Development Company, L.P. The information contained herein is subject to change without notice.
12
Temporary Keys and Production Keys
After you have completed the license activation process, you will receive an email from
[email protected], that will contain your EON (Entitlement Order Number) in the subject
line (other text could be included, as well). Included in this email is a copy of your license certificate and,
if applicable, your temporary keys are attached. Temporary keys are included for all platforms/servers
and all products are enabled. They are valid until the end of the month and allow you to get started
immediately, without having to wait for your permanent license keys for your specific servers. With your
temporary keys, you can run production without any disclaimer messages and use HP Exstream without
having to license your workstations.
Warning: Keep in mind that these temporary keys are not specific for your software purchase.
If you use modules in the temporary key that you have not licensed, these modules
will no longer work when you start using your permanent license keys.
After activating your licenses, you will receive an email within 1-2 business days that contains your HP
Exstream license keys along with your Customer ID and password for workstation registration. HP
Exstream keys have a file name extension of .ekf. AFP Studio keys have a file name extension of .key.
If you have activated floating licenses, this email will also contain your server license file and your
workstation license file. License files have an extension of .lic.
For node-locked licensing, after you have received your customer-specific permanent HP Exstream keys,
you can install the HP Exstream keys in your HP Exstream database and complete the license activation
process for your workstations (GUI software). Any workstation that accesses your HP Exstream database
with the permanent key must be licensed before you can use HP Exstream on the workstation. Keep in
mind that with node-locked licensing, you can only license as many workstations as you have HP
Exstream licenses available.
For more information on node-locked licensing, see the Installing HP Exstream Products guide.
For floating licensing, you must install the FLEXnet Publisher License Server on the server listed during the
license activation process. You can apply the license file for the license server when you install the HP
Exstream Vendor Daemon, or at a later date using the FLEXnet Publisher License Server.
For information about installing FLEXnet Publisher License Server and the HP Exstream Vendor Daemon,
see the License Server Installation Readme.
Next, you must install the HP Exstream software and apply the key and license files on all machines that
have HP Exstream software installed. Using Design Manager, your users can now check out licenses and
begin using the HP Exstream products that you have licensed.
For more information about floating licensing check in and check out, see the Installing HP Exstream
Products guide.

March 2012 © 2012 Hewlett-Packard Development Company, L.P. The information contained herein is subject to change without notice.
13
Installing Your Keys in an HP Exstream Database
To install your key in an HP Exstream Database, complete the following steps:
Existing users 1. In Design Manager, select File > Change database.
The Select Database dialog box opens.
2. From the Select the database to open list, select the database that
you want to update with the new key.
3. Click OK.
4. Log into Design Manager as a design user with administrative (super
user) access.
5. In the Library, go to Environment > System.
6. Drag the System Setting heading to the Property Panel.
7. Click the Key tab.
8. Click .
The Open Exstream Key File dialog box opens.
9. In the Open Exstream Key File dialog box, select the new license
key file (.ekf).
10. Click Open.
11. From the Edit menu, select Save.
New users 1. When you log into HP Exstream for the first time, you receive a message
stating that the key is invalid. Click OK.
The Enter a New HP Exstream Key dialog box opens.
2. Click .
The Open Exstream Key File dialog box opens.
3. In the Open Exstream Key File dialog box, select the new license
key file (.ekf).
4. Click Open.
Installing Your Keys in the Server/Production Environment
1. Open the key file (.ekf) using a text editor.
The first line in the file starts with the text “**Key.” It is followed by a string of characters, and
then followed by “**Customer.”
2. Copy the string of the characters after “**Key” and before “**Customer” (excluding any spaces
before or after the string). This text is the license key sting.
3. Update your control file by pasting the license key string into your control file after the engine
switch „-key=‟.
4. Save your control file.

March 2012 © 2012 Hewlett-Packard Development Company, L.P. The information contained herein is subject to change without notice.
14
Finding Answers to Your Questions
Any additional questions or issues that you experience during the license activation process, contact the
Exstream Customer Assistance team at [email protected].