how to take attendance using microsoft excel : attendance
TRANSCRIPT
Syracuse University Syracuse University
SURFACE SURFACE
Community Benchmarks Program Maxwell School of Citizenship and Public Affairs
Fall 2003
How to take attendance using Microsoft Excel : attendance How to take attendance using Microsoft Excel : attendance
proposal for Southwest Community Center, Syracuse Department proposal for Southwest Community Center, Syracuse Department
of Parks, Recreation and Youth Programs of Parks, Recreation and Youth Programs
Syracuse University. Maxwell School. Community Benchmarks Program.
Follow this and additional works at: https://surface.syr.edu/cbp
Part of the Public Affairs, Public Policy and Public Administration Commons
Recommended Citation Recommended Citation Syracuse University. Maxwell School. Community Benchmarks Program., "How to take attendance using Microsoft Excel : attendance proposal for Southwest Community Center, Syracuse Department of Parks, Recreation and Youth Programs" (2003). Community Benchmarks Program. 30. https://surface.syr.edu/cbp/30
This Report is brought to you for free and open access by the Maxwell School of Citizenship and Public Affairs at SURFACE. It has been accepted for inclusion in Community Benchmarks Program by an authorized administrator of SURFACE. For more information, please contact [email protected].
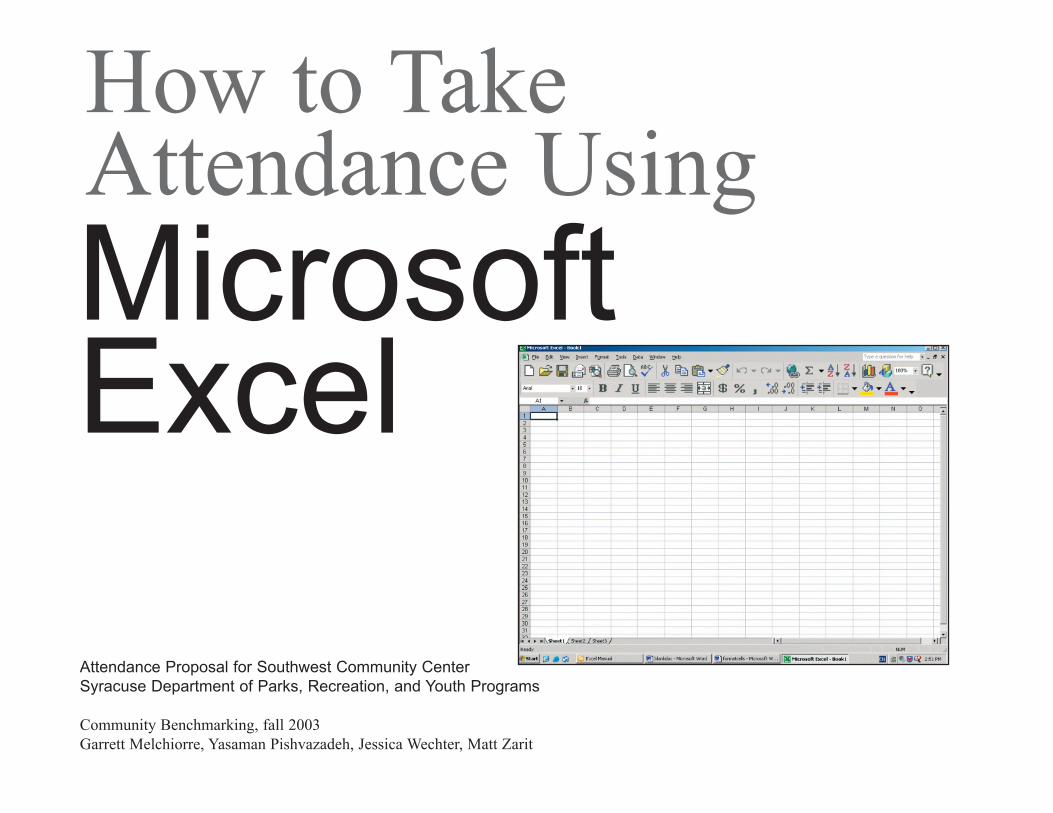
Microsoft Excel
How to Take Attendance Using
Attendance Proposal for Southwest Community CenterSyracuse Department of Parks, Recreation, and Youth Programs
Community Benchmarking, fall 2003Garrett Melchiorre, Yasaman Pishvazadeh, Jessica Wechter, Matt Zarit
1 Excel Manual
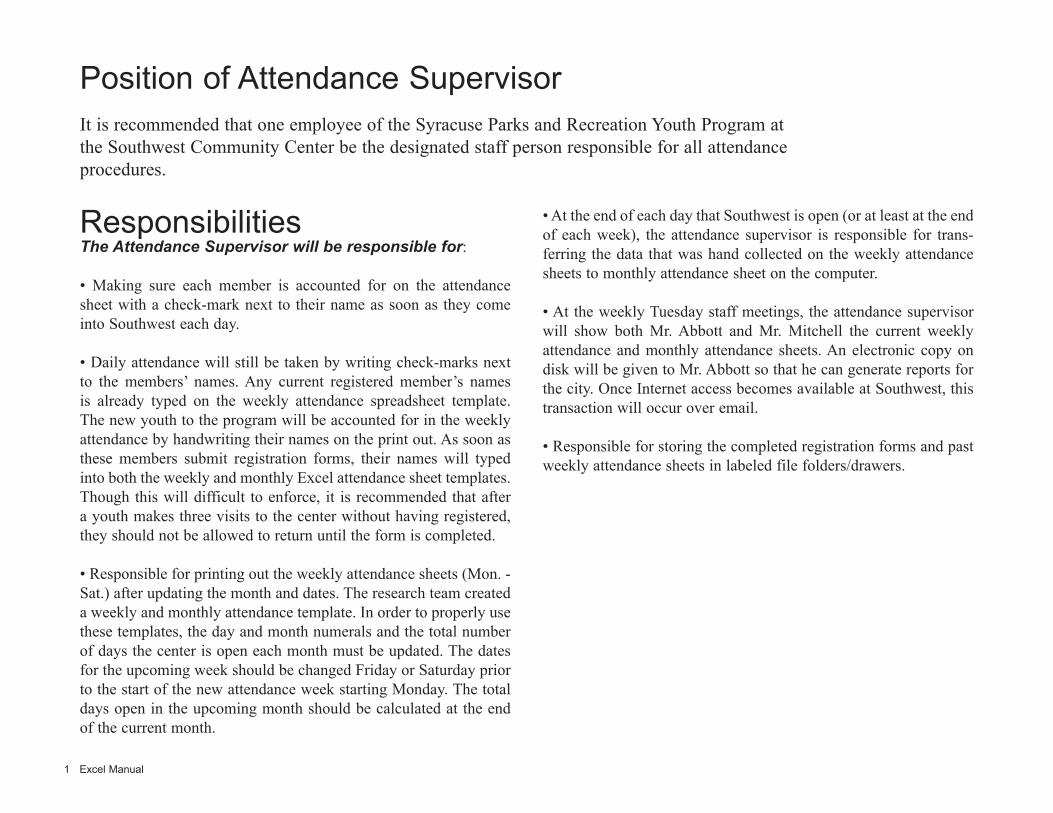
Position of Attendance SupervisorIt is recommended that one employee of the Syracuse Parks and Recreation Youth Program at the Southwest Community Center be the designated staff person responsible for all attendance procedures.
Responsibilities The Attendance Supervisor will be responsible for:
• Making sure each member is accounted for on the attendance sheet with a check-mark next to their name as soon as they come into Southwest each day.
• Daily attendance will still be taken by writing check-marks next to the members’ names. Any current registered member’s names is already typed on the weekly attendance spreadsheet template. The new youth to the program will be accounted for in the weekly attendance by handwriting their names on the print out. As soon as these members submit registration forms, their names will typed into both the weekly and monthly Excel attendance sheet templates. Though this will difficult to enforce, it is recommended that after a youth makes three visits to the center without having registered, they should not be allowed to return until the form is completed.
• Responsible for printing out the weekly attendance sheets (Mon. - Sat.) after updating the month and dates. The research team created a weekly and monthly attendance template. In order to properly use these templates, the day and month numerals and the total number of days the center is open each month must be updated. The dates for the upcoming week should be changed Friday or Saturday prior to the start of the new attendance week starting Monday. The total days open in the upcoming month should be calculated at the end of the current month.
• At the end of each day that Southwest is open (or at least at the end of each week), the attendance supervisor is responsible for trans-ferring the data that was hand collected on the weekly attendance sheets to monthly attendance sheet on the computer.
• At the weekly Tuesday staff meetings, the attendance supervisor will show both Mr. Abbott and Mr. Mitchell the current weekly attendance and monthly attendance sheets. An electronic copy on disk will be given to Mr. Abbott so that he can generate reports for the city. Once Internet access becomes available at Southwest, this transaction will occur over email.
• Responsible for storing the completed registration forms and past weekly attendance sheets in labeled file folders/drawers.
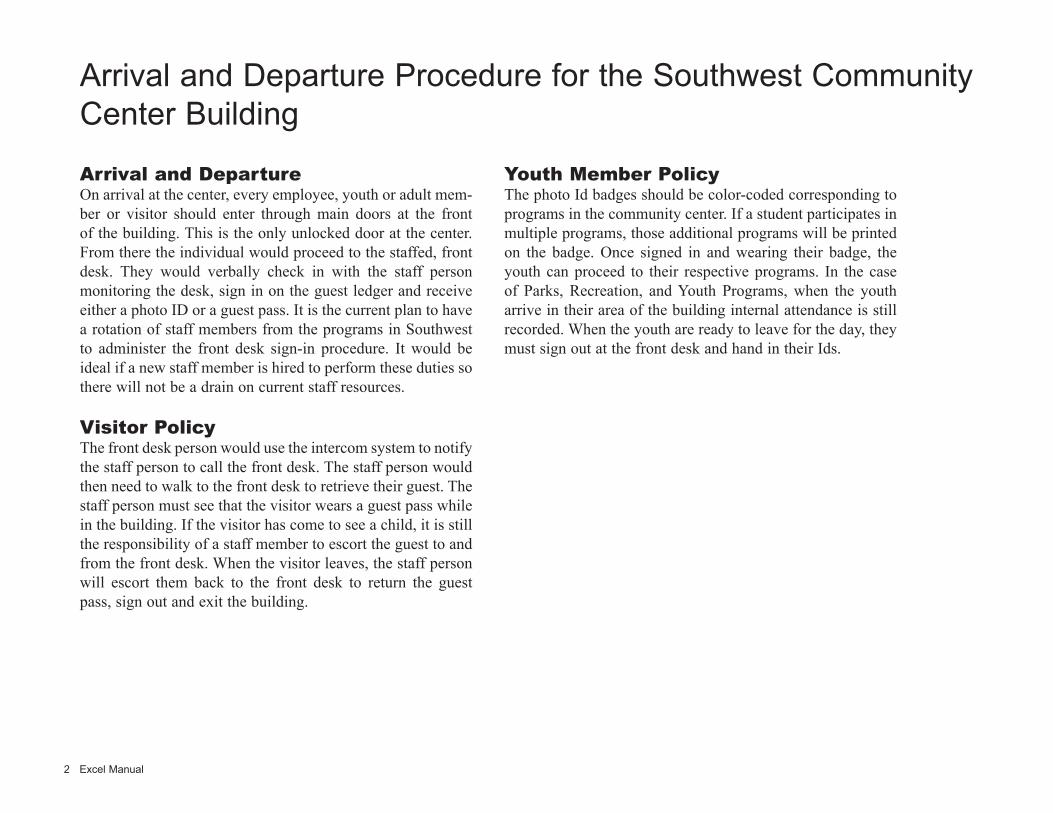
Arrival and Departure Procedure for the Southwest Community Center Building
Arrival and DepartureOn arrival at the center, every employee, youth or adult mem-ber or visitor should enter through main doors at the front of the building. This is the only unlocked door at the center. From there the individual would proceed to the staffed, front desk. They would verbally check in with the staff person monitoring the desk, sign in on the guest ledger and receive either a photo ID or a guest pass. It is the current plan to have a rotation of staff members from the programs in Southwest to administer the front desk sign-in procedure. It would be ideal if a new staff member is hired to perform these duties so there will not be a drain on current staff resources.
Visitor PolicyThe front desk person would use the intercom system to notify the staff person to call the front desk. The staff person would then need to walk to the front desk to retrieve their guest. The staff person must see that the visitor wears a guest pass while in the building. If the visitor has come to see a child, it is still the responsibility of a staff member to escort the guest to and from the front desk. When the visitor leaves, the staff person will escort them back to the front desk to return the guest pass, sign out and exit the building.
Youth Member PolicyThe photo Id badges should be color-coded corresponding to programs in the community center. If a student participates in multiple programs, those additional programs will be printed on the badge. Once signed in and wearing their badge, the youth can proceed to their respective programs. In the case of Parks, Recreation, and Youth Programs, when the youth arrive in their area of the building internal attendance is still recorded. When the youth are ready to leave for the day, they must sign out at the front desk and hand in their Ids.
2 Excel Manual
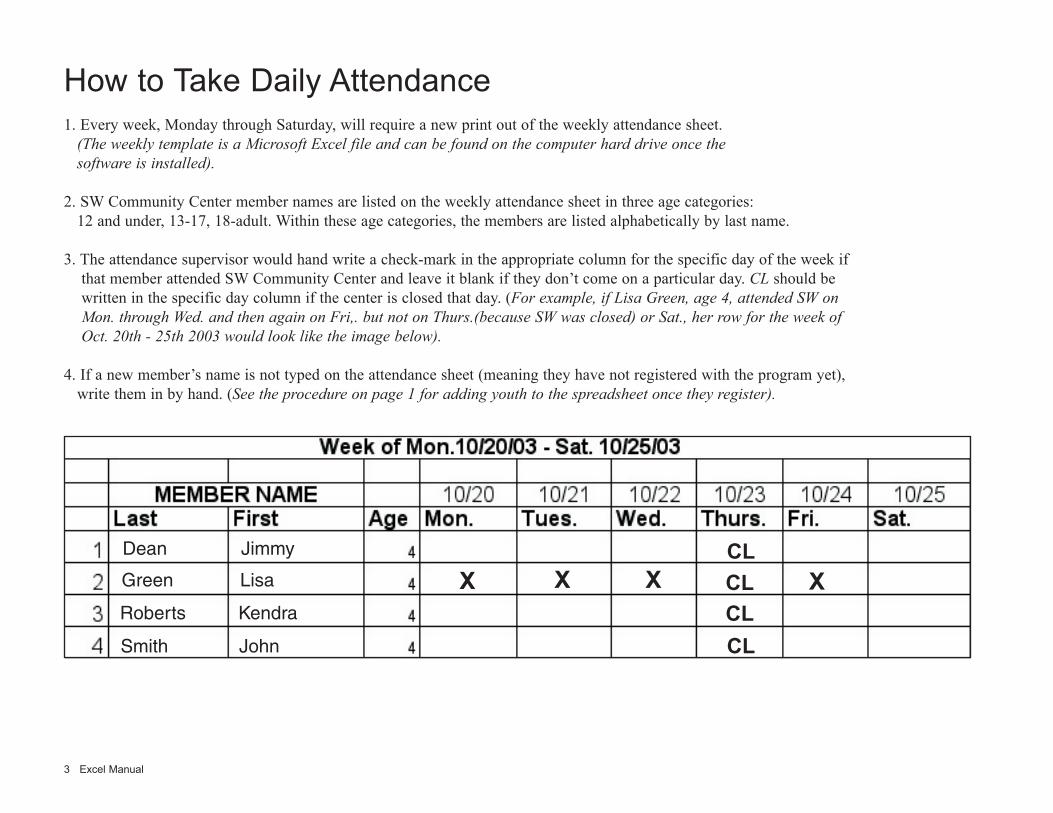
How to Take Daily Attendance1. Every week, Monday through Saturday, will require a new print out of the weekly attendance sheet. (The weekly template is a Microsoft Excel file and can be found on the computer hard drive once the software is installed).
2. SW Community Center member names are listed on the weekly attendance sheet in three age categories: 12 and under, 13-17, 18-adult. Within these age categories, the members are listed alphabetically by last name.
3. The attendance supervisor would hand write a check-mark in the appropriate column for the specific day of the week if that member attended SW Community Center and leave it blank if they don’t come on a particular day. CL should be written in the specific day column if the center is closed that day. (For example, if Lisa Green, age 4, attended SW on Mon. through Wed. and then again on Fri,. but not on Thurs.(because SW was closed) or Sat., her row for the week of Oct. 20th - 25th 2003 would look like the image below).
4. If a new member’s name is not typed on the attendance sheet (meaning they have not registered with the program yet), write them in by hand. (See the procedure on page 1 for adding youth to the spreadsheet once they register).
3 Excel Manual
CL
CL
CL
X
CL
X X
Smith John
Dean Jimmy
Roberts Kendra
Green Lisa X

Viewing the Excel WindowWhen you open Microsoft Excel the screen will look like this:
Formula BarAny data you are entering (words or numbers) will appear here. You can also click on a specific cell and then make changes to the data inside it by typing in the formula bar.
Menu BarGo to these menus
(starting with file) to instruct Excel to perform certain commands. When you click on one of the
words a menu drops down.
Name BoxThe address of the currently
selected (active) cell appears here.
Active CellThe cell that is currently select-ed for entering data in (it’s col-umn & row address appears in
the name box).
Worksheet TabsEach sheet is like a page in the Excel document. Click on a particular sheet with the mouse to go to that sheet to enter in data.
Cell AddressCells are the individual rectangles, formed by the intersec-tion of a column & row. Each cell has a specific address determined by the column letter (first) and row number (second). For example, the cell C3 is the intersection of column C & row 3. It’s highlighted by a black border in this picture and is also in this case the active cell.
Office Assistant This paper clip image is called the office assistant. It automatically appears when you start working in Excel. It serves as an help index for using Excel.You can type in ques-tions you may have about using the program in and it will bring up pos-sible solutions.
Toolbars Frequently used commands such as changing the font, saving etc. are available as toolbar buttons here.
Title BarThis bar contains the name of the Excel document you are working with.
4 Excel Manual
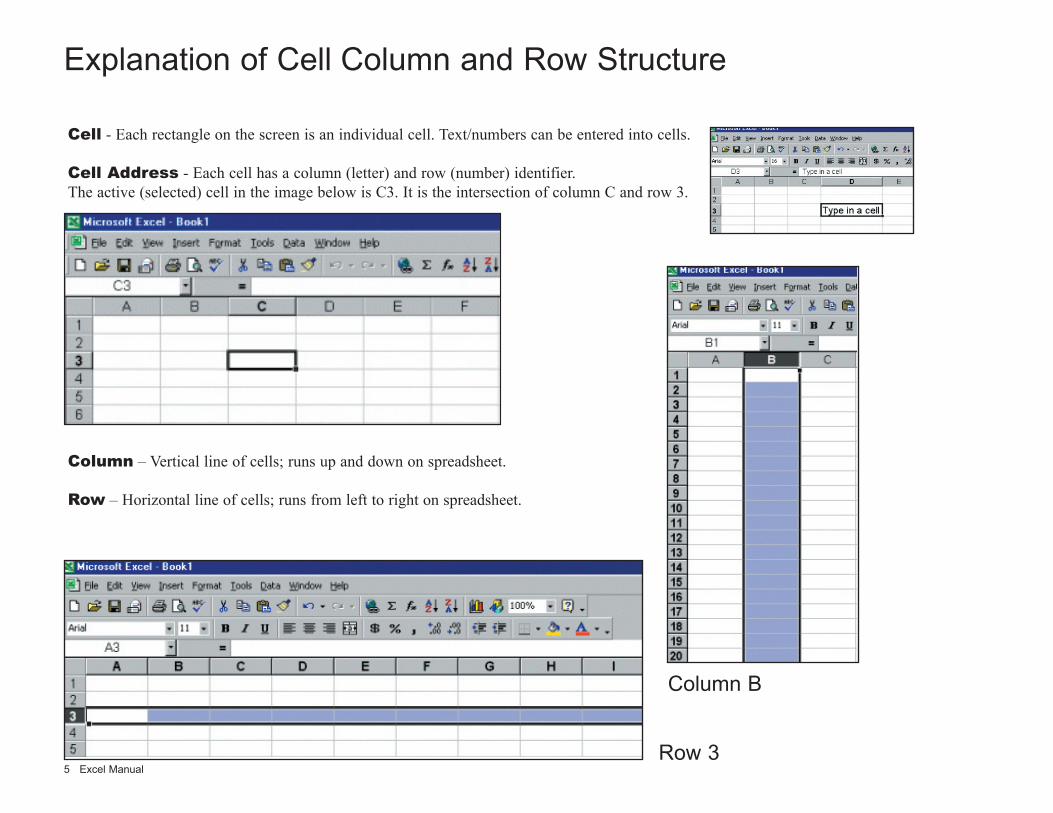
Explanation of Cell Column and Row Structure
Cell - Each rectangle on the screen is an individual cell. Text/numbers can be entered into cells.
Cell Address - Each cell has a column (letter) and row (number) identifier. The active (selected) cell in the image below is C3. It is the intersection of column C and row 3.
Column – Vertical line of cells; runs up and down on spreadsheet.
Row – Horizontal line of cells; runs from left to right on spreadsheet.
Row 3
Column B
5 Excel Manual

To Open/Start Using Microsoft Excel
1. Click on the start button located in the bottom left corner of the screen 2. Move the mouse to highlight to programs 3. Click Microsoft Excel
Opening a File (like a weekly attendance sheet)
1. Click file on the menu bar, scroll down and select open2. Double Click on the folder named attendance 3. Double Click the current week you wish to work with. 4. Wait for the computer to open the file in Excel
Using the Mouse to Select/Drag
1. The mouse icon in Excel looks like a white cross2. To select a series of cells, click on the first one of either the column or row you want to select3. While still clicking on the mouse, drag in the direction of the rest of the cells, then release the mouse4. The cells will turn blue as you drag over them, showing that they’ve been selected
Using the Office Assistant (paper clip image) To make the Microsoft Office Assistant appear on screen
1. Click on help on the menu bar2. Go down and click on show the office assistant
The Office Assistant can answer questions when you need help1. Click on the paper clip2. type your question in the box (be as specific as possible with the problem you are having)3. Click search
When done using the Office Assistant or to make it disappear1. Click on help on the menu bar2. Go down and click on hide the office assistant
Undoing an actionTo undo something, you must do it immediately after you performed the undesirable action 1.Go to edit on the menu bar2. Select undo 3. You may also undo the action prior to the first undo by going to edit and undo again
Basic Excel Operation
6 Excel Manual
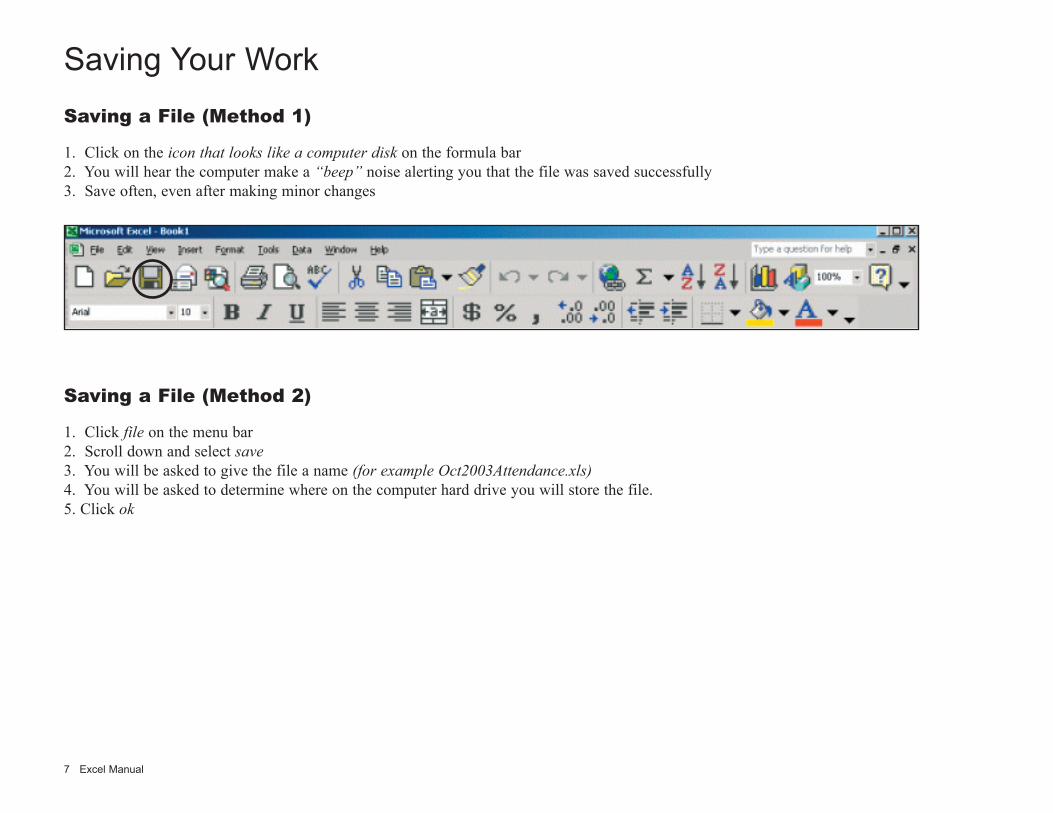
Saving a File (Method 1)
1. Click on the icon that looks like a computer disk on the formula bar2. You will hear the computer make a “beep” noise alerting you that the file was saved successfully3. Save often, even after making minor changes
Saving Your Work
Saving a File (Method 2)
1. Click file on the menu bar 2. Scroll down and select save 3. You will be asked to give the file a name (for example Oct2003Attendance.xls)4. You will be asked to determine where on the computer hard drive you will store the file.5. Click ok
7 Excel Manual
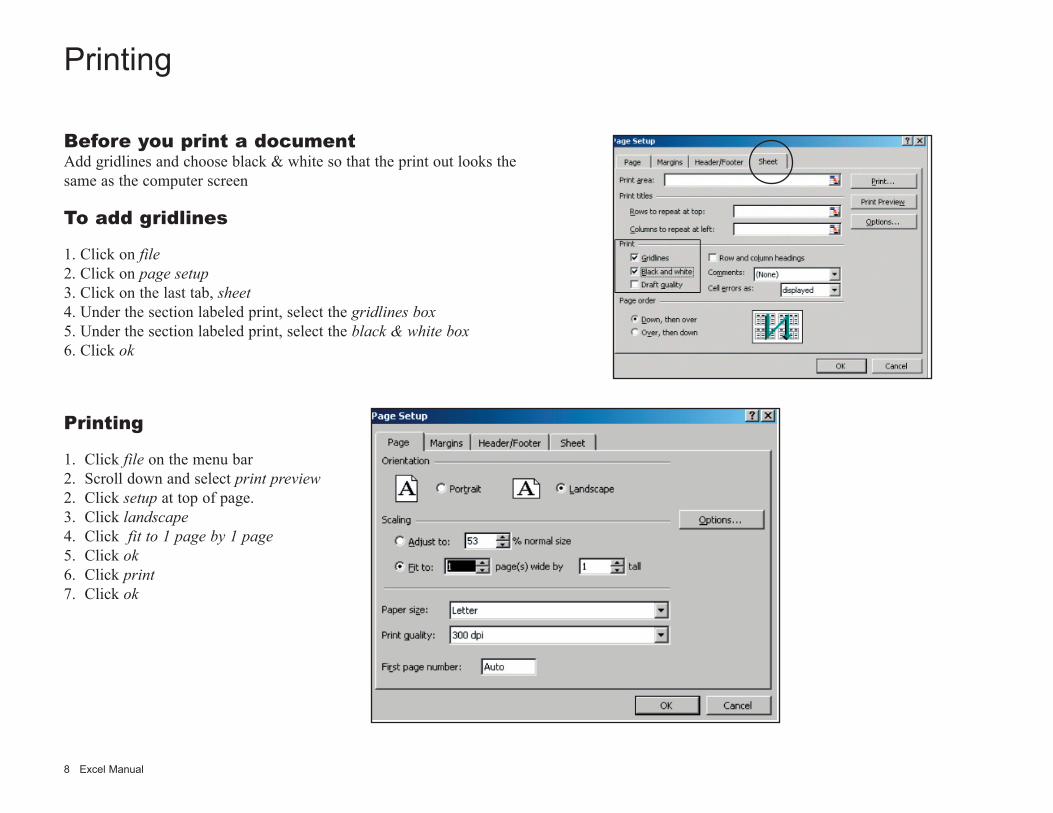
Before you print a documentAdd gridlines and choose black & white so that the print out looks thesame as the computer screen
To add gridlines
1. Click on file2. Click on page setup3. Click on the last tab, sheet4. Under the section labeled print, select the gridlines box5. Under the section labeled print, select the black & white box6. Click ok
Printing 1. Click file on the menu bar 2. Scroll down and select print preview2. Click setup at top of page.3. Click landscape 4. Click fit to 1 page by 1 page5. Click ok6. Click print 7. Click ok
Printing
8 Excel Manual
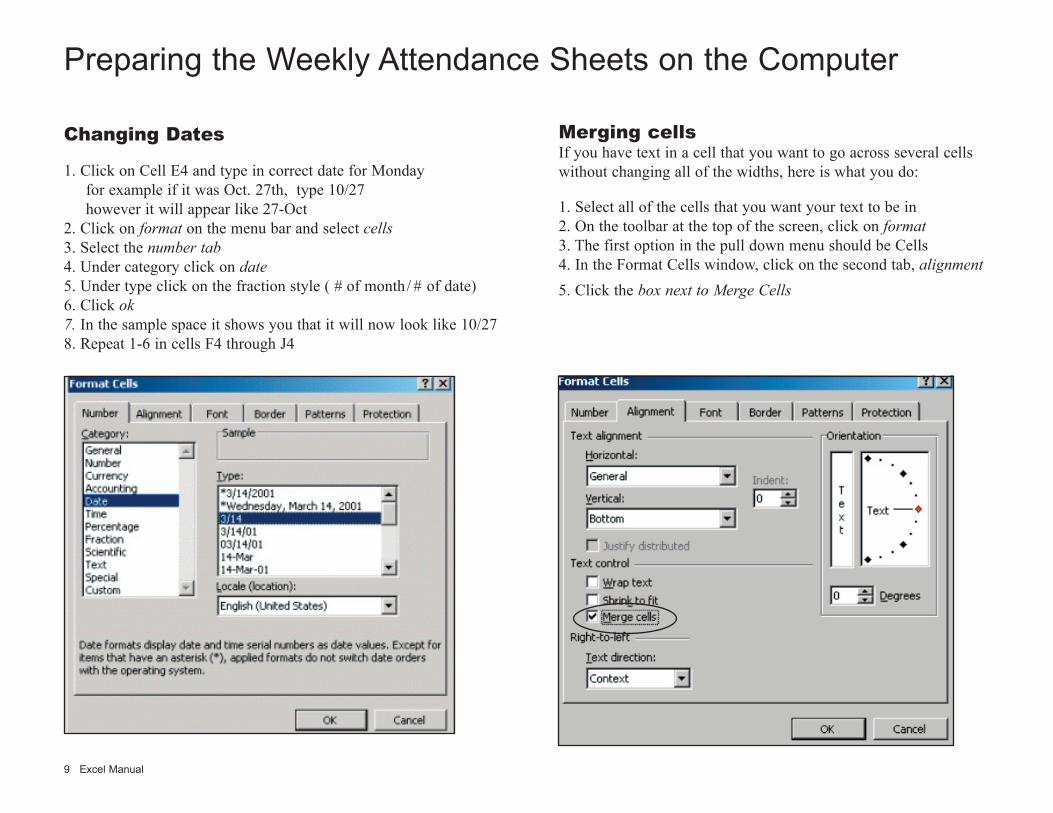
Changing Dates
1. Click on Cell E4 and type in correct date for Monday for example if it was Oct. 27th, type 10/27 however it will appear like 27-Oct 2. Click on format on the menu bar and select cells3. Select the number tab4. Under category click on date5. Under type click on the fraction style ( # of month/ # of date) 6. Click ok7. In the sample space it shows you that it will now look like 10/278. Repeat 1-6 in cells F4 through J4
Merging cellsIf you have text in a cell that you want to go across several cells without changing all of the widths, here is what you do:
1. Select all of the cells that you want your text to be in2. On the toolbar at the top of the screen, click on format3. The first option in the pull down menu should be Cells 4. In the Format Cells window, click on the second tab, alignment
5. Click the box next to Merge Cells
Preparing the Weekly Attendance Sheets on the Computer
9 Excel Manual
How to Maintain the Weekly Attendance Sheets on the Computer
Adding new names To add the names that had to be handwritten at the end of all the of the typed names
1. Scroll down to the last inserted name 2. Click on the cell below the last name column (B) and enter the new member’s last name3. Use the tab key or click with the mouse into the next cell to the right4. Enter the member’s first name in the first name column (A)5. Continue this process to enter in the age
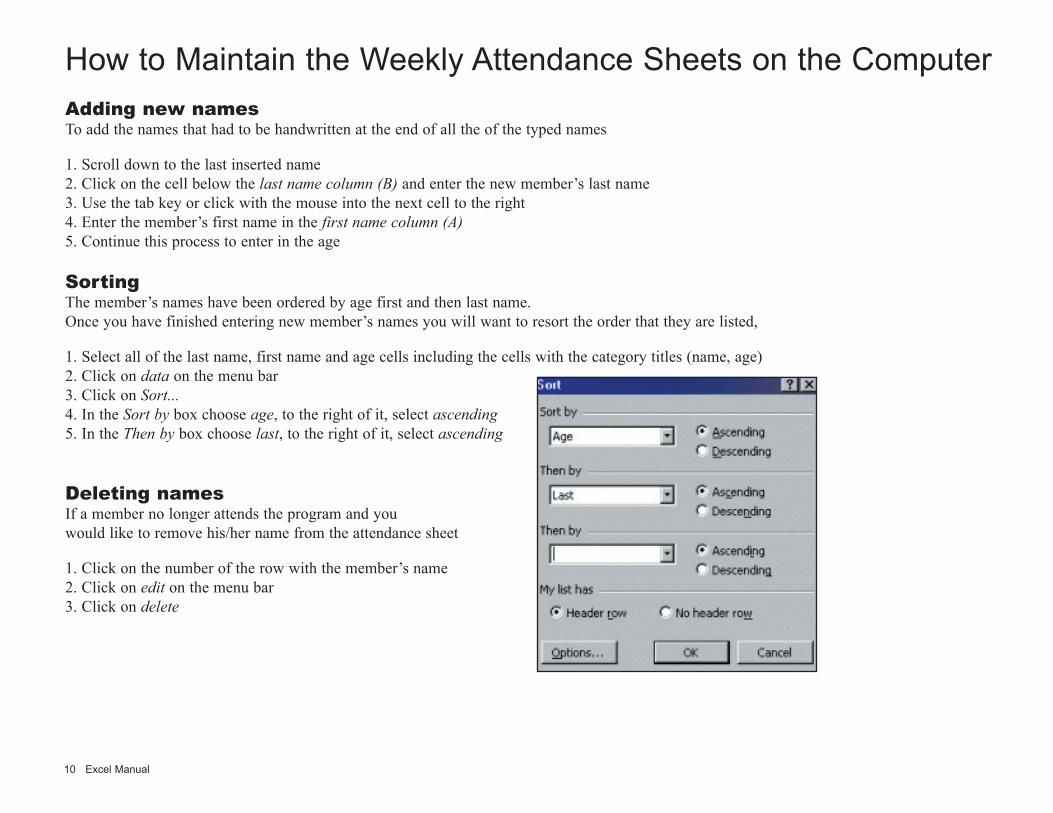
SortingThe member’s names have been ordered by age first and then last name. Once you have finished entering new member’s names you will want to resort the order that they are listed,
1. Select all of the last name, first name and age cells including the cells with the category titles (name, age)2. Click on data on the menu bar3. Click on Sort...4. In the Sort by box choose age, to the right of it, select ascending5. In the Then by box choose last, to the right of it, select ascending
Deleting namesIf a member no longer attends the program and you would like to remove his/her name from the attendance sheet
1. Click on the number of the row with the member’s name 2. Click on edit on the menu bar3. Click on delete
10 Excel Manual
Useful Excel Commands
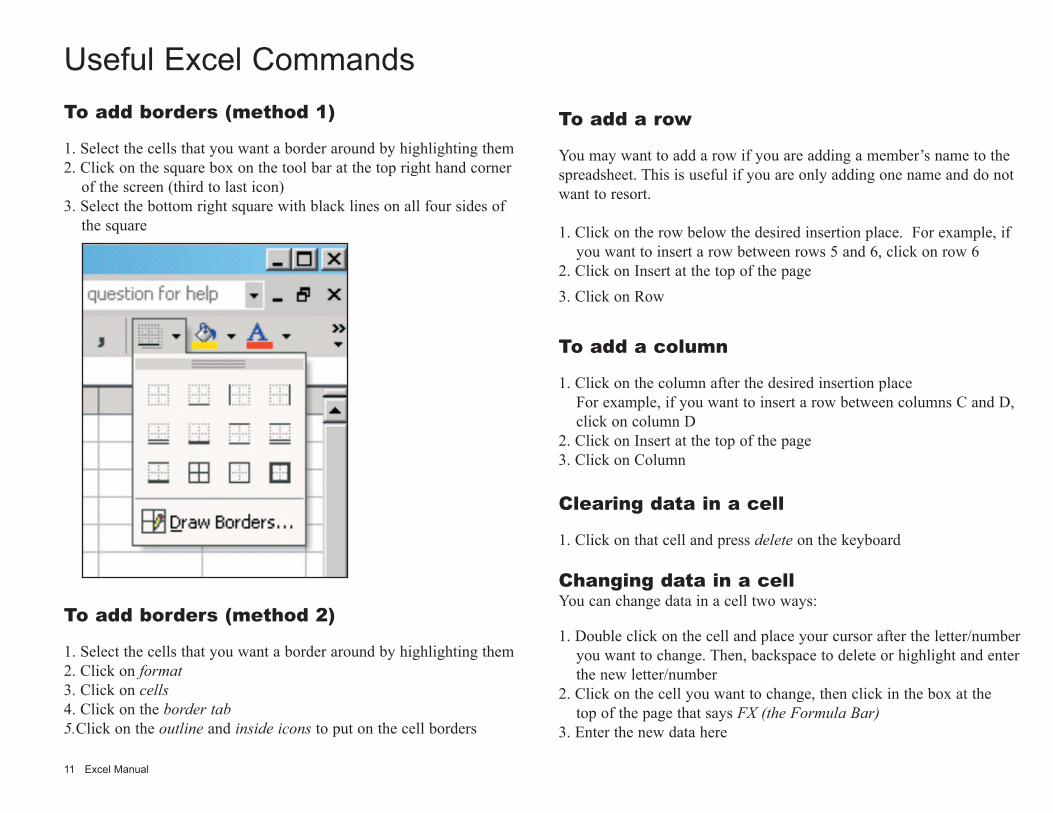
To add borders (method 1)
1. Select the cells that you want a border around by highlighting them2. Click on the square box on the tool bar at the top right hand corner of the screen (third to last icon)3. Select the bottom right square with black lines on all four sides of the square
To add borders (method 2)
1. Select the cells that you want a border around by highlighting them2. Click on format3. Click on cells4. Click on the border tab5.Click on the outline and inside icons to put on the cell borders
To add a row
You may want to add a row if you are adding a member’s name to the spreadsheet. This is useful if you are only adding one name and do not want to resort.
1. Click on the row below the desired insertion place. For example, if you want to insert a row between rows 5 and 6, click on row 62. Click on Insert at the top of the page
3. Click on Row
To add a column
1. Click on the column after the desired insertion place For example, if you want to insert a row between columns C and D, click on column D2. Click on Insert at the top of the page 3. Click on Column
Clearing data in a cell
1. Click on that cell and press delete on the keyboard
Changing data in a cellYou can change data in a cell two ways:
1. Double click on the cell and place your cursor after the letter/number you want to change. Then, backspace to delete or highlight and enter the new letter/number2. Click on the cell you want to change, then click in the box at the top of the page that says FX (the Formula Bar)3. Enter the new data here
11 Excel Manual
Finding the sum of a row
1. In a cell at the end of a row, start with an =2. Following the = write SUM giving you =SUM3. Then add a parenthesis sign after the SUM, giving you =SUM(4. Keeping the cell selected, click on the cell with the first numbers that you want to add, and drag across the row through all of the cells that you want included. This will make the formula look like this: =SUM(A5:E55. Close the parenthesis, giving you =SUM(A5:E5)
Finding the sum of a column
1. In a cell at the end of a column, start with an =2. Following the = write SUM giving you =SUM3. Then add a parenthesis sign after the SUM, giving you =SUM(4. Keeping the cell selected, click on the cell with the first numbers that you want to add, and drag down the column through all of the cells that you want included. This will make the formula look like this: =SUM(A5:A155. Close the parenthesis, giving you: =SUM(A5:A15)
Finding the percentage of days attended
1. Pick a cell at the end of the first row that has student data entered, put an = in that cell2. As you would do to find the sum of a row, add SUM( and then click and drag through the row. This will give you something that looks like this: =SUM(G5:G15)3. Now, in a cell above the data, there should be a cell labeled “Number of Days Open.” Make sure that this number is up to date. Also, take note of the cell identification (for example, B6).4. Click back into the equation that you had, and after the =SUM(G5:G15) put a / to signify division. Now add a ( and first put a $ followed by the letter in the cell identification for the cell that has the number of days open in it. Following the letter, put another $ and then the number from that cell and then close the parenthesis. Your formula should now look something like this: =SUM(G5:G15)/($B$6). The purpose of putting in the dollar signs is to keep that value locked throughout all of the cells. 5. To finish off the equation, after the last parenthesis, put *100. This will give you your final percentage.6. To get this formula in all of the cells, put the cursor in the lower right hand corner of the cell that you just put a formula in until you get a
12 Excel Manual
Excel Formulas Used in the Monthly Attendance Sheet