how to create, edit and publish a screen...
TRANSCRIPT

How to Create, Edit and
Publish a Screen Recording
Presented by Simon Doherty, Creative and Digital
Marketing Springboard Course, UCC
19/02/2013

Introduction
This lesson demonstrates how to create a screen recording on a PC and publish it on YouTube.
You will be able to create a video
recording of anything on your computer screen, add a voice-over, text and images of your work, portfolio or client project to demonstrate or market your skills and knowledge to an online audience.

Training Outline
Lesson 1: Create a Screen Recording with CamStudio
Lesson 2: Edit the Screen Recording with Windows Live Movie Maker
Lesson 3: Publish the Screen Recording to YouTube

Lesson 1: Objectives
Download and install CamStudio.
Create a folder to save your recordings.
Choose what you want to record, this could be a
Powerpoint Presentation, a .pdf file, or description of your
website or Facebook page.
Set up the mouse cursor highlight for improved visual guide,
so the viewer can follow the mouse position on the screen.
Increase the size of your text for better visibility before the
movie is compressed and uploaded.
Decide if you want to record voice or musical instrument or
sounds, if so what microphone are you using.

Lesson 1: CamStudio
Visit http://www.camstudio.org
Scroll down and click
the Download button
Select Save and then
Run to install the program

Launch CamStudio
Double click the CamStudio icon to launch the program
The CamStudio control panel

CamStudio Control Panel Functions
Pause
Record
Stop

Select Region – Full Screen
Full Screen will record the entire screen space on your PC.
Select Region or Fixed Region to record only a portion of your screen

Select Options – Cursor Options
Cursor Options allows you to add a highlight shape to your mouse cursor, so viewers can follow your mouse as it moves on the screen

In Cursor Options, select the
Highlight Cursor checkbox

In Cursor Options, select a Shape
for your highlight and a Color

Select a colour from the pallette
and click OK

For Audio recording, select Options –
Record audio from microphone

Select Audio Options – Audio
Options for Microphone

Select the Audio Capture Device
In Audio Options for Microphone –
Audio Capture Device; select the
drop down menu to see what
microphone to use.
If you have connected an external
microphone it should how up on
the drop down menu.
Select Ok to save the settings.

Select Options – Program Options

Select Minimize program on
start recording to hide the
control panel during recording
Select Save settings on exit to
save the settings when you
close the program, so the next
recording will use the same
settings

Select Options –
Program Options –
Temporary directory for
recording – Use user
specified directory: to
save your recordings to a
folder of your choosing

Select a folder to save to and click OK

Click the red record button to
start the screen recording

The CamStudio Panel disappears
from the screen
It is in the hidden icons
section in the bottom
right of the Windows
taskbar

Right click the CamStudio icon and
select Stop to stop the recording

Enter a file name to save the
screen recording

Lesson 1: Wrap-up
You are now ready to edit your screen recording in Windows Movie Maker.
To summarize: Installed CamStudio. Made a Save folder. Added a highlight to the mouse cursor. Set up a microphone Selected what you want to record. Increased the text size. Created a Screen Recording

Lesson 2: Windows Live Movie Maker
Launch Windows Live Movie Maker. Add your screen recording to the editing
window Set the start and end points Add titles, captions and credits Insert transitions Add photos or screenshots Save your movie project

Lesson 2: Launch Windows Live
Movie Maker

Select Click here to browse for
videos and photos

Select your screen recording movie
and click Open

The Preview Window on the left displays your movie.
The Edit Window on the right shows a timeline and frames
of your movie files.

Use the Timeline bar to set a start point and an end
point for your movie
Click and drag the Timeline bar to the point where you
want your movie to start. This will cut out the movie files
to the left of the Timeline bar

Select Add videos and photos to add more movie or
photos to your project

To set the dimension of your movie, select Project –
Widescreen for 16:9 format or Standard for 4:3 format

Select Animations to add animated transition effects
between your movie clips

Select Home – Title to add the Opening Title to your
movie

Select Format to edit the text font, colour and
background of the title

Select Format to add an animation to your titles

Select Home – Credits to add the Credits to your
movie

Select File – Save movie to save you project

Lesson 2: Wrap-up
Launch Windows Live Movie Maker. Add your screen recording to the editing
window Set the start and end points Add titles, captions and credits Insert transitions Add photos or screenshots Save your movie project

Lesson 3: YouTube
Connect to the Internet
Open Windows Live Movie Maker
Select the movie you want to publish
Select Publish – YouTube
Sign in with Windows Live account, or create free account
Select the Recommended movie size
Sign into YouTube account
Edit the title, description, tags, category and permissions
Publish the movie to YouTube

Launch Windows Live Movie Maker

Open the movie project you want to publish
Select Publish - YouTube

Select the Recommended size to publish
YouTube limits movie sizes to less than 2GB gigabytes
or less than 15 minutes duration

Sign in to Windows Live account or create a new
account (free)

Sign in to your YouTube account
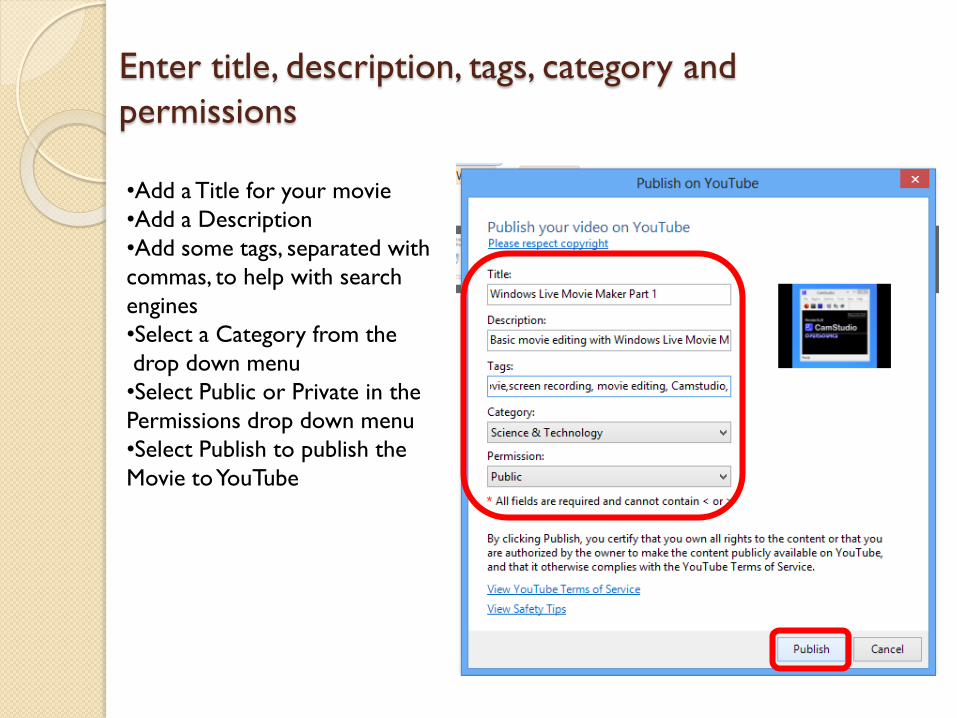
Enter title, description, tags, category and
permissions
•Add a Title for your movie
•Add a Description
•Add some tags, separated with
commas, to help with search
engines
•Select a Category from the
drop down menu
•Select Public or Private in the
Permissions drop down menu
•Select Publish to publish the
Movie to YouTube

Lesson 3: Wrap-up
Connect to the Internet
Open Windows Live Movie Maker
Select the movie you want to publish
Select Publish – YouTube
Sign in with Windows Live account, or create free account
Select the Recommended movie size
Sign into YouTube account
Edit the title, description, tags, category and permissions
Publish the movie to YouTube

Summary of Lesson
Lesson 1: Create a Screen Recording with CamStudio
Lesson 2: Edit the Screen Recording with Windows Live Movie Maker
Lesson 3: Publish the Screen Recording to YouTube

Assessment and Evaluation
Publish a movie live to YouTube so students can follow process
Publish .pdf of Powerpoint to website for students to download