hc325 es - asahi · hc325 read the instruction manual. ... ventilación de la máquina de coser y...
TRANSCRIPT
Manual de Instrucciones ESP
HC325
Read the instruction manual.Lea el manual de instrucciones.
HC325_ES.book Page 1 Friday, April 11, 2008 8:55 AM
2
HC325_ES.book Page 2 Thursday, April 10, 2008 4:15 PM

3
NameplateWhen calling for service, please notice the MODEL NAME that is described on the back of your sewing machine.
Placa de nombresCuando llame por servicio, por favor tome nota de que el del modelo que está descrito en la parte posterior de su máquina de coser.
MODEL NAMENOMBRE DEL MODELO
HC325_ES.book Page 3 Friday, April 11, 2008 8:55 AM

4
English
“IMPORTANT SAFETY INSTRUCTIONS”When using the sewing machine, basic safety precautions should always be followed, including the following:Read all instructions before using.
DANGER - - To reduce the risk of electric shock.1 The sewing machine should never be left unattended when plugged in. Always unplug the sewing
machine from the electrical outlet immediately after using and before cleaning.2. Always unplug before relamping. Replace the bulb with same type rated 15 watts.3. Do not reach for the sewing machine that has fallen into water. Unplug immediately.4. Do not place or store sewing machine where it can fall or be pulled into a tub or sink. Do not place or
drop into water or other liquid.WARNING - - To reduce the risk of burns, fire, electric shock, or injury to
persons.1 Do not allow to be used as a toy. Close attention is necessary when this sewing machine is used by
or near children.2. Use this sewing machine only for its intended use as described in this manual. Use only attachments
recommended by the manufacturer as contained in this manual.3. Never operate this sewing machine if it has a damaged cord or plug, if it is not working properly, if it
has been dropped or damaged, or dropped into water. Return this sewing machine to the nearestauthorized dealer or service center for examination, repair, electrical or mechanical adjustment.
4. Never operate the sewing machine with any air openings blocked. Keep ventilation openings of thesewing machine and foot controller free from the accumulation of lint, dust, and loose cloth.
5. Never drop or insert any object into any opening.6. Do not use outdoors.7. Do not operate where aerosol (spray) products are being used or where oxygen is being
administered.8. To disconnect, turn all controls to the off (“O”) position, then remove plug from outlet.9. Do not unplug by pulling on cord. To unplug, grasp the plug, not the cord.10. Keep fingers away from all moving parts. Special care is required around the sewing machine
needle.11. Always use proper needle plate. The wrong plate can cause the needle to break.12. Do not use bent needles.13. Do not pull or push fabric while stitching. It may deflect the needle causing it to break.14. Switch the sewing machine off (“O”) when making any adjustments in the needle area, such as
threading needle, changing needle, threading bobbin, or changing presser foot, etc.15. Always unplug sewing machine from the electrical outlet when removing covers, lubricating, or when
making any other user servicing adjustments mentioned in this instruction manual.16. Never operate on a soft surface such as a bed or couch where the air openings may be blocked.17. Appliance (230-240V) is provided with double insulation. Use only identical replacement parts. See
instructions for servicing Double-insulate Products. Servicing Double-Insulated Products (230V-240V)
In a double-insulated product, two systems of insulation are provided instead of grounding. No groundingmeans is provided on a double-insulated product nor should a means for grounding be added to the productServicing a double-insulated product requires extreme care and knowledge of the system and should onlybe done by qualified service personnel. Replacement parts for a double-insulated product must be identicalto those parts in the product. The symbol is marked on the double-insulated product.
This sewing machine is intended for household use.SAVE THESE INSTRUCTIONS
HC325_ES.book Page 4 Thursday, April 10, 2008 4:15 PM

5
Español
“INSTRUCCIONES IMPORTANTES DE SEGURIDAD”Cuando utilice un aparato eléctrico, se deben tener siempre ciertas precauciones básicas de seguridad, incluyendo las siguientes:Lea todas las instrucciones antes de utilizar su máquina.
PELIGRO - - Para reducir el riesgo de quemaduras, fuego, golpes de corriente o daños a personas.
1. La máquina de coser nunca debe ser dejada sin atención mientras esté enchufada. Siempredesenchufe la máquina de coser del toma corriente, inmediatamente después de dejar de usarlay antes de limpiarla.
2. Siempre desenchufe antes de cambiar la ampolleta. Reemplace la ampolleta por una del mismotipo, de 15 watts.
3. No tome una máquina que haya caído al agua. Desenchúfela de inmediato.4. No coloque o guarde la máquina en algún lugar del que pueda caer o ser empujada a la bañera o
al lavabo. No la coloque o sumerja dentro del agua u otro líquido.ADVERTENCIA - - Para reducir el riesgo de quemaduras, incendios,
descargas eléctricas, o lesiones personales:1 No permita que sea utilizado como juguete. Cuando este aparato es utilizado por, o cerca de niños,
es necesario prestar especial atención.2. Utilice el aparato sólo para el uso al que se le destina, tal como se describe en este manual. Utilice
únicamente los accesorios recomendados por el fabricante, que se incluyen en este manual.3. No utilice nunca este aparato si el cable o enchufe están dañados, si no funciona correctamente, si se ha
dejado caer o ha sufrido algún daño, o si ha sido sumergido en agua. Lleve el aparato al concesionarioautorizado más cercano para que sea examinado , reparado o ajustado mecánica o eléctricamente.
4. No utilice nunca el aparato si los orificios de ventilación están bloqueados. Mantenga los orificios deventilación de la máquina de coser y del pedal control (reostato) sin acumulaciones de hilo, polvo yfragmentos de tela.
5. Nunca deje caer o introduzca ningún objeto en ninguna abertura.6. No utilice al aire libre.7. No utilice nunca este aparato en lugares donde se estén utilizando producto en aerosol (spray), o
donde se esté administrando oxígeno.8. Para desconectarlo, apague todos los controles (posición “O”) y después desconecte el enchufe de
la toma de corriente.9. No desenchufe el aparato tirando el cable. Para desenchufar, tire del enchufe, no del cable.10. Mantenga los dedos alejados de las piezas en movimiento. Se debe prestar especial atención en las
proximidades de la aguja.11. Utilice siempre la placa aguja adecuada. Una placa incorrecta puede causar el quiebre de la aguja.12. No utilice agujas dobladas.13. No tire o empuje de la tela mientras cosa la máquina. Puede desviar la aguja, causando que ésta se
quiebre.14. Apague (“O”) la máquina de coser cuando haga ajustes en el área de la aguja, por ejemplo, cuando
enhebre la aguja, cuando cambie la aguja, cuando coloque la bobina o cuando cambie el pedal.15. Desenchufe siempre la máquina de coser de la toma eléctrica cuando retire las cubiertas, lubrique
el aparato, o cuando realice cualquier otro ajuste mencionado en el manual de instrucciones.16. No utilice nunca el aparto sobre una superficie blanda, tal como un sofá , donde los orificios de
ventilación puedan quedar bloqueados.17. El dispositivo (230-240V) que se provee con esta máquina, tiene doble aislamiento. Use repuestos
idénticos para reemplazar la partes. Vea las instrucciones de servicio para productos con dobleaislación.
SERVICIO PARA PRODUCTOS CON DOBLE AISLAMIENTO (230-240v)En un producto de doble aislación son dos sistemas de aislación, en lugar de tierra. El no incluirtierra en un producto con doble aislación, significa que no debe ser adicionada la conexión aTierra. La asistencia técnica de un producto de doble aislación requiere cuidado y conocimientode los sistemas y debe ser hecho por personal técnico calificado. El reemplazo de partesrelativas a la doble aislación, debe ser por partes idénticas. El símbolo de doble aislación estámarcado.
Esta máquina de coser es para uso doméstico.Guarde esta instrucciones
HC325_ES.book Page 5 Thursday, April 10, 2008 4:15 PM

1
English
CONTENTS
NAMES OF PARTSSide dial type ........................................ 2
ACCESSORIES ........................................ 3
SETTING UPConnecting foot controller and power cord............................................ 5Power / Light switch.............................. 5Foot controller....................................... 5Extension table ..................................... 5
VARIOUS CONTROLSPattern selection dial ............................ 6Stitch length dial ................................... 6Zigzag width control dial ....................... 6Presser foot lever ................................. 6
THREADING THE MACHINEBobbin winding ..................................... 8Bobbin threading .................................. 9Upper threading.................................. 12How to use needle threader ............... 13Bringing up lower thread with presser foot up.................................... 14
SEWING BASICSStraight stitching ................................. 15Adjusting thread tension ..................... 17Changing foot ..................................... 17Declutch knob..................................... 18Reverse sewing lever ......................... 18Drop feed lever ................................... 18Presser foot pressure adjustment knob.................................................... 19Thick fabric sewing ............................. 19Zigzag stitching................................... 20Stretch stitching .................................. 20
HOW TO USE BUILT IN STITCHESBlind hem stitch .................................. 21Overcasting ........................................ 21Overlocking......................................... 22Smocking............................................ 23Mending.............................................. 24Applique work ..................................... 25Piping / Zipper Foot ............................ 26Zipper sewing ..................................... 27Free hand embroidery ........................ 28Twin needle threading ........................ 30Pin tucking using twin needle ............. 31Walking Foot....................................... 32Darning Foot....................................... 33Piecing Foot........................................ 35Open Toe Appliqué Foot .................... 36Ruffler Foot......................................... 37
BUTTONHOLEMaking buttonholes ............................ 39Adjusting stitch balance of buttonhole........................................... 41
MAINTENANCEChanging light bulb............................. 42Cleaning ............................................. 43Oiling .................................................. 44
TROUBLE SHOOTINGLower thread tension adjustment ....... 45Changing needle ................................ 47Checking needle................................. 48Cleaning the shuttle race.................... 48Trouble chart ...................................... 49
FABRIC, THREAD AND NEEDLE TABLE .................................................... 52
NAME OF STITCH PATTERNS ............. 53
HC325_ES.book Page 1 Thursday, April 10, 2008 4:15 PM
1
Español
CONTENIDOS
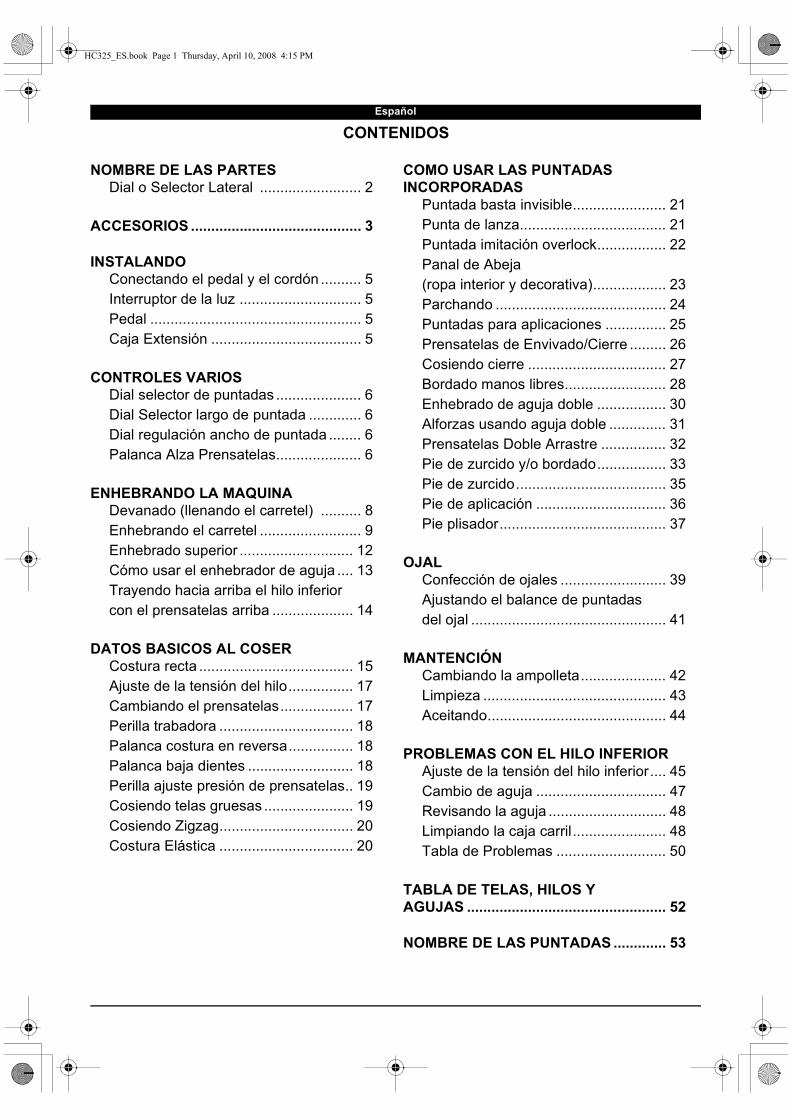
NOMBRE DE LAS PARTESDial o Selector Lateral ......................... 2
ACCESORIOS .......................................... 3
INSTALANDOConectando el pedal y el cordón .......... 5Interruptor de la luz .............................. 5Pedal .................................................... 5Caja Extensión ..................................... 5
CONTROLES VARIOSDial selector de puntadas ..................... 6Dial Selector largo de puntada ............. 6Dial regulación ancho de puntada ........ 6Palanca Alza Prensatelas..................... 6
ENHEBRANDO LA MAQUINADevanado (llenando el carretel) .......... 8Enhebrando el carretel ......................... 9Enhebrado superior ............................ 12Cómo usar el enhebrador de aguja .... 13Trayendo hacia arriba el hilo inferior con el prensatelas arriba .................... 14
DATOS BASICOS AL COSERCostura recta ...................................... 15Ajuste de la tensión del hilo................ 17Cambiando el prensatelas.................. 17Perilla trabadora ................................. 18Palanca costura en reversa................ 18Palanca baja dientes .......................... 18Perilla ajuste presión de prensatelas.. 19Cosiendo telas gruesas ...................... 19Cosiendo Zigzag................................. 20Costura Elástica ................................. 20
COMO USAR LAS PUNTADASINCORPORADAS
Puntada basta invisible....................... 21Punta de lanza.................................... 21Puntada imitación overlock................. 22Panal de Abeja (ropa interior y decorativa).................. 23Parchando .......................................... 24Puntadas para aplicaciones ............... 25Prensatelas de Envivado/Cierre ......... 26Cosiendo cierre .................................. 27Bordado manos libres......................... 28Enhebrado de aguja doble ................. 30Alforzas usando aguja doble .............. 31Prensatelas Doble Arrastre ................ 32Pie de zurcido y/o bordado................. 33Pie de zurcido..................................... 35Pie de aplicación ................................ 36Pie plisador......................................... 37
OJALConfección de ojales .......................... 39Ajustando el balance de puntadas del ojal ................................................ 41
MANTENCIÓNCambiando la ampolleta..................... 42Limpieza ............................................. 43Aceitando............................................ 44
PROBLEMAS CON EL HILO INFERIORAjuste de la tensión del hilo inferior.... 45Cambio de aguja ................................ 47Revisando la aguja ............................. 48Limpiando la caja carril....................... 48Tabla de Problemas ........................... 50
TABLA DE TELAS, HILOS Y AGUJAS ................................................. 52
NOMBRE DE LAS PUNTADAS ............. 53
HC325_ES.book Page 1 Thursday, April 10, 2008 4:15 PM
1
28
27
29
1
7
8
9
10
2 6
12
13
26
32
5
30
31
3 4
11
15
17
222120
19
18
4
23
24
25
16
14
HC325_ES.book Page 1 Thursday, April 10, 2008 4:15 PM

2
English Español
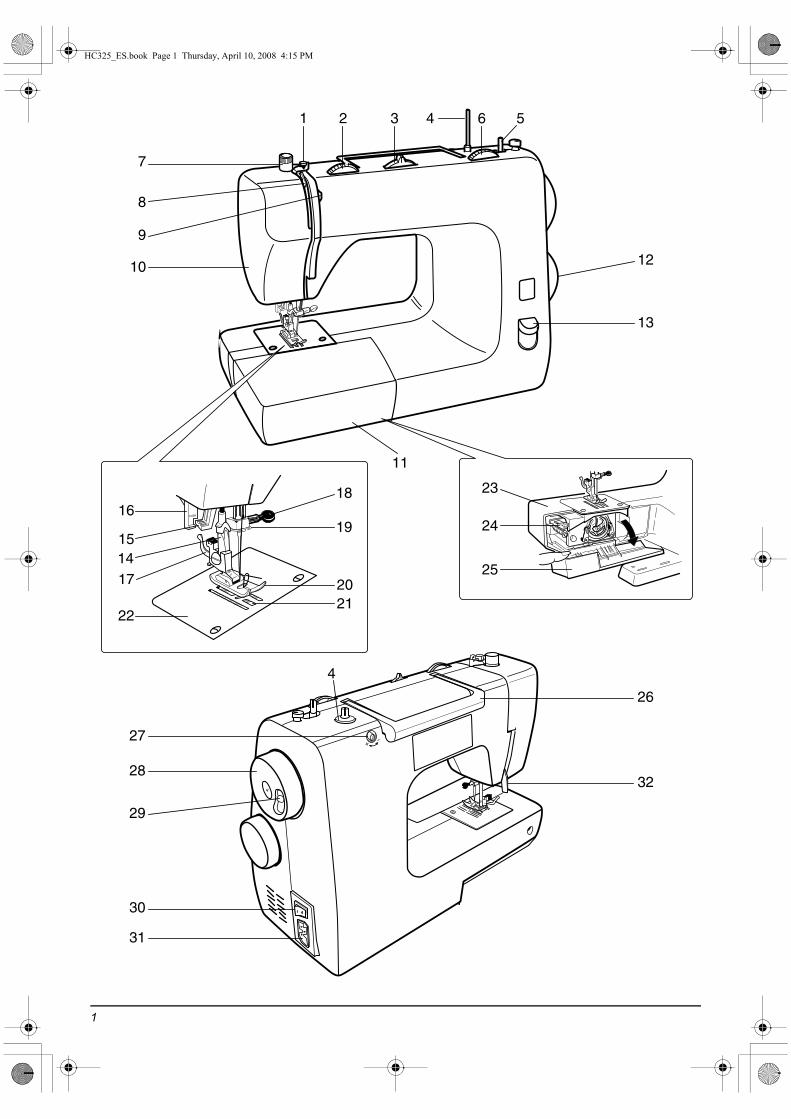
NAMES OF PARTSSide dial type1. Pre-tension2. Upper thread tension dial3. Zigzag width control4. Spool pin (Removable)5. Bobbin winder shaft6. Stitch length dial7. Presser foot pressure adjustment knob8. Take up lever9. Upper tension plate10.Face cover11.Extension table12.Pattern selection dial13.Reverse sewing lever14.Thread cutter15.Needle threader lever16.Buttonhole lever17.Foot release lever18.Needle clamp screw19.Needle guide for upper thread20.Presser foot21.Feed dogs22.Needle plate23.Free arm24.Drop feed lever25.Shuttle cover26.Handle27.Buttonhole stitch adjuster28.Handwheel29.Declutch knob30.Power / Light Switch31.Plug socket32.Presser foot lever
NOMBRE DE LAS PARTESDial o Selector Lateral 1. Pre-tensión2. Regulación de tensión hilo superior3. Control del ancho del zig-zag4. Porta carrete móvil5. Devanador6. Dial de largo de puntada7. Perilla de ajuste de presión del prensatelas8. Tirahilo superior9. Placa tensión superior10.Tapa lateral11.Caja extensión12.Dial selector de puntadas13.Palanca retroceso14.Corta hilo15.Palanca del enhebrado de la aguja16.Palanca accionadora ojal automático 1 paso17.Palanca de cambio de prensatelas18.Tornillo sujetador de la aguja19.Guía aguja para hilo superior20.Pie prensatela21.Dientes22.Plancha aguja23.Brazo libre24.Perilla para bajar los dientes25.Tapa carril26.Manilla27.Ajustador puntada ojal28.Volante29.Perilla devanado (llenar carrete) y trabar
costura30.Interruptor luz31.Enchufe hembra32.Palanca de alza prensatelas
HC325_ES.book Page 2 Thursday, April 10, 2008 4:15 PM

3
STANDARD ACCESSORIES ACCESORIOS STANDARD INCLUIDOS (se encuentran dentro de caja extensiÛn)
1 #14
2
3
8
9
10
4
14
5
11
16
6
12
17
15150022-352
150002-360
150002-481
1950002-530
150002-472
150048-116 679111-CFB40
719001-364
672467-AGA10
672409-CGA10
850001-513
7
672466-CGA10
719001-367 679318-CGA10
1921002-181
1650009-842
1921003-520
13
672497-CGA10
18
19
150002-491
1550002-184
672896-CGA10
Manual de Instrucciones ESP
HC325
FOOT CONTROLLER LAMP E14 15W THIS MANUALPEDAL AMPOLLETA E14 15W ESTE MANUAL
FITTED COLOCADA
HC325_ES.book Page 3 Friday, April 11, 2008 9:12 AM
678561-CCA40

4
English Español
NAMES OF ACCESSORIESStandard accessories1. Zigzag sewing foot (on machine)2. Piping / Zipper foot3. Buttonhole foot4. Needle plate screw driver5. Buttonhole cutter6. Oiler7. Bobbins (3 pcs.)8. Standard needle (3 pcs., #14)9. Ball point needle (1 pc.)10.Screw driver (small) (1 pc.)11.Twin needle (1 pc.)12.Quilting guide13.Walking foot14.Darning foot15.Piecing foot16.Open toe Appliqué foot17.Spool pin supplied (1 pc.) (on machine)18.Extra spool pin (for twin needle sewing)19.Ruffler foot
❈ Accessories are stored inside the extension table.
NOMBRE DE LOS ACCESORIOSAccesorios standard1. Pie de Zigzag (en la máquina)2. Pie de envivado y cierre3. Pie de ojal4. Desatornillador de la placa aguja5. Cortador de ojal6. Aceitera7. Carreteles (3 unid.)8. Aguja standard (3 unid. Nº 14)9. Aguja punta bola (1 unid.)10.Desatornillador (chico, 1 unid.)11.Aguja Doble (1 unid.)12.Guía de acolchado13.Pie doble arrastre14.Pie de zurcido y/o bordado15.Pie patchwork16.Pie para aplicación17.Porta carrete (1 unid., en la máquina)18.Porta carrete extra (para coser con aguja doble)19.Pie plisador
❈ los accesorios se encuentran dentro de la caja extensión.
HC325_ES.book Page 4 Thursday, April 10, 2008 4:15 PM

5
EspañolEnglish
SETTING UPConnecting foot controller and power cord (fig A)1. Connect the plug of the foot controller to the plug
socket.2. Insert the power cord to an outlet.
Caution!Be sure the voltage of the machine (information is on the back of the machine) correspond to power supply.The specifications vary from country to country.
Power / Light switch (fig B)Turn the switch on to sew.This switch controls both power and light.The machine will not move without the Power / Light switch on.
Foot controller (fig C)The more you press the foot controller, the faster the machine runs.
Extension table (fig D)The machine converts into a free-arm model by removing the extension table.
1. Remove the table by pulling it off to the left, and the machine converts into a free-arm model.
Free-arm is more convenient to sew trousers, sleeves, cuffs of T-shirts, blouses, etc.
INSTALANDOConectando el pedal y el cordón (fig. A)1. Conecte el interruptor del pedal al enchufe hembra
en su máquina.2. Inserte el cordón al toma-corriente.
Precaución!Asegúrese del voltaje de la máquina (la información está en la parte posterior de la máquina) corresponde al suministro eléctrico.Las especificaciones varias de país a país.
Interruptor de la luz (fig. B)Presione el interruptor en encendido para coser.Este interruptor controla la luz y el suministro eléctrico.La máquina no se moverá sin que el interruptor esté en encendido.
Pedal (fig. C)Cuanto más presiones Ud. el pedal, más rápido trabajará su máquina.
Caja Extensión (fig. D)La máquina se convierte en una máquina de brazo libre, removiendo la extensión.1. Remueva la caja extensión, tirándola hacia la
izquierda, y su máquina se convertirá en un modelo de brazo libre.
El brazo libre es más conveniente para coser prendas tubulares, como pantalones, mangas, puños de camisas, blusas etc.
OFF
ON❈ ➀
➁ ❈
A B
C D
HC325_ES.book Page 5 Thursday, April 10, 2008 4:15 PM

English Español
6
VARIOUS CONTROLSPattern selection dial (fig A)To select stitch, be sure needle is at its highest position.The required stitch is selected by turning the Pattern Selection Dial.The Pattern Selection Dial can be turned either way.
Stitch length dial (B-1)Stitch length can be easily changed by turning the Stitch Length Dial.For shorter stitch, turn Stitch Length Dial to a lower number.For longer stitch, turn to a higher number.Standard stitch length is between 2 to 3.However, for stitch patterns 12 through 23, the stitchlength dial should be set to 5.
Zigzag width control dial (B-2)The width of Zigzag stitch can be selected by turning the Zigzag Width Control Dial.For wider zigzag stitch, turn the dial to a higher number.For narrower zigzag, turn the dial to a lower number.
Presser foot lever (fig C)There are 3 positions for the presser foot lever.1. To sew, the presser foot should be at the lowest
position a.2. To insert or remove fabric, and to change presser
foot, middle position b.3. To remove thick fabric, highest position c.
❈ Raise presser foot lever up as far as it will go for position c.The lever will not stop at position c.Hold it in position c.
CONTROLES VARIOSDial selector de puntadas (fig. A)Para seleccionar la puntada, asegúrese que la aguja esté en la posición más alta.La puntada que se necesita se selecciona haciendo girar el Dial Selector de Puntadas.El Dial Selector de Puntadas puede girarse en ambos sentidos.
Dial Selector largo de puntada (B-1)El largo de la puntada puede ser cambiado fácilmente, girando el Dial Selector de Largo de Puntada.Para una puntada más corta, gire el Dial Selector de Largo de Puntada a un número más bajo.Para una puntada más larga, gire el Dial Selector de Largo de Puntada, a un número más alto. El largo standard de puntada es entre 2 y 3.Sin embargo, para diseños de puntadas desde el número 12 hasta el 23, el largo de puntada debe ser fijado en 5.
Dial regulación ancho de puntada (ancho de zigzag) (B-2)El ancho de puntada (zigzag), puede ser seleccionado, girando el Dial Regulador de Ancho de Puntada. Para puntadas (zigzag) más anchas, gire el Dial hacia números más altos. Para puntadas (zigzag) más angostas, gire el Dial hacia nú meros menores.
Palanca Alza Prensatelas (fig. C)Existen 3 posiciones para la palanca alza prensatelas.1. Para coser, la palanca debe estar en la posición
más baja. a 2. Para colocar o retirar la tela y para cambiar de
prensatelas, la palanca debe estar en la posición del medio. b
3. Para colocar o retirar telas gruesas, la palanca debe estar en la posición más alta. c
❈ Suba la palanca alza prensatelas lo más alto que se pueda, para ir a la posición c.La palanca no se mantendrá en la posición c.Sosténgala Usted en posición c.
B-1
c
b
a
Max 15W
5 4 3 2
B-2SIDE DIAL MODEL
A B C
HC325_ES.book Page 6 Thursday, April 10, 2008 4:15 PM

7
A
B C
1 2
D E
F
HC325_ES.book Page 7 Thursday, April 10, 2008 4:15 PM
8
English Español
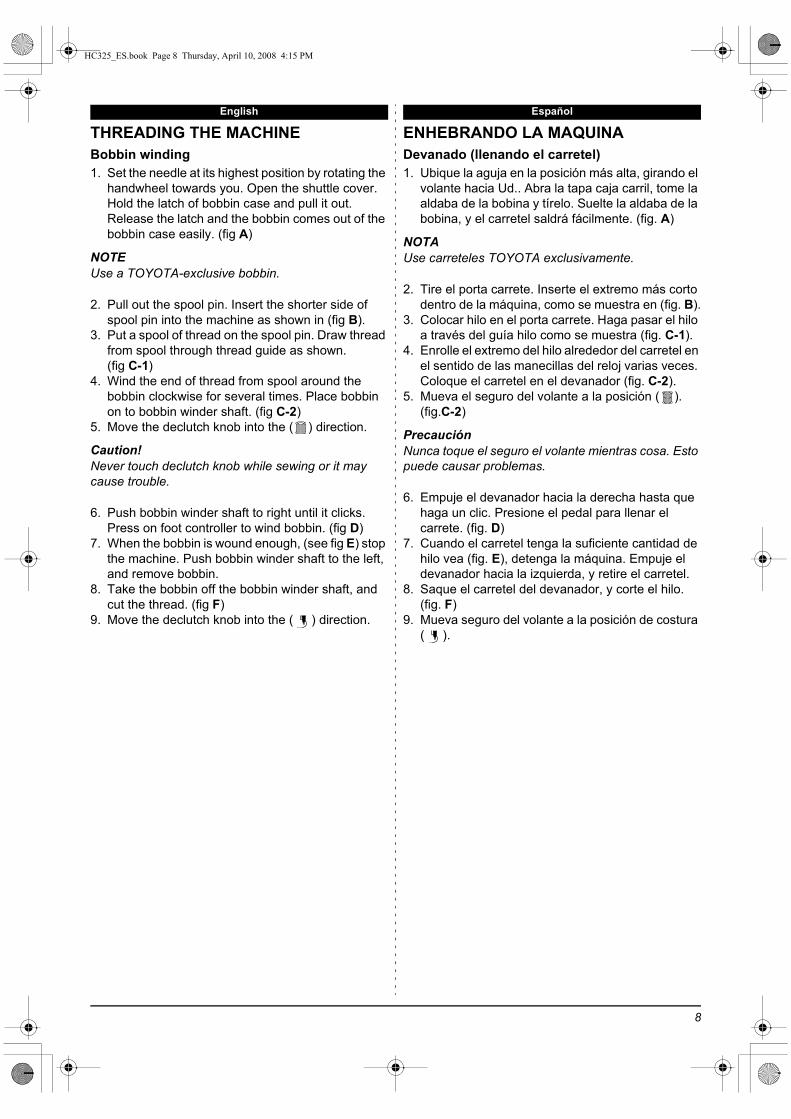
THREADING THE MACHINEBobbin winding1. Set the needle at its highest position by rotating the
handwheel towards you. Open the shuttle cover. Hold the latch of bobbin case and pull it out. Release the latch and the bobbin comes out of the bobbin case easily. (fig A)
NOTEUse a TOYOTA-exclusive bobbin.
2. Pull out the spool pin. Insert the shorter side of spool pin into the machine as shown in (fig B).
3. Put a spool of thread on the spool pin. Draw thread from spool through thread guide as shown. (fig C-1)
4. Wind the end of thread from spool around the bobbin clockwise for several times. Place bobbin on to bobbin winder shaft. (fig C-2)
5. Move the declutch knob into the ( ) direction.
Caution!Never touch declutch knob while sewing or it may cause trouble.
6. Push bobbin winder shaft to right until it clicks. Press on foot controller to wind bobbin. (fig D)
7. When the bobbin is wound enough, (see fig E) stop the machine. Push bobbin winder shaft to the left, and remove bobbin.
8. Take the bobbin off the bobbin winder shaft, and cut the thread. (fig F)
9. Move the declutch knob into the ( ) direction.
ENHEBRANDO LA MAQUINADevanado (llenando el carretel) 1. Ubique la aguja en la posición más alta, girando el
volante hacia Ud.. Abra la tapa caja carril, tome la aldaba de la bobina y tírelo. Suelte la aldaba de la bobina, y el carretel saldrá fácilmente. (fig. A)
NOTAUse carreteles TOYOTA exclusivamente.
2. Tire el porta carrete. Inserte el extremo más corto dentro de la máquina, como se muestra en (fig. B).
3. Colocar hilo en el porta carrete. Haga pasar el hilo a través del guía hilo como se muestra (fig. C-1).
4. Enrolle el extremo del hilo alrededor del carretel en el sentido de las manecillas del reloj varias veces. Coloque el carretel en el devanador (fig. C-2).
5. Mueva el seguro del volante a la posición ( ). (fig.C-2)
PrecauciónNunca toque el seguro el volante mientras cosa. Esto puede causar problemas.
6. Empuje el devanador hacia la derecha hasta que haga un clic. Presione el pedal para llenar el carrete. (fig. D)
7. Cuando el carretel tenga la suficiente cantidad de hilo vea (fig. E), detenga la máquina. Empuje el devanador hacia la izquierda, y retire el carretel.
8. Saque el carretel del devanador, y corte el hilo. (fig. F)
9. Mueva seguro del volante a la posición de costura ( ).
HC325_ES.book Page 8 Thursday, April 10, 2008 4:15 PM

9
English Español
Bobbin threading1. Place the bobbin in its case with the thread running
clockwise. (fig A)2. Guide the thread into the slot 1 of bobbin case.
(fig B)
Enhebrando el carretel1. Coloque el carretel en la bobina con el hilo girando
en el sentido de las manecillas del reloj. (fig. A)2. Guíe el hilo a través de la ranura 1 de la bobina.
(fig. B)
➀
A B
HC325_ES.book Page 9 Thursday, April 10, 2008 4:15 PM
English Español
10
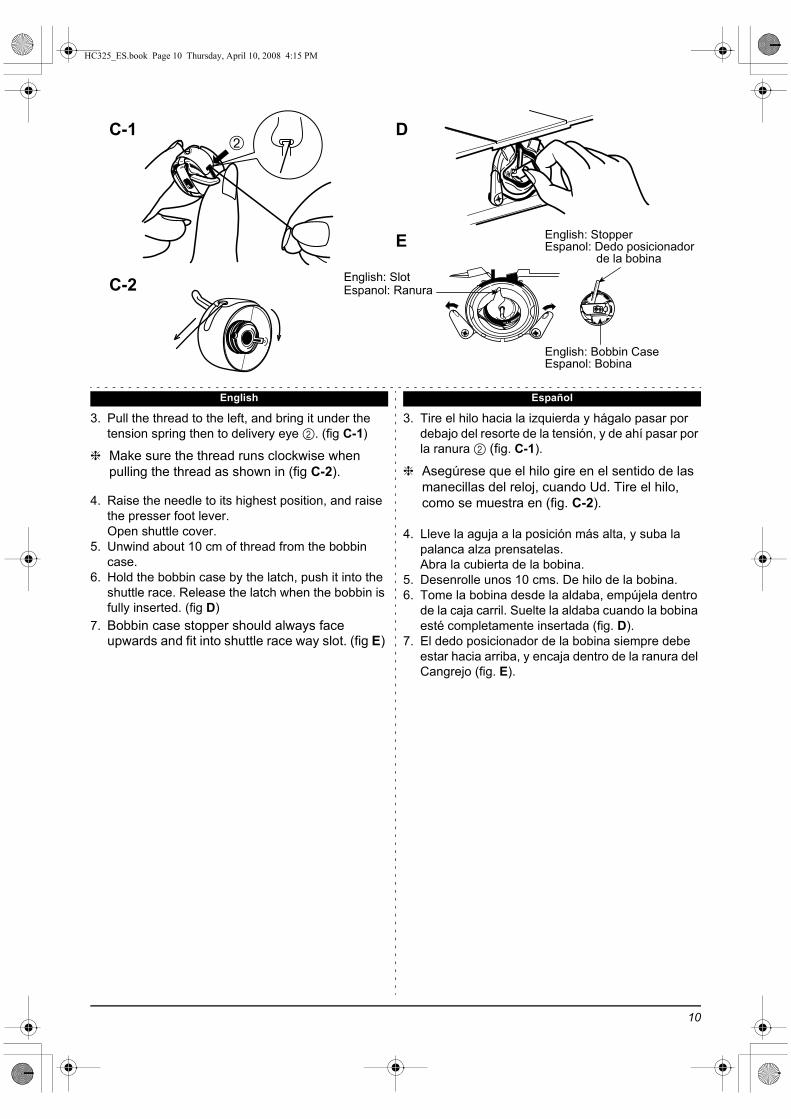
3. Pull the thread to the left, and bring it under the tension spring then to delivery eye 2. (fig C-1)
❈ Make sure the thread runs clockwise when pulling the thread as shown in (fig C-2).
4. Raise the needle to its highest position, and raise the presser foot lever. Open shuttle cover.
5. Unwind about 10 cm of thread from the bobbin case.
6. Hold the bobbin case by the latch, push it into the shuttle race. Release the latch when the bobbin is fully inserted. (fig D)
7. Bobbin case stopper should always face upwards and fit into shuttle race way slot. (fig E)
3. Tire el hilo hacia la izquierda y hágalo pasar por debajo del resorte de la tensión, y de ahí pasar por la ranura 2 (fig. C-1).
❈ Asegúrese que el hilo gire en el sentido de las manecillas del reloj, cuando Ud. Tire el hilo, como se muestra en (fig. C-2).
4. Lleve la aguja a la posición más alta, y suba la palanca alza prensatelas.Abra la cubierta de la bobina.
5. Desenrolle unos 10 cms. De hilo de la bobina.6. Tome la bobina desde la aldaba, empújela dentro
de la caja carril. Suelte la aldaba cuando la bobina esté completamente insertada (fig. D).
7. El dedo posicionador de la bobina siempre debe estar hacia arriba, y encaja dentro de la ranura del Cangrejo (fig. E).
➁C-1 D
C-2 English: SlotEspanol: Ranura
English: StopperEspanol: Dedo posicionador
de la bobina
English: Bobbin CaseEspanol: Bobina
E
HC325_ES.book Page 10 Thursday, April 10, 2008 4:15 PM
11
A
G H
B
15 cm
D
FE
➂
➃
➄➅
➀➁
C
HC325_ES.book Page 11 Thursday, April 10, 2008 4:15 PM
12
English Español
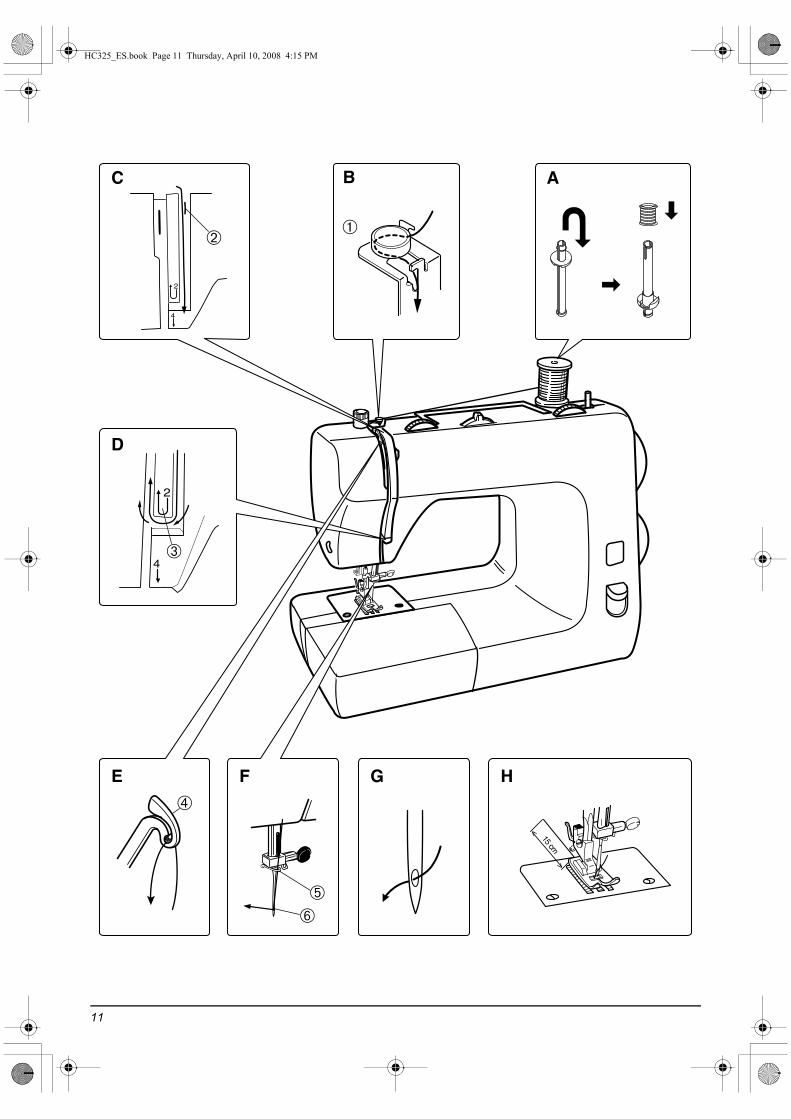
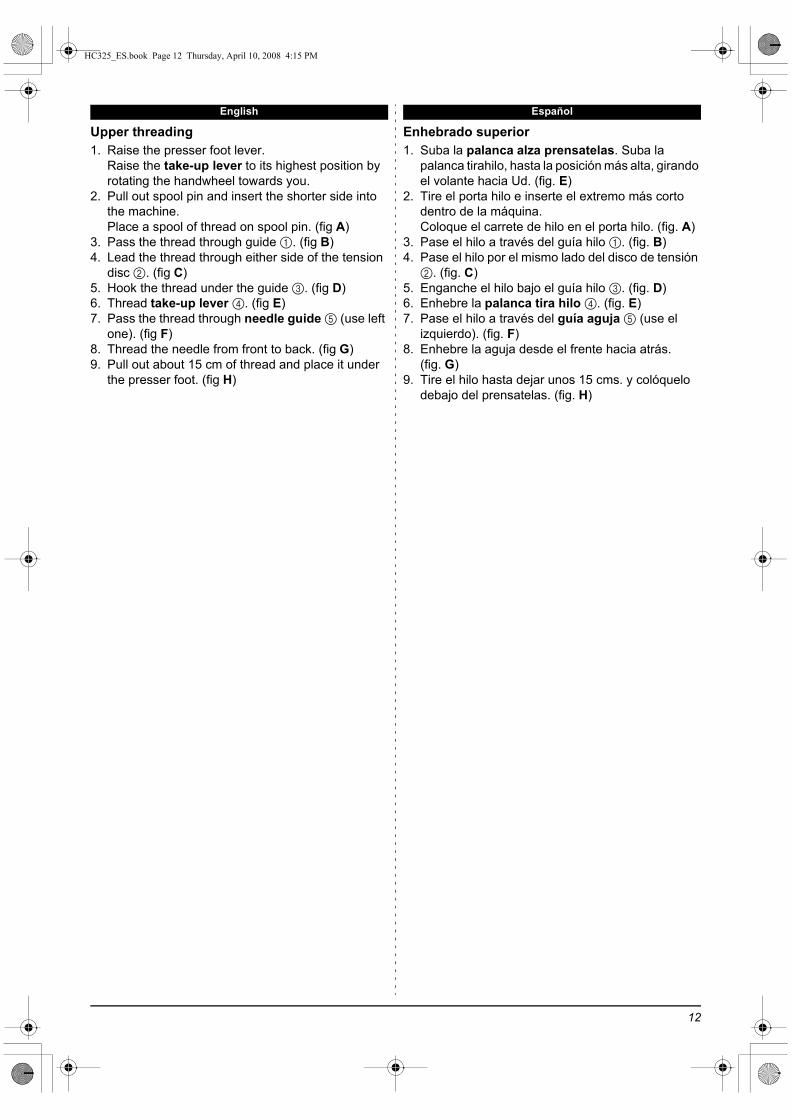
Upper threading1. Raise the presser foot lever.
Raise the take-up lever to its highest position by rotating the handwheel towards you.
2. Pull out spool pin and insert the shorter side into the machine.Place a spool of thread on spool pin. (fig A)
3. Pass the thread through guide 1. (fig B)4. Lead the thread through either side of the tension
disc 2. (fig C)5. Hook the thread under the guide 3. (fig D)6. Thread take-up lever 4. (fig E)7. Pass the thread through needle guide 5 (use left
one). (fig F)8. Thread the needle from front to back. (fig G)9. Pull out about 15 cm of thread and place it under
the presser foot. (fig H)
Enhebrado superior1. Suba la palanca alza prensatelas. Suba la
palanca tirahilo, hasta la posición más alta, girando el volante hacia Ud. (fig. E)
2. Tire el porta hilo e inserte el extremo más corto dentro de la máquina.Coloque el carrete de hilo en el porta hilo. (fig. A)
3. Pase el hilo a través del guía hilo 1. (fig. B)4. Pase el hilo por el mismo lado del disco de tensión 2. (fig. C)
5. Enganche el hilo bajo el guía hilo 3. (fig. D)6. Enhebre la palanca tira hilo 4. (fig. E)7. Pase el hilo a través del guía aguja 5 (use el
izquierdo). (fig. F)8. Enhebre la aguja desde el frente hacia atrás.
(fig. G)9. Tire el hilo hasta dejar unos 15 cms. y colóquelo
debajo del prensatelas. (fig. H)
HC325_ES.book Page 12 Thursday, April 10, 2008 4:15 PM
13
English Español
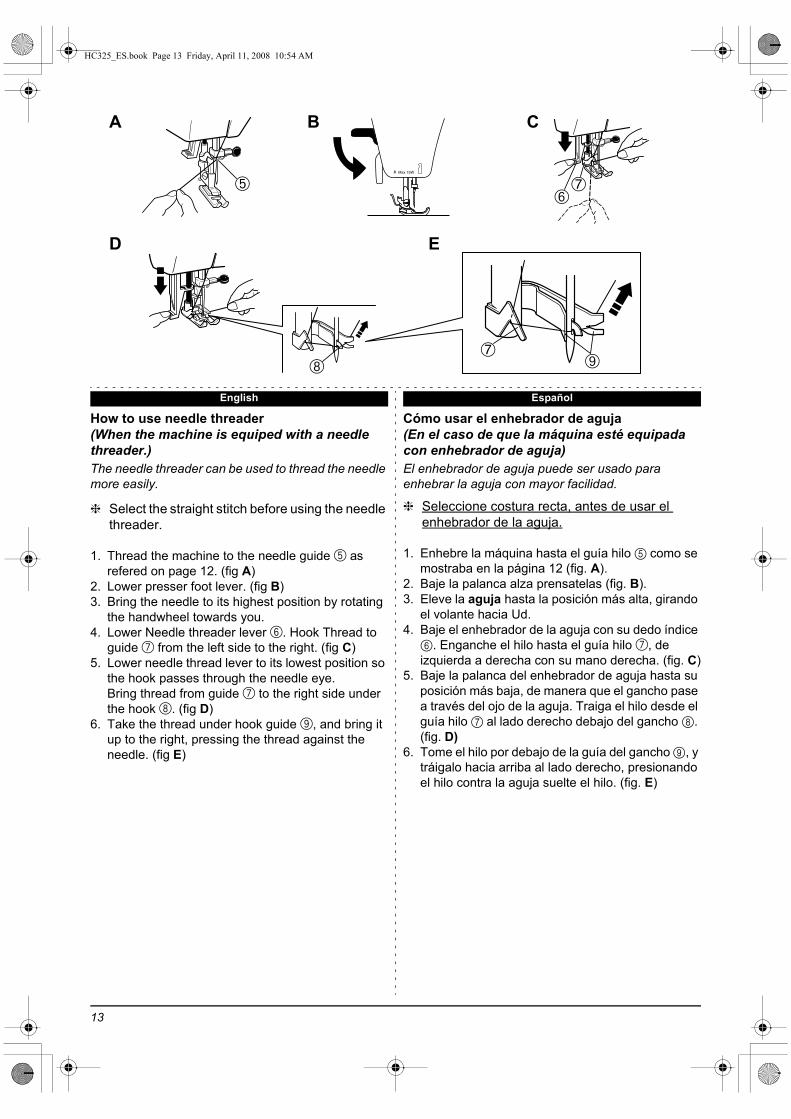
How to use needle threader(When the machine is equiped with a needle threader.)The needle threader can be used to thread the needle more easily.
❈ Select the straight stitch before using the needle threader.
1. Thread the machine to the needle guide 5 as refered on page 12. (fig A)
2. Lower presser foot lever. (fig B)3. Bring the needle to its highest position by rotating
the handwheel towards you.4. Lower Needle threader lever 6. Hook Thread to
guide 7 from the left side to the right. (fig C)5. Lower needle thread lever to its lowest position so
the hook passes through the needle eye.Bring thread from guide 7 to the right side under the hook 8. (fig D)
6. Take the thread under hook guide 9, and bring it up to the right, pressing the thread against the needle. (fig E)
Cómo usar el enhebrador de aguja(En el caso de que la máquina esté equipada con enhebrador de aguja)El enhebrador de aguja puede ser usado para enhebrar la aguja con mayor facilidad.
❈ Seleccione costura recta, antes de usar el enhebrador de la aguja.
1. Enhebre la máquina hasta el guía hilo 5 como se mostraba en la página 12 (fig. A).
2. Baje la palanca alza prensatelas (fig. B).3. Eleve la aguja hasta la posición más alta, girando
el volante hacia Ud.4. Baje el enhebrador de la aguja con su dedo índice 6. Enganche el hilo hasta el guía hilo 7, de izquierda a derecha con su mano derecha. (fig. C)
5. Baje la palanca del enhebrador de aguja hasta su posición más baja, de manera que el gancho pase a través del ojo de la aguja. Traiga el hilo desde el guía hilo 7 al lado derecho debajo del gancho 8. (fig. D)
6. Tome el hilo por debajo de la guía del gancho 9, y tráigalo hacia arriba al lado derecho, presionando el hilo contra la aguja suelte el hilo. (fig. E)
➅➆
➇➆
➈
Max 15W
➄
A B C
D E
HC325_ES.book Page 13 Friday, April 11, 2008 10:54 AM
English Español
14
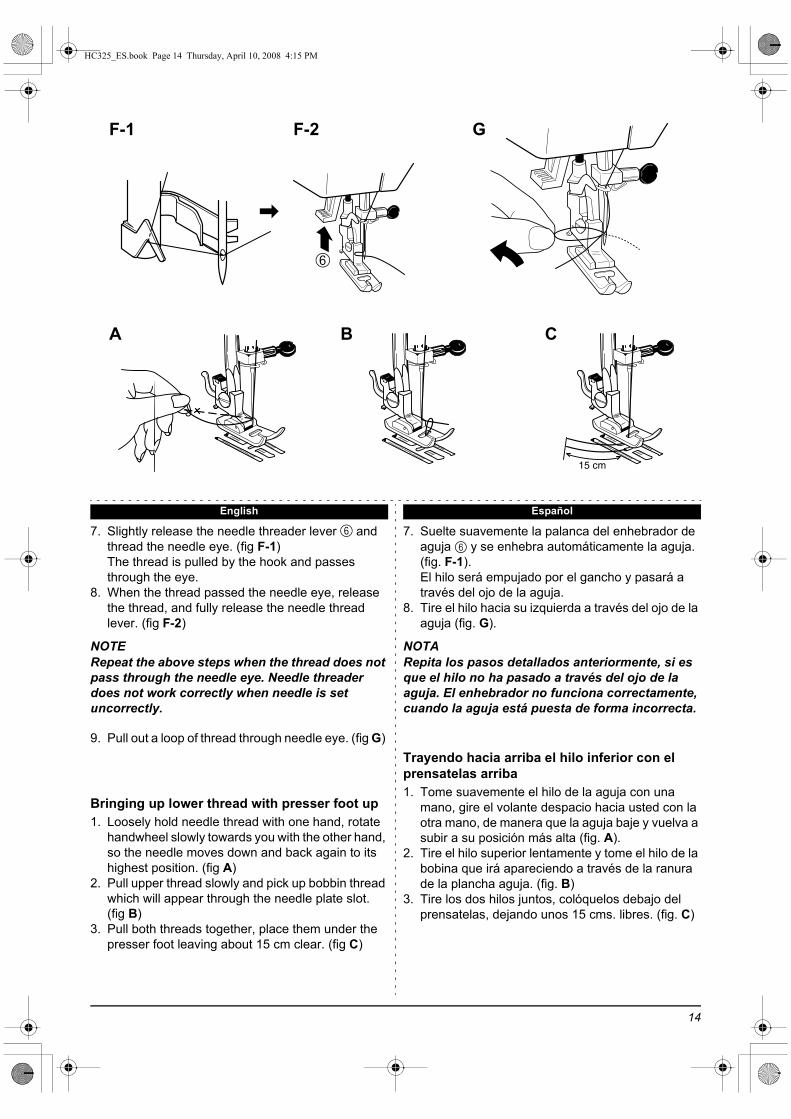
7. Slightly release the needle threader lever 6 and thread the needle eye. (fig F-1)The thread is pulled by the hook and passes through the eye.
8. When the thread passed the needle eye, release the thread, and fully release the needle thread lever. (fig F-2)
NOTERepeat the above steps when the thread does not pass through the needle eye. Needle threader does not work correctly when needle is set uncorrectly.
9. Pull out a loop of thread through needle eye. (fig G)
Bringing up lower thread with presser foot up1. Loosely hold needle thread with one hand, rotate
handwheel slowly towards you with the other hand, so the needle moves down and back again to its highest position. (fig A)
2. Pull upper thread slowly and pick up bobbin thread which will appear through the needle plate slot. (fig B)
3. Pull both threads together, place them under the presser foot leaving about 15 cm clear. (fig C)
7. Suelte suavemente la palanca del enhebrador de aguja 6 y se enhebra automáticamente la aguja. (fig. F-1).El hilo será empujado por el gancho y pasará a través del ojo de la aguja.
8. Tire el hilo hacia su izquierda a través del ojo de la aguja (fig. G).
NOTARepita los pasos detallados anteriormente, si es que el hilo no ha pasado a través del ojo de la aguja. El enhebrador no funciona correctamente, cuando la aguja está puesta de forma incorrecta.
Trayendo hacia arriba el hilo inferior con el prensatelas arriba1. Tome suavemente el hilo de la aguja con una
mano, gire el volante despacio hacia usted con la otra mano, de manera que la aguja baje y vuelva a subir a su posición más alta (fig. A).
2. Tire el hilo superior lentamente y tome el hilo de la bobina que irá apareciendo a través de la ranura de la plancha aguja. (fig. B)
3. Tire los dos hilos juntos, colóquelos debajo del prensatelas, dejando unos 15 cms. libres. (fig. C)
15 cm
➅
F-1 F-2 G
A B C
HC325_ES.book Page 14 Thursday, April 10, 2008 4:15 PM
15
EspañolEnglish
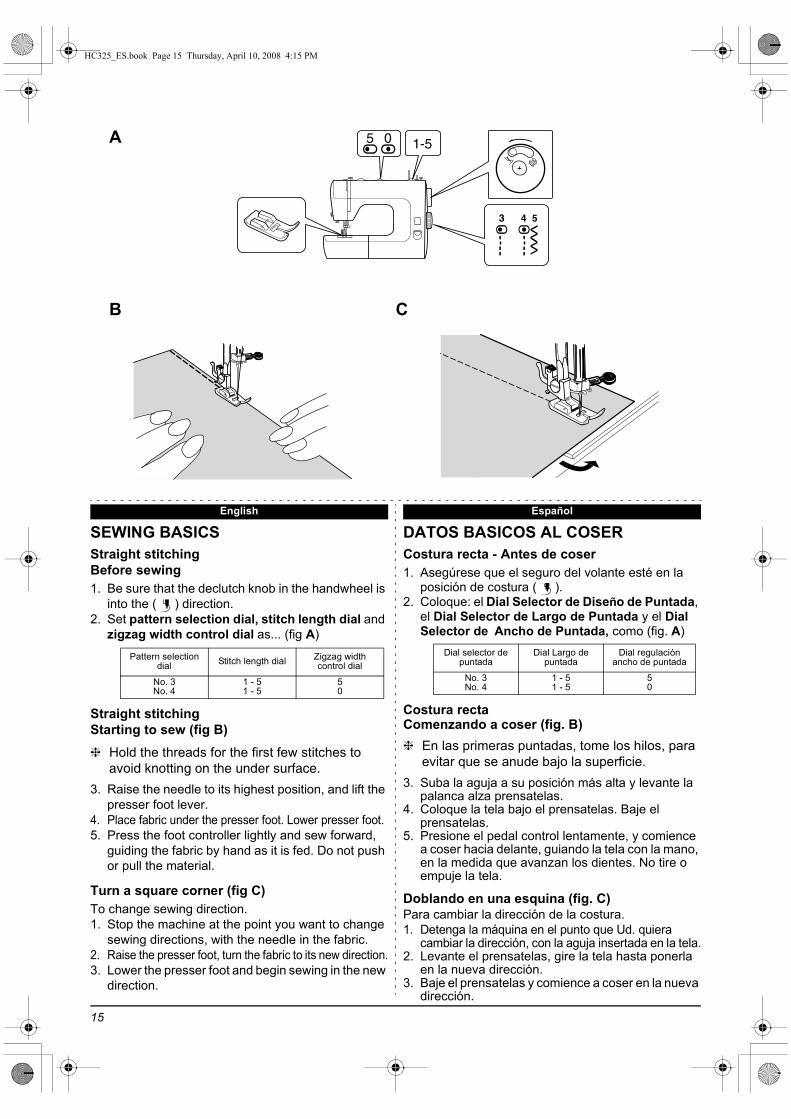
SEWING BASICSStraight stitchingBefore sewing1. Be sure that the declutch knob in the handwheel is
into the ( ) direction.2. Set pattern selection dial, stitch length dial and
zigzag width control dial as... (fig A)
Straight stitchingStarting to sew (fig B)❈ Hold the threads for the first few stitches to
avoid knotting on the under surface.
3. Raise the needle to its highest position, and lift the presser foot lever.
4. Place fabric under the presser foot. Lower presser foot.5. Press the foot controller lightly and sew forward,
guiding the fabric by hand as it is fed. Do not push or pull the material.
Turn a square corner (fig C)To change sewing direction.1. Stop the machine at the point you want to change
sewing directions, with the needle in the fabric.2. Raise the presser foot, turn the fabric to its new direction.3. Lower the presser foot and begin sewing in the new
direction.
Pattern selection dial Stitch length dial Zigzag width
control dial
No. 3No. 4
1 - 51 - 5
50
DATOS BASICOS AL COSERCostura recta - Antes de coser 1. Asegúrese que el seguro del volante esté en la
posición de costura ( ).2. Coloque: el Dial Selector de Diseño de Puntada,
el Dial Selector de Largo de Puntada y el Dial Selector de Ancho de Puntada, como (fig. A)
Costura rectaComenzando a coser (fig. B)❈ En las primeras puntadas, tome los hilos, para
evitar que se anude bajo la superficie.3. Suba la aguja a su posición más alta y levante la
palanca alza prensatelas.4. Coloque la tela bajo el prensatelas. Baje el
prensatelas.5. Presione el pedal control lentamente, y comience
a coser hacia delante, guiando la tela con la mano, en la medida que avanzan los dientes. No tire o empuje la tela.
Doblando en una esquina (fig. C)Para cambiar la dirección de la costura.1. Detenga la máquina en el punto que Ud. quiera
cambiar la dirección, con la aguja insertada en la tela.2. Levante el prensatelas, gire la tela hasta ponerla
en la nueva dirección.3. Baje el prensatelas y comience a coser en la nueva
dirección.
Dial selector de puntada
Dial Largo de puntada
Dial regulación ancho de puntada
No. 3No. 4
1 - 51 - 5
50
1-55 0
4 53
A
B C
HC325_ES.book Page 15 Thursday, April 10, 2008 4:15 PM

English Español
16
Reverse sewing (fig D)To reinforce seam, it is recommended to start or end with a few stitches in reverse sewing.Push the reverse lever to sew reverse. Guide the fabric as it is fed. Do not pull the material.For reinforcment, a few stitches are enough.Release lever to return to forward sewing.
Finishing sewing (fig E)1. Stop pressing the foot controller. Turn the
handwheel until the needle is at its highest position. Raise presser foot.
2. Draw out the fabric to the left. (fig E-1)3. Cut threads with thread cutter behind presser bar.
(fig E-2)4. Leave 15 cm of thread clear behind to prevent the
thread from drawing out of the needle eye. (fig E-3)
Cosiendo en reversa (remate) (fig. D)Para reforzar la costura, es recomendable comenzar y terminar el proceso con algunas puntadas en reversa (remate).Empuje la palanca de reversa para coser en reversa. Guíe la tela en la medida que retroceden los dientes. No tire la tela. Para rematar son suficientes algunas puntadas. Suelte la palanca para continuar con la costura recta hacia delante.
Terminando de coser (fig. E)1. Deje de presionar el pedal. Gire el volante hasta
que la aguja se encuentre en la posición más alta. Suba el prensatelas.
2. Retire la tela hacia la izquierda. (fig. E-1)3. Cortelos hilos con el corta cadcneta que está
detras de la barra prensatela. (fig. E-2)4. Deje unos 15 cms. de hilo libre, para prevenir que
la aguja de la máquina se desenhebre. (fig. E-3)
15 cm
D E-1
E-2 E-3
HC325_ES.book Page 16 Thursday, April 10, 2008 4:15 PM

17
English Español
Adjusting thread tensionA good seam is formed when the tension is well balanced and both threads (upper thread and lower thread) are locked together in the center of the fabric.After you finish sewing, check if the upper thread and lower thread are equal.Adjust the thread tension by turning the Upper Thread Tension Dial.
a : Thread tensions are equal. Both threads are locked in the center of the fabric.
b : Upper thread tension is too tight. Upper thread lies straight along the surface of the fabric. Correct the tension by turning the dial to a lower number.
c : Upper thread tension is too loose. Upper thread lies straight along the reverse side of fabric. Correct the tension by turning the dial to a higher number.
Changing foot1. Set needle to its highest position by rotating the
handwheel towards you.Move presser foot lever to the middle position.
2. Raise foot release lever and remove foot. (fig A-1)3. Place the desired foot on the needle plate under
the foot holder.Lower the presser foot lever so that the foot snaps on to the foot holder. (fig A-2)
Ajuste de la tensión del hiloUna buena costura se forma cuando las tensiones están bien equilibradas y ambos hilos (inferior y superior) están juntos ubicados al centro de la tela.Después de que Ud. termine de coser, revise si el hilo superior e inferior están iguales.Ajuste la tensión del hilo, girando el Dial de Tensión del Hilo Superior.
a : Las tensiones están iguales. La unión de ambos hilos están ubicados y se encuentran en el centro de la tela.
b : Tensión del hilo superior está muy apretada. El hilo superior está recto sobre la superficie de la tela. Para conseguir la tensión ideal, hay que girar el dial a un número inferior.
c : Tensión del hilo superior está muy suelta. El hilo superior está recto por el reverso de la tela. Para conseguir la tensión ideal, hay que girar el dial a un número superior.
Cambiando el prensatelas1. Coloque la aguja en su posición más alta, girando
el volante hacia Ud.Mueva el prensatelas a su posición media.
2. Suba el prensatelas, suelte la palanca y retire el prensatelas. (fig. A-1)
3. Coloque el prensatelas escogidos sobre la plancha aguja, debajo del sujetador del prensatelas. Baje la palanca del prensatelas de tal manera que el prensatelas encaje en el sujetador. (fig. A-2)
6 5 4
5 4 3
7 6 5
a
b
c
AA-1 A-2
HC325_ES.book Page 17 Thursday, April 10, 2008 4:15 PM
English Español
18
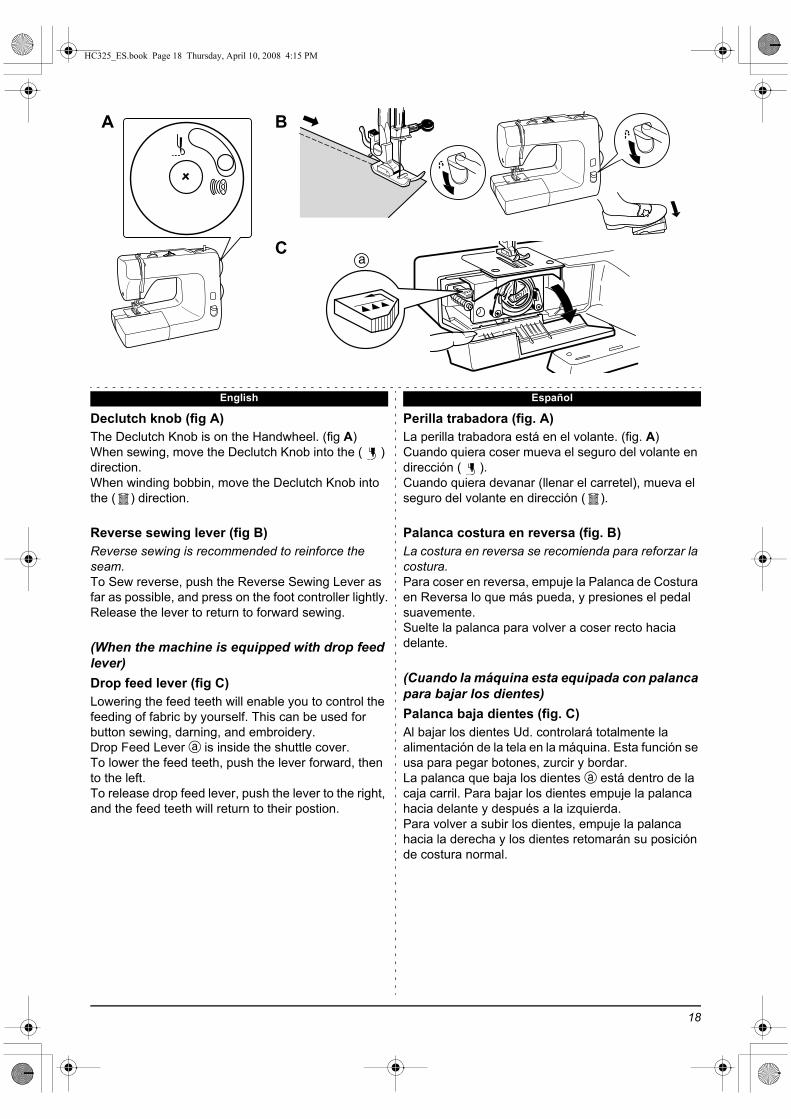
Declutch knob (fig A)The Declutch Knob is on the Handwheel. (fig A)When sewing, move the Declutch Knob into the ( ) direction.When winding bobbin, move the Declutch Knob into the ( ) direction.
Reverse sewing lever (fig B)Reverse sewing is recommended to reinforce the seam.To Sew reverse, push the Reverse Sewing Lever as far as possible, and press on the foot controller lightly.Release the lever to return to forward sewing.
(When the machine is equipped with drop feed lever)Drop feed lever (fig C)Lowering the feed teeth will enable you to control the feeding of fabric by yourself. This can be used for button sewing, darning, and embroidery.Drop Feed Lever a is inside the shuttle cover.To lower the feed teeth, push the lever forward, then to the left.To release drop feed lever, push the lever to the right, and the feed teeth will return to their postion.
Perilla trabadora (fig. A)La perilla trabadora está en el volante. (fig. A)Cuando quiera coser mueva el seguro del volante en dirección ( ).Cuando quiera devanar (llenar el carretel), mueva el seguro del volante en dirección ( ).
Palanca costura en reversa (fig. B)La costura en reversa se recomienda para reforzar la costura.Para coser en reversa, empuje la Palanca de Costura en Reversa lo que más pueda, y presiones el pedal suavemente.Suelte la palanca para volver a coser recto hacia delante.
(Cuando la máquina esta equipada con palanca para bajar los dientes)Palanca baja dientes (fig. C)Al bajar los dientes Ud. controlará totalmente la alimentación de la tela en la máquina. Esta función se usa para pegar botones, zurcir y bordar.La palanca que baja los dientes a está dentro de la caja carril. Para bajar los dientes empuje la palanca hacia delante y después a la izquierda.Para volver a subir los dientes, empuje la palanca hacia la derecha y los dientes retomarán su posición de costura normal.
a
A B
C
HC325_ES.book Page 18 Thursday, April 10, 2008 4:15 PM

19
English Español
(When the machine is equipped with presser foot pressure)Presser foot pressure adjustment knob (fig A) The presser foot pressure is adjusted by turning the dial at the top of the machine.When sewing normal or heavy fabric : Turn the dial to 3.When sewing thin or stretch fabric : Turn the dial to 2-3.When darning : Turn the dial to 1-2.
Thick fabric sewing(Particularly Denim)When sewing thick fabric or the thick part of the fabric as shown in (fig B), it is important to sew slowly and use the proper needle size (refer page 52). Gently guide the fabric as you sew.
Especially, at the points that the thickness changes (fig B-1), sew slowly by rotating the handwheel by hand. This will prevent needle breaking and deflecting.
(Cuando la máquina está equipada con presión de prensatelas)Perilla ajuste presión de prensatelas (fig. A)La presión del prensatelas se ajusta girando el dial que está en la parte superior de la máquina.Cuando se cosan telas normales o gruesas: gire el dial hasta 3Cuando se cosan telas delgadas o elásticas: gire el dial a 3-2.Cuando zurza: gire el dial a 1-2
Cosiendo telas gruesas(Particularmente mezclilla)Cuando cosa telas gruesas o partes gruesas de la tela, como se muestra en (fig. B), es importante coser despacio y usar el grosor de aguja adecuado (refiérase a página 52).Guíe poco a poco la tela, en la medida que Ud. cosa.
Especialmente en los puntos en que el grosor cambia (fig. B-1), cosa despacio guiando el volante con su mano.Esto evitará que la aguja se quiebre o se deforme.
➀➀x
y
xy
A B
HC325_ES.book Page 19 Thursday, April 10, 2008 4:15 PM

English Español
20
Zigzag stitching1. Be sure that the declutch knob in the handwheel is
into the ( ) direction.2. Set pattern selection dial, stitch length dial and
zigzag width control dial as... (fig A)
❈ Slightly loosen upper thread tension. Better looking zigzag stitches require less upper tension than straight stitching.
3. Follow the steps as you did in straight stitching.
Stretch stitchingThe following stitches shown (fig B) can be used with stretch and knit fabrics.(13) Straight stretch stitch(14) RicRac stretch stitch(15) Overlock stitch(18) Decorative stitch
Cosiendo Zigzag1. Asegúrese que el seguro del volante esté en la
posición de costura ( ).2. Coloque: el Dial Selector de Diseño de Puntada,
el Dial Selector de Largo de Puntada y el Dial Selector de Ancho de Puntada, como (fig. A)
❈ Suelte ligeramente la tensión del hilos superior. Para una mejor presentación de las puntadas zigzag se requiere una tensión menor que para costura recta.
3. Siga los pasos que dio en costura recta.
Costura ElásticaLas puntadas indicadas (fig. B) pueden ser usadas en telas elásticas y de punto.(13) Recta triple(14) Zig-Zag Triple(15) Overlock para Tela Stretch(18) Overlock Telas Lycra Inversa
1-51-5
4 5
13 1514 18
A B
HC325_ES.book Page 20 Thursday, April 10, 2008 4:15 PM

21
EspañolEnglish
HOW TO USE BUILT IN STITCHESBlind hem stitch1. Be sure that the declutch knob in the handwheel is
into the ( ) direction.2. Set pattern selection dial, stitch length dial and
zigzag width control dial as... (fig A)3. Fold the material as shown in (fig B). Place it under
the presser foot.For neater finish, it is preferable to pin and press the hem before sewing.
4. Sew on the fold, so that straight stitches are made on the hem edge, and the zigzag just catches only one or two threads of fold. (fig C)(fig D) a : Correct seam
b : Needle catching edge of fold too much.c : Needle is not catching edge of fold at all.
❈ Use zigzag sewing foot or option foot (blind stitch foot).
OvercastingFor light-weight material:Overcasting prevents edge of fabric from fraying.1. Be sure that the declutch knob in the handwheel is
into the ( ) direction.2. Set pattern selection dial, stitch length dial and
zigzag width control dial as... (fig E) 3. Set the seam allowance under the presser foot with
the edge of fabric in the line with side of the presser foot. (fig F)
NOTEFor thick fabric (particularly denim), use wide zigzag stitch, for light fabric, use narrow zigzag stitch.❈ Use zigzag sewing foot or option foot
(overcasting foot).
COMO USAR LAS PUNTADAS INCORPORADASPuntada basta invisible1. Asegúrese que el seguro del volante esté en
posición de costura ( ). 2. Coloque: el Dial Selector de Diseño de Puntada,
el Dial Selector de Largo de Puntada y el Dial Selector de Ancho de Puntada, como (fig. A)
3. Doble la tela como se muestra (fig. B). Colóquelo bajo el prensatelas Para una mejor terminación, es preferible sujetar y planchar el borde antes de coser.
4. Cosa en el doblez , de tal manera que la puntada recta sea hecha sobre el borde de la basta, y el zigzag sólo atrape una o dos hebras del doblez. (fig. C) (fig. D): a: Costura correcta
b: Aguja tomando demasiado del doblez.c: La aguja no está tomando el borde de
la basta completamente.❈ Use el prensatelas para zigzag o prensatelas
opcional (prensatelas costura invisible).Punta de lanza (sobrecostura)Para tela de peso ligero:La sobrecostura previene que la tela se deshilache.1. Asegúrese que la seguro del volante esté en
posición de costura ( ).2. Coloque: el Dial Selector de Diseño de Puntada,
el Dial Selector de Largo de Puntada y el Dial Selector de Ancho de Puntada, como (fig. E)
3. Coloque el sector de costura bajo el prensatelas con el borde de la tela alineado con el prensatelas. (fig. F)
NOTAPara telas gruesas, use la puntada de zigzag ancha. Para tela delgada, use la puntada de zigzag angosta.❈ Use el prensatelas para zigzag u otro pie
opcional (pie de sobrecostura).
3 - 5 mm (0.2”)
a b c
2
1-5
5
6
4-5
4 5
A B C
D E F
HC325_ES.book Page 21 Thursday, April 10, 2008 4:15 PM
English Español
22
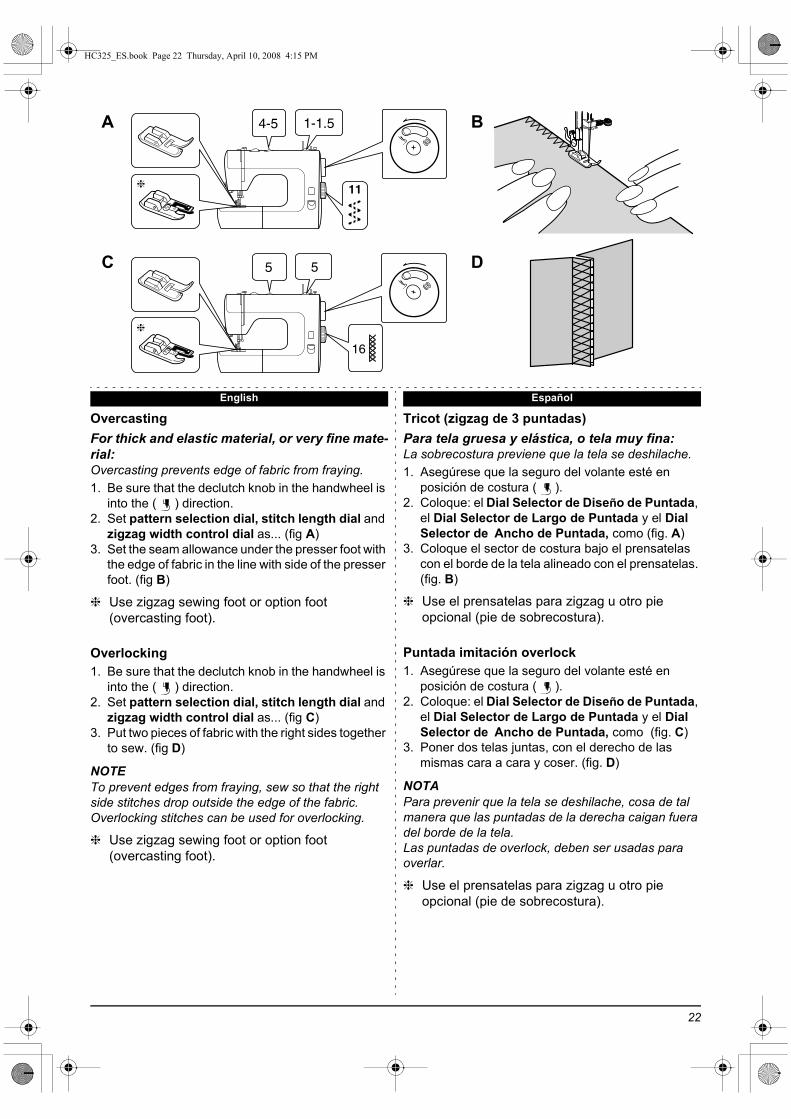
Overcasting For thick and elastic material, or very fine mate-rial:Overcasting prevents edge of fabric from fraying.1. Be sure that the declutch knob in the handwheel is
into the ( ) direction.2. Set pattern selection dial, stitch length dial and
zigzag width control dial as... (fig A) 3. Set the seam allowance under the presser foot with
the edge of fabric in the line with side of the presser foot. (fig B)
❈ Use zigzag sewing foot or option foot (overcasting foot).
Overlocking1. Be sure that the declutch knob in the handwheel is
into the ( ) direction.2. Set pattern selection dial, stitch length dial and
zigzag width control dial as... (fig C)3. Put two pieces of fabric with the right sides together
to sew. (fig D)
NOTETo prevent edges from fraying, sew so that the right side stitches drop outside the edge of the fabric.Overlocking stitches can be used for overlocking.
❈ Use zigzag sewing foot or option foot (overcasting foot).
Tricot (zigzag de 3 puntadas)Para tela gruesa y elástica, o tela muy fina:La sobrecostura previene que la tela se deshilache.1. Asegúrese que la seguro del volante esté en
posición de costura ( ).2. Coloque: el Dial Selector de Diseño de Puntada,
el Dial Selector de Largo de Puntada y el Dial Selector de Ancho de Puntada, como (fig. A)
3. Coloque el sector de costura bajo el prensatelas con el borde de la tela alineado con el prensatelas. (fig. B)
❈ Use el prensatelas para zigzag u otro pie opcional (pie de sobrecostura).
Puntada imitación overlock1. Asegúrese que la seguro del volante esté en
posición de costura ( ).2. Coloque: el Dial Selector de Diseño de Puntada,
el Dial Selector de Largo de Puntada y el Dial Selector de Ancho de Puntada, como (fig. C)
3. Poner dos telas juntas, con el derecho de las mismas cara a cara y coser. (fig. D)
NOTAPara prevenir que la tela se deshilache, cosa de tal manera que las puntadas de la derecha caigan fuera del borde de la tela.Las puntadas de overlock, deben ser usadas para overlar.
❈ Use el prensatelas para zigzag u otro pie opcional (pie de sobrecostura).
1-1.5
11
5
4-5
5
16
A B
C D
HC325_ES.book Page 22 Thursday, April 10, 2008 4:15 PM

23
English Español
Smocking1. Be sure that the declutch knob in the handwheel is
into the ( ) direction.2. Sew two straight lines with very loose thread
tension. Make knots in one end. (Long stitch)3. Gather fabric towards the knots while holding the
other end of lower thread. (fig A) 4. Set pattern selection dial, stitch length dial and
zigzag width control dial as... (fig B)5. Sew smocking stitches on the gathered part
between two straight stitches. (fig C)6. Remove the straight stitches after finishing the
smocking.
Panal de Abeja (ropa interior y decorativa)1. Asegúrese que el seguro del volante esté en
posición de costura ( ).2. Cosa dos costuras rectas con la tensión del hilo
muy suelta. Haga un nudo en uno de los extremos. (puntada larga)
3. Recoja la tela desde el nudo, mientras sujeta el otro extremo del hilo inferior. (fig. A)
4. Coloque: el Dial Selector de Diseño de Puntada, el Dial Selector de Largo de Puntada y el Dial Selector de Ancho de Puntada, como (fig. B)
5. Cosa las costuras de panal de abeja en la parte recogida entre dos costuras rectas. (fig. C)
6. Saque las puntadas rectas después de terminar el fruncido.
5
17
5
A B
C
HC325_ES.book Page 23 Thursday, April 10, 2008 4:15 PM

English Español
24
Mending1. Be sure that the declutch knob in the handwheel is
into the ( ) direction.2. Set pattern selection dial, stitch length dial and
zigzag width control dial as... (fig A)3. Place a patch over the worn part. Sew along the
edge of the right side of the patch.4. Trim the worn part along the seam on the wrong
side of fabric. (fig B)
Mending a rip (fig C)Set the machine in the same way as for mending.Sew the edges of tear together first. Then sew one more seam on each side (right side and wrong side) of the fabric.A piece of fabric can be placed underneath to reinforce the rip.
Parchando1. Asegúrese que la seguro del volante esté en
posición de costura ( ).2. Coloque: el Dial Selector de Diseño de Puntada,
el Dial Selector de Largo de Puntada y el Dial Selector de Ancho de Puntada, como (fig. A)
3. Coloque el parche sobre la parte dañada. Cosa alrededor de los bordes por el lado derecho del parche.
4. Corte la parte rota a lo largo de la costura, por el revés de la prenda. (fig. B)
Parchando una rasgadura (fig. C)Coloque la máquina en la misma posición que para el zurcido. Cosa de manera de que los bordes queden juntos, luego cosa una vez más en cada costado (por el derecho y por el revés) de la tela.Un trozo de tela puede ser colocado por debajo para reforzar la costura en la rasgadura.
1-1.5
11
1-2
A B
C
HC325_ES.book Page 24 Thursday, April 10, 2008 4:15 PM

25
English Español
Applique work1. Be sure that the declutch knob in the handwheel is
into the ( ) direction.2. Set pattern selection dial, stitch length dial and
zigzag width control dial as... (fig A)3. Draw a design on material for the applique, and cut
it out. (fig B)4. Lay stabilizer under the fabric and baste the cut out
(or pin it) on the desired location.5. Sew around the edge of the cut carefully. (fig C) To change directions at corners or to sew very small circles:Stop the machine with the needle pointing just away from the edge of the cut. Lift presser foot and turn the material. Lower presser foot and continue sewing.
Puntadas para aplicaciones1. Asegúrese que el seguro del volante esté en la
posición de costura ( ).2. Coloque: el Dial Selector de Diseño de Puntada,
el Dial Selector de Largo de Puntada y el Dial Selector de Ancho de Puntada, como (fig. A)
3. Dibuje un diseño en la tela que se va a utilizar de adorno para aplicar y recórtelo. (fig. B)
4. Extienda un estabilizador bajo la tela, hilvánelo o sujételo con alfileres en la ubicación deseada.
5. Cosa alrededor de los bordes de la aplicación cuidadosamente. (fig. C)
Para cambiar de dirección en las esquina o para coser pequeños círculos:Detenga la máquina en la esquina de la aplicación, inserte la aguja en la tela, suba el prensatelas, gire la tela hasta ubicarla en la dirección correcta. Baje el prensatelas y continúe cosiendo.
53-5
21 22
A B
C
HC325_ES.book Page 25 Thursday, April 10, 2008 4:15 PM
English Español
26
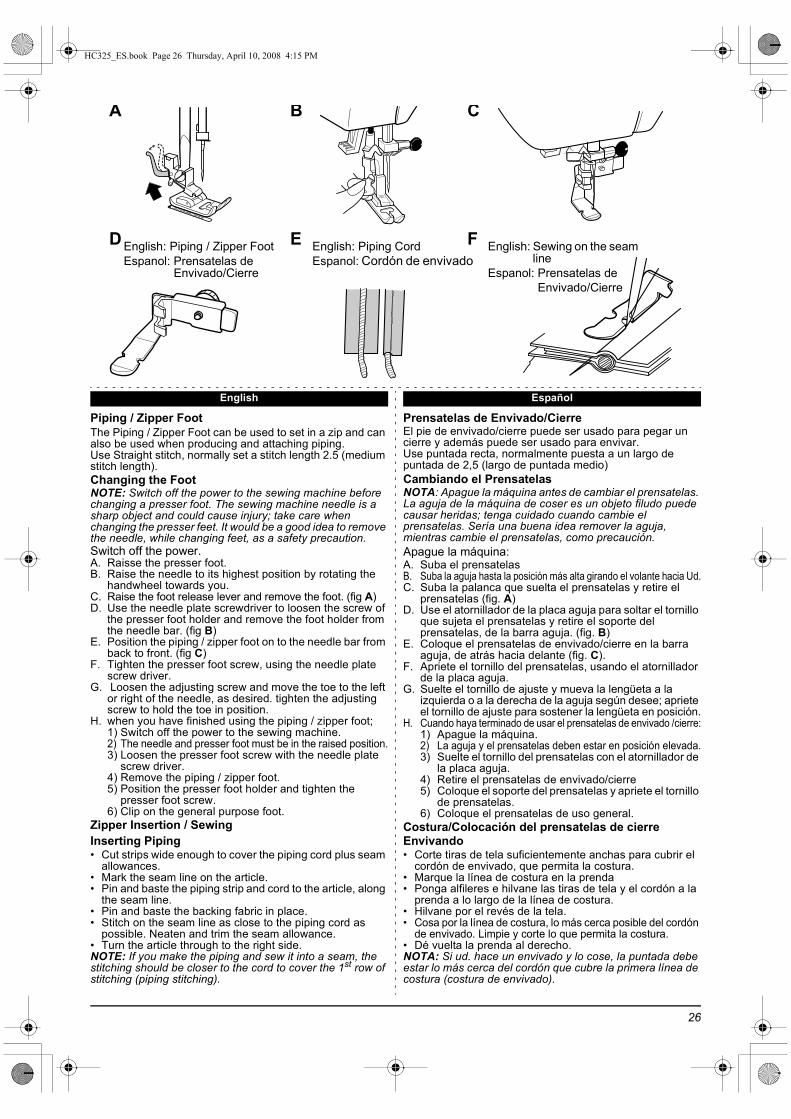
Piping / Zipper FootThe Piping / Zipper Foot can be used to set in a zip and can also be used when producing and attaching piping.Use Straight stitch, normally set a stitch length 2.5 (medium stitch length).Changing the FootNOTE: Switch off the power to the sewing machine before changing a presser foot. The sewing machine needle is a sharp object and could cause injury; take care when changing the presser feet. It would be a good idea to remove the needle, while changing feet, as a safety precaution.Switch off the power.A. Raisse the presser foot.B. Raise the needle to its highest position by rotating the
handwheel towards you.C. Raise the foot release lever and remove the foot. (fig A)D. Use the needle plate screwdriver to loosen the screw of
the presser foot holder and remove the foot holder from the needle bar. (fig B)
E. Position the piping / zipper foot on to the needle bar from back to front. (fig C)
F. Tighten the presser foot screw, using the needle plate screw driver.
G. Loosen the adjusting screw and move the toe to the left or right of the needle, as desired. tighten the adjusting screw to hold the toe in position.
H. when you have finished using the piping / zipper foot;1) Switch off the power to the sewing machine.2) The needle and presser foot must be in the raised position.3) Loosen the presser foot screw with the needle plate
screw driver.4) Remove the piping / zipper foot.5) Position the presser foot holder and tighten the
presser foot screw.6) Clip on the general purpose foot.
Zipper Insertion / SewingInserting Piping• Cut strips wide enough to cover the piping cord plus seam
allowances.• Mark the seam line on the article.• Pin and baste the piping strip and cord to the article, along
the seam line.• Pin and baste the backing fabric in place.• Stitch on the seam line as close to the piping cord as
possible. Neaten and trim the seam allowance.• Turn the article through to the right side.NOTE: If you make the piping and sew it into a seam, the stitching should be closer to the cord to cover the 1st row of stitching (piping stitching).
Prensatelas de Envivado/CierreEl pie de envivado/cierre puede ser usado para pegar un cierre y además puede ser usado para envivar.Use puntada recta, normalmente puesta a un largo de puntada de 2,5 (largo de puntada medio)Cambiando el PrensatelasNOTA: Apague la máquina antes de cambiar el prensatelas. La aguja de la máquina de coser es un objeto filudo puede causar heridas; tenga cuidado cuando cambie el prensatelas. Sería una buena idea remover la aguja, mientras cambie el prensatelas, como precaución.Apague la máquina:A. Suba el prensatelasB. Suba la aguja hasta la posición más alta girando el volante hacia Ud.C. Suba la palanca que suelta el prensatelas y retire el
prensatelas (fig. A)D. Use el atornillador de la placa aguja para soltar el tornillo
que sujeta el prensatelas y retire el soporte del prensatelas, de la barra aguja. (fig. B)
E. Coloque el prensatelas de envivado/cierre en la barra aguja, de atrás hacia delante (fig. C).
F. Apriete el tornillo del prensatelas, usando el atornillador de la placa aguja.
G. Suelte el tornillo de ajuste y mueva la lengüeta a la izquierda o a la derecha de la aguja según desee; apriete el tornillo de ajuste para sostener la lengüeta en posición.
H. Cuando haya terminado de usar el prensatelas de envivado /cierre:1) Apague la máquina.2) La aguja y el prensatelas deben estar en posición elevada.3) Suelte el tornillo del prensatelas con el atornillador de
la placa aguja.4) Retire el prensatelas de envivado/cierre5) Coloque el soporte del prensatelas y apriete el tornillo
de prensatelas.6) Coloque el prensatelas de uso general.
Costura/Colocación del prensatelas de cierreEnvivando• Corte tiras de tela suficientemente anchas para cubrir el
cordón de envivado, que permita la costura.• Marque la línea de costura en la prenda• Ponga alfileres e hilvane las tiras de tela y el cordón a la
prenda a lo largo de la línea de costura.• Hilvane por el revés de la tela.• Cosa por la línea de costura, lo más cerca posible del cordón
de envivado. Limpie y corte lo que permita la costura.• Dé vuelta la prenda al derecho.NOTA: Si ud. hace un envivado y lo cose, la puntada debe estar lo más cerca del cordón que cubre la primera línea de costura (costura de envivado).
A B C
D E FEnglish: Piping / Zipper FootEspanol: Prensatelas de
Envivado/Cierre
English: Piping CordEspanol: Cordón de envivado
English: Sewing on the seam line
Espanol: Prensatelas de Envivado/Cierre
HC325_ES.book Page 26 Thursday, April 10, 2008 4:15 PM

27
English Español
Zipper sewing1. Be sure that the declutch knob in the handwheel is
into the ( ) direction.2. Set pattern selection dial, stitch length dial and
zigzag width control dial as... (fig A)3. Set the Zipper Foot on the right side of the needle.
Sew the right side of the zipper. Guide the fabric carefully so that the zipper teeth of the right side are parrallel with the left edge of the foot. (fig B)
4. Re-set the Zipper Foot to the left side of the needle.Sew the left side of the zipper in the same way. (fig C)
❈ Use piping / zipper foot.
Cosiendo cierre1. Asegúrese que el seguro del volante esté en
posición de costura ( ).2. Coloque: el Dial Selector de Diseño de Puntada,
el Dial Selector de Largo de Puntada y el Dial Selector de Ancho de Puntada, como (fig. A)
3. Coloque el prensatelas de cierre a la derecha de la aguja. Cosa al costado derecho del cierre. Guíe la tela cuidadosamente de manera tal que los dientes del cierre del costado derecho estén paralelos con el borde izquierdo del prensatelas.(fig. B)
4. Reubique el prensatelas de cierre al costado izquierdo de la aguja. Cosa el lado izquierdo del cierre de la misma forma. (fig. C)
❈ Use prensatelas envivado/cierre.
1-55 0
3 54
A B
C
HC325_ES.book Page 27 Thursday, April 10, 2008 4:15 PM

English Español
28
Free hand embroidery1. Be sure that the declutch knob in the handwheel is
into the ( ) direction.2. Drop feed teeth. (see page 18)3. Set pattern selection dial, stitch length dial and
zigzag width control dial as... (fig A)4. Reduce upper thread tension slightly to prevent
lower thread from being pulled up. Satin zigzag stitches requires less upper tension than straight stitching.
FOR GOOD EMBROIDERYIt is important to use the correct needle and threads.Use embroidery thread for upper thread, and a thinner thread of same kind and color for lower thread.
5. Trace your design on the material and center it in an embroidery hoop. Make sure the material is taut.Lay stabilizer underneath when embroidering thin fabric.
6. Pull out lower thread by turning the handwheel towards you while holding the upper thread lightly.Lower presser foot.
7. Pick up lower thread then make two or three stitches. Cut off excess threads. (fig B)
8. Start sewing along the outline of the design. Guide the hoop by hand. (fig C)
9. Sew several straight stitches at the end of the stitching for reinforcment.
Needle ThreadNo. 9 120 - 100No. 11 100 - 80No. 14 60 - 50
Bordado manos libres1. Asegúrese que el seguro del volante esté en
posición de costura ( ).2. Baje los dientes de la máquina (vea página 18)3. Coloque: el Dial Selector de Diseño de Puntada,
el Dial Selector de Largo de Puntada y el Dial Selector de Ancho de Puntada, como (fig. A)
4. Reduzca la tensión del hilo superior levemente, para prevenir que el hilo inferior sea tirado hacia arriba. Las puntadas de relleno en zigzag requiere menor tensión superior que la puntada recta.
PARA UN BUEN BORDADOEs importante usar agujas e hilos correctos. Use hilos de bordar en la parte superior, e hilo fino del mismo tipo y color en el hilo inferior.
5. Dibuje el diseño en la tela y centre el bastidor de bordado. Asegúrese que el material quede tirante.Coloque un estabilizador bajo la tela, cuando borde un material muy delgado.
6. Tire hacia fuera el hilo inferior, girando el volante hacia ud., mientras sostiene suavemente el hilo superior. Baje el prensatelas.
7. Tome el hilo inferior, luego haga 2 o 3 puntadas. Corte el exceso de hilo. (fig. B)
8. Comience a coser a lo largo de la línea exterior del diseño. Guíe el bastidor con la mano. (fig. C)
9. Cosa varias puntadas rectas al final de la costura, para reforzar.
Grosor Aguja HiloNo. 9 120 - 100No. 11 100 - 80No. 14 60 - 50
02-5
4 5
A B
C
HC325_ES.book Page 28 Thursday, April 10, 2008 4:15 PM

29
AB
D
C
E F
➁➀
➂
➃
➄
➅
HC325_ES.book Page 29 Thursday, April 10, 2008 4:15 PM

30
English Español
Twin needle threading1. Set the extra spool pin on the machine. Place a
spool of thread on each spool pin. (fig A)2. Thread the two threads in the same way for single
needle (page 12), except the next 3 points at (fig C) and (fig F).1 At the Tension disc, pass threads separately to
the right and to the left. (fig C)2 At the needle guide 5, pass threads through
separate guides, one to the left guide, other to the right guide. (fig F)
3 At the needle eye 6, the thread from the right needle guide should go through the right needle eye.The thread from the left side to the left needle eye. (fig F)
Caution!Remember to use less than 2.5 zigzag width.Needle threader can not be used on twin needle threading.
Enhebrado de aguja doble1. Coloque el portahilo adicional de la máquina (el
portahilo adicional y la aguja doble, son accesorios opcionales que pueden ser utilizados en algunas máquinas). Coloque cada cono de hilo en su portahilo (fig. A) .
2. Enhebre los dos hilos en la misma forma de enhebrado de aguja simple (página 12) , excepto los 3 puntos indicados en (fig. C y fig. F), para lo cual considere:1 En el disco de tensión pase el hilo
separadamente hacia la derecha y la izquierda. (fig. C)
2 En el guía aguja 5 pase el hilo a través de la guía separadamente, uno por la guía izquierda, y el otro por la guía derecha. (fig. F)
3 En el ojo de la aguja 6 el hilo del guía derecha deber ir en la aguja derecha y el hilos del lado izquierdo debe ir en el ojo de la aguja izquierda. (fig. F)
PRECAUCIÓNRecuerde no usar un ancho superior a 2,5 en puntada zigzag.No se puede usar enhebrador automático en aguja doble.
HC325_ES.book Page 30 Thursday, April 10, 2008 4:15 PM
31
English Español
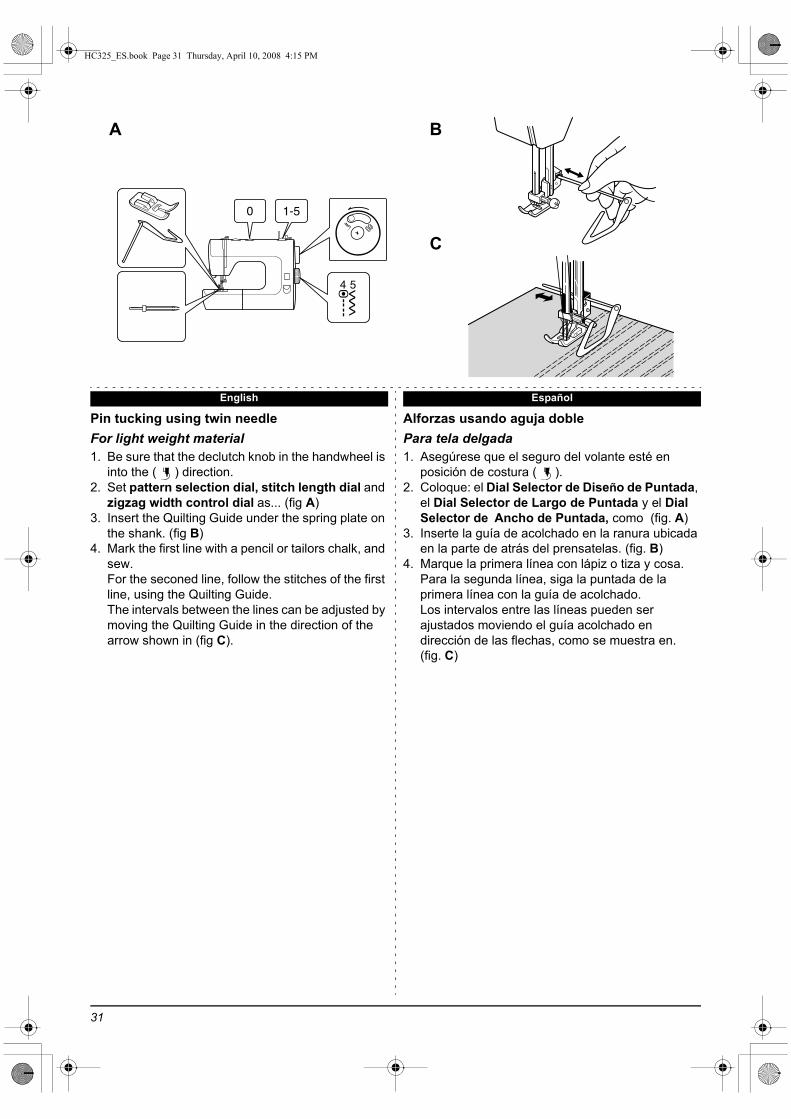
Pin tucking using twin needleFor light weight material1. Be sure that the declutch knob in the handwheel is
into the ( ) direction.2. Set pattern selection dial, stitch length dial and
zigzag width control dial as... (fig A)3. Insert the Quilting Guide under the spring plate on
the shank. (fig B)4. Mark the first line with a pencil or tailors chalk, and
sew.For the seconed line, follow the stitches of the first line, using the Quilting Guide.The intervals between the lines can be adjusted by moving the Quilting Guide in the direction of the arrow shown in (fig C).
Alforzas usando aguja doblePara tela delgada1. Asegúrese que el seguro del volante esté en
posición de costura ( ).2. Coloque: el Dial Selector de Diseño de Puntada,
el Dial Selector de Largo de Puntada y el Dial Selector de Ancho de Puntada, como (fig. A)
3. Inserte la guía de acolchado en la ranura ubicada en la parte de atrás del prensatelas. (fig. B)
4. Marque la primera línea con lápiz o tiza y cosa.Para la segunda línea, siga la puntada de la primera línea con la guía de acolchado.Los intervalos entre las líneas pueden ser ajustados moviendo el guía acolchado en dirección de las flechas, como se muestra en. (fig. C)
1-50
4 5
A B
C
HC325_ES.book Page 31 Thursday, April 10, 2008 4:15 PM
English Español
32
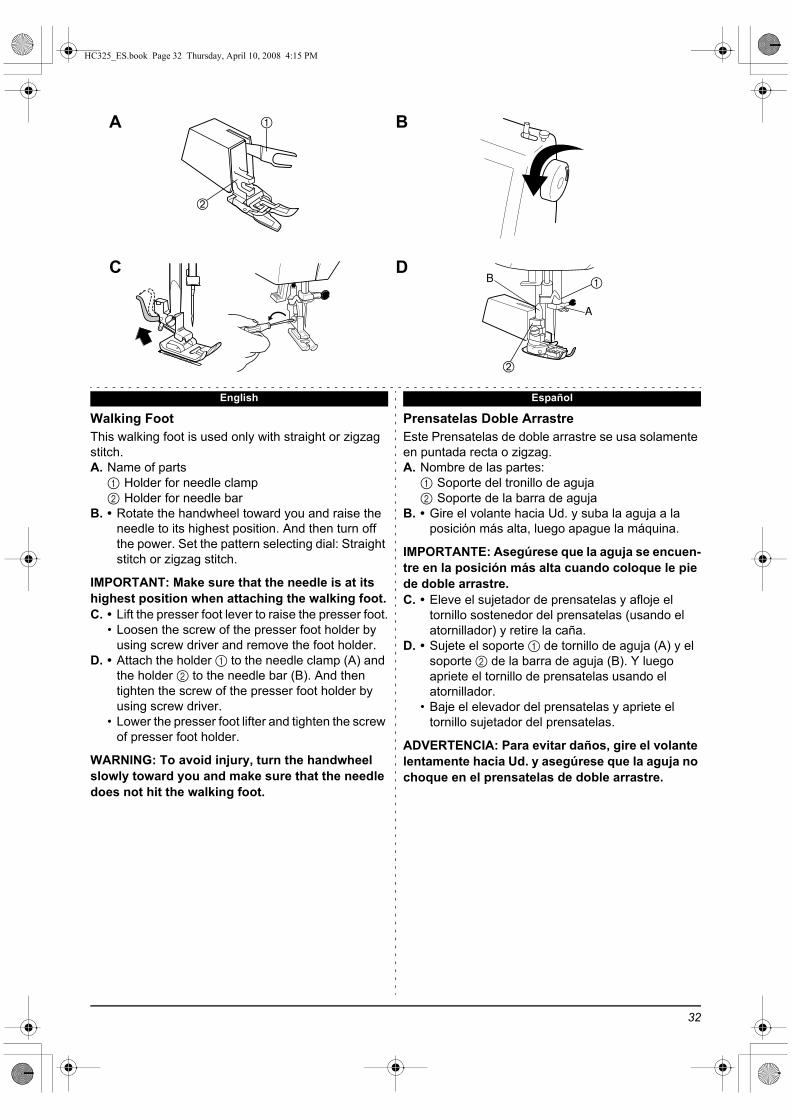
Walking FootThis walking foot is used only with straight or zigzag stitch. A. Name of parts1 Holder for needle clamp2 Holder for needle bar
B. • Rotate the handwheel toward you and raise the needle to its highest position. And then turn off the power. Set the pattern selecting dial: Straight stitch or zigzag stitch.
IMPORTANT: Make sure that the needle is at its highest position when attaching the walking foot.C. • Lift the presser foot lever to raise the presser foot.
• Loosen the screw of the presser foot holder by using screw driver and remove the foot holder.
D. • Attach the holder 1 to the needle clamp (A) and the holder 2 to the needle bar (B). And then tighten the screw of the presser foot holder by using screw driver.
• Lower the presser foot lifter and tighten the screw of presser foot holder.
WARNING: To avoid injury, turn the handwheel slowly toward you and make sure that the needle does not hit the walking foot.
Prensatelas Doble ArrastreEste Prensatelas de doble arrastre se usa solamente en puntada recta o zigzag.A. Nombre de las partes:1 Soporte del tronillo de aguja2 Soporte de la barra de aguja
B. • Gire el volante hacia Ud. y suba la aguja a la posición más alta, luego apague la máquina.
IMPORTANTE: Asegúrese que la aguja se encuen-tre en la posición más alta cuando coloque le pie de doble arrastre.C. • Eleve el sujetador de prensatelas y afloje el
tornillo sostenedor del prensatelas (usando el atornillador) y retire la caña.
D. • Sujete el soporte 1 de tornillo de aguja (A) y el soporte 2 de la barra de aguja (B). Y luego apriete el tornillo de prensatelas usando el atornillador.
• Baje el elevador del prensatelas y apriete el tornillo sujetador del prensatelas.
ADVERTENCIA: Para evitar daños, gire el volante lentamente hacia Ud. y asegúrese que la aguja no choque en el prensatelas de doble arrastre.
A B
C D
HC325_ES.book Page 32 Thursday, April 10, 2008 4:15 PM

33
English Español
Darning FootA. Rotate the handwheel toward you and raise the
needle to its highest position. And then turn off the power.
B. Lift the presser foot lever to raise the presser foot.C. Attach the darning foot.D. Select either straight (center needle position) or
zigzag stitch.E. Connect the foot control, so that both hands are
free to guide the fabric.F. Lower the feed dog.
Pie de zurcido y/o bordadoA. Gire el volante hacia Ud. y eleve la aguja a la
posición más alta. Luego apague la máquina.B. Eleve el prensatelas y retírelo.C. Coloque el pie de zurcido y/o bordado.D. Selecciones puntada recta (posición de la aguja al
centro) o puntada zigzag.E. Conecte el pedal. Así sus manos estarán guiando
la tela.F. Baje los dientes de la máquina.
A B C
D E F
HC325_ES.book Page 33 Thursday, April 10, 2008 4:15 PM

English Español
34
G. Leave about 4” (10 cm) of lower thread tail after threading.
H. Place the fabric under the presser foot.I. If the fabric does not slide under the presser foot,
raise the presser foot.• Turn the handwheel toward you to bring up the
lower thread.J. • By holding the lower thread gently, sew about
4 stitches.• For darning, cut off any excess threads.• For free-motion quilting, use a sewing needle to
hide the excess threads underneath the quilting pieces. Trim any threads that are still showing.
K. • Use both hands to guide the fabric and keep it in its place.
L. • Trace your design on the material and place it in an embroidery hoop.
• Make sure the material is taut.• Lay a stabilizer underneath when embroidering
on a thin fabric.• Guide the hoop with your hands.
IMPORTANTRemember to raise the feed dog when you have finished.
❈ Embroidery hoop not include.
G. Libere 10 cms de hilo inferior después de enhebrar.
H. Coloque la tela bajo el pie de zurcido y/o bordado.I. Si la tela no se desliza debajo del prensatelas,
suba el prensatelas, girando el volante:• Gire el volante hacia Ud. para subir el hilo inferior
J. • Para enganchar el hilo inferior, cosa lentamente alrededor de 4 puntadas-
• Para zurcir, corte los excesos de hilo• Para acolchado manos libres (quilting), use una
aguja para esconder el exceso de hilo bajo las piezas de acolchado. Corte cualquier hilo que aún se vea.
K. • Use ambas manos para guiar la tela, y mantenerlas en su lugar.
L. • Dibuje su diseño en la tela y colóquelo en el bastidor.
• Asegúrese que la tela esté tirante.• Coloque estabilizador por debajo de la tela,
cuando esté bordando una tela muy fina.• Guíe el bastidor con sus manos.
IMPORTANTERecuerde levantar los dientes de la máquina, una vez que haya terminado.
❈ No se incluye el bastidor de bordado.
G H I
J K L
HC325_ES.book Page 34 Thursday, April 10, 2008 4:15 PM

35
English Español
Piecing Foot1/4” Piecing FootUse the 1/4” piecing foot whenever a 1/4” seam allowance is required.A. Raise the foot release lever to remove the foot.B. Place the piecing foot on the needle plate aligning
needle holes.C. Lower the presser foot lever so that the ankle
snaps on the foot.To stitch a 1/4” seam:D. Align the edges of the fabrics with the right edge of
the presser foot.E. When pivoting at a corner, stop when the fabric
edge is even with the front red line on the foot. Lower the needle into the fabric and pivot. Continue to stitch.
To stitch a 1/8” seam:F. Align the edges of the fabrics with the inside edge
of the right side of the presser foot.G. When pivoting at a corner, stop when the fabric
edge is even with the middle red line on the foot. Lower the needle into the fabric and pivot. Continue to stitch.
Pie Patchwork, de 1/4” para unión de costura, asegurando un ancho correctoUse el Prensatelas de 1/4” que requieran 1/4 de pulgada de borde:A. Suba la palanca que suelta el prensatelas y retire
el prensatelas.B. Coloque el pie de patchwork de unión en la placa
aguja, alineado con el ojo de la agujaC. Baje la palanca del prensatelas de tal manera que
la barra aguja encaje en el pie.Para hacer una costura de 1/4” de pulgada:D. Alinee los bordes de la tela con el borde derecho
del prensatelas.E. Cuando gire en la esquina, deténgase cuando el
borde de la tela esté paralelo a la línea roja frontal que está en el prensatelas. Baje la aguja dentro de la tela y gire. Continúe la costura.
Para hacer una costura de 1/8” de pulgadaF. Alinee los bordes de la tela con el borde interior
derecho del prensatelas.G. Cuando gire en la esquina, deténgase cuando el
borde de la tela esté en la línea roja media que está en el prensatelas. Baje la aguja dentro de la tela y gire. Continúe la costura.
A B C
D E F G
HC325_ES.book Page 35 Thursday, April 10, 2008 4:15 PM
English Español
36
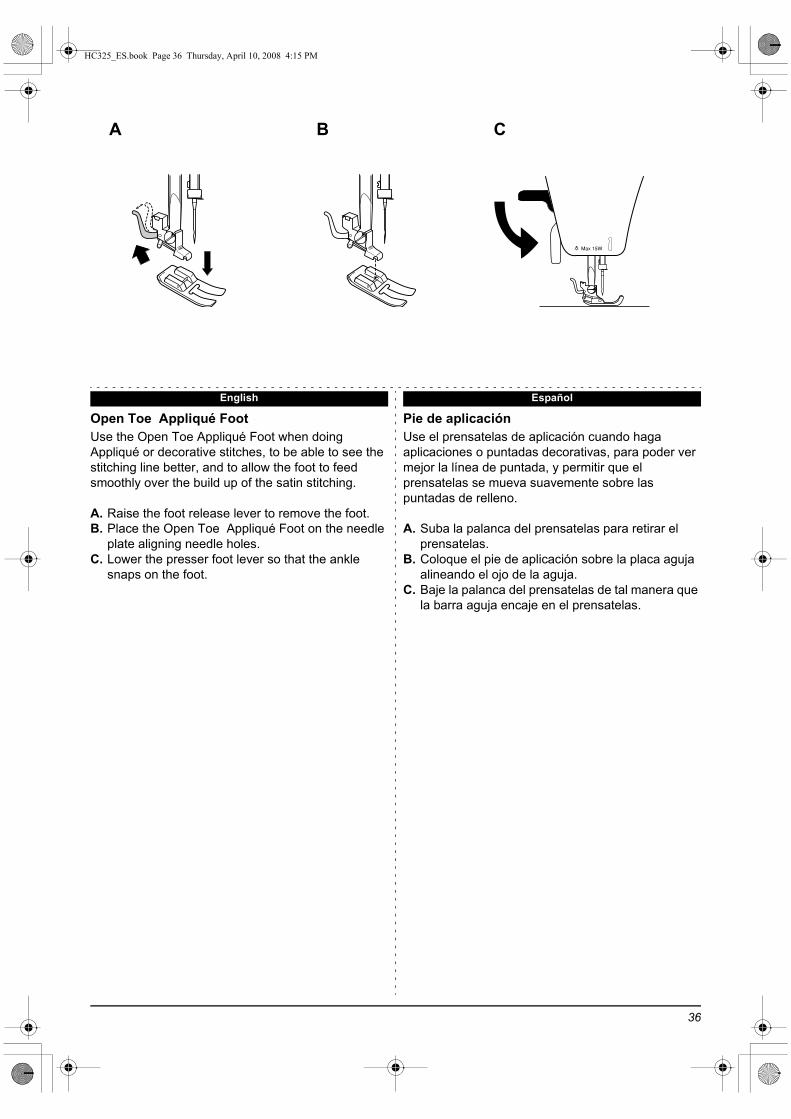
Open Toe Appliqué FootUse the Open Toe Appliqué Foot when doing Appliqué or decorative stitches, to be able to see the stitching line better, and to allow the foot to feed smoothly over the build up of the satin stitching.
A. Raise the foot release lever to remove the foot.B. Place the Open Toe Appliqué Foot on the needle
plate aligning needle holes. C. Lower the presser foot lever so that the ankle
snaps on the foot.
Pie de aplicaciónUse el prensatelas de aplicación cuando haga aplicaciones o puntadas decorativas, para poder ver mejor la línea de puntada, y permitir que el prensatelas se mueva suavemente sobre las puntadas de relleno.
A. Suba la palanca del prensatelas para retirar el prensatelas.
B. Coloque el pie de aplicación sobre la placa aguja alineando el ojo de la aguja.
C. Baje la palanca del prensatelas de tal manera que la barra aguja encaje en el prensatelas.
A B C
HC325_ES.book Page 36 Thursday, April 10, 2008 4:15 PM

37
Attachment settings: Ajustes del accesorio:
EN
ES
Ruffler Foot
USE: Use this attachment to make pleated or gathered ruffles to decorate your work.
Pie plisador
<NOTE>
A
B
C
E
D
FG
H
I
Sewing machine settings: Ajustes para la máquina:
Fabric : For medium weight fabrics<Note> Do not use for thick fabrics and stretch fabrics.Stitch selection : Straight stitch (center needle position)Stitch length : 3 - 5 mmSewing speed : Slow speed ~ Medium speed
Recommended settingAjustes recomendados
for Gatheringpara fruncidos
for Pleatingpara plisados
Sewing finishFinalización del cosido
Recommended stitch lengthLongitud de puntada recomendada
5mm (max)5mm. (max.)
5mm (max)5mm. (max.)
C. Space adjusting leverC. Palanca para ajustar la distancia
Slot 1Ranura 1
Slot 6Ranura 6
E. Fullness adjusting indicatorE. Indicador de longitud del plisado 82
EShallower tucksPlisado más bajo
Deeper tucksPlisado más profundo
TuckPlisado
Tejidos : para géneros medios<Nota> No lo use con tejidos finos ni elásticos.Selección de puntada :Puntada recta ( centre la posición de la aguja )Longitud de la puntada : 3-5 mmVelocidad de cosido : Velocidad lenta ~ Velocidad media
C
<Nota>
USO: Use este prensatelas para hacer plisados o fruncidos para decorar sus prendas.
La cantidad de plisados que se formarán dependerá del tipo de tejido utilizado. Haga pruebas antes de empezar con su tejido para comprobar que los plisados se forman tal y como Ud. desea.
The fullness of the ruffles depends on the types of fabric. Please make trial sewing as a test in advance.
Part names : A. Fork armB. ProjectionC. Space adjusting lever
The space adjusting lever controls the frequency of gathers or pleats. Raise this lever and move it so that the projection (B) enters one of the slots. Slot 1 : One tuck for each stitchSlot 6 : One tuck for every 6 stitchesSlot 12 : One tuck for every 12 stitchesThe star : Straight stitch (No tucks)
D. Fullness adjusting indicator screwE. Fullness adjusting indicator
Turn the adjusting indicator by turning the screw (D) to a larger number for deeper tucks, and to a smaller number for shallower tucks. When the indicator is set at '0', ruffles will not be formed.
F. Separator guideG. Ruffling bladeH. Separator bladeI. Holder for presser bar
Partes :A. HorquillaB. Saliente/ProyecciónC. Palanca para ajustar la distancia
La palanca para ajustar el espacio controla la frecuencia de plisados o fruncidos. Levante esta palanca y muévala hasta que la parte (B) entre en una de las ranuras.Ranura 1 : un plisado por cada puntadaRanura 6 : un plisado por cada 6 puntadasRanura 12 : un plisado por cada 12 puntadasRanura * : Puntada recta ( sin plisado )
D. Tornillo para ajustar la longitud del plisadoE. Indicador de longitud del plisado
Ajuste la longitud del plisado moviendo el tornillo (D) hacia un número mayor para conseguir plisado más largos, y hacia un número menor para conseguir plisados más cortos. Cuando tenga el marcador en el número 0, no se formarán plisados, tendrá puntada recta.
F. Guía de separaciónG. Lámina de plisadoH. Lámina de separaciónI. Soporte para el prensatelas
HC325_ES.book Page 37 Thursday, April 10, 2008 4:15 PM
38
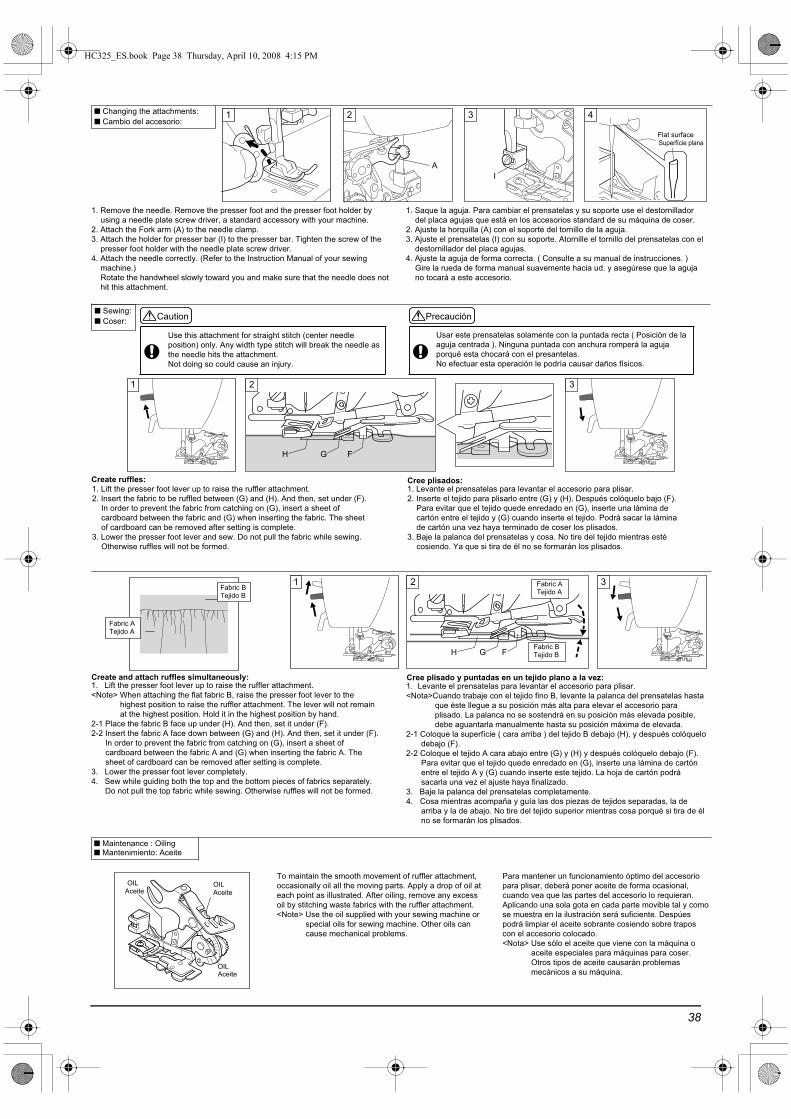
Create and attach ruffles simultaneously:
OILAceite
OIL
OILAceite
Changing the attachments: Cambio del accesorio:
Sewing: Coser: Caution Precaución
Create ruffles: Cree plisados:
Maintenance : Oiling Mantenimiento: Aceite
31
H G F
2 31 Fabric ATejido A
Fabric BTejido B
21 3
AI
4
Flat surface
Fabric BTejido B
Fabric ATejido A
Superfície plana
Cree plisado y puntadas en un tejido plano a la vez:
Aceite
1. Remove the needle. Remove the presser foot and the presser foot holder by using a needle plate screw driver, a standard accessory with your machine.
2. Attach the Fork arm (A) to the needle clamp.3. Attach the holder for presser bar (I) to the presser bar. Tighten the screw of the
presser foot holder with the needle plate screw driver. 4. Attach the needle correctly. (Refer to the Instruction Manual of your sewing
machine.)Rotate the handwheel slowly toward you and make sure that the needle does not hit this attachment.
1. Saque la aguja. Para cambiar el prensatelas y su soporte use el destornillador del placa agujas que está en los accesorios standard de su máquina de coser.
2. Ajuste la horquilla (A) con el soporte del tornillo de la aguja.3. Ajuste el prensatelas (I) con su soporte. Atornille el tornillo del prensatelas con el
destornillador del placa agujas.4. Ajuste la aguja de forma correcta. ( Consulte a su manual de instrucciones. )
Gire la rueda de forma manual suavemente hacia ud. y asegúrese que la aguja no tocará a este accesorio.
1. Lift the presser foot lever up to raise the ruffler attachment.2. Insert the fabric to be ruffled between (G) and (H). And then, set under (F).
In order to prevent the fabric from catching on (G), insert a sheet of cardboard between the fabric and (G) when inserting the fabric. The sheet of cardboard can be removed after setting is complete.
3. Lower the presser foot lever and sew. Do not pull the fabric while sewing. Otherwise ruffles will not be formed.
1. Levante el prensatelas para levantar el accesorio para plisar.2. Inserte el tejido para plisarlo entre (G) y (H). Después colóquelo bajo (F).
Para evitar que el tejido quede enredado en (G), inserte una lámina de cartón entre el tejido y (G) cuando inserte el tejido. Podrá sacar la lámina de cartón una vez haya terminado de coser los plisados.
3. Baje la palanca del prensatelas y cosa. No tire del tejido mientras esté cosiendo. Ya que si tira de él no se formarán los plisados.
1. Lift the presser foot lever up to raise the ruffler attachment.<Note> When attaching the flat fabric B, raise the presser foot lever to the
highest position to raise the ruffler attachment. The lever will not remain at the highest position. Hold it in the highest position by hand.
2-1 Place the fabric B face up under (H). And then, set it under (F).2-2 Insert the fabric A face down between (G) and (H). And then, set it under (F).
In order to prevent the fabric from catching on (G), insert a sheet of cardboard between the fabric A and (G) when inserting the fabric A. The sheet of cardboard can be removed after setting is complete.
3. Lower the presser foot lever completely.4. Sew while guiding both the top and the bottom pieces of fabrics separately.
Do not pull the top fabric while sewing. Otherwise ruffles will not be formed.
1. Levante el prensatelas para levantar el accesorio para plisar.<Nota>Cuando trabaje con el tejido fino B, levante la palanca del prensatelas hasta
que éste llegue a su posición más alta para elevar el accesorio para plisado. La palanca no se sostendrá en su posición más elevada posible, debe aguantarla manualmente hasta su posición máxima de elevada.
2-1 Coloque la superfície ( cara arriba ) del tejido B debajo (H), y después colóquelo debajo (F).
2-2 Coloque el tejido A cara abajo entre (G) y (H) y después colóquelo debajo (F).Para evitar que el tejido quede enredado en (G), inserte una lámina de cartón entre el tejido A y (G) cuando inserte este tejido. La hoja de cartón podrá sacarla una vez el ajuste haya finalizado.
3. Baje la palanca del prensatelas completamente.4. Cosa mientras acompaña y guía las dos piezas de tejidos separadas, la de
arriba y la de abajo. No tire del tejido superior mientras cosa porqué si tira de él no se formarán los plisados.
Use this attachment for straight stitch (center needle position) only. Any width type stitch will break the needle as the needle hits the attachment.Not doing so could cause an injury.
To maintain the smooth movement of ruffler attachment, occasionally oil all the moving parts. Apply a drop of oil at each point as illustrated. After oiling, remove any excess oil by stitching waste fabrics with the ruffler attachment.<Note> Use the oil supplied with your sewing machine or
special oils for sewing machine. Other oils can cause mechanical problems.
Para mantener un funcionamiento óptimo del accesorio para plisar, deberá poner aceite de forma ocasional, cuando vea que las partes del accesorio lo requieran. Aplicando una sola gota en cada parte movible tal y como se muestra en la ilustración será suficiente. Despúes podrá limpiar el aceite sobrante cosiendo sobre trapos con el accesorio colocado.<Nota> Use sólo el aceite que viene con la máquina o
aceite especiales para máquinas para coser. Otros tipos de aceite causarán problemas mecánicos a su máquina.
Usar este prensatelas solamente con la puntada recta ( Posición de la aguja centrada ). Ninguna puntada con anchura romperá la aguja porqué esta chocará con el presantelas.No efectuar esta operación le podría causar daños físicos.
2
H G F
HC325_ES.book Page 38 Thursday, April 10, 2008 4:15 PM

39
English Español
Making buttonholesSet machine as shown in (fig A).
❈ Snap on buttonhole foot.
When setting buttonhole foot, make sure button plate a is set to back side. (fig B)Incorrect setting may cause needle to break and injury.
Determine lengthMark starting point of buttonhole on fabric. (fig C) Pull part a of buttonhole foot back and set button in part as shown in (fig B).
❈ When using soft or elastic fabric, it is recomended to place interfacing material between the fabrics.
Confección de ojalesPreparar la máquina como se indica (fig. A).
❈ Poner el pie prensatelas para ojales.
Al poner el pie presatelas para ojales, aseguress de que la place del botón a esta puesta en la parte detrás. (fig. B)Poniendola de una manera incorrecta puede romper el hilo y perjudicarle.
Determinar la longitudMarcar el punto de partida del pie prensatelas sobre el tejido. (fig. C)Tirar la parte a del pie prensatelas y poner el botón en las partes como esta indicado (fig. B).
❈ Al coser tejidos ligeros o elásticos, esta recomendado poner un tejido intermedio entre los tejidos.
a12
0.4-13-5A B
C
HC325_ES.book Page 39 Thursday, April 10, 2008 4:15 PM
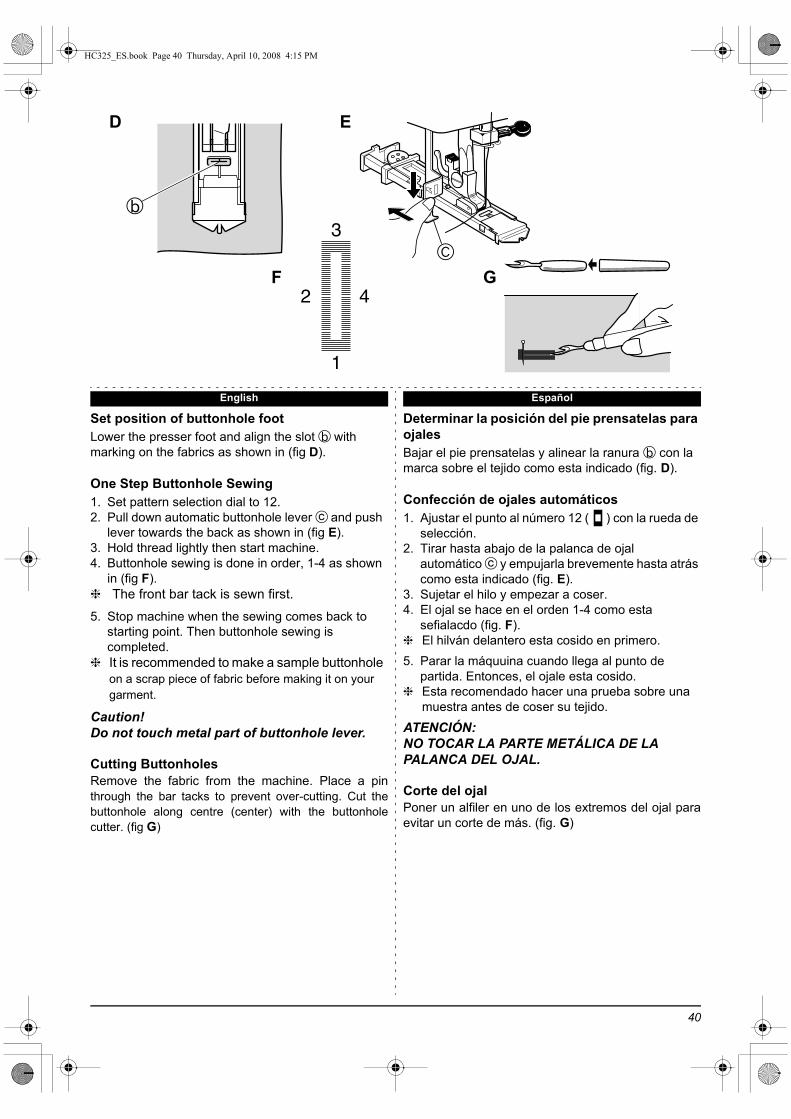
English Español
40
Set position of buttonhole footLower the presser foot and align the slot b with marking on the fabrics as shown in (fig D).
One Step Buttonhole Sewing1. Set pattern selection dial to 12.2. Pull down automatic buttonhole lever c and push
lever towards the back as shown in (fig E).3. Hold thread lightly then start machine.4. Buttonhole sewing is done in order, 1-4 as shown
in (fig F). ❈ The front bar tack is sewn first.
5. Stop machine when the sewing comes back to starting point. Then buttonhole sewing is completed.
❈ It is recommended to make a sample buttonhole on a scrap piece of fabric before making it on your garment.
Caution!Do not touch metal part of buttonhole lever.
Cutting ButtonholesRemove the fabric from the machine. Place a pinthrough the bar tacks to prevent over-cutting. Cut thebuttonhole along centre (center) with the buttonholecutter. (fig G)
Determinar la posición del pie prensatelas para ojalesBajar el pie prensatelas y alinear la ranura b con la marca sobre el tejido como esta indicado (fig. D).
Confección de ojales automáticos1. Ajustar el punto al número 12 ( ) con la rueda de
selección.2. Tirar hasta abajo de la palanca de ojal
automático c y empujarla brevemente hasta atrás como esta indicado (fig. E).
3. Sujetar el hilo y empezar a coser.4. El ojal se hace en el orden 1-4 como esta
sefialacdo (fig. F). ❈ El hilván delantero esta cosido en primero.5. Parar la máquuina cuando llega al punto de
partida. Entonces, el ojale esta cosido.❈ Esta recomendado hacer una prueba sobre una
muestra antes de coser su tejido.
ATENCIÓN:NO TOCAR LA PARTE METÁLICA DE LA PALANCA DEL OJAL.
Corte del ojalPoner un alfiler en uno de los extremos del ojal paraevitar un corte de más. (fig. G)
b
C
3
4
1
2
D E
F G
HC325_ES.book Page 40 Thursday, April 10, 2008 4:15 PM
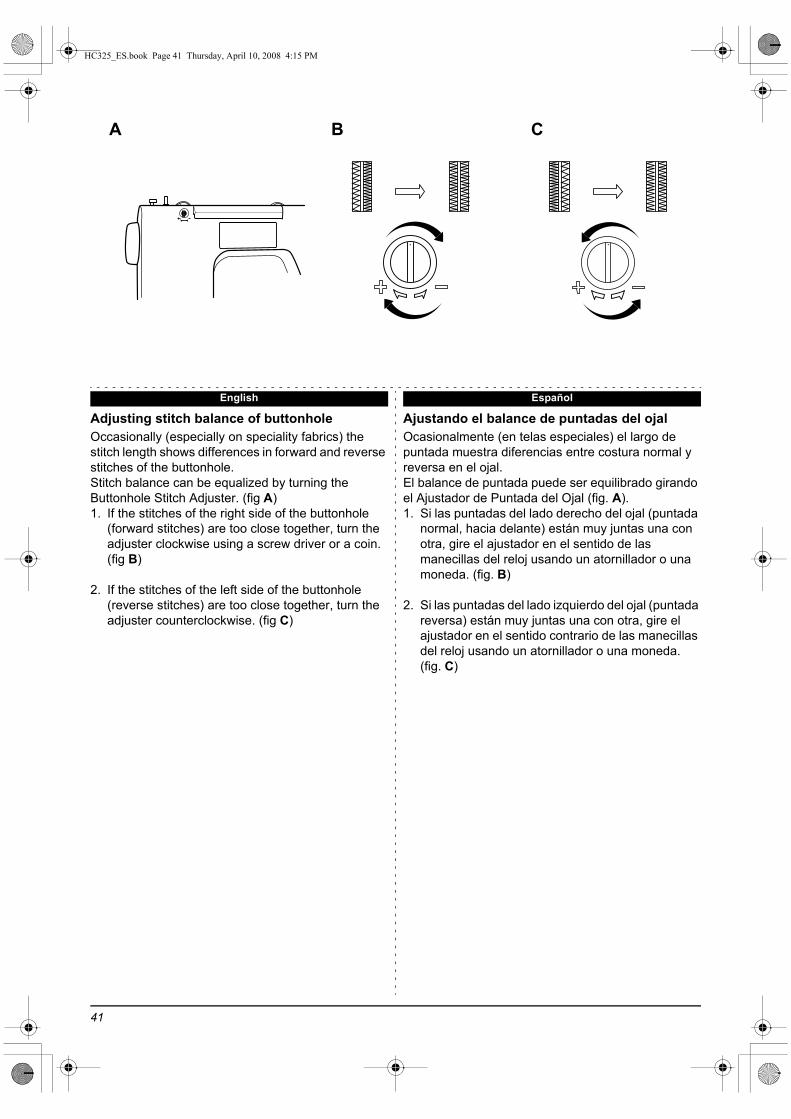
41
English Español
Adjusting stitch balance of buttonholeOccasionally (especially on speciality fabrics) the stitch length shows differences in forward and reverse stitches of the buttonhole.Stitch balance can be equalized by turning the Buttonhole Stitch Adjuster. (fig A)1. If the stitches of the right side of the buttonhole
(forward stitches) are too close together, turn the adjuster clockwise using a screw driver or a coin. (fig B)
2. If the stitches of the left side of the buttonhole (reverse stitches) are too close together, turn the adjuster counterclockwise. (fig C)
Ajustando el balance de puntadas del ojalOcasionalmente (en telas especiales) el largo de puntada muestra diferencias entre costura normal y reversa en el ojal.El balance de puntada puede ser equilibrado girando el Ajustador de Puntada del Ojal (fig. A).1. Si las puntadas del lado derecho del ojal (puntada
normal, hacia delante) están muy juntas una con otra, gire el ajustador en el sentido de las manecillas del reloj usando un atornillador o una moneda. (fig. B)
2. Si las puntadas del lado izquierdo del ojal (puntada reversa) están muy juntas una con otra, gire el ajustador en el sentido contrario de las manecillas del reloj usando un atornillador o una moneda.(fig. C)
A B C
HC325_ES.book Page 41 Thursday, April 10, 2008 4:15 PM

English Español
42
MAINTENANCEChanging light bulb
Caution!Disconnect power supply before carrying out maintenance. Make sure bulb is not hot.
1. Unplug the machine.2. Loosen screw 1, and remove face cover. (fig A)3. Remove bulb by unscrewing it in an anticlockwise
direction.4. Install a new bulb by screwing it in clockwise.
(fig B)5. Replace the face cover, tighten the screw.
MANTENCIÓNCambiando la ampolleta
Precaución!Desenchufe la máquina antes de efectuar cualquier acción. Asegúrese que la ampolleta no esté caliente.
1. Desenchufe la máquina.2. Suelte el tornillo 1, y retire la tapa lateral (fig. A)3. Retire la ampolleta girándola en sentido contrario a
las manecillas del reloj.4. Instale una nueva ampolleta, girándola en el
sentido de las manecillas del reloj (fig. B)5. Coloque la tapa lateral y apriete el tornillo.
➀
A B
HC325_ES.book Page 42 Thursday, April 10, 2008 4:15 PM
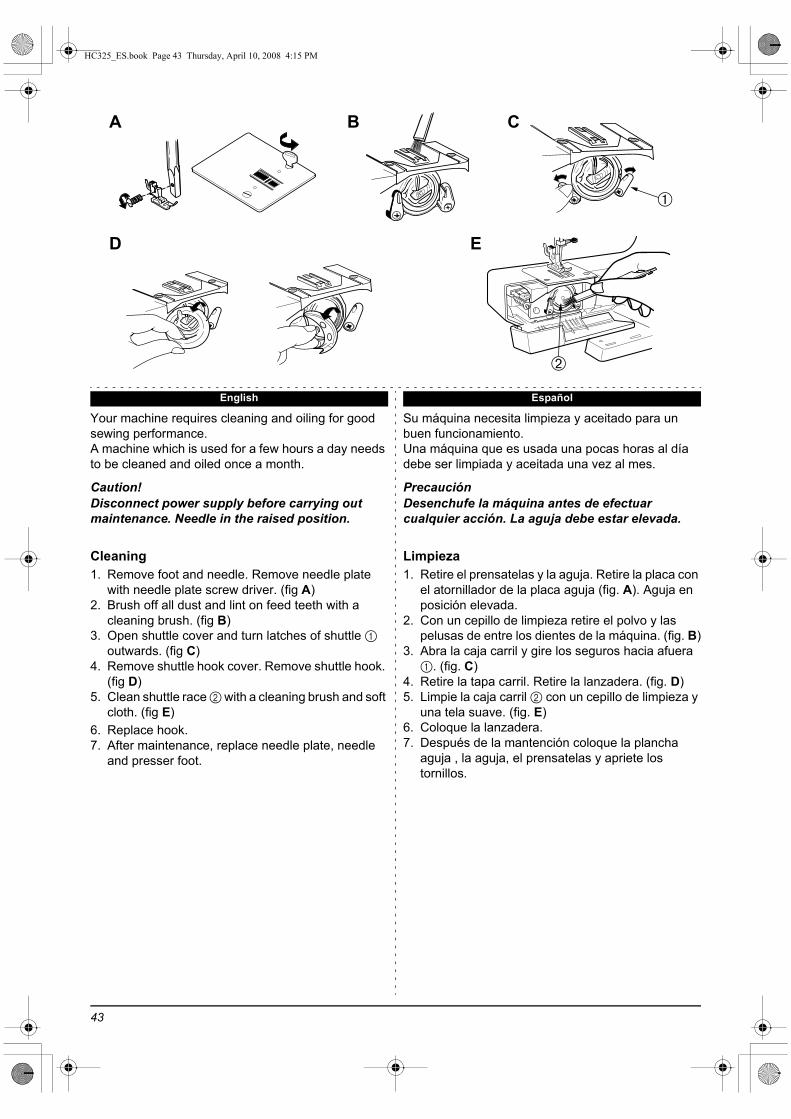
43
English Español
Your machine requires cleaning and oiling for good sewing performance.A machine which is used for a few hours a day needs to be cleaned and oiled once a month.
Caution!Disconnect power supply before carrying out maintenance. Needle in the raised position.
Cleaning1. Remove foot and needle. Remove needle plate
with needle plate screw driver. (fig A)2. Brush off all dust and lint on feed teeth with a
cleaning brush. (fig B)3. Open shuttle cover and turn latches of shuttle 1
outwards. (fig C)4. Remove shuttle hook cover. Remove shuttle hook.
(fig D)5. Clean shuttle race 2 with a cleaning brush and soft
cloth. (fig E)6. Replace hook.7. After maintenance, replace needle plate, needle
and presser foot.
Su máquina necesita limpieza y aceitado para un buen funcionamiento.Una máquina que es usada una pocas horas al día debe ser limpiada y aceitada una vez al mes.
PrecauciónDesenchufe la máquina antes de efectuar cualquier acción. La aguja debe estar elevada.
Limpieza1. Retire el prensatelas y la aguja. Retire la placa con
el atornillador de la placa aguja (fig. A). Aguja en posición elevada.
2. Con un cepillo de limpieza retire el polvo y las pelusas de entre los dientes de la máquina. (fig. B)
3. Abra la caja carril y gire los seguros hacia afuera 1. (fig. C)
4. Retire la tapa carril. Retire la lanzadera. (fig. D)5. Limpie la caja carril 2 con un cepillo de limpieza y
una tela suave. (fig. E)6. Coloque la lanzadera.7. Después de la mantención coloque la plancha
aguja , la aguja, el prensatelas y apriete los tornillos.
➁
➀
A B C
D E
HC325_ES.book Page 43 Thursday, April 10, 2008 4:15 PM

English Español
44
Caution!Disconnect power supply before carrying out maintenance.
OilingUse oil manufactured specially for sewing machine use.Other oils will eventually cause mechanism to jam.
Apply a drop of oil to part of shuttle where friction occures. (fig F)
PrecauciónDesenchufe la máquina antes de efectuar cualquier acción de mantención.
AceitandoUse el aceite elaborado especialmente para máquinas de coser.Otros aceites eventualmente causar que los mecanismos se tranquen.
Aplique una gota de aceite en el cangrejo, en el lugar en el que se produce la fricción. (fig. F)
F
HC325_ES.book Page 44 Thursday, April 10, 2008 4:15 PM
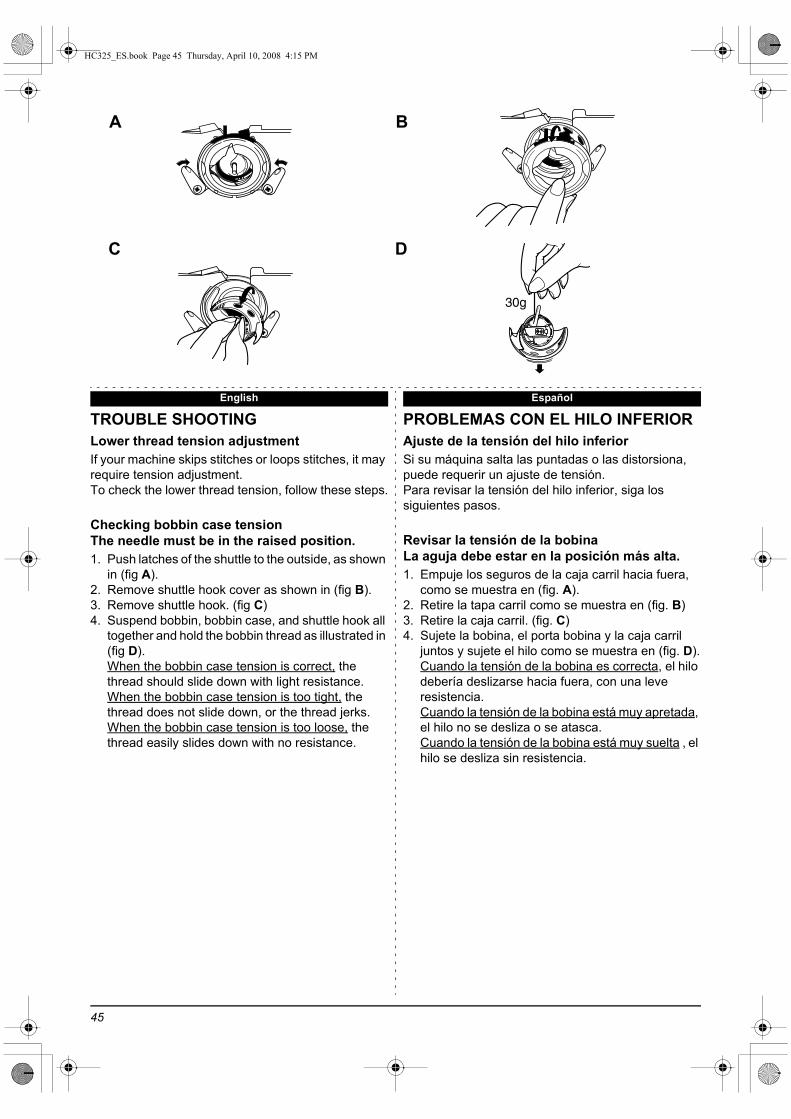
45
English Español
TROUBLE SHOOTINGLower thread tension adjustmentIf your machine skips stitches or loops stitches, it may require tension adjustment.To check the lower thread tension, follow these steps.
Checking bobbin case tensionThe needle must be in the raised position.1. Push latches of the shuttle to the outside, as shown
in (fig A).2. Remove shuttle hook cover as shown in (fig B).3. Remove shuttle hook. (fig C)4. Suspend bobbin, bobbin case, and shuttle hook all
together and hold the bobbin thread as illustrated in (fig D).When the bobbin case tension is correct, the thread should slide down with light resistance.When the bobbin case tension is too tight, the thread does not slide down, or the thread jerks.When the bobbin case tension is too loose, the thread easily slides down with no resistance.
PROBLEMAS CON EL HILO INFERIORAjuste de la tensión del hilo inferiorSi su máquina salta las puntadas o las distorsiona, puede requerir un ajuste de tensión.Para revisar la tensión del hilo inferior, siga los siguientes pasos.
Revisar la tensión de la bobinaLa aguja debe estar en la posición más alta.1. Empuje los seguros de la caja carril hacia fuera,
como se muestra en (fig. A).2. Retire la tapa carril como se muestra en (fig. B)3. Retire la caja carril. (fig. C)4. Sujete la bobina, el porta bobina y la caja carril
juntos y sujete el hilo como se muestra en (fig. D).Cuando la tensión de la bobina es correcta, el hilo debería deslizarse hacia fuera, con una leve resistencia. Cuando la tensión de la bobina está muy apretada, el hilo no se desliza o se atasca.Cuando la tensión de la bobina está muy suelta , el hilo se desliza sin resistencia.
30g
A B
C D
HC325_ES.book Page 45 Thursday, April 10, 2008 4:15 PM
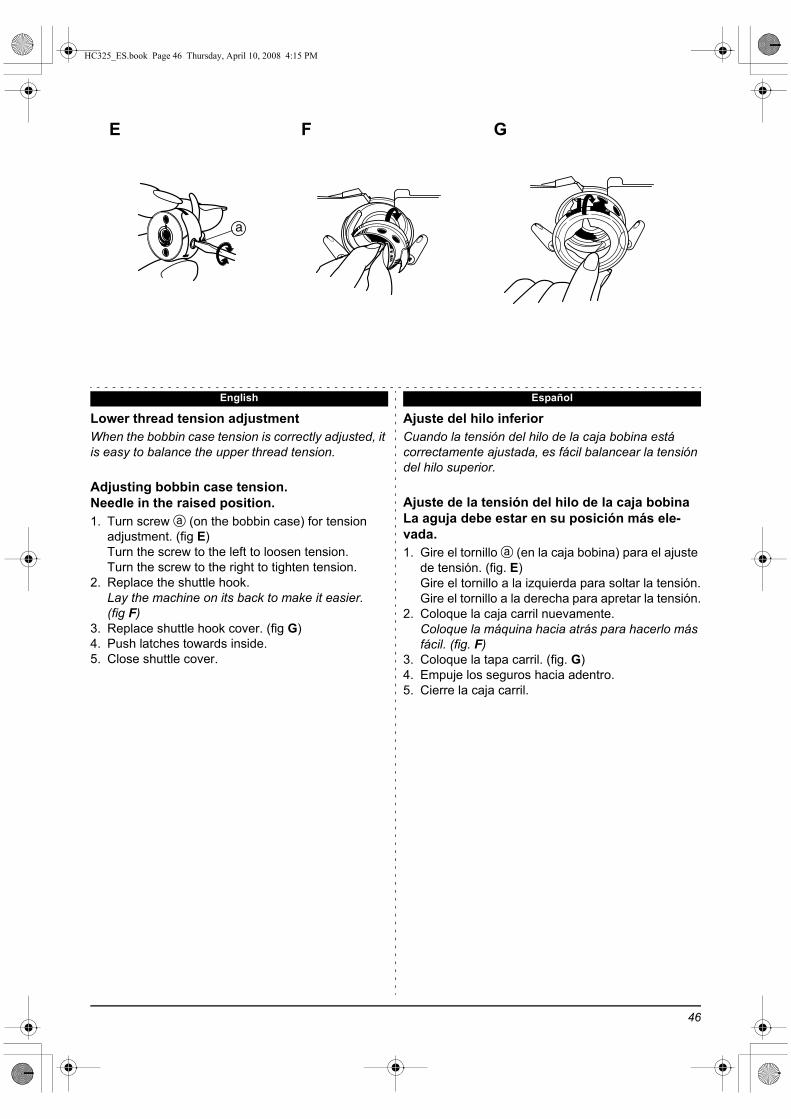
English Español
46
Lower thread tension adjustmentWhen the bobbin case tension is correctly adjusted, it is easy to balance the upper thread tension.
Adjusting bobbin case tension.Needle in the raised position.1. Turn screw a (on the bobbin case) for tension
adjustment. (fig E)Turn the screw to the left to loosen tension.Turn the screw to the right to tighten tension.
2. Replace the shuttle hook.Lay the machine on its back to make it easier. (fig F)
3. Replace shuttle hook cover. (fig G)4. Push latches towards inside.5. Close shuttle cover.
Ajuste del hilo inferiorCuando la tensión del hilo de la caja bobina está correctamente ajustada, es fácil balancear la tensión del hilo superior.
Ajuste de la tensión del hilo de la caja bobinaLa aguja debe estar en su posición más ele-vada.1. Gire el tornillo a (en la caja bobina) para el ajuste
de tensión. (fig. E)Gire el tornillo a la izquierda para soltar la tensión.Gire el tornillo a la derecha para apretar la tensión.
2. Coloque la caja carril nuevamente.Coloque la máquina hacia atrás para hacerlo más fácil. (fig. F)
3. Coloque la tapa carril. (fig. G)4. Empuje los seguros hacia adentro.5. Cierre la caja carril.
a
E F G
HC325_ES.book Page 46 Thursday, April 10, 2008 4:15 PM
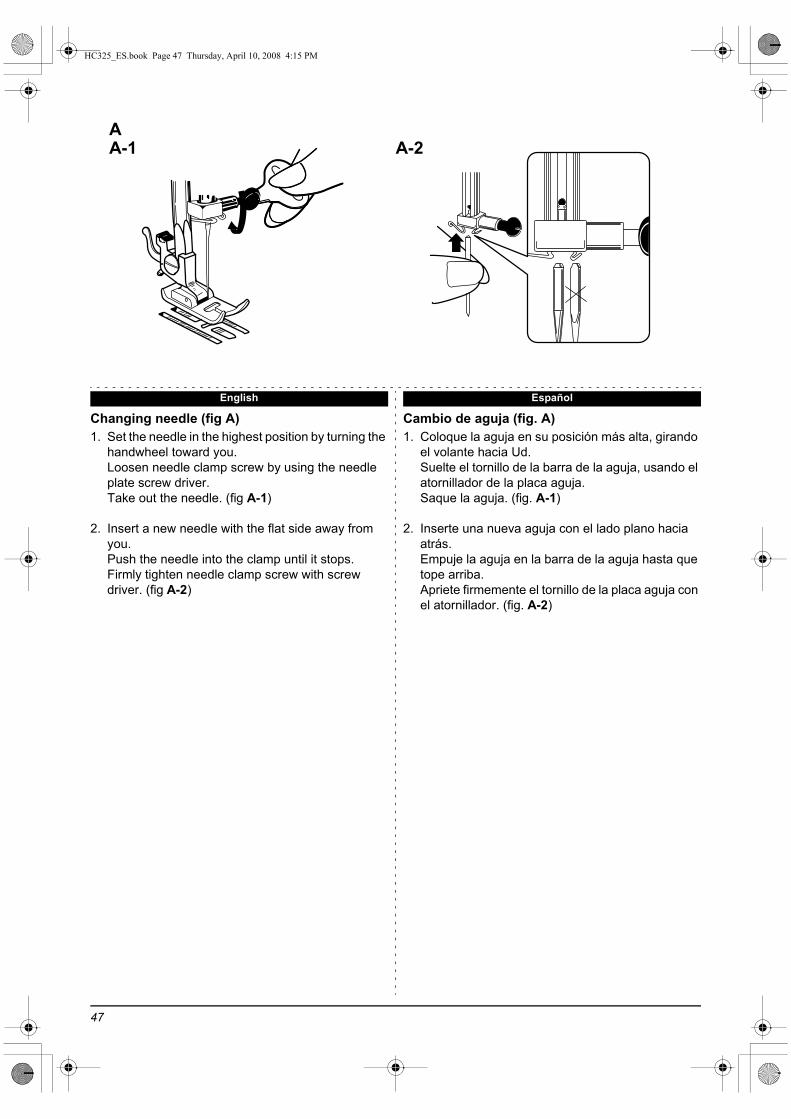
47
English Español
Changing needle (fig A)1. Set the needle in the highest position by turning the
handwheel toward you.Loosen needle clamp screw by using the needle plate screw driver.Take out the needle. (fig A-1)
2. Insert a new needle with the flat side away from you.Push the needle into the clamp until it stops.Firmly tighten needle clamp screw with screw driver. (fig A-2)
Cambio de aguja (fig. A)1. Coloque la aguja en su posición más alta, girando
el volante hacia Ud.Suelte el tornillo de la barra de la aguja, usando el atornillador de la placa aguja.Saque la aguja. (fig. A-1)
2. Inserte una nueva aguja con el lado plano hacia atrás.Empuje la aguja en la barra de la aguja hasta que tope arriba.Apriete firmemente el tornillo de la placa aguja con el atornillador. (fig. A-2)
AA-1 A-2
HC325_ES.book Page 47 Thursday, April 10, 2008 4:15 PM
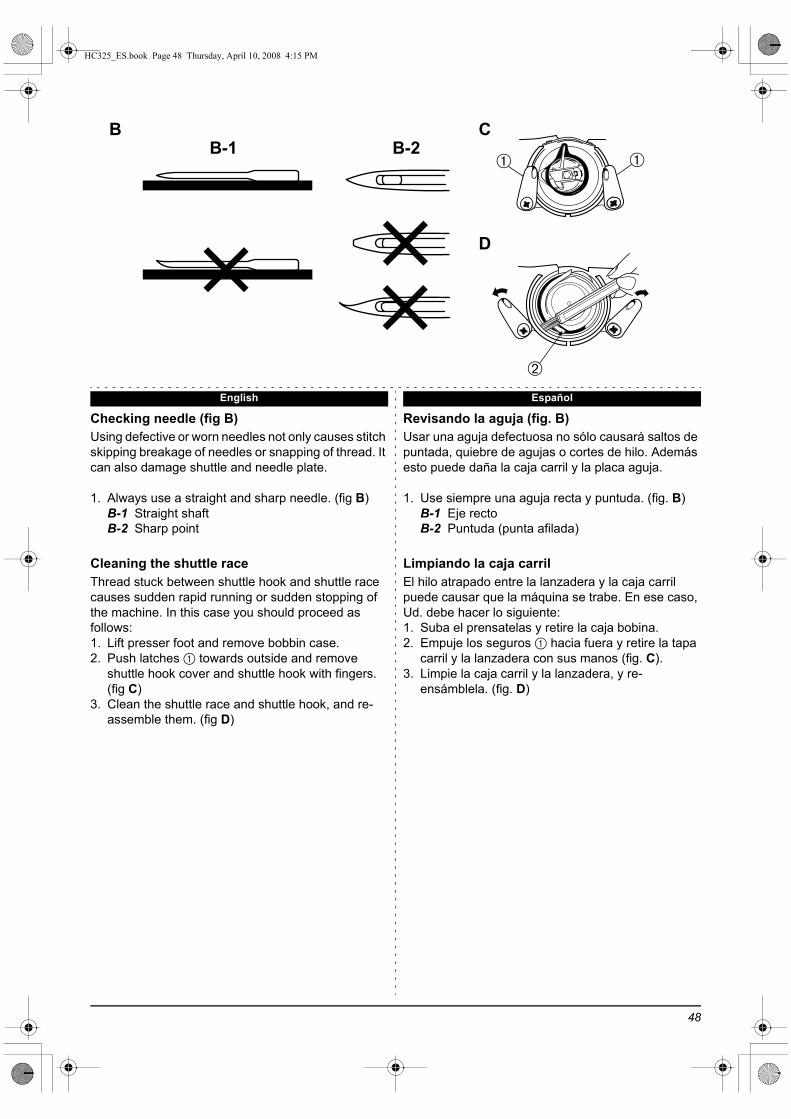
English Español
48
Checking needle (fig B)Using defective or worn needles not only causes stitch skipping breakage of needles or snapping of thread. It can also damage shuttle and needle plate.
1. Always use a straight and sharp needle. (fig B)B-1 Straight shaftB-2 Sharp point
Cleaning the shuttle raceThread stuck between shuttle hook and shuttle race causes sudden rapid running or sudden stopping of the machine. In this case you should proceed as follows:1. Lift presser foot and remove bobbin case.2. Push latches 1 towards outside and remove
shuttle hook cover and shuttle hook with fingers. (fig C)
3. Clean the shuttle race and shuttle hook, and re-assemble them. (fig D)
Revisando la aguja (fig. B)Usar una aguja defectuosa no sólo causará saltos de puntada, quiebre de agujas o cortes de hilo. Además esto puede daña la caja carril y la placa aguja.
1. Use siempre una aguja recta y puntuda. (fig. B)B-1 Eje rectoB-2 Puntuda (punta afilada)
Limpiando la caja carrilEl hilo atrapado entre la lanzadera y la caja carril puede causar que la máquina se trabe. En ese caso, Ud. debe hacer lo siguiente:1. Suba el prensatelas y retire la caja bobina.2. Empuje los seguros 1 hacia fuera y retire la tapa
carril y la lanzadera con sus manos (fig. C).3. Limpie la caja carril y la lanzadera, y re-
ensámblela. (fig. D)
➀➀
➁
B CB-1 B-2
D
HC325_ES.book Page 48 Thursday, April 10, 2008 4:15 PM
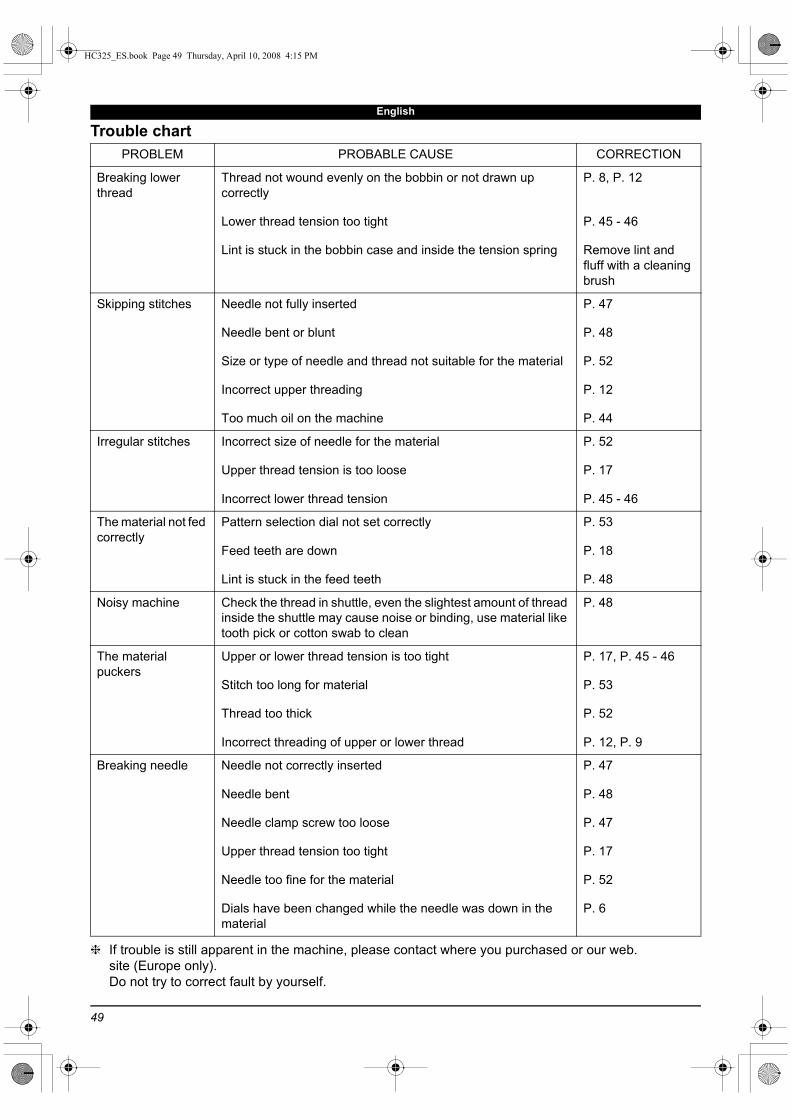
49
English
Trouble chart
❈ If trouble is still apparent in the machine, please contact where you purchased or our web. site (Europe only).Do not try to correct fault by yourself.
PROBLEM PROBABLE CAUSE CORRECTION
Breaking lower thread
Thread not wound evenly on the bobbin or not drawn up correctly
Lower thread tension too tight
Lint is stuck in the bobbin case and inside the tension spring
P. 8, P. 12
P. 45 - 46
Remove lint and fluff with a cleaning brush
Skipping stitches Needle not fully inserted
Needle bent or blunt
Size or type of needle and thread not suitable for the material
Incorrect upper threading
Too much oil on the machine
P. 47
P. 48
P. 52
P. 12
P. 44
Irregular stitches Incorrect size of needle for the material
Upper thread tension is too loose
Incorrect lower thread tension
P. 52
P. 17
P. 45 - 46
The material not fed correctly
Pattern selection dial not set correctly
Feed teeth are down
Lint is stuck in the feed teeth
P. 53
P. 18
P. 48
Noisy machine Check the thread in shuttle, even the slightest amount of thread inside the shuttle may cause noise or binding, use material like tooth pick or cotton swab to clean
P. 48
The material puckers
Upper or lower thread tension is too tight
Stitch too long for material
Thread too thick
Incorrect threading of upper or lower thread
P. 17, P. 45 - 46
P. 53
P. 52
P. 12, P. 9
Breaking needle Needle not correctly inserted
Needle bent
Needle clamp screw too loose
Upper thread tension too tight
Needle too fine for the material
Dials have been changed while the needle was down in the material
P. 47
P. 48
P. 47
P. 17
P. 52
P. 6
HC325_ES.book Page 49 Thursday, April 10, 2008 4:15 PM

50
Español
Tabla de Problemas
❈ Si persiste el problema en la máquina, consulte a su vendedor o el sitio Web (sólo en Europa).No trate de corregirlo usted mismo.
PROBLEMA CAUSA PROBABLE CORRECCION
Corte de hilo inferior Hilo del carrete disparejo o no conducido hacia arriba correctamente.
Demasiada tensión en el hilo inferior.
Pelusa acumulada en la bobina o en el resorte de tensióng.
P. 8, P. 12
P. 45 - 46
Quitar pelusa con cepillo
Salto de puntadas Colocación inadecuada de la aguja.
Aguja doblada o sin punta.
Hilo o aguja inadecuados para la tela.
Enhebrado incorrecto del hilo superior.
Demasiado aceite en el cangrejo.
P. 47
P. 48
P. 52
P. 12
P. 44
Puntadas irregulares
Medida de aguja no correcta para la tela utilizada.
Tensión del hilo superior demasiado baja.
Tensión incorrecta del hilo inferior.
P. 52
P. 17
P. 45 - 46
La tela no se mueve El selector de diseño no ubicado correctamente.
Los dientes están abajo.
Altura incorrecta o pelusas en los dientes.
P. 53
P. 18
P. 48
Máquina ruidosa Revise si hay hilo en el cangrejo, incluso una pequeña cantidad de hilo en el cangrejo puede causar ruidos o enredos, use un mondadientes o un paño de algodón para limpiar.
P. 48
La tela se arruga Tensión superior o inferior muy apretada.
Puntada demasiada larga para la tela.
Hilo demasiado grueso.
Enhebrado incorrecto de los hilos superior o inferior.
P. 17, P. 45 - 46
P. 53
P. 52
P. 12, P. 9
Se rompe la aguja Colocación inadecuada de la aguja.
Aguja doblada.
El tornillo sujetador de la aguja está flojo (suelto).
Tensión del hilo superior muy alta.
Aguja muy fina para la tela.
Diales han sido cambiados mientras la aguja estaba clavada en la tela.
P. 47
P. 48
P. 47
P. 17
P. 52
P. 6
HC325_ES.book Page 50 Thursday, April 10, 2008 4:15 PM
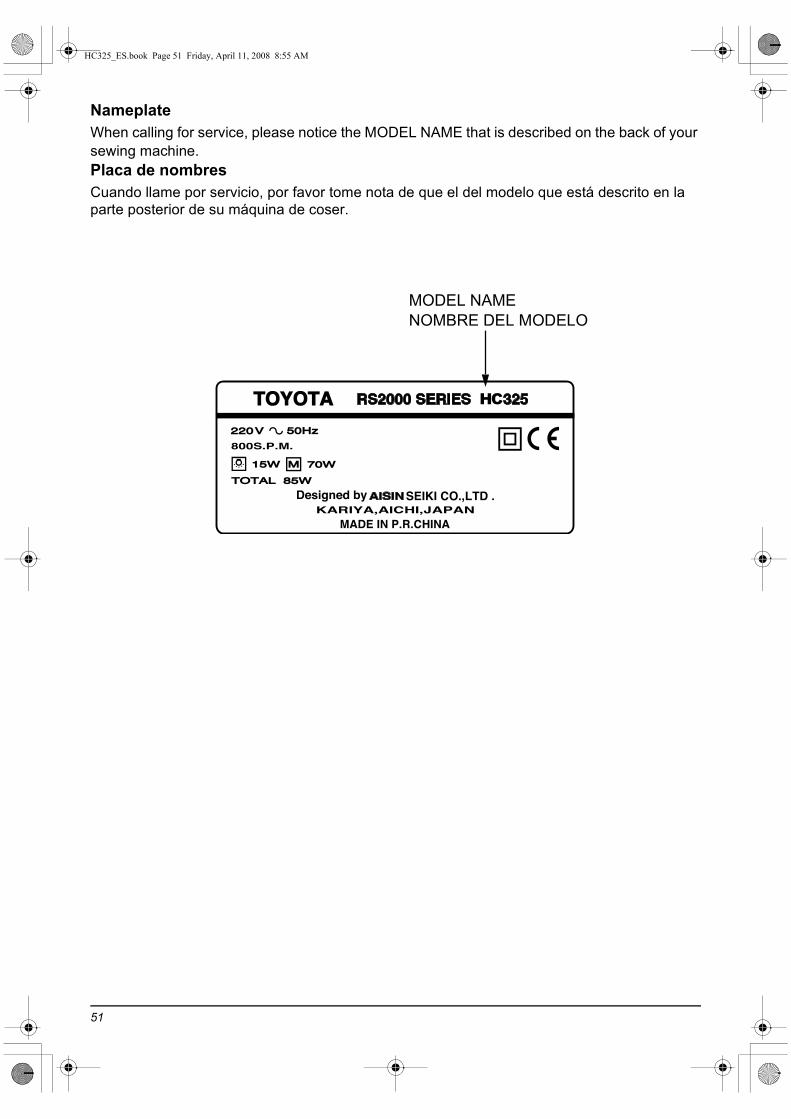
51
NameplateWhen calling for service, please notice the MODEL NAME that is described on the back of your sewing machine.Placa de nombresCuando llame por servicio, por favor tome nota de que el del modelo que está descrito en la parte posterior de su máquina de coser.
MODEL NAMENOMBRE DEL MODELO
HC325_ES.book Page 51 Friday, April 11, 2008 8:55 AM

52
English
FABRIC, THREAD AND NEEDLE TABLE
TABLA DE TELAS, HILOS Y AGUJAS
FABRIC
THREAD NEEDLE
REMARKSEuropean Cotton
Mercerized Cotton
Cotton Covered
Polyester, Silk, Nylon
European 705
U.S. Size15 x 1 Point Style
VERY SHEER: Lace, Voile, Chiffon, Net 70 60 Silk, Nylon 65-70 9 Regular Loosen upper
tension one or two pointsSHEER: Blouse, Crepe
Lawn, Organdy, Taffeta 50-70 60 Silk, Nylon 65-70 9 Regular
LIGHT-WEIGHT: Crepe,Wool, Brocada, Velvet 30 60 Silk 75-80 11 Regular
MEDIUM: Wool, Silk, Linen,Velveteen, Cotton, Faille, Terrycolth
30 50 Silk 80-90 11-14 Regular
HEAVY: Denim, Duck, Sailcloth 30 Heavy Duty C.C.Poly 100 16 RegularEXTRA HEAVY: Upholstery,Canvas, Awning 30 Heavy Duty C.C.Poly 120 19 Regular
[KNITS]LIGHIT-WEIGHT: Tricot 50-70 60 Silk, Nylon 70 9 Ball PointMEDIUM-WEIGHT: Jersey, Double knit 30 50 Silk, Nylon
C.C.Poly 70-80 9-10 Ball Point
HEAVY-WEIGHT: Double knit 30 50 Silk, NylonC.C.Poly 80-90 11-14 Ball Point
FAKE-FURS, VELOURS 30 Heavy Duty C.C.Poly 90-100 14-16 Ball Point[LEATHER]VINYLS FILMS 30 50 C.C.Poly 90 14 WedgeLIGHT-TO-MEDIUM-WEIGHT 30 50 C.C.Poly 90-100 14-16 WedgeHEAVY LEATHER 30 Heavy Duty C.C.Poly 100-110 16-18 Wedge[DECORATIVE TOUCHES]TOP STITCHING Silk twist 100-110 16-18 RegularMACHINE EMBROIDERY Size 50-70 65-80 9-11 Regular
TELAS
HILO AGUJAS
NOTASAlgodón europeo
Algodón Mercerizado
Algodón cubierto con
poliéster, seda, nylon
705 Europea
Medida USA
15 x 1
Estilo de punta
MUY DELGADA: Encaje, Gasa, Velo, Tul 70 60 Seda, Nylon 65-70 9 Regular Suelte la ten-
sión superior en 1 o 2 pun-tos
DELGADA: Trevira, Crepe, Linette, Organdí, Tafetán
50-70 60 Seda, Nylon 65-70 9 Regular
LIVIANA: Crepe, Lana, Bro-cado, Terciopelo 30 60 Seda 75-80 11 Regular
MEDIANA: Lana, Seda, Lino, Pana, Algodón, Falla, Toalla 30 50 Seda 80-90 11-14 Regular
PESADA: Mezclilla 30 Heavy Duty C.C.Poly 100 16 RegularMUY PESADA Tapicería, Toldos de lona 30 Heavy Duty C.C.Poly 120 19 Regular
[TEJIDOS]LIVIANO: Tricot 50-70 60 Seda, Nylon 70 9 Punta BolaMEDIANO: Jersey, Doble punto 30 50 Seda, Nylon,
C.C.Poly 70-80 9-10 Punta Bola
PESADO: Doble Punto 30 50 Seda, Nylon,C.C.Poly 80-90 11-14 Punta Bola
PIELES SINTETICAS, VELOURO 30 Heavy Duty C.C.Poly 90-100 14-16 Punta Bola[CUERO]TEVINIL 30 50 C.C.Poly 90 14 Punta LanzaLIVIANO A MEDIANO 30 50 C.C.Poly 90-100 14-16 Punta LanzaCUERO PESADO 30 Heavy Duty C.C.Poly 100-110 16-18 Punta Lanza[TOQUES DECORATIVOS]PUNTADAS TOP Seda trenzada 100-110 16-18 RegularMAQUINA BORDADORA Tamaño 50-70 65-80 9-11 Regular
Español
HC325_ES.book Page 52 Thursday, April 10, 2008 4:15 PM

53
English Español
NAME OF STITCH PATTERNS1. Scallop2. Domino stitch3. Straight stitch (left position)4. Straight stitch (center position)5. Zigzag stitch6. Blind stitch7. Stretch blind hem8. Overcast stitch9. Overcast stitch10.Serpentine stitch11.Mending stitch12.Buttonhole13.Straight stretch stitch14.RicRac stretch stitch15.Overlock stitch16.Overlock stitch17.Honeycomb18.Decorative stitch19.Decorative stitch20.Decorative stitch21.Applique stitch22.Applique stitch23.Fagoting stitch24.Decorative stitch25.Decorative stitch
NOMBRE DE LAS PUNTADAS1. Medialuna2. Dominó3. Recta lado Izquierdo4. Recta Central5. Zig-Zag6. Basta Invisible Fina7. Basta Invisible elasticada8. Basta Invisible9. Basta Invisible Inversa10.Serpiente11.Tricot (pegado de elástico)12.Ojal 1 Paso13.Recta triple14.Zig-Zag Triple15.Overlock para Tela Stretch16.Overlock para Lanas y Telas de Algodón17.Panal de Abeja Decorativa18.Overlock Telas Lycra Inversa19.Española20.Griega21.Rastrillo22.Rastrillo Inverso23.Unión de Telas24.Milán25.Troya
1 2 3 6 7 8 9 10 11 12
18171615 19 20 21 22 23 24 25
54 1413
HC325_ES.book Page 53 Thursday, April 10, 2008 4:15 PM

HC325_ES.book Page 54 Thursday, April 10, 2008 4:15 PM
HC325_ES.book Page 54 Thursday, April 10, 2008 4:15 PM

HC325_ES.book Page 54 Thursday, April 10, 2008 4:15 PM

679111-CFB40
HC325_ES.book Page 54 Thursday, April 10, 2008 4:15 PM