guide - names.co.uk · pdf fileaccount and choosing a template to editing a page and ... you...
TRANSCRIPT
Beginner’sguide

3
HelloReady to build a website? Our easy-to-use software allows to create and customise the style and layout of your site without you having to understand any coding or HTML.
In this guide we’ll take you through the basics, from creating your account and choosing a template to editing a page and changing your background. Everything you need to know to get your site started!
What’s inside?Before you start
Part 1 . HomepageAdding an intro or welcome (editing text)Adding your site name (introducing the Page Master)Adding images (and a logo if you have one)Page length
Part 2 . Design settingsSite size WallpaperBackground
Part 3 . PagesChanging names in the menuChanging the order of your pagesMaking a sub-pageAdding a new page

Before you start
It makes sense to plan as much as you can before diving in and creating your site. Not only will you save time, but it will also help you take a strategic approach. Boring as that may sound, it really will help you with the process and ensure your website is as amazing as it can be.
Here’s what you need to planYour site name and addressThe name you give your site will appear on your home page, in the browser window and in search engine listings, so make it both relevant, memorable and not too complicated. You should also consider SEO (search engine optimisation) when deciding this – see our guide ‘Writing a site name and description for SEO’ for more details.The ‘site address’ is the URL address used to access the site e.g. mysiteaddress.com and should therefore include your site name
Style and layoutWhat look and feel do you want for your site? Do you want it to be clean and minimal, or colourful and packed with features and information? What you choose will ultimately depend on you, your personal taste, your audience and what your website is about.Do some research before you decide. Check out other websites for inspiration. Note how they use space and present information. It might even be worth sketching out a few rough drawings as this will help you crystallise what’s important to you from the outset.
3
Warning: don’t dive in!
PagesIt’s helpful to decide what pages you’ll need before you start creating them. Do you want a welcome page? About page? A shop? Image gallery? Contact page? Now’s the time to decide.
ContentOnce you’ve decided what pages you want, it’s worth planning what you’ll put on them. When it comes to your text (copy), try to keep it relevant and concise. Say too much and you’ll risk switching people off... ...Images are a great way to prevent this happening. Engage visitors with striking visuals that tell them about you and what you do and you should be able to sustain their interest (cute cat pics are great but we’d suggest you refrain from using them unless they reflect what your website’s about). Your images should be in jpeg, gif, png or swf format.
4

Adding an intro or welcome section Editing text
Your homepage, or landing page, is the most important page of your site. It’s your welcome to visitors and should sell what your site is about.Key to this is your introduction. A paragraph or two that explain who you are and what you have to offer should do it. Remember to keep it concise though. Nobody wants to read through a huge amount of text at this stage.
Editing text:Most items on the page can be edited just by clicking on them. Generally one click will select the object to move and a double-click will allow you to edit it. For example, in the site above you can see some text starting ‘Hello...’. If I wanted to change that to ‘Welcome’, I’d double-click the text box, highlight the text I want to change, and type ‘Hello’.
Part 1 . Homepage
5

6
Title text example
There are two types of text box. Title text (the type we just looked at) for titles, page headers and body text for lenghty pieces of written content. Both are edited in exactly the same way but for particularly lengthy pieces of text, you may want to type it in a Word or text document first, then copy and paste it in the text box. If you find you can’t select or highlight your chosen text, it means the text is located within the Page Master (see next chapter).
The size of the text box will automatically adjust to accommodate the text you type. You can also adjust it manually.
You can also change the properties of the text, including font, point size, style and colour through the Editor > Fonts

7
The Page Master The Page Master is a layer that sits behind every page of your site - any object that’s placed on it will appear in the same place across your site. This is really useful for things such as your title, logo and contact details.
To access it, go to Page Master to the left of your screen.
Add a logoYour template probably already has a placeholder title in place, but if it doesn’t, you can add one by clicking Insert > Title on the top tool barThis can then be highlighted and edited like any other text - so you can choose any font and style that suits your brand and the rest of your site.

MenuWhile here, you may have noticed this is also where the menu lives. You can resize and reposition it by selecting it,and you can amend the properties via the Editor.
You can’t change the menu page names at this point. That’s done through Organise pages, which we’ll come to shortly. Jump to Organising pages.
When you’re happy with any changes you’ve made, click Save on the tool bar and then Page in the top-left corner to switch back to the normal page view.
Adding imagesIt’s a good idea to personalise your site with your logo, if you have one, along with any photos that can bring what you do to life - be they your finest landscape shots to promote your photography services, or close-ups of your latest hand-printed t-shirt collection.
Upload your imagesUploading your own files couldn’t be easier. Just head over to Upload on the top tool bar. Browse to find your file and select it. The image will then upload to the file manager of your site.Any content you upload is stored, managed and accessed in the file manager.
Add images You can then add images to a page by clicking Use this in the bottom-right of the file manager panel (shown below).
8

Edit imagesAs with text boxes, you can click and drag images around the page and use the resize handles to change the size or shape of the image. You also have the option to rotate.To rotate click once on the image and then use the rotate button on the Editor to enable rotation. Grab the rotate handles and drag the item around to the preferred angle.If you cannot see the rotate option in the Editor, then rotation isn’t possible on that particular object.
As you’ve seen, you can edit text, images and other objects in pretty much the same way - it’s just a case of clicking, dragging and re-styling through the Editor.So, have a play around until you find a layout that suits and use the homepage as the starting point for a style you can develop throughout the site. if you find that you do need a bit more space to work with...
9

10
Page lengthGo to Pages on the top tool bar, then Page length on the menu to the left.
Here you can increase (or decrease) the length of the page you’re working on, as well as Apply to all pages throughout.
There isn’t an option to change the width of an individual page but you can alter the width of your site through Design > Site size.
Part 2 . Design settings
11
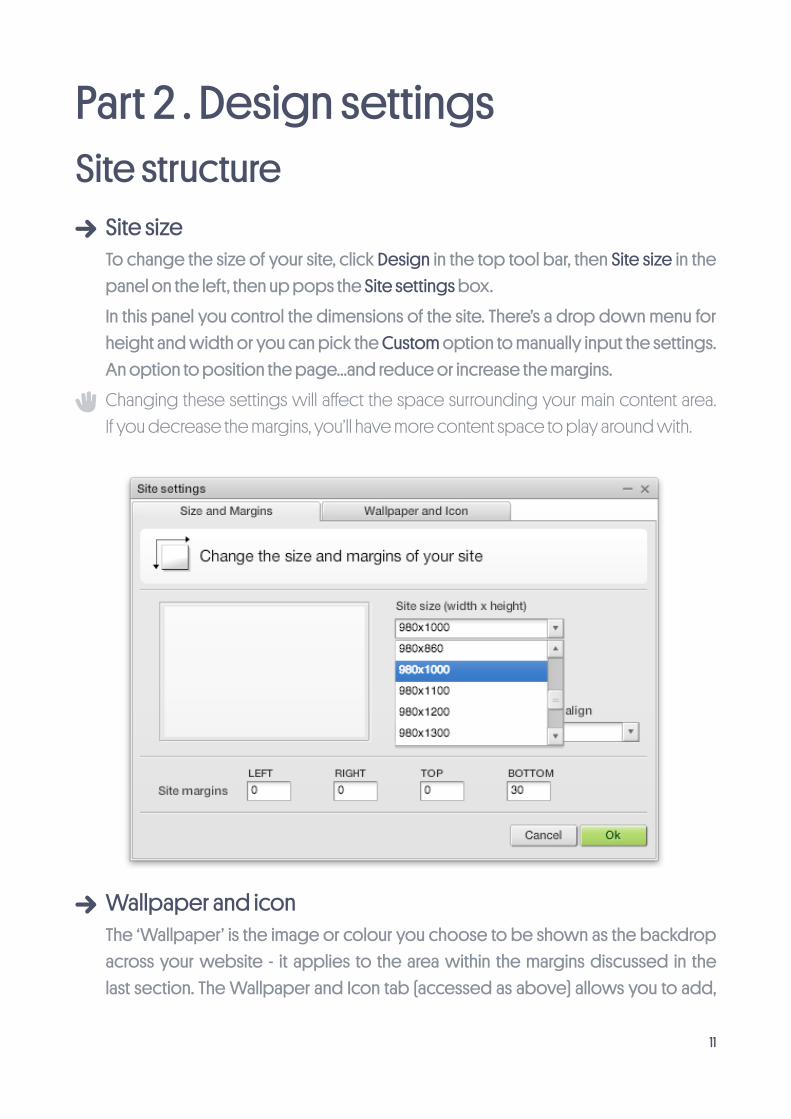
Site structureSite sizeTo change the size of your site, click Design in the top tool bar, then Site size in the panel on the left, then up pops the Site settings box.In this panel you control the dimensions of the site. There’s a drop down menu for height and width or you can pick the Custom option to manually input the settings. An option to position the page...and reduce or increase the margins.Changing these settings will affect the space surrounding your main content area. If you decrease the margins, you’ll have more content space to play around with.
Wallpaper and icon The ‘Wallpaper’ is the image or colour you choose to be shown as the backdrop across your website - it applies to the area within the margins discussed in the last section. The Wallpaper and Icon tab (accessed as above) allows you to add,

12
remove or change images and colours, as well as giving you control over how they’re displayed.The Wallpaper and Icon tab (accessed as above) allows you to add, remove or change images and colours, as well as giving you control over how they’re displayed.We’ll cover the Favourites icon in a separate design guide.
The wallpaper you choose will provide the backdrop across your site, on all pages, so choose well! You can, however, choose a different background to apply to the main content area, should you wish. You do? Then the next section’s for you!
13
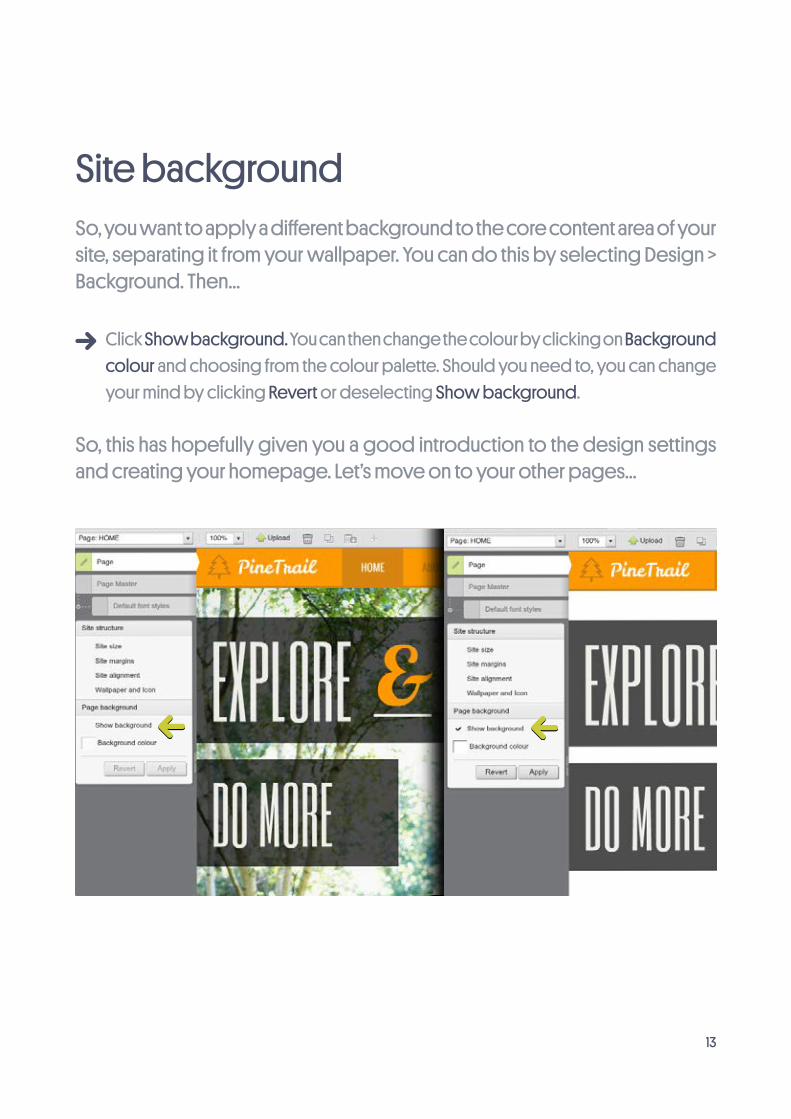
Site backgroundSo, you want to apply a different background to the core content area of your site, separating it from your wallpaper. You can do this by selecting Design > Background. Then...
Click Show background. You can then change the colour by clicking on Background colour and choosing from the colour palette. Should you need to, you can change your mind by clicking Revert or deselecting Show background.
So, this has hopefully given you a good introduction to the design settings and creating your homepage. Let’s move on to your other pages...

Part 3 . Pages
14
Organising pagesTo access a particular page on your site, go to the drop-down menu on the top-left of the tool bar and select the page you want to edit.To add pages, changes the name of existing pages, and change the order in which your pages appear, click on Pages in the tool bar, then Organise your pages in the menu on the left. This will bring you to the Pages panel, as below.
Changing page names in the menuThe name of each page appears in the same order as presented on your site e.g. ‘Home’ then ‘About’ and so on.If you want to rename a page, simply delete the existing page (text) and type a new one.
15
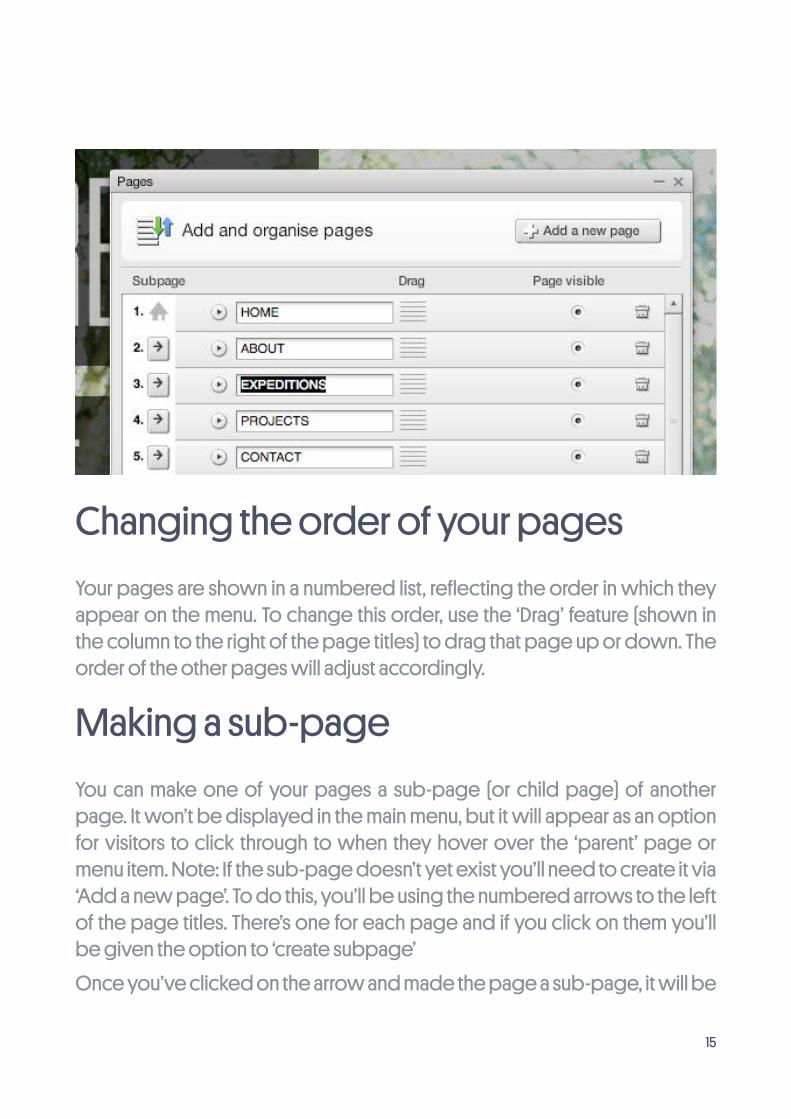
Changing the order of your pagesYour pages are shown in a numbered list, reflecting the order in which they appear on the menu. To change this order, use the ‘Drag’ feature (shown in the column to the right of the page titles) to drag that page up or down. The order of the other pages will adjust accordingly.
Making a sub-pageYou can make one of your pages a sub-page (or child page) of another page. It won’t be displayed in the main menu, but it will appear as an option for visitors to click through to when they hover over the ‘parent’ page or menu item. Note: If the sub-page doesn’t yet exist you’ll need to create it via ‘Add a new page’. To do this, you’ll be using the numbered arrows to the left of the page titles. There’s one for each page and if you click on them you’ll be given the option to ‘create subpage’Once you’ve clicked on the arrow and made the page a sub-page, it will be
16
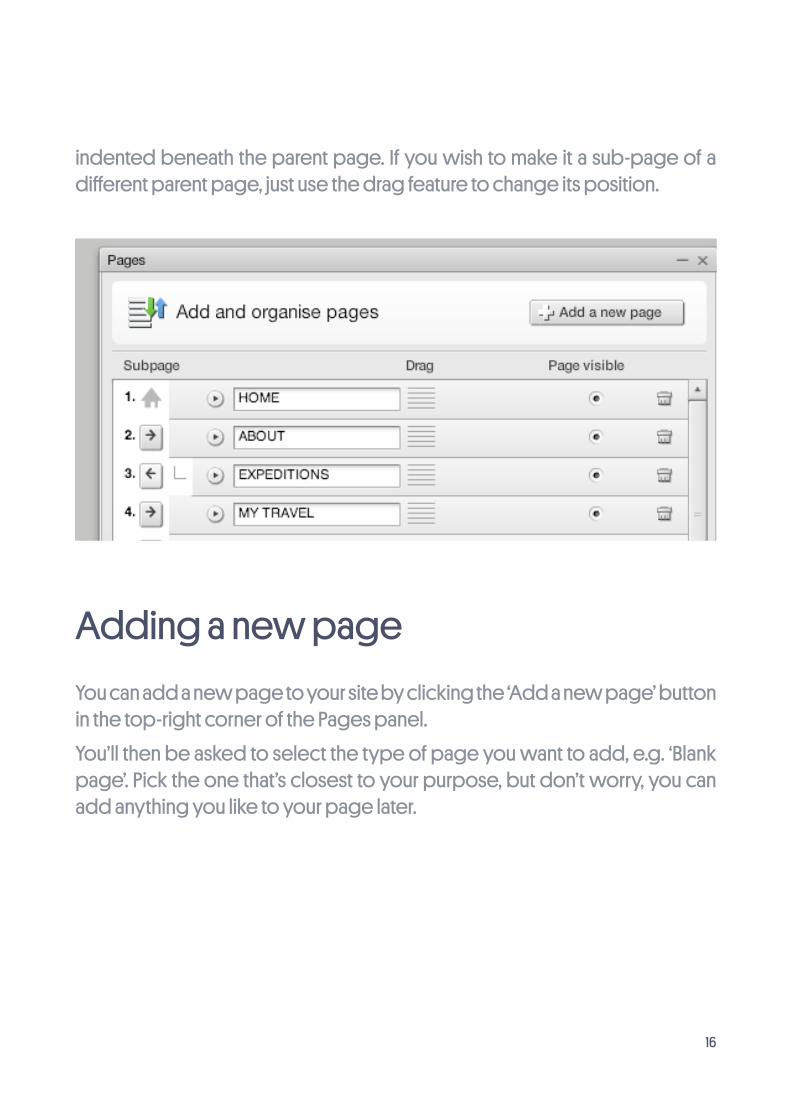
indented beneath the parent page. If you wish to make it a sub-page of a different parent page, just use the drag feature to change its position.
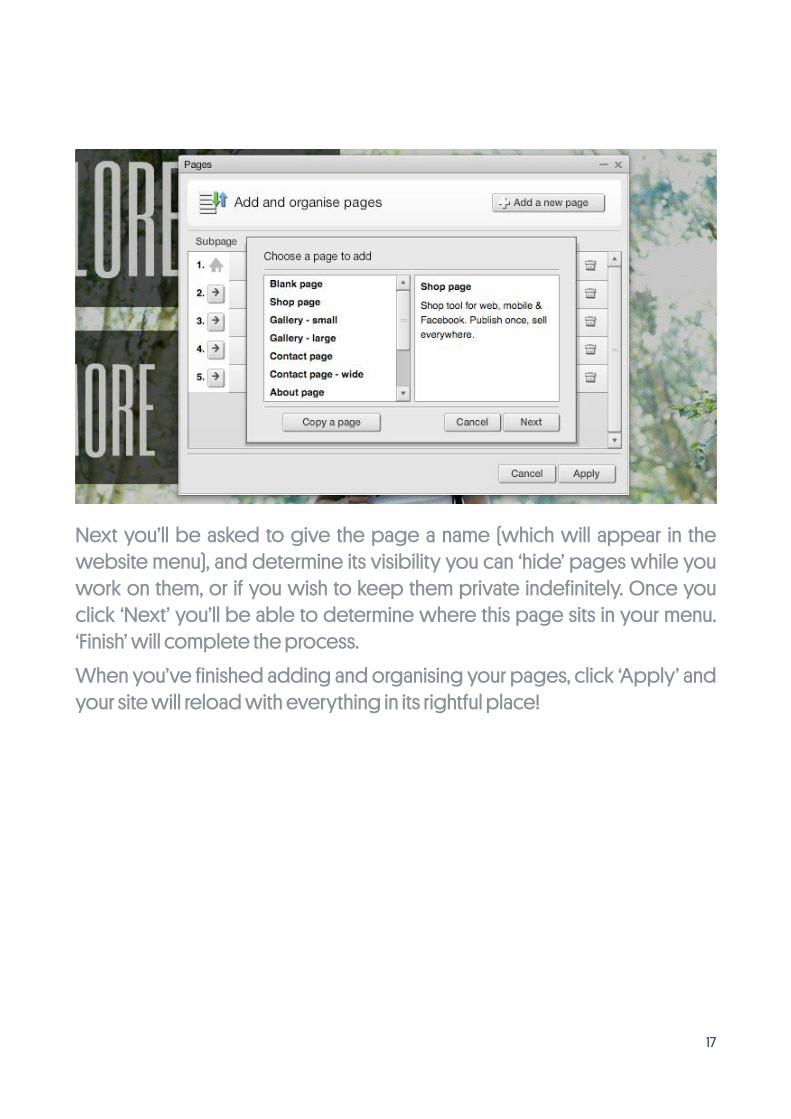
Adding a new pageYou can add a new page to your site by clicking the ‘Add a new page’ button in the top-right corner of the Pages panel.You’ll then be asked to select the type of page you want to add, e.g. ‘Blank page’. Pick the one that’s closest to your purpose, but don’t worry, you can add anything you like to your page later.
17
Next you’ll be asked to give the page a name (which will appear in the website menu), and determine its visibility you can ‘hide’ pages while you work on them, or if you wish to keep them private indefinitely. Once you click ‘Next’ you’ll be able to determine where this page sits in your menu. ‘Finish’ will complete the process.When you’ve finished adding and organising your pages, click ‘Apply’ and your site will reload with everything in its rightful place!

...and that’s pretty much it for now.
Now that you’ve introduced yourself to the various tools and features, have a play around, get a feel for things, and get ready for more guides coming your way soon.
18