gs richcopy 360 standard v7.1 and enterprise v8 will provide its best effort to support customers...
TRANSCRIPT
GS RichCopy 360
Standard v7.1 and Enterprise v8.1
Administrator’s Manual
GuruSquad
5442 Safe harbor Court
Fairfax, VA, 22032
USA
Email: [email protected]
Phone: +1 (703) 868 - 9252

GS RichCopy 360 (Standard v7.1 and Enterprise v8.1) March 2016
Page | ii
Licensing
The GS RichCopy 360 follows a perpetual licensing model. A perpetual licensing model allows the
customer to install and use the software indefinitely. GS RichCopy 360 is licensed per machine, requiring
that you purchase a license for each client computer and/or device where the software is to be installed.
Other licensing options are available such as volume, site, and enterprise licensing.
Note: Licensing models such as volume, site and enterprise have to be discussed and arranged with sales
prior to purchasing GS RichCopy 360.
Disclaimer
The software is provided "AS IS" without any warranty, either expressed or implied, including, but not
limited to, the implied warranties of merchantability and fitness for a particular purpose. The author will
not be liable for any special, incidental, consequential or indirect damages due to loss of data or any
other reason.
Support & Upgrade
GuruSquad will provide its best effort to support customers with an active subscription (e.g.,
maintenance). Only customers with an active subscription will be eligible to download the latest version
of the product to which they are licensed.
Feedback
If you encounter any problems or difficulties using the software, or suggestions, comments or bugs
discovered using the utility, please send a message to [email protected].
GS RichCopy 360 (Standard v7.1 and Enterprise v8.1) March 2016
Page | 1
Table of Contents
Introduction ......................................................................................................................................3
Benefits of GS RichCopy 360 Consider the following benefits of GS RichCopy 360: ...............................3
Easy to Understand and Use ..................................................................................................................... 3
Robust Performance .................................................................................................................................. 3
Affordable Value ....................................................................................................................................... 3
Key Features of GS RichCopy 360 .............................................................................................................. 3
Installation Requirements ..................................................................................................................5
System Requirements ................................................................................................................................ 5
Licensing .................................................................................................................................................... 5
Storage and Privileges Requirements ....................................................................................................... 5
Installing GS RichCopy 360 (Standard and Enterprise) .........................................................................6
Upgrading from a previous version of GS RichCopy 360 ........................................................................... 6
New installation instructions .................................................................................................................... 6
Registering GS RichCopy 360 ..............................................................................................................9
Initial Configuration of GS RichCopy 360 ........................................................................................... 11
Service Configuration .............................................................................................................................. 11
Connect As Accounts ............................................................................................................................... 12
Email Configuration Settings................................................................................................................... 13
Maximum Allowed Concurrent Jobs Execution ....................................................................................... 14
Backup and Restore GS RichCopy 360 Database .................................................................................... 14
Managing and Creating Jobs in GS RichCopy 360 ............................................................................... 16
Jobs Overview.......................................................................................................................................... 16
Job Status Legends: ............................................................................................................................. 17
Job Progress Indicators: ...................................................................................................................... 17
Show Progress Screen: ........................................................................................................................ 18
Job Details Interface ................................................................................................................................ 19
Creating a New Job Using the Wizard ..................................................................................................... 25
Creating a TCP Copy Job (Enterprise Only): ............................................................................................. 29
Installing Remote Transfer Agent (RTA) Enterprise Only: ................................................................... 36
Configuring and Administering the Remote Transfer Agent (RTA) Enterprise Only ............................. 39
Byte Level Replication (Enterprise Only): .......................................................................................... 40
Sync Poisoning Protection (Enterprise Only): .................................................................................... 43
Exporting and Importing batch jobs from CSV (Enterprise Only): ....................................................... 45

GS RichCopy 360 (Standard v7.1 and Enterprise v8.1) March 2016
Page | 2
Status Log Screen: ............................................................................................................................ 47
Command Line Support: ................................................................................................................... 48
GS RichCopy 360 Client CLI “GSRichCopy360.exe”: ............................................................................ 48
CLI GSRichCopy360.exe Examples: ..................................................................................................... 53
Retrieving Job Information from GS RichCopy 360 Client “GSAPI” CLI (Enterprise Only) ..................... 54
CLI GSAPI Examples: ............................................................................................................................ 56
Enable Remote Management and Remove Admin Privileges Restriction:.............................................. 56
GS RichCopy 360 RTA (Remote Transfer Agent) CLI (Enterprise Only): ................................................ 58
CLI RTA Examples: ............................................................................................................................... 60
Enable RTA Remote Management and Remove Admin Privileges Restriction: ...................................... 61
Environment Variables: .................................................................................................................... 63
FAQs: ............................................................................................................................................... 65
Assigning Log On as a Service ................................................................................................................. 65
Method 1: ........................................................................................................................................... 65
Method 2: ........................................................................................................................................... 66
GS RichCopy 360 (Standard v7.1 and Enterprise v8.1) March 2016
Page | 3
Introduction
GS RichCopy 360 is designed to work on windows servers and workstations and is perceived as the
industry leader for file\folder replication and synchronization in WAN and LAN environments. GS
RichCopy 360 will even work over VPN connections and across the internet (Enterprise version only).
Our current version is the ideal solution for high-volume server and workstations transactions over
networks using LAN, WAN and VPN connections and across the internet thanks to 11 years of
refinement.
GS RichCopy 360 is offered in two different versions, Standard and Enterprise. Enterprise version
includes all options offered in Standard as well as other advanced options such as Bulk Job Create/
Import, block level replication, Real-time replication, Compression, Encryption, replication over TCP port
(recommended for replication across the internet and locked down firewall environments and many
more options covered later in the admin guide.
Benefits of GS RichCopy 360 Consider the following benefits of GS RichCopy 360:
Easy to Understand and Use Our patent pending design is slick and easy, providing the best admin experience possible while using
intelligent and sophisticated logic and advanced methods under the hood.
GS RichCopy 360 is designed for daily use by staff that also have other responsibilities. The GS RichCopy
360 interface provides what you need and where you expect to find it. It offers advanced capabilities
with minimal configuration overhead.
Robust Performance GS RichCopy 360 offers advanced multi-threading technology utilizing 100% parallel computing
techniques along with proprietary patent pending technology that offers the most robust and powerful
performance possible.
Affordable Value GS RichCopy 360 provides functionality that is comparable, if not superior, to most other solutions.
What’s more, the total cost of ownership of GS RichCopy 360 and is less than the initial purchase cost of
most other solutions. GS RichCopy 360 comes with free support from our highly trained support staff.
Key Features of GS RichCopy 360 Considering the previously listed benefits of GS RichCopy 360 and the following features, GS RichCopy
360 is a simple choice to make.
GS RichCopy 360 is job-based and can be configured with multiple jobs per server\workstation to
operate in the following modes\ features:
• Real-time (Only available in GS RichCopy 360 Enterprise)
• Byte-Level file replication to save on bandwidth and file copy time (Only available in GS
RichCopy 360 Enterprise)

GS RichCopy 360 (Standard v7.1 and Enterprise v8.1) March 2016
Page | 4
• Ability to use compress data during transmission making transfers much more efficient and
robust (Only available in GS RichCopy 360 Enterprise).
Option to replicate data across the internet with data being highly encrypted during
transmission (Only available in GS RichCopy 360 Enterprise).
• Repeat Interval (e.g. every 30 Minutes, 1 hour, daily, weekly …etc.)
• Scheduled (e.g. Friday 11:00 pm)
• On demand.
Command line support. Jobs can be created, triggered, stopped..etc via command line locally
from the same machine or passed remotely from another machine. This is useful to centrally
manage all the clients.
• Run as a windows service or as currently logged in user.
• Connect As specific user to source\ target machines which can be useful in workgroup and
multi-domain\forest environments.
• Long path and file name support out of the box.
• Sync Poisoning provides a safety net where data on the RTA server is backed up in the event it is
about to get overwritten or deleted by its source job
• Advanced Multi-Threading technology utilizing 100% parallel computing techniques and along
with proprietary patent pending technology offering the most robust and powerful performance
possible.
• GS RichCopy 360 has the ability to copy open and locked files due its full integration with
Volume Shadow Service (VSS).
• Option to replicate NTFS ACL security permissions, file and folder attributes, and date time
stamps.
• Advanced file and folder inclusion\exclusion settings by pattern in name, full name or explicit.
• Send email notifications on failure and\or success using local SMTP server or any other email
provider such as Gmail.
• Environment Variable is fully supported throughout most fields in the applicaiton.
Each job has its own unique configuration (Definition of Source and Target Folder) and its own settings.
The GS RichCopy 360 suite can be very useful in copying/moving/ mirroring directories along with all of
their files and subfolders, ACLs, and Attributes from one location to another (same server or different
server). Additionally, you have the option to have the source (folder you are copying from) to be
mirrored exactly on the target (folder you are copying to).
Another useful feature is the ability to replicate only the directory tree (structure) without files. This
feature will basically copy only the exact directory structure of source.

GS RichCopy 360 (Standard v7.1 and Enterprise v8.1) March 2016
Page | 5
Installation Requirements GS RichCopy 360 provides a simple, wizard-driven installation process.
System Requirements GS RichCopy 360 supports all of the following operating systems:
Windows 10
Windows 2012R2
Windows 2012
Windows 2008 R2
Windows 2008
Windows 2003
Windows 8.1
Windows 8
Windows 7
Windows XP
Windows Vista
GS RichCopy 360 supports x32 and x64 bit Windows running on PIII equivalent or higher processor and
minimum of 2GB of RAM.
Licensing Once installed, GS RichCopy 360 will run in trial mode (Copies only 5 files from every folder). The
software will automatically switch to a full version by providing a valid serial key. No uninstall or reinstall
required.
Storage and Privileges Requirements GS RichCopy 360 requires only 40MB of available space to successfully install. It is recommended
however, to have more available disk space to meet logging requirements in the event logs will be
stored on the same drive partition.
GS RichCopy 360 requires elevated admin privileges when installing and administering GS RichCopy 360.
GS RichCopy 360 (Standard v7.1 and Enterprise v8.1) March 2016
Page | 6
Installing GS RichCopy 360 (Standard and Enterprise) Before installing GS RichCopy 360 installation, make sure that the server\workstation on which you are
installing it currently meets or exceeds stated requirements.
Upgrading from a previous version of GS RichCopy 360 When upgrading from a previous version of GS RichCopy 360, simply remove the previous installation
and install the new version (this will retain all configurations intact as they are stored in the database).
To upgrade to the latest build of the current version, simply “check for update” in the info tab or
download the latest package from the GuruSquad.com.
Note, “check for update” will only upgrade the same primary version. For instance, it will upgrade 7.1 to
7.2. However, it will not upgrade 7.1 to 8.0. Such upgrades require a full uninstall of the previous version
and then install the latest version. After the upgrade, the application will switch to trial mode until it is
activated with a GS RichCopy 360 Enterprise serial number. All the current jobs and configurations will be
preserved. However, once the GS RichCopy 360 standard is upgraded GS RichCopy 360 Enterprise, the
database will not be downward compatible which means it cannot be used with GS RichCopy 360
Standard as the database schema has changed.
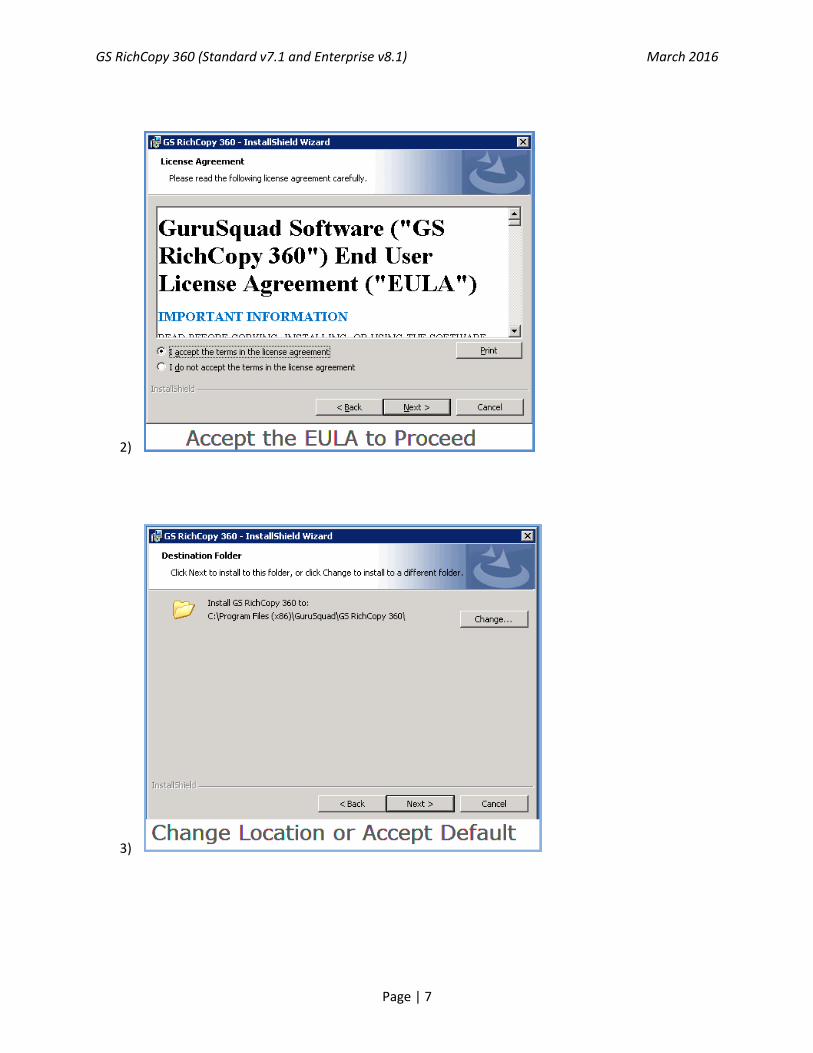
New installation instructions Prior to installing GS RichCopy 360, you must download and install .Net framework 4.0. If it is already
installed, you may skip this step.
Note: .Net framework 4.0 will suffice if it is already installed. GS RichCopy 360 will not proceed if .Net
framework is not installed.
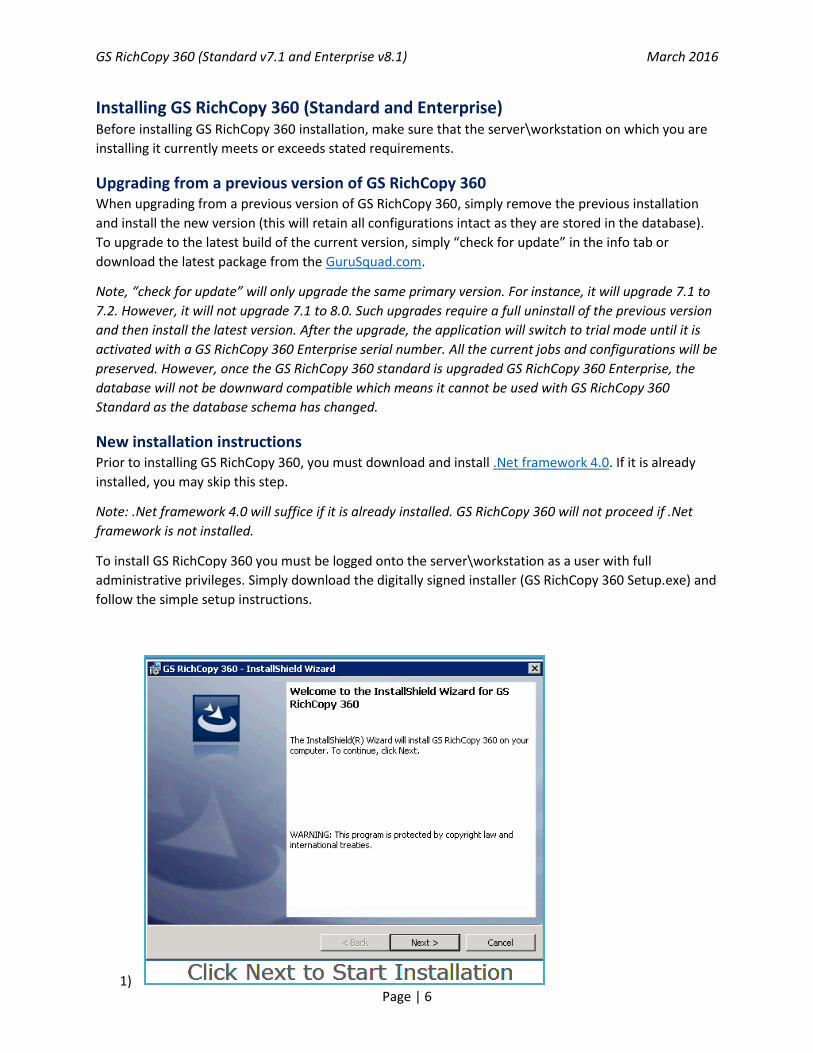
To install GS RichCopy 360 you must be logged onto the server\workstation as a user with full
administrative privileges. Simply download the digitally signed installer (GS RichCopy 360 Setup.exe) and
follow the simple setup instructions.
1)
GS RichCopy 360 (Standard v7.1 and Enterprise v8.1) March 2016
Page | 7
2)
3)
GS RichCopy 360 (Standard v7.1 and Enterprise v8.1) March 2016
Page | 8
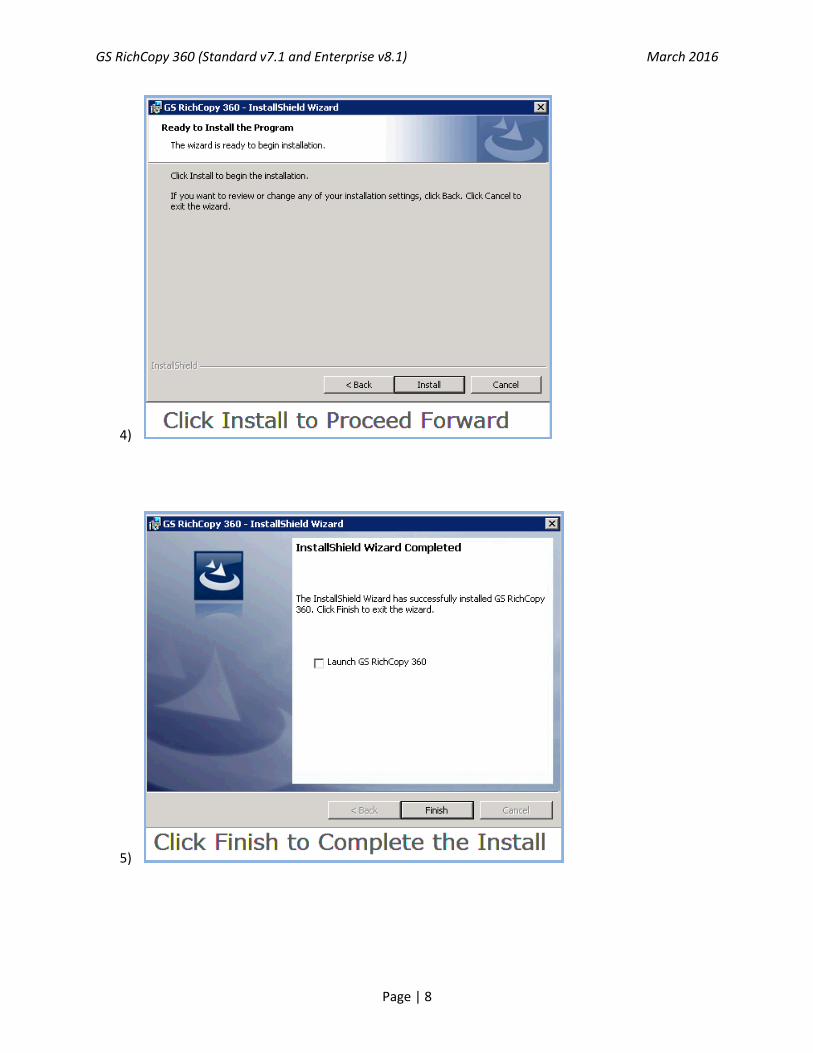
4)
5)
GS RichCopy 360 (Standard v7.1 and Enterprise v8.1) March 2016
Page | 9
After following these five simple installation steps, your newly installed copy of GS RichCopy 360 is ready
to be registered and configured.
Registering GS RichCopy 360 To register a newly installed or trial version of GS RichCopy 360, you will need the product serial key
along with your email address. This email address will be used for further correspondence/support and
to check for license authenticity. It is important to note that serial numbers will only work for the
version issued (i.e. Standard or Enterprise) Once you have secured them, follow the steps below:
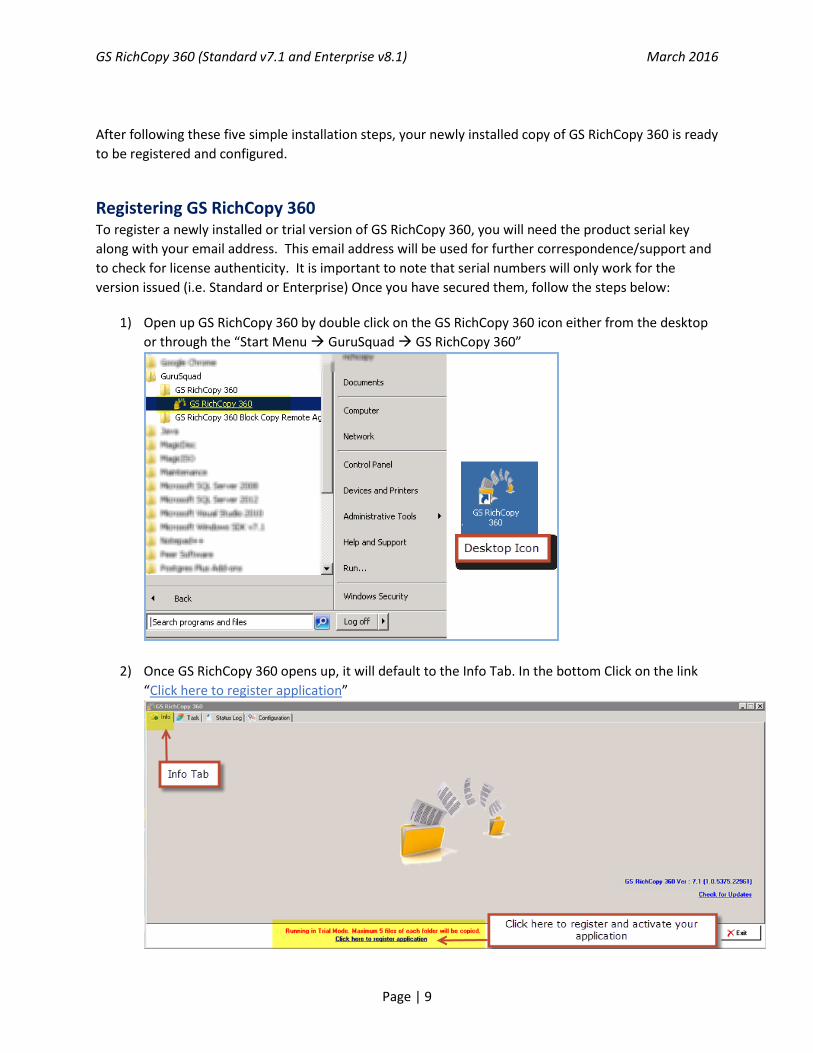
1) Open up GS RichCopy 360 by double click on the GS RichCopy 360 icon either from the desktop
or through the “Start Menu GuruSquad GS RichCopy 360”
2) Once GS RichCopy 360 opens up, it will default to the Info Tab. In the bottom Click on the link
“Click here to register application”
GS RichCopy 360 (Standard v7.1 and Enterprise v8.1) March 2016
Page | 10
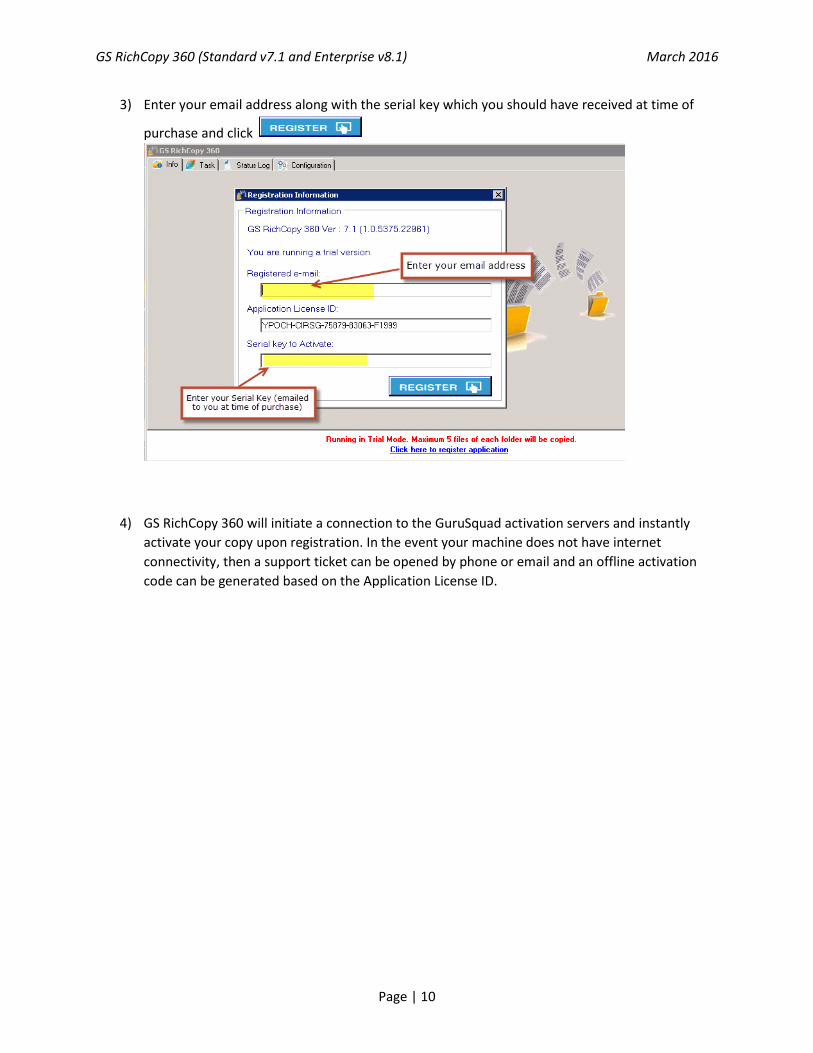
3) Enter your email address along with the serial key which you should have received at time of
purchase and click
4) GS RichCopy 360 will initiate a connection to the GuruSquad activation servers and instantly
activate your copy upon registration. In the event your machine does not have internet
connectivity, then a support ticket can be opened by phone or email and an offline activation
code can be generated based on the Application License ID.

GS RichCopy 360 (Standard v7.1 and Enterprise v8.1) March 2016
Page | 11
Initial Configuration of GS RichCopy 360 GS RichCopy 360 requires minimal configuration and is ready to work right out of the box. IT
administrators do have the option to configure certain components such as whether or not to run GS
RichCopy 360 as a “Windows Service” and what credentials to run the service as. Other configuration
parameters are Connect As accounts (Impersonation), email configuration settings, maximum
concurrent jobs to run, and backup and restore GS RichCopy Database which all will be covered later in
this section.
All of the settings that dictate how GS RichCopy 360 are covered under the Configuration Tab
Service Configuration By default, GS RichCopy 360 will install a service called “GS RichCopy 360 Service”. The service will be in
a running state running under the Local System Account. In the Service Configuration Section, you can
change it to run under a different user account. This user account can be a local user or a domain user.
It is very common to have this service account be a domain account that has access to both source and
target locations. It is important to note that this account must have administrative privileges in order to
copy open and locked files as well as Log On as a Service rights if you are running Windows 2008R2 or
later. Refer to “Assigning Log On as a Service” in Support section in this guide.
As you select “Windows Service Account” you will be presented with a service account form to use.
If you set different credentials or switch back to “running under Local System Account”, you must stop
and start the service for the changes to take effect. (Note: if you have any running jobs configured to run
under the services account, those jobs will be terminated and they will to be restarted). You can stop and
start the service from within the configuration tab as reflected in the screen shot below

GS RichCopy 360 (Standard v7.1 and Enterprise v8.1) March 2016
Page | 12
Connect As Accounts GS RichCopy 360 offers the option to run jobs as the logged in user or service account. There may be
times in which the service account and/or logged in account may not have access rights to connect to
the source and\or destination. In those instances, GS RichCopy 360 provides another option to specify
accounts and save them in the GS RichCopy 360 database. These accounts can then later be selected
and used to Connect As those users who have the necessary permissions for the source and\or
destination when creating a job. We will discuss this in more details when we get to creating a job.
Please reference the screen shot below for further clarification
NOTE: the service account and connect as credentials saved in GS RichCopy 360 have their passwords
fully encrypted.

GS RichCopy 360 (Standard v7.1 and Enterprise v8.1) March 2016
Page | 13
Email Configuration Settings GS RichCopy 360 offers the option to send email notifications once a job completes to alert you of its
success or failure status. GS RichCopy 360 can use any SMTP servers, locally or cloud servers i.e. Gmail,
Hotmail, or Yahoo. Below are two different sample configurations.
These settings are inherited on every configured job; user may also customize recipients for each job.
The above screen shot showing the settings for an open SMTP Server that requires no authentication.
Note: Make sure your non-authenticated SMTP servers can accept relay requests from the machine or
machines hosting GS RichCopy 360 if you select this feature.

GS RichCopy 360 (Standard v7.1 and Enterprise v8.1) March 2016
Page | 14
The
above screenshot showing settings for Gmail.
Note: Environment variables is supported in the From, To, CC, and BCC fields. Refer to Environment Variable
section for more details.
Maximum Allowed Concurrent Jobs Execution GS RichCopy 360 can run multiple jobs at the same time. Running many jobs simultaneously can
however impact performance. Trying to manage that can be difficult if there are a lot of jobs defined.
For this reason, setting a maximum concurrent job amount is recommended. If there are more jobs
trying to run than the max concurrent allowed, they will be queued up until other jobs are either
completed or terminated. For example, if the max allowed concurrent job execution is set to 6 and 8
jobs are trying to run concurrently then GS RichCopy 360 will allow only 6 jobs to run and the remaining
two will be queued up until the two of the 6 jobs complete or stop.
The default value for Max Allowed Concurrent Job Execution is 6.
Backup and Restore GS RichCopy 360 Database GS RichCopy 360 saves all entire configuration settings, including job definitions, to a single database
stored locally on the machine. The database file is called GSRichCopy360.sdf and its default location is
“C:\GSRICHCOPY360DB” folder.
GS RichCopy 360 provides the option to backup and restore the database manually by clicking the
backup or restore button under the Configuration tab. In addition, GS RichCopy 360 offers the option to
have the database backed up regularly at a specific time every X number of days. By default this option
is not turned on. If you do not make changes to the database often, it is recommended you space out
the number of days in order to minimize the number of backup files. It is highly recommended that the
backup location is stored onto a different location from where the GS RichCopy 360 currently resides.
Warning: Restoring the database will overwrite everything (job definitions, configurations) stored in the
current database. GS RichCopy service must be stopped before restoring the database. Once the
database is restored, the GS RichCopy 360 UI and service must be restarted in order to reload and
reflect the new configurations.

GS RichCopy 360 (Standard v7.1 and Enterprise v8.1) March 2016
Page | 15

GS RichCopy 360 (Standard v7.1 and Enterprise v8.1) March 2016
Page | 16
Managing and Creating Jobs in GS RichCopy 360 GS RichCopy 360 offers a simple yet intuitive design that makes it easy to manage and create jobs. All
the options are available in a single pane of glass so that any option can be easily selected. Moreover,
our job setup wizard can walk you through the most commonly used options. We will discuss each
section in full detail.
Once you open up GS RichCopy 360, click on the Jobs Tab to manage and create jobs.
Jobs Overview Once you select the Jobs tab, you will see a list of all defined jobs listed along with their current status
(Running, completed, queued up) as well as other configured settings for each job such as email
notification settings.
There are several dashboard buttons to start, stop and create new jobs. Please refer to screen below to
get a much clearer overview
GS RichCopy 360 (Standard v7.1 and Enterprise v8.1) March 2016
Page | 17
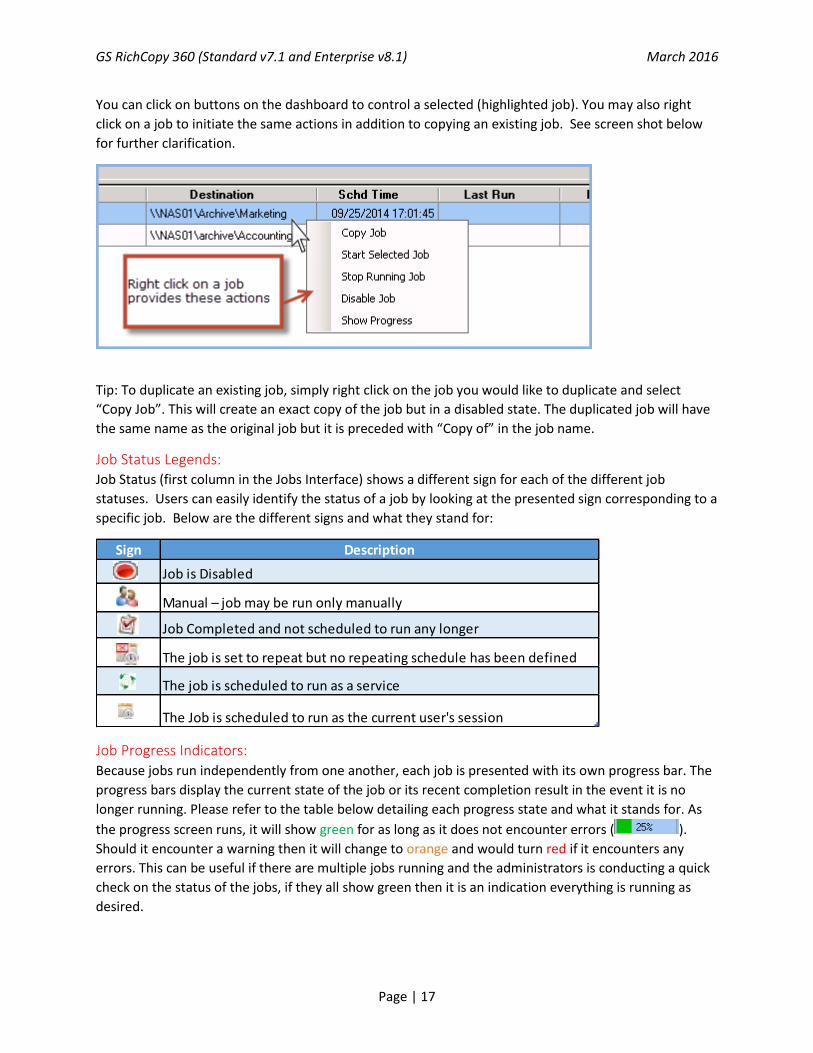
You can click on buttons on the dashboard to control a selected (highlighted job). You may also right
click on a job to initiate the same actions in addition to copying an existing job. See screen shot below
for further clarification.
Tip: To duplicate an existing job, simply right click on the job you would like to duplicate and select
“Copy Job”. This will create an exact copy of the job but in a disabled state. The duplicated job will have
the same name as the original job but it is preceded with “Copy of” in the job name.
Job Status Legends: Job Status (first column in the Jobs Interface) shows a different sign for each of the different job
statuses. Users can easily identify the status of a job by looking at the presented sign corresponding to a
specific job. Below are the different signs and what they stand for:
Job Progress Indicators: Because jobs run independently from one another, each job is presented with its own progress bar. The
progress bars display the current state of the job or its recent completion result in the event it is no
longer running. Please refer to the table below detailing each progress state and what it stands for. As
the progress screen runs, it will show green for as long as it does not encounter errors ( ).
Should it encounter a warning then it will change to orange and would turn red if it encounters any
errors. This can be useful if there are multiple jobs running and the administrators is conducting a quick
check on the status of the jobs, if they all show green then it is an indication everything is running as
desired.
Sign Description
Job is Disabled
Manual – job may be run only manually
Job Completed and not scheduled to run any longer
The job is set to repeat but no repeating schedule has been defined
The job is scheduled to run as a service
The Job is scheduled to run as the current user's session

GS RichCopy 360 (Standard v7.1 and Enterprise v8.1) March 2016
Page | 18
State Description
Running Job is gathering all the information to start the job operation. The gathering process is fully multi-threaded.
Stopped The job has been terminated by the user or by some other intervention (Service stopped…etc.)
Error Job experienced a problem. This could mean it completed with errors or it did not fully complete (i.e. target is full; source or target is down…etc.)
Queued Job is waiting in line for its turn to run. Check Max Allowed Concurrent Job Execution in the event it reached its limit at the current state
Completed Job has completed successfully with no errors to report
Progress %
As the job runs, percentage of the progress is displayed showing the overall progress of the job. Click on it to see full details regarding its progress. User can see detailed progress for individual job by clicking progress button at bottom.
Show Progress Screen:
When a job is in a running state, users can click on the progress bar ( ) next to the running job
or show progress button ( ) in the Jobs Tab to see full details regarding that job’s progress.
If a job is set to multi-thread (highly recommended), then each copy thread and its progress will be
shown as well. Please refer to the screen shot below

GS RichCopy 360 (Standard v7.1 and Enterprise v8.1) March 2016
Page | 19
Job Details Interface GS RichCopy 360 offers a single pane of glass when viewing\modifying an existing job. The user
interface is very rich in terms of features and options, while being simple and intuitive.
In this section we will do a deep dive into the different features and settings offered in the job details
screen. Users can access the job details screen in two different ways:
1) Double clicking on existing job or selecting the edit button “ "corresponding to that
specific job.
2) By creating a job through the Job Creation Wizard (discussed in the next section), advanced
users have the option to skip the wizard and jump directly into a blank job details screen.

GS RichCopy 360 (Standard v7.1 and Enterprise v8.1) March 2016
Page | 20
Refer to the screen shots below for details on each option
1) Job Name: This is the name of the job by which you will identify it. The name has to be unique. It
is highly suggested to use a descriptive name such as “Accounting Data” or “Copy Email Archive”
so that other uses\administrators can relate to the role of this job in the future. Job names are
referenced in the Job Status Tab (discussed later) and in email notifications (if turned on).
2) Description: This field is available to enter a description for the job.
3) Source: Type or browse to the path (folder) where you want to copy FROM. Source will always
point to a folder not to a file. Note: Path variables is supported in this field. Refer to Environment
Variable section for more details.
Copy as Root Folder: When this option is selected, it will create the source root folder and its
contents on the destination. Otherwise, it will only copy the contents of the root folder to the
destination.
4) Destination Type: There are two ways data can be copied:
a. Normal: This method uses SMB to copy data such as \\192.168.0.11\share or a local drive such

GS RichCopy 360 (Standard v7.1 and Enterprise v8.1) March 2016
Page | 21
as d:\target.
b. TCP: This option is only available in GS RichCopy 360 Enterprise. User can specify a specific port
(by default it uses TCP 8008) to transmit the data. This option requires a few additional
configuration settings and a light Remote Transfer Agent must be installed on the recipient
machine which will be later discussed in TCP Copying method.
5) Destination: Type or browse to the path (folder) where you want to copy to. This folder will be
created if it does not exist. Please note if you are using the TCP option, then a job serial number
is presented instead of a destination path prompt. Please refer to TCP Copying method for more
details. Note: Path variables is supported in this field. Refer to Environment Variable section for
more details.
6) Connect As (Source), (Destination): Users have the option to impersonate a different user to
connect to the source and\or destination. This is practical when the logged in user or the service
account used does not have access to the source folder. The Connect As user accounts are
defined in the Connect As section under the Configuration Tab.
7) Copy Files Instantly: If you enable this option then GS RichCopy 360 will start the
replication\move before it calculates the total amount of data being replicated\moved. The
progress percentage bar will automatically adjust up or down until the total calculation is
complete. This option is recommended when the data in the source is more than 500k files and
folders or the source has a high latency. Disabling this option may slow the start of the
replication/move but will provide a more accurate percentage from the start.
8) Copy Options: There are several copy options that can be used and you must select one of them:
a. Copy Changes Only: Copy only files and folders that are new or modified from the source
to destination (Deltas only). This option will not delete files from destination if they do
not match in source. If the destination has the same replica files, then those files will be
skipped.
b. Mirror: Mirror the destination to the source. Please note that if a file is deleted from the
source, it will be deleted from the target.
c. Move: Move files and directories (delete from source after copying).
d. DIR: Copy the directory tree structure only.
e. Copy All: Copy all files and folders from source to destination (Overwrite files and folders
that match in the destination). This option will not skip any files if the files in destination
are exact replicas as in the source.
9) Copy Flag: There are options to choose from when copying:
a. Locked: If checked, this option will copy locked and open files via VSS integration. In
order for the open file copy to work properly, the source has to be on the local computer
as GS RichCopy 360 would work seamlessly with VSS (Volume Shadow Service) to copy
the locked\open file(s).
b. File Compare: This sets the file comparison element to compare whether a file in source
and destination match or if it needs to be overwritten in destination. The options are:

GS RichCopy 360 (Standard v7.1 and Enterprise v8.1) March 2016
Page | 22
1. File size comparison: If this option is selected then comparison is determined by the
file size.
2. Last-modified Timestamp: If this option is selected then comparison is determined by
the last-modified time stamp.
3. Both: This option would use the Last-modified timestamp and file size, if both match,
then the file will be skipped, otherwise if one of the two options returns a mismatch,
then the source file is copied to the destination.
c. ACLs: Copies all of the NTFS security permissions, including inheritance blocking and
advanced ACL settings. If the destination file or folder matches the source except for the
NTFS security settings, then only the security settings will be replicated over and it will
not trigger a retransmission of the entire file or folder. For example, if a word doc exists
in both source and destination but the permissions are different, then GS RichCopy 360
would detect that the files are identical and it would just replicate the permissions to
destination so that they are fully the same.
Skipped files ACLs (slow): This option checks the ACL NTFS permissions even on files that
have been skipped to ensure that NTFS permissions set on files in the destination match
permissions set on the source side. While setting NTFS permissions on the file level is not
a recommended practice, this option is available and triggering may increase the
duration of the job while it compares the NTFS permission on every file.
d. Detect File Changes Real-time: If this option is checked, the job will monitor changes to
files in Real-Time and use these changes as triggers for file synchronization. If selected,
user will be presented with a configure option to monitor file ACL changes and file
attribute changes. Furthermore, the option to exclude or include specific file extensions
to be used in real-time replication (Note: This option is only available in GS RichCopy 360
Enterprise).
e. Block Level Copy: Select this option to enable/disable byte level replication. Byte Level
allows you to transfer just the changed data in a file when synchronizing, instead of the
entire file. This is useful in saving bandwidth especially when dealing with large file sizes.
(Note: This option is only available in GS RichCopy 360 Enterprise).
f. Folder Time Stamp: Folders in the destination will have their timestamps copied from the
source.

GS RichCopy 360 (Standard v7.1 and Enterprise v8.1) March 2016
Page | 23
g. Attributes: If this option is selected, file and folder attributes will be synchronized from
source to the destination. If the destination file or folder matches the source except for
the attributes, then only the attribute settings will be replicated over and it will not
trigger a retransmission of the entire file.
h. Date Filter: This feature provides the option to copy\move files whose last modified date
are before (prior) or within the specified number of days. A date range can also be set as
a date filter. Files not matching the date criteria set will be excluded. Date filters will not
be applied to folders. Once this feature is selected, the user is presented with different
option to set the filter date criteria which is presented in the screen shot below.
i. Terminate Job if Machines are unreachable: This option is highly useful in the event the
source or destination machines are unreliable. If this option is selected, then GS RichCopy
360 will continue to attempt to copy files instead of timing out. This option can be useful
when copying across high latency links or over strained or unreliable WAN connections.
10) Misc: There are three different options under Miscellaneous:
a. Logs: You can type or browse where you want the log file to be placed. Note: Path
variables is supported in this field. Refer to Environment Variable section for more
details.
b. Log App: If a log file already exists, then logging will just append to the file instead of
overwriting it.
c. Log Size: If a number is specified (in MB), then once the file log sizes reaches that limit the job
will start logging to new file (however the job will continue to run). This option is useful to avoid
large log files.
11) Job Status: Jobs are created as Enabled jobs by default. This means they can be run on demand or
as scheduled jobs. Jobs that are set to disabled will NOT run on demand or as scheduled.

GS RichCopy 360 (Standard v7.1 and Enterprise v8.1) March 2016
Page | 24
It is also worth noting that if a job is duplicated, the duplicated job is going to default to
“Disabled”.
12) Run As Service: If the box is checked, then the job will run as a service using the service credential
specified in the Configuration Tab (default is Local System Account). If the box is not checked,
then the software will utilize the session of the logged on user that is running the application.
There are many advantages to running a job under a service account. The first and foremost
reason is that jobs will not terminate due to a user logging off or closing the GS RichCopy
application. A service account can run as the Local System Account, which is an account that has
full access to every file and folder on the system (in most scenarios). For example, a machine that
has locked down permissions may have issues copying folders and files as the user credentials
used may not have sufficient rights. Using a service account running as Local System Account
may provide better results.
It is worth noting that jobs have to be set to run at a scheduled time in order to be configured to
run using service account. A scheduled job can always be triggered to start manually which would
in that sense run the job on demand as a service.

GS RichCopy 360 (Standard v7.1 and Enterprise v8.1) March 2016
Page | 25
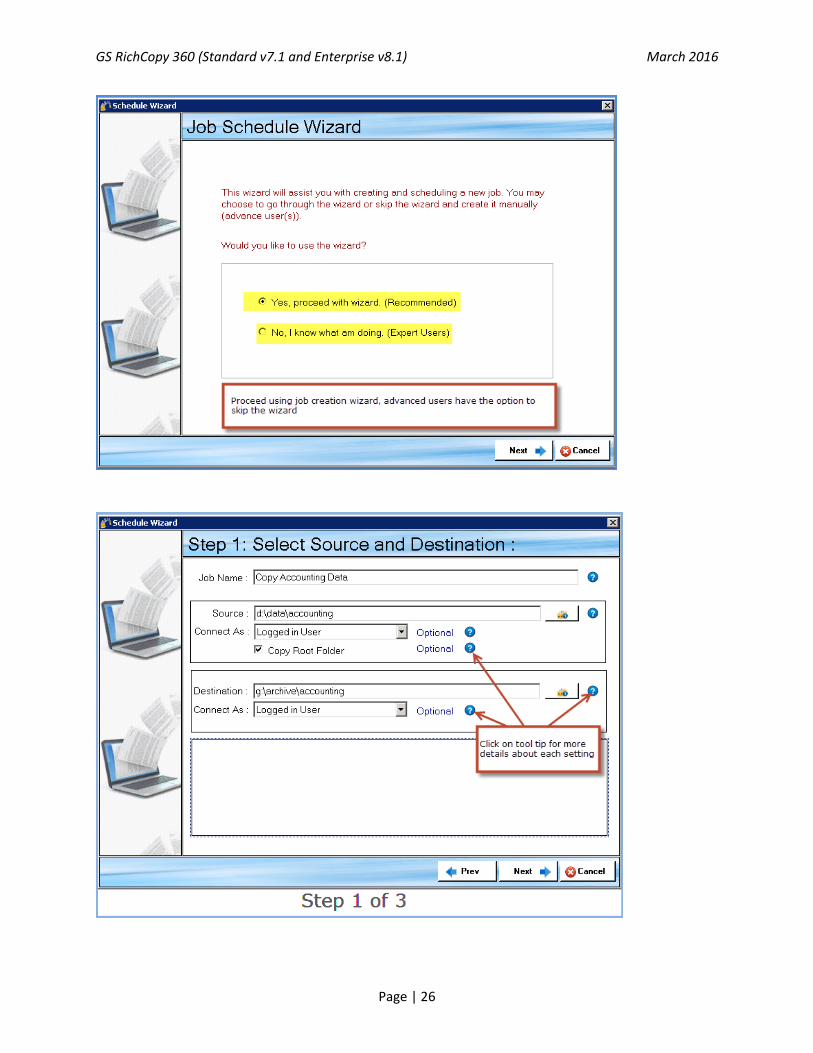
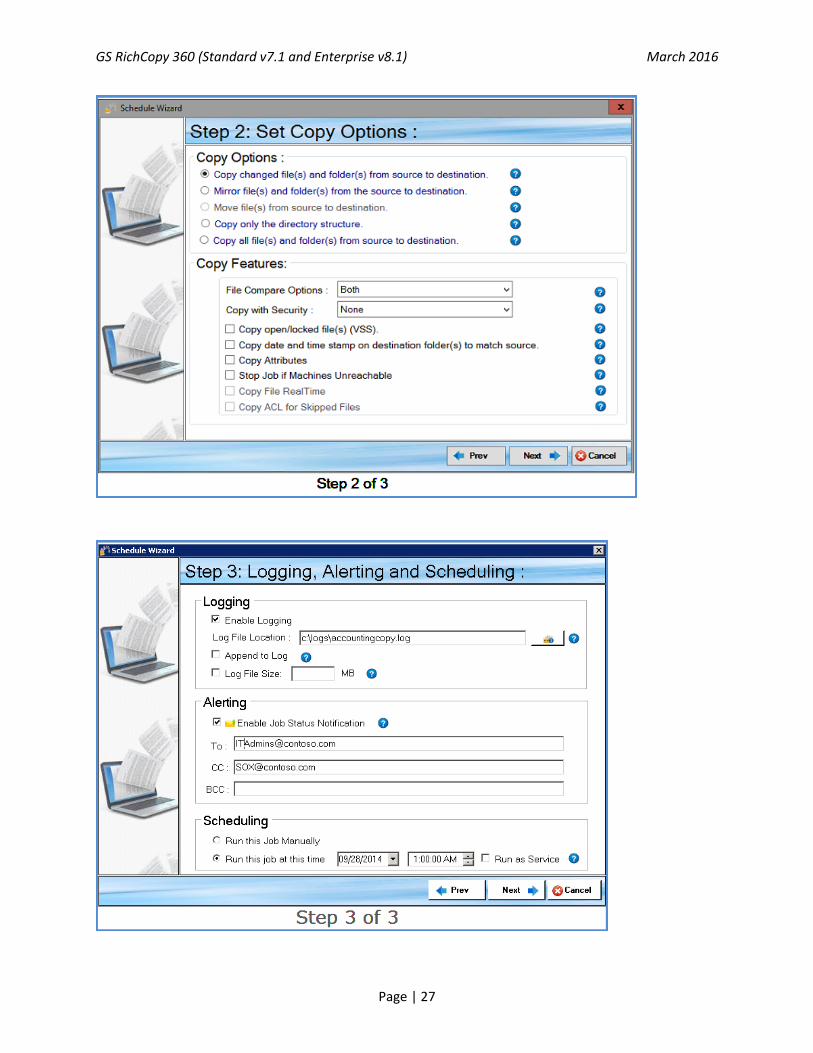
Creating a New Job Using the Wizard GS RichCopy 360 offers a simple job creation wizard. The wizard walks IT administrators through most
commonly used settings (a total of three steps) and a full summary of the selected options is displayed
at the end for confirmation.
While most of the available options are self-explanatory, help tool tips are displayed next to each setting
to further clarify its role, purpose and how it impacts the job if selected. Tool tips are represented by the
icon .
Moreover, expert users have the option to skip the wizard and jump directly to the detailed job screen
and create the job that way.
It is worth noting that once a job is created (whether through the wizard or by jumping directly to the
detailed job’s screen), it can always be modified at a later time if the need arises.
Reference screen shots to learn more about the job creation wizard.
GS RichCopy 360 (Standard v7.1 and Enterprise v8.1) March 2016
Page | 26
GS RichCopy 360 (Standard v7.1 and Enterprise v8.1) March 2016
Page | 27
GS RichCopy 360 (Standard v7.1 and Enterprise v8.1) March 2016
Page | 28
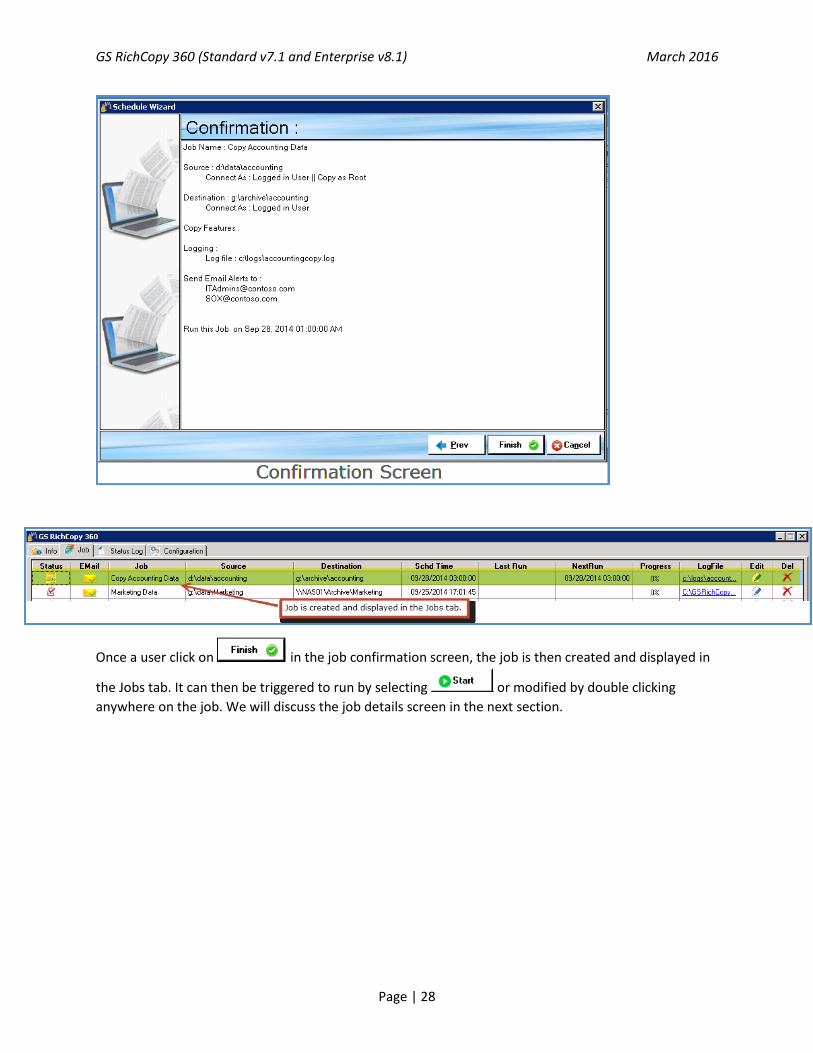
Once a user click on in the job confirmation screen, the job is then created and displayed in
the Jobs tab. It can then be triggered to run by selecting or modified by double clicking
anywhere on the job. We will discuss the job details screen in the next section.
GS RichCopy 360 (Standard v7.1 and Enterprise v8.1) March 2016
Page | 29
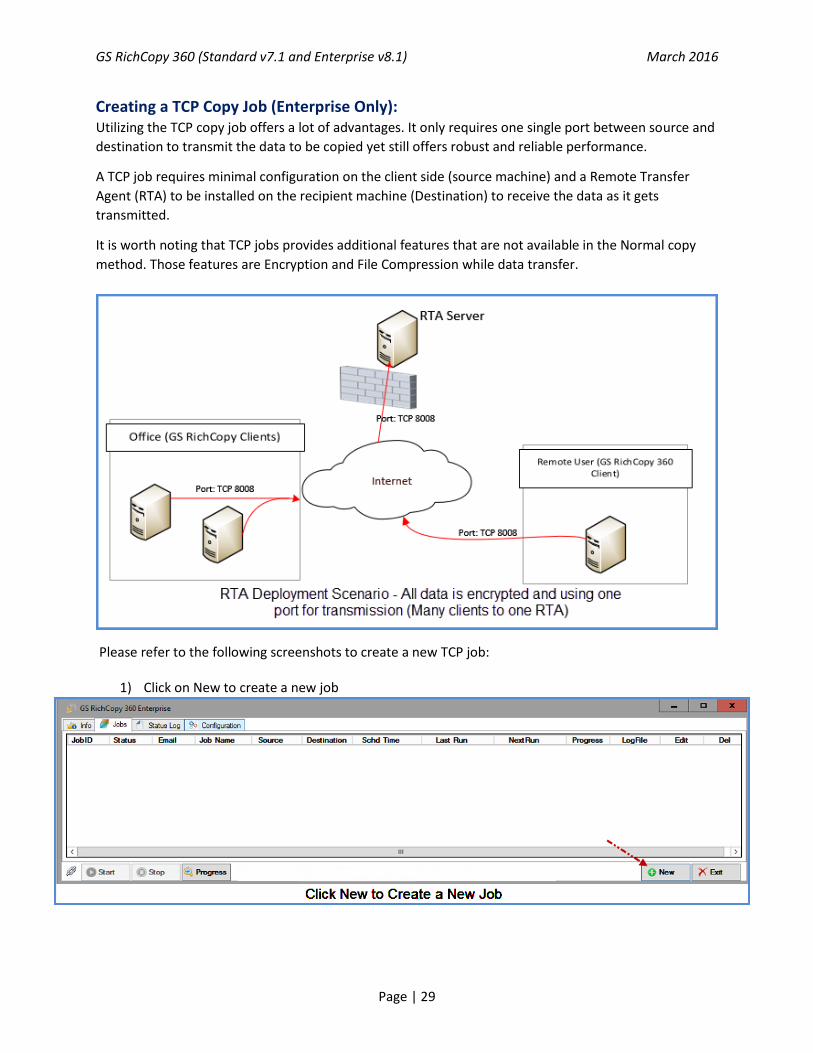
Creating a TCP Copy Job (Enterprise Only): Utilizing the TCP copy job offers a lot of advantages. It only requires one single port between source and
destination to transmit the data to be copied yet still offers robust and reliable performance.
A TCP job requires minimal configuration on the client side (source machine) and a Remote Transfer
Agent (RTA) to be installed on the recipient machine (Destination) to receive the data as it gets
transmitted.
It is worth noting that TCP jobs provides additional features that are not available in the Normal copy
method. Those features are Encryption and File Compression while data transfer.
Please refer to the following screenshots to create a new TCP job:
1) Click on New to create a new job

GS RichCopy 360 (Standard v7.1 and Enterprise v8.1) March 2016
Page | 30
2) Select “No I know what I am doing (Expert Users)” and click Finish to bypass the wizard as it
currently does not offer creating TCP jobs.
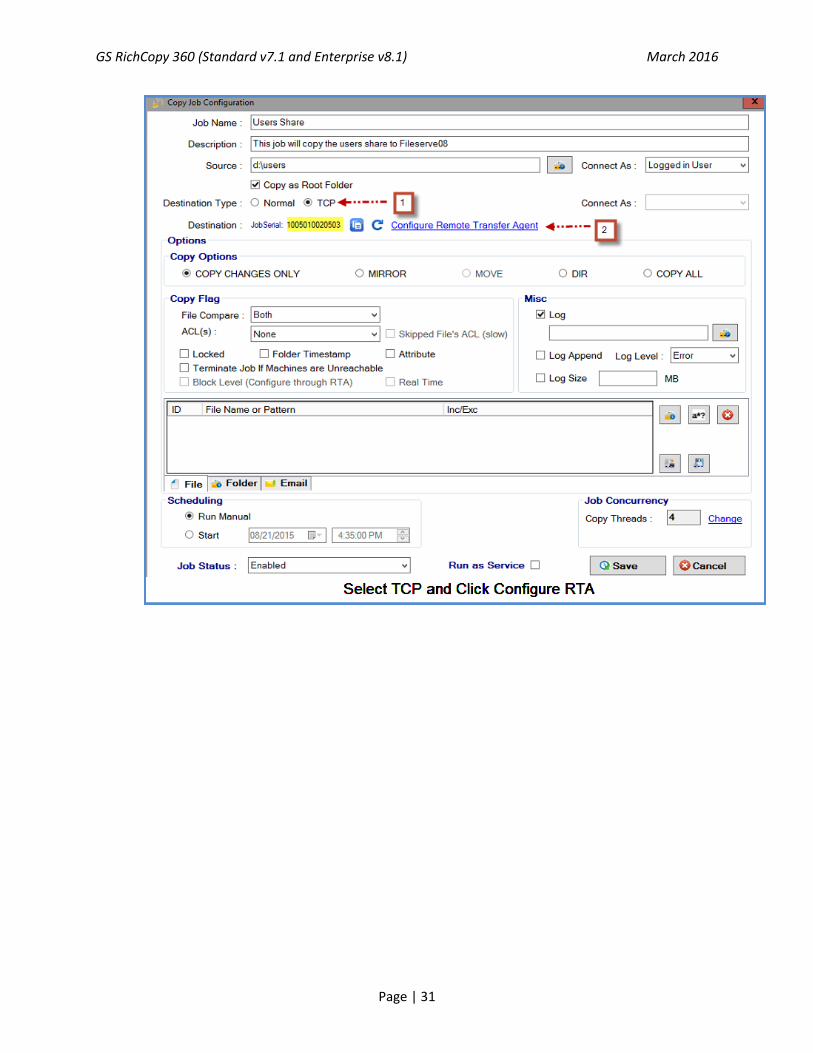
3) Populate the Job Name and Source and the rest of the options as desired except for Destination,
select TCP Method and click on the copy clipboard to copy the Job Serial. Then click to configure
the Remote Transfer Agent. It is important to note: The Job Serial is a unique number that is
randomly created on the source per job. The admin will provide the job serial on the target
machine (RTA) as he\she creates the receiving end of the job.
Note: Job Serial can be set by the administrator if so is required. It can be done from the
command line. All manually set Serial Jobs have to be prefixed by 99999 and should be 13
character long numeric value. This can be useful in scenarios where the administrator wants to
automate job creation on the client and the RTA server. Refer to GS RichCopy 360 Client CLI for
more information and examples or type gsrichcopy360 /? From the command prompt (must be
in the folder: Program Files\GuruSquad\GS RichCopy 360 Enterprise).
GS RichCopy 360 (Standard v7.1 and Enterprise v8.1) March 2016
Page | 31
GS RichCopy 360 (Standard v7.1 and Enterprise v8.1) March 2016
Page | 32
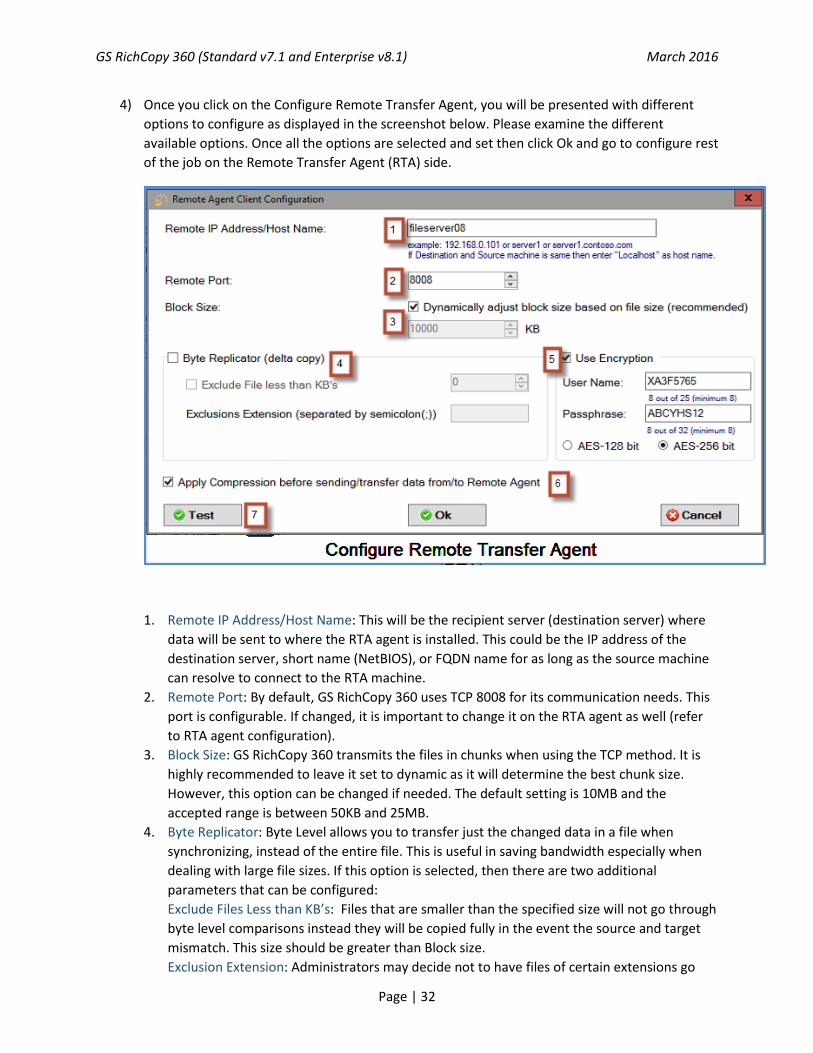
4) Once you click on the Configure Remote Transfer Agent, you will be presented with different
options to configure as displayed in the screenshot below. Please examine the different
available options. Once all the options are selected and set then click Ok and go to configure rest
of the job on the Remote Transfer Agent (RTA) side.
1. Remote IP Address/Host Name: This will be the recipient server (destination server) where
data will be sent to where the RTA agent is installed. This could be the IP address of the
destination server, short name (NetBIOS), or FQDN name for as long as the source machine
can resolve to connect to the RTA machine.
2. Remote Port: By default, GS RichCopy 360 uses TCP 8008 for its communication needs. This
port is configurable. If changed, it is important to change it on the RTA agent as well (refer
to RTA agent configuration).
3. Block Size: GS RichCopy 360 transmits the files in chunks when using the TCP method. It is
highly recommended to leave it set to dynamic as it will determine the best chunk size.
However, this option can be changed if needed. The default setting is 10MB and the
accepted range is between 50KB and 25MB.
4. Byte Replicator: Byte Level allows you to transfer just the changed data in a file when
synchronizing, instead of the entire file. This is useful in saving bandwidth especially when
dealing with large file sizes. If this option is selected, then there are two additional
parameters that can be configured:
Exclude Files Less than KB’s: Files that are smaller than the specified size will not go through
byte level comparisons instead they will be copied fully in the event the source and target
mismatch. This size should be greater than Block size.
Exclusion Extension: Administrators may decide not to have files of certain extensions go
GS RichCopy 360 (Standard v7.1 and Enterprise v8.1) March 2016
Page | 33
through block level comparison for various reasons. If so, then setting those extensions and
separating them with a semicolon if more than one extension is needed.
5. Use Encryption: Using encryption in GS RichCopy 360 is very easy to implement. What is
required is to provide a User Name and a Passphrase. The combinations will later need to be
retyped in the RTA agent (destination machine). GS RichCopy 360 supports AES 128 and AES
258. Encryption adds very little to no noticeable overhead when using modern CPUs which
support AES instruction set.
6. Apply Compression before sending data to RTA agent: One other advantage of using TCP
method is the option to compress data before transmission. GS RichCopy 360 uses high and
robust level of compression which is one of the most trusted, reliable, and robust
compression algorithms defined to date.
7. Test: If the Remote Transfer Agent is installed on the recipient (receiving) machine, then the
test button can confirm if it can establish communication. If it reports that it is failing, then it
is likely a firewall port issue or the RTA agent service is not started on the recipient machine.
5) Once a TCP job is configured on the client side (Source machine), similar configurations need to
take place on the Remote Transfer Agent (destination machine). The RTA agent must first be
installed on the destination machine before it can be configured (very light installation package).
In the event the RTA is not installed, please refer to installing Remote Transfer Agent. If the RTA
is already installed on the destination machine, then follow these steps to complete the TCP job
configuration.
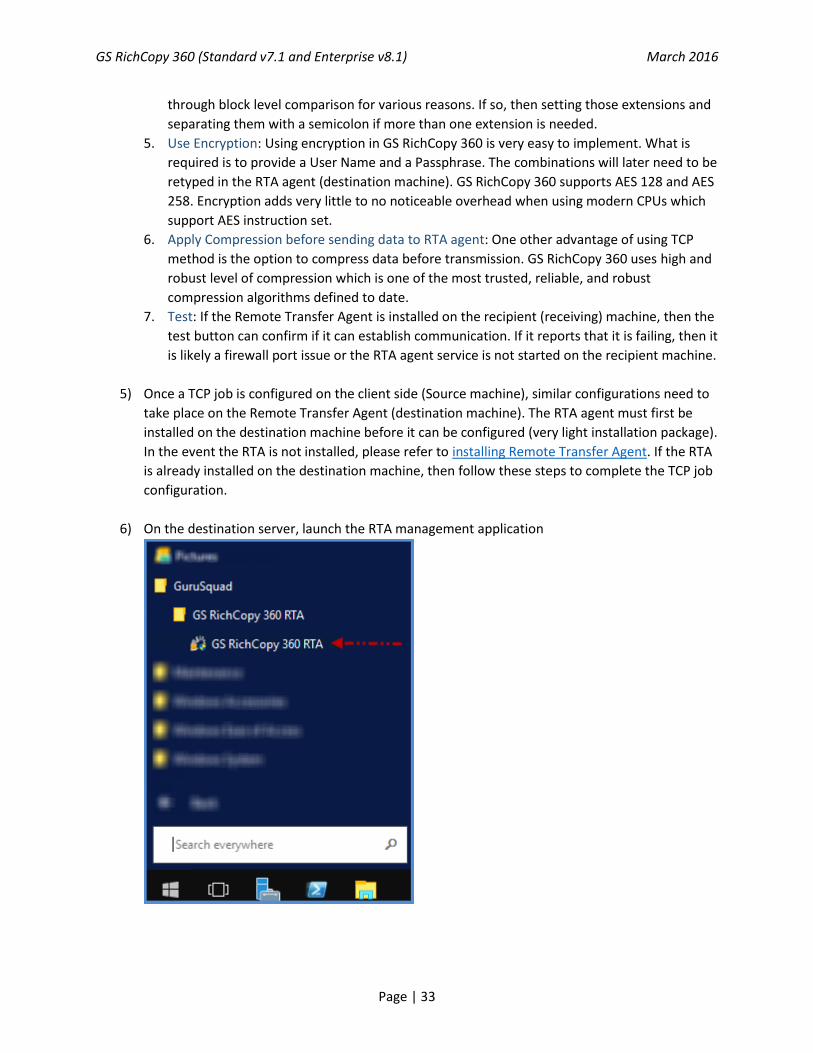
6) On the destination server, launch the RTA management application

GS RichCopy 360 (Standard v7.1 and Enterprise v8.1) March 2016
Page | 34
7) Click on New RTA Job Configuration
8. New RTA Agent screen you will be presented with different options to configure as
displayed in the screenshot below. Please examine the different available options. Once all
the options are selected and set then click Ok
1) Job Name: This is the name of the job by which you will identify it. The name has to be
unique. It is highly suggested to use a descriptive name such as “Accounting Data” or

GS RichCopy 360 (Standard v7.1 and Enterprise v8.1) March 2016
Page | 35
“Copy Email Archive” so that other uses\administrators can relate to the role of this job
in the future.
2) Description: This field is available to enter a description for the job.
3) Job Serial: The job serial must match the job serial presented on the client side (Source
machine).
4) Destination: Type or browse to the path (folder) where you want to copy to. Note: This
is relative to the destination machine not the source machine. Note: Path variables is
supported in this field. Refer to Environment Variable section for more details.
5) Encryption: If encryption is set in the source job, then the user name and passphrase
need to be provided to match what is configured in the source job.
6) Sync Poisoning: Sync Poisoning provides a safety net where data on the RTA server is
backed up in the event it is about to get overwritten or deleted by its source job. Sync
poisoning works in a very simple process. Should a file get deleted or overwritten by a
newer file coming from the source job, then this file is moved over to the specified
backup folder. The Max Size will purge files from the “backup location” as the Max Size
threshold is reached. The deletion process will use FIFO as it is deletion criteria.
Note: Path variables is supported in this field. Refer to Environment Variable section for
more details.
7) Job Enabled: This option enables the RTA server to accept incoming connections
directed with this job serial. If the job is not enabled, any connections directed with this
job serial will be rejected.
8) Click Save on the RTA configuration screen. The job is now ready to execute. Just start it
from client screen.

GS RichCopy 360 (Standard v7.1 and Enterprise v8.1) March 2016
Page | 36
Installing Remote Transfer Agent (RTA) Enterprise Only:
The Remote Transfer Agent comes in its own standalone installation packages. There is an
installation package for 32 bit machines (GS RichCopy 360 RTA x86.msi) and one for 64 bit
machines (GS RichCopy 360 RTA x64.msi) as reflected in the screenshot below.
Please note Access Database engine is a prerequisite for RTA to function properly, it will be
installed silently if needed. It needs to be in the same folder as the RTA MSI installation folder to
get installed.
To install the RTA:
1) Double click on the installation MSI package corresponding to your OS platform (x86 or x64).
2) Click Next to proceed with the installation

GS RichCopy 360 (Standard v7.1 and Enterprise v8.1) March 2016
Page | 37
3) Review and accept the EULA then Click Next
4) Review and change the path location if needed then Click Next twice to start the installation

GS RichCopy 360 (Standard v7.1 and Enterprise v8.1) March 2016
Page | 38
5) Click Finish to complete the installation

GS RichCopy 360 (Standard v7.1 and Enterprise v8.1) March 2016
Page | 39
Configuring and Administering the Remote Transfer Agent (RTA) Enterprise Only Once the RTA is installed on the target machine (destination machine). There are some minimal
configurations that could be changed. However, upon a successful install, it should work out of the box.
Here we will examine and familiarize you with the different available options in RTA screen.
There is a single management interface for RTA which could be launched from the start menu.
The RTA management screen provides a single pane of glass showing all current job activities in addition
to overall configurations. Please examine the different settings to get more familiar with it.
1) Remote Agent Service Status: RTA runs as a service. The service will either show as running or stopped
along with the account it is running under. By default, it uses local system which has full access right to all
local drives. The account can be changed from services.msc. The service is called: GS RichCopy 360
Enterprise RTA Service. The stop and start buttons change the status of the service. Stopping the service
terminates all current jobs as well as stops the server from accepting any new connections.
2) Sync Poisoning Service Status: The service is in charge of keeping defined sync poisoning locations in
various jobs below their assigned threshold. Note that by default it runs under the context of local system.
Should there be a need to use a different account then the account credentials need to be changed in
services.msc for the service named GS RichCopy 360 Enterprise Sync Poisoning Service. Similar to the RTA
service, the start and stop buttons change the status of the sync poisoning service.

GS RichCopy 360 (Standard v7.1 and Enterprise v8.1) March 2016
Page | 40
3) Port: RTA service uses port TCP 8008 by default. Should there be the need to use a different port, then this
number can be changed and applied by clicking the save link. Recycling of the RTA service is going to be
required for the new defined port to be used.
4) Refresh: The refresh link refreshes the current job activity screen. By default, the job activity screen
refreshes every 15 seconds but the administrator has the option to refresh as needed.
5) Export: Export provides the option to export currently defined jobs to a CSV file.
6) New RTA Job Configuration: TCP jobs require to be setup on the RTA server (receiving end). Clicking on this
link presents a new TCP job configuration screen.
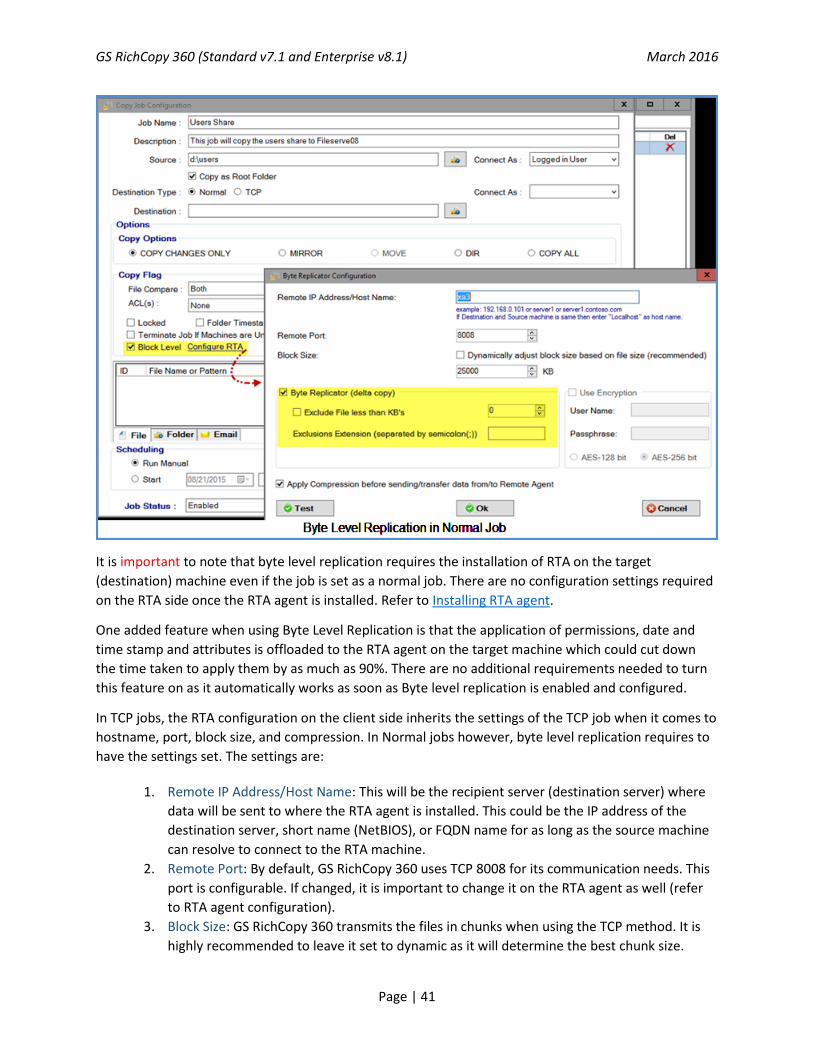
Byte Level Replication (Enterprise Only): Byte Level allows you to transfer just the changed data in a file when synchronizing, instead of the entire
file. This is useful in saving bandwidth especially when dealing with large file sizes. Byte level replication
is available in both copy methods TCP and Normal however in TCP jobs it has to be enabled from the
RTA configuration screen where in Normal jobs it is configured from. Please see screenshot below for
further clarification.
GS RichCopy 360 (Standard v7.1 and Enterprise v8.1) March 2016
Page | 41
It is important to note that byte level replication requires the installation of RTA on the target
(destination) machine even if the job is set as a normal job. There are no configuration settings required
on the RTA side once the RTA agent is installed. Refer to Installing RTA agent.
One added feature when using Byte Level Replication is that the application of permissions, date and
time stamp and attributes is offloaded to the RTA agent on the target machine which could cut down
the time taken to apply them by as much as 90%. There are no additional requirements needed to turn
this feature on as it automatically works as soon as Byte level replication is enabled and configured.
In TCP jobs, the RTA configuration on the client side inherits the settings of the TCP job when it comes to
hostname, port, block size, and compression. In Normal jobs however, byte level replication requires to
have the settings set. The settings are:
1. Remote IP Address/Host Name: This will be the recipient server (destination server) where
data will be sent to where the RTA agent is installed. This could be the IP address of the
destination server, short name (NetBIOS), or FQDN name for as long as the source machine
can resolve to connect to the RTA machine.
2. Remote Port: By default, GS RichCopy 360 uses TCP 8008 for its communication needs. This
port is configurable. If changed, it is important to change it on the RTA agent as well (refer
to RTA agent configuration).
3. Block Size: GS RichCopy 360 transmits the files in chunks when using the TCP method. It is
highly recommended to leave it set to dynamic as it will determine the best chunk size.

GS RichCopy 360 (Standard v7.1 and Enterprise v8.1) March 2016
Page | 42
However, this option can be changed if needed. The default setting is 10MB and the
accepted range is between 50KB and 25MB.
4. Byte Replicator: Byte Level allows you to transfer just the changed data in a file when
synchronizing, instead of the entire file. This is useful in saving bandwidth especially when
dealing with large file sizes. If this option is selected, then there are two additional
parameters that can be configured:
Exclude Files Less than KB’s: Files that are smaller than the specified size will not go through
byte level comparisons instead they will be copied fully in the event the source and target
mismatch.
Exclusion Extension: Administrators may decide not to have files of certain extensions go
through block level comparison for various reasons. If so, then setting those extensions and
separating them with a semicolon if more than one extension is needed.
5. Apply Compression before sending data to RTA agent: One other advantage of using TCP
method is the option to compress data before transmission. GS RichCopy 360 uses LZ4
compression which is one of the most trusted, reliable, and robust compression algorithms
defined to date.
Encryption is not available in Normal jobs thus the encryption option is greyed out in byte
level configuration screen. Encryption with byte level replication is not available when using
TCP jobs.
GS RichCopy 360 (Standard v7.1 and Enterprise v8.1) March 2016
Page | 43
Sync Poisoning Protection (Enterprise Only): Replication is a powerful tool, but it also isn’t discriminating. If a series of files becomes corrupt
or a user incorrectly alters a file at the source drive, those unwanted changes will be replicated
to the copy location as well, unless the replication is handled by GS RichCopy 360 Enterprise.
Whenever a file is modified at the source, 360 Enterprise offers Sync Poisoning feature to back
up the copied original at the destination target drive location to another location before
replicating the newly altered file. This ensures that you always have a prior version of every
adulterated file that you can go back to. GS RichCopy 360 Enterprise ensures that the availability
and integrity of your files is always preserved.
Sync Poisoning is defined and configured per job basis. Each job has a configurable threshold to
set a quota if desired which is monitored real-time, so backup disk never goes out of space.
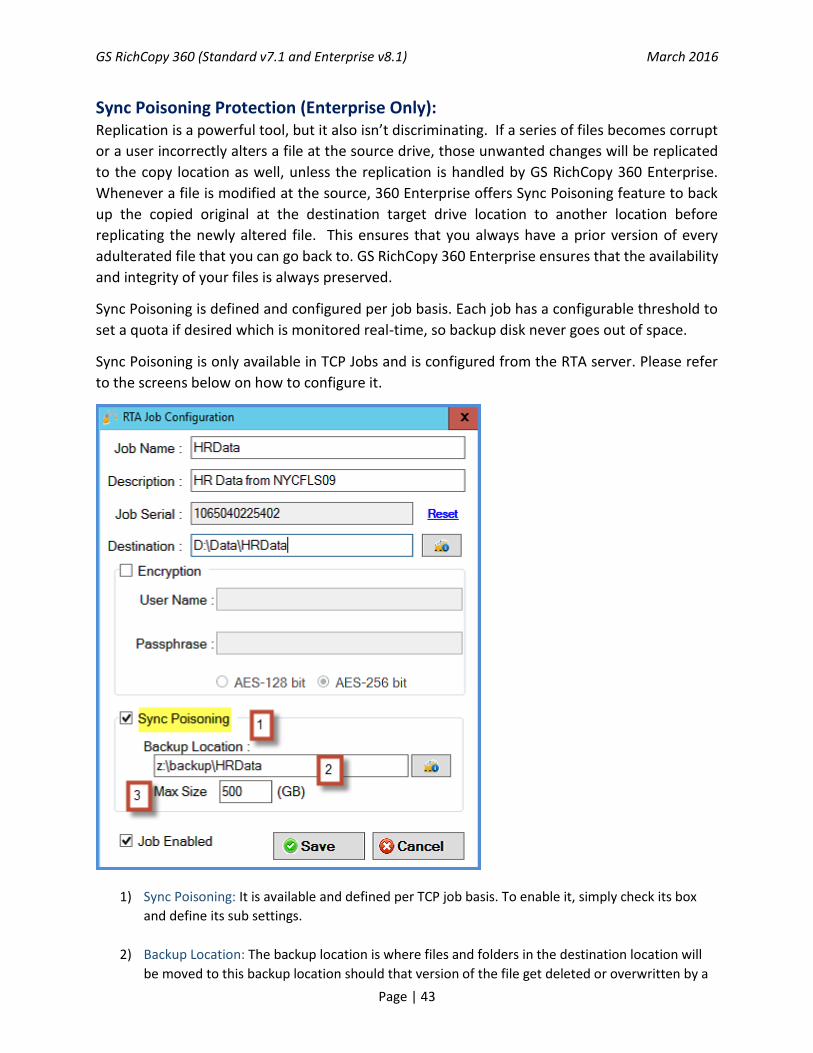
Sync Poisoning is only available in TCP Jobs and is configured from the RTA server. Please refer
to the screens below on how to configure it.
1) Sync Poisoning: It is available and defined per TCP job basis. To enable it, simply check its box
and define its sub settings.
2) Backup Location: The backup location is where files and folders in the destination location will
be moved to this backup location should that version of the file get deleted or overwritten by a

GS RichCopy 360 (Standard v7.1 and Enterprise v8.1) March 2016
Page | 44
newer file coming from the source job. The same directory structure is mirrored in the backup
location so that files can quickly be identified.
3) Max Size: To prevent the backup location from running out of space, system administrator may
set a threshold so that should the backup location reach that threshold, Sync Poisoning will
clean it up using FIFO algorithm (First In First Out).

GS RichCopy 360 (Standard v7.1 and Enterprise v8.1) March 2016
Page | 45
Exporting and Importing batch jobs from CSV (Enterprise Only): System administrators have the ability to import thousands of jobs in a matter of a few clicks. Here are
the steps to do so:
1) Create a dummy job which would act as a template for the jobs you want to import. The main
focus is to make all the necessary selections such as type of job (copy changes, mirror, directory
structure), inclusion\ exclusion filters, whether to run once, run at a specific time, repeat
intervals …etc. Then click on Save to save the job.
2) Right click on the dummy job in the jobs screen.
3) Save the exported CSV file.
4) Open up the CSV file in a spreadsheet program such as MS Excel and copy and duplicate the
dummy job. Each row will be imported as a job. Each job must contain a different job name.
Make sure you specify the source and destinations as needed and save the file (as a CSV)
5) Go back to GS RichCopy 360, click on the Jobs tab and right click anywhere and select import
jobs

GS RichCopy 360 (Standard v7.1 and Enterprise v8.1) March 2016
Page | 46
6) The import screen will pop up. Then:
a. Click browse to browse to the file.
b. Click Validate to validate the jobs are not duplicated and all the set values in the CSV are
as expected. Once the validation runs through, any green rows are valid jobs, any red
rows are rows with errors. If there are any errors, then the errors can be seen scrolling
to the right would under the error column
c. Click import to start importing the jobs. Jobs with error will be skipped.
7) Confirmation will be displayed once the job import is successful.
8) Going back to the jobs screen, all imported jobs should be displayed.
GS RichCopy 360 (Standard v7.1 and Enterprise v8.1) March 2016
Page | 47
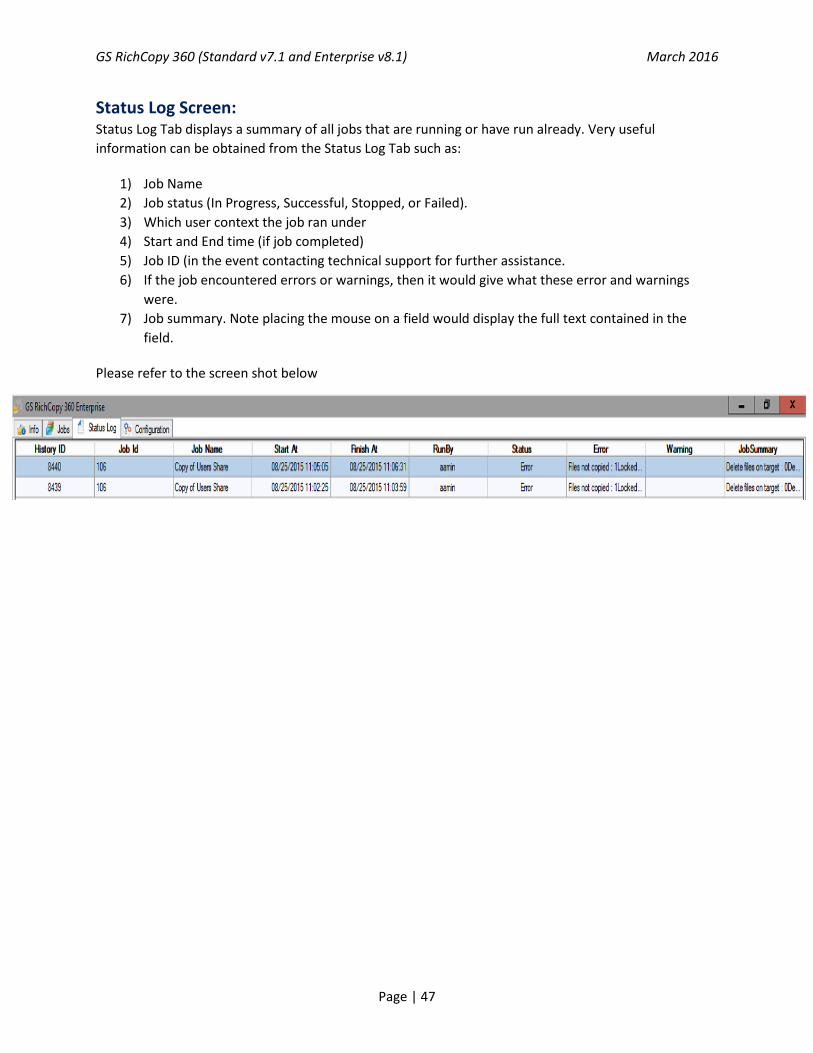
Status Log Screen: Status Log Tab displays a summary of all jobs that are running or have run already. Very useful
information can be obtained from the Status Log Tab such as:
1) Job Name
2) Job status (In Progress, Successful, Stopped, or Failed).
3) Which user context the job ran under
4) Start and End time (if job completed)
5) Job ID (in the event contacting technical support for further assistance.
6) If the job encountered errors or warnings, then it would give what these error and warnings
were.
7) Job summary. Note placing the mouse on a field would display the full text contained in the
field.
Please refer to the screen shot below

GS RichCopy 360 (Standard v7.1 and Enterprise v8.1) March 2016
Page | 48
Command Line Support: GS RichCopy 360 Standard and Enterprise both offer command line support. This is highly useful for
administrators that are looking to automate job management and creation from the command line.
The command line offers the ability to manage installed GS RichCopy 360 clients installed locally and
ones that are installed on remote machines. This provides administrators the option to mass
configure\manage clients from one central machine.
Over the next few sections we will cover the different command line options and where they are used
along with simple to follow examples. Most importantly, we will cover the Generate Command Line
Script which provides a full syntax from a pre-defined job so that administrators can save time and
efforts in terms of figuring out the right syntax to use.
Note: The CLI fully supports environment variables. Refer to Environment Variable section for more
details.
We will break down the command line into two different sections:
1) GS RichCopy 360 Clients: This section will cover how to manage clients using CLI. There are
two CLI commands that can be used:
a. GSRicCopy360.exe: This is used to set actions such as creating, deleting, enabling
and disabling job.
b. GSAPI.exe: GSAPI is used to retrieve information about jobs defined in GS RichCopy
360 Clients. It can report on job running status, job history, and list of jobs defined.
Note that GSAPI is only available in GS RichCopy 360 Enterprise.
2) GS RichCopy 360 RTA: This section will cover how to manage RTA servers using CLI.
GS RichCopy 360 Client CLI “GSRichCopy360.exe”: As stated earlier, GS RichCopy 360 client CLI is used to manage installed clients locally and on remote
machines.
To access the CLI version of GS RichCopy 360, run command prompt as an administrator (right click on
the start menu and select Command Prompt (Admin) as the screenshot below. Note: If there is a
requirement where users without admin privileges need the ability to run GS RichCopy 360 CLI, then
refer to “Enable Remote Management and Grant Access for Users without Admin Privileges”

GS RichCopy 360 (Standard v7.1 and Enterprise v8.1) March 2016
Page | 49
Once in the command prompt navigate to the GS RichCopy 360 folder. By default, it is installed in
(C:\Program Files\GuruSquad\GS RichCopy 360 Enterprise) for the enterprise and (C:\Program
Files\GuruSquad\GS RichCopy 360) for the standard version.
To list all the available parameters in the command line, type gsrichcopy360.exe /? and it will display all
available commands and optional parameters as per the screen below.
Important Tip: Before we dig any deeper, it is important to know that an administrator can create a
template job in the GS RichCopy 360 GUI and generate a command line script for that job. This would
simplify the need of having to find out the right syntax and save on time spent to script the job via CLI.

GS RichCopy 360 (Standard v7.1 and Enterprise v8.1) March 2016
Page | 50
This is most useful when the intent is to script a job creation. It is extremely easy to generate a
command line script from the GUI. All what is required after the “dummy job” is created with all of its
options (copy options, scheduling, include\exclude filters…etc) is to right click on the job and select
Generate Command Line Script which would copy the full syntax to the clipboard which can later be
pasted in Notepad or CLI to be changed or executed.
Usage: GSRichCopy360.exe [Action Command] [Required Parameters] [Options]
Action Commands: There are several action commands that can be issued via CLI. Please note that
different commands will have different required and optional parameters. Studying supplied examples
will provide great clarity on when and how to use each of them. It is important to note that jobs must be
configured to run as a service to be set to run from the CLI.
:: Action Commands: The following are the available commands that can be used:
Command Description
enablejob Enable an existing job.
disablejob Disable an existing job.
runexistingjob Run an existing job that has already been created.
deleteexistingjob Delete an existing job.
stopexistingjob Stop an existing job that is currently running.
createjob Create a new job.
createandrunjob Create a new job and run it.
The commands EnableJob, DisableJob, RunExistingJob, DeleteExsitingJob, and StopExistingJob share the
same required parameters which is basically to specify which job to apply the action to. Jobs can be
referenced by Job ID (JobID) or Job Name (JobName). Syntax would look something similar to this:
Enablejob jobname:”Account Job” OR DeleteExistingJob jobid:115
As for CreateJob and CreateAndRunJob, they have several required and optional parameters. Please
reference below to get familiar with the available parameters. (Remember, using Generate CLI Script
from the GUI would save administrators from having to assemble a job creation command. However, it
is strongly advised to get familiar with the different options so that once a job is CLI generated from the
GUI, it can be modified as desired.)
Note: Administrators have the ability to set the Job Serial via the command line. All manually set Serial
Jobs have to be prefixed by 99999 and should be 13 character long numeric value. This can be useful in
scenarios where the administrator wants to automate job creation on the client and the RTA server. For
more information, type gsrichcopy360 /? From the command prompt (must be in the folder: Program
Files\GuruSquad\GS RichCopy 360 Enterprise) or study example 7 below.
<deletejobwhencomplete> --It will be used only with createjob and createandrunjob. Default is false.
<"jobdescription:<jobdescription>">
"source:<source folder path>"

GS RichCopy 360 (Standard v7.1 and Enterprise v8.1) March 2016
Page | 51
"destination:<destination folder path>"
<"sourceusername:username <sourcepassword:password>> | <sourcerunasuser:<account name
connect as configured in app>">
if sourcepassword is not passed with sourceusername then it will be prompted and will not be stored in
the database for future use. Note: this option cannot be associated with recurring jobs.
SourceUserName:domain\username or [email protected]
<"destinationusername:username <destinationpassword:password>> | <destinationrunasuser:<account
name connect as configured in app>">
if destinationpassword is not passed with destinationusername then it will prompted and will not be
stored in the database for future use. Note: this option cannot be associated with recurring jobs.
DestinationUserName:domain\username or [email protected]
<preservecredentials> --Default is Off. it will be use with sourceusername,destinationusername and if
user has not selected to prompt for password.
<fileexc:<Comma separated values>>
<fileinc:<Comma separated values>>
<folderexc:<Comma separated values>>
<filderinc:<Comma separated values>>
<jobinactive> --Default is Active/Enabled
<runonservice> --Default is Off -- Note: This parameter must be used with createandrunjob, and jobs
that are scheduled.
<copyasroot> --Default is Off
<instantcopy> --Default is Off
<copylockedfile> --Default is Off
<copyattributes> --Default is Off
<preservedatetimestamp> --Default is Off
<stopifmachineunreachable> --Default is Off
<copyacl:FileFolder|File"> --Default is Off
<copyaclforskippedfiles> --It may be used only if CopyAcl is FileFolder
<COPYALL|MIRROR|MOVE|DIR|COPYCHANGES>
<"filecompareoption:COPY ONLY NEWLY CREATED FILES|SKIP IF DESTINATION IS NEWER|TIMESTAMP +
SIZE|FILE SIZE|MODIFIED TIMESTAMP"> --Default is TIMESTAMP + SIZE
<"taskconcurrency:<1-256>"> --Task Concurrency must be in range of 1-256. Default is 4.

GS RichCopy 360 (Standard v7.1 and Enterprise v8.1) March 2016
Page | 52
<"folderdepth:<folder depth to scan>"> --Default is 0. Folder depth must be in range of 1-99.
<userealtime <realtimeonacl> <realtimeonattribute> "realtimeincext|realtimeexcext:<comma
separated extension>"> (Note: UseRealTime is only available in GS RichCopy 360 Enterprise).
<"datefilterfromdate:<dd-MMM-yyyy HH:mm>" "datefiltertodate:<dd-MMM-yyyy HH:mm>" |
"datefilterlastdays|datefilterpriordays|datefilterlastmins:value must be 1-10000">
--Default Log is Off
<logenabled "loglevel:All|Error(Default)|Diagnostic" "logpath:<log file path>" logappend(Default is off)
logsize:<logsize> --Log File Size must be in range of 1-50000 MB. Default is 5000 MB.>
<mailactive mailto:<mail address> mailcc:<mail address> mailbcc:<mail address> --Default is Off
"recurrencescheduled:RunOnSchedule|RunOnce"
"startdatetime:<dd-MMM-yyyy HH:mm>"
--Following recurrence settings are applicable only if recurrencescheduled is selected RunOnSchedule.
"recurstartdate:<dd-MMM-yyyy>" "recurstarttime:<HH:mm:ss>" "recurendtime:<HH:mm:ss>"
<TerminateCondition:<ENDAFTEROCCURENCE|ENDBYDATE> <terminateconditionvalue:<numeric with
ENDAFTEROCCURENCE|date with ENDBYDATE>>
"recurinterval:<it should be in Once, 2 minutes, 5 minutes, 10 minutes, 15 minutes, 30 minutes, 60
minutes, 4 hours, 8 hours, 12 hours, 16 hours,23 hours. Default is 2 minutes.>"
"recurpattern:DAILY|WEEKLY|MONYHLY|YEARLY"
"recurevery:1"
"monthno:MonthNo must be in range 0-11." "monthdayno:MonthDayNo must be in range 0-30."
"weekno:WeekNo must be in range 0-4." "weekdayno:<WeekDayNo must be in range 0-6.>" --user can
pass multiple entries comma separated.
--RTA Configuration if TCP Copy or Block Copy is selected (Note: TCP and Block copy are only available in
GS RichCopy 360 Enterprise).
<usebytereplicator extensiontoexclude:<comma separated extensions>
excludefilesizeinkb:<ExcludeFileSizeinKB must be in range of 0-1000000 KB. Default is 15000 KB. it must
be greater than MinBlockSizeKB.>>
usetcpcopy
<"jobserial:<jobserial prefixed with 99999 and should be 13 character long numeric value.>"> --If value
not passed for jobserial and TCPCopy is selected then job serial will be calculated internally.
"ipaddress:<RTA IpAddress>"
"port:<RTA Port must be in range of 1-65535. Default is 8008.>"
"minblocksizekb:<MinBlockSizeKB must be in range of 50-25000 KB. Default is 10000 KB.>"
<usecompression> --Default is Off

GS RichCopy 360 (Standard v7.1 and Enterprise v8.1) March 2016
Page | 53
--Encryption may be used with only usetcpcopy parameter. Default encryption is Off.
"<useencryption username:<minimum 8 character length> passphrase:<minimum 8 character length>
encryptionkeytype:<AES-128|AES-256(Default)>>"
CLI GSRichCopy360.exe Examples: Example 1: This command will copy changes only from c:\source to \\server\share with several copy
flags:
GSRichCopy360.exe createjob "jobname:Test Job" "source:c:\source" "destination:\\server\share"
"taskconcurrency:4" runonservice DIR "copyacl:Folder" "filecompareoption:File Size"
"recurrencescheduled:RunOnce" "startdatetime:13-Feb-2016 19:30"
Example 2: This command will mirror c:\source to \\server\share and send an email to multiple
recipients. The is scheduled to run once at 19:30 of that day (7:30PM in military time):
GSRichCopy360.exe createjob "jobname:Test Job" "jobdescription:Mirror Job" "source:c:\source"
"destination:\\server\share" copyasroot "taskconcurrency:4" runonservice MIRROR "copyacl:Folder"
"filecompareoption:File Size" logenabled "loglevel:Error" "logpath:c:\logs\testjob.log" mailactive
"mailto:[email protected],[email protected]" "mailcc:[email protected]"
"mailbcc:[email protected]" "recurrencescheduled:RunOnce" "startdatetime:19:30"
Example 3: This command will move data from c:\source to \\server\share and will run every day and
repeat every 5 minutes:
GSRichCopy360.exe createjob "jobname:Test Job" "jobdescription:Mirror Job" "source:c:\source"
"destination:\\server\share" copyasroot "taskconcurrency:4" runonservice MOVE "copyacl:Folder"
"filecompareoption:File Size" "recurrencescheduled:RunOnSchedule" "startdatetime:12-Feb-2016
19:30" "recurstartdate:12-Feb-2016" "recurstarttime:00:00:00" "recurendtime:23:59:59"
"recurinterval:5 minutes" "recurpattern:DAILY" "recurevery:1"
Example 4: This command will create and run DIR command from c:\source to \\server\share using a
specified username and will prompt for password Then will delete the job once it is completed:
GSRichCopy360.exe createandrunjob "jobname:Test Job" "jobdescription:Mirror Job"
"source:c:\source" "destination:\\server\share" destinationusername:corp\admin1 "taskconcurrency:4"
runonservice DIR "copyacl:Folder" "filecompareoption:File Size" "recurrencescheduled:RunOnce"
"startdatetime:13-Feb-2016 19:30" deletejobwhencomplete
Example 5: This command will enable a job on a remote machine:
GSRichCopy360.exe serviceip:192.168.0.10 enablejob jobid:115
Example 6: This command will create a TCP copy job using AES256 encryption and compression and will
repeat every Monday:
GSRichCopy360.exe createjob "jobname:Test Job" "jobdescription:Mirror Job" "source:c:\source"
"taskconcurrency:4" runonservice DIR "copyacl:Folder" "filecompareoption:File Size"
"recurrencescheduled:RunOnSchedule" "startdatetime:13-Feb-2016 19:30" "recurstartdate:13-Feb-
2016" "recurstarttime:00:00:00" "recurendtime:23:59:59" "recurinterval:Once"

GS RichCopy 360 (Standard v7.1 and Enterprise v8.1) March 2016
Page | 54
"recurpattern:WEEKLY" "recurevery:1" "WeekDayNo:1" usetcpcopy "ipaddress:192.168.0.200"
"port:8008" "minblocksizekb:10000" usecompression useencryption "username:DC4ZE2QOQP"
"passphrase:OLMECAE4P31P3MZZ1B1UQJXDF1EFYUNR" "encryptionkeytype:AES-256"
Example 7: This command will create a TCP copy job and set the Job Serial to 9999912345678
GSRichCopy360.exe createjob "jobname:Accounting Archive" "source:c:\source" copyasroot
"taskconcurrency:4" runonservice COPYCHANGES copylockedfile copyattributes
"filecompareoption:Timestamp + Size" logenabled "loglevel:Error" "logpath:c:\logs\accounting.log"
mailactive "mailto:[email protected]" "recurrencescheduled:RunOnSchedule" "startdatetime:16-
Feb-2016 21:49" "recurstartdate:15-Feb-2016" "recurstarttime:07:00:00" "recurendtime:10:59:59"
"recurinterval:5 minutes" "recurpattern:DAILY" "recurevery:1" usetcpcopy
"ipaddress:rtaserv01.acme.com" "port:8008" "minblocksizekb:10000" jobserial:9999912345678
Retrieving Job Information from GS RichCopy 360 Client “GSAPI” CLI (Enterprise
Only) GSAPI is used to retrieve information about jobs defined in GS RichCopy 360 Clients. It can report on job
running status, job history, and list of jobs defined.
GSAPI.exe is accessed from Windows Command Prompt. Once in the command prompt navigate to the
GS RichCopy 360 folder. By default, it is installed in (C:\Program Files\GuruSquad\GS RichCopy 360
Enterprise).
To list all the available parameters in the command line, type GSAPI.exe /? and it will display all
available commands and optional parameters as per the screen below.
Usage: GSAPI.exe [Action Command] [Options]
Action Commands: There are several action commands that can be issued via CLI. Please note that
different commands will have different required and optional parameters. Studying supplied examples
will provide great clarity on when and how to use each of them. It is important to note that jobs must be
configured to run as a service to be set to run from the CLI.
:: Action Commands: The following are the available commands that can be used:
Command Description
Getjoblist Provides a list of all existing jobs.
Getjobstatus Provides status of an existing job (running, stopped...etc.).
Getjobhistory Provides history job details.
GS RichCopy 360 (Standard v7.1 and Enterprise v8.1) March 2016
Page | 55
If GSAPI.exe is not used with any optional parameters then it will report on all jobs. However, it can also
be narrowed down to a specific job using the parameters “-JobName” and “-JobID” at which point it
would report information relating to the specified job.
GetJobHistory parameter can make use of one more optional parameter “-list”. GetJobHistory by default
reports back the entire when reporting on specific job. Using list however, returns only the latest X job
history details for specified job.
Results of GSAPI.exe will be displayed in a tabular format by default (-ft). Administrator may pass the
parameter -json which displays results in JSON format.

GS RichCopy 360 (Standard v7.1 and Enterprise v8.1) March 2016
Page | 56
CLI GSAPI Examples: Please reference the details below about GSAPI.exe and study the provided examples.
Example 1: GSAPI.exe -getjobhistory -jobname:"Accounting Data Archive"
Example 2: GSAPI.exe -getjobstatus -json -jobid:103
Example 3: GSAPI.exe -getjoblist -json
Example 4: GSAPI.exe -getjobstatus -ft -jobid:103
Example 5: GSAPI.exe - getjobhistory -jobname:"Accounting Data Archive" -list:5
Example 6: GSAPI.exe - getjobhistory -jobid:"105" -list:5
Example 7: GSAPI.exe - getjobhistory -jobid:"105"
Enable Remote Management and Remove Admin Privileges Restriction: By default, the CLI commands (GSRichCopy360.exe and GSAPI.exe) will execute on the local machine
they are run on. However, GS RichCopy 360 extends the option to issue commands to a remote
machine. To do so, the command should include the parameter: serviceip:<IP Address or hostname>. By
default, it would use the port TCP 8889. If the default port is changed on the client, then the command
serviceport:<portnumber> should be used.
Here is an example that would enable a job on a remote machine to further clarify:
GSRichCopy360.exe ServiceIP:192.168.0.10 enablejob jobid:115
GSAPI.exe -ServiceIP:192.168.0.10 -getjobhistory
Please note that by default GS RichCopy 360 clients:
1) Only allow CLI from the local machine itself by default. If a client needs to be managed from
another machine, then a config file must be edited on the client that is allowing its management
to specify the allowed IP addresses.
Complete the following steps grant other machine remote CLI access:
a) Go to C:\Program Files\GuruSquad\GS RichCopy 360 Enterprise
b) Open the GSRichCopy360Service.exe.config file with notepad.

GS RichCopy 360 (Standard v7.1 and Enterprise v8.1) March 2016
Page | 57
c) Add the IP addresses in the section named AllowedIPAddress as per the screen below. Note
they must be separated by commas. Do not leave this section blank as it would set it to
accept from commands from any IPs.
d) Save the file GSRichCopy360Service.exe.config.
e) Restart the GS RichCopy 360 Service.
2) Only users with admin privileges can use the GS RichCopy 360 command line by default. Should
there be a need to have users without admin privileges use the GS RichCopy 360 CLI, then a
config file must be edited to remove the admin privileges restriction.
a) Go to C:\Program Files\GuruSquad\GS RichCopy 360 Enterprise
b) Open the GSRichCopy360Service.exe.config file with notepad.
c) Set the value to false in the section named IsOnlyAdminAllowedfromCLI as per the screen
below.
d) Save the file GSRichCopy360Service.exe.config.
e) Restart the GS RichCopy 360 Service.

GS RichCopy 360 (Standard v7.1 and Enterprise v8.1) March 2016
Page | 58
GS RichCopy 360 RTA (Remote Transfer Agent) CLI (Enterprise Only):
The RTA comes with its own command line that can be triggered directly from the RTA server or from a
remote machine that has an installation of an RTA server.
To access the CLI version of RTA, run command prompt as an administrator (right click on the start menu
and select Command Prompt (Admin) as the screenshot below. Note: If there is a requirement where
users without admin privileges need the ability to run RTA CLI, then refer to “Enable RTA Remote
Management and Grant Access for Users without Admin Privileges”
Once in the command prompt navigate to the GS RichCopy 360 folder. By default, it is installed in
(C:\Program Files\GuruSquad\GS RichCopy 360 RTA).
To list all the available parameters in the command line, type GSRichCopy360.TransferAgent.exe /? and
it will display all available commands and optional parameters as per the screen below.
Important Tip: Before we dig any deeper, it is important to know that an administrator can create a
template RTA job in the GS RichCopy 360 RTA GUI and generate a command line script for that job. This
would simplify the need of having to find out the right syntax and save on time spent to script the job via
CLI.

GS RichCopy 360 (Standard v7.1 and Enterprise v8.1) March 2016
Page | 59
This is most useful when the intent is to script an RTA job creation. It is extremely easy to generate a
command line script from the GUI. All what is required after the “dummy RTA job” is created with all of
its options (Job Name, Description, Job Serial,…etc) is to right click on the job and select Generate
Command Line Script which would copy the full syntax to the clipboard which can later be pasted in
Notepad or CLI to be changed or executed.
Usage: GSRichCopy360.TransferAgent.exe [Action Command] [Required Parameters] [Options]
Action Commands: There are several action commands that can be issued via CLI. Please note that
different commands will have different required and optional parameters. Studying supplied examples
will provide great clarity on when and how to use each of them. It is important to note that jobs must be
configured to run as a service to be set to run from the CLI.
:: Action Commands: The following are the available commands that can be used:
Command Description
enablejob Enable an existing RTA job.
disablejob Disable an existing RTA job.
deleteexistingjob Deletes existing RTA job.
resetjobserial Replaces jobserial with another one.
resetclient Allows a different client to use this job.
createjob Create a new RTA job.
The commands EnableJob, DisableJob, DeleteExistingJob, ResetClient share the same required
parameters which is basically to specify which job to apply the action to. Jobs can be referenced by Job
ID (JobID) or Job Name (JobName). Syntax would look something similar to this:
GSRichCopy360.TransferAgent.exe Enablejob jobname:”Account Job” OR DeleteExistingJob jobid:115
The optional parameters that can used are jobname, JobSerial, and JobId. Note: only one can be used.
ResetJobSerial on the other requires one more additional parameter which is NewJobSerial. Please
reference example below to follow the proper syntax:

GS RichCopy 360 (Standard v7.1 and Enterprise v8.1) March 2016
Page | 60
GSRichCopy360.TransferAgent.exe jobserial:1234567890123 newjobserial:1122334455667
In the stated example, we are switching the old jobserial “1234567890123” with a new jobserial
“1122334455667”.
As for CreateJob, it has several required and optional parameters. Please reference below to get familiar
with the available parameters. (Remember, using Generate CLI Script from the RTA GUI would save
administrators from having to assemble a job creation command. However, it is strongly advised to get
familiar with the different options so that once a job is CLI generated from the GUI, it can be modified as
desired.)
"jobname:<jobname>" (Required)
"jobdescription:<jobdescription>" (Required)
"destination:<destination folder path>" (Required)
"jobserial:<jobserial>" (Required)
<jobdisabled> --Default is Active/Enabled (Optional)
"<useencryption username:<minimum 8 character length> passphrase:<minimum 8 character length>
(Optional)
encryptionkeytype:<AES-128|AES-256(Default)>>" (Optional)
"<usesyncpoison backuppath:<backuppath> backupsize:<1-99999 GB>>" (Optional)
Example of a job creation command:
GSRichCopy360.TransferAgent.exe createjob "jobname:test" "jobdescription:test"
"destination:c:\destination" "jobserial:2034241500223" useencryption "username:dsfdsfsdfsd"
"passphrase:dfsfdsfdsfsdf" "encryptionkeytype:AES-256" usesyncpoison
"backuppath:c:\destination11" "backupsize:111"
CLI RTA Examples: Example 1: This command will create an RTA job with the name "Accounting",
destination:d:\data\accounting, JobSerial:1234567890123 and sync poisoning of 5GB:
GSRichCopy360.TransferAgent.exe createjob "jobname:Accounting" "jobdescription:Accounting
Server" "destination:d:\data\accounting" "jobserial:1234567890123" useencryption
"username:ABCDEFGHI" "passphrase:12345678" "encryptionkeytype:AES-256" usesyncpoison
"backuppath:e:\sync\accounting" "backupsize:5"
Example 2: This command will enable an existing RTA job with the name Accounting:
GSRichCopy360.TransferAgent.exe enablejob jobname:"accounting"
GSRichCopy360.TransferAgent.exe enablejob jobserial:1234567890123 **Note:this is another example
using JobSerial

GS RichCopy 360 (Standard v7.1 and Enterprise v8.1) March 2016
Page | 61
Example 3: This command will change JobSerial:1234567890123 to 1111111111111 for an existing RTA
job:
GSRichCopy360.TransferAgent.exe resetjobserial jobserial:1234567890123
newjobserial:1111111111111
GSRichCopy360.TransferAgent.exe resetjobserial jobname:"accounting" newjobserial:1111111111111
**Note:this is another example using JobName
Example 4: This command will reset an existing RTA job so that it can be used by another GS RichCopy
360 client:
GSRichCopy360.TransferAgent.exe resetclient jobserial:1234567890123
GSRichCopy360.TransferAgent.exe resetclient jobname:"accounting" **Note:this is another example
using JobName
Example 5: This command will delete an existing RTA job:
GSRichCopy360.TransferAgent.exe deleteexistingjob jobserial:1234567890123
Example 6: This command will create a RTA job from a remote machine:
GSRichCopy360.TransferAgent.exe serviceip:192.168.0.5 createjob "jobname:Accounting"
"jobdescription:Accounting Server" "destination:d:\data\accounting" "jobserial:1111111111111"
useencryption "username:ABCDEFGHI" "passphrase:12345678" "encryptionkeytype:AES-256"
usesyncpoison "backuppath:e:\sync\accounting" "backupsize:5"
Enable RTA Remote Management and Remove Admin Privileges Restriction: By default, the CLI commands will execute on the local machine they are run on. However, GS RichCopy
360 RTA extends the option to issue commands to a remote machine. To do so, the command should
include the parameter: serviceip:<IP Address or hostname>. By default, it would use the port TCP 8008.
If the default port is changed on the client, then the command serviceport:<portnumber> should be
used.
Here is an example that would enable a job on a remote machine to further clarify:
GSRichCopy360.TransferAgent.exe serviceip:192.168.0.10 enablejob jobid:115
Please note that by default GS RichCopy 360 RTA:
1) Only allow CLI from the local machine itself by default. If a client needs to be managed from
another machine, then a config file must be edited on the client that is allowing its management
to specify the allowed IP addresses.
Complete the following steps grant other machine remote CLI access:
a) Go to C:\Program Files\GuruSquad\GS RichCopy 360 RTA

GS RichCopy 360 (Standard v7.1 and Enterprise v8.1) March 2016
Page | 62
f) Open the GSRichCopy360EnterpriseRTAService.exe.config file with notepad.
g) Add the IP addresses in the section named AllowedIPAddress as per the screen below. Note
they must be separated by commas. Do not leave this section blank as it would set it to
accept from commands from any IPs.
h) Save the file GSRichCopy360EnterpriseRTAService.exe.config.
i) Restart the GS RichCopy 360 Enterprise RTA Service.
2) Only users with admin privileges can use the GS RichCopy 360 command line by default. Should
there be a need to have users without admin privileges use the GS RichCopy 360 CLI, then a
config file must be edited to remove the admin privileges restriction.
a) Go to C:\Program Files\GuruSquad\GS RichCopy 360 RTA
f) Open the GSRichCopy360EnterpriseRTAService.exe.config file with notepad.
g) Set the value to false in the section named IsOnlyAdminAllowedfromCLI as per the screen
below.
h) Save the file GSRichCopy360EnterpriseRTAService.exe.config.
i) Restart the GS RichCopy 360 Enterprise RTA Service.

GS RichCopy 360 (Standard v7.1 and Enterprise v8.1) March 2016
Page | 63
Environment Variables: GS RichCopy 360 (Standard and Enterprise) support environment variables in the GUI and the command
line interface (CLI). Environment variables support is not limited to paths only; it is fully supported in the
following areas:
1) Source and Destination. 2) Log location. 3) Folder and File (Inclusion\Exclusion) filters. 4) Mail fields (from, to, CC, and BCC). 5) Destination path and Sync Poisoning path on RTA server. (Enterprise Only).
All Windows environment variables can be used to include system and user defined variables, they can
be inserted like so: %VARIABLE% or ^VARIABLE^ (Note: it is recommended to use ^VARIABLE^ format
if using the CLI.
To find out environment variables defined in a windows system, go to the command prompt and type
SET then press enter.
Popular environment variables are:
%USERNAME% -- current window user name
%USERPROFILE% -- current user profile directory.
%COMPUTERNAME% -- windows name of this computer.
GS RichCopy 360 also provides another set of variables that can be used in creating dynamic archives for
yearly, monthly, weekly and/or daily backups or based on date:
Variable Description
%GSRICH% App Startup path
%YYYY% YEAR 4 Digit 2016
%YY% YEAR 2 Digit 16
%MM% MONTH 2 DIGIT 02 (case sensitive)
%MMM% MONTH Feb
%MMMM% MONTH February
%DD% Day 26
%DDD% Day Fri
%DDDD% Day Friday
%DOW% Day of Week 5
%hh% Hour 05 in 12 hour format (case sensitive)
%HH% Hour 17 in 24 hour format (case sensitive)
%mm% Minute (case sensitive)
%SS% Seconds
%TT% AM/PM
%MS% Milliseconds
%WOM% Week of Month
. Here is a good example of using GS RichCopy 360 special variables:

GS RichCopy 360 (Standard v7.1 and Enterprise v8.1) March 2016
Page | 64
Assuming the job above is scheduled to run weekdays only, then it would create this folder structure in destination (NOTE: DC4 is the name of the computer used in this example)
Another good example of using environment variables is using it in the mail to field. Variables can be appended to an email address or act as a full email address if desired. In the screenshot below, %StoreNumber% would be an environment variable that is pre-defined by the system administrator. If the value for instance was 12, then the email would have been sent to [email protected]. Similarly, if the %headquarters% translated to a value of [email protected] then an email is sent to this address. Please reference the screenshot below

GS RichCopy 360 (Standard v7.1 and Enterprise v8.1) March 2016
Page | 65
FAQs: Below are some of the frequently asked questions our support and sales staff have received. We have
compiled this list and are continually updating it to provide you with the best support possible.
If you do not find your question or need some assistance, feel free to contact us by email or phone and
we will gladly work with you.
Email: [email protected]
Phone: +1 703 868-9252
Assigning Log On as a Service Q1: When we specify a username and password to use for our GS RichCopy 360 server, the service fails
to start. This account is already an administrator. How can we start the service?
A1: In windows 2008 R2 and later, When specifying a user name and password for GS RichCopy Service
to use (under the configuration tab) and the service fails and cannot start, it is because the user
specified requires “log on as a service” privileges. This can be accomplished in two different ways:
Method 1:
1) Go to the “start” menu search Type “services.msc”
2) Locate GS RichCopy 360 Service and double click on it.
3) Click on the logon tab Click on This account and type the user name and password for the
user you want GS RichCopy 360 service to use Click ok.
Doing so, would automatically grant the username you specified logon as service rights. You
should receive a notification that the right to logon as a service has been granted. Please ensure
that you have to stop and start the service for the change to take effect.

GS RichCopy 360 (Standard v7.1 and Enterprise v8.1) March 2016
Page | 66
Method 2:
1) Go to the “start” menu search Type “secpol.msc”
2) Click on Local Policies User Rights Assignment Double click on Log on as a service
3) Click on Add User or Group type the user name and password for the user you want GS
RichCopy 360 service to use Click ok and Ok all the way out. Doing so, would grant the
username you specified logon as service rights. GS RichCopy 360 service must be stopped and

GS RichCopy 360 (Standard v7.1 and Enterprise v8.1) March 2016
Page | 67
started again for the change to take effect.