good titration practice - microsep
TRANSCRIPT

How to Achieve the Best ResultsDay-to-Day Titration Practice
Hints & Tips
Good Titration Practice
Brochure
GTP
– H
ints
& T
ips

Contents
1. Introduction .................................................................................................................2 2. Parts in a titration system that define the accuracy and repeatability of an analysis...............3
2.1. Important aspects of a general titration system ........................................................3 2.2. Important aspects of a Karl Fischer titration system (Coulometric)..............................4 2.3. Important aspects of a Karl Fischer titration system (Volumetric)................................5
3. Hints and Tips for daily use ...........................................................................................6 3.1. General Titration ..................................................................................................6 3.2. Karl Fischer (Coulometric) ..................................................................................22 3.3. Karl Fischer (Volumetric) ....................................................................................34
4. Theoretical description of GTP influencing aspects ..........................................................42 4.1. Accuracy, precision and trueness.........................................................................42 4.2. Types of errors...................................................................................................44 4.3. The best method for the job.................................................................................45 4.4. Reagent handling...............................................................................................49 4.5. Sensor handling and maintenance .......................................................................51 4.6. The effects of temperature on the results................................................................52 4.7. Instrument care and maintenance ........................................................................53 4.8. Sample handling ...............................................................................................54 4.9. How to get the best titration results.......................................................................55
METTLER TOLEDO 2/58 GTP – Hints & Tips
1. Introduction In this brochure hints and tips are given for performing general titrations, coulometric Karl Fischer titrations and volumetric Karl Fischer titrations. These hints and tips are organised with respect to the individual components that a titration system is composed of.
In the next chapter (chapter 2) a typical system is presented for every type of titration system (gen-eral, coulometric KF and volumetric KF). On the shown images of the system, numbered tags are inserted next to every important element. In the following chapter, chapter 3, this same numbering is used for a description of these particular components. For every component the focus might be different, depending on what is most important.
This brochure is part of the METTLER TOLEDO ‘Good Titration PracticeTM’ (GTP) effort in that it as-sists in training of professionals on the usage of METTLER TOLEDO titrators, gives an assessment of the parameters that influence result accuracy and repeatability in titration, and it suggests the correct measures to maintain result quality and secure operation of a titration setup.

METTLER TOLEDO 3/58 GTP – Hints & Tips
2. Parts in a titration system that define the accuracy and repeatability of an analysis
2.1. Important aspects of a general titration system
Figure 1: A typical modern titration system setup. Excellence titrator with touch screen and both manual titration stand and Rondo sample changer.
1. Titration beakers (see page 6)
2. Burettes (see page 8)
3. Tubes (see page 8)
4. Sensor (see page 10)
5. Sample solution (see page 14)
6. Dosing unit (see page 15)
7. Titration stand (see page 15)
8. Automation (see page 16)
9. Stirrer (see page 19)
10. Titrant (not on picture) / Titer standards (see page 20)
11. Environment (see page 21)
1
3
4
5
6
2
7 8
9
11

METTLER TOLEDO 4/58 GTP – Hints & Tips
2.2. Important aspects of a Karl Fischer titration system (Coulometric)
Figure 2: Setup for automated coulometric Karl Fischer titration. The C30 titrator is connected to a Stromboli oven sample changer, air pump and drying unit.
12. Sensor (see page 22)
13. Generator electrode (see page 23)
14. Sample insertion (see page 25)
15. Solvent / reagent / catholyte (see page 26)
16. Titration vessel / Environment (see page 27)
17. Magnetic stirrer (see page 29)
18. Stromboli oven (see page 29)
19. Vials (see page 32)
20. Gas supply (see page 32)
21. Drying materials (see page 33)
22. Transfer tube (see page 34)
12
13 14
15 16 17 18
19 20
21
22

METTLER TOLEDO 5/58 GTP – Hints & Tips
2.3. Important aspects of a Karl Fischer titration system (Volumetric)
Figure 3: V30 volumetric Karl Fischer titrator with Solvent Manager
23. Burette Karl Fischer (see page 34)
24. Titrant Karl Fischer titration (not on picture) / Titer standards (see page 35)
25. Sensor (see page 36)
26. Magnetic stirrer (see page 36)
27. Siphon (see page 37)
28. Titration vessel / Environment (see page 37)
29. Solvent Manager (see page 39)
30. Drying tubes (see page 40)
31. Sample insertion (see page 40)
23
25
26
27
28
29
30 31

METTLER TOLEDO 6/58 GTP – Hints & Tips
3. Hints and Tips for daily use In this chapter all items designated in the previous chapter are described in detail with regard to the proper handling and maintenance for best analysis results. For all items the correct usage is described and also some hints and tips for daily use are given.
3.1. General Titration
1. Titration Beakers Cleanliness The first and most important rule for titration beakers is that they should be absolutely clean before using them for an analysis. Single use polypropylene beakers are available that provide cleanliness without the hassle of cleaning. Glass beakers should be cleaned in a dishwasher and rinsed at least 2 times with deionised water before using them again.
Materials The standard 100 mL titration beakers that METTLER TOLEDO offers for its ma-nual titration stands and sample changers are available in both plastic and glass. The plas-tic beakers can be used for almost any liquid samples; they are made from polypropylene, which is resistant to virtually all chemicals. Since plastic beakers have a tendency to accu-mulate electrical charge, solid samples that are susceptible to static electricity should be weighed and measured in glass beakers (especially solid titer standards). Glass beakers should of course not be used for samples that contain hydrofluoric acid, as HF solutions can dissolve glass. Also lye solutions corrode glass, but they are not as aggressive in this respect as HF.
UV radiation For samples that contain analytes sensitive to ultraviolet light, special titration beakers should be used that stop UV radiation and so protect the sample. Mettler-Toledo offers red titration beakers (order number 25777) for this purpose. These beakers are for instance used in peroxide value and vitamin C content determinations.
Special beakers Special beakers can also be used for small samples, when heating or cooling of samples is required or if aliquotation of samples is demanded (e.g. microtitration beaker (23516); thermostatable titration beaker (23517)).

METTLER TOLEDO 7/58 GTP – Hints & Tips
Standard titration beaker Glass titration beaker Glass vessel, 250 mL
Micro titration beaker Aliquoting beaker Thermostatable beaker
Coulometric KF cell Volumetric KF cell Beaker for 2-phase titration

METTLER TOLEDO 8/58 GTP – Hints & Tips
2. Burettes Size Burette size is an important factor when choosing the right conditions for a titration analysis. Depending on the expected consumption of titrant a certain burette size is chosen. In general one chooses the sample and burette size in such a way that between 20 and 90% of the total burette volume is used during a titration. Keeping to these limits guarantees maximum accuracy for titrant addition and therefore also for content determination. Different sizes of burettes are available, 1 mL, 5 mL, 10 mL and 20 mL.
Valve The standard valve used in burettes is made from PTFE (Teflon®) and has a very high chemical resistance. For applications when ruggedness or endurance against wear and tear is required, ceramic valves should be used. Some applications could be e.g. continuous operation in a 24/7 production and quality testing environment and/or in applications that use titrants that are prone to crystallisation, like potassium permanganate (KMnO4).
Plug & Play Burettes with plug and play functionality automatically transfer all necessary information about the titrant contained in the burette to a titrator and also update the in-formation on the burette when a new titer determination is performed, or when any other changes are made to the titrant. This convenient feature avoids transcription errors and simplifies GLP compliance. The most important data that are stored on the burette are: the name of the titrant, the concentration of the titrant, titer, last date that the titer has been de-termined, how the titer determination was performed and by which user, the lot number of the titrant, the volume of the burette, the serial number of the glass burette and titrant expiration data.
Recertification In environments where very strict requirements on measurement accuracy and traceability to standards are implemented it is important to follow the wear of glass burettes over time. With prolonged and regular use, the volume of the glass burette will change and this change is checked at regular recertification intervals. During recertification the customer burettes are compared against a reference burette, which is in its turn certified in regular intervals in the Mettler-Toledo Metrology department in Switzerland. There the reference burettes are tested for compliance against the ISO 8655-3 norm (procedure used is according to ISO 8655-6). Should the customer burette during certification fall outside the testing limits, the burette needs to be exchanged, as the required accuracy cannot be achieved anymore.
3. Tubes Bubbles One of the most common error sources in titrimetric analysis is the presence of gas bubbles in titration tubes. Gas bubbles significantly contribute to elevated titrant consump-tion, even though no titrant has been added to react with the analyte. The content for the an-alyte found in this way will thus be too high.
Bubbles can either be introduced into the tubing during aspiration, or they can be formed when the titration tubes are already filled. Gas bubbles that are introduced during filling can be eliminated by rinsing the burette several times during filling and making sure that the suction tube is completely submerged in the titrant solution.

METTLER TOLEDO 9/58 GTP – Hints & Tips
Some bubbles can be avoided by placing the titrant solution at the same height (or a bit higher) as the titrator. In this case there is less force on the titrant when it is aspirated and thus not as many bubbles are formed.
For titrants that contain either wanted or unwanted gas (e.g. Karl Fischer titrants, SO2) bub-bles can appear from the titrant when the filling speed of the burette is too high, so that gas is released by the titrant. In this case lower the filling speed of the burette to avoid these problems. If the gas is not an integral part of the titrant, these problems can also be avoided by removing the gas beforehand from the titrant, by e.g. heating or ultrasonic degassing.
Should a gas bubble get stuck in the tubing despite all precautions, it can often be dislodged by gently tapping the tubing where the bubble is and next rinsing the tubing again.
Some anionic detergent can be added as auxiliary reagent to the titrant; the detergent will decrease the surface tension and prevent air bubbles getting stuck in the tubing. This should only be done if the surfactant does not influence the titration reaction.
Special tubes The standard, manual titration stand tube that is delivered with any titrator is made as short as possible and has no special connection possibilities. Special tubes can be ordered for particular applications like sample changers, other automation solutions or for the use of special titrant containers like the Merck Titripac®1.
Manual titration tube Automation tube (threaded dispense end)
1 The special tubes for connection of METTLER TOLEDO burettes to Merck Titripac® are sold with the part number
51108048

METTLER TOLEDO 10/58 GTP – Hints & Tips
PowerShower lead to tube Suction tube PowerShower
Suction tube for Merck TitriPac®
Figure 4: Different types of titration tubes
Siphon To stop diffusion of titrant out of the titration tubes when no titration is running, all titration tubes should contain a siphon tip to limit the outflow of titrant as much a possible. Especially when titrants are heavier than the sample solution (e.g. iodine in Karl Fischer titration) diffusion would otherwise become a serious threat to measurement accuracy. If a titration tube is used for reagent addition or draining, the siphon tip has to be removed as the efficiency of dosing and draining will be compromised by the presence of the siphon tip.
Figure 5: Siphon tip
4. Sensor Since sensors are the actual ‘measurement devices’ they have a very large influence on the result of any titration. Several factors contribute to their behaviour:

METTLER TOLEDO 11/58 GTP – Hints & Tips
Response If a sensor is sluggish because of old age or bad maintenance the measurement value detected by the sensor will always lag behind the ‘true’ value of the measurement parameter in the sample itself. In general this will cause too high a titrant consumption and thus too high results.
Sensor Calibration Sensor calibration is particularly important for endpoint titrations. In end-point titrations titrant addition is stopped when a precisely defined measurement value is reached and the titrant consumption up to this point is used for the calculation of the required result. In this type of titration, the accuracy of the measurement value is thus directly related to the determined amount of the analyte content in the sample. This also means that an accurate measurement value, possible because of a good calibration, gives an accurate content determination. (pH sensors and ion selective electrodes only)
After every maintenance action that is performed on a sensor (cleaning, regeneration, etc.), the sensor will have to be calibrated again.
Sensor Test If no calibration of the sensor is needed for accuracy of endpoint, but general functionality needs to be tested; a sensor test can be performed. The sensor test checks if the electrode is in good working order via a determination the slope, offset and drift with 2 pH buffer solutions. No data is written into the setup by a sensor test procedure.
Reference electrode Another important factor for a sensor is the corresponding reference electrode. The reference electrode provides the stable reference signal against which the measurement signal is determined. The reference electrode needs to be inert and provide a stable potential.
Important as well is to use an electrolyte solution that is inert to the sample and titrant and to maintain a filling level for the reference electrode that is always above the level of the sample solution. If this is not the case the direction of flow will not be of electrolyte outwards, but of sample into the electrode!
For further information about pH sensors and reference electrodes, please also refer to the METTLER TOLEDO ‘pH Theory Guide’ (ME-51300047).
Conditioning The ion sensitive membrane of any pH or ion selective electrode needs to be conditioned before the sensor can be used. If the sensor is not conditioned before use its response will be very sluggish and flat. Usually conditioning is best done overnight with a dilute solution of the ion to be measured (e.g. 20 ppm); for more specific information, please refer to the operating manuals of the electrode to be used.
Also when a pH sensor is used for longer times in non-aqueous media, the sensor needs to be conditioned in water or buffer solution before a next use to restore the hydration layer, without which a pH sensor cannot function.
Diaphragm / junction / Electrolyte flow For a reference electrode to work properly, good contact of the reference element with the sample solution is necessary. Contact between reference system and sample is established via the junction (also known as diaphragm) of the reference electrode. The junction is an essentially open contact between the sample solution and the reference system that allows the flow of the reference electrolyte solution. The flow of the ions in the reference electrolyte, which act as a salt bridge, allows the closing

METTLER TOLEDO 12/58 GTP – Hints & Tips
of the circle in the electrochemical system that starts with the sensor that is selective for the measured ions (see also the ‘pH Theory Guide’).
Figure 6: Schematic diagram of the electrochemical system of a combined pH sensor
Different junctions have been developed to provide the best contact for different kinds of sam-ples. The most common junctions in use today are: the ceramic junction, which consists of a porous ceramic material that allows slow electrolyte flow, this is mainly used for ‘clean’ samples; the sleeve junction, which is a larger ground glass junction and allows faster elec-trolyte flow, mainly used for ion poor or dirty media; and open junctions, that are completely open to the electrolyte and thus require a solid state electrolyte inside the reference electrode. For further information about electrode junctions, please also refer to the METTLER TOLEDO ‘pH Theory Guide’ (ME-51300047).
Figure 7: Sensors with ceramic, sleeve and open junctions
Cleaning (solutions) If a sensor is not clean, i.e. when a film covers the important parts of the sensor (sensing membrane and junction), the sensor is not in direct contact with the sample solution and can therefore not react to the sample and measure its potential. In this case wrong results will be determined. Depending on the kind of material that pollutes the sensor, certain cleaning solutions can be used.

METTLER TOLEDO 13/58 GTP – Hints & Tips
For aqueous contaminants the sensor can be rinsed with deionised water for cleaning. When the sensor is covered with oils or fat, ethanol or, when needed, acetone can be used for rinsing. Never wipe the sensor itself with a tissue for cleaning, as this could cause a build-up of static electricity. For more specific contaminations also purpose made cleaning solutions are available.
Proteins: Proteins can be a problem either for the membrane as it leaves a film on the sen-sor; more specifically proteins are a problem when they block the junction with their bulky structure. To get rid of proteins, a cleaning solution with pepsin1 – which destroys the pro-teins – can be used.
Ag2S: If sulphides are present in the sample that is being measured the silver in the reference electrode can precipitate with the sulphides to form Ag2S(s). As the two ions meet at the junction of the electrode, blockage of the junction is usually the consequence. This precipitate can be avoided by using an electrode with an Argenthal™ reference system, which stops silver from the reference element going out of the electrode. Should the Argenthal™ system not be an available option, the precipitate can be released from the junction by cleaning with a thiourea solution2.
AgCl: One very common ion with which silver also precipitates is chloride. Chloride is part of many samples as common salt. This means that also AgCl often causes blockage of the re-ference junction and thus also malfunction of the electrode. To dissolve AgCl, soak the elec-trode in concentrated ammonia solution.
Damaged membrane surface: After prolonged use the glass membrane itself can also be-come damaged and unresponsive. With a regeneration3 solution which contains HF this ‘tired’ membrane can be regenerated by etching off the thin layer of pH glass which is dama-ged, to reveal a new and intact layer of pH glass. This process can be repeated only a few times though as a small layer of membrane glass is removed every time the sensor is re-generated, and the pH sensitive layer only has a limited thickness. When regenerating, do not leave the sensor in the solution too long as this would cause the whole pH glass layer to dissolve in one step and leave you with a non-functioning sensor.
For further information about (pH) sensors please also refer to the METTLER TOLEDO booklet ‘pH Theory Guide‘.
Plug & Play Sensors with plug and play functionality automatically transfer all necessary sensor information to a titrator and update the information on the chip when a new calibra-tion is performed, or when other changes are made. That ensures – without any action on the part of the operator – that only the correct sensor with the specific, valid data is used.
1 The pepsin solution can be ordered from METTLER TOLEDO, part number 51340068
2 The thiourea solution can be ordered from METTLER TOLEDO, part number 51340070
3 The regeneration solution can be ordered from METTLER TOLEDO, part number 51340073

METTLER TOLEDO 14/58 GTP – Hints & Tips
Figure 8: Sensor with Plug&Play functionality and cross-section with chip
5. Sample solution Volume The sample volume that is used for any titration should be sufficient to cover the sensor’s active parts (junction and sensing membrane or metal ring). Normally this volume should be around 50 mL to be able to also fit in stirrer, titration tubes and dosing tubes. For smaller sample sizes special beakers like the microtitration beaker (15−20 mL sample volume, see point 1) or Rondo 30 beakers (30−80 mL sample volume) should be used.
Amount of sample The amount of analyte in the sample to be determined should be enough to ideally use up during titration approximately half of the burette volume. If the sample is in liquid form it can be added to the sample solution with e.g. a pipette, a dosing unit or a more advanced dosing device like the Liquid Handler. When the sample is in solid form the weight of the sample should be determined with a balance that has a resolution of at least 0.1 mg. For a more precise discussion of balance accuracy and resolution, please refer to the respective theory part in section 4.8.
Powdered samples: be aware of electrostatic influences on powdered samples. If the used titration beakers are electrostatically charged, the powdered samples will adhere to the walls of the beakers and might not be accessible for titration. The results will then be incorrect. If the sample is susceptible to electrostatic charge build-up, it should be weighed either in glass beakers or through an AntiStatic Kit that can be connected to METTLER TOLEDO analytical balances.
Solvents For most titration analysis the amount of sample itself will be too small to be able to dip sensor, stirrer, etc into the sample and perform a titration. This means that the sample will have to be diluted, and in titration this diluent is called a ‘solvent’. The solvent should be inert, be able to dissolve the sample, and be easily obtainable in the large quantities needed. The most used solvents in titration are water, (mixtures of) organic solvents and strong acids. Because the solvent is inert and doesn’t participate in the reaction, the amount of solvent added is immaterial.
If the solvents are not 100% pure (as is often the case with organic solvents) the impurities might interfere with the titration and cause inaccurate results. In this case a blank value determination for the solvent has to be performed by titrating the matrix without the actual sample and recording the consumption of the titrant. This consumption is the blank value

METTLER TOLEDO 15/58 GTP – Hints & Tips
and should be subtracted from the following sample titration results. If a new batch of solvent is opened, also a new blank determination has to be performed.
In most METTLER TOLEDO titrators blank values of solvents can be assigned to user-defined global variables within the titration method that is used to measure the blank value of a solvent. These blank values can afterwards be used by other titration methods that need to compensate sample determinations for this blank value. If needed, the usable life of these values can be monitored as well.
One application in which this is vital is the determination of free fatty acid (FFA) content in edible oils. For titration, these oils are dissolved in a mixture of ethanol and diethyl ether. These solvents will contain some small amount of acidic components and that to be mea-sured in a blank determination to deduct them in the acid content titration of the sample and matrix together.
Further information about this and other titration fundamentals can be found in the METTLER TOLEDO theory booklet ‘Fundamentals of Titration’ (51725311).
pH value Many redox and argentometric reactions important for titration (e.g. reactions with permanganate, dichromate or silver nitrate) need acidic environments to proceed. For this reason it is important to add e.g. 20% sulphuric acid to the sample solution before titration. The exact amount and type of acid required can be found in the METTLER TOLEDO application brochures for specific reactions.
GSST With a ‘normalised’ sample solution the functionality of the general titration system can be checked after installation. This is done during the so-called General System Suitability Test (GSST) and is performed as part of any IPac and EQPac installation procedure by Mettler-Toledo certified personnel. In case of general titration the test consists of a titer determination of 0.1 M NaOH solution using solid potassium hydrogen phthalate (C8H5KO4) as titer stan-dard. To be able to pass the GSST a certain accuracy and precision has to be achieved.
6. Dosing unit A burette drive (Dosing unit) is a vital part of any titrator because of the direct relationship between the stroke of the piston inside a burette of a certain volume and the volume of titrant dispensed. The titrator calculates the titrant consumption to the endpoint / equivalence point of any titration by looking up the spatial position of the piston at the exact point where the end of the titration was evaluated. Of course, this is not only important for direct titrations, it is also important for other dosing actions, e.g. for back titration, standard addition, etc.
Because of this it is very important to calibrate the piston stroke of any dosing unit on a re-gular basis and adjust any deviations accordingly. Mettler-Toledo’s service organisation can provide dosing unit recertification at required service intervals. Further information can be found on www.mt.com/service.
7. Titration stand (manual) The manual titration stand is connected directly to the titrator. Every titrator is able to ac-commodate one titration stand; the Excellence titrators can accommodate up to two titration stands. The titration stands can be screwed on top on the titrator to ensure stability.

METTLER TOLEDO 16/58 GTP – Hints & Tips
In the manual titration stand several lead-throughs are available for fitting sensors, titration tubes, stirrers, pump tubes, etc., in different sizes standard taper joints (e.g. NS 7.5 for titra-tion tubes, NS 14.5 for sensors). Stoppers are also available for these joints (part numbers 23452 and 23451 respectively) to be able to minimize air contact when analysing oxidative samples.
Should the number of lead-throughs for titration tubes not be sufficient (if e.g. several bu-rettes for dosing reagents and pumps for dilution and draining are present), it is possible to use a ‘4 in 1 dispensing tube adapter’ (51108356) to expand one sensor taper joint into 4 inputs for titration tubes.
Figure 9: 4 in 1 dispensing tube adapter
Manual rinse unit For thorough rinsing of all sensors, tubes and stirrer a rinsing insert (equivalent to the Rondo/Rondolino PowerShower™) can be added into the manual titration stand. This ring insert is delivered with a pump bottle to manually rinse the parts in the titration stand after the sample has been measured.
8. Automation Sample changers For high throughput titrations several sample changers are available, which one is most suitable depends on the amount of samples that have to be measured and the degree of automation required. For all sample changers the titration head can ac-commodate more tubes and sensors than the manual titration stand, as automation often requires more tubing and sensors. Also here extra tubings can be added with the 4 in 1 extension by using one sensor space.
Since the sensors and titration stands are not cleaned by hand between sample when using automation, it is very important to add enough cleaning and conditioning steps in the me-thod after every sample to be sure that the sensor is clean and conditioned before a next sample is measured. Especially with oily samples and non-aqueous titrations these steps are very important.
For instance for an acid number determination of used oils a full cleaning, conditioning and dip-ping cycle could be composed of: 1) Rinsing above sample with acid number solvent via PowerShower™ to rinse off most of the oil and leave this in the sample beaker; 2) Movement to rinsing beaker for dip-rinse of several spray-rinse cycles cleaning with e.g. chloroform to

METTLER TOLEDO 17/58 GTP – Hints & Tips
remove the last traces of sample; 3) Move to conditioning beaker to condition the sensor in water of buffer 4 for several minutes to hydrate the membrane and condition the sensor so that the next sample can be properly measured again; 4) Dip rinse in special rinse beaker filled with acid number solvent to remove last traces of water, as this would interfere with the following titration.
PowerShower™ All METTLER TOLEDO titration sample changers can be fitted with a PowerShower™. The PowerShower™ allows rinsing of the sensors and tubes as the titration head is moving upwards out of the sample. In this way the rinsing liquid ends up in the spent sample and the movement time to the next sample is optimally used to clean all implements before they are dipped into the next sample. The water is sprayed out of a perforated ring towards the centre of the titration head. Depending on the amount of rinsing liquid chosen to be sprayed, the rinsing is continuous or with intervals.
Please note that the standard delivery o-ring in the PowerShower™ is made of FPM (fluoro-elastomer), which is not resistant to acetone, ethers or acetic acid. If any of these solvents will be used for rinsing, special o-rings should be ordered. Below an overview of chemical resistances of several o-ring materials to most commonly used solvents in titration:
Table 1: Chemical resistance of overview for some o-ring materials and some of the most common solvents used in titration
Material
Solvent
FPM
(standard delivery) EPDM Kalrez™
Acetic acid - + +
Acetone - + +
Alcohols + + +
Chlorobenzene + - +
Chloroform + - +
Ethers - - +
Inorganic acids/bases + + +
Oils + - +
Toluene + - +
Pumps / Dosing Units Additional automation can be provided by connecting extra dosing units and/or pumps to the titration setup for adding auxiliary reagents and/or solvents. It should be noted here that pumps can add liquids very quickly but not so accurately, for e.g. the diaphragm pump the maximum addition rate is 600 mL/min, for the peristaltic pump it is
METTLER TOLEDO 18/58 GTP – Hints & Tips
250 mL/min. For this reason the pumps are most suitable for addition of inert diluents as e.g. water, where the volume is not important. Please note that this is mostly not valid with organic solvents as these often have a non-zero blank value and thus need to be added in a more precise way with a Dosing unit!
Should a reasonably accurate dispensing nevertheless be required, the pump can be ‘ad-justed’ with the following recipe: A certain volume of deionised water is dispensed with the pump into a titration beaker of known weight. After the dispensing the titration beaker with the water pumped into it can be weighed again to determine the weight, and thus the volume, of the dispensed water. If this is different from the amount requested, the factor between the two can be used to change the pump speed in the titrator setup.
If accurate dosing is required, for example if reagents are added for a back titration, an extra Dosing unit or a Liquid Handler should be connected to a titrator.
Sample treatment Further sample preparation can also be automated if needed. Examples are e.g. heating / boiling of samples, using waiting/reaction times, performing measure-ments with different sensors, serial dilutions, consecutive sensor calibrations, titer determi-nations and sample series measurement without user interference, and many more.
Some practical examples where automation is used are:
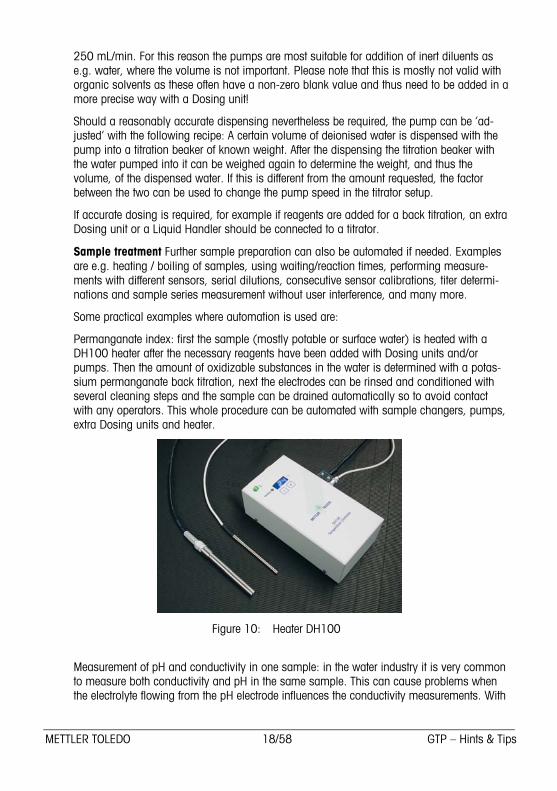
Permanganate index: first the sample (mostly potable or surface water) is heated with a DH100 heater after the necessary reagents have been added with Dosing units and/or pumps. Then the amount of oxidizable substances in the water is determined with a potas-sium permanganate back titration, next the electrodes can be rinsed and conditioned with several cleaning steps and the sample can be drained automatically so to avoid contact with any operators. This whole procedure can be automated with sample changers, pumps, extra Dosing units and heater.
Figure 10: Heater DH100
Measurement of pH and conductivity in one sample: in the water industry it is very common to measure both conductivity and pH in the same sample. This can cause problems when the electrolyte flowing from the pH electrode influences the conductivity measurements. With

METTLER TOLEDO 19/58 GTP – Hints & Tips
the help of a sample changer it can be avoided that the sample gets contaminated before measuring conductivity. With the Rondo sample changer this can be solved by using two different towers, the first with conductivity electrode, the second with the pH electrode. Another solution is implemented in the Sample Handler; here the conductivity electrode is place lower in the titration stand and the z-arm makes an intermediate stop to first measure conductivity. Only in a second movement the z-arm goes completely down and dips the pH electrode in the sample solution.
Preparation of ISE calibration solutions and calibration: if a laboratory performs daily mea-surements with ion selective electrodes, a lot of time can be saved by automatically prepar-ing the calibration standards every morning and consecutively calibrating the electrodes. This can be achieved with a Rondo sample changer to provide the beaker with stock solution to dilute and the empty beakers for the freshly prepared calibration solutions. An extra dosing unit can be used for dispensing of (T)ISA(B)1, and a Liquid Handler will make the serial dilution of the (for example) 1000 ppm stock to make calibration standards of 100, 10 and 1 ppm.
9. Stirrer Speed The speed of the stirrer (and the stirring time as well) should be adapted to the kind of samples measured. For normal, aqueous matrices with non-viscous samples that dis-solve well, the standard titration speed of 30% is fine. For solid samples the stirring time and speed should be increased to guarantee complete dissolution of the solid sample and avoid finding lower content caused by incomplete dissolution. This is especially important for solid titer standards as incomplete dissolution of these would not only invalidate the titer deter-mination itself, but also all consecutive sample measurements. Caution should be taken not to use an excessive stirring speed as this will cause sample loss over the rim of the titration beaker.
Sensor cavities In sensors with cavities care has to be taken that no air is captured in these cavities when the stirring speed is too high. This can happen for example for a Phototrode or for a conductivity sensor. If an air bubble gets caught in these sensors, the signal will sud-denly get very noisy and change in intensity. The bubble can be removed by shaking the sensor like a fever thermometer.
Surfactants An excessive stirring speed is also an issue when measuring surfactants. Here bubbles will be formed, although the ensuing problem is different. With surfactants all the soap molecules will accumulate on the surface of the soap bubble, and this will cause the concentration of surfactant in the sample solution to be reduced and measured incorrectly. This problem can be avoided by lowering the stirring speed, or, if this is not possible, by adding some methanol to the sample solution to reduce frothing.
Blockage If during a running titration the stirrer does get blocked by tubes in the titration bea-ker the sample will not be sufficiently homogenised and mixed anymore. The reaction will
1 (Total) Ionic Strength Adjustment (Buffer): An ISA solution is used to level the ion activity for all sample solutions to
enable ISE measurements in sample solutions. If the sample solution needs additional removal of interfering ions and/or pH buffering it is not called ISA solution, but TISAB solution.

METTLER TOLEDO 20/58 GTP – Hints & Tips
then not proceed at all or only locally, and the titration curve will show a very erratic sensor potential. This erratic behaviour will disappear as soon as the blockage is removed and the sample can be homogenized again.
Mini-stirrer For small titration beakers (e.g. Rondo 30 beakers or micro-titration beakers) the propellers of the compact stirrer are too large. To make them fit these smaller beakers the individual blades of the propeller can be cut off to approximately 1/3 of their original size with a pair of scissors. Alternatively the ‘Micro-propeller stirrer’ (655073) can be ordered.
Figure 11: Micro-propeller stirrer
10. Titrant / Titer standards Titer determination The concentration of a titrant needs to be known accurately to be able to deduce the content of the analyte in the sample solution. If the titrant concentration is unknown or inaccurate, the analyte content cannot be determined. From the determined titrant concentration and the nominal titrant concentration the titer is calculated. The titer is the ratio ‘determined concentration / nominal concentration’ and is generally ~1.
Standards For titer determinations preferably primary standards should be used. A primary standard is a substance that reacts with the titrant in a known ratio and which is available in high purity, very stable, non-hygroscopic, and a high molecular weight. All these pro-perties combined ensure that an accurate determination of the titrant concentration can be performed. Some primary standards are e.g. TRIS/THAM for acids, potassium hydrogen phthalate for bases, NaCl/KCl for argentometric titrations and potassium dichromate for re-dox reactions. Further information about primary standards for specific titrations can be found in regulatory documentation, see e.g. NIST Standard Reference Materials (SRMs).
Usable life Titrants will deteriorate over time through various external influences like oxidat-ion, precipitation, carbon dioxide absorption or degradation by UV radiation. Some of these can be counteracted for example by using drying tubes filled with NaOH on carrier material (CO2 absorption) or with brown bottles (UV radiation), but this is not always possible and often also not completely. The titrant deterioration changes the concentration of the titrant; the rate of deterioration determines how long the titrant can be used for without per-forming a new titer determination. This is called the usable life of a titrant. After the useable life has expired a new titer determination has to be performed before a new analysis should be done. In the Excellence Titrators the useable life of a specific titrant can be defined and new titer determinations enforced before continuation of analysis is allowed.

METTLER TOLEDO 21/58 GTP – Hints & Tips
Life span The lifespan of a titrant is the time after which a titrant should be replaced. The lifespan is different for every type of titrant. Acids are for example more stable than alkaline titrants and could thus have a life span of a year compared to half a year for a base. During the whole life span regular titer determinations have to be performed to guarantee reliable results.
11. Environment Temperature The temperature range of the environment in which the titrator is placed is im-portant for the hardware of the titrator to function properly. For most titrators a temperature range from 5 to 40 degrees Celsius is acceptable.
Humidity Related to temperature is humidity. With increasing temperature, the maximum amount of water in the air also increases. For most titrators a maximum relative atmospheric humidity of 80% for temperatures of up to 31°C is unproblematic. Above 31°C the humidity should decrease linearly to 50% relative atmospheric humidity at 40°C. For KF titration humidity is especially critical as the amount of water in the air influences the actual analysis itself, not only the proper functioning of the titrator. This will be described in more detail in points 16& 28.
Controlled environments Some titrators need to be placed partly or completely in special environments like glove boxes, fume hoods or others. For these applications longer cables and titration tubes are available to allow the operation of a titrator in these settings.
Electrical environment For an uninterrupted operation of any electronic device a stable power supply is a prerequisite. If there are frequent power interruptions, no continuous operation will be possible and sample series will be cut short.

METTLER TOLEDO 22/58 GTP – Hints & Tips
3.2. Karl Fischer (Coulometric)
Figure 12: Close up of the coulometric titration cell
12. Sensor Principle The Karl Fischer sensor has two platinum pins. Between these two pins an alter-nating current is provided of 20 μA (this setting can be changed by the user). The voltage between the two pins depends on the amount of ions present in the solution.
During the KF reaction, so when not all water has reacted yet, there are no free ions, all ad-ded iodine immediately reacts with water. This means that there is very low conductivity in the solution and that thus the potential needs to be high to uphold the 20 μA current.
Immediately after the last water has reacted with the titrant, an excess of iodine (I2) is pre-sent. This iodine will be reduced at the negatively charged pin of the sensor to iodide (I-) and cause a charge flow to the positively charged pin: the potential between the two pins can now be reduced and still a 20 μA current will flow. This potential reduction caused by iodine excess is what is measured and what signifies the endpoint of the titration1.
1 For detailed information about the Karl Fischer titration process (both volumetric and coulometric), please refer to
METTLER TOLEDO application brochure ‘GTP – Good Titration Practice in Karl Fischer Titration’ (51725145)
12
13
14
15 16
17

METTLER TOLEDO 23/58 GTP – Hints & Tips
Figure 13: Operating principle of the KF sensor. If excess iodine is present in the solution this will be reduced at the cathode to iodide, and travel to the anode where it is oxidised again to iodine. The cur- rent that this produces lowers the potential and is detected.
Sensor potential The potential of the sensor is mainly dependent on the conductivity of the solution and the polarisation current maintained. For new sensors the potential is somewhat higher than for sensors which have been used for several titrations already. This is because during the first few titrations an irremovable layer of platinum-iodine complexes form that increase the potential.
Figure 14: Platinum double pin sensor for KF titrations
13. Generator electrode The generator electrode in coulometric Karl Fischer titration generates in situ the iodine for the KF reaction. Iodide is present as a reagent in the coulometric solvent and is oxidised at the anode to iodine. In this way the iodine is generated on demand. As soon as the sensor de-tects an excess of iodine at the end of the reaction, the generator electrode will stop gener-ating iodine. Two types of generator electrodes are available:
With diaphragm This electrode has a physical barrier between the anode and the cathode. This separation is made from a porous ceramic material and guarantees that easily reducible samples cannot reach the cathode and are reduced by the hydrogen formed there. This con-cerns mainly nitro compounds and unsaturated hydrocarbons: water is generated by reduc-tion with H2 and results are altered.

METTLER TOLEDO 24/58 GTP – Hints & Tips
A disadvantage of using a generator electrode with diaphragm is that both the diaphragm and the catholyte in the cathode compartment can contain water. The diaphragm will absorb water during cleaning as the methanol (or any other solvent) used for cleaning will not be 100% water-free. Afterwards the water will be released slowly again during use of the elec-trode, and cause a high drift. To minimize this drift, the generator electrode can be dried in a drying oven overnight at 70−80°C.
If the diaphragm water content is not the cause for the high drift, the water in the catholyte is probably the reason why water is coming into the titration cell (assuming of course that the titration cell is sufficiently closed to laboratory air humidity). To avoid water diffusion from the catholyte into the anolyte compartment one can: 1) make sure that the liquid level in the catholyte compartment is lower than that in the anolyte compartment, so that the flow goes in the direction of the cathode. This level difference will be maintained if the solvent solution is stirred. 2) One can add some KF titrant to the catholyte compartment, so that the water in the catholyte compartment reacts with iodine and cannot diffuse into the anolyte compart-ment.
For cleaning the diaphragm, the electrode can be immersed in a suitable solvent (e.g. meth-anol) for some hours to dissolve the contaminant. Do not clean the diaphragm with any interfering substances such as water or acetone, as these will slowly dissipate out of the diaphragm during the next use of the electrode.
Without diaphragm In this electrode no physical separation is present between the anode and cathode. This means that the titration vessel is filled only with one solvent, which is both anolyte and catholyte. These generator electrodes have many benefits as they are generally easier to handle. Only one solvent is needed, the diaphragm does not catch any dirt and water which can be released later on, no drift can be introduced from water in the catholyte, etc.
Since the cathode is open to the sample and the anode compartment in generator electrodes without diaphragm, small errors can occur here if samples or generated iodine is reduced at the cathode. The cathode placement inside the generator electrode is such that this effect is minimized; only with very small sample sizes (< 50 μg water/sample) or with susceptible samples like nitro compounds and unsaturated hydrocarbons an effect can be noticed. For these the better choice would be the electrode with diaphragm.
Without the protection of the diaphragm behind the gauze that is the contact point between anode and iodide, this mesh is very vulnerable to mechanical damage during handling and through jumping magnetic stirrers. If the mesh is bent by this, it can be bent back into shape without any loss of performance.

METTLER TOLEDO 25/58 GTP – Hints & Tips
Figure 15: Generator electrode with diaphragm and without diaphragm
14. Sample insertion Septum Sample insertion into a coulometric titration cell should always happen with a syringe that pierces the septum present in the titration cell. The water content that is detected with a coulometer is so low that any other insertion technique would introduce so much water into the cell that this prevents accurate detection of the sample’s water content.
Since each sample insertion makes an additional hole in this septum, the septum needs to be exchanged on a regular basis to keep influx of humidity and drift low1.
Figure 16: Shown are the septum-stopper for sample insertion in a coulometric KF titrator and a septum. The silicone septum can be exchanged by opening the stopper.
1 The part number for a pack of 12 septa is 51108740

METTLER TOLEDO 26/58 GTP – Hints & Tips
Gas One exception to the rule above is if the water is introduced into the cell via a carrier gas. This could be either gas from a gas cylinder, where the gas itself is the sample, or from a heating oven, where the sample remains behind in the vials, and the gas acts as carrier for the evaporated water only. In both cases the gas is introduced into the vessel via a glass tube that is connected to the origin of the gas flow (oven or cylinder). Inside the titration vessel the glass tube ends well below the solvent filling level to make sure that the hygro-scopic methanol in the solvent absorbs the water from the gas while it bubbles through the solvent.
Sample weight The technique used for the weighing of the sample is called back weighing. With this technique the syringe containing the sample inside is put on the balance and the balance is zeroed. Next, the sample is injected into the titration cell with the syringe and the syringe is returned to the balance. The absolute value of this weight can now be transferred to the titrator either manually or automatically via a connection between balance and titrator.
Amount of sample How much sample needs to be inserted depends on the expected water content of the sample. For coulometric KF titration a water content of less than 1-5% can be measured. If the water content is too high, the coulometric method becomes slow and in-accurate. For very low water contents (below 100 ppm) the sample size needs to be very large to measure with acceptable accuracy. For a water content of e.g. 10 ppm a sample size of at least 8 grams is required. The larger the sample size, the smaller the sample vol-ume can become. In every METTLER TOLEDO Karl Fischer titrator, the optimal sample size can also be calculated automatically if the expected water content for a certain sample is known.
Syringe The syringe used for sample insertion should have a rubber plunger to make sure that the syringe runs smoothly when inserting sample. When pushing the sample out of the syringe, make sure that all of the sample is transferred into the solvent and not splashed against the walls of the titration vessel. After the sample has been inserted, using the grading on the syringe to estimate the amount needed, slightly pull back the plunger to pull back any drops hanging on the needle of the syringe. If these drops remain at the end of the needle they get stuck against the inside of the septum when pulling the syringe out. This will then cause a higher drift as the water will slowly evaporate and get into the solvent.
Drift When adding the sample, it is important that the drift in the titration vessel is low (a drift of ~ 4 μg/min should be achievable; with an oven connected a bit higher drift can be expected). For a more elaborate treatment of drift, please refer to point 16.
GSST Proof of correct operation can be obtained by performing a General System Suitability Test (GSST). With the GSST the operation of the system is tested by measuring a certified standard and is performed by Mettler-Toledo trained service personnel. The GSST is part of any IPac and EQPac qualification package.
15. Solvent / reagent / catholyte Capacity / filling level of solvent The titration vessel should be filled to the 100 mL mark with coulometric solvent that contains iodide. The solvent usually has a capacity of approx-imately 1000 mg of water (with a filling level of 100 mL). Generally the solvent will have to

METTLER TOLEDO 27/58 GTP – Hints & Tips
be exchanged for other reasons before the capacity is exhausted. Some reasons could be e.g. titration vessel too full after addition of many or large volume samples, debris left in titration vessel when measuring ‘dirty’ samples, or when the reagent has been in the titration vessel for more than 2 weeks (smelly sulfides and mercaptans are formed).
Types of solvents Lots of different solvents for coulometric Karl Fischer titration are available commercially from several different producers. Solvents can be purchased for special sam-ples like oils, ketones, oven samples, etc. A complete overview of titrants and solvents can be found in the GTP brochure for Karl Fischer titration. For some samples there are also special catholytes available, e.g. for aldehydes and ketones that would react with the meth-anol in the catholyte, but also for oven samples.
Solvent Manager Solvent exchange can be automated with the Solvent Manager to facilitate the process of emptying and filling the titration vessel.The Solvent Manager is a purpose made pump/valve assembly that allows the user to easily exchange, drain and fill solvent in a KF titration vessel. For all these functions shortcuts can be defined on the titrator’s home screen and with C30 titrators, even automatic solvent exchange can be chosen / forced after e.g. every few samples, or a certain time period. (For further information about the Solvent Manager please also refer to point 29. Solvent Manager).
16. Titration vessel / Environment Drift The titration vessel should be sealed as much as possible against influx from the ex-ternal environment. There is always water present in the ambient environment; any air being able to get into the titration cell will influence the measurement of water in the sample. For this reason all stoppers and inserts in the titration vessel are lubricated with silicone grease to make sure that the connections are air tight. Any overpressure inside the cell, caused by H2 formation in the generator electrode, is released through the drying tube positioned inside the generator electrode. This drying tube allows contact between the titration vessel and the outside.
Even with all precautions, some water will always be able to get into the titration cell and this will show up as a baseline of water measurement, and is called the drift. Usually, it should be possible to achieve a drift value maximally of 4 μg/min or lower.
High drift If it is not possible to keep a low drift value during the standby phase of the KF titration, the following possibilities should be checked first:
Silicone grease: Please check if all the stoppers and electrodes going into the titration vessels are well lubricated with silicone grease and move them to and fro a few times to spread the grease evenly and make a coherent seal without any gaps for air to move through.
Septum: Check if the septum is still intact. After the insertion of many samples the septum can become leaky because of all the needles piercing through it. Replace the septum if necessary.
Humidity and temperature: If the temperature and humidity are too high, also the drift will be higher. If possible provide a stable temperature and humidity. Be aware that even in an air
METTLER TOLEDO 28/58 GTP – Hints & Tips
conditioned laboratory the humidity might be quite high as most air conditioners only cool the air, but don’t dehumidify it.
Droplets: The presence of droplets of reagent on the walls of the titration vessel can also cause a higher drift as water can be slowly released from these droplets. Shaking the titration vessel to remove these droplets from the walls will help.
Side reactions: Make sure that no side reactions from previous samples are causing the high drift. For ketone / aldehyde samples, water could be formed in a reaction with methanol and thus create a drift. If the samples are very viscous or insoluble, water can be released from incompletely dissolved samples and thus create a drift. If in doubt, exchange the anolyte (and catholyte) and start with a freshly filled titration cell to exclude any previous samples as a source of high drift.
Catholyte / diaphragm: If a generator electrode with diaphragm is used for the iodine gener-ation, both the diaphragm and the catholyte could be a source of high drift. The diaphragm can contain water if it has been previously cleaned, or has been out of the solvent for some time. The catholyte will also contain small amounts of water. The water in the catholyte can be removed by adding some volumetric KF titrant to the catholyte compartment until the iodide does not react any more (until the dark brown colour remains). From the diaphragm the water can be removed by placing the generator electrode in an oven for a few hours (at 70−80°C). Alternatively, if measurements should be started in the morning, one can prepare the titration vessel the previous evening and remove all the water in the cell overnight during pretitration/standby, thus achieving a low drift in the morning.
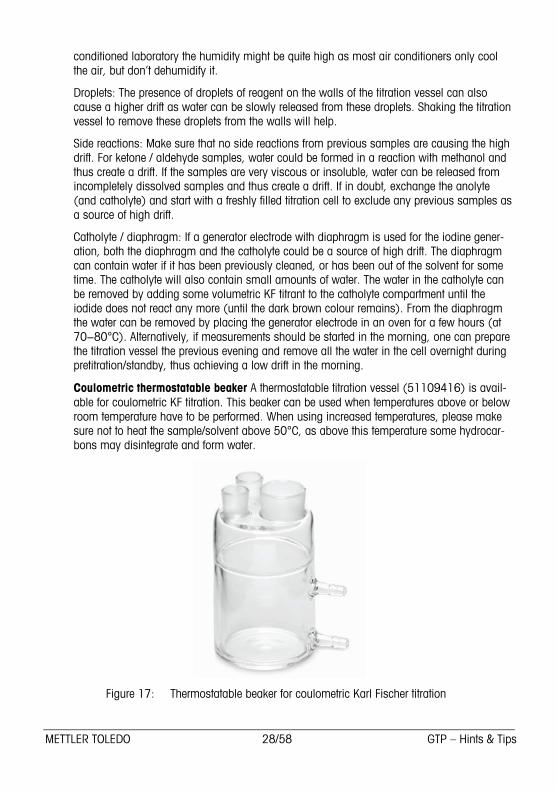
Coulometric thermostatable beaker A thermostatable titration vessel (51109416) is avail-able for coulometric KF titration. This beaker can be used when temperatures above or below room temperature have to be performed. When using increased temperatures, please make sure not to heat the sample/solvent above 50°C, as above this temperature some hydrocar-bons may disintegrate and form water.
Figure 17: Thermostatable beaker for coulometric Karl Fischer titration

METTLER TOLEDO 29/58 GTP – Hints & Tips
17. Magnetic stirrer Speed The stirrer makes sure that the sample and solvent are homogenized completely so that the water in the sample is available for reaction with iodine. The speed of the magnetic stirrer needs to be set sufficiently high for this to be possible. On the other hand, the stirring speed should not be so high as to cause turbulent flow of the solvent and sample in the titration beaker. Generally the stirring speed is set to 45% for coulometric KF titrations.
Size The size of the magnetic stirrer needs to be sufficiently large to be able to stir the whole content of the beaker. If the stirrer is too small it is possible that only part of the fluid volume mixes and that the iodine generated cannot reach all the (water in the) sample or even the sensor. In this case too much iodine is produced and the results will be too high. For this reason, please try to use only the standard delivery magnet stirrer or one of similar size.
Solvent exchange If the samples measured do not dissolve in the anolyte if is beneficial to also run the stirrer during reagent exchange. The stirring of the reagent during drainage will make sure that the sample and reagent form a suspension, so that the sample is drained with the reagent. If no stirring would be used, the sample would remain at the bottom of the vessel and would need to be cleaned out by hand.
Solvent exchange can be automated with the Solvent Manager to facilitate the process of emptying and filling the titration vessel.The Solvent Manager is a purpose made pump/valve assembly that allows the user to easily exchange, drain and fill solvent in a KF titration ves-sel. For all these functions shortcuts can be defined on the titrator’s home screen and with C30 titrators, even automatic solvent exchange can be chosen / forced after e.g. every few samples, or a certain time period.
When using the Solvent Manager for coulometric titration the tubing needs to be inserted into the titration vessel before solvent can be exchanged; if the tubing would be constantly connected too much water would be able to enter the titration vessel and interfere with the analysis.
The Solvent Manager is described in more detail in point 29.
18. Stromboli oven The operating principle of the KF oven is that the sample is sealed in a vial of its own and is heated under a flow of dry, inert carrier gas. During the heating of the sample the water will be released and will be carried by the gas into the titration vessel. The total amount of water in the sample is then determined via titration in the KF cell.
Samples A Karl Fischer oven is generally only used if the sample characteristics require it. There are several reasons why the sample cannot be measured directly:
Solubility: If the sample is not soluble in methanol or any other solvents that are usually added to KF reagents, the water must be released from the sample in another way. For many samples like crude oils, inorganic substances or polymers, heating the samples is the easiest and most reliable way to release water from them.

METTLER TOLEDO 30/58 GTP – Hints & Tips
Side reactions: Also if the sample shows a side reaction with any reagent in the titration vessel (e.g. methanol or iodide), the sample cannot be measured directly as the results will be faulty.
‘Dirty’ samples: Another reason why it is not acceptable to add the samples directly to the titration vessel is if the samples would form a slurry at the bottom of the titration vessel and therefore force the exchange of solvent after every few samples. Not only the higher drift and decreased measurement accuracy is a problem here, also the expense of having to ex-change the solvent every few samples.
Drift When using an oven, the drift value is not only composed of the water going into the titration cell, but also of the residual water in the carrier gas and the water getting into the oven/vial/tubing assembly. Since there are more sources of water getting into the system with an oven, this means that the drift will generally be higher in a system with an oven. Special drying tubes should be used as generator electrode insert when using an oven. These tubes are bent, with the drying compartment located outside the generator electrode itself, to pre-vent any condensing solvents dripping back into the titration beaker.
Figure 18: Bent drying tube for the generator electrode for use with KF oven
Before going into the system, the carrier gas should be dried first with silica gel and next molecular sieve to remove as much water as possible before it enters the sample vial.
The drift determination in a KF oven system is therefore done with the system running as it normally would for a sample. The temperature, gas flow and setup are exactly the same as for a sample, the only difference with a normal sample determination is that the vial itself contains a drift insert. This accelerates the drift determination. Furthermore the drift of the vial does not need to be taken into account as this is part of the blank value (see below), which is also determined in an oven analysis. The system is run like this for some time (mostly ½ hour is sufficient), during which the drift can be observed to decrease to a stable value. If the drift stabilises at an acceptable level, the titration can be started. A good drift value for
METTLER TOLEDO 31/58 GTP – Hints & Tips
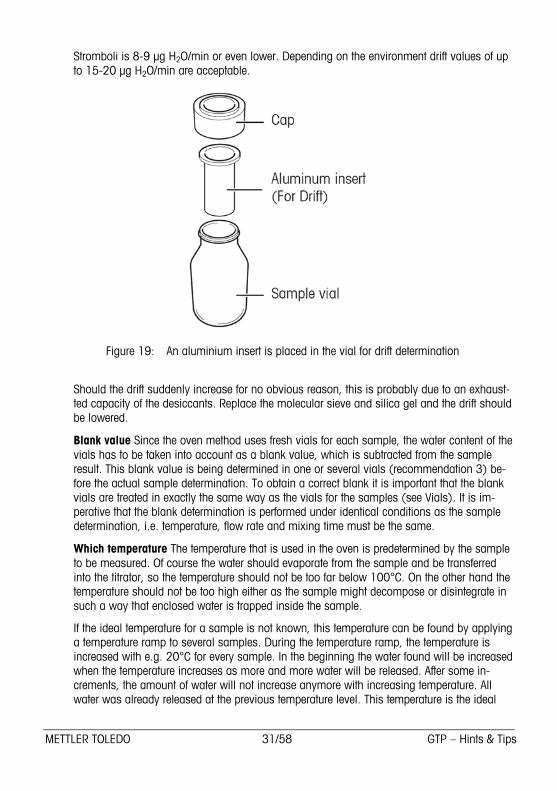
Stromboli is 8-9 μg H2O/min or even lower. Depending on the environment drift values of up to 15-20 μg H2O/min are acceptable.
Figure 19: An aluminium insert is placed in the vial for drift determination
Should the drift suddenly increase for no obvious reason, this is probably due to an exhaust-ted capacity of the desiccants. Replace the molecular sieve and silica gel and the drift should be lowered.
Blank value Since the oven method uses fresh vials for each sample, the water content of the vials has to be taken into account as a blank value, which is subtracted from the sample result. This blank value is being determined in one or several vials (recommendation 3) be-fore the actual sample determination. To obtain a correct blank it is important that the blank vials are treated in exactly the same way as the vials for the samples (see Vials). It is im-perative that the blank determination is performed under identical conditions as the sample determination, i.e. temperature, flow rate and mixing time must be the same.
Which temperature The temperature that is used in the oven is predetermined by the sample to be measured. Of course the water should evaporate from the sample and be transferred into the titrator, so the temperature should not be too far below 100°C. On the other hand the temperature should not be too high either as the sample might decompose or disintegrate in such a way that enclosed water is trapped inside the sample.
If the ideal temperature for a sample is not known, this temperature can be found by applying a temperature ramp to several samples. During the temperature ramp, the temperature is increased with e.g. 20°C for every sample. In the beginning the water found will be increased when the temperature increases as more and more water will be released. After some in-crements, the amount of water will not increase anymore with increasing temperature. All water was already released at the previous temperature level. This temperature is the ideal

METTLER TOLEDO 32/58 GTP – Hints & Tips
temperature to use for the sample. (See e.g. Mettler-Toledo application note M396 as an example.)
GSST For checking the oven/instrument setup functionality a Mettler-Toledo trained service engineer can perform a General System Suitability Test (GSST) on the system to see if all components are still in good working order. For this test certified oven water standards are used. Several oven standards with different water contents (e.g. 5.55% or 1%) can be purchased from commercial brands like Hydranal® or Apura®.
19. Vials Treatment of vials For best repeatability and accuracy, all vials used within one sample series (blanks and samples) should be treated in the same way. This means that a complete batch of vials should be washed at the same time in the dishwasher. After the washing, they should all be transferred to the drying cupboard and be stored in the same place in the lab. Blank vials should be measured immediately before the sample vials, so that the atom-spheric conditions are as similar as possible. The blank vials should be closed with the aluminium foil at the same time as the sample vials are closed. All these steps guarantee that the water content in all the blank and sample vials is comparable, and that the blank deducted from the samples is the correct one.
Blank vials For the blank vials it is important that they are treated in exactly the same way as the sample vials are before and during measurement to guarantee that the blank value is the true one. Washing, drying, storage, closure with foil, measurement temperature, gas flow and measurement duration should be exactly as with the sample vials.
Insert for drift vial For the drift determination, the vial is not important in itself. The drift vial is used only to flush air/gas trough the system and measure the water content of the air/gas that ends up in the titration vessel. The drift measurement can therefore be done with a nor-mal vial, but since the blank value of the vials can be quite high, it might take too long for the drift value to become stable. To reduce the volume of the system, and to speed up the drift stabilisation and measurement process, inserts are available for the drift vial (see also point 18).
Sample preparation For one series all the sample vials are filled at the same time and closed with sticky aluminium foil together with the blank vials. For the sample vials the weight is inserted into the sample series on the titrator. Next the rubber caps are pushed over the foil. The purpose of the rubber caps with the upstanding rim is to make the fit between the vials and the oven airtight such that no extra drift is introduced, even after the piercing of the aluminium seal. There are blue rubber caps for the sample vials and green caps for the blank vials.
20. Gas supply If the carrier gas used for oven measurements is normal air, a pump is needed to pump the air through the moisture filters and the oven/titrator assembly. If the carriers gas is taken from a gas cylinder (e.g. for nitrogen), the pressure from the cylinder is sufficient to let the gas flow through the setup and no pump is required.

METTLER TOLEDO 33/58 GTP – Hints & Tips
Flow The gas flow is regulated with a flow meter in the setup. The flow rate is important as the gas needs to flow slowly enough for the water carried by the gas to be absorbed by the methanol in the titration vessel. If the flow is too quick the water will not have time to be absorbed in the solvent and will thus not be measured. For most samples a flow rate of ~ 100 mL/min is sufficient. The flow should not be too low, as the water from the sample could then condense in the tubes and never reach the titration vessel.
Which gas? The gas to be used depends on the temperature in the oven and the kind of sample measured. Whenever there is a risk of oxidation, nitrogen gas should preferably be used as a carrier. Should this not be possible, it is important that the oven temperature is kept as low as possible (certainly below 160°C) to avoid oxidation by oxygen in the air. For all other non-oxidizable samples air can be used as a carrier gas.
Stop valve for carrier gas If a different carrier gas than normal air is used, an optional stop valve can be used in the Stromboli gas flow setup. The stop valve makes sure that the ex-pensive carrier gas is used only during measurements. When the instrument is not mea-suring the valve switches off the carrier gas flow and makes sure that the system is vented.
An additional function of this valve is extra safety after an unplanned stop of the measure-ment. Venting of the system in this case stops a backflow of KF reagents into the oven, as cooling of the carrier gas would create a vacuum if the system were closed, drawing very flammable KF reagents into the hot oven.
Figure 20: Drying unit / flow meter assembly without and with stop valve
21. Drying unit The drying unit dries the carrier gas that comes from the pump (or gas cylinder) and goes into the sample. The drying unit has 2 separate elements that can be filled with desiccants. In general the first bottle is filled with silica gel as this has a large water absorption capacity. Since the silica gel leaves some residual water in the gas, the second unit is filled with molecular sieve as this removes the remaining water almost completely. An important advantage of both these desiccants is that they can be dried and reused.
The desiccants obviously have a finite capacity and thus need to be exchanged when they are saturated. For the silica gel this can be observed as a change in its colour, and it is safest to change both desiccants when the colour change is observed. If the desiccants are

METTLER TOLEDO 34/58 GTP – Hints & Tips
not exchanged on time the drift of the system will increase and can only be lowered again by exchanging the drying substances.
The advantage of using silica gel and molecular sieve is that they can be dried after use and be reused. Silica gel can be dried at 150°C; molecular sieve needs temperatures of up to 300°C. Both should be dried for several hours, preferably overnight.
22. Transfer tube When the water evaporates from the sample in the oven, the carrier gas takes the water va-pour away and towards the titration vessel. To reach the titration vessel the water vapour needs to travel through a transfer tube from the oven to the titrator. If the sample temperature is very low there is a risk that the vapour will condense during its transfer through the tube. To avoid this, a heated transfer tube1 is available to make sure that all water evaporated from the sample reaches the titration vessel.
3.3. Karl Fischer (Volumetric)
23. Burette Karl Fischer Burette size For volumetric Karl Fischer titration the standard burette size is 5 mL. This vol-ume is large enough for all sample size / water content combinations that are advised in the literature and with the ‘sample size calculator’ on the titrators. If too much water would be added via a sample in one measurement, the titration time would be very long, with no ad-ditional increase in the accuracy of the results. For samples with very small water contents also a 1 mL burette can be used, but even here the preference would be to use less con-centrated titrants (e.g. 2 mg water / mL titrant, instead of 5 mg/mL).
Filling speed The burette filling speed is especially important for 2-component reagents as these have the tendency to degas during filling of the burette. This is not such an issue for 1-component reagents. The risk for degassing is higher, the higher the temperature. If the for-mation of gas bubbles is observed during filling of the burette, decrease the fill rate of the burette to 60%.
Gas bubbles Degassing can also happen if the titrant comes from a cooler environment (e.g. a basement) into the lab and is immediately used for titration. In the warmer surroundings, less gas can be dissolved in liquids and thus bubbles can form in the tubing. Always let the temperature equilibrate before using a new titrant.
Blockages If the Karl Fischer titrants are not used for longer times make sure to empty the burettes. If the burettes are stored filled with titrant, the auxiliary base contained in the titrant will crystallize in the burette and cause blockages the valve or the siphon. Because of this blockage, the pressure will be built up and the titrant will leak out of the burette. To remove the blockage the affected parts will need to be soaked in water for some time.
1 The heatable transfer tube has part number 51108836

METTLER TOLEDO 35/58 GTP – Hints & Tips
Additional dosing unit With the V30 volumetric Karl Fischer Titrator an additional dosing unit can be connected to the titrator to add auxiliary reagents to the titration vessel automatically. The sort of reagents that can be added are for example buffers to keep the pH of the KF vessel in the right range when measuring acidic or basic samples, or solvent solutions to increase solubility, like chloroform.
Red burette cover Since the KF titrant (i.e. iodine) is susceptible to UV induced decompo-sition, it should be protected in the burette from light radiation by using a red cover that is mounted over the glass burette.
24. Titrant Karl Fischer titration (not on picture) / Titer standards Titrants Different kinds of titrants are commercially available. Which one to use depends on the sample to be determined and the user requirements. Titrants with different iodine con-centrations are available for samples with lower or higher water content. Titrants with special solvents (not methanol) are available for samples that contain aldehydes or ketones that would react with methanol. Also environmental friendly titrants containing ethanol as solvent instead of methanol are available. For further information, please refer to the brochure ‘GTP – Karl Fischer titration’ (51725145).
Concentration determination Since the titrants for KF titration are not stable over longer periods of time, a new concentration determination has to be performed regularly. If this is not done the accuracy of the analysis cannot be guaranteed.
When the titrants are freshly produced the concentration will be higher than the nominal concentration on the bottle, to make sure that they still have the nominal concentration on the ‘use by’ date. So for a titrant with a nominal concentration of 5 mg H2O/mL titrant, the concentration might be 5.5 mg H2O/mL if it comes straight from the factory. Over time the concentration of the titrant will decrease; if titrant is not used up within a certain period (months if the bottle is opened, years if the bottle is closed), the concentration might even get too low. If the titrant becomes so old that the concentration falls below 4 mg H2O/mL titrant, the titrant should be discarded, as the titration will become too slow.
Also for concentration determinations it is important to equilibrate the temperature of the titrant (see above ‘gas bubbles’). The volume of KF titrants changes significantly with tem-perature, so if the concentration is determined at a different temperature any subsequent samples will have erroneous results.
Water standards Different water standards are available to determine the current concen-tration of the titrant.
Certified water standards: The standards which are easiest to use are the certified liquid water standards that can be purchased from e.g. Sigma-Aldrich or Merck. These standards have a certified water content per mass unit and can be dosed with a syringe. Available water con-tents are: 10 mg/g, 1 mg/g and 0.1 mg/g (in % these are 1%, 0.1% and 0.01%). Additionally, special standards are available for water in oils.
Solid water standard: Another option is to use a solid standard with a fixed amount of hy-dration water. The most used standard is disodium tartrate dihydrate (Na2C4H4O6 · 2 H2O),

METTLER TOLEDO 36/58 GTP – Hints & Tips
which has a water content of 15.66% and which can also be bought commercially for the purpose of KF titrant concentration determination.
Since the solubility of sodium tartrate is very limited in methanol (and even worse in etha-nol), one has to be very careful when using this standard. If the solvent is saturated too high results for the concentration of the titrant are obtained. After 3 concentration determinations in methanol (40 mL in titration vessel) with ~ 40 mg of sodium tartrate, the solvent will have to be exchanged.
Solid water standard is also available in the form of tablets. In this case a fixed amount of water (10 mg) is present in every tablet. The handling here is much simplified as the tablet can be added from the packaging straight into the titration vessel (caution: use tweezers to add the tablet as hands contain a lot of moisture!). Note that the tablets do not dissolve completely and solvent should be replaced regularly. The precision of water tablets is not as good as with some other standards.
Water: Pure water can also be used to check the water content of a KF titrant. This is the most inexpensive option, but also the most difficult and potentially most inaccurate one. When using pure water one has to practice the handling of the micro syringes beforehand and has to know the inserted volume or mass of the water very precisely. Any deviation from the expected amount of water or any loss of water during handling will introduce a large error, because the water ‘lost’ is 100% pure.
25. Sensor The sensor and principle for volumetric Karl Fischer titration is the same as for coulometric Karl Fischer titration. Therefore please refer to point 12, page 22 for information about the sensor.
26. Magnetic stirrer Speed The stirrer supports complete homogenization of sample and solvent so that the water in the sample is available for the reaction with iodine. The speed of the magnetic stirrer needs to be set sufficiently high to enable this. On the other hand, the stirring speed should not be so high as to cause turbulent flow of the solvent and sample in the titration beaker. Generally the stirring speed is set to 35% for volumetric KF titration.
Size The size of the magnetic stirrer needs to be sufficiently large to be able to stir the whole content of the beaker. If the stirrer is too small it is possible that only the inner part of the solvent is stirred and the outer part remains immobile and separated from the inner part. In this case the iodine added will not be able to react with all the water and will possibly not reach the sensor. Incorrect measurements will be the result. For this reason, please try to use only the standard delivery magnet stirrer or one of similar size.
Solvent exchange If the samples measured do not dissolve in the anolyte if is beneficial to also run the stirrer during reagent exchange. The stirring of the reagent during drainage will make sure that the sample and reagent form a suspension, so that the sample is drained with the reagent. If no stirring would be used, the sample would remain at the bottom of the vessel and would need to be cleaned out by hand.

METTLER TOLEDO 37/58 GTP – Hints & Tips
Solvent exchange can be automated with the Solvent Manager to facilitate the process of emptying and filling the titration vessel.The Solvent Manager is a purpose made pump/valve assembly that allows the user to easily exchange, drain and fill solvent in a KF titration ves-sel. For all these functions shortcuts can be defined on the titrator’s home screen and with V30/T70/T90 titrators, even automatic solvent exchange can be chosen / forced after e.g. every few samples, or a certain time period.
27. Siphon In volumetric KF titration the siphon tip is important for two reasons:
Leakage of iodine: The siphon tip generally protects the diffusion of titrant into the sample solution. In the case of KF titrant this is crucial as the titrant has a higher density than the KF solvent and gravity would empty the whole titration tube into the sample vessel. Both the high density of the titrant, caused by iodine, and the low density of methanol in the titration vessel contribute to this density gradient. With the siphon tip this process can be halted and trustworthy measurements attained.
Blockage by crystallisation: If the titrant is not used for a longer time, the methanol in which the iodine and the other KF reagents are dissolved will evaporate. This will cause crystal-lisation of the auxiliary base in the reagents, and these crystals will block the siphon and tubing. To avoid this blockage, always empty the titration tubes when storing KF titrant over a longer period of time. Should the blockage already have occurred, soak the tubing in water for some time to dissolve the crystals.
28. Titration Vessel / Environment Drift The titration vessel should be sealed as much as possible against air coming in from the external environment. There is always water present in air; any air being able to get into the titration cell will influence the measurement of water in the sample. For this reason all stoppers and inserts in the titration vessel are greased with silicone grease to make sure the connections are air tight. Any overpressure that is formed inside the titration cell (e.g. by gas formation or titrant addition) can escape via a short tube that is inserted into the lid of the titration vessel and is connected to a drying tube situated behind the titration beaker. This way a pressure equilibration between cell and environment is possible. (See also point 31.)

METTLER TOLEDO 38/58 GTP – Hints & Tips
Figure 21: On the right hand side of the photograph the tubing between titration cell and drying tube can be seen; this ensures that no overpressure builds up
Even with all precautions, some water will always be able to get into the titration cell and this will show up as a baseline of water measurement, and is called the drift. Usually, it should be possible to achieve a drift value of 4 μg/min or lower.
High drift If it is not possible to keep a low drift value during the standby phase of the KF titration, the following possibilities should be checked first:
Silicone grease: Please check if all the stoppers and sensor going into the titration vessel are well greased with silicone grease and move them to and fro a few times to spread the grease evenly and make a coherent seal without any gaps for air to move through.
Humidity and temperature: If the temperature and humidity are too high, also the drift will be higher. If possible provide a stable temperature and humidity. Be aware that even in an air conditioned laboratory the humidity might be quite high as most air conditioners only cool the air, but do not dehumidify it.
Droplets: The presence of droplets of reagent on the walls of the titration vessel can also cause a higher drift as water can be slowly released from these droplets. Shaking the titra-tion vessel to remove these droplets from the walls will help.
Side reactions: Make sure that no side reactions from previous samples are causing the high drift. For ketone / aldehyde samples, water could be formed in a reaction with methanol and thus create a drift. If the samples are very viscous or insoluble, water can be released from incompletely dissolved samples and thus create a drift. If in doubt, exchange the anolyte (and catholyte) and start with a freshly filled titration cell to exclude any previous samples as a source of high drift.

METTLER TOLEDO 39/58 GTP – Hints & Tips
Volumetric thermostatable beaker Some samples benefit from higher measurement tem-peratures to increase solubility. For this a thermostatable titration vessel (p/n 51107497) is available. When using increased temperatures, please make sure not to heat the sample/ solvent above 50°C, as above this temperature some hydrocarbons may disintegrate and form water. The most used KF application at higher temperatures is for sugar products, for further information please refer to application brochure 38, ‘Karl Fischer Titration’ (ME-51725075A).
29. Solvent Manager In Karl Fischer titration solvents have to be exchanged regularly. To make this process easier and less harmful for the user, a Solvent Manager can be used. A Solvent Manager is a pur-pose made pump/valve assembly that allows the user to easily exchange, drain and fill solvent in a KF titration vessel. For all these functions shortcuts can be defined on the titra-tor’s home screen and with a volumetric KF titrator, all the tubing can remain in place, ready to use whenever the user needs its functionality.
With the C30 and V30 KF titrators (or even T70/T90), also automatic solvent/reagent ex-change can be chosen / forced after e.g. every few samples, or a certain time period.
N.B. The solvent manager can be used for coulometric titration too. In this case the tubing needs to be inserted into the titration vessel before solvent can be exchanged; if the tubing would be constantly connected too much water would be able to enter the titration vessel and interfere with the analysis.
Figure 22: The principle of the Solvent Manager. During drainage the valve is switched so that the solvent from the vessel is as- pirated to waste, during filling the valve of the pump is positioned such that fresh solvent is drawn into the vessel.

METTLER TOLEDO 40/58 GTP – Hints & Tips
In general titration, the Solvent Manager can also be used for draining of spent sample. Since for general titration the amount of reagent added is usually important, it is not possible to fill with the Solvent Manager here. The amount of the reagent pumped varies with the filling level of the bottle.
30. Drying tubes Not only titration vessels, also titrants, are sensitive to atmospheric water in Karl Fischer titration. To avoid water getting into the titrant bottle, drying tubes filled with molecular sieve are attached to the bottles. The molecular sieve is doped with silica gel for indication of wa-ter saturation.
Drying tubes should be present on all bottles of KF titrants and solvents, on the waste bottle of the Solvent Manager and connected to the titration vessel. With coulometric titration they are additionally present on top of the generator electrode, as the generator electrode needs to be open to the outside environment to release hydrogen gas which is formed at the cathode.
31. Sample insertion For volumetric Karl Fischer titration, sample insertion is not as critical as for coulometric titration. The sample can be input in the titration vessel by briefly opening the vessel to in- sert the solid or liquid sample. The water content determined with volumetric KF is much higher, so any atmospheric water getting into the titration vessel with the sample will not disturb the measurements as much as it would do for coulometric KF.
Figure 23: Three hole adapter for sample insertion in volumetric Karl Fischer titration
Three hole adapter Most samples for volumetric KF will be inserted via the three hole adap-ter in the lid of the titration vessel. The three hole adapter has different size stoppers that can be removed for sample insertion and also the whole adapter itself can be removed for sam-ple addition. The following are the most common ways to enter samples with the volumetric technique:
Weighing boat: For solid substances, a weighing boat is often the easiest way to weigh, insert and back-weigh the sample for analysis. The most suitable weighing boats are made from glass (to avoid electrostatics) and have a spout to pour the sample into the titration

METTLER TOLEDO 41/58 GTP – Hints & Tips
vessel. Depending on the size and length of the spout, either the whole three hole adapter or only one of the stoppers within has to be removed from the titration vessel.
Pieces: If the sample is in fixed pieces (e.g. tablets), they can be inserted by taking hold of them with a set of tweezers. Never touch KF samples with bare skin, the moisture on the skin will contaminate the samples and increase the water content found!
Syringe: For liquids a syringe is by far the easiest option to add the sample to the vessel. As with the coulometer, also there the syringe with sample is weighed, the sample inserted and then the weight differential is determined via back weighing. For addition with a syringe, only the smallest stopper in the three hole adapter has to be removed. When pushing the sample from the syringe, make sure that no adhering droplets are at the tip of the needle when pull-ing the syringe back out of the vessel. If there is a drop hanging on the needle, first pull back the plunger a little bit to draw the drop back into the needle.
Visco-Spoon™: Samples which are in the intermediate area between liquid and solid can be inserted with the Visco-Spoon™. With this spatula-like tool, a bit of very viscous sample can be scooped and placed in the titration beaker. Because of the length of the Visco-Spoon™ the sample will be below liquid level and will slowly dissolve and release its water.
Figure 24: Visco-Spoon™ for inserting viscous samples like creams and pastes

METTLER TOLEDO 42/58 GTP – Hints & Tips
4. Theoretical description of GTP influencing aspects This chapter gives a theoretical overview of possible error sources to be aware of in titration. For a thorough description of titration theory, please refer to the GTP booklet ‘Fundamentals of Titration’ (order number 51725311).
4.1. Accuracy, precision and trueness
Trueness The trueness of a result is defined as the closeness of the mean value of the results of a measure-ment series to the ‘true’ value. But what is the ‘true’ value? In theory this ‘true’ value is the result that would be obtained by a perfect measurement. In practice the ‘true’ value is the universally recognized result or certified value. Synonyms include reference value, best estimate or assigned value.
Mathematically the trueness is given by:
rxb −= where r = true value
nx
x i∑= x = mean value of a series of n measurements
Figure 25: Trueness of a result
Deviation from the ‘true’ value is due to systematic errors and can generally be corrected for.
x b r

METTLER TOLEDO 43/58 GTP – Hints & Tips
Precision The precision of a result is defined as the closeness of the individual results in a series to each other and is given statistically by the standard deviation, s or relative standard deviation, srel of a series of measurements.
∑ −=−=
n
1i
2
)x(xi1n1s and
100xs srel ×= (also known as %RSD)
Figure 26: Precision of a result
The term precision includes the repeatability of the measurements (measured under identical conditions) as well as the reproducibility of the measurements when conditions are varied e.g. different instrument, different operator, different time of day etc.
Poor precision is generally due to random errors and the source of the imprecision is harder to identify.
Accuracy Accuracy is a term used to describe the combination of both the trueness and the precision of the result and is influenced by both systematic and random errors.

METTLER TOLEDO 44/58 GTP – Hints & Tips
4.2. Types of errors
An error is defined as any deviation from the true value and can be classified as systematic, ran-dom or gross errors.
Systematic errors A systematic error is an error that is constant or drifting slightly and is due to a consistent mistake made during the analysis. Typical systematic errors in titration analyses include:
• Differing or incorrect analytical method compared to that used to determine the ‘true’ value
• Incorrect calculation formulas
• Sampling errors
• Sample size errors e.g. due to a constant weighing error
• Incorrect titrant concentration
• False or missing blank value
• Incorrect or missing sensor adjustment
• Too high titration speed for the chemical reaction
• Too high titration speed for the sensor response
Once the source of a systematic error is identified it is usually easy to correct for these errors.
Random errors A random error is a component of the overall error that varies in an unpredictable fashion. It is usually difficult to identify these errors. Typical sources of random errors include:
• Poor sample handling
• Inadequate equipment e.g. too low balance resolution, wrong grade of glassware etc.
• Incorrect method parameters e.g. too large increments, insufficient waiting time between increments.
• Bubbles in burette tubes
• Ineffective rinsing between samples
• Lack of operator training
• Inadequate environmental conditions e.g. temperature and humidity fluctuations
If the source of a random error cannot be identified then the only solution is to increase the number of replicates in order to get a more trustworthy mean value. This generally leads to waste of sam-ple, reagents and time.

METTLER TOLEDO 45/58 GTP – Hints & Tips
Gross errors Gross errors are a form of both systematic and random errors caused by blunders or mistakes and are easily identifiable. Another name for gross errors is avoidable mistakes. Typical gross errors include:
• Notation mistakes
• Calculation errors
• Mix up of samples and/or reagents
• Wrong sample sizes
• Misunderstandings in instrument operation
• Transcription errors
Adequate training and care during analysis usually eliminates the sources of gross errors.
Some of the common sources of errors are discussed below in more detail.
4.3. The best method for the job
When performing a titration with a modern automatic titrator there are usually two possibilities when selecting the type of method. These are an endpoint titration to a predefined potential or an equivalence point titration.
The endpoint titration This method of titrating is characterized by setting a predefined end point, usually historically based on the colour change of an indicator or as specified in some standard. The most common form of the endpoint titration is the pH endpoint.
Figure 27: An endpoint titration to pH 8.2
pH
pH 8.2
V (mL)

METTLER TOLEDO 46/58 GTP – Hints & Tips
The endpoint titration has the advantage that it is easy to understand, is usually fairly quick, and closely matches what was done during a manual titration.
The greatest disadvantages of the endpoint titration are that it may not coincide with the ‘true’ re-sult, it generally requires regular adjustment of the sensor, and often is temperature dependent. The temperature dependence is due to the fact that the measured pH is temperature dependent. As a result it is necessary to measure the sample temperature and compensate for any change if it differs from that measured during sensor adjustment.
The equivalence point titration As the name implies, this method of titration involves determining the point at which the amount of titrant added is exactly equivalent to the amount of analyte originally present in the sample. This point coincides with the chemically ‘true’ result and is the preferred method. The result is generally accepted as the inflection point in the titration curve.
Figure 28: The equivalence point titration
This method has the advantages that it is the ‘true’ result, it does not require sensor calibration and the titration itself is not temperature dependent. The only disadvantages are that it can be slightly slower and only applies when there is a clear inflection point in the curve.
The correct method parameters From the above it is clear that the equivalence point method is the preferred method but irrespective of the method chosen, the control and evaluation parameters can critically affect the accuracy and precision of the result. Generally speaking there are three main ways of adding the titrant incre-ments as well as two ways of determining how long to wait between each addition.
With dynamic titrant addition the size of the increment depends on the shape of the titration curve. In flat regions of the curve large increments are added while in the steep region where an equi-valence point is expected the titrator adds small increments. This results in a fast but accurate titration but still requires some care in selecting appropriate parameters. If too large increments are added in the steep region of the curve then precision suffers since the instrument has to fit a curve
Equivalence point
pH
V (mL)

METTLER TOLEDO 47/58 GTP – Hints & Tips
with very few data points. On the other hand, if the minimum increments are too small then noise results and it becomes difficult for the instrument to evaluate an equivalence point.
Figure 29: Increment size and dynamic titrant addition
For very steep titration curves or curves with a sudden break it is often better to use increment titrant addition or addition using fixed increments rather than dynamic. This is particularly the case with the figure below. Here a large initial increment followed by a succession of small increments would result in a better curve fit and therefore better precision.
Figure 30: Incremental titrant addition for steep titration curves
The last method of titrant addition is used exclusively with endpoint titration and is called con-tinuous titrant addition. With this addition the instrument adds titrant continuously at a high rate until a certain distance from the preset endpoint. At this point the rate of addition is reduced until a minimum addition rate or increment size is reached at the endpoint. The distance from the end-point, sometimes termed the control band, will determine the analysis time as well as the accuracy and precision of the titration. Small control bands result in faster titrations but can result in over titration if the curve is steep. As a rule the steeper the curve the larger the control band must be.
predispense Small fixed increments result in better result for curves with sudden break
Multiple EQPs Single EQP Interpolated EQP
a. Increments too large b. Ideally sized increments c. Increments too small resulting in noise

METTLER TOLEDO 48/58 GTP – Hints & Tips
Figure 31: Continuous titrant addition
For the time between increments either a fixed time is defined, or the equilibrium to be reached is awaited using specified equilibrium criteria. In the case of equilibrium both the reaction to be complete and the sensor to respond to any changes is awaited. This is the better method and it is done by defining a maximum drift in the sensor signal before the next increment can be added. If, however, this maximum drift is set to a value that is too high or a fixed time between increments is set that is too short the titrant is added too quickly.
In this case two possible situations can arise. The first is when the titrant is added at a rate faster than the chemical reaction between the titrant and analyte. In this case a build-up of excess titrant, followed by a premature termination of the titration results. This gives results that are consistently too low. In the second case the titrant is added at a rate faster than the sensor response time and this causes a lagging of the sensor signal behind the reaction. Here results that are consistently too high are obtained.
Figure 32: Waiting time between increments
Slow reaction, fast sensor
Rate matched to reaction and response
Fast reaction, slow sensor
mV
pH
endpoint
control band
mL
mL

METTLER TOLEDO 49/58 GTP – Hints & Tips
4.4. Reagent handling
Preparation and storage of titrants In order to get accurate and precise results it is imperative that titrants are prepared and stored with care. This is of particular importance with titrants that are not stable over time. In the case of bases e.g. sodium and potassium hydroxide, it is important that the titrants are prepared with carbon di-oxide free water or solvent and that they are protected from atmospheric exposure to carbon diox-ide. This can be done by attaching a drying tube containing an absorbent (e.g. NaOH on a gra-nular carrier) to the titrant bottle. If not then CO2 is absorbed which reacts with the bases to form carbonate. The end result is that the titrant is a mixture of bases and it becomes impossible to get correct results with the titrant.
The alternative here is to use closed, air tight containers with titrant which are produced e.g. by Merck as Titripac®, or by Sigma-Aldrich as VOLPAC®.
Figure 33: Tube filled with NaOH on carrier to avoid titrant CO2 absorption
Many titrants e.g. iodine, permanganate, dichromate, are light sensitive and must be protected by storing short term in brown glass bottles and longer term by storing in the dark. One of the most critical of titrants when it comes to handling is Karl Fischer reagent used for water determination. This titrant must be protected from light as well as from the ingress of atmospheric humidity. This is done by attaching a drying tube containing silica gel or molecular sieve.
Last but not least, the temperature of titrants should be controlled to prevent expansion and con-traction. This results in concentration changes as well as degassing resulting in bubbles in burette tubes.
Irrespective of whether stored and prepared correctly, it is important to regularly determine the titer or true titrant concentration of titrants.

METTLER TOLEDO 50/58 GTP – Hints & Tips
Titer determination It should be noted that volumetric titration is not an absolute method since the result is influenced by the titrant concentration or titer. The effective titrant concentration normally differs from the nom-inal concentration due to either inaccurate preparation, purity of titrant used, or changes due to instability. The effective concentration is determined by means of a titer determination or a titration of a substance of exactly known concentration, usually a primary standard.
It is essential to perform a titer determination on all titrants before used for the first time. This also applies to purchased reagents of certified concentration since the titer determination not only com-pensates for concentration errors but also any minor burette inaccuracies. This is of particular im-portance with corrosive bases since they attack the glass walls of the burette resulting in small volume changes.
Depending on the stability of the titrant the titer determination has to be performed more or less fre-quently. Table 2: lists some common titrants together with recommendations for titer determination.
Table 2: Common titrants and handling procedures
Titrant Standard used Frequency Comments
Sodium hydroxide, NaOH
Potassium hydrogen phthalate (KHP)
Weekly Protect from CO2.
Sulphuric acid, H2SO4
Tris(hydroxymethyl)amino-methane (THAM) or sodium carbonate
Every 14 days
-
2,6-Dichlorophenol Indophenol (DPI)
Ascorbic acid Daily Protect from light. Store in a cool and dark place. Replace every 2 days.
Iodine, I2 Di-sodium oxalate Daily Protect from light and keep cool. Store in the dark.
Potassium permanganate (KMnO4)
Di-sodium oxalate Every 14 days
Protect from light. Store in the dark.
Silver nitrate, AgNO3
Sodium chloride Every 14 days
Protect from light.
Karl Fischer Reagent
Disodium tartrate dihydrate Daily Protect from humidity and light.
The titer (or factor) of the titrant is defined as the ratio of the actual concentration to the nominal concentration.

METTLER TOLEDO 51/58 GTP – Hints & Tips
4.5. Sensor handling and maintenance
In the case of pH endpoint titration a critical factor affecting result accuracy is the slope and zero point of the sensor. Both of these parameters are used to convert the raw signal from the sensor (in mV) into the pH of the sample solution according to the Nernst equation:
SEpH pH 0 −= , where
E = measured signal (in mV)
S = sensor slope = -2.3 RT/nF
pH0 = sensor zero point = E0/S
Figure 34: pH calibration curve
Depending on temperature fluctuations and measurement conditions the sensor calibration (if nec-essary) should be done at least once per day. In addition to this it is important for all sensors that the electrolyte is replaced at least once every 3 months and that the sensor is regularly cleaned. Depending on potential contaminants the cleaning agent varies from thiourea for sulphides, pepsin for proteins, acetone for edible fats and oils or toluene or similar for mineral oil or grease.
If glass sensors are used in non-aqueous applications then it is also important to ensure that the sensor membrane is always hydrated by conditioning the sensor between samples in water or dilute acid. If this is not done then the sensor will become sluggish with time and the accuracy of the results could be affected. Finally when not in use, sensors should always be stored in elec-trolyte, never deionised water, and in the majority of cases, not dry. The exception to this is the case of some ion-selective electrodes which can be stored dry.
pH 4 7
10 pH0
mV
Theoretical slope = -59.16mV/pH @ 25°C

METTLER TOLEDO 52/58 GTP – Hints & Tips
4.6. The effects of temperature on the results
Temperature can have two different effects on a titration. The first becomes apparent when per-forming an endpoint titration to a predefined pH value. The pH of the sample depends on the degree of dissociation of the acids and bases present, which is temperature dependent. A tem-perature change therefore gives rise to a real change in the pH of the sample that cannot be corrected for without knowing the sample’s exact composition. A further effect concerns the ac- tual measurement process and the slope of the sensor calibration curve.
The slope of the calibration curve is tem-perature dependent so it is important to either perform the analysis at the same temperature as that when the sensor was adjusted or to measure both tem-peratures and compensate for the change in slope of the calibration curve. Fortunately most mod-ern instruments are able to simultaneously measure the sample temperature and automatically compensate for this error.
The second major effect that temperature has on the titration concerns the density, and therefore the concentration of the titrant. If, for example, the titer of the titrant was determined in the morning with a laboratory temperature of 20°C and samples are titrated in the afternoon at a temperature of 30°C then this 10°C change in temperature can cause a significant reduction in titrant concentra-tion that is not being catered for. This is of particular significance with non-aqueous titrants where the coefficient of thermal expansion is much higher. Below is a table showing typical errors when this is not taken care of.
Table 3: Error in concentration due to temperature changes
Titrant % Error per °C change
0.1 M NaOH 0.027
1 M NaOH 0.036
0.1 M HCl 0.026
1 M HCl 0.029
1 component 5 mg/mL Karl Fischer Reagent 0.092
There are 3 possibilities to minimize this error. The best solution is to maintain constant tempe-rature in the laboratory. If the titer and samples are measured at the same temperature then there is no error.
In many cases, however, this is not feasible and an alternative solution must be found. The error can be reduced by re-determining the titer whenever there is a significant change in temperature. The final possibility is to measure the temperature of the titrant and to correct for the change in concentration due to temperature by multiplying by a correction factor.
For the case of Karl Fischer reagent listed in the table above, the correction factor is calculated as follows:

METTLER TOLEDO 53/58 GTP – Hints & Tips
Factor, f = 1 + (Ttiter – Tsample) x 0.092/100
With a 10°C difference in temperature (Ttiter – Tsample = -10) this would result in a correction factor of
f = 1 – 10 x 0.00092
= 0.9908
By multiplying our results by this factor the error is taken care of.
4.7. Instrument care and maintenance
Burette care Clean and well maintained burettes are crucial to reliable results. It is recommended that burettes are emptied and properly cleaned at least once every 3 months. In particular care should be taken with the burette tips. The majority of burettes for commercially available instruments include what is known as an anti-diffusion tip. This tip serves two purposes. The first is to prevent diffusion of either titrant into the sample or sample into the burette in between actual additions, and the second is to ensure that small drops or a fine stream of titrant is added to the sample. Generally an anti-diffusion tip consists of a restriction in the tube opening and as such can result in tube blockages if regular maintenance is not performed. When tube blockages occur they often result in burette leakage due to pressure build up. These leakages in turn result in problems with result precision. Nevertheless, under no circumstances should the anti-diffusion tips be removed as this will result in far greater precision problems.
Figure 35: Typical anti-diffusion tip
During routine use care should be taken to ensure that burette tubes do not contain any bubbles. These bubbles can occur either through degassing of the titrant during the filling of the burette, or due to leaks. To prevent degassing of the titrant it is often possible to reduce the filling speed and hence the amount of vacuum on the titrant during the filling. Any bubbles in the dispensing tube will cause random errors resulting in poor precision.

METTLER TOLEDO 54/58 GTP – Hints & Tips
In addition to cleaning it is also recommended that burettes be calibrated at least once per year to verify the dosing volume accuracy. This is of particular importance with titrants that are corrosive to glass such as strong alkali solutions. This should be done gravimetrically according to ISO8655 part 6. In the case were a burette fails to meet the requirements of the standard the glass cylinder or the entire burette should be replaced.
Instrument maintenance To ensure accurate and precise results it is recommended that instruments should be routinely serviced at least once per year.
4.8. Sample handling
By far the biggest source of random errors resulting in precision problems is in the sample han-dling. These errors include in homogeneity of the sample itself, sample storage problems, incorrect sample size, weighing errors, and careless handling to name but a few. Critical in most cases is the sample size. The sample should be large enough to ensure that it is representative while at the same time it should not be so large that repeated burette fillings are necessary during the titration. The ideal titration should give a titrant consumption of between 20 and 90% of a single burette volume. If inhomogeneity requires the sample to be larger than this, then a more concentrated titrant should be used.
On the other extreme, the sample should also be large enough so that weighing or sample mea-suring errors are kept to a minimum. Here a suitable balance must be used to ensure that the sample size exceeds the minimum weight of the balance. This minimum weight is defined as the weight which when measured tenfold, results in a repeatability of weighing result of less than a predefined value e.g. United States Pharmacopoeia (USP) states a value of less than 0.1%. If the example of standardization of KF titrant with disodium tartrate dehydrate is considered, a small sample of typically 50 mg due to solubility problems in methanol is required. In this case, in order to ensure a weighing uncertainty of less than 0.1% a balance is needed with a readability of at least 0.01 mg. If pure water is being used to standardize the KF reagent then to ensure a titrant consumption of 30 to 80% of a burette volume a sample size of 7.5 to 20 mg of water must be used. In this case a balance with 0.01 mg readability is insufficient if an uncertainty of 0.1% or better is the target.
In the case of liquid samples the appropriate grade of glassware or volumetric apparatus must be used and care must be taken to avoid handling errors such as parallax.
Conclusion Achieving both true and precise results is not a trivial task. There are many things that must be taken care of and it is only possible if care is taken from start to finish. Starting with using the correct method, preparing fresh titrants and standardizing them, calibrating the sensor, and finally with careful handling of the sample. This result in high quality results but consistently superior quality results is only possible if the whole system is routinely maintained.

METTLER TOLEDO 55/58 GTP – Hints & Tips
4.9. How to get the best titration results
The primary goal of any analysis is to get accurate and precise results in as short a time as pos-sible. Often neglecting the smallest thing can have an enormous impact on the reliability and quality of the final result. This chapter discusses some of the critical factors affecting titration re-sults and provides some insight into how to eliminate some of the more common errors.
Quality management in titration Quality management has become a relevant topic for the user of analytical instruments. It is mainly based on documentation of the proven technical specifications, the measurements and the ana-lytical methods used. The documentation represents the basics of each quality management sys-tem and is requested by the auditors during periodical checks.
Quality management: why? • The customer requires correct results with respect to e.g. accuracy, precision, and reproducibility.
• Pharmaceutical companies and government organizations (e.g., FDA, EPA) require traceability of the results and thus qualification of the instruments.
Both can be achieved by a complete documentation of results, compliance to technical specifi-cations and method checks.
The documentation procedure of analytical work in the laboratory is regulated by the applied QM-System (e.g. GLP), the proof of technical specifications is resumed in the certification procedure and specific analytical methods have to be tested in order to get correct results, i.e. the methods have to be validated. Last but not least, the instrument has to be maintained over the whole lifetime to guarantee continuation of correct results.
These individual areas encompass the following:
GLP: Quality of planning, performing, controlling and reporting of laboratory work
Certification: Quality of the instrument and of the measured values obtained by this instrument
Validation: Quality of the analytical method and thus of the achieved results
Qualification: Quality checking over the whole lifetime of the instrument
GLP International bodies have elaborated a set of rules concerning the analytical work in the laboratory in order to achieve a standard regulation recognized and accepted in all countries of the world. These rules are commonly known as GLP rules (GLP, Good Laboratory Practice). GLP is a formal framework for testing chemicals and consists of 10 specific rules. The goals of GLP are:
• Quality assurance of test data
• Mutual acceptance of data
METTLER TOLEDO 56/58 GTP – Hints & Tips
• Avoid multiplication of tests
In particular, avoiding the multiplication of tests saves costs and time. For instance, a customer does not have to repeat the same test that the producer performed at the end of the production process of a specific chemical product.
Certification of an automatic titrator The certification is a check of the instrument in order to
• Verify if the technical specifications are fulfilled,
• or to verify if the actual specifications meet the required level
Certification is only a part of a list of measures to guarantee correct results. Other points that have to be considered are the system suitability tests, the sensor calibration, the titrant standardization, and method validation which are described in this chapter too.
A complete certification of the titrator can be performed by testing the following hardware:
Sensor input and amplifier: • Potential measurement with certified voltmeter
• Temperature sensor input (measurement with certified resistors)
Dosing accuracy: • Burette motor drive: Measurement of the piston stroke with a certified micrometer
• Glass burette: Measurement of the deviations from the specified diameter value of the glass cyl-inder. Different volumes of water are dispensed and their mass is compared to the dispensing of a certified reference burette.
Qualification Quality management requires the documentation of the performance over the whole lifetime of the instrument, i.e., from the project phase through manufacturing, installation, operation until disposal of the instrument.
All these steps are resumed in the comprehensive concept of Qualification:
• Specification Qualification (SQ): Requirements, Functions, Design, HW/SW
• Construction Qualification (CQ): Production control for each product
• Design Qualification (DQ): Selection of correct instrument for intended use
• Installation Qualification (IQ): Evidence of correct installation at customer’s facility
• Operational Qualification (OQ): Evidence and compliance to specifications, SOPs, initial calibration, user training
• Performance Qualification (PQ): Periodical calibration and certification
• Maintenance Qualification (MQ): Definition of preventive maintenance and calibration/certification intervals

METTLER TOLEDO 57/58 GTP – Hints & Tips
METTLER TOLEDO titrators are supported with regard to the following:
• Specially trained MT service engineers that perform the calibration and certification of the titrator hardware with specific calibrated and certified tools (CertiCase, Excellence Test Unit) to ensure traceability to international standards
• The declaration of System Validation stating that the titrator was developed and manufactured in accordance to a strict quality management system.
• IPac: service product that offers an initial equipment qualification including installation and operational qualification (IQ/OQ) of the titrator at the installation site and the corresponding qualification documentation
• EQPac: service product that offers complete qualification including full documentation of the instrument's history.
• EduPac: with this education package one of our Mettler-Toledo specialists provides users with training on their instruments after they have been installed. Additional refresher courses can be taught when needed for further users.
Figure 36: Pictured are IPac and EQPac for Titration Excellence titrators

METTLER TOLEDO 58/58 GTP – Hints & Tips
Validation of Titration Methods While the goal of any analysis is to get correct results, very often the ‘correct’ result is not neces-sary the ‘true’ result. As a result our goal is in fact to get the best result possible. This means a result as accurate, precise and true as possible. To do this it is important to critically investigate the factors affecting each of these and minimize the negative influences. Before doing this it is required to define what is meant by the terms accuracy, precision and trueness (the definition used here is according to ISO 5725-1:1994).
Summary Different areas of quality management are concerned with different part of the data acquisition process, as an overview the following can be stated:
GLP Formal framework, regulations
Certification Hardware, specifications
Validation Chemistry, measurement method
Qualification Lifetime evidence of measuring system

www.mt.comFor more information
Mettler-Toledo AG, AnalyticalCH-8603 Schwerzenbach, SwitzerlandTel. +41 44 806 77 11Fax +41 44 806 73 50
Subject to technical changes© 09/2010 Mettler-Toledo AG51725313, Printed in SwitzerlandMarkt Support AnaChem / MarCom Analytical
GTP – Hints & Tips Day-to-Day Titration Practice
In this booklet hints and tips are given for performing general titrations, coulometric Karl Fischer titrations and volumetric Karl Fischer titrations.
For all types of titrations hints and tips on the basis of individual components are given.
GTP – Hints and Tips outlines specific aspects of the complete system with the ultimate goal of achieving better results with titration.