get online - teradekcdn.teradek.com/public/vidiupro/docs/teradek_vidiu_pro...get online 1 need more...
TRANSCRIPT

Start/Stop Joystick: ● (button press): Start/stop broadcasts, exit menu screens
Menu Joystick:▲,▼, , : Select menu items, change status screen on main display, select characters ,● (button press): Confirm selection, open selected menu Reset Button: Hold for 3−6 seconds: Reset all network settings Hold for 10+ seconds: Perform complete factory reset
▲
▲
CHOOSE A PLATFORM AND QUALITY 2
GET ONLINE 1
NEED MORE HELP?1. Support forum: http://support.teradek.com → Contains tips, information and all the latest firmware & software updates. 2. Training videos: http://www.teradek.com/training TERADEK SUPPORT STAFF: [email protected] or call 888−941−2111 ext2 (Mon−Fri 9am to 6pm PST)
A: SD Card slot B: Video Input StatusC: Encoder Status D: Broadcast StatusE: Warning Indicator
F: Start/Stop Joystick G: Menu Joystick H: USB Port I: HDMI input J: MIC/Line input
K: Headphone output L: Reset Button M: Ethernet N: DC InputO: Power Switch
pantone 1795 pantone 355 pantone 307
F
G
A
JK
LM
NO
B
D
E
C
I
H
▲
iOS
ANDROID/PC
CONNECT TO A WIRED NETWORK
CONNECT VIA A 3G/4G USB MODEM
Download the VidiU app from the App Store. Next, decide how VidiU should connect to the Internet:
Connect to VidiU Pro’s WiFi network: VidiU−pro−XXXXX (serial number of the device)
Open a web browser and navigate to http://172.16.1.1, or find VidiU using Bonjour
Enter the Settings menu and open the Network section to configure VidiU Pro’s WiFi
Once configured, connect your mobile device or computer to the same network as VidiU Pro
Use the VidiU app (Android) or a Bonjour browser (PC/Mac) to find VidiU Pro’s new IP address.
Using the VidiU app, web UI, or front panel prompts, Enter the Broadcast menu
Choose a platform − Ustream, Livestream, YouTube, Twitch − or select manual RTMP
Enter your credentials or RTMP destination info and press apply
Select your desired Video bitrate and resolution under the Broadcast Quality menu
Plug an Ethernet cable into VidiU Pro’s 10/100 Ethernet port and connect it to an Internet−connected Ethernet switch or router
Connect a compatible 3G/4G modem to VidiU Pro via USB. See http://support.teradek.com for a list of supported modems
Use your phone’s data plan
Connect to an existing WiFi network
Connect to VidiU’s WiFi network: VidiU−XXXXX (serial number of the device)
Ensure Bluetooth is enabled on your iOS device, then open the VidiU app and select VidiU pro under the list of Bluetooth devices
Open the VidiU app and select VidiU under the list of WiFi devices.
If your iOS device is connected to a WiFi network, the Network field will be completed automatically. Enter the WiFi network’s password and press Connect. Click Done.
When prompted, click Yes to use your cellular data plan. If you have a ShareLink account, up to four phones can be used simultaneously.
After a few seconds VidiU should connect to your network. Select VidiU pro under WiFi Devices once it appears.
1
2
1
1
1
3
2
2
2
3
3
3
4
4
5
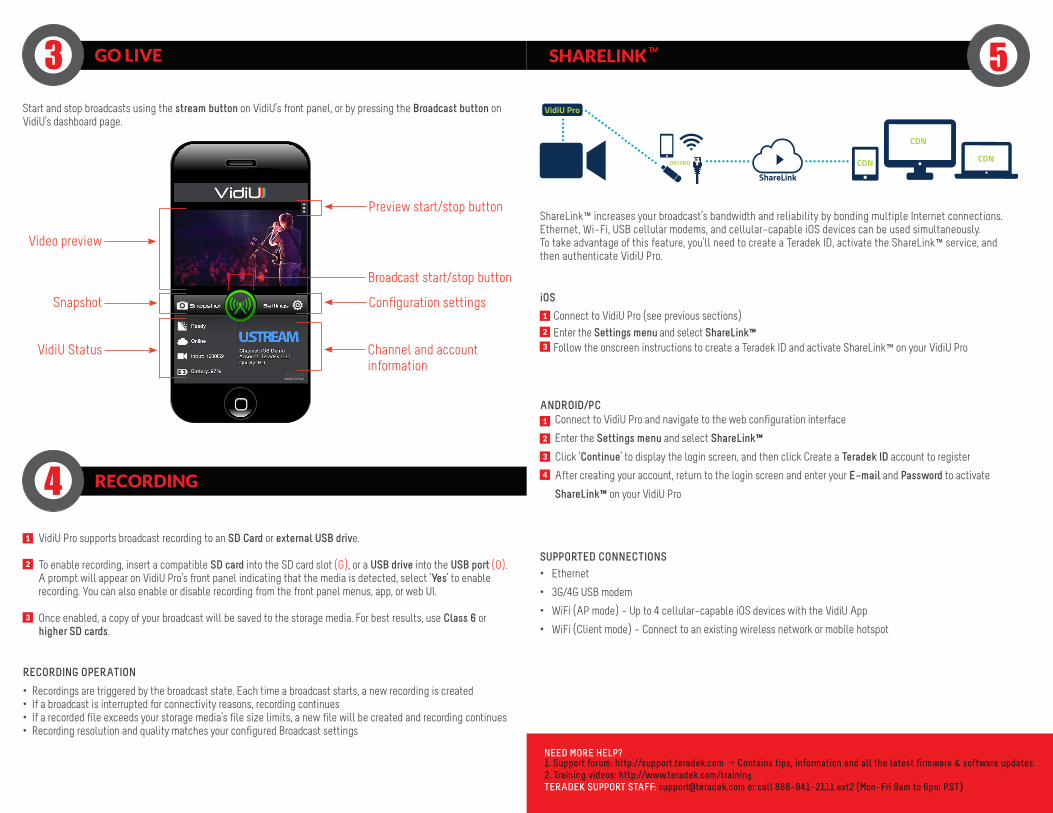
SHARELINK™ 5GO LIVE
RECORDING
3
4
Video preview
Broadcast start/stop button
Configuration settings
Preview start/stop button
Channel and account information
Snapshot
VidiU Status
Start and stop broadcasts using the stream button on VidiU’s front panel, or by pressing the Broadcast button on VidiU’s dashboard page.
VidiU Pro supports broadcast recording to an SD Card or external USB drive.
To enable recording, insert a compatible SD card into the SD card slot (G), or a USB drive into the USB port (O). A prompt will appear on VidiU Pro’s front panel indicating that the media is detected, select ‘Yes’ to enable recording. You can also enable or disable recording from the front panel menus, app, or web UI.
Once enabled, a copy of your broadcast will be saved to the storage media. For best results, use Class 6 or higher SD cards.
• Recordings are triggered by the broadcast state. Each time a broadcast starts, a new recording is created• If a broadcast is interrupted for connectivity reasons, recording continues• If a recorded file exceeds your storage media’s file size limits, a new file will be created and recording continues• Recording resolution and quality matches your configured Broadcast settings
1
2
3
RECORDING OPERATION
ShareLink™ increases your broadcast’s bandwidth and reliability by bonding multiple Internet connections. Ethernet, Wi−Fi, USB cellular modems, and cellular−capable iOS devices can be used simultaneously. To take advantage of this feature, you’ll need to create a Teradek ID, activate the ShareLink™ service, and then authenticate VidiU Pro.
iOS
Connect to VidiU Pro (see previous sections)
Enter the Settings menu and select ShareLink™Follow the onscreen instructions to create a Teradek ID and activate ShareLink™ on your VidiU Pro
1
2
3
ANDROID/PC
SUPPORTED CONNECTIONS
Connect to VidiU Pro and navigate to the web configuration interface
Enter the Settings menu and select ShareLink™Click ‘Continue’ to display the login screen, and then click Create a Teradek ID account to register
After creating your account, return to the login screen and enter your E−mail and Password to activate
ShareLink™ on your VidiU Pro
• Ethernet
• 3G/4G USB modem
• WiFi (AP mode) − Up to 4 cellular−capable iOS devices with the VidiU App
• WiFi (Client mode) − Connect to an existing wireless network or mobile hotspot
1
2
3
4
NEED MORE HELP?1. Support forum: http://support.teradek.com → Contains tips, information and all the latest firmware & software updates. 2. Training videos: http://www.teradek.com/training TERADEK SUPPORT STAFF: [email protected] or call 888−941−2111 ext2 (Mon−Fri 9am to 6pm PST)
VidiU Pro
CDN
CDN
CDNOR/AND
ShareLink