g14 designing and planning laboratories -
TRANSCRIPT

G14 Designing and PlanningLaboratories
May 2009
May
200
9G
14 D
esig
ning
and
Pla
nnin
g La
bora
torie
s
Contents1. Designing for science................................................................................................................................ 1
1.1 Introduction..................................................................................................................................... 11.2 The people and processes involved ............................................................................................... 11.3 The number and type of laboratories required ............................................................................... 21.4 Preparation and storage rooms...................................................................................................... 31.5 Other aspects of science department design ................................................................................. 41.6 A planning checklist........................................................................................................................ 51.7 Building in progress ........................................................................................................................ 71.8 On-going maintenance and repair .................................................................................................. 8
2. Planning and designing a laboratory......................................................................................................... 92.1 General principles........................................................................................................................... 92.2 Some details to consider ................................................................................................................ 92.3 Size and shape of the room.......................................................................................................... 102.4 Fume cupboards........................................................................................................................... 132.5 Coats and bags ............................................................................................................................ 14
3. The laboratory environment .................................................................................................................... 153.1 Introduction................................................................................................................................... 153.2 Acoustics ...................................................................................................................................... 153.3 Heating ......................................................................................................................................... 153.4 Lighting ......................................................................................................................................... 153.5 Windows ....................................................................................................................................... 163.6 Ventilation..................................................................................................................................... 163.7 Doors ............................................................................................................................................ 173.8 Floors............................................................................................................................................ 183.9 Eye wash and related facilities ..................................................................................................... 203.10 Fire prevention and control measures .......................................................................................... 203.11 Provision for ICT, etc .................................................................................................................... 21
4. Furniture, systems and layouts ............................................................................................................... 224.1 The needs of practical work.......................................................................................................... 224.2 Layouts and services.................................................................................................................... 224.3 Cupboards, drawers and shelves ................................................................................................. 274.4 Teachers’ area.............................................................................................................................. 284.5 Suppliers and fitters...................................................................................................................... 28
5. Bench surfaces........................................................................................................................................ 295.1 Benches in schools and colleges ................................................................................................. 295.2 Iroko: the traditional wood for bench surfaces.............................................................................. 295.3 Synthetic surfaces ........................................................................................................................ 325.4 Abuse ........................................................................................................................................... 345.5 Brighter colours but ...................................................................................................................... 345.6 Thickness ..................................................................................................................................... 365.7 Costs of different surfaces............................................................................................................ 36
6. Services................................................................................................................................................... 376.1 Gas ............................................................................................................................................... 376.2 Water supply................................................................................................................................. 386.3 Sinks, taps and drains .................................................................................................................. 396.4 Electricity ...................................................................................................................................... 436.5 Vacuum ........................................................................................................................................ 44
7. Preparation rooms and storage............................................................................................................... 457.1 Introduction................................................................................................................................... 457.2 Strategy and space....................................................................................................................... 457.3 Activities ....................................................................................................................................... 467.4 Storage ......................................................................................................................................... 477.5 The greenhouse and animal house .............................................................................................. 50
Appendix 1 References ................................................................................................................................... 51Appendix 2 Model science suite / laboratory specification .............................................................................. 55
© CLEAPSS 2009Strictly Confidential
Circulate to members and associates onlyAs with all CLEAPSS materials, members and associates are free to copy all or part of this guide foruse in their own establishments.
CLEAPSSBrunel Science Park
Kingston LaneUxbridgeUB8 3PQ
Tel: 01895 251496Fax: 01895 814372
E-mail: [email protected] Site: www.cleapss.org.uk

1
G14 Designing and Planning Laboratories1. Designing for science1.1 IntroductionThis guide is written to help those planning and designing laboratories in schools, whether it’s a wholenew science suite or a refurbishment of an individual lab or prep room. The guide will be useful toscience teachers, headteachers, education authority science advisers and inspectors, architects andproperty services departments. For the most part, we have assumed that readers will not be veryfamiliar with designing laboratories and have tried to point out the pitfalls.
School science laboratories are an expensive investment and are expected to last for many years. Apoor design will impact on generations of pupils, teachers and technicians. As is so often the case, thecheapest option is not necessarily the best value for money even in the short and medium term. A well-designed and fitted laboratory may have much lower maintenance costs. In its publication on assetmanagement planning (for details see appendix 1) the government emphasised the importance oflifetime costs, balancing capital expenditure against running costs. Some modern designs have notproved to be sufficiently robust for school use and, frankly, look tatty after just a few years.
Most science teachers, and even architects, do not have much opportunity to practice at designing forscience. Both may be tempted to draw upon personal experiences to identify what liked most / leastabout laboratories they have worked in. It is important, therefore, to use guides like this and otherdocuments listed in appendix 1 to achieve an overview of the range of designs, what is possible andwhat to avoid. Where they exist, science advisers / inspectors usually do have good opportunities tovisit a wide range of laboratories and see them in action. If necessary, it may be worth paying for theiradvice.
It might be useful to visit schools that have recently had new science facilities, not only to see thedesign but also to talk to staff about how the results work in practice. With this in mind, in 2007 theDCSF commissioned a set of designs under the title Project Faraday. In this project six brand newschool buildings had special attention paid to their science facilities and a further 6 existing schoolbuildings had designs for refurbishments. These designs and some accompanying information havebeen published by the DCSF as Project Faraday. Exemplar designs for science (see appendix 1).
Building Schools for the Future (BSF) is a government project that is aiming to “rebuild or renew nearlyevery secondary school in England”. This guide has been reviewed and updated so as to be availablefor the many science departments that will be undertaking a rebuild or renewal.
CLEAPSS is in a unique position to have an overview of successful and unsuccessful lab designs. Wevisit a wide variety of schools each year and take around 7000 Helpline calls a year, of which about3% relate directly to laboratory design and fittings. Many come from teachers or technicians, but othersinclude science advisers and architects. Our experiences are summarised in this guide.
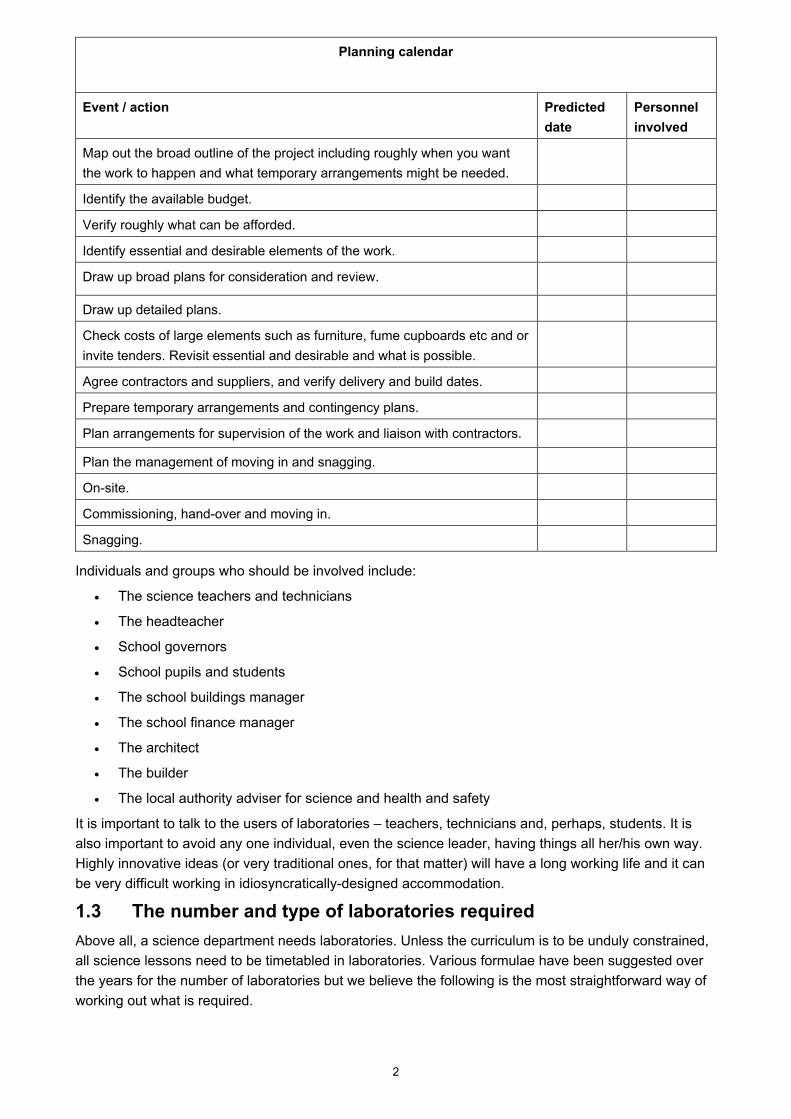
1.2 The people and processes involvedA very early consideration must be to identify the groups and individuals that may have a view on thedesign of new science facilities. Thereafter there must be a planned process by which each can beconsulted at appropriate times during the design, and build, process. A planning calendar like the oneon the next page will be useful to help effective consultation.
2
Planning calendar
Event / action Predicteddate
Personnelinvolved
Map out the broad outline of the project including roughly when you wantthe work to happen and what temporary arrangements might be needed.
Identify the available budget.
Verify roughly what can be afforded.
Identify essential and desirable elements of the work.
Draw up broad plans for consideration and review.
Draw up detailed plans.
Check costs of large elements such as furniture, fume cupboards etc and orinvite tenders. Revisit essential and desirable and what is possible.
Agree contractors and suppliers, and verify delivery and build dates.
Prepare temporary arrangements and contingency plans.
Plan arrangements for supervision of the work and liaison with contractors.
Plan the management of moving in and snagging.
On-site.
Commissioning, hand-over and moving in.
Snagging.
Individuals and groups who should be involved include:
• The science teachers and technicians
• The headteacher
• School governors
• School pupils and students
• The school buildings manager
• The school finance manager
• The architect
• The builder
• The local authority adviser for science and health and safety
It is important to talk to the users of laboratories – teachers, technicians and, perhaps, students. It isalso important to avoid any one individual, even the science leader, having things all her/his own way.Highly innovative ideas (or very traditional ones, for that matter) will have a long working life and it canbe very difficult working in idiosyncratically-designed accommodation.
1.3 The number and type of laboratories requiredAbove all, a science department needs laboratories. Unless the curriculum is to be unduly constrained,all science lessons need to be timetabled in laboratories. Various formulae have been suggested overthe years for the number of laboratories but we believe the following is the most straightforward way ofworking out what is required.

3
Calculate the total number of periods of science taught per week now (or in the future, if this is likely tochange). Divide by the number of teaching periods per week. This gives the minimum number oflaboratories needed. Multiply by 1.11 to 1.25 to allow for the fact that laboratories should normally beused for only 80 to 90% of the week, to permit servicing and to allow sensible time-tabling. Rounding tothe nearest whole number will give the number of laboratories needed.
needed labs of Number weekthe in periods of number Total
1.25] to [1.11 week]per taught periods science of number [Total=
×
For example, suppose, in a particular school, that 7 staff each teach 20 periods in a 25-period week. Inaddition, the head of department teaches 16 periods, a deputy head 4 periods and a member of the PEdepartment teaches 6 periods. Thus there are 166 periods of science in the week. The calculation:166/25 suggests a provision of 6.64 laboratories. However, to allow for sensible timetabling, 8 labs willbe needed. The occupancy of 8 labs would be 166 / (8 × 25) i.e. 83% of the week. Theoretically theschool could go for 7 labs but this would mean an occupancy rate of 166 / (7 × 25) i.e. 95%, which,experience has shown is simply impossible to manage in terms of servicing, cleaning and timetabling.
Rather than design labs specifically for biology, physics and chemistry, or lower-school and post-16students, multipurpose labs offer much greater flexibility. However, it is likely that only some of thelaboratories will have fume cupboards and these will inevitably be used for chemistry. A laboratory withmore than one fume cupboard will be needed for post-16 chemistry but it should be large enough to beused for younger classes as well. Similarly, a laboratory with good blackout (as opposed to dim out forvideos, etc) may be needed for post-16 physics, but it too should be suitable for other aged classes.New courses, such as the planned diploma, may require a mixture of different types of workspaces andthis, too, is most easily catered for by a system that can offer flexibility.
1.4 Preparation and storage roomsDetailed consideration of prep and storage rooms can be found in chapter 7. However, it is essential atthe beginning of the planning process that the needs for preparation and storage are not overlooked.Irrespective of the final design, at the very least these rooms will be used to:
• prepare equipment / materials for lessons,
• wash up and dry equipment and dispose of materials after lessons,
• hold equipment / materials (often on trolleys) to go out to lessons and equipment/materials justreturned,
• store chemicals safely and securely,
• store other equipment so it is accessible and secure,
• store radioactive materials safely and securely,
• allow technicians to undertake routine administration including managing teacher lessonrequisitions,
• allow a certain amount of equipment repair.
These activities cannot be effectively and safely undertaken in rooms that are too small, badly laid out,poorly furnished, or located randomly around the science department. The work of technicians insupporting science lessons in integral to the success of those lessons and therefor the preparationands storage needs must be considered right from the outset.

4
1.5 Other aspects of science department designThere are major advantages in having all the science accommodation on one floor, preferably theground floor, with no steps or changes of level. Much equipment needs to be moved around and thisshould be easily possible using trolleys. If a department is not situated on the ground floor, a goods lift(hoist) may be necessary, although this is an expensive option.
Table 1 lists a range of rooms and facilities, in addition to teaching labs, which might be needed in ascience department. For a discussion about layout of the whole department, see Building Bulletin 80:Science Accommodation in Secondary Schools. A Design Guide (see appendix 1). In addition, don’tforget cleaners’ cupboards, toilets, etc. The need for fire exits to the corridors may also imposeconstraints. The publication Fire safety risk assessment, education premises is also useful (seeappendix 1). Laboratory Design for Teaching and Learning (ASE) (see appendix 1) allows you to planthe layout within a lab and offers options for choosing furniture etc.
Table 1 Accommodation, other than laboratories, required for a science suite
Preparation room There are advantages in having one large central preparation room, serving theentire department. See chapter 7.
Store room(s) Some items can be stored in a sufficiently large preparation room, but a separate,lockable, ventilated, chemical store is highly desirable, preferably opening off thepreparation room. Store rooms for other items are useful to prevent clutter in thepreparation room.
Science departmentoffice or departmentalbase
With the growth in paper work, e.g. schemes of work, assessment records, etc adepartmental office is essential. The preparation room is a technicians’ work area.It should not be used as a science department office.
Dark room / opticsroom
Now not generally considered necessary in schools, although if not provided, onelaboratory will require reasonable blackout for post-16 optics work. Mostlaboratories need dim out for viewing whiteboards or screens, etc.
Animal room Live animals will be needed from time to time, e.g. for observation andmeasurement. However, these can usually be kept in the teaching laboratory orpreparation room. The cost of an animal room is rarely justified.
Greenhouse Live plants are often required and a greenhouse can repay its cost many timesover, if it is unlikely to be subject to vandalism.
Outside growing areaand/or pond
The science department can make very effective use of outside growing areas,environmental areas, ponds, etc both as a source of specimens for work in thelaboratories and for ecological investigations. Vandalism can be a problem unlessthe site is carefully chosen and/or the local community involved in its creation.Further guidance on this is available in CLEAPSS guide L221 Developing andUsing Environmental Areas in School Grounds (see appendix 1).
Student resource baseand other study areas
Science departments can promote independent study by the provision of aresource area that has a number of computers and paper resources. Unlikelaboratories, pupils may be able to work there unsupervised. Imaginative designscan provide small areas where individuals or small groups can work together, ontheir own or with a teacher.
In addition a department can provide other rooms more suited to discussion anddebate, lectures or paper-based activities without taking up lab space. Experienceof timetabling constraints suggest that such provision should not automatically beconsidered as a low cost alternative to one or more laboratories, but as additionalfacilities to the standard lab provision. This will produce a science suite thatenables and promotes a wide range of teaching and learning approaches withoutconstraining practical, lab-based science.

5
1.6 A planning checklistIt’s not always easy to keep track of the design process to make sure that nothing important is omitted.The checklist below has been kept simple and straightforward, gives a useful overview, and will providea science department with facilities that will allow its teaching to flourish.
General Have you considered and planned for:
1 Sufficient laboratories to teach practical science and allow time for proper routineservicing.
2 A large enough prep room for the technicians to work, and to house immediatelyneeded chemicals and equipment.
3 Sufficient other secure and accessible storage including an internal (i.e. within thebuilding) chemical store.
4 Laboratories and prep room on the same floor and at the same level.
5 A science staff room, equipped with tea and coffee-making facilities, for preparation,marking and meetings.
6 Mechanical ventilation for the laboratories, prep rooms and chemical storage rooms.
7 Protection from solar gain for windows that face the sun.
8 Heat-sensitive, not smoke-sensitive fire alarms used in the science suite andcorridor.
9 Sufficient fume cupboards to teach chemistry.
10 Sufficient black out to teach physics.
Laboratories Have you considered and planned for laboratories which have:(See also chapters 3 & 4.)
11 A floor area of least 90m2.
12 A bench space of 0.36 m2 for each pupil to work on.
13 Sufficient, well distributed, sinks, gas taps, power points and ICT connections foreffective science teaching.
14 A large sink with a hot water supply.
15 An eye-wash station.
16 Accessible shut-offs for gas, electricity and water and an earth-leakage circuitbreaker on the electrical supply.
17 Provision for pupils to hang coats and store bags.
18 Space to park a trolley holding equipment and materials for the lesson.
19 Windows that can be easily opened when required.
20 Sufficient lighting with provision for lights close to the whiteboard to be switched offor dimmed.
21 Lockable cupboards for storing materials and books.
22 Provision for teacher-led demonstrations that might require gas, water andelectricity.
23 An interactive whiteboard, projector etc and enough space to connect the computerto data-logging equipment for demonstrating to a class.
24 Sufficient display boards.
25 A site for two small carbon dioxide fire extinguishers and a fire blanket.

6
Laboratoryfurniture
Will the furniture have: (See also chapters 4, 5 & 6.)
26 Laboratory bench height of 900 mm.
27 Bench tops made of a suitable material, such as wood, stone-filled resin or solidlaminate.
28 Cupboards doors fitted with 270° hinges.
29 Sufficient comfortable stools.
30 Water taps of a non-rotating pillar design.
The prepand storageroom(s)
Have you considered and planned for preparation and storage facilities that have:(See also chapter 7.)
31 Sufficient room for the technicians to prepare lessons without general interruptionfrom other staff.
32 An office area equipped with a computer and connected to the web.
33 Provision for storage of technicians’ reference books and other paper resources.
34 If appropriate, provision for the storage of paper resources for teaching e.g.worksheets, etc.
35 Provision for orderly storage of science equipment and materials, including ‘bench’solutions.
36 Sufficient space for trolleys.
37 Workbenches set at a height of 900 mm and with enough working surfaces to meetthe needs of the department.
38 At least one large sink with a double drainer and hot and cold water supply.
39 A lockable, ventilated chemical store.
40 Provision for the lockable storage of highly flammable chemicals.
41 Provision for the lockable storage for radioactive materials (should not be in thechemical store).
42 Provision for the secure storage of gas cylinders, not in the same room as theflammables cupboard or the radioactive materials.
43 A ducted fume cupboard, or easy access to one.
44 A refrigerator, freezer, and dishwasher or laboratory glass washer.
45 Display and message boards on the wall.
46 A site for two small carbon dioxide fire extinguishers and a fire blanket.

7
1.7 Building in progressConstructing a completely new science block can go ahead at any time without disturbing teaching.However, conversion or upgrading existing accommodation may well be noisy, dirty, dangerous andgenerally disruptive. Most schools, therefore, attempt to arrange such work for the summer break,which becomes a peak period for suppliers and manufacturers. Problems can arise with long deliverytimes, staff shortages and sub-contracted fitters. In addition, school staff who need to be consulted orwho could spot difficulties as they arise, may well be on leave. Delays are commonplace.
It is therefore better if schools can arrange for work to be done at other times of year, possibly bymaking use of temporary accommodation. Alternatively, could rooms be released when the examinationseason starts or the work done during the Easter break? Whenever the work is arranged, it is wise toassume that it will not be completed on time, and make contingency plans.
Watch what is going onSomeone in the science departments should obtain copies of any plans as and when they are drawn upor modified. This can be useful to help ensure that all changes, even last-minute ones, are consideredby, and agreed with, the department. Plans can also help resolve disputes when building starts.
Once contractors begin work it remains vital that science staff keep a close eye on what is happening.Many small decisions are made on site and it is important to identify potential mistakes and inform thearchitect or project manager before it is too late or too expensive to rectify them. If building work is to becarried out in the holidays try to arrange a rota so that senior science staff come in regularly andfrequently to check what is happening. For local authority schools, the property services departmentmay be contracted to oversee the project. For large projects, this is usually worthwhile since scienceteachers are not trained site managers.
Some suppliers use their own fitters which means that the fitters build up experience of working with theproducts you are interested in. Others make extensive use of subcontractors, often for individual partsof the project, which may be less satisfactory. For example, electricians are specialists who often comein to do a particular task, without necessarily understanding the nature of the whole project. In oneschool, wall-mounted sockets were installed too low so that when the benches were fitted, mouldedplugs could not be inserted. Details of heights for sockets and the position of any cut-off switches areoften not specified in drawings and may be decided on the day of fitting by whoever is doing the job.Where the location of such installed items is important, it is best to write information clearly on the walls.Fitters installing gas or water taps sometimes find it is quicker to drill one large hole, rather than severalsmaller ones, making anti-rotation devices useless. This emphasises the need for a clear brief andinstructions.
Temporary arrangementsThe Construction (Design and Management) Regulations 2007 (CDM) (see appendix 1) place varioushealth and safety responsibilities on the designer, the contractors, and on the client (i.e. the school orlocal authority). The Regulations do not apply to small projects where the project will last for less than30 days, but new building, and some refurbishment of laboratories, will be covered.
If the Regulations do apply, then the HSE must be informed and a CDM co-ordinator appointed. One ofthe duties of the CDM co-ordinator is to prepare a health and safety file. The Head of Science, scienceadvisor, etc, will have specialist knowledge that they should draw to the attention of the CDMco-ordinator. For example, during a refurbishment, it may well be necessary to remove chemicals intotemporary storage. The nature of the chemicals, their hazards and any particular storage requirementsmay need to be pointed out. CLEAPSS will be happy to discuss with members the risk assessmentinvolved in the use of temporary storage.

8
Dealing with and moving the radioactives cupboard is a particular instance where the department needsto make some arrangements of its own. Contractors have been known to ‘lose’ an entire radioactivescupboard and its contents, generally because the person on the ground has no idea what he is dealingwith. For further advice on this see the CLEAPSS guide L93 Managing ionising radiations andradioactive substances in schools.
Moving inThere will normally be a hand-over date when the supplier says “We have finished – it is all yours”. Thecontract terms and conditions will usually specify how minor problems (‘snagging’) will be dealt with.Science staff need to be careful to compile a list of problems and ensure they are rectified before hand-over, or obtain an agreement that they will be rectified afterwards. Fume cupboards should becommissioned, i.e. they should be tested and shown to comply with the relevant specification, and thesupplier should provide the school with the written result of these tests. Other items may also need tobe commissioned, e.g. electronic gas and water shut off systems. The service manual giving details ofhow various items of equipment are to be used should be available at the hand over.
If a new suite of laboratories has been built, there will be lots of equipment and chemicals to be movedin. There is often an unwritten assumption that technicians will do this. There may be advantages insuch an arrangement in that technicians will know the hazards of chemicals, understand that a Fortinbarometer must be carried upright, etc. However, before making this assumption make certain thatmanual handling issues caused by moving large quantities, perhaps up stairs, or over large distancesare resolved. Transporting bulk chemicals by road, if necessary, is a specialist task which is nowbeyond the scope of teachers or technicians. If the building work and hand-over is done during theholidays, who will be available and will technicians need to be paid overtime?
1.8 On-going maintenance and repairAll laboratories, including those that are brand new, need maintenance and repair. Try to make surethat the service manual specifies the manufacturer and details for various fittings – water and gas taps,etc. Then, if these need to be replaced, new items can match the existing fittings. Indeed, it is a goodidea to obtain a stock of spares, certainly the ferrules from the bottom of stools and detachable tapnozzles, but perhaps even one or two gas and water taps.
For repair work schools often use local contractors who may lack experience or not know the suppliersof original fittings. It is important, therefore, to specify exactly what is needed, i.e. like-for-likereplacement, and, if necessary, CLEAPSS may be able to suggest sources. Do not accept non-matching gas taps, especially if they have a different size nozzle. For repairing gas fittings, a Gas Safe-registered contractor must be used. Similarly, with water fittings, most plumbers will not know where toobtain laboratory taps, and may try to install domestic-style fittings.
Bench surfaces will need maintenance from time to time to keep them in good condition (see section 8of the CLEAPSS Laboratory Handbook). Bottle traps will need to be emptied on a regular basis andplans made to ensure that this happens.

9
2. Planning and designing a laboratory2.1 General principlesFor even one new laboratory there are a number of important points to consider:
• How big can it be? This will determine how many pupils can be sensibly taught in the room andwhat range of teaching and learning approaches might be possible. (In Northern Ireland, there is alegal maximum class size, but in England and Wales there is no limit. Anyone in Northern Irelandplanning new science accommodation must consult the Department of Education BuildingHandbook; section 4 (see Appendix 1). There are some significant differences in regulation andpractice in the Province from other parts of the UK). There is more detailed discussion of room sizelater in this chapter but it is always a good idea to make the useable space as large as you can.Future changes are more easily accommodated in a larger room than a smaller one.
• What room layout do you want? Chapter 4 has more on this but layout can be constrained by whatservices you want, and where.
• What image of science do you wish to present. This may influence your choice not only of layoutbut of bench surfaces and furniture colours. Chapters 4 & 5 have more on this.
• How much can you spend? Use your money wisely by contacting several suppliers/manufacturersto obtain their latest catalogues. Ask them for names of reasonably local schools where they haveinstalled labs and visit them if you can.
• Who will draw up the plans? Ask building professionals to draw up detailed plans andspecifications; obtain several quotations for the work.
• What are your contingency plans? Be prepared to prune plans drastically if costs overrun youravailable budget.
Rules of thumb• Larger spaces offer much more flexibility than smaller.
• Fewer fixed structures also offer more future flexibility.
• Buying cheap furniture and fittings will probably turn out to be very expensive over a 25 yearlifetime.
Compromise is usually necessary. A goods lift (hoist) is highly desirable if the science department is noton the ground floor, but may simply be beyond the budget. However, consider the consequences of notinstalling such a facility on the legal requirements of the Manual Handling Regulations. Implementingthe Disability Discrimination Act may well involve the installation of a passenger lift. If locatedsufficiently close to the science department this may do away with the need for a separate sciencegoods lift. The structure of the building may make it impractical to put fume cupboards where you wantthem and this may have knock-on effects on the rest of the laboratory. As budgets are likely to be tight,some items may have to be cut or downgraded at the last minute if something else provesunexpectedly expensive. It is important to design laboratories for a realistic number of pupils. Alaboratory that is designed to cater for, say, 28 pupils, will struggle to cope with 33. Pupils will probablyhave to sit with their backs to the teacher, may not have adequate room for their knees when seated,may not have services in a convenient place and may be dangerously over-crowded for practical work.
2.2 Some details to considerThere is a need to balance capital expenditure against running costs. The concept of lifetime costs isparticularly relevant in the context of school laboratory fume cupboards. The calculation in section 2.4shows that the lifetime costs for ducted cupboards will be appreciably lower than for filter fumecupboards, despite the higher capital cost of the former.

10
There are major differences between refurbishing an existing laboratory and adapting non-scienceaccommodation to laboratory use. For example, in most laboratories, gas, electricity, water anddrainage services will be required on at least some benches. It is very expensive, noisy and dusty to digup existing floors in order to lay ducting for such services. Drains present particular problems. In a newbuild, services can be easily placed wherever required, but a decision on the location will be needed atan early stage, when the foundations are laid and perhaps before the final layout has been agreed. Inan adaptation of an existing laboratory, service ducts may well be available, but not necessarily at theideal location. Almost certainly, they cannot be moved, although it may be possible to box them in.Where non-science accommodation is adapted, it may well be necessary to accept that only servicesaround the periphery of the room are possible, perhaps supplemented by peninsular arrangements.(Note that in Northern Ireland, the DENI room layout and guidance specify the briefs for laboratories)
Some architects are very experienced in laboratory design but many are not. Architects may, in turn,call in other experts such as ventilation engineers but it would be unwise to assume, for example, thats/he is an expert in fume cupboards for school laboratories. Appendix 2 is a model brief for a laboratorywhich could be used to provide an architect or contractor with the basic features of a lab which youwant. Members are free to copy and adapt it as necessary (a Word version is on the members’ part ofthe CLEAPSS web site) but we would welcome feedback from users.
It is important when asking for quotations from contractors that you specify very precisely what youwant. In general, furniture and equipment should comply with the relevant and current British Standard.BS3202 is the standard for laboratory furniture, but much of it is irrelevant to schools. The DfEEdocument Furniture and Equipment in Schools: a purchasing guide, (see appendix 1) gives someguidance although is not specifically aimed at science suites. The standard for fume cupboards inschools is given in Building Bulleting 88 (formerly known as Design Note 29 Fume Cupboards inSchools) (see appendix 1). The British Standard for fume cupboards, BS 7258, acknowledges that itmay not be relevant in all circumstances and specifically mentions Design Note 29 Fume Cupboards inSchools.
Some firms specialise in laboratory work and are very knowledgeable; others are not. Find out whetherthe installation is being done by a firm’s own staff or by subcontractors. An apparently cheap quotationmay be cheap because a firm is giving you exactly what you asked for. A more expensive one, from anexperienced laboratory installer, may be giving you what it knows from experience you are likely towant, if you had thought to specify it. For example, an experienced company will usually providesufficiently thick bench materials to avoid the risk of cracking, and a drip groove will be carved on theunderside of a bench. For ideas on what to specify, see Appendix 2. Reputable companies complain,with some justification, that they are undercut; the cheapest quotation is not necessarily the best.Always ask for the names of two or three local schools where the company you intend to use hasinstalled the system of interest, two or three years ago; then visit and talk to the staff there.
2.3 Size and shape of the roomThe size of the room needed is obviously related to the number of pupils to be taught there. For a fullerdiscussion, see the CLEAPSS leaflet PS9 Science Class Sizes, Laboratory Sizes and Possible Effectson Safety. In Safety in Science Education the (then) DfEE states:
There are no regulations controlling the size of individual laboratories but adequate space is clearlyneeded for safe practical work. For 30 pupils at key stages 3 and 4, 85 m2 is recommended; below70 m2 a laboratory will be appropriate for groups of 25 or fewer.
As well as overall area, the area of work surface available for each pupil affects safety; 0.36 m2 isrecommended as a minimum.
For 30 pupils, modern purpose-built laboratories are likely to have an area of 85 to 95 m2. In NorthernIreland, 90 m2 is required for 20 pupils. In Science Accommodation for Secondary Schools the (then)DfEE suggests 83 to 99 m2 is needed for a class of 30 pupils below age16, and 20 post-16 students. In

11
the past 80 or 85 m2 was quite common. This can give a satisfactory, although hardly generous, amountof space, especially as class sizes are rising, pupils are physically bigger than in the past and there is aneed to accommodate large items such as computers. For those departments that prefer a degree ofseparation between practical and theory work larger labs are virtually essential. Older, general-purposelaboratories could well be 100 m2. Older laboratories intended for 6th form use could be as small as50 m2. In most schools it would be unwise to design such small laboratories now, as designating someaccommodation specifically for A-level use is rarely a cost-effective use of limited accommodation andmay create huge time-tabling problems.
Where new laboratories are created by conversion or adaptation, it is quite possible that the area will bebelow 80 m2. This may seriously constrain the layouts that are possible and lead to over-crowding.
The shape of the room is also important. A long thin room gives poor acoustics and poor sight lines.Laboratories are larger than ordinary classrooms; they have hard reflecting surfaces (the benches) andsometimes noisy equipment (extractor fans, fume cupboards). This results in poor acoustics. Equally, itseems to be quite difficult to provide a satisfactory layout of benches in an almost square room. In a90 m2 laboratory, 10m × 9m works reasonably well. Whilst, traditionally, the teacher’s base has been onthe shorter wall, there may well be some advantages in having the room the other way round. It shouldat least be considered. Pupils will be closer to the teacher although some sight lines may be awkward.If windows are (mainly) along one long wall, the direction of the Sun should be considered, to avoid theteacher being dazzled when watching the class.
The size of the room is not the only factor – the amount of bench space per pupil is also important. TheDCSF recommends a minimum of 0.30 m2 per pupil, but 0.36 m2 per pupil is a figure commonly usedand this permits two pupils to sit at a standard table (1200 mm × 600 mm), with each having a 600 mmlength of bench. Octagonal benches often have a front edge dimension of 745 mm and, even allowingfor the taper, this can give more than 0.36 m2 per pupil. However, sometimes smaller octagons areused, e.g. 600 mm (or even less) front edges, which obviously gives less space, especially if there is araised portion in the middle. Remember the need for knee space when sitting at a bench. If, in largeclasses, pupils have to sit around the sides of the room, the positioning of cupboards may prevent themsitting comfortably when working.
A common problem is to leave too little space between workbench and cupboards, or between pupilswho are working back to back. The diagram on the next page is reproduced, with permission, fromScience Accommodation for Secondary Schools which itself was adapted from BS3202 and shows safedistances between benches, cupboards, etc.
Modern laboratories tend to have much lower ceilings than traditional ones. This means that there is amuch smaller volume of air and hence any fumes are less diluted. As any fumes are likely to be warmerthan the surrounding air, they will tend to rise, but with a low ceiling this means that they may end up athead height, rather than out of harm’s way. Even if there are no fumes, the heat generated by a classset of Bunsen burners can make conditions very uncomfortable. Specify the greatest ceiling height thatyou can but additional ventilation may well be necessary (see section 3.6). Ventilation may affect theoperation of fume cupboards. In Northern Ireland DENI specifies a minimum ceiling height of 2.7 m fornew buildings.

12
Figure 1 Safe distances between benches, cupboards etc1
1050-1350
1350 - 1650
1050-1350
1050-1350
900-1050
1050-1200
1350-1500
900-1050
1 1
2 2
3 3
4 4
5 5
6 6
900-1050
1350-1500
1050-1200
900-1050
Key
circulation
pupil table
coat and bagstorage
pupil
1 Reproduced with permission from Science Accommodation in Secondary Schools, Building Bulletin 80, DfEE,The Stationery Office, 1999.

13
2.4 Fume cupboardsFume cupboards are considered in detail in Building Bulletin 88, CLEAPSS Guide R9a and otherpublications. This chapter is only intended to give a brief overview. Fume cupboards may either haveducts, where fans remove hazardous fumes from the laboratory and discharge them to the atmosphere,or filters which remove fumes and recirculate the air to the laboratory. The latter are cheaper to buy butthe running costs are much higher and, in the medium to long term, will normally be the more expensiveoption.
Fume cupboards are essential items to include in a suite of laboratories and preparation rooms. Ifscience is taught to Key Stage 4, it is recommended that half of the laboratories should be fitted withfume cupboards. This provision could increase if years 12 and 13 are taught chemistry to A or AS levelor GNVQ. There should also be a fume cupboard in the preparation room where hazardous bulksolutions and gases are handled by technicians. This will avoid them interrupting classes andtransporting hazardous materials and equipment to and from laboratories.
The cost of a fume cupboard with ducting will be in excess of £3500 and it may be tempting toeconomise on the number required. However, to do so, could increase the likelihood of carrying outexperimental work with hazardous gases and volatile chemicals in the open laboratory, increasing therisk. If fume cupboards are provided in less than a third of the laboratories, then those rooms with fumecupboards will be used mainly for chemistry, which may conflict with the desired teaching methods ofthe department. If fume cupboards are fixed, then room changes will be required when certainhazardous procedures are being carried out.
It is important that provision for fume cupboards is planned at an early stage. To function properly,ducts must rise to above roof level, which may be considered unsightly. Airflow may be seriouslyaffected by draughts from doors, windows etc. Siting is discussed in detail in Building Bulletin 88.
If ducted cupboards are used they must be located so as to ensure maximum visibility by a class, nottucked into an obscure part of the room. If they are sited on a side wall (or even worse in a corner) it willbe very difficult for 30 pupils to see any procedures in the fume cupboard as the demonstrator will be inthe way. It is possible to obtain fume cupboards with a flexible duct. This allows the fume cupboard tobe moved away from the wall so that the teacher can stand behind and the pupils can obtain a good all-round view of the operations that are being demonstrated. However, the flexible hose used for ductingmay need periodic replacement and special connection points for gas, water and drainage may berequired.
These problems appear to be avoided by using mobile filter fume cupboards. However, these have theirdisadvantages too. The filter will need to be tested regularly (more expensive and/or time-consumingthan just testing the air flow, which all fume cupboards require), the filter will need replacing at regularintervals (a cost of over £200 to the departmental budget), the cabinets may be less robust and thefitting of service points increases costs and limits mobility to about 1 m from the service point. Inaddition, no filter is 100% efficient and residual smells may cause concern. Table 2 overleaf provides anestimate (at 2008 figures) of the lifetime costs of the two sorts of fume cupboards. In making thiscalculation we are confident that a ducted fume cupboard will last 25 years but we are less sure about amobile, non-ducted fume cupboard. If the latter lasts only 15 years then the lifetime costs will riseaccordingly.

14
Table 2 Comparative costs of fixed and recirculatory fume cupboards (2008)
Ducted fume cupboard Recirculatory, filter fume cupboard
Cost of purchase and instillationwith all fittings.
£3600 Purchase £2376
Cost of annual testing for 25 years £1000 Cost of fitting at least one setof docking connections tosupply gas and water
£500
Cost of testing for 25 years £2500
Cost of 5 filters £1100
Cost of 10 pre-filters £120
Total cost for 25 years £4600 £6596.00
2.5 Coats and bagsPupils often carry a number of books, folders, etc to lessons. Whether brought in plastic carrier bags,rucksacks or carried loose, they present a serious storage problem. Left on workbenches they are likelyto be in the way and, if chemicals are being handled, may well be damaged. Placed on the floor, theypresent a serious trip hazard, as pupils move around to collect equipment, conduct their investigations,etc. A dozen open-fronted locker-type spaces are quite inadequate for a class of 30. Ideally, each pupilneeds his/her own locker space and there should certainly be at least one between two, with sparecapacity for those with large bags. In any case, putting all the bag storage in one location is likely toresult in severe congestion at the start and end of lessons. Racks outside the laboratory can savespace within it but, in most schools, these will not be sufficiently secure.
Increasingly, pupils also carry their outdoor coats with them to lessons. Placing them over chair backs,as in most other classes, is not feasible where stools are used. Draping them over stools is potentiallydangerous and puts them at risk of damage by chemicals. One coat hook between two pupils is thevery minimum that is required. To avoid congestion, two racks in separate parts of the laboratory arepreferable to one rack. Hooks should be at a height where they will not poke out the eyes of youngerpupils: about 1.2 m above floor level will probably be suitable in many schools. Some bags could bestored on a shelf above a row of coat hooks, thus giving some protection from the hooks.

15
3. The laboratory environment3.1 IntroductionThis chapter examines perhaps rather mundane facilities within the laboratory which, if not seriouslyconsidered, can cause major problems. Financial, security, health, safety, welfare and environmentalissues all need to be addressed and compromises may have to be reached. The bare requirements arelaid down in the School Premises Regulations but there are many Building Bulletins that provide goodadvice and guidance on various aspects of design.
3.2 AcousticsThe maximum acceptable, background noise level in a science laboratory is the same as in any otherteaching room, i.e. about 40 dB. Should a laboratory be next to a road, measures may need to be takento reduce noise levels but these could affect other important aspects such as ventilation. Therecommended reverberation time for a laboratory is in the range 0.5 to 0.8 s. If reverberation time is anylonger than this, when the teacher and pupils speak they tend to speak louder to make themselvesheard which only makes the situation worse. Acoustic panels, window blinds and drapes and woodenfurniture reduce reverberation time. It is unwise to fit acoustic panels on ceilings because this will notallow the teacher’s voice to be reflected to all pupils. It is advisable that fume cupboards and otherventilation units run at less than 65 dB (at a distance of 300 mm) from the motor so that teachers canheard over the machine and not be tempted to switch it off if the fume cupboard motor is too loud.Guidance for designers can be found in Acoustic Design of Schools: Building Bulletin 93.
3.3 HeatingThe School Premises Regulations require that the heating system should maintain a temperature of18 °C, 0.5 m above floor level when the outside temperature is -1 °C. Laboratories should not need tobe warmed up using Bunsen burners during the first period of the day. Interestingly, Building Bulletin 87mentions that vertical gradients should be avoided and the temperature at 2 m should not exceed thatat floor level by 3 °C. This could be quite difficult to avoid when 15 sets of Bunsen burners are operatingin a room with a low ceiling.
Although we do not recommend outside chemical stores, if one has to be built, there should be someheating to prevent contents of bottles freezing and condensation dampening, and eventually rotting,labels.
For work involving microorganisms in which draughts must be prevented, the use of hot air blowersshould be avoided unless these can be easily switched off in individual labs.
Heating systems need to be planned with furniture layouts in mind to ensure they work effectively.
3.4 LightingGuidance on lighting is given in Building Bulletin 90. Science rooms should be treated as any otherroom and should have an illuminance of not less than 300 lux on the work surface (350 lux in NorthernIreland). The section on science work and laboratories stresses a need for “adjustable bench lightswhere directional lighting is appropriate”, i.e. portable lighting. Usually, special lighting for microscopesand physics activities would be provided using portable lamps. Particular attention should be paid toglare from white boards, projection screens and computer monitors and from benches with palecolours. Lighting over a demonstration area or projection screen should be separately switchable.
Some schools have installed time switches and other systems to control lighting on environmentalgrounds. Unless these can be reprogrammed or overridden then they can be a considerable nuisanceto a teacher or technician working in the room.

16
3.5 WindowsWindows can be treated as a source of light or ventilation and provide a view out of a room. It isrecommended that a minimum of 20% of an exterior wall is glazed (in Northern Ireland one wall shouldbe glazed to bench height). However, if windows occupy too large an area or are south or west facing,the room may warm up to an unbearable temperature during a sunny day. Summer-time temperaturesin excess of 28 °C are considered undesirable. Protection can be obtained by using outside shading(which will affect day lighting of the room) or blinds. Curtains may be considered for some laboratoriesbut are unsuitable where Bunsen burners are used around the side bench.
It may be necessary to darken the room (dim out) when visual aids are used and to reduce glare. Blackmaterial is unsuitable as it absorbs too much heat and warms up the room. Grey reflective blinds aresuitable. Blinds should not be allowed to flap freely because any wind will cause noise, possibly breakthe blind or knock over equipment. Full blackout may be required for certain activities during lessons onlight in physics and occasionally in biology. Flexibility of use will be severely limited if this is availableonly in one laboratory.
The means to open windows and/or to operate blinds should be considered when the furniture layout isplanned. Too often it is impossible to reach the mechanism safely because tables or benches are in theway. Climbing on bench tops or stools is not acceptable.
3.6 VentilationThe Education (School Premises) Regulations require that teaching rooms in schools should beventilated at a minimum rate of 8 litres per second per person. For a teaching room with 31 peoplepresent this becomes 893 m3 hr-1. For a room with an area of 90 m2 and a height of 3 m this becomesequivalent to 3.3 room air changes hr-1 (ACH). Building Bulletin 101: Ventilation of School Buildingsdiscusses the issue in more depth and recommends the following.
Ventilation should be provided to limit the concentration of carbon dioxide in all teaching and learningspaces. When measured at seated head height, during the continuous period between the start andfinish of teaching on any day, the average concentration of carbon dioxide should not exceed 1500parts per million (PPM).
In addition to the requirement to meet the carbon dioxide performance standard, it is recommended thatthe design should also meet the following advisory performance standards that reflect the needs of theSchool Premises Regulations and the recommendations of the Health and Safety Executive.
• The maximum concentration of carbon dioxide should not exceed 5000 PPM during the teaching day.
• At any occupied time, including teaching, the occupants should be able to lower the concentrationof carbon dioxide to 1000 PPM.
Building Bulletin101 recommends (section 2.5) that a ventilation rate for the laboratory and prep roomsof 5 air changes per hour should be adequate to deal with additional carbon dioxide from Bunsenburners.
To provide adequate ventilation, windows should be open at the top to let warm air out and at thebottom to let cooler air in but remember that excessive draughts can affect Bunsen burner flames.Restricting whether, how and how far windows open, for reasons of energy conservation, noise controlor to prevent intrusion, may limit ventilation. The lab may, therefore, require forced ventilation. If thisbecomes necessary, choose an acid / steam resistant extractor. It is important that the volume of theroom is taken into consideration when choosing the right specification of the unit. It is more efficient,although more expensive, to have two smaller working units than one larger unit. It is also necessary tohave a sufficient in-flow of air so that the extraction fan(s) work efficiently. This could be accomplishedby leaving a door open but teachers often do not like doing this during lessons so suitable windows orvents are needed. Alternatively, one or more fans can be installed to blow fresh air in while other fansremove stale air.

17
Figure 2 Variation in carbon dioxide levels over a day in labs
Science departments may have a datalogging system with a carbon dioxide sensor that can be used tomonitor the air in a room. CLEAPSS monitored a number of schools / labs using a Pasco dataloggingsystem. School 1 had a laboratory that caused concern to teachers, quite possibly because of the highcarbon dioxide levels. Levels of CO2 increased throughout the day because even after a class had leftthere was little chance of getting the levels back to normal. School 2 had some mechanical ventilation sothat when the children had left, fresh air was coming in. The peaks in both graphs occurred when theBunsen burners were used for a short time. (The very tall spikes in school 2 occurred when a pupilapproached close to the sensor.)
Schools that have reconditioned air circulating around the building have reported problems fromteachers of other subjects who object to the aroma of organic chemicals being pumped into their rooms.CLEAPSS has even heard of schools switching these systems off because they are so expensive torun. Forced-air ventilation that is not under independent control could be highly undesirable for work inmicrobiology when draughts must be prevented.
Technicians deal with chemicals in bulk often in small rooms. Ventilation is no less important for thepreparation room than the teaching laboratories.
3.7 DoorsDoors to labs, preparation and storage rooms must be lockable. Contrary to popular opinion, except inNorthern Ireland, there is no requirement for a second exit door to a laboratory, unless the room exit isin a dangerous position. In its previous guidance, Fire and the Design of Educational Buildings (DES,1988), the laboratory was classified as an “area of high fire risk” so that any door should have a fireresistance of not less than 30 minutes and Class 0 surface spread to wall and ceiling surfaces. If anypart of a laboratory was more than 12 m from the door exit then another exit should be available. Thisguidance has now been withdrawn and the employer must now carry out a risk assessment beforedeciding on appropriate provision. In practice, in new buildings it is normal to provide two exits tolaboratories.
Fire doors should be self-closing, remain closed whenever possible and, because they must have aclose fit to the frame, they are often very difficult to open, especially by those carrying equipment orpushing trolleys. To avoid manual handling problems, doors can be fitted with electromechanical orelectromagnetic devices that hold the door open until such time that the alarm system activates.Naturally, the doors would be shut when the school is unoccupied. It would be useful to check regularlywith a spring balance the force required to open and hold fire doors apart.
Because of security problems, (i.e. the need to keep laboratories locked, and the hazards ofsubstances used or stored) laboratories should not normally be a fire-escape route. It is sensible toinsert glazed panels into doors to allow individuals to see who or what might be on the other side. Suchpanels should be long enough to allow for wheelchair users and short people. They must also meet therecommended standards in the Workplace (Health, Safety and Welfare Regulations) 1992. ApprovedCode of Practice, Regulation 14.
School 1 School 2

18
3.8 FloorsIf any activities in a laboratory involve levelling, e.g. using an accurate balance, a sprung floor is tooflexible and hence, unsuitable.
VinylThe most popular covering material is vinyl, which is resistant to most chemicals. Safety flooringcontains aluminium oxide and quartz embedded in the polymer that gives the flooring superior non-slipbut distinctly abrasive properties. It can be recognised by light reflecting from the embedded crystals. Itis designed for areas that may become wet and is often thought to be suitable for school laboratories.There are no intermediate grades of slip resistance in moving from safety flooring to normal, smooth,vinyl flooring. However, safety flooring may be susceptible to indentation by stools. As its rough surfaceabrades a stool’s rubber or plastic ferrules (end caps), the exposed metal edges of the stool’s feet thencut and damage the floor further. It is worth looking at the indentation data provided by variousmanufacturers. The measurement procedure for this material is laid down by BS EN 433. Schoolcleaners will need to know that slip-resistant flooring requires more than just mopping; mechanicalagitation is essential to remove dirt from the tiny crevices.
A well-made, smooth, vinyl floor has more resistance to abuse by stools than safety flooring but will bemore slippery when wet. It is less expensive than safety flooring. Very light-coloured floors show marksfrom the rubber soles of shoes and stool ferrules. These can, however, be removed by appropriatecleaning agents and an abrasive pad. Technicians have reported that it is also difficult to see thepresence of water on pale-coloured floorings. Naturally, the best method of avoiding slips is to reportand remove liquid spills once they occur and to wear sensible shoes.
An underlay should always be used beneath the vinyl; this will also improve the acoustics in a room.Vinyl floorings split if treated very badly but can be repaired.
WoodWood block flooring is unlikely to be considered for new laboratories but may be retained in aconversion. If sealed well and regularly then it does not show the dirt and is particularly useful inabsorbing sound. If sealing is not carried out then water will be absorbed into the wood blocks, whichwill distort, rise and dislodge. A non-slip polish also needs to be applied. Stools, even with rubberferrules, may scratch the wood but not completely destroy it.
CarpetThis, at first glance may seem strange but teachers, who have carpets in their laboratories, havereported how much quieter the room is and that there is less wear and tear caused by stools. Stains dooccur, but if a good quality kitchen or industrial grade carpet with water-repellent properties is used,spills can be washed off before they soak in. Carpets may be particularly suitable for schools in the11 to 16 age group where the use of corrosive chemicals is limited. The use of carpet tiles would bemore advantageous as those that become seriously contaminated (e.g. with mercury) or damaged inother ways, could be replaced. However, this will mean purchasing and storing additional carpet tileswhen the initial flooring is laid. Carpets should also be run up at the edges of walls and units so thatthere are no crevices in which dirt can collect.
StoolsPupils are required to sit on a stool for some time during a lesson. Occasionally they may becomebored and take out their frustration on the stool. To balance a stool on one leg is an amazing feat but itapplies a large pressure on the floor and continual twisting drills a hole in the vinyl and ruins the ferrules(end caps) on the bottom of the stools. If the metal base of the stool’s feet is open then even moredamage may be done. Some pupils will undo and remove any visible screw heads. Protruding screwscan ruin clothes, especially tights, and removed screws may allow the seat to slide off when next used.

19
When choosing stools, make sure they are the correct height. Shorter pupils will need taller stools.BS3202 recommends a height difference of 220 mm between the height of the work surface and thetop of the stool but in Building Bulletin 80 the DfES suggests 240 to 270 mm. However, the bench andunderframe thickness can be as much as 100 mm thick (less if metal framed) suggesting a stool heightof no more than 510 mm which some would consider too low. There should be footrests at anappropriate height and shaped seats are more comfortable. However, for wooden stools, this addssignificantly to the cost. Stools with backs provide more support for the lower back but they cannot beplaced under the bench when pupils commence practical work. They are left in the gangways and canpresent a considerable hazard. Some types of stool may be stackable, although how helpful that wouldbe in most laboratories is questionable.
Wood seating
This is the standard wooden stool. The wide legs and protective ferruleshould, however, cause little damage to floors. It has a pleasantappearance. Wooden stools can be bought with a back support butthey will be more expensive and they will not go under the bench.
This is a mixture of the woodenseat but with metal legs. Somedesigns have had screws in theseat which pupils may be temptedto undo.
Plastic seating
The stools have a polypropylene, shaped seat based on tubular steel legs. It is possible to designinto the seat some back support although larger supports are available.
Metal legs can be noisy when the stool is moved (especially if you are on the floor below).
This stool has a skid base toavoid indentation of the vinyl(especially safety) flooring. Ithas a cantilever design so it‘hooks’ onto the bench.
It is important to ensure that replacement plastic or rubber ferrules are available from the supplier andthe caretaker keeps a stock of them. If they are not replaced rapidly, considerable damage to the floorwill result. One stool manufacturer now suggests the use of steel rather than plastic or rubber ferrules,at least on non-slip floors. These appear to last for a great while and may solve the problem of holesdrilled into flooring.

20
3.9 Eye wash and related facilitiesSimple and effective eye-wash facilities can be provided by a short length of clean rubber tubingattached to a laboratory tap at a sink dedicated to this purpose (see chapter 6.3). Such a sink should beadjacent to a bench so that, if necessary, an injured person could lie on it whilst the eye was beingrinsed. It’s important, too, that the injured person’s head can be placed over the sink.
During the refurbishment or building of a school science laboratory a low-cost, plumbed-in eye-washcould be considered since installation costs would be minimal. Misbehaviour has caused problems withsuch systems in some schools. Schools do not require the installation of emergency showers but coldrunning water will be required to wash chemicals off the skin or to cool heat burns. This could beprovided by the water supply to the eye-wash sink.
3.10 Fire prevention and control measuresAlthough many science lessons utilise Bunsen burners, the chances of these setting fire to the buildingare extremely remote. Poor electrical wiring and arson are behind most school fires. Guidance onplanning for fire prevention and control is provided in Building Bulletin100: Design for Fire Safety InSchools and also in Fire safety risk assessment: education premises. Guidance on the legal aspects offire risk assessment is in PS49, Fire Risk Assessment in School Laboratories, which is on the CD-ROM.
Alarm systems
The DfEE in Science Accommodation in Secondary Schools, BB80 advises that “Automatic firedetection is not generally required in science laboratories, however in situations where it is, heat ratherthan smoke detectors should be specified”. In general, smoke alarms, even in the corridor, can betriggered by the use of Bunsen burners. Fit heat alarms instead, but ensure that the trigger temperatureshould be high enough to cope with the heat radiated by a class set of Bunsen burners in operation.
Some schools have fitted automatic alarm systems in laboratories. These vary in how elaborate theyare but those which are part of a whole school system are sometimes linked directly to the local firestation. Smoke sensors in such systems can cause serious interruptions to lessons for the whole schooland considerable annoyance to the local fire brigade. Systems can be installed which are triggered byheat during the day and smoke at night when the school is not in session.
Fire doors
Fire doors are often very heavy and cause a major issue for technicians and teachers moving throughthe rooms and corridors carrying equipment, chemicals and books. They may even be too heavy for thechildren to open as well. In BB100: Design For Fire Safety In Schools, it states “Hold open devices onfire-resisting self-closing doors on circulation routes will allow staff and pupils to move through thebuilding freely. The hold open devices can be integral within the door-closing device attached to thedoor or stand-alone. In either case they must be connected to the automatic fire detection and alarm(AFD) system so the devices will release immediately when the detectors are actuated and the doorswill close. This will ensure that compartmentation is maintained.”
Laboratory doors - one or two?
Except in Northern Ireland, it is now not necessary for a laboratory to have two exits if a suitable riskassessment is carried out. However it may be that the laboratory is a part of a fire escape route or theremay be a fume cupboard or flammable cupboard close to one door in which case another exit isrequired. In practice, in new buildings it is normal to provide two exits to laboratories.
Fire fighting equipment
We recommend two 2 kg carbon-dioxide extinguishers and one fire blanket. A sand bucket (normally areceptacle for rubbish!) is not required. When using flammable metals, it is better to have a bag of sandimmediately available in case of fire. Dry powder extinguishers are not recommended as they causepermanent damage to computers and lead to such a mess that industrial cleaning will be required. Afire blanket can be used to smother fires, often causing less damage than a carbon dioxide

21
extinguisher, which may blast apparatus across the bench. In Northern Ireland the provision of fire-fighting equipment must satisfy the Building Control Authority.
3.11 Provision for ICT, etcPupils need computers for certain activities. Computer suites are not normally suitable for activitiessuch as datalogging, though some dataloggers store information for later downloading. Many schools orscience departments own a bank of laptops, which are brought into the laboratory when needed.
Teachers often connect a personal laptop to the lab projector and the school network. Connectionpoints and controls need to be accessible e.g. mounted on the teacher’s bench to avoid trailing cablesfrom the wall. Increasingly cameras, sometimes connected to a microscope, are used to displaydemonstrations to the class. These are usually linked to the projector, possibly via a computer thoughmany could display directly via the projector or via a large television monitor if used away from the frontof the room. Consider where such a monitor might be sited to be visible yet not prone to being knockedduring practical work e.g. near a fume cupboard or other fixed areas or equipment.
A matt screen may be needed to display images from a camera; the whiteboard may be too shiny.Consider mounting a drop-down screen or an additional screen adjacent to the whiteboard.
Further guidance can be found in sections 16.5 and 16.7 of the CLEAPSS Handbook and the guideL250 Using cameras to enhance practical science.
In Northern Ireland new laboratories should be provided with an interactive whiteboard and dataprojector, 4 double ICT points for student use and an additional teacher’s point.

22
4. Furniture, systems and layouts4.1 The needs of practical workTo provide for and manage effective practical work a laboratory needs:
• tables or benches for pupils to work at where they can be as far from each other as possible (forsafety reasons),
• easy access for all to services such as gas, water, electricity and drainage,
• surfaces, easily accessible by technicians, where equipment can be laid out and gathered back in,
• walkways so the teacher can easily reach all parts of the room.
In addition, schools need to ensure that efficient use is made of the often limited space available. In avery large laboratory it may be possible to have a practical end and a theory end and teachers are oftenvery satisfied with this arrangement. It is not likely to be a realistic option in schools where space is at apremium.
If you have never designed a lab, or even if you have you can get a very good idea of how any designwill work by mapping it out on paper. Use graph paper and a scale of roughly 10mm to 1 m you canquickly and easily drawn an outline of your room, and include on that outline all doors, windows, fixedfurniture and any other obstructions or constraints. It is not difficult to cut out scale size tables andbenches and to move them around the room to see just what can be achieved. If this does not appealyou can instead use the ASE computer programme Laboratory Design for Teaching and Learning. InNorthern Ireland the DENI guidance provides a number of possible layouts.
4.2 Layouts and servicesThe routing of servicesAn important issue to decide early on in the planning process is how pipes and cables will reach pupils’benches and whether it is feasible (because of the nature of the building or cost) for services to beprovided on all benches. Are services needed on every bench? For most laboratories, gas andelectricity will be needed for all pupils but it may be sufficient to have water and drainage in a fewplaces around the periphery of the room. However, this would not be suitable for a laboratory to beused for A-level chemistry.
If services are to be supplied to fixed benches or to bollards the only routes are:
• through ducts in the floor,
• via overhead booms, or
• around the walls.
Ducts in the floor
Ducts in the floor are much the most flexible option for a new build but it is likely to be expensive, noisyand dusty to dig up existing concrete floors. For a room on the first or higher floors, it may be possibleto run services above a suspended ceiling of the room below, if the ceiling is high enough. In a new-build situation, floor access outlets are best arranged diagonally across the floor. This allows the roomto be ‘turned round’ (from portrait to landscape) in some future refurbishment, without the need to digup the floor.

23
Overhead booms
One or two manufacturers have produced systems in which the services are supplied via overheadbooms. In practice, these have proved to have a number of problems.
• They have not proved robust enough for use in some schools.
• They are unsightly, give a rather claustrophobic appearance to the room and can restrict sight lines.
• They may be more vulnerable to vandalism.
• Drainage for water supplies has to be pumped away, which may be noisy and has presented costlymaintenance problems; sometimes there have been complaints of smells.
A number of schools that had such systems have subsequently removed them. If used, they are farmore suited to physics laboratories than chemistry (which need to make much more use of water anddrainage facilities). They work satisfactorily where the laboratory has a separate theory area. Acombination of water and sinks around the perimeter and overhead gas/electrical services can worksatisfactorily.
Around the walls
Because no services are available on pupils’ benches or tables, practical work has to be confined tobenches around the perimeter of the room. This means that books and papers may be kept on clean,dry tables away from the practical area but often, the tables are butted up to the side benches in anattempt to increase the area available for practical work. Such arrangements can work satisfactorilywhere classes are small (e.g. as in some special schools) but, with normal-size classes, it tends toresult in pupils being far too crowded for safe working. It also means that pupils are working with theirbacks to the teacher, which does not help discipline or safety. Sometimes, where gas taps are onlyavailable on wall benches, schools attach long lengths of tubing to Bunsen burners so that the burnerscan be used on tables projecting at right angles to the wall. We do not consider this to be a safearrangement because pupils may not be able to reach the gas tap in an emergency and trailing tubingis itself a hazard. There are similar problems with trailing electrical cables.
A peninsula unit can bring services from the walls into the body of the room. Having peninsulasprojecting from the walls is less inflexible than it might seem and this is a relatively cheap way ofproviding services to pupil benches when converting an existing laboratory. Sometimes, quite extensivedaisy chains can be formed, although this may restrict movement. If space is limited (i.e. the room is toosmall) then a peninsula arrangement can make the most effective use of what is available. However, ateacher’s access to the corners may be rather restricted.
Furniture and layoutIn practice, modern laboratory layouts tend to be a compromise. During whole class teaching sessions,most of the pupils end up facing the teacher, but a significant proportion have to sit sideways. This willaffect their sight lines to the whiteboard and they may have to turn their necks to an uncomfortableangle. If the class is large, a few pupils may have to sit with their backs to the teacher but, at the designstage, this should not be regarded as acceptable. Before agreeing any plans work out what proportionof the pupils will face the teacher and what proportion will sit sideways. Several detailed examples oflayouts appear in Building Bulletin 80 and are well worth studying, although several designs have pupilswith their backs to the teacher. This occurs when 30 pupils are accommodated around 4 bollards; 6bollards offer more flexibility and are a much better option.
Building Bulletin 80 does tend to emphasise the importance of adaptability. It is important to distinguishbetween short-term and long-term adaptability. Short-term adaptability refers to the possibility of theteacher moving the furniture round according to the needs of a particular lesson. For example, tablesmight be arranged in a U-shape for a class discussion, all separated for a test, arranged in blocks forgroup discussion and in long rows for practical work with dynamics trolleys running down ramps. Inpractice, teachers rarely make use of this flexibility on a day-to-day basis because it is too time-

24
consuming, noisy and disruptive to move tables. However, it is useful if the layout can be altered inresponse to the behaviour of pupils or changing fashions in teaching style or for special occasions suchas open days.
Long-term adaptability means that the furniture comes in kit form, which can be taken apart and movedelsewhere if, for example, a laboratory is no longer needed. In effect, the idea is to recycle the furniture.In practice, however, if a laboratory has been in place for 10 years, it is nearly always cheaper to buynew furniture rather than face the cost of dismantling the old furniture carefully. In any case, after 10years, such furniture is likely to look well worn.
Despite advantages, we think that adaptability, both long- and short-term, is less important that issometimes suggested.
ExamplesIn the following illustrated examples (which are better viewed on a screen) we have tried to ensure thatpupils are facing the teacher and have adequate access to a sink. There is a minimum distance of 1mbetween the tables and the side benches.
Fixed benches with underfloor services
Some schools still like traditional, long, fixed benches arranged as in either of the above diagrams.Often cupboards containing equipment are installed under the perimeter benches. Such fixed benchesmay mean that it takes longer than desired for teachers to reach pupils in an emergency. For thisreason the walkways between benches must remain clear. The use of peninsula benching solves thisproblem. There is no flexibility with the design, which may affect some teaching styles.
Fixed benches with services around the room
The services are around the room only. A significant health and safety issue is that pupils will be doingpractical work with their backs toward the teacher. With the peninsula design on the right they may alsobe rather squashed together. For the teacher’s bench to have its own services it must be linked to thewall as in the second design.

25
Service pedestals with tables
Many modern laboratories are built around the idea of a service pedestal, with perhaps 4 or 6 of thesearranged as islands at strategic places on the floor. Service pedestals are fixed to the floor and are nowalmost invariably 600 × 600 mm. Even with the larger pedestal, some schools have found it necessaryover time to fasten the pedestals to the floor with additional bolts. (A design for a robust fixing plateappeared in the CLEAPSS Bulletin 100, Autumn 1997).
Rectangular tables, usually 600 × 1200 mm, are arranged around the pedestals in a variety of patterns.If the gap between pedestals is an exact multiple of 600 mm then very flexible layouts can be achieved,including, if desired, long rows as well as smaller blocks. With block arrangements, it can be difficult toavoid some pupils in larger classes sitting sideways on to the teacher, or even having their backs toher/him. The whole point of the system is that moveable tables provide a degree of flexibility. However,some schools have decided to bolt smaller tables to the floor, to cut down the noise if they are movedand to prevent the tables rocking on uneven floors.
Tables sold today are usually metal framed because these are cheaper than wooden frames. They alsogive more legroom because the legs are narrower than the wooden equivalent or they may becantilevered. A steel frame makes such tables unsuitable for work with magnets and compasses.A-level physics groups sometimes report having to work in the corridor to avoid interference.
Service pedestals with tables and fixed benches
In this design services are routed around the walls and fed along a fixed bench along to the servicepedestal. The outer table at each pedestal can be made fixed or be loose as required.
Octagonal unitsOctagonal-shaped units bolted to the floor have become popular in place of rectangles. Sometimes theoctagons function as separate islands, but pairs are common. The octagons will have gas andelectricity (sometimes on a raised platform in the centre) with water and drainage available at a linkingunit between two octagons (creating a sort of dumbbell shape). A raised platform can make it difficultfor the teacher to see what a pupil is doing. It also wastes space as it is often too small for pupils’ booksand folders. Sometimes octagons form a daisy chain of perhaps 2, 3 or even 4 linked units (which sufferfrom even worse access problems for the teacher than traditional long benches). There are the samelimitations on bringing services under the floor, as are described above, so there may be peninsulararrangements.

26
It may seem obvious but an octagon with 8 sides can sit 8 pupils. If one or two sides are removed toconnect to other octagons or to perimeter benches via rectangular bridging units then there will be only7 or even 6 places for pupils. Illustrations of layouts in the brochures of some suppliers can be verymisleading, with, say, 8 pupils arranged around the 7 remaining sides of the octagon. We would adviseschools to look very carefully at illustrations. If pressed, some suppliers may suggest sitting the 8th pupilon the rectangular bridging unit, but this is not practicable if there is a sink in the middle of it and, ifthere is not, there may well be no knee space.
Undoubtedly some teachers like octagons – they look modern and impressive in school brochures. Thearrangement with 6 to 8 pupils facing each other helps facilitate group discussion. However, unlessclasses are unusually small, or there has been unusually generous provision in the number ofoctagons, many pupils end up with their backs to the teacher. With well-motivated pupils this may notbe a problem but most schools do not like pupils sitting with their backs permanently to the teacher.One school avoided this problem by insisting that the sinks in the linking units were offset so pupilscould sit there. One local authority provides 6 octagons in a laboratory, with some moveable tables, andthis easily copes with 32 pupils. Several independent schools with classes of 24 or less are happy with4 octagons. Most of the discontent arises from combinations of large classes and only 4 octagons.
Apart from pupil-seating arrangements, there may be health and safety and other disadvantages, too.With 8 pupils working around the same table, if an explosion occurs or if chemicals spurt out of a badly-heated test tube, it is more likely that somebody will be in the firing line, than if there are only 2 pupils ata table. Also, an octagonal shape does not make good use of a rectangular room. Large unused – andunusable – circulation spaces are created. The work surface available to each pupil may be less,although this obviously depends on the size of the octagon. Front edges may be as much as 745 mm(which is satisfactory) but they can be as small as 600 mm, or even 500 mm, where efforts are made tosqueeze a full class into a small room. Clearly no system can cope with this, but manufacturers claimthat, with good design, octagons are better at overcoming the problems. However, a CLEAPSSquestionnaire, respondents were about 3:1 against octagons, with typical quotes shown in Table 2. Tobe fair, there are also strong feelings in favour of octagons, of which representative quotes are alsoshown.
Table 3 Pros and cons for octagons
Arguments against octagons Arguments for octagons
• Noise levels have increased dramatically sincethe move.
• With older pupils there is no elbow room.
• Too many pupils have their backs to theteacher.
• Lack of room for some activities, e.g. with metrerule in light investigations.
• Gas taps and sockets cannot easily be seenand so malicious damage is not spotted.
• Very difficult to prevent chattering.
• Safety – very difficult to move around.
• No teacher’s demonstration bench.
• Lack depth for sitting comfortably at stools.
• Superb for practical work.
• Smart, modern appearance.
• Fits a lot of pupils in.
• All pupils near the teacher.
• Freer movement when pupils need to fetchapparatus.
• Big space for demonstrations.
• Ideal for A-level
• Pupils give greater respect to the moderndesign.

27
Octagons with services around the room Octagons with underfloor services
It is necessary to keep 1.4 m between the octagons to allow passage between seated pupils. Whencontemplating octagon designs pay close attention to where the pupils will sit and how many have theirbacks to the teacher.
Other systemsSome companies have systems involving other shapes of table, for example a hexagon or a mobilehalf-moon shape on the end of a mobile rectangle, butted up against fixed rectangles. Anothercompany offers triangular service units, around which can be arranged three rectangular tables withhalf-moon ends. Circular and teardrop-shaped tables also have some advantages. We have too littleexperience of these to be able to offer much comment but schools considering such options shouldthink carefully about the extent to which comments on octagons might be equally applicable.
4.3 Cupboards, drawers and shelvesIt is important to have furniture of the correct height but choosing a suitable bench height for pupils ofwidely-varying heights is not straightforward. Building Bulletin 80 suggests that 900 mm is suitable forpupils at KS 3 and 4.
Some suppliers have a cantilevered system, where the worktop is supported on a frame independentlyof the under-bench units. This means that under-bench units can be added or moved at will. A varianton this is the suspended system, where under-bench units are hung from the metal frame. Whilst intheory this makes for easier cleaning, schools which had the system often felt that moving cupboardswas not as straightforward as the suppliers claimed.
Drawers (or shelves) under pupil benches rapidly accumulate chewing gum, orange peel and worse.They are rarely, if ever, used for permanent storage, although some teachers like them as pupils canput folders, etc, there during practical work. Drawers under side benches may well be used for storageof small items and, on the whole, work well if pupils are not sitting regularly at the side benches.Cupboards under pupil benches can be useful for storing bags, etc.
Cupboards are not usually placed under moveable tables for obvious reasons. Fitted into pedestalservice units they give pupils too easy access to service fittings unless locked. They can be fitted underoctagons (as these are fixed to the floor) but frequently are not as they would reduce knee space.Cupboards can be fitted successfully under the teacher’s side of single-sided pupil benches. Kneespace is preserved and pupils do not have too easy access to the cupboard.
Shelves will be needed in most laboratories for books but it is now not usually considered safe to storebottles of chemicals in laboratories, unless under lock and key. Glass-fronted cupboards are useful fordisplaying models, etc. In many schools a filing cabinet will be necessary in each laboratory for storingassessment records, schemes of work, etc.
QualityFurniture of varying quality is available and is an example where a failure to adhere to the ‘rules ofthumb’ listed at the start of this chapter leads to problems. Pupils are hard on furniture of all sorts,

28
which is why school furniture in general needs to be more robust than domestic furniture. Make certainyou are fitting your new lab with good quality furniture. Consider not just the materials but how units areassembled and fixed to the floor.
We have had a number of complaints about cupboard doors coming off. Hinges that can open to 270°are more suitable than 180° hinges. Pupils inevitably open cupboard doors forcefully and if the dooronly opens so that it is at right angles to the cupboard front (180° hinge) then great leverage can beexerted, eventually forcing the screws out. This is compounded in some systems by hinges which havescrew holes positioned so that the screw goes close to the edge of the carcass, eventually leading tothe wood splitting and the hinge coming off.
Provision for pupils with special educational needsIn an increasing number of schools it will be necessary to make provision for pupils with specialeducational needs and in particular for wheelchair users. It is possible to obtain benches (with orwithout services) of adjustable height and if required these should be built into the planning at an earlystage. They are expensive and are available from specialist suppliers. (For sources, see the CLEAPSSleaflet PS14 Laboratory furniture and fittings: suppliers and manufacturers or BESA web site). Tabletops should be grooved to contain spills, as pupils in wheelchairs will be unable to jump out of the way.More information is also given in CLEAPSS guide L77 Science for Secondary-aged Pupils with SpecialEducational Needs.
4.4 Teachers’ areaIn most laboratories it will be necessary to identify where the teacher will be based. This should beadjacent to the whiteboard and the emergency cut-offs, which should all be located reasonably closetogether. It is also sensible to locate fire extinguishers in this area. It is often suggested that emergencycut-offs should be close to the door but in some schools they may be too vulnerable to interference. Itwill be necessary to carry out a risk assessment taking into account the likely behaviour of pupils.
The teacher will need storage space, at least some of it lockable. Teachers also need a space forcarrying out demonstrations, although in some layouts it may be possible to use pupil benches.
4.5 Suppliers and fittersMost suppliers can now supply units in a variety of configurations and with a range of bench surfaces.Most will offer a laboratory design service; some charge for this, others do not. Some specialise inlaboratories – in hospitals, universities, or research. Some specialise in the schools market – primaryand secondary, libraries and laboratories. Others are general furniture suppliers. Some are nationalsuppliers, others just serve a local market. Some supply the prefabricated parts but subcontract thefitting to local agents, whereas others use their own fitters. A local company may have relatively littleexperience of doing laboratory work but, on the other hand, being local, may be keen to please. Smalllocal companies may offer a design and fit service, purchasing units from major suppliers. A companywhich is not local is more likely to subcontract the fitting to avoid the cost of hotel accommodation for itsown fitters. It is worth trying to find out about the after-sales service that a company offers.
Because there are so many combinations of suppliers and systems we have found it impossible toevaluate the quality of work done by particular companies. Sometimes schools complain about thequality of the work or fittings but on checking the original specification it becomes clear that schoolshave been supplied with exactly what they ordered – perhaps not what they later wished they hadordered.
CLEAPSS provides and regularly updates a short leaflet for PS14 Laboratory furniture and fittings:suppliers and manufacturers. Most of the firms listed are likely to be members of BESA (the BritishEducational Supply Association). For the most part, information in PS14 has been supplied by thecompany concerned but where we have been able to form some judgement there is a comment in thelast column.

29
5. Bench surfaces5.1 Benches in schools and collegesThe expense of buying and installing a bench surface in a laboratory demands that it must last for manyyears. During its lifetime in schools, the bench will be subjected to a series of abuses, both accidentaland deliberate. The bench surface will:
• have chemicals spilt upon it, despite careful management by teachers, because pupils, especiallythe younger ones, are inexperienced in handling chemicals,
• be wiped at the end of each practical lesson in the interests of hygiene and to reducecontamination; the surface must therefore repel water especially around the vulnerable areas closeto sinks, where hands are washed or apparatus is rinsed,
• have hot objects placed on it, ranging from glass beakers containing boiling water to red-hotcrucibles,
• be subjected to knocks, bangs, scratches and abrasions caused by heavy apparatus (e.g retortstands) and stools; caretakers and cleaners like to have stools placed on the benches as thisresults in quicker and more effective cleaning but unfortunately the stools scratch the surface,
• be deliberately burnt, scratched and carved by some pupils.
A new surface is a pleasing sight. It is a shame that accidents, wear and tear and vandalism spoil it. Nomatter how observant and careful a teacher is, a bench surface will suffer during its lifetime but schoolswill certainly expect benches to be used for well over 20 years. The bench surface, therefore, should beresistant to chemicals, water, hot objects and abrasion. However, it should also be quickly and easilyrepaired. The perfect bench surface for schools at a reasonable price does not exist, so compromiseshave to be made in the light of investigation, experience and local priorities.
5.2 Iroko: the traditional wood for bench surfacesTropical rain forestsIn the early 1990s, CLEAPSS began to investigate alternative surfaces to wooden benching (usuallyiroko) because many local authorities were concerned about the sustainability of tropical forests.
Tropical rain forests are being cut an alarming rate and not being replaced by younger trees. Countriesharvesting timber (e.g. Ghana) have now installed organisations to monitor the situation and haveprogrammes for planting new trees. The UK has policies that require that the timber used comes onlyfrom a sustainable source. From April 2009 there will be a requirement to procure timber that is grownsustainably. The Central Point of Expertise on Timber Procurement's (CPET) web site provides furtherinformation and advice on meeting the UK Government’s timber procurement policy requirements.
You can find a list of suppliers of Iroko on the Timber Trade Federations (TTF) web site. Members ofthe TTF have all signed up to the Code of Conduct that commits them to source from well-managedsupplies. If iroko supplies are limited, other timbers with similar properties (e.g. merbau) might well besuitable so it is worth knowing why iroko has been used for laboratory benching.
Properties of irokoIroko is tried and tested. It has certainly survived well with some benches being more than 50 years old.Its properties centre on its resistance to water.

30
Table 4 The effect of water ingress in various woods
Maple Beech Iroko
Moisture content of wood in air with 90% humidity 21% 20% 15%
Moisture content of wood in air with 60% humidity 12.5% 12% 11%
Corresponding tangential movement along the grain 2.6% 3.1% 1.0%
Corresponding radial movement perpendicular to the grain 1.8% 1.7% 0.5%
Iroko resists water ingress better than temperate hardwoods. Seasoned wood is not stable. It expands,contracts and warps with changes in its water content. Water has an affinity for the glucose units incellulose and this causes the units to be pushed apart. Although normally reversible, extreme floodingcan cause the fibres to become completely separated. Table 4 refers to wood achieving equilibrium withdifferent water levels in the air. It shows that less water is absorbed by iroko and that movement ofcellular components is small, less than one third of that of European beech and Canadian maple (seeWood Preservation by B A Richardson).
The effect of water on woods is particularly relevant to areas around sinks, especially as water vapouris also rapidly lost or gained through the end-grain surfaces as well. This results in the wood splittingand the development of fungi, causing staining and decay. Veneers are particularly prone to thisproblem (see The International Book of Wood).
Just as iroko repels water, it will repel aqueous solutions of chemicals. However, if the solution is notwiped away immediately, the chemical may begin to react with the surface finish and ultimately with thewood itself. Acids and alkalis react with cellulose, breaking the polymer down into smaller units,weakening the wood in that area. Other reagents, such as oxidising agents, attack all the chemicals inthe surface while organic solvents dissolve away the resins.
Other woods (e.g. beech) could be used for tables where practical activities not involving chemicalstake place.
Using younger treesAs it takes 40 years after planting for iroko trees to grow to maturity for logging, the slowness in returnon the investment into reforestation is not helpful to a country's economy. However, planks or sheetscan be made from wood taken from trees that are only twenty years old. Small solid finger-jointed stripsof wood are glued together with a strong adhesive. In our immersion test, this version did not comeapart, nor warp as normal iroko samples did.
How it is put together How it appears
Woods from temperate climates, e.g. beech, can also be built up into planks in much the same way asiroko. Immersion tests showed that the blocks can come apart. As woods are usually coated withlacquers or oils to prevent water ingress, this would not happen for some time but areas around sinksmay soon be prone to splitting.

31
Protecting wood surfacesIt is imperative that wood is sealed to prevent or resist attack by water and chemical reagents.
A finish should:
• repel water and aqueous solutions initially so that, if immediately wiped away, the active chemicalsin the solutions do not have time to be absorbed into the fibres of the wood and then react withthem,
• be resistant to abrasions,
• be repairable quickly, safely and by people with perhaps little time and/or experience in workingwith wood.
The finishes available are listed in Table 5 along with comments that CLEAPSS has received abouttheir use in schools. There are various types of varnishes and oils. Oils based upon tung oil are lessgreasy than linseed oil, but regular oiling is required.
Table 5 Various finishes on iroko
Property Lacquer Varnish Oil
Appearance Gloss or matt. Very pleasingappearance.
Gloss or matt. Matt.
Waterrepellent?
Yes. Yes. Yes but continual washingwill remove oil.
Effect ofchemicals?
Dilute solutions have verylittle effect. However, it isattacked by concentratedacids and alkalis.
It can be attacked by dilutealkaline solutions andorganic solvents.
It is attacked by dilutealkaline solutions andorganic solvents.
Effect of ahot crucible?
Lacquer decomposes andthe wood shows a burnmark.
Varnish decomposes andthe wood shows a burnmark
Wood shows a burn mark.
Can it bescratched?
Yes. Dilute alkalis andorganic solvents can thenattack the exposed wood.
Yes. The layer of varnishcan be peeled away toexpose more areas. Dilutealkalis and organic solventscan then attack the exposedwood.
Yes. Dilute alkalis andorganic solvents can thenattack the exposed wood.
Can thesurface berepaired inhouse?
Not without expert help. Itwill take several days and isbest done during schoolholidays.
Yes. Small areas can bevery easily sanded andrecoated. After coatinglarger areas, harmful fumeswill be given off. It couldtake a number of days if twocoats are applied.
Yes. Small areas can bevery easily sanded andrecoated. After coatinglarger areas, harmful fumeswill be given off. It couldtake a number of days if twocoats are applied.
Othercomments
Very expensive unless apart of the original package.
Moderately expensivedepending upon the labourused. Some areas need tobe revarnished every year.
Least expensive dependingupon the labour used. Someareas need to be reoiledevery year.

32
Are synthetic surfaces a green alternative?Just because synthetic surfaces do not use tropical hardwoods, does not mean that they are suitablealternatives. Remember that:
• wood is a renewable resource, if the forests are managed efficiently, whereas synthetic materialsare often derived from oil, a non-renewable resource,
• considerable energy is used in converting oil to the synthetic substances,
• if forests are given no value to a local community, then they will be removed forever and land madeover to other cash-crop farming. Allowing countries, such as Ghana, to manage their forestssensibly, provides local employment and valuable export revenue,
• the Overseas Development Agency and the World Bank recognise that timber exports are a keyelement in the economy of developing countries.
5.3 Synthetic surfacesIntroductionSynthetic surfaces are derived from oil-based chemicals. Comments from schools vary from the‘greatest thing ever invented’ to ‘bring back iroko’. It is therefore difficult to make a ‘best-buy’recommendation. Much depends on the attitude of teachers, technicians and pupils towards their newteaching environment.
Surfaces available include:
• A thin layer of melamine formaldehyde supported on layers of phenol formaldehyde, which might, inturn, be supported on MDF or a similar wood-derived base,
• acrylic (polymethyl methacrylate) or polyester resins, filled with mineral particles which may besupported on an MDF base,
• polyepoxides (cast epoxy resins).
Formaldehyde-based laminates(e.g. Trespa Athlon, Trespa Toplabplus, Formica Compact, Formica Chemtop2, Abet Labgrade.)
Thin sheets of paper are impregnated with formaldehyde resins. The surface layers, which can be dyeddifferent colours, consist of a melamine-formaldehyde resin. Under this layer are the darker phenol-formaldehyde layers (see diagram overleaf). The most durable of these worktops are made only ofthese two resins and are often referred to as solid laminates. They use a thick phenol-formaldehydelayer (12 to 20 mm thick) and cannot be degraded by water ingress.
Less expensive worktops, such as those in kitchens, use a thin double-layered surface (0.9 mm thick)glued with a strong adhesive at high pressure onto an MDF, plywood or chipboard base (about 16 mm).For laboratory use, these should be avoided because of the difficulty of ensuring that water cannotenter the material, particularly at edges and near sinks. Water ingress causes the glue to soften and thesurface layer comes away from the base. It is possible to seal the edges completely with timber and byusing a post-formed surface to combat water entry, but we are not confident even then that suchsurfaces can withstand the rigorous demands of science teaching and learning. (Post-forming is theprocess of bending the laminate around a curved surface with no visible seams.)

33
Laminate on chipboard base with a post-formed edge
Great claims are made about the chemical resistance of the laminates but in schools thermal andmechanical resistance are as important. The principal disadvantage of laminates is that the surface canbe permanently damaged by hot crucibles, hot tongs or, even worse, a Bunsen burner flamedeliberately applied to the surface. The surface will burn and may crack. In addition, because pupilsdrop equipment or bang stools onto benches the surfaces have been known to chip. Benches with thethinnest resin layers are most at risk.
At least one manufacturer has impregnated the surface layer with silica to improve resistance toabrasion (Trespa Toplabplus).
These laminate benches are widely used in schools because they are relatively cheap. However, ifflame or impact abuse is likely designers would be well advised to choose an alternative.
Mineral-filled acrylic or polyester resins(e.g. Corian, Surrell, Diorite, Karadon, Swanstone, Wilsonart, Velstone, Sirface, Athena and Coveran.)
The mineral particles (usually hydrated aluminium oxide) are bonded together with resins such as anacrylic or polyester resin or mixtures of the two. Fire resistance of these materials is variable but isgreater than for the formaldehyde-based laminates. Under test, those surfaces that did catch fireextinguished themselves after a few seconds.
When first used as a solid for laboratory benching in the 1990s, some cracked because people perchedon an unsupported surface or seated pupils tried to lift the bench with their knees. Now, thinner layersof the resin are bonded to an MDF base which makes the bench tops less likely to crack whensubjected to mechanical or heat stress and, coincidentally, much lighter. The solid resins are still usedas surfaces in fume cupboards and sinks.
Recent advances include integrating mineral fibres into the matrix to improve mechanical stress. Thismeans that less material is used to attain adequate stress resistance and the product is less expensive.You may be given samples to test. By all means do this, but keep the samples to ensure the surfaceused in your laboratory is consistent with the material tested.

34
Mineral-filled resin surfaces are easy to clean, light in colour and have reasonable stain and heatresistance, although they will not resist deliberate burning with a flame. Despite bonding to an MDFbase we have not heard of any problems with water-ingress, unlike formaldehyde-based laminates.
Polyepoxides(e.g. Durcon and Simmons. Durcon offers a range of colours. The standard colours of surfacesmanufactured by Simmons are white, ivory or light grey, but other colours appear to be available.)
These are particularly useful as materials for sinks and fume cupboard surfaces. They have excellentchemical and thermal resistance. Tables with solid polyepoxide tops can be quite heavy and thesurface feels very cold, which may be thought uncomfortable.
5.4 AbuseEven in the best-managed schools, wilful abuse can occur. It is not unknown for pupils to direct aBunsen burner flame onto the surface for several seconds or minutes. Under test, when deliberatelyburnt using a non-luminous flame, wood and formaldehyde-based laminates will start to be seriouslydamaged in 15 seconds. The latter will make crackling noises and bits of the material can be projectedin all directions. The mineral-filled resin surfaces can withstand serious damage until after 30 s but,after that, they start to char and disintegrate. The most resistant to wilful burning were the polyepoxideswhich were only slightly affected after 2 minutes of abuse. Students have also been known to vandalisesurfaces with penknives, files, scissors etc. No surfaces will survive such abuse. If necessary, mostsurfaces except formaldehyde-based laminates can be sanded down with sandpaper but will leave adepression where the burn or other damage occurred. If sanding iroko, the sander and others in theroom should wear a dust mask suitable for fine particles (e.g. FFP2S) because the fine dust particlesare known to be hazardous.
Accidental abuse by chemicals, hard objects (including stools on benches, retort stands etc) or burnsby hot crucibles, tongs and electrically-heated wires are more common forms of abuse. Table 6 showsthe results of some tests carried out at CLEAPSS.
5.5 Brighter colours but…Synthetic surfaces are usually available in a wide range of colours. Lighter colours make rooms brighterand various colour schemes can be designed. However, the lighter the colour, the more the stained andburnt areas will show. Many surfaces have a mottled appearance that can be helpful in not showingstains so readily. However, it is also more difficult to locate areas where a chemical has been spilt,possibly leading to further damage, getting chemicals onto clothes or even injury if the spill is notnoticed and wiped up. In addition, shiny surfaces can lead to glare. CLEAPSS recommends dark mattfinishes for bench surfaces where practical work is carried out.
Iroko wood may start reasonably light in colour but darkens with age.

35
Table 6 Abuse of bench surfacesMaterial Resistance to chemicals Resistance to abrasions Resistance to burnsIroko wood Resistance depends on the
finish. Dilute sodium hydroxidesolution affects the finishesmost. See Table 5.
Abrasions can causeunevenness on thesurface. A scratch can bedisguised by resealing.
Wood will char if red-hotobjects are placed on it.The burn may be quitedeep. The surface is notrepairable and sanding willleave a depression.
Formaldehyde-basedlaminatesbonded to abase (MDF,chip-board orplywood)
Water will soak intounprotected edges of the woodand expand the layers. Thesurface will then come awayfrom the wood base.Comments about unbondedformaldehyde-based laminatesalso apply (see below).
The base can be exposedif the upper layer isseverely scratched.
A hot crucible separatesthe paper layers in the0.9 mm laminate. Repair isnot possible.
Formaldehyde-basedlaminates, notbonded to anMDF or similarbase
The surface initially shows ahigh resistance to mostchemicals but, after attack by aconcentrated acid or beingscratched, the surface holdsstains more readily. Silvernitrate solution attacks thesurface very slowly, taking 24hours to produce a dark stain2.
It takes considerableeffort to expose thelowers layers of the resin.If the upper layer is lightcoloured, a scratch willappear dark as the lowerlayers are exposed.
A brown mark is leftbehind on the surface. Ifthe object is red hot, theresin may bubble and flakeaway. Repair is notpossible.
Mineral-filledresin surfaces
Most chemicals do not affectthe surface thoughconcentrated sulphuric acidleaves a white patch, silvernitrate stains the surfacebrown and, in reflected light, itis possible to see smears fromorganic solvents. Areas wherethe surface has beenscratched absorb methyleneblue and iodine more readilybut the mottled design used onthis material is such that theseproblems will be camouflaged.
Repeated placing ofstools on the surfacecauses some chipping. Ifa knife, for example,scratches the surface, thedamage can be sandedout using coarse wet anddry paper followed by afiner grade.
The hot crucible testleaves a white ring. Thedamage can, however, berepaired using a specialkit, although somesuppliers will insist oncoming in to do the workthemselves.
Polyepoxides Concentrated sulphuric acidattacks the surface but this canbe sanded down.
When metal objects (e.gretort stands) are draggedalong the surface(especially if light incolour) then scuff markscan be seen. Scratchesappear white at first but allthese problems can beovercome using scouringpowders and a dampcloth.
Hot objects have littleeffect on the surface; evena red-hot crucible left onlythe slightest of marks.Deliberate abuse by aBunsen burner flame willeventually cause damage.
2 Silvosol® removes silver nitrate or iodine stains. It can be obtained from Rotec Scientific Ltd, 10 Bridgeturn
Avenue, Old Wolverhampton, Milton Keynes, MK12 5QL; tel 01908 223399; fax 01908 223000.

36
5.6 ThicknessIt is tempting to cut costs by using a smaller thickness for a bench surface especially if it is made of anexpensive material. Cracks have occurred when the bench has a cantilever design and is not supportedby a cupboard or a framework. This even occurred with teachers sitting on mineral-filled resin benchesin a nonchalant manner. Iroko should be at least 25 mm thick. Laminates without a base of MDF etcshould be at least 16 mm thick. Some of the mineral-filled resin surfaces are as thin as 3 mm on a25 mm MDF-base; and this appears to take the strains quite well. Other makes use a 13 mm thicksurface on a 25 mm base which, up to now, has caused few problems with regard to cracking (seepicture below).
5.7 Costs of different surfacesThe relative cost of different materials for bench surfaces has changed over recent years. BuildingBulletin 80 did suggest an order of costs but this is not likely to be valid any longer. What is important is:
• if you have already selected one particular type of bench material, that you obtain more than onequote for the supply or work,
• if you have not decided on what bench material to specify, ask you supplier to quote for differenttypes.
Laminates bonded to a base (e.g. MDF) would be a little cheaper than solid laminates. However, somemanufacturers have quoted prices to CLEAPSS for laboratories with mineral-filled resin surfaces at onlya little more than an iroko-surfaced laboratory. Much depends on the thickness specified so it isimportant to be sure you are comparing like with like.

37
6. Services6.1 GasNational guidance on gas installations is contained in the booklet Gas installations for educationalestablishments, published by the International Institution of Gas Engineers and Managers (IGEM).
Where a gas pipe enters a laboratory, there should be an isolating valve. There is no requirement forthis to be done in existing installations, but any new-build or conversion should have it and sometimes itis desirable to fit it retrospectively. The isolating valve should be close to the place where the gassupply enters the laboratory.
Three sorts of valve are available, in order of increasing cost:
• a manual valve, ie, a spanner or similar,
• an electric solenoid valve which may be remotely switched,
• an automatic system linked to sensors (e.g. ‘Gasguard’ produced by EFM Flamefast).
A manual valve is appropriate in many situations, especially if it is lockable in the ‘off’ position.However, it does need to be easily accessible, which may not always be possible. The valve should besuitably labelled with the ‘off’ and ‘on’ positions indicated.
A solenoid valve has the advantage that the switch and the valve itself can be in different places andthere can be more than one switch. The valve might be outside the laboratory (useful in conversionswhere pipes could be inaccessible) and the switch could be close to the teacher’s area. Any gas fittershould be able to obtain suitable valves. A possible disadvantage would be the loss of gas supply in theevent of a power cut. The system is often designed so that a key is required to reset the system afterthe supply has been switched off. This is usually necessary to provide vandal proofing but could be anuisance if the key is not readily available. The electrical supply to the solenoid must be on a separatecircuit to the main laboratory supply, so that it can be switched off independently.
Automatic systems linked to sensors are relatively expensive. In early installations schools experiencedmany problems, with gas being shut off unexpectedly or inconveniently, but this appears to havereduced. In any event, some problems can be easily overcome by staff training. Systems include a timeclock that switches the gas off out of school hours. This is useful if vandalism is a problem butinconvenient if you want to run an open evening because the controller needs reprogramming. Whenthe time clock switches on in the morning, pressure sensors check whether any gas taps are open, andthe system switches off automatically if there are. It was this feature which proved initially difficultbecause of the need to set the system to detect the difference between 16 Bunsen burners connectedcorrectly and one open tap with nothing connected. It is claimed that this problem has been solved.
Building Bulletin 80 recommends one gas tap per pupil. The gas taps should be on the tops of benches,never on the sides. Gas taps should be positioned so that pupils do not need to use long lengths ofBunsen burner tubing. The taps should have either drop-down or spring-loaded keys so that theycannot become ‘knocked on’. The on / off positions should be readily visible to a teacher or technician.The taps should be securely fixed on the bench but the screws should not be visible because studentshave been known to unscrew them. The Gas Safety (installation and use) Regulations demand that allwork of this nature should be carried out by competent engineers (such as those that are Gas Saferegistered). CLEAPSS strongly recommends that anti-rotation devices (e.g. Liverpool plates) are usedso that gas taps will not rotate when mishandled by pupils. Beware that fitters sometimes fail to installgas taps in accordance with the designer’s intentions so safety devices may be circumvented.
If possible, a mains gas supply should be installed. Failing this, liquid petroleum gas (LPG) should bepiped in from cylinders outside the laboratory, in accordance with the relevant British Standard (BS5482-1:2005) and the LPG Association Codes of Practice. Schools that use LPG can obtain advice onstorage of cylinders from a Gas Safe engineer. As the gas / air ratio for burning LPG is different to thatfor natural gas, special Bunsen burners and other gas equipment must be purchased.

38
Hoses, for flexible connection pipes to mobile benches or mobile fume cupboards, should be no morethan 1.4 m in length, located outside rising duct work and be suitably and securely connected.Moreover, the mobile unit itself should be restrained with a stainless or galvanised steel restraint cable,securely fixed to the floor, bench or bollard. The length of this cable should avoid excessive strain onthe fittings caused by moving the unit.
6.2 Water supplyThe Water Supply (Water Fittings) Regulations 1999 replaced various local Water Bylaws to ensurethat there is no contamination of the public water supplies. The term ‘water fittings’ includes pipes (otherthan mains), taps, meters, cisterns, water closets, etc. Any new fitting now has to carry a CE mark orconform to a Harmonised Standard. If schools wish to alter or extend the water supply to theirpremises, they should inform their local water undertaker (i.e. the ‘water company’).
There has been considerable discussion about the requirements of taps and their fittings in schoollaboratories. The main issues are:
• There must be some means of ensuring that, under all circumstances, there is no possibility ofwaste water contaminating the incoming water supply.
• Lab taps can, and often do, have lengths of rubber tubing attached which can drape in a sink.These tubes can compromise the air gap between water in the sink and the tap.
• The waste water in the sink could be classified as fluid category 4 – fluid which represents asignificant health hazard because of the concentration of toxic substances, including chemical andpotentially harmful organisms. Under some circumstances it has been argued that the water in thesink might be as high as fluid category 5 (the most harmful).
• A length of pipe attached to a tap means that it is possible for water in the sink or drain to backflowinto the tap and this possibility must now be fully guarded against.
• The simplest means of achieving this is by having a large enough permanent air gap between anywaste water and the incoming supply.
A number of air gap devices, fitted into the pipe system or to the tap itself, have been designed andtried but none has proved effective, or indeed sensible, in the context of school science. The bestsolution, at least to CLEAPSS and to the water suppliers, is to provide the required air gap at the pointwhere the water enters the lab or the science suite. This is achieved through some form of header tankthat has a ball valve to control the inflow of water and an outflow pipe to the lab(s). Science suites orlaboratories which already have water supplied through a header tank need take no further action.However, since it is current practice to supply mains water directly to taps or appliances in any building,header tanks are no longer routinely installed.
For new labs it is possible to purchase a small compact header tank which will fit under a bench (seefigure 3 overleaf). A small electric pump is fitted to the outflow pipe that responds, like those in powershowers, by switching on only when there is a demand for water from one or more taps. The pumpensures that adequate water pressure is maintained to supply condensers, stills and water vacuumpumps, and means that the tank can be sited under a convenient part of the bench.
Whatever arrangements are made for the supply of water there should be a control valve (or tap) ineach room to turn the water off in an emergency. If, for any reason, the water in the lab is at a highpressure, then water will gush out of a tap too quickly. It rebounds out of the sink or apparatus and onto the surrounding bench area or possibly into the eyes and/or on to the clothes of the people close by.This could be dangerous if the apparatus already contains a hazardous chemical. In such situations avalve in the supply can be used to adjust the flow rate. In any case, for maintenance purposes it is anadvantage and possibly, depending on the design, a requirement for the supply to each tap or group oftaps to be isolated using a service valve.

39
Figure 3
Header tank withball
valve and floatsuitably raised
Standardlaboratory taps
Plumbed-ineye wash
Schematic Diagram of Water Supplyin a Laboratory incorporating theHeader Tank and Pump
SV = Service valveSCV= Single check valve
SV
SV
SVSV
SCV
SCVSV
Pump
Mains watersupply
The diagram also makes clear that any plumbed-in eye wash station should be connected directly tothe mains supply.
6.3 Sinks, taps and drainsProvisionSinks are required in laboratories and preparation rooms for a water supply for practical activities, towash equipment, to dispose of low hazard solutions, to wash hands after handling chemicals or livingorganisms and to apply immediate remedial measures after an accident. At least one sink will require asupply of hot water for hand washing.
If a room were to be fitted with only one sink, then there would be a considerable amount of movementby pupils in the room with all the problems that might then occur. On the other hand, the more sinks thatare close to pupils’ work places, the more abuse they may suffer, such as removing nozzles from taps,bending the tap stem, and generally using the sinks as a rubbish bin. Building Bulletin 80 recommendsone sink per 6 pupils. A sink is also recommended for the demonstration bench (if there is one), thefume cupboard (if there is one) and another for washing hands and applying remedial measures (seechapter 3.9). The number of sinks for pupils may need to increase if they have to be sited around theperimeter as this may make access to the sinks by pupils more difficult.
Certain operations in chemistry carried out in post-16 courses require a sink to be an integral part of theprocedure, e.g. use of a condenser. These sinks need to be positioned near the other services andcarefully sited so that long lengths of rubber tubing are not required for connections. Also there shouldbe at least one tap, to which tubing can be fitted, for each pair of students.

40
Sink materials and sizeThe traditional material for sinks is fire clay which is extremely hard. These heavy ‘Belfast’ sinks aredurable, resistant to chemicals and heat, and relatively easy to clean. They have been known to crazeand even to crack. Glass apparatus dropped in them shatters readily. Sinks made of other materials aremore forgiving. Cast epoxy sinks are highly resistant to both heat and chemical attack. In some casesthey may be slightly cheaper than fire clay. Polypropylene sinks resist attack by chemicals, but can bedamaged by hot objects. Stainless-steel sinks are attacked by metal particles and corrosion can start.We generally do not recommend stainless steel sinks in laboratories and preparation rooms but if usedthey should be specified to 316 grade which resists corrosion better than domestic grade sinks (304).Sinks made of mineral-filled resins are also available and have good heat and chemical resistance. Ifsinks are made of light-coloured materials, they can become stained and dirty unless cleaned regularly.
Sinks for general laboratory use should be of reasonable size. We suggest about 300 × 200 mm, with adepth of 150 mm. If sinks are too small, water, even at low pressure, will gush out of the tap and splashonto surrounding areas. A larger sink may be required for washing up, if this is not done in thepreparation room, perhaps in a dishwasher. Some activities, such as filling bowls or submergingpotometers, require a greater depth than 150 mm, e.g. 220 mm. Any larger sink is also best forproviding hand-washing facilities which are necessary in every laboratory so that staff and pupils canwash their hands after handling chemicals and living organisms. One hot tap is usually adequate. Itshould provide water at a temperature that is suitable for direct hand washing (see also section 7.3).Hand-drying facilities will also be needed. Whatever the intention, if paper towels are provided, they willcertainly be used throughout the laboratory for wiping up spills. Roller towels are often a better option.Hot air dryers are unsuitable because they will not be able to cope with the demand of a large numberof children all wanting to dry their hands at the same time. They are also noisy.
The height of the sink is particularly important in preparation rooms to avoid the technician adopting astooping position when using the sink.
Sink areasThe bench area around sinks is particularly vulnerable to problems caused by water ingress, if thetraditional design (see diagram below) is used, in which the sink fits to the underside of the bench.Continual swelling and contraction and removal of the oils and resins in the wood benches leads tocracks and discolouration. With laminates, the plastic surface layer can come away from the woodbase. Grooved wooden draining boards may become badly marked. This arrangement is very commonwith Belfast sinks.
If the bench surface is wood or laminate boded to a base, the water ingress occurs here
The lip protects the edge and supports the sink
The sink is held in place by a base support or straps
Traditional sink arrangement
Drop-in sink arangement
The use of drop-in bowls and/or sinks), in which the lip fits over the bench surface, protects the edgefrom attack by water. A sealant is used to stop water entering under the lip. Sinks made of stainlesssteel, vulcathene and other synthetic materials can be fitted in this way. The lip can be extended so thatit includes a drainer.

41
TapsCLEAPSS strongly advises that fixing or locating plates (e.g. Liverpool plates) are used so that taps willnot rotate when mishandled by pupils. Beware that fitters sometimes fail to install water taps inaccordance with the designer’s intentions, so that anti-rotation devices may be circumvented.
Water fittings can have one, two, three or even more taps and outlets. Each sink should be fitted withone or (if the use is primarily for chemistry) two taps, i.e. a double outlet. The height of the tap nozzleabove the sink should be in the region of 225 to 270 mm although this should be higher for taps in thepreparation room or on a demonstration bench to allow for taller apparatus being used. It would beuseful in the preparation room to have swan necked taps with lower outlets as well as the high outlet(i.e. a triple outlet) so that one of the lower outlets can be permanently fixed to the still. The hand-washing sink should be fitted with pillar taps for both hot and cold water.
There are two designs of taps, the swan-neck or the pillar (see Table 7), which can both be fitted withvarious nozzles (see Table 8). The illustrations show single taps. Double or triple taps are available butin most laboratories single taps will be sufficient.
Table 7 Tap designs
Swan neck Pillar
This is a single swan-necked tap.
There are two pillar tap designs available.
The handle is sited low down on the right or left. The handle is always central so that there are noleft and right-hand models.
Pupils can bend the neck. The swivel outlet can belocked but this might encouraged more vandalism.
There is no rotation and the pillars are more robustthan swan-neck taps.
Leaks may occur around the swivel joint. There are no joints where water leaks out.
The tap is not close to the nozzle and so watercontinues to drip after the tap is turned off. Thisencourages pupils to over tighten the tap or flick thedrips of water.
The tap is near the nozzle, especially in the designon the left, so once the tap is turned off, there areno more drips.
The tap handle is set back which may be difficult forsome pupils to reach.
One design has the tap handle nearer the pupil,which is useful for shorter individuals.
Chromium-plated domestic taps should not be used in science rooms as they may quickly corrode.Epoxy-coated, kitchen-type pillar taps are available from laboratory suppliers. These are tall and leanforward so as not to splash the edge of the sink.

42
Thought should also be given to the nozzles on the taps. Table 8 shows four varieties.
Table 8 Nozzles for taps
This is a fixed nozzlewith a narrow openingwhich may becomeblocked in time with limescale. Once damaged,the whole tap will needreplacing! Suitable forthe preparation roomand the demonstrationbench.
This is a large boreremovable nozzle towhich only wide boretubing can be fitted. Thisnozzle can be removedby students and thethread is easilydamaged. The largebore allows water to flowmore gently and notsplash everywhere. Areserve supply will berequired.
This is a removablenozzle to whichnarrower bore tubingcan be attached (e.g. forfilter pumps). It canbecome blocked withlime scale. It can beremoved by studentsand its thread is easilydamaged. A reservesupply will be required.
This is a fixed full-boreanti-splash nozzle.Tubing cannot be fixedto it. It is suitable fortaps above hand-washing and apparatuscleaning sinks where areasonable volume ofwater is required butobviously not if rubbertubing is necessary foreye-rinsing purposes.
Sink traps and drainsPVC is used for drains in domestic situations and is probably suitable for most school sciencelaboratories. More commonly, however, high-density polythene or polypropylene (e.g. Vulcathene) isused as these are more resistant to chemicals and are necessary for more advanced work and in fumecupboards. There should be an adequate number of access points so that blockages can be easilydealt with.
Easily accessible anti-siphon bottle-traps are required under each sink, in order to remove pen tops,broken test tubes, etc. However, as the liquid that schools put down laboratory sinks should not be verymuch more than dirty water, the much larger dilution traps (or dilution recovery traps), made ofvulcathene, glass or even ceramic, are not needed. In fact large traps are a disincentive to frequentemptying.
A bottle trap A dilution trap(may also be twice the size and/or made of glass)

43
6.4 ElectricityMains supplyBuilding Bulletin 80 recommends one electrical socket per pupil. Installation should be carried out bycompetent persons working to the Requirements for Electrical Installation regulations, published by theInstitute of Electrical Engineers. Guidance was given in GS23, Electrical Safety in Schools (HSE, 1990).Although this is no longer published, the HSE has made it clear in recent letters that it regards theadvice as still valid. If necessary, CLEAPSS could supply a copy.
Science laboratories will normally require at least two separate 30 amp ring-main circuits to supplystandard mains sockets. A detailed drawing should specify which sockets are connected to which main.
The students’ ring main, normally supplying sockets on most benches, should be easy to switch off inan emergency or when not in use. One or more additional ring mains should be used to supply othersockets. These could include those on the teacher’s bench, any side benches where long-termexperiments or animal care systems (such as aquaria) may be set up, refrigerators and cleaners’sockets. Sockets not included in the students’ ring main should be labelled to make it clear that theelectricity supply is permanently connected (e.g. “Maintained supply”).
Separate RCDs (residual current devices, sometimes known as earth-leakage circuit breakers, ELCBs)can be fitted to each ring main if required. Standard 30 mA, 30 ms RCDs are satisfactory. Those withmore sensitive settings can sometimes trip unnecessarily with certain apparatus, such as some types ofheater and IT equipment.
Fume cupboards should ideally be connected to a separate circuit. They should not be powered fromthe students’ ring main or from any circuit including sockets protected by an RCD. This ensures that, ifthe students’ ring main is turned off or an RCD trips, the fume cupboards (which may containhazardous gases) will continue working.
Mains sockets are best positioned away from a water supply but this cannot be avoided with certaindesigns, e.g. pedestal units. In this case, the sockets should be positioned to minimise the possibility ofsplashes from taps (which should not swivel). It should not be possible for water to flow or drip on tomains sockets. Sockets should not normally be below the height of the bench top. However, where thisis the case, physical protection (such as a lip or a hood) should be provided to prevent overflowing orspilt water from coming into contact with the socket. The fitting of an RCD will give further protectionwhere mains sockets are positioned in close proximity to water supplies, but this should be in additionto the measures described above. People are sometimes surprised that it is considered acceptable tohave electrical sockets adjacent to a water supply, e.g. on a pedestal unit. However, we have never hadreports of any accidents arising from such an arrangement.
It is important to ensure that mains sockets and their housings are sufficiently strong to withstand thetreatment from children who may be excited, in a hurry or both. Budget materials that may beappropriate for domestic use will not last long in a laboratory. In addition, the socket housings must besecurely mounted to avoid the possibility of fittings working loose. Some types of raised sockets (wherethe area of the base is relatively small compared with the height of the housing) are liable to sufferdamage by rocking and should be avoided.

44
Low-voltage supplies (up to 24 V)For science laboratories, portable low-voltage supply units are preferable to a built-in unit, whether thebuilt-in system is centrally controlled (e.g. the old ‘Legg units’) or takes the form of separate modules(i.e. a more modern trunking system). The reasons are outlined below in Table 9.
Table 9 Advantages of portable low-voltage supply units over a fixed supply
Economical It is more economical to buy a set of low-voltage supply units than a built-insystem (to which must be added the cost of installation).
Flexible use of laboratories More work areas can be used for low-voltage practical work as portablesupplies can be carried from one room to another on a trolley.
Independent working Portable supplies allow pupils to change the voltage for their owninvestigations independently of each other. Centrally controlled systems donot allow this.
Maintenance Portable supplies require standard portable appliance testing. If one portablesupply goes wrong, it can be serviced while the others remain in use. Built-insupplies usually require specialist inspection and testing. If a built-in supplygoes wrong, then specialist on-site technical support is usually required fromthe manufacturer and the whole system may be out of use for some time and,indeed, money may not be available for it to be repaired.
Maximum current output Portable supplies can deliver 4, 5, 6 or 8 A depending on the model chosen.Centrally-controlled systems typically deliver 30 A over 15 outputs, i.e. only2 A maximum per output.
Vandalism An act of vandalism on a portable unit, although serious, would not affect thepractical work carried out by others in the same room. Portable supplies canbe stored away when not in use. Built-in systems present a continuoustemptation to vandals.
6.5 VacuumA vacuum line is not normally required in schools, although it may be needed in some colleges. If thewater pressure is, for any reason, too low or erratic to obtain a vacuum by using water pumps this maybe an option worth considering in laboratories used for A-level chemistry.

45
7. Preparation rooms and storage7.1 IntroductionEfficient and effective science teaching depends on equipment and materials being in the rightlaboratory at the right time. In most schools, it is the task of the technician(s) working from thepreparation room, to ensure this happens. Thought should be given not only to how much space isrequired for preparation and storage, but also to ergonomic issues, essential in addressing the manualhandling and work needs of technicians.
A preparation room should not normally be an office area for teaching staff to prepare lessons or domarking, If it has to be, provision should be made for separating the areas. Technicians will, forexample, be handling chemicals in bulk or engaged in micro-biological procedures, both of whichrequire the utmost concentration and no interruptions. Prep rooms should also not be used ortemporary accommodation for pupils, for any reason.
More information on the needs of technicians in the prep room can be found in CLEAPSS Guide L248a;Running a Prep Room.
7.2 Strategy and spaceCLEAPSS prefers a central store and preparation room servicing all three sciences on the same floor.This means that, in large schools, the technicians can work as a team, security will be improved and thepreparation room can be staffed continuously. Many difficult manual handling problems are solved aswell. In some central prep room designs, many or most of the labs lead directly off the prep room.Whilst appearing to provide very good access, the prep room walls are perforated by a large number ofdoors leaving a very limited amount of wall space for benching and storage shelves etc. This sort ofdesign will make the servicing science lessons harder not easier. In busy prep rooms its worthconsidering providing for an ‘in’ and an ‘out’ door to avoid the possibility of collisions.
Prep rooms not on the ground floor of a building should, if at all possible, be supplied with a lift or ahoist. A small hoist should be sited so that its doors open at a convenient height to transfer heavyobjects straight onto a trolley. The doors to the hoist should be lockable to avoid any misuse or rubbishbeing thrown into the chute.
Having individual subject-based prep and store rooms, such as are often found in older buildings,Independent Schools, VI form & FE colleges, can lead to duplication of equipment (e.g balances) andmanual handling problems. Sometimes, in existing installations, such prep and store rooms are situatedon different floors, or even in different buildings, which is far from ideal. Supervision, shared working,learning from others and simply working as a team are much more difficult. It also means that one ormore of these small preparation rooms may be unstaffed at times.
DfEE guidance in Science Accommodation in Secondary Schools, BB80 suggests that the amount ofspace required for preparation rooms and storage should be 0.4 to 0.5 m2 of floor area for each sciencepupil place. Therefore, for a suite of six laboratories each holding 30 pupils, the preparationroom/storage area should be 6 × 30 × (0.4 to 0.5) m2, i.e. 72 to 90 m2, the size of another laboratory.This assumes that there is already 4 to 6 m3 of storage space in each laboratory (for local resourcesand display). If the design means that a central prep room has to be smaller than the calculation abovewould determine, more storage room will need to be found in the laboratories or in smaller satellite orancillary store rooms. The disadvantages of such arrangements include dirty or soiled equipment oftenbeing left in rooms, an increased risk of pupils stealing equipment / materials and the imposition of evengreater restrictions if a room ever has to be used as a form base or by non-science teachers.

46
The amount of space needed for different functions is suggested in Table 10 and possiblearrangements for a central preparation room are shown in the following diagrams. Chemicals are bestkept in a separate chemical store opening off the main preparation room.
Table 10 Allocation of space within a preparation room
Area %
Preparation 17
Washing up 9
Mobile storage 8
Circulation 23
Office 11
Equipment storage 21
Chemical storage 11
Should space be limited, priority should be given to the preparation, washing-up and mobile trolleyarea. It would be hoped that separate small rooms could be found for the technicians’ office andstorage areas.
Chemical store
Washing-uparea
Trolley park
Office area Equipment storage
Dry WetChemical
store
Preparation area Washing-up
area
Trolley park
Office areaEquipment
storage
Dry Wet
Trolleypark
Preparation area
7.3 ActivitiesPreparation areaRequirements for the preparation area include;
• a fume cupboard,
• a dish washer (or, if you can afford it, a laboratory glass washer),
• a water purifier (i.e. a still, de-ioniser or reverse osmosis unit),
• a refrigerator,
• a freezer (or combined fridge / freezer) and
• a drying cabinet (or oven).
In the diagram above, there should be flat bench space and room for 2 sinks. Equipment and materialsused regularly for preparation can be stored above and below the bench. The height of benching shouldnot be the same as in the laboratories, which are designed for students. In the preparation room,benches will need to be at adult height, i.e. 900 mm to avoid a technician having to stoop while workingat the bench.

47
Washing-up areaThe washing-up sink (to a depth of over 220 mm) should have a double-drainer and both hot and coldwater. The hot water supply should be true hot water, not a blended or thermostatically-controlledsupply. A dishwasher is almost essential and a drying cabinet would also be useful, although an ovenmight be used instead. A domestic dishwasher is satisfactory for most schools although using one in aprep room will invalidate its guarantee. A laboratory glass washer will give years of service but thesecost between £1,800 and £3,200 depending on size, with, typically, £2,400 for generally suitable model.To the cost of purchase needs to be added the cost of installation which may not be the same as for adomestic dishwasher.
Office areaThe office area for use by the technicians should include the following:
• a space for reading and writing,
• computer (with links to any local intranet and the internet),
• printer,
• telephone,
• storage for useful publications (e.g. Hazcards, suppliers catalogues) and currently used schemesof work,
• filing cabinets,
• lockers,
• a TV aerial socket (to record programmes).
7.4 StorageChemicalsA full discussion on chemical storage can be found in section 7 of the CLEAPSS Laboratory Handbook.If designers have questions about this rather specialised area of storage, they can contact CLEAPSSon the Helpline quoting the name of the school or local authority they are working for.
An indoor store is sufficient for most schools and colleges. By placing it so that is opens off thepreparation room, security is enhanced and manual handling problems are reduced. An indoor store willrequire a fire-resistant cupboard to hold a maximum of 50 litres of highly flammable liquids, which willbe sufficient for most schools.
Flammables cupboards must conform to data found inAppendix 2 of The Storage Of Flammable Liquids. Typicalexamples are shown on the right. Amongst therequirements are at least 30 minute fire integrity, class 0surface spread of flame, fastenings that have a meltingpoint greater than 750 °C and sufficiently durable that anyspillages within the cabinet can be contained and removedwithout affecting fire resistance.

48
The following extract, relating to the ventilation of chemical stores, is taken from Ventilation In SchoolBuildings, BB101, which states;
“Chemicals should preferably be stored in a dedicated chemical store room. As these are notoccupied for significant lengths of time, a ventilation rate of 2 ach (air changes per hour) shouldsuffice. Storerooms with well-sealed fire doors can preclude inward make-up air to replaceexhausted air. This problem may also arise to a lesser extent with modern laboratories and preprooms with highly sealed windows. Pathways for make-up air, and the location of intakes inrelation to outlets, therefore need to be considered carefully. It is sometimes possible to fitgrilles, even in fire doors.”
Chemical storerooms should have at least one outside wall.
The light switch for a chemical store should be located outside the room and the fan should be fittedwith a time switch. Whether spark-proof electrical fittings should be used in chemical stores holdinghighly flammable chemicals is discussed more fully in section 7 of the Laboratory Handbook. However,If no dispensing is carried out, the risk of explosions is minimal and no spark-proofing is required. Evenif a little dispensing were to be carried out, it can be argued that any release of vapour would neverreach a level that could cause a problem.
It is not recommended that chemicals should be stored in the preparation room fume cupboard.However, a lockable cupboard placed underneath the fume cupboard and connected by a vent pipe canbe used to store substances such as concentrated hydrochloric acid and bromine. It may be advisableto connect a time switch so that this cupboard is vented at regular intervals. Such an arrangement isespecially useful if the school has no separate chemical store and these chemicals have to be kept inthe preparation room where a technician is normally working for the whole day.
External chemical stores are often of prefabricated construction and such units are available withvarious degrees of fire resistance. Under the DSEAR, the following materials are deemed to be ofminimal risk and do not require to be tested further: concrete, fired clay (brick), ceramics, steel,concrete blocks and plaster and masonry containing not more than 1% by weight or volume of organicmaterial. Otherwise, if the building adjoins the school, the building material will need 60 minutes fireresistance.
Whether internal or external, flammable-liquid stores should be particularly carefully sited, accountbeing taken of the need to:
• maintain escape routes in a fire,
• ensure that, in the interests of safe handling, dangerous chemicals should be kept as near aspossible to the laboratories in which they are most likely to be used,
• prevent access by vandals, and
• shade from direct heating by the Sun.
Heating for frost and condensation protection is desirable in external stores (e.g. with a thermostat setto 10 °C) and the cost of this is one of the major arguments against an external site.
Windows should be avoided; they are not permitted on internal walls (i.e. walls common to a mainbuilding and an external store) and are not advisable for security reasons on external walls.
A single door is preferable unless the store is very large (for a school) in which case more exits may berequired for fire safety. Doors should open outward and it should not be possible for somebody to beinadvertently locked inside the store. The entrance to the store should be ramped so that a trolley canbe wheeled in.
Much is made of containment but the probability of catastrophic destruction of all containers in the storeis extremely remote. If the free floor space is 3 m by 2 m and a full 25-litre drum suddenly leaks thenthe depth of the spill is less than 0.5 cm. If the floor slopes slightly to the centre then the spill will collect

49
in an accessible place (not a drain) and can possibly be dealt with using the spill kit that is kept insidethe store (staff should not put themselves at risk when dealing with the spill of a hazardous chemical).
There needs to be provision for a small store cupboard for radioactive sources. This should be in anarea not permanently occupied by any one person but also not in the same room as the cupboard forhighly flammables.
Small schools such as Pupil Referral Units, middle schools and prep schoolsThere may be so little room for storage in the prep room areas that the chemicals have to be stored inthe laboratory where children work. In this case, all cupboards in the laboratories must be locked afteruse. In very small schools that have just one laboratory, no prep room and use a limited number ofchemicals, this may be the only option. For these, there must be a small secure flammables cabinet,secure storage for corrosives and at least one other secure cupboard for the other chemicals. If storageis even more limited, the school can purchase diluted acids instead of preparing their own, thus doingaway with the secure storage for corrosives.
EquipmentAlso see Guide L248a, Running a Prep Room, section 6.2.
Commonly used equipment such as Bunsen burners, tripods, gauzes, heat-proof mats etc, along withbasic eye protection, are best kept in the laboratories. Whether glassware should be kept inlaboratories is a matter of departmental preference but technicians often complain that dirty and soiledglassware is left behind in laboratory storage cupboards after practical work. On the other hand, someapproaches to science teaching require that pupils select the equipment they need from a rangeavailable.
If (some of) the laboratories and the preparation room are not on the same floor then more equipment,especially that which is heavy, may need to be stored out of the preparation room. For instance,microscopes, masses and rocks can be stored in specific laboratories to which pupils will come ratherthan the technician moving these heavy objects to separate laboratories on different floors. Havingaccess to a hoist or lift between floors would help to address this problem.
Storage in the preparation room can either be static, mobile or rolling. Rolling storage, with the shelvesmoving on rails by turning a wheel, is particularly useful if space is at a premium. It is, however,expensive and upper floors may need to be designed, or reinforced, to be stronger than a standardfloor. The shelving depth should be between 450 and 650 mm. A large array of removable tray storagecan look impressive but will not be suitable for all the items needed to be stored. Shelves and/orcupboards are needed for large, long and bulky items.
Various tray racking systems are available with simple shelves, wire baskets or colourful plasticcontainers of various sizes that can be moved to a trolley quite easily. The trolleys supplied with suchsystems typically have small wheels and are unsuitable for carrying materials over rough surfaces.
Finally, if wall space is not a problem, consideration should be given to a suspended system where atrack is fixed to the wall and shelving units, cupboards, panels and whiteboards are suspended from it.
TrolleysEquipment trolleys are an essential item of the preparation room. Ideally, two trolleys should beprovided per laboratory (plus one for the preparation room). This allows for one trolley to be in thelaboratory (with delivered equipment) and the other in the preparation room (with returned materialsand those awaiting delivery). They can be used for storage but more importantly they should be usedby technicians for moving equipment from room to room instead of carrying it. Where equipment andmaterials need to be carried from one site to another across playgrounds etc, trolleys should havelarger and more robust wheels.

50
ShelvingThere is no reason why shelving, even in the chemical store, should not be made of wood. Steel andaluminium fixings do show signs of corrosion after a few years especially in the chemical store andshould be inspected annually. There is no reason to have lips on shelves. Bottles have been broken byhitting the glass on the lip.
The height of shelving should not exceed 2000 mm. Light articles stored at this height should only beused on very rare occasions. Even so, stepladders will be required. Heavy objects (in excess of 10 kg),including piles of books and paper, should be stored between 800 and 1100 mm from the floor. Seealso section 7 of the CLEAPSS Laboratory Handbook.
7.5 The greenhouse and animal houseA greenhouse is a very valuable asset to a science department. It should be sited in a safe placebecause vandalism could be a problem. It could be bought from a local garden centre and erected byexperienced workers who will probably have it built within a day. Further information can be found insection 14 of the CLEAPSS Laboratory Handbook. However, there are advantages in having agreenhouse that is an integral part of the building, e.g. adjacent to the preparation room. Not only is itconvenient for technician use but also it is likely to be much less subject to vandalism.
Advice from the DfEE suggests that animals should be kept in a separate room to the preparation room.However, provision of a separate animal room is rarely justified nowadays. If animals are kept, andthere are good reasons for doing so, particular attention will need to be paid to ventilation and variationsin temperature.

51
Appendix 1 ReferencesGovernment PublicationsAsset Management Plans. Section 1Framework, DfEE, 1999.
Available from DfEE Publications Centre, PO Box 5050, Sudbury, SuffolkCO10 6ZQ; tel 0845 602 2260; fax 0845 603 3360.
Building Bulletin 80: ScienceAccommodation in SecondarySchools. A Design Guide, SchoolBuilding and Design Group, DfES,revised 2004.
www.teachernet.gov.uk/_doc/6152/BB%2080_19.pdf
This is a very comprehensive and essential publication, particularly usefulfor suggested layouts, etc. Gives helpful guidance on costs, although thefigures may become out of date as time goes by. CLEAPSS considers thatthere is too much emphasis placed on flexible or adaptable furniture andnot enough on low-cost and easy maintenance.
Building Bulletin 87: Guidelines forEnvironmental Design in Schools,DfES, 2nd Edition 2003. SchoolBuilding and Design Group.
This can be downloaded fromwww.teachernet.gov.uk/docbank/index.cfm?id=4753.
This is a useful document as it provides useful advice based upon TheEducation (School Premises) Regulations 1999.
Building Bulletin 88: FumeCupboards in Schools, DfEEArchitects and Building Branch.
This publication can only be purchased through The Stationery Office at acost of £14.95 (1998; £14.95; ISBN 0112710271), however a low resolutionversion with very low resolution images can be downloaded fromhttp://publications.teachernet.gov.uk/default.aspx?PageFunction=productdetails&PageMode=publications&ProductId=0112710271&
This is a revision of the previous publication, Design Note 29, FumeCupboards in Schools, published in 1982 and based on research carriedout by CLEAPSS. The DfEE commissioned CLEAPSS to write itssuccessor, although there were subsequently some minor modifications.Design Note 29 was the normal specification for school fume cupboardsand its relevance to schools is acknowledged in the British Standard onfume cupboards. Building Bulletin 88 does not significantly change thestandard of Design Note 29, it merely expands on it and clarifies itsmeaning.
Building Bulletin 90: Lighting Designfor Schools, DfEE Architects andBuilding Branch, 1997.
In section 5.3 it includes only a brief reference to science laboratories andpreparation rooms. Amongst other things, it makes the point that goodlighting helps avoid accidents. It suggests that bench tops should have amatt surface and be lighter in colour, although the latter may be vulnerableto chemical stains.www.teachernet.gov.uk/docbank/index.cfm?id=8413
The Stationery Office (TSO) ISBN: 0112710417. Price: £22.95.
Building Bulletin 93: Acoustic Designof Schools, DfES School Buildingand Design Group.
Published in 2003. Guidance is provided on controlling outside noise suchas rain on the roof, aircraft and road noise, moving chairs from the roomabove etc.
www.teachernet.gov.uk/management/resourcesfinanceandbuilding/schoolbuildings/environ/acoustics/
Building Bulletin 98: Area Guidelinesfor Schools, DfES, 2004.
Suggests 1 laboratory per 150 pupils as a rule of thumb. Gives furtherguidance on area when dealing with sixth forms. It uses a max of 30 pupilsfor each laboratory.
www.teachernet.gov.uk/docbank/index.cfm?id=8104
Building Bulletin 100: Design for FireSafety in Schools, DfES SchoolBuilding and Design Group
ISBN 9781859462911 is available at £19.95 from RIBA Bookshops (MailOrder Office), 15 Bonhill Street, London, EC2P 2EA, UK;tel: 020 7256 7222 or it can downloaded fromwww.teachernet.gov.uk/docbank/index.cfm?id=12199.
Building Bulletin 101: Ventilation ofSchool Buildings.
Published in 2006. BB101 discusses indoor air quality with examples oftypical pollutants and how to control them in school buildings. It mentionsschool laboratories and prep rooms.
www.teachernet.gov.uk/management/resourcesfinanceandbuilding/schoolbuildings/environ/iaq/

52
Building Bulletin 102: Designing fordisabled children and children withspecial educational needs. Guidancefor mainstream and special schools,DCSF, 2008.
Provides non-statutory design guidance on accommodation for childrenwith SEN and disabilities for special school and mainstream schoolprojects. Also available for download fromwww.teachernet.gov.uk/_doc/13210/BB102.pdf
The Stationery Office (TSO) ISBN: 9780117039346 Price: £25.00
Central Point of Expertise on TimberProcurement's (CPET) (funded byDEFRA).
Go to www.proforest.net/cpet/
Contractors in Schools. Informationfor head teachers, school governorsand bursars, HSE, 1996.
Available from HSE Books, PO Box 1999, Sudbury, Suffolk CO10 6FS;tel 01787 881165; fax 01787 313995.
Fire safety risk assessment:education premises.
Available from Department for Communities and Local GovernmentPublications; tel: 0870 830 7099, ISBN 139781851128198 andISBN 101851128190; and also available onwww.firesafetyguides.communities.gov.uk,
Furniture and Equipment in Schools:a Purchasing Guide: ManagingSchool Facilities, Guide 7.
This publication discusses specification issues although there is not a lotabout science.
www.teachernet.gov.uk/docbank/index.cfm?id=5641
Gas Safety (Installation and Use)Regulations. Approved Code ofPractice and Guidance, L56, 1998.
HSE Books ISBN 0717616355
Manual Handling. Guidance on theRegulations, HSE Books, 1998.
Available from PO Box 1999, Sudbury, Suffolk CO10 6FS;tel 01787 881165; fax 01787 313995.
Northern Ireland. Department ofEducation School Building Handbook(Section 4)
Provides advice and guidance on the planning and design of new schoolbuildings and the relevant standards. Should be used in conjunction withthe Approved Schedule of Accommodation provided by the Department ofEducation.
www.deni.gov.uk/index/85-schools/13-schools_estates_pg/13-content-buildinghandbook.htm
Northern Ireland. DENI circular No2005/5
Provides guidance on permitted class sizes in practical subjects.
Project Faraday. Exemplar designsfor science.
Project Faraday’s main objective is to develop exemplar designs to informand inspire all those involved in renewing or refurbishing their sciencefacilities, particularly those involved in major capital programmes such asBuilding Schools for the Future (BSF) and Academies. It can either bepurchased in paper form or downloaded from the teachernet web site. Inpaper: ISBN 9780112711971, TSO; tel: 0870 600 5522. Via the internet onwww.teachernet.gov.uk/management/resourcesfinanceandbuilding/schoolbuildings/innovativedesign/Faraday/
The Dangerous Substances andExplosive Atmospheres Regulations(DSEAR) 2002
Available from www.opsi.gov.uk/si/si2002/20022776.htm.
Schools are mentioned in DSEAR as a vulnerable audience.
The Education (School Premises)Regulations 1999, SI No 2.
This sets the basic legal requirements of the working conditions in a school.It says nothing about science laboratories.
www.opsi.gov.uk/si/si1999/19990002.htm
The Storage Of Flammable LiquidsHSG51.
HSE books ISBN 0717614719, although published under the previousRegulations, is still the basis of current advice.
Water Supply (Water Fittings)Regulations 1999, SI 1148.
Go to www.opsi.gov.uk/si/si1999/19991148.htm.These regulations do not apply to fittings in place before 1st July 1999.
Workplace (Health, Safety andWelfare Regulations) 1992.
For glass in doors see ApprovedCode of Practice, Regulation 14paragraphs 147 to 152.
Go to www.opsi.gov.uk/SI/si1992/Uksi_19923004_en_1.
For a short, useful HSE information note on glazing seewww.hse.gov.uk/pubns/indg212.htm.

53
Relevant CLEAPSS Publications
CLEAPSS Laboratory Handbook. Many sections of the Handbook deal with aspects of laboratory design,either directly or by implication. Section 7 has details on the storage ofchemicals which, on application, can be sent to architects or bursars as aseparate entity. Section 8, Laboratories, is also relevant, although much ofthe chapter is concerned with maintenance and organisation rather thandesign.
L9: Fume Cupboards: Suppliers andRepairers.
Provides some advice on choosing fume cupboards but mainly informationon suitable models for schools which meet the requirements of DfEEBuilding Bulletin 88: Fume Cupboards in Schools.
L77 Science for Secondary-agedPupils with Special EducationalNeeds (January 2000).
Mainly about curriculum matters, but some references to adaptationsneeded.
L221 Developing and UsingEnvironmental Areas in SchoolGrounds (December 1998).
A lengthy guide that discusses the curriculum value of such areas, thefacilities needed and issues of health, safety and maintenance.
PS9 Science Class Sizes,Laboratory Sizes and PossibleEffects on Safety (2004).
The main emphasis is on class size and risk assessment, not on the designof laboratories.
PS24 Automatic dishwashers inschool and college laboratories(March 2003).
Reports the results of a survey of schools that have used mostly domesticdishwashers in science preparation rooms.
Association for Science Education Publication
Laboratory design for teaching andlearning, Association for ScienceEducation, 2004.
www.ase.org.uk/ldtl/This is a web site from which many useful documents can be downloaded.The case study information is interesting but the design programme is slow.
Topics in Safety, 3rd Edition, (2001). Topic 6 is entitled Laboratory design for health and safety. It summarisessome of the choices you have to make and also deals with chemicalstorage. Topic 7 is on fume cupboards.

54
Other Publications and resourcesPublications by official bodes are very expensive with much detail and ‘in house’ jargon which theteachers and senior management will not understand without a lot of detailed study. They are notrequired to be bought by the schools but the school ought to expect that the architect and designerknow about them.
BS 5482-1:2005, Code of practicefor domestic butane- and propane-gas-burning installations.
This is for installations at permanent dwellings, residential park homes andcommercial premises, with installation pipework sizes not exceeding DN 25for steel and DN 28 for corrugated stainless steel or copper BSI.ISBN 0580447472.
BS EN 14056. Laboratory furniture –Recommendations for design andinstallation.
This is for the suppliers and installers. The space-distances betweenwalls and benches and between benches is contained in this document.
Available from British Standards Institution: Chiswick High Road, LondonW4 4AL; tel: 020 8996 9001; fax: 020 8996 7001; e-mail: [email protected];web site: www.bsi.org.uk.
Gas Installations for EducationalEstablishments.
IGE/UP/11, Communication number 1704, ISBN 0717700682. Thisprovides information about the gas piping and gas cut-offs in school rooms,ISBN 0717700682, available from the International Institution of GasEngineers, Chanwood Wing, Holywell Park, Ashby Road, Loughborough,LE11 3GH; email: [email protected] web site: www.igem.org.uk.
Guide to non-domestic gaspipework installation standards.
IGE/UP/2 Edition 2 – 2008, Communication number 1729. Thisdocument gives practical guidance to gas operatives when engaged ininstalling gas pipework used in the non-domestic sector. It providesguidance on flexible hoses.
LPGA Code of Practice 1: BulkLPG Storage at Fixed Installations,1998. Code of Practice 7, Storageof full and empty LPG cylindersand cartridges, LPG Association,1998.
Publications available from The LP Gas Association, Unit 14, BowCourt, Fletchworth Gate, Burnsall Road, Coventry, CV5 6SP;email: [email protected]; web site: www.lpga.co.uk.
Requirements for ElectricalInstallations: IEE WiringRegulations, BS7671:2008, ISBN:9780863418440, £65.
This specialist document provides guidance for the electriciansinstalling the wiring for the laboratory and protection from electric shock.See www.theiet.org/publishing/books/wir-reg/17th-edition.cfm.
SLL LIGHTING GUIDE 10:Daylighting and window design.
1999, ISBN: 0900953985, The Chartered Institution of Building ServicesEngineers (CIBSE).
The International Book of Wood,Edited by M Bramwell
Mitchell Beazley, 1976 ISBN-10: 0855330813;ISBN-13: 978-0855330811.
Timber Trades Federation. An organisation which supports the sourcing and using of timber in theUK. Web site www.ttf.co.uk. For a list of suppliers of iroko use:www.ttf.co.uk/buying/products/products.asp?productid=23.
Wood Preservation. Author Barry ARichardson.
Taylor & Francis; 2 edition (4 Mar 1993) ISBN-10: 0419174907ISBN-13: 978-0419174905.

55
Appendix 2 Model science suite / laboratory specificationThe following is a model specification for a science department. It is based on documents supplied byseveral local authorities. It will need adapting to the needs of particular schools, especially if only onelaboratory is to be provided, rather than a suite. Some situations will require compromises, especiallywhere existing accommodation is to be adapted. However, the model specification will serve as a usefulchecklist to ensure nothing is forgotten. It also illustrates the level of detail needed to ensure that youobtain exactly what you want. Some parts are in square brackets indicating that the contents of thebrackets may be additions or amendment. In one or two cases two such sections provide alternativeswhere one should be deleted. Where we thought it helpful we have offered suggested values butelsewhere the space between the bracket is left blank for the reader to insert appropriate numbers. Thisappendix needs to be read in conjunction with the main chapters of this guide and, in places, with otherpublications, particularly in Northern Ireland, with the DENI School Building Handbook.
Members can obtain a customisable version of this appendix (known as DL14) from the CD-ROM or theCLEAPSS web site.
General1. The floor area of each laboratory should be 85 to 95 m2.
2. All the laboratories on the same floor, serviced by a central preparation room and store. [Iflaboratories are not on the ground floor, then a service lift (hoist) should be provided.]
3. All laboratories should be general purpose, i.e. not specifically biology, chemistry, physics,although a few will have specialist facilities [e.g. blackout or one or more fume cupboard(s)].
4. A ducted fume cupboard to be provided in the preparation room. This fume cupboard needshave a corrosion-resistant, ventilated cupboard beneath it, for the storage of fuming or volatilechemicals.
5. Fume cupboards to be provided in 33 to 50% of the laboratories. In the teaching laboratories,fume cupboards should be glazed all round and sufficiently mobile that they can be pulledaway from the wall for demonstration purposes. If there is a 6th form, one laboratory willrequire 2 or 3 fume cupboards, depending upon pupil numbers. Fume cupboards should notbe located in corners, nor near doors where drafts might upset air flow. Guidance in BuildingBulletin 88 about siting and specification is to be followed.
6. Telephones should be provided both in the preparation room and in the science departmentoffice.
7. Access to the school computer network to be provided in all teaching laboratories, in thepreparation room and in the science department office.
8. There should be good ventilation, with at least 6 air changes per hour in teaching laboratoriesand preparation rooms.
9. Window opening mechanisms should be easily reached, without having to climb on benchesetc.
10. Floors should be level, with no steps and, if possible, no ramps. Floors to be covered with adurable material and, if appropriate, non-slip.
11. Very early in the design process a risk assessment is needed for each laboratory and preproom to determine whether a second exit is needed in case of fire.
12. A good general level of illumination is required, around 300 lux. In addition, where close ordetailed work is carried out, e.g. in the preparation room, task lighting should be provided.
13. Furniture, and its purchase, should comply with the principles in Furniture and Equipment inSchools: a Purchasing Guide: Managing School Facilities, Guide 7.
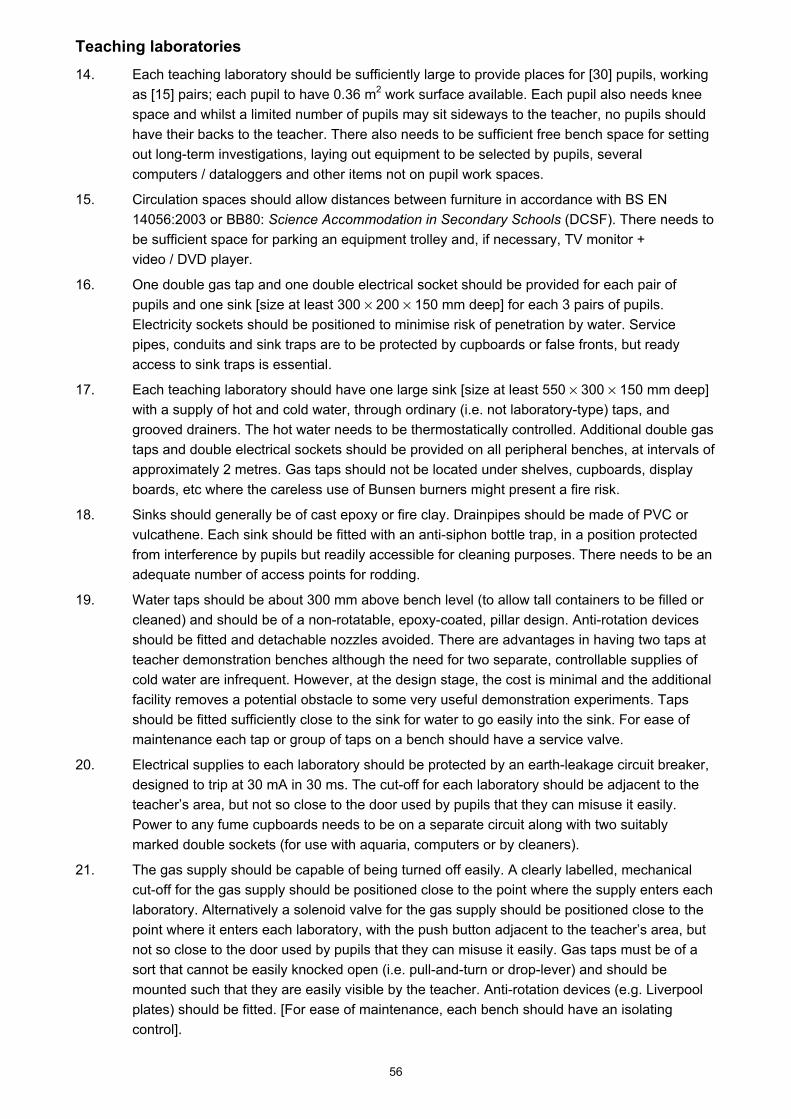
56
Teaching laboratories14. Each teaching laboratory should be sufficiently large to provide places for [30] pupils, working
as [15] pairs; each pupil to have 0.36 m2 work surface available. Each pupil also needs kneespace and whilst a limited number of pupils may sit sideways to the teacher, no pupils shouldhave their backs to the teacher. There also needs to be sufficient free bench space for settingout long-term investigations, laying out equipment to be selected by pupils, severalcomputers / dataloggers and other items not on pupil work spaces.
15. Circulation spaces should allow distances between furniture in accordance with BS EN14056:2003 or BB80: Science Accommodation in Secondary Schools (DCSF). There needs tobe sufficient space for parking an equipment trolley and, if necessary, TV monitor +video / DVD player.
16. One double gas tap and one double electrical socket should be provided for each pair ofpupils and one sink [size at least 300 × 200 × 150 mm deep] for each 3 pairs of pupils.Electricity sockets should be positioned to minimise risk of penetration by water. Servicepipes, conduits and sink traps are to be protected by cupboards or false fronts, but readyaccess to sink traps is essential.
17. Each teaching laboratory should have one large sink [size at least 550 × 300 × 150 mm deep]with a supply of hot and cold water, through ordinary (i.e. not laboratory-type) taps, andgrooved drainers. The hot water needs to be thermostatically controlled. Additional double gastaps and double electrical sockets should be provided on all peripheral benches, at intervals ofapproximately 2 metres. Gas taps should not be located under shelves, cupboards, displayboards, etc where the careless use of Bunsen burners might present a fire risk.
18. Sinks should generally be of cast epoxy or fire clay. Drainpipes should be made of PVC orvulcathene. Each sink should be fitted with an anti-siphon bottle trap, in a position protectedfrom interference by pupils but readily accessible for cleaning purposes. There needs to be anadequate number of access points for rodding.
19. Water taps should be about 300 mm above bench level (to allow tall containers to be filled orcleaned) and should be of a non-rotatable, epoxy-coated, pillar design. Anti-rotation devicesshould be fitted and detachable nozzles avoided. There are advantages in having two taps atteacher demonstration benches although the need for two separate, controllable supplies ofcold water are infrequent. However, at the design stage, the cost is minimal and the additionalfacility removes a potential obstacle to some very useful demonstration experiments. Tapsshould be fitted sufficiently close to the sink for water to go easily into the sink. For ease ofmaintenance each tap or group of taps on a bench should have a service valve.
20. Electrical supplies to each laboratory should be protected by an earth-leakage circuit breaker,designed to trip at 30 mA in 30 ms. The cut-off for each laboratory should be adjacent to theteacher’s area, but not so close to the door used by pupils that they can misuse it easily.Power to any fume cupboards needs to be on a separate circuit along with two suitablymarked double sockets (for use with aquaria, computers or by cleaners).
21. The gas supply should be capable of being turned off easily. A clearly labelled, mechanicalcut-off for the gas supply should be positioned close to the point where the supply enters eachlaboratory. Alternatively a solenoid valve for the gas supply should be positioned close to thepoint where it enters each laboratory, with the push button adjacent to the teacher’s area, butnot so close to the door used by pupils that they can misuse it easily. Gas taps must be of asort that cannot be easily knocked open (i.e. pull-and-turn or drop-lever) and should bemounted such that they are easily visible by the teacher. Anti-rotation devices (e.g. Liverpoolplates) should be fitted. [For ease of maintenance, each bench should have an isolatingcontrol].

57
22. Each laboratory needs a teacher’s area equipped with gas, water and electricity services, awhite board for writing, an interactive whiteboard or screen for a projector, space, if necessary,for the projector and for a computer, work surface (with knee space) and lockablecupboard / drawers. Space may also need to be provided for a trolley with a large TV monitorand video / DVD. The teacher also requires some book shelves close by.
23. Full blackout is required in [some] laboratories (which should be ones which do not have afume cupboard). Other laboratories require dim out only. This should be provided by rollerblinds or slatted blinds, running in slots. Blinds must be non-flammable and should notinterfere with ventilation arrangements. It must be possible to reach the operating mechanismeasily, without having to climb on benches etc.
24. There should be provision for hanging coats and storing pupils’ bags for [30] pupils (fewer inNorthern Ireland).
25. [Each laboratory should have a simple plumbed-in eye wash station] / [Where a sink is to beused for eye washing there should be a sufficiently large bench or table adjacent so that thecasualty can lie on this, if necessary, whilst rinsing takes place. Taps should be positioned soas not to interfere with the irrigation process].
26. Furniture should comprise fixed benches around the walls, with […] tables / service pedestals /octagonal units, all at a height of 900 mm. Where pedestals / tables are used, distancesbetween pedestals should be an exact multiple of the dimensions of the table, so that longruns can be created. Bench tops should be made of …, with a drip groove under the edges. Inaddition, there should be one adjustable height, fully serviced table (for use by those in wheelchairs).
27. Allowing for knee spaces, if required, and access to sinks, cupboards (with drawers / shelves /tray racks) should be fitted under fixed benches, with the cupboards mounted on plinths.There should also be […] wall-mounted, lockable, glass-fronted cupboards. There should be[…] wall-mounted, (lockable) cupboards with wooden doors and […] book shelves. Except forsliding doors, all cupboard doors should be fitted with 270° hinges.
28. Large display boards should be fitted on walls not carrying cupboards, bookshelves orwindows.
29. Each laboratory should have clearly labelled fire-fighting equipment as agreed with the fireofficer – preferably two 2 kg carbon dioxide extinguishers and one fire blanket, to be locatedadjacent to the teacher’s base, but not adjacent to the door used by pupils.
30. Each laboratory should have […] (plastic-seated / wooden-seated / wood) stools for all pupils,the teacher and at least one visitor. Heights of stools shall be such as to leave a gap of250 mm between the stool top and the underside of the bench.

58
Preparation and storage areas, etc31. The total area of preparation room + store room(s) should be [0.4 to 0.5] m2 for each pupil
place provided (i.e. 15 m2 for each 30-pupil laboratory; in Northern Ireland, 20 m2). Of this, 25to 30% should be work area, 20 to 30% fixed storage (including the chemical store), 10%mobile (trolley) storage and the remainder circulation space. The chemical store room doormust be lockable and, if practicable, open directly off the preparation room. Other storeroomsshould at least be adjacent to the prep room.
32. Facilities in the prep room should include: a ducted fume cupboard, washing-up area with hotwater and large sink [size at least 600 × 400 × 250 mm] made of […], a plumbed-in, domestic-type dishwasher, practical work area (adjacent to sink with water purifier[still / de-ioniser]), refrigerator, freezer [or combined fridge / freezer], gas and electricityservices, parking space for trays of completed and/or returned preparations (could be onbenches or on racking), space for parking at least 1 trolley per laboratory + 1, storage spacefor items for immediate use (e.g. tools), long-term storage space (depending on the provisionof separate store rooms) and an office work area (with telephone, computer, book shelves,filing cabinet, place for personal effects). Some, or all, of the bench surface in the preparationarea may need to be impervious if microbiological work is to be carried out there.
33. The chemical store should be ventilated with an extraction system fitted using an acid-resistant fan and operating on a time switch that can be over-ridden. If the chemical store is tobe used for dispensing highly flammable liquids, switches should be outside the storeroom.The chemical store should contain a highly flammable liquids cupboard (capacity 50 litres),[…] lockable wooden cupboards (for extra security), and shelves covering the remainingspace. Shelving should be adjustable for height, mostly about 150 mm deep, but the bottomtwo rows should be about 200 mm deep. Along one wall there should be a plinth to store largebottles and a bund or sill to contain spills from them. (For an 11 - 18 school, approximately44 m of chemical storage is needed, including any in cupboards or in the preparation room;26 m is generally adequate for a school without a sixth form.)
34. The main storage should consist of a mixture of tray racks (compatible with the trolleys to beused), shelves and cupboards.
35. The teaching staff office should include work places for […] teachers, […] standard filingcabinets and […] computer work stations.
36. A greenhouse, with a floor area of approximately [ … ] m2 should be provided, if possibleopening off, or adjacent to, the preparation room. If south-facing, it should have roller-blindshades and a means of (automatically) opening windows for use during summer months. Itshould be glazed on three sides or one side if it has roof glazing, with the glazing extending tofloor level. Heating should operate independently of the school heating during winter months,and preferably be thermostatically controlled. If possible, fan heating should be provided sinceair circulation is desirable, otherwise tube heating should be provided. A piped water supply isdesirable, with provision for a tap and connection to an automatic watering system, e.g.capillary matting reservoir tank. At least two waterproof electrical sockets should be provided.Standard 300 lux light fittings will be needed for staff, and additional lighting (11,000 to21,500 lux) is desirable especially for successful plant growth in north-facing locations. Thereshould be provision for suitable staging / benches for plant trays / propagators, permittinghousing of plants to floor level if glazing is to this height.