fdot 2014 cctv pole placement design · pdf filecctv cabinet on pole. clear zone shall be...
TRANSCRIPT

4’ Min.
Travel LaneTravel Lane
12’ 12’
24’
Travel Lane Travel Lane
12’12’
24’ See Note 2
TYPE BTYPE A
GENERAL NOTES:
�
greater than or equal to minimum clear zone requirements.
Distance must be in accordance with project design documents and 2.
drilled shaft if drilled shaft is more than 4" above adjacent grade.
CCTV cabinet on pole. Clear zone shall be measured to the edge of
For location where pole foundation is lower than roadway, mount 1.
CCTV POLE PLACEMENT
07/01/07 1 1 18100
6/24/2013
4:1
2:3
3 P
M
RE
VISIO
N
C:\
d\projects\standards\its\18000-s\18100-01.d
gn
NO.
SHEET
NO.
INDEX
sm
970re
DESCRIPTION:
REVISION
LAST
of DESIGN STANDARDS
FDOT 2014
Guardrail
CabinetShoulderExisting Grade Cabinet
�

TYPICAL CCTV SITE
07/01/13 1 1 18101
6/24/2013
4:1
2:3
4 P
M
RE
VISIO
N
C:\
d\projects\standards\its\18000-s\18101-01.d
gn
NO.
SHEET
NO.
INDEX
sm
970re
DESCRIPTION:
REVISION
LAST
of DESIGN STANDARDS
FDOT 2014
Dome Type CCTV Camera
(See Index 18107)
For Ground Mounted Cabinet
(See Index 18108)
For Pole Mounted Cabinet
(See Index 18107)
For Ground Mounted Cabinet
Concrete Concrete
Dome Type CCTV Camera
(See Index 18108)
For Pole Mounted Cabinet
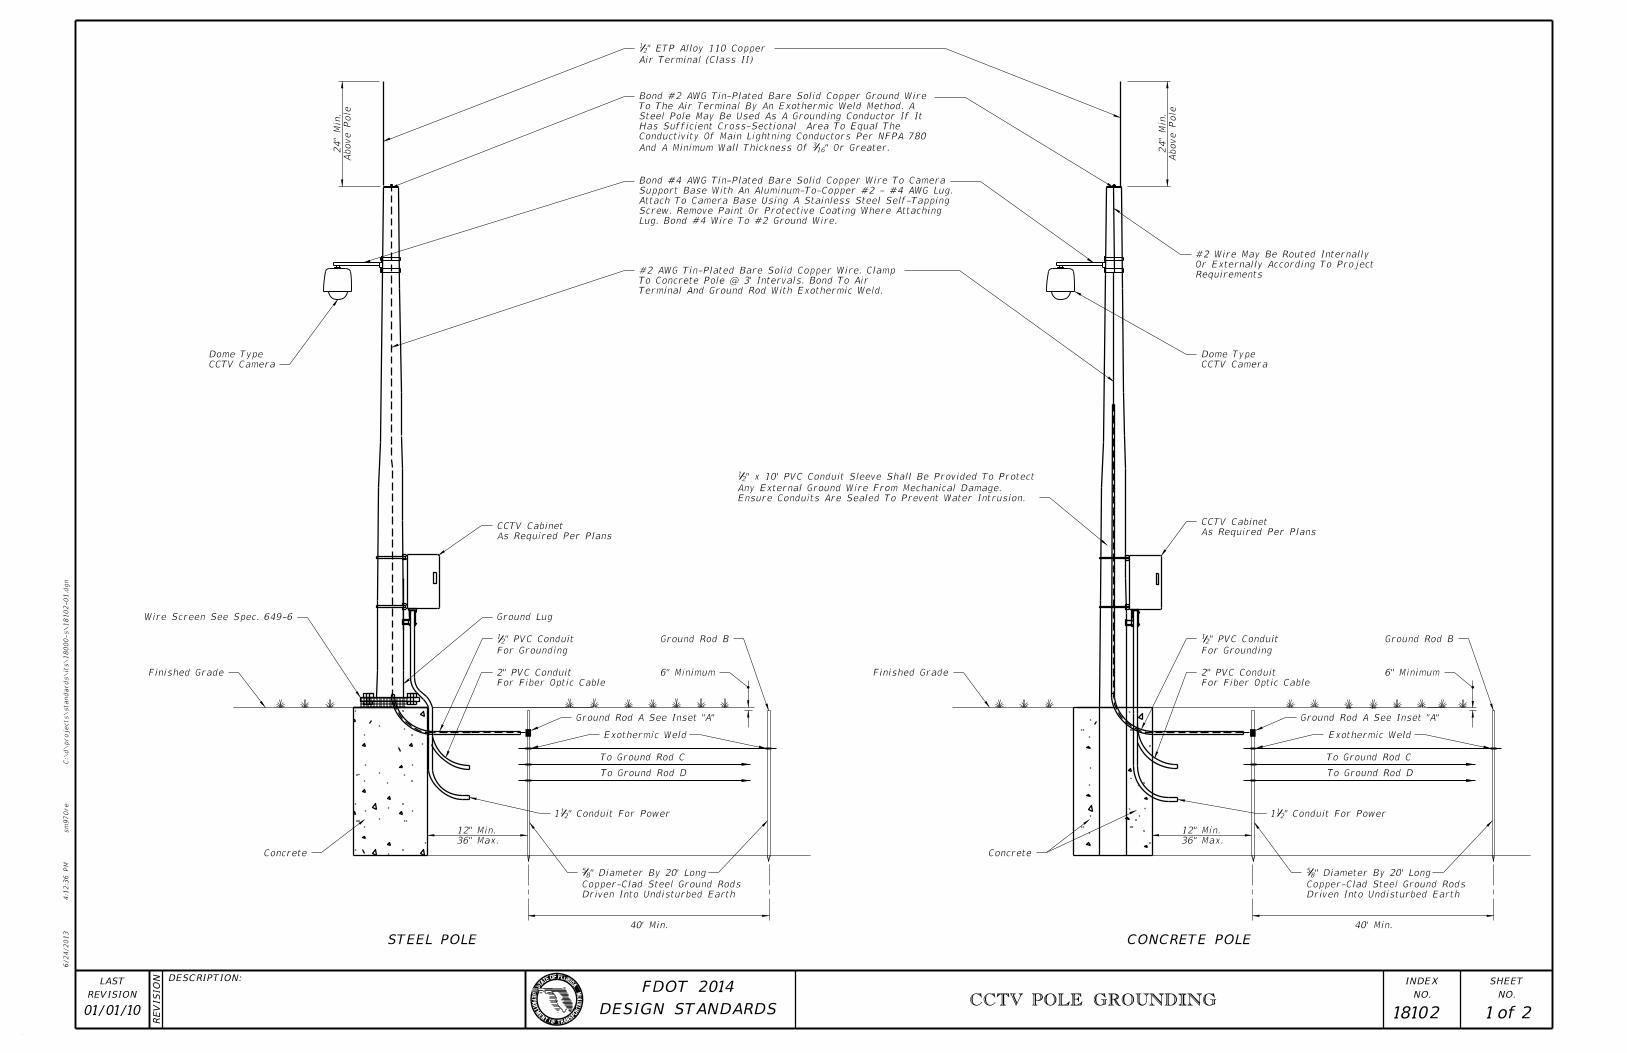
For Grounding (See Index 18102)For Grounding (See Index 18102)
CCTV CabinetCCTV Cabinet
CONCRETE POLESTEEL POLE
To Ground Rod C
To Ground Rod D
Above Pole
24"
Min.
36" Max.
12" Min.
To Ground Rod D
To Ground Rod C
CONCRETE POLESTEEL POLE
40’ Min.40’ Min.
36" Max.
12" Min.
Above Pole
24"
Min.
CCTV POLE GROUNDING
01/01/10 1 2 18102
6/24/2013
4:1
2:3
6 P
M
RE
VISIO
N
C:\
d\projects\standards\its\18000-s\18102-01.d
gn
NO.
SHEET
NO.
INDEX
sm
970re
DESCRIPTION:
REVISION
LAST
of DESIGN STANDARDS
FDOT 2014
Concrete
Driven Into Undisturbed Earth
Copper-Clad Steel Ground Rods
" Diameter By 20’ Long85
Driven Into Undisturbed Earth
Copper-Clad Steel Ground Rods
" Diameter By 20’ Long85
Concrete
Exothermic Weld
Ground Rod A See Inset "A"
" Conduit For Power211 " Conduit For Power2
11
Exothermic Weld
Ground Rod A See Inset "A"
For Grounding
" PVC Conduit 21
For Fiber Optic Cable
2" PVC Conduit
As Required Per Plans
CCTV Cabinet
CCTV Camera
Dome Type
Requirements
Or Externally According To Project
#2 Wire May Be Routed Internally
6" Minimum
Ground Rod B
Finished Grade
Wire Screen See Spec. 649-6 Ground Lug
For Fiber Optic Cable
2" PVC Conduit 6" Minimum
Ground Rod B
Finished Grade
CCTV Camera
Dome Type
Air Terminal (Class II)
" ETP Alloy 110 Copper21
Ensure Conduits Are Sealed To Prevent Water Intrusion.
Any External Ground Wire From Mechanical Damage.
" x 10’ PVC Conduit Sleeve Shall Be Provided To Protect 21
Terminal And Ground Rod With Exothermic Weld.
To Concrete Pole @ 3’ Intervals. Bond To Air
#2 AWG Tin-Plated Bare Solid Copper Wire. Clamp
Lug. Bond #4 Wire To #2 Ground Wire.
Screw. Remove Paint Or Protective Coating Where Attaching
Attach To Camera Base Using A Stainless Steel Self-Tapping
Support Base With An Aluminum-To-Copper #2 - #4 AWG Lug.
Bond #4 AWG Tin-Plated Bare Solid Copper Wire To Camera
" Or Greater.163And A Minimum Wall Thickness Of
Conductivity Of Main Lightning Conductors Per NFPA 780
Has Sufficient Cross-Sectional Area To Equal The
Steel Pole May Be Used As A Grounding Conductor If It
To The Air Terminal By An Exothermic Weld Method. A
Bond #2 AWG Tin-Plated Bare Solid Copper Ground Wire
As Required Per Plans
CCTV Cabinet
For Grounding
" PVC Conduit 21

CCTV POLE GROUNDING
07/01/07 2 2 18102
6/24/2013
4:1
2:3
8 P
M
RE
VISIO
N
C:\
d\projects\standards\its\18000-s\18102-02.d
gn
NO.
SHEET
NO.
INDEX
sm
970re
DESCRIPTION:
REVISION
LAST
of DESIGN STANDARDS
FDOT 2014
Wire Continuous To Air Terminal
#2 AWG Tin-Plated Bare Solid Copper
Rods B, C And D As Required
Solid Copper Wire To Ground
#2 AWG Min. Tin-Plated Bare
Wire To Electrical Service Ground
#6 AWG Tin-Plated Bare Solid Copper
Main Ground Rod A
Ground Rod DGround Rod B
Ground Rod C
Bonding Wire Conduit
Handhole
CabinetCCTV
Pole
Air Terminal Down Lead Conduit
Should
er
Travel
Lane
Travel
Lane
(Typical)
120deg
"Sphere Of Influence"
20’ Radius Each
GENERAL NOTES:
GROUND ROD PLACEMENT DETAIL
(Typical Each Pole)
INSET "A"
See Note 1
ORIENTATION OF CONDUITS AND DEVICES ON POLE
Main ground rod to be placed immediately adjacent to pole.9.
Route all camera cables inside arm of mounting bracket.8.
Place ground system within right of way.7.
to meet the ground resistance requirements in the contract documents.
Ground rod A is required. Ground rods B, C and D will be required as necessary 6.
All air terminals must meet UL-96A.5.
All data, coaxial and power cables to the camera shall be completely concealed.4.
depth of 6".
Install marker tape directly above all grounding electrodes and conductors at a 3.
Exothermically weld all connections to ground rods.2.
or equal to minimum clear zone requirements.
Distance must be in accordance with project design documents and greater than 1.

TYPICAL CCTV CABINET EQUIPMENT LAYOUT
07/01/07 1 1 18104
6/24/2013
4:1
2:3
9 P
M
RE
VISIO
N
C:\
d\projects\standards\its\18000-s\18104-01.d
gn
NO.
SHEET
NO.
INDEX
sm
970re
DESCRIPTION:
REVISION
LAST
of DESIGN STANDARDS
FDOT 2014
Air Vent Dual Fans
Air Vent
Threaded Holes
19" EIA Rack With Tapped 10-32
For Equipment
TVSS Protected Outlets
For Portable Tools
GFI Protected Convenience Outlet
(Number Of Outlets - Project Specific)
Ground Bussbar
Primary AC Power Filter,
Service Entrance, Breaker,
Power Distribution Assembly
Video
Data
Power
Protection
TVSS Surge
Full Width And Depth
Area To Remain Clear For
Sliding Drawer
CCTV Interface Panel
Preterminated Fiber Optic Patch Panel
Full Width And Depth
Area To Remain Clear For
And Terminal Server
Ethernet Switch, Video Encoder
Shelf
Full Width And Depth
Area To Remain Clear For
(Number Of Outlets - Project Specific)
Ground Bussbar
Primary AC Power Filter,
Service Entrance, Breaker,
Power Distribution Assembly
Power
Data
Video
Protection
TVSS Surge
Full Width And Depth
Area To Remain Clear For
Sliding Drawer
CCTV Interface Panel
Preterminated Fiber Optic Patch Panel
Full Width And Depth
Area To Remain Clear For
And Terminal Server
Ethernet Switch, Video Encoder
Full Width And Depth
Shelf
Area To Remain Clear For
24"22"
Cabin
et Front 3
6"
RU3
"4
15
"4
15 R
U3
RU1
RU1
RU2
RU1
RU1
RU3
"4
15
"4
31
"4
31
"2
13
"4
31
"4
31
"4
31
"4
31 R
U1
RU1
FRONT VIEWSIDE VIEW
GENERAL NOTES:
Project-specific designs may not include all components illustrated here.
Cabinet layout represents preferred placement of typical devices. 6.
side next to the pole when pole mounted.
There shall be front and rear doors. Both doors shall have the hinged 5.
Conduit entrances are in bottom of cabinet.4.
The minimum CCTV cabinet dimensions shall be 36"H X 24"W X 22"D.3.
All dimensions and scale are approximate.2.
Cabinet layout is for pole or base mounted installations.1.

Single Mode Fiber Optic
Ethernet 100/1000 Base FX
Surge Suppressor
Transient Voltage
Power
Ethernet
Data
TVSS
RS-232
Local Management Port
Access
Maintenance
Terminal Server
Video Encoder Ethernet Switch
Access
Maintenance
10/100 Base TX/RX
Ethernet
RS-232
Local Management Port
Video
Composite
TVSS
CCTV Camera
TVSS
Assembly
Power Distribution
For Portable Tools
Convenience Outlet(s)
GFI Electric Utility
From
AC Service
LEGEND
10/100 Base T
X/R
X
Ethernet
For Equipment Power
TVSS Protection
Serial Data
RS-232/422/485
CCTV BLOCK DIAGRAM
07/01/07 1 1 18105
6/24/2013
4:1
2:4
1 P
M
RE
VISIO
N
C:\
d\projects\standards\its\18000-s\18105-01.d
gn
NO.
SHEET
NO.
INDEX
sm
970re
DESCRIPTION:
REVISION
LAST
of DESIGN STANDARDS
FDOT 2014
Cabinet
Or More Devices
May Be One
Supplies
Power
Optional
Supply
Power
Optional

GENERAL NOTES:
Service Assembly
To Power
CCTV Cabinet
waterproof duct plugs and seals.
All network communications conduits and ducts shall be sealed with approved 6.
See Index 18102 for grounding requirements.5.
pullbox and cabinet are stated in the contract documents.
Sizes and types of conduits and innerducts for network communications between the 4.
devices.
Ensure that all electronic equipment power is protected and conditioned with TVSS 3.
Furnish and install TVSS protection on all video, data, and power cabling in cabinet.2.
Contractor shall splice fiber optic cables in cabinet to preterminater patch panel.1.
GROUND MOUNTED CCTV CABINET
07/01/13 1 1 18107
6/24/2013
4:1
2:4
3 P
M
RE
VISIO
N
C:\
d\projects\standards\its\18000-s\18107-01.d
gn
NO.
SHEET
NO.
INDEX
sm
970re
DESCRIPTION:
REVISION
LAST
of DESIGN STANDARDS
FDOT 2014
Conduits (As Shown On Plans)
Fiber Optic Communications
On Plans)
Conduits (As Shown
Communications
Fiber Optic Power Conduit
#4 AWG Ground Wire
" PVC Grounding Conduit21
Cabinet And Pole
Cabling To Camera Between
2" PVC Conduit For Routing
Fiber Optic Pull Box

POLE MOUNTED CCTV CABINET
07/01/07 1 1 18108
6/24/2013
4:1
2:4
5 P
M
RE
VISIO
N
C:\
d\projects\standards\its\18000-s\18108-01.d
gn
NO.
SHEET
NO.
INDEX
sm
970re
DESCRIPTION:
REVISION
LAST
of DESIGN STANDARDS
FDOT 2014
(As Shown On Plans)
Fiber Optic Communications Conduit
For Grounding
" PVC Conduit21
Conduit
Power
" RGS 211
Fiber Optic Pull Box
Power Conduit To Power Service Assembly
(As Shown On Plans)
Fiber Optic Communications Conduits
(See Detail A)
Pole Mounted Cabinet
(See Detail A)
Pole Mounted Cabinet
For Grounding
" PVC Conduit21Fiber Optic Pull Box
Power Conduit To Power Service Assembly
(As Shown On Plans)
Fiber Optic Communications Conduits
Conduit
Power
" RGS 211
Camera Composite Cable
Type LB 2" For
One Pulling Elbow
Entrance Shall Be Factory Installed
Pole Opening For Cabinet
Stainless Steel Band
Pole Plate With
Camera Cable
Composite
Camera Cable
Composite
Power Service Assembly
Power Into Cabinet From
" RGS Conduit Riser For211
Shown On Plans)
Conduits (As
Communications
For Fiber Optic (1)
" For Power211(1)
Conduit Risers(2)
Cable
For Fiber Optic Drop
2" PVC Conduit Riser
Avoid conflicts with handhole.
as directed by the Engineer.
personnel given site conditions
best access for maintenance
cabinet height to achieve
Field adjust pole-mounted
7. Pole mounted cabinets shall be mounted with hinges next to the pole.
waterproof duct plugs and seals.
6. All network communications conduits and ducts shall be sealed with approved
5. Ensure that equipment cabinet is bonded to CCTV pole grounding system.
the pull box and cabinet are stated in the contract documents.
4. Sizes and types of conduits and innerducts for network communications between
3. Furnish and install secondary TVSS protection on outlets for equipment in cabinet.
2. Furnish and install TVSS protection on all cabling in cabinet.
1. Contractor shall splice fiber optic cables in cabinet to preterminated patch panel.
Cabinet
CCTV
Cabinet
CCTV
SIDE VIEWFRONT VIEW
DETAIL A
GENERAL NOTES:
CONCRETE POLESTEEL POLE
3’
�
*

24’
GENERAL NOTES:
CAMERA LOWERING DEVICE DETAIL
CAMERA MOUNTING WITH LOWERING DEVICE
CAMERA MOUNTING DETAILS
01/01/10 1 2 18110
6/24/2013
4:1
2:4
7 P
M
RE
VISIO
N
C:\
d\projects\standards\its\18000-s\18110-01.d
gn
NO.
SHEET
NO.
INDEX
sm
970re
DESCRIPTION:
REVISION
LAST
of DESIGN STANDARDS
FDOT 2014
For Power, Data And Video
TVSS Surge Protection
Strain Relief Fitting
Assembly And Junction Box)
(Between Lower Contact
Sealing Gasket
Double Support Arms
Guide Pin
Unit Cover
Disconnect
Socket
Connector
Disconnect Unit
EPDM O-Ring Seal
Pulley
Divided Channel Arm
Clamps
U-Bolt
Pole Fitter
Connectors And Camera Wiring
Removable Top Cap
Pole Top Junction Box
Air Terminal Class II
" ETP Alloy 110 Copper 21
Clamps
U-Bolt
Unit Fitter
Disconnect
Contact Connector
Sealing Gasket Ring
Camera Connectors
Pulley
CCTV Lowering Cable
And Stabilizing Weight
Camera Junction Box
And Dome Flange
Camera Mounting Bracket
Assembly
Lower Contact
Camera (TYP)
Dome Type CCTV
Guide And Support
3-Way Tracking
Cable Stop Block
Interior Conduit
Mount To Side Of Pole
Ground Rod Base
Separate Drawing
Pole Details On
Bolted Here
Conduit To Be
See Index 18113 for concrete pole details and Index 18111 for steel pole details.10.
Use a Camera Lowering Device listed on the Approved Product List (APL).9.
All communication and power cables must be neatly bundled and secured.8.
" diameter PVC conduit.41The stainless steel device lowering cable shall be installed inside the pole within a 1 7.
Use air terminal extension when the pole top junction box is wider than top of pole.6.
" Standard NPT Pipe Thread.21Camera to be mounted to camera junction box and stabilizing weight via 15.
Design camera mounting arm and connection to tenon according to FDOT Structures Manual (current edition).4.
supplier and schedule a manufacturer’s representative to be on-site.
proper, safe operation of the system. Before erecting the first pole the contractor must contact the lowering device
certification. This ensures the product is assembled correctly and that all necessary persons are trained in the
The lowering device manufacturer shall provide an on-site installation inspection and operator instruction and 3.
revolutions per minute. One lowering tool per every 10 lowering devices is required.
chuck variable-speed reversible industrial-duty electric drill that matches the winch’s manufacturer-recommended
The lowering device manufacturer shall supply both a portable lowering tool with a manual hand crank and a half-inch 2.
prewired to lowering device at the factory.
Lowering device to be shipped ready for pole attachment to include 100 ft. of composite power and signal cable 1.

CAMERA MOUNTING DETAILS
01/01/10 2 2 18110
6/24/2013
4:1
2:4
8 P
M
RE
VISIO
N
C:\
d\projects\standards\its\18000-s\18110-02.d
gn
NO.
SHEET
NO.
INDEX
sm
970re
DESCRIPTION:
REVISION
LAST
of DESIGN STANDARDS
FDOT 2014
Varies (30"
Max.) Dia.
Varies (2’ Max.)
(Or Method Approved By Engineer)
Pole Plate With Stainless Steel Band
" Dia.216
Mounting The CCTV Camera Housing
With CCTV Camera Manufacturer For
Bracket Design And Flange Connection
The Contractor Shall Coordinate
Assembly (TYP)
Dome Type Camera
Fitting
Strain Relief
By CCTV Manufacturer
Bracket Design May Vary
Provisions For CCTV Camera
Designed To Match Mounting
Fixed Mounting Bracket Must Be
Nipple Grommet For Steel Poles.
For Concrete Poles. Hole With
Cast In Place 2" Galvanized Nipple
Camera
Cabling To
(Or Method Approved By Engineer)
Pole Plate With Stainless Steel Band
Remove Paint Or Protective Coating Where Attaching Lug.
Lug. Attached To Camera Base With A Stainless Steel Screw.
Camera Support Base By An Aluminum To Copper #2-#14 AWG
Bond #4 AWG Tin-Plated Bare Solid Copper Ground Wire To
Supplied To Match Camera
Camera Connector Harness
CAMERA MOUNTING WITH FIXED BRACKET
GENERAL NOTES:
accordance with Section 630 of the Standard Specifications.
Galvanized pipe connections and conduit entry points shall be sealed in 7.
pole details.
See Index 18113 for concrete pole details and Index 18111 for steel 6.
approval.
registered in the State of Florida, to the Engineer for review and
mounting arm, signed and sealed by a Professional Engineer
The contractor shall submit shop drawings for the proposed fixed 5.
Mounting bracket arm shall be level after installation.4.
No field welding shall be permitted.3.
FDOT Structures Manual (current edition).
Design camera mounting arm and connection to the pole according to 2.
roadway before manufacturing camera mount assembly.
installation of the camera mount, and angle with respect to the
Verify the pole type, the dimensions of the pole at the point of 1.
SECTION AA
Not To Scale
FIXED MOUNTING BRACKET DETAIL
A A

STEEL CCTV POLE
07/01/13 1 4 18111
6/24/2013
4:1
2:5
0 P
M
RE
VISIO
N
C:\
d\projects\standards\its\18000-s\18111-01.d
gn
NO.
SHEET
NO.
INDEX
sm
970re
DESCRIPTION:
REVISION
LAST
of DESIGN STANDARDS
FDOT 2014
POLE NOTES:INSTALLATION NOTES:
GENERAL NOTES
FOUNDATION NOTES:
Section 455.
that no payment for the foundation shall be made under
in accordance with Section 455 of the Specifications except
The foundation for the CCTV structure shall be constructed 6.
Foundation applies to slopes 1:4 or flatter.5.
Specifications.
Install Anchor Bolts in accordance with Section 649-5 of the 4.
galvanization.
A heavy-hex nuts and plate washers. ASTM F2329
Anchor Bolts: ASTM F1554 Grade 55 with ASTM A563 Grade 3.
Reinforcing Steel: ASTM A615 Grade 60.2.
classifications.
compressive strength at 28 days for all environment
Concrete: Class IV (Drilled Shaft) with a minimum 4,000 psi 1.
mounting details.
Refer to Index No. 18108 for conduit and cabinet 4.
28 day compressive strength.
concrete has achieved 70% of the minimum specified
The pole shall not be erected until the foundation b.
Install pole plumb.a.
Pole Installation Notes:3.
stands, etc.) with lowering device manufacturer.
(including Tenon, Tenon mounting plates, parking
Coordinate all lowering device hardware requirements c.
closures.
camera can be safely lowered without requiring lane
as shown in the plans. Position CCTV pole so that the
Mount lowering arm perpendicular to the roadway or b.
is routed securely and free from slack.
pole. Ensure that any electrical wire within the pole
interfering with any electrical wire that is in the
in an interior conduit to prevent it from tangling or
Place the lowering cable that moves within the pole a.
Lowering Device Installation Notes:2.
Position Park Stands 2" below the top of the handhole.d.
the tenon.
Position other cable guide 1" directly below the top of c.
Position one cable guide 2" below the handhole.b.
aligned with each other.
Locate top and bottom cable guides within the pole a.
Cable Supports: Electrical Cable Guides and Eyebolts.1.
anchor bolt locations.
shaft if the CSL access tube locations cannot be moved out of conflict with
circumference of the reinforcing cage. Notify the Engineer before excavating the
locations, move the CSL access tube location – two inches along the inner
excavating the shaft. When CSL access tube locations conflict with anchor bolt
Verify CSL access tubes will not interfere with anchor bolt installation before 12.
1‰" in diameter.
Additional wire access holes not shown in this Design Standard shall not exceed 11.
All other steel: ASTM A123.
Nuts, bolts and washers: ASTM F2329.
Galvanization:h.
Stainless steel screws: AISI Type 316.g.
Handhole cover: ASTM A1011 Grade 50, 55, 60 or 65.f.
Handhole frame: ASTM A709 Grade 36 or ASTM A36.e.
Washers: ASTM F-436.
Nuts: ASTM A563.
Bolts: ASTM A325, Type 1.d.
Weld Metal: E70XX.c.
Steel Plates and Pole Cap: ASTM A36 or ASTM A709 Grade 50.b.
ASTM A595 Grade A (55 ksi yield) or Grade B (60 ksi yield).
ASTM A572 Grade 50, 60 or 65 (greater than or equal to 1/4") or
ASTM A1011 Grade 50, 55, 60 or 65 (less than 1/4") or
Pole:a.
Pole Material Specifications:10.
plans.
necessary. Submit Shop Drawings for minor modifications not detailed in the
This Design Standard is considered fully detailed and no shop drawings are 9.
not exceed the bolt diameter plus 1/2".
diameter plus 1/16", prior to galvanizing. Hole diameters for anchor bolts shall
Except for Anchor Bolts, all bolt hole diameters shall be equal to the bolt 8.
of steel) and pole base wall thickness.
Provide Financial Project ID, pole height, manufacturer’s name, yield strength (Fy
Locate inside pole and visible from handhole.
with stainless steel screws.
Furnish each pole with a 2"x4" (max.) aluminum identification tag, secured to pole
Identification tag:7.
Highway Signs, Luminaires and Traffic Signals, Section 5.15, Welded Connections.
requirements see AASHTO Standard Specifications for Structural Supports for
Welding Code (Steel) ANSI/AWS D1.1 (current edition). For additional welding
Perform all welding in accordance with the American Welding Society Structural 6.
tube thickness.
All other areas, size the partial penetration welds to at least 60% of the pole
splices shall be complete penetration welds for the splice length plus six inches.
penetration welds. Longitudinal seam welds on female section of telescopic field
Longitudinal seam welds within 6" of circumferential welds shall be complete 5.
Up to two longitudinal seam welds are permitted.4.
Use only circumferential welds at base.3.
Pole shaft may be either One or Two sections (with telescopic field splice).2.
inches per foot.
The pole shaft shall be round or 16 sided or more with a constant taper of 0.14 1.

TABLE DESIGNSHAFT
(ft)Height
OverallPole
Diameter
Shaft LengthShaft
tReinforcemen
Longitudinal
50 4’-0" 10’-0" #11(12)
55 4’-0" 10’-6" #11(12)
60 4’-6" 11’-0" #11(16)
65 4’-6" 12’-0" #11(16)
70 5’-0" 12’-6" #11(18)
TABLE DESIGN BOLT ANCHOR AND PLATEBASE
(ft)Height
OverallPole
(in.)
Diameter
PlateBase
(in.)
Thickness
PlateBase
(in.)
CircleBolt
Anchor
BoltsNo.
(in.)
Diameter
Bolt
Anchor
(in.)
tEmbedmen
BoltAnchor
(in.)
Projection
BoltAnchor
Minimum
50 27 2.5 22 6 1.25 31 8.5
55 28 2.5 23 6 1.25 33 8.5
60 33 2.5 27 6 1.5 34 9.5
65 35 2.5 29 6 1.5 35 9.5
70 40 2.5 33 6 1.75 38 10.5
TABLE* DESIGNPOLE
(ft)Height
OverallPole
(Top) 1Section (Bottom) 2Section Joint
Length
(in.)
Thickness
Wall
(in.) Dia.Tip(in.)
Dia.BaseLength
(in.)
Thickness
Wall
(in.) Dia.Tip(in.)
Dia.Base
(in)Length
Splice
Minimum
50--- --- --- --- 50’-0" 0.25 10 17 ---
24’-0" 0.25 10.5 13.875 28’-3" 0.25 13.031 17 21
55 30’-0" 0.25 10.781 15 27’-6" 0.3125 14.125 18 24
60 35’-0" 0.25 13.094 18 27’-9" 0.3125 17.094 21 27
65 34’-0" 0.25 14.406 19.188 34’-0" 0.3125 18.219 23 30
70 33’-3" 0.25 16.719 21.375 40’-0" 0.3125 20.375 26 33
STEEL CCTV POLE
07/01/13 2 4 18111
6/24/2013
4:1
2:5
2 P
M
RE
VISIO
N
C:\
d\projects\standards\its\18000-s\18111-02.d
gn
NO.
SHEET
NO.
INDEX
sm
970re
DESCRIPTION:
REVISION
LAST
of DESIGN STANDARDS
FDOT 2014
2’-
9"
Splice Length
Overall
Heig
ht
Length Sectio
n 2
Length Sectio
n 1
Handhole
Pole
Mounting Method
Coordinate
(See Index 18102)
Air Terminal
Approaching Traffic
Arm And Away From
From The Lowering
Handhole Shall Be 90°
"217" x 27" –
Shaft
Drilled
Top Of
Grade
Finish
2’-
9"
Splice Length
Overall
Heig
ht
Length Sectio
n 2
Length Sectio
n 1
Pole
Handhole
Drilled Shaft
Top Of
Finish Grade
Approaching Traffic
Arm And Away From
From The Lowering
Handhole Shall Be 90°
"217" x 27" –
Nipple Grommet
2" Hole With
Mounting Method
Coordinate
(See Index 18102)
Air Terminal
Pole Tenon
Pole Cap Plate
Pole Top Plate
Pole Top Plate
Conduit
Interior
Of Pole Raceway
Inside Diameter
5‰" Minimum
See Index 18110
Details
For Camera Mounting
See Index 18110
Mounting Details
For Camera
Pole Raceway
Diameter Of
Inside
5‰" Minimum
¡ Of Handhole¡ Of Handhole
Device
Camera With Lowering
Mounting Bracket
Camera With Fixed
POLE DESIGN TABLES
* Diameter Measured Flat to Flat
WITHOUT LOWERING DEVICE
ELEVATION
WITH LOWERING DEVICE
ELEVATION
ORIENTATION VIEW
2’
ORIENTATION VIEW

STEEL CCTV POLE
07/01/13 3 4 18111
6/24/2013
4:1
2:5
4 P
M
RE
VISIO
N
C:\
d\projects\standards\its\18000-s\18111-03.d
gn
NO.
SHEET
NO.
INDEX
sm
970re
DESCRIPTION:
REVISION
LAST
of DESIGN STANDARDS
FDOT 2014
3" x ˘�" Backing
Finish Grade
).niM( paL "2-’2
#5 Tie Bars
Drilled Shaft
Center of
For Reinforcement)
Spaced (See Table
Reinforcement Eq.
Longitudinal CSL Tube (Typ.)
Spaced (See Table)
Anchor Bolts Equally Handhole Ring
Edge of Base Plate
Base Plate And Pole
Center of Drilled Shaft,
See Spec. 649-6
Wire Screen
Double Nuts (Typ.)
Cover Plate
Drilled Shaft
Handhole Ring
2’-
3"
1’-
0"
Min.
(Typ.)
6"
Cover
5"
7"
Spacin
g
#5 Tie
s
1’-
0"
Min.
6 S
p.
@ 4"
Chamfer
1" x 1"
Shaft Length
4"
Cover (T
op)
Anchor Bolts
Sp.
@ 1’-
6" (M
ax.)
4"
6"
Em
bed
ment
Anchor B
olt
Break Radius Typical
Radius)
= 0.25 x (Inside
Min. Break Radius
Thickness
Wall
to flat
measure center
Inside Radius
Center of Pole
Thickness
0.6 x Wall
" Plate Washer83
3"X ˘�" Backing
Anchor Bolt
Leveling Nut
be half height ’Jam’ Nut.
Double Nuts, Top Nut may
Typ. (See Pole Notes)
Anchor Bolt Circle
1" Min.
1"
Projectio
n
Min.
Anchor B
olt
Shaft Diameter
Shaft DiameterPole Base Diameter
Base Plate Diameter
Base Plate Diameter
6" Cover (Typ.)
See Joint Weld Detail
Measured Flat to Flat
Tip Diameter or Base Diameter
Wall Thk.
Pole
Pole
1"
1’-
7‰"
1"
Opening
Base Plate
JOINT WELD DETAIL
�»
45°
�»
Silicone Caulk
1" Min.
x Wall Thk.
(Wall Thk. +
(Anchor Bolts and Conduits Not Shown)
FOUNDATION PLAN
BASE PLATE AND FOUNDATION DETAILS
BASE PLATE AND ANCHORAGE ELEVATION
B
SECTION B-B
SECTION A-A
C
C
DD
AA
B
SECTION D-D
(16-Sided Pole Shown, 18-Sided and Round Pole Similar)
SECTION C-C
(Max.)
(1) Bolt Diameter
Thickness
Base Plate
Drilled Shaft
Silicone Caulk
…"
2 X Anchor Bolt Diameter
Opening
Base Plate
Anchor Bolt Circle
(Conduits, Reinforcement, and CSL Tubes Not Shown)(Conduits and CSL Tubes Not Shown)
for Wall Thk.
on Pole Design Table
See Section 2 (Bottom)
STEEL CCTV POLE
07/01/13 4 4 18111
6/24/2013
4:1
2:5
7 P
M
RE
VISIO
N
C:\
d\projects\standards\its\18000-s\18111-04.d
gn
NO.
SHEET
NO.
INDEX
sm
970re
DESCRIPTION:
REVISION
LAST
of DESIGN STANDARDS
FDOT 2014
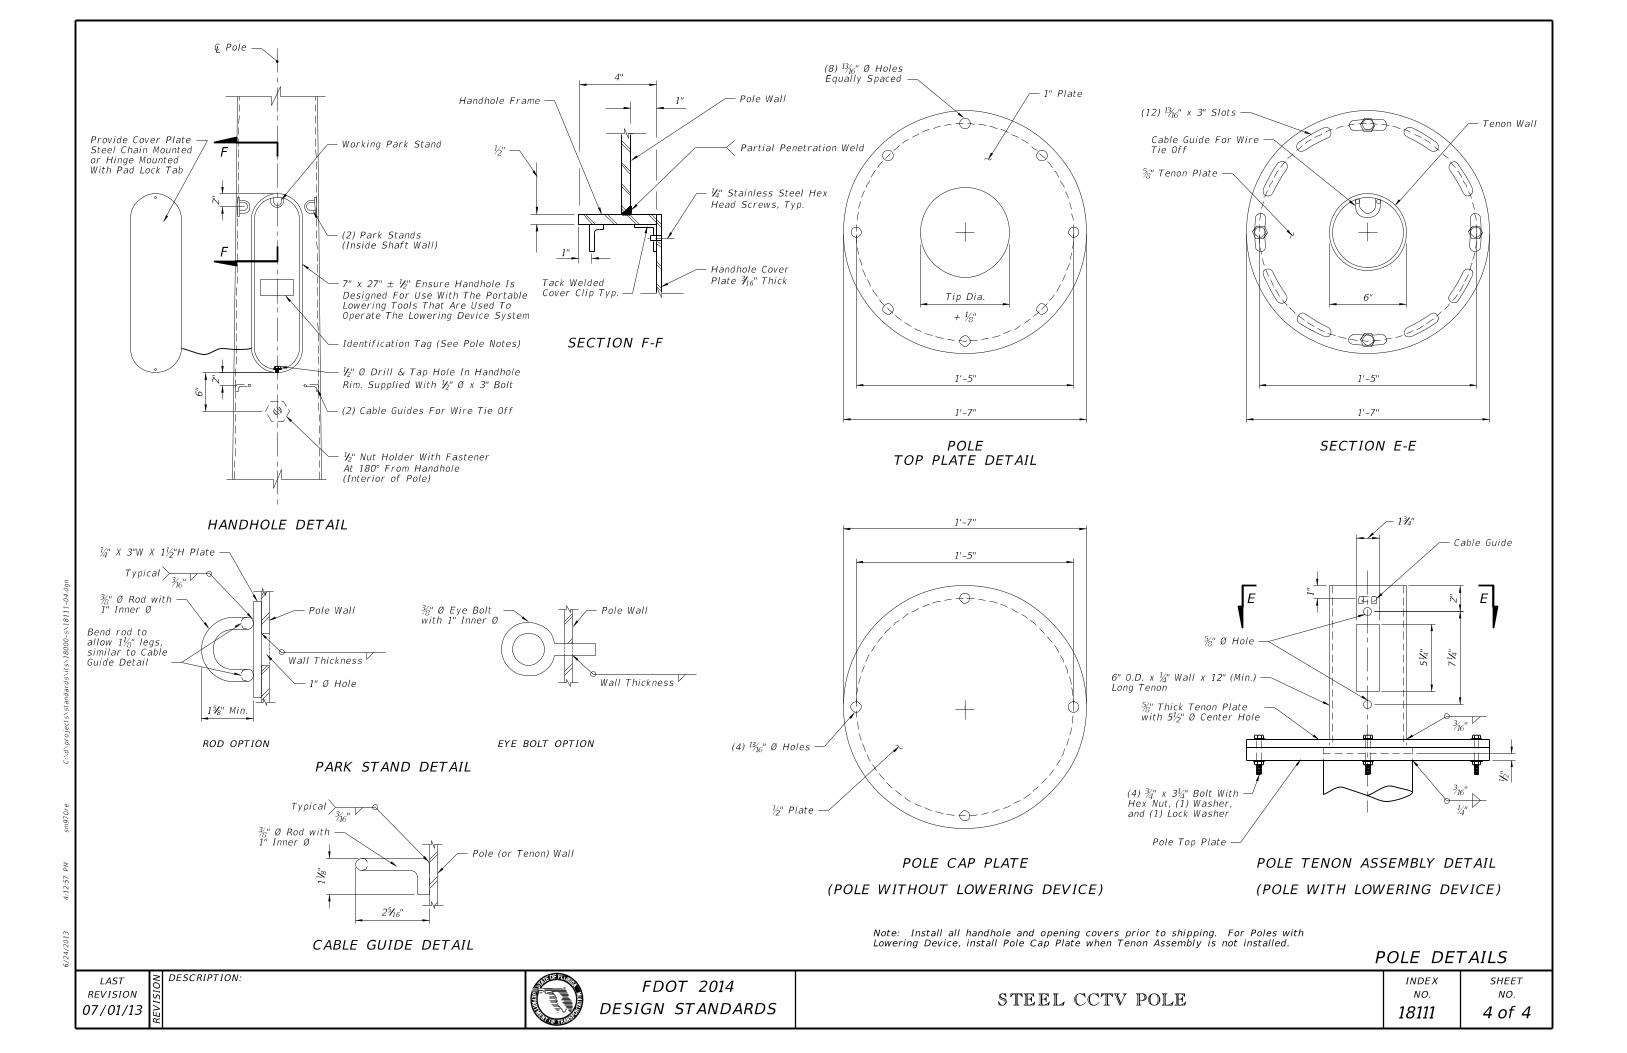
Pole Top Plate
(12) ˘�" x 3" S
˘�" ˆ�
1’-5"
1’-7"
"4
17
"4
15
6"
1’-5"
1’-7"
2"1"
and (1) Lock Washer
Hex Nut, (1) Washer,
(4) ˘�" x 3˘�" Bolt
with 5b" Ø Center Hole
˘�" Thick Tenon Pl
1" Plate
Tenon Wall
"431
Long Tenon
6" O.D. x ˘�" Wall x 12" (Mi
1’-7"
1’-5"
(4) ˘�" ˆ�
b" Plate
"2
1
Equally Spaced
(8) ˘�" ˆ� H
�
" Ø x 3" Bolt21Rim. Supplied With
" Ø Drill & Tap Hole In Handhole 21
Operate The Lowering Device System
Lowering Tools That Are Used To
Designed For Use With The Portable
" Ensure Handhole Is 217" x 27" –
With Pad Lock Tab
or Hinge Mounted
Steel Chain Mounted
Provide Cover Plate
" Thick 163Plate
Handhole Cover
6"
2"
2"
EYE BOLT OPTION
with 1" Inner Ø
˘�" ˆ� Eye
1" Ø Hole
1" Inner Ø
˘�" ˆ� Rod
ROD OPTION
" Min.851
"8
11
1" Inner Ø
˘�" ˆ� Rod
"1652
(Inside Shaft Wall)
(2) Park Stands
Cable Guide
(2) Cable Guides For Wire Tie Off
Tie Off
Cable Guide For Wire
˘�" Tenon P
Pole Wall Pole Wall
Pole (or Tenon) Wall
Working Park Stand
Head Screws, Typ.
" Stainless Steel Hex 41
‰"
Cover Clip Typ.
Tack Welded
Partial Penetration Weld
Pole Wall
4"
1"Handhole Frame
+
Tip Dia.
Lowering Device, install Pole Cap Plate when Tenon Assembly is not installed.
Note: Install all handhole and opening covers prior to shipping. For Poles with
(Interior of Pole)
At 180° From Handhole
" Nut Holder With Fastener 21
Identification Tag (See Pole Notes)
1"
˘�" X 3"W X 1˘�"H
Guide Detail
similar to Cable
allow 1˘�" le
Bend rod to
POLE DETAILS
TOP PLATE DETAIL
POLE
POLE TENON ASSEMBLY DETAIL
E
SECTION E-E
PARK STAND DETAIL
�»
�»
�»
E
SECTION F-F
HANDHOLE DETAIL
F
F
Wall Thickness
�»Typical
Wall Thickness
Typical
�»
POLE CAP PLATE
CABLE GUIDE DETAIL
(POLE WITHOUT LOWERING DEVICE) (POLE WITH LOWERING DEVICE)

CONCRETE CCTV POLE
07/01/13 1 4 18113
6/24/2013
4:1
2:5
9 P
M
RE
VISIO
N
C:\
d\projects\standards\its\18000-s\18113-01.d
gn
NO.
SHEET
NO.
INDEX
sm
970re
DESCRIPTION:
REVISION
LAST
of DESIGN STANDARDS
FDOT 2014
GENERAL NOTES
with lowering device manufacturer.
(including Tenon, Tenon mounting plates, parking stand, etc.)
Coordinate all lowering device hardware requirements 3.
safely lowered without requiring lane closures.
in the plans. Position CCTV pole so that the camera can be
Mount lowering arm perpendicular to the roadway or as shown 2.
from slack.
electrical wire within the pole is routed securely and free
any electrical wire that is in the pole. Ensure that any
interior conduit to prevent it from tangling or interfering with
Place the lowering cable that moves within the pole in an 1.
Storage, Handling and Erection locations shown may vary within – 3".13.
detailed in the plans.
are necessary. Submit Shop Drawings for minor modifications not
This Design Standard is considered fully detailed and no shop drawings 12.
prevent displacement during concreting operations.
Tie ground wires to the interior of reinforcing steel as necessary to 11.
Install pole plumb.10.
Pole Length
Pole Manufacturer
Financial Project ID
with 1" height or as approved in the Producers’ Quality Control Program:
following sheets. Include the following information using inset numerals
Provide Identification Markings on the poles where indicated on the 9.
plated screws.
inserts embedded in the poles in conjunction with round headed chrome
materials. Attach cover plates to poles using lead anchors or threaded
Provide handhole and coupler cover plates made of non-corrosive 8.
Provide a 1" minimum cover.7.
Standard Specifications.
Provided a Class 3 surface finish as specified in Section 400-15 of the 6.
cross section. Stagger lap splices as needed.
splice. No more than two opposing rebar to be spliced at the same
For Reinforcing Steel, lap splice to consist of a 3’-0" lap length at each 5.
turns are required at the top and bottom of poles.
For spiral reinforcing, one turn is required for spiral splices and two 4.
butt end.
the tip end of the prestressed strand first or simultaneously with the
accordance with Section 450-11.6 of the Standard Specifications. Cut
Flush cut prestressing strands and epoxy coat tip and butt surfaces in 3.
The pole shall be round or 12-sided.2.
All other steel: ASTM A123
Bolts, nuts and washers: ASTM F2329Galvanization:g.
Steel plates and Pole Cap: ASTM A36 or ASTM A709 Grade 50.f.
Washers: ASTM F436.
Nuts: ASTM A563, Grade A Heavy Hex.
Bolts: ASTM F1554, Grade 55.e.
Spiral Reinforcing: ASTM A82 Cold-Drawn.d.
Reinforcing Steel: ASTM A615 Grade 60.c.
Prestressing Strands: ASTM A416 Grade 270 low relaxation.b.
transfer.
Pole: Use Class VI Concrete with 6 ksi minimum strength at a.
Pole Material Specifications:1.
LOWERING DEVICE INSTALLATION NOTES: POLE NOTES:
CONCRETE CCTV POLE
07/01/13 2 4 18113
6/24/2013
4:1
3:0
1 P
M
RE
VISIO
N
C:\
d\projects\standards\its\18000-s\18113-02.d
gn
NO.
SHEET
NO.
INDEX
sm
970re
DESCRIPTION:
REVISION
LAST
of DESIGN STANDARDS
FDOT 2014
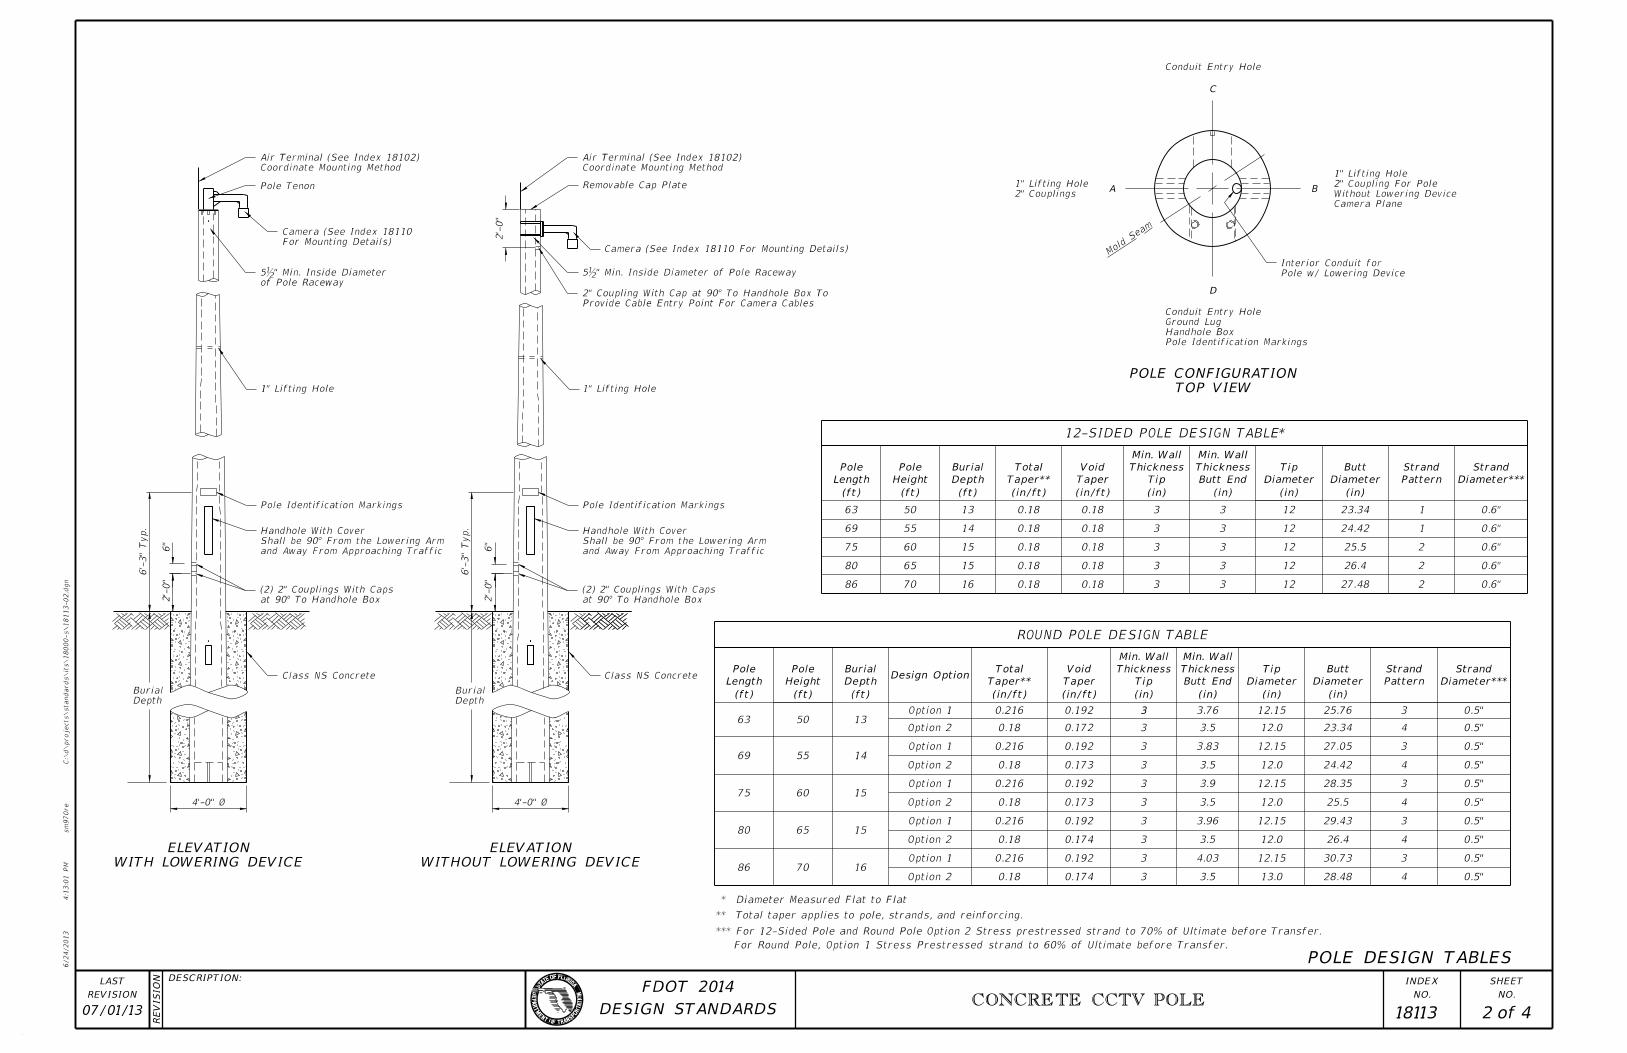
POLE DESIGN TABLES
A B
C
D
6"
1" Lifting Hole
Class NS Concrete
2’-
0"
at 90° To Handhole Box
(2) 2" Couplings With Caps
Provide Cable Entry Point For Camera Cables
2" Coupling With Cap at 90° To Handhole Box To
and Away From Approaching Traffic
Shall be 90° From the Lowering Arm
Handhole With Cover
2’-
0"
Coordinate Mounting Method
Air Terminal (See Index 18102)
Removable Cap Plate
Camera (See Index 18110 For Mounting Details)
1" Lifting Hole
6"
Class NS Concrete
2’-
0"
Coordinate Mounting Method
Air Terminal (See Index 18102)
at 90° To Handhole Box
(2) 2" Couplings With Caps
and Away From Approaching Traffic
Shall be 90° From the Lowering Arm
Handhole With Cover
For Mounting Details)
Camera (See Index 18110
Pole Tenon
Pole w/ Lowering Device
Interior Conduit for
Mold
Seam
4’-0" Ø 4’-0" Ø
6’-
3"
Typ.
6’-
3"
Typ.
Depth
Burial
Depth
Burial
5‰" Min. Inside Diameter of Pole Raceway
Pole Identification Markings Pole Identification Markings
of Pole Raceway
5‰" Min. Inside Diameter
Conduit Entry Hole
TOP VIEW
POLE CONFIGURATION
WITHOUT LOWERING DEVICE
ELEVATION
WITH LOWERING DEVICE
ELEVATION
Camera Plane
Without Lowering Device
2" Coupling For Pole
1" Lifting Hole
2" Couplings
1" Lifting Hole
For Round Pole, Option 1 Stress Prestressed strand to 60% of Ultimate before Transfer.
Pole Identification Markings
Handhole Box
Ground Lug
Conduit Entry Hole
* TABLE DESIGN POLE12-SIDED
Length
Pole
Height
Pole
Depth
Burial
Taper**
Total
Taper
Void
Tip
Thickness
WallMin.
EndButt
Thickness
WallMin.
Diameter
Tip
Diameter
Butt
Pattern
Strand
*Diameter**
Strand
(ft) (ft) (ft) (in/ft) (in/ft) (in) (in) (in) (in)
63 50 13 0.18 0.18 3 3 12 23.34 1 0.6"
69 55 14 0.18 0.18 3 3 12 24.42 1 0.6"
75 60 15 0.18 0.18 3 3 12 25.5 2 0.6"
80 65 15 0.18 0.18 3 3 12 26.4 2 0.6"
86 70 16 0.18 0.18 3 3 12 27.48 2 0.6"
TABLE DESIGN POLEROUND
Length
Pole
Height
Pole
Depth
Burial OptionDesign
Taper**
Total
Taper
Void
Tip
Thickness
WallMin.
EndButt
sThicknes
WallMin.
Diameter
Tip
Diameter
Butt
Pattern
Strand
*Diameter**
Strand
(ft) (ft) (ft) (in/ft) (in/ft) (in) (in) (in) (in)
63 50 13 1Option 0.216 0.192 3 3.76 12.15 25.76 3 0.5"
2Option 0.18 0.172 3 3.5 12.0 23.34 4 0.5"
69 55 14 1Option 0.216 0.192 3 3.83 12.15 27.05 3 0.5"
2Option 0.18 0.173 3 3.5 12.0 24.42 4 0.5"
75 60 15 1Option 0.216 0.192 3 3.9 12.15 28.35 3 0.5"
2Option 0.18 0.173 3 3.5 12.0 25.5 4 0.5"
80 65 15 1Option 0.216 0.192 3 3.96 12.15 29.43 3 0.5"
2Option 0.18 0.174 3 3.5 12.0 26.4 4 0.5"
86 70 16 1Option 0.216 0.192 3 4.03 12.15 30.73 3 0.5"
2Option 0.18 0.174 3 3.5 13.0 28.48 4 0.5"
Flat to Flat Measured Diameter *
reinforcing. and strands, pole, to applies taper Total**
Transfer. before Ultimate of 70% to strand prestressed Stress 2 Option Pole Round and Pole 12-Sided For***

�
CONCRETE CCTV POLE
07/01/13 3 4 18113
6/24/2013
4:1
3:0
4 P
M
RE
VISIO
N
C:\
d\projects\standards\its\18000-s\18113-03.d
gn
NO.
SHEET
NO.
INDEX
sm
970re
DESCRIPTION:
REVISION
LAST
of DESIGN STANDARDS
FDOT 2014
A
Pole Height Burial Depth
0.30 L
0.30 L
0.17 L0.53 L
0.70 L
Pole Length (L)
1’-0" Plug
Total Taper
Erection
3" Pitch
Varies
1.25" Pitch
Burial Depth
1.25" Pitch
3’-0"
A4’-3"
1" Lifting Hole
6"9"1’-6"
Tip End (Top)
‰" Grd. Lug
to Reinf. Cage
‰" Grd. Lug Grounded
(Bottom)
Butt End
At 0° and 180° from Handhole
4" x 12" Conduit Entry Holes
#5 Gage Spiral
Reinforcing
Storage and
Handling
Final Grade Location
2" Couplings With Cap
4b" x 30" Handhole
Drain Hole
1b" Ø
Hole
1" Lifting
#2 AWG Stranded Ground Conductor
� Void & Se
#5 Gage Spiral
Circular Void
See
Table
Wall
Thickn
ess
#5 Gage Spiral
Circular Void
� Void & Se
See
Table
Wall
Thickn
ess
1‰"
#5 Gage Spiral
Circular Void
� Void & Se
See
Table
Wall
Thickn
ess
1" Min Cover
1" Min Cover
1" Min Cover
¡ Of Handhole
¡
1‰"
#5 Gage Spiral
Circular Void
� Void & Se
See Ta
bleWall Thi
ckness
1" Min Cover
around pole
spaced equally
Strand and Rebar
equally around pole
Strands spaced
Active and Dormant
9°
9°
Strand and Rebar Layout
(Typ. around pole)
Circle to Flat
1‰" Center of S
trand
1‰"
Center of Str
and
Circle to Flat
Tip or Butt Diameter
Measured Flat to Flat
18°
18°
36°
equally around pole
Strands spaced
Active and Dormant
Tip or Butt Diameter
Measured Flat to Flat
(Strands and Reinforcing Not Shown)
POLE ELEVATION
(Strands, Holes, and Fixtures Not Shown)
SPIRAL REINFORCING ELEVATION
STRAND LEGEND
Strands and Rebar shown are continuous from Tip End to Butt End.
Note:
SECTION A-A SECTION A-A SECTION A-A
(6) #4 Rebar
(4) #5 Rebar (Shown) or -
Dormant Strand 0.6 in.-
Prestressed Strand-
(12 - SIDED)
STRAND PATTERN 1
(12 - SIDED)
STRAND PATTERN 2
(ROUND - OPTION 2)
STRAND PATTERN 4
SECTION A-A
(ROUND - OPTION 1)
STRAND PATTERN 3
cover requirements are met.
area of spiral wire is provided to that shown in this standard and the
Spiral wire may be wrapped in two directions given that an equivalent *

CONCRETE CCTV POLE
07/01/13 4 4 18113
6/24/2013
4:1
3:0
6 P
M
RE
VISIO
N
C:\
d\projects\standards\its\18000-s\18113-04.d
gn
NO.
SHEET
NO.
INDEX
sm
970re
DESCRIPTION:
REVISION
LAST
of DESIGN STANDARDS
FDOT 2014
˘�" Tenon P
Pole
"4
15
2"
B B
"431
˘�" ˆ�
(8) ˘�" x 2" Slots Equally Sp
1’-
0"
Min.
" Tenon Plate
85
"4
17
Cap Set Screws, Equally Spaced.
Tenon With 3-…" Ø x 20 Hex Head
Provide a Tenon Cap and Fix to the
Tenon Wall
"212
"4
17
9"
"8
7"
87
2" R
˘�" P
(2) ˘�" ˆ�
" Ø215
I.D.
Tenon
6" O.D. x …" Wall x 12" (Min.) Long
(4) b" Ø Nut with Flat Washer
D D
�
˘�" ˆ�
˘�" R (T
"852
(4) ˘�" ˆ� Holes Equally S
Pole
Washer
(4) b" Ø Nut with Flat
In Wall
#5 Bar x 5’-0" Long Centered
�»
˘�" Cap P
�» 3"Bend at Three Corners
˘�" Galvanized Steel Pl
Tip Dia. (– …")
O.D. Plate
Bolt Circle
Tip Dia. (– …")
O.D. Plate
3"
‰" x 1‰" SCH. 40 Pipe
"214
3"
"214
˘�" ˆ� Eye Bolt
1" Inner Ø
…" Cap Plate
˘�" ˆ ˘�" ˆ
Provide Cable Guide
Note 2)
Be Cast Into Pole (See
´‰" ˆ� x 2˘�" Min. Inse
" from ¡ bar to side surface211
of handhole (Typ. ea. side)
4‰" x 30" Handhole
alternate connector)
(See Note 3 for
15" Embedment, Equally Spaced
(4) b" Ø x 18" Galv. Bolts with
connector)
(See Note 3 for alternate
15" Embedment, equally spaced
(4) b" Ø x 18" Galv. Bolts with
(Pipe Option Shown)
Each Side of Handhole
(2) Park Stands,
2"
(– …")
Tip Dia. - 2¾"
Bolt Circle
(– …")
Tip Dia. - 2¾"
SECTION B-B
TENON COVER
HANDHOLE DETAIL
WITHOUT LOWERING DEVICE
TOP OF POLE DETAIL
SECTION D-D - PARK STAND DETAIL
PIPE OPTIONEYE BOLT OPTION
Handhole frame may be Cast Aluminum 356.2.4.
attach plate w/ (4) ‰" x 1¾" stainless steel bolts.
rods with a threaded nut. At top of rod, thread a coupling nut to
As an alternate, embed (4) ‰" ł x 18" stainless steel threaded 3.
Install ‰" Ø x 5" long stud with hex nut in insert before shipment.2.
Install all handhole and opening covers prior to shipping.1.
Notes:
TOP OF POLE DETAIL WITH LOWERING DEVICE
CAP PLATE DETAIL

lanes varies.
and direction of travel
Note: Actual number
lanes varies.
and direction of travel
Note: Actual number
Shoulder (Paved)
Travel Lane
Travel Lane
Travel Lane
Min.
4’
Shoulder (Paved)
Travel Lane
Travel Lane
Travel Lane
Min.
4’
Min.
4’
Travel LaneTravel LaneTravel Lane
Variable Variable
See Note 2
Clear Zone
See Note 1
Clear Zone
See Note 1
Variable Variable
Travel Lane Travel Lane Travel Lane
Variable
Clear Zone
See Note 1
Variable
Min.
4’
Min.
4’
Min.
4’
� �
�
accordance with Plans Preparation Manual Volume I, Chapters 2 and 4.
Clear zone distance and setbacks from edge of travel lane shall be in3.
four feet in length.
Extend Catwalk from DMS to outer edge of paved shoulder but not less than2.
than 4" above adjacent grade.
Clear zone shall be measured to edge of the drilled shaft if drilled shaft is more
If no guardrail or barrier wall exists, structure shall be outside the clear zone.1.
DYNAMIC MESSAGE SIGN WALK-IN
01/01/12 1 1018300
6/24/2013
4:1
3:0
8 P
M
RE
VISIO
N
C:\
d\projects\standards\its\18000-s\18300-01.d
gn
NO.
SHEET
NO.
INDEX
sm
970re
DESCRIPTION:
REVISION
LAST
of DESIGN STANDARDS
FDOT 2014
Line
Ground
Catwalk
ShoulderVolume I, Table 2.10.4
Plans Preparation Manual
19’-6" Min. Clearance Per
Lightning Protection
Grounding And
See Sheet 6 For
Line
Ground
See Note 2
Variable
Catwalk
(DMS)
Message Sign
Dynamic
Walk-In
ShoulderVolume I, Table 2.10.4
Plans Preparation Manual
19’-6" Min. Clearance Per
Lightning Protection
Grounding And
See Sheet 6 For
GuardrailDrilled Shaft
Catwalk
DMS Structure
GuardrailDrilled Shaft
Catwalk
DMS Structure
Drilled Shaft Guardrail
DMS CANTILEVER SIGN STRUCTURE
TYPICAL PLAN VIEW
SPAN SIGN STRUCTURE
TYPICAL PLAN VIEW
SPAN SIGN STRUCTURE
TYPICAL ELEVATION VIEW
CANTILEVER SIGN STRUCTURE
TYPICAL ELEVATION VIEW
GENERAL LAYOUT
GENERAL NOTES:
DYNAMIC MESSAGE SIGN WALK-IN
01/01/10 2 1018300
6/24/2013
4:1
3:1
0 P
M
RE
VISIO
N
C:\
d\projects\standards\its\18000-s\18300-02.d
gn
NO.
SHEET
NO.
INDEX
sm
970re
DESCRIPTION:
REVISION
LAST
of DESIGN STANDARDS
FDOT 2014
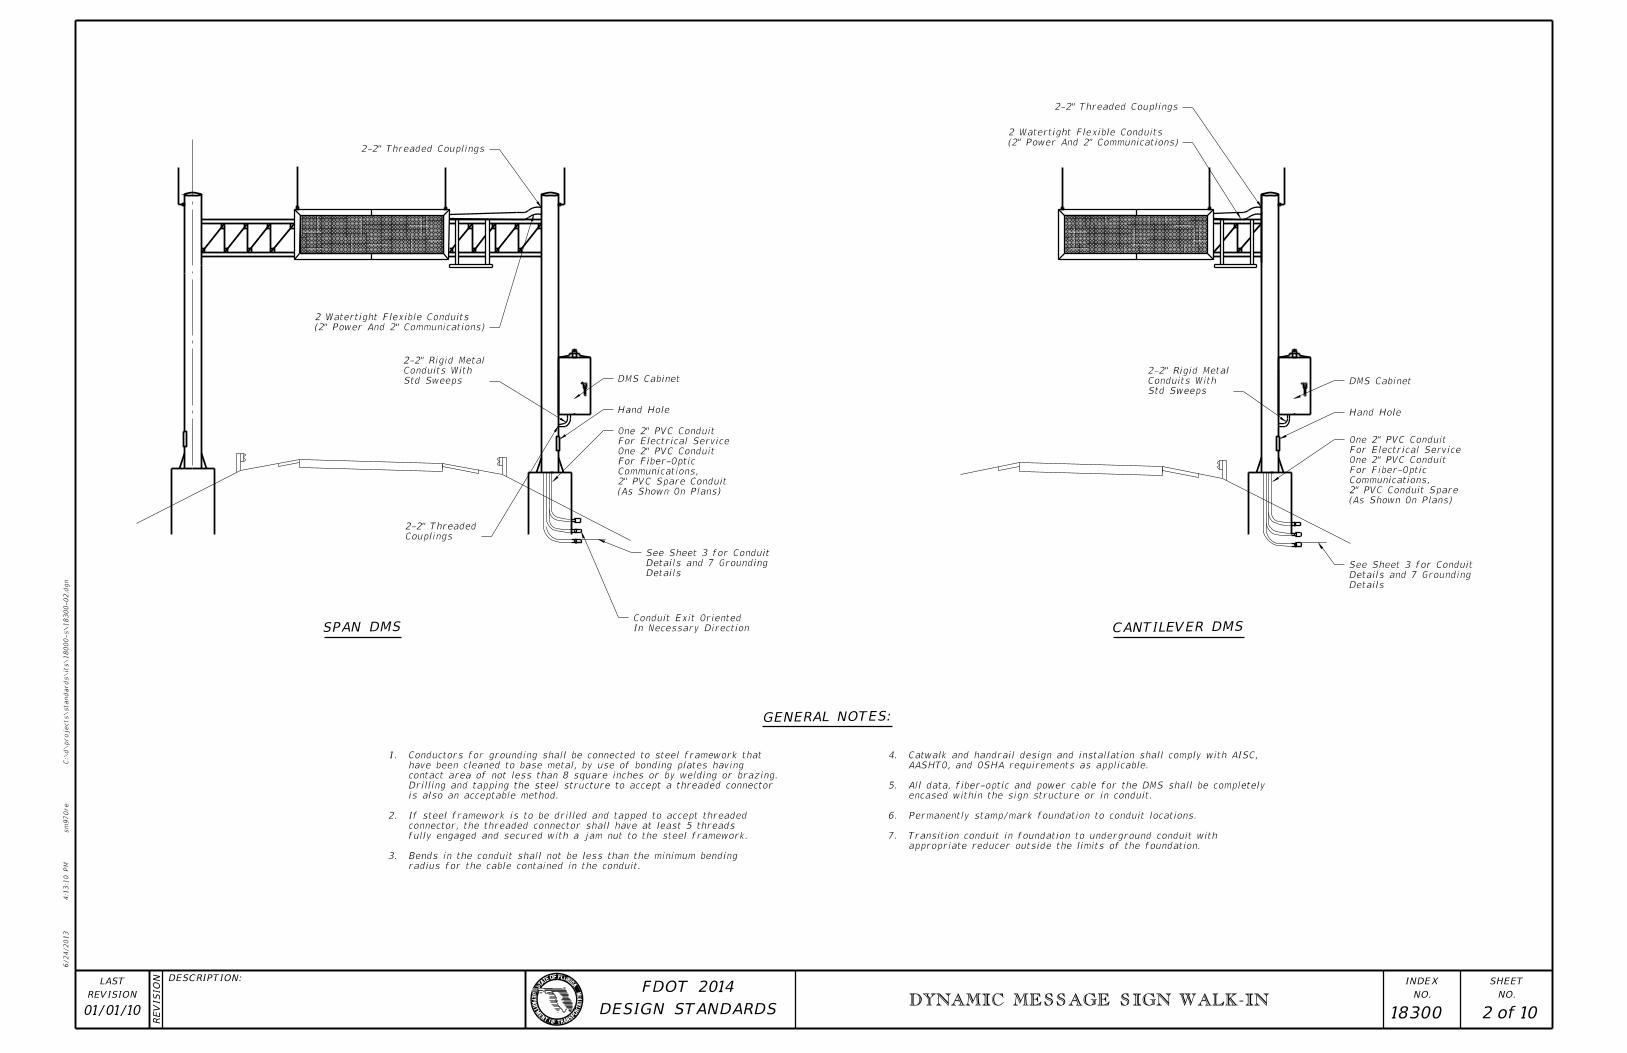
2-2" Threaded Couplings
(2" Power And 2" Communications)
2 Watertight Flexible Conduits
Std Sweeps
Conduits With
2-2" Rigid Metal
Couplings
2-2" Threaded
DMS Cabinet
Hand Hole
In Necessary Direction
Conduit Exit Oriented
Details
Details and 7 Grounding
See Sheet 3 for Conduit
2-2" Threaded Couplings
(2" Power And 2" Communications)
2 Watertight Flexible Conduits
Std Sweeps
Conduits With
2-2" Rigid Metal
DMS Cabinet
Hand Hole
Details
Details and 7 Grounding
See Sheet 3 for Conduit
(As Shown On Plans)
2" PVC Conduit Spare
Communications,
For Fiber-Optic
One 2" PVC Conduit
For Electrical Service
One 2" PVC Conduit
(As Shown On Plans)
2" PVC Spare Conduit
Communications,
For Fiber-Optic
One 2" PVC Conduit
For Electrical Service
One 2" PVC Conduit
radius for the cable contained in the conduit.
Bends in the conduit shall not be less than the minimum bending3.
fully engaged and secured with a jam nut to the steel framework.
connector, the threaded connector shall have at least 5 threads
If steel framework is to be drilled and tapped to accept threaded2.
is also an acceptable method.
Drilling and tapping the steel structure to accept a threaded connector
contact area of not less than 8 square inches or by welding or brazing.
have been cleaned to base metal, by use of bonding plates having
Conductors for grounding shall be connected to steel framework that1.
appropriate reducer outside the limits of the foundation.
Transition conduit in foundation to underground conduit with7.
Permanently stamp/mark foundation to conduit locations.6.
encased within the sign structure or in conduit.
All data, fiber-optic and power cable for the DMS shall be completely5.
AASHTO, and OSHA requirements as applicable.
Catwalk and handrail design and installation shall comply with AISC,4.
SPAN DMS
GENERAL NOTES:
CANTILEVER DMS

(Thru Handhole)
DYNAMIC MESSAGE SIGN WALK-IN
01/01/13 3 1018300
6/24/2013
4:1
3:1
2 P
M
RE
VISIO
N
C:\
d\projects\standards\its\18000-s\18300-03.d
gn
NO.
SHEET
NO.
INDEX
sm
970re
DESCRIPTION:
REVISION
LAST
of DESIGN STANDARDS
FDOT 2014
2’ Max
Service Assembly
(2" PVC) To Power
Power Conduit
(As Shown On Plans)
(2" PVC)
Communications Conduit
Fiber-Optic
Conduit
2" PVC Grounding
Spare
2" PVC Conduit
Service Assembly
(2" PVC) To Power
Power Conduit
2" PVC Grounding Conduits
Transition Conduit Outside Foundation
Finished Grade (Varies)
Bottom Of Plate
Wire Screen - See Spec. 649-6
Top Of Conduits
Hand Hole
Std Sweeps
Conduits With
2-2" Rigid Metal
1’-
0"
Back Truss Chord
Per DMS Manufacturer
Conduit Entrance Location
Communications Cable
Separately Power And
Two J-Hooks To Support
Removable Top Plate
Air Terminal
For Power And Communications
2-2" Threaded Couplings
Communications
For Electrical Service And
Two Watertight 2" Flexible Conduits
Top Truss Chord
Door Hinge
Access Door
DMS
Door Latch / Handle
Handrail
Post
Grating
Catwalk
Bottom Truss Chord
Rigid Metal Conduit
Couplings For
2-2" Threaded
Spare
2" PVC Conduit
(See Index 17700)
Splice Box
Or Fiber-Optic
Fiber-Optic Pull Box
Spare
2" PVC Conduit
See
Note 3
Varie
s 2’-
6" to 4’-
0"
Hex Head Screws, Typ.
" Dia. Stainless Steel41
Cover Clip, Typ.
Tack Welded
Full Penetration Weld
Continuous With A
Frame Made
" Handhole 834" x
" Hole, Typ.165
Handhole Cover
11 Gage
Cover Clip Typ.
Tack Welded
Handhole FrameHex Head Screws, Typ.
" Stainless Steel 41
"83
Cover
11 Gage Handhole
See Pole Top Cut-Away Detail
maintenance of anchor bolts.
Avoid conflicts with stiffeners, hand-hole and
given site conditions as directed by the Engineer.
to achieve best access for maintenance personnel
Field adjust pole-mounted DMS cabinet height3.
conduits are approximate.
grounding. The number and placement of
See sheet 7 for additional conduits for 2.
depending on project requirements.
DMS Cabinet may be pole or ground mounted1.
Cabinet
Mounted
Ground
Cabinet
DMS
Mounted
Pole-
(As Shown On Plans)
(2" PVC)
Communications Conduit
Fiber-Optic
GENERAL NOTES:
HANDHOLE FRAME
A
A
Full Penetration
Weld
"21
R=2
10"
5"
HANDHOLE COVER
"4
310
"435
"87
R=2
SECTION A-A
Partial Penetration Weld
4"
1"

DYNAMIC MESSAGE SIGN WALK-IN
07/01/13 4 1018300
6/24/2013
4:1
3:1
4 P
M
RE
VISIO
N
C:\
d\projects\standards\its\18000-s\18300-04.d
gn
NO.
SHEET
NO.
INDEX
sm
970re
DESCRIPTION:
REVISION
LAST
of DESIGN STANDARDS
FDOT 2014
2" Threaded Couplings (2)
(Cantilever Sign Structure Shown, Span Sign Structure Similar)
Truss Connection Plates, Splices And 5’-0" (Max.) Spacing
Quantity And Spacing Of The Members Will Be Dictated By Locations Of
Vertical Hanger Spacing 5’-0" (Max.)
HANGER LOCATION DETAIL
GENERAL NOTES
the sign truss.
Threaded couplings shall be located on sign side of column above 10.
the cost of the sign structure.
hanger, associated members, and hardware shall be incidental to
Cost of the installation of the DMS on truss including the vertical 9.
installed in accordance with the manufacturer’s recommendations.
All bolts shall have single self-locking nuts, or locking nut system, 8.
galvanizing.
All bolt holes shall be equal to the bolt diameter plus ˘�", prior7.
ASTM A123All other steel items
ASTM F2329All nuts, bolts and washers
All steel items shall be galvanized as follows:6.
plates.
allow vertical hanger placement as shown on the plans with no conflicts with gusset or splice
hangers and horizontal mounting member attached to the sign enclosure. Field locate holes to
carefully measure the exact locations for field drilling the b" bolt holes in the vertical
Before erection, after both the delivery of the DMS and the steel truss, the contractor shall 5.
enclosure with the centerline of the truss.
Locate the sign laterally on the structure as shown in the plans. Vertically center the sign 4.
these shop drawings are approved.
Shop drawings including the DMS connection are required and fabrication shall not begin until 3.
4500 lb.
DMS and Hanger Design Wind Speed: 150 miles per hour. Maximum DMS weight for design: 2.
Specifications for Structural Supports for Highway Signs, Luminaires and Traffic Signals.
Design Specifications: FDOT Structures Manual (current edition) and AASHTO Standard 1.

DYNAMIC MESSAGE SIGN WALK-IN
07/01/10 5 1018300
6/24/2013
4:1
3:1
6 P
M
RE
VISIO
N
C:\
d\projects\standards\its\18000-s\18300-05.d
gn
NO.
SHEET
NO.
INDEX
sm
970re
DESCRIPTION:
REVISION
LAST
of DESIGN STANDARDS
FDOT 2014
6"
–6"
–
Lock NutsGalvanized With Matching 2-‰" Ø ASTM A325 Bolts Field Drill Holes And Provide
Truss Chord
Dia.
+b"

b" Ø Bolts
� Hole
DMS Sign Enclosure
With The DMS Sign
Framework And Included
Attached To The Internal
Horizontal Member
Aluminum Zee 4x3.13x3.58
6061-T6 Structural
3 Z Bea
ms E
quall
y S
paced
DMS Sign Enclosure
Back Face Of
Hanger @ 5’ (Max.) Spacing
ASTM A709, Gr.36 Steel W6x9
� Truss
b" Ø U-Bolts
â�� Hole b" Ø U-Bolts
� Hole
b" Ø Bolts
� Hole
Truss Chord
W6x9
Galv. With Matching Lock Nuts
2-b" Ø ASTM A325 U-Bolts
U-Bolts
2˘�"
Truss Chord
2-b" Ø U-Bolts

Aluminum Zee
See Truss
Data S
heet
END VIEW
SECTION B-B SECTION C-C
SECTION A-A
C
C
AA
B
B

DYNAMIC MESSAGE SIGN WALK-IN
07/01/13 6 1018300
6/24/2013
4:1
3:1
8 P
M
RE
VISIO
N
C:\
d\projects\standards\its\18000-s\18300-06.d
gn
NO.
SHEET
NO.
INDEX
sm
970re
DESCRIPTION:
REVISION
LAST
of DESIGN STANDARDS
FDOT 2014
Ground Rod With Exothermic Weld
Bond To All Air Terminals And
Solid Copper Ground Wire.
#2 AWG Tin-Plated Bare
See Detail B
See Detail A
Minimum Contact Area
Surface Base Of 8 Square-Inch
Air Terminal (Class II)
b" ETP Alloy 110 Copper
2’
4’
2’
4’
2’
See Detail A See Detail A
See Detail B (typ.)
Minimum Contact Area
Surface Base Of 8 Square-Inch
Air Terminal (Class II)
b" ETP Alloy 110 Copper
MAX
20’
Ground Rod With Exothermic Weld
Bond To All Air Terminals And
Solid Copper Ground Wire.
#2 AWG Tin-Plated Bare
SPAN DMSCANTILEVER DMS
DETAIL BDETAIL A
GENERAL NOTES:
shall not exceed 20 feet.
Lightning protection shall conform to NFPA 780. Spacing between air terminals9.
See Sheet 7 for ground rod placement detail.8.
Grounding system shall be placed within right of way.7.
All air terminals must meet UL-96A.6.
maintain electrical continuity.
Copper flat surfaces shall be bolted, welded, or brazed securely to framework to5.
Install marker tape directly above all grounding electrodes and conductors.4.
3 auxiliary ground rods.
ground rod for instances when conditions will not allow for the installation of the
The contractor may, upon approval of the Engineer, install a 30-foot sectional3.
Exothermically weld all connections to ground rods.2.
All grounding materials shall meet the requirements of Section 620.1.

DYNAMIC MESSAGE SIGN WALK-IN
01/01/12 7 1018300
6/24/2013
4:1
3:2
0 P
M
RE
VISIO
N
C:\
d\projects\standards\its\18000-s\18300-07.d
gn
NO.
SHEET
NO.
INDEX
sm
970re
DESCRIPTION:
REVISION
LAST
of DESIGN STANDARDS
FDOT 2014
(Typical)
40’
Ground Rod D
Ground Rod C
Ground Rod B
Ground Rod A
Foundation
Sign Structure
Ground
To Electrical Service
Bare Copper Wire
#6 AWG Tin-Plated
Air Terminal
Copper Wire Continuous To
#2 AWG Tin-Plated Bare Solid
C AND D As Required
To Ground Rods B,
Bare Copper Wire
#2 AWG Tin-Plated
and Sizes
Conduit Uses
See Sheet 3 for
Ground Rod B
As Required
Wire To Ground Rods B, C And D
Tin-Plated Bare Solid CopperImmediately Adjacent To Pole
Main Ground Rod To Be Placed
Exothermic Weld
Driven Into Undisturbed Earth
Copper-Clad Steel Ground Rods
˘�" Diameter By 20’
Min.
40’ Max.
36"
Min.
12"
On Sheet 6
See Note 3
Wire To Electrical Service Ground
#6 AWG Tin-Plated Bare Solid Copper
Grounding Conduit (2" PVC)
Ground Wire In Structure
#6 AWG Tin-Plated Bare Solid Copper
2" PVC Grounding Conduits
To Electrical Service
Finished Grade
Hand Hole
Exothermic Weld.
And Ground Rod With
To All Air Terminals
Ground Wire. Bond
Bare Solid Copper
#2 AWG Tin-Plated
2’ Min.
Min.
4’
Sign (DMS)
Dynamic Message
Catwalk
Outside Foundation
Transition Conduit
See Inset A
Finished Grade
6" Min.
"Sphere Of Influence"
20’ Radius Each
Should
er
Travel
Lane
Travel
Lane
Requirements
Clear Zone
Per
To Ground Rod D
To Ground Rod C
Cabinet
DMS
Cabinet
Mounted
Ground
INSET ’A’
(TYPICAL)
GROUND ROD PLACEMENT DETAIL
DYNAMIC MESSAGE SIGN WALK-IN
07/01/10 8 1018300
6/24/2013
4:1
3:2
1 P
M
RE
VISIO
N
C:\
d\projects\standards\its\18000-s\18300-08.d
gn
NO.
SHEET
NO.
INDEX
sm
970re
DESCRIPTION:
REVISION
LAST
of DESIGN STANDARDS
FDOT 2014
See Note 3
and Modem (optional)
Dial-up Telephone
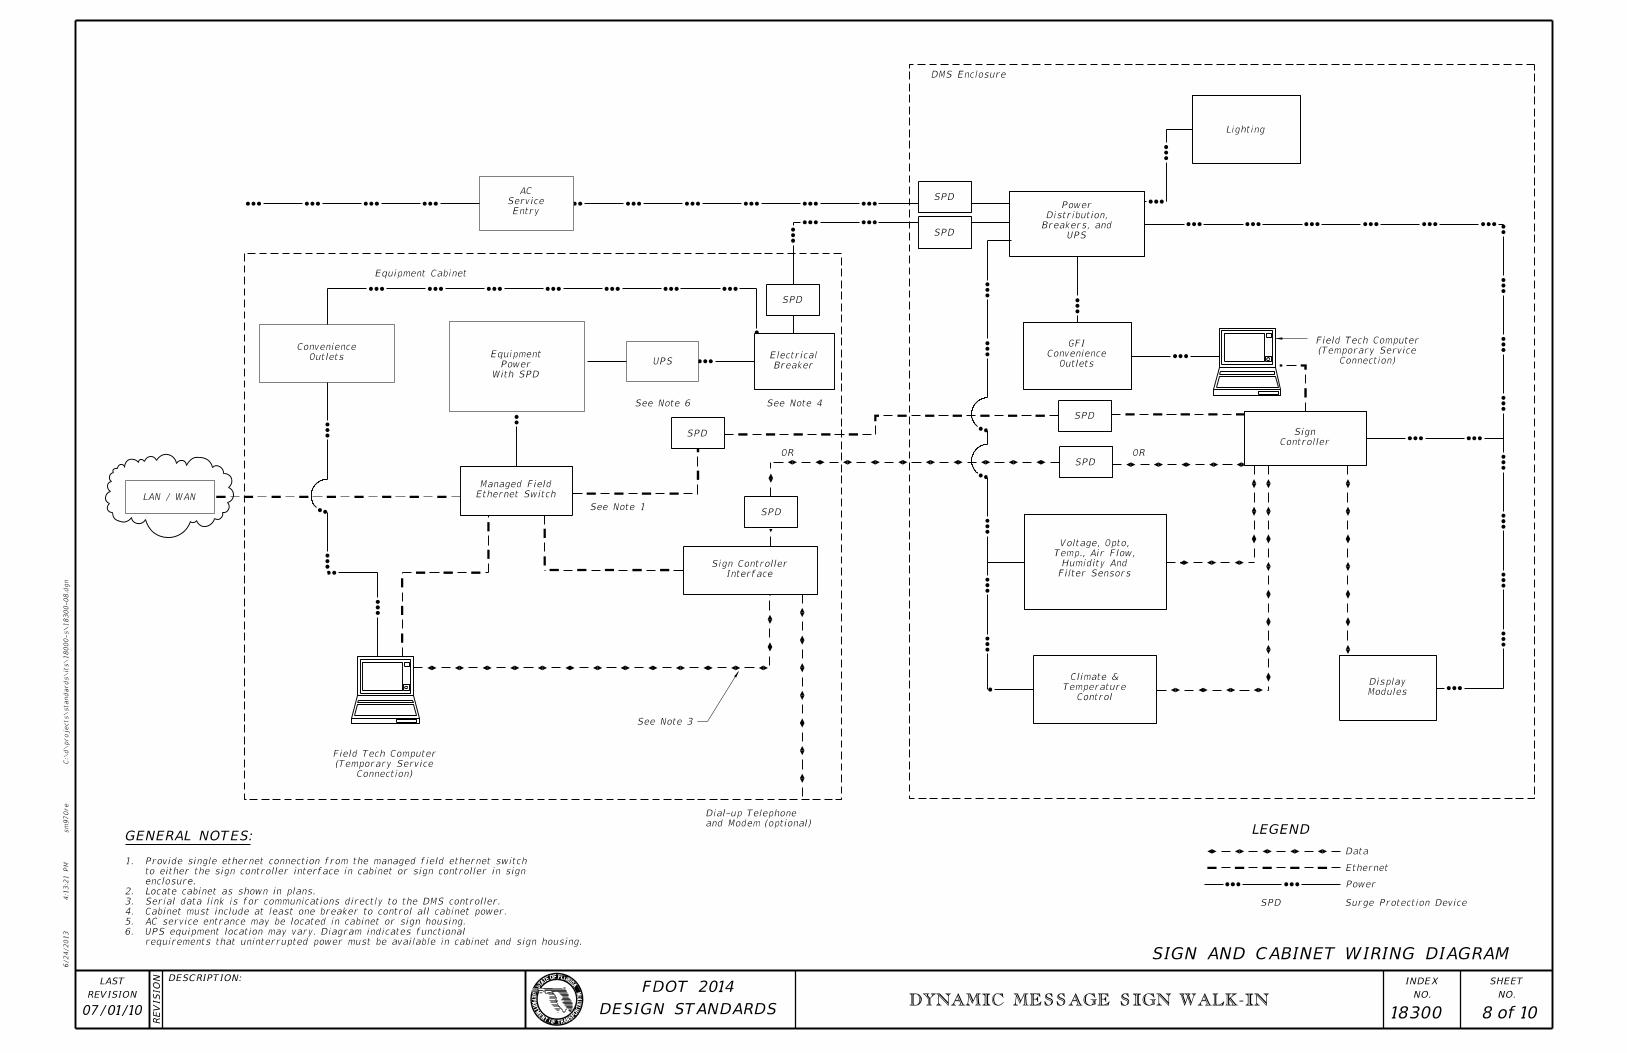
requirements that uninterrupted power must be available in cabinet and sign housing.
UPS equipment location may vary. Diagram indicates functional6.
AC service entrance may be located in cabinet or sign housing.5.
Cabinet must include at least one breaker to control all cabinet power.4.
Serial data link is for communications directly to the DMS controller.3.
Locate cabinet as shown in plans.2.
enclosure.
to either the sign controller interface in cabinet or sign controller in sign
Provide single ethernet connection from the managed field ethernet switch1.
Surge Protection Device
Power
Ethernet
Data
SPD
Control
Temperature
Climate &
Modules
Display
Filter Sensors
Humidity And
Temp., Air Flow,
Voltage, Opto,
SPD
SPD
Controller
Sign
OR
Outlets
Convenience
GFI
UPS
Breakers, and
Distribution,
Power
SPD
SPD
Lighting
DMS Enclosure
Entry
Service
AC
Equipment Cabinet
Outlets
Convenience
With SPD
Power
EquipmentUPS
Breaker
Electrical
SPD
SPD
SPD
See Note 6 See Note 4
See Note 1
OR
Interface
Sign Controller
Ethernet Switch
Managed Field
LAN / WAN
Connection)
(Temporary Service
Field Tech Computer
Connection)
(Temporary Service
Field Tech Computer
GENERAL NOTES:LEGEND
SIGN AND CABINET WIRING DIAGRAM

DYNAMIC MESSAGE SIGN WALK-IN
07/01/10 9 1018300
6/24/2013
4:1
3:2
3 P
M
RE
VISIO
N
C:\
d\projects\standards\its\18000-s\18300-09.d
gn
NO.
SHEET
NO.
INDEX
sm
970re
DESCRIPTION:
REVISION
LAST
of DESIGN STANDARDS
FDOT 2014
(As Required)
But Pole Side)
Sunshields (All Sides
Terminal Strips
Blocks, Ground Bussbar
Primary AC Filter, Terminal
Service Entrance, Breakers,
Power Distribution Assembly
Circuit Breakers
Secondary
Main Circuit Breaker
Vents
Dual Fans
10-32 Threaded Holes
19" EIA Rack With Tapped
For Portable Tools
Convenience Outlet
GFI Protected
Hardware
Communications
Outlets For
SPD Protected
2-2" Rigid Metal Conduits
Reserved For Ventilation
Lifting Eyes
Light/Shelf
Sign Controller
Switch
Managed Field Ethernet
FO Patch Panel
Document Drawer/Shelf
Connection
Generator Power
Light/Shelf
Sign Controller
Switch
Managed Field Ethernet
FO Patch Panel
Document Drawer/Shelf
Connection
Generator Power
46" (T
yp.)
22" (Typ.)24" (Typ.)
19.75" (Typ.)
12"
1.7
5"
3.5
"3.5
"
3.5
"
1.7
5"
3.5
"5.5
"
Ethernet SPDs
Data
Data
Light/Shelf
Sign Controller
Switch
Managed Field Ethernet
FO Patch Panel
Document Drawer/Shelf
RIGHT SIDE VIEW
POLE MOUNTED DMS CABINET
FRONT VIEWLEFT SIDE VIEW
GENERAL NOTES:
CABINET LAYOUT 1
may vary.
Power Distribution Assembly component layout, orientation and location8.
Batteries and UPS may be located in sign housing or cabinet.7.
outlets with at least one main disconnect and three circuit breakers.
Load center shall be sized for connected equipment and convenience6.
troubleshooting.
to provide full access to DMS sign for control, programming and
Either an access controller or local access panel shall be provided 5.
protected and (1) GFI protected.
Minimum number of duplex outlets is three, (2) SPD4.
Conduit entrances are at bottom of cabinet.3.
All dimensions and equipment locations are approximate.2.
Cabinet layout is for pole or ground mounted installations.1.

DYNAMIC MESSAGE SIGN WALK-IN
07/01/10 10 1018300
6/24/2013
4:1
3:2
5 P
M
RE
VISIO
N
C:\
d\projects\standards\its\18000-s\18300-10.d
gn
NO.
SHEET
NO.
INDEX
sm
970re
DESCRIPTION:
REVISION
LAST
of DESIGN STANDARDS
FDOT 2014
62" (T
yp.)
52.8
5" (T
yp.)
32.5" (Typ.)
1.6
7"
19.75"
24" (Typ.)
2.6
"
2.6
"
30" (Typ.)
10-32 Threaded Holes
19" EIA Rack With Tapped
120 VAC SPD
For Portable Tools
Convenience Outlet
GFI Protected
Hardware
Communications
Outlets For
SPD Protected
Dual Fans
UPS
Power Distribution
Drawer/Shelf
Document
Ethernet Switch
Managed Field
Sign Controller
FO Patch Panel
5.5"Load Center
Ter
min
al
Strip
s
Bus Bars
See Note 8.
(varies)
Batteries
See Note 8.
(varies)
Batteries
7"
+/-
10"
+/-
Light/Shelf
Vents
Light/Shelf Light/Shelf
See Note 8.
(varies)
Batteries
Ethernet
SPDs
SPD
Power
Data
Data
Sign Controller
Ethernet Switch
Managed Field
FO Patch Panel
Drawer/Shelf
Document
Power Distribution
UPS
Reserved for Ventilation
RIGHT SIDE VIEWLEFT SIDE VIEW
GROUND MOUNTED DMS CABINET
FRONT VIEW
CABINET LAYOUT 2