explain everything explained! by helen stevens...explain everything. i.e. youtube clips can be...
TRANSCRIPT

How I use Explain Everything
Some ideas.....
Import a student essay/piece of work and record your feedback and an-
notations around it. This will create a video file which they can replay
over and over again.... And have the benefit of your wisdom over and
over again.... What could be better?
Import a poem or text (or a source/activity/document, whatever suits
your subject) and create a video of your thoughts and annotations around
it. Upload it for revision, for all your students to use. I have done this in
the past with great success, my Year 11s found it very useful over
Easter!
Turning that idea on its head, you could give the same task to every stu-
dent in the room, ask them to take the lead annotating a piece of text/
source etc and explain everything they know about it. Collate the student
videos and upload for revision. Suddenly, with very little effort on your
part, you will find you have created a huge bank of revision resources
for your class. I would use this by giving every student a page of a
chapter, for example, to annotate and explain. This then ensures you
don’t have to review the same chapter/idea in the lesson therefore giving
you more lesson time whilst putting the students in control of their
learning.
Import an exemplar essay/excellent piece of work. Record a video where
you go through WHY it is so excellent in detail. This is a great task to
do with exam style questions as then your students will be able to watch
that video over and over again, before they start their response, giving
them tips and strategies for success.
In the style of an Oxbridge tutorial, you could also ask your students to
do the same with their own work. They would have to send you a video
explaining the ideas and analysing their own piece of work. This is a
really challenging task for students and will ensure that they really spend
the time THINKING about what they produce, rather than just thrashing
it out in half on hour on the computer and handing it in without even
proof reading!
Import your PowerPoints as video files and upload to Wordpress. If you
are really brave, you could actually record your lesson as you go through
the PowerPoint and then upload it for your students. This is scary but
excellent for absent pupils!
Give a student a stimulus text/idea/question/statement to debate in the
app, and get them to create a video of the music/research/webpages/
ideas/connections which have informed their ideas. This is great for
creative work or in more drama based lessons. Or, it is just a great way
of ‘exploding’ a concept, but putting your students in the driving seat!
Explain Everything.... Explained! By Helen Stevens

This is your home screen. It will be blank
until you start saving projects.
However, as the iPad doesn’t have that
much storage. It is advisable you save your
projects and then export them to YouTube/
Google Drive/Dropbox frequently so it
doesn’t clog up your device. More on that
later...
Click on this button
to get started on a
new project!
Click on this button
to import a document
or powerpoint saved
to your Dropbox /
Google Drive ac-
Click on a colour
template...
This is now your first slide of
your Explain Everything file.
Some images may be different as
it has recently been updated, but
the same functions remain. The
best way to understand these func-
tions is to just have a go.

This button is very useful. It allows you to add in
pictures/videos/web pages to discuss and use in
your presentation/video explanation.
If you want to add a picture it
will take you to this page
which shows your photos. It is
a good idea to save the photo/
image you need to your camera
roll first so it is ready and wait-
ing for you.
To do this, find the image you
need on the internet or from a
file on foldr/email it to your-
self. Open the image, then
press and hold the power but-
ton and home button together,
this will take a screen shot of
the image and will automati-
cally save it to your camera
This is quite fun; you can
use a web browser through
Explain Everything. I.e.
YouTube clips can be
paused and discussed at key
points. It is also good for
students using the app—
you can get them to
‘explain everything’! Very
useful for a variety of
different lessons!
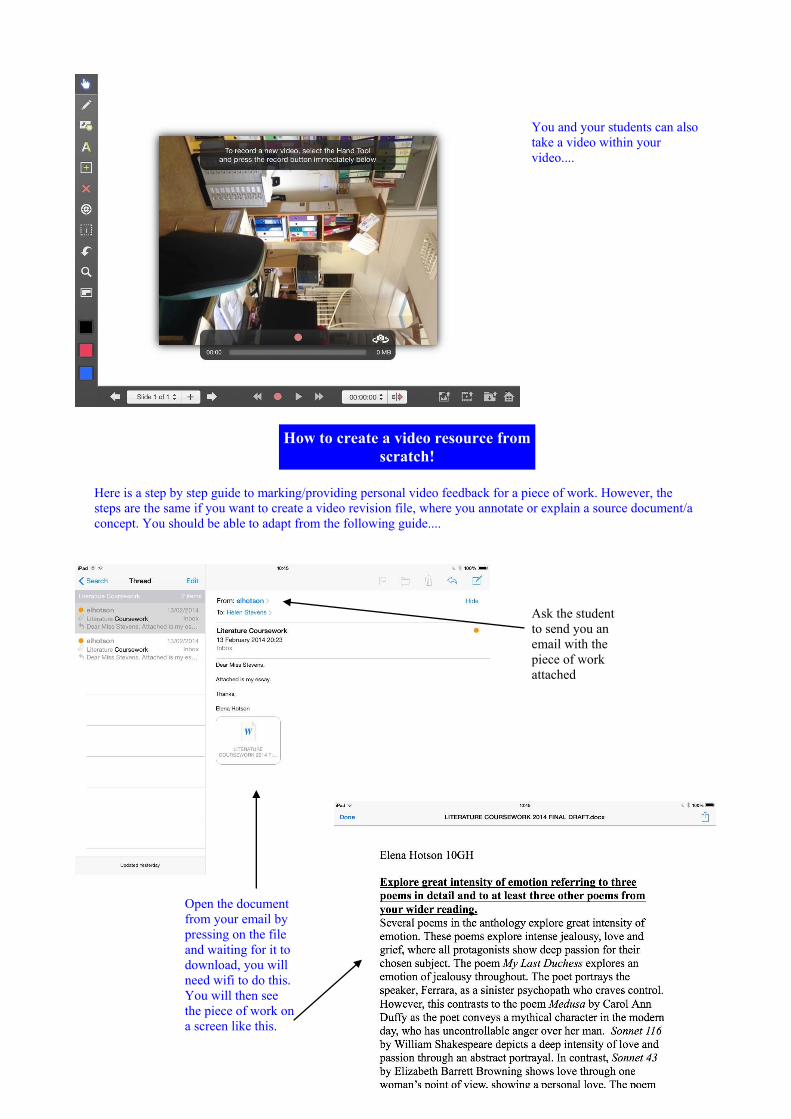
You and your students can also
take a video within your
video....
How to create a video resource from
scratch!
Ask the student
to send you an
email with the
piece of work
attached
Here is a step by step guide to marking/providing personal video feedback for a piece of work. However, the
steps are the same if you want to create a video revision file, where you annotate or explain a source document/a
concept. You should be able to adapt from the following guide....
Open the document
from your email by
pressing on the file
and waiting for it to
download, you will
need wifi to do this.
You will then see
the piece of work on
a screen like this.
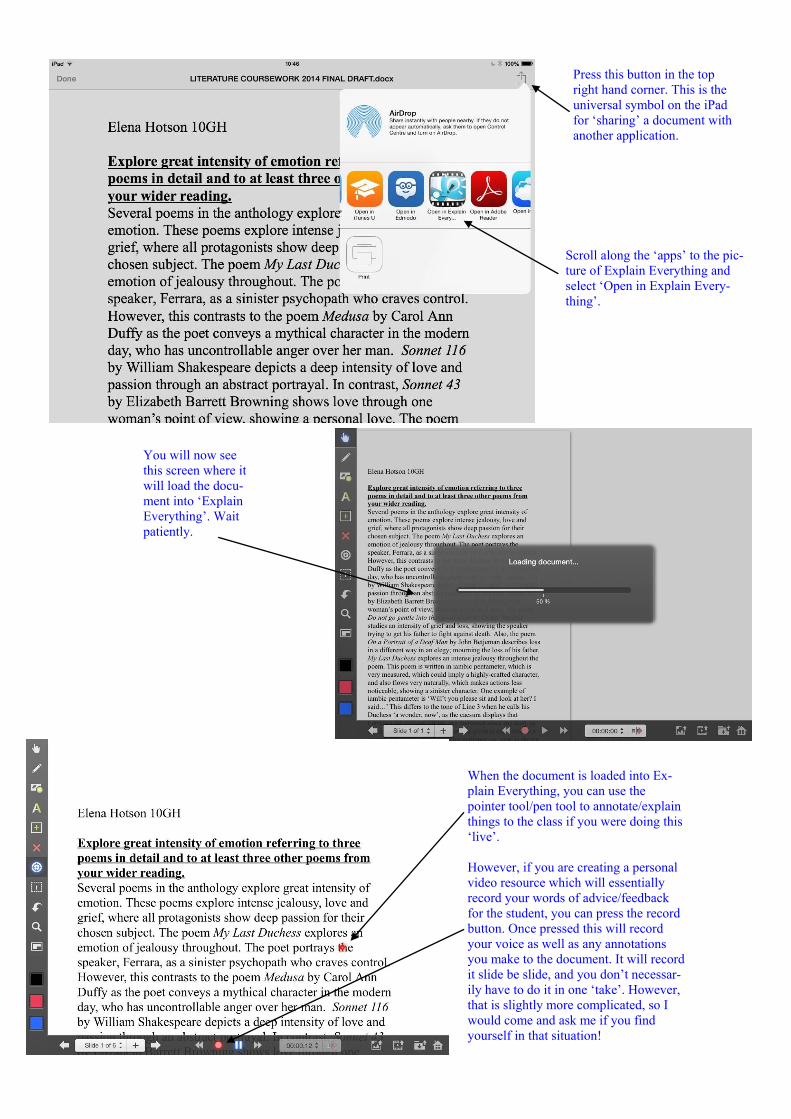
Press this button in the top
right hand corner. This is the
universal symbol on the iPad
for ‘sharing’ a document with
another application.
Scroll along the ‘apps’ to the pic-
ture of Explain Everything and
select ‘Open in Explain Every-
thing’.
You will now see
this screen where it
will load the docu-
ment into ‘Explain
Everything’. Wait
patiently.
When the document is loaded into Ex-
plain Everything, you can use the
pointer tool/pen tool to annotate/explain
things to the class if you were doing this
‘live’.
However, if you are creating a personal
video resource which will essentially
record your words of advice/feedback
for the student, you can press the record
button. Once pressed this will record
your voice as well as any annotations
you make to the document. It will record
it slide be slide, and you don’t necessar-
ily have to do it in one ‘take’. However,
that is slightly more complicated, so I
would come and ask me if you find
yourself in that situation!

Here you can see me making
marking annotations whilst
recording my feedback. It
cuts down the need to write
anything down. I use this for
more important, longer and
more complex pieces of
work, which would usually
take me hours to mark. Have
you ever had the feeling
when you are marking and
trying to write down an
elaborate explanation that it
would be so much easier if
you just could explain it to
them.... Well Explain Every-
thing helps you do just that!
This timing bar tracks how
long you have been recording.
When you finish recording,
you will see the total time of
your recording.
You can pause your recording
by pressing the pause button.
And then start again by re-
pressing ‘record’.
You can listen and watch
it back again, by pressing
the play button, but be
ready to cringe at
everything you have
said!

Now it comes to exporting
the document so you can
send it back to the student/
make it available to your
class. You need to press
this button and then you
will see the following
options.
Choose where you wish to save it. I like
to use Google Drive for sharing videos as
it has a huge amount of storage space and
ONLY the student with the link you send
will be able to view it. HOWEVER, you
can also make an unlisted YouTube
video which works the same.
When you have chosen where
you want to save it, press
‘export’.
Choose the name to
save it under and
press ‘OK’
You will
see a list of
your previ-
ous saved
videos
here...

When you have selected a
name for your file and
pressed OK, you will see
this screen where it com-
presses it into the right
format. Be aware that this
may take some time, en-
sure you internet connec-
tion does not drop or you
will have to start again.
It will then automatically
upload to your chosen
place.
Hopefully you will then see
this message and you are
done!

The BASICS: How to export and
save your
presentation
Press this button and you will see this page, this
allows you to save to your Dropbox and Google
Drive/YouTube account, thereby saving space on
your iPad. You will need to have linked these to-
gether before hand, but it is not difficult and I will
help you with that today, if you haven’t got an
account.
You will see this page and
make sure you save it in the
format you want. I.e. If it is
a video you will need to
save it as a video....

The simple way to save your
presentation is just this but-
ton. This will mean it will
save to your home page like
this:
But remember, too many and you will run out of storage, so it is better to export when you can!