essix appliance technology updateruhbakhsh-ortholab.com/wp-content/uploads/essix.pdf · essix...
TRANSCRIPT
A Scientific Journal
on the Fabrication,
Alteration & Retention
of Essix Appliances
SPRING 2003
E S S I X ® A P P L I A N C E
TECHNOLOGY UPDATE
Table of Contents
Fabrication of Essix Retainers
Retention By Telephone
Getting the Perfect Fit
Precautions With Clear Plastic Appliances
Moving Teeth With Essix Appliances
Bite Planes
Closing Re-opened Extraction Sites
Holding Corrected Anterior Open Bites Closed
Essix Temporary Anterior Bridges
Posterior Stabilization Appliance
Intrusion of Excessively Erupted Teeth
Stabilization and Protection of the
Osteointegrating Implant
Whitening Trays
Bleaching Teeth During Supervised Retention
Fabricating Essix Mouthguards
Frequently Asked Questions
Hands-On Training
2
8
9
11
12
20
22
23
26
28
30
32
33
34
38
39
42
Raintree Essix PublicationSpring 2003 • Volume 3©2003 Raintree Essix, Inc.#95100 (Rev. 02-2003)
Essix®, Divots and Windows®, Essix C+®, Essix Embrace®, Retainer Brite®, Remin+®, VACUUM MAXIMIZERs, Prestige®, Trim-Rite®, and
Tray-Rite® are all registered trademarks of Raintree Essix, Inc. Biostar/Ministar® is a registered trademark of Scheu Dental.
All descriptions and items listed herein are subject to change. Not responsible for typographical errors. ©2003 Raintree Essix, Inc.
Essix plastic has been acceptedworldwide for its strength, clarity,size and cost. It’s proven,consistent and guaranteed.
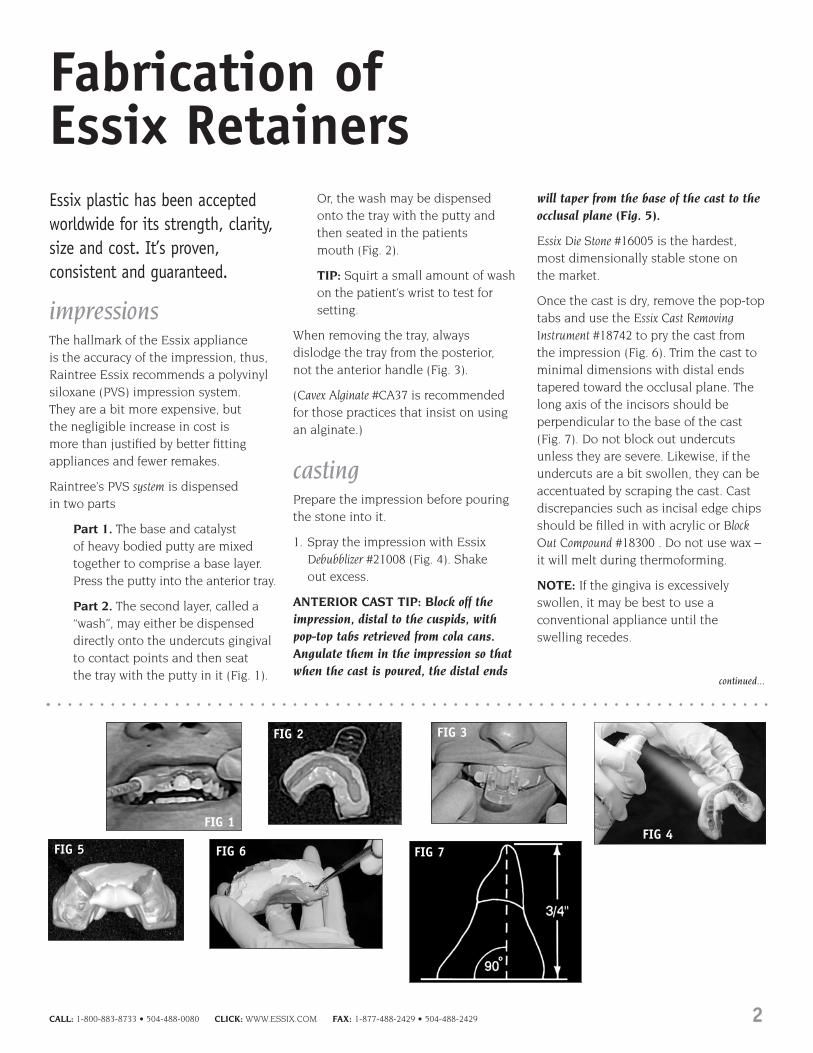
impressionsThe hallmark of the Essix appliance is the accuracy of the impression, thus,Raintree Essix recommends a polyvinylsiloxane (PVS) impression system. They are a bit more expensive, but the negligible increase in cost is more than justified by better fittingappliances and fewer remakes.
Raintree’s PVS system is dispensed in two parts
Part 1. The base and catalyst of heavy bodied putty are mixedtogether to comprise a base layer.Press the putty into the anterior tray.
Part 2. The second layer, called a“wash”, may either be dispenseddirectly onto the undercuts gingivalto contact points and then seat the tray with the putty in it (Fig. 1).
Or, the wash may be dispensedonto the tray with the putty andthen seated in the patients mouth (Fig. 2).
TIP: Squirt a small amount of washon the patient’s wrist to test forsetting.
When removing the tray, alwaysdislodge the tray from the posterior, not the anterior handle (Fig. 3).
(Cavex Alginate #CA37 is recommendedfor those practices that insist on usingan alginate.)
castingPrepare the impression before pouringthe stone into it.
1. Spray the impression with EssixDebubblizer #21008 (Fig. 4). Shake out excess.
ANTERIOR CAST TIP: Block off theimpression, distal to the cuspids, withpop-top tabs retrieved from cola cans.Angulate them in the impression so thatwhen the cast is poured, the distal ends
will taper from the base of the cast to theocclusal plane (Fig. 5).
Essix Die Stone #16005 is the hardest,most dimensionally stable stone on the market.
Once the cast is dry, remove the pop-toptabs and use the Essix Cast RemovingInstrument #18742 to pry the cast fromthe impression (Fig. 6). Trim the cast tominimal dimensions with distal endstapered toward the occlusal plane. Thelong axis of the incisors should beperpendicular to the base of the cast(Fig. 7). Do not block out undercutsunless they are severe. Likewise, if theundercuts are a bit swollen, they can beaccentuated by scraping the cast. Castdiscrepancies such as incisal edge chipsshould be filled in with acrylic or BlockOut Compound #18300 . Do not use wax –it will melt during thermoforming.
NOTE: If the gingiva is excessivelyswollen, it may be best to use aconventional appliance until theswelling recedes.
CALL: 1-800-883-8733 • 504-488-0080 CLICK: WWW.ESSIX.COM FAX: 1-877-488-2429 • 504-488-2429 2
FIG 1
FIG 2 FIG 3
FIG 5FIG 4
FIG 6
Fabrication of Essix Retainers
continued...
FIG 7

thermoformingRaintree Essix recommends a vacuum thermoforming machine for allit’s applications. The Essix Machine #85000(Fig. 8) is not only compact andinexpensive, but need only be pluggedin – no compressed air is necessary.(The Essix machine has been specificallydesigned to allow optimal suctionbeneath the cast.) The VACUUMMAXIMIZERS™ #85999 further enhancethe suction beneath the cast dependingon the cast size (Fig. 9).
When heating any plastic, preheat themachine before using! Heating timesmay vary with current fluctuations orlength of time the heating element has been on.
Essix C+®
Features◆ 1.0mm (.040”) thickness◆ Contact clarity◆ Flexible◆ Durable◆ Withstands bruxing◆ Will not crack or bubble◆ Up to 2 years of wear◆ Does not accept bonding agents◆ Excellent for:
• Retention• Tooth movement
Basic Retainer VacuumInstructions1. Pre-heat the vacuum machine for at
least 3 minutes or until the heatingelement is a solid orange color.
2. Place the plastic into the frame on
the vacuum machine and the model on the base plate. Do not placemodel directly in center, offset 1/4”.
3. Swing the heating element over theplastic. Observe the plastic as itheats.
4. Essix C+ rises toward the heatsource, then becomes wavy as itlowers from the raised position (Fig. 10).
5. The waves will start to flatten outinto its original flat position – thisis the optimal thermoforming time.Do not let Essix C+ sag.
6. Move the heating element away fromthe plastic.
7. Turn on the vacuum, then lower theplastic over the model.
8. Push into the plastic at eachundercut with the Essix Accentuator #18943 (Fig 11).
9. Immediately spray the plasticencased model with Essix FreezeSpray #22000 (Fig. 12). This is anessential step. Not only does it cool the plastic, prohibiting furtherthinning, but it “shrinks” thematerial around the cast, realizing a tighter fit.
10. Let vacuum continue to run untilplastic is cool.
Essix A+™
Features◆ 0.5mm (.020”) to 3.0mm (.120”)
thickness◆ Protective blue film on both sides
◆ Brilliantly clear◆ Rigid◆ Accepts bonding materials◆ Up to 6 months of wear◆ Excellent for:
• Retention• Tooth movement• Bite planes• Splints made with acrylic
Basic Retainer VacuumInstructions1. Pre-heat the vacuum machine for at
least 3 minutes or until the heatingelement is a solid orange color.
2. Remove the blue film on both sidesof the sheet of plastic beforethermoforming.
3. Place the plastic into the frame onthe vacuum machine and the modelon the base plate.
4. Swing the heating element over theplastic. Observe the plastic as itheats.
5. Essix A+ should sag approximately1/2” to reach optimal retention.
6. Move the heating element away fromthe plastic.
7. Turn on the vacuum, then lower theplastic over the model.
8. Let vacuum continue to run untilplastic is cool.
Thickness Vacuum Heat Time Biostar® Code0.5mm (.020”) 20 seconds 930.75mm (.030”) 25 seconds 1031.0mm (.040”) 30 seconds 1131.5mm (.060”) 40 seconds 1332.0mm (.080”) 45 seconds 1633.0mm (.120”) 50 seconds 193
Thickness Vacuum Heat Time Biostar® Code1.0mm (.040”) 45 Seconds 163
FIG 9There are more holes and the holes are biggerthan most other vacuum machines.
FABRICATION OF ESSIX RETAINERS, continued
FIG 10 FIG 12FIG 11
continued...
FIG 8
3 CALL: 1-800-883-8733 • 504-488-0080 CLICK: WWW.ESSIX.COM FAX: 1-877-488-2429 • 504-488-2429
Essix Embrace®
Features◆ 0.75mm (.030”) and 1.0mm (.040”)
thickness◆ Clear and Rigid◆ Up to 16 months of wear◆ Accepts bonding agents◆ Excellent for:
• Retention• Minor splints• Bite planes
Basic Retainer VacuumInstructions1. Pre-heat the vacuum machine for at
least 3 minutes or until the heatingelement is a solid orange color.
2. Place the plastic curved side up intothe frame on the vacuum machineand the model on the base plate.
3. Swing the heating element over theplastic. Observe the plastic as itheats.
4. Essix Embrace will completelyflatten – this is the optimalthermoforming time.
5. Move the heating element awayfrom the plastic.
6. Turn on the vacuum, then lower theplastic over the model.
7. Let vacuum continue to run untilplastic is cool.
Essix U-C-Me™
Features◆ Same characteristics as Essix C+ only
it glows in the dark
Basic Retainer VacuumInstructions1. Pre-heat the vacuum machine for at
least 3 minutes or until the heatingelement is a solid orange color.
2. Place the plastic into the frame onthe vacuum machine and the modelon the base plate. Do not placemodel directly in center, offset 1/4”.
3. Swing the heating element over theplastic. Observe the plastic as itheats.
4. Essix C+ rises toward the heatsource, then becomes wavy as itlowers from the raised position.
5. The waves will start to flatten outinto its original flat position – thisis the optimal thermoforming time.Do not let Essix C+ sag.
6. Move the heating element away fromthe plastic.
7. Turn on the vacuum, then lower theplastic over the model.
8. Push into the plastic at eachundercut with the Essix Accentuator#18943.
9. Immediately spray the plasticencased model with Essix FreezeSpray #22000. This is an essentialstep. Not only does it cool theplastic, prohibiting further thinning,but it “shrinks” the material aroundthe cast, realizing a tighter fit.
10. Let vacuum continue to run untilplastic is cool.
troubleshootingThe retainer fits the cast, but does notfit the patient. The problem lies withthe impression.
1. If/when using an alginate impressionmaterial, the mold must be pouredimmediately (within 5 minutes).Otherwise the impression willexpand, thus distorting theduplication.
2. The stone used must be dry. Storestone in a closed container in a dryroom. Stone will absorb atmospheric
humidity and expand the cast.
3. Casts should be trimmed properly – no more than 3/4” (Fig. 13). Trim awaythe palate of full arch impressions.
The plastic did not adapt well to the cast.
1. Always use a VACUUM MAXIMIZERfor vacuum machines.
2. If using a Biostar, do not embed thecast in beads. Use the flat base plate.
3. Cast should be trimmed properly – no more than 3/4” (Fig. 13). Trim awaythe palate of full arch impressions.
The lingual, palatal edge lifts awayfrom the cast.
1. Plastic must be cooled immediately,spray with Freeze Spray afterthermoforming.
2. Or, use Gordon contouring orWeingart pliers to bend the edgetoward the palate.
trimming an essixapplianceAnterior Retainers1. Cut away the excess plastic using the
Essix Mayo Scissors #18001. Then cutout a “tab” on the lingual and labial(Fig. 14) to pull the plastic away fromthe cast.
Thickness Vacuum Heat Time Biostar® Code1.0mm (.040”) 45 Seconds 163
Thickness Vacuum Heat Time Biostar® Code0.75mm (.030”) 35 Seconds 133 1.0mm (.040”) 40 seconds 143
CALL: 1-800-883-8733 • 504-488-0080 CLICK: WWW.ESSIX.COM FAX: 1-877-488-2429 • 504-488-2429 4
FABRICATION OF ESSIX RETAINERS, continued
FIG 13
FIG 14
continued...

2. Cut the distal ends off using the Essix Lab Knife #18800 (Fig. 15).
3. Pull the tabs to remove the cast from the plastic.
4. Cut straight across from canine to canine. Approximately 1mm on thegingival of the lingual and 2-3mm onthe gingival of the labial (Figs. 16a &16b).
5. Round out the edges cutting towards the incisal edge of thecanines (Fig. 17a). Resulting retainer(Fig. 17b).
Full Arch Retainers1. Trim away all excess plastic (Fig. 18).
2. Cut off the distal third of theterminating molar (Fig. 19) using the Essix Precision Electric Heat Knife#88550, the Essix Wheel Saw #18320, or cut the distal ends off using theEssix Lab Knife #18800.
3. Trim the plastic to approximately1mm onto the gingiva on the lingual
and labial. This can be done using aWheelsaw #18320 on a Dremel #DR001or a Precision Electric Heat Knife #88550and cutting the plastic directly on thecast (Fig. 20). Or, first removing theplastic from the cast and trimmingthe edge with Mayo Scissors #18001.
4. The plastic can be gently pried fromthe cast with the Essix Cast RemovingInstrument #18742 working from themolars towards the canines (Fig. 21).
5. Have the patient seat the applianceand bite down on double-sidedarticulating paper. Grind away anyhigh spots on the retainer in orderthat the anteriors will occlude (Fig. 22).
6. The edges of the retainers can bepolished using the Essix Border Polishers#18970 or Essix Polishing Brushes#18981, #18982 and #18983 on aDremel #DR001 (Figs. 23 and 24).
contraindications andlimitations of essixappliancesEssix appliances should be coincidentwith patient behavior. If the patient hasdisplayed poor hygiene and a casualattitude about treatment, it might bebetter to place a bonded appliance,wait for the tissue to normalize (andperhaps for the patient to mature a bit)and use an Essix as an exit appliance,i.e. after the bonded appliance isremoved.
If the patient displayed severepretreatment rotations of the anteriorteeth, it would be advisable to considerfiberotomies, and retain with a bondedcuspid–to-cuspid appliance. Thisprecludes the incisor jiggling betweennon-wear during the day and the wearwhile sleeping. Again, it would beprudent to use the Essix as an exitappliance – after the bonded applianceor Hawley is discontinued.
5 CALL: 1-800-883-8733 • 504-488-0080 CLICK: WWW.ESSIX.COM FAX: 1-877-488-2429 • 504-488-2429
FABRICATION OF ESSIX RETAINERS, continued
FIG 18 FIG 19 FIG 20
FIG 21 FIG 22 FIG 23 FIG 24
continued...
FIG 16A FIG 16B FIG 17A
FIG 17B
FIG 15

help your patients care for their essix appliancesThe Essix How to Care for Your ApplianceBrochure #99S60 is a perfect handout togive to patients. Included on the backof the brochure is an area to imprintyour office information, as well as ahandy wearing schedule where theorthodontist may indicate how theappliance should be worn. The text of the brochure is as follows:
CALL: 1-800-883-8733 • 504-488-0080 CLICK: WWW.ESSIX.COM FAX: 1-877-488-2429 • 504-488-2429 6
FABRICATION OF ESSIX RETAINERS, continued
continued...
Don’t Blame Your Dog . . .
The number 1 reason for retainer loss is pets. If left out, animals will oftenchew up the appliances. Other causesof retainer loss are due to melting(placing the retainer too close tocurling irons and hot curlers) ormisplacement (from wrapping theappliance in a napkin that is mistakenlythrown away). To avoid these hazards,always keep your appliance in the caseprovided by your doctor.
Why Wear Retainers?
Retainers, as the name implies, retainthe teeth in the corrected position.Failure to wear retainers as directed,even for a short period of time, may cause the teeth to shift intopretreatment position. It is veryimportant that you follow the specificinstructions given to you to maintainsatisfactory results.
Your Wearing Schedule
It is imperative to adhere to yourretention schedule. If not followed,your teeth may shift to the extent thatyou may need to be retreated. Consultback panel for your wearing schedule.
Cleaning
Do not brush appliance withtoothpaste – it dulls the plastic andmay crack the appliance. To maintainthe brilliance of your appliance, usesoap and water* or Essix Retainer Brite®
#RB-TP. For best results, follow yourdoctor’s recommendation.
*Not hot water
Retainer Tips
1. Retainers should not be worn whileeating.
2. Always bring your retainers with youfor each appointment. If a retainer islost or damaged, you will be chargedfor replacements or repairs.
3. If you miss a few nights, wear theretainer full time and bite down toseat if fully. The teeth may be a littlesore, but should realign in a shortperiod of time. If they do not, callyour doctor.
4. If your retainer ever becomes loose(if you can flip it out with yourtongue), discontinue wear and call your doctor immediately.
5. Do not chew gum – it sticks to the plastic.

essix retention letter topatients/parentsRaintree recommends giving yourpatients written instructions for thecare and schedule of wear for theirretainers since, often times the patientwill forget verbal instructions. A simpleletter to the patient like the one to theright or the Essix How to Care for YourAppliance Brochure is perfect as well.
7 CALL: 1-800-883-8733 • 504-488-0080 CLICK: WWW.ESSIX.COM FAX: 1-877-488-2429 • 504-488-2429
FABRICATION OF ESSIX RETAINERS, continued
Sample letter:
Dear Patient/Parent,
I would like to thank you for your efforts in helping us treat your malocclusion.The appliances are off, your smile is delightful, and I trust you are as satisfied as I am with the results. However, to maintain the finished result, it is imperativethat you adhere to your retention schedule. If it’s not followed, your teeth mayshift to the extent that re-treatment, with additional expense, would be involved.As we discussed, this can be avoided by simply wearing your retainers as directed.My staff and I will help you to adhere to the following guidelines:
◆ Follow the prescribed schedule of wear (insert specific instructions). Retainersmay not be worn while eating or drinking – certain foods will stain yourappliance.
◆ When wearing the retainers at night only, they must be worn every night.
◆ Clean the retainer with Retainer Brite cleaning tablets. Do not brush theretainer with toothpaste, it will cause the plastic to crack and dull.
◆ If an edge of the retainer irritates your gums, trim with a scissors or smoothwith an emery board.
◆ Store the retainer, in the case that was supplied by the office, when it is not in your mouth.
◆ If the retainer is lost, call the office immediately (insert phone number).Replacement retainers can be provided at a nominal fee.
◆ If you miss a night or two, wear the retainer full time, and bite down to seat it fully. The teeth will be sore, but will soon realign.
◆ Place a bead of fluoride gel in the retainer once a week (prior to bedtime) and leave in overnight. This will make your teeth stronger.
◆ If your retainer becomes too loose, call us immediately and discontinuewearing.
Again, my thanks for being a wonderful patient. Be sure to beam that delightfulsmile on everyone.
Sincerely,
Dr. (Insert signature)

Retention By TelephoneLet the patient know that the reason you are checkingretention by phone is because the Doctor respects theirtime, but is concerned about how they are maintaining their finished results.
The person making the call should be familiar with thepatient’s history, i.e., when they finished treatment and any special comments that the Doctor noted when retentionwas initiated. Be prepared for some chitchat.
The following items should be checked during the phoneconversation
◆ Are they wearing the Essix appliance as prescribed?
◆ Does the appliance still fit well?
◆ Are they cleaning the appliance with Retainer Brite or warm water? Remindthe patient not to use toothpaste or a toothbrush that has toothpasteon it – this will dull the plastic andpossibly crack it.
◆ Are there any spots where the appliancehas cracked or worn through?
◆ Are they still seeing theGeneral Dentist for routine check-ups?
◆ Do they, for any reason,wish to schedule anappointment with the Doctor? If so,schedule theappointment. If it is theDoctor’s choice to see thepatient at the next recall time, tell the patientthat they should call the office in a few months to schedule an appointment.
◆ The patients should be informed not to wait for the nextretention call if any problems should arise – they shouldcall the office immediately.
At the conclusion of the call, again mention the Doctor’sconcern for maintaining the finished result and remind the patient that you will be contacting them again in a few months.
Note: Although retention could possibly be checked via e-mail, a dialogue with a staff member is more meaningfuland establishes a more personal contact.
CALL: 1-800-883-8733 • 504-488-0080 CLICK: WWW.ESSIX.COM FAX: 1-877-488-2429 • 504-488-2429 8
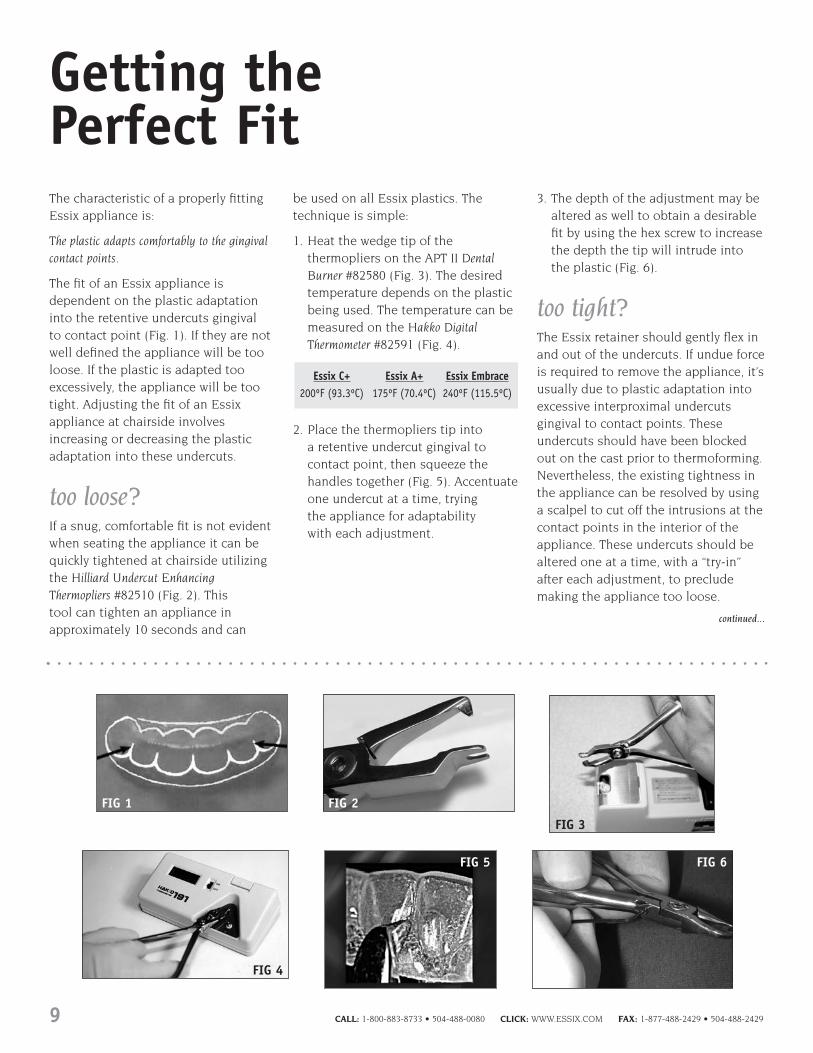
Getting the Perfect FitThe characteristic of a properly fittingEssix appliance is:
The plastic adapts comfortably to the gingivalcontact points.
The fit of an Essix appliance isdependent on the plastic adaptationinto the retentive undercuts gingival to contact point (Fig. 1). If they are notwell defined the appliance will be tooloose. If the plastic is adapted tooexcessively, the appliance will be tootight. Adjusting the fit of an Essixappliance at chairside involvesincreasing or decreasing the plasticadaptation into these undercuts.
too loose?If a snug, comfortable fit is not evidentwhen seating the appliance it can bequickly tightened at chairside utilizing the Hilliard Undercut EnhancingThermopliers #82510 (Fig. 2). This tool can tighten an appliance inapproximately 10 seconds and can
be used on all Essix plastics. Thetechnique is simple:
1. Heat the wedge tip of thethermopliers on the APT II DentalBurner #82580 (Fig. 3). The desiredtemperature depends on the plasticbeing used. The temperature can bemeasured on the Hakko DigitalThermometer #82591 (Fig. 4).
2. Place the thermopliers tip into a retentive undercut gingival tocontact point, then squeeze thehandles together (Fig. 5). Accentuate one undercut at a time, trying the appliance for adaptability with each adjustment.
3. The depth of the adjustment may bealtered as well to obtain a desirablefit by using the hex screw to increasethe depth the tip will intrude intothe plastic (Fig. 6).
too tight?The Essix retainer should gently flex inand out of the undercuts. If undue forceis required to remove the appliance, it’susually due to plastic adaptation intoexcessive interproximal undercutsgingival to contact points. Theseundercuts should have been blockedout on the cast prior to thermoforming.Nevertheless, the existing tightness inthe appliance can be resolved by usinga scalpel to cut off the intrusions at thecontact points in the interior of theappliance. These undercuts should bealtered one at a time, with a “try-in”after each adjustment, to precludemaking the appliance too loose.
Essix C+ Essix A+ Essix Embrace200ºF (93.3ºC) 175ºF (70.4ºC) 240ºF (115.5ºC)
9 CALL: 1-800-883-8733 • 504-488-0080 CLICK: WWW.ESSIX.COM FAX: 1-877-488-2429 • 504-488-2429
continued...
FIG 1 FIG 2
FIG 3
FIG 4
FIG 5 FIG 6
gingival discomfort?If the appliance impinges on the facialtissue, causing it to blanch (Fig. 7) atthe superior part of the labial border of the appliance, reduce the excessivegingival height of the plastic with acurved Mayo Scissors #18001 to no morethan 1.0mm onto the facial gingivarather than the conventional 2.0-3.0mm (Fig. 8). However, do not trim theappliance to conform to the cervicalline. This would eliminate the plasticadaptation to the retentive undercuts.
minor relapse?Slightly maligned teeth can berealigned without resorting to fixedappliances, or constructing anotherEssix appliance. Because of theresiliency and flex-memory of Essixplastic, it consistently returns to itsoriginal thermoformed state, therebyreturning the teeth to their debondedposition when worn for a sufficienttime. If, for whatever reason, the teethhave shifted slightly, the applianceusually will seat, albeit somewhatawkwardly. The patient’s cooperation is mandatory. They must wear theappliance full time until the applianceseats comfortably and the teeth have
realigned – usually within 2-3 weeks.After alignment, it’s back to the usualnight only regime.
Teeth can also be realigned chairsideby utilizing the existing Essix Retainerand the appropriate Hilliard Thermopliers(see page 12). The patient must wearthe modified Essix Retainer full timeuntil the teeth have realigned. Then anew Essix Retainer can be fabricated to be worn at night only.
CALL: 1-800-883-8733 • 504-488-0080 CLICK: WWW.ESSIX.COM FAX: 1-877-488-2429 • 504-488-2429 10
GETTING THE PERFECT FIT, continued
FIG 7
FIG 8

Precautions To Be Aware ofWith Clear Plastic Appliances
There has been a flurry of interest in clear plastic appliances to alignteeth without the esthetic compromiseassociated with fixed appliances.However, there are precautions that the clinician should be aware of whenusing clear plastic appliances, andthese are: (1) to avoid the possibility of demineralizing enamel, and (2)grossly disrupting the occlusion.
demineralization Any plastic appliance that covers some or all of the teeth is, in effect, a tray. When fluoride is placed in theappliance, the enamel becomes moreresistant to decay likewise when bleachis placed in it, the teeth become whiter.However, when acidic beverages areretained in the appliance, it becomesan acid-containing trench causing theenamel to become susceptible todemineralization. This is one of thereasons that clear plastic retainers are to be worn only at night, afterbrushing and flossing – to preclude the possibility of demineralization of acid-containing beverages that could be retained in the appliance.
When any full-arch clear plasticappliance is used, it is incumbent on the clinician to inform the patient of the dental side effects of acid-containing beverages when wearingthese devices full-time, and to flush the mouth with water immediately afterdrinking acid-containing beverages(soft drinks, fruit juice cola beveragesetc.) Daily fluoride rinses, such asEssix’s Home Gel #74400, are alsorecommended. These precautions may prevent incisal edges from beingmarred by unsightly decalcification
(Figs. 1A & 1B).
disturbance in occlusionAdditionally, if a full coverage plasticappliance is used to move teeth, or is used as a full-time retainer forextended periods, it should beequilibrated. If not equilibrated, itcould cause significant prematureocclusal contacts in the posterior teethand, in turn, induce an anterior openbite due to the “1 to 3” prostheticconcept. 1mm of bite-opening on theterminal molars will induce 3mm ofbite-opening on the incisors becauseprior to translation the initial openingmovement from centric relation ispurely rotational with a hinge-axis(center of rotation) around thecondyles. When a full coverage plasticappliance is seated, the thickness ofthe appliance between the terminalmolars will inevitably cause a hinge-axis interference, and will induce adisproportionately larger anterior openbite (Fig. 2A). This dilemma isavoidable – simply equilibrate full-archclear plastic appliances when they areinitially seated. If only one device isneeded, equilibrate it. If upper andlower appliances are worn concurrently,place one and equilibrate it. Then placethe other and equilibrate it untilreasonable occlusal and incisal bitesare established (Fig. 2B).
In summation, the clinician should be aware of the potential fordemineralization, and/or the occlusaland incisal disruptions that full timeappliances can generate, no matterwhat their purpose. Then, the stepsnecessary to nullify, or at least diminishthese effects can be initiated.
11 CALL: 1-800-883-8733 • 504-488-0080 CLICK: WWW.ESSIX.COM FAX: 1-877-488-2429 • 504-488-2429
FIG 1AAppearance of enamel prior to wearing a plasticappliance (surgical splint) that covered theincisal edges of the maxillary anterior teeth.
FIG 1BIncisal edges demineralized due to drinking a colabeverage and constantly wearing the appliance.
FIG 2AThe open bite induced when upper and lowerfull coverage plastic appliances were placed.
FIG 2BOcclusion after equilibration with plasticappliances in place.

Moving Teeth with Essix AppliancesUsing the Hilliard Thermopliers
the basics Tooth movement up to 3mm with Essixappliances is simple, inexpensive andclinician controlled. Tooth movementrequires force and space. The HilliardThermopliers for tooth movementprovide force to move teeth by creating a bump directly into an Essix appliance.
heating the hilliardthermopliersThe thermopliers are heated and thenplaced on the Essix® appliance at thedesired tooth position.
1. The wedge tips of the pliers areheated to a temperature that willthermoform Essix plastic. Therecommended heat source is the APT II Dental Burner #82580(Fig. 1).
2. Exact temperatures can bedetermined by a digital readout on a Hakko Digital Thermometer #82591(Fig. 2). The desired temperature willvary depending on the plastic beingused.
3. Once the pliers are heated, place the tip where the bump is indicated.Slowly squeeze the handles together.A projection will develop into theappliance* (Fig. 3).
4. This “bump” can be increased forfurther movement at subsequent
appointments in 1-mm incrementsusing the hex screw** provided withthe pliers (Fig. 4).
*When using C+ plastic, cool the bump with Freeze Spray prior to removing the thermopliers.
**All thermopliers, except for the Slot-formingThermopliers, are fully adjustable with the supplied hex wrench.
creating space in an essix applianceThe targeted tooth must have space tomove into. Any one of the followingmethods can obtain this. TIP: Alwayscreate the space before making thebumps.
METHOD I: Creates a “bubble” inside the applianceinto which the targeted tooth can move.No Triad or stone is needed.
1. Heat the Bubble tip of the Bubble-forming Thermopliers. Slowly squeezethe pliers into the targeted area of the appliance starting near theinterproximal.Work the pliers aroundthe area that the tooth will bemoving into, bellying out the plasticas much as needed (Fig. 5).* It will be necessary to re-heat thepliers with each application, as itwill cool.**
*It may be necessary to first use the Micro-rampThermopliers to start the edges of the bubble that will becreated on the incisal edge and interproximal region.
**When using C+ plastic, cool the bump with FreezeSpray prior to removing the thermopliers.
Essix C+ Essix A+ Essix Embrace200ºF (93.3ºC) 175ºF (70.4ºC) 240ºF (115.5ºC)
continued...
FIG 2HAKKO digitalreadoutthermometer.
CALL: 1-800-883-8733 • 504-488-0080 CLICK: WWW.ESSIX.COM FAX: 1-877-488-2429 • 504-488-2429 12
FIG 1APT II dental burner toheat the tips of thethermoforming pliers.
FIG 5Using the Bubble-forming Thermopliers to createa bump from the inside of the Essix appliance.
FIG 4Adjusting the sizeof the thermoformedbump with the hexscrew.
FIG 3Thermoforming pliersinducing a bump in anEssix appliance.
Creating Space
Heating the Hilliard Thermopliers

METHOD II:Creates a “bubble” inside the applianceinto which the targeted tooth can move.This method requires Triad or stone toachieve the bubble, and more time to form.
Materials Needed: Acrylic, Stone or Light-cured Composite
1. Place a thickness of acrylic, stone or light-cured composite, on thesurface of the target tooth on themodel that is proportionate to the amount of projected toothmovement (Fig. 6). This will form a bubble in the thermoformedappliance.
METHOD III:Creates a “window” for the targeted toothto move into. It is essentially a hole cutinto the appliance.
Materials Needed: Essix® Window Bur,Scalpel or Lab Knife
1. Use the Window Bur #18925 to drillthrough the inside of the Essix®
appliance on the opposing side ofthe target tooth, creating a hole into
which the tooth will move.
2. Use the Lab Knife #18800 or Scalpelto trim the window to the contactpoints and smooth out the plastic. A window is created for the tooth to move into (Fig. 7).
bodily tooth movement1. Pre-treatment tooth alignment.
Blocked-out incisor requires morespace than can be obtained bystripping its proximal surfaces (Fig. 8).
2. Insert separators* one contact awayfrom the blocked-out incisor tocreate an open field for better visualaccess. See the patient no more than5 days after placement (Fig. 9).
3. Use ARS to create space (0.5mm –1.0mm) (Fig. 10).
4. Use separators (slightly larger thanin Step 2) to move teeth into spacecreated in previous step (Fig. 11).Again, see the patient no more than5 days after placement.
5. Use ARS to create additional space(0.5mm – 1.0mm) adjacent to thetarget tooth (Fig. 12).
6. Construct an Essix appliance overthe working cast.
7. Create a facial window (space withinthe appliance) for the tooth to moveinto (Fig. 13).
8. Use Hilliard pliers to create force in1mm increments to move the toothinto the facial window. Maxillary Pliers#82520 (bigger tip) is used formoving upper teeth. Mandibular Pliers#82530 (smaller tip) is used formoving lower teeth.
NOTE: 24-hour wear, except whileeating, is recommended. Estimatedresults are 1mm per month (Fig. 14).
9. Finished result. Retain with a new conventional Essix® retainer(Fig. 15).
*Use S2 separators for posterior teeth. For anterior teeth,use small “O” plastic rings typically used for ligating awire into a bracket slot.
MOVING TEETH WITH ESSIX APPLIANCES, continued
FIG 6Blocking out the cast to create spacefor the target tooth to move into.
FIG 7Cutting a window to generate spacefor the target tooth to move.
continued...
13 CALL: 1-800-883-8733 • 504-488-0080 CLICK: WWW.ESSIX.COM FAX: 1-877-488-2429 • 504-488-2429
Creating Space, continued Bodily Tooth Movement
FIG 8 FIG 9 FIG 10
FIG 11FIG 12 FIG 13
Space on facial provides space fortarget tooth to move into.
FIG 14 FIG 15

rotationThe depth and position of the bumpand space in this technique aredictated by the amount of and type of rotation the clinician wants. Thistechnique utilizes the Micro-rampThermopliers #82560.
1. Insert separators on either side ofthe tooth to create an open field forinterproximal reduction (Fig. 16).
2. Use ARS to create additional space between teeth (Fig. 17).
3. Construct an Essix® appliance over the working cast (Fig. 18).
4. Create space for the rotation tomove into by one of the followingmethods:
A. Cut the window into the appliance with the Window Bur#18925 and scalpel (Fig. 19A).
B. Block out the space with Triadprior to thermoforming the appliance, thus the space will be contained within the retainer (Fig. 19B).
C. Use the Bubble-forming Thermopliers #82590 to create a bump from the inside of the Essix appliance (Fig. 19C). No cuts are made in the appliance, which could be a source of irritation to the tongue.
5. EXAMPLE 1: Mesial-lingual rotation ofan upper central (on one side only) –the mesial aspect of the tooth is to be rotated and the disto-labialsurface is to remain stable. A 10%portion of the disto-lingual should
not be included in the space for therotation. The bump is placed on themesio-labial of the appliance. Thedisto-lingual surface acts as a hingeallowing only the mesio-labialportion of the tooth to rotate(Fig. 20A).
EXAMPLE 2: Rotation on both sides ofthe arch – In order to rotate from thelingual and the labial surfaces of thetooth, space is needed on either side.Likewise, a bump is required on bothsides of the tooth as well (Fig. 20B).
CALL: 1-800-883-8733 • 504-488-0080 CLICK: WWW.ESSIX.COM FAX: 1-877-488-2429 • 504-488-2429 14
MOVING TEETH WITH ESSIX APPLIANCES, continued
continued...
Window
FIG 16 FIG 17 FIG 18 FIG 19A
FIG 19B FIG 19C
FIG 20AFIG 20B
Bump is on the Labial
Space on both sides ofthe tooth
Bump
Rotation

torquing1. Pre-treatment tooth alignment
(Fig. 21).
2. Construct an Essix® appliance over the working cast (Fig. 22).
3. Create space for the tooth to moveinto (see page 12, Creating Space)leaving an incisal edge cap (Fig. 23).
4. Using the Maxillary Pliers #82520,place a 1mm bump near the gingivalborder. (For lower teeth, use theMandibular Pliers #82530.) Use theMicro-ramp Pliers #82560 to induce abump close to the gingival
margin (Fig. 24) if the Maxillary andMandibular Pliers are too thick.
5. Dotted line indicates new toothposition (Fig. 25).
tipping1. Pre-treatment tooth alignment
(Fig. 26).
2. Construct an Essix® appliance overthe working cast (Fig. 27).
3. Create space for the tooth to moveinto (see page 12, Creating Space).Make sure the incisal cap is also cutaway, but the gingival contact pointremains (Fig. 28).
4. Using the Maxillary Pliers #82520,place a 1mm bump near the incisaledge. (For lower teeth, use theMandibular Pliers #82530.) Use theMicro-Ramp Pliers #82560 to induce a bump close to incisal margin (Fig. 29) if the Maxillary andMandibular Pliers are too thick.
5. Increase the depth of the originalbump on subsequent visits foradditional tooth movement. Use thehex-screw adjustment on the pliersto make this happen (Fig. 30).
6. Dotted line indicates new toothposition (Fig. 31).
15 CALL: 1-800-883-8733 • 504-488-0080 CLICK: WWW.ESSIX.COM FAX: 1-877-488-2429 • 504-488-2429
MOVING TEETH WITH ESSIX APPLIANCES, continued
continued...
Window Window
2mm bump =2mm toothmovement
3mm bump =3mm toothmovement
WindowForceInducingBump Incisal Edge Cap
Window
Torquing
Tipping
FIG 21
FIG 26FIG 27
FIG 22 FIG 23FIG 24 FIG 25
1mm bump =1mm toothmovement
WindowWindow
FIG 28 FIG 29
FIG 31FIG 30

mesial and distalmovementTriad gel #30009 is placed on the working model on the side of the tooth thelateral movement is to occur on. Thiscreates a space, like a channel, in thethermoplastic for the tooth to move into when a force is created on theopposite side. This technique utilizesthe Mesial-Distal Thermopliers #82630.
If a lower central incisor is to move to the mesial…
1. Triad gel is placed on the mesial of incisor on work model (Fig. 32).This inhibits obstruction of toothmovement due to contact with thethermoplastic appliance.
2. The force for the desired movement is provided by either of the followingmethods:
A. a bump preparation in the plaster on the distal of the incisor (Fig. 33).
B. a bump formed in thethermoplastic with the Mesial-Distal Thermopliers after theappliance has been fabricated (Fig. 34).
Additional force from a larger bump inthe thermoplastic (either at insertion orat subsequent adjustments) can bemade with the appropriate HilliardThermopliers. The Bubble-Bumptechnique allows several teeth to bemoved at the same time in the mesial-distal direction. The capability to movein the mesial-distal direction can becombined with other movements on thesame appliance to allow movement ofteeth in all three planes of space.
Space created by relief on thework model
Relief needs to be placed in such amanner as to consider the overalldesired movement.
METHOD I: At the incisal edge the reliefmust be even or slightly above theincisal edge of the incisor or the reliefwill be insufficient and the tooth willstrike the inside of the Essix® applianceas it tries to rotate. Any contact with theplastic will stop the tooth from movingwhen the appliance is in the mouth.When first applying the relief material, it may be beneficial to use a straightedge resting on the incisal edge to the incisor and parallel to the occlusalplane in order to judge whether or notsufficient material has been placed.
METHOD II: Another method is to add the Triad relief and then place theretainer model on a flat surface with theincisal edge towards the flat surface.Gravity will move the Triad gel toward the flat surface. The Triad gel then is lightcured. This technique generally will helpthe orthodontist that is starting to usethis technique so that they do notinadvertently block the desiredmovement of a specific tooth.
Depth of the Space Relief
The depth of the space relief placed on the plaster cast has to take intoconsideration the anticipated toothmovement. It is important to rememberthat contact with the plastic of the Essix®
retainer will stop tooth movement. It isbetter to have a slightly larger bubblethan needed rather than a smallerbubble than needed.
The orthodontist has to consider suchadditional factors as the opposingocclusion and comfort to the patient. If the appliance is too uncomfortablethe patient will have more difficultywearing the appliance than if theappliance is comfortable. The bumpdepth is determined by evaluating thedistance the tooth has to be moved and what is tolerable by the patient on the initial placement.
CALL: 1-800-883-8733 • 504-488-0080 CLICK: WWW.ESSIX.COM FAX: 1-877-488-2429 • 504-488-2429 16
MOVING TEETH WITH ESSIX APPLIANCES, continued
continued...
Mesial-DistalMovement,occlusal view.
Mesial-DistalMovement,occlusal view.
Triad Gel Bump placed in the plastic
Mesial-Distal Movement
FIG 32 Mesial-DistalMovement,occlusal view.
Triad Gel
FIG 33
FIG 34

17 CALL: 1-800-883-8733 • 504-488-0080 CLICK: WWW.ESSIX.COM FAX: 1-877-488-2429 • 504-488-2429
MOVING TEETH WITH ESSIX APPLIANCES, continued
anterior intrusionMaterials Needed: Triad Light-curing Gel
In order to intrude a tooth using anEssix® appliance, relief must beprovided on the lingual and labialsurfaces of the target tooth in theappliance. Then a bump is created onthe occlusal surface of the target tooth.The goal is to have light, continuousforce on the target tooth as opposed toheavy pressure. The relief allows this tohappen. Triad gel #30009 is added to theworking model to provide this relief.
1. If an upper tooth is to be intruded,Triad gel is added in a spherical form on the labial and a pear shapeon the lingual to help preventinterference with the lower anterior teeth (Fig. 35).
2. If a lower tooth is to be intruded,Triad gel is added in a pear shape on the labial surface and a sphericalshape on the lingual surface (Fig. 36).
3. The target tooth is notched on theworking model (1mm to 2mm indepth) to generate the intrusive forcein the gingival direction (Fig. 37).
4. For the most efficient intrusion of a particular tooth, the intrusionappliance should be worn full timeor as much as possible in order tokeep the light continuous force on the tooth.
5. At the subsequent appointment, a small window is prepared in thelingual of the appliance so that the Micro-ramp Thermopliers #82560can be inserted to make theadditional intrusion adjustment.
NOTES ON INTRUSION:
1. Intrusion adjustments work well on a single tooth. It is possible to intrude two teeth at the same time but it becomes progressively more difficult to seat the appliance if more than two teeth are intruded at the same time.
2. It may be necessary to increase the retention of theEssix® appliance if there is not sufficient retention.
3. The pathway for the tooth that is to be intruded needs to be clear of obstruction. ARS, separators or tooth movement may be necessary before theimpression is taken for fabrication of the intrusionappliance.
Intrusion – Upper (side view).
Lingual –Triad Gelapplied in a sphericalshape.
Lingual –Triad Gelapplied in apear shape.
Labial –Triad Gelapplied ina sphericalshape
Labial –Triad Gelapplied in a pearshape.
Intrusion – Lower (side view).
FIG 37Intrusion – Incisal edge notch(labial view).
FIG 35
FIG 36
continued...
Anterior Intrusion

CALL: 1-800-883-8733 • 504-488-0080 CLICK: WWW.ESSIX.COM FAX: 1-877-488-2429 • 504-488-2429 18
MOVING TEETH WITH ESSIX APPLIANCES, continued
increasing adjustmentsIn a case where there the initial “bump”is not quite covering enough surfacearea for the desired movement, anadjustment can be made to it toincrease its size. These pliers will notstretch/thin the previously formedbump. The Small Circle Thermopliers#82620 and Large Circle Thermopliers#82610 allow the entire surface area of the bump to have the samethickness.
1. Heat the tip of the Large or SmallCircle Thermopliers (Fig. 38).
2. Place the heated tip around theinitial “bump” and squeeze (Fig. 39).When using C+® plastic, cool thebump with Freeze Spray #22000prior to removing the thermopliers.
FIG 38 FIG 39
FIG 40ABEFORE: Initial “bump” in appliance.
FIG 40BAFTER: Resulting “bump” after using theLarge Circle Thermopliers.
Increasing Adjustments

19 CALL: 1-800-883-8733 • 504-488-0080 CLICK: WWW.ESSIX.COM FAX: 1-877-488-2429 • 504-488-2429
Bite Planes
continued...
There are two methods for making anEssix bite plane. One method usesacrylic, the other does not.
bite plane with hilliard thermopliers1. Thermoform an Essix anterior
appliance and trim as usual. Essix A+™ or C+® plastic may be used.
2. Seat the appliance in the patient’smouth. Have the patient bite downon single-sided articulating paper.
3. Remove the appliance from thepatient’s mouth.
4. Heat the tip of the HilliardBite Plane Thermopliers #82540 to theappropriate temperature. The HakkoDigital Thermometer #82591 will give theexact temperature of the pliers (Fig. 1).
5. Place the bulb tip inside the appliancetoward the markings (Fig. 2).
6. Squeeze the plier’s handles together.
7. A “bump” will form on the outer,lingual surface of the appliance.
8. Proceed with making “bumps” on all the marked spots (Fig. 3).
9. Seat the appliance in the patient’smouth.
Essix C+ Essix A+ Essix Embrace200ºF (93.3ºC) 175ºF (70.4ºC) 240ºF (115.5ºC)
FIG 1
FIG 2
FIG 3

CALL: 1-800-883-8733 • 504-488-0080 CLICK: WWW.ESSIX.COM FAX: 1-877-488-2429 • 504-488-2429 20
bite plane using acrylic1. Using Essix A+™ plastic, thermoform
a basic anterior retainer and trim asusual. (Cannot use Essix C+® plasticas acrylic will not bond to it.)
2. Choose either Triad ProvisionalMaterial #31006 or Triad Light Cure Gel #30004 to bond to the plastic(Figs. 4a & 4b).
3. With the retainer on the cast,scratch a line on the lingual surfacefrom cuspid-to-cuspid (Fig. 5).
4. Remove the retainer from the cast,and then from its internal surfacemake 2 perforations in each tooth(Fig. 6).
5. Roughen the surface on the externalside of the perforations using theEssix Trimming bur #18901 (Fig. 7).
6. Place the retainer back on the cast.Paint cold cure acrylic monomerwith a small brush over theroughened area (Fig. 8).
7. If using the Provisional material, cut a1/2” piece, roll it on a flat surfaceuntil it is approximately the lengthof the anterior retainer and 1/4”wide (Fig. 9). If using the Triad gel,proceed to step 8. Apply a secondcoat of acrylic monomer to theretainer. Mold the rope of Provisionalmaterial to the scratched surface ofthe appliance.
8. If using Triad gel, squeeze a ropeonto the retainer from cuspid–to-cuspid on the roughened surfaceafter the second application of the acrylic.
9. Light cure the Triad. Since thechemical reaction between theplastic and the Triad is incompleteat this time, leave the model for at least 30 minutes (Fig. 10).
10. Remove the appliance from the cast and seat in the patient’smouth. Final adjustments forvertical and incisal contact should be made.
FIG 5
FIG 7 FIG 8
FIG 10
FIG 9
FIG 6
FIG 4ATriad Provisional material.
FIG 4BTriad gel.
BITE PLANES, continued

21 CALL: 1-800-883-8733 • 504-488-0080 CLICK: WWW.ESSIX.COM FAX: 1-877-488-2429 • 504-488-2429
Closing Re-Opened Extraction SitesAfter extraction: (Fig. 1)
1. Thermoform a full arch Essix®
appliance with C+® plastic.
2. Cut the appliance at the site of the extraction (Fig. 2).
3. Create a hook on either side of theextraction space of the appliance onthe facial and lingual surfaces. Thereare two ways to incorporate hooksinto an Essix® appliance.
A. Cutting the plastic to form a hook
1. Cut a horizontal line on thegingival third with a scalpel(Fig. 3).
2. Cut a vertical line very close to the interproximal (Fig. 4).
3. Cut a horizontal line parallel to the first cut (Fig. 5).
4. Round out the edges forpatient comfort.
5. Flex away the hook from the body of the plastic.
6. A thin walled elastic (20g) isattached to the appliance(Fig. 6).
B. Thermoforming a hook into the plastic with the HilliardThermoforming Pliers.
1. Heat the bulb tip of the Hilliard Hook-forming Thermopliers#82550 and measure thetemperature on the HakkoDigital Thermometer #82591according to the plastic beingused (Fig. 7).
2. Insert the Thermopliers into the retainer where the bump isindicated and squeeze towardthe exterior surface (Fig. 8).
3. Heat the “lipped” edge of the Hilliard Slot-formingThermopliers #82570. Use the Hakko Thermometer tomeasure the exact temperatureappropriate for the plasticbeing used.
4. Place the heated edge of the pliers on the side of the“bump” were the elastic willattach and squeeze (Fig. 9). Theorientation of the hook shouldbe in the same direction as theforce vector of the elastic. Athin walled elastic is attachedto the appliance.
5. A thin walled elastic can nowbe attached to the hooks.
6. The extraction space is nowclosed, a new Essix® appliancemust be made.Essix C+ Essix A+ Essix Embrace
200ºF (93.3ºC) 175ºF (70.4ºC) 240ºF (115.5ºC)
FIG 1
FIG 5
FIG 8
FIG 6
FIG 9FIG 7
FIG 3
FIG 4
FIG 2

CALL: 1-800-883-8733 • 504-488-0080 CLICK: WWW.ESSIX.COM FAX: 1-877-488-2429 • 504-488-2429 22
Forced Amplified Retention for Holding Corrected Anterior Open Bites Closed
John J. Sheridan DDS, MSDJason McFall DDSLarry L. Layfield DDS
There seems to be no shortage oftreatment options for closing ananterior open bite. Orthodontics,surgery, magnets, growth alterationdevices, or combinations of thesetechniques are effective.1-4 Keeping it closed is quite another matter. Thetendency to return to the pretreatmentstatus is formidable and unpredictable.It could be a matter of time.
The resolution of anterior open bite is usually accomplished during thefinal stages of treatment. Although, the patient may be in appliances fortwo years, the open bite correction isusually resolved during the last fewmonths. That’s precious little time for form to adapt to function. Theuntreated open bite exists for years in adolescents, or decades in adults. Topresume that the teeth, orthodontically
held in a corrected position for arelatively short period, will alter thisestablished biomorphology wouldseem improbable.5,6 However, we can’tarbitrarily extend treatment times forthe sole purpose of achieving a morestable result. There’s simply no dataindicating how long that would be.Force amplified retention wasconceived to address this dilemma. It can hold the corrected open biteclosed (Fig. 1a).
Retention is thought of as the staticphase of treatment. However, it mayhave to be supplemented with a forcevector, placed when needed, to counterthe relapse tendency of open bitecorrection. Force amplified retentioncan do this. It involves conventionalupper and lower cuspid-to-cuspidlingual retainers, low profile bondedlingual hooks*, intraoral elastics. Thelingual wires must be bonded to eachtooth to insure that the elastic forceis distributed to all anterior teeth
(Fig. 1b). The advantages of forceamplified retention are:
◆ Correction of anterior open bite canbe maintained until the bite appearsstable.
◆ Trial periods, without the verticalelastics, indicate if the corrected bite is stable. If there is relapse, the elastic wear can be resumed.
◆ There is no need to alter or changethe appliance.
◆ The appliance is esthetic. There areno visible appliances, and night onlywear is suggested.
◆ The effect of the vertical elastics canbe varied by changing their size, theduration, or both.
The appliance has dual application:with a vertical elastic force, theappliance will maintain, or correct, an open bite. Without the elastics, the bonded cuspid-to-cuspid wires are conventional static retainers.
FIG 1AForce amplified retention consisting ofcuspid-to-cuspid bonded lingual retainers,lingual Caplin hooks, and intraoral elastics.
FIG 1BForce amplified retention consisting ofcuspid-to-cuspid bonded lingual retainers,Caplin hooks, and intraoral elastics.
continued...

23 CALL: 1-800-883-8733 • 504-488-0080 CLICK: WWW.ESSIX.COM FAX: 1-877-488-2429 • 504-488-2429
case reportPretreatment status
A 29 yr. old male presented with aClass I malocclusion, and minor incisorcrowding in both arches (Figs. 2 & 3), anda 3mm anterior open bite. The uppercentral incisors were ramped lingually,camouflaging the extent of the openbite on the frontal view (Fig. 4). Theseverity of the open bite is realizedwhen viewed from the side (Fig. 5).
He was advised, by other specialists,that resolution could involve surgery,the removal of permanent teeth, orboth, and there was a significantdegree of relapse associated with any method of open bite correction.
The patient elected to have the openbite closed with vertical anterior elasticforce, and the crowding resolved with
Air-rotor Stripping (ARS).7,8 Theresolution of the crowding byexpansion was considered a poortreatment option. This would haveexacerbated the open bite.
Treatment
Space to correct upper and lowercrowding, and slightly retract themaxillary cuspids, was created by ARS.Both arches were bonded from secondpremolar to second premolar (Fig. 6).There was no apparent need tobond/band molars.
The open bite was resolved bysectioning the lower arch distal to thecuspids after the arches were aligned.Up-and-down elastics correlated incisalcoupling with smile line esthetics. Ineffect, the lower incisors were extrudedmore than the upper incisors. Theappliances were removed when the
anterior bite was closed, all crowdingresolved, and the quality of occlusionwas acceptable (Figs. 7-9). Treatmenttime was 5.5 months.
Post-treatment retention
An amplified retention system wasconstructed with instructions to usevertical elastics at night only (Fig. 10).They exerted a slight force (100gm)when the teeth were in centricocclusion. The awkwardness of placingthe lingual elastics was resolved withminimal trial-and-error efforts,and theuse of an elastic placement tool.** Thepatient had no difficulty sleeping withthe elastics in place.
After two months, the elastics werediscontinued for stability appraisal. The anterior bite opened slightly. Nighttime vertical elastic wear was resumed,and the bite closed within one week.
FORCE AMPLIFIED RETENTION, continued
FIG 5Side view of anterioropen bite.
FIG 3Minor pretreatment upper incisorcrowding.
FIG 6Second premolar-to-premolar bonding.
FIG 7Frontal view of finished case.
FIG 8Buccal section view of finished case.
continued...
FIG 2Minor pretreatment lower incisorcrowding.
FIG 4Frontal view of anterior open bite.

CALL: 1-800-883-8733 • 504-488-0080 CLICK: WWW.ESSIX.COM FAX: 1-877-488-2429 • 504-488-2429 24
The patient continued sleeping with vertical elastics in place for anadditional two months. Again, elasticwear was discontinued for stabilityevaluation. The bite remained efficient,and is so currently. The bonded wiresand cleats will be removed if the bitecontinues to be stable. If there isreopening, elastics can be resumed.
conclusionForce amplified retention is a sensibleoption for maintaining the incisalefficiency of a corrected anterior openbite, or for a stand alone treatmentoption. The vertical elastic force can be initiated at any time, and for as longas the clinician deems necessary. This
extended time-line may allow form to adapt to function, reducing thatvariable in the multifactorial etiology of anterior open bite. Data indicate that the surgical correction of anterioropen bite is somewhat more stablethan orthodontic resolution.9 However,due to recent restrictions in insurancecoverage, most orthodontic surgicalprocedures are not eligible fortreatment, financially restricting theavailability of this option. That meansthat orthodontic correction of anterioropen bite will be more prevalent, andmore efficient methods of retention willbe necessary. Force amplified retentionis a step in that direction.
FIG 10Vertical elastics worn at night only.
FORCE AMPLIFIED RETENTION, continued
REFERENCES
1. Katsaros C. and Berg R. Anterior open bite malocclusion: a follow-up study of orthodontic treatment effects,. Eur. J. Orthod. 15:273-280, 1993.
2. Lew, K.K. and Loh, H.S. A ten-year follow-up case report following surgical correction of anterior open bite. Aust. Dent. J., 36:109-112, 1991.
3. Dellinger, E.L. Active vertical corrector treatment long-term follow-up of anterior open bite treated by intrusion of posterior teeth, Am. J. Orthod. Dentofac. Orthop. 110:145-154,1996.
4. Erbay, E; Ungur, T. and Ulgen, M. The effects of Frankels function regulator (FR-4) therapy on the treatment of Angle Class I skeletal anterior open bite malocclusion, Am. J.Orthod. Dentofac. Orthop. 108:9-21, 1995.
5. Lansley, C.V.; Stirrups, D.R. and Moos, K.F. Relapse following surgical treatment of anterior open bite, Br. J. Oral Maxillofac. Surg. 24:391-404, 1986.
6. Kuster, R. And Ingervall, B. The effect of treatment of skeletal open bite with two types of bite-blocks, Eur. J. Orthod. 14:489-99, 1992.
7. Sheridan, J.J.; LeDoux, W. and McMinn, R. Essix retainers: fabrication and supervision for permanent retention, J. Clin. Orthod. (77)37-45, 1993.
8. Sheridan J.J., McMinn R., LeDoux, W. Essix thermosealed appliances: various orthodontic uses, J. Clin. Orthod. 29:108-113, 1995
9. Bailey, L.J.; Philips, C. And Turvey, T.A. Stability following superior repositioning of the maxilla by Le Fort I osteotomy: five-year follow-up, Int. J. Adult Orthodon. OrthognathSurg. 9:163-173, 1994.
* Caplin hook. GAC International. 185 Oval Dr., Central Islip, NY 11722.
** Elastic Placer. GAC International. 185 Oval Dr., Central Islip, NY 11722.
FIG 9Finished lower arch with crowdingresolved.

25 CALL: 1-800-883-8733 • 504-488-0080 CLICK: WWW.ESSIX.COM FAX: 1-877-488-2429 • 504-488-2429
Essix Temporary Anterior BridgesThe basic Essix® appliance can be modified to serve astemporary anterior bridges. The Essix technology provides a simpler, more efficient way to retain and replace missinganterior teeth. Exceptionally aesthetic bridges can befabricated quickly and inexpensively in the office.
technique1. Fit a pontic of appropriate size and color into
the edentulous area. Trim the base of the pontic to approximate the ridge (Fig. 1).
2. Cut a trench into the lingual surface of the pontic (Fig. 2A)with the Essix Trimming Bur #18901.
3. Secure the pontic to the cast with Blockout Compound#18300 (Fig. 2B). Pink acrylic can be used in the gingivalarea. Do not use wax, it will melt during thermoforming.
4. Thermoform the Essix plastic sheet over the cast.
5. The pontic will dislodge from the cast and mechanicallylock into the appliance (Fig. 3).
6. Trim the appliance as usual.
NOTE: For children with minimal pronounced undercuts, we recommend
Essix A+™ .030” and .040”. In all other cases, use Essix C+®.
FIG 1
FIG 2B
FIG 2A
FIG 3
continued...

CALL: 1-800-883-8733 • 504-488-0080 CLICK: WWW.ESSIX.COM FAX: 1-877-488-2429 • 504-488-2429 26
case reports Case 1: A patient with a congenitallymissing upper right lateral incisor hadbeen wearing an upper Hawley retainerwith a pontic for two years afterremoval of fixed appliance. Theretentive ball clasp of the retaineropened a 2mm space between theupper right second bicuspid and thefirst molar. And the patient was alsoconcerned about a loose fit. An Essixbridge was fabricated with little, if anydisruption of the buccal occlusion.
Case 2: An adolescent patient hadcongenitally missing upper lateralincisors. After orthodontic treatment,the edentulous spaces were filled withpontics in an Essix bridge.
Case 3: A preadolescent patient lost all her maxillary incisors when she bitinto an electrical cord. An Essix bridgeincorporating both central and lateralincisor pontics was constructed. Unlikemost Essix bridges, this one wasextended distal to the first molars for added stability and retention.
Case 4: An adult lost both maxillarycentral incisors in a car accident. Afterorthodontic treatment, an Essix bridgewas fabricated to replace the missingteeth. The patient wears a conventionalEssix lower retainer.
conclusionWe have found the Essix temporarybridge to be superior in all respects to conventional devices. It is aninexpensive and aesthetic appliancethat not only replaces missing anteriorteeth, but also serves as an efficientretainer.
ANTERIOR BRIDGES, continued
Finished case with a congenitallymissing lateral incisor.
Essix bridge with lateral incisor pontic.
Buccal section occlusion without Essix bridge.
Buccal section occlusion with Essix bridge.
Finished case with congenitallymissing lateral incisors.
Lateral incisors compensated with an Essix bridge.
Central and lateral incisorstraumatically lost.
Maxillary incisors compensatedwith an Essix bridge.
CASE
2CA
SE 1
Maxillary central incisors traumatically lost. Missing incisors compensated with an Essix bridge.
CASE
4
CASE
3
27 CALL: 1-800-883-8733 • 504-488-0080 CLICK: WWW.ESSIX.COM FAX: 1-877-488-2429 • 504-488-2429
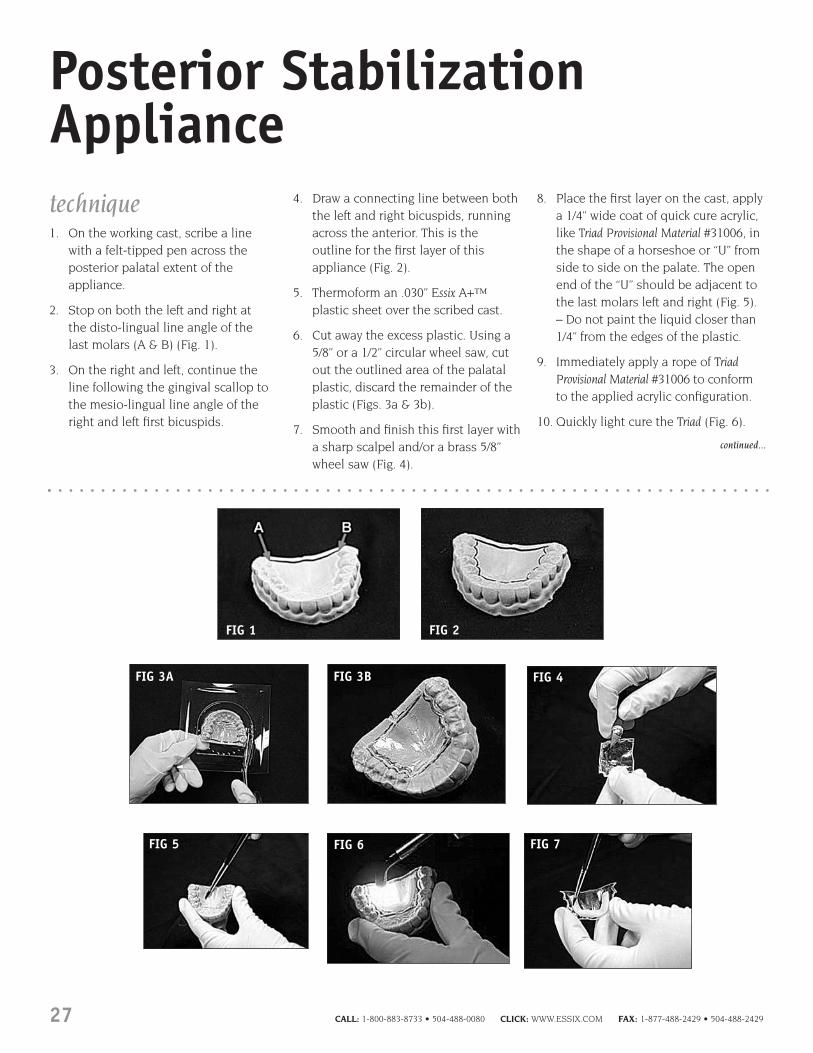
Posterior StabilizationAppliancetechnique1. On the working cast, scribe a line
with a felt-tipped pen across theposterior palatal extent of theappliance.
2. Stop on both the left and right at the disto-lingual line angle of the last molars (A & B) (Fig. 1).
3. On the right and left, continue theline following the gingival scallop tothe mesio-lingual line angle of theright and left first bicuspids.
4. Draw a connecting line between boththe left and right bicuspids, runningacross the anterior. This is theoutline for the first layer of thisappliance (Fig. 2).
5. Thermoform an .030” Essix A+™plastic sheet over the scribed cast.
6. Cut away the excess plastic. Using a5/8” or a 1/2” circular wheel saw, cutout the outlined area of the palatalplastic, discard the remainder of theplastic (Figs. 3a & 3b).
7. Smooth and finish this first layer witha sharp scalpel and/or a brass 5/8”wheel saw (Fig. 4).
8. Place the first layer on the cast, applya 1/4” wide coat of quick cure acrylic,like Triad Provisional Material #31006, inthe shape of a horseshoe or “U” fromside to side on the palate. The openend of the “U” should be adjacent tothe last molars left and right (Fig. 5).– Do not paint the liquid closer than1/4” from the edges of the plastic.
9. Immediately apply a rope of TriadProvisional Material #31006 to conformto the applied acrylic configuration.
10. Quickly light cure the Triad (Fig. 6).
FIG 1
FIG 3A FIG 3B FIG 4
FIG 2
FIG 5 FIG 7FIG 6
continued...

CALL: 1-800-883-8733 • 504-488-0080 CLICK: WWW.ESSIX.COM FAX: 1-877-488-2429 • 504-488-2429 28
11. With the first plastic layer in hand(off of the cast) liberally apply acoating of acrylic liquid on theoutside of the plastic and Triad. Do not allow the monomer to flow to the underside of the plastic (Fig. 7).
12. Replace the cast on the machine.Thermoform a second layer of .030”Essix A+™ plastic over the plastic (Fig. 8).
13. Allow the acrylic-plastic “sandwich”to cure for at least one hour.
14. Cut away the excess plastic. With a circular wheel saw cut away thebuccal and occlusal plastic from themesial of the first bicuspids left andright (Figs. 9a & 9b).
15. That which remains should be adouble .030” sandwich reinforcedwith Triad with a single layer of .030”plastic covering the lingual, incisaland labial surfaces of the cuspid-to-cuspid area.
16. The rough trimmed appliance is nowremoved from the cast and trimmedso the posterior segment conforms to that of the first layer
17. The anterior section of the retainer istrimmed to the outline of the basiccuspid-to-cuspid retainer (Fig. 10).
18. Final trimming is achieved using thefollowing: Essix Mayo Scissors #18001and/or Crown & Bridge Scissors #18002,Essix Lab Knife #18800, Essix BorderPolishers #18970.
19. The finished appliance (Fig. 11).
FIG 9A FIG 9B
FIG 10 FIG 11
POSTERIOR STABILIZATION APPLIANCE, continued
FIG 8

29 CALL: 1-800-883-8733 • 504-488-0080 CLICK: WWW.ESSIX.COM FAX: 1-877-488-2429 • 504-488-2429
Intrusion of Excessively Erupted TeethThe basic Essix® appliance can bemodified to rapidly intrude individual,or groups of teeth without affectingreciprocal movement of adjacent teeth.An Essix intrusion does not require anyclasps or metal elements.
METHOD I:Opening Occlusal Surface
The intrusion of teeth that havepassively erupted into an extractionsite in the opposing arch can be abiomechanical challenge. Intrusion,without significant extrusion ofadjacent teeth can be accomplishedwith the following technique.
1. Thermoform a basic full arch Essix® appliance. Trim as usual.
2. Cut away the occlusal surface of the extruded tooth (Fig. 1).
3. Use the Hilliard Hook Forming #82550and Slot Forming Thermopliers #82570to create two buttons, one on thebuccal and one on the lingual, of the appliance to attach elastics.
A. Heat the bulb tip of the HilliardHook-forming Thermopliers andmeasure the temperature on theHakko Digital Thermometer #82591according to the plastic beingused (Fig. 2).
B. Insert the Thermopliers into the retainer where the bump is
indicated and squeeze toward theexterior surface (Fig. 3). Repeatthis step for the second button.
C. Heat the “lipped” edge of theHilliard Slot-forming Thermopliers. Usethe Hakko Thermometer to measurethe exact temperature appropriatefor the plastic being used.
D. Place the heated edge of the plieron the side of the “bump” werethe elastic will attach andsqueeze. Repeat this step for the second button (Fig. 4).
E. The elastic can now be attached to the buttons (Figs. 5a & Fig. 5b).
Essix C+ Essix A+ Essix Embrace200ºF (93.3ºC) 175ºF (70.4ºC) 240ºF (115.5ºC)
FIG 2
FIG 3 FIG 4
FIG 5AFIG 5B
FIG 1
Super erupted molar into a long-standing extraction site.
Molar intruded without any extension of the bordering teeth.
CASE STUDY
Before
After
continued...

CALL: 1-800-883-8733 • 504-488-0080 CLICK: WWW.ESSIX.COM FAX: 1-877-488-2429 • 504-488-2429 30
METHOD II:This method will require a wirethreader (made from .030 stainlesssteel) to pass the elastic throughthe appliance from one side to theother so that the holes in theappliance may be kept small.
1. Construct a full arch Essix®
appliance over the working cast (Fig. 6).
2. Heat the Elastic Hook-formingThermopliers #82550 (Fig. 7).
3. Place the heated thermopliers at thedesired location on the applianceand squeeze gently to create theinitial bump (Fig. 8). Remove thethermopliers with a rolling motionrather than pulling it straight out.
4. Heat the Slot-forming Thermopliers#82570.
5. Place the “lipped edge” around thebase of the bump previously formedwith the Hook-forming Thermopliersand squeeze the handles together(Fig. 9A, result Fig. 9B).
6. It is necessary to orient the Slot-forming Thermopliers along the vector force of the elastic.
7. Repeat steps 2 through 6 on theopposing side of the arch.
8. Cut a small hole on the labial andlingual gingival to the occlusal edge.
9. Thread the elastic through the holesand attach to the elastics on eitherside of the arch.
This method may be preferable toMethod I if the open occlusal edge is a source of irritation to the tongueor lips.
INTRUSION OF EXCESSIVELY ERUPTED TEETH, continued
FIG 7 FIG 8
FIG 9A FIG 9B
FIG 6

31 CALL: 1-800-883-8733 • 504-488-0080 CLICK: WWW.ESSIX.COM FAX: 1-877-488-2429 • 504-488-2429
Stabilization and Protectionof the Osteointegrating Implant
The technology for fabricating an Essixbridge can be modified to isolate animplant while it is integrating withalveolar bone.1
technique1. The oral projection of the implant
post will be blocked out to create an isolation chamber (Fig. 1).
2. The implant post needs to be protected from direct andtransmucosal forces (Fig. 2).
3. Cover the orally exposed part of the implant on the working cast with a 2mm layer of acrylic.
4. Trim the base of the pontic toconform to the acrylic base on the alveolar ridge.
5. Cut a large and deep trench on thelingual of the pontic to mechanicallylock it into the thermoformedplastic.
6. Thermoform Essix C+® over the cast.
7. Remove the plastic from the castand trim as usual.
When the appliance is placed, therewill be an isolation space between the base of the pontic and the implantdue to the acrylic layer placed prior topontic adaptation and thermoforming(Fig. 3). The implant, while it isintegrating with alveolar bone, will beisolated from direct and transmucosalforces. During this interval the patientcan enjoy the esthetic appliance.
1.Moscowitz E. Sheridan J. Protecting the osteointegratingimplant. New York State Dent J. 63(4), 1997.
FIG 1
FIG 2
FIG 3

CALL: 1-800-883-8733 • 504-488-0080 CLICK: WWW.ESSIX.COM FAX: 1-877-488-2429 • 504-488-2429 32
Whitening TraysBlocking out casts for whitening trays is timely, unnecessary and costly sincemuch of the dispensed bleach iswasted (Fig. 1).
There are three types of plasticbeing used by most practitioners who prescribe at-home whitening:
1. .020” (1/2mm) Coping material – a hard, thin, opaque material thatfeatures a low melt temperature andexcellent thermoforming.
2. .040” (1mm) EVA – a soft, clearmaterial easily vacuum formed andtrimmed.
3. .020” (1/2mm) Tray-Rite® – a semi-soft, clear material easily vacuumformed and trimmed. It does notshrink under heat and is nearlyimpossible to bite through.
Raintree recommends the Tray-Ritematerial for general use (Fig. 2). Tray-Rite is smooth and comfortable to wear. It clings to the teeth providingbetter coverage. Thus, the bleaching gel covers the entire tooth surface anddoesn’t spill over onto the gingiva.
technique1. Pre-heat the vacuum machine for at
least 3 minutes or until the heatingelement is a solid orange color.
2. Spray the model with Tray-RiteRelease Spray #21004 to prevent traymaterial from sticking to the model(Fig.3).
3. Place the plastic into the frame onthe vacuum machine and the modelon the base plate.
4. Swing the heating element over the plastic. Observe the plastic as it heats.
5. Essix Tray-Rite will become wavy thenflatten to its original position – thisis the optimal thermoforming time.
6. Move the heating element awayfrom the plastic.
7. Turn on the vacuum, then lower the plastic over the model.
8. Immediately spray the plasticencased model with Essix FreezeSpray #22000 (Fig. 4). This is anessential step. Not only does it
cool the plastic, prohibiting furtherthinning, but it “shrinks” thematerial around the cast, realizinga tighter fit.
9. Let vacuum continue to run forapproximately 30 seconds or untilplastic is cool.
10. Trim the tray on the model usingthe Trim-Rite Electric Knife #88500.Place the tip of the blade exactlywhere the tooth meets the gingivaand allow that ridge to guide yourmovements (Fig. 5).
11. Seat the whitening tray to check for tissue contact. Best results areobtained when the tray is cut 1mmshort of the soft tissue.
12. Give the model with the tray on it to the patient for their safekeeping(Fig. 6).
Tip: Instruct your patients to dispensethe gel on each tooth lingual to labialfor less waste (Fig 7).
FIG 1
FIG 2
FIG 3
FIG 5
FIG 6
FIG 7
FIG 4

33 CALL: 1-800-883-8733 • 504-488-0080 CLICK: WWW.ESSIX.COM FAX: 1-877-488-2429 • 504-488-2429
Bleaching Teeth DuringSupervised RetentionintroductionBleaching effectively brightens andwhitens the teeth without causing any significant detrimental side effects.It can be logically included duringsupervised retention, because it’srelatively devoid of complexities,requires minimal chair time, canusually be achieved in two to three weeks and, especially in adults,demonstrably improves the estheticquality of the case.
However, orthodontists are not in thebleaching business, nor should they be. Bleaching should be limited to a one-time retention phase, estheticaugmentation. In that context it makessense. Bleaching does not last forever.It must be redone periodically, usuallyevery two-to-three years, when diet andlife styles inevitably cause re-staining.However, that’s the responsibility of the referring dentist. The orthodontistinitiates the bleaching effect and thefamily dentist supervises it fromthereon. With this format, it would be difficult to construe specialistbleaching as an infringement upon the purview of the general dentist. In fact, the specialist has created aclinical service requiring long-termmaintenance by the referring dentist.
the physiologicrationale for bleaching Bleaching, when done according toestablished guidelines, is safe andcondoned by the American Dental
Association. Several clinical trials have been published attesting to its non-pathological effect on teeth1-4
and tissues.5,6 There is no change inenamel hardness and the bacteriostaticproperties of the bleaching gel inhibitcaries during the bleaching process.In a recent survey 91% of dentistsstated they used vital tooth bleachingwith minimal side effects. 62% of these noted only mild transient tooth sensitivity in 11% of their cases.46% of the clinicians reported minorsoft-tissue irritation in 5.5% of the timeand less than 2% reported minimalsystemic effects.7 The apparentsymptoms were controlled by simplyaltering the strength of the bleachingagent and/or adjusting the time ofapplication.
Teeth can be bleached with heat and chemicals, in-office light andchemicals, and in-office lasers.However, the least complex, mosteffective and simplest technique for the orthodontist is professionallyfabricated trays coupled with at-homecarbamide peroxide bleaching. It’s used by 63% of dentists8 and would be the most logical choice fororthodontists because it is practicallydevoid of complications, can be easilysynthesized with supervised retentionand requires minimal chair time.
Hydrogen peroxide is the only activeingredient in all tooth-whiteningproducts. When this oxidizing agent is combined with urea, carbamideperoxide is formed. This compound,initially used as an oral antiseptic for
wound healing, has been sanctioned bythe FDA for use as a non-prescriptionoral antiseptic since 1974. The gelconsistency is established whencarbamide peroxide is blended with an inert ingredient (glycerin, propyleneglycol, or both) and thickened withnon-toxic carbopol that slows therelease of oxygen. Flavoring is oftenadded for taste. The teeth whiten whenhydrogen peroxide separates from theurea, penetrates the enamel, andoxidizes (bleaches) the stains. The urea (a naturally occurring chemical) is absorbed non-toxically by the body’s system.
Bleaching gel strengths can be as lowas 5% carbamide peroxide and reach as high as 44%. The most popularstrengths for at-home bleaching are10% and 15%. The higher of thesestrengths is used to whiten the moreprominent stains. Gels that containless than 10% carbamide peroxidedon’t seem to be very effective. Gelsthat contain 18% or more should beused carefully and probably not byorthodontists because, althoughtreatment time may be reduced, there’sa greater risk of complications withoutany significant increase in the degree of induced whiteness.
bleaching sensitivities Thermal and tissue sensitivities are the usual complications, but areusually mild and transient in naturewith at-home bleaching. The causes are a pre-existing sensitivity to glycerin, propylene glycol or flavoring;
continued...

CALL: 1-800-883-8733 • 504-488-0080 CLICK: WWW.ESSIX.COM FAX: 1-877-488-2429 • 504-488-2429 34
overexposure to the whitening gel, or an ill-fitting tray that irritates thetissue. The patient’s history should be checked for sensitivity to glycerin or propylene glycol. They should beasked about reactions to hand andfacial creams, makeup foundations,lipsticks, deodorants and processedfood. Glycerin and glycol are commonlyused in these items. A strong indicatorof reactions to these products is if thepatient has to use non-allergeniccosmetics.
Exposed dentin often contributes tohypersensitivity, especially amongyounger patients. The tissue recessionand root dentin exposure that comeswith age does not seem inducediscomfort.9 Untreated caries andrestorations with open margins can also contribute to thermalhypersensitivity. To minimize, orcompletely eliminate bleaching gelinduced tissue irritation do notdispense more than a seven-daysupply. The patient can pick up anadditional weekly supply or it can be mailed.
It is imperative that the bleachingschedule be limited to a two-hourapplication no more than twice a day.But still, if any disquieting sensitivityoccurs, the time of gel applicationshould be reduced and irritation willusually dissipate within a few days asthe tissue tolerance increases. Then, a normal bleaching schedule can beresumed. Also, hot and cold beveragesshould be avoided for at least one-halfhour following bleaching gelapplication and ibuprofen can beprescribed. Bleaching gel applicationshould be resumed very slowly in time
and frequency when sensitivity hasdissipated. Additionally, untreatedperio problems should be resolved andrecent surgery allowed to heal beforeinitiating the whitening process.Although there are no clinical orempirical data establishing carbamideperoxide as detrimental to pregnancies,prudence dictates total avoidance.
Teeth discolored by aging, smoking, or chromogenic materials (coffee, tea, red wine, tobacco etc.) have anexcellent prognosis from bleaching.That’s why bleaching is usually moreapplicable for adults – they’ve had a longer stain-exposure period.Bleaching is rarely indicated in youngerpatients, although it can be done onpatients as young as ten years of age.There is no age limit for adults.
Single dark teeth (no endodonticsdone) lighten almost as well as otherteeth, but it takes a while longer. Brownfluorosis discoloration responds well to whitening, but may require somemicroabrasion. Stained cracks in teeth clean well with no evidence ofadditional sensitivity. Brown-orangestains in adults bleach fastest andeasiest. Blue-gray stains are moredifficult and moderate-to-darktetracycline stains bleach only slightly9.Normal bleaching treatment time isusually one-to-three weeks although itcould be extended for months for moreintrinsic staining. No detrimental effecton teeth or patient is associated withextended treatment times.9 However, all areas on a given tooth do notbleach at the same rate. The incisalthird of the crown is the easiest towhiten. The middle third is more of a challenge, but not much, and the
cervical third is the most difficult towhiten. Non-vital teeth don’t respondwell to bleaching because thediscoloration is not superficial, it’s deeply intrinsic. These teeth will become lighter, but noticeably less than adjacent teeth and thewhiteness dissipates more rapidly.
White spots will not bleach.Tetracycline and fever induced stainswill not be completely removed, butreasonable improvement can beexpected. However, treatment could be extended for up to six months orlonger. It would be best to refer the fewpatients that display severe internalstaining to the general dentist.
at-home bleachingAt-home bleaching simply involveshaving the patient place a whiteninggel in a tray, constructed by theorthodontist, and wearing it asdirected. The tray plastic is supple,relatively inexpensive, FDA sanctioned,and practically invisible when in place. More importantly it is thin,approximately 0.25 mm whenthermoformed, and compressible whenthe patient is biting in centric. Thisminimizes any propping open of thebite while the patient is in retentionand assures efficient ionic dispersion of the bleaching element.
Blocking out the cast, to formbleaching gel reservoirs (adjacent tothe enamel surfaces to be bleached) is controversial. Whether or not thereservoir gel allows a more efficientand robust oxygenating ionic transfercan be debated.9 However, there is oneaspect of incorporating reservoirs that
BLEACHING TEETH DURING SUPERVISED RETENTION, continued

35 CALL: 1-800-883-8733 • 504-488-0080 CLICK: WWW.ESSIX.COM FAX: 1-877-488-2429 • 504-488-2429
continued...
is not debatable. It involves a relativelycomplex and expensive laboratoryprocedure that is unnecessary (Fig. 1). Also, placing reservoir pockets reducesretention potential since the closeadaptation at the gingival margin of the tray is compromised, which in turnincreases the potential for gel leakageonto the gingiva and subsequentirritation. These undesirable sideeffects can be completely eliminated by not making any cast or traymodifications whatsoever.
Thermoformed bleaching trays are so thin (0.25mm) and supple that swallowing or occluding on thetray causes flexure and a consequentdistribution of the bleaching gel to allcovered enamel surfaces. This uniquetechnique completely obviates castmodification resulting in appreciablesavings in cost and time (Fig. 2).
The procedure is as follows: For mostpatients, the tray extends anteriorlyfrom the first premolars. It can beextended distally for the exceptionallywide smile. Terminal molars rarely need bleaching, however extending
the tray does improve retention. Priorto bleaching, the color of teeth, asindicated by a prosthetic shade guide,should be recorded. After bleaching is complete, the shade is also noted.Bleaching results are much moreevident if only one arch, usually theupper, is treated at a time. The contrastbetween the bleached arch, whencompared to the unbleached opposingarch gives the patient a visual analogfor monitoring the improvement.
Prior to bleaching, the teeth should beprophied with Raintree Essix’s PeroxideProphy Paste #PP30K. This jump-startsthe bleaching process and can lightenthe common stains (yellow-white orbrown-orange) up to one shadeimmediately. There will be a veryminor color relapse immediately afterbleaching, because the oxygen trappedin the enamel (which changes theoptical quality) diffuses out. That’s why teeth should not be bondedimmediately after bleaching – theoxygen saturation of the enamel willappreciably decrease bond strength.Also, initially bleached
teeth will appear slightly chalky but willreturn to normal luster in a few days.
instructions to thepatient◆ Preferably, the tray should be placed
after the teeth are brushed andflossed
◆ Don’t place a bead of the bleachinggel in the bottom of the tray,because at least one-half will flow to the lingual surface where it isbasically wasted. Using excessbleaching gel is simply a wasteof the product and may result intissue irritation.
◆ Place the moderately thin line of thebleaching gel on each tooth insidethe tray from the labial to lingualsurface (Fig. 3). Demonstrate this on one-half of the tray and supervisethe patient doing the same in theother half. Instruct the patient towipe off any excess gel, that mayhave extruded onto the tissue, with a napkin.
FIG 1 FIG 3
FIG 2
Essix Tray-Rite .020” Bleaching Tray (left) has bettercoverage than conventional EVA (1mm mouthguardmaterial).
BLEACHING TEETH DURING SUPERVISED RETENTION, continued
continued...

CALL: 1-800-883-8733 • 504-488-0080 CLICK: WWW.ESSIX.COM FAX: 1-877-488-2429 • 504-488-2429 36
◆ The tray is to be in placed each dayfor no more than two periods of twohours each. There should be a restperiod of three hours between theapplications. The peroxide inbleaching gel is a cleansing agentand will keep the tray clean. If forwhatever reason, the tray needs tobe cleaned, it is done with a Q-tipand soapy water.
◆ The bleaching tray is not to be wornwhile sleeping. That’s when retainersare to be worn. The tray material isnot sturdy enough to stabilize theteeth.
◆ The patient should return to the office for additional gel orarrangements can be made toperiodically mail the required supply.It’s a mistake to provide all thebleaching gel at one time (Fig. 4).Dispense a one-week supply at a time, or else the patient willinevitably try to accelerate thebleaching process and cause undue irritation to the tissue.
◆ Bleach only one arch, usually theupper, for the first week. This givesthe patient a base line progresscomparison with the unbleachedopposing arch. After one week, botharches can be bleached. Noticeableresults will be apparent within ten days.
◆ Give the cast and the responsibilityfor its safe keeping to the patient forfuture touch-ups by their generaldentist (Fig. 5).
conclusionBleaching teeth during the retentionphase is an esthetic ancillary serviceand charging a reasonable fee isappropriate. This will, of course, vary with office management policies. A guideline that may be useful is thenational average fee for this service. It’s $254 for one arch and $444 for botharches.7 A healthy smile improves self-image and confidence projecting anaura of health to others. Studies haveshown this to be increasingly importantto people in both their personal andprofessional lives.10 Amplifying theesthetic benefit of our finished cases by whitening the teeth, as part ofsupervised retention would seem to be a patient service that should no longer be ignored.
FIG 4
FIG 5
BLEACHING TEETH DURING SUPERVISED RETENTION, continued
REFERENCES1. Russell, C.M., Dickinson, G.L., and Johnson, M.H., et al. Dentist-supervised home bleaching with ten percent
carbamide peroxide gel: a six month study. J. Esthet. Dent. 8:177-82, 1996.2. Schulte, J.R., Morrissette, D.B., Gasior, E.J. and Czajewski, M.V. The effects of bleaching application time on the
dental pulp. J. Amer. Dent. Assn. 125:1330-5, 1993.3. Haywood, V.B., Leonard, R.H., Nelson, C.F., and Burnson, W.D. Effectiveness, side effects and long-term status
of nightguard vital bleaching. J. Amer. Dent. Assn. 125:1219-26, 1994.4. Nathoo, S.A., Chmielewski, M.B., and Kirkup, R.E. Effects of Colgate Platinum Professional Tooth whitening
System on microhardness of enamel, dentin and composite resins. Compend Contin Educ Dent. 15(supplement17):S627-30, 1994.
5. Sterrett, J., Price, R.B. and Bankey, T. Effects of home bleaching on the tissues of the oral cavity. J Can Dent Assoc.61:412-20, 1995.
6. Curtis, J.W., Kickinson, G.L., Downey, M.C., et al. Assessing the effects of 10 percent carbamide peroxide on oral soft tissues. J. Amer. Dent Assn. 127:1218-23, 1996.
7. Christensen, F.J. Bleaching teeth: Practitioner trends. J. Amer. Dent. Assn. Special Supplement V128:16-18 April1997.
8. Haywood, V.B. The Food and Drug Administration and its influence on home bleaching. Curr Opin Cosmet Dent.12-8, 1993.
9. Haywood, V.B. Nightguard vital bleaching: current concepts and research. J. Amer. Dent. Assn. SupplementV128:19-25, April 1997.
10. Coldstein R.R. Esthetic dentistry – a health service. J. Dent. Res. 3:641-2, 1993.

37 CALL: 1-800-883-8733 • 504-488-0080 CLICK: WWW.ESSIX.COM FAX: 1-877-488-2429 • 504-488-2429
technique1. Pre-heat the vacuum machine for at
least 3 minutes or until the heatingelement is a solid orange color.
2. Spray themodel withseparatingmedium toprevent thematerial fromsticking to themodel (Fig. 1).
3. Place themouthguardmaterial into the frame on thevacuum machineand the model onthe base plate(Fig. 2).
4. Position theEssix logo
approximately 3mm from the incisaledge on the palatal side of theinteriors (Fig. 3). This can be tested
first by lowering the frame with themouthguard material over the castand moving the cast into the correctposition prior to thermoforming.
5. Swing the heating element over theplastic. Observe the material as it heats.
6. Mouthguard material will sagapproximately 1/2” – this is theoptimal thermoforming time.
7. Move the heating element away fromthe plastic.
8. Turn on the vacuum, then lower theplastic over the model.
9. Let vacuumcontinue torun for 30-60seconds oruntil plasticis cool (Fig. 4).
10. Spray with Freeze Spray #22000. Do not handle the appliance while thematerial is hot or the appliance willdistort.
11. Trim theappliancewith scissorsor the Trim-rite ElectricKnife #88500to free theanterior andposteriorfrenums (Fig. 5). Themouthguardshould cover the complete occlusalsurface.
12. After trimming, replace the applianceon the cast and gently swipe a butanetorch around the mouthguard’s edgesto smooth out rough spots (Fig. 6).
attaching a helmet strap1. After trimming, replace the
mouthguard onto the cast.
2. Heat the anteriors of themouthguard using the micro torch(Fig. 1). (Do not melt the plastic,gently swipe the torch across theanteriors).
3. Heat the end of the strap (Fig. 2).Fuse (press together) the strap to theanterior section of the mouthguard.
4. While stillwarm, press thestrap into themouthguard tosmooth out (Fig. 3).
5. Use soap and water to lubricatestrap.
Run mouthguard strap over facial barof helmet – push through slit (Fig. 4).
FIG 1
FIG 2
FIG 1
FIG 2
FIG 3
FIG 4
FIG 4
FIG 5
FIG 6
FIG 3
Fabricating EssixMouthguards
Note: The Essix logo within the material is a 1/8” piece ofplastic that serves as a palatal brace. This anchors anteriors in case of a forceful bite, sometimes caused in contact sports.

CALL: 1-800-883-8733 • 504-488-0080 CLICK: WWW.ESSIX.COM FAX: 1-877-488-2429 • 504-488-2429 38
Frequently Asked QuestionsQ. What is the difference between Essix A+™ and Essix C+®
Plastic?
Essix A+™ Essix C+®
Description Great when wearing For orthodonticsfull time for a specified when a patient grinds.treatment goal. Crystal Esthetic, but lessclear, and FDA allowed, brilliant than Essix this rugged, inexpensive A+. It is virtually plastic has excellent flex indestructible, memory, and a snap-in FDA allowed and fit. inexpensive.
Bond Acrylic Yes No
Tooth Yes Not with divoter. OnlyMovement with the Hilliard
Thermopliers
Used for Yes Yes (with HilliardBite Planes Thermopliers)
Average Retainer 6 months 2 yearsLife
Protective Film Yes No
Abrasive Proof No Yes - Guaranteed
Recommended No Yesfor Full-Arch
Q. Is there a difference between Essix materials and thematerial I am using now?
A. Quite simply Essix materials are the best and areconsistent with prices on the market. Our plastic isunquestionably the most reliable and the most consistent to thermoform than any other comparable product. All of our applicable intraoral products are FDA allowed. Ourplastic is unique – Essix A+™ and Tray-Rite have their ownpatents, Essix C+® is patent pending.
Q. If I construct a full arch appliance, will I have thecracking and remakes that are associated with these devices?
A. No. Full arch appliances should be made with Essix C+.This material is impervious to occlusally induced fracture.
Q. How do you occlusally adjust a full-arch Essix appliance?
A. By equilibrating the occlusal surface. With the applianceseated, check the occlusion with equilibrating paper. If thereare some high spots, reduce them by grinding the spots withthe Essix Trimming Bur #18901. This does not effect theefficiency or strength of the appliance.
Q.What is the best way to remove the thermoformed plasticfrom the cast?
A. On a cuspid-to-cuspid appliance, a lingual and labial tab should be trimmed, then cut away the distal ends of theplastic. Using the tabs, pull the plastic away from the castand the cast will drop out. On a full arch appliance, trim the distal ends away after removing the excess plastic. Use Trim-Rite Knife #88500. Then use the Essix Cast RemovingInstrument #18742 to pry the plastic from the cast from thedistal ends.
Q. Why are Essix retainers delivered in duplicates?
A. The clarity of the Essix appliance allows them to be losteasily. Giving the patient two retainers cuts down on theemergency visits and are negligible in time and cost.
Q. Why am I not getting a good fit on Essix C+ plastic?
A. Essix C+ has it’s own thermoforming idiosyncracies. It does not thermoform like Essix A+ plastic. It is essential that the cast height be no higher than 3/4”. The undercuts,gingival to the contact points can be emphasized with the Essix Accentuator #18943. The plastic encased cast shouldbe sprayed with Freeze Spray #22000 immediately afterthermoforming. The vacuum machine should be fully heatedprior to thermoforming.
Q. How can I get a better fit on the margins of an applianceconstructed with Essix C+?
A. Follow the instructions in the previous question. TheFreeze Spray #22000 is essential to reducing any lift on thelingual or labial margins.
continued...

39 CALL: 1-800-883-8733 • 504-488-0080 CLICK: WWW.ESSIX.COM FAX: 1-877-488-2429 • 504-488-2429
Q. Which plastic do I use for toothmovement?
A. Using the Hilliard Tooth-MovingThermopliers, any plastic can be used tomove teeth. The Thermopliers must beheated to the correct temperaturedepending on the plastic being used.For Essix A+ plastic the Thermopliersshould be heated to 175ºF (70.4ºC), for Essix C+ the temperature is 200ºF(93.3ºC) and for Essix Embrace 240ºF(115.5ºC).
Q. Using the Divots and Windowstechnique, how many teeth can bemoved at one time?
A. It is best to move one tooth at atime. However, two teeth that are notadjacent may be efficiently moved atone time. It’s best not to try to align a whole section of teeth with a singleappliance. Tip: If using the HilliardThermopliers – two adjacent teeth can bemoved using acrylic to build up the “window”instead of cutting out the window!
Q. Can Essix appliances induce anopen-bite?
A. Not if the schedule of wear isfollowed.
Q. Does Essix have a material formodel duplication?
A. Yes. Like all of our products, it is the best, consistent with price on themarket. You have a choice of .040”,.060” or .080” clear mouthguardmaterial.
Q. What if the appliance fits the modelbut not the patient’s mouth?
A. There is a problem with theimpression. If alginate is used, it mustbe poured immediately, otherwise,there will be expansion. Check thequality of the stone being used –inexpensive plasters and stones have high expansion rates.
Q. Why is it important to usepolyvinyl siloxane impression material?
A. The fit of an Essix appliance isdirectly related to the dimensionalaccuracy of the cast. And, the best cast can only be fabricated from themost dimensionally stable impressionmaterial – polyvinyl siloxane. It is moreexpensive than alginates, but morethan compensated with fewer remakesand better fit of the appliance. Theimpression can be stored for up to 6 months before being poured initially,and can be poured multiple timeswithout distortion. You must wait 30 minutes before pouring, however, or there will be a loss of accuracy.
Q. Why is Coltene’s Micro systempolyvinyl siloxane recommended overother brands?
A. The delivery system is more efficientwith 30% less waste in the mixingapplicator tips than compared to other products.
Q. What is the difference between theEssix pink die stone and the Essix FastCast?
A. Obviously their color, the Die Stoneis pink and the Fast Cast is white. Butthe prime difference is the pink stone is 18,000 psi, has a working time of 6-8minutes and completely dry in 4 hours.The white Fast Cast is 14,000 psi, hasworking time of 90 seconds and iscompletely dry in 30 minutes.
Q. What is the difference betweenEssix stones and the plaster I use now?
A. Essix Die Stone is the highestcompression strength (18,000 psi)stone and is dimensionally stable. This stone sets so smoothly and dense,separating medium is not necessary.
Q. Are alginates suitable for Essixappliances?
A. Alginates are not recommended for cuspid-to-cuspid appliances, but if used must be poured immediately!Alginate is okay for full arch appliances.
Q. Why should I use Debubblizer?
A. It is helpful in reducing castdiscrepancies and bubbles in the cast.
Q. Should I be using tray adhesive?
A. This is necessary for solid metal trays. It is not necessary, butrecommended for perforated metaltrays. Adhesives should be used forplastic, disposable trays.
FREQUENTLY ASKED QUESTIONS, continued
continued...

CALL: 1-800-883-8733 • 504-488-0080 CLICK: WWW.ESSIX.COM FAX: 1-877-488-2429 • 504-488-2429 40
Q. Is a separating liquid on the castnecessary prior to thermoforming?
A. It is always helpful to use aseparating medium for ease inremoving the plastic from the cast.
Q. Why do I need to use theVACUUM MAXIMIZER™ on my vacuum machine?
A. The maximizers condense thesuction toward the center of themachine directly under the cast(s). This concentrates the vacuum’s powerinto a specific working area and insuressuperior plastic-to-cast adaptation.
Q. When is the Triad gel used in Essix technology?
A. It can be used to correct castdiscrepancies, attach pontics whenconstructing a temporary bridge, tomake posterior extension appliancesand to fabricate anterior bridges.
Q.What is the Blazer Torch used for?
A. To smooth out the edges of themouthguard and to attach the straps to a mouthguard.
Q. What is the purpose of the Dremeltool in Essix technology?
A. All of the Essix burs, borderpolishers and wheel saws are used in the Dremel tool. It is inexpensive,lightweight, rechargeable and easy to handle.
Q. Why are Essix laminatedmouthguards the best?
A. Because simply put it is thestrongest mouthguard materialavailable. A hardened palatal brace isplaced between two injection moldedcross-woven vinyl sheets and laminatedtogether. The custom fit allows forexcellent oxygen intake – henceimproved performance.
Q. What are the settings for theBiostar machine that would correspondto thermoforming Essix Plastic Sheets?
A. Essix A+ .020” = Biostar setting #93Essix A+ .030” = Biostar setting #103Essix A+ .040” = Biostar setting #113Essix A+ .060” = Biostar setting #133Essix A+ .080” = Biostar setting #163Essix A+ .120” = Biostar setting #193Essix Embrace .030” = Biostar
setting #133Essix Embrace .040” = Biostar
setting #143Essix C+ .040” = Biostar setting #163Essix Mouthguard (EVA) .040” =
Biostar setting #142Essix Mouthguard (EVA) .060” =
Biostar setting #162Essix Mouthguard (EVA) .080” =
Biostar setting #200Essix Mouthguard (EVA) .120” =
Biostar setting #225Essix Mouthguard (EVA) .150” =
Biostar setting #266Essix Mouthguard (Laminate) .160”
= Biostar setting #266Essix Tray Rite .020” = Biostar
setting #113
Q. What size plastic sheet do I need?
A. All Vacuum Machines – 5” squareBiostar = 125mm Square or CircleMinistar = 125mm CircleErkopress/Drufomat = 120mm Circle
FREQUENTLY ASKED QUESTIONS, continued

41 CALL: 1-800-883-8733 • 504-488-0080 CLICK: WWW.ESSIX.COM FAX: 1-877-488-2429 • 504-488-2429
Customized Hands-on Essix TrainingLearn the rationale, applications and techniques of Essix appliances.
◆ Retainers◆ Bleaching Trays◆ Bite Planes◆ Temporary Bridges◆ AND much, much more
Become familiar with the HilliardThermoforming Pliers used to generate minor tooth movement in Essixappliances.
◆ Bodily Movement◆ Torquing, Tipping, Rotation, Intrusion◆ Bite Planes◆ Close Diastemas
in your officeFull Day: Our technical representativewill come to your office and teach youand/or your staff for approximately 6hours! Our presentations are tailored toyour needs. If you want to concentrateon the fabrication of the basic Essixretainer and not learn how to makebleaching trays – your representativewill fulfill that requirement.
raintree essixheadquartersFull Day: You and up to 4 staff memberscan receive the same 6 hours of trainingas explained above in our lab atcorporate headquarters in New Orleans.This is encouraged for offices that donot have the space or the desire to havea training session in their office.
study clubs Our technical representative willcustomize a lecture geared to your studyclub’s needs. We will come to your studyclub site and train your members on theEssix technique or topic(s) of yourchoice. This is a great way for doctors to get the benefit of a personal trainingand to discuss with their colleagues theadvantages of using Essix.
essentials of essixOur newest educational programincludes a lecture and hands-on trainingdesigned to teach the orthodontic andgeneral dental assistants with Essixtechniques and products.
This 3-5 hour program, held at RaintreeEssix’s headquarters in New Orleans,covers the rationale and techniquesbehind Essix appliances.
◆ Retainers◆ Bleaching Trays◆ Bite Planes◆ Temporary Bridges◆ AND much, much more
There is also an introduction to theHilliard Thermoforming Pliers for minortooth movement.
Space is limited! Call today toreserve your space or for moreinformation: 1-800-883-8733

“You have a clear choice...”
©2003 Raintree Essix, Inc.
To find answers to frequently asked questions about Essix retainers, go to www.essix.com/choice. If you like, please e-mail any specific questions to [email protected].
“...so should your patients!”What would your patients prefer? Wearing a bulky, traditional appliance full-time. Or wearing an Essix only at night ... a retainer that’s not the least bulky, essentially invisible, and doesn’t interfere with their speech.
Offer your patients the clear choice — Essix.
You’ll save thousands of dollars and hundreds of hours of chair time ... while increasing patientsatisfaction and enhancing your reputation forstate-of-the-art treatment, two sure paths toincreased referrals.
Turn Around Time 3-5 days (Requires a second patient visit)
HAWLEY RETAINER ESSIX® RETAINER
15-30 minutes (Usually done during the debonding visit)
Lab vs. Material Costsfor Upper & Lower Appliances
Essix Savings per Patient: $58.62
Annual Essix Savings on 200 Starts: $11,724
Call For Your
FREECD-ROM
To find out more about the Essix retainer and
receive your FREE easy “How To” CD-ROM –
Essix Appliance Fabricationfrom A to Z – call today...
1-800-883-8733and mention the code
“CLEARCHOICE ”
$1.38(Plus any cost of your assistant’s time)
$60.00

4001 Division Street • Metairie, LA 70002Phone 1-800-883-8733 • 504-488-0080
Toll Free Fax 1-877-488-2429 • 504-488-2429www.essix.com