entry of progress in sap module after creation of progress master · pdf fileentry of progress...
TRANSCRIPT

ENTRY OF PROGRESS IN SAP MODULE AFTER CREATION OF PROGRESS MASTER DATA
This document gives brief information about the progress entry and creation of master data of activities involved in the each type of works in PS Module of SAP system. The main steps for entry of progress in SAP system involved following steps:
(i) Creation of Master Data for the progress of work
(ii) Entry of the physical progress of the work by the end user.
1. CREATION OF MASTER DATA FOR THE PROGRESS OF WORK:
1.1 SAP EASY ACCESS:
❶
❷
Steps Action
❶ Enter Transaction code: ZPSPP01 at the command prompt.
❷ Click on Enter OR Click on Green Colour symbol.
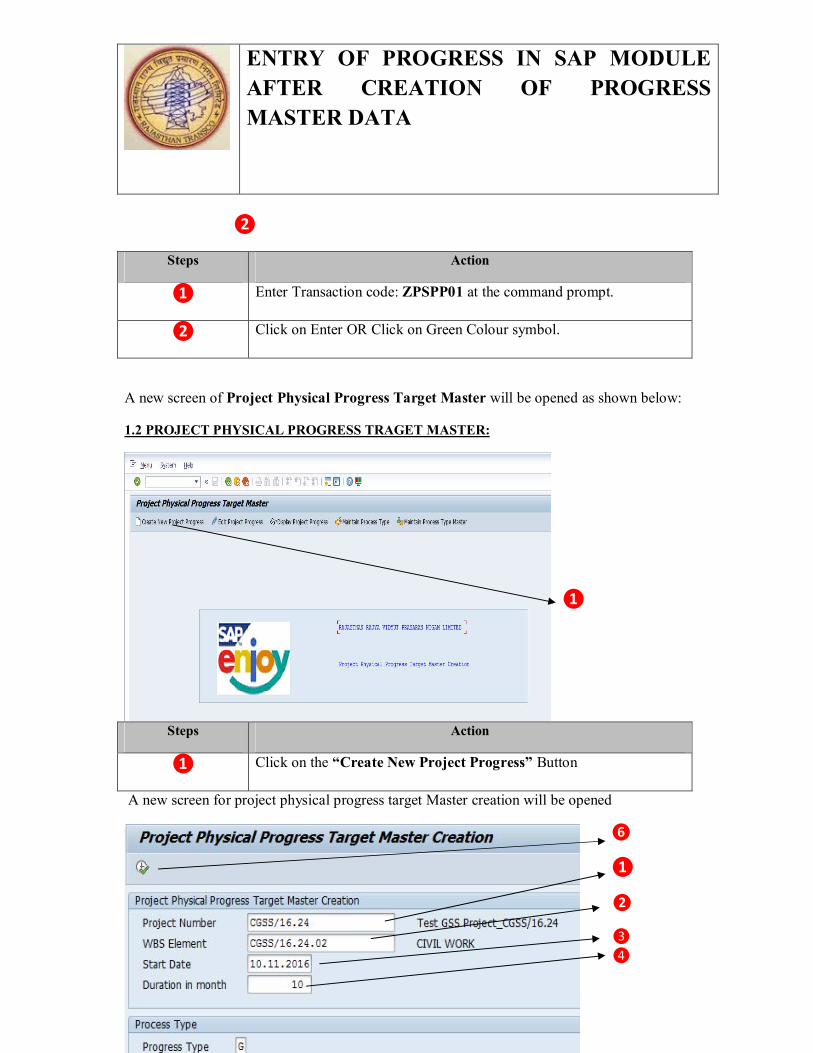
A new screen of Project Physical Progress Target Master will be opened as shown below:
1.2 PROJECT PHYSICAL PROGRESS TRAGET MASTER:
❶

ENTRY OF PROGRESS IN SAP MODULE AFTER CREATION OF PROGRESS MASTER DATA
Steps Action
❶ Click on the “Create New Project Progress” Button
A new screen for Project Physical Progress Target Master Creation will be opened as shown below
❶
❷
❸
❹
❺
❻
Steps Action
❶ Enter Project code OR Click on F4 button
❷ Enter the WBSE element OR Click on F4 button and select respective WBS element
❸ Enter the Start Date
❹ Enter expected duration for completion of the project
❺ Enter the progress type as “G” for the substation project and “L” for the Line projects.
❻ Click on execute button
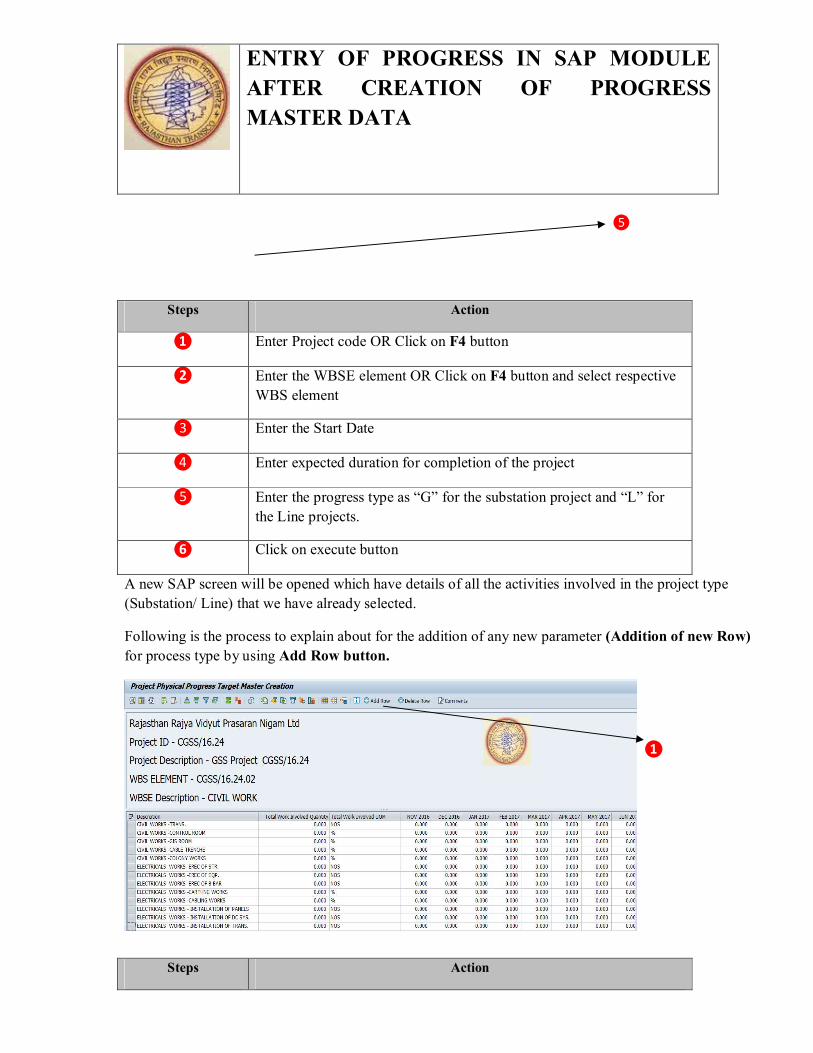
A new SAP screen will be opened which has details of all the activities involved in the project type (Substation/ Line) that we have already selected.

ENTRY OF PROGRESS IN SAP MODULE AFTER CREATION OF PROGRESS MASTER DATA
A snap shot of the screen is given hereunder:
❸
❶
❷
Steps Action
❶ Enter the “total work involved quantity” in the Column no-2.
❷ Enter the amount of the work Targets in the Column -4.
❸ After entry in the all field of project, click on the save button. This will create and save the targets of the work involved in the project.
1.2 PROCESS TO ADD A ROW AND DELETION OF A ROW FOR PROCESS TYPE MASTER
❶
ENTRY OF PROGRESS IN SAP MODULE AFTER CREATION OF PROGRESS MASTER DATA
❷
Steps Action
❶ Enter Transaction code: ZPSPP01 at the command prompt.
❷ Click on Enter OR Click on Green Colour symbol.
A new screen of Project Physical Progress Target Master will be opened as shown below:
1.2 PROJECT PHYSICAL PROGRESS TRAGET MASTER:
❶
Steps Action
❶ Click on the “Create New Project Progress” Button
A new screen for project physical progress target Master creation will be opened
❻
❶
❷
❸ ❹
ENTRY OF PROGRESS IN SAP MODULE AFTER CREATION OF PROGRESS MASTER DATA
❺
Steps Action
❶ Enter Project code OR Click on F4 button
❷ Enter the WBSE element OR Click on F4 button and select respective WBS element
❸ Enter the Start Date
❹ Enter expected duration for completion of the project
❺ Enter the progress type as “G” for the substation project and “L” for the Line projects.
❻ Click on execute button
A new SAP screen will be opened which have details of all the activities involved in the project type (Substation/ Line) that we have already selected.
Following is the process to explain about for the addition of any new parameter (Addition of new Row) for process type by using Add Row button.
❶
Steps Action

ENTRY OF PROGRESS IN SAP MODULE AFTER CREATION OF PROGRESS MASTER DATA
❶ Click on add row button.
After click on Add Row, a new line item will be added.
❶
Steps Action
❶ Enter the Description, total work involved quantity, Unit of Measurement for the newly added line item OR new row.
As explained above, we can add the various parameters of process type by using Add Row button.
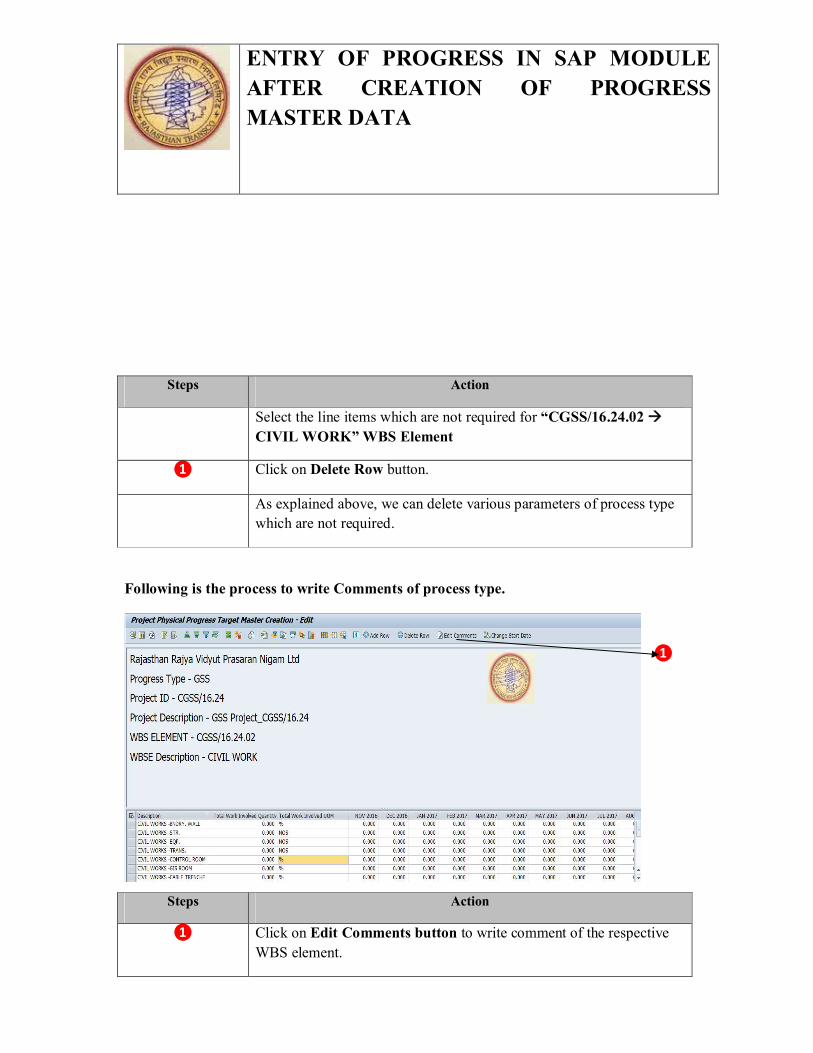
Following is the process to delete the parameters of process type.
❶
ENTRY OF PROGRESS IN SAP MODULE AFTER CREATION OF PROGRESS MASTER DATA
Steps Action
Select the line items which are not required for “CGSS/16.24.02 CIVIL WORK” WBS Element
❶ Click on Delete Row button.
As explained above, we can delete various parameters of process type which are not required.
Following is the process to write Comments of process type.
❶
Steps Action
❶ Click on Edit Comments button to write comment of the respective WBS element.

ENTRY OF PROGRESS IN SAP MODULE AFTER CREATION OF PROGRESS MASTER DATA
A new screen will be displayed as shown below in which we write the comments.
❶
❷
Steps Action
❶ Write the Comments in the comments box
❷ Click on Enter OR click on Green colour icon
As explained above, we can enter the comments of respective WBS elements.

ENTRY OF PROGRESS IN SAP MODULE AFTER CREATION OF PROGRESS MASTER DATA
2. ENTRY OF THE PHYSICAL PROGRESS OF THE WORK
2.1 SAP EASY ACCESS:
❶
❷
Steps Action
❶ After creation of Target Master, the monthly progress entry of each type of activity is to be entered by the end-user.
Enter Transaction code “ZPSPP02” for entry of progress at the command prompt.
❷ Click on Green Symbol to execute the command.
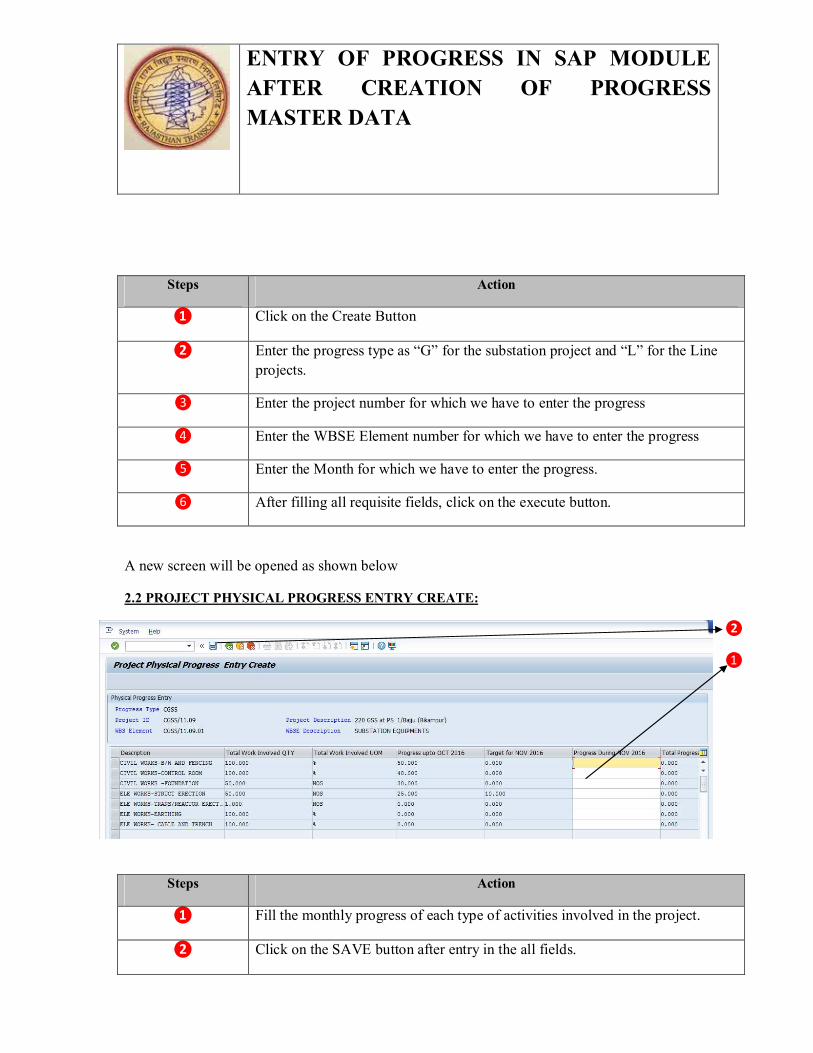
A new screen will be opened as shown below
2.2 PROJECT PHYSICAL PROGRESS ENTRY:
❻
❶
❷
❸
❹
❺
ENTRY OF PROGRESS IN SAP MODULE AFTER CREATION OF PROGRESS MASTER DATA
Steps Action
❶ Click on the Create Button
❷ Enter the progress type as “G” for the substation project and “L” for the Line projects.
❸ Enter the project number for which we have to enter the progress
❹ Enter the WBSE Element number for which we have to enter the progress
❺ Enter the Month for which we have to enter the progress.
❻ After filling all requisite fields, click on the execute button.
A new screen will be opened as shown below
2.2 PROJECT PHYSICAL PROGRESS ENTRY CREATE:
❷
❶
Steps Action
❶ Fill the monthly progress of each type of activities involved in the project.
❷ Click on the SAVE button after entry in the all fields.