en “trail angel” child bike tow-bar user manual fr … · manual de uso da barra de reboque...
TRANSCRIPT

EN
FR
ES
DE
IT
NL
PT
PL
HU
RU
RO
“TRAIL ANGEL” CHILD BIKE TOW-BAR USER MANUAL
NOTICE BARRE DE TRACTION POUR VELO D’ENFANT “TRAIL ANGEL”
MANUAL DE USO BARRA DE REMOLQUE PARA NIÑOS “TRAIL ANGEL”
GEBRAUCHSANLEITUNG KINDERFAHRRADANHÄNGESTANGE “TRAIL ANGEL”
MANUALE D’USO BARRA TRAINO BIMBO “TRAIL ANGEL”
HANDLEIDING VOOR GEBRUIK VAN SLEEPSTANG VOOR KINDERFIETS “TRAIL ANGEL”
MANUAL DE USO DA BARRA DE REBOQUE PARA BICICLETA INFANTIL “TRAIL ANGEL”
INSTRUKCJA OBSŁUGI DRĄŻKA HOLOWNICZEGO “TRAIL ANGEL”
A „TRAIL ANGEL” GYERMEK VONTATÓRÚD HASZNÁLATI KÉZIKÖNYVE
РУКОВОДСТВО ПО ЭКСПЛУАТАЦИИ КРЕПЛЕНИЯ-ПРИЦЕПА ДЛЯ ДЕТСКОГО ВЕЛОСИПЕДА “TRAIL ANGEL”
MANUAL DE FOLOSINŢĂ BARĂ TRACTARE BICICLETĂ COPII “TRAIL ANGEL”
SK
CS
NÁVOD NA POUŽITIE ŤAŽNEJ TYČE NA PRIPOJENIE DETSKÉHO BICYKLA “TRAIL ANGEL”
NÁVOD K POUŽÍVÁNÍ TAŽNÉ TYČE PRO PŘIPOJENÍ DĚTSKÉHO KOLA “TRAIL ANGEL”
SV HANDBOK FÖR ANVÄNDNING AV DRAGSTÅNG FÖR BARN “TRAIL ANGEL”
BG РЪКОВОДСТВО ЗА УПОТРЕБА НА ТЕГЛИЧ ЗА ДЕТСКИ ВЕЛОСИПЕД “TRAIL ANGEL”
TR “TRAIL ANGEL” ÇOCUK BİSİKLETİ ÇEKİ DEMİRİ KULLANICI EL KİTABI
UK ІНСТРУКЦІЯ З ЕКСПЛУАТАЦІЇ ЗЧІПНОГО ПРИСТРОЮ ДЛЯ ДИТЯЧОГО ВЕЛОСИПЕДА TRAIL ANGEL
AR “TRAIL ANGEL” دليل استخدام قضيب سحب دراجة الطفل
DA BRUGSVEJLEDNING TIL TRÆKSTANG TIL BARNECYKEL “TRAIL ANGEL”
GR ΕΓΧΕΙΡΙΔΙΟ ΧΡΗΣΗΣ ΡΑΒΔΟΥ ΕΛΞΗΣ “TRAIL ANGEL”
HE “Trail Angel” מדריך למשתמש למתקן גרירה לאופני ילדים


DF
AB
E
C
A
D B
C
pezzi / pieces Art.300 - 304
A
B
C
D
E
F
Dado da 6
Dado da 6 Dado da 8
300 - 304_Trail Angel_26/04/12 1/2 Copyright © 2012 Peruzzo Italy - MADE IN ITALY
M8x175 x1
x1
x1
x2
x1
x1 x1 x1
x1
x4
x1 x1 x1
x2 x2 x1 x1
x2
x2
x1
x2
x2
x2
x2
x2
x1x1
x1 x1
x3 x1
x2
x1x1x1
x1 x2
x1
x5
x4
x4
x2
x2
x8 x2
M8x160
M6x75
Dado da 8 Dado da 6
M8x50
M6x85
M6x25
M6x30
Ø16-18

h. min. 10 cmh. max 15 cm
F
A
A1
A2
C
E
300 - 304_Trail Angel_26/04/12 2/2 Copyright © 2012 Peruzzo Italy - MADE IN ITALY
F A
G
E
C
E1
G1
F1

ART. 300 - 304_“TRAIL ANGEL” CHILD BIKE TOW-BAR
“TRAIL ANGEL” CHILD BIKE TOW-BAR USER MANUAL Always read the instructions below carefully every time you use this product. Keep these instructions for future use.Before using the child bike tow-bar check the use and maintenance booklets of your adult and child bikes to ensure that they are suitable for use with the tow-bar.REMEMBER THAT THE CHILD BIKE TOW-BAR IS A SAFE PRODUCT IF USED CORRECTLY. Nevertheless it can cause serious and even fatal accidents when used improperly.Before using the child bike tow-bar make sure that the bikes and their users (adult and child ) observe all the requirements listed below and verify any regulations for using a child bike tow-bar existing in the country of use.If these requirements cannot be respected, you must not use the child bike tow-bar as this could give rise to serious ac-cidents, including fatal ones.
The manufacturer shall only deem itself to be responsible in the event of manufacturing defects in the child bike tow-bar itself. Irresponsible or inappropriate use, as it is not compliant with the instructions, cannot be attributed to defects in the product and therefore absolutely no responsibility will by recognized on the manufacturer’s part.If you note any difficulty during the assembly stage or if you have any doubts regarding the use of the child bike tow-bar, please consult an expert in the sales outlet, visit the “questions and answers” section of the www.trail-angel.com site, or send us your question through the “contact us” section of the site itself.
REQUIREMENTS FOR THE USE OF THE CHILD BIKE TOW-BAR
REQUIREMENTS OF THE BICYCLES
ADULT BIKEWheel diameter Minimum size: 635 mm (25”)
Diameter and characteristics of the seat-post tube Min 25.4 mm (1”), Max 31.8 mm (1.25”)
Precautions for useThe use of non-metal seat posts is forbidden.Accessories or parts that may interfere with the operation of the tow-bar must never be used.
CHILD BIKEWheel diameter Minimum wheel size: Min 255 mm (10”) Max 510 mm (20”)
Diameter and characteristics of the handlebar columns
Diameter min. 34mm (1.34”), max 38mm (1.50”). Ensure that the brake cable does not interfere with the child bike tow-bar connector.
Precautions for use
If the bike is fitted with stabilizer wheels: turn them upwards or remove them altogether before using the child bike with the tow-bar.Accessories or parts that may interfere with the operation of the tow-bar must never be used.
REQUIREMENTS FOR THE CYCLISTS
ADULT CYCLIST
Basic skill Must be an adult and able to ride a bicycle with complete mastery of the same.
Equipment Must wear a helmet approved in accordance with the regulations in force.
CHILD CYCLIST
Basic skillThe child must be able to grip the handlebar properly and, in any case, dem-onstrate a certain confidence in riding the bike and be capable of pedalling properly.
Equipment
The child must wear a helmet approved in accordance with the rules in force while the use of adequate protection for the knees and elbows is also recommended. Make sure that the child wears clothing that is suitable for the weather conditions, in particular, make sure the child is suitably protected in the event of rain.
PERMISSIBLE MAXIMUM WEIGHTS
Adult’s weight DMust have sufficient weight for towing (minimum double the child’s weight)
Child’s weight Max 30 kg (66.14 lb)
Child bike weight Max 15 kg (33.07 lb)
Child bike weight + child’s weight
In any case the towed weight must not exceed 45 kg (99.21 lb)
MAINTENANCE, SUPPORT AND WARRANTY
1. All the child bike tow-bar components are subject to wear. Check the condition of the product before using it every time. If any component is found to be working inadequately get it replaced at an authorized sales outlet;
2. Stop using the child bike tow-bar immediately if you notice any operating problem;3. Carry out a mechanical inspection of the child bike tow-bar before every use, taking particular care with the fixing and articulation points;4. Lubricate the cardan joint (fig. B) if necessary;5. Cracks, bending and colour changes are an indication of wear: replace any worn parts immediately;6. Keep the components of the child bike tow-bar clean and dry at all times. Water and dirt can cause corrosion and the consequent malfunction-
ing of the product;7. When no longer in use, do not store the tow-bar in damp places or exposed to the sun;8. The product warranty is applicable in the case of defects caused by the materials or manufacturing of the product for 2 years from the date of
purchase. In the event of complaint, the defective product must be returned to Peruzzo s.r.l. or to the sales outlet where it was purchased, along with the document proving the date of purchase;
9. If the manufacturer recognizes any defects in the product, the warranty shall be limited exclusively to the replacement of defective parts;10. The warranty does not cover any assemblies or improper use of the product.
The user is responsible for understanding and applying the assembly operations for the “TRAIL ANGEL” tow-bar.
EN EN

INSTRUCTIONS FOR ASSEMBLING THE “TRAIL ANGEL” CHILD BIKE TOW-BAR
TOOLS REQUIRED FOR FITTING THE TOW-BAR • 2 open-end wrenches, size 13• 2 open-end wrenches, size 10• 1 Phillips screwdriver
INSTRUCTIONS FOR ASSEMBLING THE TOW-BAR1. Check that all the components are present in the pack (check against the list accompanying the assembly drawings );2. Assemble the tie-rod as illustrated in fig.D, make sure that the ends are parallel (do not over-tighten, apply a force of 2 Nm); *3. Assemble the central assembly, fig. A, as in the drawing, taking care that the tubes are assembled correctly; *4. Insert the rubber joint cover inside the tube and fix the cardan joint (pre-assembled) as in fig.B, apply a force of 5 Nm; *5. Connect tie-rod fig.D to the central assembly fig.A, apply a force of 5 Nm, then tighten the bolt installed at the point where the tie-rod tubes
cross over fig.D, apply a force of 5 Nm; 6. Insert fig.C is provided with two holes on each side having different diameters (16/18 mm – 0.63”/0.71”), check which of the two holes has
the correct diameter to fit the hub axle nut of the child bike, then fix the insert, in the correct direction fig.C, to the tube with the bolt provided, apply a force of 3 Nm;
7. Next insert the element fig.C in the hub axle nut of the child bike (attention: for this step it is not necessary to remove any components of the child bike)
* for art.304, the pre-assembled “Trail Angel” child bike tow-bar, this operation is not required
INSTRUCTIONS FOR THE CONNECTORS ON THE BICYCLES
As regards the steps indicated in this section, work exclusively on the bicycles and not on the child bike tow-bar:1. Forcefully fix the connector on the steering column of the child’s bike and insert the scratch prevention cardboard at the front, see fig. F (find the
most suitable space on the steering column for positioning the connector. If necessary it is possible to rotate the position of the connector, fig. F, by 180° compared with what is shown in the figure);
2. Attach the tow-bar unit to the seat post of the adult bike fig.E, with the cardboard pads to prevent scratching the seat post, and tighten the bolts securely to 10 Nm.
INSTRUCTIONS FOR CONNECTING THE TOW-BAR BETWEEN THE TWO BIKES1. Insert the square tube of the bar to the drawbar and lock it using the provided lever, fig. E1, (if there are obstacles such as the saddle, for
example, it is possible to insert the pin the other way around);2. Attach tie-rod D to coupler F with the bolt and knobs provided as illustrated in fig.F1 and tighten securely to 5 Nm (attention: the first time the
tow-bar is used insert the bolt and nut completely within the plastic knobs);3. Unscrew the knob A2 and the knob A1 until the teeth are completely released as in fig. A;4. Fit the wheel-holder inserts C on the nuts of the front hub of the child’s bicycle;5. Slightly tighten the knob A2 and lift the tow-bar to which the child bike is attached until the front wheel height is about 12 cm. Check that the
teeth of the assembly A are perfectly coupled then tighten knob A1 to 10 Nm and A2 to 15 Nm;6. Cover the cardan joint with the rubber joint cover;7. When the bar is not in use and folded on the adult bike as in fig. G, remember to screw the knobs A1 and A2 and use the provided straps to fix
it to the bike as in fig. G1.
MAIN SAFETY RULES FOR THE USE OF THE CHILD BIKE TOW-BAR
PRELIMINARY CHECKS BEFORE EVERY USE1. Check that nuts and screws are adequately secured;2. All the fasteners, nuts, pins and other components must be adjusted after the first 10 hours of use;3. Check that there is no damage or breakage of any of the parts of the child bike tow-bar;4. Check that the cardan joint, the fixing pins and any other part of the child bike tow-bar have not been worn or damaged; replace them im-
mediately if they are damaged or worn;5. Check that the insert C is fitted properly on the wheel axle of the child’s bike;6. Check that there is no deterioration such as breakages, cracks, etc, in seat post tube of the adult bike;7. Check that there is no deterioration such as breakages, cracks, etc, in handlebar column of the child’s bike;8. Check that the adult bike brakes work properly;9. Check that the wheel and rear brakes of the child’s bike work adequately;10. Ensure that the adult and child’s bike meet all the requirements specified in the section “requirements for the use of the child bike tow-bar” in
these instructions;11. Ensure that the characteristics and equipment of both adult and child meet all the requirements specified in the section “requirements for the
use of the child bike tow-bar” in these instructions.12. Do not use the product if any of the parts are faulty, worn or damaged;13. Do not modify the product in any way. Tampering could affect the safety of the product.
CHECKS AND PRECAUTIONS DURING USE
1. If the child’s bike wobbles over the limit (the child has difficulty staying balanced on the bike) check that the closing force of the fastenings, fig. F and E, is adequate;
2. When using for the first time, check the child bike tow-bar in open, obstacle-free spaces in order to ensure the correct operation of all the components, particularly when starting, braking, making turns, etc. Then, only when both adult and child have gained confidence with the towing system, should alternative paths be attempted;
3. The adult cyclist and the child cyclist must know how to uses their bicycles correctly, and be familiar with the braking, changing and steering procedures as well as with all other actions that are fundamental for guaranteeing safe use of their bikes;
4. The child bike tow-bar must be used exclusively by two people: 1 adult for towing and 1 child on the rear towed bike. Both must wear approved helmets and the use of knee and elbow protection is also recommended;
5. Do not use the child bike tow-bar on rough ground, off-road or on steep slopes but only on flat tracks.6. Do not use the child bike tow-bar on roads with motor vehicle traffic, and in any case adhere strictly to the laws of the country in which the
product is used and to the rules of safe, common sense cycling ;7. Never exceed a speed of 20 km per hour when towing;8. Avoid humps, kerbstones, footpaths, etc.;9. Never make sharp turns or turns with angles below 90°;10. Pay attention to other users or things that could interfere with your path;11. Do not use the tow-bar with electric bicycles (pedal assisted) or other motorised vehicles;12. When using, allow for the need for greater space for starting and stopping the bicycles;13. When starting, the adult must position him/herself with his/her feet firmly on the ground until the child has mounted and is appropriately
anchored to the handlebars and pedals;14. Never use the child bike tow-bar if the child is tired, inattentive or distracted;15. Never leave the child unattended;16. The child must remain seated on the bicycle at all times during use of the tow-bar;17. Users must always wear shoes that guarantee adequate adherence to the pedals. Never ride barefoot or with sandals, etc.;18. When using the child bike tow-bar at night, use approved lighting devices.
The “Trail Angel” child bike tow-bar is manufactured by: Peruzzo s.r.l. Via Meucci, 115 - 36028 Rossano Veneto (VI) Italy
ART. 300 - 304_“TRAIL ANGEL” CHILD BIKE TOW-BAR
EN EN
ART. 300 - 304_BARRE DE TRACTION POUR VELO D'ENFANT “TRAIL ANGEL”
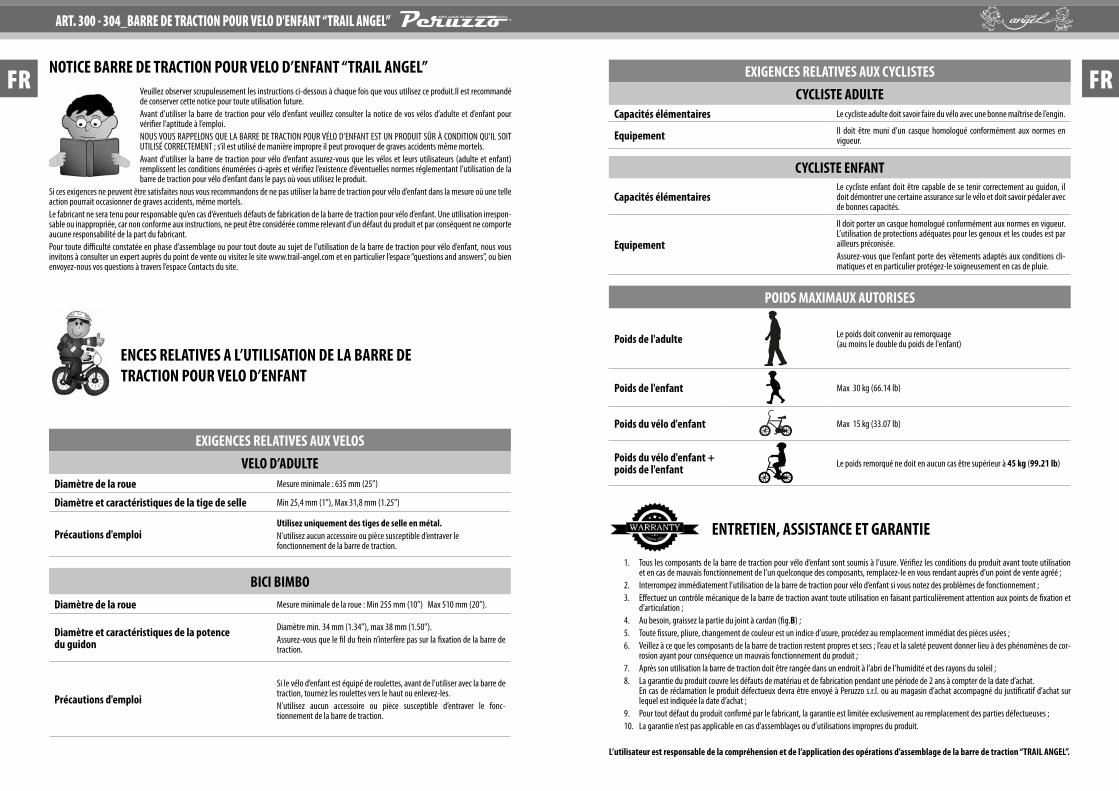
NOTICE BARRE DE TRACTION POUR VELO D’ENFANT “TRAIL ANGEL”Veuillez observer scrupuleusement les instructions ci-dessous à chaque fois que vous utilisez ce produit.Il est recommandé de conserver cette notice pour toute utilisation future.Avant d’utiliser la barre de traction pour vélo d’enfant veuillez consulter la notice de vos vélos d’adulte et d’enfant pour vérifier l’aptitude à l’emploi.NOUS VOUS RAPPELONS QUE LA BARRE DE TRACTION POUR VÉLO D’ENFANT EST UN PRODUIT SÛR À CONDITION QU’IL SOIT UTILISÉ CORRECTEMENT ; s’il est utilisé de manière impropre il peut provoquer de graves accidents même mortels.Avant d’utiliser la barre de traction pour vélo d’enfant assurez-vous que les vélos et leurs utilisateurs (adulte et enfant) remplissent les conditions énumérées ci-après et vérifiez l’existence d’éventuelles normes réglementant l’utilisation de la barre de traction pour vélo d’enfant dans le pays où vous utilisez le produit.
Si ces exigences ne peuvent être satisfaites nous vous recommandons de ne pas utiliser la barre de traction pour vélo d’enfant dans la mesure où une telle action pourrait occasionner de graves accidents, même mortels.Le fabricant ne sera tenu pour responsable qu’en cas d’éventuels défauts de fabrication de la barre de traction pour vélo d’enfant. Une utilisation irrespon-sable ou inappropriée, car non conforme aux instructions, ne peut être considérée comme relevant d’un défaut du produit et par conséquent ne comporte aucune responsabilité de la part du fabricant.Pour toute difficulté constatée en phase d’assemblage ou pour tout doute au sujet de l’utilisation de la barre de traction pour vélo d’enfant, nous vous invitons à consulter un expert auprès du point de vente ou visitez le site www.trail-angel.com et en particulier l’espace “questions and answers”, ou bien envoyez-nous vos questions à travers l’espace Contacts du site.
ENCES RELATIVES A L’UTILISATION DE LA BARRE DE TRACTION POUR VELO D’ENFANT
EXIGENCES RELATIVES AUX VELOS
VELO D’ADULTEDiamètre de la roue Mesure minimale : 635 mm (25”)
Diamètre et caractéristiques de la tige de selle Min 25,4 mm (1”), Max 31,8 mm (1.25”)
Précautions d'emploiUtilisez uniquement des tiges de selle en métal.N’utilisez aucun accessoire ou pièce susceptible d’entraver le fonctionnement de la barre de traction.
BICI BIMBODiamètre de la roue Mesure minimale de la roue : Min 255 mm (10”) Max 510 mm (20”).
Diamètre et caractéristiques de la potence du guidon
Diamètre min. 34 mm (1.34”), max 38 mm (1.50”). Assurez-vous que le fil du frein n’interfère pas sur la fixation de la barre de traction.
Précautions d'emploi
Si le vélo d’enfant est équipé de roulettes, avant de l’utiliser avec la barre de traction, tournez les roulettes vers le haut ou enlevez-les.N’utilisez aucun accessoire ou pièce susceptible d’entraver le fonc-tionnement de la barre de traction.
EXIGENCES RELATIVES AUX CYCLISTES
CYCLISTE ADULTECapacités élémentaires Le cycliste adulte doit savoir faire du vélo avec une bonne maîtrise de l’engin.
Equipement Il doit être muni d’un casque homologué conformément aux normes en vigueur.
CYCLISTE ENFANT
Capacités élémentaires Le cycliste enfant doit être capable de se tenir correctement au guidon, il doit démontrer une certaine assurance sur le vélo et doit savoir pédaler avec de bonnes capacités.
Equipement
Il doit porter un casque homologué conformément aux normes en vigueur. L’utilisation de protections adéquates pour les genoux et les coudes est par ailleurs préconisée.Assurez-vous que l’enfant porte des vêtements adaptés aux conditions cli-matiques et en particulier protégez-le soigneusement en cas de pluie.
POIDS MAXIMAUX AUTORISES
Poids de l'adulte Le poids doit convenir au remorquage (au moins le double du poids de l'enfant)
Poids de l'enfant Max 30 kg (66.14 lb)
Poids du vélo d'enfant Max 15 kg (33.07 lb)
Poids du vélo d'enfant + poids de l'enfant Le poids remorqué ne doit en aucun cas être supérieur à 45 kg (99.21 lb)
ENTRETIEN, ASSISTANCE ET GARANTIE
1. Tous les composants de la barre de traction pour vélo d’enfant sont soumis à l’usure. Vérifiez les conditions du produit avant toute utilisation et en cas de mauvais fonctionnement de l’un quelconque des composants, remplacez-le en vous rendant auprès d’un point de vente agréé ;
2. Interrompez immédiatement l’utilisation de la barre de traction pour vélo d’enfant si vous notez des problèmes de fonctionnement ;3. Effectuez un contrôle mécanique de la barre de traction avant toute utilisation en faisant particulièrement attention aux points de fixation et
d’articulation ;4. Au besoin, graissez la partie du joint à cardan (fig.B) ;5. Toute fissure, pliure, changement de couleur est un indice d’usure, procédez au remplacement immédiat des pièces usées ;6. Veillez à ce que les composants de la barre de traction restent propres et secs ; l’eau et la saleté peuvent donner lieu à des phénomènes de cor-
rosion ayant pour conséquence un mauvais fonctionnement du produit ;7. Après son utilisation la barre de traction doit être rangée dans un endroit à l’abri de l’humidité et des rayons du soleil ;8. La garantie du produit couvre les défauts de matériau et de fabrication pendant une période de 2 ans à compter de la date d’achat.
En cas de réclamation le produit défectueux devra être envoyé à Peruzzo s.r.l. ou au magasin d’achat accompagné du justificatif d’achat sur lequel est indiquée la date d’achat ;
9. Pour tout défaut du produit confirmé par le fabricant, la garantie est limitée exclusivement au remplacement des parties défectueuses ;10. La garantie n’est pas applicable en cas d’assemblages ou d’utilisations impropres du produit.
L’utilisateur est responsable de la compréhension et de l’application des opérations d’assemblage de la barre de traction “TRAIL ANGEL”.
FR FR

NOTICE DE MONTAGE DE LA BARRE DE TRACTION POUR VELO D’ENFANT “TRAIL ANGEL”
EQUIPEMENT NECESSAIRE POUR LE MONTAGE DE LA BARRE DE TRACTION • 2 clés fixes de 13• 2 clés fixes de 10• 1 tournevis cruciforme
INSTRUCTIONS POUR L’ASSEMBLAGE DE LA BARRE DE TRACTION1. Assurez-vous que tous les composants sont présents dans l’emballage (voir la liste figurant sur le schéma de montage) ;2. Assemblez le tirant comme illustré sur la fig.D en veillant à ce que les extrémités soient parallèles (ne serrez pas trop fort la fermeture, appliquez
une force de 2 Nm) ;*3. Assemblez le groupe central fig.A comme illustré, en faisant attention au sens de tubes ; *4. Introduisez le cache en caoutchouc dans le tube et fixez le joint à cardan (déjà assemblé) comme illustré sur la fig.B, appliquez une force de 5
Nm ; *5. Assemblez le tirant fig.D au groupe central fig.A, appliquez une force de 5 Nm, puis serrez la vis présente au croisement des tubes du tirant
fig.D, appliquez une force de 5 Nm ; 6. L’élément fig.C présente deux trous sur les deux côtés avec un diamètre différent (16/18 mm – 0,63”/0,71”), vérifiez lequel des deux trous
s’adapte correctement à l’écrou de l’axe du moyeu du vélo d’enfant, puis fixez dans le bon sens l’élément fig.C au tube avec la vis prévue à cet effet, appliquez une force de 3 Nm ;
7. Introduisez ensuite l’élément fig.C dans l’écrou de l’axe du moyeu du vélo d’enfant (attention : lors de cette opération aucun composant du vélo d’enfant ne doit être enlevé)
* pour l’art. 304 barre de traction pour vélo d’enfant “Trail Angel”, version pré-assemblée, cette opération n’est pas requise.
INSTRUCTIONS POUR LES FIXATIONS SUR LES VELOS
Pour les étapes indiquées dans ce chapitre agissez uniquement sur les vélos et non pas sur la barre de traction :1. Fixez avec force la fixation sur le tube de direction du vélo d’enfant en introduisant la protection antirayures en carton sur le devant, voir fig.F
(localisez l’endroit le plus approprié sur le tube de direction pour la position de la fixation, au besoin il est possible de faire pivoter la position de la fixation fig.F de 180° par rapport à l’illustration) ;
2. Fixez le groupe de traction à la tige de la selle du vélo adulte fig.E en utilisant les protections antirayures pour éviter de rayer la tige de la selle et bloquez fortement les vis en appliquant une force de 10 Nm.
INSTRUCTIONS POUR ATTELER LA BARRE DE TRACTION ENTRE LES DEUX VELOS1. Introduisez le tube carré de la barre sur le tube/timon et bloquez avec le levier fourni fig.E1 (en cas de présence d’obstacles comme par exemple
la selle, il est possible d’introduire l’axe par le dessous) ;2. Fixez le tirant D à la fixation F avec la vis et les boutons fournis comme illustré sur la fig.F1 et bloquez fortement en appliquant une force de 5
Nm (attention : lors de la première utilisation introduisez complètement la vis et l’écrou dans les boutons en plastique) ;3. Dévissez le bouton A2 et le bouton A1 jusqu’à ce que les dents soient complètement débloquées comme illustré sur la fig.A ;4. Introduisez les éléments de support de la roue C sur les écrous du moyeu avant du vélo d’enfant ;5. Fermez légèrement le bouton A2 et levez la barre de traction à laquelle est fixé le vélo d’enfant jusqu’à ce que la roue avant du vélo arrive à
environ 12 cm, assurez-vous que les dents du groupe A coïncident parfaitement et fixez fortement les boutons A1 en appliquant une force de 10 Nm et A2 en appliquant une force de 15 Nm ;
6. Couvrez le joint à cardan avec le cache en caoutchouc ;7. Lorsque la barre n’est pas utilisée et est repliée sur le vélo adulte comme illustré sur la fig.G, n’oubliez pas de visser les boutons A1 et A2 et
utilisez les courroies pour la fixer au vélo comme illustré sur la fig.G1.
PRINCIPALES NORMES DE SECURITE POUR L’UTILISATION DE LA BARRE DE TRACTION POUR VELO D’ENFANT
CONTROLES PRELIMINAIRES AVANT TOUTE UTILISATION1. Assurez-vous que les écrous et la visserie sont bien fixés ;2. Toutes les fermetures, écrous, axes et autres composants doivent être contrôlés et adaptés après les 10 premières heures d’utilisation ;3. Assurez-vous que toutes les parties de la barre de traction pour vélo d’enfant sont en bon état et ne présentent aucun dommage ;4. Assurez-vous que le joint à cardan, les axes de fixation et toute autre partie de la barre de traction ne présentent aucun signe d’usure ou de
dommage, dans le cas contraire remplacez-les immédiatement ;5. Assurez-vous que l’élément C est bien introduit sur l’axe de la roue du vélo d’enfant ;6. Assurez-vous que la tige de la selle du vélo d’adulte ne présente aucun signe de détérioration comme des cassures, fissures, etc ;7. Assurez-vous que la potence du guidon du vélo d’enfant ne présente aucun signe de détérioration comme des cassures, fissures, etc ;8. Assurez-vous que les freins du vélo d’adulte fonctionnent parfaitement ;9. Assurez-vous que la roue et les freins arrière du vélo d’enfant fonctionnent parfaitement ;10. Assurez-vous que les vélos d’adulte et d’enfant satisfont à toutes les exigences spécifiées dans le chapitre “Exigences relatives à l’utilisation de
la barre de traction pour vélo d’enfant” présentes dans la notice ;11. Assurez-vous que les caractéristiques et l’équipement d’adulte et d’enfant satisfont à toutes les exigences spécifiées dans le chapitre “Exigences
relatives à l’utilisation de la barre de traction pour vélo d’enfant” présentes dans la notice ;12. N’utilisez pas le produit en présence de composants défectueux, usés ou endommagés ;13. Il est recommandé de n’apporter aucune modification au produit dans la mesure où toute manipulation pourrait compromettre sa sécurité.
CONTROLES ET RECOMMANDATIONS EN PHASE D’UTILISATION
1. Si le vélo oscille excessivement (l’enfant a du mal à rester en équilibre sur son vélo) assurez-vous que la force de fermeture des fixations fig.F et E est appropriée ;
2. Lors de la première utilisation essayez la barre de traction dans des espaces ouverts et sans obstacles afin de vérifier le bon fonctionnement de tous les composants, notamment lors des phases de départ, de freinage, dans les virages, etc ; le produit pourra être utilisé sur des parcours alternatifs seulement après que l’adulte et l’enfant se seront familiarisés avec le système de remorquage ;
3. Le cycliste adulte et le cycliste enfant doivent savoir utiliser correctement le vélo et connaître le mode de freinage, de changement de rapport, de braquage et toute autre action jugée fondamentale afin de garantir une utilisation de l’engin en toute sécurité ;
4. La barre de traction pour vélo d’enfant doit être utilisée exclusivement par 2 personnes :1 adulte pour le remorquage et 1 enfant sur le vélo arrière tracté ; tous deux doivent être munis d’un casque homologué, il est par ailleurs conseillé d’utiliser des protections pour les genoux et les coudes ;
5. N’utilisez jamais la barre de traction pour vélo d’enfant sur des parcours déformés, hors route ou en présence de fortes pentes, mais uniquement sur des parcours plats ;
6. N’utilisez jamais la barre de traction pour vélo d’enfant sur des parcours empruntés par des véhicules à moteur et dans tous les cas respectez scrupuleusement les lois du pays dans lequel vous utilisez le produit ainsi que les normes de bon sens ;
7. Ne dépassez jamais la vitesse de 20 km/h en phase de remorquage ;8. Evitez tout dos-d’âne, bordure, trottoir, etc. ;9. Evitez tout virage brusque ou virage inférieur à 90° ;10. Faites attention aux autres usagers ou à toute autre chose susceptible d’interférer sur votre parcours ;11. N’utilisez jamais la barre de traction avec des vélos électriques (à pédalage assisté) ou avec tout autre véhicule à moteur ;12. En phase d’utilisation pensez à prévoir un peu plus d’espace pour le départ et l’arrêt des vélos ;13. En phase de départ, l’adulte doit rester avec les pieds posés bien fermement au sol tant que l’enfant n’est pas monté et accroché correctement
au guidon et aux pédales ;14. N’utilisez jamais la barre de traction si l’enfant est fatigué, peu vigilant, distrait ;15. Ne laissez jamais l’enfant sans surveillance ;16. Lors de l’utilisation de la barre de traction l’enfant doit rester toujours assis sur le vélo ;17. Les utilisateurs doivent se munir de chaussures aptes à garantir une bonne adhérence aux pédales ; ne pédalez pas pieds nus ou avec des
sandales, etc. ;18. N’utilisez la barre de traction pour vélo d’enfant la nuit que si vous êtes équipés de dispositifs d’éclairage homologués.
La barre de traction pour vélo d’enfant “Trail Angel” est produite par : Peruzzo s.r.l. Via Meucci, 115 - 36028 Rossano Veneto (VI) Italie
ART. 300 - 304_BARRE DE TRACTION POUR VELO D'ENFANT “TRAIL ANGEL”
FR FR