electrical upgrade - phase 2 sugar river...
TRANSCRIPT
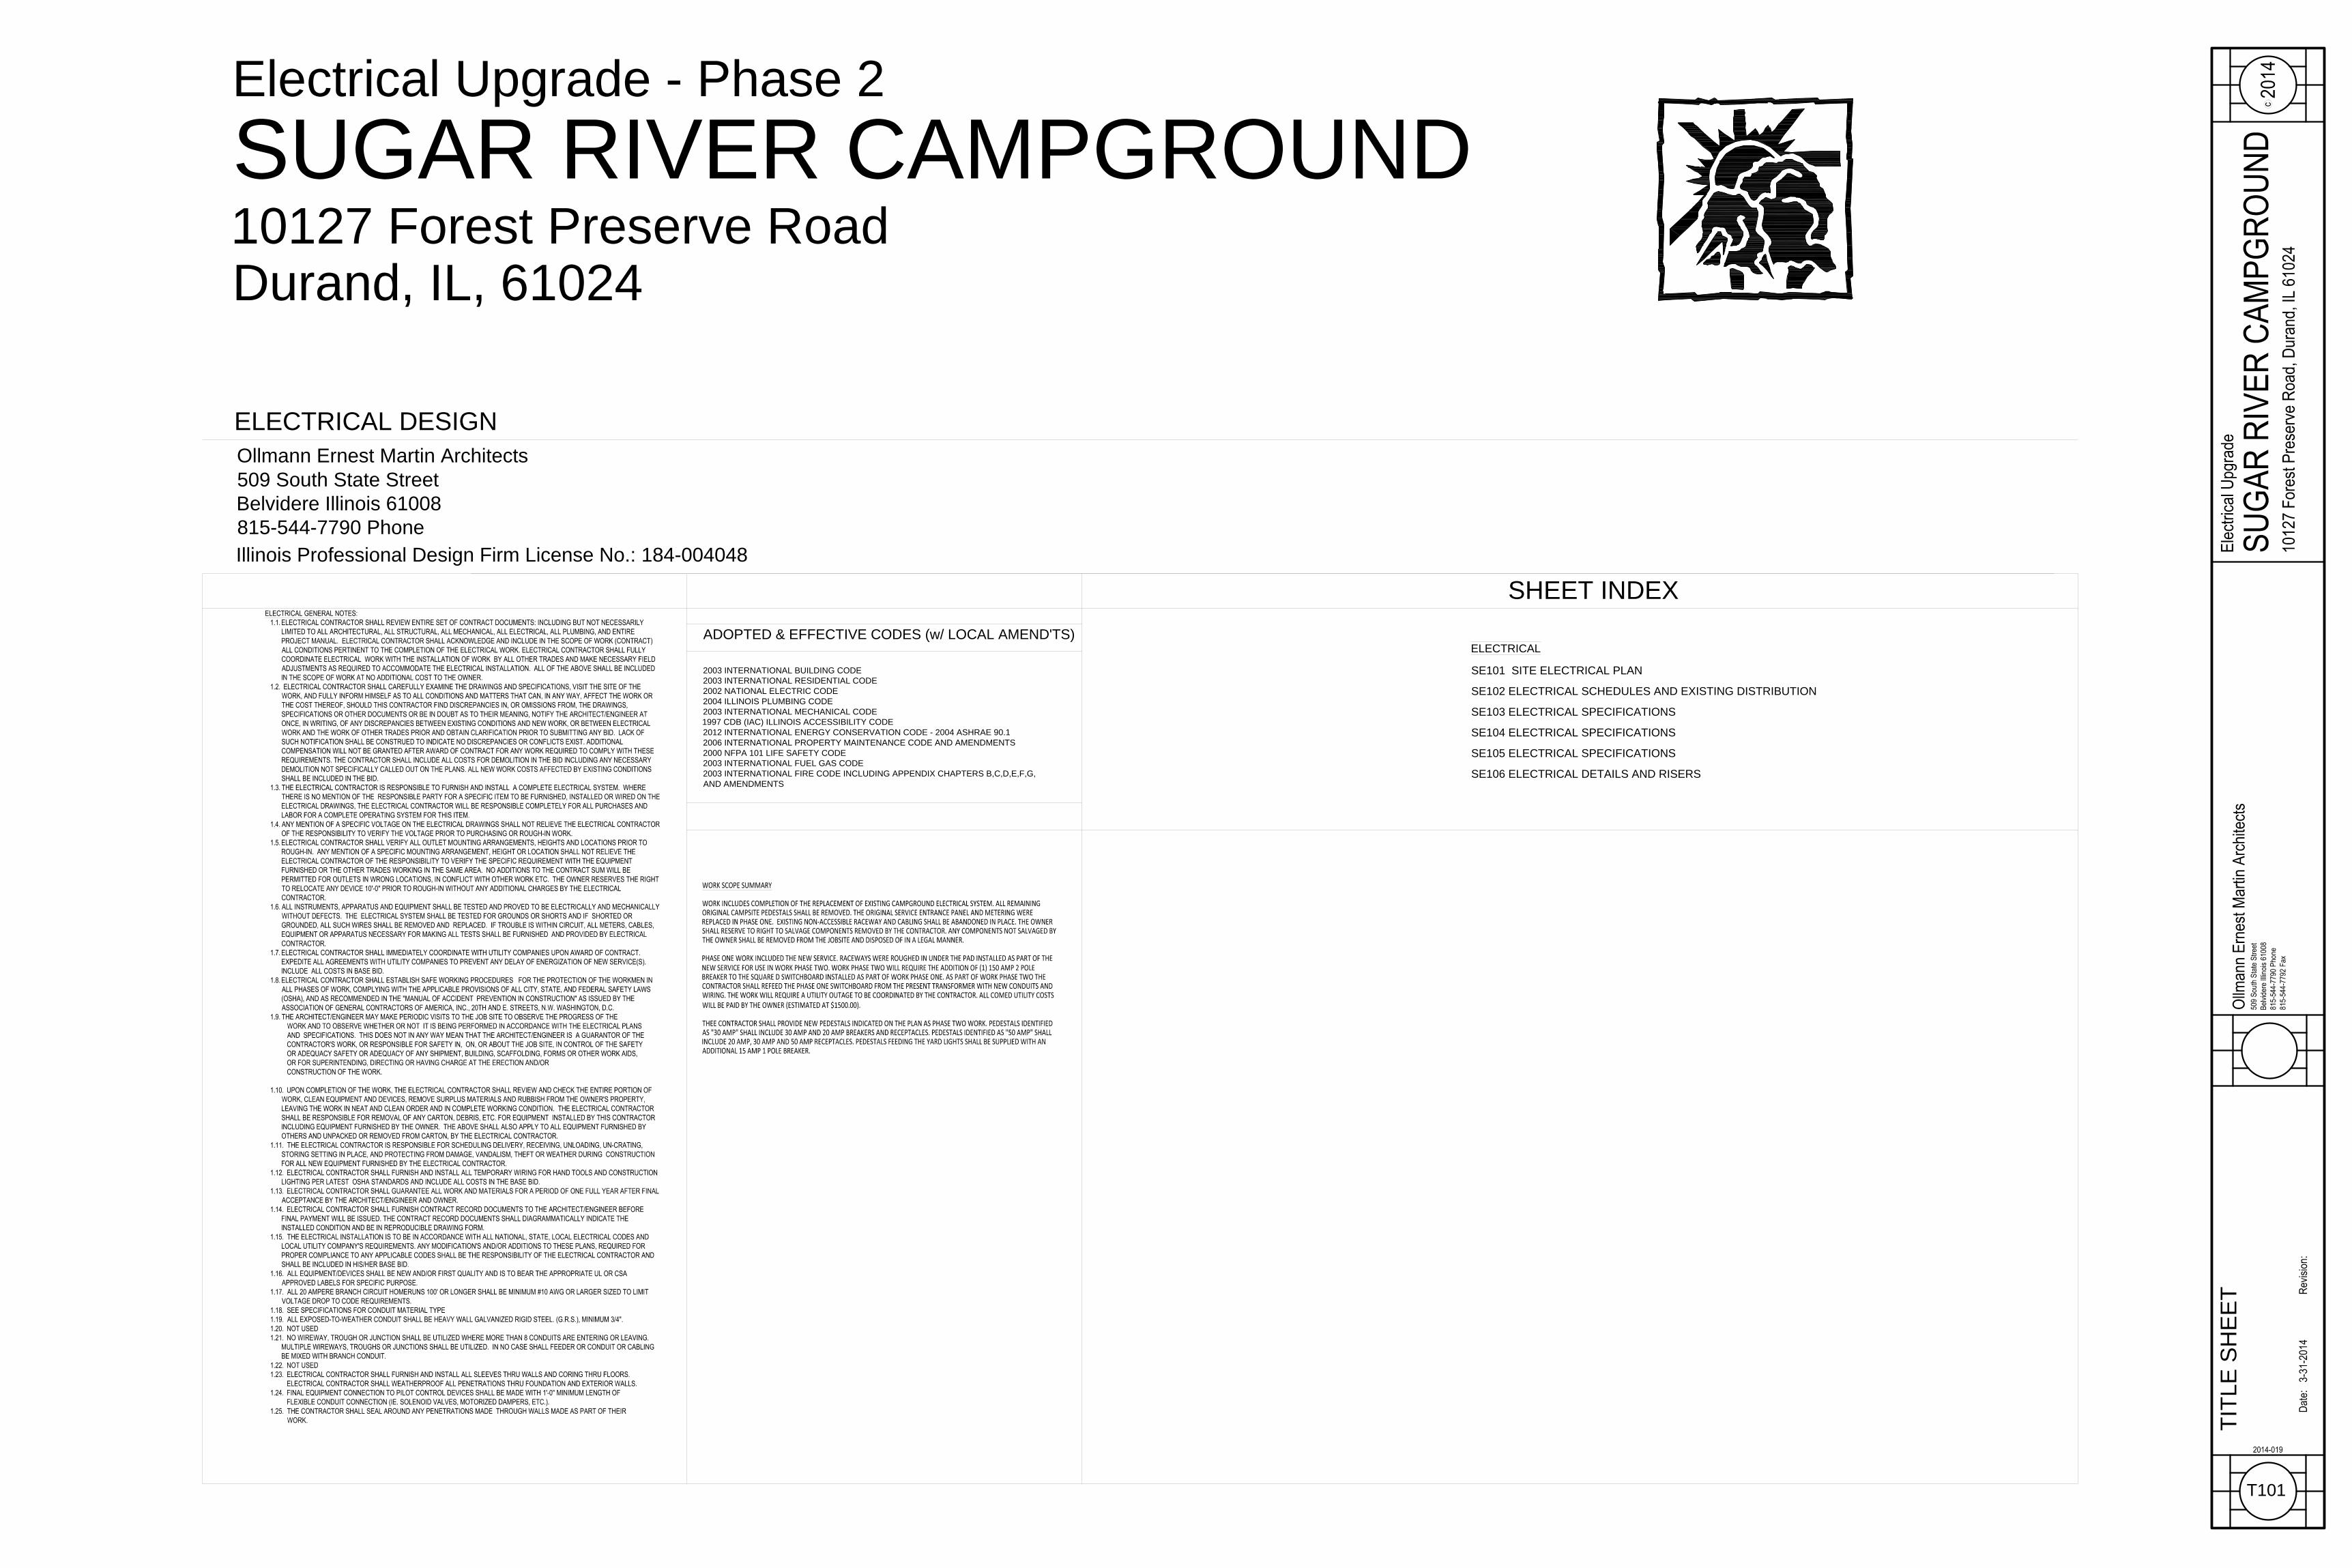
ELECTRICAL DESIGN
Ollmann Ernest Martin Architects
509 South State Street
Belvidere Illinois 61008
815-544-7790 Phone
SHEET INDEX
Electrical Upgrade - Phase 2
SUGAR RIVER CAMPGROUND
10127 Forest Preserve Road
Durand, IL, 61024
Illinois Professional Design Firm License No.: 184-004048
ELECTRICAL
SE101 SITE ELECTRICAL PLAN
SE102 ELECTRICAL SCHEDULES AND EXISTING DISTRIBUTION
SE103 ELECTRICAL SPECIFICATIONS
SE104 ELECTRICAL SPECIFICATIONS
SE105 ELECTRICAL SPECIFICATIONS
SE106 ELECTRICAL DETAILS AND RISERS
2003 INTERNATIONAL BUILDING CODE
2003 INTERNATIONAL RESIDENTIAL CODE
2002 NATIONAL ELECTRIC CODE
2004 ILLINOIS PLUMBING CODE
2003 INTERNATIONAL MECHANICAL CODE
1997 CDB (IAC) ILLINOIS ACCESSIBILITY CODE
2012 INTERNATIONAL ENERGY CONSERVATION CODE - 2004 ASHRAE 90.1
2006 INTERNATIONAL PROPERTY MAINTENANCE CODE AND AMENDMENTS
2000 NFPA 101 LIFE SAFETY CODE
2003 INTERNATIONAL FUEL GAS CODE
2003 INTERNATIONAL FIRE CODE INCLUDING APPENDIX CHAPTERS B,C,D,E,F,G,
AND AMENDMENTS
ADOPTED & EFFECTIVE CODES (w/ LOCAL AMEND'TS)
TIT
LE
S
HE
ET
T101

6
7
26
27
40
41
42
43
44
11
45
64
63
62
57
29
35
46
47
LP
0 50 NORTH
ELECTRIC MAIN
LP
LP
w
w
w
48
ELECTRIC SERVICE PEDESTAL (50 AMP)
28
w
100 Feet
WATER HYDRANT
8
9
10
56
55
51
50
49
15
14
13
HOST SITE
54
53
52
20
19
18
17
16
w21
23
22
4
5
37
38
39
65
3
30
HOST SITE
69
32
67
66
36
SHOWER HOUSE
70
E
PATH TO PLAY AREA
33
68
34
2
1
25
61
60
59
58
24
PHASE II CAMPSITES 12-30 & 46-70
47 51
55
60
69
6473
65
66
67
68
69
70
71
72
73
59
5857
56
55
54
55
53
55
52
55
51
55
48
49
50
74
37
36
35
34
33
32
46
27
28
29
30
31
61
62
63
50 AMP
1
55
5147
1
1
1
1
1
1
1
1
1
1
1
1
1
1
1
1
11
1
1
1
1
63
43
42
38 45 46
39
40
45
41
26 30 32 35
PX
PX
PX
PX
PX
PX
1
25
24
23
22
21
15 20
1
7
60
50 AMP
50 AMP
PX
PX
PX
50 AMP
PX
PX
PX
PX
50 AMP
PX
PX
PX
PX
PX
1
PX
PX
1
PX
PX
PX
50 AMP
50 AMP
50 AMP
PX
9
9
9
9
5
5
5
5
16
16
16
16
16
16
17
17
17
9
9
9
9
18
18
30 AMP
30 AMP
30 AMP
30 AMP
30 AMP 30 AMP
30 AMP
30 AMP30 AMP30 AMP
30 AMP
30 AMP
30 AMP
30 AMP
30 AMP 30 AMP
30 AMP
30 AMP30 AMP
30 AMP
30 AMP
30 AMP
30 AMP
30 AMP30 AMP
30 AMP30 AMP
30 AMP
30 AMP
30 AMP
30 AMP
30 AMP
30 AMP
30 AMP
30 AMP
30 AMP
30 AMP
18
18
17
15
15
15
13
13
13
4
4
4
4
14
14
7
7
7
7
7
7
30 AMP
FUTURE GRAVELPATH
GRAVEL HDCP.CAMP PAD
ELECTRIC SERVICE PEDESTAL (30 AMP)
16
17
18
19
6
5
4
3
13
1 7
2
7
8
9
10
11
12
13
14
CAMPG
ROUND ROAD
2
2
8
8
8
8
8
8
6
6
6
6
6
6
50 AMP
30 AMP
30 AMP
30 AMP
30 AMP
30 AMP
30 AMP
50 AMP
30 AMP
30 AMP
50 AMP
30 AMP
30 AMP
50 AMP
30 AMP
30 AMP
30 AMP
30 AMP
30 AMP
30 AMP
50 AMP
50 AMP
30 AMP
30 AMP
10
10
10
10
10
11
11
11
11
11
11
EXISTINGPUMPHOUSE
EXISTING SERVICE
ENTRANCE MAIN
PANEL
REMOVE EXISTING PEDESTAL AND ALL EXPOSED
RACEWAY & WIRING.
EXISTING FEED TO
GUARD SHACK
EXISTING COMED
TRANSFORMER
31
3
9
12
DISCONNECT TEMPORARY FEED TO EXISTING SITES
45-47 PRESENTLY SUPPLIED FROM PEDESTAL 45.
X
REFER TO FEEDER LIST FOR ADDITIONAL
INFORMATION.
SE101
SIT
E E
LE
CT
RIC
AL P
LA
N
SITE ELECTRICAL PLAN

1
3
4
5
6
7
8
9
25
26
27
32
33
35
36
37
38
39
40
41
42
43
44
10
11
45
69
70
68
67
66
65
64
63
62
61
60
59
58
57
56
55
54
53
52
51
50
48
49
28
29
30
24
23
22
21
20
19
18
17
16
15
14
13
46
47
LP
CONTROLPANEL
ELECTRIC MAIN
34
2
w
w
w
w
T
PUMPHOUSE
SE102
ELE
CT
RIC
AL S
CH
ED
ULE
S
AN
D E
XIS
TIN
G D
IS
TR
IB
UT
IO
N
EXISTING DISTRIBUTION PLAN
NO SCALE

DIVISION 16 - ELECTRICAL
SECTION 16050 - BASIC ELECTRICAL MATERIALS AND METHODS
1.1 GENERAL
A. The following definitions apply to this Section:
Retain abbreviations that remain after this SLV Section has been edited.
1. EMT: Electrical metallic tubing.
2. FMC: Flexible metal conduit.
3. IMC: Intermediate metal conduit.
4. LFMC: Liquidtight flexible metal conduit.
5. RNC: Rigid nonmetallic conduit.
B. Coordinate chases, slots, inserts, sleeves, and openings with Owner.
1.2 PRODUCTS
A. Pipe Sleeves: ASTM A 53, Type E, Grade A, Schedule 40, galvanized steel, plain ends.
B. Cable Supports for Vertical Conduit: Factory-fabricated assembly consisting of threaded body and insulating wedging plug for nonarmored electrical cables
in riser conduits. Body constructed of malleable-iron casting with hot-dip galvanized finish.
C. Concrete Forms and Reinforcement Materials:
1. Concrete: 3000-psi (20.7-MPa), 28-day compressive strength.
1.3 EXECUTION
A. Headroom Maintenance: If mounting heights or other location criteria are not indicated, arrange and install components and equipment to provide the
maximum possible headroom.
B. Materials and Components: Install level, plumb, and parallel and perpendicular to other building systems and components, unless otherwise indicated.
C. Equipment: Install to facilitate service, maintenance, and repair or replacement of components. Connect for ease of disconnecting, with minimum
interference with other installations.
D. Right of Way: Give to raceways and piping systems installed at a required slope.
E. Apply firestopping to cable and raceway penetrations of fire-rated floor and wall assemblies to achieve fire-resistance rating of the assembly.
F. Construct concrete bases of dimensions indicated, but not less than 4 inches (100 mm) larger, in both directions, than supported unit. Follow supported
equipment manufacturer's anchorage recommendations and setting templates for anchor-bolt and tie locations, unless otherwise indicated. Use 3000-psi
(20.7-MPa), 28-day compressive-strength concrete and reinforcement.
G. Protect existing electrical equipment and installations indicated to remain. If damaged or disturbed in the course of the Work, remove damaged portions
and install new products of equal capacity, quality, and functionality.
H. Accessible Work: Remove exposed electrical equipment and installations, indicated to be demolished, in their entirety.
I. Abandoned Work: Cut and remove buried raceway and wiring, indicated to be abandoned in place, 2 inches (50 mm) below the surface of adjacent
construction. Cap raceways and patch surface to match existing finish.
J. Remove demolished material from Project site.
K. Remove, store, clean, reinstall, reconnect, and make operational components indicated for relocation.
L. Cut, channel, chase, and drill floors, walls, partitions, ceilings, and other surfaces required to permit electrical installations. Perform cutting by skilled
mechanics of trades involved.
M. Repair and refinish disturbed finish materials and other surfaces to match adjacent undisturbed surfaces. Install new fireproofing where existing
firestopping has been disturbed. Repair and refinish materials and other surfaces by skilled mechanics of trades involved.
END OF SECTION 16050
DIVISION 16 - ELECTRICAL
SECTION 16060 - GROUNDING AND BONDING
PART 1 - GENERAL
1.1 SUMMARY
A. This Section includes methods and materials for grounding systems and equipment.
1.2 SUBMITTALS
A. Product Data: For each type of product indicated.
1.3 QUALITY ASSURANCE
A. Electrical Components, Devices, and Accessories: Listed and labeled as defined in NFPA 70, Article 100, by a testing agency acceptable to authorities
having jurisdiction, and marked for intended use.
B. Comply with UL 467 for grounding and bonding materials and equipment.
PART 2 - PRODUCTS
2.1 CONDUCTORS
A. Insulated Conductors: Copper or tinned-copper wire or cable insulated for 600 V unless otherwise required by applicable Code or authorities having
jurisdiction.
B. Bare Copper Conductors:
1. Solid Conductors: ASTM B 3.
2. Stranded Conductors: ASTM B 8.
3. Tinned Conductors: ASTM B 33.
4. Bonding Cable: 28 kcmil, 14 strands of No. 17 AWG conductor, 1/4 inch (6 mm) in diameter.
5. Bonding Conductor: No. 4 or No. 6 AWG, stranded conductor.
6. Bonding Jumper: Copper tape, braided conductors, terminated with copper ferrules; 1-5/8 inches (41 mm) wide and 1/16 inch (1.6 mm) thick.
7. Tinned Bonding Jumper: Tinned-copper tape, braided conductors, terminated with copper ferrules; 1-5/8 inches (41 mm) wide and 1/16 inch (1.6 mm)
thick.
2.2 CONNECTORS
A. Listed and labeled by a nationally recognized testing laboratory acceptable to authorities having jurisdiction for applications in which used, and for specific
types, sizes, and combinations of conductors and other items connected.
B. Bolted Connectors for Conductors and Pipes: Copper or copper alloy, bolted pressure-type, with at least two bolts.
1. Pipe Connectors: Clamp type, sized for pipe.
C. Welded Connectors: Exothermic-welding kits of types recommended by kit manufacturer for materials being joined and installation conditions.
2.3 GROUNDING ELECTRODES
A. Ground Rods: Copper-clad steel 5/8 in diameter by 96 inches.
PART 3 - EXECUTION
3.1 APPLICATIONS
A. Conductors: Install solid conductor for No.8 AWG and smaller, and stranded conductors for No. 6 AWG and larger, unless otherwise indicated.
B. Isolated Grounding Conductors: Green-colored insulation with continuous yellow stripe. On feeders with isolated ground, identify grounding conductor
where visible to normal inspection, with alternating bands of green and yellow tape, with at least three bands of green and two bands of yellow.
C. Conductor Terminations and Connections:
1. Pipe and Equipment Grounding Conductor Terminations: Bolted connectors.
2. Underground Connections: Welded connectors, except as otherwise indicated.
3. Connections to Structural Steel: Welded connectors.
3.2 EQUIPMENT GROUNDING
A. Install insulated equipment grounding conductors with the following items, in addition to those required by NFPA 70:
4. Feeders and branch circuits.
3.3 INSTALLATION
A. Grounding Conductors: Route along shortest and straightest paths possible, unless otherwise indicated or required by Code. Avoid obstructing access or
placing conductors where they may be subjected to strain, impact, or damage.
B. Ground Rods: Drive rods until tops are 2 inches (50 mm) below finished floor or final grade, unless otherwise indicated.
1. Interconnect ground rods with grounding electrode conductor below grade and as otherwise indicated. Make connections without exposing steel or
damaging coating, if any.
C. Bonding Straps and Jumpers: Install in locations accessible for inspection and maintenance, except where routed through short lengths of conduit.
1. Bonding to Structure: Bond straps directly to basic structure, taking care not to penetrate any adjacent parts.
2. Bonding to Equipment Mounted on Vibration Isolation Hangers and Supports: Install so vibration is not transmitted to rigidly mounted equipment.
3. Use exothermic-welded connectors for outdoor locations, but if a disconnect-type connection is required, use a bolted clamp.
END OF SECTION 16060
DIVISION 16 - ELECTRICAL
SECTION 16073 - HANGERS AND SUPPORTS FOR ELECTRICAL SYSTEMS
PART 1 - GENERAL
1.1 SUMMARY
A. Section includes:
1. Hangers and supports for electrical equipment and systems.
2. Construction requirements for concrete bases.
1.2 PERFORMANCE REQUIREMENTS
A. Design supports for multiple raceways capable of supporting combined weight of supported systems and its contents.
B. Design equipment supports capable of supporting combined operating weight of supported equipment and connected systems and components.
C. Rated Strength: Adequate in tension, shear, and pullout force to resist maximum loads calculated or imposed for this Project, with a minimum structural
safety factor of five times the applied force.
1.3 QUALITY ASSURANCE
A. Welding: Qualify procedures and personnel according to AWS D1.1/D1.1M, "Structural Welding Code - Steel."
B. Comply with NFPA 70.
PART 2 - PRODUCTS
2.1 SUPPORT, ANCHORAGE, AND ATTACHMENT COMPONENTS
A. Steel Slotted Support Systems: Comply with MFMA-4, factory-fabricated components for field assembly.
1. Manufacturers: Subject to compliance with requirements, provide products by one of the following:
a. Allied Tube & Conduit.
b. Cooper B-Line, Inc.; a division of Cooper Industries.
c. ERICO International Corporation.
d. GS Metals Corp.
e. Thomas & Betts Corporation.
f. Unistrut; Tyco International, Ltd.
g. Wesanco, Inc.
2. Metallic Coatings: Hot-dip galvanized after fabrication and applied according to MFMA-4.
3. Painted Coatings: Manufacturer's standard painted coating applied according to MFMA-4.
4. Channel Dimensions: Selected for applicable load criteria.
B. Raceway and Cable Supports: As described in NECA 1 and NECA 101.
C. Conduit and Cable Support Devices: Steel hangers, clamps, and associated fittings, designed for types and sizes of raceway or cable to be supported.
D. Support for Conductors in Vertical Conduit: Factory-fabricated assembly consisting of threaded body and insulating wedging plug or plugs for non-armored
electrical conductors or cables in riser conduits. Plugs shall have number, size, and shape of conductor gripping pieces as required to suit individual
conductors or cables supported. Body shall be malleable iron.
E. Structural Steel for Fabricated Supports and Restraints: ASTM A 36/A 36M, steel plates, shapes, and bars; black and galvanized.
F. Mounting, Anchoring, and Attachment Components: Items for fastening electrical items or their supports to building surfaces include the following:
1. Mechanical-Expansion Anchors: Insert-wedge-type, zinc-coated steel, for use in hardened portland cement concrete with tension, shear, and pullout
capacities appropriate for supported loads and building materials in which used.
h. Manufacturers: Subject to compliance with requirements, provide products by one of the following:
1) Cooper B-Line, Inc.; a division of Cooper Industries.
2) Empire Tool and Manufacturing Co., Inc.
3) Hilti Inc.
4) ITW Ramset/Red Head; a division of Illinois Tool Works, Inc.
5) MKT Fastening, LLC.
2. Concrete Inserts: Steel or malleable-iron, slotted support system units similar to MSS Type 18; complying with MFMA-4 or MSS SP-58.
3. Clamps for Attachment to Steel Structural Elements: MSS SP-58, type suitable for attached structural element.
4. Through Bolts: Structural type, hex head, and high strength. Comply with ASTM A 325.
5. Toggle Bolts: All-steel springhead type.
6. Hanger Rods: Threaded steel.
2.2 FABRICATED METAL EQUIPMENT SUPPORT ASSEMBLIES
A. Description: Welded or bolted, structural-steel shapes, shop or field fabricated to fit dimensions of supported equipment.
B. Materials: Comply with requirements in Division 5 Section "Metal Fabrications" for steel shapes and plates.
PART 3 - EXECUTION
3.1 APPLICATION
A. Comply with NECA 1 and NECA 101 for application of hangers and supports for electrical equipment and systems except if requirements in this Section are
stricter.
B. Maximum Support Spacing and Minimum Hanger Rod Size for Raceway: Space supports for EMT, IMC, and RMC as scheduled in NECA 1, where its
Table 1 lists maximum spacings less than stated in NFPA 70. Minimum rod size shall be 1/4 inch (6 mm) in diameter.
C. Multiple Raceways or Cables: Install trapeze-type supports fabricated with steel slotted support system, sized so capacity can be increased by at least 25
percent in future without exceeding specified design load limits.
1. Secure raceways and cables to these supports single-bolt conduit clamps using spring friction action for retention in support channel.
D. Spring-steel clamps designed for supporting single conduits without bolts may be used for 1-1/2-inch (38-mm) and smaller raceways serving branch circuits
and communication systems above suspended ceilings and for fastening raceways to trapeze supports.
3.2 SUPPORT INSTALLATION
A. Comply with NECA 1 and NECA 101 for installation requirements except as specified in this Article.
B. Raceway Support Methods: In addition to methods described in NECA 1, EMT may be supported by openings through structure members, as permitted in
NFPA 70.
C. Strength of Support Assemblies: Where not indicated, select sizes of components so strength will be adequate to carry present and future static loads
within specified loading limits. Minimum static design load used for strength determination shall be weight of supported components plus 200 lb (90 kg).
D. Mounting and Anchorage of Surface-Mounted Equipment and Components: Anchor and fasten electrical items and their supports to building structural
elements by the following methods unless otherwise indicated by code:
1. To Wood: Fasten with lag screws or through bolts.
2. To New Concrete: Bolt to concrete inserts.
3. To Masonry: Approved toggle-type bolts on hollow masonry units and expansion anchor fasteners on solid masonry units.
4. To Existing Concrete: Epoxy Anchors.
5. To Steel: Beam clamps (MSS Type 19, 21, 23, 25, or 27) or Spring-tension clamps.
6. To Light Steel: Sheet metal screws.
7. Items Mounted on Hollow Walls and Nonstructural Building Surfaces: Mount cabinets, panelboards, disconnect switches, control enclosures, pull and
junction boxes, transformers, and other devices on slotted-channel racks attached to substrate.
E. Drill holes for epoxy anchors in concrete at locations and to depths that avoid reinforcing bars.
3.3 INSTALLATION OF FABRICATED METAL SUPPORTS
A. Cut, fit, and place miscellaneous metal supports accurately in location, alignment, and elevation to support and anchor electrical materials and equipment.
B. Field Welding: Comply with AWS D1.1/D1.1M.
3.4 CONCRETE BASES
A. Construct concrete bases of dimensions indicated but not less than 4 inches (100 mm) larger in both directions than supported unit, and so anchors will be a
minimum of 10 bolt diameters from edge of the base.
B. Use 3000-psi, 28-day compressive-strength concrete. Concrete materials, reinforcement, and placement ."
C. Anchor equipment to concrete base.
1. Place and secure anchorage devices. Use supported equipment manufacturer's setting drawings, templates, diagrams, instructions, and directions
furnished with items to be embedded.
2. Install anchor bolts to elevations required for proper attachment to supported equipment.
3. Install anchor bolts according to anchor-bolt manufacturer's written instructions.
3.5 PAINTING
A. Touchup: Clean field welds and abraded areas of shop paint. Paint exposed areas immediately after erecting hangers and supports. Use same materials
as used for shop painting. Comply with SSPC-PA 1 requirements for touching up field-painted surfaces.
1. Apply paint by brush or spray to provide minimum dry film thickness of 2.0 mils (0.05 mm).
B. Galvanized Surfaces: Clean welds, bolted connections, and abraded areas and apply galvanizing-repair paint to comply with ASTM A 780.
C. Include all costs for painting in the bid.
END OF SECTION 16073
DIVISION 16 - ELECTRICAL
SECTION 16075 - ELECTRICAL IDENTIFICATION
PART 1 - GENERAL
1.1 SUMMARY
A. Section Includes:
1. Identification of power and control cables.
2. Identification for conductors.
3. Underground-line warning tape.
4. Instruction signs.
5. Equipment identification labels.
6. Miscellaneous identification products.
1.2 SUBMITTALS
B. Product Data: For each electrical identification product indicated.
1.3 QUALITY ASSURANCE
A. Comply with ANSI A13.1.
B. Comply with NFPA 70.
C. Comply with 29 CFR 1910.144 and 29 CFR 1910.145.
D. Comply with ANSI Z535.4 for safety signs and labels.
E. Adhesive-attached labeling materials, including label stocks, laminating adhesives, and inks used by label printers, shall comply with UL 969.
PART 2 - PRODUCTS
2.1 POWER AND CONTROL CABLE IDENTIFICATION MATERIALS
A. Comply with ANSI A13.1 for minimum size of letters for legend and for minimum length of color field for each raceway and cable size.
B. Self-Adhesive Vinyl Labels: Preprinted, flexible label laminated with a clear, weather- and chemical-resistant coating and matching wraparound adhesive
tape for securing ends of legend label.
SE103
ELE
CT
RIC
AL
SP
EC
IF
IC
AT
IO
NS

C. Write-On Tags: Polyester tag, 0.010 inch thick, with corrosion-resistant grommet and cable tie for attachment to conductor or cable.
5. Marker for Tags: Permanent, waterproof, black ink marker recommended by tag manufacturer.
6. Marker for Tags: Machine-printed, permanent, waterproof, black ink marker recommended by printer manufacturer.
D. Snap-Around Labels: Slit, pretensioned, flexible, preprinted, color-coded acrylic sleeve, with diameter sized to suit diameter of raceway or cable it identifies
and to stay in place by gripping action.
E. Snap-Around, Color-Coding Bands: Slit, pretensioned, flexible, solid-colored acrylic sleeve, 2 inches (50 mm) long, with diameter sized to suit diameter of
raceway or cable it identifies and to stay in place by gripping action.
2.2 CONDUCTOR IDENTIFICATION MATERIALS
A. Color-Coding Conductor Tape: Colored, self-adhesive vinyl tape not less than 3 mils (0.08 mm) thick by 1 to 2 inches (25 to 50 mm) wide.
B. Self-Adhesive Vinyl Labels: Preprinted, flexible label laminated with a clear, weather- and chemical-resistant coating and matching wraparound adhesive
tape for securing ends of legend label.
C. Marker Tapes: Vinyl or vinyl-cloth, self-adhesive wraparound type, with circuit identification legend machine printed by thermal transfer or equivalent
process.
2.3 UNDERGROUND-LINE WARNING TAPE
A. Tape:
1. Recommended by manufacturer for the method of installation and suitable to identify and locate underground electrical utility lines.
2. Printing on tape shall be permanent and shall not be damaged by burial operations.
3. Tape material and ink shall be chemically inert, and not subject to degrading when exposed to acids, alkalis, and other destructive substances
commonly found in soils.
B. Color and Printing:
1. Comply with ANSI Z535.1 through ANSI Z535.5.
2. Inscriptions for Red-Colored Tapes: ELECTRIC LINE, HIGH VOLTAGE.
2.4 INSTRUCTION SIGNS
A. Engraved, laminated acrylic or melamine plastic, minimum 1/16 inch (1.6 mm) thick for signs up to 20 sq. inches (129 sq. cm) and 1/8 inch (3.2 mm) thick
for larger sizes.
1. Engraved legend with black letters on white face.
2. Punched or drilled for mechanical fasteners.
3. Framed with mitered acrylic molding and arranged for attachment at applicable equipment.
B. Adhesive Film Label: Machine printed, in black, by thermal transfer or equivalent process. Minimum letter height shall be 3/8 inch (10 mm).
C. Adhesive Film Label with Clear Protective Overlay: Machine printed, in black, by thermal transfer or equivalent process. Minimum letter height shall be 3/8
inch (10 mm). Overlay shall provide a weatherproof and UV-resistant seal for label.
2.5 EQUIPMENT IDENTIFICATION LABELS
A. Adhesive Film Label with Clear Protective Overlay: Machine printed, in black, by thermal transfer or equivalent process. Minimum letter height shall be 3/8
inch (10 mm). Overlay shall provide a weatherproof and UV-resistant seal for label.
B. Self-Adhesive, Engraved, Laminated Acrylic or Melamine Label: Adhesive backed, with white letters on a dark-gray background. Minimum letter height
shall be 3/8 inch (10 mm).
C. Stenciled Legend: In nonfading, waterproof, black ink or paint. Minimum letter height shall be 1 inch.
2.6 MISCELLANEOUS IDENTIFICATION PRODUCTS
F. Paint: Select paint system applicable for surface material and location (exterior or interior).
G. Fasteners for Labels and Signs: Self-tapping, stainless-steel screws or stainless-steel machine screws with nuts and flat and lock washers.
PART 3 - EXECUTION
3.1 INSTALLATION
A. Location: Install identification materials and devices at locations for most convenient viewing without interference with operation and maintenance of
equipment.
B. Apply identification devices to surfaces that require finish after completing finish work.
C. Self-Adhesive Identification Products: Clean surfaces before application, using materials and methods recommended by manufacturer of identification
device.
D. Attach signs and plastic labels that are not self-adhesive type with mechanical fasteners appropriate to the location and substrate.
E. System Identification Color-Coding Bands for Raceways and Cables: Each color-coding band shall completely encircle cable or conduit. Place adjacent
bands of two-color markings in contact, side by side. Locate bands at changes in direction, at penetrations of walls and floors, at 50-foot (15-m) maximum
intervals in straight runs, and at 25-foot (7.6-m) maximum intervals in congested areas.
F. Underground-Line Warning Tape: During backfilling of trenches install continuous underground-line warning tape directly above line at 6 to 8 inches (150 to
200 mm) below finished grade. Use multiple tapes where width of multiple lines installed in a common trench exceeds 16 inches (400 mm) overall.
G. Painted Identification: Comply with requirements in Division 9 painting Sections for surface preparation and paint application.
3.2 IDENTIFICATION SCHEDULE
A. Power-Circuit Conductor Identification, 600 V or Less: For conductors in vaults, pull and junction boxes, manholes, and handholes, use color-coding
conductor tape to identify the phase.
1. Color-Coding for Phase and Voltage Level Identification, 600 V or Less: Use colors listed below for ungrounded branch-circuit conductors.
a. Color shall be factory applied or field applied for sizes larger than No. 8 AWG, if authorities having jurisdiction permit.
b. Colors for 208/120-V Circuits:
1) Phase A: Black.
2) Phase B: Red.
3) Phase C: Blue.
c. Field-Applied, Color-Coding Conductor Tape: Apply in half-lapped turns for a minimum distance of 6 inches (150 mm) from terminal points and in
boxes where splices or taps are made. Apply last two turns of tape with no tension to prevent possible unwinding. Locate bands to avoid obscuring
factory cable markings.
B. Install instructional sign including the color-code for grounded and ungrounded conductors using adhesive-film-type labels.
C. Locations of Underground Lines: Identify with underground-line warning tape for power, lighting, communication, and control wiring and optical fiber cable.
1. Limit use of underground-line warning tape to direct-buried cables.
2. Install underground-line warning tape for both direct-buried cables and cables in raceway.
END OF SECTION 16075
DIVISION 16 - ELECTRICAL
SECTION 16120 - CONDUCTORS AND CABLES
PART 1 - GENERAL
1.1 SUMMARY
A. This Section includes the following:
.
1. Building wires and cables rated 600 V and less.
2. Connectors, splices, and terminations rated 600 V and less.
3. Sleeves and sleeve seals for cables.
1.2 SUBMITTALS
A. Product Data: For each type of product indicated.
B. Field quality-control test reports.
1.3 QUALITY ASSURANCE
A. Electrical Components, Devices, and Accessories: Listed and labeled as defined in NFPA 70, Article 100, by a testing agency acceptable to authorities
having jurisdiction, and marked for intended use.
B. Comply with NFPA 70.
PART 2 - PRODUCTS
2.1 CONDUCTORS AND CABLES
Conductors are stranded, compressed 1350-H19, H16, or H26 aluminum, insulated with vulcanized interlinked polyethylene (VIP1), Southwire's
cross-linked polyethylene. Neutrals are triple yellow extruded stripe. Cables with "YES" neutrals have sequential footage markers. Conductors are durably
surface printed for identification. Two phase conductors and one neutral conductor are cabled together to produce the triplex cable configuration.
Conductors are also available paralleled.
2.2 CONNECTORS AND SPLICES
C. Available Manufacturers: Subject to compliance with requirements, manufacturers offering products that may be incorporated into the Work include, but are
not limited to, the following:
D. Manufacturers: Subject to compliance with requirements, provide products by one of the following:
1. AFC Cable Systems, Inc.
2. Hubbell Power Systems, Inc.
3. O-Z/Gedney; EGS Electrical Group LLC.
4. 3M; Electrical Products Division.
5. Tyco Electronics Corp.
6. Ideal Industries
C. Description: Factory-fabricated connectors and splices of size, ampacity rating, material, type, and class for application and service indicated.
2.3 SLEEVES FOR CABLES
A. Steel Pipe Sleeves: ASTM A 53/A 53M, Type E, Grade B, Schedule 40, galvanized steel, plain ends.
B. Cast-Iron Pipe Sleeves: Cast or fabricated "wall pipe," equivalent to ductile-iron pressure pipe, with plain ends and integral waterstop, unless otherwise
indicated.
C. Coordinate sleeve selection and application with selection and application of firestopping.
2.4 SLEEVE SEALS
D. Manufacturers: Subject to compliance with requirements, provide products by one of the following:
1. Advance Products & Systems, Inc.
2. Calpico, Inc.
3. Metraflex Co.
4. Pipeline Seal and Insulator, Inc.
B. Description: Modular sealing device, designed for field assembly, to fill annular space between sleeve and cable.
1. Sealing Elements: EPDM interlocking links shaped to fit surface of cable or conduit. Include type and number required for material and size of raceway
or cable.
2. Pressure Plates: Carbon steel. Include two for each sealing element.
3. Connecting Bolts and Nuts: Carbon steel with corrosion-resistant coating of length required to secure pressure plates to sealing elements. Include one
for each sealing element.
PART 3 - EXECUTION
3.1 CONDUCTOR MATERIAL APPLICATIONS
A. Feeders: As indicated on the feeder schedule.
B. Branch Circuits: Copper. Solid for No. 10 AWG and smaller; stranded for No. 8 AWG and larger.
3.2 CONDUCTOR INSULATION AND MULTICONDUCTOR CABLE APPLICATIONS AND WIRING METHODS
C. Feeders and Branch Circuits: Type THHN-THWN, single conductors in raceway.
3.3 INSTALLATION OF CONDUCTORS AND CABLES
A. Conceal cables in finished walls, ceilings, and floors, unless otherwise indicated.
B. Use manufacturer-approved pulling compound or lubricant where necessary; compound used must not deteriorate conductor or insulation. Do not exceed
manufacturer's recommended maximum pulling tensions and sidewall pressure values.
C. Use pulling means, including fish tape, cable, rope, and basket-weave wire/cable grips, that will not damage cables or raceway.
D. Install exposed cables parallel and perpendicular to surfaces of exposed structural members, and follow surface contours where possible.
E. Support cables according to Division 16 Section "Electrical Supports."
F. Identify and color-code conductors and cables according to Division 16 Section "Electrical Identification."
G. Tighten electrical connectors and terminals according to manufacturer's published torque-tightening values. If manufacturer's torque values are not
indicated, use those specified in UL 486A .
H. Make splices and taps that are compatible with conductor material and that possess equivalent or better mechanical strength and insulation ratings than
unspliced conductors.
3.4 SLEEVE INSTALLATION FOR ELECTRICAL PENETRATIONS
A. Coordinate sleeve selection and application with selection and application of firestopping.
B. Concrete Slabs and Walls: Install sleeves for penetrations unless core-drilled holes or formed openings are used. Install sleeves during erection of slabs
and walls.
C. Fire-Rated Assemblies: Install sleeves for penetrations of fire-rated floor and wall assemblies unless openings compatible with firestop system used are
fabricated during construction of floor or wall.
D. Cut sleeves to length for mounting flush with both wall surfaces.
E. Extend sleeves installed in floors 2 inches (50 mm) above finished floor level.
F. Size pipe sleeves to provide 1/4-inch (6.4-mm) annular clear space between sleeve and cable unless sleeve seal is to be installed.
G. Seal space outside of sleeves with grout for penetrations of concrete and masonry.
H. Interior Penetrations of Non-Fire-Rated Walls and Floors: Seal annular space between sleeve and cable, using joint sealant appropriate for size, depth,
and location of joint according to Division 7 Section "Joint Sealants."
I. Fire-Rated-Assembly Penetrations: Maintain indicated fire rating of walls, partitions, ceilings, and floors at cable penetrations. Install sleeves and seal with
firestop materials.
J. Roof-Penetration Sleeves: Seal penetration of individual cables with flexible boot-type flashing units applied in coordination with roofing work.
K. Aboveground Exterior-Wall Penetrations: Seal penetrations using sleeves and mechanical sleeve seals. Size sleeves to allow for 1-inch (25-mm) annular
clear space between pipe and sleeve for installing mechanical sleeve seals.
L. Underground Exterior-Wall Penetrations: Install cast-iron "wall pipes" for sleeves. Size sleeves to allow for 1-inch (25-mm) annular clear space between
cable and sleeve for installing mechanical sleeve seals.
3.5 SLEEVE-SEAL INSTALLATION
A. Install to seal underground exterior-wall penetrations.
B. Use type and number of sealing elements recommended by manufacturer for cable material and size. Position cable in center of sleeve. Assemble
mechanical sleeve seals and install in annular space between cable and sleeve. Tighten bolts against pressure plates that cause sealing elements to
expand and make watertight seal.
3.6 FIRESTOPPING
A. Apply firestopping to electrical penetrations of fire-rated floor and wall assemblies to restore original fire-resistance rating of assembly.
END OF SECTION 16120
DIVISION 16 - ELECTRICAL
SECTION 16130 - RACEWAYS AND BOXES
PART 1 - GENERAL
1.1 SUMMARY
A. This Section includes raceways, fittings, boxes, enclosures, and cabinets for electrical wiring.
1.2 SUBMITTALS
A. Product Data: For surface raceways, wireways and fittings, floor boxes, hinged-cover enclosures, and cabinets.
B. Shop Drawings: For custom enclosures and cabinets. Include plans, elevations, sections, details, and attachments to other work.
1.3 QUALITY ASSURANCE
A. Electrical Components, Devices, and Accessories: Listed and labeled as defined in NFPA 70, Article 100, by a testing agency acceptable to authorities
having jurisdiction, and marked for intended use.
B. Comply with NFPA 70.
PART 2 - PRODUCTS
2.1 METAL CONDUIT AND TUBING
A. Rigid Steel Conduit: ANSI C80.1.
B. IMC: ANSI C80.6.
C. EMT: ANSI C80.3.
D. FMC: Zinc-coated steel.
E. LFMC: Flexible steel conduit with PVC jacket.
F. Fittings for Conduit (Including all Types and Flexible and Liquidtight), EMT, and Cable: NEMA FB 1; listed for type and size raceway with which used, and
for application and environment in which installed.
1. Fittings for EMT: Steel compression type.
2.2 NONMETALLIC CONDUIT
A. RNC: NEMA TC 2, Type EPC-40-PVC, or NEMA TC-7 , Type HPDE unless otherwise indicated.
B. Fittings for RNC: NEMA TC 3; match to conduit or tubing type and material.
2.3 METAL WIREWAYS
C. Manufacturers: Subject to compliance with requirements, provide products by one of the following:
1. Cooper B-Line, Inc.
2. Hoffman.
3. Square D; Schneider Electric.
B. Description: Sheet metal sized and shaped as indicated, NEMA 250, Type 1, unless otherwise indicated.
C. Fittings and Accessories: Include couplings, offsets, elbows, expansion joints, adapters, hold-down straps, end caps, and other fittings to match and mate
with wireways as required for complete system.
D. Wireway Covers: Hinged type.
E. Finish: Manufacturer's standard enamel finish.
SE104
ELE
CT
RIC
AL
SP
EC
IF
IC
AT
IO
NS

2.4 SURFACE RACEWAYS
A. Surface Metal Raceways: Galvanized steel with snap-on covers. Manufacturer's standard enamel finish in color selected by Owner.
4. Manufacturers: Subject to compliance with requirements, provide products by one of the following:
a. Thomas & Betts Corporation.
b. Walker Systems, Inc.; Wiremold Company (The).
c. Wiremold Company (The); Electrical Sales Division.
2.5 BOXES, ENCLOSURES, AND CABINETS
A. Sheet Metal Outlet and Device Boxes: NEMA OS 1.
B. Cast-Metal Outlet and Device Boxes: NEMA FB 1, ferrous alloy, Type FD, with gasketed cover.
C. Small Sheet Metal Pull and Junction Boxes: NEMA OS 1.
D. Cast-Metal Access, Pull, and Junction Boxes: NEMA FB 1, galvanized, cast iron with gasketed cover.
E. Hinged-Cover Enclosures: NEMA 250, Type 1, with continuous-hinge cover with flush latch, unless otherwise indicated.
1. Metal Enclosures: Steel, finished inside and out with manufacturer's standard enamel.
F. Cabinets:
1. NEMA 250, Type 1, galvanized-steel box with removable interior panel and removable front, finished inside and out with manufacturer's standard
enamel.
2. Hinged door in front cover with flush latch and concealed hinge.
3. Key latch to match panelboards.
4. Metal barriers to separate wiring of different systems and voltage.
5. Accessory feet where required for freestanding equipment.
PART 3 - EXECUTION
3.1 RACEWAY APPLICATION
G. Outdoors: Apply raceway products as specified below, unless otherwise indicated:
1. Exposed Conduit: IMC.
2. Concealed Conduit, Aboveground: IMC.
3. Underground Conduit: RNC, Type EPC-40-PVC, direct buried, or HPDE if directionally bored..
4. Connection to Vibrating Equipment (Including Transformers and Hydraulic, Pneumatic, Electric Solenoid, or Motor-Driven Equipment): LFMC.
5. Boxes and Enclosures, Aboveground: NEMA 250, Type 3R.
B. Comply with the following indoor applications, unless otherwise indicated:
1. Exposed, Not Subject to Physical Damage: EMT.
2. Exposed and Subject to Severe Physical Damage: IMC. Includes raceways in the following locations:
a. Loading dock.
b. Corridors used for traffic of mechanized carts, forklifts, and pallet-handling units.
c. Mechanical rooms.
3. Concealed in Ceilings and Interior Walls and Partitions: EMT.
4. Connection to Vibrating Equipment (Including Transformers and Hydraulic, Pneumatic, Electric Solenoid, or Motor-Driven Equipment): FMC, except
use LFMC in damp or wet locations.
5. Damp or Wet Locations: IMC.
C. Minimum Raceway Size: 3/4-inch trade size.
D. Raceway Fittings: Compatible with raceways and suitable for use and location.
1. Rigid and Intermediate Steel Conduit: Use threaded rigid steel conduit fittings, unless otherwise indicated.
3.2 INSTALLATION
A. Comply with NECA 1 for installation requirements applicable to products specified in Part 2 except where requirements on Drawings or in this Article are
stricter.
B. Keep raceways at least 6 inches (150 mm) away from parallel runs of flues and steam or hot-water pipes. Install horizontal raceway runs above water and
steam piping.
C. Complete raceway installation before starting conductor installation.
D. Support raceways as specified in Division 16 Section "Electrical Supports."
E. Arrange stub-ups so curved portions of bends are not visible above the finished slab.
F. Install no more than the equivalent of three 90-degree bends in any conduit run except for communications conduits, for which fewer bends are allowed.
G. Conceal conduit and EMT within finished walls, ceilings, and floors, unless otherwise indicated.
H. Raceways Embedded in Slabs:
1. Run conduit larger than 1-inch (27-mm) trade size, parallel or at right angles to main reinforcement. Where at right angles to reinforcement, place
conduit close to slab support.
2. Arrange raceways to cross building expansion joints at right angles with expansion fittings.
3. Change from Type EPC-40-PVC to IMC before rising above the floor.
I. Raceway Terminations at Locations Subject to Moisture or Vibration: Use insulating bushings to protect conductors, including conductors smaller than
No. 4 AWG.
J. Install pull wires in empty raceways. Use polypropylene or monofilament plastic line with not less than 200-lb (90-kg) tensile strength. Leave at least 12
inches (300 mm) of slack at each end of pull wire.
K. Raceways for Optical Fiber and Communications Cable: Install as follows:
1. 3/4-Inch (19-mm) Trade Size and Smaller: Install raceways in maximum lengths of 50 feet (15 m).
2. 1-Inch (25-mm) Trade Size and Larger: Install raceways in maximum lengths of 75 feet (23 m).
3. Install with a maximum of two 90-degree bends or equivalent for each length of raceway unless Drawings show stricter requirements. Separate lengths
with pull or junction boxes or terminations at distribution frames or cabinets where necessary to comply with these requirements.
L. Install raceway sealing fittings at suitable, approved, and accessible locations and fill them with listed sealing compound. For concealed raceways, install
each fitting in a flush steel box with a blank cover plate having a finish similar to that of adjacent plates or surfaces. Install raceway sealing fittings at the
following points:
1. Where conduits pass from warm to cold locations, such as boundaries of refrigerated spaces.
2. Where otherwise required by NFPA 70.
M. Expansion-Joint Fittings for RNC: Install in each run of aboveground conduit that is located where environmental temperature change may exceed 30
deg F (17 deg C), and that has straight-run length that exceeds 25 feet (7.6 m).
1. Install expansion-joint fittings for each of the following locations, and provide type and quantity of fittings that accommodate temperature change listed
for location:
d. Outdoor Locations Not Exposed to Direct Sunlight: 125 deg F temperature change.
e. Outdoor Locations Exposed to Direct Sunlight: 155 deg F temperature change.
f. Indoor Spaces: Connected with the Outdoors without Physical Separation: 125 deg F temperature change.
2. Install fitting(s) that provide expansion and contraction for at least 0.00041 inch per foot of length of straight run per deg F of temperature change.
3. Install each expansion-joint fitting with position, mounting, and piston setting selected according to manufacturer's written instructions for conditions at
specific location at the time of installation.
N. Flexible Conduit Connections: Use maximum of 72 inches (1830 mm) of flexible conduit for equipment subject to vibration, noise transmission, or
movement; and for transformers and motors.
1. Use LFMC in damp or wet locations subject to severe physical damage.
2. Use LFMC in damp or wet locations not subject to severe physical damage.
O. Recessed Boxes in Masonry Walls: Saw-cut opening for box in center of cell of masonry block, and install box flush with surface of wall.
3.3 INSTALLATION OF UNDERGROUND CONDUIT
A. Direct-Buried Conduit:
1. Excavate trench bottom to provide firm and uniform support for conduit
2. Install backfill matching existing conditions.
3. After installing conduit, backfill and compact. Start at tie-in point, and work toward end of conduit run, leaving conduit at end of run free to move with
expansion and contraction as temperature changes during this process. Firmly hand tamp backfill around conduit to provide maximum supporting
strength. After placing controlled backfill to within 12 inches (300 mm) of finished grade, make final conduit connection at end of run and complete
backfilling with normal.
4. Install manufactured rigid steel conduit elbows for stub-ups at poles and equipment and at building entrances through the floor.
g. Couple steel conduits to ducts with adapters designed for this purpose, and encase coupling with 3 inches (75 mm) of concrete.
h. For stub-ups at equipment mounted on outdoor concrete bases, extend steel conduit horizontally a minimum of 60 inches (1500 mm) from edge of
equipment pad or foundation. Install insulated grounding bushings on terminations at equipment.
5. Warning Planks: Bury warning planks approximately 12 inches (300 mm) above direct-buried conduits (when conduits are not directionally bored),
placing them 24 inches (600 mm) o.c. Align planks along the width and along the centerline of conduit.
3.4 FIRESTOPPING
A. Apply firestopping to electrical penetrations of fire-rated floor and wall assemblies to restore original fire-resistance rating of assembly
END OF SECTION 16130
DIVISION 16 - ELECTRICAL
SECTION 16442 - PANELBOARDS
PART 1 - GENERAL
1.1 SUMMARY
A. Section includes distribution panelboards and lighting and appliance branch-circuit panelboards.
1.2 SUBMITTALS
B. Product Data: For each type of product indicated.
C. Shop Drawings: For each panelboard and related equipment.
1. Include dimensioned plans, elevations, sections, and details. Show tabulations of installed devices, equipment features, and ratings.
2. Detail enclosure types and details for types other than NEMA 250, Type 1.
3. Detail bus configuration, current, and voltage ratings.
4. Short-circuit current rating of panelboards and overcurrent protective devices.
5. Include evidence of NRTL listing for series rating of installed devices.
6. Detail features, characteristics, ratings, and factory settings of individual overcurrent protective devices and auxiliary components.
7. Include wiring diagrams for power, signal, and control wiring.
8. Include time-current coordination curves for each type and rating of overcurrent protective device included in panelboards.
D. Field quality-control reports.
E. Panelboard schedules for installation in panelboards.
F. Operation and maintenance data.
1.3 QUALITY ASSURANCE
A. Electrical Components, Devices, and Accessories: Listed and labeled as defined in NFPA 70, by a qualified testing agency, and marked for intended
location and application.
B. Comply with NEMA PB 1.
C. Comply with NFPA 70.
PART 2 - PRODUCTS
2.1 GENERAL REQUIREMENTS FOR PANELBOARDS
A. Fabricate and test panelboards according to IEEE 344 to withstand seismic forces defined in Division 16 Section "Vibration and Seismic Controls for
Electrical Systems."
B. Enclosures: Floor-mounted cabinets.
1. Rated for environmental conditions at installed location.
a. Not Used.
b. Outdoor Locations including outdoor electrical room: NEMA 250, Type 3R .
2. Front: Secured to box with concealed trim clamps. For surface-mounted fronts, match box dimensions; for flush-mounted fronts, overlap box.
3. Hinged Front Cover: Entire front trim hinged to box and with standard door within hinged trim cover.
4. Provide with optional floor mounting for installation on existing equipment pad.
5. Directory Card: Inside panelboard door, mounted in transparent card holder.
C. Incoming Mains Location: based on installation location.
D. Phase, Neutral, and Ground Buses: Hard-drawn copper, 98 percent conductivity.
E. Conductor Connectors: Suitable for use with conductor material and sizes.
1. Material: Hard-drawn copper, 98 percent conductivity.
2. Main and Neutral Lugs: Mechanical type.
3. Ground Lugs and Bus Configured Terminators: Mechanical type.
4. Feed-Through Lugs: Mechanical type, suitable for use with conductor material. Locate at opposite end of bus from incoming lugs or main device.
5. Subfeed (Double) Lugs: Mechanical type suitable for use with conductor material. Locate at same end of bus as incoming lugs or main device.
F. Service Equipment Label: NRTL labeled for use as service equipment for panelboards with one or more main service disconnecting and overcurrent
protective devices.
G. Future Devices: Mounting brackets, bus connections, filler plates, and necessary appurtenances required for future installation of devices.
H. Panelboard Short-Circuit Current Rating: Fully rated to interrupt symmetrical short-circuit current available at terminals.
2.2 DISTRIBUTION PANELBOARDS
I. Manufacturers: Subject to compliance with requirements, provide products by one of the following:
1. Square D; a brand of Schneider Electric.
2. Substitutions as approved by Owner's Representative.
B. Panelboards: NEMA PB 1, power and feeder distribution type.
C. Doors: Secured with vault-type latch with tumbler lock; keyed alike.
D. Mains: as indicated in the schedule.
E. Branch Overcurrent Protective Devices: For Circuit-Breaker Frame Sizes 125 A and Smaller: Bolt-on circuit breakers. See drawings and panel schedules
F. Branch Overcurrent Protective Devices: For Circuit-Breaker Frame Sizes Larger Than 125 A: Bolt-on circuit breakers; plug-in circuit breakers where
individual positive-locking device requires mechanical release for removal.
2.3 NOT USED
2.4 DISCONNECTING AND OVERCURRENT PROTECTIVE DEVICES
A. Manufacturers: Subject to compliance with requirements, provide products by one of the following:
1. Square D; a brand of Schneider Electric.
2. Substitutions as approved by Owner's Representative.
B. Molded-Case Circuit Breaker (MCCB): Comply with UL 489, with interrupting capacity to meet available fault currents.
1. Thermal-Magnetic Circuit Breakers: Inverse time-current element for low-level overloads, and instantaneous magnetic trip element for short circuits.
Adjustable magnetic trip setting for circuit-breaker frame sizes 250 A and larger.
2. Molded-Case Circuit-Breaker (MCCB) Features and Accessories:
a. Standard frame sizes, trip ratings, and number of poles.
b. Lugs: Mechanical style, suitable for number, size, trip ratings, and conductor materials.
c. Application Listing: Appropriate for application; Type SWD for switching fluorescent lighting loads; Type HID for feeding fluorescent and
high-intensity discharge (HID) lighting circuits.
PART 3 - EXECUTION
3.1 INSTALLATION
C. Receive, inspect, handle, store and install panelboards and accessories according to NEMA PB 1.1.
D. Anchor to existing equipment pad
E. Install overcurrent protective devices and controllers not already factory installed.
2. Set field-adjustable, circuit-breaker trip ranges.
F. Install filler plates in unused spaces.
G. Arrange conductors in gutters into groups and bundle and wrap with wire ties.
H. Comply with NECA 1.
3.2 IDENTIFICATION
A. Identify field-installed conductors, interconnecting wiring, and components; provide warning signs complying with Division 16 Section "Electrical
Identification."
B. Create a directory to indicate installed circuit loads and incorporating Owner's final room designations. Obtain approval before installing. Use a computer
or typewriter to create directory; handwritten directories are not acceptable.
C. Panelboard Nameplates: Label each panelboard with a nameplate complying with requirements for identification specified in Division 16 Section "Electrical
Identification."
D. Device Nameplates: Label each branch circuit device in distribution panelboards with a nameplate complying with requirements for identification specified
in Division 16 Section "Electrical Identification."
END OF SECTION 16442
SE105
ELE
CT
RIC
AL
SP
EC
IF
IC
AT
IO
NS

NEW PEDESTAL LOCATION:
O'-TO 15' FORWARD OF
REAR OF CAMPSITE. 9'-0"
OFFSET FROM
LONGITUDINAL
CENTERLINE OF VEHICLE
PARKING AREA. PEDESTAL
LOCATIONS SHALL BE
STAKED AND APPROVED
BY THE FOREST PRESERVE
FIELD ENGINEER OR HIS
REP. PRIOR TO
INSTALLATION. STAKES
SHALL BE PROVIDED BY
THE CONTRACTOR.
PARKING AREA
CENTERLINE SHALL
BE DEFINED IN
FIELD BY DNR
STAFF
0' - 15'-0"
APPROX. 9'-0"
CONTRACTOR TO PROVIDE
REFLECTIVE VINYL NUMBERS
CORRESPONDING TO CAMPSITE BEING
SERVED. PARK STAFF WILL INSTALL
NUMBERS BELOW SERVICE COVER
DOOR. IN LOCATIONS WHERE ONLY 30
AMP AND 20 AMP DEVICES ARE TO BE
USED PROVIDE A LOCKING MEANS FOR
THE 50 AMP BREAKER
PROVICE CONDUIT INTO
PEDESTAL POST A MINIMUM OF
2-INCHES ABOVE GRADE. EXTEND
CONDUIT TO BELOW GRADE.
ROUTE DIRECT BURY WIRING
INTO CONDUIT
FINISHED GRADE
WIRE SIZE AS INDICATED IN
FEEDER TABLE
MIN. 36"
38"
24"
MIN. 36"
FINISHED GRADE
WARNING TAPE
ELECTRICAL CABLE TRENCH DETAIL
NTS
6"
MIN MIN
4"
6"
4"
6"
12"
24"
GRANULAR BACKFILL
SAND
4" TOPSOIL,
SEED & MULCH
COMPACTED GRAVEL
PER PLAN
ASPHALT PAVEMENT
SE106
ELE
CT
RIC
AL D
ET
AILS
AN
D R
IS
ER
S
PEDESTAL PLAN
NO SCALE
SERVICE NEW WORK
RISER DIAGRAM
NO SCALE
GROUNDING DETAIL
NO SCALE