elastic drums - mominstruments.com · elastic drums user manual version 2.1 thank you for...
TRANSCRIPT
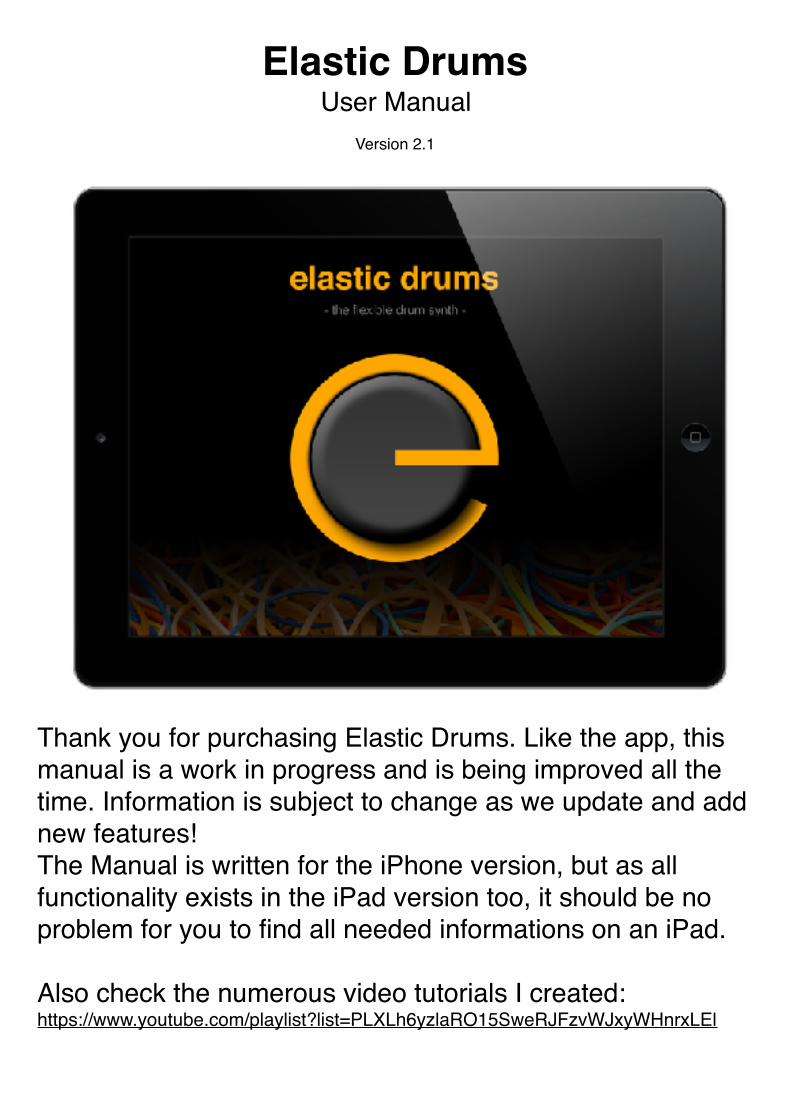
Elastic DrumsUser Manual
Version 2.1
Thank you for purchasing Elastic Drums. Like the app, this manual is a work in progress and is being improved all the time. Information is subject to change as we update and add new features!The Manual is written for the iPhone version, but as all functionality exists in the iPad version too, it should be no problem for you to find all needed informations on an iPad.
Also check the numerous video tutorials I created: https://www.youtube.com/playlist?list=PLXLh6yzlaRO15SweRJFzvWJxyWHnrxLEl

Elastic Drums 1Main navigation 2
Top Menu 2Bottom Menu 4
Instrument screen 5Synth parameters 8
hiHat 10snare 11clap 12square 13fm 14fm4op 15wobble 16grain 17tom 18bass 19drone 20sampler (IAP) 21pm1 25pm2 26merz 27mod 28
Recording 29Options (Instrument screen) 31Pattern screen 33
Mixer screen 35Options (Mixer screen) 37
Effects screen 39Options (Effects screen) 41
File screen 42Options (File screen) 44
Seite �1

Main navigationOn iPhone, Elastic Drums navigation is split into top and bottom menus.
Top Menu
These buttons mostly operate the sequencer. From left to right:
• ▶︎ Play/Stop: Start/stop the Elastic Drums sequencer.• ◇ Play mode: Switches between Pattern (empty diamond)
and Song (solid + rotating diamond) mode. Pattern mode loops only the current pattern. Song mode loops the pattern sequence (see Pattern screen).
• ○ Record: Opens a Record audio menu for recording the sequencer or exporting a pattern (see Recording).
• Pattern: Displays the current pattern. Swipe left/right to switch to the next or previous patterns.
• ⚒ Options: Opens a contextual popup that provides additional settings for the current screen.
• ? Help: Displays an overlay explaining the features of the current screen.
Jam screen 45Midi Implementation 48Performance: About glitches and crackles 50
Seite �2

Seite �3

Bottom Menu
These buttons switch between the various Elastic Drums screens. From left to right:
• Instrument screen: Create your percussion sounds, record parameter automation, and arrange the sequencer.
• Pattern screen: Arrange your sequenced patterns into a Song (which plays in Song mode).
• Mixer screen: A classic mixer screen with individual settings for volume, pan, mute, solo and FX, as well as main volume and tempo. This is called Arrange screen on iPad.
• Effects screen: Set the values of your effects and record FX automation.
• File screen: Load and save Elastic Drums presets and play with dedicated master effects.
• Jam screen: For intuitive and fun live jams, where you can trigger your sounds, patterns and different master effects.
iPad
On iPad, sequencer operation and screen navigation are both collected in the top menu.
Seite �4

Instrument screenThe Instrument screen displays:
• The sequence of the current pattern.• The parameters of the current drum part.
Seite �5

• Buttons to affect the current drum part and access the other parts.
On the top-left is the sequencer grid. Tapping the grid toggles the steps on and off. By default each active step is filled in. However, the value (y position) of an active step can vary depending on whether you have set a velocity target (such as volume, in the above screenshot) for the drum part. See below for more information.
The synth menu opens the synthesizer presets window, which lets you select the percussion type, load a sound preset, or save a new preset for the current percussion type. You can also press the “rnd” button to generate a new sound with randomized parameters.
On the right, the buttons numbered 1-6 allow you to switch between your 6 drum parts. When a sound is triggered in the sequence, the white indicator on its corresponding button will blink.
The autom button, beneath the numbered buttons, activates automate mode. When tapped, this button will start blinking to indicate that automate mode is active. You can now record real-time manipulations on the synthesizer parameter knobs. To stop recording automation, tap the autom button again. (Note: If the sequencer is playing in Song mode, you may not see your recorded automation until the song loops again.)
By tapping the velocity button and then tapping one of the synthesizer parameter knobs, you can set a velocity target. The velocity target is symbolized by a yellow outline on the
Seite �6

knob, and this parameter will be affected by the velocity (y position) values of the activated steps in the sequencer.Solo mutes all drum parts except for the currently visible part. This is not recorded.
Mute will mute the currently active drum part. This information is recorded per pattern, meaning that in Song mode, a drum part could be muted in one pattern and un-muted in another pattern.
Sequencer settings
The time knob sets the tempo for the current part as a multiple of the master tempo (set in the Mixer screen).
The len knob sets the length of the current part (between 1 and 16 steps).
The delay knob sets the delay of the current sequencer according the global time (between 0 and 1 steps).
Mixer settings
Volume and pan set the volume and pan of a drum part.
The two FX knobs are used to send a drum part to the FX units (see Effects screen). Leaving each knob at 12 o’clock produces a dry signal, where no sound goes to the FX units. Turning the FX 1 2 knob sends to mono effect 1 (left), and
Seite �7

mono effect 2 (right). Turning FX 3 4 sends to stereo effect 3 (left) and stereo effect 4 (right).
Note: Due to limited CPU performance on iPhone 4s only one mono and one stereo effect are available on this device.
Synth parameters
All percussion types have the same four global synth parameters. These global parameters can also be affected in the screemaster effects screen via the “param” XY input field (see File screen).
On iPhone, tapping the arrow on the upper-right corner of the parameters section will reveal all parameters of the current drum part, as in the picture below.
The following pages describe synth specific parameters for each percussion synth.
parameter descriptionpitch overall pitch of the instrumenttone EQ: from low-pass and neutral to high-passdecay time for initial attack/hit/body of the instrumentrelease time for “tail” of the sound
Seite �8

kick
The pitch of a single oscillator is dropped quickly to provide the classic electronic kick sound.
parameter descriptionfreq initial pitch of the drum.curve time taken by the pitch curve, from initial to final
pitchsquare sinewave to squarewave shaping of the drum
synth oscillatorlowpass a low-pass filter on the drum oscillator, effective
before the “overdrive” parameter. This can be used to tame some of the harmonics introduced by increased “square” level
overdrive distorted gain stage. use a little bit to add oomph to a standard kick, or crank it right up for big, pounding gabber kicks
noise the colour of the initial noise hitwarble quite subtle “warbling” of the pitch, to simulate the
random fluctuations of true analogue machineswarble spd
Seite �9

hiHat
Triangle oscillators are modulated to provide the metallic body of the hat, and a pitched noise source is added to simulate the diffused tail sound.
parameter descriptionnoise A tone of the noise source. noise 'pitch'.noise B tone of the noise source. noise ‘randomness'noise+++ noise source gainoverdrive overall gain / distortion of the snare drumbody time length of the snare hit / bodybody+++ hit / body section gainshaper A non-linear waveshaping distortionshaper B
Seite �10

snare
Two detuned oscillators form the "body" of the drum. A pitched noise source forms the snare "rattle" tail section.
parameter descriptionbody gain volume of the initial hit / bodybody time diffusion time of the initial hit / body (can be
further shaped with the global “decay” parameter, too)
highpass high-pass filter tone control. (can also be further shaped with the overall tone parameter)
osc_xfade crossfade between the metallic “pitched” oscillators and the noise oscillator
detune pitched oscillators detune amountFM pitched oscillators frequency modulation amountnoise A pitched oscillators noise modulationnoise B noise oscillator tone control
Seite �11

clap
A noise burst oscillator creates short bursts of noise, which are repeated in succession to create the effect of a clap echoing in a room. The noise bursts are then passed through a bandpass filter to simulate the rounded sound of cupped hands as they clap.
parameter descriptionecho time between successive noise burstsamp_env decay time on each noise burst. Increasing this
time has an effect similar to adding reverb to the sound
tone 2 tone of the noise burst oscillatortone 3 frequency of the noise burst oscillatorvcf high filter high frequencyvcf res filter resonancevcf env filter envelope shapeoverdrive how hard you're clapping
Seite �12

square
A fairly simple 2-oscillator synthesizer running through a bandpass filter. Both the pitch of the oscillators and the frequency of the filter are modulated by their own envelopes. A variety of percussive and synth effects are possible.
parameter descriptionenv1 depth pitch envelope modulation:
0% = rising pitch50% = no modulation100% = falling pitch
env1 time pitch envelope decay timedetune detune amount of second oscillatornoise noise modulation of oscillator pitchfilter cutoff frequencyoverdrive oscillator distortion (before filter)env2 depth filter envelope modulation amountenv2 time filter envelope decay time
Seite �13

fm
A simple 2-oscillator (carrier + modulator) FM synth, with a waveshaper filter. There is a 2-stage decay + release envelope for the pitch and FM amount. It’s good for 'fuzzy' sounds.
parameter descriptionFM ratio carrier to modulator pitch ratioFM amount depth of the oscillator modulationFM env pitch envelope to FM depthoverdrive gain distortion of the oscillatorpitch env1 pitch envelope decay (first stage)pitch env2 pitch envelope release (second stage)shaper A non-linear waveshaping distortionshaper B
Seite �14

fm4op
a 4-operator FM synth, configured especially for percussive sounds. Good for metallic sounds, but can do a wide range of FM-based percussion.
parameter descriptionratio 1 ratio of oscillator pitches to the master pitchratio 2ratio 3mod 1 modulation depths of each oscillatormod 2mod 3env ratio ratio between the noisy attack envelope section,
and the pitched tail sectionop 3 <-> 4 crossfade between FM operators 3 and 4. Its
effect will depend on your settings for ratios and mod depths
Seite �15

wobble
more of a synth than a percussion effect, this is a simple 2-oscillator affair, with a retriggered LFO to wobble the pitch, and then some overdrive and waveshaping distortion. Best suited for bass sounds.
parameter descriptiondetune second oscillator detunegrainsize the frequency at which new grains are producednoise noise to FM amountoverdrive gain distortionpitch env grain pitch envelope timegrain vcf filter cutoffvcf env grain filter envelope shapevcf res grain filter resonance
Seite �16

grain
A non-sample-based granular synth. Small segments of sound, each with their own envelope and filter, are played back together to form a type of grain cloud. This is more of an abstract synth; while not particularly useful for emulating traditional instruments, it can make some interesting sounds that fit well in an electronic kit.
parameter descriptiondetune detune amount of oscillator 2overdrive gain distortionshaper A non-linear waveshaping distortionshaper BLFO depth amount of LFO used to modulate the oscillators
pitchesLFO rate from slow to fastLFO phase initial phase offset (reset on every hit)LFO shape 0 = triangle
1 = square
Seite �17

tom
The pitches of 3 detuned oscillators are dropped quickly by an envelope. The result is mixed and filtered, and then finally sent through a VCA. A click is added to simulate the initial hit.
parameter descriptiontom type floor tom, low tom, mid tom, high tomclick initial click volumeatt pitch (attack pitch) the initial pitch of the drum before
the pitch envelope is triggereddecay1 body section decay timebody depth ratio of the enveloped attack sound to the
resonating body soundoverdrive how hard the tom is hitenv time the overall envelope time for the tom (affects
pitch and volume)env depth the overall envelope depth (affects pitch and
volume)
Seite �18
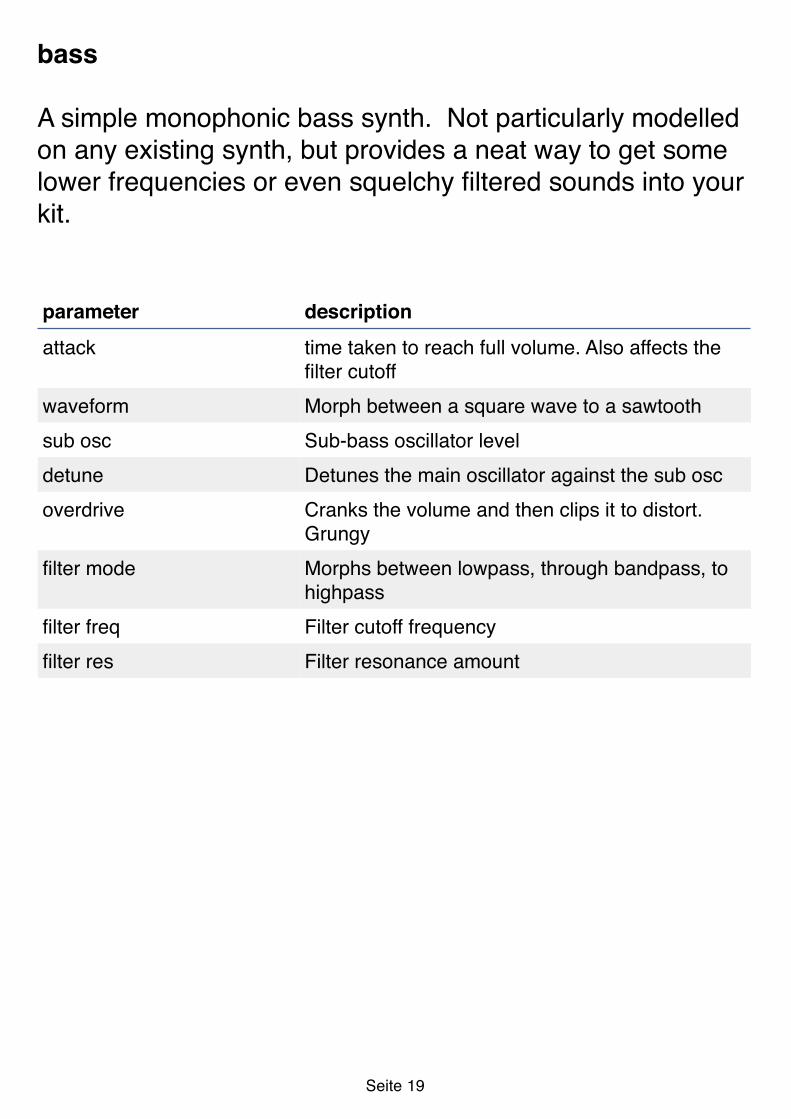
bass
A simple monophonic bass synth. Not particularly modelled on any existing synth, but provides a neat way to get some lower frequencies or even squelchy filtered sounds into your kit.
parameter descriptionattack time taken to reach full volume. Also affects the
filter cutoffwaveform Morph between a square wave to a sawtoothsub osc Sub-bass oscillator leveldetune Detunes the main oscillator against the sub oscoverdrive Cranks the volume and then clips it to distort.
Grungyfilter mode Morphs between lowpass, through bandpass, to
highpassfilter freq Filter cutoff frequencyfilter res Filter resonance amount
Seite �19

drone
A 2 x 3-oscillator, dual filter, pad / string / drone synthesizer, generally intended for long atmospheric sounds.
parameter descriptionattack Time taken to reach full volume. Also affects the
filter cutoffnoise Amount of noise added to the frequency input of
the oscillatorsdetune1 Detune for oscillators 1,2,3detune2 Detune for oscillators 4,5,6filter freq Filter cutoff frequencyfilter res Filter resonance amountfilter 2 off Offset for the frequency of the 2nd filterpitch 2 off Offset for pitch of oscillators 4,5,6
Seite �20

sampler (IAP)
When you choose the sampler instrument the sample choose, sample editor window will automatically open. You can not edit the sounds in the „editor“ itself, it only gives you a ‚vague‘ overview how your sample looks like and how you loop settings are, and so on.
To use your own sounds or to record sounds with the built in microphone, you have to purchase the „sample import“ option, by simply clicking on the import button.
After you purchased the sample import option,
you can get samples into Elastic Drums via:
- iTunes: Throw samples via iTunes -> Apps -> ElasticDrums -> Documents into Elastic Drums’ documents folder. Even folders should work. Maybe you have to close Elastic Drums and reopen, so see the samples listed
Seite �21

- ShareAudio: After you successfully purchase the sample import option, pressing the import button will open ShareAudio, where you can import audio files listed in there
- Email/Cloud drive: You can email sounds to yourself via email or put them into cloud drive. Then tap the sample and choose Elastic Drums via the „open in“ screen …
- Microphone: After you purchase the import option, the red record/microphone button will get visible and activated. While you hold the button the microphone will record, when you release the button the recording will get stoped. You can yet no further edit the sample (like truncate, normalize), please you other specialized programs for that, like Audioshare, etc.
Hint: I got asked a lot, if you can use the „sample import“ option on different devices? Sure! You don't have to buy the sample import option multiple times for different devices. Still there will occur a „buy“ button, not a restore button. But after you click "buy", there is a connection to iTunes, where it will get detected, if you have purchased the import option. If you already purchased it, it will get restored on your device.
Seite �22

sampler synth parameters
The sampler used in Elastic Drums can not only pitch and reverse samples it can also loop certain slices of a sample. As always all parameters can get automatized, so you should be able to create sounds you can not create with other tools very easily.
If you switch presets with the sampler included you might notice some glitches. This is from samples getting loaded for the preset. There is not much we can do about that. The other option would have been to stop the sequencer
while loading, but this would have killed the „flow“.
Seite �23

parameter descriptionattack Time taken to reach full volumesustain Volume level when envelope switches from decay
to releaseoffset How far into the original sample to start playback.
ie: zero = start at the beginning of the sampledirection forwards or reverseloopStart Loop start pointloopLen Time of the looped snippetloopSmth Smoothing of the loop wraparound point.
Reduces clicks when turned higherloopUntil How long to loop for. After this point is reached,
the tail of the sample will be played. Also, a value of 0 will deactivate the loop mode
Seite �24

pm1
Physical Modelling Synth #1 (drums)A burst of noise simulates the hitting of a physical drum body, which is then shaped by a small filter bank and circulating feedback.
parameter descriptionstick how hard the body is hitstiff the rigidity of the drum skin. 0 = loose, 1 = tight.
A “loose” body creates a wobbly echo effect bodyLength the length of the drum body. 0 = tiny, 1 = huge. A
“huge” drum will also create an echo effectdamping “brightness” of the drum body. 0 = metallic, 1 =
dullmidFreq centre resonating frequency of the drum bodylow<->mid 0 = bass frequencies boosted, 1 = mid
frequencies boostedhighFreq high resonating frequency of the drum bodyhighAmt how much high frequency is resonated
Seite �25

pm2
Physical Modelling Synth #2 (marimba, xylophones, etc).A larger bank of filters with more dissonant frequencies creates more metallic tones reminiscent of striking wood or metal with a mallet.
parameter descriptionfreq-A, freq-B adjusts the frequency spectrum of the filter bankamp-A, amp-B adjust the volume of each formant in the filter
bankres overall resonance of the body. 0 = woody, 1 =
ringing, metallicsaturate output volume boostdelay echo timefeedback echo feedback
Seite �26

merz
Chaotic fractal noise generator.A thick and brooding wall of oscillating noise, which is filtered and shaped into various forms, with feedback. Well worth spending some time to discover its secrets.
parameter descriptiongrain Grainy LFO which goes up into audio rangetweak Filter frequency multiplier pump Filter output boostersat Oscillator saturationLFO Low frequency modulator of the base oscillatorsdelay FM feedback delay timedelayLFO FM feedback oscillatorfb FM feedback amount. 0 = clean, 1 = dirty
Seite �27

mod
A repetitive series of pulses are modulated with an LFO, and then cut up using a further “stretch” LFO.
parameter descriptionoscFreq Base frequency of the output oscillatoroscDepth Multiplier for the oscillator frequencylfoFreq Main LFO frequencylfoDepth Main LFO depthstretchA and stretch B Control the speed and shape of the stretch cuttertimbreA and timberB Waveshapers for the output oscillator, creating
various timbres
Seite �28

Recording
The Record audio menu allows you to:
All audio recording is done in realtime. Means you can only record with the sequencer running.
• Activate the option to additionally record all single channels: all 6 drum channel will get recorded to mono wav’s without effects. You will see these in the apps documents folder available via iTunes
Seite �29

• Record audio synced: Will record either the current (next) playing pattern, or the whole Song. In Song recording mode ED will jump to the very last pattern and the start recording, when pattern 1 starts
• Record with a Manual start (press the Play button to stop recording)
• Play your recording• Email your recording(s)• Upload your recording to your Soundcloud account • Copy your recording(s) to Kymatica’s AudioShare app
(available separately on the App Store)
Soundcloud upload only works with the stereo recording of the master out. Email and AudioShare will also share the mono recordings of the 6 single channels, if you activated single channel recording.
Seite �30

Options (Instrument screen)
• </>: Shifts all steps from the active sequence to the left or right
• Rand seq: Randomizes active sequencer data• Rand instr: Randomizes active instrument data• Rand instr+seq: Randomizes active sequencer and
instrument data• Rand all seq: Randomizes sequencer data on all 6
channelsSeite �31

• Rand all seq+instr: Randomizes sequencer data and Instruments data on all 6 channels
• Midi learn: Learn function to control the 16 parameters of a synthesizer of a channel. Long tap will delete all Midi assignments
• Copy seq+instr: Copies the instrument and sequencer data of one channel. Select another channel and paster it into it (Can also be another preset).
The Randomize all function also randomizes instrument types, if used while the first pattern is active (as in the above screenshot). If Randomize all is used in a pattern other than 1, the instrument types will not be randomized. This generates more results that fit with the first pattern.
Seite �32

Pattern screenThe Pattern screen lets you arrange patterns into a Song.
(On iPad the Pattern screen is folded into the Arrange screen.)
Each cell in the grid represents a unique pattern. Patterns without sequencer data (empty patterns) will appear plain black. Patterns with sequencer data will display filled steps.
When Song mode is activated (by tapping the song button or by tapping the Play mode diamond so that it is solid), Elastic Drums will
play pattern after pattern in loop mode.
To copy a pattern:1. Choose a pattern (by tapping a cell)2. Press the “copy” button3. Tap another cell in the grid to copy the pattern to that cell
Seite �33

To delete a pattern:1. Choose a pattern (by tapping a cell)2. Press the “delete” button to empty the chosen cell of
sequencer data
The + / - buttons change the length of a song in increments of 4
Longtap on a pattern cell will enable you to move the cell to another position in the grid.
Seite �34

Mixer screen
The Mixer screen shows the most basic channel settings for the active pattern, similar to what you would expect on a classic mixing console.
Seite �35

You can set volume, pan, mute and solo states, and FX sends (only on iPads and newer iPhones with taller screen dimensions).
You might remember that these settings are also accessible on the Instrument screen. Contrary to the Instrument screen, you cannot automate the values here. However, mute states do get “remembered” per pattern.
On the top of the Mixer screen you can set global volume and bpm. With tempo X, you can multiply your global bmp so that one pattern can be twice as fast as the preceding pattern, and so on.
On iPad this screen is called the Arrange screen. It also contains the Pattern screen (see above, Pattern screen) and Master Effects (see below, File screen).
Seite �36

Options (Mixer screen)
This Options menu presents Audio & Midi settings.
Background Audio is disabled by default, but your settings will get stored. We recommend that you deactivate background audio when you want to save battery power.
Modify the Audio buffer size to change the latency (response time) of your app. Smaller values decrease latency, but also increase the CPU power Elastic Drums will need.
With Metro vol you can change the level of the
metro click, that you hear, when you are in sequence „record“ mode in the instruments screen.
Ableton Link is a new wireless sync technology developed by Ableton. If you want play in sync with other apps or Ableton Live with Link implemented, turn it on. If you enable
Seite �37

Link, Midi clock in will be automatically set to „No Midi input“, because both sync techniques make no sense together.If you enable Midi clock out ED will send out clock signals to all available Midi out ports. Handle the incoming clock signal in your receiving app or hardware device. If an app runs with double speed, make sure it’s not receiving clock signals via two in ports (sync signal will get doubled in this case).
With Same controller for all instr. enabled you can use the same Midi controllers to tweak the knobs of all 6 instruments. In that mode, you will control the knobs of the actual visible instrument, the other instruments will be unaffected.
If you want to send out the sequencers trigger signals as notes (CC’s are not supported yet), choose the right Midi out channel you want to send the notes. The outgoing notes will be the same as the incoming notes you set via Midi learn.
If you want to receive Note messages, choose the right Midi in channel and choose the right Note in port in the midi interfaces table. This works for the trigger buttons of the Jam screen so far only. No other buttons are supported to receive Midi.
If you want to receive Midi clock messages from external devices or other apps, choose the right Clock in port in the midi interfaces table.
Seite �38

Effects screenThe Effects screen looks simple but contains as much depth as the Instrument screen.
The position of each numbered circle in the XY pad represents the 2 parameters (shown on the lower-left and upper-right) of the corresponding effect.
fx1 and fx2 are mono, while fx3 and fx4 are stereo effects. Selecting an effect (by tapping it in the list) immediately enables it for recording automation on the XY pad. After playing with the XY pad while the sequencer is on, you will see the FX circles retracing your finger movements.
You may disable effects automation (thus enabling static FX settings on the Effects screen) in the Options menu. There you can also customize routing of mono effects to stereo effects (see below).
Seite �39

Note: Due to limited CPU performance on iPhone 4s and iPad 2, only one mono and one stereo effect are available on these devices.
To erase all FX automation on the current pattern, double-tap the XY pad.
Mono effects Stereo effectsDistortion (disto) Reverb, based on Miller Pucket’s
reverb (mverb)Mono Flanger (flanger) Standard Reverb from the Pure Data
library (pureverb)Bit Crusher (bcrush) Gated Reverb (gateverb)Shaper (shaper) Filtered Delay (vcfdel)Comb filter (comb) Dow Echo (dowecho)Frequency shifter (fshift) Stereo Chorus chorus)Low-pass / High-pass filter (filter) Stereo Flanger (flanger)Ring Modulator (ringm) Dual Filter (dualvcf)Pitch Shifter (pshifter) Autopan (autopan)Strobe effect (strobe)Mono Stuter (stutter)
Seite �40

Options (Effects screen)
• Send fx1to3: Amount of fx1 effected sound to send to fx3• Send fx2to4: Amount of fx2 effected sound to send to fx4• Autom off: Toggles FX automation on/off (defaults to “on”)
Seite �41

File screenOnly on iPhone, the File screen is divided into two sections.
In the upper half, you can choose, save, delete and email Elastic Drums presets. These are different from synth presents: they are complete projects and retain pattern, song and FX (as well as parameter) data.
Seite �42

With the demo button you can toggle on/off the demo presets delivered to you. They can not get deleted, but you can turn of their visibility so you will only see the presets stored by yourself.The tempo button toggles on/off tempo updates when you change a preset. Each preset has it’s own tempo stored. Normally the tempo changes when you select a new preset. With tempo change disabled, tempo will stay the same, when you select a new preset.
In the bottom half of the File screen are additional Master Effects that affect all instruments at once.
(On iPad the Master Effects are found on the Arrange screen.)
• swing sets the swing factor for all patterns when in Song mode, for the actual pattern, when in Pattern mode. The swing grid is selectable for 2,4,8, or 16 steps. The center setting of swing rate provides no swing at all, to the left and to the right positions will affect the swing effect in positive and negative way. Swing will ONLY work with the sequencer time set zu 1!
• param will change the global synth parameters of all instruments at the same time. Horizontal movement affects the decay/release rate of all sounds; vertical movement affects the pitch/tone of all sounds.
Double-clicking on an effect’s XY pad will reset that effect (effect settings at zero; XY pad at center position).
Seite �43

Options (File screen)
Here is all kinds of information about Elastic Drums—for example, the Manual!
If you like Elastic Drums, please rate the app in iTunes (this is very much appreciated!) or spread the word. This will help us to work on further improvements and updates.
Seite �44

Jam screenThis screen was introduced in update 1.6. It’s made for intuitive and fun live jams, where you can trigger your sounds, patterns and different master effects. Either with a Audiobus remove device, a midi controller or just in the app itself.
With Midi learn enabled, you can assign Midi notes to all „trigger“ buttons, you see in this screen. And you can assign Midi Controller to the knobs you see in this screen. Don’t forget to choose a Midi input port first, otherwise you will get not Midi informations into the app.
Long tap Midi learn will delete all Midi assignments
• ▶︎ Play/Stop: Start/stop the Elastic Drums sequencer.• ◇ Play mode: Switches between Pattern (empty diamond)
and Song (solid diamond) mode.• </> switch screens: Swipe through your screens
Seite �45

Channel trigger
• pat with the 8 pat buttons you can quickly switch between the first 8 patterns of a song.
• < > switch to the previous, next pattern of you preset.• mute will toggle-mute the sounds of the 6 channels. It
works also as a toggle switch: When you long press a mute button the sound will get un-mute again, when you release the button.
Master effects
• trig will trigger the synth engines of the 6 channels. With the trig roll knob you can choose for every trigger button if there trigger will occur continuously (normally called roll) or not and how fast the roll effect will be
• swing will activate a swing effect. If the there is already swing in your pattern swing will temporarily change to this settings and come back to the saved settings, when releasing the effect
• para will change the global synth parameters of all instruments at the same time.
• stop emulates a tape stop effect. Set the tape time for each button with the according stop knob.
• freeze is a stutter effect combined with a filter effect. Set the stutter time and the filter freq with the according knobs.
• stutt is like freeze a delay based repeat effect. this time you change the values of the amount that gets written and played
• delay activates a delay when tapping the button. Set the delay time and the delay fx mix with the according knobs.
Seite �46

When you press midi learn 2 knobs (midiX, midiY) will appear temporarily. You can assign midi controllers to them, to control the x and y axis of the fx pad. After midi learn is done, they will be invisible again. They only serve to assign 2 midi controllers to the xy pad.
Seite �47

Midi ImplementationThe Midi Implementation of Elastic Drums is limited but should be enough to tweak the most important elements of the app.
When ED is in InterApp-Audio mode and hosted by another app, ED can receive Midi via InterApp-Audio. Be aware to avoid double triggers by receiving Midi via InterApp-Audio AND the usual Midi ports. Update 1.7.7 will disable the possibility to do so.
The Knobs which you can tweak, are basically the instrument knobs, where you change the sound of a channel. And you can control the x- and y- axis of the jam screen xy pad. To control these knobs, you have to go into Midi learn mode via the midi learn button, available in the jam screen and via option in instr. screen.
The Buttons that are able to receive Midi notes, already have a predefined assignment, but you can change it to your needs (with the exception of the „hidden“ commands, where is no visible button available at the moment).
Please keep in mind that Midi notes get handled differently. The MIDI specification only defines note number 60 as "Middle C", and all other notes are relative. The most common convention is the one where MIDDLE C (note #60) is C3 (C in the 3rd octave). In the other convention, Middle C is designated „C4“. So Midi Note number 36 might be C1 or C0 in the other case.
Seite �48
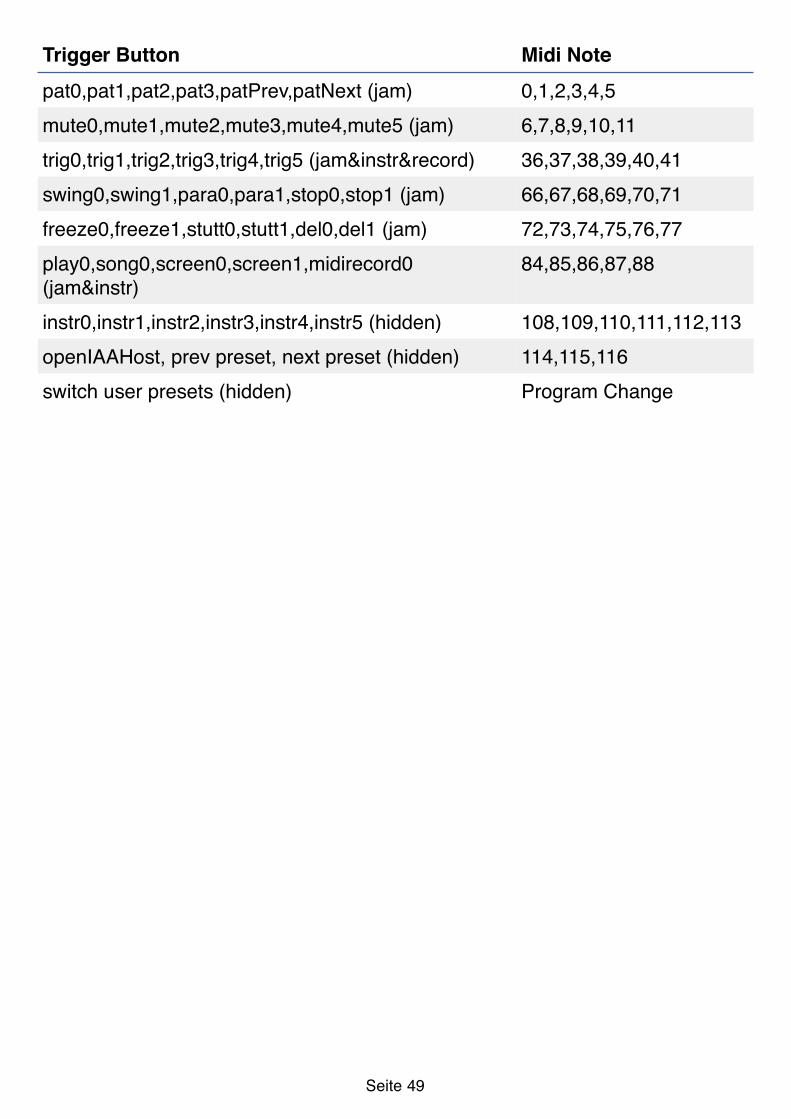
Trigger Button Midi Notepat0,pat1,pat2,pat3,patPrev,patNext (jam) 0,1,2,3,4,5mute0,mute1,mute2,mute3,mute4,mute5 (jam) 6,7,8,9,10,11trig0,trig1,trig2,trig3,trig4,trig5 (jam&instr&record) 36,37,38,39,40,41swing0,swing1,para0,para1,stop0,stop1 (jam) 66,67,68,69,70,71freeze0,freeze1,stutt0,stutt1,del0,del1 (jam) 72,73,74,75,76,77play0,song0,screen0,screen1,midirecord0 (jam&instr)
84,85,86,87,88
instr0,instr1,instr2,instr3,instr4,instr5 (hidden) 108,109,110,111,112,113openIAAHost, prev preset, next preset (hidden) 114,115,116switch user presets (hidden) Program Change
Seite �49

Performance: About glitches and crackles
„Aaaah, help, there are this crackling noises and glitchy sounds, Elastic Drums sounds like shit !!!“ :(
There is no doubt that Elastic Drums is VERY CPU CONSUMING, it’s not a sampler, but a 6 percussion synthesizers! All sounds get calculated and created in real time. If you are on older devices, such as an iPad 2, there is not too much you can do about that in general, but you can try the following things, to improve performance:
a) Enlarge Audio buffer: (Mixer ->) Audio & Midi settingsb) Mute the channels, you don’t need. When a channel is
muted, the synth engine get’s switched off, which saves CPU
c) Switch off effects, you don’t need. This also switches of the effects of this channel and saves some CPU again
d) Sometimes it may even help to completely delete Elastic Drums (backup your presets before!), freshly download and install from iTunes and to do a restart of your device - leaked from IT crowd ;)
Seite �50