duramax installation instructions - summitracing gm... · installation instructions and manual ......
TRANSCRIPT
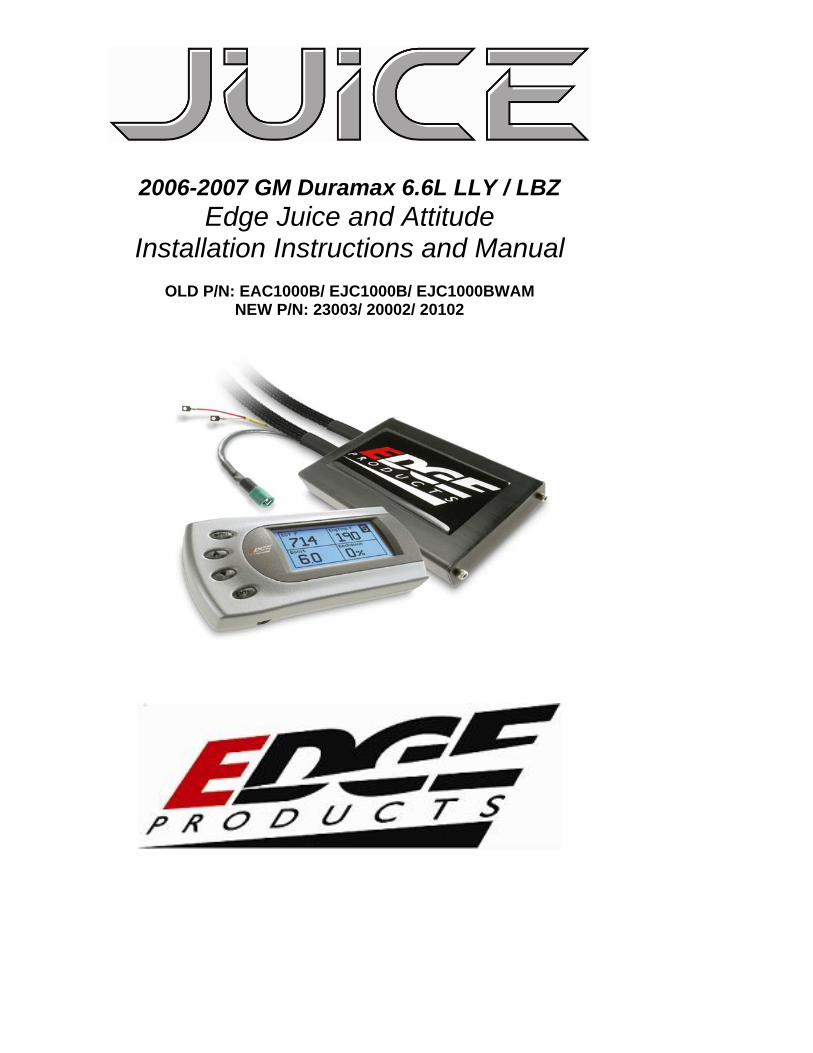
2006-2007 GM Duramax 6.6L LLY / LBZ Edge Juice and Attitude
Installation Instructions and Manual
OLD P/N: EAC1000B/ EJC1000B/ EJC1000BWAM NEW P/N: 23003/ 20002/ 20102

GM Juice/Attitude Manual Edge Products
2
Table of Contents
DISCLAIMER OF LIABILITY ___________________________________________ 4
LIMITATION OF WARRANTY___________________________________________ 4
About the Chevy/GM Juice _______________________________________________ 7
Chevy/GM Juice Getting Connected ________________________________________ 8 Supplied Items:_____________________________________________________________ 8 Required Tools: ____________________________________________________________ 8 The Edge Juice Module ______________________________________________________ 8 Harness Connector__________________________________________________________ 9 Mounting the Juice Module__________________________________________________ 11 Connecting the Harness_____________________________________________________ 11 Final Inspection ___________________________________________________________ 11
Using the Juice________________________________________________________ 12 Adjusting Power Levels _____________________________________________________ 12 Towing___________________________________________________________________ 12
Power Gains __________________________________________________________ 13
Power Gains __________________________________________________________ 13
Making Sense of It All __________________________________________________ 14 EGT _____________________________________________________________________ 15 The Juice Module and your Transmission______________________________________ 15
Transmission Relearning________________________________________________ 16
Transmission Relearning________________________________________________ 16
Edge Attitude Monitor __________________________________________________ 17
About the Attitude _____________________________________________________ 18
Power Gains __________________________________________________________ 19
Chevy/GM Attitude Getting Connected_____________________________________ 20 Changing the Display_______________________________________________________ 26 Two Function Bar Graph Display Sample______________________________________ 27 Two Function Digital Display Sample _________________________________________ 27 Three Function Digital Display Sample ________________________________________ 27 Four Function Digital Display Sample_________________________________________ 28
Changing Variables on the Screen ________________________________________ 29 Display___________________________________________________________________ 29
Adjusting the Backlight _________________________________________________ 32
GM Juice/Attitude Manual Edge Products
3
Juice Configuration ____________________________________________________ 33 Juice Configuration ________________________________________________________ 34 Max EGT Set Point ________________________________________________________ 34 Disabling Backdown at Set EGT _____________________________________________ 36 Low Boost Fueling Adjustment_______________________________________________ 37 Shift Defuel Setting ________________________________________________________ 38 Tire Size _________________________________________________________________ 39 Turbo Cool-Down Setup ____________________________________________________ 40
Use EGT ______________________________________________________________________ 40 Use Time ______________________________________________________________________ 41
Alerts________________________________________________________________ 42
Records ______________________________________________________________ 45
Performance Tests _____________________________________________________ 46
Adjusting Juice Power Levels ____________________________________________ 48 Power Gains ______________________________________________________________ 48
Retrieve / Clear Diagnostic Trouble Codes (DTC) ____________________________ 49
Clearing Trouble Codes_________________________________________________ 50
HOT UNLOCK CODE__________________________________________________ 51
Edge Products Technical Support_________________________________________ 51
© 2007, Edge Products All rights reserved.
Edge Products
1080 South Depot Dr. Ogden, UT 84404 (1-888-360-3343
www.edgeproducts.com Manual Version 6

GM Juice/Attitude Manual Edge Products
4
THIS IS A HIGH PERFORMANCE PRODUCT. USE AT YOUR OWN RISK.
Do not use this product until you have carefully read the following agreement. This sets forth the terms and conditions for the use of this product. The installation of this product indicates that the BUYER has read and understands this agreement and accepts its terms and conditions
DISCLAIMER OF LIABILITY Edge Products, LLC and its successors, distributors, jobbers, and dealers (hereafter SELLER) shall in no way be responsible for the product's proper use and service. THE BUYER HEREBY WAIVES ALL LIABILITY CLAIMS. The BUYER acknowledges that he/she is not relying on the SELLER’s skill or judgment to select or furnish goods suitable for any particular purpose and that there are no liabilities which extend beyond the description on the face hereof and the BUYER hereby waives all remedies or liabilities, expressed or implied, arising by law or otherwise, (including without any obligations of the SELLER with respect to fitness, merchantability and consequential damages) or whether or not occasioned by the SELLER's negligence. The SELLER disclaims any warranty and expressly disclaims any liability for personal injury or damages. The BUYER acknowledges and agrees that the disclaimer of any liability for personal injury is a material term for this agreement and the BUYER agrees to indemnify the SELLER and to hold the SELLER harmless from any claim related to the item of the equipment purchased. Under no circumstances will the SELLER be liable for any damages or expenses by reason of use or sale of any such equipment. The SELLER assumes no liability regarding the improper installation or misapplication of its products. It is the installer's responsibility to check for proper installation and if in doubt, contact the manufacturer.
LIMITATION OF WARRANTY Edge Products, LLC (hereafter "SELLER") gives Limited Warranty as to description, quality, merchantability, fitness for any product’s purpose, productiveness, or any other matter of SELLER's product sold herewith. The SELLER shall be in no way responsible for the product’s open use and service and the BUYER hereby waives all rights other than those expressly written herein. This Warranty shall not be extended or varied except by a written instrument signed by SELLER and BUYER. The Warranty is Limited to one (1) year from the date of sale and limited solely to the parts contained within the product's kit. All products that are in question of Warranty must be returned shipping prepaid to the SELLER and must be accompanied by a dated proof of purchase receipt. All Warranty claims are subject to approval by Edge Products, LLC Under no circumstances shall the SELLER be liable for any labor charged or travel time incurred in diagnosis for defects, removal, or reinstallation of this product, or any other contingent expenses. If the BUYER sends back a failed unit that is out of warranty and chooses to buy a refurbished unit, the refurbished unit will only carry a 60 day warranty. If the BUYER purchases a new unit at a predetermined discounted rate, it will have the standard 1 year warranty. Under no circumstances will the SELLER be liable for any damage or expenses insured by reason of the use or sale of any such equipment.
IN THE EVENT THAT THE BUYER DOES NOT AGREE WITH THIS AGREEMENT: THE BUYER MAY PROMPTLY RETURN THIS PRODUCT, IN A NEW AND UNUSED CONDITION, WITH A DATED PROOF OF PURCHASE, TO THE PLACE OF PURCHASE WITHIN SIXTY (60) DAYS FROM DATE OF PURCHASE FOR A FULL REFUND. THE INSTALLATION OF THIS PRODUCT INDICATES THAT THE BUYER HAS READ AND UNDERSTANDS THIS AGREEMENT AND ACCEPTS ITS TERMS AND CONDITIONS.
GM Juice/Attitude Manual Edge Products
5
IMPORTANT INFORMATION ABOUT YOUR VEHICLE’S WARRANTY — PLEASE READ! Many of our customers ask, “Will your product void my vehicle’s manufacturer’s warranty?” While the answer is straightforward from a legal standpoint, it’s important to educate our customers (and all after-market consumers) on some industry realities and offer some common sense precautions to minimize your risk. Consumers of aftermarket products are protected by the Federal Magnusson-Moss Warranty Act. The Act states that if something breaks on your vehicle and you take it in for warranty repair, the dealer must honor your warranty unless whatever modifications you have added to your vehicle actually caused the problem in question. Edge is committed to providing quality products that are safe to use. Our products do not cause damage to a vehicle when used as intended. Please keep in mind that towing in anything higher than level two and hard driving in levels four and five are not recommended. However, the reality is that many dealerships have been known to void warranties on vehicles that use aftermarket products as a matter of policy. This applies in particular to those aftermarket products that produce horsepower, such as performance enhancement “chips,” modified intake manifolds, or aftermarket exhaust systems, regardless of product brand. Any aftermarket company that does not acknowledge this is misleading you. Although you have strong legal protection as a consumer in regard to your vehicle’s warranty, the practical reality is that taking legal action against a dealer or manufacturer to fight a voided warranty is a costly and time-intensive process. For this reason, Edge strongly recommends you always disconnect and remove your module/programmer and monitor when you take your vehicle to a dealer for warranty work. It is also for this reason that Edge focuses the bulk of their product development efforts on producing modules and digital monitors that can be easily removed. Even if you remove your unit, you should note that dealers can detect the use of ANY programmer — Evolution or otherwise — even if the unit has been removed.

GM Juice/Attitude Manual Edge Products
6
This warranty is void for any new products purchased through auction websites. Warranty is valid only for new products purchased through Authorized Dealers (proof of purchase required for all warranty claims). All Edge modules and programmers are built to operate with OEM calibrations. When you take your vehicle to a service center they may, by your request or otherwise, update your vehicles calibrations. Therefore it is important that you return your vehicle to stock before taking it in for service. Edge updates its active products (i.e. those currently being manufactured) to work effectively with updated OEM calibrations. However, this process can take some time as Edge is not always made aware of calibration changes made by the OEM. In the case of discontinued products, Edge cannot ensure that your unit will work effectively if you take your vehicle to a dealership and you are given, by your request or otherwise, a new calibration.
GM Juice/Attitude Manual Edge Products
7
About the Chevy/GM Juice Thank you for purchasing the Edge Juice Module for the Chevy/GM Duramax Diesel®. The Juice module has been developed and produced from the highest quality materials available to ensure the best performance for years to come. If you have any questions, please contact Edge Products. We will be very happy to answer your questions about our complete product line. The Juice Module is an add-on Engine Control Module (ECM) for the Duramax® Engine that offers additional features not available with the factory setup. Since it is an add-on ECM, it uses all the factory data, and then enhances the factory settings to optimize your truck’s performance. These features include: • Engine temperature monitoring and power increase from the Juice module as engine reaches operating temperature • Three selectable power level settings when using the Juice with the supplied toggle switch (5 on-the-fly selectable power settings when the Attitude monitor is combined with the Juice). • Transmission slip monitoring - If any transmission slip is detected power is decreased to prevent the transmission from slipping The Juice module offers a large power increase over stock throughout the rpm range, but the power is most noticeable in the midrange rpm’s. This greatly improves drivability and towing performance. Transmission downshifting is greatly reduced, especially while passing or towing. The Juice also regulates power delivery and timing based on engine temperature. This means that while the engine temperature is below 130° F no additional fueling or timing is delivered. At 130° F the module begins delivering fuel. The Juice delivers 100% of the calculated additional fuel at 150° F, and at 160° F the Juice also starts modifying timing.

GM Juice/Attitude Manual Edge Products
8
Chevy/GM Juice Getting Connected Supplied Items: 1. Edge Juice Module 2. Three Wire Ties 3. Two Velcro Strips 4. Brass Fuse Tap 5. Three Position toggle switch (Not supplied if shipped with Attitude monitor). Required Tools: None Please read these instructions completely so that you understand each step prior to installation. The Edge Juice Module This picture shows the Edge Juice Module with the harness cable and Edge Attitude Display wiring (Attitude instructions on pg.13)

GM Juice/Attitude Manual Edge Products
9
Harness Connector – Your Juice module is equipped with a harness that can be disconnected at the Juice module itself (See figure 1A). It is important to make sure that your juice module is always connected to the harness when the wiring harness is connected to the truck, otherwise the truck may not run properly, or may trigger engine “codes.”
These two connectors are EGT thermocouple connections.
This cable is where the optional Edge Attitude Display module gets connected.
This is the turbo timer connecter

GM Juice/Attitude Manual Edge Products
10
FIGURE 1A

GM Juice/Attitude Manual Edge Products
11
Mounting the Juice Module 1. The Power Edge Juice Module can mount on top of or to the side of the black plastic fuse box cover located on the driver’s side fender (Use caution when mounting the Juice on top of the fuse box as the Hood may sometimes come in contact with the module). Attach the module using the supplied Velcro, allowing enough harness movement for removal of the fuse box cover. Connecting the Harness 2. Disconnect both stock connectors by squeezing the ears on the backside of the connector and pulling the gray lever. 3. Gently insert the Juice connectors and lock in place with the gray levers, and then gently connect the stock connectors to the other end of the Juice connectors. Notice: Use caution when inserting connector bodies. If the connector does not slide smoothly, remove the connector, inspect the pins, and retry installation. Final Inspection 4. Recheck all connections for a properly secure installation. Using the supplied wire ties, secure the wiring harness to prevent possible damage. 5. Start the engine. The engine should start and run like a stock truck. If the engine does not start or run properly, turn off the motor, remove the keys from the ignition, then remove the juice module and inspect the pins inside both connectors. Straighten pins or clear foreign material from the pins and connector surfaces, and then re-install the connectors. If failure conditions still exist, contact your dealer or Edge Products, LLC. When trying to restart, make sure that the key has been turned off for at least 10 seconds before cranking the engine.

GM Juice/Attitude Manual Edge Products
12
Using the Juice Adjusting Power Levels The Juice has three power levels. The Juice module was designed to allow the user to select any of the three power levels on the fly with the supplied three position switch. Level 3 is with the switch towards the tab. Towing It is recommended that you use the Tow/Haul transmission mode while towing. This provides torque converter lockup in gears 2-6, which reduces transmission heat and also raises the shift rpm threshold to keep the rpm’s higher. It is recommended that you maintain engine rpm above 1800 while towing. While towing, the Juice module allows the engine to pull many grades in the mid rpm’s rather than having to downshift and pull them in the high rpm’s. This provides for lower EGT (Exhaust Gas Temperature) with the same power output. EGT rises significantly with rpm--especially above 2500. It is highly recommended that you install an EGT gauge while using the Edge Juice. The Edge Attitude monitor displays EGT’s and can limit the EGT to a user definable set point by reducing additional fueling. This is a great safety feature that comes only with the Edge Attitude. Notice: It is recommended while towing you use power levels 1 or 2 due to EGT and transmission stress
GM Juice/Attitude Manual Edge Products
13
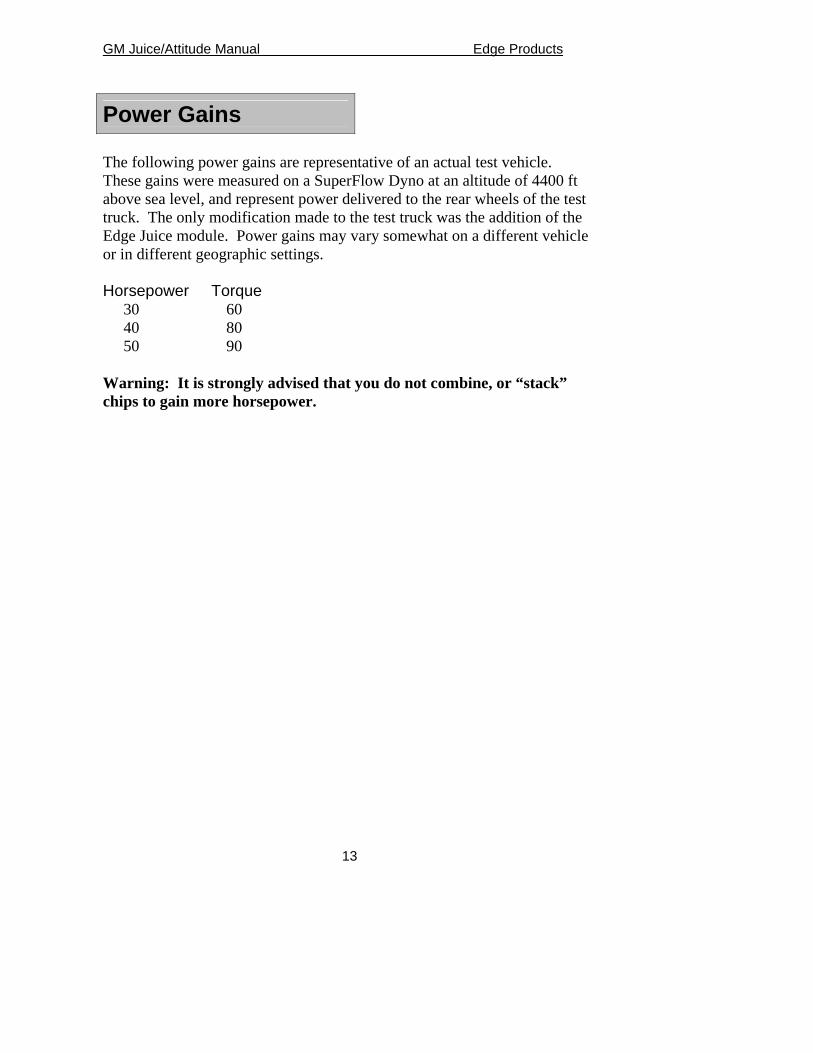
Power Gains The following power gains are representative of an actual test vehicle. These gains were measured on a SuperFlow Dyno at an altitude of 4400 ft above sea level, and represent power delivered to the rear wheels of the test truck. The only modification made to the test truck was the addition of the Edge Juice module. Power gains may vary somewhat on a different vehicle or in different geographic settings. Horsepower Torque
30 60 40 80 50 90
Warning: It is strongly advised that you do not combine, or “stack” chips to gain more horsepower.
Power Gains

GM Juice/Attitude Manual Edge Products
14
Making Sense of It All The first thing you will probably notice is improved performance, especially if this is your first time driving a diesel truck with a performance module, You will experience more power, better throttle response, better passing and acceleration, and even better fuel economy. If you are towing, not only does the extra power the Edge Juice module delivers enable you to maintain speed going up a hill, but the added power will also keep you in a higher gear, so your transmission will not keep “hunting” for lower gears. We recommend level one or level two for towing applications. Only use level two if you are towing a light load. The remaining power levels are designed to match fueling with any additional upgrades you may have done to your vehicle. Level 3 is as far as you should go on a stock truck and should never be used while towing. Levels four, five, and the optional power level 6 are race levels and are designed to be used with upgraded drive trains. If you have modified your injectors, upgraded the transmission, installed an aftermarket turbo or performed other similar enhancements, levels four and five will match fueling to the additional performance created by these upgrades. On a stock truck, it is possible to overstress the engine and transmission while driving in levels four and five.
GM Juice/Attitude Manual Edge Products
15
EGT EGT stands for exhaust gas temperature, and is the single most important indicator of how a diesel engine is performing. Unlike a gasoline motor, a diesel motor will continue to make power as more fuel is added. As more fuel is added, heat will be generated until the motor just gets too hot and things start to melt. This is a situation you want to avoid. Exhaust gas temperature is the ideal measurement of how hot the motor is, since temperature fluctuations in exhaust gas are almost instantaneous. Just so you know, it is possible to generate excessive EGT on a stock truck, particularly if you are towing. This is why we always recommend installing an EGT gauge, and why we built the Attitude monitor, which monitors EGT and will automatically defuel your truck when EGTs get too high. In our experience 1350 degrees is about as high as you want to let your EGTs go. Keep in mind, the stress on your engine created by the heat is a function of both temperature and time. A brief spike to 1400 that lasts a second is not that big of a deal. Pulling up a hill for several minutes at 1400 is far worse. As you drive your truck in the various power settings, keep your eye on the EGTs. Depending on how you drive and where you drive, you may find a particular power level is more suitable to your power needs. The Juice Module and your Transmission The automatic transmission has a fluid-filled clutch-like device called a torque converter. This device uses the spinning motion of the motor to drive the transmission which drives your wheels. As the truck speed stabilizes, the torque converter engages a mechanical connection which locks the two halves of the torque converter, so the output shaft is going the same speed as the input shaft. This mechanical linking of the two halves is called Transmission Lock-up. If the motor produces too much power, this mechanical lock-up can start to slip. When this slipping occurs, the Juice module reduces the power output to allow the transmission to function properly. This is a great feature that provides an extra level of protection for your vehicle. Please keep in mind however, that if you run in level 4 or 5, the additional power is so great that it is possible to overstress a stock Allison transmission if you drive too hard.

GM Juice/Attitude Manual Edge Products
16
Transmission Relearning The Allison transmission is a “Smart” transmission. This means that it pays attention to how smoothly the transmission is changing gears, and modifies the shifting to improve drivability. When the motor delivers more power (by adding the Juice module), the transmission has to ‘re-learn’ how to shift. After first installing the Juice module, you may notice rough shifting. The best way to re-teach the transmission is to set the truck in the power level you will be using most of the time. Then set out to drive, some city, some highway, varying the driving and the speed. A good rule of thumb would be 200 to 300 miles. You will notice the shifting becoming better, and your truck responding better to the additional power as you go through the learning cycle.
Transmission Relearning

GM Juice/Attitude Manual Edge Products
17
Edge Attitude Monitor Installation Instructions & Manual
Old P/N: EAC1000B
New P/N: 23003
GM Juice/Attitude Manual Edge Products
18
About the Attitude
The Attitude allows you to monitor the performance of your vehicle’s vital engine components and output values. The following parameters can be displayed on the main Attitude screen:
• EGT (exhaust gas temperature)
• Barometric PSI
• Speed MPH
• 1Gear (torque converter lock)
• Intake Air Temp
• Load %
• Transmission Temp
• Throttle %
• Turbo Boost PSI
• RPM
• Back down (Percent back down due to high EGT)
• ECM Volts
• Engine Coolant Temp
• Fuel Temp (measure in the fuel rail)
• Module Temp
One of the most powerful features of the Attitude is the option to monitor the EGT of your vehicle and automatically lower the power output to maintain an EGT below a maximum desired level. The Attitude will also alert you both visually and audibly at pre-set engine parameter thresholds and also record the maximum values reached in each of the parameters. 1 A lock symbol will appear next to the current gear on the Attitude display if the torque converter is locked.

Attitude Edge Products
19
Power Gains The following power gains are representative of an actual test vehicle. These gains were measured on a SuperFlow Dyno at an altitude of 4400 ft above sea level, and represent power delivered to the rear wheels of the test truck. The only modification made to the test truck was the addition of the Edge Juice module. Power gains may vary somewhat on a different vehicle or in different geographic settings.
HP Torque Level 1 30 60 Level 2 40 80 Level 3 50 90 Level 4 60 100 Level 5 80 130 *Level 6 100 200 Warning: It is strongly advised that you do not combine, or “stack” chips to gain more horsepower. *NOTE: Level 6 is a high performance level that is classified as “HOT”, and is not recommended for stock trucks. In order to unlock level 6 you will need to complete the “Hot Unlock Form” and there is an additional fee. You can find the form at www.edgeproducts.com, under “Hot Unlock Form”. NOTE: The Edge Juice Module for the LBZ engine may cause an apparent power surge or oscillation. This happens when transmission clutch slip is detected by the Juice Module which then compensates for the slip by decreasing engine power output in order to reduce wear on the transmission by eliminating slip. This occurs primarily in Level 5 or 6. To eliminate this surge it is recommended that the vehicle operator not use level 5 or 6 power level when the transmission is in gear 6.
Formatted: Bullets and Numbering

Attitude Edge Products
20
Chevy/GM Attitude Getting Connected The Attitude monitor connects under the hood to the Edge Juice module. Follow these steps to install the Attitude: 1. Place your Attitude monitor on the dash of your vehicle approximately where you want it installed and, with the driver’s door open, feed the cable through the open door, and into the engine compartment via the slot near the hood hinge. 2. Determine where you want to attach the Attitude mounting bracket and insert it into your dashboard. The bracket fits well in the seam of the dash board by separating the seam slightly and sliding in the bottom portion of the bracket until it snaps into place (see figure 1). The following pictures demonstrate how to best mount the Attitude with the new bracket.
Figure 1
Figure 2
The bracket fits well in the seam of the dash board by separating the seam slightly and sliding in the bottom portion of the bracket until it snaps into place.
After the bracket is mounted, use the supplied two sided tape to secure the Attitude to the bracket.

Attitude Edge Products
21
3. Connect the Attitude to your Edge Juice module by snapping together the cables with the green connections (see figure 3). Secure any excess cable to prevent entanglement with moving engine parts.
Figure 3
Connect the attitude to the juice with this connecter
Run this wire into the fuse box to connect the turbo timer

Attitude Edge Products
22
4. Run the black wire with the red end into the fuse box to connect the turbo timer. Use the supplied fuse tap to connect to the right side (side closest to the fire wall) of the 10A TBC BATT fuse (see figure 4).
Figure 4 5. It is necessary to tap a small hole into your exhaust manifold to insert the EGT sensor. The EGT probe must be mounted before the turbo to operate properly. Drill the hole using a 5/ 16 or a 21/64” drill bit, then tap it with an 1/8” NPT tap (see tip on figure 5). Once the hole is drilled and tapped, run the motor at idle for 10 to 15 seconds to clear the few remaining shavings from the manifold. Once the engine has been run, screw in the stainless fitting and insert the EGT sensor by sliding it into the hole (see figure 5 & 6) and tightening the back end stainless fittings.
Connect the turbo timer wire to the right side of this fuse, using the supplied fuse tap.

Attitude Edge Products
23
Figure 5
Figure 6
The EGT thermocouple installed into the drilled and tapped exhaust manifold

Attitude Edge Products
24
Figure 7
Tip: Pulling back the wheel splash guard provides easy access to the exhaust manifold for tapping the EGT cable.

Attitude Edge Products
25
Once your Attitude monitor is installed successfully and you have turned on your vehicle, you will see a screen similar to the following:
Press the <ENTER> key to accept the terms and conditions in your Owner’s Manual. A screen similar to the following appears indicating that your Juice and Attitude were installed correctly.

Attitude Edge Products
26
Changing the Display
The Attitude allows you to view multiple engine parameters on the same screen. To select a desired view, perform the following steps:
1. Press the [Menu] button until the Setup screen appears:
2. Select the Display option and press the [Enter] button. The following screen appears:
3. Select the desired viewing option by using the up and down arrows and pressing the [Enter] key. Below are examples of the display options:

Attitude Edge Products
27
Two Function Bar Graph Display Sample
Two Function Digital Display Sample
Three Function Digital Display Sample
Attitude Edge Products
28
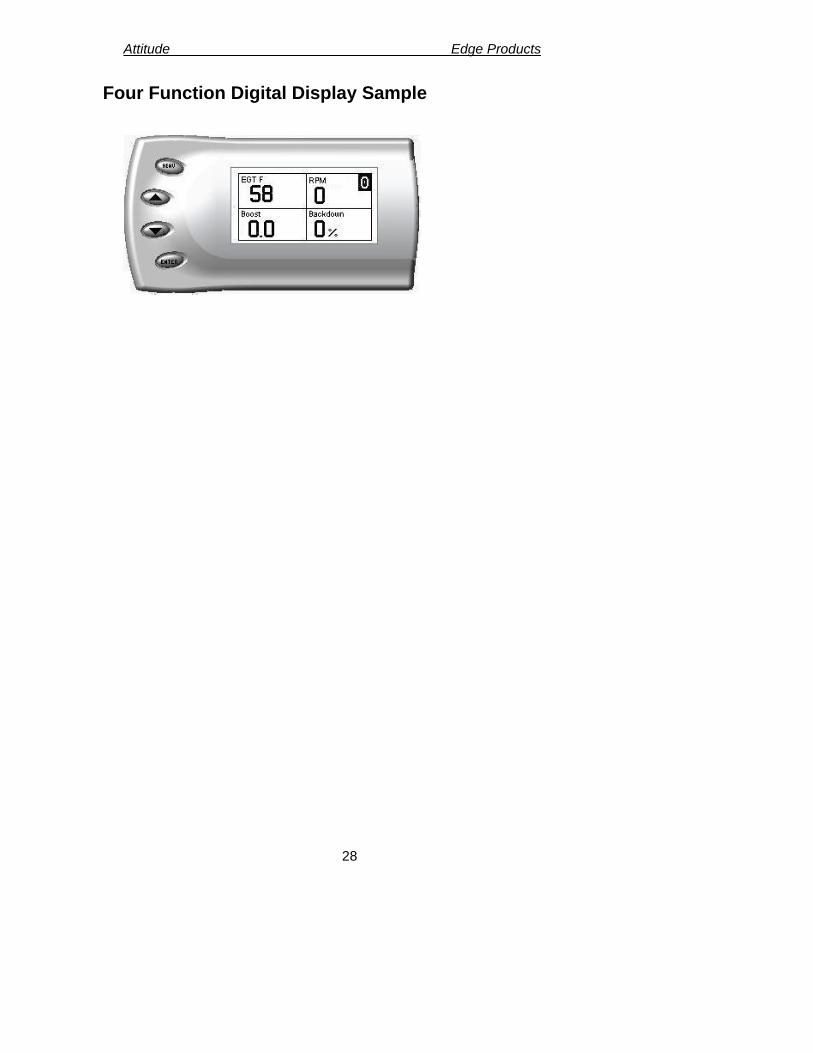
Four Function Digital Display Sample

Attitude Edge Products
29
Changing Variables on the Screen
The following is a list of main options that can be performed on the Attitude, the majority of which have sub-options for advanced settings:
• Boost
• EGT (exhaust gas temperature)
• Barometric PSI
• Speed MPH
• Engine Coolant Temp
• Gear (TCC Lock)
• Intake Air Temp
• ECM Volts
• Fuel Temp (rail)
• Engine Load %
• Transmission Temp
• Throttle Position
• RPM
• Back down % Display To change the variables on the screen, perform the following steps:
1. When viewing the main screen of variables, press the [Menu] button. The following screen appears:

Attitude Edge Products
30
2. Select the Display option and press [Enter]. The following screen appears:
3. Select the desired display style you would like and press [Enter]. Depending on which option you choose, a screen similar to the following appears:

Attitude Edge Products
31
4. This screen lists the current variables you have selected to view and their respective positions on the screen (i.e., TOP LEFT, etc.). Select the variable you would like to change and press [Enter]. A screen listing the possible replacement variables similar to the following appears:
5. Select the variable you would like to view and press [Enter]. The
Setup Digital Displays screen appears again listing the variable options you have chosen to view. If you have no more changes, select the Set As Display option and press [Enter]. The main screen appears with your desired variable in view.
Attitude Edge Products
32
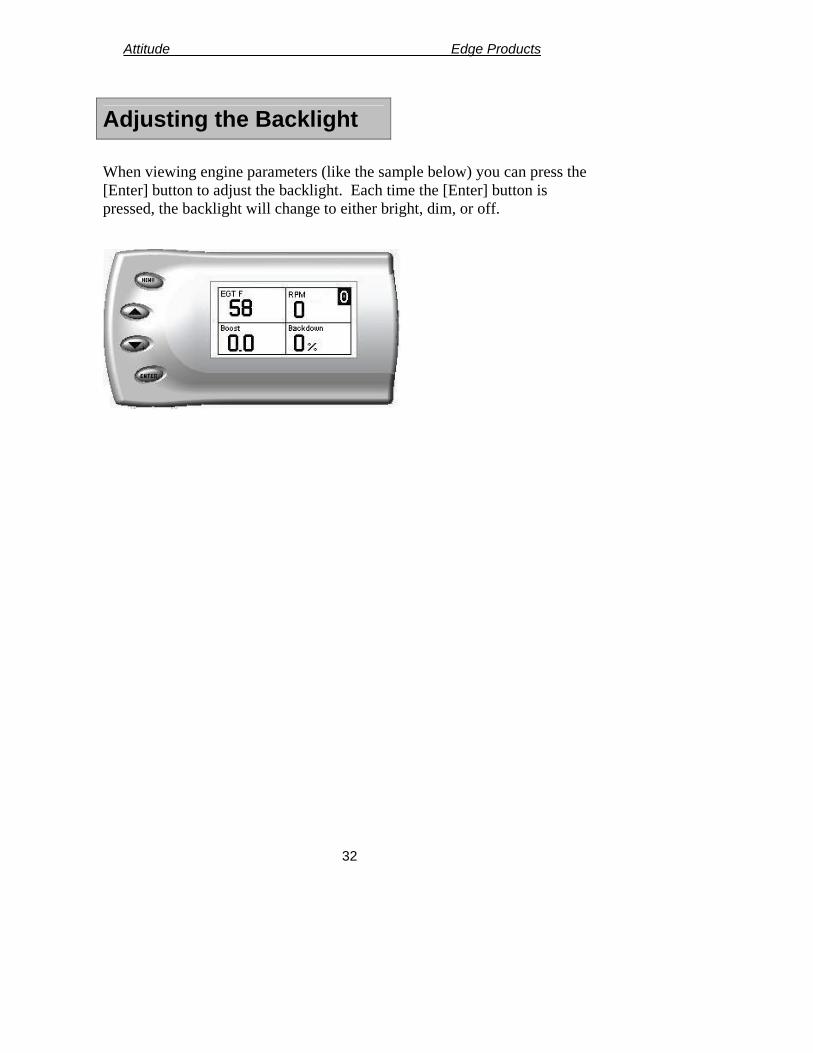
Adjusting the Backlight When viewing engine parameters (like the sample below) you can press the [Enter] button to adjust the backlight. Each time the [Enter] button is pressed, the backlight will change to either bright, dim, or off.

Attitude Edge Products
33
Juice Configuration The Attitude allows you to configure the Juice module in a variety of ways. To change the Juice configurations, perform the following steps:
1. Press the [Menu] button until the Setup screen appears:
2. Select the Juice Configuration option and press [Enter]. The following screen appears:
3. Select the desired option and press [Enter]. The following are descriptions of each of the Juice Configuration options available:

Attitude Edge Products
34
Juice Configuration
• Cold Engine Protection
• Low Boost Fueling Adjust
• Max EGT Set Point
• Tire Size
• Turbo Cool down setup
• Shift Defuel Setting
Max EGT Set Point As the exhaust gas temperature approaches the EGT set point, a percentage of defueling occurs. This percentage is represented by the backdown value you can display on the screen. The percentage represents the amount of defueling that is occurring due to the max EGT value being reached. In other words, fueling is decreased at higher percentages. When this value reaches 100% the fueling delivered by the Juice module will be totally disabled. However, stock fueling will allow the truck to reach its stock EGT levels which may exceed the preset Max EGT Set Point which you set in the Attitude. Important Note: Any other high performance modifications in addition to the Juice can allow the fueling to exceed stock EGT levels even after 100% defueling by the Attitude is reached, which may result in detrimental EGT levels.
The backdown percent represents the amount of defueling that is occurring when the max EGT level is reached.
Attitude Edge Products
35
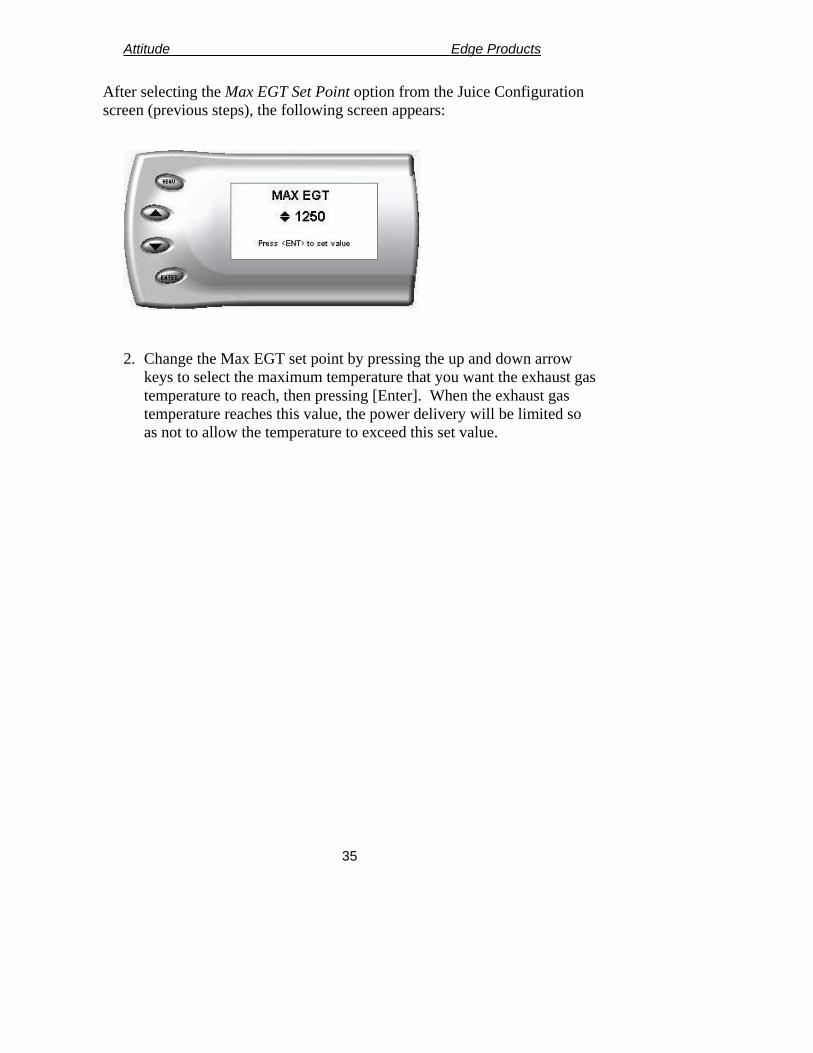
After selecting the Max EGT Set Point option from the Juice Configuration screen (previous steps), the following screen appears:
2. Change the Max EGT set point by pressing the up and down arrow keys to select the maximum temperature that you want the exhaust gas temperature to reach, then pressing [Enter]. When the exhaust gas temperature reaches this value, the power delivery will be limited so as not to allow the temperature to exceed this set value.

Attitude Edge Products
36
Disabling Backdown at Set EGT There are times you may want to disable the EGT backdown feature for a limited period such as in a competition setting. For whatever the reason you can disable the EGT backdown for a period of 1-120 minutes. Warning: Disabling this feature could lead to dangerous EGT levels.
To remove the option that backs down the power at a set EGT point, perform the following steps:
1. Make sure the Attitude is set to view the EGT level as one of the engine parameters.
2. When you are viewing EGT as one of the engine parameters, press [Enter] twice quickly and the following screen will appear:
3. The number on this screen represents the number of minutes the EGT Backdown feature will be disabled. Press the up or down arrow keys to select the desired number of minutes you would like this feature disabled. (The number of minutes you do NOT want your power decreased because of high EGT levels.)
4. After you have selected the number of minutes you would like the EGT backdown option disabled, press [Enter]. The screen will return to your previous view mode, and the Juice power level indicator will flash until the designated time for disabling has been reached. When the Juice power level indicator quits flashing, your set max EGT backdown level will go into effect.
This number is the number of minutes you want to disable the EGT backdown feature.
Attitude Edge Products
37
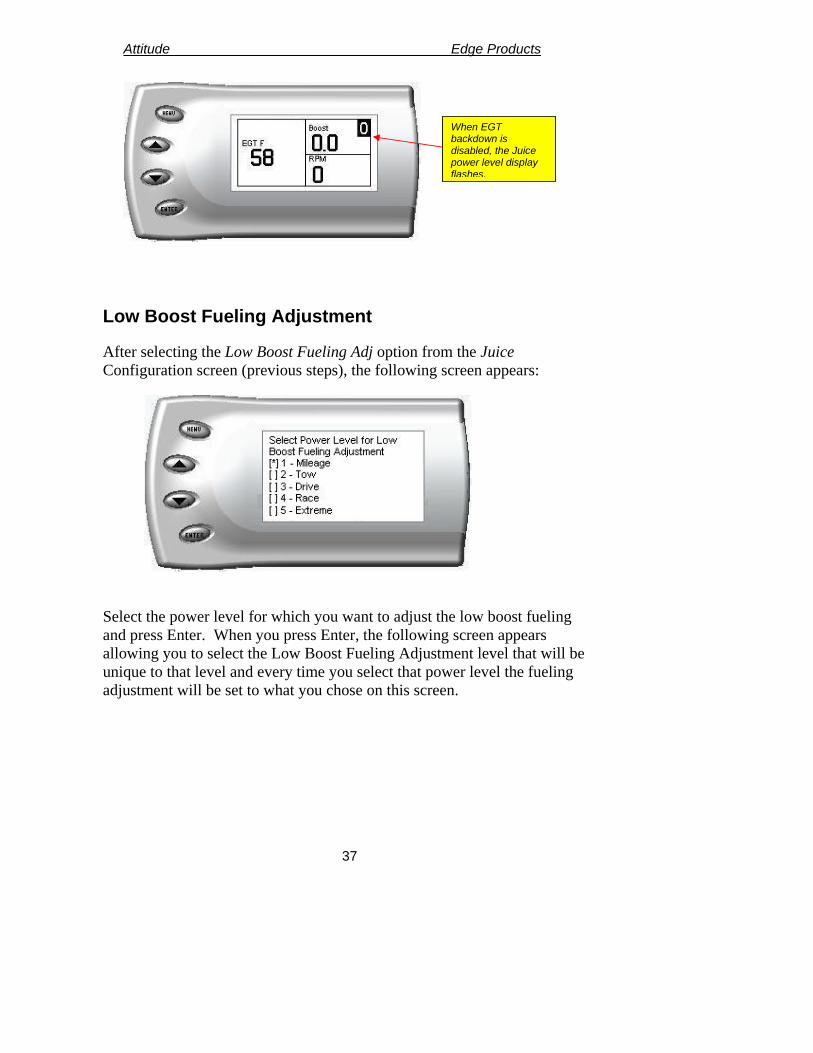
Low Boost Fueling Adjustment After selecting the Low Boost Fueling Adj option from the Juice Configuration screen (previous steps), the following screen appears:
Select the power level for which you want to adjust the low boost fueling and press Enter. When you press Enter, the following screen appears allowing you to select the Low Boost Fueling Adjustment level that will be unique to that level and every time you select that power level the fueling adjustment will be set to what you chose on this screen.
When EGT backdown is disabled, the Juice power level display flashes.

Attitude Edge Products
38
Adjusting the fuel at low boost allows you to adjust the response and smoke output before the turbocharger builds boost pressure in the intake. Select level 1 for the lowest level of response and smoke at low boost, and select level 5 for the highest level. You will see a significant change in vehicle response and smoke depending upon which level you select. To leave this screen, press the [Menu] button multiple times. Shift Defuel Setting With this option the amount of fuel delivered to the engine during the shift point is reduced—thus decreasing torque during the shift point. This will cause less wear on the transmission—and result in overall improved drivability.
Attitude Edge Products
39
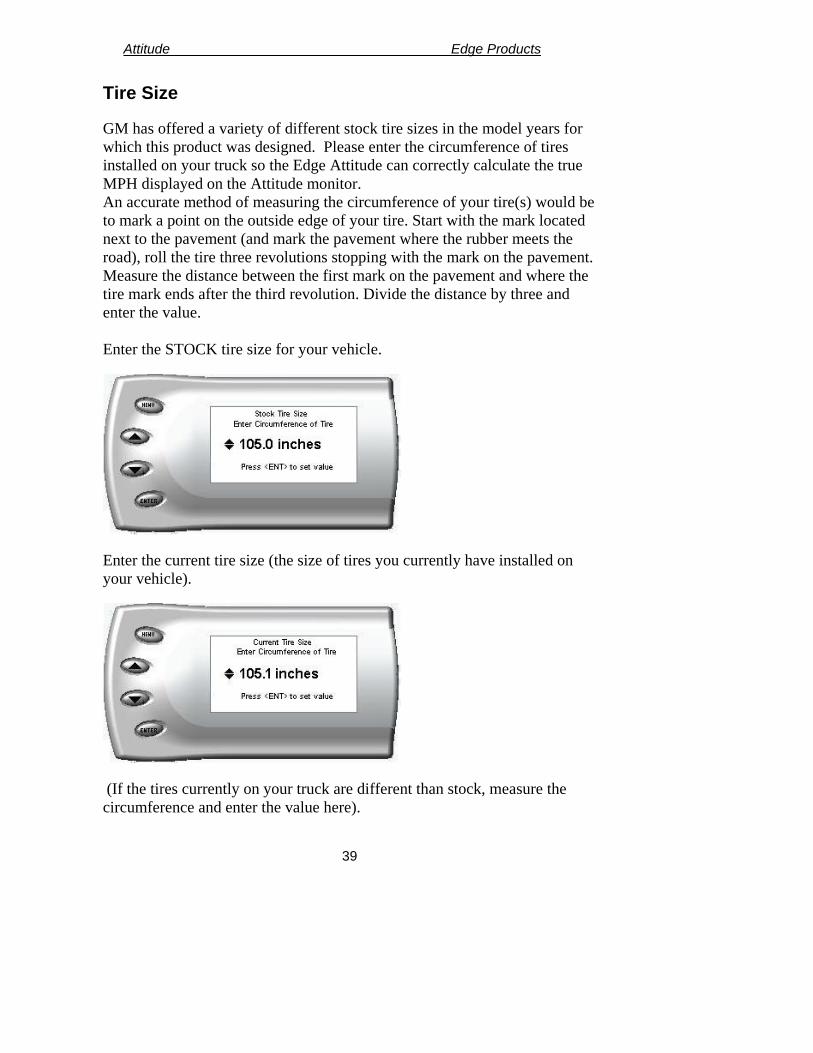
Tire Size GM has offered a variety of different stock tire sizes in the model years for which this product was designed. Please enter the circumference of tires installed on your truck so the Edge Attitude can correctly calculate the true MPH displayed on the Attitude monitor. An accurate method of measuring the circumference of your tire(s) would be to mark a point on the outside edge of your tire. Start with the mark located next to the pavement (and mark the pavement where the rubber meets the road), roll the tire three revolutions stopping with the mark on the pavement. Measure the distance between the first mark on the pavement and where the tire mark ends after the third revolution. Divide the distance by three and enter the value. Enter the STOCK tire size for your vehicle.
Enter the current tire size (the size of tires you currently have installed on your vehicle).
(If the tires currently on your truck are different than stock, measure the circumference and enter the value here).

Attitude Edge Products
40
Turbo Cool-Down Setup This feature allows the engine to continue running (after key-off) until one of two conditions are met. 1) If the EGT falls below the target EGT set point or 2) the time set expires. Press the throttle pedal to override this feature and shut off the motor. WARNING: Due to potential exhaust buildup, it strongly recommended that this feature not be used if your vehicle’s motor will be running unattended in a garage or enclosed area.
Use EGT

Attitude Edge Products
41
Use Time (In minutes)
NOTE: The Turbo Timer feature will set trouble codes. (Your truck thinks something is wrong when you turn off the key and the motor keeps running.) To prevent your check engine light from coming on as a result of these trouble codes, use the “Clear DTCs on Power Up” feature. IMPORTANT: This mode will cause DTC’s that can only be cleared with engine off. NOTE: When using “Clear DTC’s on Power Up” DO NOT put the truck into gear until the Attitude screen has finished clearing codes. If you do put the truck in gear during the code clearing process, you will experience a Shift Inhibitor message, and your truck will not go into gear.

Attitude Edge Products
42
Alerts
The Attitude can actually alert you when certain engine parameter levels are met such as EGT, Boost, and Engine Temperature. When these parameter thresholds are met or exceeded, the Attitude screen will display the value and you will hear a repeating audible alarm. The volume of this audible alarm can not be changed.
• EGT Alert
• Boost Alert
• Trans Temp
• Engine Temp Alert
• Speed Alert
To set alerts, perform the following steps:
1. Press the [Menu] button until the Setup screen appears:
2. Select the Alerts option and press [Enter]. The following screen appears:

Attitude Edge Products
43
3. Turn alerts On by scrolling to the Alerts are On/Off option and press [Enter] to turn alerts On or Off.
To change the EGT Alert value [default is 1350] scroll to the EGT Alert option and press [Enter]. The following screen appears:
4. Press the up and down arrow keys until you see the desired EGT level at which you want to be alerted and press [Enter] to set that value.
5. To change the Boost Alert value [default is 25] scroll to the Boost Alert option and press [Enter]. The following screen appears:
6. Press the up and down arrow keys until you see the desired Boost level at which you want to be alerted and press [Enter] to set that value.
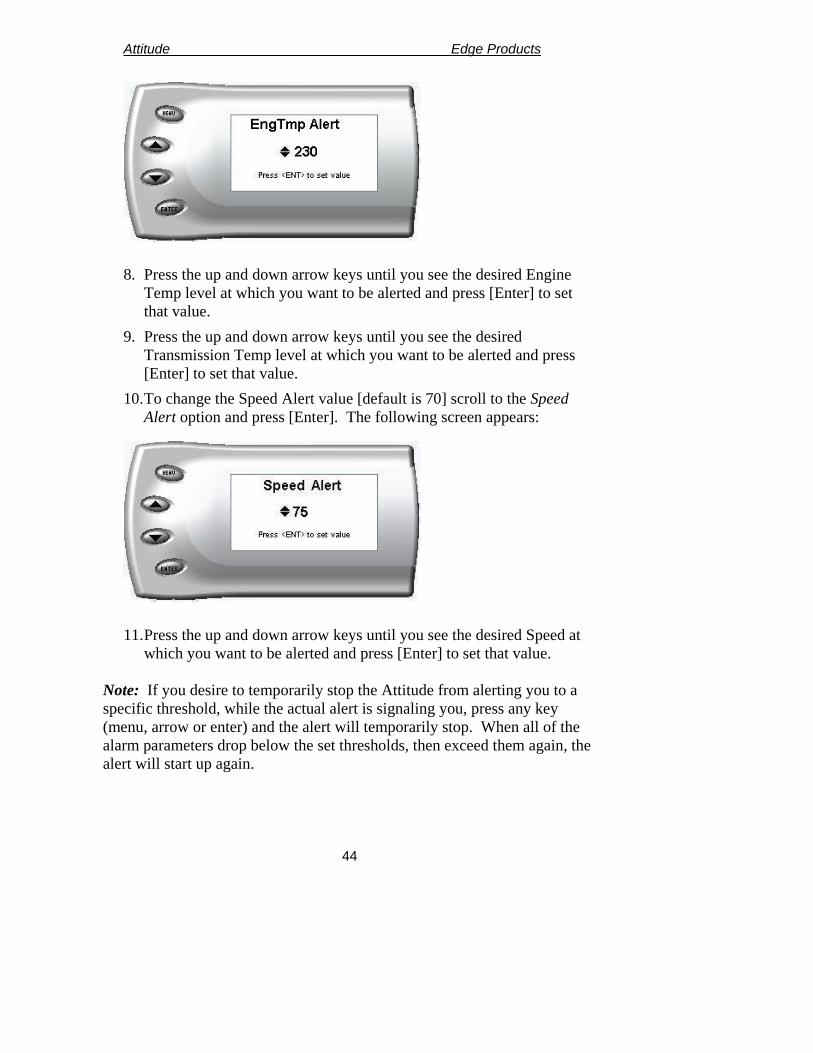
7. To change the Engine Temperature Alert value [default is 210] scroll to the EngTemp Alert option and press [Enter]. The following screen appears:
Attitude Edge Products
44
8. Press the up and down arrow keys until you see the desired Engine Temp level at which you want to be alerted and press [Enter] to set that value.
9. Press the up and down arrow keys until you see the desired Transmission Temp level at which you want to be alerted and press [Enter] to set that value.
10. To change the Speed Alert value [default is 70] scroll to the Speed Alert option and press [Enter]. The following screen appears:
11. Press the up and down arrow keys until you see the desired Speed at which you want to be alerted and press [Enter] to set that value.
Note: If you desire to temporarily stop the Attitude from alerting you to a specific threshold, while the actual alert is signaling you, press any key (menu, arrow or enter) and the alert will temporarily stop. When all of the alarm parameters drop below the set thresholds, then exceed them again, the alert will start up again.

Attitude Edge Products
45
Records The Attitude can keep a record of the maximum engine parameter values that your vehicle produces. These records are stored in the Records section of the Attitude.
• Engine Temp F
• 0-60
• ¼ mile
• Mod Temp
• Trans Temp
• RPM
• Speed
To view or clear these values, perform the following steps:
1. Press the [Menu] button until the Setup screen appears:
2. Select the Records option and press [Enter]. The following screen appears:
3. All of the records are stored on this screen. To clear an individual record, select that record and press [Enter]. To clear all the values, select Clear All and press [Enter].

Attitude Edge Products
46
Performance Tests The Attitude allows you to test the performance of your vehicle by timing the 0-60 and the ¼ mile times. To run these tests, perform the following steps:
1. Press the [Menu] button until the Setup screen appears:
2. Select the Performance Tests option and press [Enter]. The following screen appears:
Attitude Edge Products
47
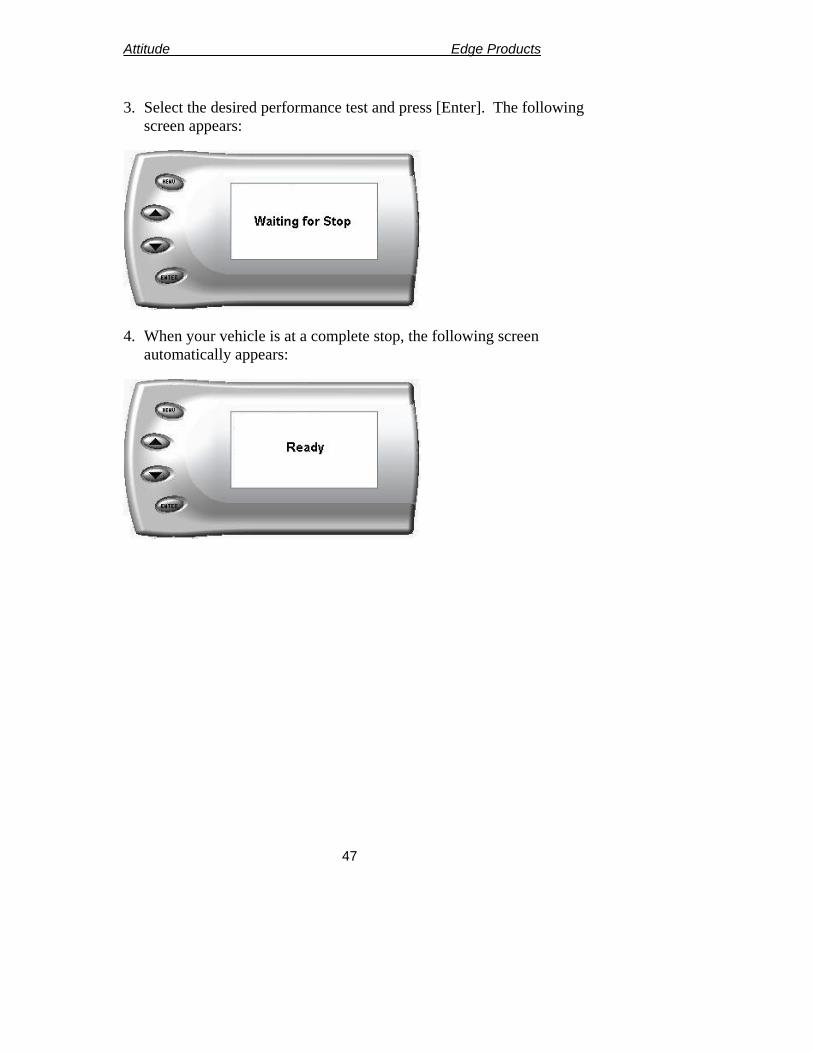
3. Select the desired performance test and press [Enter]. The following
screen appears:
4. When your vehicle is at a complete stop, the following screen automatically appears:
Attitude Edge Products
48
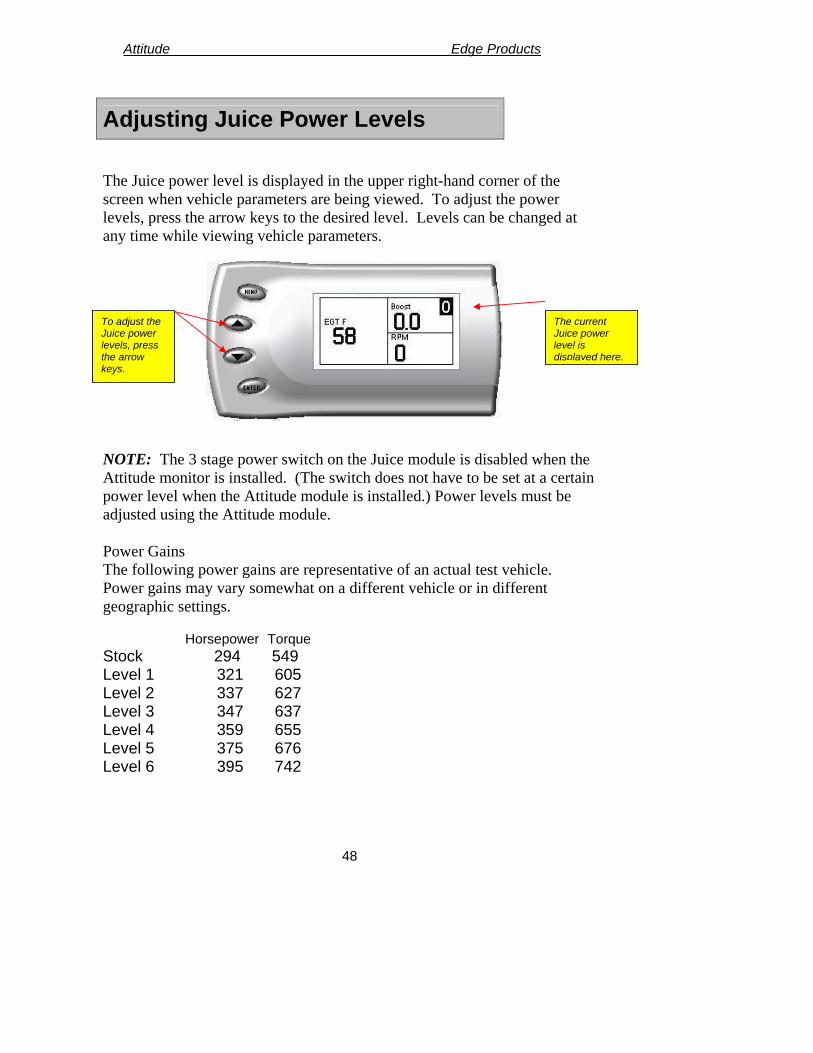
Adjusting Juice Power Levels
The Juice power level is displayed in the upper right-hand corner of the screen when vehicle parameters are being viewed. To adjust the power levels, press the arrow keys to the desired level. Levels can be changed at any time while viewing vehicle parameters.
NOTE: The 3 stage power switch on the Juice module is disabled when the Attitude monitor is installed. (The switch does not have to be set at a certain power level when the Attitude module is installed.) Power levels must be adjusted using the Attitude module. Power Gains The following power gains are representative of an actual test vehicle. Power gains may vary somewhat on a different vehicle or in different geographic settings.
Horsepower Torque Stock 294 549 Level 1 321 605 Level 2 337 627 Level 3 347 637 Level 4 359 655 Level 5 375 676 Level 6 395 742
The current Juice power level is displayed here.
To adjust the Juice power levels, press the arrow keys.
Attitude Edge Products
49
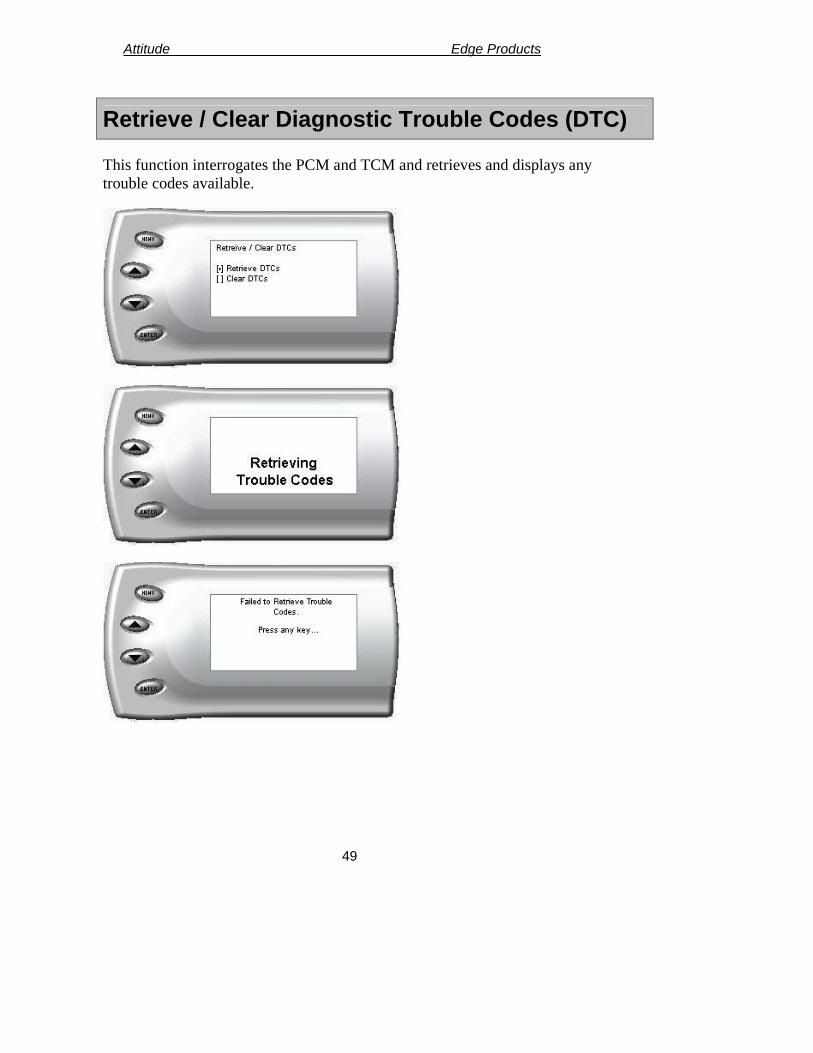
Retrieve / Clear Diagnostic Trouble Codes (DTC) This function interrogates the PCM and TCM and retrieves and displays any trouble codes available.

Attitude Edge Products
50
Clearing Trouble Codes Diagnostic trouble codes in the PCM and TCM can be cleared by selecting the “Clear DTCs” from the menu. A feature has been added that will allow automatic trouble code clearing on power up which can be enabled by selecting the option from the menu. IMPORTANT: This feature will likely prevent ANY trouble codes from appearing, which could be dangerous.

Attitude Edge Products
51
HOT UNLOCK CODE Your Juice module is equipped with an optional level 6, this level is a high performance level, and should be used only when proper drive-train upgrades have been made. To unlock level 6 (HOT) you will need to visit www.edgeproducts.com and download the Hot Unlock Form waiver. You will find this form in the sub-menu Hot Unlock Form, located on the home page of the website. Once you completely fill out the form, you will fax it to the number listed on the Hot Unlock Form. The Hot Unlock option costs $100.00. Warning: We highly recommend the addition of aftermarket lift pumps when running level 5 & 6 on your 06 LBZ or LLY. Without them your truck may set a fuel rail pressure low DTC.
.
Edge Products Technical Support 888-360-3343
To expedite your support call, please have part number (i.e.,
EAF2100A), version number, and Date of Manufacture ready prior to calling support.

Attitude Edge Products
52
© 2007, Edge Products All rights reserved.
Edge Products 1080 South Depot Dr.
Ogden, UT 84404 888-360-3343
www.edgeproducts.com Manual Version 5