installation instructions - strictly dieselduramax power steering lines . 01-10 6.6l duramax diesel...
TRANSCRIPT

DURAMAX POWER STEERING LINES 01-10 6.6L DURAMAX DIESEL 2500 / 3500 TRUCKS
INSTALLATION INSTRUCTIONS

Last Updated: 5/3/2019 Page 1 of 14 © S Diesel, LLC
hank You for purchasing the Driven Diesel High Pressure Power Steering Line kit for the 2001-2010 GM Duramax Diesel Pickups. Please thoroughly read and familiarize yourself with this guide before proceeding with the installation of the kit. It is your responsibility to
always work safely. Make sure that there is plenty of light and you are using properly sized jacks and jack stands to lift and support your truck. After reading this installation manual, if you feel that the job is beyond your capability, please have this work performed by a qualified mechanic. Below you will find a general list of tools to complete this job. This list is based on the tools we use in our shop. Since we understand that not every home mechanic will have the same tools as our shop, we will try to offer alternatives for the less common tools in the step-by-step instructions.
REQUIRED TOOL / ITEM LIST
5/16” Nut Driver or Similar 11mm Deep Socket
13mm & 15mm Shallow Sockets 16mm, 18mm & 19mm Open End Wrenches
Trim Panel Removal Tool or Similar One Quart of Power Steering Fluid
Cleaning Supplies (brake clean or similar, rags, etc)
COMPONENT IDENTIFICATION (see image on front cover of this document)
COMPONENTS BELOW ARE DISASSEMBLED IN THE FRONT COVER IMAGE
Steering Gear Tube Assembly (lower right – longest tube) Outer Hydroboost Tube Assembly (middle right)
Steering Gear to Hydroboost Hose (upper left – longest hose)
COMPONENTS BELOW ARE ASSEMBLED IN THE FRONT COVER IMAGE Power Steering Pump Tube Assembly (upper right – “S” shaped tube)
Inner Hydroboost Tube Assembly (lower left – tube with rubber damper) Power Steering Pump to Hydroboost Hose (middle – shortest hose)
IMPORTANT FIRST STEPS
Completing this job is going to require working both inside the driver side front inner fender and on top of the engine through the hood. Start by setting the parking brake and then jacking up the front of the truck and removing both front tires. Using appropriately sized jack stands, lower the truck to a level that will allow you to work in both areas safely while keeping the truck level (front to back).
For safety reasons, we do NOT recommend leaving the truck supported only by a hydraulic floor jack.
T

Last Updated: 5/3/2019 Page 2 of 14 © S Diesel, LLC
STEP-BY-STEP INSTALLATION INSTRUCTIONS 1. Place a drain pan under the steering gear box and power steering pump. Both will leak when you
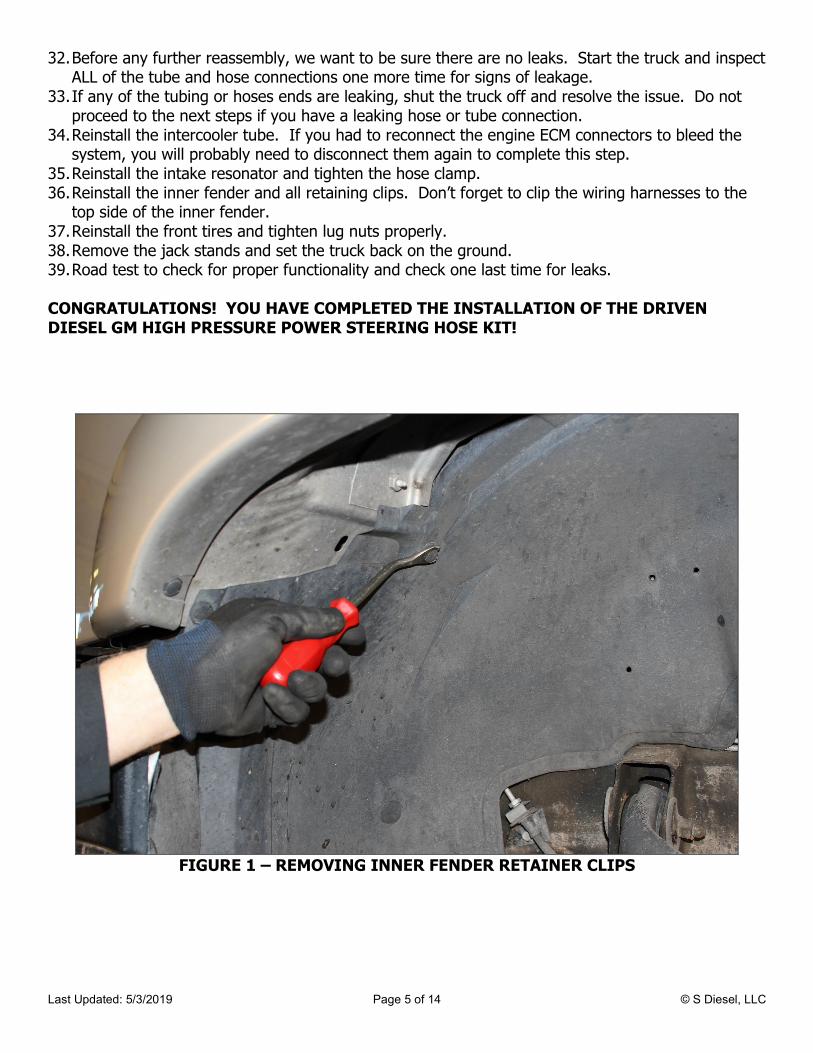
start disconnecting the old lines. 2. Using a trim panel removal tool, locate and remove all of the plastic retainer clips that hold the
driver side front inner fender in place (see Figure 1). Note: MOST of these clips have a separate center pin, pry the center pin up first, then pry under the large head to remove the clip. If you do not have a trim panel removal tool, you can use a flat blade screwdriver to get them started and a long handled pair of wire cutters or needle nose pliers to pull them the rest of the way out.
3. Once all of the retainer clips have been removed, pull the inner fender down SLIGHTLY to expose the top surface. You will find one or two wiring harnesses that are attached to the top of the inner fender, use the trim panel removal tool or similar to release them (see Figure 2).
4. Finish removing the inner fender to expose the areas where you will be working to change out the power steering lines (see Figure 3).
5. Using the 5/16” nut driver (or similar), loosen the hose clamp at the base of the intake resonator and remove the resonator from the engine (see Figure 4).
6. If this truck is equipped with an aftermarket tuner that plugs in to the engine ECM connectors (ie. Edge, Banks, etc), you will need to disconnect the aftermarket harness and pull it out of the way to make removing the intercooler tube easier. See Figure 4 for the location of these connectors.
7. Locate the upper intercooler tube coupler and its clamps (see Figure 4). Using an 11mm socket, loosen one of the clamps. We generally loosen the clamp on the engine side because the coupler generally comes off the intake easier than the tube.
8. Locate the lower intercooler tube coupler and its clamp (see Figure 5). Using an 11mm socket, loosen the clamps and remove the tube from the coupler. You may need to run an angled pick or similar type tool around between the coupler and the tube as they are frequently stuck to each other.
9. Lift the intercooler tube out of the truck from the top (see Figure 6). 10. Using a 15mm socket, remove the bolt and captured nut from the center of the steering shaft
assembly (see Figure 7). Once removed, push the upper shaft up to free the lower shaft to fall out of the way.
11. Using Figure 8, locate the retainer clamp on the stock steering gear to hydroboost power steering line. NOTE OF THE ORIENTATION OF THE CLAMP! Remove the bolt using a 13mm socket. WE ARE NOW READY TO START REMOVING THE STOCK HIGH PRESSURE POWER STEERING HOSES. WE WILL BE STARTING WITH THE LOWER CONNECTIONS AND GIVING THEM A CHANCE TO DRAIN BEFORE REMOVING THE UPPER CONNECTIONS…IT’S LESS MESSY THIS WAY.
12. Working through the inner fender, locate the two lines at the top of the power steering gear box (see Figure 9). Loosen the outer line first, we are not replacing this hose but it needs to be out of the way to work on the other one. Lift the outer line off the gearbox and set aside. Next, loosen inner line and lift it off the gearbox. Both of these lines will be leaking fluid, make sure the drain pan is positioned to catch the fluid.
13. Locate the lower rear fitting on the power steering pump (see Figure 10). Note the routing of the wiring harness through the tubes at the back of the pump. Loosen the lower rear fitting and remove the factory tube from the power steering pump. This will also leak, verify that your drain pan is positioned to catch the fluid.
14. Wait a few minutes until the disconnected hoses stop leaking fluid before proceeding.

Last Updated: 5/3/2019 Page 3 of 14 © S Diesel, LLC
15. Using Figures 11 & 12, locate the engine and fender side power steering pressure hoses at the hydroboost unit. Loosen and disconnect both hoses.
16. Remove both factory power steering hose assemblies from the truck. Closely look at the ends of both assemblies and verify that the o-rings came out with the hoses. If any o-rings are missing, locate and remove them from the hydroboost, steering gear or power steering pump before continuing to the next step!
17. Some trucks will have an exhaust manifold gasket with a squared off top / front corner (see circled area in Figure 13). This corner of the gasket gets in the way of easily starting the new power steering tube, gently push it back toward the engine to make it easier.
18. Transfer the retainer clamp from the factory steering gear tube to the new Driven Diesel steering gear tube (longest tube of the set). ***** EXTREMELY IMPORTANT - see Figure 14 for correct clamp orientation! *****
19. Install the new steering gear tube. The nut end attaches to the INNER port on the steering gear, turn the nut in “finger tight” for now. You can now reinstall the OUTER hose connection on the steering gear and turn the nut in “finger tight”.
20. Install the 13mm bolt in the retainer clamp and tighten, tube should be above the bolt on frame. 21. Locate and install the OUTER (fender side) tube onto the hydroboost. Turn the nut in “finger
tight” for now. 22. Locate the longer of the two Driven Diesel hydraulic hoses and loosely connect it to the two tube
assemblies installed in the previous steps. Hydraulic hoses have a “natural bend”, try to take advantage of this when routing the hose.
23. Locate and loosely install the Driven Diesel power steering pump tube assembly. See Figure 15 for correct orientation of the tube and the wiring harness.
24. Locate the remaining Driven Diesel tube and hose assemblies. Loosely attach one end of the hose to the tube.
25. Loosely attach the other end of the hose to the power steering pump tube assembly. 26. Install the remaining tube onto the INNER (engine side) of the hydroboost. Turn the nut in
“finger tight” for now. AT THIS POINT YOU SHOULD HAVE ALL OF THE TUBING ASSEMBLIES INSTALLED AND CONNECTED TO THE HYDRAULIC HOSES. ONE HOSE ASSEMBLY SHOULD BE CONNECTING THE INNER PORT OF THE STEERING GEAR TO THE OUTER PORT OF THE HYDROBOOST. THE OTHER HOSE ASSEMBLY SHOULD BE CONNECTING THE LOWER REAR PORT OF THE POWER STEERING PUMP TO THE INNER PORT OF THE HYDROBOOST. IF THIS IS NOT HOW YOUR HOSES ARE ROUTED, PLEASE GO BACK THROUGH THE INSTRUCTIONS AND CORRECT THE INSTALLATION BEFORE PROCEEDING!
27. Using your open end metric wrenches, go over every TUBING NUT and tighten them. Don’t forget to tighten the outer hose on the steering gear (the one we didn’t replace). These connections are sealed with an o-ring, do not over tighten them!
28. Next, tighten all of the hose to tube connections. It is extremely important that you use a backup wrench to hold the tube ends while tightening the hose. Failure to hold the tubing ends while tightening the hose ends may result in damage to the tube.
29. Using brake clean (or similar), clean the areas where power steering fluid leaked (such as the top of the steering gear). This will make it easier to verify a leak free installation.
30. If necessary, reconnect the engine ECM connectors. 31. Reconnect the upper and lower steering shafts. Before installing the bolt and captured nut, check
the orientation of the steering wheel to make sure it’s pointing in the right direction.

Last Updated: 5/3/2019 Page 4 of 14 © S Diesel, LLC
IMPORTANT! DURAMAX POWER STEERING SYSTEM BLEED PROCEDURE! The following procedure was developed in our shop specifically to address issues with properly purging the Duramax Power Steering system of air. This procedure can be used after installing our Driven Diesel line kit, replacing the Hydroboost unit, replacing the Steering Gear or replacing the Power Steering Pump. Please keep in mind that, the higher the mileage on the power steering pump, the more it is likely to be sensitive to air in the power steering system. We do NOT recommend attempting to bleed the power steering system using vacuum, or by simply turning the wheels back and forth with the engine off, etc. It is important that you follow our procedure for bleeding the system exactly.
A. This procedure assumes that the front of the truck is still jacked up and on jack stands, and is sitting as close to LEVEL as possible.
B. Fill the power steering reservoir, it should be at the FULL line on the dipstick. C. WITH THE ENGINE OFF, slowly turn the steering wheel to the RIGHT until it stops. This puts
the steering gear at the end of its travel and makes it easier to bleed air from the system. D. Check the fluid level in the reservoir as turning the wheel to the right can either cause fluid to
spit out the top, or be drawn down into the system. Top off if needed, before proceeding. E. While holding the steering wheel just slightly off the far right lock position, start the engine
and let it run for 2-3 seconds. Do NOT move the steering wheel while the engine is running. F. Check and top off the fluid level if needed. G. Repeat steps E & F five to seven more times. H. At this point, you should see small, “foam like” bubbles in your power steering reservoir. Stop
the bleeding procedure and walk away from the truck for 10 minutes. This step allows these small air bubbles time to rise and dissipate, an important step in the process.
I. Start the engine, slowly turn the steering wheel to the LEFT while PUMPING THE BRAKE PEDAL SEVERAL TIMES, then turn the engine off.
J. Check the fluid reservoir, if “foam like” bubbles are present again, walk away from the truck for 10 minutes.
K. Check and top off the fluid level if needed. L. Start the engine, slowly turn the steering wheel to the right until it stops. Then, slowly turn it
back to the left until it stops. Turn the engine off. M. Check and top off the fluid level if needed. N. Repeat steps L & M several times, until the fluid level stops dropping. O. Inspect all of the power steering line connections for leaks at this time. If any leaks are found,
correct the problem, clean the area and repeat steps L&M again. P. If the fluid is still “foam like” or the pump is still making noise at this point, return to step C
and repeat the bleeding procedure again. Power Steering Pump noise is generally an indication of either air the system or a failing pump. The introduction of air into the system can finish off an already tired pump, which is why our bleeding procedure was developed. If, after completing the above bleeding procedure, your power steering pump continues to remain noisy, it is very likely that a replacement pump will be the only cure. The Driven Diesel power steering line kit, when properly installed and bled of air, will not “cause” any noise unless the hoses are tightened in a position where they are vibrating against another under-hood component.
Last Updated: 5/3/2019 Page 5 of 14 © S Diesel, LLC
32. Before any further reassembly, we want to be sure there are no leaks. Start the truck and inspect ALL of the tube and hose connections one more time for signs of leakage.
33. If any of the tubing or hoses ends are leaking, shut the truck off and resolve the issue. Do not proceed to the next steps if you have a leaking hose or tube connection.
34. Reinstall the intercooler tube. If you had to reconnect the engine ECM connectors to bleed the system, you will probably need to disconnect them again to complete this step.
35. Reinstall the intake resonator and tighten the hose clamp. 36. Reinstall the inner fender and all retaining clips. Don’t forget to clip the wiring harnesses to the
top side of the inner fender. 37. Reinstall the front tires and tighten lug nuts properly. 38. Remove the jack stands and set the truck back on the ground. 39. Road test to check for proper functionality and check one last time for leaks. CONGRATULATIONS! YOU HAVE COMPLETED THE INSTALLATION OF THE DRIVEN DIESEL GM HIGH PRESSURE POWER STEERING HOSE KIT!
FIGURE 1 – REMOVING INNER FENDER RETAINER CLIPS

Last Updated: 5/3/2019 Page 6 of 14 © S Diesel, LLC
FIGURE 2 – RELEASING WIRING HARNESS BEFORE REMOVING INNER FENDER
FIGURE 3 – INNER FENDER REMOVED

Last Updated: 5/3/2019 Page 7 of 14 © S Diesel, LLC
FIGURE 4 – ENGINE BAY COMPONENT LOCATIONS
FIGURE 5 – LOWER INTERCOOLER TUBE COUPLER

Last Updated: 5/3/2019 Page 8 of 14 © S Diesel, LLC
FIGURE 6 – REMOVING THE DRIVER SIDE INTERCOOLER TUBE
FIGURE 7 – STEERING SHAFT BOLT

Last Updated: 5/3/2019 Page 9 of 14 © S Diesel, LLC
FIGURE 8 – STEERING GEAR TO HYDROBOOST TUBE CLAMP AND BOLT
FIGURE 9 – POWER STEERING LINES AT THE STEERING GEAR

Last Updated: 5/3/2019 Page 10 of 14 © S Diesel, LLC
FIGURE 10 – POWER STEERING PUMP LINE AND WIRING HARNESS ROUTING
FIGURE 11 – ENGINE SIDE HYDROBOOST HOSE/TUBE CONNECTION

Last Updated: 5/3/2019 Page 11 of 14 © S Diesel, LLC
FIGURE 12 – FENDER SIDE HYDROBOOST HOSE/TUBE CONNECTION
FIGURE 13 – EXHAUST MANIFOLD GASKET MAY NEED TO BE PUSHED BACK

Last Updated: 5/3/2019 Page 12 of 14 © S Diesel, LLC
FIGURE 14 – CORRECT ORIENTATION OF TRANSFERRED TUBE CLAMP – IMPORTANT!
FIGURE 15 – CORRECT ORIENTATION OF THE POWER STEERING PUMP TUBE
Last Updated: 5/3/2019 Page 13 of 14 © S Diesel, LLC
S DIESEL, LLC (dba STRICTLY DIESEL AND/OR DRIVEN DIESEL*) WARRANTY AND LIABILITY POLICY
MANY OF THE PRODUCTS SOLD BY S DIESEL, LLC, ARE DESIGNED TO INCREASE VEHICLE PERFORMANCE…USE AT YOUR OWN RISK!
Do not install or use any product(s) purchased from S DIESEL, LLC (“S DIESEL”)
until you have carefully read the following Warranty and Liability Policy (the “Warranty”).
PRODUCT WARRANTY POLICY Subject to the limitations, exclusions, and qualifications set forth below, the product or the products made and sold by S DIESEL (the "S Diesel Product" or "S Diesel Products") are warranted to Buyer as set forth in this Warranty. The installation of the S Diesel Products indicates that Buyer has read, understands and agrees to the terms and conditions of this Warranty. Any warranty on products that are made by another manufacturer which are resold by S DIESEL to Buyer is made to Buyer by the manufacturer of such products in accordance with and subject to all conditions and limitations of the manufacturer's warranty in effect on the date of the purchase by Buyer. S DIESEL makes no warranties to Buyer, express or implied, with respect to such products that are made by another manufacturer. LIMITED WARRANTY The S Diesel Products (except S Diesel Products specified to have different warranty terms) are warranted to be free from defects in material and workmanship, under normal use and service for a period (the “Product Warranty Period”) of ninety (90) days from date of delivery to Buyer, unless S DIESEL performs the work installing the S Diesel Products, in which case the Product Warranty Period shall be extended to equal the Service Warranty Period (as defined below under “SERVICE WARRANTY POLICY”). S DIESEL’s liability under this Warranty is limited to repair or replacement at its option, subject to the provisions set forth herein, of any S Diesel Products which upon examination S DIESEL are found to be defective. Buyer shall prepay cost of transportation of defective S Diesel Products to S DIESEL for inspection. S DIESEL shall not have any responsibility under this Warranty unless (1) the defect in an S Diesel Product results in a claim arising within the Product Warranty Period, measured from the date of delivery to Buyer, (2) the S Diesel Product, if installed by an installer other than S DIESEL, was properly installed, (3) the S Diesel Product was normally maintained and not subject to misuse, negligence or accident, and (4) the S Diesel Product, system components and/or accessories were not repaired or altered in such a way that in the judgment of S DIESEL the S Diesel Product’s performance or reliability was adversely affected. EXCLUSIONS Any of the above warranties by S DIESEL shall not apply if Buyer’s vehicle is in an accident, misused, neglected, altered from the S Diesel Product’s manufacturer original designs or specifications or serviced in connection with a warranty claim hereunder without prior written approval of S DIESEL. REMEDIES EXCLUSIVE Repair or replacement of defective S Diesel Products in accordance with the Limited Warranty above shall be Buyer’s exclusive remedy for and shall constitute satisfaction of any and all liabilities of S DIESEL with respect to any defect in any S Diesel Product whether based in warranty, contract, tort, negligence, strict liability or otherwise. DISCLAIMERS AND LIMITATIONS THE EXPRESS WARRANTIES SET FORTH ABOVE ARE EXCLUSIVE AND IN LIEU OF ALL OTHER WARRANTIES, CONDITIONS AND TERMS AS TO QUALITY OR FITNESS OF ALL PRODUCTS SUPPLIED BY S DIESEL TO BUYER, WHETHER WRITTEN, ORAL OR IMPLIED, STATUTORY OR OTHERWISE, INCLUDING WITHOUT LIMITATION, ANY WARRANTIES OR CONDITIONS OF MERCHANTABILITY OR FITNESS FOR A PARTICULAR PURPOSE, AND ALL SUCH OTHER WARRANTIES, CONDITIONS AND TERMS ARE HEREBY DISCLAIMED AND EXCLUDED BY S DIESEL. IN NO EVENT SHALL S DIESEL BE LIABLE FOR ANY LOSS OF ACTUAL OR ANTICIPATED PROFITS, LOSS OF ANTICIPATED BUSINESS, COST OF SUBSTITUTE PRODUCTS, LOSS OF USE OR DOWNTIME COSTS OR DELAY CLAIMS (WHETHER DIRECT OR INDIRECT) NOR FOR ANY OTHER SPECIAL, INDIRECT, INCIDENTAL OR CONSEQUENTIAL DAMAGES ARISING OUT OF OR RELATING TO THIS WARRANTY OR THE SUPPLY OF S DIESEL PRODUCTS TO BUYER, WHETHER BASED IN WARRANTY, CONTRACT, TORT, NEGLIGENCE, STRICT LIABILITY OR OTHERWISE. BUYER ACKNOWLEDGES THAT (A) THE PRODUCTS PURCHASED FROM S DIESEL WILL BE USED IN CONNECTION WITH ACTIVITIES, UNDER EXTREME CONDITIONS AND/OR SUBJECT TO MODIFICATIONS REQUESTED BY BUYER FOR WHICH THE PRODUCTS MAY OR MAY NOT BE SUITABLE; (B) THE WARRANTY OF SUCH PRODUCTS FOR PERFORMANCE IN CONNECTION WITH SUCH ACTIVITIES, UNDER SUCH EXTREME CONDITIONS AND/OR SUBJECT TO SUCH MODIFICATIONS REQUESTED BY BUYER IS NOT POSSIBLE; AND (C) ANY MANUFACTURER’S WARRANTY MAY BE VOIDED BY USE OF THE PRODUCTS IN CONNECTION WITH SUCH ACTIVITIES, UNDER SUCH EXTREME CONDITIONS AND/OR SUBJECT TO SUCH MODIFICATIONS REQUESTED BY BUYER. BUYER ACKNOWLEDGES THAT THE INSTALLATION OF ANY S DIESEL PRODUCTS THAT ARE NOT LEGAL FOR USE ON POLLUTION CONTROLLED MOTOR VEHICLES IS DONE SOLELY AT THE REQUEST OF BUYER AND ALL RESPONSIBILITY FOR ANY EFFECTS ON THE ORIGINAL VEHICLE MANUFACTURERS WARRANTY, ABILITY TO PASS ANY EMISSIONS INSPECTIONS OR FOR ANY FINES THAT MAY OCCUR DUE TO THE REMOVAL OF FEDERALLY MANDATED EMISSION CONTROL EQUIPMENT IS ON BUYER. No employee or representative of S Diesel has the authority to make any representation, promise or agreement which in any way varies from the terms and conditions of this Warranty. No suit or claim based on any cause of action, regardless of form, arising out of or relating to this Warranty or any of the S Diesel Products supplied by S DIESEL may be brought by Buyer or anyone claiming by, through or under Buyer against S DIESEL more than one year after the date that such cause of action arose. IN THE EVENT BUYER DOES NOT AGREE WITH THE TERMS AND CONDITIONS OF THIS WARRANTY, BUYER MAY PROMPTLY RETURN THE PRODUCT TO S DIESEL FOR A FULL REFUND. THE PRODUCT MUST BE IN NEW, UNUSED AND RESELLABLE CONDITION, BE RECEIVED

Last Updated: 5/3/2019 Page 14 of 14 © S Diesel, LLC
WITHIN FIFTEEN (15) DAYS OF THE ORIGINAL PURCHASE AND BE ACCOMPANIED BY A DATED PROOF OF PURCHASE (RECEIPT). PRODUCTS RETURNED IN NEW, UNUSED AND RESELLABLE CONDITION MAY STILL BE SUBJECT TO RESTOCKING/REPACKAGING FEES. THE INSTALLATION OR USE OF ANY PRODUCT PURCHASED FROM S DIESEL INDICATES THAT BUYER HAS READ, UNDERSTANDS AND AGREES TO THE TERMS AND CONDITIONS OF THIS WARRANTY.
SERVICE WARRANTY POLICY
Subject to the limitations, exclusions, and qualifications set forth below, the service or services performed by S DIESEL (the "S Diesel Service" or "S Diesel Services") are warranted to Buyer as set forth in this Warranty. LIMITED WARRANTY The S Diesel Services (except S Diesel Services specified to have different warranty terms) are warranted to have been performed in a workmanlike manner and to hold up under normal use and service for a period (the “Service Warranty Period”) of twelve months from date the S Diesel Services are performed or twelve thousand miles from the documented odometer reading at the time the S Diesel Services are performed, whichever occurs first. S DIESEL’s liability under this Warranty is limited to replication, subject to the provisions set forth herein, of any S Diesel Services which upon examination S DIESEL are found to have not been performed in a workmanlike manner. S DIESEL shall not have any responsibility under this Warranty unless (1) the defect in an S Diesel Service results in a claim arising within the Service Warranty Period, measured from the date the S Diesel Service is performed, (2) the vehicle upon which the S Diesel Service was performed was normally maintained and not subject to misuse, negligence or accident, and (3) the vehicle upon which the S Diesel Service was performed was not repaired or altered in such a way that in the judgment of S DIESEL the S Diesel Service’s durability was adversely affected. EXCLUSIONS Any of the above warranties by S DIESEL shall not apply if Buyer’s vehicle is in an accident, misused, neglected, or serviced in connection with a warranty claim hereunder without prior written approval of S DIESEL. REMEDIES EXCLUSIVE Replication of unsatisfactory S Diesel Services in accordance with the Limited Warranty above shall be Buyer’s exclusive remedy for and shall constitute satisfaction of any and all liabilities of S DIESEL with respect to any defect in any S Diesel Service whether based in warranty, contract, tort, negligence, strict liability or otherwise. WITHOUT LIMITING THE FOREGOING, IN NO EVENT SHALL S DIESEL BE LIABLE FOR ANY LOSS OF ACTUAL OR ANTICIPATED PROFITS, LOSS OF ANTICIPATED BUSINESS, COST OF SUBSTITUTE SERVICES, LOSS OF USE OR DOWNTIME COSTS OR DELAY CLAIMS (WHETHER DIRECT OR INDIRECT) NOR FOR ANY OTHER SPECIAL, INDIRECT, INCIDENTAL OR CONSEQUENTIAL DAMAGES ARISING OUT OF OR RELATING TO THIS WARRANTY OR THE PERFORMANCE OF S DIESEL SERVICES FOR BUYER, WHETHER BASED IN WARRANTY, CONTRACT, TORT, NEGLIGENCE, STRICT LIABILITY OR OTHERWISE.
GENERAL PROVISIONS APPLICABLE TO BOTH PRODUCT AND SERVICE WARRANTIES
ASSIGNABILITY OF WARRANTY This Warranty is for the exclusive benefit of Buyer and is not assignable. WARRANTY CLAIMS PROCEDURE Warranty claim forms can be printed from the company websites (http://www.drivendiesel.com (Products) and http://www.strictlydiesel.com (Services)). A properly completed warranty claim form and a copy of the invoice for any defective Product or Service must be received by the Seller within the earlier of 30 days after the expiration of the Warranty Period or the incident giving rise to the claim. To qualify for an adjustment under this Warranty a defective Product must be returned prepaid to the Seller for inspection and must be accompanied by a dated proof of purchase receipt. In addition, the serial number of the defective Product, if any, must match the serial number on Buyer’s invoice. All Warranty claims are subject to approval by the Seller and/or the Product’s manufacturer. Buyer must pay all applicable service charges and taxes. Defective Products accepted for warranty compensation become the property of the Seller. To qualify for an adjustment under this Warranty a vehicle upon which S Diesel Services have been performed must be delivered to the Seller during Seller’s hours of operation for inspection and must be accompanied by a dated proof of purchase receipt. WAIVER Any failure of the part of S Diesel to insist on strict compliance with the Warranty Provisions shall no way constitute a waiver of such right. No claim or rights arising out of a breach of the Warranty Provisions by Buyer may be discharged in whole or in part by a waiver of the claim or right, unless the waiver is in writing signed by an authorized representative of S Diesel. S Diesel’s waiver or acceptance of any breach by Buyer of any provisions of the Warranty Provisions shall not constitute a waiver of or an excuse for nonperformance as to any other provision of the Warranty Provisions nor as to any prior or subsequent breach of the same provision. APPLICABLE LAW The Warranty shall be governed by the laws of the State of Arizona (excluding Arizona law with respect to conflicts of law). * Driven Diesel was formerly known as ITP Diesel, LLC and Sinister Diesel, LLC.