digital hydrometer sbs-2500 · page 3 sbs-2500 manual 09-15-ti2500 (262) 703-5800 •...
TRANSCRIPT

Digital Hydrometer
SBS-2500 INSTRUCTIONMANUAL
Storage Battery Systems LLC • Instruction Manual for SBS-2500 Digital Hydrometer • Rev. 09-15

Page 2SBS-2500 Manual 09-15-TI2500
(262) 703-5800 • [email protected]
Table of Contents1 Introduction ............................................................................................................................................................. 42 Safety Measures ....................................................................................................................................................... 43 Description of the Instrument ................................................................................................................................. 5 3.1 SBS-2500 .................................................................................................................................................................. 5 3.2 Display ...................................................................................................................................................................... 5 3.3 Keys .......................................................................................................................................................................... 54 Tutorial ..................................................................................................................................................................... 7 4.1 Inserting batteries .................................................................................................................................................... 7 4.2 Configuration ........................................................................................................................................................... 7 4.3 Test measurement ................................................................................................................................................... 8 4.4 Adjustment ............................................................................................................................................................... 8 4.5 Cleaning .................................................................................................................................................................... 8 4.6 Switching off and on ................................................................................................................................................ 85 Menu ........................................................................................................................................................................ 9 5.1 Using the menu ........................................................................................................................................................ 9 5.2 Measurement Unit (Measure Unit) ....................................................................................................................... 10 5.3 Temperature Unit (Temp. Unit) ............................................................................................................................. 12 5.4 Measure Mode ....................................................................................................................................................... 12 5.5 Adjustment Mode (Calib. Mode) ........................................................................................................................... 12 5.6 Interface ................................................................................................................................................................. 12 5.7 Beep . ...................................................................................................................................................................... 12 5.8 Background Lighting and LCD-Contrast (LCD) ....................................................................................................... 13 5.9 Automatic Switch-off (Power) ............................................................................................................................... 13 5.10 Software Version (Version No.) ............................................................................................................................. 13 5.11 Date & Time ........................................................................................................................................................... 13 5.12 Identification .......................................................................................................................................................... 136 Measurement ......................................................................................................................................................... 136.1 Procedure for proper measurement ..................................................................................................................... 136.2 Filling the measuring cell using the built-in sample pump ................................................................................... 146.3 Filling the measuring cell using an external syringe ............................................................................................. 146.4 Measuring .............................................................................................................................................................. 156.5 Saving the results ................................................................................................................................................... 156.6 Displaying and marking saved results ................................................................................................................... 156.7 Printing and transferring results ............................................................................................................................ 166.8 Deleting results ...................................................................................................................................................... 177 Adjustment (cal) ..................................................................................................................................................... 17 7.1 Adjusting the measuring cell with water ............................................................................................................... 17 7.2 Adjusting the measuring cell with a density standard .......................................................................................... 18 7.3 Adjusting the measuring cell with air .................................................................................................................... 18 7.4 Adjusting the temperature display ........................................................................................................................ 198 Interface ................................................................................................................................................................. 20 8.1 IR printer settings .................................................................................................................................................. 20 8.2 Data transfer to PC ................................................................................................................................................ 20 8.3 Data format ............................................................................................................................................................ 219 Error Messages and Malfunctions ......................................................................................................................... 2210 Cleaning and Maintenance .................................................................................................................................... 23 10.1 Cleaning the measuring cell ................................................................................................................................... 23 10.2 Cleaning the housing ..............................................................................................................................................23 10.3 Replacing the sample tube .................................................................................................................................... 23 10.4 Replacing the sample pump .................................................................................................................................. 2311 Standard equipment .............................................................................................................................................. 2412 Technical data ........................................................................................................................................................ 2513 Appendices ............................................................................................................................................................. 26

Page 3SBS-2500 Manual 09-15-TI2500
(262) 703-5800 • [email protected]
1. Introduction to the SBS-2500The SBS-2500 is a portable measuring instrument suited for determining the density of liquids. The instrument uses the oscillating body method.
To fill the measuring cell the built-in sample pump or a syringe may be used. The results are automatically calculated into one of the following units: density, specific gravity, API degrees, Brix, % Alcohol, % H2SO4, Baumé, Plato, Proof or a user-defined unit. The value is then shown on the backlit display.
For exact measurements, it is imperative to correct the temperature’s influence on the density. Depending on the selected unit the SBS-2500 carries out this result correction automatically. For this task, the instrument uses either internally-stored tables or one of the 10 temperature-compensation coefficients entered by the user.
The results, along with the sample identification, temperature, temperature-coefficient, date and time can be saved. Together with the instrument identification they can then, via the integrated infrared interface, be transferred to the computer or printed out on a printer.
2. Safety MeasuresMeasures for Your Protection and Operational Safety
Do not work in an explosion-hazardous environment! The instrument housing is not gas tight. Otherwise, there is a risk of explosion from sparks and/or risk of corrosion by gasses which can seep in.
• Always hold the end of the sample tube over a waste container! There is a risk of injury when emptying corrosive substances.
• Leave the syringe in the sample intake after injecting a sample! Otherwise, the sample will run out of the measuring cell.
1. Never press on the measuring cell window! This can influence the oscillation characteristics of the measuring cell.
2. Do not clean the measuring cell with concentrated NaOH (caustic soda) or HF (hydrogen fluoride)! Both substances chemically corrode the measuring cell.
3. Use batteries of the specified type only. Otherwise, proper operation cannot be guaranteed.
4. Do not submerge the housing in liquid! The instrument is only resistant to splashed water.
5. Ensure that the following environmental conditions are met:•nostrongvibrationspresent•notindirectsunlight•nohighhumiditypresent•nocorrosivegassespresent•temperaturebetween–20°Cand70°C• no strong electrical or magnetic fields present

Page 4SBS-2500 Manual 09-15-TI2500
(262) 703-5800 • [email protected]
3. Description of the Instrument3.1 SBS-2500
1. Backlit Display2. Keypad3. Drain button4. Sample pump5. Cover of sample pump6. Connector for syringe adapter7. Fixing screw for sample tube8. Sample tube9. Measuring cell10. Infrared interface11. Lock button12. Fill button13. Battery compartment cover

Page 5SBS-2500 Manual 09-15-TI2500
(262) 703-5800 • [email protected]
3.2 Display
1. Selected unit of measurement2. Result3. Sample identification (a…z or space)4. Sample number, or error number if an error has occurred5. Appears if “Stability” is set to “Auto”6. Appears if “Memory” in is set to “Auto”7. Appears if “Memory” out is set to “Auto”. If a printer or PC is connected, the data are transferred
automatically8. Battery-power indicator9. Temperature(°C/°F)10. Appears if delete mode is activated11. Mark for results
For the identification of invalid or incorrect results or for marking a sample change∆Referencetemperature(fortheunits“Comp.Density”and“SG”only)

Page 6SBS-2500 Manual 09-15-TI2500
(262) 703-5800 • [email protected]
3.3 Keys
Red symbols: Press key longer than 2 seconds.Blue symbols: Press key briefly.
No. Symbol Short Key Press Long Key Press
1 • Move marker to the left• Mark saved results
• Delete saved results
2 • Move marker upward• Select sample number
(ascends)• Switch between “Yes” and
“No” setting
• Select temperature-compensationcoefficientα
3 • Move marker to the right• Display saved results• Transfer one saved result
to a printer/PC
• Transfer a series of saved results to a printer/PC
4 • Move marker downward• Select sample number
(descends)• Switch between “Yes” and
“No” setting
• Call up adjustment mode
5 esc Exit the menu Switch instrument on or off
6 ok/meas. • Start measurement• Confirm input• Confirm data delete• Confirm data transfer• While pressing and holding
key 5: enter the menu
NoteOnlythearrowsymbolsareusedtorepresentkeys1–4inthefollowingoperationinstructions.

Page 7SBS-2500 Manual 09-15-TI2500
(262) 703-5800 • [email protected]
4. Tutorial
4.1 Inserting Batteries
1. Open the battery compartment cover on the back of the SBS-2500.2. Remove battery compartment.3. Insert batteries into the battery compartment, observing correct polarity.4. Insert battery compartment, ensuring that the contacts of the battery compartment face the instrument.5. Close battery compartment cover.6. The instrument switches on automatically and is immediately ready for operation.7. With the backlighting switched off the battery lasts about 90 hours.
If nothing appears in the display, check the polarity of the batteries and battery compartment.
4.2 ConfigurationConfiguring the instrument for test measurement.
Entering the MenuPress the keys “ok/meas.” and “esc” simultaneously.
The instrument switches to the “FUNCTION” menu, Measure Unit appears in reverse display (white on black).
Selecting Setting• Confirm Measure Unit by pressing the “ok/meas.” key.• Press the key repeatedly until SG(t/t) is marked.• Confirm SG(t/t) by pressing the “ok/meas.” key.
Setting Date and Time• Use the key to switch to “Date & Time”.• Confirm Date & Time with the “ok/meas.” key.• To set the date, confirm Date with the “ok/meas.” key.• Use the side arrows to select the number to change, and use the up and down arrows to change the value.
Confirm with “ok/meas”.• Use the down arrow key to switch to “Time” and confirm with “ok/meas”. Set the time as described above.
Exiting the MenuPress the “esc” key.The instrument is configured for test measurement.

Page 8SBS-2500 Manual 09-15-TI2500
(262) 703-5800 • [email protected]
4.3 Test Measurement
1. Push drain button (3) downward completely.2. Ensure that the sample tube is located in the accompanying density standard or in distilled water.3. Press the fill button (12) slowly to fill the measuring cell.4. Ensure that no air bubbles are contained within the measuring cell.5. Press the “ok/meas.” key.
The instrument automatically executes a measurement and the result appears in reverse display.Theresultforwatermustbe1.000intheselectedmeasurementuntilSG(t/t).
If the deviation is < 0.0005Adjustment is ok, the instrument is ready for measurement.
If the deviation is > 0.0005Adjust instrument, see Chapter 4.4.
4.4 AdjustmentInitializing Adjustment
• Press and hold the key until CALIB (Water) appears on the display. The instrument adjusts automatically (duration: approximately 1 minute).
• After adjustment is completed, the measured deviation from the theoretical value and Execute? (No) appears.
• Press the or key. Execute? (Yes) appears.• Press the “ok/meas.” key to confirm.
The adjustment is confirmed.
4.5 CleaningThe built-in sample pump or an external syringe can be used to fill the measuring cell with cleaning liquid.1. Empty the measuring cell completely before cleaning. Press the drain button downward completely2. Clean the measuring cell daily with a suitable cleaning liquid.3. For very dirty measuring cells, let the inside of the cell soak in the cleaning liquid.4. Repeat cleaning if necessary.5. If the housing is soiled, clean with a cleaning tissue.
4.6 Switching Off and OnSwitching offPress and hold the “esc” key until the display is turned off. The instrument is now turned off.
Switching onPress and hold the “esc” key until the display appears. The instrument is ready for operation.

Page 9SBS-2500 Manual 09-15-TI2500
(262) 703-5800 • [email protected]
5. MenuThe menu of the SBS-2500 offers the following functions:
Measurement Unit (Measure Unit) see Chapter 5.2Temperature Unit (Temp. Unit) see Chapter 5.3Measure Mode see Chapter 5.4Adjust Mode (Calib. Mode) see Chapter 5.5Interface see Chapter 5.6Beep see Chapter 5.7Backlighting and LCD-Contrast (LCD) see Chapter 5.8Automatic Switch-off (Power) see Chapter 5.9Software Version (Version No.) see Chapter 5.10Date & Time see Chapter 5.11Identification see Chapter 5.12
5.1 Using the Menu
Entering the menuPress the keys “ok/meas.” and “esc” simultaneously.The instrument switches to the menu
Selecting Functions• Press and keys repeatedly until the desired function is marked.• Press the “ok/meas.” key to activated the marked function.
The instrument switches to the corresponding submenu or activates the desired function.
Numerical Input• Select decimal places with the and keys.• Change value with the and keys.• Press the “ok/meas.” key to confirm the value.
Exiting the MenuPress the “esc” key.

Page 10SBS-2500 Manual 09-15-TI2500
(262) 703-5800 • [email protected]
5.2 Measurement Unit (Measure Unit)
The following unites are available for selection:
DensityAvailable density units:g/cm3
lb/gal (US) 1 g/cm3 = 8.3454 lb/gallb/gal (IP) 1 g/cm3 = 10.0224 lb/gal
Comp. Density (Temperature-compensated density)Density measurement in g/cm3 at a reference temperature.
All results at the same reference temperature (T0,e.g.20°C),regardlessofthemeasuringtemperature(T).
Compensated density = measured density •(1+α• (T - T0))
10 temperature-compensation coefficients can be saved.
The following input is required:Comp. No. Number of the temperature-compensation coefficient (0...9)Comp. Temp. Reference temperature (T0)αx1000 Temperature-compensationcoefficientFortypicaltemperature-compensationcoefficients,seeChapter13.2;calculationofα,seepage11.
SG (t/t) (specific gravity)
SG(t/t)= Density of the sample at T Density of water at T
T Measuring temperatures
SG (specific gravity, temperature-compensated)
SG= Density of the sample, temperature-compensated for T0 Density of water at T110 temperature-compensation coefficients can be saved.
The following input is required:Comp. No. Number of the temperature-compensation coefficient (0...9)Comp. T. T0/T1°C(entertemperaturesT0 and T1)αx1000 Temperature-compensationcoefficientFortypicaltemperature-compensationcoefficients,seeChapter13.2;calculationofα,seepage11.
API (American Petroleum Institute)Themeasuredvaluesareconvertedtoareferencetemperatureof15°Cor60°F.ThisconversionisbasedonAPItables:product group A: crude oil; product group B: fuel, petroleum products; product group D: lubricants. The result can be expressed as density (e.g. APIA (Density)), or directly in API degrees (e.g. APIA (degrees)).
Brix (Sucrose)Measurementofthesucroseconcentration,percentweightat20°C.
Alcohol (Ethanol)Measurementoftheethanolconcentrationinwater,percentweight(Wt%)orpercentvolume(Vol%)at20°C.
H2SO4 (Sulfuric acid concentration)Measurementofthesulfuricacidconcentration,percentweightat20°C.
Baume (°Baumé scale)Measurementin°Baumé(heavyBauméford>1,lightBauméford<1)calculatedtoareferencetemperature.
10 temperature-compensation coefficients can be saved. Input of temperature-compensation coefficients via Comp. Density.Fortypicaltemperature-compensationcoefficients,seeChapter13.2;calculationofα,seepage1.

Page 11SBS-2500 Manual 09-15-TI2500
(262) 703-5800 • [email protected]
PlatoMeasurementof°Platoat20°C.
ProofMeasurementoftheProofdegreeat60°F.The Proof degree is a unit used to determine the ethanol content.
Proof (US): Measurement with US unit (100v/v% = 200 US Proof).Proof (IP): Measurement with IP unit (100v/v% = 175 British Proof).
Conc. (Concentrations)Measurement of the concentration via the input of the desired concentration-conversion formula y = a + bx at a reference temperature.
y = concentration in % or without unitsa, b = sample-dependent coefficientsx = measured density.
The following units are possible for x:• 1/compensated density -1• compensated density -1• compensated density• 1/specific gravity -1• specific gravity -1• specific gravity
Calculation of the temperature-compensation coefficient αMeasure density of the sample:• at a temperature (T1) above the normal measuring temperature,• at a temperature (T2) below the normal measuring temperature.
Calculateαaccordingtotheformula:density at T2 = density at T1 •(1+α• (T1 - T2))
or
α = ( density at T2 - 1 ) / T1 - T2
density at T1
Entervalueαx1000intotheinstrument.
NoteThe temperatures T1 and T2havetobeenteredintotheselectedunit(°Cor°F,seechapter5.3).
Example(measured)densityat26°C(T1) 0.7844 g/cm3
(measured)densityat15°C(T2) 0.7937 g/cm3
α = ( 0.7937 - 1 ) / 26 - 15
0.7844
α=(1.011856-1)/11=0.011856/11=0.001078
αx1000=1.078; enter this value into the instrument.
10 temperature-compensation coefficients can be saved. Input of temperature-compensation coefficients via Comp. Density. For typical temperature-compensation coefficients, see Chapter 13.2.

Page 12SBS-2500 Manual 09-15-TI2500
(262) 703-5800 • [email protected]
5.3 Temperature Unit (Temp. Unit)Datain°Cor°F(selectable).
5.4 Measure ModeConfiguration of sample identification, stability mode and method of data storage.
Sample Name Sample identification. A letter (a...z or space) can be set for the identification of samples.
Stability Stability control. Auto The result is accepted automatically when the display is stable. Manu Result accepted by pressing the “ok/meas.” key.
Mode Method of data storage. Labo By pressing the “ok/meas.” key the result is saved and transferred (printer, PC). Field By pressing the “ok/meas.” key the result is saved. Custom User-defined setting. Memory in Save results. Auto Save result automatically. Manu Result saved by pressing the “ok/meas.” key Memory out Transfer result to PC or printer. Auto Transfer result automatically. Manu Transfer result by pressing the key.
5.5 Adjustment Mode (Calib. Mode)Off Adjust measuring cell with accompanying density standard or distilled water.
On Adjust measuring cell with desired density standard. The following input is required: Density Density of the density standard (g/cm3) at the reference temperature Temp Reference temperature αx1000 Temperature-compensationcoefficientofthedensitystandard• 1000
5.6 InterfacePRN Printer interface Data transfer to printer Printer with serial interface and connected infrared adapter. Results are formatted for output to a
printer. Transfer rate (baud rate), parity and stop and data bits must be configured according to the
peripheral device.
THE FOLLOWING SETTINGS ARE REQUIRED FOR THE METTLER TOLEDO LC-P45 PRINTER:Baud rate 9600Parity noneStop bits 1Data bits 8
RS Serial interface. The Excel macro “PortableCapt” for data transfer to the computer via the infrared adapter is located on the CD.
IrDA Data transfer to the PC with the integrated IrDA interface in accordance with protocol 1.20
5.7 BeepOff Beep off.On Beep on.

Page 13SBS-2500 Manual 09-15-TI2500
(262) 703-5800 • [email protected]
5.8 Background Lighting and LCD-Contract (LCD)BacklightingThe backlighting is turned off automatically 5 seconds after the last time a key has been pressed (Auto off), or it is always off (Always off).
ContrastDisplay contrast is adjustable to one of 9 levels with the keys.
5.9 Automatic Switch-off (Power)
Off Automatic switch-off is off. The instrument must be switched off manually.On The instrument switches off automatically if not operated for 10 minutes.
5.10 Software Version (Version No.)The software version is displayed.
5.11 Date & TimeThe settings for date and time can be edited here. The date is displayed in the format year/month/day (e.g. 2003/03/04 for March 4, 2003). Both date and time are included in the data transfer to a printer or computer.
5.12 IdentificationAn identification consisting of 10 letters and numbers (instrument name, user, etc.) may be entered here. This identification will be included in the data transfer to a printer or computer.
6. Measurement (meas)6.1 Procedure for Proper Measurement
• Test the instrument for accuracy with the accompanying density standard or distilled water before beginning any measurements (See Chapter 4.3).
• Ensure that the measuring cell is clean before each measurement. Insufficient cleaning leads to remaining residue in the measuring cell and, therefore, incorrect results.
• Check the sample for chemical resistance of the instrument materials.
Sample tube: PTFE (polytetrafluorethylene)
Measuring cell: Borosilicate glass
Measuring cell holder: PPS (polyphenylene sulphide)
Sample pump: PP (polypropylene)
Ensure that the samples to be measured:• Are liquid enough to be sucked up or injected;• Can be dissolved with a solvent suitable for cleaning the measuring cell;• Are homogeneous (no emulsions or suspended particles, no air bubbles);• Have reached ambient temperature in the measuring cell.
Forsampleswhichare20°Ccolderthantheambienttemperature,heatthesamplebeforebeginningthesamplingprocedure.

Page 14SBS-2500 Manual 09-15-TI2500
(262) 703-5800 • [email protected]
NoteThe unit display flashes when the difference in temperature between the sample and the ambient air is greater than±5°C
Forsamplesofhighviscosity(>2000mPa•s):• Use an external syringe to fill the measuring cell.
6.2 Filling the Measuring Cell Using the Built-In Sample Pump
• Ensure that the sample tube is in the sample.• Press the fill button (12) slowly to fill the measuring cell.• Ensure that there are no air bubbles in the measuring cell.
6.3 Filling the Measuring Cell Using an External Syringe
• Press the drain button (3).• Slide up the lock button (11).• Remove the screw stopper (6) with a coin.• Screw in the adapter for the external syringe.• Hold the sample tube over a waste container.• Slowly inject the sample into the measuring cell.• Ensure that there are no air bubbles in the measuring cell.• Do not remove the syringe while measuring.

Page 15SBS-2500 Manual 09-15-TI2500
(262) 703-5800 • [email protected]
6.4 MeasuringThe procedure is dependent upon the settings in the menu, see Chapter 5.4.
The symbol appears in the display: Measuring with automatic stability control• Press the “ok/meas.” key to start measuring.
The symbol blinks during measurement. The result appears in reverse display.
The symbol does not appear on the display: Measuring with manual stability control
The instrument measures continuously.• Wait until the displayed value stabilizes.• If the result is to be saved: Press the “ok/meas.” key. The result appears in reverse display.
Measuring with Temperature-Compensation Coefficients (α)(Comp. Density, SG, Conc. or Baume on the display)• Press the key until a previously-saved temperature-compensation coefficient appears in the display,
e.g. α1=0.132.• Select the desired coefficient using the and keys.• Confirm the selected coefficient with the “ok/meas.” key.• Measure using either automatic or manual stability control.
Emptying the Measuring Cell• Hold the sample tube over a waste container.• Press drain button (3) downward slowly and move it up again with the fill button (12).
6.5 Saving the ResultsThe instrument can save up to 1100 results internally. Each time a result is saved, the number of internally-stored values increases by one.
The procedure for saving the results is dependent upon the settings in the menu (See Chapter 5.4).
The symbol appears in the display: Saving all results automaticallyThe instrument saves all results automatically.
The symbol does not appear in the display: Saving selected results manually
Save the result:• Press the “ok/meas.” key.
Do not save the result:• Press the “esc” key.
6.6 Displaying and Marking Saved Results
Displaying Saved Results• Press the key.The sample number flashes and the symbol appears.• Scroll through the saved results using the and keys.
Marking ResultsFor the identification of invalid or incorrect results or for marking a sample change.• Select the desired sample number using the and keys.• Press the “ok/meas.” key.The selected sample number is marked with an asterisk.

Page 16SBS-2500 Manual 09-15-TI2500
(262) 703-5800 • [email protected]
NoteThe marking is removed if the sample has already been marked.
6.7 Printing and Transferring ResultsConditions• The interface and peripheral device are configured properly, see Chapter 5.6 and Chapter 8.• For PRN and RS interfaces, the infrared adapter must be connected to the printer/PC.
The procedure for printing and transferring results is dependent upon the settings in the menu (See Chapter 5.4).
ImportantTo transfer or print results, hold the instrument in the direction of the infrared adapter at a maximum distance of approx. 20 cm.
The symbol appears in the display: Printing or transferring results automatically
Every displayed result is transferred automatically.
The symbol does not appear in the display: Printing or transferring selected results manually• Press the key.• Select desired result with the or key.• Press the “ok/meas.” key to transfer/print the result.
The symbol flashes and the result is transferred.
Printing and Transferring Results of a Series of Samples Manually• Press and hold the key until Memory out, Execute? (All) appears in the display.• Press the or key.
Execute? (Range) appears.• Press the “ok/meas.” key to confirm.• Enter the desired series of samples (from ... to ...) using the arrow keys.
To transfer the series of samples:• Press the “ok/meas.” key.The sample series (from ... to ...) is confirmed. The symbol flashes and the results of the selected series of samples are transferred.
To Print or Transfer All Results Manually• Press and hold the key until Memory out, Execute? (All) appears in the display.• Press the “ok/meas.” key.
The symbol in the display flashes and all results are transferred.
After a successful transfer, the user is asked whether he/she would like to delete the transferred results:Memory All Clear Execute? (No).
Leaving Transferred Results Intact• Confirm Memory All Clear Execute? (No) by pressing the “ok/meas.” button.
Deleting Transferred Results• Press the or key.
Execute? (Yes) appears.• Press the “ok/meas.” key to confirm.All results are deleted.

Page 17SBS-2500 Manual 09-15-TI2500
(262) 703-5800 • [email protected]
6.8 Deleting ResultsIt is not possible to delete individual results with the SBS-2500.
Deleting all results• Press and hold the key until Memory All Clear Execute? (No) appears in the display.• Press the or key.
Execute? (Yes) appears.• Press the “ok/meas.” key to confirm.All results are deleted.
7. Adjustment (cal)Before adjusting• Carry out a test measurement before adjusting the measuring cell (See Chap. 4.3).
Test measurement result < 0.9995 or > 1.0005• Check if the measuring cell is dirty, clean if necessary and repeat the test measurement.
Test measurement result once again < 0.9995 or > 1.0005• Readjust instrument.
7.1 Adjusting the Measuring Cell with Water
Settings in the menu• Calib. Mode: off
Adjusting• Ensure that the measuring cell and sample tube are clean.• Fill the clean measuring cell with the accompanying density standard or distilled water and ensure that no air
bubbles are allowed to enter.• Press and hold the key until CALIB (Water) appears in the display.
The instrument adjusts automatically (duration: approx. 1 minute). After adjustment is completed, the measured deviation from the theoretical value and Execute? (No) appears.
Measured Deviation <0.001Press the or key. Execute? (Yes) appears.- Press the “ok/meas.” key to confirm.The adjustment is confirmed.
Measured deviation ≥ 0.001• Check whether the measuring cell is dirty and if there are air bubbles.
Measuring cell is clean and contains no air bubbles:• Press the or key.
Execute? (Yes) appears.• Press the “ok/meas.” key.
Measuring cell is dirty and/or contains air bubbles:• Execute? (No) is confirmed by pressing the “ok/meas.” button.• Clean the cell if necessary and readjust.

Page 18SBS-2500 Manual 09-15-TI2500
(262) 703-5800 • [email protected]
7.2 Adjusting the Measuring Cell with a Density StandardIf a different density range is to be used, the measuring cell can be adjusted using a density standard of your choice (e.g. toluene from the NIST, National Institute of Standards and Technology) instead of distilled water.
Setting in the Menu• Calib. Mode: On• Enter the following density standard values into the menu:
Density Density of the density standard (g/cm3) at the reference temperatureTemp Reference temperatureαx1000 Temperature-compensationcoefficientofthedensitystandard•1000
Adjusting• Ensure that the measuring cell and sample tube are clean.• Fill the clean measuring cell with the density standard (e.g. Toluene) ensuring that no bubbles are allowed to
enter.• Press and hold the up and down keys simultaneously until CALIB (STD) appears in the display.
The instrument adjusts automatically (duration: approx. 1 minute). After adjustment is completed, the measured deviation from the theoretical value and Execute? (No) appears.
Measured Deviation <0.001Press the or key. Execute? (Yes) appears.- Press the “ok/meas.” key to confirm.The adjustment is confirmed.
Measured deviation ≥ 0.001• Check whether the measuring cell is dirty and if there are air bubbles.
Measuring cell is clean and contains no air bubbles:• Press the or key.
Execute? (Yes) appears.• Press the “ok/meas.” key.
Measuring cell is dirty and/or contains air bubbles:• Execute? (No) is confirmed by pressing the “ok/meas.” button.• Clean the cell if necessary and readjust.
7.3 Adjusting the Measuring Cell with AirThe SBS-2500 measures with the specified accuracy if the measuring cell is correctly adjusted with the accompanying density standard or distilled water.
Additional adjustment with air is generally not necessary, but is recommended when:• The measuring cell is replaced,• Thedisplayeddensityofairis<0.0007g/cm3or>0.0015g/cm3.

Page 19SBS-2500 Manual 09-15-TI2500
(262) 703-5800 • [email protected]
Setting in the MenuCalib. Mode: Off.
Preparing the Measuring Cell• Clean the measuring cell with a suitable solvent and rinse with ethanol.• Hold the sample tube over a waste container.• Connect a tube from the connection of the external syringe to an air pump (volume flow 1…2 l/min) connected
to dry tube filled with 5…10 g silica gel.• Dry measuring cell for approx. 5…10 min.• Wait approx. 30 min. until the measuring cell has reached the ambient temperature.
Adjusting• Press the and keys simultaneously.
CALIB (Air) appears in the display. The instrument adjusts the measuring cell automatically.
Adjustment is complete when CALIB (Air) disappears (after approx. 2 min.).• Adjust measuring cell with water or a density standard of your choice.
7.4 Adjusting the Temperature DisplayAdjustment of the temperature display is generally not necessary, as the SBS-2500 was adjusted at the factory before shipment.If the displayed temperature deviates from the actual temperature, carry out the following steps for adjustment:• Check settings in the Measure Mode menu.
Stability: Manu Memory in: Manu
• Switch instrument off.• Set instrument aside for approx. one hour at a constant temperature.• Switch instrument on.• Press the “ok/meas.” key briefly; the display appears in reverse.• Read temperature on the instrument and from an external thermometer.• Determine and log the difference between the actual temperature (external thermometer) and the
temperature displayed on the instrument.• Press the and keys simultaneously.CALIB (°C) or CALIB (°F) (depending on the selected temperature unit) appears, and the unit flashes.• Enter the logged temperature difference (with sign) using the arrow keys.

Page 20SBS-2500 Manual 09-15-TI2500
(262) 703-5800 • [email protected]
• Press the “ok/meas.” key.
The temperature display is adjusted.
ExampleDisplayedvalueoninstrument: 21.7°CActualtemperature: 21.3°CDifference: 21.3°C–21.7°C=–0.4°CValue to be entered: –0.4 (°C)
8. InterfaceUsing the infrared interface of the SBS-2500, the stored measurements together with the sample identification, the measurement unit, the temperature, the temperature compensation coefficient, the instrument identification, date and time can be printed out with a printer or transferred to a PC.
An infrared adapter or a PC/printer with an IrDA interface is required.
ImportantData transfer is only possible when:•Thereisvisualcontactbetweentheinfraredadapterandtheinfraredinterface;•ThedistancebetweentheSBS-2500andtheinfraredadapterisnomorethan20cm.
8.1 IR Printer SettingsConfigure the infrared interface of the SBS-2500 as described in Chapter 5.6.• Connect infrared adapter to printer.• Switch printer on.• Press the menu button on the printer.• Set the following serial interface parameters, see the operating instructions for the printer:
Baud rate: 9600Parity: NoneStop bits: 1Data bits: 8
8.2 Data Transfer to PC• Configure the infrared interface of the SBS-2500 as follows (Interface, See Chapter 5.6):
Interface: RSBaud rate: 9600Parity: NoneStop Bits: 1Data Bits: 8
• Connect the infrared adapter to an available serial interface (COM1, COM2,…) on the PC.• Insert the accompanying CD-ROM in to the CD drive of the PC.• Install the PortableCapt program (Excel macro).• Start the PortableCapt program on the PC.• In the Excel macro: select the serial interface (COM1, COM2, …) to which the infrared adapter is connected.• For further procedures, see Chapter 6.7.
Page 21SBS-2500 Manual 09-15-TI2500
(262) 703-5800 • [email protected]
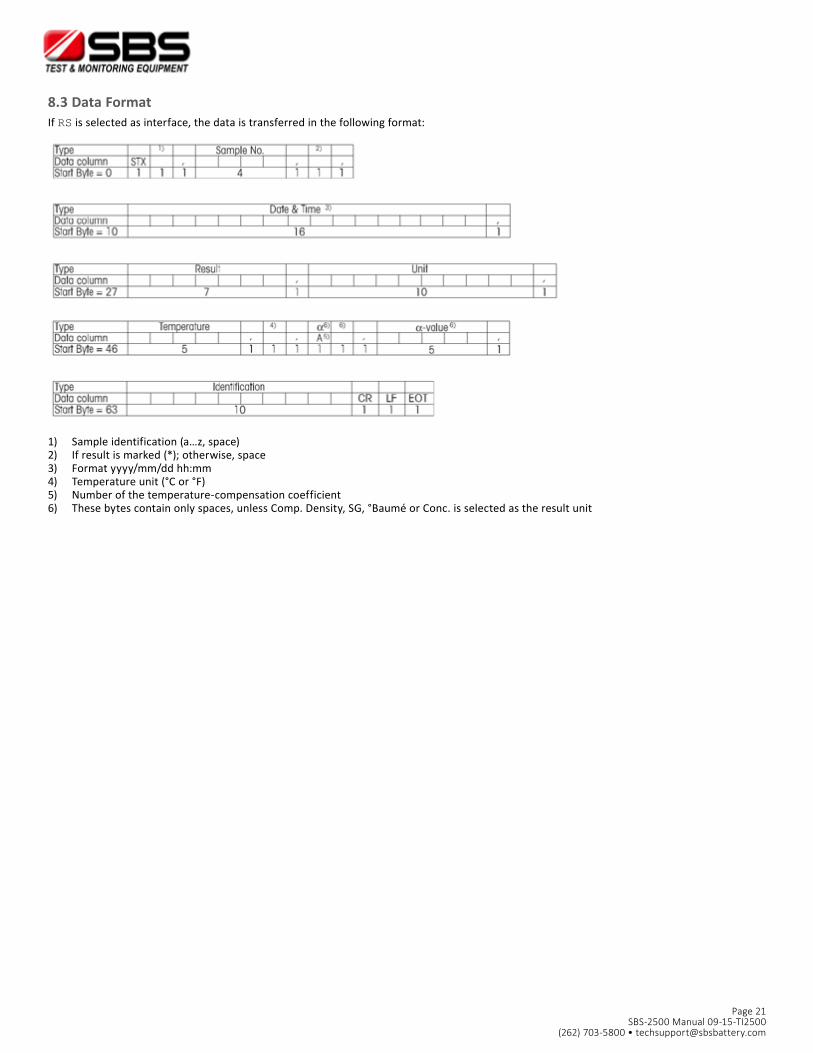
8.3 Data FormatIf RS is selected as interface, the data is transferred in the following format:
1) Sample identification (a…z, space)2) If result is marked (*); otherwise, space3) Format yyyy/mm/dd hh:mm4) Temperatureunit(°Cor°F)5) Number of the temperature-compensation coefficient6) Thesebytescontainonlyspaces,unlessComp.Density,SG,°BauméorConc.isselectedastheresultunit

Page 22SBS-2500 Manual 09-15-TI2500
(262) 703-5800 • [email protected]
9. Error Messages and MalfunctionsError Possible Causes What to DoE-01 Adjustment error:
• Measuring cell not filled with water• Air bubbles in measuring cell• Sample tube defective• Measuring cell is dirty• Measuring cell defective
• Fill measuring cell with water• Use bubble-free, distilled water• Replace sample tube• Clean measuring cell• Call SBS Test Equipment Service
E-02 Measuring cell fault• Measuring cell is dirty• Measuring cell is defective
• Clean measuring cell• Call SBS Test Equipment Service
E-03 Sample temperature not measured correctly
• Call SBS Test Equipment Service
E-04 Error in ambient temperature measurement
• Call SBS Test Equipment Service
E-05 Full appears instead of a sample number: Data memory full
• Delete data from memory
E-06 Memory Fault • Call SBS Test Equipment Service
E-07 Measuringtimeof10minutesexceeded • Switch instrument off and on again• Measure using bubble-free, distilled
waterIf error appears again: Call SBS Test Equipment Service
BATT Batteriesempty Replacebatteries(seeChapter4.1)Result=0.0000orstronglynegativeresults:Menusettingincorrect
Set Calib. Mode to off

Page 23SBS-2500 Manual 09-15-TI2500
(262) 703-5800 • [email protected]
10. Cleaning and Maintenance10.1 Cleaning the Measuring CellThe built-in sample pump or an external syringe can be used to fill the measuring cell with cleaning liquid.• Clean measuring cell daily with a suitable cleaning liquid.• For a very dirty measuring cell let the inside of the cell soak with cleaning liquid.• Repeat cleaning if necessary.
10.2 Cleaning the Housing• Never use aggressive liquids or solvents to clean the housing of the SBS-2500.• We recommend that you use the cleaning tissues which come with the instrument.
10.3 Replacing the Sample Tube
• Loosen fixing screw (7) of sample tube in the direction of the arrow and remove old sample tube.• Insert new sample tube with washer into screw gland of sample tube.• Tighten screw gland of sample tube to instrument by hand.• Check sample tube for secure seating.
10.4 Replacing the Sample Pump
Removing cover of sample pump• Slightly press together cover of sample pump on grip recesses and detach it.• Pull sample pump out of guide system.
Inserting sample pump• Insert new sample pump into guide system
Ensure that the pump plunger (2) and pump body (3) are situated in the corresponding guides when inserting the sample pump.• Check for proper functioning of sample pump.• Put the cover of the sample pump back in its place.

Page 24SBS-2500 Manual 09-15-TI2500
(262) 703-5800 • [email protected]
11. Standard Equipment
The instrument is delivered pre-assembled with the following equipment.
1 SBS-2500
2 AAA Batteries (LR03, 1.5V)
1 CD-ROM
1 Operating instructions
1 IR Adapter

Page 25SBS-2500 Manual 09-15-TI2500
(262) 703-5800 • [email protected]
12. Technical DataMeasurement principle Densitymeasurementusingtheoscillatingbody
method
Sample intake Using the built-in sample pump or an external syringe
Range of density measurement 0.0000 - 2.0000 g/cm3
Accuracy ±0.001 g/cm3
Resolution 0.0001 g/cm3
Working temperature 5°-35°C
Storage temperature -20°C-70°C
Temperature accuracy ±0.2°C
Measurement range Brix (d) 0.0 - 84.0%
Accuracy ±0.3%
Measurement range Ethanol (d) wt% 0.0 - 100.0%
Accuracy ±1.0%
Measurement range Ethanol (d) vol% 0.0 - 100.0%
Accuracy ±1.0%
Measurement range H2SO4 0.0 - 100.0%
Accuracy ±1.0%
Measurement range light Baumé 10-100°Baumé
Accuracy ±0.4°Baumé
Measurement range heavy Baumé 0-72°Baumé
Accuracy ±0.1°Baumé
Measurement range Plato 0.0 - 20.0%
Accuracy ±0.3%
Measurement range Proof (US) 0.0 - 200.0
Accuracy ±2.0
Measurement range Proof (IP) 0.0 - 175.0
Accuracy ±1.75
Display Backlit LC-Display
Materials
Housing PBT (polyester)
Measuring cell Borosilicate glass
Wetted parts PTFE(polytetrafluorethylene)
Borosilicate glass
PPS(polyphenylenesulfide)
PP (polypropylene)
Weight Approx. 360g
Measuring time per sample 1 - 10 minutes
Data memory 1100 results
Interface Infrared for printer and PC
Battery operation 2x1.5Vbatteries(LR03);typeAAA
Battery lifetime Approximately90hours(withbacklightingoff)
Subject to technical changes.

Page 26SBS-2500 Manual 09-15-TI2500
(262) 703-5800 • [email protected]
13. Appendix13.1 Density of Water (0 °C to 40 °C)
Temperature °C Density g/cm3
0 .99984
1 .99990
2 .99994
3 .99996
4 .99997
5 .99996
6 .99994
7 .99990
8 .99985
9 .99978
10 .99970
11 .99961
12 .99950
13 .99938
14 .99925
15 .99910
16 .99894
17 .99878
18 .99860
19 .99841
20 .99821
21 .99799
22 .99777
23 .99754
24 .99730
25 .99705
26 .99679
27 .99652
28 .99624
29 .99595
30 .99565
31 .99534
32 .99503
33 .99471
34 .99438
35 .99404
36 .99369
37 .99333
38 .99297
39 .99260
40 .99222[Chemical Handbook Fundamental Version, Rev. 3, Table 5.2 (1984)]

Page 27SBS-2500 Manual 09-15-TI2500
(262) 703-5800 • [email protected]
13.2 Temperature-Compensation Coefficients α
Substance Temperature Range (°C) α • 103 / °CWater 15 - 30 0.23Ethanol 0 - 30 1.09m-xylene 0 - 30 0.99p-xylene 15 - 30 1.02Glycerine 15 - 30 0.49Chloroform 0 - 30 1.26Carbon tetrachloride 0 - 30 1.22Toluene 0 - 30 1.07Benzene 6 - 30 1.21Methanol 6 - 30 1.18Acetone 0 - 30 1.42Bromobenzene 0 - 30 0.91Cyclohexane 0 - 30 1.20Isopropanol 0 - 30 1.06n-nonane 0 - 30 1.08