department user manual - finance jharkhand€¦ · p a g e | 2 je-gras (e-government receipts...
TRANSCRIPT

P a g e | 1
DEPARTMENT USER MANUAL

P a g e | 2
Je-GRAS (e-Government Receipts Accounting System)
Department User Manual
©PMU, Finance Department, Govt. Of Jharkhand

P a g e | 3
INDEX
TOPIC PAGE NO.
1. Introduction 4
2. Je-GRAS Process 5
3. Internal User Login 7
4. Department Users 8
a. HOME 9
b. DEPARTMENT ROLE
CREATE OFFICE 10
CHANGE OFFICE PASSWORD 13
MODIFY OFFICE 14
c. MANAGE PURPOSE
CREATE PURPOSE 15
d. MIS REPORT 17
e. CHANGE PASSWORD 18

P a g e | 4
Je-GRAS: e-Government Receipts Accounting System
1. INTRODUCTION
Je-GRAS is an online Government Receipts Accounting System. The departments which generate revenue
for the Government are associated with Je-GRAS.
To participate in Je-GRAS, one has to click on new user creation and requires filling up their credentials.
Once the login ID is generated then one is authorized to use Je-GRAS for all types of challan submission.
For one time transactions user can login by using Guest User login
For easy and rapid processing one must create required profile that would help the user to enter challan
details without any hassle.
After submission of challan details, now website is transferred to selected bank website user can use this
site by using the internet facility. Bank will authenticate transaction and return to Je-GRAS portal with
transaction status.
One may take printout of challan in five copies in case of manual banking (cheque/DD). Registered users
and guest have access to view history of transactions and take print of old transactions.

P a g e | 5
2. e-GRAS PROCESS
I. For making any online payments / remittances, the remitter / payee may login into the
Jharkhand e-GRAS website. He shall fill in the required details in order to prepare an e-Challan.
A unique Identification No. i.e. Government Reference Number (GRN) shall be created for each
and every transaction. He may have option to choose the mode of payment i.e. Electronic or
Manual (Cash / Cheque / DD) to effect the payment.
II. When the Electronic mode of payment is selected by the payee / remitter, he shall be directed to
choose the Bank from where he wants to effect the payment. Once the bank is selected, he shall
be directed to the selected banks website. The remitter / payee shall then login into the banks
website using his Internet banking user ID and password. He shall then direct the payment to
the Cyber Treasury, Government of Jharkhand account, which effects debit to his bank account
and credit to the Government of Jharkhand Account. Again a separate unique identification
number i.e. Bank Challan Identification Number (Bank CIN) is created at the bank website.
III. The transaction shall affect debit to the remitter’s/payee’s bank account and credit to the
Government Account opened with the Participating bank.
IV. The payee shall then be directed back to the Je-GRAS website where his e- Challan shall be
available to him with both the unique ids i.e. (GRN and CIN) once the payment is successful.
Success will be printed as watermark in case of successful transaction. The banks name, date
of the transaction and bank CIN shall be instantly updated on the Je-GRAS website. The scroll
number shall be updated on the successful remittance of receipts to the RBI and confirmation
of the data updated by the Participating bank by the Cyber Treasury on regular intervals as
specified in the agreement.
V. Once the remitter / payee is directed and enters into the Participating banks website; the
Participating bank shall be responsible for the transaction made by the payee from his bank
account. The Participating bank shall be responsible to correct the losses, if any, to its
customers on account of transaction charges, double payments, wrong credits / debits etc. In
case of any disruption in the Internet network in between the government of Jharkhand
website (Je-GRAS) and the Participating bank’s website, the bank shall make correction to the
data losses, if any; to the government on resuming the network connections.

P a g e | 6
VI. Participating bank shall not in any way dispute the payment having been made once a
“successful” transaction message is updated from Participating bank’s server to the
Government server.
VII. The funds collected so, in the Government account shall be remitted to Government’s account
with the Reserve Bank of India electronically or by RTGS as far as possible or as per the terms
agreed upon mutually.
VIII. Fund transfer:
a) The cut-off time for transactions in a day or as prescribed by RBI time to time for reporting
e-payments pertaining to that day to RBI, e-payment received after that time shall be
accounted on the next working day for reporting purposes and that RBI calendar would be
followed for reckoning holidays.
b) At every End of Day, Participating Aggregator Bank /GATEWAY shall pool in all receipts of
a particular day in the Government account.
c) Participating bank shall remit every end of day’s receipts preferably by RTGS/ or any
other payment mechanism mode acceptable to the Reserve bank of India (RBI) into the
Government account with the RBI. Participating bank shall at the same time send an
electronic Scroll in the format defined by the Government from time to time; and a hard
copy of the same to the Cyber Treasury Officer.
d) In case, the Participating Bank has to revert any transaction on their end; only the
reversions on account of double debits to the payee’s account is permissible at the request
of the payee; within the purview of the banking regulations in force from time to time.
Such reversions are only possible till the time; the receipts are remitted to the RBI
Government account. Once the funds are remitted there shall not be any reversion.

P a g e | 7
3. INERTNAL USER LOGIN
There are five types of internal user login:
a) Accountant General (AG) Office
b) Bank
c) Jharkhand Government Departments.
d) Office Users (Under Jharkhand Govt. Departments)
e) Treasury Officer (TO)
All the internal Users will be created by the Admin (PMU, Finance Department, Govt. Of Jharkhand)
Fig. 1 Jharkhand e-GRAS Home Page
The home page (Fig. 1) displays the login screen for all types of users. The user must enter the Login ID
and corresponding password to proceed.

P a g e | 8
4. DEPARTMENT USERS
Once the Department User logins into the Jharkhand e-GRAS system following options are
available (Fig. 2):
i. HOME (Click to go to Department Home page)
ii. DEPARTMENT ROLE
a. CREATE OFFICE
b. CHANGE OFFICE PASSWORD
c. MODIFY OFFICE
iii. MANAGE PURPOSE
a. CREATE PURPOSE
iv. MIS REPORT
v. CHANGE PASSWORD
Fig 2 Department Home Page

P a g e | 9
4.1 HOME
The HOME tab takes the user back to the Department User Home page (Fig, 2a).
Fig 2a. Department home Page

P a g e | 10
4.2 DEPARTMENT ROLE > CREATE OFFICE
Fig. 3 Create Office Tab
Under the Department Role tab the Create Office option (Fig. 3) allows the Department user to create
new Office role.
Fig. 4 Create Department User Page
1
2
3 4
6 5
7 8
12
14
16
10 9
13
15 17
11

P a g e | 11
The different fields of CREATE USER (Department) page (Fig. 4) are explained as follows:
1. Department Name:
The department name cannot be changed. It is fixed with the associated Login ID of the
department.
2. Treasury:
Select the Treasury under which the office needs to be created.
3. Office Name:
Select office name from the available list of offices.
4. Login ID:
The Login ID is the Office code by default. The user can edit the Login ID if required.
5. Password:
Enter the password for the office Login ID being created. The Password must be at least 8
characters long and include at least one Special Character, one Number, and one Capital letter.
6. Confirm Password:
Re-enter the password for the office Login ID being created.
7. Name / Office:
Enter the name of the person or office that will be using the system.
8. User Type:
User type is OFFICE by default and cannot be edited.
9. E-mail ID:
Enter the E-mail ID of the office or person.
10. Address:
Enter the postal address of the office or person.
11. Country:
Enter the country name for address purpose.
12. State:
Enter the State name.

P a g e | 12
13. City:
Enter the city or town name.
14. Mobile Number:
Enter the mobile number.
15. PIN Code:
Enter the Postal Index Number (PIN).
16. ID Type:
Select ID type for ID proof from the available list if ID options (Aadhaar Card / BPL ID / Beneficiary ID
/ College ID / Driving License / Employee ID Card / Lessee No. / PAN Card / Ration Card / Registration No. /
School ID / TAN No. / TIN NO. (Commercial Tax)/ Vehicle No. / Voter ID).
17. ID Number:
Enter the ID number of the ID type selected.
P a g e | 13
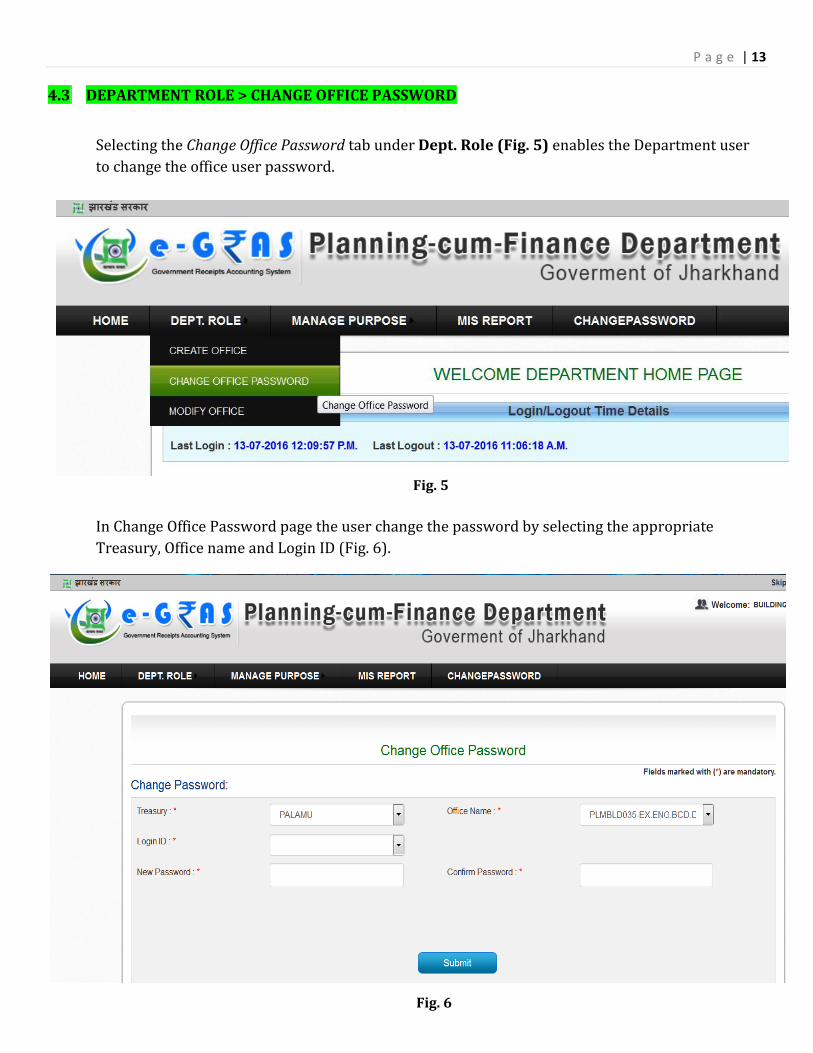
4.3 DEPARTMENT ROLE > CHANGE OFFICE PASSWORD
Selecting the Change Office Password tab under Dept. Role (Fig. 5) enables the Department user
to change the office user password.
Fig. 5
In Change Office Password page the user change the password by selecting the appropriate
Treasury, Office name and Login ID (Fig. 6).
Fig. 6

P a g e | 14
4.4 DEPARTMENT ROLE > MODIFY OFFICE
Department user can modify the details of any office by clicking on the MODIFY OFFICE option under the
DEPT. ROLE tab (Fig. 7).
Fig. 8
In the Manage Office page Office details must be selected in following order (Fig. 8):
i) Treasury
ii) Office Name
iii) Login ID
After this the edit office details page is displayed where the Personal details can be edited.
Fig. 7

P a g e | 15
4.5 MANAGE PURPOSE > CREATE PURPOSE
A Purpose defines the type of revenue or tax that needs to be collected by the Government under a
particular head for a particular department. For example Commercial Tax (Value Added Tax or VAT,
Electric Duty, Luxury Tax, Entertainment Tax etc.), Registration (Stamp & Registration Fees), Transport
(Vehicles & Driving License), Traffic (Traffic Challan), Excise & Prohibition (Malt Liquor, Country Spirits
etc.) etc.
New Purpose can be created by clicking on the CREATE PURPOSE tab under the MANAGE PUSPOSE tab
(Fig. 9).
Fig. 9
The different fields on Create Purpose page must be filled in the order as discussed below (Fig. 10):
1. Department List:
Displays the Department under which the collection is to be made. This cannot be edited and is
autofilled depending upon the department from which the user has logged in.
2. Major Code:
Select the Major Code.
3. Sub-Major Code:
Select the Sub-Major Code.

P a g e | 16
4. Minor Code:
Select the Minor Code
5. Sub-Code:
Select the Sub-Code
6. Purpose:
The purpose name is auto filled in by default. But it can be edited to make it more user friendly
that will explain the purpose clearly to the layman.
After filling in the details of the purpose Submit button must be cicked in order to create the purpose.
Fig. 10
5
3
1
4
6
2

P a g e | 17
4.6 MIS REPORT
The MIS REPORT tab allows the Department user to view a District-wise consolidated report of total
number and amount of Challans till date or in a particular time period.
Fig. 11
User can select a particular date from the given option and click on Search button to view the report (Fig. 11).

P a g e | 18
4.7 CHANGE PASSWORD
The CHANGE PASSWORD option allows the Department user to change their existing password (Fig. 12).
Fig. 12
To change the password the user must follow the steps below:
1. Enter the existing password in the Old Password section.
2. Enter the new password in the New Password section.
3. Enter the new password again in the Confirm Password section.
4. Click on Submit button.
3
1
4
2