deneb 1 26 help
DESCRIPTION
It is the manual of DENEB user interface for Computational softwares.TRANSCRIPT
DENEb -1.26 help documents
DENEb
help 1.26
© 2012 Atelgraphics
DENEb -1.26 help documents
Index DENEb's General Introduction
The philosophy behind DENEb Installation of DENEb and plugins Atoms, molecules and samples in DENEb
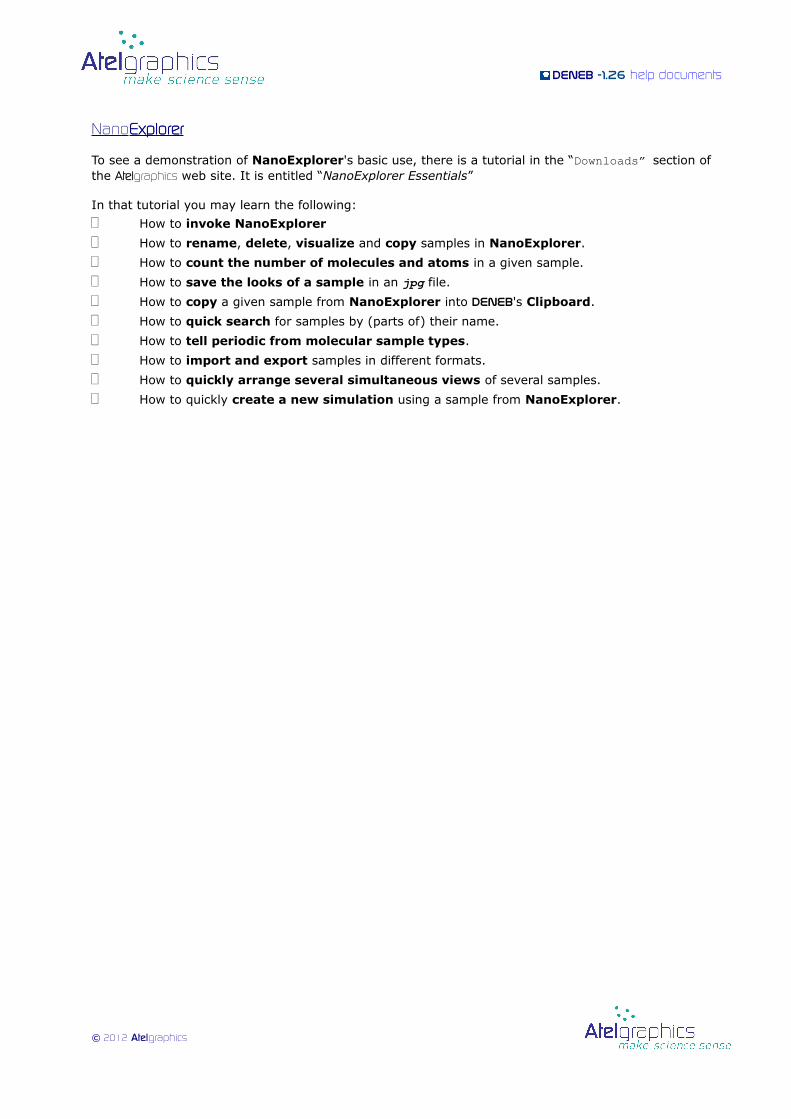
DENEb's NanoExplorer
NE: Loading new samples Note about DENEb's XYZ format
NE: Saving samplesNE: Organizing your samples
DENEb's Sample Manipulator
SM: The coordinates of your objects. Absolute, local, and scaled coordinates
SM: Translating and rotating objects.SM: The Plane.SM: Simple buildingSM: Building periodic samples
SM: Nanotube BuildersSM: Using the atom “Properties”
- Property tags for SIESTA simulations SM: Animation of samples
DENEb's Project Browser
PB: General Idea.PB: The concept of project and simulation.PB: Quick reference guide.PB: Defining engine configurations.
PB: Job Manager PB: Parameters Editor PB: SIESTA Parameters Editor
© 2012 Atelgraphics
DENEb -1.26 help documents
DENEb 1.26 video-demos
Deneb's YouTube videos
DENEb's older video-tutorials
NanoExplorer Project Browser Sample Manipulator: Invoking Mouse drag mode Sliders and buttons mode Simple building Building periodic samples Running simulations DENEb's CHEAT-SHEETS
Sample Manipulator Mouse Actions Sample Manipulator Key navigation DENEb's Known issues
© 2012 Atelgraphics
DENEb -1.26 help documents
DENEb's General Introduction
© 2012 Atelgraphics
DENEb -1.26 help documents
© 2012 Atelgraphics
DENEb -1.26 help documents
The philosophy behind D ENEb
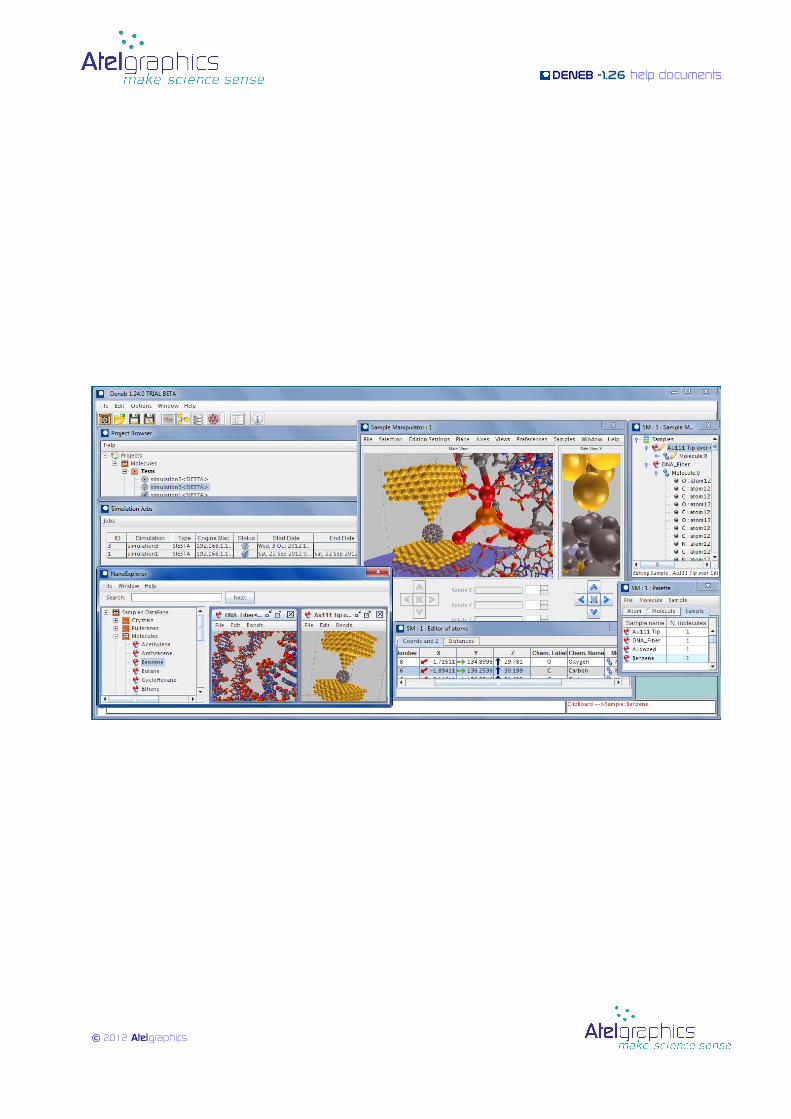
DENEb is a software package whose aim is to facilitate and expedite the work of researchers in the fields of Quantum Atomistic Simulations. With DENEb you can create, execute, retrieve, organize and centralize your thousands of simulations belonging to your hundreds of research projects.
Your simulations might apply to very many different physical systems, they could also belong to different calculation engines (e.g. SIESTA, QuantumESPRESSO, CPMD, VASP, etc), and could be launched for execution into several different remote hosts … Nevertheless, DENEb can keep track of each of them and present them to you neatly organized and readily accessible from your PC. Using DENEb´s Project Browser the user can choose any kind of classification for his simulations, based on kind of sample, type of calculation engine, etc. Use customary labels and organize them, in groups and projects, into tree structures of any depth. Quickly search and -with a single click- store/retrieve all of it: Simulations, projects, their organization, and their resulting data.
In a similar way, the group of all the physical systems of your interest can be easily organized using DENEb's NanoExplorer. This tool provides with tree-organization of thousands of samples, fully customizable, and with quick-search abilities. It is seamlessly integrated with Project Browser and acts both as an independent database and as a source/repository of all your samples. NanoExplorer provides visualization and import/export abilities to/from different formats. You can mass import your older samples, that may be stored in different formats. Also, its whole database can be stored/retrieved with a single click.
To edit your samples use DENEb's Sample Manipulator. This tool provides with extensive abilities to build samples from scratch, combine them into new ones, and modify existing ones. With Sample Manipulator you have complete freedom to edit your samples in almost any imaginable way. It introduces new concepts and auxiliary graphical tools that enable accurate manipulation and navigation. You can open several instances of Sample Manipulator concurrently, this facilitates the simultaneous visualization/manipulation/combination of several samples. Of course, Sample Manipulator is also fully integrated with the rest of DENEb´s tools by simple copy-and-paste operations.
From DENEb's Project Browser, you can define simulations by coupling a given sample to a given set of computational parameters. The Parameter Editor enables graphical setting of all the computational parameters that define the simulation. There is one Parameter Editor tool for each calculation-engine plugin (e.g. the SIESTA plugin, the QE plugin, the VASP plugin, etc) that you include in DENEb. Do not worry about what Parameter Editor to use on what simulation: DENEb keeps track of the calculation types and calls the correct editor in each case. You can use DENEb with any given number of plugins.
Project Browser's Job Manager is an important tool since it holds the list of simulations that have been launched, it lists their status and allows you to retrieve and access the outputs of those that have successfully finished. This tool allows you to: Launch simulations for execution into remote hosts where the calculation engine is installed; monitor automatically the remote computations’ state (pending, running, success, fail); and retrieve automatically the computations’ output-log and output files.
© 2012 Atelgraphics
DENEb -1.26 help documents
Installation of DENEb and plugins
Deneb TRIAL installation instructions To install Deneb Trial in your PC is very easy, you only have to follow these steps:
• For Windows (7, Vista):1. Download and execute the latest Deneb installer for Windows, trial version, for
example: "deneb_TRIAL_1.26.0-setup.exe".2. Follow the instructions from the installation wizard.
• For Linux (most recent distributions):1. Download and execute the latest Deneb installer for Linux, trial version, for example:
"deneb_TRIAL_linux_1.26.0-setup.bin". You might need to set execution permission to the file.
2. The installation will proceed automatically. Execute ./run.sh from the installation directory, to launch Deneb. You can optionally execute the shell called createShortCut.sh so that Deneb's icon will appear in the launcher when executing it.
Hardware minimum requirements to successfully run Deneb Trial: • Intel i3 CPU 2.4 GHz or better. Or AMD equivalent CPUs.• 3 Gb RAM.• 150 Mb available hard disk space.• Graphics card ATI Mobility Radeon HD 5145, or better, with 1 GB Graphics Memory, with the
latest drivers.
Note: Deneb can run in less powerful hardware configurations, but good real-time response might not be obtained under those circumstances.
Hardware suggested requirements for a very good performance:• Intel i7 920 2.6 GHz or better. Or AMD equivalent CPUs.• 4 Gb RAM or greater.• 150 Mb available hard disk space.• Graphics card Nvidia GT220, ATI 5570 or better with 2 GB Graphics Memory, with the latest
drivers.
Supported Operating Systems:➢ Windows vista/ windows7 with .NET framework 3.5 or better with latest service packs and the
latest drivers (DirectX 10 or newer). ➢ Linux Kernel 2.4 or newer.
Installing a plugin in DENEb In order to create simulations and run them in your Engine, you need to install the plugin corresponding to the calculation engine (e.g., SIESTA or CPMD or VASP). This is how to install a plugin in DENEb:
• 1.- Download a plugin file (with extension .bin) for your Engine from the Atelgraphics website.
• 2.- Obtain from Atelgraphics your plugin license file.
• 3.- Run DENEb application.
• 4.- Select Plugins->Install plugin from the Main menu.
• 5.- Browse and select your downloaded .bin file and press the Apply button.• 6.- Put in DENEb's root directory your plugin license file.
Notes: Deneb TRIAL version comes with the SIESTA plugin already installed. So, out of the box, you can
produce and launch siesta calculations from Deneb's Project Browser with a single click. Do not hesitate contacting us at: [email protected] reporting non expected behaviors of
Deneb.
© 2012 Atelgraphics

DENEb -1.26 help documents
Make sure that you have installed the latest drivers for your graphics card. This is relevant specially in Linux since Deneb might not work properly unless you make sure that you have installed some recent drivers. To achieve this, it sometimes requires for you to access the manufacturer web-page, download the drivers, and manually install them.
© 2012 Atelgraphics
DENEb -1.26 help documents
Atoms, molecules and samples in D ENEb
For DENEb, the sample is the basic unit that specifies a physical system. A sample is part of a simulation. In other words, we only need to couple a sample with a set of computational parameters in order to completely define a given simulation. Briefly defined: A sample is a set of molecules. In turn, a molecule is simply defined as a set of atoms. And an atom is defined as a given nucleus placed at a given point of space. As for the electrons: To define a given sample, electrons need not to be specified since the electronic density is, instead, usually a result of the simulation once computed.
Atoms are represented as spheres in DENEb. By default their size is given by the covalent radius of the corresponding chemical specie. Their default color is given by some common standard (JMol). The radii and colors of any group of atoms can be customarily changed at will, when using Sample Manipulator.
Molecules and samples do not have any particular representation on their own, other than their group of atoms (spheres). You can, nevertheless, select/unselect, translate, rotate, replace, eliminate, etc, in short, treat them as units by using the Sample Manager of Sample Manipulator. Samples and molecules can also be addressed by mouse actions if choosing the pick mode accordingly (pick mode options are: 'atom', 'molecule' and 'sample'). You can also clone them (or parts of them) and transfer molecules from sample to sample, or atoms from molecule to molecule, etc... the very many possibilities will be discovered in this document and video-tutorials.
© 2012 Atelgraphics
DENEb -1.26 help documents
DENEb's NanoExplorer
© 2012 Atelgraphics

DENEb -1.26 help documents
© 2012 Atelgraphics
DENEb -1.26 help documents
DENEb 's NanoExplorer : Loading new samples
As we have said in previous sections, for DENEb, the sample is the basic unit that specifies a physical system. DENEb's NanoExplorer is a database of samples, that may contain any number of samples organized in groups in an arbitrary tree structure. The samples in NanoExplorer can be used as the starting point, or building blocks to compose new samples using Sample Manipulator. In addition, any new sample built in Sample Manipulator can be stored for later use in NanoExplorer. The connection point among these tools and the Project Browser is, as you already know, DENEb's Clipboard. Out of the box NanoExplorer comes filled out with some samples in some default tree structure, importantly, note that these are just some examples on how you can organize your NanoExplorer database, they are not meant to be accurate or useful for any particular purpose. NanoExplorer is instead intended to be your private set of own tested samples.
We show next how to load samples into NanoExplorer. There are several ways:
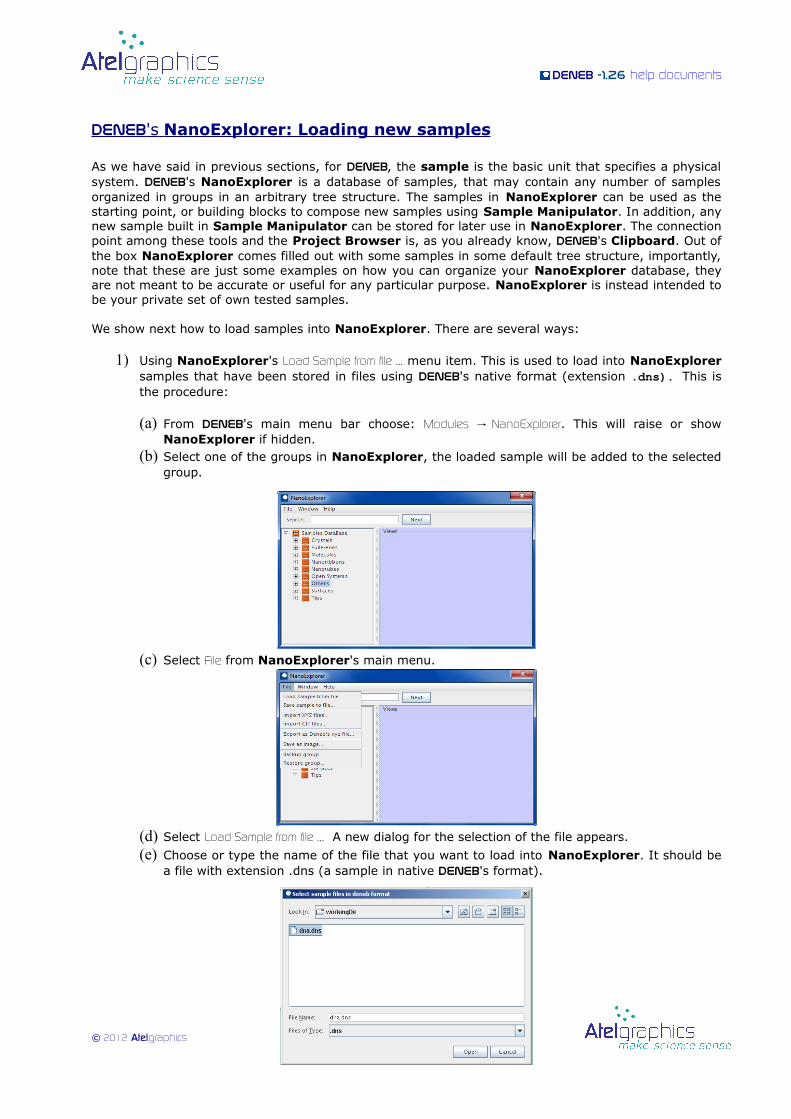
1) Using NanoExplorer's Load Sample from file … menu item. This is used to load into NanoExplorer samples that have been stored in files using DENEb's native format (extension .dns). This is the procedure:
(a) From DENEb's main menu bar choose: Modules NanoExplorer→ . This will raise or show NanoExplorer if hidden.
(b) Select one of the groups in NanoExplorer, the loaded sample will be added to the selected group.
(c) Select File from NanoExplorer's main menu.
(d) Select Load Sample from file … A new dialog for the selection of the file appears.
(e) Choose or type the name of the file that you want to load into NanoExplorer. It should be a file with extension .dns (a sample in native DENEb's format).
© 2012 Atelgraphics
DENEb -1.26 help documents
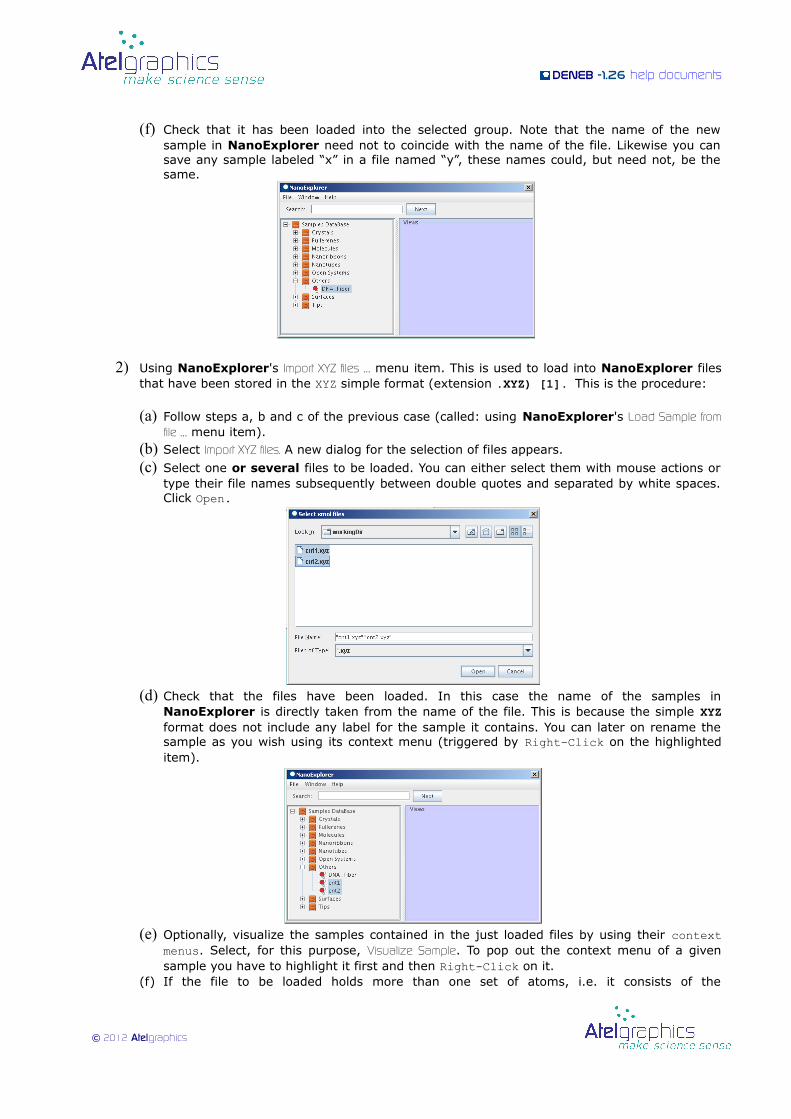
(f) Check that it has been loaded into the selected group. Note that the name of the new sample in NanoExplorer need not to coincide with the name of the file. Likewise you can save any sample labeled “x” in a file named “y”, these names could, but need not, be the same.
2) Using NanoExplorer's Import XYZ files … menu item. This is used to load into NanoExplorer files that have been stored in the XYZ simple format (extension .XYZ) [1]. This is the procedure:
(a) Follow steps a, b and c of the previous case (called: using NanoExplorer's Load Sample from file … menu item).
(b) Select Import XYZ files. A new dialog for the selection of files appears.
(c) Select one or several files to be loaded. You can either select them with mouse actions or type their file names subsequently between double quotes and separated by white spaces. Click Open.
(d) Check that the files have been loaded. In this case the name of the samples in NanoExplorer is directly taken from the name of the file. This is because the simple XYZ format does not include any label for the sample it contains. You can later on rename the sample as you wish using its context menu (triggered by Right-Click on the highlighted item).
(e) Optionally, visualize the samples contained in the just loaded files by using their context menus. Select, for this purpose, Visualize Sample. To pop out the context menu of a given sample you have to highlight it first and then Right-Click on it.
(f) If the file to be loaded holds more than one set of atoms, i.e. it consists of the
© 2012 Atelgraphics
DENEb -1.26 help documents
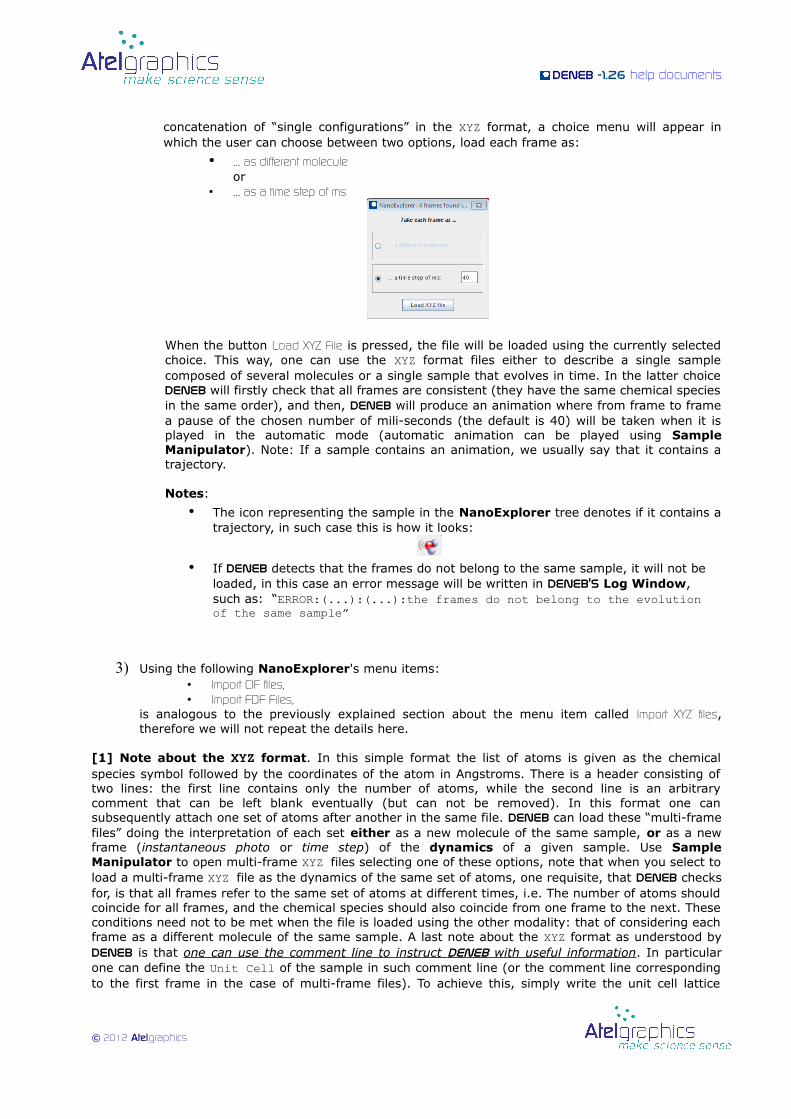
concatenation of “single configurations” in the XYZ format, a choice menu will appear in which the user can choose between two options, load each frame as:
• … as different molecule or
• … as a time step of ms
When the button Load XYZ File is pressed, the file will be loaded using the currently selected choice. This way, one can use the XYZ format files either to describe a single sample composed of several molecules or a single sample that evolves in time. In the latter choice Deneb will firstly check that all frames are consistent (they have the same chemical species in the same order), and then, Deneb will produce an animation where from frame to frame a pause of the chosen number of mili-seconds (the default is 40) will be taken when it is played in the automatic mode (automatic animation can be played using Sample Manipulator). Note: If a sample contains an animation, we usually say that it contains a trajectory.
Notes:
• The icon representing the sample in the NanoExplorer tree denotes if it contains a trajectory, in such case this is how it looks:
• If Deneb detects that the frames do not belong to the same sample, it will not be loaded, in this case an error message will be written in Deneb's Log Window, such as: “ERROR:(...):(...):the frames do not belong to the evolution of the same sample”
3) Using the following NanoExplorer's menu items:• Import CIF files, • Import FDF Files,
is analogous to the previously explained section about the menu item called Import XYZ files, therefore we will not repeat the details here.
[1] Note about the XYZ format. In this simple format the list of atoms is given as the chemical species symbol followed by the coordinates of the atom in Angstroms. There is a header consisting of two lines: the first line contains only the number of atoms, while the second line is an arbitrary comment that can be left blank eventually (but can not be removed). In this format one can subsequently attach one set of atoms after another in the same file. DENEb can load these “multi-frame files” doing the interpretation of each set either as a new molecule of the same sample, or as a new frame (instantaneous photo or time step) of the dynamics of a given sample. Use Sample Manipulator to open multi-frame XYZ files selecting one of these options, note that when you select to load a multi-frame XYZ file as the dynamics of the same set of atoms, one requisite, that DENEb checks for, is that all frames refer to the same set of atoms at different times, i.e. The number of atoms should coincide for all frames, and the chemical species should also coincide from one frame to the next. These conditions need not to be met when the file is loaded using the other modality: that of considering each frame as a different molecule of the same sample. A last note about the XYZ format as understood by DENEb is that one can use the comment line to instruct DENEb with useful information . In particular one can define the Unit Cell of the sample in such comment line (or the comment line corresponding to the first frame in the case of multi-frame files). To achieve this, simply write the unit cell lattice
© 2012 Atelgraphics
DENEb -1.26 help documents
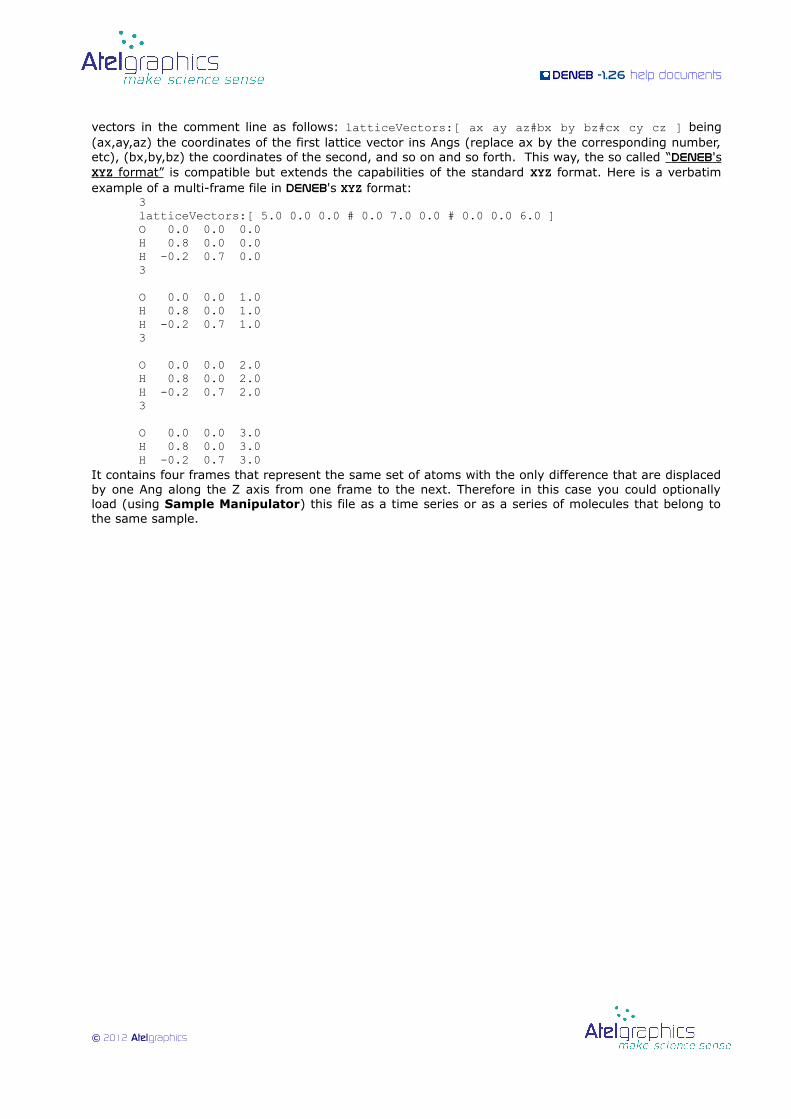
vectors in the comment line as follows: latticeVectors:[ ax ay az#bx by bz#cx cy cz ] being (ax,ay,az) the coordinates of the first lattice vector ins Angs (replace ax by the corresponding number, etc), (bx,by,bz) the coordinates of the second, and so on and so forth. This way, the so called “ DENEb 's XYZ format” is compatible but extends the capabilities of the standard XYZ format. Here is a verbatim example of a multi-frame file in DENEb's XYZ format:
3latticeVectors:[ 5.0 0.0 0.0 # 0.0 7.0 0.0 # 0.0 0.0 6.0 ]O 0.0 0.0 0.0H 0.8 0.0 0.0H -0.2 0.7 0.03
O 0.0 0.0 1.0H 0.8 0.0 1.0H -0.2 0.7 1.03
O 0.0 0.0 2.0H 0.8 0.0 2.0H -0.2 0.7 2.03
O 0.0 0.0 3.0H 0.8 0.0 3.0H -0.2 0.7 3.0
It contains four frames that represent the same set of atoms with the only difference that are displaced by one Ang along the Z axis from one frame to the next. Therefore in this case you could optionally load (using Sample Manipulator) this file as a time series or as a series of molecules that belong to the same sample.
© 2012 Atelgraphics
DENEb -1.26 help documents
DENEb 's NanoExplorer: Saving samples
As we have said in previous sections, for DENEb, the sample is the basic unit that specifies a physical system. DENEb's NanoExplorer is a database of samples, that may contain any number of samples organized in groups, in an arbitrary tree structure. The samples in NanoExplorer can be used as the starting point, or building blocks to compose new samples, when using Sample Manipulator. Also, any new sample built using Sample Manipulator can be stored for later use in NanoExplorer. The connection point among these utilities and the Project Browser is, as you already know, DENEb's Clipboard. Out of the box NanoExplorer comes filled out with some samples in some default tree structure, importantly, note that these are just some examples on how you can organize your NanoExplorer database, they are not meant to be accurate or useful for any particular purpose. NanoExplorer is instead intended to be your private set of own tested samples.
We show next how to save in disk the samples stored in NanoExplorer. There are several ways:
1) Doing nothing at all: NanoExplorer has file persistence built in , this means that, every time you add a new sample to NanoExplorer, it will create a related file and will store the information in there. It acts as a persistence database in this sense. You can close DENEb at anytime being sure that all samples in NanoExplorer will remain there next time when you open DENEb. NanoExplorer is, in fact, the standard place where you will give persistence and organization to all your samples when using DENEb. It can hold hundreds of thousands of samples, and it implements lazy loading algorithms; this means that you do not need to worry about the size of the whole database in NanoExplorer. Even though the data base might be too large in terms of memory, DENEb only loads in RAM the samples that are being used at each time, while the rest remain stored in disk.
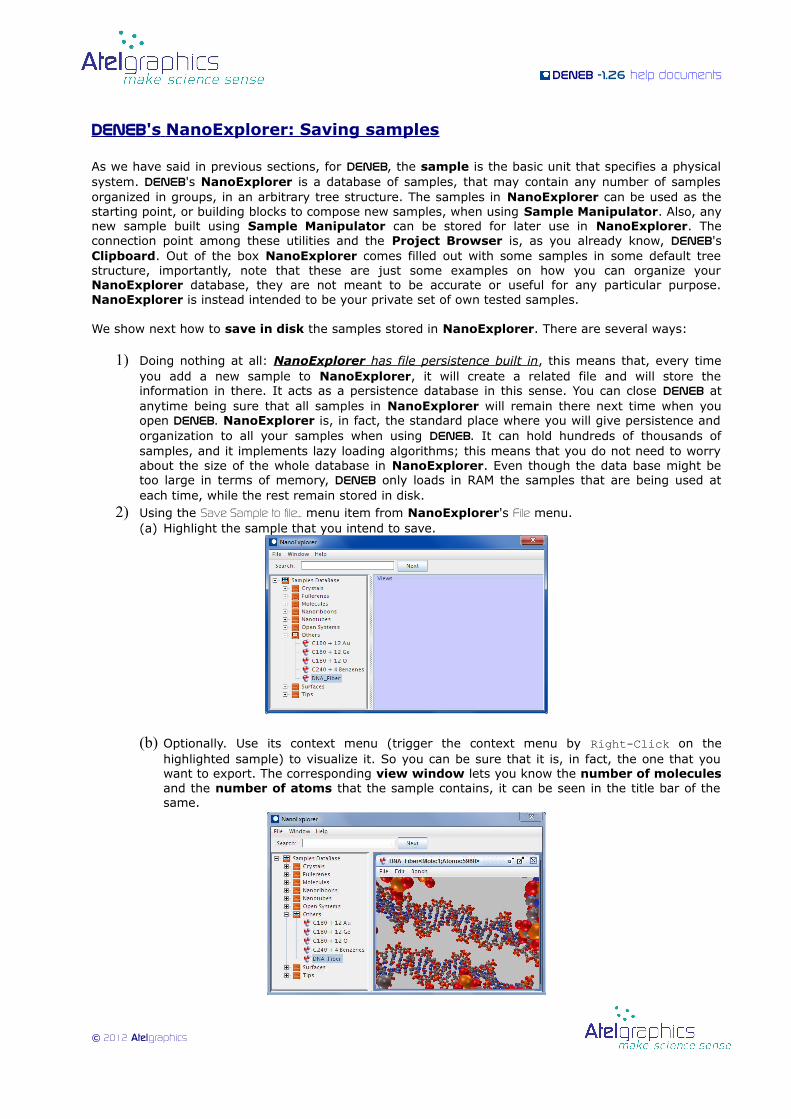
2) Using the Save Sample to file... menu item from NanoExplorer's File menu.(a) Highlight the sample that you intend to save.
(b) Optionally. Use its context menu (trigger the context menu by Right-Click on the highlighted sample) to visualize it. So you can be sure that it is, in fact, the one that you want to export. The corresponding view window lets you know the number of molecules and the number of atoms that the sample contains, it can be seen in the title bar of the same.
© 2012 Atelgraphics
DENEb -1.26 help documents
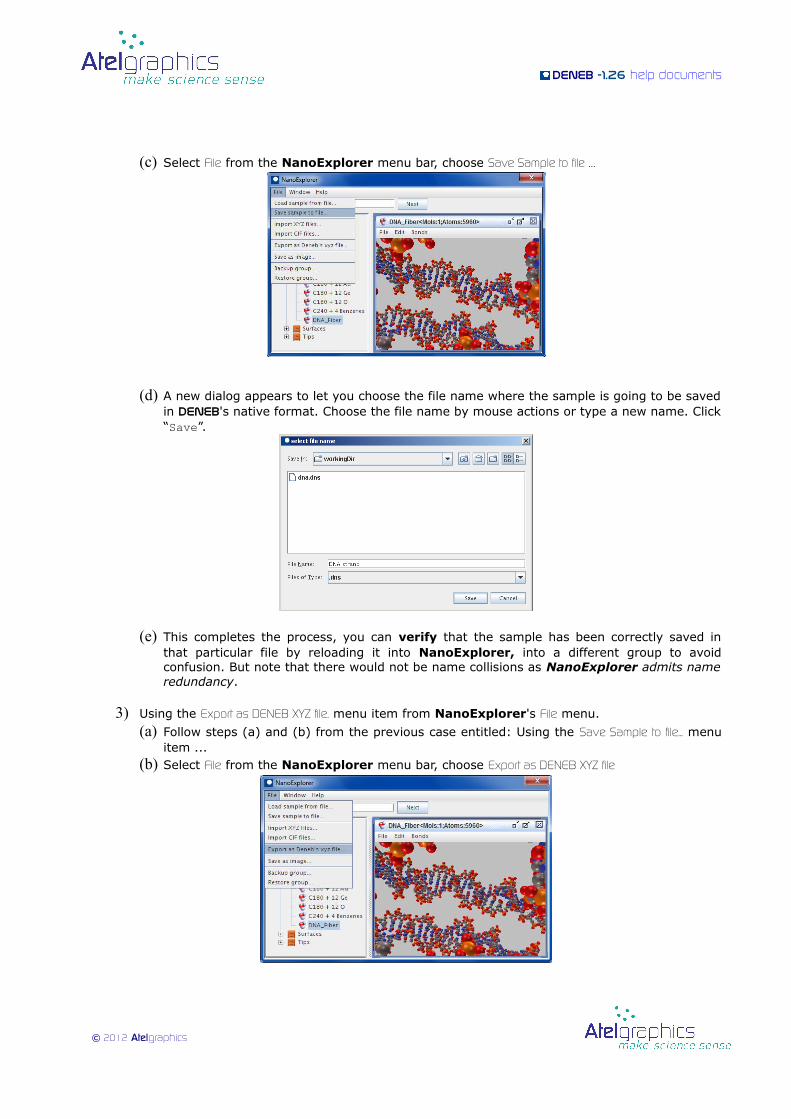
(c) Select File from the NanoExplorer menu bar, choose Save Sample to file …
(d) A new dialog appears to let you choose the file name where the sample is going to be saved in DENEb's native format. Choose the file name by mouse actions or type a new name. Click “Save”.
(e) This completes the process, you can verify that the sample has been correctly saved in that particular file by reloading it into NanoExplorer, into a different group to avoid confusion. But note that there would not be name collisions as NanoExplorer admits name redundancy.
3) Using the Export as DENEB XYZ file. menu item from NanoExplorer's File menu.
(a) Follow steps (a) and (b) from the previous case entitled: Using the Save Sample to file... menu item ...
(b) Select File from the NanoExplorer menu bar, choose Export as DENEB XYZ file
© 2012 Atelgraphics
DENEb -1.26 help documents
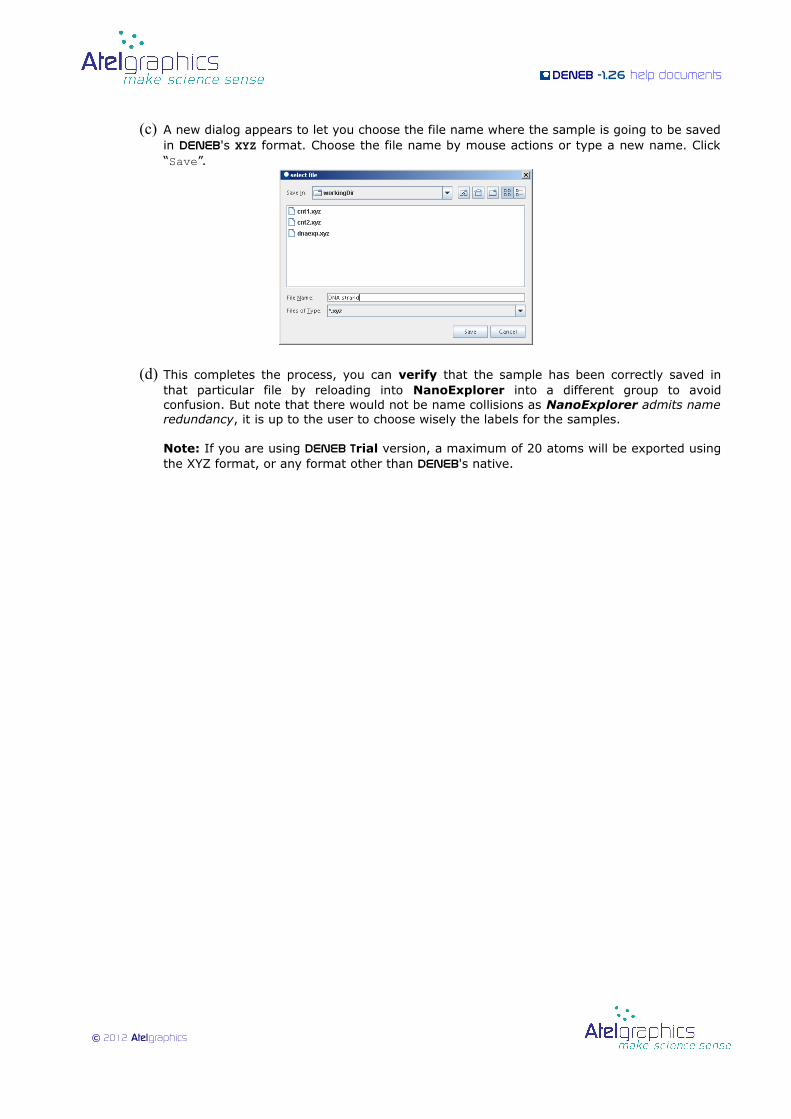
(c) A new dialog appears to let you choose the file name where the sample is going to be saved in DENEb's XYZ format. Choose the file name by mouse actions or type a new name. Click “Save”.
(d) This completes the process, you can verify that the sample has been correctly saved in that particular file by reloading into NanoExplorer into a different group to avoid confusion. But note that there would not be name collisions as NanoExplorer admits name redundancy, it is up to the user to choose wisely the labels for the samples.
Note: If you are using Deneb Trial version, a maximum of 20 atoms will be exported using the XYZ format, or any format other than Deneb's native.
© 2012 Atelgraphics
DENEb -1.26 help documents
DENEb 's NanoExplorer: Organizing your samples
As we have said in previous sections, for DENEb, the sample is the basic unit that specifies a physical system. DENEb's NanoExplorer is a database of samples, that may contain any number of samples organized in groups in an arbitrary tree structure. The samples in NanoExplorer can be used as the starting point, or building blocks to compose new samples using Sample Manipulator. Likewise, any new sample built in Sample Manipulator can be stored for later use in NanoExplorer. The connection point among these utilities and the Project Browser is, as you already know, DENEb's Clipboard. Out of the box NanoExplorer comes filled out with some samples in some default tree structure, importantly, note that these are just some examples on how you can organize your NanoExplorer database, they are not meant to be accurate or useful for any particular purpose. NanoExplorer is instead intended to be your private set of own tested samples.
We show next how to organize the samples stored in NanoExplorer in a tree structure with arbitrary depth. The main operations that you need to know are the following.
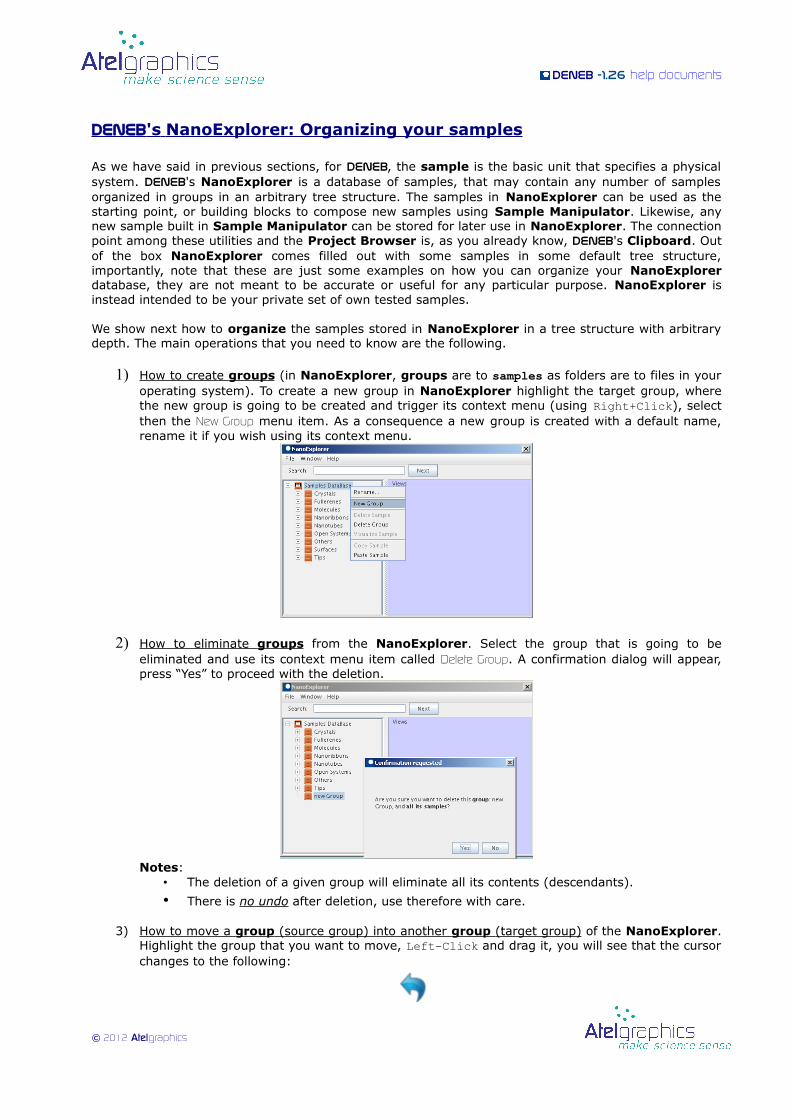
1) How to create groups (in NanoExplorer, groups are to samples as folders are to files in your operating system). To create a new group in NanoExplorer highlight the target group, where the new group is going to be created and trigger its context menu (using Right+Click), select then the New Group menu item. As a consequence a new group is created with a default name, rename it if you wish using its context menu.
2) How to eliminate groups from the NanoExplorer. Select the group that is going to be eliminated and use its context menu item called Delete Group. A confirmation dialog will appear, press “Yes” to proceed with the deletion.
Notes:• The deletion of a given group will eliminate all its contents (descendants).
• There is no undo after deletion, use therefore with care.
3) How to move a group (source group) into another group (target group) of the NanoExplorer. Highlight the group that you want to move, Left-Click and drag it, you will see that the cursor changes to the following:
© 2012 Atelgraphics
DENEb -1.26 help documents
This means that a drag-and-drop operation is being carried out. During the drag, the source group remains highlighted, while the possible targets will be highlighted as the cursor touches them.
Note that only groups (and not samples) are highlighted as possible targets during the drag operation. When you reach the desired target group, release the Left-Click, this will complete the drag-and-drop operation. As a result the source group will be moved to become a new child of the target. Notes:
• Before starting the drag-and-drop operation, make sure that the target group is reachable, in other words, that its ascendants are not collapsed.
• If the target group is reachable but not visible (out of the current window limits), worry not, NanoExplorer will automatically scroll properly while you drag.
• If the drop action is done over a sample (instead of a group), the operation will have no effect.
• If, during the drag, the cursor is taken beyond the limits of the NanoExplorer window, it recovers its default shape, but note that the drop action can still occur. When you “drop” out of NanoExplorer, it will still set the target at the “current row” which is deduced by extrapolation beyond its current viewport.
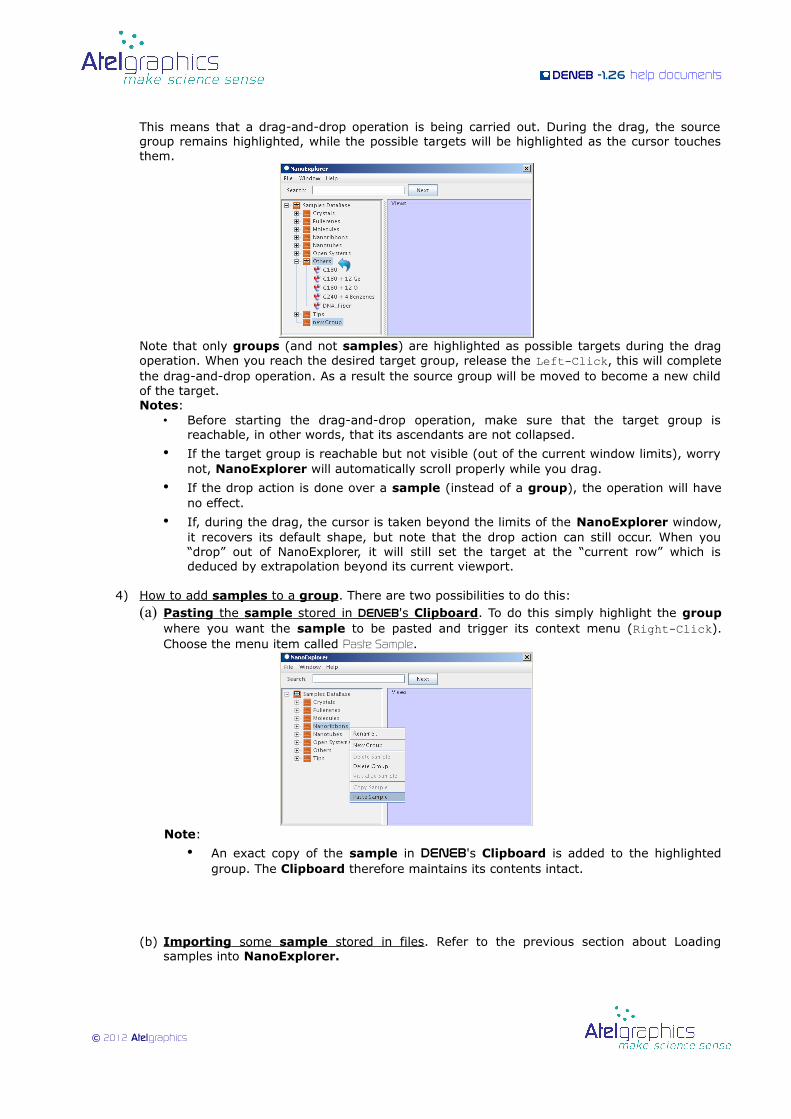
4) How to add samples to a group . There are two possibilities to do this:(a) Pasting the sample stored in DENEb 's Clipboard . To do this simply highlight the group
where you want the sample to be pasted and trigger its context menu (Right-Click). Choose the menu item called Paste Sample.
Note:
• An exact copy of the sample in DENEb's Clipboard is added to the highlighted group. The Clipboard therefore maintains its contents intact.
(b) Importing some sample stored in files . Refer to the previous section about Loading samples into NanoExplorer.
© 2012 Atelgraphics

DENEb -1.26 help documents
5) How to move a sample from one group to another . You can simply use the drag-and-drop technique as explained in point (3) above, only that the source is a sample instead of a group in this case.
This ends this section about Deneb's NanoExplorer.
© 2012 Atelgraphics
DENEb -1.26 help documents
DENEb's Sample Manipulator
© 2012 Atelgraphics
DENEb -1.26 help documents
© 2012 Atelgraphics
DENEb -1.26 help documents
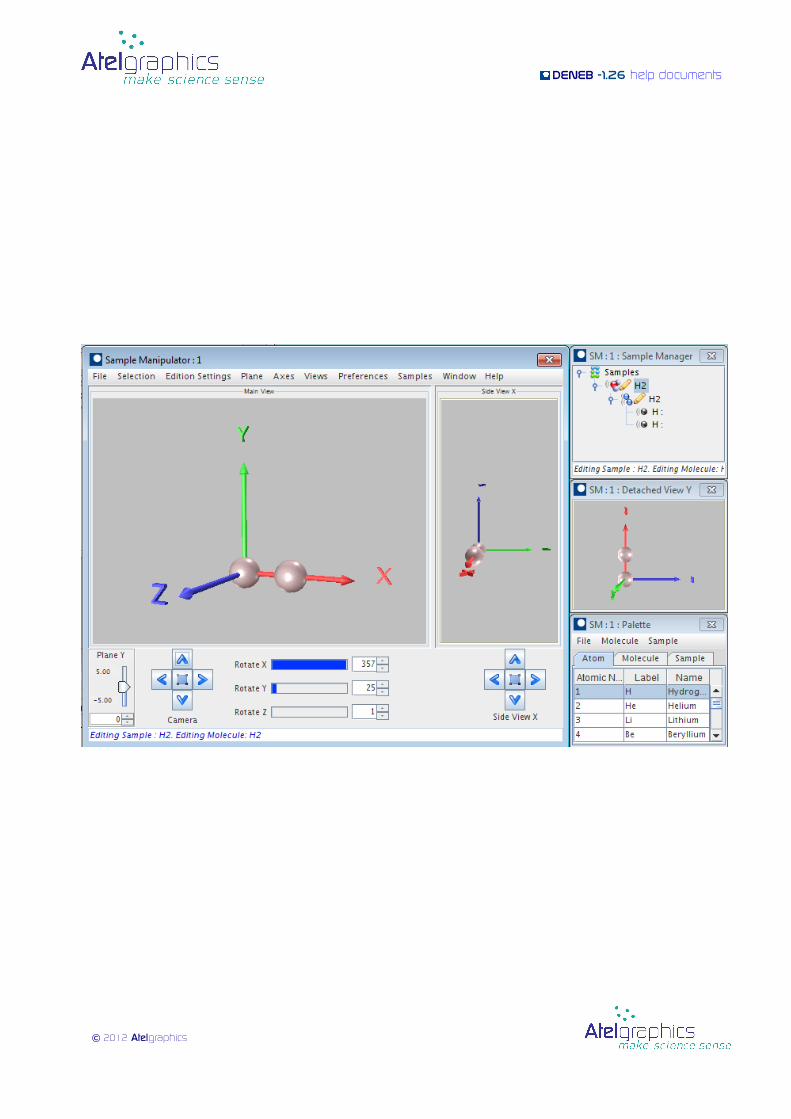
DENEb Sample Manipulator: The coordinates of your objects. Absolute, local, and scaled coordinates
DENEb's Sample Manipulator defines a fixed, absolute Cartesian system of coordinates. Samples are placed at points with absolute coordinates.
Meaning of “placing a sample at a point”: Note that a sample is an extended object, so placing it at a given point in space has to be properly defined. We properly define placing of a sample by referring to an specific point related to the sample, we call it the sample's reference point. Thus, when you place sample at a given point of space (e.g. by mouse selecting it), what you are placing there is the sample's reference point. What is the sample's reference point? In DENEb's conventions, the reference point of a sample is an arbitrary point. It does not need to be its geometrical center, or the position of any of its atoms. It is the point where the sample's local reference system is placed. Of course, the sample's local reference system is a Cartesian coordinate system that the sample carries with it, such that all molecules that belong to that sample are placed at local points defined with respect to the sample's local reference system. As a consequence, if you move the sample's reference point, from an absolute point to another, all its molecules (preserving their local coordinates) move along.
Note that a molecule is to its atoms, like a sample is to its molecules. Therefore the position of an atom with respect to the molecule’s local reference system is also to be properly defined. And DENEb defines it in a completely analogous way:
Meaning of “placing a molecule at a point”: We properly define placing of a molecule by referring to an specific point related to the molecule, we call it the molecule's reference point. Thus, when you place a molecule at a given point, what you are placing there is the molecule's reference point. What is the molecule's reference point? In DENEb's conventions, the reference point of a molecule is an arbitrary point. It does not need to be its geometrical center, or the position of any of its atoms. It is the point where the molecule's local reference system is placed. The molecule's local reference system is a Cartesian coordinate system that the molecule carries with it, such that all atoms that belong to that molecule are placed at local points defined with respect to the molecule's local reference system. As a consequence, if you move the molecule's reference point, from a point to another, all its atoms (preserving their local coordinates) move along.
Of course, at a given time, each atom is ultimately placed at a given point of space that has its absolute coordinates values. DENEb's Sample Manipulator does present to you both the local and absolute coordinates of atoms and allows you to edit one or another at your will, keeping their synchronization at all times (use for this the Atom Editor triggered by: Selection Selection→ operation Edit current selection→ ).
In DENEb, all reference systems have the same orientation at all times, this is: All local or absolute, X axes are parallel to each other, and likewise about the Y and Z axes.
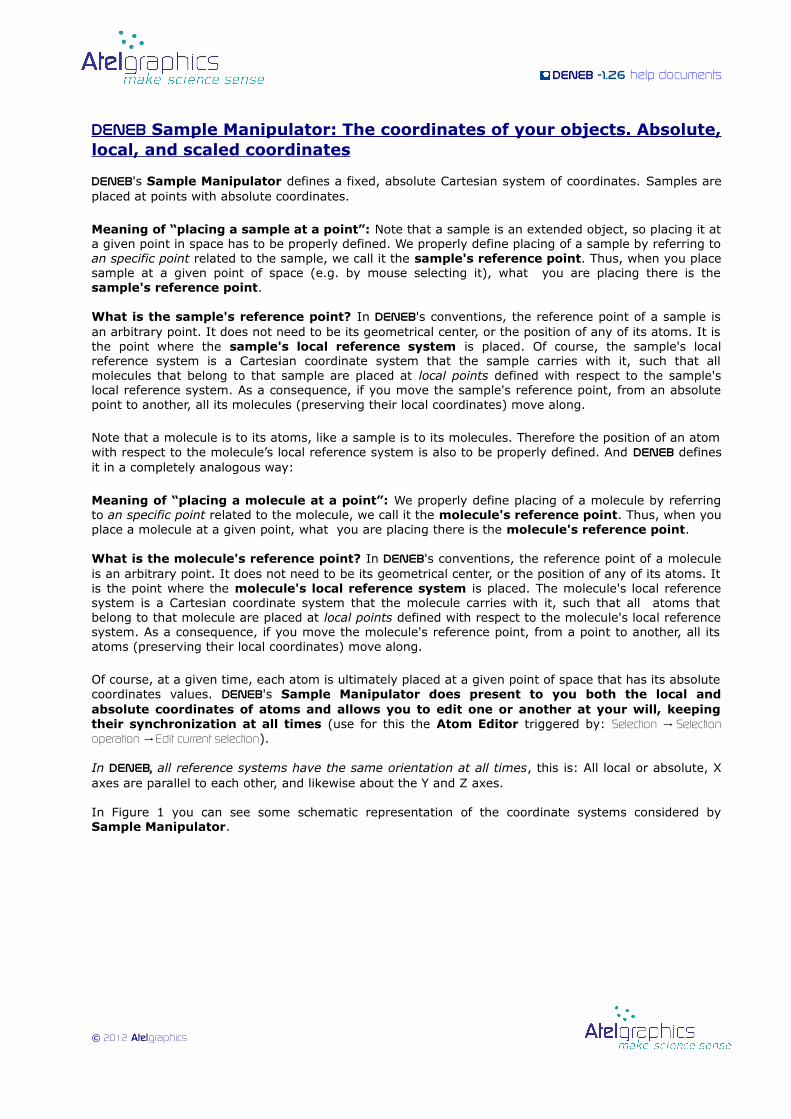
In Figure 1 you can see some schematic representation of the coordinate systems considered by Sample Manipulator.
© 2012 Atelgraphics
DENEb -1.26 help documents
Scaled coordinates: All samples posses a so called unit cell (a box intended for periodic repetitions). By default the unit cell is not shown, which means that the sample is 'non-periodic' (also called 'isolated'), but the user can choose to show the unit cell (using the molecule's Sample Manager context menu), which automatically means that the sample becomes 'periodic'. The periodic or isolated character is mostly relevant when a simulation is launched to a given engine. The unit cell box is, in turn, defined by 3 lattice vectors, that form as well a reference system. It is usual to give the atomic coordinates with respect to the unit cell lattice vectors, in some cases it is simpler to do it this way. Sample Manipulator presents, as well, the scaled coordinates of the atoms at user's will, and allows to directly edit them, keeping perfect synchronization with respect to their local and absolute ones. To visualize/modify the scaled coordinates of any given group of atoms use the Sample Manipulator's Atom Editor that can be triggered from the Selection menu: Selection Selection Operations Edit current→ → selection.
© 2012 Atelgraphics
Figure1: DENEb's Sample Manipulator coordinate systems. A sample, consisting of two water molecules, is represented along with an skematic view of the coordinate systems considered by Sample Manipulator. There is an absolute reference system (thicker axes labeled “Absolute”), with respect to which the sample has been placed at a given point in space (the sample's reference point), where the axes labeled as “sample” are found. A solid black line represents the vector from the absolute origin to the sample's position. Both molecules have positions defined in local coordinates with respect to the sample's reference system. The positions of the molecules in the sample's reference system are represented by the solid orange vectors. The molecule's local reference systems (labeled as “mol-1” and “mol-2”) are the ones with respect to which the atom´s local coordinates are defined. Purple thin lines represent the positions of the atoms in their molecule local systems.
DENEb -1.26 help documents
DENEb 's Sample Manipulator: Translating and rotating objects
Meaning of translating samples, molecules and atoms: in Sample Manipulator you will learn that you can translate atoms, molecules and samples. What is the difference between 'moving all atoms in a molecule' and 'moving the molecule itself'? If you select all atoms in a molecule and shift their position by a vector (using the main menu option: Selection Selection Operations Translate→ → , that applies to atoms) you are changing their local coordinates with respect to their local reference system (with respect to their molecule's reference system). However, if you choose to shift the position of the molecule itself (using its Sample Manager context menu) you are keeping fixed the local coordinates of the atoms but you are changing the coordinates of the molecule with respect to its sample's local reference system. Visually, however, you will see the atoms displacing just in the same way. Likewise, it is not the same to translate all molecules in a sample than to translate the sample itself. A bit of practice will surely let you learn these simple concepts readily.
Meaning of rotating samples, molecules and atoms: in Sample Manipulator you will learn that you can rotate atoms, molecules and samples with respect to arbitrary axes. What is the difference between 'rotating all atoms in a molecule' and 'rotating the molecule itself'? If you select all atoms in a molecule and rotate their position by an angle with respect to a given axis (using the main menu option: Selection Selection operations Rotation→ → , that applies to all selected atoms), you are changing their local coordinates with respect to their local reference system (molecule's reference system). However, if you choose to rotate the position of the molecule itself (using the Sample Manager context menu of that molecule) ,you are keeping fixed the local coordinates of the atoms and you are just displacing (around the rotation axis) the molecule's reference point, whose local coordinates (with respect to its sample's local reference system) will change. In fact, unlike in the translation case, these two cases result in really different atomic motions: For example if the molecule's reference point lays on the rotation axis, the “rotations of the molecule” leave everything unchanged; while it is not so if one chooses to rotate the atoms individually.Likewise, it is not the same to 'rotate all molecules in a sample' than 'to rotate the sample itself' (which just displaces its reference point). A bit of practice with Sample Manipulator will surely help you learn these concepts better, as well.
DENEb 's Sample Manipulator: The plane.
To edit your samples use DENEb's Sample Manipulator. This tool provides with extensive abilities to build samples from scratch, combine them into new ones, and modify existing ones. With Sample Manipulator you have complete freedom to edit your samples in almost any imaginable way. It introduces new concepts and auxiliary graphical tools that enable accurate manipulation and navigation. The Plane of the Sample Manipulator is one of such tools. It is an auxiliary object that helps in several ways:
• Enables accurate mouse-picking of points in the three dimensional space, for several uses: for placement of new objects, placement of center of rotation of the main view camera, displaying the coordinates of an specific mouse-picked point.
• Provides a geometrical reference to select/un-select atoms according to their position.
The Plane is just that: An infinite plane that can be placed perpendicular either to X, Y, or the Z axis and at any height within. Its orientation can be controlled with Plane Plane settings Perpendicular to, and→ → its position can be controlled with the plane control-panel placed at the bottom-left corner of the Sample Manipulator main window. The plane control-panel is a combined slider, text, and spinner-buttons synchronized input system, you can specify the plane's position by either of them. The plane's motion range can be modified by Plane Plane settings Set motion range→ → , that has the key short-cut Ctrl+R. Even though the plane is infinite, its visual representation is rather not, so we can actually see it better. It is a rectangular area of a user chosen size, position and color. To choose these visual settings of the plane use: Plane Visual Select color→ → , and Plane Visual Select visible size→ → , respectively.
Hint: the plane can be also used as a location template by simply playing with its variable visual shape and size, e.g, if you wish to place 4 atoms in an square configuration of a given size you
© 2012 Atelgraphics
DENEb -1.26 help documents
can simply choose the plane to have that shape and size, and then Click-place the atoms at its vertices.
DENEb 's Sample Manipulator: Simple building
There are many different ways to construct new samples using Sample Manipulator. In general you will probably start with some already made samples, modify them and/or combine them into new ones. Nevertheless, for the sake of simplicity, we describe here the case in which you start with a clean slate:
1) How to build a simple molecule from scratch:a) From DENEb's main menu bar choose: Window View Sample Manipulator New→ → . This will
create and show a new Sample Manipulator. A toolbar short-cut button for this menu item can be also found just below the main menu bar. This is how it looks:
The main larger button creates a new Sample Manipulator when pressed, while the smaller button at its right gives short-cut access to the already created Sample Manipulators (if any).
b) From the newly created Sample Manipulator, choose the tab “sample” in the Palette window, placed by default at the bottom right. Select the sample called “Empty”, it is a sample with one empty molecule, where we can add atoms to fill it up at will.
c) To place the Empty sample in space Left-Click at some point of the Main's View Plane. By default the plane is seen as a yellow square of 5 Angs of size. Since it is empty, in this case, you will notice that a new sample has been created not because of the appearance of atoms (spheres) at the scene, but because of the appearance of a new branch in the Sample Manager window (placed at the upper left corner of the Sample Manipulator by default).
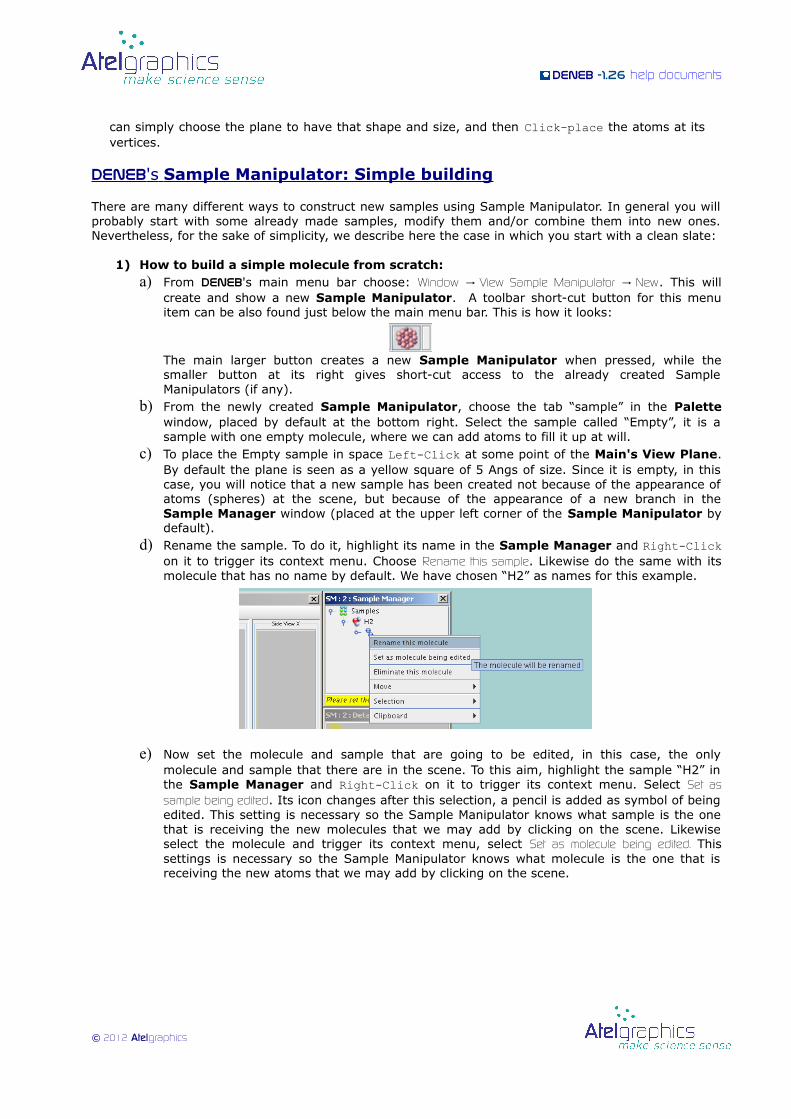
d) Rename the sample. To do it, highlight its name in the Sample Manager and Right-Click on it to trigger its context menu. Choose Rename this sample. Likewise do the same with its molecule that has no name by default. We have chosen “H2” as names for this example.
e) Now set the molecule and sample that are going to be edited, in this case, the only molecule and sample that there are in the scene. To this aim, highlight the sample “H2” in the Sample Manager and Right-Click on it to trigger its context menu. Select Set as sample being edited. Its icon changes after this selection, a pencil is added as symbol of being edited. This setting is necessary so the Sample Manipulator knows what sample is the one that is receiving the new molecules that we may add by clicking on the scene. Likewise select the molecule and trigger its context menu, select Set as molecule being edited. This settings is necessary so the Sample Manipulator knows what molecule is the one that is receiving the new atoms that we may add by clicking on the scene.
© 2012 Atelgraphics
DENEb -1.26 help documents
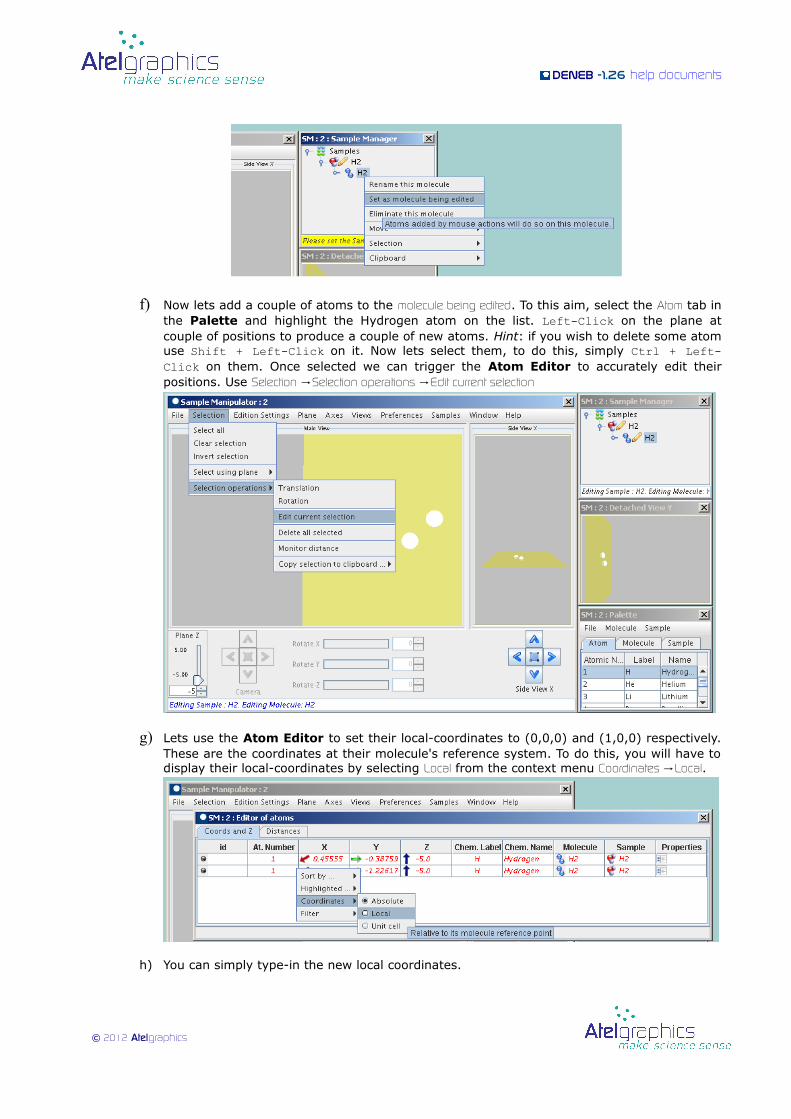
f) Now lets add a couple of atoms to the molecule being edited. To this aim, select the Atom tab in the Palette and highlight the Hydrogen atom on the list. Left-Click on the plane at couple of positions to produce a couple of new atoms. Hint: if you wish to delete some atom use Shift + Left-Click on it. Now lets select them, to do this, simply Ctrl + Left-Click on them. Once selected we can trigger the Atom Editor to accurately edit their positions. Use Selection Selection operations Edit current selection→ →
g) Lets use the Atom Editor to set their local-coordinates to (0,0,0) and (1,0,0) respectively. These are the coordinates at their molecule's reference system. To do this, you will have to display their local-coordinates by selecting Local from the context menu Coordinates Local→ .
h) You can simply type-in the new local coordinates.
© 2012 Atelgraphics
DENEb -1.26 help documents
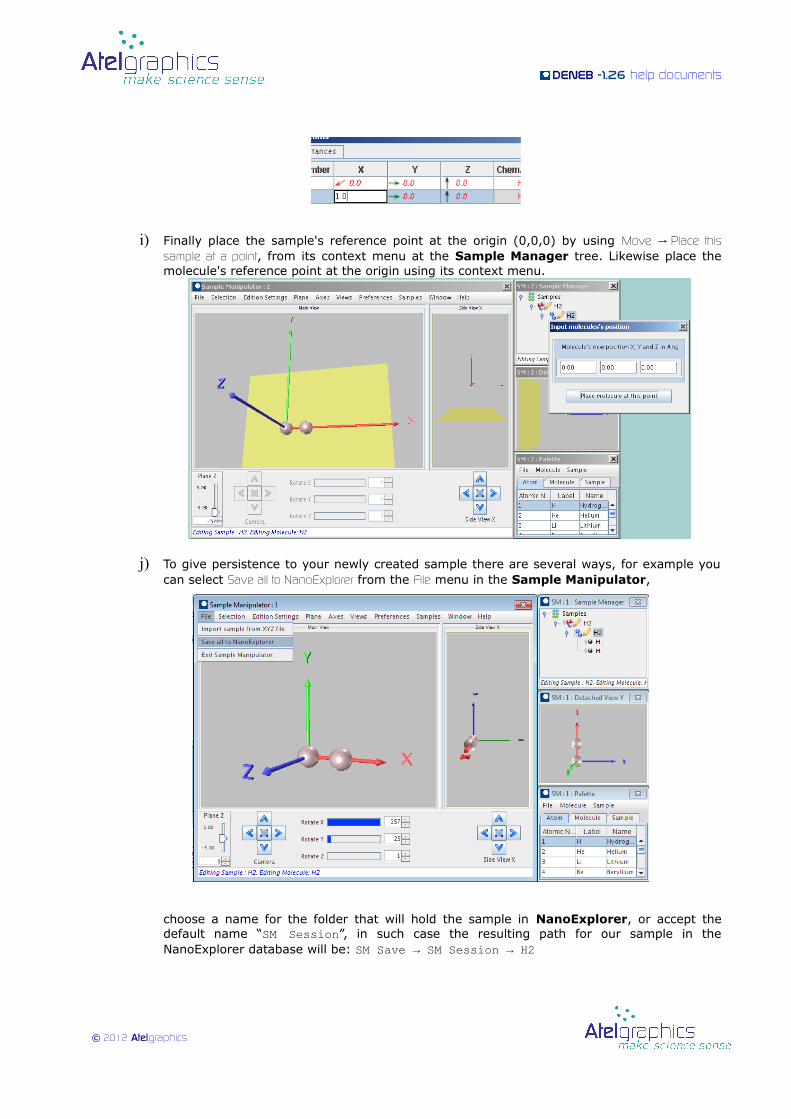
i) Finally place the sample's reference point at the origin (0,0,0) by using Move Place this→ sample at a point, from its context menu at the Sample Manager tree. Likewise place the molecule's reference point at the origin using its context menu.
j) To give persistence to your newly created sample there are several ways, for example you can select Save all to NanoExplorer from the File menu in the Sample Manipulator,
choose a name for the folder that will hold the sample in NanoExplorer, or accept the default name “SM Session”, in such case the resulting path for our sample in the NanoExplorer database will be: SM Save → SM Session → H2
© 2012 Atelgraphics
DENEb -1.26 help documents
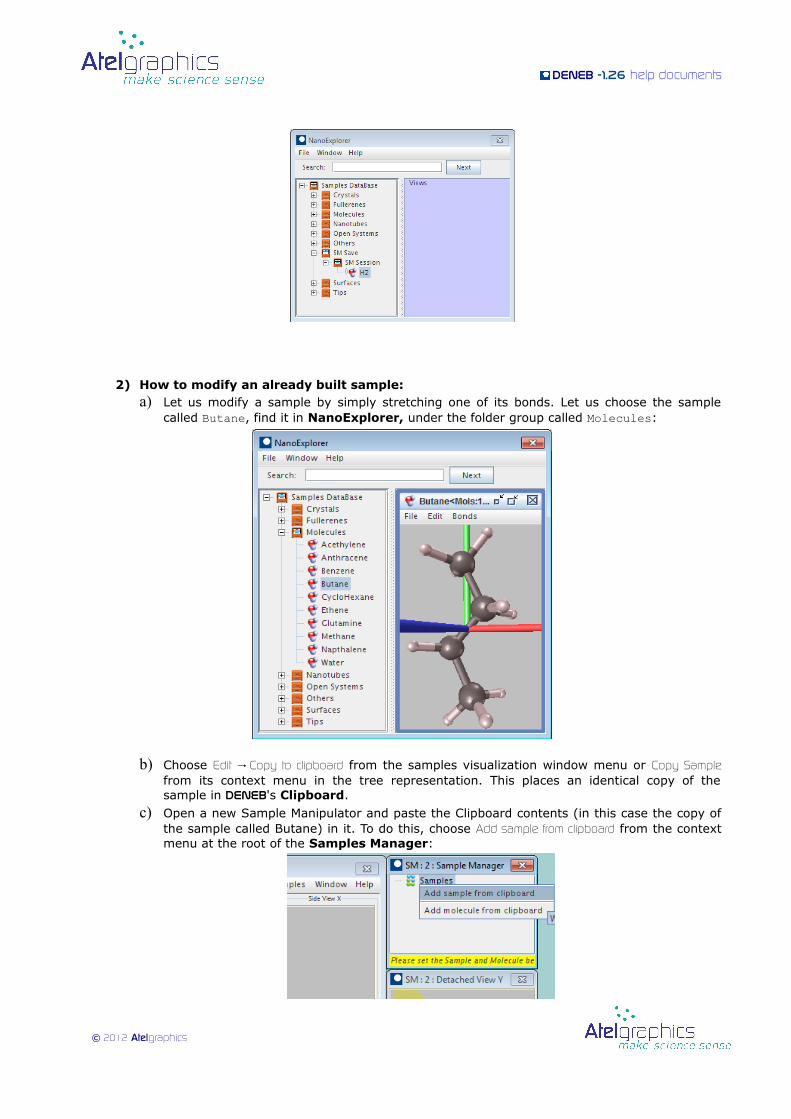
2) How to modify an already built sample:a) Let us modify a sample by simply stretching one of its bonds. Let us choose the sample
called Butane, find it in NanoExplorer, under the folder group called Molecules:
b) Choose Edit Copy to clipboard→ from the samples visualization window menu or Copy Sample from its context menu in the tree representation. This places an identical copy of the sample in Deneb's Clipboard.
c) Open a new Sample Manipulator and paste the Clipboard contents (in this case the copy of the sample called Butane) in it. To do this, choose Add sample from clipboard from the context menu at the root of the Samples Manager:
© 2012 Atelgraphics
DENEb -1.26 help documents
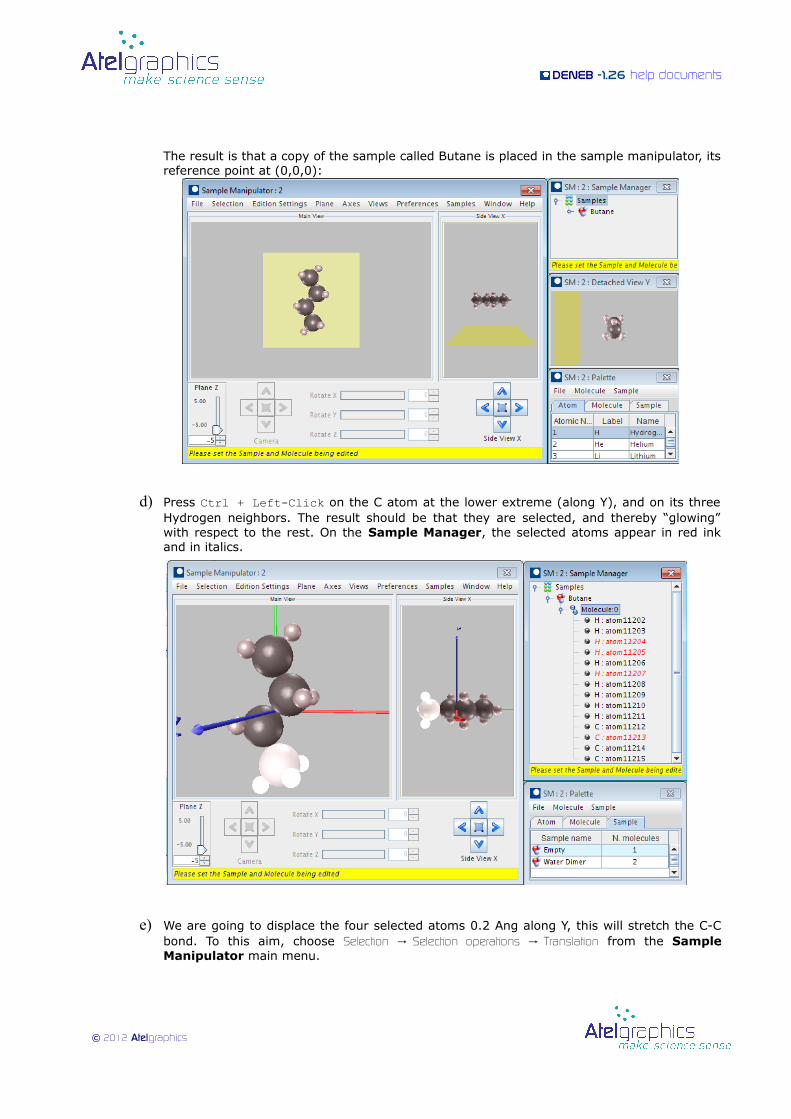
The result is that a copy of the sample called Butane is placed in the sample manipulator, its reference point at (0,0,0):
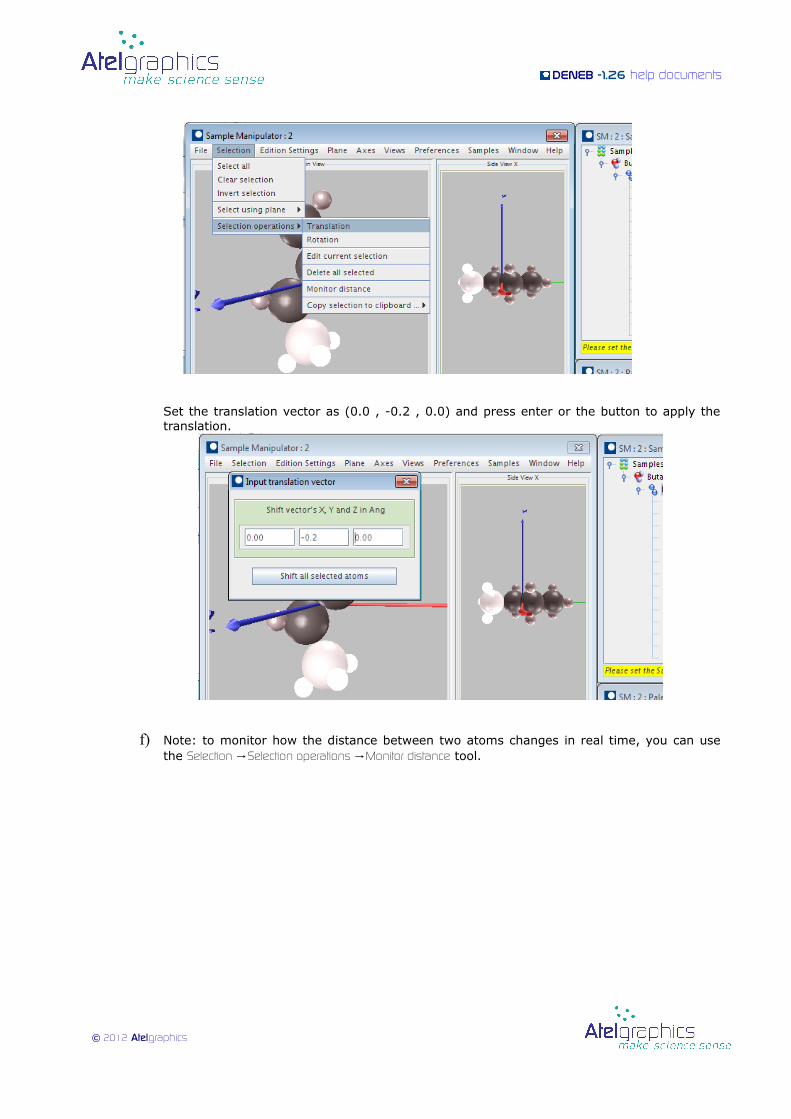
d) Press Ctrl + Left-Click on the C atom at the lower extreme (along Y), and on its three Hydrogen neighbors. The result should be that they are selected, and thereby “glowing” with respect to the rest. On the Sample Manager, the selected atoms appear in red ink and in italics.
e) We are going to displace the four selected atoms 0.2 Ang along Y, this will stretch the C-C bond. To this aim, choose Selection Selection operations Translation→ → from the Sample Manipulator main menu.
© 2012 Atelgraphics
DENEb -1.26 help documents
Set the translation vector as (0.0 , -0.2 , 0.0) and press enter or the button to apply the translation.
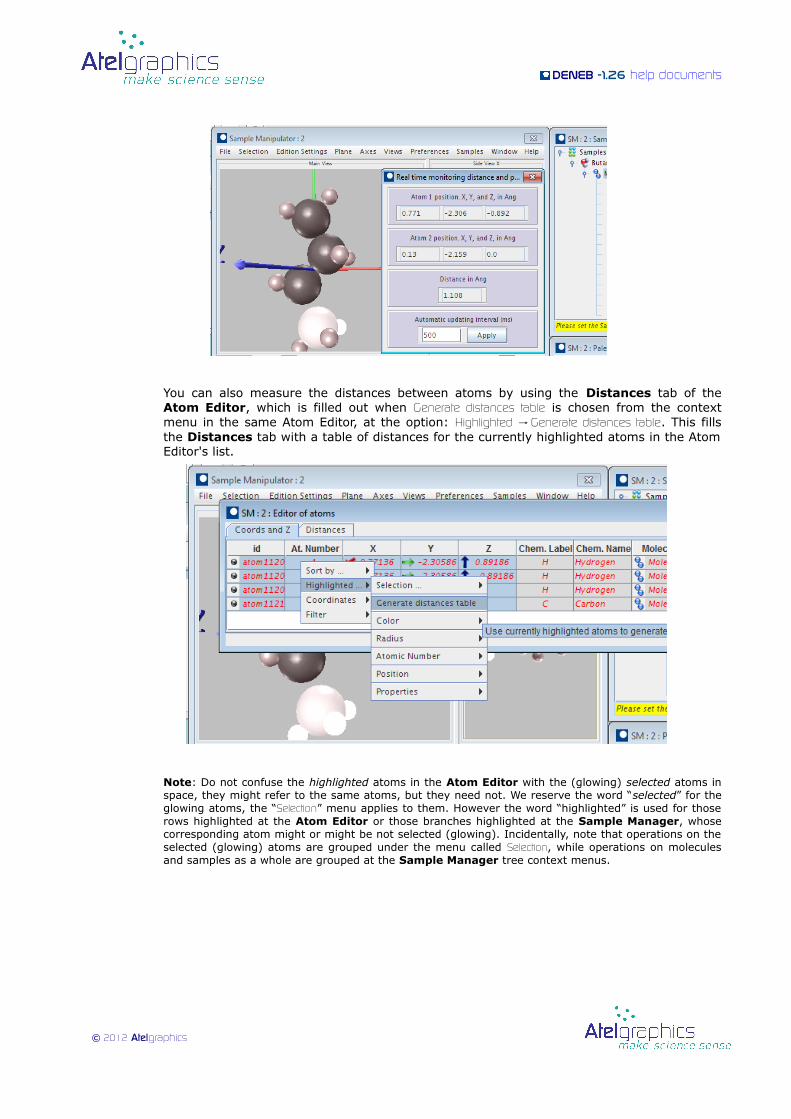
f) Note: to monitor how the distance between two atoms changes in real time, you can use the Selection Selection operations Monitor distance→ → tool.
© 2012 Atelgraphics
DENEb -1.26 help documents
You can also measure the distances between atoms by using the Distances tab of the Atom Editor, which is filled out when Generate distances table is chosen from the context menu in the same Atom Editor, at the option: Highlighted Generate distances table→ . This fills the Distances tab with a table of distances for the currently highlighted atoms in the Atom Editor's list.
Note: Do not confuse the highlighted atoms in the Atom Editor with the (glowing) selected atoms in space, they might refer to the same atoms, but they need not. We reserve the word “selected” for the glowing atoms, the “Selection” menu applies to them. However the word “highlighted” is used for those rows highlighted at the Atom Editor or those branches highlighted at the Sample Manager, whose corresponding atom might or might be not selected (glowing). Incidentally, note that operations on the selected (glowing) atoms are grouped under the menu called Selection, while operations on molecules and samples as a whole are grouped at the Sample Manager tree context menus.
© 2012 Atelgraphics
DENEb -1.26 help documents
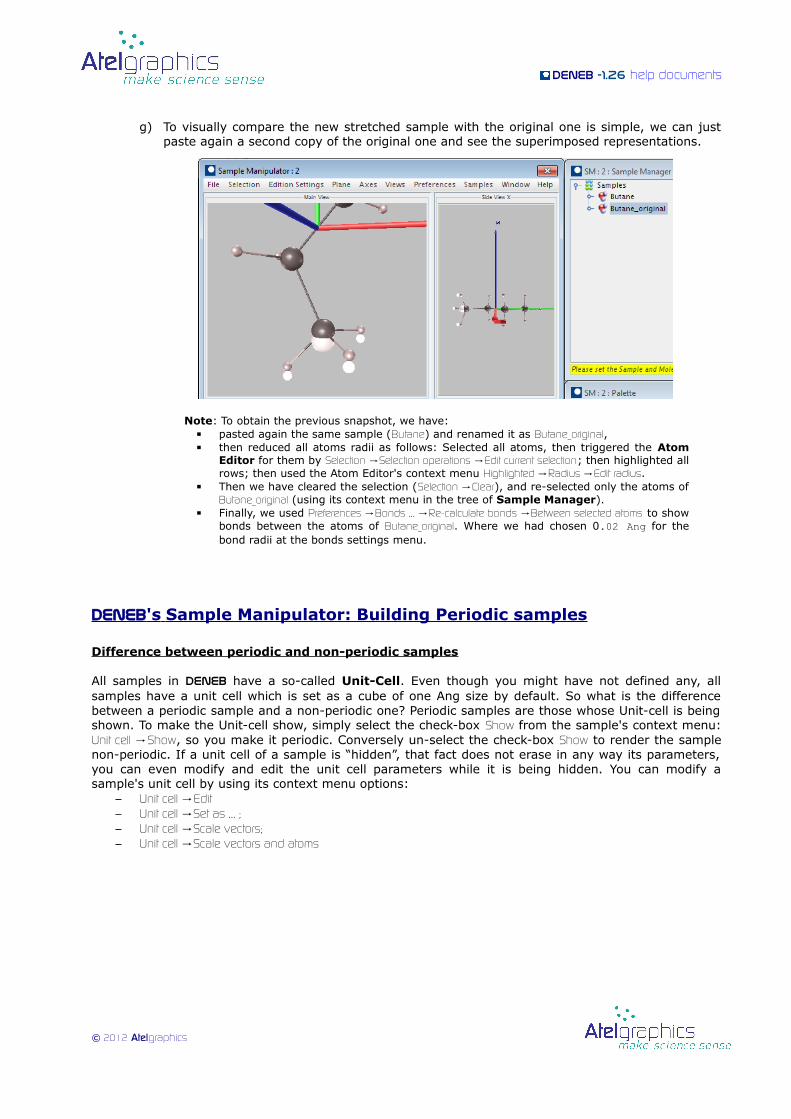
g) To visually compare the new stretched sample with the original one is simple, we can just paste again a second copy of the original one and see the superimposed representations.
Note: To obtain the previous snapshot, we have:▪ pasted again the same sample (Butane) and renamed it as Butane_original, ▪ then reduced all atoms radii as follows: Selected all atoms, then triggered the Atom
Editor for them by Selection Selection operations Edit current selection→ → ; then highlighted all rows; then used the Atom Editor's context menu Highlighted Radius Edit radius→ → .
▪ Then we have cleared the selection (Selection Clear→ ), and re-selected only the atoms of Butane_original (using its context menu in the tree of Sample Manager).
▪ Finally, we used Preferences Bonds … Re-calculate bonds Between selected atoms→ → → to show bonds between the atoms of Butane_original. Where we had chosen 0.02 Ang for the bond radii at the bonds settings menu.
DENEb 's Sample Manipulator: Building Periodic samples
Difference between periodic and non-periodic samples
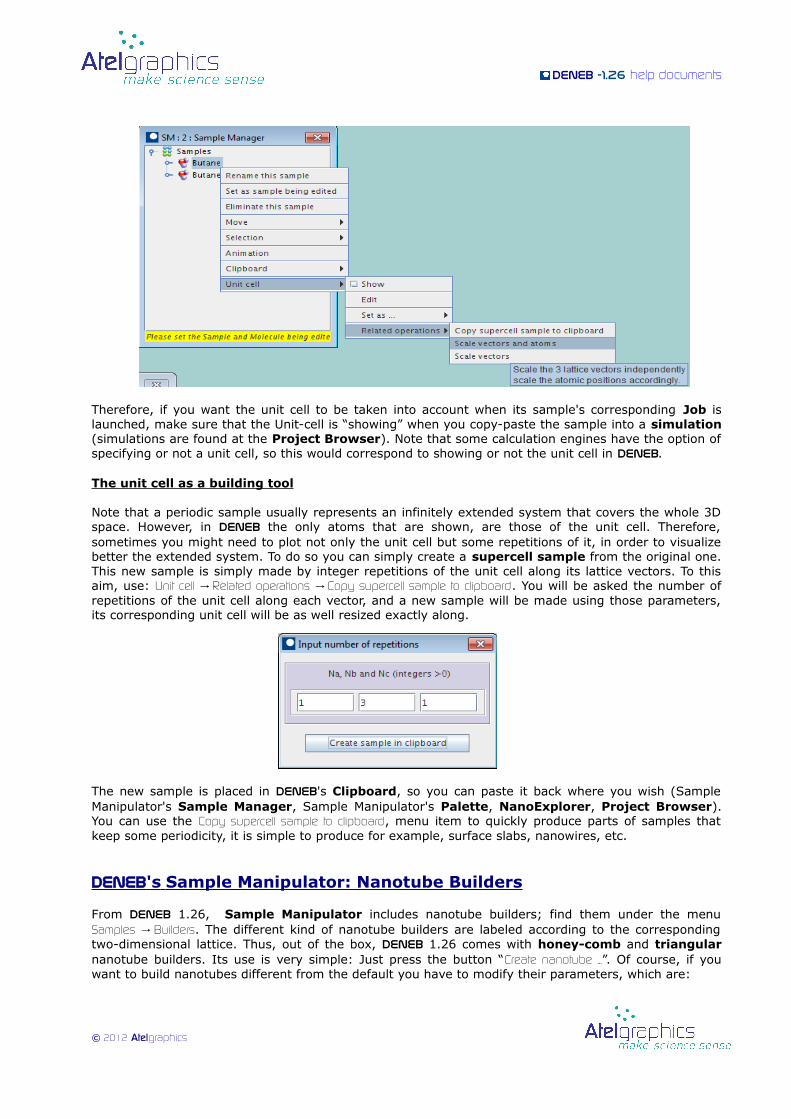
All samples in Deneb have a so-called Unit-Cell. Even though you might have not defined any, all samples have a unit cell which is set as a cube of one Ang size by default. So what is the difference between a periodic sample and a non-periodic one? Periodic samples are those whose Unit-cell is being shown. To make the Unit-cell show, simply select the check-box Show from the sample's context menu: Unit cell Show→ , so you make it periodic. Conversely un-select the check-box Show to render the sample non-periodic. If a unit cell of a sample is “hidden”, that fact does not erase in any way its parameters, you can even modify and edit the unit cell parameters while it is being hidden. You can modify a sample's unit cell by using its context menu options:
– Unit cell Edit →– Unit cell Set as … ;→– Unit cell Scale vectors;→– Unit cell Scale vectors and atoms→
© 2012 Atelgraphics
DENEb -1.26 help documents
Therefore, if you want the unit cell to be taken into account when its sample's corresponding Job is launched, make sure that the Unit-cell is “showing” when you copy-paste the sample into a simulation (simulations are found at the Project Browser). Note that some calculation engines have the option of specifying or not a unit cell, so this would correspond to showing or not the unit cell in Deneb.
The unit cell as a building tool
Note that a periodic sample usually represents an infinitely extended system that covers the whole 3D space. However, in Deneb the only atoms that are shown, are those of the unit cell. Therefore, sometimes you might need to plot not only the unit cell but some repetitions of it, in order to visualize better the extended system. To do so you can simply create a supercell sample from the original one. This new sample is simply made by integer repetitions of the unit cell along its lattice vectors. To this aim, use: Unit cell Related operations Copy supercell sample to clipboard→ → . You will be asked the number of repetitions of the unit cell along each vector, and a new sample will be made using those parameters, its corresponding unit cell will be as well resized exactly along.
The new sample is placed in Deneb's Clipboard, so you can paste it back where you wish (Sample Manipulator's Sample Manager, Sample Manipulator's Palette, NanoExplorer, Project Browser). You can use the Copy supercell sample to clipboard, menu item to quickly produce parts of samples that keep some periodicity, it is simple to produce for example, surface slabs, nanowires, etc.
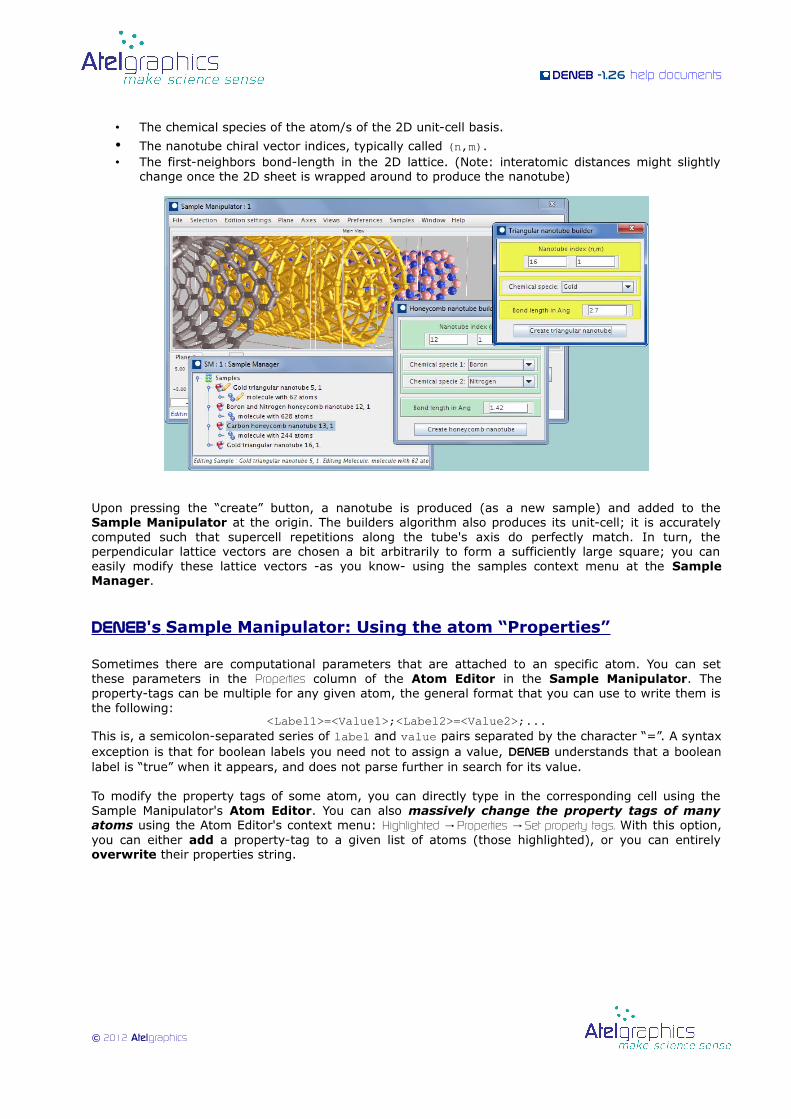
DENEb 's Sample Manipulator: Nanotube Builders
From Deneb 1.26, Sample Manipulator includes nanotube builders; find them under the menu Samples Builders→ . The different kind of nanotube builders are labeled according to the corresponding two-dimensional lattice. Thus, out of the box, Deneb 1.26 comes with honey-comb and triangular nanotube builders. Its use is very simple: Just press the button “Create nanotube ...”. Of course, if you want to build nanotubes different from the default you have to modify their parameters, which are:
© 2012 Atelgraphics
DENEb -1.26 help documents
• The chemical species of the atom/s of the 2D unit-cell basis.
• The nanotube chiral vector indices, typically called (n,m).• The first-neighbors bond-length in the 2D lattice. (Note: interatomic distances might slightly
change once the 2D sheet is wrapped around to produce the nanotube)
Upon pressing the “create” button, a nanotube is produced (as a new sample) and added to the Sample Manipulator at the origin. The builders algorithm also produces its unit-cell; it is accurately computed such that supercell repetitions along the tube's axis do perfectly match. In turn, the perpendicular lattice vectors are chosen a bit arbitrarily to form a sufficiently large square; you can easily modify these lattice vectors -as you know- using the samples context menu at the Sample Manager.
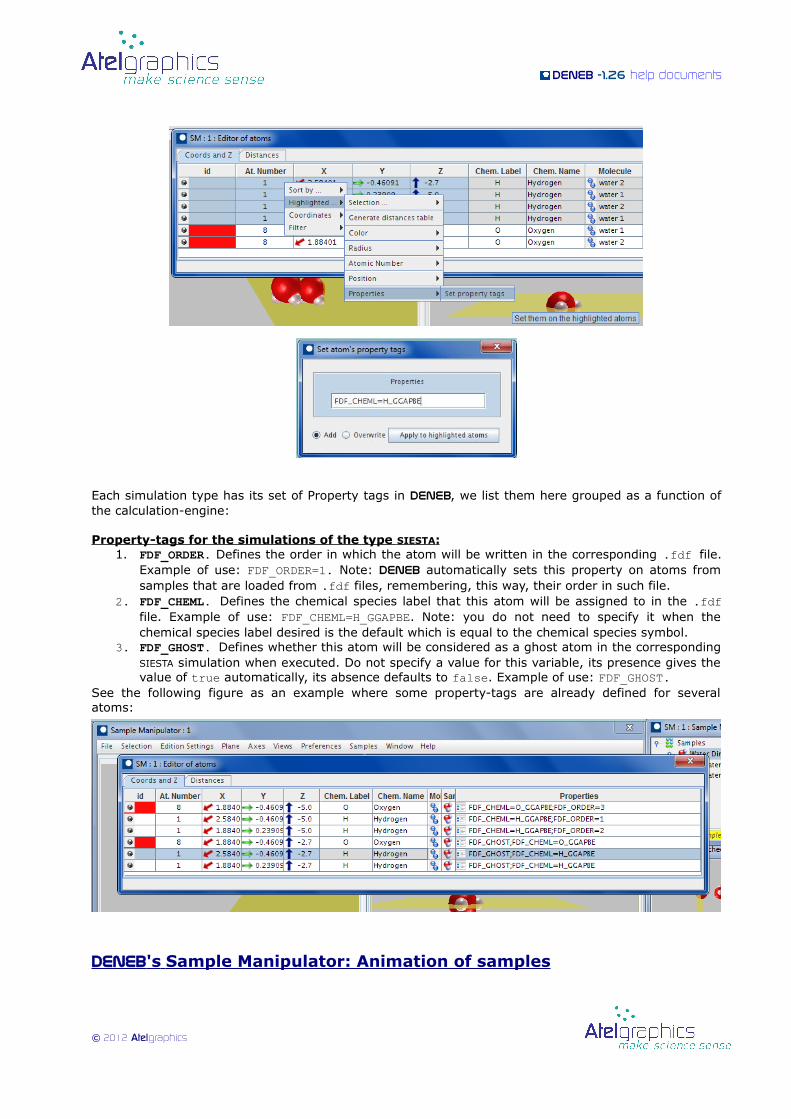
DENEb 's Sample Manipulator: Using the atom “Properties”
Sometimes there are computational parameters that are attached to an specific atom. You can set these parameters in the Properties column of the Atom Editor in the Sample Manipulator. The property-tags can be multiple for any given atom, the general format that you can use to write them is the following:
<Label1>=<Value1>;<Label2>=<Value2>;...This is, a semicolon-separated series of label and value pairs separated by the character “=”. A syntax exception is that for boolean labels you need not to assign a value, Deneb understands that a boolean label is “true” when it appears, and does not parse further in search for its value. To modify the property tags of some atom, you can directly type in the corresponding cell using the Sample Manipulator's Atom Editor. You can also massively change the property tags of many atoms using the Atom Editor's context menu: Highlighted Properties Set property tags. → → With this option, you can either add a property-tag to a given list of atoms (those highlighted), or you can entirely overwrite their properties string.
© 2012 Atelgraphics
DENEb -1.26 help documents
Each simulation type has its set of Property tags in Deneb, we list them here grouped as a function of the calculation-engine:
Property-tags for the simulations of the type SIESTA : 1. FDF_ORDER. Defines the order in which the atom will be written in the corresponding .fdf file.
Example of use: FDF_ORDER=1. Note: Deneb automatically sets this property on atoms from samples that are loaded from .fdf files, remembering, this way, their order in such file.
2. FDF_CHEML. Defines the chemical species label that this atom will be assigned to in the .fdf file. Example of use: FDF_CHEML=H_GGAPBE. Note: you do not need to specify it when the chemical species label desired is the default which is equal to the chemical species symbol.
3. FDF_GHOST. Defines whether this atom will be considered as a ghost atom in the corresponding SIESTA simulation when executed. Do not specify a value for this variable, its presence gives the value of true automatically, its absence defaults to false. Example of use: FDF_GHOST.
See the following figure as an example where some property-tags are already defined for several atoms:
DENEb 's Sample Manipulator: Animation of samples
© 2012 Atelgraphics
DENEb -1.26 help documents
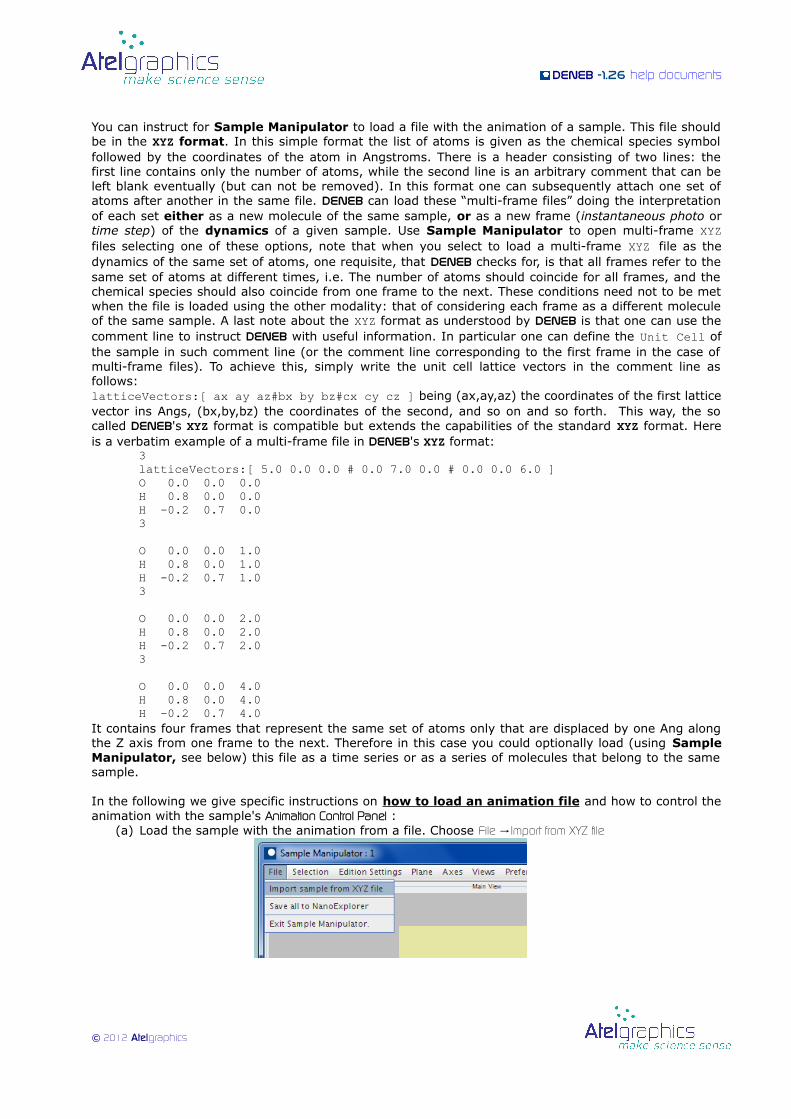
You can instruct for Sample Manipulator to load a file with the animation of a sample. This file should be in the XYZ format. In this simple format the list of atoms is given as the chemical species symbol followed by the coordinates of the atom in Angstroms. There is a header consisting of two lines: the first line contains only the number of atoms, while the second line is an arbitrary comment that can be left blank eventually (but can not be removed). In this format one can subsequently attach one set of atoms after another in the same file. DENEb can load these “multi-frame files” doing the interpretation of each set either as a new molecule of the same sample, or as a new frame (instantaneous photo or time step) of the dynamics of a given sample. Use Sample Manipulator to open multi-frame XYZ files selecting one of these options, note that when you select to load a multi-frame XYZ file as the dynamics of the same set of atoms, one requisite, that DENEb checks for, is that all frames refer to the same set of atoms at different times, i.e. The number of atoms should coincide for all frames, and the chemical species should also coincide from one frame to the next. These conditions need not to be met when the file is loaded using the other modality: that of considering each frame as a different molecule of the same sample. A last note about the XYZ format as understood by DENEb is that one can use the comment line to instruct DENEb with useful information. In particular one can define the Unit Cell of the sample in such comment line (or the comment line corresponding to the first frame in the case of multi-frame files). To achieve this, simply write the unit cell lattice vectors in the comment line as follows:latticeVectors:[ ax ay az#bx by bz#cx cy cz ] being (ax,ay,az) the coordinates of the first lattice vector ins Angs, (bx,by,bz) the coordinates of the second, and so on and so forth. This way, the so called DENEb's XYZ format is compatible but extends the capabilities of the standard XYZ format. Here is a verbatim example of a multi-frame file in DENEb's XYZ format:
3latticeVectors:[ 5.0 0.0 0.0 # 0.0 7.0 0.0 # 0.0 0.0 6.0 ]O 0.0 0.0 0.0H 0.8 0.0 0.0H -0.2 0.7 0.03
O 0.0 0.0 1.0H 0.8 0.0 1.0H -0.2 0.7 1.03
O 0.0 0.0 2.0H 0.8 0.0 2.0H -0.2 0.7 2.03
O 0.0 0.0 4.0H 0.8 0.0 4.0H -0.2 0.7 4.0
It contains four frames that represent the same set of atoms only that are displaced by one Ang along the Z axis from one frame to the next. Therefore in this case you could optionally load (using Sample Manipulator, see below) this file as a time series or as a series of molecules that belong to the same sample.
In the following we give specific instructions on how to load an animation file and how to control the animation with the sample's Animation Control Panel :
(a) Load the sample with the animation from a file. Choose File Import from XYZ file→
© 2012 Atelgraphics
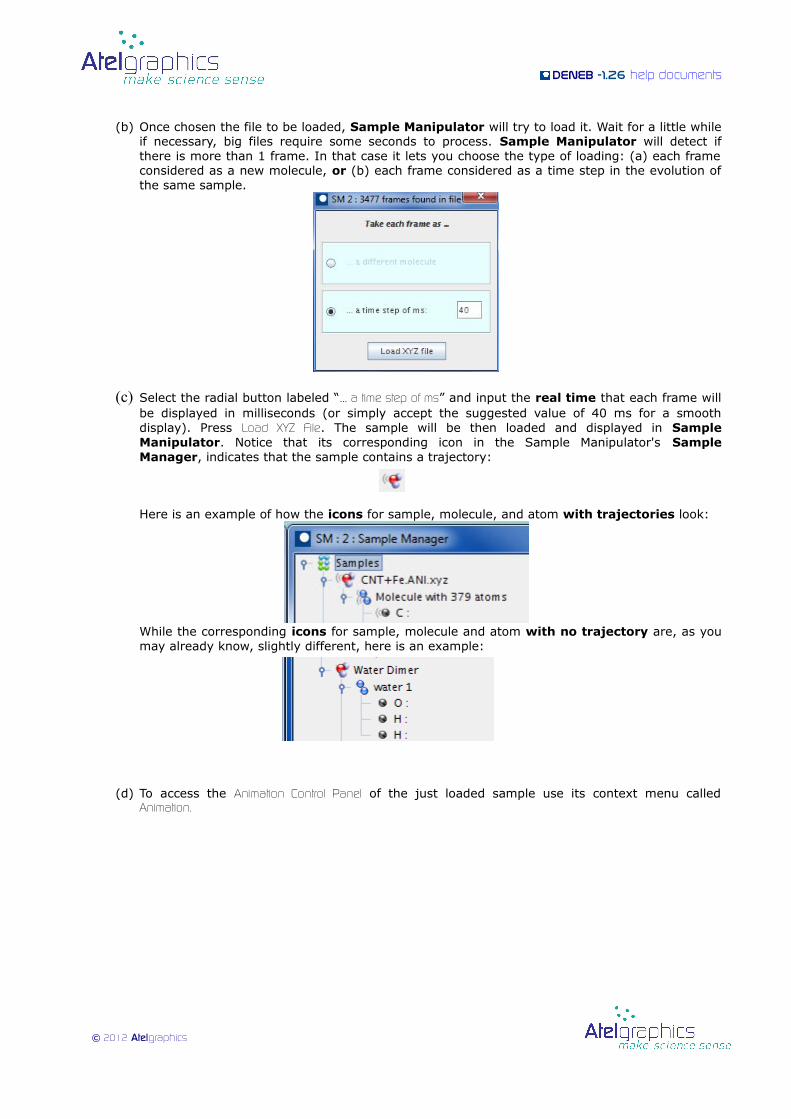
DENEb -1.26 help documents
(b) Once chosen the file to be loaded, Sample Manipulator will try to load it. Wait for a little while if necessary, big files require some seconds to process. Sample Manipulator will detect if there is more than 1 frame. In that case it lets you choose the type of loading: (a) each frame considered as a new molecule, or (b) each frame considered as a time step in the evolution of the same sample.
(c) Select the radial button labeled “… a time step of ms” and input the real time that each frame will be displayed in milliseconds (or simply accept the suggested value of 40 ms for a smooth display). Press Load XYZ File. The sample will be then loaded and displayed in Sample Manipulator. Notice that its corresponding icon in the Sample Manipulator's Sample Manager, indicates that the sample contains a trajectory:
Here is an example of how the icons for sample, molecule, and atom with trajectories look:
While the corresponding icons for sample, molecule and atom with no trajectory are, as you may already know, slightly different, here is an example:
(d) To access the Animation Control Panel of the just loaded sample use its context menu called Animation.
© 2012 Atelgraphics
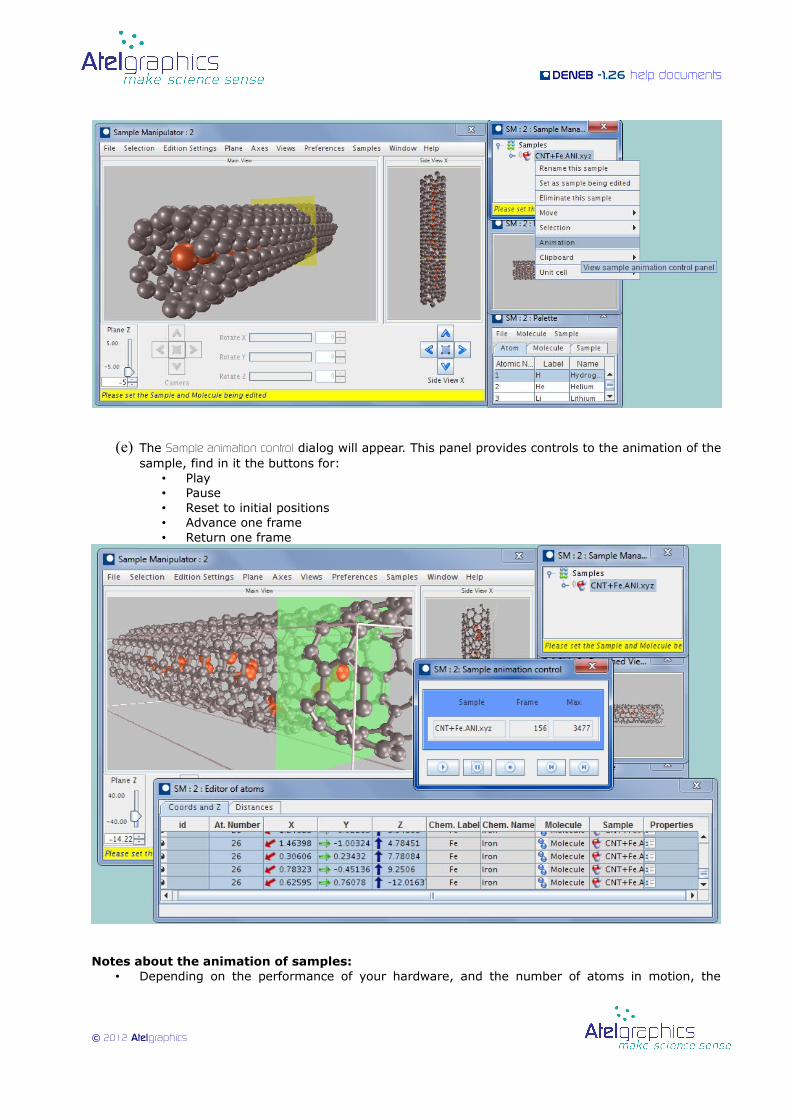
DENEb -1.26 help documents
(e) The Sample animation control dialog will appear. This panel provides controls to the animation of the sample, find in it the buttons for:
• Play• Pause• Reset to initial positions• Advance one frame• Return one frame
Notes about the animation of samples:• Depending on the performance of your hardware, and the number of atoms in motion, the
© 2012 Atelgraphics

DENEb -1.26 help documents
animation display could be more or less smooth.
• If bonds are showing (Preferences → Bonds → Show) you will notice that they do not follow the dynamics of the animation. This is a feature aimed not to hinder performance. Therefore, you will probably want to observe the dynamics while not showing bonds, and to recalculate bonds when wanted at specific frames (Preferences → Bonds → Re-calculate bonds → … ).
© 2012 Atelgraphics
DENEb -1.26 help documents
DENEb's Project Browser
© 2012 Atelgraphics
DENEb -1.26 help documents
© 2012 Atelgraphics
DENEb -1.26 help documents
Deneb 's Project Browser: General idea.
As we have mentioned earlier, DENEb's aim is to facilitate and expedite the work of researchers in the fields of Atomistic Simulations. With DENEb you can create, execute, retrieve, organize and centralize your thousands of simulations belonging to your hundreds of research projects. Deneb's Project Browser is the place where you can create, modify, organize, classify and centralize all your projects.
From DENEb's Project Browser, you can create simulations by coupling a given sample to a given set of computational parameters. Your simulations might apply to very many different physical systems, they could also belong to different calculation engines (e.g. SIESTA, QuantumEspresso, CPMD, VASP, etc), and could be launched for execution into several different remote hosts … In spite of this, Project Browser can keep track of each of them and present them to you neatly organized and readily accessible. Using DENEb´s Project Browser you can choose any kind of classification for your simulations, based on kind of sample, type of calculation engine, etc. Use customary labels and organize them, in groups and projects, into tree structures of any depth. Quickly search and -with a single click- store/retrieve all of it: Simulations, projects, their organization, and their resulting data.
Deneb 's Project Browser: The concept of project and simulation.
We have already used these words (project and simulation), but let us properly define them with regard to Deneb's understanding before continuing.
Definition of project:A project in Deneb's terms, is loosely defined as the set of simulations corresponding to a given real-life research project. These can be just a few or very many; a project can, thereby, have an internal classification structure of any complexity, customarily defined into a tree-organization. But a project can not contain another project within.
Definition of simulation:A simulation in Deneb's terms, is loosely defined as a representation of a ready-to-use input-file for some calculation engine. Deneb considers that all simulations are composed of two distinct parts:
1. The sample, where the physical system is defined. Which is the object that NanoExplorer and Sample Manipulator are dedicated to.
2. The parameters, which are the rest of computational parameters (related to the scientific model, the numerical precision, etc) that a calculation-engine needs to completely define a single execution run. This is the object to which the Parameters Editor is dedicated to.
Note: Some little mixing is unavoidable, for example the property-tags, that you can edit using the Atom Editor of Sample Manipulator, reflect properties of the atoms that are not strictly related to the definition of the physical system itself, but rather to the calculation according to some calculation-engine.
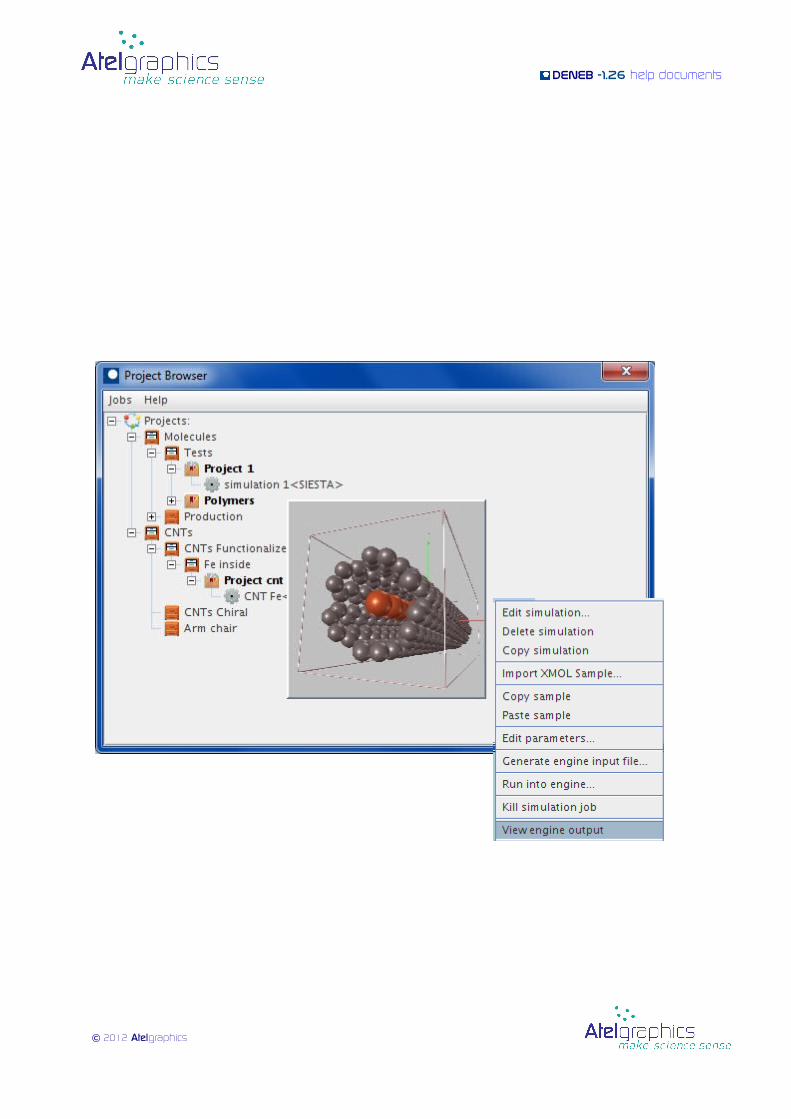
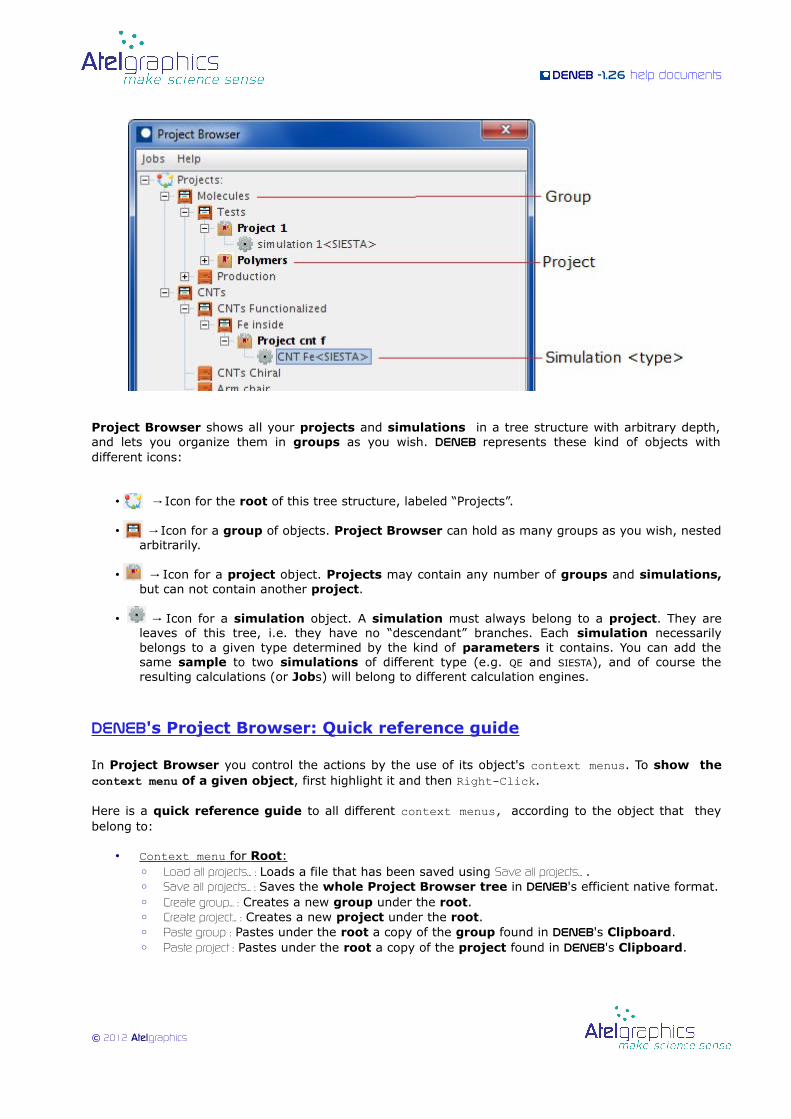
The Project Browser tree, presents different icons for different kind of objects, this facilitates that you quickly know what are you looking at, here is an example:
© 2012 Atelgraphics
DENEb -1.26 help documents
Project Browser shows all your projects and simulations in a tree structure with arbitrary depth, and lets you organize them in groups as you wish. Deneb represents these kind of objects with different icons:
• Icon for the → root of this tree structure, labeled “Projects”.
• Icon for a → group of objects. Project Browser can hold as many groups as you wish, nested arbitrarily.
• Icon for a → project object. Projects may contain any number of groups and simulations, but can not contain another project.
• Icon for a → simulation object. A simulation must always belong to a project. They are leaves of this tree, i.e. they have no “descendant” branches. Each simulation necessarily belongs to a given type determined by the kind of parameters it contains. You can add the same sample to two simulations of different type (e.g. QE and SIESTA), and of course the resulting calculations (or Jobs) will belong to different calculation engines.
Deneb 's Project Browser: Quick reference guide
In Project Browser you control the actions by the use of its object's context menus. To show the context menu of a given object, first highlight it and then Right-Click.
Here is a quick reference guide to all different context menus, according to the object that they belong to:
• Context menu for Root : ◦ Load all projects... : Loads a file that has been saved using Save all projects... .◦ Save all projects... : Saves the whole Project Browser tree in Deneb's efficient native format.◦ Create group... : Creates a new group under the root.◦ Create project... : Creates a new project under the root.◦ Paste group : Pastes under the root a copy of the group found in deneb's Clipboard.◦ Paste project : Pastes under the root a copy of the project found in deneb's Clipboard.
© 2012 Atelgraphics

DENEb -1.26 help documents
• Context menu for Group : ◦ Create group...: Creates a new group under the highlighted group.◦ Edit group...: Edits the highlighted group's label and description.◦ Delete group...: Deletes the highlighted group.◦ Create project...: Creates a new project under the highlighted group.◦ Create simulation...: Creates a new simulation under the highlighted group.◦ Create simulation from file...: Loads a valid input-file for some calculation engine, and creates a
new simulation of the corresponding type. For example, from a SIESTA input file (with extension .fdf) , it creates a new SIESTA simulation under the highlighted group.
◦ Copy group: Creates a copy of the highlighted group and places it into deneb's Clipboard.◦ Paste group: Pastes a copy of the group found in deneb's Clipboard.◦ Paste project: Pastes a copy of the project found in deneb's Clipboard.◦ Paste simulation: Pastes a copy of the simulation found in deneb's Clipboard.
• Context menu for Project : ◦ Create simulation...: Creates a new simulation under the highlighted project.◦ Create simulation from file...: Loads a valid input-file for some calculation engine, and creates a
new simulation of the corresponding type. For example, from a SIESTA input file (with extension .fdf) , it creates a new SIESTA simulation under the highlighted project.
◦ Create group...: Creates a new group under the highlighted project.◦ Edit project description...: Edits the label and description of the highlighted project.◦ Delete project: Deletes the highlighted project.◦ Copy project: Places a copy of the highlighted project into deneb's Clipboard.◦ Paste group: Pastes a copy of the group found in deneb's Clipboard.◦ Paste simulation: Pastes a copy of the simulation found in deneb's Clipboard.
• Context menu for Simulation : ◦ Edit simulation...: Edits the label and description of the highlighted simulation.◦ Delete simulation: Deletes the highlighted simulation.◦ Copy simulation: Places a copy of the highlighted simulation into deneb's Clipboard.◦ Import XMOL Sample...: Reads a file in XMol format (extension .XYZ) and creates a sample
which is placed in the highlighted simulation. Deneb will detect if there is more than 1 frame in the file. In that case it lets you choose the type of loading: each frame considered as a new molecule, or each frame considered as a time step in the evolution of the same sample.
◦ Copy sample: Places a copy of the sample in the highlighted simulation into deneb's Clipboard.
◦ Paste sample: Pastes a copy of the sample found in deneb's Clipboard into the highlighted simulation.
◦ Edit parameters...: Launches a new Parameters Editor that displays and allows to modify the parameters of the highlighted simulation.
◦ Generate engine input file...: Creates a corresponding engine input-file using the data from the highlighted simulation (sample and parameters). The type of engine input-file obtained matches the type of simulation. For example, if the highlighted simulation is of the SIESTA
type, deneb will generate a ready-to-use .fdf file (SIESTA input file).
◦ Run into engine...: Creates a job and launches it for execution into a given calculation engine. deneb will show you a list with all the engine configurations currently defined for the given simulation type. After you choose one, deneb will create and submit a new job to that specified machine (see Job Manager).You will notice that the icon corresponding to the simulation just launched to “run into engine” changes.
Here is a list of possible icons for simulations that have been submitted and their meaning:
• = Submitted and waiting to be sent to the remote engine machine.
© 2012 Atelgraphics
DENEb -1.26 help documents
• = Simulation currently running in the remote machine.
• = Execution finished correctly (without any detected errors).
• = Execution finished with some detected error.
◦ Kill simulation job: Halts and eliminates the associated job that is currently running in the remote machine (see Job Manager).
◦ View engine output...: Retrieves and displays the current output file of the corresponding remote job (see Job Manager).
Drag and Drop:In Project Browser, you can drag-and-drop objects to easily rearrange the tree. It is safe to experiment with drag and drop because when you attempt a non-valid motion (e.g., to move a project into another project) Project Browser will not complete such operation and will report about it.
Deneb 's Project Browser: Defining engine configurations
Deneb's Project Browser can directly launch simulations for remote execution. But of course, Deneb needs to know some information about the remote calculation engines so it can connect and launch jobs on them. The set of data that defines a given executable in a given machine is called, in Deneb 's terms, an engine configuration. Deneb can store and use multiple engine configurations. This is how you can define them:
1. From Deneb's main window use Edit Preferences→ , you can also use the main toolbar short-cut button that looks like the following:
2. Fill out the requested information such as:a) IP : the IP address of the remote machineb) SSH port: port to use for the ssh connection.c) User name and User password: login information on the remote machine, the password field is
not displayed and not susceptible to be copy-pasted.d) Parallel options: Select whether the executable is supposed to be launched for execution in
parallel. Options are: 1. Use MPI: check this box if you want the jobs to be submitted using mpiexec or
mpirun.2. NP: Input here the number of processors to be used. 3. Use PBS: check this box if the jobs are to be launched to a PBS type queue.4. Args. : set here the particular arguments to be passed when launching to the PBS
queue.e) Executable File: Name of the executable file.f) Bin Directory: absolute path where to find the executable file.g) Data Directory: absolute path where to find write the data generated from simulations
executions.h) Pseudos Dir: absolute path where to find the pseudo-potential files.
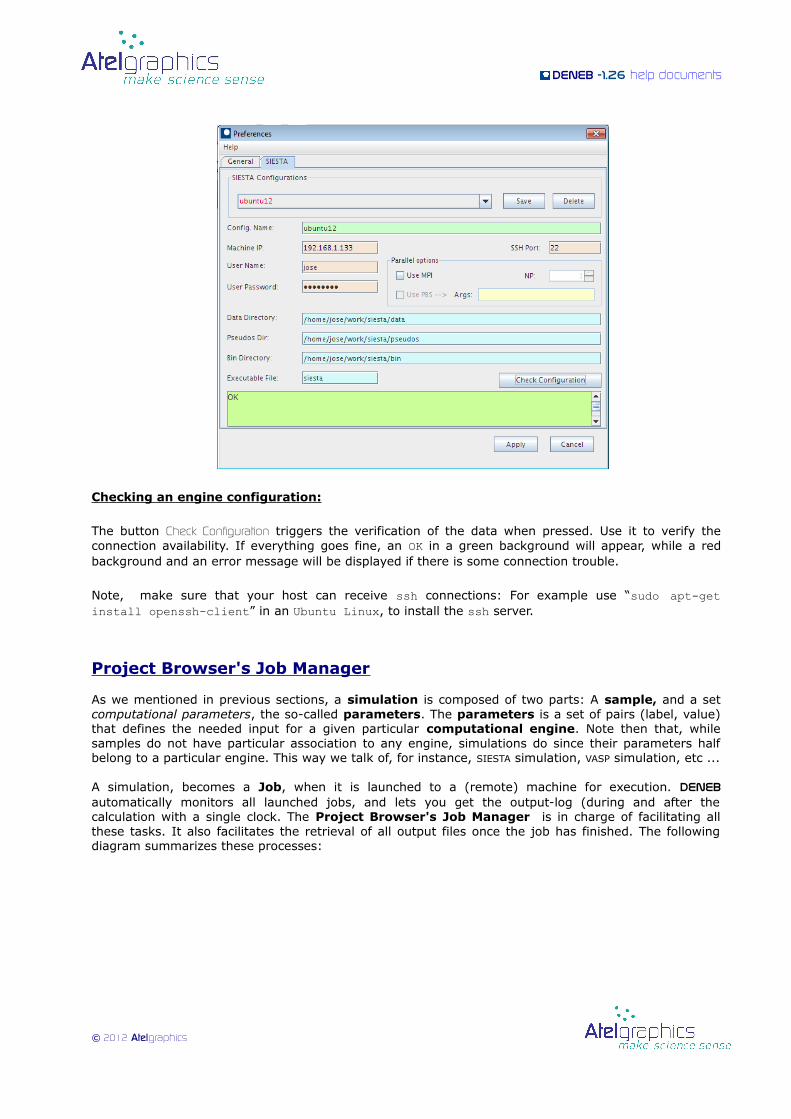
For example, here is a possible engine configuration for SIESTA type simulations:
© 2012 Atelgraphics
DENEb -1.26 help documents
Checking an engine configuration:
The button Check Configuration triggers the verification of the data when pressed. Use it to verify the connection availability. If everything goes fine, an OK in a green background will appear, while a red background and an error message will be displayed if there is some connection trouble.
Note, make sure that your host can receive ssh connections: For example use “sudo apt-get install openssh-client” in an Ubuntu Linux, to install the ssh server.
Project Browser's Job Manager
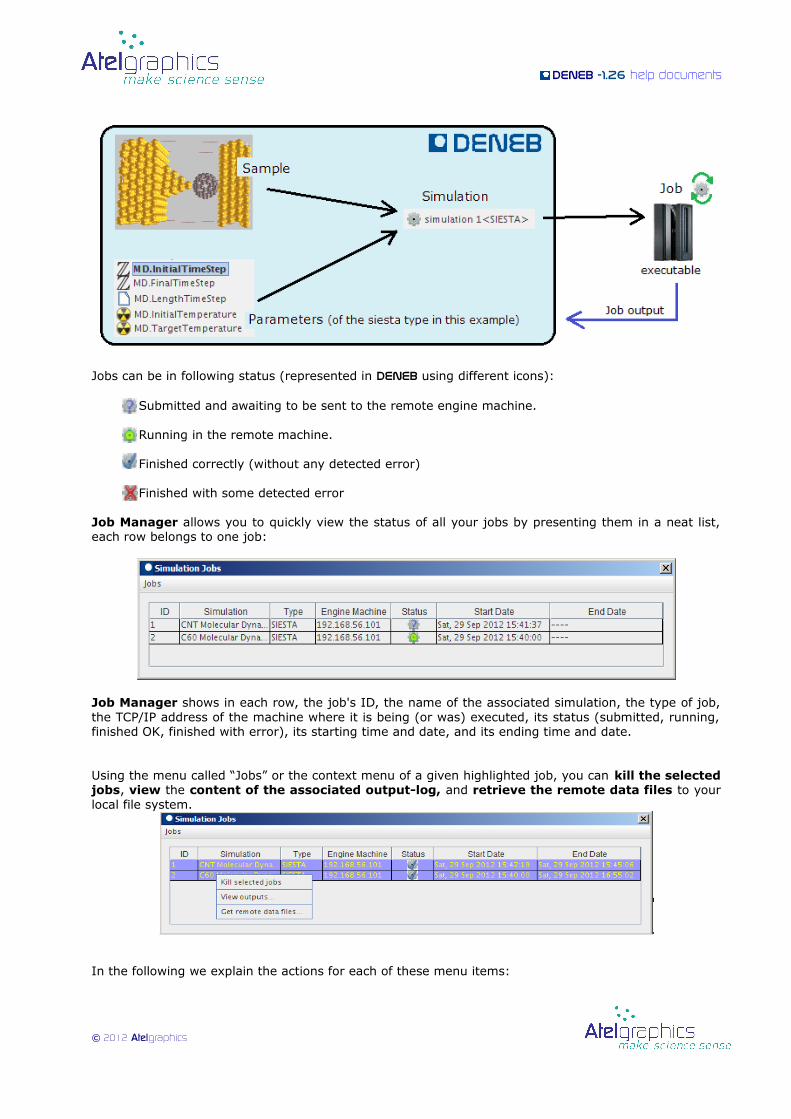
As we mentioned in previous sections, a simulation is composed of two parts: A sample, and a set computational parameters, the so-called parameters. The parameters is a set of pairs (label, value) that defines the needed input for a given particular computational engine. Note then that, while samples do not have particular association to any engine, simulations do since their parameters half belong to a particular engine. This way we talk of, for instance, SIESTA simulation, VASP simulation, etc ...
A simulation, becomes a Job, when it is launched to a (remote) machine for execution. Deneb automatically monitors all launched jobs, and lets you get the output-log (during and after the calculation with a single clock. The Project Browser's Job Manager is in charge of facilitating all these tasks. It also facilitates the retrieval of all output files once the job has finished. The following diagram summarizes these processes:
© 2012 Atelgraphics
DENEb -1.26 help documents
Jobs can be in following status (represented in Deneb using different icons):
Submitted and awaiting to be sent to the remote engine machine.
Running in the remote machine.
Finished correctly (without any detected error)
Finished with some detected error
Job Manager allows you to quickly view the status of all your jobs by presenting them in a neat list, each row belongs to one job:
Job Manager shows in each row, the job's ID, the name of the associated simulation, the type of job, the TCP/IP address of the machine where it is being (or was) executed, its status (submitted, running, finished OK, finished with error), its starting time and date, and its ending time and date.
Using the menu called “Jobs” or the context menu of a given highlighted job, you can kill the selected jobs, view the content of the associated output-log, and retrieve the remote data files to your local file system.
In the following we explain the actions for each of these menu items:
© 2012 Atelgraphics
DENEb -1.26 help documents
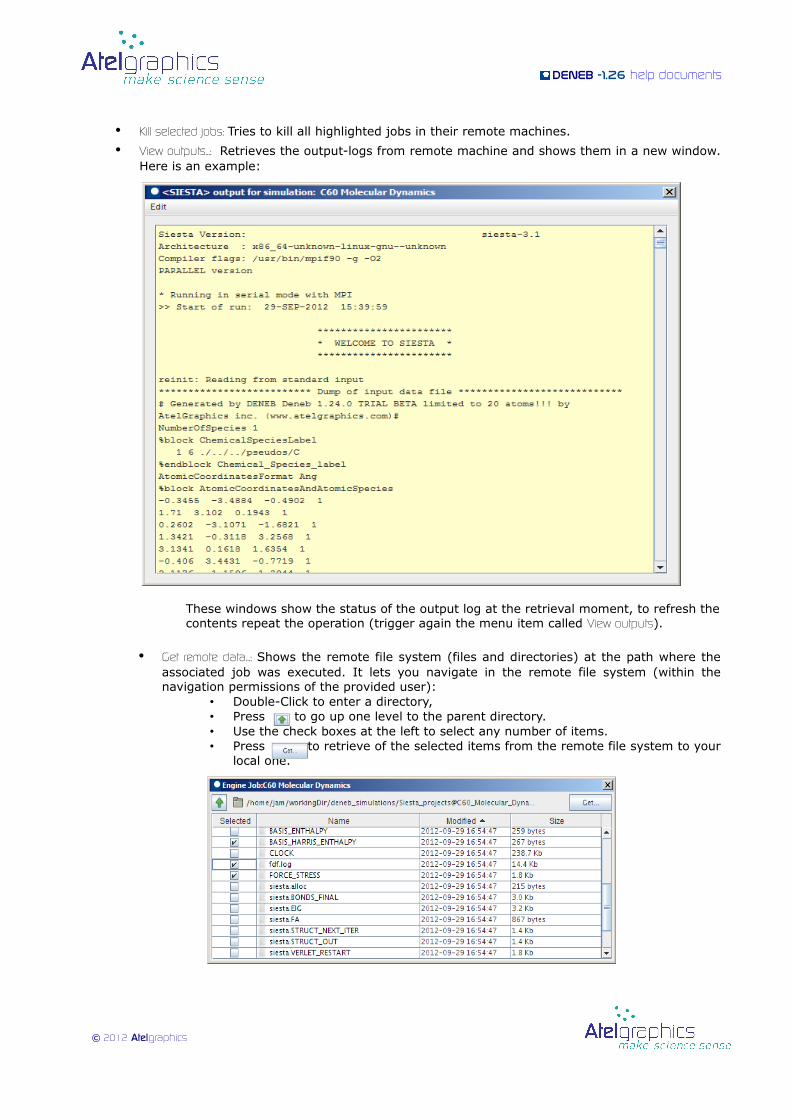
• Kill selected jobs: Tries to kill all highlighted jobs in their remote machines.
• View outputs...: Retrieves the output-logs from remote machine and shows them in a new window. Here is an example:
These windows show the status of the output log at the retrieval moment, to refresh the contents repeat the operation (trigger again the menu item called View outputs).
• Get remote data...: Shows the remote file system (files and directories) at the path where the associated job was executed. It lets you navigate in the remote file system (within the navigation permissions of the provided user):
• Double-Click to enter a directory,• Press to go up one level to the parent directory. • Use the check boxes at the left to select any number of items. • Press to retrieve of the selected items from the remote file system to your
local one.
© 2012 Atelgraphics
DENEb -1.26 help documents
Deneb 's Parameters Editor
As we mentioned in previous sections, a simulation is composed of two parts: A sample, and a set computational parameters, the so-called parameters. The parameters is a set of pairs (label, value) that defines the needed input for a given particular computational engine. Note then that, while samples do not have particular association to any engine, simulations do since their parameters half belong to a particular engine. This way we talk of, for instance, SIESTA simulation, VASP simulation, etc …
As we have seen, using Project Browser you can create a new simulation, provide it with a new sample (for example by pasting it from the Clipboard), and it will be directly ready to be click to launched for remote execution. This sends a default calculation for that sample and is sometimes all we need. The typical default calculation consist of computing the corresponding electronic density.
But for the most part we do require to change the default parameters so we can perform, for example, band structure calculations, mechanical relaxations, molecular dynamics, etc. To specify these computational parameters you can trigger the Parameters Editor from the context menu of any given simulation. When doing so, Deneb will start the editor corresponding to the type of simulation called for. Each plugin provides a new Parameters Editor so there are as many types of Parameter Editors as plugins you have in your system (not to confuse with “add-on”s. Remember each plugin enables the compatibility with a calculation engine, while add-ons are features that you can add to Deneb not specifically linked a calculation engine).
In the following we describe the workings of the different Parameter Editors:
Deneb 's SIESTA - Parameters Editor
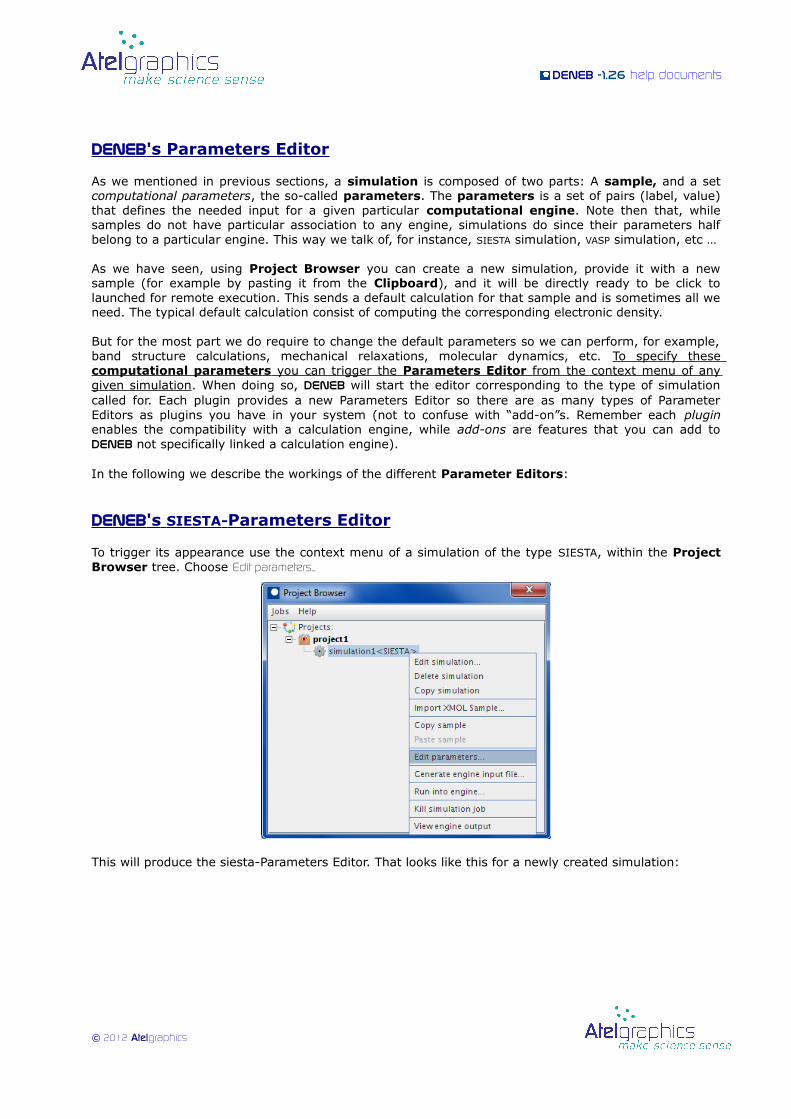
To trigger its appearance use the context menu of a simulation of the type SIESTA, within the Project Browser tree. Choose Edit parameters...
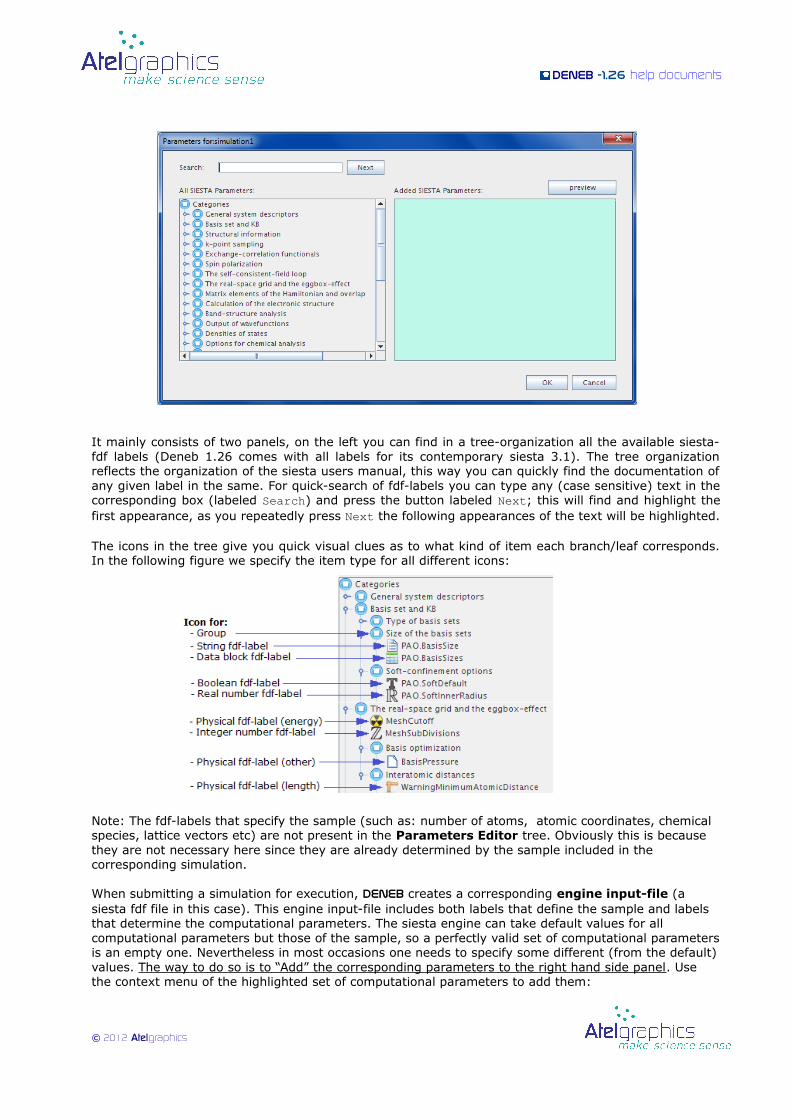
This will produce the siesta-Parameters Editor. That looks like this for a newly created simulation:
© 2012 Atelgraphics
DENEb -1.26 help documents
It mainly consists of two panels, on the left you can find in a tree-organization all the available siesta-fdf labels (Deneb 1.26 comes with all labels for its contemporary siesta 3.1). The tree organization reflects the organization of the siesta users manual, this way you can quickly find the documentation of any given label in the same. For quick-search of fdf-labels you can type any (case sensitive) text in the corresponding box (labeled Search) and press the button labeled Next; this will find and highlight the first appearance, as you repeatedly press Next the following appearances of the text will be highlighted.
The icons in the tree give you quick visual clues as to what kind of item each branch/leaf corresponds. In the following figure we specify the item type for all different icons:
Note: The fdf-labels that specify the sample (such as: number of atoms, atomic coordinates, chemical species, lattice vectors etc) are not present in the Parameters Editor tree. Obviously this is because they are not necessary here since they are already determined by the sample included in the corresponding simulation.
When submitting a simulation for execution, Deneb creates a corresponding engine input-file (a siesta fdf file in this case). This engine input-file includes both labels that define the sample and labels that determine the computational parameters. The siesta engine can take default values for all computational parameters but those of the sample, so a perfectly valid set of computational parameters is an empty one. Nevertheless in most occasions one needs to specify some different (from the default) values. The way to do so is to “Add” the corresponding parameters to the right hand side panel. Use the context menu of the highlighted set of computational parameters to add them:
© 2012 Atelgraphics
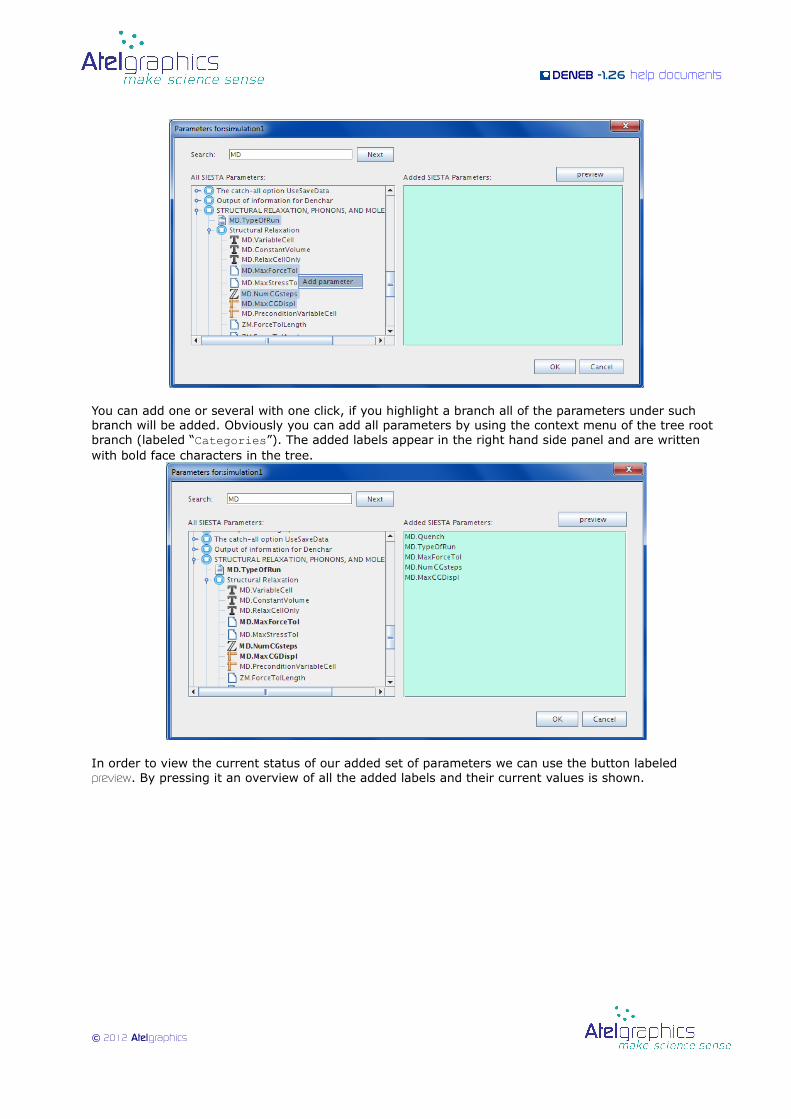
DENEb -1.26 help documents
You can add one or several with one click, if you highlight a branch all of the parameters under such branch will be added. Obviously you can add all parameters by using the context menu of the tree root branch (labeled “Categories”). The added labels appear in the right hand side panel and are written with bold face characters in the tree.
In order to view the current status of our added set of parameters we can use the button labeled preview. By pressing it an overview of all the added labels and their current values is shown.
© 2012 Atelgraphics
DENEb -1.26 help documents
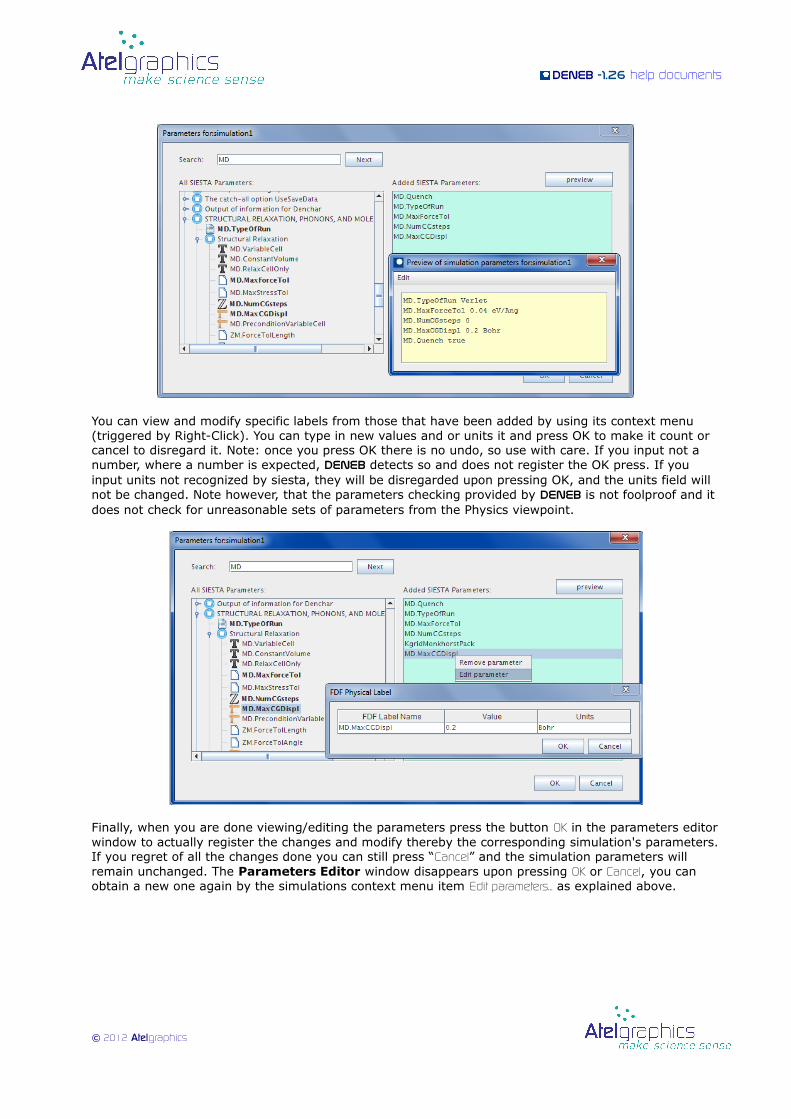
You can view and modify specific labels from those that have been added by using its context menu (triggered by Right-Click). You can type in new values and or units it and press OK to make it count or cancel to disregard it. Note: once you press OK there is no undo, so use with care. If you input not a number, where a number is expected, Deneb detects so and does not register the OK press. If you input units not recognized by siesta, they will be disregarded upon pressing OK, and the units field will not be changed. Note however, that the parameters checking provided by Deneb is not foolproof and it does not check for unreasonable sets of parameters from the Physics viewpoint.
Finally, when you are done viewing/editing the parameters press the button OK in the parameters editor window to actually register the changes and modify thereby the corresponding simulation's parameters. If you regret of all the changes done you can still press “Cancel” and the simulation parameters will remain unchanged. The Parameters Editor window disappears upon pressing OK or Cancel, you can obtain a new one again by the simulations context menu item Edit parameters... as explained above.
© 2012 Atelgraphics
DENEb -1.26 help documents
DENEb's video-demos
© 2012 Atelgraphics
DENEb -1.26 help documents
Deneb 's YouTube videos One picture is worth a thousand words. And a video is about 24 pictures per second. In Atelgraphics YouTube channel you can find some video demonstrations and tutorials about Deneb. Sometimes the faster way to learn is to see it done, check the atelgraphicschannel regularly.
Here you have a relatively short list of links (the one as of December 2012), the number of these will steadily grow.
1. A short video of the visualization of the results of a molecular dynamics (MD) simulation with Deneb, water over a Pt surface. Water dissociation over Pt. One minute.
2. A complete demo. Learn it all in only 15 minutes: Create a sample, modify it, include it in a simulation, execute it remotely, retrieve the results and visualize the MD animation. Gold dimer into C60 complete.
3. Another demo on how to visualize an animation resulting from a MD simulation. Iron atoms inside a Carbon nanotube.Six minutes.
Note: if this document is already old (date of writing is December 2012) it could be that the links above are already dead.
© 2012 Atelgraphics
DENEb -1.26 help documents
DENEb's older video-tutorials
(Note: the following video tutorials are for version 1.2 of Deneb, but still useful to learn many concepts.)
© 2012 Atelgraphics
DENEb -1.26 help documents
Nano Explorer To see a demonstration of NanoExplorer's basic use, there is a tutorial in the “Downloads” section of the Atelgraphics web site. It is entitled “NanoExplorer Essentials” In that tutorial you may learn the following:
How to invoke NanoExplorer
How to rename, delete, visualize and copy samples in NanoExplorer.
How to count the number of molecules and atoms in a given sample.
How to save the looks of a sample in an jpg file.
How to copy a given sample from NanoExplorer into DENEb's Clipboard.
How to quick search for samples by (parts of) their name.
How to tell periodic from molecular sample types.
How to import and export samples in different formats.
How to quickly arrange several simultaneous views of several samples.
How to quickly create a new simulation using a sample from NanoExplorer.
© 2012 Atelgraphics
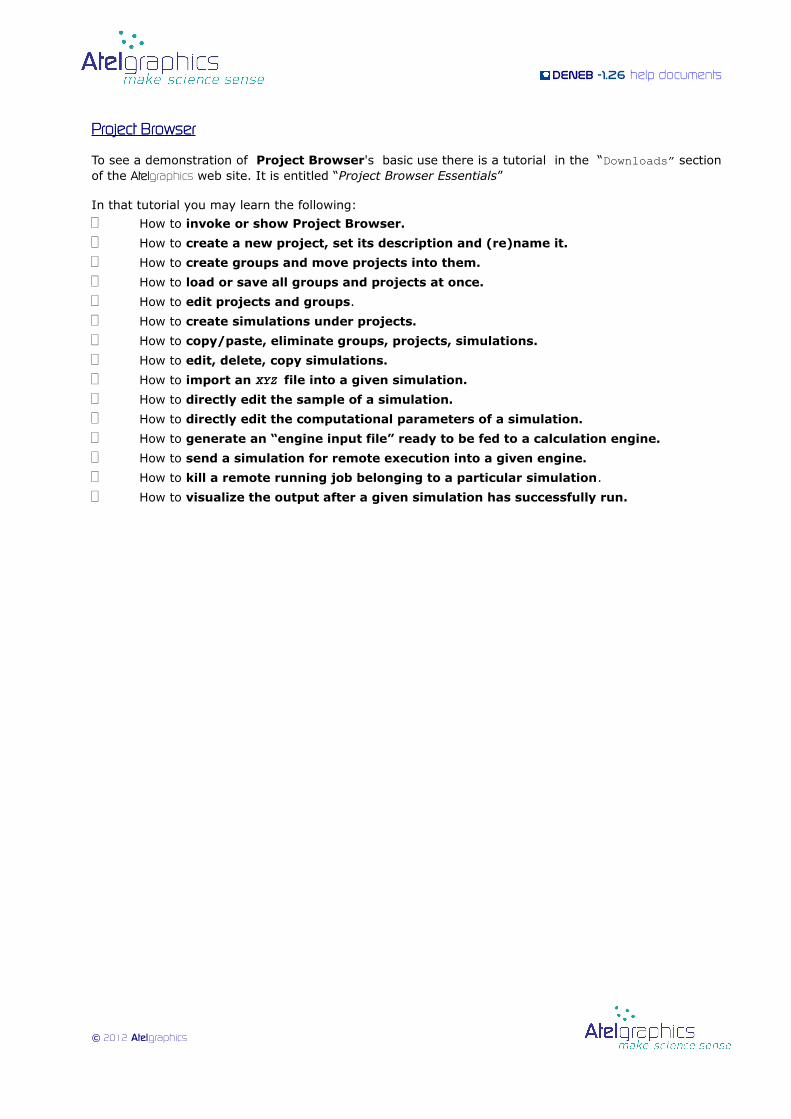
DENEb -1.26 help documents
Project Browser To see a demonstration of Project Browser's basic use there is a tutorial in the “Downloads” section of the Atelgraphics web site. It is entitled “Project Browser Essentials” In that tutorial you may learn the following:
How to invoke or show Project Browser.
How to create a new project, set its description and (re)name it.
How to create groups and move projects into them.
How to load or save all groups and projects at once.
How to edit projects and groups.
How to create simulations under projects.
How to copy/paste, eliminate groups, projects, simulations.
How to edit, delete, copy simulations.
How to import an XYZ file into a given simulation.
How to directly edit the sample of a simulation.
How to directly edit the computational parameters of a simulation.
How to generate an “engine input file” ready to be fed to a calculation engine.
How to send a simulation for remote execution into a given engine.
How to kill a remote running job belonging to a particular simulation.
How to visualize the output after a given simulation has successfully run.
© 2012 Atelgraphics

DENEb -1.26 help documents
Sample Manipulator: invoking To see a demonstration of Sample Manipulator's several simultaneous instances management, there is a tutorial in the “Downloads” area of the Atelgraphics web site. It is entitled “Invoking Sample Manipulator” In that tutorial you may learn the following:
How to invoke or show several instances of Sample Manipulator.
How to eliminate some of the instances created.
How to view the list of the currently active Sample Manipulator instances.
What is the meaning of the order in which the different instances may appear in the list.
© 2012 Atelgraphics
DENEb -1.26 help documents
Sample Manipulator: Mouse Drag Mode To see a demonstration of Sample Manipulator's camera control in the Mouse Drag mode there is a tutorial in the “Downloads” area of the Atelgraphics web site. It is entitled “Mouse Drag Mode in Sample Manipulator” In that tutorial you may learn the following:
How to quickly show all windows of Sample Manipulator.
How to resize 'main view' and 'side view' using the split panel.
How to zoom in/out of the detached view panel.
How to add a new sample chosen from the Sample Manipulator's Palette.
How to set the Mouse Drag mode for camera control.
How to control rotation, zoom and shift of the camera in the Mouse Drag mode.
How to change the 'center of camera rotation' by mouse picking a point in space.
How to control the position of the auxiliary plane in this (and all) mode.
© 2012 Atelgraphics
DENEb -1.26 help documents
Sample Manipulator: Sliders and buttons mode To see a demonstration of Sample Manipulator's camera control in the Sliders and Buttons mode there is a tutorial in the “Downloads” area of the Atelgraphics web site. It is entitled “Sliders and Buttons Mode in Sample Manipulator” In that tutorial you may learn the following:
How to set the Sliders and buttons mode.
How to zoom in and out in this mode.
How to reset the view to a default position.
How shift step by step the camera.
How to create new samples picking them from the Palette.
How to display the coordinate axes.
How to rotate the camera using the progress bars, spinners, and typing angle values.
How to rotate around each different axis.
How to shift the camera position by mouse-drag.
A tip to better compare samples: How to accurately specify the same view point.
How to control the side view panel camera.
How to dock/undock, and resize the detached view panel.
How to control the detached-view camera: shifts and zooms.
How to reset to default the view of the detached-view panel.
How to dock all Sample Manipulator's side windows.
How to exit a Sample Manipulator instance destroying its memory content.
© 2012 Atelgraphics
DENEb -1.26 help documents
Sample Manipulator: Simple building To see a demonstration of Sample Manipulator's abilities to build from scratch there is a tutorial in the “Downloads” area of the Atelgraphics web site. It is entitled “Sample Manipulator: Building simple samples” In that tutorial you may learn the following:
A short-cut to show all Sample Manipulator's windows.
How to choose a sample from the Palette.
The use of the Empty Sample of the Palette.
How the Sample Manager offers a tree view of the samples.
How to rename the samples and molecules using the Sample Manager.
How to set a molecule/sample as 'the one being edited'.
How to choose an specific atom from the Palette.
How to add atoms by mouse actions using the plane.
How to select all atoms using the Selection menu.
How to edit the current selection.
How to type new coordinates for a given atom in the Atom Editor.
How to add a just built sample to the Palette (that has persistence functions).
How to place clone copies of a given sample by mouse actions.
How to quickly visualize coordinates in the Sample Manager tooltips.
© 2012 Atelgraphics
DENEb -1.26 help documents
Sample Manipulator: Building periodic samples To see a demonstration of Sample Manipulator's abilities to build from scratch periodic samples there is a tutorial in the “Downloads” area of the Atelgraphics web site. It is entitled “Sample Manipulator: Building simple periodic samples” In that tutorial you may learn the following:
How to use the Empty sample from the Palette.
How to place a sample at an specific point.
How to make a sample periodic.
How to find an atom in the Palette.
How to place an atom by mouse picking.
How to rename a sample/molecule.
How to set a sample/molecule as the one being edited.
How to display the coordinate axes.
How to select an atom by mouse ctrl-clicking.
How to edit the atom's scaled coordinates by using the Atom Editor.
How to tag an atom with a customary label.
How to obtain information from an atom viewing the Atom Editor tool tips.
How to edit a sample's unit cell parameters (to set them as an FCC lattice, in this case).
How to add to the Palette a just created sample.
How to create a supercell sample from a given sample, by repetitions along the lattice vectors.
How to choose a new center of camera rotation by mouse picking.
© 2012 Atelgraphics
DENEb -1.26 help documents
Running simulations To see a demonstration on how to launch for execution a just created simulation there is a tutorial in the “Downloads” area of the Atelgraphics web site. It is entitled “Running simulations” In that tutorial you may learn the following:
How to set the parameters relative to the remote host where the simulations will be run.
What parameters are needed in order to instruct DENEb about said remote host.
How to create a new project in Project Browser.
How to create a new simulation under a project.
How to bring a sample from the NanoExplorer database into the just created simulation.
How to short-cut visualize, as a tooltip, the sample contained in a simulation.
How to edit the computational parameters of the simulation.
How to select specific parameters and edit them using Parameter Editor.
How to preview the parameters section (not containing the sample) of the engine input file.
How to generate an engine input-file that can be directly sent to the calculation engine.
How to instruct DENEb to: generate the input file, deliver it to the remote host, and start the simulation in the remote host. With a single click.
How to view a summary of the jobs that have been launched for execution using the Job Manager.
What icons uses DENEb to indicate different statuses of the launched simulations.
How the main panel status bar shows information about the latest submitted job.
How DENEb detects when the remote job has finished and, if successful, retrieves the output.
How the status of a job is shown both in the Project Browser and in the Job Manager.
How to view the output file of a finished simulation.
© 2012 Atelgraphics
DENEb -1.26 help documents
DENEb's cheat-sheets
© 2012 Atelgraphics
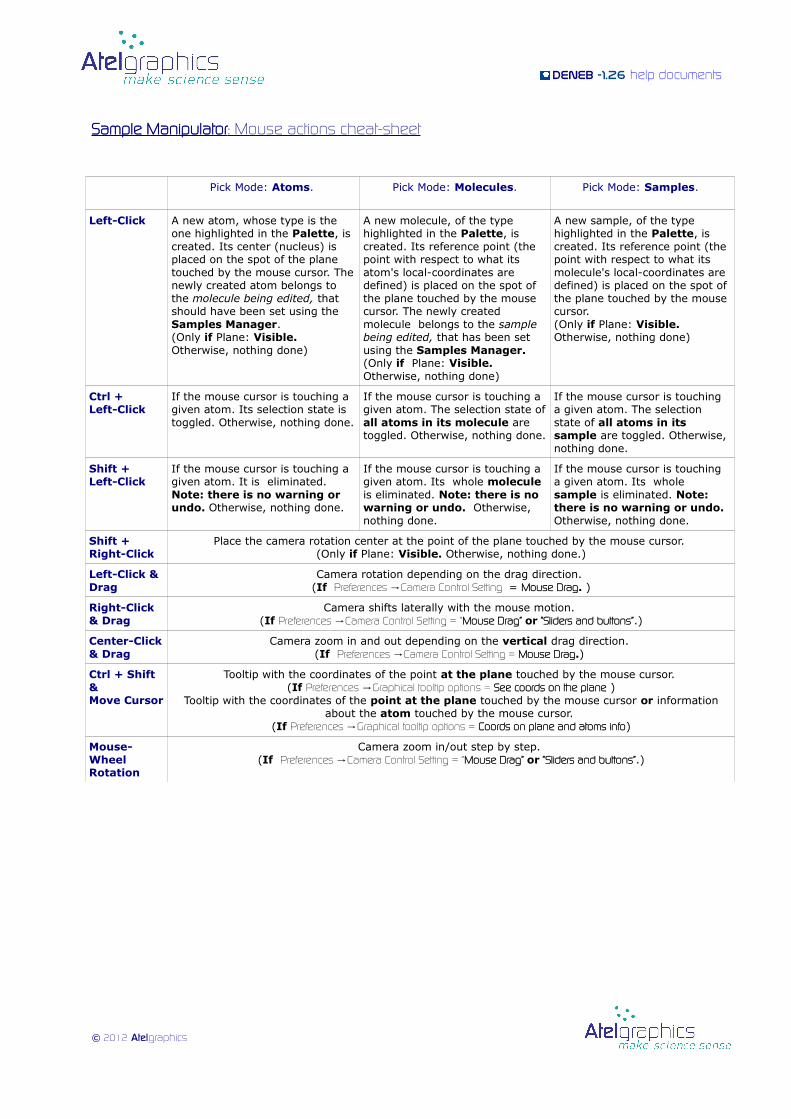
DENEb -1.26 help documents
Sample Manipulator : Mouse actions cheat-sheet
Pick Mode: Atoms. Pick Mode: Molecules. Pick Mode: Samples.
Left-Click A new atom, whose type is the one highlighted in the Palette, is created. Its center (nucleus) is placed on the spot of the plane touched by the mouse cursor. The newly created atom belongs to the molecule being edited, that should have been set using the Samples Manager. (Only if Plane: Visible. Otherwise, nothing done)
A new molecule, of the type highlighted in the Palette, is created. Its reference point (the point with respect to what its atom's local-coordinates are defined) is placed on the spot of the plane touched by the mouse cursor. The newly created molecule belongs to the sample being edited, that has been set using the Samples Manager.(Only if Plane: Visible. Otherwise, nothing done)
A new sample, of the type highlighted in the Palette, is created. Its reference point (the point with respect to what its molecule's local-coordinates are defined) is placed on the spot of the plane touched by the mouse cursor.(Only if Plane: Visible. Otherwise, nothing done)
Ctrl + Left-Click
If the mouse cursor is touching a given atom. Its selection state is toggled. Otherwise, nothing done.
If the mouse cursor is touching a given atom. The selection state of all atoms in its molecule are toggled. Otherwise, nothing done.
If the mouse cursor is touching a given atom. The selection state of all atoms in its sample are toggled. Otherwise, nothing done.
Shift +Left-Click
If the mouse cursor is touching a given atom. It is eliminated. Note: there is no warning or undo. Otherwise, nothing done.
If the mouse cursor is touching a given atom. Its whole molecule is eliminated. Note: there is no warning or undo. Otherwise, nothing done.
If the mouse cursor is touching a given atom. Its whole sample is eliminated. Note: there is no warning or undo. Otherwise, nothing done.
Shift +Right-Click
Place the camera rotation center at the point of the plane touched by the mouse cursor. (Only if Plane: Visible. Otherwise, nothing done.)
Left-Click & Drag
Camera rotation depending on the drag direction. (If Preferences Camera Control Setting→ = Mouse Drag. )
Right-Click & Drag
Camera shifts laterally with the mouse motion. (If Preferences Camera Control Setting = “→ Mouse Drag” or “Sliders and buttons”.)
Center-Click & Drag
Camera zoom in and out depending on the vertical drag direction. (If Preferences Camera Control Setting = → Mouse Drag.)
Ctrl + Shift & Move Cursor
Tooltip with the coordinates of the point at the plane touched by the mouse cursor. (If Preferences Graphical tooltip options = → See coords on the plane )
Tooltip with the coordinates of the point at the plane touched by the mouse cursor or information about the atom touched by the mouse cursor.
(If Preferences Graphical tooltip options = → Coords on plane and atoms info)
Mouse-Wheel Rotation
Camera zoom in/out step by step. (If Preferences Camera Control Setting = “→ Mouse Drag” or “Sliders and buttons”.)
© 2012 Atelgraphics
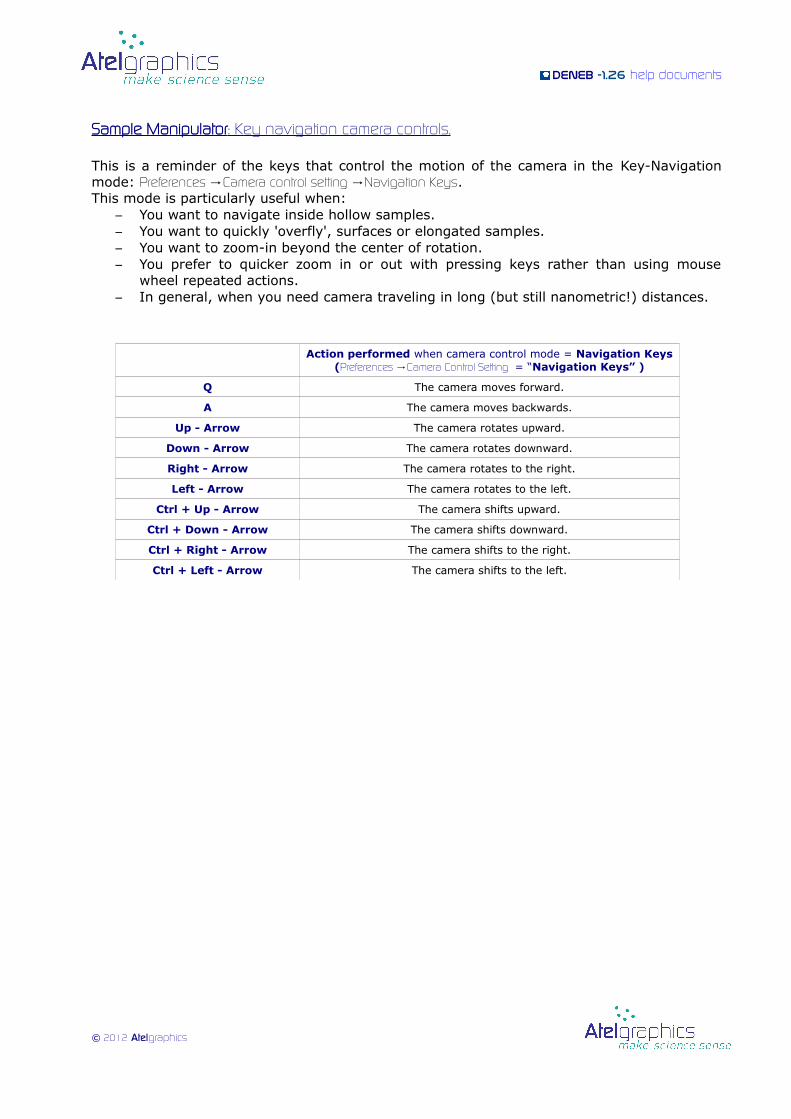
DENEb -1.26 help documents
Sample Manipulator : Key navigation camera controls.
This is a reminder of the keys that control the motion of the camera in the Key-Navigation mode: Preferences Camera control setting Navigation Keys→ → .This mode is particularly useful when:
– You want to navigate inside hollow samples.– You want to quickly 'overfly', surfaces or elongated samples.– You want to zoom-in beyond the center of rotation.– You prefer to quicker zoom in or out with pressing keys rather than using mouse
wheel repeated actions. – In general, when you need camera traveling in long (but still nanometric!) distances.
Action performed when camera control mode = Navigation Keys(Preferences Camera Control Setting→ = “Navigation Keys” )
Q The camera moves forward.
A The camera moves backwards.
Up - Arrow The camera rotates upward.
Down - Arrow The camera rotates downward.
Right - Arrow The camera rotates to the right.
Left - Arrow The camera rotates to the left.
Ctrl + Up - Arrow The camera shifts upward.
Ctrl + Down - Arrow The camera shifts downward.
Ctrl + Right - Arrow The camera shifts to the right.
Ctrl + Left - Arrow The camera shifts to the left.
© 2012 Atelgraphics

DENEb -1.26 help documents
DENEb-1.26 . Known issues
1. “Out of memory” issue : This version can address 2Gb of RAM maximum. This means that when the user has opened (visualized) samples that together add up to about 20K atoms DENEB might exit unexpectedly with an out of memory uncaught exception. Beware therefore when visualizing bulky or numerous samples with NE or SM, save your work frequently just in case.
© 2012 Atelgraphics

DENEb -1.26 help documents
© 2012 Atelgraphics