de montfort online research & innovation system doris · de montfort online research &...
TRANSCRIPT

DE MONTFORT UNIVERSITY
De Montfort Online Research & Innovation System
DORIS User Guide
01/01/2015
DORIS is a central research and innovation information system to support the complete research award cycle, including pre-award applications and post award project management and outputs/publications to DMU’s open research archive.
1
Contents Page
Page No. Purpose of the User Guide.........................................................................2
Research process………………………………………………………………………..3 Pre-Award Process Workflow Overview……………………………………..4 Post-Award Process Workflow Overview……………………………………5 Logging On………………………………………………………………………………….6
Dashboard .................................................................................................7 Projects
Ideas (Optional)………………………………………………………………………….9 Applications……………………………………………………………………………. 16 Project…..………………………………………………………………………………….29 Funding Calls…………………………………………………………………………….43 Extensions…………………………………………………………………………………45
Activities
Tasks…………………………………………………………………………………………46 Persons, Business Cards, Organisations……………………………………….50 Persons……………………………………………………………………………………..54
Business Cards………………………………………………………………………….57 Organisations ……………………………………………………………………………………..60 Research Groups……………………………………………………………………….66 Countries…………………………………………………………………………………..70 Classifications ……………………………………………………………………………………..72 Research Interests…….…………………………………………………………..….76 Notifications……………………………………………………………………………………….77 Statistics Outputs/Publications Journals Outputs/Publications This is used by the Researcher to notify the Library of outputs and/or publications to be made available on DMU’s open access repository (DORA). Library will update this section later.
2
Purpose of this User Guide
DORIS is DMU’s Current Research Information System. It is used as a centralised system to support the complete research award cycle, including pre-award applications and post award project management and outputs/publications to DMU’s open research archive (DORA). This User Guide is essential to help ensure that all information is recorded and managed in a standardised way across DMU. This will help us all when using the system on a daily basis and applies to all members of staff engaged in research activity, such as Researchers, Faculty Research & Innovation Offices (RIOs), Research, Business and Innovation (RBI) staff, and including those in temporary or part-time employment.
ITMS has been involved in the configuration of DORIS and will continue to support this system.
3
Research Process
The following are involved in the Research Process
Researcher
Faculty Research & Innovation Office (RIO)
Faculty Head of Research & Innovation
Faculty Head of School/Department
Faculty PVC/Dean
Research, Business & Innovation Directorate (RBI)
Researcher A Researcher may be a Principle Investigator (PI) on some projects and /or a Co-Investigator (Co-I) and/or part of a Research Group on other projects.
Faculty RIO Each Faculty is slightly different but they have:
Research & Innovation Officer/Office Manager
Research Administrators
Faculty Finance Partner
Faculty Finance Officers
Faculty Faculty Finance Partner
Head of Research
Head of School/Department
PVC/Dean
RBI Director of Research & Innovation
Head of Research Support
Research Development Manager
Research Council & Charities Officer
Research & Knowledge Exchange Programmes Officer
Knowledge Exchange team
RBI Policy Team

4
Pre-Award Process Overview
The process begins when a researcher either; a) has an idea and then finds the relevant funding opportunity to apply to or b) a call comes from the funding body and a Researcher applies for funding. The Application/Proposal is then developed by the Researcher with support from relevant staff including RIO and RBI staff as required. The application is reviewed, including the Costing & Pricing sign off by the Faculty Finance Partner, Researcher; Head of Research; Head of School/Dept.; PVC/Dean; before submitting to the funder.
On submission the funder could ask for peer review or changes to the application.
The funding body will either:
Reject
Award for the full cost
Award for a less cost We then have to check to see whether to accept the award, if yes then the Contract* (*where required – with some funders we agree to the Terms & Conditions when we submit) goes to Legal for sign off/negotiation. Legal have their process, sometimes Legal is done pre-award (for new funders/complex contracts) and sometimes post-award.
IdeaDraft Proposal
Application
Proposal Development
Costing & Pricing
calculated
Costing & Pricing Agreed
Quality Assurance
Submitted to Funder
Unsuccessful Awarded

5
Post-Award Process Overview
DMU has to evidence that we are complying with the contracts and legal T&Cs from the relevant funding body. DMU has to submit evidence of the project (procurement/time etc.) to the funding body on the agreed submissions dates in order for the funding body to check and then release the funds to DMU. Funding bodies carry out Audits to ensure that we are complying with their T&Cs.
Notified of Award
Legal Checks
Set up Budget Codes and Finance Schedule
PI Starts work on Project
PI spends funds
Claims Processed & submitted to
Funder
Payment Received from
Funder
Income Allocated to the Project
Review/Final Reports
Project Closed as Completed

6
Login All staff will have to complete training before access rights to DORIS are granted. Training is provided by Research, Business & Innovation and your Faculty Research Office. Click on the link https://doris.dmu.ac.uk and select DORIS SSO Login on the top right hand side and use your Single Sign On user name and password.

7
Dashboard (the Default Page)
Go to My Settings to update your email preferences On the Header on the right hand side of the Dashboard select the orange arrow next to your role, and then select My Settings

8
Message Settings
Email – tick this box to receive selected notifications via email. User Delegation You can search and attach a selected person to act on your behalf. This is how Heads of Research etc. can delegate approval sign off. Upload a photo
You can upload a photo if you would like to.
In Research Role you can also attach your Search Profiles and ORCID No.

9
Ideas (optional)
This section is used by the Researcher. It is a space where you can write or attach your ideas, before, during or after an Application or Project. Only the Researcher can view this, unless they attach another person to their Ideas in order to share information/thoughts. There is a space to attach confidential documents that can only be viewed by the Researcher. If the Researcher wants to turn the Idea into an Application then the information within the idea is automatically uploaded onto the application by saving the Idea as an Application. The Ideas section of DORIS is not mandatory, and it is for the individual Researchers to determine if it is helpful, and to use in the way that benefits them. If an Idea is related to a current Project then the two can be aligned to show which Project the Idea originated from. You can discard your Idea if you decide not to convert it to an Application. A red asterisk denotes a mandatory field/tab * To view your Ideas - select Projects from the menu on the left hand side of your Dashboard, then select Ideas. All your Ideas are listed
To create a new Idea
select Add New from the top right hand side of your Dashboard select Projects
then Idea

10
There are five tabs:
1. Key Information 2. Team 3. Potential Funders 4. Tasks 5. Related Items
1. Key Information Title – type in the title of your Idea Abstract – type the abstract for the Idea Possible type of project application Use the arrow to show the drop down list and select the relevant type Expected Budget – enter the value
Please Note: If grant is over £1,000,000 then Approval must be signed off by COO if over £2,000,000 then Approval must be signed off by Finance and HR. Currency – select from the drop – down list

11
Expected start date – add a suggested start using the calendar icon Expected end date – add a suggested end date using the calendar icon Key Documents – use the browse icon to search for and attach and file(s)
2. Team
Idea Owner – this is automatically populated by the system Involved Colleagues – use the plus icon to look up and attach DMU colleagues Research Groups - use the plus icon to look up and attach the relevant Research Group. Please Note: Once you have attached a staff member they will be able to view your Idea

12
3. Potential
Funders Funder(s) – use the link to funding opportunities to access Research Professional
Funding Call – use the plus icon to search for and attach the funding call
Funders – use the plus icon to search for and attach the relevant funder

13
4. Tasks This is where your tasks for the Idea are listed – use the plus icon to create a new task.
Name – type in the title of the task* Deadline – use the calendar to select a date
Email Reminder – use the calendar to select a date
Task Type – Select the appropriate type from the drop - down list*
Please Note: Email Reminders will ONLY be received if the relevant member of staff has ticked the Email box in their Settings

14
Description – type in the description
Person Registering the Task – use the plus icon to search and select the relevant person
Person Responsible for Carrying out the Task - use the plus icon to search and select the relevant person
Documents – use the browse icon to search and attach any documents relevant to the task
Then select Done

15
5. Related
Items
This is to search and attach any items to your Idea. Use the plus icon to search for and attach the relevant information. When you Save and Close your Idea as an Application this is automatically uploaded by the system.
Save and Close your Idea and select the appropriate status Set Status ‘Draft’ ‘Discarded’ to close your Idea. ‘Save as Project Application’ a new Application is created and details from the Idea are automatically carried over. Then select Done

16
Applications – proposal submission for a grant This section is used by the Researcher, the Faculty Research Office and RBI. Researchers can view their own Applications and other’s Applications where the researcher has been attached e.g. member of a Research group. Workflow steps include
In preparation – application at draft stage
For approval
Submitted to Funder
Reply from Funder You must complete the Costing & Pricing Pro-Forma and get approval signature from you Faculty Finance Partner, the Ethics Form (if needed) and any necessary Peer Review and attach to the Application by saving in the Documents Tab. Please Note: If you created a new Application from an Idea when you set the status as ‘Save as Project Application’ a new application is created and details from the Idea are automatically carried over. To view all your Applications, from your dashboard select Projects on the left hand menu, then select Applications. This view also shows you the Status of each of your Applications.

17
To create an application (proposal submission for a grant) you need to start with the Application module On the top right hand side of your Dashboard Click on Add New, - Projects, - Application
Select the Type of Project Application from a list of twelve options.
You have opened a New Application There are eight tabs across the top. A red asterisk a mandatory field *
1. Key Information 2. Funding Details 3. Applicants 4. Related Items 5. Tasks 6. Documents 7. Approval 8. Submission
18
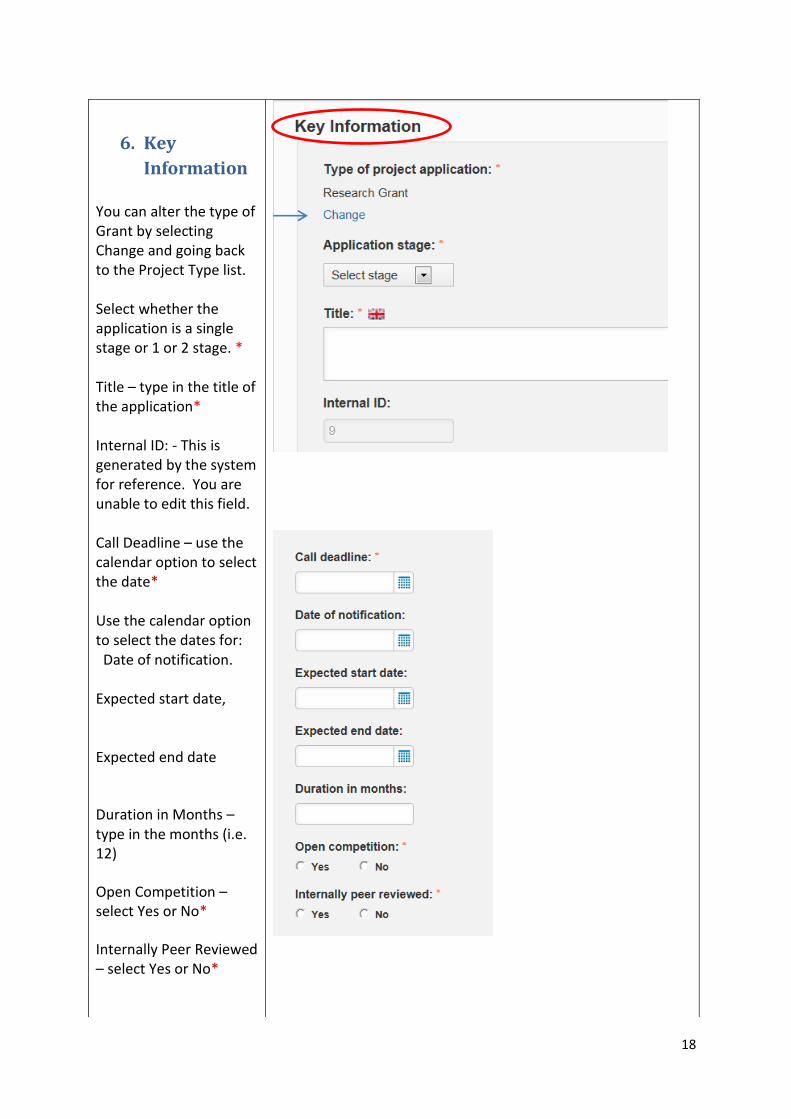
6. Key
Information You can alter the type of Grant by selecting Change and going back to the Project Type list. Select whether the application is a single stage or 1 or 2 stage. * Title – type in the title of the application* Internal ID: - This is generated by the system for reference. You are unable to edit this field. Call Deadline – use the calendar option to select the date* Use the calendar option to select the dates for: Date of notification. Expected start date, Expected end date
Duration in Months – type in the months (i.e. 12)
Open Competition – select Yes or No*
Internally Peer Reviewed – select Yes or No*

19
Abstract – type the abstract for the application Detailed description – type the description DMU Support Contacts – use the plus icon to search for support staff to help with this application
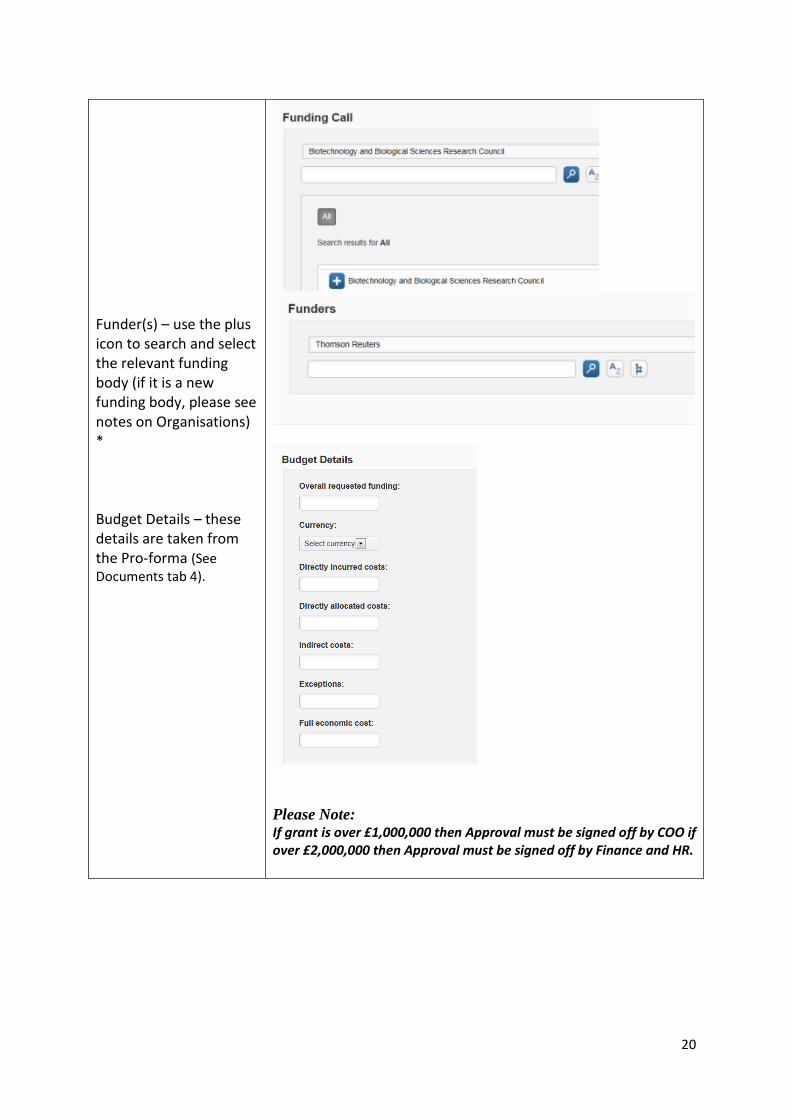
2. Funding
Details Funding Call – use the plus icon to search for and attach the funding call
20
Funder(s) – use the plus icon to search and select the relevant funding body (if it is a new funding body, please see notes on Organisations) * Budget Details – these details are taken from the Pro-forma (See Documents tab 4).
Please Note: If grant is over £1,000,000 then Approval must be signed off by COO if over £2,000,000 then Approval must be signed off by Finance and HR.
21
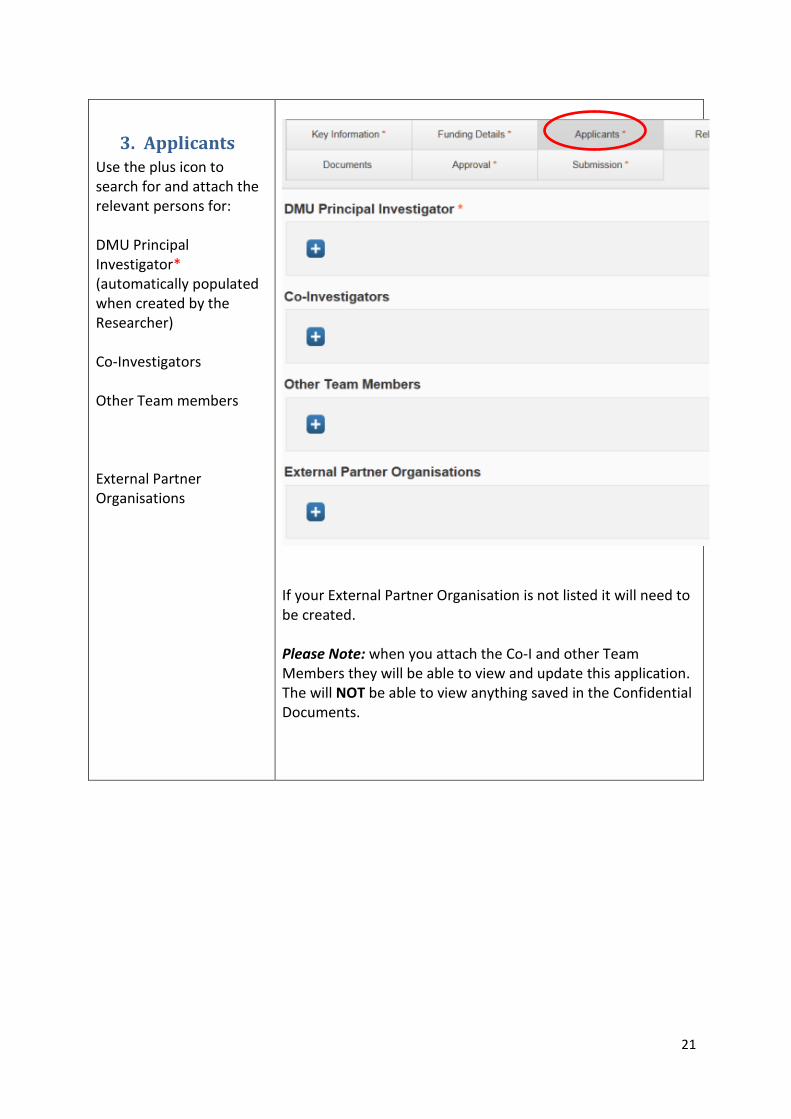
3. Applicants Use the plus icon to search for and attach the relevant persons for: DMU Principal Investigator* (automatically populated when created by the Researcher) Co-Investigators Other Team members External Partner Organisations
If your External Partner Organisation is not listed it will need to be created. Please Note: when you attach the Co-I and other Team Members they will be able to view and update this application. The will NOT be able to view anything saved in the Confidential Documents.

22
4. Related Items Related Ideas - If you have created your application from your Ideas this will automatically show under the Related Ideas section Related Projects – use the plus icon to search for and select any other Project that this application relates to. Research Groups – use the plus icon to search for and attach the Research Group Research Interests – use the plus icon to search and select from the list (CASRAI classifications) Keywords – use the plus icon to search and select from the keywords

23
5. Tasks This shows your list of tasks. The Status can be: Draft, Planned or Complete. Tasks are NOT mandatory but can be helpful un planning activities – each task is listed separately – and tasks can be delegated to others. Click on the plus icon to create new tasks Name – type in the title of the task* Deadline – use the calendar to select a date Email Reminder – use the calendar to select a date for the reminder to be emailed Task Type – Select the appropriate type from the drop - down list*
24
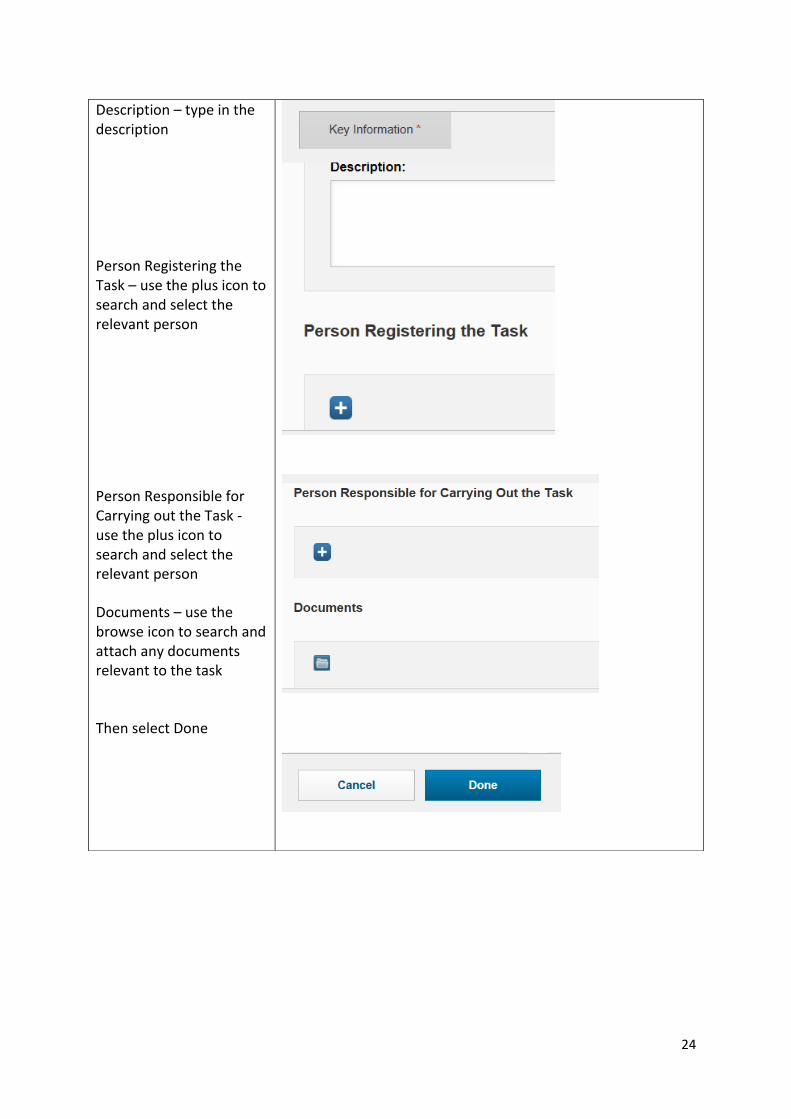
Description – type in the description Person Registering the Task – use the plus icon to search and select the relevant person
Person Responsible for Carrying out the Task - use the plus icon to search and select the relevant person
Documents – use the browse icon to search and attach any documents relevant to the task
Then select Done

25
6. Documents
Pre-Award Documents – use the browse icon to search for and select relevant documents. Please note: documents uploaded here will be available for everyone selected under the Applicants tab Pre-Award Confidential Documents* – upload confidential documents here including: Costing & Pricing Pro-forma Ethics
Please note: only the PI and relevant staff will be able to view confidential documents. Your application will not go to the Approval Stage until the pro-forma is attached to the Pre-Award Confidential Documents
26
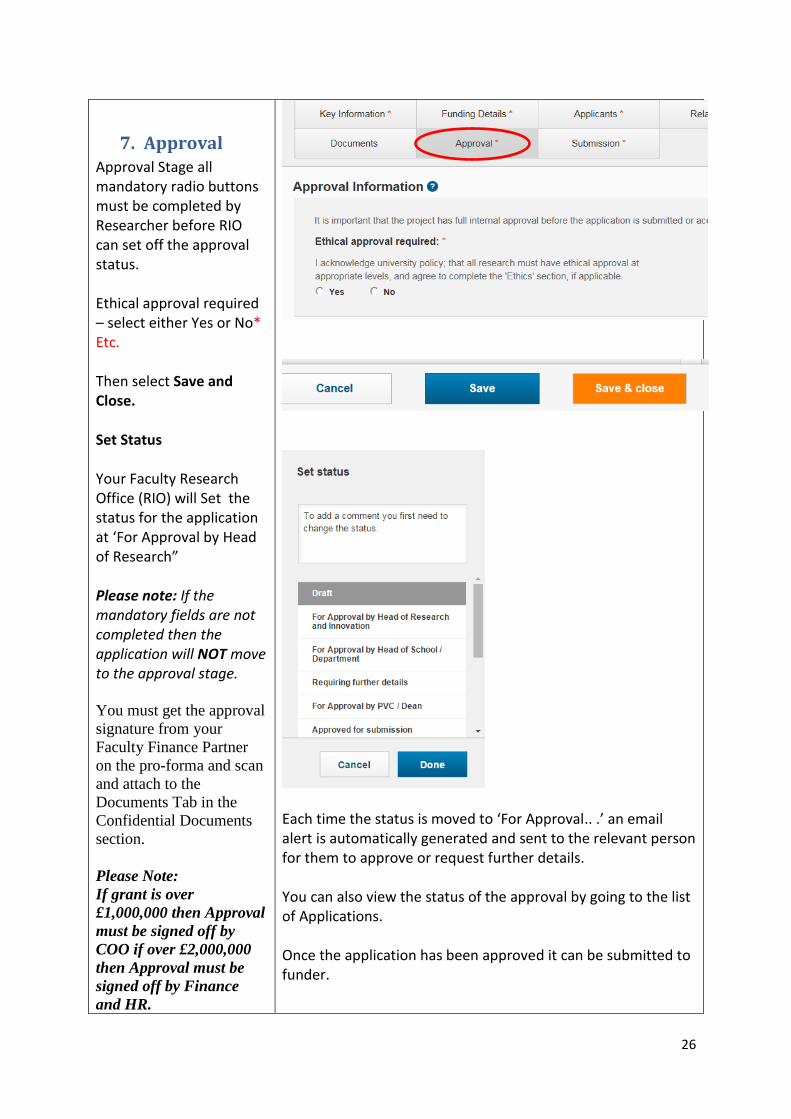
7. Approval Approval Stage all mandatory radio buttons must be completed by Researcher before RIO can set off the approval status. Ethical approval required – select either Yes or No* Etc. Then select Save and Close. Set Status Your Faculty Research Office (RIO) will Set the status for the application at ‘For Approval by Head of Research” Please note: If the mandatory fields are not completed then the application will NOT move to the approval stage.
You must get the approval
signature from your
Faculty Finance Partner
on the pro-forma and scan
and attach to the
Documents Tab in the
Confidential Documents
section.
Please Note:
If grant is over
£1,000,000 then Approval
must be signed off by
COO if over £2,000,000
then Approval must be
signed off by Finance
and HR.
Each time the status is moved to ‘For Approval.. .’ an email alert is automatically generated and sent to the relevant person for them to approve or request further details. You can also view the status of the approval by going to the list of Applications. Once the application has been approved it can be submitted to funder.
27
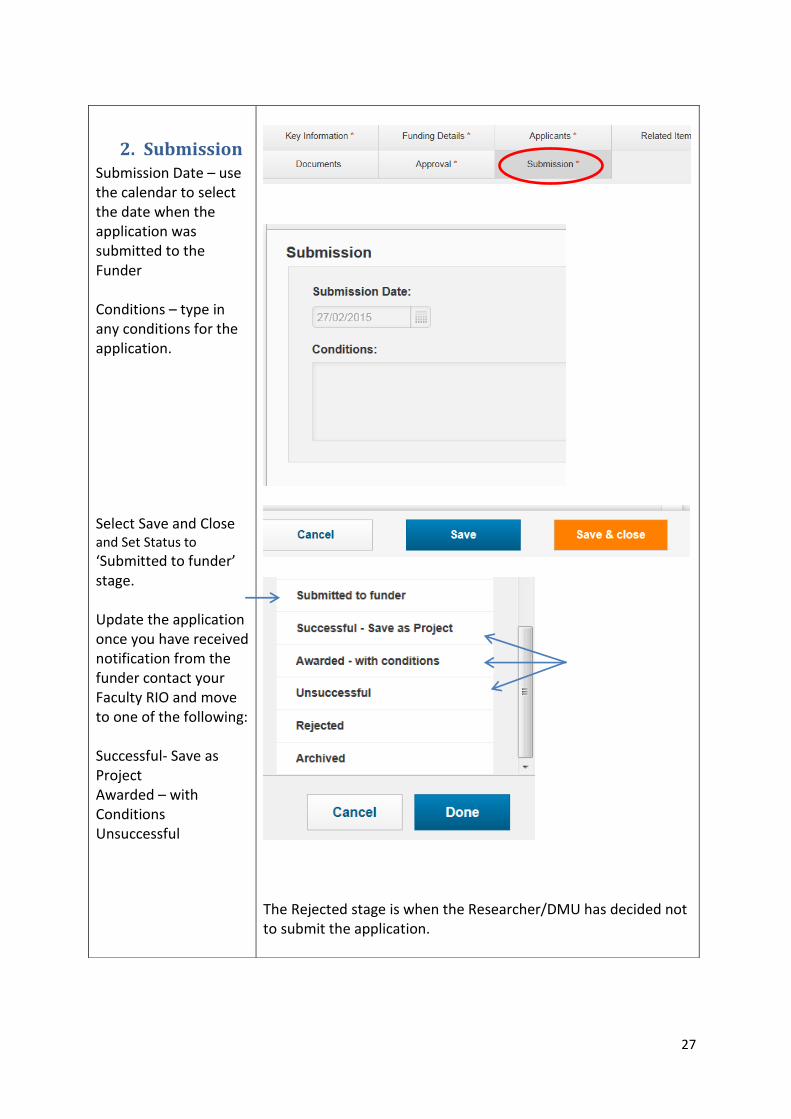
2. Submission Submission Date – use the calendar to select the date when the application was submitted to the Funder Conditions – type in any conditions for the application. Select Save and Close and Set Status to
‘Submitted to funder’ stage. Update the application once you have received notification from the funder contact your Faculty RIO and move to one of the following: Successful- Save as Project Awarded – with Conditions Unsuccessful
The Rejected stage is when the Researcher/DMU has decided not to submit the application.
28
The status shows the stage of the application. Draft – this is editable
Once everything has been completed your Faculty Research Office (RIO) will save and close and Set Status for the application at ‘For Approval by Head of Research & Innovation Stage’. Please note: If the mandatory fields are not completed then the application will NOT move to the approval stage. You must attach the pro-forma, signed by the Faculty Finance Partner and attach to the Confidential Documents section of the Documents Tab.
For approval by Head of Research & Innovation The Faculty Head of Research & Innovation can approve and move to ‘For Approval by Head of School/Dept.’ or ask for ‘Requiring further details’
For Approval by Head of School/Dept. The Head of School/Dept. can approve and move to ‘For Approval by PVC/Dean” or ask for ‘Requiring further details’
For Approval by PVC/Dean The PVC/Dean can move to ‘Approved for submission’ or ‘Requiring further details’
Submitted to Funder To put in the submission date Successful – Save as Project – and scan and attach the Grant Acceptance documents. Awarded – with conditions Unsuccessful Rejected Archived

29
Projects
This section is used by the Researcher, the Faculty Research Office (RIO) and RBI. A lot of information previously entered into the Application has been brought across automatically. Some fields are not editable by Researchers. The Research Faculty Office will ensure the legal checks, budget code; budget details and Finance Schedule are set up before moving the Project from In Preparation to Live. Workflow steps include • In preparation – Budgets and a copy of the Grant Acceptance is uploaded. • Live - Ongoing project management • Project complete and at validation stage • Project Closed To manage and update your Project select Projects from the left hand menu on your Dashboard
Here you can see all your projects with the Status shown on the right hand side

30
Select your Project. Information previously entered into the Application has been brought across on the creation of the new Project. A red asterisk denotes a mandatory field *
There are nine tabs across the top. 1. Key Information 2. Project Members 3. Funder 4. Budget Details 5. Related Items 6.Activity Plan 7.Documents 8.Legal 9.Research Outputs

31
1. Key
Information Type of Award – this data was previously entered in the Application module and has been brought through. Researchers are NOT able to edit these fields. Project Code – this shows the Project Code* see Budget Details tab Title – this data was previously entered in the Application module and has been brought through following the success of the application.*
Internal ID: - This is generated by the system for reference. You are unable to edit this field. The data was previously entered in the Application:
Acronym
Start Date
End Date
Duration in Months

32
Extensions – If the project needs an extension use the plus icon to search and select the relevant extension. Ethical Approval Sought – select Yes or No* Ethical Approval Obtained use the calendar to select the date of Ethical Approval * Abstract - this data was previously entered in the Application module and has been brought through following the success of the application Detailed description – this data was previously entered in the Application Research Support Comments – this is a free text field for research support staff to edit

33
Intellectual Property? Yes No* this data was previously entered in the Application Currency –previously entered in the Application DMU Support Contacts Select from the list of DMU staff that have been set up as support contacts.

34
2. Project
Members These fields were automatically populated from the associated Application.

35
3. Funder These fields were automatically populated from the associated Application.

36
4. Budget
Details DMU Project/Budget Code –the Project Code is supplied from Finance* Researchers cannot edit this field Input the Grant Awarded amount Budget Values – Input the values as agreed with Finance/Funder. Each Sub-Total is auto summed. Total – this field is auto summed.
Please Note: When Project Type DMEL is selected there is also a field for VAT. Budget Values: These are the agreed budget details from the start of the project and are for information only. If you require more detailed/up to date figures from Finance please speak to your Faculty RIO
37
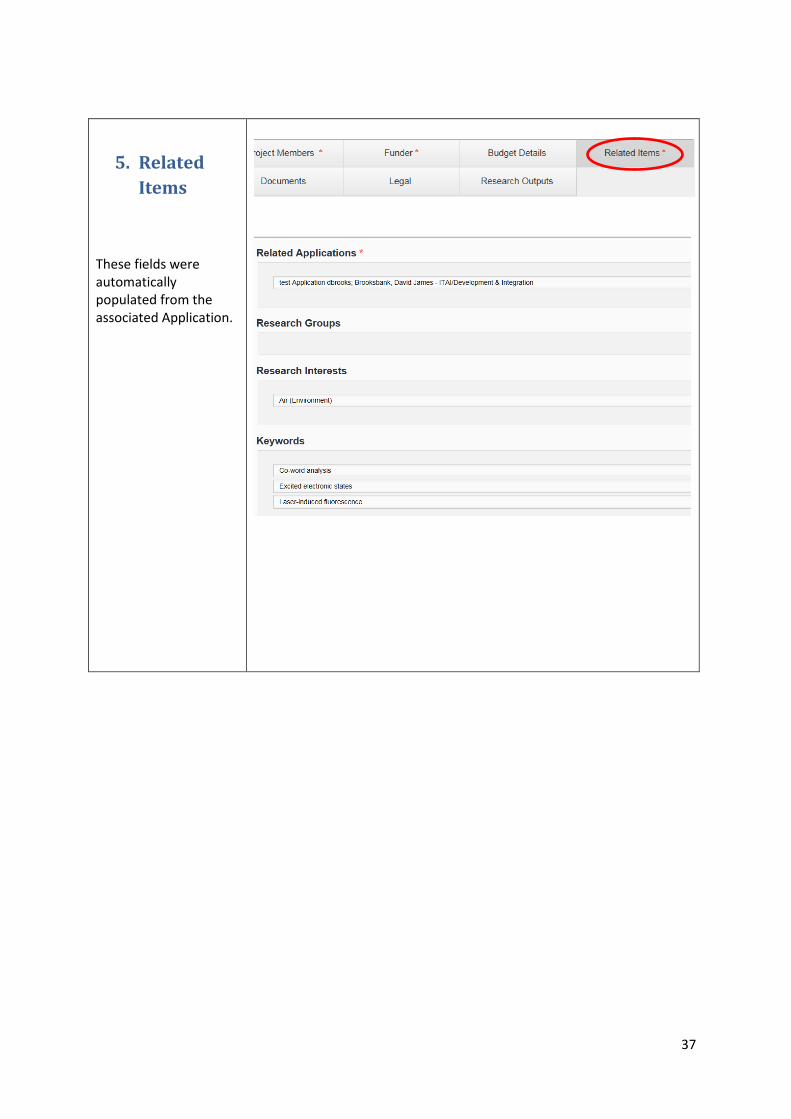
5. Related
Items These fields were automatically populated from the associated Application.

38
6. Activity
Plan This is where you create your tasks for managing the Project and it shows your list of tasks Click on the plus icon to create a new task Name – type in the title of the task* Deadline – use the calendar to select a date Email Reminder – use the calendar to select a date for the reminder to be emailed Task Type – Select the appropriate type from the drop - down list*
Please Note: Email Reminders will ONLY be received if the relevant member of staff has ticked the Email box in their Settings

39
Description – type in the description Person Registering the Task – use the plus icon to search and select the relevant person Person Responsible for Carrying out the Task - use the plus icon to search and select the relevant person. Documents – use the browse icon to search and attach any documents relevant to the task Then select Done.

40
7. Documents The Documents tab is shown in two sections Pre-Award and Post Award. Pre-Award Documents – this data was previously entered in the Application module and has been brought through following the success of the application Post-Award Documents - – use the browse icon to search for and select relevant documents. Please note: documents uploaded here will be available for everyone selected under the Project Members tab Post-Award Confidential Documents – upload confidential documents here
Please note: only the PI and relevant staff will be able to view Confidential documents

41
8. Legal Does this require legal consideration? Yes or No* Legal Comments – this is a free text box Collaboration/Consortium Agreement Required? Yes or No * Non-Disclosure Agreement Required? Yes or No * Legal Documents - use the browse icon to search for and select relevant documents
Set Status The status shows the stage of the Project. Your RIO will set the stage to ‘Live’. When Project is completed your Faculty Research Office (RIO) will save and close and Set Status at Review/Reports pending stage.

42
In Preparation – Project is editable at this stage
Once everything has been completed your Faculty Research Office (RIO) will save and close and Set Status at ‘Live’. Please note: If the mandatory fields are not completed then the Project will NOT move to the Live stage.
Live– Project is editable at this stage by Researcher and RIO and RBI. Once the project has ended and everything has been completed your Faculty Research Office (RIO) will save and close and Set Status at Review/Reports pending stage.
Closed - All reports have been completed and the project is completed Rejected – If after being awarded the grant offer is rejected, your Faculty Research Office (RIO) will close the project as rejected. Archived
9. Research
Outputs This is for the Researcher to attach Publications during/after the project has been set to ‘Live’ Use the plus icon to search for and select relevant Publications.

43
Funding Calls
Under Projects on the menu on the left hand side of your Dashboard select Funding Calls to view all the calls – it is expected that these will be internal funding opportunities, created by RBI/RIO
Select a Funding Call
This shows the details of the Funding Call. Researchers are NOT able to edit this

44
To create a new funding call select Add New on the right hand side of your dashboard and select Funding Call Input the relevant information. There is only one tab. – Key Information

45
Extensions
Under Projects on the menu on the left hand side of your Dashboard select Extensions to view all
To create a new Extension select Add New on the right hand side of your dashboard and select Extension
Input the relevant fields
46
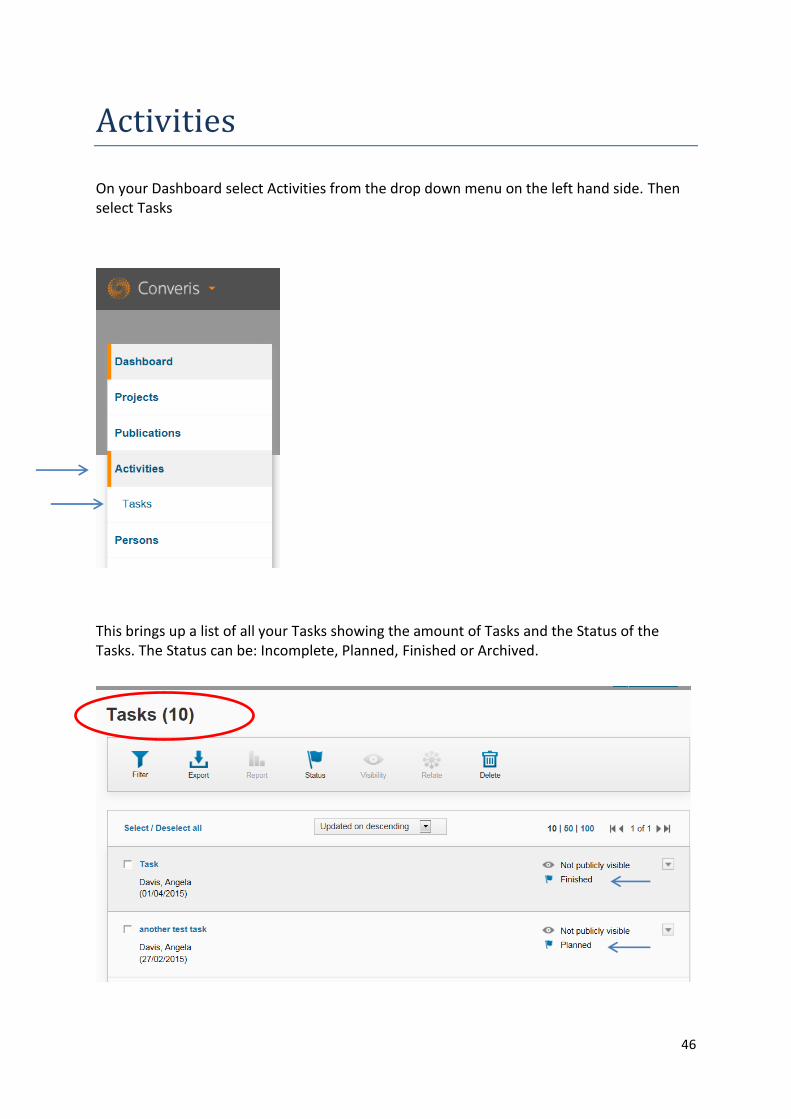
Activities
On your Dashboard select Activities from the drop down menu on the left hand side. Then select Tasks
This brings up a list of all your Tasks showing the amount of Tasks and the Status of the Tasks. The Status can be: Incomplete, Planned, Finished or Archived.
47
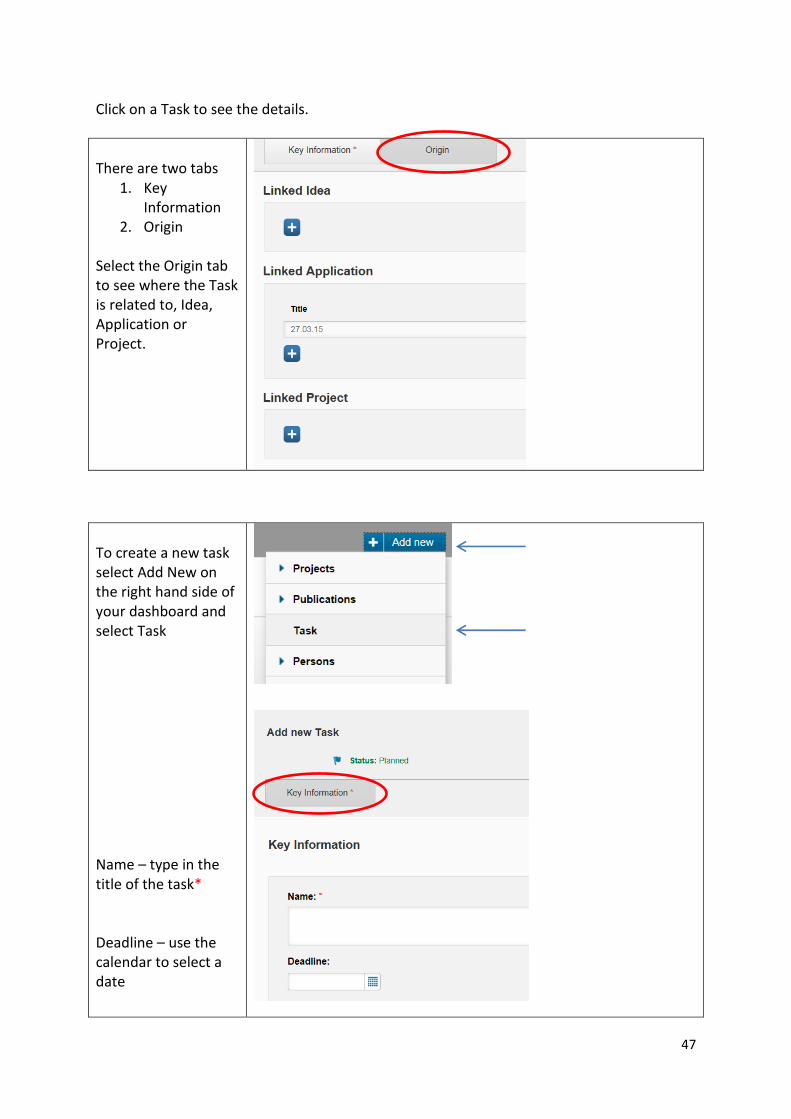
Click on a Task to see the details.
There are two tabs
1. Key Information
2. Origin Select the Origin tab to see where the Task is related to, Idea, Application or Project.
To create a new task select Add New on the right hand side of your dashboard and select Task Name – type in the title of the task* Deadline – use the calendar to select a date

48
Email Reminder – use the calendar to select a date for the reminder to be emailed. Please Note: Email reminder will only be sent if the member of staff has selected the ‘tick email’ button on their Settings. Task Type – Select the appropriate type from the drop - down list* Description – type in the description Person Registering the Task – use the plus icon to search and select the relevant person
Person Responsible for Carrying out the Task - use the plus icon to search and select the relevant person
Documents – use the browse icon to search and attach any documents relevant to the task

49
Then select Done. When you save and close the Set Status box appears and you can select from one of the following options.
50
Persons/Business Cards and Organisations
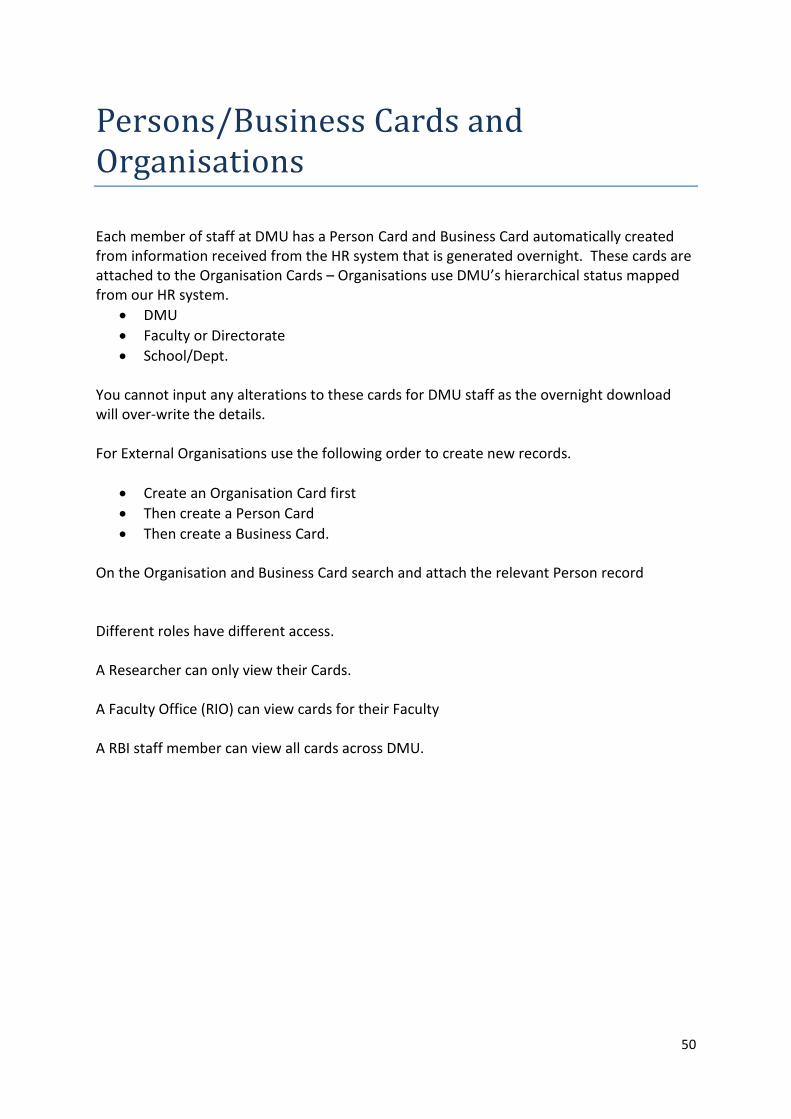
Each member of staff at DMU has a Person Card and Business Card automatically created from information received from the HR system that is generated overnight. These cards are attached to the Organisation Cards – Organisations use DMU’s hierarchical status mapped from our HR system.
DMU
Faculty or Directorate
School/Dept. You cannot input any alterations to these cards for DMU staff as the overnight download will over-write the details. For External Organisations use the following order to create new records.
Create an Organisation Card first
Then create a Person Card
Then create a Business Card. On the Organisation and Business Card search and attach the relevant Person record Different roles have different access. A Researcher can only view their Cards. A Faculty Office (RIO) can view cards for their Faculty A RBI staff member can view all cards across DMU.

51
Persons
All person details for DMU staff are imported from the HR database on a nightly import. You cannot edit these details. You can create Person Cards for external people only.
On your Dashboard select Persons from the drop down menu on the left hand side. Then select Persons.
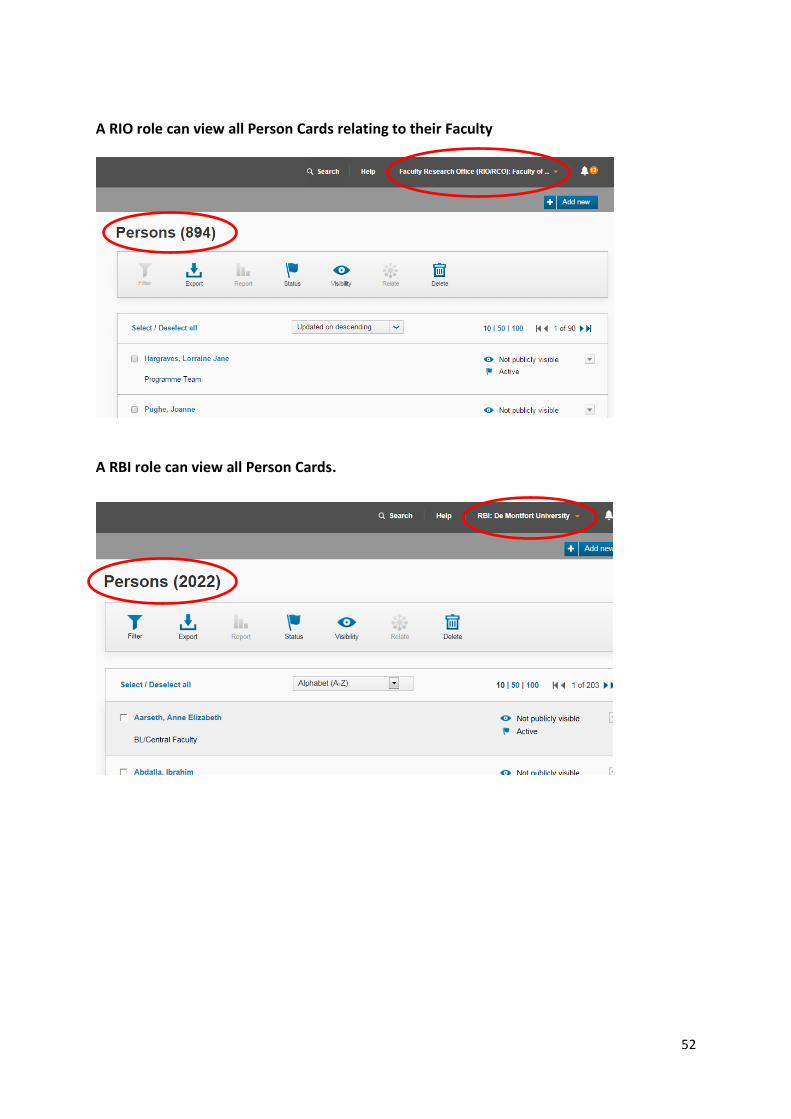
A Researcher can only view their Person Card.
52
A RIO role can view all Person Cards relating to their Faculty
A RBI role can view all Person Cards.

53
Use the Filter to find records, and use the drop down arrows to select each query, and then select Apply
You can see how many results your search has generated.
54
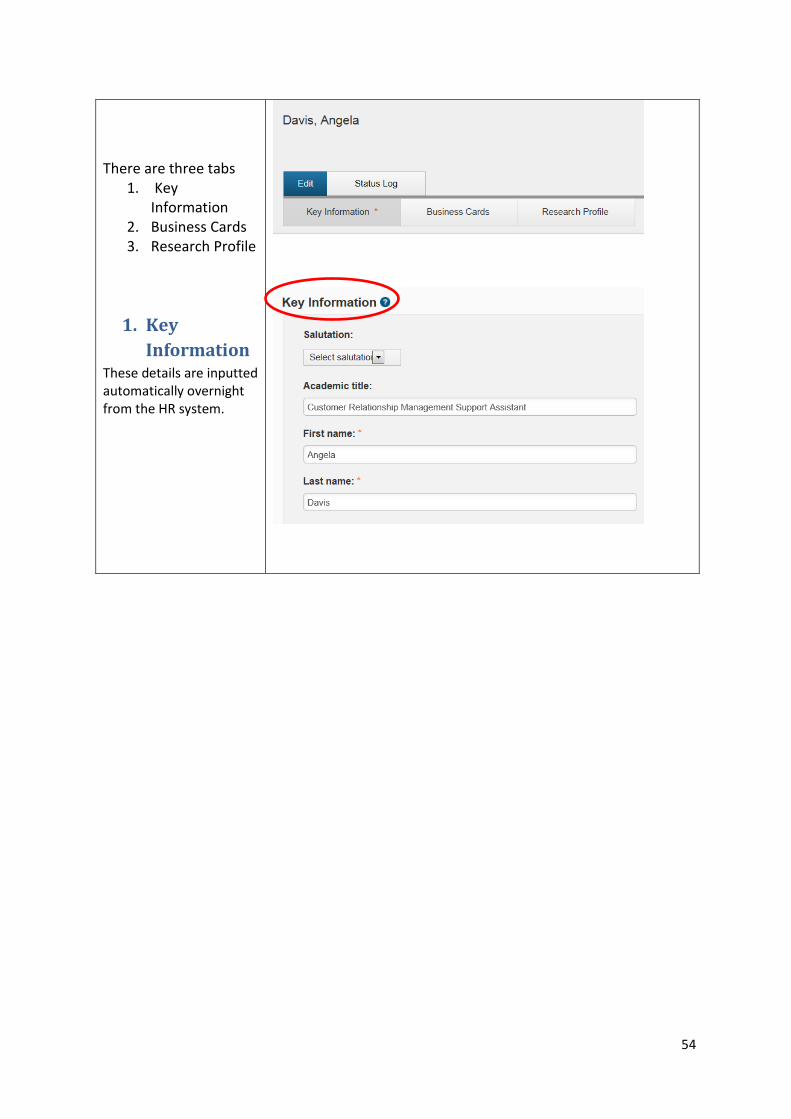
There are three tabs
1. Key Information
2. Business Cards 3. Research Profile
1. Key
Information These details are inputted automatically overnight from the HR system.
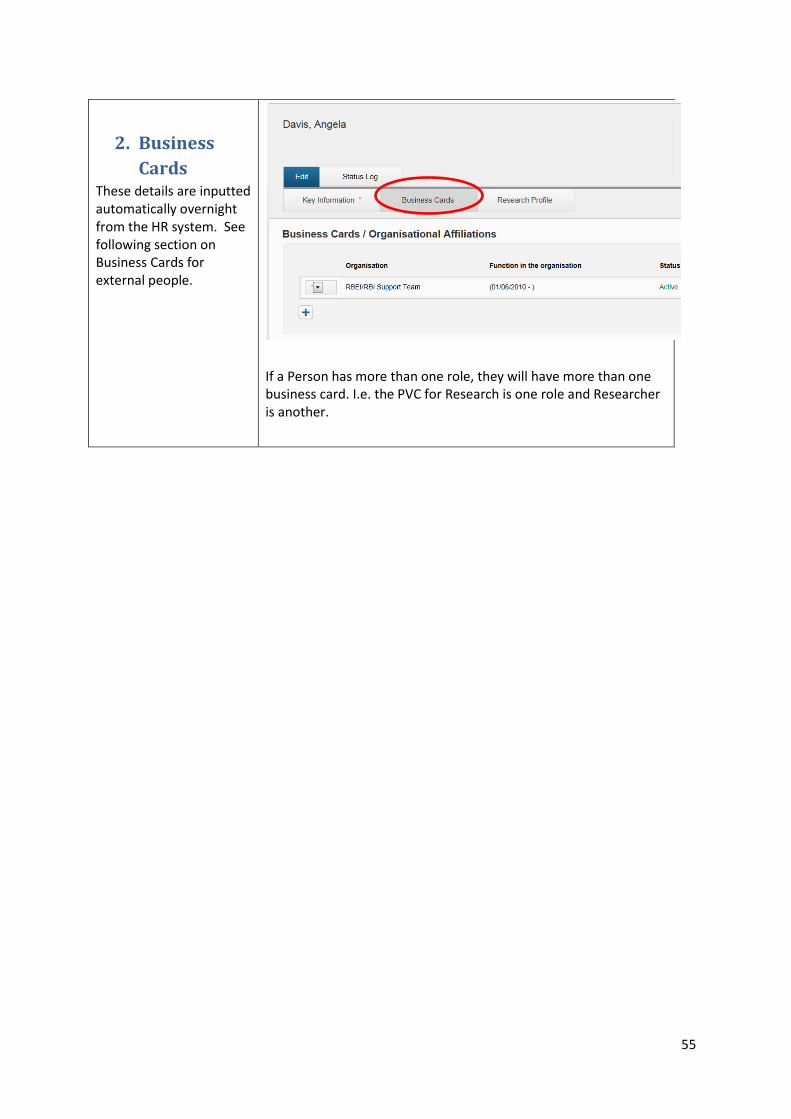
55
2. Business
Cards These details are inputted automatically overnight from the HR system. See following section on Business Cards for external people.
If a Person has more than one role, they will have more than one business card. I.e. the PVC for Research is one role and Researcher is another.

56
3. Research
Profile This is for the Researcher to edit. Research Interest- this is a free text box
Research Interests – use the plus icon to search and select from the list (CASRAI classifications)
Keywords – use the plus icon to search and select from the keywords Embedded Videos – Add links to videos

57
Business Card
All Business Card details for DMU staff are imported from the HR database on a nightly import. You cannot edit these details. You can create Business Cards for external people only. Each Person has a Business Card. If a Person has more than one role, they will have more than one business card. I.e. the PVC for Research and Innovation is one role and Researcher is another. On your Dashboard select Persons from the drop down menu on the left hand side. Then select Business Cards.

58
A Researcher can only view their Business Card(s). You can see the status of your Business Card e.g. Active or Ended
The RIO role can view all Business Cards relating to their Faculty.

59
The RBI role can view all Business Cards.
Staff details are inputted automatically overnight from the HR system. See following section on Business Cards for external people.

60
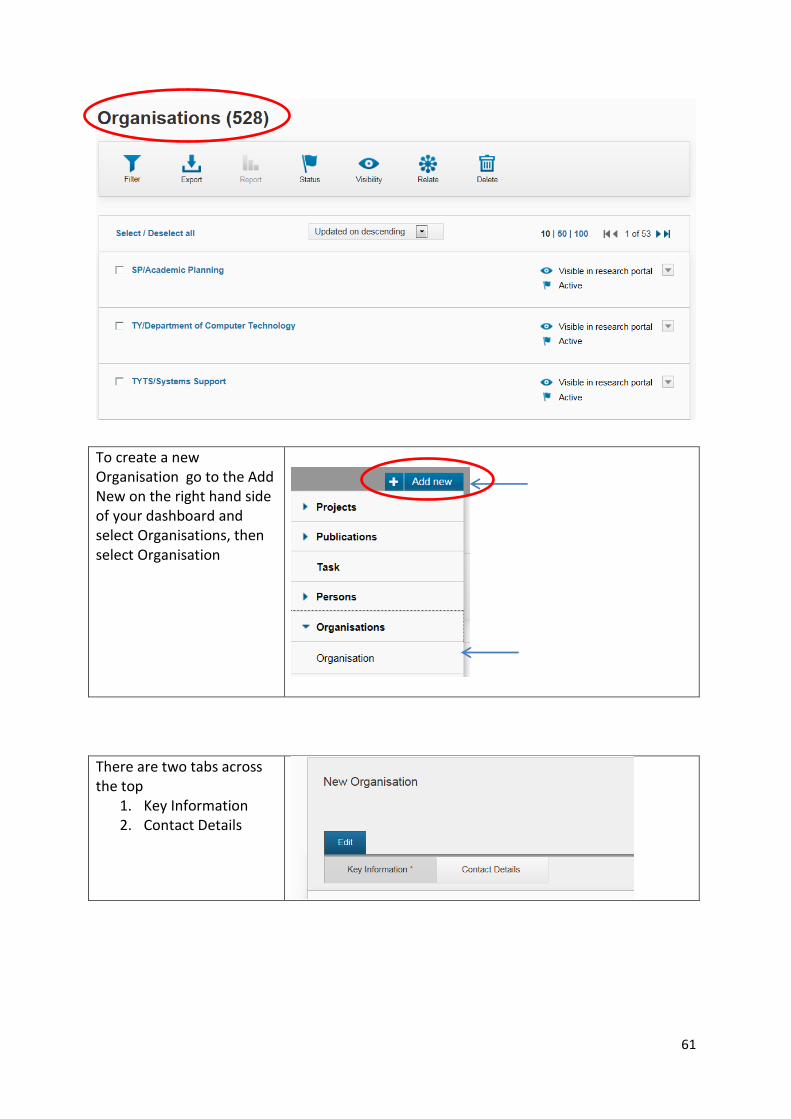
Organisations On your Dashboard select Organisations from the drop down menu on the left hand side. Then select Organisations. There are two types of Organisations
1. DMU – Faculty/Dept. School 2. External companies
1. DMU – Faculty/Dept. School - These details are uploaded nightly from our HR System.
2. External Companies –The details for each organisation need to be uploaded.
61
To create a new Organisation go to the Add New on the right hand side of your dashboard and select Organisations, then select Organisation
There are two tabs across the top
1. Key Information 2. Contact Details

62
1. Key
Information Name – this is the name of the organisation Acronym – If the Organisation has an acronym enter the details here DORIS ID: - this field is populated automatically by the system. Internal or External – select from the drop down list. Type of organisation – select from the drop down list
Select whether the organisation is a Funding Body

63
Click on the plus icon and search and select for the relevant HESA code
Click on the plus icon and search and select for the relevant Country Superior organisation - the system inputs this information Research activities – this is a text box

64
Research Interests - click on the plus icon and search and select Keywords - click on the plus icon and search and select
2. Contact
Details Enter the contact details for the Organisation Save and close and select the status

65
66
Research Groups
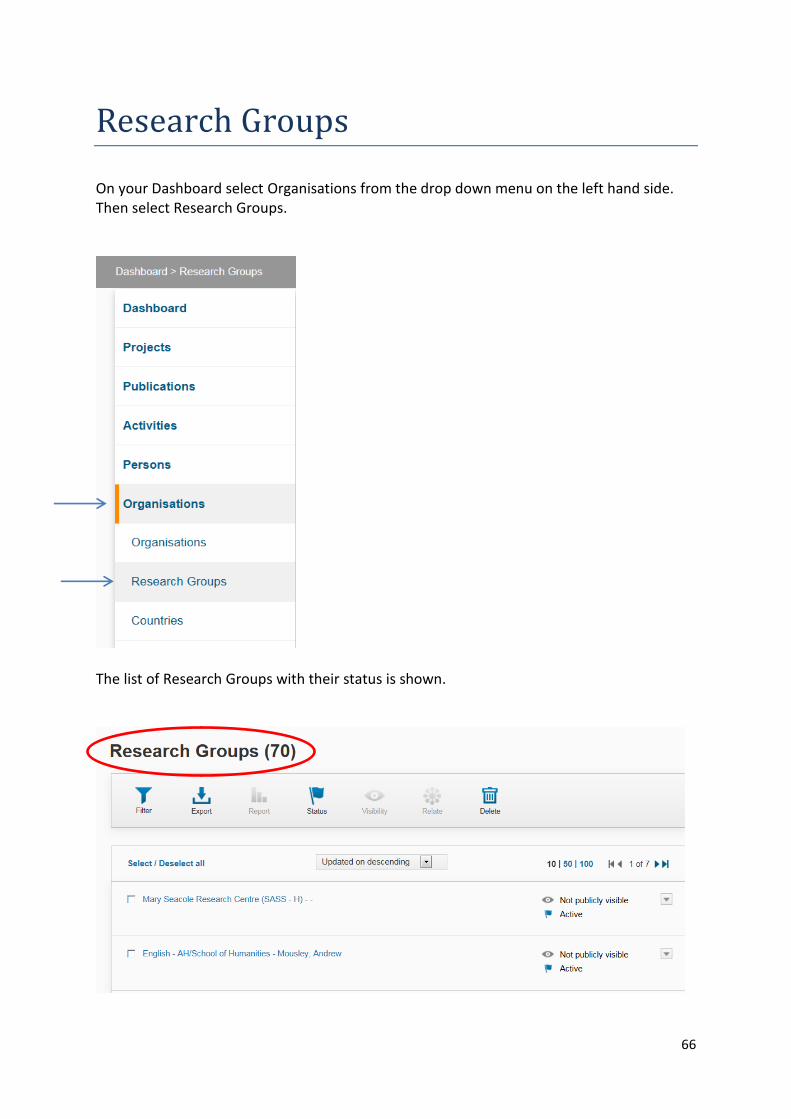
On your Dashboard select Organisations from the drop down menu on the left hand side. Then select Research Groups.
The list of Research Groups with their status is shown.

67
To create a new Research Group go to the Add New on the right hand side of your dashboard and select Organisations, then select Research Group Please note: Research Groups need to be authorised by the Faculty Research Office before creating.
There are two tabs across the top.
1. Research Group 2. Linked Research

68
1. Research Group
Name – this is the name of the Research Group Terms of reference – this is a free text box Start Date – enter the date that the Group was formed End Date – enter the date when the Group has finished DORIS ID - this field is populated automatically by the system, you are not able to edit this. Research Interest – use the plus icon to search and select Group Lead/PI - use the plus icon to search and select Group Members - use the plus icon to search and select
69
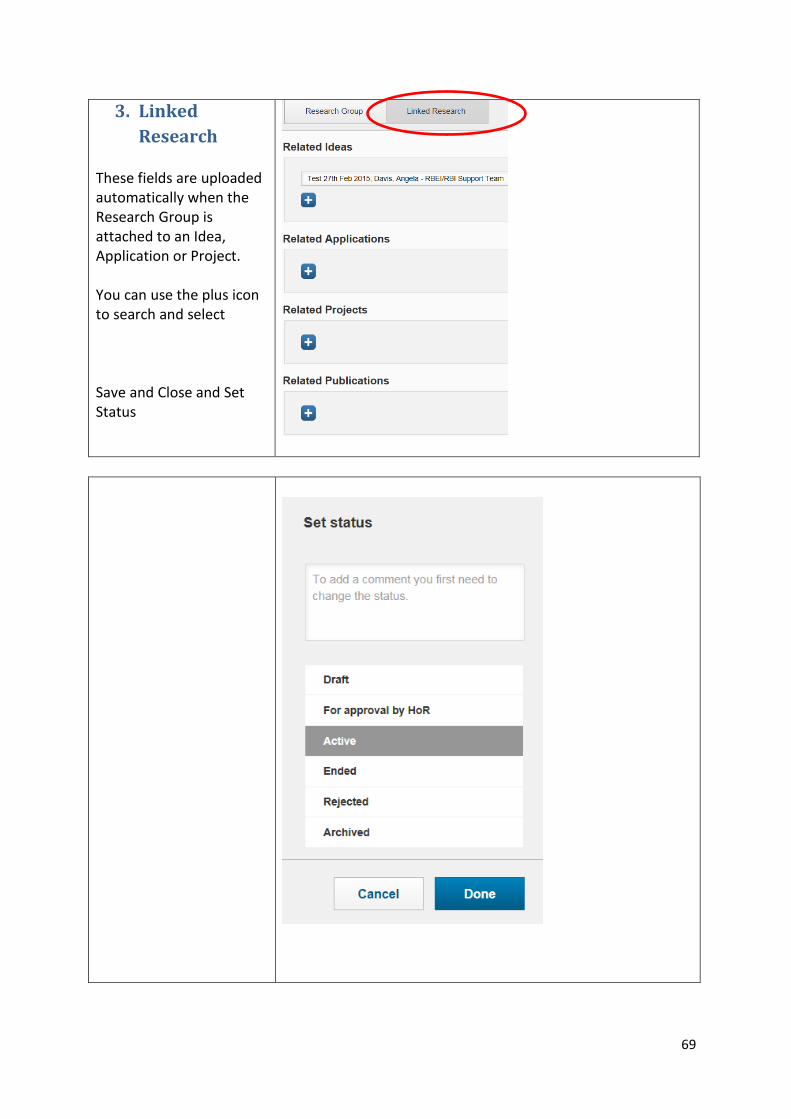
3. Linked
Research
These fields are uploaded automatically when the Research Group is attached to an Idea, Application or Project. You can use the plus icon to search and select Save and Close and Set Status
70
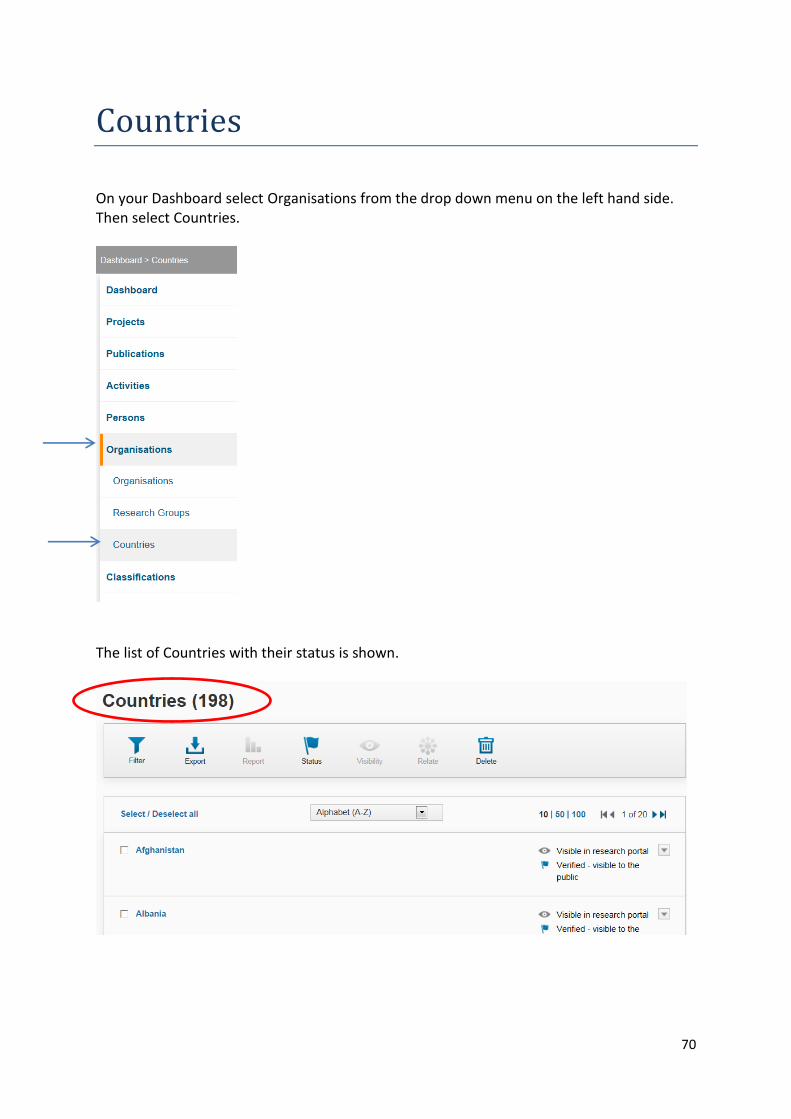
Countries
On your Dashboard select Organisations from the drop down menu on the left hand side. Then select Countries.
The list of Countries with their status is shown.

71
There is one tab on Countries Key Information

72
Classifications
Support Staff view
Researcher View

73
On your Dashboard select Classifications from the drop down menu on the left hand side. Then select Keywords. The list of Keywords with their status is shown.
To create a new Keyword select the Add New on the right hand side of your dashboard and select Keyword.
There are two tabs across the top
1. Key Information 2. Related
Information

74
1. Key
Information Input the title of the keyword and the description

75
2. Related
Information
You can use the plus icon to search and select

76
Research Interests
On your Dashboard select Classifications from the drop down menu on the left hand side. Then select Research Interests
This shows the list of Research Interests with their status
To create a new Research Interest go to your Person Card and select the tab Research Interests and use the plus icon to search and attach your research interest. See Page 56 of this User Guide

77
Notifications
Notifications are shown in DORIS. Some notifications are also sent to your email address, if you have selected the ability to receive email notifications. See page…for further details
1. On your
Dashboard select Notifications from the drop down menu on the left hand side. Then select Notifications.
2. On your Dashboard select the Notifications Icon from the top right hand side. (you can see how many notifications you have)
78
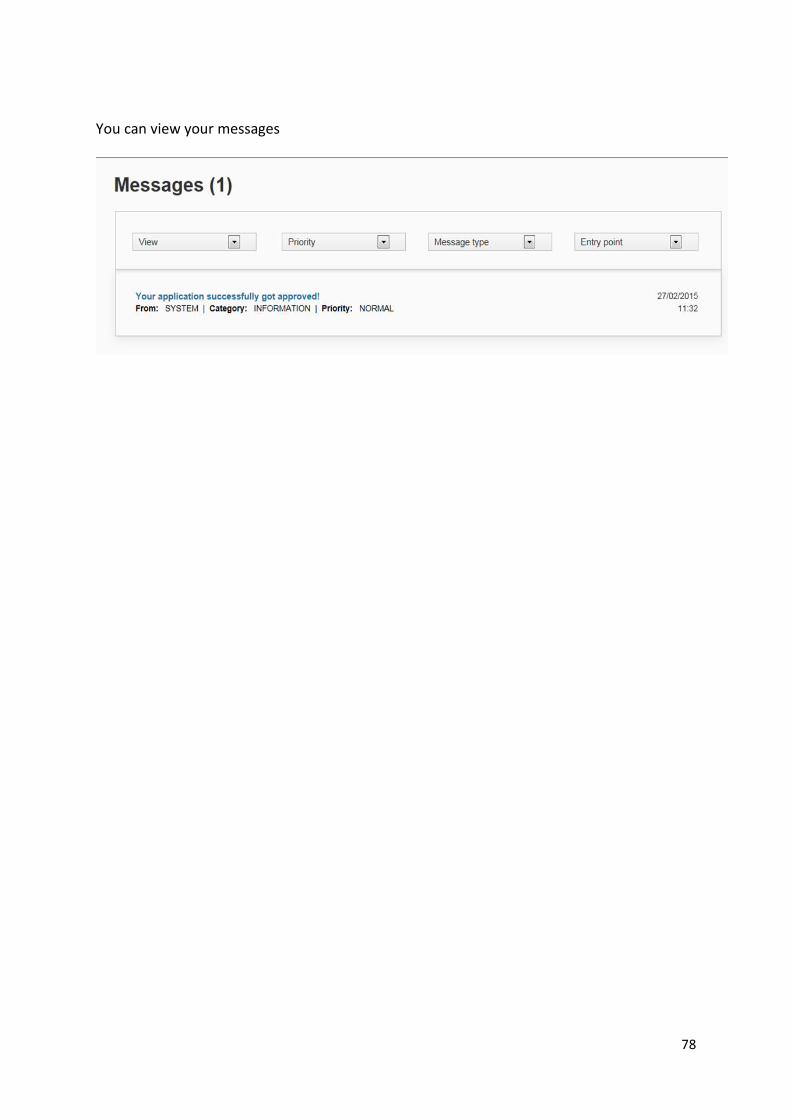
You can view your messages