creating css column layouts - lynda.comfiles.lynda.com/files/.../dw_8_btb/dw8_btb_chap_03.pdf ·...
TRANSCRIPT
3Creating CSS Column Layouts
Crafting a Two-Column CSS Layout 35
Setting Up the Page Structure 36
Building the Header and Navigation 41
Containing the Content 44
Building the Footer 49
Converting to a Three-Column
CSS Layout 51
For all the benefits of using CSS to create your page layouts—more
flexibility, less code, faster download—this technique does have one big
drawback: the learning curve. Although inserting layout elements, primarily
<div> tags, is easy in Dreamweaver 8, understanding where those elements
go is something else altogether. In this chapter, you’ll learn how to create
the two most common layouts, those with two and three columns. Both
layout variations include a header section and a footer section, and you
can easily modify them to fit your particular needs.
Macromedia Dreamweaver 8 Beyond the Basics : H•O•T34
03_DWRBB_HOT_(34-55)2.qxd 08/25/2006 12:56 PM Page 34
35Chapter 3 : Creating CSS Column Layouts
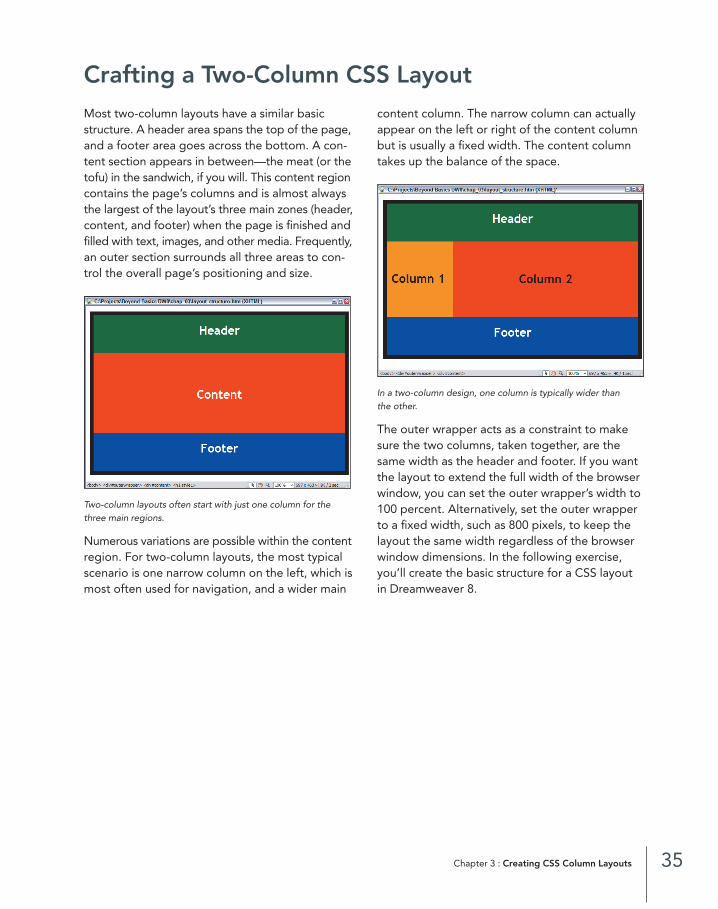
Crafting a Two-Column CSS LayoutMost two-column layouts have a similar basicstructure. A header area spans the top of the page,and a footer area goes across the bottom. A con-tent section appears in between—the meat (or thetofu) in the sandwich, if you will. This content regioncontains the page’s columns and is almost alwaysthe largest of the layout’s three main zones (header,content, and footer) when the page is finished andfilled with text, images, and other media. Frequently,an outer section surrounds all three areas to con-trol the overall page’s positioning and size.
Two-column layouts often start with just one column for thethree main regions.
Numerous variations are possible within the contentregion. For two-column layouts, the most typicalscenario is one narrow column on the left, which ismost often used for navigation, and a wider main
content column. The narrow column can actuallyappear on the left or right of the content columnbut is usually a fixed width. The content columntakes up the balance of the space.
In a two-column design, one column is typically wider than the other.
The outer wrapper acts as a constraint to makesure the two columns, taken together, are thesame width as the header and footer. If you wantthe layout to extend the full width of the browserwindow, you can set the outer wrapper’s width to100 percent. Alternatively, set the outer wrapperto a fixed width, such as 800 pixels, to keep thelayout the same width regardless of the browserwindow dimensions. In the following exercise,you’ll create the basic structure for a CSS layout in Dreamweaver 8.
03_DWRBB_HOT_(34-55)2.qxd 08/25/2006 12:56 PM Page 35
1E X E R C I S E
Setting Up the Page Structure
Enough with the theory—let’s build a page! In this exercise, you’ll create a new page and begin definingand applying the associated CSS. The page will follow the concepts outlined in the previous section. You’llstart with a minor bit of housekeeping that will help you write better, more concise code.
Copy the chap_03 folder from the Dreamweaver 8 HOT CD-ROM onto your desktop.
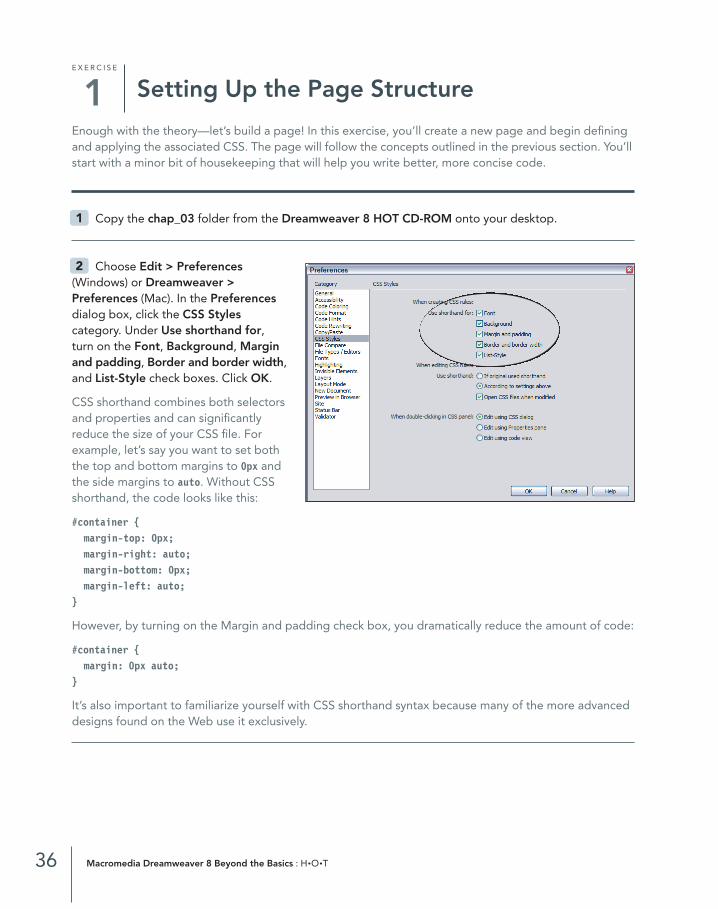
Choose Edit > Preferences(Windows) or Dreamweaver >Preferences (Mac). In the Preferencesdialog box, click the CSS Stylescategory. Under Use shorthand for,turn on the Font, Background, Marginand padding, Border and border width,and List-Style check boxes. Click OK.
CSS shorthand combines both selectorsand properties and can significantlyreduce the size of your CSS file. Forexample, let’s say you want to set boththe top and bottom margins to 0px andthe side margins to auto. Without CSSshorthand, the code looks like this:
#container {margin-top: 0px;margin-right: auto;margin-bottom: 0px;margin-left: auto;
}
However, by turning on the Margin and padding check box, you dramatically reduce the amount of code:
#container {margin: 0px auto;
}
It’s also important to familiarize yourself with CSS shorthand syntax because many of the more advanceddesigns found on the Web use it exclusively.
2
1
36 Macromedia Dreamweaver 8 Beyond the Basics : H•O•T
03_DWRBB_HOT_(34-55)2.qxd 08/25/2006 12:56 PM Page 36
In the Files panel, open two_col_layout.htm from the chap_03folder you copied to your desktop. In the Document toolbar, make sure the CSS Layout Box Model and CSS Layout Outlines options are on.
To give you a head start, I’ve already given two_col_layout.htm a title; otherwise, the page is blank. The first phase of creating a new CSS structure is to define the core layout styles.
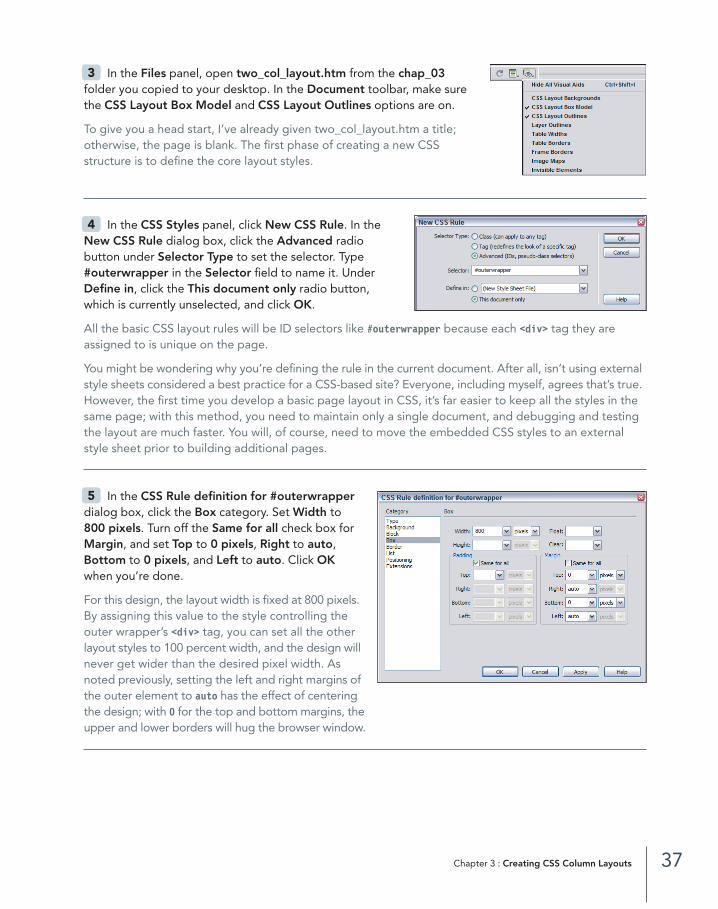
In the CSS Styles panel, click New CSS Rule. In theNew CSS Rule dialog box, click the Advanced radio button under Selector Type to set the selector. Type#outerwrapper in the Selector field to name it. UnderDefine in, click the This document only radio button,which is currently unselected, and click OK.
All the basic CSS layout rules will be ID selectors like #outerwrapper because each <div> tag they areassigned to is unique on the page.
You might be wondering why you’re defining the rule in the current document. After all, isn’t using externalstyle sheets considered a best practice for a CSS-based site? Everyone, including myself, agrees that’s true.However, the first time you develop a basic page layout in CSS, it’s far easier to keep all the styles in thesame page; with this method, you need to maintain only a single document, and debugging and testingthe layout are much faster. You will, of course, need to move the embedded CSS styles to an externalstyle sheet prior to building additional pages.
In the CSS Rule definition for #outerwrapperdialog box, click the Box category. Set Width to800 pixels. Turn off the Same for all check box forMargin, and set Top to 0 pixels, Right to auto,Bottom to 0 pixels, and Left to auto. Click OKwhen you’re done.
For this design, the layout width is fixed at 800 pixels.By assigning this value to the style controlling theouter wrapper’s <div> tag, you can set all the otherlayout styles to 100 percent width, and the design willnever get wider than the desired pixel width. Asnoted previously, setting the left and right margins ofthe outer element to auto has the effect of centeringthe design; with 0 for the top and bottom margins, the upper and lower borders will hug the browser window.
5
4
3
37Chapter 3 : Creating CSS Column Layouts
03_DWRBB_HOT_(34-55)2.qxd 08/25/2006 12:56 PM Page 37
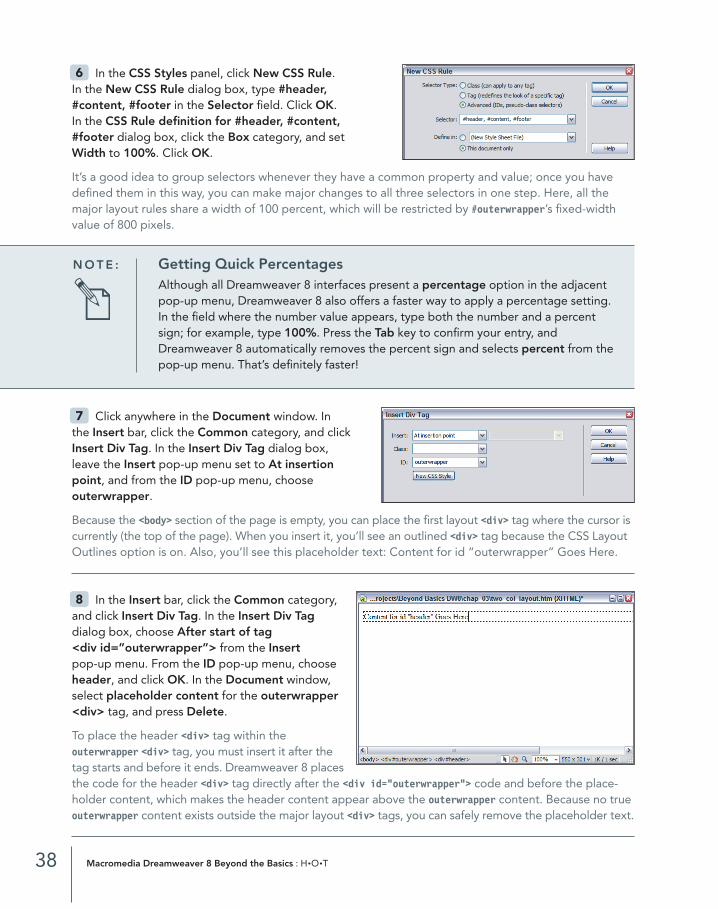
In the CSS Styles panel, click New CSS Rule. In the New CSS Rule dialog box, type #header, #content, #footer in the Selector field. Click OK. In the CSS Rule definition for #header, #content,#footer dialog box, click the Box category, and setWidth to 100%. Click OK.
It’s a good idea to group selectors whenever they have a common property and value; once you havedefined them in this way, you can make major changes to all three selectors in one step. Here, all themajor layout rules share a width of 100 percent, which will be restricted by #outerwrapper’s fixed-widthvalue of 800 pixels.
6
38 Macromedia Dreamweaver 8 Beyond the Basics : H•O•T
N O T E : Getting Quick PercentagesAlthough all Dreamweaver 8 interfaces present a percentage option in the adjacentpop-up menu, Dreamweaver 8 also offers a faster way to apply a percentage setting.In the field where the number value appears, type both the number and a percentsign; for example, type 100%. Press the Tab key to confirm your entry, andDreamweaver 8 automatically removes the percent sign and selects percent from thepop-up menu. That’s definitely faster!
Click anywhere in the Document window. In the Insert bar, click the Common category, and clickInsert Div Tag. In the Insert Div Tag dialog box,leave the Insert pop-up menu set to At insertionpoint, and from the ID pop-up menu, choose outerwrapper.
Because the <body> section of the page is empty, you can place the first layout <div> tag where the cursor iscurrently (the top of the page). When you insert it, you’ll see an outlined <div> tag because the CSS LayoutOutlines option is on. Also, you’ll see this placeholder text: Content for id “outerwrapper” Goes Here.
In the Insert bar, click the Common category,and click Insert Div Tag. In the Insert Div Tagdialog box, choose After start of tag <div id=”outerwrapper”> from the Insertpop-up menu. From the ID pop-up menu, chooseheader, and click OK. In the Document window,select placeholder content for the outerwrapper<div> tag, and press Delete.
To place the header <div> tag within the outerwrapper <div> tag, you must insert it after thetag starts and before it ends. Dreamweaver 8 places the code for the header <div> tag directly after the <div id=”outerwrapper”> code and before the place-holder content, which makes the header content appear above the outerwrapper content. Because no trueouterwrapper content exists outside the major layout <div> tags, you can safely remove the placeholder text.
8
7
03_DWRBB_HOT_(34-55)2.qxd 08/25/2006 12:56 PM Page 38
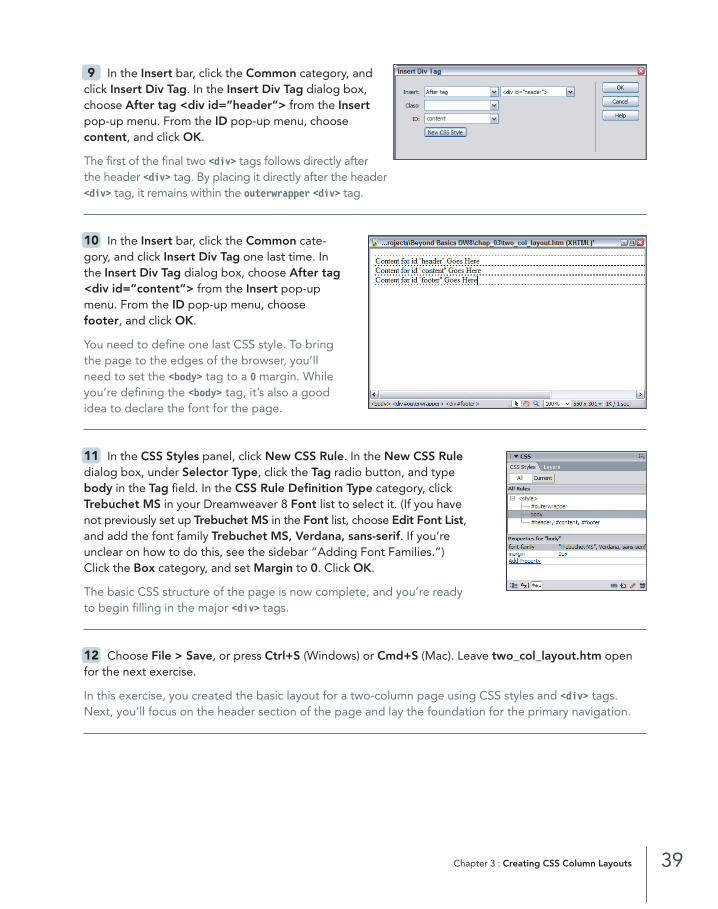
In the Insert bar, click the Common category, andclick Insert Div Tag. In the Insert Div Tag dialog box,choose After tag <div id=”header”> from the Insertpop-up menu. From the ID pop-up menu, choose content, and click OK.
The first of the final two <div> tags follows directly afterthe header <div> tag. By placing it directly after the header <div> tag, it remains within the outerwrapper <div> tag.
In the Insert bar, click the Common cate-gory, and click Insert Div Tag one last time. Inthe Insert Div Tag dialog box, choose After tag<div id=”content”> from the Insert pop-upmenu. From the ID pop-up menu, choosefooter, and click OK.
You need to define one last CSS style. To bringthe page to the edges of the browser, you’llneed to set the <body> tag to a 0 margin. Whileyou’re defining the <body> tag, it’s also a goodidea to declare the font for the page.
In the CSS Styles panel, click New CSS Rule. In the New CSS Ruledialog box, under Selector Type, click the Tag radio button, and typebody in the Tag field. In the CSS Rule Definition Type category, clickTrebuchet MS in your Dreamweaver 8 Font list to select it. (If you havenot previously set up Trebuchet MS in the Font list, choose Edit Font List,and add the font family Trebuchet MS, Verdana, sans-serif. If you’reunclear on how to do this, see the sidebar “Adding Font Families.”) Click the Box category, and set Margin to 0. Click OK.
The basic CSS structure of the page is now complete, and you’re ready to begin filling in the major <div> tags.
Choose File > Save, or press Ctrl+S (Windows) or Cmd+S (Mac). Leave two_col_layout.htm openfor the next exercise.
In this exercise, you created the basic layout for a two-column page using CSS styles and <div> tags.Next, you’ll focus on the header section of the page and lay the foundation for the primary navigation.
12
11
10
9
39Chapter 3 : Creating CSS Column Layouts
03_DWRBB_HOT_(34-55)2.qxd 08/25/2006 12:56 PM Page 39
40 Macromedia Dreamweaver 8 Beyond the Basics : H•O•T
N O T E : Adding Font FamiliesDreamweaver 8 comes with a core selection of font families that work for a great dealof Web design. However, you can always customize your font selections. Once youdo, your enhanced options are available on every site.
At the bottom of every Font list, whether in the Property Inspector, in the CSS Ruledefinition for X dialog box, or even in Code view, you’ll find the Edit Font Listoption. Click Edit Font List to open the Edit Font List dialog box. The current fontfamilies appear in the upper area, labeled Font list, and a list of your system fontsappears in the lower-right area, labeled Available Fonts. Select any entry from theAvailable Fonts list, and click the Add (<<) button to place the selected font in theChosen Font pane. Add fonts to the same pane to create a font family, such asTrebuchet MS, Verdana, sans-serif. It’s always best to include one of the genericfonts (cursive, decorative, fantasy, monospace, sans-serif, or serif) as the final memberof your font family, just in case the user doesn’t have any of the fonts you selected.
03_DWRBB_HOT_(34-55)2.qxd 08/25/2006 12:56 PM Page 40
2E X E R C I S E
Building the Header and Navigation
Many headers include a logo and the primary navigation and maintain a constant width and height.Oftentimes, a dark gray border crosses the top of the header while framing the page. In this exercise, youwill continue building the two-column layout you began in the previous exercise. Specifically, you willbuild a two-column version of the page comp in Chapter 1, “Getting Started.” A two-column design is one of the most common layouts on the Web.
If you followed the previous exercise, two_col_layout.htm should still be open in Dreamweaver. Ifit’s not, complete Exercise 1, and then return to this exercise.
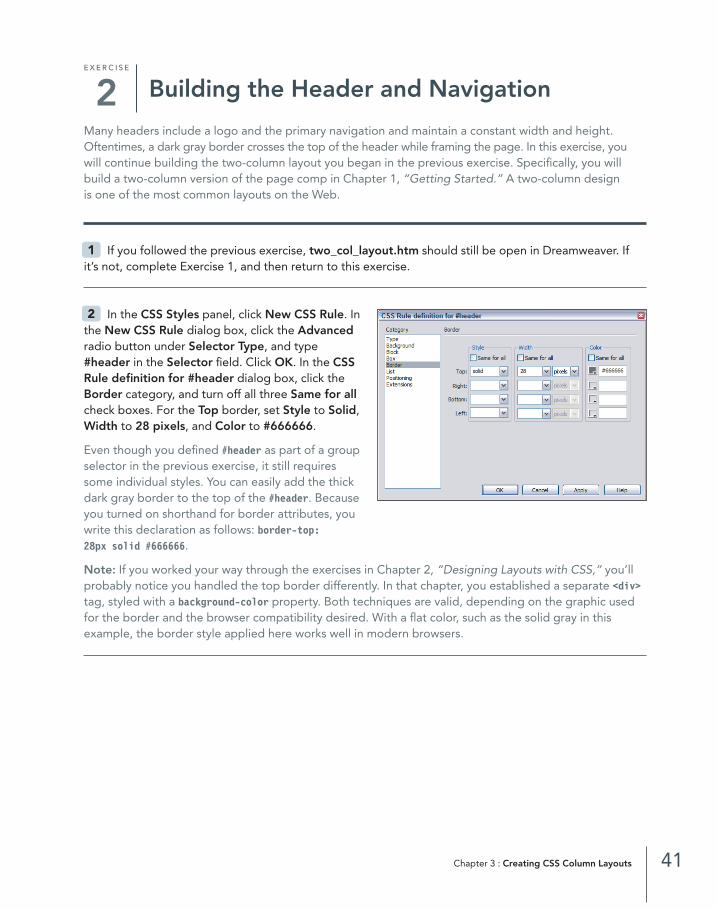
In the CSS Styles panel, click New CSS Rule. Inthe New CSS Rule dialog box, click the Advancedradio button under Selector Type, and type#header in the Selector field. Click OK. In the CSSRule definition for #header dialog box, click theBorder category, and turn off all three Same for allcheck boxes. For the Top border, set Style to Solid,Width to 28 pixels, and Color to #666666.
Even though you defined #header as part of a groupselector in the previous exercise, it still requiressome individual styles. You can easily add the thickdark gray border to the top of the #header. Becauseyou turned on shorthand for border attributes, youwrite this declaration as follows: border-top: 28px solid #666666.
Note: If you worked your way through the exercises in Chapter 2, “Designing Layouts with CSS,” you’llprobably notice you handled the top border differently. In that chapter, you established a separate <div>tag, styled with a background-color property. Both techniques are valid, depending on the graphic usedfor the border and the browser compatibility desired. With a flat color, such as the solid gray in thisexample, the border style applied here works well in modern browsers.
2
1
41Chapter 3 : Creating CSS Column Layouts
03_DWRBB_HOT_(34-55)2.qxd 08/25/2006 12:56 PM Page 41

While still in the CSS Rule definition for#header dialog box, click the Positioning category,and choose relative from the Type pop-up menu.Set Height to 122 pixels. Click OK.
You need the relative positioning attributebecause the <div> tag this style is applied to willcontain an absolutely positioned style. You’ll recallfrom Chapter 2, “Designing Layouts with CSS,”that unless you want to position the <div> tag rela-tive to the upper left of the document, absolutelypositioned <div> tags must be within a relativepositioned <div> tag. Finally, you specify the heightof the #header style to match the comp.
In the #header <div> tag, delete the place-holder content. In the CSS Styles panel, makesure #header is selected, and in the Propertiespane, click Add Property. Type background inthe Property column, and press Enter (Windows)or Return (Mac). In the Value column, typeurl(assets/main_logo.gif) no-repeat 50px 46px.Press Enter (Windows) or Return (Mac).
As shown in Chapter 2, “Designing Layouts withCSS,” the logo appears as a background image.Like with the border CSS property, you can com-bine the various background properties in a single series of values. The two final pixel values represent thehorizontal and vertical (or, if you prefer, x and y) coordinates for the left and top of the image, respectively.
In the CSS Styles panel, click New CSS Rule. In the New CSS Rule dialogbox, click the Advanced radio button under Selector Type, and type #navbarin the Selector field. Click OK. In the CSS Rule definition for #navbar dialogbox, click the Positioning category, and choose absolute from the Positionpop-up menu. In the Placement section, type 30px in the right field and 4px in the bottom field. Click OK.
The main navigation will appear in an absolutely positioned <div> tag. Althoughyou could determine offset values from the left and top corner of the containing<div> tag, #header, it’s much easier to use the right and bottom properties,because #navbar is designed to appear nearly flush right and at the bottom ofthe area.
5
4
3
42 Macromedia Dreamweaver 8 Beyond the Basics : H•O•T
03_DWRBB_HOT_(34-55)2.qxd 08/25/2006 12:56 PM Page 42
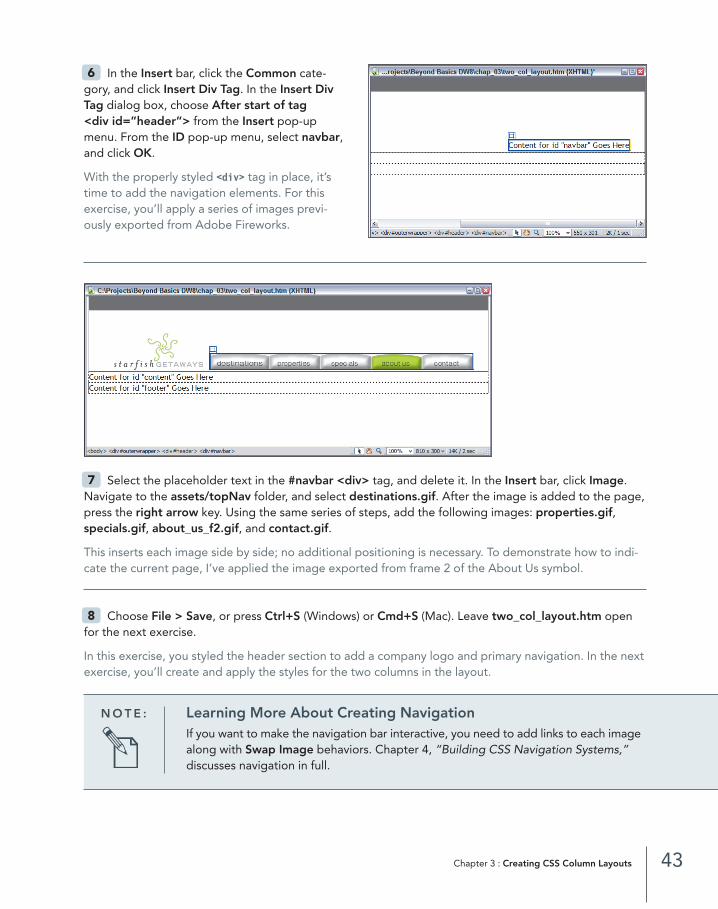
In the Insert bar, click the Common cate-gory, and click Insert Div Tag. In the Insert DivTag dialog box, choose After start of tag <div id=”header”> from the Insert pop-upmenu. From the ID pop-up menu, select navbar,and click OK.
With the properly styled <div> tag in place, it’stime to add the navigation elements. For thisexercise, you’ll apply a series of images previ-ously exported from Adobe Fireworks.
Select the placeholder text in the #navbar <div> tag, and delete it. In the Insert bar, click Image.Navigate to the assets/topNav folder, and select destinations.gif. After the image is added to the page,press the right arrow key. Using the same series of steps, add the following images: properties.gif, specials.gif, about_us_f2.gif, and contact.gif.
This inserts each image side by side; no additional positioning is necessary. To demonstrate how to indi-cate the current page, I’ve applied the image exported from frame 2 of the About Us symbol.
Choose File > Save, or press Ctrl+S (Windows) or Cmd+S (Mac). Leave two_col_layout.htm openfor the next exercise.
In this exercise, you styled the header section to add a company logo and primary navigation. In the nextexercise, you’ll create and apply the styles for the two columns in the layout.
8
7
6
43Chapter 3 : Creating CSS Column Layouts
N O T E : Learning More About Creating NavigationIf you want to make the navigation bar interactive, you need to add links to each imagealong with Swap Image behaviors. Chapter 4, “Building CSS Navigation Systems,”discusses navigation in full.
03_DWRBB_HOT_(34-55)2.qxd 08/25/2006 12:56 PM Page 43
3E X E R C I S E
Containing the Content
The content area is the most sophisticated page area. With a two-column structure at its heart, this areaincorporates the side navigation as well as a split content section. In all, you require four separate CSSstyles and <div> tags to achieve the goals of the design: #content (the outer wrapper for the area),#navColumn (the side navigation), #contentColumn (main text and image region), and #contentFeature (thehighlighted section below the #contentColumn <div> tag). In this exercise, you’ll create the styles for eachcolumn, apply them to separate <div> tags, and insert placeholder content.
If you followed the previous exercise, two_col_layout.htm should still be open. If it’s not, completeExercise 2, and then return to this exercise.
In the CSS Styles panel, click New CSS Rule. In the New CSS Rule dialogbox, click the Advanced radio button under Selector Type, and type #contentin the Selector field. Click OK. In the CSS Rule definition for #content dialogbox, select the Type category, and set Size to .8 ems. Click the Box category,turn off the Same for all check box for Padding, and then set Top to 10 pixels.Click the Positioning category, and set Overflow to Auto. Click OK.
As with the #header style, you are establishing rules specific to the #content style.You’re making the text a bit smaller than usual (about 10 points instead of 12),and you’re giving the content a bit of room to breathe at the top.
The overflow: auto declaration is an important one because it keeps content infloated <div> tags from breaking through their container elements. For several years, designers handledthe same issue by inserting a blank <div> tag with a clear: both style. Although this largely worked, itadded an unnecessary markup element for presentation only—exactly what CSS is meant to avoid.
In the CSS Styles panel, click New CSS Rule.In the New CSS Rule dialog box, click theAdvanced radio button under Selector Type, andtype #navColumn in the Selector field. Click OK.In the CSS Rule definition for #navColumn dialogbox, click the Text category, set Size to 1 emsand Line height to 150%. Click the Box category,and set Width to 156 pixels and Float to left.Turn off the Same for all check box for Padding,and type 30 for both Top and Left. Click OK.
The links in the side navigation are simply text, so you can easily set up the design of them here.You’re applying a static width because the overall layout is not intended to expand. Floating this column is a key aspect to creating a two-column design.
3
2
1
44 Macromedia Dreamweaver 8 Beyond the Basics : H•O•T
03_DWRBB_HOT_(34-55)2.qxd 08/25/2006 12:56 PM Page 44
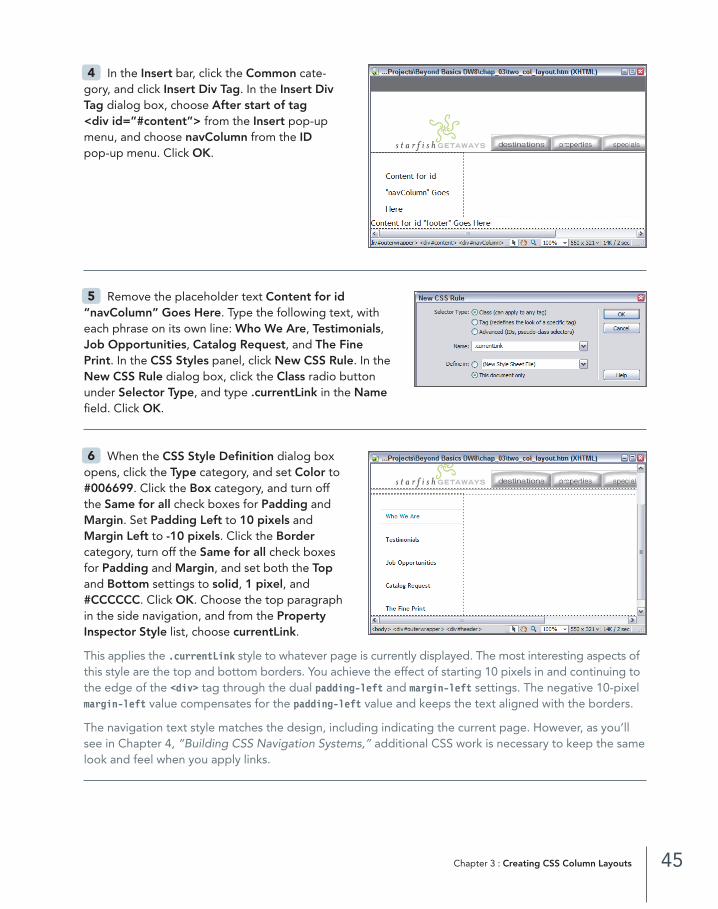
In the Insert bar, click the Common cate-gory, and click Insert Div Tag. In the Insert DivTag dialog box, choose After start of tag <div id=”#content”> from the Insert pop-upmenu, and choose navColumn from the IDpop-up menu. Click OK.
Remove the placeholder text Content for id“navColumn” Goes Here. Type the following text, witheach phrase on its own line: Who We Are, Testimonials,Job Opportunities, Catalog Request, and The FinePrint. In the CSS Styles panel, click New CSS Rule. In theNew CSS Rule dialog box, click the Class radio buttonunder Selector Type, and type .currentLink in the Namefield. Click OK.
When the CSS Style Definition dialog boxopens, click the Type category, and set Color to#006699. Click the Box category, and turn offthe Same for all check boxes for Padding andMargin. Set Padding Left to 10 pixels andMargin Left to -10 pixels. Click the Border category, turn off the Same for all check boxesfor Padding and Margin, and set both the Topand Bottom settings to solid, 1 pixel, and#CCCCCC. Click OK. Choose the top paragraphin the side navigation, and from the PropertyInspector Style list, choose currentLink.
This applies the .currentLink style to whatever page is currently displayed. The most interesting aspects ofthis style are the top and bottom borders. You achieve the effect of starting 10 pixels in and continuing tothe edge of the <div> tag through the dual padding-left and margin-left settings. The negative 10-pixelmargin-left value compensates for the padding-left value and keeps the text aligned with the borders.
The navigation text style matches the design, including indicating the current page. However, as you’llsee in Chapter 4, “Building CSS Navigation Systems,” additional CSS work is necessary to keep the samelook and feel when you apply links.
6
5
4
45Chapter 3 : Creating CSS Column Layouts
03_DWRBB_HOT_(34-55)2.qxd 08/25/2006 12:56 PM Page 45
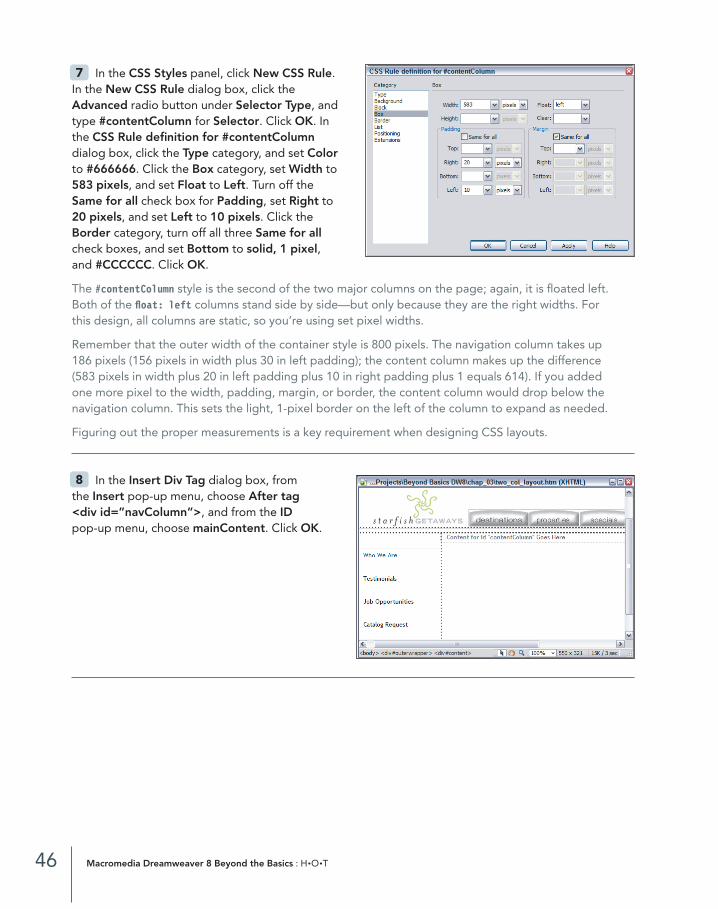
In the CSS Styles panel, click New CSS Rule.In the New CSS Rule dialog box, click theAdvanced radio button under Selector Type, andtype #contentColumn for Selector. Click OK. Inthe CSS Rule definition for #contentColumndialog box, click the Type category, and set Colorto #666666. Click the Box category, set Width to583 pixels, and set Float to Left. Turn off theSame for all check box for Padding, set Right to20 pixels, and set Left to 10 pixels. Click theBorder category, turn off all three Same for allcheck boxes, and set Bottom to solid, 1 pixel,and #CCCCCC. Click OK.
The #contentColumn style is the second of the two major columns on the page; again, it is floated left.Both of the float: left columns stand side by side—but only because they are the right widths. For this design, all columns are static, so you’re using set pixel widths.
Remember that the outer width of the container style is 800 pixels. The navigation column takes up 186 pixels (156 pixels in width plus 30 in left padding); the content column makes up the difference (583 pixels in width plus 20 in left padding plus 10 in right padding plus 1 equals 614). If you added one more pixel to the width, padding, margin, or border, the content column would drop below the navigation column. This sets the light, 1-pixel border on the left of the column to expand as needed.
Figuring out the proper measurements is a key requirement when designing CSS layouts.
In the Insert Div Tag dialog box, from the Insert pop-up menu, choose After tag <div id=”navColumn”>, and from the IDpop-up menu, choose mainContent. Click OK.
8
7
46 Macromedia Dreamweaver 8 Beyond the Basics : H•O•T
03_DWRBB_HOT_(34-55)2.qxd 08/25/2006 12:56 PM Page 46
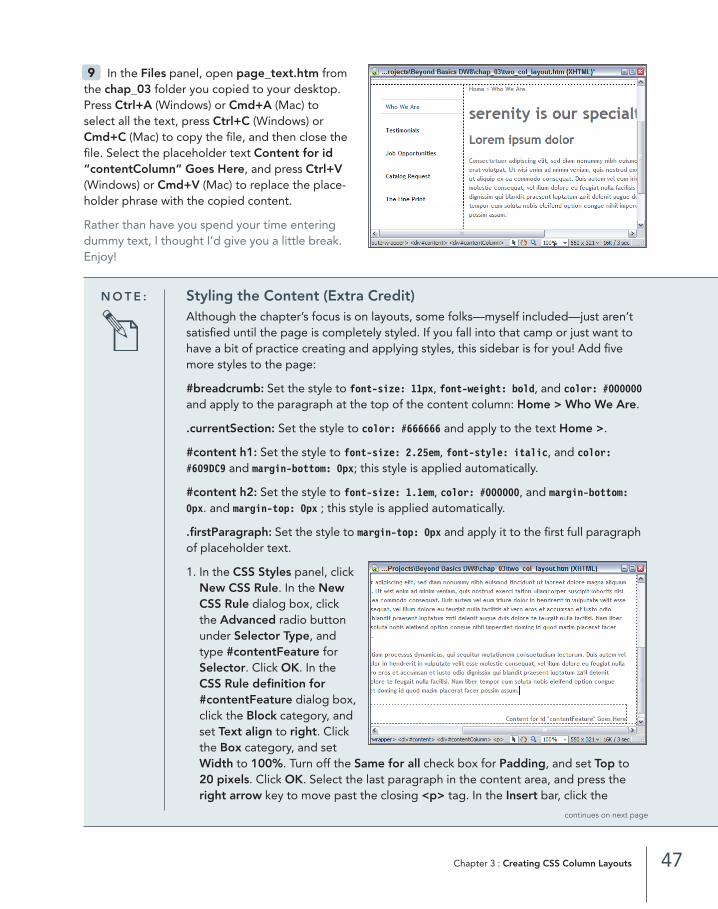
In the Files panel, open page_text.htm fromthe chap_03 folder you copied to your desktop.Press Ctrl+A (Windows) or Cmd+A (Mac) toselect all the text, press Ctrl+C (Windows) orCmd+C (Mac) to copy the file, and then close thefile. Select the placeholder text Content for id“contentColumn” Goes Here, and press Ctrl+V(Windows) or Cmd+V (Mac) to replace the place-holder phrase with the copied content.
Rather than have you spend your time enteringdummy text, I thought I’d give you a little break. Enjoy!
9
47Chapter 3 : Creating CSS Column Layouts
N O T E : Styling the Content (Extra Credit)Although the chapter’s focus is on layouts, some folks—myself included—just aren’tsatisfied until the page is completely styled. If you fall into that camp or just want tohave a bit of practice creating and applying styles, this sidebar is for you! Add fivemore styles to the page:
#breadcrumb: Set the style to font-size: 11px, font-weight: bold, and color: #000000and apply to the paragraph at the top of the content column: Home > Who We Are.
.currentSection: Set the style to color: #666666 and apply to the text Home >.
#content h1: Set the style to font-size: 2.25em, font-style: italic, and color:#609DC9 and margin-bottom: 0px; this style is applied automatically.
#content h2: Set the style to font-size: 1.1em, color: #000000, and margin-bottom:0px. and margin-top: 0px ; this style is applied automatically.
.firstParagraph: Set the style to margin-top: 0px and apply it to the first full paragraphof placeholder text.
1. In the CSS Styles panel, clickNew CSS Rule. In the NewCSS Rule dialog box, clickthe Advanced radio buttonunder Selector Type, andtype #contentFeature forSelector. Click OK. In theCSS Rule definition for#contentFeature dialog box,click the Block category, andset Text align to right. Clickthe Box category, and setWidth to 100%. Turn off the Same for all check box for Padding, and set Top to20 pixels. Click OK. Select the last paragraph in the content area, and press theright arrow key to move past the closing <p> tag. In the Insert bar, click the
continues on next page
03_DWRBB_HOT_(34-55)2.qxd 08/25/2006 12:56 PM Page 47
Choose File > Save, or press Ctrl+S (Windows) or Cmd+S (Mac). Leave two_col_layout.htm openfor the next exercise.
In this exercise, you specified styles within each column of the content area and applied them to formatthe side navigation and the main content area. In the next exercise, you’ll set the styles for the footerarea of the page.
48 Macromedia Dreamweaver 8 Beyond the Basics : H•O•T
N O T E : Retracing Previous StepsIf you’re working through this book in sequence, you’ll recall filling in the #contentFeature<div> tag in Chapter 2, “Designing Layouts with CSS.” If you’d like to include examplecontent in this area, insert the necessary images. Here’s a reminder: This <div> tag hasthree images—text_unique.gif, text_follow.gif, and box_arrow.gif.
N O T E : Styling the Content (Extra Credit) continuedCommon category, and click Insert Div Tag. In the Insert Div Tag dialog box, leave the Insert pop-up menu set to the default At insertion point, and choosecontentFeature from the ID pop-up menu. Click OK.
The #contentFeature style sets up an area that sits below the main content. Tokeep it lined up, you define the style at 100 percent width, with some padding onthe top to separate the two sections. The technique for placing the #contentFeature<div> tag ensures that it appears within the #contentColumn <div> tag but afterthe content.
2. Choose File > Save, or press Ctrl+S (Windows) or Cmd+S (Mac). Leavetwo_col_layout.htm open for the next exercise.
10
03_DWRBB_HOT_(34-55)2.qxd 08/25/2006 12:56 PM Page 48

4E X E R C I S E
Building the Footer
In some ways, the #footer style is a mirror image of the #header style. Both have a single border (one on thetop, the other on the bottom) containing the same dimensions and color. Both are applied to <div> tags oneither side of the content area but inside the overall containing wrapper. The #footer style, however, betterillustrates the idiom “Less is more.” Unlike the #header style, the #footer style has no height requirement,just a bit of padding. In this exercise, you’ll style the footer section and insert necessary content.
If you followed the previous exercise, two_col_layout.htm should still be open. If it’s not, completeExercise 3, and then return to this exercise.
In the CSS Styles panel, click New CSS Rule. In the New CSS Rule dialog box, click the Advancedradio button under Selector Type, and type #footer for Selector. Click OK. In the CSS Rule definitionfor #footer dialog box, click the Text category, and set Size to .625 ems. Click the Block category, andset Text align to center. Click the Box category, turn off the Same for all check box for Padding, and setTop to 1 ems. Click the Border category, turn off all three Same for all check boxes, and set Bottom tosolid, 28 pixels, and #666666. Click OK.
You’re applying the ems measurement to ensure the text in this section resizes properly if the browserfont size changes. The text size, .625 ems, is approximately equivalent to a 10-point font when viewed atthe browser’s default settings. Although a bit of space appears above the placeholder text, notice noneappears between the text and the border. You’ll adjust that in the next step.
2
1
49Chapter 3 : Creating CSS Column Layouts
03_DWRBB_HOT_(34-55)2.qxd 08/25/2006 12:56 PM Page 49
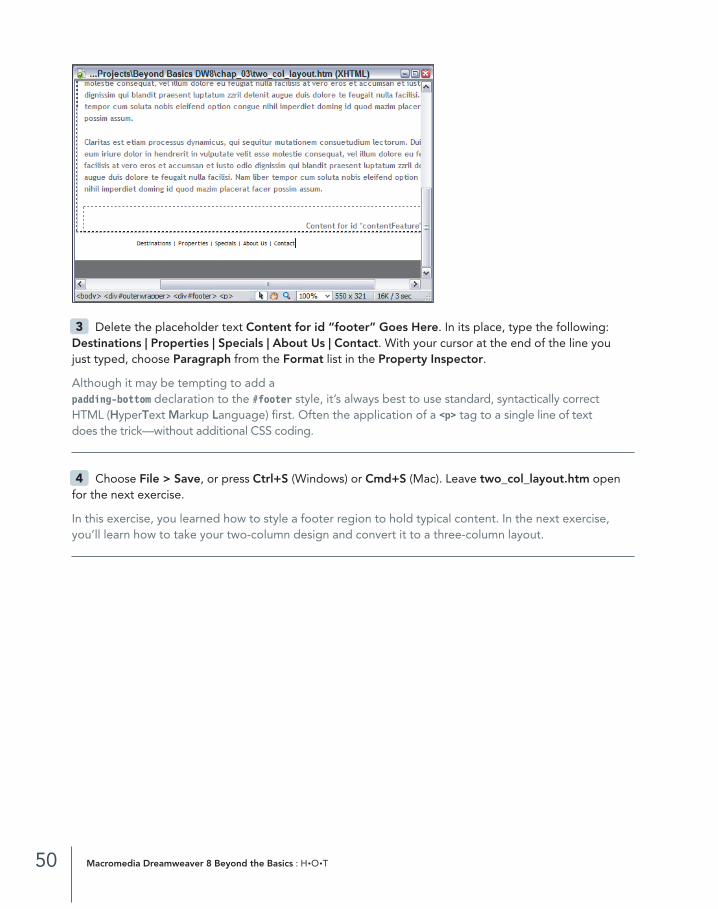
Delete the placeholder text Content for id “footer” Goes Here. In its place, type the following:Destinations | Properties | Specials | About Us | Contact. With your cursor at the end of the line you just typed, choose Paragraph from the Format list in the Property Inspector.
Although it may be tempting to add a padding-bottom declaration to the #footer style, it’s always best to use standard, syntactically correct HTML (HyperText Markup Language) first. Often the application of a <p> tag to a single line of text does the trick—without additional CSS coding.
Choose File > Save, or press Ctrl+S (Windows) or Cmd+S (Mac). Leave two_col_layout.htm openfor the next exercise.
In this exercise, you learned how to style a footer region to hold typical content. In the next exercise,you’ll learn how to take your two-column design and convert it to a three-column layout.
4
3
50 Macromedia Dreamweaver 8 Beyond the Basics : H•O•T
03_DWRBB_HOT_(34-55)2.qxd 08/25/2006 12:56 PM Page 50
5E X E R C I S E
Converting to a Three-Column CSS Layout
As you saw in the previous exercises when developing the two-column layout, the float property is key.Although you set each column to float: left, you could have just as easily set to them to float: right—as long as you apply the property consistently. The same is true of a third column.
In this exercise, you’ll convert the two-column design to a three-column version. The techniques involvedare pretty straightforward. First, you’ll define a new style and insert the associated <div> tag. Next, you’llreduce the existing content column in width to accommodate the new column. Then, you’ll create a newwrapper <div> tag to enclose the two columns. Finally, you’ll move the bottom section to properly spanboth content columns.
To make the exercise more universally applicable, you’ll also learn a technique to make it easy to switchlayouts from one page to another, just by changing a class in the <body> tag.
If you followed the previous exercise, two_col_layout.htm should still be open in Dreamweaver. Ifit’s not, complete Exercise 4, and then return to this exercise.
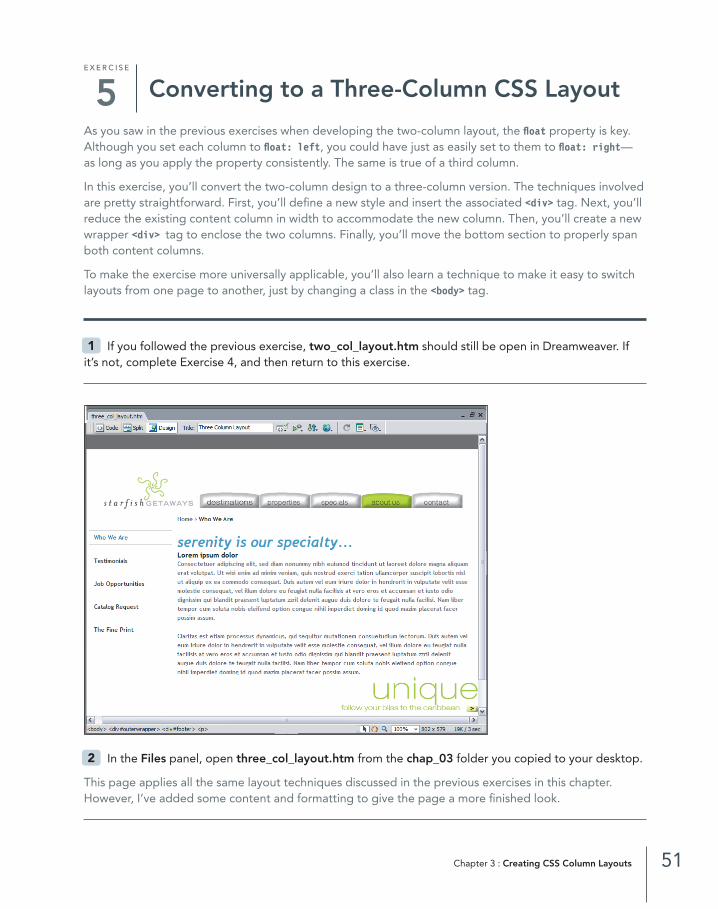
In the Files panel, open three_col_layout.htm from the chap_03 folder you copied to your desktop.
This page applies all the same layout techniques discussed in the previous exercises in this chapter.However, I’ve added some content and formatting to give the page a more finished look.
2
1
51Chapter 3 : Creating CSS Column Layouts
03_DWRBB_HOT_(34-55)2.qxd 08/25/2006 12:56 PM Page 51
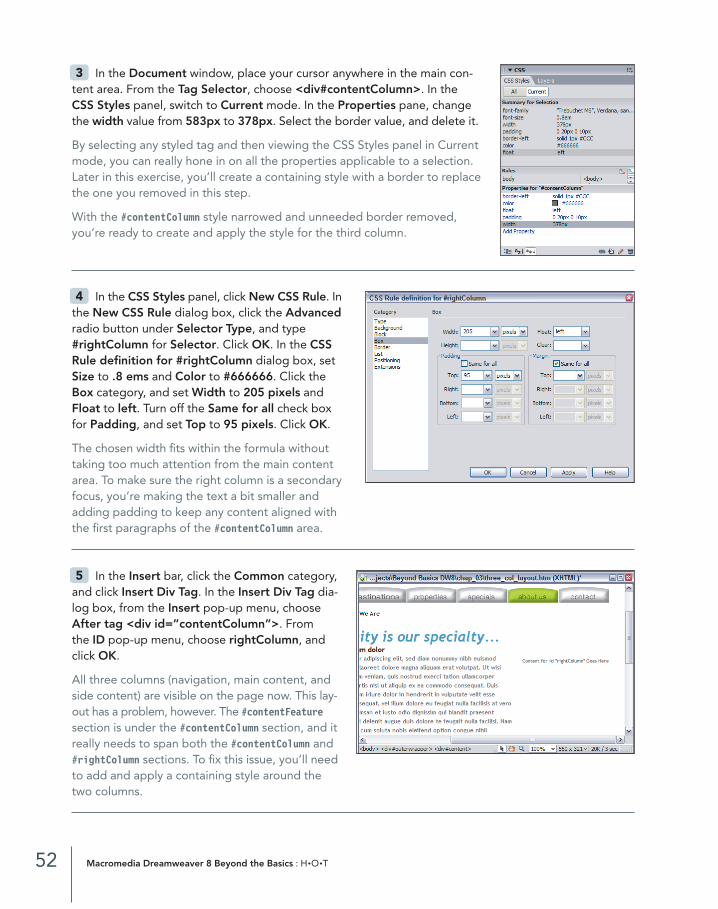
In the Document window, place your cursor anywhere in the main con-tent area. From the Tag Selector, choose <div#contentColumn>. In theCSS Styles panel, switch to Current mode. In the Properties pane, changethe width value from 583px to 378px. Select the border value, and delete it.
By selecting any styled tag and then viewing the CSS Styles panel in Currentmode, you can really hone in on all the properties applicable to a selection.Later in this exercise, you’ll create a containing style with a border to replacethe one you removed in this step.
With the #contentColumn style narrowed and unneeded border removed,you’re ready to create and apply the style for the third column.
In the CSS Styles panel, click New CSS Rule. Inthe New CSS Rule dialog box, click the Advancedradio button under Selector Type, and type#rightColumn for Selector. Click OK. In the CSSRule definition for #rightColumn dialog box, setSize to .8 ems and Color to #666666. Click theBox category, and set Width to 205 pixels andFloat to left. Turn off the Same for all check boxfor Padding, and set Top to 95 pixels. Click OK.
The chosen width fits within the formula withouttaking too much attention from the main contentarea. To make sure the right column is a secondaryfocus, you’re making the text a bit smaller andadding padding to keep any content aligned with the first paragraphs of the #contentColumn area.
In the Insert bar, click the Common category,and click Insert Div Tag. In the Insert Div Tag dia-log box, from the Insert pop-up menu, chooseAfter tag <div id=”contentColumn”>. From the ID pop-up menu, choose rightColumn, andclick OK.
All three columns (navigation, main content, andside content) are visible on the page now. This lay-out has a problem, however. The #contentFeaturesection is under the #contentColumn section, and itreally needs to span both the #contentColumn and #rightColumn sections. To fix this issue, you’ll need to add and apply a containing style around the two columns.
5
4
3
52 Macromedia Dreamweaver 8 Beyond the Basics : H•O•T
03_DWRBB_HOT_(34-55)2.qxd 08/25/2006 12:56 PM Page 52
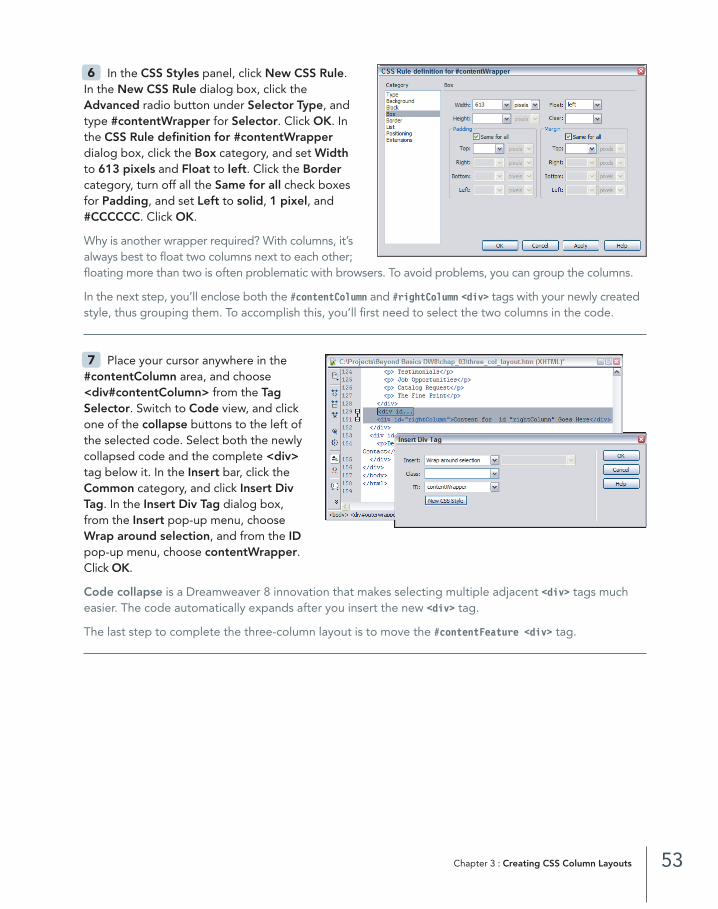
In the CSS Styles panel, click New CSS Rule.In the New CSS Rule dialog box, click theAdvanced radio button under Selector Type, andtype #contentWrapper for Selector. Click OK. Inthe CSS Rule definition for #contentWrapperdialog box, click the Box category, and set Widthto 613 pixels and Float to left. Click the Bordercategory, turn off all the Same for all check boxesfor Padding, and set Left to solid, 1 pixel, and#CCCCCC. Click OK.
Why is another wrapper required? With columns, it’salways best to float two columns next to each other;floating more than two is often problematic with browsers. To avoid problems, you can group the columns.
In the next step, you’ll enclose both the #contentColumn and #rightColumn <div> tags with your newly createdstyle, thus grouping them. To accomplish this, you’ll first need to select the two columns in the code.
Place your cursor anywhere in the#contentColumn area, and choose<div#contentColumn> from the TagSelector. Switch to Code view, and clickone of the collapse buttons to the left ofthe selected code. Select both the newlycollapsed code and the complete <div>tag below it. In the Insert bar, click theCommon category, and click Insert DivTag. In the Insert Div Tag dialog box,from the Insert pop-up menu, choose Wrap around selection, and from the IDpop-up menu, choose contentWrapper. Click OK.
Code collapse is a Dreamweaver 8 innovation that makes selecting multiple adjacent <div> tags mucheasier. The code automatically expands after you insert the new <div> tag.
The last step to complete the three-column layout is to move the #contentFeature <div> tag.
7
6
53Chapter 3 : Creating CSS Column Layouts
03_DWRBB_HOT_(34-55)2.qxd 08/25/2006 12:56 PM Page 53
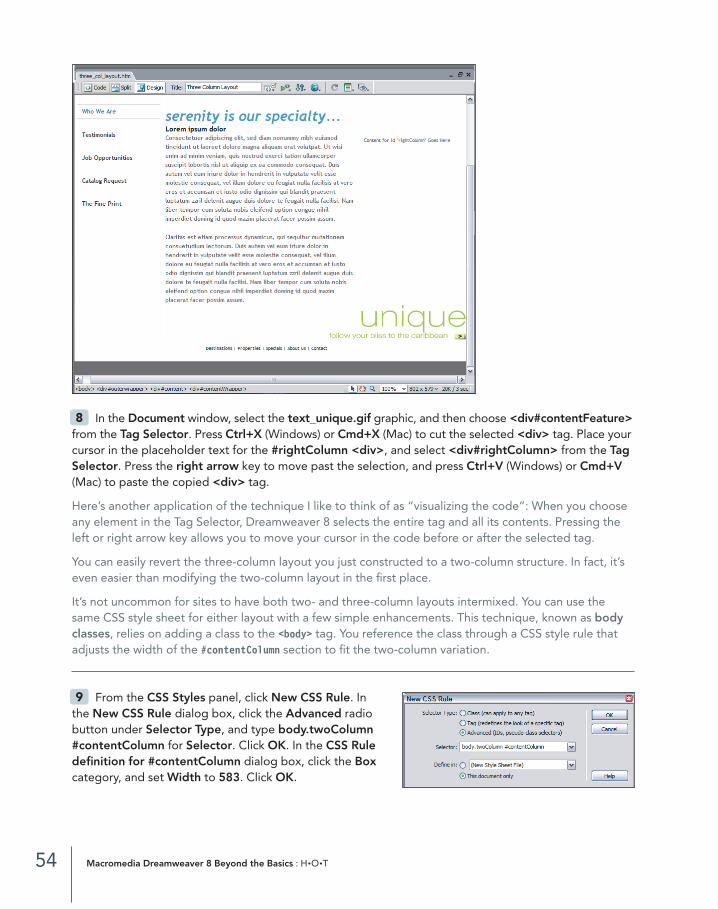
In the Document window, select the text_unique.gif graphic, and then choose <div#contentFeature>from the Tag Selector. Press Ctrl+X (Windows) or Cmd+X (Mac) to cut the selected <div> tag. Place yourcursor in the placeholder text for the #rightColumn <div>, and select <div#rightColumn> from the TagSelector. Press the right arrow key to move past the selection, and press Ctrl+V (Windows) or Cmd+V(Mac) to paste the copied <div> tag.
Here’s another application of the technique I like to think of as “visualizing the code”: When you chooseany element in the Tag Selector, Dreamweaver 8 selects the entire tag and all its contents. Pressing theleft or right arrow key allows you to move your cursor in the code before or after the selected tag.
You can easily revert the three-column layout you just constructed to a two-column structure. In fact, it’seven easier than modifying the two-column layout in the first place.
It’s not uncommon for sites to have both two- and three-column layouts intermixed. You can use thesame CSS style sheet for either layout with a few simple enhancements. This technique, known as bodyclasses, relies on adding a class to the <body> tag. You reference the class through a CSS style rule thatadjusts the width of the #contentColumn section to fit the two-column variation.
From the CSS Styles panel, click New CSS Rule. Inthe New CSS Rule dialog box, click the Advanced radiobutton under Selector Type, and type body.twoColumn#contentColumn for Selector. Click OK. In the CSS Ruledefinition for #contentColumn dialog box, click the Boxcategory, and set Width to 583. Click OK.
9
8
54 Macromedia Dreamweaver 8 Beyond the Basics : H•O•T
03_DWRBB_HOT_(34-55)2.qxd 08/25/2006 12:56 PM Page 54
The Advanced selector type is extremely flexible. In this step, you’re creating a rule that affects the#contentColumn style when the <body> tag has a class of .twoColumn. You’ll notice you’re setting the width to the same value you used when creating the two-column layout.
Now, you’re all set up to make the switch back to a two-column design.
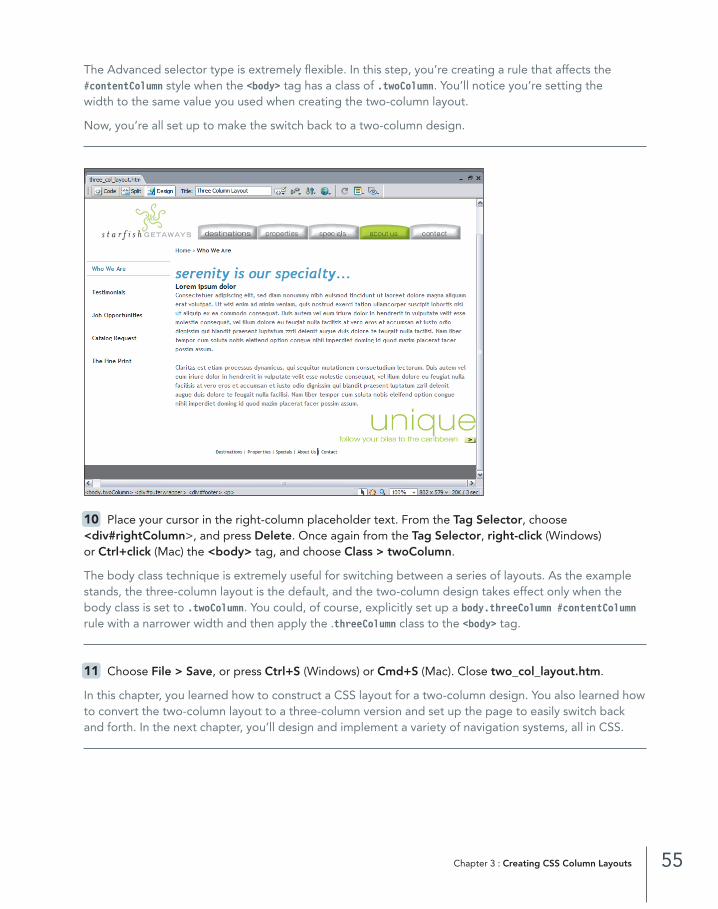
Place your cursor in the right-column placeholder text. From the Tag Selector, choose<div#rightColumn>, and press Delete. Once again from the Tag Selector, right-click (Windows) or Ctrl+click (Mac) the <body> tag, and choose Class > twoColumn.
The body class technique is extremely useful for switching between a series of layouts. As the examplestands, the three-column layout is the default, and the two-column design takes effect only when thebody class is set to .twoColumn. You could, of course, explicitly set up a body.threeColumn #contentColumnrule with a narrower width and then apply the .threeColumn class to the <body> tag.
Choose File > Save, or press Ctrl+S (Windows) or Cmd+S (Mac). Close two_col_layout.htm.
In this chapter, you learned how to construct a CSS layout for a two-column design. You also learned howto convert the two-column layout to a three-column version and set up the page to easily switch backand forth. In the next chapter, you’ll design and implement a variety of navigation systems, all in CSS.
11
10
55Chapter 3 : Creating CSS Column Layouts
03_DWRBB_HOT_(34-55)2.qxd 08/25/2006 12:56 PM Page 55