creating page layouts with css - … · see “resetting the dreamweaver workspace” in the ......
TRANSCRIPT

127Lesson 5, Creating Page Layouts with CSS
What you’ll learn in this lesson:• Understanding the CSS
Box model
• Creating Divs and AP Divs
• Stacking and overlapping elements
• Styling box contents
• Using visual aids to fi ne-tune positioning
Lesson 5
Now that you’ve used Cascading Style Sheets, you’ve seen how powerful they can be for styling a page. CSS is equally powerful as a layout tool, allowing you to freely position page content in ways not possible with HTML alone.
Starting upBefore starting, make sure that your tools and panels are consistent by resetting your workspace. See “Resetting the Dreamweaver workspace” in the Starting Up section of this book.
You will work with several fi les from the dw05lessons folder in this lesson. Make sure that you have loaded the dwlessons folder onto your hard drive from the supplied DVD. See “Loading lesson fi les” in the Starting Up section of this book.
Before you begin, you need to create site settings that point to the dw05lessons folder. Go to Site > New Site, or, for details on creating a site, refer to Lesson 2, “Setting Up a New Site.”
Creating Page Layouts with CSS
DWCS6_06Pass.indb 127DWCS6_06Pass.indb 127 5/2/12 5:16 PM5/2/12 5:16 PM

5 The CSS Box model
Dreamweaver CS6 Digital Classroom128
See Lesson 5 in action!
Use the accompanying video to gain a better understanding of how to use some of the features shown in this lesson. The video tutorial for this lesson can be found on the included DVD.
The CSS Box modelCSS positions elements within a page using the Box model, which refers to the fact that all HTML elements have default boxes that you can choose to style. You can think of a box as a container for text, images, media, tables, and other content. In most cases, the width and height of a box is determined by the amount of content; however, you can also assign an explicit width and height to any box. Additionally, each box can have its own optional padding, margin, and border settings (described in detail shortly).
Toward the end of Lesson 4, “Styling Your Pages with CSS,” you began to explore page structure through the use of the HTML <div> element. The Box model in CSS applies to all elements in HTML but is often paired with <div> tags. The <div> element, in conjunction with CSS rules, can be freely positioned, formatted, and even told how to interact with other boxes adjacent to it. You can also stack and overlap <div> containers, opening the door to fl exible and creative layouts that are not possible with HTML alone.
This lesson dives deeper into the many uses of the <div> element. If you have jumped directly to this lesson, it is highly recommended that you understand the basic concepts in Lesson 4, “Styling Your Pages with CSS,” before starting this one.
If you’ve worked with layout applications such as InDesign, the idea of creating and positioning containers for page content should be very familiar to you. Boxes created with the <div> tag can be thought of as analogous to the text and image frames you create in InDesign.
The basics of CSS margins, padding, and bordersThe Box model allows each element on a page to have unique margin, padding, and border settings.
Lorem ipsum dolor sit ametconsectetuer adipiscing elitsed diam nonummy nibheuismod tincidund ut laoreetdolore magna aliguam erat
A B C D
E
A. Margin. B. Border. C. Padding. D. Content width. E. Visible width.
5
DWCS6_06Pass.indb 128DWCS6_06Pass.indb 128 5/2/12 5:16 PM5/2/12 5:16 PM

5
129Lesson 5, Creating Page Layouts with CSS
The CSS Box model
Margins refer to the transparent area surrounding the box, which you set using the margin group of CSS properties. Margins can play an essential role in creating distance between a box and the content surrounding it (such as other boxes), or the boundaries of the page itself. You can set margins for all sides at once or uniquely for each side.
Padding is the distance between the inside edge of the box and its contents. By setting padding, you create space between the box and any text, images, or other content that it contains. You set padding using the padding group of CSS properties, and, like margins, you can set padding for all four sides of a box at once or for each side individually.
The border of a box is transparent by default, but you can add width, color, and a border style for decoration or defi nition around boxes. Borders sit directly between margins and padding, and defi ne the actual boundaries of the box. You set borders using the border group of CSS properties and, like margins and padding, you can defi ne borders for all four sides at once or for each side individually.
You can incorporate each property into any style rule and attach it to a box, similar to the way you’ve attached classes to paragraphs and tables in previous lessons.
Reviewing the <div> elementAs mentioned earlier, when exploring and creating page layouts with CSS, you will frequently encounter and use the <div> element. The <div> element creates areas or divisions within an HTML document; you can place page content such as text and images directly within sets of <div> tags. Dreamweaver enables you to create CSS-driven page layouts using the Insert Div Tag and Draw AP Div buttons in the Insert panel; both of these features use <div> tags to create areas of layout, but do this in diff erent ways.
Reviewing the ID selector In Lesson 4, “Styling Your Pages with CSS,” you learned about the diff erent selector types in CSS: classes, tags, pseudo-class selectors, and IDs. In this lesson, IDs take center stage and become an essential part of working with CSS boxes and positioning. An ID is a special selector type created for a unique element using the same name within a page, and it’s meant for one-time use only. ID rules appear within a style sheet and are preceded by a pound sign (#), in contrast to classes, which are preceded by a period character ( . ).
Because IDs can be used only once per page, they are ideal for setting properties that need to be specifi c to a single element, such as positioning information. In other words, page elements such as headers or columns occupy a specifi c position on the page, such as top, right, left, and so on. When creating layouts using the Insert Div Tag button, Dreamweaver requires you to create or assign an ID rule for each box created. When drawing boxes with the Draw AP Div button, Dreamweaver automatically creates a unique ID rule that contains positioning, width, and height information for that specifi c box.
DWCS6_06Pass.indb 129DWCS6_06Pass.indb 129 5/2/12 5:16 PM5/2/12 5:16 PM

5 The CSS Box model
Dreamweaver CS6 Digital Classroom130
Because the <div> element has no display attributes, it is given its properties by either an ID or a class, or both. Dreamweaver has a bias; therefore, the program is more likely to use CSS IDs for layout. Think of an ID as a set of instructions that give a <div> its unique appearance and behavior (as DNA does to a human being). An ID rule is matched to a <div> using the tag’s ID attribute.
The Code view shows the style sheet and <div> tag that create the container.
DWCS6_06Pass.indb 130DWCS6_06Pass.indb 130 5/2/12 5:16 PM5/2/12 5:16 PM

5
131Lesson 5, Creating Page Layouts with CSS
The CSS Box model
Tables or CSS for layout?
When CSS first appeared as a tool for layout (in the early 2000s), a debate started within the web design community about the best approach to creating page layouts, because designers could use either CSS or HTML tables. The argument went something like this: Many designers felt like tables were the wrong tool for the job and CSS, with its box model, should be adopted as the primary method for positioning page content. Designers in favor of tables asserted that tables are more reliable in older browsers and easier and quicker to build. For the most part, the argument has been resolved: CSS layout is now regarded as the industry standard for creating page layouts.
Here is a brief overview of what you need to know:
Tables: Although fewer sites are being built from scratch in tables these days, there remain countless websites that were built with them and are still on the Web being updated and maintained. Designers who find themselves having to maintain a tables-based site would do well to understand their behavior. Also, HTML email often relies on the use of tables due to the limited capabilities of email readers.
Tables’ limitations include the following: You are restricted to its cell-based structure, and to achieve more complex layouts, you need to nest several levels of tables. Tables also add extraneous code to pages and can present difficulties in accessibility for devices such as screen readers.
CSS: CSS positioning has been around for many years. However different browsers have chosen to support it at varying and inconsistent levels. At this point, CSS positioning has a set of Best Practices that are widely known and used across the web design and development industry. If you need your sites to work reliably in older browsers, testing is still necessary to expose potential inconsistencies.
The CSS Advisor and Browser Compatibility Check features in Dreamweaver CS6 benefit designers who want to use CSS more extensively. These tools f lag and help troubleshoot any CSS-related items that may be incompatible or inconsistent in commonly used browsers. The CSS Advisor and Browser Compatibility Check are discussed in detail in Lesson 16, “Managing Your Website: Reports, Optimization, and Maintenance.”
DWCS6_06Pass.indb 131DWCS6_06Pass.indb 131 5/2/12 5:16 PM5/2/12 5:16 PM

5 Creating a centered container for your page
Dreamweaver CS6 Digital Classroom132
Creating a centered container for your pageThe goal of this lesson is to create the home page for the Organic Utopia site. This page will look like the thumbnail below.
The completed layout you will be creating in this lesson.
The home page will be a diff erent design and layout than the rest of the site (this layout is covered in more detail in Lesson 6, “Advanced Page Layout.”), and you will start by creating a container that will end up nesting the other sections of your page such as the header, sidebar and other elements. This container will have a fi xed width of 960 pixels and also be centered within the browser window.
This container will use a combination of relative positioning and automatic margins to achieve the centering eff ect. Relative positioning allows you to position this box relative to the body of the page, and the automatic margins will force the fi xed-width container to stay centered regardless of the browser window’s width.
1 In the Files panel, navigate to the dw05lessons folder and double-click the layout.html fi le to open it. This document has been partially prepared for you, with a background color and a page title added. Additionally, the default font, font color, and font size have been defi ned as Lucida Sans, grey, and small, respectively. Your fi rst step will be to add a box, which will become your main column of text.
2 If it’s not already visible, open the Insert panel by choosing Window > Insert. The Insert panel features a list of objects that can be added to your pages easily.
DWCS6_06Pass.indb 132DWCS6_06Pass.indb 132 5/2/12 5:16 PM5/2/12 5:16 PM

5
133Lesson 5, Creating Page Layouts with CSS
Creating a centered container for your page
3 In the bottom-left corner of your document window, click the <body> tag. Remember, the body tag encloses all the other tags within a page. You will now create a new <div> element that will function as a container for the other layout elements. In the Insert panel, click the Insert Div Tag button.
Click the Insert Div Tag to add a container div element.
4 The Insert Div Tag dialog box appears. Click in the ID text fi eld and type container, then click the New CSS Rule button. In the New CSS Rule defi nition dialog box that appears, make sure that #container is listed as the Selector Name and then click OK. The CSS Rule defi nition dialog box appears and you can begin to style your container div.
5 Select the Box listing in the Category column on the left side of the dialog box. In the Width text fi eld, type 840 and make sure px (pixels) is selected from the drop-down menu to the right. For Height, type 800 in the text fi eld. In the Margin section, uncheck Same for All, then, from the Right margin drop-down menu, choose auto. Choose auto from the Left margin drop-down menu as well.
Choose the settings for the #container element.
DWCS6_06Pass.indb 133DWCS6_06Pass.indb 133 5/2/12 5:16 PM5/2/12 5:16 PM

5 Creating a centered container for your page
Dreamweaver CS6 Digital Classroom134
You’ll explore using margins in more depth, but by setting a margin value of auto to the left and right side of the container, you are instructing the browser to put equal amounts of space on the right and left sides. The end result will be a box that is centered within the browser window.
6 Select the Background category on the left side of the dialog box, then click the Background-color swatch and choose the white (#FFF) swatch. This adds a background color of white to your entire container, separating it from the background.
7 Select the Positioning category on the left side of the dialog box and choose relative from the Position drop-down menu. This is key to the success of your next steps. By setting the position of the container to relative you will be able to position the page elements using the container as a frame of reference. Press OK in this dialog box, as well as OK for the Insert Div Tag dialog box that is still open.
8 Choose File > Save, then choose File > Preview in Browser. Your container will be centered in the middle of your browser window and Dreamweaver’s default placeholder text is aligned in the top left of your container. (Occasionally, we have noticed Dreamweaver does not add this placeholder text; if this is the case for you, return to Dreamweaver, click within the container, and then type content for id “container” Goes Here.)
With position set to relative and auto margins the container element will always be centered.
Resize the browser width; the container stays centered until the window is narrower than 840 pixels, at which point the box is cropped. Close your browser. If your container div did not appear centered, it is possible you are using an older browser. Even if your container div is centered, there are a few additional steps you will now add to ensure the page centers in older browsers.
DWCS6_06Pass.indb 134DWCS6_06Pass.indb 134 5/2/12 5:16 PM5/2/12 5:16 PM

5
135Lesson 5, Creating Page Layouts with CSS
Creating a centered container for your page
Making layouts cross-browser compatibleIf you are new to web design, welcome to the world known as CSS hacks. In an ideal world, all web browsers would render HTML and CSS using the same set of rules, and all web pages would look the same, regardless of the browser. Unfortunately, this is not the case. For a variety of reasons, diff erent web browsers render pages diff erently. For example, older web browsers such as Netscape 4 and Internet Explorer 4 do not render CSS positioning particularly well. More modern browsers have their own set of quirks as well. In certain cases, additional rules can be added to the CSS that make the page work. These fi xes are never ideal because they require additional code and sometimes create more problems than they solve; however, they are necessary if you want your pages to look similar across browsers.
1 With layout.html open, double-click the body rule in the CSS Styles panel to edit its properties. In the CSS Rule defi nition dialog box, select the Block category and choose center from the Text-align drop-down menu. Press OK.
This fi xes a problem that exists with version 6 (and earlier) of Internet Explorer regarding automatic margins. Although this fi xes the bug, it creates another problem in that it will center all text on your page (you can see this currently in your container). So, in order to fi x that problem you must create another rule to counteract this one.
2 Double-click the #container rule in the CSS Styles panel. In the CSS Rule defi nition dialog box, select the Block category on the left, and then choose left from the Text-align drop-down menu. This will align your text to the left, and all is back to normal. Press OK to accept these changes.
3 Choose File > Save.
In this exercise you created a centered box named container. In the next exercise, you will place all your other layout sections as well as your content, into this container. Before doing this, a brief overview of the diff erence between absolute and relative positioning may help.
For a more in-depth look at cross-browser compatibility see the Web Design with HTML and CSS Digital Classroom book available in electronic and print formats.
DWCS6_06Pass.indb 135DWCS6_06Pass.indb 135 5/2/12 5:16 PM5/2/12 5:16 PM

5 Creating a centered container for your page
Dreamweaver CS6 Digital Classroom136
Absolute versus relative positioningAbsolute positioning: An element that is set to absolute strictly follows the positioning values given to it, relative only to its containing element. The containing element can be another div or the page itself. Absolutely positioned elements are pulled out of the normal fl ow of HTML content, and regardless of what surrounds them (for example, text content or neighboring divs), they always appear at the exact coordinates assigned to them.
Here is an example of a div absolutely positioned within another div. The larger div (Box #1) is the containing element, and so any positioning values assigned to Box #2 are relative to the element boundaries of Box #1.
Box #2 is contained, or nested, within Box #1.
Adding additional content to the containing box (#1) has no eff ect on the nested div. It remains positioned outside the fl ow of HTML.
Box #2 remains in position even with added content in Box #1.
DWCS6_06Pass.indb 136DWCS6_06Pass.indb 136 5/2/12 5:16 PM5/2/12 5:16 PM

5
137Lesson 5, Creating Page Layouts with CSS
Creating a centered container for your page
Relative positioning: A relatively positioned element accepts values for position properties such as top and left, but it also takes the normal fl ow of neighboring HTML content into account. Here are boxes and values shown in the preceding two fi gures; the only diff erence here is that the position property for Box #2 has been set to relative instead of absolute.
Box #2 is still off set, just as before, but it’s being displaced by the content before it.
Although it appears that the top and left values have changed, they haven’t. Unlike absolutely positioned elements, relatively positioned elements stay within the normal fl ow of HTML content, which means that they can be displaced by the elements (in this case, the text) surrounding them. In this example, Box #2 is still 50 pixels from the top and 50 pixels from the left, but its point of reference is the end of the preceding text content, not Box #1.
Positioning items relatively is useful when you want an item to fl ow with the items surrounding it. The following image shows fi ve divs nested inside a larger div to create a menu.
All menu items are positioned relative to one another, and so they fall into place based on each other’s position.
DWCS6_06Pass.indb 137DWCS6_06Pass.indb 137 5/2/12 5:16 PM5/2/12 5:16 PM

5 Positioning content with AP Divs
Dreamweaver CS6 Digital Classroom138
The same example is shown in the fi gure below, with the position set to absolute for all menu items. The result is a collapse of the menu—all the menu items are trying to occupy the same place at the same time, without regard for their neighbors.
When set to absolute, the menu items stack on top of one another, because they all must be at the same place, regardless of the elements that surround them.
The fi les used for these examples are located in the dw05lessons folder, and are named absolute_relative.html and relative_menu.html. Open them in Dreamweaver and explore the code to further your knowledge.
Any element, or, in this case, any box, can have the position property applied, and one of fi ve possible values can be set: absolute, fi xed, relative, static, or inherit. The two most commonly used are absolute and relative, and although both can accept positioning properties such as top and left; they are rendered diff erently, even with identical positioning values.
Positioning content with AP DivsNow that your container is centered on the page, you’ll need to add boxes to hold content within the container. The easiest and most visual way to place boxes in Dreamweaver is with the Draw AP Div button. An AP or Absolute Positioned Div is placed exactly where you draw it, using the page as its point of reference by default; after drawing, you can reposition it precisely.
For this exercise, you’ll want your AP Divs to be positioned using the container as their point of reference. To change the default behavior of AP Divs as you draw them, an additional step is required. This step will ensure that your AP Divs are nested inside the container div.
DWCS6_06Pass.indb 138DWCS6_06Pass.indb 138 5/2/12 5:16 PM5/2/12 5:16 PM

5
139Lesson 5, Creating Page Layouts with CSS
Positioning content with AP Divs
1 In the layout.html document, choose Edit > Preferences (Windows) or Dreamweaver > Preferences (Mac OS) and then choose the AP Elements category. Click the checkbox labeled Nesting. This ensures that the new boxes you create will be nested inside the container. Click OK.
Set your Preferences so that new AP Elements automatically nest when inside your container.
Creating a header section with the Draw AP DivYou have already created a container that is centered within your page; now you’ll add the other layout elements, starting with the header. The Draw AP Div tool allows you to add boxes within your pages manually. Once a box is added, you can style it with CSS (change the width and height, add background color and more) and you can also add content such as text or images.
1 In the Insert panel, click the drop-down menu and choose Layout.
The Layout section of the Insert panel displays the available layout icons.
DWCS6_06Pass.indb 139DWCS6_06Pass.indb 139 5/2/12 5:16 PM5/2/12 5:16 PM

5 Positioning content with AP Divs
Dreamweaver CS6 Digital Classroom140
2 In the Insert panel, click the Draw AP Div button. Move back over the page; your cursor is now a crosshair signifying that you can begin to draw.
3 Place your cursor below the placeholder text in the top-left corner of the container and then click and drag down and to the right to draw a box. Stop approximately 25% of the way down the screen. The box appears with a handle in the top left corner.
The newly created AP Div has a handle in its top-left corner.
4 Click the selection handle in the top-left corner of the AP Div and click and drag the box around the screen to see how you can position the box manually. Notice in the Property Inspector that the properties for your box are displayed and dynamically change as you move it; currently just the Left and Top position (L and T) will change. Your settings will likely be diff erent than those in the fi gure.
Click inside the Bg color text fi eld, type #9fcc41, and then press Enter (Windows) or Return (Mac OS) to apply the color, which is a yellow-green shade.
The Property Inspector displays the properties of the AP Div and allows you to set its background color.
You will now position this box to become your header.
5 In the bottom-left corner of the Property Inspector, locate the CSS-P Element text fi eld. It is currently named apDiv1. Select the text within this text fi eld and type header.
When Dreamweaver creates new AP Divs, it gives them the default names of apDiv1, apDiv2, and so on. You can, and most often should, rename these, simply because the default name is nondescriptive and unhelpful. Keep in mind that functionally, this is exactly the same step as the previous exercise when you named the div “container.” In both cases you are creating a CSS ID behind the scenes.
6 Select the placeholder text Content for id “container” Goes Here and delete it. You are about to create your header at the top of the page and you don’t need this content.
7 If you currently do not have rulers visible, choose View > Rulers > Show. Click the edge of the header div again, and pay careful attention to the L (Left) and the T (Top) values.
DWCS6_06Pass.indb 140DWCS6_06Pass.indb 140 5/2/12 5:16 PM5/2/12 5:16 PM

5
141Lesson 5, Creating Page Layouts with CSS
Positioning content with AP Divs
You will now position the header to the top-left corner of the container using the Property Inspector.
8 In the Property Inspector, type 0px into the L (Left) text fi eld and press Enter (Windows) or Return (Mac OS). The box moves and the left side of the box is positioned horizontally at 0 pixels. Type 0px into the T (Top) text fi eld and press Enter (Windows) or Return (Mac OS). The top of the box is positioned vertically at 0 pixels.
Be sure to type the number and the px value (i.e., 100px) together in order for position to be valid.
With Top and Left values both set to 0px the header is aligned to the top-left corner of the container.
9 You also need to set the width of this header. Again, you could do this manually by dragging the edges of the header box, but this is not precise. It is better to use number values and match the width of the header to the width of the container.
In the Property Inspector, type 840px for the W value and 80px for the H value.
10 You can add content to the box by simply typing in it. Click inside the box on the workspace and type Organic Utopia. You’ll be replacing this with the logo a bit later, for now this will serve as a placeholder.
11 Choose File > Save to save your work, and then preview your page by choosing File > Preview in Browser or by pressing the Preview/Debug in browser button ( ) at the top of the document window. Close the browser when fi nished.
DWCS6_06Pass.indb 141DWCS6_06Pass.indb 141 5/2/12 5:16 PM5/2/12 5:16 PM

5 Positioning content with AP Divs
Dreamweaver CS6 Digital Classroom142
Adding an introduction section to your pageNow you can add additional sections to your page. The fi rst section you’ll add is a box below the header where you’ll format an introductory paragraph to state the mission of the site, and grab the user’s attention.
1 In the Insert panel, click the Draw AP Div object and draw a box below your header. Don’t worry about the exact size of the box, but make the width about half the header and roughly twice the height.
A good habit to get into is renaming your AP Divs immediately after they are created.
2 Click the edge of the new div and in the CSS-P Element text fi eld, type intro and press Enter (Windows) or Return (Mac OS).
3 Click inside the intro box and type the following text: Organic Utopia is a community owned and operated supermarket and marketplace. Anyone may shop in our stores but members enjoy special discounts and other benefi ts.
The #intro AP Div with added text.
Now you’ll format the text in this box using techniques from the last lesson.
4 In the Property Inspector, click the HTML button if necessary. Select and highlight the text you entered and choose Paragraph from the Format drop-down menu.
DWCS6_06Pass.indb 142DWCS6_06Pass.indb 142 5/2/12 5:16 PM5/2/12 5:16 PM

5
143Lesson 5, Creating Page Layouts with CSS
Positioning content with AP Divs
5 With the text still selected, click the CSS button in the Property Inspector. Then click the Font drop-down menu and choose the Georgia, Times New Roman, Times, serif family. The New CSS Rule defi nition dialog box will open. The Selector Type will be compound. The Selector Name is #container #intro p. Press the Less Specifi c button to set the selector to #intro p.
Press OK and the change is applied.
6 In the Property Inspector, click the Size drop-down menu to change the font size and choose the keyword large.
Set the paragraph text inside the intro box to Georgia and large.
Depending on how large you made your intro box, you will likely need to adjust the width and height of the box.
7 Click the edge of the intro box to activate it and then click any of the anchor points on the box to adjust the width and height. We used a width of 720px and a height of 130px.Click anywhere on the background of the page to deselect the intro div.
DWCS6_06Pass.indb 143DWCS6_06Pass.indb 143 5/2/12 5:16 PM5/2/12 5:16 PM

5 Positioning content with AP Divs
Dreamweaver CS6 Digital Classroom144
Adding images to your layoutBefore you add the remaining sections of your page, you’ll add images to both the header and container sections of the page. First, you’ll add a background image of vegetables to the right side of your header.
1 In the CSS Styles panel double-click the #header rule to open the CSS Rule defi nition dialog box. Click the Background category. In addition to the background color, you can also add CSS background images.
2 In the Background image section, press the Browse button. In the select Image Source dialog box, navigate to the images folder within the dw05lessons folder and select veggies.jpg. Press OK (Windows) or Choose (Mac OS). Press Apply and you will see the image tiled across the header. (If you see a Missing Profi le message click OK.)
By default, background images in CSS have this tiled eff ect, so you will need to add additional properties in order to remove the tiling and position the image to the right.
3 From the Background-repeat drop-down menu, choose no-repeat. From the Background-position (X) drop-down menu, choose right. Press OK and you see the image now aligned to the right side of the header.
Background images can be added and positioned to a <div> element.
A background image is controlled by CSS, and you can only have one background image per element. So in order to have two images inside the header, you’ll add the Organic Utopia logo as an inline element. This means the logo is being added to the HTML code, not the CSS.
DWCS6_06Pass.indb 144DWCS6_06Pass.indb 144 5/2/12 5:16 PM5/2/12 5:16 PM

5
145Lesson 5, Creating Page Layouts with CSS
Positioning content with AP Divs
4 Select the Organic Utopia placeholder text in the #header div and delete it. Then choose Insert > Image. In the Select Image Source dialog box, navigate to the images folder within the dw05lessons folder and select ou_logo.gif. Press OK (Windows) or Open (Mac OS). Type OrganicUtopia Logo into the text fi eld when asked to add an Alternative text tag, and then press OK. The image appears in the top-left corner of the header. You will position this image away from the sides of the header box later in the lesson. (If you receive a Missing Profi le message, click OK.)
When working with images, follow this rule of thumb: HTML inline images should be used for content; CSS background images should be used for decoration. One way to test this rule is to imagine the impact on the page if the image were not displayed. In the example above, the image of the vegetables is not essential, so the website would not be adversely aff ected if the image is not displayed; however, the logo is important, so it should be considered content, not decoration.
Photoshop integrationOften the images used in your web page need to be modifi ed in Photoshop before they integrate well with your design. Photoshop and Dreamweaver are integrated in a few ways. In this exercise, you will see how Dreamweaver can optimize .psd fi les when you insert them into your page.
1 In the CSS Styles panel, double-click the #container rule. Click the Background category and choose the Browse button in the Background-image section. In your dw05lessons folder, open the artwork folder. Choose the veggiebackground.psd fi le and press OK (Windows) or Open (Mac OS) The Image Optimization dialog box appears.
This dialog box appears because you have chosen a .psd fi le to import and this is not a valid fi le format for the Web. Dreamweaver triggers the Image Optimization dialog box, which allows you to optimize the graphic and save it in a more appropriate format.
Importing a .psd fi le into Dreamweaver will trigger the Image Preview, allowing you to save as a web graphic.
DWCS6_06Pass.indb 145DWCS6_06Pass.indb 145 5/2/12 5:16 PM5/2/12 5:16 PM

5 Positioning content with AP Divs
Dreamweaver CS6 Digital Classroom146
2 Click the Preset menu and choose “JPEG high for Maximum Compatibility” if it is not already selected. Slide the Quality slider to 1 and notice that the preview of the image on your page becomes pixelated. Reducing the quality results in a smaller fi le size, but going too low results in unacceptable loss of detail.
3 Drag the Quality slider to 70, and notice that the quality improves dramatically. As with most compression, the goal is to fi nd a good balance between small fi le size and image quality.
4 Click OK, and then navigate to the images folder in the dw05lessons folder and double-click it. In the URL section, notice the path images/veggie_background.jpg. It’s important to understand that you are saving a copy of the original PSD fi le as a JPEG in this step. Click Save and you now have a link to the new background image.
5 Click the Background-repeat drop-down menu and choose no-repeat, and then click OK.
Adding Main and Sidebar content areasNow you’ll add two more sections to your page: a main column, which will feature the latest news from our fi ctional company Organic Utopia and a sidebar column, which features incentives for visitors to become members.
1 In the Insert panel, click the Draw AP Div button, then place your cursor below the intro box and click and drag down and to the right. As you are drawing the AP Div notice there are width and height values that are updated in the Status Bar on the bottom right of your document window
The width and height of an AP Div are updated in the Status bar as you draw the div.
Make the AP Div roughly 450px wide by 200px high. Don’t try to get the exact dimensions, as it is very diffi cult to be precise when drawing. You can always fi ne-tune the width and height in the Property Inspector.
DWCS6_06Pass.indb 146DWCS6_06Pass.indb 146 5/2/12 5:16 PM5/2/12 5:16 PM

5
147Lesson 5, Creating Page Layouts with CSS
Positioning content with AP Divs
2 Click the border of the div and in the CSS-P Element text fi eld rename the div to main. Next, click the Bg color swatch in the Property Inspector and from the color swatches that appear, choose white.
3 Click the Draw AP Div button again and draw another box to the right of the Main div. Make this one approximately the same height, and the width should be about 240. Again don’t worry about the exact dimensions for now.
4 Click the border of the new div and in the CSS-P Element text fi eld, type sidebar to rename the AP Div. Click the Bg color menu and make this background white as well.
You’ll now make sure the top edges of the two boxes are lined up.
5 Click the handle on the top-left of the main div and reposition it to the following left and top values: L (Left) should be 35 and T (Top) should be 260.
Setting the Left and Top values of an AP Div.
6 Click the top-left edge of the sidebar div and type 260 for the Top value. You can use the left and right arrows on your keyboard to nudge the div horizontally. We ended up with a Left value of 515.
With the top values the same for both boxes, the top edges line up. Once the boxes are lined up, you can always move them as a unit by selecting and dragging or nudging them.
7 Click the edge of the main div to select it and then Shift+click the sidebar. With both boxes selected, press your up arrow keys to move both boxes upward. There is no right value here, use your judgment and push the two boxes closer to the intro text.
DWCS6_06Pass.indb 147DWCS6_06Pass.indb 147 5/2/12 5:16 PM5/2/12 5:16 PM

5 Positioning content with AP Divs
Dreamweaver CS6 Digital Classroom148
Adding additional content and stylesUp to this point, you’ve been working with the base structure of your layout. Now it’s time to add additional content in the form of text so that you can see how your layout works with real content, and make any necessary changes.
1 Double-click the main_content.html fi le in the Files panel to open it. This is text that has already been formatted; all that is necessary is to copy and paste it into your layout.
2 Choose Edit > Select All and then choose Edit > Copy. Close the main_content.html document. In the layout.html document, click inside the main div and choose Edit > Paste. The content appears styled as Lucida Grande because there is a rule in the body defi ning the font-family; however, there are no CSS rules yet for headings or paragraphs.
The results of copying and pasting the main_content.html page into your main div element.
You pasted more content than can fi t inside this box, which is why the text is fl owing outside the boundaries of the container. In fact, what you are seeing is one of the disadvantages of using AP Divs. Defi ning the width and height of a box in pixels creates an infl exible container. One solution to this is simply to expand the size of the box.
3 Click the bottom of the blue border for the div and drag it down slightly, the box will automatically expand to fi t the existing content.
Now you’ll add the content to the member benefi t section.
4 Double-click the memberbenefi ts_content.html fi le in the Files panel. Choose Edit > Select All and then choose Edit > Copy. Close the memberbenefi ts_content.html document. In the layout.html document, click inside the sidebar and choose Edit > Paste.
5 Click the bottom of the sidebar div and drag it down slightly to expand the box to fi t the content.
DWCS6_06Pass.indb 148DWCS6_06Pass.indb 148 5/2/12 5:16 PM5/2/12 5:16 PM

5
149Lesson 5, Creating Page Layouts with CSS
Setting margins and borders
Setting margins and bordersAs you learned earlier, CSS uses the Box model for elements, and as such, each element can be given unique margins, padding, and borders, either for decorative or practical purposes.
Now that you have content inside your columns, it is clear that you need to do some fi ne-tuning. Your text and logo are crowded against their respective div elements and you should make them more pleasing and readable. Technically, you can start anywhere, but in this exercise, you’ll start at the top of your page and work down.
1 Select the Organic Utopia logo in the header. In the CSS Styles panel, press the New CSS Rule button ( ). The New CSS Rule dialog box appears and the Selector Name, #container #header img is selected. Since the rule gets more specifi c from left to right, ultimately you are targeting the <img> tag located inside the header div, which is inside the container div. Click OK.
2 In the CSS Rule defi nition dialog box that appears, select the Box category on the left. If necessary, move the dialog box to see the logo. Uncheck the Same for All checkbox in the Margin section. In the Top text fi eld, type 20 and press Apply. The logo is pushed down 20 pixels from the top of the header div, because there is now a 20-pixel margin applied to the top of the image.
3 In the Left margin text fi eld, type 15 and press OK. Adding a 15-pixel left margin pushes the logo to the right. Now you’ll add similar margins in the main column.
4 Click anywhere inside the heading Celebrating Vegetables in the main column. In the CSS Styles panel, press the New CSS Rule button. In the New CSS Rule dialog box, make sure the selector name reads #container #main h2. Press OK.
5 In the CSS Rule defi nition dialog box, select the Box category, and uncheck the Same for All checkbox in the Margin section. In the Left text fi eld, type 15 and press OK.
Applying a left margin of 15 to the main heading.
DWCS6_06Pass.indb 149DWCS6_06Pass.indb 149 5/2/12 5:16 PM5/2/12 5:16 PM

5 Setting margins and borders
Dreamweaver CS6 Digital Classroom150
6 Click inside the paragraph below the Celebrating Vegetables heading. In the CSS Style panel, press the New CSS Rule button and in the New CSS Rule dialog box, make sure that #container #main p is highlighted in the Selector Name text fi eld. Press OK.
7 In the CSS Rule defi nition dialog box, select the Box category from the left column, and uncheck the Same for All checkbox in the Margin section. In the Left and Right text fi elds, type 15. You need to add both left and right padding because the text fi lls the main container. Press OK.
Overriding default margins in CSSIf you are new to Dreamweaver and/or CSS, an important concept is that of default margins. Web browsers will apply default margins to most block elements unless there is a value overriding them. So paragraphs and headings, for example, will have space between them even if you haven’t set a value. You can see this space by using Dreamweaver’s Inspect feature.
1 In your document window, click the Live View button to cause the Live Code and Inspect buttons to appear. Click the Inspect Mode; Dreamweaver will prompt you to change your workspace settings. Press “Switch Now” to change your settings to the Split Code view. Now you can hover over elements on your page and see the normally invisible margins.
2 Place your cursor over the Celebrating Vegetables heading. The yellow highlight shows the margins being applied to this element.
The Inspect feature in Dreamweaver CS6 highlights the margins of an element in yellow.
DWCS6_06Pass.indb 150DWCS6_06Pass.indb 150 5/2/12 5:16 PM5/2/12 5:16 PM
5
151Lesson 5, Creating Page Layouts with CSS
Setting margins and borders
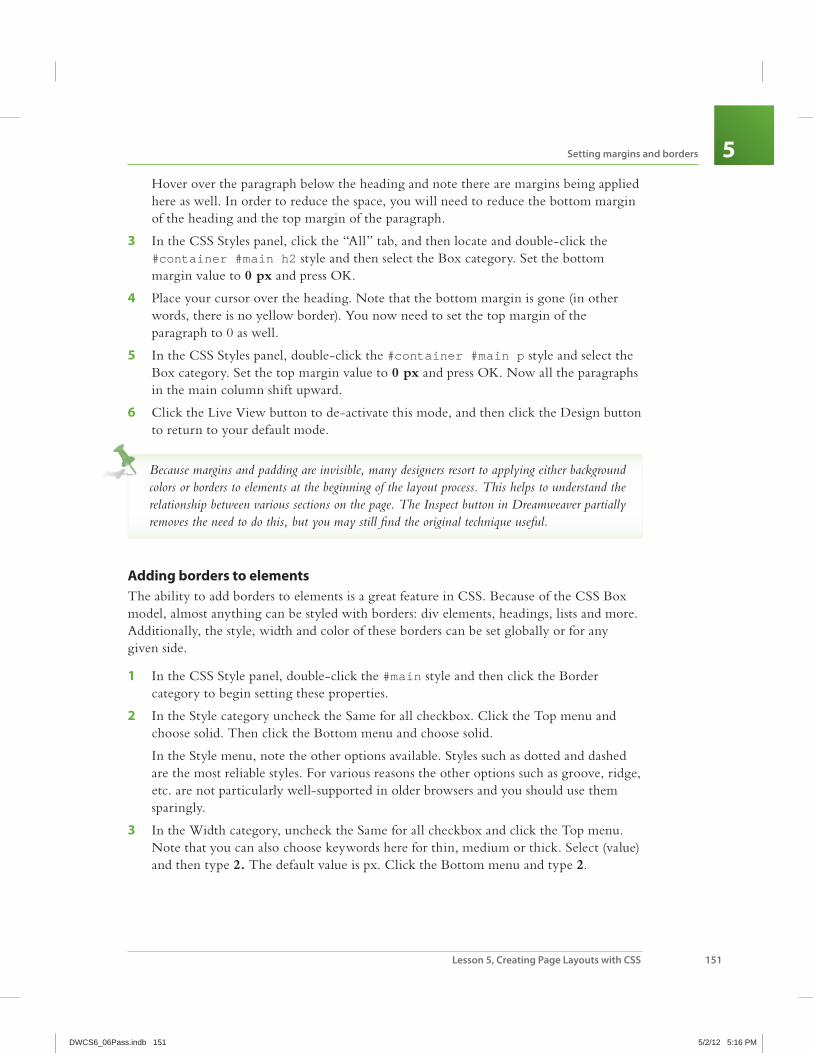
Hover over the paragraph below the heading and note there are margins being applied here as well. In order to reduce the space, you will need to reduce the bottom margin of the heading and the top margin of the paragraph.
3 In the CSS Styles panel, click the “All” tab, and then locate and double-click the #container #main h2 style and then select the Box category. Set the bottom margin value to 0 px and press OK.
4 Place your cursor over the heading. Note that the bottom margin is gone (in other words, there is no yellow border). You now need to set the top margin of the paragraph to 0 as well.
5 In the CSS Styles panel, double-click the #container #main p style and select the Box category. Set the top margin value to 0 px and press OK. Now all the paragraphs in the main column shift upward.
6 Click the Live View button to de-activate this mode, and then click the Design button to return to your default mode.
Because margins and padding are invisible, many designers resort to applying either background colors or borders to elements at the beginning of the layout process. This helps to understand the relationship between various sections on the page. The Inspect button in Dreamweaver partially removes the need to do this, but you may still fi nd the original technique useful.
Adding borders to elementsThe ability to add borders to elements is a great feature in CSS. Because of the CSS Box model, almost anything can be styled with borders: div elements, headings, lists and more. Additionally, the style, width and color of these borders can be set globally or for any given side.
1 In the CSS Style panel, double-click the #main style and then click the Border category to begin setting these properties.
2 In the Style category uncheck the Same for all checkbox. Click the Top menu and choose solid. Then click the Bottom menu and choose solid.
In the Style menu, note the other options available. Styles such as dotted and dashed are the most reliable styles. For various reasons the other options such as groove, ridge, etc. are not particularly well-supported in older browsers and you should use them sparingly.
3 In the Width category, uncheck the Same for all checkbox and click the Top menu. Note that you can also choose keywords here for thin, medium or thick. Select (value) and then type 2. The default value is px. Click the Bottom menu and type 2.
DWCS6_06Pass.indb 151DWCS6_06Pass.indb 151 5/2/12 5:16 PM5/2/12 5:16 PM

5 Setting margins and borders
Dreamweaver CS6 Digital Classroom152
4 In the Color category, uncheck the Same for all checkbox and in both the Top and Bottom fi elds type #063. This is a dark green color.
Setting border styles for the top and bottom of the Main div element.
Click OK in the CSS Rule defi nition dialog box.
The borders will be hard to see since the div is still selected.
5 Choose File > Save All and preview the results by choosing File > Preview in Browser.
Take a moment to admire your layout. You’re almost done; however the last step is to future proof your page layout.
6 Close the browser and return to Dreamweaver.
Future proofing your layoutAbsolutely positioning the elements of your page layout is very stable and reliable, but it also has some fundamental limitations. You have already seen what happens when there is more content than can fi t inside a box: the box overfl ows resulting in unattractive content. You have also seen one solution, which is simply to expand the size of the box. Even this is not an ideal solution though. Content on the Web changes constantly; text is added and removed, images are inserted and so on. The designer of the page may have little or no control over this, especially if they are handing a website off to a client who will eventually be updating and modifying the site.
To help strengthen your layout for future modifi cation, you can use a CSS property called overfl ow. This will help you prevent the worst-case scenario of text that breaks your layout as it overfl ows its container. For this exercise, you’ll apply overfl ow to the Members Benefi ts sidebar.
DWCS6_06Pass.indb 152DWCS6_06Pass.indb 152 5/2/12 5:16 PM5/2/12 5:16 PM

5
153Lesson 5, Creating Page Layouts with CSS
The pros and cons of Absolutely Positioned CSS layouts
1 Click the bottom edge of the sidebar and then drag the bottom of the box upward until half of the list items are overfl owing out of the box.
Text that is overfl owing over the sidebar.
2 Double-click the #sidebar style in the CSS Styles panel and then click the Positioning category.
3 Click the Overfl ow menu and choose auto. This automatically adds scrollbars to any <div> element that has more text than can fi t inside. Click OK. You will see in Dreamweaver’s design view that the box has snapped to fi t the original height.
4 Choose File > Save, then File > Preview in Browser. Your div now has a scrollbar. While it may not be an ideal solution if you do not like scrollbars, at least it doesn’t break the layout. Close the browser and return to Dreamweaver.
The pros and cons of Absolutely Positioned CSS layoutsYou will now take a look at the limitations and weaknesses of the layout you have just created. Absolutely positioned layouts in Dreamweaver are the quickest and easiest way to get a web page up and working, however, as noted earlier they are not the most fl exible.
In this exercise, we hope to point out some of the limitations of Absolutely Positioned layouts so that you can judge for yourself whether they fi t all your needs or whether you need to be looking at the next step of creating pages using more advanced layout techniques, which are covered in Lesson 6, “Advanced Page Layout.”
To illustrate this, you will take a look at your existing layout with the premise that someone has asked you to make the entire container larger and also switch the position of the two columns on your page.
DWCS6_06Pass.indb 153DWCS6_06Pass.indb 153 5/2/12 5:16 PM5/2/12 5:16 PM

5 The pros and cons of Absolutely Positioned CSS layouts
Dreamweaver CS6 Digital Classroom154
1 In the Design view, click the edge of your #container div to select it and in the Property Inspector, change the Width from 840 to 960. The container width expands but when adding this extra 120 pixels of space, your header and the other sections are no longer well-aligned.
Your background image is now also too narrow. This cannot be easily resolved in Dreamweaver. You would have to go back to Photoshop, resize the image, and export it again. For now, you’ll simply turn it off temporarily.
2 In the CSS Styles panel, click the #container style, and click the All button if necessary. Now select the background-image property. Click the Disable/Enable CSS Property button ( ) at the bottom of the panel to turn off this image for now.
Clicking the Disable/Enable CSS Property button removes the style for the background image.
With the background image temporarily removed, it is easier to see the structure of your layout.
3 Click the right edge of the header and drag it to the right to expand the width. Drag the header beyond the container and notice it is easy to break your layout. This is because absolutely positioned elements don’t interact with the other elements on the page; you need to manually adjust them.
4 In the CSS Property Inspector, set the W (Width) value of the header to 960. It must match the width of the container exactly. Although you’ll also notice that the background image of the vegetables remains fl ush right.
5 Click the edge of the intro box, and, using your arrow keys, nudge it to the right until it is centered within the page.
Now you need to switch the position of the main and sidebar divs.
DWCS6_06Pass.indb 154DWCS6_06Pass.indb 154 5/2/12 5:16 PM5/2/12 5:16 PM

5
155Lesson 5, Creating Page Layouts with CSS
The pros and cons of Absolutely Positioned CSS layouts
6 Click the edge of the main div and use your arrow keys to nudge it to the right. Notice that it overlaps your sidebar. This is due to the behavior of absolutely positioned elements allowing them to occupy the same space on the page.
The property that controls which element is highest in the stacking order is called the z-index. Dreamweaver sets this property automatically when you create AP Divs. Elements with the higher z-index value will always “win” and be visible over elements with a lower z-index. You can also modify z-index values if you choose to adjust this.
7 Click the edge of the sidebar div and using your arrow keys nudge to the left until it reaches the original position of the main div.
You may need to nudge the position of the two boxes until you are satisfi ed with their position. Additionally, feel free to adjust the width of the boxes if needed.
Switching the position of the two boxes requires you to move them manually.
Adjusting the width of the layout and the columns is not signifi cantly diffi cult but it’s also not very effi cient. Wouldn’t it be nice if expanding the width of the container automatically readjusted the columns within the new space? In fact, there are techniques you can use to accomplish this. They are called fl oat-based layouts and you will learn these techniques in the next lesson. For now, save and close the fi les.
Congratulations, you have fi nished Lesson 5, “Creating Page Layouts with CSS.”
For a more in-depth look at Cascading Style Sheets see the Web Design with HTML and CSS Digital Classroom book, and for a discussion of CSS3 and HTML5 see the HTML5 Digital Classroom book. Both of these titles are available in electronic and print formats.
DWCS6_06Pass.indb 155DWCS6_06Pass.indb 155 5/2/12 5:16 PM5/2/12 5:16 PM

5 Review
Dreamweaver CS6 Digital Classroom156
Self studyGet some practice with layout by creating a new div named footer in layout.html. Bring in the content from the footer.html fi le provided in your assets folder. Style the footer using the techniques learned in this lesson.
Open the style for the sidebar and apply similar margins and borders to those that you applied for the main div.
Experiment with your layout by expanding the width of the container div, changing the background color and adding borders. You will be surprised at how small changes to these properties can have dramatic eff ects on the appearance of your page.
Review Questions1 In what two ways can <div> elements be automatically created for the purpose of
layout in Dreamweaver?
2 Which one of the following two buttons requires you to assign an ID name: the Draw AP Div button or the Insert AP Div button?
3 What is the overfl ow property and why would you use it?
Answers1 By using the Draw AP Div and Insert Div Tag buttons, located in the Layout section
of the Insert panel.
2 The Insert AP Div button requires you to assign an ID name if it is a new ID, or choose a pre-existing ID name. The Draw AP Div button creates a generic name for your divs.
3 The overfl ow property allows you to change the way a box appears if there is too much content. For example, an overfl ow set to auto creates a scroll bar if there is more content than can fi t in the box.
DWCS6_06Pass.indb 156DWCS6_06Pass.indb 156 5/2/12 5:16 PM5/2/12 5:16 PM